

Page 1

Quick Reference
Faxing
E-mailing
Copying
Making copies
1
Load an original document into the ADF tray or on the scanner
glass.
Note: To avoid a cropped image, make sure that the original
document and output have the same paper size.
2
From the home screen, touch Copy, and then specify the
number of copies.
If necessary, adjust the copy settings.
3
Copy the document.
Note: To make a quick copy, from the control panel, press
Copying on both sides of the paper
1
Load an original document into the ADF tray or on the scanner
glass.
2
From the home screen, touch Copy > Paper Setup.
3
Adjust the settings.
4
Copy the document.
Copying multiple pages onto a single sheet
1
Load an original document into the ADF tray or on the scanner
glass.
2
From the home screen, touch Copy > Pages per Side.
3
Adjust the settings.
4
Copy the document.
Sending a fax
Using the control panel
1
Load the original document into the ADF tray or on the scanner
glass.
2
From the home screen, touch Fax, and then enter the needed
information.
3
If necessary, configure other fax settings.
4
Send the fax job.
Using the computer
Note: Make sure that the Universal Fax driver is installed.
For Windows users
.
With a document open, click File > Print.
1
2
Select the printer, and then click Properties, Preferences,
Options, or Setup.
3
Click Fax > Enable fax, and then enter the recipient number.
4
If necessary,
5
Send the fax job.
For Macintosh users
With a document open, choose File > Print.
1
2
Select the printer and enter the recipient number.
3
If necessary,
4
Send the fax job.
configure
configure
other fax settings.
other fax settings.
Sending an e-mail
Using the control panel
1
Load an original document into the ADF tray or on the scanner
glass.
2
From the home screen, touch E-mail, and then enter the
needed information.
Note: You can also enter the recipient using the address
book or shortcut number.
3
If necessary, configure the output file type settings.
4
Send the e-mail.
Using the shortcut number
1
From the control panel, press #, and then enter the shortcut
number using the keypad.
2
Send the e‑mail.
Printing
Printing from a computer
Note: For labels, card stock, and envelopes, set the paper size
and type in the printer before printing the document.
1
From the document that you are trying to print, open the Print
dialog.
2
If necessary, adjust the settings.
3
Print the document.
Printing confidential and other held
jobs
For Windows users
1
With a document open, click File > Print.
1
Page 2
2
Click Properties, Preferences, Options, or Setup.
3
Click Print and Hold.
4
Select Use Print and Hold, and then assign a user name.
5
Select the print job type (Confidential, Repeat, Reserve, or
Ver ify ).
If the print job is
6
Click OK or Print.
7
From the printer home screen, release the print job.
•
For confidential print jobs, navigate to:
Held jobs > select your user name > Confidential > enter
the PIN > select the print job >
Print
•
For other print jobs, navigate to:
Held jobs > select your user name > select the print job >
configure the settings > Print
confidential,
then enter a four
configure
the settings >
‑
digit PIN.
For Macintosh users
1
With a document open, choose File > Print.
If necessary, click the disclosure triangle to see more options.
2
From the print options or Copies & Pages menu, choose Job
Routing.
3
Select the print job type (Confidential, Repeat, Reserve, or
Ver ify ).
If the print job is confidential, then assign a user name and a
four
‑
digit PIN.
4
Click OK or Print.
5
From the printer home screen, release the print job.
•
For confidential print jobs, navigate to:
Held jobs > select your user name >
the PIN > select the print job >
Print
•
For other print jobs, navigate to:
Held jobs > select your user name > select the print job >
configure the settings > Print
Confidential
configure
the settings >
> enter
2
Select the job to cancel.
From the computer
1
Depending on the operating system, do either of the following:
•
Open the printers folder, and then select your printer.
•
From the System Preferences in the Apple menu, navigate
to your printer.
2
Select the job to cancel.
Loading paper
Loading trays
CAUTION—TIPPING HAZARD: To reduce the risk of
equipment instability, load each tray separately. Keep all
other trays closed until needed.
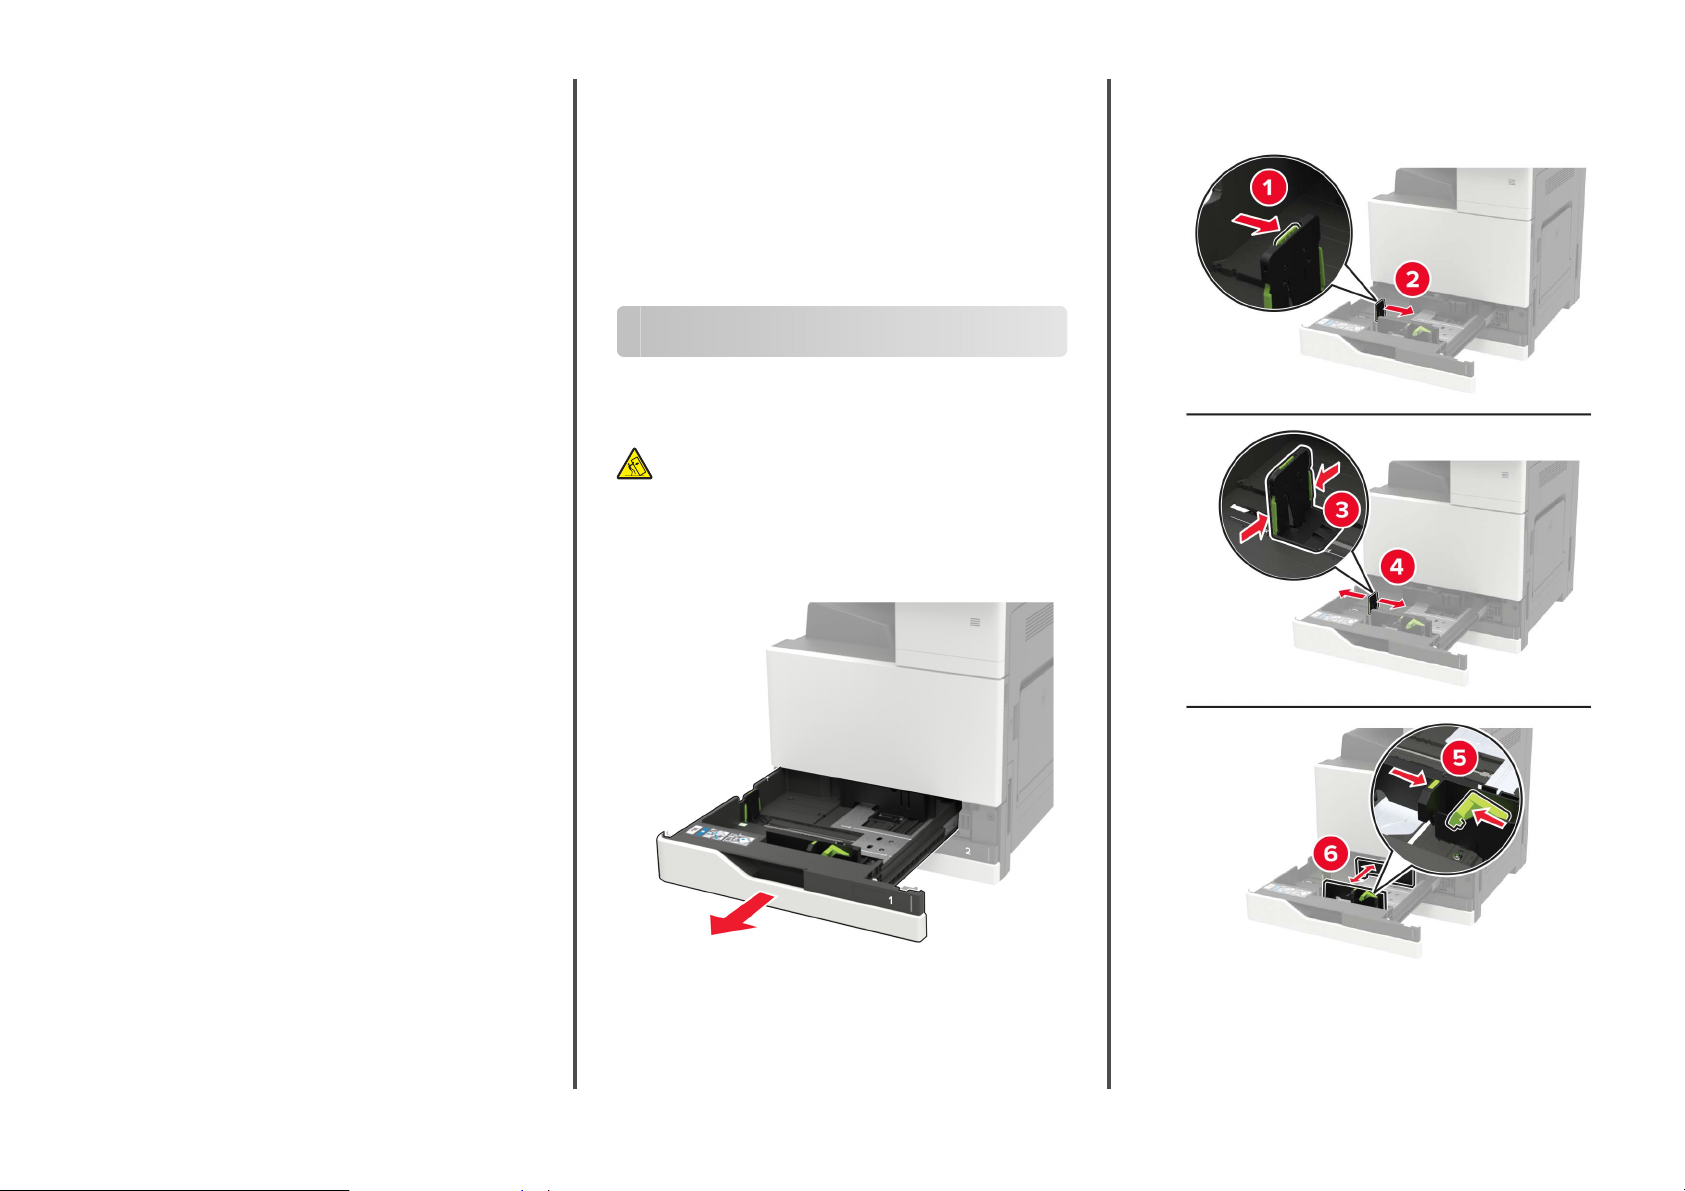
1
Pull out the tray.
Note: Do not remove trays while the printer is busy.
2
Adjust the guides to match the size of the paper that you are
loading.
Canceling a print job
From the printer control panel
1
From the home screen, touch Job Queue.
Note: You can also access this setting by touching the top
section of the home screen.
2
Page 3
3
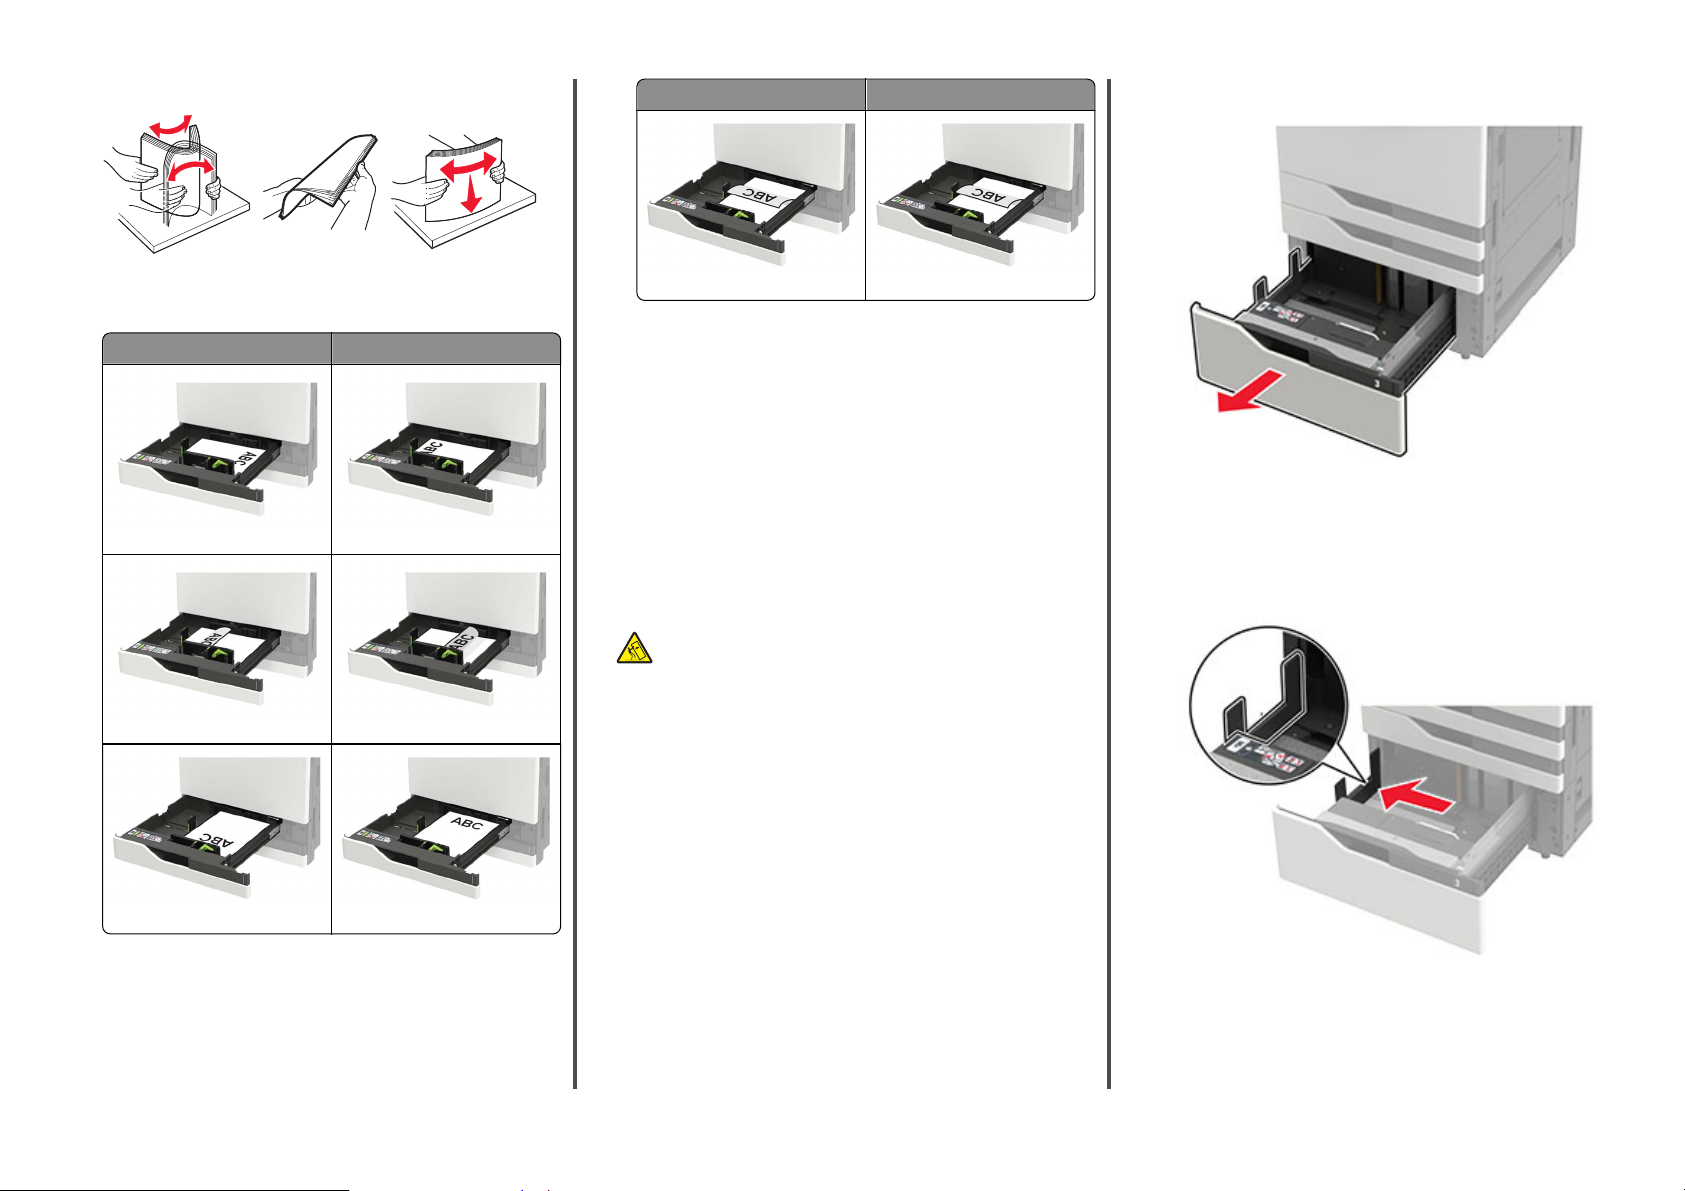
Flex, fan, and align the paper edges before loading.
4
Load the paper.
•
When using letterhead, do either of the following:
Without an optional finisher With an optional finisher
One‑sided printing One‑sided printing
Without an optional
Two‑sided printing Two‑sided printing
•
Load pre‑punched paper with the holes toward the front or
left side of the tray.
•
Do not slide paper into the tray.
•
To avoid paper jams, make sure that the stack height is
below the maximum paper fill indicator.
5
Insert the tray.
If loading a paper type other than plain, from the control panel,
set the paper size and paper type to match the paper loaded.
finisher
With an optional
finisher
Loading the 2500‑sheet tray
The 2500‑sheet tray supports only one paper size, either A4 or
letter. To check the supported paper size, pull out the tray and
then locate the size indicator on the bottom of the tray.
CAUTION—TIPPING HAZARD: To reduce the risk of
equipment instability, load each tray separately. Keep all
other trays closed until needed.
1
Pull out the tray.
Notes:
•
To avoid paper jams, do not remove trays while the
printer is busy.
•
To avoid errors, make sure that the transfer guide is
always at the left side of the tray.
Two‑sided printing Two‑sided printing
One‑sided printing One‑sided printing
3
Page 4
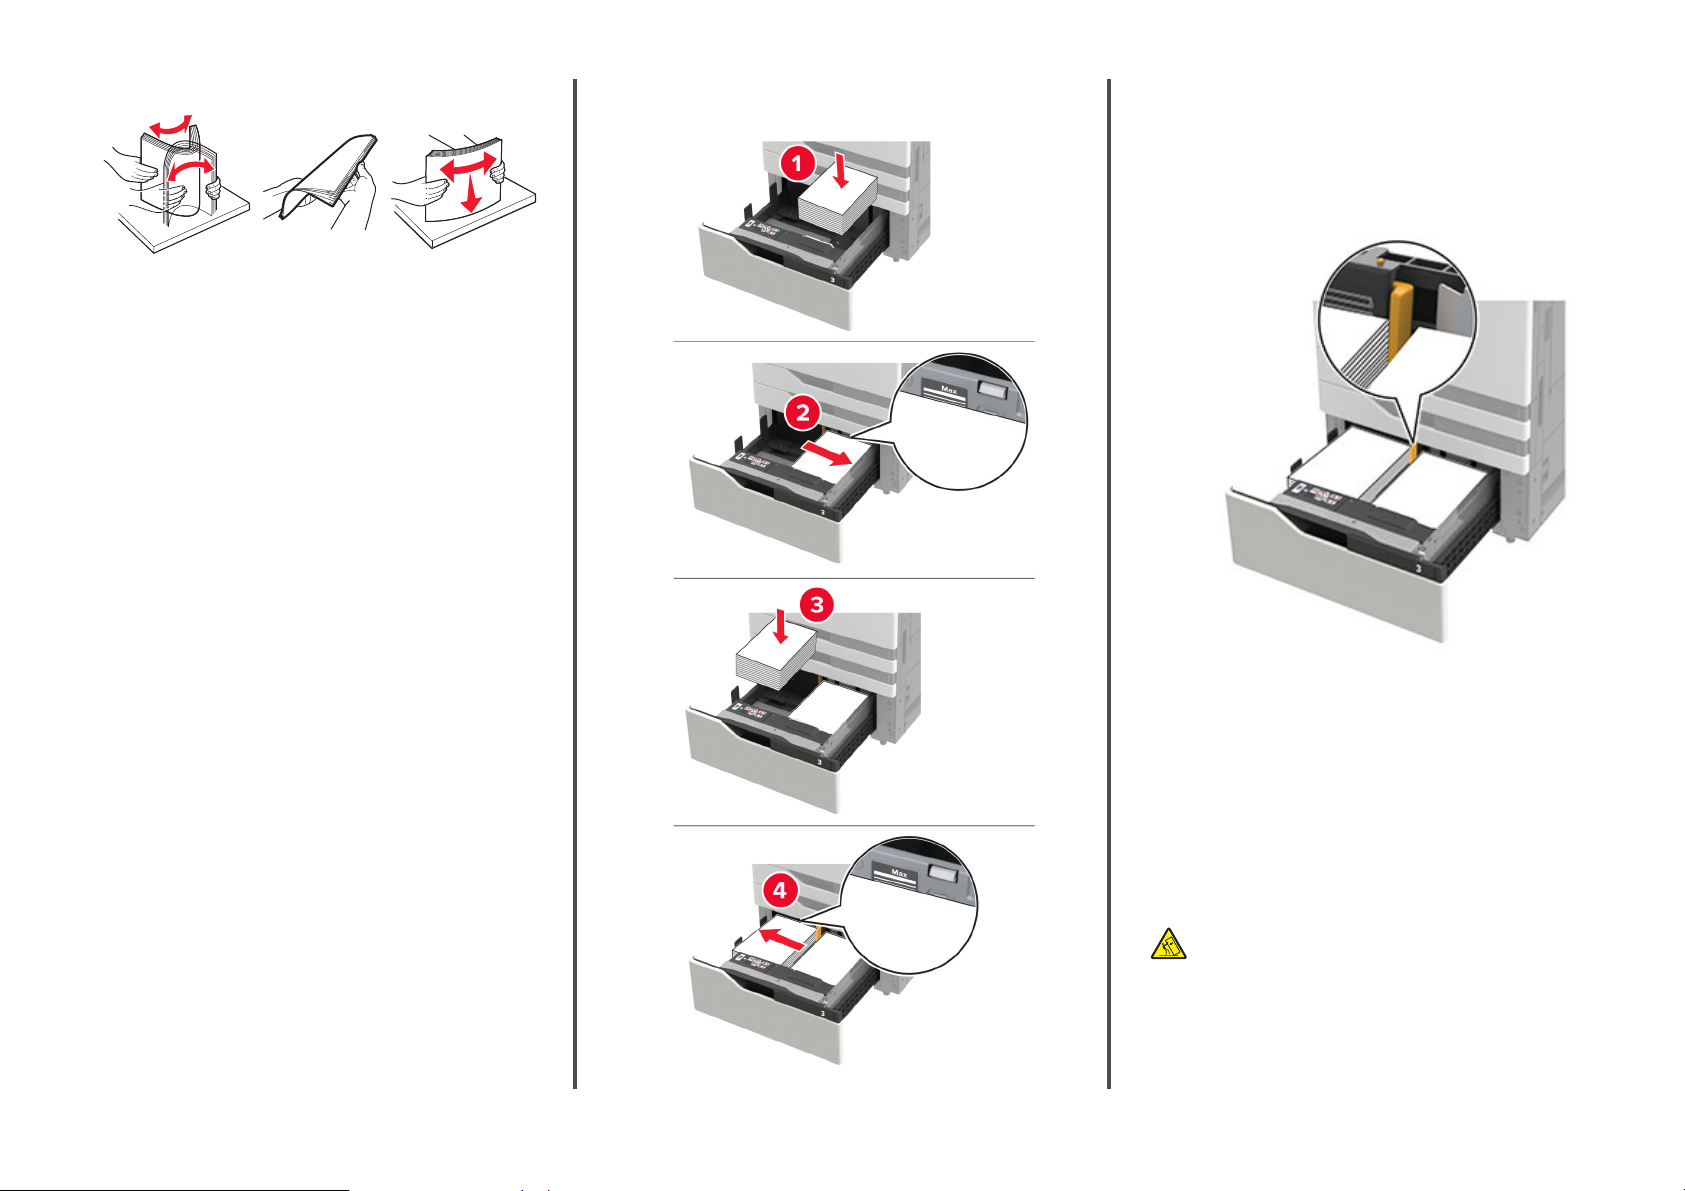
2
Flex, fan, and align the paper edges before loading.
3
Load the paper stack on the right side, and then load the paper
stack on the left side.
•
Make sure that the stack height is below the maximum
paper fill indicator on each side of the tray.
•
Load letterhead faceup for one‑sided printing.
•
Load letterhead facedown for two‑sided printing.
•
Make sure that the paper stacks do not cross the divider.
Push each paper stack against the sides of the tray.
4
Insert the tray.
5
From the control panel, navigate to: Settings > Device >
Maintenance > Configuration Menu > Tra y Con figu rat ion >
Size Sensing.
6
Select the tray and paper size.
Loading the 3000‑sheet tray
The 3000‑sheet tray supports only one paper size, either A4 or
letter.
CAUTION—TIPPING HAZARD: To reduce the risk of
equipment instability, load each tray separately. Keep all
other trays closed until needed.
1
Open door F, and then lift the feed roller.
Warning—Potential Damage: To avoid damage and poor
performance, do not touch the feed rollers.
4
Page 5
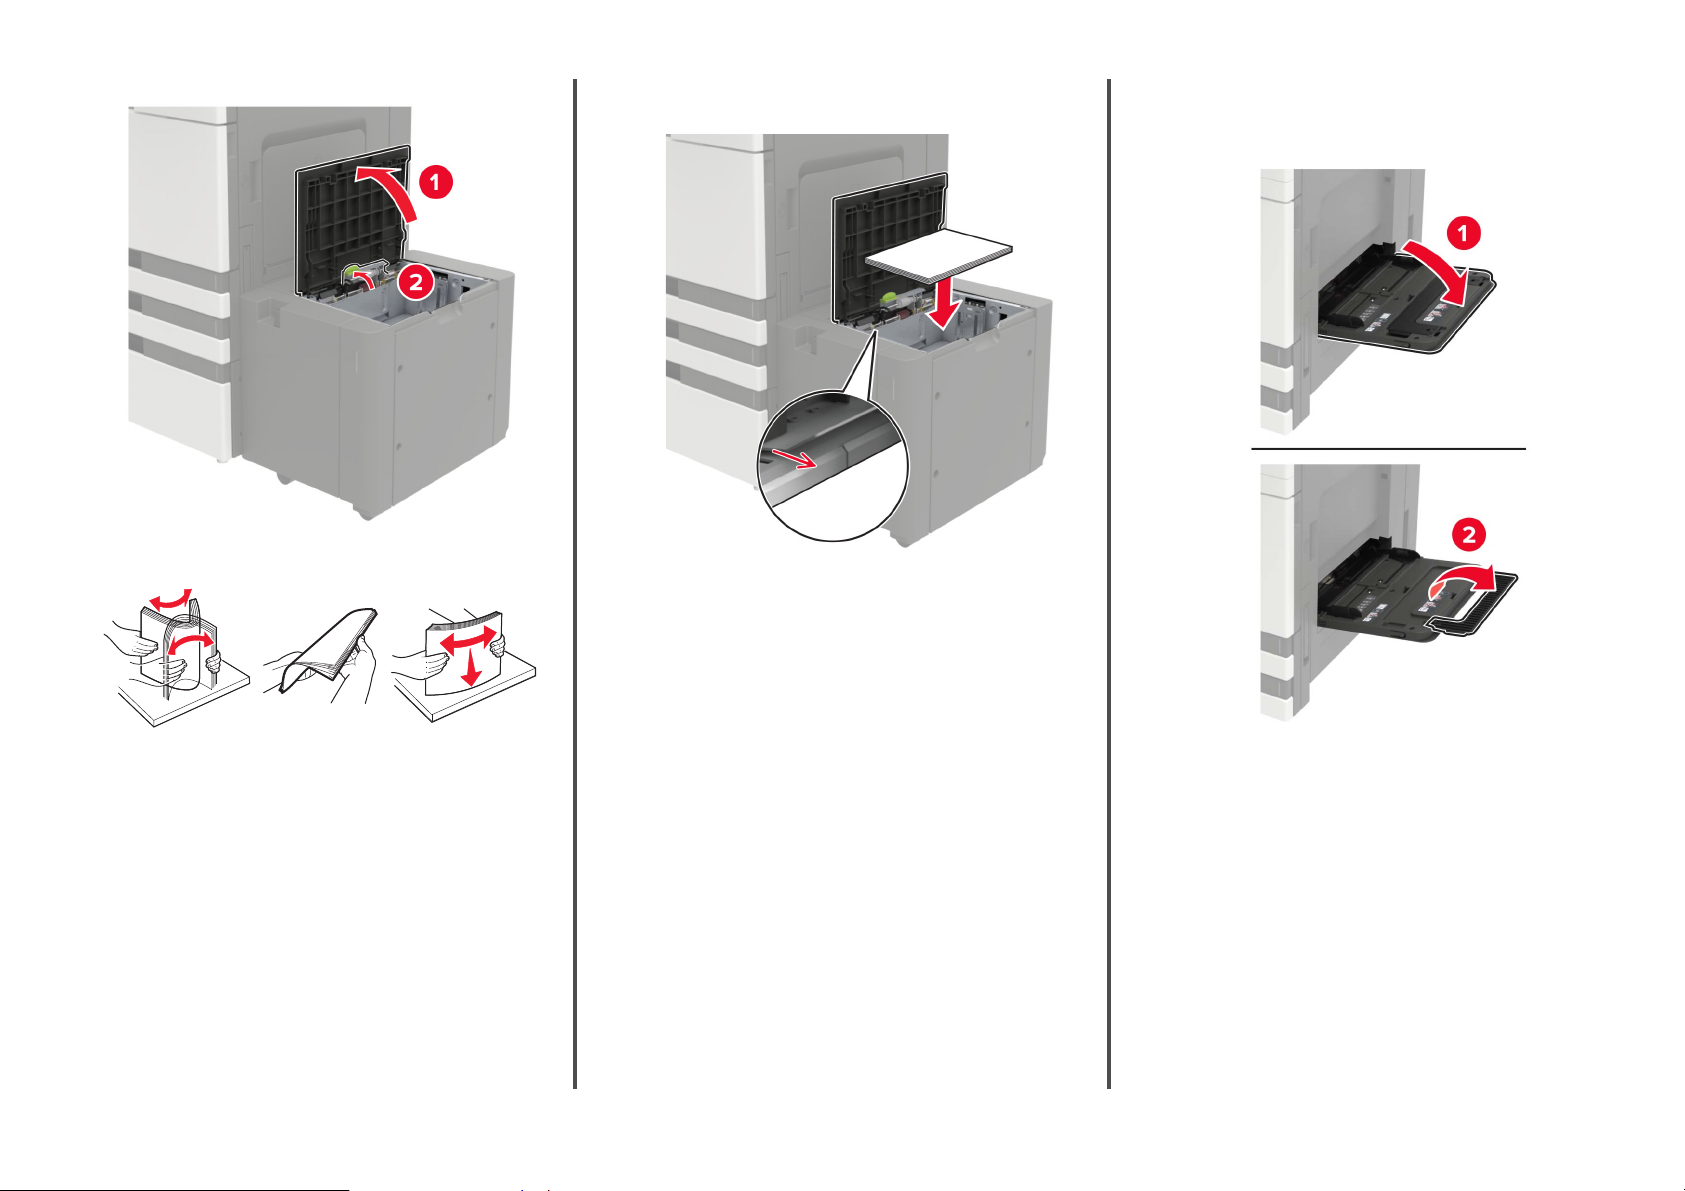
2
Flex, fan, and align the paper edges before loading.
•
To avoid paper jams, make sure that the stack height is
below the angle on the frame.
4
Lower the feed roller, and then close the door.
5
From the control panel, navigate to: Settings > Device >
Maintenance > Configuration Menu > Tra y Con figu rat ion >
Size Sensing.
6
Select the tray and paper size.
Loading the multipurpose feeder
1
Open the multipurpose feeder.
3
Load the paper stack with the printable side facedown.
•
Load letterhead facedown for one‑sided printing.
•
Load letterhead faceup for two‑sided printing.
5
Page 6
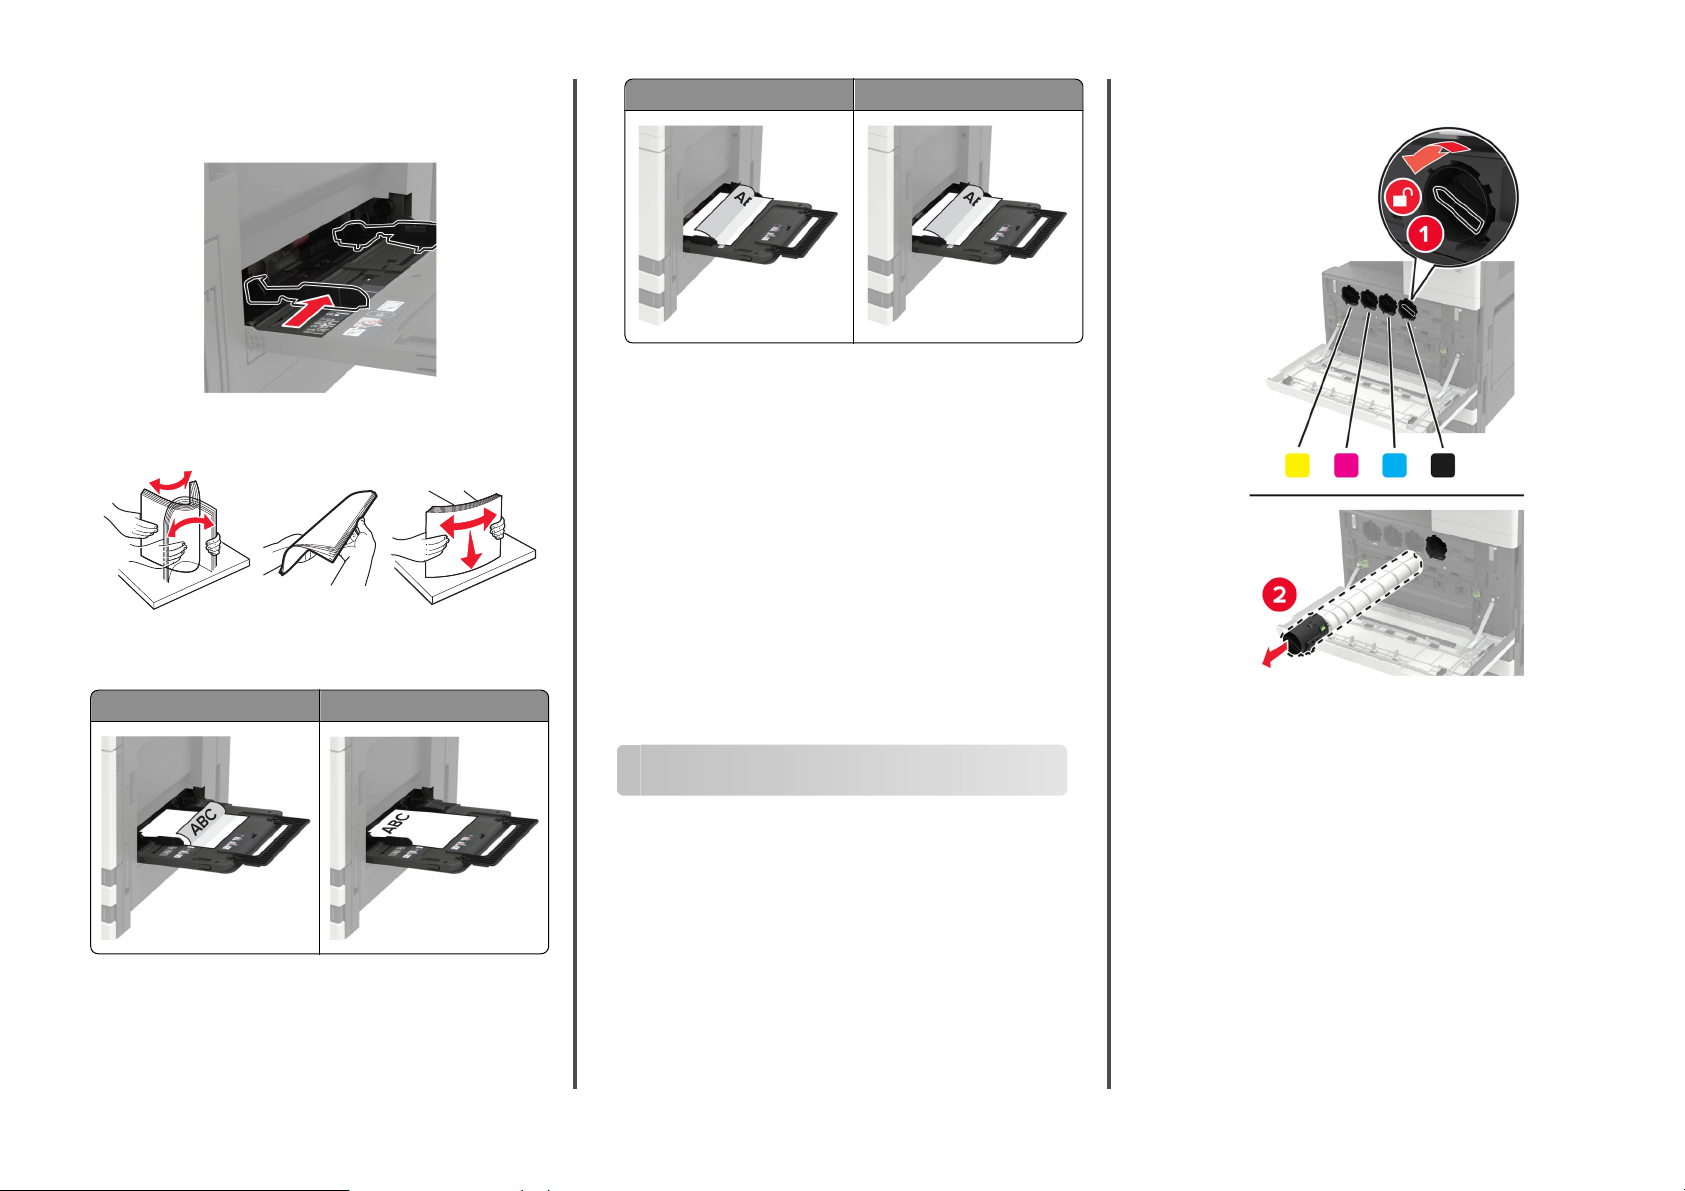
2
Adjust the guide to match the size of the paper that you are
loading.
3
Flex, fan, and align the paper edges before loading.
4
Load the paper or specialty media.
When using letterhead, do either of the following:
One‑sided printing Two‑sided printing
One‑sided printing Two‑sided printing
Warning—Potential Damage: When using envelopes, do not
use envelopes with stamps, clasps, snaps, windows, coated
linings, or self
5
From the control panel, set the paper size and paper type to
match the paper loaded.
‑
stick adhesives.
Setting the size and type of the specialty media
The trays automatically detect the size of plain paper. For specialty
media like labels, card stock, or envelopes, do the following:
1
From the home screen, navigate to:
Settings > Paper > Tray Configuration > Paper Size/Type >
select a paper source
2
Set the size and type of the specialty media.
2
Remove the toner cartridge.
3
Unpack the new toner cartridge.
Maintaining the printer
Replacing a toner cartridge
1
Open door A.
6
Page 7
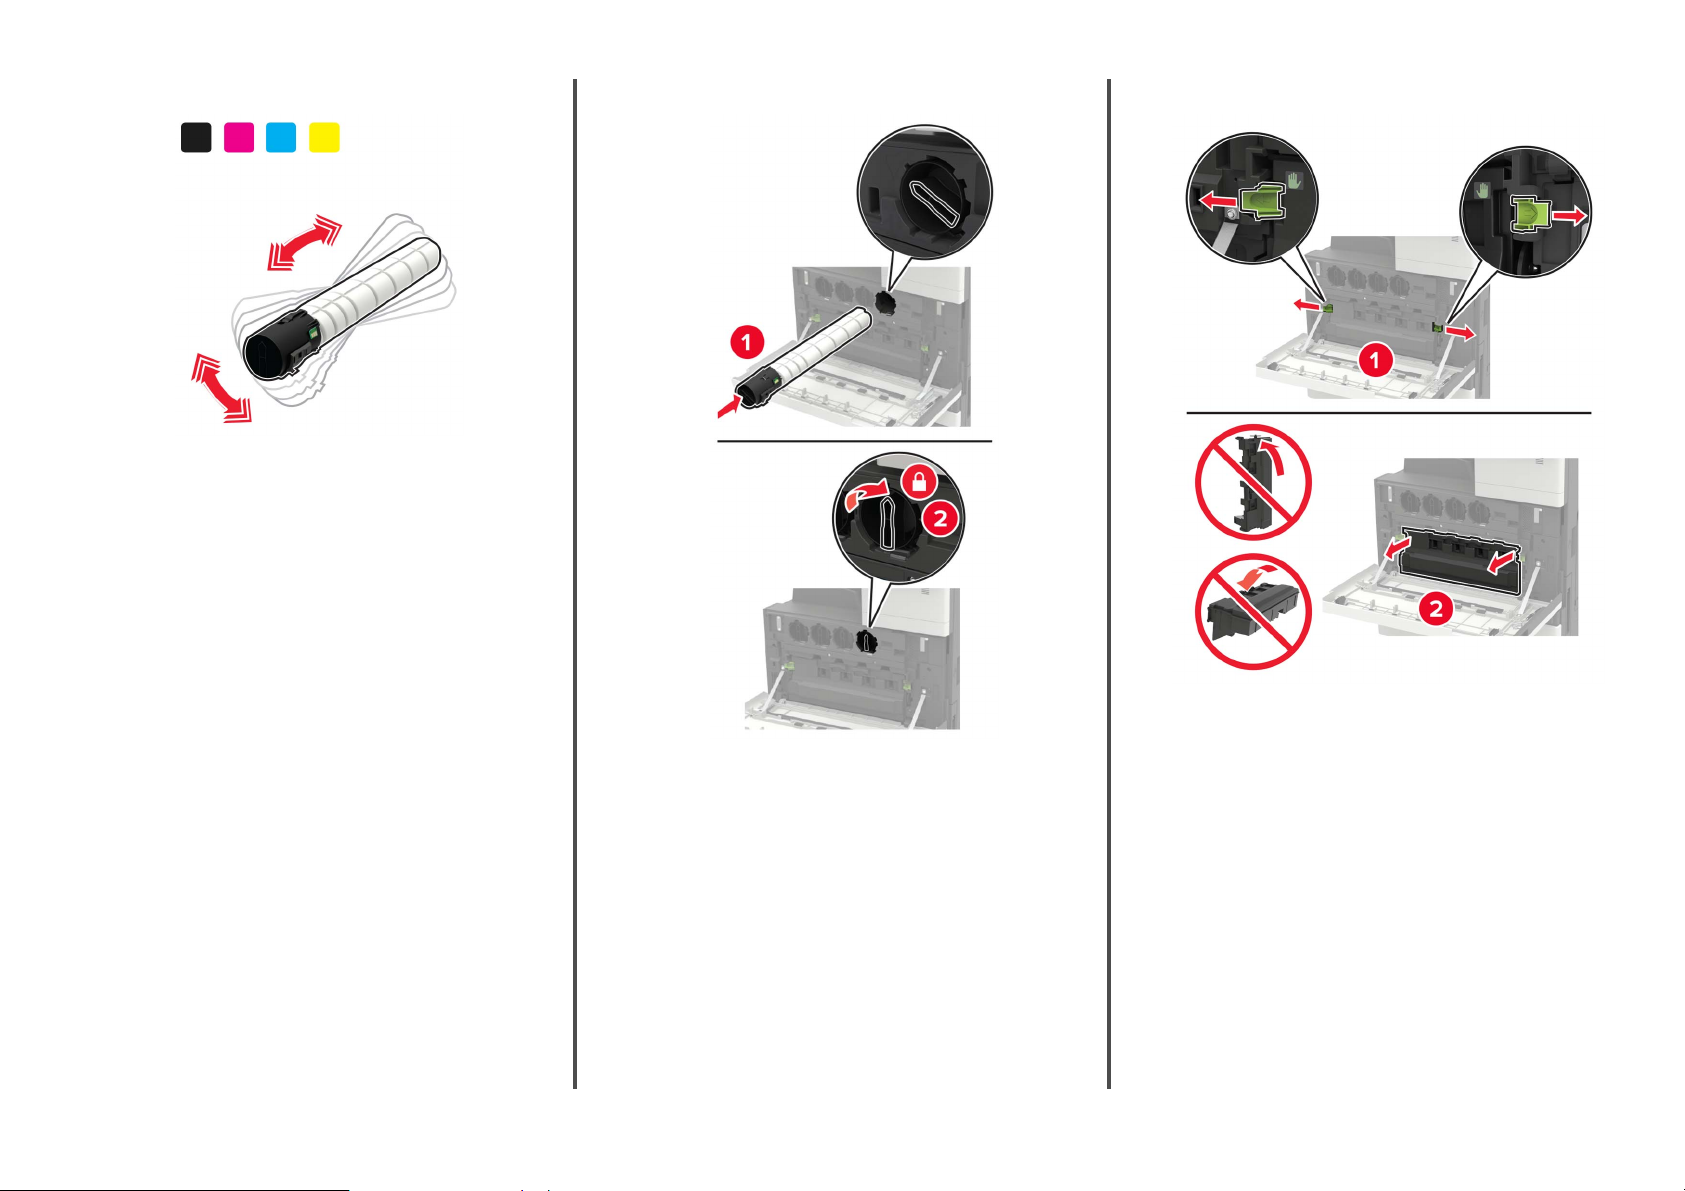
4
Shake the toner cartridge three times.
5
Insert the new toner cartridge.
6
Remove the waste toner bottle.
7
Page 8
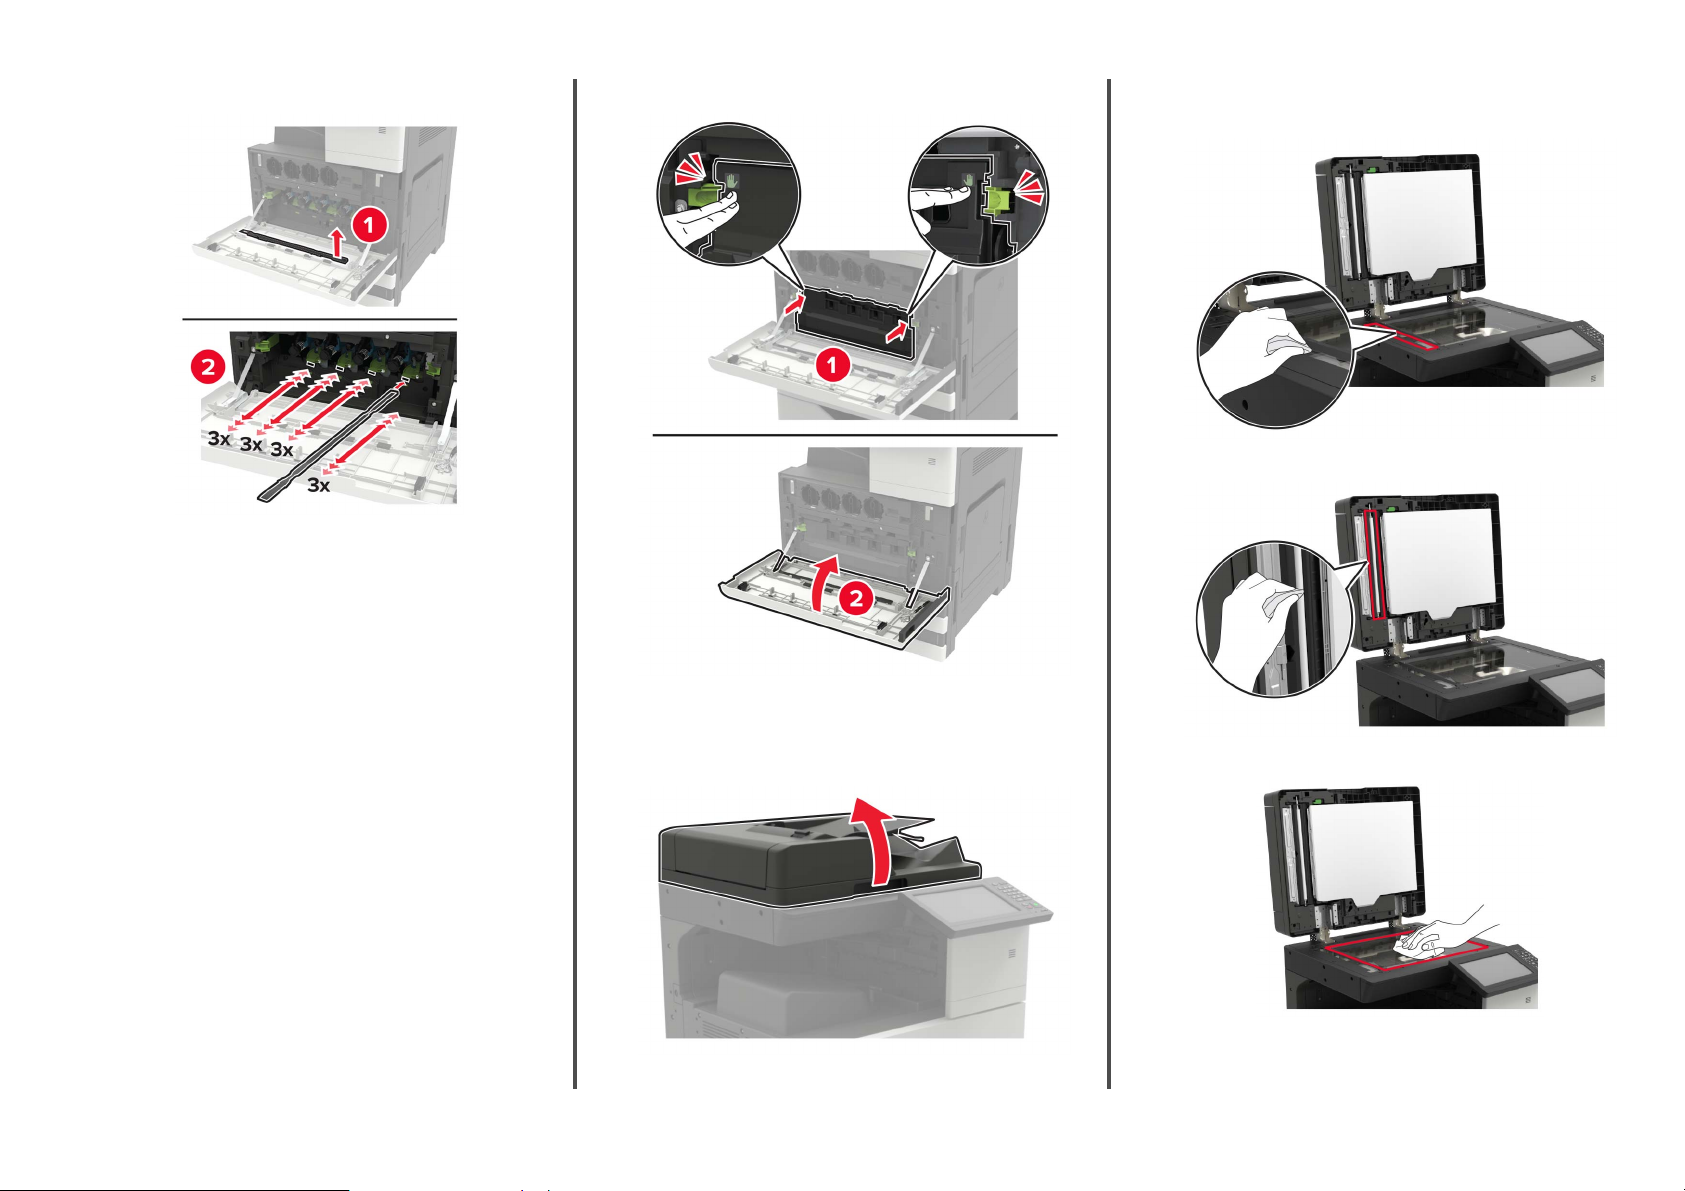
7
Using the printhead wiper, clean the printhead lens.
8
Insert the wiper back into place.
9
Insert the waste toner bottle, and then close the door.
2
Using a damp, soft, lint-free cloth, wipe the following areas:
•
ADF glass
•
ADF glass pad
Cleaning the scanner
1
Open the scanner cover.
8
•
Scanner glass
Page 9
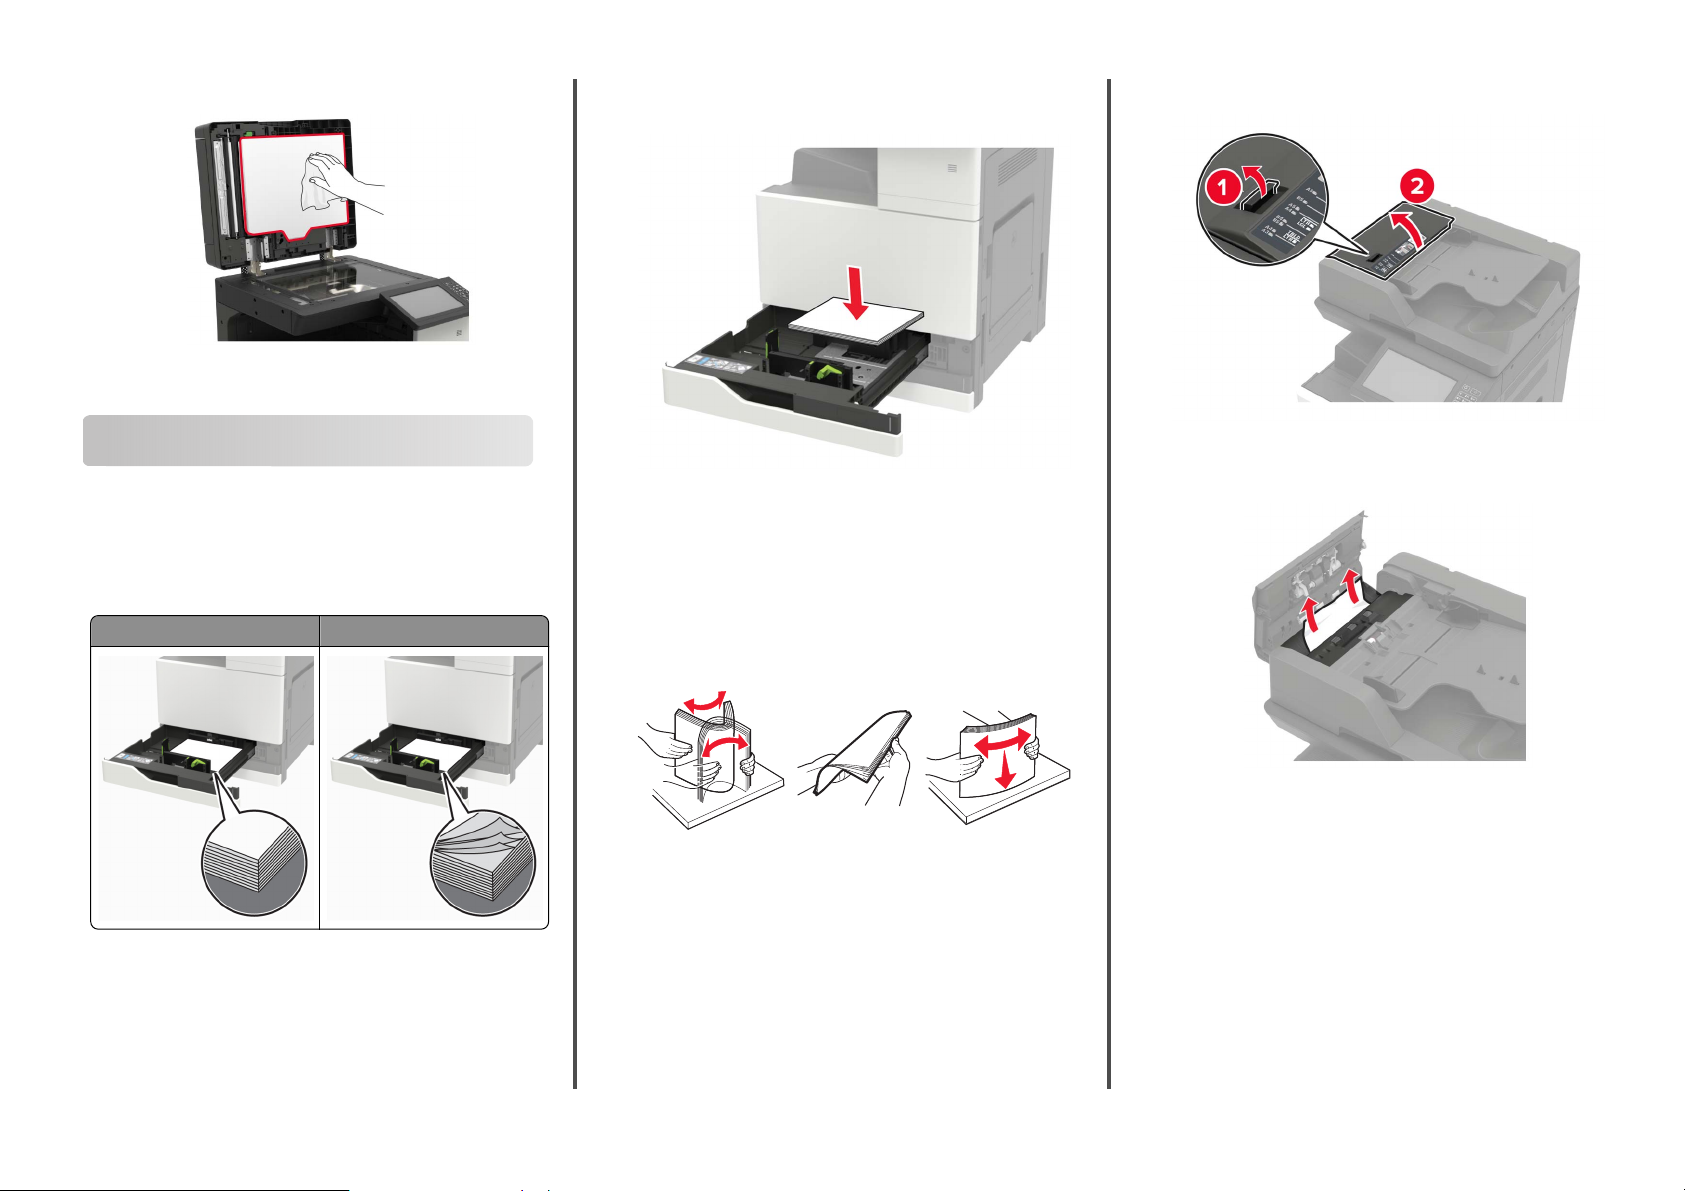
•
Scanner glass pad
3
Close the scanner cover.
•
Do not slide paper into the tray. Load paper as shown in the
illustration.
2
Open door B.
Clearing jams
Avoiding jams
Load paper properly
•
Make sure that the paper lies
Correct loading of paper Incorrect loading of paper
•
Do not load or remove a tray while the printer is printing.
•
Do not load too much paper. Make sure that the stack height
is below the maximum paper fill indicator.
in the tray.
flat
•
Make sure that the paper guides are positioned correctly and
are not pressing tightly against the paper or envelopes.
•
Push the tray firmly into the printer after loading paper.
Use recommended paper
•
Use only recommended paper or specialty media.
•
Do not load paper that is wrinkled, creased, damp, bent, or
curled.
•
Flex, fan, and align the paper edges before loading.
•
Do not use paper that has been cut or trimmed by hand.
•
Do not mix paper sizes, weights, or types in the same tray.
•
Make sure that the paper size and type are set correctly on the
computer or printer control panel.
•
Store paper according to manufacturer recommendations.
Paper jam in the automatic document feeder
1
Remove all original documents from the ADF tray.
3
Remove the jammed paper.
Note: Make sure that all paper fragments are removed.
4
Close the door.
9
Page 10
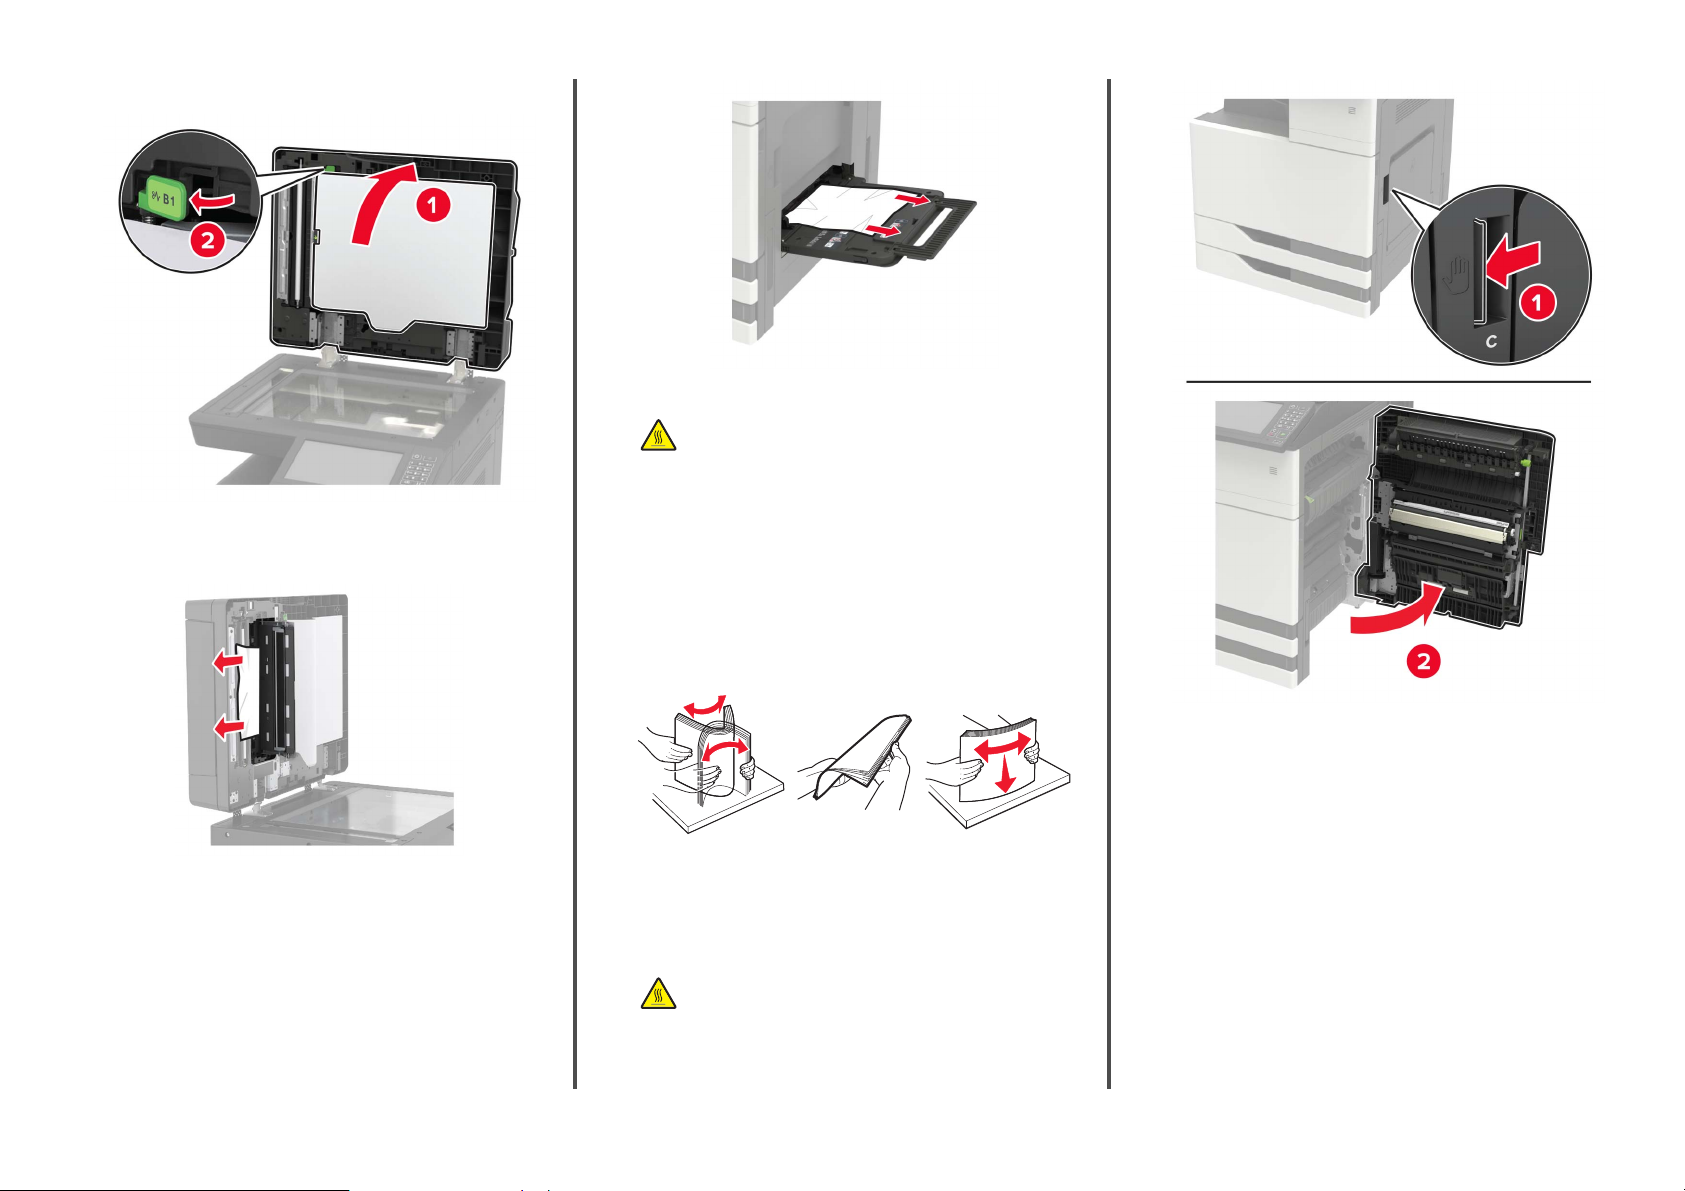
5
Open door B1.
6
Remove the jammed paper.
Note: Make sure that all paper fragments are removed.
3
Open door C to remove any paper fragments.
CAUTION—HOT SURFACE: The inside of the printer
might be hot. To reduce the risk of injury from a hot
component, allow the surface to cool before touching
it.
Notes:
•
Make sure that the door does not hit any cable attached
to the printer.
•
If a 3000‑sheet tray is installed, then slide the tray to the
right to open the door.
4
Close the door.
5
Flex, fan, and align the paper edges before loading.
7
Close the door.
Paper jam in the multipurpose feeder
1
Remove paper from the multipurpose feeder.
2
Remove the jammed paper.
Note: Make sure that all paper fragments are removed.
6
Reload paper.
Paper jam in door C
1
Open door C.
CAUTION—HOT SURFACE: The inside of the printer
might be hot. To reduce the risk of injury from a hot
component, allow the surface to cool before touching
it.
10
Notes:
•
Make sure that the door does not hit any cable attached
to the printer.
•
If a 3000‑sheet tray is installed, then slide the tray to the
right to open the door.
2
Remove the jammed paper from any of the following locations.
Note: Make sure that all paper fragments are removed.
Page 11
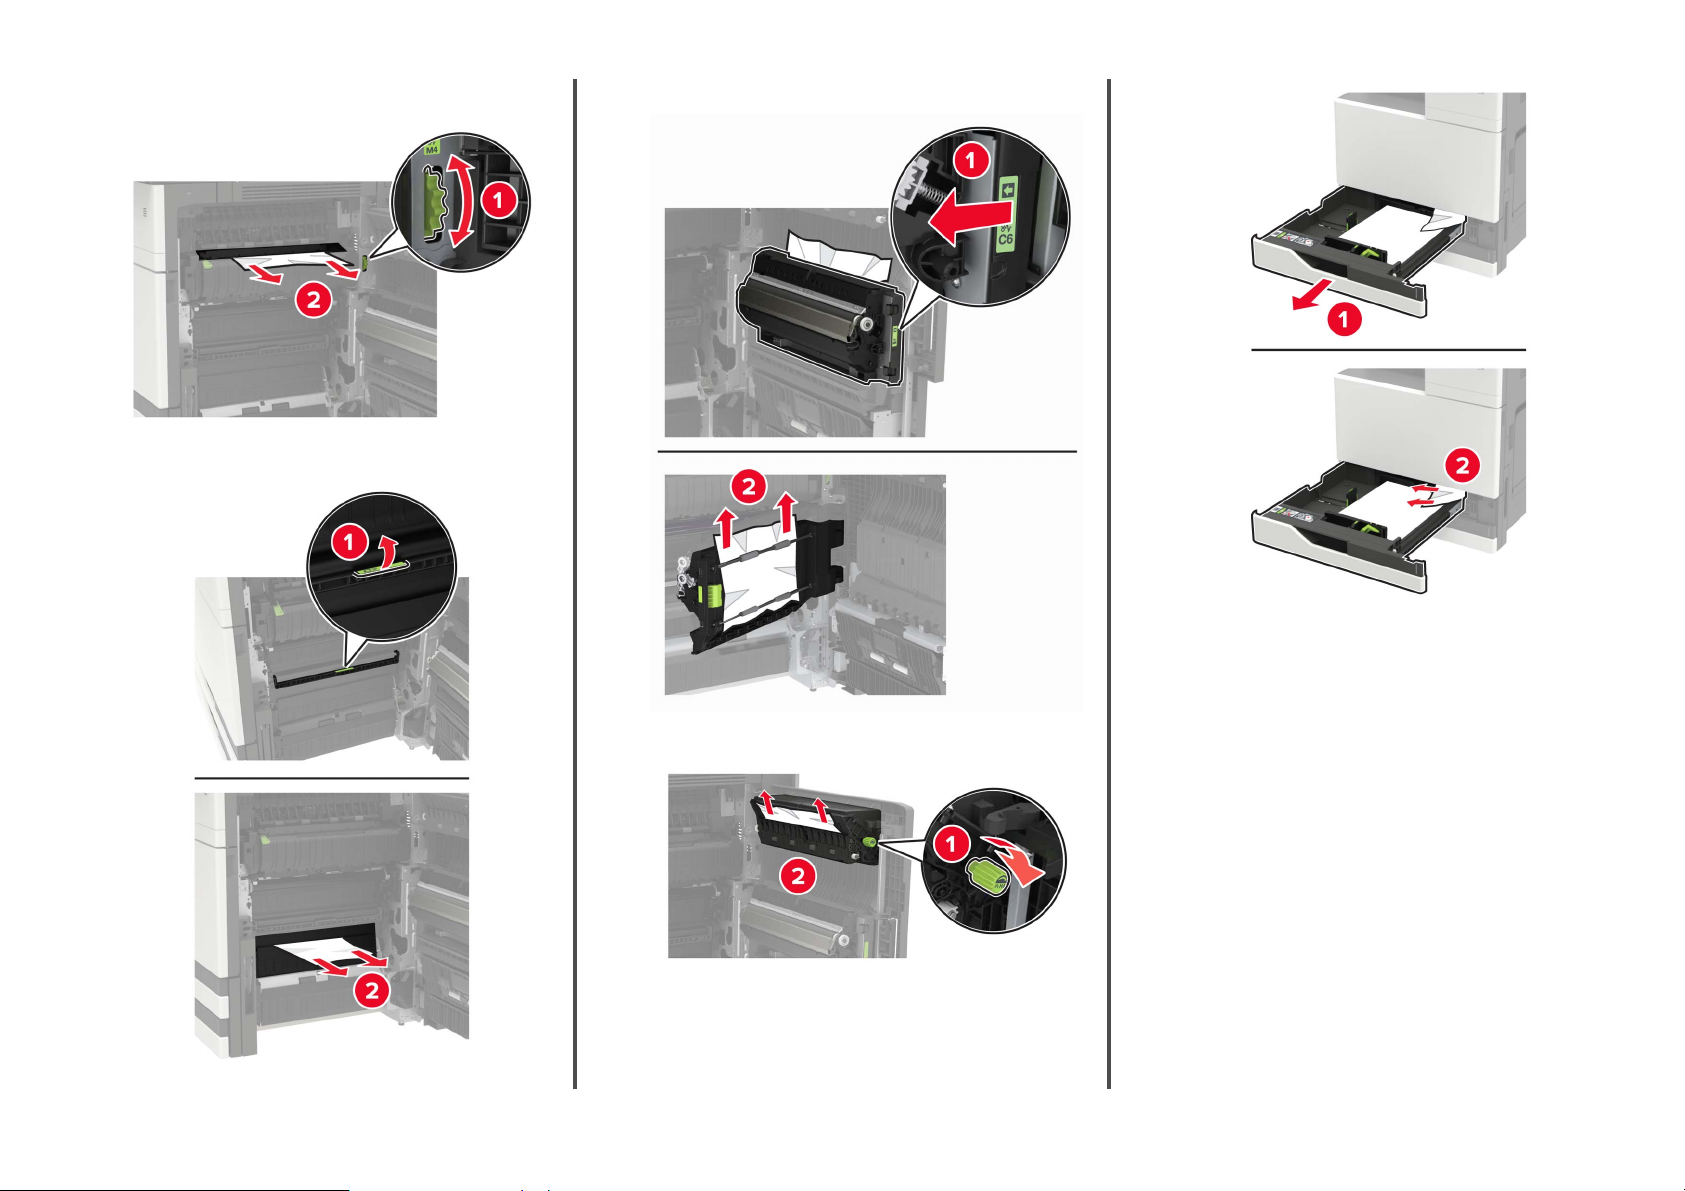
•
Fuser area
•
Below the fuser area
•
Duplex area
4
Close the trays, and then close the door.
•
Above the duplex area
3
Open the standard trays, and then remove the jammed paper.
Note: Make sure that all paper fragments are removed.
11
Page 12
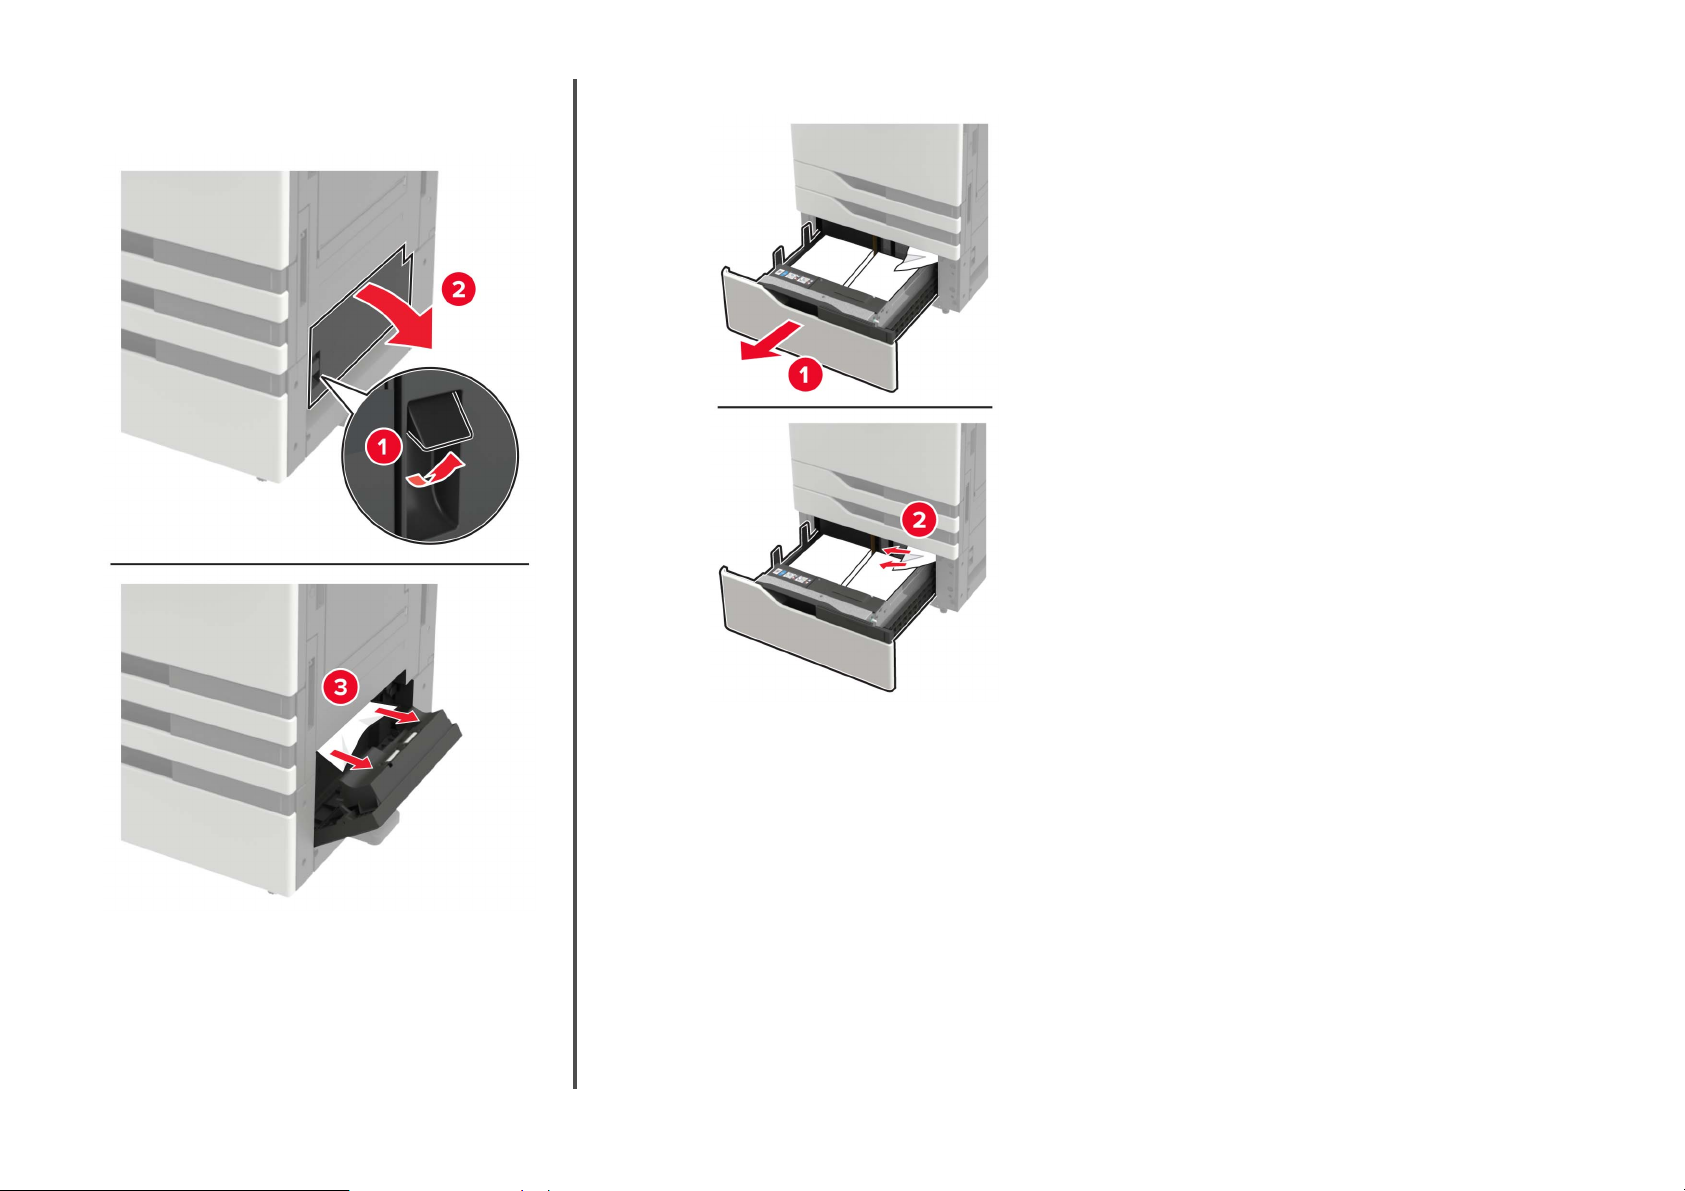
Paper jam in door D
1
Open door D, and then remove the jammed paper.
Note: Make sure that all paper fragments are removed.
Notes:
•
If a 3000‑sheet tray is installed, then slide the tray to the
right to open the door.
•
Open door C to make sure that all paper fragments are
removed, and then close the door.
2
Open the optional tray, and then remove the jammed paper.
3
Close the tray, and then close the door.
12
 Loading...