

Page 1

X63 All-In-One
Getting Star ted
July 2001
www.lexmark.com
Page 2

Edition: July 2001
The following paragrap h does not apply to any country where such pr ovisi ons are inconsistent with local law: LEXMARK
INTERNATIONAL, INC., PROVIDES THIS PUBLICATION “AS IS” WITHOUT WARRANTY OF ANY KIND, EITHER EXPRESS
OR IMPLIED, INCLUDING, BUT NOT LIMITED TO, THE IMPLIED WARRANTIES OF MERCHANT A BILITY OR FITNESS FOR A
PARTICULAR PURPOSE. Some states do not allow disclaimer of express or implied warranties in certain transactions; therefore,
this statement may not apply to you.
This publication could include technical inaccuracies or typographical errors. Changes are periodically made to the information
herein; these changes will be incorporated in later editions. Improvements or changes in the products or the programs described
may be made at any time.
Comments about this publication may be addressed to Lexmark International, Inc., Department F95/032-2, 740 West New Circle
Road, Lexington, Kentucky 40550, U.S.A. In the United Kingdom and Eire, send to Lexmark International Ltd., Marketing and
Services Department, Westhorpe House, Westhorpe, Marlow Bucks SL7 3RQ. Lexmark may use or distribute any of the
information you supply in any way it believes appropriate without incurring any obligation to you. You can purchase additional
copies of publications related to this product by calling 1-800-553-9727. In the United Kingdom and Eire, call 0628-481500. In
other countries, contact your point of purchase.
References in this publication to products, programs, or services do not imply that the manufacturer intends to make these
available in all countries in which it operates. Any reference to a product, program, or service is not intended to state or imply that
only that product, program, or service ma y be used. Any functi onally equivalent pr oduct, program, or service that does not infringe
any existing intellectual property right may be used instead. Evaluation and verification of operation in conjunction with other
products, programs, or services, except those expressly designated by the manufacturer, are the user’s responsibility.
Lexmark and Lexmark with diamond design are trademarks of Lexmark International, Inc., registered in the United States and/or
other countries.
Other trademarks are the property of their respective owners.
© Copyright 2001 Lexmark International, Inc. All rights reserved.
UNITED STATES GOVERNMENT RESTRICTED RIGHTS
This software and documentation are provided with RESTRICTED RIGHTS. Use, duplication or disclosure by the Government is
subject to restrictions as set forth in subparagraph (c)(1)(ii) of the Rights in Technical Data and Computer Software clause at
DFARS 252.227-7013 and in applicable FAR provisions: Lexmark International, Inc., Lexington, KY 40550.
Federal Communications Commission (FCC) Compliance information statement
This product complies with the limits for a Class B digital device, pursuant to Part 15 of the FCC Rules. Refer to the online User’s
Guide for additional compliance information.
This product complies with Part 68 of the FCC rules. Refer to the online User’s Guide for additional compliance information.
ENERGY STAR
The EPA ENERGY STAR Office Equipment program is a partnership effort with manufacturers to promote the introduction of
energy-efficient products and to reduce air pollution caused by power generation.
Companies participating in this program introduce products that power down when they are not being used. This feature will cut
the energy used by up to 50 percent. Lexmark is proud to be a participant in this program.
As an ENERGY STAR partner, Lexmark International, Inc. has determined that this product meets the ENERGY STAR guidelines
for energy efficiency.
Safety information
• Connect the power cord to properly grounded electrical outlet that is near the product and easily accessible.
• Refer service or repairs, other than those described in the manual, to a professional service person.
• Use only Lexmark replacement parts to maintain the safety of this product.
• Do not use the fax function during a lightning storm.
Warning
In the text of this book, a warning indicates possible machine damage or loss of data.
Copyright advisory
It may be illegal to copy certain materials without permission or license, including docu ments, image s, and currenc y. If you are not
sure whether you have permission, seek legal advice.
Page 3
Contents
Getting to know your operator panel .................2
Setting up your All-I n-On e ....... .... ..... ..... ..... .........3
Installing the CD software ...................................7
Copying ........ ............................. ............................ 9
Sending a fax ......................................................10
Receiving a fax ...................................................11
Scanning ............................................................. 13
Printing .... .............. ............... .............. ............... ..14
Troubleshooting ........ ............................. ............ 15
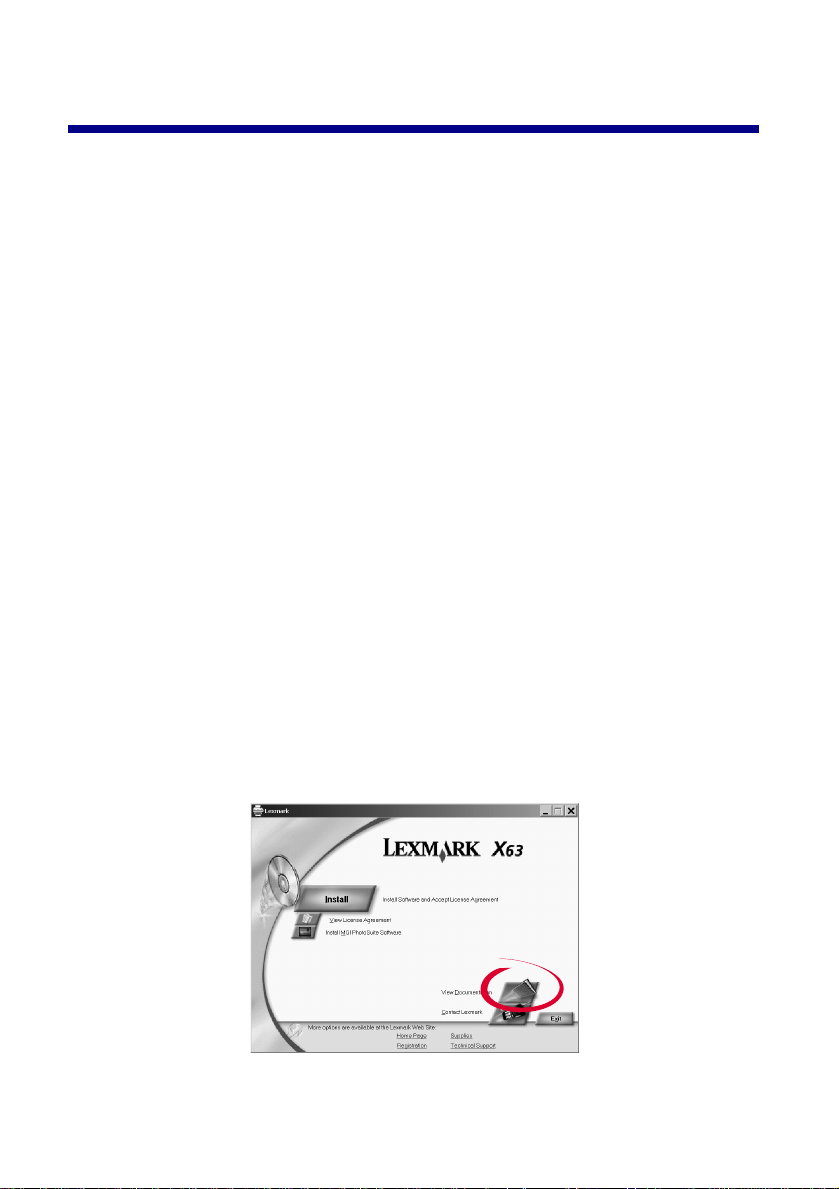
To view your online User’s Guide, inser t your CD into the CD-ROM drive,
and then click View Documentation from the Lexmark™ X63 screen.
1
Page 4
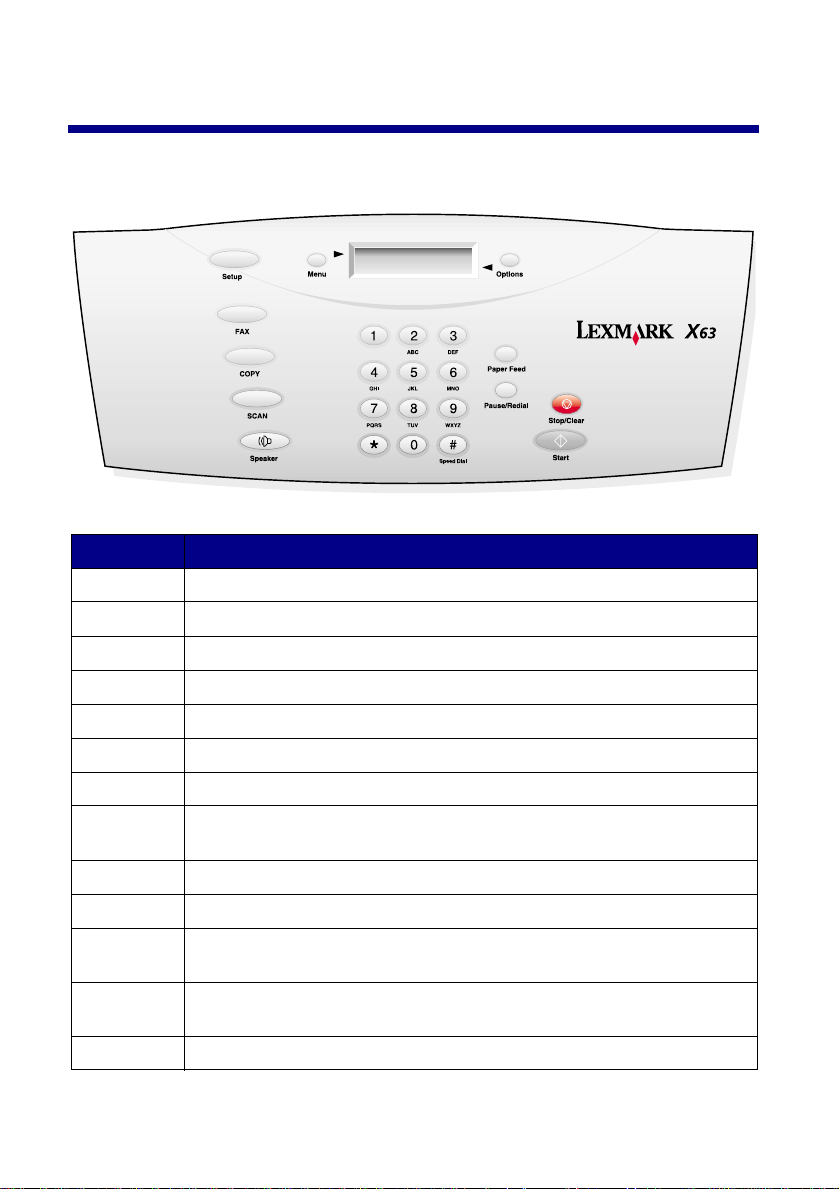
Getting to know your operator panel
Press… When you want to…
Setup Access the system setup, maintai n your cartridges, and print reports.
F A X Initiate sending a fax.
COPY Initiate a copy job.
SCAN Initiate a scan job.
Speaker Listen as you m anually dial and connect t o another fax number.
Menu Scroll through availab le features on the display.
Options Scroll through the settings for the feature you sel ect.
The key pad
buttons
Speed Dial Access the speed dial menu.
Paper Feed Continue printing after reloading the paper tray.
Pause/
Redial
Stop/Clear Stop a fax, copy, scan, or print job or cle ar an i ncorrect value on the
Start Start an action, such as faxing.
Dial a fax n um ber or select a number of copies.
Add a three-second pause when dialing or dial the last number called.
display.
2
Page 5
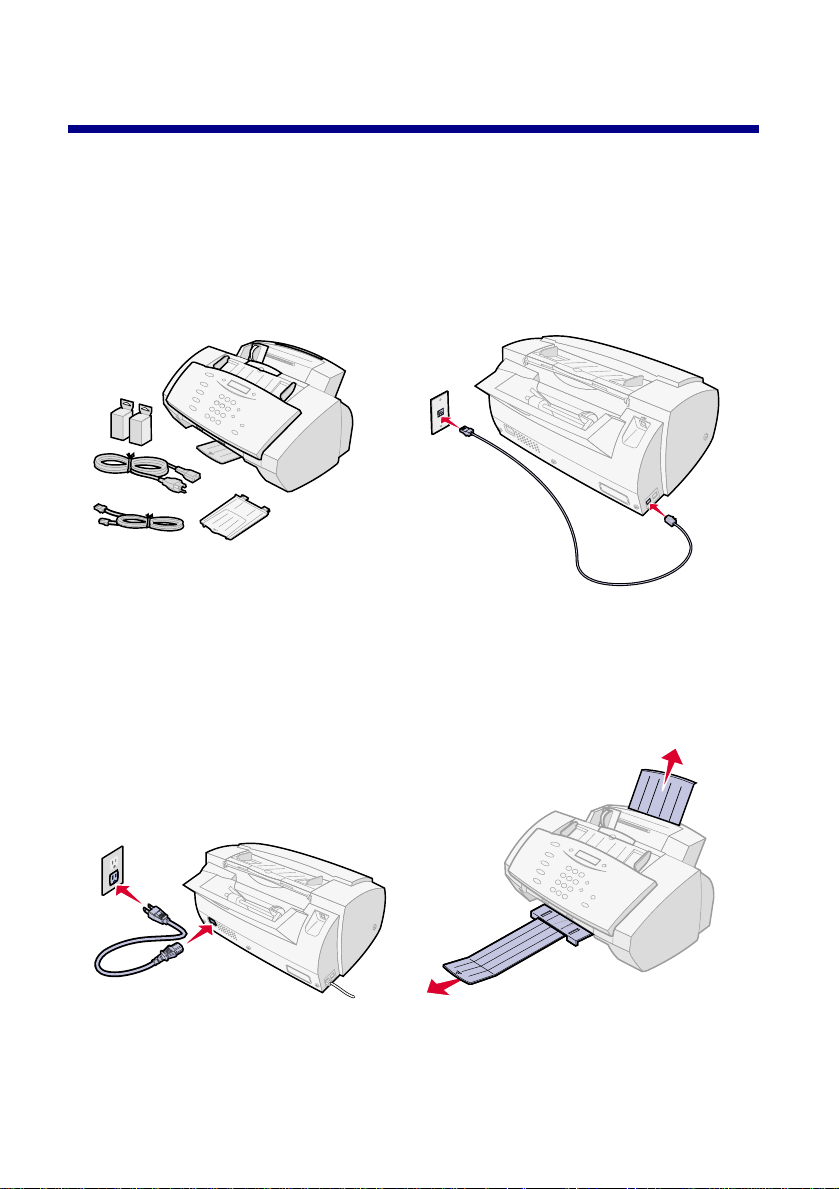
Setting up your All-In-One
1
1
3
Unpack your All-In-One.
Connect the power cor d to a
properly grounded electrical
outlet.
Warning: Do not
connect the USB
cable at this time.
Connect the telephone
2
cord to your wall jack and
to your All-In-One.
Push the Speaker button to
check your phone line for a
dial tone.
4
Extend the paper exit tray
and the paper support.
3
Page 6

56
Load paper in the paper
support.
Squeeze and slide th e paper
guide to the left edge of the
paper.
Attach the document exit
tray, and then extend the
document support.
Pull the operator panel
7
toward you, and then open
the cartridge access door.
Remove the sticker and
8
transparent tape from the
cartridges.
Warning: Do not touch the
gold contact are a of the
cartridges.
4
Page 7
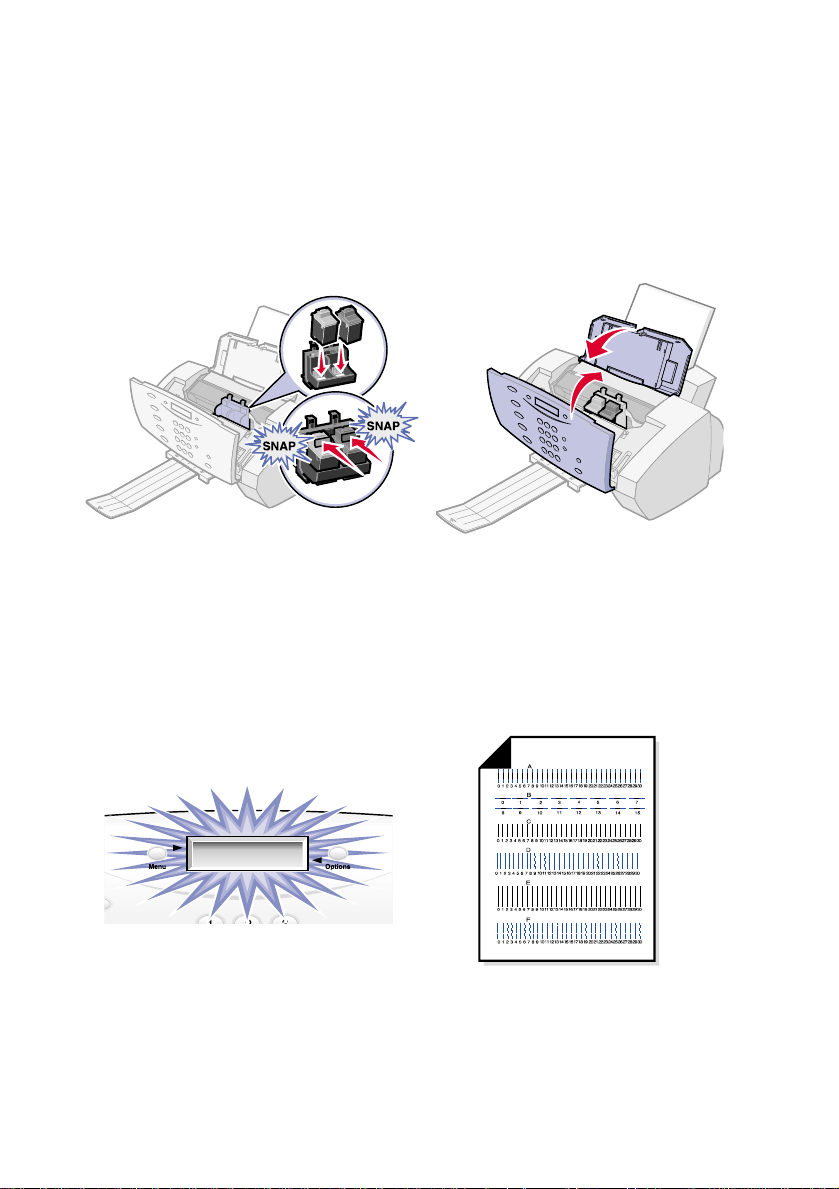
9
Place the color cartridge into the
left side of the cartridge carrier
and the black cartridge i nto the
right side of the cartridge car rier .
Push back on the cartridges until
they snap into place.
Close the cartridge access
10
door, and then close the
operator panel .
11 12
Read the operator panel
display and select the
cartridges you installed
using the Options and
Start buttons.
5
Wait for the alignment
page to print.
Page 8

13
Enter the best values from the
printed alignmen t page usi ng the
operator panel keypad.
Note: You mu st use two di gits for
each number. For example, 05
or 18.
14
You may want to program
your All-In-One to display
the current date and ti m e.
To set the displ ayed date
and time:
1. Press Setup.
2. Using the operator
panel keypad, enter a
two-digit num ber for the
month, day, year, hour,
and minute.
3. Press 1 for AM or press
2 for PM.
Congratulations!
You can now use your All-In-One to fax and copy without
using a computer. To scan, print, copy, and fax using a
computer, continue with the software installation steps on
page 7 .
6
Page 9
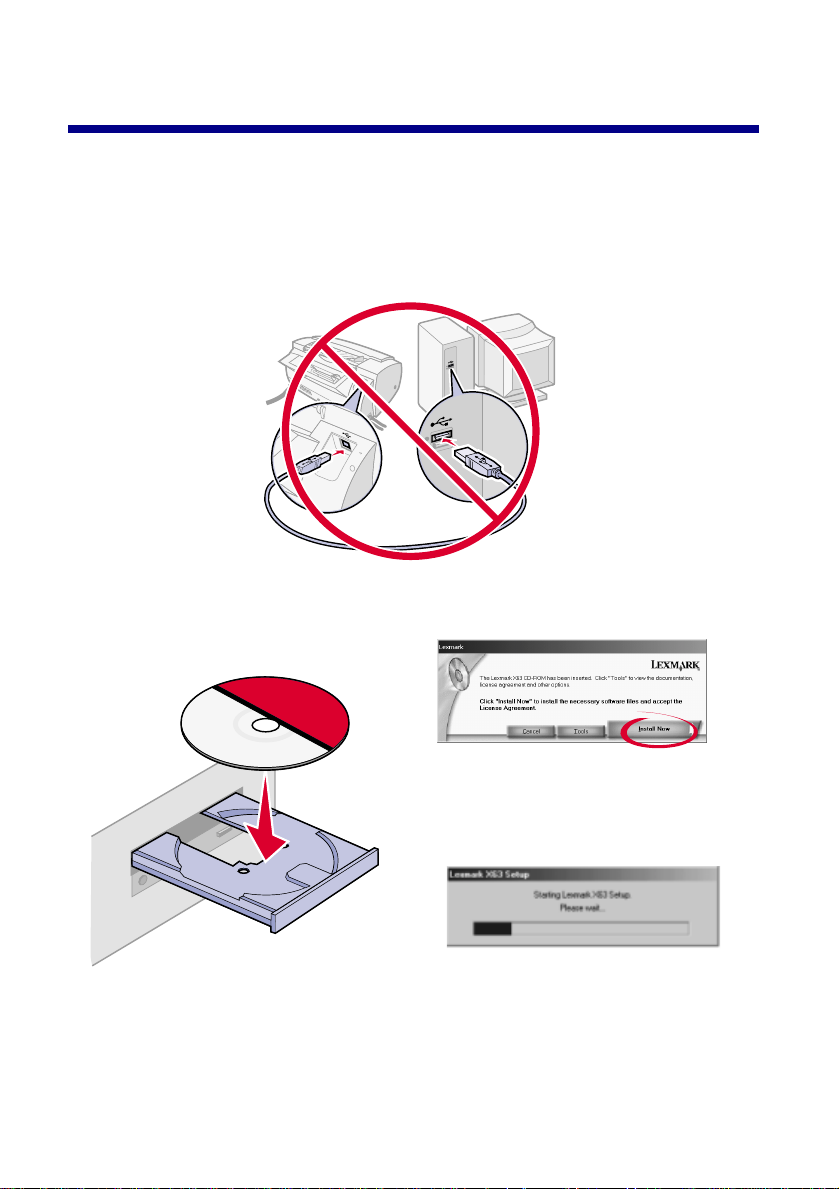
Instal ling the CD software
Warning: Do not connect the USB cable at
this time. The CD software installation
instructions will prompt you.
1
Insert your CD into the
CD-ROM drive.
Click Install Now.
2
Wait whi le files are l oaded
3
onto your computer.
7
Page 10

4
Click Ne xt.
5
Click Next.
6
8
8
Click N ext.
Wait while software is
installed onto your computer.
If your USB cable is
If your USB cable is
connected to your
connected to your
7
7
All-In-One, disconnect it
All-In-One, disconnect it
now.
now.
Click OK..
Click OK.
When this screen appears:
9
1 Connect the USB cable to your
computer and to your All-In-One.
2 Wait for the printer driver to
install.
3 Click OK.
8
Page 11
Copying
To copy a document:
• P lace your document face down and top down in the document
support. DOCUMENT LOADED appears on the operator panel display.
• S lide the document guide until it rests against both edges of your
document.
Using the operator panel: Using the software:
1 Press COPY.
2 Press the keypad buttons
to select the numbe r of
copies.
3 Press Start.
1 Make sure y ou have installed the All-In-One
software. For help , see page 7.
2 Click Start Programs Lexmark X6 3 Scan &
Copy Control Program.
3 Select the number of copies.
4 Click the b utton that matches your desired copy
mode (Color, Gray, B/W, Text).
5 Click Copy.
9
Page 12

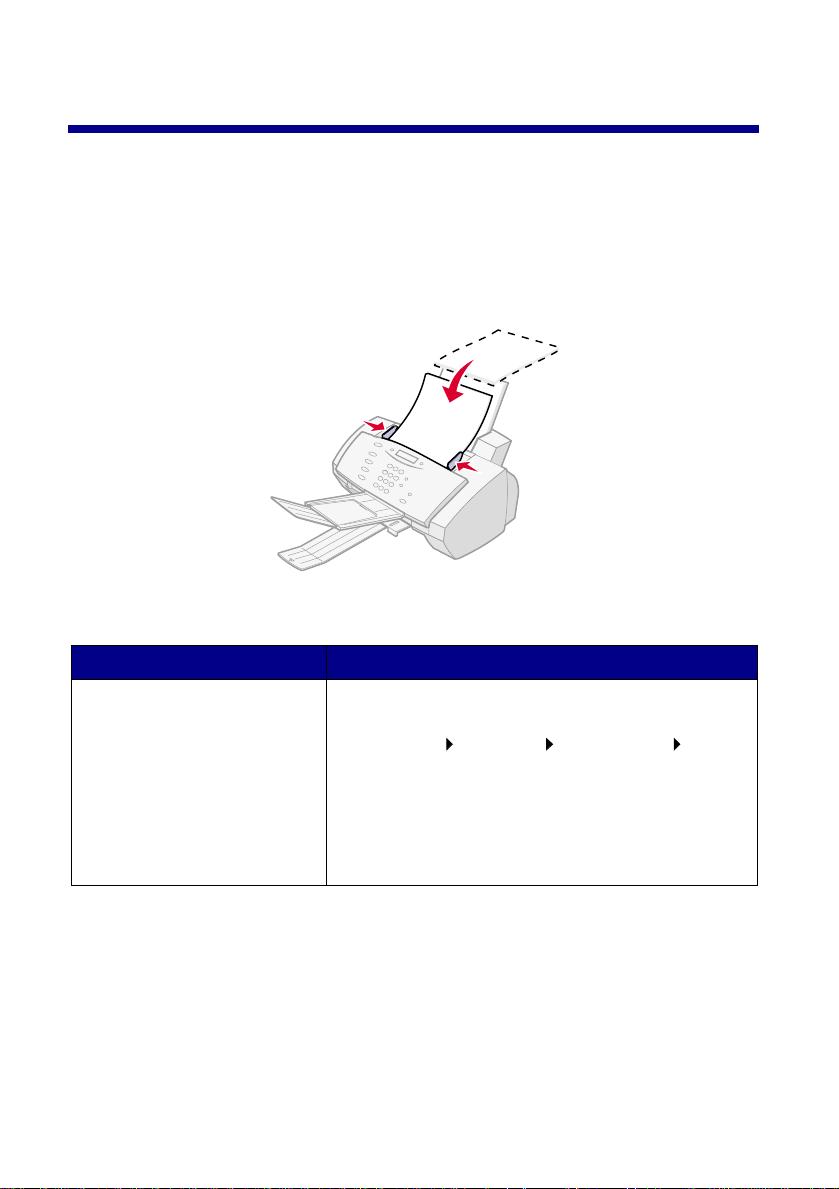
Send in g a fa x
1 Place your document face down and top down in the document
support. DOCUMENT LOADED appears on the operator panel display.
Slide the document guide until it rests against both edges of your
document.
2 Press FAX.
3 Press the keypad buttons to enter a fax number.
4 Press Start.
To set up your All-In-One to send or receive a fax using your telephone,
answering machine, or computer modem, refer to page 72 of the online User’s
Guide. To access the online User’s Guide see page 1.
Using the Speed Dial bu tto n to send a fax
You can program a fax number as a speed dial number using the Fax Setup
Utility. Click Start
fax numbers for your All-In-One.
To send a fax using a programmed speed dial number:
Programs Lexmark X63 Fax Setup Utility to program
1 Press Speed Dial, and then press the number that corresponds with
your programmed speed dial number in the Fax Setup Utility .
2 Press Start.
10
Page 13

Receiv ing a fax
Your All-In-One has three modes for receiving faxes: FAX, ANS/FAX, and
TEL. The current mode appears in the upper right corner of the operator
panel display.
Mode: Function:
F A X Receive faxes automatically without using y our telephone
handset. Your All-In-One will receive al l incoming calls as faxes.
ANS/FAX Connects your All-In-One with an answering machine to
TEL Manually receive faxes by pressing either *9* on your
To change the fax receive mode:
automatically receive both i ncom ing voice messages and
faxes.
telephone keypad or by pressing Start twice on your All-In-One
operator panel .
1 Press Setup, and then press Menu until you see FAX RECEIVE MODE
on the display.
2 Press Options unt il you see the mode you want to select.
3 Press Start.
Using Distinctive Ring Pattern Detection (DRPD)
Distinctive ring is a service provided by some telephone companies that
assigns two phone numbers to one phone line, each of which makes your
phone ring differently. If you subscribe to this service, you can program your
All-In-One to learn one phone number and distinctive ring for incoming faxes:
1 Press Setup, and then press Menu until you see SETUP DRPD on the
display.
2 Press Options unt il you see LEARN, and then press Start.
3 Dial the telephone number that you will use as a fax number.
11
Page 14

Your All-In-One will learn the distinctive ring of the telephone number
you dial.
4 Press Setup.
5 Press Me nu until you see FAX RECEIVE MODE on the display.
6 Press Options unt il you see DRPD, and then press Start.
The All-In-One detects the ring pattern it has learned and automatically
answer all incoming faxes on the second ring. All other ring patterns are
ignored.
Note: DRPD now appears as a fourth fax receive mode in the
operator panel menu.
12
Page 15

Scanning
To scan a document:
• Make sure you have installed the All-In-One software.
• P lace your document face down and top down in the document
support. DOCUMENT LOADED appears on the operator panel display.
• S lide the document guide until it rests against both edges of your
document.
Using the operator panel: Using the software:
1 Press SCAN.
The Scan & Copy Control Program
appears.
2 Click the button that matches your
scan destination (Scan to Application,
Scan to File, or Scan and E-mail).
3 Click Send.
1 Make sure y ou have installed the
All-In-One softw are on your computer.
For help, see page 7.
2 Click Start Programs Lexmark
X63 Scan & Copy Control Program.
3 Click the button that matches your
scan destination (Scan to Application,
Scan to File, or Scan and E-mail).
4 Click S end.
13
Page 16

Printing
To print a document :
1 Ma ke sure you have installed the All-In-One software. For help, see
page 7.
2 From your software application, select File Print.
3 To customize print settings, click Properties or Printer Preferences.
4 From the Print dialog box, click OK or Print (depending on the software
application).
14
Page 17

Troubleshooting
Checking first things first
When your All-In-One has a problem, first make sure:
• The power cord is plugged into your All-In-One and into a properly
grounded electrical outlet.
• Your telephone cord is securely attached to the line jack on your
All-In-One and to the wall jack.
• Your telephone has a dial tone.
• T he operator panel and the cartridge access door are completely
closed.
• READY appears on the display.
• T he stic k er and transparent tape covering the bottom of the cartridges
are removed.
Clearing paper jams
Your All-In-One may have a paper jam in either the document path or the
printer paper path. To clear a paper jam:
1 Open the operator panel and remove any paper from the document
path.
2 If paper is still jammed in the All-In-One, open the cartridge access
door and remove any paper from the printer paper path.
3 Close the cartridge access door, and then close the operator panel
firmly until it snaps into place.
4 Press Stop/ Clea r.
15
Page 18

Solving fax problems
The numbers stored in the Speed Dial memory do not dial
correctly.
Make sure the numbers are stored in the speed dial memory correctly . To print
a speed dial list:
1 Press Setup.
2 Press Me nu until you see PRINT REPORT.
3 Press Options until you see SPEED DIAL LIST.
4 Press Start to print the list.
The All-In-One cannot receive faxes automatically.
Make sure your fax receive mode is set to either ANS/FAX or FAX. For help,
see page 11.
The All-In-One cannot receive faxes manually.
Make sure you do one of the following:
• Press Star t twice on the All-In-One operator pane l.
• Press *9* on your telephone, and then hang up.
Other fax transmission problems
The machine sending you a fax or the machine you are sending a fax to may
be turned off, out of paper, or disabled. Contact the owner of that machine if
you experience the following problems:
• Your All-In-One will not send a fax.
• Incoming faxes are incomplete.
• Incoming faxes have blank spaces.
• Incoming faxes have spots.
• Incoming faxes are of poor quality.
• Incoming faxes have stretched words.
• Your All-In-One dials a number, but cannot make a connection with
another fax machine.
16
Page 19

Solving copy problems
NOT AVAILABLE appears on the operator panel display
Most of the time, when your NOT A VAILABLE appears on your operator panel
display, you are attempting to make multiple copies while your All-In-One is
set to a color copy mode.
If you would like to make multiple black and white copies without a computer,
you can change the color mode to BLACK QUICK, BLACK NORMAL, or
BLACK PHOTO using the menus on your operator panel display.
If you would like to make multiple color copies, you must attach your
All-In-One to your computer using a USB cable. If you have installed the
All-In-One software on your computer, click Start
Scan & Copy Control Program. Use the Scan & Copy Control Program to
make color copies. For All-In-One CD software installation instructions, see
page 6.
Programs Lexmark X63
Solvin g other probl em s
For help with other problems, refer to the online User’s Guide for detailed
troubleshooting information. To access the online User’s Guide, see page 1.
17
Page 20

Statement of Limited
Warranty
Lexmark International, Inc.,
Lexington, KY
This warranty applies to the United
States and Canada. For
customers outside the U.S. and
Canada, refer to the countryspecific warranty information that
came with your printer.
Lexmark™X63 All-In-One
This Statement of Limited
Warranty applies to this product if it
was originally purchased for your
use, and not for resale, from
Lexmark or a Lexmark remarketer,
referred to in this statement as
“Remarketer.”
Warranty
Lexmark warrants that this
product:
•Is manufactured from new
parts, or new and serviceable
used parts, which perform like
new parts
•Is free from defects in material
and workmanship
•Conforms to Lexmark’s official
published specifications
•Is in good working order
If this product does not function as
warranted during the warranty
period, contact a Remarketer or
Lexmark for repair or replacement
(at Lexmark’s option) without
charge.
If this product is a feature or option,
this statement applies only when
that feature or option is used with
the product for which it was
designed. To obtain warranty
service, you may be required to
present the feature or option with
the product.
If you transfer this product to
another user, warranty service
under the terms of this statement
is available to that user for the
remainder of the warranty period.
You should transfer proof of
original purchase and this
statement to that user.
Warranty service
The warranty period is 12 months
and starts on the date of original
purchase as shown on the
purchase receipt.
To obtain warranty service you
may be required to present proof of
original purchase. Warranty
service will be provided at a
Remarketer or a Lexmark
designated location. You may be
required to deliver your product to
the Remarketer or Lexmark, or
ship it prepaid and suitably
packaged to a Lexmark designated
location. You are responsible for
loss of, or damage to, a product in
transit to the Remarketer or the
designated location.
When warranty service involves
the exchange of a product or part,
the item replaced becomes the
property of the Remarketer or
Lexmark. The replacement may be
a new or repaired item. The
replacement item assumes the
remaining warranty period of the
original product.
Replacement is not available to
you if the product you present for
exchange is defaced, altered, in
need of a repair not included in
warranty service, or damaged
beyond repair. Also, such product
must be free of any legal
obligations and restrictions.
Before you present this product for
warranty service, remove all
programs, data, and removable
storage media.
For further explanation of your
warranty alternatives and the
nearest Lexmark authorized
servicer in your area, please
contact Lexmark at 1-800-5396275, or on the World Wide Web at
www.lexmark.com.
Free remote technical support is
provided for this product
throughout its warranty period. For
products no longer covered by a
Lexmark warranty, technical
support may only be available for a
fee.
Extent of warranty
We do not warrant uninterrupted or
error-free operation of a product.
Warranty service does not include
repair of failures caused by:
•Modification or attachments
•Accidents or misuse
•Unsuitable physical or
operating environment
•Maintenance by anyone other
than Lexmark or a Lexmark
authorized servicer
•Operation of a product beyond
the limit of its duty cycle
•Failure to have installed a
maintenance kit as specified
(if applicable)
•Use of printing media outside
of Lexmark specifications
•Use of other than Lexmark
supplies (such as toner
cartridges, inkjet cartridges,
and ribbons)
•Use of other than Lexmark
product or component
ALL EXPRESS AND IMPLIED
WARRANTIES, INCLUDING THE
IMPLIED WARRANTIES OF
MERCHANTABILITY AND
FITNESS FOR A PARTICULAR
PURPOSE, ARE LIMITED IN
DURATION TO THE WARRANTY
PERIOD. NO WARRANTIES,
EXPRESS OR IMPLIED, WILL
APPLY AFTER THIS PERIOD.
Limitation of liability
Your sole remedy under this
Statement of Limited Warranty is
set forth in this section. For any
claim concerning performance or
nonperformance of Lexmark or a
Remarketer for this product under
this Statement of Limited Warranty,
you may recover actual damages
up to the limit set forth in the
following paragraph.
Lexmark's liability for actual
damages from any cause
whatsoever will be limited to the
greater of 1) $5,000 or 2) the
amount you paid for the product
that caused the damages. This
limitation of liability will not apply to
claims by you for bodily injury or
damage to real property or tangible
personal property for which
Lexmark is legally liable. In no
event will Lexmark be liable for any
lost profits, lost savings, incidental
damage, or other economic
consequential damages. This is
true even if you advise Lexmark or
a Remarketer of the possibility of
such damages. Lexmark is not
liable for any claim by you based
on a third party claim.
This limitation of remedies also
applies to any developer of
materials supplied to Lexmark.
Lexmark’s and the developer’s
limitations of remedies are not
cumulative. Such developer is an
intended beneficiary of this
limitation.
Additional rights
Some states do not allow
limitations on how long an implied
warranty lasts, or do not allow the
exclusion or limitation of incidental
or consequential damages, so the
limitations or exclusions contained
above may not apply to you.
This warranty gives you specific
legal rights. You may also have
other rights which vary from state
to state.
 Loading...