

Page 1

X6100 Series
User’s Guide for Windows
• “Learning about your All-In-One” on page 9
Information about the printer parts and software.
• “Networking” on page 75
How to use your All-In-One in a network environment.
• “Maintaining your All-In-One ” on page 76
Caring for your print cartridges and ordering supplies.
• “Troubleshooting” on page 87
Information about setup problems, error messages, print quali ty problems,
paper jams, and much more.
www.lexmark.com
Page 2

Edition: October 2003
The following paragraph does not apply to any country where such provisions are inconsistent
with local law: LEXMARK INTERNATIONAL, INC., PROVIDES THIS PUBLICATION “AS IS” WITHOUT
WARRANTY OF ANY KIND, EITHER EXPRESS OR IMPLIED, INCLUDING, BUT NOT LIMITED TO,
THE IMPLIED WARRANTIES OF MERCHANTABILITY OR FITNESS FOR A PARTICULAR PURPOSE.
Some states do not allow disclaimer of express or implied warranties in certain transactions; therefore,
this statement may not apply to you.
This publication could include technical inaccuracies or typographical errors. Changes are periodically
made to the information herein; these changes will be incorporated in later editions. Improvements or
changes in the products or the programs described may be made at any time.
Comments about this publication may be addressed to Lexmark International, Inc., Department F95/
032-2, 740 West New Circle Road, Lexington, Kentucky 40550, U.S.A. In the United Kingdom and Eire,
send to Lexmark International Ltd., Marketing and Services Department, Westhorpe House, Westhorpe,
Marlow Bucks SL7 3RQ. Lexmark may use or distribute any of the information you supply in any way it
believes appropriate without incurring any obligation to you. You can purchase additional copies of
publications related to this product by calling 1-800-553-9727. In the United Kingdom and Eire, call +44
(0)8704 440 044. In other countries, contact your point of purchase.
References in this publication to products, programs, or services do not imply that the manufacturer
intends to make these available in all countries in which it operates. Any reference to a product, program,
or service is not intended to state or imply that only that product, program, or service may be used. Any
functionally equivalent product, program, or service that does not infringe any existing intellectual
property right may be used instead. Evaluation and verification of operation in conjunction with other
products, programs, or services, except those expressly designated by the manufacturer, are the user’s
responsibility.
Lexmark and Lexmark with diamond design are trademarks of Lexmark International, Inc.
© 2003 Lexmark International, Inc.
All rights reserved.
UNITED STATES GOVERNMENT RIGHTS
This software and any accompanying documentation provided under this agreement are commercial
computer software and documentation developed exclusively at private expense.
Safety infor mation
• Use only the power supply provided with this product or the manufacturer's authorized replacement
power supply.
• Connect the power supply cord to an electrical outlet that is near the product and easily accessible.
• Refer service or repairs, other than those described in the user documentation, to a professional
service person.
CAUTION: Do not use the fax feature during a lightning storm. Do not set up this product or make any
electrical or cabling connections, such as the power supply cord or telephone, during a lightning storm.
Mercury statement
This product contains mercury in the lamp (<5mg Hg). Disposal of mercury may be regulated due to
environmental considerations. For disposal or recycling information, contact your local authorities or the
Electronic Industries Alliance: www.eiae.org.
Page 3

Contents
Contents ..............................................................................i
Finding more information .................................................1
Setting up your All-In-One ................................................3
Set up the All-In-One .................................................................... 3
Learning about your All-In-One ........................................9
Understand the All-In-One parts .............................. ...... ....... ...... .. 9
Use the control panel ..................................................................13
Use the All-In-One software ........................................................ 16
Loading paper and originals ...........................................24
Load plain paper into the paper support .....................................24
Load an original document into the ADF ..................................... 28
Load an original document on the scanner glass ....................... 30
Copying .............................................................................31
Copy using the control panel and the scanner glass ..................31
Copy using the control panel and the ADF .................................33
Copy using the All-In-One software and scanner glass ..............34
Copy using the All-In-One software and ADF .............................36
Scanning ...........................................................................40
Scan using the control panel and the scanner glass ..................40
i
Page 4

Scan using the All-In-One software and the scanner glass ........42
Scan using the control panel and the ADF ................................. 44
Scan using the All-In-One software and the ADF ....................... 45
Scan multiple images ..................................................................46
E-mail a scanned image or document ........................................46
Save an image on your computer ...............................................47
Edit text found in a scanned document using Optical Character
Recognition ................ ................................................................. 47
Enlarge or reduce documents ..................................................... 47
Printing .............................................................................50
Print a document ......................................................................... 50
Print collated copies .................................................................... 50
Print more than one page on a sheet of paper ........................... 51
Print an image as a multi-page poster ........................................51
Print last page first ......................................................................51
Print repeating images ................................................................ 52
Print two images on one page .................................................... 52
Print a banner ............................................................................. 53
Faxing ...............................................................................55
Receive a fax ..............................................................................55
Send a fax ............................... ....... ...... ....... ...... ....... ...... .............57
Send a fax from your PC ............................................................. 61
Customize a fax job .................................................................... 62
Networking .......................................................................75
Maintaining your All-In-One ............................................76
Replace the print cartridges .............................. ....... ...... ....... ...... 76
ii
Page 5

Align the print cartridges .............................................................81
Improve print quality ....................................................................82
Preserve the print cartridges ....................................................... 85
Clean the scanner glass ............................................................. 85
Order supplies ............................................................................. 86
Troubleshooting ...............................................................87
Setup troubleshooting .................................................................87
General troubleshooting ..............................................................87
More troubleshooting options .................................................... 103
Fax troubleshooting .................................................................. 104
iii
Page 6

iv
Page 7

Finding more information
Your All-In-One comes with many helpful resources.
Resource Description
Box contents These items are in the box with your All-In-One:
• Power supply
• Line cord
• Setup sheet
• Installation software CD
• User’s Guide
• Black print cartridge
• Color print cartridge
Setup sheet The setup sheet provides instructions on how to set up your
All-In-One hardware and software and information on setup
troubleshooting.
User’s Guide The User’s Guide provides information on:
• Basic usage of your All-In-One
• Printing, scanning, copying, and faxing
• Printing digital photos
• Creating projects
• Maintaining your All-In-One
• Setup and general troubleshooting
Help The Help provides information on using the All-In-One
software.
To access the help:
Click the Lexmark X6100 S eries A ll-In-One C enter icon on
your desktop, and then click Help.
1
Page 8

Resource Description
Readme file After you install your software, you can access the Readme
Lexmark Web
site
file from the Lexmark 6100 Series All-In-One folder. The
Readme file contai ns late-bre aking inf ormation t hat does not
appear in the User’s Guide or the Help.
To access the Readme file:
Click Start Prog rams Lexmark X6100 Series Readme.
The Web site has information on:
• Upgrades–Software upgrade information
• Customer Care–Contact information, order status,
warranty, and repair information
• Downloads–Drivers
• Reference–Printer documentation and product
specifications
You can get more information from the Lexmark Web site at:
http://support.lexmark.com/.
2
Page 9

Setting up your All-In-One
Set up the All-In-One
Multiple methods of setup are possible with the All-In-One you have
purchased. The Setup sheet that came with your All-In-One provides basic
setup instructions. However, you can also connect your All-In-One with
equipment, such as a telephone, an answering machine, or a computer
modem.
Note: The X6100 Series All-In-One is an analog device that
works best when directly connected to the wall jack.
Other devices (such as a telephone or answering
machine) can be successfully attached to pass through
the All-In-One, as described in the setup steps. If you
want a digital connection such as ISDN, DSL, or ADSL,
a third party device is required.
Equipment Benefits See this section:
• All-In-One
• phone cord
• All-In-One
• telephone
• two phone cords
Make copies and send
and receive fax es witho ut
the use of a computer.
• Use the fax line as a
normal telephone line.
• Set up your All-In-One
wherever your
telephone is.
• Make copies and send
and receive faxes
without the use of a
computer.
3
“Connecting directly to a
telephone wall jack” on
page 5
“Connecting to a
telephone” on page5
Page 10
Equipment Benefits See this section:
• All-In-One
• telephone
• answering machine
• three phone cords
• All-In-One
• telephone
• computer modem
• three phone cords
Note: The phone cord must be connected into the correct
Receive both incoming
voice messages and
faxes.
Increase the number of
phone connection
outlets.
position.
“Connecting to an
answering ma chi ne” on
page 7
“Connecting to a
computer modem” on
page 8
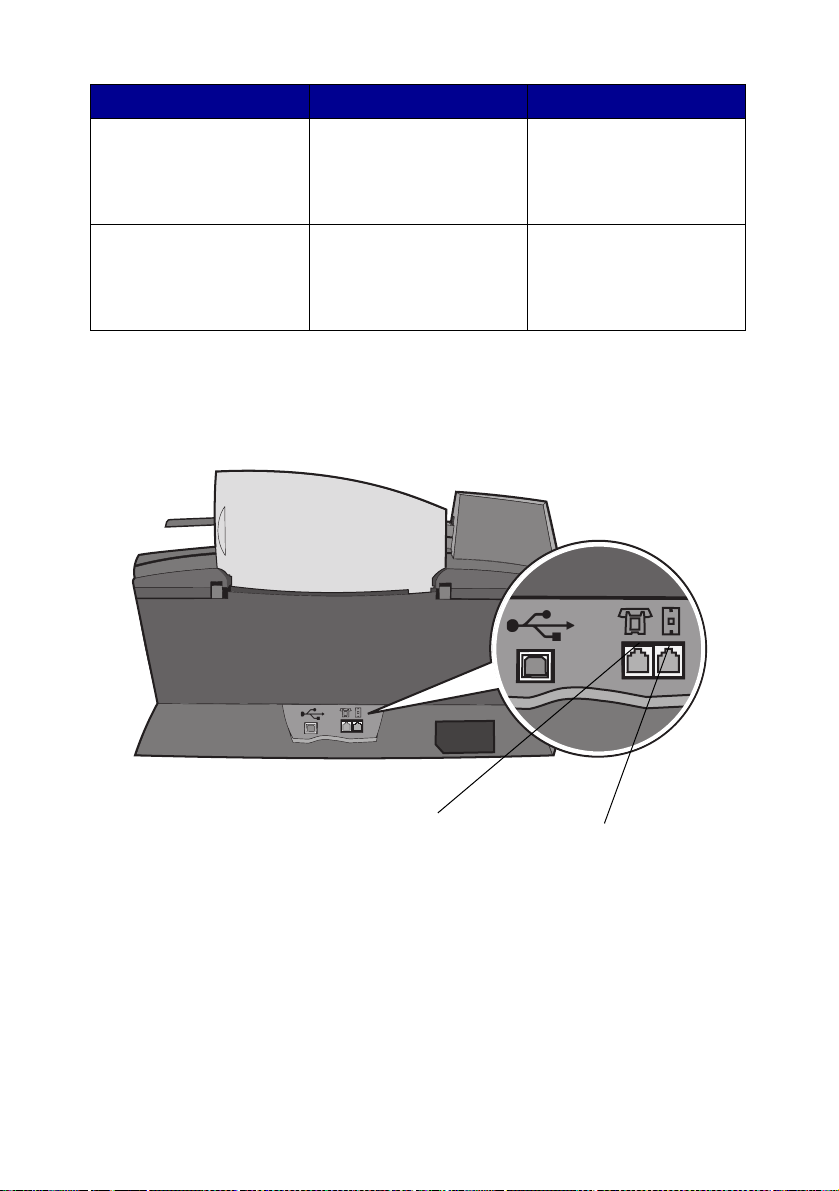
Telephone/
answering machine
port
4
Wall jack port
Page 11
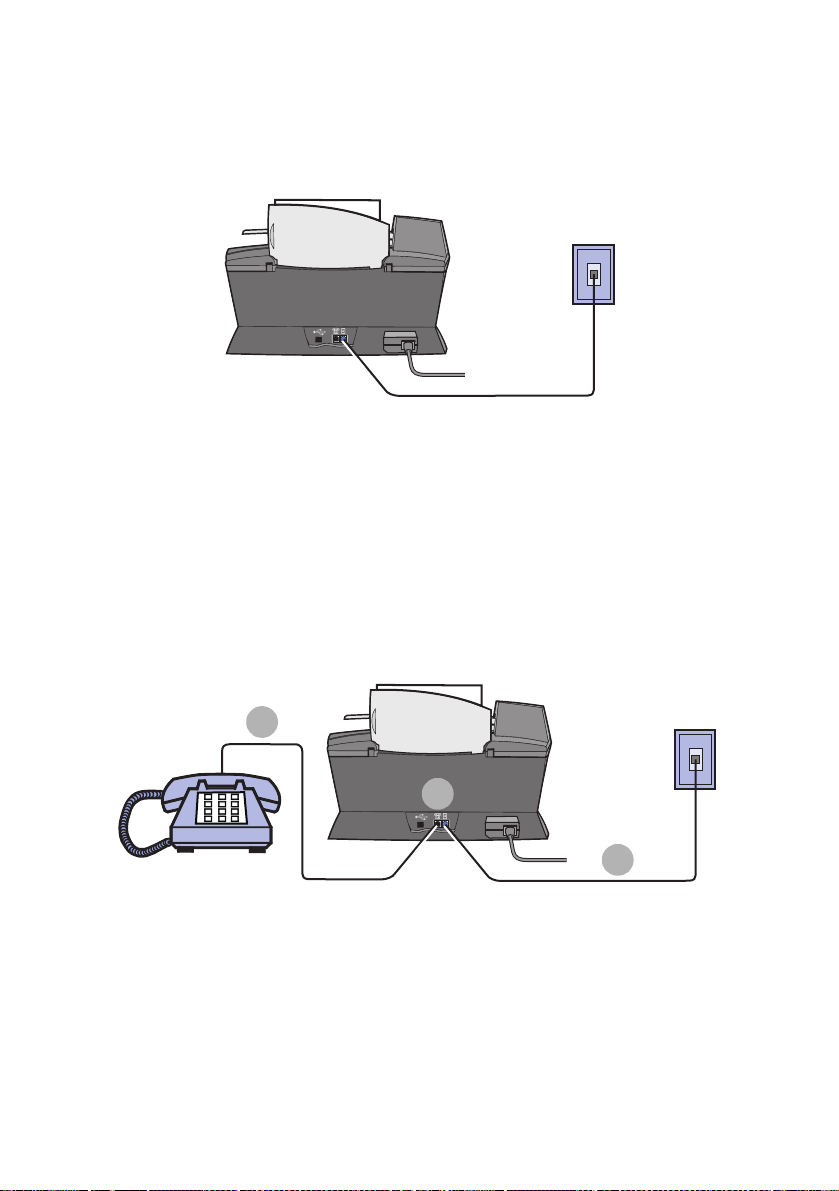
Connecting directly to a telephone wall jack
Connect a phone cord from the wall jack port on the All-In-One to the
telephone wall jack.
Connecting to a telephone
If your All-In-One does not have a handset, you can connect a telephone to
your All-In-One to use the fax line as a normal telephone line.
2
1
3
1 Remo v e the protective plug from the telephone/answering machine
port on the back of the All-In-One.
2 Connect a phone cord from the telephone to the telephone/
answering machine port on the All-In-One.
5
Page 12

3 Connect a phone cord from the wall jack port on the All-In-One to
the telephone wall jack.
Note: Special setup option shown on page 56 for manual
receive modes.
6
Page 13
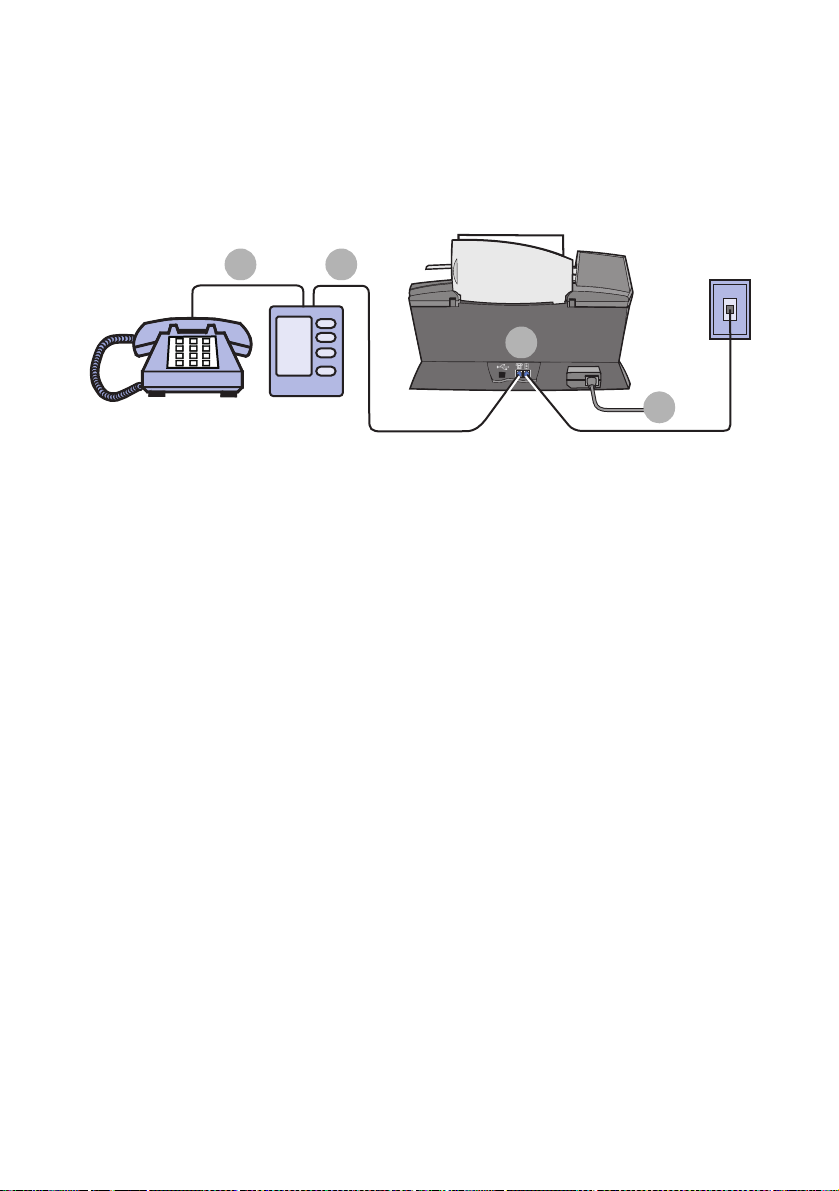
Connecting to an answering machine
1
3
2
4
1 Connect a phone cord from the telephone to the answering
machine.
2 Remo v e the protective plug from the telephone/answering machine
port on the back of the All-In-One.
3 Connect a phone cord from the answering machine to the
telephone/answering machine port on the All-In-One.
4 Connect a phone cord from the wall jack port on the All-In-One to
the telephone wall jack.
Note: Special setup option shown on page 57 for using
answering machines with an X6170.
7
Page 14
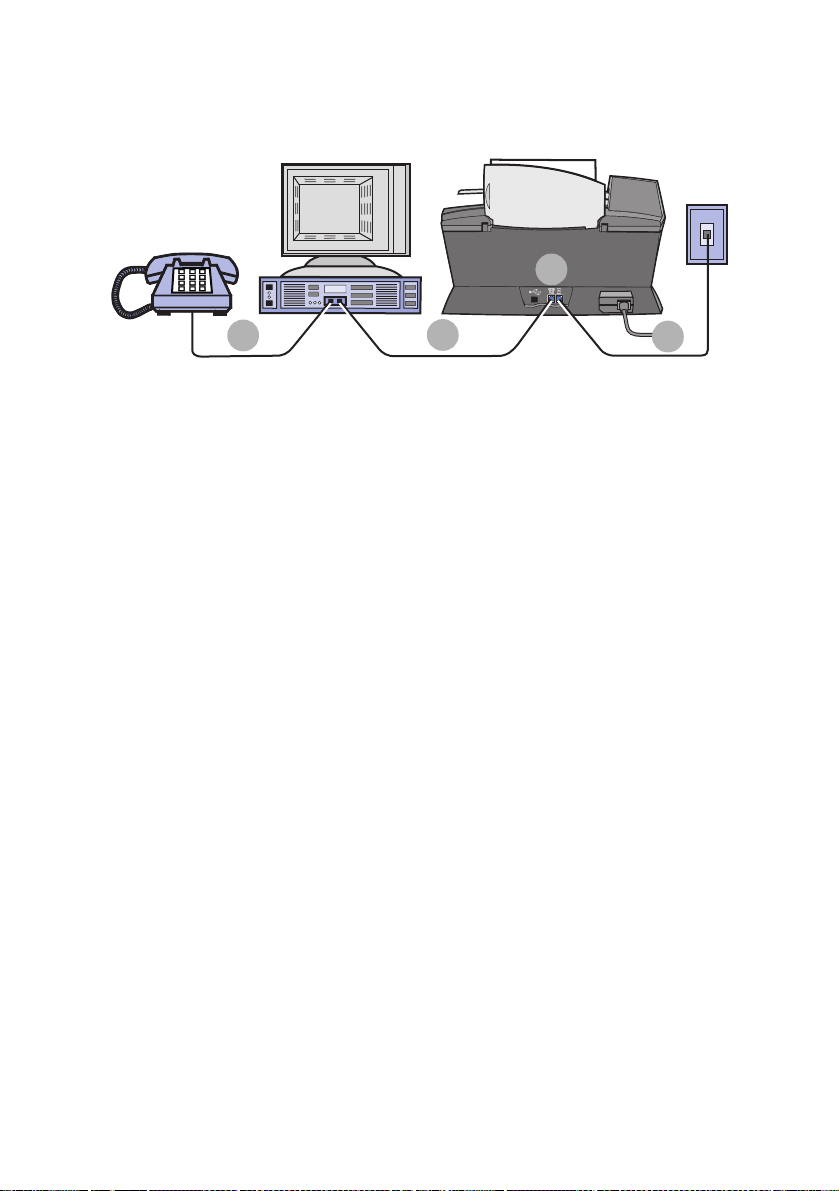
Connecting to a computer modem
2
1
3
4
1 Connect a phone cord from the telephone to the computer modem.
2 Remo v e the protective plug from the telephone/answering machine
port on the back of the All-In-One.
3 Connect a phone cord from the computer modem to the telephone/
answering machine port on the All-In-One.
4 Connect a phone cord from the wall jack port on the All-In-One to
the telephone wall jack.
Note: Special setup option shown on page 56 for manual
receive modes.
8
Page 15

Learning about your All-In-One
To set up your All-In-One, follow the instructions on the Lexmark X6100
Series Setup sheet to install the hardware and software. For setup
troubleshooting, see page 87.
Understand the All-In-One parts
The Lexmark™ X6100 Series All-In-One is a color scanner, color printer,
color copier, and color fax machine. This guide shows you how to use the
All-In-One features.
Note: You do not have to attach your All-In-One to your
computer to make copies or send faxes.
The Lexmark X6100 Series is available in two models. One model has an
Automatic Document Feeder (ADF), and the other does not. The table on
page 12 describes each part.
9
Page 16
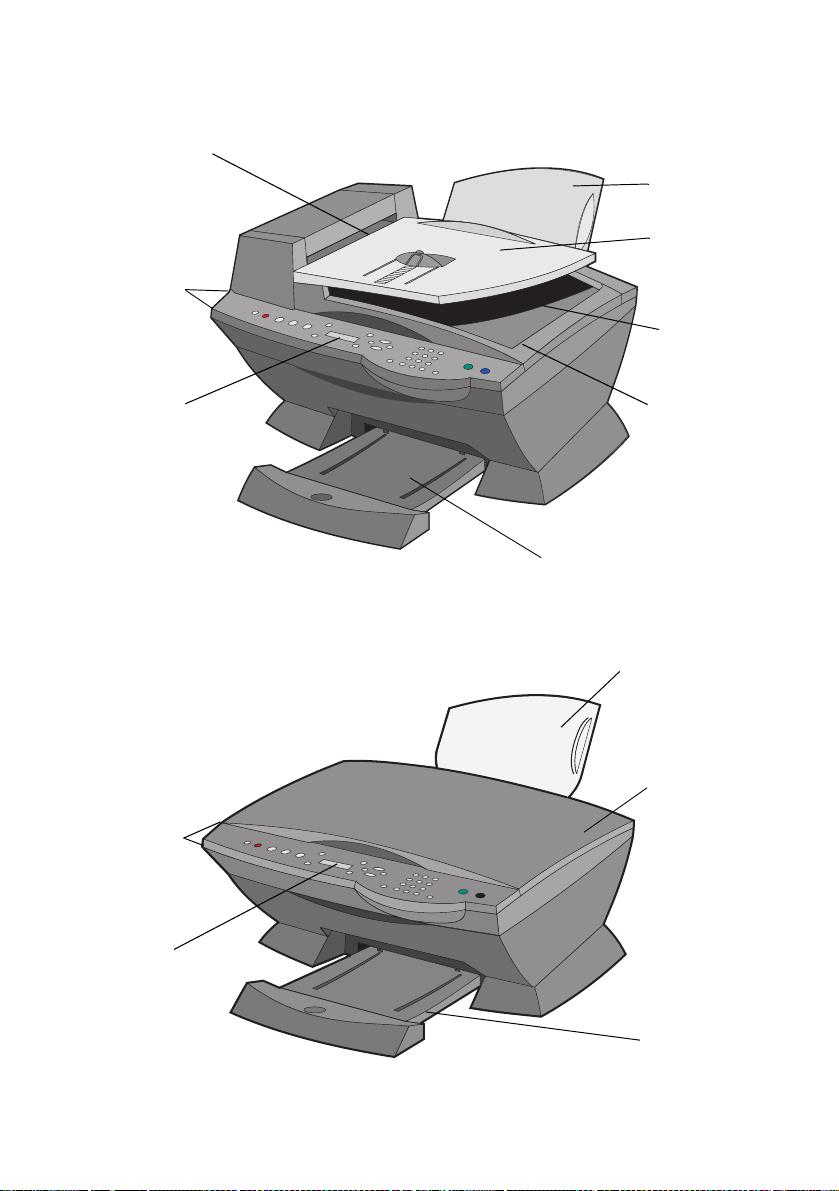
A Lexmark X6100 Series with an ADF:
Automatic
Document
Feeder (ADF)
Control
panel
Paper
support
ADF input
tray
ADF exit
tray
Display
A Lexmark X6100 Series without an ADF:
Control
panel
Display
Paper exit tray
Top cover
Paper
support
Top cover
10
Paper exit
tray
Page 17
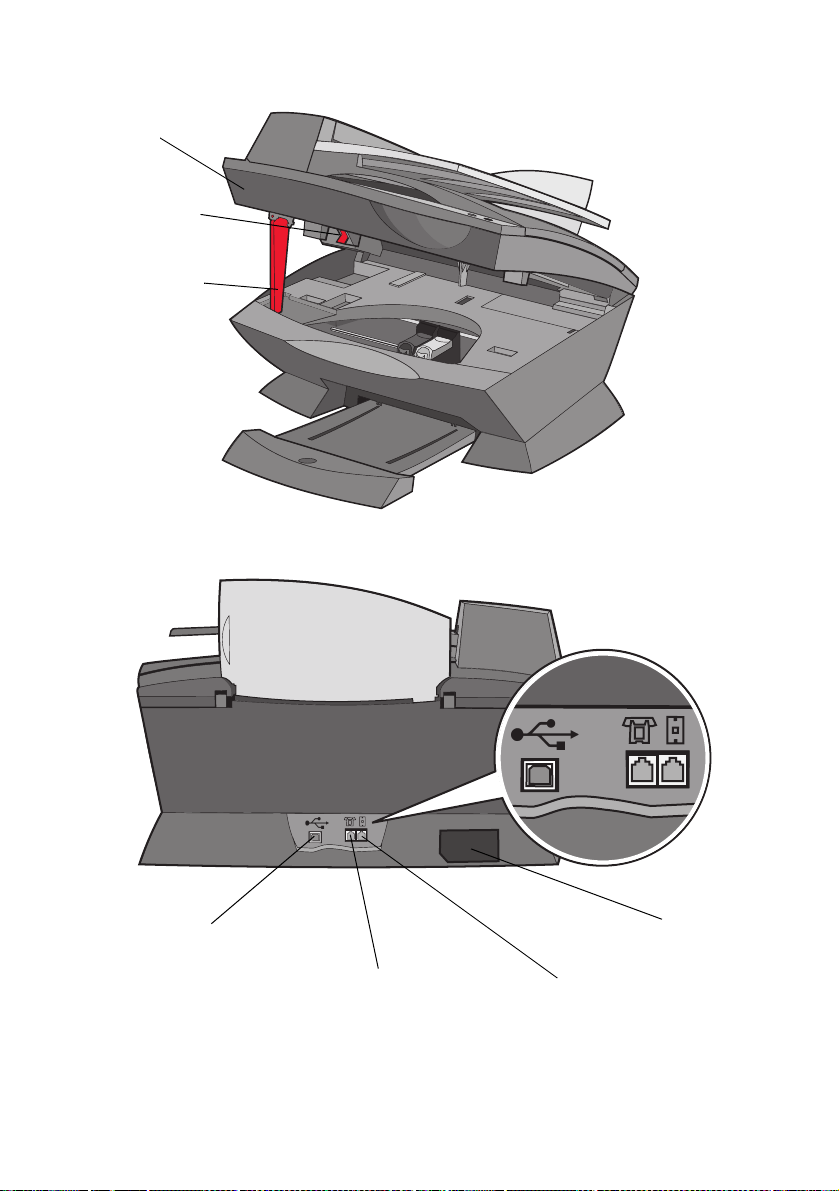
Scanner unit
Scanner lock
Scanner
support
USB cable port
Telephone/answering
machine port
11
Power supply
connector
Wall jack port
Page 18

Use the: When you want to:
Automatic Document
Feeder (ADF)
ADF exit tray Pick up your original document after it has gone
ADF input tray Load original documents in the All-In-One.
Display Check the status of the All-In-One or view settings.
Control panel Operate your All-In-One (attached to a computer or
Paper exit tray Stack paper as it exits the All-In-One.
Paper support Load paper in the All-In-One.
Power supply connector Supply power to the All-In-One.
Scanner lock Lock or unlock the scanner.
Scanner support Keep the scanner unit open.
Scanner unit • Install or change print cartridges.
Telephone/answering
machine port
Top cover • Place an item on the scanner glass.
Copy or fax m ul t ip le pag es.
through the ADF.
unattached). For more information, see page 13.
Note: Lock the scanner if you are moving your
All-In-One. Unlock the scanner before use.
• Lock or unlock the scanner.
Note: Lift the scanner unit to do these things.
Connect an ans wering machi ne or telephone to your
All-In-One.
• Remove an item from the scanner glass.
Note: Lift or remove the top cover to do these
things.
USB cable port Connect your All-In-One to a computer.
Wall jack port Connect the telephone line.
12
Page 19
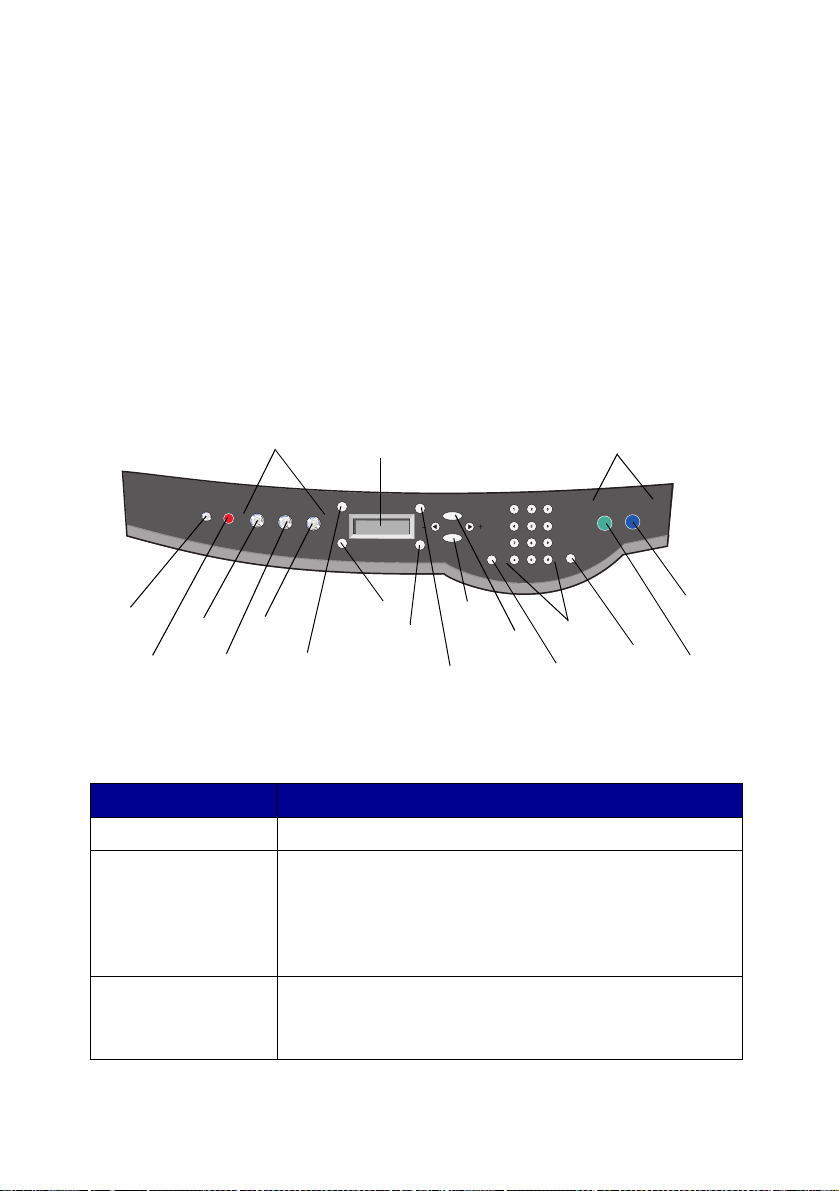
Use the control panel
The control panel buttons help you scan, copy, fax, and customize
documents. When Power is lit, the All-In-One is on. You can select a mode
from the Mode area, select or change settings using several of the buttons,
and initiate a scan, copy, or fax from the Start buttons on the far right.
The display features:
• All-In-One status
• Messages
• Menus
The table beginning on page 13 describes each button function.
Power
Stop/
Clear
Copy
Scan
Fax
Number
of
Copies
Display
Quality
Lighter/
Darker
Select
Reduce/
Enlarge
Options
Speed Dial
Keypad
Start buttonsMode area
Redial/
Pause
Press: To:
Power • Turn your All-In-One on or off.
Stop/Clear • Cancel a scan, print, or copy job in progress.
• Clear a fax number or end a fax transmission and
return the display to the fax default.
• Exit a menu.
• Clear current settings and return to default settings.
Copy Enter copy mode.
Note: This button is lit when the All-In-One is in copy
mode.
Black
Color
13
Page 20
Press: To:
Scan Enter scan mode (possible when the All-In-One is
Fax Enter fax mode. The All-In-One can receive a fax while in
Quality • Select from the following copy qualities: Quick,
Number of Copies Specify a number (1-99) of copies.
Lighter/Darker Lighten or darken a copy or fax.
Reduce/Enlarge Customize the size of your original document by a
Left arrow • Decrease a number on the display.
Select Choose the option that appears on the dis play.
attached to a computer).
Note: This button is lit when the All-In-One is in scan
mode.
any mode.
Note: This button is lit when the All-In-One is in fax
mode.
Normal, Better, or Best.
• Select a fax resolution: Standard, Fine, Superfine, or
Ultrafine.
• Select a scan resolution when the All-In-One is
attached to a computer.
percentage, Fit to Page, or to poster size.
• Scroll through a list on the display.
Options Scroll through the list of menu headings (see page 15).
Right arrow • Increase a number.
• Scroll through a list on the display.
Speed Dial Use the speed dial feature while the All-In-One is in fax
mode.
Note: If you press Speed Dial when y our All-In-One is in
copy or scan mode, the All-In-One will automatically
switch to fax mode.
14
Page 21

Press: To:
A keypad number
or symbol
Redial/Pause • Redial the last number entered when the machine is
Color Start a color copy, fax, or scan job.
Black Start a black and white copy, fax, or scan job.
• In fax mode:
Enter fax numbers.
Get through an automated answering system.
Select letters when creating a Speed Dial list.
Type numbers to enter or edit the date and time
shown on the All-In-One display.
• In copy mode:
Select the number of copies you want to make.
in fax mode.
• Insert a three-second pause in the number to be
dialed.
Enter a pause only when you have already begun
entering the number.
Note: If you press Redial/Pause when your All-I n-One is
in copy or scan mode, the All-In-One automatically
switches to fax mode.
Note: In the Mode area, make sure the mode you want
is lit.
Note: In the Mode area, make sure the mode you want
is lit.
Enter text on the control panel
If you want to create a speed dial list using the control panel, you need to
enter text using the keypad buttons.
To enter text:
1 Find the number button that corresponds to the letter you want to
enter and press it repeatedly until the correct letter appears.
2 Press the right arrow button to move to the next character space.
Note: To enter a space between words, press the right arrow
button twice.
15
Page 22

3 Repeat the above steps until you are finished entering text.
4 Press Select.
Use the All-In-One software
The All-In-One software includes the:
• Fax Setup Utility (page 16)
• Lexmark All-In-One Center (page 19)
• Print Properties (page 19)
• Lexmark Photo Editor (page 21)
• Lexmark X6100 Series Solution Center (page 22)
• Optical Character Recognition (page 23)
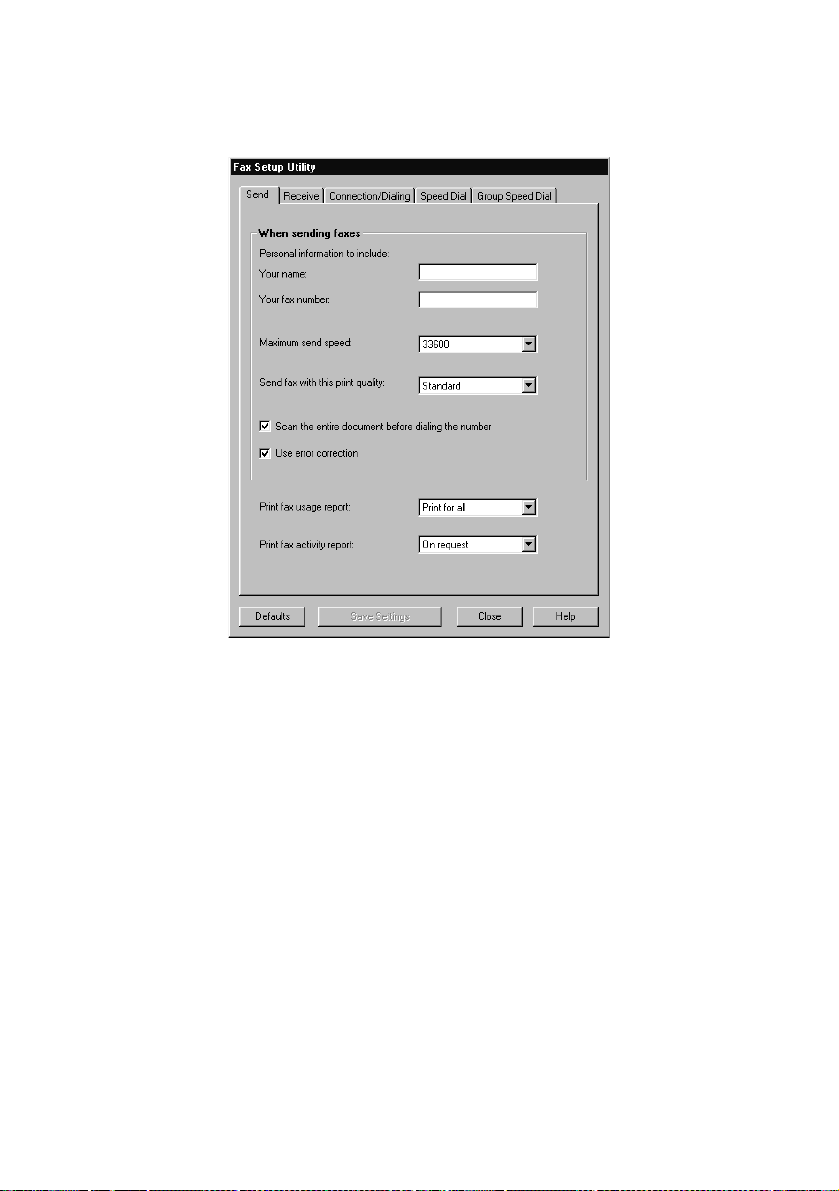
Using the Fax Setup Utility
Use this utility to adjust the fax send and receive settings. When you save
the settings, they apply to every fax you send or receive. You can also use
this utility to create and edit your speed dial list.
• Click Start Programs Lexmark X6100 Series Fax Setup
Utility.
16
Page 23
• From the Lexmark All-In-One Center, click the Maintain/
Troubleshoot tab and then click Display the Fax Setup Utility.
17
Page 24

The following table contains the Fax Setup Utility tabs.
On this tab: You can:
Send • Enter your name and fax number.
• Select a maximum send speed and a print quality for
outgoing faxes.
• Choose whether to scan the entire document before
dialing the number.
• Choose whether to use error correction.
• Select when to print a fax usage report.
• Select when to print a fax activity report.
Receive • Choose whether you want a header (the sender’s fax
number and name) to appear on each page you
receive.
• Choose whether you want to print a footer (date, time ,
and page number) on each page.
• Automatically reduce an incoming fax to fit to the
paper size loaded or print it on two sheets of paper.
• Select whether you want to forward a fax or print it,
and then forward it.
Connection/Dialing • Select the number of times you want the machine to
Speed Dial Add to, create, or edit the speed dial list.
Group Speed Dial Create a group number and name and add phone
redial and the time between those attempts if the fax
cannot be sent on the first try.
• Select the phone line format you want to use (Pulse,
Touch-tone, Behind a PBX).
• Enter a dialing prefix.
• Choose how (manually, if fax tones are detected, or
after a certain amount of rings) you want to answer
incoming calls.
• Choose a distinctive ring.
numbers to the group.
18
Page 25

Using the Lexmark All-In-One Center
To access the Lexmark All-In-One Center, the software driver for your
Lexmark X6100 Series:
• Double-click the Lexmark X6100 Series All-In-One Center
desktop icon.
• Click Start Programs Lexmark X6100 Series Lexmark
All-In-One Center.
You can use the Lexmark All-In-One Center to:
• Scan, copy, print, and do other tasks.
• View images you have scanned or saved.
• Select copy and scan settings.
• Access troubleshooting and maintenance information.
• Access the Fax Setup Utility (see page 16).
Using Print Properties
You can change your All-In-One settings in Print Properties. To open Print
Properties:
19
Page 26
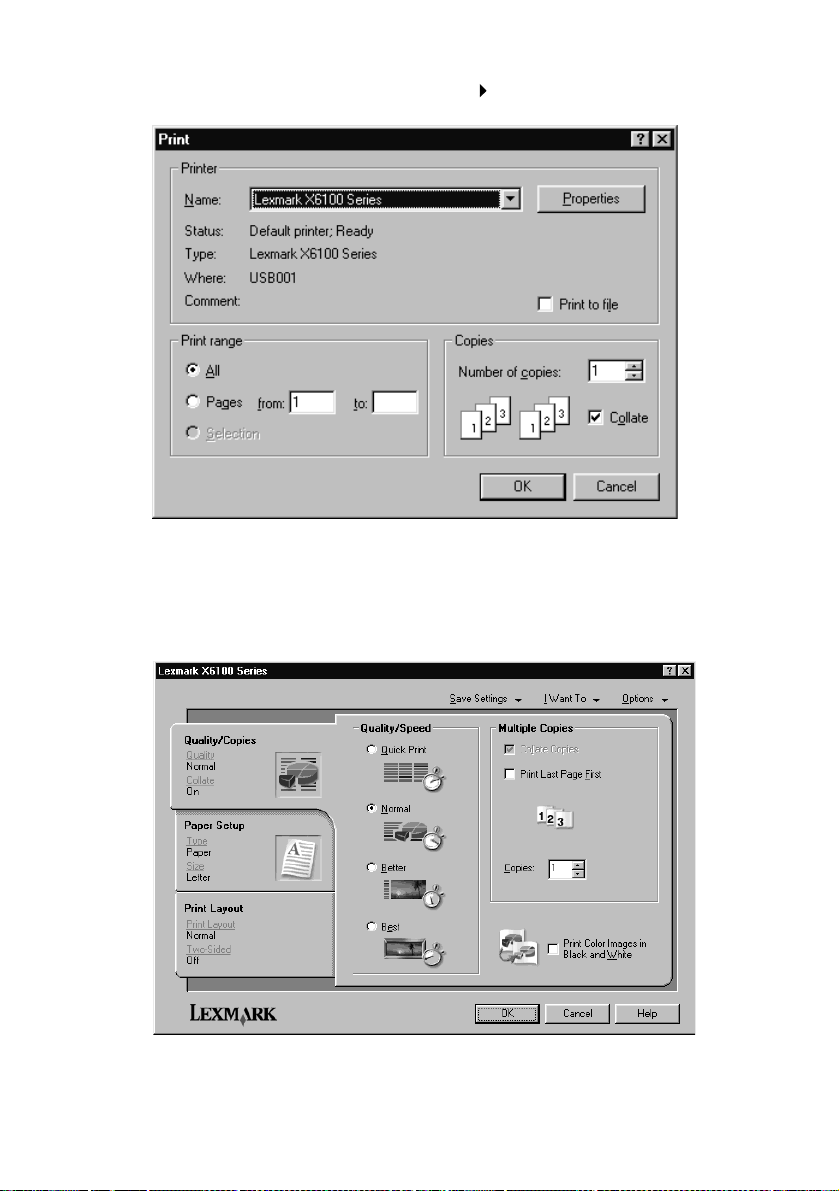
1 With your document open, click File Print.
2 In the Print dialog box, click Properties, Preferences, Options, or
Setup (depending on your program or operating system).
The Print Properties screen appears.
20
Page 27
The I Want To menu helps you select the All-In-One settings
needed to print a variety of things such as photos, banners, and
envelopes.
Use the tabs (Quality/Copies, Paper Setup, and Print Layout) along
the left side of the Print Properties dialog box to select your
All-In-One print setti ngs.
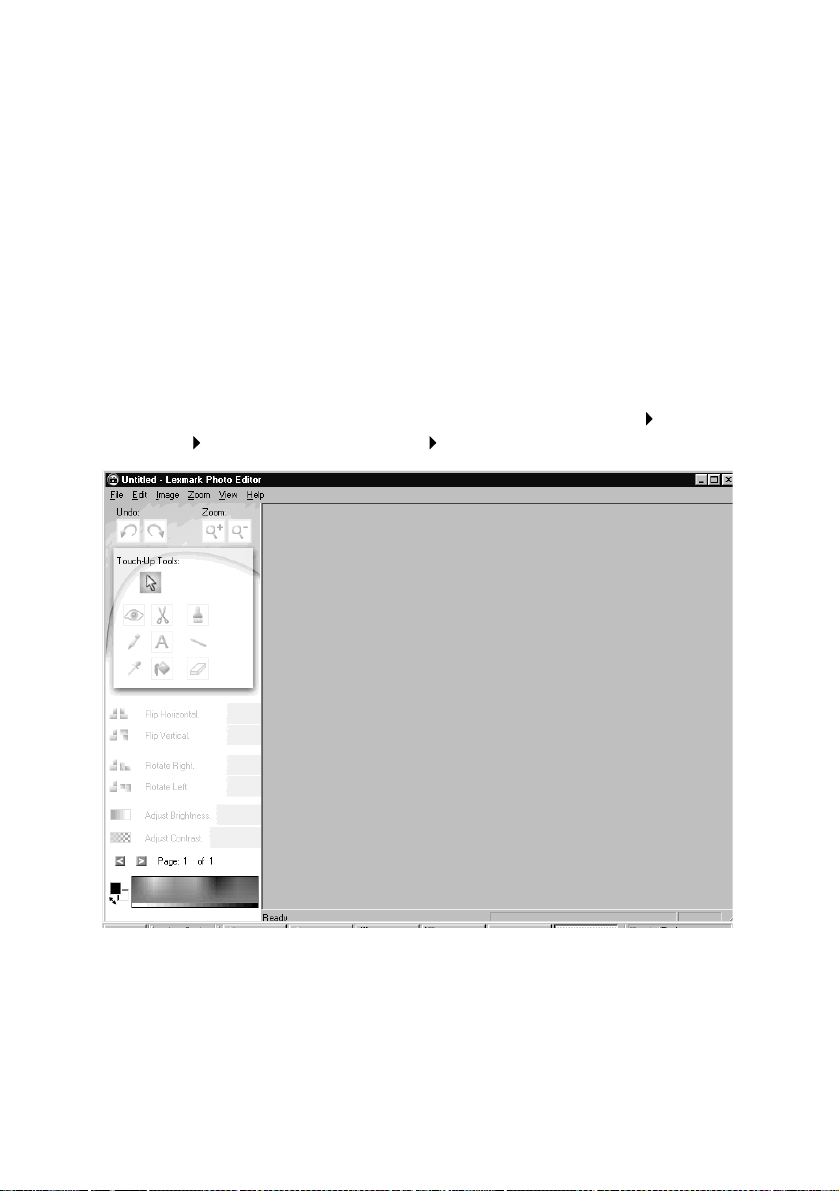
Using the Lexmark X6100 Series Photo Editor
The Photo Editor lets you adjust photo attributes (brightness, contrast, red
eye reduction, and orientation) of scanned images. You can also crop an
image or erase part of it.
To access the Lexmark X6100 Series Photo Editor, click Start
Programs Lexmark X6100 Series Lexmark Photo Editor.
21
Page 28
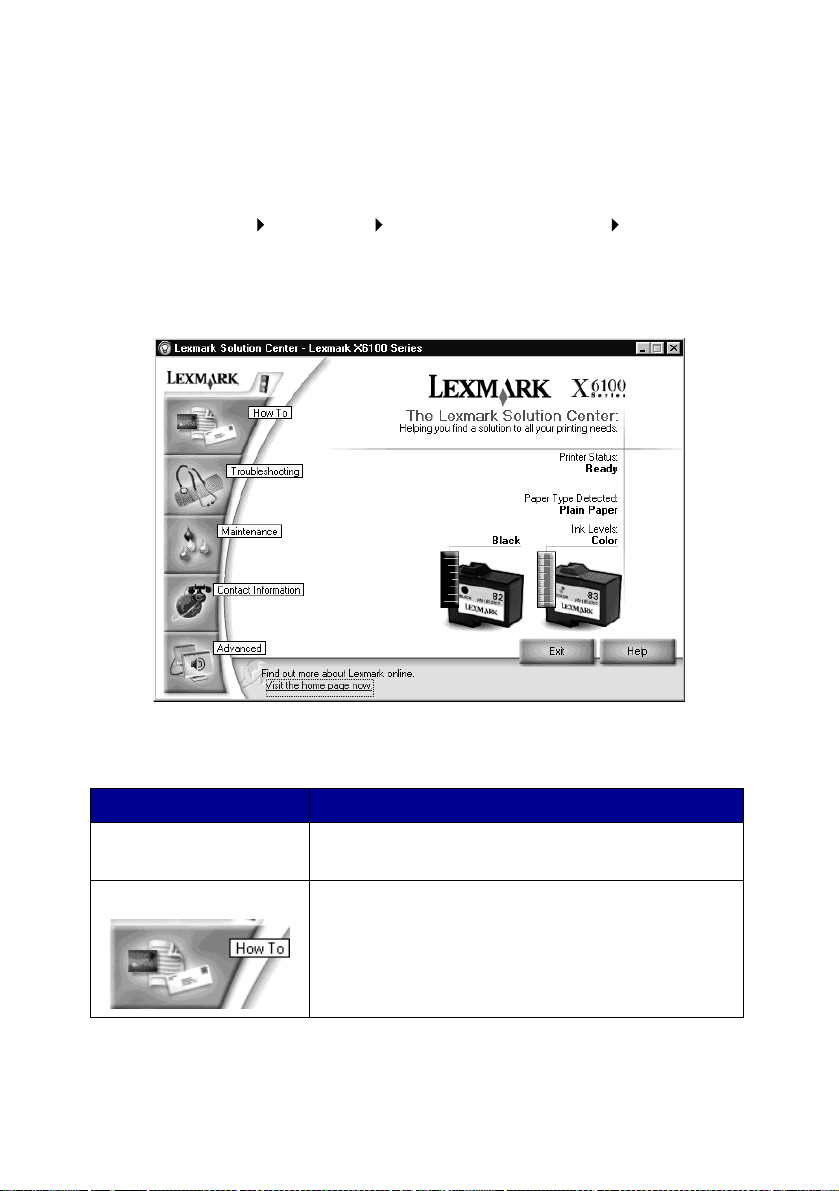
Using the Lexmark Solution Center
The Lexmark Solution Center (LSC) provides All-In-One help and
information about printer status, paper type detected, and ink levels. There
are two ways to open the LSC:
• Click Start Programs Lexmark X6100 Series Lexmark
Solution Center.
• From the All-In-One Center, click the Maintain/Troubleshoot tab
and click on a topic.
The following table describes the LSC tabs:
From this area or tab: You can:
Printer Status • Ch eck printer status
• Check ink levels
How To • Learn about basic features.
• Print, scan, copy, and fax instructions.
• Look at project information.
22
Page 29

From this area or tab: You can:
Troubleshooting • Check the current All-In-One status.
• View recommended Help topics.
• View common troubleshooting topics.
• Search for more specific troubleshooting topics.
Maintenance • Install a new print cart ridge.
• Order new cartridges.
• Print a test page.
• Clean your print cartridges to fix horizontal
streaks.
• Align the cartridges.
Contact Information • Order ink cartridges or supplies.
• Get an All-In-One software update.
• See special offers.
• Register your All-In-One.
• View Lexmark phone numbers.
• Visit the Lexmark Customer Support Web site.
Advanced • Change voice or appearance options.
• See software version information.
• Change the network printing settings.
Using Optical Character Recognition
You can use Optical Character Recognition (OCR) to edit document text.
1 From your desktop, double-click the Lexmark X6100 Series
All-In-One Center icon.
The All-In-One Main Page appears.
2 From the Productivity Tools list, select Edit text found in a
scanned document (OCR).
3 Follow the steps on your screen, and then click Send Now.
23
Page 30
Loading paper and originals
The basic functions of your All-In-One are the copy, scan, print, and fax
functions. First, learn how to load paper into your All-In-One with the
following instructions. Then, read on to learn how to copy, scan, print, and
fax.
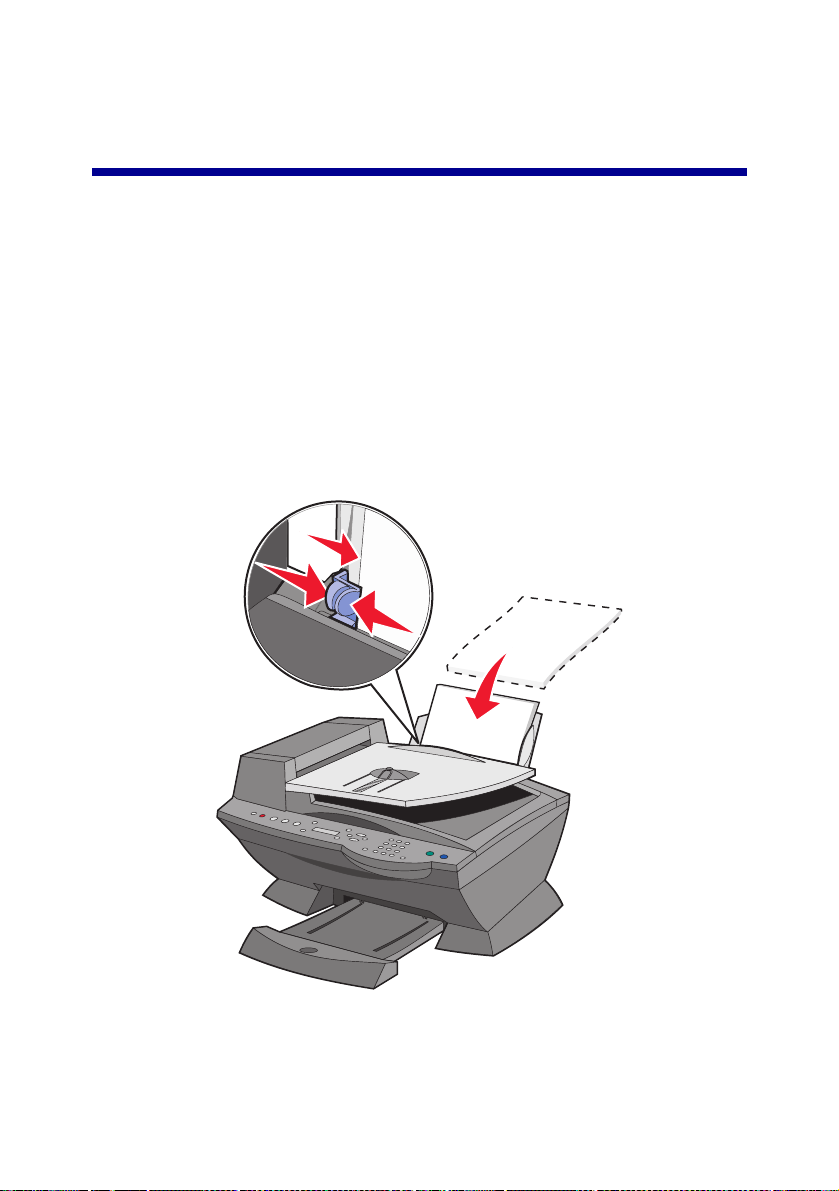
Load plain paper into the paper support
1 Place the paper against the right side of the paper support.
Note: Do not force the paper into the All-In-One.
2 Squeeze and slide the paper guide to the left edge of the paper.
24
Page 31

Note: The top of letter size paper should be slightly above the
paper suppor t .
Load banner paper into the paper support
1 Place a stack of banner paper (20 sheets or less) on the top cover,
and feed in the first sheet.
2 Place the paper against the right side of the paper support.
3 Squeeze and slide the paper guide to the left edge of the paper.
25
Page 32

Note: Once the All-In-One begins printing, wait until you can
see the leading edge of the banner exiting the
All-In-One, and then carefully unfold the paper down to
the floor in front of the All-In-One.
26
Page 33

Follow these guidelines when loading paper in the paper support.
Load up to: Make sure:
100 sheets of
plain paper
10 envelopes • The print side of the envelopes faces you.
10 greeting ca rds,
index cards,
postcards, or
photo cards
• The paper is loaded vertically aga inst the right side of the
paper support.
• The paper guide is against the left edge of the paper.
Note: To load letterhead, make sure the front of the
letterhead fac es y o u, an d feed the top of the letterhead into
the All-In-One first.
• The envelopes are loaded vertically
against the right side of the paper
support.
• The stamp location is in the uppe r left
corner.
• The paper guide rests against th e left
edge of the envelopes.
• Y ou cho ose to p rint the en v elope w ith
Landscape orientation.
• You select the correct envelope size.
Select the next biggest size if the exact envelope size is
not listed, and set the left and right margins so that your
envelope text will be correctly positioned on the
envelope.
Note: You can load a single envelope into the paper
support without removing plain paper.
• The print side of the cards faces you.
• The cards are loaded vertically against the right side of
the paper support.
• The paper guide rests against the left edge of the cards.
25 sheets of
coated, photo, or
glossy paper
10 transparencies • The rough side of the transparencies faces you.
• The glossy or coated side of the paper faces you.
• The paper guide rests against the left edge of the photo
paper.
• The paper guide rests against the left edge of the
transparencies.
Note: You can load a single transparency into the paper
support without removing plain paper.
27
Page 34

Load up to: Make sure:
100 sheets of
custom size paper
25 iron-on
transfers
20 sheets of
banner paper
• The print side of the paper faces you.
• Your paper size fits within these dimensions:
Width
• 76 - 216 mm
• 3.0 - 8.5 inches
Length
• 127 - 432 mm
• 5.0 - 17.0 inches
• The paper guide rests against the left edge of the paper.
• Y ou follow the loading instructio ns on the iron-on tr a nsf er
packaging.
• The blank side of the transfers faces you.
• The paper guide is against the left edge of the iron-on
transfers.
• The banner paper is designed for use with in kj et printers.
• You select Letter Banner or A4 Banner in Print
Properties. For help, see “Using Print Properties” on
page 19. Failure to do so will cause a paper jam.
• You remove any paper from the paper support before
inserting banner paper.
• Place a stack of banner paper with only the number of
sheets you need to print your banner on top of the
All-In-One.
Note: The paper exit tray can hold up to 50 sheets of paper.
Load an original document into the ADF
You can load up to 50 sheets of your original document (text side up) in the
ADF (available on some models) for scans, copies, and faxes.
28
Page 35

Note: Y ou can load A4, Letter, or legal size paper into the ADF
text side up.
Note: You cannot load small images in the ADF. Place small
images on the scanner glass.
Note: Make sure you select paper type and paper size in Print
Properties. For help, see “Using Print Properties” on
page 19.
29
Page 36

Load an original document on the scanner glass
1 Make sure your computer and your All-In-One are on.
2 Open the top cover.
3 Place the original document face down on the scanner glass in the
upper left corner.
4 Close the top cover.
Note: Make sure you select paper type and paper size in Print
Properties. For help, see “Using Print Properties” on
page 19.
30
Page 37

Copying
You can use your All-In-One to copy in several ways.
Copy using the control panel and the scanner glass
1 Make sure your All-In-One is on.
2 Open the top cover.
31
Page 38

3 Place the item you want to copy face down on the scanner glass in
the upper left corner. Make sure the top of the document faces left.
4 Close the top cover, and then load paper in the paper support.
5 From the Mode area on the control panel, press Copy to enter copy
mode.
32
Page 39

6 If you want to make more than one copy, press the numbers on the
keypad that corres pond with the number of copies you want to
make.
7 From the Start area on the control panel, press Color to create a
color copy of a color image or press Black to create a black and
white copy.
Copying appears on the display.
Copy using the control panel and the ADF
1 Make sure your All-In-One is on and blank paper is loaded in the
paper support.
2 Load up to 50 sheets of your document face-up into the ADF
(available on some models).
3 From the Mode area on the control panel, press Copy to enter copy
mode.
4 From the control panel, customize your document. See page 37 for
setting and menu options.
33
Page 40

5 From the Start area on the control panel, press Color to create a
color copy of a color image or press Black to create a black and
white copy.
Copying appears on the display.
Copy using the All-In-One software and scanner glass
1 Make sure blank paper is loaded in the paper support.
2 Make sure your computer and your All-In-One are on.
3 Open the top cover.
34
Page 41

4 Place the item you want to copy face down on the scanner glass in
the upper left corner.
5 Close the top cover.
6 From your desktop, double-click the Lexmark X6100 Series
All-In-One Center icon.
The All-In-One Main Page appears.
7 Click See More Copy Settings.
35
Page 42

8 Select a quantity and color for your copies.
Note: To choose a paper size or further customize your copy
job, click Display Advanced Copy Settings.
9 Click Copy Now.
Copy using the All-In-One software and ADF
1 Make sure your computer and All-In-One are on and paper is
loaded in the paper support.
2 Load up to 50 sheets of your document face-up into the ADF
(available on some models).
3 From your desktop, double-click the Lexmark X6100 Series
All-In-One Center icon.
The All-In-One Main Page appears.
4 Click See More Copy Settings.
5 Select a quantity and color for your copies.
36
Page 43

Note: To choose a paper size or further customize your copy
job, click Display Advanced Copy Settings.
6 Click Copy Now.
Control panel menus
When you press the Options button repeatedly, the following menu
headings appear.
Copy mode
From this sub menu: You can:
BLANK PAPER SIZE Specify the size of the paper loaded in the paper
support:
Letter
•
• Legal
• B5
• A4
• A5
• A6
• 3x5
• 4x6
• L
• 2L
Note: For other specialty sizes, see the All-In-One
Center.
BLANK PAPER TYPE Specify the type of paper loaded in the paper
support:
Auto Detect (default)
•
•
Plain
• Coated
• Photo
• Transparency
Auto Detect optimizes the setting according to
the type of paper loaded.
Note: For other spec ialty types, see the
All-In-One Center.
37
Page 44

From this sub menu: You can:
REPEAT IMAGE Specify how many copies of one image you want
on one page:
1 x per page
•
• 4 x per page
• 9 x per page
• 16 x per page
COLOR
Adjust the color intensity of the copy.
ORIGINAL SIZE Specify the size of the document on the glass.
Auto detect is the default.
Note: Specify an original size other than Auto
Detect to confine the scan area to the size of the
original selected.
CONTENT TYPE Specify the type of d ocument on the scanner
glass.
COLLATE-BLACK Collate multiple black and white copies.
Note: You can collate color copies from the
All-In-One software.
KEY PRESS TONE Turn on or off the sound that is made when you
press a control panel button. The options are:
Off
•
Low (default)
•
High
•
MAINTENANCE
• Check ink levels.
• Change cartridges.
• Align cartridges.
• Clean cartridges.
• Print a test page.
POWER SAVE Select a time to begin reducing power:
After 30 min (default)
•
•
After 60 min
• Never
• Immediately
• After 10 min
CLEAR SETTINGS
Select when you w ant y o ur All -In-O ne to retu rn to
the default settings:
After two min
•
• Never
38
Page 45

From this sub menu: You can:
SET DEFAULTS
LANGUAGE
Note: The option currently selected is noted with an asterisk
Set your defau lt sett ing s to:
• Use Factory
• Use Current
Select a language for all display text.
(*) on the display.
39
Page 46

Scanning
You can use your All-In-One to scan in several ways.
Scan using the control panel and the scanner glass
1 Make sure your All-In-One is on and connected to your computer.
2 Open the top cover.
40
Page 47

3 Place the item you want to scan face down on the scanner glass in
the upper left corner.
4 Close the top cover.
5 From the Mode area on the control panel, press Scan to put the
All-In-One in scan mode.
6 Press the right arrow button to scroll through the list of possible
programs to which you can scan.
41
Page 48

7 Press Select when the program to which you want to scan appears.
8 From the Start area on the control panel, press Black to begin a
black and white scan or Color to begin a color scan.
Scan using the All-In-One software and the scanner glass
1 Make sure your computer and All-In-One are on.
2 Open the top cover.
42
Page 49

3 Place the item you want to scan face down on the scanner glass in
the upper left corner.
4 Close the top cover.
5 From your desktop, double-click the Lexmark X6100 Series
All-In-One Center icon.
The All-In-One Main Page appears.
43
Page 50

6 From the Send scanned image to: drop-down box, select your scan
destination.
7 Click See More Scan Settings.
8 Answer the other questions on your screen to further customize
your scan job.
9 Click Scan Now.
Scan using the control panel and the ADF
1 Make sure your computer and All-In-One are on.
2 Load up to 50 sheets of the original document face up into the ADF
(available on some models).
3 From the Mode area on the control panel, press Scan to put the
All-In-One in scan mode.
4 Press the right arrow button to scroll through the list of possible
programs to which you can scan.
5 Select the program to which you want to scan.
44
Page 51

6 From the Start area on the control panel, press Black to begin a
black and white scan or Color to begin a color scan.
Scan using the All-In-One software and the ADF
Note: Some programs do not support multiple page scanning.
1 Make sure your computer and All-In-One are on.
2 Load up to 50 sheets of the original document face up into the ADF
(available on some models).
3 Double-click the Lexmark X6100 Series All-In-One Center
desktop icon.
The All-In-One Main Page appears.
4 From the Send scanned image to: drop-down box, select your scan
destination.
Note: If you want to further customize your scan, click See
More Scan Settings for more customizing options.
5 Click Scan Now.
45
Page 52

Scan multiple images
You can scan multiple images at once to save time:
1 Put the first sheet on the scanner glass.
2 From your desktop, double-click the Lexmark X6100 Series
All-In-One Center icon.
The All-In-One Main Page appears.
3 From the Send scanned image to: drop-down box, select your scan
destination.
4 Click See More Scan Settings.
5 Click Display Advanced Scan Settings.
The Advanced Scan Settings dialog box appears.
6 Select Scan multiple items before output.
7 Click OK.
8 Click Scan Now.
9 When y ou are prompted to do so, place the next page on the
scanner glass.
E-mail a scanned image or document
You can send photographs to people through e-mail:
1 Open the top cover.
2 Place the photograph you want to scan face down on the scanner
glass.
3 Close the top cover.
4 From your desktop, double-click the Lexmark X6100 Series
All-In-One Center icon.
The All-In-One Main Page appears.
46
Page 53

5 Click Preview Now.
6 From the Productivity Tools area, click E-mail an image or
document.
7 From the What is being scanned? menu, select Photo.
8 Follow the instructions on the screen to prepare the photograph for
e-mail.
9 Click Attach Now.
10 Write a note to accompany the attached photo, and then send it.
Save an image o n your computer
1 From your desktop, double-click the Lexmark X6100 Series
All-In-One Center icon.
The All-In-One Main Page appears.
2 From the Productivity Tools area, click Save an image on my
computer.
3 Follow the directions to save an image on your computer.
Edit text found in a scanned document using Optical Character Recognition
1 From your desktop, double-click the Lexmark X6100 Series
All-In-One Center icon.
The All-In-One Main Page appears.
2 From the Productivity Tools list, click Edit text found in a scanned
document (OCR).
3 Follow the steps on your screen.
Enlarge or reduce documents
1 Make sure you have paper loaded in the paper support.
47
Page 54

2 Open the top cover.
3 Place the document or pattern you want to enlarge or reduce face
down on the scanner glass.
4 Close the top cover.
5 From your desktop, double-click the Lexmark X6100 Series
All-In-One Center icon.
The All-In-One Main Page appears.
6 Click Preview Now.
7 From the Productivity Tools area, select Enlarge or reduce an
image.
8 Follow the instructions on the screen to select the size of your new
image.
9 When you are finished customizing your image, click Print Now.
Control panel menus
When you press the Options button repeatedly, the following menu
headings appear.
Scan mode
From this sub menu: You can:
ORIGINAL SIZE Specify the size of the document on the scanner
POWER SAVE Select a time to begin reducing power:
glass.
Note: Leave this on Auto Detect (default) unless the
size of the document you printed is not satisfactory.
• After 10 min
• After 30 min (default)
•
After 60 min
• Never
• Immediately
48
Page 55

From this sub menu: You can:
CLEAR SETTINGS
SET DEFAULTS
Select when you wan t your All-In-On e to return to the
default setti ngs:
After two minute s
•
• Never
Set your defau lt sett ing s to:
Use Factory
•
•
Use Current
LANGUAGE Select a language for all display text.
Note: The option currently selected is noted with an asterisk
(*) on the display.
49
Page 56

Printing
Print a document
1 Make sure your computer and your All-In-One are on.
2 With your document open, click File Print.
3 To change the All-In-One settings, click Properties, Options,
Setup, or Preferences (depending on the program or operating
system), and then make changes to the settings.
4 Click OK.
5 From the Print dialog box, click OK or Print (depending on the
program).
Print collated copies
When your All-In-One is attached to your computer, you can print black and
white or color collated copies. To print collated copies:
1 Make sure you have paper loaded in the paper support.
2 From your desktop, double-click the Lexmark X6100 Series
All-In-One Center icon.
The All-In-One Main Page appears.
3 Click See More Copy Settings.
4 Select the Collate Copies check box.
5 Click Copy Now.
When you are using your All-In-One without a computer, you can print
black and white collated copies:
1 Make sure you have paper loaded in the paper support.
50
Page 57

2 Press Copy.
3 Press Options repeatedly until Collate - Black appears.
4 Press the right arrow to scroll to the amount of pages you want to
collate.
5 Press Select.
Print more than one page on a sheet of paper
1 Make sure paper is loaded.
2 From your desktop, double-click the Lexmark X6100 Series
All-In-One Center icon.
The All-In-One Main Page appears.
3 From the Productivity Tools area, click More than one page on a
sheet of paper.
4 Follow the instructions on your screen.
Print an image as a multi-page poster
1 Make sure you have paper loaded in the paper support.
2 From your desktop, double-click the Lexmark X6100 Series
All-In-One Center icon.
The All-In-One Main Page appears.
3 Under Productivity Tools, click Print an image as a multi-page
poster, and then follow the instructions to print your poster.
Print last page first
1 Make sure you have paper loaded in the paper support.
2 From your desktop, double-click the Lexmark X6100 Series
All-In-One Center icon.
51
Page 58

The All-In-One Main Page appears.
3 Click See More Copy Settings.
4 Select the Print Last Page First check box.
5 Click Copy Now.
Print repeat ing im ag es
You can print the same image multiple times, as few as two per page and
as many as eight per page, on one sheet of paper:
1 Load A4 or letter size paper in the paper support.
2 From your desktop, double-click the Lexmark X6100 Series
All-In-One Center icon.
The All-In-One Main Page appears.
3 From the Productivity Tools menu, click Repeat an image several
times on one page.
4 Follow the instructions on your screen, and then click Print Now.
Print two images on one page
You can print two images on one page to save paper or create interesting
documents:
1 Make sure you have paper loaded.
2 From your desktop, double-click the Lexmark X6100 Series
All-In-One Center icon.
The All-In-One Main Page appears.
3 Click View Saved Images.
4 From the Productivity Tools menu, click Print two different
pictures on one page (2 on 1).
5 Follow the instructions on your screen.
52
Page 59

Print a banner
1 Place a stack of banner paper (20 sheets or less) on the top cover,
and feed in the first sheet.
2 With your document open, click File Print.
3 Click Properties.
4 From the I Want To menu, click Print a banner.
5 Follow the instructions on your screen.
6 Click OK.
7 Click OK.
8 Click OK.
53
Page 60

Note: Once the All-In-One begins printing, wait until you can
see the leading edge of the banner exiting the
All-In-One, and then carefully unfold the paper down to
the floor in front of the All-In-One.
54
Page 61

Faxing
You can use your All-In-One to send color or black and white faxes. You
can send and receive (see page 55) A4, legal, and letter size documents.
If you want to... In this way... See this topic:
Receive a fax The All-In-One always
answers the call.
You answer calls and
decide to accept a fax.
The answering machine
answers calls or the
All-In-One detects fax
tones and accepts a fax.
Send a fax Using the control panel
and scanner glass
Using the control panel
and ADF
Using the All-In-One
Center
Sending a fax from your PC“Send a fax from your
Customize a fa x job Using the Fax Setup
Utility
Using the control panel “Use the control panel”
“Automatically” on
page 56
“Manually” on page 56
“Answering machine” on
page 57
“Use the control panel
and scanner glass” on
page 57
“Use the control panel
and ADF” on page 60
“Use the All-In-One
Center” on page 61
PC” on page 61
“To customize your
settings” on page67
on page 67
Receive a fax
You can choose to receive a fax automatically, manually, or through an
answering machine.
55
Page 62

Note: For your All-In-One to receive a color fax, the machine
from which you are receiving must also support color
faxes.
Automatically
Recommended for a dedicated fax line.
Your All-In-One will automatically accept incoming faxes. If you change
your settings and want to reset to automatic answering mode:
1 From the control panel, press Fax.
2 Press Options until Answer fax when appears.
3 Press the right arrow to choose After 1 ring, After 2 rings,
After 3 rings (default), or After 5 rings.
4 Press Select.
When the number of rings that you set is detected, the All-In-One
automatically receives your fax.
Manually
Recommended for a shared fax and telephone line.
You can choose to accept incoming faxes by setting your All-In-One to
manual answering mode.
1 From the control panel, press Fax.
2 Press Options until Answer fax when appears.
3 Press the right arrow to choose Manual-Press #.
4 Press Select.
5 When it rings, pick up a telephone that is connected to the external
jack of the All-In-One and listen for the fax calling tone.
6 Press the pound (#) key on the telephone to accept the incoming
fax.
7 Hang up the telephone.
56
Page 63

The All-In-One receives your fax.
Note: To successfully accept an incoming fax, you must use
the telephone that is directly attached to the All-In-One.
Answering machine
Recommended for a shared fax and telephone line.
To receive a fax if you are connected through an answering machine:
1 From the control panel, press Fax.
2 Press Options until Answer fax whe n appears.
3 Press the right arrow to choose Fax Tone Heard.
4 Press Select.
When a ring is detected, the answering machine picks up the call.
• If a fax is detected, the All-In-One receives the fax, and
disconnects the answering machine.
• If not, the answering m achine completes the call.
Note: To successfully accept an incoming fax, you must use
the telephone that is directly attached to the All-In-One.
Note: Y ou must set up the equipment as shown on page 5 and
6 to work properly.
Send a fax
Use the control panel and scanner glass
1 Make sure your All-In-One is on.
2 Open the top cover.
57
Page 64

3 Put the first page of your document face down on the scanner glass
in the upper left corner.
4 Close the top cover.
5 On the control panel, press Fax.
6 Using the numbers on the keypad, enter the fax number.
7 Press Black or Color.
58
Page 65

8 Do you have another page?
• If not, press 2 to answer No.
• If yes, press 1, then follow these steps:
1 When your machine prompts you for another page, place the
second page of your document face down on the scanner glass.
2 Press Select.
3 Repeat these steps until you have scanned the last page of your
document. Then, press 2 to answer No.
Note: To send a color fax from y our All-In-One, the machine to
which you are sending a fax must also support color
faxes.
59
Page 66

Use the control panel and ADF
1 Make sure your All-In-One is on.
2 Load up to 50 sheets of your original document face up in the ADF.
3 On the control panel, press Fax.
4 Use the keypad to:
• Enter the fax number, and then press Black or Color.
• Press Speed Dial, and then:
– Use the arrow keys to scroll through the list to find the number
you want, and then press Black or Color.
– Use the keypad to enter a two-digit number (viewable in the
upper left of the display), and then press Black or Color.
Note: If you do not have a Speed Dial list but want to create
one, see page 62.
The All-In-One scans your document and sends your fax to the
number you entered.
60
Page 67

Use the All-In-One Center
1 Make sure your All-In-One is attached to a computer.
2 Load up to 50 sheets of your original document face-up in the ADF.
3 From your desktop, double-click the Lexmark X6100 Series
All-In-One Center icon.
The All-In-One Main Page appears.
4 Under Productivity Tools, click Fax an image or document.
5 Follow the instructions on your screen to complete the task.
Note: All faxes sent through the fax driver use the Fine
resolution.
Send a fax from your PC
You can create a soft copy document on your computer and send a black
and white fax of it to someone else.
Note: Y ou cannot receive soft copy fax es , only send them. All
incoming faxes will print from your All-In-One.
To send a fax from your computer program using the fax modem in your
All-In-One:
1 With your document open, click File Print.
2 In the printer list, select the Fax Lexmark X6100 Series printer.
3 To send a soft copy fax, follow the instructions in the program that
launches.
Note: All faxes sent using the soft copy fax feature appear in
Fine resolution.
61
Page 68

Customize a fax job
There are several fax features on your Lexmark X6100 Series that make
sending faxes more efficient.
Setting Up Speed Dial
Using the computer (recommended)
1 Click Start Programs Lexmark X6100 Series Lexmark
All-In-One Center Fax Setup Utility.
2 Click the Sp eed Dial tab.
3 Follow the instructions on the Speed Dial tab to add a new number
to your speed dial list.
4 Press Save Settings after you finish your updates. Nothing is
saved until you press this button.
Using the control panel
1 Press Fax.
2 Press Options until you see Edit speed dials.
3 Press Select.
4 Enter the fax number and press Select.
5 Enter the name using the keypad. Press the key more than once to
scroll through letters.
6 Press Select when you are finished.
Note: If you are using a PC with Chinese or Japanese
languages, you are unable to enter a name.
62
Page 69

Using Speed Dial
To make sending faxes easier, you can enter up to 100 speed dial
numbers. You can enter 80 individual fax numbers and 20 groups that can
hold up to 5 phone numbers each.
1 Press Fax.
2 Press Speed Dial.
3 The first speed dial number in the list appears.
4 Scroll through the list using the left and right arrow buttons or use
the keypad to enter the two-digit speed dial number.
5 Press Color or Black.
Sending a multi-page fax to a group
You can send a multi-page fax to as many as 5 people at once.
To send a broadcast fax immediately
1 Press Fax.
2 Enter a fax number.
3 Press Black or Color to send the fax immediately or press Select
to enter another fax number.
4 Press Black or Color to send the fax to both numbers or press
Select to enter another fax number. Continue this procedure until all
of the fax numbers (up to 5 numbers) have been entered.
To delay sending a broadcast fax
1 On the control panel, press Fax.
2 When the default screen appears, press Options until Delay
Until appears.
3 Press Select.
63
Page 70

4 Enter the time you want your fax to send.
5 Press Select.
6 If your All-In-One is in 24 hour mode, the screen will return to the
default display. If the machine is set to 12 hour mode, press 1 for
AM or 2 for PM.
7 Using the keypad, enter the fax number.
8 Press Black or Color to send your fax to this number or press
Select to enter another fax number (you can do this up to 5 times
and the delayed fax will be sent to as many numbers as you
entered).
Note: At the designated time, the fax numbers are dialed and
the fax transmitted to all of the designated fax numbers.
If the fax transmission is unsuccessful to any of the
numbers on the broadcast list, the unsuccessful
numbers will be tried again at the end of the list.
Sending a delayed fax using speed dial
1 On the control panel, press Fax.
2 When the default screen appears, press Options until Delay
Until appears.
3 Press Select.
4 Enter the time you want your fax to send.
5 Press Select.
6 If your All-In-One is in 24 hour mode, the screen will return to the
default display. If the machine is set to 12 hour mode, press 1 for
AM or 2 for PM.
64
Page 71

7 Press Speed Dial and then:
• Use the arrow buttons to scroll through the speed dial list to find
the desired fax number, and then press Black or Color.
OR
• Press the keypad buttons to enter a two-digit number (viewable
in the upper left corner of the display), and then press Black or
Color.
Manually dialing a fax while listening to a telephone line
The manual dialing feature lets you dial a telephone number while listening
to the call through a speaker on the All-In-One. It is useful when you must
navigate an automated answering system before sending your fax.
1 On the control panel, press Fax.
2 Press Options repeatedly until On Hook Dial appears.
3 Press Select.
You can now hear the dial tone of the phone line.
4 Enter the number to which you want to send a fax.
Note: Press the keypad numbers to navigate an automated
answering system, if necessary.
5 Press Black or Color when you hear fax tones.
Distinctive ring patterns
Distinctive ring is a service provided by some telephone companies that
assigns multiple phone numbers to a single telephone line. If you subscribe
to this service, you can program your All-In-One to have a distinctive ring
pattern and phone number for incoming faxes.
To use distinctive ring for faxing:
1 Order the distinctive ring service from your telephone company.
2 On the control panel, press Fax.
65
Page 72

3 Press Options repeatedly until Advanced Fax appears. Press
Select.
4 Press Options repeatedly until Distinctive ring appears.
5 Select a distinctive ring:
• Any (default; T his sett ing answe rs an y type of
ring.)
• Single ring
• Double ring
• Triple ring
66
Page 73

To customize your settings
Use the Fax Setup Utility
You can adjust the fax settings in the Fax Setup Utility. These settings
apply to the faxes you send or receive.
1 Click Start Programs Lexmark X6100 Series Fax Setup
Utility.
2 Click each tab and change the settings as desired.
3 Press Save Settings after you finish your updates. Nothing is
saved until you press this button.
4 Click Close.
Use the control panel
You can use the control panel to customize your fax jobs. Press Fax to
enter Fax mode, and then press Options repeatedly to see each sub
menu.
Note: Y ou can also use the Fax Utility Software to adjust most
of the All-In-One fax settings. For more information, see
“Using the Fax Setup Utility” on page 16.
From this sub menu: You can:
PENDING FAXES Cancel any faxes that have not been sent.
PRINT REPORTS Print:
• An activity report (the last 40 sent and
received faxes)
• A send log
• A receive log
• A se ttings list (lists settings such as ringer
volume, fax quality, redial attempts)
67
Page 74

From this sub menu: You can:
ANSWER FAX WHEN Select how a fax is received.
• Automatically:
After 1 ring
After 2 rings
After 3 rings
(default)
After 5 rings
• Manually:
Press # on external phone connected to the
All-In-One.
• Fax tone heard:
When an answering machine is connected to
the external phone jack on the All-In-One.
Note: For more information, see page 57.
DELAY UNTIL Enter a specific time to send a fax. For help, see
page 63.
Note: Make sure the date and time are entered
correctly before you set a specific time to send a
fax.
ON HOOK DIAL Press Select to use On Hook Dial and dial the
number when you hear a dial tone.
For more information, see page 65.
RINGER TONE Choose a tone for incoming rings:
• Off
• Low (default)
• High
KEY PRESS TONE
SPEAKER VOLUME
Turn on or off the sound that is made when you
press a control panel button. The options are:
Off
•
• Low (default)
High
•
Turn the All-In-One speaker v o lum e (affects
All-In-One fax sounds) to:
Off
•
• Low (default)
High
•
68
Page 75

From this sub menu: You can:
EDIT SPEED DIAL Do these things to your speed dial list:
• Add to it
• Remove a number from it
• Modify it
• Print it
Note: For more information, see page 62.
EDIT TIME/DATE Edit the time and date.
Note: Make sure you enter a number into each of
the available spaces. For example, 01:00 for 1:00.
PERSONALIZE FAX Enter your name or the name of your business and
your number. This information appears as a
heading to iden tify y ou and yo ur fax machine to the
fax recipient .
BLANK PAPER SIZE Choose:
• A4
• Letter
• Legal
Note: If no asterisk (*) is presen t, a paper si ze tha t
is not supported by fax has been selected through
the copy menu.
BLANK PAPER TYPE Specify the type of paper loaded in the paper
support:
Auto Detect (default)
•
•
Plain
• Coated
• Photo
• Transparency
Auto Detect optimizes the setting according to
the type of paper loaded.
Note: For other specialty types, see page27.
FAX FORWARD • Turn this feature off (default).
• Enter a number to forward the fax to.
• Print the fax and forward it.
ADVANCED FAX Press Select to see a menu of advanced fax
options (page 70).
69
Page 76

From this sub menu: You can:
MAINTENANCE
• Check ink levels.
• Change cartridges.
• Align cartridge s.
• Cl ean car tridges.
• Print a test page.
Note: Some links will not work while a job is in
progress.
CLEAR SETTINGS Select when you want your All-In-One to return to
the default settings:
After two minut es
•
Never
•
SET DEFAULTS
Set your default settings to:
Use Factory
•
• Use Current
Advanced Fax options
From this Advanced Fax
option:
You can select:
Redial attempts The number of times you want the machi ne to try
again if your fax does not go through:
0 times
•
• 1 time
• 2 times (default)
•
3 times
• 4 times
• 5 times
Redial interval
The time the machine waits before attempting a
fax call again:
1 min
•
• 2 min
• 3 min (default)
•
4 min
• 5 min
• 6 min
• 7 min
• 8 min
70
Page 77

From this Advanced Fax
option:
You can select:
Fax confirmation • Off (no status page is printed)
•
Print for all (prints a status report after
each fax you send including jobs that have
errors).
Print for error s (prints a statu s report
•
only after jobs that did not send). (default)
Activity report
generation
• On request (you can ask for the report to
print). (default)
•
After 40 faxes (report is automatically
generated after 40 faxes print).
Fit fax to page • Try to fit (default)
•
Two pages
Fax footer
• On (if you want the machine to insert the time,
date, and page number at the bottom of each
incoming fax). (default)
• Off
Dialing method
• Touch Tone (default)
•
Pulse
• Behind a PBX (Dial tone detect off) - send
a fax without waiting for a dial tone
Ring pattern • Any (default)
•
Single ring
•
Double ring
• Triple ring
Note: You can choose distinctive rings , if they a re
available from your local telephone service. If
they are not available, select Any. See
“Distinctive ring patterns” on page 65 for setup
instructions.
Dial prefix • None (default)
•
Create - you can crea te an up to 8 ch ar ac ter
prefix to be added to the beginning of each
number dialed.
Scan before dial • Yes (default)
•
Yes - Only works with standard or fine black
and white fax e s .
71
Page 78

From this Advanced Fax
option:
You can select:
Max send speed A bps speed:
33,600 (defau lt)
•
•
31,200
• 28,800
• 26,400
• 24,000
• 21,600
• 19,200
• 16,800
• 14,400
• 12,000
• 9,600
• 7,200
• 4,800
• 2,400
Error correction
• On (default)
•
Off
Note: Typically, error correction should be on.
However, you can turn error correction off if you
have an older computer or have trouble sending a
fax.
Language Your language
72
Page 79

From this Advanced Fax
option:
You can select:
Country code • Argentina
• Australia
• Austria
• Belgium
• Brazil
• Bulgaria
• Canada
• Chile
• Columbia
• Croatia
• Czech Republic
• Denmark
• Ecuador
• Egypt
• Estonia
• Finland
• France
• Germany
• Greece
• Guam
• Hong Kong
• Hungary
• India
• Indonesia
• Ireland
• Israel
• Italy
• Japan
• Latvia
• Lithuania
• Luxembourg
• Malaysia
• Mexico
• Netherlands
• New Zealand
• Norway
73
Page 80

From this Advanced Fax
option:
Country code
(continued)
You can select:
•
Peoples Republi c of Chi na
• Peru
• Philippines
• Poland
• Portugal
• Puerto Rico
• Romania
• Russia
• Saudi Arabia
• Singapore
• Slovenia
• South Africa
• Spain
• Sweden
• Switzerland
• Taiwan
• Thailand
• Turkey
• UAE
• UK
• USA
• Venezuela
• Virgin Islands
Note: The option currently selected is noted with an asterisk
(*) on the display.
74
Page 81

Networking
A network is a group of devices connected to each other for the purpose of
sharing information. You can purchase a network adapter from Lexmark
separately. Here is a quick look at what you can do if you are considering
using your All-In-One across a network:
• Print from multiple computers if your All-In-One is attached to a
computer.
• Copy using the control panel.
• Use the Print to fax feature. However, Fax Setup Utility functions are
not available. Fax setup must be done from the control panel.
Note: You cannot use your All-In-One to scan across a
network.
75
Page 82

Maintaining your All-In-One
Replace the print cartridges
The Lexmark X6100 Series uses the following cartridges:
Item: Part number:
Black cartridge 82
Color cartridge 83 or 88
Note: For information about ordering supplies, see page 86.
1 Make sure the All-In-One is on.
2 Lift the scanner unit until the scanner support keeps it open.
The print cartridge carrier moves and stops at the loading position,
unless the All-In-One is busy.
76
Page 83

3 Squeeze the tabs on the cartridge lids, and then lift the lids.
4 Remove the old cartridges. Store them in an air-tight container or
dispose of them.
5 If you are installing new cartridges, remove the foam, sticker, and
transparent tape from the bottom of the cartridges.
Warning: Do not touch the gold contact area on the cartridges.
77
Page 84

6 Insert the black cartridge in the left carrier and the color cartridge in
the right carrier.
7 Snap the lids closed.
78
Page 85

8 Lift the scanner unit, and then push the scanner support to the right
while lowering the scanner unit until it is completely closed.
79
Page 86

9 Load paper into the paper support.
10 Use the buttons on the control panel to answer the questions that
appear on the display:
a If the color cartridge you installed is new (it has never been
used), press Select.
If it is old (it has been used), press the right arrow button once,
and then press Select.
b If the part number that appears is the number of the cartridge
you are using, press Select.
If it is not the number of the cartridge you are using, press the
right arrow button until the correct part number appears, and
then press Select.
c If the black cartridge you installed is new, press Select.
If it is old, press the right arrow button once, and then press
Select.
80
Page 87

The part number that appears should be the number of the
cartridge you are using.
d Press Select to choose the part number that appears.
e If you installed new cartridges, continue with “Align the print
cartridges” to ensure proper installation.
Align the print cartridge s
There are two instances when you align your print cartridges: after
installing new cartridges and to solve print quality problems.
After installing new cartridges
After you install your print cartridges, a message appears on the control
panel display.
1 Make sure paper is loaded in the paper support.
2 Press Select to print an alignment page.
Alignment Page Printing appears on the display and an
alignment page prints. Once the alignment page prints, your
automatic alignment is complete.
To solve print quality problems
Align your cartridges to solve print quality problems such as:
• Characters are not properly formed or are not aligned at the left
margin.
• Vertical, straight lines are wavy.
1 Load paper in the paper support.
2 On the control panel, press Copy.
3 Press Options until Maintenance appears.
81
Page 88

4 Press the right arrow until Align C artridges appears, and then
press Select.
An alignment page prints. Once this page prints, your automatic
alignment is complete.
Improve print quality
If you are not satisfied with the print quality of your document, make sure
you:
• Use the appropriate paper for the document. For example, use
photo paper if you are using a photo cartridge.
• Use paper that is a heavier weight, bright white, or coated.
• Select a higher print quality:
1 From your software application, click File Print.
The Print dialog box appears.
2 From the Print dialog box, click Properties, Preferences, or
Options.
3 From the Quality/Speed area, select Better or Best.
If your document still does not have the print quality you want, follow these
steps:
1 Reinsert the print cartridges:
a Remove the print cartridges. For help, see page 77.
b Insert the print cartridges. For help, see page 78.
c Print your document again.
82
Page 89

2 Clean the print nozzles:
Using the control panel
a Load paper in the All-In-One. For help, see page 24.
b Press Copy.
c Press Options until Mai ntenan ce appears on the display.
d Press the right arrow until Clean Cartridges appears on the
display.
e Press Select. A nozzle page prints, forcing ink through the
nozzles to clean the clogged nozzles.
f Print your document again to verify that your print quality has
improved.
g If you are not satisfied with the print quality , continue with step 3,
and then print your document again.
Using the Lexmark All-In-One Center
a Load paper. For help, see page 24.
b Click Start Programs Lexmark X6100 Series
Lexmark X6100 Series All-In-One Center.
c From the Maintenance tab, click Clean to fix horizontal
streaks.
d Click Print. A nozzle page prints, forcing ink through the nozzles
to clean the clogged nozzles.
e Print your document again to verify that your print quality has
improved.
f If you are not satisfied with the print quality , continue with step 3,
and then print your document again.
3 Wipe the print cartridge nozzles and contacts:
a Remove the print cartridges. For help, see page 77.
b Dampen a clean, lint-free cloth with water.
83
Page 90

c Gently hold the cloth against the nozzles for about three
seconds, and then wipe in the direction shown.
Nozzles
d Using another clean section of the cloth, gently hold the cloth
against the contacts for about three seconds, and then wipe in
the direction shown.
Contacts
e With another clean section of the cloth, repeat steps c through d.
f Let the nozzles and contacts dry completely.
g Reinsert the print cartridges.
h Clean the print nozzles. For help, see page 83.
i Print your document again.
84
Page 91

j If the print quality does not improve, repeat step 3 up to two
more times.
k If print quality is still not satisfactory , replace the print cartridges.
For information, see page 76.
Preserve the print cartridges
To ensure the longest life from your print cartridges and optimum
performance from your All-In-One:
• Keep a new print cartridge in its packaging until you are ready to
install it.
• Do not remove a print cartridge from the All-In-One except to
replace, clean, or store it in an airtight container. The print
cartridges do not print correctly if left exposed for an extended
period because the ink dries.
Lexmark’s warranty does not cover repair of failures or damage caused by
a refilled cartridge. We do not recommend use of refilled cartridges.
Refilling cartridges can affect print quality and cause damage to the
All-In-One. For best results, use Lexmark supplies.
Clean the scanner glass
Clean the scanner glass when ink smudges, fingerprints, or dirt are
apparent.
To clean:
• Dampen a clean, lint-free cloth with a non-abrasive cleaning
solvent.
• Gently wipe the scanner glass clean.
Note: Make sure all ink or corrective fluid on the document is
dry before placing the document on the scanner glass.
85
Page 92

Order supplies
To order All-In-One supplies or to locate a dealer near you, contact the
Lexmark Web site at www.lexmark.com.
Item: Part number:
Black cartridge 82
Color cartridge 83 or 88
USB cable 12A2405
86
Page 93

Troubleshooting
Setup troubleshooting
If you experience problems while setting up your All-In-One, make sure:
• You unlock the scanner bed by pushing the scanner lock down. For
help locating the scanner lock, see the picture of the All-In-One on
page 11.
• You only have one Lexmark X6100 Series attached to your
computer.
• Your operating system is compatible with your All-In-One. The
Lexmark X6100 Series supports these operating systems:
Windows 98 Windows 2000
Windows Me Windows XP
General troubleshooting
When your All-In-One has a problem, before contacting Lexmark Customer
Support, check the following items.
If your All-In-One is not attached to a computer, make sure:
• The power supply is firmly plugged into your All-In-One and an
electrical outlet.
• You installed the print cartridges correctly. The black cartridge is
inserted in the left carrier and the color cartridge in the right carrier.
For help, see page 76.
• You removed the sticker and tape from the bottom of both print
cartridges. For help, see page 76.
• The paper is loaded correctly. For help, see page 24.
87
Page 94

If your All-In-One is attached to a computer, make sure:
• Both your computer and your All-In-One are on.
• The All-In-One is connected directly to your computer.
• The All-In-One is set as your default printer.
• The USB cable is securely attached to your computer and to your
All-In-One. To purchase a USB cable, part number 12A2405, visit
the Lexmark Web site at www.lexmark.com.
Anytime your All-In-One has a problem, make sure:
• You unlock the scanner:
1 Press Power to turn the All-In- One off.
2 Unlock the scanner.
3 Press Power to turn the All-In- One back on.
Note: I f you have not unlocked the scanner, you will hear a
loud banging noise when you turn the All-In-One on.
• You install both of the print cartridges. The Lexmark X6100 Series
only works if you have both cartridges installed. For help installing
the cartridges, see page 76.
• You remove the stickers, transparent tape, and foam from the
bottom of the print cartridges. For an illustration, see page 77.
Problem: Go to:
Document does not print page 89
Document prints slowly page 89
Document misfeeds or jams page 90
Document prints poorly page 93
Document is too light or too dark page 93
Display language is not preferable page 95
Date and time on the display are incorrect page 95
All-In-One is not communicating with the computer page 96
Black and white copy quality is un satisfactor y page 96
88
Page 95

Problem: Go to:
Document has a checkerboard pattern page 97
Scanned image is unsatisfactorily cropped page 98
Edges of scanned documents are cropped page 99
Scanner unit will not close page 99
Fax settings need adjustment page 99
All-In-One is scanning and copying without a
pre-scan
Error messages and flashing lights page 100
Cannot send a fax page 104
Cannot receive a fax page 105
Received fax is blank page 105
Received fax has poor print quality page 105
page 99
Document does not print
• Make sure the cartridges are properly installed. For help, see
page 76.
• Use an undamaged USB cable.
• Check your All-In-One status to make sure your document is not
being held or paused.
To check All-In-One status:
1 Click Start Settings Printers.
2 Double-click the Lexmark X6100 Series icon, and then click
Printer.
3 Make sure no check mark appears next to Pause Printing.
4 Print a test page.
• Check the software program.
Document prints slowly
• Close programs not in use.
89
Page 96

• Reduce the print quality resolution (Quick and Normal print more
quickly than Better and Best).
Note: Photos or documents containing graphics may take
longer to print than regular text.
• Consider pu rchasing more Random Acc ess Memory (RAM) for y our
computer.
Document misfeeds or jams
Paper misfeeds or multiple sheets feed
•
Use a paper recommended for inkjet printers.
• Do not force the paper into the All-In-One.
• Do not load too much paper into the All-In-One. For help, see
page 24.
• Make sure the paper guide rests against the left edge of the paper
and does not cause the paper to bow in the paper support.
90
Page 97

• Place the All-In-One on a flat, level surface.
• Select the correct paper type and size.
• If you are printing a banner, make sure you select Letter Banner or
A4 Banner in Print Properties. For help, see page 19.
Pap er jams
If a paper jam occurs in the paper support, remove the paper from the
All-In-One. If the paper is lodged too far into the All-In-One and cannot be
removed:
1 Press Power to turn the All-In-One off.
2 Pull slowly and firmly on the paper to remove it.
If you cannot reach the paper because it is too far into the
All-In-One:
a Lift the scanner unit, and then pull the paper out.
91
Page 98

b Lower the scanner unit to close it.
3 Press Power to turn the All-In-One on, and then print your
document.
Note: If you are printing a banner, make sure you select Letter
Banner or A4 Banner in Print Properties. For help, see
“Using Print Properties” on page 19.
If a paper jam occurs in the ADF:
1 Turn the All-In-One off.
92
Page 99

2 Open the ADF.
3 Remove the paper jam.
4 Close the ADF.
5 Turn the All-In-One on.
6 Print any missing pages.
Document prints poorly
Document is too light or too dark
You can lighten or darken your document from the control panel.
1 On the control panel, press Lighter/Darker.
2 Press the right arrow to darken your document or the left arrow to
lighten it.
3 When the asterisk (*) on the display moves to a satisfactory
position, press Select.
93
Page 100

Vertical, straight lines are not smooth
To improve the print quality of vertical, straight lines in tables, borders, and
graphs:
• Test the cartridge alignment. For help, see page 81.
• Clean the nozzles. For help, see page 83.
Characters are missing or unexpected
Make sure the scanner glass is clean.
1 Dampen a clean lint-free cloth.
2 Gently wipe the scanner glass.
Note: Make sure all ink or corrective fluid on the document is
dry before placing the document on the scanner glass.
Print is too dark or smudged
•
Let the ink dry before handling the paper.
• Select the correct paper type and size in Properties, Preferences, or
from the All-In-One Center.
• Make sure the paper is straight and unwrinkled.
• Select the appropriate Quality for the paper type. If you are printing
on inkjet paper, select Quick Copy from the Quality/Copies tab of
Properties, Preferences, or from the All-In-One Center.
• Clean the cartridge nozzles. For help, see page 83.
Printed pages have alternating bands of light and dark print
(intermittent printing)
If your document has alternating bands of light and dark print, you might
need to select the highest print quality.
1 With your document open, click File Print.
2 In the Print dialog box, click Properties, Preferences, Options, or
Setup (depending on your program or operating system).
3 Select Best on the Quality/Copies tab.
94
 Loading...