

Page 1
Lexmark™ X560
Quick Reference
Loading paper and specialty media
Loading Tray 1 (MPT)
In addition to plain paper, Tray 1 (MPT) can use various other sizes
and types of paper or specialty media, such as envelopes and
transparencies.
Notes:
• Make sure Tray 2 is completely installed before opening Tray
1 (MPT).
• Load up to 150 sheets or a stack of paper that weighs 60–216
g/m2 and is less than 15 mm (.59 in.) high. The minimum paper
size supported is 76.2 x 127 mm (3 x 5 in.).
• Tray 1 (MPT) supports paper or specialty media within the
following dimensions: 76.2 x 127 mm–220.0 x 355.6 mm
(3 x 5 in.–.8.66 x 14 in.).
• For duplex printing, you can load paper that is 64–163 g/m
• Do not load different types of paper at the same time.
• Do not remove or add paper to Tray 1 (MPT) when printing,
or if there is any paper still in the tray. Doing so may cause a
paper jam.
• Do not put any objects other than paper in Tray 1 (MPT).
• Always load paper short edge first.
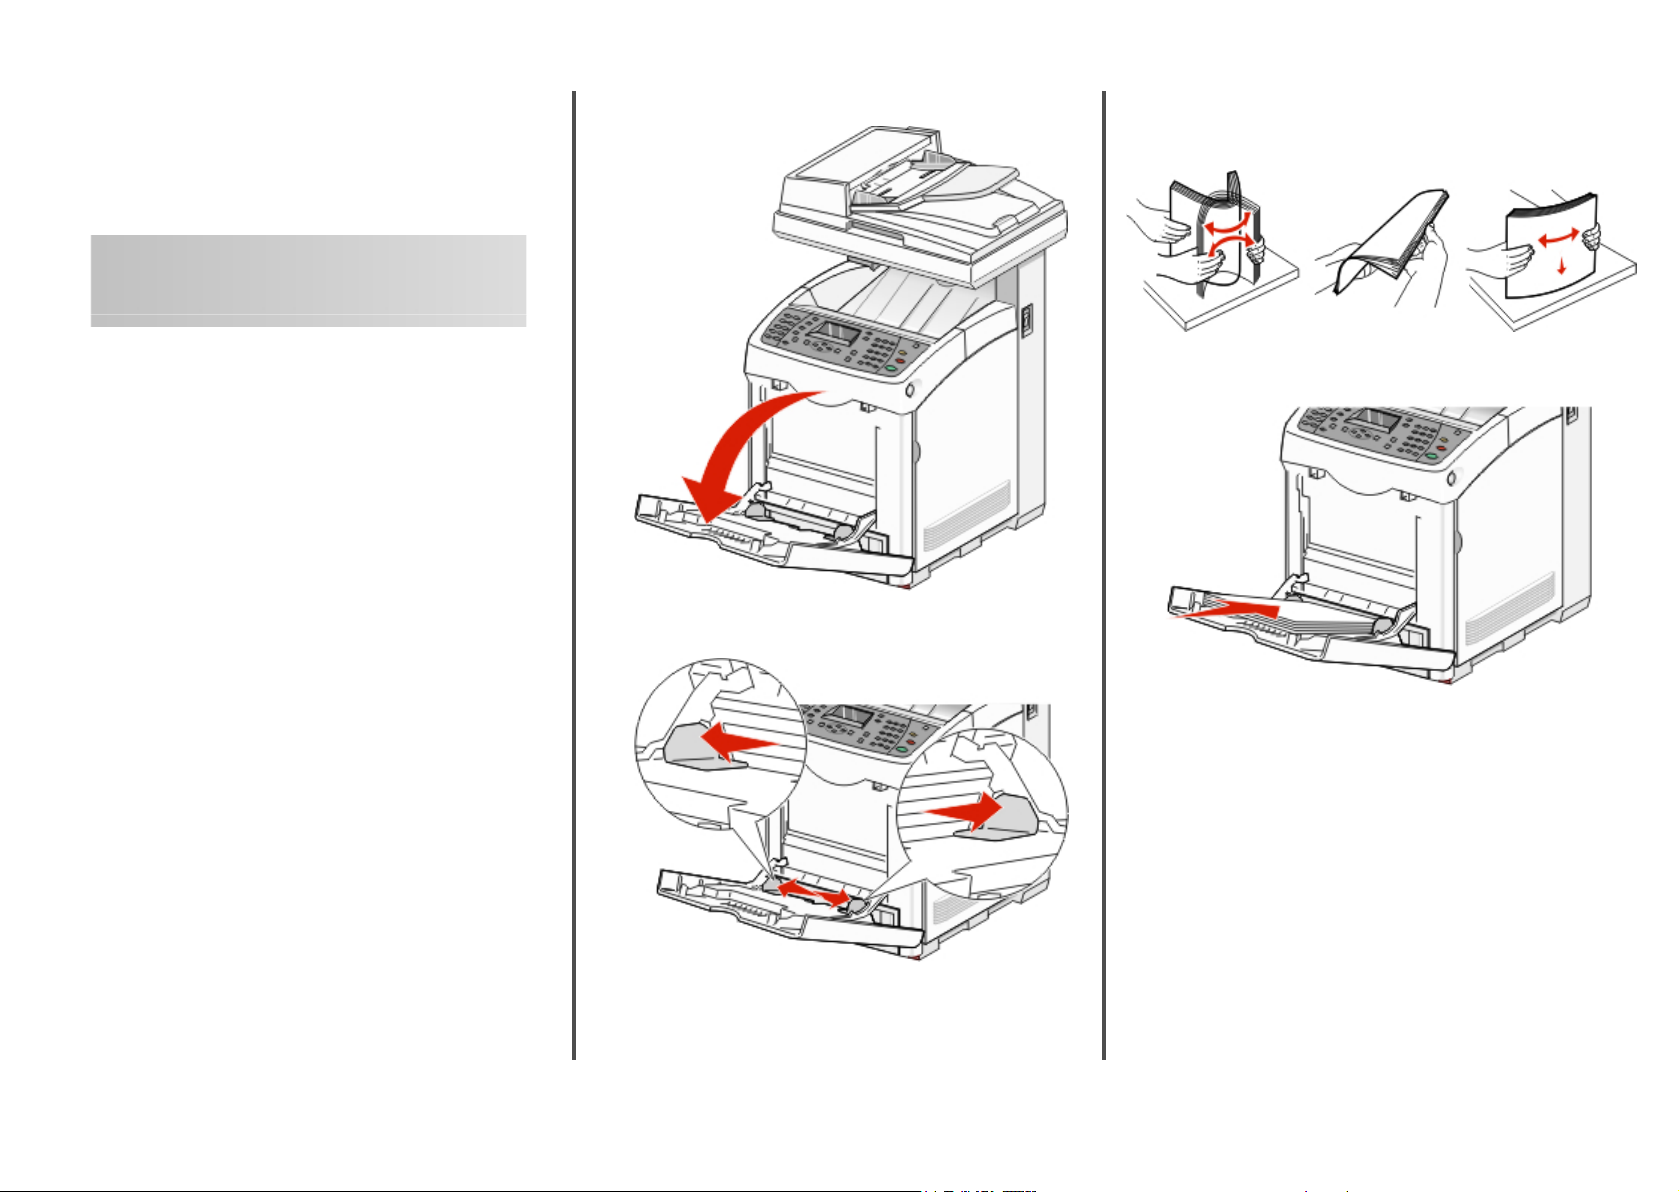
To load paper in Tray 1 (MPT):
1 Gently pull open the Tray 1 (MPT) cover.
2 Slide the width guides to the edges of the tray. The width
guides should be fully extended.
2
.
3 Flex the sheets back and forth to loosen them, and then fan
them. Do not fold or crease the paper. Straighten the edges on
a level surface.
4 Insert all paper or specialty media facedown and top edge first
into Tray 1 (MPT).
1
Page 2
5 Slide the width guides until they rest lightly against the edges
of the paper stack.
Loading Tray 2 and Tray 3
The printer has two trays to select from: the standard tray (Tray 2),
also known as the 250-sheet tray, and the optional 550-sheet tray
(Tray 3), which is part of the 550-sheet drawer and fits into the
support unit. Proper paper loading prevents jams and facilitates
trouble-free printing.
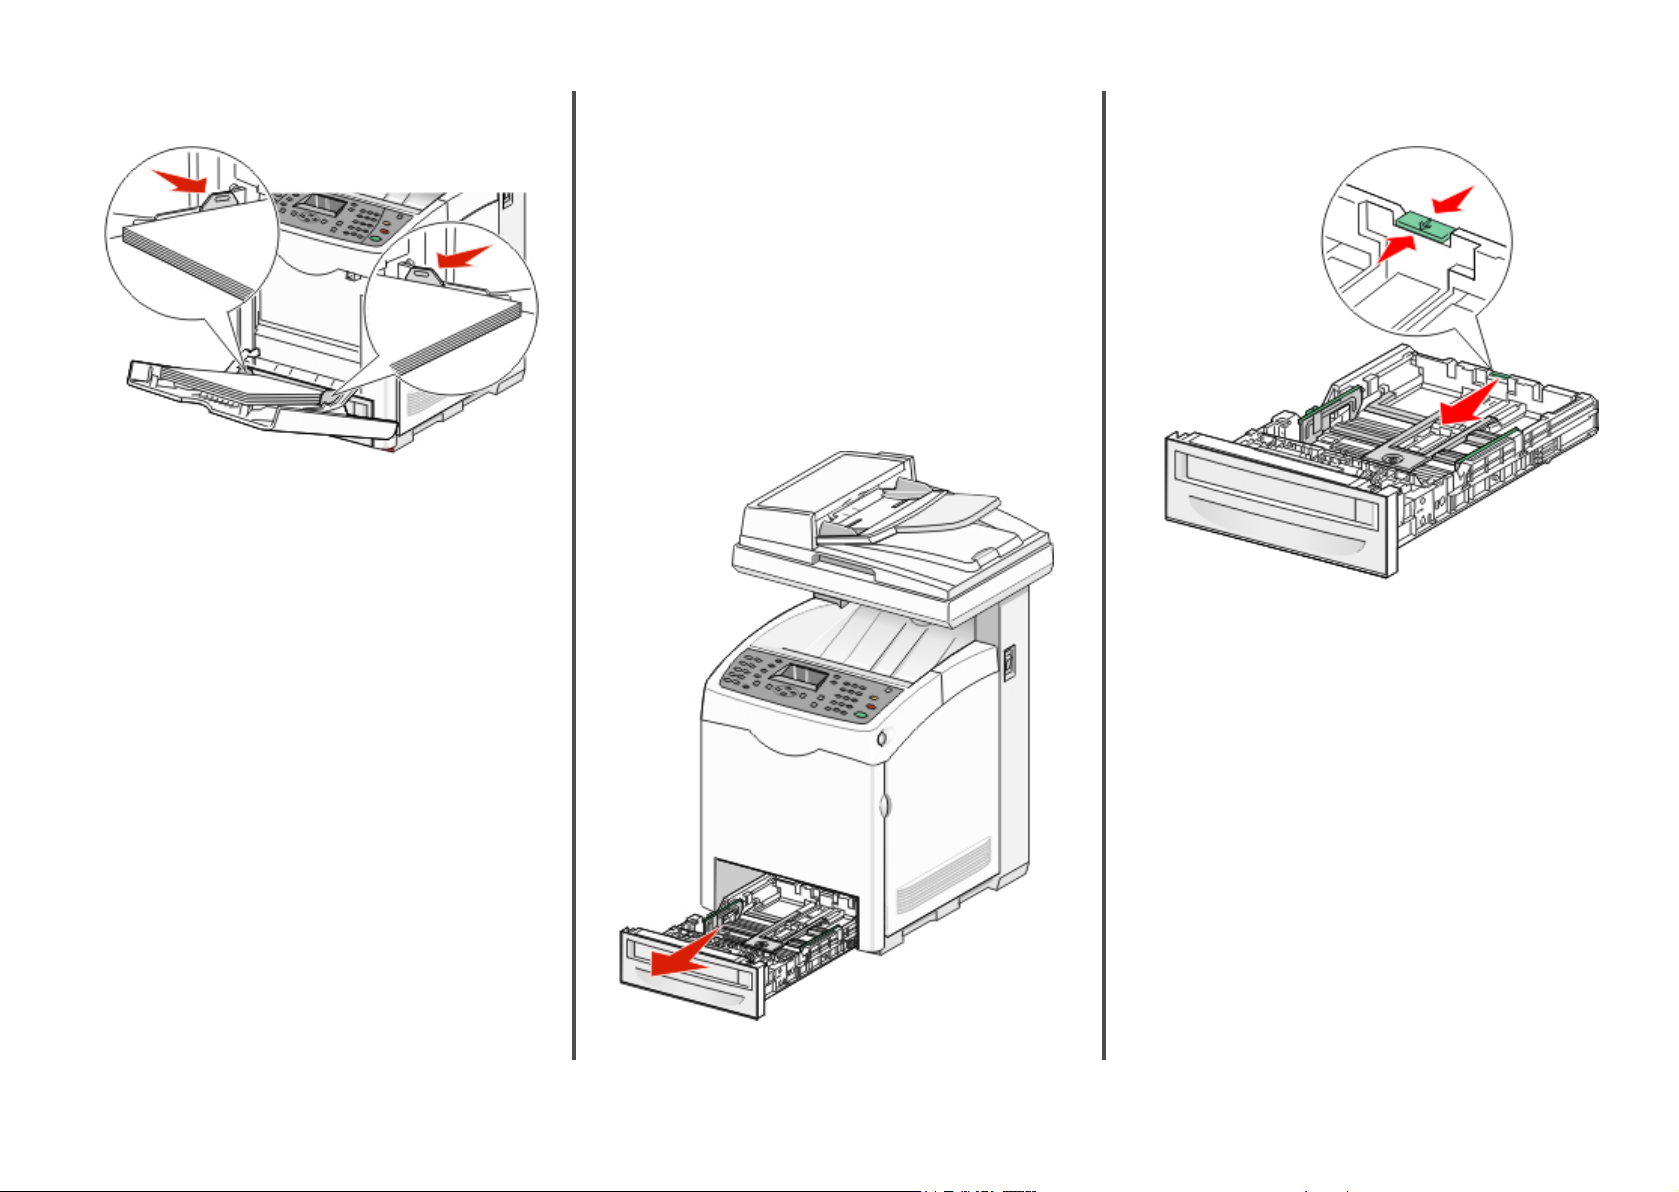
Load the standard tray or optional tray in the same way.
1 Grasp the handle, and pull the tray out. Remove the tray
completely.
Note: Do not remove trays while a job prints. Doing so may
cause a jam.
2 Squeeze the length guide tab as shown. Slide the guide to the
correct position for the paper size being loaded.
2
Page 3

3 Squeeze the width guide tabs together as shown, and slide the
width guide to the correct position for the paper size being
loaded.
When loading preprinted letterhead, place the header toward
the front of the tray.
6 Press or repeatedly to select the desired paper type,
and then press OK.
7 Press repeatedly until Select Function appears.
Copying
Note: Notice the load line label on the side of the tray which
indicates the maximum stack height for your paper.
4 Flex the sheets back and forth to loosen them, and then fan
them. Do not fold or crease the paper. Straighten the edges on
a level surface.
5 Load the paper stack with the recommended print side faceup.
Load the stack toward the back of the tray as shown.
6 Align the tray, and insert it.
Setting the Paper Type
1 Make sure the printer is on and Select Function appears.
2 From the printer control panel, press System.
3 Press
4 Press or repeatedly until the desired tray appears, and
5 Press
or repeatedly until Tray Settings appears,
and then press OK.
then press OK.
or repeatedly until Paper Type appears, and
then press OK.
Making a copy
1 Load an original document faceup, short edge first into the
ADF or facedown on the scanner glass.
Note: Do not load postcards, photos, small items,
transparencies, photo paper, or thin media (such as magazine
clippings) into the ADF. Place these items on the scanner glass.
2 If you are loading a document into the ADF, adjust the paper
guides.
3 From the printer control panel, press Copy.
4 Use the keypad to enter the number of copies.
5 To change the color mode, press Color Mode until the light
comes on next to the selection you want. Choose between
B&W (black and white) and Color.
6 Adjust the copy options.
7 Press Start to begin copying.
Notes:
• To cancel the copy function, press Stop at any time.
• Print jobs are interrupted when users make copies.
Printing continues while the printer scans the originals.
When the copies are ready to print, the print job pauses,
the copies print, and then the print job resumes. Copies
cannot be made while printing a received fax.
3
Page 4

Copying multiple pages onto a single sheet
In order to save paper, you can copy two consecutive pages of a
multiple-page document onto a single sheet of paper. There are
several settings available:
N-Up setting Description
Off Copies one original page image onto one
Auto Copies two original pages, reduces the
ID Copy Copies two original size images onto one
Manual Reduces the two original images as
1 Load an original document faceup, short edge first into the
ADF or facedown on the scanner glass.
Note: Do not load postcards, photos, small items,
transparencies, photo paper, or thin media (such as magazine
clippings) into the ADF. Place these items on the scanner glass.
2 If you are loading a document into the ADF, adjust the paper
guides.
3 From the printer control panel, press Copy.
4 Use the keypad to enter the number of copies.
5 To change the color mode, press Color Mode until the light
comes on next to the selection you want. Choose between
B&W (black and white) and Color.
6 Press or repeatedly until N-Up appears, and then press
OK.
7 Press
8 Press Start to begin copying.
or repeatedly until the N-Up option you want
appears, and then press OK.
side of a sheet of paper
images, and prints them on one side of a
sheet of paper
side of a sheet of paper
specified in Reduce/Enlarge, and prints
them on one side of a sheet of paper
Faxing
Sending a fax using the ADF
1 Make sure the printer is on and is connected to a working
phone line.
2 Load an original document faceup, short edge first into the
ADF.
Note: Do not load postcards, photos, small items,
transparencies, photo paper, or thin media (such as magazine
clippings) into the ADF. Place these items on the scanner glass.
3 Adjust the paper guides.
4 From the printer control panel, press Fax.
5 Press or repeatedly until Fax to appears, and then
press OK.
6 Press
7 Press Start to start the fax job.
Sending a fax using the scanner glass
1 Make sure the printer is on and is connected to a working
2 Place the first page facedown on the scanner glass.
3 Press or repeatedly until Fax to appears, and then
4 Press
5 Press Start
6 If you want to send a single page, select No, and then press
or repeatedly to select the type of recipient, and
then press OK.
phone line.
press OK.
or repeatedly to select the type of recipient, and
then press OK.
to start the fax job.
After the page is scanned, Another Page? appears. Press
or repeatedly to select No or Yes, and then press OK.
repeatedly until Select Function appears.
7 If you want to send more than one page, select Yes. Place
Next Page appears. Place the next page facedown on the
scanner glass. Press
Continue, and then press OK.
8 Repeat step 7 for all necessary pages. When finished, choose
No, and then press repeatedly until Select
Function appears.
or repeatedly to select
Printing
Printing a document from Windows
1 With a document open, click File ª Print.
2 Click Properties, Preferences, Options, or Setup.
3 Adjust the settings.
4 Click OK.
5 Click OK or Print.
Printing Secure Print jobs from the printer control panel
To print data stored in the printer by Secure Print:
1 Make sure the printer is on and Select Function appears.
2 From the printer control panel, press Job Status.
3 Press or repeatedly until Walk-Up Features
appears, and then press OK.
4 Press
5 Press
6 Using the keypad, enter the password, and then press OK.
or repeatedly until Secure Print appears, and
then press OK.
or repeatedly to select your user name, and then
press OK.
4
Page 5

7 Select the name of the job that you want to print, and then
press OK.
8 Press or repeatedly to select either Print and
Delete or Print and Save, and then press OK.
Notes:
• The displayed user ID (up to 8 characters) is the User ID
specified in the Secure Print dialog box of the Paper/Output
tab of Print Properties.
• For the password, enter the Password set in the Secure Print
dialog box of the Paper/Output tab of Print Properties. If
Password is not configured, there will be no setting on the
printer control panel.
• The document name displayed (up to 12 characters) is the
Document Name specified in the Secure Print dialog of the
Basic tab of Print Properties.
Canceling a print job from the printer control panel
To cancel a print job, press Stop at any time.
Note: If the print job continues to print, part of the job may have
already been transmitted to the printer buffer before the stop
command was sent. Canceling appears on the display, and the
remaining buffered pages are printed before the job is canceled.
3 Dampen a clean, lint-free cloth with water.
Warning—Potential Damage: Do not use household
cleaners or detergents, as they may damage the finish of the
printer.
4 Wipe only the outside of the printer, making sure to remove
any ink residue that has accumulated on the standard exit bin.
Warning—Potential Damage: Using a damp cloth to clean
the interior may cause damage to your printer.
5 Make sure the standard exit bin is dry before beginning a new
print job.
Cleaning the scanner glass
Clean the scanner glass if you encounter print quality problems,
such as streaks on copied or scanned images.
1 Slightly dampen a soft, lint-free cloth or paper towel with
water.
2 Open the scanner cover.
4 Wipe the white underside of the scanner cover and the white
plastic input guides until they are clean and dry.
Note: The white plastic input guides are located on the
scanner cover underneath the ADF on the left side.
5 Close the scanner cover.
Maintaining the printer
Cleaning the exterior of the printer
1 Make sure that the printer is turned off and unplugged from
the wall outlet.
CAUTION—SHOCK HAZARD: To avoid the risk of
electric shock, unplug the power cord from the wall
outlet and disconnect all cables to the printer before
proceeding.
2 Remove paper from the standard exit bin.
3 Wipe the scanner glass (which includes the document glass
and ADF glass) until it is clean and dry.
5
 Loading...