

Page 1

X5400 Series Fax Guide
January 2008 www.lexmark.com
Page 2

Contents
Introduction........................................................................................5
Finding information about the printer...........................................................................................................................5
Understanding the parts of the printer........................................7
Understanding the parts of the printer..........................................................................................................................7
Fax Setup.............................................................................................9
Getting the printer ready to fax........................................................................................................................................9
Using an RJ11 adapter .....................................................................................................................................................................9
Choosing a fax connection.......................................................................................................................................................... 12
Connecting to an answering machine .................................................................................................................................... 13
Connecting directly to a telephone wall jack ....................................................................................................................... 14
Connecting directly to a telephone wall jack in Germany............................................................................................... 14
Connecting to a computer with a modem............................................................................................................................ 16
Connecting to a telephone ......................................................................................................................................................... 17
Setting up to fax while behind a PBX ...................................................................................................................................... 18
Using a digital phone service ..................................................................................................................................................... 18
Using Fax............................................................................................19
Loading original documents on the scanner glass.................................................................................................19
Loading original documents into the Automatic Document Feeder...............................................................20
Sending a fax.........................................................................................................................................................................22
Entering a fax number .................................................................................................................................................................. 22
Sending a fax using the software.............................................................................................................................................. 23
Sending a fax using the control panel .................................................................................................................................... 23
Sending a fax while listening to a call (On Hook Dial)....................................................................................................... 24
Sending a broadcast fax at a scheduled time....................................................................................................................... 24
Receiving a fax......................................................................................................................................................................25
Receiving a fax manually.............................................................................................................................................................. 25
Setting a fax manual answer code............................................................................................................................................ 25
Using Caller ID from the control panel ................................................................................................................................... 25
Using Caller ID from the software............................................................................................................................................. 26
Receiving a fax automatically ..................................................................................................................................................... 26
Receiving a fax with an answering machine......................................................................................................................... 26
Forwarding faxes.................................................................................................................................................................27
Using the Phone Book.......................................................................................................................................................28
Using the control panel Phone Book....................................................................................................................................... 28
Using the computer Phone Book.............................................................................................................................................. 28
Customizing fax settings...................................................................................................................................................29
Contents
2
Page 3

Customizing settings using the Fax Setup Utility ............................................................................................................... 29
Understanding the Fax menu .................................................................................................................................................... 31
Setting Auto Answer to on .......................................................................................................................................................... 32
Setting up a fax header................................................................................................................................................................. 32
Setting up a fax footer .................................................................................................................................................................. 33
Blocking junk faxes......................................................................................................................................................................... 34
Blocking unwanted changes to fax settings ......................................................................................................................... 35
Using the Fax Solutions Software ............................................................................................................................................. 35
Setting up a dialing prefix ........................................................................................................................................................... 36
Setting the distinctive ring .......................................................................................................................................................... 36
Setting the number of rings before receiving a fax automatically ............................................................................... 37
Setting up Speed Dial.................................................................................................................................................................... 37
Printing fax activity reports..............................................................................................................................................38
Ordering Cartridges.........................................................................39
Ordering print cartridges..................................................................................................................................................39
Troubleshooting...............................................................................40
Setup Troubleshooting.....................................................................................................................................................40
Incorrect language appears on the display........................................................................................................................... 40
Power button is not lit .................................................................................................................................................................. 40
Software does not install.............................................................................................................................................................. 41
Removing and reinstalling the software ................................................................................................................................ 42
Fax troubleshooting...........................................................................................................................................................43
Cannot send or receive a fax....................................................................................................................................................... 43
Can send but not receive faxes.................................................................................................................................................. 45
Can receive but not send faxes.................................................................................................................................................. 46
Printer receives a blank fax.......................................................................................................................................................... 47
Received fax has poor print quality.......................................................................................................................................... 47
Caller ID information is not displayed ..................................................................................................................................... 47
Fax Error ............................................................................................................................................................................................. 48
Fax Mode Unsupported................................................................................................................................................................ 48
Remote Fax Error............................................................................................................................................................................. 48
Phone Line Busy .............................................................................................................................................................................. 49
Phone Line Error.............................................................................................................................................................................. 50
Notices................................................................................................51
Product information...........................................................................................................................................................51
Edition notice........................................................................................................................................................................51
Contents
3 4
Page 4

Page 5
Introduction
CAUTION—POTENTIAL INJURY: To reduce the risk of fire, use only a 26 AWG or larger telecommunications
(RJ-11) cord when connecting this product to the public switched telephone network.
Finding information about the printer
Publications
See the For
Quick Setup sheet Initial setup instructions that came with the printer.
Printed Getting Started guide Additional setup instructions that came with the printer.
Note: Not all products come with printed publications.
Electronic User's Guide Complete instructions for using the printer. The electronic version installs
automatically with the printer software.
Customer support
Description Where to find (North America) Where to find (rest of world)
Telephone support
Call us at
• US: 1-800-332-4120
– Monday–Friday (8:00 AM–11:00 PM EST),
Saturday (Noon–6:00 PM EST)
• Canada: 1-800-539-6275
– Support in English: Monday–Friday
(8:00 AM–11:00 PM EST), Saturday (Noon–
6:00 PM EST)
– Support in French: Monday–Friday
(9:00 AM–7:00 PM EST)
• Mexico: 01-800-253-9627
– Monday–Friday (8:00 AM–8:00 PM EST)
Note: Support numbers and times may change
without notice. For the most recent telephone
numbers available, see the printed warranty
statement that came with your printer.
Telephone numbers and support hours vary by
country or region.
Visit our Web site at www.lexmark.com. Select
a country or region, and then select the
Customer Support link.
Note: For additional information about
contacting Lexmark, see the printed warranty
that came with your printer.
Introduction
5
Page 6
Description Where to find (North America) Where to find (rest of world)
E-mail support
For e-mail support, visit our Web site:
www.lexmark.com.
1 Click CUSTOMER SUPPORT.
2 Click Technical Support.
3 Select your printer family.
4 Select your printer model.
5 From the Support Tools section, click e-Mail
Support.
E-mail support varies by country or region, and
may not be available in some instances.
Visit our Web site at www.lexmark.com. Select
a country or region, and then select the
Customer Support link.
Note: For additional information about
contacting Lexmark, see the printed warranty
that came with your printer.
6 Complete the form, and then click Submit
Request.
Limited Warranty
Description Where to find (USA) Where to find (rest of world)
Limited Warranty Information
Lexmark International, Inc. furnishes a
limited warranty that this printer will
be free of defects in materials and
workmanship for a period of 12
months after the original date of
purchase.
To view the limitations and conditions of this
limited warranty, see the Statement of
Limited Warranty included with this printer,
or set forth at www.lexmark.com.
1 Click CUSTOMER SUPPORT.
2 Click Warranty Information.
3 From the Statement of Limited
Warranty section, click Inkjet &
All-In-One Printers.
Warranty information varies by
country or region. See the printed
warranty that came with your
printer.
4 Scroll through the Web page to view the
warranty.
Record the following information (located on the store receipt and the back of the printer), and have it ready when
you contact customer support so that they may serve you faster:
• Machine Type number
• Serial number
• Date purchased
• Store where purchased
Introduction
6
Page 7
Understanding the parts of the printer
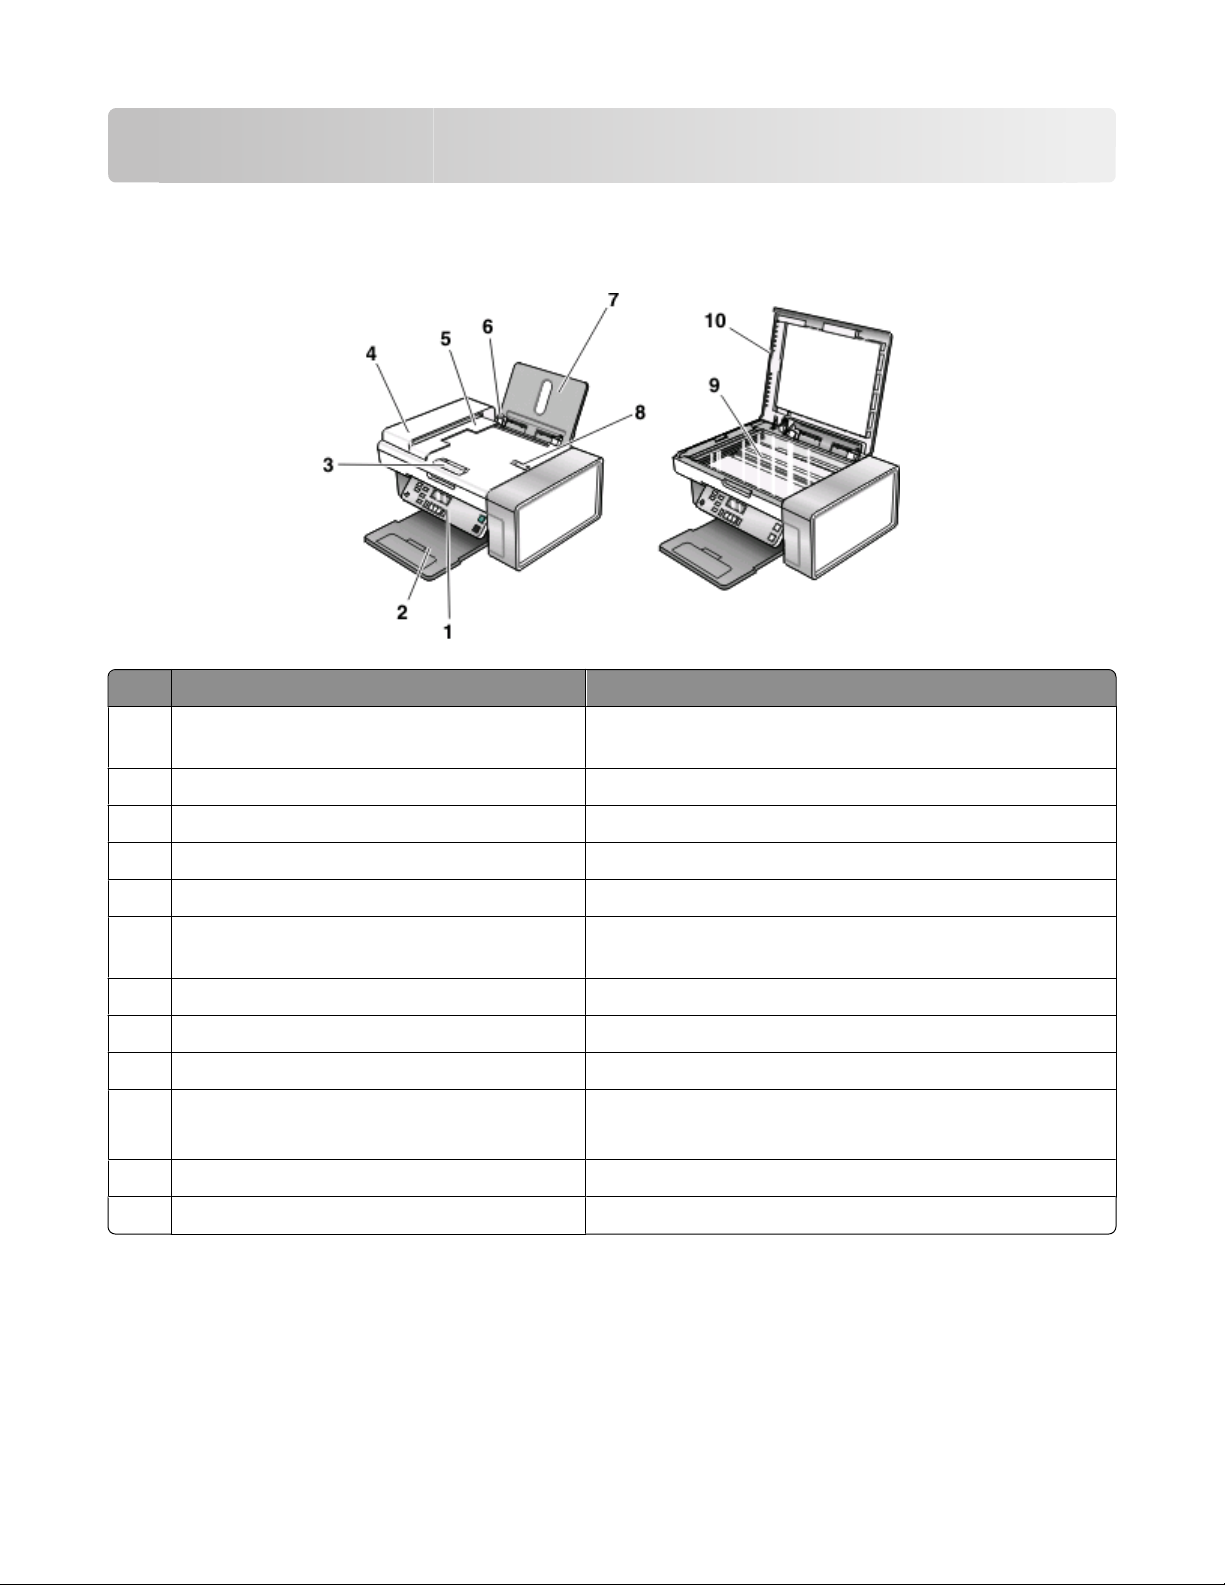
Understanding the parts of the printer
Use the To
PictBridge port Connect a PictBridge-enabled digital camera or a flash drive to
1
the printer.
Memory card slots Insert a memory card.
2
Control panel Operate the printer.
3
4 Paper exit tray Hold paper as it exits.
Automatic Document Feeder (ADF) paper guide Keep paper straight when feeding into the ADF.
5
6 Automatic Document Feeder (ADF) Scan, copy, or fax multiple-page letter-, legal-, and A4-size
documents.
Automatic Document Feeder (ADF) exit tray Hold paper as it exits the ADF.
7
8 Paper guide Keep paper straight when feeding.
Paper support Load paper.
9
10 Automatic Document Feeder (ADF) paper stop
• Stop paper as it exits the ADF.
• Support A4- and legal-size paper as it exits the ADF.
Scanner glass Copy, scan, fax, or remove an item.
11
Top cover Access the scanner glass.
12
Understanding the parts of the printer
7
Page 8
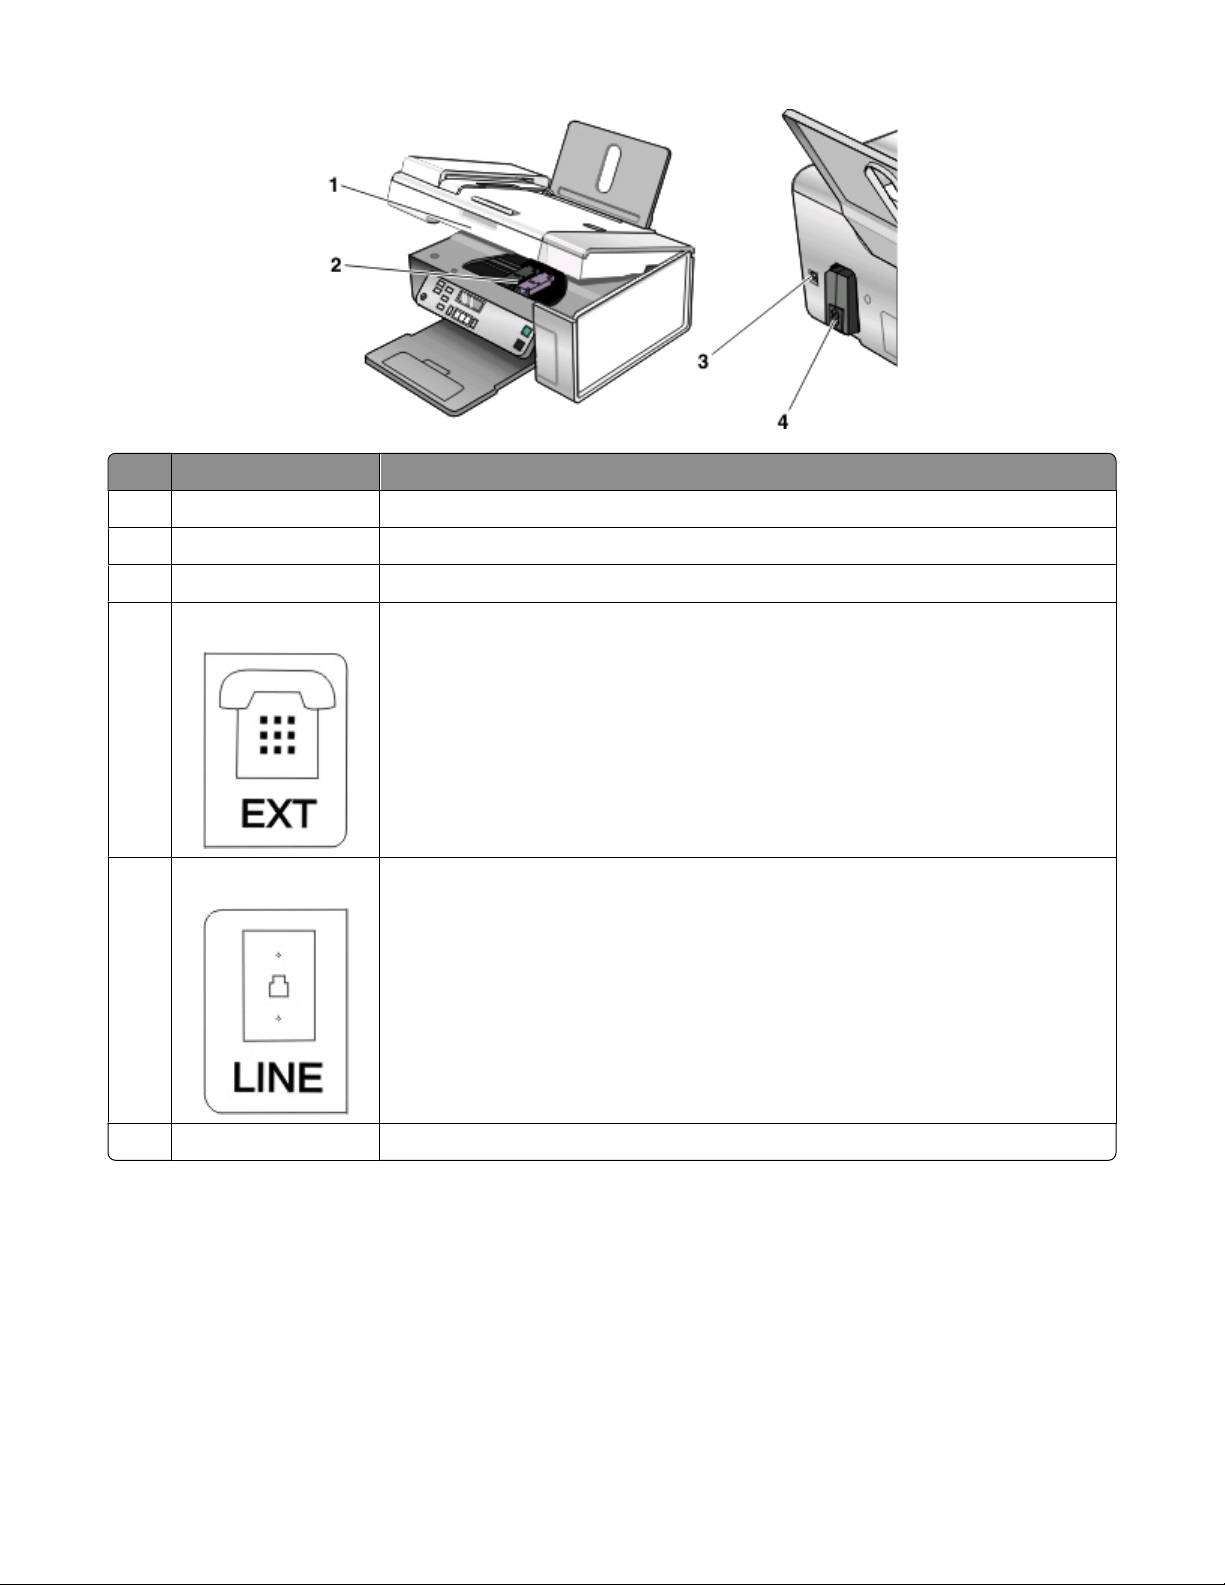
Use the To
1 Scanner unit Access the print cartridges.
Print cartridge carrier Install, replace, or remove a print cartridge.
2
3 USB port Connect the printer to a computer using a USB cable.
EXT port C on n e c t a d d i ti o n al d e vi c e s , s u c h a s a da t a / fa x m od e m , te l e ph o n e, o r a ns w e ri n g ma c h i ne
4
to the printer.
Note: Remove the plug to access the port.
LINE port Connect the printer to an active telephone line to send and receive faxes. The printer
5
must be connected to this telephone line to receive incoming fax calls.
Note: Do not connect additional devices to the LINE port, and do not connect a DSL
(digital subscriber line), ISDN (integrated services digital network), or cable modem to
the printer.
6 Power supply with port Connect the printer to a power source.
Understanding the parts of the printer
8
Page 9

Fax Setup
Getting the printer ready to fax
CAUTION—SHOCK HAZARD: Do not use the fax feature during a lightning storm. Do not set up this product
or make any electrical or cabling connections, such as the power supply cord or telephone, during a lightning
storm.
Using an RJ11 adapter
Country/region
• United Kingdom
• Ireland
• Finland
• Norway
• Denmark
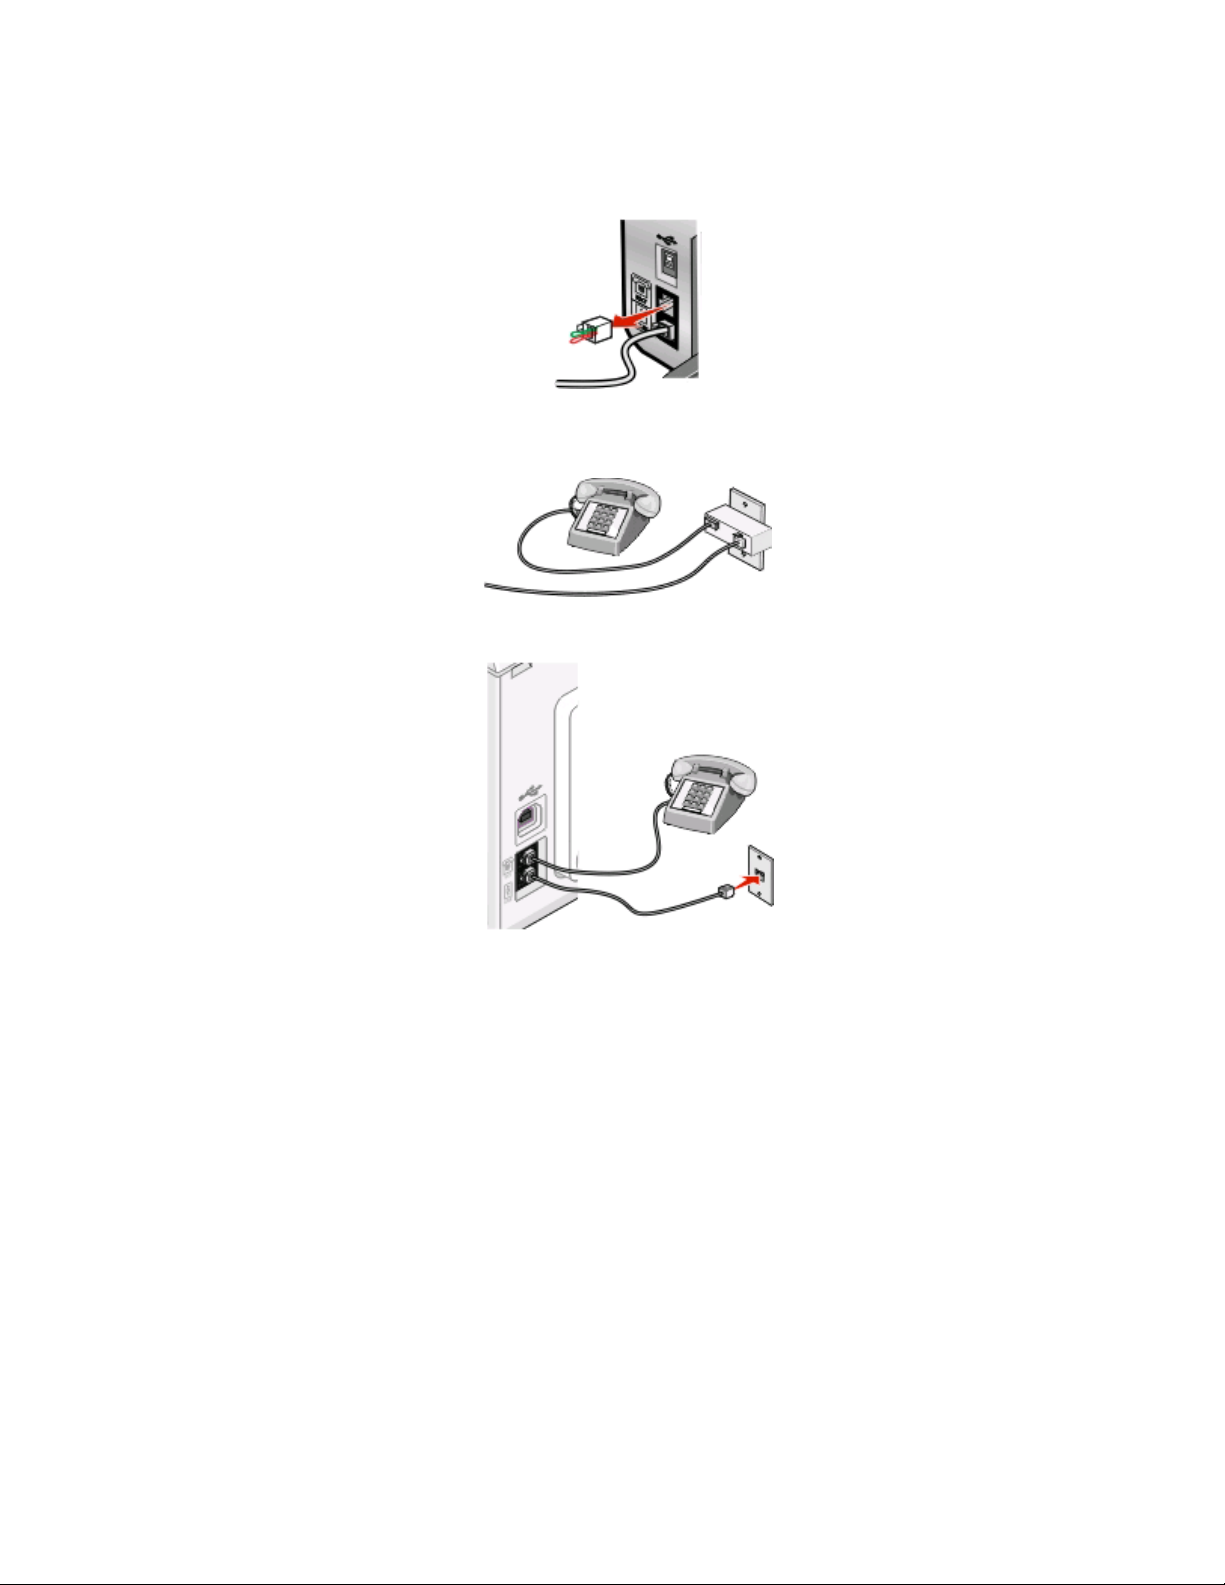
To connect your printer to an answering machine or other telecommunications equipment, use the telephone line
adapter included in the box with the printer.
1 Connect one end of the telephone cord into the Line port of the printer.
2 Connect the adapter to the telephone line that came with the printer.
• Italy
• Sweden
• Netherlands
• France
• Portugal
Note: The UK adapter is shown. Your adapter may look different, but it will fit the telephone outlet used in your
location.
3 Connect the telephone line of your chosen telecommunications equipment to the left outlet of the adapter.
Fax Setup
9
Page 10
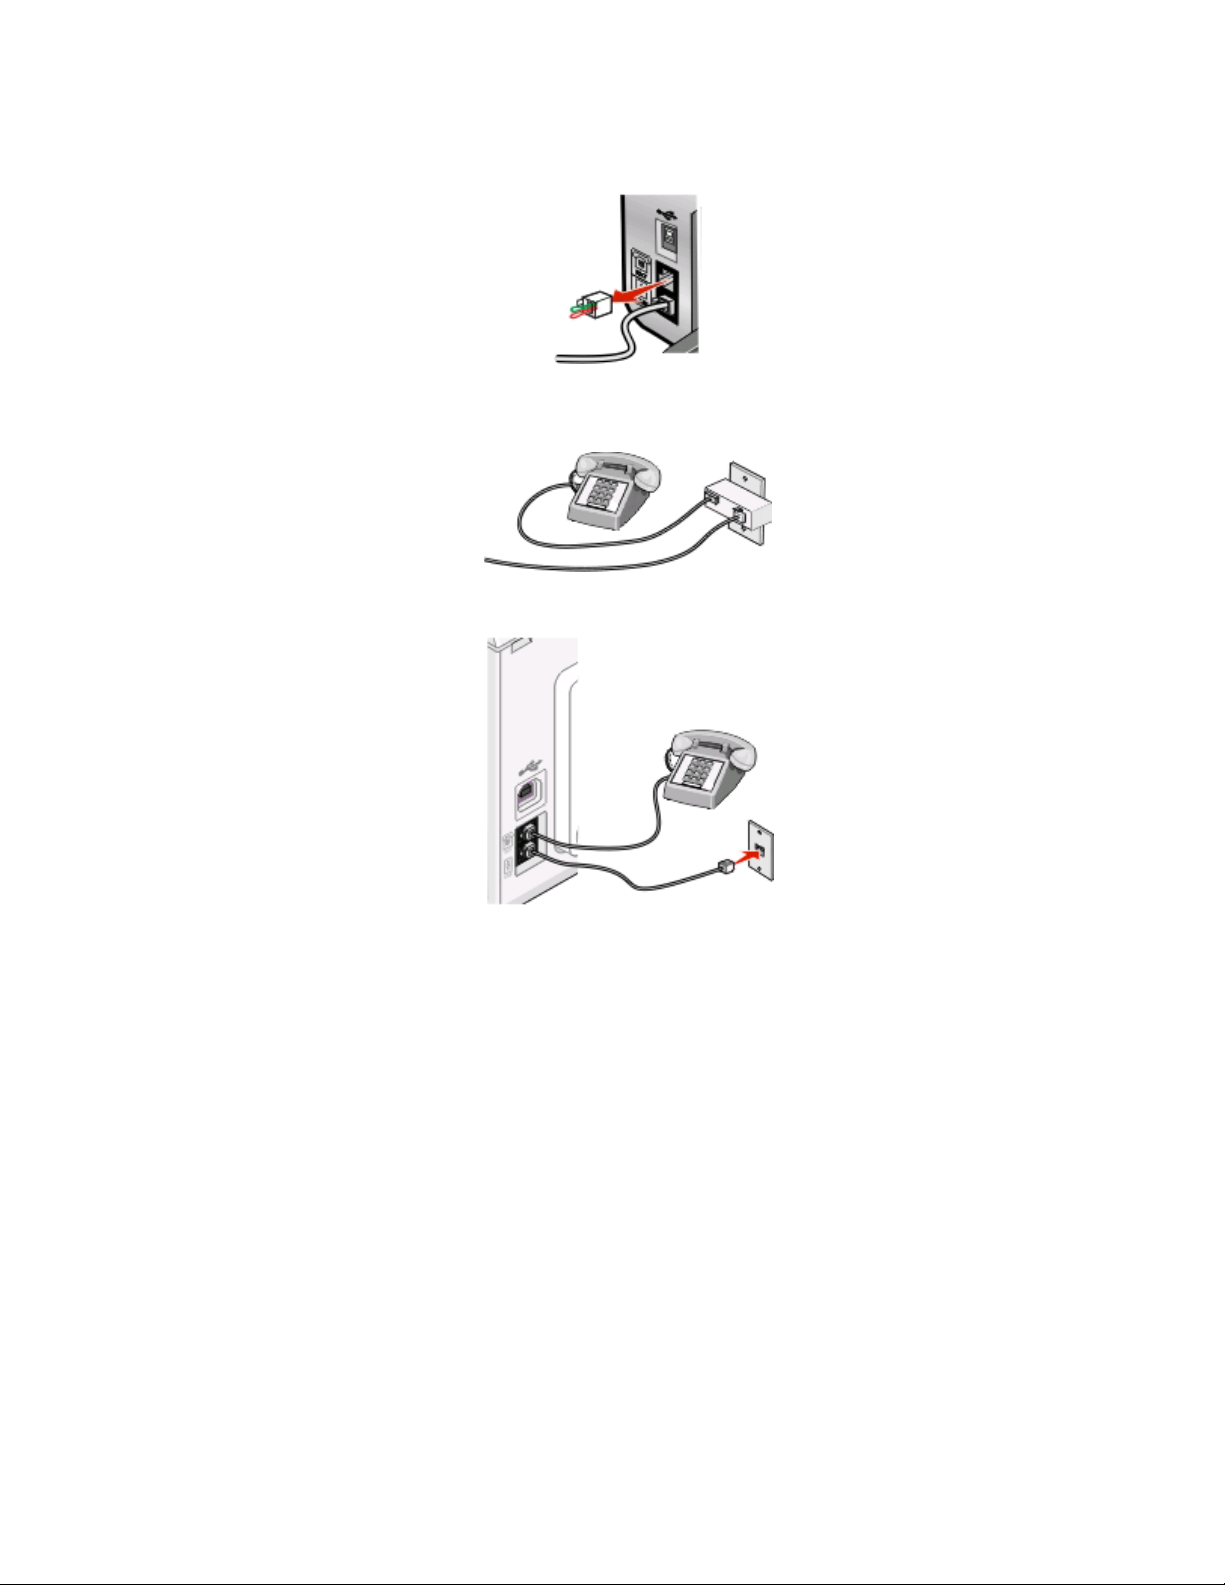
If your telecommunications equipment uses a US-style (RJ11) telephone line, follow these steps to connect the
equipment:
1 Remove the plug from the EXT port on the back of the printer.
Note: Once this plug is removed, any country- or region-specific equipment you connect to the printer by the
adapter, as shown, will not function properly.
2 Connect your telecommunications equipment directly to the EXT port on the back of the printer.
Warning—Potential Damage: Do not touch cables or the printer in the area shown while actively sending or
receiving a fax.
Country/region
• Saudi Arabia
• United Arab Emirates
• Egypt
• Bulgaria
• Czech Republic
• Belgium
• Australia
• South Africa
• Israel
• Hungary
• Poland
• Romania
• Russia
• Slovenia
• Spain
• Turkey
• Greece
Fax Setup
10
Page 11
To connect an answering machine or other telecommunications equipment to the printer:
1 Remove the plug from the back of the printer.
Note: Once this plug is removed, any country- or region-specific equipment that you connect to the printer by
the adapter, as shown, will not function properly.
2 Connect your telecommunications equipment directly to the EXT port on the back of the printer.
Warning—Potential Damage: Do not touch cables or the printer in the area shown while actively sending or
receiving a fax.
Country/region
• Germany
• Austria
• Switzerland
Fax Setup
11
Page 12
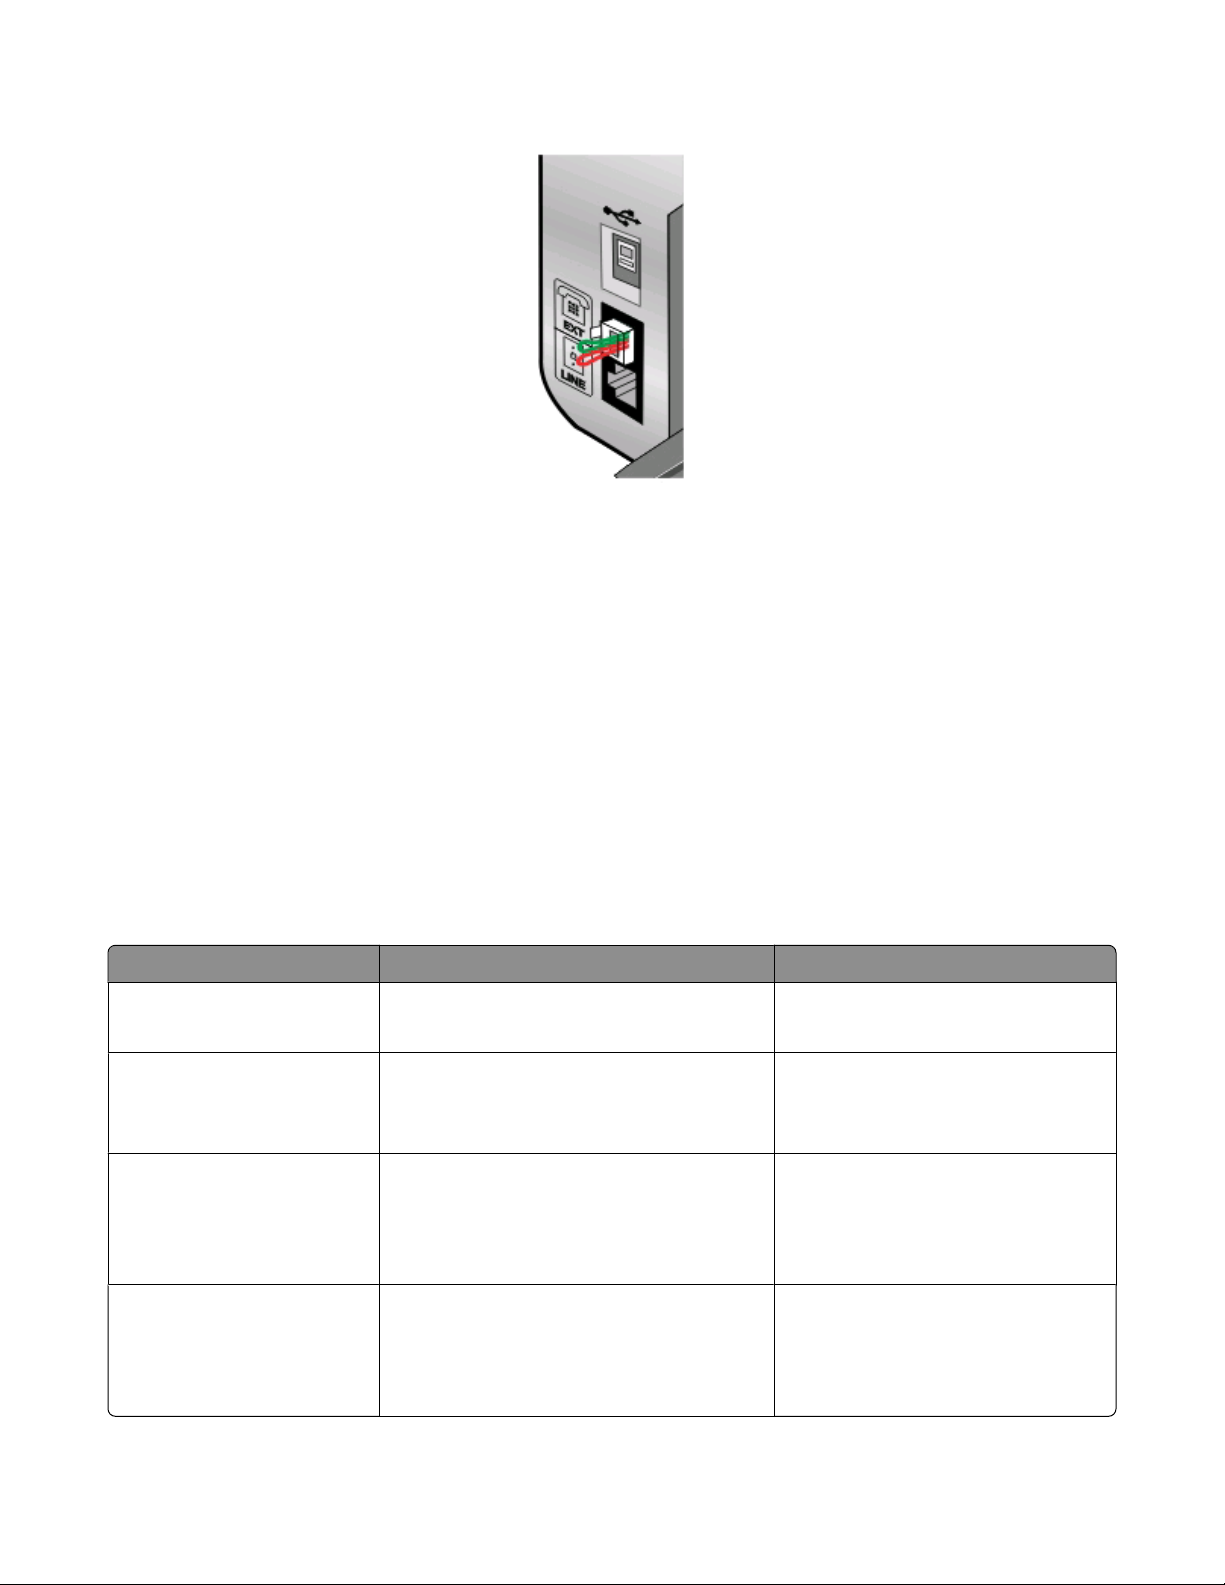
There is a plug installed in the EXT port of the printer. This plug is necessary for the proper functioning of the printer.
Note: Do n ot r emo ve t he p lug . If you remo ve it, ot her tele com mun ica tio ns d evi ces in y our hom e (s uch as teleph one s
or answering machines) may not work.
Choosing a fax connection
You can connect the printer with equipment such as a telephone, an answering machine, or a computer modem. If
problems occur, see “Setup Troubleshooting” on page 40.
Note: The printer is an analog device that works best when directly connected to the wall jack. Other devices (such
as a telephone or answering machine) can be successfully attached to pass through the printer, as described in the
setup steps. If you want a digital connection such as ISDN, DSL, or ADSL, a third-party device (such as a DSL filter) is
required.
You do not need to attach the printer to a computer, but you do need to connect it to a telephone line to send and
receive faxes.
You can connect the printer to other equipment. See the following table to determine the best way to set up the
printer.
Equipment Benefits See this section
• The printer
• A telephone cord
• The printer
• A telephone
• Two telephone cords
• The printer
• A telephone
Send and receive faxes without using a
computer.
• Use the fax line as a normal telephone line.
• Send and receive faxes without using a
computer.
Receive both incoming voice messages and
faxes.
“Connecting directly to a telephone wall
jack” on page 14
“Connecting to a telephone” on
page 17
“Connecting to an answering machine”
on page 13
• An answering machine
• Three telephone cords
• The printer
• A telephone
• A computer modem
• Three telephone cords
Send faxes using the computer or the printer. “Connecting to a computer with a
modem” on page 16
Fax Setup
12
Page 13
Connecting to an answering machine
Connect an answering machine to the printer to receive both incoming voice messages and faxes.
Note: Setup steps may vary depending on your country or region. For more information on connecting the printer
to telecommunications equipment, see the related topic, “Using an RJ11 adapter.”
1 Make sure you have the following:
• A telephone
• An answering machine
• Three telephone cords
• A telephone wall jack
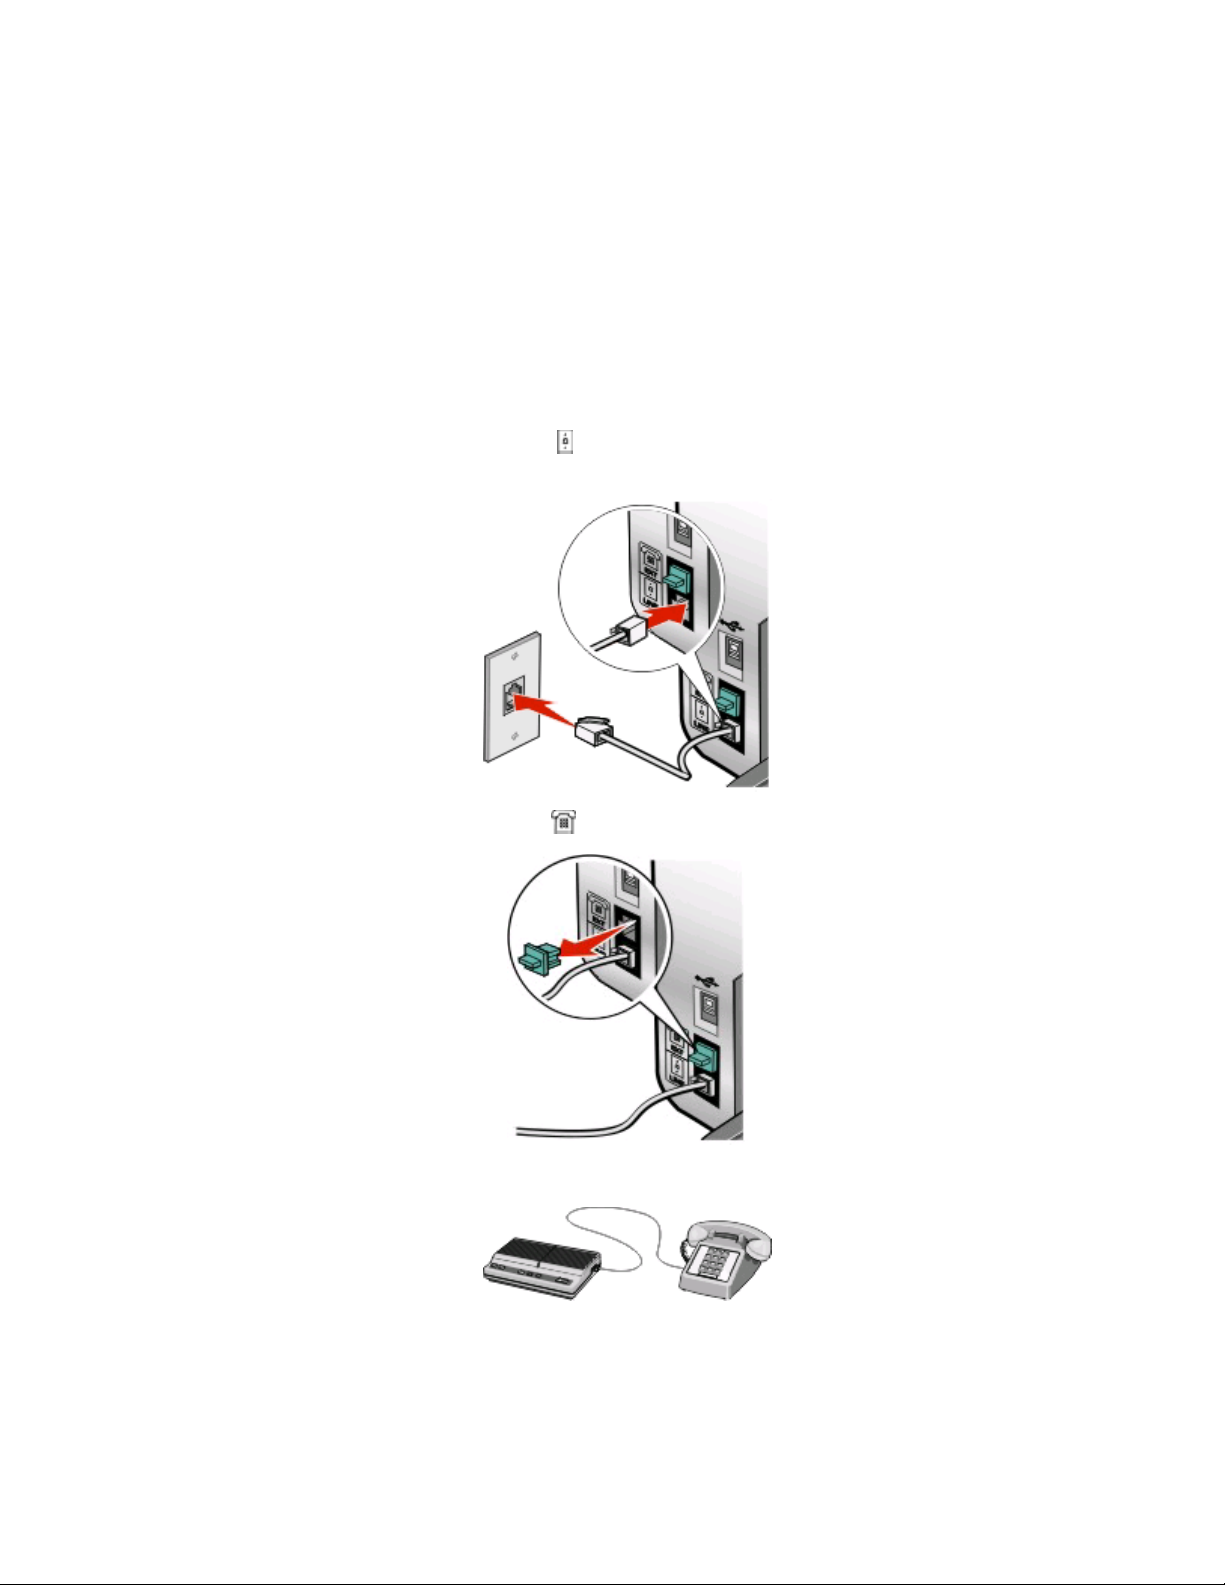
2 Connect one telephone cord into the LINE port of the printer, and then plug it into an active telephone wall
jack.
3 Remove the protective plug from the EXT port of the printer.
4 Connect a second telephone cord from the telephone to the answering machine.
Fax Setup
13
Page 14
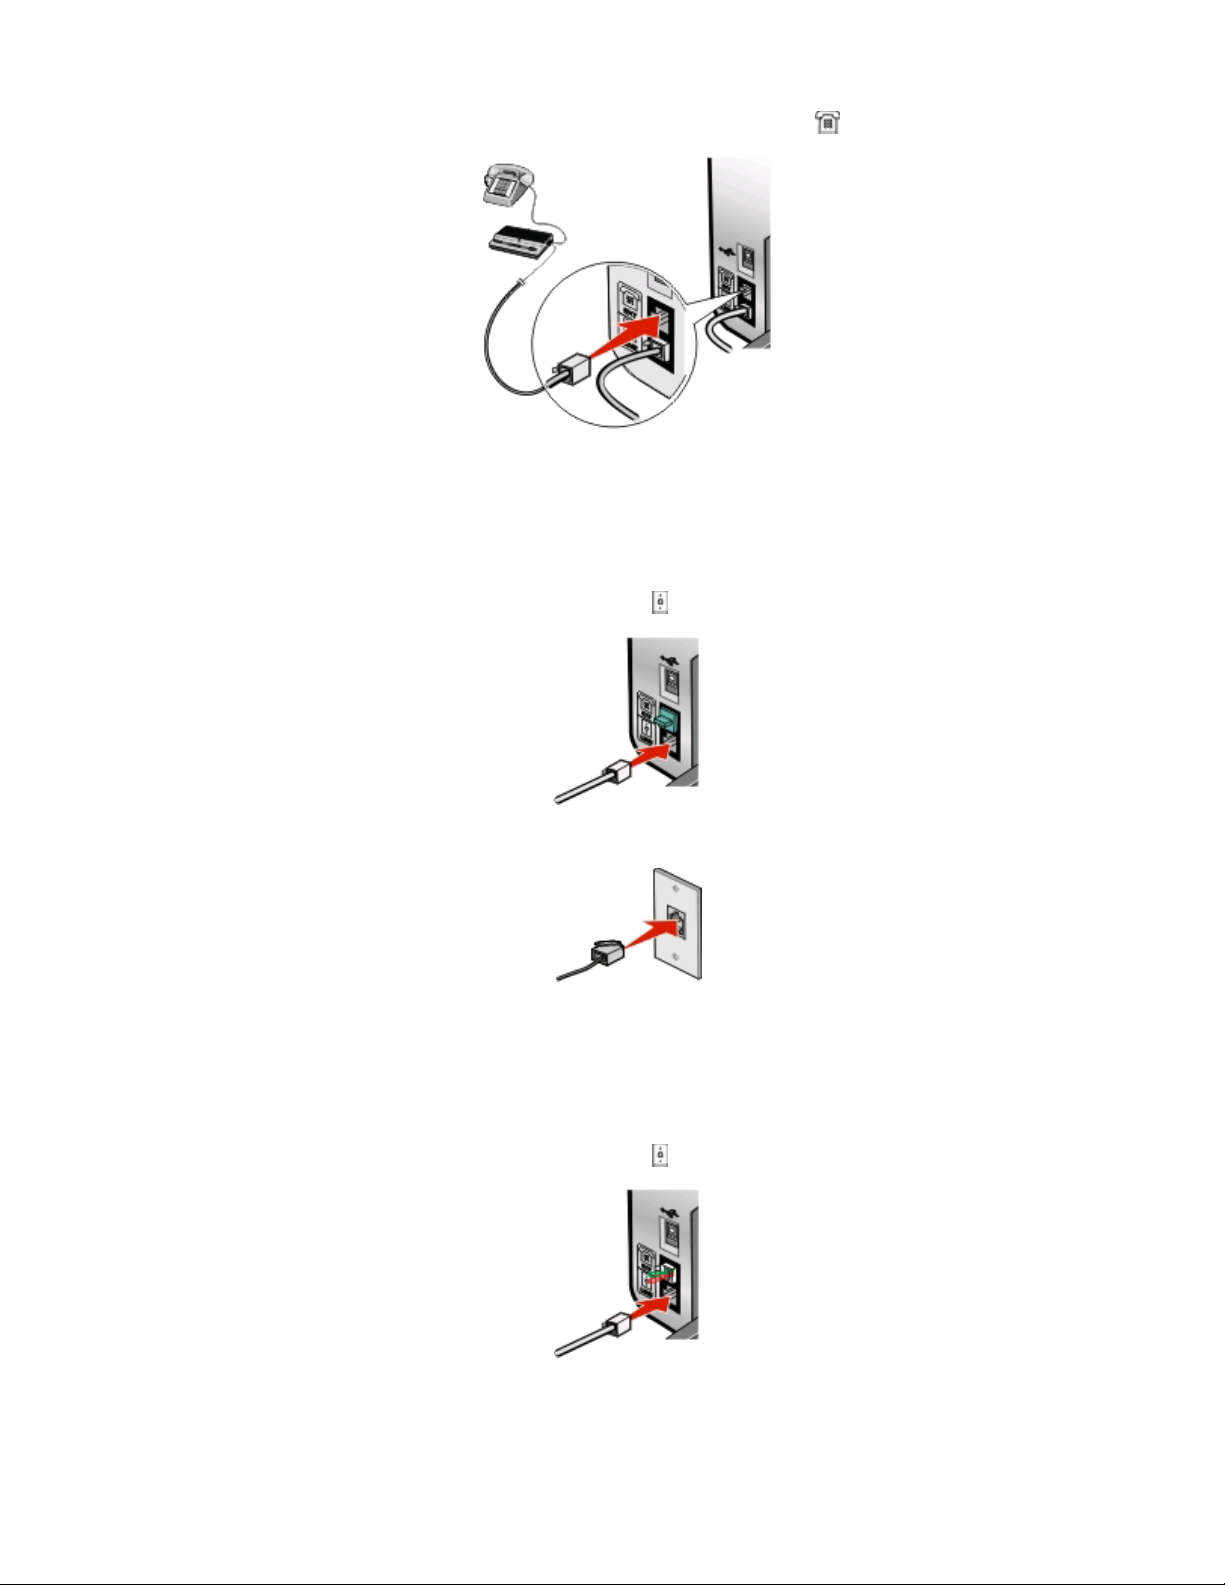
5 Connect a third telephone cord from the answering machine to the EXT port of the printer.
Connecting directly to a telephone wall jack
Connect the printer directly to a telephone wall jack to send and receive faxes without using a computer.
1 Make sure you have a telephone cord and a telephone wall jack.
2 Connect one end of the telephone cord into the LINE port of the printer.
3 Connect the other end of the telephone cord into an active telephone wall jack.
Connecting directly to a telephone wall jack in Germany
Connect the printer directly to a telephone wall jack to send and receive faxes without using a computer.
1 Make sure you have a telephone cord (provided with the product) and a telephone wall jack.
2 Connect one end of the telephone cord into the LINE port of the printer.
Fax Setup
14
Page 15
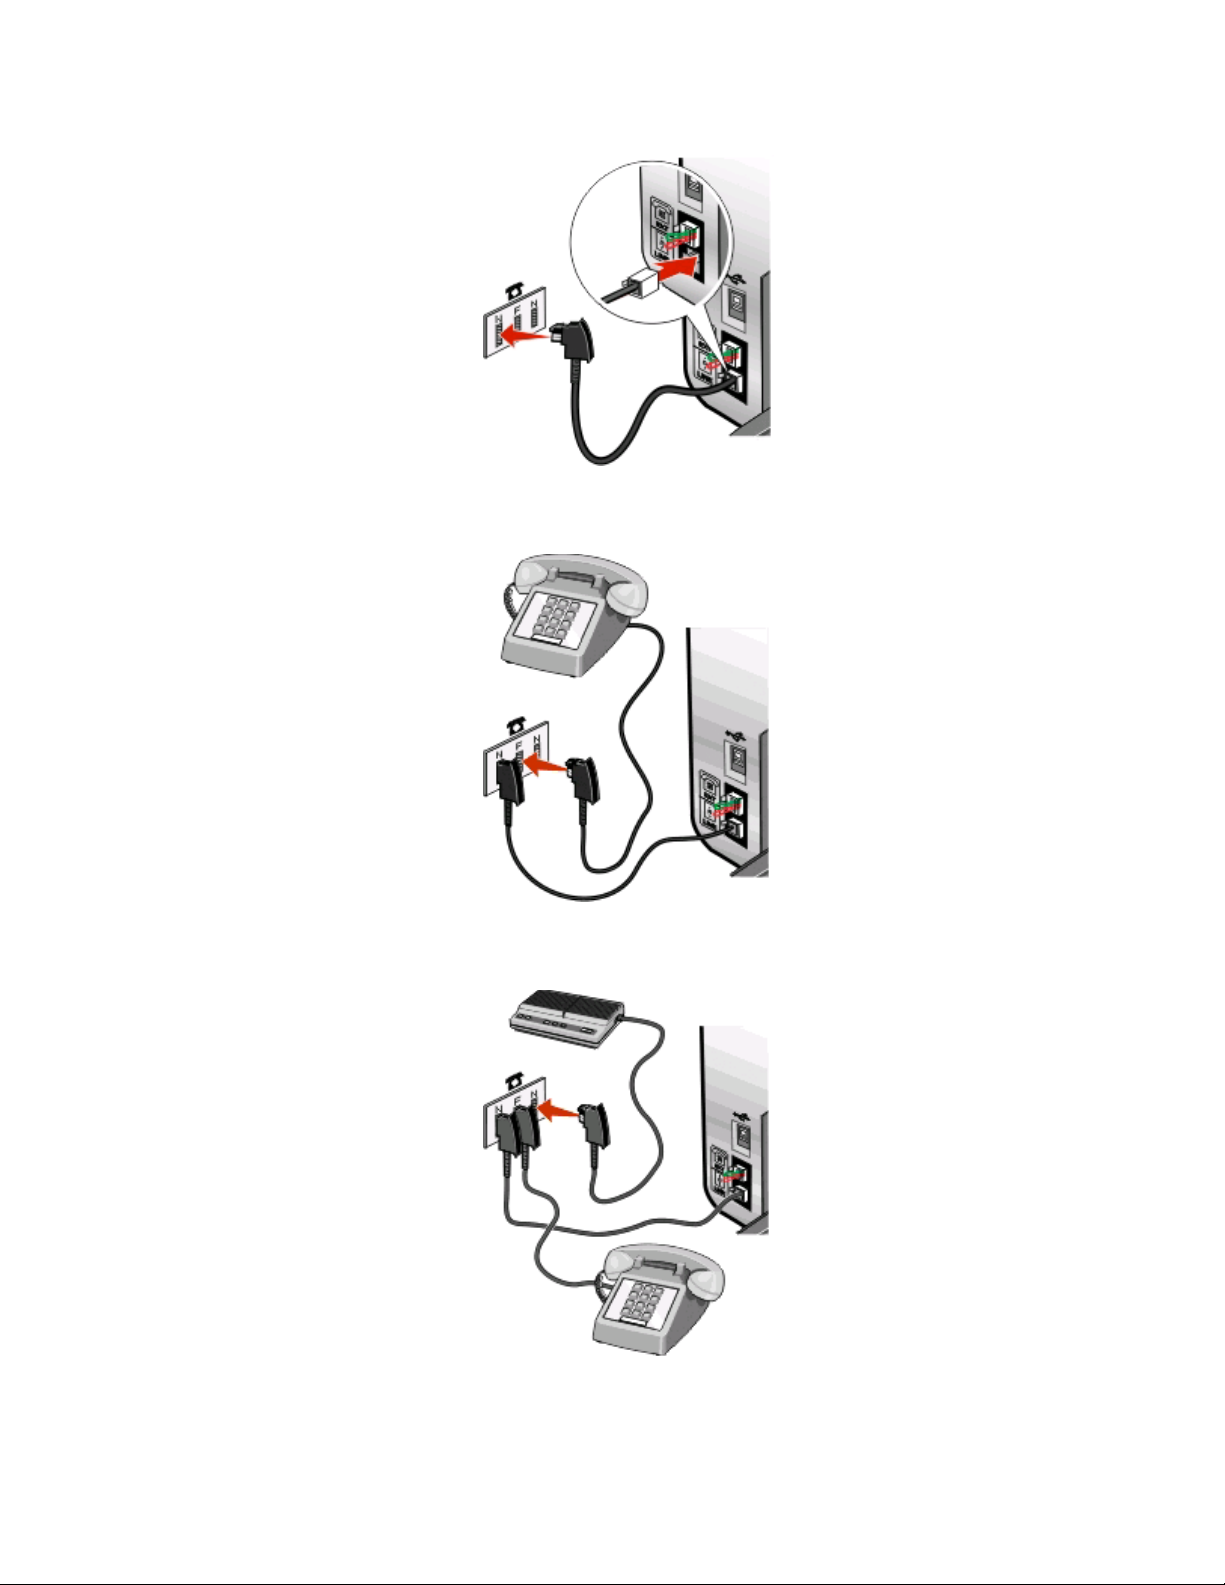
3 Connect the other end of the telephone cord into the N slot of an active telephone wall jack.
4 If you would like to use the same line for both fax and telephone communication, connect a second telephone
line (not provided) between the telephone and the F slot of an active telephone wall jack.
5 If you would like to use the same line for recording messages on your answering machine, connect a second
telephone line (not provided) between the answering machine and the other N slot of the telephone wall jack.
Fax Setup
15
Page 16
Connecting to a computer with a modem
Connect the printer to a computer with a modem to send faxes from the software application.
Note: Setup steps may vary depending on your country or region. For more information on connecting the printer
to telecommunications equipment, see the related topic, “Using an RJ11 adapter.”
1 Make sure you have the following:
• A telephone
• A computer with a modem
• Two telephone cords
• A telephone wall jack
2 Connect a telephone cord into the LINE port of the printer, and then plug it into an active telephone wall jack.
3 Remove the protective plug from the EXT port of the printer.
4 Connect a second telephone cord from the computer modem to the EXT port of the printer.
Fax Setup
16
Page 17

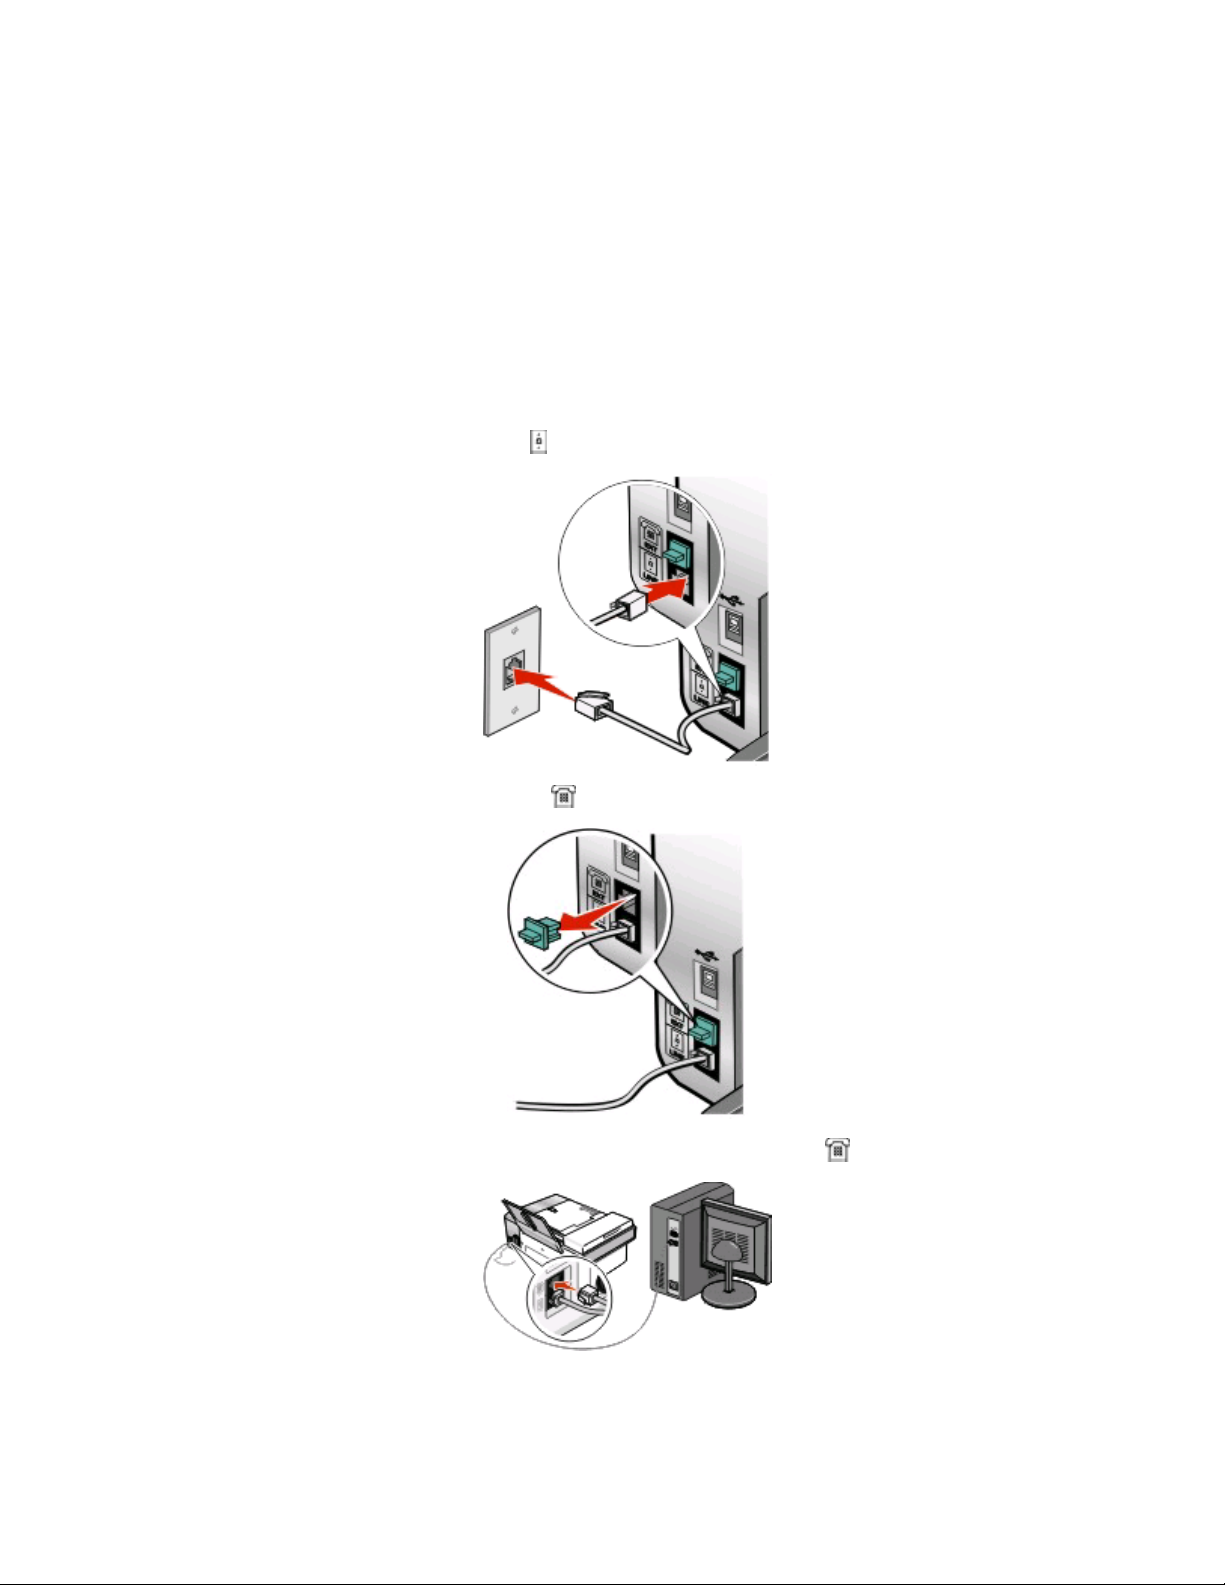
Connecting to a telephone
Connect a telephone to the printer to use the fax line as a normal telephone line. Then set up the printer wherever
your telephone is located to make copies or to send and receive faxes without using a computer.
Note: Setup steps may vary depending on your country or region. For more information on connecting the printer
to telecommunications equipment, see the related topic, “Using an RJ11 adapter.”
1 Make sure you have the following:
• A telephone
• Two telephone cords
• A telephone wall jack
2 Connect one telephone cord to the LINE port of the printer, and then plug it into an active telephone wall jack.
3 Remove the protective plug from the EXT port of the printer.
Fax Setup
17
Page 18

4 Connect the other telephone cord to a telephone, and then plug it into the EXT port of the printer.
Setting up to fax while behind a PBX
If the printer is being used in a business or office, it may be connected to a Private Branch Exchange (PBX) telephone
system. Ordinarily, when dialing a fax number, the printer waits to recognize the dial tone and then dials the fax
number. However, this method of dialing may not work if the PBX telephone system uses a dial tone that is not
recognizable to most fax machin es. The “Dialing while behind a PBX” feature enables the printer to dial the fax number
without waiting to recognize the dial tone.
1 From the desktop, double-click the Productivity Studio icon.
2 From the Settings area of the Welcome Screen, click Fax History and Settings.
3 From the “I Want To” menu, click Adjust speed dial list and other fax settings.
4 Click the Dialing and Sending tab.
5 From the “Dialing on your phone line” area, select Behind PBX from the Dialing Method drop-down list.
6 Click OK to save the setting.
Using a digital phone service
The fax modem is an analog device. Certain devices can be connected to the printer so that digital telephone services
can be used.
• If you are using an ISDN telephone service, connect the printer to an analog telephone port (an R-interface port)
on an ISDN terminal adapter. For more information and to request an R-interface port, contact your ISDN provide r.
• If you are using DSL, connect to a DSL filter or router that will support analog use. For more information, contact
your DSL provider.
• If you are using a PBX telephone service, make sure you are connecting to an analog connection on the PBX. If
none exists, consider installing an analog telephone line for the fax machine. For more information on faxing
when using a PBX telephone service, see the related topic, “Setting up to fax while behind a PBX.”
Fax Setup
18
Page 19
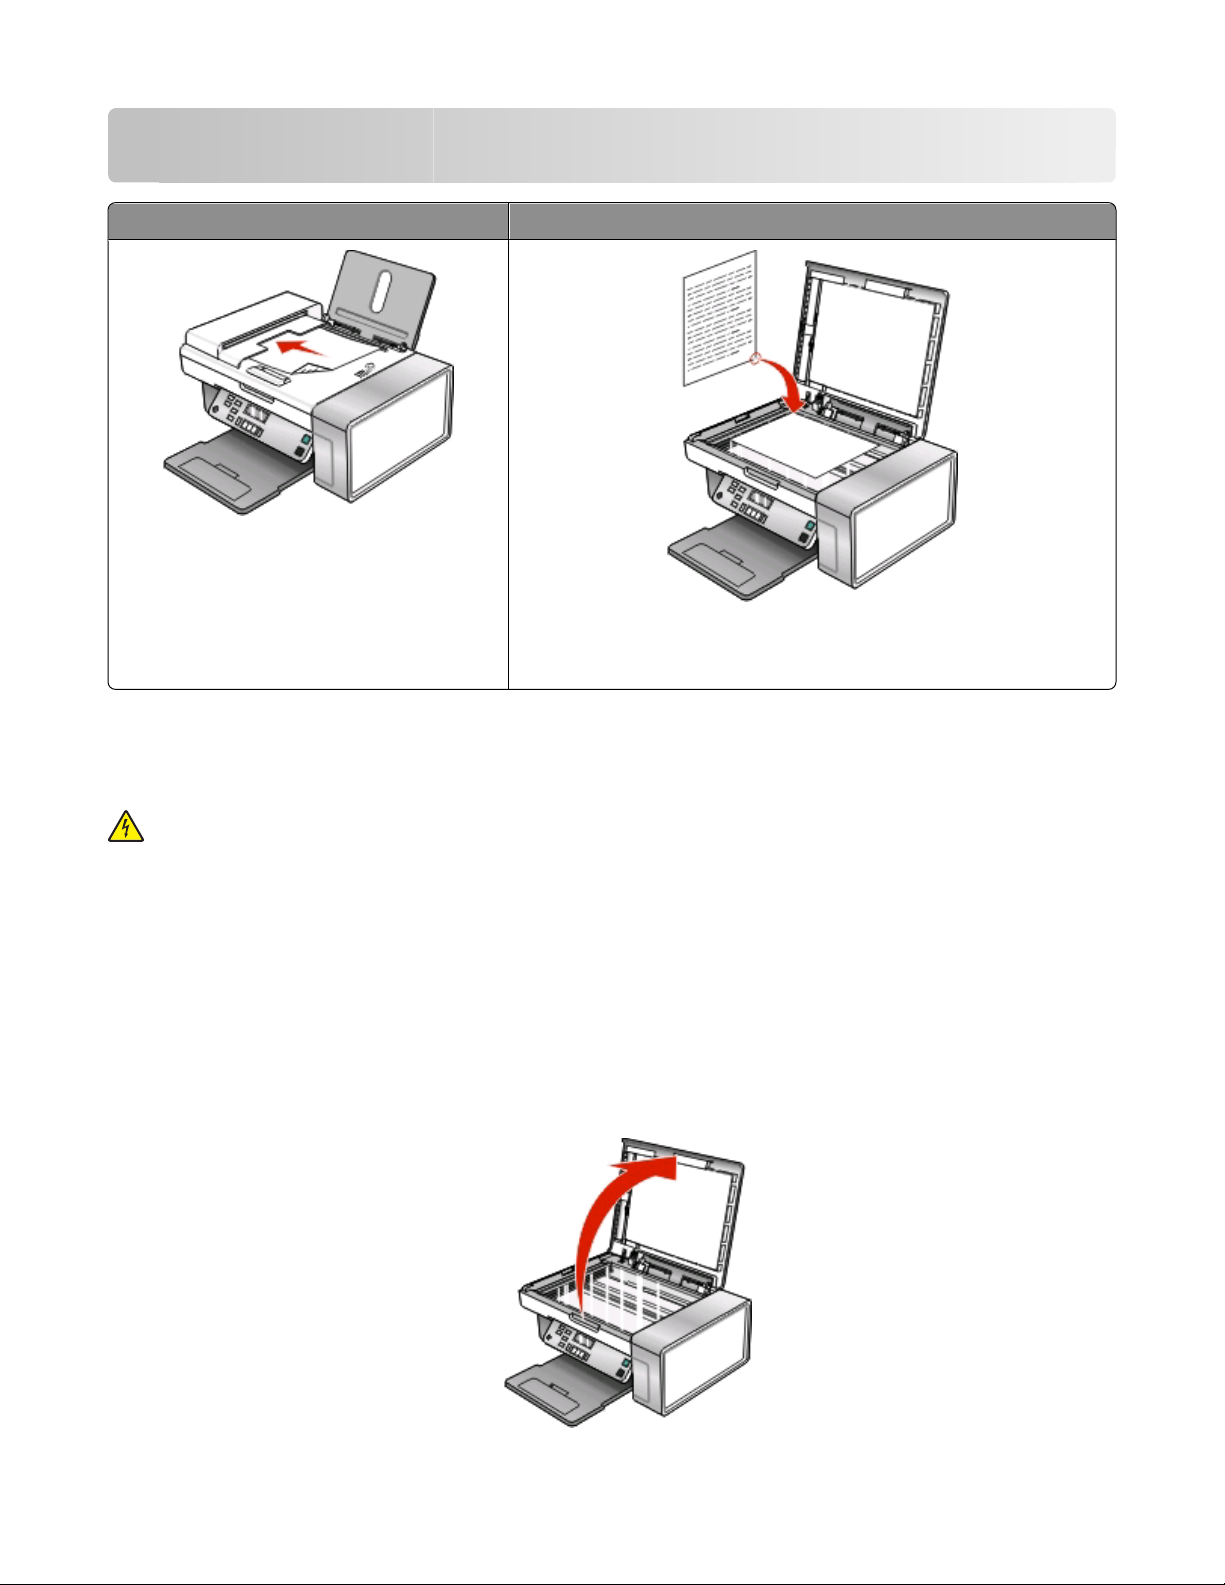
Using Fax
ADF Scanner glass
Use the ADF for:
• Multiple-page A4 or letter-size documents.
• Legal-size documents.
Use the scanner glass for single pages, small items (such as postcards or
photos), transparencies, photo paper, or thin media (such as magazine
clippings).
Note: If you want to customize fax settings:
• Using the control panel, see “Understanding the Fax menu” on page 31.
• Using the computer, see “Customizing settings using the Fax Setup Utility” on page 29.
CAUTION—SHOCK HAZARD: Do not use the fax feature during a lightning storm. Do not set up this product
or make any electrical or cabling connections, such as the power supply cord or telephone, during a lightning
storm.
Loading original documents on the scanner glass
You can scan and then print photos, text documents, magazine articles, newspapers, and other publications. You
can scan a document for faxing.
1 Make sure the computer and the printer are on.
2 Open the top cover.
Using Fax
19
Page 20

3 Place the original document or item facedown on the scanner glass in the upper left corner.
4 Close the top cover to avoid dark edges on the scanned image.
Loading original documents into the Automatic Document Feeder
You can load up to 15 sheets of an original document into the Automatic Document Feeder (ADF) for scanning,
copying, and faxing. You can load A4-, letter-, or legal-size paper into the Automatic Document Feeder (ADF).
Notes:
• Use only new, unwrinkled paper that is not curled.
• Do not load postcards, photos, small items, transparencies, photo paper, or thin media (such as magazine
clippings) into the Automatic Document Feeder (ADF). Place these items on the scanner glass.
1 If you are using A4- or letter-size paper, then pull up the Automatic Document Feeder (ADF) paper stop.
2 Adjust the paper guide on the Automatic Document Feeder (ADF) tray to the width of the original document.
Using Fax
20
Page 21

3 Fan the original document.
4 Load the original document facedown and top edge first into the Automatic Document Feeder (ADF) until you
hear a beep.
Document Loaded appears on the display, and the document feeds into the Automatic Document Feeder
(ADF).
Note: Preview is not supported when using the Automatic Document Feeder (ADF). You can preview one page at a
time when using the scanner.
Using Fax
21
Page 22

Automatic Document Feeder (ADF) paper capacity
Load up to Make sure
15 sheets of:
• Letter-size paper
• A4 paper
• Legal-size paper
Sending a fax
Entering a fax number
• You adjust the paper guide on the Automatic Document Feeder
(ADF) tray to the width of the original document.
• The original document is loaded facedown, top edge first, until
you hear a beep.
• The paper size fits within these dimensions:
Width:
– 210.0 mm–215.9 mm
– 8.25 in.–8.5 in.
Length:
– 279.4 mm–355.6 mm
– 11.0 in.–14.0 in.
• You allow preprinted media to dry thoroughly before loading into
the Automatic Document Feeder (ADF).
• You do not use media printed with metallic ink particles.
• You avoid embossed designs.
1 From the control panel, press Fax Mode.
2 Enter a fax number using:
The text box Enter a fax number using the keypad.
Notes:
• You can include a calling card number as part of the fax number.
• Enter a maximum of 64 digits in a fax number.
• Press Pause / Redial to insert a three-second pause in a number you are
entering to wait for an outside line or get through an automated
answering system.
Speed Dial or Group Dial
a Press Phone Book.
b Enter Speed Dial and/or Group Dial numbers.
• Press or repeatedly until the Speed Dial or Group Dial number
you want appears.
• Use the keypad to enter the number of the Speed Dial entry (1–89) or
Group Dial entry (90–99).
Notes:
• For instructions on how to add Speed Dial or Group Dial numbers
using the computer, see “Setting up Speed Dial” on page 37.
• For instructions on how to add Speed Dial or Group Dial numbers
using the control panel, see “Using the Phone Book” on page 28.
Using Fax
22
Page 23

3 If you want to send a fax to a group of numbers (broadcast fax):
a Press .
b Repeat step 2, using any combination of the previous methods, until a maximum of 30 fax numbers have
been entered.
Sending a fax using the software
You can scan a document to the computer and then fax it to someone using the software.
1 Load an original document facedown in the Automatic Document Feeder (ADF).
2 From the desktop, double-click the Productivity Studio icon.
3 From the right pane of the Welcome Screen, click Fax.
4 Select the Document option.
5 Click Start.
6 Enter the recipient information, and then click Next.
Note: A fax number can include up to 64 numbers, commas, periods, spaces, and/or these symbols: * # + - ( ).
7 Enter the cover page information, and then click Next.
8 If there are any additional documents that you want to send with your fax, add these now, and then click Next.
9 To send your fax:
• Immediately—Select the Send now option.
• At a scheduled time:
a Select the Delay sending until option.
b Set a time and date.
10 If you want a paper copy of your fax, select Print a copy of your fax.
11 Click Send.
Sending a fax using the control panel
1 Make sure the printer is on.
2 Load an original document facedown into the ADF or on the scanner glass.
Note: Do not load postcards, photos, small items, transparencies, photo paper, or thin media (such as magazine
clippings) into the ADF. Place these items on the scanner glass.
3 From the control panel, press Fax Mode.
4 Enter a fax number or press Phone Book to select a number from the Speed Dial or Group Dial list. For more
information, see “Entering a fax number” on page 22.
Note: To set up Speed Dial, see “Setting up Speed Dial” on page 37.
5 If you want to send a fax to a group of numbers (broadcast fax):
a Press .
b Repeat step 4 and press until a maximum of 30 fax numbers have been entered.
6 Press Start Color or Start Black.
Using Fax
23
Page 24

Sending a fax while listening to a call (On Hook Dial)
The manual dialing feature lets you dial a telephone number while listening to the call through a speaker on the
printer. It is useful when you must navigate an automated answering system or enter a calling card number before
sending your fax.
1 From the control panel, press Fax Mode.
2 Press .
3 Press or repeatedly until On Hook Dial appears, and then press . You can now hear the dial tone of the
telephone line.
4 Enter a fax number. For more information, see the related topic, “Entering a fax number.”
Note: Press the keypad numbers to use an automated answering system.
5 Press Start Color or Start Black.
Sending a broadcast fax at a scheduled time
You can send a fax to a combination of up to 30 people or groups at a time you choose.
1 Load an original document facedown into the ADF or on the scanner glass.
Note: Do not load postcards, photos, small items, transparencies, photo paper, or thin media (such as magazine
clippings) into the ADF. Place these items on the scanner glass.
2 From the control panel, press Fax Mode.
3 Press .
4 Press or repeatedly until Delay Fax appears.
5 Press .
6 Press or repeatedly until Delay Until appears.
7 Press .
8 Enter the time you want to send the fax.
9 Press .
10 If the printer is not set to the 24 hour mode, press or repeatedly to select AM or PM.
11 Press to save your settings.
12 Enter a fax number, or press Phone Book to select a number from the Speed Dial or Group Dial list. For more
information, see “Entering a fax number” on page 22.
13 If needed, repeat step 12 and press until a maximum of 30 fax numbers have been entered.
14 Press Start Color or Start Black.
Note: At the designated time, the fax numbers are dialed and the fax is sent to all of the designated fax numbers. If
the fax transmission is unsuccessful to any of the numbers on the broadcast list, the unsuccessful numbers will be
dialed again.
Using Fax
24
Page 25

Receiving a fax
Receiving a fax manually
1 Make sure the Auto Answer light is off.
2 To receive the fax if you have not set up a manual answer code:
• Press Start Color or Start Black.
or
• Press * 9 * on the telephone after you answer it and hear fax tones.
3 To receive a fax if you have set up a manual answer code, enter the code on the telephone after you answer it
and hear fax tones.
Note: For information on how to set up a manual answer code, see the related topic, “Setting a fax manual answer
code.”
4 Hang up the telephone. The printer receives the fax.
Setting a fax manual answer code
1 From the desktop, double-click the Productivity Studio icon.
2 From the Settings area in the left pane of the Welcome screen, click Setup and manage faxes.
3 From the “I Want To” menu, click Adjust speed dial list and other fax settings.
4 Click the Ringing and Answering tab.
5 From the “Answering on your phone line type” area, enter the code you want to use.
Note: The code can include up to seven numbers, commas, periods, and/or these symbols: * # + - ( ).
6 Click OK to save the setting.
Using Caller ID from the control panel
Caller ID is a service provided by some telephone companies that identifies the telephone number (and possibly the
name) of the person who is calling. If you subscribe to this service, it works with the printer. When you receive a fax,
the telephone number of the person who is sending you the fax appears on the display.
Note: Caller ID is available only in some countries and regions.
The printer supports two distinct Caller ID patterns: Pattern 1 (FSK) and Pattern 2 (DTMF). Depending on the country
or region you live in and the telecommunications company you subscribe to, you may need to switch the pattern to
display Caller ID information.
1 From the control panel, press Fax Mode.
2 Press or repeatedly until Tools appears.
3 Press .
4 Press or repeatedly until Device Setup appears.
5 Press .
6 Press or repeatedly until Caller ID Pattern appears.
Using Fax
25
Page 26

7 Press .
8 Press or repeatedly until the setting you want appears.
9 Press to save the setting.
Using Caller ID from the software
Caller ID is a service provided by some telephone companies that identifies the telephone number or the name of
the person who is calling. If you subscribe to this service, it works with the printer. When you receive a fax, the
telephone number or name of the person who is sending you the fax appears on the display.
Notes:
• Caller ID is available only in some countries and regions.
• The number of patterns is defined by the country or region setting and only the number of patterns defined for
the selected country or region is shown.
The printer supports two distinct Caller ID patterns: Pattern 1 (FSK) and Pattern 2 (DTMF). Depending on the country
or region you live in and the telecommunications company you subscribe to, you may need to switch the pattern to
display Caller ID information.
1 From the desktop, double-click the Productivity Studio icon.
2 From the Settings area of the Welcome Screen, click Fax History and Settings.
3 From the “I Want To” menu, click Adjust speed dial list and other fax settings.
4 Click the Ringing and Answering tab.
5 From the “Answering on your phone line type” section, select the pattern number you want from the “Caller ID
pattern” drop-down list.
6 Click OK to save the setting.
Receiving a fax automatically
1 From the desktop, double-click the Productivity Studio icon.
2 From the Settings area in the left pane of the Welcome screen, click Setup and manage faxes.
3 From the “I Want To” menu, click Adjust speed dial list and other fax settings.
4 Click the Ringing and Answering tab.
5 From the “Automatically answer incoming calls as a fax” area, select On from the Auto Answer drop-down list.
6 To turn the Auto Answer feature on and off at scheduled times, select the settings you want from the drop-down
lists.
7 To set the number of telephone rings before the printer automatically receives faxes, select a setting from the
“Pick-up on the” drop-down list in the “Answering on your phone line type” area.
8 Click OK to save the settings.
Receiving a fax with an answering machine
Note: You must set up the equipment as shown in the related topic, “Connecting to an answering machine” on
page 13.
Using Fax
26
Page 27

To receive a fax with an answering machine connected to the printer:
1 Make sure that Auto Answer is on.
Note: An indicator, resembling a telephone handset with the word FAX under it, is shown in the top left corner
of the display when Auto Answer is on.
2 Make sure you have set the number of times the telephone rings before receiving a fax automatically. For more
information, see “Setting the number of rings before receiving a fax automatically” on page 37
When a telephone ring is detected, the answering machine picks up the call.
• If the printer detects a fax, it receives the fax and disconnects the answering machine.
• If the printer does not detect a fax, the answering machine receives the call.
3 Set the answering machine to answer incoming calls before the printer does.
For example, if you set the answering machine to answer calls after three rings, set the printer to answer calls
after five rings.
Forwarding faxes
Use the fax-forwarding feature if you are going to be away but still want to receive your faxes. There are three
fax-forwarding settings:
• Off—(Default).
• Forward—The printer sends the fax to the designated fax number.
• Print & forward—The printer prints the fax and then sends it to the designated fax number.
To set up fax forwarding:
1 From the desktop, double-click the Productivity Studio icon.
2 From the Settings area in the left pane of the Welcome screen, click Setup and manage faxes.
3 From the “I Want To” menu, click Adjust speed dial list and other fax settings.
4 Click the Ringing and Answering tab.
5 From the “Forward received faxes to another number” area, select the setting you want from the “Fax forwarding”
drop-down list.
6 Enter the number to which you want to forward the fax.
Notes:
• You can include a calling card number as part of the fax number.
• A fax number can include up to 64 numbers, commas, periods, and/or these symbols: * # + - ( ).
7 Click OK to save the setting.
Using Fax
27
Page 28

Using the Phone Book
Using the control panel Phone Book
The control panel Phone Book is a directory of Speed Dial entries (1–89) and Group Dial entries (90–99).
To access a Phone Book entry:
1 From the control panel, press Phone Book.
2 Press or repeatedly until the entry you want appears.
or
Use the keypad to enter the number of the Speed Dial or Group Dial entry.
To access the Phone Book menu:
1 From the control panel, press Fax Mode.
2 Press .
3 Press or repeatedly until Phone Book appears.
4 Press .
5 Press or repeatedly until the setting you want appears.
6 Press , and follow the instructions on the display.
Use this To
View View Phone Book entries.
Add Create a new Speed Dial or Group Dial entry.
Remove Delete a Speed Dial or Group Dial entry.
Modify Edit a Speed Dial or Group Dial entry.
Print Print all Speed Dial and Group Dial entries in the Phone Book.
Note: For instructions on how to add Speed Dial or Group Dial entries to the Phone Book using the computer, see
“Setting up Speed Dial” on page 37.
Using the computer Phone Book
Address books from your operating system appear as Phone Books.
To access a Phone Book entry:
1 From the desktop, double-click the Productivity Studio icon.
2 From the Welcome Screen, click Fax History and Settings.
3 From the “I Want To” menu, click View phonebook.
4 To modify the Phone Book, select an option, enter the new information, and click OK.
Using Fax
28
Page 29

Use this To
New Contact Create a new Phone Book entry.
New Group Create a new Group Phone Book entry.
Edit Edit a Phone Book entry.
Delete Delete a Phone Book entry.
Add Contact to Speed Dial list Add a Phone Book entry to your Speed Dial or Group Dial list.
Note: For more information on how to set up multiple Speed Dial and/or Group Dial entries, see “Setting up Speed
Dial” on page 37.
Customizing fax settings
Customizing settings using the Fax Setup Utility
You can adjust the fax settings in the Fax Setup Utility. These settings apply to the faxes you send or receive.
1 From the desktop, double-click the Productivity Studio icon.
2 Click Fax History and Settings.
The Fax Solutions Software screen appears.
3 Click Adjust speed dial list and other fax settings.
Using Fax
29
Page 30
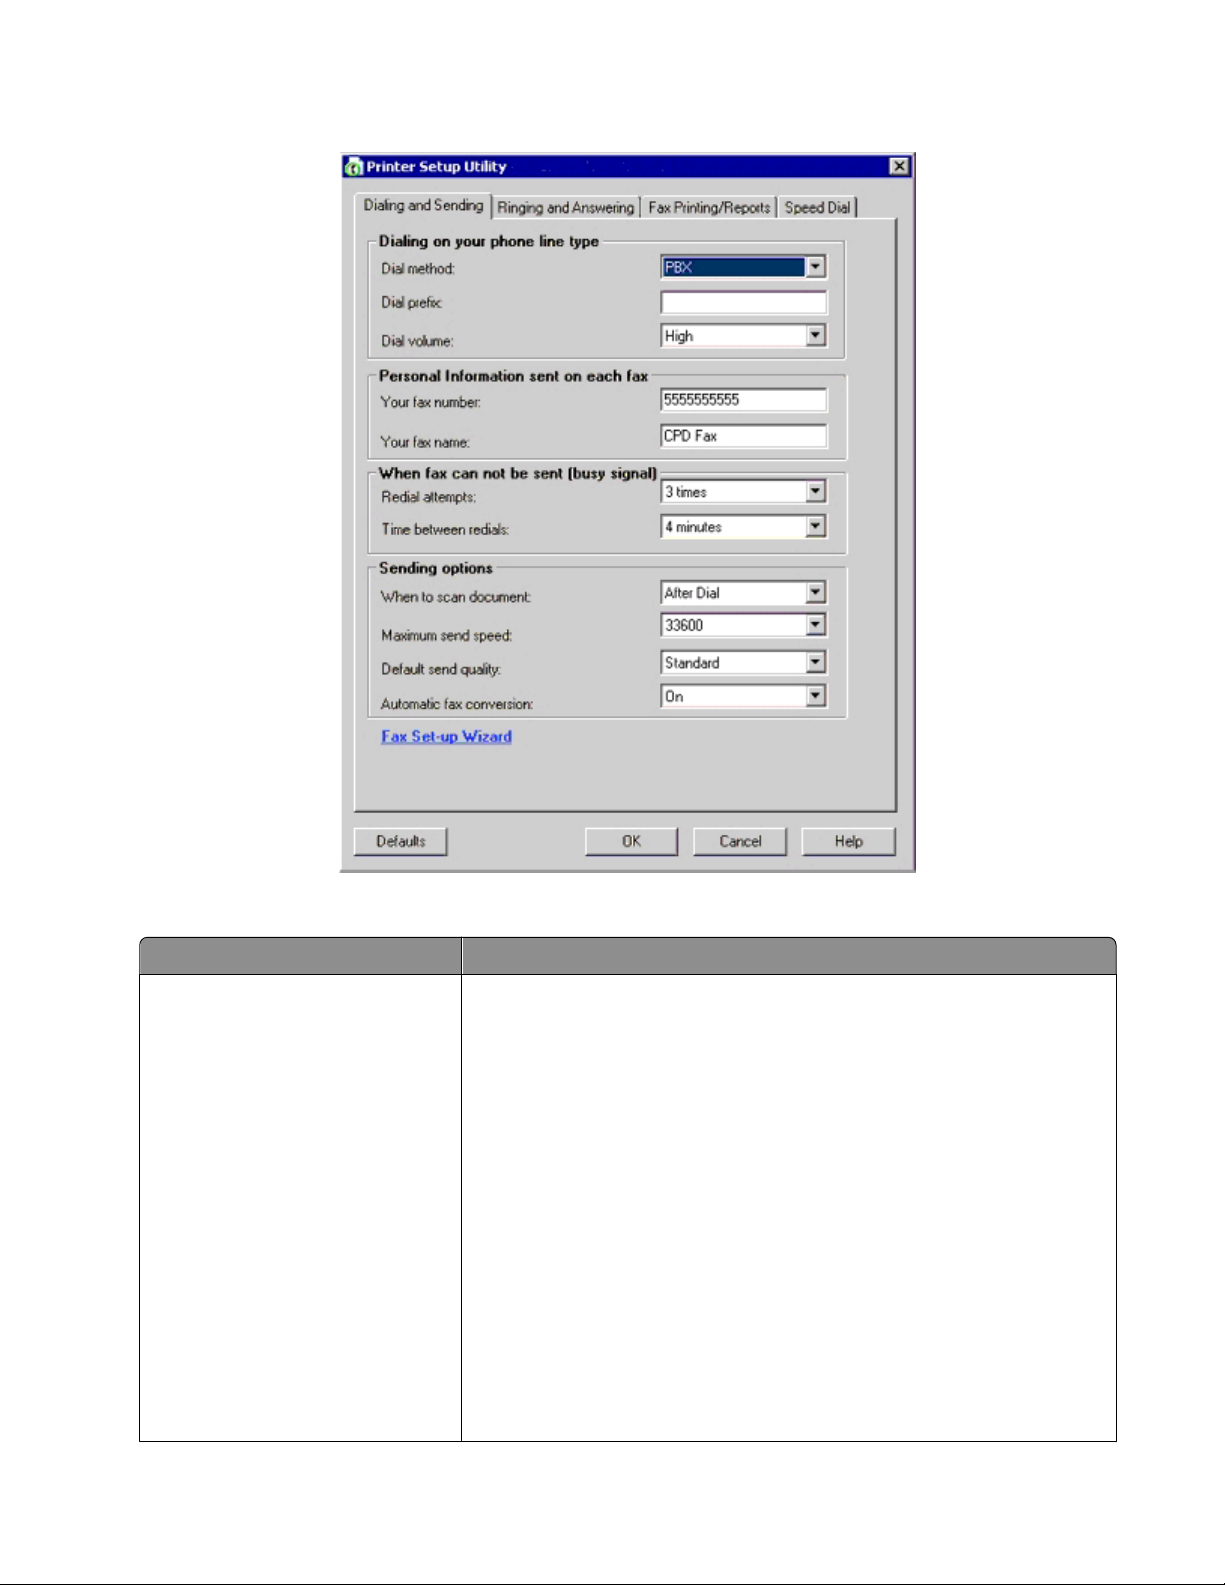
The following screen appears.
4 Click each tab, and change the settings as needed.
Tab Options
Dialing and Sending
• Select the telephone line format you want to use.
• Enter a dialing prefix.
• Select a dialing volume.
• Enter your name and fax number.
Notes:
– You can include a calling card number as part of the fax number.
– Enter a maximum of 64 digits in a fax number.
• Select the number of times you want the machine to redial and the time
between those attempts if the fax cannot be sent on the first try.
• Choose whether to scan the entire document before dialing the number.
Note: Select After Dial if you are sending a large fax or a multiple-page
color fax.
• Select a maximum send speed and print quality for outgoing faxes.
• From the “Automatic fax conversion” line, select ON to match the resolution
setting of the receiving fax machine.
Using Fax
30
Page 31
Tab Options
Ringing and Answering
• Select incoming call options.
• Select auto answer options.
• Select whether you want to forward a fax, or print it and then forward it.
• Enter a fax forwarding number.
• Manage blocked faxes.
Fax Printing / Reports
• Automatically reduce an incoming fax to fit to the paper size loaded, or
print it on two sheets of paper.
• Choose whether to print a footer (the date, time, and page number) to
appear on each page you receive.
• Select a paper source.
• Choose whether to print on both sides of the paper.
• Select when to print fax activity and confirmation reports.
Speed Dial Create, add to, edit, or delete entries from the Speed Dial list, including Group
Dial entries.
Cover Page Choose and customize your fax cover page and message.
5 Click OK after you finish customizing the settings.
6 Close the Fax Setup Utility.
Understanding the Fax menu
To access and navigate the Fax menu:
1 From the control panel, press Fax Mode.
The fax default screen appears.
2 If you do not want to change a setting, enter the fax number and press Start Color or Start Black.
3 If you want to change a setting, press .
4 Press or repeatedly until the menu item you want appears.
5 Press .
6 Press or repeatedly until the submenu item you want or the setting you want appears.
7 Press .
Note: Pressing
8 To go into additional submenus and settings, repeat step 6 and step 7 as needed.
9 If needed, press repeatedly to return to the previous menus and make other setting selections.
10 Press Start Color or Start Black.
Use this To
selects a setting. An * appears next to the selected setting.
Quality* Adjust the quality of a fax you are sending.
Phone Book Add, edit, and print names and fax numbers of individuals or groups.
Using Fax
31
Page 32

Use this To
On Hook Dial Dial a telephone number while listening to the call through a speaker on
the printer. This is useful when you must navigate an automated answering
system before sending your fax.
Delay Fax Enter a specific time to send a fax.
Note: Make sure the date and time are entered correctly before setting a
specific time to send a fax.
Auto Answer Answer all incoming phone calls.
Lighter / Darker* Adjust the brightness of a fax you are sending.
Fax Setup
Tools
• Print fax history or transmission status reports.
• Customize settings for receiving a fax.
• Select fax printing options.
• Customize settings for sending a fax.
• Block faxes from the numbers you specify.
• Maintenance
– View ink levels.
– Clean cartridges.
– Align cartridges.
– Print a test page.
• Device Setup—Customize printer setup settings.
• Defaults—Customize printer settings.
Setting Auto Answer to on
1 From the desktop, double-click the Productivity Studio icon.
2 From the Welcome Screen, click Fax History and Settings.
3 From the “I Want To” menu, click Adjust speed dial list and other fax settings.
4 Click the Ringing and Answering tab.
5 From the Auto Answer drop-down list, select On.
6 Click OK to save the setting.
The Auto Answer light on the control panel comes on. When the number of rings you set is detected, the printer
automatically receives the incoming fax.
Setting up a fax header
During the initial setup of your printer, you were prompted to enter your name, fax number, date, and time. This
information is used to create a fax header for faxes you send.
If you have not entered this information:
1 From the control panel, press Fax Mode.
2 Press .
3 Press or repeatedly until Fax Setup appears.
Using Fax
32
Page 33

4 Press .
5 Press or repeatedly until Dialing and Sending appears.
6 Press .
7 Press or repeatedly until Your Fax Name appears.
8 Press .
9 Enter your name using the keypad.
Note: You can enter a maximum of 20 characters.
10 Press to save the setting.
11 Press or repeatedly until Your Fax Number appears.
12 Press .
13 Enter your fax number using the keypad.
Note: You can enter a maximum of 64 numbers.
14 Press to save the setting.
15 Press twice.
16 Press or repeatedly until Tools appears.
17 Press .
18 Press or repeatedly until Device Setup appears.
19 Press .
20 Press or repeatedly until Date/Time appears.
21 Press .
22 Enter the date using the keypad.
23 Press .
24 Enter the time using the keypad.
25 Press .
26 If the hour you entered is 12 or less, press or repeatedly until AM, PM, or 24hr appears.
27 Press to save the setting.
Setting up a fax footer
1 From the control panel, press Fax Mode.
2 Press .
3 Press or repeatedly until Fax Setup appears.
4 Press .
5 Press or repeatedly until Fax Printing appears.
Using Fax
33
Page 34

6 Press .
7 Press or repeatedly until Fax Footer appears.
8 Press .
9 Press or repeatedly until On appears.
10 Press .
11 During the initial setup of your printer, you were prompted to enter the date and time. If you have not entered
this information:
a Press twice.
b Press or repeatedly until Tools appears.
c Press .
d Press or repeatedly until Device Setup appears.
e Press .
f Press or repeatedly until Date/Time appears.
g Press .
h Enter the date using the keypad.
i Press .
j Enter the time using the keypad.
k Press .
l If the hour you entered is 12 or less, press or repeatedly until AM, PM, or 24hr appears.
m Press to save the setting.
Blocking junk faxes
1 From the desktop, double-click the Productivity Studio icon.
2 From the left pane of the Welcome screen, click Fax.
The Fax Solution Software appears.
3 Click Tools Preferences and Settings.
4 Click the Receiving Faxes tab.
5 From the “Block Junk Faxes” area, select the check box beside Enable Fax Blocking.
6 If you want to block faxes from specific phone numbers:
a Click Manage Block List.
b Click New.
c Enter a phone number in the Fax Identifier field and corresponding contact name in the Notes field.
Notes:
• You can include a calling card number as part of the fax number.
• A fax number can include up to 64 numbers, commas, periods, and/or these symbols: * # + - ( ).
• You can block faxes from up to 50 phone numbers.
7 Click OK to save the setting.
Using Fax
34
Page 35

Blocking unwanted changes to fax settings
This feature blocks network users from changing fax settings.
1 From the control panel, press Settings.
2 Press or repeatedly until Device Setup appears.
3 Press .
4 Press or repeatedly until Host Fax Settings appears.
5 Press .
6 Press or until Block appears.
7 Press .
Using the Fax Solutions Software
Use this software to adjust how faxes are sent and received. When you save the settings, they apply to every fax you
send or receive. You can also use this software to create and edit the Speed Dial list.
1 Open the program through one of these methods:
Method 1 Method 2
a Do one of the following:
• In Windows Vista, click .
• In Windows XP and earlier, click Start.
b Click Programs or All Programs Lexmark
X5400 Series.
c Click Fax Solutions.
a Do one of the following:
• In Windows Vista, click .
• In Windows XP and earlier, click Start.
b Click Programs or All Programs Lexmark X5400 Series.
c Click Productivity Studio.
The Productivity Studio screen appears.
d Click the Fax icon.
2 When the Fax Solutions Software appears, as shown, use the “I Want To” menu to:
• Send a fax.
• Adjust the Speed Dial list and other fax settings.
• View and use the Phonebook, so you can add new contacts or groups, edit or delete contacts or groups, and
add contacts or groups to Speed Dial lists.
• View several sample cover pages that you can choose from. You can also add your company logo to a sample
cover page.
3 To access any of the items in the “I Want To” menu, click the item.
Using Fax
35
Page 36

4 If needed, click the toolbar items to:
Click To
Fax
Tools
Help Locate information on faxing, fax settings, and so on.
For information on changing fax settings, see “Customizing settings using the Fax Setup Utility” on page 29
• Send a fax.
• Forward a fax.
• View, print, or modify a fax.
• Delete a fax.
• Retry to send a fax.
• Access and use the Phonebook.
• View several sample cover pages you can choose from.
• View a fax history.
• Change software preferences for fax lists.
• Adjust fax settings.
5 After changing settings, click OK.
6 Close the Fax Solutions Software.
Setting up a dialing prefix
You can add a prefix to the beginning of each number dialed. The prefix can include up to eight numbers, commas,
periods, and/or these symbols: * # + - ( ).
1 From the desktop, double-click the Productivity Studio icon.
2 From the Settings area in the left pane of the Welcome screen, click Setup and manage faxes.
3 From the “I Want To” menu, click Adjust speed dial list and other fax settings.
4 Click the Dialing and Sending tab.
5 Enter the prefix to be dialed before each telephone number.
6 Click OK to save the setting.
Setting the distinctive ring
Distinctive ring is a service provided by some telephone companies that assigns multiple phone numbers to a single
telephone line. If you subscribe to this service, you can program your printer to have a distinctive ring pattern and
phone number for incoming faxes.
1 From the desktop, double-click the Productivity Studio icon.
2 From the Settings area in the left pane of the Welcome screen, click Setup and manage faxes.
3 From the “I Want To” menu, click Adjust speed dial list and other fax settings.
4 Click the Ringing and Answering tab.
Using Fax
36
Page 37

5 From the “Answering on your phone line t ype” area, select the setting you want from the “Distinctive ring pattern”
drop-down list.
6 Click OK to save the setting.
Setting the number of rings before receiving a fax automatically
1 From the desktop, double-click the Productivity Studio icon.
2 From the Welcome Screen, click Fax History and Settings.
3 From the “I Want To” menu, click Adjust speed dial list and other fax settings.
4 Click the Ringing and Answering tab.
5 From the “Pick-up on the” drop-down list, select the setting you want.
6 From the Auto Answer drop-down list, select On.
7 Click OK to save the setting.
The Auto Answer light on the control panel comes on. When the number of rings you set is detected, the printer
automatically receives the incoming fax.
Setting up Speed Dial
1 From the desktop, double-click the Productivity Studio icon.
2 From the Settings area of the Welcome Screen, click Fax History and Settings.
3 From the “I Want To” menu, click Adjust speed dial list and other fax settings.
4 Click the Speed Dial tab.
5 To add a fax number to your Speed Dial list:
a Click the next empty line in the list.
b Type in a fax number.
c Place the cursor in the Contact Name field.
d Type in a contact name.
e Add fax numbers as needed, following the steps above, on lines 2–89.
6 To add a fax group:
a Scroll down and click line 90.
A new entry box appears.
b Click the next empty line in the list.
c Enter up to 30 fax numbers for the group.
d Place the cursor in the Contact Name field.
e Type in a contact name.
f Repeat these steps to add additional groups using lines 91–99 as necessary.
7 Click OK to save the entries.
Using Fax
37
Page 38

Notes:
• You can include a calling card number as part of the fax number.
• A fax number can include up to 64 numbers, commas, periods, spaces, and/or these symbols: * # + - ( ).
Printing fax activity reports
1 From the desktop, double-click the Productivity Studio icon.
2 From the left pane of the Welcome screen, click Fax.
The Fax Solution Software appears.
3 Click Tools Create Report.
4 From the Display drop-down list, select Sent and Outgoing Faxes, Received, or Incoming Faxes.
5 Choose a date range.
6 Click Print.
Using Fax
38
Page 39

Ordering Cartridges
Ordering print cartridges
Lexmark X5400 Series models
Item Part number
Black cartridge 28A 175
Black cartridge
High yield black cartridge 34 500
Color cartridge 29A 150
Color cartridge
High yield color cartridge 35 475
Photo cartridge 31 Not applicable
1
Values obtained by continuous printing. Declared yield value in accordance with ISO/IEC 24711.
2
Licensed Return Program Cartridge
2
2
28 175
29 150
Average cartridge standard page yield is up to
1
Ordering Cartridges
39
Page 40

Troubleshooting
Setup Troubleshooting
Incorrect language appears on the display
These are possible solutions. Try one of the following:
CHANGE THE LANGUAGE SELECTION DURING INITIAL SETUP
After you select a language, Language appears again on the display. To change the selection:
1 Press or repeatedly until the language you want appears on the display.
2 Press to save.
SELECT A DIFFERENT LANGUAGE AFTER INITIAL SETUP
1 From the control panel, press Copy Mode.
2 Press .
3 Press or repeatedly until Tools appears.
4 Press .
5 Press or repeatedly until Device Setup appears.
6 Press .
7 Press or repeatedly until Language appears.
8 Press .
9 Press or repeatedly until the language you want appears on the display.
10 Press to save.
Power button is not lit
These are possible solutions. Try one or more of the following:
PRESS POWER BUTTON
Make sure the printer is on by pressing .
Troubleshooting
40
Page 41

DISCONNECT AND RECONNECT THE POWER CORD
1 Disconnect the power cord from the wall outlet, and then from the printer.
2 Plug the cord all the way into the power supply on the printer.
3 Plug the cord into an electrical outlet that other electrical devices have been using.
4 If the light is not on, press .
Software does not install
These are possible solutions. Try one or more of the following:
CHECK YOUR OPERATING SYSTEM
The following operating systems are supported: Windows Vista, Windows XP, Windows 2000, and Mac OS X.
Note: Windows 2000 users should use Service Pack 3 or later.
CHECK YOUR SYSTEM REQUIREMENTS
Check that your computer meets the minimum system requirements listed on the printer box.
CHECK USB CONNECTION
1 Check the USB cable for any obvious damage.
2 Firmly plug the square end of the USB cable into the back of the printer.
3 Firmly plug the rectangular end of the USB cable into the USB port of the computer.
The USB port is marked with the
USB symbol.
REINSTALL THE SOFTWARE
1 Turn off and then restart your computer.
2 Click Cancel on all New Hardware Found screens.
3 Insert the CD, and then follow the instructions on the computer screen to reinstall the software.
RECONNECT POWER SUPPLY
1 Press to turn the printer off.
2 Disconnect the power cord from the wall outlet.
3 Gently remove the power supply from the printer.
Troubleshooting
41
Page 42

4 Reconnect the power supply to the printer.
5 Plug the power cord into the wall outlet.
6 Press to turn the printer on.
DISABLE ANTI-VIRUS PROGRAMS
1 Close all open software applications.
2 Disable any anti-virus programs.
3 Double-click the My Computer icon.
In Windows XP, click Start to access the My Computer icon.
4 Double-click the CD–ROM drive icon.
5 If necessary, double-click setup.exe.
6 Follow the instructions on the computer screen to install the software.
UNINSTALL AND REINSTALL SOFTWARE
Uninstall the printer software, and then reinstall it. For more information, see “Removing and reinstalling the
software” on page 42.
Removing and reinstalling the software
If the printer is not functioning properly, or if a communications error message appears when you try to use the
printer, you may need to remove and reinstall the printer software.
1 Click Programs or All Programs Lexmark X5400 Series.
2 Select Uninstall.
3 Follow the instructions on the computer screen to remove the printer software.
4 Restart the computer before reinstalling the printer software.
5 Click Cancel on all New Hardware Found screens.
6 Insert the CD, and then follow the instructions on the computer screen to reinstall the software.
Note: If the install screen does not appear automatically after you restart your computer, click Start Run, and
then type D:\setup, where D is the letter of your CD-ROM drive.
If the software still does not install correctly, visit our Web site at www.lexmark.com to check for the latest software.
1 In all countries or regions except the United States, select your country or region.
2 Click the links for drivers or downloads.
3 Select your printer family.
4 Select your printer model.
5 Select your operating system.
6 Select the file you want to download, and then follow the directions on the computer screen.
Troubleshooting
42
Page 43

Fax troubleshooting
Cannot send or receive a fax
These are possible solutions. Try one or more of the following:
CHECK MESSAGES
If an error message is displayed, follow the instructions on the display.
MAKE SURE THE PRINTER IS ON
If the light is not on, see “Power button is not lit” on page 40.
CHECK CABLE CONNECTIONS
Make sure cable connections for the following hardware are secure, if applicable:
• Power supply
• Telephone
• Handset
• Answering machine
CHECK THE TELEPHONE WALL JACK
1 Plug a telephone into the wall jack.
2 Listen for a dial tone.
3 If you do not hear a dial tone, plug a different telephone into the wall jack.
4 If you still do not hear a dial tone, plug a telephone into a different wall jack.
5 If you hear a dial tone, connect the printer to that wall jack.
REVIEW DIGITAL PHONE SERVICE CHECKLIST
The fax modem is an analog device. Certain devices can be connected to the printer so that digital telephone
services can be used.
• If you are using an ISDN telephone service, connect the printer to an analog telephone port (an R-interface
port) on an ISDN terminal adapter. For more information and to request an R-interface port, contact your ISDN
provider.
• If you are us ing DS L, c onn ect to a DSL fi lter or rout er t hat wi ll s upp ort ana log use . For m ore inf orm ati on, con tac t
your DSL provider.
• If you are using a PBX telephone service, make sure you are connecting to an analog connection on the PBX.
If none exists, consider installing an analog telephone line for the fax machine. For more information on faxing
when using a PBX telephone service, see “Setting up to fax while behind a PBX” on page 18.
Troubleshooting
43
Page 44

VERIFY DIAL TONE
• Place a test call to the telephone number to which you want to send a fax to make sure that it is working
correctly.
• If the telephone line is being used by another device, wait until the other device is finished before sending a
fax.
• If you are using the On Hook Dial feature, turn up the volume to verify a dial tone.
DISCONNECT OTHER EQUIPMENT TEMPORARILY
To ensure the printer is working correctly, connect it directly to the telephone line. Disconnect any answering
machines, computers with modems, or telephone line splitters.
CHECK FOR PAPER JAMS
Check for and clear any paper jams.
DISABLE CALL WAITING TEMPORARILY
Call Waitin g can disrupt fax transmis sions. Disable this feature before sen ding or receiving a fax. Call your telephone
company to obtain the keypad sequence for temporarily disabling Call Waiting.
DO YOU HAVE VOICE MAIL SERVICE?
Voice mail offered through your local telephone company may disrupt fax transmissions. To enable both voice
mail and the printer to answer calls:
• See “Setting the distinctive ring” on page 36. Setting selections include single ring, double ring, triple ring, and
any ring.
• Consider adding a second telephone line for the printer.
CHECK COUNTRY CODE
Make sure the country code has been set for the country or region where you are operating the printer:
1 From the control panel, press Fax Mode.
2 Press .
3 Press or repeatedly until Tools appears.
4 Press .
5 Press or repeatedly until Device Setup appears.
6 Press .
7 Press or repeatedly until Country Code appears.
8 Press .
9 Press or repeatedly until the country or region where you are operating the printer appears.
10 Press to save the setting.
Troubleshooting
44
Page 45

IS YOUR PRINTER MEMORY FULL?
Change the setting to Scan after Dial.
1 From the control panel, press Fax Mode.
2 Press .
3 Press or repeatedly until Fax Setup appears.
4 Press .
5 Press or repeatedly until Dialing and Sending appears.
6 Press .
7 Press or repeatedly until Scan appears.
8 Press .
9 Press or repeatedly until After Dial appears.
10 Press .
Can send but not receive faxes
These are possible causes and solutions. Try one or more of the following:
LOAD PAPER
Load paper to print any faxes that have been stored in the printer.
CHECK THE AUTO ANSWER BUTTON
If the Auto Answer light is on:
• The printer will answer after the preset number of telephone rings.
• If you are using a distinctive ring, see “Setting the distinctive ring” on page 36.
CHECK INK
Check the ink levels, and install a new cartridge if necessary.
CHECK WHETHER FAX FORWARDING IS SELECTED
1 From the control panel, press Fax Mode.
2 Press .
3 Press or repeatedly until Fax Setup appears.
4 Press .
5 Press or repeatedly until Ringing and Answering appears.
6 Press .
7 Press or repeatedly until Fax Forward appears.
Troubleshooting
45
Page 46

8 Press .
9 Press or repeatedly to view the current Fax Forwarding setting.
10 To turn off Fax Forwarding, press or repeatedly until Off appears.
11 Press to save the setting.
Can receive but not send faxes
Check mode selection
Check document
placement
Check the Dial Prefix
setting
Check Speed Dial
number
Be sure that printer is
detecting a dial tone
To make sure the printer is set for faxing, press Fax Mode.
Load the original document facedown in the ADF or in the upper left corner of the scanner glass.
1 From the control panel, press Fax Mode.
2 Press .
3 Press or repeatedly until Fax Setup appears.
4 Press .
5 Press or repeatedly until Dialing and Sending appears.
6 Press .
7 Press or repeatedly until Dial Prefix appears.
8 Press .
9 To change the setting, press or repeatedly until Create appears.
10 Press .
11 Enter the prefix to be dialed before each telephone number.
12 Press .
• Check to make sure Speed Dial has been programmed for the number that you wish to dial.
See “Setting up Speed Dial” on page 37.
• As an alternative, dial the telephone number manually.
• See “Sending a fax while listening to a call (On Hook Dial)” on page 24.
• Check the Dial Method setting.
1 Listen for a dial tone. If you hear a dial tone but the printer hangs up without dialing, this
means it did not recognize the dial tone.
2 From the control panel, press Fax Mode.
3 Press .
4 Press or repeatedly until Fax Setup appears.
5 Press .
6 Press or repeatedly until Dialing and Sending appears.
7 Press .
8 Press or repeatedly until Dial Method appears.
9 Press .
10 Press or repeatedly until Dial Behind PBX appears.
11 Press to save this setting.
Troubleshooting
46
Page 47

Printer receives a blank fax
These are possible causes and solutions. Try one or more of the following:
CHECK ORIGINAL DOCUMENT
Ask the sender to verify the original document was loaded correctly.
CHECK INK
Check the ink levels, and install a new print cartridge if necessary.
CHECK CARTRIDGES
1 Remove the print cartridges.
2 Make sure the sticker and tape have been removed.
3 Reinsert the print cartridges.
Received fax has poor print quality
These are possible causes and solutions. Try one or more of the following:
REVIEW CHECKLIST FOR SENDER
• Check that the quality of the original document is satisfactory.
• Resend the fax. There may have been a problem with the quality of the telephone line connection.
• Increase the fax scan resolution.
CHECK INK
Check the ink levels, and install a new print cartridge if necessary.
Caller ID information is not displayed
ALLER ID PATTERN MAY NOT BE SET CORRECTLY
C
The printer supports two distinct Caller ID patterns: Pattern 1 (FSK) and Pattern 2 (DTMF). Depending on the country
or region you live in and the telecommunications company you subscribe to, you may need to switch the pattern
for the printer to display Caller ID information. For more information, see “Using Caller ID from the software” on
page 26.
Troubleshooting
47
Page 48

Fax Error
The fax machines have stopped communicating.
Resend the fax. There may have been a problem with the quality of the telephone line connection.
Fax Mode Unsupported
The receiving fax machine does not support the type of fax you attempted to send. If it does not support:
• Your scan resolution—lower the scan resolution.
1 From the control panel, press Fax Mode.
2 Press .
3 Press or repeatedly until Quality appears.
4 Press .
5 Press or repeatedly until a lower quality appears.
6 Press .
• Legal-size paper—reformat the document on letter-size paper.
Remote Fax Error
These are possible causes and solutions. Try one or more of the following:
CHECK PHONE LINE
Resend the fax. There may have been a problem with the quality of the telephone line connection.
LOWER THE TRANSMISSION SPEED
1 From the control panel, press Fax Mode.
2 Press .
3 Press or repeatedly until Fax Setup appears.
4 Press .
5 Press or repeatedly until Dialing and Sending appears.
6 Press .
7 Press or repeatedly until Max Send Speed appears.
8 Press .
9 Press or repeatedly until a lower speed appears.
10 Press .
Notes:
• The lower the transmission speed, the longer it will take your fax to send.
• This solution will reduce the speed for future faxes until you reset the transmission speed.
Troubleshooting
48
Page 49

11 Resend the fax.
12 If the problem persists, repeat the previous steps to send the fax at successively lower transmission speeds.
Note: 2400 bps is the lowest transmission speed.
Phone Line Busy
These are possible causes and solutions. Try one or more of the following:
CHANGE REDIAL SETTINGS
The printer automatically redials three times at 2-minute intervals. You can change the default settings to redial
up to five times at intervals up to 8 minutes.
To change the redial settings:
1 From the control panel, press Fax Mode.
2 Press .
3 Press or repeatedly until Fax Setup appears.
4 Press .
5 Press or repeatedly until Dialing and Sending appears.
6 Press .
7 To change the number of times the printer will redial:
a Press or repeatedly until Redial Attempts appears.
b Press .
c Press or repeatedly until the setting you want appears.
d Press .
8 To change the length of time between redials:
a Press or repeatedly until Redial Time appears.
b Press .
c Press or repeatedly until the setting you want appears.
d Press .
SCHEDULE TO RESEND FAX AT A LATER TIME
See “Sending a broadcast fax at a scheduled time” on page 24.
Troubleshooting
49
Page 50

Phone Line Error
These are possible causes and solutions. Try one or more of the following:
REVIEW DIGITAL PHONE SERVICE CHECKLIST
The fax modem is an analog device. Certain devices can be connected to the printer so that digital telephone
services can be used.
• If you are using an ISDN telephone service, connect the printer to an analog telephone port (an R-interface
port) on an ISDN terminal adapter. For more information and to request an R-interface port, contact your ISDN
provider.
• If you are us ing DS L, c onn ect to a DSL fi lter or rout er t hat wi ll s upp ort ana log use . For m ore inf orm ati on, con tac t
your DSL provider.
• If you are using a PBX telephone service, make sure you are connecting to an analog connection on the PBX.
If none exists, consider installing an analog telephone line for the fax machine. For more information on faxing
when using a PBX telephone service, see “Setting up to fax while behind a PBX” on page 18.
CHECK PHONE LINE
If the telephone line is being used by another device, wait until the other device is finished before sending the fax.
CHECK CABLE CONNECTIONS
Make sure cable connections for the following hardware are secure, if applicable:
• Power supply
• Telephone
• Handset
• Answering machine
Troubleshooting
50
Page 51

Notices
Product information
Product name:
Lexmark X5400 Series
Machine type:
4425
Model(s):
001
A01
002
A02
003
Edition notice
January 2008
The following paragraph does not apply to any country where such provisions are inconsistent with local
law: LEXMARK INTERNATIONAL, INC., PROVIDES THIS PUBLICATION “AS IS” WITHOUT WARRANTY OF ANY KIND,
EITHER EXPRESS OR IMPLIED, INCLUDING, BUT NOT LIMITED TO, THE IMPLIED WARRANTIES OF MERCHANTABILITY
OR FITNESS FOR A PARTICULAR PURPOSE. Some states do not allow disclaimer of express or implied warranties in
certain transactions; therefore, this statement may not apply to you.
This publication could include technical inaccuracies or typographical errors. Changes are periodically made to the
information herein; these changes will be incorporated in later editions. Improvements or changes in the products
or the programs described may be made at any time.
References in this publication to products, programs, or services do not imply that the manufacturer intends to make
these available in all countries in which it operates. Any reference to a product, program, or service is not intended
to state or imply that only that product, program, or service may be used. Any functionally equivalent product,
program, or service that does not infringe any existing intellectual property right may be used instead. Evaluation
and verification of operation in conjunction with other products, programs, or services, except those expressly
designated by the manufacturer, are the user’s responsibility.
For Lexmark technical support, visit support.lexmark.com.
For information on supplies and downloads, visit www.lexmark.com.
If you don't have access to the Internet, you can contact Lexmark by mail:
Lexmark International, Inc.
Bldg 004-2/CSC
740 New Circle Road NW
Lexington, KY 40550
Notices
51
Page 52

© 2008 Lexmark International, Inc.
All rights reserved.
UNITED STATES GOVERNMENT RIGHTS
This software and any accompanying documentation provided under this agreement are commercial computer
software and documentation developed exclusively at private expense.
Trademarks
Lexmark and Lexmark with diamond design are trademarks of Lexmark International, Inc., registered in the United
States and/or other countries.
All other trademarks are the property of their respective owners.
Notices
52
 Loading...