

Page 1
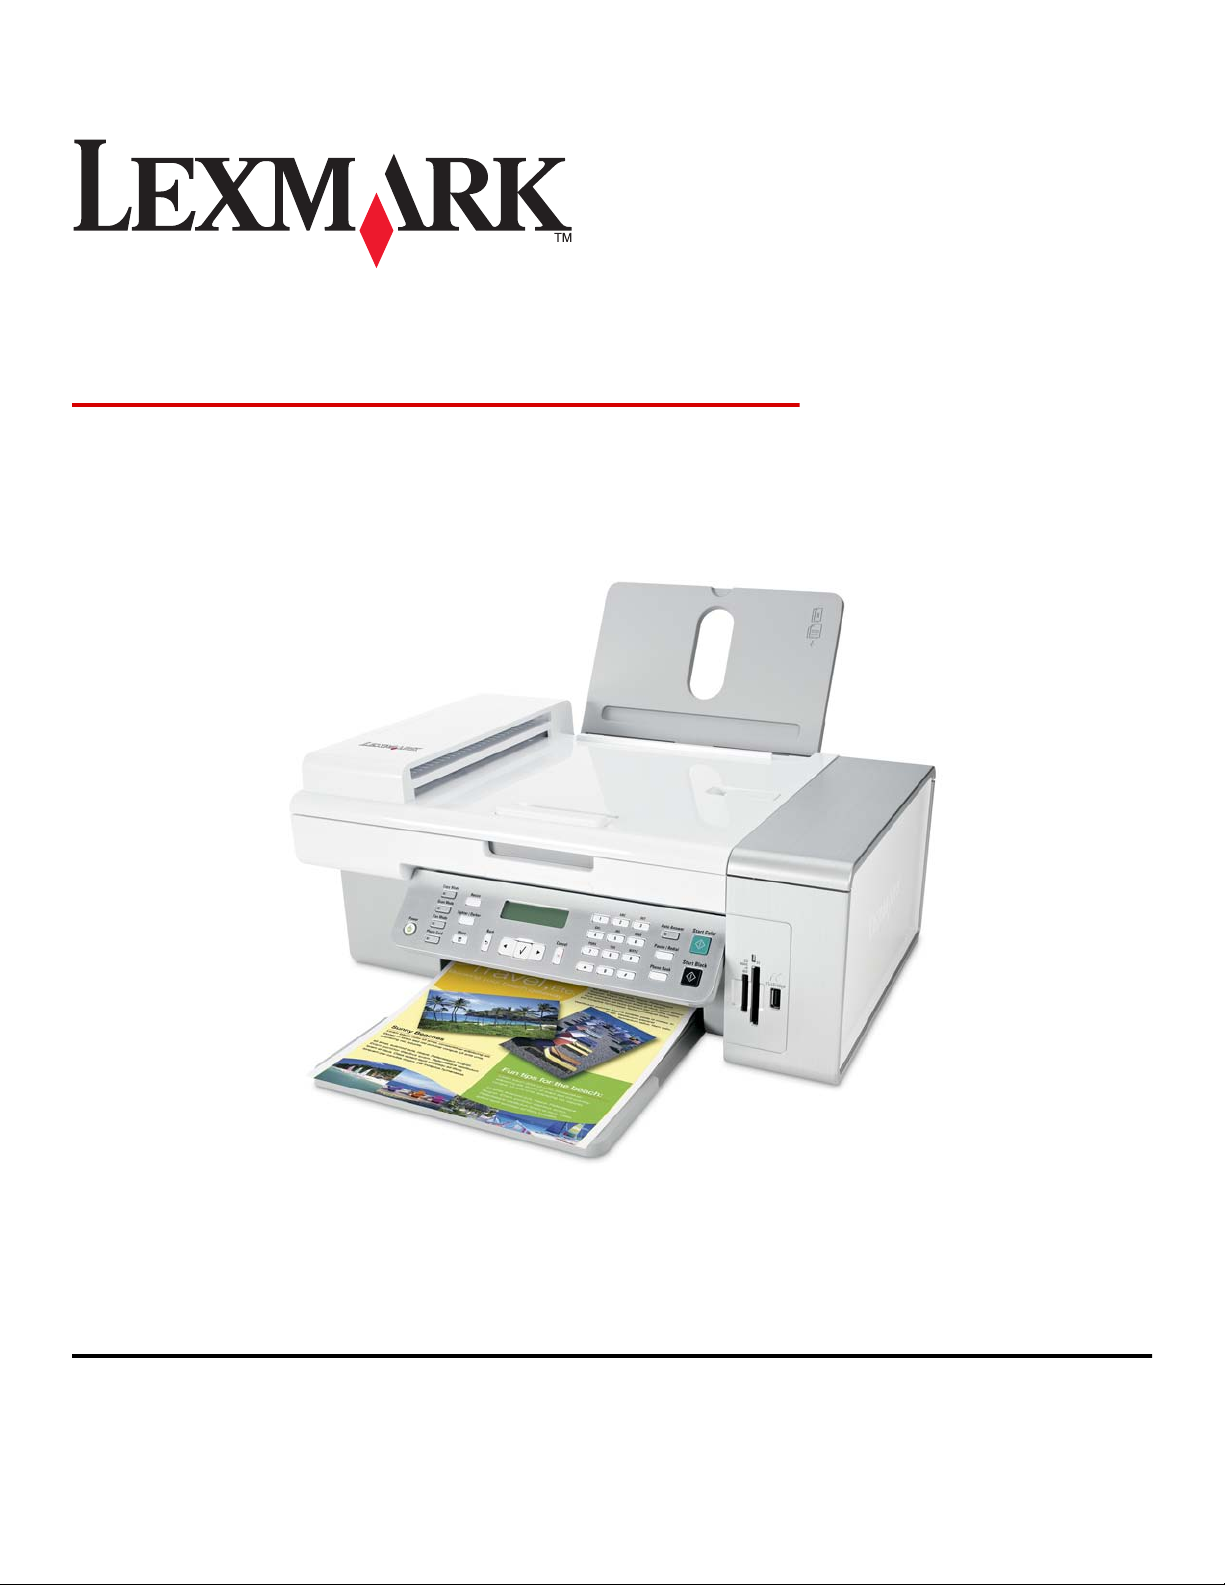
5400 Series All-In-One
Setup Solutions
January 2007 www.lexmark.com
Lexmark and Lexmark with diamond design are trademarks of Lexmark International, Inc., registered in the United States and/or other countries.
All other trademarks are the property of their respective owners.
© 2007 Lexmark International, Inc.
All rights reserved.
740 West New Circle Road
Lexington, Kentucky 40550
Page 2

Edition notice
January 2007
The following paragraph does not apply to any country where such provisions are inconsistent with local law: LEXMARK INTERNATIONAL,
INC., PROVIDES THIS PUBLICATION “AS IS” WITHOUT WARRANTY OF ANY KIND, EITHER EXPRESS OR IMPLIED, INCLUDING, BUT NOT LIMITED TO,
THE IMPLIED WARRANTIES OF MERCHANTABILITY OR FITNESS FOR A PARTICULAR PURPOSE. Some states do not allow disclaimer of express or
implied warranties in certain transactions; therefore, this statement may not apply to you.
This publication could include technical inaccuracies or typographical errors. Changes are periodically made to the information herein; these
changes will be incorporated in later editions. Improvements or changes in the products or the programs described may be made at any time.
Comments about this publication may be addressed to Lexmark International, Inc., Department F95/032-2, 740 West New Circle Road, Lexington,
Kentucky 40550, U.S.A. In the United Kingdom and Eire, send to Lexmark International Ltd., Marketing and Services Department, Westhorpe House,
Westhorpe, Marlow Bucks SL7 3RQ. Lexmark may use or distribute any of the information you supply in any way it believes appropriate without
incurring any obligation to you. To obtain additional copies of publications related to this product, visit the Lexmark Web site at
www.lexmark.com.
References in this publication to products, programs, or services do not imply that the manufacturer intends to make these available in all countries
in which it operates. Any reference to a product, program, or service is not intended to state or imply that only that product, program, or service
may be used. Any functionally equivalent product, program, or service that does not infringe any existing intellectual property right may be used
instead. Evaluation and verification of operation in conjunction with other products, programs, or services, except those expressly designated by
the manufacturer, are the user’s responsibility.
© 2007 Lexmark International, Inc.
All rights reserved.
UNITED STATES GOVERNMENT RIGHTS
This software and any accompanying documentation provided under this agreement are commercial computer software and documentation
developed exclusively at private expense.
Page 3

Setup Solutions
This guide contains information about:
• “Safety information” on page 3
• “Finding information about the printer” on page 3
• “Using the control panel buttons and menus” on page 6
• “Changing print cartridges” on page 15
• “Achieving better print quality” on page 17
• “Ordering supplies” on page 20
• “Setup troubleshooting” on page 21
• “Resetting to factory default settings” on page 24
• “Removing and reinstalling the software” on page 25
Safety information
Use only the power supply and power supply cord provided with this product or the manufacturer's authorized
replacement power supply and power supply cord.
Connect the power supply cord to a properly grounded electrical outlet that is near the product and easily accessible.
Use only a 26 AWG or larger telecommunications (RJ-11) cord when connecting this product to the public switched
telephone network.
Refer service or repairs, other than those described in the user documentation, to a professional service person.
This product is designed, tested, and approved to meet strict global safety standards with the use of specific Lexmark
components. The safety features of some parts may not always be obvious. Lexmark is not responsible for the use of
other replacement parts.
CAUTION—SHOCK HAZARD: Do not use the fax feature during a lightning storm. Do not set up this product
or make any electrical or cabling connections, such as the power supply cord or telephone, during a lightning
storm.
Use care when you replace a lithium battery.
CAUTION—POTENTIAL INJURY: There is a danger of explosion if a lithium battery is incorrectly replaced.
Replace it only with the same or equivalent type of lithium battery. Do not recharge, disassemble, or incinerate
a lithium battery. Discard used batteries according to the manufacturer's instructions and local regulations.
Finding information about the printer
Setup
sheet
Description Where to find
The Setup sheet gives you instructions for setting up
hardware and software.
You can find this document in the printer box or on the
Lexmark Web site at www.lexmark.com.
3
Page 4

Getting Started
Description Where to find
or
Setup Solutions
booklet
The Getting Started booklet gives you instructions for
setting up hardware and software (on Windows
operating systems) and some basic instructions for
using the printer.
Note: If your printer supports Macintosh operating
systems, see the Mac Help:
You can find this document in the printer box or on the
Lexmark Web site at www.lexmark.com.
1 From the Finder desktop, double-click the Lexmark
5400 Series folder.
2 Double-click the printer Help icon.
The Setup Solutions booklet tells you how to solve
printer setup problems.
Note: These documents do not ship with all printers. If
you did not receive a Getting Started booklet or a Setup
Solutions booklet, see the User's Guide instead.
User's Guide
Description Where to find
The User's Guide gives you instructions for using the
printer and other information such as:
• Using the software (on Windows operating systems)
• Loading paper
• Printing
• Working with photos
• Scanning (if supported by your printer)
• Making copies (if supported by your printer)
• Faxing (if supported by your printer)
• Maintaining the printer
• Connecting the printer to a network (if supported by
your printer)
• Troubleshooting problems with printing, copying,
scanning, faxing, paper jams, and misfeeds
Note: If your printer supports Macintosh operating
systems, see the Mac Help:
1 From the Finder desktop, double-click the Lexmark
5400 Series folder.
When you install the printer software, the User's Guide
will be installed.
1 Click Start Programs or All Programs Lexmark
5400 Series.
2 Click User's Guide.
I f t h e l in k t o t h e User's Guide i s n ot o n y o ur d e sk t op , fo l l ow
these instructions:
1 Insert the CD.
The installation screen appears.
Note: If necessary, click Start Run, and then type
D:\setup, where D is the letter of your CD-ROM drive.
2 Click View User's Guide (including Setup
Troubleshooting).
3 Click Yes.
An icon of the User's Guide appears on your desktop,
and the User's Guide appears on the screen.
You can also find this document on the Lexmark Web site
at www.lexmark.com.
2 Double-click the printer Help icon.
4
Page 5
Help
Description Where to find
The Help gives you instructions for using the software, if
your printer connects to a computer.
While in any Lexmark software program, click Help,
Tips Help, or Help Help Topics.
Lexmark Solution Center
Description Where to find
The Lexmark Solution Center software is included on
your CD. It installs with the other software, if your printer
connects to a computer.
To access the Lexmark Solution Center:
1 Click Start Programs or All Programs Lexmark
5400 Series.
2 Select Lexmark Solution Center.
Customer support
Description Where to find (North America) Where to find (rest of world)
Telephone support
Call us at
• US: 1-800-332-4120
Monday–Friday (8:00 AM–11:00 PM EST)
Saturday (Noon–6:00 PM EST)
• Canada: 1-800-539-6275
Monday–Friday (9:00 AM–9:00 PM EST)
Saturday (Noon–6:00 PM EST)
Telephone numbers and support hours vary
by country or region.
Visit our Web site at www.lexmark.com.
Select a country or region, and then select
the Customer Support link.
Note: For additional information about
contacting Lexmark, see the printed
warranty that shipped with your printer.
• Mexico: 001-888-377-0063
Monday–Friday (8:00 AM–8:00 PM EST)
E-mail support
Note: Support numbers and times may
change without notice. For the most recent
phone numbers available, see the printed
warranty statement that shipped with your
printer.
For e-mail support, visit our Web site:
www.lexmark.com.
1 Click CUSTOMER SUPPORT.
2 Click Technical Support.
3 Select your printer family.
4 Select your printer model.
5 From the Support Tools section, click e-
Mail Support.
6 Complete the form, and then click Submit
Request.
E-mail support varies by country or region,
and may not be available in some instances.
Visit our Web site at www.lexmark.com.
Select a country or region, and then select
the Customer Support link.
Note: For additional information about
contacting Lexmark, see the printed
warranty that shipped with your printer.
5
Page 6

Limited Warranty
Description Where to find (US) Where to find (rest of world)
Limited Warranty Information
Lexmark International, Inc.
furnishes a limited warranty that
this printer will be free of defects in
materials and workmanship for a
period of 12 months after the
original date of purchase.
To view the limitations and conditions of
this limited warranty, see the Statement of
Limited Warranty included with this
printer, or set forth at
www.lexmark.com.
1 Click CUSTOMER SUPPORT.
2 Click Warranty Information.
Warranty information varies by
country or region. See the printed
warranty that shipped with your
printer.
3 From the Statement of Limited
Warranty section, click Inkjet &
All-In-One Printers.
4 Scroll through the Web page to view
the warranty.
Record the following information (located on the store receipt and the back of the printer), and have it ready when
you contact us so that we may serve you faster:
• Machine Type number
• Serial number
• Date purchased
• Store where purchased
Using the control panel buttons and menus
Using the control panel
The display shows:
• Printer status
• Messages
• Menus
6
Page 7
2
6
3
4
5
1
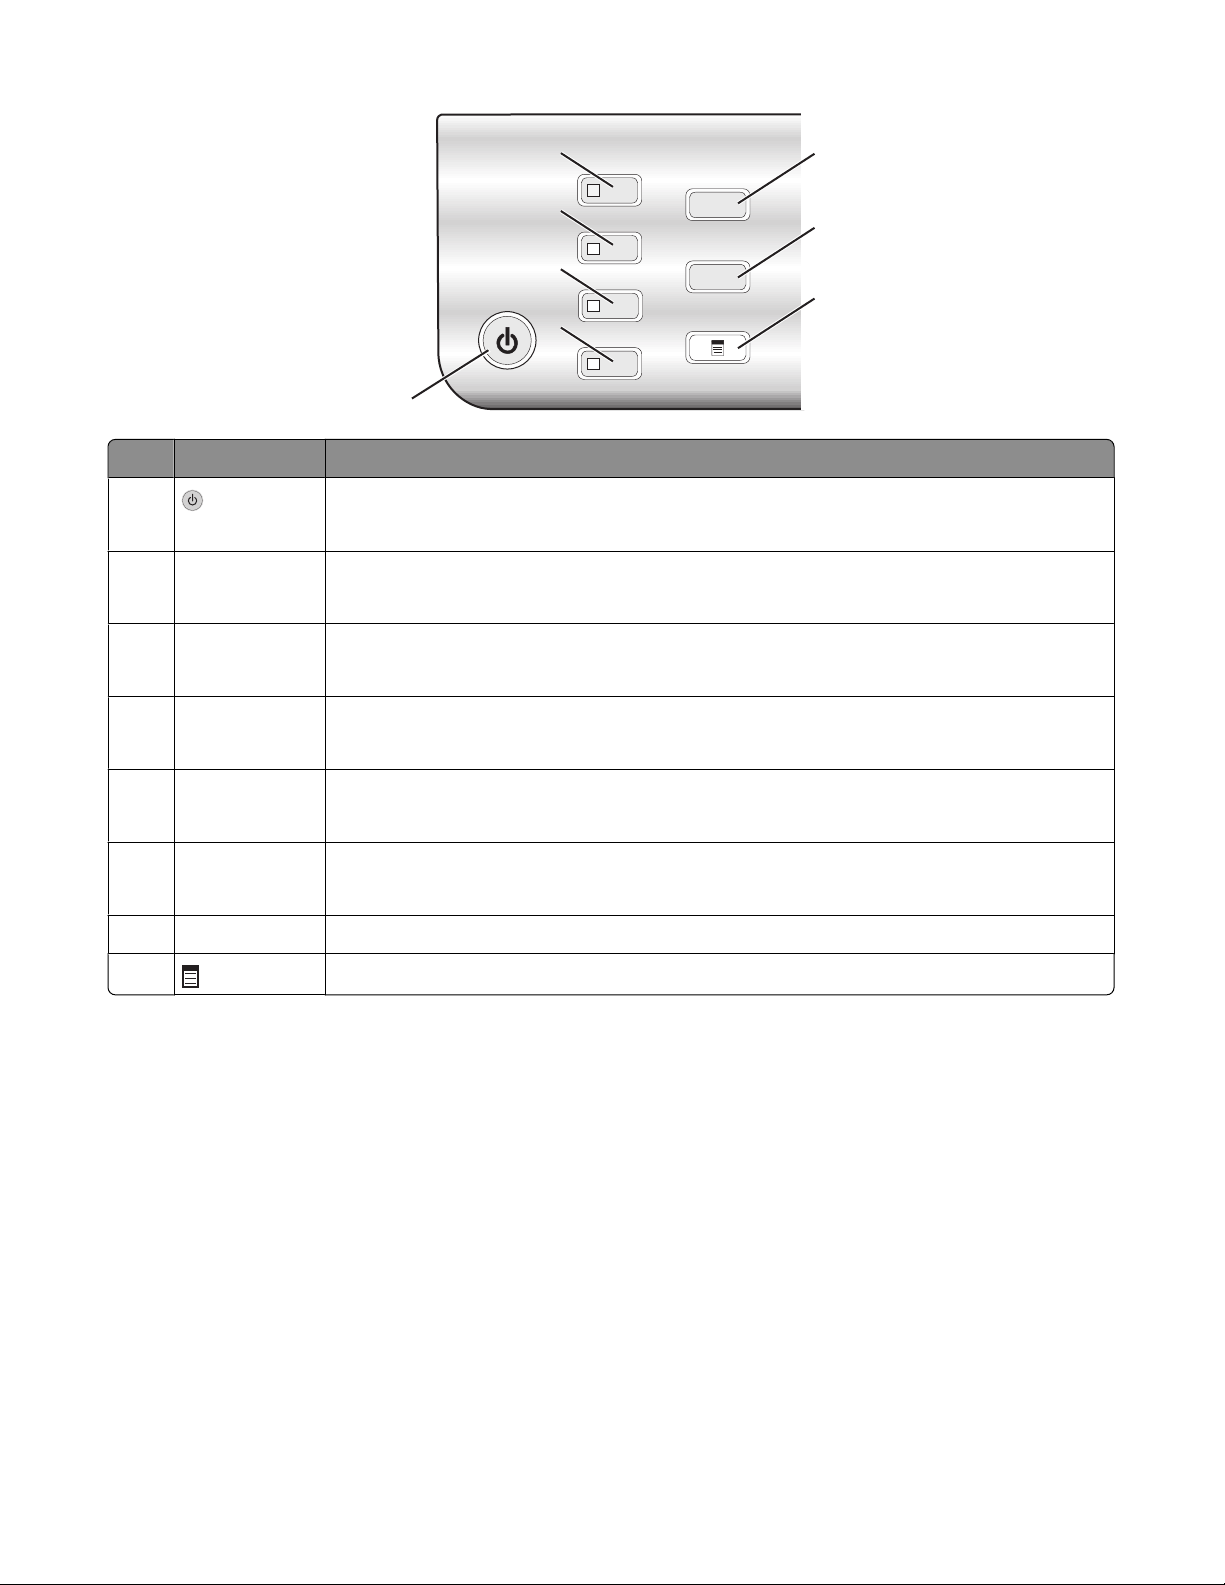
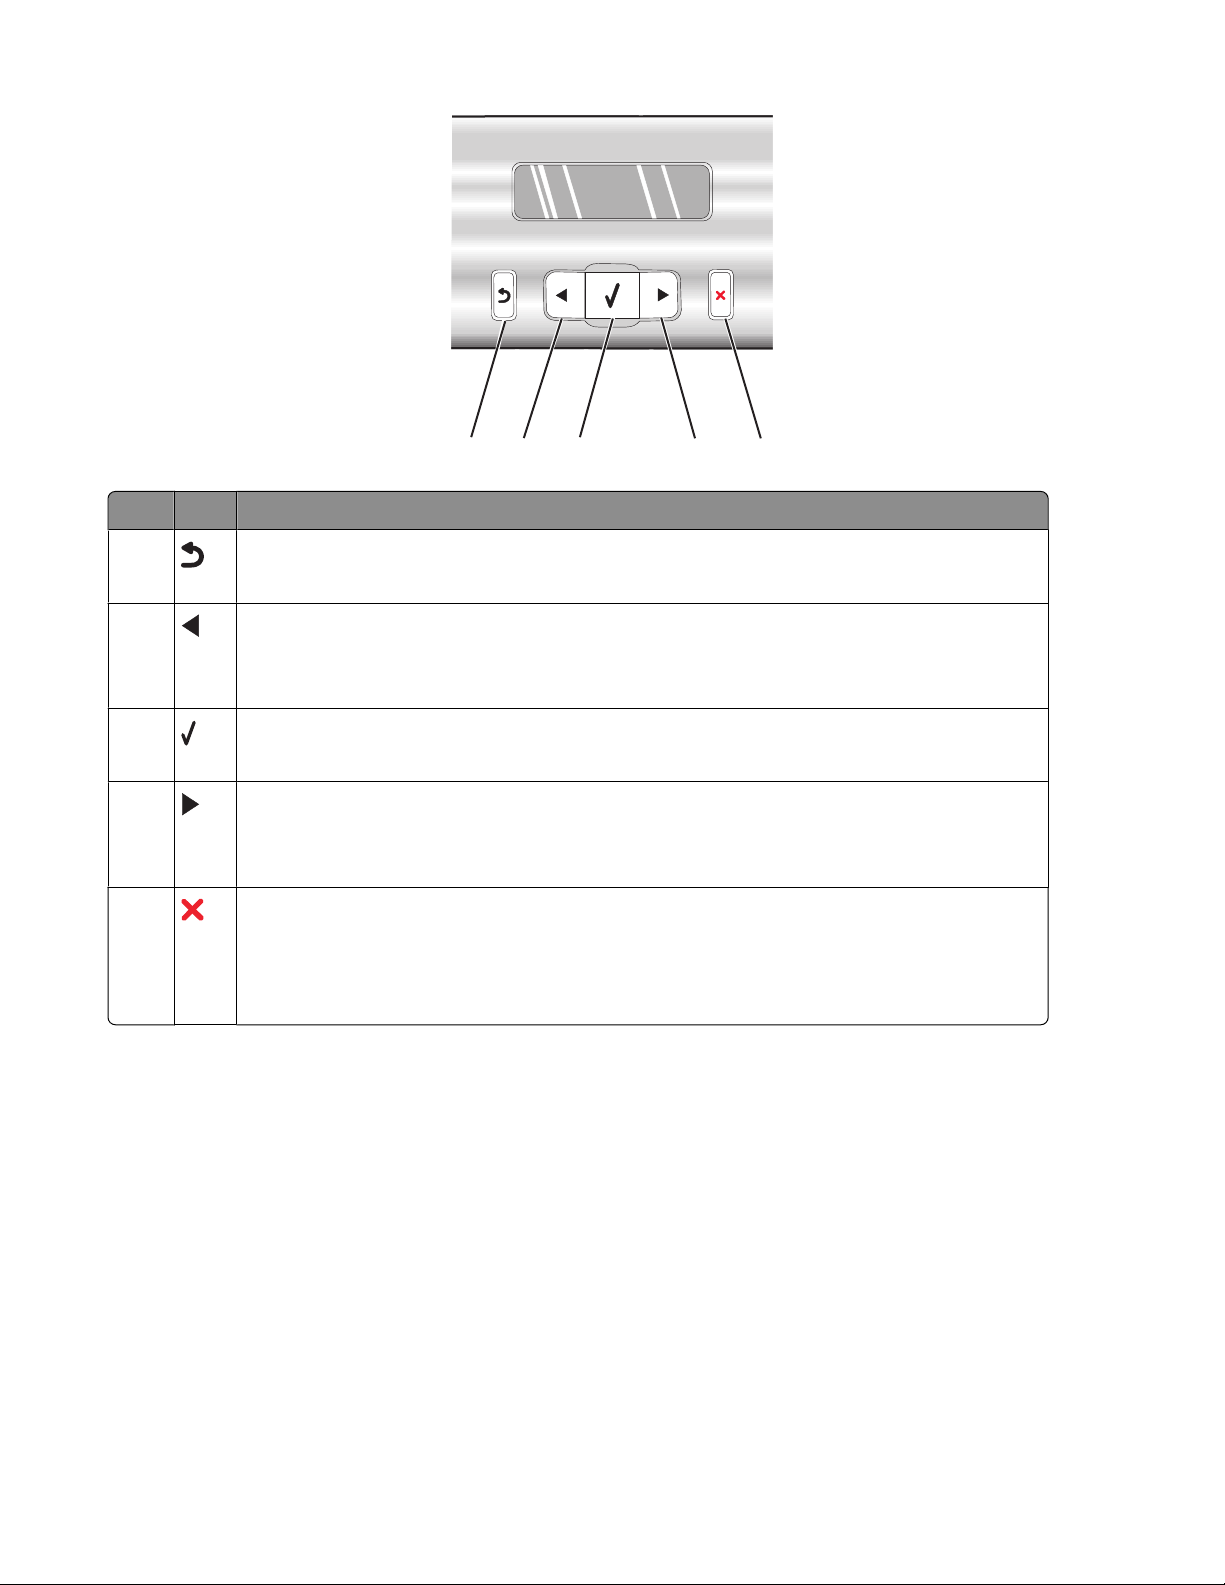
Press To
1
• Turn the printer on and off.
• Stop the print, copy, scan, or fax process.
Copy Mode Access the copy default screen and make copies.
2
Note: The mode is selected when the button light is on.
Scan Mode Access the scan default screen and scan documents.
3
Note: The mode is selected when the button light is on.
Fax Mode Access the fax default screen and send faxes.
4
Note: The mode is selected when the button light is on.
7
8
Photo Card Access the photo default screen and print photos.
5
Note: The mode is selected when the button light is on.
Resize
6
• In Copy mode: Change the size of a copy.
• In Photo Card mode: Change the size of a photo.
Lighter / Darker Adjust the brightness of a copy, fax, or photo.
7
8
Display the Copy, Scan, Fax, or Photo Card menu, depending on which mode is selected.
7
Page 8
Press To
2
1
3
4
5
1
• Return to the previous screen.
• Delete a letter or number.
2
• Decrease a number.
• Delete a letter or number.
• Scroll through menus, submenus, or settings on the display.
3
• Select a menu or submenu item that appears on the display.
• Feed or eject paper.
4
• Increase a number.
• Enter a space between letters or numbers.
• Scroll through menus, submenus, or settings on the display.
5
• Cancel a print, copy, scan, or fax job in progress.
• Clear a fax number or end a fax transmission and return to the fax default screen.
• Exit a menu or submenu, and return to the default copy, scan, fax, or photo card screen.
• Clear current settings or error messages, and return to default settings.
8
Page 9

1
2
3
4
Press To
A keypad number or symbol In Copy mode or Photo Card mode: Enter the number of copies or prints you
1
want to make.
In Fax mode:
5
6
• Enter fax numbers.
• Navigate an automated answering system.
• Select letters when creating a Speed Dial list.
• Type numbers to enter or edit the date and time shown on the display.
Auto Answer Set the printer to answer all incoming calls when the button light is on.
2
Pause / Redial In Fax mode:
3
• Display the last number dialed. Press or to view the last five numbers
dialed.
• Insert a three-second pause in the number to be dialed to wait for an
outside line or get through an automated answering system. Enter a pause
only when you have already begun entering the number.
Phone Book Access any of the programmed Speed Dial numbers (1–89) or Group Dial
4
numbers (90–99).
Start Color Start a color copy, scan, fax, or photo print job, depending on which mode is
5
selected.
Start Black Start a black-and-white copy, scan, fax, or photo print job, depending on
6
which mode is selected.
Using the Copy menu
To access and navigate the Copy menu:
1 From the control panel, press Copy Mode.
The copy default screen appears.
2 If you do not want to change a setting, press Start Color or Start Black.
3 If you want to change a setting, press .
4 Press or repeatedly until the menu item you want appears.
5 Press .
9
Page 10

6 Press or repeatedly until the submenu item you want or the setting you want appears.
7 Press .
Note: Pressing
selects a setting. An * appears next to the selected setting.
8 To go into additional submenus and settings, repeat step 6 and step 7 as needed.
9 If needed, press repeatedly to return to the previous menus and make other setting selections.
10 Press Start Color or Start Black.
Use this To
Copies
Resize
1
1
Specify how many copies to print.
• Specify the percentage for enlarging or reducing the original copy.
• Specify a specific copy size.
• Create a multiple-page poster.
Lighter / Darker
Quality
1
1
Paper Size Specify the size of the paper loaded.
Paper Type Specify the type of paper loaded.
Repeat Image
1
Collate Print one or more copies in the correct order.
1
N-Up
Original Size
Original Type
1
1
Adjust the brightness of a copy.
Adjust the quality of a copy.
Choose how many copies of an image to print on a page.
Choose how many pages to print on a page.
Specify the size of the original document.
Specify the type of the original document.
Tools
• Maintenance
– View ink levels.
– Clean cartridges.
– Align cartridges.
– Print a test page.
• Device Setup—Customize printer setup settings.
• Defaults—Customize printer settings.
1
Temporary setting. For information on saving temporary and other settings, see “Saving settings” on page 14.
Using the Scan menu
To access and navigate the Scan menu:
1 From the control panel, press Scan Mode.
The scan default screen appears.
2 Press or repeatedly until the scan destination you want appears.
10
Page 11

3 If you do not want to change a setting, press Start Color or Start Black.
4 If you want to change a setting, press .
5 Press or repeatedly until the menu item you want appears.
6 Press .
7 Press or repeatedly until the submenu item you want or the setting you want appears.
8 Press .
Note: Pressing
selects a setting. An * appears next to the selected setting.
9 To go into additional submenus and settings, repeat step 7 and step 8 as needed.
10 If needed, press repeatedly to return to the previous menus and make other setting selections.
11 Press Start Color or Start Black.
Use this To
Quality
Original Size
Tools
1
1
Adjust the quality of a scan.
Specify the size of the original document.
• Maintenance
– View ink levels.
– Clean cartridges.
– Align cartridges.
– Print a test page.
• Device Setup—Customize printer setup settings.
• Defaults—Customize printer settings.
1
Temporary setting. For information on saving temporary and other settings, see “Saving settings” on page 14.
Using the Fax menu
To access and navigate the Fax menu:
1 From the control panel, press Fax Mode.
The fax default screen appears.
2 If you do not want to change a setting, enter the fax number and press Start Color or Start Black.
3 If you want to change a setting, press .
4 Press or repeatedly until the menu item you want appears.
5 Press .
6 Press or repeatedly until the submenu item you want or the setting you want appears.
7 Press .
Note: Pressing
8 To go into additional submenus and settings, repeat step 6 and step 7 as needed.
selects a setting. An * appears next to the selected setting.
11
Page 12

9 If needed, press repeatedly to return to the previous menus and make other setting selections.
10 Press Start Color or Start Black.
Use this To
Quality
Phone Book Add, edit, and print names and fax numbers of individuals or groups.
On Hook Dial Dial a telephone number while listening to the call through a speaker
Delay Fax Enter a specific time to send a fax.
Auto Answer Answer all incoming phone calls.
Lighter / Darker
1
1
Adjust the quality of a fax you are sending.
on the printer. This is useful when you must navigate an automated
answering system before sending your fax.
Note: Make sure the date and time are entered correctly before setting
a specific time to send a fax.
Adjust the brightness of a fax you are sending.
Fax Setup
• Print fax history or transmission status reports.
• Customize settings for receiving a fax.
• Select fax printing options.
• Customize settings for sending a fax.
• Block faxes from the numbers you specify.
Tools
• Maintenance
– View ink levels.
– Clean cartridges.
– Align cartridges.
– Print a test page.
• Device Setup—Customize printer setup settings.
• Defaults—Customize printer settings.
1
Temporary setting. For information on saving temporary and other settings, see “Saving settings” on page 14.
Using the Photo Card menu
1 If necessary, press Photo Card, or insert a memory card or a flash drive into the printer.
2 Press or repeatedly until the menu item you want appears.
3 Press .
4 Press or repeatedly until the submenu item you want or the setting you want appears.
5 Press .
Note: Pressing
selects a setting. An * appears next to the selected setting.
6 To go into additional submenus and settings, repeat step 4 and step 5 as needed.
12
Page 13

7 If needed, press repeatedly to return to the previous menus and make other setting selections.
8 Press Start Color or Start Black.
Menu item Action
Proof Sheet Print and then scan a proof sheet:
• for all photos on the memory card
• for the most recent 20 photos
• by date
Print Photos Print photos directly from a memory card or flash drive.
Save Photos
• Save photos stored on a memory card or flash drive to the computer.
• Copy photos from a memory card to a flash drive.
Photo Effects
Paper Size1
Photo Size1
Layout
Quality
1
1
Paper Type1
Tools
1
2
2
2
Apply red-eye reduction, color effects, or automatic image enhancement to
your photos.
Specify the size of the paper loaded.
Specify the size photo you want.
Center one photo on a page, or specify the number of photos to print on a
page.
Adjust the quality of printed photos.
Specify the type of paper loaded.
• Maintenance
– View ink levels.
– Clean cartridges.
– Align cartridges.
– Print a test page.
• Device Setup—Customize printer setup settings.
• Defaults—Reset printer settings to factory defaults.
1
Setting will return to factory default setting when a memory card or flash drive is removed.
2
Setting must be saved individually. For more information, see Note below table.
Note: To save Paper Size, Paper Type, or Photo Size settings:
1 Press .
2 Press or repeatedly until Tools appears.
3 Press .
4 Press or repeatedly until Defaults appears.
5 Press .
6 Press or repeatedly until the setting type you want appears.
7 Press .
13
Page 14

8 Press or repeatedly until the setting you want appears.
9 Press .
Saving settings
In a setting menu, an * appears next to the default setting. To change the setting:
1 Press or repeatedly until the setting you want appears.
2 Press :
• To save most settings. An * appears next to the saved setting.
• To select a temporary setting. An * appears next to the selected setting.
Note: The printer reverts to the default setting of a temporary setting after two minutes of inactivity or if
the printer is turned off.
Temporary settings
Copy Mode
– Copies
– Resize
– Lighter/Darker
– Quality
– Repeat Image
– N-Up
– Original Size
– Original Type
Scan Mode
– Quality
– Original Size
– Resize
Fax Mode
– Lighter/Darker
– Quality
Photo Card The following Photo Card settings will not time-out after two minutes of
inactivity or turning off the power but will return to the factory default settings
when a memory card or flash drive is removed.
– Photo Effects
– Paper Size
– Photo Size
– Layout
– Quality
– Paper Type
To change the time-out feature:
a Press .
b Press or repeatedly until Tools appears.
c Press .
14
Page 15

d Press or repeatedly until Device Setup appears.
e Press .
f Press or repeatedly until Clear Settings Timeout appears.
g Press .
h Press or repeatedly until Never appears.
i Press .
3 To change one or more temporary settings into new default settings:
a Press .
b Press or repeatedly until Tools appears.
c Press .
d Press or repeatedly until Defaults appears.
e Press .
f Press or repeatedly until Set Defaults appears.
g Press .
h Press or repeatedly until Use Current appears.
i Press .
Changing print cartridges
Removing a used print cartridge
1 Make sure the printer is on.
2 Lift the scanner unit.
The print cartridge carrier moves and stops at the loading position, unless the printer is busy.
15
Page 16

3 Press down on the cartridge carrier lever to raise the cartridge carrier lid.
4 Remove the used print cartridge.
Note: If you are removing both cartridges, repeat step 3 and step 4 for the second cartridge.
Installing print cartridges
1 If you are installing new print cartridges, remove the sticker and tape from the back and bottom of the cartridges.
1
Warning—Potential Damage: Do not touch the gold contact area on the back or the metal nozzles on the
bottom of the cartridges.
2 Press down on the cartridge carrier levers to raise the cartridge carrier lids.
3 Insert the black cartridge or the photo cartridge in the left carrier. Insert the color cartridge in the right carrier.
2
16
Page 17

4 Close the lids.
5 Close the scanner unit, making sure to keep your hands out from underneath the scanner unit.
The control panel display will prompt you to load paper and press to print an alignment page.
Note: The scanner unit must be closed to start a new scan, print, copy, or fax job.
Achieving better print quality
Improving print quality
If you are not satisfied with the print quality of a document, make sure you:
• Use the appropriate paper for the document. If you are printing photos or other high quality images, for best
results use Lexmark Premium Photo Paper or Lexmark Photo Paper.
• Use a paper that is a heavier weight or bright white.
• Select a higher print quality.
If the document still does not have the print quality you want, follow these steps:
1 Align the print cartridges. For more information, see “Aligning print cartridges” on page 18.
If print quality has not improved, continue to step 2.
2 Clean the print cartridge nozzles. For more information, see “Cleaning the print cartridge nozzles” on page 18.
If print quality has not improved, continue to step 3.
17
Page 18

3 Remove and reinsert the cartridges. For more information, see “Removing a used print cartridge” on page 15 and
“Installing print cartridges” on page 16.
If print quality has not improved, continue to step 4.
4 Wipe the print cartridge nozzles and contacts. For more information, see “Wiping the print cartridge nozzles and
contacts” on page 19.
If print quality is still not satisfactory, replace the cartridge. For more information, see “Ordering supplies” on
page 20.
Aligning print cartridges
1 Load plain or heavyweight matte paper.
2 From the control panel, press Copy Mode.
3 Press .
4 Press or repeatedly until Tools appears.
5 Press .
6 Press or repeatedly until Maintenance appears.
7 Press .
8 Press or repeatedly until Align Cartridges appears
9 Press .
An alignment page prints.
If you aligned the cartridges to improve print quality, print your document again. If print quality has not improved,
clean the print cartridge nozzles.
Cleaning the print cartridge nozzles
1 Load plain paper.
2 Press Copy Mode.
3 Press .
4 Press or repeatedly until Tools appears.
5 Press .
6 Press or repeatedly until Maintenance appears.
7 Press .
8 Press or repeatedly until Clean Cartridges appears.
9 Press .
A page prints, forcing ink through the print cartridge nozzles to clean them.
10 Print the document again to verify that the print quality has improved.
11 If print quality has not improved, try cleaning the nozzles up to two more times.
18
Page 19

Wiping the print cartridge nozzles and contacts
1 Remove the print cartridges.
2 Dampen a clean, lint-free cloth with water.
3 Gently hold the cloth against the nozzles for about three seconds, and then wipe in the direction shown.
4 Using another clean section of the cloth, gently hold the cloth against the contacts for about three seconds, and
then wipe in the direction shown.
5 With another clean section of the cloth, repeat step 3 and step 4.
6 Let the nozzles and contacts dry completely.
7 Reinsert the print cartridges.
8 Print the document again.
9 If the print quality does not improve, clean the print nozzles. For more information, see “Cleaning the print
cartridge nozzles” on page 18.
10 Repeat step 9 up to two more times.
11 If print quality is still not satisfactory, replace the print cartridges.
19
Page 20

Ordering supplies
Ordering cartridges
Lexmark 5490 Series models
Item Part number
Black cartridge
Color cartridge
Black cartridge 28A 215
Color cartridge 29A 185
High yield black cartridge 34 550
High yield color cartridge 35 500
Photo cartridge 31 Not applicable
1
Values obtained by continuous printing. Declared yield value in accordance with ISO/IEC 24711 (FDIS).
2
Licensed Return Program Cartridge
Lexmark 5400 Series models (except Lexmark 5490)
Item Part number
Black cartridge 32
Color cartridge 33
High-yield black cartridge 34
2
2
28 215
29 185
Average cartridge standard page yield is up to
1
High-yield color cartridge 35
Photo cartridge 31
Ordering paper and other supplies
To order paper and other supplies or to locate a dealer near you, visit our Web site at www.lexmark.com.
Notes:
• For best results when printing photos or other high-quality images, use Lexmark Premium Photo Paper or
Lexmark Photo Paper.
• To prevent smudging, avoid touching the surface of a printed photo. For best results, remove each printed sheet
individually from the paper exit tray, and allow the prints to dry at least 24 hours before stacking, displaying, or
storing.
20
Page 21

To order a USB cable (part number 1021294), go to www.lexmark.com.
Paper Paper size
Lexmark Premium Photo Paper
• 4 x 6 in.
• 10 x 15 cm
• Letter
• A4
• L
Lexmark Photo Paper
• 4 x 6 in.
• 10 x 15 cm
• Letter
• A4
Setup troubleshooting
• “Incorrect language appears on the display” on page 21
• “Power button is not lit” on page 22
• “Software does not install” on page 22
• “Page does not print” on page 23
• “Cannot print from digital camera using PictBridge” on page 24
Incorrect language appears on the display
Correcting a language
selection during initial
setup
Selecting a different
language after initial
setup
After you select a language, Language appears again on the display. To change the
selection:
1 Press or repeatedly until the language you want appears on the display.
2 Press to save.
1 From the control panel, press Copy Mode.
2 Press .
3 Press or repeatedly until Tools appears.
4 Press .
5 Press or repeatedly until Device Setup appears.
6 Press .
7 Press or repeatedly until Language appears.
8 Press .
9 Press or repeatedly until the language you want appears on the display.
10 Press to save.
Note: If you cannot understand the language on the display, see “Resetting to factory
default settings” on page 24.
21
Page 22

Power button is not lit
Check power connection
1 Disconnect the power cord from the wall outlet, and then from the printer.
2 Plug the cord all the way into the power supply on the printer.
3 Plug the cord into an electrical outlet that other electrical devices have been using.
4 If the light is not on, press .
Software does not install
Check your operating
system
Check your system
requirements
USB cable may not be
connected
The following operating systems are supported: Windows 98/Me, Windows 2000,
Windows XP, and Mac OS X.
Check that your computer meets the minimum system requirements listed on the box.
1 Check the USB cable for any obvious damage.
2 Firmly plug the square end of the USB cable into the back of the printer.
3 Firmly plug the rectangular end of the USB cable into the USB port of the computer.
Use these steps to install
the printer software
May need to reconnect
power supply
Other software may be
running
The USB port is marked with the
USB symbol.
1 Turn off and then restart your computer.
2 Click Cancel on all New Hardware Found screens.
3 Insert the CD, and then follow the instructions on the computer screen to reinstall
the software.
1 Press to turn the printer off.
2 Disconnect the power cord from the wall outlet.
3 Gently remove the power supply from the printer.
4 Reconnect the power supply to the printer.
5 Plug the power cord into the wall outlet.
6 Press to turn the printer on.
1 Close all open software applications.
2 Disable any anti-virus programs.
3 Double-click the My Computer icon.
In Windows XP, click Start to access the My Computer icon.
4 Double-click the CD–ROM drive icon.
5 If necessary, double-click setup.exe.
6 Follow the instructions on the computer screen to install the software.
22
Page 23

Software may not be
installed correctly
1 Uninstall the printer software, and then reinstall it. For more information, see
“Removing and reinstalling the software” on page 25.
2 If the software still does not install correctly, visit our Web site at
www.lexmark.com to check for the latest software.
a In all countries or regions except the United States, select your country or region.
b Click the links for drivers or downloads.
c Select your printer family.
d Select your printer model.
e Select your operating system.
f Select the file you want to download, and then follow the directions on the
computer screen.
Page does not print
Check messages If an error message is displayed, see “Error messages” in the “Troubleshooting” chapter
of the User's Guide.
Check power
Paper may not be loaded
correctly
Check ink Check the ink levels, and install new print cartridges if necessary.
Cartridges may have tape
on them
If the light is not on, see “Power button is not lit” on page 22.
Remove and then load paper.
1 Remove the print cartridges.
2 Make sure the sticker and tape have been removed.
1
2
3 Reinsert the cartridges.
Make sure the printer is
set as the default printer
and is not on hold or
paused.
1 Click:
• In Windows XP Pro: Start Settings Printers and Faxes.
• In Windows XP Home: Start Control Panel Printers and Faxes.
• In Windows 2000: Start Settings Printers.
• In Windows 98/Me: Start Settings Printers.
2 Double-click the name of your printer.
3 Click Printer.
• Make sure no check mark appears next to Pause Printing.
• Make sure a check mark does appear next to Set As Default.
23
Page 24

May need to reconnect
power supply
1 Press to turn the printer off.
2 Disconnect the power cord from the wall outlet.
3 Gently remove the power supply from the printer.
4 Reconnect the power supply to the printer.
5 Plug the power cord into the wall outlet.
6 Press to turn the printer on.
Software may not be
installed correctly
1 Uninstall the printer software, and then reinstall it. For more information, see
“Removing and reinstalling the software” on page 25.
2 If the software still does not install correctly, visit our Web site at
www.lexmark.com to check for the latest software.
a In all countries or regions except the United States, select your country or region.
b Click the links for drivers or downloads.
c Select your printer family.
d Select your printer model.
e Select your operating system.
f Select the file you want to download, and then follow the directions on the
computer screen.
Cannot print from digital camera using PictBridge
Enable PictBridge printing
from camera
Make sure the camera is
PictBridge-enabled
Enable PictBridge printing on the camera by selecting the correct USB mode. For more
information, see the digital camera documentation.
1 Disconnect the camera.
2 Connect a PictBridge-enabled digital camera to the PictBridge port. See the digital
camera documentation to determine whether it is PictBridge-enabled.
Check USB cable Use only the USB cable that came with the camera.
Remove memory cards Remove any memory cards from the printer.
Check messages If an error message is displayed, see “Error messages” in the “Troubleshooting” chapter
of the User's Guide.
Resetting to factory default settings
You can reset your printer to the original settings without using the printer menus.
Note: Resetting to factory default settings will delete all printer settings you selected, including Speed Dial and Group
Dial numbers.
1 Press , , and Start Color at the same time.
Warning—Potential Damage: Do not release the buttons until Language appears on the display indicating
that the printer has been reset.
2 Follow the prompts on the display to choose your language, country or region code, date, time, and fax number.
24
Page 25

Removing and reinstalling the software
If the printer is not functioning properly, or if a communications error message appears when you try to use the
printer, you may need to remove and reinstall the printer software.
1 Click Start Programs or All Programs Lexmark 5400 Series.
2 Select Uninstall.
3 Follow the instructions on the computer screen to remove the printer software.
4 Restart the computer before reinstalling the printer software.
5 Click Cancel on all New Hardware Found screens.
6 Insert the CD, and then follow the instructions on the computer screen to reinstall the software.
Note: If the install screen does not appear automatically after you restart your computer, click Start Run, and then
type D:\setup, where D is the letter of your CD-ROM drive.
25
 Loading...