

Page 1
Lexmark 5000 Series All-In-One
User Guide
May 2007 www.lexmark.com
Page 2

Page 3

Contents
Safety information.........................................................................................................7
Getting the printer ready to fax....................................................................................8
Choosing a fax connection..................................................................................................................8
Using an RJ11 adapter........................................................................................................................9
Connecting directly to a telephone wall jack.....................................................................................12
Connecting directly to a telephone wall jack in Germany..................................................................12
Connecting to a telephone................................................................................................................13
Connecting to an answering machine...............................................................................................14
Connecting to a computer with a modem..........................................................................................16
Using a digital phone service.............................................................................................................17
Faxing using the control panel...................................................................................18
Getting started...................................................................................................................................18
Sending a fax.....................................................................................................................................20
Receiving a fax..................................................................................................................................22
Customizing dial settings...................................................................................................................24
Customizing fax settings....................................................................................................................27
Managing fax jobs.............................................................................................................................29
Faxing using the computer.........................................................................................34
Getting started...................................................................................................................................34
Sending a fax.....................................................................................................................................36
Receiving a fax..................................................................................................................................36
Customizing dial settings...................................................................................................................37
Customizing fax settings....................................................................................................................39
Managing fax jobs.............................................................................................................................41
Printing.........................................................................................................................43
Getting started...................................................................................................................................43
Learning about the All-In-One software print options........................................................................48
Performing printing and related tasks................................................................................................50
Managing print jobs...........................................................................................................................56
Copying.........................................................................................................................58
Getting started...................................................................................................................................58
Performing copying and related tasks...............................................................................................60
Contents
3
Page 4

Scanning.......................................................................................................................64
Getting started...................................................................................................................................64
Learning about the All-In-One Center scan options..........................................................................65
Performing scanning and related tasks.............................................................................................71
Scanning over a network...................................................................................................................77
Working with photos...................................................................................................79
Getting started...................................................................................................................................79
Using a PictBridge-enabled digital camera to control printing photos...............................................80
Working with photos..........................................................................................................................81
Networking the printer.................................................................................................89
Networking overview.........................................................................................................................89
Selecting a network printer................................................................................................................89
Installing the printer on additional network computers......................................................................90
Printer sharing...................................................................................................................................90
Finding your MAC address................................................................................................................90
Understanding the printer...........................................................................................91
Understanding the printer parts.........................................................................................................91
Understanding the software.............................................................................................................104
Maintaining the printer..............................................................................................115
Print cartridges................................................................................................................................115
Printing a test page using the control panel....................................................................................120
Printing a test page using the computer..........................................................................................121
Improving print quality.....................................................................................................................121
Cleaning the exterior of the printer..................................................................................................122
Cleaning the scan lens and white roller...........................................................................................122
Refilling print cartridges...................................................................................................................123
Using genuine Lexmark print cartridges..........................................................................................123
Ordering print cartridges..................................................................................................................123
Ordering paper and other supplies..................................................................................................124
Finding information about the printer...............................................................................................125
Contacting Customer Support.........................................................................................................127
Troubleshooting.........................................................................................................128
Setup troubleshooting.....................................................................................................................128
Fax troubleshooting.........................................................................................................................133
Print troubleshooting........................................................................................................................142
Contents
4
Page 5

Copy troubleshooting.......................................................................................................................153
Scan troubleshooting.......................................................................................................................155
Jams and misfeeds troubleshooting................................................................................................160
Error messages...............................................................................................................................163
Settings are not saved.....................................................................................................................170
Resetting the printer to factory default settings...............................................................................170
Removing and reinstalling the software..........................................................................................171
Notices........................................................................................................................172
Edition notice...................................................................................................................................172
Product information.........................................................................................................................173
Power consumption.........................................................................................................................179
Networking glossary..................................................................................................185
Contents
5 6
Page 6

Page 7

Safety information
Use only the power supply and power supply cord provided with this product or the manufacturer's authorized
replacement power supply and power supply cord.
Connect the power supply cord to a properly grounded electrical outlet that is near the product and easily accessible.
CAUTION: Do not twist, bind, crush, or place heavy objects on the power cord. Do not subject the power cord
to abrasion or stress. Do not pinch the power cord between objects such as furniture and walls. If the power
cord is misused, a risk of fire or electrical shock results. Inspect the power cord regularly for signs of misuse.
Remove the power cord from the electrical outlet before inspecting it.
Use only a 26 AWG or larger telecommunications (RJ-11) cord when connecting this product to the public switched
telephone network.
Refer service or repairs, other than those described in the user documentation, to a professional service person.
This product is designed, tested, and approved to meet strict global safety standards with the use of specific Lexmark
components. The safety features of some parts may not always be obvious. Lexmark is not responsible for the use
of other replacement parts.
CAUTION: Do not use the fax feature during a lightning storm. Do not set up this product or make any electrical
or cabling connections, such as the power supply cord or telephone, during a lightning storm.
Safety information
7
Page 8
Getting the printer ready to fax
CAUTION: Do not use the fax feature during a lightning storm. Do not set up this product or make any electrical
or cabling connections, such as the power supply cord or telephone, during a lightning storm.
Choosing a fax connection
You can connect the printer with equipment such as a telephone, an answering machine, or a computer modem. If
problems occur, see the topics listed under “Setup troubleshooting” in the “Troubleshooting” chapter.
Notes:
• The printer is an analog device that works best when directly connected to the wall jack.
• Other devices (such as a telephone or answering machine) can be successfully attached to pass through the
printer, as described in the setup steps.
• If you want a digital connection such as ISDN, DSL, or ADSL, a third-party device (such as a DSL filter) is
required. For more information, see “Using a digital phone service” on page 17.
You do not need to attach the printer to a computer, but you do need to connect it to a telephone line to send and
receive faxes.
You can connect the printer to other equipment. See the following table to determine the best way to set up the
printer.
Equipment Benefits See this section
• The printer
• A telephone
cord
• A telephone wall
jack
• The printer
• An answering
machine
• Two telephone
cords
• A telephone wall
jack
• The printer
• A computer
modem
• Two telephone
cords
• A telephone wall
jack
• Use the fax line as a normal
telephone line.
• Send and receive faxes
without using a computer.
• Use the fax line as a normal
telephone line.
• Send and receive faxes
without using a computer.
• Receive incoming voice
messages.
• Use the fax line as a normal
telephone line.
• Send and receive faxes
without using a computer.
• Send faxes using the
computer.
For more information, see “Connecting directly to a
telephone wall jack” on page 12.
For more information, see “Connecting to an answering
machine” on page 14.
For more information, see “Connecting to a computer with
a modem” on page 16.
Related topics:
• “Setup troubleshooting” on page 128
• “Using a digital phone service” on page 17
Getting the printer ready to fax
8
Page 9

• “Connecting directly to a telephone wall jack” on page 12
• “Connecting to an answering machine” on page 14
Using an RJ11 adapter
Country/region
• United Kingdom
• Ireland
• Finland
• Norway
• Denmark
To connect your printer to an answering machine or other telecommunications equipment, use the telephone line
adapter included in the box with the printer.
1 Connect one end of the telephone cord into the Line port of the printer.
2 Connect the adapter to the telephone line that came with the printer.
• Italy
• Sweden
• Netherlands
• France
• Portugal
Note: The UK adapter is shown. Your adapter may look different, but it will fit the telephone outlet used in your
location.
3 Connect the telephone line of your chosen telecommunications equipment to the left outlet of the adapter.
Getting the printer ready to fax
9
Page 10

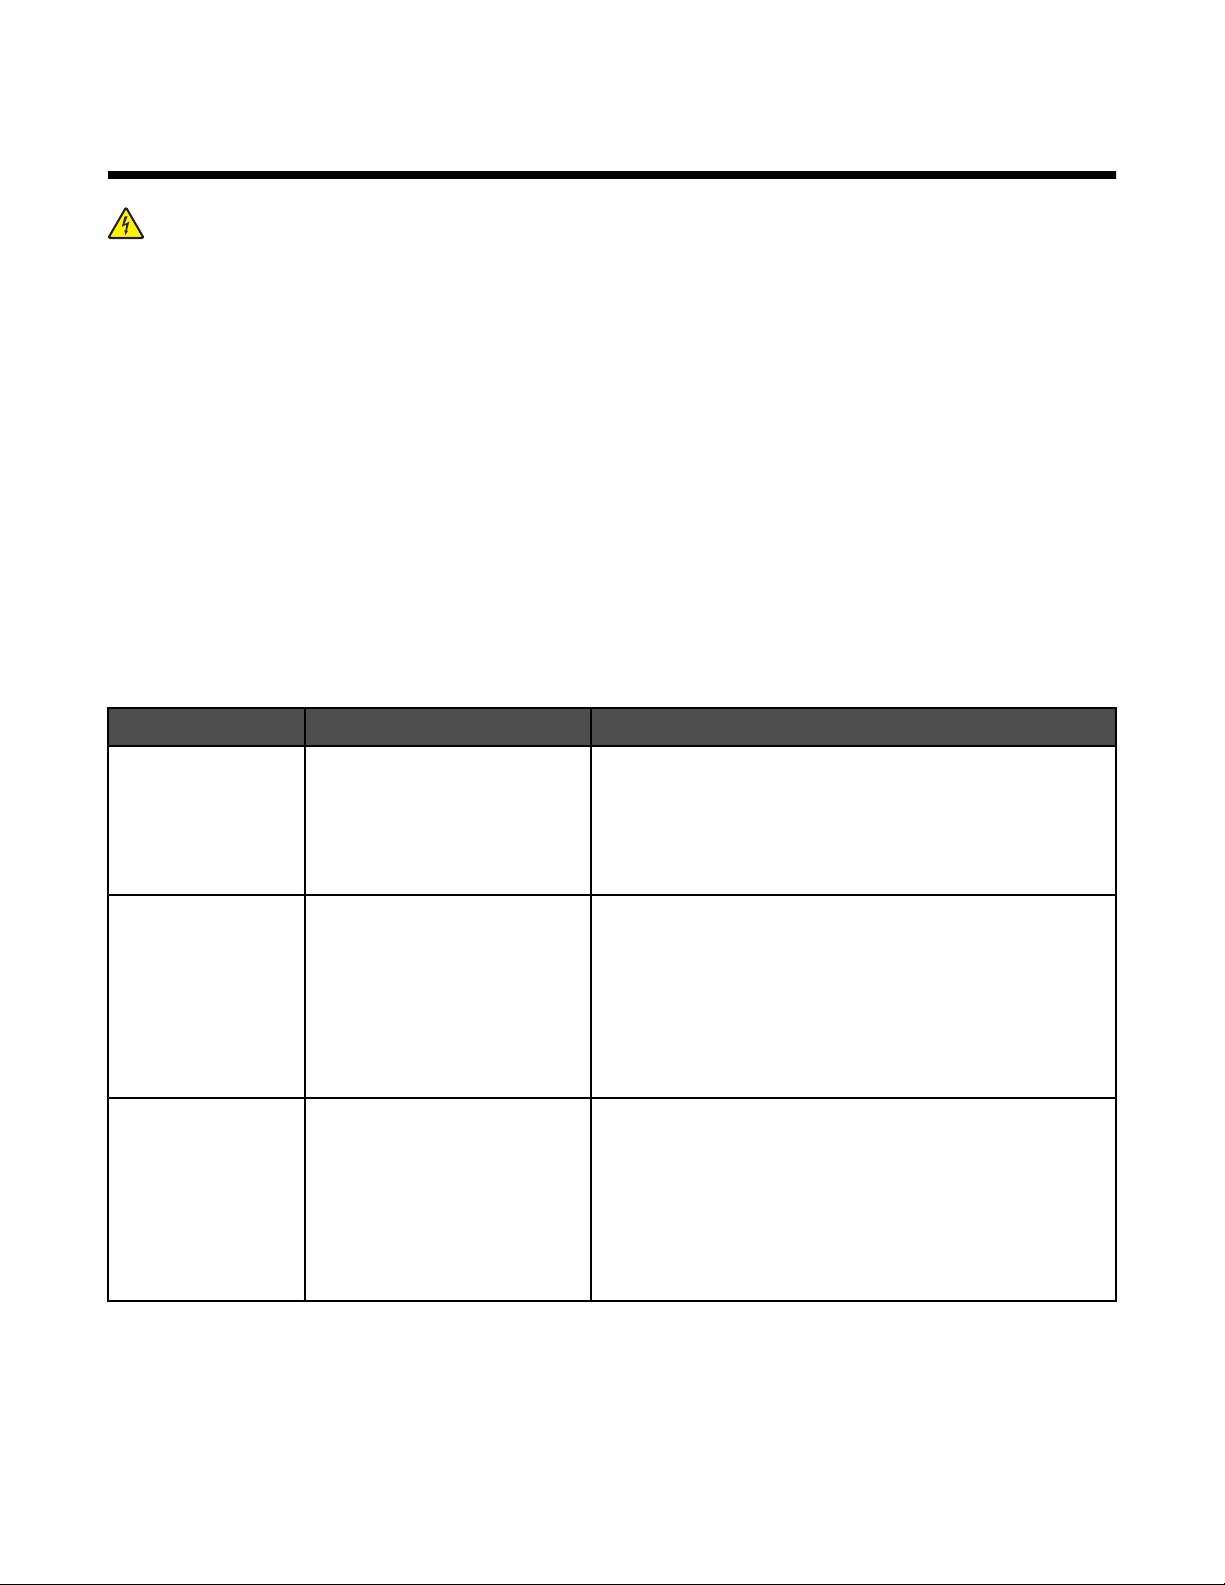
If your telecommunications equipment uses a US-style (RJ11) telephone line, follow these steps to connect the
equipment:
1 Remove the plug from the EXT port on the back of the printer.
Note: Once this plug is removed, any country- or region-specific equipment you connect to the printer by the
adapter, as shown, will not function properly.
2 Connect your telecommunications equipment directly to the EXT port on the back of the printer.
Warning: Do not touch cables or the printer in the area shown while actively sending or receiving a fax.
Country/region
• Saudi Arabia
• United Arab Emirates
• Egypt
• Bulgaria
• Czech Republic
• Belgium
• Australia
• South Africa
• Israel
• Hungary
• Poland
• Romania
• Russia
• Slovenia
• Spain
• Turkey
• Greece
Getting the printer ready to fax
10
Page 11
To connect an answering machine or other telecommunications equipment to the printer:
1 Remove the plug from the back of the printer.
Note: Once this plug is removed, any country- or region-specific equipment that you connect to the printer by
the adapter, as shown, will not function properly.
2 Connect your telecommunications equipment directly to the EXT port on the back of the printer.
Warning: Do not touch cables or the printer in the area shown while actively sending or receiving a fax.
Country/region
• Germany
• Austria
• Switzerland
There is a plug installed in the EXT port of the printer. This plug is necessary for the proper functioning of the printer.
Getting the printer ready to fax
11
Page 12
Note: Do not remove the plug. If you remove it, other telecommunications devices in your home (such as telephones
or answering machines) may not work.
Connecting directly to a telephone wall jack
Connect the printer directly to a telephone wall jack to make copies or to send and receive faxes without using a
computer.
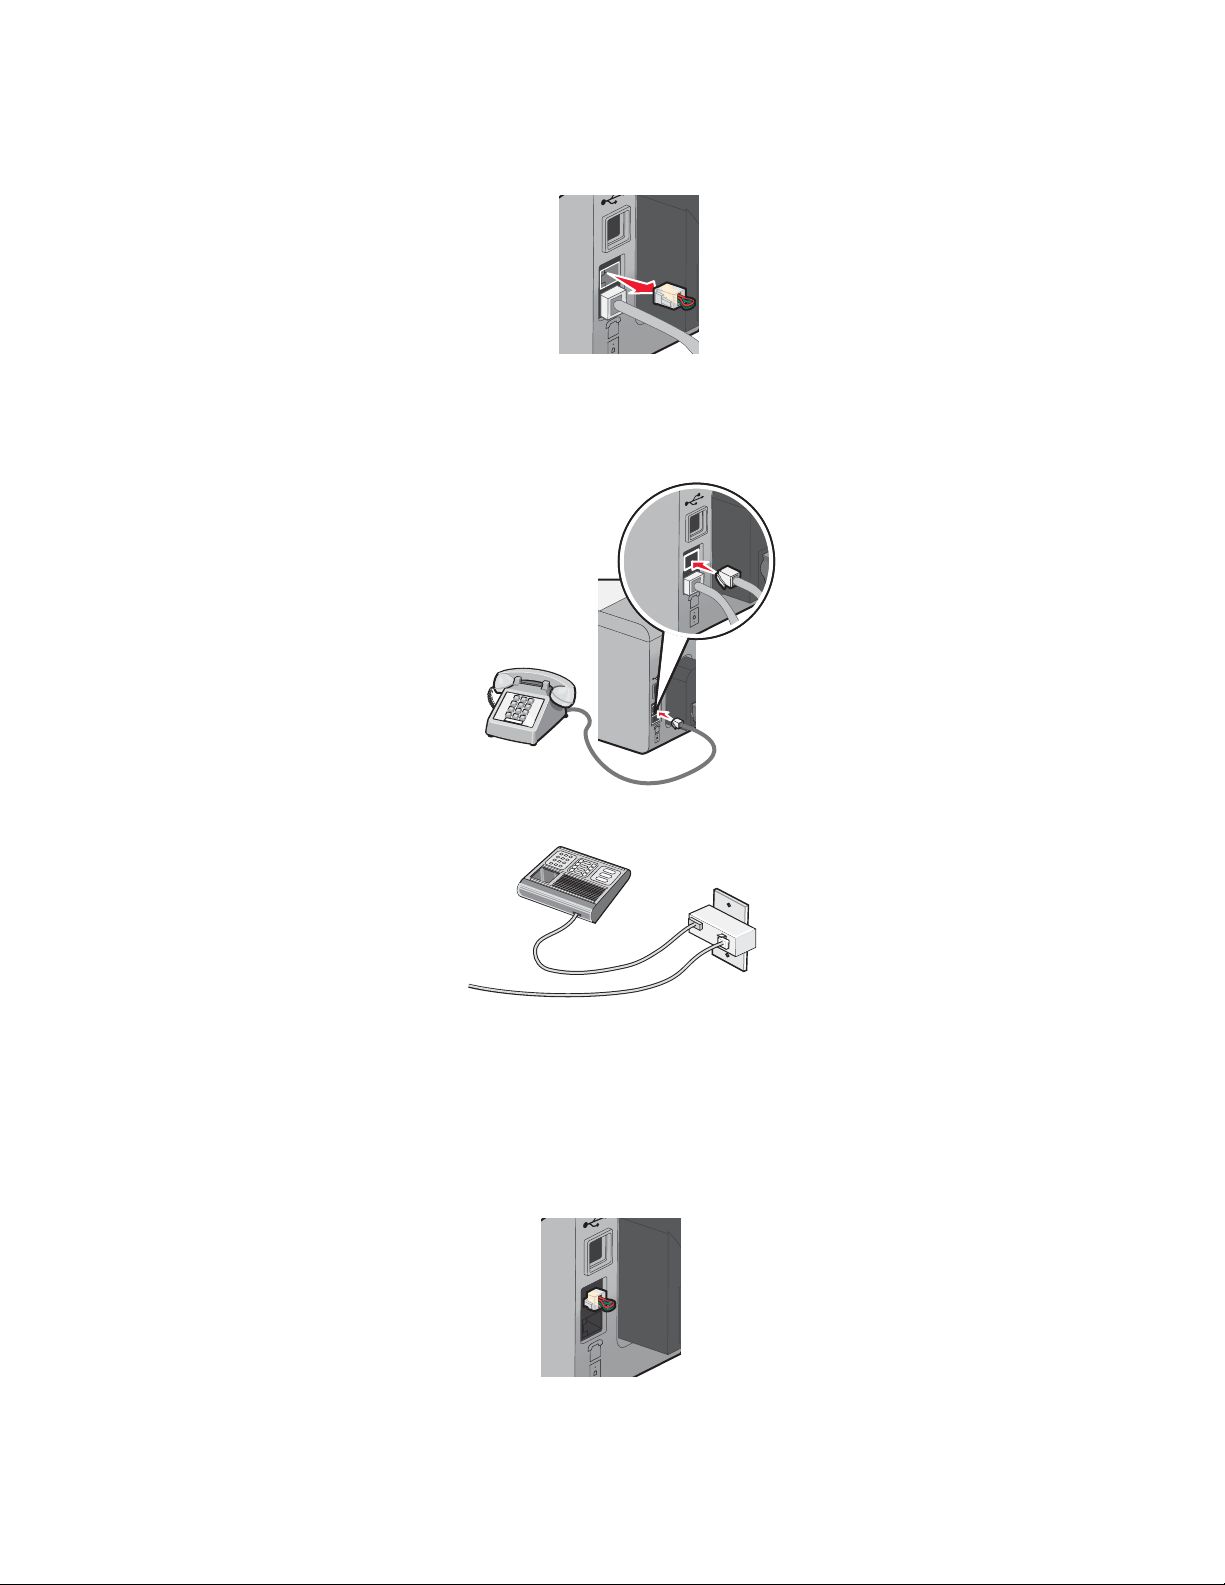
1 Make sure you have a telephone cord and a telephone wall jack.
2 Connect one end of the telephone cord into the LINE port of the printer.
3 Connect the other end of the telephone cord into an active telephone wall jack.
Connecting directly to a telephone wall jack in Germany
Connect the printer directly to a telephone wall jack to send and receive faxes without using a computer.
1 Make sure you have a telephone cord (provided with the product) and a telephone wall jack.
2 Connect one end of the telephone cord into the LINE port of the printer.
3 Connect the other end of the telephone cord into the N slot of an active telephone wall jack.
Getting the printer ready to fax
12
Page 13
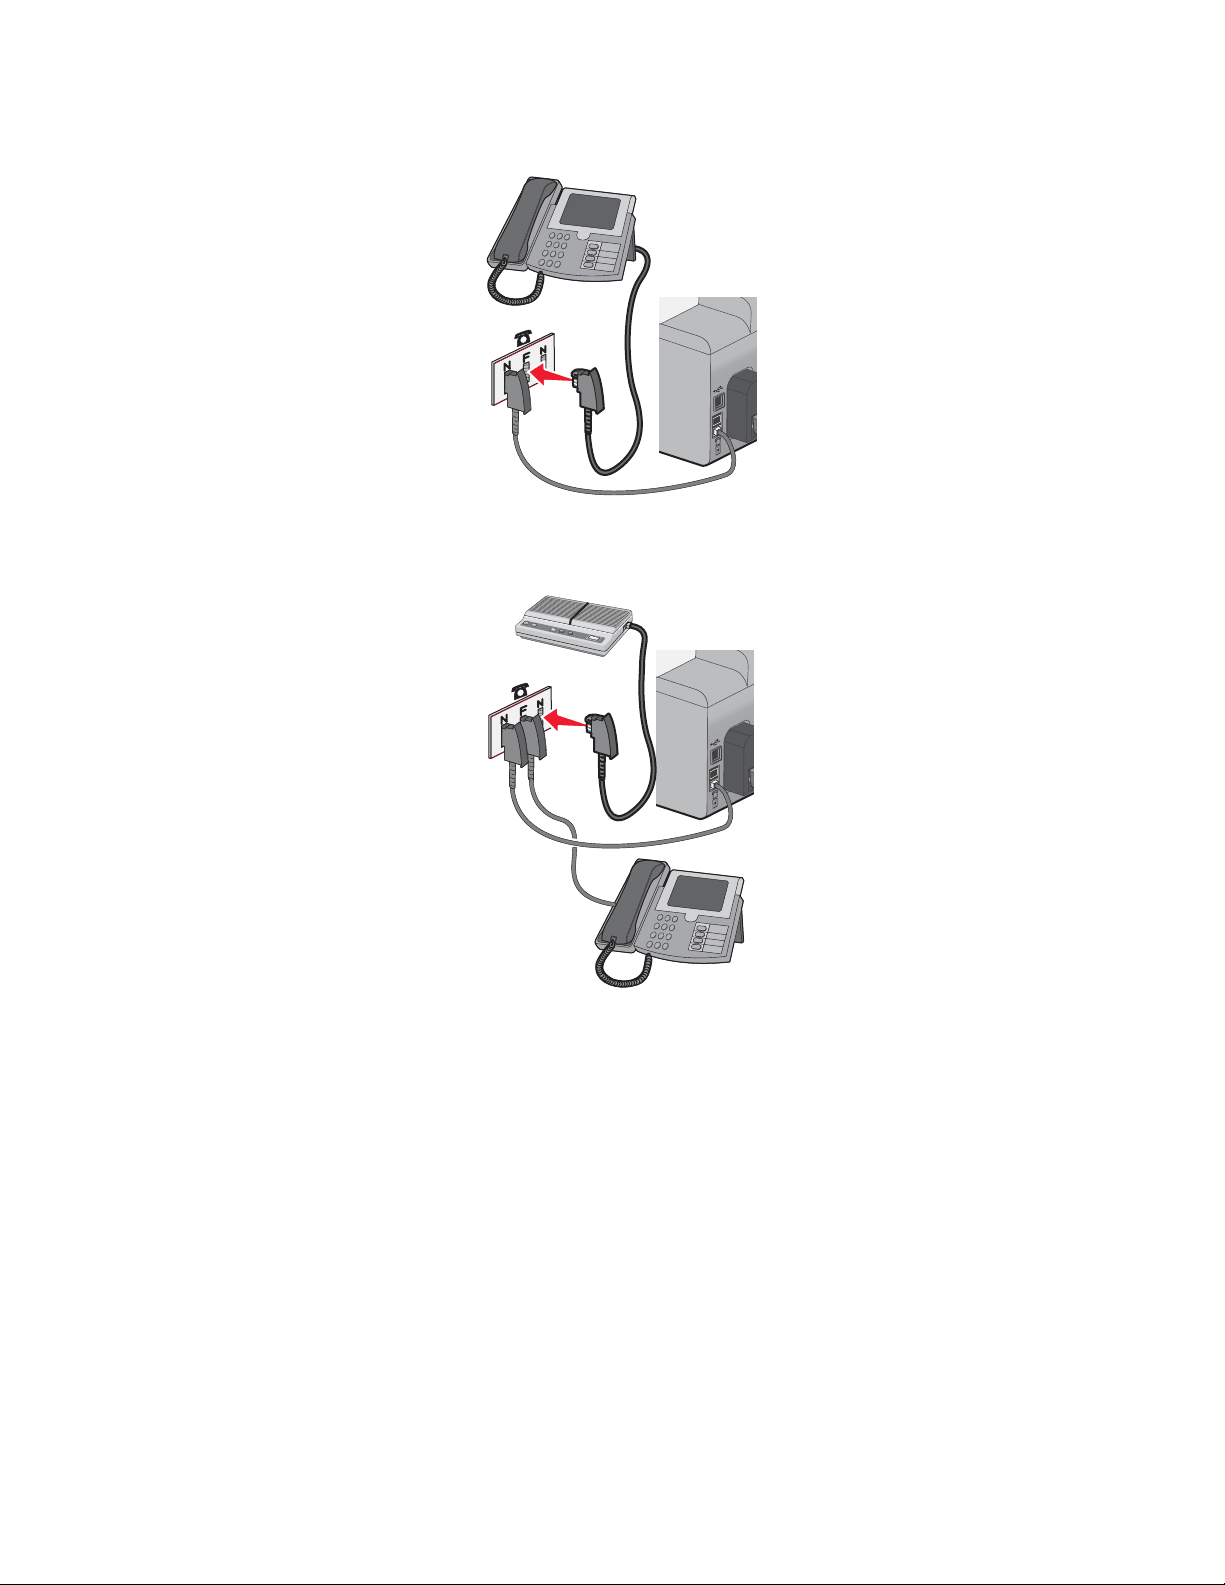
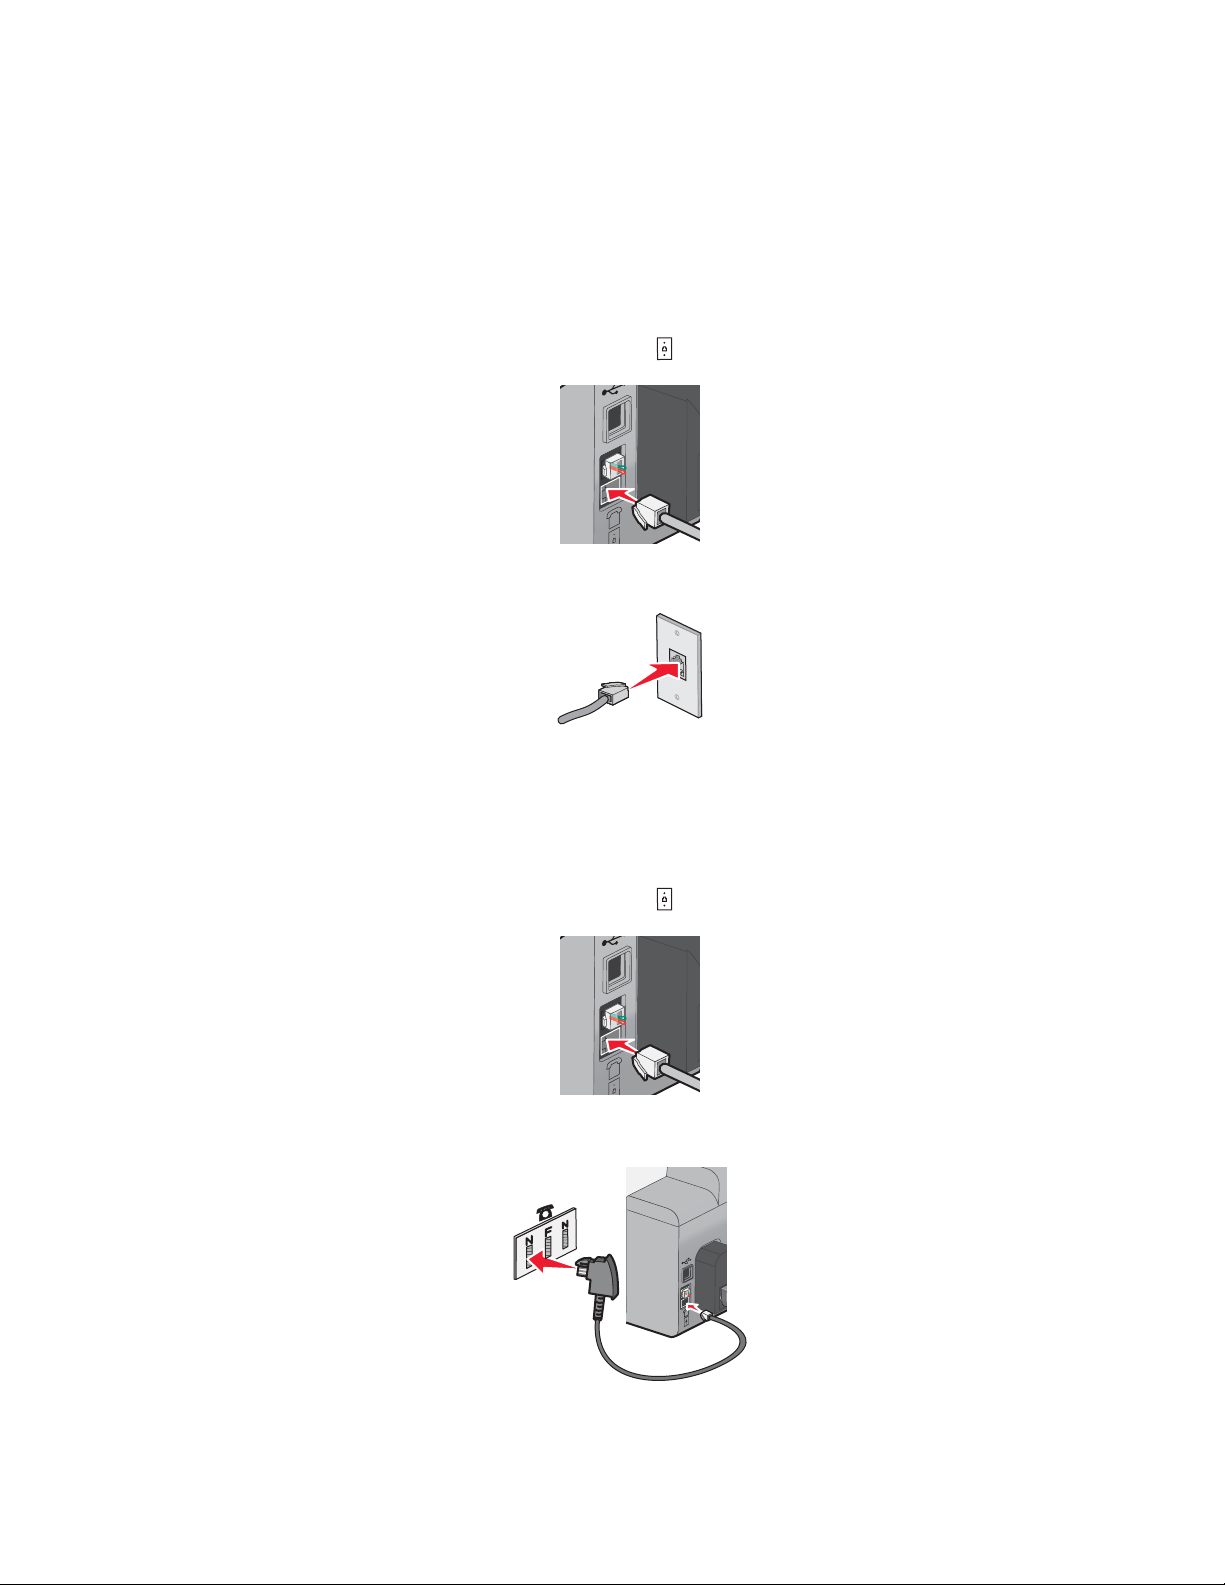
4 If you would like to use the same line for both fax and telephone communication, connect a second telephone
line (not provided) between the telephone and the F slot of an active telephone wall jack.
5 If you would like to use the same line for recording messages on your answering machine, connect a second
telephone line (not provided) between the answering machine and the other N slot of the telephone wall jack.
Connecting to a telephone
Connect a telephone to the printer to use the fax line as a normal telephone line. Then set up the printer wherever
your telephone is located to make copies or to send and receive faxes without using a computer.
Note: Setup steps may vary depending on your country or region. For more information on connecting the printer
to telecommunications equipment, see the related topic, “Using an RJ11 adapter.”
1 Make sure you have the following:
• A telephone
• Two telephone cords
• A telephone wall jack
Getting the printer ready to fax
13
Page 14
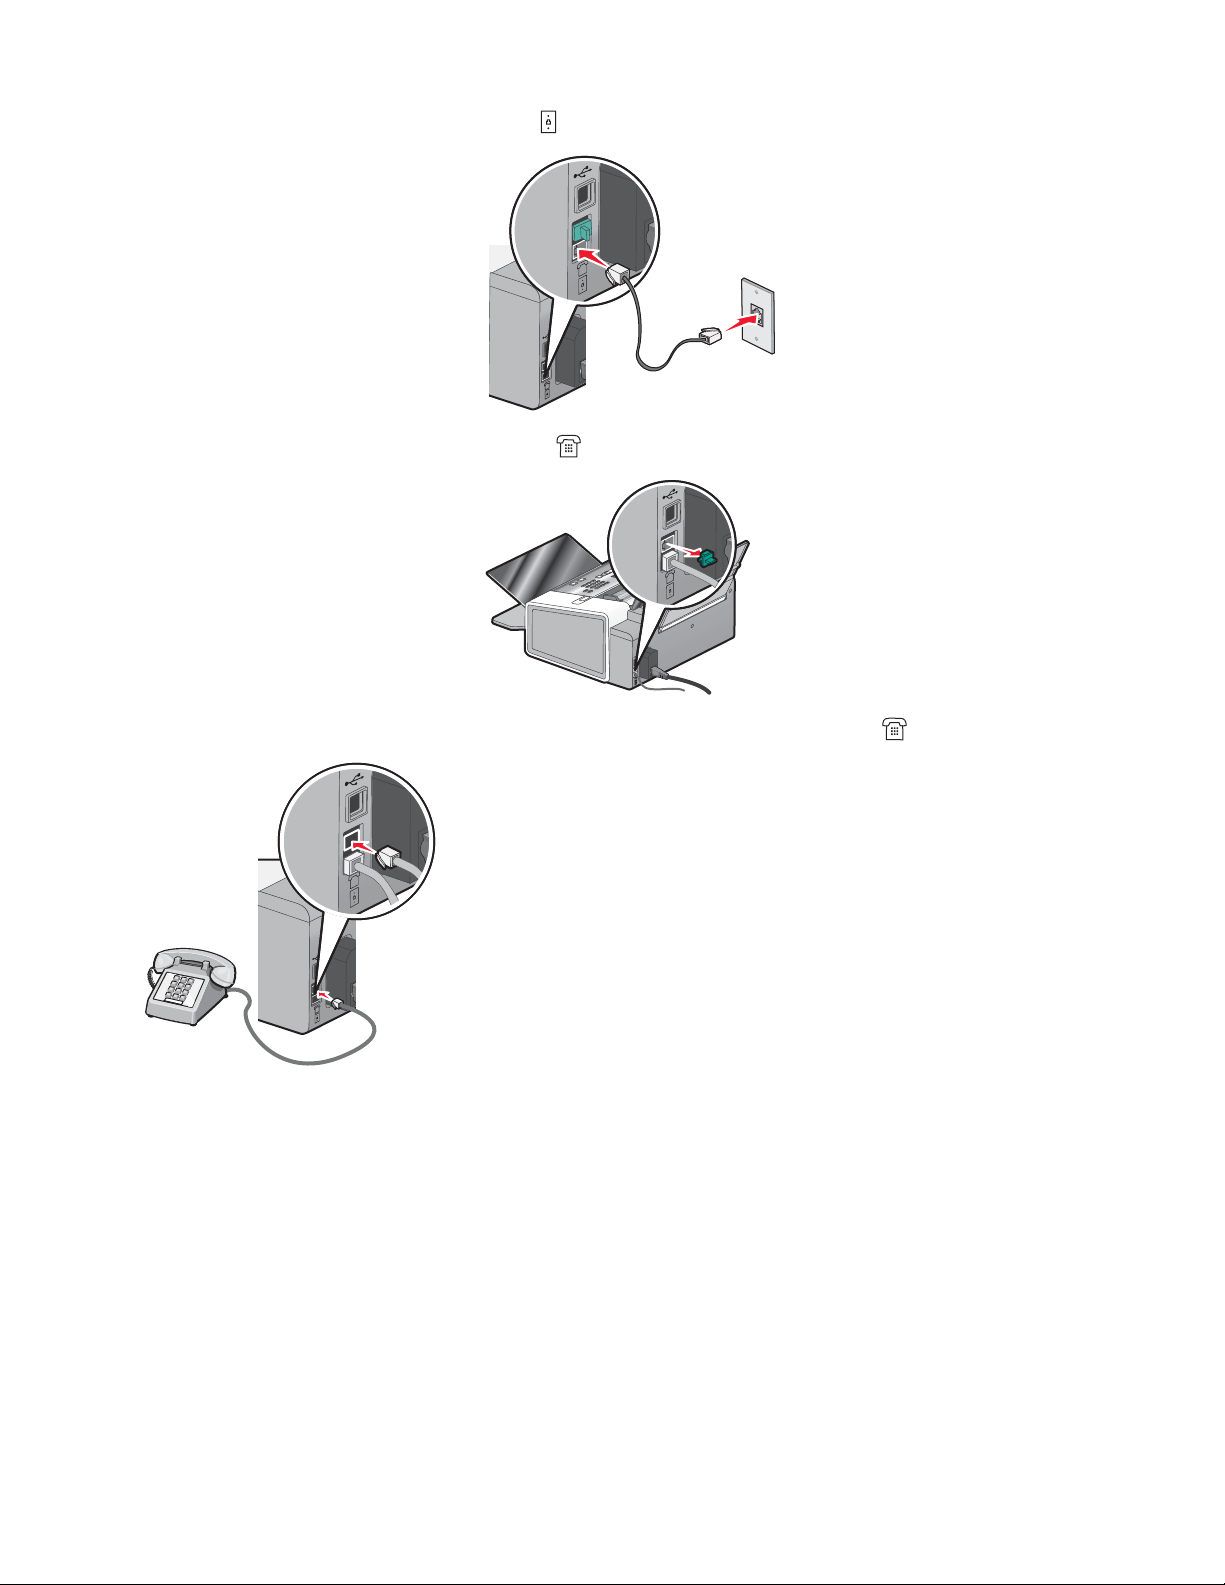
2 Connect one telephone cord to the LINE port of the printer, and then plug it into an active telephone wall jack.
3 Remove the protective plug from the EXT port of the printer.
4 Connect the other telephone cord to a telephone, and then plug it into the EXT port of the printer.
Related topics:
• “Using an RJ11 adapter” on page 9
Connecting to an answering machine
Connect an answering machine to the printer to receive both incoming voice messages and faxes.
Note: Setup steps may vary depending on your country or region. For more information on connecting the printer
to telecommunications equipment, see the related topic, “Using an RJ11 adapter.”
1 Make sure you have the following:
• A telephone
• An answering machine
Getting the printer ready to fax
14
Page 15
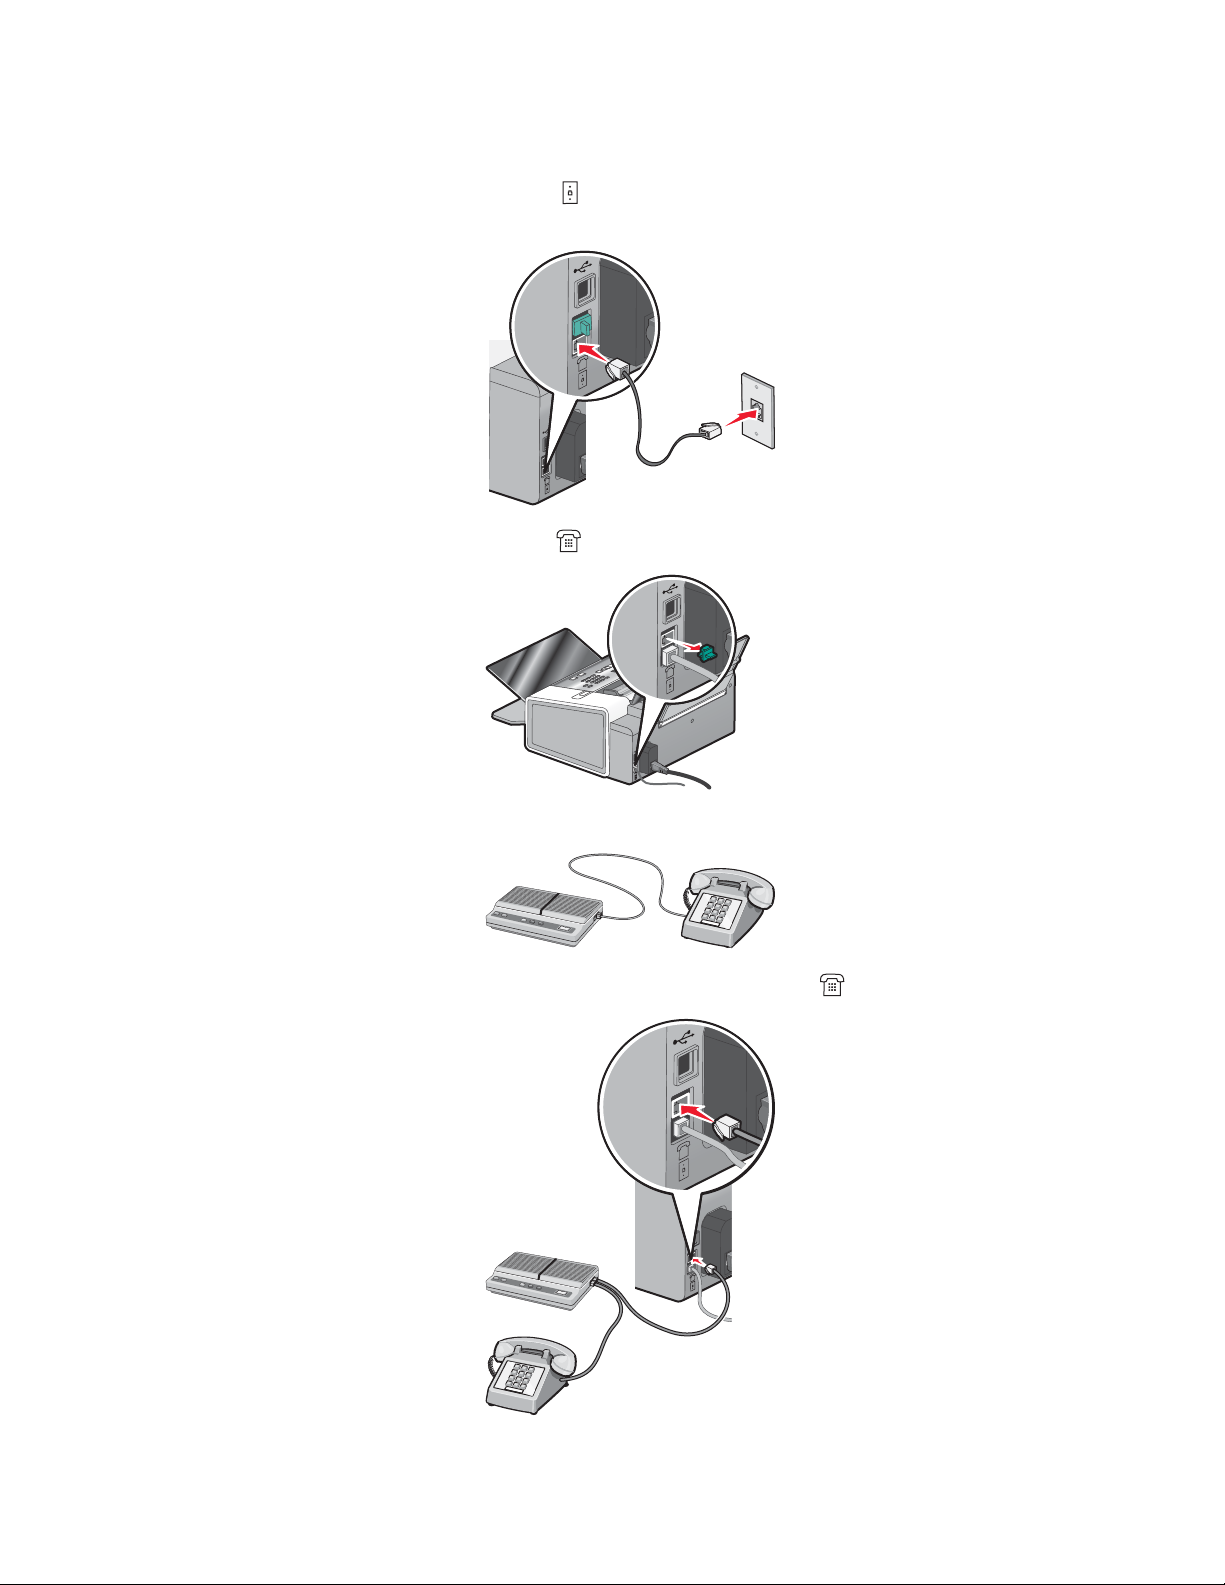
• Three telephone cords
• A telephone wall jack
2 Connect one telephone cord into the LINE port of the printer, and then plug it into an active telephone wall
jack.
3 Remove the protective plug from the EXT port of the printer.
4 Connect a second telephone cord from the telephone to the answering machine.
5 Connect a third telephone cord from the answering machine to the EXT port of the printer.
Getting the printer ready to fax
15
Page 16
Related topics:
• “Using an RJ11 adapter” on page 9
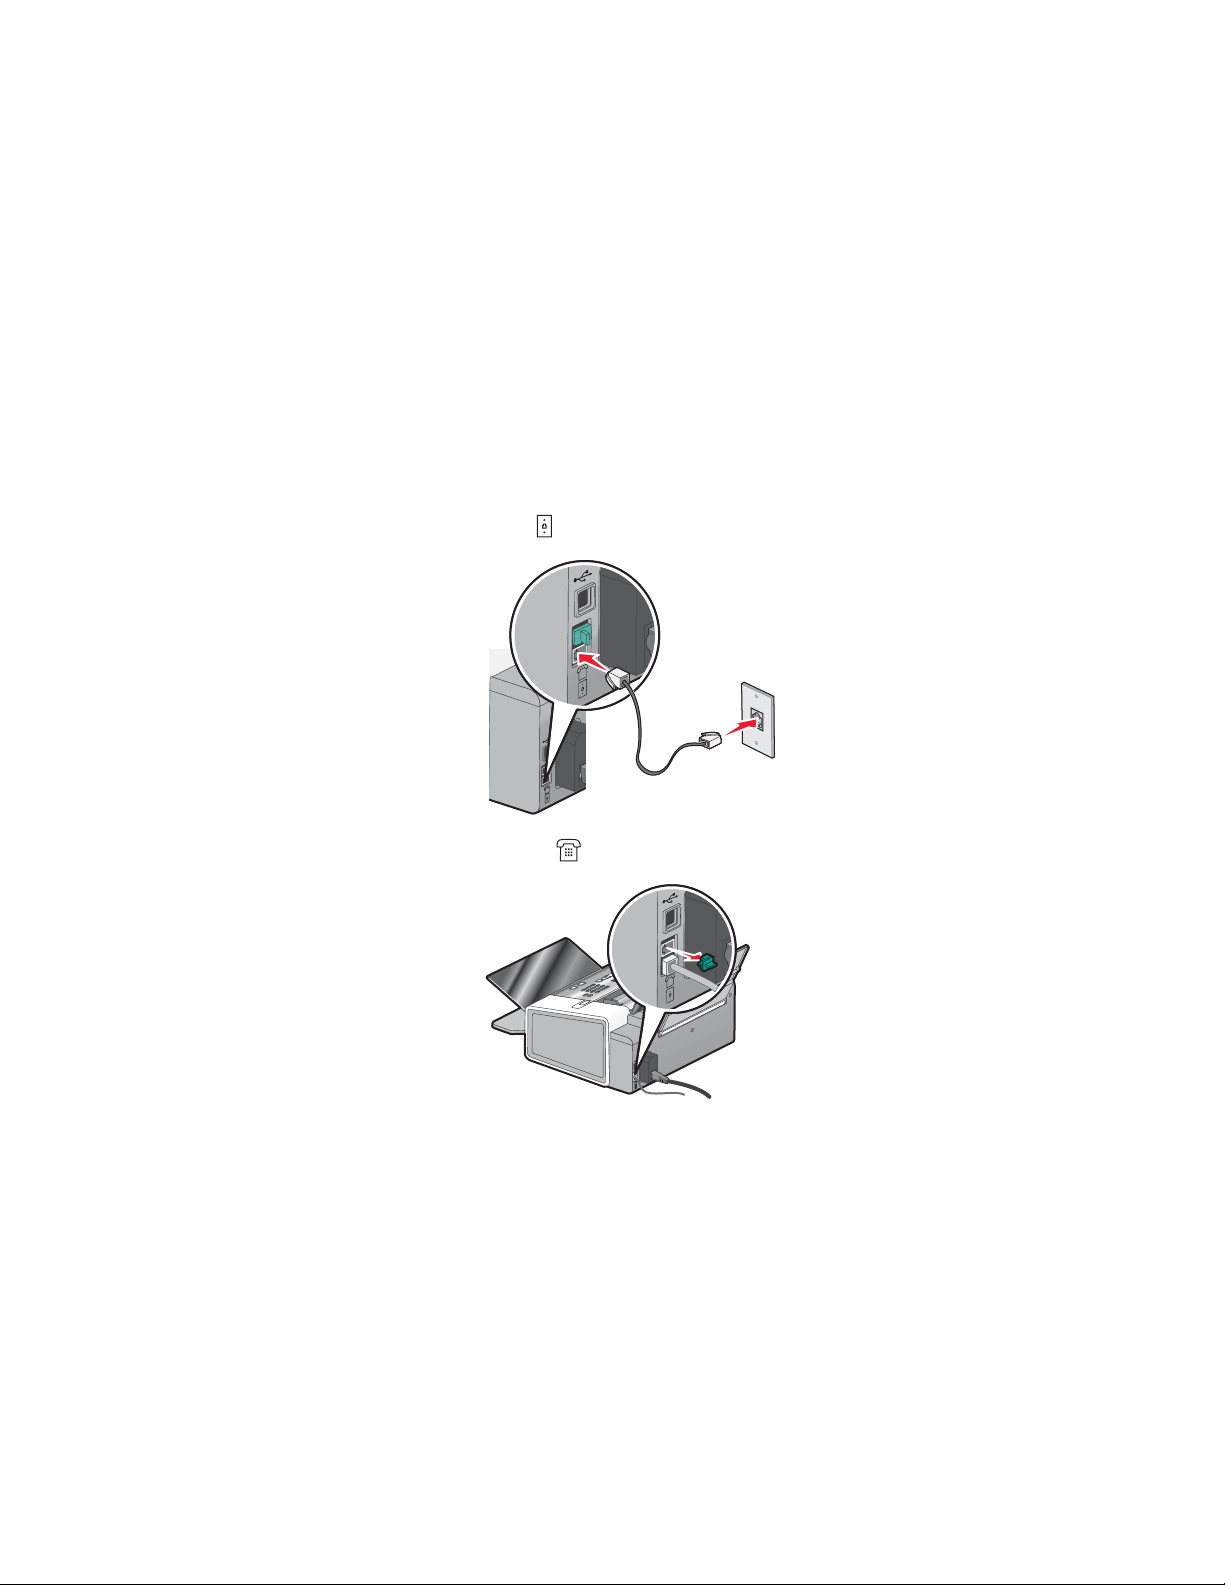
Connecting to a computer with a modem
Connect the printer to a computer with a modem to send faxes from the software application.
Note: Setup steps may vary depending on your country or region. For more information on connecting the printer
to telecommunications equipment, see the related topic, “Using an RJ11 adapter.”
1 Make sure you have the following:
• A telephone
• A computer with a modem
• Two telephone cords
• A telephone wall jack
2 Connect a telephone cord into the LINE port of the printer, and then plug it into an active telephone wall jack.
3 Remove the protective plug from the EXT port of the printer.
Getting the printer ready to fax
16
Page 17
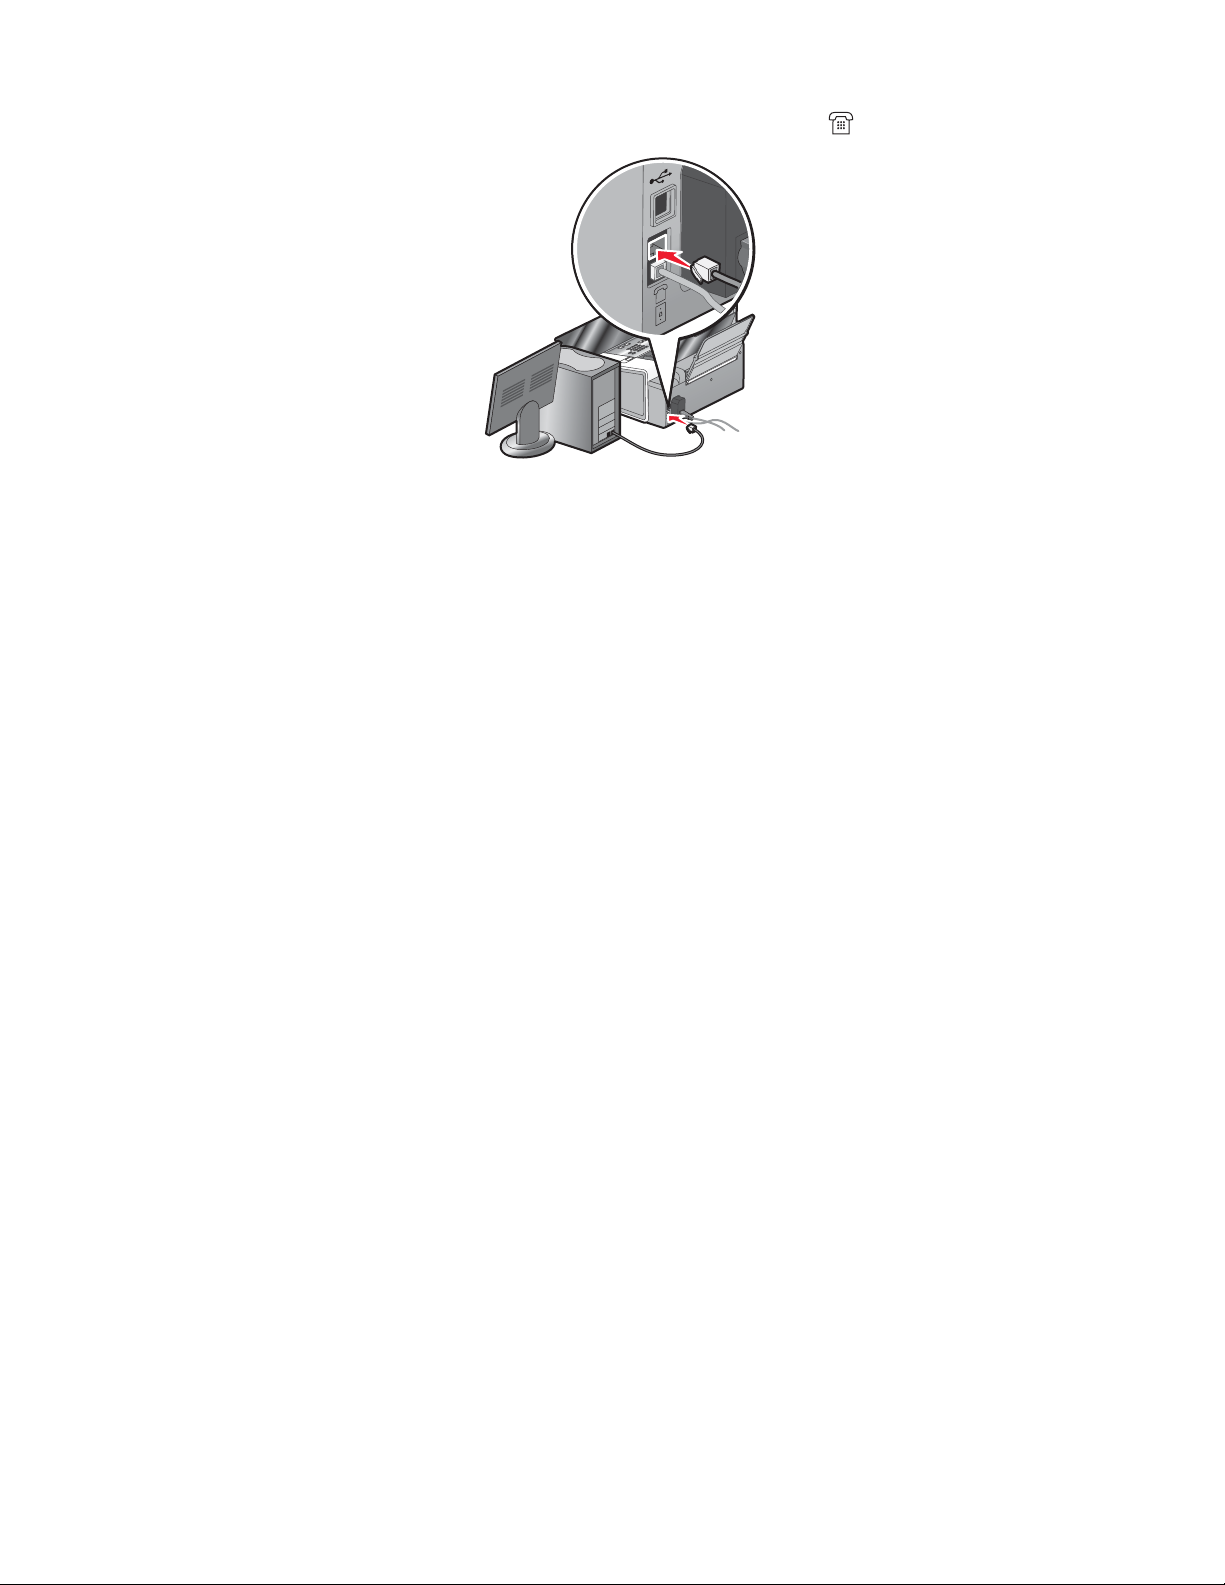
4 Connect a second telephone cord from the computer modem to the EXT port of the printer.
Related topics:
• “Using an RJ11 adapter” on page 9
Using a digital phone service
The fax modem is an analog device. Certain devices can be connected to the printer so that digital telephone services
can be used.
• If you are using an ISDN telephone service, connect the printer to an analog telephone port (an R-interface port)
on an ISDN terminal adapter. For more information and to request an R-interface port, contact your ISDN
provider.
• If you are using DSL, connect to a DSL filter or router that will support analog use. For more information, contact
your DSL provider.
• If you are using a PBX telephone service, make sure you are connecting to an analog connection on the PBX.
If none exists, consider installing an analog telephone line for the fax machine. For more information on faxing
when using a PBX telephone service, see the related topic, “Setting up to fax while behind a PBX.”
Related topics:
• “Setting up to fax while behind a PBX” on page 30
Getting the printer ready to fax
17
Page 18

Faxing using the control panel
2
1
Getting started
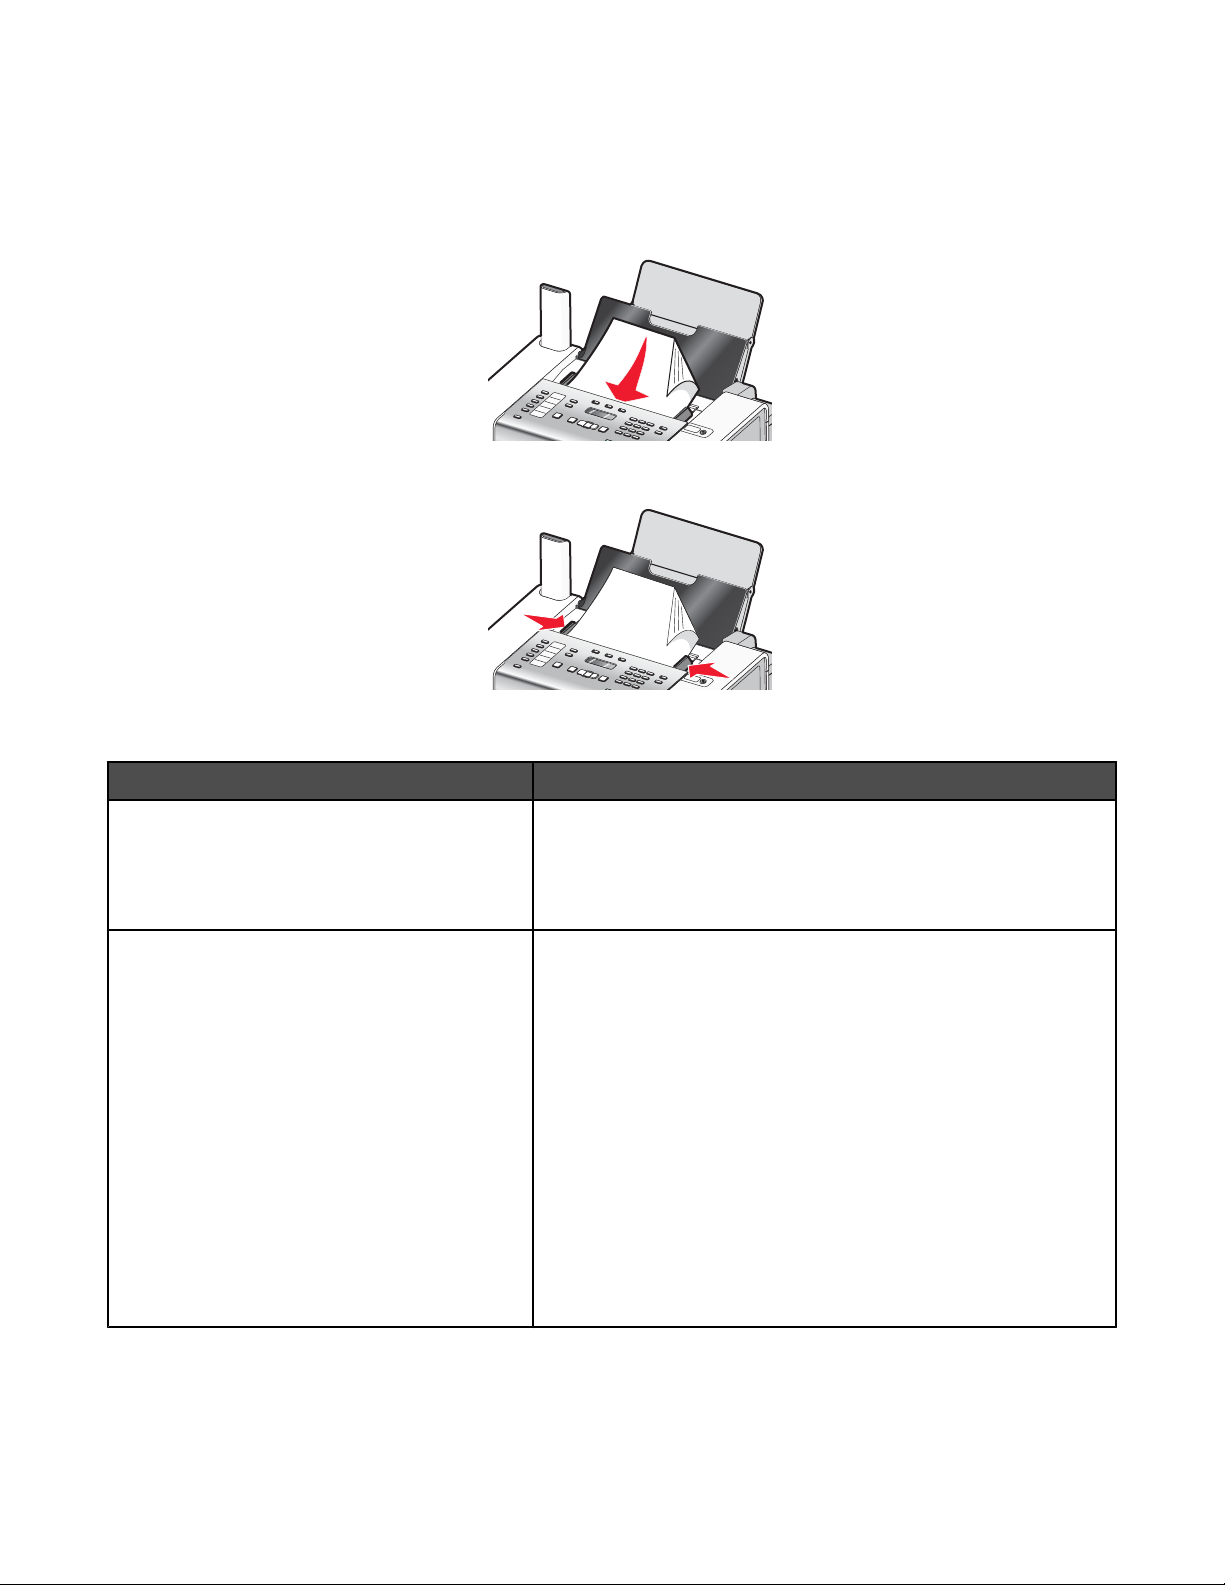
Loading paper
1 Make sure:
• You use paper designed for inkjet printers.
• If you are using photo, glossy, or heavyweight matte paper, you load it with the glossy or printable side facing
you. (If you are not sure which side is the printable side, see the instructions that came with the paper.)
• The paper is not used or damaged.
• If you are using specialty paper, you follow the instructions that came with it.
• You do not force paper into the printer.
2 Before loading paper the first time, slide the paper guides out toward the edges of the paper support. You can
load up to:
• 100 sheets of plain paper
• 25 sheets of heavyweight matte paper
• 25 sheets of photo paper
• 25 sheets of glossy paper
Note: Photos require more drying time. Remove each photo as it exits, and allow it to dry to avoid ink smudging.
3 Load the paper vertically in the center of the paper support, and adjust the paper guides to rest against the edges
of the paper.
Note: To avoid paper jams, make sure the paper does not buckle when you adjust the paper guides.
Related topics:
• “Using the automatic paper type sensor” on page 43
Faxing using the control panel
18
Page 19
Loading original documents into the Automatic Document Feeder (ADF)
You can load up to 30 sheets of an original document into the Automatic Document Feeder (ADF) for scanning,
copying, and faxing.
1 Load an original document facedown into the ADF.
2 Adjust the paper guides on the ADF to rest against the edges of the paper.
Automatic Document Feeder (ADF) paper capacity
Load up to Make sure
30 sheets of:
• Letter-size paper
• The document is loaded facedown.
• The paper guides rest against the edges of the paper.
• A4 paper
• Legal-size paper
30 sheets of:
• Custom-size paper
• Prepunched paper
• Reinforced-edge copier paper
• Preprinted forms
• Letterhead paper
• Photo paper
• The document is loaded facedown.
• The paper guides rest against the edges of the paper.
• The paper size fits within these dimensions:
Width:
– 76.2 mm–215.9 mm
– 3.5 in.–8.5 in.
Length:
– 127.0 mm–355.6 mm
– 5.0 in.–14.0 in.
• You allow preprinted media to dry thoroughly before loading
into the ADF.
• You do not use media printed with metallic ink particles.
• You avoid embossed designs.
Related topics:
• “Understanding the parts of the printer” on page 92
• “Scanning a document” on page 71
Faxing using the control panel
19
Page 20
Sending a fax
Entering a fax number using the control panel
1 From the control panel, press Fax Mode.
2 Enter a fax number using:
The keypad
Quick Dial
Speed Dial or Group Dial
Enter a fax number using the keypad.
Notes:
• You can include a calling card number as part of the fax number.
• A fax number can include up to 64 numbers and/or the symbols * or
#.
• Press Redial / Pause to insert a three-second pause in a number
you are entering to wait for an outside line or get through an
automated answering system. A comma appears on the display.
Press Quick Dial 1, 2, 3, 4, or 5.
Note: For instructions on how to set Quick Dial buttons, see “Setting up
Quick Dial buttons using the control panel” and/or “Setting up Quick Dial
buttons using the computer.”
a Press Phone Book.
b Enter Speed Dial and/or Group Dial numbers.
• Press or repeatedly until the Speed Dial or Group Dial
number you want appears.
• Use the keypad to enter the number of the Speed Dial entry (1–
89) or Group Dial entry (90–99).
Notes:
• For instructions on how to add Speed Dial or Group Dial numbers
using the computer, see the related topic, “Setting up Speed
Dial.”
• For instructions on how to add Speed Dial or Group Dial numbers
using the control panel, see the related topic, “Using the control
panel Phonebook.”
3 If you want to send a fax to a group of numbers (broadcast fax):
a Press .
b Repeat entering fax numbers, using any combination of the previous methods, until a maximum of 30 fax
numbers have been entered.
Note: Each fax number contained in Group Dial entries counts toward the 30-number maximum.
Related topics:
• “Setting up Speed Dial using the computer” on page 38
• “Setting up Quick Dial buttons using the control panel” on page 26
• “Using the control panel Phonebook” on page 24
Faxing using the control panel
20
Page 21

Sending a fax using the control panel
Make sure the printer is on.
1 Load an original document facedown in the Automatic Document Feeder (ADF).
2 From the control panel, press Fax Mode.
3 Enter a fax or Speed Dial (1–89) number; press Quick Dial 1, 2, 3, 4, or 5; or press Phone Book to select a
number from the Speed Dial or Group Dial list. For more information, see “Entering a fax number.”
Note: Press the keypad numbers to use an automated answering system.
4 If you want to send a fax to a group of numbers (broadcast fax):
a Press .
b Add fax numbers for the group, and press until all have been entered, for a maximum of 30.
Note: Each fax number contained in Group Dial entries counts toward the 30-number maximum.
5 Press Start Color or Start Black.
Related topics:
• “Entering a fax number using the control panel” on page 20
• “Using the control panel Phonebook” on page 24
Sending a broadcast fax at a scheduled time
You can send a fax to a group of fax numbers at a time you choose.
1 Load an original document facedown in the Automatic Document Feeder (ADF).
2 From the control panel, press Fax Mode.
3 Press .
4 Press or repeatedly until Delay Fax appears, and then press .
5 Press or repeatedly until Delay Until appears, and then press .
6 Enter the time you want to send the fax, and then press .
7 If the printer is not set to the 24-hour mode, press or repeatedly to select AM or PM, and then press to
save your settings.
8 Enter a fax or Speed Dial (1–89) number; press Quick Dial 1, 2 , 3, 4, or 5; or press Phonebook to select a
number from the Speed Dial or Group Dial list. For more information, see “Entering a fax number.”
Note: Press the keypad numbers to use an automated answering system.
9 If needed, add more fax numbers, and press until all, for a maximum of 30, have been entered.
Note: Each fax number contained in Group Dial entries counts toward the 30-number maximum.
10 Press Start Color or Start Black.
Note: At the designated time, the fax program dials and sends the fax to all of the designated fax numbers. If the
fax transmission is unsuccessful to any of the numbers on the broadcast list, the unsuccessful numbers will be dialed
again based on your redial settings. For information on changing redial settings, see “Phone Line Busy.”
Faxing using the control panel
21
Page 22

Related topics:
• “Entering a fax number using the control panel” on page 20
• “Phone Line Busy” on page 139
Sending a fax while listening to a call (On Hook Dial) using the control panel
The manual dialing feature lets you dial a telephone number while listening to the call through a speaker on the
printer. It is useful when you must navigate an automated answering system or enter a calling card number before
sending your fax.
1 From the control panel, press Fax Mode.
2 Press .
3 Press or repeatedly until On Hook Dial appears, and then press . You can now hear the dial tone of
the telephone line.
4 Enter a fax or Speed Dial (1–89) number; press Quick Dial 1, 2, 3, 4, or 5; or press Phone Book to select a
number from the Speed Dial or Group Dial list. For more information, see “Entering a fax number.”
Note: Press the keypad numbers to use an automated answering system.
5 Press Start Color or Start Black.
Related topics:
• “Entering a fax number using the control panel” on page 20
Receiving a fax
Receiving a fax automatically using the control panel
1 Make sure the Auto Answer light is on.
2 To set the number of telephone rings before the printer automatically receives faxes:
a Press Fax Mode.
b Press .
c Press or repeatedly until Fax Setup appears.
d Press .
e Press or repeatedly until Ringing and Answering appears.
f Press .
g Press or repeatedly until Pick Up On appears.
h Press .
i Press or repeatedly until the setting you want appears.
j Press to save the setting.
Auto Answer light turns on. When the numbers of rings you set is detected, the printer automatically receives
the incoming fax.
Faxing using the control panel
22
Page 23

Receiving a fax manually
1 Make sure the Auto Answer light is off.
2 To receive the fax if you have not set up a manual answer code:
• Press Start Color or Start Black.
or
• Press * 9 * on the telephone after you answer it and hear fax tones.
3 To receive a fax if you have set up a manual answer code, enter the code on the telephone after you answer it
and hear fax tones.
Note: For information on how to set up a manual answer code, see the related topic, “Setting a fax manual
answer code.”
4 Hang up the telephone. The printer receives the fax.
Related topics:
• “Setting a fax manual answer code using the control panel” on page 23
Receiving a fax with an answering machine using the control panel
Note: You must set up the equipment as shown in the related topic, “Connecting to an answering machine.”
To receive a fax with an answering machine connected to the printer:
1 Make sure that Auto Answer is on. For more information, see the related topic, “Setting Auto Answer to on.”
2 Make sure you have set the number of times the telephone rings before receiving a fax automatically. See the
related topic, “Setting the number of rings before receiving a fax automatically using the control panel.”
When a telephone ring is detected, the answering machine picks up the call.
• If the printer detects a fax, it receives the fax and disconnects the answering machine.
• If the printer does not detect a fax, the answering machine receives the call.
3 Set the answering machine to answer incoming calls before the printer does.
For example, if you set the answering machine to answer calls after three rings, set the printer to answer calls
after five rings.
Related topics:
• “Connecting to an answering machine” on page 14
• “Setting Auto Answer to On” on page 37
• “Setting the number of rings before receiving a fax automatically using the control panel” on page 26
Setting a fax manual answer code using the control panel
1 From the control panel, press Fax Mode.
2 Press .
3 Press or repeatedly until Fax Setup appears.
4 Press .
5 Press or repeatedly until Ringing and Answering appears.
6 Press .
Faxing using the control panel
23
Page 24

7 Press or repeatedly until Manual Pickup Keycode appears.
8 Press .
9 Enter the code you want up to seven characters. Characters can include numbers or the symbols * and #.
10 Press to save the setting.
Using Caller ID from the control panel
Caller ID is a service provided by some telephone companies that identifies the telephone number or the name of
the person who is calling. If you subscribe to this service, it works with the printer. When you receive a fax, the
telephone number or name of the person who is sending you the fax appears on the display.
Notes:
• Caller ID is available only in some countries and regions.
• The number of patterns is defined by the country or region setting and only the number of patterns defined for
the selected country or region is shown.
The printer supports two distinct Caller ID patterns: Pattern 1 (FSK) and Pattern 2 (DTMF). Depending on the country
or region you live in and the telecommunications company you subscribe to, you may need to switch the pattern to
display Caller ID information.
1 From the control panel, press Settings.
2 Press or repeatedly until Device Setup appears.
3 Press .
4 Press or repeatedly until Caller ID Pattern appears.
5 Press .
6 Press or repeatedly until the setting you want appears.
7 Press to save the setting.
Customizing dial settings
Using the control panel Phonebook
The control panel Phonebook is a directory of Speed Dial entries (1–89) and Group Dial entries (90–99).
To access a Phonebook entry:
1 From the control panel, press Phonebook.
2 Press or repeatedly until the entry you want appears.
or
Use the keypad to enter the number of the Speed Dial or Group Dial entry.
To access the Phone Book menu:
1 From the control panel, press Fax Mode.
2 Press .
3 Press or repeatedly until Phone Book appears, and press .
Faxing using the control panel
24
Page 25
4 Press or repeatedly until the setting you want appears.
5 Press , and follow the instructions on the display.
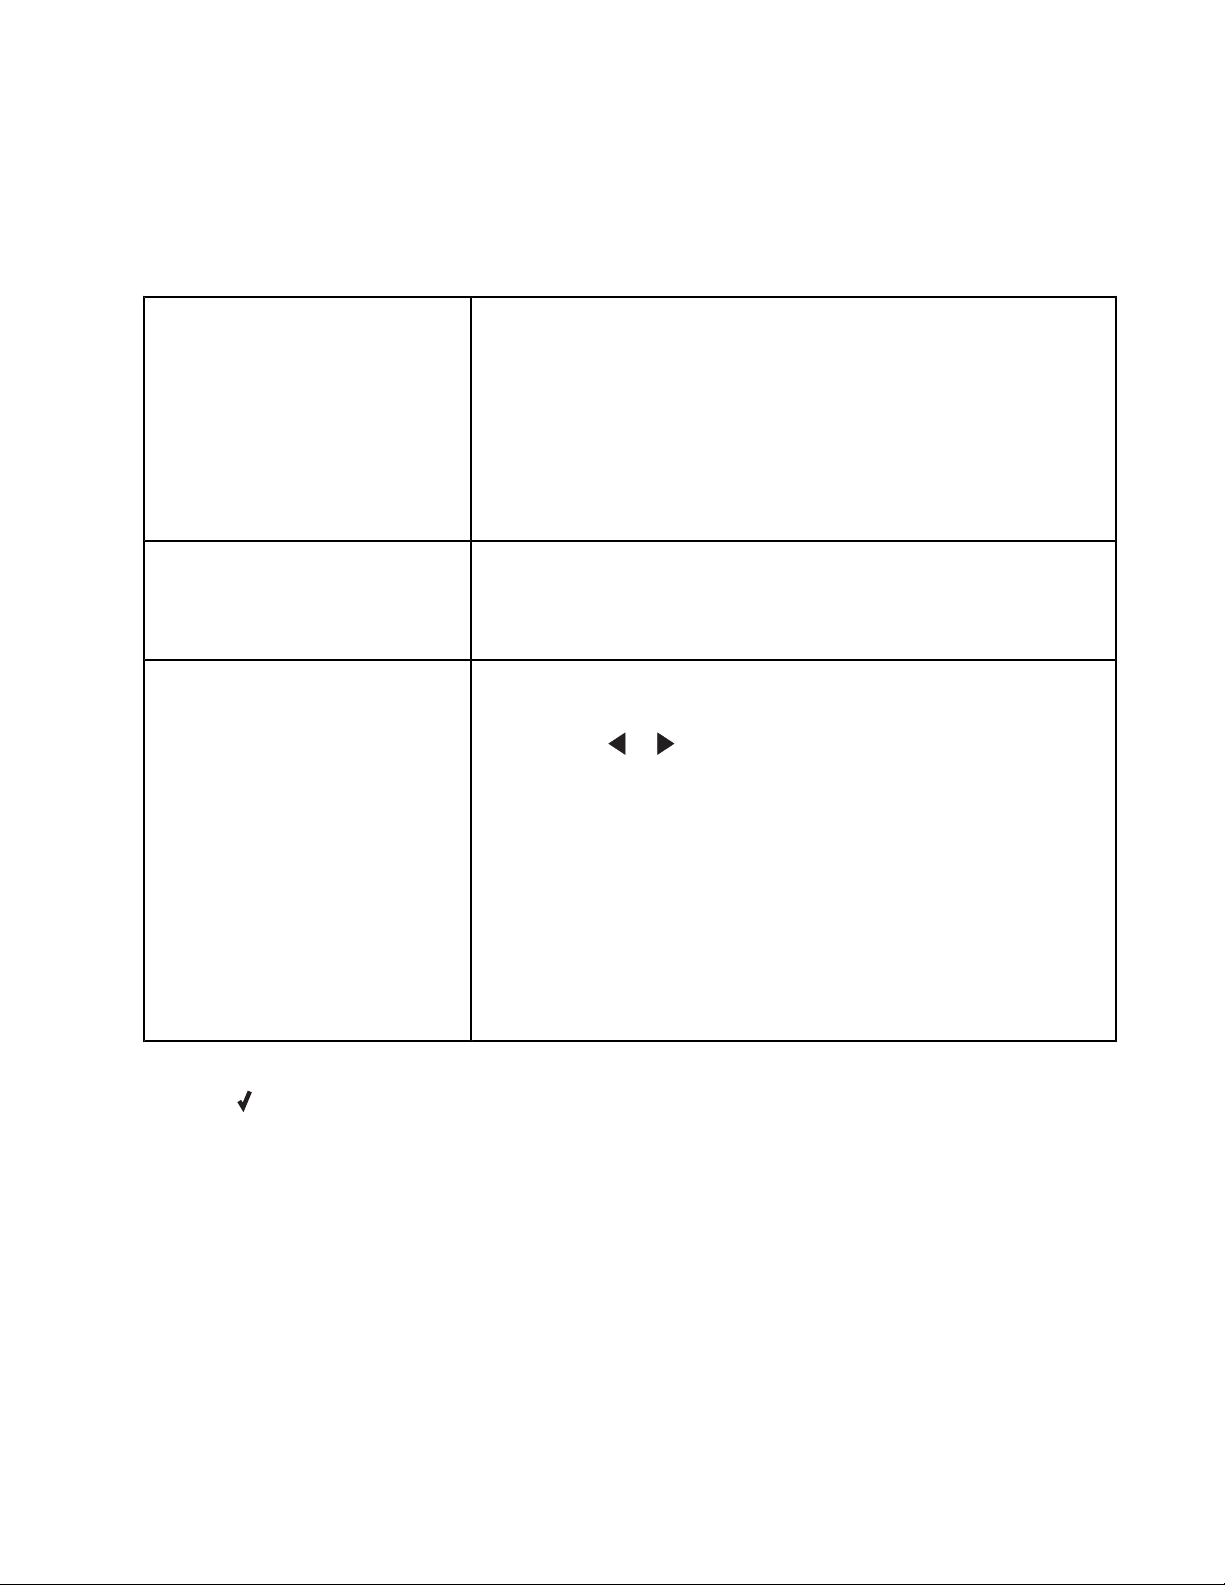
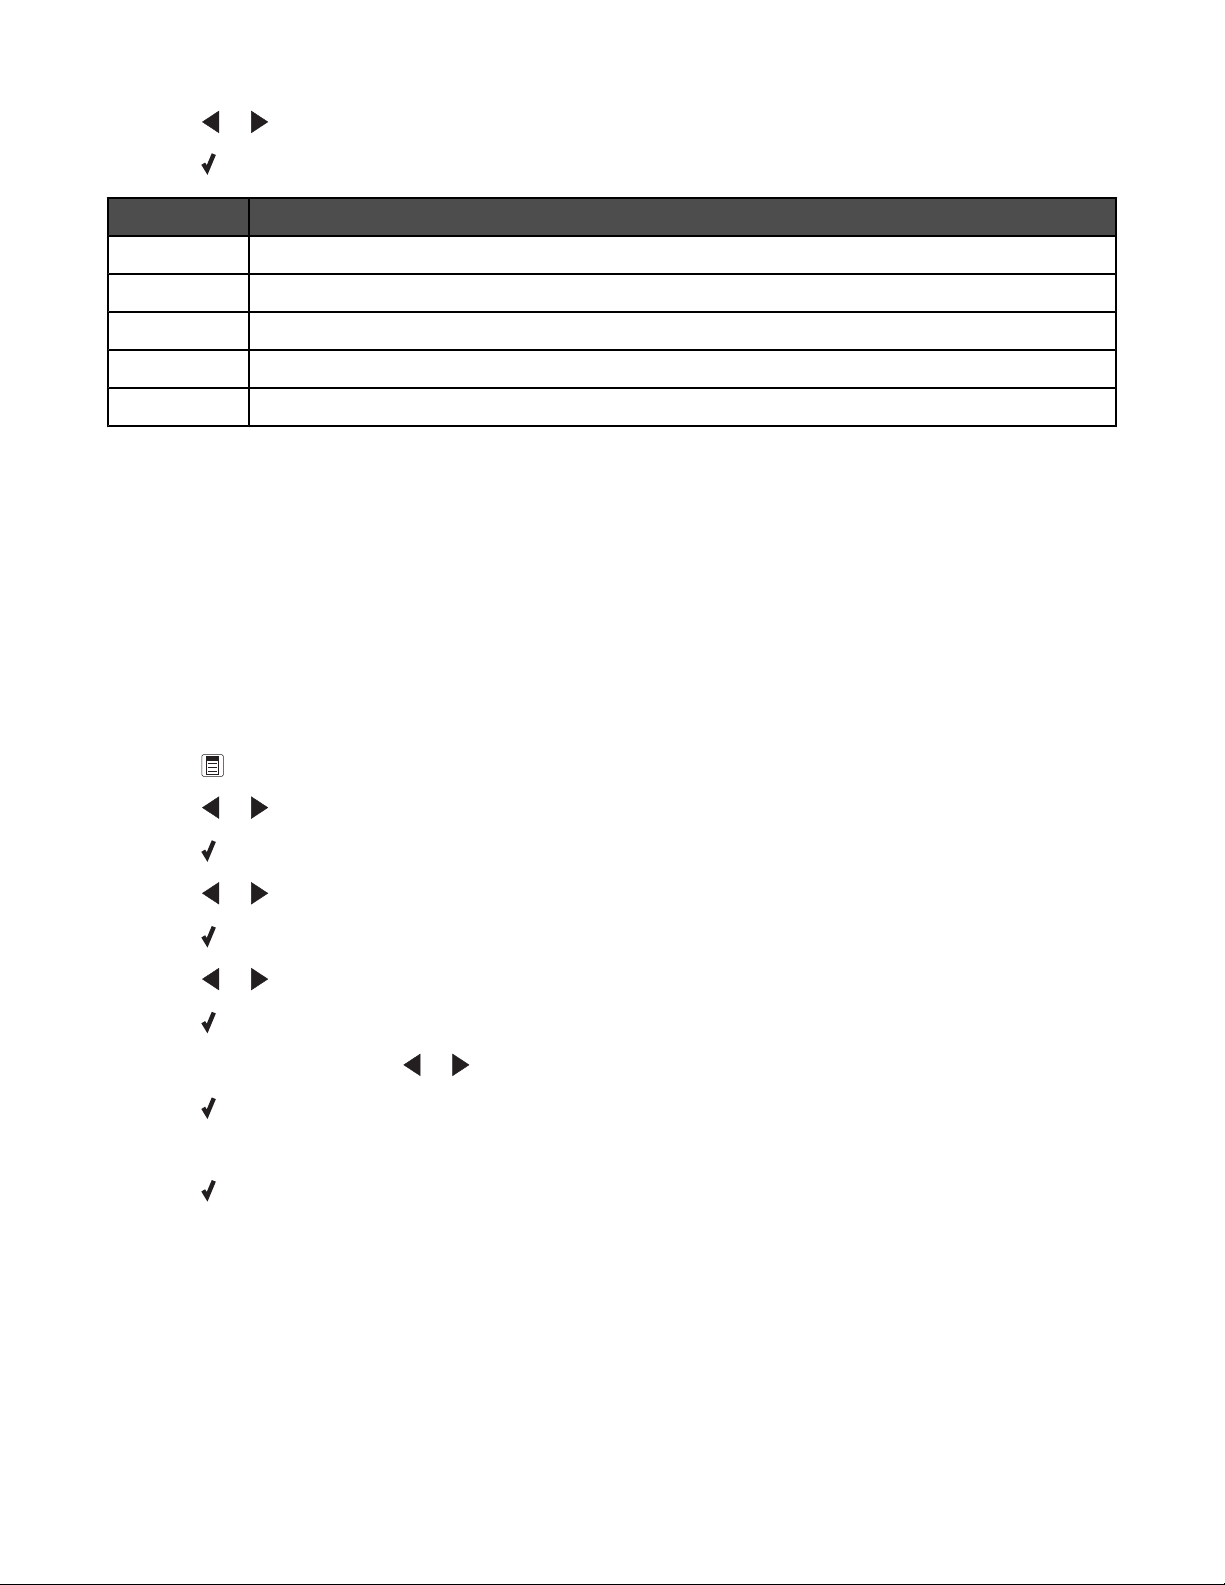
Use this To
View View Phonebook entries.
Add Create a new Speed Dial or Group Dial entry.
Remove Delete a Speed Dial or Group Dial entry.
Modify Edit a Speed Dial or Group Dial entry.
Print Print all Speed Dial and Group Dial entries in the Phone Book.
Note: For instructions on how to add Speed Dial or Group Dial entries to the Phonebook using the computer, see
the related topic, “Setting up speed dial.”
Related topics:
• “Setting up Quick Dial buttons using the control panel” on page 26
Setting up a dialing prefix using the control panel
You can add a prefix of up to eight characters to the beginning of each number dialed. Characters can include
numbers, the symbols * and #, or a three-second pause created by pressing Redial / Pause. The pause appears as
a comma on the display.
1 From the control panel, press Fax Mode.
2 Press .
3 Press or repeatedly until Fax Setup appears.
4 Press .
5 Press or repeatedly until Dialing and Sending appears.
6 Press .
7 Press or repeatedly until Dial Prefix appears.
8 Press .
9 To change the setting, press or repeatedly until Create appears.
10 Press .
11 Enter the prefix to be dialed before each telephone number.
12 Press to save the setting.
Related topics:
• “Using the control panel” on page 95
Faxing using the control panel
25
Page 26

Setting the distinctive ring using the control panel
Distinctive ring is a service provided by some telephone companies that assigns multiple phone numbers to a single
telephone line. If you subscribe to this service, you can program your printer to have a distinctive ring pattern and
phone number for incoming faxes.
1 From the control panel, press Fax Mode.
2 Press .
3 Press or repeatedly until Fax Setup appears.
4 Press .
5 Press or repeatedly until Ringing and Answering appears.
6 Press .
7 Press or repeatedly until Ring Pattern appears.
8 Press .
9 Press or repeatedly until the ring pattern you want appears.
10 Press to save the setting.
Related topics:
• “Using the control panel” on page 95
Setting up Quick Dial buttons using the control panel
1 From the control panel, press Fax Mode.
2 Enter a fax number.
Notes:
• You can include a calling card number as part of the fax number.
• A fax number can include up to 64 characters. Characters can include numbers, the symbols * and #, or a
three-second pause created by pressing Redial / Pause. The pause appears as a comma on the display.
3 Hold down an empty Quick Dial button for two seconds.
4 To program additional Quick Dial buttons, repeat step 2 through step 3.
Note: You can also program any empty Quick Dial button whenever you are prompted to enter a fax number.
Setting the number of rings before receiving a fax automatically using the control panel
1 From the control panel, press Fax Mode.
2 Press .
3 Press or repeatedly until Fax Setup appears.
4 Press .
5 Press or repeatedly until Ringing and Answering appears.
6 Press .
Faxing using the control panel
26
Page 27

7 Press or repeatedly until Pick Up On appears.
8 Press .
9 Press or repeatedly until the setting you want appears.
10 Press to save the setting.
11 Make sure the Auto Answer light is on.
When the number of rings you set is detected, the printer automatically receives the incoming fax.
Related topics:
• “Using the control panel” on page 95
Customizing fax settings
Setting up a fax header using the control panel
During the initial setup of your printer, you were prompted to enter your name, fax number, date, and time. This
information is used to create a fax header for faxes you send.
If you have not entered this information:
1 From the control panel, press Fax Mode.
2 Press .
3 Press or repeatedly until Fax Setup appears.
4 Press .
5 Press or repeatedly until Dialing and Sending appears.
6 Press .
Note: In Australia, skip to step step 11. The last 20 digits of your fax number is your Fax Name or Station ID.
7 Press or repeatedly until Your Fax Name appears.
8 Press .
9 Enter your name using the keypad.
Note: You can enter a maximum of 24 characters.
10 Press to save the setting.
11 Press or repeatedly until Your Fax Number appears.
12 Press .
13 Enter your fax number using the keypad.
Note: You can enter a maximum of 64 numbers and/or the symbols * or #.
14 Press to save the setting.
15 Press Settings.
16 Press .
Faxing using the control panel
27
Page 28

17 Press or repeatedly until Device Setup appears.
18 Press .
19 Press or repeatedly until Date/Time appears.
20 Press .
21 Enter the date using the keypad.
22 Press .
23 Enter the time using the keypad.
24 Press .
25 If the hour you entered is 12 or less, press or repeatedly until AM, PM, or 24hr appears.
26 Press to save the setting.
Related topics:
• “Using the control panel” on page 95
Setting up a fax footer using the control panel
1 From the control panel, press Fax Mode.
2 Press .
3 Press or repeatedly until Fax Setup appears.
4 Press .
5 Press or repeatedly until Fax Printing appears.
6 Press .
7 Press or repeatedly until Fax Footer appears.
8 Press .
9 Press or repeatedly until On appears.
10 Press .
11 During the initial setup of your printer, you were prompted to enter the date and time. If you have not entered
this information:
a Press Settings.
b Press .
c Press or repeatedly until Device Setup appears.
d Press .
e Press or repeatedly until Date/Time appears.
f Press .
g Enter the date using the keypad.
h Press .
i Enter the time using the keypad.
Faxing using the control panel
28
Page 29

j Press .
k If the hour you entered is 12 or less, press or repeatedly until AM, PM, or 24hr appears.
l Press to save the setting.
Related topics:
• “Using the control panel” on page 95
Changing Caller ID pattern using the control panel
The printer supports two distinct Caller ID patterns: Pattern 1 (FSK) and Pattern 2 (DTMF). Depending on the country
or region you live in and the telecommunications company you subscribe to, you may need to switch the pattern for
the printer to display Caller ID information.
1 From the control panel, press Settings.
2 Press or repeatedly until Device Setup appears.
3 Press .
4 Press or repeatedly until Caller ID Pattern appears.
5 Press .
6 Press or repeatedly until the Caller ID pattern setting indicated by an * appears.
Note: The number of patterns is defined by the country or region setting and only the number of patterns defined
for the selected country or region is shown.
7 If you want to change the Caller ID pattern:
a Press or repeatedly until the Caller ID pattern you want appears.
b Press to save the setting.
Managing fax jobs
Forwarding faxes
Use the fax forwarding feature if you are going to be away, but still want to receive your faxes. There are three fax
forwarding settings:
• Off—(Default).
• Forward—The printer sends the fax to the designated fax number.
• Print & Forward—The printer prints the fax and then sends it to the designated fax number.
To set up fax forwarding:
1 From the control panel, press Fax Mode.
2 Press .
3 Press or repeatedly until Fax Setup appears.
4 Press .
5 Press or repeatedly until Ringing and Answering appears.
6 Press .
7 Press or repeatedly until Fax Forward appears.
Faxing using the control panel
29
Page 30

8 Press .
9 Press or repeatedly until the setting you want appears.
10 Press .
11 Enter the number to which you want to forward the fax.
12 Press to save the setting.
Note: If you select Forward or Print & Forward, Forward will appear in the lower left corner of the fax default
menu. To view the selected setting, press
repeatedly.
Related topics:
• “Using the control panel” on page 95
Setting up to fax while behind a PBX
If the printer is being used in a business or office, it may be connected to a Private Branch Exchange (PBX) telephone
system. Ordinarily, when dialing a fax number, the printer waits to recognize the dial tone and then dials the fax
number. However, this method of dialing may not work if the PBX telephone system uses a dial tone that is not
recognizable to most fax machines. The “Dialing while behind a PBX” feature enables the printer to dial the fax
number without waiting to recognize the dial tone.
1 From the control panel, press Fax Mode.
2 Press .
3 Press or repeatedly until Fax Setup appears.
4 Press .
5 Press or repeatedly until Dialing and Sending appears.
6 Press .
7 Press or repeatedly until Dial Method appears.
8 Press .
9 Press or repeatedly until Behind PBX appears.
10 Press to save this setting.
Related topics:
• “Using the control panel” on page 95
Printing fax activity reports using the control panel
1 From the control panel, press Fax Mode.
2 Press .
3 Press or repeatedly until Fax Setup appears.
4 Press .
5 Press or repeatedly until Reports appears.
6 Press .
Faxing using the control panel
30
Page 31

7 Press or repeatedly until the type of report you want to print appears.
8 Press .
9 Press or repeatedly until the setting you want appears.
10 Press to print the report.
Related topics:
• “Using the control panel” on page 95
Blocking unwanted changes to fax settings using the control panel
This feature blocks network users from changing fax settings.
1 From the control panel, press Settings.
2 Press or repeatedly until Device Setup appears.
3 Press .
4 Press or until Host Fax Settings appears.
5 Press .
6 Press or until Block appears.
7 Press to save this setting.
Blocking junk faxes using the control panel
If you have Caller ID, you can block faxes sent from specific numbers and/or all faxes which do not include a Caller
ID number.
1 From the control panel, press Fax Mode.
2 Press .
3 Press or repeatedly until Fax Setup appears.
4 Press .
5 Press or repeatedly until Fax Blocking appears.
6 Press .
7 Press or repeatedly until Turn On/Off appears.
8 Press .
9 Press or repeatedly until On appears.
10 Press .
11 If you want to block faxes from specific phone numbers:
a Press or repeatedly until Add appears.
b Press .
c Enter a fax number of up to 64 characters. Characters can include numbers and the symbols * and #.
d Press .
Faxing using the control panel
31
Page 32

e If you want to enter a corresponding name, enter it using the keypad buttons.
Note: A name can include up to 24 characters.
f Press .
g If you want to enter additional numbers:
1 Press .
2 Repeat step c through step f.
Note: You can enter up to 50 phone numbers.
h If you do not want to enter additional numbers:
1 Press or repeatedly until No appears.
2 Press .
12 If you want to block all faxes that do not provide a Caller ID number:
a Press or repeatedly until Block No-ID appears.
b Press .
c Press or repeatedly until On appears.
d Press to save the setting.
13 If you want to print a list of blocked faxes:
a Press or repeatedly until Print appears.
b Press to print the list.
Changing Caller ID pattern using the control panel
The printer supports two distinct Caller ID patterns: Pattern 1 (FSK) and Pattern 2 (DTMF). Depending on the country
or region you live in and the telecommunications company you subscribe to, you may need to switch the pattern for
the printer to display Caller ID information.
1 From the control panel, press Settings.
2 Press or repeatedly until Device Setup appears.
3 Press .
4 Press or repeatedly until Caller ID Pattern appears.
5 Press .
6 Press or repeatedly until the Caller ID pattern setting indicated by an * appears.
Note: The number of patterns is defined by the country or region setting and only the number of patterns defined
for the selected country or region is shown.
7 If you want to change the Caller ID pattern:
a Press or repeatedly until the Caller ID pattern you want appears.
b Press to save the setting.
Faxing using the control panel
32
Page 33

Canceling a fax after a document is loaded using the control panel
If you have loaded a document into the Automatic Document Feeder (ADF) and the printer roller has started pulling
it into the printer, but you have not yet initiated your fax job:
1 Pull the control panel up.
2 Gently lift your original document out of the ADF.
3 Push the control panel down until it snaps into place.
Faxing using the control panel
33
Page 34

Faxing using the computer
2
1
Getting started
Loading paper
1 Make sure:
• You use paper designed for inkjet printers.
• If you are using photo, glossy, or heavyweight matte paper, you load it with the glossy or printable side facing
you. (If you are not sure which side is the printable side, see the instructions that came with the paper.)
• The paper is not used or damaged.
• If you are using specialty paper, you follow the instructions that came with it.
• You do not force paper into the printer.
2 Before loading paper the first time, slide the paper guides out toward the edges of the paper support. You can
load up to:
• 100 sheets of plain paper
• 25 sheets of heavyweight matte paper
• 25 sheets of photo paper
• 25 sheets of glossy paper
Note: Photos require more drying time. Remove each photo as it exits, and allow it to dry to avoid ink smudging.
3 Load the paper vertically in the center of the paper support, and adjust the paper guides to rest against the edges
of the paper.
Note: To avoid paper jams, make sure the paper does not buckle when you adjust the paper guides.
Related topics:
• “Using the automatic paper type sensor” on page 43
Faxing using the computer
34
Page 35

Loading original documents into the Automatic Document Feeder (ADF)
You can load up to 30 sheets of an original document into the Automatic Document Feeder (ADF) for scanning,
copying, and faxing.
1 Load an original document facedown into the ADF.
2 Adjust the paper guides on the ADF to rest against the edges of the paper.
Automatic Document Feeder (ADF) paper capacity
Load up to Make sure
30 sheets of:
• Letter-size paper
• The document is loaded facedown.
• The paper guides rest against the edges of the paper.
• A4 paper
• Legal-size paper
30 sheets of:
• Custom-size paper
• Prepunched paper
• Reinforced-edge copier paper
• Preprinted forms
• Letterhead paper
• Photo paper
• The document is loaded facedown.
• The paper guides rest against the edges of the paper.
• The paper size fits within these dimensions:
Width:
– 76.2 mm–215.9 mm
– 3.5 in.–8.5 in.
Length:
– 127.0 mm–355.6 mm
– 5.0 in.–14.0 in.
• You allow preprinted media to dry thoroughly before loading
into the ADF.
• You do not use media printed with metallic ink particles.
• You avoid embossed designs.
Related topics:
• “Understanding the parts of the printer” on page 92
• “Scanning a document” on page 71
Faxing using the computer
35
Page 36

Sending a fax
Sending fax while behind a PBX
If the printer is being used in a business or office, it may be connected to a Private Branch Exchange (PBX) telephone
system. Ordinarily, when dialing a fax number, the printer waits to recognize the dial tone and then dials the fax
number. However, this method of dialing may not work if the PBX telephone system uses a dial tone that is not
recognizable to most fax machines. The “Dialing while behind a PBX” feature enables the printer to dial the fax
number without waiting to recognize the dial tone.
1 From the Finder desktop, double-click the Lexmark 5000 Series folder.
2 Double-click the Lexmark 5000 Series Fax Setup Utility icon.
3 From the Fax Setup Utility dialog, click the Send tab.
4 From the Dialing Method pop-up menu, select PBX.
5 Click Save Settings.
Receiving a fax
Receiving a fax automatically using the computer
1 From the Finder desktop, double-click the Lexmark 5000 Series folder.
2 Double-click the Lexmark 5000 Series Fax Setup Utility icon.
3 From the Fax Setup Utility dialog, click the Receive tab.
4 From the Auto Answer pop-up menu, select On.
5 From the “Answer On” pop-up menu, select a setting.
Note: When the number of rings you set is detected, the printer automatically receives the incoming fax.
6 Click Save Settings.
Related topics:
• “Setting the number of rings before receiving a fax automatically” on page 38
• “Setting Auto Answer to On” on page 37
Setting a fax manual answer code
1 From the Finder desktop, double-click the Lexmark 5000 Series folder.
2 Double-click the Lexmark 5000 Series Fax Setup Utility icon.
3 From the Fax Setup Utility dialog, click the Receive tab.
4 In the Manual Answer Code field, enter the code you want to use.
Notes:
• The default code setting is *9*.
• The code can include up to seven numbers, commas, periods, and/or these symbols: *#+-().
5 Click Save Settings.
Faxing using the computer
36
Page 37

Customizing dial settings
Adding contacts from the Address Book
1 From the Finder desktop, double-click the Lexmark 5000 Series folder.
2 Double-click the Fax Setup Utility icon.
3 Select the Speed Dials tab.
4 Click .
5 From the Address Book, click and drag the contact that you want to add to your printer's Speed Dial list.
Note: Only the fax numbers specified in the Address Book contact is reflected on the Speed Dial list. If there is
more than one fax number for a contact, the application automatically creates separate entries.
6 Click Save Settings.
Using Caller ID from the software
Caller ID is a service provided by some telephone companies that identifies the telephone number (and possibly the
name) of the person who is calling. If you subscribe to this service, it works with the printer. When you receive a fax,
the telephone number of the person who is sending you the fax appears on the display.
Note: Caller ID is available only in some countries and regions.
The printer supports two distinct Caller ID patterns: Pattern 1 (FSK) and Pattern 2 (DTMF). Depending on the country
or region you live in and the telecommunications company you subscribe to, you may need to switch the pattern to
display Caller ID information.
1 From the Finder desktop, double-click the Lexmark 5000 Series folder.
2 Double-click the Lexmark 5000 Series Fax Setup Utility icon.
3 From the Fax Setup Utility dialog, click the Receive tab.
4 From the Caller ID Pattern pop-up menu, select the pattern number you want to use.
5 Click Save Settings.
Setting Auto Answer to On
1 From the Finder desktop, double-click the Lexmark 5000 Series folder.
2 Double-click the Lexmark 5000 Series Fax Setup Utility icon.
3 From the Fax Setup Utility dialog, click the Receive tab.
4 From the Auto Answer pop-up menu, choose On.
5 Click Save Settings.
The Auto Answer light on the control panel comes on. When the number of rings you set is detected, the printer
automatically receives the incoming fax.
Faxing using the computer
37
Page 38

Setting up a dialing prefix
You can add a prefix to the beginning of each number dialed. The prefix can include up to eight numbers, commas,
periods, and/or these symbols: * # + - ( ).
1 From the Finder desktop, double-click the Lexmark 5000 Series folder.
2 Double-click the Lexmark 5000 Series Fax Setup Utility icon.
3 From the Fax Setup Utility dialog, click the Send tab.
4 In the Dialing Prefix field, enter the prefix to be dialed before each telephone number.
5 Click Save Settings.
Setting the distinctive ring
Distinctive ring is a service provided by some telephone companies that assigns multiple phone numbers to a single
telephone line. If you subscribe to this service, you can program your printer to have a distinctive ring pattern and
phone number for incoming faxes.
1 From the Finder desktop, double-click the Lexmark 5000 Series folder.
2 Double-click the Lexmark 5000 Series Fax Setup Utility icon.
3 From the Fax Setup Utility dialog, click the Receive tab.
4 From the Distinctive Ring Pattern pop-up menu, select the ring pattern you want to use.
5 Click Save Settings.
Setting the number of rings before receiving a fax automatically
1 From the Finder desktop, double-click the Lexmark 5000 Series folder.
2 Double-click the Lexmark 5000 Series Fax Setup Utility icon.
3 From the Fax Setup Utility dialog, click the Receive tab.
4 From the “Answer On” pop-up menu, select the setting you want to use.
5 From the Auto Answer pop-up menu, select On.
6 Click Save Settings.
The Auto Answer light on the control panel turns on. When the number of rings you set is detected, the printer
automatically receives the incoming fax.
Setting up Speed Dial using the computer
1 From the Finder desktop, double-click the Lexmark 5000 Series folder.
2 Double-click the Fax Setup Utility icon.
3 Select the Speed Dials tab.
4 Click + to enter contact names and fax numbers in the Individuals or Groups tabs.
Note: To delete an entry from the Speed Dial list, select it, and then click -.
5 Click Save Settings.
Faxing using the computer
38
Page 39

Related topics:
• “Customizing settings using the Fax Setup Utility” on page 39
Customizing fax settings
Using the Fax Setup Utility
Use this utility to adjust how faxes are sent and received. When you save the settings, they apply to every fax you
send or receive. You can also use this utility to create and edit the Speed Dial list.
1 From the Finder desktop, double-click the Lexmark 5000 Series folder.
2 Double-click the Fax Setup Utility icon.
3 From the Device menu, select your printer. Customize your settings as needed.
Note: For a list of available options, see “Customizing settings using the Fax Setup Utility” on page 39.
4 Click Save Settings after you finish customizing the settings.
5 Close the Fax Setup Utility.
Setting a fax quality using the computer
You can set or change the quality of your outgoing fax.
1 From the Finder desktop, double-click the Lexmark 5000 Series folder.
2 Double-click the Lexmark 5000 Series Fax Setup Utility icon.
3 From the Fax Setup Utility dialog, click the Send tab.
4 From the Default Send Quality pop-up menu, select a quality.
Note: To automatically change colored faxes into black and white documents if the receiving fax machine cannot
receive colored faxes, select the Automatically convert fax send quality check box. Checking this box will
automatically downgrade outgoing fax resolution.
5 Click Save Settings.
Customizing settings using the Fax Setup Utility
You can adjust the fax settings in the Fax Setup Utility. These settings apply to the faxes you send or receive.
1 From the Finder desktop, double-click the Lexmark 5000 Series folder.
2 Double-click the Lexmark 5000 Series Fax Setup Utility icon.
3 From the Fax Setup Utility dialog, choose the printer from the Device pop-up menu.
Note: If you are using a network printer to send a fax, the MAC address of your printer is shown on the Device
pop-up menu. Otherwise, only the printer name is shown.
Faxing using the computer
39
Page 40

From here You can
Send
Receive
• Select the telephone dial method you want to use.
• Enter a dialing prefix.
• Select a dialing volume.
• Select the number of times you want the machine to redial and the time between
those attempts if the fax cannot be sent on the first try.
• Select whether to scan the entire document before dialing the number.
• Select a maximum send speed and print quality for outgoing faxes.
• Select the print quality of your fax job.
• Select Automatically convert fax send quality to match the resolution setting of
the receiving fax machine.
• Enter your name and fax number.
Notes:
– You can include a calling card number as part of the fax number.
– Enter a maximum of 64 digits in a fax number.
• Select incoming call options.
• Select Auto Answer options.
• Select whether you want to forward a fax, or print it and then forward it.
• Enter a fax forwarding number.
• Manage blocked faxes.
Faxing using the computer
40
Page 41

From here You can
Fax/Report Printing
• Choose to reduce an incoming fax to fit to the paper size loaded, or print it on two
sheets of paper.
• Choose whether to print a footer (the date, time, and page number) to appear on
each page you receive.
• Select when to print fax activity and confirmation reports.
Speed Dials Create, add to, edit, or delete entries from the Speed Dial list, including Group Dial entries.
4 Click Save Settings after you finish customizing the settings. To change settings back to the factory default
settings, click Factory Defaults. To load your saved settings, click Revert to Saved.
5 Close the Fax Setup Utility.
Setting a fax sending speed
You can set or change the sending speed of your outgoing fax.
1 From the Finder desktop, double-click the Lexmark 5000 Series folder.
2 Double-click the Lexmark 5000 Series Fax Setup Utility icon.
3 From the Fax Setup Utility dialog, click the Send tab.
4 From the Maximum Send Speed pop-up menu, select a speed setting.
Note: The maximum sending speed is 33600 bps.
5 Click Save Settings.
Managing fax jobs
Forwarding faxes using the computer
Use the fax-forwarding feature if you are going to be away but still want to receive your faxes. There are three
fax-forwarding settings:
• Off—(Default).
• Forward—The printer sends the fax to the designated fax number.
• Print & forward—The printer prints the fax and then sends it to the designated fax number.
To set up fax forwarding:
1 From the Finder desktop, double-click the Lexmark 5000 Series folder.
2 Double-click the Lexmark 5000 Series Fax Setup Utility icon.
3 From the Fax Setup Utility dialog, click the Receive tab.
4 From the Forward Faxes pop-up menu, select the setting you want to use.
5 In the Forward Destination Number field, enter the number to which you want to forward the fax.
Note: A fax number can include up to 64 numbers, commas, periods, and/or these symbols: * # + - ( ).
6 Click Save Settings.
Faxing using the computer
41
Page 42

Printing fax activity reports
1 From the Finder desktop, double-click the Lexmark 5000 Series folder.
2 Double-click the Lexmark 5000 Series Fax Setup Utility icon.
3 From the Fax Setup Utility dialog, click the Fax/Report Printing tab.
4 From the Fax Confirmation Report pop-up menu, select:
Notes:
• Print on error if you want to print only error reports
• Print for all faxes if you want to print all outgoing and incoming faxes
5 Click Save Settings.
Blocking junk faxes
1 From the Finder desktop, double-click the Lexmark 5000 Series folder.
2 Double-click the Lexmark 5000 Series Fax Setup Utility icon.
3 From the Fax Setup Utility dialog, click the Receive tab.
4 To enable fax blocking, select the Enable fax number filtering check box.
5 Click theManage Filter List button.
Note: A filter list box appears.
6 Click + to enter a contact name and fax number to be blocked.
7 Click to access the address book.
8 Click and drag the contact name and number that you want added into the list to be blocked.
9 To edit or delete a previously entered name and number, click the contact details, and then click -.
10 Click OK.
11 Click Save Settings.
Faxing using the computer
42
Page 43

Printing
2
1
Getting started
Using the automatic paper type sensor
The printer is equipped with an automatic paper type sensing device. The Paper Type Sensor automatically detects
the type of paper that has been loaded into the printer and adjusts the settings for you. For example, if you want to
print a photo, load photo paper into the printer. The printer detects the type of paper and automatically adjusts the
settings to give you optimum photo-printing results.
Loading paper
1 Make sure:
• You use paper designed for inkjet printers.
• If you are using photo, glossy, or heavyweight matte paper, you load it with the glossy or printable side facing
you. (If you are not sure which side is the printable side, see the instructions that came with the paper.)
• The paper is not used or damaged.
• If you are using specialty paper, you follow the instructions that came with it.
• You do not force paper into the printer.
2 Before loading paper the first time, slide the paper guides out toward the edges of the paper support. You can
load up to:
• 100 sheets of plain paper
• 25 sheets of heavyweight matte paper
• 25 sheets of photo paper
• 25 sheets of glossy paper
Note: Photos require more drying time. Remove each photo as it exits, and allow it to dry to avoid ink smudging.
3 Load the paper vertically in the center of the paper support, and adjust the paper guides to rest against the edges
of the paper.
Note: To avoid paper jams, make sure the paper does not buckle when you adjust the paper guides.
Related topics:
• “Using the automatic paper type sensor” on page 43
Printing
43
Page 44

Loading greeting cards, index cards, photo cards, and postcards
1
2
1
2
You can load up to 25 greeting cards, index cards, photo cards, or postcards at a time.
1 Load cards with the print side facing you.
2 Make sure:
• The cards are loaded in the center of the paper support.
• The paper guides rest against the edges of the cards.
Note: Photo cards require more drying time. Remove each photo card as it exits, and allow it to dry to avoid ink
smudging.
Loading envelopes
You can load up to 10 envelopes at a time.
Warning: Do not use envelopes that have metal clasps, string ties, or metal folding bars.
1 Load envelopes in the center of the paper support with the stamp location in the upper left corner.
2 Make sure:
• The print side of the envelopes faces you.
• The envelopes are designed for use with inkjet printers.
• The paper guides rest against the edges of the envelopes.
Notes:
• Do not load envelopes with holes, perforations, cutouts, or deep embossing.
• Do not use envelopes that have exposed flap adhesive.
• Envelopes require more drying time. Remove each envelope as it exits, and allow it to dry to avoid ink
smudging.
Loading labels
You can load up to 25 sheets of labels at a time.
1 Load labels with the print side facing you and the top of the sheet fed into the printer first.
2 Make sure:
• The print side of the labels faces you.
• The top of the labels feeds into the printer first.
• The adhesive on the labels does not extend to within 1 mm of the edge of the labels.
Printing
44
Page 45

• You use full label sheets. Partial sheets (with areas exposed by missing labels) may cause labels to peel
off during printing, resulting in a paper jam.
• The labels are loaded in the center of the paper support.
• The paper guides rest against the edges of the labels.
Note: Labels require more drying time. Remove each sheet of labels as it exits, and allow it to dry to avoid ink
smudging.
Loading transparencies
You can load up to 50 transparencies at a time.
1 Load transparencies with the rough side facing you. If the transparencies have a removable strip, each strip
should face away from you and down toward the printer.
2 Make sure:
• The transparencies are loaded in the center of the paper support.
• The paper guides rest against the edges of the transparencies.
Notes:
• Transparencies with paper backing sheets are not recommended.
• Transparencies require more drying time. Remove each transparency as it exits, and allow it to dry to avoid
ink smudging.
Loading iron-on transfers
You can load up to 10 iron-on transfers at once, but you will achieve best results loading them one at a time.
1 Load iron-on transfers with the print side of the transfer facing you.
2 Make sure:
• You follow the loading instructions that came with the iron-on transfers.
• The transfers are loaded in the center of the paper support.
• The paper guides rest against the edges of the transfers.
Loading custom-size paper
You can load up to 100 sheets of custom-size paper at a time.
1 Load paper with the print side facing you.
2 Make sure:
• The paper size fits within these dimensions:
Width:
– 76.0–216.0 mm
– 3.0–8.5 inches
Length:
– 127.0–432.0 mm
– 5.0–17.0 inches
• The stack height does not exceed 10 mm.
• The paper is loaded in the center of the paper support.
• The paper guides rest against the edges of the paper.
Printing
45
Page 46

Loading banner paper
You can load up to 20 sheets of banner paper at a time.
1 Remove all paper from the paper support before loading the banner paper.
2 Tear off only the number of pages needed to print the banner.
3 Place the required stack of banner paper behind the printer.
4 Feed the leading edge of the banner paper into the printer first.
5 Make sure:
• The paper is loaded in the center of the paper support.
• The paper guides rest against the edges of the paper.
Loading original documents into the Automatic Document Feeder (ADF)
You can load up to 30 sheets of an original document into the Automatic Document Feeder (ADF) for scanning,
copying, and faxing.
1 Load an original document facedown into the ADF.
2 Adjust the paper guides on the ADF to rest against the edges of the paper.
Printing
46
Page 47

Automatic Document Feeder (ADF) paper capacity
Load up to Make sure
30 sheets of:
• Letter-size paper
• A4 paper
• Legal-size paper
30 sheets of:
• Custom-size paper
• Prepunched paper
• Reinforced-edge copier paper
• Preprinted forms
• Letterhead paper
• Photo paper
Related topics:
• “Understanding the parts of the printer” on page 92
• “Scanning a document” on page 71
• The document is loaded facedown.
• The paper guides rest against the edges of the paper.
• The document is loaded facedown.
• The paper guides rest against the edges of the paper.
• The paper size fits within these dimensions:
Width:
– 76.2 mm–215.9 mm
– 3.5 in.–8.5 in.
Length:
– 127.0 mm–355.6 mm
– 5.0 in.–14.0 in.
• You allow preprinted media to dry thoroughly before loading
into the ADF.
• You do not use media printed with metallic ink particles.
• You avoid embossed designs.
Choosing compatible specialty paper types
• Heavyweight matte paper—A photo paper with a matte finish used for printing high-quality graphics.
• Lexmark PerfectFinish
printers, but compatible with all inkjet printers. It is used specifically for printing professional quality photos with
a glossy finish. It is best when used with genuine Lexmark evercolor
water-resistant.
• Lexmark Photo Paper—An outstanding "everyday" heavyweight inkjet photo paper designed for use with
Lexmark printers, but compatible with all brands of inkjet printers. Although inexpensive, it offers excellent image
quality and outstanding value.
• Lexmark Premium Photo Paper—A heavier photo paper specifically designed to bond chemically with Lexmark
inks for eye-catching results. Fast drying, it prevents bleeding and feathering even when the image is saturated.
• Transparency—A clear, plastic media primarily used for overhead projectors.
• Card stock—A very thick paper used for printing sturdier items, such as greeting cards.
• Iron-On transfer—A type of media that has a reverse image printed on it that can be ironed onto fabric.
TM
Photo paper—A high-quality photo paper specifically designed for Lexmark inkjet
TM
2 ink, providing photos that are fade- and
Printing
47
Page 48

Learning about the All-In-One software print options
Choosing a paper size
1 With a document open, click File Page Setup.
2 From the “Format for” pop-up menu, choose 5000 Series.
Note: When you select Any Printer, your paper size choices are limited. By selecting the name of your printer,
you have many more paper size options.
3 From the Paper Size pop-up menu, choose a paper size.
4 Click OK.
Related topics:
• “Using the Page Setup dialog” on page 105
Choosing a paper type
By default, the paper type sensor is set to Automatic. It can detect and adjust the paper type settings for plain,
heavyweight matte, glossy/photo, and transparency paper. To manually choose the paper type:
1 With a document open, click File Print.
2 From the Copies & Pages pop-up menu, choose Quality & Media.
3 From the Paper Type pop-up menu, choose a paper type.
4 Click Print.
Notes:
• Manually choosing a paper type turns off the paper type sensor for the current print job.
• For multiple-page jobs, the printer assumes the subsequent pages are the same paper type as the first sheet
detected.
Related topics:
• “Using the Print dialog” on page 106
Choosing a print quality
1 With a document open, click File Print.
2 From the Printer pop-up menu, choose 5000 Series.
3 From the Copies & Pages pop-up menu, choose Quality & Media.
4 From the Print Quality menu, select the appropriate print quality for the document:
• Automatic—The printer sets the print quality for the paper type loaded (default setting).
• Quick Print—Best for text-only documents with reduced print quality but faster print speed.
• Normal—Recommended for most types of documents.
• Photo—Recommended for photos and documents with graphics.
5 Click Print.
Related topics:
• “Using the Print dialog” on page 106
Printing
48
Page 49

Collating copies using the computer
The printer can sort multiple copy jobs. For example, if you print two copies of a three-page document, and you
choose not to collate them, the pages print in this order: 1, 1, 2, 2, 3, 3. If you choose to collate, the pages print in
this order: 1, 2, 3, 1, 2, 3.
1 With a document open, click File Print.
2 In the Copies field, enter the number of copies you want to print.
3 Choose Collated.
Related topics:
• “Collating copies using the control panel” on page 62
• “Using the Print dialog” on page 106
Sharpening an image
1 From the Finder desktop, double-click the Lexmark 5000 Series folder.
2 Double-click the Lexmark 5000 Series Center icon.
3 Click Preview/Edit to open the Scan dialog.
4 From the dialog, select Preview.
5 Reload the document into the ADF, and then click Close on the reminder dialog.
Note: Click on the check box on the reminder dialog if you do not want this dialog to reappear until you reopen
the application.
6 From the Scan dialog, click to open the Scan Settings drawer.
7 Click the Adjustments tab.
8 From the Blur/Sharpen area, move the slider to adjust the level of sharpness of the scanned image.
Related topics:
• “Customizing scan settings from the Scan dialog” on page 67
• “Enhancing photo print quality using the software” on page 87
Resetting All-In-One software settings to defaults
1 From the Finder desktop, double-click the Lexmark 5000 Series folder.
2 Double-click the Lexmark 5000 Series Center icon.
3 Click Defaults.
Related topics:
• “Using the All-In-One Center” on page 110
• “Customizing scan settings from the Scan dialog” on page 67
Printing
49
Page 50

Performing printing and related tasks
Printing a document
1 Load paper.
2 With a document open, click File Print.
3 From the Printer pop-up menu, choose 5000 Series.
4 From the third pop-up menu from the top, select the settings you want to adjust, and adjust the settings.
You can specify print quality, the number of copies to print, the type of paper you're printing on, and how you
want the pages to print.
5 Click Print.
Related topics:
• “Loading paper” on page 18
• “Using the Print dialog” on page 106
Printing photos using the computer
1 Load photo paper, with the glossy or printable side facing you. (If you are not sure which side is the printable
side, see the instructions that came with the paper.) For more information, see “Loading paper” on page 18.
2 Customize the settings as needed in the Page Setup dialog.
a With a photo open, choose File Page Setup.
b From the “Format for” pop-up menu, choose 5000 Series.
c From the Paper Size pop-up menu, choose the paper size loaded.
d Choose an orientation.
e Click OK.
3 Customize the settings as needed in the Print dialog.
a With a photo open, choose File Print.
b From the Printer pop-up menu, choose 5000 Series.
c For Mac OS X version 10.4 or later, click Advanced. Otherwise, proceed to the next step.
d From the Copies & Pages pop-up menu, type the number of copies to be printed.
e From the same pop-up menu, choose Quality & Media.
• From the Paper Type pop-up menu, choose the type of paper you are using.
• From the Print Quality area, choose Automatic or Photo.
f Click Print.
Note: To prevent smudging or scratching, avoid touching the printed surface with your fingers or sharp objects. For
best results, remove each printed sheet individually from the paper exit tray, and allow the prints to dry at least 24
hours before stacking, displaying, or storing.
Related topics:
• “Enhancing photo print quality using the software” on page 87
Printing
50
Page 51

Printing borderless photos
From your software application, set the page margins to zero, and then adjust the image on the screen so that it
covers the entire page.
Note: Some applications do not support margin setting.
1 Load photo or glossy paper, with the glossy or printable side facing you. (If you are not sure which side is the
printable side, see the instructions that came with the paper.) For more information, see “Loading paper” on
page 18.
2 Customize the settings as needed in the Page Setup dialog.
a With a photo open, choose File Page Setup.
b From the “Format for” pop-up menu, choose 5000 Series.
c From the Paper Size pop-up menu, choose the paper size loaded.
Note: Make sure you choose an option that has (Borderless) in it. For example, if you loaded letter-size
photo paper, choose US Letter (Borderless).
d Choose an orientation.
e Click OK.
3 Customize the settings as needed in the Print dialog.
a With a photo open, choose File Print.
b From the Printer pop-up menu, choose 5000 Series.
c For Mac OS X version 10.4 or later, click Advanced. Otherwise, proceed to the next step.
d From the Copies & Pages pop-up menu, type the number of copies to be printed.
e From the same pop-up menu, choose Quality & Media.
• From the Paper Type pop-up menu, choose the type of paper you are using.
• From the Print Quality area, choose Automatic or Photo.
f Click Print.
Note: To prevent smudging or scratching, avoid touching the printed surface with your fingers or sharp objects. For
best results, remove each printed sheet individually from the paper exit tray, and allow the prints to dry at least 24
hours before stacking, displaying, or storing.
Related topics:
• “Enhancing photo print quality using the software” on page 87
Printing cards
1 Load greeting cards, index cards, or postcards.
Notes:
• Make sure the thickness of each card does not exceed 0.020 inch (0.50 mm).
• Make sure the print side of the card faces you.
2 Customize the settings as needed in the Page Setup dialog.
a With a document open, click File Page Setup.
b From the “Format for” pop-up menu, choose 5000 Series.
c From the Paper Size pop-up menu, choose a card size.
Printing
51
Page 52

d Choose an orientation.
e Click OK.
3 Customize the settings as needed in the Print dialog.
a From the software application, click File Print.
b From the Printer pop-up menu, choose 5000 Series.
c Click Print.
Notes:
• To avoid paper jams, do not force the cards into the printer.
• To prevent smudging, remove each card as it exits, and let it dry before stacking.
Related topics:
• “Loading greeting cards, index cards, photo cards, and postcards” on page 44
Printing envelopes
1 Load envelopes.
Notes:
• Do not load envelopes with holes, perforations, cutouts, deep embossing, metal clasps, metal folding bars,
string ties, or exposed flap adhesive.
• Make sure the print side of the envelopes faces you.
2 Customize the settings as needed in the Page Setup dialog.
a With a document open, click File Page Setup.
b From the “Format for” pop-up menu, choose 5000 Series.
c From the Paper Size pop-up menu, choose the envelope size loaded.
d Choose an orientation.
Notes:
• Most envelopes use landscape orientation.
• Make sure the same orientation is also selected in the software application.
e Click OK.
3 Customize the settings as needed in the Print dialog.
a From the software application, click File Print.
b From the Printer pop-up menu, choose 5000 Series.
c Click Print.
Related topics:
• “Loading envelopes” on page 44
Printing iron-on transfers
1 Load iron-on transfers.
2 Customize the settings as needed in the Page Setup dialog.
a With a document open, click File Page Setup.
b From the “Format for” pop-up menu, choose 5000 Series.
Printing
52
Page 53

c From the Settings pop-up menu, choose Page Attributes.
d Choose a paper size.
e Choose an orientation.
f Click OK.
3 Customize the settings as needed in the Print dialog.
a From the software application, click File Print.
b From the Printer pop-up menu, choose 5000 Series.
c From the pop-up menu in the center, choose Quality & Media.
d From the Paper Type pop-up menu, choose Iron-On Transfer.
Note: Choosing Iron-On Transfer automatically mirrors the image you want to print.
e Select a print quality other than Quick Print. Photo is recommended.
4 Click Print.
Note: To prevent smudging, remove each iron-on transfer as it exits, and let it dry before stacking.
Related topics:
• “Using the Page Setup dialog” on page 105
• “Using the Print dialog” on page 106
Printing transparencies
1 Load transparencies.
2 Customize the settings as needed in the Page Setup dialog.
a With a document open, click File Page Setup.
b From the “Format for” pop-up menu, choose 5000 Series.
c From the Paper Size pop-up menu, choose a paper size.
d Choose an orientation.
e Click OK.
3 Customize the settings as needed in the Print dialog.
a From the software application, click File Print.
b From the Printer pop-up menu, choose 5000 Series.
c From the third pop-up menu from the top, choose Quality & Media.
• From the Paper Type pop-up menu, choose Transparency.
• Select a print quality.
Note: Higher print quality settings result in better quality documents but may take longer to print.
d Click Print.
Note: To prevent smudging, remove each transparency as it exits, and let it dry before stacking. Transparencies
may require up to 15 minutes to dry.
Related topics:
• “Loading transparencies” on page 45
Printing
53
Page 54

Printing a banner
1 Remove all paper from the paper support.
2 Tear off only the number of pages needed for the banner (up to 20 sheets).
3 Place the required stack of banner paper on the top cover.
4 Load only the first page of banner paper into the paper support with the leading edge of the banner going into
the printer.
5 Adjust the left and right paper guides.
6 Customize the settings in the Page Setup dialog.
a With your document open, choose File Page Setup.
b From the Settings pop-up menu, choose Page Attributes.
c From the “Format for” pop-up menu, choose the printer.
d From the Paper Size pop-up menu, choose A4 Banner or US Letter Banner.
e Select an orientation.
f Click OK.
7 Customize the settings in the Print dialog.
a With your document open, choose File Print.
b From the Printer pop-up menu, choose the printer.
c From the third pop-up menu from the top, choose Quality & Media.
• From the Paper Type pop-up menu, choose Plain.
• Select a print quality.
Note: Higher print quality settings result in better quality documents but may take longer to print.
d Click OK.
Related topics:
• “Using the Print dialog” on page 106
• “Loading banner paper” on page 46
Printing multiple pages on one sheet
1 Load paper.
2 Customize the settings as needed in the Page Setup dialog.
a With a document open, choose File Page Setup.
b From the “Format for” pop-up menu, choose 5000 Series.
Printing
54
Page 55

c From the Settings pop-up menu, choose Page Attributes.
d Choose a paper size.
e Choose an orientation.
f Click OK.
3 Customize the settings as needed in the Print dialog.
a With a document open, click File Print.
b From the Printer pop-up menu, choose 5000 Series.
c From the third pop-up menu from the top, choose Layout.
• From the Pages per Sheet pop-up menu, choose the number of pages you want to print on one sheet.
• From the Layout Direction area, click the icon that shows the order you want the pages to print on one
sheet.
• If you want to print a border around each page image, choose an option from the Border pop-up menu.
d Click Print.
Related topics:
• “Loading paper” on page 18
Printing color images in black and white
This setting is available only if there is a black print cartridge installed.
1 Load paper.
2 Customize the settings in the Page Setup dialog as needed.
3 With a document open, click File Print.
4 From the Printer pop-up menu, choose 5000 Series.
5 From the third pop-up menu from the top, choose Color Options.
6 From the Document Color pop-up menu, choose Black Only.
7 Click Print.
Related topics:
• “Loading paper” on page 18
Printing multiple copies of a stored document
1 With a document open, click File Print.
2 From the Printer pop-up menu, choose 5000 Series.
3 From the third pop-up menu, choose Copies & Pages.
4 Enter the number of copies you want to print.
Related topics:
• “Using the Print dialog” on page 106
Printing
55
Page 56

Printing the last page first (reverse page order)
For Mac OS X version 10.4.2 or later:
1 With a document open, click File Print.
2 From the third pop-up menu, choose Paper Handling.
3 From the Page Order menu, select Reverse.
4 Click Print.
For Mac OS X version 10.3.9:
1 With a document open, click File Print.
2 From the third pop-up menu, choose Paper Handling.
3 Select Reverse page order.
4 Click Print.
Related topics:
• “Using the Print dialog” on page 106
Managing print jobs
Pausing print jobs
1 While the document is printing, click the printer icon on the dock.
2 From the queue window, select the job you want to pause.
3 Click the Hold icon.
Note: You can also click the Stop Jobs icon to pause printing all jobs.
Related topics:
• “Using the Print dialog” on page 106
• “Resuming print jobs” on page 57
• “Canceling a print job” on page 56
Canceling a print job
To cancel a print job using the control panel:
1 Press .
Printing stops and the print cartridge carrier returns to its home position.
2 Press to turn off the printer.
To cancel a print job using the computer:
1 While the document is printing, click the printer icon on the dock.
2 From the queue window, select the job you want to cancel.
3 Click the Delete icon.
Printing
56
Page 57

Related topics:
• “Using the control panel” on page 95
• “Pausing print jobs” on page 56
Resuming print jobs
1 From the Finder desktop, choose Applications Utilities Print Center or Printer Setup Utility, depending
on the operating system version you are using.
2 From the list of printers, double-click your printer.
3 From the printer pop-up menu, click Start Jobs if you want to resume all print jobs in the queue. If you want to
resume a particular print job, select the document name, and then click Resume.
Related topics:
• “Pausing print jobs” on page 56
• “Canceling a print job” on page 56
Printing
57
Page 58

Copying
2
1
Getting started
Loading paper
1 Make sure:
• You use paper designed for inkjet printers.
• If you are using photo, glossy, or heavyweight matte paper, you load it with the glossy or printable side facing
you. (If you are not sure which side is the printable side, see the instructions that came with the paper.)
• The paper is not used or damaged.
• If you are using specialty paper, you follow the instructions that came with it.
• You do not force paper into the printer.
2 Before loading paper the first time, slide the paper guides out toward the edges of the paper support. You can
load up to:
• 100 sheets of plain paper
• 25 sheets of heavyweight matte paper
• 25 sheets of photo paper
• 25 sheets of glossy paper
Note: Photos require more drying time. Remove each photo as it exits, and allow it to dry to avoid ink smudging.
3 Load the paper vertically in the center of the paper support, and adjust the paper guides to rest against the edges
of the paper.
Note: To avoid paper jams, make sure the paper does not buckle when you adjust the paper guides.
Related topics:
• “Using the automatic paper type sensor” on page 43
Copying
58
Page 59

Loading original documents into the Automatic Document Feeder (ADF)
You can load up to 30 sheets of an original document into the Automatic Document Feeder (ADF) for scanning,
copying, and faxing.
1 Load an original document facedown into the ADF.
2 Adjust the paper guides on the ADF to rest against the edges of the paper.
Automatic Document Feeder (ADF) paper capacity
Load up to Make sure
30 sheets of:
• Letter-size paper
• The document is loaded facedown.
• The paper guides rest against the edges of the paper.
• A4 paper
• Legal-size paper
30 sheets of:
• Custom-size paper
• Prepunched paper
• Reinforced-edge copier paper
• Preprinted forms
• Letterhead paper
• Photo paper
• The document is loaded facedown.
• The paper guides rest against the edges of the paper.
• The paper size fits within these dimensions:
Width:
– 76.2 mm–215.9 mm
– 3.5 in.–8.5 in.
Length:
– 127.0 mm–355.6 mm
– 5.0 in.–14.0 in.
• You allow preprinted media to dry thoroughly before loading
into the ADF.
• You do not use media printed with metallic ink particles.
• You avoid embossed designs.
Related topics:
• “Understanding the parts of the printer” on page 92
• “Scanning a document” on page 71
Copying
59
Page 60

Performing copying and related tasks
Making a copy
1 Load paper.
2 Load an original document facedown in the Automatic Document Feeder (ADF).
3 From the control panel, press Copy Mode.
4 Press Start Color or Start Black.
If you want to change a setting
1 From the control panel, press .
2 Press or repeatedly until the menu item you want appears, and then press .
3 Press or repeatedly until the submenu item or the setting you want appears, and then press .
4 To go into additional submenus and settings, repeat as needed.
5 If needed, press repeatedly to return to the previous menus and make other setting selections.
6 Press Start Color or Start Black.
Related topics:
• “Using the control panel” on page 95
• “Loading original documents into the Automatic Document Feeder (ADF)” on page 19
Copying photos
1 Load photo paper with the glossy or printable side facing you. (If you are not sure which side is the printable
side, see the instructions that came with the paper.)
2 Load the photo facedown in the center of the Automatic Document Feeder (ADF), and adjust the ADF paper
guides to rest against the edges of the photo.
3 From the control panel, press Copy Mode.
4 Press .
5 Press or repeatedly until Quality appears.
6 Press .
7 Press or repeatedly until Photo appears.
8 Press .
9 Press or repeatedly until Paper Setup appears.
10 Press .
11 Press or repeatedly until Paper Size appears.
12 Press .
13 Press or repeatedly until the size you want appears.
14 Press .
Copying
60
Page 61

15 Press or repeatedly until Paper Type appears.
16 Press .
17 Press or repeatedly until the type of paper loaded into the printer appears.
18 Press .
19 Press Start Color or Start Black.
Related topics:
• “Using the control panel” on page 95
Copying multiple images on one page using the control panel
1 Load paper into the paper support.
2 Load original documents facedown into the ADF tray.
3 From the control panel, press Copy Mode.
4 Press .
5 Press or repeatedly until N-Up appears.
6 Press .
7 Press or repeatedly until the setting you want appears.
8 Press .
9 Press Start Color or Start Black.
Related topics:
• “Using the control panel” on page 95
Enlarging or reducing an image
1 Load paper.
Note: If you are copying photos, use photo or heavyweight matte paper, with the glossy or printable side facing
you. (If you are not sure which side is the printable side, see the instructions that came with the paper.)
2 Load an original document or photo facedown in the Automatic Document Feeder (ADF).
3 From the control panel, press Copy Mode.
4 Press .
5 Press or repeatedly until Resize appears.
6 Press .
7 Press or repeatedly until the setting you want appears.
Note: If you select Custom Resize, press and hold
press
.
or until the size you want appears, and then
8 Press Start Color or Start Black.
Copying
61
Page 62

Related topics:
• “Loading original documents into the Automatic Document Feeder (ADF)” on page 19
• “Using the control panel” on page 95
Adjusting copy quality
Quality specifies the resolution used for the copy job. Resolution involves a dots-per-inch (dpi) count; the higher the
dpi count, the higher the resolution and copy quality.
1 Load paper.
2 Load an original document facedown in the Automatic Document Feeder (ADF).
3 If necessary, press Copy Mode.
4 Press .
5 Press or repeatedly until Quality appears.
6 Press .
7 Press or repeatedly until the quality you want appears.
8 Press .
9 Press Start Color or Start Black.
Making a copy lighter or darker
If you want to adjust the look of a copy or photo, you can adjust it to make it lighter or darker.
1 Load paper.
Note: If you are copying photos, use photo or heavyweight matte paper, with the glossy or printable side facing
you. (If you are not sure which side is the printable side, see the instructions that came with the paper.)
2 Load an original document facedown in the ADF.
3 From the control panel, press Copy Mode.
4 Press Lighter/Darker.
5 Press or repeatedly to adjust the slider.
6 Press .
7 Press Start Color or Start Black.
Collating copies using the control panel
If you print multiple copies of a multiple-page document, you can choose to print each copy as a set (collated) or to
print the copies as groups of pages (not collated).
Collated Not collated
Copying
62
Page 63

1 Load paper.
2 Load an original document facedown in the Automatic Document Feeder (ADF).
3 From the control panel, press Copy Mode.
4 Press .
5 Press or repeatedly until Collate appears.
6 Press .
7 Press or repeatedly until On appears.
Note: You can collate copies only if you did not make any changes in the Resize menu.
8 Press Start Color or Start Black.
Related topics:
• “Making a copy” on page 60
• “Collating copies using the computer” on page 49
• “Using the control panel” on page 95
Canceling a copy after document is loaded
If you have loaded a document into the Automatic Document Feeder (ADF) and the printer roller has started pulling
it into the printer, but you have not yet initiated your copy job:
1 Pull the control panel up.
2 Gently lift your original document out of the ADF.
3 Push the control panel down until it snaps into place.
Related topics:
• “Using the control panel” on page 95
Copying
63
Page 64

Scanning
Getting started
Loading original documents into the Automatic Document Feeder (ADF)
You can load up to 30 sheets of an original document into the Automatic Document Feeder (ADF) for scanning,
copying, and faxing.
1 Load an original document facedown into the ADF.
2 Adjust the paper guides on the ADF to rest against the edges of the paper.
Automatic Document Feeder (ADF) paper capacity
Load up to Make sure
30 sheets of:
• Letter-size paper
• A4 paper
• Legal-size paper
• The document is loaded facedown.
• The paper guides rest against the edges of the paper.
Scanning
64
Page 65

Load up to Make sure
30 sheets of:
• Custom-size paper
• Prepunched paper
• Reinforced-edge copier paper
• Preprinted forms
• Letterhead paper
• Photo paper
• The document is loaded facedown.
• The paper guides rest against the edges of the paper.
• The paper size fits within these dimensions:
Width:
– 76.2 mm–215.9 mm
– 3.5 in.–8.5 in.
Length:
– 127.0 mm–355.6 mm
– 5.0 in.–14.0 in.
• You allow preprinted media to dry thoroughly before loading
into the ADF.
• You do not use media printed with metallic ink particles.
• You avoid embossed designs.
Related topics:
• “Understanding the parts of the printer” on page 92
• “Scanning a document” on page 71
Learning about the All-In-One Center scan options
Choosing where to send scanned images
1 From the Finder desktop, double-click the Lexmark 5000 Series folder.
2 Double-click the Lexmark 5000 Series Center icon.
3 From the “Send scanned image to” pop-up menu, choose the scan destination.
• File—Saves the scanned image as a file to open later.
• Clipboard—Saves the scanned image to the Clipboard so you can paste it into another document. Large
scans may not fit the Clipboard.
Note: Scanning at a high resolution to the Clipboard uses a large amount of system memory and drastically
affects system performance.
• An application—Opens the scanned image in the specified application.
Related topics:
• “Saving a scanned image” on page 76
• “Using the All-In-One Center” on page 110
Editing the Customize list
The list of applications in the Customize list is generated when you install the All-In-One software. You can expand
this list to a maximum of 50 applications. You can add, remove, or modify an application in the Customize list.
1 From the Finder desktop, double-click the Lexmark 5000 Series folder.
2 Double-click the Lexmark 5000 Series Center icon.
3 From the “Send scanned image to” pop-up menu, scroll down to the bottom of the list, and choose Customize
list. The Customize list dialog appears, showing all available applications.
Scanning
65
Page 66

To add an application to the list:
1 Click +.
2 Click Browse to navigate through the list of applications available on the computer. Click the application that
you want to add to the Available Applications list.
3 Click OK.
4 From the File Type pop-up menu, choose the type of file you want to send to your chosen application.
5 Edit the display name if desired. This is the name that will appear in the “Send scanned image to” pop-up menu.
6 Click OK.
To remove an application from the list:
1 From the list of applications, choose the application you want to remove.
2 Click -.
3 If you are sure, click OK when prompted. Otherwise, click Cancel.
To modify an application in the list:
1 From the list of applications, choose the application you want to modify.
2 Click Edit.
3 Edit the name to be displayed in the “Send scanned image to” pop-up menu.
• Click Browse to choose a new path to the application.
• From the File Type pop-up menu, choose the type of file you want to send to this application. You can choose
only one type of file.
• Click OK.
Related topics:
• “Selecting the All-In-One Center Preferences setting” on page 70
Adjusting color settings when scanning
You can manually adjust the color settings for optimum color output.
1 From the Finder desktop, double-click the Lexmark 5000 Series folder.
2 Double-click the Lexmark 5000 Series Center icon.
3 From the All-In-One Center, click Preview/Edit to open the Scan dialog.
4 From the Scan dialog, click to open the Scan Settings drawer.
5 From the Settings tab:
• Select a preset scan setting corresponding to your document.
• If you are not satisfied with a preset setting, customize the scan settings by adjusting color depth and
resolution, and choosing a descreening option if you need to remove wavy patterns from images scanned
from magazines or newspapers.
• Reduce background noise, if necessary. Select Reduce Background Noise, and move the slider to adjust
the level of noise reduction.
Scanning
66
Page 67

6 From the Adjustments tab:
• Adjust the brightness, contrast, and gamma (color correction curve). Move the sliders to adjust the levels.
• Sharpen the image. Move the slider to adjust sharpness of your image.
• Invert colors. Select Invert Colors to reverse the colors of your image. The effect is similar to that of a film
negative.
Related topics:
• “Customizing scan settings from the Scan dialog” on page 67
• “Adjusting the brightness of an image” on page 69
Customizing scan settings from the Scan dialog
You can adjust the scan settings and do creative scanning jobs on the Scan dialog.
1 From the Finder desktop, double-click the Lexmark 5000 Series folder.
2 Double-click the Lexmark 5000 Series Center icon.
3 Click Preview/Edit to open the Scan dialog.
4 Click to open the Scan Settings drawer and change the settings as needed.
The Scan dialog has three main sections: the Settings tab, the Adjustments tab, and the Preview area.
From here Go to To
Settings tab Scan Settings Select a preset scan setting according to the color and
document type of your scan.
Note: Select Custom Settings to customize the scan setting
manually instead of using a preset scan setting.
Reduce Background Noise Remove smudges and light background shading in color
documents.
Scanning
67
Page 68

From here Go to To
Adjustments tab Brightness Adjust the lightness and darkness of the scanned image.
Contrast Adjust the tone of the image as it is set off against a light or
dark background.
Gamma Increase or decrease the color correction curve. Enabling
gamma lets you adjust the amount of ink on the page.
Blur/Sharpen Adjust the level of sharpness of the scanned image.
Rotate Image Rotates the image 90 degrees clockwise per click.
Invert Colors Reverse the colors of the image by inverting the RGB data.
The effect created is similar to that of a film negative.
Mirror Produce a mirror image of the document or image.
Defaults Reset the Adjustment controls to the factory default settings.
Preview area See a preview of the image. Some settings in the dialog are
interactive, so you can readily view the changes on the
image as you adjust the settings. Clicking
original document and shows the recent changes in the
Preview area.
Auto-crop sensitivity Select or clear Auto-crop sensitivity to activate or deactivate
auto-cropping. Adjust the slider to adjust cropping
sensitivity.
rescans the
Width, height, and file size
display
These buttons are at the top of the Preview area:
Click To
Show or hide the Scan Settings drawer.
Refresh the image in the Preview area.
Start scanning.
See the dimension of the scanned image. Select your
preferred unit of measurement from the pop-up menu.
Related topics:
• “Using the All-In-One Center” on page 110
Cropping photos using the software
You can use the Auto-crop feature to highlight certain focal points or to show only a specific portion of an image.
1 From the Finder desktop, double-click the Lexmark 5000 Series folder.
2 Double-click the Lexmark 5000 Series Center icon.
Scanning
68
Page 69

3 From the All-in-One Center dialog, click Preview/Edit.
4 From the dialog, select Preview.
5 Reload the photo into the ADF, and then click Close on the reminder dialog.
Note: Select the check box on the reminder dialog if you do not want the dialog to reappear until you reopen
the application.
6 Select Auto-crop sensitivity.
Note: Selecting Auto-crop sensitivity automatically selects the area to be scanned.
7 If you are satisfied with the cropped image, click .
If you are not satisfied with the cropped image, make adjustments.
a Use any of these methods to make adjustments:
• Move the slider.
Note: The slider adjusts the file size, width, and height of the image. If the dashed border seems to
disappear, the crop area is set beyond the size of the image.
• Click and drag the nodes to expand or minimize the crop area.
• Click and drag the crop area to a part of the image you want copied.
Note: These actions will deactivate Auto-crop sensitivity.
b Click to preview the image.
c Click to scan the image.
Related topics:
• “Using the All-In-One Center” on page 110
Adjusting the brightness of an image
1 From the Finder desktop, double-click the Lexmark 5000 Series folder.
2 Double-click the Lexmark 5000 Series Center icon.
3 From the All-In-One Center, click Preview/Edit to open the Scan dialog.
4 From the dialog, click Preview.
5 Reload the document into the ADF, and then click Close on the reminder dialog.
Note: Click on the check box on the reminder dialog if you do not want this dialog to reappear until you reopen
the application.
6 Click to open the Scan Settings drawer.
7 Select the Adjustments tab.
8 From the Brightness area, move the slider to lighten or darken the image.
Scanning
69
Page 70

Related topics:
• “Customizing scan settings from the Scan dialog” on page 67
• “Adjusting color settings when scanning” on page 66
Sharpening an image
1 From the Finder desktop, double-click the Lexmark 5000 Series folder.
2 Double-click the Lexmark 5000 Series Center icon.
3 Click Preview/Edit to open the Scan dialog.
4 From the dialog, select Preview.
5 Reload the document into the ADF, and then click Close on the reminder dialog.
Note: Click on the check box on the reminder dialog if you do not want this dialog to reappear until you reopen
the application.
6 From the Scan dialog, click to open the Scan Settings drawer.
7 Click the Adjustments tab.
8 From the Blur/Sharpen area, move the slider to adjust the level of sharpness of the scanned image.
Related topics:
• “Customizing scan settings from the Scan dialog” on page 67
• “Enhancing photo print quality using the software” on page 87
Selecting the All-In-One Center Preferences setting
When scanning from the control panel, you have two options:
• You can indicate that you want the Scan dialog to open on the computer screen when you press Start Color or
Start Black on the control panel. With this option, you can preview the scanned document, and then adjust the
scan settings using the All-In-One Center. For more information, see “Using the All-In-One Center” on
page 110.
• You can indicate that you want to skip the Scan dialog, and send the scanned document straight to your selected
application.
To modify the Preferences setting:
1 From the Finder desktop, double-click the Lexmark 5000 Series folder.
2 Double-click the Lexmark 5000 Series Center icon.
3 From the menu bar, click Lexmark All-In-One Center.
4 Choose Preferences.
5 Select or unselect Show preview when Scan button pressed on the printer to indicate your preferred
scanning option.
• If you select Show preview when Scan button pressed on the printer, the Scan dialog opens on the
computer screen when you press Start Color or Start Black on the control panel.
• If you unselect it, the scanned document is sent straight to your selected application when you press Start
Color or Start Black on the control panel.
Scanning
70
Page 71

Note: By default, Show preview when Scan button pressed on the printer is selected.
6 Click OK to close the Preferences dialog with your scan settings applied and go back to the scan job, or you
can click the Customize list icon to edit the Available Applications list.
Click
to go to the Help Center for more information.
Related topics:
• “Editing the Customize list” on page 65
• “Performing scanning and related tasks” on page 71
Resetting All-In-One software settings to defaults
1 From the Finder desktop, double-click the Lexmark 5000 Series folder.
2 Double-click the Lexmark 5000 Series Center icon.
3 Click Defaults.
Related topics:
• “Using the All-In-One Center” on page 110
• “Customizing scan settings from the Scan dialog” on page 67
Performing scanning and related tasks
Scanning a document
1 Make sure the printer is connected to a computer, and both the printer and the computer are on.
2 Load an original document facedown into the Automatic Document Feeder (ADF).
For help on loading a document into the ADF, see “Loading original documents into the Automatic Document
Feeder”.
3 From the control panel, press Scan Mode.
4 Press or repeatedly until the destination to which you want to scan appears.
5 Press Start Color or Start Black.
6 From the dialog, select Preview.
7 Reload the document into the ADF, and then click Close on the reminder dialog.
Note: Click on the check box on the reminder dialog if you do not want this dialog to reappear until you reopen
the application.
8 To edit, crop, or adjust the brightness of the document, click Scan Settings on the Scan dialog. For help on how
to customize scan settings, see “Customizing scan settings from the Scan dialog”.
9 Click Scan on the Scan dialog.
10 From the “Save As” menu, enter a file name.
11 From the Where pop-up menu, choose a destination for the scanned item.
12 From the “Format for” pop-up menu, choose a file type.
13 Click OK.
Scanning
71
Page 72

Related topics:
• “Loading original documents into the Automatic Document Feeder (ADF)” on page 19
• “Using the control panel” on page 95
• “Customizing scan settings from the Scan dialog” on page 67
Scanning a text-only document
1 Make sure the printer is connected to a computer, and both the printer and the computer are on.
2 Load an original document facedown into the Automatic Document Feeder (ADF).
3 From the Finder desktop, double-click the Lexmark 5000 Series folder.
4 Double-click the Lexmark 5000 Series Center icon.
5 From the “What is being scanned?” menu, choose Black Text.
6 Adjust the settings as needed.
7 Click Scan.
Related topics:
• “Loading original documents into the Automatic Document Feeder (ADF)” on page 19
Scanning a text and graphics document
1 Make sure the printer is connected to a computer, and both the printer and the computer are on.
2 Load an original document facedown into the Automatic Document Feeder (ADF).
3 From the Finder desktop, double-click the Lexmark 5000 Series folder.
4 Double-click the Lexmark 5000 Series Center icon.
5 From the “What is being scanned?” menu, choose Mixed Graphics and Text.
6 Adjust the settings as needed.
7 Click Scan.
Related topics:
• “Loading original documents into the Automatic Document Feeder (ADF)” on page 19
Scanning an item for Web page viewing
1 Make sure the printer is connected to a computer, and both the printer and the computer are on.
2 Load an original document facedown into the Automatic Document Feeder (ADF).
3 From the Finder desktop, double-click the Lexmark 5000 Series folder.
4 Double-click the Lexmark 5000 Series Center icon.
5 From the “How will the scanned image be used?” pop-up menu, choose To be viewed on monitor/web
page.
6 Adjust the settings as needed.
7 Click Scan.
Scanning
72
Page 73

Related topics:
• “Loading original documents into the Automatic Document Feeder (ADF)” on page 19
Scanning images for editing
1 Make sure the printer is connected to a computer, and both the printer and the computer are on.
2 Load an original image facedown into the Automatic Document Feeder (ADF).
3 From the Finder desktop, double-click the Lexmark 5000 Series folder.
4 Double-click the Lexmark 5000 Series Center icon.
5 From the “What is being scanned?” menu, choose Photo or Magazine or Newspaper.
6 From the “How will the scanned image be used?” pop-up menu, choose To be printed or To be viewed on
monitor/Web page.
7 From the “Send scanned image to” pop-up menu, choose a destination folder or application for your scanned
photo.
8 Select Prompt for multiple pages if you have several photos to scan.
9 Click Preview/Edit to open the Scan dialog and adjust settings.
From the Settings tab, you can select a preset scan setting, descreen magazine or newspaper scans, and reduce
background noise.
From the Adjustments tab, you can customize the settings as needed.
10 Crop photos, if needed. For more information, see “Cropping photos using the software” on page 68.
11 Click .
Related topics:
• “Loading original documents into the Automatic Document Feeder (ADF)” on page 19
Scanning multiple pages using the Automatic Document Feeder
1 Load original documents facedown into the Automatic Document Feeder (ADF).
2 From the Finder desktop, double-click the Lexmark 5000 Series folder.
3 Double-click the Lexmark 5000 Series Center icon.
4 Select Prompt for multiple pages. This option automatically scans all documents loaded into the ADF and
creates a numbered file name according to the one you specified.
Scanning
73
Page 74

Notes:
• To save each scanned item under a different file name, select Prompt to name each page.
• When a scan job is saved as a PDF, the Save dialog will prompt once and all scanned pages are saved in
a single file.
5 Click Scan.
6 In the Save dialog, enter a file name for your scan job.
7 From the Where pop-up menu, choose a destination for the scanned items.
8 From the “Format for” pop-up menu, choose a file type.
9 Click OK.
Related topics:
• “Loading original documents into the Automatic Document Feeder (ADF)” on page 19
Scanning a portion of an image
You can scan certain portions of an image or a document using the cropping function of the Scan dialog. This option
is good for scanning logos, parts of a magazine page, or sections of a photo.
1 Make sure the printer is connected to a computer, and both the printer and the computer are on.
2 Load an original document or image facedown into the Automatic Document Feeder (ADF).
3 From the Finder desktop, double-click the Lexmark 5000 Series folder.
4 Double-click the Lexmark 5000 Series Center icon.
5 Click Preview/Edit.
6 From the dialog, select Preview.
7 Reload the document into the ADF, and then click Close on the reminder dialog.
Note: Select the check box on the reminder dialog if you do not want this dialog to reappear until you reopen
the application.
8 Click inside the document or image in the preview area.
9 Drag the nodes on the crop area to select the part of the image that you want to scan.
Note: Drag the nodes on the dashed border to expand or minimize the crop area.
10 Click .
11 Click . Only the designated cropped area is saved or sent to an application.
Related topics:
• “Loading original documents into the Automatic Document Feeder (ADF)” on page 19
Scanning
74
Page 75

Scanning clear images from magazines or newspapers
Descreening helps to remove wavy patterns from images scanned from magazines or newspapers.
1 Make sure the printer is connected to a computer, and both the printer and the computer are on.
2 Load an original document facedown into the Automatic Document Feeder (ADF).
3 From the Finder desktop, double-click the Lexmark 5000 Series folder.
4 Double-click the Lexmark 5000 Series Center icon.
5 From the “What is being scanned?” menu, select Magazine or Newspaper.
6 Click Preview/Edit.
7 From the dialog, select Preview.
8 Reload the document, and then click Close on the reminder dialog.
Note: Click on the check box on the reminder dialog if you do not want this dialog to reappear until you reopen
the application.
9 Click to open the Scan Settings drawer.
10 From the Descreen pop-up menu on the Settings tab, choose Magazine or Newspaper.
11 Click .
Related topics:
• “Loading original documents into the Automatic Document Feeder (ADF)” on page 19
Scanning text for editing
Use the Optical Character Recognition (OCR) software feature to scan a document and produce text you can edit
with a word-processing application.
Note: This function will work only if you have installed ABBYY FineReader 5 SprintX.
1 Load an original document facedown into the Automatic Document Feeder (ADF).
2 From the Finder desktop, double-click the Lexmark 5000 Series folder.
3 Double-click the Lexmark 5000 Series Center icon.
4 From the “What is being scanned?” menu, select a document type other than Photo.
5 From the “How will the scanned image be used?” pop-up menu, choose To be edited (OCR).
6 From the “Send scanned image to” menu, choose a word-processing application to use for editing.
7 Click Scan.
8 Open the scanned document from the word-processing application for previewing and editing.
9 Edit and save the document.
Related topics:
• “Loading original documents into the Automatic Document Feeder (ADF)” on page 19
Scanning
75
Page 76

Scanning documents or images for e-mailing
When you want to scan a new item and send it through e-mail:
1 Load an original document facedown into the Automatic Document Feeder (ADF).
2 From the Finder desktop, double-click the Lexmark 5000 Series folder.
3 Double-click the Lexmark 5000 Series Center icon.
4 From the “What is being scanned?” menu, select a document type.
5 From the “How will the scanned image be used?” menu, choose To be viewed on monitor/web page.
6 From the “Send scanned image to” menu, choose an application.
7 Click Scan.
8 Retrieve the scanned image from the application, and send it through e-mail as an attachment.
Related topics:
• “Loading original documents into the Automatic Document Feeder (ADF)” on page 19
Saving a scanned image
1 Make sure the printer is connected to a computer, and both the printer and the computer are on.
2 Load an original document facedown into the Automatic Document Feeder (ADF).
3 From the Finder desktop, double-click the Lexmark 5000 Series folder.
4 Double-click the Lexmark 5000 Series Center icon.
5 From the “Send scanned images to” pop-up menu, choose the application where you want to save the scanned
image.
6 Adjust the settings as needed.
7 Click Scan.
8 Enter the file name, format, and location where you want the scanned image to be saved.
9 Click OK.
Related topics:
• “Loading original documents into the Automatic Document Feeder (ADF)” on page 19
Canceling a scan job
• To cancel a scan job before your document is pulled down into the Automatic Document Feeder (ADF),
press
• If you have loaded a document into the Automatic Document Feeder (ADF) and the printer roller has started
pulling it into the printer, but you have not yet initiated your scan job:
1 Pull the control panel up.
2 Gently lift your original document out of the ADF.
3 Push the control panel down until it snaps into place.
• To cancel a scan job in the All-In-One Center, click Cancel on the scanning progress dialog.
.
Related topics:
• “Using the control panel” on page 95
Scanning
76
Page 77

Scanning over a network
Setting a network printer to scan
Assigning a name to your computer
You can assign a name to your computer when you install the printer software for the first time. Choose this name
when you scan an item on the network printer and want to send the scanned image to your computer. The name of
the computer can be changed, as needed.
1 From the Finder desktop, double-click the Lexmark 5000 Series folder.
2 Double-click the Lexmark 5000 Series Center icon.
3 From the menu, choose Advanced Network Scan Settings.
4 In the Computer Name field, type in the name of your computer.
5 Click Save.
Related topics:
•
“Setting a “scan to network” PIN” on page 77
Setting a “scan to network” PIN
Assigning a “scan to network” PIN lets you control the sending of scanned items to your computer. You can assign
a “scan to network” PIN when you install the printer software for the first time. You can also change it as needed.
1 From the Finder desktop, double-click the Lexmark 5000 Series folder.
2 Double-click the Lexmark 5000 Series Center icon.
3 From the menu, choose Advanced Network Scan Settings.
4 Select the check box to specify a PIN.
5 Type in a four-digit PIN. Use a combination of numbers from 1-9.
6 Click Save.
Related topics:
•
“Assigning a name to your computer” on page 77
Selecting printers that can scan to your computer
1 From the Finder desktop, double-click the Lexmark 5000 Series folder.
2 Double-click the Lexmark 5000 Series Center icon.
3 From the menu, choose Advanced Network Scan Access.
The Scan Network Access dialog appears.
4 Press + to search for printers connected to the local subnet.
The Network All-in-One Selection dialog appears.
5 In the search field, type the IP address of the print server. Consult your network administrator for help finding
the IP address of the print server.
If you want to narrow your search to a certain subnet, type the IP address of the print server and the subnet
mask in CIDR notation.
Scanning
77
Page 78

6 On your keyboard, press return.
7 From the Network All-in-One Selection dialog, select the printer you want to scan to your computer.
8 Click Select.
9 Repeat step 4 to step 8 for every printer that you want to scan to your computer.
10 When finished, click Done.
Note: To remove a printer from the list, select the printer, and then click —.
Scanning to a computer over a network
Make sure:
• The printer is connected to the network through a print server, and the printer and computer receiving the scan
are on.
• The printer is configured to scan over a network (Direct IP Printing).
1 Load an original document facedown in the Automatic Document Feeder (ADF).
2 From the control panel, press Scan Mode.
3 Press or repeatedly until the computer to which you want to scan appears.
4 Press .
5 Press or repeatedly until the scan destination you want appears.
6 Press Start Color or Start Black.
Related topics:
• “Setting a network printer to scan” on page 77
Scanning
78
Page 79

Working with photos
2
1
Getting started
Using the automatic paper type sensor
The printer is equipped with an automatic paper type sensing device. The Paper Type Sensor automatically detects
the type of paper that has been loaded into the printer and adjusts the settings for you. For example, if you want to
print a photo, load photo paper into the printer. The printer detects the type of paper and automatically adjusts the
settings to give you optimum photo-printing results.
Loading paper
1 Make sure:
• You use paper designed for inkjet printers.
• If you are using photo, glossy, or heavyweight matte paper, you load it with the glossy or printable side facing
you. (If you are not sure which side is the printable side, see the instructions that came with the paper.)
• The paper is not used or damaged.
• If you are using specialty paper, you follow the instructions that came with it.
• You do not force paper into the printer.
2 Before loading paper the first time, slide the paper guides out toward the edges of the paper support. You can
load up to:
• 100 sheets of plain paper
• 25 sheets of heavyweight matte paper
• 25 sheets of photo paper
• 25 sheets of glossy paper
Note: Photos require more drying time. Remove each photo as it exits, and allow it to dry to avoid ink smudging.
3 Load the paper vertically in the center of the paper support, and adjust the paper guides to rest against the edges
of the paper.
Note: To avoid paper jams, make sure the paper does not buckle when you adjust the paper guides.
Related topics:
• “Using the automatic paper type sensor” on page 43
Choosing compatible specialty paper types
• Heavyweight matte paper—A photo paper with a matte finish used for printing high-quality graphics.
• Lexmark PerfectFinish Photo paper—A high-quality photo paper specifically designed for Lexmark inkjet
printers, but compatible with all inkjet printers. It is used specifically for printing professional quality photos with
a glossy finish. It is best when used with genuine Lexmark evercolor 2 ink, providing photos that are fade- and
water-resistant.
Working with photos
79
Page 80

• Lexmark Photo Paper—An outstanding "everyday" heavyweight inkjet photo paper designed for use with
Lexmark printers, but compatible with all brands of inkjet printers. Although inexpensive, it offers excellent image
quality and outstanding value.
• Lexmark Premium Photo Paper—A heavier photo paper specifically designed to bond chemically with Lexmark
inks for eye-catching results. Fast drying, it prevents bleeding and feathering even when the image is saturated.
• Transparency—A clear, plastic media primarily used for overhead projectors.
• Card stock—A very thick paper used for printing sturdier items, such as greeting cards.
• Iron-On transfer—A type of media that has a reverse image printed on it that can be ironed onto fabric.
Using a PictBridge-enabled digital camera to control printing photos
You can connect a PictBridge-enabled digital camera to the printer, and use the buttons on the camera to select and
print photos.
1 Insert one end of the USB cable into the camera.
Note: Use only the USB cable that came with the digital camera.
2 Insert the other end of the cable into the PictBridge port on the front of the printer.
Warning: Do not touch the USB cable, any network adapter, or the printer in the area shown while actively
printing from a PictBridge-enabled digital camera. A loss of data can occur. Also, do not remove the USB cable
or network adapter while actively printing from a PictBridge-enabled digital camera.
Notes:
• Make sure the PictBridge-enabled digital camera is set to the correct USB mode. For more information, see
the documentation that came with your camera.
• If the PictBridge connection is successful, the following appears on the computer screen: PictBridge
camera detected. Press
to change settings.
• Values selected within the menu items are the settings used for PictBridge printing if no explicit selection is
made from the camera.
3 Follow the instructions in the camera documentation to select and print photos.
Working with photos
80
Page 81

Note: If the computer or printer is turned off while the camera is connected, you must disconnect and then reconnect
the camera.
Working with photos
Note: To prevent smudging or scratching, avoid touching the printed surface with your fingers or sharp objects. For
best results, remove each printed sheet individually from the paper exit tray, and allow the prints to dry at least 24
hours before stacking, displaying, or storing.
Printing photos using the computer
1 Load photo paper, with the glossy or printable side facing you. (If you are not sure which side is the printable
side, see the instructions that came with the paper.) For more information, see “Loading paper” on page 18.
2 Customize the settings as needed in the Page Setup dialog.
a With a photo open, choose File Page Setup.
b From the “Format for” pop-up menu, choose 5000 Series.
c From the Paper Size pop-up menu, choose the paper size loaded.
d Choose an orientation.
e Click OK.
3 Customize the settings as needed in the Print dialog.
a With a photo open, choose File Print.
b From the Printer pop-up menu, choose 5000 Series.
c For Mac OS X version 10.4 or later, click Advanced. Otherwise, proceed to the next step.
d From the Copies & Pages pop-up menu, type the number of copies to be printed.
e From the same pop-up menu, choose Quality & Media.
• From the Paper Type pop-up menu, choose the type of paper you are using.
• From the Print Quality area, choose Automatic or Photo.
f Click Print.
Note: To prevent smudging or scratching, avoid touching the printed surface with your fingers or sharp objects. For
best results, remove each printed sheet individually from the paper exit tray, and allow the prints to dry at least 24
hours before stacking, displaying, or storing.
Related topics:
• “Enhancing photo print quality using the software” on page 87
Printing cards
1 Load greeting cards, index cards, or postcards.
Notes:
• Make sure the thickness of each card does not exceed 0.020 inch (0.50 mm).
• Make sure the print side of the card faces you.
2 Customize the settings as needed in the Page Setup dialog.
a With a document open, click File Page Setup.
b From the “Format for” pop-up menu, choose 5000 Series.
c From the Paper Size pop-up menu, choose a card size.
Working with photos
81
Page 82

d Choose an orientation.
e Click OK.
3 Customize the settings as needed in the Print dialog.
a From the software application, click File Print.
b From the Printer pop-up menu, choose 5000 Series.
c Click Print.
Notes:
• To avoid paper jams, do not force the cards into the printer.
• To prevent smudging, remove each card as it exits, and let it dry before stacking.
Related topics:
• “Loading greeting cards, index cards, photo cards, and postcards” on page 44
Printing borderless photos
From your software application, set the page margins to zero, and then adjust the image on the screen so that it
covers the entire page.
Note: Some applications do not support margin setting.
1 Load photo or glossy paper, with the glossy or printable side facing you. (If you are not sure which side is the
printable side, see the instructions that came with the paper.) For more information, see “Loading paper” on
page 18.
2 Customize the settings as needed in the Page Setup dialog.
a With a photo open, choose File Page Setup.
b From the “Format for” pop-up menu, choose 5000 Series.
c From the Paper Size pop-up menu, choose the paper size loaded.
Note: Make sure you choose an option that has (Borderless) in it. For example, if you loaded letter-size
photo paper, choose US Letter (Borderless).
d Choose an orientation.
e Click OK.
3 Customize the settings as needed in the Print dialog.
a With a photo open, choose File Print.
b From the Printer pop-up menu, choose 5000 Series.
c For Mac OS X version 10.4 or later, click Advanced. Otherwise, proceed to the next step.
d From the Copies & Pages pop-up menu, type the number of copies to be printed.
e From the same pop-up menu, choose Quality & Media.
• From the Paper Type pop-up menu, choose the type of paper you are using.
• From the Print Quality area, choose Automatic or Photo.
f Click Print.
Note: To prevent smudging or scratching, avoid touching the printed surface with your fingers or sharp objects. For
best results, remove each printed sheet individually from the paper exit tray, and allow the prints to dry at least 24
hours before stacking, displaying, or storing.
Related topics:
• “Enhancing photo print quality using the software” on page 87
Working with photos
82
Page 83

Printing color images in black and white
This setting is available only if there is a black print cartridge installed.
1 Load paper.
2 Customize the settings in the Page Setup dialog as needed.
3 With a document open, click File Print.
4 From the Printer pop-up menu, choose 5000 Series.
5 From the third pop-up menu from the top, choose Color Options.
6 From the Document Color pop-up menu, choose Black Only.
7 Click Print.
Related topics:
• “Loading paper” on page 18
Scanning images for editing
1 Make sure the printer is connected to a computer, and both the printer and the computer are on.
2 Load an original image facedown into the Automatic Document Feeder (ADF).
3 From the Finder desktop, double-click the Lexmark 5000 Series folder.
4 Double-click the Lexmark 5000 Series Center icon.
5 From the “What is being scanned?” menu, choose Photo or Magazine or Newspaper.
6 From the “How will the scanned image be used?” pop-up menu, choose To be printed or To be viewed on
monitor/Web page.
7 From the “Send scanned image to” pop-up menu, choose a destination folder or application for your scanned
photo.
8 Select Prompt for multiple pages if you have several photos to scan.
9 Click Preview/Edit to open the Scan dialog and adjust settings.
From the Settings tab, you can select a preset scan setting, descreen magazine or newspaper scans, and reduce
background noise.
From the Adjustments tab, you can customize the settings as needed.
10 Crop photos, if needed. For more information, see “Cropping photos using the software” on page 68.
11 Click .
Related topics:
• “Loading original documents into the Automatic Document Feeder (ADF)” on page 19
Working with photos
83
Page 84

Scanning documents or images for e-mailing
When you want to scan a new item and send it through e-mail:
1 Load an original document facedown into the Automatic Document Feeder (ADF).
2 From the Finder desktop, double-click the Lexmark 5000 Series folder.
3 Double-click the Lexmark 5000 Series Center icon.
4 From the “What is being scanned?” menu, select a document type.
5 From the “How will the scanned image be used?” menu, choose To be viewed on monitor/web page.
6 From the “Send scanned image to” menu, choose an application.
7 Click Scan.
8 Retrieve the scanned image from the application, and send it through e-mail as an attachment.
Related topics:
• “Loading original documents into the Automatic Document Feeder (ADF)” on page 19
Scanning multiple pages using the Automatic Document Feeder
1 Load original documents facedown into the Automatic Document Feeder (ADF).
2 From the Finder desktop, double-click the Lexmark 5000 Series folder.
3 Double-click the Lexmark 5000 Series Center icon.
4 Select Prompt for multiple pages. This option automatically scans all documents loaded into the ADF and
creates a numbered file name according to the one you specified.
Notes:
• To save each scanned item under a different file name, select Prompt to name each page.
• When a scan job is saved as a PDF, the Save dialog will prompt once and all scanned pages are saved in
a single file.
5 Click Scan.
6 In the Save dialog, enter a file name for your scan job.
7 From the Where pop-up menu, choose a destination for the scanned items.
8 From the “Format for” pop-up menu, choose a file type.
9 Click OK.
Related topics:
• “Loading original documents into the Automatic Document Feeder (ADF)” on page 19
Working with photos
84
Page 85

Saving a scanned image
1 Make sure the printer is connected to a computer, and both the printer and the computer are on.
2 Load an original document facedown into the Automatic Document Feeder (ADF).
3 From the Finder desktop, double-click the Lexmark 5000 Series folder.
4 Double-click the Lexmark 5000 Series Center icon.
5 From the “Send scanned images to” pop-up menu, choose the application where you want to save the scanned
image.
6 Adjust the settings as needed.
7 Click Scan.
8 Enter the file name, format, and location where you want the scanned image to be saved.
9 Click OK.
Related topics:
• “Loading original documents into the Automatic Document Feeder (ADF)” on page 19
Adjusting color settings when scanning
You can manually adjust the color settings for optimum color output.
1 From the Finder desktop, double-click the Lexmark 5000 Series folder.
2 Double-click the Lexmark 5000 Series Center icon.
3 From the All-In-One Center, click Preview/Edit to open the Scan dialog.
4 From the Scan dialog, click to open the Scan Settings drawer.
5 From the Settings tab:
• Select a preset scan setting corresponding to your document.
• If you are not satisfied with a preset setting, customize the scan settings by adjusting color depth and
resolution, and choosing a descreening option if you need to remove wavy patterns from images scanned
from magazines or newspapers.
• Reduce background noise, if necessary. Select Reduce Background Noise, and move the slider to adjust
the level of noise reduction.
6 From the Adjustments tab:
• Adjust the brightness, contrast, and gamma (color correction curve). Move the sliders to adjust the levels.
• Sharpen the image. Move the slider to adjust sharpness of your image.
• Invert colors. Select Invert Colors to reverse the colors of your image. The effect is similar to that of a film
negative.
Related topics:
• “Customizing scan settings from the Scan dialog” on page 67
• “Adjusting the brightness of an image” on page 69
Working with photos
85
Page 86

Adjusting the brightness of an image
1 From the Finder desktop, double-click the Lexmark 5000 Series folder.
2 Double-click the Lexmark 5000 Series Center icon.
3 From the All-In-One Center, click Preview/Edit to open the Scan dialog.
4 From the dialog, click Preview.
5 Reload the document into the ADF, and then click Close on the reminder dialog.
Note: Click on the check box on the reminder dialog if you do not want this dialog to reappear until you reopen
the application.
6 Click to open the Scan Settings drawer.
7 Select the Adjustments tab.
8 From the Brightness area, move the slider to lighten or darken the image.
Related topics:
• “Customizing scan settings from the Scan dialog” on page 67
• “Adjusting color settings when scanning” on page 66
Cropping photos using the software
You can use the Auto-crop feature to highlight certain focal points or to show only a specific portion of an image.
1 From the Finder desktop, double-click the Lexmark 5000 Series folder.
2 Double-click the Lexmark 5000 Series Center icon.
3 From the All-in-One Center dialog, click Preview/Edit.
4 From the dialog, select Preview.
5 Reload the photo into the ADF, and then click Close on the reminder dialog.
Note: Select the check box on the reminder dialog if you do not want the dialog to reappear until you reopen
the application.
6 Select Auto-crop sensitivity.
Note: Selecting Auto-crop sensitivity automatically selects the area to be scanned.
7 If you are satisfied with the cropped image, click .
If you are not satisfied with the cropped image, make adjustments.
a Use any of these methods to make adjustments:
• Move the slider.
Note: The slider adjusts the file size, width, and height of the image. If the dashed border seems to
disappear, the crop area is set beyond the size of the image.
• Click and drag the nodes to expand or minimize the crop area.
• Click and drag the crop area to a part of the image you want copied.
Note: These actions will deactivate Auto-crop sensitivity.
Working with photos
86
Page 87

b Click to preview the image.
c Click to scan the image.
Related topics:
• “Using the All-In-One Center” on page 110
Enhancing photo print quality using the software
1 From the Finder desktop, double-click the Lexmark 5000 Series folder.
2 Double-click the Lexmark 5000 Series Center icon.
3 From the “What is being scanned?” menu, choose Photo.
4 From the “How will the scanned image be used?” pop-up menu, choose To be printed or To be viewed on
monitor/web page. Photo scanning is optimized based on this selection.
5 Click Preview/Edit to open the Scan dialog.
6 From the dialog, select Preview.
7 Reload the photo into the ADF, then click Close on the reminder dialog.
Note: Click on the check box on the reminder dialog if you do not want this dialog to reappear until you reopen
the application.
8 From the Scan dialog, click to open the Scan Settings drawer.
9 From the Settings tab, make sure you select one of the preset scan settings appropriate for your photo.
You can also customize scan settings by adjusting color depth, resolution, and choosing a descreening option.
10 Select the Adjustments tab, and fine-tune the scan settings.
Related topics:
• “Using the All-In-One Center” on page 110
• “Customizing scan settings from the Scan dialog” on page 67
Enlarging or reducing an image
1 Load paper.
Note: If you are copying photos, use photo or heavyweight matte paper, with the glossy or printable side facing
you. (If you are not sure which side is the printable side, see the instructions that came with the paper.)
2 Load an original document or photo facedown in the Automatic Document Feeder (ADF).
3 From the control panel, press Copy Mode.
4 Press .
5 Press or repeatedly until Resize appears.
6 Press .
Working with photos
87
Page 88

7 Press or repeatedly until the setting you want appears.
Note: If you select Custom Resize, press and hold
press
.
or until the size you want appears, and then
8 Press Start Color or Start Black.
Related topics:
• “Loading original documents into the Automatic Document Feeder (ADF)” on page 19
• “Using the control panel” on page 95
Sharpening an image
1 From the Finder desktop, double-click the Lexmark 5000 Series folder.
2 Double-click the Lexmark 5000 Series Center icon.
3 Click Preview/Edit to open the Scan dialog.
4 From the dialog, select Preview.
5 Reload the document into the ADF, and then click Close on the reminder dialog.
Note: Click on the check box on the reminder dialog if you do not want this dialog to reappear until you reopen
the application.
6 From the Scan dialog, click to open the Scan Settings drawer.
7 Click the Adjustments tab.
8 From the Blur/Sharpen area, move the slider to adjust the level of sharpness of the scanned image.
Related topics:
• “Customizing scan settings from the Scan dialog” on page 67
• “Enhancing photo print quality using the software” on page 87
Working with photos
88
Page 89

Networking the printer
Networking overview
A network is a collection of devices such as computers, printers, Ethernet hubs, wireless access points, and routers
connected together for communication through cables or through a wireless connection. A network can be either
wired, wireless, or designed to have both wired and wireless devices.
Devices on a wired network use cables to communicate with each other.
Devices on a wireless network use radio waves instead of cables to communicate with each other. For a device to
be able to communicate wirelessly, it must have a wireless print server attached or installed that enables it to receive
and transmit radio waves.
Selecting a network printer
You can print or scan using a network printer connected to a local or remote subnet.
1 Open the application that you want to use. The Network Selection sheet can be accessed through two different
paths:
If you are using Do this
Lexmark Setup Assistant (during
setup)
a Install the printer software. For more information, see “Installing the
printer software” on page 104.
b Once the Printer Selection screen appears, choose Add Remote
from the drop-down menu.
All-in-One Center
a From the Finder desktop, double-click the Lexmark 5000 Series
folder.
b Double-click the Lexmark 5000 Series Center icon.
c From the menu, choose Advanced Network Scan Access.
The Network Scan Access dialog appears.
d Click +.
The Network Selection sheet appears.
2 Select a printer from your local subnet or from a remote subnet.
• The application searches for supported printers in the network or printers that are connected to your
computer.
• If you want to select a particular printer on a remote subnet, type the IP address of the print server to which
the printer is connected in the Search by IP field, and then press return on your keyboard. If you do not
know the IP address of the print server, consult the person who set up your network.
• If you want to search a remote subnet for supported printers, type any IP address that belongs to the
particular subnet in the Search by IP field and the subnet mask in CIDR notation, and then press return on
your keyboard. If you do not know the IP address of the print server, consult the person who set up your
network.
3 From the list of printers, select the name of the printer that you want to use.
4 Click Select.
Networking the printer
89
Page 90

Installing the printer on additional network computers
If you are installing your network printer for use with multiple computers on the network, insert the installation CD
into each additional computer, and follow the instructions on the computer screen.
• You do not need to repeat the connection steps for each computer you want to print to the printer.
• The printer should appear as a highlighted printer in the installation. If multiple printers appear in the list, make
sure you select the printer with the correct IP address/MAC address.
Printer sharing
With Apple's printer sharing feature, you can:
• Print to another Mac OS X user's shared printer.
• Share your printer (installed in your Macintosh) with other Mac OS X users who also use Mac OS X version 10.2
and later.
• Share your printer (installed in your Macintosh) with UNIX users.
• Share your printer (installed in your Macintosh) with Windows users.
Any printer, as well as computers and other shared resources on your local network or subnet that use the
Bonjour (formerly known as Rendezvous in Mac OS X version 10.3) technology, is accessible to your computer.
Refer to Mac Help for details about its Bonjour technology.
Note: In printer sharing, printer maintenance functions are done on the host computer. The client can print only
when the host computer is on.
Finding your MAC address
You may need the media access control (MAC) address of the print server to complete network printer configuration.
The MAC address is a series of letters and numbers listed on the bottom of the external print server.
Networking the printer
90
Page 91

Understanding the printer
Understanding the printer parts
Checking the box contents
1
2
3
4
1
2
3
8
Name Description
Black print cartridge Cartridges to be installed into the printer.
1
Color print cartridge
2
Telephone handset
3
7
Note: Cartridge combinations vary depending on the
product purchased.
6
5
• Answer incoming telephone calls and talk to
someone on the phone
• Listen for fax tones when sending a fax
Note: Plug the coiled cord in the back of the printer into
the base of the telephone handset.
Telephone cord Use for faxing. For more information about connecting
4
this cord, see “Choosing fax connection.”
Note: Your telephone cord may look different from the
one shown.
Power cord Attaches to the power supply port located at the back of
5
the printer.
Note: Your power cord may look different from the one
shown.
Setup sheet Instructions on setting up printer hardware and software,
6
and information on setup troubleshooting.
Understanding the printer
91
Page 92

Name Description
Installation software CD
7
• Installation software for the printer
• User's Guide in electronic format
• Mac Help
User's Guide, Getting Started, or Setup Solutions Printed booklet that serves as a guide.
8
Note: The User's Guide can be found on the installation
software CD that shipped with the printer.
Note: A USB cable may or may not be included.
Related topics:
• “Understanding the parts of the printer” on page 92
Understanding the parts of the printer
11
1
2
10
9
8
7
Use the To
Paper support Load paper.
1
Paper guides Keep paper straight when loading.
2
Automatic Document Feeder (ADF) Fax, copy, or scan one or more pages.
3
Note: Do not load postcards, photos, small items, or thin
media (such as magazine clippings) into the ADF.
4
• Turn the printer on and off.
6
3
4
5
• Stop the print, copy, scan, or fax process.
Control panel Operate the printer.
5
PictBridge port Connect a PictBridge-enabled digital camera.
6
Understanding the printer
92
Page 93

Use the To
Paper exit tray Hold paper as it exits.
7
Automatic Document Feeder (ADF) exit tray Pick up your original document after it has gone through
8
the ADF.
Display View menus, settings options, printer status, and
9
messages.
Automatic Document Feeder (ADF) paper guides Keep paper straight when feeding into the ADF.
10
Telephone handset
11
• Answer incoming telephone calls and talk to
someone on the phone.
• Listen for fax tones when sending a fax.
1
2
Use the To
USB port Connect the printer to a computer using a USB cable.
1
2
EXT port
Connect additional devices, such as a data/fax modem, telephone, or answering
machine to the printer.
Notes:
3
4
• Remove the plug to access the port.
• This connection method may not be applicable in all countries or regions.
EXT
Understanding the printer
93
Page 94

Use the To
3
LINE port
Connect the printer to an active telephone line to send and receive faxes. The printer
must be connected to this telephone line to receive incoming fax calls.
Note: Do not connect additional devices to the LINE port, and do not connect a DSL
(digital subscriber line), ISDN (integrated services digital network), or cable modem
to the printer.
LINE
Power supply with port Connect the printer to a power source.
4
Related topics:
• “Checking the box contents” on page 91
• “Using the control panel” on page 95
Installing another language control panel
These instructions apply only if you received one or more additional language control panels with the printer.
1 Lift and remove the control panel (if one is installed).
2 Choose the correct control panel for your language.
Understanding the printer
94
Page 95

3 Align the clips on the control panel with the holes on the printer, and then press down.
Related topics:
• “Using the control panel” on page 95
• “Understanding the parts of the printer” on page 92
Using the control panel buttons and menus
Using the control panel
The display shows:
• Printer status
• Messages
• Menus
• Setting options
1
52
Press To
Quick Dial buttons Access any of the first five programmed Speed Dial numbers.
1
Phonebook Access any of the programmed Speed Dial numbers (1–89) or Group Dial numbers (90–
2
99).
43
Understanding the printer
95
Page 96

Press To
Settings Access menus for maintenance functions, paper size and type, printer setup, and printer
3
defaults.
Quality Adjust the quality of a fax, copy, or scan.
4
5
Press To
Fax Mode Access the fax default screen and send faxes.
1
Display the Fax, Copy, or Scan menu, depending on which mode is selected.
1 23
Note: The mode is selected when the button light is on.
87654
Copy Mode Access the copy default screen and make copies.
2
Note: The mode is selected when the button light is on.
Scan Mode Access the scan default screen and scan documents.
3
Note: The mode is selected when the button light is on.
4
• Return to the previous screen.
• Delete a letter or number.
5
• Decrease a number.
• Delete a letter or number.
• Scroll through menus, submenus, or settings on the display.
6
• Select a menu or submenu item that appears on the display.
• Feed or eject paper if held for three seconds.
7
• Increase a number.
• Scroll through menus, submenus, or settings on the display.
Understanding the printer
96
Page 97

Press To
8
• Cancel a fax, print, copy, or scan job in progress.
• Clear a fax number or end a fax transmission and return to the fax default screen.
• Exit a menu or submenu, and return to the default fax, copy, or scan screen.
• Clear current settings or error messages, and return to default settings.
1
2
3
45
Press To
A keypad number or symbol In Fax mode:
1
• Enter fax numbers.
• Navigate an automated answering system.
• Select letters when creating a Speed Dial list.
• Type numbers to enter or edit the date and time shown on the display.
In Copy mode: Enter the number of copies or prints you want to make.
Auto Answer Set the printer to answer all incoming calls when the button light is on.
2
Note: For information on setting the number of rings before the printer will
answer incoming calls, see “Receiving a fax automatically using the control
panel” on page 22.
Redial / Pause In Fax mode:
3
• Display the last number dialed. Press or to view the last five numbers
dialed.
• Insert a three-second pause in the number to be dialed to wait for an
outside line or get through an automated answering system. Enter a pause
only when you have already begun entering the number.
Start Black Start a black-and-white fax, copy, scan, or print job, depending on which mode
4
is selected.
Understanding the printer
97
Page 98

Press To
Start Color Start a color fax, copy, or scan, or print job, depending on which mode is
5
selected.
Related topics:
•
“Understanding the Copy menu” on page 98
• “Understanding the Scan menu” on page 98
Understanding the Copy menu
Understanding the Copy Menu
Use this To
Copies* Specify how many copies to print.
Resize*
• Specify the percentage for enlarging or reducing the original copy.
• Specify a specific copy size.
• Create a multiple-page poster.
Lighter / Darker* Adjust the brightness of a copy.
Quality* Adjust the quality of a copy.
Paper Setup
• Specify the size of the paper loaded.
• Specify the type of paper loaded.
Collate Print one or more copies in the correct order.
N-Up* Choose how many pages to print on a single sheet.
Original Size* Specify the size of the original document.
Original Type* Specify the type of the original document.
* Temporary setting. For information on saving temporary and other settings, see the related topic on Customizing
settings.
Related topics:
“Using the control panel” on page 95
•
• “Saving settings” on page 103
Understanding the Scan menu
To understand and use the Scan menu:
1 From the control panel, press Scan Mode.
The scan default screen appears.
2 Press or repeatedly until the scan destination you want appears.
3 If you do not want to change a setting, press Start Color or Start Black.
4 If you want to change a setting, press .
5 Press or repeatedly until the menu item you want appears, and then press .
Understanding the printer
98
Page 99

6 Press or repeatedly until the submenu item or the setting you want appears, and then press .
Note: Pressing
selects a setting. An * appears next to the selected setting.
7 To go into additional submenus and settings, repeat pressing or repeatedly until the submenu item or the
setting you want appears, and then press
.
8 If needed, press repeatedly to return to the previous menus and make other setting selections.
9 Press Start Color or Start Black.
Use this To
Quality* Adjust the quality of a scan.
Original Size* Specify the size of the original document.
* Temporary setting. For information on saving temporary and other settings, see the related topic, “Customizing
Settings.”
Related topics:
“Using the control panel” on page 95
•
• “Saving settings” on page 103
Understanding the PictBridge menu
The PictBridge default settings menu lets you select printer settings if you did not specify the settings beforehand
on your digital camera. For more information on making camera selections, see the documentation that came with
your camera.
1 Connect a PictBridge-enabled digital camera to the printer.
a Insert one end of the USB cable into the camera.
Note: Use only the USB cable that came with the digital camera.
b Insert the other end of the cable into the PictBridge port on the front of the printer.
Note: The PictBridge port is marked with the
PictBridge symbol.
Understanding the printer
99
Page 100

The message, PictBridge camera detected. Press to change settings. appears on the
display.
Warning: Do not touch the USB cable, any network adapter, or the printer in the area shown while actively
printing from a PictBridge-enabled digital camera. A loss of data can occur. Also, do not remove the USB cable
or network adapter while actively printing from a PictBridge-enabled digital camera.
2 Press or repeatedly until the menu item you want appears.
3 Press .
4 Press or repeatedly until the submenu item you want or the setting you want appears.
5 Press .
Note: Pressing
selects a setting. An * appears next to the selected setting.
6 To go into additional submenus and settings, repeat the above steps.
7 If necessary, press repeatedly to return to the previous menus and make other setting selections.
Menu Item Action
Paper Setup
Photo Size
1, 2
1, 2
Specify the size and type of paper loaded.
Specify the size of printed photos.
Note: If you did not specify the photo size beforehand in your digital camera,
the default photo sizes are:
• 4 x 6 (if Letter is your default Paper Size)
• 10 x 15 cm (if A4 is your default Paper Size, and your country is not
Japan)
• L (if A4 is your default Paper Size, and your country is Japan)
1
Layout
Quality
1
2
1
Setting will return to factory default setting when the PictBridge-enabled digital camera is removed.
Setting must be saved individually.
Center one photo on a page, or specify the number of photos to print on a
page.
Adjust the quality of printed photos.
Related topics:
“Using the control panel” on page 95
•
Understanding the printer
100
 Loading...