

Page 1
Laser Printer
Quick Reference
Loading paper and specialty media
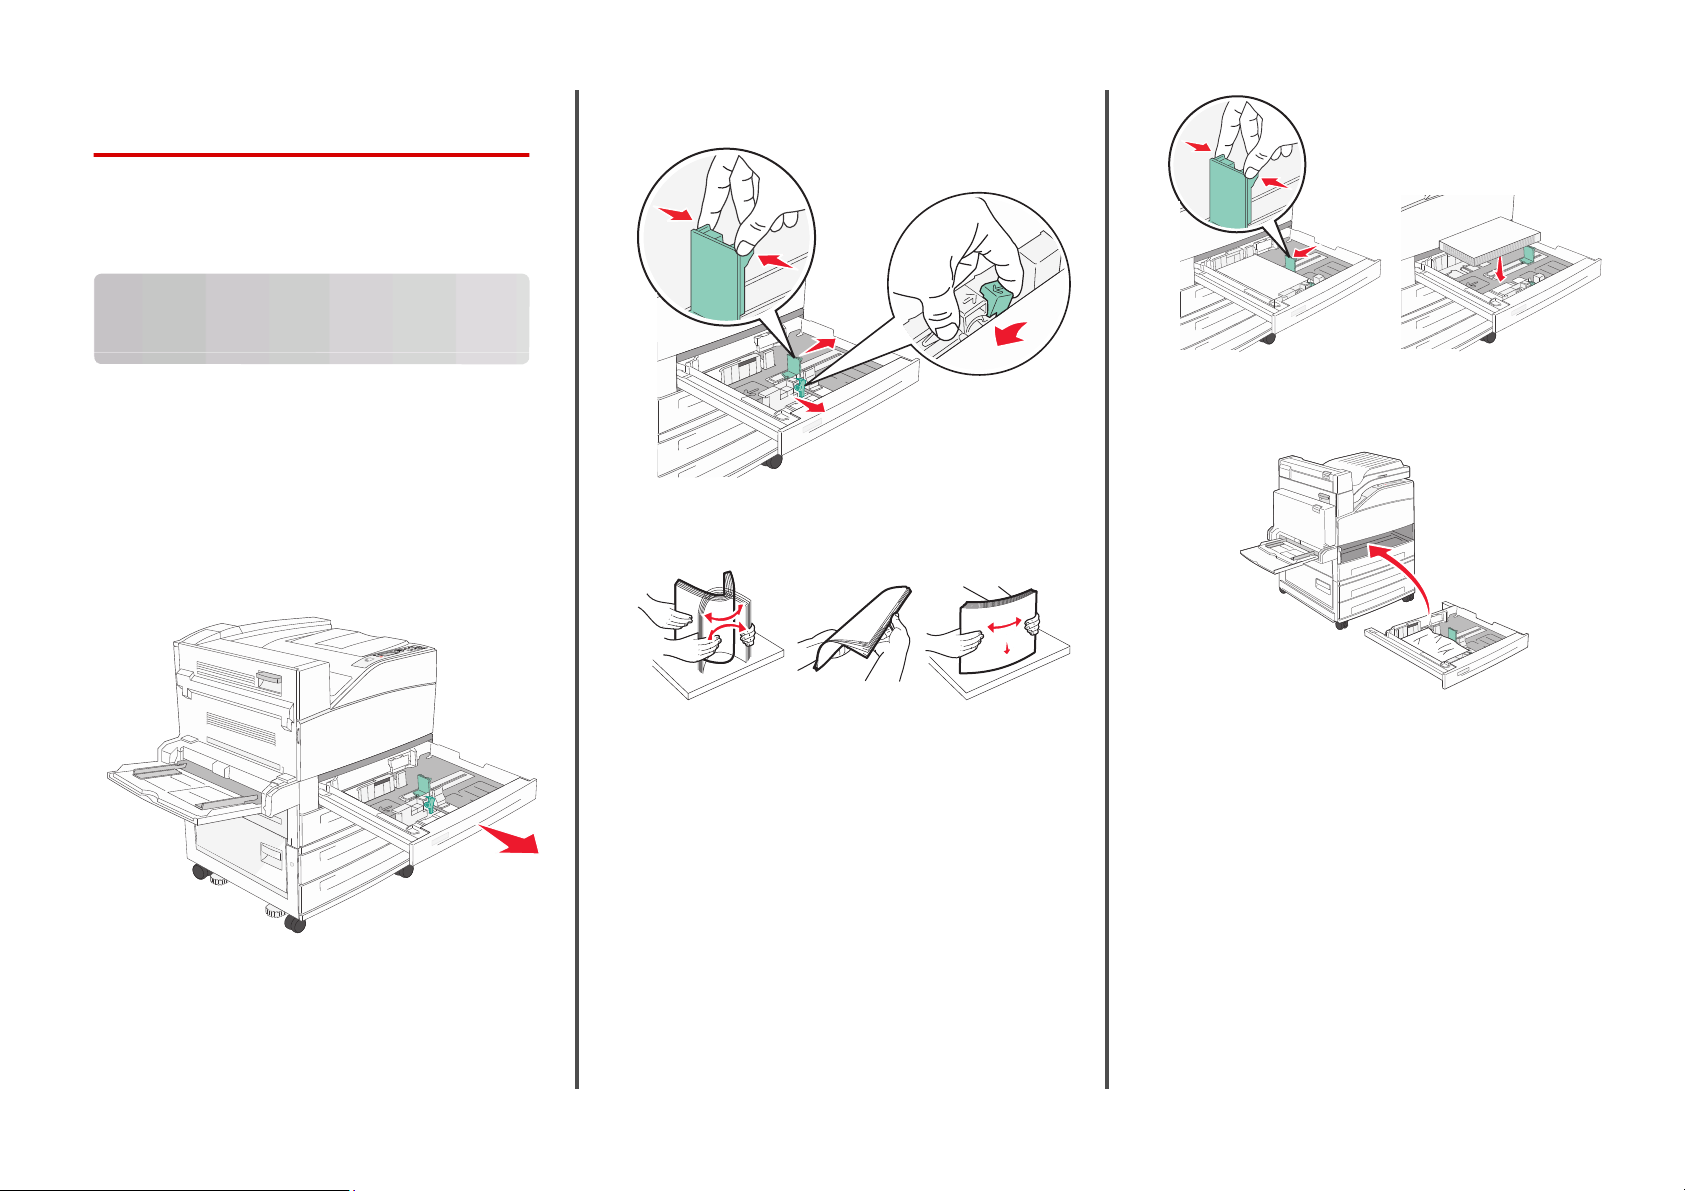
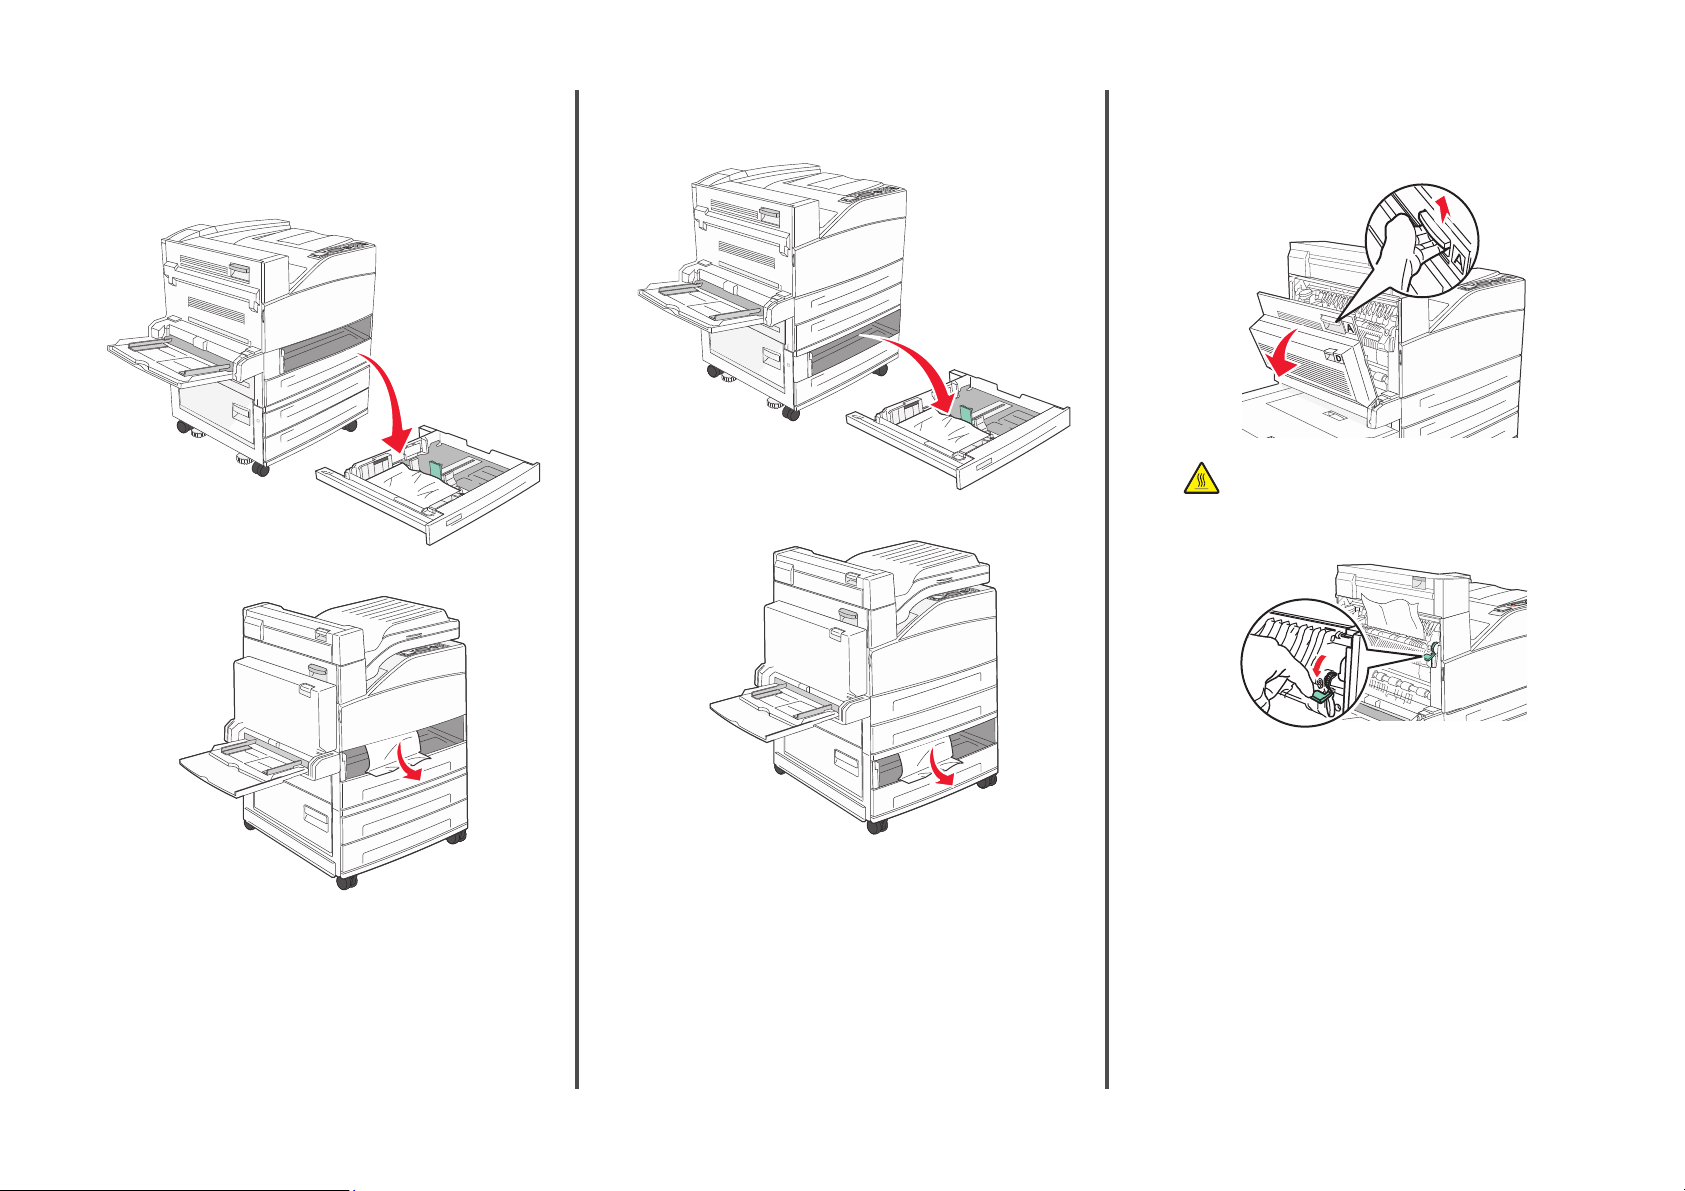
Loading the standard or optional 500-sheet trays
The printer has two standard 500-sheet trays (Tray 1 and Tray 2),
and it may have one or more optional 500-sheet trays. All
500-sheet trays support the same paper sizes and types. Paper may
be loaded in the trays in either the long-edge or short-edge
orientation.
1 Pull the tray completely out.
2 Squeeze and slide the width and length guides to the correct
positions for the paper size being loaded.
5 Make sure the paper guides are secure against the edges of
the paper.
6 Insert the tray.
3 Flex the sheets back and forth to loosen them, and then fan
them. Do not fold or crease the paper. Straighten the edges on
a level surface.
4 Load the paper stack with the reco mmended print side faceup.
Load the paper in either the long-edge or short-edge
orientation as shown.
Notes:
• Load sizes larger than A4 in the short-edge orientation.
• Make sure the paper is below the max fill line located on
the edge of the paper tray. Overloading the tray can cause
paper jams and possible printer damage.
1
7 If the paper type you loaded differs from the type that was
previously loaded in the tray, then change the Paper Type
setting for the tray.
Page 2
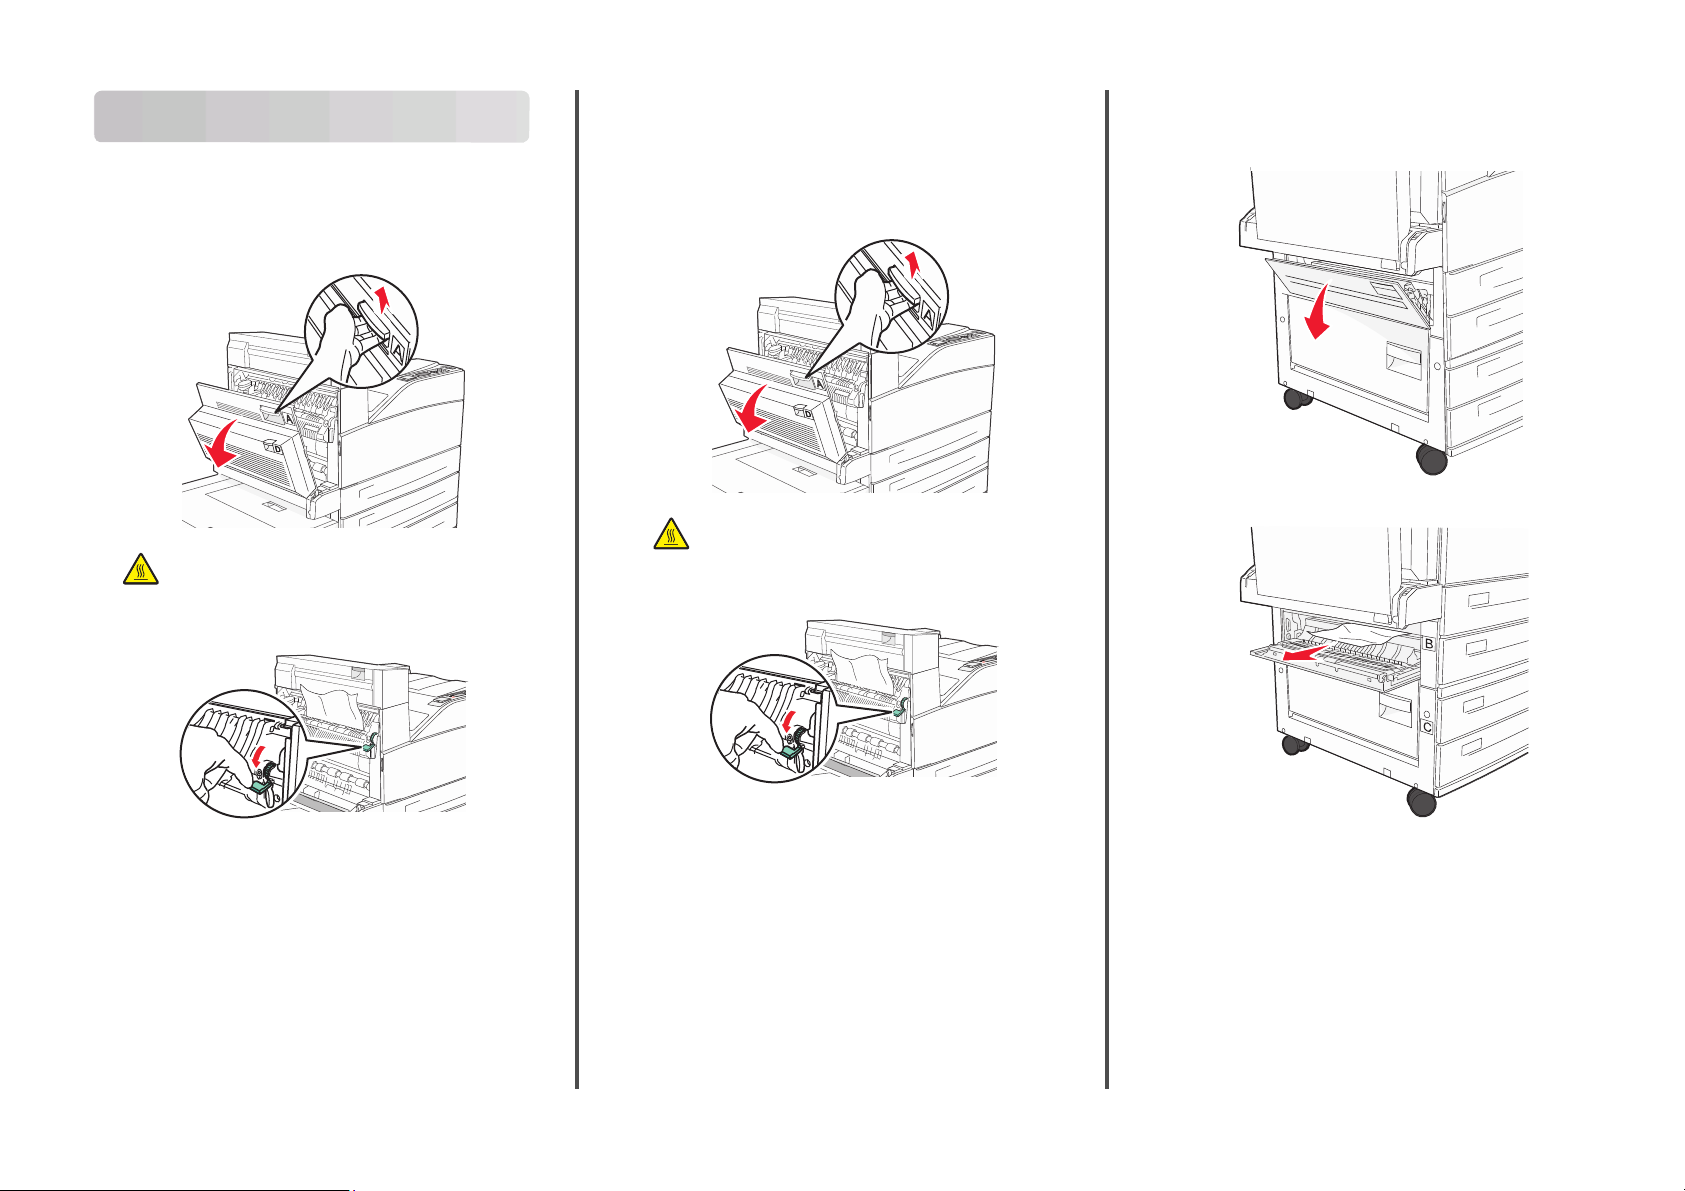
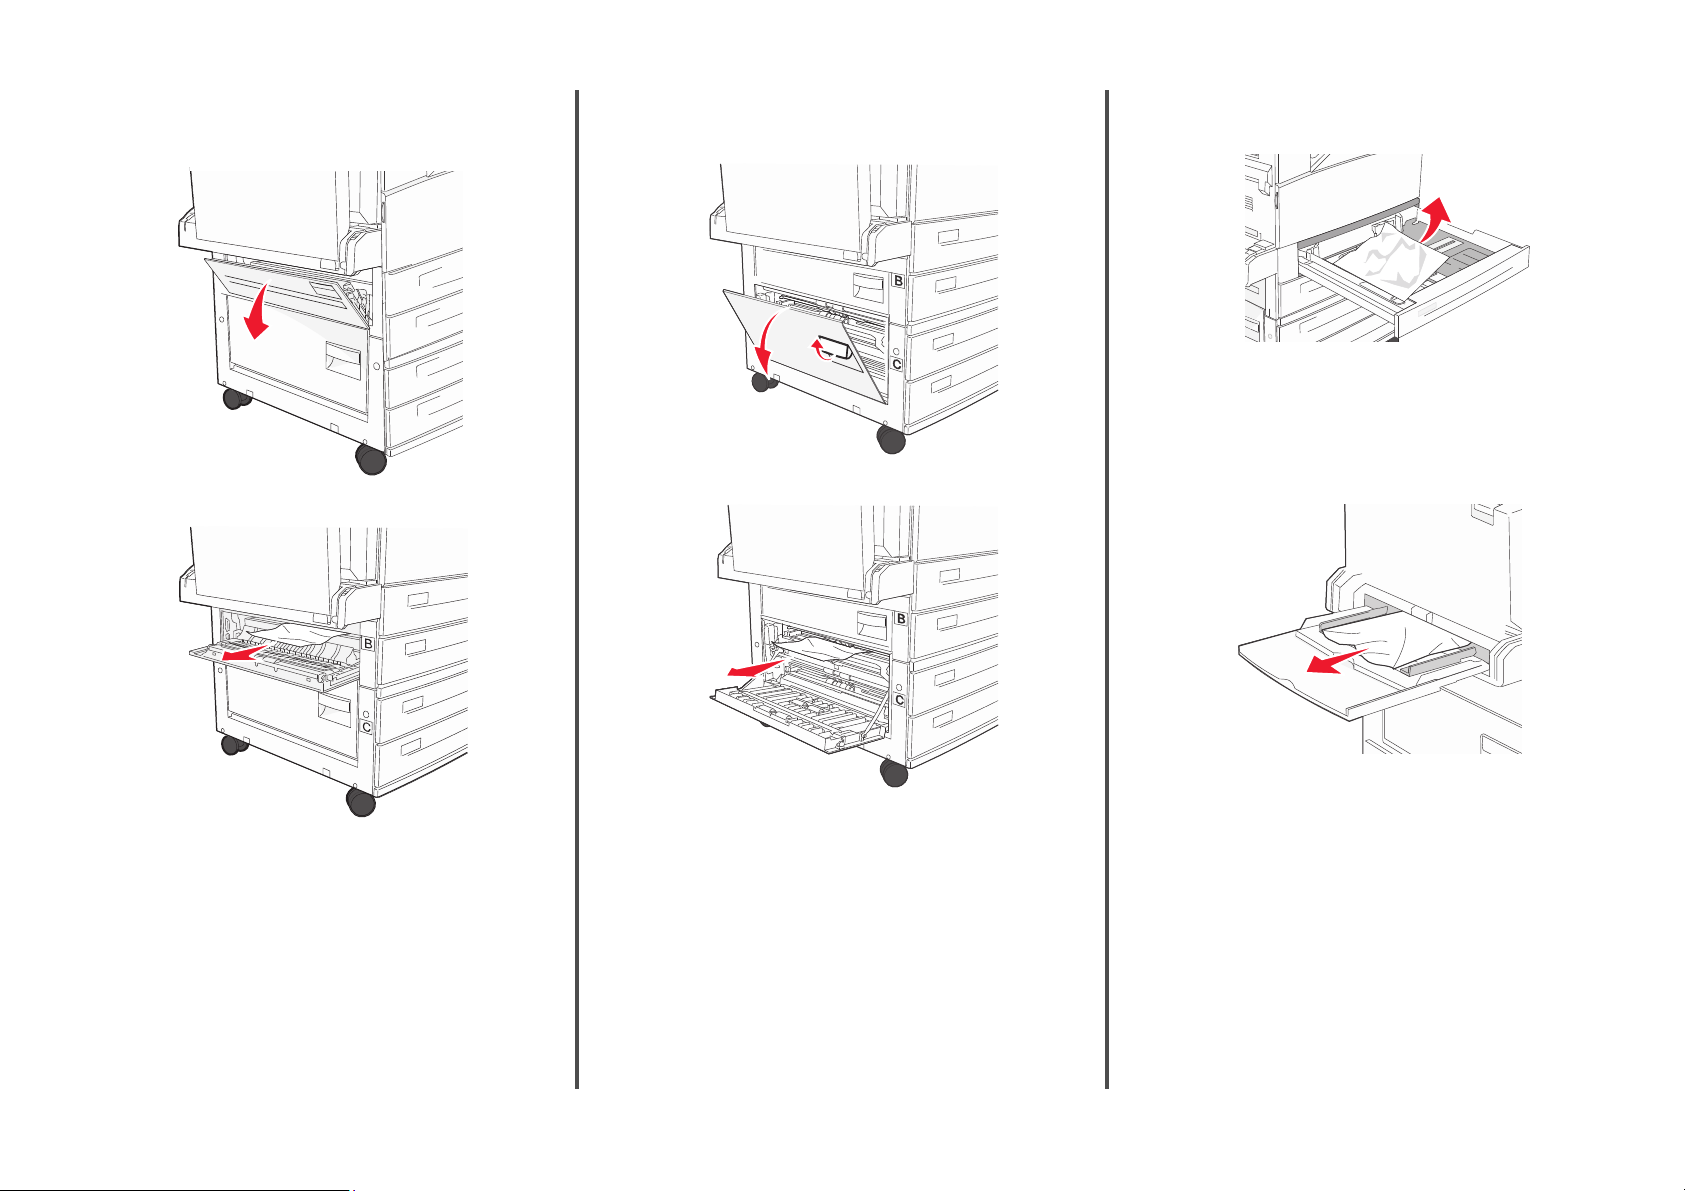
Clearing jams
200–201 paper jams
1 Open Door A by pushing the release latch up and lowering the
door.
CAUTION—HOT SURFACE: The inside of the printer
might be hot. To reduce the risk of injury from a hot
component, allow the surface to cool before touching.
2 Pull the jam up and toward you.
202 paper jam
Clearing Area A
1 Open Door A by pushing the release latch up and lowering the
door.
CAUTION—HOT SURFACE: The inside of the printer
might be hot. To reduce the risk of injury from a hot
component, allow the surface to cool before touching.
2 Pull the jam up and toward you.
Clearing Area B
1 Open Door B.
2 Pull the jam up and toward you.
Note: If the jam does not move immediately, stop pulling.
P us h d ow n a nd p u l l t h e gr e e n le v e r t o m a ke i t ea s i e r t o r em o v e
the jam. Make sure all paper fragments are removed.
3 Close Door A.
Note: If the jam does not move immediately, stop pulling.
Push down and pull the green lever to make it easier to remove
the jam. Make sure all paper fragments are removed.
3 Close Door A.
2
3 Close Door B.
Page 3
203, 230–231 paper jams
203 paper jam
1 Open Door A by pushing the release latch up and lowering the
door.
CAUTION—HOT SURFACE: The inside of the printer
might be hot. To reduce the risk of injury from a hot
component, allow the surface to cool before touching.
2 Open Door E by pushing the release latch and lowering the
door.
3 Pull the jam up.
4 Close Door E.
5 Close Door A.
230 paper jam
1 Open Door D.
2 Remove the jam.
3 Close Door D.
4 Open Door A by pushing the release latch up and lowering the
door.
CAUTION—HOT SURFACE: The inside of the printer
might be hot. To reduce the risk of injury from a hot
component, allow the surface to cool before touching.
3
Page 4
5 Open Door E by pushing the release latch and lowering the
door.
231 paper jam
1 Open Door D.
4 Open Door A by pushing the release latch up and lowering the
door.
6 Pull the jam up.
7 Close Door E.
8 Close Door A.
2 Remove the jam.
3 Close Door D.
CAUTION—HOT SURFACE: The inside of the printer
might be hot. To reduce the risk of injury from a hot
component, allow the surface to cool before touching.
5 Pull the jam up and toward you.
Note: If the jam does not move immediately, stop pulling.
Push down and pull the green lever to make it easier to remove
the jam. Make sure all paper fragments are removed.
6 Close Door A.
4
Page 5
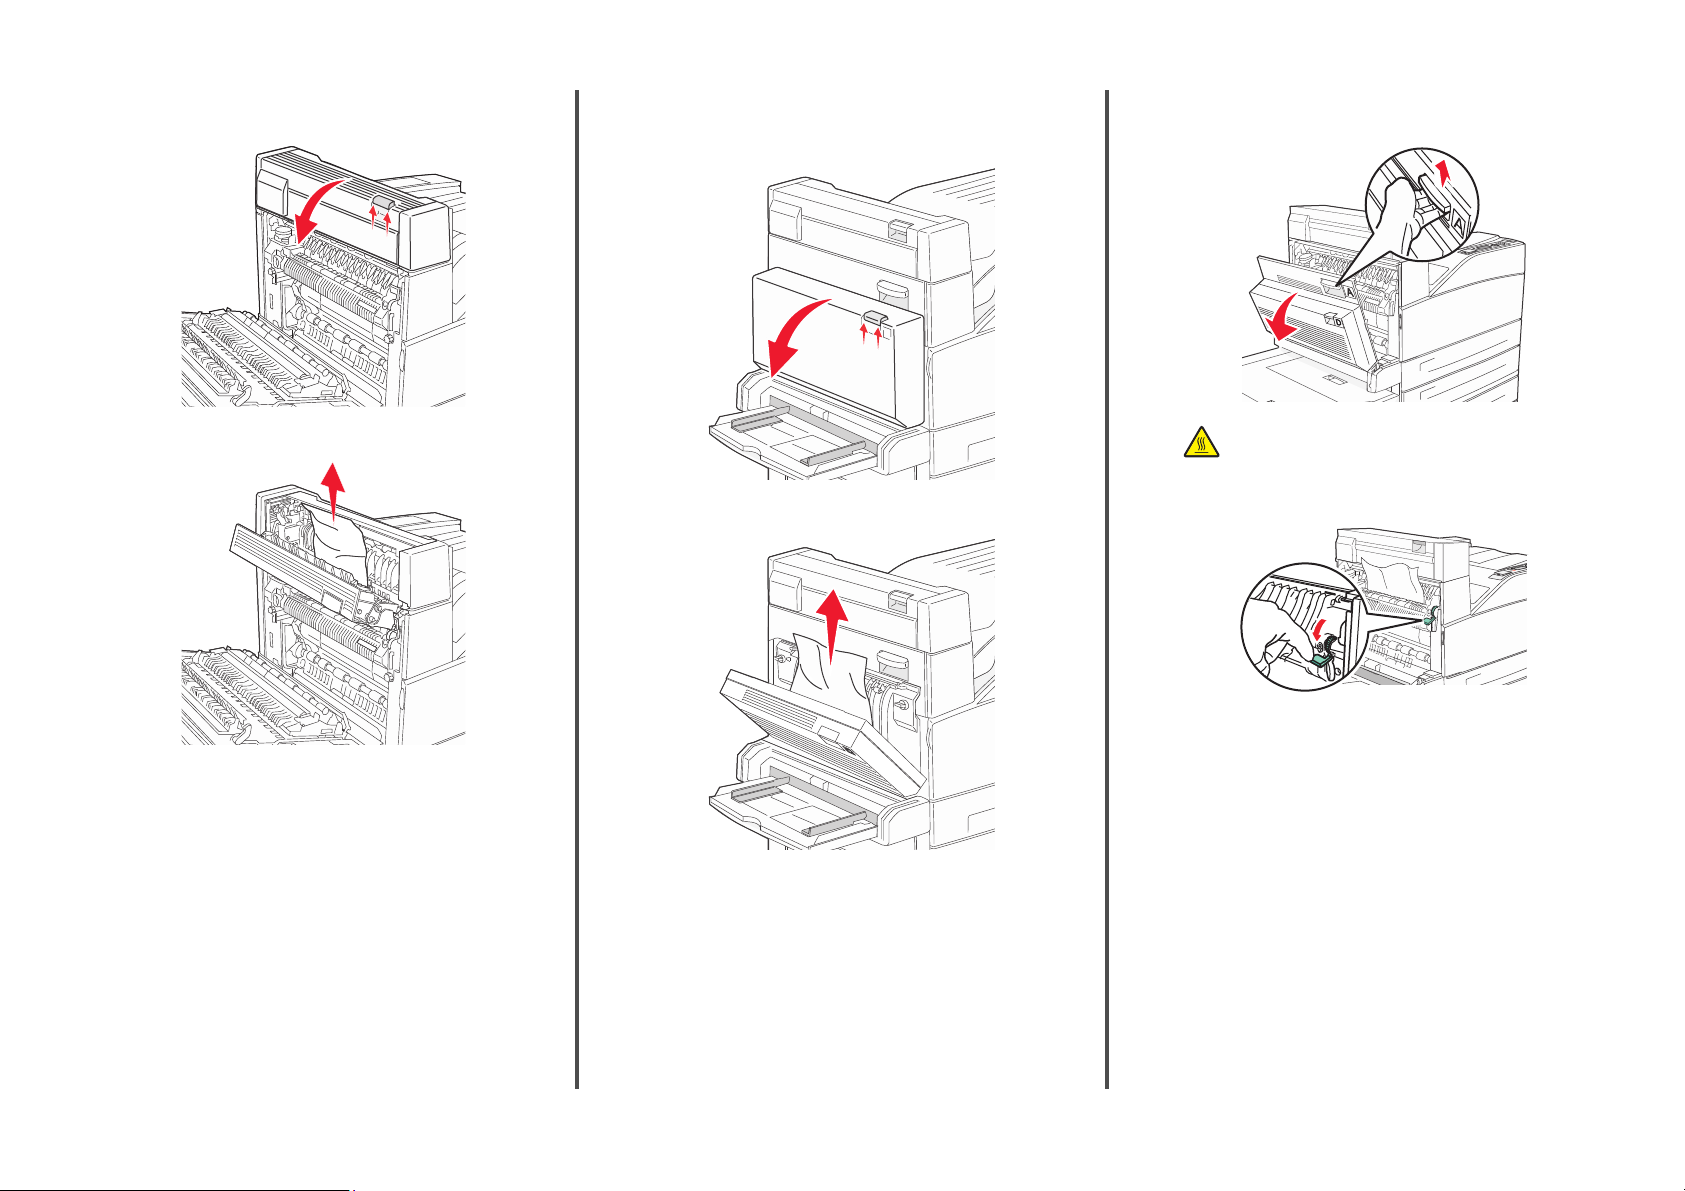
24x paper jam
Jam in Tray 1
1 Remove Tray 1 from the printer.
2 Remove the jam.
Jam in the optional tray
1 Pull the tray out.
2 Remove the jam.
Clearing jam in Door A
1 Open Door A by pushing the release latch up and lowering the
door.
CAUTION—HOT SURFACE: The inside of the printer
might be hot. To reduce the risk of injury from a hot
component, allow the surface to cool before touching.
2 Pull the jam up and toward you.
3 Insert Tray 1.
Note: If the jam does not move immediately, stop pulling.
Push down and pull the green lever to make it easier to remove
the jam. Make sure all paper fragments are removed.
3 Close Door A.
3 Insert the tray.
5
Page 6
Clearing jam in Door B
1 Open Door B.
2 Pull the jam up and toward you.
241 paper jam
1 Open Door C.
2 Pull the jam up and toward you.
4 Open Tray 1, and then remove any crumpled paper from the
tray.
5 Insert Tray 1.
250 paper jam
1 Remove the paper from the multipurpose feeder.
3 Close Door B.
Note: Make sure all paper fragments are removed.
3 Close Door C.
6
2 Flex the sheets of paper back and forth to loosen them, and
then fan them. Do not fold or crease the paper. Straighten the
edges on a level surface.
3 Load the paper into the multipurpose feeder.
4 Adjust the paper guide to rest lightly against the edge of the
paper.
Page 7
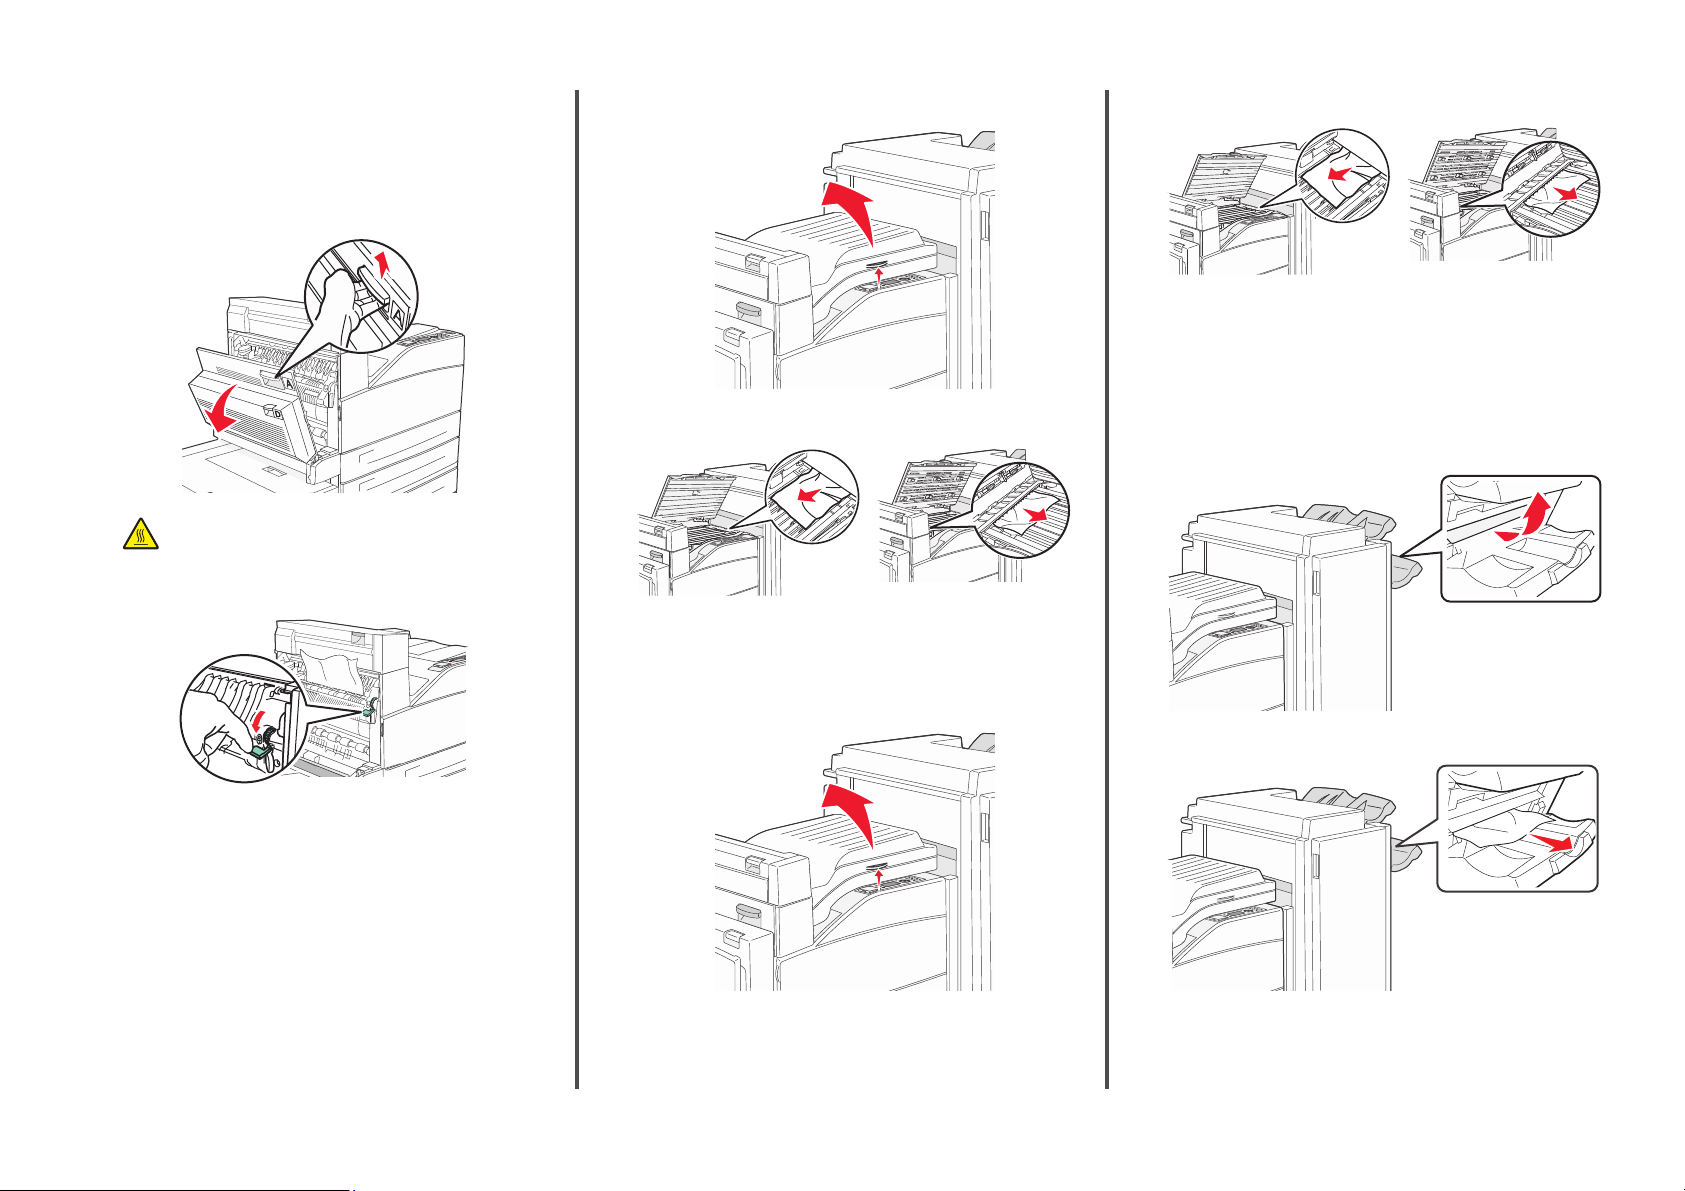
280–282 paper jams
280-281 paper jams
1 Open Door A by pushing the release latch up and lowering the
door.
4 Open Door F.
2 Remove the jam.
3 Close Door F.
283, 289 staple jams
CAUTION—HOT SURFACE: The inside of the printer
might be hot. To reduce the risk of injury from a hot
component, allow the surface to cool before touching.
2 Pull the jam up and toward you.
Note: If the jam does not move immediately, stop pulling.
P us h d ow n a nd p u l l t h e gr e e n le v e r t o m a ke i t ea s i e r t o r em o v e
the jam. Make sure all paper fragments are removed.
3 Close Door A.
5 Remove the jam.
6 Close Door F.
282 paper jam
1 Open Door F.
283 paper jam
1 Lift Door H.
2 Remove the jam.
3 Close Door H.
7
Page 8

289 staple error
1 Open Door G.
2 Hold the lever on the staple cartridge holder, and move the
holder to the right.
3 Firmly pull the colored tab to remove the staple cartridge.
4 Use the metal tab to lift the staple guard, and then pull out the
sheet of staples.
Discard the entire sheet.
6 Press down on the staple guard until it snaps securely into
place.
7 Push the cartridge holder firmly into the stapler until the holder
clicks into place.
5 Look through the cle ar covering on the bottom of the cartridge
holder to make sure no staples are jammed at the entrance.
8
8 Close Door G.
Priming Stapler appears. Priming ensures the stapler is
functioning properly.
Page 9

28x paper jam
284 paper jam
1 Open Door F.
2 Remove the jam.
4 Open Door G.
5 Remove the jam.
6 Close Door G.
7 Lift Door H.
8 Remove the jam.
9 Close Door H.
285–286 paper jams
1 Lift Door H.
3 Close Door F.
2 Remove the jam.
3 Close Door H.
9
Page 10

287–288 paper jams
1 Open Door F.
2 Remove the jam.
3 Close Door F.
4 Open Door G.
5 Remove the jam.
6 Close Door G.
10
 Loading...