

Page 1
W820
User’s Guide
April 2001
www.lexmark.com
Page 2

Page 3

Table of Contents
Chapter 1: Printer overview .............................................................. 7
Chapter 2: Sending a job to print .....................................................9
Chapter 3: Canceling a print job ....................................................10
From the printer operator panel ......................................................................... 10
From a computer running Windows ................................................................... 10
From a Macintosh computer .............................................................................. 11
Chapter 4: Conserving supplies ....................................................12
Chapter 5: Using the Print and Hold function ..............................13
Selecting a user name ....................................................................................... 13
Printing and deleting held jobs ........................................................................... 13
Repeat Print ....................................................................................................... 14
Reserve Print ..................................................................................................... 15
Verify Print .......................................................................................................... 15
Confidential jobs ................................................................................................. 15
Chapter 6: Printing a confidential job ...........................................17
Chapter 7: Print media specifications ...........................................18
Chapter 8: Loading the trays ..........................................................23
Loading trays 1, 2, and 3 .................................................................................... 23
Loading trays 4 and 5 ......................................................................................... 27
Chapter 9: Linking trays ................................................................. 30
Chapter 10: Loading the multipurpose feeder .............................. 31
Chapter 11: Loading the envelope feeder .....................................34
i
Page 4

Chapter 12: Using the output bins .................................................37
Standard bin ....................................................................................................... 37
Mailbox bins ....................................................................................................... 38
Finisher bins ....................................................................................................... 38
Chapter 13: Linking bins ................................................................39
Chapter 14: Finishing capabilities .................................................40
Stapling .............................................................................................................. 40
Finishing and bin linking ..................................................................................... 41
Hole punching .................................................................................................... 41
Chapter 15: Tips for successful printing ......................................42
Storing print media ............................................................................................. 42
Avoiding jams ..................................................................................................... 42
Chapter 16: Checking an unresponsive printer ...........................44
Chapter 17: Solving print quality problems ..................................45
Chapter 18: Solving paper feed problems ....................................52
Chapter 19: Solving other printing problems ............................... 54
Chapter 20: Solving mailbox problems ......................................... 57
Chapter 21: Solving finisher problems ......................................... 58
Chapter 22: Solving other option problems .................................61
Chapter 23: Calling for service ......................................................62
Chapter 24: Clearing print media jams ..........................................63
Understanding jam messages ............................................................................ 63
Locating jams with messages ............................................................................ 68
Clearing jams from the printer ............................................................................ 71
Clearing jams from the optional duplex unit ....................................................... 84
Clearing jams from the optional envelope feeder ............................................... 86
Clearing jams from the optional mailbox ............................................................ 87
ii
Page 5

Clearing jams from the optional finisher ............................................................. 90
Chapter 25: Clearing staple jams ................................................... 99
Chapter 26: Ordering supplies and maintenance items ........... 102
Chapter 27: Replacing the print cartridge ...................................103
Removing the old print cartridge ...................................................................... 103
Installing the new print cartridge ...................................................................... 105
Chapter 28: Cleaning the printer ..................................................109
Chapter 29: Replacing a staple cartridge ....................................110
Chapter 30: Emptying the hole punch box ................................. 113
Chapter 31: Replacing the items in the maintenance kit ........... 115
Chapter 32: Replacing the fuser ..................................................116
Removing the old fuser .................................................................................... 116
Installing a new fuser ....................................................................................... 119
Chapter 33: Replacing the transfer roller ....................................122
Removing the old transfer roller ....................................................................... 122
Installing the new transfer roller ....................................................................... 124
Chapter 34: Replacing pick rollers ..............................................126
Removing old pick rollers ................................................................................. 126
Installing new pick rollers ................................................................................. 128
Closing up ........................................................................................................ 131
Chapter 35: Cleaning the wiper blade .........................................132
Chapter 36: Resetting the maintenance page counter .............. 135
Chapter 37: Determining the status of supplies .........................136
Chapter 38: Storing supplies ....................................................... 137
Chapter 39: Recycling used supplies ..........................................138
iii
Page 6

Chapter 40: Priming the stapler ...................................................139
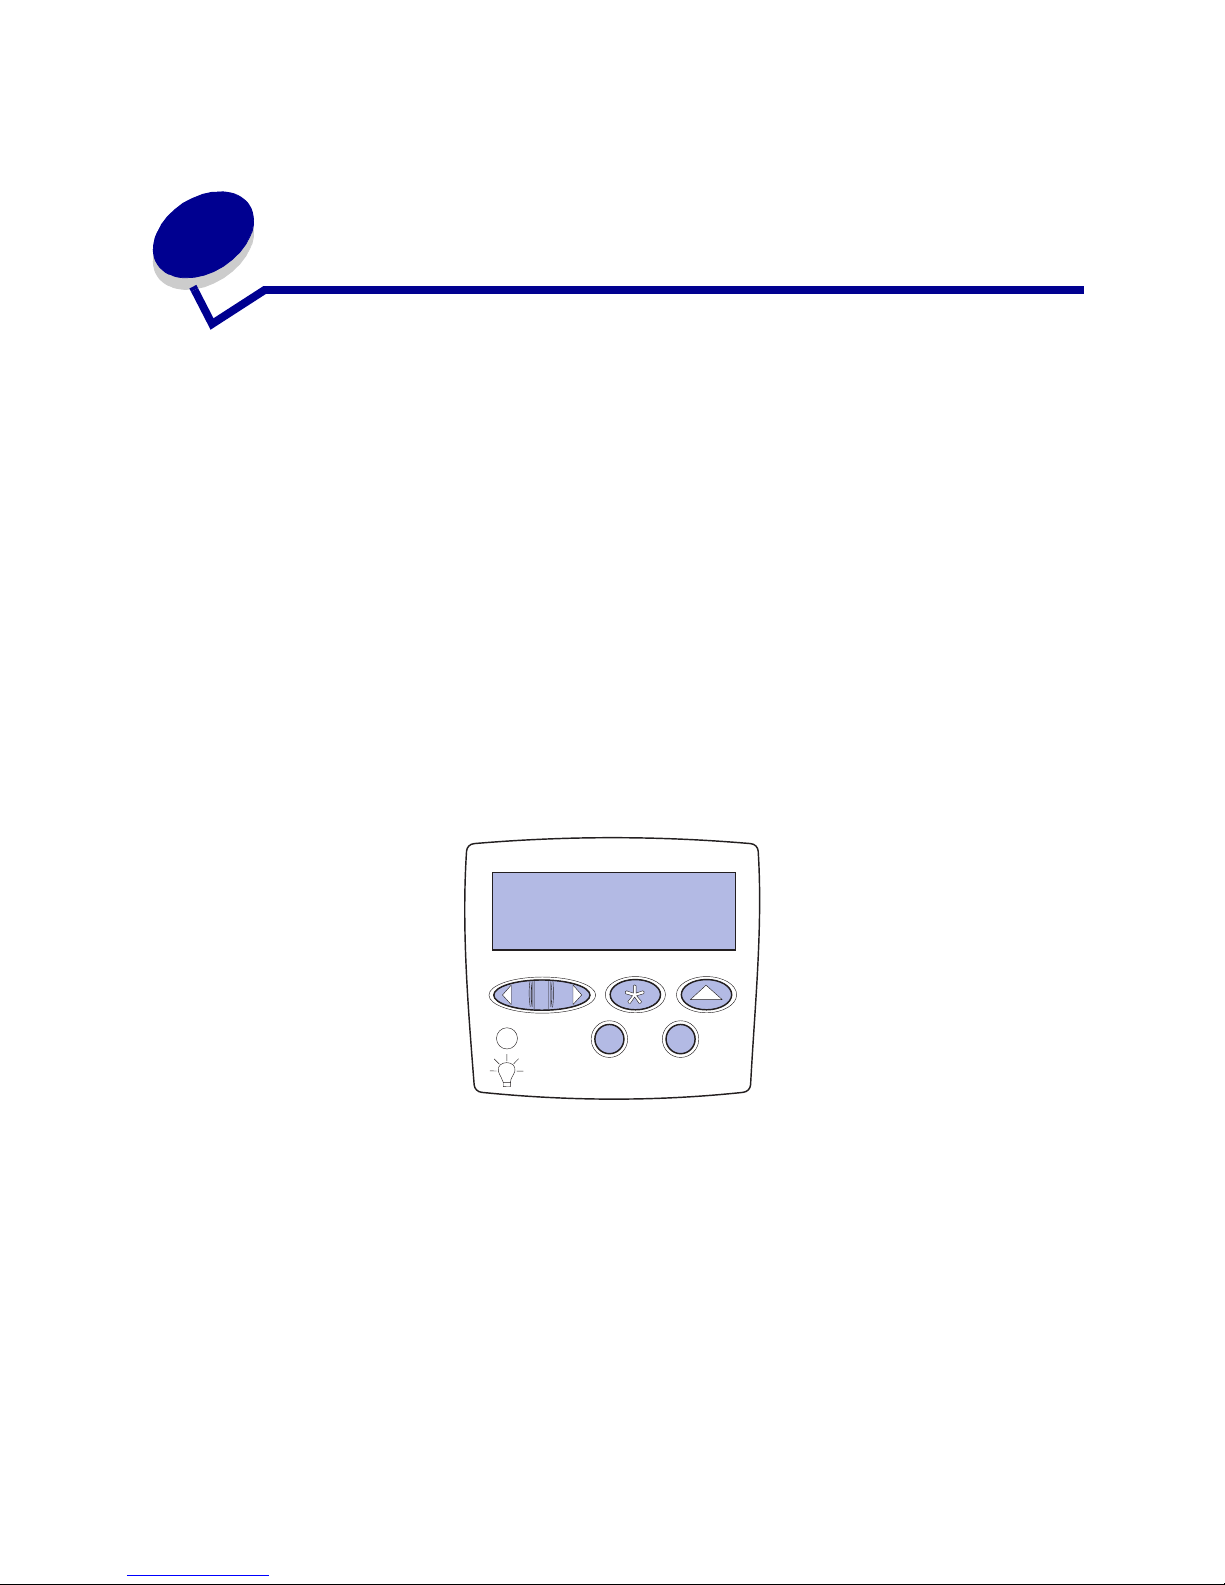
Chapter 41: Understanding the printer operator panel ............. 140
Chapter 42: Configuring printer alerts ........................................142
Chapter 43: Removing the multipurpose feeder ........................ 143
Chapter 44: Removing the optional envelope feeder ................ 144
Reinstalling the envelope feeder ...................................................................... 145
Chapter 45: Removing the optional duplex unit .........................146
Chapter 46: Removing the optional mailbox .............................. 149
Preparing for disassembly ................................................................................ 149
Disconnecting the power cords ........................................................................ 149
Using the handling tool ..................................................................................... 150
Removing the mailbox from the printer and stand ........................................... 153
Removing the mailbox stand ............................................................................ 155
Chapter 47: Removing the optional finisher ...............................159
Preparing for disassembly ................................................................................ 159
Removing the bins ........................................................................................... 159
Disconnecting the finisher from the printer ....................................................... 160
Removing the finisher from the stand .............................................................. 163
Removing the divertor cover ............................................................................ 164
Removing the transport unit ............................................................................. 165
Disassembling the stand .................................................................................. 166
Removing the finisher plate .............................................................................. 167
Chapter 48: Reinstalling the stacking arm ..................................168
Chapter 49: Removing the optional high capacity feeder .........170
Chapter 50: Removing the printer from the base cabinet .........172
Chapter 51: Removing memory and option cards ..................... 173
Accessing the printer system board ................................................................. 173
Removing memory cards ................................................................................. 173
iv
Page 7

Removing option cards .................................................................................... 174
Removing an optional firmware card ................................................................ 176
Reinstalling the printer system board ............................................................... 177
Chapter 52: Disabling the operator panel menus ......................178
Enabling the menus ......................................................................................... 178
Chapter 53: Disabling Power Saver ............................................. 179
Chapter 54: Disabling Size Sensing ............................................180
Enabling auto size sensing .............................................................................. 180
Chapter 55: Sensing special print media sizes .......................... 181
Changing the size that is sensed ..................................................................... 182
Size sensing and tray linking ............................................................................ 182
Chapter 56: Printing a menu settings page ................................ 183
Chapter 57: Restoring factory default settings .......................... 184
Chapter 58: Changing menu settings ..........................................185
Chapter 59: Understanding fonts ................................................186
Bitmapped and scalable fonts .......................................................................... 187
Resident fonts .................................................................................................. 188
Symbol sets ...................................................................................................... 193
Downloadable fonts .......................................................................................... 194
Chapter 60: Printing sample fonts ...............................................195
Chapter 61: Using printer menus .................................................196
Chapter 62: Paper Menu ............................................................... 199
Chapter 63: Finishing Menu ......................................................... 208
Chapter 64: Utilities Menu ............................................................ 215
Chapter 65: Job Menu ...................................................................220
v
Page 8

Chapter 66: Quality Menu .............................................................224
Chapter 67: Setup Menu ............................................................... 226
Chapter 68: PCL Emul Menu ........................................................ 234
Chapter 69: PostScript Menu .......................................................240
Chapter 70: Parallel Menu ............................................................241
Chapter 71: Serial Menu ...............................................................246
Chapter 72: Network Menu ...........................................................252
Chapter 73: Infrared Menu ............................................................ 256
Chapter 74: LocalTalk Menu .........................................................261
Chapter 75: USB Menu .................................................................. 265
Chapter 76: Understanding printer messages ...........................268
Notices ............................................................................................ 314
Trademarks ...................................................................................................... 316
Licensing notice ............................................................................................... 317
Safety information ............................................................................................ 317
Cautions and warnings ..................................................................................... 318
Electronic emission notices .............................................................................. 318
German acoustics statement ........................................................................... 321
Energy Star ...................................................................................................... 321
Laser notice ...................................................................................................... 322
Index ................................................................................................323
vi
Page 9
1
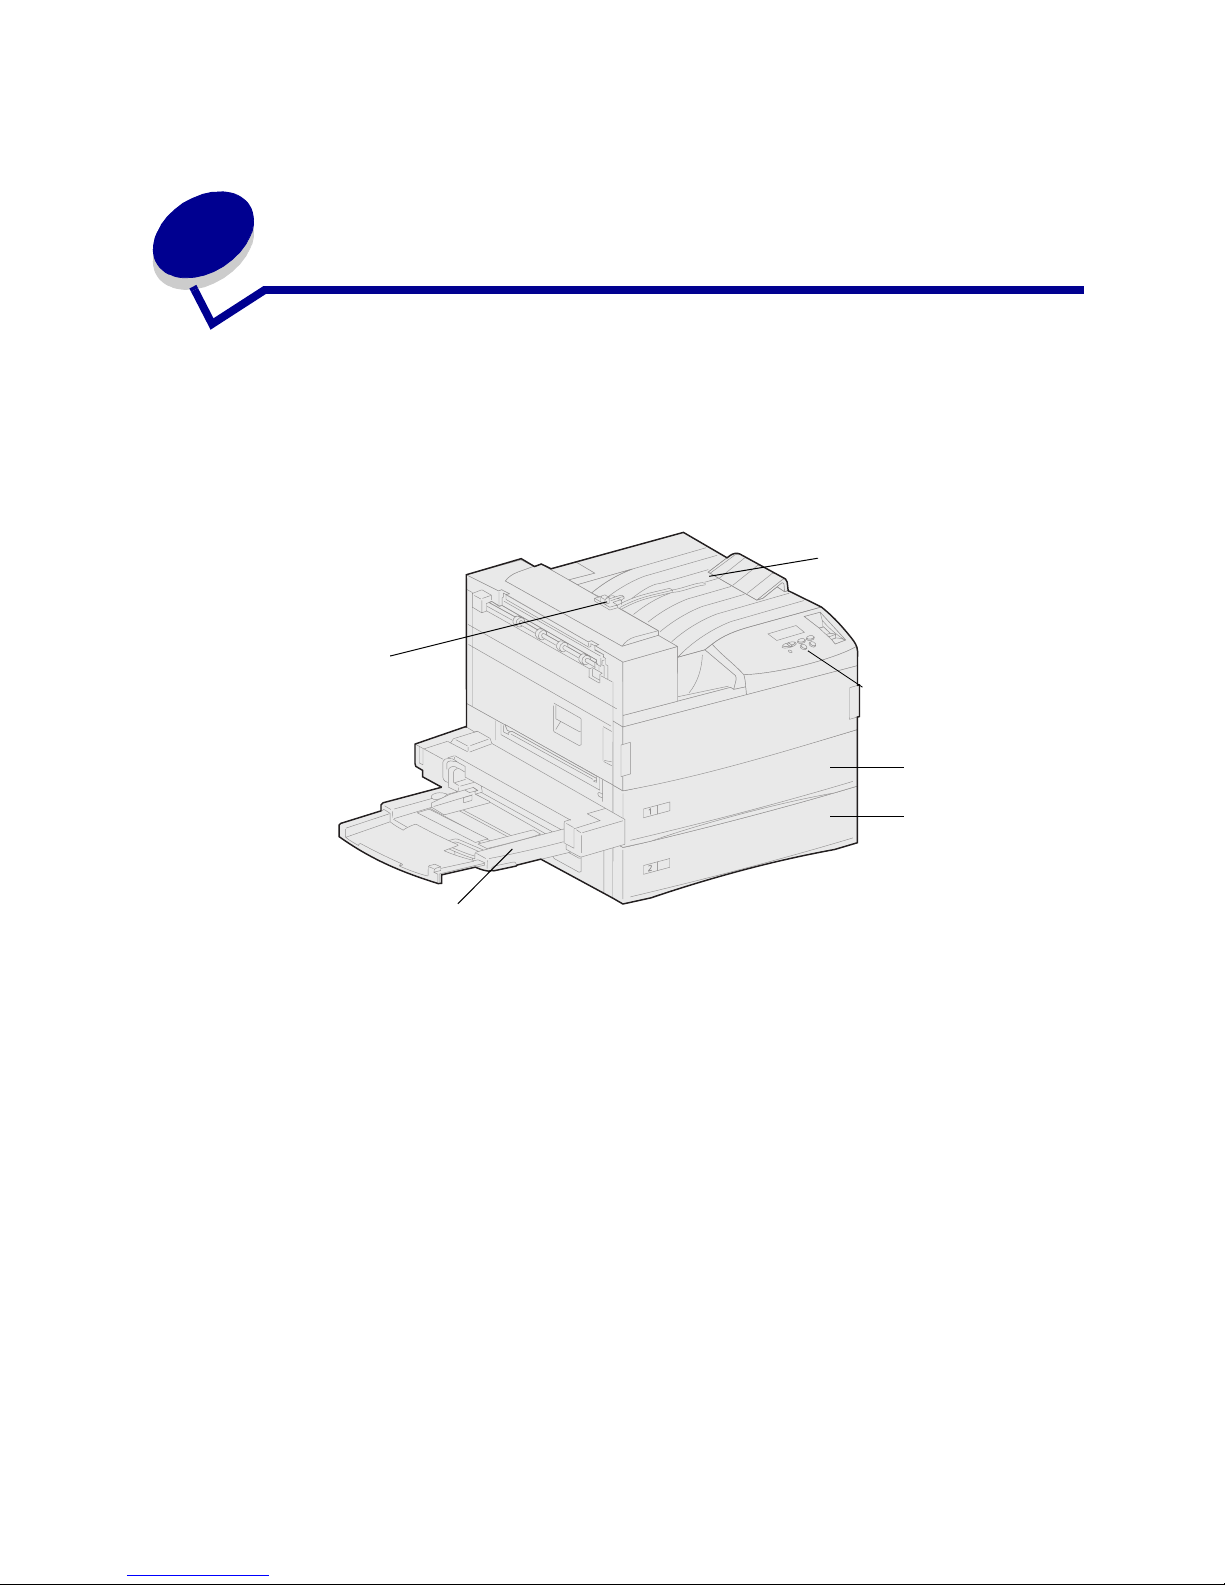
Printer overview
Standard printer
The following illustration shows the standard Lexmark W820. If you have attached paper handling
options to your printer, it may look more like one of the fully configured models shown on the following
pages.
Standard bin
Stacking arm
Operator panel
Tr ay 1
Tr ay 2
Multipurpose feeder
Note: This illustration shows the stacking arm. It is also shown in the Reinstalling the
stacking arm topic, but it is not shown in other topics.
7
Page 10

Fully configured printer with a mailbox
The following illustration shows the printer configured with an optional mailbox, duplex unit, and high
capacity feeder.
Optional mailbox
Optional duplex unit
Optional high
capacity feeder
(trays 3, 4, and 5)
Fully configured printer with a finisher
The following illustration shows the printer configured with an optional finisher, duplex unit, envelope
feeder, and high capacity feeder.
Finisher top cover
Transport unit and
transport unit cover
Bin 1
Finisher divertor
cover
Optional
duplex unit
Optional envelope
feeder
Bin 2
Finisher door
Finisher stand
8
Page 11

2
Sending a job to print
A
printer driver
Print from a software application, a window representing the printer driver opens. Select the
appropriate settings for the specific job you are sending to print. Print settings selected from the driver
override the default settings selected from the printer operator panel.
You may need to click Properties or Setup from the initial Print box to see all of the available printer
settings you can change. If you are not familiar with a feature in the printer driver window, open the
online Help for more information.
To support all the printer features, use the Lexmark custom printer drivers. Updated drivers, as well as
a complete description of the driver packages and Lexmark driver support, are available from the
Lexmark Web site. You can also use the system drivers built into your operating system. Refer to the
Setup Guide
To print a job from a typical Windows application:
1 Open the file you want to print.
2 From the File menu, select Print.
is software that lets your computer communicate with your printer. When you choose
for more information about choosing and installing drivers.
3 Verify that the correct printer is selected in the dialog box. Modify the printer settings as
appropriate (such as the pages you want to print or the number of copies).
4 Click Properties or Setup to adjust printer settings not available from the first screen, then click
OK.
5 Click OK or Print to send the job to the selected printer.
9
Page 12

3
Canceling a print job
From the printer operator panel
If the job you want to cancel is printing, and Busy appears on the display:
1 Press Menu to open the Job Menu.
Cancel Job appears on the second line of the display.
2 Press Select.
The message Canceling Job is displayed.
From a computer running Windows
Canceling a job from the taskbar
When you send a job to print, a small printer icon appears in the right corner of the taskbar.
1 Double-click the printer icon.
A list of print jobs appears in the printer window.
2 Selectthejobyouwanttocancel.
3 Press the Delete key on the keyboard.
Canceling a job from the desktop
1 Minimize all programs to reveal the desktop.
2 Double-click the My Computer icon.
3 Double-click the Printers icon.
A list of available printers appears.
4 Double-click the printer you selected when you sent the job.
A list of print jobs appears in the printer window.
5 Selectthejobyouwanttocancel.
6 Press the Delete key on the keyboard.
10
Page 13

From a Macintosh computer
When you send a job to print, the printer icon for your selected printer appears on the desktop.
1 Double-click the printer icon on your desktop.
A list of print jobs appears in the printer window.
2 Press Control and click the print job you want to cancel.
3 Select Stop Queue from the pop-up menu that appears.
11
Page 14

4
Conserving supplies
Several settings in your application software or on the display let you conserve toner and paper:
For more information,
Supply Setting What the setting does
Toner Toner Darkness in
the Quality Menu
Lets you adjust the level of toner
released on a sheet of print media. The
values range from 1 (lightest setting) to
10 (darkest setting).
see ...
Toner Darkness
Print media Multipage Print in
the Finishing
Menu
Duplex in the
Finishing Menu
Print media Use your software
application or
printer driver to
send a Verify Print
job.
Use Held Jobs in
the Job Menu to
access your Verify
Print job.
Causes the printer to print the two or
more page images on one side of a
sheet. Values for Multipage Print are 2
Up, 3 Up, 4 Up, 6 Up, 9 Up, 12 Up, and
16 Up. Combined with the duplex setting,
Multipage Print lets you print up to 32
pages on one sheet of paper (16 images
onthefrontand16ontheback).
Duplex printing is available when you
attach the optional duplex unit. It lets you
print on both sides of a sheet of paper.
Lets you examine the first copy of a
multiple-copy job to be sure it is
satisfactory before you print the other
copies. If the job is unsatisfactory, you
cancel the job.
Multipage Print
Duplex
Verify Print
Canceling a print job
Held Jobs
12
Page 15

5
Using the Print and Hold function
When sending a job to the printer, you can specify in the driver that you want the printer to hold the job
in memory and not print it immediately. When you are ready to print the job, use the printer operator
held
panel menus to identify which
panel for information on using the operator panel.) You can use this function to delay printing a job,
verify one copy before printing additional copies, request extra copies of a job at a later time, or print a
confidential job when you can be at the printer to retrieve it.
For more information about each of the four types of held jobs, click a topic:
• Repeat Print
• Reserve Print
• Verify Print
• Confidential jobs
Selecting a user name
job you want to print. (See Understanding the printer operator
All confidential and held Jobs have a user name associated with them. To access all Held Jobs or
Confidential Jobs, you must first select your user name from a list of user names for print jobs. When
the list is presented, press
for your job.
Menu to scroll through the list. Press Select once you find your user name
Printing and deleting held jobs
Once held jobs are stored in printer memory, you can use the operator panel to specify what you want
to do with one or more of the jobs. From the Job Menu, you can select either Confidential Job or Held
Jobs (Repeat Print, Reserve Print, and Verify Print jobs). Then, you select your user name from a list.
If you select Confidential Job, you must then enter the personal identification number (PIN) you
specified in the driver when you sent the job. (See Confidential jobs for more information.)
From either the Confidential Job or the Held Jobs menu items, you have five choices:
• Print All Jobs
• Print A Job
• Delete All Jobs
• Delete A Job
• Print Copies
13
Page 16

To access held jobs from the operator panel:
1 Press Menu until you see Job Menu:
– If the printer displays the Busy message, press Menu to open the Job Menu.
– If the printer displays the Ready message, press Menu once to find Confidential Job or
Held Jobs (depending on the type of job you sent) on the second line of the display. Press
Select.
Note: If you sent both types of jobs, press Menu to scroll forward to Held Jobs if you want
to access this type first. Then, press
A list of user names and associated print jobs is presented.
Select.
2 Press Menu until you see your user name in the list, and then press Select.
Note: If you are looking for a confidential job, you are prompted to enter your PIN. See
Confidential jobs for more information.
3 Press Menu until you see the action you want to take (Print A Job, Delete A Job, and so on),
and then press
Select.
4 Press Menu until you see your print job, and then press Select. An asterisk (*) appears next to
the job name indicating you have chosen to print or delete that job.
If you are prompted to enter the number of copies you want to print, press
decrease the number on the display. Press
Select.
Menu to increase or
5 Press Go to print or delete the jobs you have selected.
The printer briefly shows messages indicating what Print and Hold functions it is performing,
and then returns to the Ready message.
Recognizing when format errors occur
If the symbol appears on the operator panel display, it indicates that the printer had trouble
formatting one or more of the held jobs. These formatting problems are most commonly the result of
insufficient printer memory or invalid data that might cause the printer to flush the job.
When a symbol appears next to a held job, you can:
• Print the job. However, only part of the job may print.
• Delete the job. You may want to free up additional printer memory by scrolling through the list
of held jobs and deleting others you have sent to the printer.
Repeat Print
If you send a Repeat Print job, the printer prints all requested copies of the job
memory so you can print additional copies later.
and
stores the job in
Note: Repeat Print jobs are automatically deleted from printer memory when the printer
requires extra memory to process additional jobs.
14
Page 17

Reserve Print
If you send a Reserve Print job, the printer stores the job in memory so you can print the job later. The
job is held in memory until you delete it from the Held Jobs menu. Unlike Repeat Print jobs, Reserve
Print jobs are not automatically deleted if the printer requires extra memory to process additional jobs.
See Printing and deleting held jobs for more information on Reserve Print jobs.
Verify Print
If you send a Verify Print job, the printer prints one copy and holds the remaining copies in printer
memory. Use Verify Print to examine the first copy to see if it is satisfactory before printing the
remaining copies.
See Printing and deleting held jobs if you need help printing the additional copies stored in memory.
Note: Once all copies are printed, the Verify Print job is deleted from printer memory.
Confidential jobs
When you send a job to the printer, you can enter a personal identification number (PIN) from the
driver. The PIN must be four digits using the numbers 1–6. The job is held in printer memory until you
enter the same four-digit PIN from the operator panel and choose to print or delete the job. This
ensures that the job does not print until you are there to retrieve it, and no one else using the printer
can print the job.
Entering a personal identification number (PIN)
When you select Confidential Job from the Job Menu, the following prompt appears on the display
after you select your user name:
Enter PIN:
=____
Use the buttons on the operator panel to enter the four-digit PIN associated with your confidential job.
The numbers next to the button names identify which button to press for each digit (1–6). As you enter
the PIN, asterisks appear on the display to ensure confidentiality
Enter PIN
=****
1
Menu
2
Select3Return
5
Go
Stop
4
6
15
Page 18

If you enter an invalid PIN, the message No Jobs Found. Retry? appears. Press Go to reenter the
PIN, or press
Stop to exit the Confidential Job menu.
Once you enter a valid PIN, you can choose to print or delete jobs matching the PIN you entered. (See
Printinganddeletingheldjobsfor more information.) After printing all requested copies of the job,
the printer deletes the confidential job from memory.
16
Page 19
6
Printing a confidential job
If you print a job that is personal or confidential, and you do not want anyone else to see it, the printer
can hold your job in memory until you arrive at the printer.
Note: This will only work with the Lexmark custom drivers that came on the drivers CD
which shipped with your printer.
To print a confidential job:
1 In your word processor, spreadsheet, browser, or other application, select File, Print.
2 Click Properties.(IfthereisnoProperties button, click Setup, and then click Properties.)
3 Click Help and refer to the topic confidential print or print and hold. Follow instructions for
printing a confidential job.
4 Go to the printer when you are ready to retrieve your confidential print job, and follow these
steps:
a Press Menu until you see Confidential Job, and then press Select..
Enter PIN
=****
1
Menu
2
Select3Return
5
Go
Stop
4
6
b Press Menu until you see your user name, and then press Select.
c Use the numbered buttons on the operator panel to enter your four-digit personal
identification number (PIN). As you enter your PIN, asterisks appear on the display.
Note: If you enter an invalid PIN, the message No Jobs Found, Retry appears. Press
Go to reenter the PIN, or press Stop to exit the Confidential Job menu item.
d Press Select to print your confidential jobs.
e Your jobs print and are deleted from printer memory.
17
Page 20

7
Print media specifications
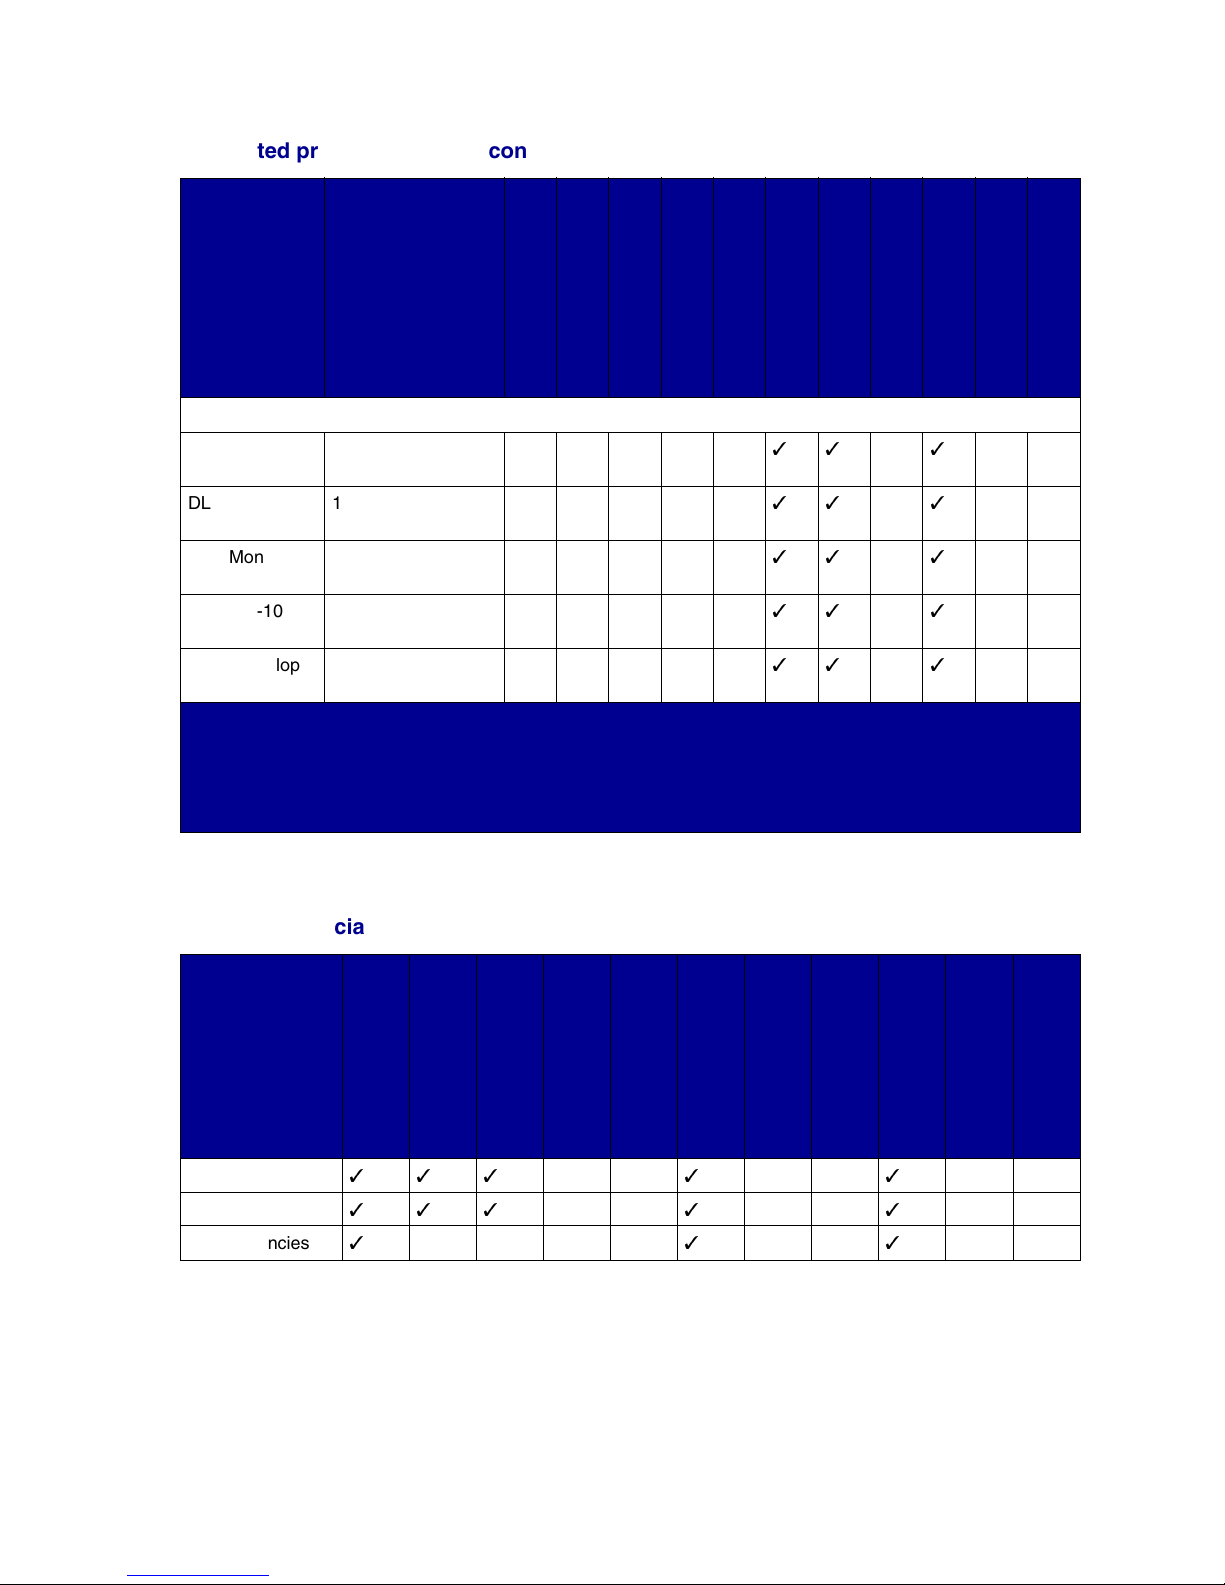
The following table details print media sizes and types supported by each input and output device. For
details about the types of print media your printer supports, refer to the
availableonLexmark’sWebsiteatwww.lexmark.com.Werecommendthatyoutryalimitedsampleof
any print media you are considering using with the printer before purchasing large quantities.
Supported print media sizes
Print media
sizes
Dimensions
Tray 1 (standard)
Tray 2 (standard)
Tray 3 (optional)
Tray 4 (optional)
Paper
Card Stock & Label Guide
Tray 5 (optional)
Multipurpose feeder
(standard)†Envelope feeder
(optional)
Duplex unit (optional)
Standard bin (standard)
10 bins in the mailbox
(optional)
2binsinthefinisher
(optional)
A3 297 x 420 mm
A4 210x297mm(8.27
A5 148x210mm(5.83
Folio 215.9 x 330 mm (8.5
JIS B4* 257 x 364 mm
JIS B5* 182 x 257 mm (7.17
Executive* 184.2 x 266.7 mm
*
Executive and Legal are supported under factory default conditions. For JIS B4 or JIS B5, see Sensing special
print media sizes.
†
The multipurpose feeder does not support auto size sensing. Print media sizes must be selected from the
printer operator panel.
‡
The dimensions for Universal must be set in the printer driver.
(11.69 x 16.54 in.)
x 11.7 in.)
x8.27in.)
x13in.)
(10.12 x 14.33 in.)
x 10.12 in.)
(7.25 x 10.5 in.)
18
Page 21
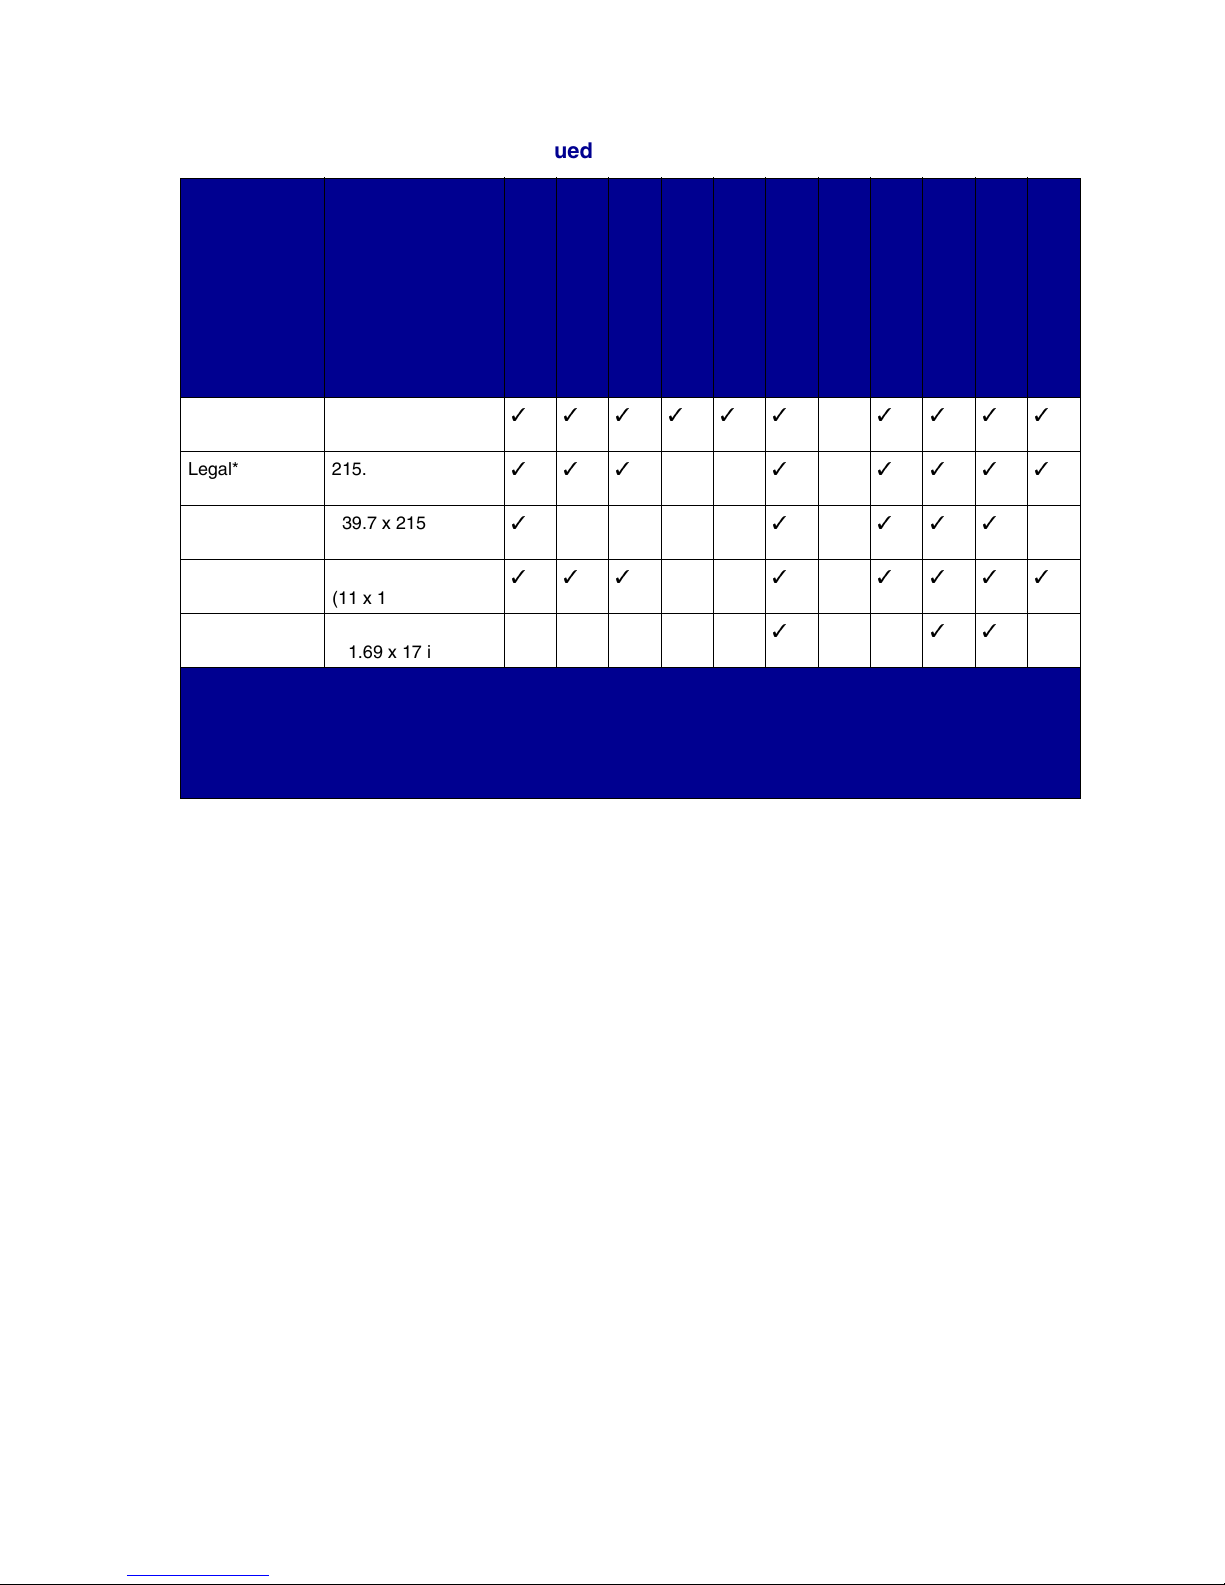
Supported print media sizes (continued)
Print media
sizes
Letter 215.9 x 279.4 mm
Legal* 215.9 x 356 mm (8.5
Statement 139.7 x 215.9 mm
11x17 279.4 x 431.8 mm
Universal
*
Executive and Legal are supported under factory default conditions. For JIS B4 or JIS B5, see Sensing special
‡
print media sizes.
†
The multipurpose feeder does not support auto size sensing. Print media sizes must be selected from the
printer operator panel.
‡
The dimensions for Universal must be set in the printer driver.
Dimensions
(8.5 x 11 in.)
x14in.)
(5.5 x 8.5 in.)
(11 x 17 in.)
297 x 431.8 mm
(11.69 x 17 in.)
Tray 1 (standard)
Tray 2 (standard)
Tray 3 (optional)
Tray 4 (optional)
Tray 5 (optional)
Multipurpose feeder
(standard)†Envelope feeder
(optional)
Duplex unit (optional)
Standard bin (standard)
10 bins in the mailbox
(optional)
2 bins in the finisher
(optional)
19
Page 22
Supported print media sizes (continued)
Print media
sizes
Dimensions
Tray 1 (standard)
Tray 2 (standard)
Tray 3 (optional)
Envelopes
Tray 4 (optional)
Tray 5 (optional)
Multipurpose feeder
(standard)†Envelope feeder
(optional)
Duplex unit (optional)
Standard bin (standard)
10 bins in the mailbox
(optional)
2 bins in the finisher
(optional)
C5 162 x 229 mm
DL 110 x 220 mm
7 ¾ (Monarch) 98.4 x 190.5 mm
10 (Com-10) 104.8 x 241.3 mm
Other envelope 245 x 215.9 mm
*
Executive and Legal are supported under factory default conditions. For JIS B4 or JIS B5, see Sensing special
print media sizes.
†
The multipurpose feeder does not support auto size sensing. Print media sizes must be selected from the
printer operator panel.
‡
The dimensions for Universal must be set in the printer driver.
(6.38 x 9.01 in.)
(4.33 x 8.66 in.)
(3.875 x 7.5 in.)
(4.125 x 9.5 in.)
(9.65x8.5in.)
Supported special print media types
Print media
types
Card stock
Labels
Transparencies
Tray 1 (standard)
Tray 2 (standard)
Tray 3 (optional)
Tray 4 (optional)
Tray 5 (optional)
Multipurpose feeder
(standard)
Envelope feeder
(optional)
Duplex unit
Standard bin
10 bins in the mailbox
(optional)
2binsinthefinisher
(optional)
20
Page 23

The printer has three standard print media sources: trays 1 and 2, each of which hold 500 sheets of 20
lb paper; and the multipurpose feeder, which holds approximately 35 sheets of 20 lb paper. You can
also attach an optional high capacity feeder, which contains three trays. With all trays attached, you
can have a maximum input supply of 3,500 sheets of paper. The following table details the types, sizes,
and quantities of print media you can load in each of the sources.
Print media source, size, and capacity specifications
Print media
Source
Tray 1 (standard) Paper,
Tray 2 (standard) Paper, labels,
Tray 3 (optional)
*
Trays 3, 4, and 5 comprise the optional high capacity feeder.
†
Executive and Legal are supported under factory default conditions. For JIS B4 or JIS B5, see Sensing special
print media sizes.
‡
The multipurpose feeder does not support auto size sensing. Print media sizes must be selected from the
printer operator panel.
supported
transparencies,
labels, card stock
card stock
*
Paper, labels,
card stock
Sizes supported Capacity
A3, A4, A5, Folio, JIS B4
†
JIS B5
,Executive†, Letter,
Legal†, Statement, 11x17
†
• 500 sheets of 20 lb paper
,
• 250 sheets of labels
• 300 transparencies
• 250 sheets of card stock
A3, A4, Folio, JIS B4
†
,Executive†, Letter,
B5
†
, 11x17
Legal
A3, A4, Folio, JIS B4†,JIS
†
,Executive†, Letter,
B5
†
,JIS
• 500 sheets of 20 lb paper
• 250 sheets of labels
• 250 sheets of card stock
Legal†, 11x17
21
Page 24

Print media source, size, and capacity specifications (continued)
Print media
Source
Tray 4 (optional)
Tray 5 (optional)
Multipurpose feeder
(standard)
‡
supported
*
Paper only A4, Letter, Executive 1000 sheets of 20 lb paper
*
Paper only A4, Letter, Executive
Paper,
transparencies,
labels, card stock
Sizes supported Capacity
A3, A4, A5, Folio, JIS B4,
JIS B5, Executive, Legal,
Letter, Statement,11x17,
Universal
• 35 sheets of 20 lb paper
• 15 labels
• 25 transparencies
• 15 sheets of card stock
Envelopes 7 ¾, 10, DL, C5, Other
10 envelopes
Envelope
Envelope feeder
(optional)
*
Trays 3, 4, and 5 comprise the optional high capacity feeder.
†
Executive and Legal are supported under factory default conditions. For JIS B4 or JIS B5, see Sensing special
Envelopes 7 ¾, 10, DL C5, Other
Envelope
100 envelopes
print media sizes.
‡
The multipurpose feeder does not support auto size sensing. Print media sizes must be selected from the
printer operator panel.
22
Page 25

8
Loading the trays
Loading trays 1, 2, and 3
For suggestions on avoiding jams, see Avoiding jams.SeePrint media source, size, and capacity
specifications for tray capacities.
1 Pull the tray open until it stops.
Handhold
2 Press down on the lever on the back guide and slide the back guide toward the back of the
printer.
23
Page 26
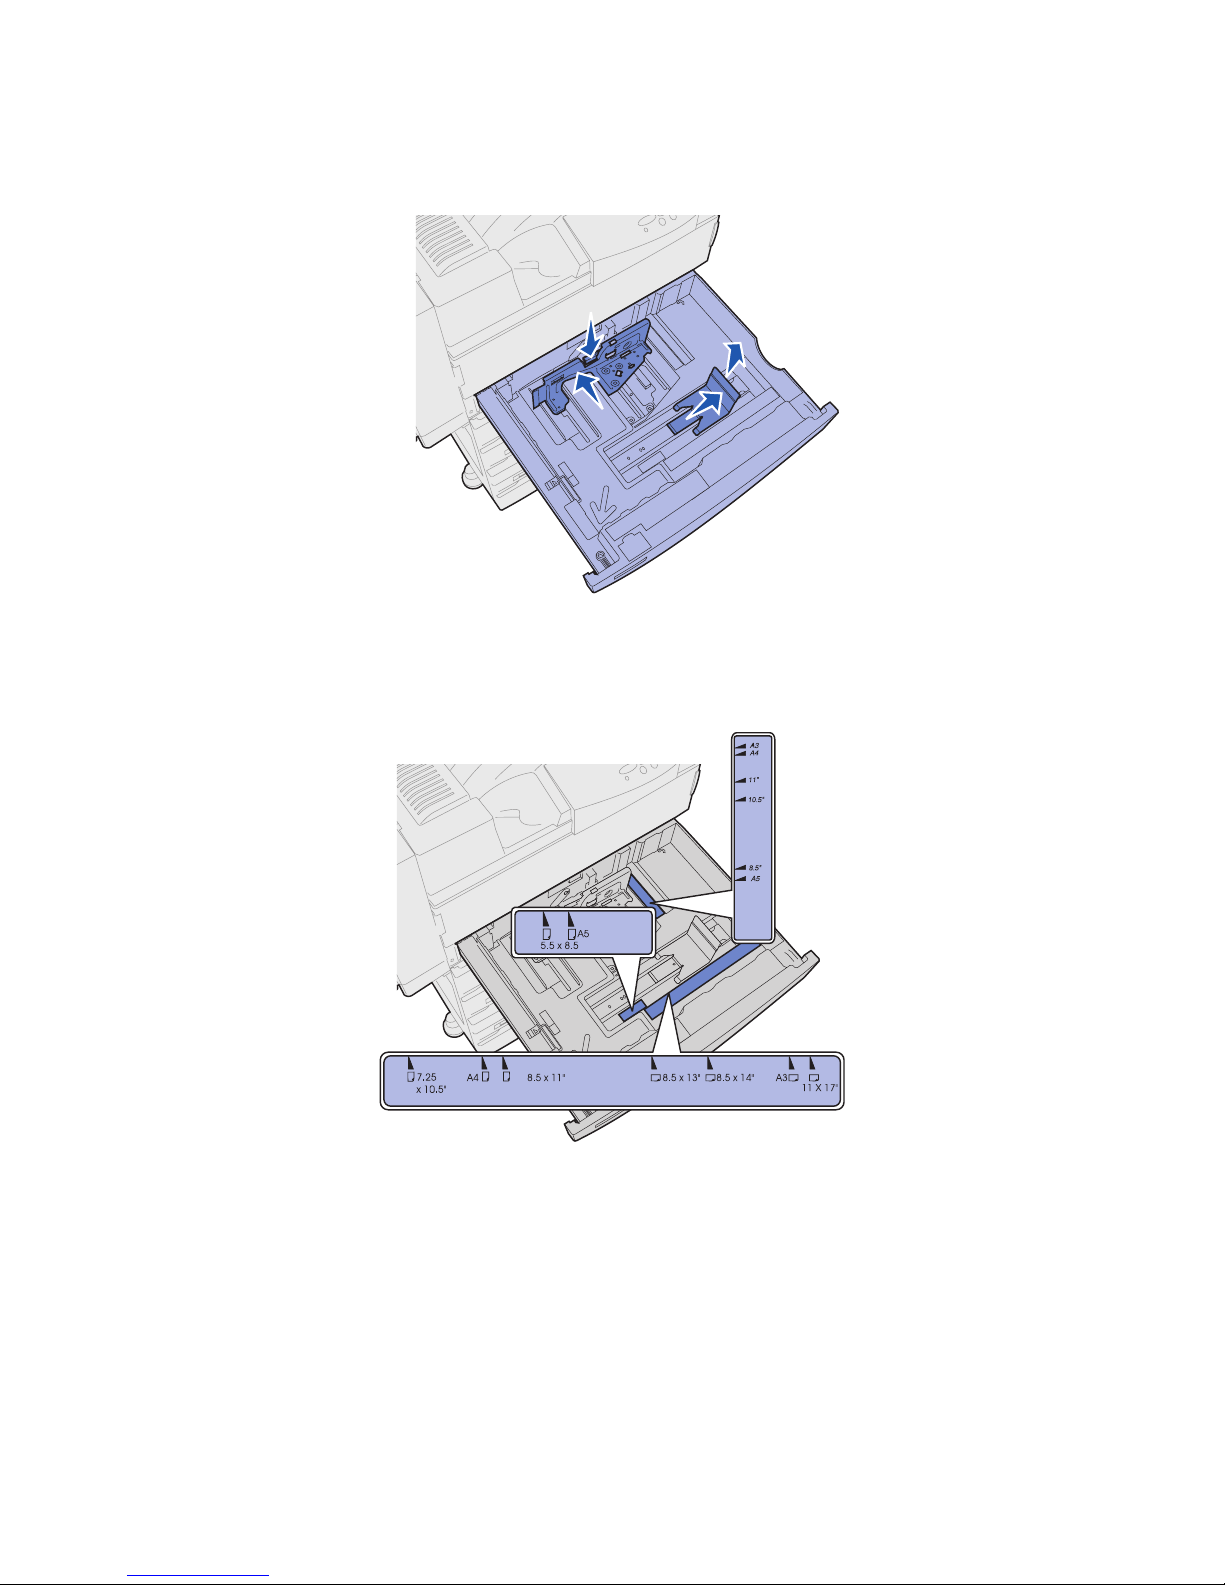
3 Lift the side guide up slightly and slide it to the right.
Note: Labels with print media size names are located on the bottom surface of the tray.
Each major indicator on the labels is marked with a number or paper-size name.
24
Page 27
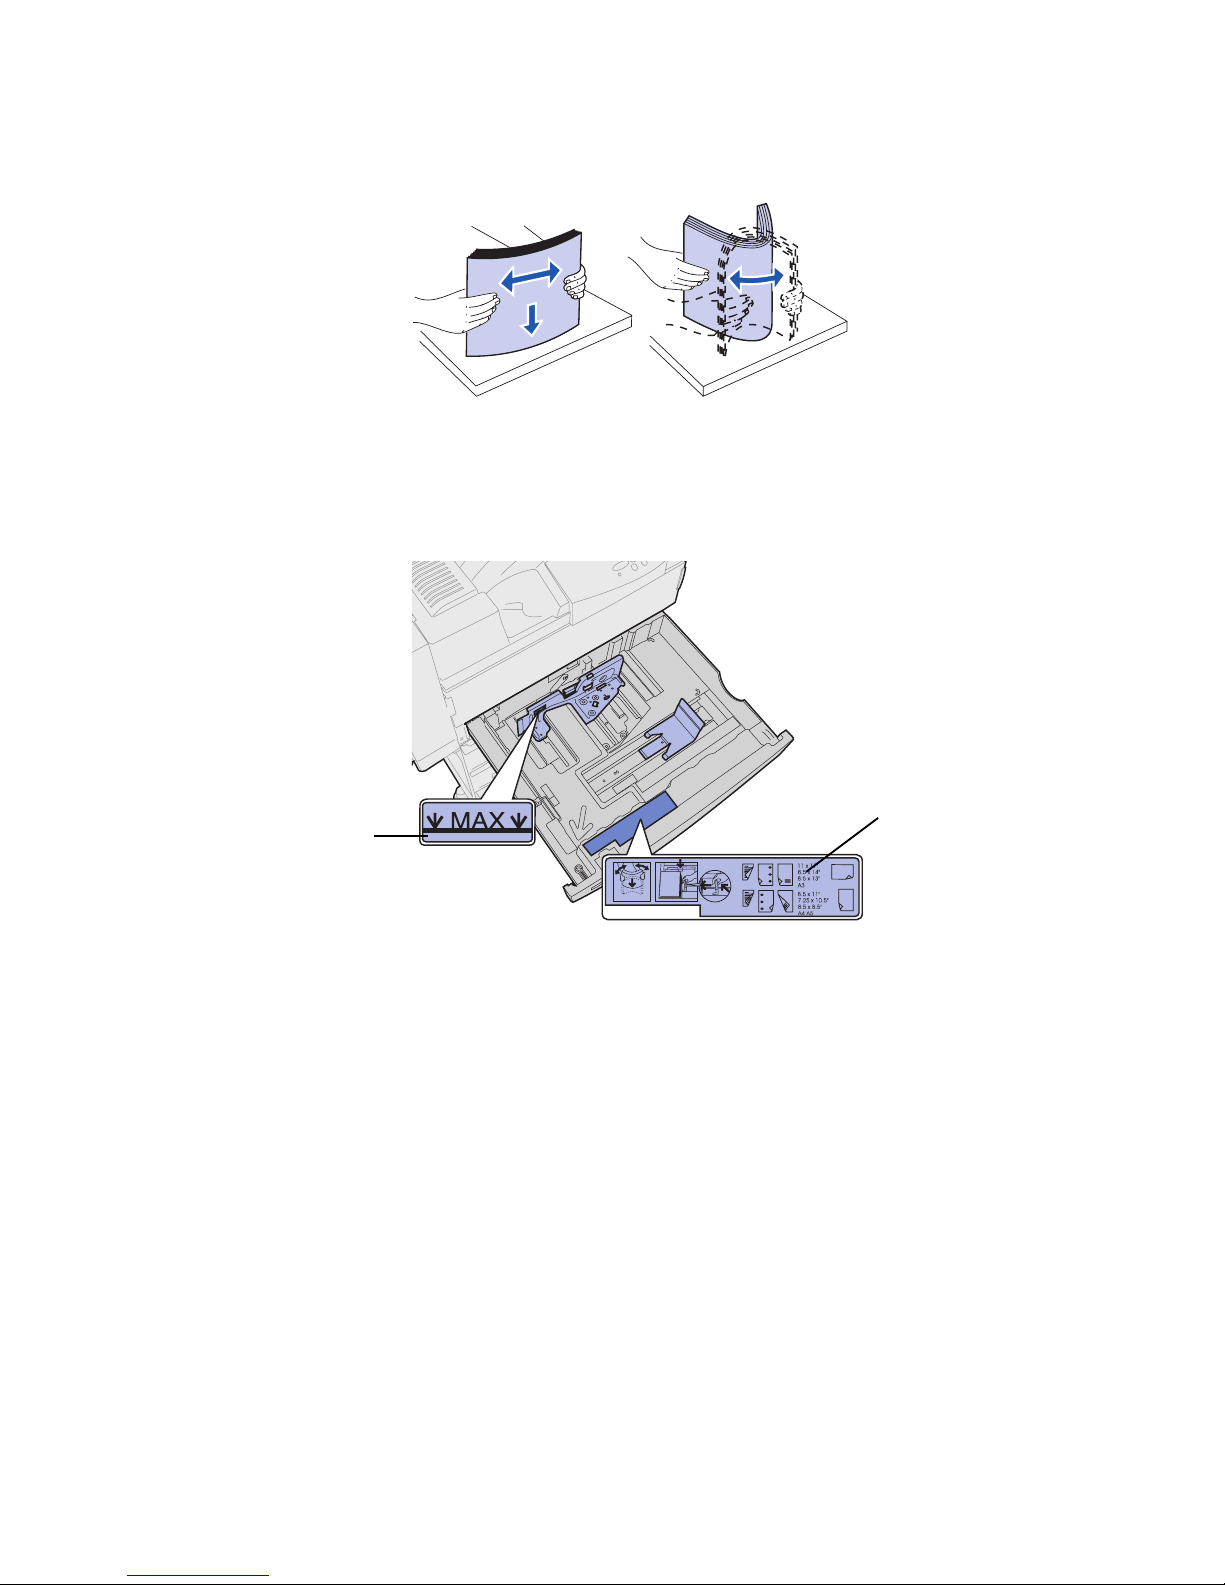
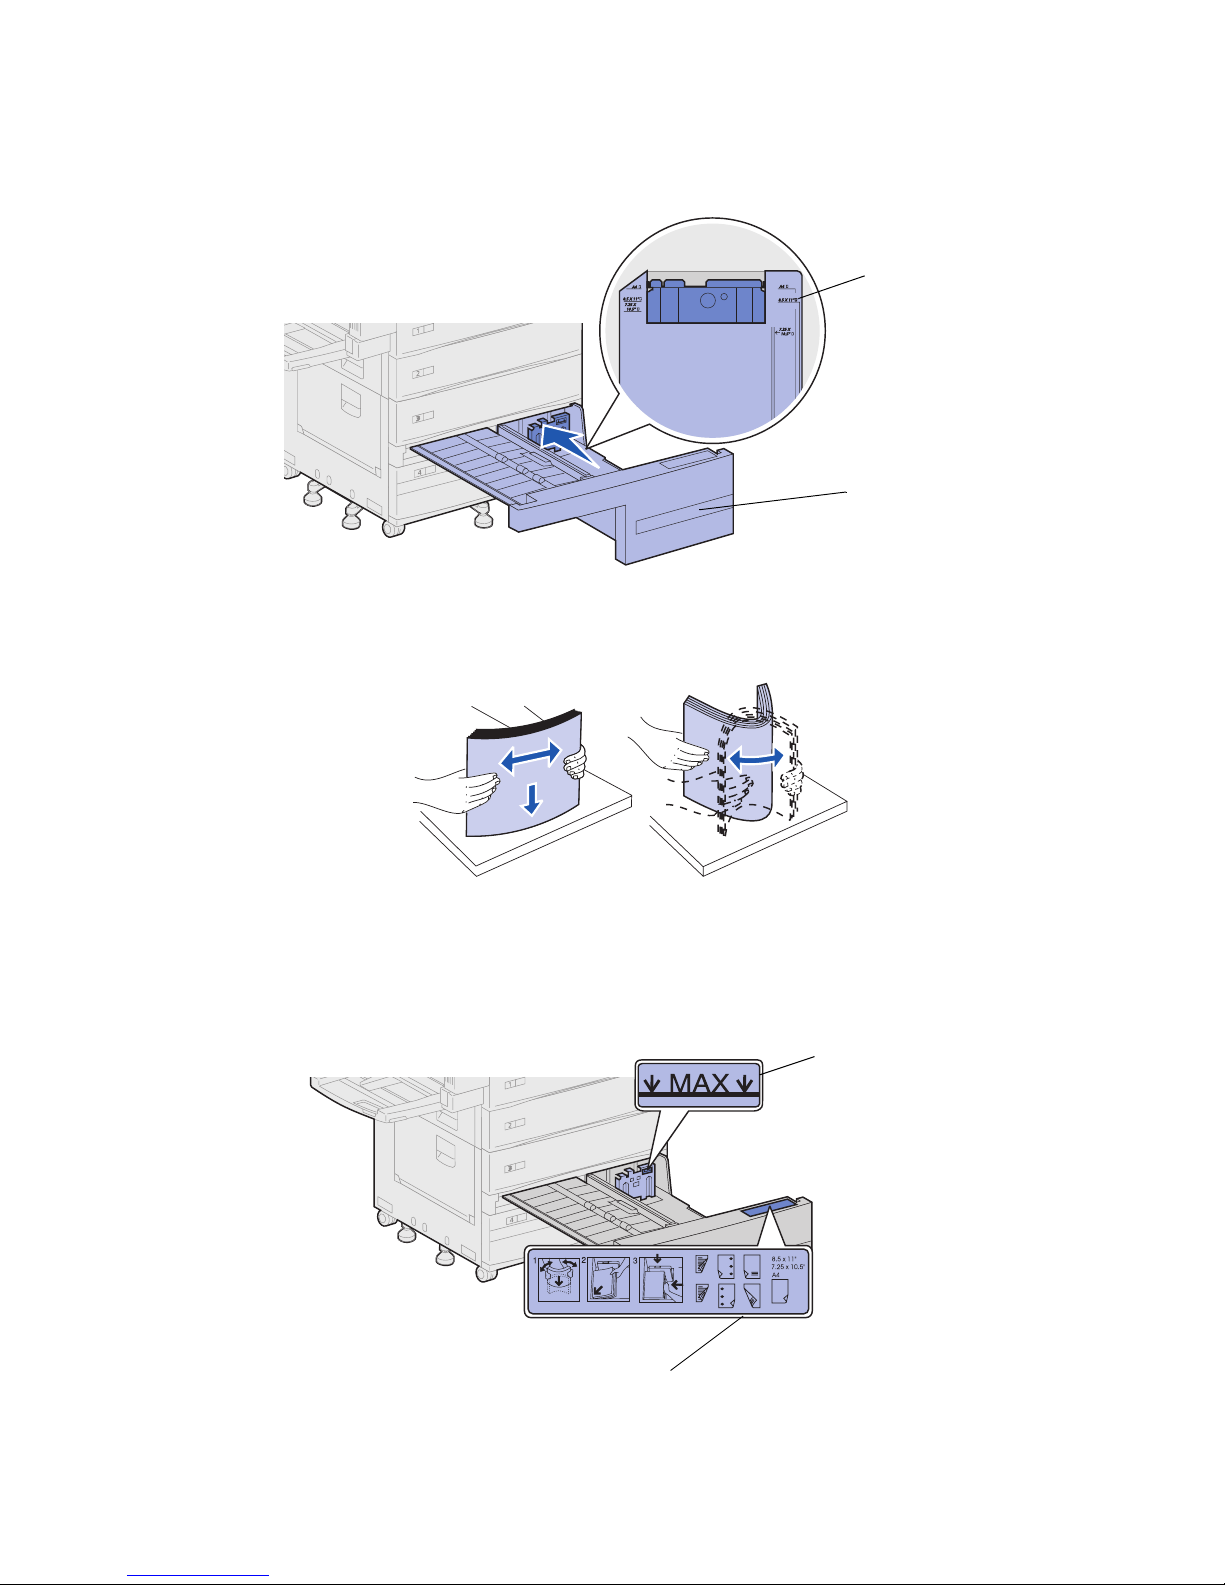
4 Flex the sheets back and forth to loosen them, and then fan them. Do not fold or crease the
print media. Straighten the edges of the stack on a level surface.
5 Orient the stack of print media correctly for the size you are loading. Refer to the icons on the
front inside surface of the tray.
Note: Do not exceed the maximum stack height indicated by the label on the back guide.
Overfilling the tray may cause paper jams. Do not load bent or wrinkled print media.
Maximum
stack height
indicator
Orientation
icons
25
Page 28
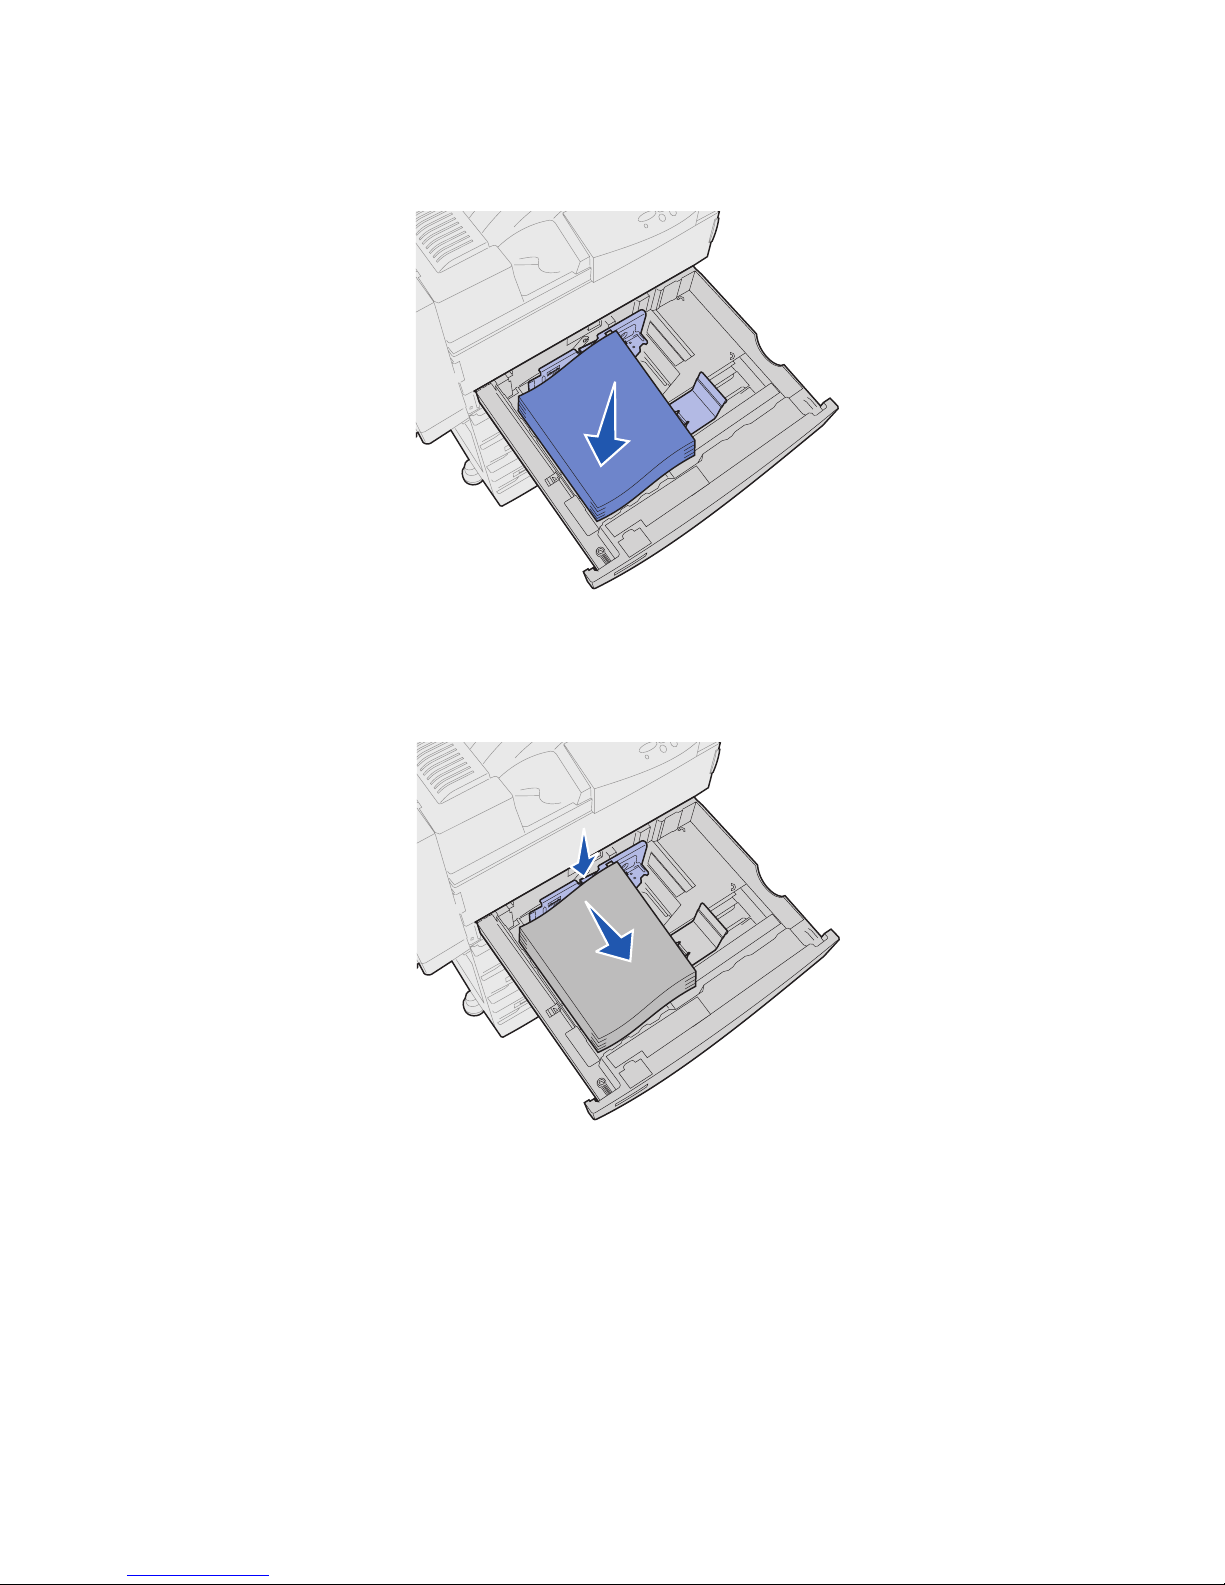
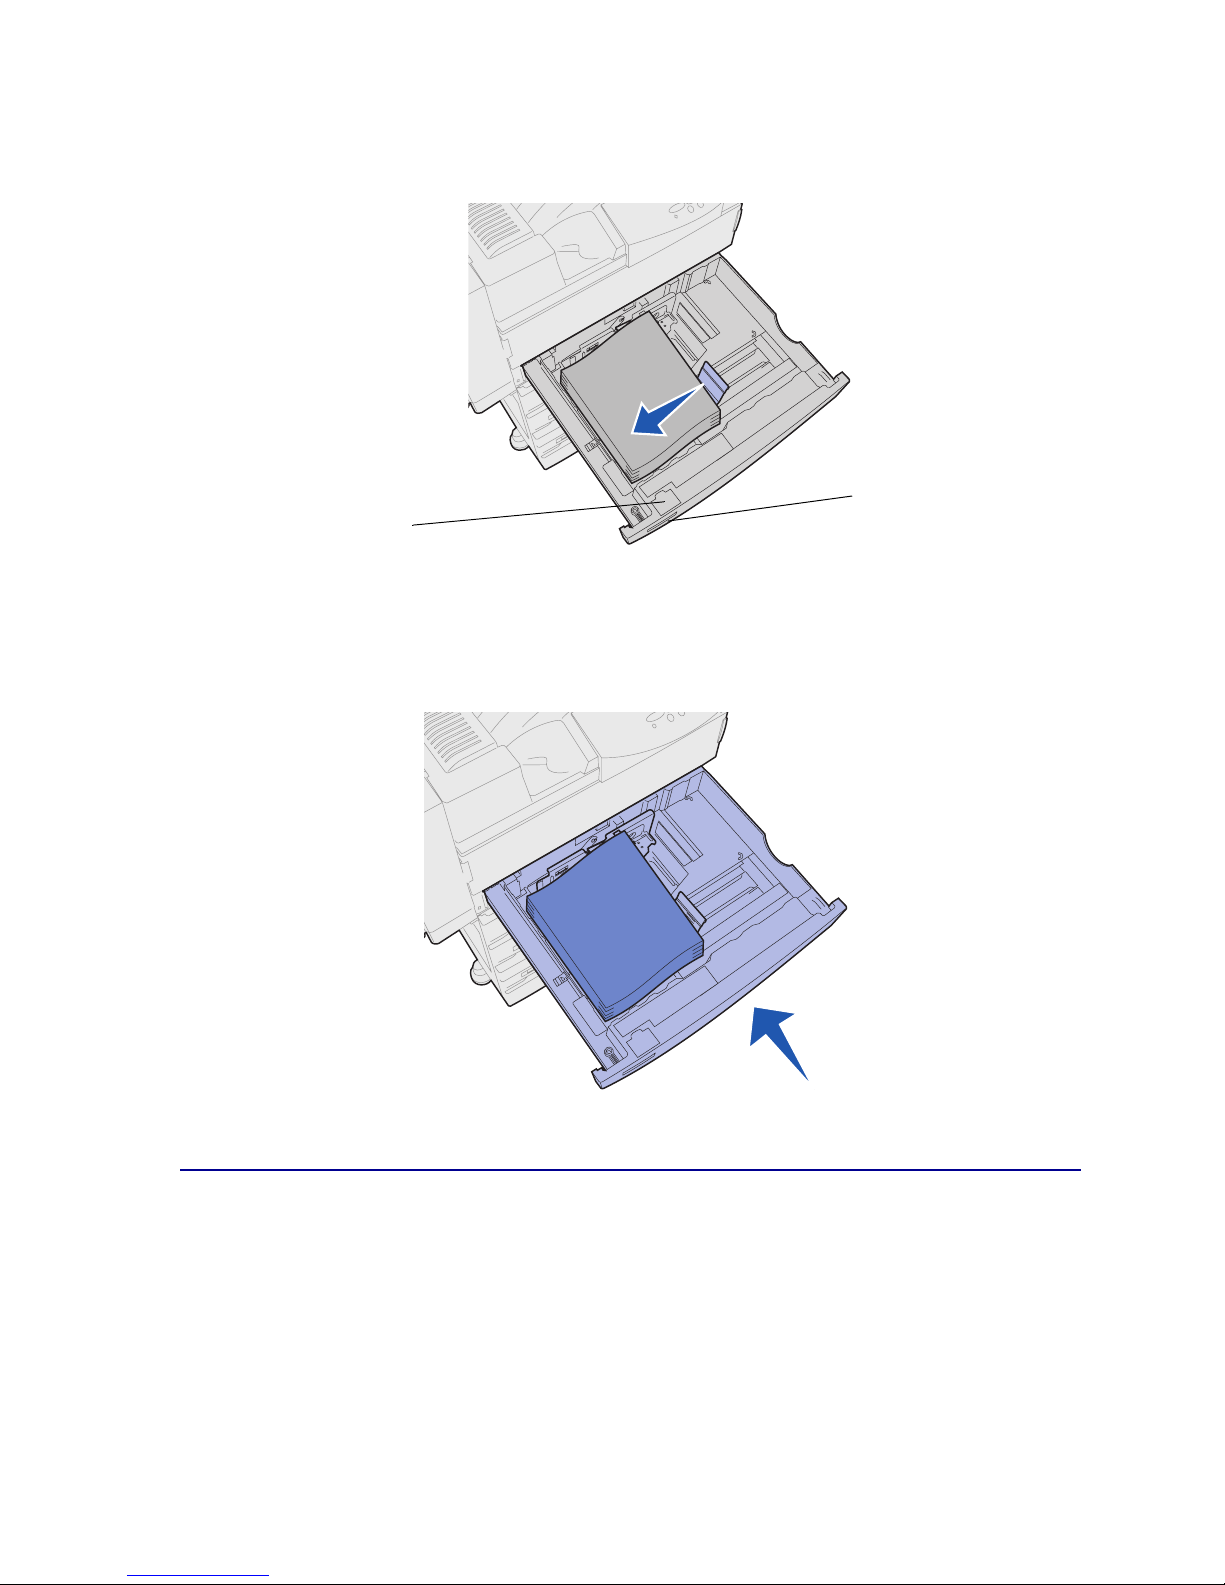
6 Place the print media against the front left corner of the tray.
7 Press down on the lever on the back guide, and then slide the back guide toward the front of
the tray until it lightly touches the stack of print media.
26
Page 29
8 Lift the side guide up slightly and slide it to the left until it lightly touches the side of the print
media. Make sure the guide locks into place in one of the detents at the bottom of the tray.
Paper-size
indicator label
goes in this slot
Note: To install a paper-size label in the paper-size indicator window, refer to the
Setup Guide
.
9 Slide the tray all the way into the printer.
Paper-size
indicator window
Loading trays 4 and 5
Load trays 4 and 5 in the optional high capacity feeder in the same way. See Print media source,
size, and capacity specifications for tray capacities.
Note: Do not load any print media other than paper in trays 4 and 5.
1 Pull the tray toward you.
27
Page 30
2 Slide the guide to the rear of the tray.
Markings on the bottom of the tray indicate paper sizes.
Markings
Handhold
3 Flex the sheets back and forth to loosen them, and then fan them. Do not fold or crease the
print media. Straighten the edges of the stack on a level surface.
4 Orient the stack of print media correctly for the size and type you are loading. Refer to the
icons on the tray.
Note: Do not exceed the maximum stack height indicated on the guide. Overfilling the
tray may cause paper jams. Do not load bent or wrinkled print media.
Maximum
stack
height
indicator
Orientation icons
28
Page 31

5 Place the print media against the front left corner of the tray.
6 Slide the guide forward until it lightly touches the stack of print media.
7 Gently push on the right side of the stack to make it even.
Note: To attach a paper-size sticker on trays 4 and 5, refer to the
8 Slide the tray all the way into the printer.
Paper-size sticker
Setup Guide
29
Page 32

9
Linking trays
If you load the same size and type of print media in more than one tray, the printer automatically links
the trays; when one tray is empty, print media feeds from the next linked tray.
For example, if you have the same size and type of print media loaded in tray 2 and tray 4, the printer
selects print media from tray 2 until it becomes empty, and then it feeds paper from the next linked tray
—tray4.
By linking all five trays, you effectively create a single source with a capacity of 3,500 sheets.
Ifyouloadthesamesizeprintmediaineachtray,makesuretheprintmediaisallthesametypetolink
the trays.
Once the trays you selected are loaded with the same size and type of print media, select the same
Paper Type setting in the Paper Menu for these sources.
To disable tray linking, set the Paper Type to a unique value in each one of the trays.
Note: To link trays loaded with Executive, Legal, JIS B4, or JIS B5 size print media, see
Sensing special print media sizes.
30
Page 33

10
Loading the multipurpose feeder
The multipurpose feeder holds approximately 35 sheets of 20 lb paper.
Note: You can load the multipurpose feeder with or without the duplex unit attached to
the printer.
1 Open the multipurpose feeder.
2 Slide the side guide all the way to the back.
3 Adjust the extension guide to the length of the print media to be used.
31
Page 34

4 Orient the stack of print media correctly for the size, type, and print method you are loading.
Refer to the icons on the feeder.
Note: Do not exceed the maximum stack height indicated on the side guide. Overfilling
the feeder may cause paper jams.
Paper size icons
Maximum stack height indicator label
Loading
and
orientation
icons
5 Place the print media along the front side of the multipurpose feeder and push the print media
into the printer as far as it will go. Do not force the print media.
32
Page 35

6 Slide the side guide forward until it lightly touches the stack.
Note: Once you load print media into the multipurpose feeder, set the Paper Size, Paper
Type, and Paper Source from the operator panel or from your software
application.
When you are not using the multipurpose feeder, remove any print media from the feeder,
push the extension guide back in, and push the multipurpose feeder to the closed position.
33
Page 36

11
Loading the envelope feeder
The optional envelope feeder holds approximately 100 envelopes.
1 Slidetheguideallthewaytotheback.
2 Fan the envelopes. Make sure all the flaps are turned correctly and the envelopes are not
stuck together.
3 Orient the stack of envelopes correctly for the size and position of the flap. Refer to the icons
on the feeder.
Note: Do not exceed the maximum stack height indicated on the guide. Overfilling the
feeder may cause paper jams.
34
Page 37

Loading and flap position icons
Maximum stack height
indicator
4 Lift the envelope weight and hold it.
Envelope
orientation icons
5 Place the envelopes along the front edge of the envelope feeder with the flap going in long
edge first.
35
Page 38

6 Lower the envelope weight.
7 Push the guide to the front until it lightly touches the stack.
Note: Do not add envelopes during a print job. Doing so may cause jams.
36
Page 39

12
Using the output bins
Standard bin
The printer has one standard bin, which holds approximately 500 sheets of print media that exit face
down.
Standard bin
37
Page 40

Mailbox bins
The optional mailbox has 10 bins, which hold approximately 100 sheets of 20 lb paper each. Print
media exits face down. Bin 1 is the bin closest to the standard bin.
Bins 1 – 10
Optional
mailbox
Finisher bins
The optional finisher has two bins. Bin 1 holds 250 sheets of 20 lb paper. Bin 2 holds 3,000 sheets of
20 lb paper. Print media exits face down to both bins.
Bin 1
Bin 2
38
Page 41

13
Linking bins
If you attach an optional finisher or mailbox to your printer, you can link output bins, or otherwise
specify how the printer sends jobs to the bins, by changing the Configure Bins settings in the Paper
Menu.
By default, the output bins for the finisher or the mailbox are configured in Mailbox mode. In this mode,
you select an output bin when you send a job to print. (If you prefer, you can select a default output bin
for all print jobs to go to.) The printer alerts you when the bin you selected becomes full, and stops
printing until you empty the bin.
If you prefer, you can change the Configure Bins setting to Link mode. All available bins are then linked
so that when one bin becomes full, the printer sends jobs to the next linked bin.
In Mail Overflow mode (only available if you’ve attached an optional mailbox), the printer automatically
sends jobs to a preassigned overflow bin when the current bin becomes full.
Type Assignment mode lets you assign different types of media to specific output bins or set of linked
bins. The printer then sends all printed media to the bin or set of linked bins that you designated to
receive each type of print media.
To change the Configure Bins setting:
1 Press Menu until you see Paper Menu, and then press Select.
2 Press Menu until you see Configure Bins, and then press Select.
Mailbox appears on the second line of the display.
3 Press Menu to scroll through the list of available configuration modes.
4 When you see the correct configuration mode, press Select to save the mode as the bin
configuration default.
5 Press Go to return the printer to the Ready state.
Note: The
For more information, see Configure Bins and Bin <x> Full.
Select button selects the menu shown on the second line of the display.
39
Page 42

14
Finishing capabilities
Stapling
The optional finisher can staple up to 50 sheets of 20 lb paper.
Staple positions
The finisher can staple print jobs in four positions, as defined by the Staple Job menu item in the
Finishing Menu. If you select Auto, the finisher places the staple based on the feed orientation of the
page. You can also select Front, Back, or Dual.
A4, A5, JIS B5, Executive, and Letter
Portrait Landscape
ABC
ABC
Illustration of staple positions:
Back
Dual
Front
A3, JIS B4, and 11x17 Legal
Portrait Landscape
ABC
ABC
ABC
Feed direction
Print side down (as print
media exits the printer)
40
Page 43

Staple position mapping for the Auto value
A3, A4, A5, JIS B4, JIS B5, Executive, Letter, Legal, and 11x17
Portrait Landscape
ABC
ABC
Stapling and offsetting
The finisher cannot staple
job, but does not offset it.
Note: You cannot offset, but stapling can occur in 3 different positions. Based on the
The standard bin and finisher bin 2 are capable of accepting offset print jobs.
and
offset a print job. If both functions are selected, the printer staples the
staple position selected, the offset stack is positioned differently in the tray.
Staplingandbinusage
Stapled jobs are sent to finisher bin 2.
Finishing and bin linking
The finisher stacks all stapled jobs in bin 2. Offset jobs go to in bin 2 first until it is full and the jobs go
to the standard bin when the bins are linked. If bin 1 and bin 2 are linked and bin 2 is full, the printer
reports that bin 1 is also full even if it is empty. In this case, the printer assumes there is no bin
available to perform the finishing functions requested by the print job because the bin is full. To clear
the message, remove the stack of paper from the bin. The printer can then receive additional stapled
or offset jobs. For more information, see Linking bins.
Hole punching
Select On as the value for the Hole Punch menu item in the Finishing Menu to punch holes along the
edge of all printed output. Select Hole Punch from the printer driver to punch holes only in output for a
specific job.
Bins 1 and 2 are capable of accepting hole punched print jobs.
41
Page 44

15
Tips for successful printing
Storing print media
Use the following guidelines to avoid paper feeding problems and uneven print quality.
• Store print media in an environment where the temperature is approximately 21°C (70°F) and
the relative humidity is 40%.
• Store cartons of paper on a pallet or shelf rather than directly on the floor.
• If you store individual packages of paper out of the original carton, make sure they rest on a
flat surface so the edges do not buckle or curl.
• Do not place anything on top of paper packages.
Avoiding jams
If you select appropriate print media (paper, transparencies, labels, and card stock) for your printer,
you’ll be well on your way to trouble-free printing.
By carefully selecting print media and loading them properly, you should be able to avoid most jams.
See the following for instructions on loading print media:
• Loading trays 1, 2, and 3
• Loading trays 4 and 5
• Loading the multipurpose feeder
• Loading the envelope feeder
If you do experience a paper jam, see Clearing print media jams for instructions on clearing the jam.
The following hints can help you avoid paper jams:
• Use only recommended print media. Refer to the
Lexmark’s Web site at www.lexmark.com for more information about which print media will
provide optimum results for your printing environment.
• If you need detailed information before purchasing large quantities of customized print media,
refer to the
• Do not load wrinkled, creased, or damp paper.
• Flex, fan, and straighten paper before you load it.
Card Stock & Label Guide
.
Card Stock & Label Guide
available on
42
Page 45

• Do not overload the print media sources. Make sure the stack height does not exceed the
maximum height indicated by the labels in the sources.
• Push all trays
firmly
into the printer after loading them.
• Make sure the guides in the trays are properly positioned for the size print media you have
loaded.
• Do not load print media in a tray while a job is printing by selecting print media from this same
tray. Wait for a Load Tray <x> message before you remove the tray from the printer. After
you reinstall the loaded tray, press
load it so long as the print job is not selecting the print media from it.
Go to continue printing. You may remove another tray and
• Do not send jobs to staple, hole punch, or offset for transparencies, labels, or card stock.
• We recommend that transparencies, labels, card stock, and envelopes not be sent to the
optional mailbox or optional finisher. These print media types should be sent to the standard
bin.
• If an optional finisher or mailbox is attached to your printer, make sure the printer and option
are correctly aligned. Refer to the
Setup Guide
for alignment instructions.
• Make sure all cables that connect the duplex unit, high capacity feeder, finisher, or mailbox to
the printer are correctly attached. Refer to the
Setup Guide
for more information.
• If a jam should occur, check the operator panel message to locate the correct jam access
doors. See Message maps for more information.
43
Page 46

16
Checking an unresponsive printer
Sometimes printer problems are very easy to solve. If your printer is not responding, first make sure:
• The power cord is plugged into the printer and a properly grounded electrical outlet.
• The electrical outlet is not turned off by any switch or breaker.
• Other electrical equipment plugged into the outlet is working.
• The printer is turned on.
• The printer cable is securely attached to the printer and the host computer, print server,
option, or other network device.
Once you’ve checked each of these possibilities,
problem.
If the printer does not respond, check the printer circuit breaker switch. It should be in the On position.
turn the printer off and back on
.Thisoftenfixesthe
44
Page 47

17
Solving print quality problems
You may be able to correct many print quality problems by replacing a supply or maintenance item that
has reached the end of its intended life. Check the operator panel for a message about a printer
consumable. See Determining the status of supplies for information about other ways to identify
consumables that need to be replaced.
Use the following table to find solutions to any print quality problems you have detected.
Symptom Cause Solution
Blank pages The printer was priming the
stapler.
The print cartridge is defective
or empty.
The transfer roller is defective. Replace the transfer roller.
Black pages The print cartridge is
defective.
Your printer requires
servicing.
If you primed the stapler, a blank sheet of
paper prints.
See Priming the stapler.
Replace the print cartridge.
See Replacing the print cartridge.
See Replacing the items in the
maintenance kit.
Replace the print cartridge.
See Replacing the print cartridge.
Call for service.
45
Page 48

Symptom Cause Solution
Print too light The Toner Darkness setting is
too light.
Youareusingprintmediathat
does not meet the printer
specifications.
Print too light The print cartridge is low on
toner.
The print cartridge is defective
or has been installed in more
than one printer.
Select a different Toner Darkness setting
from the printer driver before sending the
job to print.
• Use recommended paper and other print
media. Refer to the
Guide
available on Lexmark’s Web site
at www.lexmark.com for detailed
specifications.
• Load print media from a new package.
• Avoid textured paper with rough finishes.
• Make sure the paper you load in the
trays is not damp.
Replace the print cartridge.
See Replacing the print cartridge.
Replace the print cartridge.
See Replacing the print cartridge
Card Stock & Label
46
Page 49

Symptom Cause Solution
Print too dark The Toner Darkness setting is
too dark.
The print cartridge is defective
or has been installed in more
than one printer.
Gray background The Toner Darkness setting is
too dark.
The print cartridge is
defective.
Uneven print density The print cartridge is
defective.
Thetransferrolleriswornor
defective.
Select a different Toner Darkness setting
from the printer driver before sending the
job to print.
Replace the print cartridge.
See Replacing the print cartridge.
Select a different Toner Darkness setting
from the printer driver before sending the
job to print.
Replace the print cartridge.
See Replacing the print cartridge.
Replace the print cartridge.
See Replacing the print cartridge.
Replace the transfer roller.
See Replacing the items in the
maintenance kit.
Print irregularities The paper has absorbed
moistureduetohighhumidity.
Youareusingprintmediathat
does not meet the printer
specifications.
Thetransferrolleriswornor
defective.
The fuser is worn or defective. Replace the fuser.
Load paper from a fresh package in the
paper tray.
For information on storing paper, see
Storing print media.
Use recommended paper and other print
media. Avoid textured paper with rough
finishes.
Refer to the
availableonLexmark’sWebsiteat
www.lexmark.com for detailed
specifications.
Replace the transfer roller.
See Replacing the items in the
maintenance kit.
See Replacing the items in the
maintenance kit.
Card Stock & Label Guide
47
Page 50

Symptom Cause Solution
White or black line The print cartridge or fuser is
defective.
Streaked horizontal lines The print cartridge, transfer
roller, or fuser may be
defective, empty, or worn.
Replace the print cartridge.
See Replacing the print cartridge.
Replace the fuser.
See Replacing the items in the
maintenance kit.
Replace the printer cartridge, the transfer
roller, or fuser as needed.
See Replacing the print cartridge,
Replacing the transfer roller,and
Replacing the fuser for more information.
48
Page 51

Symptom Cause Solution
Streaked vertical lines Toner is smeared before
fusing to the paper.
If print media is stiff, try feeding from
another tray.
49
Page 52

Symptom Cause Solution
Toner specks The print cartridge is
Toner rubs off the print
media easily when you
handle the sheets.
Skewed print The guides in the selected tray
defective.
Thetransferrolleriswornor
defective.
The fuser is worn or defective. Replace the fuser.
The paper pick rollers are
dirty.
Toner is in the paper path. Call for service.
The two removable screws on
the fuser were not removed.
Thetexturesettingiswrong
for the type of print media you
are using.
are not in the correct position
for the print media size loaded
in the tray.
Replace the print cartridge.
See Replacing the print cartridge.
Replace the transfer roller.
See Replacing the items in the
maintenance kit.
See Replacing the items in the
maintenance kit.
Replace the pick rollers.
See Replacing the items in the
maintenance kit.
Remove the screws.
See Replacing the fuser.
Change Paper Texture from Normal to
Smooth or Rough.
Move the guides in the tray to the proper
positions for the size loaded.
See Loading the trays for detailed
instructions on adjusting the guides in each
tray.
The paper pick rollers are dirty
or worn.
Incorrect margins The guides in the selected tray
are set for a different size print
media than what is loaded in
the tray.
Auto size sensing is set off,
but you loaded a different size
print media in a tray. For
example, you inserted A4 size
paper into the selected tray
butdidnotsetthePaperSize
to A4.
Replace the pick rollers.
See Replacing the items in the
maintenance kit.
Move the guides in the tray to the proper
positions for the size loaded.
See Loading the trays for detailed
instructions on adjusting the guides in each
tray.
Set the Paper Size to A4.
50
Page 53

Symptom Cause Solution
Incorrect margins
continued
(
Clipped images The guides in the selected tray
Ghost images Low toner level in the print
)
The paper pick rollers are
worn.
are set for a different size print
media than what is loaded in
the tray.
cartridge.
Replace the pick rollers.
See Replacing the items in the
maintenance kit.
Move the guides in the tray to the proper
positions for the size loaded.
See Loading the trays for detailed
instructions on adjusting the guides in each
tray.
Make sure the Paper Type setting is
correct for the print media you are using.
Replace the print cartridge.
See Replacing the print cartridge.
The print media curls
badly once it prints and
exits to a bin.
Thetexturesettingiswrong
for the type of print media you
are using.
51
Change Paper Texture from Rough to
Normal or Smooth.
Page 54

18
Solving paper feed problems
If print media has trouble traveling through the printer, paper jams or other paper feed problems can
result. Use the following table to find solutions to paper feed problems you are experiencing. For
information about paper feed problems in output options, see Solving mailbox problems or Solving
finisher problems.
For detailed instructions on clearing paper jams, see Clearing print media jams. For tips on avoiding
paper jams, see Avoiding jams.
Symptom Cause Solution
Paper frequently
jams.
Paper frequently
jams in the printer
(continued).
The Paper Jam
message remains
after you remove the
jammed print media.
You are using print media that does not
meet the printer specifications.
You have loaded too much paper or too
many envelopes.
The guides in the selected tray are not set
to the appropriate position for the size
print media loaded.
Paper has absorbed moisture due to high
humidity.
The paper pick rollers are dirty or worn. Replace the pick rollers.
You have not cleared the entire paper
path, or you did not open the door
specified by the message to check for
jams in this area.
Use recommended paper and other print
media. Refer to the
Guide
availableonLexmark’sWebsiteat
www.lexmark.com for detailed
specifications.
Make sure the stack of paper you load
does not exceed the maximum stack
height indicated at the back of the tray or
on the multipurpose feeder. Make sure the
stack of envelopes you load does not
exceed the maximum stack height
indicated on the envelope feeder.
Move the guides in the tray to the correct
position.
See Loading the trays for detailed
instructions.
• Load paper from a fresh package.
• Store paper in its original wrapper until
you load it.
See Storing print media for more
information on properly storing media.
See Replacing the items in the
maintenance kit.
Clear print media from the entire paper
path, open the door indicated by the
operator panel message, clear the jam,
andclosethedoor.Theprinterresumes
printing.
See Clearing print media jams for more
information.
Card Stock & Label
52
Page 55

Symptom Cause Solution
The page that
jammed does not
reprint after you
clear the jam.
Envelopes fail to
feed through the
optional envelope
feeder.
Jam Recovery in the Setup Menu is set to
Off.
The envelope stack is too deep. Decrease the stack of envelopes by half.
Set Jam Recovery to Auto or On.
53
Page 56

19
Solving other printing problems
Use the following table to find solutions to other printing problems.
Symptom Cause Solution
The operator panel
displayisblankor
displays only
diamonds.
Jobs don’tprint. The printer is not ready to
The printer self test failed. Turn the printer off, wait about 10 seconds, and turn
receive data.
the printer back on.
Performing Self Test appears on the display.
When the test is completed, the Ready message is
displayed.
If the messages do not appear, turn the printer off
and call for service.
Make sure the system board is pushed back in place
and option cards are fully seated. See Reinstalling
the printer system board.
Make sure Ready or Power Saver appears on the
display before sending a job to print. Press
return the printer to the Ready state.
Go to
54
Page 57

Symptom Cause Solution
Jobs don’tprint
(continued)
It takes longer than
expected to print a
job.
.
The specified output bin is full. Remove the stack of paper from the output bin as
The specified tray is empty. Load paper in the tray as indicated by the operator
Youareusingthewrong
printerdriverorareprintingto
afile.
Your MarkNet™ print server is
not set up properly or is not
connected properly.
Youareusingthewrong
interface cable, or the cable is
not securely connected.
The job is too complex. Reduce the complexity of your print job by
Page Protect is set to On. Set Page Protect to Off from the Setup Menu.
Print Resolution is set to
1200 Image Quality.
indicated by the operator panel message, and then
Go.
press
panel message.
See Loading the trays for detailed instructions.
• Verify that you selected the printer driver
associated with the W820.
• If you are using a USB port, make sure you are
running Windows 98/Me or Windows 2000, and
using a
Windows 98/Me or Windows 2000 compatible
printer driver.
Verify that you have properly configured the printer
for network printing. Refer to the drivers CD or to
Lexmark’s Web site at www.lexmark.com for
information.
Make sure you are using a recommended interface
cable. Refer to the
specifications.
eliminating the number and size of fonts, the number
and complexity of images, and the number of pages
in the job.
If your job includes complex images, it may take
longer to print when the resolution is set to 1200
Image Quality. To print the job faster, select another
print resolution from the printer driver before sending
the job to print. You may notice some reduction in
print quality.
Setup Guide
for cable
The job prints from
the wrong tray or on
the wrong print
media.
Incorrect characters
print.
Tray linking does not
work.
The printer driver settings are
overriding the operator panel
menu settings.
Youareusinganincompatible
parallel cable.
The printer is in Hex Trace
mode.
Tray linking is not configured
properly.
55
Make sure the Paper Size and Paper Type
specifiedintheprinterdriverarecorrectforthejob
you are printing.
If you’re using a parallel interface, make sure you’re
using an IEEE 1284-compliant parallel cable. We
recommend Lexmark part number 1329605 (10 ft) or
1427498 (20 ft) for the standard parallel port.
If Ready Hex appears on the display, you must exit
Hex Trace mode before you can print your job. Turn
the printer off and back on to exit Hex Trace mode.
To configure the linked trays:
• Make sure the Tray x Type value in the Paper
Type menu item in the Paper Menu is the same
for all linked trays.
• Make sure the Tray x Size value in the Paper
Size menu item in the Paper Menu is the same
for all linked trays.
Page 58

Symptom Cause Solution
Large jobs do not
collate.
Unexpected page
breaks occur.
Collate is not set to On. Set Collation to On in the Finishing Menu or
The job is too complex. Reduce the complexity of the print job by eliminating
The printer does not have
enough memory.
The job has timed out. Set Print Timeout to a higher value from the Setup
through the printer driver.
the number and size of fonts, the number and
complexity of images, and the number of pages in
the job.
Add printer memory or an optional hard disk.
Refer to the
selecting memory options to install.
Menu.
Setup Guide
for information on
56
Page 59

20
Solving mailbox problems
Use the following table to find solutions to problems with the optional mailbox.
Symptom Cause Solution
Paper jams before
reaching the mailbox.
Paper jams in the
mailbox at the plastic
deflector area.
The mailbox and the printer
are misaligned because the
mailbox deflector is caught.
The mailbox cable is not
connected properly.
Thestackingarmhasnot
been removed.
Realign the mailbox and the printer. Refer to the
Setup Guide
Check the cable connection. Refer to the
for instructions on connecting the mailbox to the
printer.
Refer to the
for instructions.
Setup Guide
Setup Guide
for instructions.
57
Page 60

21
Solving finisher problems
Use the following table to find solutions to problems with the optional finisher.
Symptom Cause Solution
Paper frequently
jams in the finisher.
The printer only
prints to bin 1.
You cannot clear the
280 Paper Jam /
Open Cover H
message.
The finisher and the printer
are misaligned.
The printer and finisher have
been moved.
The transport unit is not
properly installed.
You are trying to staple, hole
punch, or offset print jobs on
print media other than paper.
The finisher cables are not
connected properly.
The transport unit is not
properly installed.
Properly align the finisher with the printer. Refer to the
Setup Guide
Alignthetopoftheguiderailwiththelineonthe
holding plate by rotating the two alignment knobs
closest to the holding plate. This action raises or
lowers the guide rail, depending on which way the
knobs are turned. The edge of the guide rail should
line up with the sticker where the white and gray
portions divide.
Verify that you have properly installed the transport
unit on top of the printer. If the 28x Paper Jam /
Open Cover H message recurs, then it is not properly
installed. The gears must be completely engaged for
paper to travel successfully from the printer to the
finisher.
Refer to the
instructions.
Restrict use of the special finishing features to paper
meeting the printer specifications.
Check the cable connections. Refer to the
Setup Guide
to the printer.
Correctly install the transport unit on top of the printer.
Refer to the
for instructions.
Setup Guide
for instructions on connecting the finisher
Setup Guide
for detailed installation
for instructions.
The finisher does not
offset the print job as
requested.
You’ve selected both
offsetting
job.
and
stapling for the
The finisher cannot staple
functions are selected, the printer staples the job, but
does not offset it.
and
offset a print job. If both
58
Page 61

Symptom Cause Solution
Pages are not
stapled.
Staple priming fails.
The Priming
Failed, Retry
message displays. See
Priming Failed,
Retry for more
information.
You are trying to staple too
many sheets.
The staple cartridge holder is
not installed or is not installed
correctly.
The staple cartridge is empty. Install a new staple cartridge. See Replacing a staple
The stapler is jammed. Check the stapler for a staple jam. See Clearing
Staples are not properly
positioned in the stapler.
The staple cartridge is empty. Insert a new staple cartridge.
Thestapleprimingsource
tray is empty.
Bin 2 is full. Remove the stack of paper from bin 2.
The staple cartridge holder is
not installed or is not installed
correctly.
Reduce the number of pages in the staple job.
The finisher can staple up to 50 sheets of 20 lb paper.
If you attempt to staple a larger stack of paper, the
finisher ejects the stack without stapling it.
Reinstall the stapler cartridge holder into the stapler.
See Replacing a staple cartridge for instructions.
cartridge for instructions.
staple jams.
Prime the stapler. See Priming the stapler.
See Replacing a staple cartridge for instructions.
Load paper in the staple priming source tray specified
in the Finishing Menu. See Staple Prime Src for more
information.
Reinstall the staple cartridge holder.
See Replacing a staple cartridge for instructions.
The staple is in the
wrong corner of the
stack.
The stapler is jammed. Clear the staple jam.
See Clearing staple jams for instructions.
The correct staple position
was not selected in the
Staple Job menu item in the
Finishing Menu.
Select a different staple position. The Auto menu item
staples the stack based on the feed method of the
paper in relation to the leading edge of the paper. For
more information on positions, see Staple Job and
Staple positions.
If necessary, reformat your print job from the software
application or rotate your print job using the printer
driver to avoid stapled sets that are difficult to read.
A4, A5, JIS B5, Executive, and Letter
Portrait Landscape
ABC
A3, JIS B4, and 11x17 Legal
Portrait Landscape
ABC
ABC
ABC
ABC
59
Page 62

Symptom Cause Solution
A printer message
indicates that all
linked bins are full,
butsomebinsare
empty.
The 287 Paper Jam
Open Deflector G
message displays
after you install the
finisher.
Feed direction
streaks are on stacks
of paper exiting to
the bins.
There is no bin available to
perform the finishing
functions requested by the
print job because the bin is
full.
The divertor cover is installed
incorrectly.
The wiper blade is dirty or
installed incorrectly.
To clear the message, remove the stack of paper from
the bin.
Remove and realign the divertor cover. Refer to the
Setup Guide
Remove, clean, and reinstall the wiper blade. See
Cleaning the wiper blade or refer to the instruction
sheet in the maintenance kit box.
for instructions.
60
Page 63

22
Solving other option problems
Use the following table to find solutions to problems with other options.
Symptom Cause Solution
An option does not operate
correctly after it is installed, or it
stops working.
You cannot print using the
infrared port on the optional
Tri-Port Adapter.
You cannot print using the
infrared port on the optional
Tri-Port Adapter
(continued)
.
The option is not installed correctly. Remove the option and reinstall it.
The cables connecting the option to
the printer are not attached
correctly.
The printer driver does not
recognize that the option is
installed.
The infrared port is not configured
properly.
The connection between the two
infrared devices cannot be made.
Check the cable connections. Refer
Setup Guide
to the
Your printer driver may not
automatically recognize that an
option is attached to your printer.
Open the driver and verify that all
the printer configuration settings
are correct.
Make sure neither Infrared Port
nor Infrared Buffer is set to
Disabled in the Infrared Menu.
Also make sure the Window Size
and Transmit Delay settings are
correct.
Make sure the distance between
the two infrared ports is 3 m (10 ft)
or less. If necessary, move the
ports closer together.
Make sure no objects are between
the two ports.
Make sure the computer is set on a
level surface.
If necessary, turn off the lights in
the room or close window shades
or blinds. Bright light, such as direct
sunshine or nearby artificial lights,
may interfere with communication.
for instructions.
You cannot print using the
LocalTalk port.
The LocalTalk port is not set up
correctly.
61
• Make sure neither LocalTalk
Port nor LocalTalk Buffer is set
to Disabled in the LocalTalk
Menu.
• For Macintosh users, verify that
the printer is set up correctly in
the Macintosh Chooser.
• If you have two Tri-Port Adapters
installed, only one LocalTalk and
one infrared port works. The
Tri-Port Adapter installed in
connector slot 1 is active.
Page 64

23
Calling for service
When you call for printer service, be prepared to describe the problem you are experiencing or the
error message on the display.
You’ll also need to know your printer model type and serial number. Refer to the label on the back of
the printer near the power cord for this information. The serial number is also listed on the menu
settings page you can print from the Utilities Menu. See Printing a menu settings page for more
information.
For service in the U.S. or Canada, call 1-800-Lexmark (1-800-539-6275). For other countries, refer to
the numbers listed on the drivers CD.
62
Page 65

24
Clearing print media jams
For tips on avoiding jams, see Avoiding jams.
If you do experience a jam, see the following instructions in this topic to clear the jam and continue
printing.
• Understanding jam messages
• Locating jams with messages
• Clearing jams from the printer
• Clearing jams from the optional duplex unit
• Clearing jams from the optional envelope feeder
• Clearing jams from the optional mailbox
• Clearing jams from the optional finisher
Understanding jam messages
When a jam occurs, the printer displays a two-line 2xx Paper Jam message and stops operating.
Although the location of the jam appears on the second line of the display,
from the entire paper path
See Paper path for an explanation about areas where you can access jams. Immediately following
Paper path see the illustrations of areas where you can access jams.
Note: If you have an optional finisher attached to your printer, the secondary message
.PressGo to clear the message and continue printing.
Leave Staple Job in Finisher or Clear Staple Job from Finisher alternates with the
2xx Paper Jam message.
Paper path
The paper path is the route paper travels as it makes its way from the selected paper source through
the printer and into the selected output bin. To clear the paper in the path, start at the paper source the
printer is using for the current job. Open all doors and covers between the source and the selected
output bin. If you are not sure which source the printer is using, start with tray 5, if installed; otherwise,
start with tray 2.
See the following illustrations for a better understanding of the path the paper travels through the
printer and its options. The jam numbers are listed based on location within the paper path.
The doors and covers that give you access to paper in the path when a jam occurs are labeled on the
Message maps.
you must clear all paper
63
Page 66

Paper path of standard trays and optional trays, optional duplex unit, and
multipurpose feeder
246
261
208, 231
232, 233, 234
250, 253, 255
248
260
273
252
201,
202
257
258
247
204
256
251
209, 210, 211
241
243
244
259
200
249
242
245
254
64
Page 67

Paper path of optional envelope feeder in relation to trays, optional duplex unit, and
path to the optional mailbox
271, 272
65
Page 68

Paper path of optional mailbox in relation to printer and optional duplex unit
For each bin, this area
is 285
For each bin, the curved
portion of the path
leading into the bin and
thepathtothebinis284
284
281
281
282
280
66
Page 69

Paper path of transport unit and optional finisher in relation to printer and optional
duplex unit
287
280
281
282
283
284
286
289
285
288, 293
291
294
292
295
290
Message maps
You can use the
installed) to locate the doors, covers, and options you must open or remove to clear the paper path.
message map
on the front of the printer (or on the transport unit if the finisher is
67
Page 70

Locating jams with messages
Message Area where jam occurs See:
200 Paper Jam Open Door A
201 Paper Jam Open Door A
202 Paper Jam Open Door A
204 Paper Jam Open Door A Fuser area Fuser area
208 Paper Jam Open Door A
209 Paper Jam Open Door A
210 Paper Jam Open Door E Fuser area
211 Paper Jam Open Door A Fuser area
231 Paper Jam Open Door E
232 Paper Jam Open Door E
233 Paper Jam Open Door E
234 Paper Jam Open Door E
241 Paper Jam Open Door A Around tray 1 Tray 1 and the print cartridge
241 Paper Jam Open Tray 1 In or behind tray 1 Behind trays 1, 2, and 3
242 Paper Jam Open Door B Around tray 2 Tray 2
242 Paper Jam Open Tray 2 In or behind tray 2 Behind trays 1, 2, and 3
243 Paper Jam Open Door A Around tray 1 Tray 1 and the print cartridge
244 Paper Jam Open Door B Around tray 2 Tray 2
244 Paper Jam Open Tray 3 In or behind tray 3 Behind trays 1, 2, and 3
245 Paper Jam
Open Doors A, B
Rollers under the print cartridge Tray 1 and the print cartridge
area
Duplex unit area or the fuser area step 5 on page 72
Duplex unit Clearing jams from the optional
duplex unit
area
area
Around trays 1 and 2 Tray 1 and the print cartridge
area
Tray 2
246 Paper Jam Open Door B Around tray 2 Tray 2
247 Paper Jam Open Door C Around trays 3, 4, and 5 Tray 3
Tray 4
Tray 5
247 Paper Jam Open Tray 4 In or behind tray 4 Tray 4
248 Paper Jam
Open Doors B, C
249 Paper Jam Open Door C Around trays 3, 4, and 5 Tray 3
250 Paper Jam Open Door B Around tray 2 Tray 2
251 Paper Jam Open Door C Around trays 3, 4, and 5 Tray 3
251 Paper Jam Open Tray 5 In tray 5 Tray 5
Around trays 2, 3, 4, and 5 Tray 2
Tray 3
Tray 4
Tray 5
Tray 4
Tray 5
Tray 4
Tray 5
68
Page 71

Message Area where jam occurs See:
252 Paper Jam
Open Doors B, C
253 Paper Jam
Open Doors A, B, C
254 Paper Jam Open Door C Around trays 3, 4, and 5 Tray 3
254 Paper Jam Open Tray 5 In tray 5 Tray 5
255 Paper Jam Open Door A Around tray 1 Tray 1 and the print cartridge
255 Paper Jam
Remove MP Feeder
255 Paper Jam
Remove Envelope
256 Paper Jam
Open Doors A, B
257 Paper Jam
Open Door B
258 Paper Jam Open Door C Around trays 3, 4, and 5 Tray 3
Around trays 2, 3, 4, and 5 Tray 2
Tray 3
Tray 4
Tray 5
Around trays 1, 2, 3, 4, and 5 Tray 1 and the print cartridge
area
Tray 2
Tray 3
Tray 4
Tray 5
Tray 4
Tray 5
area
Multipurpose feeder Multipurpose feeder
Envelope feeder Clearing jams from the optional
envelope feeder
Removing the optional
envelope feeder
Around trays 1 and 2 Tray 1 and the print cartridge
area
Tray 2
Around tray 2 Tr ay 2
Tray 4
Tray 5
259 Paper Jam Open Door C Around trays 3, 4, and 5 Tray 3
259 Open Tray 5 In tray 5 Tray 5
260 Paper Jam Open Door E In the duplex unit Clearing jams from the optional
261 Paper Jam
Open Doors B, C
271 Paper Jam
Remove Env Feeder
272 Paper Jam
Remove Env Feeder
273 Paper Jam
Remove Envelope
273 Paper Jam
Remove MP Paper
Around trays 2, 3, 4, and 5 Tray 2
Envelope feeder Clearing jams from the optional
Envelope feeder Clearing jams from the optional
Multipurpose feeder Multipurpose feeder
Tray 4
Tray 5
duplex unit
Tray 3
Tray 4
Tray 5
envelope feeder
Removing the optional
envelope feeder
envelope feeder
69
Page 72

Message Area where jam occurs See:
280 Paper Jam Open Cover H Transport unit Iftheprintmediaisjammed
280 Paper Jam Open Door D Mailbox Clearing jams from the optional
281 Paper Jam Open Cover H Transport unit Iftheprintmediaisjammed
281 Paper Jam Open Door D Mailbox Clearing jams from the optional
282 Paper Jam Open Cover H Transport unit Iftheprintmediaisjammed
282 Paper Jam Open Door D Mailbox Clearing jams from the optional
283 Paper Jam Open Cover H Transport unit Iftheprintmediaisjammed
284 Paper Jam Open Cover H Transport unit
284 Paper Jam Open Door D Mailbox Clearing jams from the optional
285 Paper Jam Open Cover H Transport unit Iftheprintmediaisjammed
285 Paper Jam Open Door D Mailbox Clearing jams from the optional
286 Paper Jam Open Cover H Transport unit Iftheprintmediaisjammed
inside the transport unit
between the rollers:
mailbox
inside the transport unit
between the rollers:
mailbox
inside the transport unit
between the rollers:
mailbox
inside the transport unit
between the rollers:
mailbox
inside the transport unit
between the rollers:
mailbox
inside the transport unit
between the rollers:
287 Paper Jam
Open Deflector G
288 Paper Jam Open Door K Above the hole punch area page 95
289 Paper Jam Open Door K
290 Paper Jam Open Door K Above the stapler page 96
291 Paper Jam Open Door K Finisher Clearing jams from the optional
292 Paper Jam Open Cover J Finisher top cover page 94
293 Paper Jam Open Cover J Finisher top cover Iftheprintmediaisjammed
294 Paper Jam Open Cover J Finisher top cover
295 Paper Jam
Open Door K
This message alternates with the
following message:
Clear Staple Job
from Finisher
Finisher - Deflector Iftheprintmediaisjammed
Finisher accumulator (area where
sheets accumulate in order to be
stapled)
under the divertor cover:
finisher
under the finisher top cover:
page 94
70
Page 73

Clearing jams from the printer
Tray 1 and the print cartridge area
Note: The following instructions are written assuming you are using the multipurpose
feeder and the duplex unit. If you are using the envelope feeder, you must remove
it before opening the duplex unit door. For instructions, see Removing the
optional envelope feeder.
1 Open the multipurpose feeder.
2 Push up on the latch to release the duplex unit door (Door E).
3 Gently lower the door to the open position.
4 Pull up on handle to open the printer side door (Door A).
71
Page 74

5 Remove the paper based on what part is visible.
– If the paper is visible, pull it straight out and continue with step 9 on page 72.
– If the paper is not visible or there is not enough showing to grasp easily, it is still in the
tray. Complete step 6 on page 72 through step 9 on page 72.
– If the paper is not visible in the tray, the paper is lodged behind the tray and requires that
you remove the tray. See Behind trays 1, 2, and 3.
6 Pull tray 1 open.
7 Pull the paper to the right, and then straight out.
8 Close tray 1.
9 Close the printer side door (Door A).
72
Page 75

CAUTION: Firmly push on the upper middle part of the door. There is a label on the door to
show where to push on the door. Pushing in this area ensures the door is closed
and prevents damage to the door.
10 Close the duplex unit door (Door E).
Tray 2
1 Pull up on handle to open the tray 2 side door (Door B).
2 Remove the paper as follows:
73
Page 76

– If the paper is visible, pull it straight out and continue with step 5 on page 74.
– If the paper is not visible or there is not enough showing to grasp easily, it is still in the
tray. Complete step 3 through step 6 on page 74.
– If the paper is not visible in the tray, the paper is lodged behind the tray and requires that
you remove the tray. See Behind trays 1, 2, and 3.
3 Pull tray 2 open.
4 Pull the paper to the right, and then straight out.
5 Close tray 2.
6 Close the tray 2 side door (Door B).
Tray 3
1 Open the side door of trays 3 and 4 (Door C).
74
Page 77

2 Remove the paper as follows:
– If the paper is visible, pull it straight out and continue with step 6 on page 75.
– If the paper is not visible or there is not enough showing to grasp easily, it is still in the
tray. Complete step 3 through step 6 on page 75.
– If the paper is not visible in the tray, the paper is lodged behind the tray and requires that
you remove the tray. See Behind trays 1, 2, and 3 and
Behind Tray 4.
3 Pull tray 3 open.
4 Pull the paper to the right, and then straight out.
5 Close tray 3.
6 Close the side door for trays 3 and 4 (Door C).
75
Page 78

Tray 4
1 Pull up on handle to open the side door for trays 3 and 4 (Door C).
2 Remove the paper as follows:
– If the paper is visible, pull it straight out and continue with step 6 on page 76.
– If the paper is not visible or there is not enough showing to grasp easily, it is still in the
tray. Complete step 3 through step 6 on page 76.
– If the paper is not visible in the tray, the paper is lodged behind the tray and requires that
you remove the tray. See Behind trays 1, 2, and 3 and
Behind Tray 4.
3 Pull tray 4 open.
4 Pull the paper to the right, and then straight out.
5 Close tray 4.
6 Close the side door for trays 3 and 4 (Door C).
76
Page 79

Tray 5
1 Pull tray 5 open.
2 Lift the plastic cover and hold it open.
3 Pull the paper to the right, and then straight out.
4 Close the plastic cover.
5 Close tray 5.
Note: If the print media cleared tray 5, the print media could be lodged behind Door C.
See Tray 3 to see how to clear a jam behind Door C.
77
Page 80

Behind trays 1, 2, and 3
In rare cases, a piece of print media can become lodged behind a tray where it cannot be reached
unless the tray is removed from the printer.
1 Pull the tray out to the stop position.
2 Graspeachsideofthetray.
3 Pull the tray straight up, and then out toward you. Set the tray aside.
4 Pull the paper straight out.
5 Align the guides on the bottom of the tray with the slots in the printer.
78
Page 81

6 Lift the tray up slightly and push it all the way into the printer.
Behind Tray 4
1 Pull the tray out to the stop position.
2 Push down the tab on the left side of the tray.
3 Graspeachsideofthetray.
4 Pull the tray straight up, and then out toward you. Set the tray aside.
5 Pull the paper straight out.
6 Align the guides on the bottom of the tray with the tracks in the printer.
Note: You must align the guide properly or the tray will not slide into the printer.
79
Page 82

7 Push the tray all the way into the printer.
Behind Tray 5
To access jams behind tray 5, remove tray 3, and tray 2 if necessary. Then, reach behind tray 5 and
pull the paper out.
Multipurpose feeder
Print media may jam in one of three locations in the multipurpose feeder. Remove the jam based on
the print media location:
If print media jams as it begins to move from multipurpose feeder into the printer, pull the sheet straight
out.
80
Page 83

If print media jams after it enters the printer from the multipurpose feeder:
1 Push up on the latch to release the duplex unit door (Door E).
2 Gently lower the door to the open position.
3 Pull up on handle to open the printer side door (Door A).
4 Pull the sheet straight out.
If the sheet is too short to grasp:
a Close the printer side door (Door A) and close the duplex unit door (Door E).
The printer automatically cycles, forcing the sheet to move forward.
b Open the duplex unit door (Door E) and the printer side door (Door A).
c Pull the sheet straight out.
5 Close the printer side door (Door A).
81
Page 84

6 Close the duplex unit door (Door E).
Fuser area
1 Push up on the latch to release the duplex unit door (Door E).
2 Gently lower the door to the open position.
3 Pull up on handle to open the printer side door (Door A).
CAUTION: The fuser may be hot. Allow time for it to cool before continuing.
4 Remove the paper based on what part of the paper is visible:
– If print media is jammed in the rollers, pull the sheet straight out.
82
Page 85

– If print media is caught under the fuser, but only a small portion of the sheet is visible, as
shown in the following illustration, do not pull the sheet out. Complete the following steps
to remove the sheet.
a Push the green lever toward the back of the printer to loosen it, and then pull it up.
b Drop the lever down and pull it up again. Repeat this two or three times.
The jammed print media is forced out from under the fuser so you can grasp it easier. It forces
it out in one of two methods, so remove the jam based on the location as follows.
– Print media exits to the standard bin, pull it straight out.
83
Page 86

– If the print media exits to the top of the fuser, grasp the sheet on both sides and gently pull
it out.
5 Close the printer side door (Door A).
6 Close the duplex unit door (Door E).
Clearing jams from the optional duplex unit
Note: If an optional envelope feeder is installed on the printer, you must remove it so you
can open the duplex unit door. For instructions, see Removing the optional
envelope feeder.
1 Push up on the latch to release the duplex unit door (Door E).
2 Gently lower the door to the open position.
3 Remove the jammed sheet based on its location.
84
Page 87

– If the sheet is jammed under the plastic grid in the duplex option:
a Raise the plastic grid.
b Pull the jammed sheet straight out.
c Lower the plastic grid.
– If the sheet has exited to the printer side door, grasp the jammed sheet and pull it straight
out.
4 Close the duplex unit door (Door E).
85
Page 88

Clearing jams from the optional envelope feeder
1 Remove the envelope feeder. See Removing the optional envelope feeder.
2 Push up on the latch to release the duplex unit door (Door E).
3 Gently lower the door to the open position.
4 Pull up on handle to open the printer side door (Door A).
5 Pull the jammed envelope straight out.
6 Close the printer side door (Door A).
7 Close the duplex unit door (Door E).
8 Reinstall the envelope feeder. See Reinstalling the envelope feeder.
86
Page 89

Clearing jams from the optional mailbox
1 Open the mailbox door (Door D) by pulling the handhold to the right. The door swings open.
2 Remove the jammed sheet based on its location.
– If the print media is jammed in one of the 10 bins, but you see only the trailing edge behind
the door as shown do not pull the short portion of the jam from inside of the door.
a Instead locate the leading edge of the print media in one of the bins.
87
Page 90

b Pull the print media straight out of the bin.
– If the print media is jammed between the fuser area and a mailbox bin, pull the sheet
straight up.
– If only a small portion of the jammed print media is visible and the rest is caught in the
fuser area, see Fuser area for instructions on clearing the jam.
88
Page 91

– The print media is jammed under the mailbox plastic deflector.
a Reach under the mailbox plastic deflector. Pull it to the right. The plastic deflector moves
up. Keep the plastic deflector in this up position.
b Pull the print media down and straight to the right from the standard bin.
3 Close the printer side door (Door A).
4 Close the duplex unit door (Door E).
5 Close the mailbox door (Door D).
89
Page 92

Clearing jams from the optional finisher
Remove the jam based on its location.
If the print media is jammed under the divertor cover:
1 Under the transport unit, locate the clear tab at the end of the clear plastic deflector.
2 Grasp the tab and pull to the right. The plastic deflector (Deflector G) moves up. Keep the
plastic deflector in this up position.
Ta b
Plastic
deflector
Divertor cover
3 Pull the print media down and straight out from the standard bin.
90
Page 93

If the print media is jammed in the standard bin, use one of the following methods to remove the sheet:
• Pull the sheet toward you.
• If the sheet does not pull out easily:
1 Push the finisher latch.
91
Page 94

2 Grasp the finisher and slide it to the right.
3 Pull the sheet out.
92
Page 95

4 Push the finisher against the printer until the plastic spokes on the transport unit are firmly
seated in the holes on the divertor cover.
Hole
Plastic spoke
Transport unit
Divertor
cover
Hole
Plastic spoke
If the print media is jammed inside the transport unit between the rollers:
1 Pull up on the handle to open the transport unit cover (Cover H).
2 Pull the sheet straight out.
Transport unit cover
3 Close the transport unit cover (Cover H).
93
Page 96

If the print media is jammed under the finisher top cover:
CAUTION: To avoid rings on your hand being caught by the spring-loaded plastic plate in this
area, remove your rings first. If your hand is caught in this area, press down on the
plastic plate with your other hand to provide some clearance, and then pull your
hand free.
1 Grasp the cutout handhold on the finisher top cover (Cover J) and pull up.
2 Pull the print media straight up.
Plastic plate
3 Close the finisher top cover (Cover J).
If the print media is jammed in one of the bins, pull the sheet to the right and then straight out.
94
Page 97

If the print media is jammed between the transport unit and the finisher:
1 Open the finisher door (Door K).
2 In the top left corner inside the finisher, pull the green lever down and to the right. Hold it out of
the way.
The leading edge of the print media is under the lever.
95
Page 98

3 Pull the jammed sheet straight out.
If the print media is jammed above the green lever above the stapler:
1 Pull the green lever down and to the right. Hold it out of the way.
2 Pull print media straight out.
Lever
96
Page 99

If there is not enough to grasp above the green lever above the stapler:
1 Locate the left green knob and turn it in the direction of the arrow. The print media moves so
you can grasp it.
2 Pull the print media straight out.
3 Close the finisher door (Door K).
97
Page 100

The print media exits to bin 2, but there is not enough to grasp from the bin:
1 Open the finisher door (Door K).
2 Locate the right green knob above the stapler and turn it in the direction of the arrow. More of
the print media moves to the bin.
3 Pull the print media out of the bin. If the print media does not release easily, complete
step 1 on page 98 to step 2 on page 98, and then close the finisher door (Door K).
The print media is caught between the two bins in the accumulator area.
1 Push up on the green tab between the two bins and hold it in place.
2 Pull the jammed paper out.
Green tab
98
 Loading...