


Optra
TM
W810
User’s Reference

First Edition (August 1999)
The following paragraph does not apply to any country where such provisions are inconsistent
with local law: LEXMARK INTERNATIONAL, INC., PROVIDES THIS PUBLICATION “AS IS” WITHOUT
WARRANTY OF ANY KIND, EITHER EXPRESS OR IMPLIED, INCLUDING, BUT NO T LIMITED TO,
THE IMPLIED WARRANTIES OF MERCHANTABILITY OR FITNESS FOR A PARTICULAR PURPOSE.
Some states do not allow di sclaimer of express or implied warranties in certain transactions; therefore,
this statement may not apply to you.
This publication could include technical inaccuracies or typographical errors. Changes are periodically
made to the information herein; these changes will be incorporated in later editions. Improvements or
changes in the products or the pr ograms described may be made at any time.
A form for the reader’s comments is provi ded at the b ack of this pu bl ication. I f the f orm has been remo v ed,
comments may be addressed to Lexmark International, Inc., Department F95/035-3, 740 West New
Circle Road, Lexington, Kentucky 40550, U.S.A. In the United Kingdom and Eire, send to Lexmark
International Ltd., Marketing an d Services Department, Westhorpe House, Westhorpe, Marlow Bucks
SL7 3RQ. Lexmark may use or distribute any of the information you supply in any way it believes
appropriate without incurring any obligation to you. You can purchase additional copies of publications
related to this product by calling 1-800-553-9727. In the United Kingdom and Eire, call 0628-481500. In
other countries, contact your point of purchase.
References in this publication to products, programs, or services do not imply that the manufacturer
intends to make these available in al l co untries in whic h it op erates. Any reference to a product, program,
or service is not intended to state or imply that only that product, program, or service may be used. Any
functionally equivalent product, program, or service that does not infringe any existing intellectual
property right may be used instead. E valuation and verification of operation in conjunctio n with other
products, programs, or services, except those expressly designated by the manufacturer, are the user’s
responsibility.
Lexmark, Lexmark with diamond design, MarkNet, MarkVision, and Opt ra are trademarks of Lexmark
International, Inc., registered in the United States and/or other countries.
PictureGrade is a trademark of Lexmark International, Inc.
Operation ReSource is a service mark of Lexmark International, Inc.
Other trademarks are the property of their respective owners.
© Copyright 1999 Lexmark International, Inc.
All rights reserved.
UNITED STATES GOVERNMENT RESTRICTED RIGHTS
This software and documentation are provided with RESTRICTED RIGHTS. Use, duplication or
disclosure by the Government is subject to restriction s a s set forth in subparagraph (c)(1)(ii) o f th e Ri g ht s
in Technical Data and Computer Software clause at DFARS 252.227-7013 and in applicable FAR
provisions: Lexmark International, Inc., Lexington, KY 40550

iii
Table of contents
Table of contents
Preface . . . . . . . . . . . . . . . . . . . . . . . . . . . . . . . . . . . . . . . vii
Introducing the Lexmark Optra W810 printer . . . . . . . . . . . . . . . . vii
Standard model . . . . . . . . . . . . . . . . . . . . . . . . . . . . . . . . . . . vii
Fully configured model . . . . . . . . . . . . . . . . . . . . . . . . . . . . . .viii
Printer operator panel . . . . . . . . . . . . . . . . . . . . . . . . . . . . . . . . . . ix
About this book . . . . . . . . . . . . . . . . . . . . . . . . . . . . . . . . . . . . . . . xi
Printer pocket . . . . . . . . . . . . . . . . . . . . . . . . . . . . . . . . . . . . . xi
Conventions . . . . . . . . . . . . . . . . . . . . . . . . . . . . . . . . . . . . . . xii
Other sources of information . . . . . . . . . . . . . . . . . . . . . . . . . . . . xii
Setup Guide
. . . . . . . . . . . . . . . . . . . . . . . . . . . . . . . . . . . . . . xii
Drivers, MarkVision and Utilities
CD . . . . . . . . . . . . . . . . . . . xii
Lexmark Web site . . . . . . . . . . . . . . . . . . . . . . . . . . . . . . . . .xiii
Complete Printer Reference
. . . . . . . . . . . . . . . . . . . . . . . . . .xiii
Chapter 1: Understanding printer messages . . . . . . . . . . .1
Chapter 2: Troubleshooting . . . . . . . . . . . . . . . . . . . . . . .19
Print quality problems . . . . . . . . . . . . . . . . . . . . . . . . . . . . . . . . . .20
Paper feed problems . . . . . . . . . . . . . . . . . . . . . . . . . . . . . . . . . .28
Other printing problems . . . . . . . . . . . . . . . . . . . . . . . . . . . . . . . .30
Finisher problems . . . . . . . . . . . . . . . . . . . . . . . . . . . . . . . . . . . . .35
Mailbox problems . . . . . . . . . . . . . . . . . . . . . . . . . . . . . . . . . . . . .38
Calling for service . . . . . . . . . . . . . . . . . . . . . . . . . . . . . . . . . . . . .39
Chapter 3: Clearing paper jams . . . . . . . . . . . . . . . . . . . .41
Understanding paper jam messages . . . . . . . . . . . . . . . . . . . . . .41
Paper path . . . . . . . . . . . . . . . . . . . . . . . . . . . . . . . . . . . . . . .42
Message maps . . . . . . . . . . . . . . . . . . . . . . . . . . . . . . . . . . . .43
Clearing jams from the printer . . . . . . . . . . . . . . . . . . . . . . . . . . .44
Tray 4 (optional 2500-sheet drawer) . . . . . . . . . . . . . . . . . . .44
Trays 2 and 3 . . . . . . . . . . . . . . . . . . . . . . . . . . . . . . . . . . . . .48
Tray 1 . . . . . . . . . . . . . . . . . . . . . . . . . . . . . . . . . . . . . . . . . . .53
Manual feed unit . . . . . . . . . . . . . . . . . . . . . . . . . . . . . . . . . . .56
Duplex unit . . . . . . . . . . . . . . . . . . . . . . . . . . . . . . . . . . . . . . .57

iv
Table of contents
Photoconductor area . . . . . . . . . . . . . . . . . . . . . . . . . . . . . . .58
Fuser area . . . . . . . . . . . . . . . . . . . . . . . . . . . . . . . . . . . . . . .60
Clearing jams from the mailbox option . . . . . . . . . . . . . . . . . . . . .62
Clearing jams from the finisher option . . . . . . . . . . . . . . . . . . . . .69
Chapter 4: Loading paper . . . . . . . . . . . . . . . . . . . . . . . .79
Loading the paper trays . . . . . . . . . . . . . . . . . . . . . . . . . . . . . . . .79
Loading tray 1 . . . . . . . . . . . . . . . . . . . . . . . . . . . . . . . . . . . .80
Loading trays 2 and 3 . . . . . . . . . . . . . . . . . . . . . . . . . . . . . . .88
Loading the 2500-sheet tray (tray 4) . . . . . . . . . . . . . . . . . .101
Tips for successful printing . . . . . . . . . . . . . . . . . . . . . . . . . . . . .104
Storing media . . . . . . . . . . . . . . . . . . . . . . . . . . . . . . . . . . . .104
Avoiding paper jams . . . . . . . . . . . . . . . . . . . . . . . . . . . . . . .105
Chapter 5: Replacing supplies . . . . . . . . . . . . . . . . . . . .107
Determining the status of supplies . . . . . . . . . . . . . . . . . . . . . . .108
Requesting audible alarms . . . . . . . . . . . . . . . . . . . . . . . . . . . . .109
Storing supplies . . . . . . . . . . . . . . . . . . . . . . . . . . . . . . . . . . . . .109
Recycling used supplies . . . . . . . . . . . . . . . . . . . . . . . . . . . . . . .110
Installing a toner cartridge . . . . . . . . . . . . . . . . . . . . . . . . . . . . .111
Installing the photoconductor kit . . . . . . . . . . . . . . . . . . . . . . . . .116
Replacing the photoconductor cartridge . . . . . . . . . . . . . . .117
Replacing the paper dust remover . . . . . . . . . . . . . . . . . . . .124
Installing the transfer kit . . . . . . . . . . . . . . . . . . . . . . . . . . . . . . .130
Replacing the transfer roller . . . . . . . . . . . . . . . . . . . . . . . . .131
Replacing the ozone filter . . . . . . . . . . . . . . . . . . . . . . . . . . .135
Resetting the printer’s internal counter . . . . . . . . . . . . . . . .139
Installing the fuser . . . . . . . . . . . . . . . . . . . . . . . . . . . . . . . . . . .140
Resetting the printer’s internal counter . . . . . . . . . . . . . . . .147
Installing a staple cartridge . . . . . . . . . . . . . . . . . . . . . . . . . . . . .148
Chapter 6: Maintaining the finisher option . . . . . . . . . . .155
Clearing a staple jam . . . . . . . . . . . . . . . . . . . . . . . . . . . . . . . . .156
Priming the stapler . . . . . . . . . . . . . . . . . . . . . . . . . . . . . . . . . . .162
Emptying the hole punch box . . . . . . . . . . . . . . . . . . . . . . . . . . .163
Resetting the printer’s internal counter . . . . . . . . . . . . . . . .168

v
Table of contents
Aligning the finisher with the printer . . . . . . . . . . . . . . . . . . . . . .169
Adjusting the finisher’s standing position . . . . . . . . . . . . . . .169
Adjusting the finisher’s height . . . . . . . . . . . . . . . . . . . . . . .173
Chapter 7: Aligning the mailbox option . . . . . . . . . . . . .177
Adjusting the mailbox’s standing position . . . . . . . . . . . . . . . . . .178
Adjusting the mailbox’s height . . . . . . . . . . . . . . . . . . . . . . . . . .183
Chapter 8: Removing options . . . . . . . . . . . . . . . . . . . .189
Removing the transport unit . . . . . . . . . . . . . . . . . . . . . . . . . . . .190
Detaching a mailbox or a finisher . . . . . . . . . . . . . . . . . . . . . . . .193
Removing memory and option cards . . . . . . . . . . . . . . . . . . . . .196
Accessing the system board . . . . . . . . . . . . . . . . . . . . . . . .196
Removing a memory card . . . . . . . . . . . . . . . . . . . . . . . . . .198
Removing an option card . . . . . . . . . . . . . . . . . . . . . . . . . . .199
Removing a hard disk . . . . . . . . . . . . . . . . . . . . . . . . . . . . .201
Removing the duplex option . . . . . . . . . . . . . . . . . . . . . . . . . . . .203
Detaching the duplex unit . . . . . . . . . . . . . . . . . . . . . . . . . . .203
Removing the manual feed unit . . . . . . . . . . . . . . . . . . . . . .207
Adjusting the side door tension . . . . . . . . . . . . . . . . . . . . . .210
Removing an optional drawer . . . . . . . . . . . . . . . . . . . . . . . . . . .212
Chapter 9: Using the print and hold function . . . . . . . . .215
Printing and deleting held jobs . . . . . . . . . . . . . . . . . . . . . . . . . .215
Recognizing when format errors occur . . . . . . . . . . . . . . . .217
Repeat Print . . . . . . . . . . . . . . . . . . . . . . . . . . . . . . . . . . . . . . . .217
Reserve Print . . . . . . . . . . . . . . . . . . . . . . . . . . . . . . . . . . . . . . .218
Verify Print . . . . . . . . . . . . . . . . . . . . . . . . . . . . . . . . . . . . . . . . .218
Confidential jobs . . . . . . . . . . . . . . . . . . . . . . . . . . . . . . . . . . . . .218
Appendix: Printer menus . . . . . . . . . . . . . . . . . . . . . . . .221
Index . . . . . . . . . . . . . . . . . . . . . . . . . . . . . . . . . . . . . . . .229

vi
Table of contents
vii
Preface
Preface
Introducing the Lexmark Optra W810
printer
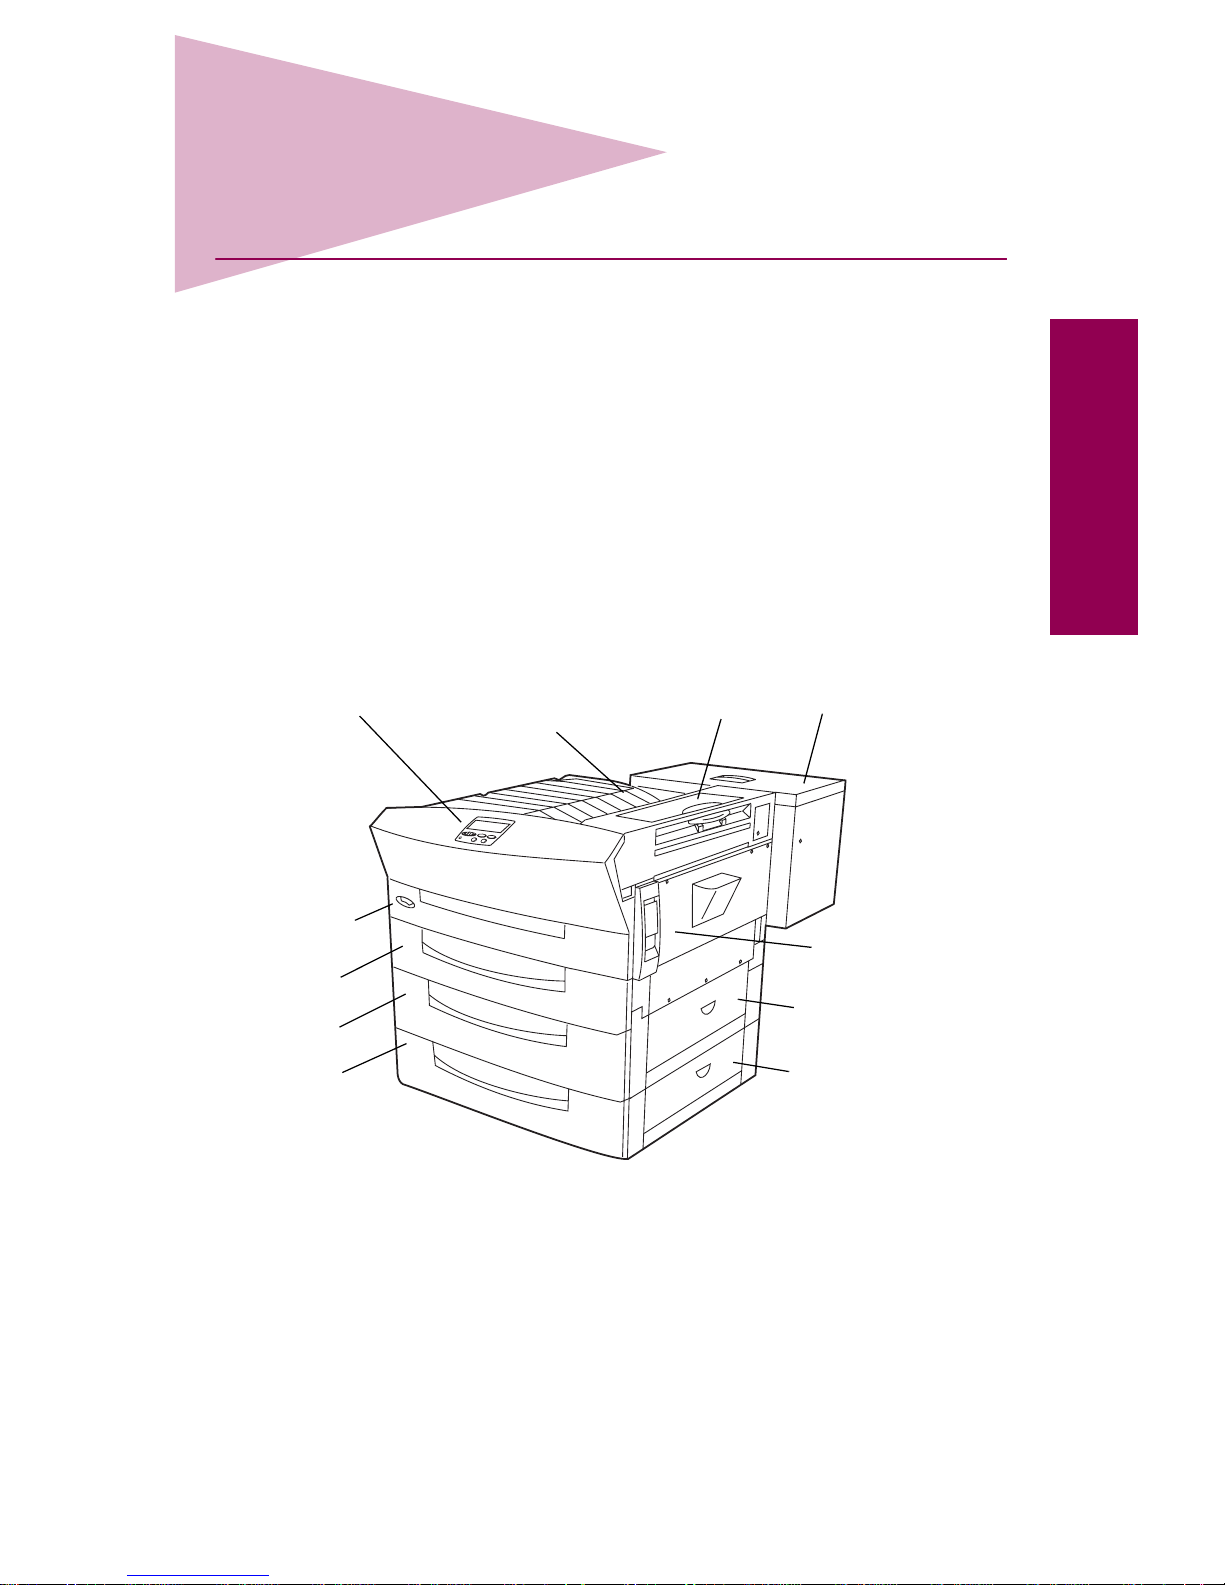
Standard model
The following illustr ation sho ws the standard Optra™ W810 printer. If you
have attached paper handling options to your printer, it ma y look more like
one of the fully configured models shown on page viii. The illustrations in
this book reflect the standard model, unless it’s necessary to show
another configuration.
Tray 1
Tray 2
Tray 3
Fuser cover
(Cover B)
Side door
(Door C)
Jam access door
for tray 2 (Door D)
Jam access door
for tray 3 (Door E)
Toner box
(Cover A)
Standard
output bin
Operator panel
On/off
button
viii
Preface
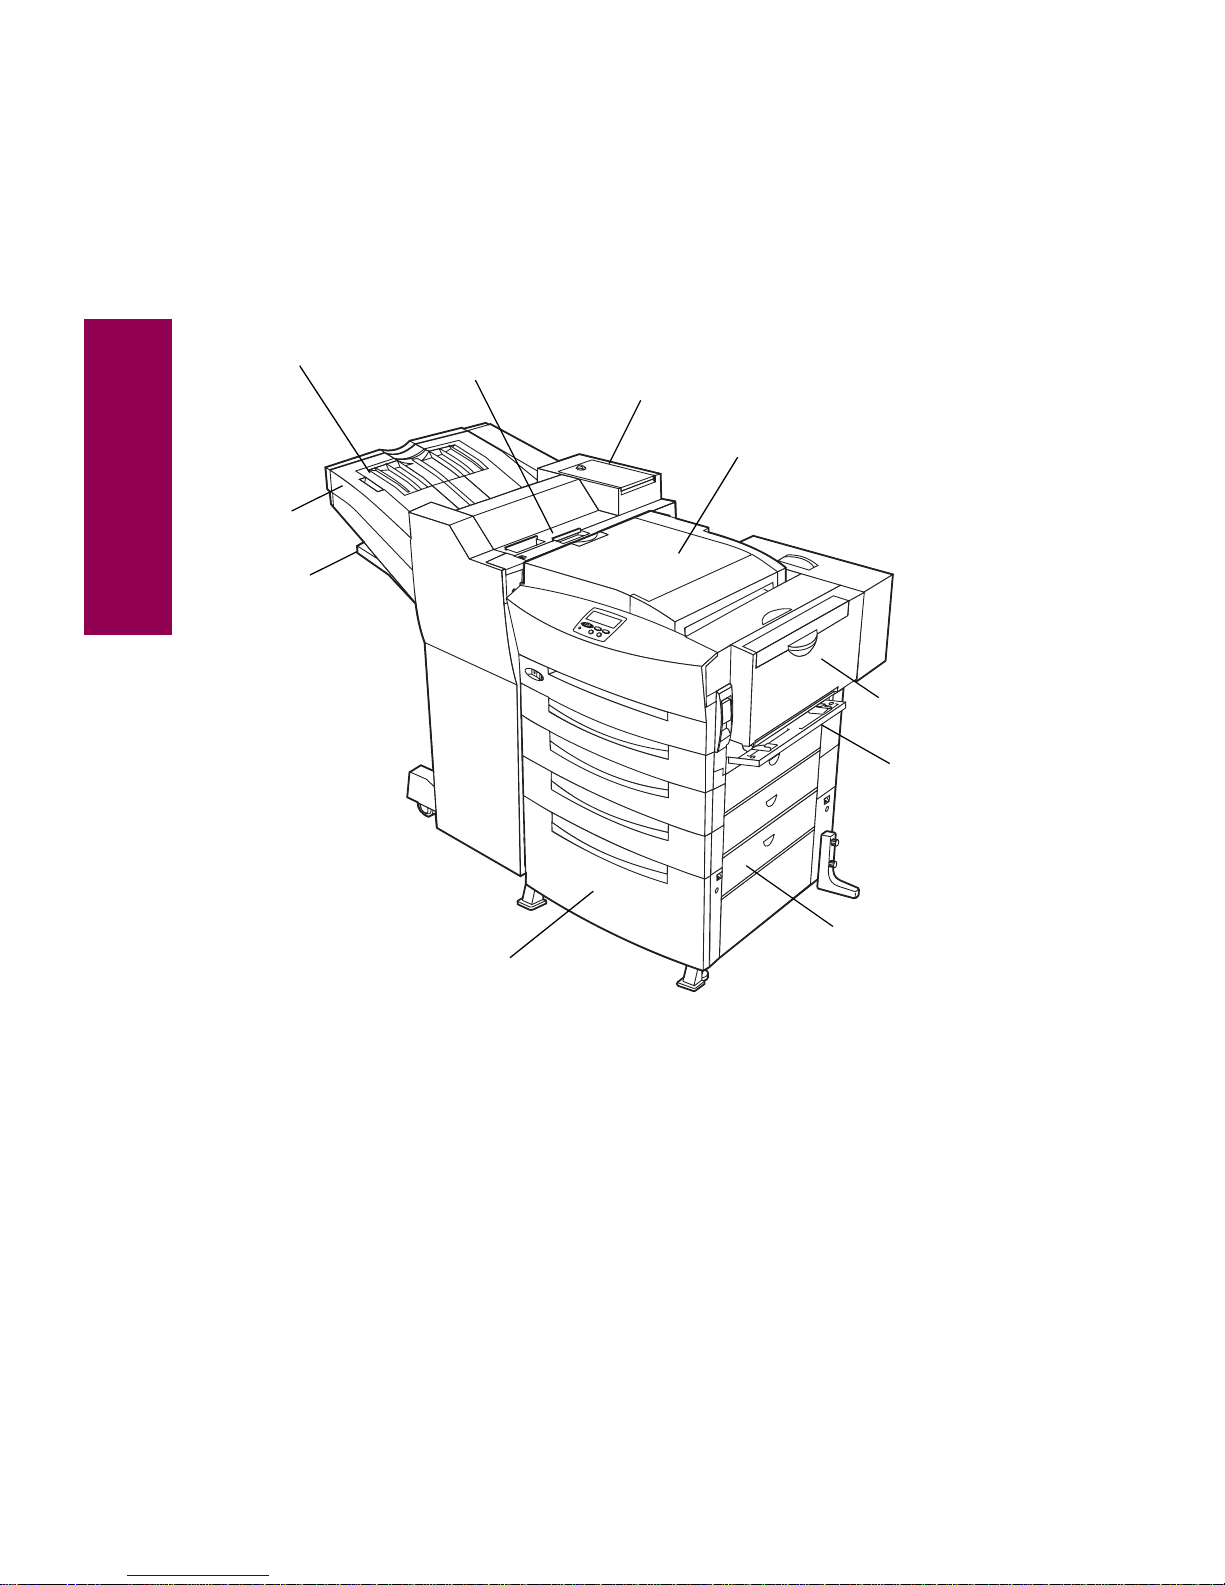
Fully configured model
The following illustration shows the Optra W810 configured with all the
paper handling options, including a
finisher
. You may have attached a
10-bin mailbox
instead of a finisher.
Finisher
Stapler cover
(Cover L)
Transport unit
(Cover H)
Duplex unit
(Door G)
Manual
feed unit
Tray 4
(2500-sheet drawer)
Jam access door
for tray 4 (Door F)
Finisher top cover
(Cover M)
Finisher bin cover
(Cover N)
Bin 1
Bin 2
ix
Preface
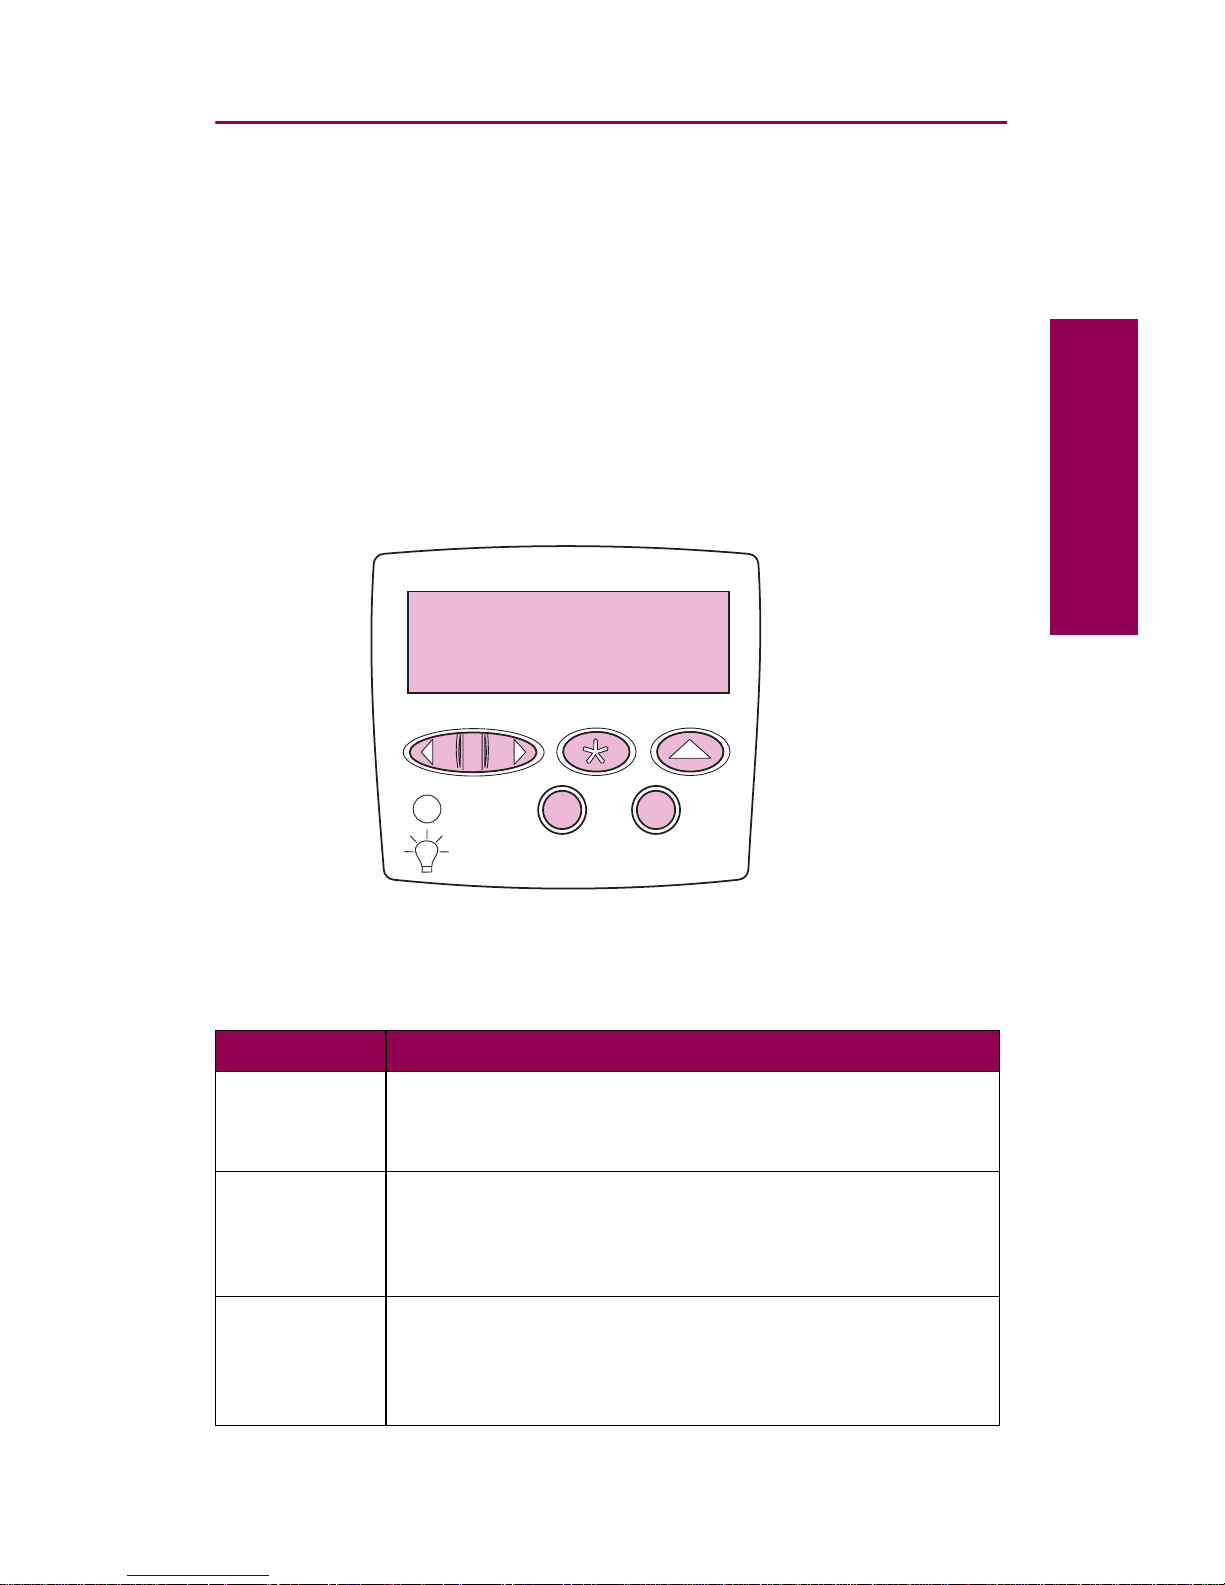
Printer operator panel
Several procedures outlined in this book require that you use the printer
operator panel to clear a message or select an item from a menu. The following information may help you become more familiar with the operator
panel.
The operator panel has six buttons and a light that flashes when the
printer is processing a job. The numbers next to the button names have
significance only if you are trying to print a job you marked
Confidential
from the printer driver. See “Using the print and hold function” on
page 215 for more information.
Operator panel buttons
Button Press this button to …
Go
• Make the printer ready to receive print jobs.
• Clear certain messages from the display.
• Exit printer menus and return the printer to the ready state.
Stop
• Clear certain messages from the display.
• Take the printer offline.
• Stop printer activity when the printer is busy processing a
job.
Menu>
and
<Menu
• Open the menus from the ready state.
• Open the Job Menu while the printer is busy.
• Scroll to the next menu, item in a menu, or value.
• Increase or decrease a numerical value.
Ready
Tray 3 Empty
1
Menu
2
Select 3Return
4
Go
5
Stop
6
x
Preface
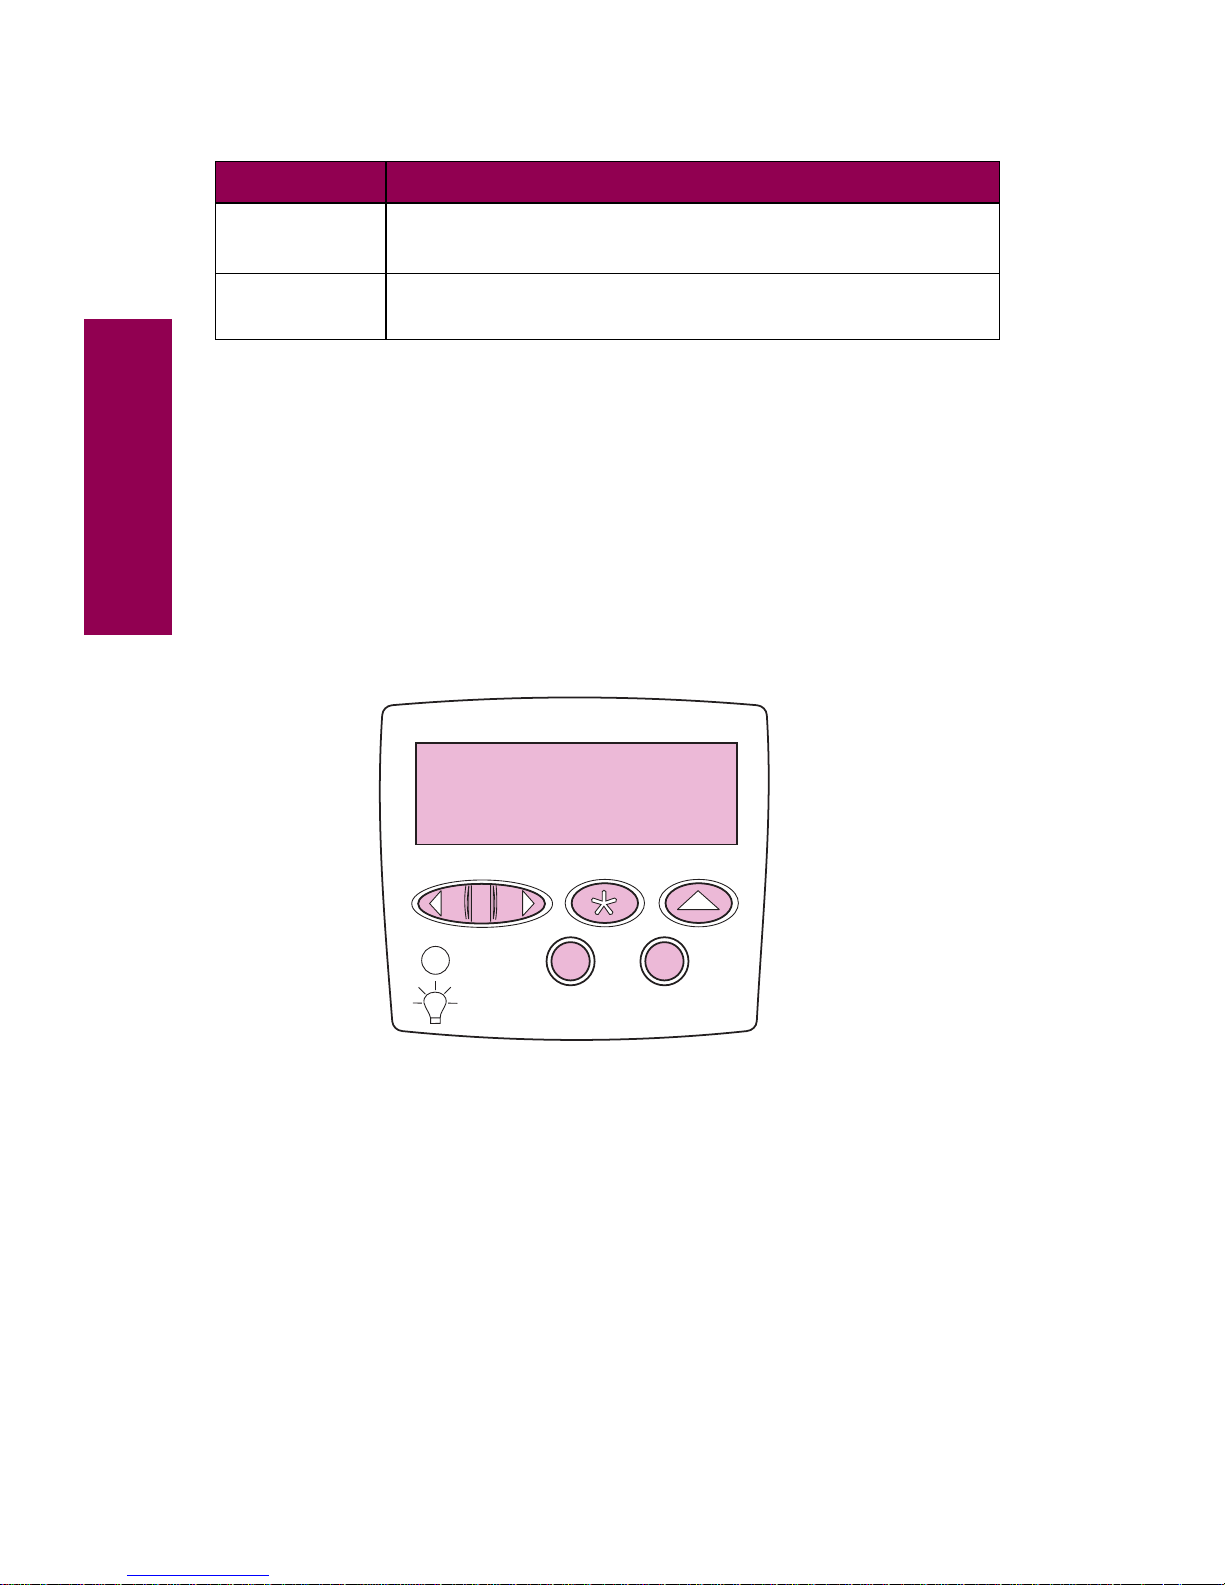
If your printer is configured as a network printer available to a number of
users, it is possible that
Menus Disabled appears on the display when you
press
Menu> or <Menu from the Ready display. Disabling the menus pre-
vents users from using the operator panel to inadvertently change a
printer default that has been set by the person managing the printer. You
can still clear messages and select items from the Job Menu when printing a job, but you cannot change other printer settings. You can, however,
use your Lexmark pr inter driver to override printer defaults and select settings for individual print jobs.
See page 221 for a brief overview of the printer menus available from the
operator panel. For more detailed information about each of the menu
items, refer to the
Complete Printer Reference
available on Lexmark’s
Web site (www.lexmark.com).
Select
• Select the item listed on the second line of the display.
• Clear certain messages from the display.
Return
Back up to the previous level of the menu structure without
making a selection.
Operator panel buttons (continued)
Button Press this button to …
Menus Disabled
1
Menu
2
Select 3Return
4
Go
5
Stop
6
xi
Preface
About this book
Use this book whenever you have a question about the Optra W810
printer or encounter a problem when using the printer. It includes inf ormation about loading paper, replacing consumables, clearing paper jams,
and troubleshooting other printer problems. Refer to the
Complete Printer
Reference
if you need more detailed information about your printer.
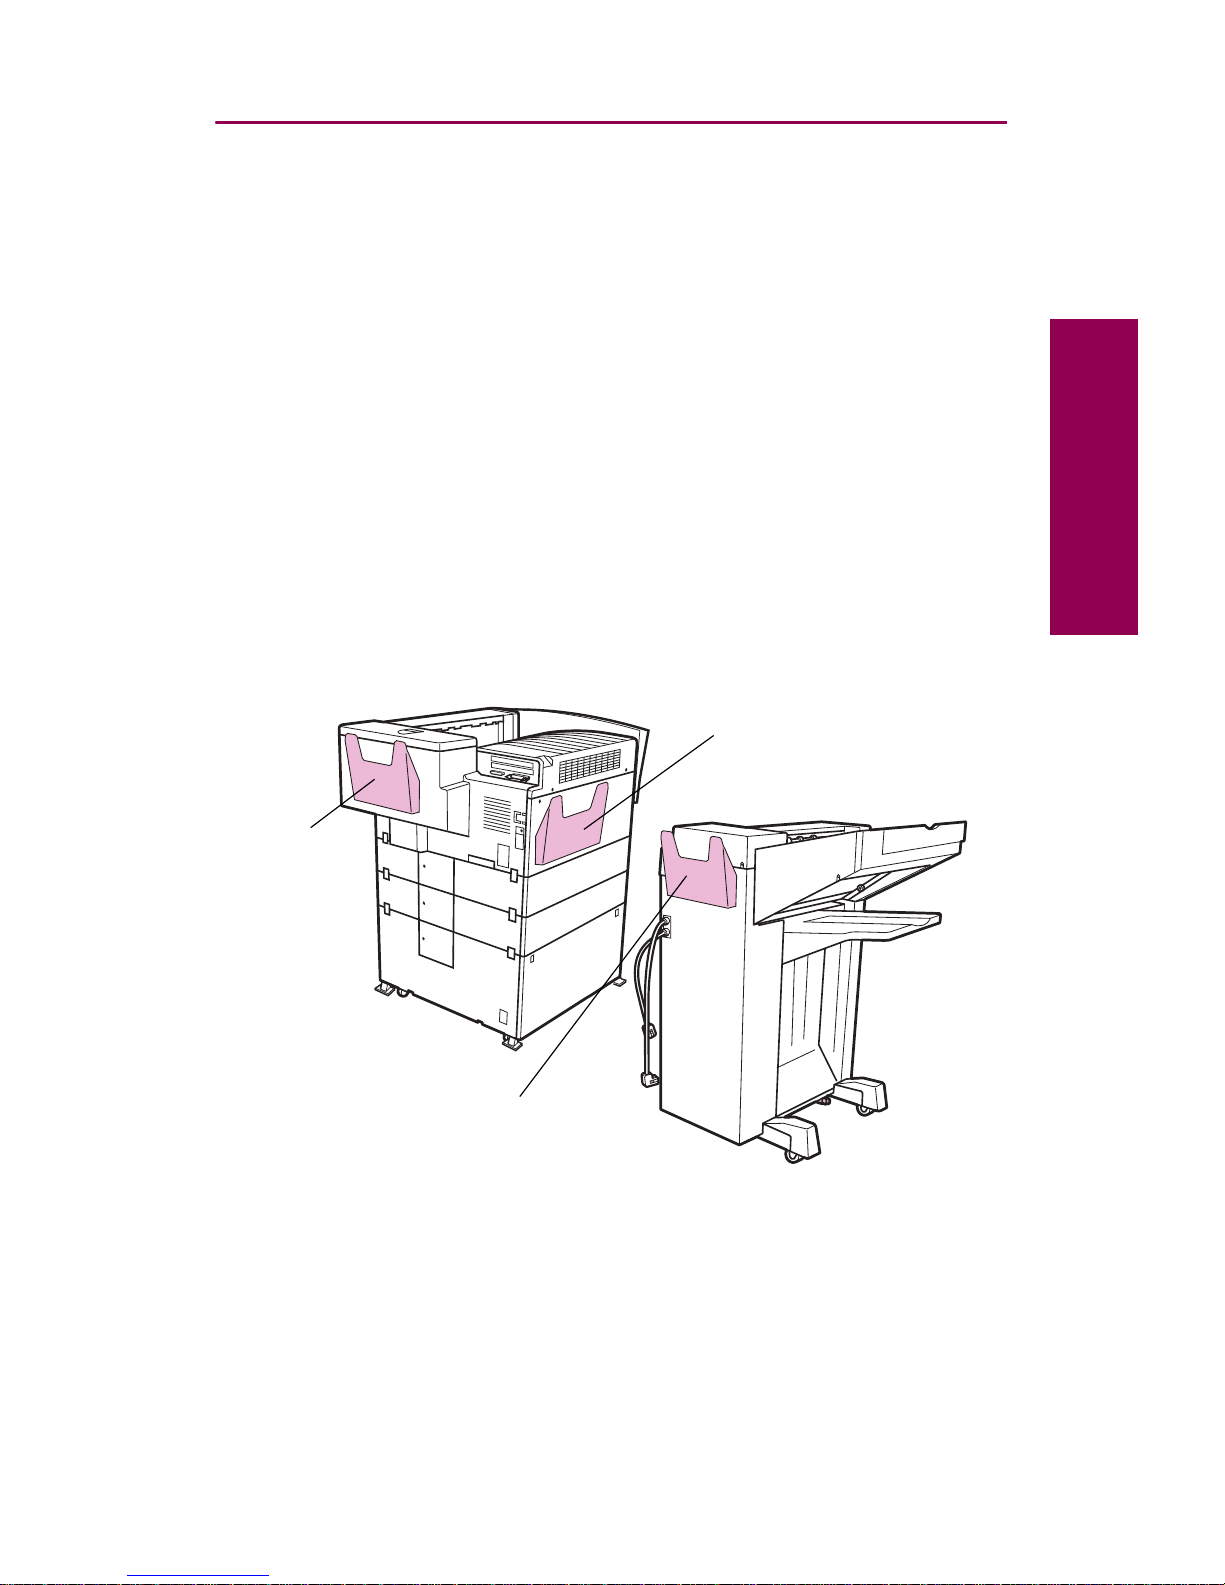
Printer pocket
We recommend that you keep the
User’s Reference
in the handy printer
pocket, which should be attached to the printer (or optional finisher) in
one
of the three locations shown in the following illustration. Keeping the
book with the printer makes it readily accessible to all users.
If you prefer searching for information online, a copy of this book is also
available on Lexmark’s Web site.
Rear view
Left side of printer
Back of
toner box
Back of finisher

xii
Preface
Conventions
It may help you to recognize the conventions we’ve used in this book:
• Operator panel buttons are printed in boldface type:
Press
Go
after clearing a paper jam.
• Messages that appear on the printer operator panel display are
also printed in boldface type:
If
Replace Toner
appears on the operator panel display, install
a new toner cartridge.
NOTE:
A note provides information you may find useful.
W
ARNING
: A warning identifies something that might damage
your printer hardware or software.
CAUTION: A caution identifies something that might cause you
harm.
Other sources of information
For more information about the Optra W810 printer , refer to the other documents that shipped with your printer, or to the Lexmark Web site.
Setup Guide
The
Setup Guide
provides detailed instructions for setting up your new
printer and installing options, and includes important safety information.
Drivers, MarkVision and Utilities CD
In addition to printer drivers and utilities, the
Drivers, MarkVision and Utili-
ties
CD also includes additional information about Lexmark printers. After
launching the CD, click
View Documentation
and then click one of the fol-
lowing options:
•
Printer Commands
takes you to the
Technical Reference
, which
includes details about printer languages and commands, interface specifications, and memory management.

xiii
Preface
•
Special Media
takes you to the
Card Stock & Label Guide,
which
provides information about choosing the proper media for your
printer.
•
MarkVision Printer Utility
takes you to documents providing details
about the MarkVision™ printer management utility.
•
MarkNet Print Servers
takes you to documents containing informa-
tion about configuring MarkNet internal print servers.
Lexmark Web site
Access our site on the World Wide Web for updated printer drivers and
utilities, and documentation including the
Complete Printer Reference
:
http://www.lexmark.com
Complete Printer Reference
The
Complete Printer Reference
on Lexmark’s Web site provides information about printer features and specifications, printer options, printer
settings, using the menus to change printer defaults, selecting appropriate paper and other media, and managing memory.

xiv
Preface

1
Messages
1
Understanding
printer messages
Messages appear on your operator panel display about the current state
of the printer or indicating printer problems you must resolve. Use the following table to understand printer messages. Explanations of numbered
messages (for example,
38 Memory Full) begin on page 12. For informa-
tion on using the operator panel, see page ix.
If you need to refer to a list of the menus available from the operator
panel, see page 221 for a brief overview. For more detailed information
about each of the menu items, refer to the
Complete Printer Reference
available on Lexmark’s Web site (www.lexmark.com).
Printer messages
Message Action
Activating Menu
Changes
The printer is activating changes made to the printer
settings.
Bin x Full
The specified bin is full. Remove the stack of paper
from the bin to clear the message. If you assigned
the bin a name, the message displays the bin name
instead of the bin number.
Use the message maps on top of the printer to
locate the bin. See page 43 for an illustration.
Busy
The printer is busy receiving, processing, or printing
data. The light on the operator panel blinks while the
printer is processing data.
When the printer is busy, you can press
Menu>
or
<Menu
to open the Job Menu. From the Job Menu,
you can:
• Cancel the current job.
• Choose to print or delete any held jobs or confidential jobs. See “Using the print and hold
function” on page 215 for more information.

2
Messages
Cancelling Job The printer is processing a request to cancel the
current print job.
Change Tray
x
The printer is requesting a different media than what
is loaded in the tray or set in the P aper Siz e or P aper
Type menus.
Check the second line of the display for the custom
media name defined using the MarkVision utility, the
media size, or the media type and size the printer is
looking for (
Plain Letter, for example).
To clear the message:
• Load the requested type and size media in the
tray specified on the display. The printer automatically clears the message and continues printing
the job.
For more information, see “Loading paper” on
page 79.
• Press
Select to clear the message and continue
printing on the media currently loaded in the tray.
• Cancel the current job. Press
Menu> or <Menu.
The Job Menu is displayed. Press
Menu>
or
<Menu until Cancel Job appears on the second
line of the operator panel display. Press
Select.
Check Finisher
Installation
Check Mailbox
Installation
The specified option is detached from the printer. To
clear this message, push the option flush against the
printer and make sure the set pin and magnetic
bracket are properly attached. For more inf ormation,
refer to the
Setup Guide
.
Clearing Job
Accounting Stat
The printer is deleting all job statistics stored on the
hard disk option.
Close Cover
x
The specified cover is open. Close the cov er to clear
the message.
Use the message maps on top of the printer to
locate the cover. See page 4 3 for an illustration.
Note:
If
Close Cover H
appears on the display and
the transport unit cover is closed, make sure the
cable connecting the finisher or mailbox option to the
transport unit is securely attached.
Close Door
x
The specified door is open. Close the door to clear
the message.
Use the message maps on top of the printer to
locate the door. See page 43 for an illustration.
Printer messages (continued)
Message Action

3
Messages
Defragmenting
DO NOT POWER OFF
The printer is defragmenting the flash memory
option to reclaim storage space occupied by deleted
resources.
Note:
Do not turn the printer off while this message
is displayed.
Delete All Jobs.
Go/Stop?
The printer is requesting confirmation to delete all
held jobs.
• Press
Go to continue. The printer deletes all Print
and Hold jobs.
• Press
Stop
to cancel this operation.
See “Using the print and hold function” on page 215
for more information.
Deleting Jobs
The printer is deleting one or more held jobs.
For more information on held jobs, see “Using the
print and hold function” on page 215.
Disabling Menus
The printer is responding to a request to disable the
menus. While the menus are disabled, you cannot
change the printer default settings from the operator
panel.
Empty Box K
The hole punch box in the optional finisher is full. To
clear the message, you must empty the hole punch
box and reset the hole punch counter.
See “Emptying the hole punch box” on page 163 for
detailed instructions.
Enabling Menus The printer is responding to a request to make the
menus available to all users. When this message
clears, press
Menu> or <Menu to view the menus
from the operator panel.
Enter PIN:
=____
Use the operator panel buttons to enter the four-digit
personal identification number (PIN) you identified in
the driver when you sent the confidential job to the
printer.
See “Using the print and hold function” on page 215
for more information.
Fax
x
The printer is processing a fax through an optional
serial interface.
Files will be
Lost. Go/Stop?
You have changed the Job Buffer Size setting from
the operator panel, and the printer must reformat the
hard disk to activate the change. If you press
Go, all
files currently stored on the disk will be deleted.
Press
Return or Stop to cancel this operation.
Printer messages (continued)
Message Action

4
Messages
Flushing Buffer The printer is flushing corrupted print data and
discarding the current print job.
Formatting Disk The printer is formatting the hard disk option.
Note:
Do not turn the printer off while this message
is displayed.
Formatting Flash
DO NOT POWER OFF
The printer is formatting the flash memory option.
Note:
Do not turn the printer off while this message
is displayed.
Infrared
x An optional infrared interface is the active communi-
cation link.
Insert PC
Cartridge
The photoconductor cartridge is either not installed
or is installed incorrectly. Correctly install the photoconductor cartridge to clear the message.
For installation instructions, see page 116.
Insert Stapler The stapler either is not installed or is installed
incorrectly.
• Correctly install the stapler to clear the message.
For installation instructions, see step 12 on
page 153.
• Press
Go to ignore the message.
If you choose to ignore the message, the printer
handles the job as if the stapler were installed but
out of staples. If the
Load Staples message
appears, press
Go again to ignore the message
and print the job without stapling it.
Insert Trayx
Insert the specified tray completely into the printer.
Note:
If you cannot clear this message and the
specified tray is a 500-sheet paper tray (tr ay 2 or tr a y
3, or an optional tray 4), make sure the left paper
guide is properly inserted and snaps into the slot at
the front of the tray. For detailed instructions, see
step 5 on page 93.
Invalid
Network
x
Code
The code in an internal print server (also called an
internal network adapter or INA) is not valid. The
printer cannot receive any jobs until valid code is
programmed into the internal print server.
You can download network code while this message
is displayed.
Printer messages (continued)
Message Action

5
Messages
Load Manual You have sent a request for a manual feed job to the
printer, and the printer is ready for you to insert a
single sheet into the manual feed tray. (A manual
feed tray is available on your printer
only
if a duplex
unit is installed.)
Check the second line of the display for the custom
media name defined using the MarkVision utility, the
media size, or the media type and size the printer is
looking for (
Plain Letter
, for example).
To clear the message:
• Load media of the requested type and size in the
manual feed tray, with the print side face down.
– For A4, A5, B5, executive, and letter size
paper, feed the long edge of the paper first.
– For A3, B4, legal, and 11x17 size paper, feed
the short edge of the paper first.
• Press
Select
or Go to ignore the manual feed
request and print on media already installed in
one of the paper sources. If the printer finds a tray
that has media of the correct type and size, it
feeds media from that tray. If the printer cannot
find a tray with the correct media type and size, it
prints on whatever media is installed in the default
paper source.
• Cancel the print job. Press
Menu> or <Menu. The
Job Menu is displayed. Press
Menu>
or
<Menu
until Cancel Job appears on the second line.
Press
Select
.
Load Staples
The printer is trying to staple the print job, but the
stapler is empty. To clear this message:
• Install a new staple cartridge in the stapler. See
page 148 for detailed instructions.
• Press
Go to clear the message and continue
printing without stapling.
• Cancel the print job. Press
Menu> or <Menu. The
Job Menu is displayed. Press
Menu> or <Menu
until Cancel Job appears on the second line.
Press
Select.
Printer messages (continued)
Message Action

6
Messages
Load Tray x The printer is trying to feed paper from a source it
detects is empty.
Check the second line of the display for the custom
media name defined using the MarkVision utility, the
media size, or the media type and size the printer is
looking for (
Plain Letter, for example).
To clear the message:
• Load media of the requested type and size in the
tray specified on the display. The printer automatically clears the message and continues printing
the job.
• Cancel the print job. Press
Menu>
or
<Menu
. The
Job Menu is displayed. Press
Menu>
or
<Menu
until Cancel Job appears on the second line.
Press
Select.
See “Loading paper” on page 79 for more detailed
information.
LocalTalk
x
An optional LocalTalk interface is the active communication link.
Menus Disabled The printer menus are disabled. You cannot change
the printer default settings from the operator panel.
Network Card
Busy
An internal print server is being reset.
Network
x
An optional network interface is the active communication link.
No Jobs Found.
Retry?
The four-digit personal identification number (PIN)
you entered is not associated with any print job.
• Press
Go to enter another PIN.
• Press
Stop
to exit the PIN entry prompt.
See “Using the print and hold function” on page 215
for more information.
Not Ready
The printer is not ready to receive or process data.
Someone pressed
Stop to take the printer offline.
Press
Go to make the printer ready to receive jobs.
Ovrflow Bin Full The mailbox’s designated overflow bin is full.
Remove the stack of paper from the bin to clear the
message.
Parallel The standard parallel interface is the active commu-
nication link.
Parallel
x
An optional parallel interface is the active communication link.
Printer messages (continued)
Message Action

7
Messages
Performing
Self Test
The printer is running the normal series of start-up
tests it performs after it is turned on.
Power Saver The printer is reducing its electr icity consumption
while it is idle. When your printer is inactive for the
period of time specified in the Power Saver menu
item (20 minutes is the factory default), the
Power
Saver
message replaces the Ready message on the
display.
Your printer is ready to receive and process data.
When
Power Saver is displayed, you can:
• Press
Go to quickly warm the printer to normal
operating temperature and display the
Ready
message.
• Press
Menu>
or
<Menu
to open the menus.
Priming Failed,
Retry. Go/Stop?
The printer failed to prepare the stapler to staple
print jobs.
• Press
Go to attempt priming the stapler again.
• Make sure the stapler has staples installed and
there is no sign of a staple jam.
• Make sure there is paper in the tray specified in
the Staple Prime Source menu.
• If you are printing a job, press
Return
or
Stop
to
continue the print job without priming the stapler.
See “Priming the stapler” on page 162 for more
information.
Priming Stapler
The printer is preparing the stapler to staple print
jobs. After the printer feeds a sheet of paper from
the tray specified in the Staple Prime Source menu,
the stapler attempts to staple the page until it is
successful. The stapled page is then output to bin 2.
See “Priming the stapler” on page 162 for more
information.
Print Jobs on
Disk. Go/Stop?
Jobs that were spooled to the optional disk before
the printer was last turned off have not yet printed.
• Press
Go to print the jobs.
• Press
Return or Stop to delete the jobs from the
disk without printing them.
Printing
Directory List
The printer is processing or printing a directory of all
files stored on the flash memory option and the hard
disk option.
Printing Font
List
The printer is processing or printing a list of all
available fonts for the selected printer language.
Printer messages (continued)
Message Action

8
Messages
Printing Job
Accounting Stat
The printer is processing or printing all job
accounting statistics stored on the hard disk option.
Printing Menu
Settings
The printer is processing or printing the menu
settings page.
Program Flash
DO NOT POWER OFF
The printer is storing resources, such as fonts or
macros, in the flash memory option.
Note:
Do not turn the printer off while this message
is displayed.
Programming Disk
DO NOT POWER OFF
The printer is storing resources, such as fonts or
macros, on the hard disk option.
Note:
Do not turn the printer off while this message
is displayed.
Queuing and
Deleting Jobs
The printer is deleting one or more held jobs and
sending one or more jobs held in the print queue to
print.
For more information on held jobs, see “Using the
print and hold function” on page 215.
Queuing Jobs
The printer is sending one or more jobs held in the
print queue to print.
For more information on held jobs, see “Using the
print and hold function” on page 215.
Ready
The printer is ready to receive and process print
jobs.
Press
Menu>
or
<Menu
to take the printer out of the
Ready
state and open the menus.
Remove Paper
Std Bin
Remove Paper
Output Bin
x
The specified output bin is full. Remove the stack of
paper from the bin and press
Go
to clear the
message.
Remove Paper
All Output Bins
All of the linked output bins are full. Remove the
stacks of paper from each bin to clear the message.
Printer messages (continued)
Message Action

9
Messages
Replace Fuser Replace the fuser to maintain top performance and
avoid print quality and paper feeding problems.
To clear the message:
• Replace the fuser and reset the printer’s internal
counter for the fuser. See page 140 for detailed
instructions on replacing the fuser.
• If necessary, press
Go
to continue printing. If you
delay replacing the fuser, you may experience
printing problems related to a fuser operating
beyond its intended life.
Replace PC Kit
The photoconductor cartridge must be replaced.
When replacing the photoconductor, also replace
the paper dust remover shipped as part of the photoconductor kit.
To clear this message:
• Replace the photoconductor cartridge and paper
dust remover. See page 116 for detailed
instructions on replacing these items.
• If necessary , press
Go
to continue printing without
replacing the photoconductor cartridge.
Note:
If you do not replace the photoconductor
cartridge now, the printer will soon display the
Replace PC Kit To Continue
message and stop
operating. You will not be able to print until you
replace the photoconductor cartridge.
Replace PC Kit
To Continue
The printer has ceased operating. You cannot print
until you replace the items in the photoconductor kit.
See “Installing the photoconductor kit” on page 116
for more information.
Replace Toner
The toner cartridge is empty.
To clear the message:
• Replace the toner cartridge. See “Installing a
toner cartridge” on page 111 for detailed
instructions.
Replace Toner
Cartridge
• If Replace Toner Cartridge appears on the
display, press
Go
to continue printing without
replacing the toner cartridge.
Note:
If you do not replace the toner cartridge now,
the printer will soon display the
Replace Toner To
Continue
message and stop operating. You will not
be able to print until you replace the toner cartridge.
Printer messages (continued)
Message Action

10
Messages
Replace Toner
To Continue
The printer has ceased operating. You cannot print
until you replace the toner cartridge.
See “Installing a toner cartridge” on page 111 for
more information.
Replace Toner/PC Kit You must replace both the toner cartridge and photo-
conductor cartridge.
To clear the message:
• Replace both the toner cartridge and the items in
the photoconductor kit. For more information on
replacing these supplies, see “Installing a toner
cartridge” on page 111 and “Installing the photoconductor kit” on page 116.
• Press
Go
to continue printing without replacing
the toner cartridge and photoconductor cartridge.
Note:
If you do not replace the toner and photoconductor cartridges now, the printer will soon display
either the
Replace T oner To Continue
or
Replace PC
Kit To Continue
message and stop operating. You
will not be able to print until you replace the toner
and photoconductor cartridges.
Replace Transfer
Kit
Replace the items included in the transfer kit to
ensure proper printer operation.
To clear the message:
• Replace the items in the transfer kit and reset the
internal counter for the transfer kit. See page 130
for detailed instructions.
• Press
Go
to clear the message and continue
printing. If you delay replacing the transfer kit, y ou
may experience printing problems.
Resetting
Active Bin
The printer is setting the active bin back to the first
bin in a linked set of bins.
Resetting the
Printer
The printer is deleting any print jobs in process and
restoring all printer settings to the user defaults.
Restoring Factory
Defaults
The printer is restoring the factory default printer
settings.
Refer to the
Complete Printer Reference
on
Lexmark’s Web site (www.lexmark.com) for more
information on factory default settings.
Serial x An optional serial interface is the active communi-
cation link.
Printer messages (continued)
Message Action

11
Messages
Staples Empty The finisher is out of staples, or the stapler is not
installed. If necessary, install a new staple cartridge
and then reinsert the stapler to clear the message.
For more information on replacing staples, see
page 148.
Staples Low The finisher has less than 40 staples left in the
stapler. Install a new staple cartridge to clear the
message.
For more information on replacing staples, see
page 148.
Std Bin Full The standard output bin is full. Remove the stack of
paper in the bin to clear the message.
Tray x Empty The specified tray is out of paper. Load paper in the
tray to clear the message.
For more information, see “Loading paper” on
page 79.
Tray x Low The specified tray is low on paper. Add more paper
to clear the message.
For more information, see “Loading paper” on
page 79.
Tray x Missing
Insert the specified tray completely into the printer.
Note:
If you cannot clear this message and the
specified tray is a 500-sheet paper tray (tr ay 2 or tr a y
3, or an optional tray 4), make sure the left paper
guide is properly inserted and snaps into the slot at
the front of the tray. For detailed instructions, see
step 5 on page 93.
USB
x
The printer is processing data through the specified
USB port.
Waiting The printer has received a page of data to print, but
is waiting for an End of Job command, Form Feed
command, or for additional data.
When
Waiting is displayed, you can:
• Press
Go to print the contents of the buffer.
• Cancel the current job. Press
Menu>
or
<Menu.
The Job Menu is displayed. Press
Menu>
or
<Menu
until
Cancel Job
appears on the second
line of the operator panel display. Press
Select
.
Printer messages (continued)
Message Action

12
Messages
2xx Pap er Jam The printer detects a paper jam. Although the
location of the paper jam appears on the second line
of the display,
you must clear the entire paper path
before continuing your print job
.
W
ARNING
:
If paper is jammed in the optional
2500-sheet tray, do not open the tray until you have
checked the jam access door on the right side of the
printer (Door F) for jammed paper. Opening the tray
when paper is jammed in the vertical transport area
may damage your printer and require a service call.
See “Clearing paper jams” on page 41 for detailed
instructions.
After you clear the paper path, press
Go to clear the
message and continue printing. The printer prints a
new copy of the page that jammed if Jam Recovery
is set to On or Auto.
Leave Staple Job
in Finisher
Clear Staple Job
from Finisher
Clear Job
from Finisher
Note:
If you have an optional finisher attached to
your printer, the message
Leave Staple Job in
Finisher
,
Clear Staple Job from Finisher
, or
Clear
Job from Finisher
may alternate with the 2xx Paper
Jam
message.
34 Wrong Paper
Size in Tray
x
34 Wrong Paper
Size Manual Feed
The printer was expecting to pick a different size
paper from the specified tray than what it now
detects is moving through the paper path.
If the message indicates the problem is in tray 1,
verify that the Tray 1 Size setting in the Paper Menu
matches the size paper loaded in the tray.
If the message indicates the problem is in tray 2 or
tray 3 (or an optional 500-sheet tray 4), check to be
sure the tray’s left paper guide is in the proper
position for the size paper loaded. This message
may occur, for example, if you loaded letter size
paper in a tray where the left paper guide is inserted
in the slot for legal size paper . In addition, make sure
the paper is positioned in the correct orientation in
the tray. See “Loading trays 2 and 3” on page 88 for
detailed paper loading instructions.
Press
Go
to clear the message and continue
printing. The printer does not automatically reprint
the page that prompted the message.
Printer messages (continued)
Message Action

13
Messages
35 Res Save Off
Deficient Memory
The printer lacks the memory needed to enable
Resource Save. This message usually indicates too
much memory is allocated for one or more of the
printer link buffers.
• Press
Go to disable Resource Save and continue
printing.
• To enable Resource Save after you get this
message:
– Make sure the link buff er is set to Auto , and e xit
the menus to activate the link buffer changes.
When
Ready is displayed, enable Resource
Save from the Setup Menu.
– Install additional memory.
37 Insufficient
Collation Area
The printer memory (or optional disk, if installed)
does not have the space necessary to collate the
print job.
• Press
Go
to print the portion of the job already
stored and begin collating the rest of the job.
• Cancel the current job. Press
Menu> or <Menu.
The Job Menu is displayed. Press
Menu> or
<Menu until Cancel Job appears on the second
line of the operator panel display. Press
Select
.
37 Insufficient
Defrag Memory
The printer cannot defragment flash memory
because the printer memory used to store undeleted
flash resources is too full.
Press
Go
to clear the message.
To avoid another
37 Insufficient Defrag Memory
error message:
• Delete fonts, macros, and other data in printer
memory.
• Install additional printer memory.
Printer messages (continued)
Message Action

14
Messages
37 Insufficient
Memory
Held Jobs may be
lost. Go/Stop?
The printer memory is too full to continue processing
print jobs.
The messages
37 Insufficient Memory
and
Held
Jobs may be lost. Go/St op?
alternate on the display
until you do one of the following:
• Press
Go
to clear the messages and continue
printing the job. The printer frees memory by
deleting the oldest held job and continues
deleting held jobs until there is enough printer
memory to process the job.
• Press
Stop
to clear the messages without
deleting any held jobs. Some data in the current
job may not print or may not print correctly.
• Cancel the current job. Press
Menu>
or
<Menu
.
The Job Menu is displayed. Press
Menu> or
<Menu
until
Cancel Job
appears on the second
line of the operator panel display. Press
Select
.
38 Memory Full
The printer is processing data, but the memory used
to store pages is full.
• Press
Go
to clear the message and continue
printing the job. Some data may not print or may
not print correctly.
• Cancel the current job. Press
Menu> or <Menu.
The Job Menu is displayed. Press
Menu> or
<Menu
until
Cancel Job
appears on the second
line of the operator panel display. Press
Select.
To simplify the print job:
• Reduce the amount of text or graphics on a page.
• Delete unnecessary downloaded fonts or macros.
Install additional printer memory to avoid future
38 Memory Full
errors.
Printer messages (continued)
Message Action

15
Messages
39 Complex Page The page may not print correctly because the print
information on the page is too complex.
• Press
Go
to clear the message and continue
printing the job. Some data may not print or may
not print correctly.
• Cancel the current job. Press
Menu>
or
<Menu
.
The Job Menu is displayed. Press
Menu>
or
<Menu
until
Cancel Job
appears on the second
line of the operator panel display. Press
Select.
To avoid another
39 Complex Page
error message:
• Set Page Protect to On in the Setup Menu.
• Reduce the complexity of the page by:
– Reducing the amount of text or gr aphics on the
page.
– Deleting unnecessary downloaded fonts or
macros.
• Install additional memory.
51 Defective
Flash
The printer detects a defective flash memory option.
Press
Go to clear the message and continue
printing. You must install a different flash memory
option before you can download any resources to
flash.
52 Flash Full There is not enough free space in the flash memory
option to store the data you are trying to download.
Press
Go
to clear the message and continue
printing. Downloaded fonts and macros not
previously stored in flash memory are deleted.
To avoid another
52 Flash Full
error message:
• Delete fonts, macros, and other data stored on
the flash memory option.
• Install a larger flash memory option.
53 Unformatted
Flash
The printer detects an unformatted flash memory
option. You must format the flash memory option
before you can store any resources on it.
Press
Go to clear the message and continue
printing.
To format the flash memory option, select Format
Flash from the Utilities Menu.
If the error message remains, the flash memory
option may be defective and require replacing.
Printer messages (continued)
Message Action

16
Messages
54 Serial
Option
x
Error
The printer has detected a serial interface error on
an optional serial port. Make sure the serial link is
set up correctly and you are using the appropriate
cable.
• Press
Go to clear the message and continue
printing. The job may not print correctly.
• Reset the printer. Press
Menu>
or
<Menu
. The
Job Menu is displayed. Press
Menu>
or
<Menu
until Reset Printer appears on the second line.
Press
Select
.
54 Std Par ENA
Conne
ction Lost
54 Par x ENA
Connection Lost
The printer has lost the connection to an external
print server (also called an external network adapter
or ENA).
• Make sure the cable connecting the ENA and the
printer is securely attached. Turn the printer off
and then on again to see if the printer recognizes
the connection.
• Press
Go
to clear the message. The printer
erases any reference to the ENA and then resets.
54 Ser x Fax
Connection Lost
The printer has lost the connection to the external
modem. If the Fax Port menu item in the Fax Menu is
not set to Disabled, the printer automatically
assumes a modem is connected for fax processing.
If the printer does not detect a modem connected to
the serial port, it displays this message.
• Reconnect the modem to the serial port to enable
the printer to receive faxes.
• Press
Go
to clear the message and continue
normal printer operations. You cannot receive
faxes until the modem is reconnected.
If you do not intend to configure the serial port for
receiving faxes, set the Fax Port menu item to
Disabled to prevent the printer from displaying this
message.
55 Insufficient
Fax Buffer
The buffer used to process data is too full to receive
an incoming fax. This has broken the connection
between the printer and the sending fax machine.
The printer will not accept additional fax data until
sufficient fax buffer space is made available.
Press
Go to clear the message and print any fax
data stored in the fax buffer. Some data may not
print or may not print correctly.
To avoid another
55 Insufficient Fax Buffer, increase
the size of the Fax Buffer in the Fax Menu.
Printer messages (continued)
Message Action

17
Messages
56 Serial
Port
x
Disabled
Data has been sent to the printer through a se rial
port, but the serial port is disabled.
Press
Go
to clear the message. The printer discards
any data received through the serial port.
To avoid another
56 Serial Port x Disabled error
message, make sure the Serial Buffer menu item in
the Serial Menu is not set to Disabled.
56 Std Parallel
Port Disabled
56 Parallel
Port
x
Disabled
Data has been sent to the printer through a parallel
port, but the parallel port is disabled.
Press
Go to clear the message. The printer discards
any data received through the parallel port.
To avoid another error message, make sure the
Parallel Buffer menu item in the Parallel Menu is not
set to Disabled.
58 Too Many
Disks Installed
The printer only supports one disk option at a time.
To clear the message turn the printer off and unplug
the printer. Remove one of the disk options from the
printer.
See page 196 for information on removing disks.
61 Defective
Disk
The printer detects a defective disk option.
Press
Go to clear the message and continue
printing. You must install a different disk option
before you can perf orm any operations that require a
hard disk.
See page 196 for information on removing a disk.
62 Disk Full
There is not enough memory on the disk option to
store the data sent to the printer.
Press
Go to clear the message and continue
processing. Any information not previously stored on
the disk option is deleted.
63 Unformatted
Disk
The printer detects an unformatted disk option.
Press
Go to clear the message and continue
printing.
You must format the disk before you can perf orm any
disk operations. To format the disk, select Format
Disk from the Utilities Menu.
If the error message remains, the disk option may be
defective and require replacing. Disk operations are
not allowed until the defective disk is replaced and
the new one is formatted.
Printer messages (continued)
Message Action

18
Messages
70–79 messages Reserved for messages relating to the internal print
server.
Refer to the
Drivers, MarkVision and Utilities
CD for
more information. Click
View Documentation
and
then click
MarkNet Print Servers
.
900–999 Service When a service message occurs, turn the printer off
and check all cable connections. Turn the printer
back on.
If the service message recurs, call for service and
report the message number and description of the
problem.
Printer messages (continued)
Message Action

19
Troubleshooting
2
Troubleshooting
Sometimes printer problems are very easy to solve. If your printer is not
responding, first make sure:
• The power cord is plugged into the printer and a properly
grounded electrical outlet.
• The electrical outlet is not turned off by any switch or breaker.
• Other electrical equipment plugged into the outlet is working.
• The printer is turned on.
• The printer cable is securely attached to the printer and the host
computer, print server, or other network device.
Once you’ve checked each of these possibilities,
turn the printer off and
back on
. This often fixes the problem.
If a message appears on the operator panel display, see page 1 for more
information. If the message indicates the printer has a paper jam, turn to
page 41 for instructions on clearing the jam.
The tables in this chapter identify some printing problems you may
encounter and what you can do to resolve them. Additional troubleshooting information can be found in the
Complete Printer Reference
on Lexmark’s Web site (www.lexmark.com). If you still cannot solve your
problem, call for service.
Where do I go from here?
Type of problem See page …
Print quality 20
Paper feeding 28
Other printing problems 30
Finisher function 35
Mailbox function 38

20
Troubleshooting
Print quality problems
You may be able to correct many print quality problems by replacing a
supply or maintenance item that has reached the end of its intended life.
Check the operator panel f or a message about a printer consumable . See
“Determining the status of supplies” on page 108 for more information
about other ways to identify consumables that need to be replaced.
Use the following table to find solutions to any print quality problems you
have detected.
Print quality problems
Symptom Cause Solution
Blank pages
The photoconductor
cartridge is defective.
Replace the photoconductor
cartridge.
See “Replacing the photoconductor cartridge” on page 117.
The transfer roller is
defective.
Replace the transfer roller.
See “Replacing the transfer
roller” on page 131.
The printer was
priming the stapler.
When you insert a new staple
cartridge, the printer verifies
that staples are in the proper
position by stapling a blank
sheet of paper.
Black pages
The photoconductor
cartridge is defective.
Replace the photoconductor
cartridge.
See “Replacing the photoconductor cartridge” on page 117.
Your printer requires
servicing.
Call for service.

21
Troubleshooting
Print too light The Print Darkness
setting is too light.
Select a different Print
Darkness setting from the
printer driver before sending
the job to print.
Toner Saver is on. Turn Toner Saver off from the
printer driver before sending
the job to print.
You are using media
that does not meet the
printer specifications.
• Use recommended paper
and other media. Refer to
the
Complete Printer
Reference
on Lexmark’s
Web site for detailed
specifications.
• Load media from a new
package.
• Avoid textured paper with
rough finishes.
• Make sure the paper you
load in the trays is not damp.
The toner cartridge is
empty.
Replace the toner cartridge.
See “Installing a toner
cartridge” on page 111.
The printer is shifting
toner from the toner
cartridge to the photoconductor cartridge.
If you just installed a new toner
cartridge, the printer may be
filling the toner reservoirs in the
photoconductor cartridge. You
may also hear motor noises
while this procedure occurs.
Normal printing should resume
in three minutes or less.
The photoconductor
cartridge is defective or
has been installed in
more than one printer.
Replace the photoconductor
cartridge.
See “Replacing the photoconductor cartridge” on page 117.
Print quality problems (continued)
Symptom Cause Solution

22
Troubleshooting
Print too dark The Print Darkness
setting is too dark.
Select a different Print
Darkness setting from the
printer driver before sending
the job to print.
The toner cartridge is
defective.
Replace the toner cartridge.
See “Installing a toner
cartridge” on page 111.
The photoconductor
cartridge is defective or
has been installed in
more than one printer.
Replace the photoconductor
cartridge.
See “Replacing the photoconductor cartridge” on page 117.
Blurred
background
The toner cartridge is
defective.
Replace the toner cartridge.
See “Installing a toner
cartridge” on page 111.
Uneven print
density
The toner cartridge is
defective.
Replace the toner cartridge.
See “Installing a toner
cartridge” on page 111.
The photoconductor
cartridge is defective.
Replace the photoconductor
cartridge.
See “Replacing the photoconductor cartridge” on page 117.
The transfer roller is
worn or defective.
Replace the transfer roller.
See “Replacing the transfer
roller” on page 131.
Print quality problems (continued)
Symptom Cause Solution

23
Troubleshooting
Irregularities The paper has
absorbed moisture
due to high humidity.
Load paper from a fresh
package in the paper tray.
See “Storing supplies” on
page 109 for information on
storing paper.
You are using media
that does not meet the
printer specifications.
• Use recommended paper
and other media. Refer to
the
Complete Printer
Reference
on Lexmark’s
Web site for detailed
specifications.
• Avoid textured paper with
rough finishes.
The transfer roller is
worn or defective.
Replace the transfer roller.
See “Replacing the transfer
roller” on page 131.
The fuser is worn or
defective.
Replace the fuser.
See “Installing the fuser” on
page 140.
White or black line The photoconductor
cartridge is defective.
Replace the photoconductor
cartridge.
See “Replacing the photoconductor cartridge” on page 117.
Print quality problems (continued)
Symptom Cause Solution

24
Troubleshooting
Toner specks The toner cartridge is
defective.
Replace the toner cartridge.
See “Installing a toner
cartridge” on page 111.
The photoconductor
cartridge is defective.
Replace the photoconductor
cartridge.
See “Replacing the photoconductor cartridge” on page 117.
The transfer roller is
worn or defective.
Replace the transfer roller.
See “Replacing the transfer
roller” on page 131.
The fuser is worn or
defective.
Replace the fuser.
See “Installing the fuser” on
page 140.
The paper dust
remover is worn.
Replace the paper dust
remover, which is included in
the photoconductor kit.
See “Replacing the paper dust
remover” on page 124.
Toner is in the paper
path.
Call for service.
Paper feed rollers are
dirty.
Call for service.
Print quality problems (continued)
Symptom Cause Solution

25
Troubleshooting
Skewed print The paper guides in
the selected paper tray
are not in the correct
position for the size
media loaded in the
tray.
Remove the paper in the tray
and move the paper guides to
the proper positions.
See “Loading the paper trays”
on page 79 for detailed
instructions on adjusting the
guides in each tray.
Paper is not properly
positioned under the
corner bucklers.
If you’re feeding from a
500-sheet paper tray (tray 2 or
tray 3, or an optional tray 4),
make sure the stack of paper
fits under the corner bucklers
before pushing the tray into the
printer.
See step 10 on page 99 for an
illustration of the corner
bucklers.
The paper tray is not
completely inserted
into the printer.
Push the tray firmly into the
printer to make sure it is fully
inserted.
Paper feed rollers are
dirty or wor n.
Call for service.
Print quality problems (continued)
Symptom Cause Solution

26
Troubleshooting
Incorrect margins The paper tray is not
completely inserted
into the printer.
Push the tray firmly into the
printer to make sure it is fully
installed.
The left paper guide in
the 500-sheet tray is
set for a different size
paper than what is
loaded in the tray.
Insert the paper guide in the
correct position for the size
paper in the tray.
See page 88 for information on
loading the 500-sheet drawer.
You did not set the
correct paper size for
tray 1.
After loading paper in tray 1,
set the default paper size from
the printer operator panel:
1 From the Paper Menu,
select Paper Size.
2 Select Tray 1 Size.
3 Select the correct paper
size from the list of available values.
For information on using the
operator panel, see page ix.
The locking clips are
not securing the
drawer to the printer.
Attach the four locking clips to
the drawer. Refer to the
Setup
Guide
for installation
instructions.
The margin settings
for the selected tray
need to be adjusted.
Adjust the appropriate margin
settings in the Registration
Menu.
Refer to the
Complete Printer
Reference
on Lexmark’s Web
site for information about
accessing this menu.
The paper feed rollers
are worn.
Call for service.
Print quality problems (continued)
Symptom Cause Solution

27
Troubleshooting
Clipped images The paper tray is not
completely inserted
into the printer.
Push the tray firmly into the
printer to make sure it is fully
installed.
The left paper guide in
the 500-sheet tray is
set for a different size
paper than what is
loaded in the tray.
Insert the paper guide in the
correct position for the size
paper in the tray.
See page 88 for information on
loading paper.
You did not set the
correct paper size for
tray 1.
After loading paper in tray 1,
set the default paper size from
the printer operator panel:
1 From the Paper Menu,
select Paper Size.
2 Select Tray 1 Size.
3 Select the correct paper
size from the list of avail-
able values.
For information on using the
operator panel, see page ix.
Print quality problems (continued)
Symptom Cause Solution
ABCDEF
ABCDEF
ABCDEF
ABCDEF
ABCDEF

28
Troubleshooting
Paper feed problems
If paper has trouble traveling through the printer, paper jams or other
problems relating to mechanical paper feed can result. Use the following
table to find solutions to paper feed problems you are experiencing. For
information about paper feed problems in output options, see “Finisher
problems” on page 35 or “Mailbox problems” on page 38.
For detailed instructions on clearing paper jams, see page 41. For tips on
avoiding paper jams, see page 105.
Paper feed problems
Symptom Cause Solution
Paper
frequently jams
in the printer.
You are using
media that does not
meet the printer
specifications.
Use recommended paper and other
media. Refer to the
Complete Printer
Reference
on Lexmark’s Web site for
detailed specifications.
You have loaded
too much paper in
the tray.
Make sure the stack of paper you load
in the tray does not exceed the
maximum stack height indicated at the
back of the tray.
The paper guides in
the trays are not set
to the appropriate
position for the size
media loaded in the
tray.
Move the paper guides to the correct
position.
See “Loading the paper trays” on
page 79 for detailed instructions.
Paper is not
securely under the
corner bucklers in
the 500-sheet trays.
Make sure paper is loaded properly in
the paper tray.
See page 88 for more information.
The 500-sheet tray
is not completely
inserted into the
printer.
Push the tray firmly into the printer.
Paper has
absorbed moisture
due to high humidity.
• Load paper from a fresh package in
the tray.
• Store paper in its original wrapper
until you load it in the tray.
See page 104 for more information on
properly storing media.

29
Troubleshooting
Paper
frequently jams
in the printer
(
continued
).
You are feeding
100% cotton paper
from tray 1.
Feed 100% cotton paper from the
500-sheet trays or the optional
2500-sheet drawer (trays 2, 3, or 4).
Paper feed rollers
are dirty or worn.
Call for service.
You are feeding
media into the
manual feed tray
incorrectly.
Make sure you load media correctly:
– Load media print side down.
– For A4, A5, B5, executive, and
letter size paper, feed the long
edge of the paper first.
– For A3, B4, legal, and 11x17 size
paper, feed the short ed ge of the
paper first.
The
Paper Jam
message
remains after
you remove the
jammed paper.
You have not
cleared the entire
paper path.
Clear paper from the entire paper path,
and then press
Go.
See page 41 for detailed instructions
on clearing paper jams.
The page that
jammed does
not reprint after
you clear the
jam.
Jam Recov ery in the
Setup Menu is set to
Off.
Set Jam Recovery to Auto or On.
Refer to the
Complete Printer
Reference
on Lexmark’s Web site for
more information about changing the
setting.
Paper feed problems (continued)
Symptom Cause Solution

30
Troubleshooting
Other printing problems
Use the following tab le to find solutions to other printing problems you are
experiencing.
Other printing problems
Symptom Cause Solution
The operator
panel display is
blank or only
displays
diamonds.
The printer’s self
test failed.
Turn the printer off, wait about 10
seconds, and turn the printer back on.
Performing Self Test
appears on the
operator panel display. When the test
is completed, the
Ready
message is
displayed.
If the messages do not appear, turn
the printer off and call for service.
Jobs don’t print. The printer is not
ready to receive
data.
Make sure
Ready or Power Saver
appears on the operator panel display
before sending a job to print. Press
Go
to return the printer to the ready state.
One of the printer
supplies has
reached the end of
life.
If
Replace Toner to Continue
or
Replace PC Kit to Continue
appears
on the display, you cannot continue
printing until you replace the supply
item specified in the message.
See page 107 for instructions on
replacing supplies.
The specified
output bin is full.
Remove the stack of paper from the
output bin and press
Go
.
The specified paper
tray is empty.
Load paper in the tray.
See “Loading the paper trays” on
page 79 for detailed instructions.
You are using the
wrong printer driver
or are printing to
File.
Verify that you selected the printer
driver associated with the Optra W810
printer.
Note:
If you are using a USB port,
make sure you are running
Windows 98 and using a Windows 98
compatible printer driver.

31
Troubleshooting
Jobs don’t print
(
continued
).
Your MarkNet
™
print ser ver is not
set up properly or is
not connected
properly.
V erify that you hav e properly set up the
network address and that the network
cable is securely connected.
Refer to the
Setup Guide
or to the
Drivers, MarkVision and Utilities
CD for
information. After launching the CD,
click View Documents and then click
MarkNet Print Servers.
Port settings are
incorrect.
Make sure the current communications
settings are correct. Refer to the
Setup
Guide
for information on configuring
MarkNet ports. Refer to the
Complete
Printer Reference
on Lexmark’s Web
site for information on parallel, serial,
fax, or LocalTalk port settings.
You are using the
wrong interface
cable, or the cable is
not securely
connected.
Make sure you are using a recommended printer cable. Refer to the
Setup Guide
for cable specifications.
It takes longer
than expected
to print a job.
The job is too
complex.
Reduce the complexity of your print job
by eliminating the number and size of
fonts, the number and complexity of
images, and the number of pages in
the job.
Page Protect is On. Set Page Protect Off from the Setup
Menu.
The resolution is set
to 1200 Image
Quality.
If your job includes complex images, it
may take longer to print when the
resolution is set to 1200 Image Quality .
To print the job faster, select another
print resolution from the printer driver
before sending the job to print. You
may notice some reduction in print
quality.
The job prints
from the wrong
tray or on the
wrong print
material.
The printer driver
settings are
overriding the
operator panel
menu settings.
Make sure the Paper Size and Paper
Type specified in the printer driver are
correct for the job you are printing.
Other printing problems (continued)
Symptom Cause Solution

32
Troubleshooting
Incorrect
characters
print.
You are using an
incompatible
parallel cable.
If you’re using parallel interface, make
sure you’re using an IEEE
1284-compliant parallel cable. We
recommend Lexmark part number
1329605 (10 ft) or 1427498 (20 ft) for
the standard parallel port.
The printer is in Hex
Trace mode.
If
Ready Hex appears on the operator
panel display, you must exit Hex Trace
mode before you can print your job.
Turn the printer off and back on to exit
Hex Trace mode.
Tray linking
does not work.
Tray linking is not
configured properly.
To configure the linked trays:
• Make sure the Paper Type setting in
the Paper Menu is the same for all
linked trays.
• Make sure the Paper Size setting is
the same for all linked trays.
–
Tray 1
: Verify the Tray 1 Size set-
ting in the Paper Menu is correct.
–
Trays 2 and 3
: Verify the left
paper guide inside the tray is
installed in the correct position.
(This procedure also applies to
tray 4
, if you have an optional
500-sheet tray installed.) Use the
instructions beginning with step 3
on page 90 to move the left
paper guide.
–
Tray 4
: If you have an optional
2500-sheet drawer installed, the
Paper Size setting is pre-set at
the factory to either letter or A4
size paper.
Tray
x
Missing
appears on the
operator panel
display even
though the tray
is installed in
the printer.
The left paper guide
in the specified tray
is not properly
inserted.
Pull open the tray, remove the paper,
and reinsert the left paper guide,
making sure the guide snaps into the
notch at the front of the tray.
For detailed instructions, see step 5 on
page 93.
Other printing problems (continued)
Symptom Cause Solution

33
Troubleshooting
Large jobs do
not collate.
The job is too
complex.
Reduce the complexity of the print job
by eliminating the number and size of
fonts, the number and complexity of
images, and the number of pages in
the job.
Add printer memory or a hard disk
option.
Refer to the
Complete Printer
Reference
on Lexmark’s Web site for
information on managing printer
memory and selecting memory options
to install.
Unexpected
page breaks
occur.
The job has timed
out.
Set Print Timeout to a higher value
from the Setup Menu.
The printer
generates an
unusual motor
noise that lasts
up to three
minutes.
The printer is trying
to determine if there
is toner remaining
in the toner
cartridge.
If
Replace Toner appears on the
display, replace the toner cartridge.
See “Installing a toner cartridge” on
page 111.
If no message is displayed and you
just inserted a new toner cartridge, the
printer may be transporting toner into
the photoconductor cartridge. The
motor noises should cease in three
minutes or less.
An option does
not operate
correctly after it
is installed, or it
stops working.
Communication has
failed between the
printer and the
option.
Turn the printer off, wait about 10
seconds, and turn the printer back on.
The option is not
set up correctly.
Turn the printer off and check the
connection between the option and the
printer. Refer to the
Setup Guide
for
complete installation instructions.
The printer driver
does not recognize
that the option is
installed.
Your printer driver may not automatically recognize that an option is
attached to your printer. Open the
driver and verify that all the printer
configuration settings are correct.
Other printing problems (continued)
Symptom Cause Solution

34
Troubleshooting
Y ou cannot print
using the
infrared port on
the tri-port
interface card.
The infrared port is
not configured
properly.
Make sure neither Infrared Port nor
Infrared Buffer is set to Disabled in the
Infrared Menu. Also make sure the
Window Size and Transmit Delay
settings are correct.
The connection
between the two
infrared devices
cannot be made.
Make sure the distance between the
two infrared ports is 3 m (10 ft) or less.
If necessary, move the ports closer
together.
Refer to the
Setup Guide
for more
information.
Make sure no objects are between the
two ports.
Make sure the computer is set on a
level surface.
If necessary, turn off the lights in the
room or close window shades or
blinds. Bright light, such as direct
sunshine or nearby artificial lights, may
interfere with communication.
Y ou cannot print
using the
LocalTalk port.
The LocalT alk port is
not set up correctly.
Make sure neither LocalTalk Port nor
LocalTalk Buffer is set to Disabled in
the LocalTalk Menu.
Note: For Macintosh users, verify that
the printer is set up correctly in the
Macintosh Chooser.
You cannot
receive faxes
via the fax port.
The fax port is not
configured correctly.
Make sure neither Fax Port nor Fax
Buffer is set to Disabled in the Fax
Menu.
The fax machine
connected to your
printer is not
compatible with your
printer.
Make sure the fax machine you have
connected to your printer is a class 1
fax modem.
The connection has
been lost.
If power to the modem has been interrupted, complete the following steps
in
the order listed:
1 Turn the printer off.
2 Turn the modem on.
3 Turn the printer on.
Refer to the
Setup Guide
for more
information.
Other printing problems (continued)
Symptom Cause Solution

35
Troubleshooting
Finisher problems
Use the following table to find solutions to problems you are experiencing
with the finisher option.
Finisher problems
Symptom Cause Solution
Paper
frequently jams
in the finisher.
The finisher and
printer are
misaligned.
Properly align the finisher with the
printer.
See “Aligning the finisher with the
printer” on page 169.
The finisher cables
are not connected
properly.
Check the cable connections. Refer to
the
Setup Guide
for instructions on
connecting the finisher to the printer.
The transport unit is
not properly
installed.
If the
280 Paper Jam / Open Cover H
message recurs, verify that you have
properly installed the transport unit on
top of the printer. The gears must be
completely engaged for paper to trav el
successfully from the printer to the
finisher.
Refer to the
Setup Guide
for detailed
installation instructions.
You are trying to
staple, hole punch,
or offset media other
than paper.
Restrict use of the special finishing
features to paper meeting the printer
specifications.
Refer to the
Complete Printer
Reference
on Lexmark’s Web site for
more information.
You cannot
clear the
280 Paper Jam /
Open Cover H
message.
The transport unit is
not properly
installed.
Verify that you have properly installed
the transport unit on top of the printer.
Refer to the
Setup Guide
for detailed
installation instructions.
The finisher
does not offset
the print job as
requested.
You’ve selected both
offsetting
and
stapling for the job.
The finisher cannot staple
and
offset a
print job. If both functions are selected,
the printer staples the job, but does not
offset it.

36
Troubleshooting
Pages are not
stapled.
The stapler is not
installed or is not
installed correctly.
Reinstall the stapler.
See page 148 for instructions on
removing and installing the stapler.
The stapler is out of
staples.
Insert a new staple cartridge.
See “Installing a staple cartridge” on
page 148.
The stapler is
jammed.
Check the stapler for a staple jam.
See “Clearing a staple jam” on
page 156.
The stapler is not
primed.
Prime the stapler.
See “Priming the stapler” on page 162.
Staples are not
properly positioned
in the stapler.
Prime the stapler.
See “Priming the stapler” on page 162.
You are trying to
staple too many
sheets.
The finisher can staple up to 50 sheets
of 20 lb paper. If you attempt to staple
a larger stack of paper, the finisher
ejects the stack without stapling it.
Reduce the number of pages in the
staple job.
Staple priming
fails.
The stapler is out of
staples.
Insert a new staple cartridge.
See “Installing a staple cartridge” on
page 148.
The staple priming
source tray is empty.
Load paper in the staple priming
source tray specified in the Finishing
Menu.
Bin 2 is full. Remove the stack of paper from bin 2.
The stapler is not
installed or is not
installed correctly.
Reinstall the stapler.
See page 148 for instructions on
removing and installing the stapler.
The stapler is
jammed.
Check the stapler for a staple jam.
See “Clearing a staple jam” on
page 156.
Finisher problems (continued)
Symptom Cause Solution

37
Troubleshooting
The staple is in
the wrong
corner of the
stack.
The stapler has a
fixed position in the
finisher, which
determines the
placement of the
staple.
You cannot change the position of the
staple. If necessary , reformat your print
job from the software application or
rotate your print job using the printer
driver to avoid stapled sets that are
difficult to read.
A printer
message says
that all linked
bins are full, but
bin 1 is empty.
Bin 2 (the default bin
for all stapled and
offset jobs) is full.
The finisher stacks all stapled jobs and
all offset jobs in bin 2. If bin 1 and bin 2
are linked and bin 2 is full, the printer
reports that bin 1 is full also.
To clear the message, remove the
stack of paper from bin 2. The printer
can then receive additional stapled or
offset jobs.
The transport
unit falls from
the top of the
printer when
you pull away
the finisher.
The guide rail
attaching the
finisher to the printer
is not properly
installed.
Reinstall the guide rail. When properly
installed, the guide rail prevents you
from pulling the finisher too far away
from the printer.
Refer to the
Setup Guide
for detailed
installation instructions.
Finisher problems (continued)
Symptom Cause Solution
Portrait Landscape
Portrait Landscape
A4, A5, B5, executive, and letter
ABC
ABC
ABC
ABC
A3, B4, legal, and 11x17

38
Troubleshooting
Mailbox problems
Use the following table to find solutions to problems you are experiencing
with the mailbox option.
Mailbox problems
Symptom Cause Solution
Paper
frequently jams
in the mailbox.
The mailbox and
the printer are
misaligned.
Align the mailbox with the printer.
See “Aligning the mailbox option” on
page 177.
The mailbox cables
are not connected
properly.
Check the cable connections. Refer to
the
Setup Guide
for instructions on
connecting the mailbox to the printer.
The transport unit is
not correctly
installed.
If the
280 Paper Jam / Open Cover H
message recurs, verify that you have
properly installed the transport unit on
top of the printer. The gears must be
completely engaged for paper to trav el
successfully from the printer to the
mailbox.
Refer to the
Setup Guide
for detailed
installation instructions.
You cannot
clear the
280 Paper Jam /
Open Cover H
message.
The transport unit is
not properly
installed.
Verify that you have properly installed
the transport unit on top of the printer.
Refer to the
Setup Guide
for detailed
installation instructions.
The transport
unit falls from
the top of the
printer when
you pull away
the mailbox.
The guide rail
attaching the
mailbox to the
printer is not
properly installed.
Reinstall the guide rail. When properly
installed, the guide rail prevents you
from pulling the mailbox too far away
from the printer.
Refer to the
Setup Guide
for detailed
installation instructions.

39
Troubleshooting
Calling for service
When you call for printer service, be prepared to describe the problem
you are experiencing or the error message on the operator panel.
You’ll also need to know your printer model type and serial number. Refer
to the label on the back of the printer under the toner box for this information. The serial number is also listed on the menu settings page you can
print from the Utilities Menu or from your internet browser, if you have a
MarkNet print server attached to your printer. See page 108 for more
information about printing the menu settings page.

40
Troubleshooting

41
Clearing jams
3
Clearing paper jams
By carefully selecting print materials and loading them properly, you
should be able to avoid most paper jams. See page 79 for instructions on
loading media. For other tips on avoiding paper jams, see page 105. If
you do experience a paper jam, follow the instructions in this chapter to
clear the jam and continue printing.
Understanding paper jam messages
When a paper jam occurs, the printer displays a two-line 2
xx
Paper Jam
message and stops operating. Although the location of the paper jam
appears on the second line of the display,
you must clear all paper from
the entire paper path
. Press the Go button on the operator panel to clear
the message and continue printing.
See “Paper path” on page 42 for an illustration of the areas where y ou can
access jammed paper.
NOTE:
If you have an optional finisher attached to your printer,
the message
Leave Staple Job in Finisher , Clear Staple Job
from Finisher
, or Clear Job from Finisher may alternate
with the
2
xx
Paper Jam message.

42
Clearing jams
Paper path
The
paper path
is the route paper travels as it makes its way from the
selected paper source through the printer and into the selected output
bin. To clear the paper in the path, start at the paper source the printer is
using for the current job and open all doors and covers between the
source and the selected output bin. If you are not sure which source the
printer is using, start with tray 4, if installed, or tray 3.
Refer to the f ollo wing illustration for a better understanding of the path the
paper travels through the printer. We have labeled the doors and covers
that give you access to paper in the path when a jam occurs.
Front view
Jam access door
for optional
2500-sheet
drawer (Doo r F)
Duplex door
(Door G)
Jam access
door for tray 2
(Door D)
Jam access doo r
for tray 3
(Door E)
Standard
output bin
Fuser cover
(Cover B)
Side door
(Door C)
Manual
feed tray
Tray 1
Tray 2
Tray 3
Tray 4

43
Clearing jams
Message maps
You can use the
message map
on top of the printer (or on the transport
unit if an optional finisher or mailbox is installed) to locate the doors and
covers you must open when clearing the paper path.
Mailbox lower
access door
(Door J)
Mailbox upper
access door
(Door I)
Output
bins
Jam access doors
(Doors D , E, and F)
Duplex door
(Door G)
Manual
feed tray
Transport unit
cover (Cover H)
Finisher bin cover
(Cover N)
Finisher
top cover
(Cover M)
Message map for printer with
mailbox or finisher attached
Message map
for printer
Fuser cover
(Cover B)
Trays 1, 2, 3, and 4
Output bins

44
Clearing jams
Clearing jams from the printer
The instructions in this section walk you through the steps necessary to
clear paper from the entire paper path. Use the following table to determine where to begin clearing the paper path.
NOTE: If Jam Recovery is set On, the printer reprints any pages
you clear from the paper path. Refer to the Complete
Printer Reference on Lexmark’s Web site
(www.lexmark.com) for more information.
Tray 4 (optional 2500-sheet drawer)
If the printer is feeding paper from an optional 2500-sheet drawer, follow
the instructions beginning in this section to clear the paper jam. Skip to
page 48 if the printer is feeding from a 500-sheet drawer.
W
ARNING
:
Do not pull open the 2500-sheet tray until you
clear all paper from the jam access door on the
right side of the printer (Door F). Opening the tray
when paper is jammed in the vertical transport area
may result in problems that require a service call.
If the paper source for the job is … Go to page …
Tray 4 (optional 2500-sheet drawer) 44
Tray 4 (optional 500-sheet drawer) 48
Tray 2 or 3 48
Tray 1 53
Manual feed tray 56
Unknown 44

45
Clearing jams
1
Open the jam access door on the right side of the printer
(Door F).
2
If you cannot grasp the edge of the paper, rotate the paper
release wheel to roll the paper out of the printer.

46
Clearing jams
3
Pull the jammed paper straight out.
4
Close the jam access door.

47
Clearing jams
5
If you cannot reach the paper from the jam access door,
open tray 4 and remove the jammed paper.
W
ARNING
:
If the paper has lodged behind the paper tray where
you cannot reach it, discontinue using tray 4 and call
for service.
6
Close tray 4.
7
Go to page 48 to continue clearing the paper path.

48
Clearing jams
Trays 2 and 3
If the printer is feeding paper from tray 2 or 3, or from an optional
500-sheet drawer (tray 4), follow the instructions beginning in this section
to clear the paper jam.
1
Open the jam access doors on the right side of the printer
(Doors D and E).
NOTE:
Do not open the paper tra ys until you clear all paper from
the jam access doors.
2
Pull the jammed paper out of the printer, as shown.
a
If you can see the edge of the jammed paper, pull the
paper straight out.

49
Clearing jams
b
If the paper is tightly bound inside the printer, pull out
the upper edge of the jammed paper, and then pull the
paper straight out.
c
If the paper is jammed as shown, release the upper edge
of the paper, and then pull the paper straight out.

50
Clearing jams
3
Close the jam access doors.
4
If you cannot reach the paper from the jam access door, pull
open the paper tray and remove the jammed paper.
5
Press down on the pressure plate inside the tray until it
clicks into place.
Make sure the adjustable guides are snug against the paper, and
the paper stack fits under the corner bucklers.

51
Clearing jams
6
If it appears the paper has lodged behind the paper tray,
completely remove the tray to retrieve the paper:
a
Release the tabs on either side of the tray, as shown, and
pull the tray straight out of the printer.
b
Remove any paper from inside the opening for the tray.

52
Clearing jams
7
Reinsert the tray.
a
Make sure the pressure plate is pressed down inside the
tray, and the paper stack fits under the corner bucklers.
b
Align the paper tray with the opening and insert the tray
completely into the printer.
If the tray is not pushed completely into the printer, text and
images may print in the wrong position on the page, and margins may appear incorrect.
8
Go to page 53 to continue clearing the paper path.

53
Clearing jams
Tray 1
If the printer is feeding paper from tray 1, follow the instructions in this
section to clear jammed paper from the drawer.
1
Pull open tray 1.
2
Press down on the pressure plate until it clicks into place.
3
Remove the jammed paper by pulling it out, as shown.

54
Clearing jams
4
If it appears the paper has lodged behind the paper tray,
completely remove the tray to retrieve the paper:
a
Use a pencil or similar object to press the tab on the right
side of the tray, as shown.
b
Pivot the tray to the left, and then firmly move the tray
back and forth to work the tray out of the printer.
Removing the tray may require some force.
c
Remove any paper from inside the opening for the tray.

55
Clearing jams
5
Reinsert the tray.
a
Make sure the pressure plate is pressed down inside the
tray.
b
Align the left side of the tray with the guides inside the
opening.
c
Insert the rails on the right side of the tray into the metal
bracket that extends from inside the printer, as shown.
NOTE:
If the metal bracket slides into the printer while you are
inserting the rails, re-extend the bracket.
Metal bracket

56
Clearing jams
6
Push the tray firmly into the printer.
7
Continue clearing paper from the path:
–
If you have a duplex unit installed, go to “Manual f eed unit” to
continue clearing the paper path.
–
If you do not have a duplex unit installed, skip to “Photoconductor area” on page 58.
Manual feed unit
NOTE:
The manual feed tr ay is available only if the duplex unit is
attached to your printer.
Follow these instructions if you are feeding a single sheet of media into
the manual feed tray. Skip to “Photoconductor area” on page 58 if a manual feed unit is not installed.
1
Pull the jammed sheet straight out of the printer.
2
If the printer is duplexing the print job, go to page 57 to
continue clearing the paper path.

57
Clearing jams
Duplex unit
Follow these steps if the printer is duplexing the print job. Skip to “Photoconductor area” on page 58 if a duplex unit is not installed or you are not
duplexing the print job.
1
Open the duplex door (Door G).
2
Depending on the location of the jammed sheet:
a
Pull the jammed paper straight down and out of the
duplex unit.

58
Clearing jams
b
Pull the jammed paper straight up and out of the duplex
unit.
3
Close the duplex door.
4
Go to “Photoconductor area” to continue clearing the paper
path.
Photoconductor area
1
Lift the side door latch and lower the side door (Door C).

59
Clearing jams
2
Depending on the location of the jammed sheet:
a
Pull the jammed paper out from under the
photoconductor cartridge, as shown.
b
Pull the jammed paper straight out from under the
transfer roller, as shown.
W
ARNING
:
Do not touch the transfer roller. Touching the transf er
roller can result in print quality problems.

60
Clearing jams
3
If you have an output option attached to your printer, skip to:
–
“Clearing jams from the mailbox option” on page 62, or
–
“Clearing jams from the finisher option” on page 69.
Otherwise, continue with “Fuser area”.
Fuser area
CAUTION:
The fuser area becomes very hot during printer
operation. Avoid touching parts in this area of the
printer until they have cooled.
1
With the side door still open, lower the fuser cover (Cover B).

61
Clearing jams
2
If paper is jammed in the fuser, pull the paper release levers
in the direction of the arrows.
3
Remove the jammed paper, as shown.
4
Close the fuser cover.
5
Close the side door.
6
Press Go on the operator panel to continue printing.
The printer clears the
2xx Paper Jam
message and continues
printing. If the message does not clear, paper is still present in the
path. Recheck all doors, covers, and trays in the paper path.

62
Clearing jams
Clearing jams from the mailbox option
Remember to clear all paper from the entire paper path, not just the area
indicated in the paper jam message. See page 41 for more information.
Instructions for clearing jams from the mailbox begin on page 63.
Refer to the f ollo wing illustration for a better understanding of the path the
paper travels through the transport unit to the mailbox option.
NOTE: If paper jams in the mailbox option recur, make sure the
mailbox cab les are securely connected and the mailbox is
properly aligned with the printer. See page 177 for more
information.
Output
bins
Transport unit cover
(Cover H)
Fuser cover
(Cover B)
Side door
(Door C)

63
Clearing jams
1
Pull the mailbox away from the printer.
2
Lift the side door latch and lower the side door (Door C).

64
Clearing jams
3
Lower the fuser cover (Cover B).
CAUTION:
The fuser area becomes very hot during printer
operation. Avoid touching parts in this area of the
printer until they have cooled.
4
If paper is jammed in the fuser, pull the paper release levers
in the direction of the arrows.

65
Clearing jams
5
Remove the jammed paper as shown.
6
Close the fuser cover.
7
Close the side door.
8
Raise the transport unit cover (Cover H).

66
Clearing jams
9
Pull the jammed paper straight out of the mailbox.
10
Close the transport unit cover.
If the
280 Paper Jam / Open Cover H
message frequently recurs,
make sure you ha ve properly installed the transport unit. Refer to
the
Setup Guide
for complete installation instructions.

67
Clearing jams
11
Open the upper access door on the mailbox (Door I).
12
Pull the jammed paper straight down and out of the mailbox.
13
Close the upper access door.
14
Open the lower access door (Door J).
15
Pull the jammed paper straight down and out of the mailbox.

68
Clearing jams
16
Close the lower access door.
17
Push the mailbox against the printer.
18
Pull any jammed paper straight out of the bins.
19
Press Go on the operator panel to continue printing.
The printer clears the
2xx Paper Jam
message and continues
printing. If the message does not clear, paper is still present in the
path. Recheck all doors, covers, and trays in the paper path.

69
Clearing jams
Clearing jams from the finisher option
Remember to clear all paper from the entire paper path, not just the area
indicated in the paper jam message. See page 41 for more information.
Instructions for clearing jams from the finisher begin on page 70.
Refer to the f ollo wing illustration for a better understanding of the path the
paper travels through the transport unit to the finisher option.
NOTE: If paper jams in the finisher option recur, make sure the
finisher cables are securely connected and the finisher is
properly aligned with the printer. See page 169 for more
information.
Bin 1
Transport unit cover
(Cover H)
Finisher bin cover
(Cover N)
Finisher top cover
(Cover M)
Bin 2
Fuser cover
(Cover B)
Side door
(Door C)

70
Clearing jams
1
Pull the finisher away from the printer.
2
Lift the side door latch and lower the side door (Door C).

71
Clearing jams
3
Lower the fuser cover (Cover B).
CAUTION:
The fuser area becomes very hot during printer
operation. Avoid touching parts in this area of the
printer until they have cooled.
4
If paper is jammed in the fuser, pull the paper release levers
in the direction of the arrows.

72
Clearing jams
5
Remove the jammed paper as shown.
6
Close the side door.
7
Close the fuser cover.
8
Raise the transport unit cover (Cover H).

73
Clearing jams
9
Pull the jammed paper straight out of the finisher.
10
Close the transport unit cover.
If the
280 Paper Jam / Open Cover H
message frequently recurs,
make sure you ha ve properly installed the transport unit. Refer to
the
Setup Guide
for complete installation instructions.

74
Clearing jams
11
Open the finisher top cover (Cover M).

75
Clearing jams
12
If the finisher was punching holes when the paper jammed,
rotate the green paper release wheel 10 times to remove the
jammed paper.
Check the hole punch box for any paper that might have rolled
into it. For instructions on removing the hole punch box, see
page 163.

76
Clearing jams
13
Lift the green paper release handle to remove the jammed
paper.
14
Close the finisher top cover.

77
Clearing jams
15
Open the finisher bin cover (Cover N).
NOTE:
The message
Leave Staple Job in Finisher, Clear Staple
Job from Finisher
, or
Clear Job from Finisher
may alternate
with the
Paper Jam
message. If you see
Leave Staple Job
in Finisher
, do not remove the stack of paper located
under Cover N.
16
Remove any jammed paper.

78
Clearing jams
17
Close the finisher bin cover.
If you think the stapler may be jammed, see “Clearing a staple
jam” on page 156.
18
Push the finisher against the printer.
19
Press Go on the operator panel to continue printing.
The printer clears the
2xx Paper Jam
message and continues
printing. If the message does not clear, paper is still present in the
paper path. Recheck all doors, covers, and trays in the paper
path.

79
Loading paper
4
Loading paper
The Optra W810 has three standard trays that combine for a total paper
capacity of 1250 pages. You can also attach an optional 500-sheet drawer
or an optional 2500-sheet drawer to your printer to increase its paper
feeding capacity to a maximum of 3750 pages.
This chapter provides instructions for loading paper in the printer’s standard and optional trays. It also offers tips on properly storing the media
you plan to use in your printer, and hints on how to avoid paper jams.
For details about the types of media your printer supports, refer to the
Complete Printer Reference
on Lexmark’s Web site (www.lexmark.com).
Loading the paper trays
Use the following table as a guide to find more information about loading
each of the standard and optional trays . See page 105 for helpful suggestions for avoiding paper jams.
Where do I go from here?
Tray Capacity
Paper sizes
supported
Media type See page …
1 250 A3, A4, A5, B4, B5,
letter, executive,
legal, and 11x17
Paper, paper labels,
transparencies, and
card stock
80
2, 3, 4 500 A3, A4, B4, letter,
legal, and 11x17
Paper 88
4 2500 A4
or
letter Paper 101

80
Loading paper
Loading tray 1
Tray 1 holds 250 sheets of A3, A4, A5, B4, B5, letter, executive , legal, and
11x17 size paper. You can also load transparencies, labels, and card
stock in tray 1. If you have an optional finisher attached to your printer,
note that you cannot staple, hole punch, or offset any media other than
paper. Do
not
load 100% cotton paper in tray 1.
NOTE: If you load any media other than letter or A4 size paper in
tray 1, make sure you change the Paper Type and Paper
Size settings for that tra y from the operator panel. Refer to
the
Complete Printer Reference
for more information.
1
Pull the paper tray open until it stops.

81
Loading paper
2
Press down on the pressure plate until it clicks into place.
3
Squeeze the left paper guide and slide it all the way to the
left.

82
Loading paper
4
Press the green tab and slide the adjustable guides all the
way open.
5
Before loading paper, flex the sheets back and forth to
loosen them, and then fan them. Straighten the edges on a
level surface.

83
Loading paper
6
Load the paper with the recommended print side face up, as
shown in the illustrations on pages 84 and 85.
Do not exceed the maximum stack height indicated on the adjustable guide.
If you are loading media other than paper, do not load more than
50 sheets. Use the maximum stack height label as a guide.
Paper
Transparencies
(A)
Labels and
card stock
(B)

84
Loading paper
The orientation of the paper in the tray depends on the size paper
you’re loading:
– For A4, A5, B5, executive, and letter size paper, place the
long edge of the paper to the right of the tray.
If you’re loading preprinted letterhead, place the top of the
page at the back of the tray.
A4, A5, B5, executive, and letter size paper

85
Loading paper
– For A3, B4, legal, and 11x17 size paper , place the short edge
of the paper to the right of the tray.
If you’re loading preprinted letterhead, place the top of the
page at the left side of the tray.
A3, B4, legal, and 11x17 size paper

86
Loading paper
7
Squeeze the left paper guide and slide it toward the paper
until the guide fits snugly against the stack.
8
Press the green tab and slide the adjustable guides toward
the paper until the guides fit snugly against the stack.
 Loading...