

Lexmark Platinum Pro900, Platinum Pro905, Platinum Pro904, Platinum Pro903 Quick Reference Manual
Page 1

Lexmark Platinum Pro900 Series Quick
Reference Guide
November 2010 www.lexmark.com
Page 2
Important Message About Cartridge Recycling!
Please Read Before Opening Your Inkjet Cartridge Box
At Lexmark, we take our commitme nt to the env ironment serious ly, and we encourage our customers
to participate in our easy, no-cost method for returning empty Lexmark cartridges to Lexmark for proper
recycling. We will insure that cartridges are properly handled with zero waste to landfills.
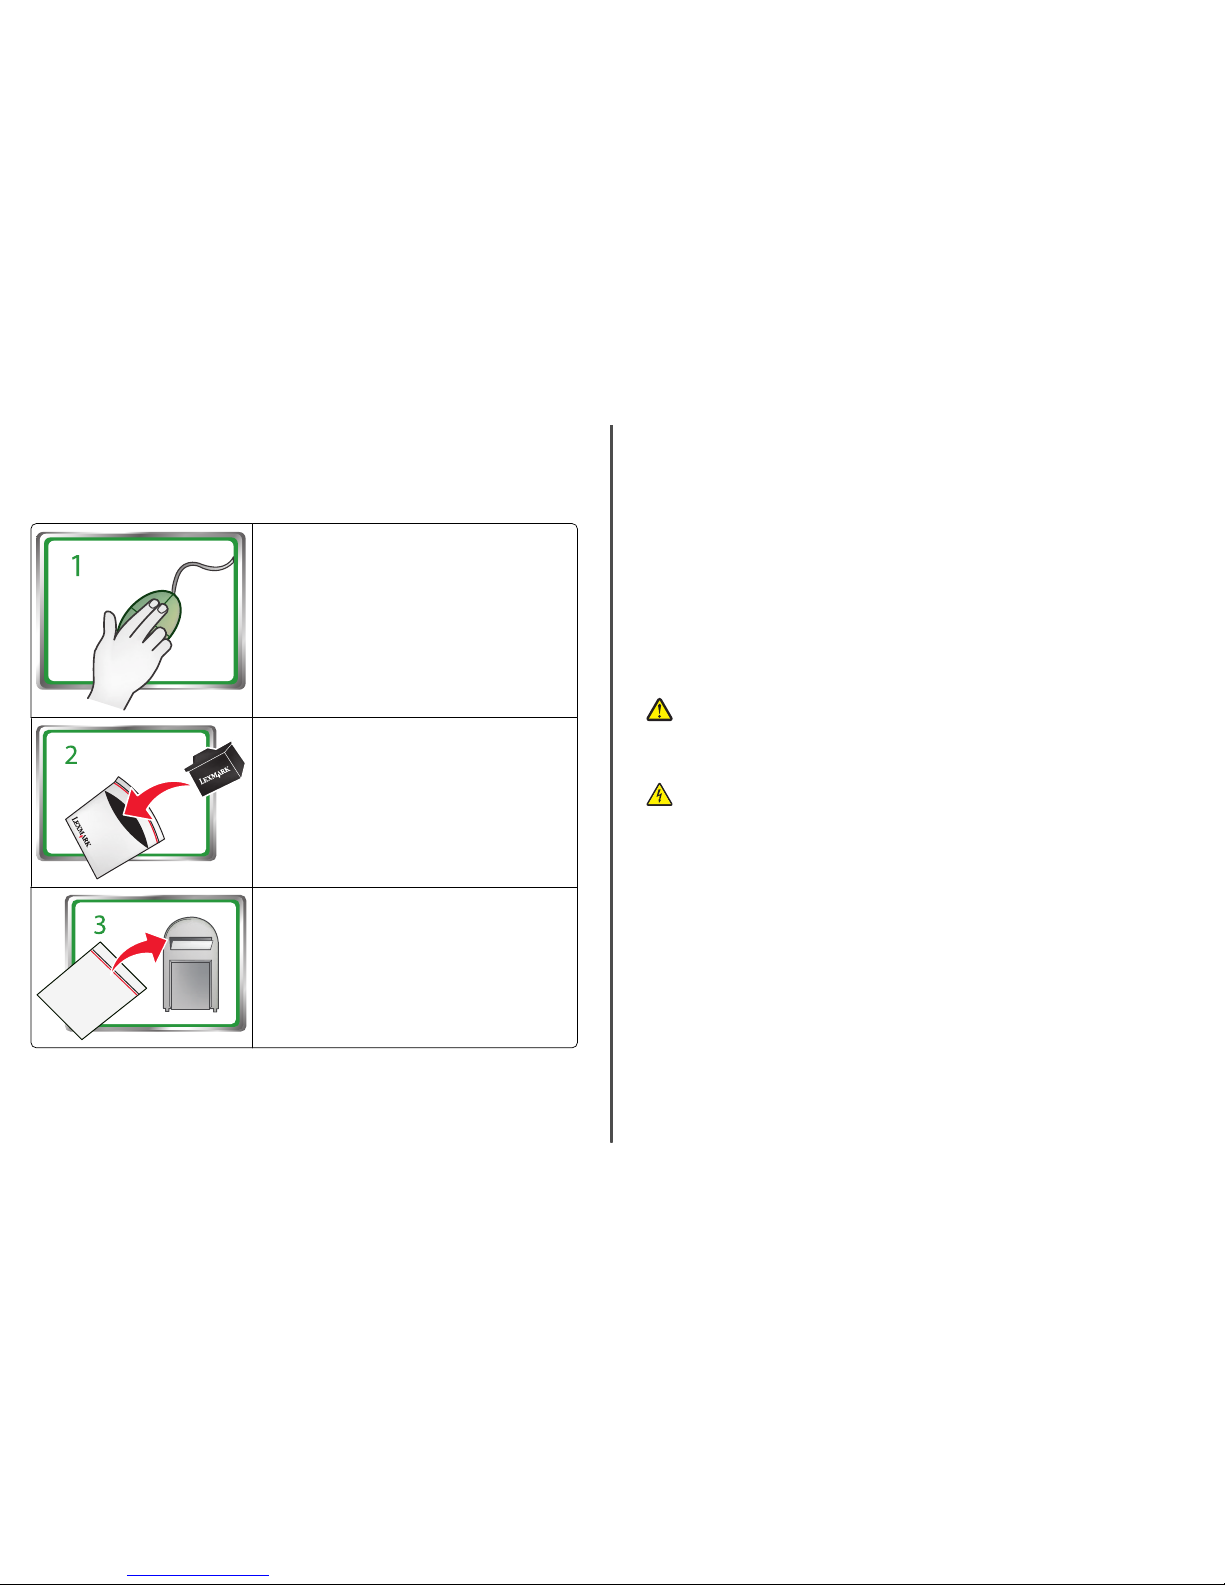
Go to www.lexmark.com/recycle. Follow instructions to
request postage-paid bags. Bags usually arrive within 7–10 days.
Place the empty Lexmark-branded inkjet cartridge(s) in the
postag e-paid re turn bag , and the n seal th e bag. If you’re se nding
single-color tanks, we recommend that you send at least two at
a time to maximize the environmental benefits.
Mail the bag to Lexmark’s recycling p artner. The bag is preaddressed.
Visit www.lexmark.com/recycle to learn more about recycling.
Lexmark-branded cartridges are always made with all new parts, though components may contain
recycled material. For warranty returns, call 1-800-332-4120.
This patented printer is licensed for, and designed to work with, only genuine Lexmark inkjet cartridges
for the life of the patented printer. You agree to: (1) use only genuine Lexmark inkjet cartridges with this
printer except as otherwise provided below, and (2) pass this license/agreement to any subsequent user
of this printer. The patented Lexmark inkjet cartridges and their contents are licensed subject to a
restriction that they may be used only once. After this single use, the license to use the print cartridges
and their contents terminates, and you agree to return them only to Lexmark for recycling. Replacement
inkjet c artridge( s) sold wit hout thes e terms ar e available through www.lexmark.com and may be refilled
by you, or a th ird party, as the only cartridg e alternative to be us ed with the li censed pr inter.
Important safety information
Connect the power cord to a properly grounded electrical outlet that is near the product and easily
accessible.
Do not place or use this product near water or wet locations.
Use only the power supply and power cord provided with this product or the manufacturer's authorized
replacements.
Use only the telecommunications (RJ-11) cord provided with this product or a 26 AWG or larger
replacement when connecting this product to the public switched telephone network.
CAUTION—POTENTIAL INJURY: Do not cut, twist, bind, crush, or place heavy objects on the power
cord. Do not subject the power cord to abrasion or stress. Do not pinch the power cord between
objects such as furniture and walls. If any of these things happen, a risk of fire or electrical shock
results. Inspect the power cord regularly for signs of such problems. Remove the power cord from
the electrical outlet before inspecting it.
CAUTION—SHOCK HAZARD: Do not use the fax feature during a lightning storm. Do not set up this
product or make any electrical or cabling connections, such as the fax feature, power cord, or
telephone, during a lightning storm.
Page 3

Contents
Important safety information.........................................................2
About your printer..........................................................................4
Finding information about the printer.................................................................................4
Minimizing your printer's environmental impact.................................................................4
Printer models......................................................................................................................5
Printer features....................................................................................................................5
Understanding the parts of the printer................................................................................5
Using the printer control panel............................................................................................6
Understanding the home screen..........................................................................................7
Navigating menus using the touch screen............................................................................8
Using memory cards and flash drives...................................................................................9
Ordering and replacing supplies....................................................10
Ordering ink cartridges.......................................................................................................10
Replacing ink cartridges......................................................................................................10
Maintaining ink cartridges..................................................................................................11
Using the printer software............................................................12
Minimum system requirements.........................................................................................12
Installing the printer software............................................................................................12
Using the Windows printer software.................................................................................13
Using the Macintosh printer software...............................................................................13
Printing.........................................................................................14
Printing a document...........................................................................................................14
Printing on both sides of the paper (duplexing) automatically..........................................15
Printing photos using the printer control panel.................................................................15
Printing documents from a memory card or flash drive (Windows only)..........................16
Canceling print jobs............................................................................................................16
Copying.........................................................................................17
Tips for copying..................................................................................................................17
Making copies.....................................................................................................................17
Copying photos...................................................................................................................17
Making a duplex copy automatically..................................................................................17
Canceling copy jobs............................................................................................................17
Scanning.......................................................................................18
Tips for scanning.................................................................................................................18
Scanning to a local or network computer..........................................................................18
Scanning to a flash drive or memory card..........................................................................18
Scanning directly to e-mail using the printer software......................................................18
Scanning to a PDF...............................................................................................................19
Canceling scan jobs.............................................................................................................19
E-mailing.......................................................................................19
Sending e-mail....................................................................................................................19
Canceling an e-mail............................................................................................................20
Using SmartSolutions....................................................................21
What is SmartSolutions?....................................................................................................21
Troubleshooting............................................................................21
Notices.........................................................................................24
Index............................................................................................26
3
Page 4

About your printer
Finding information about the printer
The Quick Reference Guide contains basic instructions on how to accomplish common printer tasks like
printing, copying, and scanni ng. It also includes information on troubleshooting common printer s etup
problems.
For additional information about the printer, see the following:
What are you looking for? Find it here
Initial s etup instructions
• Quick Setup sheet
• Hardware S etup Wizard*
Additional set up and instructions for using the
printer
Comprehensive User's Guide installed automatically with
the printer software.*
After installing your printer, you can access the User's
Guide from the printer program folder:
For Windows users
1 Click or Start.
2 Click All Programs or Pr ograms, and then select the
printer progra m folder from the list.
3 Select View User 's Guide.
For Macintosh users
In Mac O S X versio n 10.6
1 From the Applicatio ns folder in the Finder, double-cli ck
the printer folder.
2 Double-cli ck User's Gui de.
In Mac OS X version 10.5 or earlier
1 From the Finder des ktop, double-cli ck the printer folder.
2 Double-cli ck User's Gui de.
Help using the printer software Software HelpHelp installed automatically with the printer
softwa re.* C lick Help from any printer software program or
applic ation.
The latest supp lemental information, updates,
online tech nical support, and teleph one
support
Support Web site—http://support.lexmark.com
* Available on the installation software CD and on the Lexmark Web site at http://support.lexmark.com.
Minimizing your printer's environmental impact
We are committed to protecting the environment and are continually improvi ng our printers to reduce
their environmental impact. By selecting certain printer settings or tasks, you may be able to reduce your
printer's environmental impact even further.
Conserving energy
• Activate Eco-Mode. This feature sets the screen brightn ess to low and sets the printer to change to
Power Saver mode after the printer is left idle for 10 minutes.
• Select the lowest Power Saver timeout. The Power Saver featur e puts the printer in a minimum-power
standby mode after the printer ha s been idle for a set amount of time (the Power Saver timeo ut).
• Share your printer. Wireless/network printers allow you to share a single printer among multiple
computers, thus conservi ng energy and other resources.
Conserving paper
• Activate Eco-Mode. On selected printer models, this feature sets the printer to automatically print on
both sides of the paper (duple x) for copy and fax jobs, and for printing in Windows and Mac OS X 10.6
or later.
• Print more than one page image on one side of the paper. The “Pages per sheet” featur e allows you
to print multiple pages on one she et. You can print up to 8 page images on one side of a sheet of paper.
• Print on both sides of the paper. Duplexing lets you print on both sides of the paper manua lly or
automatically (dependi ng on your printer model).
• Preview print jobs before printing. Use the preview features found in Toolbars, the Print or Print
Preview dialog, or the printer dis play (depending on your printer model).
• Scan and save. To avoid printing multi ple copies, you can scan documents or ph otographs and save
them to a computer program, appl ication, or flash drive for presentation.
• Use recy cled paper.
Conserving ink
• Use Quick Print or Draft Mode. These modes can be used to print documents using les s ink than
normal and are ideal for printing documents that are mostly text.
• Use High Yi eld cartridges. Inks in High-Yield cartridges allow you to print more pages with fewer
cartridges.
• Clean the printhead. Before replacing and recycling your ink cartridges, try using the “Clean Printhead”
and “Deep Clean Printhe ad” features. These features cle an the printhead nozzles to improve the
quality of your prints.
Recycling
• Return ink c artridges for reu se or recycling throu gh the Lexmark Cartridge Collec tion Program. To
return an ink cartridge, go to www.lexmark.com/recycle. Follow the instructions to request a
postage-paid ba g.
• Recycle the product packaging.
• Recycle your old printer instead of throwing it away.
4
Page 5
• Recycle paper from discarded print jobs.
• Use recy cled paper.
To read the Lexmark Environmental Sustainability Report, see www.lexmark.com/environment.
Printer models
The installation software CD that came with your printer works for the following printer models:
• Lexmark Pro 905
• Lexmark Pro 904
• Lexmark Pro 903
Printer features
Your printer comes with full features that will help you manage and accomplish printing and imaging tasks:
• Wireless or Ethernet networking. P rint and s can from virtually anywhere in your ho me or offic e over
a secure wireless or Ethernet network, as well as share the printer among multiple computers.
• Intuitiv e touch screen. Use the full-featured color touch screen for fast, easy access to all the printer
menus. The large screen also allows you to view, ed it, and print photos directly from your digital camera
or memory device without using a com puter.
• Print. Print d ocuments and PDFs faster f rom a computer, from a USB fla sh drive, or from a Bluetooth
device. Built-in two-sided print ing lets you save money and the environment.
• Copy. Copy documents and photos with one-touch, computer-free black or color copying . Enjoy 25%
to 400% reduction and enlargement c apacity.
• Scan. Scan thick books, reports, and other multiple-page documents easily with the high resolution
flatbed scanner and the Automatic Document Fee der. Easily scan to a memory device or to multiple
laptops or PCs over a secure wireless network with up to 1200 x 4800 optical resolution.
• Fax. Do multiple-page, standalone black and color faxing at 33.6 Kbps modem speed. Other fax features
include 99 speed dials, automat ic redial, junk fax blocking, and caller ID.
• Photo prin ting. Print high quality, long-lasting photos directly from digital memory cards,
PictBridge-enabled digital cameras, and USB flash drives . Select photos to print using th e proof sheet
for computer-free printing.
• SmartSolu tions. Simplify printer tasks that you frequently repeat by creating and customizing your
printer solutions. Using the SmartSolutions toolkit on the Web, you can choose the printer tasks that
you often perform, apply your custom sett ings, and download them to your printer as shortcuts that
you can easily access anytime. Y ou can also customize your printer with solu tions that display your
online calendars, RSS feeds , and more.
• Eco-Mode. Save energy and paper by activating Eco-Mode. It automatically dims the printer display
light, puts the printer into Power Saver mode aft er 10 minutes of inactivity, and prints on b oth sides
of the paper for copy and fax jobs and for prin ting in Windows.
Understanding the parts of the printer
1
2
3
4
5
6
7
8
9
10
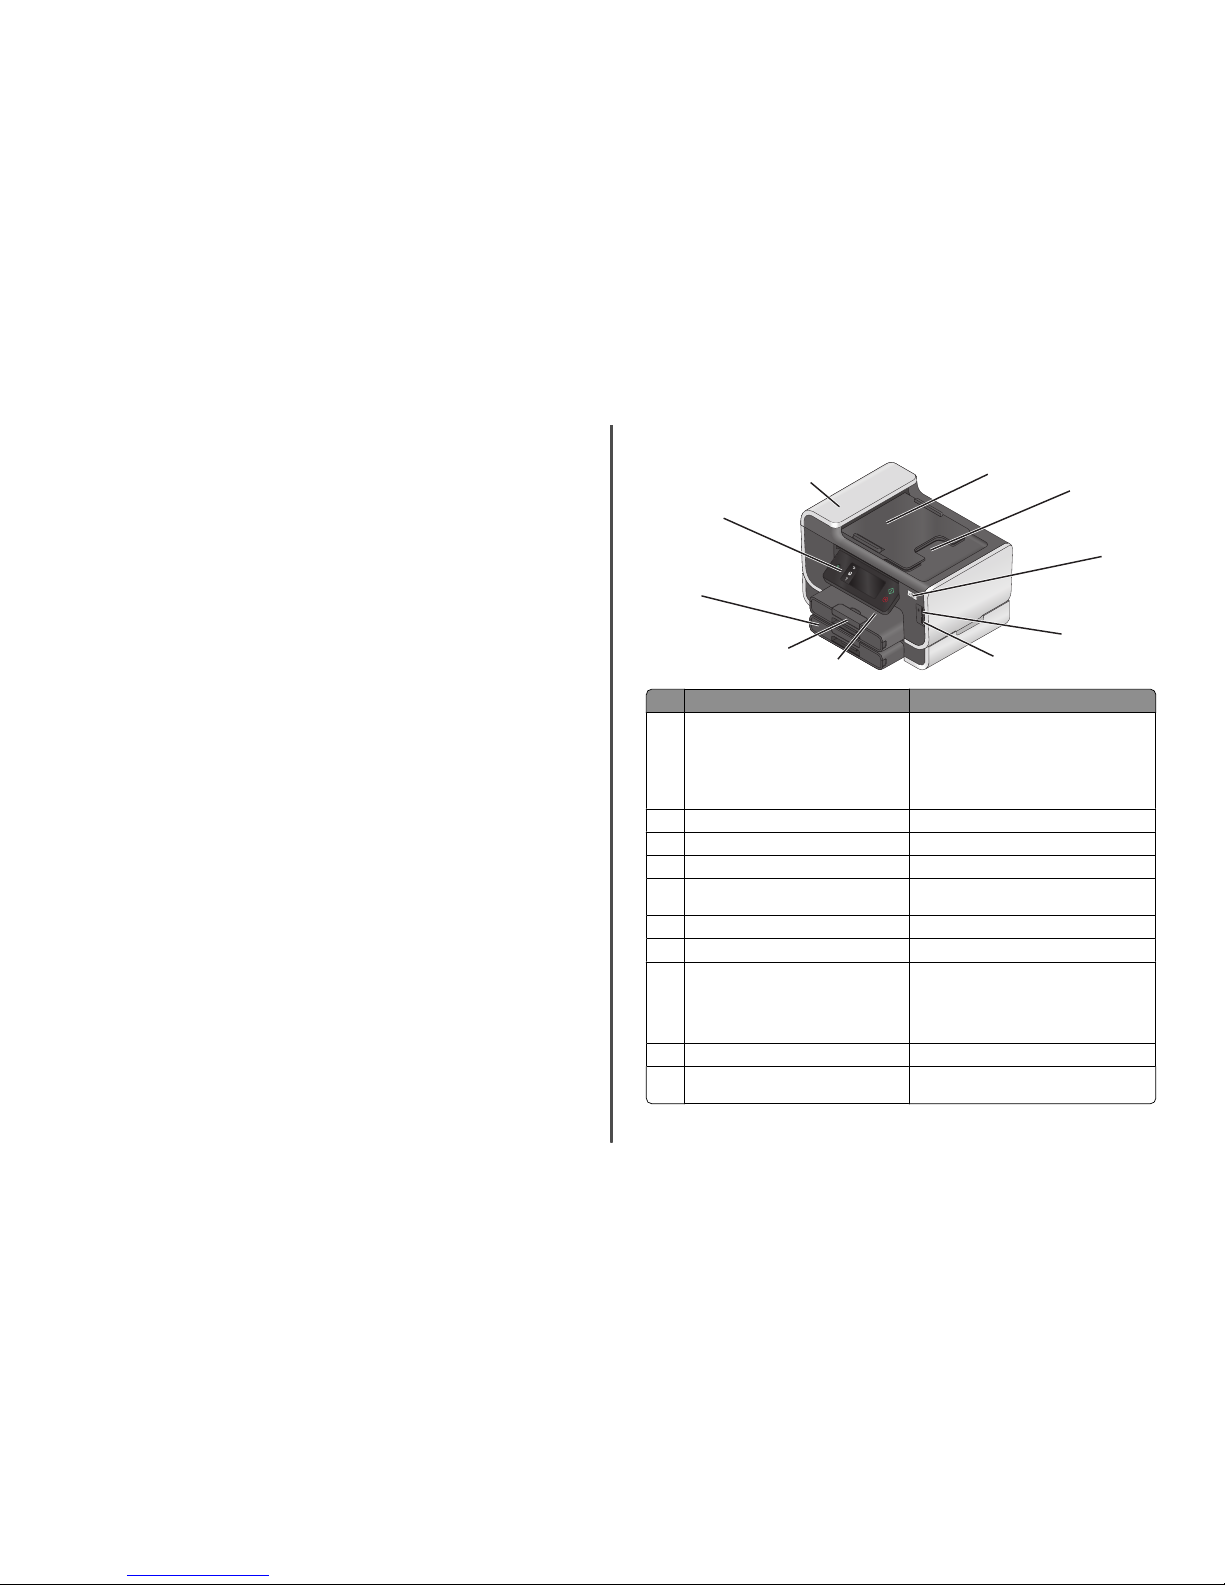
Use the To
1 Automatic Document Feeder (ADF) tray Load origin al documents in th e ADF. Recommended
for scanning, copyi ng, or faxing multiple-page
documents.
Note: Do not load postcards, photos, small items, or
thin media (s uch as magazine clipping s) into the
ADF. Plac e these items on the scanner glass.
2 ADF output tray Hold documents as they exit from the ADF.
3 Wi-Fi indicator Check wireless status.
4 Memory card slot Insert a memor y card.
5 PictBridge and USB port Connect a PictBridge-enabled digital camera, a USB
Bluetooth adapter, or a flash drive to the p rinter.
6 Paper exit tray H old paper as it exits.
7 Paper tray (T ray 1) Load paper.
8 Second paper tray (Tray 2)
Note: Your printer model may not have this
option.
Load additio nal paper.
You can load the same type of pap er as Tray 1, or
you can load a different type of paper and change
the paper default settings so the printer pulls paper
from Tr ay 2 for certain t ypes of jobs.
9 Printer control pane l Operate the pr inter.
10 ADF Scan, c opy, or fax mul tiple-page le tter-, legal-, a nd
A4-size documents.
5
Page 6
LINE
EXT
<
<
1
2
3
4
5
6
7
8
9
Use the To
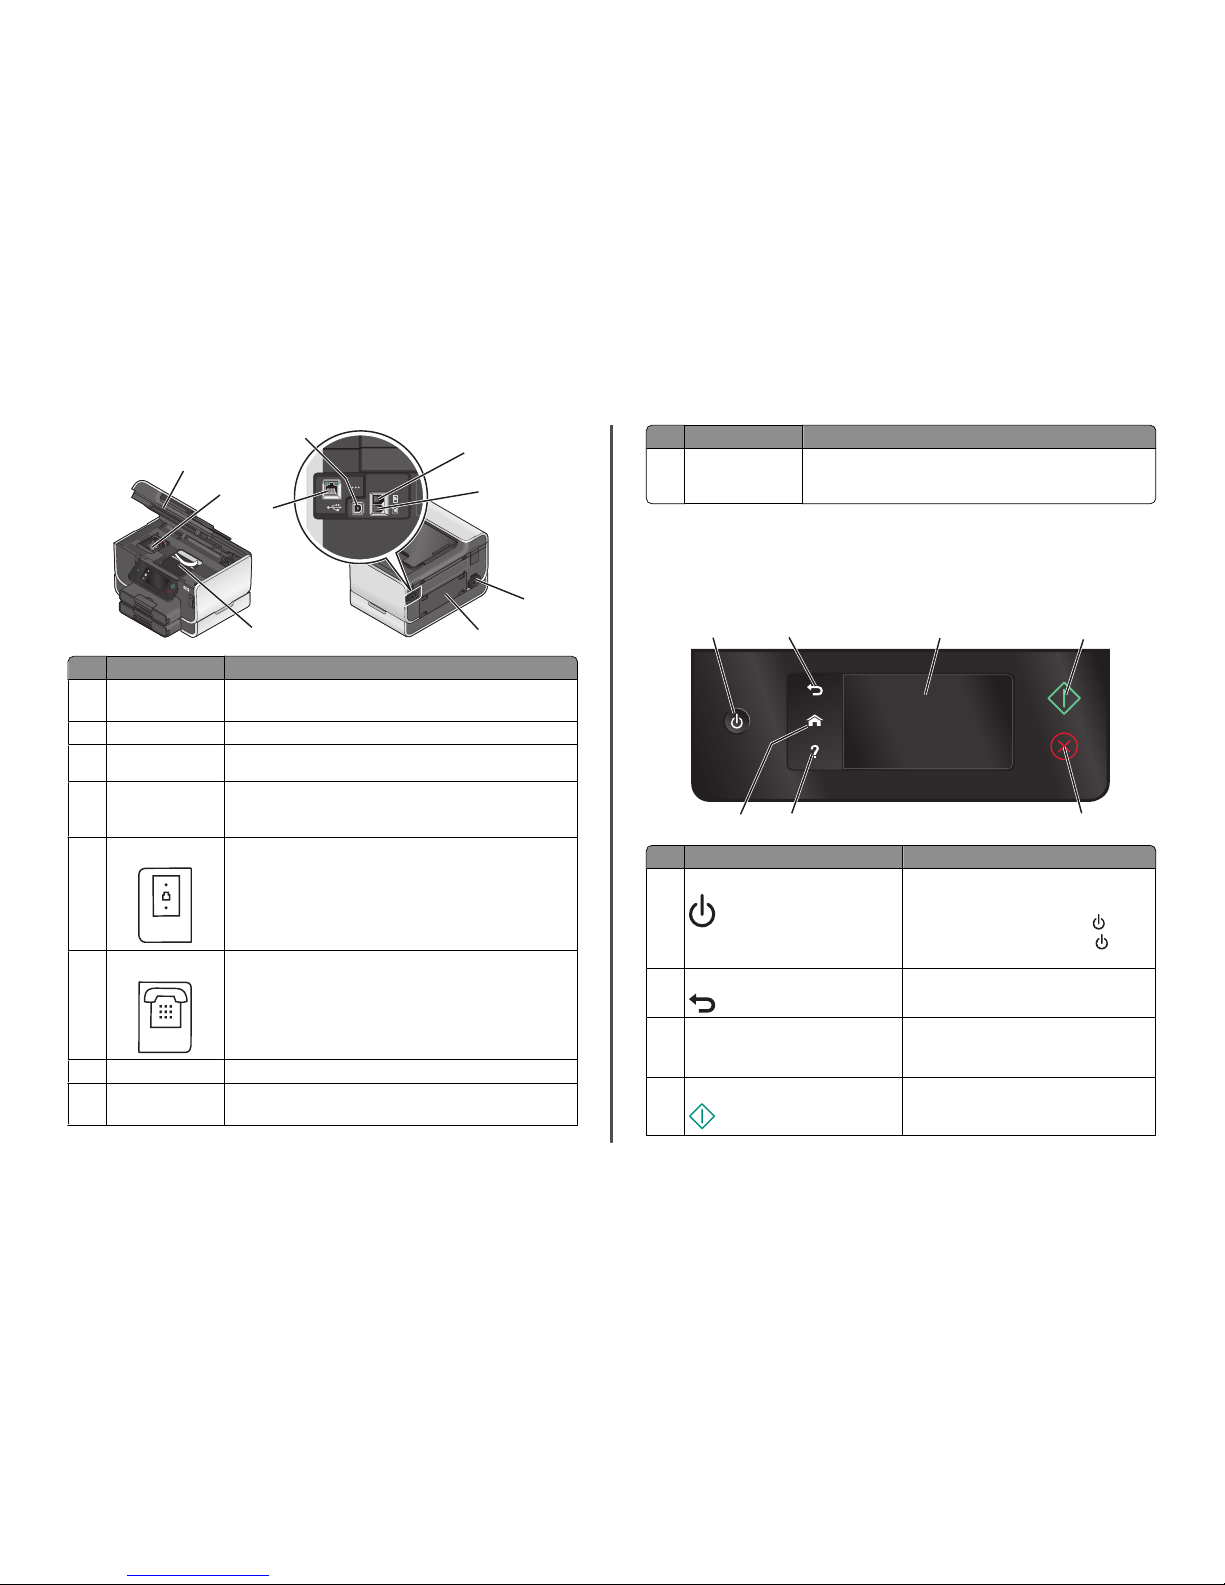
1 Scanner unit
• Access the ink cartri dges and printhead.
• Remove paper jams.
2 Ink cartridge access Install, replace, or remove ink cartridges.
3 Ethernet port Connect your p rinter to a computer, a local network, an externa l DSL, or a
cable modem.
4 USB port Connect the printer to a computer using a USB cabl e.
Warning—Potential Damage: Do not t ouch the USB port except when
plugging in or removing a USB cable or installation cable .
5 LINE Port
LINE
Connect the printer to an activ e telephone line (throug h a standard wall
jack, DSL filter, or VoIP adapter) to send and receive faxes.
6 EXT Port
EXT
Connect addit ional devices (telephone o r answering m achine) to t he printer
and the telephon e line. Use this por t if you do not have a dedicated fax line
for the printer , and if this connection method is supported in your country
or region.
Note: Remove the plug to access the port.
7 Power suppl y with port Connect the pr inter to a power source.
8 Duplex unit
• Print on both s ides of a sheet of paper.
• Remove paper jams.
Use the To
9 Printhead access Install the printhead.
Note: T he carrier moves to the printhead access area when no printhead
is insta lled in the p rinter.
Using the printer control panel
The following diagrams explain the sections of the printer control panel:
Note: T he icons are displayed when t hey are selectable on the curren t screen. If an icon is not displayed,
then the function is not available.
1
2
4
5
6
7
3
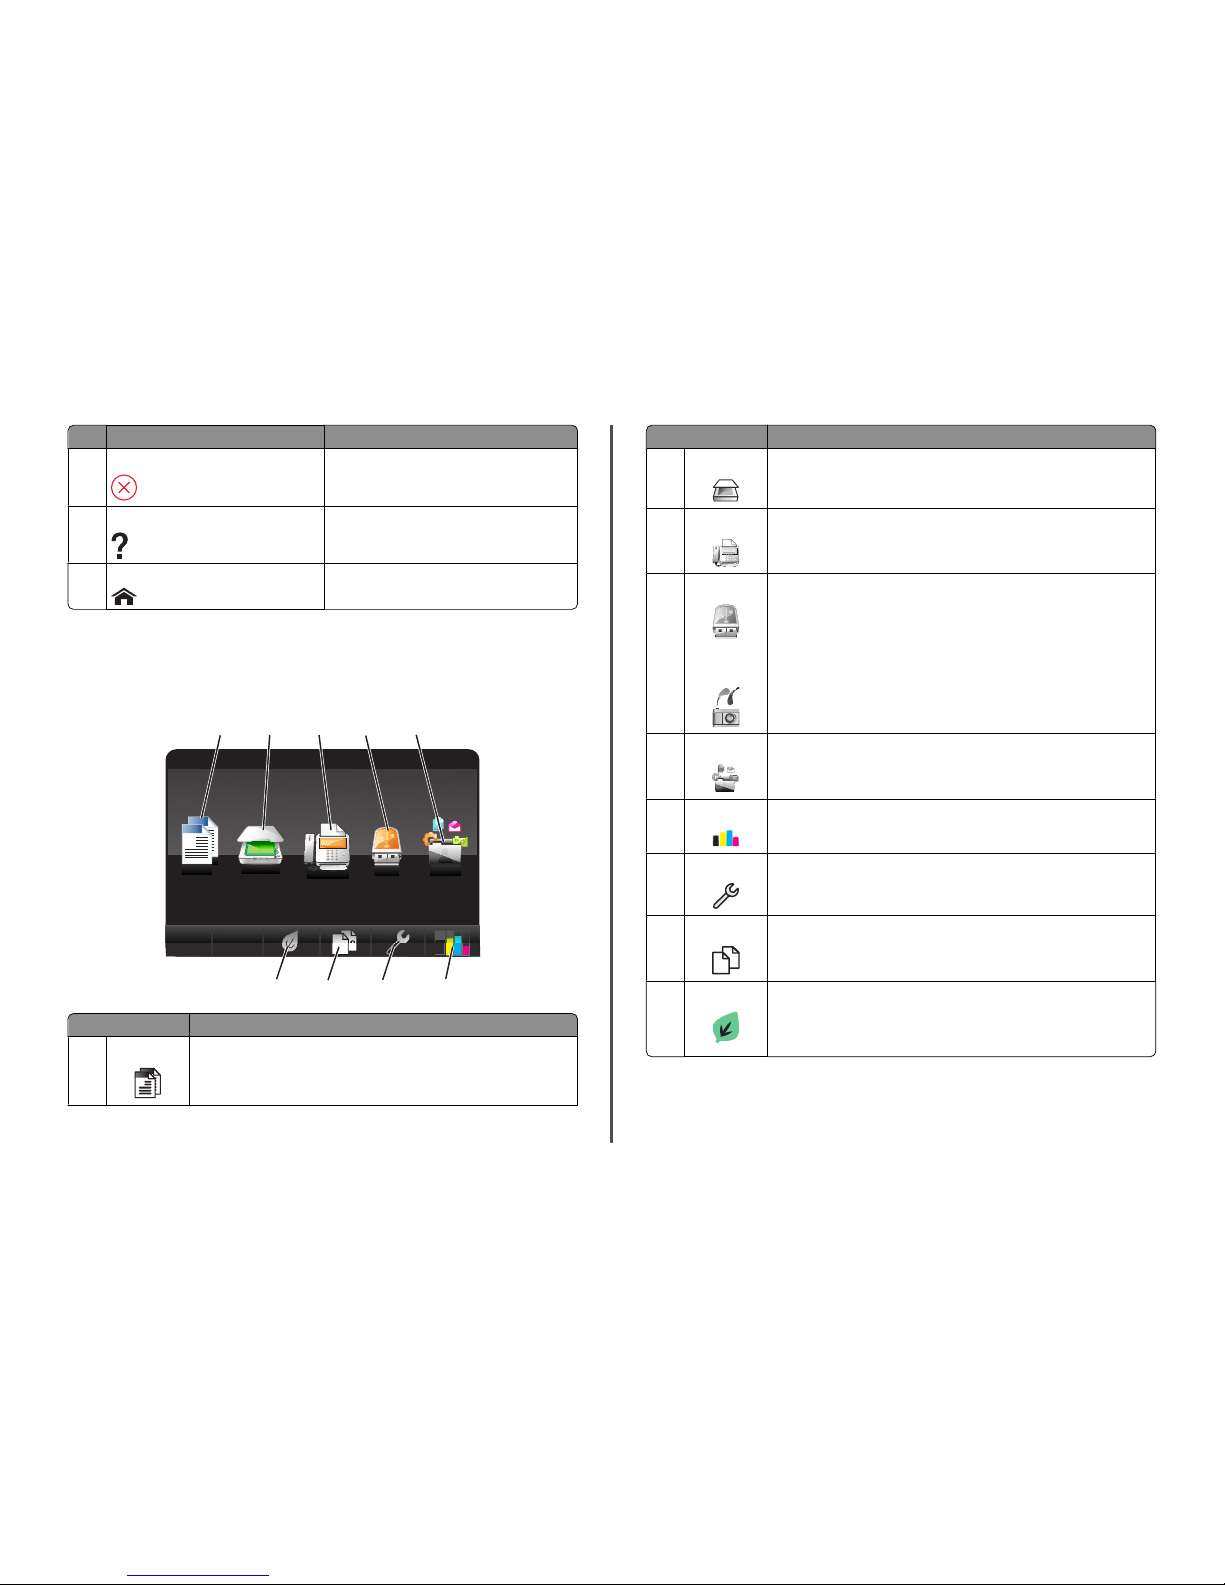
Use To
1 Power
• Turn the printer on and off.
• Switch to Power Saver mode.
Note: When the printer is on, press
to switch
to Power Saver mode. Pr ess and hold
for three
seconds to turn off the printer.
2 Back
• Return to the previous screen.
• Exit from one menu level to a higher one.
3 Touch screen display
Note: The display is turned off in Power Saver
mode.
• Navigate the printer menus.
• Change settings.
• View printer messages and animation.
4 Start Start a job, depending on which mode is selected.
6
Page 7
Use To
5 Cancel Cancel the current job or task.
6 Help Display Help text and animation.
7 Home Return to the home screen.
Understanding the home screen
After the printer is turned on and a short warm-up peri od occurs, the display shows the following ba sic
screen which is referred to as the home screen . Use the home screen selections to init iate an action, such
as copying or faxing, or to change print er settings.
2
1
A
Copy Scan
Smart
Solutions
1
2
3
5
6
7
8
9
Fax
Memory
Device
4
Display item Descri ption
1 Copy
A
A
Access the copy menu and make copies.
Display item Description
2 Scan Access the scan menu and scan documents.
3 Fax Access the fax menu and send fax es.
4 Memory Device
or
PictBridge
View, select, print, or attach photos and documents to e-mail.
Note: This icon appears only when you return to the home screen while a memory
card, flash drive, or Pict Bridge-enabled camer a is connected to the printer .
5 SmartSolutions Open the SmartSolutions menu.
6 Ink levels icon
• Display the current ink levels of the installed cartridges.
• Access cartridg e maintenance and infor mation functions.
7 Setup icon Access the setup menu and cha nge printer settings .
8 2-Sided icon
2
1
Print on both sides of a sheet of paper.
9 Eco-Mode icon Activate Eco-Mode to select the following options:
• Print on both sides of the paper (d uplex).
• Change to Power Saver mode after the printer is left idle for 10 minutes.
• Set screen brig htness to low.
7
Page 8
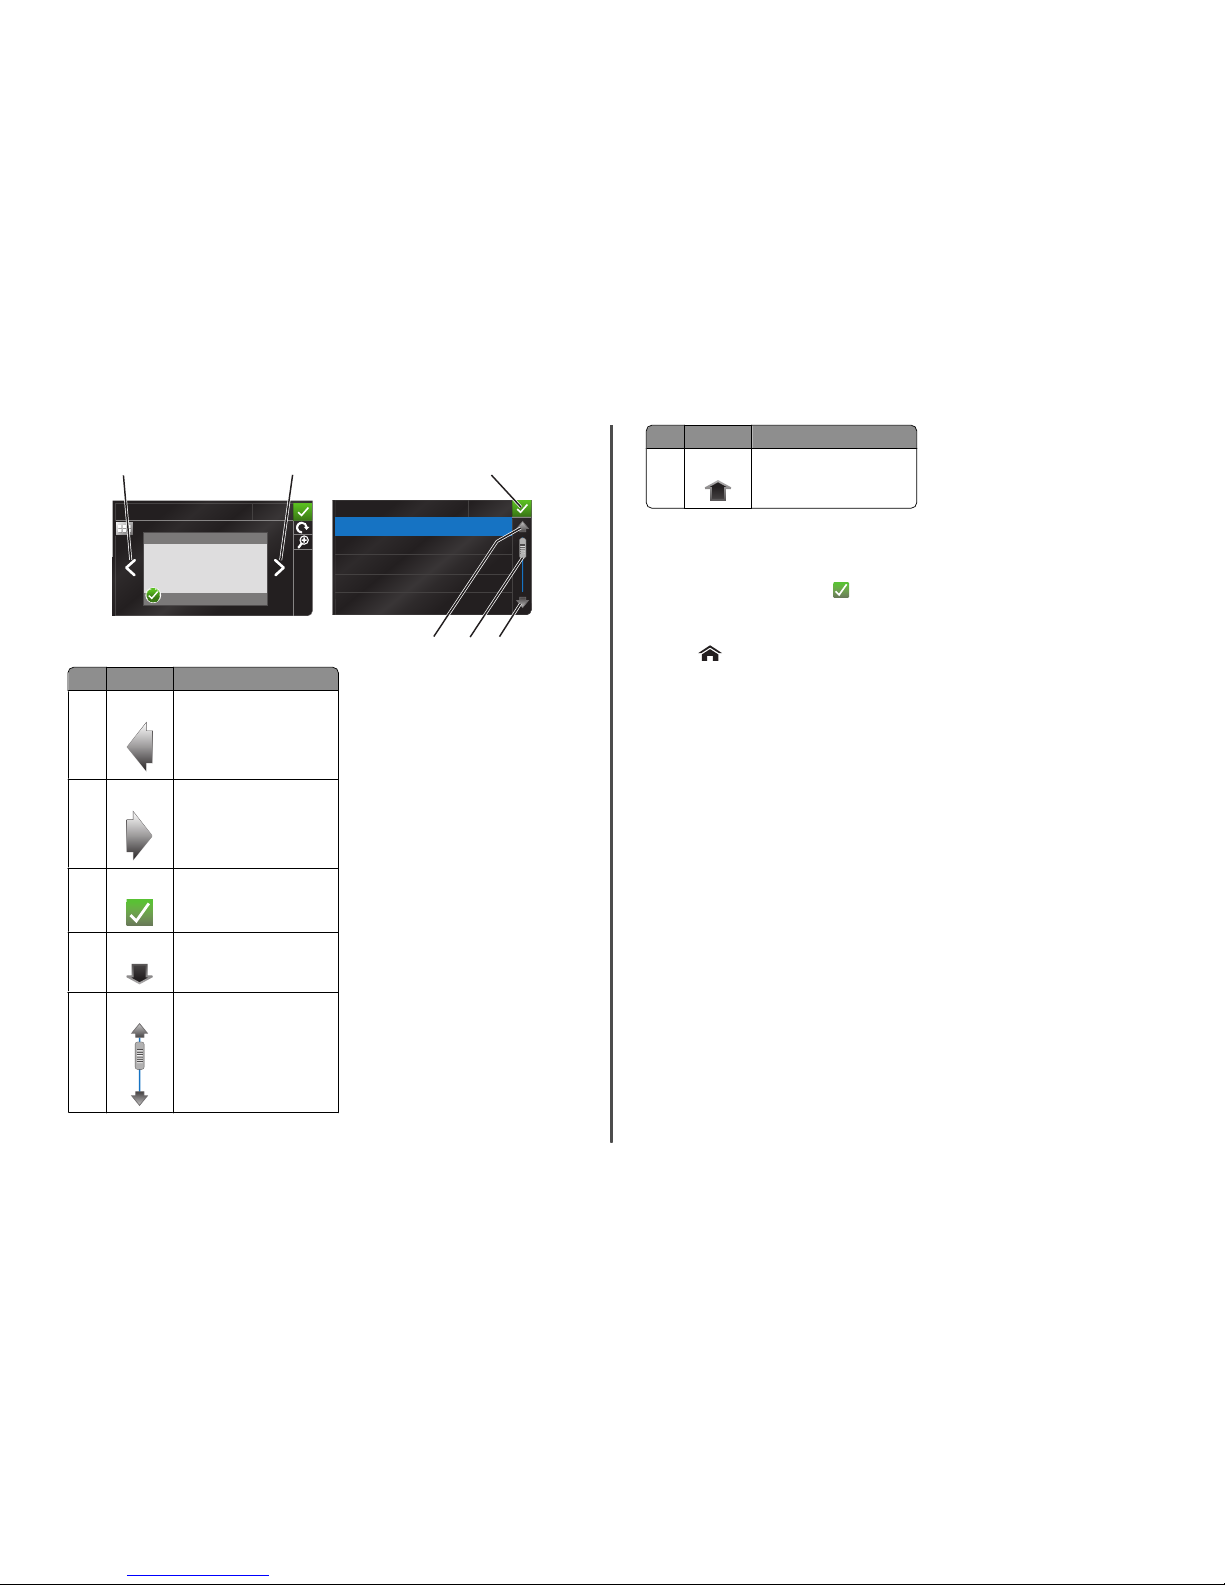
Navigating menus using the touch screen
PREVIEWING PHOTOS
PAPERTYPE
Accept
Auto Detect
Plain
Matte
Photo
Transparency
12
3
4
5
6
Accept
Use To
1 Left arrow Scroll l eft.
2 Righ t arrow Scroll right.
3 Accept Save your setting.
4 Down arrow Scro ll down.
5 Scrollbar Scroll up and down the menu list.
Use To
6 Up arrow Scroll up.
To navigate using the touc h screen:
• Drag the scrollbar or touch the arrows until th e menu or setting that you want appears on the display.
• To confirm a setting or sel ect a menu or item, touch it.
• If necessary, touch Accept, OK, or after making a selection or changing a setting. This saves the
setting.
For example, to navigate to Paper Type and change the paper type setting:
1 Touch .
Note: All the instructions in this guide start from the home screen.
2 Touch Copy.
3 Touch More Options.
4 Scroll down (using the scrollbar or arrows) until Paper Type appears on t he list.
5 Touch Paper Type.
6 Scroll up or down (using the scrollbar or arrows) to view the list of paper t ypes.
7 Select a paper type se tting by touching it, and then touch Accept to save the setting.
8
Page 9
Using memory cards and flash drives
Using a memory card or flash drive with the printer
Memory cards and flas h drives are storage devices f requently used with cameras a nd computers. You can
remove the memory card from the camera or t he flash drive from the computer and insert it directly into
the print er.
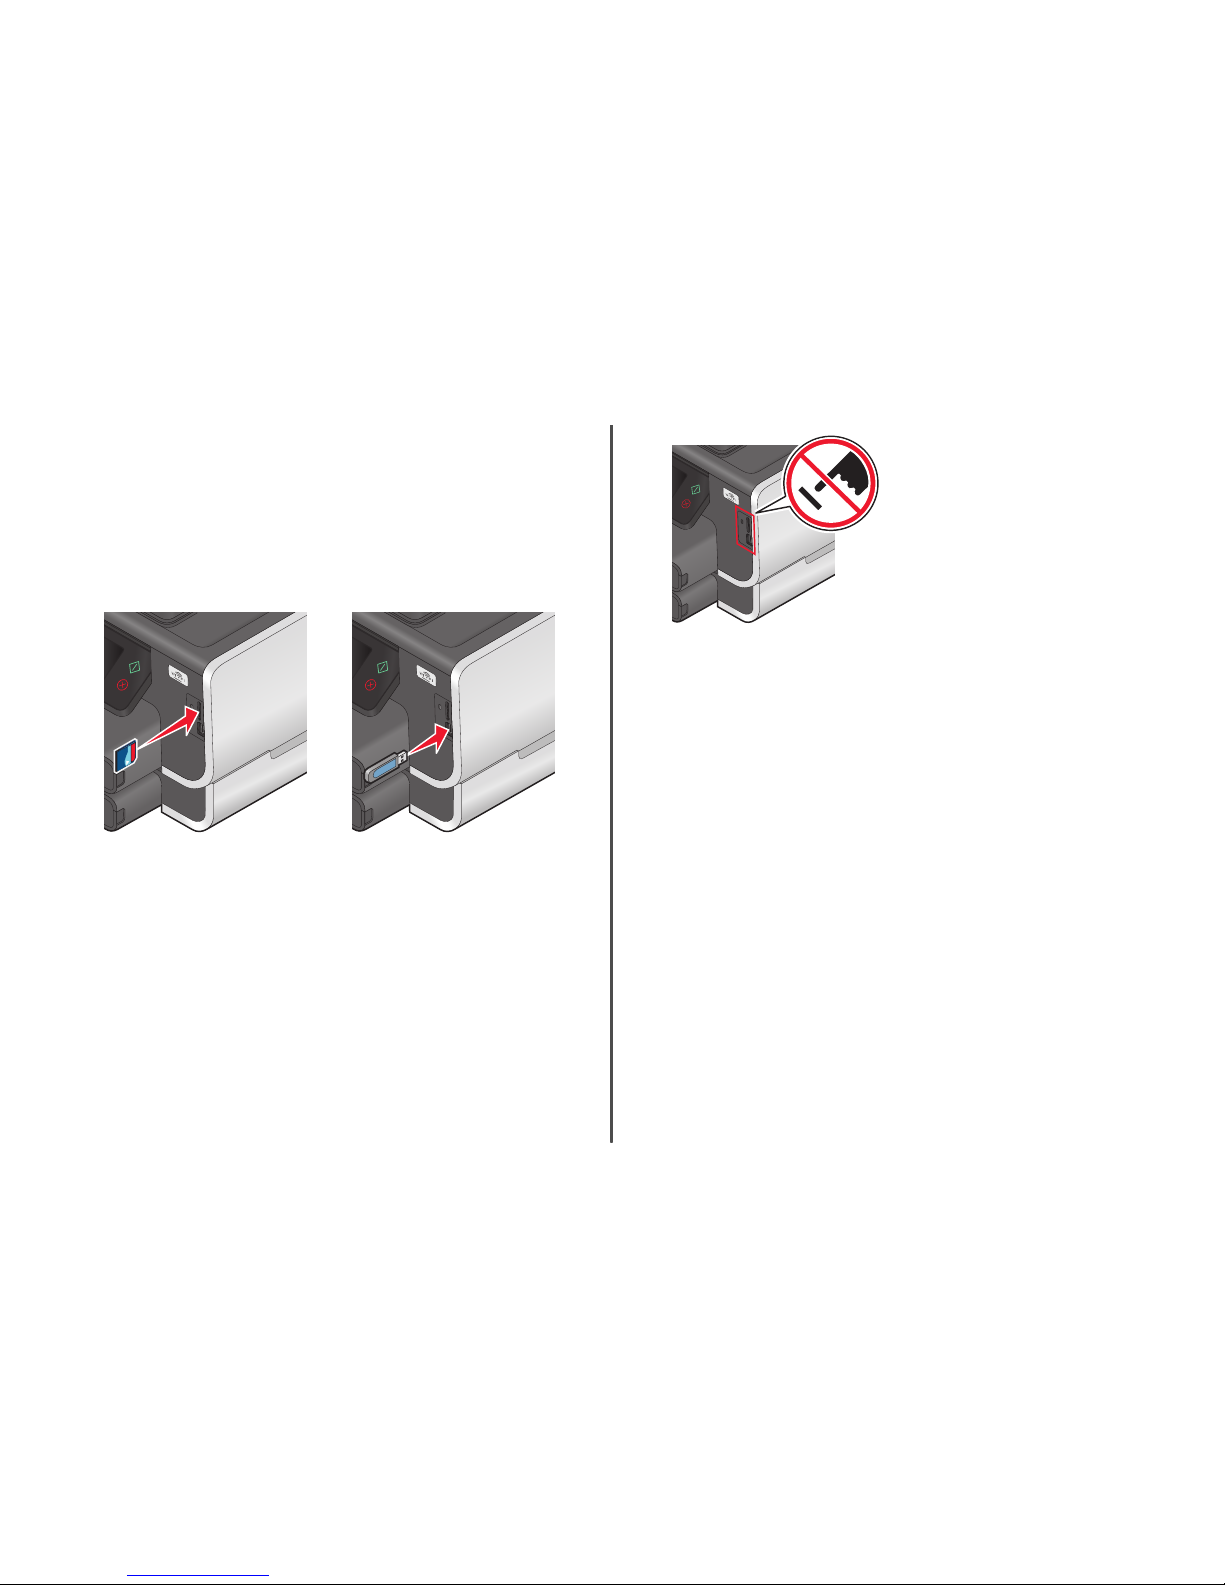
1 Insert a memory card into the card slot or a flash drive into the USB port.
Inserting a memory card Inserting a flash driv e
MEMORYSTICK
Notes:
• Insert the card with the brand name la bel facing
right.
• Make sure any arrows on the card point toward
the printer.
• If necessary, connect the memory card to the
adapter that came with it.
• Make sure t hat the memory ca rd inserted is
supported by the pr inter. For more informati on,
see “Supported memor y cards and file types”
on page 10.
FLASHDRIVE
Notes:
• The flash drive uses the same port that is used
for a PictBrid ge camera cable.
• An adapter may be neces sary if your flash drive
does not fit directly into the port.
Warning—Potential Damage: Do not touch any cables,
any network adapter, any connector, the memory device,
or the printer in the areas shown while actively printing,
reading, or writing from the memory device. A loss of
data can occur.
2 The Memory Device screen a ppears on the display.
Notes:
• If the printer does not recognize the memory device , then remove and reinsert it.
• If a flash drive or a digital camera set to mass storage mode is inserted into the USB port while a
memory card is in the card slot , then a message appears on the display prompting you to ch oose
which memory device to use.
9
Page 10
Supported memory cards and file types
Memory Card File Type
• Secure Digital (SD)
• Secure Digital High Capacity (SDHC)
• Micro Secure Digital (with adapter) (Micro SD)
• Mini Secur e Digital (wi th adapter) ( Mini SD)
• MultiMedia Card (MMC)
• Reduced Size MultiMedia Card (with a dapter)
(RS-MMC)
• MultiMedia Card mobile (with adapter)
(MMCmobile)
• Memory Stick
• Memory Stick PRO
• Memory Stick Duo (with adapter)
• Memory Stick PRO Duo (with adapter)
• xD-Picture Card
• xD-Picture Card (Type H)
• xD-Picture Card (Type M)
Documents:
• .doc (Microsoft Word)
• .xls (Microsoft Excel)
• .ppt (Microsoft PowerPo int)
• .pdf (Adobe Portable Docume nt Format)
• .rtf (Rich Text Format)
• .docx (Microso ft Word Open Docum ent Format)
• .xlsx (Microsoft Excel Open Document Format)
• .pptx (Microso ft PowerPoint Open Documen t
Format)
• .wpd (WordPerfect)
Images:
• JPEG
• TIFF
Ordering and replacing supplies
Ordering ink cartridges
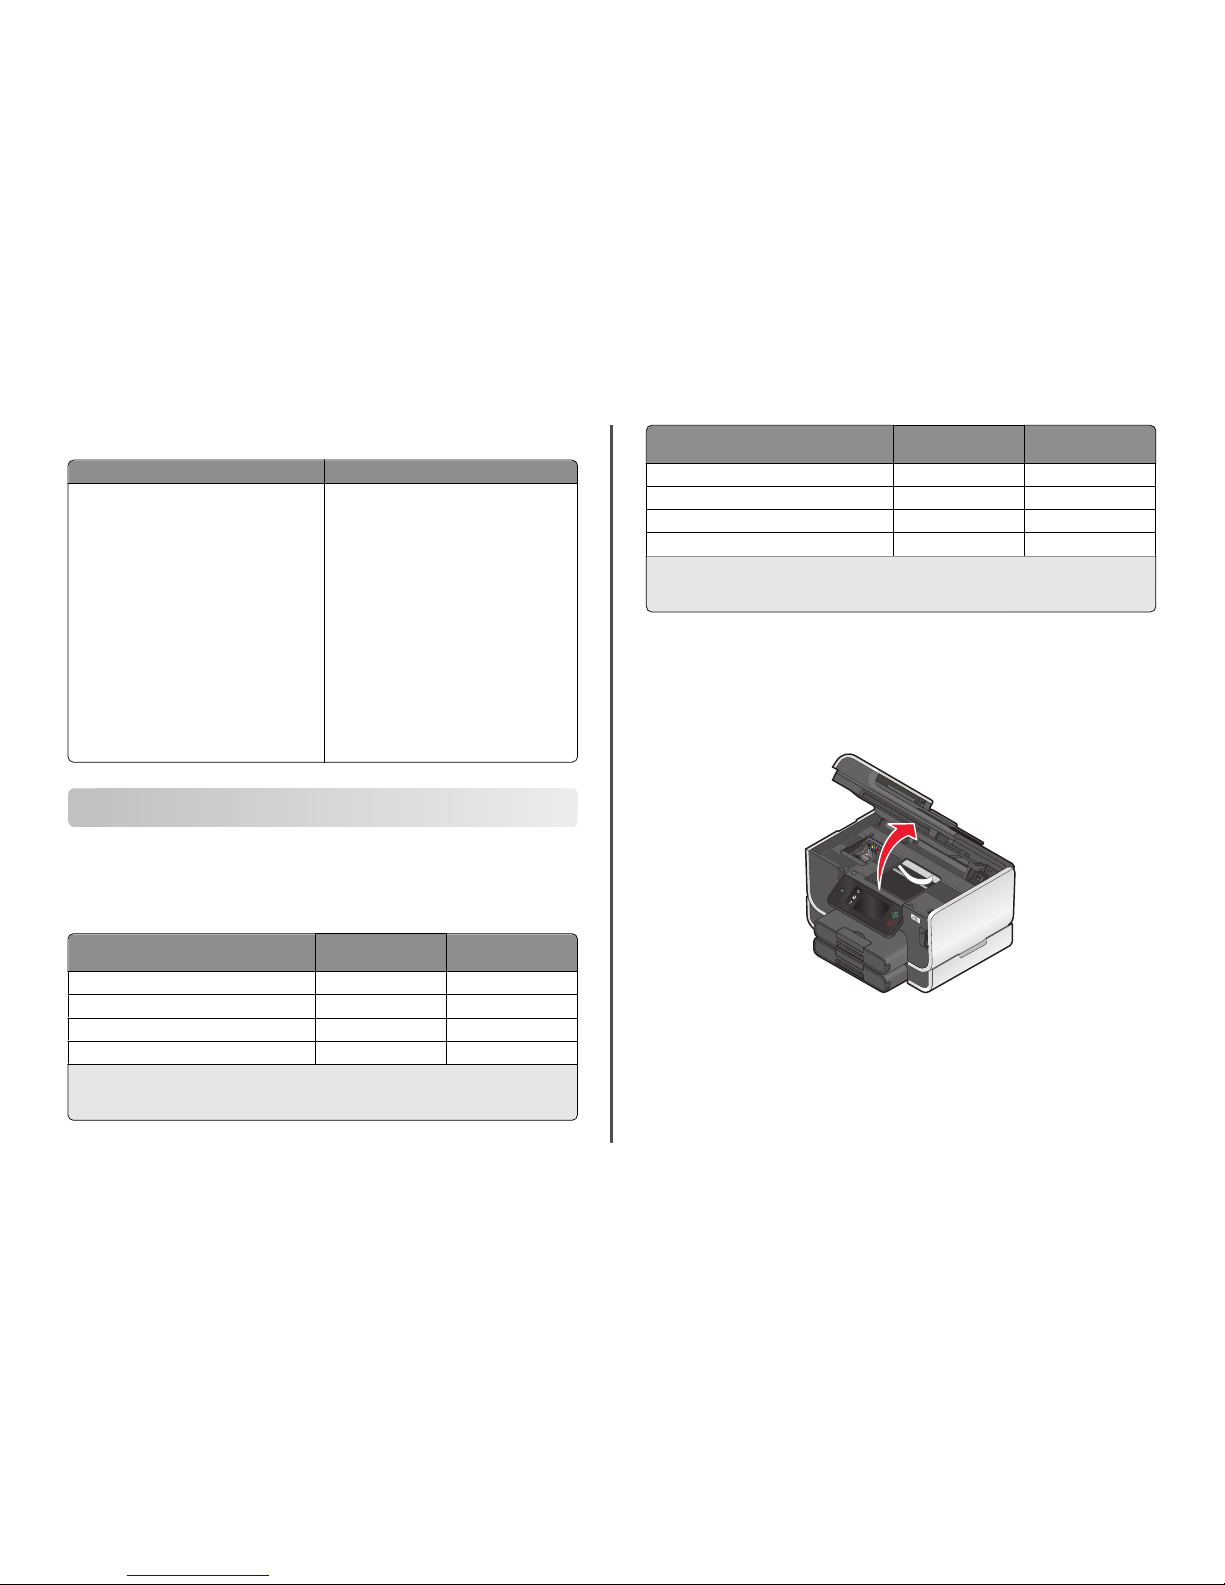
Page yields available at www.lexmark.com/pageyields. For best results, use only Lexmark ink cartridges.
Lexmark Pro900 Se ries models
Item Return Program
Cartridge
1
Regular cartridge
2
Black cart ridge 100 100A
High yield black car tridge 100XL, 105XL 100 XLA
Yellow color cartridge 100 100A
High yield yellow color cartridge 100XL 100XLA
1
Licensed for a single use only. After use, return this cartridge to Lexmark for remanufacturing, refilling, or
recycling.
2
Available only on the Lexmark Web site at ww w.lexmark.com.
Item Return Pr ogram
Cartridge
1
Regular cartridge
2
Cyan color cartridge 100 10 0A
High yield cyan color cartridge 100XL 100XLA
Magenta color cartridge 10 0 100A
High yield magenta color cartridge 100XL 100XLA
1
Licensed for a sing le use only. After use, return thi s cartridge t o Lexmark for reman ufacturing, refillin g, or
recycling.
2
Available only on the Lexmark Web site at www.lexmark.com.
Replacing ink cartridges
Make sure you have a new ink cartridge or cartr idges before you begin. You must instal l new cartridges
immediately after removing the old ones or the ink remaining in the printhead nozzles may dry out.
1 Turn on your printer.
2 Open the printer.
Note: The printhead moves to the cartridge installat ion position.
10
Page 11
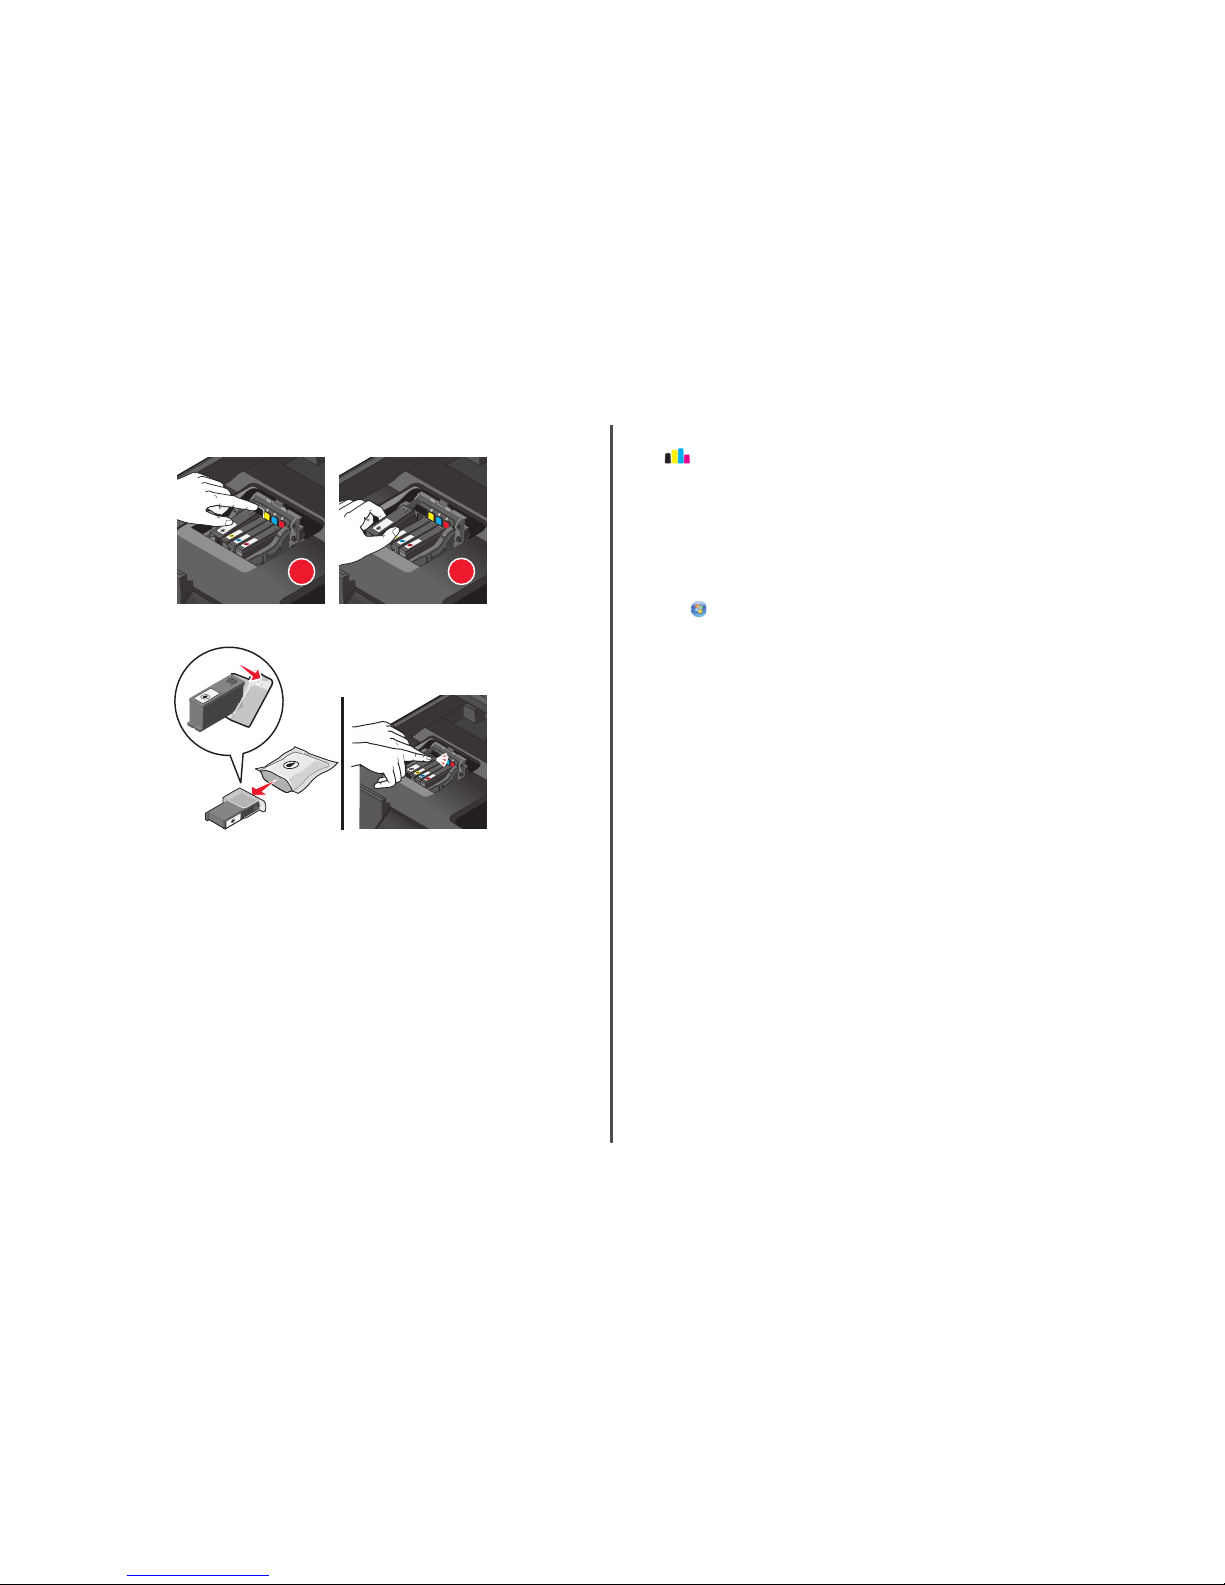
3 Press the release tab, and then remove the used ink cartridge or cartridges.
1
2
4 Install each ink cartridge. Use two hands to install the black cartridge.
Note: Install the new ink cartridges immediate ly after removing the protective cap to avoid exposing
the ink to air.
5 Close the printer.
Maintaining ink cartridges
In addition to the following tas ks that you can perform, your printer performs an automatic maintenance
cycle every week if it is plugged into an electrical outlet. It will briefly come out of Power Saver mode or
will temporarily power on if it is turned off.
Aligning the printhead
If the characters or lines on you r printed image appear jagged or wavy, then y ou may need to align the
printhead.
Using the printer control panel
1 Load plain paper.
2 From the home screen, navigate to:
> More Options > Align Printer
An alignment page prints.
Note: Do not remove the alignment page until printin g is finished.
Using the printer software
For Windows us ers
1
Load plain paper.
2 Click or Star t.
3 Click All Programs or Programs, and then select the printer program folder from the list.
4 Naviga te to:
Printer Home > select your printer > Maintenance tab > Align cartridg es
5 Follow the instructi ons on the computer screen.
For Macintosh users
Note: This feature is available only in Mac OS X version 10.5 or earlier.
1 Load plain paper.
2 From the Finder deskt op, double-click the printer progra m folder.
3 Select Printer Utility from the list.
4 From the Maintenance tab of the Printer Utility dialog, click Print Alignment Page.
5 Follow the instructi ons on the computer screen.
If you aligned the cartridges to improve print quality, then print your document again. If print quality has
not improved, then clean the print head nozzles.
Cleaning the printhead nozzles
Poor print quality is sometimes due to clogg ed printhead nozzles. Clean the printhead nozzles to improve
the quality of your prints.
Notes:
• Cleaning the printhead nozz les uses ink, so clean them only wh en necessary.
• Deep cleaning uses more ink, so try the Clean Printhead option first to save ink.
• If the ink levels are too low, then y ou must replace the ink cartridges bef ore you can clean the
printhead nozzles.
11
Page 12

Using the printer control panel
From th e home scr een, navigate to:
> More Options > Clean Printhead or Deep Clean Printhead
A cleaning page prints.
Using the prin ter software
For Windows users
1
Click or Start.
2 Click All Programs or Programs, and then select the printer program folder from the list.
3 Navigate to:
Printer Home > sel ect your printer > Maintenance tab > Cle an cartridges
4 Follow the instructions on the computer screen.
For Macintosh users
Note: This feature is available only in Mac OS X version 10.5 or earlier.
1 Load plain paper.
2 From the Finder desktop, double -click the printer program folder.
3 Select Printer Util ity from the list .
4 From the Maintenance tab, select Clean Print Nozzles.
A cleaning page prints.
Using the printer software
Minimum system requirements
The printer software requires up to 500MB of free disk space.
Supported operating systems
• Microsoft Windows 7 (Web only)
*
• Microsoft Windows V ista (SP1)
• Microsoft Windows XP (SP3)
• Microsoft Windows 2 000 (SP4 or later)
• Macintosh PowerPC OS X version 10.3.9 to 10.6
• Macinto sh Inte l OS X version 10.4 .4 to 10.6
• Linux Ubuntu 8.10 and 8.04 LTS (Web only)
*
• Linux openSUSE 11.1 and 11.0 (Web only)
*
• Linux Fedora 10 (Web only)
*
*
The printer driver for this operating system is available only at http://suppo rt.lexmark.co m.
Installing the printer software
Note: If you installed the printer software on this computer before but need to reinstall the software,
then uninstall the current software first.
For Windows users
1 Close all open softwa re programs.
2 Insert the installation software CD.
If the installation dialog s creen does not appear after a mi nute, then launch the CD manually:
a Click , or click Start and then click Ru n.
b In the Start Search or Run box, type D:\setup.exe, where D is the letter of your CD or DVD
drive.
c Press Enter, or click OK.
3 Click Install, and then follow the inst ructions on the computer screen .
For Macintosh users
1 Close all open applications.
2 Insert the installation software CD.
If the installation dialog does not appear after a minute, then click the CD icon on the desktop.
3 Double-click Instal l, and then follow the instructions on the computer screen.
Using the Internet
1 Go to th e Lexmark Web site at www.lexmark.com.
2 Naviga te to:
SUPPORT & DOWNLOADS > select your printer > select your operating system
3 Download the driver and install the printer software.
Note: Updated printer software may be available at http://support.lexmark.com.
12
Page 13

Using the Windows printer software
Software installed during printer installation
When you set up the printer using the installation software CD, all the necessary software was installed.
You may have chosen to install so me additional programs. The following t able provides an overview of
various software programs and what they can help you do.
If you did not install these additional programs during initial installation, then reinsert the installation
software CD, run the installation software, and then select Install Additional Software fro m the Software
Already Installed screen.
Printer software
Use the To
LexmarkTM Printer Home
(referre d to as Printer Home)
• Launch applications or programs.
• Access the Fax Solutions software.
• Scan or e-mail a photo or document.
• Edit scanned docume nts.
• Scan documents to PDF.
• Adjust settings for the printer.
• Order supplies.
• Maintain ink cartridges.
• Print a test page.
• Register the printer.
• Contact technical support.
Lexmark Fast Pics
(referre d to as Fast Pics )
Manage, edit, transfer, and pr int photos and documents.
Lexmark Toolbar
(referre d to as Toolbar)
• Print black or text-only Web pages to save i nk.
• Schedule automatic printin g of Web pages.
• Access Picnik a nd edit photos online.
• Print, scan, or convert local files from Windows.
Lexmark Tools for Office
(referred to as Tools for Office)
Access your favorite settings in Microsoft Office 2007.
Lexmark Fax So lutions
(referred to as Fax Solutions)
• Send a fax.
• Receive a fax in three-in-one printers.
• Add, edit, or delete contacts in the bui lt-in phone book.
• Access the Lexmark Fax Set up Utility in four-in-one pr inters. Use the
Fax Setup Utility to set the Speed Dial and Group Dial numbers, se t
Ringing and An swering, and print fax history and status reports .
Use the To
Abbyy Sprint OCR Scan a document and produce text that you can edit with a
word-processing program.
Lexmark Wireless Setup Utility
(referred to as Wi reless Setup
Utility)
• Set up the wireless printer on a wireless network.
• Change the wireless settings of the printer.
Note: This program is installed automatically with the printer software
if the printer has wireless capability.
Lexmark Serv ice Center
(referred to as Ser vice Center)
• Troubleshoot t he printer.
• Access the printer maintenance functions.
• Contact technical suppo rt.
Notes:
• This program is installed automatically with the printer software.
• You may be pr ompted to install this pr ogram from the Web,
depending on your printer model.
Printing Pr eferences When you select File Print with a document open and then clic k
Properties, a Printing Preferences dia log appears. The dialog lets y ou
select options for the print job, such as the following:
• Select the number of copies to print.
• Print two-sided copies.
• Select the paper type.
• Add a watermark.
• Enhance images.
• Save settings.
Note: Printing Preferences is installed automatically with the printer
software.
Note: Your printer may not come with some of these programs or some of the functions of these programs,
depending on the features of the print er that you purchased.
Using the Macintosh printer software
Software installed during printer installation
Applications are installed along with the printer software during insta llation.
1 From the Applications folder in the Find er, or from the Finder desktop, double-cli ck the printer folder.
2 Double-click the applic ation that you want to use.
13
Page 14

Use the To
Print dialog Adjust the print settings and schedule print jobs.
Note: With a document or photo open, choose File >
Print to access the Print dialog.
Printer Services dial og (not availabl e in Mac OS X
version 10.5 or later)
• Access the printer utility.
• Troubleshoot.
• Order ink or supplies.
• Contact Lexmark.
• Check the printer software version installed on the
computer.
Scan Center (in Mac OS X version 1 0.6)
or
Lexmark All-In-One Ce nter (in Mac OS X
version 10.5 or earlier)
(referred to as All-In-One Center )
• Scan photos and documents.
• Customize settings for scan jobs.
Printer Settings (in Mac OS X version 1 0.6)
or
Lexmark AIO Setup Utility (in Mac OS X version 10.5
or earlie r)
(referred to as AIO Setup Utility)
• Customize settings for fax jobs.
• Create and edit the Contacts list.
Network Card Reader (in M ac OS X version 10.6)
or
Lexmark Network Card Reader (in Mac OS X
version 10.5 or earlier)
(referre d to as Network Card Reader)
• View the contents of a memory device inserted into
a network printer.
• Transfer photos and PDF documents fr om a memory
device to the compu ter over a network.
Lexmark Printer Util ity (not avai lable in Mac OS X
version 10.6)
(referre d to as Printe r Utility)
• Get help with cartridge installation.
• Print a test page.
• Print an alignment page.
• Clean the prin thead nozzles.
• Order ink or supplies.
• Register the printer.
• Contact technical support.
Wireless Setup Assistant (in Mac OS X version 10.6)
or
Lexmark Wireless Setup Assistant (in Mac OS X
version 10.5 or earlier)
(referred to as Wireless Setup Assistant)
Set up the printer on a wireless network.
Note: This application is automatically installed with the
printer softwar e if the printer has w ireless capability.
Uninsta ller Remove the printer software from your computer.
Note: Your printer may not come with these applications, depend ing on the features of the printer that
you purchased.
Web Links
Web Links are links to predefined Web pa ges.
In Mac OS X version 10.6
1 From the Finder, naviga te to:
Applications > select y our printer folder > Web Links
2 Double-click the Web Link that you want to visit.
In Mac OS X version 10.5 or earlier
1 From the Finder deskt op, double-click the printer folder.
2 Double-click the Printer Utility icon.
3 From the Web Links tab, select the link you want to visit.
Use To
Customer Support Contact technic al support.
Lexmark Software Updates Download and install the latest printer software.
Lexmark Online Visit the Lexmark Web site.
Order Supplies Online Order ink or supplies.
Printer Re gistratio n Register your printer.
Visit Lexmark Sm artSoluti ons
• Visit the SmartSolutions Web site.
• Choose your cu stom solutions.
Note: Your printer may not come with t hese Web Links, depending on t he features of the printer that you
purchased.
Printing
Printing a document
For Windows users
1 With a document open, click File > Print.
2 Click Properties , Preferences, Options, or Setup.
14
Page 15

3 Select the print quality, the num ber of copies to print, the type of paper to use, and how the pages
should print.
4 Click OK to close any printer software dialogs.
5 Click OK or Print.
For Macintosh users
1 With a document open, choos e File > Page Setup.
2 From the Page Setup dialog, set the printer, paper size, and orient ation.
3 Click OK.
4 From the menu bar, choose File > Print.
5 From the Printer pop-up menu, c hoose your printer.
6 From the print options menu, choose the print quality, the number of copies to print, the type of paper
to use, and how the pages should print.
7 Click Print.
Printing on both sides of the paper (duplexing) automatically
The automatic duplex unit, availab le only on select printer models, supports A4- an d letter-size paper. If
you purchased a model without automatic duple x, or if you need to print duplex using other paper sizes,
then see the instructions for pr inting on both sides of the paper (duplexi ng) manually.
For Windows users
1 With a do cument open, click File > Print.
2 Click Properties, Preferences, Options, or Setu p.
3 Navigate to:
Advanced tab > 2-Sided Printing area > select On
Note: To use the settings defined in the printe r, select Use Printer Settings.
4 Select either the Side F lip or Top Flip option. Side Flip is the setting most often used.
5 Click OK to close any printer software dialogs.
6 Click OK or Print.
To return to single-sided printi ng, navigate to:
Advanced tab > 2-Sided Printing area > select Off
For Macintosh users
1 With a document open, choos e File > Page Setup.
2 From the Page Setup dialog , set the printer, paper size, and orie ntation.
3 Click OK.
4 From the menu bar, choose File > Print.
5 From the Printer pop-up menu, choose your printer.
6 From the print options pop-up menu, choose Print Settings or Quality & Medi a.
7 From the Paper Type pop- up menu, choose Plain Pap er.
8 From the print options pop-up menu, choose Layout.
9 From the Two-Sided pop- up menu, choose Long-Edge bin ding or Short-Edge binding.
• For Long-Edge binding, pages are bound along the long edg e of the page (left edge for portra it,
top edge for landscape).
Portrait Landscape
1
2
1
2
• For Short-Edge binding, pages are bound along the short edge of the page (top edge for portrait ,
left edge for landscape).
Portrait Landscape
10 Click Print.
Printing photos using the printer control panel
1 Load photo paper.
2 Insert a memory card, flash drive, or digital camera set to mass storage mode.
The Memory Device screen a ppears on the display.
3 Touch View Photos.
15
Page 16

The Select Photos screen appea rs.
4 Touch the photo or photos you wa nt to print.
Tips:
• If you want to clear a selected photo, then touch the photo again.
• If you want to view more photos, then touch the left or right arrow, and then touch t he photo to
select it.
5 When you are finished selec ting the photos you want to print, touch Layout.
6 If you want to change the print settings, then touch Change Settings.
If necessary, touch Accept each time you make a selection.
7 Press .
Note: For best results, allow the prints to dry at least 24 hours before stacking, displaying, or storing.
Printing documents from a memory card or flash drive
(Windows only)
To enable the File Print function:
• The printer must be connected to a computer through a USB cable or through a network.
• The printer and the computer must be on.
• The memory card or flash drive must conta in document files that are supported by the printer. For
more information, see “Support ed memory cards and file types” on page 10.
• The computer must contain appli cations that support the file type s in the memory device.
1 Insert a memory card or flash drive.
The Memory Device screen appears on the display.
2 Touch Print Do cuments.
3 Select and print the document:
If the printer is using a USB connection
a Select the file name of the document that you want to print.
b Press to start printing the doc ument.
If the printer is using a Wireless connection (selected models only)
a Select the file name of the document that you want to print.
b Press , and the n wait for the pr inter to connec t to the network co mputer or to fi nish searching
the netw ork for av ailable compu ters.
c When prompted, s elect the name of the network computer, a nd then touch Accept to start printing
the document.
Notes:
• You may be prom pted to enter a PIN if the c omputer requires it . Enter the PIN u sing the keypad.
• To assign a computer name and a PIN to the computer, see the Help for the printer software
associated with you r operating system.
Canceling print jobs
To cancel a print job from the printer control pane l, press . To cancel a print job from the computer,
do the following:
For Windows users
1 Click , or click Sta rt and then click Run.
2 In the Start Search or Run box, type control printers.
3 Press Enter, or click OK.
The printer folder opens.
4 Right- click the printer , and then select Open or See what's printi ng.
5 Cancel the print job:
• If you want to cancel a particular prin t job, then right-click the document name, and then select
Cancel.
• If you want to cancel all print jobs in the queue, then click Printer > Cancel All Documents.
For Macintosh users
1 Click the printer icon on the Dock.
2 From the print queue dialog, choose the job you want to can cel, and then click Delete.
16
Page 17
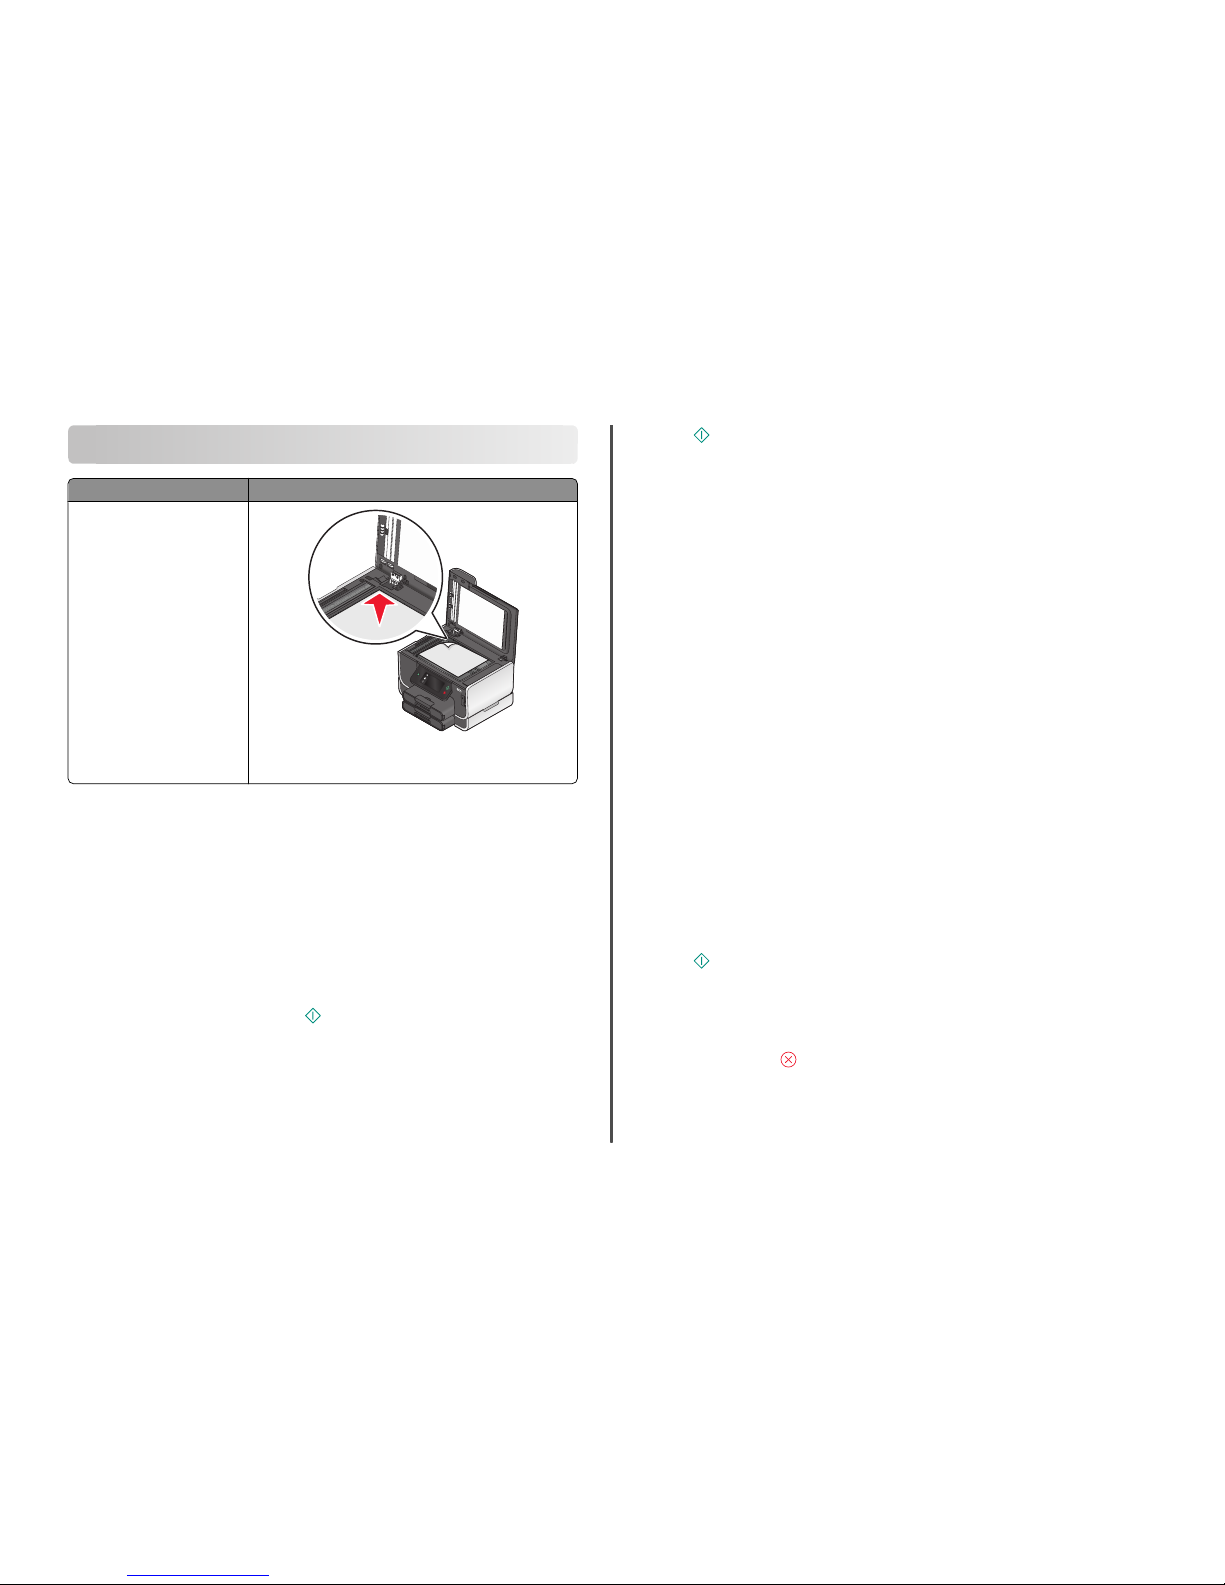
Copying
ADF Scanner glass
Use the ADF for multiple-page
documents.
Note: The ADF is avai lable only on
select models. If you pur chased a
printer without an ADF, then load
original docu ments or photos on th e
scanner glass.
Use the scanner glass for single pages, small items (such as postcards
or photos), transparencies, photo pape r, or thin media (such as
magazine clipping s).
Tips for copying
• When using the ADF, adjust the paper guide on the ADF to the width of the original document.
• When using the scanner gla ss, close the scanner lid to avoid dark edges on the scanned image.
• Do not load postcards, photos, smal l items, transparencies, photo pap er, or thin media (such as
magazine clippings) into the ADF. Place these items on the scanner glass.
Making copies
1 Load paper.
2 Load an original document faceup into the ADF or facedown on the scanner glass.
Note: From the home screen, you can press
to print one copy of th e original document using the
default settings.
3 From the home screen, navigate to Number of Copies:
Copy > Num ber of Copies
4 Enter the number of copies you want to print, and then touch Accept.
5 Touch Color or Bl ack/White to set a color or black-and-white copy.
6 Press .
Copying photos
1 Load photo paper.
2 Place a photo facedown on t he scanner glass.
3 From the home screen, navigate to Photo Reprint:
SmartSolutions > Photo Reprint
4 Touch Continue.
5 Select the photo print size, and then touch Accept.
6 Touch Continue to start pri nting.
Note: For best results, allow the prints to dry at least 24 hours before stacking, displaying, or storing.
Making a duplex copy automatically
The automatic duplex unit, available only on selected p rinter models, supports letter- and A4 -size paper.
If you purchased a model without aut omatic duplex, or if you need to mak e duplex copies using other
paper sizes, then see the instructio ns for making a duplex copy manually.
Note: You cannot make duplex copies on envelopes, card stock , or photo paper.
1 Load paper.
2 Load an original document faceup into the ADF or facedown on the sc anner glass.
3 From the home screen, navigate to 2-Sided Copies:
Copy > More Options > 2-Side d Copies
4 Choose the duplex option that matches your original docum ent, and then touch Accept:
• If you are copying a one-sided document, then touch 1 -Sided to 2- Sided.
• If you are copying a two-sided document, then touch 2- Sided to 2- Sided.
5 Press to save the first page of the document to the printer memory.
6 Follow the instructions on the display.
Canceling copy jobs
To cancel a copy job, press .
Scanning stops and the printer ret urns to the previous menu.
17
Page 18
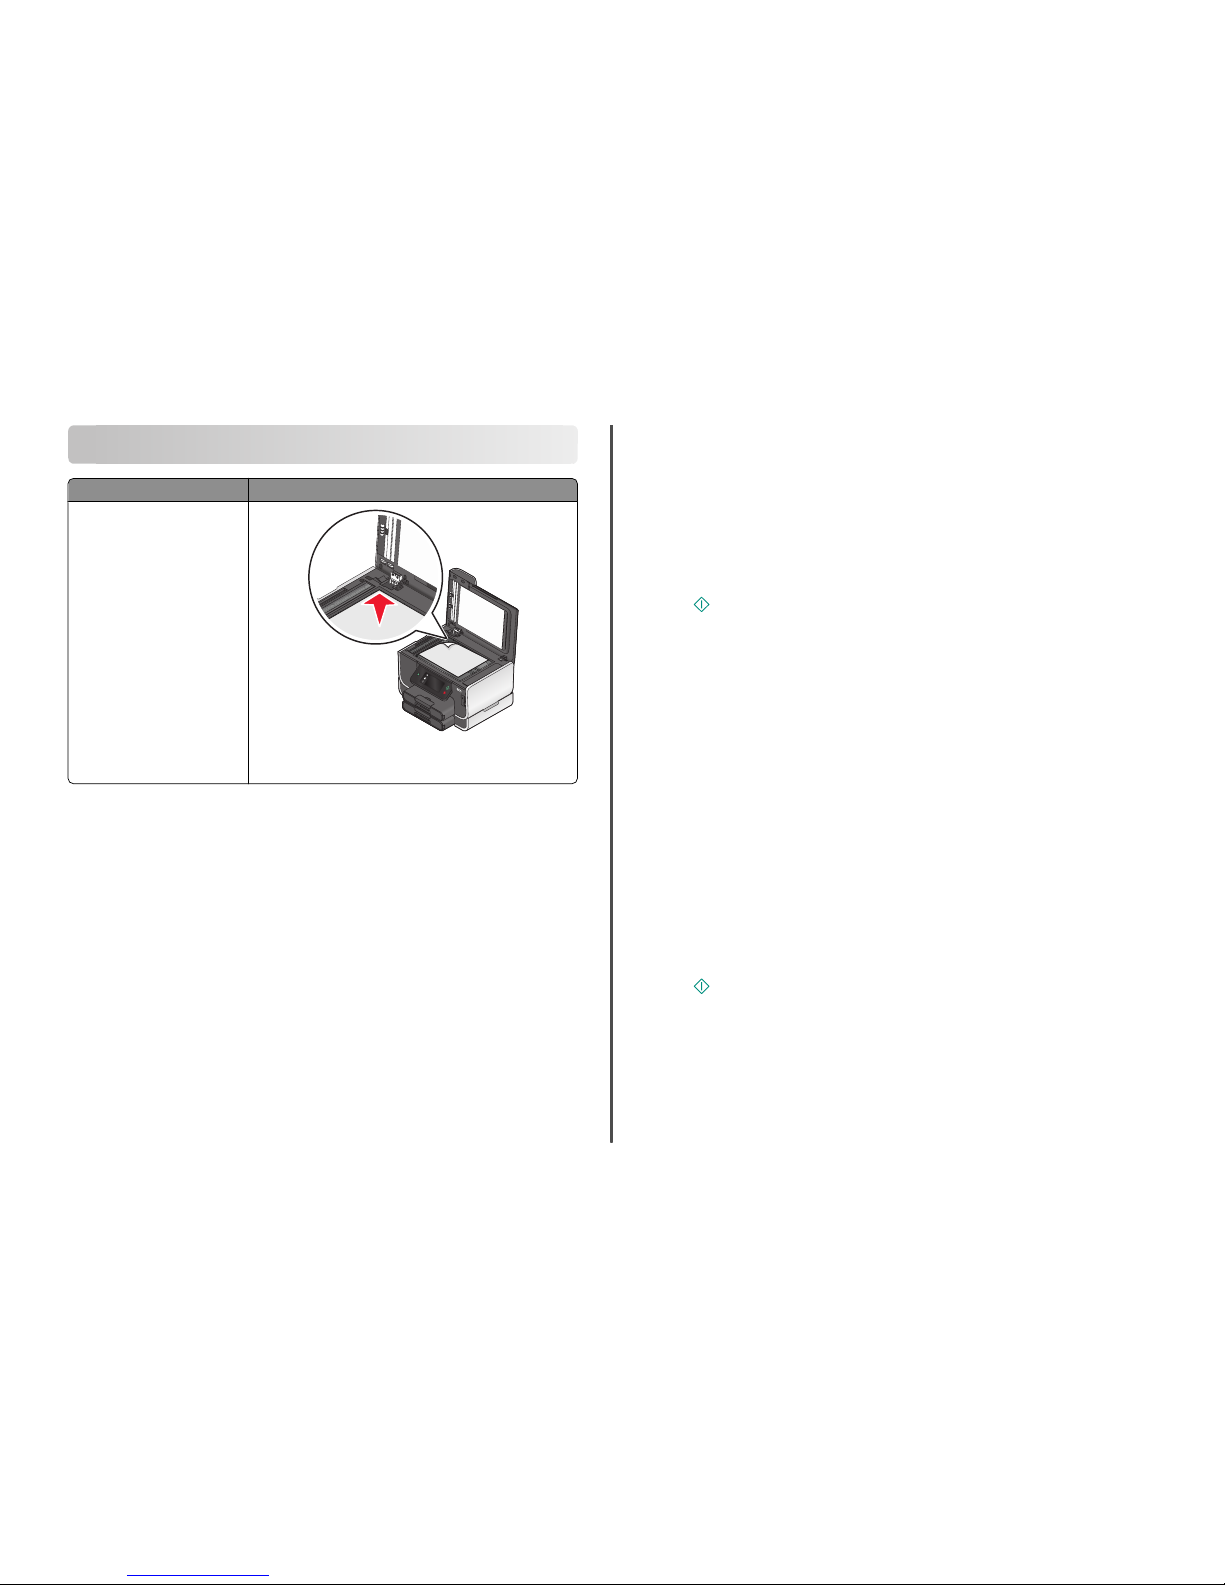
Scanning
ADF Scanner glass
Use the ADF for multiple-page
documents.
Note: The ADF is avai lable only on
select models. If you pur chased a
printer without an ADF, then load
original docu ments or photos on th e
scanner glass.
Use the scanner glass for single pages, small items (such as postcards
or photos), transparencies, photo pape r, or thin media (such as
magazine clipping s).
Tips for scanning
• When using the ADF, adjust the ADF paper guide to the width of the origina l document.
• When using the scanner gla ss, close the scanner lid to avoid dark edges on the scanned image.
• Do not load postcards, photos, smal l items, transparencies, photo pap er, or thin media (such as
magazine clippings) into the ADF. Place these items on the scanner glass.
• Select the PDF file type if you want to scan multiple pages and save them as one file.
• To initiate network scanning fr om the printer, make sure that “Enable network sca n to computer” is
selected in the General tab of the Scan Center. This is available only in Mac OS X version 10.6.
Scanning to a local or network computer
1 Load an original document faceup into the ADF or facedown on the scanner glass.
2 From the home screen, navigate to Scan to Computer:
Scan > Scan to Computer
3 Touch USB-Connected C omputer or the name of a network computer.
The local or network computer is the destination that will receive the scan. Wait until the printer has
finished downloading a list of the scan applications available on the selected computer.
Notes:
• If the printer is connected only to a local computer, then the printer will automatically download
a list of the scan applications.
• You may be prom pted to enter a PIN if the c omputer requires it. Enter the PI N using the keypad.
• To assign a computer name and a PIN to the computer, see the Help for the printer software
associated with your operating system.
4 Select an application, and then touch Accept.
5 Select the color, resolution quality and the original image size. If necessary, touch Accept each time
you make a selection.
6 Press to start scanning.
The scan is comp lete when the application you selected in step 4 opens on the destination computer, a nd
the scan appears within the application as a new file.
Scanning to a flash drive or memory card
Before you begin, make sure your flash drive or memory card is not write protected.
1 Load an original document faceup into the ADF or facedown on the sc anner glass.
2 From the home screen, navigate to Scan to Memory Device:
Scan > Scan to Memory Device
3 Insert the flash drive or memor y card.
Notes:
• The printer reads only one memory device at a time.
• If a flash drive is inserted into the USB port while a memory card is in the card slot, then a message
appears on the display promptin g you to select which memory devi ce to use.
4 Select the output file ty pe you want to crea te.
Note: Select the PDF file type if you want to scan multiple pages and save them as one file.
5 Select the color, resolution quality, and original image size. If necessary, touch Accept each time you
make a selection.
6 Press to start scanning.
The scan is complete when a messag e appears on the printer control panel indicating that the file you
scanned has been saved.
Scanning directly to e-mail using the printer software
For Windows users
1 Load an original document faceup into the ADF or facedown on the sc anner glass.
18
Page 19

2 Click or Start .
3 Click All Programs or Programs, and then select the printer program folder from the list.
4 Navigate to:
Printer Home > sel ect your printer > Email
5 Select Photo, Document, or PDF.
Note: You can select Document only if an OCR application is stored on your computer.
Scanning starts and the scan progress dialog appears.
When the scan is finished, a new e-mail m essage is created with the s canned document automatically
attached .
6 Compose your e-mail mess age.
Note: If your e-mail program does not open automatic ally, then you can scan the docume nt to the
computer and then send it throu gh e-mail as an attachment.
For Macintosh users
1 Load an original document faceup into the ADF or facedown on the scanner glass.
2 From the Applications folder in the Finder, or from the Finder deskto p, double-click the printer folder.
3 Double-click Scan Center or All-In-One Center.
4 From the “What is being scann ed?” area on the main screen, select a docum ent type.
5 From the “How will the scanned i mage be used?” menu, choos e To be viewed on monitor/web
page.
6 From the “Send scanned image to” menu, choose an e-mail applicat ion.
7 Click Scan.
When the scan is finished, a new e-mail m essage is created with the s canned document automatically
attached .
8 Compose your e-mail mess age.
Scanning to a PDF
For Windows users
1 Load an original document faceup into the ADF or facedown on the scanner glass.
2 Click or Start .
3 Click All Programs or Programs, and then select the printer program folder from the list.
4 Navigate to:
Printer Home > sel ect your printer > PDF
Scanning starts and the scan progress dialog appears.
5 Save the document as a PDF.
For Macintosh users
1 Load an original document faceup into the ADF or facedown on the sc anner glass.
2 From the Applications folder in the Find er, or from the Finder desktop, double-cli ck the printer folder.
3 Double-click Sca n Center or All-In-One Center.
4 From the “What is being s canned?” area on the main screen, sele ct a document type.
5 Customize the settings as needed.
6 Click Scan.
7 Save the document as a PDF.
Canceling scan jobs
Press on the printer control panel, or click Cancel on the computer screen.
E-mailing
Sending e-mail
Tips for e-mailing
• When using the ADF, adjust the paper guide on the ADF to the width of the original document.
• When using the scann er glass, close the scanner lid to avoid da rk edges on the scanned image.
• Do not load postcards, photos, small items, transparenc ies, photo paper, or thin media (such as
magazine clippings) into the ADF. Place these items on t he scanner glass.
• Make sure to enter your e-mail ac count information and set up the SMTP server before sen ding an
e-mail.
• Make sure the printer is connected to an Ethernet or wireless netw ork before sending a n e-mail.
If necessary, make sure the network is connected to the Internet for the printer to communicate with
the SMT P server . If the printer cannot con nect to the Inter net, the n contact your sy stem supp ort
person.
The printer support s only one active network connection (Ethernet or wireless) at a time.
• Add contacts to your addres s book. When sending an e-mail, you can ju st select contacts from you r
address book instead of ty ping their e-mail addresses repe atedly.
19
Page 20

Scanning a document or photo to e-mail
1 Load an original document faceup into the ADF or facedown on the scanner glass.
Note: You can attach only one document or photo to each e-mail.
2 From the home screen, navigate to Scan to E-mail:
Scan > Scan to E-mail
3 Select the output file type you want to create.
Note: Select the PDF file type if you want to scan multiple pages and save them as one file.
4 Touch an option to enter or s elect the recipients:
• Enter E-mail Addr ess—Enter the e-mail address manually .
• Address Book—Touch Sort by Name or Sort by Group, and then select the contact.
• Histor y—Select the name or e-mail address from the history list.
If necessary, touch OK or Accept each time you make a selection.
5 To enter additional rec ipients, touch Add Recipient, and then enter t he e-mail address, name, or g roup
you want to add.
Touch Accept every time you add a recipient .
Note: You can send an e-mail to up to 30 recipients.
6 Select the file type, color, qua lity, and original size of the documen t or photo you want to send. If
necessary, touch Accept to sa ve each se tting.
7 If you want to change the default e-mail subject:
a Touch Subject.
b Enter your subject, and then touch OK .
8 If you want to change the def ault e-mail message:
a Touch Message.
b Enter your message, and then touch OK.
9 Press .
Attaching a document or photo to e-mail
1 Insert the flash drive or memory card.
The Memory Device screen appears on the display.
Notes:
• The printer reads only one memory device at a time.
• If a flash drive is inserted into the USB port while a memory card is in the card slot, then a message
appears on the display prompt ing you to select which memory devic e to use.
2 Touch Attach File to E-mail.
3 If you want to change the defa ult e-mail subject:
a Touch Subject.
b Enter your subject, and then touch OK.
4 If you want to change the default e-mail message:
a Touch Message.
b Enter your message, and then touch OK.
5 Select the file to attach:
Note: You can attach only one document or photo to each e-mail.
• If you want to attach a document :
a Touch Attach document to E-mail.
b Touch the file name of the document that you want to attach.
c Touch Contin ue.
• If you wan t to attach a pho to:
a Touch Attach Photo to E-mail.
b Touch the photo you want to attach.
c Touch Contin ue.
6 Touch an option to ente r or select the recipients:
• Enter E-mail Address—Enter the e-mail address manual ly.
• Address Book—Touch Sort by N ame or Sort by Group, and then select the contact.
• History—Select the nam e or e-mail address from the history list.
If necessary, touch OK or Accept each time you make a selection.
7 To enter additional recipients, touch Add Recipient, and then enter the e-m ail address, name, or group
you want to add.
Touch Accept every time you add a recipient.
Note: You can send an e-mail to up to 30 recipients.
8 Touch Send.
Canceling an e-mail
To cancel an e- mail, press .
20
Page 21

Using SmartSolutions
What is SmartSolutions?
SmartSolutions is a set of solutions t hat you can create, cust omize, and download fro m the SmartSolutions
Web site (http://smartsolutions.lexmark.com) to your printer. It lets you create one-touch custom
solutions to st reamline repetitive copying, scanning, and printing tasks. SmartSolutions also lets you view
RSS feeds, calendars, and onli ne photo albums from the printer control panel.
To access a solution you creat ed or customized, touch Smar tSolutions on the print er control panel, and
then select the icon or name of the solution.
For solu tions with an option to send an e -mail, you must firs t set up your pri nter to e-m ail through
from the ho me screen.
Your printer may not come with some of t hese solutions depending on the f eatures of the printer that
you purchased.
Creating and customizing printer solutions
Before you begin, make sure:
• Your printer and computer are each conne cted to the Internet through an Ethernet or wireless
connection.
• Your printer is powered on.
1 Go to the SmartSolutions Web s ite at http://smartsolutions.lexmark.com.
2 Log in or create an account.
3 Add your printer.
4 Use the Web site to create, customize, and download solutions to your pri nter.
For more information, click HELP on the Smar tSolutions Web sit e.
Troubleshooting
Before you troubleshoot
Use this checklist to solve most printer problems:
• Make sure the power cord is plugge d into the printer and into a properly grounde d electrical outlet.
• Make sure the printer is not plugged into any surge protectors, un interrupted power supplies, or
extension cords.
• Make sure the printer is turned on.
• Make sure the printer is securely connected to the host computer, print server, or other network
access point.
• Check the printer for error messages, and resolve any errors.
• Check for paper jam messages , and clear any jams.
• Check the ink cartridges, and install new cartridges if necessary.
• Use the Service Center to locate and solve the problem (Windows only).
• Turn the printer off, wait about 10 seconds, and then turn the printer back on.
Using the Service Center to solve printer problems
The Service Center provides step -by-step troubleshooting help and contains links to print er maintenance
tasks and c ustomer support.
To open the Service Center, use on e of these methods:
Method 1 Method 2
If it appears on an error message dialog, click the
For additi onal assis tance, use the Se rvice Center
link.
1 Click or Start.
2 Click All Programs or Programs, and then select the
printer progra m folder from the li st.
3 Select Printer Home.
4 From the Support tab, select Service Center.
If Troubleshooting does not solve your problem
Visit our Web site at http://s upport.lexmark. com to find the following:
• Knowledgebase articles with the latest information and troubleshooting for your printer
• Live online technical support
• Contact numbers for telephon e technical support
Setup troubleshooting
• “Incorrect language a ppears on the display” on page 22
• “Printhead errors” on page 22
• “Software did not install” on page 22
• “Print job does not print or is missing pages” on page 23
• “Printer is printing bla nk pages” on page 23
• “Printer is busy or does not respond” on page 24
• “Cannot delete docum ents from the print queue” on pag e 24
• “Cannot print through USB ” on page 24
21
Page 22
Incorrect language appears on the display
If the "Before you troublesho ot" checklist does not solve the prob lem, then try the followin g:
C
HANGE THE LANGUAGE USING THE PRINTER MENUS
1 From the home screen, navigate to Use Factory Defaults:
> Use Factory Defaults
2 Touch Yes.
The printer resets and starts the initial printer setup.
3 Complete the initial printer setup.
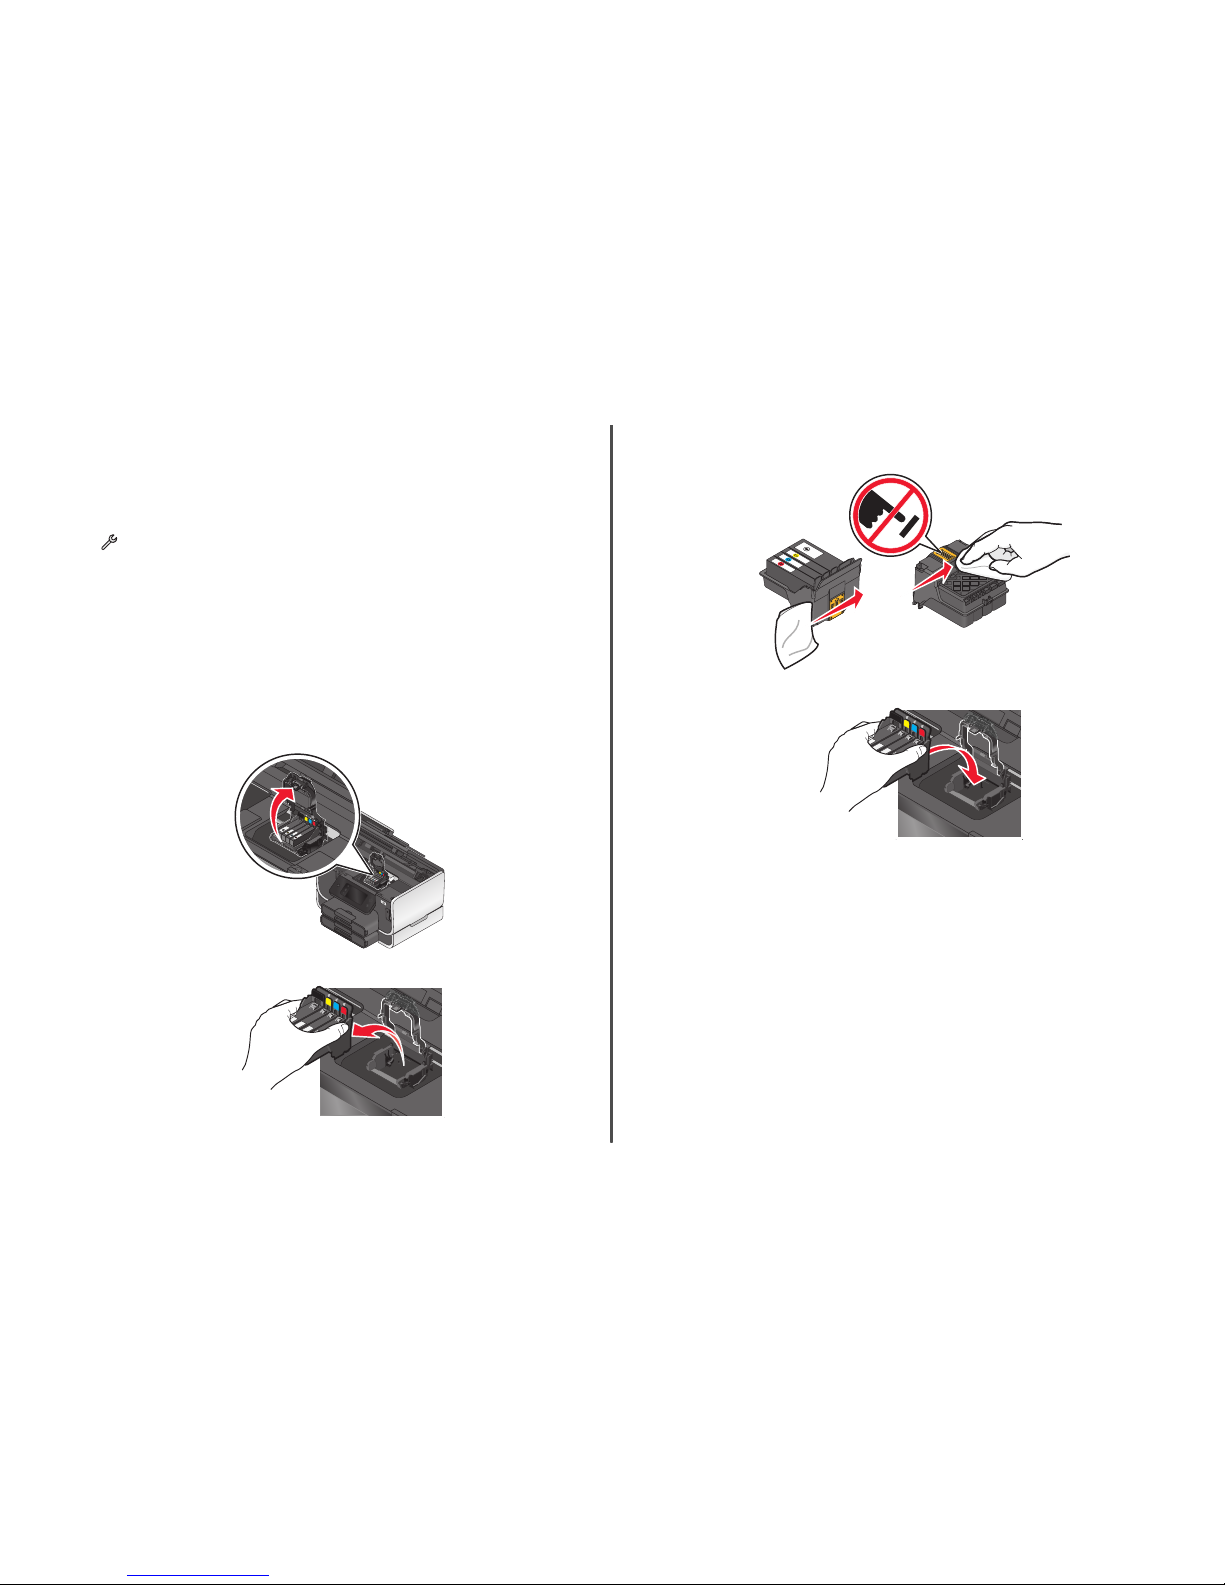
Printhead errors
If the "Before you troublesho ot" checklist does not solve the prob lem, then try the followin g:
R
EMOVE AND REINSERT THE PRINTHEAD
1 Open the printer and lift the latch.
2
2
2 Remove the printhead.
Warning—Po tential Damage: Do not touch the printhead nozzles.
3 Wipe the printhead contacts using a clean, lint-free cloth.
4 Reinsert the printhead, and then close the latch until it clicks.
5 Close the printer.
Note: If removing an d reinserting the printhead does not resolve the error, then c ontact technical support.
Software did not install
If you encountered problems while installing, or if your printer does not appear in the list in the Printers
folder or as a printer option when sending a print job, then try removing and reinstalling the software.
Before you reinstall the software, do the following:
M
AKE SURE THAT YOUR COMPUTER MEETS THE MINIMUM SYSTEM REQUIREMENTS LISTED ON THE
PRINTER
BOX
T
EMPORAR ILY DISABLE SECURITY PROGRAMS IN WINDOWS BEFORE INSTALLING THE SOFTWARE
22
Page 23

C
HECK THE
USB
CONNECTION
1 Check the USB cable for any obvious damage. If the cable is da maged, then use a new one.
2 Firmly plug the square en d of the USB cable into the back of the printer.
3 Firmly plug the rectangul ar end of the USB cable into the USB port of the computer.
The USB port is marked with a
USB symbol.
Note: If you continue to have problems, then try anot her USB port on the computer. You may have
connected to a defective port .
R
ECONNECT THE PRINTER POWER SUPPLY
1 Turn off the printer, and then unplug the power cord from the wall outlet.
2 Gently remove the power supply from the printer, and then reinse rt it.
3 Plug the power cord into the wall outlet, and then turn on the printer.
Print job does not print or is missing pages
If the "Before you troublesho ot" checklist does not solve the probl em, then try one or more of the
following:
M
AKE SURE THE INK CARTRIDGES ARE INSERTED CORRECTLY
1 Turn on the printer, and th en open the prin ter.
2 Make sure the cartridges are inserted correc tly.
The cartridges should click firmly into the matching color slot of the printhead.
3 Close the printe r.
S
ELECT YOUR PRINTER FROM THE PRINT DIALOG BEFORE SENDING THE PRINT JOB
(MAC
ONLY
)
1 With a document open, choose File > Print.
2 From the printer pop-up menu , choose your printer, and then click Print.
If your printer does not appear on the Printer list, then c hoose Add Printer. From the list of printers
in the Default tab, selec t your printer, and then click Add.
If your printer does not appea r on the list, then try either of the fol lowing:
• For a USB-connected printer, remove and then reconnect the USB cable.
• For a printer that is wirelessly connected, see the Wireless troubleshooting section.
M
AKE SURE THE PRINT JOB IS NOT PAUSED
M
AKE SURE YOUR PRINTER IS SET AS THE DEFAULT PRINTER
R
ECONNECT THE PRINTER POWER SUPPLY
1 Turn off the printer.
Note: Make sure the printer is not in Power Save r mode. Press and hold
for three seconds to turn
off the printer.
2 Pull out the power cord from the power supply.
3 After one minute, reconnect the power cord into the power supply.
4 Turn on the printer.
R
EMOVE AND RECONNECT THE
USB
CABLE CONNECTED TO YOUR PRINTER
C
HECK THE
USB
CONNECTION
1 Check the USB cable for any obv ious damage. If the cable is da maged, then use a new one.
2 Firmly plug the square end of the USB cable into the back of the printer.
3 Firmly plug the rectangular end of the USB cable into the USB port of the computer.
The USB port is marked with
.
Note: If you continue to have problems, then try another USB port on the computer. You may have
connected to a defective port.
R
EMOVE AND REINSTALL THE PRINTER SOFTWARE
Printer is printing blank pages
Blank pages may be caused by improperly installed ink cartridges.
R
EINSTAL L THE INK CARTRIDGES AND DEEP CLEAN AND ALIGN THE PRINTHEAD
1 Reinstall the ink cartridges, see “Replacing ink cartridges” on page 10 for more information.
If the cartridges do not seem to fit, ma ke sure the printhead is properly seated, and then try ins talling
the cartridges again.
2 Load plain pa per.
3 From the home screen of the pri nter control panel, navigate to Deep Clean Printhead:
> More Options > Deep Clean Printh ead
A cleaning page prints.
4 Navigate to Align Printer:
> More Options > Alig n Printer.
23
Page 24

An alignment page prints.
Note: Do not remove the alignment page until print ing is finished.
Printer is busy or does not respond
If the "Before you troublesho ot" checklist does not solve the probl em, then try one or more of the
following:
M
AKE SURE THE PRINTER IS NOT IN POWER SAVER MODE
If the power light is blinking on and off slowly, then the printer is in Power Saver mode. Press to
wake up the printer.
If the printer will not come out of Power Saver mode, then reset the power:
1 Unplug the power cord from the wall outlet, and then wait 10 seconds .
2 Insert the power cord in to the wall outlet, and then turn on th e printe r.
If this problem persists, then check our Web site for updates for your print er software or firmware.
R
ECONNECT THE PRINTER POWER SUPPLY
1 Turn off the printer, and then unplug the power cord from the wall outlet.
2 Gently remove the power supply from the printer, and then reinse rt it.
3 Plug the power cord into the wall outlet, and then turn on the printer.
Cannot delete documents from the print queue
If you have jobs stuck in the print que ue and cannot delete them to get other jobs to print, then the
computer and printer may not be communi cating.
R
ESTART THE COMPUTER AND TRY AGAIN
Cannot print through USB
If the "Before you troublesho ot" checklist does not solve the probl em, then try one or more of the
following:
C
HECK THE
USB
CONNECTION
1 Check the USB cable for any obvious damage. If the cable is da maged, then use a new one.
2 Firmly plug the square en d of the USB cable into the back of the printer.
3 Firmly plug the rectangul ar end of the USB cable into the USB port of the computer.
The USB port is marked with a USB symbol.
Note: If you continue to have problems, then try another USB port on the computer. You may have
connected to a defective port.
M
AKE SURE THE
USB
PORT IS ENABLED IN WINDOWS
1 Click , or click Start and then click Run.
2 In the Start Search or Run box, type devmgmt.msc.
3 Press Enter, or click OK.
The Device Manager opens.
4 Click the plus sign (+) beside Universal Serial Bus controllers.
If USB Host Controller and USB Root Hub are listed, then the USB port is enabled.
For more information, see the comput er documentation.
R
EMOVE AND REINSTALL THE PRINTER SOFTWARE
Network troubleshooting
If you are having trouble setting up y our printer on a network, print a network set up page, and then see
the complete network troublesho oting information in the Network Getting Started Guide or the
comprehensive User's Guide available on the installation software CD.
Printing a network setup page
A network setup page lists the configuration settings of the printer, including the IP address and MAC
address of the printer.
1 Load plain paper.
2 From the home screen, navigate to Print Setup Page:
> Network Setup > Print Setup Page
The network setup page prints.
Notices
Edition notice
November 2010
24
Page 25

The follow ing paragraph does no t apply to any country where such provisions are inco nsistent with
local law: LEXMARK INTERNATIONAL, INC., PROVIDES THIS PUBLICATION “AS IS” WITHOUT WARRANTY
OF ANY KIND, EITHER EXPRESS OR IMPLIED, INCLUDING, BUT NOT LIMITED TO, THE IMPLIED WARRANTIES
OF MERCHANTABILITY OR FITNESS FOR A PARTICULAR PURPOSE. Some states do not allow disclaimer of
express or implied warranties in cert ain transactions; therefore, this statement may not apply to you.
This publication could include technical inaccuracies or typographical errors. Changes are periodically
made to the information herein; these changes will be incorporated in later editions. Improvements or
changes in the products or the progra ms described may be made at any time.
References in this publication to pro ducts, programs, or services do not imply that the manufacturer
intends to make these available in all countries in which it operates. Any reference to a product, program,
or service is not intended to state or imply that only that product, program, or service may be use d. Any
functionally equivalent product, program, or service that does not i nfringe any existing intellectual
property right may be used instea d. Evaluation and verification of operation in conjunction with other
products, programs, or services , except those expressly des ignated by the manufacturer, are the user’s
responsibility.
For Lexmark technical support, visit support.lexmark.com.
For information on supplies and downlo ads, visit www.lexmark.com.
If you don't have access to the Int ernet, you can contact Lexmark by mail:
Lexmark International, Inc.
Bldg 004-2 /CSC
740 New Ci rcle Road NW
Lexington, KY 40550
USA
2010 Lexm ark International , Inc.
All rights reserv ed.
Trademarks
Lexmark and Lexmark with diamond design are trademarks of Lexmark International, Inc., registered in
the United States and/or othe r countries.
All other trademarks are the prope rty of their respective owners.
Federal Communications Commission (FCC) compliance
information statement
This product complies with the limits for a Class B digital device, pursuant to Part 15 of the FCC Rules.
Operation is subject to the follow ing two conditions:
1 this device may not cause harmful inte rference, and
2 this device must accept any interf erence received, including interference that may cause undesired
operation.
Any questions on this statement should be directed to:
Director of Lexmark Techno logy & Services
Lexmark International, Inc.
740 West New Circle Road
Lexington, KY 40550
(859) 232-3000
For additional compliance informati on, see the online documenta tion.
Federal Communications Commission (FCC) compliance
information statement
This product complies with Part 68 of the FCC Rules. See the product online documentati on for additional
compliance information.
25
Page 26

Index
A
ADF output tray
location 5
aligning the printhead 11
Automatic Document Feeder (ADF)
location 5
Automatic Document Feeder (ADF) tray
location 5
B
buttons
printer control panel 6
C
canceling
copy job 17
e-mail 20
print job 16
scan job 19
cannot delete documents from print queue 24
cannot print through USB 24
cartridges, ink
ordering 10
checking an unresponsive printer 21
checklist
before you troubleshoot 21
cleaning printhead nozzles 11
conserving energy, ink, and paper 4
copies
making 17
copy job
canceling 17
copying 17
on both sides of the paper 17
photos 17
tips 17
D
documents
attaching to e-mail 20
printing 14
scanning to e-mail 20
scanning using the touch screen 18
duplex
copying, automatic 17
extending drying ti me 15
printin g, automatic 15
duplex unit
location 6
E
emission notices 25
energy
conserving 4
Ethernet port
location 6
EXT port
location 6
e-mailing
attaching a photo or document 20
canceling 20
scanned documents 18
scanning a document or photo 20
tips 19
F
FCC notices 25
features, printer 5
file types
supported 10
finding
information 4
publications 4
Web site 4
flash drive
inserting 9
scanning to 18
H
home screen
icons 7
I
icons
home screen 7
printer control panel 6
incorrect language appe ars on display 22
information
finding 4
ink
conserving 4
ink cartridge access
location 5
ink cartridges
ordering 10
replacing 10
inserting a memory card or flash drive 9
installing printer software 12
L
language
changing 22
LINE port
location 6
M
Macintosh printe r software
using 13
memory card
inserting 9
scanning to 18
supported types 10
memory card slot
location 5
minimum system requirem ents 12
models, printer 5
N
navigating menus
using touch sc reen 8
network setup page
printing 24
notices 2, 25
P
page does not print 23
paper
conserving 4
paper exit tray
location 5
paper tray (Tray 1 )
location 5
paper tray (Tray 2 )
location 5
parts
diagram 5
PDF
creating from scan 19
photos
attaching to e-mail 20
copying photos 17
printing using printer control panel 1 5
scanning to e-mail 20
PictBridge and USB port
location 5
power supply port
location 6
print job
canceling 16
print troubleshooting
cannot delete documents fr om print queue 24
printer
features 5
models 5
printer control panel
buttons and icons 6
location 5
printer does not respond 24
printer features 5
printer models 5
printer printing blank pages 23
printer problems, basic solutions 21
printer software
installing 12
printer solutions 21
printhead
aligning 11
printhead access
location 5
printhead error 22
printhead nozzles
cleaning 11
printing
documents 14
network setup page 24
on both sid es of the paper 15
photos using pr inter control panel 15
two-sided 15
publications
finding 4
R
recycling 4
replacing ink cartridges 10
26
Page 27

S
safety information 2
scan job
canceling 19
scanner unit
location 6
scanning
creating a PDF from scan 19
documents for e-mailing 18
tips 18
to a computer 18
to a flash drive 18
to a memo ry card 18
to a network 18
using the touch screen 18
sending an e- mail
attaching a photo or document 20
scanning a doc ument or photo 20
Service Center 21
setup troubleshooting
cannot print through USB 24
incorrect language appears on display 22
page does not print 23
printer does not respond 24
printer printing blank pages 23
printhead error 22
software did not install 22
SmartSolutions 21
software
Service Center 21
software did not install 22
solution s 21
supported memory cards and file types 10
supported operating systems 12
T
techni cal suppor t 21
telecommunication notices 25
tips for
copying 17
e-mailing 19
scanning 18
touch screen
navigating 8
troubleshooting
checking an unresponsive print er 21
contacting technical support 21
Service Center 21
solving basic printer problems 21
troubleshooting, print
cannot delete documents fro m print queue 24
troubleshooting, set up
cannot print through USB 24
incorrect language appears on dis play 22
page does not print 23
printer does not respond 24
printer printing blank pages 23
printhead error 22
software did not install 22
U
USB port
location 6
using
Macintosh printer software 13
W
Web site
finding 4
Wi-Fi indicator
location 5
27
 Loading...