

Page 1
Quick Reference
Loading paper
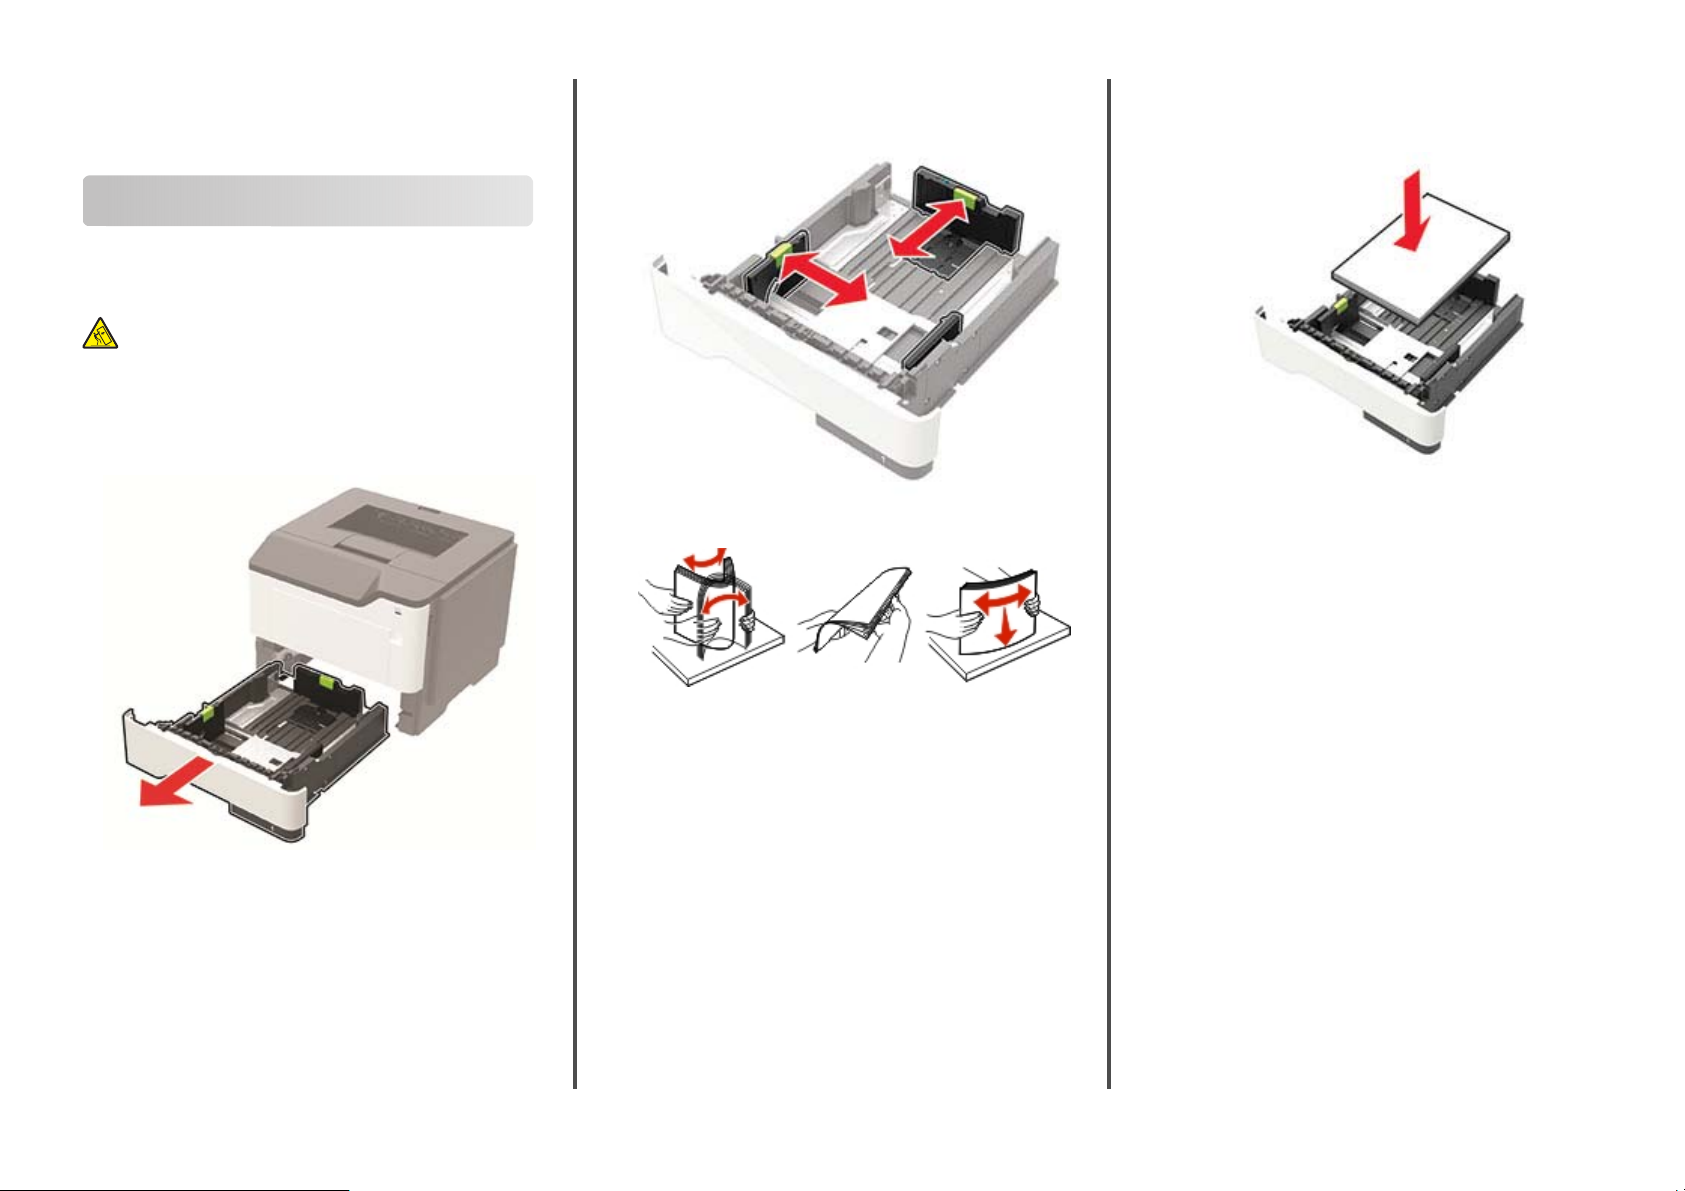
Loading trays
CAUTION—TIPPING HAZARD: To reduce the risk of
equipment instability, load each tray separately. Keep all
other trays closed until needed.
1
Remove the tray.
Note: To avoid paper jams, do not remove trays while the
printer is busy.
2
Adjust the paper guides to match the size of the paper that you
are loading.
3
Flex, fan, and align the paper edges before loading.
4
Load the paper stack with the printable side facedown, and
then make sure that the side guides fit snugly against the
paper.
Notes:
•
Load letterhead facedown with the top edge of the
sheet toward the front of the tray for one
•
Load letterhead faceup with the bottom edge of the
sheet toward the front of the tray for two
•
Do not slide paper into the tray.
•
To avoid paper jams, make sure that the stack height is
below the maximum paper fill indicator.
5
Insert the tray.
If necessary, set the paper size and paper type from the control
panel to match the paper loaded.
‑
sided printing.
‑
sided printing.
1
Page 2
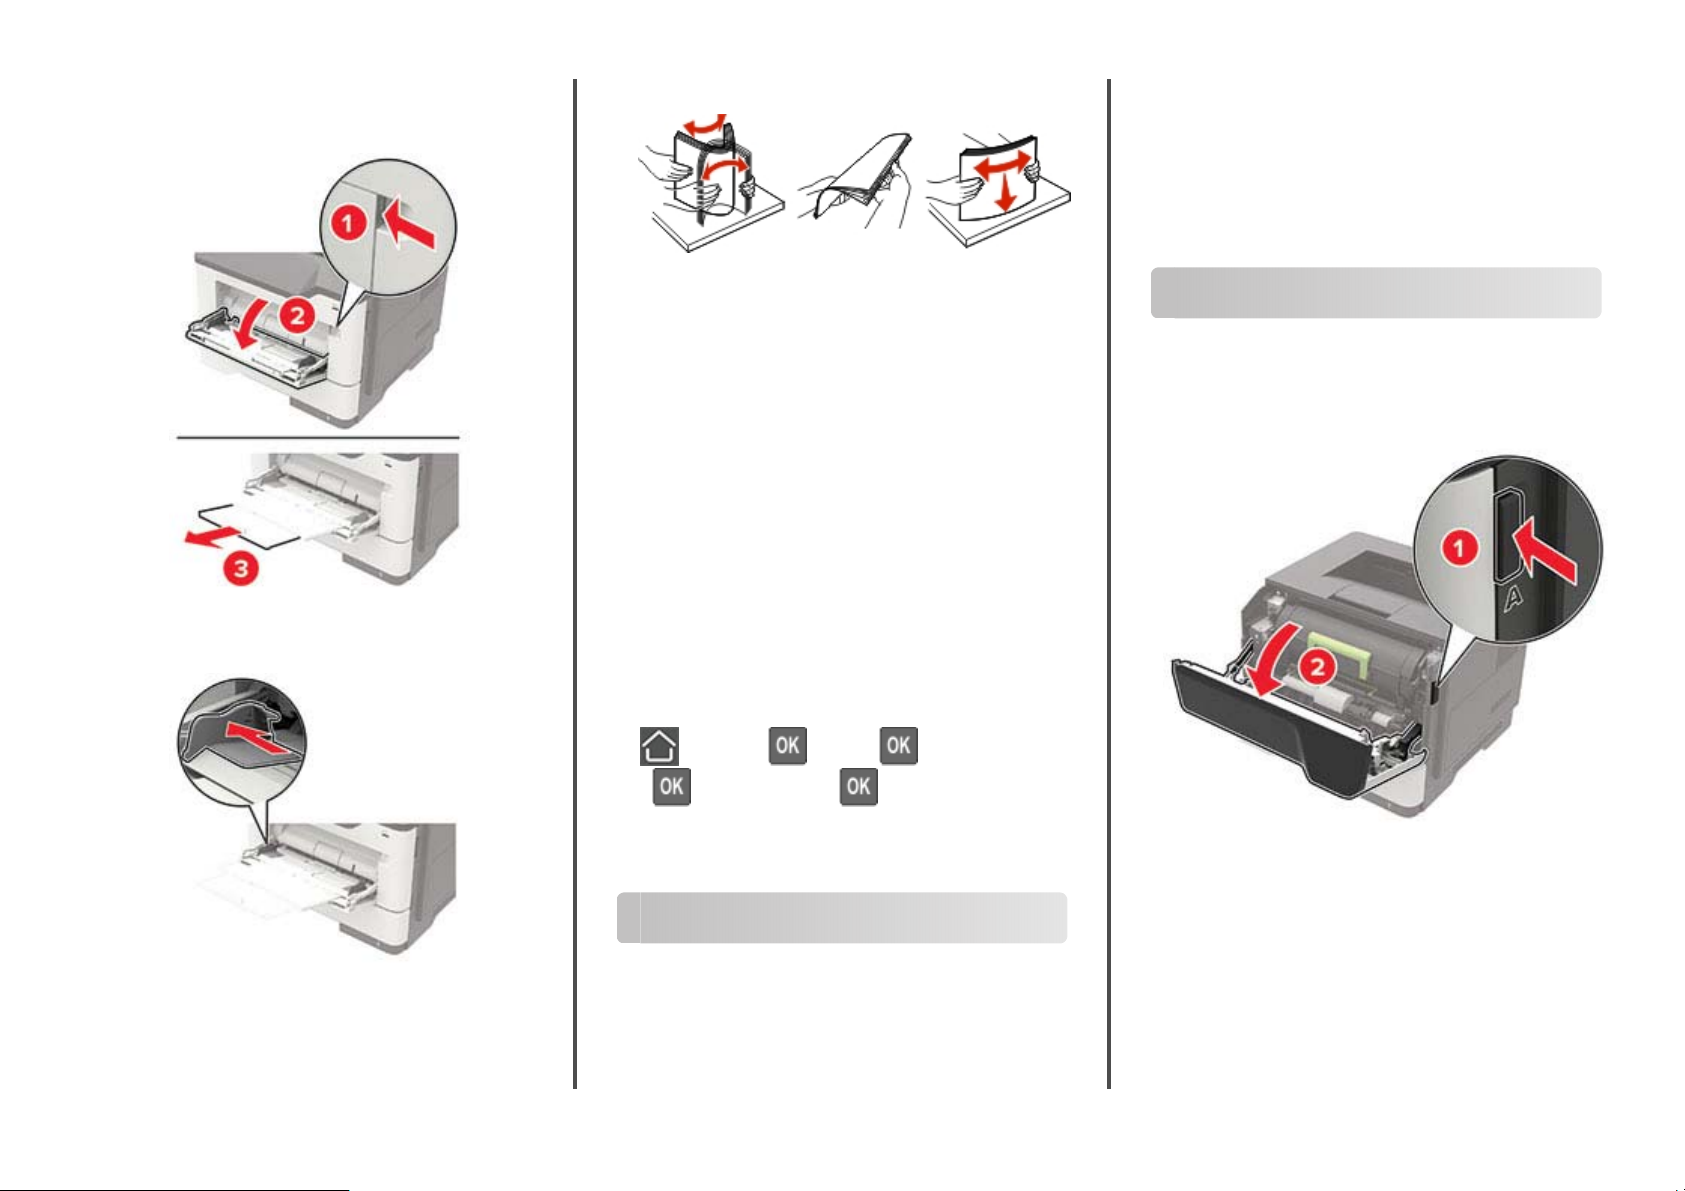
Loading the multipurpose feeder
1
Open the multipurpose feeder.
2
Adjust the guide to match the size of the paper that you are
loading.
3
Flex, fan, and align the paper edges before loading.
4
Load paper with the printable side faceup.
Notes:
•
Load letterhead faceup with the top edge of the sheet
toward the front of the tray for one
•
Load letterhead facedown with the bottom edge of the
sheet toward the front of the tray for two
•
Load envelopes with the flap facedown on the left side.
•
Load European envelopes with the
entering the printer first.
Warning—Potential Damage: Do not use envelopes with
stamps, clasps, snaps, windows, coated linings, or self
adhesives.
5
From the control panel, set the paper size and paper type to
match the paper loaded.
‑
sided printing.
‑
sided printing.
facedown and
flap
Setting the size and type of the specialty media
1
From the control panel, navigate to:
‑
stick
1
From the document that you are trying to print, open the Print
dialog.
2
If necessary, adjust the settings.
3
Print the document.
Note: For details of the function of the printer driver, refer to
the Help of the printer driver.
Maintaining the printer
Replacing the toner cartridge
1
Open door A.
> Settings > > Paper > > Tra y Con figu rat ion
> Paper Size/Type >
>
2
Select a paper source, and then configure the size and type of
the specialty media.
Printing
Printing from a computer
Note: For labels, card stock, and envelopes, set the paper size
and paper type in the printer before printing the document.
2
Page 3
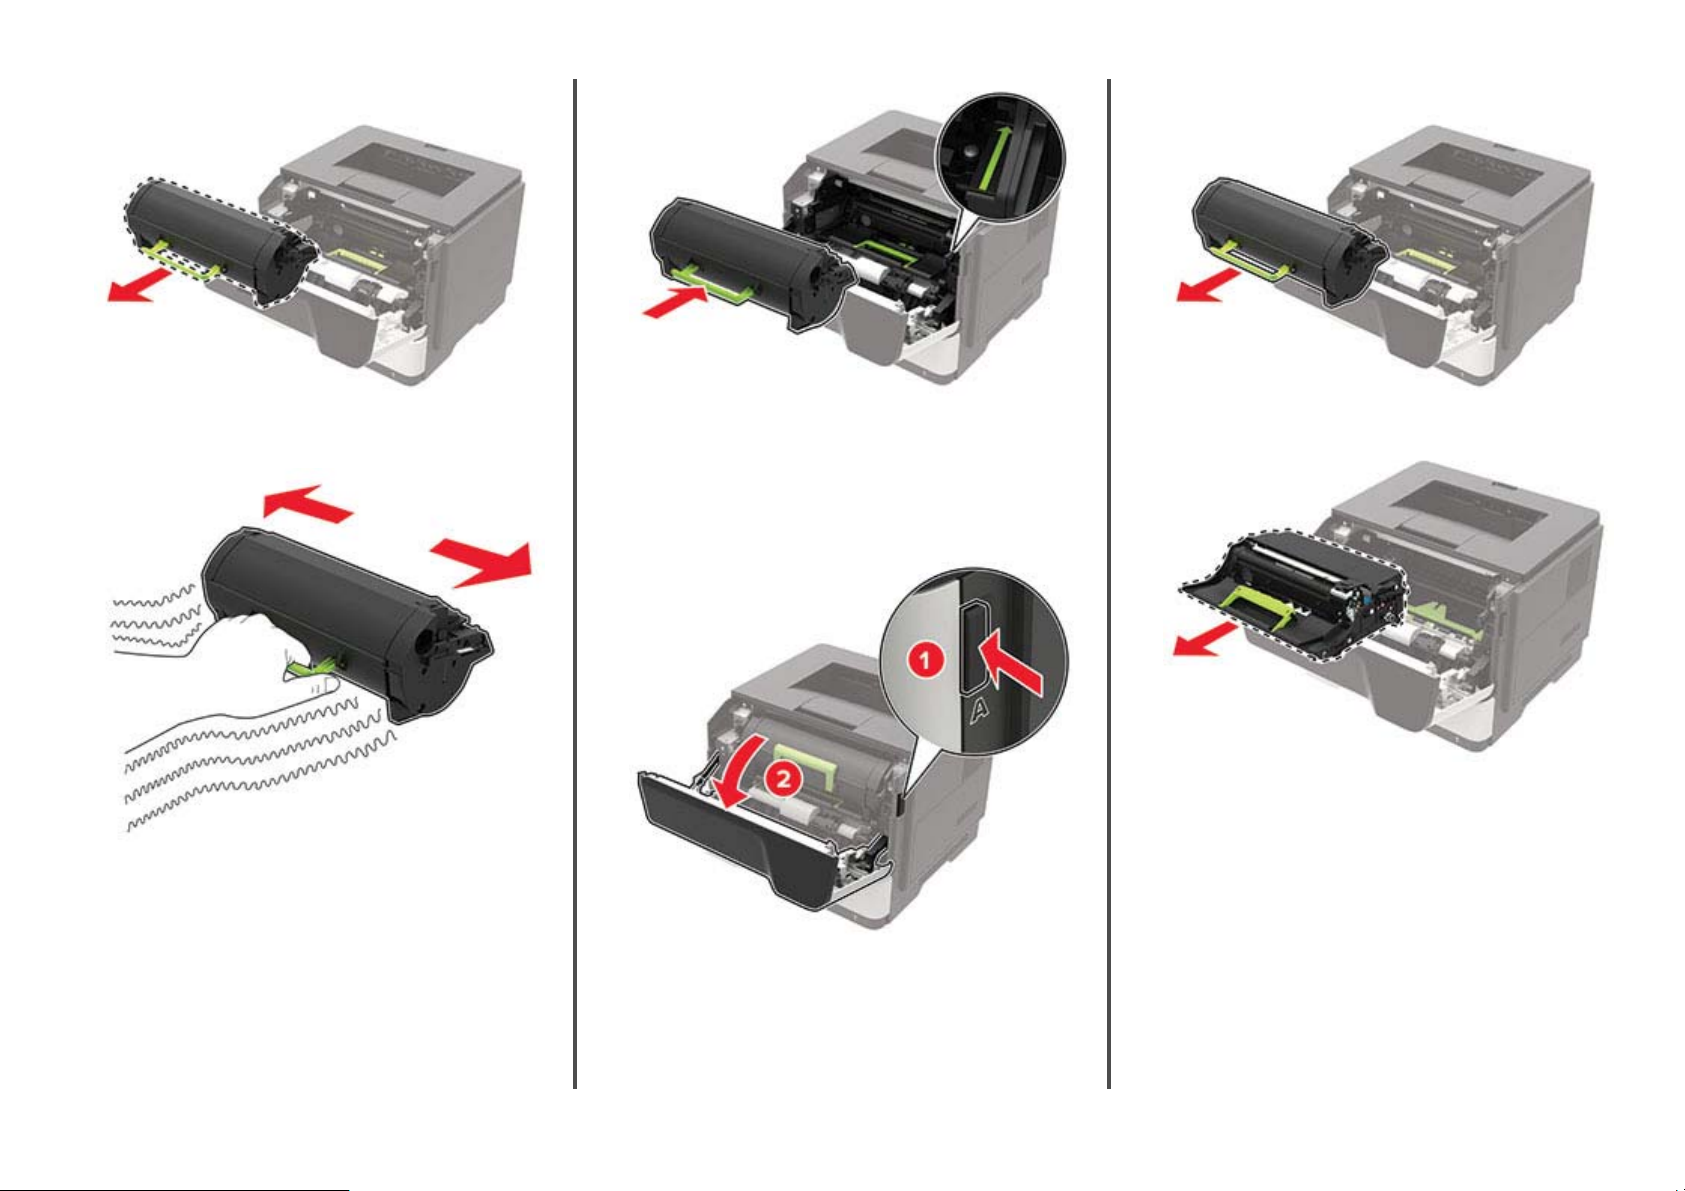
2
Remove the used toner cartridge.
3
Unpack the new toner cartridge, and then shake it three times
to redistribute the toner.
5
Close door A.
Replacing the imaging unit
1
Open door A.
2
Remove the toner cartridge.
3
Remove the used imaging unit.
4
Insert the new toner cartridge.
Note: Use the arrows inside the printer as guides.
3
Page 4

4
Unpack the new imaging unit, and then shake it three times to
redistribute the toner.
Warning—Potential Damage: Do not expose the imaging
unit to direct light for more than 10 minutes. Extended
exposure to light may cause print quality problems.
Warning—Potential Damage: Do not touch the
photoconductor drum. Doing so may aect the quality of
future print jobs.
6
Insert the toner cartridge.
Note: Use the arrows inside the printer as guides.
Correct loading of paper Incorrect loading of paper
•
Do not load or remove a tray while the printer is printing.
•
Do not load too much paper. Make sure that the stack height
is below the maximum paper fill indicator.
•
Do not slide paper into the tray. Load paper as shown in the
illustration.
5
Insert the new imaging unit.
Note: Use the arrows inside the printer as guides.
7
Close door A.
Clearing jams
Avoiding jams
Load paper properly
•
Make sure that the paper lies flat in the tray.
4
•
Make sure that the paper guides are positioned correctly and
are not pressing tightly against the paper or envelopes.
•
Push the tray firmly into the printer after loading paper.
Page 5

Use recommended paper
•
Use only recommended paper or specialty media.
•
Do not load paper that is wrinkled, creased, damp, bent, or
curled.
•
Flex, fan, and align the paper edges before loading.
•
Do not use paper that has been cut or trimmed by hand.
•
Do not mix paper sizes, weights, or types in the same tray.
•
Make sure that the paper size and type are set correctly on the
computer or printer control panel.
•
Store paper according to manufacturer recommendations.
Identifying jam locations
Notes:
•
When Jam Assist is set to On, the printer automatically
flushes blank pages or partially printed pages after a
jammed page has been cleared. Check your printed output
for blank pages.
•
When Jam Recovery is set to On or Auto, the printer reprints
jammed pages.
Jam location
1 Standard bin
2 Rear door
3 Tray [ x ]
4 Multipurpose feeder
5 Door A
Paper jam in door A
1
Remove the tray.
2
Open door A.
3
Remove the toner cartridge.
5
Page 6

4
Remove the imaging unit.
CAUTION—HOT SURFACE: The inside of the printer
might be hot. To reduce the risk of injury from a hot
component, allow the surface to cool before touching
it.
Note: Make sure that all paper fragments are removed.
Warning—Potential Damage: Do not expose the imaging
unit to direct light for more than 10 minutes. Extended
exposure to light may cause print quality problems.
Warning—Potential Damage: Do not touch the
photoconductor drum. Doing so may
future print jobs.
5
Remove the jammed paper.
the quality of
aect
6
Insert the imaging unit.
Note: Use the arrows inside the printer as guides.
7
Insert the toner cartridge.
Note: Use the arrows inside the printer as guides.
8
Close door A.
9
Insert the tray.
Paper jam in the rear door
1
Open the rear door.
CAUTION—HOT SURFACE: The inside of the printer
might be hot. To reduce the risk of injury from a hot
component, allow the surface to cool before touching
it.
6
Page 7

2
Remove the jammed paper.
Note: Make sure that all paper fragments are removed.
3
Close the rear door.
Paper jam in the standard bin
Remove the jammed paper.
Note: Make sure that all paper fragments are removed.
Paper jam in the duplex unit
1
Remove the tray.
2
Remove the jammed paper.
Note: Make sure that all paper fragments are removed.
3
Insert the tray.
7
Page 8

Paper jam in trays
1
Remove the tray.
2
Remove the jammed paper.
Note: Make sure that all paper fragments are removed.
3
Flex, fan, and align the paper edges before loading.
4
Reload paper, and then adjust the paper guide.
3
Insert the tray.
Paper jam in the multipurpose feeder
1
Remove paper from the multipurpose feeder.
2
Remove the jammed paper.
Note: Make sure that all paper fragments are removed.
8
 Loading...