

Lexmark 26H0122 - T 430d B/W Laser, 26H0200 - T 430dn B/W Laser Printer, 26H0400 - T 430 B/W Laser Printer, T430, Laser Printer Printer User Manual
www.lexmark.com
T430
User’s Guide
March 2004
Lexmark and Lexmark with diamond design are trademarks of Lexmark International, Inc.,
registered in the United States and/or other countries.
© 2004 Lexmark International, Inc.
740 West New Circle Road
Lexington, Kentucky 40550

2
Edition: March 2004
The following paragraph does not apply to any country where such provisions are inconsistent with local law: LEXMARK
INTERNATIONAL, INC., PROVIDES THIS PUBLICATION “AS IS” WITHOUT WARRANTY OF ANY KIND, EITHER EXPRESS OR
IMPLIED, INCLUDING, BUT NOT LIMITED TO, THE IMPLIED WARRANTIES OF MERCHANTABILITY OR FITNESS FOR A
PARTICULAR PURPOSE. Some states do not allow disclaimer of express or implied warranties in certain transactions; therefore, this
statement may not apply to you.
This publication could include technical inaccuracies or typographical errors. Changes are periodically made to the information herein;
these changes will be incorporated in later editions. Improvements or changes in the products or the programs described may be made
at any time.
Comments about this publication may be addressed to Lexmark International, Inc., Department F95/032-2, 740 West New Circle Road,
Lexington, Kentucky 40550, U.S.A. In the United Kingdom and Eire, send to Lexmark International Ltd., Marketing and Services
Department, Westhorpe House, Westhorpe, Marlow Bucks SL7 3RQ. Lexmark may use or distribute any of the information you supply in
any way it believes appropriate without incurring any obligation to you. You can purchase additional copies of publications related to this
product by calling 1-800-553-9727. In the United Kingdom and Eire, call +44 (0)8704 440 044. In other countries, contact your point of
purchase.
References in this publication to products, programs, or services do not imply that the manufacturer intends to make these available in all
countries in which it operates. Any reference to a product, program, or service is not intended to state or imply that only that product,
program, or service may be used. Any functionally equivalent product, program, or service that does not infringe any existing intellectual
property right may be used instead. Evaluation and verification of operation in conjunction with other products, programs, or services,
except those expressly designated by the manufacturer, are the user’s responsibility.
© 2004 Lexmark International, Inc.
All rights reserved.
UNITED STATES GOVERNMENT RIGHTS
This software and any accompanying documentation provided under this agreement are commercial computer software and
documentation developed exclusively at private expense.
Safety information
• If your product is not marked with this symbol , it must be connected to an electrical outlet that is properly grounded.
CAUTION: Do not set up this product or make any electrical or cabling connections, such as the power cord or telephone, during
a lightning storm.
• The power cord must be connected to an electrical outlet that is near the product and easily accessible.
• Refer service or repairs, other than those described in the operating instructions, to a professional service person.
• This product is designed, tested, and approved to meet strict global safety standards with the use of specific Lexmark components.
The safety features of some parts may not always be obvious. Lexmark is not responsible for the use of other replacement parts.
• Your product uses a laser.
CAUTION: Use of controls or adjustments or perf ormance of procedures other than those specified herein ma y result in hazardous
radiation exposure.
• Your product uses a printing process that heats the print media, and the heat may cause the media to release emissions. You must
understand the section in your operating instructions that discusses the guidelines for selecting print media to avoid the possibility
of harmful emissions.
Conventions
Note: A note identifies something that could help you.
CAUTION: A caution identifies something that could cause you harm.
Warning: A warning identifies something that could damage your product hardware or software.

3
Contents
Chapter 1: Printer overview .........................................................................7
Chapter 2: Print media ..................................................................................9
Print media sources and specifications ..........................................................................10
Choosing the right print media ........ .. .............................. ...............................................13
Paper ........................................................................................................................13
Preprinted forms and letterhead ...............................................................................14
Transparencies ........................................................................................................ 15
Envelopes ................................................................................................................ 16
Labels ....................................................................................................................... 17
Card stock ......... ................ ............... .. ................ ............... .. ................ .. ................ ... 18
Storing print media ......................................................................................................... 18
Preventing ja m s ........... .. ............... ... ............... ............... ... ............... .. ................ .. .......... 19
Loading trays ................................................................................................................. 20
Loading the standard tray and the optional 250-sheet tray ............................. ......... 20
Loading the optional 500-sheet tray ......................................................................... 26
Loading and using the multipurpose feeder ............................................. .. ....................31
Opening the multipurpose feeder .............................. ....................... ........................32
Loading the multipurpose feeder .................. ............................. ............................. ..34
Using the standard output bin ........................................................................................ 39
Raising the paper rest .............................................................................................. 39
Using the rear output bin ................................................................................................ 40
Clearing jams ................................................................................................................. 43
200 / 201 Paper Jam, Remove Cartridge ................................................................. 44
202 Paper Jam, Open Rear Door ............................................................................ 46
23x Paper Jam (duplex jams) .................................................................................. 49
24x Paper Jam, Check Tray <x> .............................................................................. 53
250 Paper Jam, Check MP Feeder ......................... ............................. ....................55
Chapter 3: Printing tasks ...........................................................................56
Sending a print job ................ ............................. ............................. ............................... 56
Printing from a Windows environment ..................................................................... 56
Printing from a Macintosh com p u te r ..... ............... ............... ... ............... .. ................ . 56

4
Contents
Duplexing a print job (two-sided printing) ...................... ......................... ........................57
Duplex printing on letterhead ................................................................................... 57
Using Duplex Bind .................................................................................................... 58
Canceling a print job ...................................................................................................... 59
From the printer operator panel ...............................................................................59
From a Windows computer ...................... ................................................... ............. 59
From a Macinto sh computer ...... .. ............... .. ................ .. ................ ............... .. ........ 59
Linking trays ................................................................................................................... 60
Disabling tra y lin k in g ............... ... ............... .. ................ .. ............... ... ............... .. ........ 60
Chapter 4: Understanding fonts ................................................................61
Printing a font sample list ............................................................................................... 61
Scalable fonts ................................................................................................................ 62
PCL bitmapped fonts ................. ......................................................... ...........................65
PCL symbol sets ............................................................................................................ 65
Chapter 5: Understanding the operator panel ..........................................67
Using the operator panel ........................................................................................... ..... 68
Indicator light ............................................................................................................ 68
Buttons ..................................................................................................................... 68
Using the operator panel to change printer settings .................. ........................... ......... 70
Menus Disabled ........................................... ..................................... .. ...........................71
Using the printer menus .............................................................. ........................ ........... 72
Paper Menu .............................................................................................................. 73
Finishing Menu .........................................................................................................79
Utilities Menu ............................................................................................................ 81
Job Menu ................................................................................................................. 83
Quality Menu ........ ............................................. .............................................. ......... 85
Setup Menu ..................................... .............................................................. ........... 86
PCL Emul Menu ....................................................................................................... 90
PostScript Menu ....................... ................................................................ ................ 93
PPDS Menu .............................................................................................................94
Parallel Menu .............................. .. ................................... .. .. ................................ .. ..96
Network Menu ............................. ........................ ........................ ........................ ..... 98
USB Menu ................................. .. .. .. .. .. ...................................... .. .. .........................100
Help Menu ............................ .. .. ................................................................... .. ......... 101

5
Contents
Chapter 6: Understanding the printer messages ...................................102
Chapter 7: Software and network tasks ..................................................112
Printing the menu settings and network setup pages .................................................. 113
Printing the Print Quality Test Pages .............................. ....................... ......................114
Printing PDF doc u m e n ts .. ................ .. ............... .. ................ .. ................ ............... .. ...... 114
Printing a directory list .................................................................................................. 115
Printing a confidential job ............................................................................................. 115
Entering a personal identification number (PIN) .............. ...................................... 116
Using MarkVision to manage the printer ................... ........................... ........................117
Using Hex Trace mode ................................................................................................117
Chapter 8: Supplies and maintenance information ...............................118
Maintaining the printer ................................................................................................. 118
Determining the status of supplies ............................................................................... 119
Conserving supplies ..................................................................................................... 120
Ordering supplies ......................................... .......................... ...................................... 121
Ordering a print cartridge ................ .......................................................................121
Ordering a charge roll ............................................................................................ 121
Storing the print cartridge ............................................................ ................................. 122
Changing the print cartridge .........................................................................................123
Removing the used print cartridge ......................................................................... 123
Cleaning the printer ................................................................................................ 124
Installing the ne w p rin t ca rt ridge ............. ............... .. ................ .. ................ .. .......... 124
Recycling Lexmark products ................................................ ........................... ............. 127
Replacing the charge roll ............................................................................................. 128
Removing options ........................................................................................................ 133
Removing the printer from an optional drawer ....................................................... 133
Removing optional printer memory or firmware cards ...........................................134
Chapter 9: Administration ........................................................................141
Disabling the operator panel menus ............................................................................ 142
Enabling the menus ........ ................................................. ...................................... 142
Restoring factory default settings ................................................................................. 143

6
Contents
Using the Print a nd H o ld fu n c tio n .. ................ .. ............... ... ............... .. ... ............... .. ...... 144
Selecting a use r n a m e ...... ............... .. ................ .. ............... ... ............... ................ . 144
Printing and d e le ti ng held jobs ........... ................ .. ............... ... ............... ................ . 144
Accessing held jobs from the operator panel ......................................................... 145
Recognizing when format errors occur ..................................................................145
Repeat Print ..................... ....................................................... ............................... 146
Reserve Print ......................................................................................................... 146
Verify Print .............................................................................................................. 146
Confidential jobs .....................................................................................................147
Chapter 10: Troubleshooting ...................................................................148
Solving basic p rin ter problems ............. .. ................ .. ............... .. ................ ............... ... . 148
Solving display problems ............................................................................................. 149
Solving printing problems ............................................................................................. 150
Turning on Reduced Curl mode ............................................................................. 153
Solving print quality problems ...................................................................................... 154
Solving option problems ............................................................................................... 158
Solving network printing problems ............................................................................... 159
Solving other problems ................................................................................................ 159
Contacting s e rv ic e ................................. ................ .. ............... .. ................ .. ................ . 159
Notices ........................................................................................................160
Trademarks .................................................................................................................. 160
Licensing notice ........................................................................................................... 161
Laser notice ................................................................................................................. 161
Electronic emission notices .......................................................................................... 161
Printer energy consumption ......................................................................................... 162
Index ............................................................ ................................................ 164
Printer overview
7
1
Printer overvie w
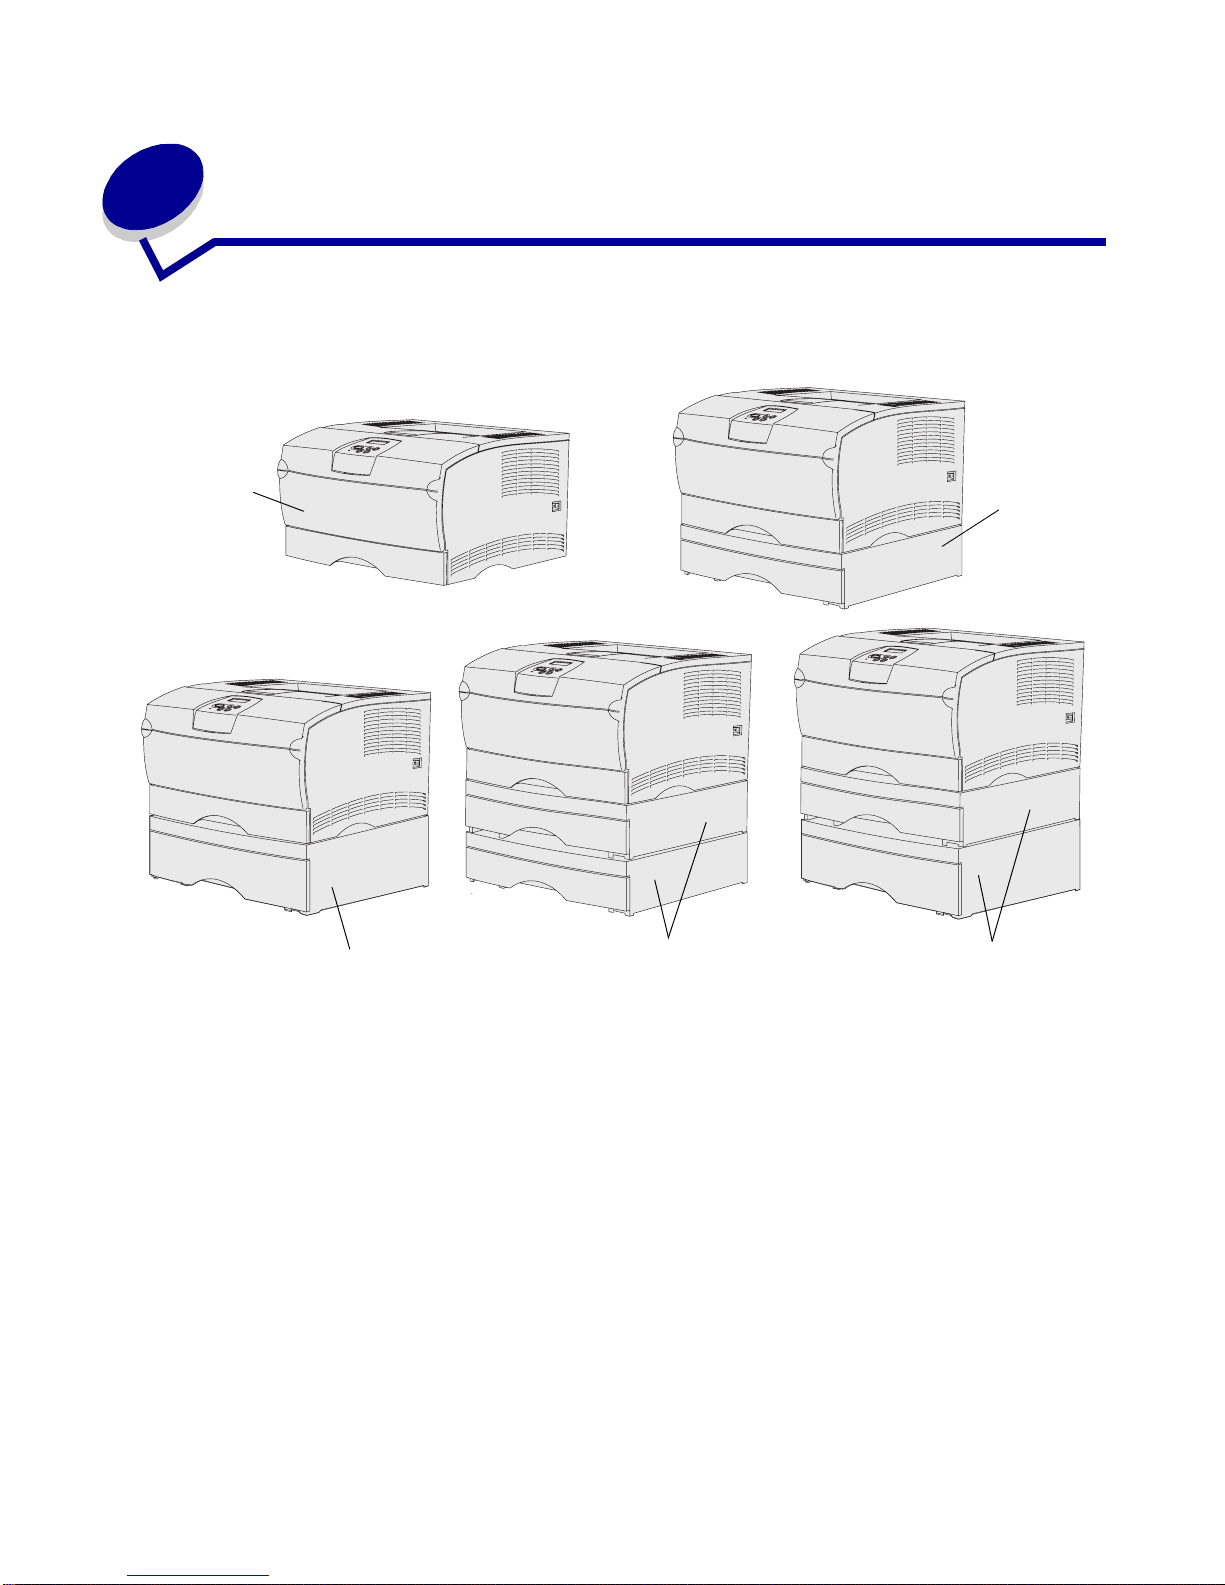
The following illustrations show the standard printer (1) and the printer configured with additional
drawers.
The printer supports up to two additional drawers in the following configurations:
• One 250-sheet drawer (2)
• One 500-sheet drawer (3)
• Two 250-sheet drawers (4)
• One 250-sheet drawer and one 500-sheet drawer (5); the 500-sheet drawer must be on the
bottom of the stack
Note: The printer does not support the addition of two 500-sheet drawers.
1
2
3
4
5
Printer overview
8
Printer overview
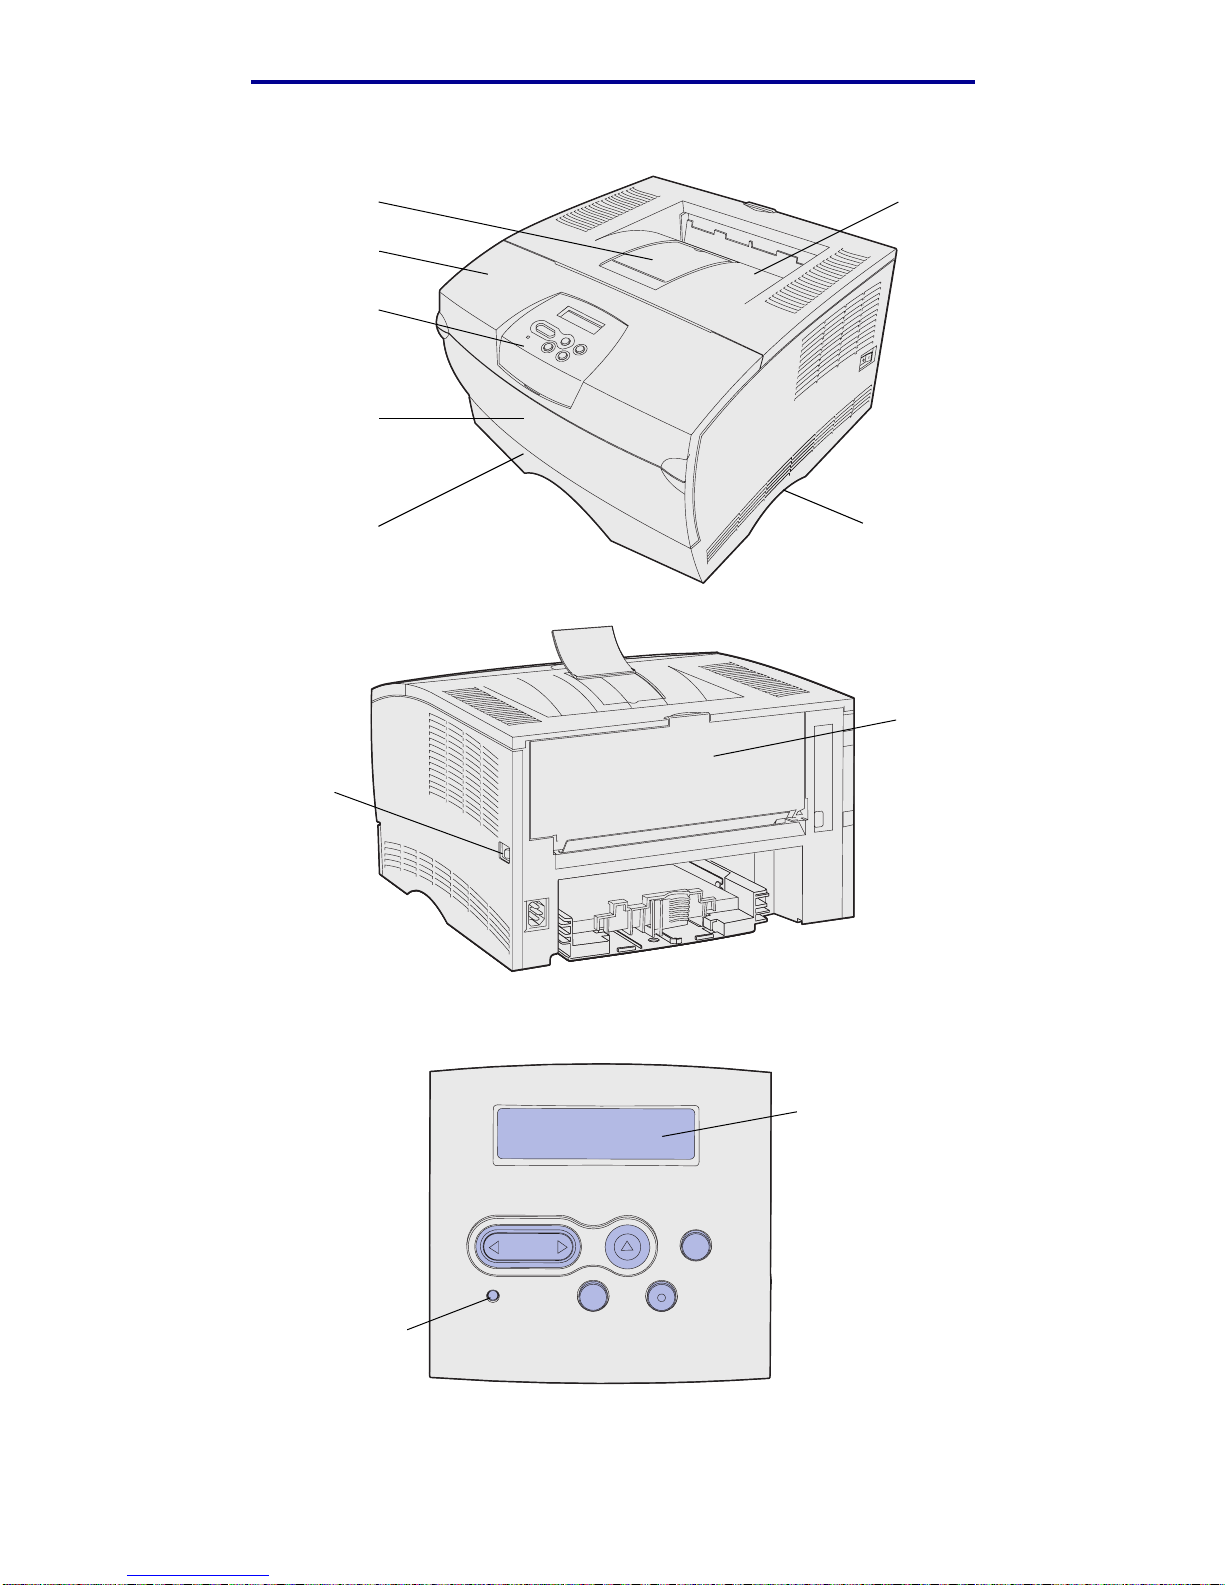
The printer operator panel has a 2-line b y 16-char ac ter li quid crystal display (LCD), five but tons , and
one indicator light that flashes when the printer is processing a job indicated by the Busy message.
Standard output bin
Handhold
Operator panel
Tray 1
Front paper support
Multipurpose feeder door
Upper front door
Rear output bin
Power button
LCD
1
Menu
2
Return
4
Light
Go
5
Stop
6
Select
3

Print media
9
2
Print media
Section Page
Print media sources and specifications 10
Choosing the right print media 13
Storing print media 18
Preventing jams 19
Loading trays 20
Loading and using the multipurpose feeder 31
Using the standard output bin 39
Using the rear output bin 40
Clearing jams 43

Print media sources and specifications
10
Print media
Print media sources and specifications
For best printer performance, properly load the trays. Never mix media types within a tray.
Print media source specifications
Source
Print media
supported
Sizes supported Weight Capacity
Tray 1
(standard
250-sheet tray)
Paper , transparencies A4, A5, JIS B5, folio, letter,
legal, executive, statement
60–105 g/m
2
(16–28 lb)
• 250 sheets of paper
• 50 transparencies
• 100 sheets of labels
Tray 2
(optional
250-sheet tray)
Paper only A4, A5, JIS B5, folio, letter,
legal, executive, statement
60–105 g/m
2
(16–28 lb)
250 sheets of paper
Tray 2
(optional
500-sheet tray)
Paper only A4, JIS B5, folio, letter,
legal, executive
60–90 g/m
2
(16–24 lb)
500 sheets of paper
Multipurpose
feeder
Paper , envelopes,
labels, transparencies,
card stock
*
Minimum:
76.2 x 127 mm (3 x 5 in.)
Maximum:
216 x 355.6 mm
(8.5 x 14 in.)
Supports all sizes listed in
Supported print media
sizes.
60–163 g/m
2
(16–43 lb)
• 100 sheets of paper
• 10 envelopes
• 30 sheets of labels
• 20 transparencies
• 10 sheets of card
stock
*
Card stock must exit through the rear output bin.
Duplex unit specifications
Exits to the standard output bin
Sizes supported A4, JIS B5, folio, letter, legal
Weight 60–105 g/m
2
(16–28 lb)

Print media sources and specifications
11
Print media
Supported print media types
✓ - indicates support
✕ - indicates no support
Print media
T ray 1 (250-sheet
tray)
Tray 2 (optional
250-sheet drawer)
Tray 2 (optional
500-sheet drawer)
Multipurpose feeder
Standard output bin
Rear output bin
Duplex
Paper ✓✓✓✓✓✓✓
Card stock ✕✕✕✓✕✓✕
Labels ✕✕✕✓✓* ✓✕
Transparencies ✓✕✕✓✓* ✓✕
Envelopes ✕✕✕✓✓✓✕
* Labels and transparencies may be sent to the standard output bin; however, they may print more
successfully when sent to the rear output bin.

Print media sources and specifications
12
Print media
Supported print media sizes
✓ - indicates support
✕ - indicates no support
T ray 1 (250-sheet
tray)
Tray 2 (optional
250-sheet drawer)
Tray 2 (optional
500-sheet drawer)
Multipurpose feeder
Standard output bin
Rear output bin
Duplex
Print media Dimensions
A4 210 x 297 mm
(8.27 x 11.7 in.)
✓✓✓✓✓✓✓
A5 148 x 210 mm
(5.83 x 8.27 in.)
✓✓✕✓✓✓✕
JIS B5 182 x 257 mm
(7.17 x 10.12 in.)
✓✓✓✓✓✓✓
Letter 215.9 x 279.4 mm
(8.5 x 11 in.)
✓✓✓✓✓✓✓
Legal 215.9 x 356 mm
(8.5 x 14 in.)
✓✓✓✓✓✓✓
Executive 184.2 x 266.7 mm
(7.25 x 10.5 in.)
✓✓✓✓✓✓✕
Folio 215.9 x 330 mm
(8.5 x 13 in.)
✓✓✓✓✓✓✓
Statement 139.7 x 215.9 mm
(5.5 x 8.5 in.)
✓✓✕✓✓✓✕
Universal 216 x 356 mm
(8.5 x 14 in.)
✓✓✕✓✓✓✓
7 3/4 Envelope
(Monarch)
98.4 x 190.5 mm
(3.875 x 7.5 in.)
✕✕✕✓✓✓✕
9 Envelope 98.4 x 225.4 mm
(3.875 x 8.875 in.)
✕✕✕✓✓✓✕
10 Envelope
(Com-10)
104.8 x 241.3 mm
(4.125 x 9.5 in.)
✕✕✕✓✓✓✕
DL Envelope 110 x 220 mm
(4.33 x 8.66 in.)
✕✕✕✓✓✓✕
C5 Envelope 162 x 229 mm
(6.38 x 9.01 in.)
✕✕✕✓✓✓✕
B5 Envelope 176 x 250 mm
(6.93 x 9.84 in.)
✕✕✕✓✓✓✕
Other Envelope
(Universal)
356 x 216 mm
(14 x 8.5 in.)
✕✕✕✓✓✓✕

Choosing the right print media
13
Print media
Choosing the right print media
Selecting the right paper or other media reduces printing problems. For best print quality, try a
sample of the paper or other media you are considering before buying large quantities.
• Capacities listed in the Print media source specifications table are for 20 lb paper, unless
otherwise noted. For w eight s of print media other than pape r, refer t o the Card Stoc k & Label
Guide.
• The followi ng sizes or types of print media must exit to the rear output bin:
– Print media 165.1 mm (6.5 in.) or less in length
– 3 x 5 in. and 4 x 6 in. inde x cards and card stock
• Select Universal size when using a nonstandard size sheet of print media. The printer
formats the page fo r the maximum size (8.5 x 14 in.). Set the actual size from your software
application.
Paper
• For the best print quality, use 75 g/m2 (20 lb) xerogr aphic, grain long paper.
• The laser printing process heats paper to high temperatures of 170°C (338°F) for non-MICR
applications. Use only paper able to withstand these temperatures without discoloring,
bleeding, or releasing ha zardous emissions. Check with the manufacturer or vendor to
determine whether the paper you have chosen is acceptable for laser printers.
• Legal size paper sent to the rear exit bin stacks improperly when too many sheets
accumulate. Remove the paper often from this bin.
• Keep paper sealed in its original packaging until ready to use.
The following papers are not recommended for use with you r printer:
• Paper with a rough or heavily textured surface
• Coated papers, such as erasable bond
• Preprinted papers manufact ured with chemicals that may contaminate the printer
• Multiple-part forms
• Synthetic papers
• Thermal papers
• Recycled paper having a weight less than 75 g/m
2
(20 lb)
Choosing the right print media
14
Print media
Preprinted forms and letterhead
Use papers printed with heat-resist ant ink s designed for use in xer og rap hic copiers. The ink must be
able to withstand temperatures up to 200°C (392°F) without melting or releasing hazardous
emissions. Use inks that are not aff ected by t he resin in toner or the sil icone in the fuser. Inks that are
oxidation-set or oil-based should meet these requirements; late x inks might not. If you are in doubt,
contact your paper supplier.
• Use only forms and letterhead printed using an offset lithographic or engraved printing
process.
• Choose papers that absorb ink, but do not bleed.
• Avoid papers with rough or heavily textured surfaces.
Printing on preprinted forms and letterhead
Check with the manufacturer or vendor to determine whether the preprinted letterhead you have
chosen is acceptable for laser printers.
Page orientation is important when printing on letterhead. Use the following table for help when
loading letterhead in the print media sources .
Print media source or process
Top of page
Print side Portrait Landscape
Tray 1
(standard tray)
Tray 2
(optional 250-sheet
or 500-sheet drawer)
Face down Front of tray Left side of tray
Duplex printing using Tr a y 1 or Tray 2 Face up Logo faces rear of tray Not applicable
Multipurpos e feeder
(including feeding individual sheets)
Face up Logo enters the printer
first
Left side of tray
Duplex printing using the
multipurpose feeder
Face down Logo enters the printer
last
Not applicable

Choosing the right print media
15
Print media
Transparencies
You can feed transparencies from the standard 250-sheet tray or the multipurpose feeder. Do not
load transparencies in the opti onal 250-sheet or 500-sheet drawer.
• Use transparencies designed specifically for laser printers. Transparencies must be able to
withstand temperatures of 175°C ( 347°F) without melting, di scoloring, or releasing hazar dous
emissions.
We recommend Lexmark laser printer transparencies: part number 70X7240 for letter size
transparencies; part number 12A5010 for A4 size transparencies.
• To prevent print quality problems, avoid getti ng fingerprints on the transparencies.
• Before loading transparencies, fan the stack to prevent sheets from sticking together.
• You can send transparencies to the standard output bin; however, they may print more
successfully when sent to the rear output bin.
• Be sure to set the P aper Type to Transparency from the printer driver or from MarkVision™ to
avoid damaging your printer.

Choosing the right print media
16
Print media
Envelopes
You can load up to 10 envelopes in the multip urpose feeder.
• Use envelopes made from 75–105 g/m
2
(20–28 lb) bond paper.
• Do not use envelopes that:
– Have excessive curl
– Are stuck together
– Are damaged in any way
– Contain windows, holes, perforations, cutouts, or embossing
– Use metal clasps, string ties, or metal foldi ng ba rs
– Have postage stamps attached
– Have any exposed adhesive when the flap is in the sealed position
• Use envelopes that can withstand temperatures of 205°C (401°F) without sealing, excessive
curling, wrinkling, or releasing hazardous emissions. If you have any doubts about the
envel opes you are considering using, check with the envelope supplier.
• A combination of high humidity (over 60%) and the high printing temperatures may seal the
envelopes.
• Set the Paper Source to MP Feeder or Manual Env, set the paper type to Envelope, and
select the correct envelope size from the printer driver or from MarkVision.
• Load envelopes with the flap side down, and position the short edge nearest the return
address to en te r th e printer first.
• Adjust the right paper guide to fit the width of the envelopes.
• If you are feeding self-sealing envelopes, open the rear output bin door so envelopes feed
straight out the back of the printer. The rear output bin holds about 10 envelopes.
• Envelopes may curl less if they exit to the rear output bin.

Choosing the right print media
17
Print media
Labels
Your printer can print on many labels designed for use with laser printers. However, vinyl labels are
not supported. These labels are supplied in letter size and A4 size sheets. Label adhesives, face
sheet (printable stock), and topcoats must be able to withstand temperatures of 205°C (401°F) and
pressure of 25 pounds per square inch (psi) (17 2 kilopascals).
For detailed information on label printing, characteristics and design, r efer to the Card Stock & Label
Guide available on Lexmark’s Web site at www.lexmark.com/publications.
When printing on labels:
• Set the Paper Type to Labels from the printer driver or from MarkVision.
• For more i nformation about printing labels from Tray 1 (s tanda rd tray), refer to the Card Stock
& Label Guide.
• You can send labels to the standard output bin; however, they may print more successfully
when sent to the rear output bin.
• Do not load labels together with paper or transparencies in the same paper source.
• Do not use label sheets with a slick backing material.
• Do not print within 1 mm (0.04 in.) of the die cut.
• Use full label sheets. Partial sheets may cause labels to peel off during printing, resulting i n a
jam. Partial sheets also c ontami nate your printer and your cartridge with adhesiv e, and could
void your printer and cartridge warranties.
• Use labels that can withstand temperatures of 205°C (401°F) without sealing, excessive
curling, wrinkling, or releasing hazardous emissions.
• Do not print within 1 mm (0.04 in.) of th e edge of the label , of the per f or ations , or bet ween diecuts of the label.
• Do not use label sheets that have adhesive to the edge of the sheet. W e recommend zone
coating of the adhesiv e at least 1 mm (0.04 in.) away from edges. Adhesive material
contaminates your printer and could void your warranty.
• If zone coating of the adhesiv e is not possib le , a 3 mm (0.125 in.) strip should be remov ed on
the leading and driver edge, and a non-oozing adhesive should be used.
• Remove a 3 mm (0.125 in.) strip from the leading edge to prevent labels from peeling inside
the printer .
• Portrait orientation is preferred, especially when printing bar codes.
• Do not use labels that hav e exposed adhesive on the sheets.

Storing print media
18
Print media
Card stock
Card stock is single ply, and has a large array of properties, such as the orientation of paper fibers
and texture, that can significantly affect the print quality.
You may only print card stock from the multipurpose feeder. Card stock m u st always exi t to the rear
output bin.
For detailed information on card stock printing, characteristics, and design, refer to the Card Stock &
Label Guide available on Lexmark’s Web site at www.lexmark.com/publications.
• Do not use card stoc k that is perf or ated or creased. Preprinting, perf or ation, and creas ing can
significantly affect the print quality and cause media handling or jamming problems.
• Avoid using card stock that may release hazardous emissions when heated.
• Do not use preprinted card stock manufactured with chemicals that may contami nate the
printer. Pre printing introduces semi-liquid and volatile components int o the printer.
• We recommend the use of grain short card stock .
Storing print media
Use the follo wing guidelines f or proper print media storag e. These help av oid paper f eeding proble ms
and uneven print quality:
• For best results, store print media in an environment where the temper atur e is approximately
21°C (70°F) and the relative humidity is 40%.
• Store cartons of print media on a pallet or shelf, rather than directly on the floor.
• If you store individual packages of print media out of the original carton, make sure they rest
on a flat surface so the edges do not buckle or curl.
• Do not place anything on top of the print media packages.
• Keep paper sealed in its original packaging until ready to use.

Preventing jams
19
Print media
Preventing jams
By carefully selecting appropriate print media and loading it properly, you should be able to avoid
most jams. If you do experience a jam, see Clearing jams for instructions.
The followi ng hints can help you avoid jams :
• Use only recommended print media. Refer to the Card Stock & Label Guide available on our
Lexmark Web site at www.lexmark.com for more information about which paper provides
optimum results for your printing environment.
• Do not load wrinkled, creased, damp, or curled print media.
• Flex, fan, and straighten print
media before you load it. If jams
do occur with print media, try
feeding one sheet at a time
through the multipurpose feeder.
• Do not overload the print media
sources. Make sure the stack
height does not exceed the maximum height indicated by the labels in the sources .
• Do not use print media that you have cut or trimmed yourself.
• Do not mix print media sizes, weights, or types in the same print media source.
• Make sure the recommended print side is face down when loading all trays and the
recommended print side is face up when loading the mul ti purpose feeder.
• Keep print media stored in an acceptable environment. See Storing print media.
• Do not remove trays during a print job.
• Push all trays in firmly after loading them.
• Make sure the guides in the tr ays are properly positioned for the size print media you have
loaded. Make sure the guides are not placed too tigh tly against the stack of print media.
• Card stock must exit to the rear output bin. See Using the rear output bin for more
information.
• Envelopes may be sent to the standard output bin; however, if the envelopes exit to the rear
output bin there is less curl.
• Make sure all cables that connect to the printer are correctly attached. Refer to the Setup
Guide for more information.
Loading trays
20
Print media
Loading trays
Your printer has two standard sources, the 250-sheet tray (standard tray) and the multipurpose
feeder. For more information, see Loading and using the multipurpose feeder. Load the print
media you use for the majority of your print jobs in the standard 250-sheet tray.
Proper print media loading helps prevent jams and helps make your printing trouble-free.
Before loading print media, know the recommended print side of the print media you are using. This
information is usually indicated on the print media package.
Do not remove trays while a job prints. Doing so may cause a jam.
Loading the standard tray and the optional 250-sheet tray
The following instructions work for loading the standard tray or the tray for the optional 250-sheet
drawer.
Your printer has one standard 250-sheet tray.
For the siz es and types of print media these trays support, see Print media source specifications.
To load the tray for the optional 500- sheet drawer, see Loading the optional 500-sheet tray.
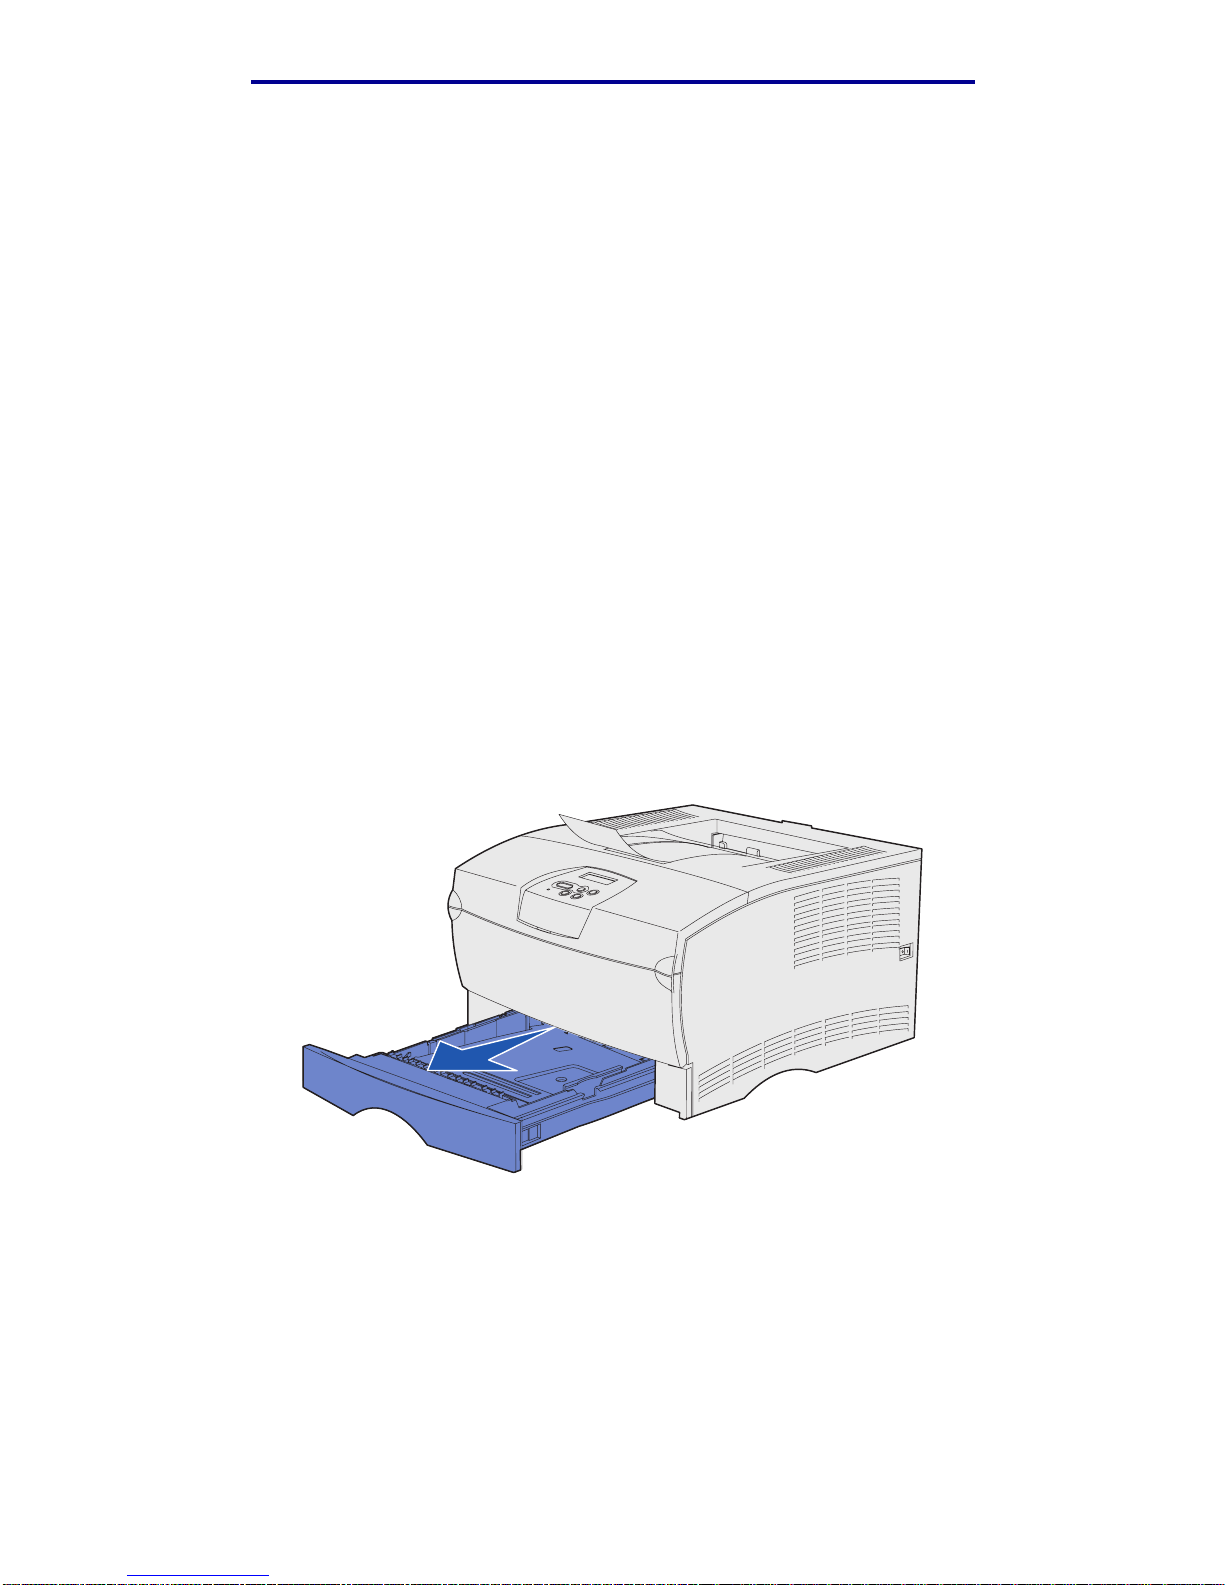
To load print media in a tray:
1 Remove the tray completely.
2 If you are l oading print media that is over 90 g/m
2
(24 lb) (but no greater tha n 105 g/m2
[28 lb]), adjust the dial on the bottom of the tray. See Loading print media over 90 g/m
2
(24 lb) on page 25 for more information.
Loading trays
21
Print media
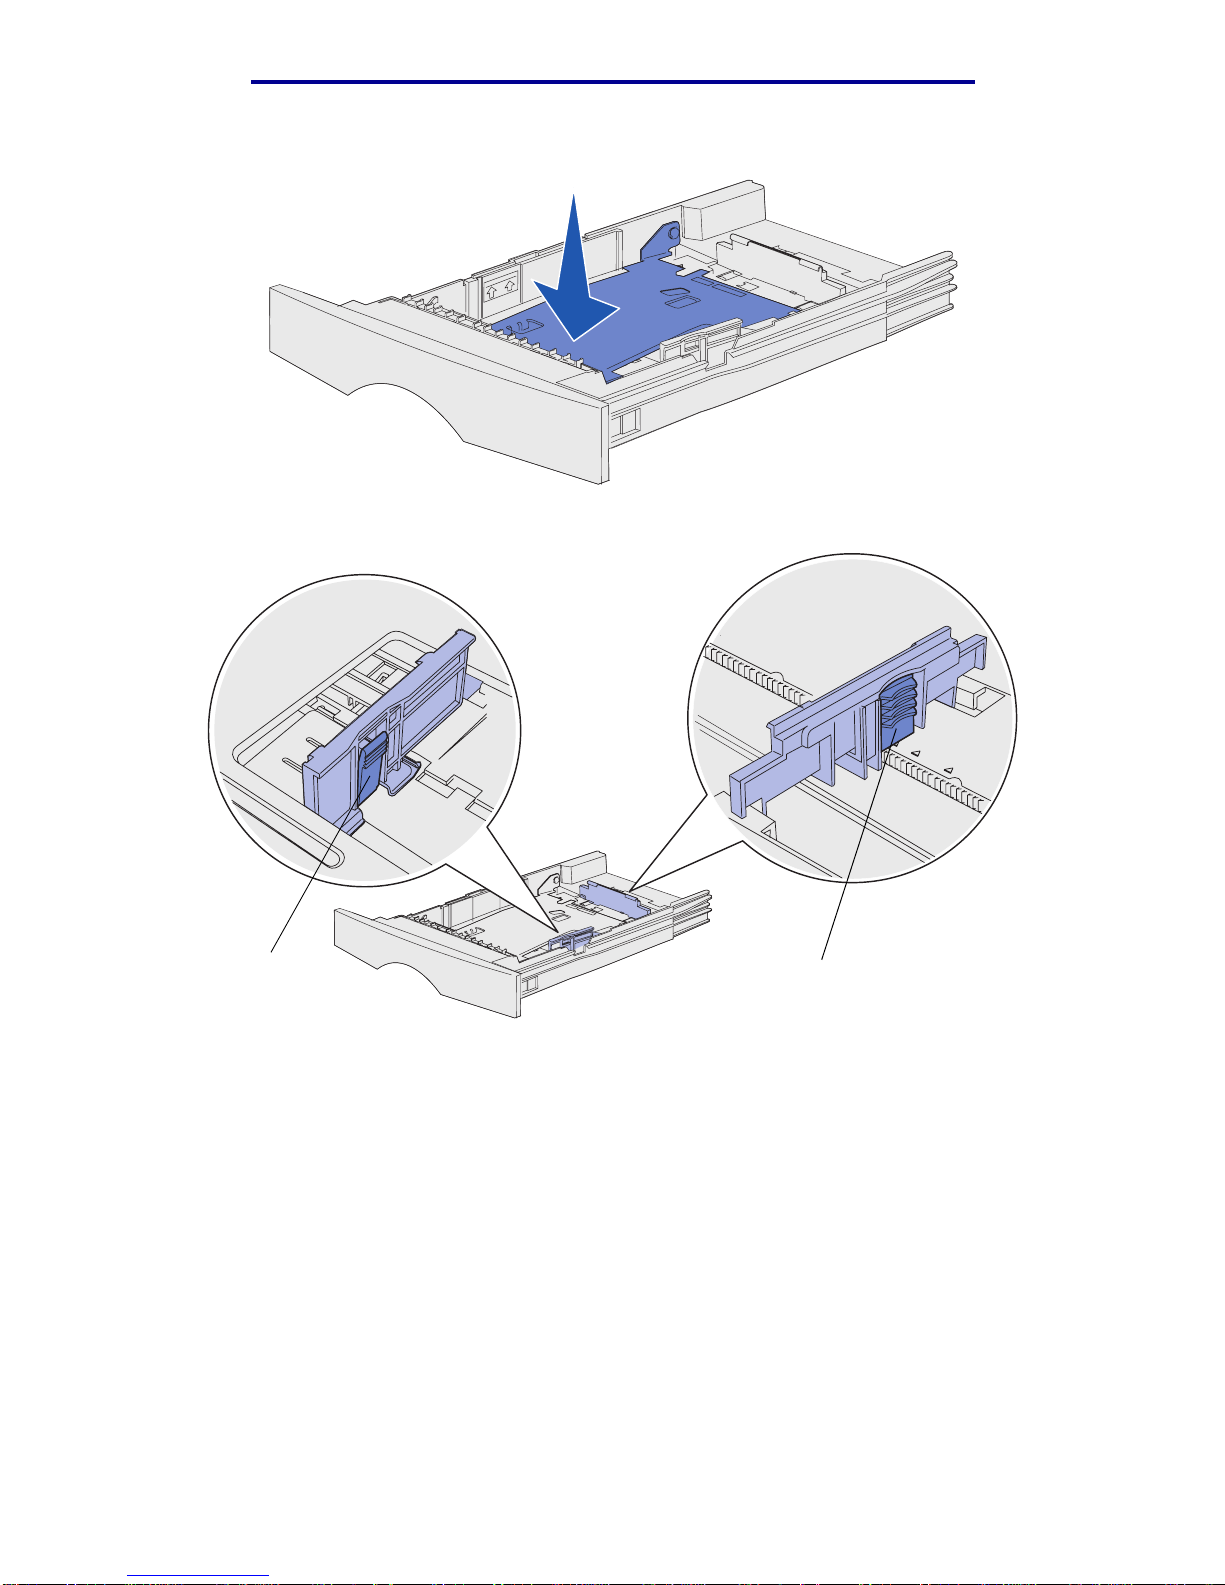
3 Press down on the metal plat e until it locks into place.
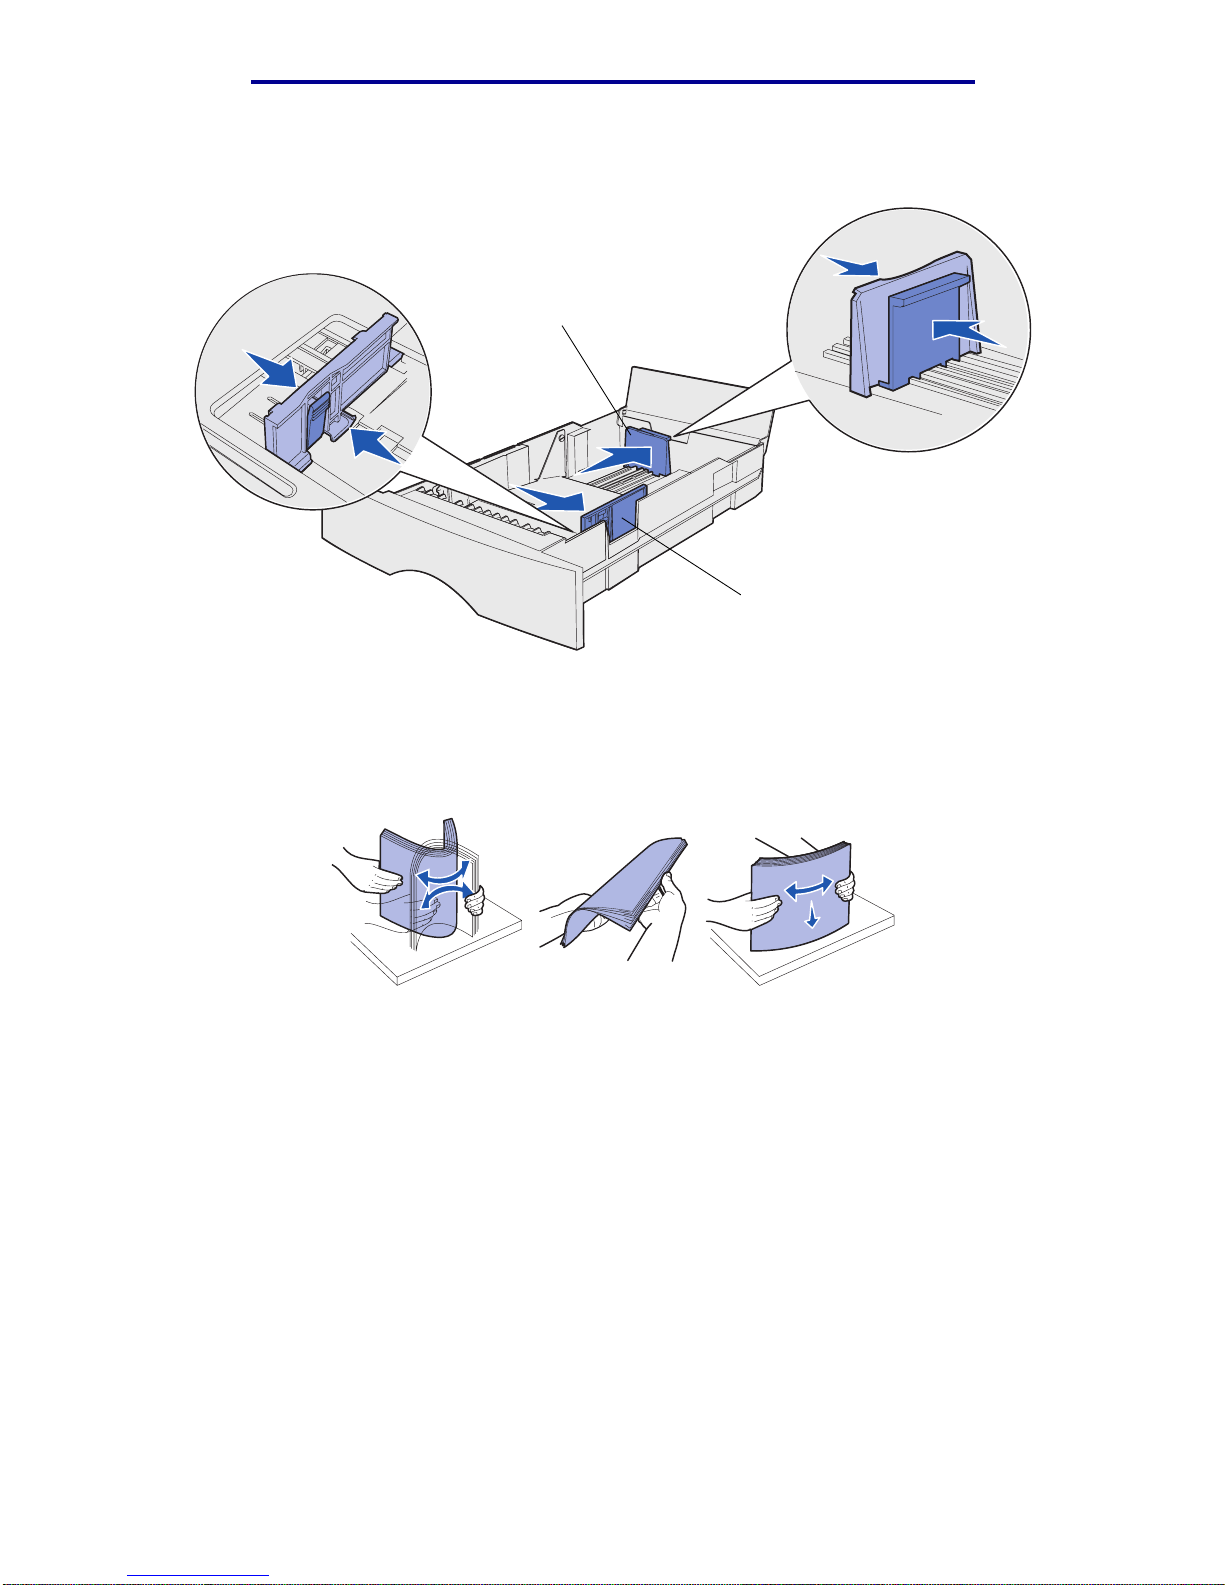
4 Locate the tabs on both of the guides.
Tab
Tab
Loading trays
22
Print media
5 Squeeze the length guide tab and the length guide together, and then slide the guide to the
back of the tray.
6 Squeeze the width gui de tab and the width guide together, and then slide the guide all the
way to the right.
7 Flex the sheets back and forth to loosen them, then fan them. Do not fold or crease the print
media. Straighten the edges on a level surface.
Hold the print media so the side you want to print on is f a ce down, and the front edge of the
stack is toward the front of the tray.
For information on loading letterhead, see Printing on preprinted forms and letterhead.
Length guide
Width guide
Loading trays
23
Print media
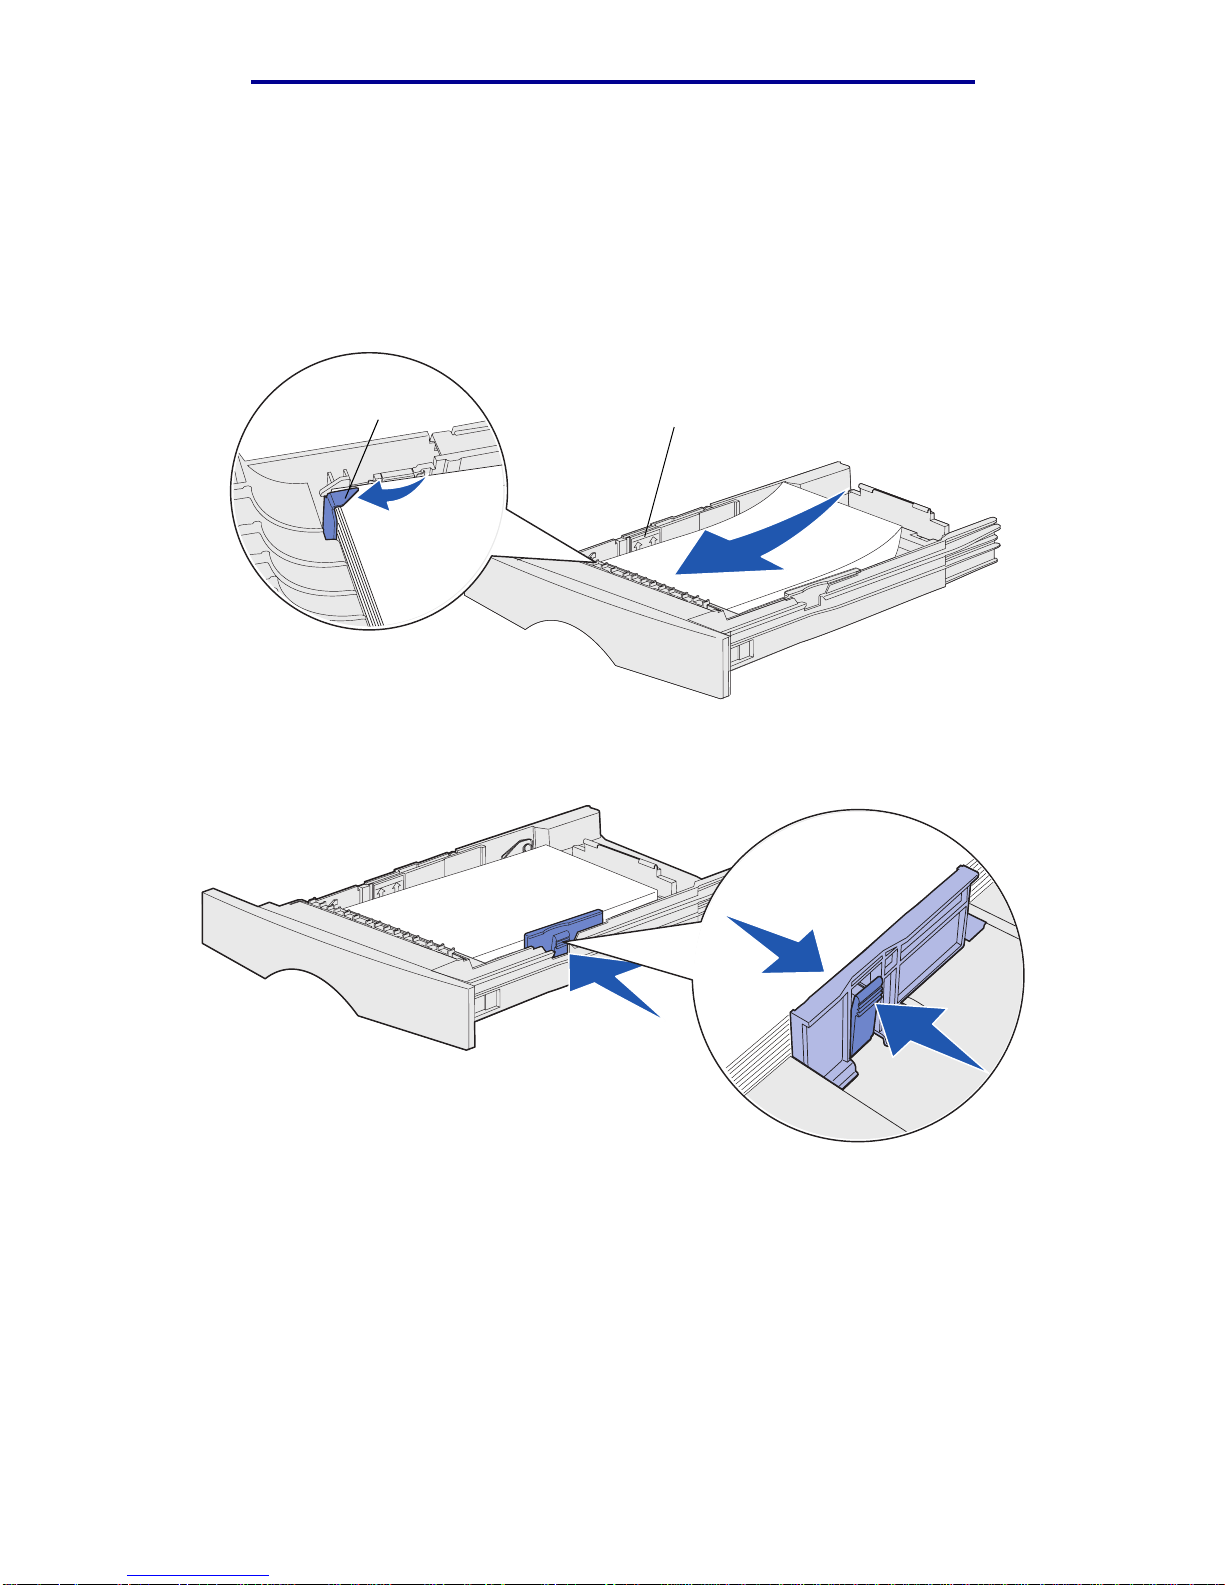
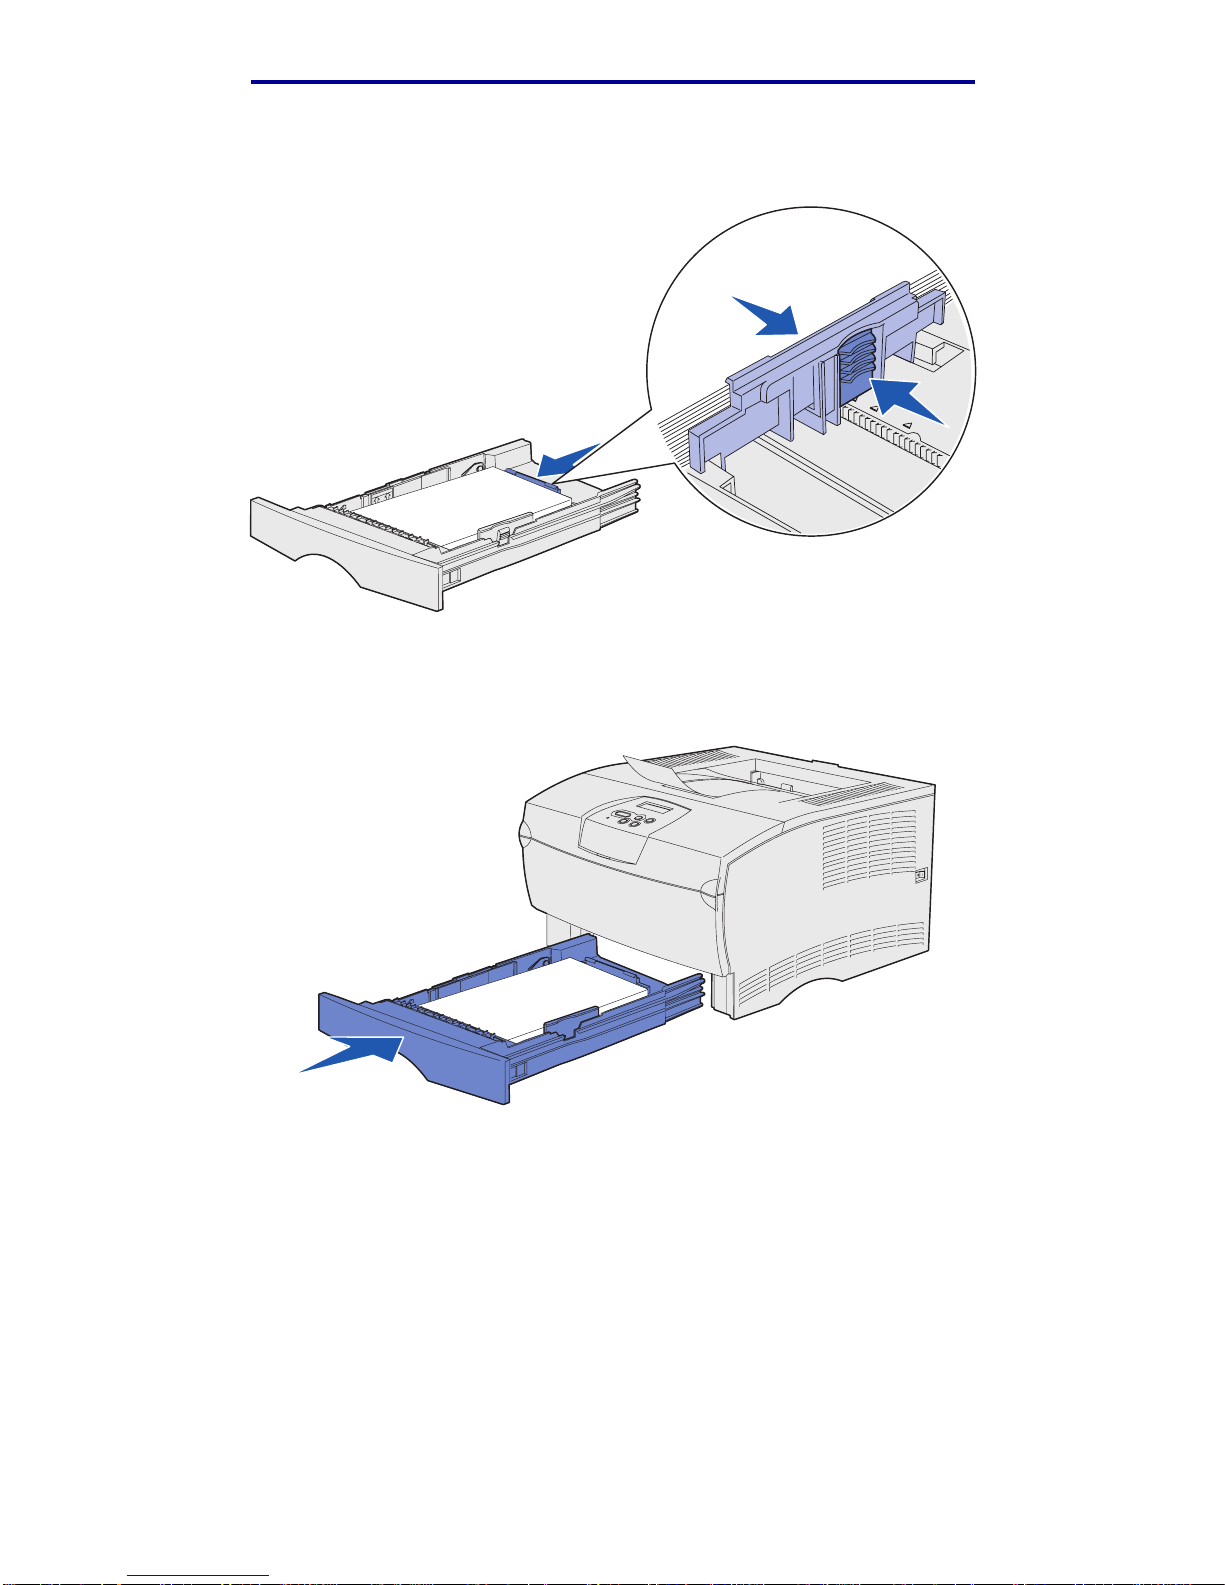
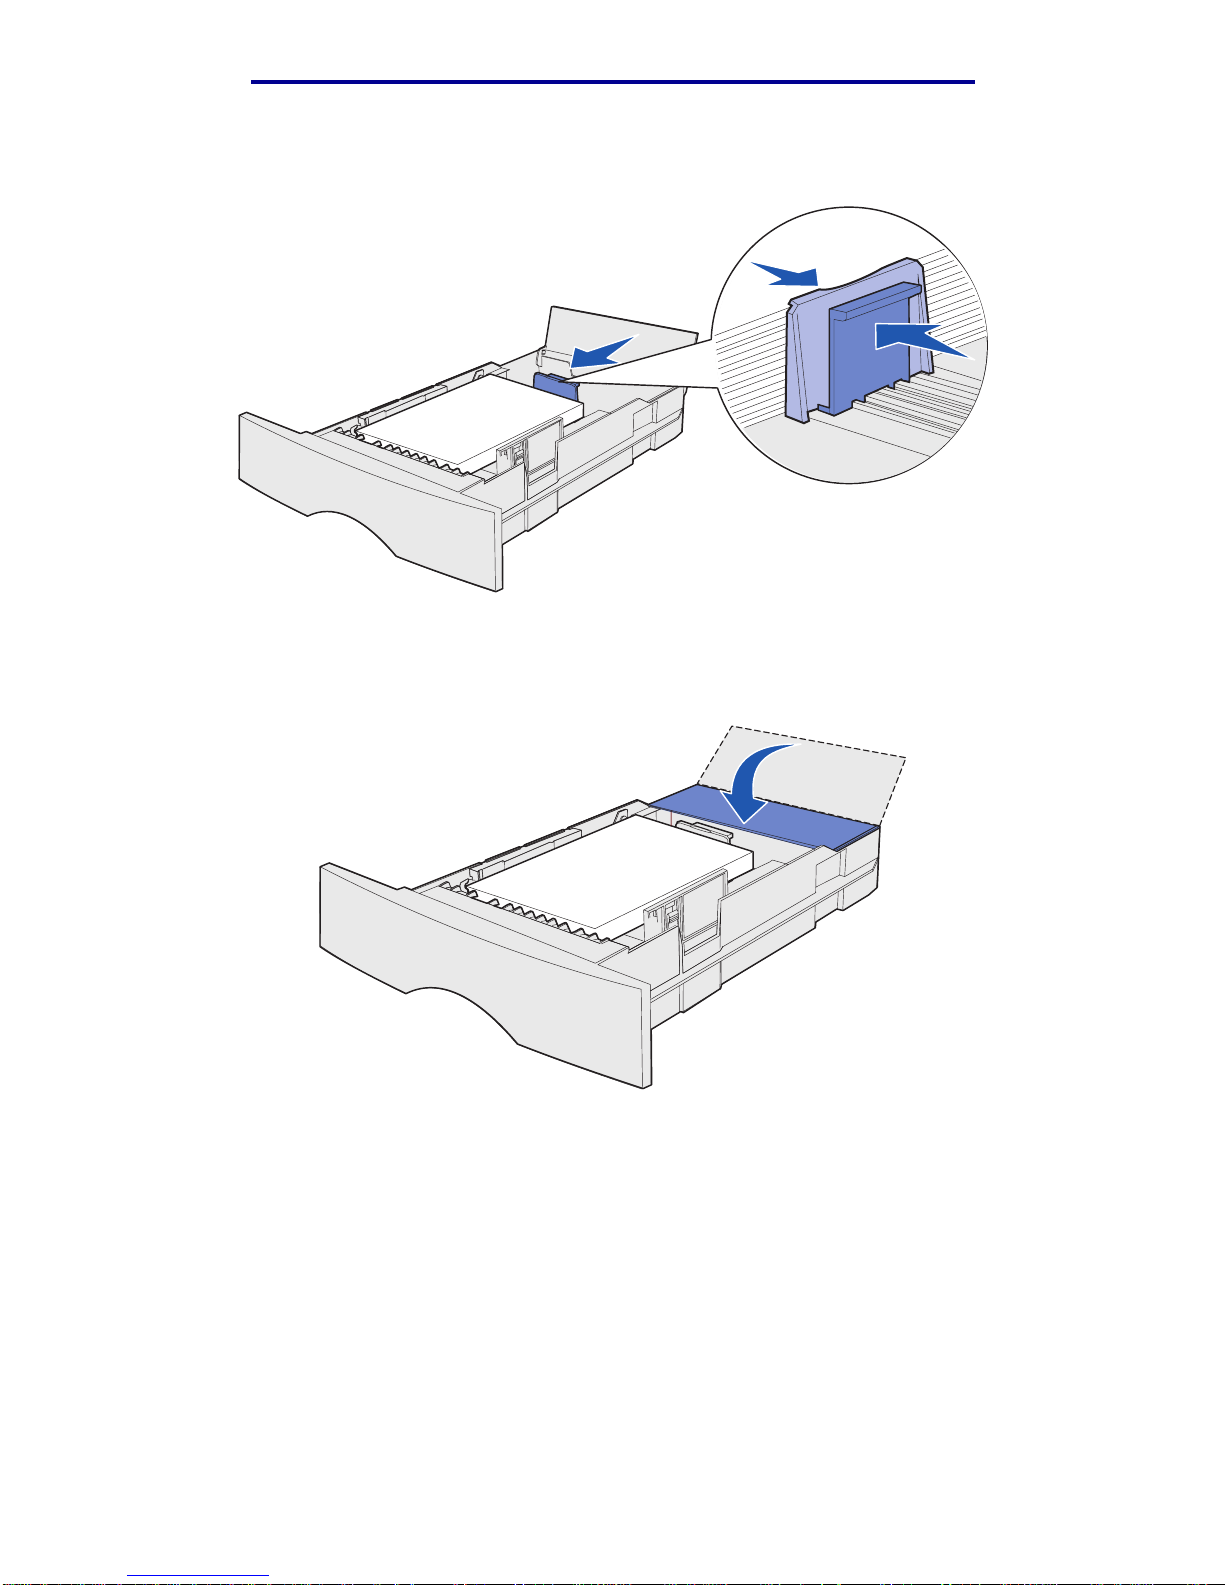
8 Place the stack of print media against the left side of the tray and insert it under the metal
stop.
Make sure the print media fi ts easily under the metal stop and is not bent or wrinkled. Do not
raise the metal stop or force print media under it.
Note: Do not exceed the maximum stack height indicated. Ov erfilli ng the tra y ma y cause
jams.
9 Squeeze the width gui de tab and the width guide together, and then slide the guide to the
edge of the print media.
Metal stop
Maximum stack height indicator
Loading trays
24
Print media
10 Squeeze the length guide tab and the length guide together, and then slide the guide to the
edge of the print media.
Note: Sliding the guides too tightly against the print media may cause misfeeds.
11 Insert the tray.
Loading trays
25
Print media
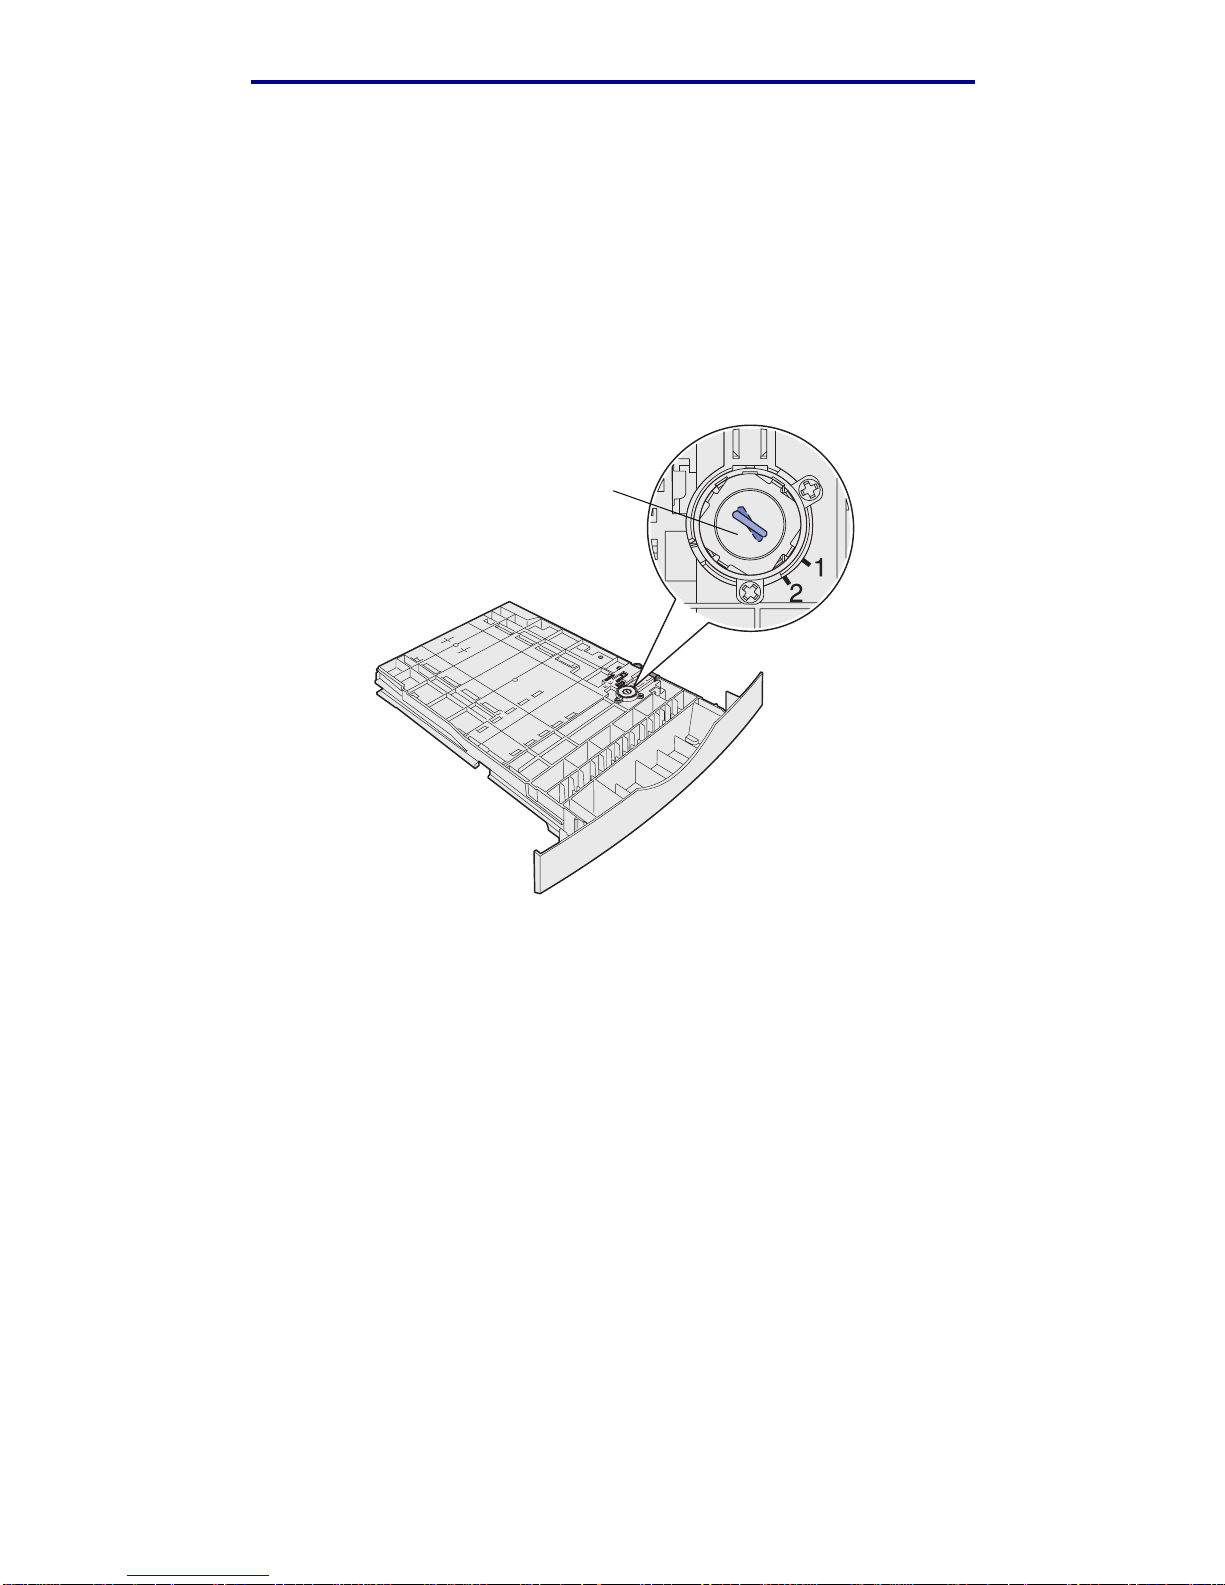
Loading print media over 90 g/m2 (24 lb)
When you are loading print media over 90 g/m2 (24 lb) (but no greater than 105 g/m2 [28 lb]) in the
standard tray or optional 250-sheet tray, the tray’s media dial must be set to position 2.
1 Remove the tray complet ely.
2 Remove any print media already in the tray.
3 Turn the tray over.
4 Using a coin, push the media dial down and turn it from position 1 to position 2.
5 Turn the tray over and load the appropriate print media as described in Loading the
standard tray and the optional 250-sheet tray on page 20.
If you are using print media that is 60–90 g/m
2
(16–24 lb), the media dial should be in position 1.
Media dial
Loading trays
26
Print media
Loading the optional 500-sheet tray
The optional 500-sheet tray only accepts paper. It has a special cover at the back of the tray to
protect legal size paper from exposure to dust.
To load paper in the tray:
1 Remove the tray complet ely.
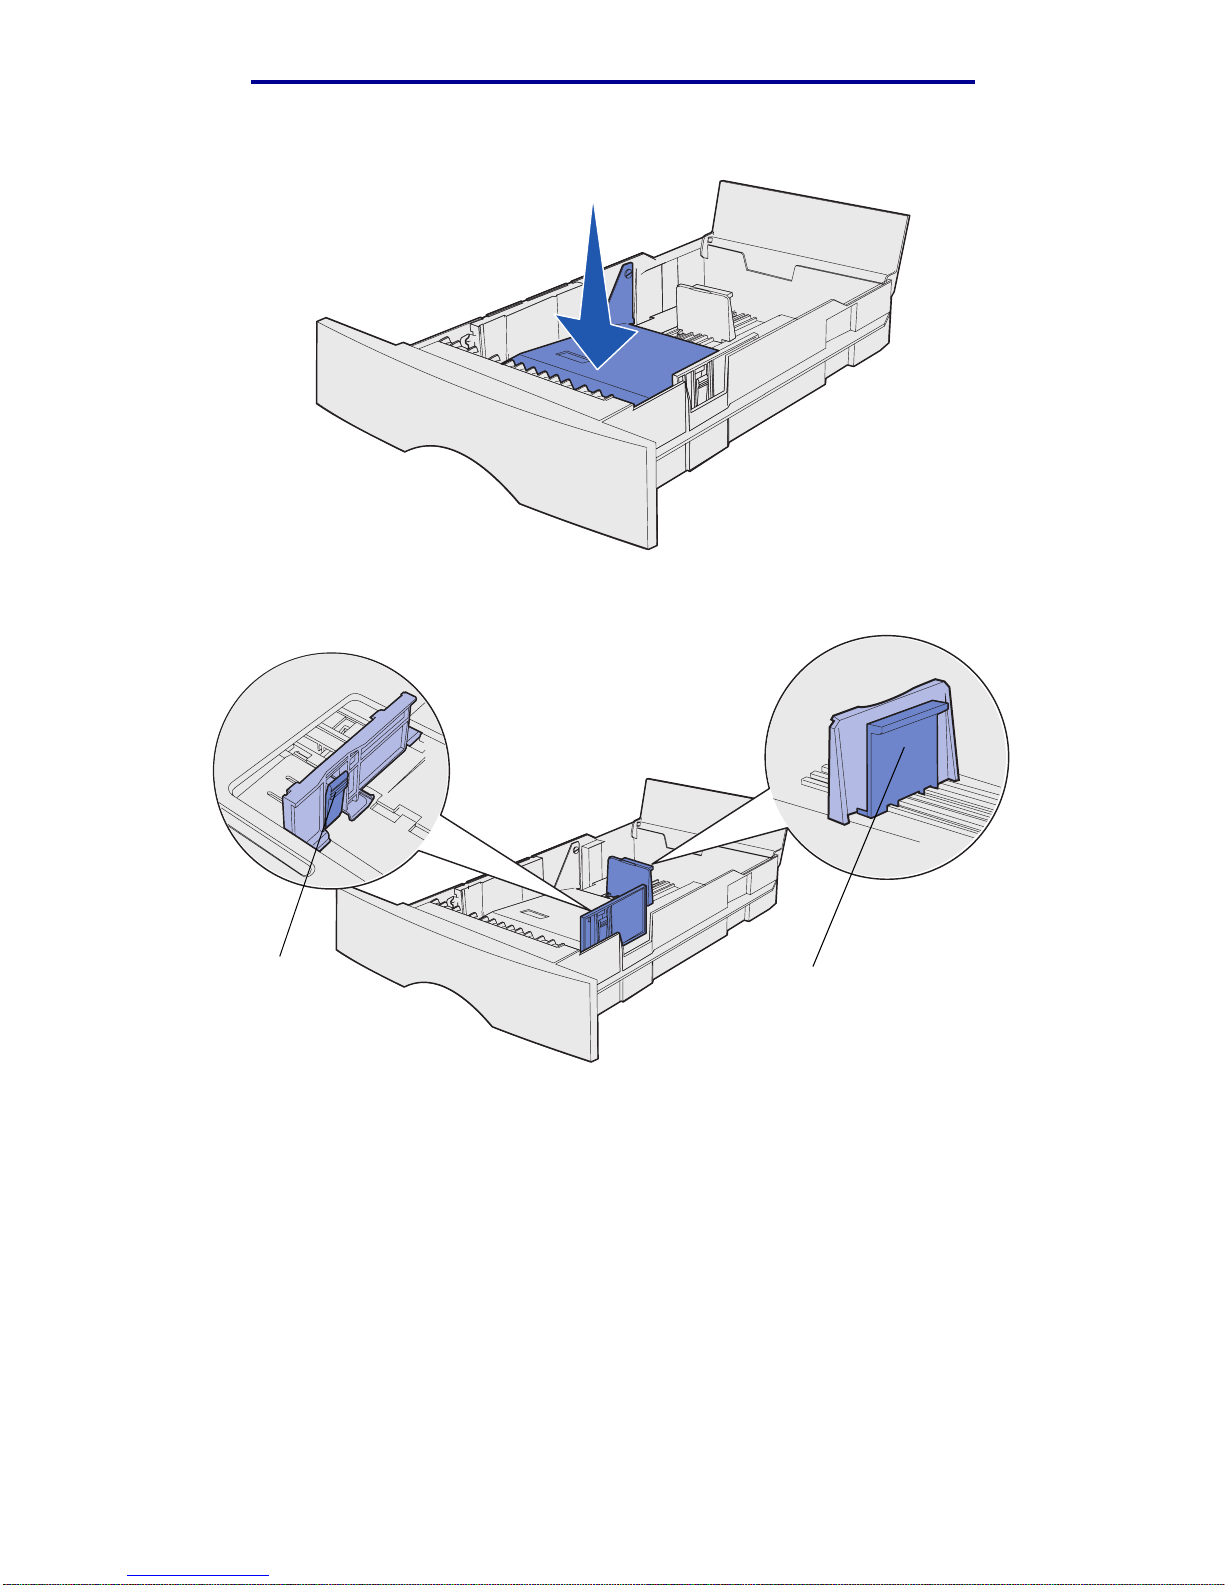
2 Raise the cover.
Loading trays
27
Print media
3 Press down on the metal plat e until it locks into place.
4 Locate the tabs on both of the guides.
Tab
Tab
Loading trays
28
Print media
5 Squeeze the length guide tab and the length guide together, and then slide the guide to the
back of the tray.
6 Squeeze the width gui de tab and the width guide together, and then slide the guide all the
way to the right.
7 Fle x the sheets bac k and f orth to loosen them, then fa n them. Do not f old or crease the pape r .
Straighten the edges on a level surface.
Hold the paper so the side you want to print on is face down, and the front edge of the stack
is toward the front of the tray.
For information on loading letterhead, see Printing on preprinted forms and letterhead.
Length guide
Width guide

Loading trays
29
Print media
8 Place the stack of paper against the left side of the tray and insert it under the metal stop.
Make sure the paper fits easily under the metal stop and is not bent or wrinkled. Do not raise
the metal stop or force paper under it .
Note: Do not exceed the maximum stack height indicated. Ov erfilli ng the tra y ma y cause
jams.
9 Squeeze the width gui de tab and the width guide together, and then slide the guide to the
edge of the paper.
Metal stop
Maximum stack
height indicator
Loading trays
30
Print media
10 Squeeze the length guide tab and the length guide together, and then slide the guide to the
edge of the paper.
Note: Sliding the guides too tightly against the paper may cause misfeeds.
11 Close the cover.
12 Insert the tray.
 Loading...