


Fax Getting Started Guide
April 2009 www.lexmark.com

Contents
IMPORTANT SAFETY INSTRUCTIONS...................................................3
Getting started....................................................................................4
Finding more information about the printer...............................................................................................................4
Navigating menus using the printer control panel...................................................................................................4
Setting up the printer to fax............................................................5
Step 1: Connect the printer to the telephone line.....................................................................................................5
Step 2: Check the dial tone..............................................................................................................................................15
Step 3: Set your fax name and fax number................................................................................................................16
Step 4: Set the printer to receive faxes automatically or manually...................................................................16
Step 5: Set the number of rings......................................................................................................................................16
Step 6: Create a contact list..............................................................................................................................................17
Sending faxes....................................................................................18
Tips for sending faxes........................................................................................................................................................18
Sending faxes using the printer control panel.........................................................................................................18
Sending faxes using the computer...............................................................................................................................18
Receiving faxes.................................................................................19
Tips for receiving faxes......................................................................................................................................................19
Receiving faxes automatically.........................................................................................................................................19
Receiving a fax manually..................................................................................................................................................19
Troubleshooting...............................................................................20
Fax troubleshooting checklist.........................................................................................................................................20
Cannot send faxes...............................................................................................................................................................20
Cannot receive faxes..........................................................................................................................................................22
Cannot run the fax software............................................................................................................................................23
Notices................................................................................................24
Contents
2

IMPORTANT SAFETY INSTRUCTIONS
Connect the power cord to an electrical outlet that is near the product and easily accessible.
Do not place or use this product near water or wet locations.
Use only the power supply and power cord provided with this product or the manufacturer's authorized
replacements.
Use only the telecommunications (RJ-11) cord provided with this product or a 26 AWG or larger replacement when
connecting this product to the public switched telephone network.
CAUTION—POTENTIAL INJURY: Do not twist, bind, crush, or place heavy objects on the power cord. Do not
subject the power cord to abrasion or stress. Do not pinch the power cord between objects such as furniture
and walls. If the power cord is misused, a risk of fire or electrical shock results. Inspect the power cord regularly
for signs of misuse. Remove the power cord from the electrical outlet before inspecting it.
CAUTION—SHOCK HAZARD: Do not use the fax feature during a lightning storm. Do not set up this product
or make any elec trical or cabling connect ions, such as the fax feature, p ower cord, or telephone, during a l ightning
storm.
Do not use the telephone to report a gas leak in the vicinity of the leak.
See the product User's Guide for additional safety information.
SAVE THESE INSTRUCTIONS.
IMPORTANT SAFETY INSTRUCTIONS
3

Getting started
Finding more information about the printer
The Fax Getting Started Guide helps you set up a fax connection, perform basic faxing tasks, and troubleshoot faxing
problems.
For additional faxing information or other in formation about the printer, see the comprehensiv e User's Guide available
in your printer program folder, on the installation software CD, or on our Web site at
www.lexmark.com/publications/.
To access the printer program folder:
For Windows users
1 Click or Start.
2 Click All Programs or Programs, and then select the printer program folder from the list.
3 Select View User's Guide.
For Macintosh users
1 From the Finder desktop, double-click the printer folder.
2 Double-click User's Guide.
Navigating menus using the printer control panel
Touch-screen models
• To perform a new task, always start from the home screen. Touch to open the home screen.
• To scroll through the menus, drag the scroll bar or touch the arrows on the display.
• To open a menu or submenu, touch the menu name or icon.
• To select a setting, touch a menu item, and then touch Accept or OK to save the setting.
Arrow-button models
• To scroll through the menus, use the arrow buttons on the printer control panel, and then press to open menus
and submenus.
• Press to select and save a setting.
Getting started
4
Setting up the printer to fax
Step 1: Connect the printer to the telephone line
Check the scenarios below and follow the setup that is applicable to your telephone service.
Scenario 1: Standard telephone line
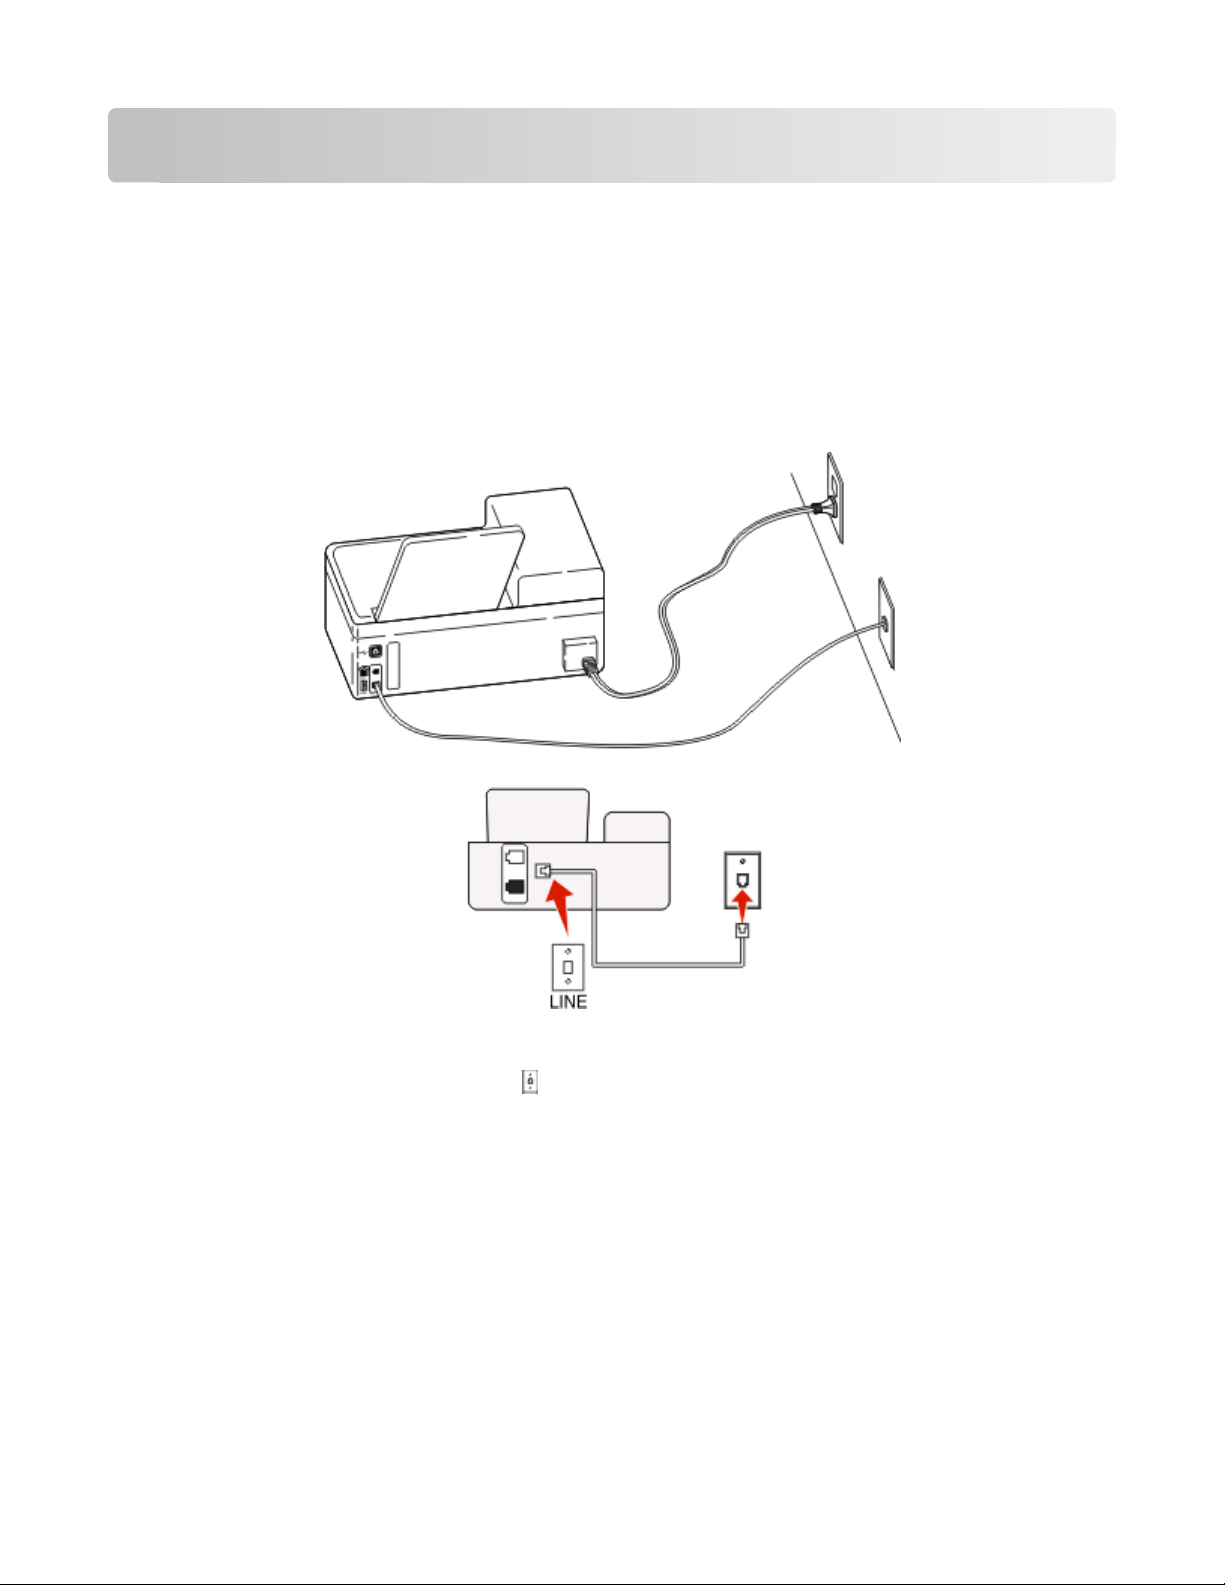
Setup 1: Printer is connected to a dedicated fax line
To connect:
Connect the cable from the wall jack to the port of the printer.
Tips for this setup:
•
You can set the printer to receive faxes automatically (Auto Answer On) or manually (Auto Answer Off).
• If you want to receive faxes automatically (Auto Answer On), then set the printer to pick up on any number of
rings that you want.
Setting up the printer to fax
5
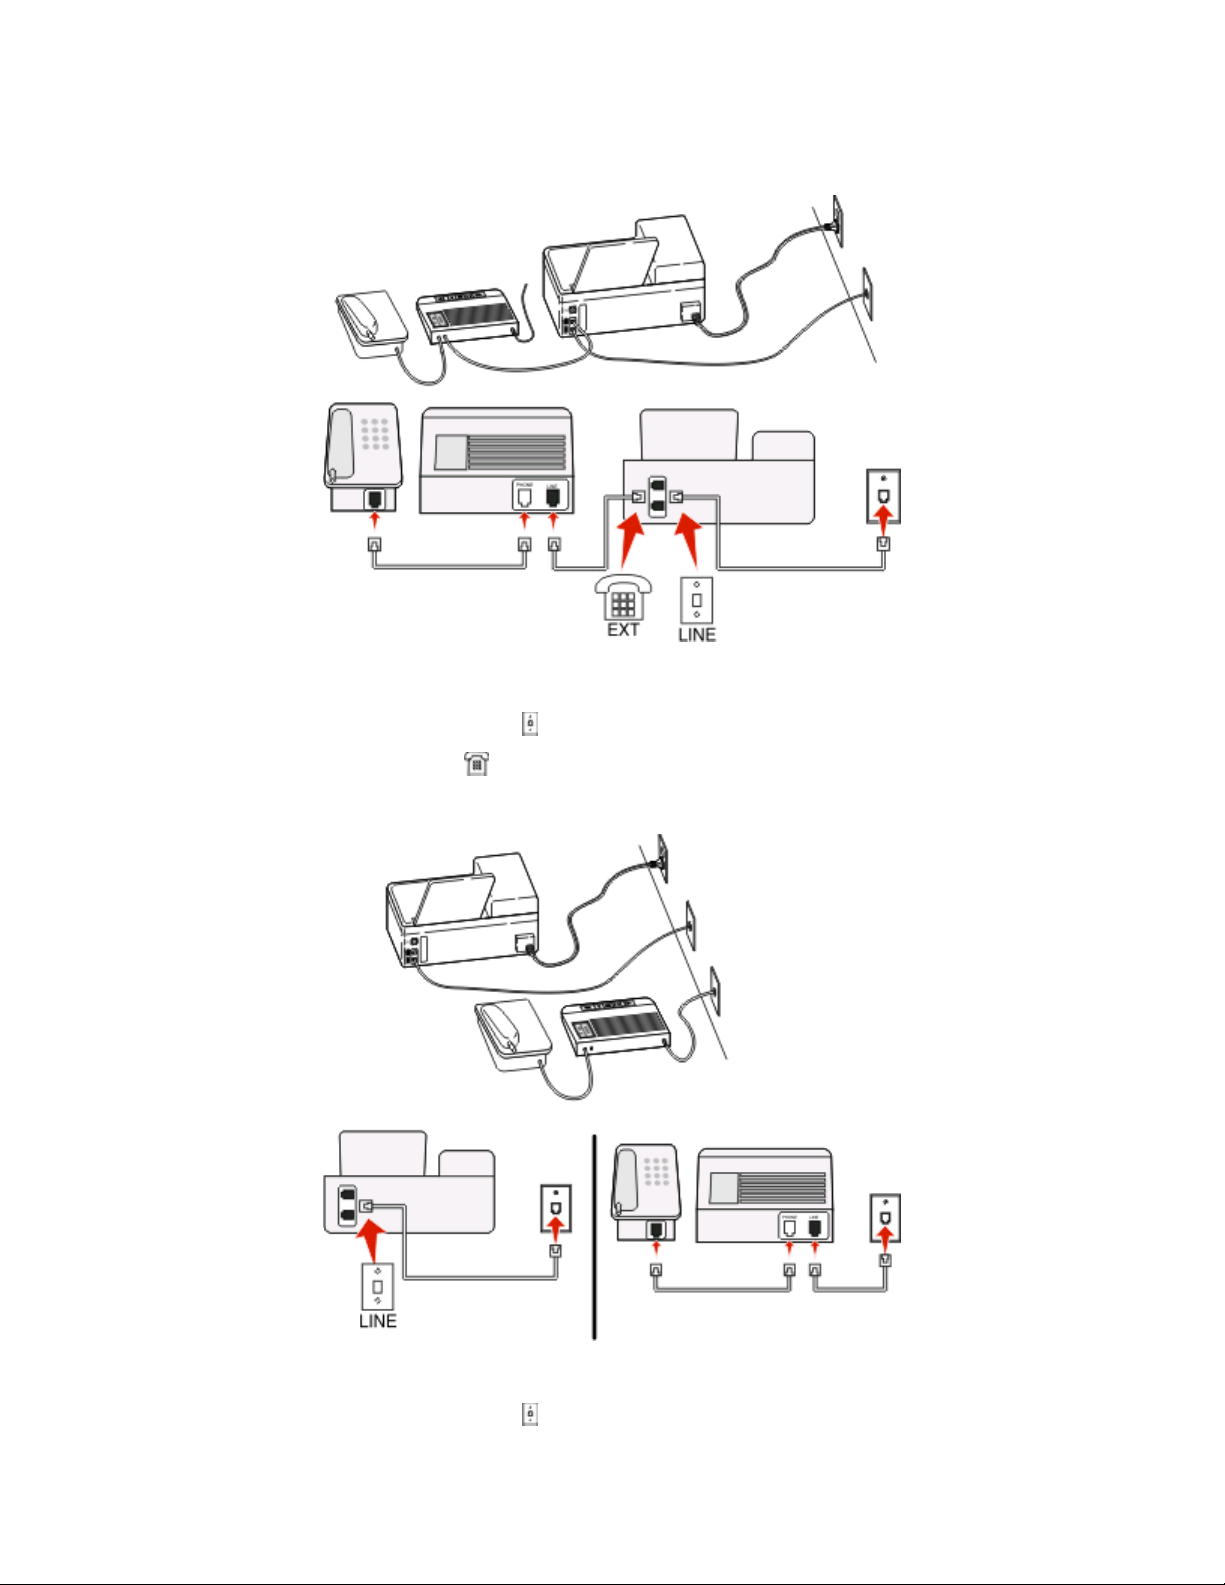
Setup 2: Printer is sharing the line with an answering machine
Connected to the same telephone wall jack
To connect:
1
Connect the cable from the wall jack to the port of the printer.
2 Remove the protective plug from the port of the printer, and then connect the answering machine to the port.
Connected to different wall jacks
To connect:
Connect the cable from the wall jack to the port of the printer.
Setting up the printer to fax
6
Tips for this setup:
•
If you have only one telephone number on your line, then you need to set the printer to receive faxes automatically
(Auto Answer On).
• Set the printer to pick up calls two rings after the answering machine. For example, if the answering machine
picks up calls after four rings, then set the printer to pick up after six rings. This way, the answering machine picks
up calls first and your voice calls are received. If the call is a fax, then the printer detects the fax signal on the line
and takes over the call.
• If you subscribe to a distinctive ring service provided by your telephone company, then make sure that you set
the correct ring pattern for the printer. Otherwise, the printer will not receive faxes even if you have set it to
receive faxes automatically.
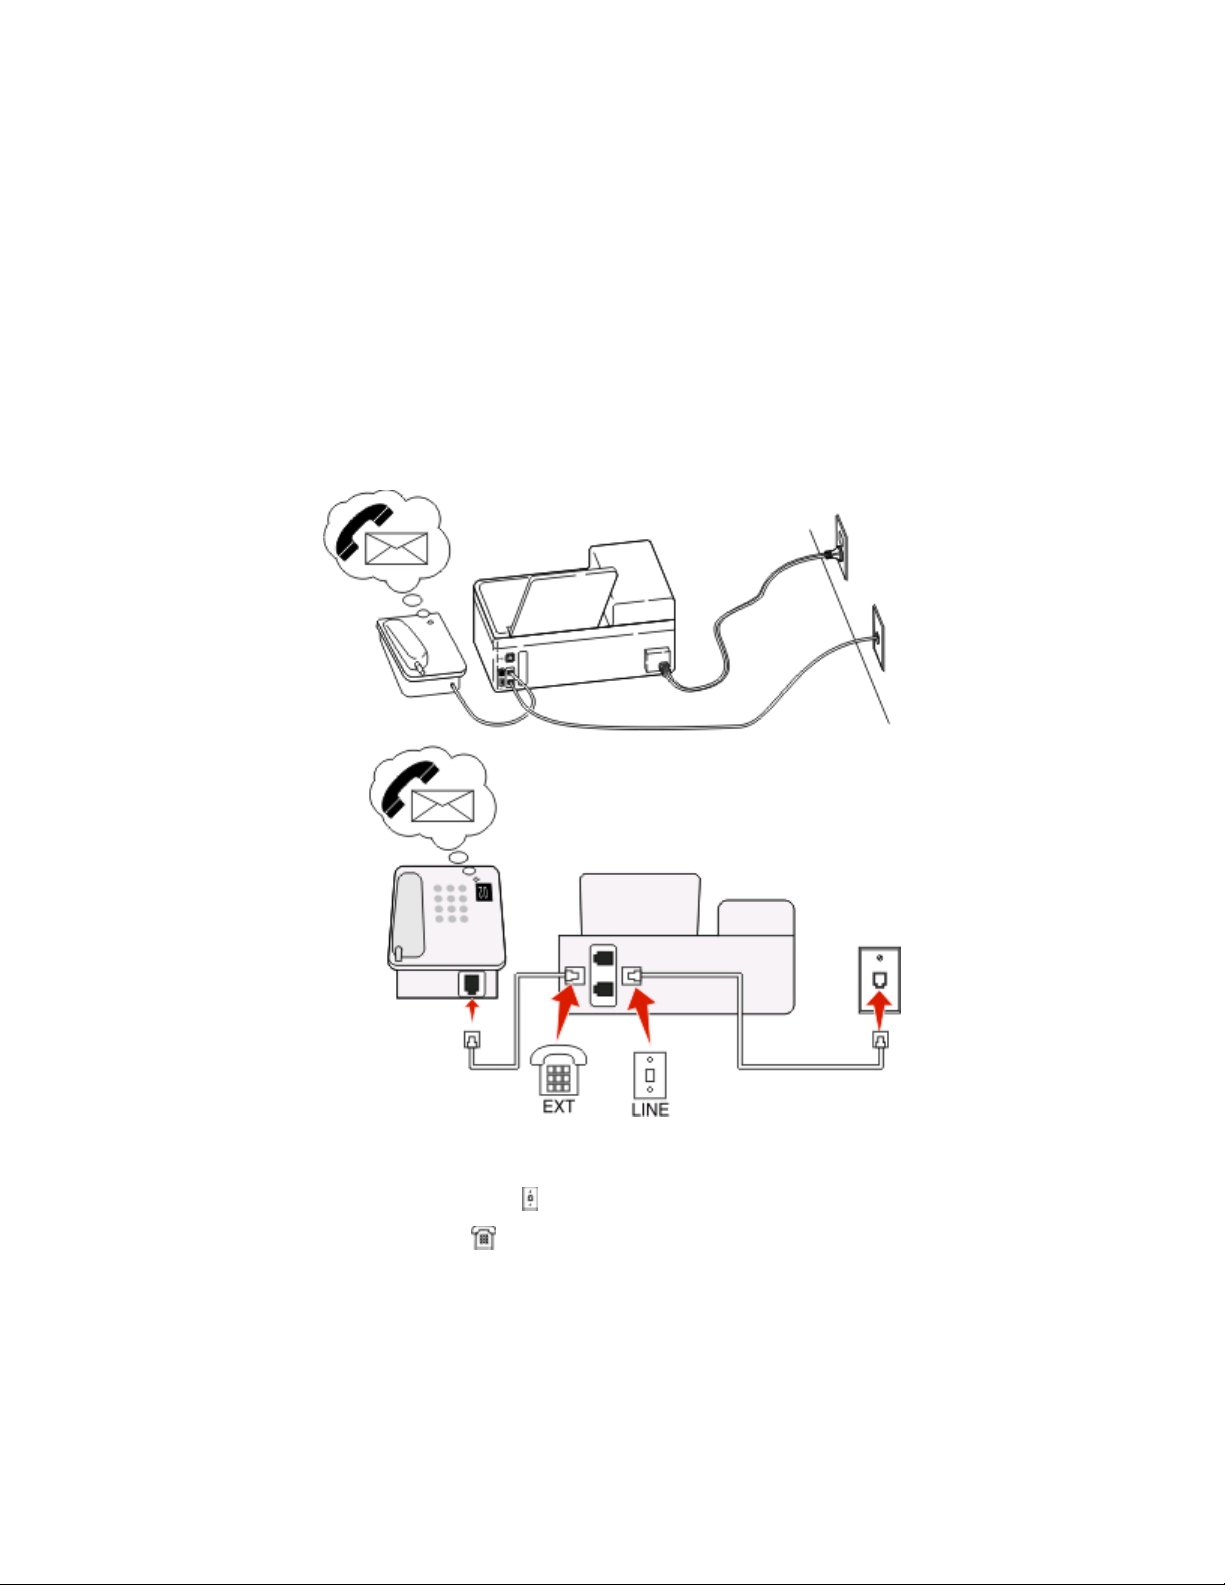
Setup 3: Printer is sharing the line with a telephone subscribed to voice mail
service
To connect:
1
Connect the cable from the wall jack to the port of the printer.
2 Remove the protective plug from the port of the printer, and then connect the telephone to the port.
Setting up the printer to fax
7

Tips for this setup:
•
This setup works best if you subscribe to a distinctive ring service. If you have distinctive ring service, then make
sure that you set the correct ring pattern for the printer. Otherwise, the printer will not receive faxes even if you
have set it to receive faxes automatically.
• If you have only one telephone number on your line, then you need to set the printer to receive faxes manually
(Auto Answer Off).
When you answer the telephone and you hear fax tones, press *9* or the manual answer code on the telephone
to receive the fax.
• You can also set the printer to receive faxes automatically (Auto Answer On), but you need to turn off the voice
mail service when you are expecting a fax. This setting works best if you are using voice mail more often than fax.
Scenario 2: Digital Subscriber Line (DSL)
A Digital Subscriber Line splits your regular telephone line into two channels: voice and Internet. Telephone and fax
signals travel through the voice channel, and Internet signals pass through the other channel. This way, you can use
the same line for analog voice calls (including faxes) and digital Internet access.
To minimize interference between the two channels and ensure a quality connection, you need to install a DSL filter
for the analog devices (fax machine, telephone, answering machine) in your network. Interference causes noise and
static on the telephone, failed and poor quality faxes for the printer, and slow Internet connection on your computer.
To install a filter for the printer:
1 Connect the line port of the DSL filter to the wall jack.
2 Connect a telephone cable from the port on the back of the printer to the phone port on the DSL filter.
Setting up the printer to fax
8

3 To continue using a computer for Internet access, connect the computer to the DSL HPN port on the DSL filter.
4 To connect a telephone to the printer, remove the protective plug from the port of the pr inter and then connect
the telephone to the port.
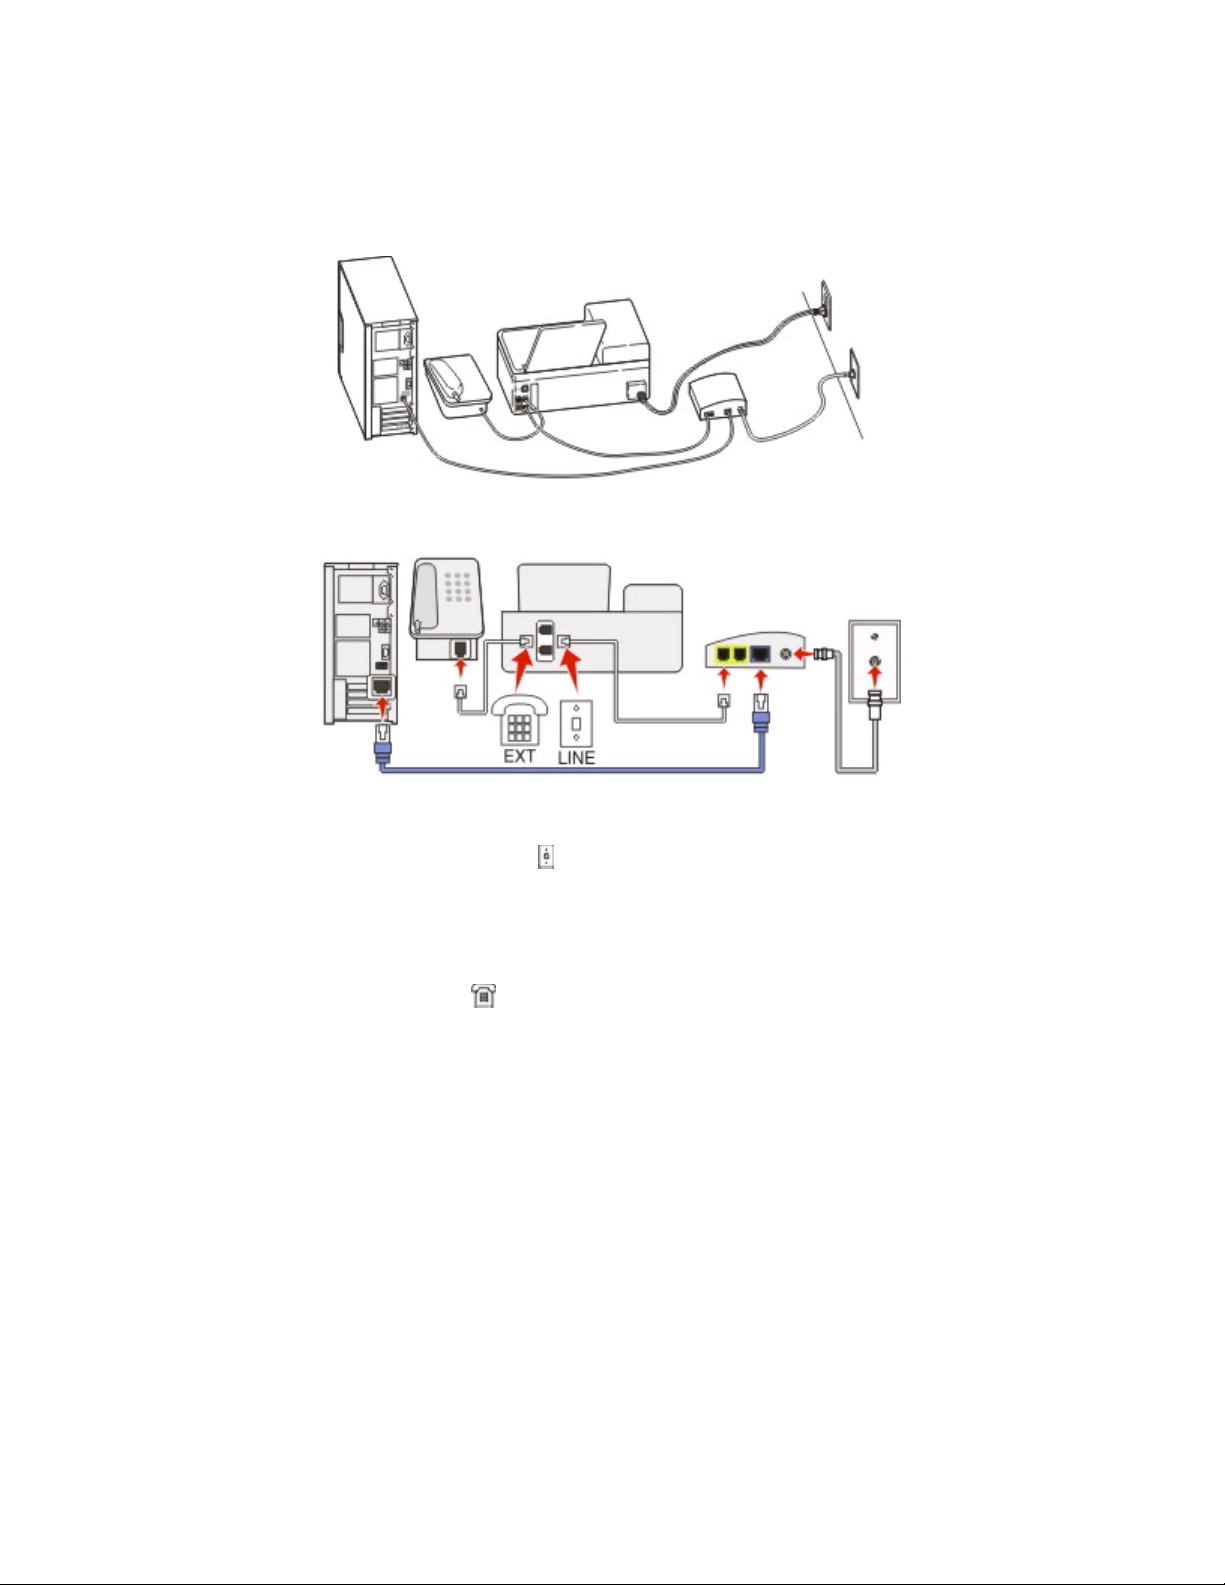
Scenario 3: VoIP telephone service
To connect:
1 Connect one end of a telephone cable to the port of the printer.
2 Connect the other end of the cable to the port labeled Phone Line 1 or Phone Port on the VoIP adapter.
The port labeled Phone Line 2 or Fax Port is not always active. You may need to pay extra to your VoIP provider
if you want to activate the second phone port.
3 Remove the protective plug from the port of the printer, and then connect the telephone to the port.
Tips for this setup:
• To make sure that the phone port on the VoIP adapter is active, plug an analog telephone into the phone port,
and then listen for a dial tone. If you hear a dial tone, then the port is active.
• If you need two phone ports for your devices but do not want to pay extra, then do not plug the printer into the
second phone port. You can use a phone splitter. Plug the phone splitter into the Phone Line 1 or Phone Port,
and then plug the printer and telephone into the splitter.
Make sure you use a phone splitter, not a line splitter. To make sure that you are using the correct splitter, plug
an analog telephone into the splitter and then listen for a dial tone.
Setting up the printer to fax
9
Scenario 4: Digital telephone service through a cable provider
Setup 1: Printer is connected directly to a cable modem
Follow this setup if you normally connect your telephone to a cable modem.
To connect:
1
Connect one end of a telephone cable to the port of the printer.
2 Connect the other end of the cable to the port labeled Phone Line 1 or Phone Port on the cable modem.
The port labeled Phone Line 2 or Fax Port is not always active. You may need to pay extra to your cable provider
if you want to activate the second phone port.
3 Remove the protective plug from the port of the printer, and then connect the telephone to the port.
Tips for this setup:
•
To make sure that the phone port on the cable modem is active, plug an analog telephone into the phone port,
and then listen for a dial tone. If you hear a dial tone, then the port is active.
• If you need two phone ports for your devices but do not want to pay extra, then do not plug the printer into the
second phone port. You can use a phone splitter. Plug the phone splitter into the Phone Line 1 or Phone
Port , and then plug the printer and telephone into the splitter.
Make sure you use a phone splitter, not a line splitter. To make sure that you are using the correct splitter, plug
an analog telephone into the splitter and then listen for a dial tone.
Setting up the printer to fax
10

Setup 2: Printer is connected to a wall jack; cable modem is installed elsewhere
in the house
Follow this setup if your cable provider activated the wall jacks in your house so that you do not have to plug your
devices into the cable modem. Your cable telephone service comes from the wall jacks.
To connect:
1
Connect the cable from the wall jack to the port of the printer.
2 Remove the protective plug from the port of the printer, and then connect the telephone to the port.
Scenario 5: Country-specific setup
Different countries have different types of telephone wall jacks. The most common wall jack is the Registered Jack-11
(RJ-11), the standard adopted by most countries. You need to have an RJ-11 plug, or a telephone cable that has an
RJ-11 connector, so you can connect a device to an RJ-11 wall jack.
The fax ports on the back of the printer and the telephone cable that comes with the printer have RJ-11 connectors.
If you have a different type of connector in your country or region, then you may need to use an RJ-11 adapter.
Setting up the printer to fax
11

Connecting the printer to a non-RJ-11 wall jack
To connect:
1
Connect one end of a telephone cable to the port of the printer.
2 Connect the other end of the cable to the RJ-11 adapter, and then connect the adapter to the wall jack.
3 If you want to connect another device (telephone or answering machine) to the same wall jack, and if the device
has a non-RJ 11 connector, then connect it directly to the wall jack.
Notes:
• Do not remove the wrap plug from the port of the printer.
• The printer may not come with an RJ-11 adapter in your country or region.
Setting up the printer to fax
12

If the additional device (telephone or answering machine) has an RJ-11 connector, then you can remove the wrap
plug and connect the device to the
port of the printer.
Connecting the printer in countries that use serial connection
I n s om e c ou nt ri es or r eg io ns , you ne ed to p lu g a ll de vi ce s i nt o t h e w al l j ac k . Y ou ca nn ot p lu g a te le p ho ne or an s we ri ng
machine into the
Austria Germany Portugal
Belgium Ireland Spain
Denmark Italy Sweden
France Netherlands Switzerland
Finland Norway United Kingdom
Warning—Potential Damage: If your country is on the list, then do not remove the wrap plug from the port of
the printer. It is necessary for the proper functioning of the devices on the telephone line.
port of the printer. This is called serial connection.
Setting up the printer to fax
13

To connect:
Connect the cable from the wall jack to the port of the printer.
Connecting the printer to a wall jack in Germany
The German wall jack has two kinds of ports. The N ports are for fax machines, modems, and answering machines.
The F port is for telephones.
Setting up the printer to fax
14

Connect the printer to any of the N ports.
To connect:
1
Connect one end of a telephone cable to the port of the printer.
2 Connect the other end of the cable to the RJ-11 adapter, and then connect the adapter to an N port.
3 If you want to connect a telephone and answering machine to the same wall jack, then connect the devices as
shown.
Step 2: Check the dial tone
A dial tone lets you know if the telephone line is working or if the printer is properly connected to the telephone line.
Make sure the telephone line and the wall jack are working
1 Plug an analog telephone into the wall jack.
2 Listen for a dial tone through the telephone handset.
If you hear a dial tone, then the telephone line and the wall jack are working.
Make sure the printer is properly connected to the telephone line
1 While the printer is connected to a telephone line through the port on the back of the printer, plug an analog
telephone into the
port of the printer.
2 Listen for a dial tone.
If you hear a dial tone, then the printer is properly connected to the telephone line.
Setting up the printer to fax
15

If you do not hear a dial tone, then review Step 1 or see the “Fax troubleshooting checklist” on page 20.
Step 3: Set your fax name and fax number
Your user information includes your name or your company name, your fax number (your fax number is your
telephone number, unless you have a dedicated fax telephone line), and the time and date on your fax machine
when a transmission is made. This information appears in the header and footer of the faxes that you send.
I n s om e c ou nt ri es , y ou ca nn ot se nd a f ax w it ho ut th i s i nf or ma ti on . S om e f ax ma ch in e s a ls o b lo c k f ax es wi t ho ut se nd er
information, so make sure that you enter this information in your printer.
1 From the printer control panel, navigate to Your Fax Name:
> Fax Setup > Dialing and Sending > Your Fax Name
2 Enter your name or your company name, and then save the setting.
3 Select Your Fax Number.
4 Enter your fax number or your telephone number, and then save the setting.
Step 4: Set the printer to receive faxes automatically or manually
If the printer is connected to a dedicated fax line or sharing the line with an answering machine, then you can set
the printer to receive faxes automatically. If the printer is sharing the line with a telephone subscribed to voice mail
service, then set the printer to receive faxes manually.
To set the printer to receive faxes automatically or manually:
1 From the printer control panel, navigate to Auto Answer:
> Fax Setup > Ringing and Answering > Auto Answer
2 Select an Auto Answer setting, and then save it.
Step 5: Set the number of rings
If you set Auto Answer to On in Step 4, then do the following. If you set Auto Answer to Off, then proceed to Step 6.
If you subscribe to Distinctive Ring
Setting the correct ring is important if you subscribe to the Distinctive Ring Pattern Detection (DPRD) feature offered
by telephone companies. This feature allows you to have multiple telephone numbers on one telephone line. Each
telephone number has a designated ring pattern (a single ring, a double ring, a triple ring). The different ring patterns
let you know which telephone number was dialed and which device you should use to answer the call.
Assign one of your telephone numbers to the printer as the fax number, and then set the printer to answer the ring
pattern of that number. If the pattern is set incorrectly, then the printer rings, but it never receives the fax.
1 From the printer control panel, navigate to Ring Pattern:
> Fax Setup > Ringing and Answering > Ring Pattern
2 Select the ring pattern for the printer, and then save the setting.
Setting up the printer to fax
16

If you do not subscribe to Distinctive Ring
If the printer is sharing the line with other devices, then set the printer to pick up on the greater number of rings. If
the printer is connected to a dedicated fax line, then you can choose any number of rings that you want.
1 From the printer control panel, navigate to Pick Up On:
> Fax Setup > Ringing and Answering > Pick Up On
2 Select the number of rings that you want, and then save the setting.
Step 6: Create a contact list
Using the printer control panel
1 From the printer control panel, navigate to Address Book:
Touch-screen models Arrow-button models
> Address Book > Fax Setup > Address Book
2 Use the menus to add a contact or a fax group. You can add up to 89 contacts and 10 fax groups.
Note: In some models, entries 1-89 are for individual contacts and entries 90-99 are for fax groups. Enter the entry
number before entering the contact name and fax number of the contact.
Using the fax software
If you are connecting the printer to a computer, then you can also create a contact list using the fax software.
For Windows users
1 Click or Start.
2 Click All Programs or Programs, and then select the printer program folder from the list.
3 Click Printer Home.
4 Click the Fax tab, and then click Edit contact list.
The Contacts tab of the Printer Setup Utility opens.
For Macintosh users
1 From the Finder desktop, double-click the printer folder.
2 Double-click the Fax Setup Utility or the AIO Setup Utility for your printer.
3 Click the Contacts tab.
• To add contacts, click the Individuals tab.
• To add fax groups, click the Groups tab.
For more information, click Help or
to view the help information for the fax software.
Setting up the printer to fax
17

Sending faxes
Tips for sending faxes
Before you send a fax:
• Make sure that the printer is on and connected to a working telephone, DSL, or VoIP line. The line is working if
you hear a dial tone.
• Load an original document faceup into the ADF or facedown on the scanner glass.
• When using the ADF, adjust the paper guide on the ADF to the width of the original document.
• When using the scanner glass, close the top cover to avoid dark edges on the scanned image.
Sending faxes using the printer control panel
1 From the printer control panel, select Fax or .
2 Enter a fax number, or import a contact from the lists available.
3 To set a color or black-and-white fax:
• For touch-screen models, touch More options, and then select a color option.
• For arrow button models, press the Color/Black button.
4 Press to start the fax job.
Warning—Potential Damage: Do not touch the cables or the
and ports while actively sending a fax.
Sending faxes using the computer
For Windows users
1 With a document open, click File Print.
2 From the Printer Name menu, select the fax version of your printer, and then click OK.
The Send Fax Wizard appears.
3 Follow the instructions on the computer screen.
For Macintosh users
1 With a document open, choose File > Print.
2 From the Printer pop-up menu, select the fax version of your printer.
Note: In order to see the fax options on the Print dialog, you must use the fax driver for your printer. If the fax
version of the printer is not on the list, choose Add a printer, and then choose the fax version of the printer.
3 Enter the name and number of the recipient.
4 Click Fax.
Sending faxes
18

Receiving faxes
Tips for receiving faxes
When receiving faxes:
• Make sure that the printer is on and connected to a working telephone, DSL, or VoIP line. The line is working if
you hear a dial tone.
• If you set the printer to receive faxes manually (Auto Answer Off), then make sure that the ringer volume is not
set to Off.
• If you have set the printer to receive faxes automatically (Auto Answer On), then load paper in the printer.
Receiving faxes automatically
1 Make sure that Auto Answer is on:
a From the printer control panel, navigate to Auto Answer:
> Fax Setup > Ringing and Answering > Auto Answer
b Turn on Auto Answer, and then save the setting.
2 Set the number of rings before the printer picks up incoming faxes:
a Select Pick Up On.
b Set the number of rings, and then save the setting.
When the number of rings you set is detected, the printer automatically receives the incoming fax.
Warning—Potential Damage: Do not touch the cables or the
and ports while actively receiving a fax.
Receiving a fax manually
1 Make sure Auto Answer is off:
a From the printer control panel, navigate to Auto Answer:
> Fax Setup > Ringing and Answering > Auto Answer
b Turn off Auto Answer, and then save the setting.
2 When the telephone rings and you hear fax tones when you pick up the handset, press on the printer or *9*
on the telephone attached to the printer.
Warning—Potential Damage: Do not touch the cables or the
and ports while actively receiving a fax.
Receiving faxes
19

Troubleshooting
Fax troubleshooting checklist
If you encounter problems sending and receiving faxes, then check the connection first:
1 Check for a dial tone on the telephone line by plugging an analog telephone into the wall jack, DSL filter, VoIP
device, or cable modem where you connected the printer. Make sure you plug the telephone into the same port.
If you do not hear a dial tone, then contact your line provider.
2 While the printer is connected to the telephone line, check for a dial tone by plugging an analog telephone into
port of the printer.
the
If you do not hear a dial tone, then use the checklist below. Listen for a dial tone after checking each item.
If you hear a dial tone but still have problems sending and receiving faxes, t hen see the other topics in this section.
Connection checklist
• Make sure that the printer and other devices on the line (if applicable) are set up and configured correctly
according to your setup scenario.
• Make sure that the cables are connected to the correct ports.
• Make sure that the cables are securely plugged in.
Check the cable connections for the following hardware, if applicable:
Power supply Answering machine Cable modem Splitter
Telephone VoIP adapter DSL filter RJ-11 adapter
• If the printer is connected to a Digital Subscriber Line, then make sure you are using a DSL filter for the printer.
• If the printer is connected to a VoIP adapter or cable modem, then make sure that the printer is plugged into the
first phone port.
• If you are using a splitter, then make sure that you are using a phone splitter. Do not use a line splitter.
Cannot send faxes
If the “Fax troubleshooting checklist” does not solve the problem, then try one or more of the following:
MAKE SURE THAT YOU HAVE REGISTERED YOUR USER INFORMATION IN THE PRINTER
If you did not enter your user information during initial setup, then enter your fax name and fax number. In some
countries, you cannot send a fax without entering your fax name or company name. Some fax machines also block
unknown faxes or faxes without sender information.
Troubleshooting
20

DECREASE THE TRANSMISSION SPEED OF THE FAX MODEM
The modem of the printer can transmit data at 33,600 bps. This is the maximum speed at which the printer can
send and receive faxes. It is not necessary, however, to set the modem to its fastest transmission capability. The
speed of the modem of the receiving fax machine must match or be greater than the speed at which you are
sending your fax. Otherwise, your fax will not be received.
To decrease the transmission speed of the modem:
1 From the printer control panel, navigate to Max Send Speed:
> Fax Setup > Dialing and Sending > Max Send Speed
2 Select a sending speed, and then save the setting.
SET THE PRINTER TO SCAN THE ORIGINAL DOCUMENT BEFORE DIALING THE NUMBER
The printer does not automatically redial if you set it to scan the original document after dialing the number.
Se t th e p ri n te r t o s ca n be fo re di a li ng so th a t y ou do no t ha ve to sc an th e d oc um en t a ga i n i f t he fa x f ai ls . T he sc an ne d
document is saved in the printer memory. The printer can then retrieve it and automatically redial the number.
To set the printer to scan before dialing:
1 From the printer control panel, navigate to Scan:
> Fax Setup > Dialing and Sending > Scan
2 Select Before Dial, and then save the setting.
ENABLE ERROR CORRECTION
Errors and blurs may appear in the faxed document if there is too much noise on the line. This option enables the
printer to transmit the bad blocks of data again and correct the errors. When a fax has too many errors, the fax may
be rejected by the receiving fax machine.
To make sure that error correction is enabled:
1 From the printer control panel, navigate to Error Correction:
> Fax Setup > Dialing and Sending > Error Correction
2 Turn on error correction, and then save the setting.
ENABLE AUTOMATIC FAX CONVERSION
If the receiving fax machine does not support color fax, then this option automatically converts the outgoing color
fax to black and white. It also automatically reduces the resolution of the fax to a resolution that the receiving
machine can support.
To make sure that automatic fax conversion is enabled:
1 From the printer control panel, navigate to Auto Fax Convert:
> Fax Setup > Dialing and Sending > Auto Fax Convert
2 Turn on automatic fax conversion, and then save the setting.
Troubleshooting
21

MAKE SURE THAT THE DIAL PREFIX SETTING IS CORRECT
The dialing prefix is the number or series of numbers that you press before you can dial the actual fax number or
telephone number. If the printer is in an office setting or i n a private branch exchange, this can be a specific nu mber
that you need to press so you can make a call outside the office.
Make sure that the dial prefix entered in the printer is correct for your network.
To check the dial prefix setting:
1 From the printer control panel, navigate to Dial Prefix:
> Fax Setup > Dialing and Sending > Dial Prefix
2 If the prefix is not correct, enter the correct prefix, and then save the setting.
Cannot receive faxes
If the “Fax troubleshooting checklist” does not solve the problem, then try one or more of the following:
MAKE SURE THAT YOU HAVE CONFIGURED THE CORRECT SETTINGS FOR YOUR SETUP
The fax settings depend on whether the printer is connected to its own fax line or shares the line with other devices.
If the printer is sharing the line with other devices, then make sure that the following are set:
• Auto Answer is On.
• The printer picks up on a greater number of rings than the other devices.
• The printer picks up on the correct distinctive ring, if you subscribe to a distinctive ring service.
MAKE SURE THAT THE PRINTER IS CONNECTED TO AN ANALOG PORT
The printer is an analog device. If you are using a PBX system, then make sure that the printer is connected to an
analog port on the PBX. You may need a digital line converter that converts digital signals into analog signals.
MAKE SURE THAT THE PRINTER MEMORY IS NOT FULL
The printer saves an incoming fax to the printer memory before it prints the fax. If the printer runs out of ink or
runs out of paper, then the printer saves the fax so you can print it later. However, if the printer memory is full, then
the printer may not be able to receive more incoming faxes. An error message appears on the display when the
printer memory is full. Resolve the error to free up space in the printer memory.
MAKE SURE THAT FAX FORWARDING IS DISABLED
You may have turned on Fax Forwarding. Disable this option so that the printer can receive the fax.
1 From the printer control panel, navigate to Fax Forward:
> Fax Setup > Ringing and Answering > Fax Forward
2 Turn off Fax Forwarding, and then save the setting.
Troubleshooting
22

INCREASE THE RINGER VOLUME
If you set the printer to receive faxes manually (Auto Answer Off), then increase the ringer volume so you can hear
incoming faxes.
MAKE SURE THAT YOU HAVE THE CORRECT MANUAL ANSWER CODE
If you set the printer to receive faxes manually (Auto Answer Off), then you need to press the correct code when
a fax comes in so that the printer can receive it.
To retrieve the correct code:
1 From the printer control panel, navigate to Manual Answer Code or Manual Pickup Code:
> Fax Setup > Ringing and Answering > Manual Answer Code or Manual Pickup Code
2 Copy the manual answer code that appears on the display.
Cannot run the fax software
The printer must be connected to a telephone, DSL, VoIP, or cable service before you can configure the fax settings
in the fax software.
MAKE SURE THE FAX SOFTWARE IS INSTALLED
The Fax Solutions Software is optional for Windows users and is installed with the printer software only if you select
it on the “Install Additional Software” screen during installation. If you did not install the fax software, then the Fax
tab on the Printer Home takes you to our Web site where you can download the software.
MAKE SURE THE PRINTER IS CONNECTED TO A TELEPHONE LINE
You need to connect the printer to your telephone line (through a standard wall jack, a DSL filter, a VoIP adapter,
or a cable modem) before you can open the fax software and configure the fax settings.
MAKE SURE THAT THE PRINTER IS CONNECTED TO THE COMPUTER
MAKE SURE THAT THE PRINTER IS NOT IN POWER SAVER MODE
Troubleshooting
23

Notices
Edition notice
April 2009
The following paragraph does not apply to any country where such provisions are inconsistent with local
law: LEXMARK INTERNATIONAL, INC., PROVIDES THIS PUBLICATION “AS IS” WITHOUT WARRANTY OF ANY KIND,
EITHER EXPRESS OR IMPLIED, INCLUDING, BUT NOT LIMITED TO, THE IMPLIED WARRANTIES OF MERCHANTABILITY
OR FITNESS FOR A PARTICULAR PURPOSE. Some states do not allow disclaimer of express or implied warranties in
certain transactions; therefore, this statement may not apply to you.
This publication could include technical inaccuracies or typographical errors. Changes are periodically made to the
information herein; these changes will be incorporated in later editions. Improvements or changes in the products
or the programs described may be made at any time.
References in this publication to products, programs, or services do not imply that the manufacturer intends to make
these available in all countries in which it operates. Any reference to a product, program, or service is not intended
to state or imply that only that product, program, or service may be used. Any functionally equivalent product,
program, or service that does not infringe any existing intellectual property right may be used instead. Evaluation
and verification of operation in conjunction with other products, programs, or services, except those expressly
designated by the manufacturer, are the user’s responsibility.
For Lexmark technical support, visit support.lexmark.com.
For information on supplies and downloads, visit www.lexmark.com.
If you don't have access to the Internet, you can contact Lexmark by mail:
Lexmark International, Inc.
Bldg 004-2/CSC
740 New Circle Road NW
Lexington, KY 40550
USA
© 2009 Lexmark International, Inc.
All rights reserved.
UNITED STATES GOVERNMENT RIGHTS
This software and any accompanying documentation provided under this agreement are commercial computer
software and documentation developed exclusively at private expense.
Trademarks
Lexmark and Lexmark with diamond design are trademarks of Lexmark International, Inc., registered in the United
States and/or other countries.
All other trademarks are the property of their respective owners.
Notices
24
 Loading...