

Page 1

Infoprint 1116
Setup Guide
S510-2307-00
Page 2

Page 3

Infoprint 1116
Setup Guide
S510-2307-00
Page 4

Page 5

English
Page 6

Edition: August 2001
Lexmark, MarkVision, and MarkNet are trademarks of Lexmark International, Inc., registered in the United States and/or other countries.
Macintosh is a trademark of Apple Computer, Inc., registered in the U.S. and other countries.
© Copyright 2001 Lexmark International, Inc.
All rights reserved.
UNITED STATES GOVERNMENT RESTRICTED RIGHTS
This software and documentation are provided with RESTRICTED RIGHTS. Use, duplication or disclosure by the Government is subject to restrictions
as set forth in subparagraph (c)(1)(ii) of the Rights in Technical Data and Computer Software clause at DFARS 252.227-7013 and in applicable FAR
provisions: Lexmark International, Inc., Lexington, KY 40550.
FCC emissions information
This device complies with Part 15 of the FCC Rules. Operation is subject to the following two conditions:
(1) This device may not cause harmful interference, and (2) this device must accept any interference received, including interference that may cause
undesired operation.
Refer to the Publications CD for details.
Safety information
• If your product is NOT marked with this symbol , it MUST be connected to an electrical outlet that is properly grounded.
• The power cord must be connected to an electrical outlet that is near the product and easily accessible.
• Refer service or repairs, other than those described in the operating instructions, to a professional service person.
• This product is designed, tested, and approved to meet strict global safety standards with the use of specific Lexmark components. The safety
features of some parts may not always be obvious. Lexmark is not responsible for the use of other replacement parts.
• Your product uses a laser, exercise CAUTION: Use of controls or adjustments or performance of procedures other than those specified
herein may result in hazardous radiation exposure.
• Your product uses a printing process that heats the print media, and the heat may cause the media to release emissions. You must understand
the section in your operating instructions that discusses the guidelines for selecting print media to avoid the possibility of harmful emissions.
Conventions
Warning!
A warning identifies something that might damage your printer hardware or software.
CAUTION! A caution identifies something that might cause you harm.
Page 7

Table of
contents
Preface . . . . . . . . . . . . . . . . . . . . . . . . . . . . . . . . . . . . . . . . . . . v
About your printer . . . . . . . . . . . . . . . . . . . . . . . . . . . . . . . . . . .v
About this book . . . . . . . . . . . . . . . . . . . . . . . . . . . . . . . . . . . viii
Other sources of information . . . . . . . . . . . . . . . . . . . . . . . . viii
Viewing the Publications CD . . . . . . . . . . . . . . . . . . . . . . . . . . ix
Step 1: Unpack the printer . . . . . . . . . . . . . . . . . . . . . . . . . . 1
Attaching an operator panel overlay . . . . . . . . . . . . . . . . . . . . .2
Removing print cartridge packaging . . . . . . . . . . . . . . . . . . . . .2
Step 2: Install the print cartridge . . . . . . . . . . . . . . . . . . . . . 4
Step 3: Install memory cards . . . . . . . . . . . . . . . . . . . . . . . .6
Removing the printer side cover . . . . . . . . . . . . . . . . . . . . . . . .6
Removing the system board shield . . . . . . . . . . . . . . . . . . . . . .8
Installing a printer memory card . . . . . . . . . . . . . . . . . . . . . . . .9
Installing a flash memory card . . . . . . . . . . . . . . . . . . . . . . . .11
Reattaching the metal shield . . . . . . . . . . . . . . . . . . . . . . . . .13
Reattaching the side cover . . . . . . . . . . . . . . . . . . . . . . . . . . .14
Table of contents
iii
Page 8

Step 4: Install the tray 2 option . . . . . . . . . . . . . . . . . . . . . 15
Step 5: Attach cables . . . . . . . . . . . . . . . . . . . . . . . . . . . . . 17
Local printing . . . . . . . . . . . . . . . . . . . . . . . . . . . . . . . . . . . . .17
Network printing . . . . . . . . . . . . . . . . . . . . . . . . . . . . . . . . . . .19
Attaching a power cord . . . . . . . . . . . . . . . . . . . . . . . . . . . . . .20
Step 6: Load paper . . . . . . . . . . . . . . . . . . . . . . . . . . . . . . . 21
Loading tray 1 . . . . . . . . . . . . . . . . . . . . . . . . . . . . . . . . . . . . .21
Loading the manual feed . . . . . . . . . . . . . . . . . . . . . . . . . . . .24
Loading the optional tray 2 . . . . . . . . . . . . . . . . . . . . . . . . . . .27
Step 7: Verify printer setup . . . . . . . . . . . . . . . . . . . . . . . . 30
Step 8: Understanding the operator panel lights . . . . . . . 31
Step 9: Install printer drivers . . . . . . . . . . . . . . . . . . . . . . . 38
iv
Local printing . . . . . . . . . . . . . . . . . . . . . . . . . . . . . . . . . . . . .38
Network printing . . . . . . . . . . . . . . . . . . . . . . . . . . . . . . . . . . .39
Index . . . . . . . . . . . . . . . . . . . . . . . . . . . . . . . . . . . . . . . . . . .44
Table of contents
Page 9

Preface
About your printer Three printer models are available: an
entry model, a standard model and a
network model. The differences between
these three models are listed in the
following table.
Item Entry model Standard model Network model
Base memory 2MB 8MB 16MB
Maximum memory 66MB 72MB 80MB
Emulations PCL 5e and
Connectivity Parallel and USB Parallel and USB 10/100 Base-TX
Ships with print
cartridge yield (at
approximately 5%
coverage)
Macintosh
compatibility
1,500 pages
(standard)
PostScript Level 2 and
PCL 6
3,000 pages
(standard)
PostScript Level 2 and
PCL 6
Ethernet and USB
3,000 pages (standard)
Preface
v
Page 10
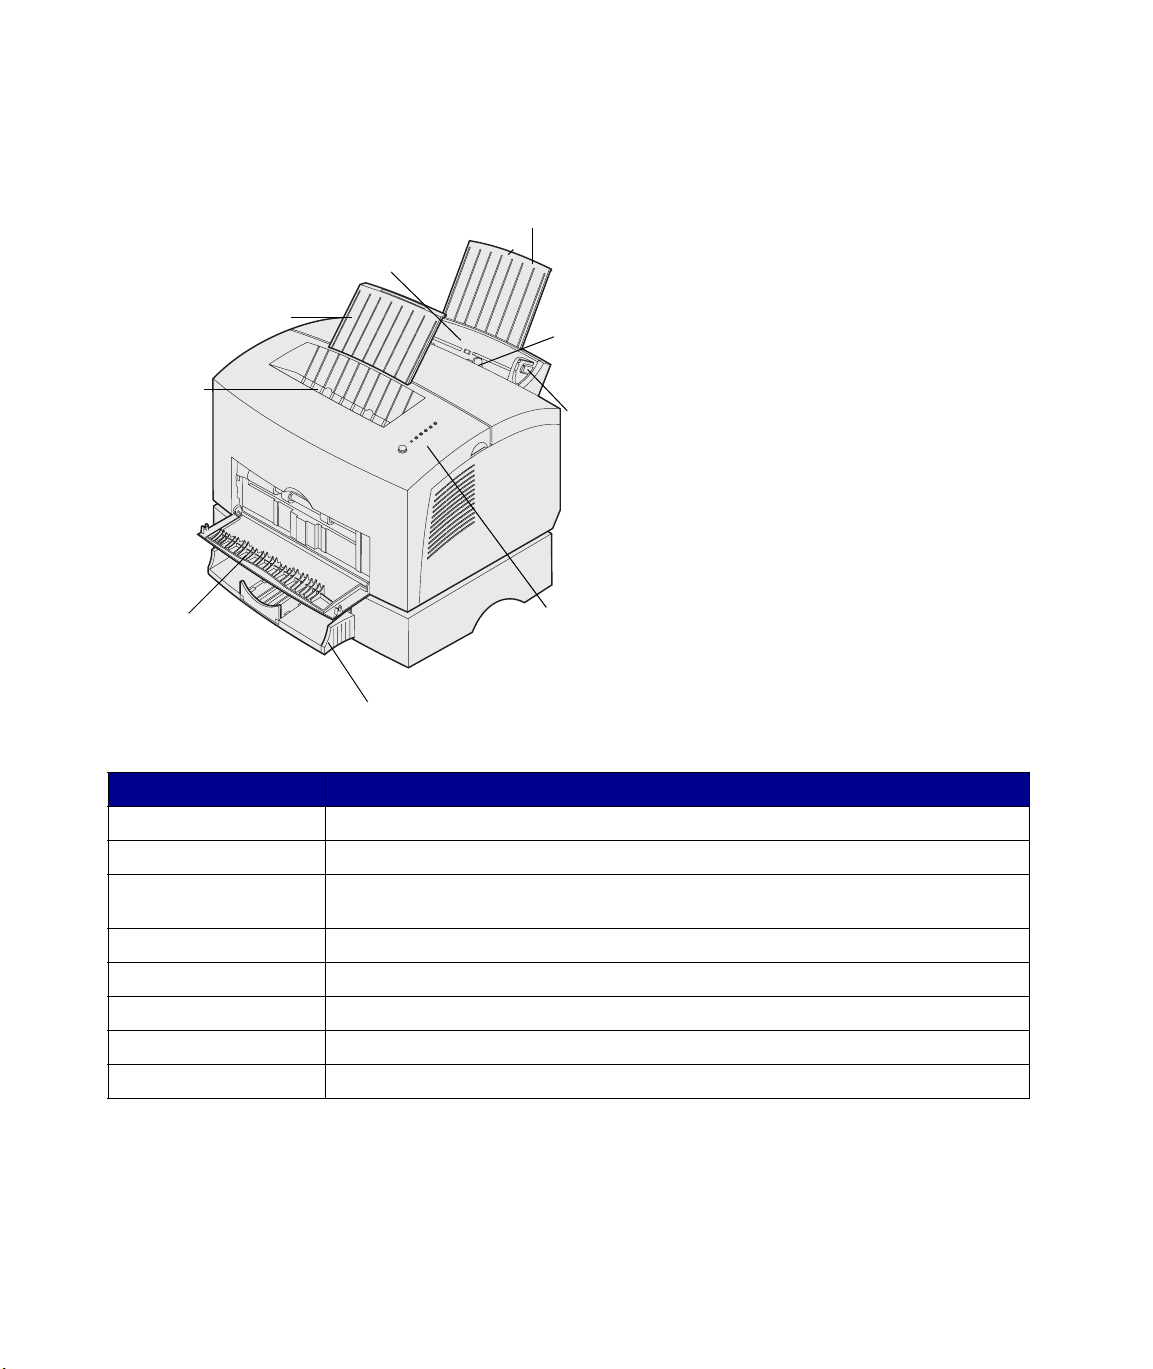
Tray 1
Paper
support
Paper support
Top
output
bin
Front output door
Optional tray 2
Manual
feed
Paper
guide
Operator
panel
lights
Use this feature: When you want to:
Tray 1 Load up to 150 sheets of paper or 10 sheets of other media.
Paper support Support media in tray 1 or the top output bin.
Manual feed Load a single sheet of paper/other media. Use for transparencies, labels, envelopes,
and card stock.
Paper guides Adjust the width of the media in tray 1 and the manual feed.
Operator panel lights Check the status of your printer.
Top output bin Stack printed documents face down.
Front output door Print on special media, for example, labels or card stock.
Optional tray 2 Increase your paper capacity.
vi
Preface
Page 11
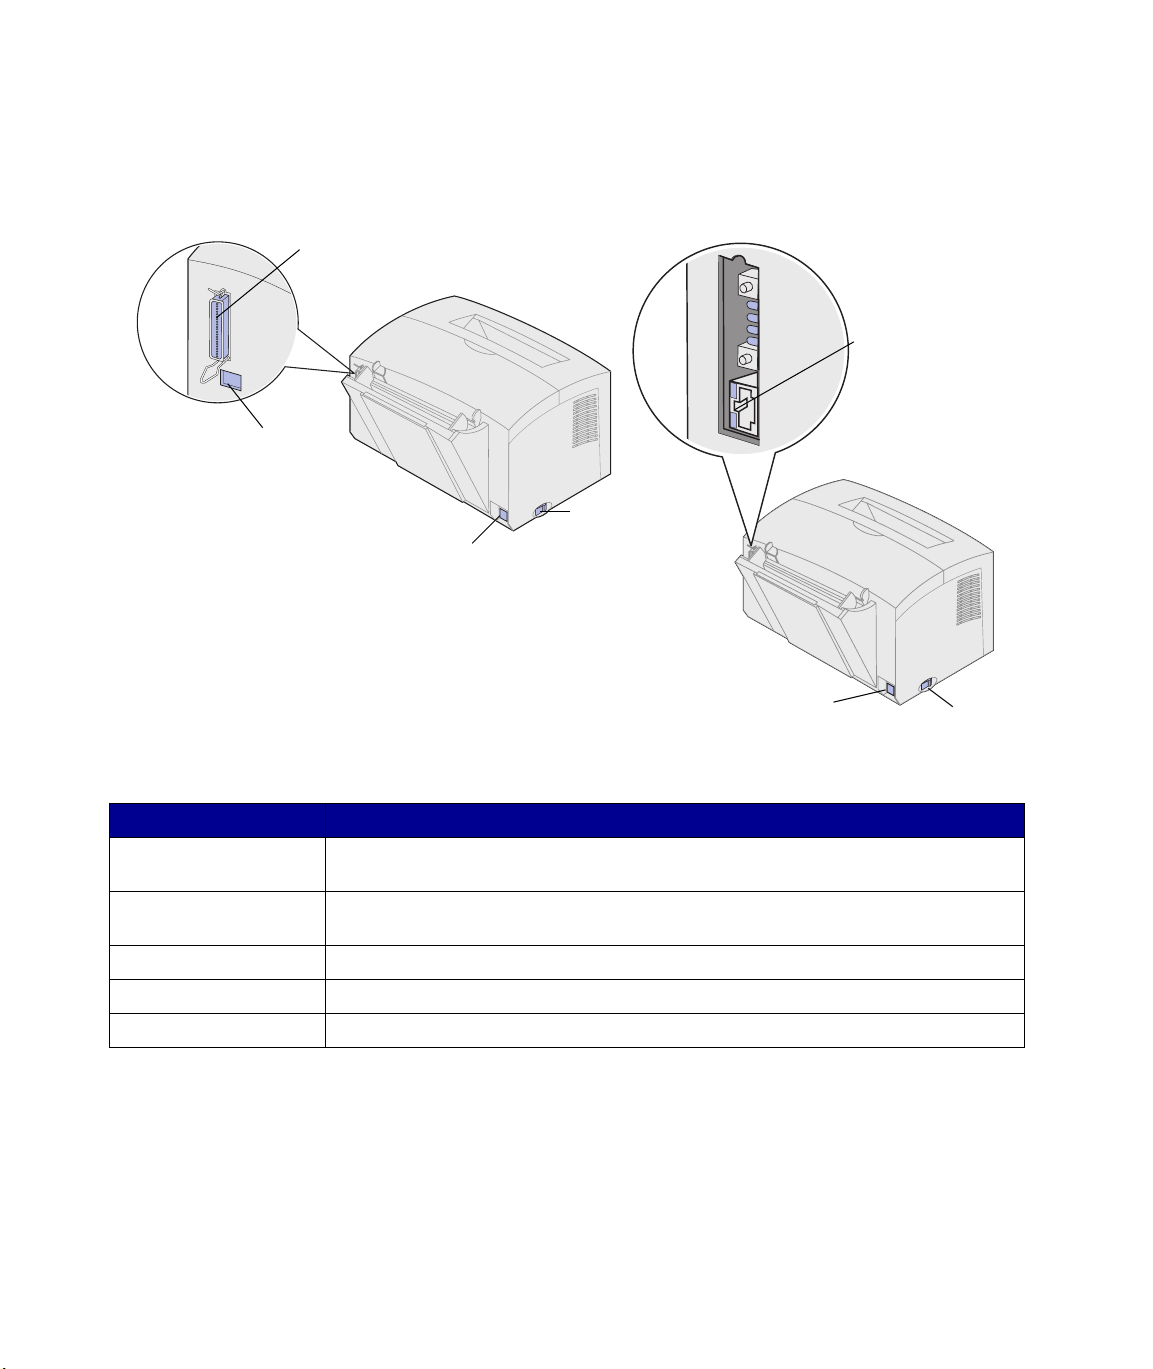
Entry and standard model
Parallel cable
connector
USB cable
connector
Network model
Ethernet
connector
Power
switch
Power cord connector
Power cord
connector
Power
switch
Use this feature: When you want to:
Parallel cable connector Connect the computer to the entry or standard model printer’s parallel port with a
parallel cable.
USB connector Connect the computer to the network printer’s USB port with a Universal Serial Bus
(USB) cable.
Ethernet cable connector Connect the computer to the network printer’s port with an Ethernet cable.
Power cord connector Connect the printer to a properly grounded wall outlet with a power cord.
Power switch Turn the printer on or off.
Preface
vii
Page 12

Operator panel The operator panel has 6 lights and 1
About this book
button. Different light sequences provide
status, attendance and service
information.
Depending on the light sequence, briefly
(approximately 1 second) push the
operator panel button to restart the
printer, display an error code, or activate
other printer functions.
Use your printer driver to change the
paper source, paper size and other
printer settings.
Note: See the safety information on the
inside of the front cover before setting up
your printer.
Other sources of
information
Publications CD The Publications CD, which is packaged
This Setup Guide provides detailed
instructions for unpacking and setting up
the printer, installing supplies and
options, loading media, launching the
drivers CD to install printer drivers and
utilities, and printing information from the
Publications CD.
with the Setup Guide, provides
information about choosing media,
understanding the operator panel lights,
clearing paper jams, and solving printing
problems.
viii
Preface
Page 13

Viewing the
Publications CD
Insert the Publications CD into your CD-
ROM drive. If the CD does not
automatically launch:
1 Select your CD-ROM drive.
2 Double-click START.PDF (or
double-click the CD icon on your
desktop and then click
START.PDF if you are using a
Macintosh computer).
You must have a copy of Adobe
Acrobat Reader, Version 4.05c
with Search or later installed on
your computer to view the
Publications CD.
If Acrobat Reader is not installed
on your operating system, visit the
Adobe Web site at
www.adobe.com to download the
Acrobat Reader version you need.
Quick Reference card The Quick Reference card provides easy
access to information about loading
paper, clearing jams, and understanding
common operator panel light messages.
Drivers CD The drivers CD contains all the
necessary printer drivers to get your
printer up and running.
Depending on which version of the
drivers CD shipped with your printer, it
may also contain MarkVision
Professional, other printer utilities,
screen fonts, and additional
documentation.
Preface
ix
Page 14

x
Preface
Page 15
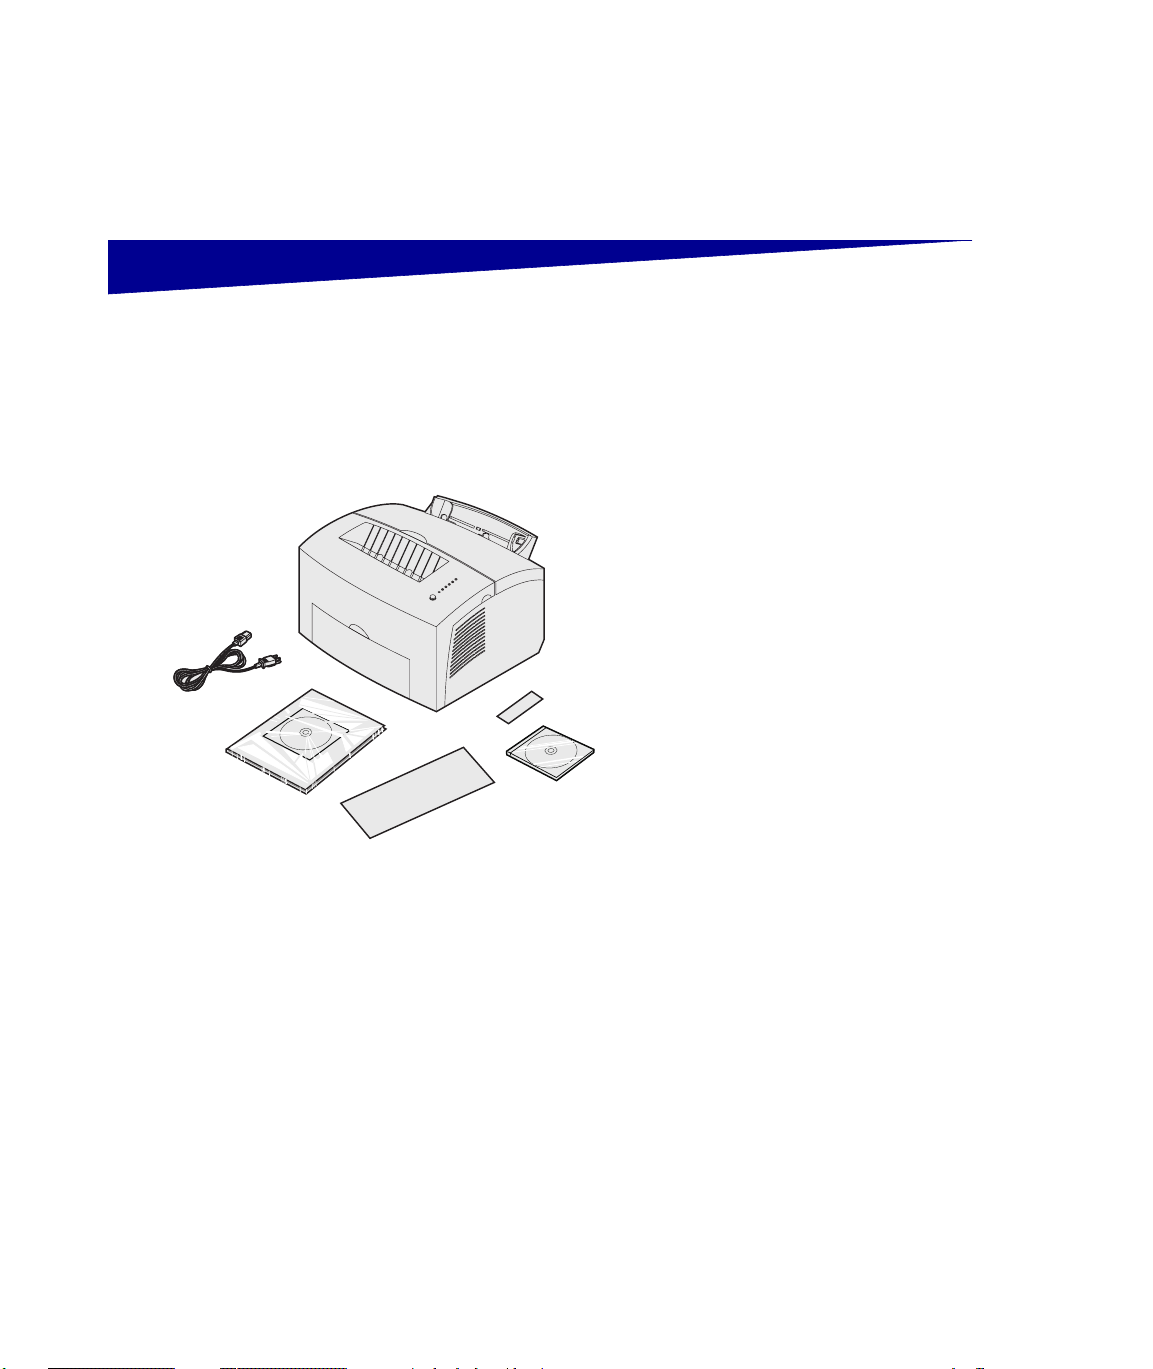
Step 1: Unpack the printer
1 Remove the printer and all
accessories from the packaging
carton.
Save the carton and packing
materials in case you need to
repack the printer for service or
storage.
2 Remove all tape from outside and
Power cord
Setup Guide and
Publications CD
Overlay
Drivers CD
Quick Reference card
inside the printer.
3 Make sure you have the following
items:
— Printer with print cartridge
installed
— Setup Guide
— Publications CD
— Quick Reference card
—Power cord
—Drivers CD
— Operator panel overlay
If you need help during setup, or if
any items are missing or
damaged, refer to your point of
purchase.
Unpack the printer
1
Page 16
4 Place the printer on a flat, stable
surface in a well-ventilated area
near your computer.
Do not place the printer:
— In direct sunlight
— Near heat sources or air
conditioners
— In dusty or dirty environments
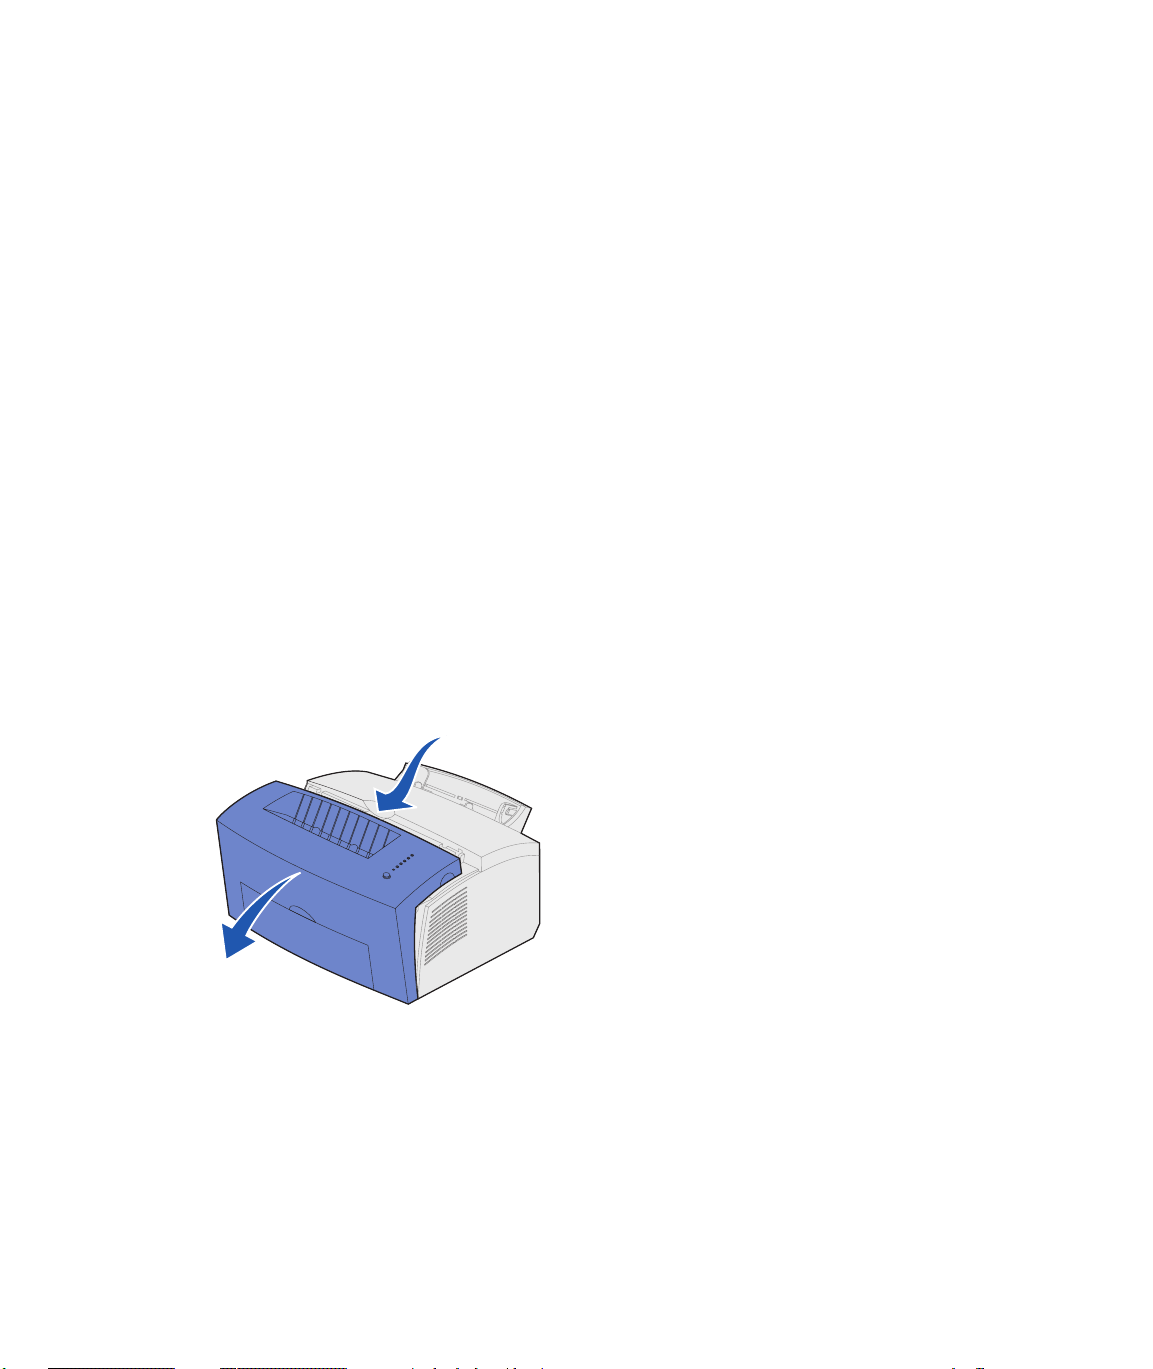
Attaching an operator
panel overlay
Removing print
cartridge packaging
If you have a non-English operator panel
overlay in your printer box and wish to
use it, peel it off, align it on the operator
panel, and press it into place.
1 Use the finger tab to pull down the
printer cover.
2
Unpack the printer
Page 17
Cartridge
handle
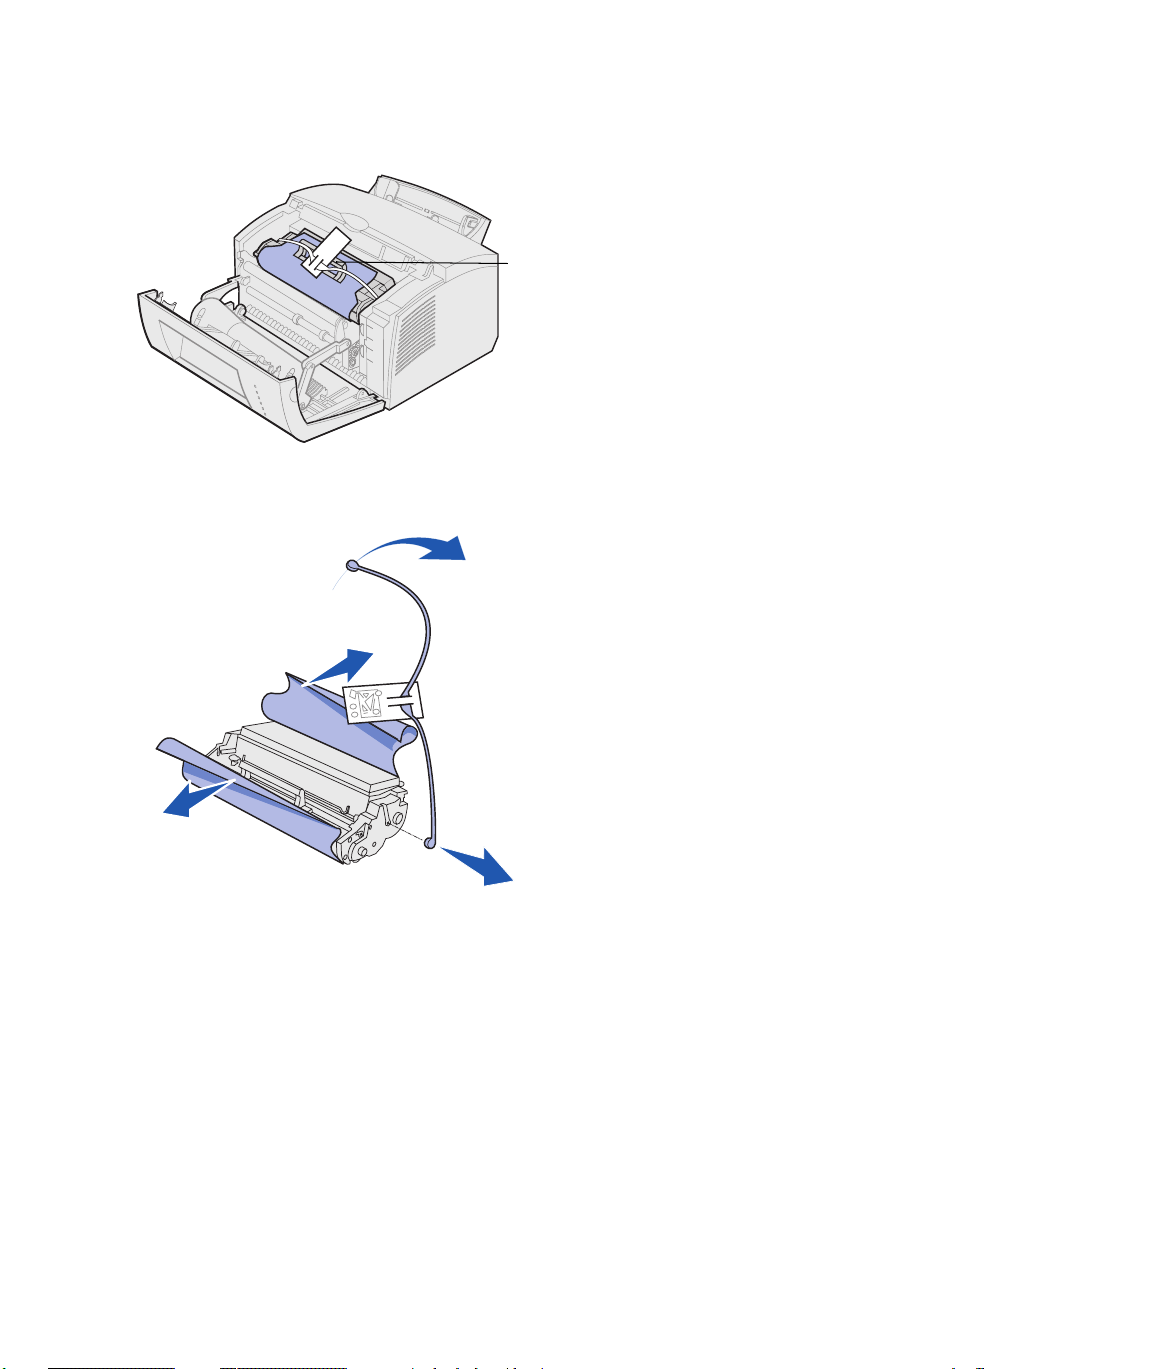
2 Grasp the cartridge handle and
pull the print cartridge straight up.
3 Remove the protective foam
packaging from the print cartridge.
4 Pull off the plastic piece attached
to the ends of the print cartridge.
Discard the plastic piece, foam
and paper.
5 Continue with “Install the print
cartridge” on page 4.
Unpack the printer
3
Page 18

Step 2: Install the print cartridge
1 Shake the cartridge to distribute
the toner evenly.
2 Insert the print cartridge:
a Align the colored labels on
either side of the print
cartridge with the
corresponding labels in the
printer.
b Holding the handle, tilt the print
cartridge down and guide it
between the print cartridge
grooves.
c Push down on the cartridge
until it is firmly in place.
4
Install the print cartridge
Page 19
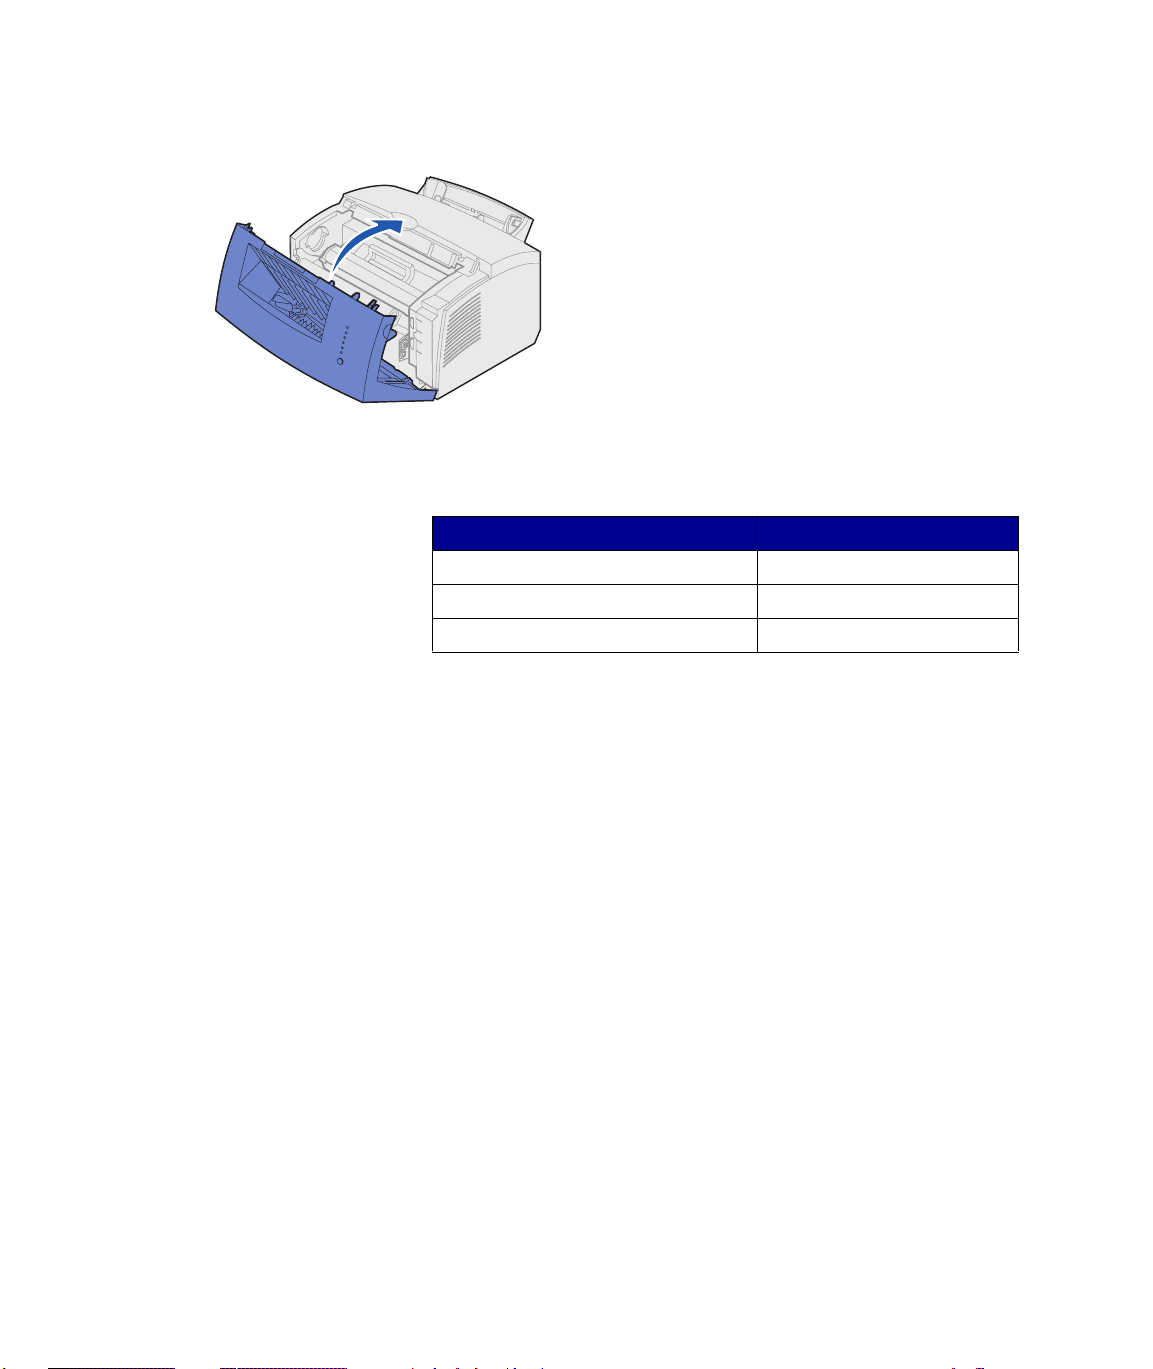
3 Close the printer cover.
What do I do next?
Task Go to page ...
Install optional memory 6
Install tray 2 15
Attach cables 17
Install the print cartridge
5
Page 20

Step 3: Install memory cards
Depending on your printer model, you
can increase printer memory for a total
of up to 66MB (entry model), 72MB
(standard model), and 80MB (network
model).
If you have a standard or network model,
you can also install a 1MB, 2MB, or 4MB
optional flash memory card for storing
downloaded fonts or macros.
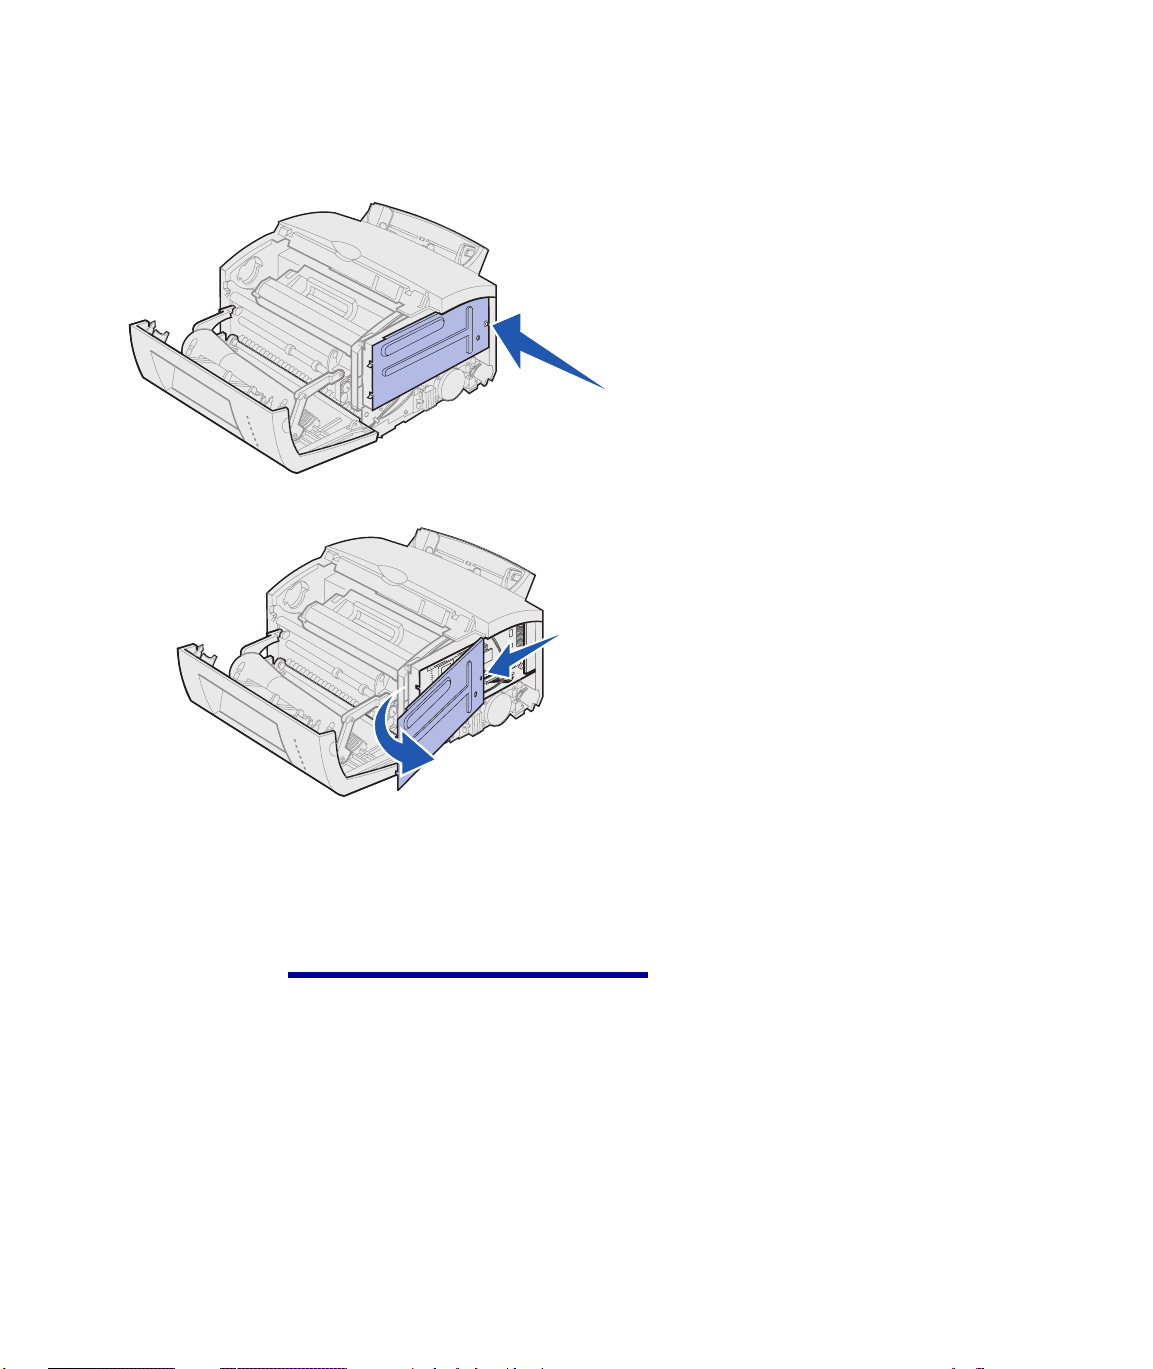
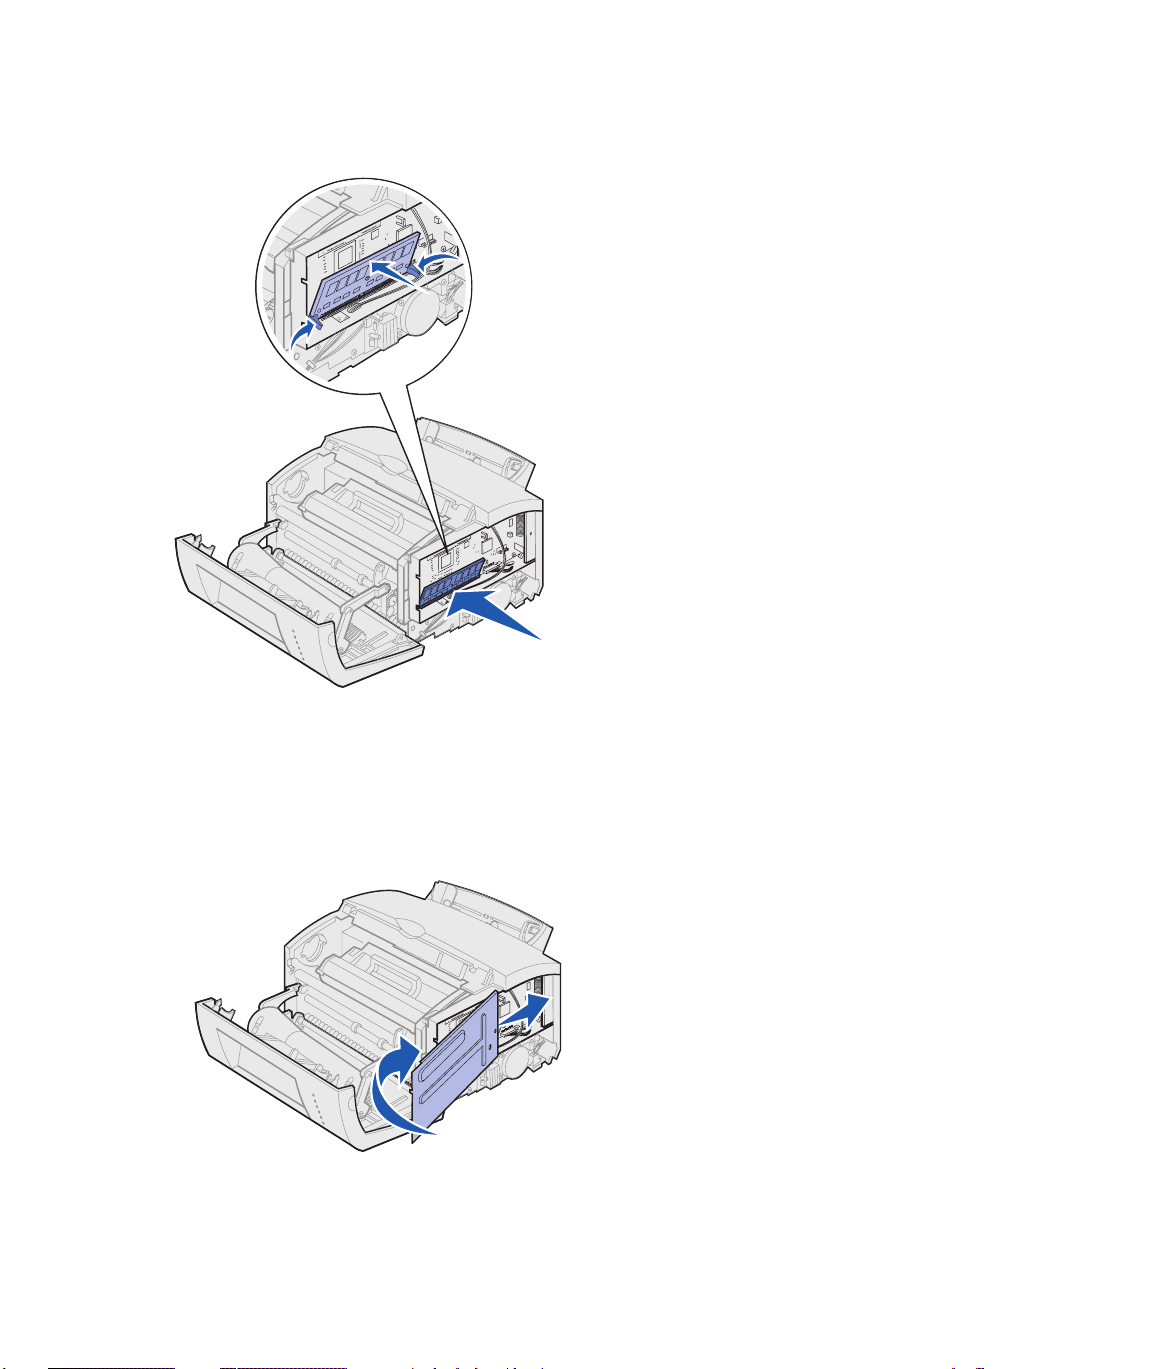
Removing the printer
side cover
Before installing any memory options,
you must remove the printer side cover.
6
Install memory cards
Page 21
CAUTION! If you are installing memory
cards sometime after setting up the
printer, turn the printer off and unplug
any attached peripherals before
continuing.
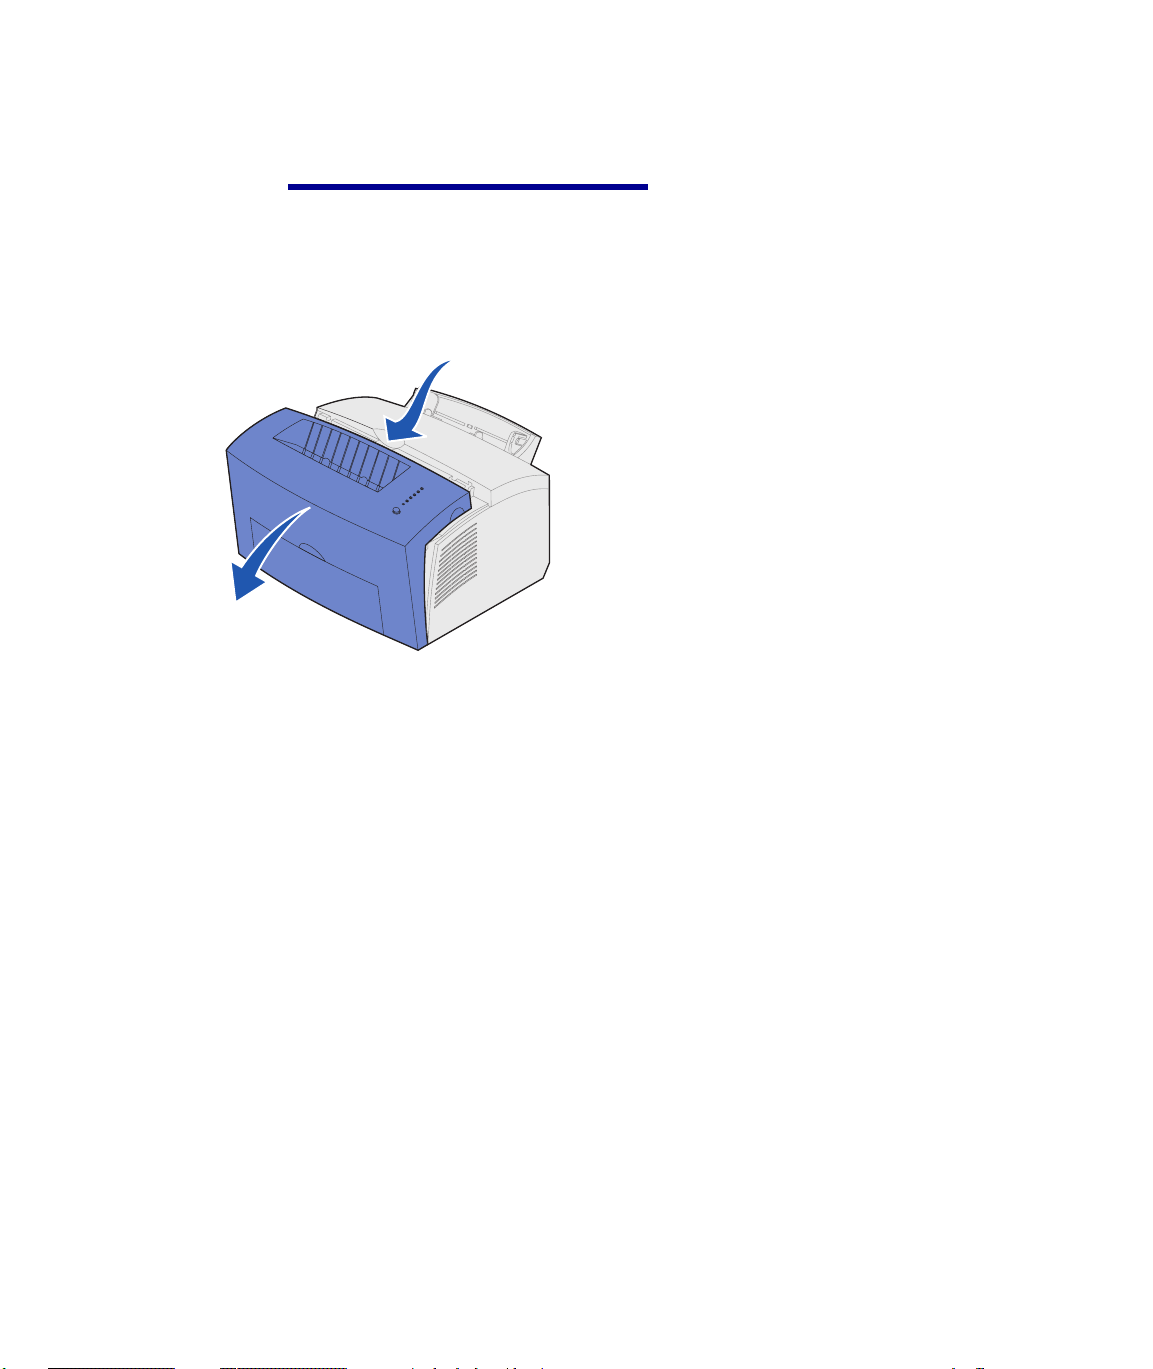
1 Open the printer front cover.
Install memory cards
7
Page 22
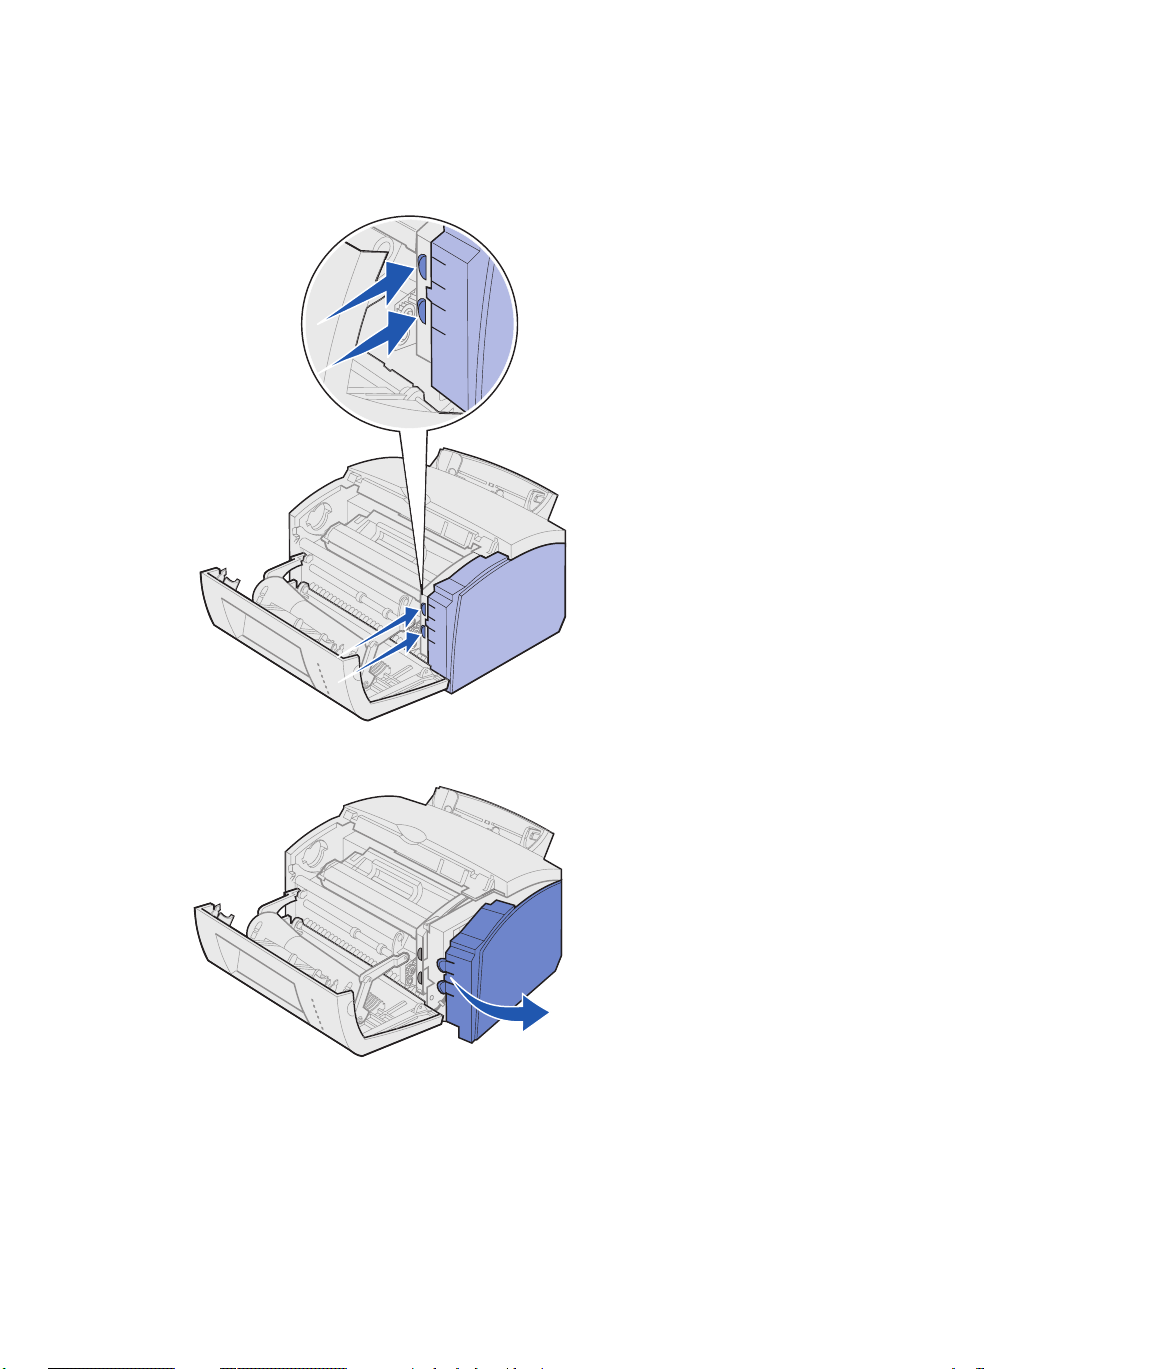
2 Firmly push in the two oval tabs as
you pull open the side cover.
3 Remove the cover and set it
aside.
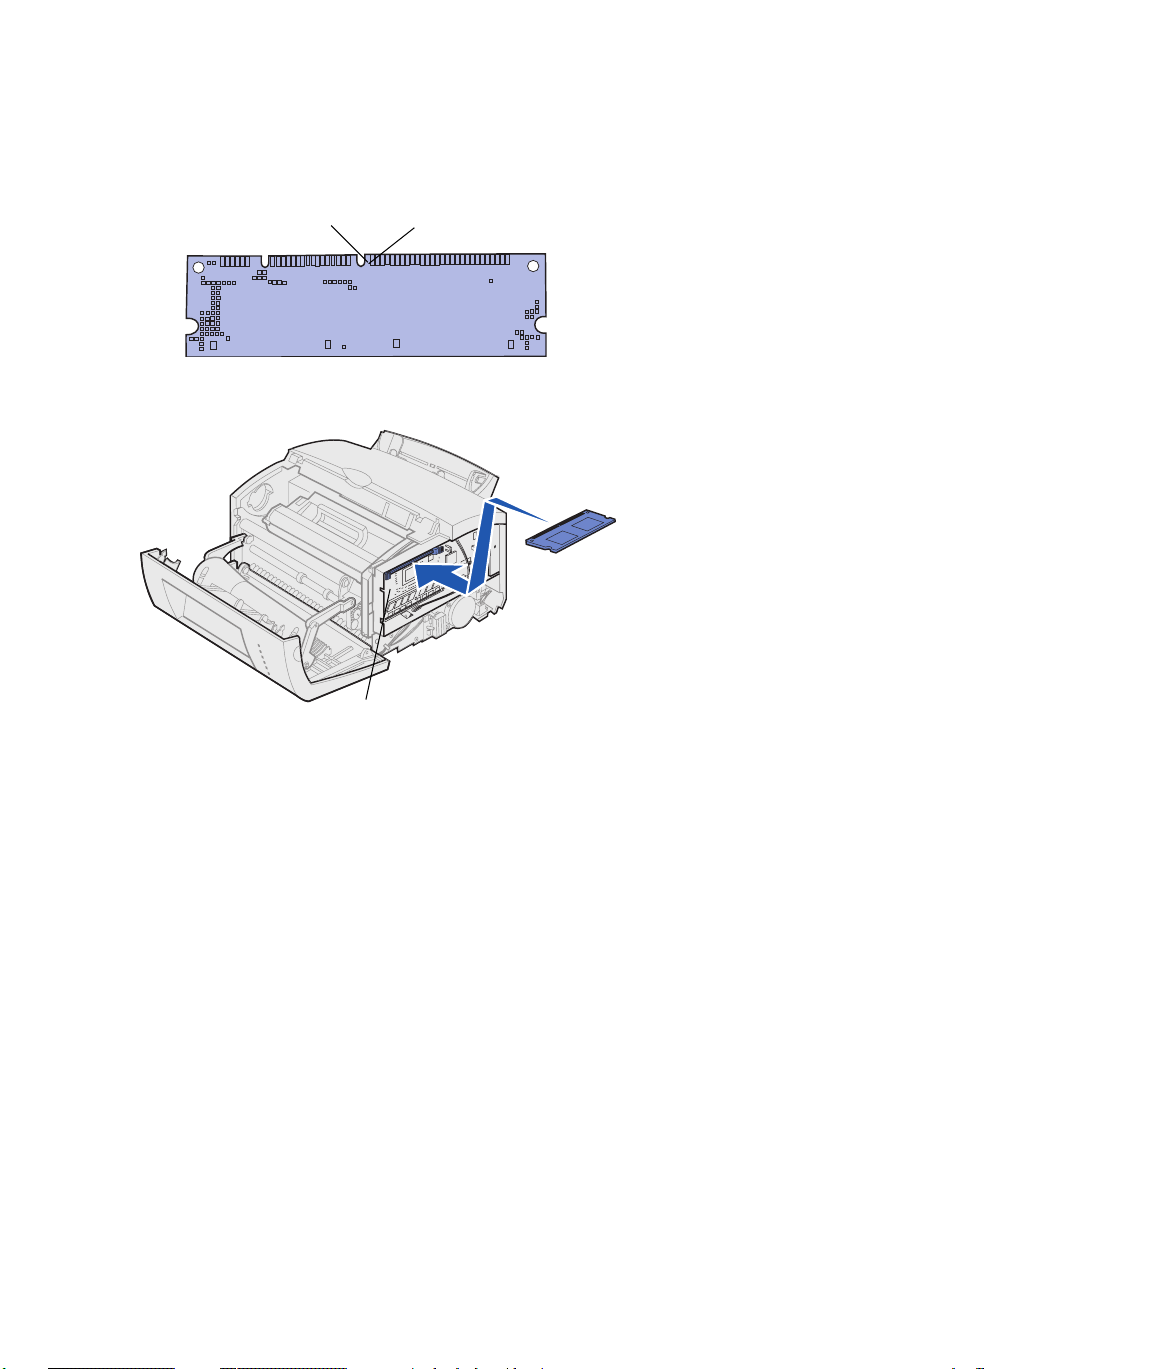
Removing the system
board shield
8
Install memory cards
You will need a small Phillips screwdriver
to remove the metal shield covering the
printer system board.
Page 23
1 Remove the single screw and set
it aside.
2 Remove the metal shield by
sliding it along the top and bottom
grooves and set it aside.
Installing a printer
memory card
Warning! Printer memory cards are
easily damaged by static electricity.
Touch something metal on the printer
before you touch a memory card.
To install an optional printer memory
card:
1 Unpack the printer memory card.
Install memory cards
9
Page 24
Connection points
System board
2 Avoid touching the connection
points along the edge of the card.
Save the packaging.
3 Locate the top connector on the
system board.
4 Hold the memory card with the
connection points pointing toward
the top connector on the system
board.
5 Insert the card into the connector.
10
Install memory cards
Page 25
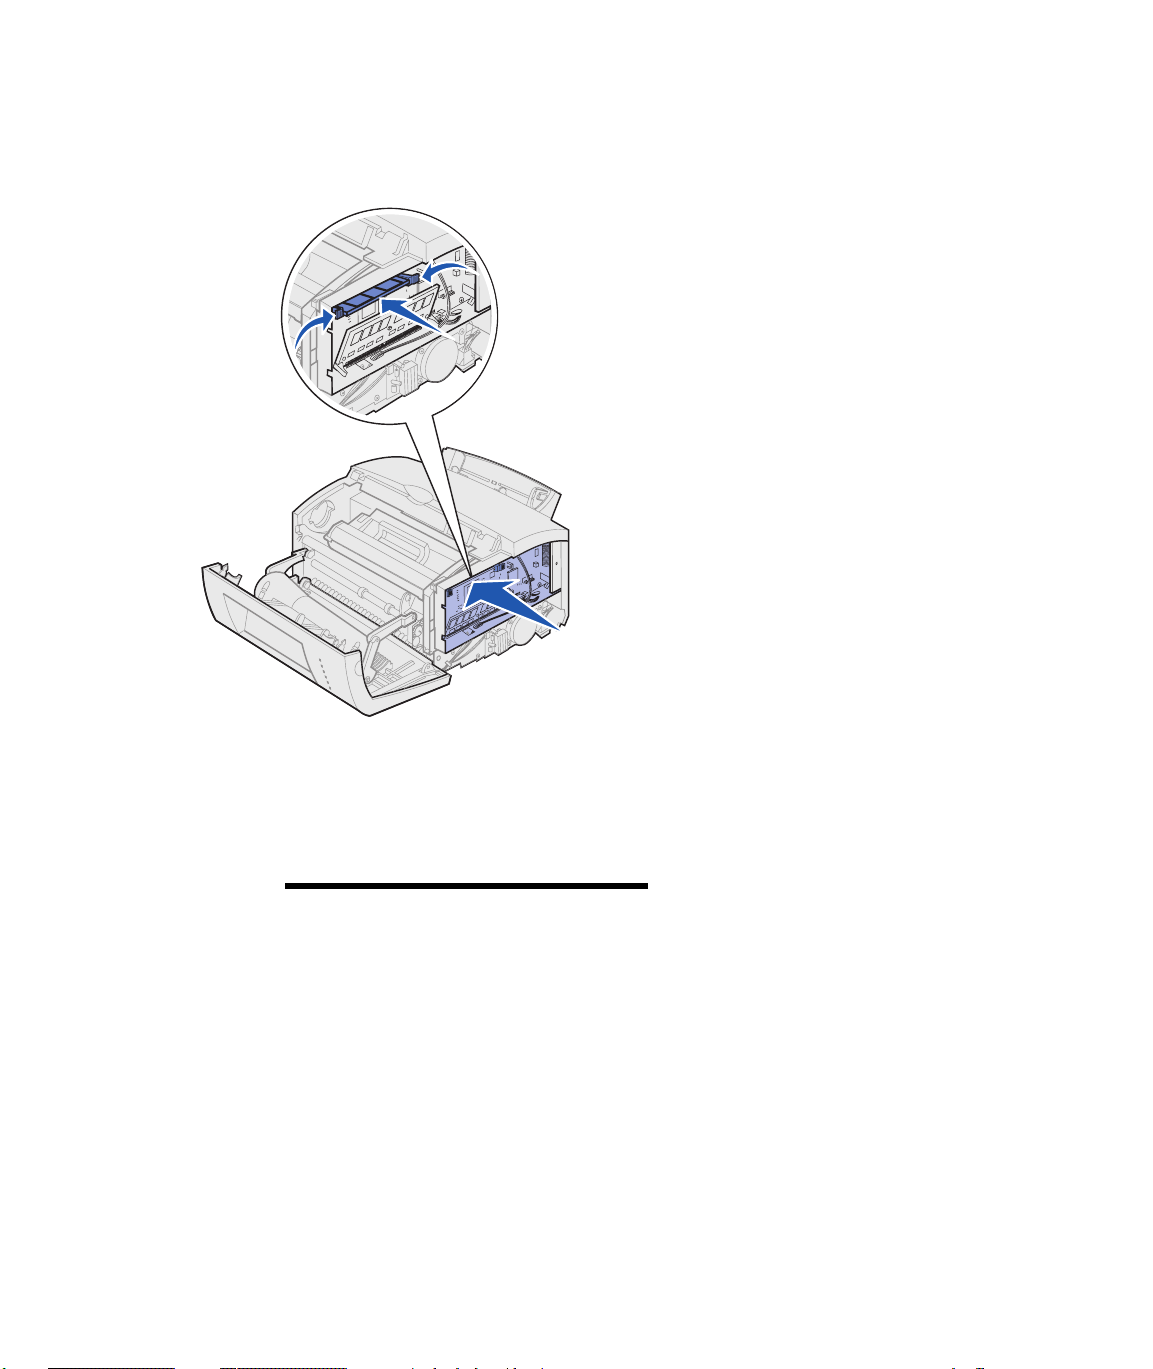
6 Push the memory card firmly into
the connector until the latches on
either side of the connector snap
into place.
7 If you are installing flash memory
in a standard or network model,
continue. Otherwise, reattach the
metal shield and side cover. See
page 13 for instructions.
Installing a flash
memory card
Note: Flash memory cards are easily
damaged by static electricity. Touch
something metal on the printer before
you touch a memory card.
1 Unpack the flash memory card.
Install memory cards
11
Page 26
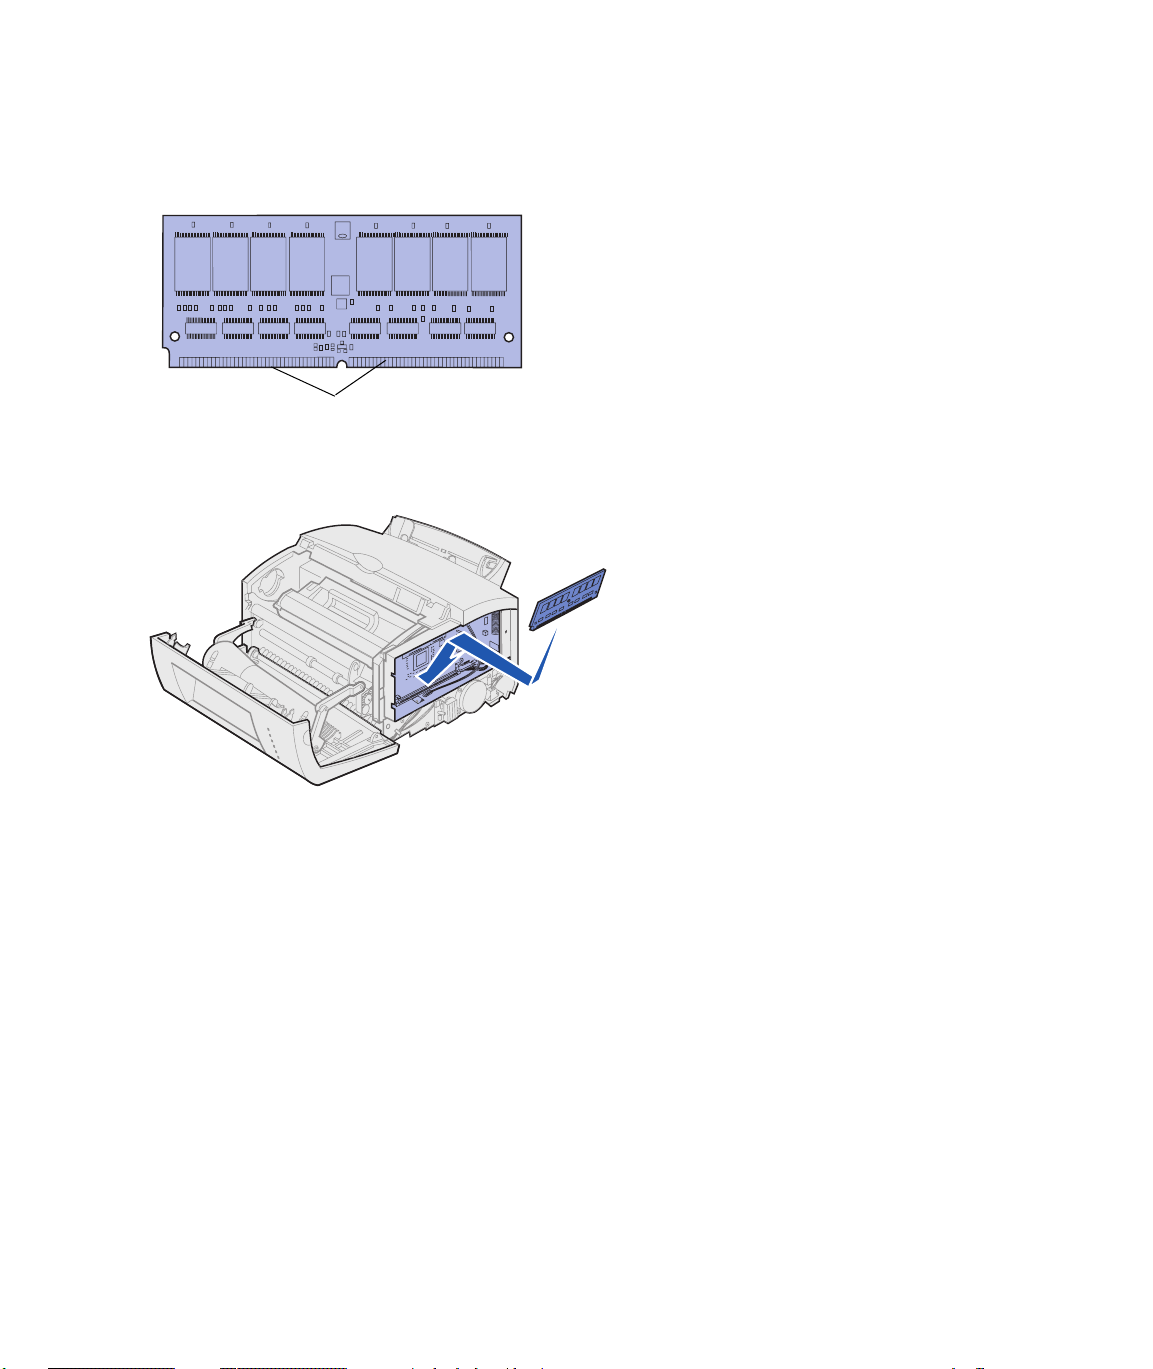
Connection points
2 Avoid touching the connection
points along the edge of the card.
Save the packaging.
3 Locate the bottom connector on
the system board.
4 Hold the option card with the
connection points pointing toward
the bottom connector on the
system board.
5 Insert the card into the connector
at a 45 degree angle.
12
Install memory cards
Page 27
6 Push the card firmly into the
connector with your thumbs until
the latches snap into place.
7 Reattach the metal shield and
side cover.
Reattaching the metal
shield
When you have finished installing the
memory card(s):
1 Align the metal shield between the
top and bottom grooves and slide
it all the way back.
2 Reattach the screw to keep the
shield in place.
Install memory cards
13
Page 28
Reattaching the side
cover
Ta b
Ta b
What do I do next?
Task Go to page...
Install the tray 2 15
Attach cables 17
1 Align the top and bottom tabs with
the corresponding slots.
2 As you close the door, push the
oval tabs firmly into the slots.
3 Close the front cover.
14
Install memory cards
Page 29
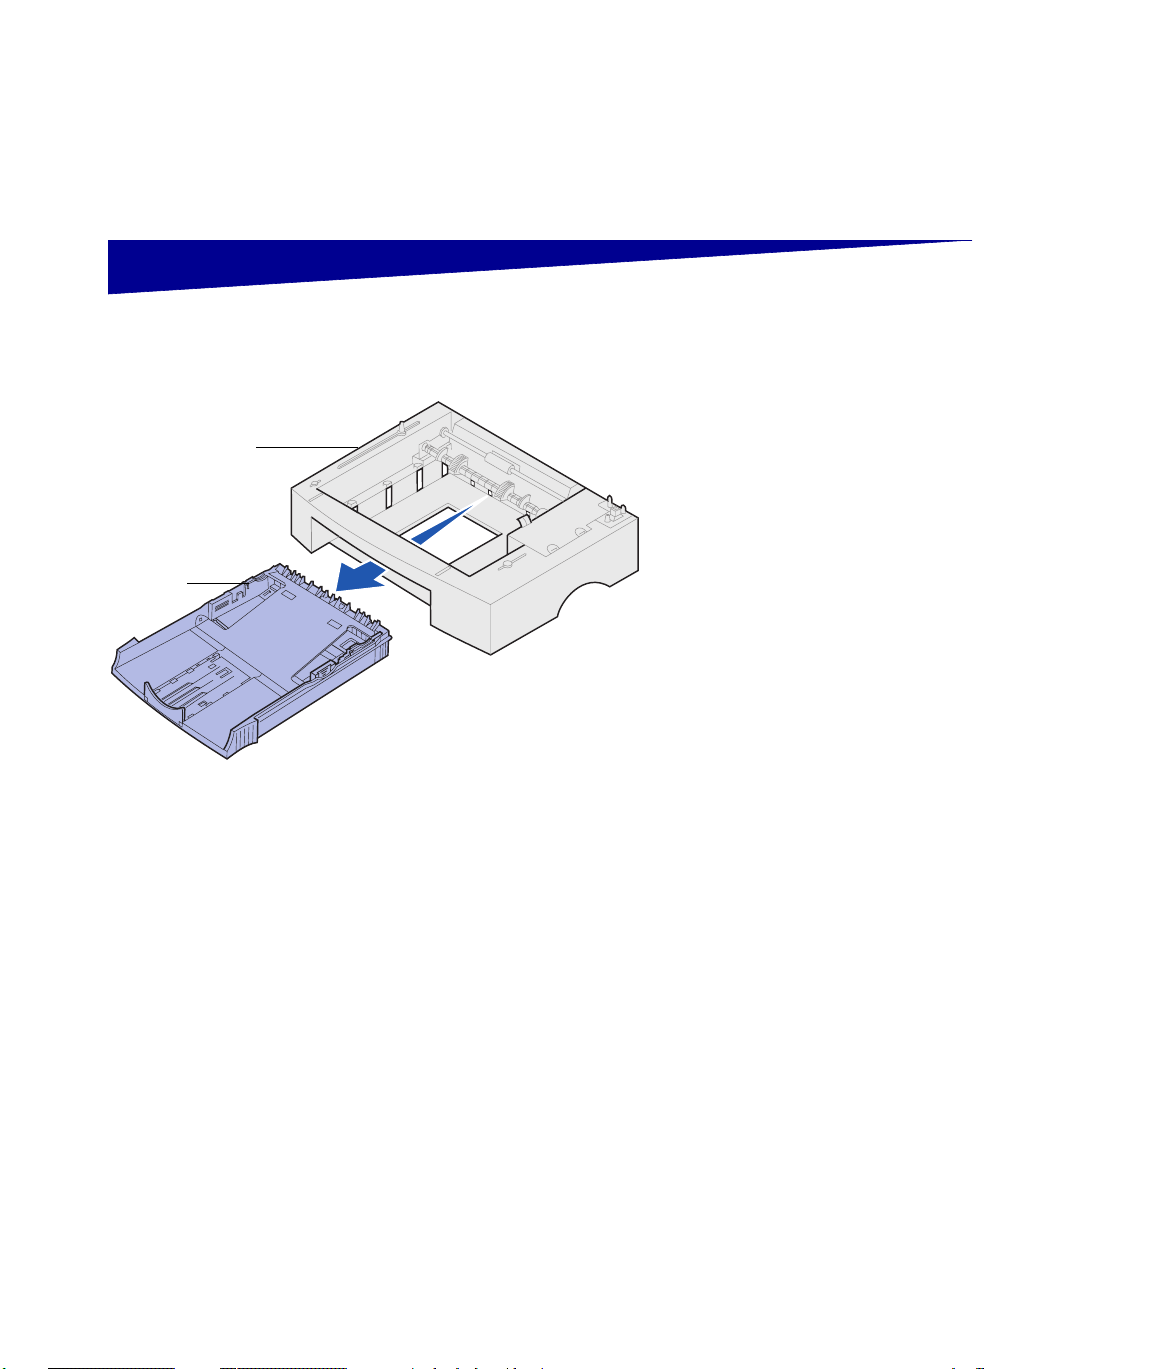
Step 4: Install the tray 2 option
You can increase paper capacity with the
optional 250-sheet drawer, which
Support unit
Paper tray
attaches underneath the printer.
A drawer consists of a paper tray and a
support unit.
1 Remove the tray from the support
unit.
2 Remove all packing material and
tape from the tray and the support
unit.
3 Place the support unit in the
location you have chosen for your
printer.
Install the tray 2 option
15
Page 30
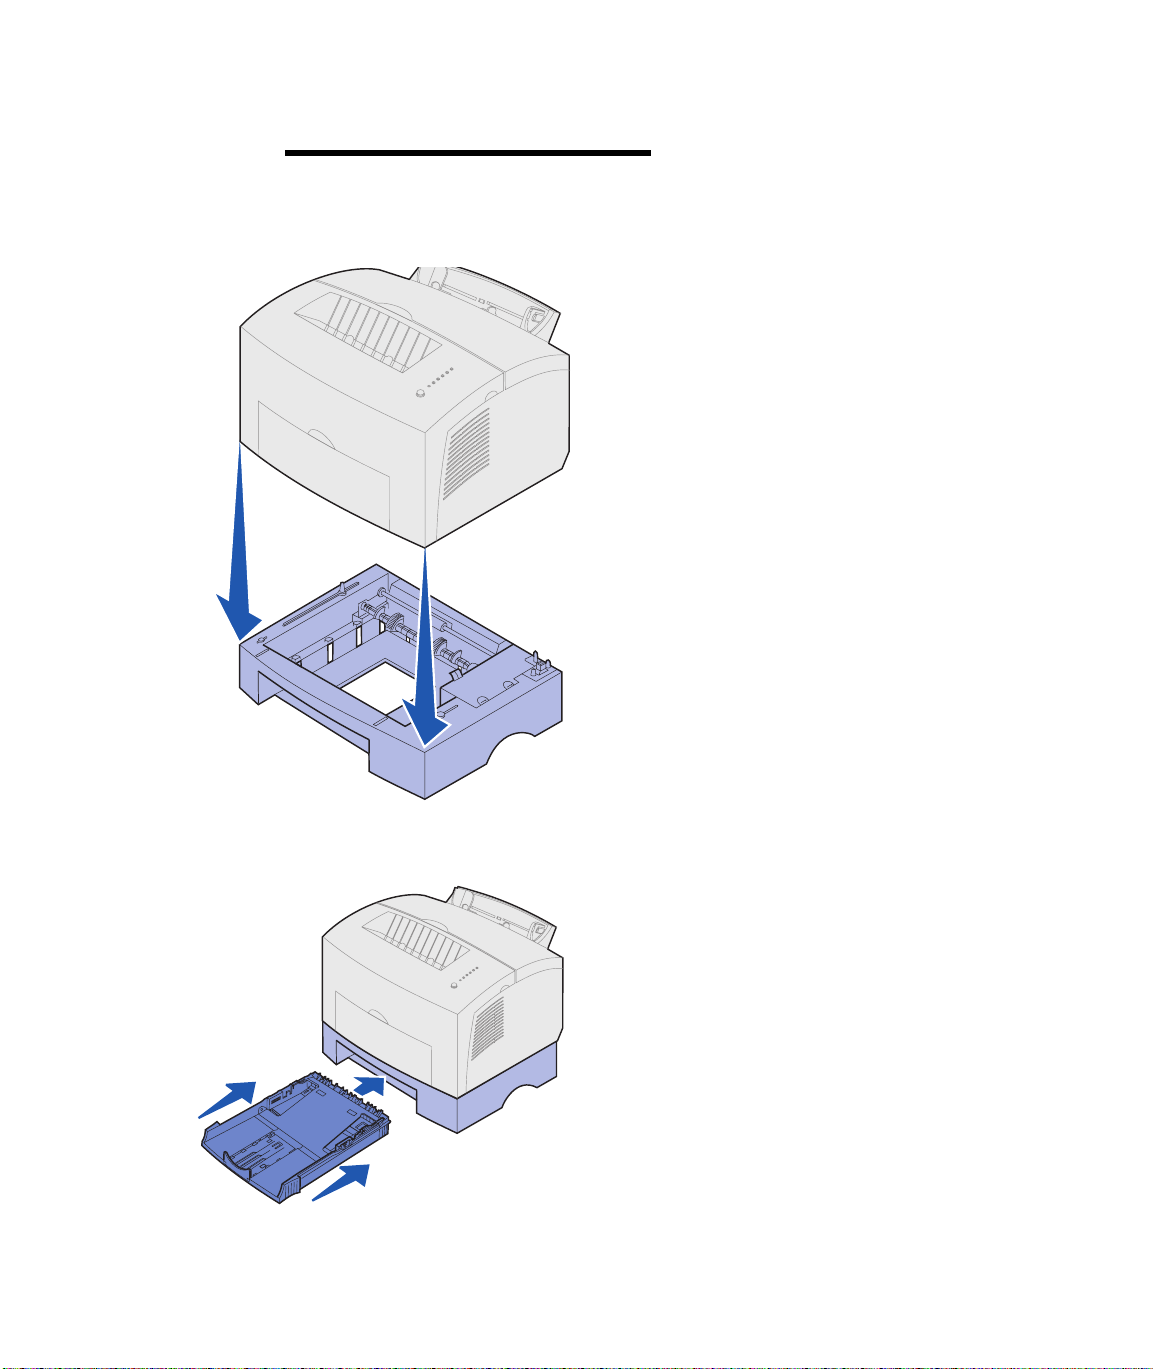
Note: If you install the 250-sheet drawer
at a later time, be sure to turn off the
printer before installing the drawer.
4 Align the printer with the front of
the support unit and place it on
top of the support unit.
Make sure the support unit is
firmly in place.
When you complete setting up the
printer, print a menu settings page
to verify the 250-sheet drawer is
listed under Installed Features
(see page 30).
16
5 Insert the tray.
Install the tray 2 option
Page 31

Step 5: Attach cables
Local printing To attach an entry or standard model
printer to a computer, we recommend
you use an IEEE-1284 compliant parallel
cable.
1 Make sure the printer, computer,
and any attached peripherals are
turned off and unplugged.
2 Plug one end of the cable into the
parallel connector on the printer.
3 Snap down the clips at each end
of the connector.
4 Plug the other end of the parallel
cable into the connector on the
computer.
Attach cables
17
Page 32

To attach your printer to a computer
using a USB cable:
1 Plug one end of the USB cable
into the USB port on the printer.
Match the USB symbol on the
cable to the USB symbol on the
printer.
2 Plug the other end of the cable
into the USB port on the
computer.
18
Attach cables
Page 33

Network printing You can attach the network model printer
to a network using an Ethernet cable
(UTP cable with RJ.45 connector).
To attach the printer to a network with an
Ethernet cable:
1 Plug one end of the Ethernet
cable into the Ethernet network
port on the MarkNet™ print
server.
2 Plug the other end of the cable
into a network LAN connection.
Attach cables
19
Page 34

Attaching a power cord 1 Make sure the printer is turned off.
2 Plug one end of the power cord
into the power cord connector.
3 Plug the other end into a properly
grounded outlet.
4 Turn on the printer.
Each indicator light turns on and
off, starting with Press Button and
ending with the Ready light.
20
Attach cables
Page 35

Step 6: Load paper
Paper support
Top
output
bin
Front output door
Tray 1
Tray 2
Paper support
Manual
feed
Your printer has two standard paper
sources: tray 1, which holds up to 150
sheets of plain paper, and a single-sheet
manual feed. Use tray 1 for most print
jobs. Use the manual feed to feed a
single page, transparency, envelope,
label, or card stock.
You can increase your printer paper
capacity with the optional 250-sheet
drawer.
An output bin on top of the printer holds
up to 100 sheets. The single-sheet front
output door provides a straight-through
paper path for special media, reducing
curling and potential paper jams.
Loading tray 1 Use tray 1, which is behind the manual
feed, to feed paper
Tray 1 holds up to 150 sheets of paper,
10 sheets of transparencies or labels, 10
envelopes, 10 sheets of card stock.
and special media.
Load paper
21
Page 36

1 Extend the rear paper support
until you hear a click.
2 Flex the sheets back and forth to
loosen them, then fan them.
22
Load paper
Page 37

3 If loading:
• letterhead paper, insert letterhead
with the top of the page pointing
down, facing you
• envelopes, insert them vertically,
flap side down with the stamp
area in the top left corner
To reduce paper jams, do not use
envelopes that:
— Have excessive curl
— Are stuck together
— Are damaged in any way
— Contain windows, holes,
perforations, cutouts, or
embossing
— Use metal clasps, string ties,
or metal folding bars
— Have postage stamps attached
— Have any exposed adhesive
when the flap is in the sealed
position
Load paper
23
Page 38

4 Extend the front paper support on
the paper output bin until you hear
a click.
5 If you are printing on legal size
paper, completely extend the front
paper support.
6 Open the front output door for a
straight-through paper path if
you’re printing on special media.
7 Slide the paper guides against the
edges of the paper or envelopes.
8 Select the paper size and type
from your software application.
9 Select the number of copies from
your software application or
printer driver if you are printing
multiple copies.
24
Load paper
Loading the manual
feed
10 Start your print job.
Use the manual feed to feed media, one
sheet at a time, into your printer.
Page 39

If you experience problems feeding
envelopes or card stock in tray 1, try
printing them one at a time from the
manual feed.
1 Extend the front paper support on
the paper output bin until you hear
a click.
2 If you are loading legal paper,
extend the front paper support all
the way up.
3 Open the front output door if
you’re printing on special media.
4 If loading:
• letterhead paper, insert one sheet
of letterhead with the top of the
page pointing down, facing you
• card stock, insert one card or
sheet vertically
• envelopes, insert one envelope
vertically, flap side down with the
stamp area in the top left corner
To reduce paper jams, do not use
envelopes that:
— Have excessive curl
— Are stuck together
— Are damaged in any way
— Contain windows, holes,
perforations, cutouts, or
embossing
— Use metal clasps, string ties,
or metal folding bars
Load paper
25
Page 40

— Have postage stamps attached
— Have any exposed adhesive
when the flap is in the sealed
position
5 Slide the paper guides flush
against the edges of the paper or
envelope.
6 Select the paper size and type
from your software application.
7 Start your print job.
8 Briefly (approximately one
second) push the operator panel
button to start printing.
9 When the Load Paper light and
the Press Button light come on,
place another piece of media in
the manual feed.
10 Press the operator panel button to
print another page.
26
What do I do next?
Task Go to page ...
Install optional tray 2 15
Attach cables 17
Load paper
Page 41

Loading the optional
tray 2
1 Grasp the tabs on either side of
the tray and pull it completely out
of the printer.
2 Make sure the metal plate is
pressed down before inserting it
into the printer.
After the tray is inserted, the metal
plate springs back up so the paper
can feed into the printer.
Load paper
27
Page 42

3 If loading A4 or legal size paper,
extend the paper support on the
front of the tray.
4 Flex the sheets back and forth to
loosen them, then fan them.
5 If loading letterhead paper, insert
letterhead face down with the top
of the page entering the printer
first.
6 Do not exceed the stack height
indicator; overfilling the tray may
cause paper jams.
28
7 Make sure the paper is under both
corner bucklers and lying flat in
the tray.
Corner bucklers
Load paper
Page 43

8 Slide the paper guides flush
against the edges of the paper.
9 Reinstall the tray, making sure the
tray is pushed all the way in.
10 Select the paper size and type
from your software application.
11 Start your print job.
Load paper
29
Page 44

Step 7: Verify printer setup
Print a menu settings page for a list of the current printer settings. If
you have a network model, your printer prints both a menu settings
page and a setup page listing the IP address and other network
settings.
1 Make sure the printer is on and briefly press the operator panel
button to print the page.
2 If you installed the optional tray 2 or additional memory, make
sure it is listed under Installed Features.
If the option is not listed, turn off the printer, unplug the power
cord, and reinstall the option.
30
Verify printer setup
Page 45

Step 8: Understanding the
operator panel lights
The operator panel lights mean different
things, depending on their sequence.
They indicate that the printer is ready to
print, the printer needs intervention, or
the printer needs servicing.
Some of the more common light
sequences are shown in the next
section. For a complete explanation of all
of the light sequences, refer to the
Understanding the operator panel lights
section of the Publications CD.
Understanding the operator panel lights
31
Page 46

Operator panel terms
Light is on
Light is off
Light is blinking
Light is blinking slowly
Press Button
Press Button
• A brief button press (push the
button once for no more than 3
seconds) restarts the printer.
• A long button press (hold until all
the lights come on) resets the
printer or selects a setting in the
special function menu (see the
Publications CD for more
information).
32
• A double button press (push and
release the button twice quickly)
displays additional error codes or
cycles through the special
function menu settings.
Understanding the operator panel lights
Page 47

The printer is ready to receive and
process data.
The printer is busy
processing data.
receiving or
Understanding the operator panel lights
33
Page 48

The printer is waiting
is received.
The printer top cover is open or the print
cartridge is not installed.
If both the Error light and Press Button
lights are on, a secondary error has
occurred:
until additional data
1 Press the operator panel button
with a double-button press to
display the secondary error code.
34
2 Refer to Understanding the
Operator Panel Lights section in
the Publications CD for
information on what it means and
what you can do.
Understanding the operator panel lights
Page 49

Tray 1 or tray 2 is out of media or the
media did not feed properly.
The printer prompts you to load another
sheet of media in the manual feed.
Understanding the operator panel lights
35
Page 50

The printer detects a jam.
The printer alerts you the toner is getting
low. Remove the print cartridge and
shake it to print more pages before
replacing it.
(On the entry model printer, the Toner
Low light does not come on if the
standard 1,500-page print cartridge is
installed.)
36
Understanding the operator panel lights
Page 51

The printer has a service error. Turn the
printer off and back on. If the lights are
still blinking, contact your point of
purchase.
Understanding the operator panel lights
37
Page 52

Step 9: Install printer drivers
A printer driver is software that lets your computer communicate with
your printer.
Local printing The following instructions explain how to install a printer driver on a
printer attached to a computer using a parallel or USB connection.
Windows Supported connections
The following printer connections are supported:
• Parallel (Windows 95/98/Me, Windows NT 4.0, and Windows
2000)
• USB (Windows 98/Me and Windows 2000)
38
Printer drivers
The following printer drivers are supported:
• Windows system printer driver
• The printer’s custom printer driver
System drivers are built into Windows operating systems. Custom
drivers are available on the drivers CD.
Installation instructions
Read the detailed online instructions on the drivers CD. Click View
Documentation and look for information about local printer
installation. Detailed instructions are provided for parallel and USB
connections.
Install printer drivers
Page 53

Macintosh If you are setting up the printer for local printing, you need to install
the PPD and use it with the LaserWriter 8 printer driver or the Adobe
PostScript driver.
The PPD and specific information about local printer installation on
Macintosh computers can be found on the drivers CD that shipped
with your printer.
After the printer is installed, print a test page to verify your printer is
correctly set up.
Network printing If you have a network printer model, the following instructions explain
how to install printer drivers on printers attached to a network.
Windows Ports
The following network printer port is supported:
• Microsoft IP port (Windows NT 4.0 and Windows 2000)
Printer drivers
Note: Using the custom printer
driver and a network port
provides enhanced functionality,
such as printer status alerts.
The following printer drivers are supported:
• Windows system printer driver
• The printer’s custom printer driver
System drivers are built into Windows operating systems. Custom
drivers are available on the drivers CD.
Printing methods
The following network printing methods are supported:
• Direct IP printing
• Shared printing (point and print, peer-to-peer)
Install printer drivers
39
Page 54

Creating ports and installing drivers
Read the detailed instructions on the drivers CD. Click View
Documentation and look for network printer installation.
If you choose to install without using the instructions on the drivers
CD, you need a basic understanding of network printing on TCP/IP
networks, printer driver installation, and the process involved in
adding new network ports.
Macintosh Your printer connects automatically to AppleTalk networks and
becomes readily visible to other network clients.
Note: A PostScript (PPD) file
provides detailed information
about the capabilities of a printer
to UNIX or Macintosh drivers or
applications.
NetWare The network printer model works with both Novell Distributed Print
You must create a printer object (icon) on the desktop of each
network client using the LaserWriter 8 printer driver and the
PostScript Printer Description (PPD) file.
Specific information about installing the printer on your AppleTalk
network can be found in the online documentation on the drivers CD
that shipped with your printer.
Depending upon which version of the drivers CD shipped with your
printer, you may also find this software on the drivers CD. Launch this
utility and follow the instructions to install the PPDs. Send a test print
job when you have finished.
Services (NDPS) and regular queue-based NetWare environments.
Novell Distributed Print Services (NDPS)
If you have an NDPS environment, we recommend you install the
NDPS IP Gateway. The gateway tightly integrates your printers with
NDPS so you can easily monitor, control, and print to them.
Additional information about network printer installation can be found
in the online documentation on the drivers CD that shipped with your
printer.
40
Install printer drivers
Page 55

Non-NDPS (queue-based)
For the latest information about support for non-NDPS (queue-based)
environments, click View Documentation on the drivers CD and look
for network printer installation.
Install printer drivers
41
Page 56

Step 10: Troubleshooting tips
Problem: What to do:
Installing a print cartridge
Characters appear light or blurred. • The print cartridge may be low on toner. Replace the cartridge.
The printer seems to be printing, but pages
are blank.
The printer is on, but nothing prints.
Jobs are not printing and the Error light is
on solid.
Attaching cables
Unexpected characters print or characters
are missing.
The operator panel lights do not come on
when the printer is turned on.
Loading paper
Toner smudges appear on the front or back
of the page.
The paper sticks together/printer feeds
multiple sheets of paper.
The paper skews or buckles. • Don’t overfill tray 1 or optional tray 2.
• The print cartridge has an error. Replace the cartridge.
• Make sure the print cartridge is installed.
• Make sure the parallel cable, USB cable or Ethernet cable is firmly
plugged in at the back of the printer.
• Make sure the power cord is firmly plugged in at the back of the
printer and at the wall outlet.
• Make sure the paper is straight and unwrinkled.
• Remove the paper from tray 1 or optional tray 2 and fan the paper.
• Don’t overfill tray 1 or optional tray 2.
• Make sure the paper is under both corner bucklers and lying flat in
the optional tray 2.
• Make sure the paper guides are properly positioned against the
edges of the paper.
42
Troubleshooting tips
Page 57

Problem: What to do:
The paper fails to feed from tray 1. • Make sure tray 1 is selected from the printer driver.
• Remove the paper from tray 1 and fan the paper.
The paper fails to feed from the optional tray 2.• Make sure tray 2 is selected from the printer driver.
• Make sure the tray is pushed all the way in.
• Make sure the metal plate is pressed down.
• Make sure the paper is under both corner bucklers.
• Make sure the paper does not exceed the stack height indicator.
• Remove the paper from the optional tray 2 and fan the paper.
Troubleshooting tips
43
Page 58

Index
Symbols
23
Numerics
250-sheet drawer 15
A
A4, loading 23, 25, 28
A5, loading 23, 25, 28
B
B5, loading 23, 25, 28
C
cable, connecting
Ethernet 19
parallel 17
USB 18
card stock, loading 23
cautions iii
CD
drivers ix
changing a print cartridge
see Publications CD Reference
connecting the printer
using a parallel cable 17
using a USB cable 18
using an Ethernet cable 19
D
drivers CD ix
drivers, installing
local printing 38
network printing 39
E
envelopes, loading 23, 25
Ethernet cable 19
executive, loading 23, 25, 28
F
features vi
I
installing
250-sheet drawer 15
memory 6
print cartridge 4
L
legal, loading 24, 25, 28
44
Index
Page 59

letter, loading 23, 25, 28
letterhead, loading 23, 25, 28
loading
card stock 23, 25
envelopes 23, 25
manual feed 24
paper
A4 23, 25, 28
A5 23, 25, 28
B5 23, 25, 28
executive 23, 25, 28
legal 24, 25, 28
letter 23, 25, 28
letterhead 23, 25, 28
transparencies 23, 25
tray 1 21
tray 2 27
local printing, drivers 38
M
Macintosh printer drivers 40
manual feed, loading 24
MarkNet internal print server 19
memory cards, installing 6
menu settings page, printing 30
P
paper jams
see the Publications CD or Quick Reference
Card
parallel cable 17
power cord, connecting 20
print cartridge
installing 4
removing 2
replacing
see Publications CD
printer
features vi
lights 31
reset 32
unpacking 1
printer drivers
Macintosh 40
Windows 39
printing
from the correct tray 43
menu settings page 30
multiple copies 24
setup page 30
Publications CD viii
Publications CD viii
N
NetWare 40
network printing, drivers 39
O
operator panel
lights viii
operator panel button viii
options
250-sheet drawer, installing 15
memory cards 6
tray 2, loading 27
Q
Quick Reference card ix
R
removing a print cartridge 2
replacing a print cartridge
see the Publications CD
resetting the printer 32
restoring factory defaults
see the Publications CD
S
safety information iii, viii
setup page, printing 30
Index
45
Page 60

special function menu
see the Publications CD
T
toner cartridge
see print cartridge
transparencies, loading 23, 25
tray 1, loading 21
tray 2, loading 27
troubleshooting
attaching cables 42
installing a print cartridge 42
loading paper 42
paper jams
see Publications CD or Quick Reference
printing from the correct tray 43
restoring factory defaults
see the Publications CD
U
unpacking the printer 1
USB cable 18
W
warnings iii
Windows printer drivers 39
46
Index
Page 61

简体中文
Page 62

版本:2001 年 8 月
Lexmark, MarkVision 和 MarkNet 是 Lexmark International, Inc. 的商标,在美国和 / 或其它国家注册。
Macintosh 是 Apple Computer, Inc. 的商标,在美国和其它国家注册。
© 版权所有 2001 Lexmark International, Inc.
保留所有权利。
美国政府的有限权利
本软件和文档根据有限权利提供。政府的使用,复制或发行受到 DFARS 252.227-7013 中的技术数据和计算机软件中的权利条款的附属条款 (c)(1)(ii) 中
所提出的规定和可应用的 FA R 规定:Lexmark International, Inc., Lexington, KY 40550 中的条款限制。
FCC 辐射信息
该设备遵照 FCC 规则的第 15 部分。操作受制于以下两个条件:
(1)该设备不会引起有害干扰,(2)该设备必须接受任何收到的干涉,包括可能引起意外操作的干涉。
详情请参阅
出版物
CD。
安全信息
• 如果您的产品没有 符号,所接的电源插座必须要有适当的接地处理。
• 电源线所连接的电源插座与产品的距离不可太远,并且要符合使用方便的原则。
• 有关维护或修理方面的细节,除了参考操作说明书以外,还可以与专业服务人员联系。
• 本产品使用特定的 Lexmark 元件,并按照严格的世界安全标准来设计、测试及验证。有些零件的安全功能特征可能不一定很明显,对于更换其他
厂家零件所造成的不良后果, Lexmark 概不负责。
• 本产品使用了激光装置。切记:使用本文档中未曾提到的控制、调整或操作方式,可能会产生危险性的辐射。
• 本产品在打印过程中会使打印介质的温度上升,而温度上升可能会导致打印介质产生释出物,请阅读并理解操作说明书中有关正确选择打印介
质的章节,以避免产生有害释出物。
常用语
警告提醒您可能损坏您的打印机硬件或软件的操作。
警告!
切记! 切记指出可能伤害您的事件和操作。
Page 63

目录
前言 . . . . . . . . . . . . . . . . . . . . . . . . . . . . . . . . . . . . . . . . . . . . . . v
关于打印机 . . . . . . . . . . . . . . . . . . . . . . . . . . . . . . . . . . . . . . . . . . . . . . . . . . . . . . . . v
关于本书 . . . . . . . . . . . . . . . . . . . . . . . . . . . . . . . . . . . . . . . . . . . . . . . . . . . . . . . . viii
其它信息来源 . . . . . . . . . . . . . . . . . . . . . . . . . . . . . . . . . . . . . . . . . . . . . . . . . . . . viii
查看出版物 CD . . . . . . . . . . . . . . . . . . . . . . . . . . . . . . . . . . . . . . . . . . . . . . . . . . . . ix
第1步: 拆卸打印机包装. . . . . . . . . . . . . . . . . . . . . . . . . . . . . . 1
粘贴操作面板盖 . . . . . . . . . . . . . . . . . . . . . . . . . . . . . . . . . . . . . . . . . . . . . . . . . . . . 2
拆卸打印鼓粉盒包装 . . . . . . . . . . . . . . . . . . . . . . . . . . . . . . . . . . . . . . . . . . . . . . . . 2
第 2 步 : 安装打印鼓粉盒. . . . . . . . . . . . . . . . . . . . . . . . . . . . . . 4
第 3 步 : 安装内存卡 . . . . . . . . . . . . . . . . . . . . . . . . . . . . . . . . . 6
拆卸打印机侧面盖板 . . . . . . . . . . . . . . . . . . . . . . . . . . . . . . . . . . . . . . . . . . . . . . . . 6
拆卸系统板挡板 . . . . . . . . . . . . . . . . . . . . . . . . . . . . . . . . . . . . . . . . . . . . . . . . . . . . 8
安装打印机内存卡 . . . . . . . . . . . . . . . . . . . . . . . . . . . . . . . . . . . . . . . . . . . . . . . . . . 9
安装闪烁存储器卡 . . . . . . . . . . . . . . . . . . . . . . . . . . . . . . . . . . . . . . . . . . . . . . . . . 11
重新安装金属挡板 . . . . . . . . . . . . . . . . . . . . . . . . . . . . . . . . . . . . . . . . . . . . . . . . . 13
重新安装侧面盖板 . . . . . . . . . . . . . . . . . . . . . . . . . . . . . . . . . . . . . . . . . . . . . . . . . 14
目录
iii
Page 64

第 4 步 : 安装进纸匣 2 选件 . . . . . . . . . . . . . . . . . . . . . . . . . . . 15
第 5 步 : 连接电缆 . . . . . . . . . . . . . . . . . . . . . . . . . . . . . . . . . . 17
本地打印 . . . . . . . . . . . . . . . . . . . . . . . . . . . . . . . . . . . . . . . . . . . . . . . . . . . . . . . . . 17
网络打印 . . . . . . . . . . . . . . . . . . . . . . . . . . . . . . . . . . . . . . . . . . . . . . . . . . . . . . . . . 19
连接电源线 . . . . . . . . . . . . . . . . . . . . . . . . . . . . . . . . . . . . . . . . . . . . . . . . . . . . . . . 20
第 6 步 : 装纸. . . . . . . . . . . . . . . . . . . . . . . . . . . . . . . . . . . . . . 21
加载进纸匣 1 . . . . . . . . . . . . . . . . . . . . . . . . . . . . . . . . . . . . . . . . . . . . . . . . . . . . . . 21
加载手动进纸器 . . . . . . . . . . . . . . . . . . . . . . . . . . . . . . . . . . . . . . . . . . . . . . . . . . . 24
加载进纸匣 2 选件 . . . . . . . . . . . . . . . . . . . . . . . . . . . . . . . . . . . . . . . . . . . . . . . . . 27
第 7 步 : 检验打印机设置. . . . . . . . . . . . . . . . . . . . . . . . . . . . . 30
第 8 步 : 理解操作面板指示灯 . . . . . . . . . . . . . . . . . . . . . . . . . 31
第 9 步 : 安装打印机驱动程序 . . . . . . . . . . . . . . . . . . . . . . . . . 38
本地打印 . . . . . . . . . . . . . . . . . . . . . . . . . . . . . . . . . . . . . . . . . . . . . . . . . . . . . . . . . 38
网络打印 . . . . . . . . . . . . . . . . . . . . . . . . . . . . . . . . . . . . . . . . . . . . . . . . . . . . . . . . . 39
iv
索引 . . . . . . . . . . . . . . . . . . . . . . . . . . . . . . . . . . . . . . . . . . . . . 44
目录
Page 65

关于打印机 打印机有三种型号:入门型号,标准型号
和网络型号。下表列出了三种型号之间的
差异。
部件 入门型号 标准型号 网络型号
前言
基本内存
最大内存
仿真 PCL 5e 和 Macintosh
连通性 并口和 USB 接口 并口和 USB 接口 10/100 Base-TX 以太网
随机打印鼓粉盒
的打印页数 (大
约 5% 的覆盖率)
2MB 8MB 16MB
66MB 72MB 80MB
PostScript Level 2
兼容性
1,500 页 (标准) 3,000 页 (标准) 3,000 页 (标准)
和 PCL 6
PostScript Level 2
和 PCL 6
和 USB 接口
前言
v
Page 66

进纸匣 1
纸张支架
纸张支架
顶部接纸架
前向出纸通道
进纸匣选件 2
手动进纸器
纸张
导片
操作面板
指示灯
使用: 当您想:
进纸匣 1 装入 150 页纸或 10 页其它介质。
纸张支架 在进纸匣 1 或顶部接纸架中支持介质。
手动进纸器 装单页纸 / 其它介质。用于透明胶片,标签,信封和卡片纸。
纸张导片 调节进纸匣 1 和手动进纸器中的介质宽度。
操作面板指示灯 检查打印机的状态。
顶部接纸架 堆放已打印的文档,打印面向下。
前向出纸通道 打印特殊介质,如标签或卡片纸。
进纸匣选件 2 增加打印机容量。
vi
前言
Page 67

入门和标准型号
USB 接口
网络型号
并口电缆接口
以太网接口
电源线插座
电源
开关
电源线插座
使用: 当您想:
并口电缆接口 用并口电缆将计算机连接到入门或标准型号打印机的并口。
USB 接口 用通用串行总线 (USB)电缆将计算机连接到网络打印机的 USB 接口。
以太网接口 用以太网电缆将计算机连接到网络打印机的端口。
电源线插座 用电源线将打印机连接到正确接地的电源插座上。
电源开关 打开或关闭打印机。
电源开关
前言
vii
Page 68

操作面板
关于本书
操作面板上有 6 个指示灯和一个按钮。不
同的指示灯序列提供不同的状态,维护和
服务信息。
根据指示灯序列,快速地 (大约一秒钟)
按操作面板按钮来重新启动打印机,显示
错误代码或激活其它打印机功能。
使用打印机驱动程序来改变纸张来源,纸
张尺寸以及其它打印机设置。
viii
前言
注意:在设置打印机之前应该先查阅封面
内的安全信息。
其它信息来源
出版物
CD
这本
设置指南
印机,安装消耗品和选件,加载介质,启
动驱动程序 CD 来安装打印机驱动程序和
实用程序,以及从
的详细说明。
出版物
供有关选择介质,理解操作面板指示灯,
清除卡纸以及解决打印问题的信息。
提供了打开包装和设置打
出版物
CD 与
设置指南
包装在一起,提
CD 打印信息
Page 69

查看出版物 CD 将
如果 CD 不能自动运行:
出版物
CD 放入 CD-ROM 驱动器中。
1 选择 CD-ROM 驱动器。
2 双击 START.PDF (如果您使用的
是 Macintosh 计算机,则双击桌面
上的 CD 图标,然后单击
START.PDF。)
您必须在计算机上安装带有搜索功
能的 4.05c 或更新版本的 Adobe
Acrobat Reader,来查阅
CD。
如果您没有安装 Acrobat Reader,
可以到 Adobe 的网站
www.adobe.com 下载所需版本。
出版物
快速参考卡
驱动程序
快速参考
除卡纸以及理解常见操作面板指示灯信息
的简易方法。
卡提供了关于如何加载纸张,清
CD 驱动程序 CD 包含使您的打印机启动并运
行所必需的所有打印机驱动程序。
根据随打印机所附带的驱动程序 CD 版
本,它可能包括 MarkVision Professional,
其它打印机实用程序,屏幕字体以及其它
文档。
前言
ix
Page 70

x
前言
Page 71

第1步: 拆卸打印机包装
1 从包装箱中取出打印机和所有附件。
保留纸板箱和包装材料,以备需要
服务或保存打印机时重新包装之用。
2 拆除打印机内外部的所有包装带。
3 确认有如下所列的部件:
— 已安装打印鼓粉盒的打印机
电源线
设置指南和出版
物 CD
快速参考卡
操作面板盖
驱动程序 CD
设置指南
—
出版物
—
—
快速参考
— 电源线
— 驱动程序 CD
— 操作面板盖
如果在安装时需要帮助或有任何部
件缺少或损坏,请联系您的销售商。
CD
卡
拆卸打印机包装
1
Page 72

粘贴操作面板盖 如果在打印机包装箱中有非英语的操作面
拆卸打印鼓粉盒包装
4 将打印机放在靠近您的计算机,并
且通风良好的平稳桌面上。
不要将打印机放置在:
— 直射阳光下
— 靠近热源或空调的地方
— 积满灰尘或肮脏的环境中
板盖而您又想使用它的话,将它撕下来,
对准操作面板按入到位。
1 用指状接片向下拉开打印机盖板。
2
拆卸打印机包装
Page 73

鼓粉盒把手
2 抓住鼓粉盒把手并把它直接拉出来。
3 拆掉打印鼓粉盒的保护泡沫包装。
4 拉出打印鼓粉盒两端的塑料片。
丢掉塑料片,泡沫和纸。
5 请继续进行第 4 页上的“安装打印鼓
粉盒”。
拆卸打印机包装
3
Page 74

第 2 步: 安装打印鼓粉盒
1 摇动鼓粉盒使鼓粉分布均匀。
2 插入打印鼓粉盒:
a 将打印鼓粉盒任意一端有颜色
的标签与打印机内相对应的标
签对齐。
b 握住把手,向下倾斜鼓粉盒并
引向打印鼓粉盒凹槽之间。
c 向下推鼓粉盒直到它卡到位。
4
安装打印鼓粉盒
Page 75

3 关上打印机盖板。
下一步做什么?
任务 见 ... 页
安装内存选件
安装进纸匣 2
连接电缆
6
15
17
安装打印鼓粉盒
5
Page 76

第 3 步: 安装内存卡
拆卸打印机侧面盖板 在安装任何内存选件之前,您必须拆卸打
根据打印机型号,您可以增加打印机内存
使总数达到 66MB( 入门型号 ), 72MB
(标准型号 ),及 80MB (网络型号)。
如果您使用标准或网络型号,您也可以安
装 1MB, 2MB,或 4MB 闪烁存储器卡
选件来存储下载字体或宏。
印机侧面盖板。
6
安装内存卡
Page 77

切记! 如果您是在安装完打印机后安装
内存卡,应先关闭打印机并拔掉所有连接
外围设备的电缆后才能继续进行操作。
1 打开打印机前盖板。
安装内存卡
7
Page 78

2 在用力推入两个椭圆凸柱的同时打
开侧面盖板。
3 拆掉盖板并将它放到旁边。
拆卸系统板挡板 您将需要一个小的 Phillips 螺丝起子来拆
卸盖在打印机系统板上的金属挡板。
8
安装内存卡
Page 79

1 拧下一个螺丝钉并把它放到旁边。
2 沿着上下两端的凹槽滑动金属挡板
将它拆下来并把它放到旁边。
安装打印机内存卡
警告!打印机内存卡容易被静电损坏。在
触摸内存卡之前应先触摸一下打印机上的
金属物。
要安装打印机内存卡选件:
1 将打印机内存卡从包装袋中取出。
安装内存卡
9
Page 80

接插脚
系统板
2 避免接触到卡边上的接插脚。保留
包装袋。
3 找到系统板上的顶部插槽。
4 拿住内存卡并将接插脚对着系统板
上的顶部插槽。
5 将卡插入插槽内。
10
安装内存卡
Page 81

6 用力将内存卡推入插槽中直到插槽
两端的线夹卡入到位。
7 如果您要给标准或网络型号安装闪
烁存储器,请继续下去。否则,重
新安装金属挡板和侧面盖板。详细
信息请参阅第 13 页。
安装闪烁存储器卡
注意:闪烁存储器卡容易被静电损坏。在
触摸存储器卡之前应先触摸一下打印机上
的金属物。
1 将闪烁存储器卡从包装袋中取出。
安装内存卡
11
Page 82

接插脚
2 避免接触到卡边上的接插脚。保留
包装袋。
3 找到系统板上的底部插槽。
4 拿住选件卡并将接插脚对着系统板
的底部插槽。
5 以倾斜45度的角度将卡插入插槽内。
12
安装内存卡
Page 83

6 用拇指用力地将卡推入插槽中直到
线夹卡入到位。
7 重新安装金属挡板和侧面盖板。
重新安装金属挡板
当您的存储器卡安装完毕后:
1 将金属挡板与上下两端的凹槽对齐,
然后将它往后滑动。
2 重新拧上螺丝钉来固定挡板。
安装内存卡
13
Page 84

重新安装侧面盖板
1 将顶部和底部的凸柱与相对应的槽
凸柱
凸柱
下一步做什么?
任务 见 ... 页
安装进纸匣 2
连接电缆
15
17
对齐。
2 当您关上盖门时,用力将椭圆凸柱
推入凹槽内。
3 关上前部盖板。
14
安装内存卡
Page 85

第 4 步: 安装进纸匣 2 选件
您可以利用连接在打印机下面的 250 页进
纸器选件来增加纸张容量。
支架
进纸匣
该进纸器由一个进纸匣和一个支架组成。
1 从支架中取出进纸匣。
2 去掉进纸匣和支架上的所有包装材
料和胶带。
3 将支架放到您准备用来放置打印机
的位置。
安装进纸匣2选件
15
Page 86

注意: 如果您想以后再安装 250 页进纸
器,确认在安装进纸器之前已经关闭打印
机。
4 将打印机与支架的前部对齐,并把
它放在支架上。
确认支架牢固地放在正确的位置上。
当您设置完打印机后,打印菜单设
置页来检验 250 页进纸器是否已被
列在 “已安装特性”中。(请参阅
第 30 页)。
16
5 插入进纸匣。
安装进纸匣2选件
Page 87

第 5 步: 连接电缆
本地打印 要将入门或标准型号的打印机连接到计算
机上,建议您使用 IEEE 1284 兼容的并口
电缆。
1 确定打印机,计算机和任何已连接
的外围设备都已关闭并拔掉了电缆。
2 将电缆的一端插入打印机的并口插
槽中。
3 卡住插槽两端的线夹。
4 将并口电缆的另一端插入计算机的
并口插槽中。
连接电缆
17
Page 88

要使用 USB 电缆连接打印机和计算机:
1 将 USB 电缆的一端插入打印机的
USB 端口中。
电缆上的 USB 符号与打印机上的
USB 符号应相匹配。
2 将电缆的另一端插入计算机的 USB
端口中。
18
连接电缆
Page 89

网络打印 您可以使用以太网电缆 (带有 RJ.45 接
头的非屏蔽双绞线电缆)将网络型号打印
机连接到网络上。
要使用以太网电缆连接打印机到网络上:
1 将以太网电缆的一端插入 MarkNet™
打印服务器上的以太网端口中。
2 将电缆的另一端连接到局域网。
连接电缆
19
Page 90

连接电源线 1 确定打印机已关闭。
2 将电源线的一端插入电源插座中。
3 将电源线的另一端插入正确接地的
插座中。
4 打开打印机。
从 Press Button (请按下面按钮)指
示灯起到 Ready (就绪)指示灯止,
每个指示灯按顺序亮起并熄灭。
20
连接电缆
Page 91

第 6 步: 装纸
打印机有两个标准的纸张来源:可以存放
纸张支架
顶部接
纸架
前向出纸通道
进纸匣 2
进纸匣 1
纸张支架
手动进纸器
150 页普通纸张的进纸匣 1,和单张送纸的
手动进纸器。大部份打印作业都是使用进
纸匣 1。使用手动进纸器可以送入单张的
纸张,透明胶片,信封,标签或卡片纸。
您可以通过使用 250 页进纸器选件来增加
打印机的纸张容量。
打印机顶部的接纸架可以存放最多 100 页
纸张。单页的前向出纸通道为特殊介质提
供直接的通道,从而减少了介质的卷曲和
潜在的卡纸情况发生。
加载进纸匣 1 使用手动进纸器后面的进纸匣 1 来加载纸
张和特殊介质。
进纸匣 1 最多可以放置 150 页纸张, 10
张透明胶片或标签, 10 个信封, 10 张卡
片纸。
装纸
21
Page 92

1 拉开后部纸张支架,直到您听到咔
嗒一声。
2 前后弯曲介质使其松散,然后将它
们扇形展开。
22
装纸
Page 93

3 如果加载:
• 信签,使页面的顶部朝下,打印面
朝着自己
• 信封,将信封垂直插入,封舌一边
向下,贴邮票处在左上角
为了减少卡纸,不要使用下列信封:
— 过度卷曲
— 粘在一起
— 有任何地方受损
— 有窗口,破洞,穿孔,剪切口或
凹凸不平
— 使用金属扣,线结或金属杆
— 粘贴了邮票
— 当封舌处于封住或关闭位置时有
暴露的粘胶
装纸
23
Page 94

4 拉开接纸架上的前部纸张支架,直
到您听到咔嗒一声。
5 如果您要在标准法律用纸尺寸的纸
张上打印,应将前部纸张支架完全
拉开。
6 如果您要在特殊介质上打印,请打
开前向输出盖门,以提供直接的出
纸通道。
7 滑动纸张导片,使它正好抵住纸张
或信封的边缘。
8 从应用软件中选择纸张尺寸和类型。
9 如果您要打印多份副本,可以在应
用软件或打印机驱动程序中选择打
印份数。
24
10 开始打印作业。
加载手动进纸器 使用手动进纸器送入介质,一次只能往打
印机中送入一页。
装纸
Page 95

如果您从进纸匣 1 中送入信封或卡片纸遇
到问题,可以试着从手动进纸器中一次送
入一张。
1 拉开接纸架上的前部纸张支架,直
到您听到咔嗒一声。
2 如果您要在标准法律用纸尺寸的纸
张上打印,应将前部纸张支架完全
拉开。
3 如果您要在特殊介质上打印,请打
开前向输出盖门。
4 如果加载:
• 信签,使页面的顶部朝下,打印面
朝着自己
• 卡片纸,垂直插入一张卡片
• 信封,垂直插入一个信封,使封舌
一边向下,贴邮票处在左上角
为了减少卡纸,不要使用下列信封:
— 过度卷曲
— 粘在一起
— 有任何地方受损
— 有窗口,破洞,穿孔,剪切口或
凹凸不平
— 使用金属扣,线结或金属杆
装纸
25
Page 96

— 粘贴了邮票
— 当封舌处于封住或关闭位置时有
暴露的粘胶
5 滑动纸张导片,使它正好抵住纸张
或信封的边缘。
6 从应用软件中选择纸张尺寸和类型。
7 开始打印作业。
8 短暂地(大约 1 秒钟)按操作面板按
钮来开始打印。
9 当 Load Paper (装纸)指示灯和
Press Button (请按下面按钮)指示
灯都亮时,把另一页介质放入手动
进纸器中。
26
装纸
10 按操作面板按钮来打印另一页。
下一步做什么?
任务 见 ... 页
安装进纸匣 2 选件
连接电缆
15
17
Page 97

加载进纸匣 2 选件
1 抓住进纸匣两边的凸柱,并将进纸
匣完全拉出打印机。
2 确认金属板在插入打印机之前已被
压下。
将进纸匣插入后,金属板会向上弹
起,使纸张能够被送入打印机中。
装纸
27
Page 98

3 如果加载 A4 或标准法律用纸尺寸的
纸张,需要拉开进纸匣前部的纸张
支架。
4 前后弯曲介质使其松散,然后将它
们扇形展开。
5 如果加载信签,将信签的打印面向
下,页面顶边先进入打印机。
6 请勿超过纸堆高度指示线;将进纸
匣装得过满可能造成卡纸。
28
7 确认纸张被压在两个角盾下面,并
平放在进纸匣中。
角盾
装纸
Page 99

8 滑动纸张导片,使它正好抵住纸张
的边缘。
9 重新插入进纸匣,确定进纸匣已经
完全推入打印机中。
10 从应用软件中选择纸张尺寸和类型。
11 开始打印作业。
装纸
29
Page 100

第 7 步: 检验打印机设置
打印菜单设置页可以得到当前打印机设置的清单。如果您使用的是网
络型号,打印机将打印菜单设置页和列出 IP 地址及其它网络设置的设
置页。
1 确定打印机已打开并简短地按操作面板按钮来打印设置页。
2 如果您安装了进纸匣 2 选件或额外的内存,确定在 “已安装特
性”下列出。
如果没有列出选件,关闭打印机,拔下电源线,重新安装选
件。
30
检验打印机设置
 Loading...