

Page 1

IBM Displaywriter System
Operator Training
Book 1 -- Basic Topics
Textpack – 4
Page 2

Contents.
Topic 1: What is This Thing All About?
Topic 2: Typing Something.
Topic 3: Printing Something on Paper.
Topic 4: Revising Something You Have Typed.
Topic 5: Centering and Underlining.
Topic 6: Deleting: Short Cuts and Extensions.
Topic 7: Rearranging text.
Topic 8; Moving the Cursor: Short Cuts.
Topic 9: Printing More Than One Copy at a Time.
Topic 10: Using Comments to Keep Track of a Document.
Topic 11: Setting Margins, Tabs, and Line Space.
Topic 12: Changing Margins, Tabs, and Line Space for Parts of a
Document.
Topic 13: Using Menus: Short Cuts.
Topic 14: Bypassing Menus.
Topic 15: Saving and Replaying Keystrokes.
Topic 16: Working on Your Own with the Displaywriter.
Page 3
Topic 1. What is This
Thing All About?
Topic 1: 1
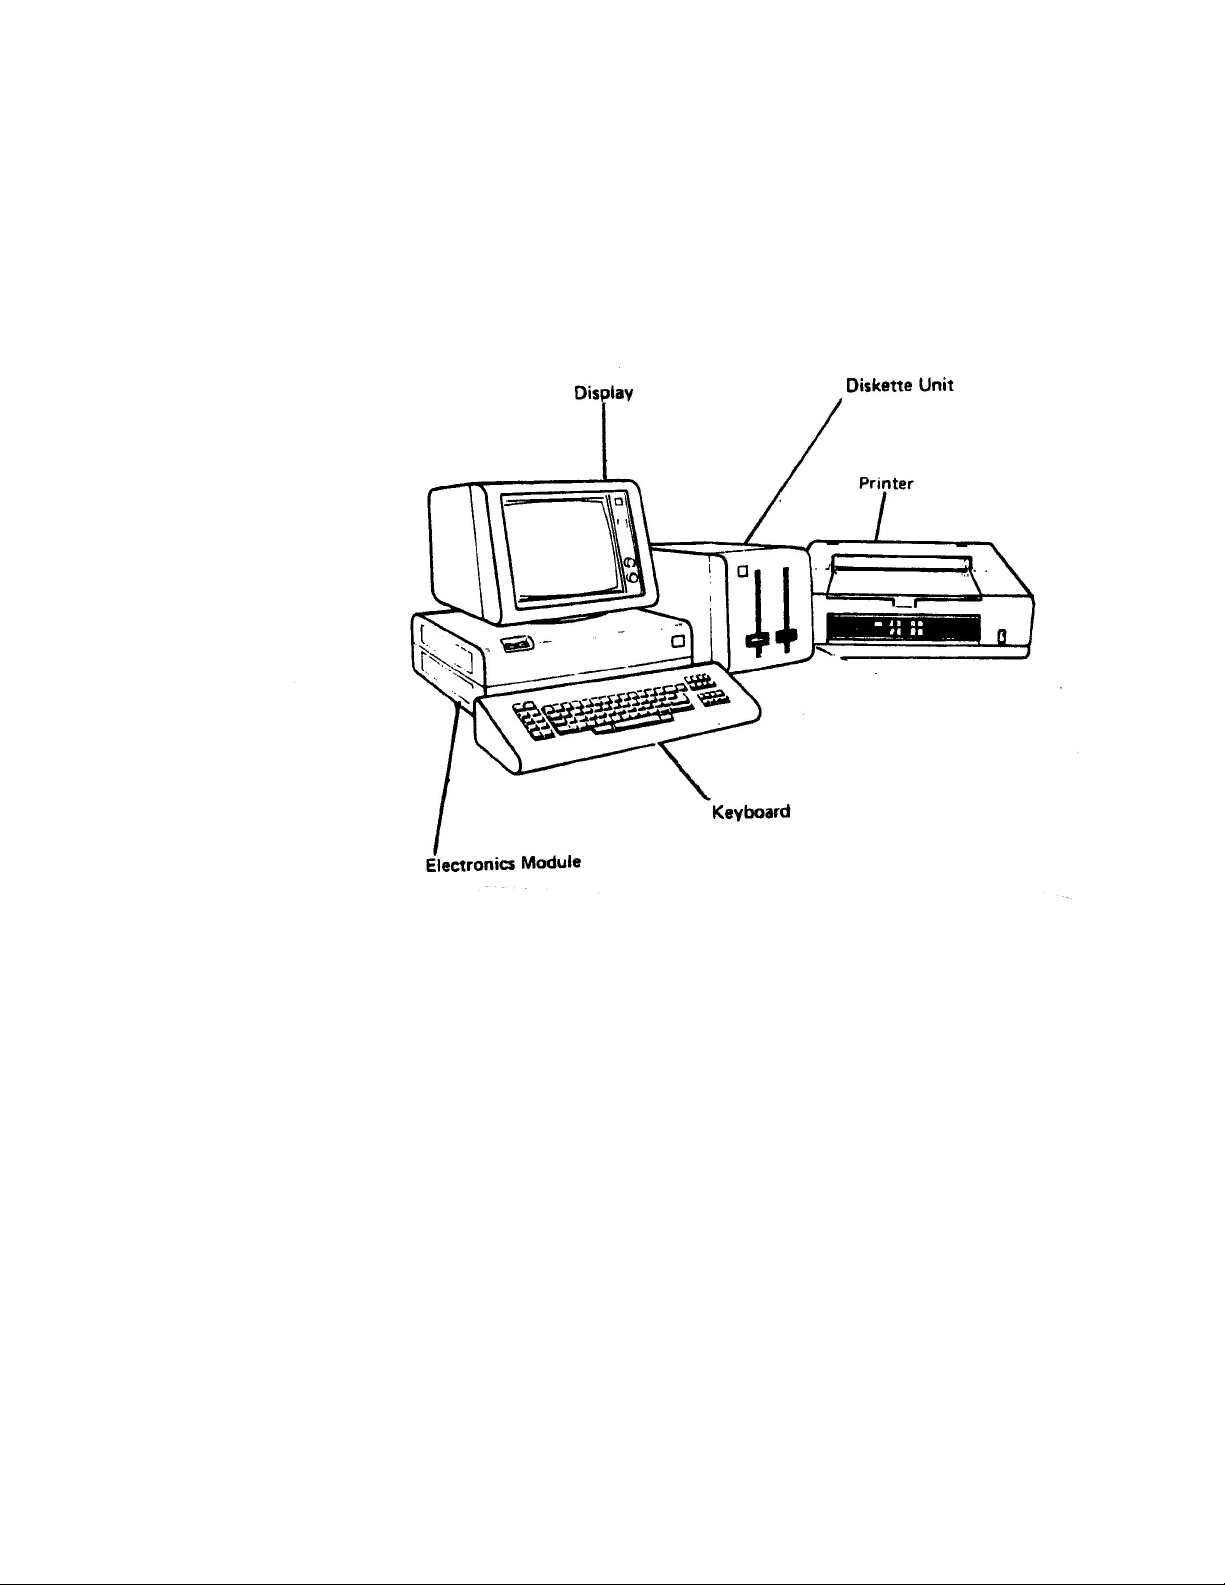
The Displaywriter is a "word processor" -- a sort of supertypewriter. The parts of the Displaywriter system are shown
below:
When you type things on the Keyboard, you will see them on the
Display screen first. This makes it easy to correct your work
before you actually print it on paper.
The Displaywriter is an enormously powerful tool to help you do
your work. It may seem very different from using typewriters. At
first it may seem difficult. But very quickly you will find that it
can help you be more effective.
This training manual is designed to help you get to the point of
really using the Displaywriter as soon as possible. At any point,
if you wish to take a detour in your training to explore the
Displaywriter, or to use it for some of your own work -- DO IT!
Even if you run into some trouble, the time you spend using and
exploring the Displaywriter on your own is time well spent. It’s
the best way to learn.
Page 4

USING THIS MANUAL
THE SECOND TYPE OF INFORMATION IS "INSTRUCTIONS",
SHOWING YOU WHAT TO DO. INSTRUCTIONS APPEAR IN THIS
FORMAT -- BOLD-FACE CAPITAL LETTERS.
GETTING STARTED
PRESS THE RIGHT SIDE OF THE POWER SWITCH (LOCATED ON
THE ELECTRONICS MODULE -- LOOK AT THE DRAWING ONE
PAGE BACK) TO TURN ON THE DISPLAYWRITER
Topic 1: 2
The Topic chapters of this manual book have been planned so
that you can use them for REFERENCE as well as for
TRAINING. So if you do go off on your own, you can still make
some use of this manual.
This manual contains three types of information. The first type is
"read-only" information, providing you with background and
explanation. Read-only information appears in this type format.
► Third is "recovery" information, telling you what to do if
something goes wrong. Recovery information is always preceded
by the symbol " ► ".
Try to read each topic ALL THE WAY THROUGH before
actually following any of the instructions.
You need to turn the power on and (in the terminology of the
Displaywriter) "load programs" from "program diskettes". There
are two program diskettes, which contain the programs you will
need to use the Displaywriter.
.
After several seconds, the letters "IBM" should appear on the
screen. You can adjust the control knobs on the Display unit so
that the letters are bright green on a dark background. You can
also tilt and turn the display for your comfort.
► If the letters do not appear, turn the system off, wait a few
seconds, and then turn it on again, adjusting the Display control
knobs. If the letters still don’t appear call the IBM Office Support
Page 5
Topic 1: 3
Center (the telephone number can be found in the Office Support
Center Guide
included in your Reference Package).
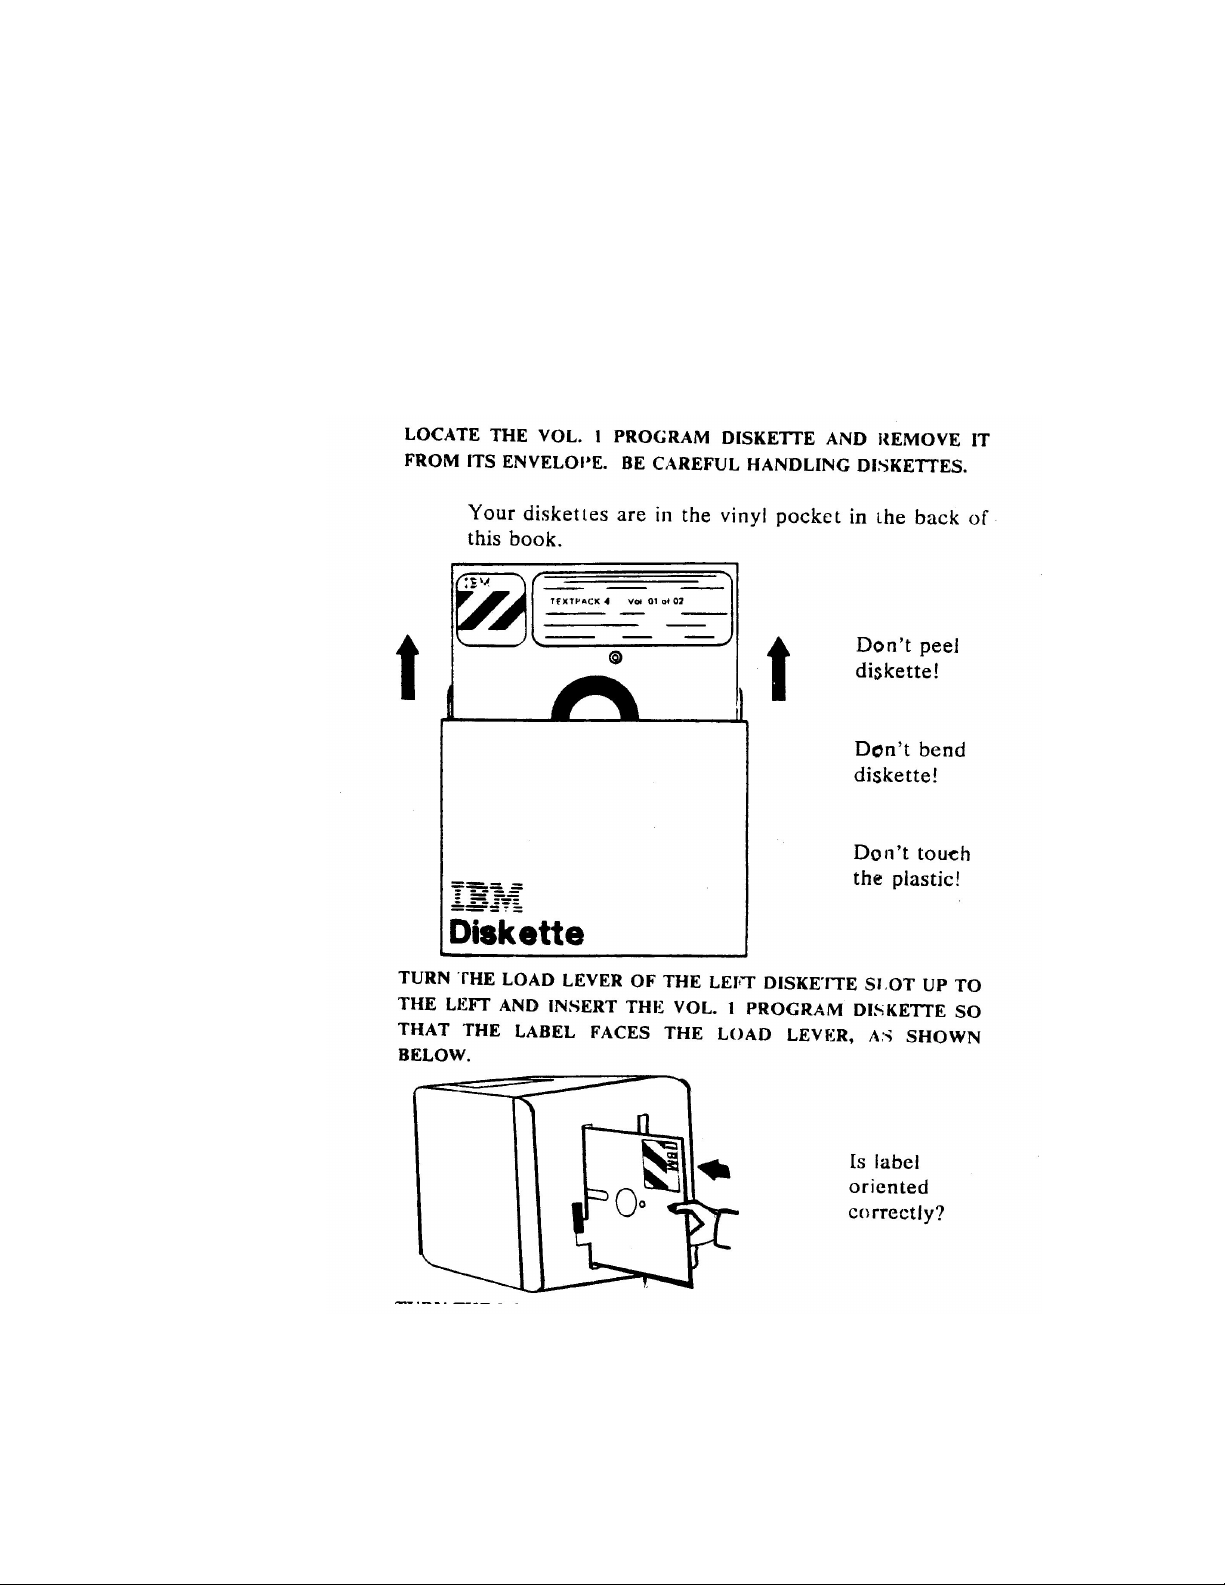
LOCATE THE VOL. 1 PROGRAM DISKETTE AND REMOVE IT
FROM ITS ENVELOPPE. BE CAREFUL HANDLING DISKETTES.
Your diskettes are in the vinyl pocket in the back of this book.
TURN THE LOAD LEVER DOWN TO THE RIGHT TO CLOSE IT.
Page 6

Turning the lever starts the program load. You will hear a
clicking sound for about 30 seconds. When the clicking stops, the
programs have been loaded. They will now be stored in the
Displaywriter until you turn it off.
You are now ready to use the Displaywriter. The list of items you
see on the screen is called the TASK SELECTION menu. It lists
the major things the Displaywriter can do. From this list of
selections (called a "menu"), you can choose the particular task
you want to accomplish using the Displaywriter.
The majority of these tasks will be involved with letters (and
other sorts of documents) -- typing or creating them, revising
them, and printing them out on paper. Therefore, most of the time
when you are working with the Displaywriter, you will be
choosing the first item on the Task Selection menu -- TYPING
TASKS.
WHAT IF I GET STUCK?
Everyone makes mistakes -- and learning to use a word processor
is difficult enough to cause many mistakes. When you do make a
mistake try to just correct it and go on -- you don’t have to do
everything perfectly. If you really do get so stuck that you can’t
continue, there is a general remedy you should keep in mind.
► Press the END key, located to the left of the keyboard.
► Now remove all diskettes from the diskette unit to avoid
damaging them, and then turn the system off.
You must now start all over again, by re-loading your programs
from the program diskettes.
ON YOUR OWN
Check your understanding so far: remove the Vol. 1 diskette, turn
the Displaywriter off, and then start it up again. Remember that
any time you turn the power off, you must always first remove
the diskettes. If you run into any trouble, just go on to Topic 2.
Topic 1: 4
Page 7

Topic 2. Typing Something.
In the terminology of the Displaywriter you will be "creating a
document" -- that is, typing a brief letter. You will first name the
document, as you might make up a name for a baby BEFORE it’s
actually born. Then you will assign the document to a work
diskette -- this is where the document will be stored by the
Displaywriter. And then, finally you will type the document at
the keyboard, and see the text appear on the screen -- your
electronic typing paper!
Note: If you turned off the power at the work station between
Topic 1 and Topic 2, turn it back on and re-insert the Vol. 1
program diskette.
TASK SELECTION
In the TASK SELECTION menu you choose the general kind of
work that you want to do. To type (create) a document, choose
TYPING TASKS.
Can you find this prompt on the screen?:
Type ID letter to choose ITEM; press ENTER.
TYPE AN a, THE ID LETTER FOR TYPING TASKS, AND THEN
PRESS THE ENTER KEY.
► If you typed the wrong ID letter, just press BKSP (backspace)
to remove the incorrect letter.
► If you typed the wrong letter
down the CODE key and press Selection menu to start over.
CANCL and REQST are on the same key. If you don’t hold
down CODE when you press CANCL, you will get REQST
(Request) instead of CANCL. You can correct this by trying
CANCL again, this time while holding down.
The Displaywriter prompts you to insert the Vol. 2 program
diskette. Its name begins with the number "6". You will find this
diskette in the vinyl pocket in the back of this book.
INSERT THE VOL. 2 PROGRAM DISKETTE.
Topic 2: 1
AND pressed ENTER too, hold
Page 8

TYPING TASKS
Topic 2: 2
In the TYPING TASKS menu you choose the specific kind of
typing task that you want to do. To type something new, choose
Create Document.
Make sure that the Displaywriter is prompting you:
Type ID letter to choose ITEM; press Enter.
TYPE AN a, THE ID LETTER TO CREATE A DOCUMENT, AND
THEN PRESS THE ENTER KEY.
► If you make a mistake, hold down the CODE key while you
then press the CANCL key.
You must
NAME your documents (letters, memos) just as you
would label a file folder -- so you can get these documents back
to work on later. Each document you create on the Displaywriter
must have a different name. The best names are short and easy to
remember.
Can you find this prompt screen?:
Type document name; press ENTER.
TYPE THE NAME First Letter AS THE DOCUMENT NAME (THE
DIFFERENCE BETWEEN UPPER AND LOWER CASE MATTERS),
AND THEN PRESS THE ENTER KEY.
► Use BKSP or Code + CANCL for typing mistakes.
► Remember that each document must have a separate name. If
you have already used a name for another document, you will get
a message that the document already exists.
You must also specify the name of the WORK DISKETTE your
document will be stored on. The work diskette you are using is
named TRAIN.
Make sure that the Displaywriter is prompting you:
Type diskette name; press ENTER.
TYPE THE NAME OF THE WORK DISKETTE, TRAIN, AND THEN
PRESS THE ENTER KEY.
Page 9

INSERT THE WORK DISKETTE WITH THE NAME TRAIN
PRINTED ON ITS LABEL, INTO THE DISKETTE SLOT
REQUESTED BY THE PROMPT.
CREATE OR REVISE
PRESS THE ENTER KEY.
Topic 2: 3
There should be a prompt on the screen asking you to insert the
work diskette TRAIN into the diskette unit. Make sure you can
find this prompt. The TRAIN diskette is in the vinyl pocket in the
back of this book.
► If you are asked to insert a diskette other than TRAIN, hold
down the CODE key and then press the REPLY key (located
near CANCL.). Again type the document name and then the
diskette name.
You do not need to make any choices on the CREATE OR
REVISE DOCUMENT menu. Can you find the following words
on the screen?:
When finished with this menu, press ENTER.
► If you accidentally choose an ITEM in the Create or Revise
Document menu, use CODE + CANCL.
Page 10
THE TYPING AREA
You type your documents in the TYPING AREA.
Topic 2: 4
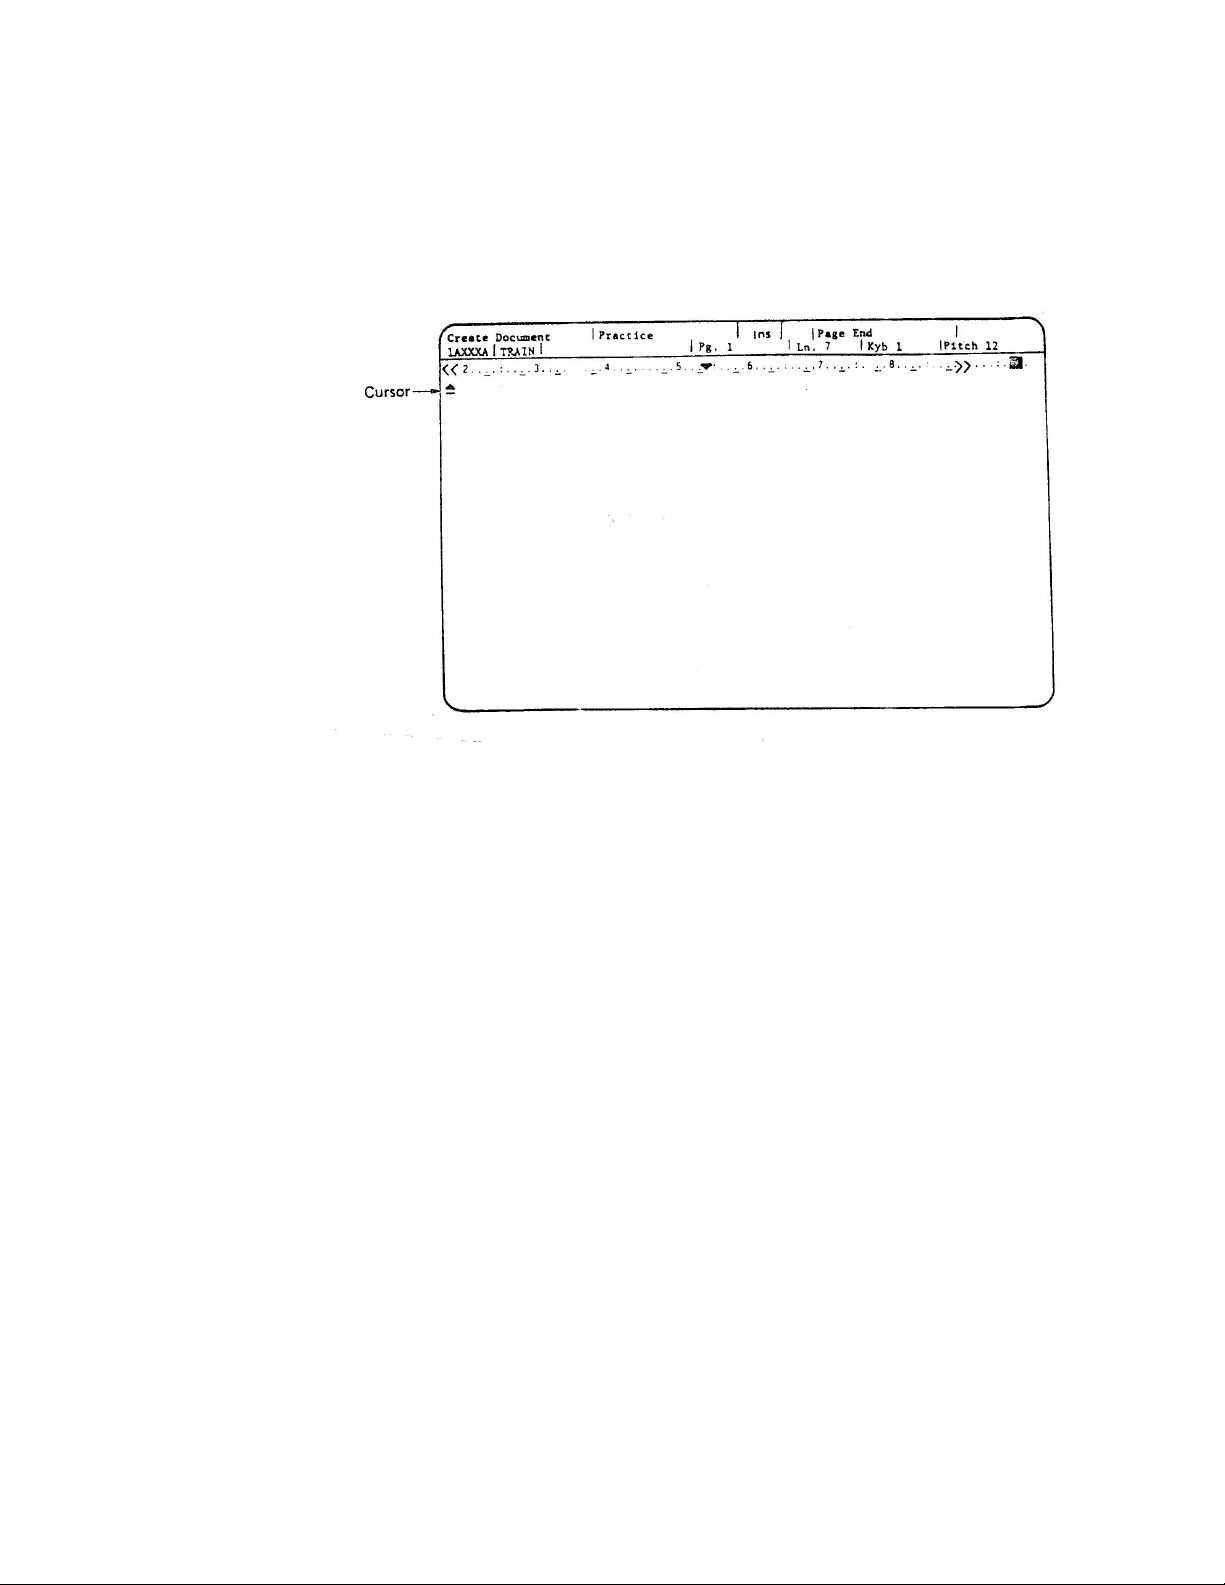
The cursor
The short horizontal line that is brightened (or highlighted) on the
screen is called the cursor. It marks your current typing position
in the Typing Area. The cursor is always positioned where the
next character you type will appear. As you type, the cursor
moves to show where you are typing.
When the cursor is under a character, that character is highlighted
on the screen. When you start, the cursor is under a triangular
Page End symbol. As you type along, this symbol moves with the
cursor, marking the end of the typed page of text.
You can use the Displaywriter as a super-typewriter: margins and
tabs have been set automatically for you, you don’t even have to
bother with carrier returns.
► At first you might find the Typing Area difficult to work in.
Try not to worry too much about typos and style. If you make a
mistake, just go on. You will learn more about correcting
mistakes later.
Page 11

Bobby – I just want to drop you a short note
to tell you that I landed safely and that
everything is going just great. Hawaii is
every bit as exciting as they say. The
people are friendly and relaxed, and the
scenery is breathtaking. If the weather is
good tomorrow, I’m going to try scuba
diving. See you all soon.
ENDING A DOCUMENT
PRESS THE END KEY
ON YOUR OWN
Topic 2: 5
TYPE THE LETTER BELOW. DON’T PRESS THE CARRIER
RETURN KEY AT ALL (SEE WHAT HAPPENS), AND
DON’T C0RRECT TYPOS.
To leave the Typing Area, you must END your document. The
Displaywriter stores it on the work diskette (TRAIN) for later
use. CODE + CANCL will not get you out of the Typing Area.
The END key is located just below the CANCL key. You must
END a displayed document before removing the work diskette or
turning the power off at the workstation -- to safely store it.
The TYPING TASKS menu reappears.
► If you remove your work diskette from the diskette unit
BEFORE you END the document you are working on, the
diskette will require "recovery". If this happens, use another work
diskette for your training.
Type a letter to a friend: (1) choose a to Create, (2) Use your
friend’s first name as the document name, (3) Use the TRAIN
work diskette, (4) Press ENTER on the Create or Revise
Document menu, (5) Type something in the Typing Area, (6)
Press END. If you have trouble, just go on to Topic 3.
Page 12

Topic 3. Printing Something
on Paper
When you type a document into the Displaywriter, you may
want to print it out on paper.
Note: If you turned off the power at the workstation between
Topic 2 and Topic 3, turn it back on and re-insert the Vol. 1 and
Vol. 2 program diskettes.
PRINT DOCUMENT
GET TO THE TYPING TASKS MENU.
Can you find this prompt on the screen?:
Type ID letter to choose ITEM; press ENTER.
TYPE d TO CHOOSE THE ITEM IN THE TYPING TASKS MENU TO
PRINT A DOCUMENT, THEN PRESS THE ENTER KEY.
► Remember BKSP and CODE + CANCL in case you make
mistakes. Remember that CANCL and REQST are on the same
key. If you don’t hold down CODE when you press CANCL, you
will get REQST (Request) instead of CANCL. You can correct
this by trying CANCL again, this time while holding down
CODE.
Make sure that the Displaywriter is prompting you:
Type document name; press ENTER.
If you have just typed in a document, the name of that document
is "suggested" (you can delete the name with BKSP, if you
want). Otherwise, the Displaywriter presents a blank where you
can type a name.
You can print a document you created in Topic 2 (for example,
the document
TRAIN work diskette, named Smith Letter.
TYPE A DOCUMENT NAME (IF THE DISPLAYWRITER HAS
ALREADY DONE THIS, JUST GO ON).
PRESS THE ENTER KEY.
Topic 3: 1
First Letter) or a document already stored on the
Page 13

Topic 3: 2
Can you find this prompt on the screen?:
Type diskette name; press ENTER.
If you have already inserted TRAIN, the Displaywriter suggests
that diskette name. Otherwise it presents a blank for you to fill in.
TYPE THE INSERTED NAME, TRAIN (IF THE DISPLAYWRITER
HAS ALREADY DONE THIS, JUST GO ON).
PRESS ENTER.
► If you are asked to insert a diskette other than TRAIN, hold
down the CODE key and then press the REPLY key (located
near CANCL).
INSERT THE TRAIN WORK DISKETTE (IF YOU HAVE NOT
ALREADY DONE SO).
Now the PRINT DOCUMENT menu appears. You do not need
to respond to the prompt on this menu.
Can you find the following words on the screen?:
When finished with this menu, press ENTER.
PRESS ENTER TO SEND THE DOCUMENT TO THE PRINTER.
► If you accidently choose an ITEM in the Print Document
menu, you can use CODE + CANCL.
The document is now ready to print. A tone (beep) sounds at the
keyboard and a blinking arrow symbol appears at the bottom left
on the screen. This indicates that the Displaywriter has a message
for you to read.
PRESS THE MSG KEY.
The MSG key is located beside the END key.
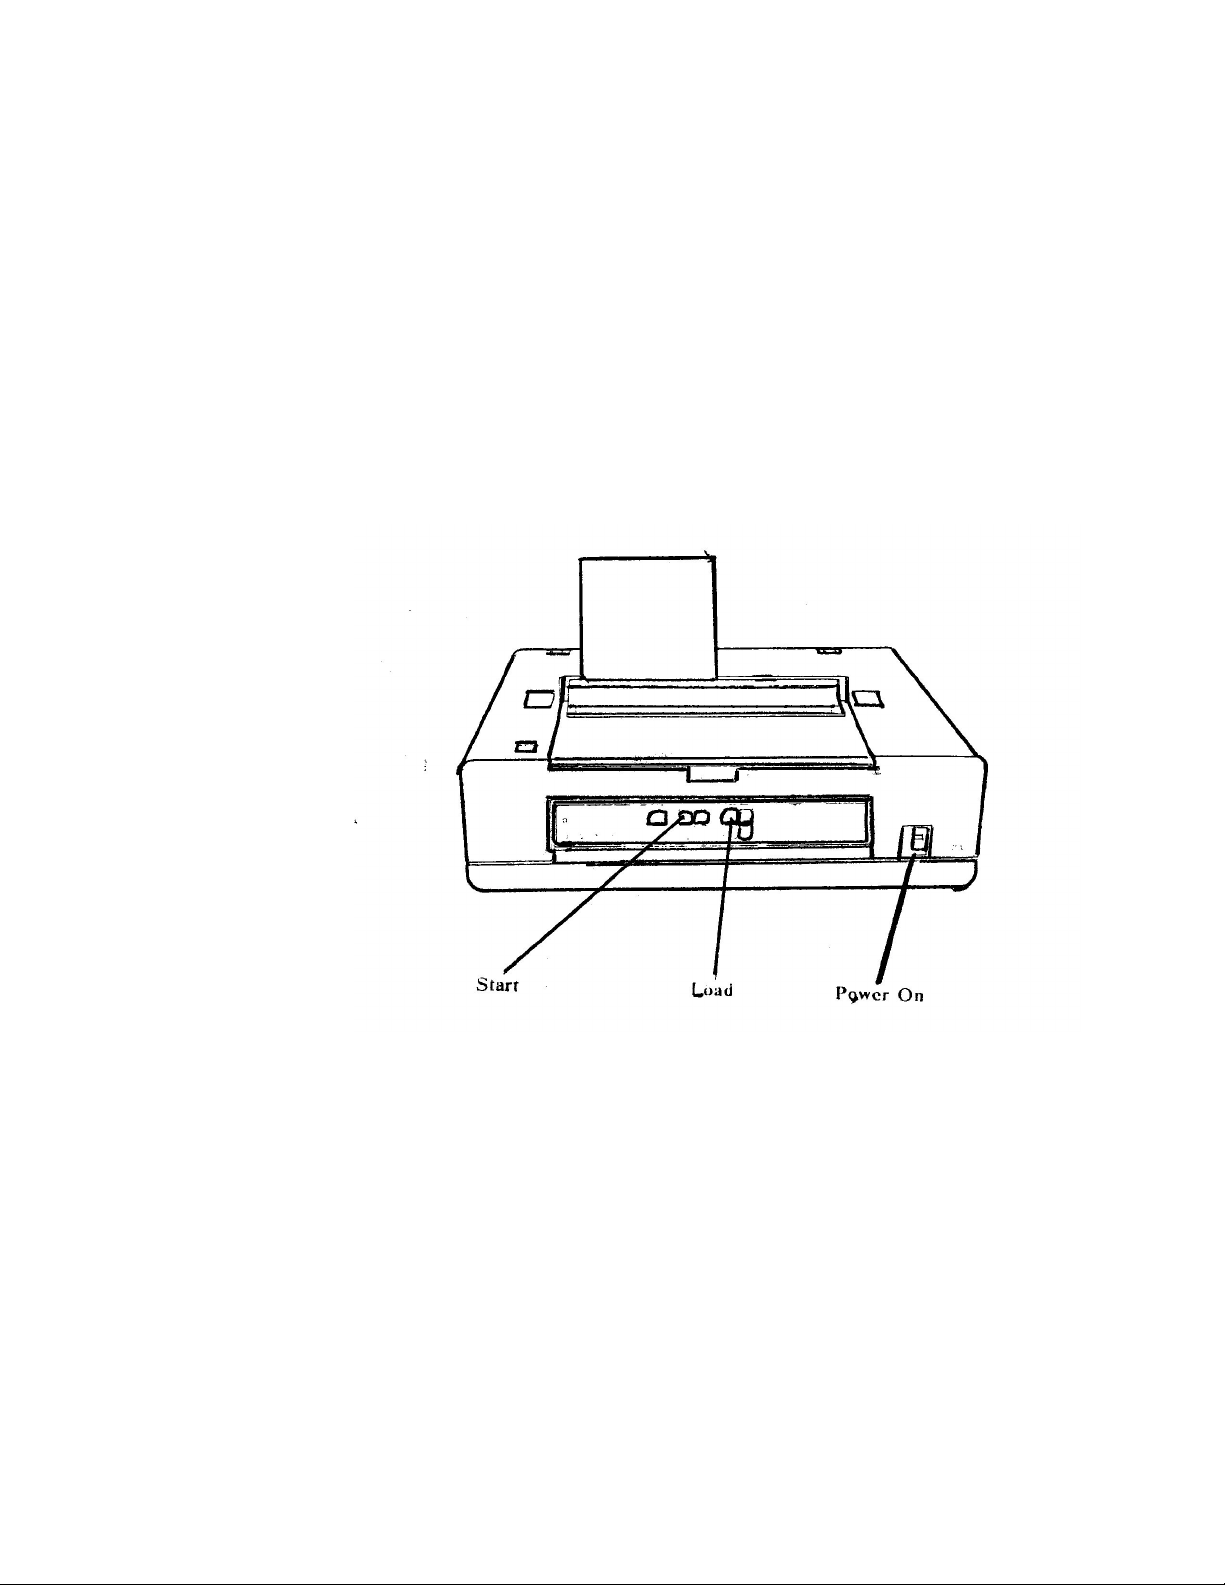
The message asks you to turn the printer power on. You need to
find the on/off switch, located on the front of the printer.
TURN THE PRINTER POWER ON.
The blinking arrow indicates another message.
Page 14
THE PRINTER
Topic 3: 3
PRESS THE MSG KEY.
This message asks you to load printer paper.
PLACE A SHEET OF PAPER INTO THE PRINTER WITH THE LEFT
EDGE OF THE PAPER LINED UP WITH THE ++++. PRESS THE LOAD
BUTTON ON THE PRINTER
.
The printer automatically indexes the paper.
IBM 5218 Printwheel Printer
PRESS THE START BUTTON ON THE PRINTER.
The paper indexes up to the first printing line.
A tone sounds and the blinking arrow re-appears on the screen,
indicating another message.
PRESS THE MSG KEY.
The message confirms the typestyle number of the printer
element and keyboard you are using by saying "Put on printer
Page 15

ON YOUR OWN
Topic 3: 4
element 086 001" (or something similar), and directs you to press
START on the printer.
AGAIN PRESS THE START BUTTON ON THE PRINTER.
► You may get an additional message asking you to press the
REQST key (located on the same key as CANCL). In such a
case, press REQST (do
NOT hold down the CODE key), and
when you see the Textpack Request Tasks menu, select item e,
corresponding to "Print with element now on printer". If you
make a mistake, remember CODE + CANCL.
Your document should now print and automatically index up
when completed. The blinking message symbol again appears.
PRESS THE MSG KEY.
The message confirms that your document has been printed.
PRESS THE MSG KEY AGAIN TO CLEAR THE LAST MESSAGE
FROM THE SCREEN.
Print the letter to a friend that you typed earlier. Remember, the
document name is your friend’s first name. The diskette name is
TRAIN.
Page 16

Topic 4. Revising Something
You Have Typed.
You may want to change something in a document that has been
typed in and stored.
Note: If you turned off the power at the workstation between
Topic 3 and Topic 4, turn it back on and re-insert the Vol. 1 and
Vol. 2 program diskettes.
DISPLAYING THE DOCUMENT
ON THE TYPING TASKS MENU, CHOOSE THE ITEM TO REVlSE A
DOCUMENT.
To try revising, use a document named Smith Letter that has
already been stored on TRAIN.
Make sure that the Displaywriter prompts you for the document
name and then for the diskette name. Carefully respond to these
prompts with the following information:
Document name: Smith Letter
Diskette name: TRAIN
► Remember, if a document name or diskette name appears on
the prompt line but is not the one you want, hold down the
CODE key and then press CANCL to remove it. Then type what
you want.
► If you are asked to insert a diskette other than TRAIN, hold
down the CODE key and then press the REPLY key (located
near CANCL).
JUST PRESS ENTER ON THE CREATE OR REVISE MENU.
► If you accidentally choose an ITEM on the Create or Revise
menu, hold down CODE and press CANCL.
The first part of the previously stored letter automatically appears
in the TYPING AREA, and you are ready to begin the revisions.
Topic 4: 1
Page 17

MOVING THE CURSOR
PRESS THE ↓ CURSOR KEY SEVERAL TIMES AND WATCH THE
CURSOR MOVE DOWN THE SCREEN.
DELETING TEXT
USE THE CURSOR KEYS TO MOVE THE CURSOR UNDER THE
FIRST
PRESS THE DEL KEY
USING THE → KEY, MOVE THE CURSOR THROUGH THE
MATERIAL TO BE DELETED, THE WORD
Topic 4: 2
The four cursor-movement keys have arrows on them (they are
located on the right of the keyboard).
The ↑, ← , and → cursor keys work analogously. Try them and
see.
If you move the cursor all the way to the bottom of the screen, or
all the way to the right, the display "shifts" so that you can see
more of your document. By moving the cursor al the way up and
to the left, you can bring the document back to where it started.
r IN THE WORD regular.
The DEL key is located up and to the right of the keyboard keys.
Is the Displaywriter prompting you?: Delete what?
► If you make a mistake at this point, use CODE + CANCL
and start the deletion again.
regular.
The word is highlighted: you can see exactly what is going to be
deleted before it actually is deleted
► If the wrong characters are highlighted use CODE + CANCL
and start the deletion again.
Page 18

Topic 4: 3
INSERTING TEXT
WHEN THE TEXT YOU WANT TO DELETE IS HIGHLIGHTED,
PRESS THE ENTER KEY.
The material you wanted to delete now disappears.
The cursor is already at the point where you want to add the word
large.
TYPE THE WORD large
► If you make a mistake, delete -- using BKSP or DEL -- and
then re-type.
The Displaywriter is usually in "insert" mode. The text to the
right of the cursor is moved over so that what you are typing can
be inserted.
Page 19

REPLACING TEXT
MOVE THE CURSOR TO THE T IN THE SIGNATURE LINE.
WHILE HOLDING DOWN CODE, PRESS THE INSERT/REPLACE
KEY.
IN THE DOCUMENT, TYPE A CAPITAL R TO REPLACE THE T.
PRESS THE INSERT/REPLACE KEY AGAIN.
PRESS THE END KEY TO STORE THE DOCUMENT.
ON YOUR OWN
Topic 4: 4
You can also use the Displaywriter in "replace" mode. When you
do this, characters you type replace the characters that were there
before.
INSERT/REPLACE is on the same key as the number "8".
Can you find the letters Repl on the "status line" at the very top of
the screen? This indicates that the Displaywriter is now in replace
mode.
Can you find the letters Ins which now appear on the status line at
the very top of the screen? This indicates that the Displaywriter is
now once again in insert mode.
As you can see on page 4:3, more deletions, insertions, and
replacements are suggested for the Smith Letter document.
Practise your revision skills by trying some of these. When you
have practiced enough, print out Smith Letter (refer to Topic 3 for
help with printing).
Page 20

Topic 5. Centering and
Underlining Text.
When you type a document using the Displaywriter, you may
want to underline and/or center some of the text.
Note: If you turned off the power at the work station between
Topic 4 and Topic 5, turn it back on and re-insert the Vol. 1 and
Vol. 2 program diskettes.
CHOOSE THE ITEM IN THE TYPlNG TASKS MENU TO CREATE A
DOCUMENT.
Use the following information, as the Displaywriter prompts you:
CENTERING
You will be typing the example document below. Its heading
must be centered.
Topic 5: 1
Document name: Winners
Diskette name: TRAIN
Winners of the Lucky Turkey Raffle
The annual Lucky Turkey Raffle was held on Tuesday morning at
the Mount Kisco Moose Lodge. The grand prize winner, for the
third year in a row was Melvin Marvin. Melvin exclaimed, "I just
don’t know what I’ll do with another thirty-five pound turkey!!!"
Runners-up, who wore bags of sweet potatoes, included the following:
Lucy Wimple, Roger Ripple, Miles Standish, and Greg Smith.
USING THE SPACE BAR (NOT THE ARROW KEYS), POSITION
THE CURSOR AT THE CENTER POINT OF THE TYPING LINE.
Page 21

UNDERLINING
Topic 5: 2
The center point is at column 54. It is marked on the typing scale,
at the top of the screen, with the symbol ▼.
WHILE HOLDING DOWN CODE, PRESS THE CTR KEY.
CTR is on the same key as the character "c". The CTR (center)
key is used to center characters on a typed line.
Nothing happens immediately, but the Displaywriter will now
center the line as you type it.
TYPE: Winners of the Lucky Turkey Raffle
PRESS THE CARRIER RETURN KEY TWICE, THEN CONTINUE
TYPING THE EXERCISE UNTIL YOU GET TO THE UNDERLINED
WORD
third.
To underline one word at a time use WORD UND (word
underline).
TYPE THE WORD YOU WANT TO UNDERLINE, third
Do not type the space that follows the word.
WHILE HOLDING DOWN CODE, PRESS THE WORD UND KEY.
WORD UND is on the same key as the character "i".
The Displaywriter underlines the word you have just typed.
► Use Del, if you make a mistake.
SPACE ONCE AND THEN CONTINUE TYPING, UNTIL YOU GET
TO THE UNDERLINED PHRASE.
For continuous underlining you can use BEGIN UND and END
UND.
WHILE HOLDING DOWN CODE, PRESS THE BEGIN UND KEY.
BEG UND is on the same key as the character "u".
Page 22

ON YOUR OWN
Topic 5: 3
Nothing happens on the screen.
TYPE THE PHRASE TO BE UNDERLINED. DO NOT TYPE THE
PUNCTUATION FOLLOWING THE LAST WORD.
► Use Del, if you make a mistake.
The Displaywriter underlines the words automatically as you
type.
WHILE HOLDING DOWN CODE, PRESS THE END UND KEY.
END UND is on the same key as the character "j".
TYPE THE PUNCTUATION FOLLOWING THE UNDERLINED
PHRASE, AND THEN FINISH THE EXERCISE.
You can make up additional text to extend this exercise and get
more experience with centering and underlining. When you
finish, try to print the document Winners out on paper (refer to
Topic 3 for help in doing this).
Page 23

Topic 6. Deleting Short Cuts
and Extensions.
There is a short cut for using the DEL key.
Note: If you turned off the power at the workstation between
Topic 5 and Topic 6, turn it back on and re-insert the program
diskettes.
DELETING A LOT OF TEXT
DISPLAY THE DOCUMENT Smith Letter.
USING THE CURSOR MOVEMENT KEYS, POSITION THE CURSOR
AT THE WORD IF, AT THE BEGINNING OF THE THIRD
PARAGRAPH.
PRESS THE DEL KEY.
The Displaywriter prompts you: Delete what?
► If you make a mistake, use CODE + CANCL and start the
deletion over.
TYPE THE LAST WORD OF THE PARAGRAPH AND THE FINAL
PERIOD:
necessary.
The entire paragraph is now highlighted.
► If you made a mistake, use CODE + CANCL and start the
deletion over.
PRESS ENTER.
The paragraph disappears.
When you type something in response to the deletion prompt, the
Displaywriter deletes everything from the current cursor position
through the first occurrence of whatever you typed.
Topic 6: 1
Page 24

DELETING BLANK LINES
The Displaywriter stores blank lines as carrier return
CHARACTERS.
USE ↑ TO POSITION THE CURSOR AT THE BEGINNING OF THE
SECOND LINE OF THE FIRST PARAGRAPH OF
PRESS CARRIER RETURN ONCE.
You have inserted a blank line in the paragraph.
USE ↑ TO POSITION THE CURSOR AT THE BEGINNING OF THE
BLACK LINE -- ALL THE WAY AT THE LEFT.
As you can see, a special highlighted carrier return character
appears. This is the special character that was inserted when you
originally pressed CARRIER RETURN.
PRESS THE DEL KEY.
WHEN THE DISPLAYWRITER PROMPTS YOU:
PRESS ENTER.
The blank line disappears. You have deleted the special
CARRIER RETURN character.
ON YOUR OWN
You can use these techniques to insert and then delete underlined
and centered material. Experiment with deletion. When you are
finished, END the Smith Letter document, and then print it out.
Topic 6: 2
Smith Letter.
Delete What?,
Page 25

Topic 7. Rearranging Text.
Displaywriter allows you to "cut and paste" pieces of your
document as you revise it.
Note: If you turned off the power at the workstation between
Topic 6 and Topic 7, turn it back on and re-insert the program
diskettes.
MOVING TEXT
Instead of deleting an entire paragraph, or even a sentence, a
word, or a single character and then re-typing it, you can use the
MOVE key to move the text from one place to another.
DISPLAY THE DOCUMENT Promotions, WHICH IS STORED ON THE
TRAIN DISKETTE.
USING THE ↓ CURSOR KEY, POSITION THE CURSOR AT THE
LEFT MARGIN ON THE FIRST LINE OF THE CIRCLED PIECE OF
TEXT, AS SHOWN BELOW.
Another special character -- the TAB -- becomes visible at the
left margin.
Topic 7: 1
Page 26

ON YOUR OWN
Topic 7: 2
PRESS THE MOVE KEY.
The MOVE key is located to the right of the DEL key.
The Displaywriter prompts you: Move what?
USE THE ↓ AND → KEYS TO MOVE THE CURSOR TO THE END
OF THE CIRCLED PIECE OF TEXT.
MOVE THE CURSOR THREE SPACES PAST THE FINAL PERIOD
IN ORDER TO INCLUDE THE CARRIER RETURN SYMBOL
(WHICH BECOMES VISIBLE ONLY WHEN THE CURSOR IS
POSITIONED UNDER IT).
The text to be moved is now highlighted.
► If you made a mistake, use CODE + CANCL and start the
move again.
PRESS ENTER.
The Displaywriter prompts you: To where?
POSITION THE CURSOR AT THE LEFT MARGIN ON THE FIRST
LINE OF THE LAST PARAGRAPH.
The special TAB character appears.
PRESS ENTER.
The highlighted paragraph is now moved.
► If you made a mistake, you can move things around some
more in order to correct it.
Additional corrections are marked in red for the Promotions
document. Using deletion, insertion, and replacement, try making
these corrections. When you are finished END the document, and
print it out on paper.
Page 27

Topic 8. Moving the Cursor:
Short Cuts.
Displaywriter allows you to move the cursor around
immediately, if you don’t want to wait to move it space by space.
Note: If you turned off the power at the workstation between
Topic 7 and Topic 8, turn it back on and re-insert the program
diskettes.
DISPLAY ONE OF YOUR STORED DOCUMENTS (First Letter, Smith
Letter, Winners, or Promotions).
CODED CURSOR KEYS
Topic 4 discussed the arrow cursor keys. If you hold down the
CODE key, pressing the various cursor keys has a different
meaning:
CODE + ↓ immediately positions the cursor at the bottom of the
page.
CODE + ↑ immediately positions the cursor at the top of the
page.
CODE + → immediately positions the cursor at the far right end
of the line.
CODE + ← immediately positions the cursor at the far left end of
the line.
EXPERIMENT WITH THE CODED CURSOR KEYS AND THEIR
UNCODED ALTERNATIVES.
You should be able to locate the cursor anywhere on the screen.
THE FIND KEY
The FIND key allows you to position the cursor by specifying a
target.
PRESS THE FIND KEY.
Topic 8: 1
Page 28

ON YOUR OWN
Topic 8: 2
The FIND key is located to the right of the arrow cursor
movement keys.
The Displaywriter prompts you: Find what?
► If you make a mistake, use CODE + CANCL and start the
find again.
TYPE: the
► If you make a mistake, BKSP or use CODE + CANCL.
PRESS ENTER.
The cursor is automatically positioned at the first occurrence of
the in the text. (This includes occurrence of the within other
words, such as in the word mother.) You cannot use FIND to
move backwards through the text.
You can combine FIND with operations for deletion, insertion,
and replacement to make it easier to revise documents. Practice
using FIND, and the other operations, before you END your
document and print it out.
Page 29

Topic 9. Printing More Than
One Copy at a Time.
The Displaywriter normally prints one copy at a time. You can
request it to print more than one.
Note: If you turned off the power at the workstation between
Topic 8 and Topic 9, turn it back on and re-insert the program
diskettes.
CHOOSE THE ITEM IN THE TYPING TASKS MENU TO PRINT A
DOCUMENT.
Use the following information, as the Displaywriter prompts you:
Document name: Promotion
Diskette name: TRAIN
CHOOSE THE ITEM IN THE PRINT DOCUMENT MENU TO
CHANGE THE PRINT QUANTITY.
► If you chose the wrong ITEM, use CODE + CANCL and
choose again.
Notice the YOUR CHOICE column in the menu. The
Displaywriter prompts you:
Type YOUR CHOICE; press ENTER.
TYPE THE NUMBER 2 AS YOUR CHOICE AND PRESS ENTER.
► If you make a mistake, use BKSP of CODE + CANCL to
change your choice.
What you typed is now highlighted under the YOUR CHOICE
column. Notice that the Displaywriter again prompts you:
Type ID letter to choose ITEM press ENTER.
The Print Document menu remains on the screen so you can
change other ITEMS, if necessary. In this exercise, only the print
quantity needs to be changed. You are finished with this menu.
Notice the words above the prompt line:
When finished with this menu, press ENTER.
PRESS ENTER.
Topic 9: 1
Page 30

ON YOUR OWN
Topic 9: 2
RESPOND TO THE MESSAGES AS THEY OCCUR. REMEMBER TO
PRESS START ON THE PRINTER AFTER RESPONDING TO EACH
MESSAGE.
Make up a letter describing a recent vacation you took to Far
Harbor, a small fishing village on the northern coast of Maine.
Try to write about ten lines of so of text. Try to use centering and
underlining as you go along. After you get something typed, try
some revisions using deletion, insertion, and replacement. Use
MOVE and FIND too, if you can work them in. Print two copies
of the document.
Page 31

Topic 10. Using Comments to
Keep Track of Documents.
Sometimes document names do not tell you enough about the
documents you have. You can use Document Comments to give
you additional information.
Note: If you turned off the power at the workstation between
Topic 9 and Topic 10, turn it back on and re-insert the program
diskettes.
CHOOSE THE ITEM IN THE TYPING TASKS MENU TO CREATE A
DOCUMENT.
Use the following information, as the Displaywriter prompts you:
Document name: First Interview
Diskette name: TRAIN
CHOOSE THE ITEM IN THE CREATE OR REVISE DOCUMENT
MENU TO TYPE A DOCUMENT COMMENT.
Notice the YOUR CHOICE column in the menu. The
Displaywriter prompts you:
Type YOUR CHOICE; press ENTER.
You can type up to 44 characters of information to describe the
contents of your document. The comment for this document is:
Schedule for October 25.
TYPE THE DOCUMENT COMMENT AND PRESS ENTER.
► If you make a mistake, use BKSP or CODE + CANCL and
then re-type the document comment.
What you typed is now highlighted under the YOUR CHOICE
column. Notice that the Displaywriter again prompts you:
Type ID letter to choose ITEM press ENTER.
If you want to change the document comment, you can choose
the ITEM again and type a different comment.
When your Document Comment is highlighted, you are finished
with this menu. Notice the words above the prompt line: When
finished with this menu, press ENTER.
Topic 10: 1
Page 32

Topic 10: 2
PRESS ENTER TO GO TO THE TYPING AREA.
► If you make a mistake, use CODE + CANCL enough times to
return to the Typing Tasks menu.
TYPE THE DOCUMENT SHOWN BELOW.
Remember that for long lines, Displaywriter will put in the
carrier returns for you. Remember also to center the heading, and
to use underlining where indicated. Use spaces or tabs to set up
the table.
INTERVIEWS
The following schedule lists each student to be interviewed
the after noon of October 25. If you will not be able to meet at
the specified time, please notify the Placement Office.
Each student must be fully aware of the total number of
hours that will be required, and each company must present an
interview outline.
STUDENT TIME COMPANY
Robert Carlson 2:00 Ace Liability
Martha Haley 2:30 Acme Airline
Jerry Hill 3:00 Mill Electric
Any students interested in interviewing with other companies
in the future, please notify the Placement Office. All
interviews will be in the Student Union Building in the second
floor ballroom.
END THE DOCUMENT.
PRINT TWO COPIES OF THE DOCUMENT.
Page 33

Topic 11. Setting Margins,
Tabs, and Line Space.
The Displaywriter sets the left margin at column 18, the right
margin at column 90, and the line spacing at 1 (single spacing) -unless you specify otherwise. You may want to use margins,
tabs, or spacing different from that which Displaywriter
automatically provides.
Note: If you turned off the power at the workstation between
Topic 8 and Topic 9, turn it back on and re-insert the program
diskettes.
CHOOSE THE ITEM IN THE TYPING TASKS MENU TO CREATE A
DOCUMENT.
Use the following information, as the Displaywriter prompts you:
CHOOSE THE ITEM IN THE CREATE OR REVISE DOCUMENT
MENU TO CHANGE THE DOCUMENT FORMAT, THEN PRESS
ENTER.
The Format Selection menu appears.
SETTING THE LINE FORMAT
CHOOSE THE ITEM IN THE FORMAT SELECTION MENU TO
CHANGE THE LINE FORMAT, AND PRESS ENTER.
The Displaywriter prompts you:
Type your choice; press ENTER.
TYPE THE NUMBER FROM THE POSSIBLE CHOICES COLUMN
THAT EQUALS DOUBLE SPACING; PRESS ENTER.
The number in the YOUR CHOICE column is now changed and
highlighted to indicate that a change has been made.
► If you made a mistake, use CODE + CANCL or choose the
same ITEM again. You can now make a new choice.
Topic 11: 1
Document name: Second Interview
Diskette name: TRAIN
Page 34

PRESS ENTER TO RETURN TO THE FORMAT SELECTION
MENU.
The Format Selection menu returns to the screen.
SETTING THE MARGINS
CHOOSE THE ITEM IN THE FORMAT SELECTION MENU TO
CHANGE MARGINS, AND PRESS ENTER.
The Margins and Tabs menu appears.
The cursor is positioned on the scale-line at the top of the screen
under the current left margin setting. The setting, indicated by
<<, is highlighted.
USE THE SPACE BAR (NOT THE CURSOR) TO SPACE FIVE TIMES
TO 23 ON THE SCALE LINE.
The scale line moves to the left as you space over.
The left margin is now set at 23.
USE THE → KEY (NOT THE SPACE BAR) TO MOVE THE CURSOR
TO THE >> RIGHT MARGIN SETTING AT 90.
The >> mark removes to the left as you backspace over. The
right margin is now set at 85.
PRESS ENTER ENOUGH TIMES TO GO TO THE TYPING AREA.
TYPE THE MATERIAL BELOW.
Topic 11: 2
INTERVIEWS
The following schedule lists each student to be interviewed
the after noon of October 25. If you will not be able to meet at
the specified time, please notify the Placement Office.
Each student must be fully aware of the total number of
hours that will be required, and each company must present an
interview outline.
Page 35

ON YOUR OWN
As you type, the text on the screen appears single-spaced. Notice
however that each time the cursor returns to the left margin, the
line number on the status line at the top of the screen increases by
2 -- indicating that the document will print double-spaced.
END AND PRINT THE DOCUMENT.
Compare the format of the Second Interview document to the first
two paragraphs of First Interview, the document you created in
Topic 10.
Besides line spacing and margins, you can change other aspects
of format in the Format Selection menu. For example, you can
change the tab settings. As a further exercise, you can create a
document named Third Interview. You can type in the some of the
same text as you did for your Second Interview document, but
change several of the format settings (you can even try a Fourth
Interview
!). When you print these documents out, compare the
different formats.
Topic 11: 3
Page 36

Topic 12. Changing Margins,
Tabs, and Line Space
for Parts of a Document.
As you type a document, you may want to change the margins,
tabs, and/or spacing just for a section of the document.
Note: If you turned off the power at the workstation between
Topic 11 and Topic 12, turn it back on and re-insert the program
diskettes.
CHANGING LINE FORMAT
DISPLAY THE DOCUMENT Second Interview, WHICH YOU
ORIGINALLY CREATED IN TOPIC 11.
POSITION THE CURSOR IMMEDIATELY TO THE RIGHT OF THE
FINAL PERIOD IN THE LAST LINE OF THE TEXT.
TYPE A CARRIER RETURN.
To type the rest of the document, as it appears on page 12:3, you
will need to change the line spacing and the margins for the table.
Look at 12:3 now.
The CHG FMT key allows you to change format after you have
already begun typing a document. It displays the FORMAT
SELECTION menu, showing only those ITEMS that can be
changed at this point in the document.
PRESS THE CHG FMT KEY.
The CHG FMT key is located immediately below the DEL key.
The Format Selection Menu appears on the screen.
CHOOSE THE ITEM IN THE FORMAT SELECTION MENU TO
CHANGE THE LINE FORMAT, THEN PRESS ENTER.
The Line Format menu appears on the screen.
► If you have trouble getting the Line Format menu, use CODE
+ CANCL to return to the Typing Page, and then try again. Be
sure that the cursor is positioned immediately to the right of the
Topic 12: 1
Page 37

final period in the last line of the text, and that you type a Carrier
Return before pressing CHG FMT.
CHOOSE THE ITEM IN THE LINE FORMAT MENU TO CHANGE
THE LINE SPACING.
The Displaywriter prompts you:
Type YOUR CHOICE; press ENTER.
TYPE THAT NUMBER FROM THE POSSIBLE CHOICES COLUMN
THAT EQUALS SINGLE SPACING.
► If you make a mistake, use CODE + CANCL and then make
your choice again.
CHANGING ADJUST LINE ENDINGS.
As you have seen, Displaywriter automatically inserts carrier
returns and adjusts line endings as you type. You can turn this
feature off from the Line Format menu.
CHOOSE THE ITEM TO CHANGE ADJUST LINE ENDINGS.
The Displaywriter prompts you:
Type YOUR CHOICE; press ENTER.
TYPE THE NUMBER FROM THE POSSIBLE CHOICES COLUMN
THAT EQUALS
No.
Remember that you will now have to type each carrier return
yourself.
► If you make a mistake, use CODE + CANCL and then make
your choice again.
PRESS ENTER ENOUGH TIMES TO RETURN TO THE TYPING
AREA.
Topic 12: 2
Page 38

Topic 12: 3
INTERVIEWS
The following schedule lists each student to be
interviewed the after noon of October 25. If you will not be
able to meet at the specified time, please notify the
Placement Office.
Each student must be fully aware of the total number of
hours that will be required, and each company must present an
interview outline.
STUDENT TIME COMPANY
Robert Carlson 2:00 Ace Liability Finance
Martha Haley 2:30 Acme Airline Service
Jerry Hill 3:00 Mill Electrictronics, Inc
Any students interested in interviewing with other
companies in the future, please notify the Placement Office.
All interviews will be in the Student Union Building in the
second floor ballroom.
TYPE THE FIRST LINE OF THE SINGLE-SPACED TABLE.
UNDERLINE EACH WORD. TYPE THE NEXT THREE LINES.
The difference between double space and single space is not
visible on the screen. But in single space the line number on the
status line at the top of the screen increases by only 1 each time
you press RETURN.
PRESS CARRIER RETURN TWICE AFTER TYPING THE THIRD
AND FINAL LINE OF THE TABLE, AND THEN STOP!
You must now change the document format back to your starting
choices, double-spacing and automatic line adjust.
PRESS THE CHG FMT KEY.
CHOOSE THE ITEM IN THE FORMAT SELECTION MENU TO
RETURN THE LINE FORMAT TO THE STARTING CHOICES.
Page 39

TYPE THE REMAINDER OF THE PASSAGE.
BUT DO NOT YET END THE DOCUMENT.
DISPLAYING FORMAT INFORMATION
Format information like tabs and carrier returns are stored by
Displaywriter as special symbols. As you have seen, these format
symbols are normally only visible when the cursor is positioned
under them. If you wish, you can display these symbols to better
understand the format of a document.
WHILE HOLDING DOWN CODE,
PRESS THE SCREEN FORMAT KEY.
SCREEN FORMAT is on the same key as END.
The Screen Format menu appears.
CHOOSE THE ITEM IN THE SCREEN FORMAT MENU TO
DISPLAY CODES.
The Displaywriter prompts you:
Type your choice; press ENTER.
TYPE THE NUMBER FROM THE POSSIBLE CHOICES COLUMN
THAT EQUALS
PRESS ENTER AGAIN TO DISPLAY THE DOCUMENT TEXT.
Yes.
Notice that the format symbols display along with the text. The
text looks funny because the special symbols take up space on
the screen and push the text to the right.
Locating Format Symbols.
You can use FIND to quickly locate format symbols in a
document.
TO GET THE TOP OF THE DOCUMENT, HOLD DOWN CODE AND
THEN PRESS THE ↑ CURSOR KEY.
PRESS THE FIND KEY.
The Displaywriter prompts you:
Topic 12: 4
Find what?
Page 40

ON YOUR OWN
Topic 12: 5
PRESS THE CHG FMT KEY TO FIND THE NEXT CHANGE
FORMAT SPECIAL CHARACTER.
PRESS ENTER.
The cursor is now positioned under the change format symbol.
From this point you can easily display the Format Selection
menu.
PRESS ENTER.
The Format Selection menu appears. From this point you could
examine and change the format settings if you wanted to.
PRESS ENTER TO RETURN TO THE DOCUMENT.
END THE DOCUMENT AND PRINT IT OUT.
You do not have to have the special symbols displayed in order
to locate them with FIND. Display Second Interview again and
FIND the CHG FMT without first displaying codes.
The formatting capabilities of the Displaywriter which you have
learned in Topics 11 and 12 are extremely powerful. Instead of
re-typing a document to put it into a different format, you only
need to type in a few new specifications. Experiment with
additional reformatting.
Page 41

Topic 13. Using Menus: Short Cuts.
You may want to "bypass" some of the intermediate menus to
more quickly complete your work. The Displaywriter provides
some shortcuts for using menus.
Note: If you turned off the power at the workstation between
Topic 12 and Topic 13, turn it back on and re-insert the program
diskettes.
YOUR CHOICE
When you make choices in a menu that has the columns YOUR
CHOICE and POSSIBLE CHOICES, you may use a shortcut to
type your selection. You can type both the ID letter and your
choice on the prompt line before you press ENTER.
DISPLAY THE CREATE AND REVISE DOCUMENT MENU OR THE
PRINT DOCUMENT MENU.
TYPE THE ID LETTER FOR AN ITEM YOU WANT TO CHANGE.
SPACE ONCE.
TYPE THE YOUR CHOICE RESPONSE FROM THE POSSIBLE
CHOICES COLUMN.
PRESS ENTER.
ON YOUR OWN
Try this out with the Format Selection menu.
Topic 13: 1
Page 42

Topic 14. Bypassing Menus.
Using further shortcuts, you can type a "menu abbreviation" on
the prompt line to go directly to a specific menu or to the typing
area.
Note: If you turned off the power at the workstation between
Topic 13 and Topic 14, turn it back on and re-insert the program
diskettes.
BYPASSING TO THE TYPING AREA
When you are on the Typing Tasks menu, you can go directly to
the Typing Area:
WHILE HOLDING DOWN CODE, PRESS MENU BYPASS.
MENU BYPASS is on the same key as GO TO. It is located to
the right of the arrow cursor keys.
The Displaywriter prompts:
Type abbreviation; press ENTER.
TYPE c TO CREATE A DOCUMENT OR r TO REVISE.
SPACE ONCE.
TYPE THE DOCUMENT NAME.
HOLD DOWN CODE AND PRESS THE
TYPE THE DISKETTE NAME.
PRESS ENTER.
The Typing Area appears. In bypassing the Create and Revise
Document menu, you accept the Displaywriter normal settings
for margins, tabs, etc.
ON YOUR OWN
A Reference Card for Menu Bypass Abbreviations is in the vinyl
pocket in the back of your book. Use this card to experiment with
menu bypass.
Topic 14: 1
"m" CHARACTER KEY.
Page 43

Topic 15. Saving and Replaying
Keystrokes.
As you type or revise a document, you may want to repeat
sequences of keystrokes -- insertions, deletions, etc.
Note: If you turned off the power at the workstation between
Topic 14 and Topic 15, turn it back on and re-insert the program
diskettes.
KEY SAVE MODE
DISPLAY THE DOCUMENT Volunteers, STORED ON TRAIN.
Try using MENU BYPASS to do this.
WHILE HOLDING DOWN CODE, PRESS THE KEY SAVE KEY.
KEY SAVE is on the same key as KEY PLAYBACK. It is
located to the left of the keyboard keys, near the CANCL key.
(Check the keyboard diagram in the vinyl pocket in the back of
this book.)
The Displaywriter responds:
When finished saving keys, press the KEY SAVE key again.
PRESS FIND.
The Displaywriter prompts you:
PRESS TAB SIX TIMES, THEN PRESS ENTER.
The cursor has moved to the first tab character on the date line.
Now you need to delete the tabs.
PRESS DEL.
The Displaywriter prompts you: Delete what?
PRESS TAB FIVE TIMES.
Be sure that all of the six tabs are highlighted.
PRESS ENTER.
Topic 15: 1
Find what?
Page 44

PRESS KEY SAVE.
PLAYBACK MODE
PRESS KEY PLAYBACK.
PRESS MSG.
PRESS KEY PLAYBACK TO REVISE THE NEXT LINE IN THE
CLOSING. REPEAT THE STEPS FOR EACH LINE THAT IS TO BE
MOVED TO THE LEFT MARGIN.
WHEN YOU ARE FINISHED REVISING, END THE LETTER, AND
PRINT IT OUT.
ON YOUR OWN
Topic 15: 2
The date moves to the left margin.
There is a message on the screen indicating that you have ended
key save mode.
You are now ready to playback the keystrokes in order to move
the lines of the closing to the left margin.
KEY PLAYBACK is on the same key as KEY SAVE, but for to
get it, you don’t need to hold down the CODE key.
The first line of the closing is revised: the tabs are deleted and the
line moves to the left margin.
There is a message: Playback completed.
What other things could you use key save and key playback for?
Try out at least one of your ideas.
Page 45

Topic 16. Working on Your Own
With the Displaywriter.
Congratulations! You have now made a first pass through the
basis operations of the Displaywriter. You are ready to use it on
your own to do real work. As you do this, there are a few things
to keep in mind.
MANAGING YOUR DOCUMENTS.
So far you have only created a small number of practice
documents. As you continue to use the Displaywriter, you will
begin to have a larger and larger number of stored documents.
From the Typing Tasks menu you can choose the ITEM to
display the index of diskette contents. This is a list of all the
documents stored on that diskette. Try this for the TRAIN
diskette -- there are a lot of documents stored on TRAIN that you
have not yet used!
MANAGING YOUR DISKETTES.
From the first, you probably noticed "Work Diskette Tasks" on
the Task Selection menu. You use Work Diskette Tasks to
manage your work diskettes. For example, you will eventually
need more than one work diskette in order to store all of your
documents. When you begin to use a new diskette you must
remember to use the Work Diskette Tasks to "initialize" your
new diskette, that is to prepare it for storing documents. You
cannot use a diskette until it has been initialized.
Using the Work Diskette Tasks, you can also duplicate a diskette.
Having more than one copy of a diskette is a way of protecting
your work, just like making photocopies is a way of protecting
work you do on paper.
WHEN THINGS GO WRONG
The Displaywriter -- like any machine -- may need repair from
time to time. As part of your Reference Package, you have a
Problem Determination Guide. This is an illustrated, step-by-step aid
to help you find out what is wrong and who can help.
Topic 16: 1
Page 46

Note:
any kind of burning smell, don’t bother with the Problem
Determination Guide
MORE ADVANCED TOPICS
Even though you can now do quite a few things with the
Displaywriter, there is a great deal more that you can eventually
learn about. Use the
Reference Package to help you get started doing your own work.
To continue your training as you work along, refer to the
Selectable Topics, Book 2, whenever you want to or need to.
Topic 16: 2
If there is obvious physical damage (like broken parts) or
. Just call your IBM Service Representative.
Work Station Procedures Guide portion of your
 Loading...