

Page 1
Quick Reference
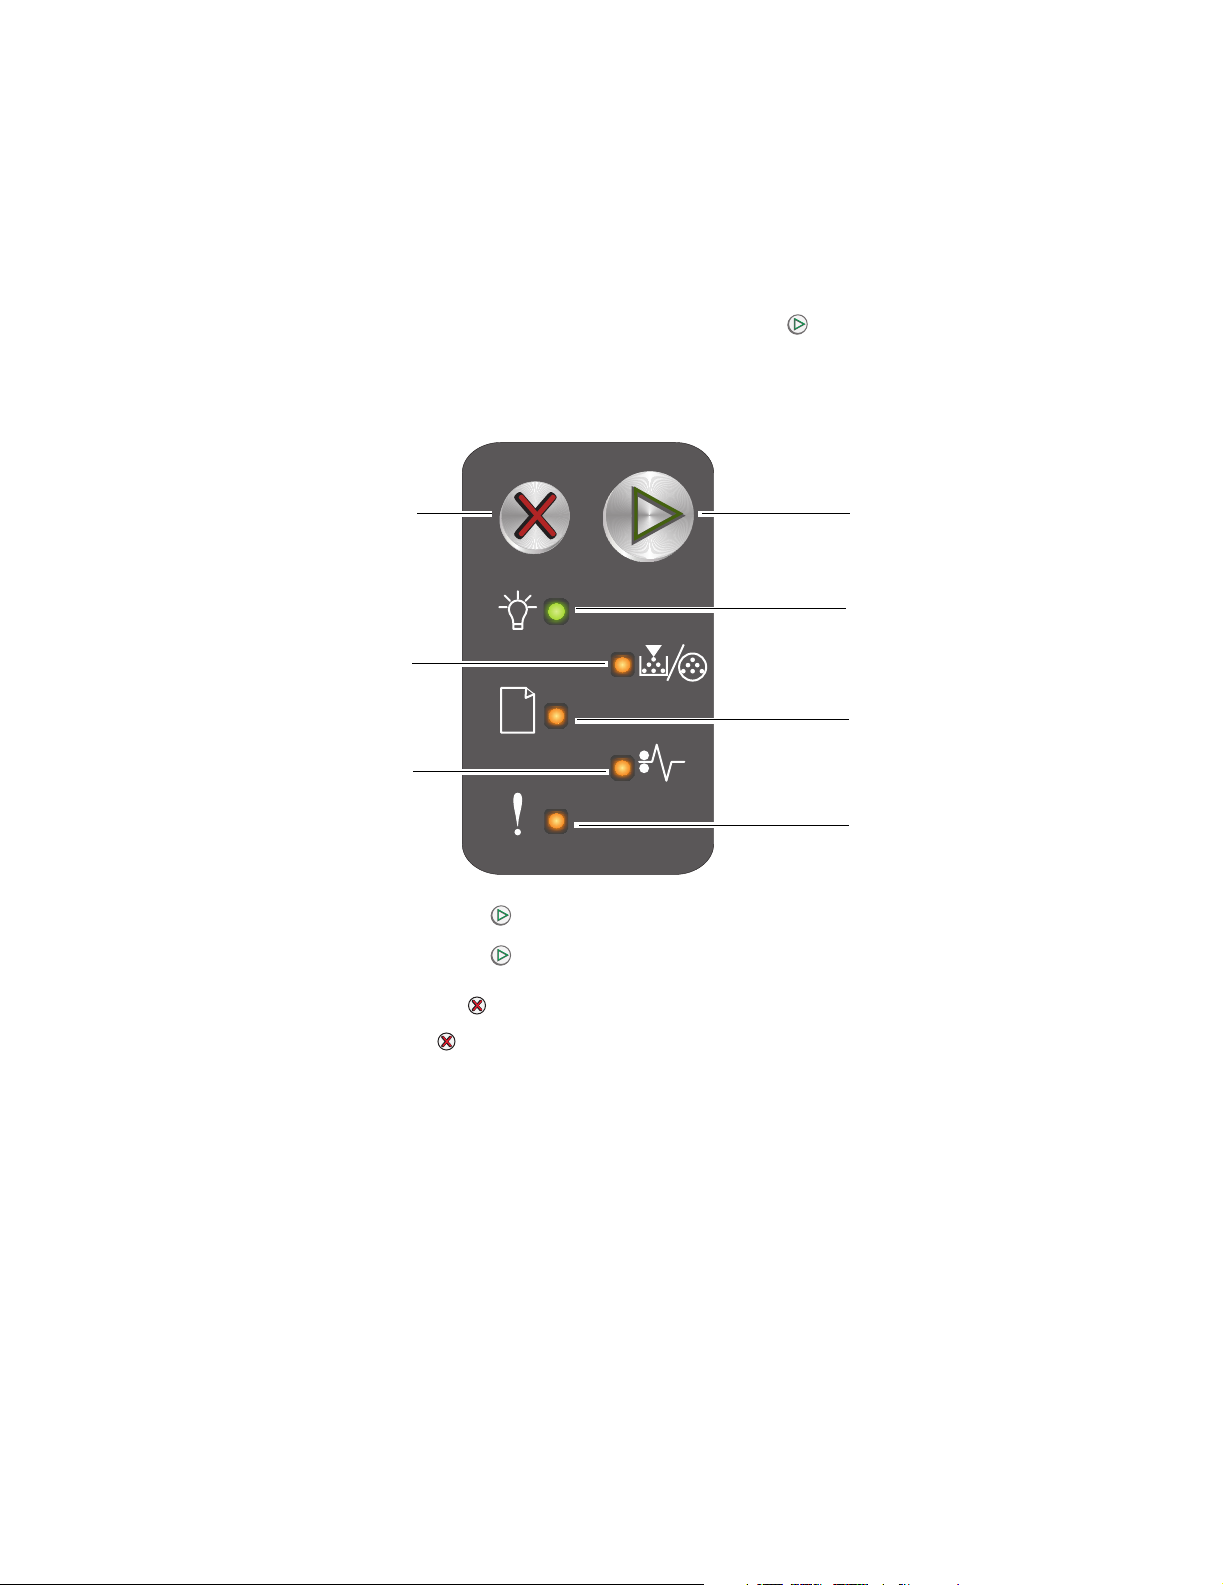
Understanding the Operator Panel
The printer operator panel has two buttons and six lights (Continue is both a light and a button).
Lights indicate the status of the printer. Buttons are used to continue or cancel the current print job.
When the printer is turned on, all lights cycle as a self test is performed. Also, when the printer is
reset, or when a printer setting is changed in the menus, all lights cycle.
Cancel
Toner Low/Replace PC Kit
Paper Jam
• Press and release Continue to resume printing.
• Press and release Continue twice quickly to display the secondary light sequence.
• Press and release Cancel to cancel the current job.
• Press and hold Cancel until all of the lights come on to reset the printer.
Continue
Ready / Data
Load / Remove Paper
Error
Understanding the operator panel lights
The operator panel lights mean different things, depending on their sequence. Lights that are off, on,
and/or blinking indicate printer conditions such as printer status, intervention, or service.
Use the light sequence table to find the message being indicated, then click the message for more
information.
Quick Reference
1
Page 2
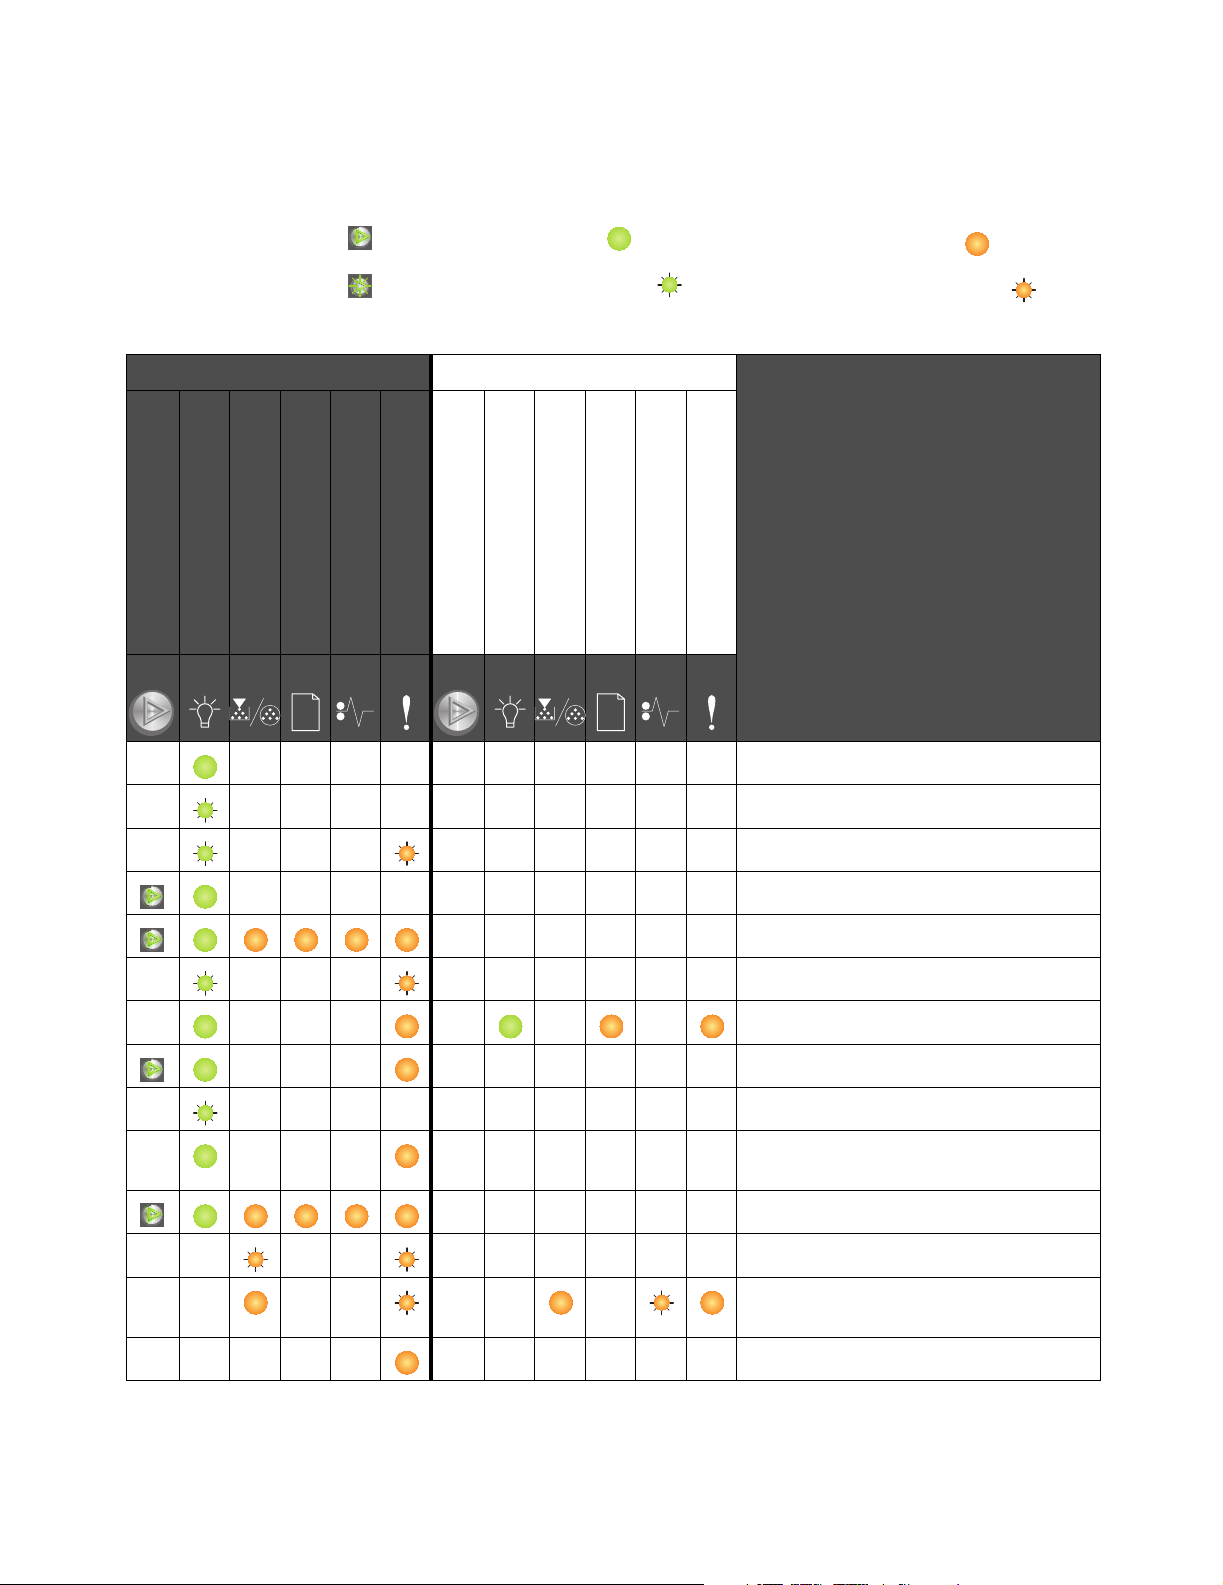
Light sequence
Continue on =
Continue blinking =
Primary light sequence Secondary light sequence
Continue
Ready / Data
Toner Low/Replace PC Kit
Load / Remove Paper
Ready / Data on =
Ready / Data blinking =
Paper Jam
Error
Continue
Ready / Data
Toner Low/Replace PC Kit
Other panel lights on =
Other panel lights blinking =
Load / Remove Paper
Paper Jam
Error
Message
Ready/Power Saver
Busy
Resolution reduced
Waiting
Cancel job/Reset printer
Flushing buffer
Invalid engine code
Not ready
Printing font list or menus settings page
Programming engine code or system
code
Restoring factory defaults
Cartridge region mismatch
Missing cartridge/Defective cartridge
detected
Open door
Understanding the Operator Panel
2
Page 3
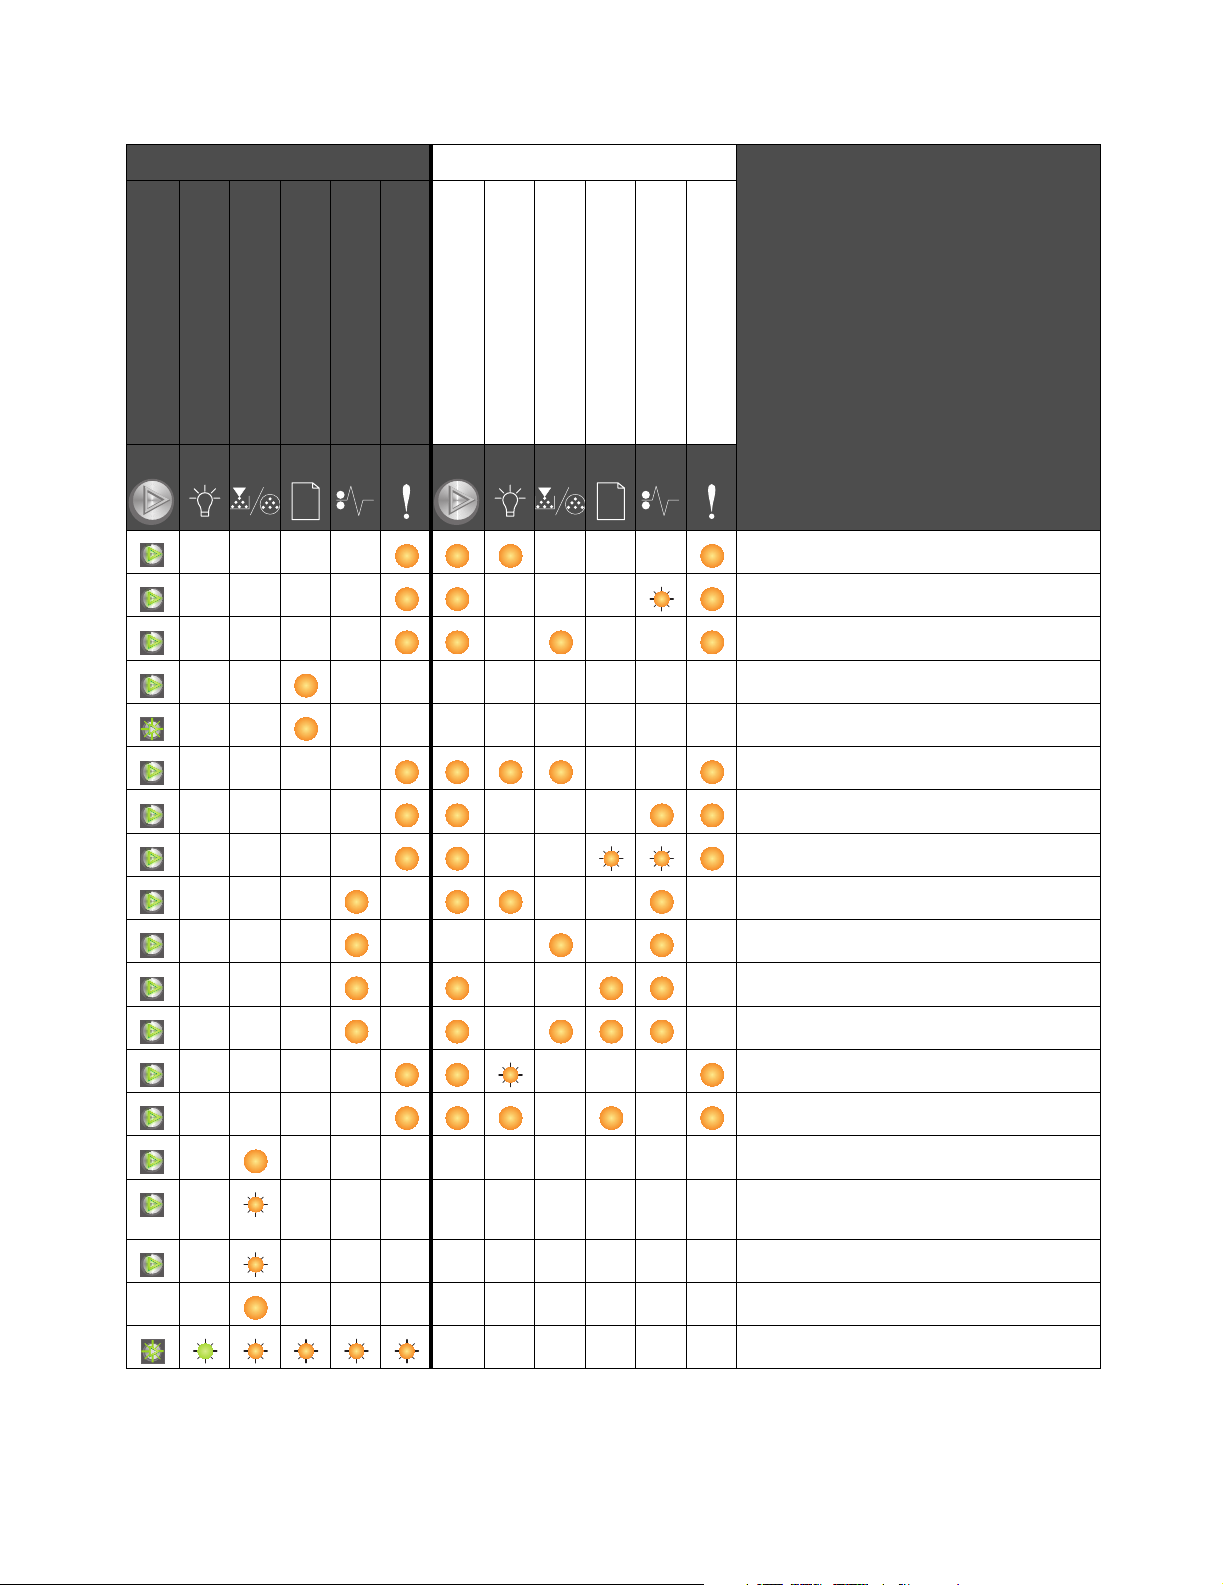
Primary light sequence Secondary light sequence
Continue
Ready / Data
Toner Low/Replace PC Kit
Load / Remove Paper
Paper Jam
Error
Continue
Ready / Data
Toner Low/Replace PC Kit
Load / Remove Paper
Paper Jam
Error
Message
Complex page
ENA connection lost
Insufficient collation area
Load media
Print side two of a duplex job
Memory full
Network interface errors
Host interface disabled
Jam at the input sensor
Jam between the input and exit sensors
Jam at printer exit sensor
Jam in Tray 1 / priority feeder
Resource save off
Short paper
Ton er lo w
Long-life photoconductor kit life
warning
Replace long-life photoconductor kit
Unsupported toner cartridge
Service error
Understanding the Operator Panel
3
Page 4

Using the printer resident Web page
The Lexmark™ E120n has a resident Web page, which can be accessed from the browser. To
access the resident Web page, type the printer’s IP address in the URL address field of the browser
(for example, http://192.168.236.24). The printer’s IP address can be found on the network setup
page of the User’s Guide.
Some resident Web page features include a real-time status window of the printer and details of the
printer’s configuration, such as current memory and engine code levels. If you have administrative
rights, you can also change printer settings.
Printing the menu settings and network setup page
To print the menu settings and network setup pages, press from the Ready state. The printer
automatically prints the menu settings and network setup pages.
A list of the printer settings and the current default values are printed on the menu settings page. The
current default settings are marked with an asterisk. The network setup page confirms the network
Status is “Connected” and lists the current network settings.
Restoring factory defaults
This function will return most of the settings back to their factory values. The display language and
the settings in the Network and USB menus are not returned to the factory defaults.
To restore the printer to the original factory defaults, press and hold for more than three
seconds.
Note: Before restoring the factory defaults, make sure the host computer or network has
stopped sending information to the printer.
Printing the menu settings and network setup page
4
Page 5

Loading paper or other print media
Source Sizes Types
Capacity*
(sheets)
Tray 1 A4, A5, JIS-B5, letter, legal, executive, folio,
statement, universal
3 x 5 inch, other Card stock 5 cards
7¾, 9, 10, DL, C5, B5, other Envelope 5 envelopes
Priority feeder A4, A5, JIS-B5, letter, legal, executive, folio,
statement, universal
A6 Plain paper,
3 x 5 inch, other Card stock 5 cards
7¾, 9, 10, DL, C5, B5, other Envelopes 3 envelopes
* Capacity for 20 lb print media, unless otherwise noted.
†
Universal size ranges:
– Tray 1 : 76–216 x 190–356 mm (3.0–8.5 x 7.5–14.0 in.) (includes 3 x 5 in. cards)
– Priority feeder: 76–216 x 190–356 mm (3.0–8.5 x 7.5–14.0 in.) (includes 3 x 5 in. cards)
†
†
Plain paper,
bond paper,
transparency,
label
Plain paper,
bond paper,
transparency,
label
bond paper
To help prevent jams:
150 sheets
5 transparencies
5 labels
15 sheets
5 transparencies
5 labels
30 sheets
• Prepare print media for loading by flexing or fanning it back and forth. Straighten the edges
on a level surface.
• Do not overload the paper trays.
• Never mix media types within a tray.
Loading paper or other print media
5
Page 6

Loading Tray 1
1 Open the paper cover by lifting up until the cover clicks into a fully open position.
2 Adjust the slide and attached backstop to the length of the selected print media.
Note: To decrease width, push in on the left guide. To increase width, squeeze the tab
attached to the right guide, and slide it to the right.
Loading paper or other print media
6
Page 7

3 Place the prepared print media into the tray, and lightly adjust all guides against the loaded
print media edges.
Note: Load letterhead paper with the design side facing up and the top edge of the sheet
feeding into the printer first. Load envelopes with the flap side down and the return
address first. The stamp area will feed through last.
4 Close the paper cover.
Loading paper or other print media
7
Page 8

Loading print media into the priority feeder
The priority feeder can be used to make quick runs of print media types or sizes not currently loaded
in Tray 1.
1 Adjust the guides to the width of the print media.
2 Place the selected print media, with the side to be printed faceup, at the center of the priority
feeder. The print media rests on the Tray 1 paper cover.
3 Push the selected print media into the printer until the print media stops.
Note: Do not force print media into the feeder. Forcing print media causes jams.
Canceling a print job
A print job can be canceled from the operator panel or from the computer. The Cancel job light
sequence appears on the operator panel when a job is canceled (see “Cancel Job/Reset printer” on
page 30 of your User’s Guide).
From printer operator panel
Press and release to cancel the current print job. Press and hold for more than three
seconds to reset the printer.
Canceling a print job
8
Page 9

From a Windows computer
1 Click Start Æ Settings Æ Printers.
2 Double-click the printer being used to print the current job.
A list of print jobs appears.
3 Right-click the current document, and then click Cancel.
From a Macintosh computer
When a job is sent to print, the printer icon appears on the desktop.
1 Click Applications.
2 Click Utilities.
3 Double-click Printer Setup Utility.
A list of print jobs appears.
4 Double-click the printer name to see a list of print jobs.
5 Click the print job you wish to cancel.
6 From the tool bar, click Delete.
Canceling a print job
9
Page 10

Clearing jams
When a jam occurs, the printer stops, and the Error light on the operator panel blinks. To determine
the location of the jam, view the secondary light sequences. Prepare the printer for jam removal by
opening the paper support and removing all printed pages from the output bin. Then, follow these
steps to clear the entire paper path.
1 Open the rear door by sliding the door release button to the right.
2 Remove any lodged print media from the paper path.
Warning: When the rear door is open, be careful not to touch the attached roller. Touching
the roller can cause contamination and affect print quality. Do not leave the rear
door open for an extended amount of time. Exposure to light will damage the blue
drum of the long-life photoconductor kit and affect print quality.
Clearing jams
10
Page 11

3 Open the top door, and remove any lodged print media from the paper path.
CAUTION: The fuser may be hot. To avoid personal injury, use caution when opening the top
door to remove a jam from the fuser area.
4 Open the front door by sliding the release button to the left.
Clearing jams
11
Page 12

5 Pull the front door up until it clicks into an open position, and remove any lodged print media.
Note: It may be necessary to remove the toner cartridge and place it on a flat, clean
surface to reach print media lodged behind it. Replace the toner cartridge when the
print media has been located and removed.
6 Close the front door by pressing firmly in the center of the front door with your thumb until the
door clicks shut.
If you need more information
• Refer to the Software and Documentation CD that came with your printer for helpful
information about using and maintaining your printer.
• Contact your administrator or Help desk if you have questions about network printing.
If you need more information
12
 Loading...