

Page 1

Forms and Bar Code Card P4.4
User's Guide
November 2019 www.lexmark.com
Page 2

Contents 2
Contents
Overview........................................................................................................ 4
Supported printer models..................................................................................................................................4
Supported fonts and bar codes.................................................................. 6
Supported bar codes..........................................................................................................................................6
Supported fonts..................................................................................................................................................10
SAP support................................................................................................. 12
Installing SAP device types..............................................................................................................................12
Modifying device types format and default settings.................................................................................12
Using Visual Bar Code Designer...............................................................13
Supported Microsoft® Windows® operating systems............................................................................... 13
Installing Visual Bar Code Designer..............................................................................................................13
Generating bar code data................................................................................................................................13
Creating and managing forms...................................................................14
Forms overview...................................................................................................................................................14
Forms Card menu...............................................................................................................................................14
Bar code menu....................................................................................................................................................16
Storing forms on the printer............................................................................................................................ 16
Capturing raw data for mapping.....................................................................................................................17
Printing forms from a flash drive.....................................................................................................................17
Identifying the version of forms on Forms and Bar Code Card..............................................................17
Font limitations....................................................................................................................................................18
Troubleshooting...........................................................................................19
The printer does not respond after installation..........................................................................................19
Forms Manager cannot detect the printer...................................................................................................19
International fonts do not print as expected...............................................................................................19
Mismatched fonts in Forms Composer and on printed forms...............................................................20
Form did not merge...........................................................................................................................................21
Form is printed in plain text.............................................................................................................................21
Cannot fax or e‑mail merged output.............................................................................................................21
Characters appear as boxes in PDFs viewed with Acrobat Reader..................................................... 21
Page 3

Contents 3
Cannot see complete list of supported forms...........................................................................................22
Data filters are not working............................................................................................................................ 22
Cannot add new forms.................................................................................................................................... 22
Bar codes do not print as expected.............................................................................................................22
Cannot generate bar codes using PCL emulation print drivers............................................................23
Unexpected results after printing a bar code............................................................................................23
Printed bar code is unreadable..................................................................................................................... 23
Notices......................................................................................................... 24
Edition notice......................................................................................................................................................24
Index.............................................................................................................28
Page 4

Overview 4
Overview
LexmarkTM Forms and Bar Code Card lets you print various standard forms and bar codes. Using an algorithm,
Forms and Bar Code Card can generate bar codes in either PCL® 5 or PostScript® (PS) emulations.
With PCL 5 emulation, a printer with an installed card is the functional equivalent of HP BarCodes and More
font set. It is also a compatible alternative to an HP LaserJet with HP BarDIMM Pro version 3.3a, including the
FREESCAPE alternate escape code feature, and Intelligent Mail bar code. Forms and Bar Code Card also
provides custom device types for printing with SAPscript in SAP R/3 applications.
Bar code options include the following features:
• OCR‑A and OCR‑B as bitmap and scalable fonts
• Independently scalable bar heights and widths
• RFID support
• Text embedment with selectable positioning
• Data format
• Automatic bar code data compression, when required
• Automatic bar code checksum calculation and character placement, when required
• Automatic placement of special characters, when required
• Built‑in 256MB flash memory
verification,
with error reporting
Forms options include the following features:
• Storing and printing of forms from a 256MB flash memory or printer hard disk
• Built‑in RFID support
• Creation of electronic forms to be merged with data
• Sending of merged output through fax and e‑mail
Notes:
– Forms Composer and Forms Manager are required in creating and managing forms.
– The forms files on Forms and Bar Code Card have the file extensions .lfm and .l.
– For more information on using RFID when printing forms, see the help documentation for Forms
Composer.
Supported printer models
• Lexmark CS42x, CS52x, CS62x
• Lexmark CS72x
• Lexmark CS82x
• Lexmark CS92x
• Lexmark CX32x, CX42x, CX52x, CX62x
• Lexmark CX72x
• Lexmark CX820, CX825, CX827, CX860
• Lexmark CX92x
• Lexmark MS52x, MS62x
Page 5

Overview 5
• Lexmark MS82x
• Lexmark MX32x, MX42x, MX52x, MX62x
• Lexmark MX72x, MX82x
Page 6

Supported fonts and bar codes 6
Supported fonts and bar codes
Supported bar codes
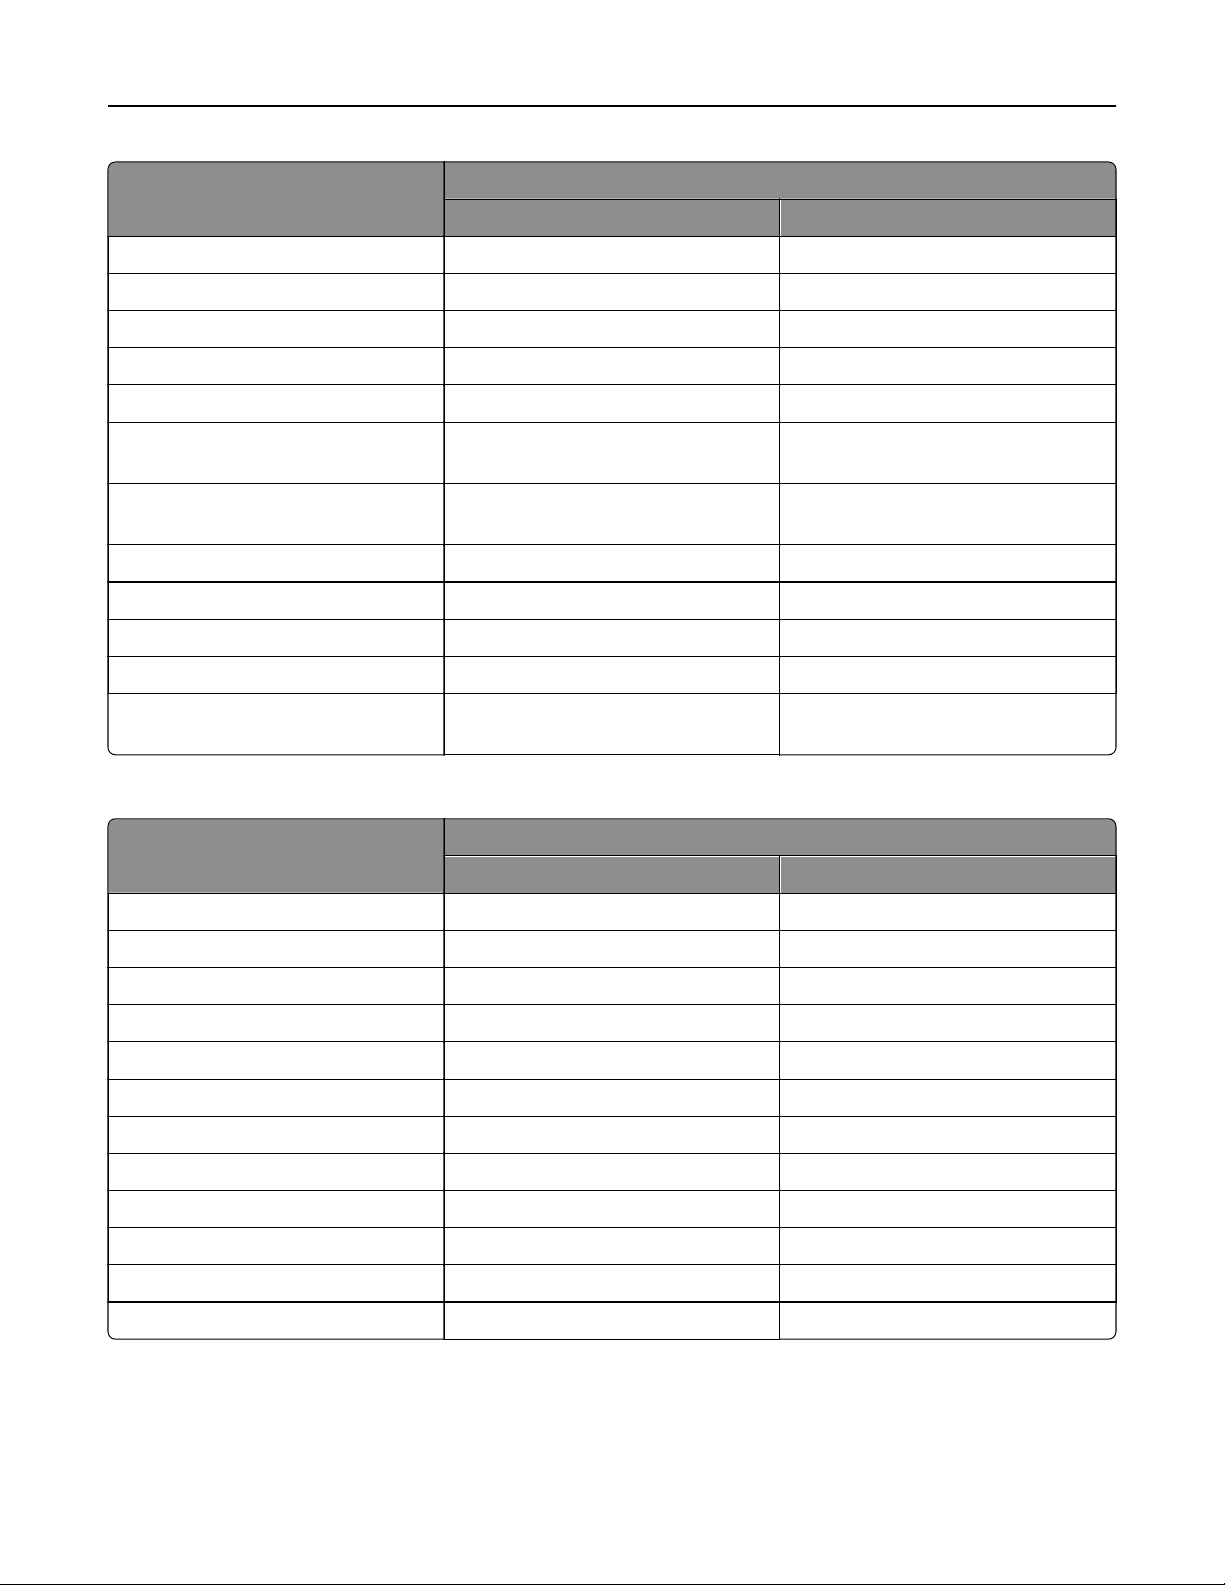
One‑dimensional bar code types and their availability on Forms and Bar Code Card
Type
PCL and PS bar codes Forms merge bar codes
Australia Post 4-State bar code (37CUST)
Australia Post 4-State bar code (52FF-MET)
Australia Post 4-State bar code (67FF-MET)
British Royal Mail 4‑State customer
code symbol (RM4SCC)
Codabar (USD ‑4, NW ‑7, Monarch ,
Code 2 of 7)
Codabar with mod16 check digit ✓ ✓
Code 128 autoswitch ✓ ✓
Code 128 A ✓ ✓
Code 128 B ✓ ✓
Code 128 C ✓ ✓
Code 3 of 9 ✓ ✓
Availability on Forms and Bar Code Card
✓✓
✓✓
✓✓
✓✓
✓✓
Code 3 of 9 with check digit ✓ ✓
Code 3 of 9 extended ✓ ✓
Code 3 of 9 extended with check digit ✓ ✓
Code 3 of 9 space encoding ✓ x
Code 3 of 9 space encoding with
check digit
Code 93 ✓ ✓
Code 93 extended ✓ ✓
Danish PTT 3 of 9 ✓ ✓
Dutch Post 4‑State bar code ✓ ✓
EAN/JAN‑8✓✓
EAN/JAN‑8 with 2‑digit supplemental ✓ ✓
EAN/JAN‑8 with 5‑digit supplemental ✓ ✓
EAN/JAN‑13 ✓ ✓
✓x
Page 7

Supported fonts and bar codes 7
Type
PCL and PS bar codes Forms merge bar codes
EAN/JAN‑13 with 2‑digit
supplemental
EAN/JAN‑13 with 5‑digit
supplemental
EAN 128 ✓ ✓
French Postal 3 of 9 A/R ✓ ✓
German Postal 2 of 5 Leitcode ✓ ✓
German Postal 2 of 5 Identcode ✓ ✓
HIBC 39/128 ✓ ✓
Interleaved 2 of 5 ✓ ✓
Interleaved 2 of 5 with check digit ✓ ✓
Intelligent Mail ✓ ✓
Industrial 2 of 5 ✓ ✓
Industrial 2 of 5 with check digit ✓ ✓
ISBN ✓ ✓
Availability on Forms and Bar Code Card
✓✓
✓✓
ISBN+5 ✓ x
ISSN ✓ ✓
ISSN+2 ✓ x
ISSN+5 ✓ x
ITF‑14 ✓ x
Japan Post 4‑State bar code ✓ ✓
Matrix 2 of 5 ✓ ✓
Matrix 2 of 5 with check digit ✓ ✓
MSI ✓ ✓
MSI with mod10 check digit ✓ ✓
MSI with mod10 and mod10 check
digit
MSI with mod11 and mod10 check
digit
Singapore Post 4‑State bar code ✓ ✓
Swiss Post ✓ ✓
UCC 128 ✓ ✓
✓✓
✓✓
UPC‑A✓✓
UPC‑E✓✓
UPC‑A with 2‑digit supplemental ✓ ✓
Page 8
Supported fonts and bar codes 8
Type
PCL and PS bar codes Forms merge bar codes
UPC‑A with 5‑digit supplemental ✓ ✓
UPC‑E with 2‑digit supplemental ✓ ✓
UPC‑E with 5‑digit supplemental ✓ ✓
USPS PLANET bar code ✓ ✓
USPS POSTNET 5‑digit ZIP code ✓ ✓
USPS POSTNET 9‑digit ZIP with 4
code
USPS POSTNET 11‑digit Delivery
Point Code
USPS Expanded POSTNET ✓ x
USPS Tray label, 10‑digit 2 of 5 ✓ ✓
USPS Sack label, 8‑digit 2 of 5 ✓ ✓
USPS Zebra code ✓ ✓
USPS FIM (Face Identification
Marking)
Availability on Forms and Bar Code Card
✓✓
✓✓
✓✓
Two‑dimensional bar code types and their availability on Forms and Bar Code Card
Type
PCL and PS bar codes Forms merge bar codes
Aztec x ✓
Codablock F ✓ ✓
Data Matrix ✓ ✓
MaxiCode ✓ ✓
MicroPDF417 ✓ ✓
PDF417 ✓ ✓
QR ✓ ✓
RSS‑14 ✓ ✓
RSS‑14 Expanded ✓ ✓
RSS‑14 Limited ✓ ✓
RSS‑14 Stacked ✓ ✓
RSS‑14 Truncated ✓ ✓
Availability on Forms and Bar Code Card
Page 9

Supported fonts and bar codes 9
Composite bar code types and their availability on Forms and Bar Code Card
Type
PCL and PS bar codes Forms merge bar codes
EAN‑8✓✓
EAN/JAN‑8 with 2‑digit supplemental ✓ ✓
EAN/JAN‑8 with 5‑digit supplemental ✓ ✓
EAN‑13 ✓ ✓
EAN/JAN‑13 with 2‑digit
supplemental
EAN/JAN‑13 with 5‑digit
supplemental
RSS‑14 ✓ ✓
RSS‑14 Expanded ✓ ✓
RSS‑14 Limited ✓ ✓
RSS‑14 Stacked ✓ ✓
RSS‑14 Truncated ✓ ✓
UCC‑128 ✓ ✓
UPC‑A✓✓
Availability on Forms and Bar Code Card
✓✓
✓✓
UPC‑E✓✓
UPC‑A with 2‑digit supplemental ✓ ✓
UPC‑A with 5‑digit supplemental ✓ ✓
UPC‑E with 2‑digit supplemental ✓ ✓
UPC‑E with 5‑digit supplemental ✓ ✓
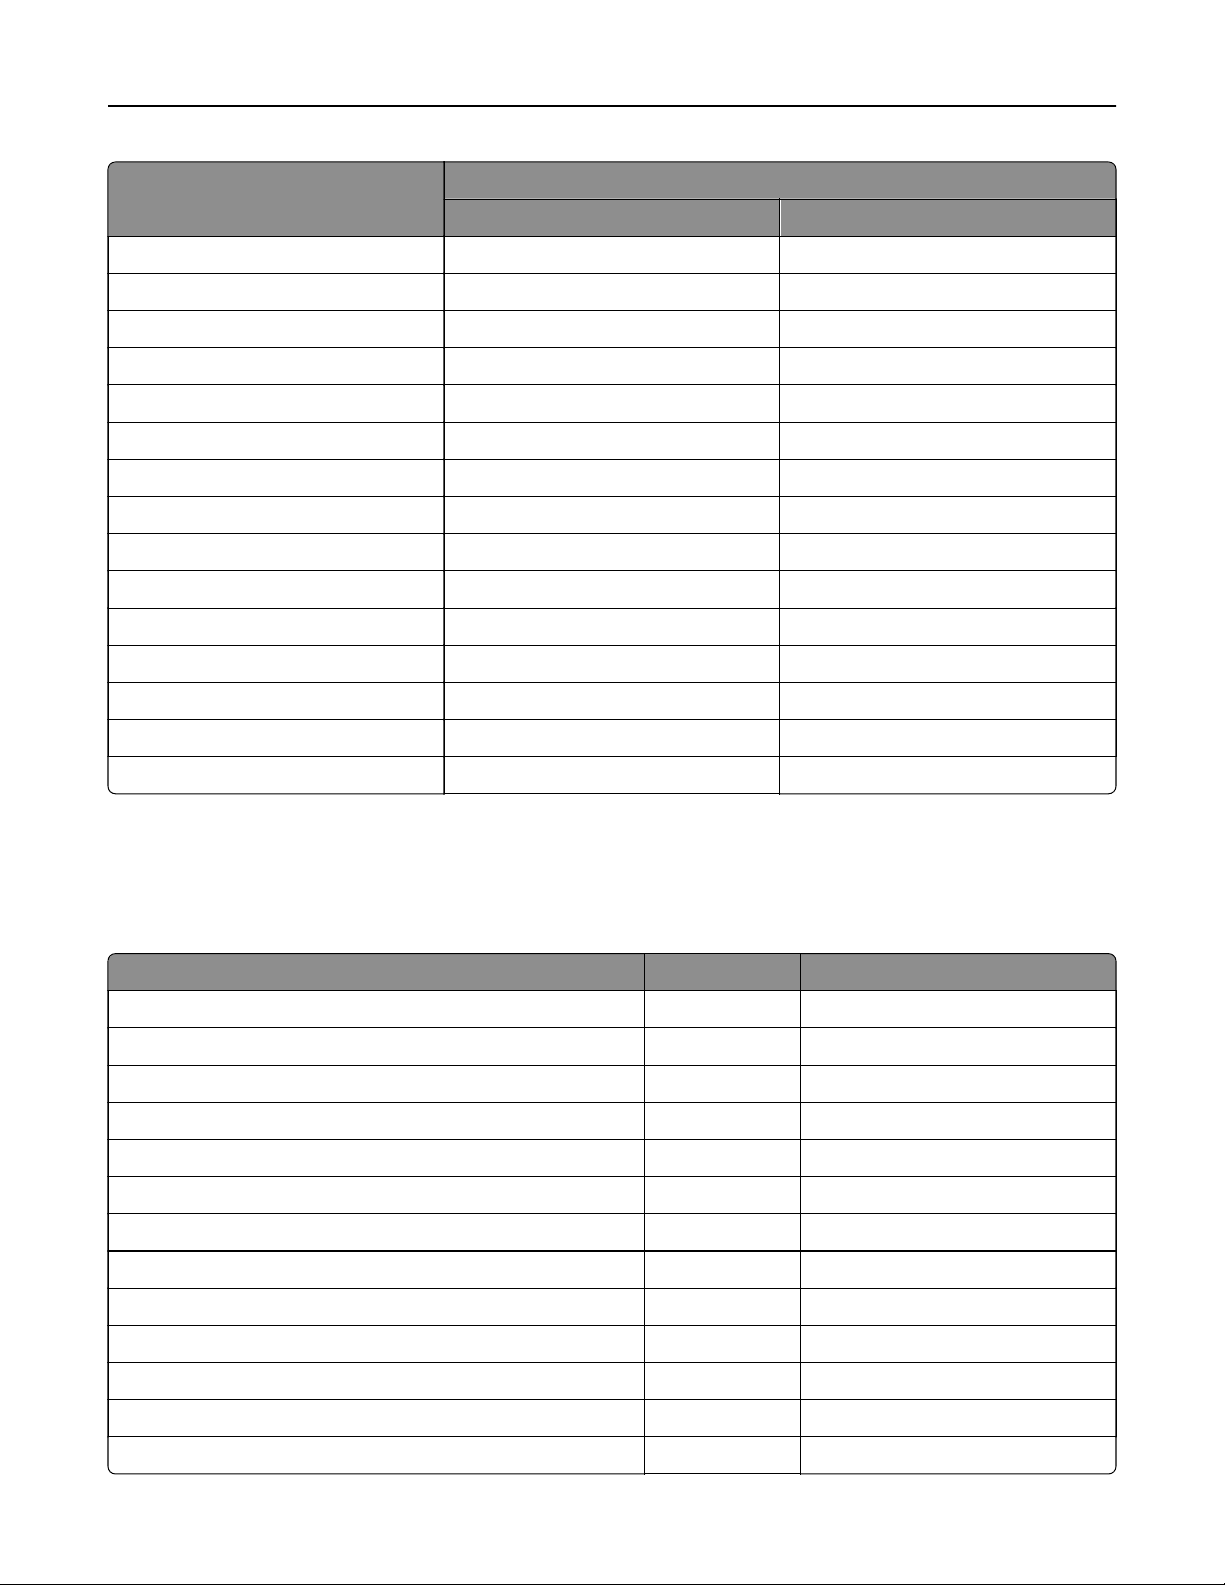
Font‑based bar code types and their availability on Forms and Bar Code Card
Type
PCL and PS bar codes Forms merge bar codes
Code 128 bitmap regular PCL only x
Code 128 bitmap wide PCL only x
Code 128 scalable regular PCL only x
Code 128 scalable narrow PCL only x
Code 128 scalable wide PCL only x
Code 3 of 9 bitmap PCL only x
Code 3 of 9 scalable half inch regular PCL only x
Availability on Forms and Bar Code Card
Code 3 of 9 scalable one inch regular PCL only x
Code 3 of 9 quarter inch regular PCL only x
Page 10
Supported fonts and bar codes 10
Type
PCL and PS bar codes Forms merge bar codes
Code 3 of 9 small high regular PCL only x
Code 3 of 9 small low regular PCL only x
Code 3 of 9 small medium regular PCL only x
Code 3 of 9 slim regular PCL only x
Code 3 of 9 wide regular PCL only x
Interleaved 2 of 5 bitmap PCL only x
Interleaved 2 of 5 scalable regular PCL only x
Interleaved 2 of 5 scalable thin PCL only x
OCR‑APCL onlyx
OCR‑B digits regular PCL only x
UPC tall PCL only x
UPC tall narrow PCL only x
UPC tall thin PCL only x
UPC half PCL only x
Availability on Forms and Bar Code Card
UPC half narrow PCL only x
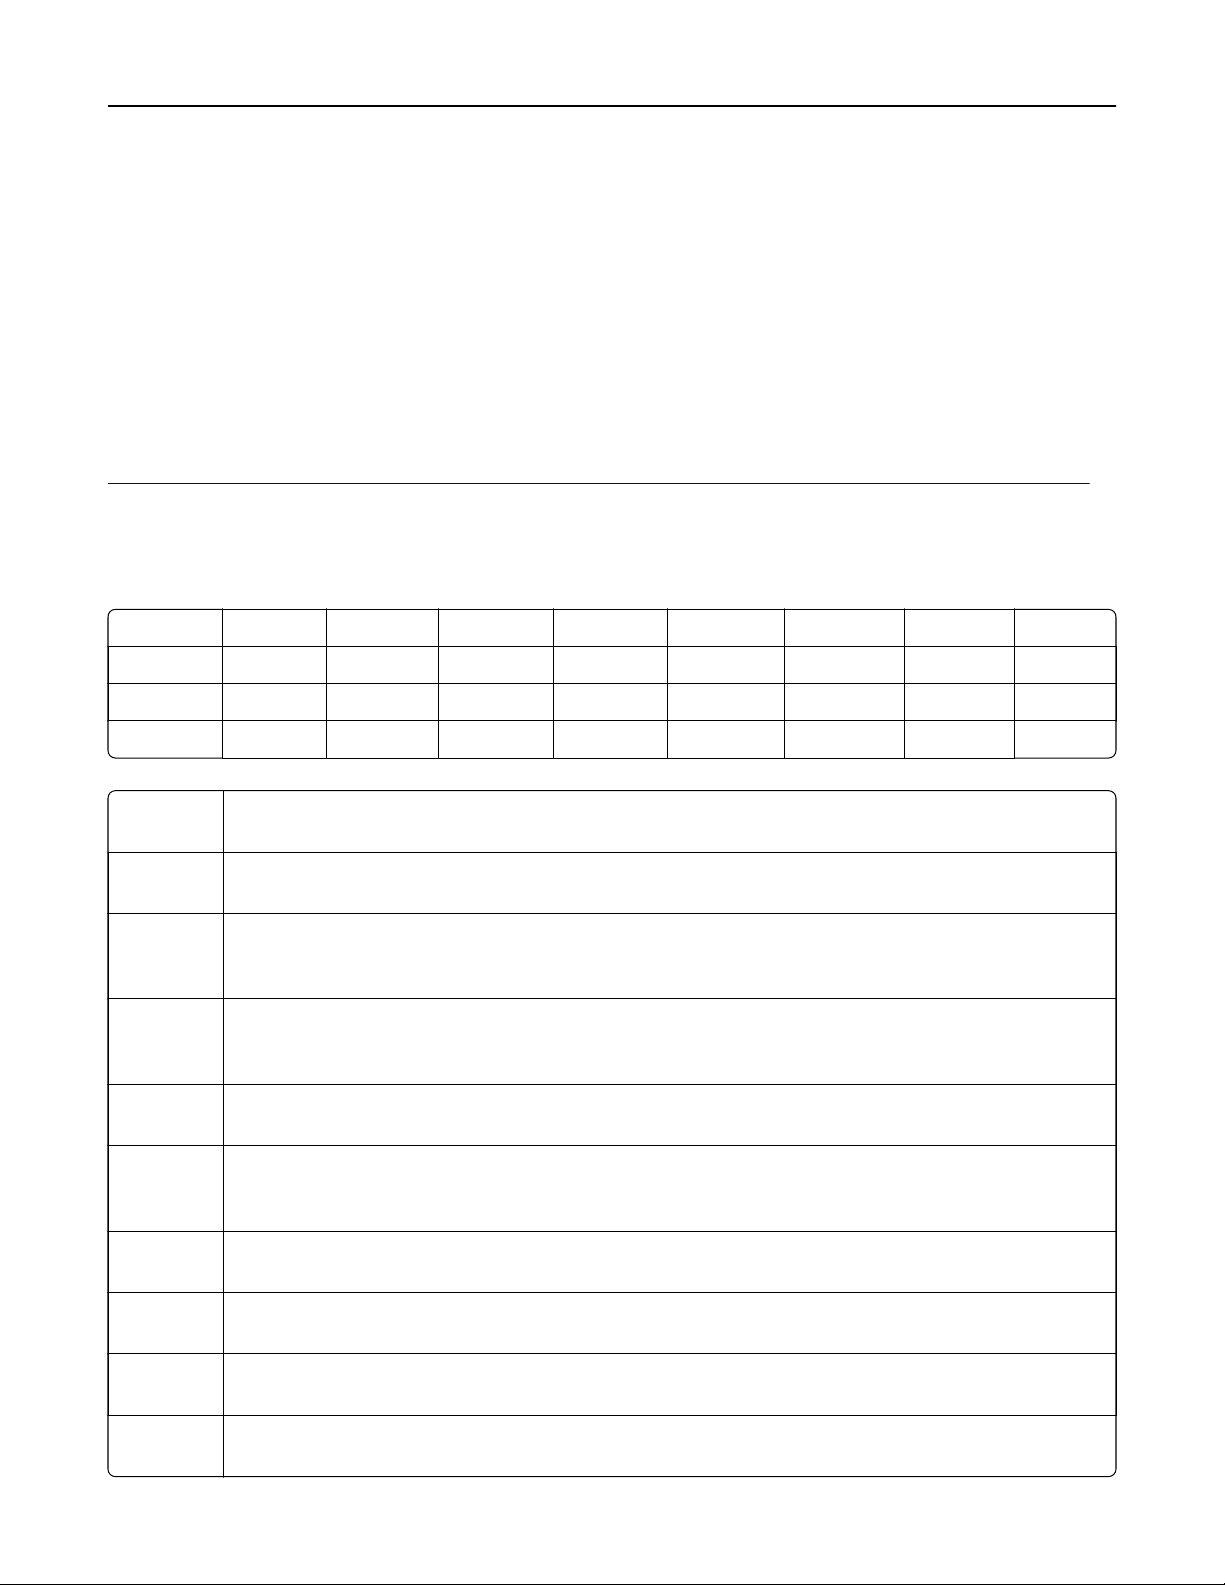
Supported fonts
To obtain the PCL 5 escape sequences used to select these fonts, print the font list using the printer control
panel. For more information, see the printer User’s Guide.
Font Type Resides
Architext CMC7 Scalable On the option card
CMC7 Scalable On the option card
Code 3 of 9 (4.69) Bitmap On the option card
Code 3 of 9 (8.11) Bitmap On the option card
Electrical symbols Scalable On the option card
Euro and other currency symbols Scalable On the option card
Line Draw Bitmap On the option card
Manufacturing symbols Scalable On the option card
MICR Scalable On the option card
OCR‑A Bitmap On the option card
OCR‑A Scalable On the option card
OCR‑B Bitmap On the option card
OCR‑B Scalable On the option card
Page 11

Supported fonts and bar codes 11
Font Type Resides
OCR‑B in Bubbles Scalable On the option card
Roman Pillar Scalable On the option card
Roman Pillar Italic Scalable On the option card
Roman Pillar Bold Scalable On the option card
Roman Pillar Bold Italic Scalable On the option card
Roman Pillar5 Scalable On the option card
UPC 10mil Bitmap On the option card
UPC 13mil Bitmap On the option card
Page 12

SAP support 12
SAP support
When used in PCL 5 emulation mode, SAP ERP software has built‑in support for many of the functions provided
by Forms and Bar Code Card.
For a list of supported device types, go to
http://service.sap.com.
Installing SAP device types
Note: You must be the SAP Basis administrator to install SAP devices.
1 Start transaction SE38.
2 Execute report RSTXSCRP to load the device type. For example, ZLXFORM2.
3 Type the name of the device type in the Object Name field.
Note: Do not include the .pri extension.
4 Select IMPORT mode, and then press the F8 button (execute).
5 Reset the SAPscript cache:
a Call transaction SE38.
b Execute the report RSTXDELL, using client = '*'.
6 Reset the character code cache:
a Start transaction SP12.
b Click character sets > Conf
(CCC) > Invalidate CCC.
buer
Note: The reset procedure is valid only on the actual instance, so you must connect on the instance
where the spool work process is running.
7 Restart the spool work process:
a Highlight the spool work process SPO.
b Click Process > cancel without core.
Note: The spool work process automatically restarts after a few seconds or on the next interrupt.
Modifying device types format and default settings
1 Start transaction SPAD.
2 Click Full Administration > Device Types.
3 Double‑click the device type.
4 Click Format, and then double‑click the format you want to modify.
5 Click Change.
6 Double‑click Printer Initialization, and then remove the number sign (#) from the beginning of each needed
line.
7 Click Save > Save.
Page 13

Using Visual Bar Code Designer 13
Using Visual Bar Code Designer
This application lets you select the bar code symbology and enter data to be encoded, and then prompt the
software to generate the bar code.
Supported Microsoft® Windows® operating systems
• Windows 7
• Windows Vista®
• Windows XP
• Windows 2000
• Windows NT® 4.0
• Windows 98
Installing Visual Bar Code Designer
1 Insert the Software and Documentation CD.
2 From the Designer subdirectory, run setup‑vbd.exe.
3 Review and accept the license agreement.
4 Select the folder where you want to install the application.
5 Follow the instructions on the computer screen.
Generating bar code data
Visual Bar Code Designer generates the PCL escape sequences, PCL HEX, or PostScript command sequences
for bar codes. These data can be used within an application, SAP device type, or as a file to test print the bar
code using Forms and Bar Code Card.
1 Click or Start.
2 Click Programs or All Programs, and then select Visual Bar Code Designer.
3 Double‑click the bar code symbology you want from the “Barcode list” window.
4 Modify the bar code settings if necessary.
5 From the Edit menu, copy the data stream you want, and then paste the text string in your application.
Notes:
• After the bar code data is generated, the test bar code can be printed by clicking the Print icon in the
toolbar. The image of the bar code prints on any printer, including those without a Forms and Bar Code
Card installed. The test bar code may be suitable for scanning.
• For more information, click the Visual Bar Code Designer Help menu, or see the Forms and Bar Code
Card Technical Reference Manual.
Page 14

Creating and managing forms 14
Creating and managing forms
Forms overview
Electronic‑forms solutions integrate both electronic and hard‑copy documents, and let you create custom forms
to create a dynamic document workflow for any business. The forms can be either printer based or server
based. You can quickly design electronic forms, store them on a printer, or automatically merge them with text
files, and then print, fax, e-mail, or archive the output.
The electronic‑forms solutions contain dierent modules that automate workflow processes. These modules
include Forms Composer and Forms Manager.
Forms Composer and Forms Manager
Note: Forms Composer and Forms Manager are required software programs that can be purchased
separately.
Forms Composer is a design tool that
the following features:
oers
• Easy-to-use graphical user interface to create forms and map data to the forms
• Importing of existing PDF documents for compatibility
• Creation of documents for printer-based and server-based technologies
The Data pane of Forms Composer allows mapping variable data that comes from the host system. You can
set the paper size and input text before downloading the form to the printer flash memory or printer hard disk.
After a form is designed and is in the printer, data can be sent directly from your host computer over a TCP/IP
network, through a USB connection to the printer, through a parallel card to the printer, or through a serial card
to the printer. Forms and Bar Code Card then merges the data with the correct form using predefined activation
conditions.
Activation conditions are defined as triggers that let you select the correct formset on the printer memory or
printer hard disk. You can define activation conditions when designing your form in Forms Composer or creating
a forms directive. Every time you create a new form for a data set, you are creating a project which you must
upload to a printer with both flash memory and Forms and Bar Code Card installed.
Forms Manager downloads and manages formsets on printers where Forms and Bar Code Card is installed.
You can add formsets to printers, retrieve printer information, and view saved files on the printer. Using Forms
Manager, you can also upgrade the Forms and Bar Code Card firmware on the printer.
Forms and Bar Code Card has firmware that automatically merges the data with the correct form design (formset)
and prints the completed form. The host data stream can be SAP RDI, ASCII, or double‑byte data encoded in
GBK, UTF-8, or UTF-16. Forms and Bar Code Card uses TrueType fonts and Adobe Font Manager (AFM) to
generate PDF output.
Forms Card menu
After the Forms and Bar Code Card is installed, more menu items are added to the standard printer menus.
These items can be found in the Forms Card menu on the Embedded Web Server.
Page 15

Creating and managing forms 15
Merge Mode settings
• Merge Mode
– Enabled—If Forms Merge Mode is enabled, then the merged output is printed.
– Disabled—If Forms Merge Mode is disabled, then the Forms Card passes all received data to the printer.
No attempt is made to merge data onto a formset.
– Data Capture—Write incoming data stream to a file on the printer storage device.
– Archive and Print—Print and archive merged PDF
is available only when the printer hard disk is installed and the card is
disk for formsets.
– Archive only—Archive merged PDF files in the formsmerge or archive directory. This option is available
only when the printer hard disk is installed and the card is configured to use the printer hard disk for
formsets.
• Data Capture Target—This option is available only when Data Capture is enabled.
– Disk | Flash— Save merged PDF Files to a printer hard disk or a portable storage device. This option is
available when Data Capture is enabled.
– Thumbdrive—This option is available only when a flash drive is inserted into the printer. Before saving
files, make sure that a formsmerge directory exists in the flash drive.
in the formsmerge or archive directory. This option
files
configured
to use the printer hard
Print Port and Filter settings
• Network Port, USB Port, Parallel Port, or Serial Port—Select to use the formsmerge code to process all
data sent to the network, USB, or parallel or serial port. Otherwise, the data file is printed as determined by
the basic printer language setting.
• Network Filter, USB Filter, Parallel Filter, or Serial Filter—Select whether to run incoming forms jobs
through the selected filter before Forms and Bar Code Card processes it.
Note: The availability of Parallel Filter and Serial Filter depends on your printer model
List of filter options:
Note: Some options may not be available depending on your printer model.
– Disabled—Indicate that all data
– NULL—Remove all null characters.
– AS400—Remove extraneous lines of data due to AS400 formatting.
– PCL—Remove all PCL escape sequences and leave plain text.
– ZPL—Remove Zebra Programming Language (ZPL) directives.
– ZPL‑F—This value is the same as ZPL, except it uses “@” as the escape character instead of “^.”
– OFIS—Remove all Optra Forms
– OFIS+NULL—Remove all null characters and all Optra Forms initialization strings.
– AS400+OFIS—Remove extraneous lines of data due to AS400 formatting and all Optra Forms
initialization strings.
• Local Port Timeout—Allow users to select a timeout value from 1 to 100 for forms jobs that come in on any
of the local ports. The default value is 10 seconds.
are
filters
TM
initialization strings.
o.
Notes:
– This setting does not apply to forms jobs sent to the network ports.
Page 16

Creating and managing forms 16
– When formsmerge is active on a local port, a job times out when triggered by the Local Port Timeout
or the Printer Timeout. This activity terminates the current job as if an “End of Form” character has
been reached.
Copy Formsets settings
Note: Make sure that a formsmerge directory exists in the
flash
drive.
• Copy Replace Duplicates—Copy and replace existing formats of the same name from a flash drive.
• Copy Do Not Replace—Cannot copy formsets with duplicate names from a
flash
drive.
Miscellaneous settings
• Print All Forms—Print all formset information found on Forms and Bar Code Card.
Notes:
– If a .ppf file exists for the formset, then the paper tray and output bin information is read from the .ppf
file and listed under the .ppf file name.
– If both a printer hard disk and a flash memory are installed, then both total size and available size for
the flash memory are shown. Only the forms on the user flash are accessible.
• Error Page Print—Print an error page when Forms and Bar Code Card encounters an error.
Bar code menu
The bar code menu is also available on the Embedded Web Server.
• Alt ESC Code—A bar code function that allows the use of an alternate escape character when processing
PCL escape sequences.
– On—Uses an alternate escape code character in addition to the default escape code character.
– O—Uses the default escape code character.
• ESC Character—When Alt ESC Code is set to On, the value defined in this setting is used in addition to the
default escape character.
– 126 (~)
– 34 (“)
– 35 (#)
– 36 ($)
– 47 (/)
– 63 (?)
– 92 (\)
– 123 ({)
– 124 (|)
– 125 (})
Storing forms on the printer
To store forms on the printer, an optional
use Forms Manager to interact with the optional flash memory or printer hard disk.
memory or printer hard disk must be installed. When it is installed,
flash
Page 17

Creating and managing forms 17
Use Forms Manager to do the following:
• Store forms on the flash memory or printer hard disk.
• Erase all forms from the flash memory or printer hard disk.
• View all forms currently stored on the printer.
Capturing raw data for mapping
Capturing raw data is necessary to properly map data to forms. For more information, see the help
documentation for Forms Manager.
1 In Forms Manager, select your printer from the Printer list.
2 Click Printer > Properties.
3 From the Mode section of the Printer Properties dialog, select Data Capture, and then click Apply.
4 Send the data file to the printer.
5 Refresh the printer in Forms Manager.
To retrieve the data
select it.
file,
Printing forms from a flash drive
The Create Flash File option in Forms Manager is used to add one or more formsets to printers that are not
attached to the network. The
created contains everything needed to add the formsets to the printer. You can save the file to a flash drive and
then access it through the USB port on the printer.
For more information on creating flash files, see the help documentation for Forms Manager.
Notes:
• If formsets on the flash drive, the printer memory, or the printer hard disk contain the same activation
conditions, then the formsets on the flash drive are used when those conditions are met.
• This function is supported only on printers with a USB port.
flash file
allows Forms Manager to communicate with these printers. The
flash file
Identifying the version of forms on Forms and Bar Code Card
Do either of the following:
• Print a menu settings page. The current version of forms is listed under Installed Features. For more
information on printing a menu settings page, see the printer User's Guide.
• Select the printer in Forms Manager, and then view the printer properties.
Note: Forms Manager is also used when upgrading the Forms and Bar Code Card firmware.
Page 18

Creating and managing forms 18
Font limitations
Windows fonts often contain more characters than the installed printer fonts. As a result, the printer may not
print all the characters on a form. This is usually a problem only for characters that fall outside of the 0–255
character code range for nonstandard code pages. Print a sample form to check whether all the characters you
want are printed.
Page 19

Troubleshooting 19
Troubleshooting
The printer does not respond after installation
Make sure that the option card is installed correctly
Turn the printer
came with the Forms and Bar Code Card kit.
and then reinstall the option card. For more information, see the installation sheet that
o,
Forms Manager cannot detect the printer
Try one or more of the following:
Check printer connections
Make sure that:
• The printer is turned on.
• The power cord is plugged into the printer and into a properly grounded electrical outlet.
• The printer is not plugged into any surge protectors, uninterruptible power supplies, or extension cords.
• The printer is securely connected to the computer, print server, or other network access point.
• You have resolved any error messages on the printer control panel display.
Make sure that the printer is connected to the network
The printer must be on the network and must match the IP or DNS name of the network.
International fonts do not print as expected
The international font set on the client computer does not match the font set on Forms and Bar Code Card.
Switch to one of the fonts available on Forms and Bar Code Card
The following international fonts are recommended for forms printed on a printer with an installed Forms
and Bar Code Card:
Intl-Univers
Intl-CG Times
Intl-Courier
ArialMT
Times New RomanPSMT
Page 20

Troubleshooting 20
Mismatched fonts in Forms Composer and on printed forms
Try one or more of the following:
Make sure that Forms Composer and the printer are
Make sure that the workflow properties for the data stream have been properly configured. For more
information, see the help documentation for Forms Composer.
For information on configuring network settings, see the documentation that came with the printer.
configured
properly
Check that font mapping has not been altered in Forms Composer
The fonts.dat file in the Forms Composer directory specifies which fonts are used for font families with
nonstandard names. The format for the information contained in the fonts.dat
font name, regular, bold, italic, bold italic. These entries specify which fonts Forms
Composer uses under which circumstances.
For example, an entry for the Bookman font family in the fonts.dat file might read Bookman, Bookman,
Bookman Demi, Bookman Italic, Bookman Demi Italic. In this example, Forms Composer uses
the font Bookman Demi for all instances of Bookman in boldface
Note: The fonts.dat file only specifies usage for font families with nonstandard names. For example,
Courier, which uses Courier, Courier Bold, Courier Italic, and Courier Bold Italic are not listed.
To check or alter the fonts.dat
file:
follows the convention
file
1 From the Forms Composer directory, use a text editor to open fonts.dat.
2 Make necessary changes to the file.
3 Save the file as fonts.dat into the same directory.
Check that font mapping has not been altered on the printer
Forms and Bar Code Card relies on font mapping to specify which fonts are used under which circumstances.
The information is contained in the manager.upr file that resides in the Forms Manager directory. When you
add a printer to Forms Manager, the manager.upr file is written to it.
To check or alter the manager.upr
for a particular printer:
file
1 From the Forms Manager\Fonts directory, use a text editor to open manager.upr.
2 Make necessary changes to the file.
3 Save the file as manager.upr into the same directory, and then delete the manager.bak file.
4 From Forms Manager, delete the printer and its associated files, and then add the printer you just
deleted.
Note: For more information on adding and deleting printers, see the help documentation for Forms
Manager.
Page 21

Troubleshooting 21
Use fonts in Forms Composer that match those on Forms and Bar Code Card
Install matching fonts on Forms and Bar Code Card
For more information on installing fonts, see the help documentation for Forms Manager.
Form did not merge
Remove unnecessary characters from the beginning of the form
A blank page prints because the first element on the page is the character for form feed or carriage return.
Form feed or carriage return characters at the beginning of a data stream cause the printer to skip to the
next page. As a result, the print job or page activation conditions may be missed.
Form is printed in plain text
Try one or more of the following:
Review the activation conditions in Forms Composer
Use Forms Composer to set up activation conditions for the form.
Make sure that the formsmerge function is not deactivated by Forms Manager
From Forms Manager, open the Printer Properties menu to activate formsmerge.
Cannot fax or e‑mail merged output
Make sure that the workflow properties for the data stream are configured properly
For more information, see the help documentation for Forms Composer.
For information on
configuring
network settings, see the printer User’s Guide.
Characters appear as boxes in PDFs viewed with Acrobat Reader
Acrobat Reader may not correctly display all characters in archived and e‑mailed attachments.
Use a dierent program to view PDFs
Merged output and preview output should match exactly. If boxes appear instead of characters in PDFs,
switching to a dierent PDF viewer (such as Foxit Reader, available from www.foxitsoftware.com) should
solve the problem.
Page 22

Troubleshooting 22
Cannot see complete list of supported forms
Use Forms Manager to view all forms stored on the optional flash memory card or the
printer hard disk
Data filters are not working
Check the Data Filters menu to see if the filter that you want is enabled
Cannot add new forms
Try one or more of the following:
Delete unused forms
Defragment the flash memory
The flash memory may be full. You can access the defragmentation feature from the Printer Properties in
Forms Manager.
Disable Printer Job Language (PJL) File Access Control
1 Open a web browser, and then type the printer IP address.
2 From the Embedded Web Server, select Settings > Print > Setup.
3 Clear the PJL A cc e ss C on t ro l check box, and then click Save.
Bar codes do not print as expected
Try one or more of the following:
Make sure that the option card is compatible with the printer
Make sure that the option card is installed
1 Print a menu settings page.
2 In the Printer Information section, check that the Forms and Bar Code Card option is listed.
Note: For more information on printing a menu settings page, see the printer User’s Guide.
Page 23

Troubleshooting 23
When using a PCL 5 emulation print driver, make sure that the escape sequence used to
generate the bar code is constructed properly
The escape sequence must begin with Esc and contain the #T parameter (not case sensitive) for the bar
code to be generated. Default values are used for parameters not explicitly defined in the sequence.
Cannot generate bar codes using PCL emulation print drivers
The option card does not support bar code printing with PCL XL or HPGL/2 emulation print drivers. Only printing
with PCL 5 is supported.
Disable advanced features using a PCL XL emulation printer driver
1 From a Windows‑based application, open the Print Properties dialog.
2 Click the Graphics tab.
3 From the Graphic mode list, select Auto select.
Unexpected results after printing a bar code
Try one or more of the following:
Make sure that the PCL 5 emulation escape sequences are complete
Immediately follow the PCL 5 emulation escape sequences that generate bar codes with an escape
Esc
sequence that
Courier with
fixed
specifies
a normal text font. For example,
pitch spacing immediately following the embedded bar code.
(s0p12h0s0b4099T returns the text to 12‑pitch
Make sure that all parameters needed are fully specified
Parameter values are not retained for subsequent bar code PCL 5 escape sequences. Each time a bar code
is generated, fully specify all parameters needed for each bar code.
Default values are used for any
unspecified
parameters.
Printed bar code is unreadable
Make sure that Print Quality settings are not too dark or too light
Print Resolution and Toner Darkness settings can aect the quality of printed bar codes. From Print
Properties, adjust the Print Quality settings before printing another bar code.
Check the paper
Use only paper that meets printer specifications. For more information, see the documentation that came
with the printer.
Page 24

Notices 24
Notices
Edition notice
November 2019
The following paragraph does not apply to any country where such provisions are inconsistent with local
law: LEXMARK INTERNATIONAL, INC., PROVIDES THIS PUBLICATION “AS IS” WITHOUT WARRANTY OF ANY
KIND, EITHER EXPRESS OR IMPLIED, INCLUDING, BUT NOT LIMITED TO, THE IMPLIED WARRANTIES OF
MERCHANTABILITY OR FITNESS FOR A PARTICULAR PURPOSE. Some states do not allow disclaimer of
express or implied warranties in certain transactions; therefore, this statement may not apply to you.
This publication could include technical inaccuracies or typographical errors. Changes are periodically made
to the information herein; these changes will be incorporated in later editions. Improvements or changes in the
products or the programs described may be made at any time.
References in this publication to products, programs, or services do not imply that the manufacturer intends to
make these available in all countries in which it operates. Any reference to a product, program, or service is
not intended to state or imply that only that product, program, or service may be used. Any functionally
equivalent product, program, or service that does not infringe any existing intellectual property right may be
used instead. Evaluation and verification of operation in conjunction with other products, programs, or services,
except those expressly designated by the manufacturer, are the user’s responsibility.
For Lexmark technical support, visit
For information on supplies and downloads, visit
© 2010 Lexmark International, Inc.
All rights reserved.
http://support.lexmark.com.
www.lexmark.com.
GOVERNMENT END USERS
The Software Program and any related documentation are "Commercial Items," as that term is
C.F.R. 2.101, "Computer Software" and "Commercial Computer Software Documentation," as such terms are
used in 48 C.F.R. 12.212 or 48 C.F.R. 227.7202, as applicable. Consistent with 48 C.F.R. 12.212 or 48 C.F.R.
227.7202-1 through 227.7207-4, as applicable, the Commercial Computer Software and Commercial Software
Documentation are licensed to the U.S. Government end users (a) only as Commercial Items and (b) with only
those rights as are granted to all other end users pursuant to the terms and conditions herein.
defined
in 48
Trademarks
Lexmark, the Lexmark logo, and Optra Forms are trademarks or registered trademarks of Lexmark International,
Inc. in the United States and/or other countries.
Microsoft, Windows, Windows Vista, and Windows NT are either registered trademarks or trademarks of the
Microsoft group of companies in the United States and other countries.
PCL® is a registered trademark of the Hewlett-Packard Company. PCL is Hewlett-Packard Company’s
designation of a set of printer commands (language) and functions included in its printer products. This printer
is intended to be compatible with the PCL language. This means the printer recognizes PCL commands used
in various application programs, and that the printer emulates the functions corresponding to the commands.
Page 25

Notices 25
PostScript is a registered trademark of Adobe Systems Incorporated in the United States and/or other countries.
The following terms are trademarks or registered trademarks of these companies:
Arial The Monotype Corporation plc
CG Times Based on Times New Roman under license from The Monotype Corporation plc, is a product
of Agfa Corporation
ITC Bookman International Typeface Corporation
Times New Roman The Monotype Corporation plc
TrueType Apple Computer, Inc.
Univers Linotype-Hell AG and/or its subsidiaries
All other trademarks are the property of their respective owners.
Notice to users in the European Union
This product is in conformity with the protection requirements of EC Council directives 2004/108/EC,
2006/95/EC and 2005/32/EC on the approximation and harmonization of the laws of the Member States
relating to electromagnetic compatibility, safety of electrical equipment designed for use within certain voltage
limits and the ecodesign of energy-using products.
Compliance is indicated by the CE marking.
The manufacturer of this product is: Lexmark International, Inc., 740 West New Circle Road, Lexington, KY,
40550 USA. The authorized representative is: Lexmark International Technology Hungária Kft., 8 Lechner Ödön
fasor, Millennium Tower III, 1095 Budapest HUNGARY, A declaration of conformity to the requirements of the
Directives is available upon request from the Authorized Representative.
This product
Products equipped with 2.4GHz Wireless LAN option are in conformity with the protection requirements of EC
Council directives 2004/108/EC, 2006/95/EC, and 1999/5/EC on the approximation and harmonization of the
laws of the Member States relating to electromagnetic compatibility, safety of electrical equipment designed
for use within certain voltage limits and on radio equipment and telecommunications terminal equipment.
Compliance is indicated by the CE marking.
Operation is allowed in all EU and EFTA countries, but is restricted to indoor use only.
satisfies
the Class B limits of EN 55022 and safety requirements of EN 60950.
The manufacturer of this product is: Lexmark International, Inc., 740 West New Circle Road, Lexington, KY,
40550 USA. The authorized representative is: Lexmark International Technology Hungária Kft., 8 Lechner Ödön
fasor, Millennium Tower III, 1095 Budapest HUNGARY, A declaration of conformity to the requirements of the
Directives is available upon request from the Authorized Representative.
Page 26
Notices 26
European Community (EC) directives conformity
This product is in conformity with the protection requirements of EC Council directives 2014/30/EU, 2014/35/EU,
2009/125/EC, and 2011/65/EU on the approximation and harmonization of the laws of the Member States
relating to electromagnetic compatibility, safety of electrical equipment designed for use within certain voltage
limits, the ecodesign of energy-related products, and on the restrictions of use of certain hazardous substances
in electrical and electronic equipment.
The manufacturer of this product is: Lexmark International, Inc., 740 West New Circle Road, Lexington, KY,
40550 USA. The authorized representative is: Lexmark International Technology Hungária Kft., 8 Lechner Ödön
fasor, Millennium Tower III, 1095 Budapest HUNGARY. A declaration of conformity to the requirements of the
Directives is available upon request from the Authorized Representative or may be obtained at
www.lexmark.com/en_us/about/regulatory-compliance/european-union-declaration-of-conformity.html.
This product
satisfies
the Class B limits of EN 55022 and EN55032 and safety requirements of EN 60950‑1 or
EN 62368-1.
This product may be used in the countries indicated in the table below.
AT BE BG CH CY CZ DE DK EE
EL ES FI FR HR HU IE IS IT
LI LT LU LV MT NL NO PL PT
RO SE SI SK TR UK
Česky Společnost Lexmark International, Inc. tímto prohlašuje, že výrobek tento výrobek je ve shodě se
základními požadavky a dalšími příslušnými ustanoveními směrnice 1999/5/ES.
Dansk Lexmark International, Inc. erklærer herved, at dette produkt overholder de væsentlige krav og øvrige
relevante krav i direktiv 1999/5/EF.
Deutsch Hiermit erklärt Lexmark International, Inc., dass sich das Gerät dieses Gerät in Übereinstimmung mit
den grundlegenden Anforderungen und den übrigen einschlägigen Bestimmungen der Richtlinie
1999/5/EG befindet.
Ελληνική ΜΕ ΤΗΝ ΠΑΡΟΥΣΑ Η LEXMARK INTERNATIONAL, INC. ∆ΗΛΩΝΕΙ ΟΤΙ ΑΥΤΟ ΤΟ ΠΡΟΪΟΝ
ΣΥΜΜΟΡΦΩΝΕΤΑΙ ΠΡΟΣ ΤΙΣ ΟΥΣΙΩ∆ΕΙΣ ΑΠΑΙΤΗΣΕΙΣ ΚΑΙ ΤΙΣ ΛΟΙΠΕΣ ΣΧΕΤΙΚΕΣ ∆ΙΑΤΑΞΕΙΣ
ΤΗΣ Ο∆ΗΓΙΑΣ 1999/5/ΕΚ.
English Hereby, Lexmark International, Inc., declares that this type of equipment is in compliance with the
essential requirements and other relevant provisions of Directive 1999/5/EC.
Español Por medio de la presente, Lexmark International, Inc. declara que este producto cumple con los
requisitos esenciales y cualesquiera otras disposiciones aplicables o exigibles de la Directiva
1999/5/CE.
Eesti Käesolevaga kinnitab Lexmark International, Inc., et seade see toode vastab direktiivi 1999/5/EÜ
põhinõuetele ja nimetatud direktiivist tulenevatele muudele asjakohastele sätetele.
Suomi Lexmark International, Inc. vakuuttaa täten, että tämä tuote on direktiivin 1999/5/EY oleellisten
vaatimusten ja muiden sitä koskevien direktiivin ehtojen mukainen.
Français Par la présente, Lexmark International, Inc. déclare que l'appareil ce produit est conforme aux
exigences fondamentales et autres dispositions pertinentes de la directive 1999/5/CE.
Magyar Alulírott, Lexmark International, Inc. nyilatkozom, hogy a termék megfelel a vonatkozó alapvetõ
követelményeknek és az 1999/5/EC irányelv egyéb elõírásainak.
Page 27

Notices 27
Íslenska Hér með lýsir Lexmark International, Inc. yfir því að þessi vara er í samræmi við grunnkröfur og aðrar
kröfur, sem gerðar eru í tilskipun 1999/5/EC.
Italiano Con la presente Lexmark International, Inc. dichiara che questo questo prodotto è conforme ai requisiti
essenziali ed alle altre disposizioni pertinenti stabilite dalla direttiva 1999/5/CE.
Latviski Ar šo Lexmark International, Inc. deklarē, ka šis izstrādājums atbilst Direktīvas 1999/5/EK būtiskajām
prasībām un citiem ar to saistītajiem noteikumiem.
Lietuvių Šiuo Lexmark International, Inc. deklaruoja, kad šis produktas atitinka esminius reikalavimus ir kitas
1999/5/EB direktyvos nuostatas.
Malti Bil-preżenti, Lexmark International, Inc., jiddikjara li dan il-prodott huwa konformi mal-ħtiġijiet
essenzjali u ma dispożizzjonijiet oħrajn relevanti li jinsabu fid-Direttiva 1999/5/KE.
Nederlands Hierbij verklaart Lexmark International, Inc. dat het toestel dit product in overeenstemming is met de
essentiële eisen en de andere relevante bepalingen van richtlijn 1999/5/EG.
Norsk Lexmark International, Inc. erklærer herved at dette produktet er i samsvar med de grunnleggende
krav og øvrige relevante krav i direktiv 1999/5/EF.
Polski Niniejszym Lexmark International, Inc. oświadcza, że niniejszy produkt jest zgodny z zasadniczymi
wymogami oraz pozostałymi stosownymi postanowieniami Dyrektywy 1999/5/EC.
Português A Lexmark International Inc. declara que este este produto está conforme com os requisitos essenciais
e outras disposições da Diretiva 1999/5/CE.
Slovensky Lexmark International, Inc. týmto vyhlasuje, že tento produkt spĺňa základné požiadavky a všetky
príslušné ustanovenia smernice 1999/5/ES.
Slovensko Lexmark International, Inc. izjavlja, da je ta izdelek v skladu z bistvenimi zahtevami in ostalimi
relevantnimi določili direktive 1999/5/ES.
Svenska Härmed intygar Lexmark International, Inc. att denna produkt står i överensstämmelse med de
väsentliga egenskapskrav och övriga relevanta bestämmelser som framgår av direktiv 1999/5/EG.
Page 28

Index 28
Index
B
bar code
generating data 13
generating, troubleshooting 23
bar code menu
alternate escape character 16
escape character 16
bar code options features 4
bar codes
composite 6
font‑based 6
one‑dimensional 6
supported 6
two‑dimensional 6
bar codes do not print as
expected 22
C
cannot add new forms 22
cannot fax or e‑mail merged
output 21
cannot generate bar codes using
PCL emulation printer drivers 23
cannot see complete list of
supported forms 22
capturing raw data for
mapping 17
characters appear as boxes in
PDFs viewed with Acrobat
Reader 21
D
data
data mapping
capturing raw data 17
are not working 22
filters
E
emission notices 25
F
flash drive
printing forms from 17
flash memory is full 22
font limitations 18
fonts
limitations 18
mismatch in Forms Composer
and printed forms 20
supported 10
form did not merge 21
form is printed in plain text 21
forms
identifying version 17
printing from a
storing 16
Forms and Bar Code Card
identifying forms version 17
Forms Card menu
copy formset 14
error page print 14
local port timeout 14
merge mode 14
network
network port 14
print all forms 14
USB
USB port 14
Forms Composer
font mismatch,
troubleshooting 20
overview 14
Forms Manager
cannot detect printer,
troubleshooting 19
capturing raw data for
mapping 17
overview 14
setting printer to Data Capture
mode 17
Forms Manager cannot detect
the printer 19
forms options features 4
forms overview 14
filters
filters
14
flash
14
drive 17
G
generating bar code data 13
I
installing SAP device types 12
installing Visual Bar Code
Designer 13
international fonts do not print as
expected 19
M
menu
bar code 16
Forms Card 14
merged output
cannot fax or e‑mail,
troubleshooting 21
mismatched fonts in Forms
Composer and on printed
forms 20
modifying device types format
and default settings 12
N
notices 25, 26
O
options features
bar codes 4
forms 4
overview
forms 14
Forms and Bar Code Card 4
Forms Composer 14
Forms Manager 14
P
PDFs
problems with 21
printed bar code is
unreadable 23
printer does not respond after
installation 19
printer models
supported 4
printing forms from a
drive 17
flash
S
SAP
installing device types 12
SAP device types
installing 12
modifying format 12
modifying settings 12
storing forms on the printer 16
supported bar codes 6
Page 29

Index 29
supported operating systems 13
supported printer models 4
T
troubleshooting
bar codes do not print as
expected 22
cannot add new forms 22
cannot fax or e‑mail merged
output 21
cannot generate bar code using
PCL emulation printer
drivers 23
cannot see complete list of
supported forms 22
data filters are not working 22
flash memory is full 22
form did not merge 21
form is printed in plain text 21
Forms Manager cannot detect
printer 19
international fonts do not print
as expected 19
printed bar code is
unreadable 23
printer does not respond after
installation 19
unexpected results after
printing a bar code 23
U
unexpected results after printing
a bar code 23
V
Visual Bar Code Designer
generating bar code data 13
installing 13
supported operating
systems 13
 Loading...