


Lexmark Z42, Z43
User’s Guide for Windows 95 and Windows 98
Color Jetprinter
TM

Edition: February 2001
The following paragraph does not apply to any country where such provisions are inconsistent with local law:
LEXMARK INTERNATION AL, INC., PROVIDES THIS PUBLICATION “AS IS” WITHOUT WARRANTY OF ANY KIND,
EITHER EXPRESS OR IMPLIED, INCLUDING, BUT NOT LIMITED TO, THE IMPLIED WARRANTIES OF
MERCHANTABILITY OR FITNESS FOR A PARTICULAR PURPOSE. Some states do not allow disclaimer of express or
implied warranties in certain transactions; therefore, this statement may not apply to you.
This publication could include technical inaccuracies or typographical errors. Changes are periodically made to
the information herein; these changes will be incorporated in later editions. Improvements or changes in the
products or the programs described may be made at any time.
References in this publication to products, programs, or services do not imply that the manufacturer intends to
make these available in all countries in which it operates. Any reference to a product, program, or service is not
intended to state or imply that only that product, program, or service may be used. Any functionally equivalent
product, program, or service that does not infringe any existing intellectual prope rty right may be used instead.
Evaluation and verification of operation in conjunction with other products, programs, or services, except those
expressly designated by the manufacturer, are the user’s responsibility.
Lexmark, Lexmark with diamond design, and ColorFine are trademarks of Lexmark International, Inc., registered
in the United States and/or other countries. Color Jetprinter is a trademark of Lexmark Inter national, Inc.
Other trademarks are the property of their respective owners.
© Copyright 2001 Lexmark International, Inc. All rights reserved.
UNITED STATES GOVERN MENT RESTRICTED RIGHTS
This software and documentation are provided with RESTRICTED RIGHTS. Use, duplication or disclosure by the
Government is subject to restrictions as set forth in subparagraph (c)(1)(ii) of the Rights in Technical Data and
Computer Software clause at DFARS 252.227-7013 and in applicable F AR prov isions: Lexmark International, Inc.,
Lexington, KY 40550.

Contents
Contents
ContentsContents
Steps to basic printing 1
Steps to basic printing 1
Steps to basic printing 1Steps to basic printing 1
Step 1: Load the paper 2
Step 2: Customize the printer settings 5
Step 3: Print your document 8
Printing beyond the basics 9
Printing beyond the basics 9
Printing beyond the basics 9Printing beyond the basics 9
Printing on both sides of a sheet of paper 9
C
C
C
C
o
o
o
o
n
n
n
n
t
t
t
t
e
e
e
e
n
n
n
n
t
t
t
t
s
s
s
s
Printing handouts 12
Printing booklets 15
Printing posters 18
Maintaining your printer 21
Maintaining your printer 21
Maintaining your printer 21Maintaining your printer 21
Using the Control Program 21
Installing or replacing print cartridges 22
Improving print quality 24
Preserving print cartridges 26
Troubleshooting 27
Troubleshooting 27
Troubleshooting 27Troubleshooting 27
Printer prints slowly or doesn’t print 28
Paper misfeeds or jams 31
Document prints with mistakes or poor quality 32
Problems with transparencies, photos, or envelopes 35
Error messages and flashing lights 36
Appendix 37
Appendix 37
Appendix 37Appendix 37
Printing from DOS 37
Contents
•
•
•
iii
iii
iiiiii
•
•

Index 41
Index 41
Index 41Index 41
Statement of Limited Warranty 37
Electronic emission notices 39
Energy star 40
Power supply 40
Safety information 40
•
•
•
iv
iv
iviv
•
•

1
1
11
Steps to basic printing
Steps to basic printing
Steps to basic printingSteps to basic printing
This book describes how to use your printer with
Windows 95 and Windows 98.
If you are using your printer with Windows NT 4.0 or
Windows 2000, refer to the User’s Guide button on the
printer software CD for Windows.
Basic printing is as easy as:
1111 Load the paper (see page 2).
2222 Customize the printer settings (see page 5).
S
S
S
S
t
t
t
t
e
e
e
e
p
p
p
p
s
s
s
s
t
t
t
t
o
o
o
o
b
b
b
b
a
a
a
a
s
s
s
s
i
i
i
i
c
c
c
c
p
p
p
p
r
r
r
r
i
i
i
i
n
n
n
n
t
t
t
t
i
i
i
i
n
n
n
n
g
g
g
g
3333 Print your document (see page 8).
Steps to basic printing
•
•
1111
•
•
•

Step 1: Load the paper
Step 1: Load the paper
Step 1: Load the paperStep 1: Load the paper
You can load up to 100 sheets of paper (depending on
thickness).
1111 Place the paper ag ainst the righ t side of the sheet fee der, with
the print side facing you.
Note: Make sure you do not force the paper into the sheet
feeder when you load it. For example, letter or A4 size paper
should extend above the top of the paper support.
Paper support
Sheet feeder
2222
•
•
•
Chapter 1
•
•
2222 Squeeze the release tab and the paper guide together and
slide the paper guide to the edge of the paper.
Paper guide
Release tab

Loading spe c ialty paper s
Loading spe c ialty paper s
Loading spe c ialty paper sLoading spe c ialty paper s
Follow these guidelines when loading specialty papers:
Load up to:
Load up to: Make sure:
Load up to:Load up to:
10 envelopes •••• the print side is facing you.
Make sure:
Make sure:Make sure:
•••• the envelopes are loaded
vertically against the right
side of the sheet feeder.
•••• the stamp location is in the
upper left corner.
•••• the paper guide is against the edge of the
envelopes.
S
S
S
S
t
t
t
t
e
e
e
e
p
p
p
p
s
s
s
s
t
t
t
t
o
o
o
o
b
b
b
b
a
a
a
a
s
s
s
s
i
i
i
i
c
c
c
c
p
p
p
p
r
r
r
r
i
i
i
i
n
n
n
n
t
t
t
t
i
i
i
i
n
n
n
n
g
g
g
g
10 greeting cards,
index cards,
postcards, or
photo cards
25 sheets of photo
paper
20 sheets of banner
paper
•••• the print side is facing you.
•••• the cards are loaded vertically against the right
side of the sheet feeder.
•••• the p ape r gu i de is a gai n s t the edge of the cards.
•••• the glossy or coated side is facing you.
•••• the p aper gu ide is agai nst the edge o f the photo
paper.
•••• you place the paper
behind the printer,
and then bring the
unattached edge of
the first page over the
top of the printer, and
into the sheet feeder.
•••• the paper guide is against the edge of the
paper.
Note: Make sure you select Banner or Banner A4
paper siz e in th e Pr in te r Properties.
Steps to basic printing
•
•
3333
•
•
•

Load up to:
Load up to: Make sure:
Load up to:Load up to:
Make sure:
Make sure:Make sure:
10 transparencies •••• the ro ug h si d es of t he t r a n sp a ren ci es are fa cing
you (smooth side down).
•••• the paper guide is against the edge of the
transparencies.
100 sheets of
custom size paper
•••• the print side is facing you.
•••• your paper size fits within these dimensions:
----Width:
76 mm to 216 mm
3.0 in. to 8.5 in.
---- Length:
127 mm to 432 mm
5.0 in. to 17.0 in.
•••• the paper guide is against the side of the paper.
25 iron-on transfers •••• you follow the instructions on the packaging to
load the iron-on transfers.
•••• the paper guide is against the side of the ironon transfers.
•
•
•
4444
Chapter 1
•
•

Step 2: Customize the printer settings
Step 2: Customize the printer settings
Step 2: Customize the printer settingsStep 2: Customize the printer settings
Your printer software includes several applications that let
you perform printing tasks. One of these applications is
called Printer Properties
The Printer Properties has four tabs: Job Finishing
Document/Quality
Document/Quality, and Advanced
Document/QualityDocument/Quality
for operating your printer and its software.
Opening the Printer Properties from an application
Opening the Printer Properties from an application
Opening the Printer Properties from an applicationOpening the Printer Properties from an application
You can open the Printer Properties from almost every
applicatio n. This lets you change printe r settings O NLY for
the documents you are currently creating in the
application.
Printer Properties.
Printer PropertiesPrinter Properties
Job Finishing, Paper
Job FinishingJob Finishing
Advanced. Each tab has settings
AdvancedAdvanced
Paper,
PaperPaper
S
S
S
S
t
t
t
t
e
e
e
e
p
p
p
p
s
s
s
s
t
t
t
t
o
o
o
o
b
b
b
b
a
a
a
a
s
s
s
s
i
i
i
i
c
c
c
c
p
p
p
p
r
r
r
r
i
i
i
i
n
n
n
n
t
t
t
t
i
i
i
i
n
n
n
n
g
g
g
g
1111 Open the application’s File
2222 Choose Print
3333 In the Printer Setup dialog box, click the Properties
Option
Option, or Setup
OptionOption
Opening the Printer Properties from Windows
Opening the Printer Properties from Windows
Opening the Printer Properties from WindowsOpening the Printer Properties from Windows
When you open the Printer Properties from Windows, the
settings apply to ALL documents, unless you change them
from the application.
1111 F ro m the Start
Printers
Printers.
PrintersPrinters
2222 From the Printers folder, right-click the printer icon for
your printer.
3333 Select Properties
Print (or Printer
PrintPrint
Setup button (depending on the application).
SetupSetup
Start menu, select Settings
StartStart
Properties from the sidebar menu.
PropertiesProperties
Printer) Setup
PrinterPrinter
File menu.
FileFile
Setup.
SetupSetup
Properties,
PropertiesProperties
Settings, and then select
SettingsSettings
Steps to basic printing
•
•
5555
•
•
•

Click the...
Click the...
Click the...Click the...
Paper
Paper tab to:
PaperPaper
Document/Quality
Document/Quality tab to select:
Document/QualityDocument/Quality
•••• Select a paper size and orientation
•••• Set the number of copies to print
•••• Reverse the printing order of your
document pages. The first page of
your document will be on top of
the stack in the paper exit tray.
•••• Collate your document
Job Finishing
Job Finishing
Job FinishingJob Finishing
tab to print:
•••• Handouts
••••Posters
•••• Booklets
••••Two-sided
•••• Color settings for the type of
document you are pri nting
•••• The type of paper you are using
•••• A print quality se tting
•••• Web Smoothing when you print
from the internet
••••Allow Pages to Dry
•••• The default settings
Advanced
Advanced tab
AdvancedAdvanced
to adjust:
••••Halftone
settings
••••Image
settings
6666
•
•
•
Chapter 1
•
•
documents
Help
Help button on any tab in the
HelpHelp
Printer Proper ties to access
the printer driver Help.

Customizing printer settings for specialty papers
Customizing printer settings for specialty papers
Customizing printer settings for specialty papersCustomizing printer settings for specialty papers
When your printer software was installed, the Printer
Properties settings were set to the default settings. Use
the default settings for printing most documents on plain
paper. To change your printer settings for printing on
specialty papers, use the following table.
When you are
When you are
When you are When you are
printing on:
printing on:
printing on:printing on:
Envelopes Paper From the Paper Size area, scroll to select
Click this Printer
Click this Printer
Click this Printer Click this Printer
Properties tab:
Properties tab:
Properties tab:Properties tab:
To make these selections:
To make these selections:
To make these selections:To make these selections:
the appropriate envelope size.
Note: Your application may override the
envelope settings in Printer Properties.
S
S
S
S
t
t
t
t
e
e
e
e
p
p
p
p
s
s
s
s
t
t
t
t
o
o
o
o
b
b
b
b
a
a
a
a
s
s
s
s
i
i
i
i
c
c
c
c
p
p
p
p
r
r
r
r
i
i
i
i
n
n
n
n
t
t
t
t
i
i
i
i
n
n
n
n
g
g
g
g
Greeting cards,
index cards,
postcards, or
photo cards
Photo papers Document/Quality From the Paper Type area, select
Paper
Document/Quality
Select the appropriate Paper Size setting.
From the Pape r Type area, sel e ct Greet ing
Card Stock
Card Stock.
Card StockCard Stock
Glossy/Photo Paper
Glossy/Photo Paper.
Glossy/Photo PaperGlossy/Photo Paper
Notes:
• You can print quality photos with the
black and color cartridge combination
that came with your printer. However,
for the best possible print quality,
replace the black cartridge with a
photo cartridge, Lexmark part number
12A1990. For help, see page 22.
• When printing photos, remove each
photo as it ex its fr o m th e pr in te r an d
allow it to dry before stacking.
Greeting
Greeting Greeting
Banner paper Paper From the list of Paper Sizes, select Banner
or Banner A4
Banner A4.
Banner A4Banner A4
Banner
BannerBanner
Steps to basic printing
•
•
7777
•
•
•

When you are
When you are
When you are When you are
printing on:
printing on:
printing on:printing on:
Click this Printer
Click this Printer
Click this Printer Click this Printer
Properties tab:
Properties tab:
Properties tab:Properties tab:
To make these selections:
To make these selections:
To make these selections:To make these selections:
Sheets of custom
size paper
Iron-on transfers Document/Quality From the Paper Type area, select Iron-On
Transparencies Document/Quality •••• From the Paper Type area, select
Paper •••• From the list of Paper Sizes, scroll to
select Custom
•••• Enter the dimensions for your custom
paper size. For help, see page 4.
Transfer
Transfer.
TransferTransfer
Note: Many software applications accept
iron-on transfers differently. We recommend printing your document on plain
paper before printing it on an iron-on
transfer.
Transparency
Transparency.
TransparencyTransparency
•••• Select Normal (600 x 600 dpi)
(1200 x 1200 dpi)
(1200 x 1200 dpi), or Maximum (2400
(1200 x 1200 dpi)(1200 x 1200 dpi)
x 1200 dpi)
x 1200 dpi) Print Quality.
x 1200 dpi) x 1200dpi)
Custom.
CustomCustom
Iron-On
Iron-On Iron-On
Normal (600 x 600 dpi), High
Normal (600 x 600 dpi)Normal (600 x 600 dpi)
Maximum (2400
Maximum (2400 Maximum (2400
High
High High
Step 3: Print your document
Step 3: Print your document
Step 3: Print your documentStep 3: Print your document
1111 From your application’s File
2222 F ro m t he Pri n t dia log bo x, cli c k OK
application).
Note: When printing transparencies,
remove each transparency as it exits from
the printer and allow it to dry before
stacking.
File menu, click Print
File File
OK or Print
OKOK
Print.
PrintPrint
Print (depending on the
Print Print
•
•
•
8888
Chapter 1
•
•

2
2
22
Printing on both sides of a sheet of paper
Printing on both sides of a sheet of paper
Printing on both sides of a sheet of paperPrinting on both sides of a sheet of paper
Printing beyond the basics
Printing beyond the basics
Printing beyond the basicsPrinting beyond the basics
You can use your printer to print:
•••• on both sides of a sheet of paper (see the following
section)
•••• handouts (see page 12)
•••• booklets (see page 15)
•••• posters (see page 18)
Your Lexmark printer lets you print on both sides of a
P
P
P
P
r
r
r
r
i
i
i
i
n
n
n
n
t
t
t
t
i
i
i
i
n
n
n
n
g
g
g
g
b
b
b
b
e
e
e
e
y
y
y
y
o
o
o
o
n
n
n
n
d
d
d
d
t
t
t
t
h
h
h
h
e
e
e
e
b
b
b
b
a
a
a
a
s
s
s
s
i
i
i
i
c
c
c
c
s
s
s
s
sheet of paper. Besides saving paper, this feature is
helpful when you want to print booklets or tablets.
Step 1: Load the paper
Step 1: Load the paper
Step 1: Load the paperStep 1: Load the paper
Load up to 100 sheets of paper against the right side of
the sheet feeder and slide the paper guide to the edge of
the paper. For help, see page 2.
Printing beyond the basics
•
•
9999
•
•
•

Step 2: Custom ize the printer settings for your two -
Step 2: Custom ize the printer settings for your tw o-
Step 2: Custom ize the printer settings for your tw o-Step 2: Custom ize the printer settings for your two sided print job
sided print job
sided print jobsided print job
1111 Open the Printer Properties. For help, see page 5.
2222 Select the page orientation and size:
3333 Customize the Printer Properties for two-sided printing:
aaaa Click the Job
Finishing
Finishing tab.
FinishingFinishing
bbbb Select Two-sided
printing
printing.
printingprinting
cccc Select a binding
edge
edge. When you
edgeedge
select Portrait
orientation, choose
between these
binding edge
options.
Job
JobJob
Two-sided
Two-sided Two-sided
binding
binding binding
Portrait
PortraitPortrait
aaaaClick the Paper
bbbb Select the appropriate Paper Size
cccc Select Portrait
Paper tab.
PaperPaper
Paper Size.
Paper SizePaper Size
Portrait or Landscape
PortraitPortrait
Landscape orientation.
LandscapeLandscape
ddddTo receive
paper
reloading
instructions,
select Pr in t
reloading
reloading
reloading reloading
instructions
instructions
instructions instructions
after th e first
after th e first
after th e first after the first
side prints
side prints.
side printsside prints
eeeeClick OK
Print
Print Print
OK.
OKOK
Note: When you select Landscape orientation, choose
between these binding edge options:
•
•
•
10
10
1010
Chapter 2
•
•
Long Edge
Binding
Short Edge
Binding
Step 3: Print your two-sided document
Step 3: Print your two-sided document
Step 3: Print your two-sided documentStep 3: Print your two-sided document
1111 From your application’s File
File menu, select Print
FileFile
Print. The odd-
PrintPrint
numbered pages print first.
2222 When the odd-numbered pages of your two-sided
document are finished printing, your printer software
prompts you to reload the paper.
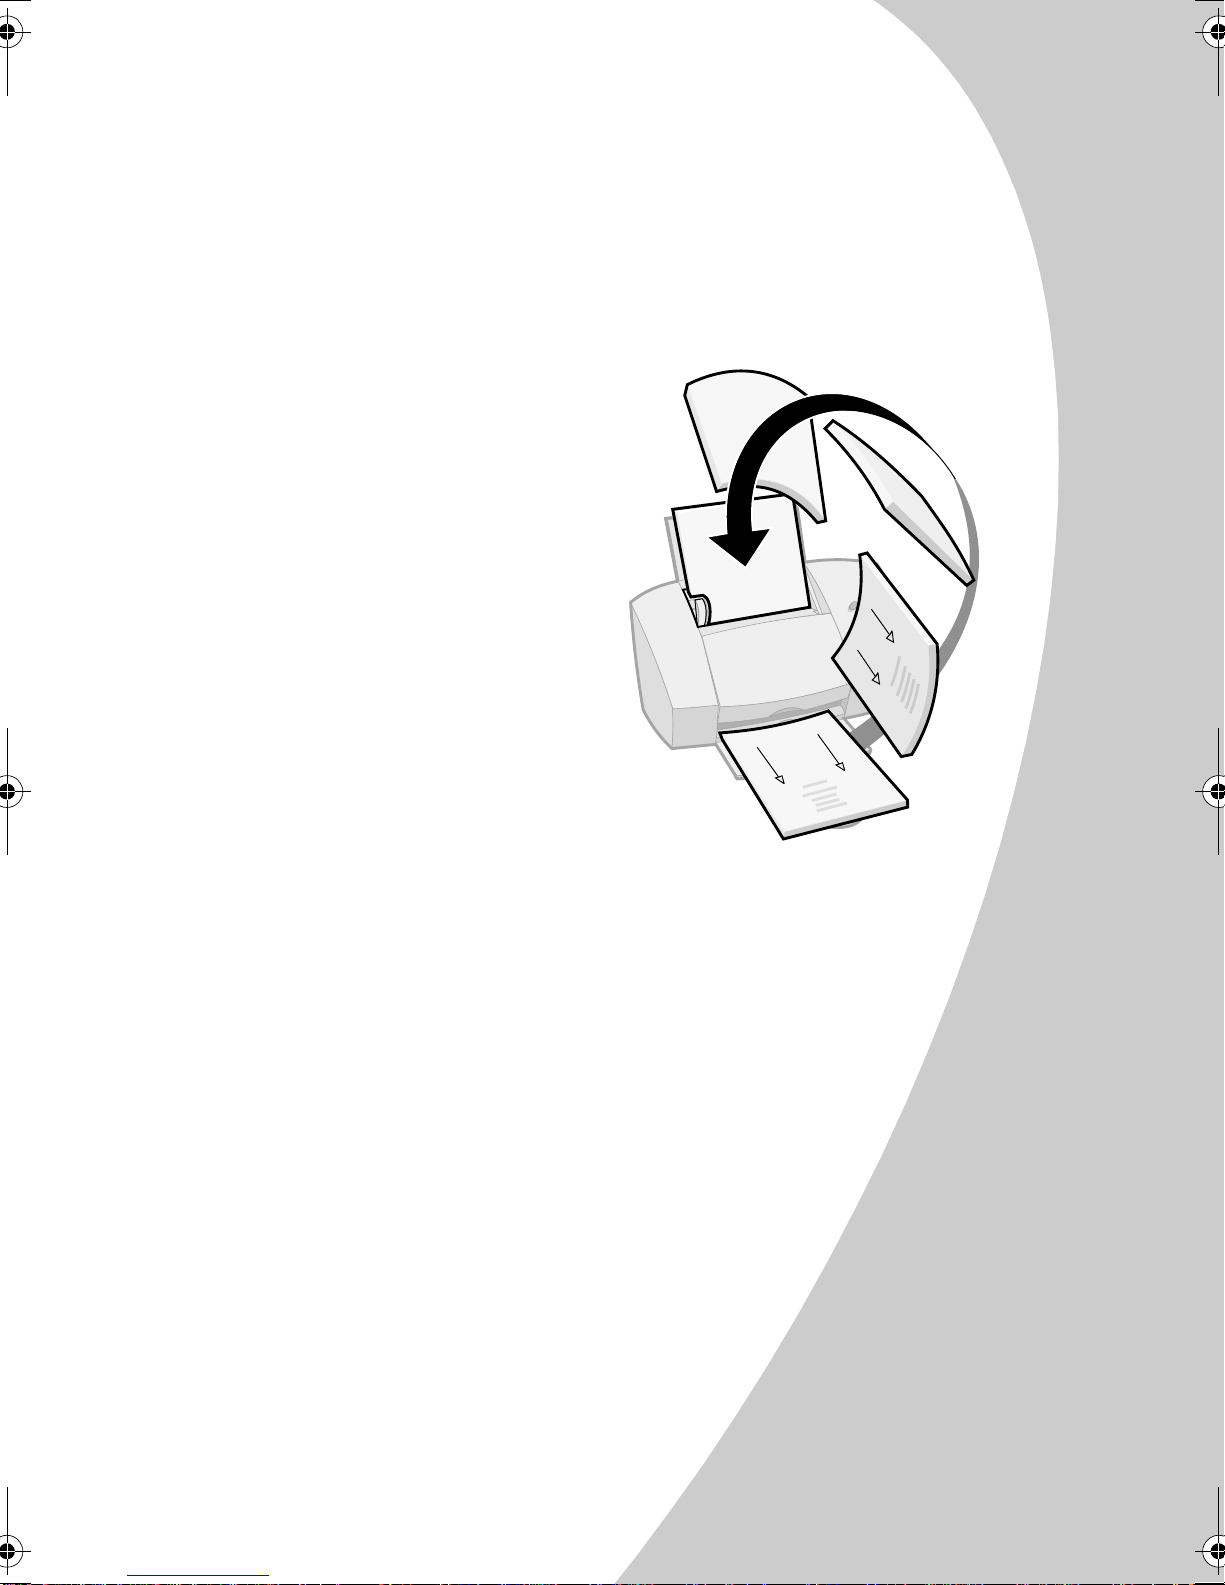
aaaa When the entire stack
is finished printing,
remove the stack.
bbbb Flip the stack of paper.
cccc Insert the stack of
paper and instruction
page with the printed
side facing away
you and the arrows
pointing down
away from
awayaway
down.
downdown
P
P
P
P
r
r
r
r
i
i
i
i
n
n
n
n
t
t
t
t
i
i
i
i
n
n
n
n
g
g
g
g
b
b
b
b
e
e
e
e
y
y
y
y
o
o
o
o
n
n
n
n
d
d
d
d
t
t
t
t
h
h
h
h
e
e
e
e
b
b
b
b
a
a
a
a
s
s
s
s
i
i
i
i
c
c
c
c
s
s
s
s
Note: The direction o f the
arrows on your instruction
page may be different
than the instruction page
shown. Always insert the
stack of paper and
instruction page with the
arrows pointing down.
3333Click OK
OK. The even-numbered pages print on the other
OKOK
side.
4444 To return to single-sided printing:
aaaa From the Printer Pro perties, click the Job Finishin g
bbbb Make sure Two-sided printing
ccccClick OK
OK.
OK OK
Two-sided printing is not
Two-sided printingTwo-sided printing
Job Finishing tab.
Job Finishing Job Finishing
not selected.
notnot
Printing beyond the basics
•
•
11
11
1111
•
•
•
 Loading...