

Page 1

C935 Series
Maintenance Guide
April 2007 www.lexmark.com
Page 2

Contents
Maintaining the printer................................................................................3
Cleaning the exterior of the printer..........................................................................................................3
Storing supplies.........................................................................................................................................3
Conserving supplies...................................................................................................................................3
Checking the status of supplies.................................................................................................................4
Checking the status of supplies from the control panel .....................................................................................4
Printing a menu settings page ............................................................................................................................ 4
Checking the status of supplies from a network computer................................................................................ 4
Ordering supplies......................................................................................................................................4
Ordering toner cartridges ................................................................................................................................... 4
Ordering photoconductors .................................................................................................................................5
Ordering staple cartridges ..................................................................................................................................5
Ordering a waste toner box ................................................................................................................................ 5
Replacing supplies.....................................................................................................................................6
Replacing the waste toner box ...........................................................................................................................6
Cleaning the printhead lenses .......................................................................................................................... 10
Replacing a photoconductor............................................................................................................................. 15
Replacing a toner cartridge............................................................................................................................... 17
Recycling Lexmark products....................................................................................................................19
Moving the printer..................................................................................................................................20
Before moving the printer ................................................................................................................................20
Moving the printer to another location............................................................................................................ 20
Setting the printer up in a new location ........................................................................................................... 20
Shipping the printer.......................................................................................................................................... 21
Contents
2
Page 3

Maintaining the printer
Periodically, certain tasks are required to maintain optimum print quality.
Cleaning the exterior of the printer
1 Make sure that the printer is turned off and unplugged from the wall outlet.
CAUTION—SHOCK HAZARD: To avoid the risk of electric shock, unplug the power cord from the wall outlet
and disconnect all cables to the printer before proceeding.
Remove paper from the paper support and paper exit tray.
2
3 Dampen a clean, lint‑free cloth with water.
Warning—Potential Damage: Do not use household cleaners or detergents, as they may damage the finish of
the printer.
4 Wipe only the outside of the printer, making sure to remove any ink residue that has accumulated on the paper
exit tray.
Warning—Potential Damage:
5 Make sure the paper support and paper exit tray are dry before beginning a new print job.
Using a damp cloth to clean the interior may cause damage to your printer.
Storing supplies
Choose a cool, clean storage area for the printer supplies. Store supplies right side up in their original packing until you
are ready to use them.
Do not expose supplies to:
Direct sunlight
•
Temperatures above 35°C (95°F)
•
High humidity above 80%
•
• Salty air
Corrosive gases
•
Heavy dust
•
Conserving supplies
There are some settings you can change from the control panel that will help you conserve toner and paper. For more
information, see “Supplies menu,” “Quality menu,” and “Finishing menu.”
If you need to print several copies, you can conserve supplies by printing the first copy and checking it for accuracy
before printing the remaining copies.
Maintaining the printer
3
Page 4

Checking the status of supplies
A message appears on the display when a replacement supply item is needed or when maintenance is required.
Checking the status of supplies from the control panel
1 Make sure the printer is on and Ready appears.
2 From the control panel, press until Status / Supplies appears, and then press .
3 Press until View supplies appears, and then press .
The status of each supply appears.
Printing a menu settings page
Print a menu settings page to review the status of the supplies.
1 Make sure the printer is on and Ready appears.
From the control panel, press .
2
3 Press repeatedly until Reports appears, and then press .
Press repeatedly until Menu Settings Page appears, and then press .
4
Printing Menu Settings appears. After the menu settings page prints, Ready appears.
Checking the status of supplies from a network computer
Note: The computer must be connected to the same network as the printer.
1
Open a Web browser.
In the address bar, type the IP address of the network printer (for example,192.264.263.17).
2
Press Enter.
3
The Device Status Page appears. A summary of supply levels is displayed.
Ordering supplies
To order supplies in the U.S., contact Lexmark at 1-800-539-6275 for information about Lexmark authorized supplies
dealers in your area. In other countries or regions, visit the Lexmark Web Site at www.lexmark.com or contact the place
where you purchased the printer.
All life estimates for printer supplies assume printing on letter‑ or A4‑size plain paper.
Note:
Ordering toner cartridges
When 88 Cyan toner low, 88 Magenta toner low, 88 Yellow toner low, or 88 Black toner
low appears, order a new cartridge.
Maintaining the printer
4
Page 5
When 88 Replace Cyan toner, 88 Replace Magenta toner, 88 Replace Yellow toner, or 88
Replace Black toner appears, you must replace the specified toner cartridge.
The recommended toner cartridges specifically designed for the printer are:
Part name Part number
Cyan High Yield Toner Cartridge C930H2CG
Magenta High Yield Toner Cartridge C930H2MG
Yellow High Yield Toner Cartridge C930H2YG
Black High Yield Toner Cartridge C930H2KG
Ordering photoconductors
When 84 Black pc unit life warning or 84 color pc unit life warning appears, order
replacement photoconductor(s).
Part name Part number
Single PC Unit C930X72G
3 Pack of PC Units C930X73G
Ordering staple cartridges
When Staples <x> low or missing appears, order the specified staple cartridge. When Staples <x>
empty or misfed or Load staples <x> appears, replace the specified staple cartridge.
See the illustrations inside the stapler finisher door for more information.
Part name Part number
Staple Cartridges–3 pack (Staples G5) 25A0013
Advanced Booklet Staples
(Staples G11 and Staples G12)
21Z0357
Ordering a waste toner box
When 82 Waste toner box nearly full appears, order a replacement waste toner box. The waste toner
box must be replaced when 82 Replace waste toner box appears.
Part name Part number
Waste Toner Box C930X76G
Maintaining the printer
5
Page 6
Replacing supplies
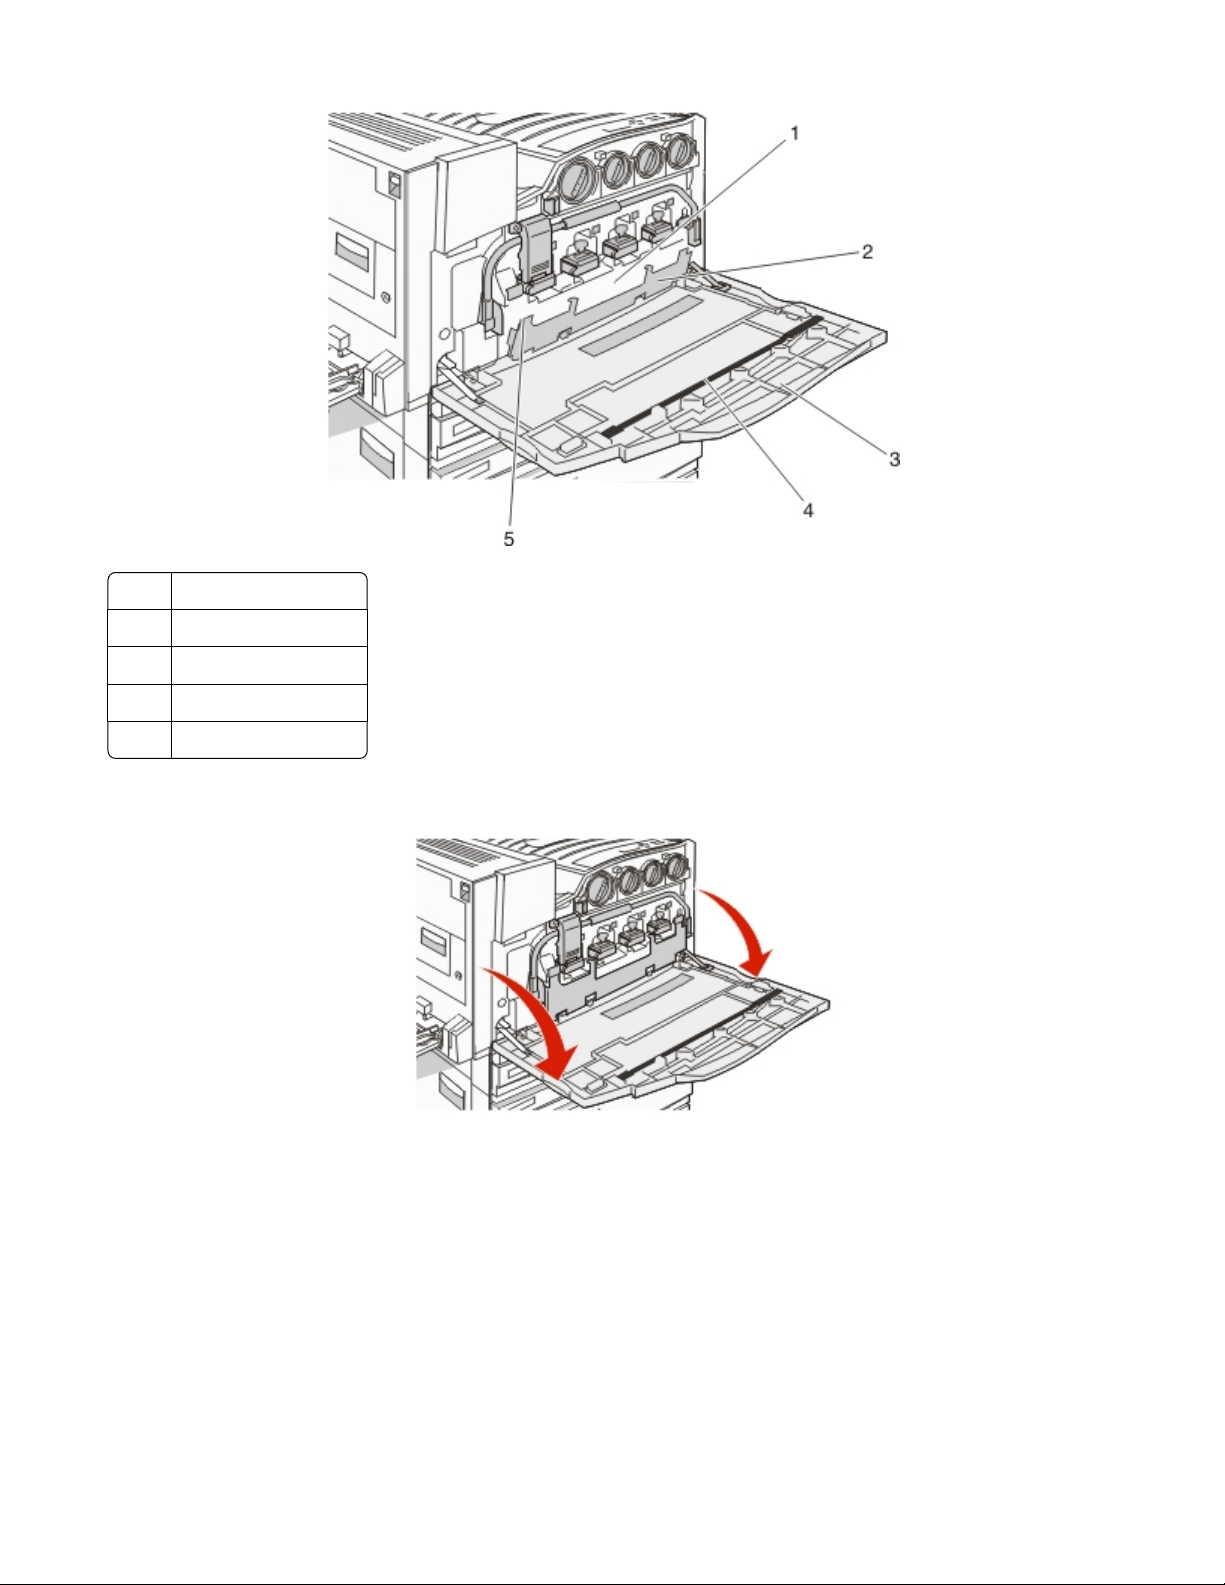
Replacing the waste toner box
Replace the waste toner box when 82 Replace waste toner box appears. The printer will not continue printing
until the waste toner box is replaced.
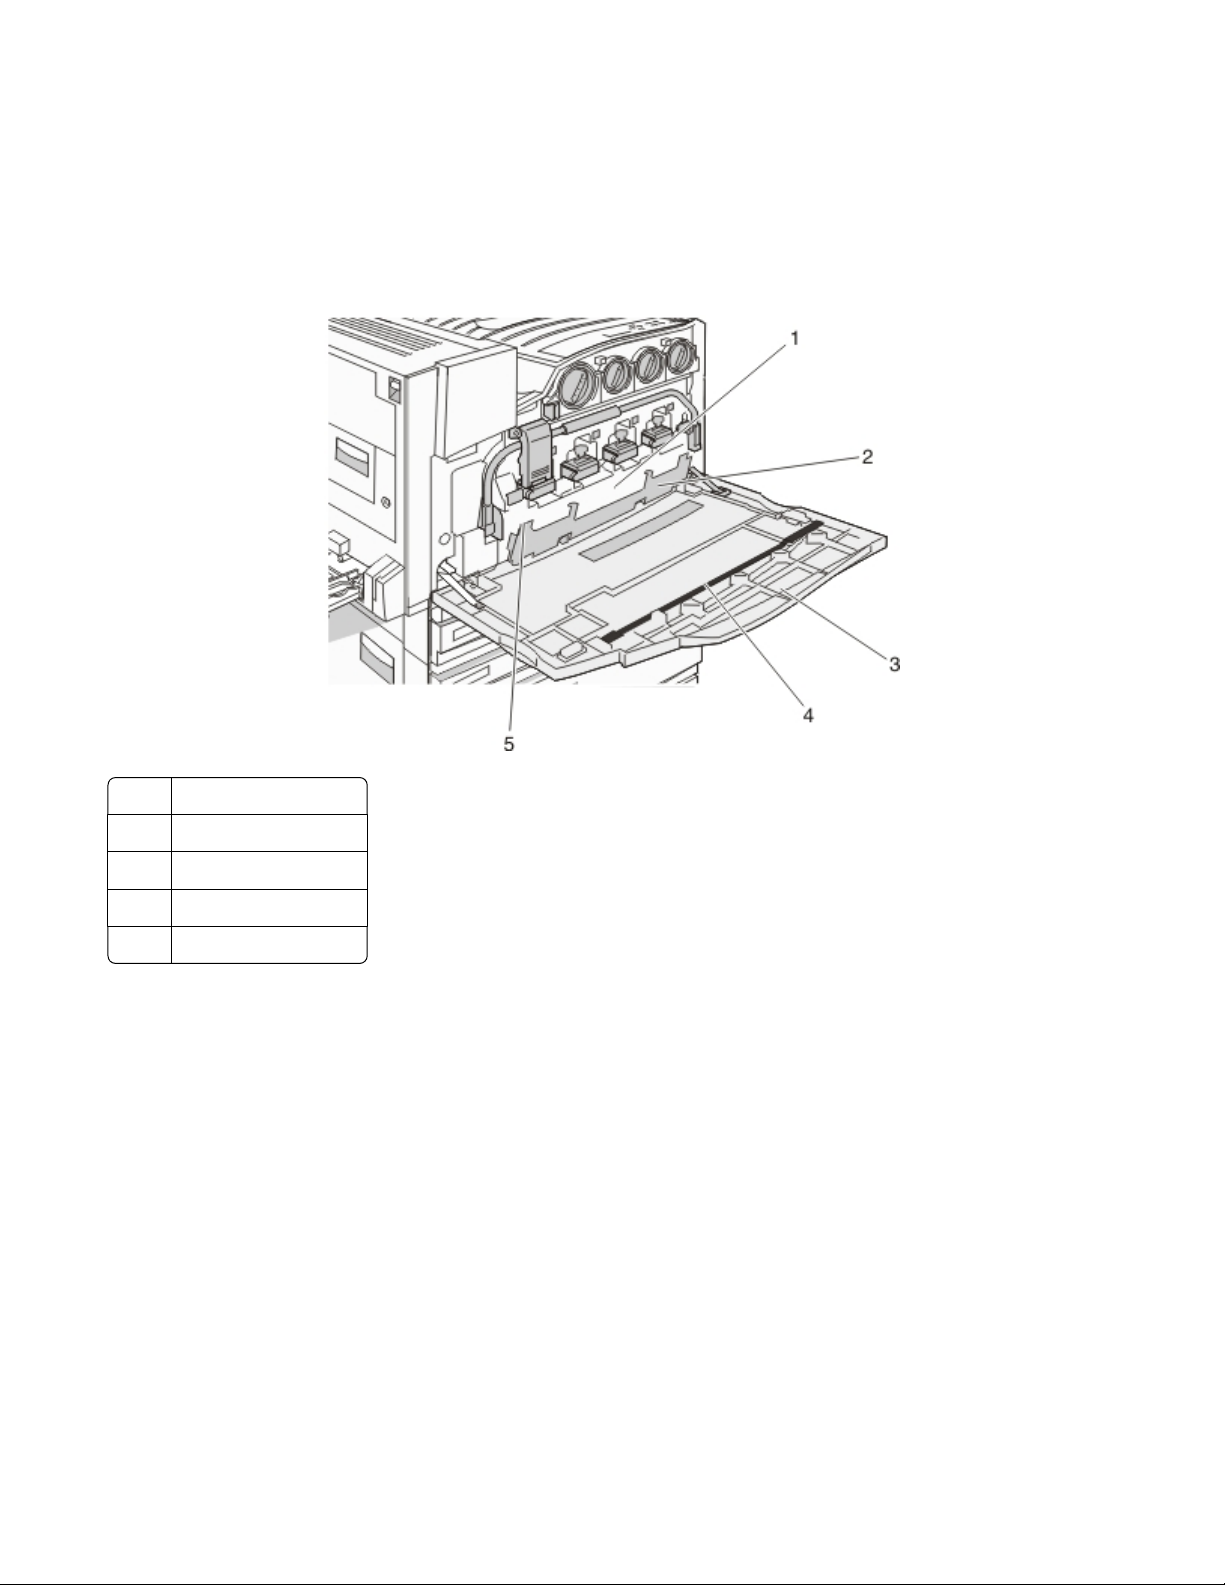
1 Waste toner box
2 Door E6
3 Door E
4 Printhead lens cleaner
5 E6 Door tab
Maintaining the printer
6
Page 7
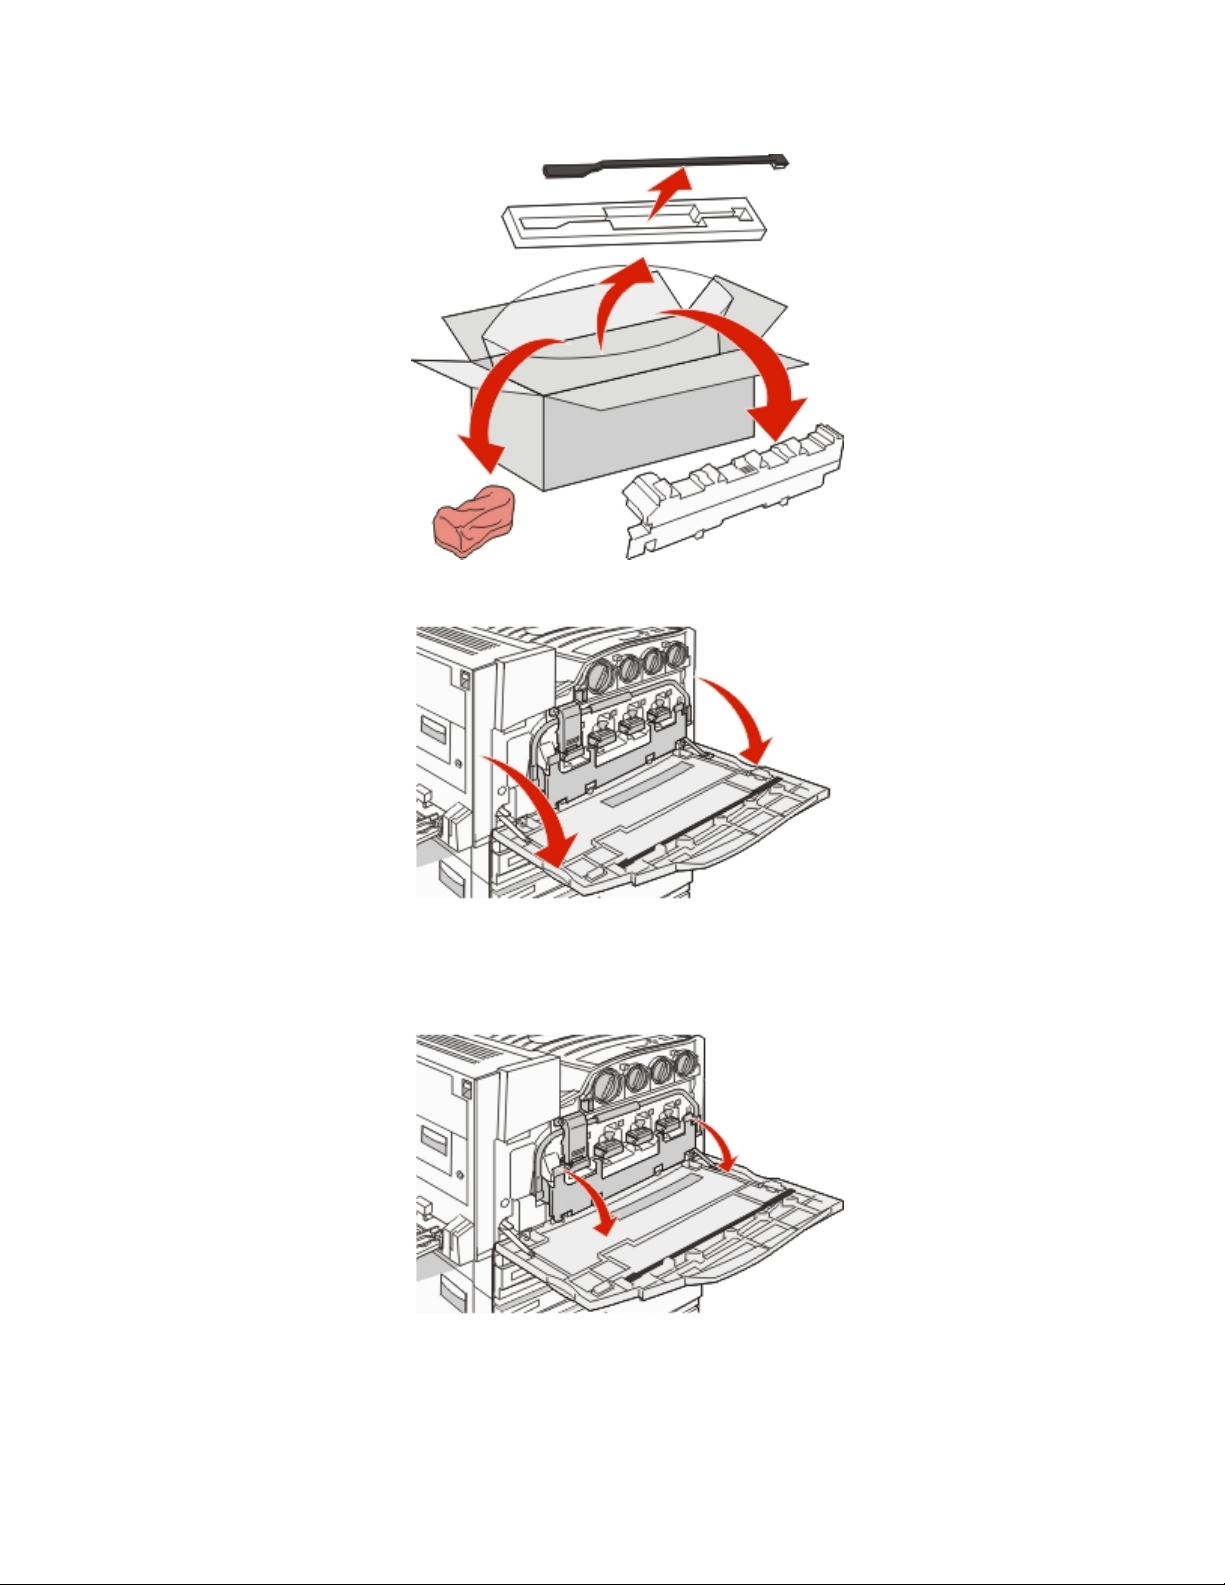
1 Unpack the replacement waste toner box and accessories.
2 Open Door E (front printer door).
Warning—Potential Damage:
than 10 minutes.
To avoid overexposing the photoconductors, do not leave the door open for more
3 Grasp the E6 Door tab, and then push the door down.
Maintaining the printer
7
Page 8

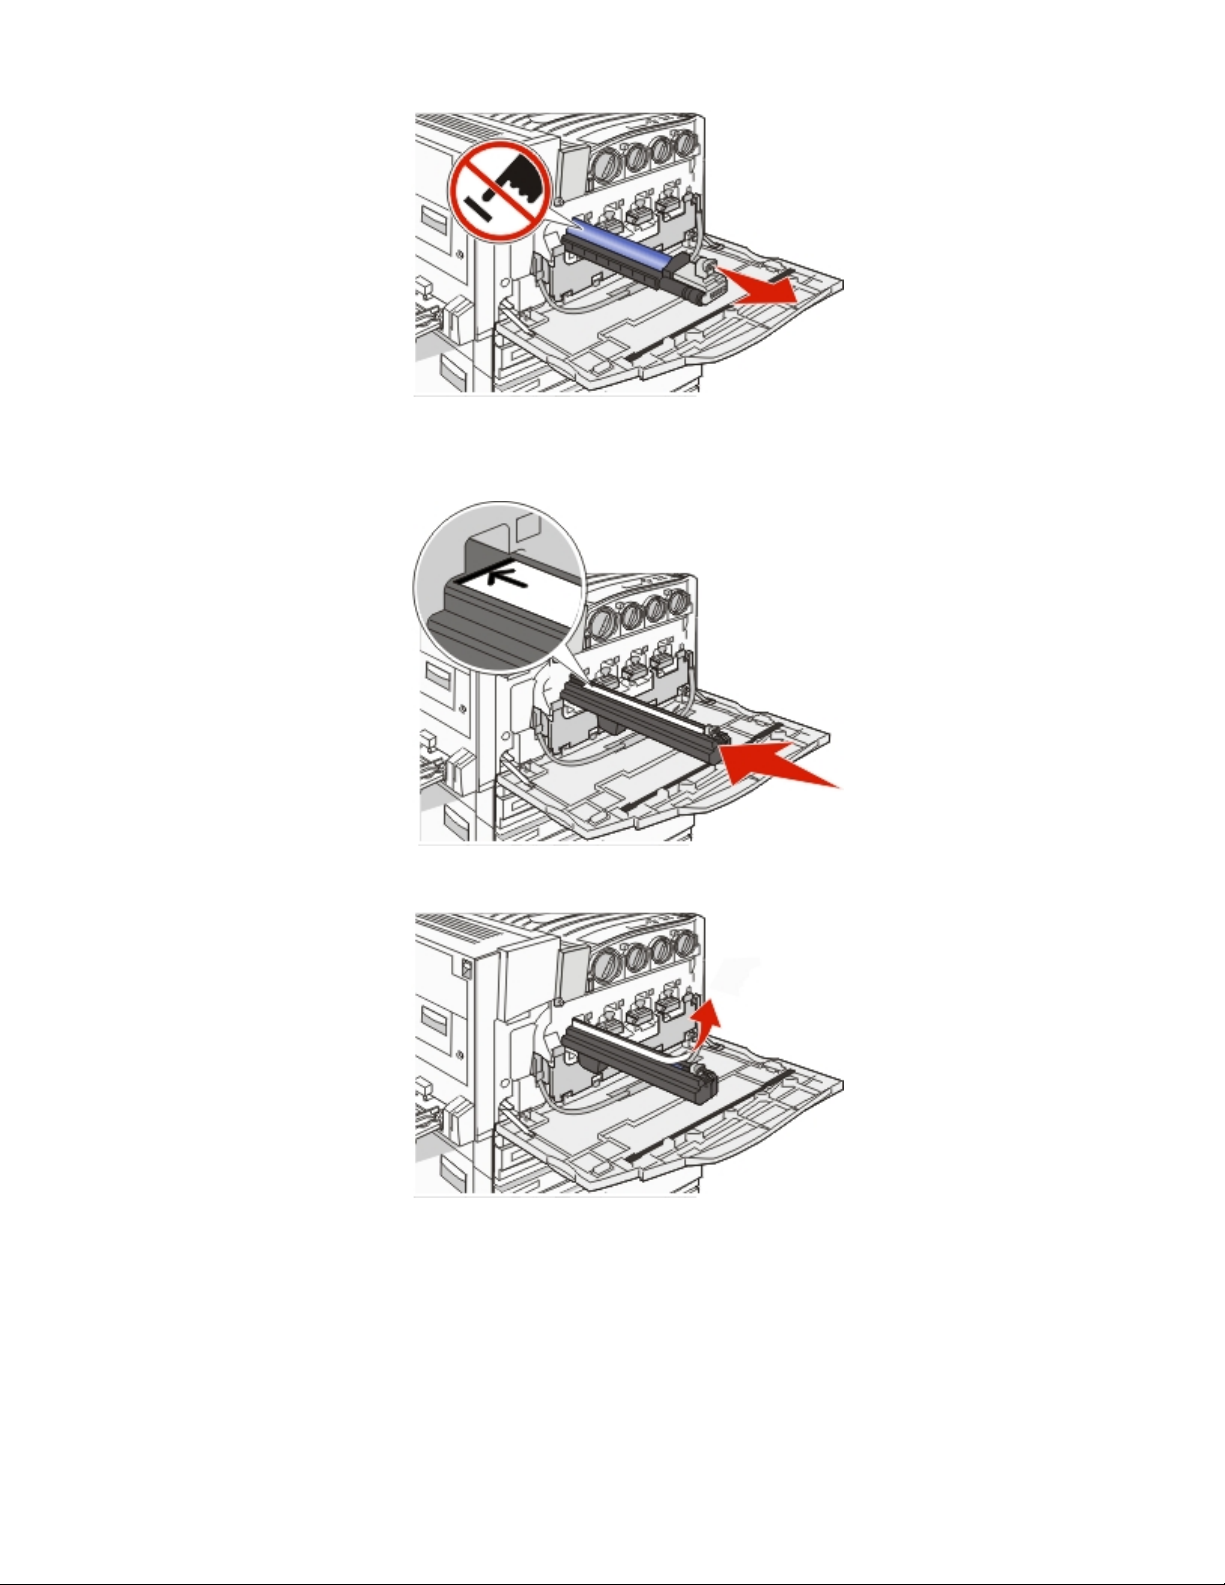
4 Remove the old printhead lens cleaner from Door E, and then discard it.
5 Remove the waste toner box.
6 Place the plastic cover over the waste toner box.
Maintaining the printer
8
Page 9
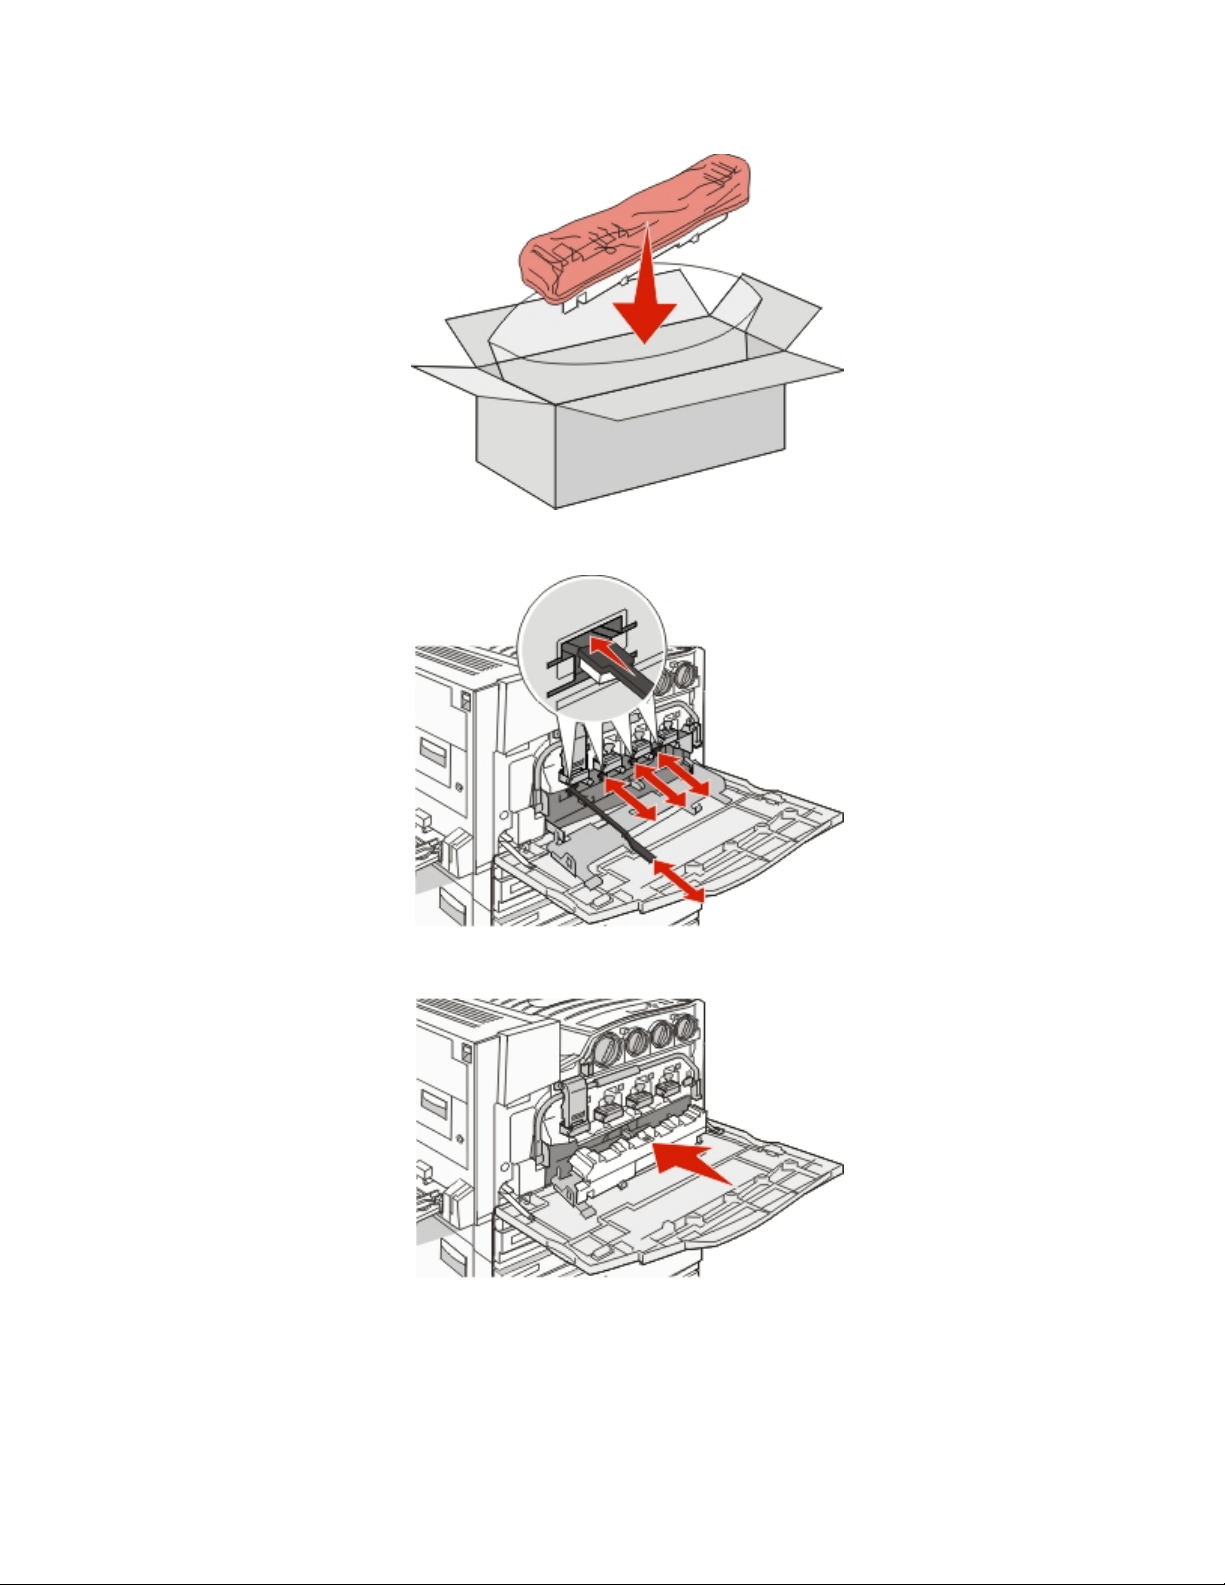
7 Place the waste toner box in the recycling bag.
8 Use the new printhead lens cleaner to clean the printhead lenses.
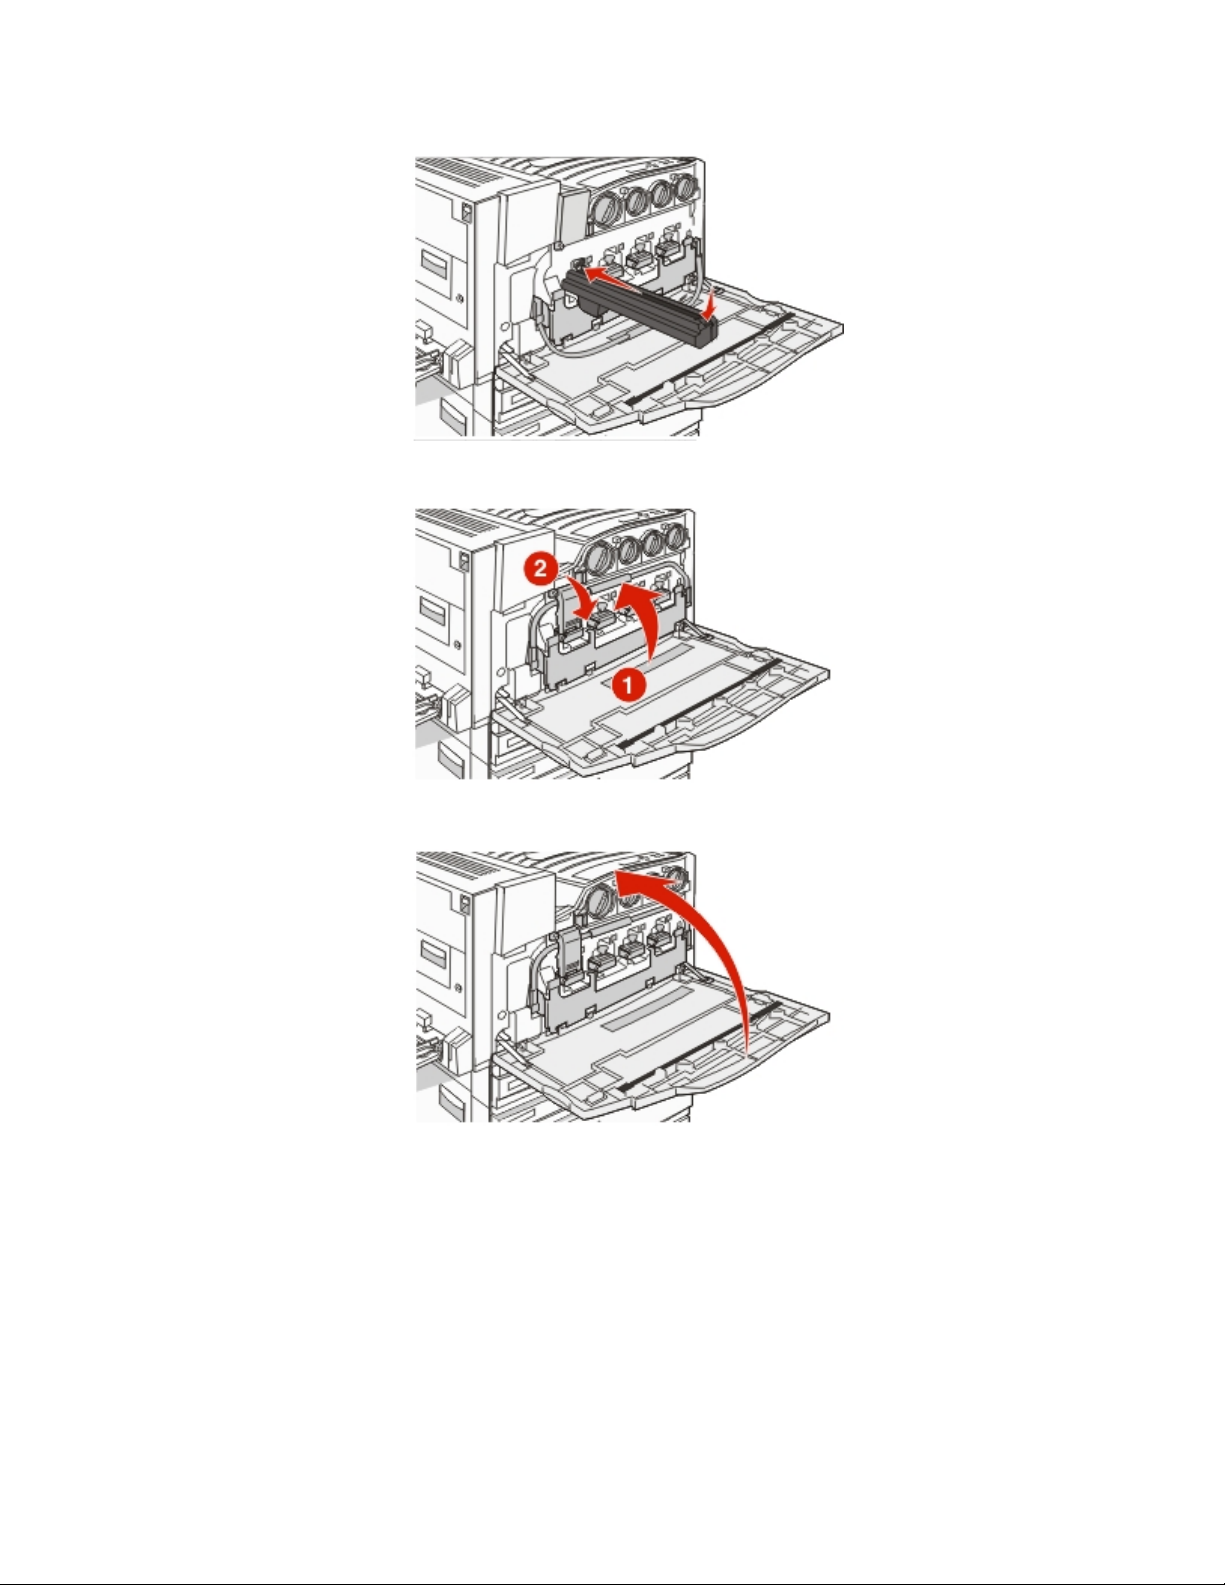
9 Insert the new waste toner box.
Maintaining the printer
9
Page 10

10 Place the new printhead lens cleaner in the notches of Door E.
11 Close Door E6.
12 Close Door E.
13 Remove all paper from the printer paper path.
Visit www.lexmark.com/recycling to learn how to recycle the waste toner box.
Cleaning the printhead lenses
Clean the printhead lenses when you replace the waste toner box or when you encounter print quality problems.
Maintaining the printer
10
Page 11
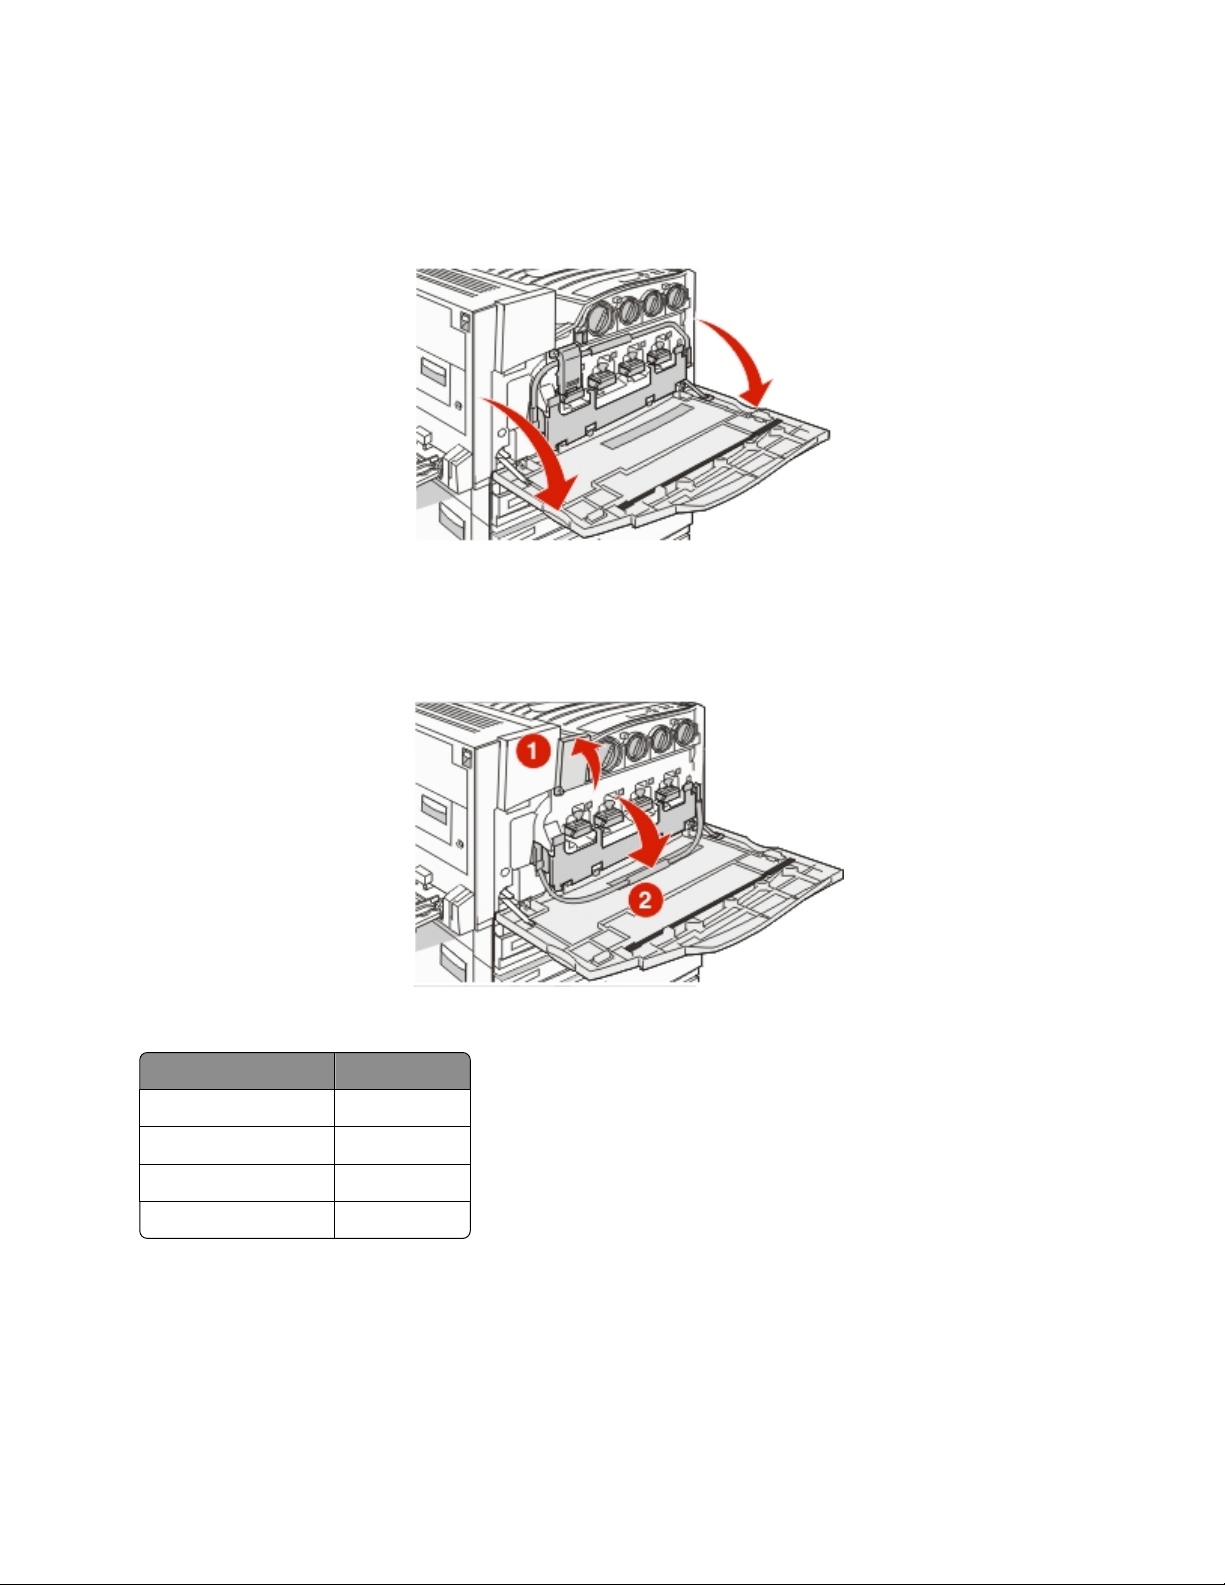
1 Waste toner box
2 Door E6
3 Door E (front door)
4 Printhead lens cleaner
5 E6 Door tab
1
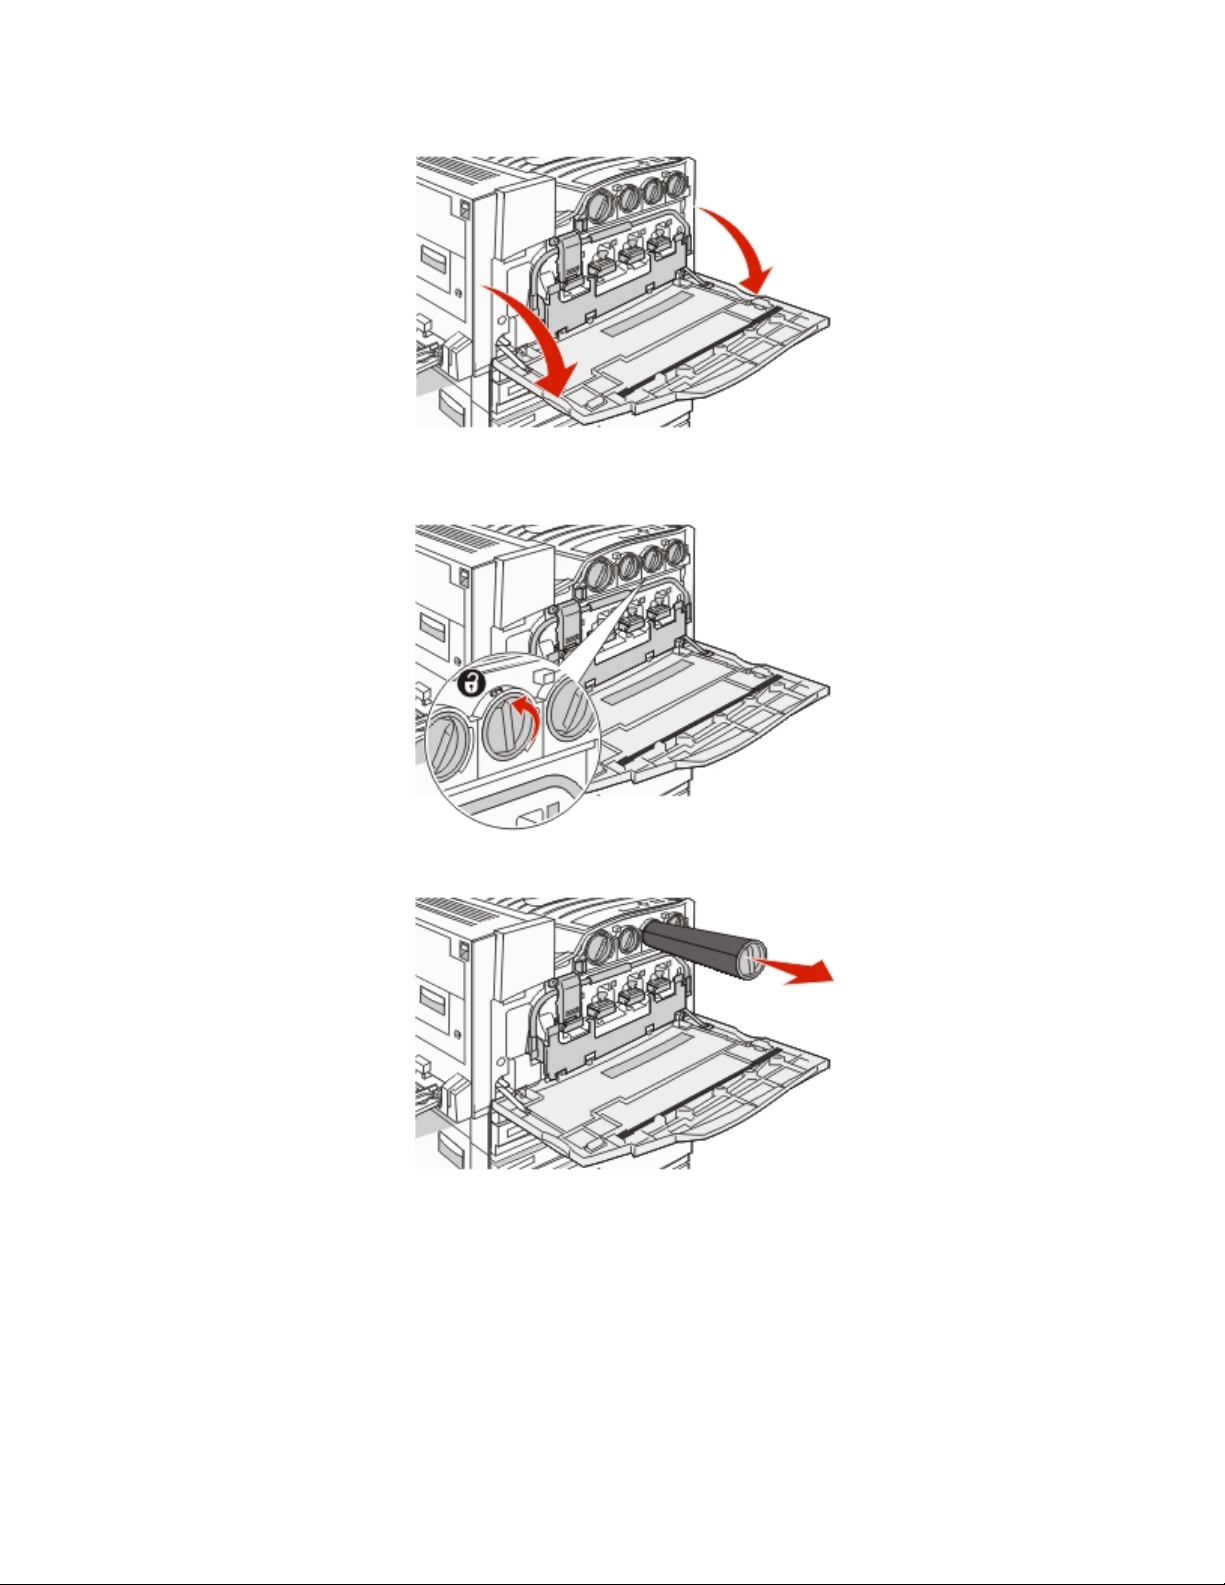
Open Door E (front door).
Warning—Potential Damage:
than 10 minutes.
To avoid overexposing the photoconductors, do not leave the door open for more
Maintaining the printer
11
Page 12

2 Grasp the E6 Door tab, and then push the door down.
3 Remove the waste toner box.
4 Locate and remove the printhead lens cleaner from Door E.
If you are replacing the waste toner box, use the printhead lens cleaner that shipped with it.
Note:
Maintaining the printer
12
Page 13

5 Insert the padded tip of the printhead lens cleaner into the first printhead lens opening.
6 Push the printhead lens cleaner all the way to the back of the lens, and then pull it out.
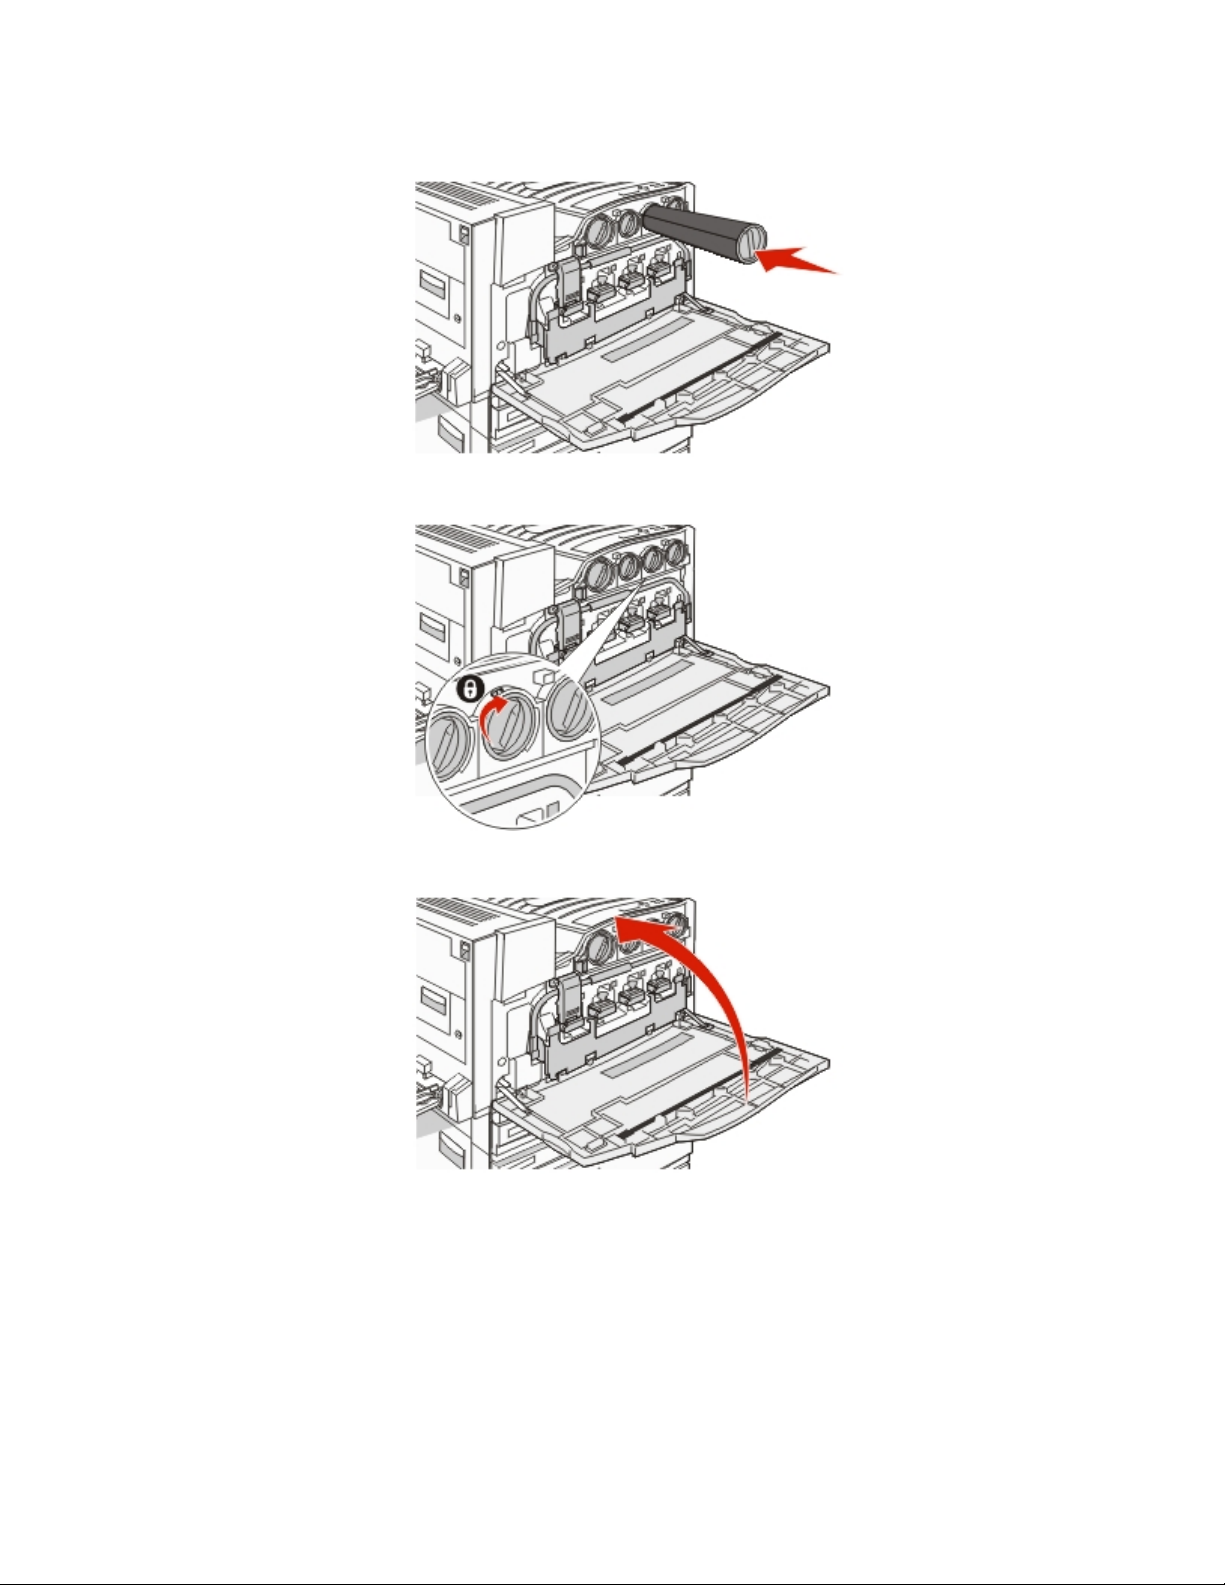
7 Clean the remaining three printhead lenses.
8
Insert the waste toner box.
Maintaining the printer
13
Page 14

9 Place the printhead lens cleaner in the notches of Door E.
10 Close Door E6.
11 Close Door E.
Maintaining the printer
14
Page 15
Replacing a photoconductor
Replace the black photoconductor when 84 Replace black pc unit appears. Replace the cyan, magenta, and
yellow photoconductors when 84 Replace color pc units appears.
1 Open Door E (front printer door).
Warning—Potential Damage: To avoid overexposing the photoconductors, do not leave the door open for more
than 10 minutes.
2 Release the bar by pressing the E5 button located on the bottom of the E5 latch, lift the E5 latch, and then press
the bar down.
3
Remove the photoconductor(s) specified on the display.
Photoconductor color
Black E1
Cyan E2
Magenta E3
Yellow E4
Opening name
Maintaining the printer
15
Page 16
4 Unpack the replacement photoconductor.
5 Align and insert the end of the photoconductor.
6
Remove the tape from the top of the photoconductor.
Maintaining the printer
16
Page 17
7 Press the button forward to insert the photoconductor while removing the casing.
8 Lift the bar up, and then press latch E5 down so that it holds the bar in position.
9 Close Door E.
Replacing a toner cartridge
Replace the specified toner cartridge (cyan, magenta, yellow, or black) when 88 Replace <color> toner
appears. The printer will not continue printing until the specified cartridge is replaced.
1 Make sure the printer is on and Ready or 88 Replace <color> toner appears.
Unpack the new cartridge, and set it near the printer.
2
Maintaining the printer
17
Page 18
3 Open Door E (front printer door).
4 Unlock the specified cartridge by turning the cartridge counterclockwise until the arrow‑shaped handle points
toward the unlock symbol.
5
Remove the cartridge by gently pulling it away from the printer.
Maintaining the printer
18
Page 19
6 Align the arrow‑shaped handle with the unlock symbol, and then insert the toner cartridge all the way into the
opening.
7 Lock the cartridge by turning the arrow‑shaped cartridge handle clockwise until it points toward the lock symbol.
8
Close Door E.
Recycling Lexmark products
To return Lexmark products to Lexmark for recycling:
1
Visit our Web site at www.lexmark.com/recycle.
Find the product type you want to recycle, and then select your country from the list.
2
Follow the instructions on the computer screen.
3
Maintaining the printer
19
Page 20

Moving the printer
Before moving the printer
CAUTION—POTENTIAL INJURY: The printer weighs 201 lb (91.2 kg); therefore, it requires at least four people or
a properly rated mechanical handling system to lift it safely. Use the handholds on the sides of the printer to lift
it, and make sure your fingers are not under the printer when you set it down. Disconnect all cords and cables
from the printer before moving it.
Follow these guidelines to avoid personal injury or printer damage:
• Use at least four people or a properly rated mechanical handling system to lift the printer.
• Turn the printer off using the power switch, and then unplug the power cord from the wall outlet.
• Disconnect all cords and cables from the printer before moving it.
• Remove all printer options before moving the printer.
Warning—Potential Damage:
warranty.
Damage to the printer caused by improper moving is not covered by the printer
Moving the printer to another location
The printer and options can be safely moved to another location by following these precautions:
• Any cart used to move the printer must have a surface able to support the full footprint of the printer. Any cart
used to move the options must have a surface able to support the dimensions of the options.
Keep the printer in an upright position.
•
• Avoid severe jarring movements.
Setting the printer up in a new location
For a basic printer, or a printer with an optional finisher installed, allow the following recommended amount of space
around the printer:
Maintaining the printer
20
Page 21
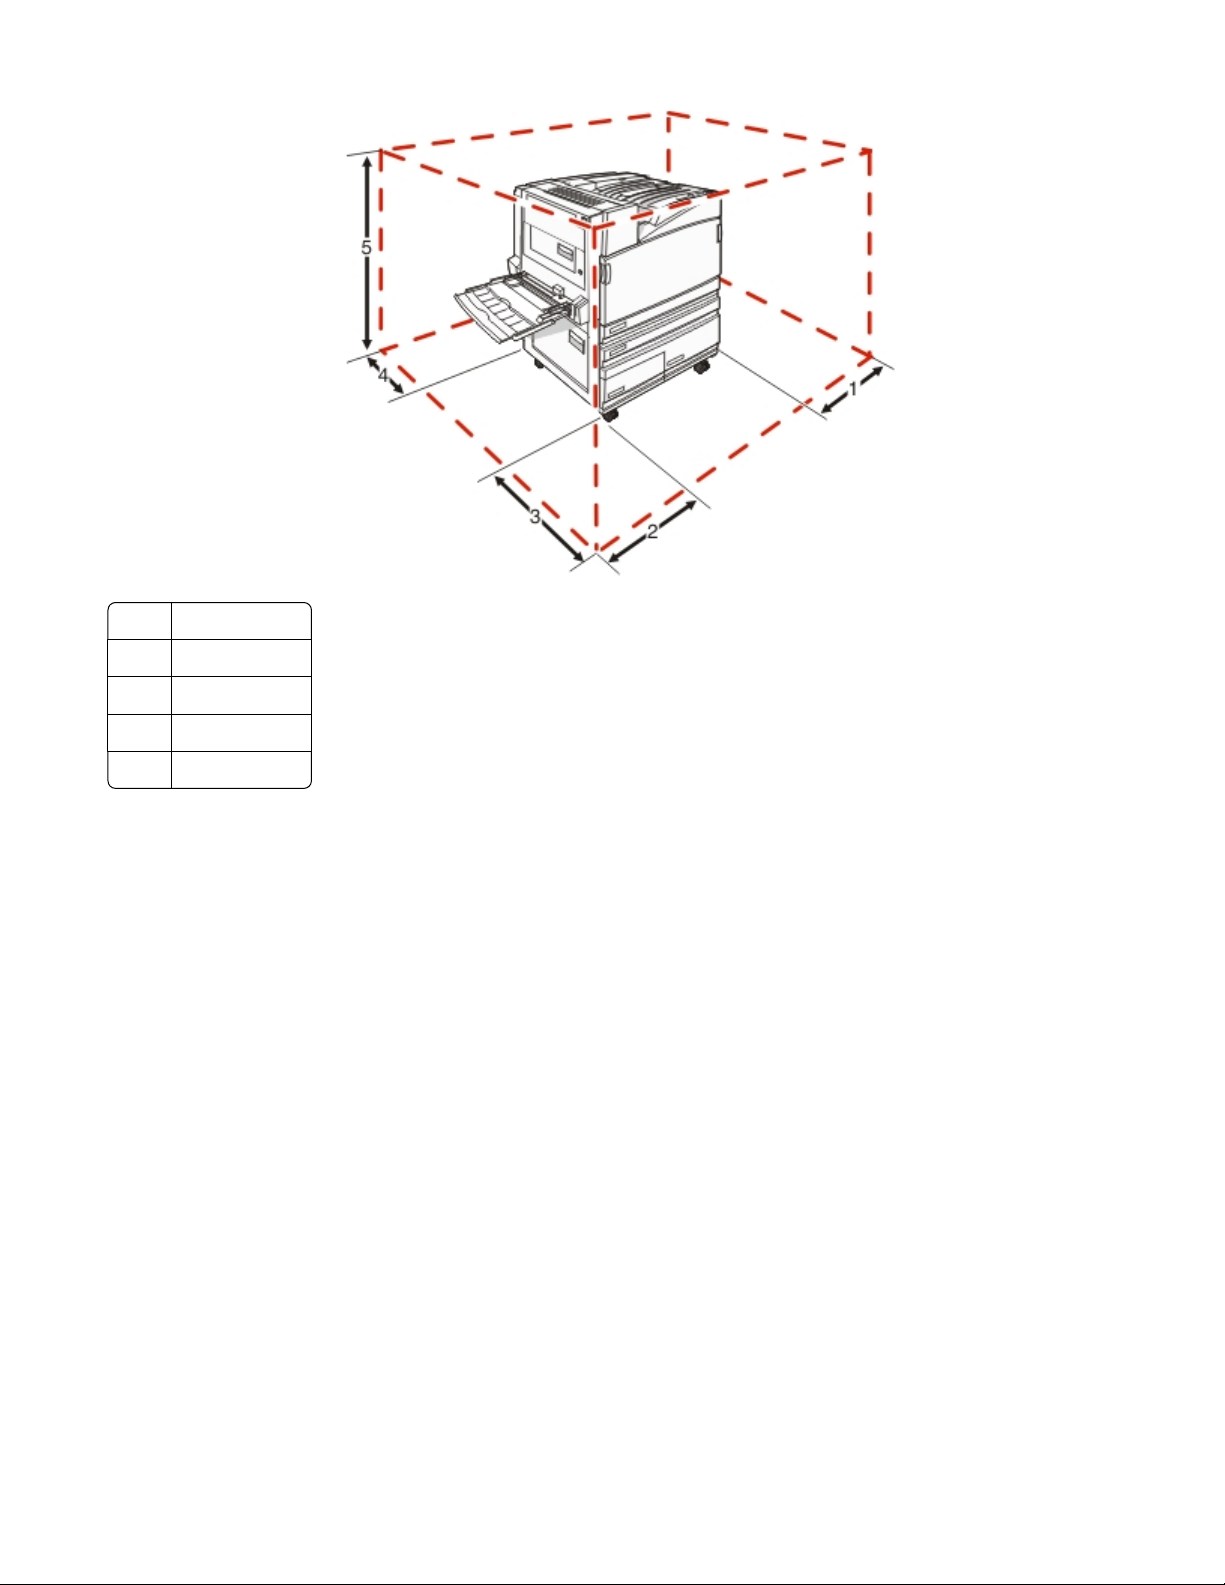
1 2 in. (50 mm)
2 2.7 ft (825 mm)
3 1.4 ft (418 mm)
4 4 in. (100 mm)
5 2.3 ft (693 mm)
Shipping the printer
When shipping the printer, use the original packaging or call the place of purchase for a relocation kit.
Maintaining the printer
21
 Loading...