

Page 1
Wireless USB Wired
START HERE
If you answer “yes”
to any of these
questions, turn to the
section indicated
for Setup and
Connection
instructions.
Do you want to connect the printer to a
wireless network?
Use the Wireless Setup and Connection.
Do you want to connect the printer
directly to the computer?
Use the USB Setup and Connection.
Do you want to connect the printer to a
wired ethernet network?
Use the Wired Setup and Connection.
Page 2
Wireless
r
1
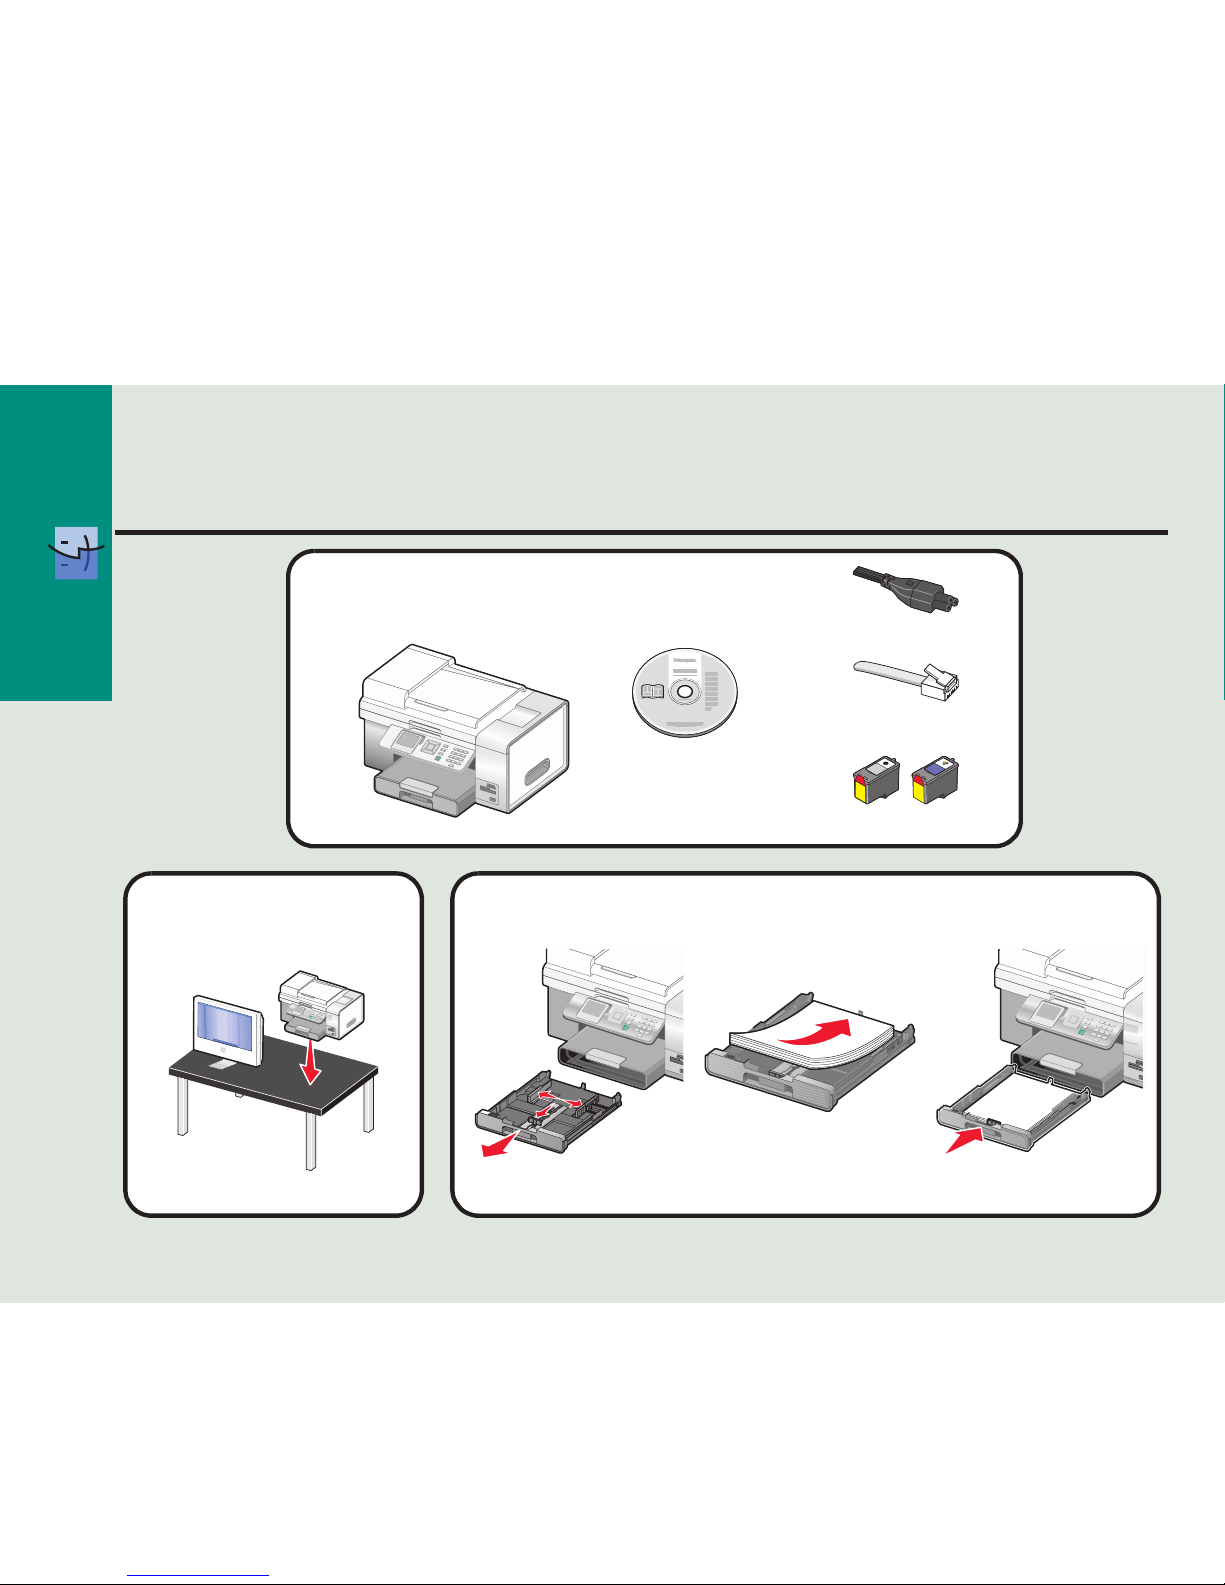
You need the following items to
complete Wireless Network Setup:
2
Move the printer near the
computer.
Wireless Setup and Connection
3
Load paper.
Installation CD
Telephone cord
Print cartridges
Power cord
Page 3
Wireless
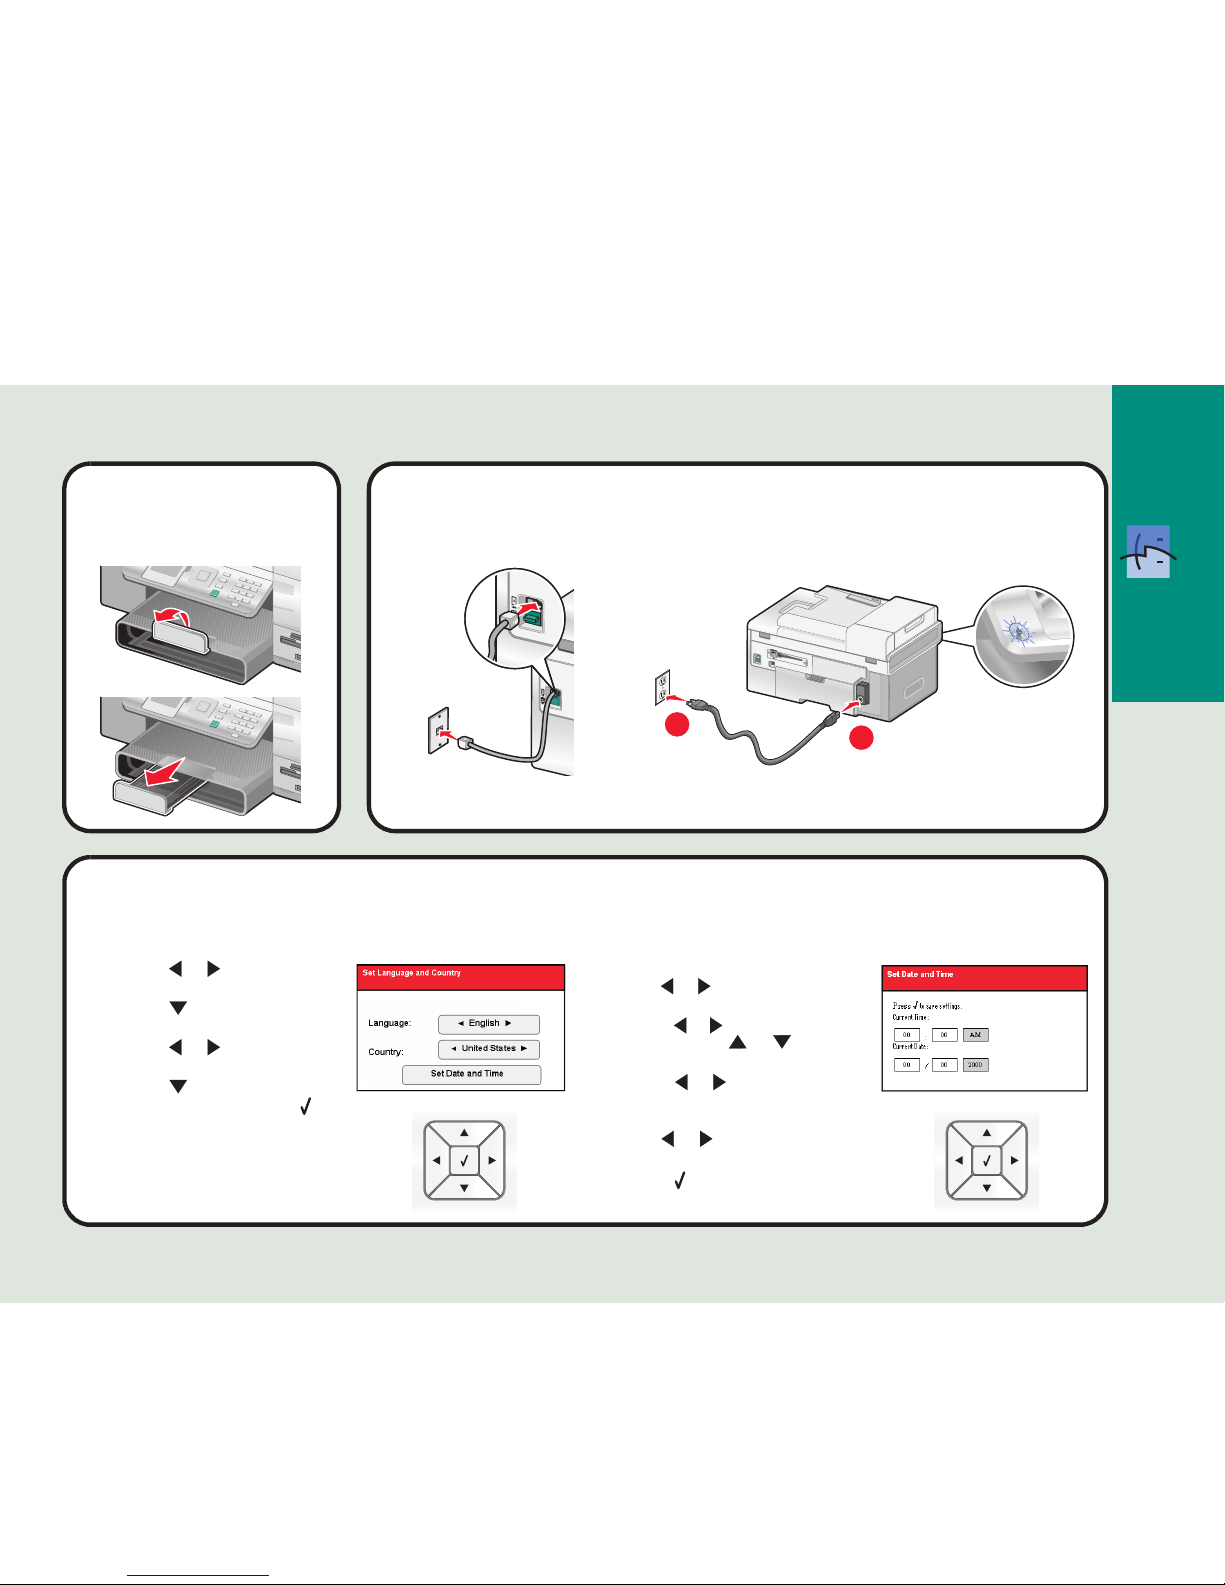
1 Press or to select the
language.
2 Press to locate the Country
setting.
3 Press or to select the
country or region.
4 Press to scroll to Set Date
and Time, and then press .
5
Connect the telephone cord and power cord.
1 Use the keypad to enter the time, and
use or to scroll between hours
and minutes.
2 Press or to scroll to AM, PM, or
24Hr, and use or to change
the setting.
3 Press or to scroll to Current
Date.
4 Use the keypad to enter the date, and
use or to scroll between day,
month, and year.
5 Press to save the settings.
6
Adjust the settings.
1
2
4
Adjust the paper exit
tray.
Page 4
Wireless
7
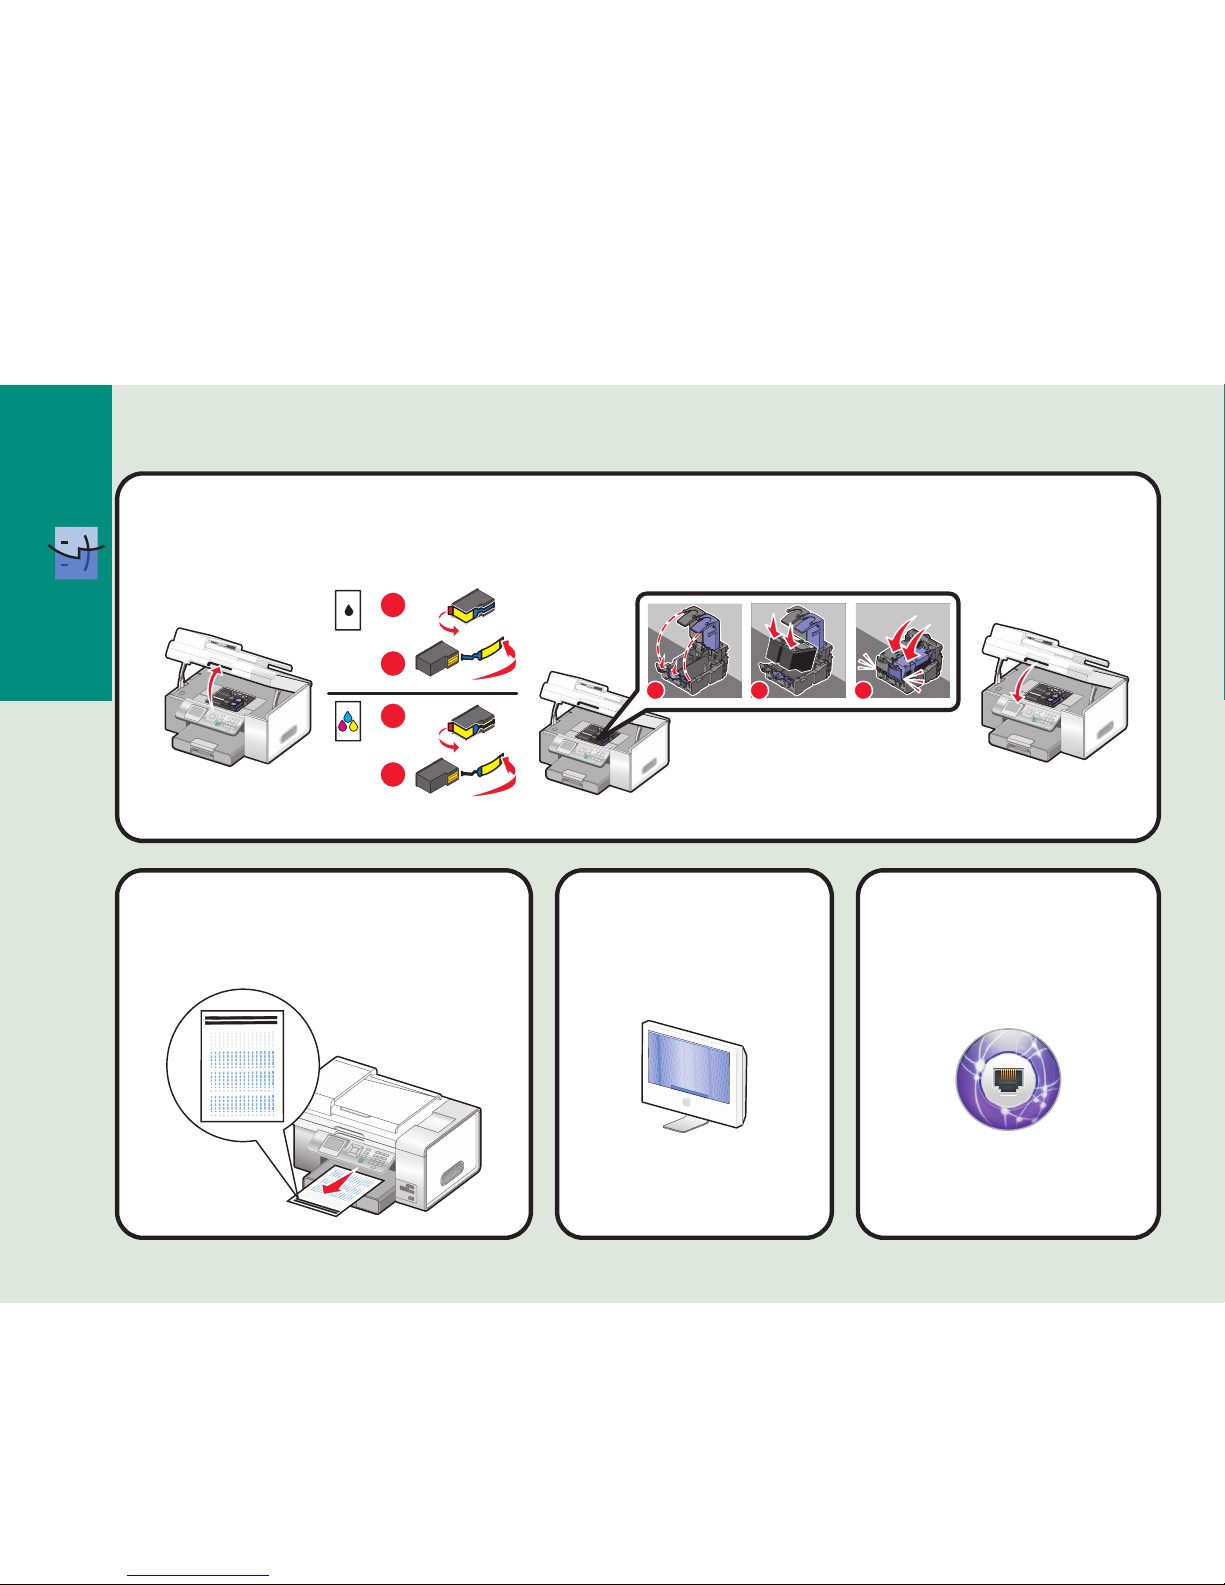
Insert the print cartridges.
The printer automatically aligns
the print cartridges and prints an
alignment page. This may take a
few minutes.
8
Make sure the
computer is on.
9
1
2
1
2
2
1
3
From the Applications
folder, double-click the
Internet Connect
icon.
10
Page 5
Wireless
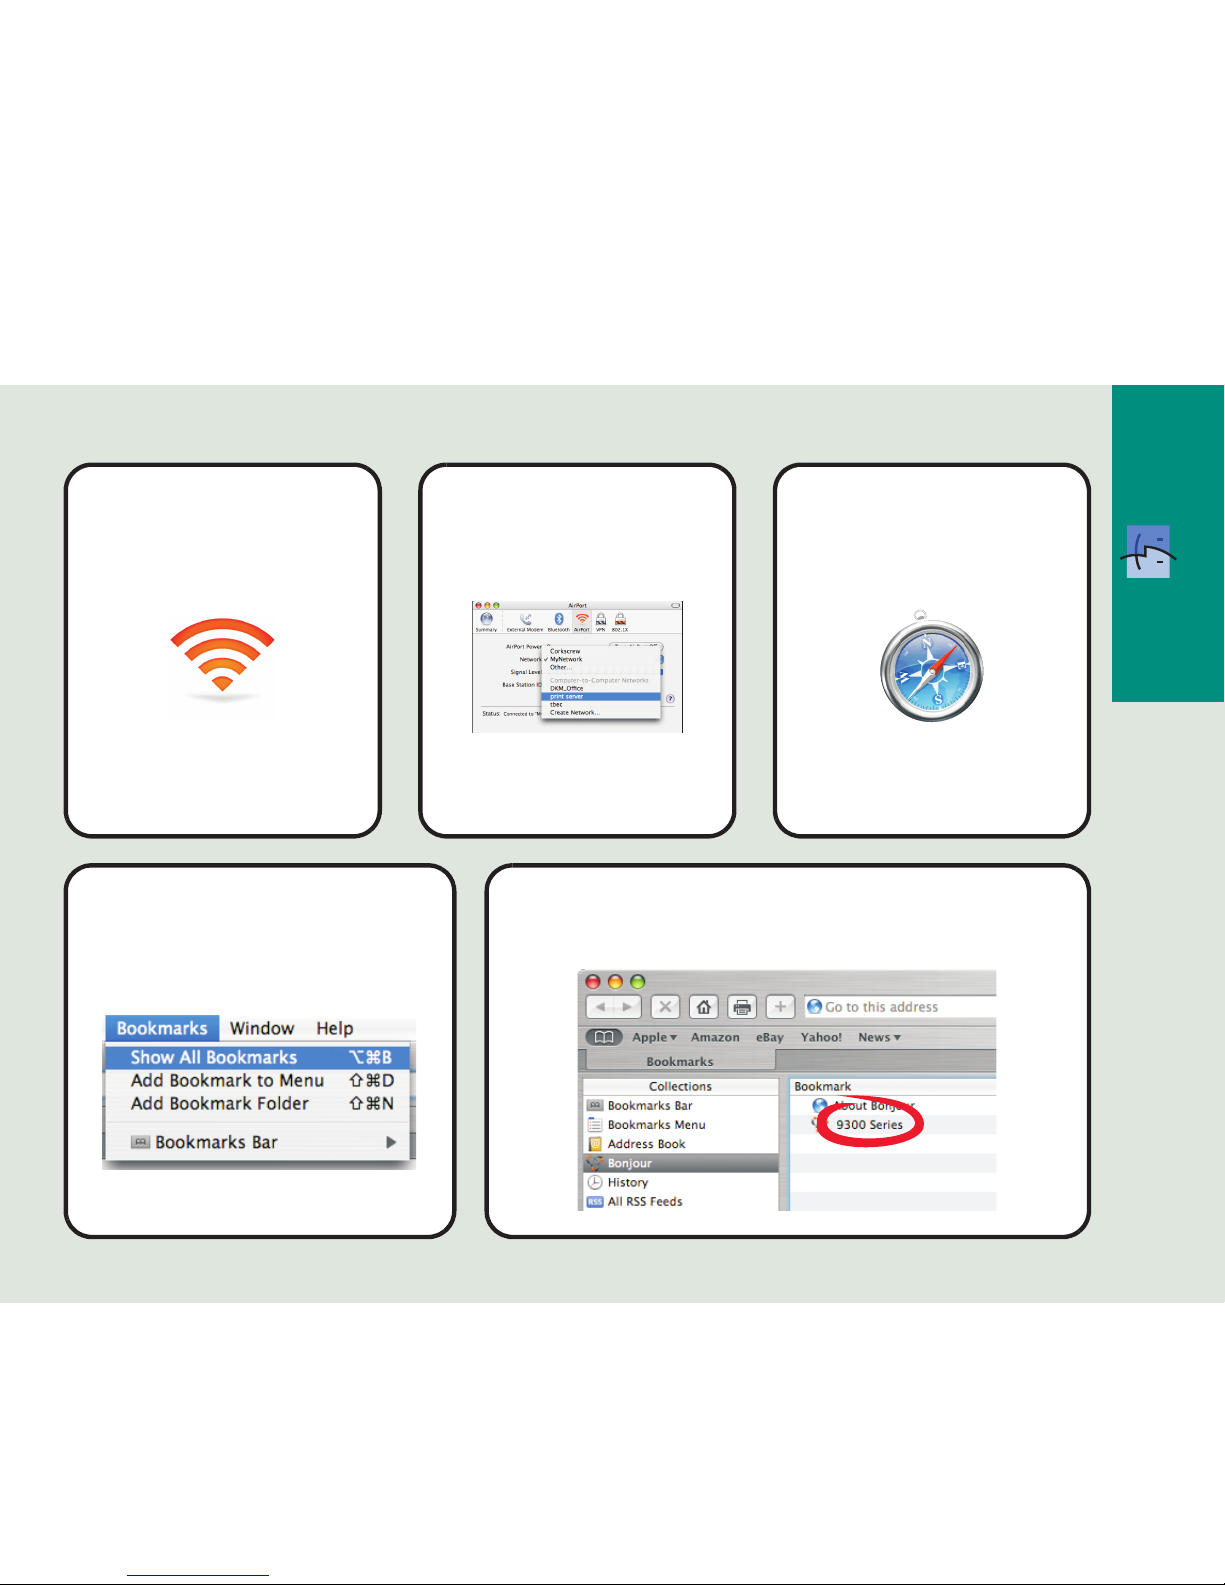
Open the Safari browser.
13
From the toolbar, click
the AirPort icon.
11
From the Network popup menu, select print
server.
12
From the Bookmarks drop-down
menu, select Show All
Bookmarks.
14
Under Collections, select Bonjour or Rendezvous,
and then double-click 9300 Series.
15
Page 6
Wireless
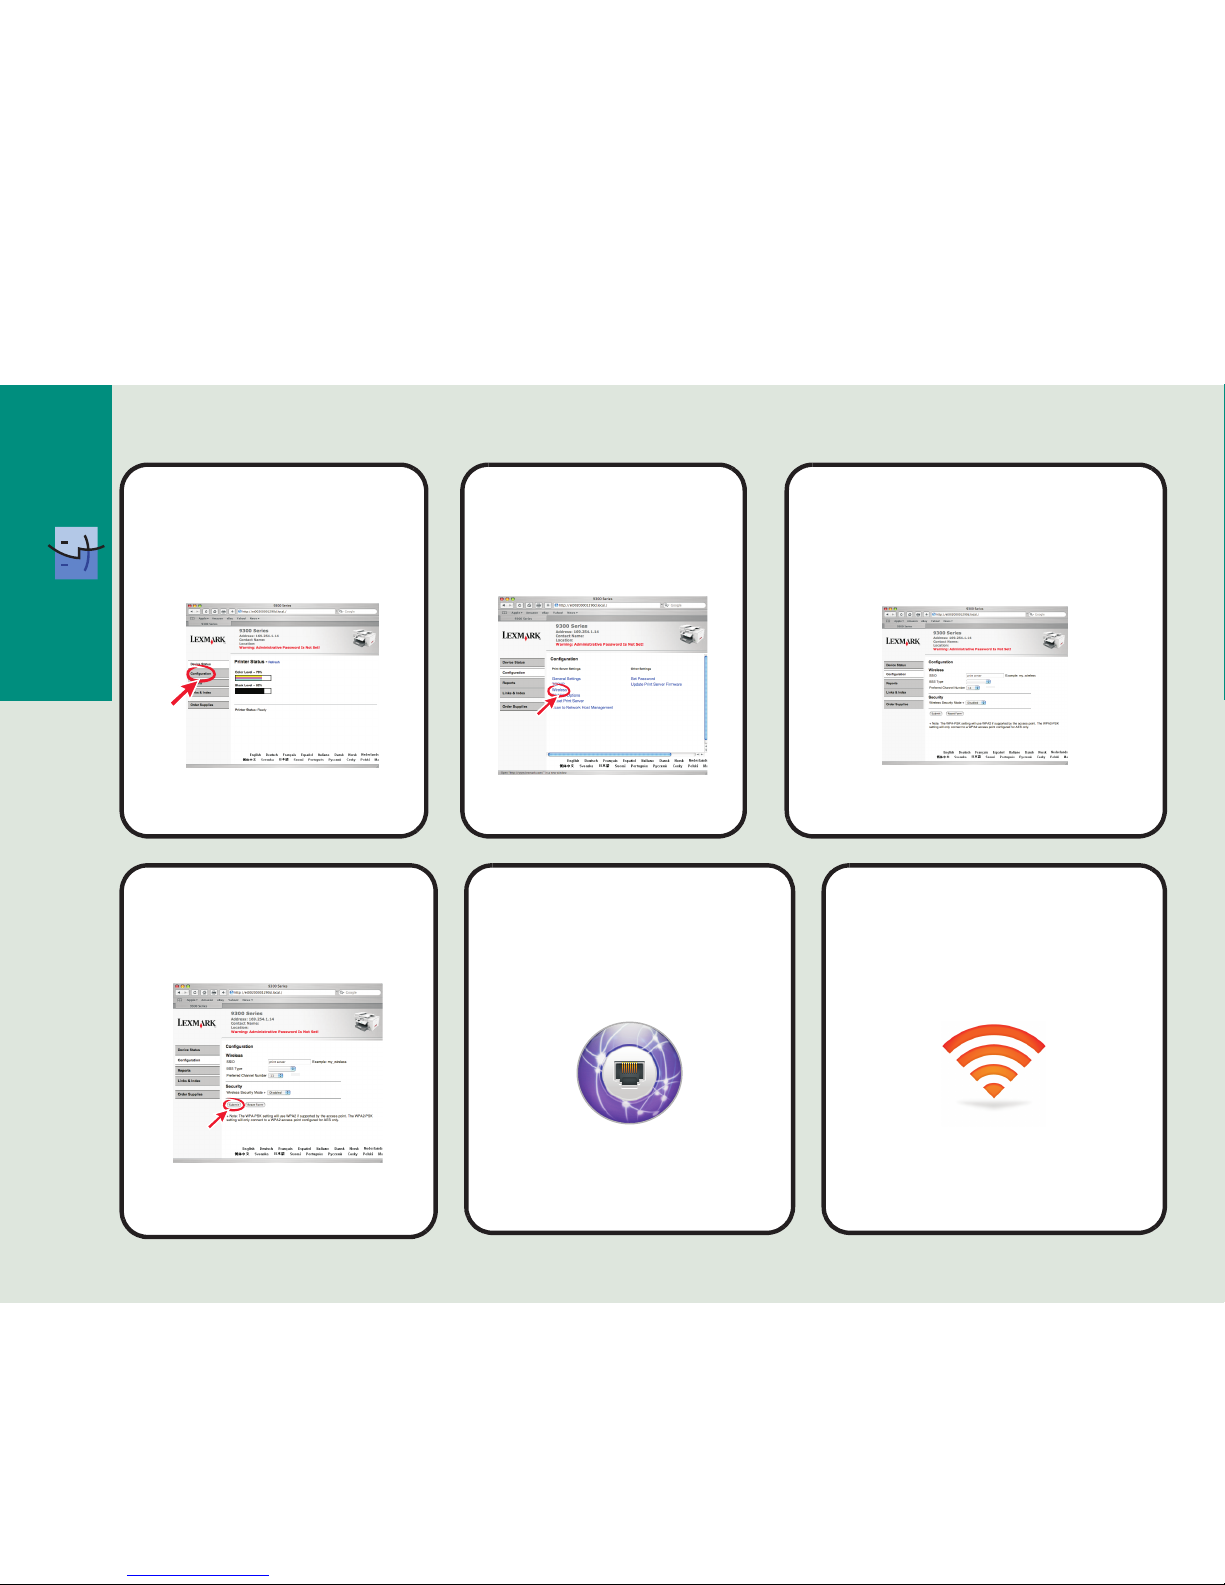
1 Enter the name of your network (SSID).
2 For BSS Type, select Infrastructure if
you are using a wireless router.
3 Select the type of security you use to
protect your wireless network.
18
Click Configuration.
16
Click Wireless.
17
From the toolbar, click the
AirPort icon.
21
Click Submit.
19
From the Applications
folder, double-click the
Internet Connect icon.
20
Note: If you do not know this information, see the
documentation that came with the wireless network or
contact the person who set up your wireless network.
Infrastructure
Infrastructure
Page 7
Wireless
24
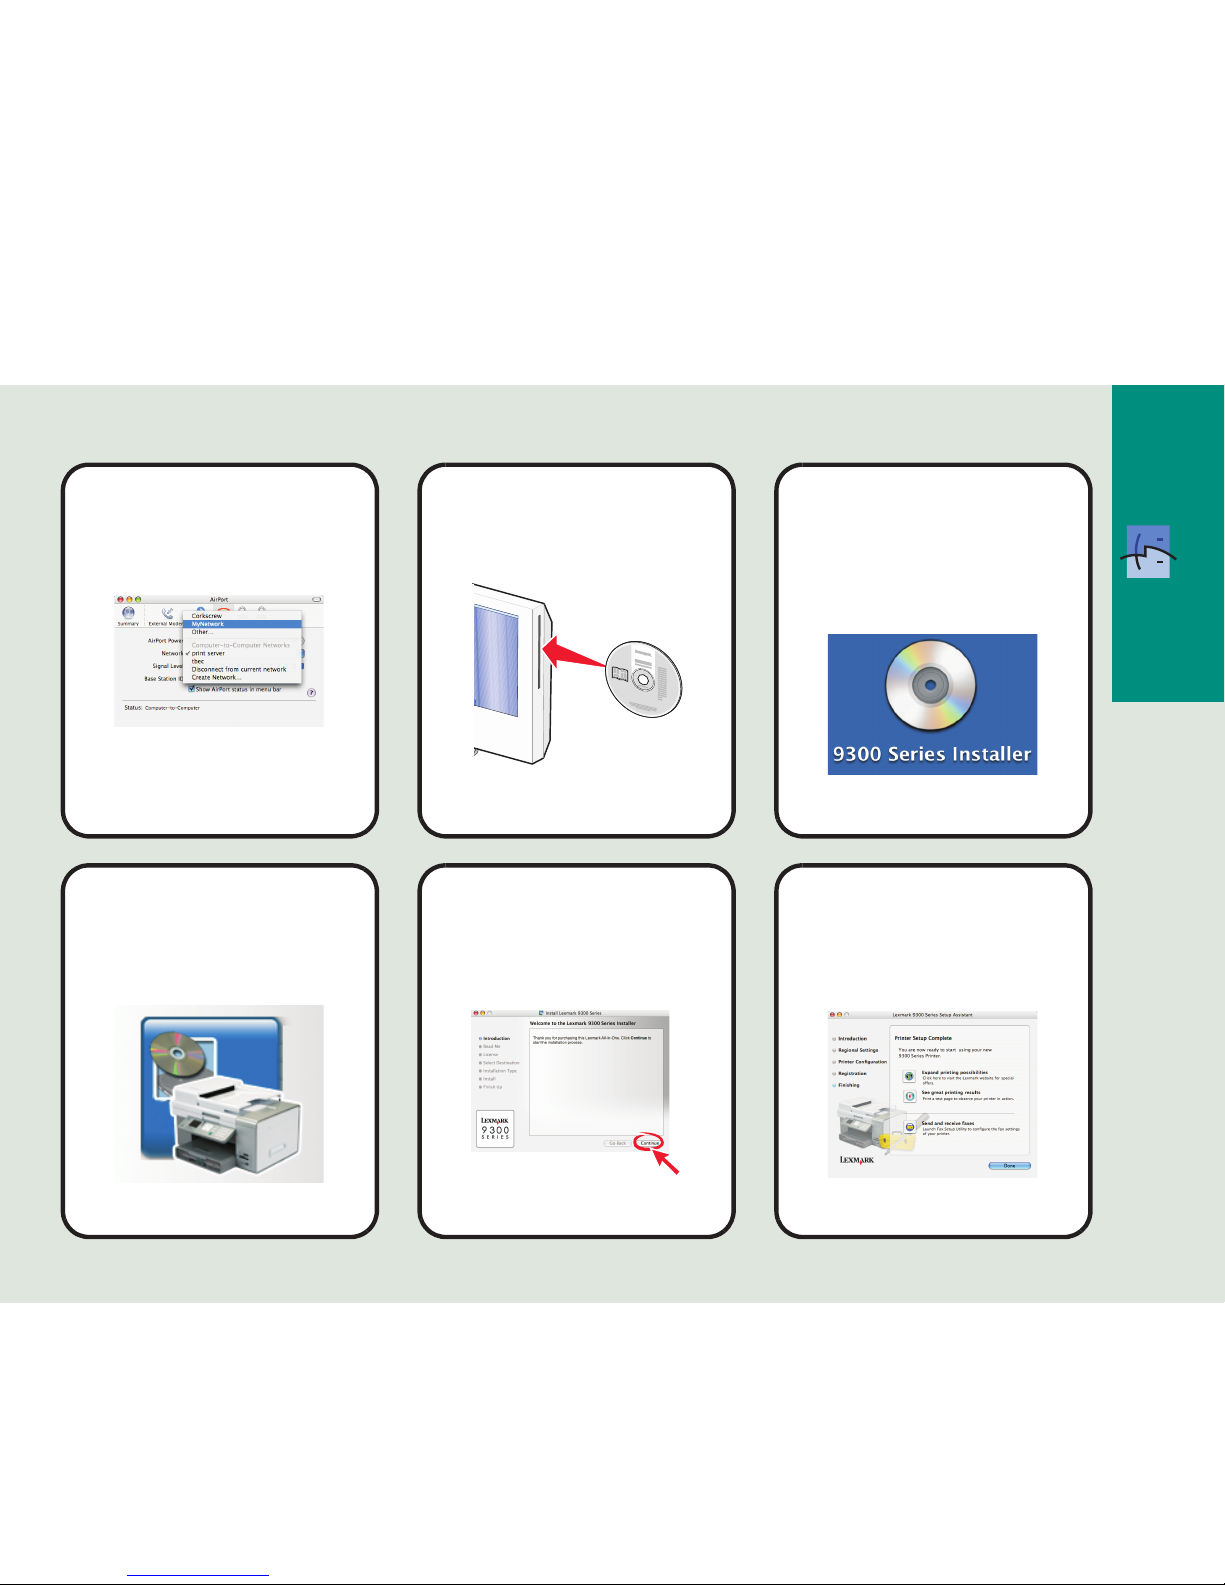
From the Network popup menu, select your
original network.
22
Insert the CD.
23
Follow the instructions on
the screen to complete
installation.
27
Double-click the Install
icon.
25
Click Continue.
26
Double-click the 9300
Series Installer icon on
the desktop.
Note: You may need to enter the password
for your wireless network security.
Page 8
Wireless
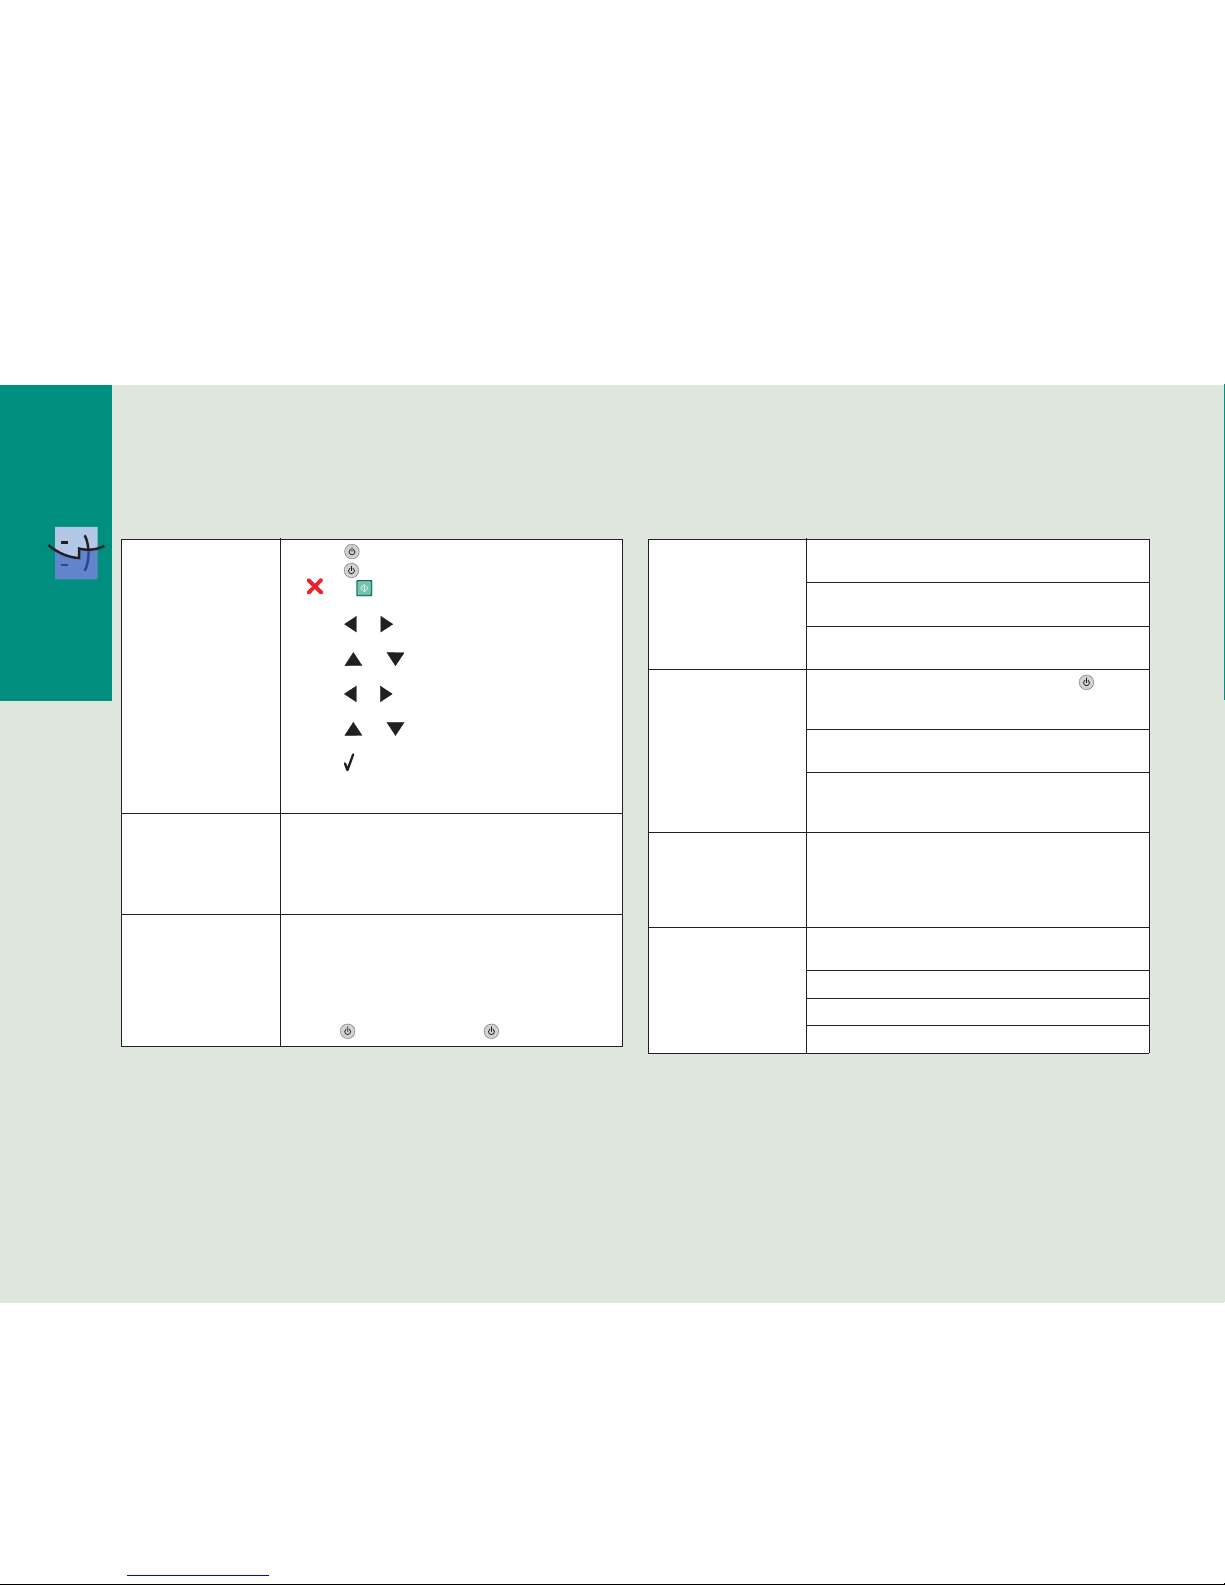
Setup troubleshooting Networking troubleshooting
Incorrect language
appears on the display.
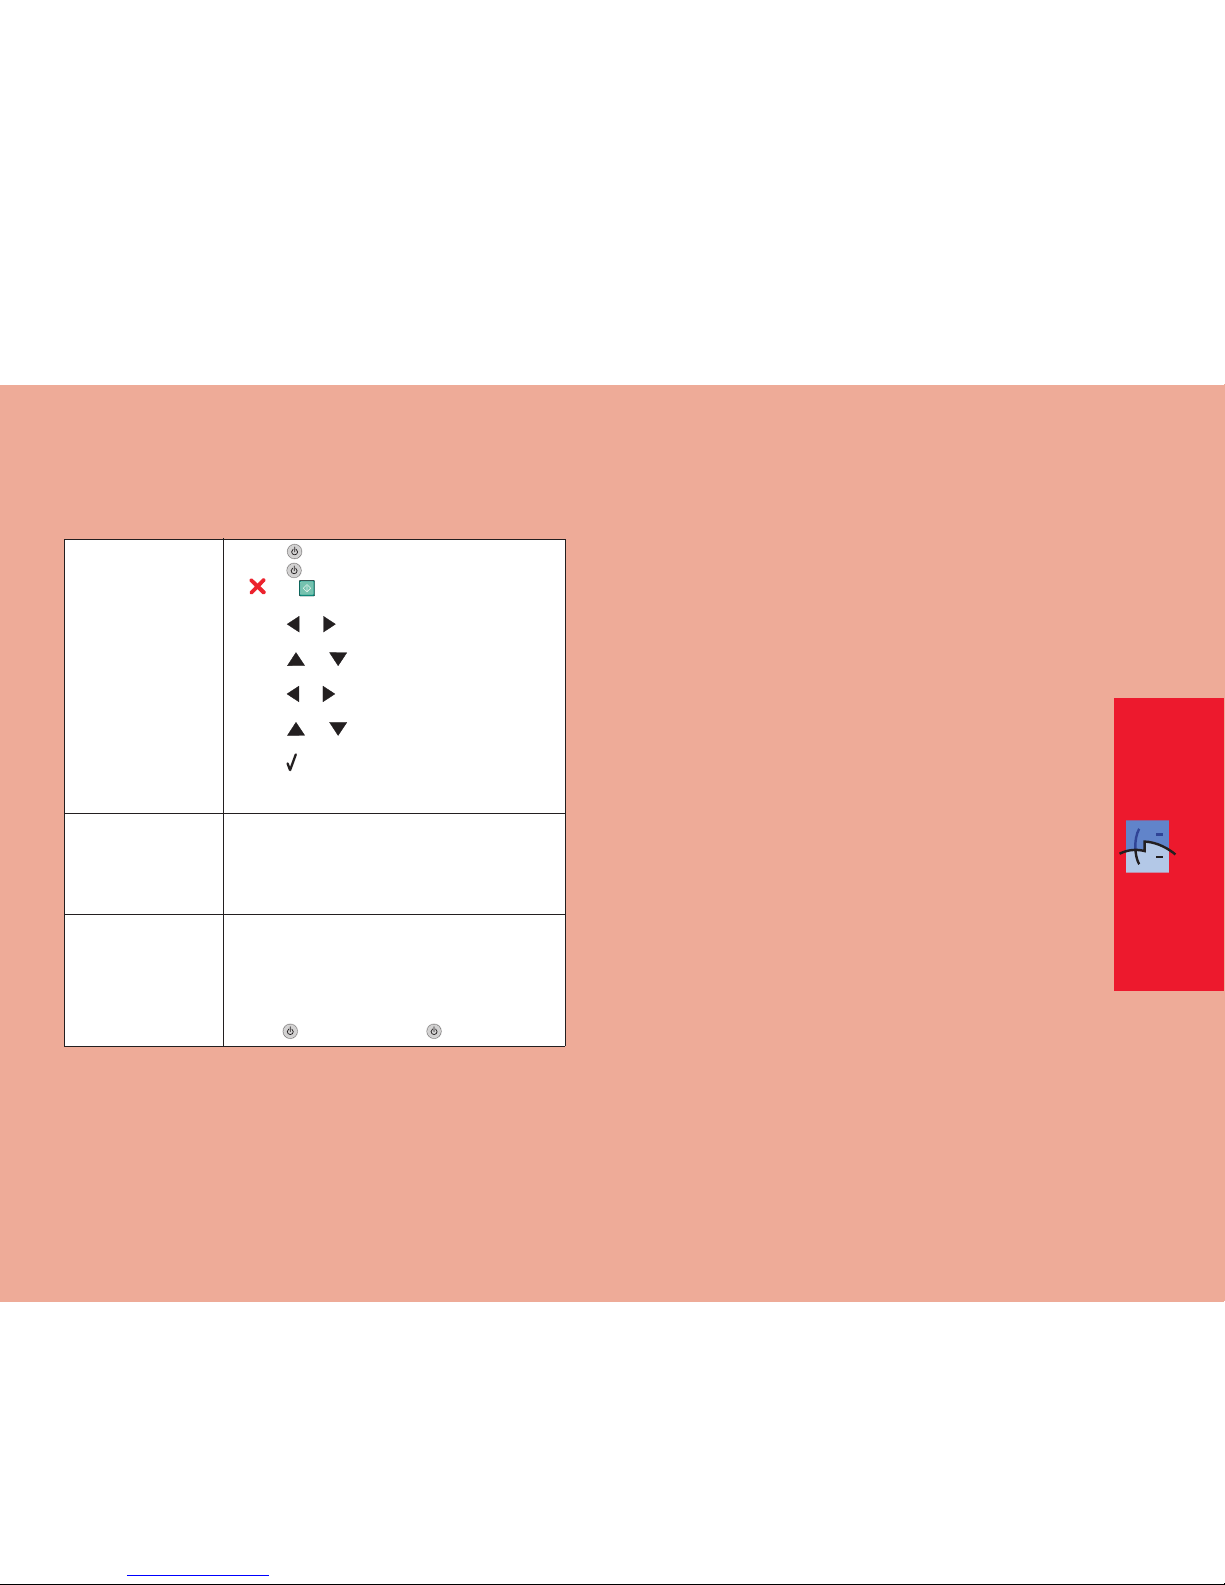
1 Press to turn the printer off.
2 Press once, and then immediately press and hold
and .
3 Release the buttons.
4 Press or repeatedly until the language you
want appears on the display.
5 Press or repeatedly until the option for
Country is highlighted.
6 Press or repeatedly until the country you want
appears on the display.
7 Press or repeatedly until Set Date and
Time is highlighted.
8 Press .
9 Set the date and time. For more information, see step
6 in the Setup documentation.
Software does not
install.
1 Turn off and then restart the computer.
2 Insert the CD.
3 Double-click the 9300 Series Installer icon.
4 Double-click the Install icon, and follow the
instructions on the screen to complete installation.
Power button is not lit. 1 Disconnect the power cord from the wall outlet, and
then from the printer.
2 Plug the cord all the way into the power supply on the
printer.
3 Plug the cord into an electrical outlet that other
electrical devices have been using.
4 If the light is not on, press .
Printer is unable to join
the network
Make sure the printer settings match those used by the
wireless network.
Make sure the printer is within range of the wireless
network.
If your network uses MAC address filtering, provide the
MAC address for the printer to your network.
Printer is configured
correctly, but cannot be
found on the network.
Make sure that the printer has power and the light is
on. For more help, see “Power button is not lit” in the
Setup troubleshooting.
Make sure the printer is within range of the wireless
network.
Make sure the printer is located away from other
electronic devices that may interfere with the wireless
signal.
Printer does not appear
on the Printer Selection
screen.
1 From the Printer Selection screen, select Add
Remote from the pop-up menu.
2 From the Add Remote pane, enter a TCP/IP address
to find printers on the network. For more information,
see the online Help.
Network printer does not
print.
Make sure all cables to the printer and to the electrical
outlet are secure.
Make sure the network is operating properly.
Restart the computer.
Uninstall and then reinstall the software.
Page 9
USB
1
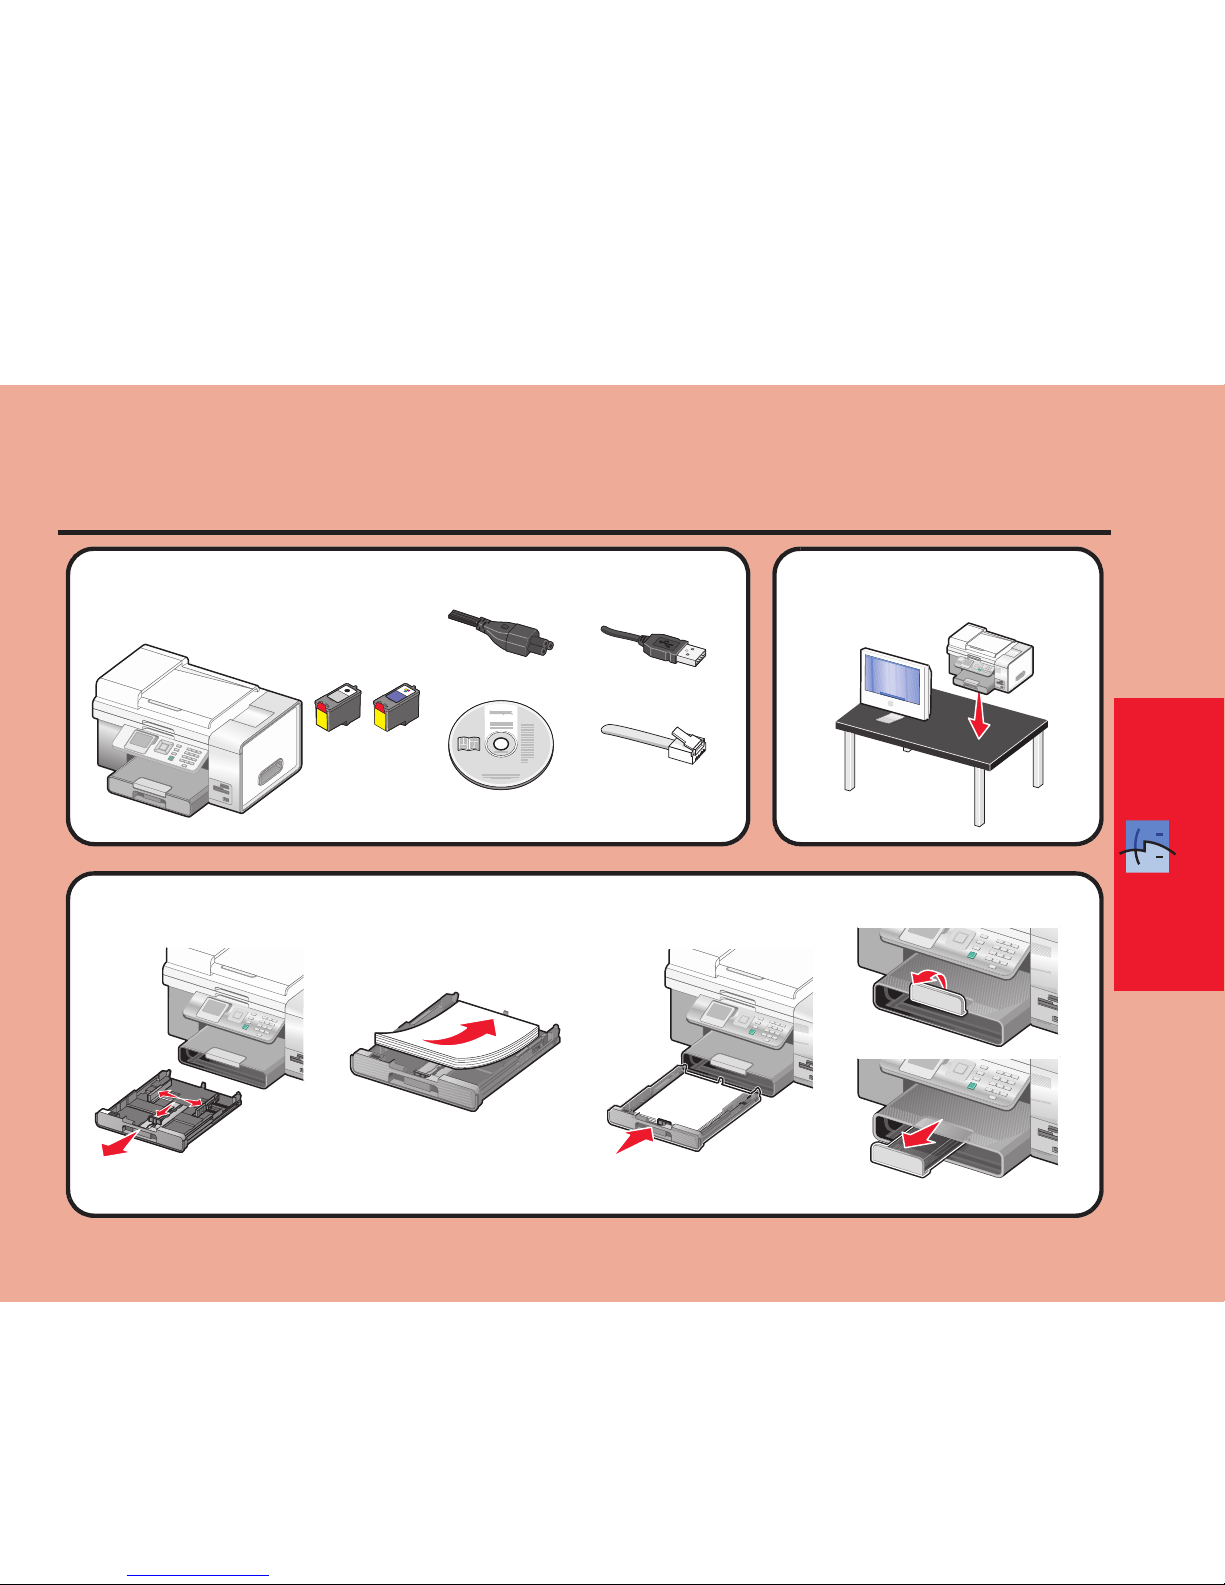
You need the following items to
complete USB Setup:
2
Move the printer near the
computer.
USB Setup and Connection
3
Load paper.
Installation CD
USB cable
(purchased separately)
Telephone cord
Print
cartridges
Power cord
Page 10
USB
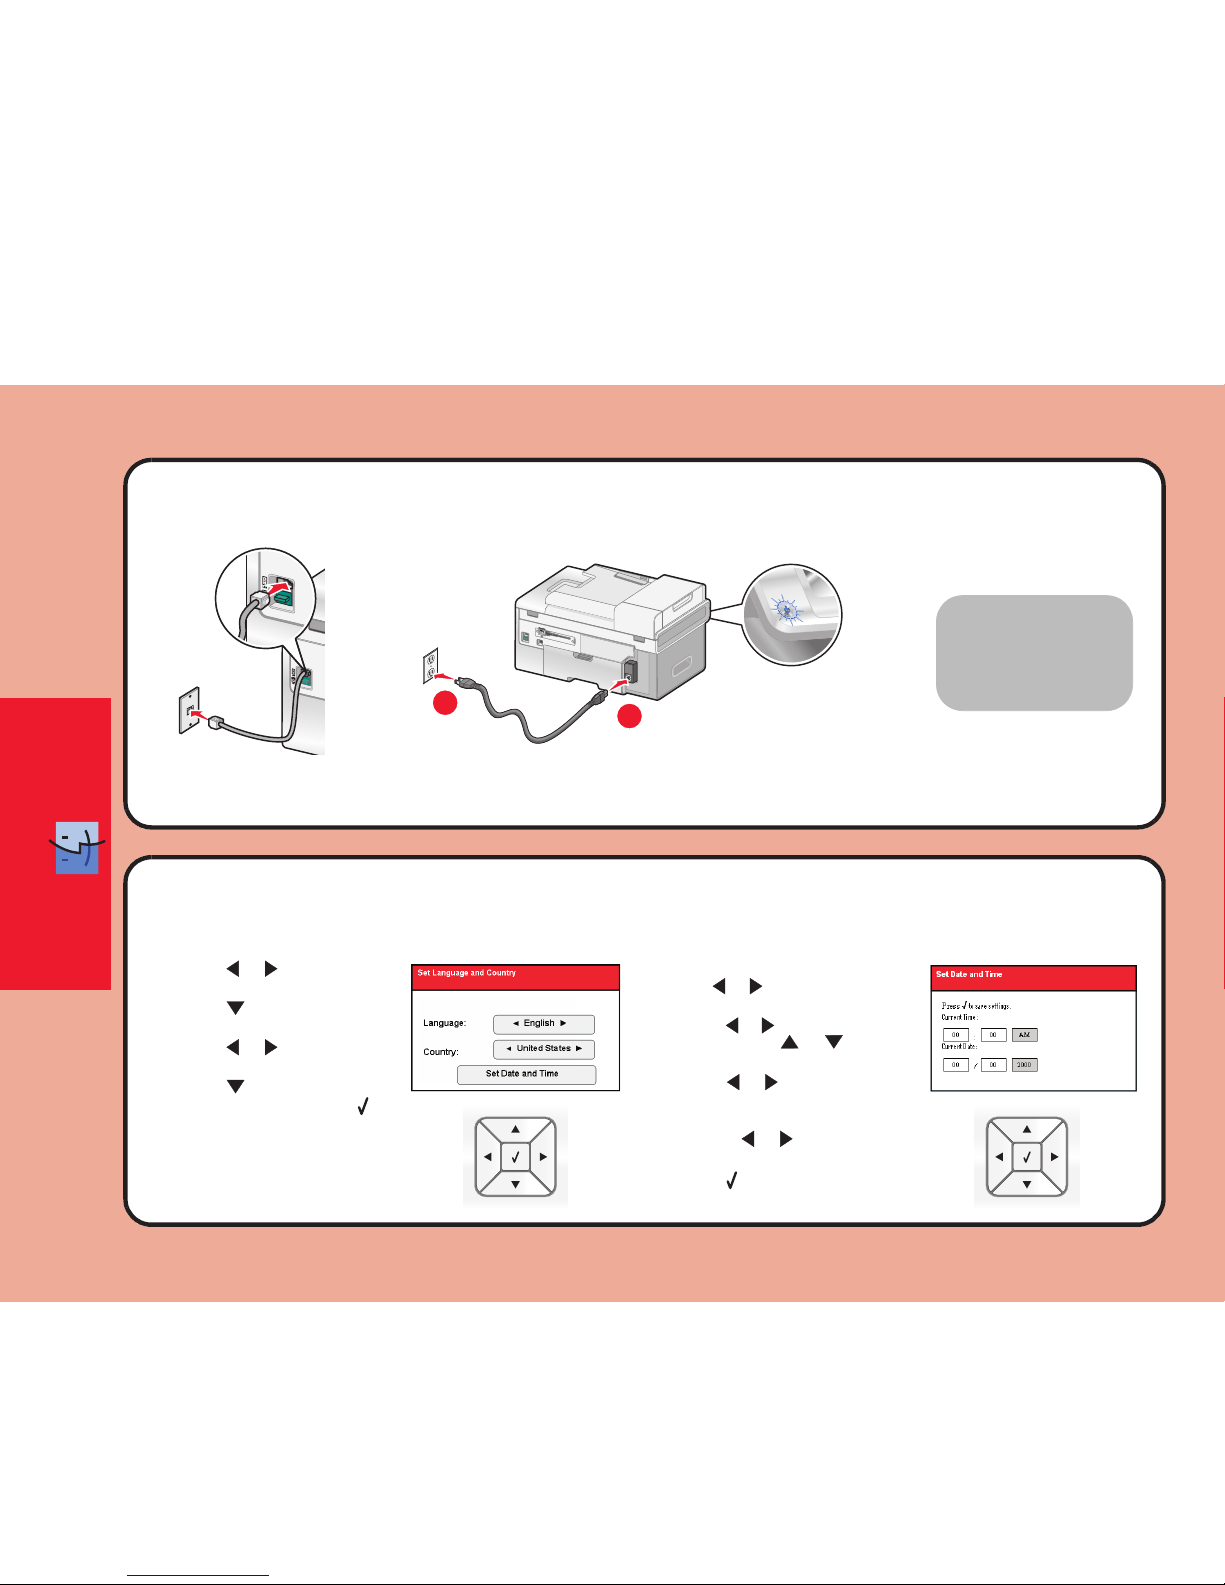
1 Press or to select the
language.
2 Press to locate the Country
setting.
3 Press or to select the
country or region.
4 Press to scroll to Set Date
and Time, and then press .
4
Connect the telephone cord and power cord.
1 Use the keypad to enter the time, and
use or to scroll between hours
and minutes.
2 Press or to scroll to AM, PM, or
24Hr, and use or to change
the setting.
3 Press or to scroll to Current
Date.
4 Use the keypad to enter the date,
and use or to scroll between
day, month, and year.
5 Press to save the settings.
5
Adjust the settings.
1
2
Important! Do
not connect the
USB cable yet.
Page 11
USB
6
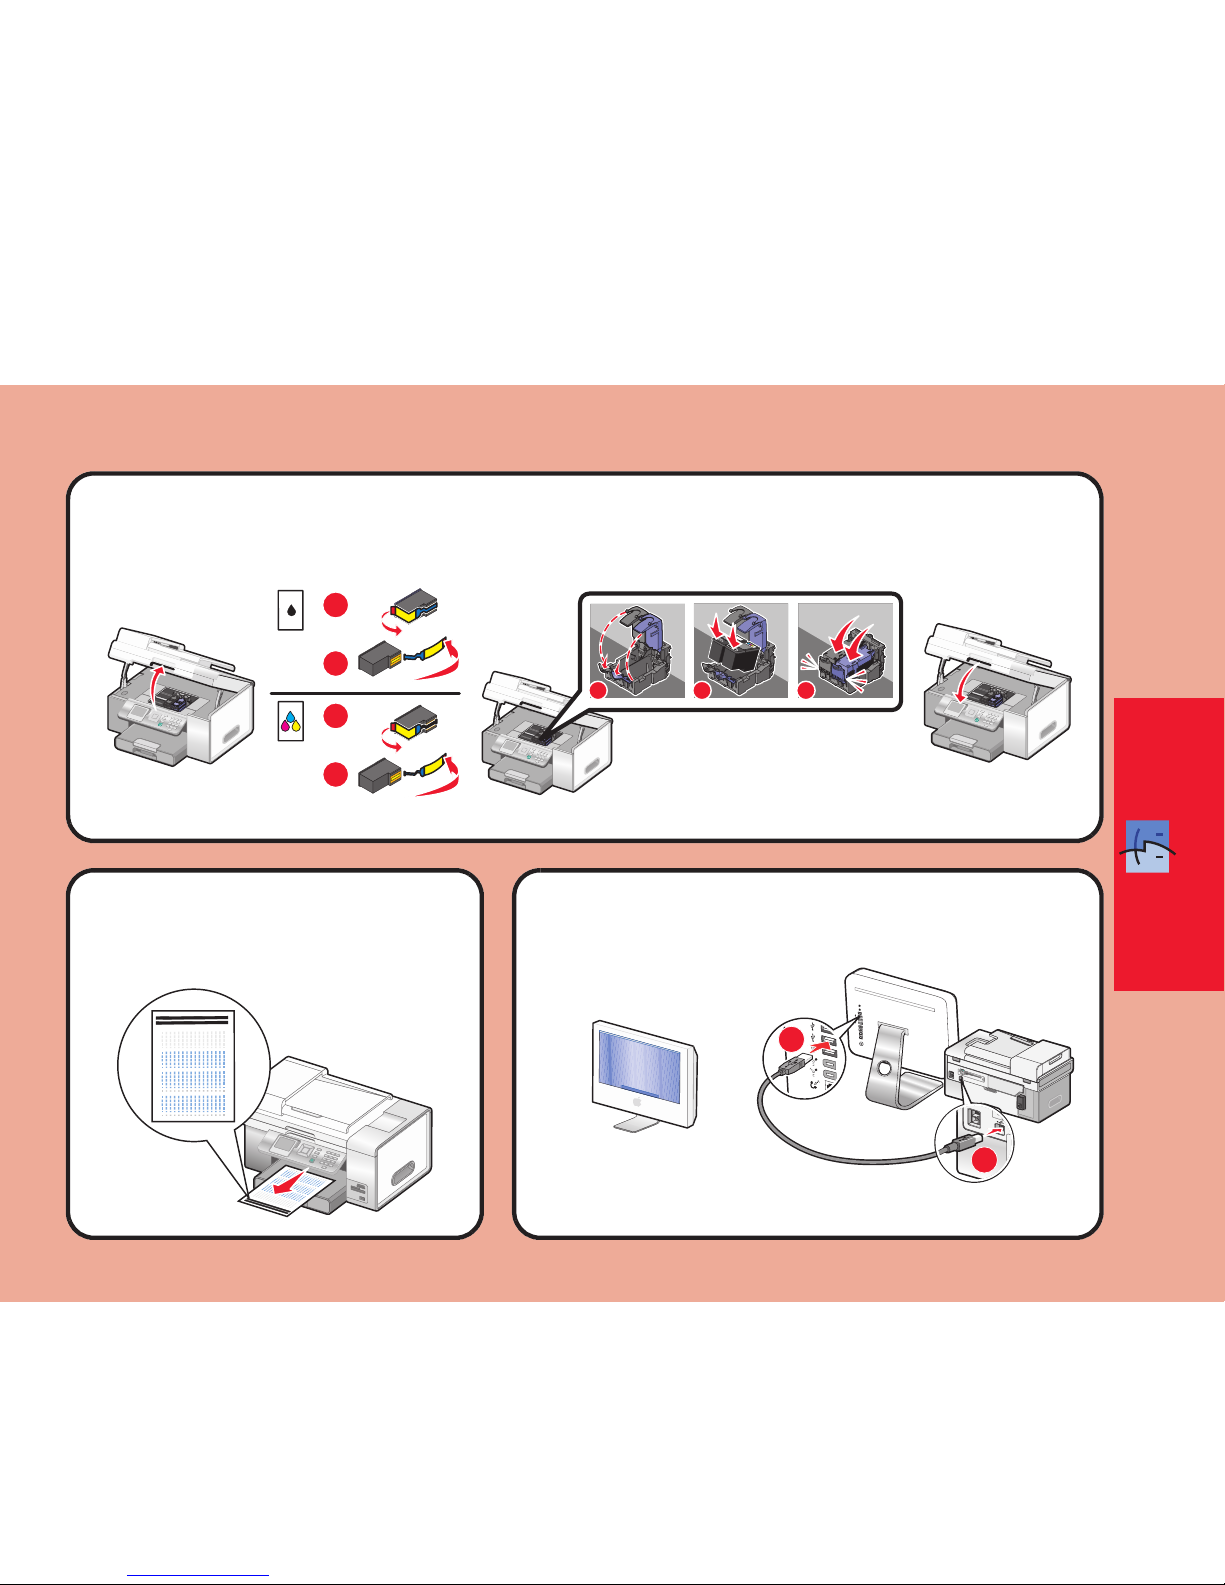
Insert the print cartridges.
The printer automatically aligns
the print cartridges and prints an
alignment page. This may take a
few minutes.
7
Make sure the computer is on, and then connect the
USB cable to the printer and to the computer.
8
1
2
1
2
2
1
3
1
2
Page 12
USB
11
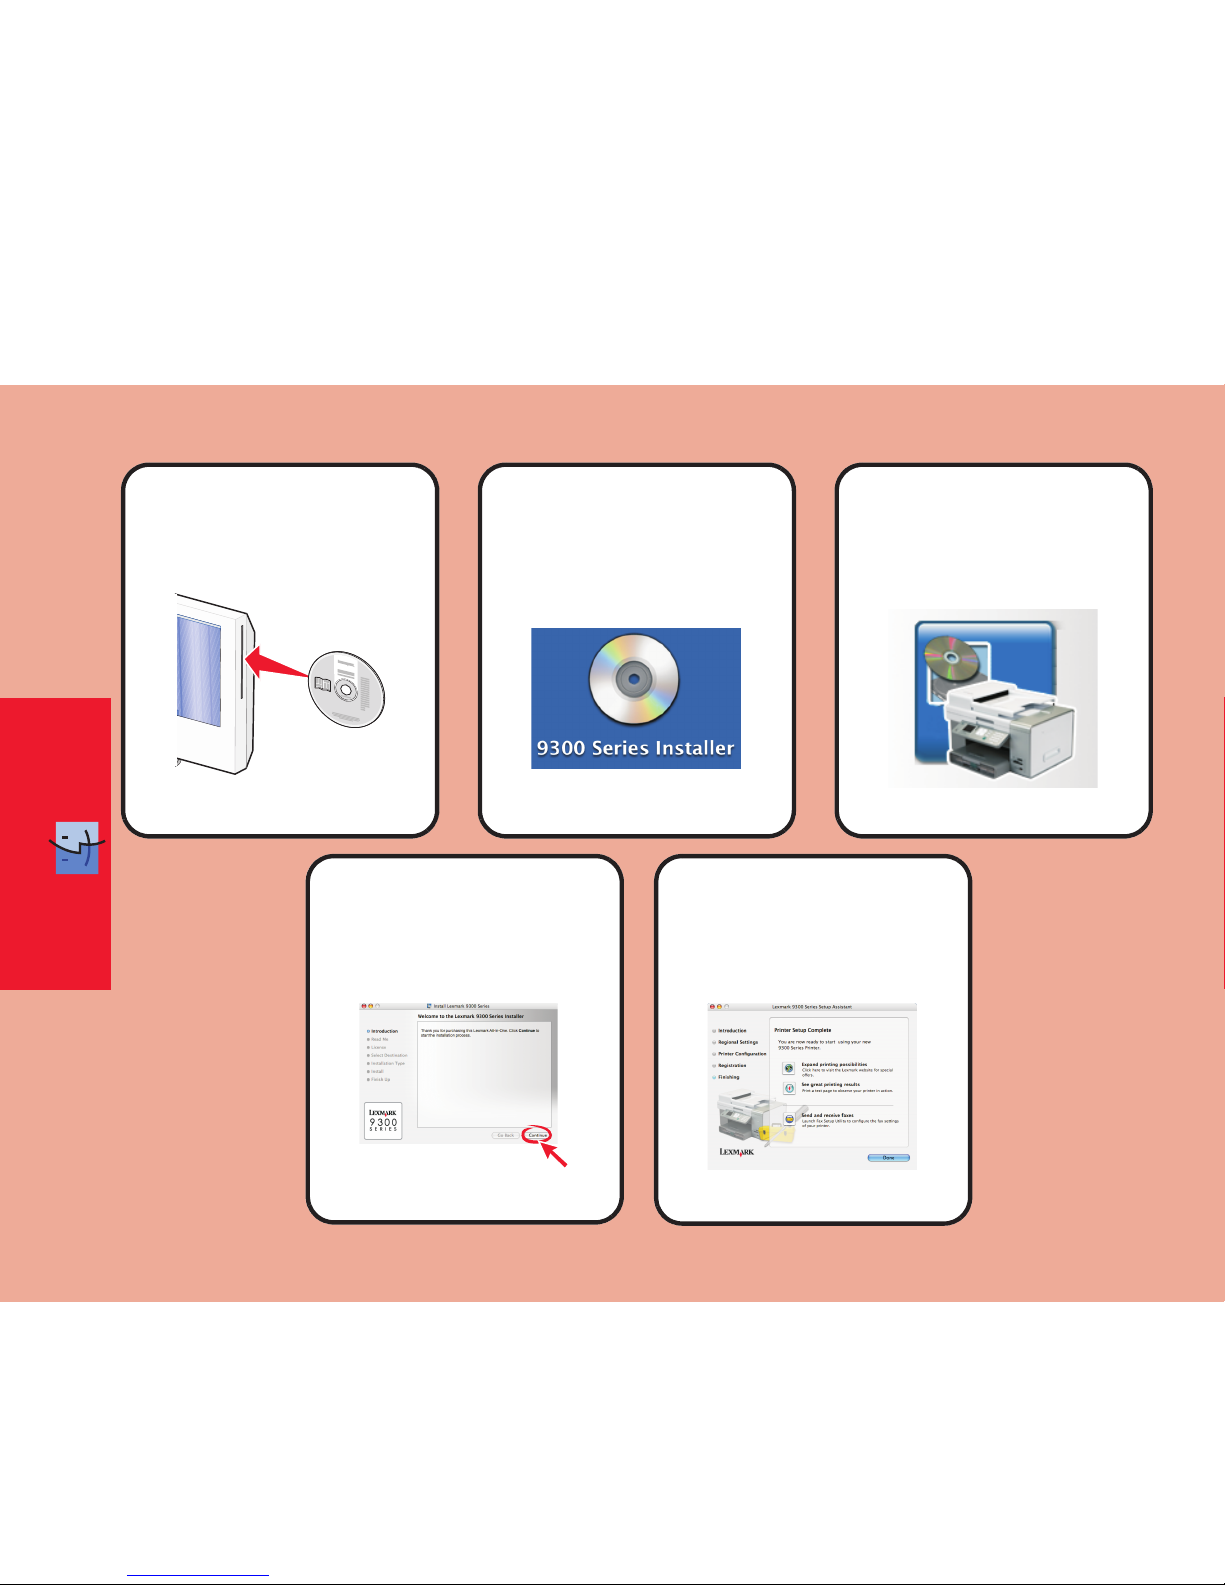
Insert the CD.
9
12
Click Continue. Follow the instructions on
the screen to complete
installation.
13
10
Double-click the 9300
Series Installer icon on
the desktop.
Double-click the Install
icon.
Page 13
USB
Setup troubleshooting
Incorrect language
appears on the display.
1 Press to turn the printer off.
2 Press once, and then immediately press and hold
and .
3 Release the buttons.
4 Press or repeatedly until the language you
want appears on the display.
5 Press or repeatedly until the option for
Country is highlighted.
6 Press or repeatedly until the country you want
appears on the display.
7 Press or repeatedly until Set Date and
Time is highlighted.
8 Press .
9 Set the date and time. For more information, see step
5 in the Setup documentation.
Software does not
install.
1 Turn off and then restart the computer.
2 Insert the CD.
3 Double-click the 9300 Series Installer icon.
4 Double-click the Install icon, and follow the
instructions on the screen to complete installation.
Power button is not lit. 1 Disconnect the power cord from the wall outlet, and
then from the printer.
2 Plug the cord all the way into the power supply on the
printer.
3 Plug the cord into an electrical outlet that other
electrical devices have been using.
4 If the light is not on, press .
Page 14
Wired
1 2
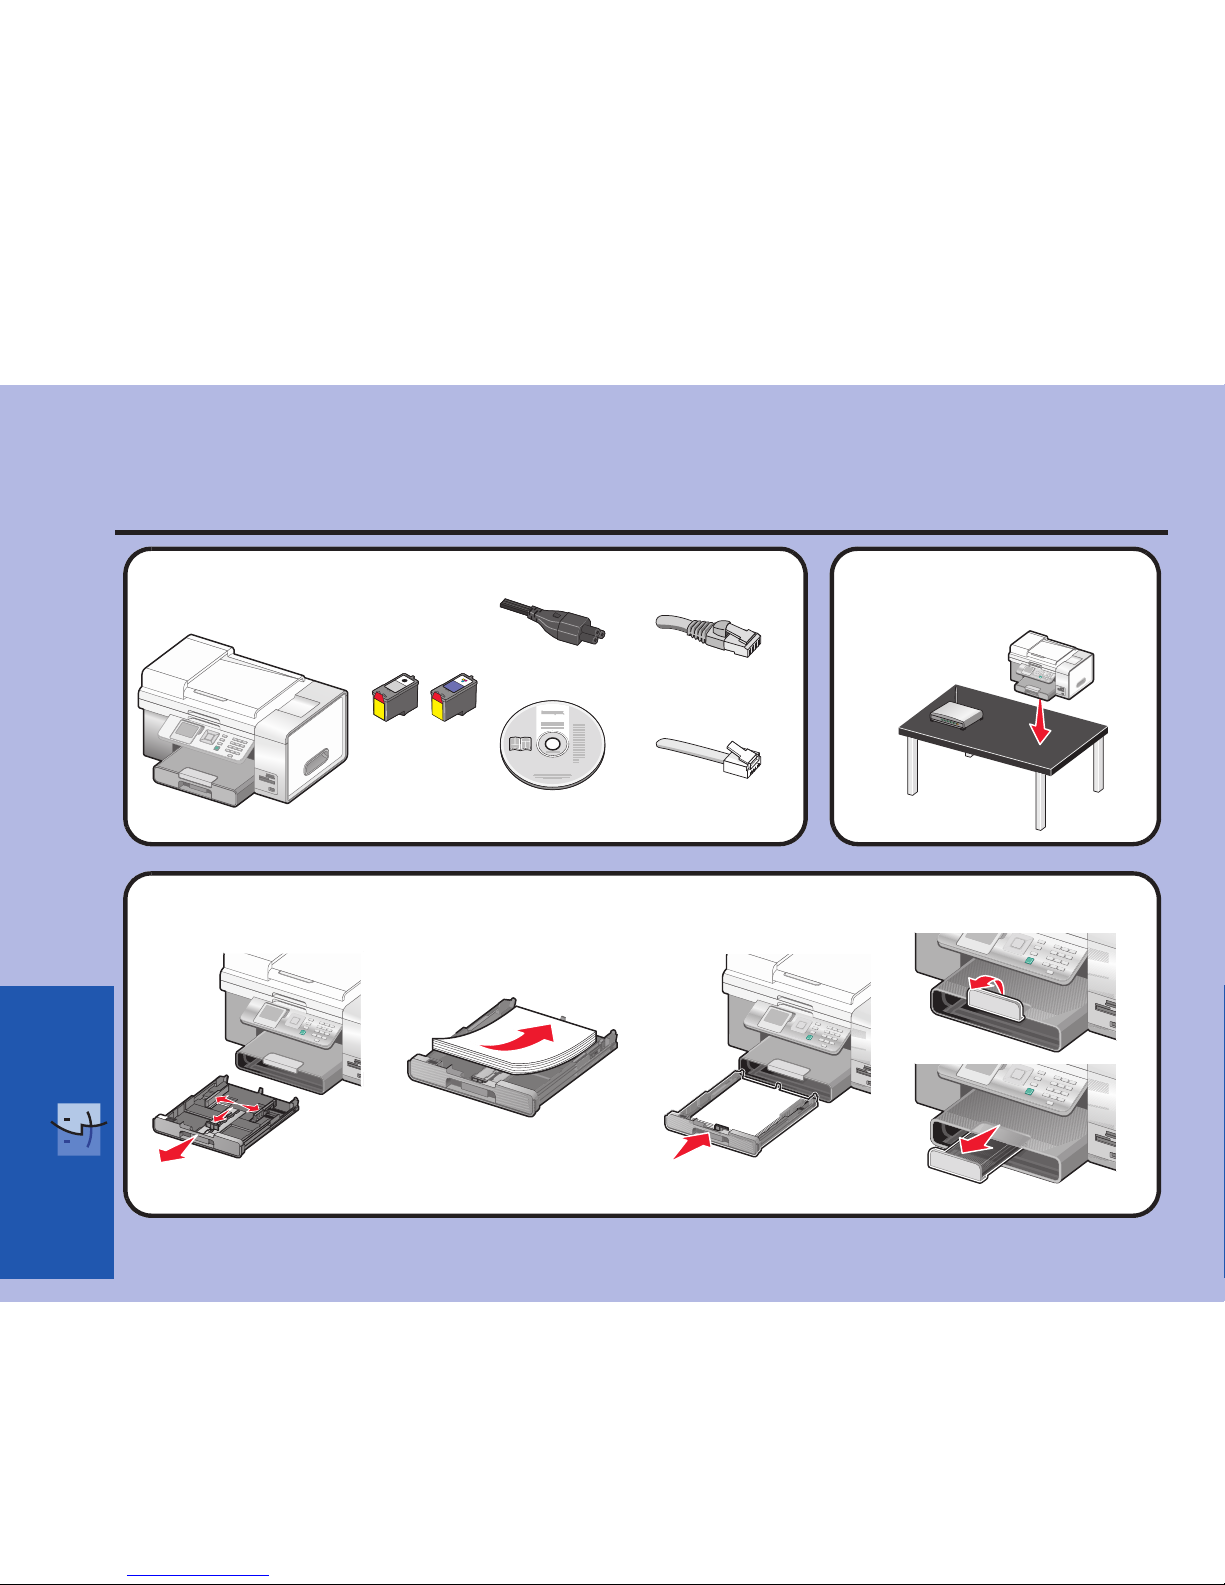
Move the printer near the
router.
Wired Setup and Connection
3
Load paper.
You need the following items to
complete Wired Network Setup:
Installation CD
Network cable
(not included)
Telephone cord
Print cartridges
Power cord
Page 15
Wired
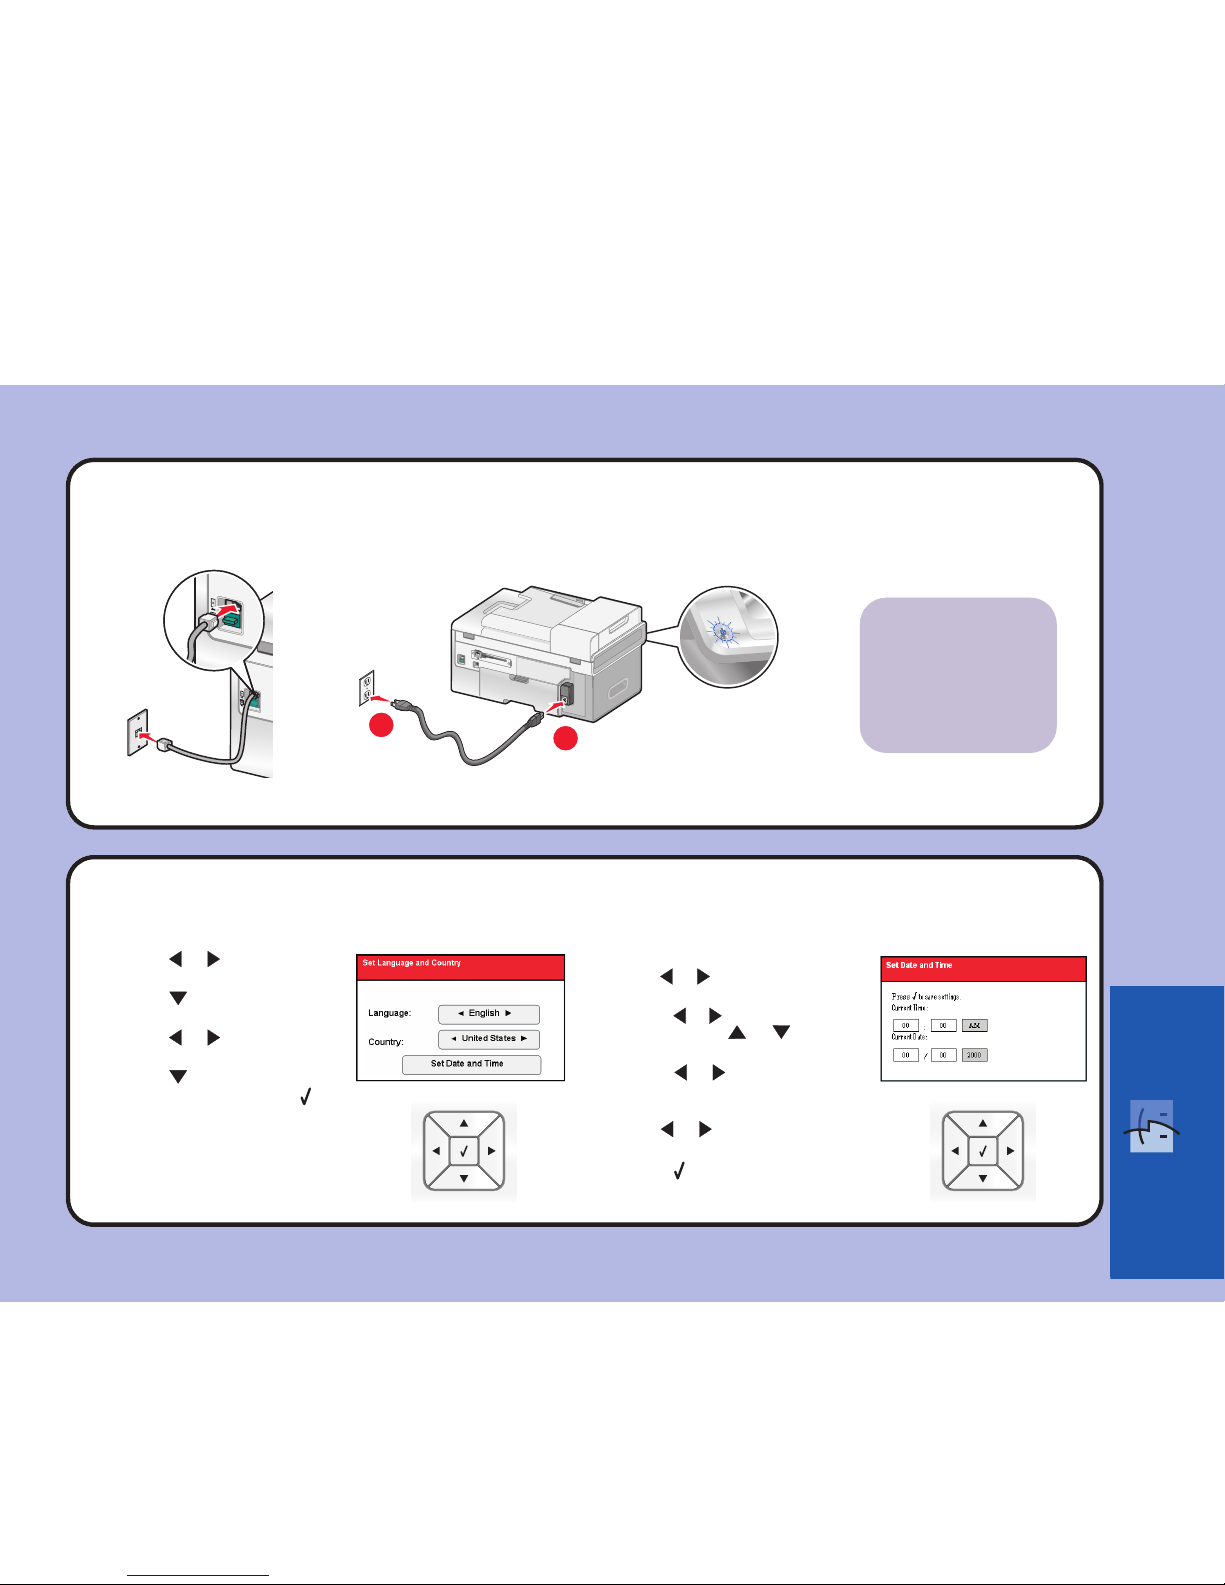
1 Press or to select the
language.
2 Press to locate the Country
setting.
3 Press or to select the
country or region.
4 Press to scroll to Set Date
and Time, and then press .
4
Connect the telephone cord and power cord.
1 Use the keypad to enter the time, and
use or to scroll between hours
and minutes.
2 Pr es s o r to sc ro ll t o A M, PM , o r
24Hr, and use or to change
the setting.
3 Press or to scroll to Current
Date.
4 Use the keypad to enter the date, and
use or to scroll between day,
month, and year.
5 Press to save the settings.
5
Adjust the settings.
1
2
Important! Do
not connect the
Network cable
yet.
Page 16
Wired
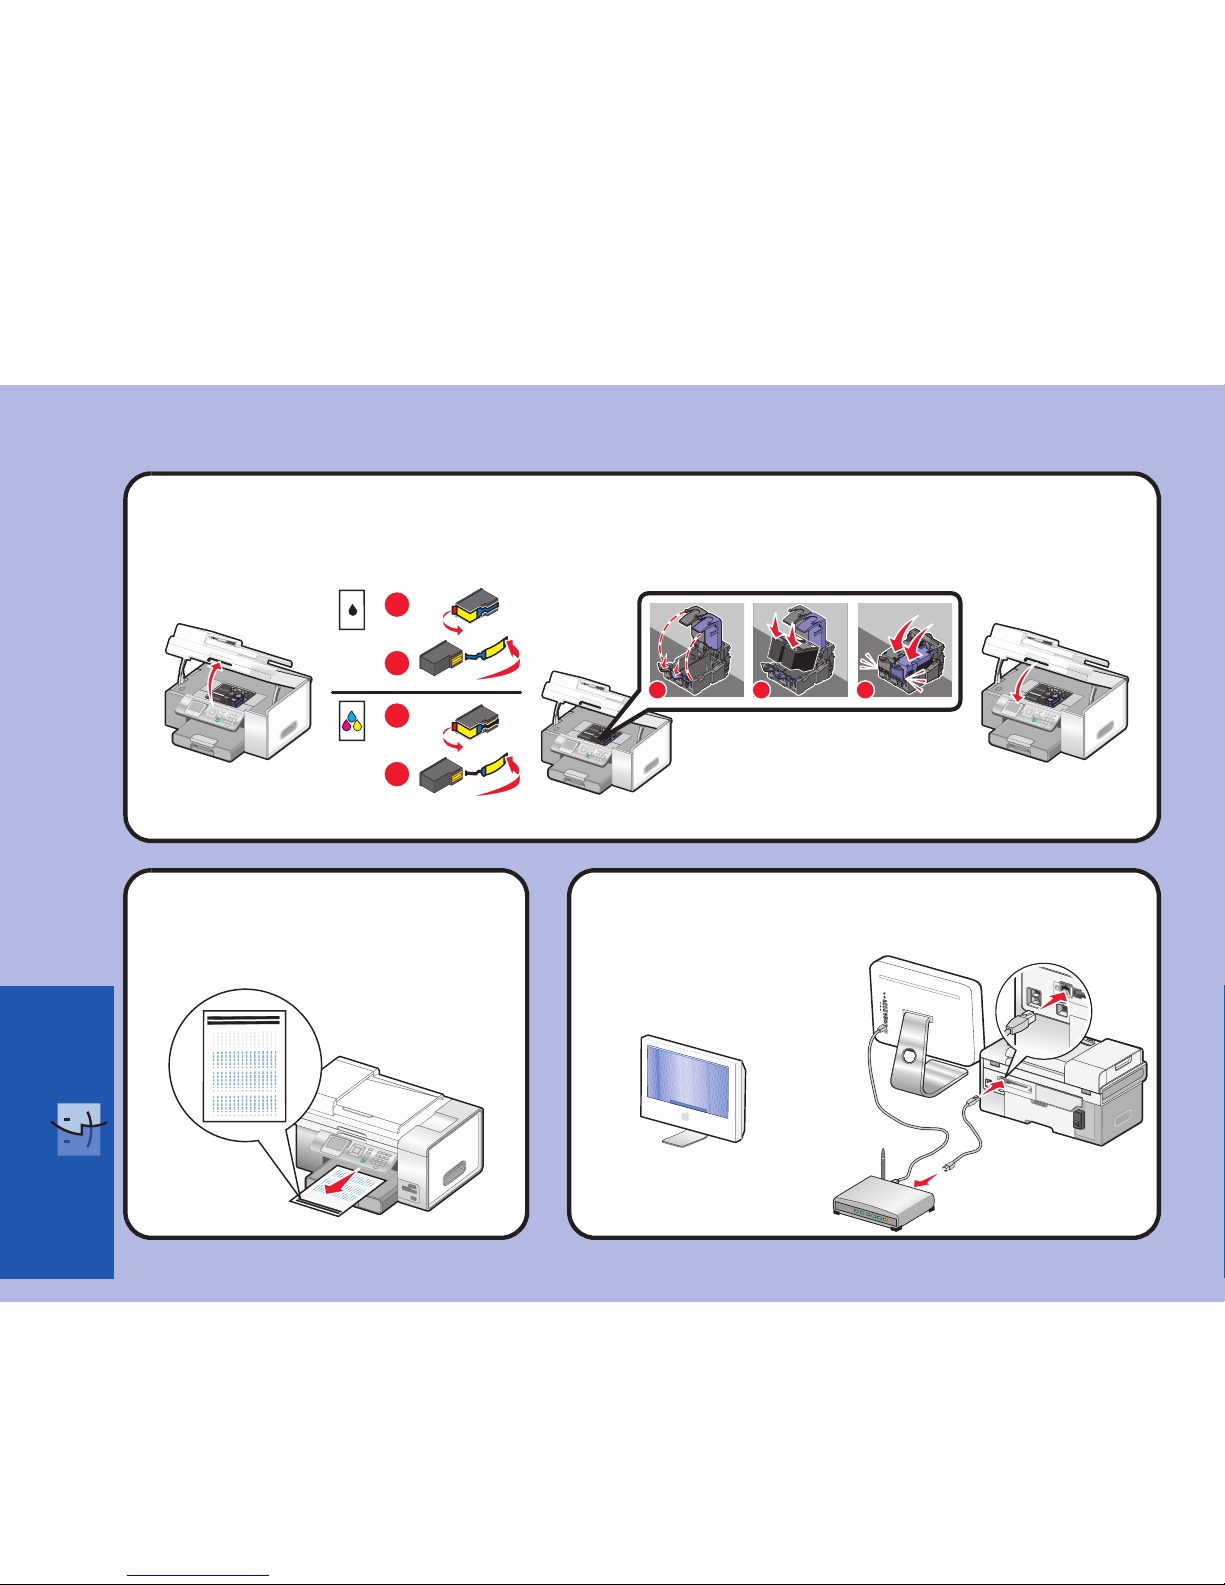
6
Insert the print cartridges.
The printer automatically aligns
the print cartridges and prints an
alignment page. This may take a
few minutes.
7
Make sure the computer is on, and then connect the
network cable to the printer and to the router.
8
1
2
1
2
2
1
3
Page 17
Wired
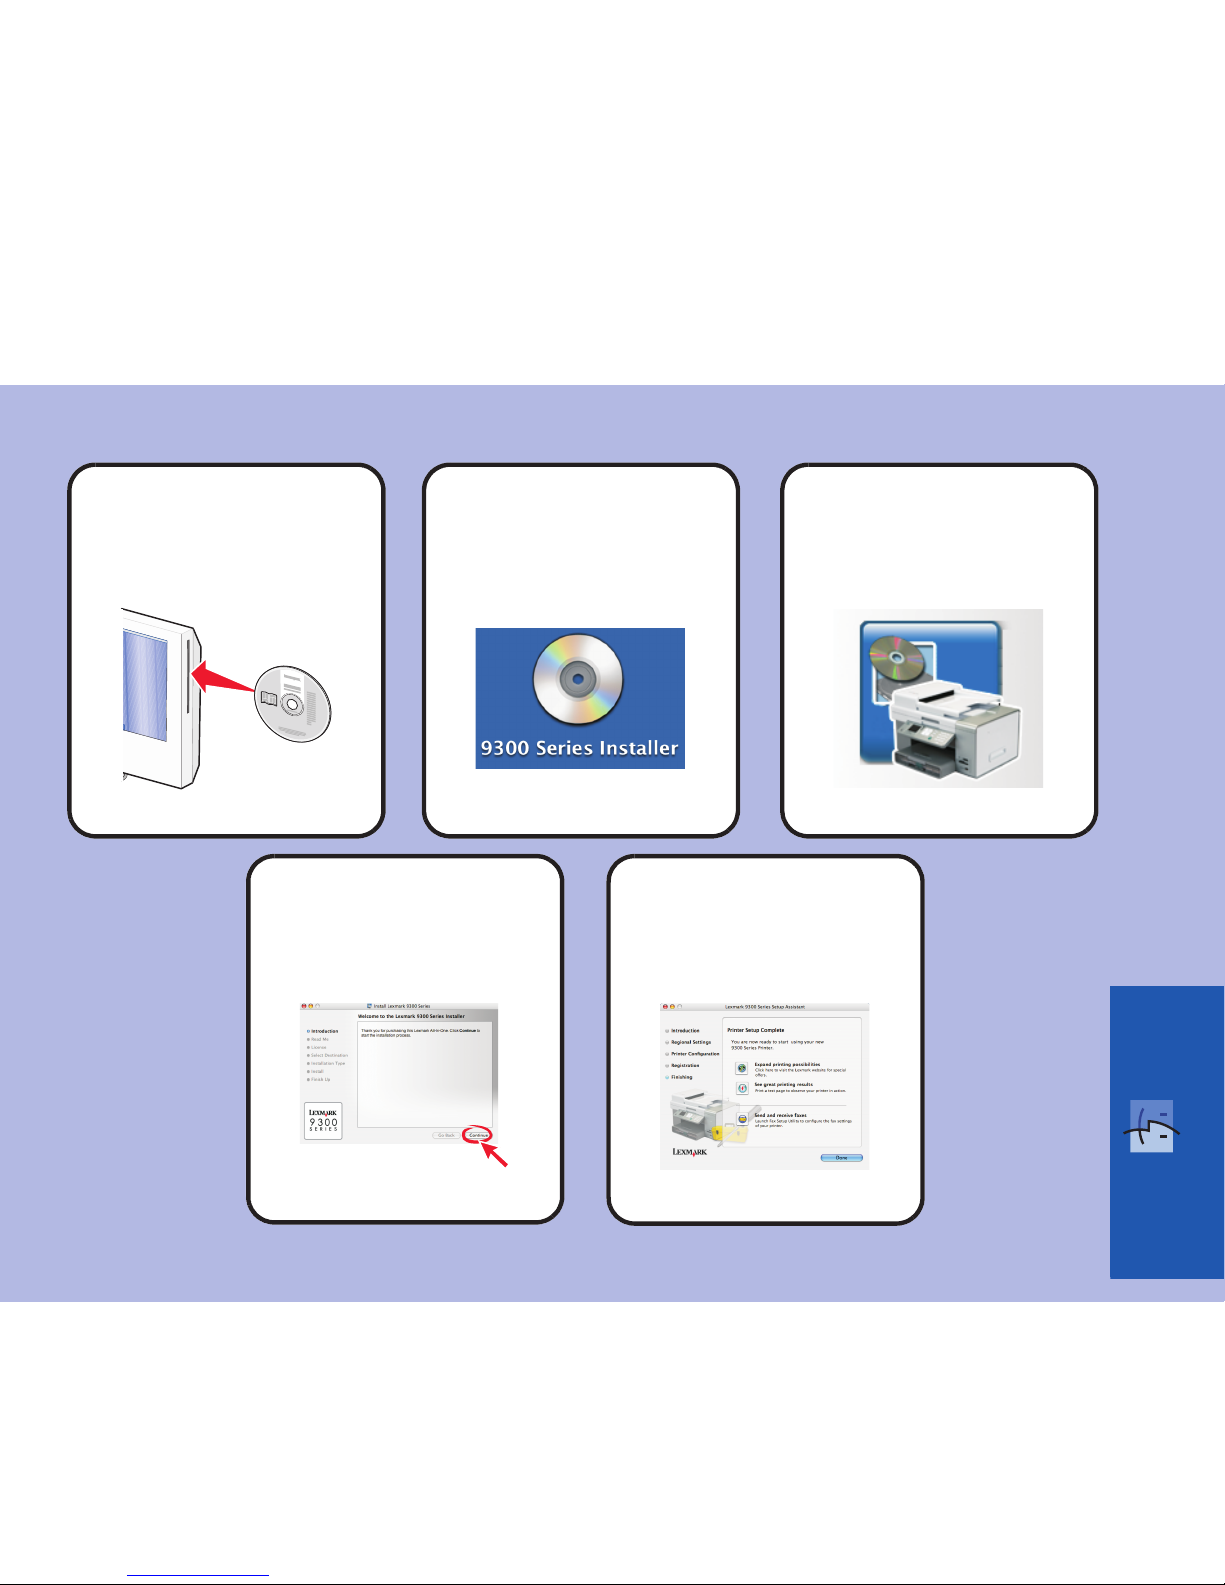
Double-click the Install
icon.
11
Insert the CD.
9
12
Click Continue. Follow the
instructions on the
screen to complete
installation.
13
Double-click the 9300
Series Installer icon on
the desktop.
10
Page 18
Wired
Setup troubleshooting Networking troubleshooting
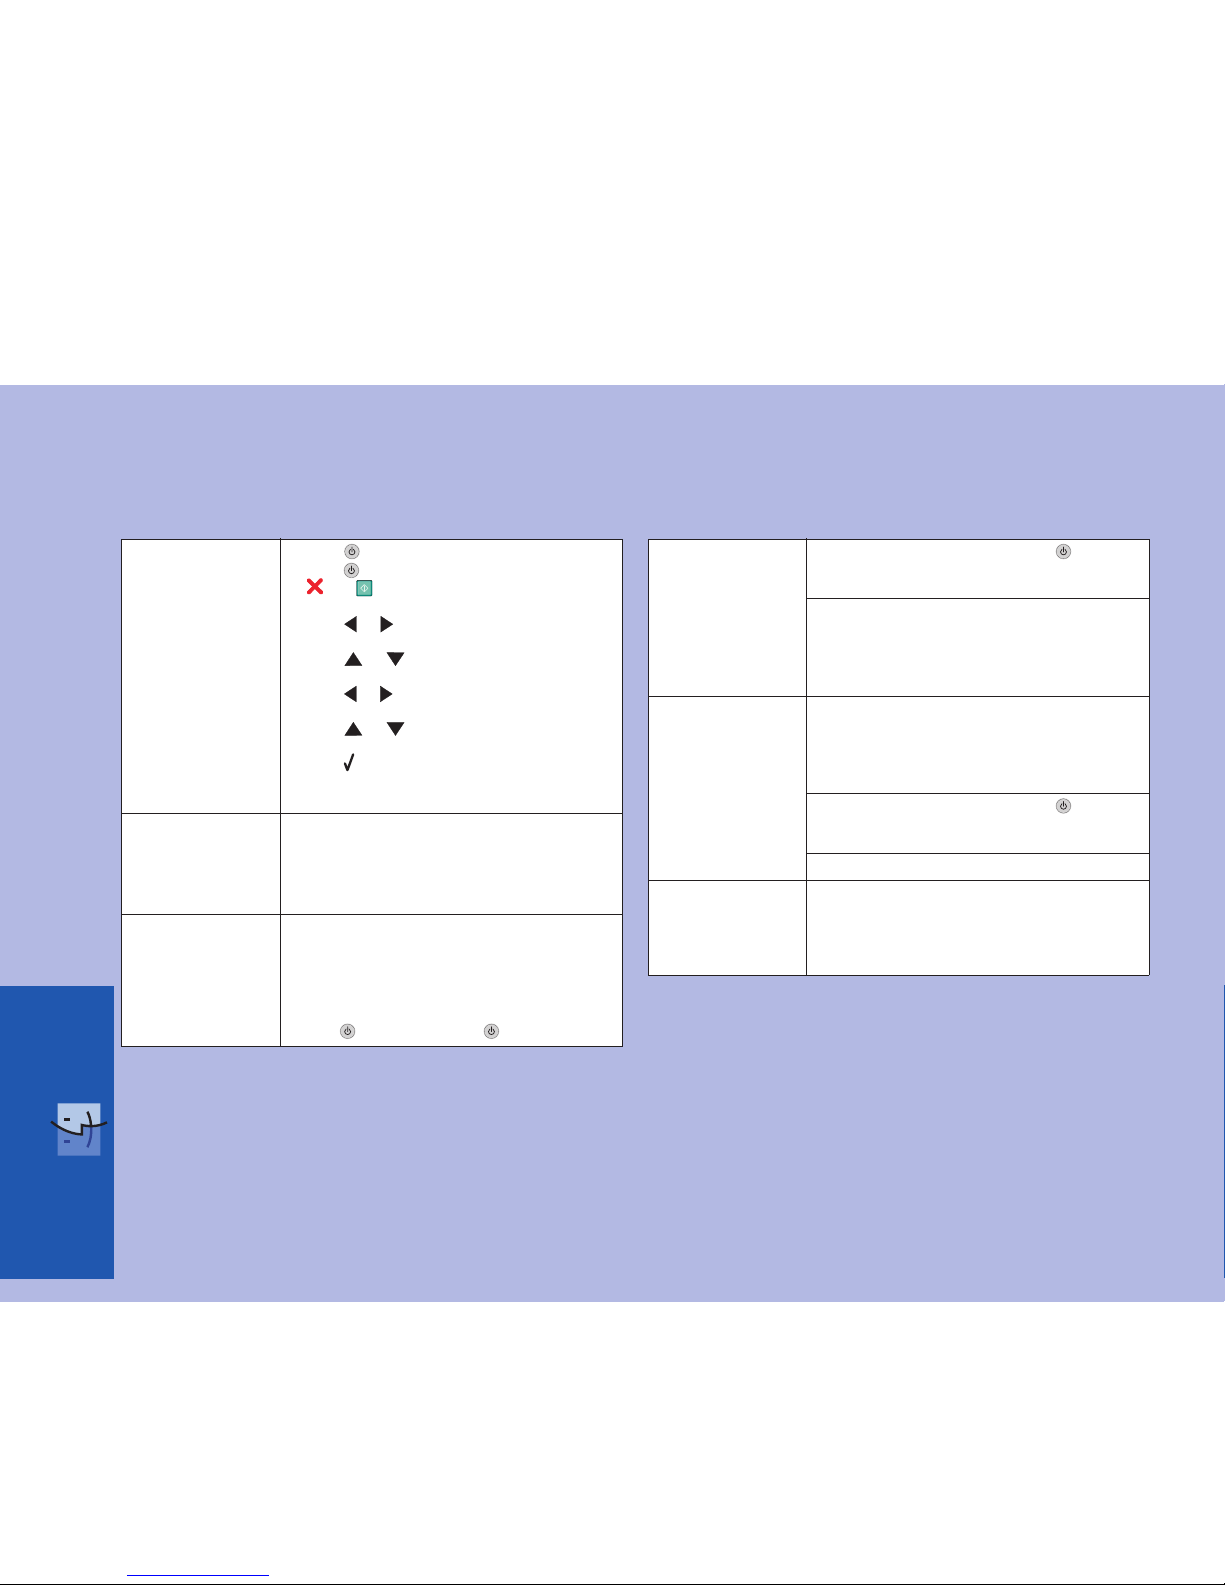
Incorrect language
appears on the display.
1 Press to turn the printer off.
2 Press once, and then immediately press and hold
and .
3 Release the buttons.
4 Press or repeatedly until the language you
want appears on the display.
5 Press or repeatedly until the option for
Country is highlighted.
6 Press or repeatedly until the country you want
appears on the display.
7 Press or repeatedly until Set Date and
Time is highlighted.
8 Press .
9 Set the date and time. For more information, see step
5 in the Setup documentation.
Software does not
install.
1 Turn off and then restart the computer.
2 Insert the CD.
3 Double-click the 9300 Series Installer icon.
4 Double-click the Install icon, and follow the
instructions on the screen to complete installation.
Power button is not lit. 1 Disconnect the power cord from the wall outlet, and
then from the printer.
2 Plug the cord all the way into the power supply on the
printer.
3 Plug the cord into an electrical outlet that other
electrical devices have been using.
4 If the light is not on, press .
The printer does not
appear in the list of
printers found on your
network
Make sure the printer has power and the light is on.
For more information see “Power button is not lit” in the
Setup troubleshooting.
1 Check the network cable for any obvious damage.
2 Firmly plug one end of the network cable into the
printer or the print server.
3 Firmly plug the other end of the network cable into the
network hub or wall connection.
The network printer
does not print.
1 Check the network cable for any obvious damage.
2 Firmly plug one end of the network cable into the
printer or the print server.
3 Firmly plug the other end of the network cable into the
network hub or wall connection.
Make sure the printer has power and the light is on.
For more information see “Power button is not lit” in the
Setup troubleshooting.
Make sure the network is operating properly.
Printer does not appear
on the Printer Selection
screen.
1 From the Printer Selection screen, select Add
Remote from the pop-up menu.
2 From the Add Remote pane, enter a TCP/IP address
to find printers on the network. For more information,
see the Help.
 Loading...