

Lexmark C772, 772dn - C Color Laser Printer, C770n - Color Laser 25ppm USB Printer Connection Manual

Connection Guide
Page 1 of 2
Connection Guide
Note: For local printing, you must install the printer software (drivers) before connecting the USB cable.
Installing printer and software for local printing using Windows
1 Launch the Software and Documentation CD that shipped with the printer.
2Click Install Printer and Software.
Note: Some Windows operating systems require that you have administrative access to install printer
software (drivers) on the computer.
3Click Agree to accept the licens e agreement.
4 Select Suggested, and then click Next.
The Suggested option is the defaul t installation for local setup. If you need to install utilities, change
settings, or customize device drivers, select Custom. Follow the instructions on the computer screen.
5 Select Local Attach, and then click Finish.
Note: It may take a few minutes for the drivers to completely load.
6 Close the Software and Documentation CD installer application.
7 Connect the USB cable. Be sur e to match the USB symbol on the cable to the USB symbol on the printer.
Note: Only Windows 98 SE, Windows Me, Windows 2000, Windows XP, and Windows Server 2003
operating systems support USB connections. Some UNIX, Linux, and Macintosh compute rs al so
support USB connections. See the c omputer operating sy stem documentation to see if your s ystem
supports USB.
8 Plug one end of the printer power cord into the socket at the back of the printer and the other end into a
properly grounded outlet.
9 Turn on the printer.
Plugging in the USB cable and turning on the printer prompts the Windo ws operating system to run the plug
and play scr eens to install the printer a s a new hardware device. The installation of printer software (drive rs)
done in step 1 should satisfy the plug and play requirements. When plug and play is finished, a printer
object will appear in your Printers folder .
Note: After the printer completes its internal tests, the Ready mess age indicates tha t the printer is ready
to receive jobs. If you see a message other than Ready on the display, see the Software and
Documentation CD for instructions on clearing the message.
10 Send a test page to print.
Using a parallel or serial cable
For detailed instructions, see the User’s Guide on the Software and Documentation CD that shipped with the
printer.
Local printing with Mac or UNIX/Linux
For detailed instructions, see the User’s Guide on the Software and Documentation CD that shipped with the
printer.

Connection Guide
Page 2 of 2
Installing printer and software for network printing using Windows
1 Make sure the printer is turned off and unplugged from the wall outlet.
2 Connect the printer to a LAN drop or hub using an ethernet cable that is compatib le with your network.
3 Plug one end of the printer power cord into the socket at the back of the printer and the other end into a
properly grounded outlet.
4 Turn on the printer.
Note: After the printer completes its internal tests, the Ready mess age indicates tha t the printer is ready
to receive jobs. If you see a message other than Ready on the display, see the publications CD for
instructions on clearing the message.
5 Go to a computer on the same network, and launch the Software and Documentation CD that shipped with
the printer .
6Click Install Printer and Software.
7Click Agree to accept the license agreement.
8 Select Suggested, and then click Next.
9 Select Network Attach, and then click Next.
10 Select your printer model from the list, and then click Next.
11 Select your printer port from the list, and then click Finish to complete the installation. A printer object is
created in the Printers folder on the computer.
If your printer port is not listed, clic k Add P ort. Enter the inf ormation requested to c reate a new p rinter port.
Select the option to create an Enhanced TCP/IP Network Port. Other port options will not give you full
functionality.
12 Send a test page to print.
Other network cabling options
The following may also be available as network options for the printer . More information is available in the
User’s Guide on the Software and Documentation CD that shipped with the printer.
• Fiber optic internal print servers
• Ethernet internal print servers
• Wireless internal print servers
• Ethernet external print servers
• Wireless external print servers
Detailed instructions for installation are shipped with the product.
Network printing using Mac, UNIX/Linux, or NetWare
For information about this support, see the User’s Guide on the Software and Document ation CD that shipped
with the printer.
You can find some additional inf ormation on the Software and Documentation CD that shipped with the printer.
Launch the Software and Documentation CD, and click View Documentation.
Color quality guide
Page 1 of 7
Color quality guide
This Color Quality guide helps users understand how operations av ailable on the printer can be used to adjust
and customize color output.
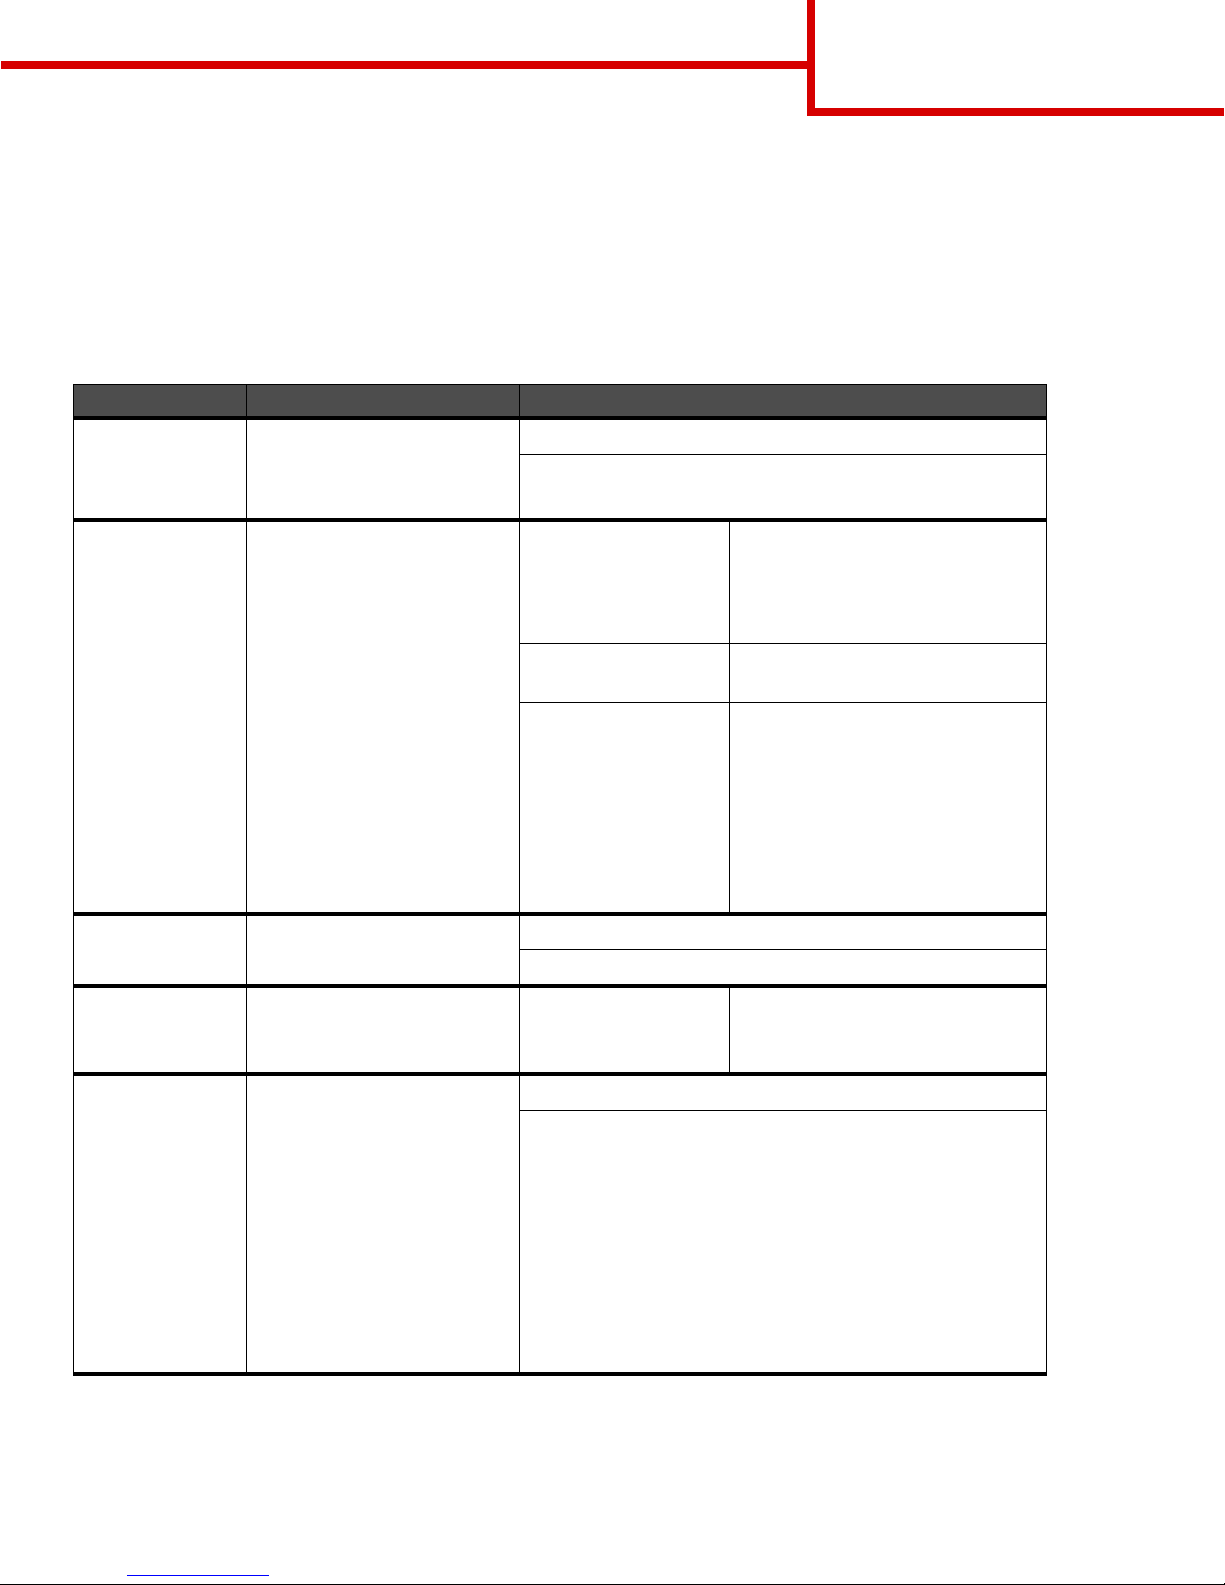
Quality Menu
Use this menu selection to change sett ings that affect print quality and save toner.
Menu selection Purpose Values
Print Mode To determine whether
images are printed in a
monochrome grayscale or in
color.
Color*
Black Only
Color
Correction
To adjust the printed color to
better match the colors of
other output devices or
standard color systems.
Due to the differences
between additive and
subtractive colors, certain
colors that appear on the
monitor are impossible to
duplicate on the printer.
Auto* Applies different color conversion
tables to each object on the
printed page, depending on the
type of obj ect and how th e color for
each object is specified.
Off No color correction is
implemented.
Manual Allows customization of the color
conversion tables applied to each
object on the printed page,
depending on the type of object
and how the color for each object
is specified. Customization is
performed using the selections
available under the Manual Color
menu item.
Print
Resolution
To select the quality of
printed output.
1200 dpi
4800 CQ*
Toner Darkness To lighten or darken printed
output and conserve toner.
1 to 5 4* is the default setting.
Select a lower number to lighten
the printed output or save toner.
Color Saver T o conserve toner in graphics
and images yet maintain high
quality text. The amount of
toner used to print graphics
and images is reduced;
however, text is printed with
default toner usage. If
selected, this setting
overrides Toner Darkness
settings. Color Saver is not
supported in PPDS, and
partially supported by the
PCL emulation driver.
On
Off*
Color quality guide
Page 2 of 7
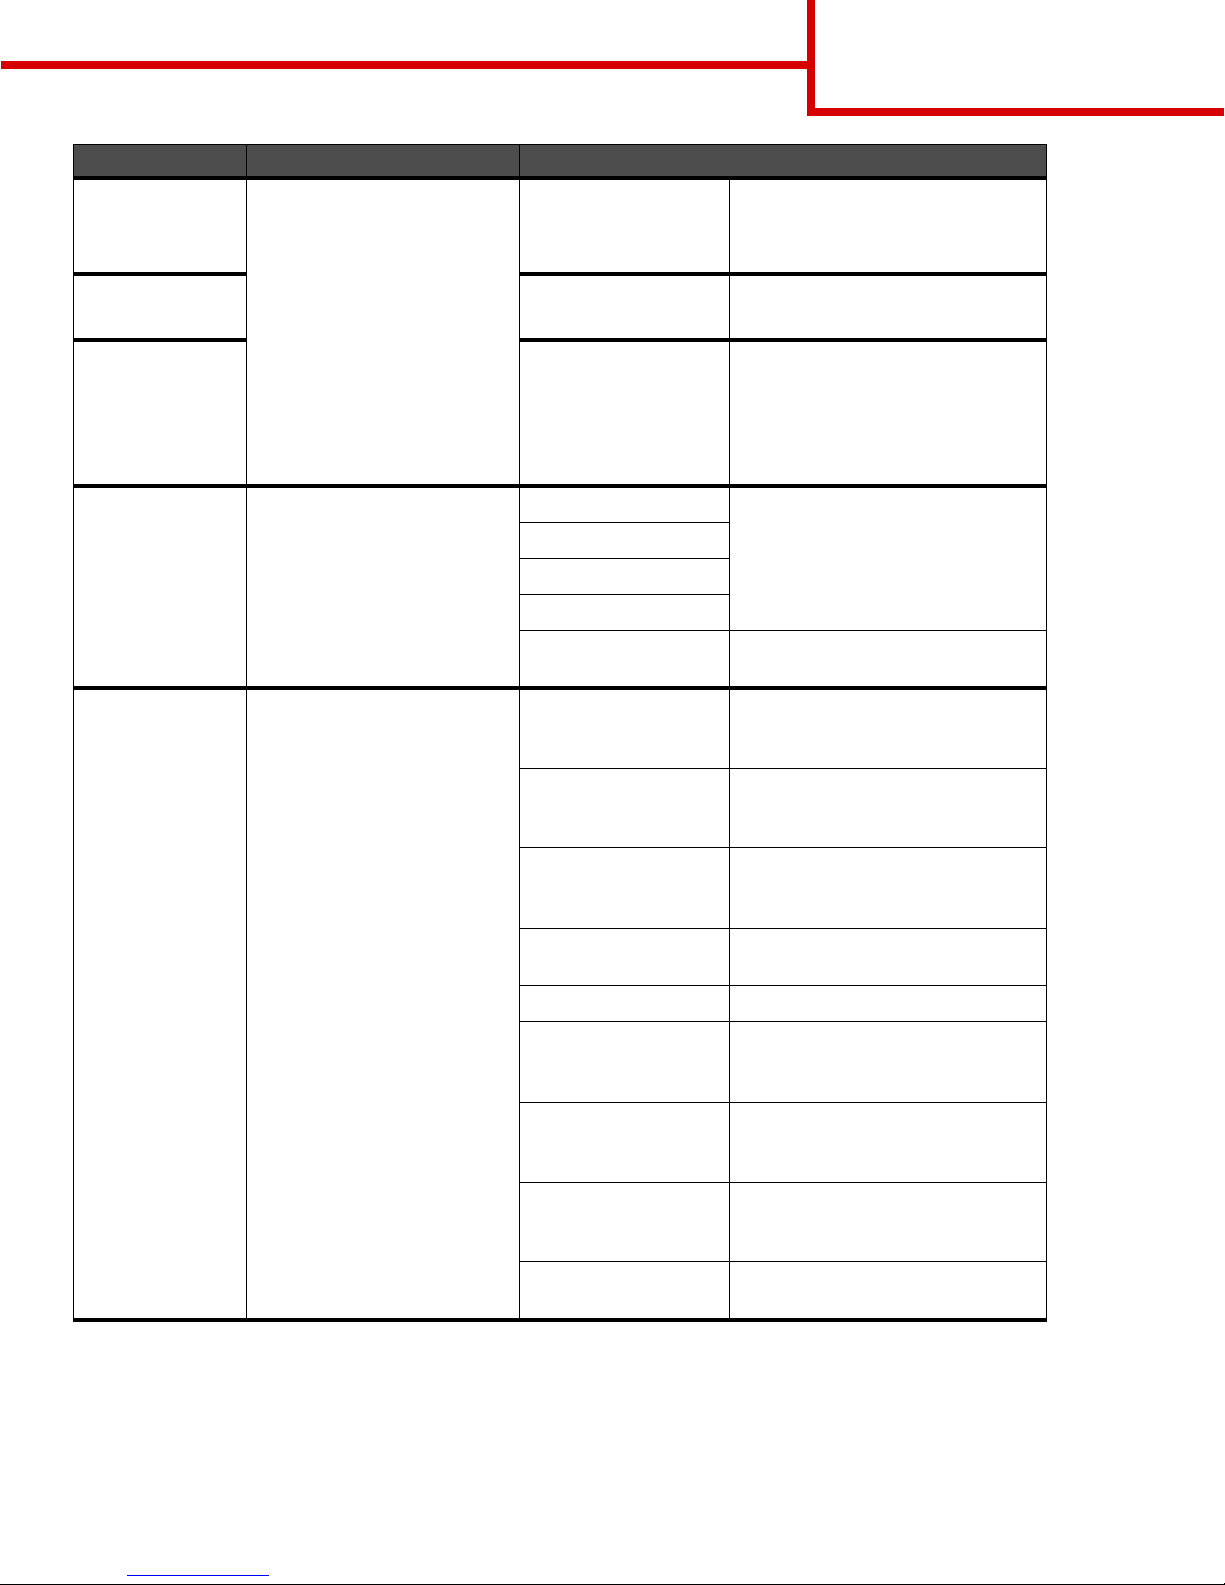
RGB Brightness To assist in making
brightness, contrast, and
saturation adjustments to
color output.
These functions do not affect
files where CMYK color
specifications are being
used. See Freque ntly asked
questions (FAQ) about
color printing in the User’s
Guide on the publications CD
for more information on color
specifications.
-6, -5, -4, -3, -2, -1, 0*,
1, 2, 3, 4, 5, 6
-6 is the maximum decrease
6 is the maximum increase
0 is the default setting
RGB Contrast 0*, 1, 2, 3, 4, 5 0 is the default setting
5 is maximum increase
RGB Saturation 0*, 1, 2, 3, 4, 5 0 is the default setting
5 is the maximum increase
Color Balance To provide users with the
ability to make subtle color
adjustme nts to printe d output
by increasing or decreasing
the amount of toner being
used for each color plane
individually.
Cyan -5, -4, -3, -2, -1, 0*, 1, 2, 3, 4, 5
-5 is the maximum decrease
5 is the maximum increase
Magenta
Yellow
Black
Reset Defaults Sets values for Cyan, Magenta,
Yellow, and Black to 0 (zero).
Color Samples To assist users in selecting
colors to be printed. Users
can print color samples
pages for each of the RGB
and CMYK color conversion
tables used in the printer.
The color samples pages
consist of a series of colored
boxes along with the RGB or
CMYK combination that
creates the color observed
for each particular box.
These pages can be useful in
helping users decide which
RGB or CMYK combinations
to use in their software
applications to create the
desired printed co lor outpu t.
The printer Embedded Web
Server interface, which is
only available on network
models, offers users more
flexibility. It lets users print
Detailed Color Samples.
sRGB Display Prints RGB samples using
sRGB Display color conversion
tables.
sRGB Vivid Prints RGB samples using
sRGB Vivid color conversion
tables.
Display—True Black Prints RGB samples using
Display—True Black color
conversion tables.
Vivid Prints RGB samples using Vivid
color conversion tables.
Off—RGB Color conversion is implemented.
US CMYK Prints CMYK samples using
US CMYK color conversion
tables.
Euro CMYK Prints CMYK samples using
Euro CMYK color conversion
tables.
Vivid CMYK Prints CMYK samples using
Vivid CMYK color conversion
tables.
Off—CMYK No color conversion is
implemented.
Menu selection Purpose Values
Color quality guide
Page 3 of 7
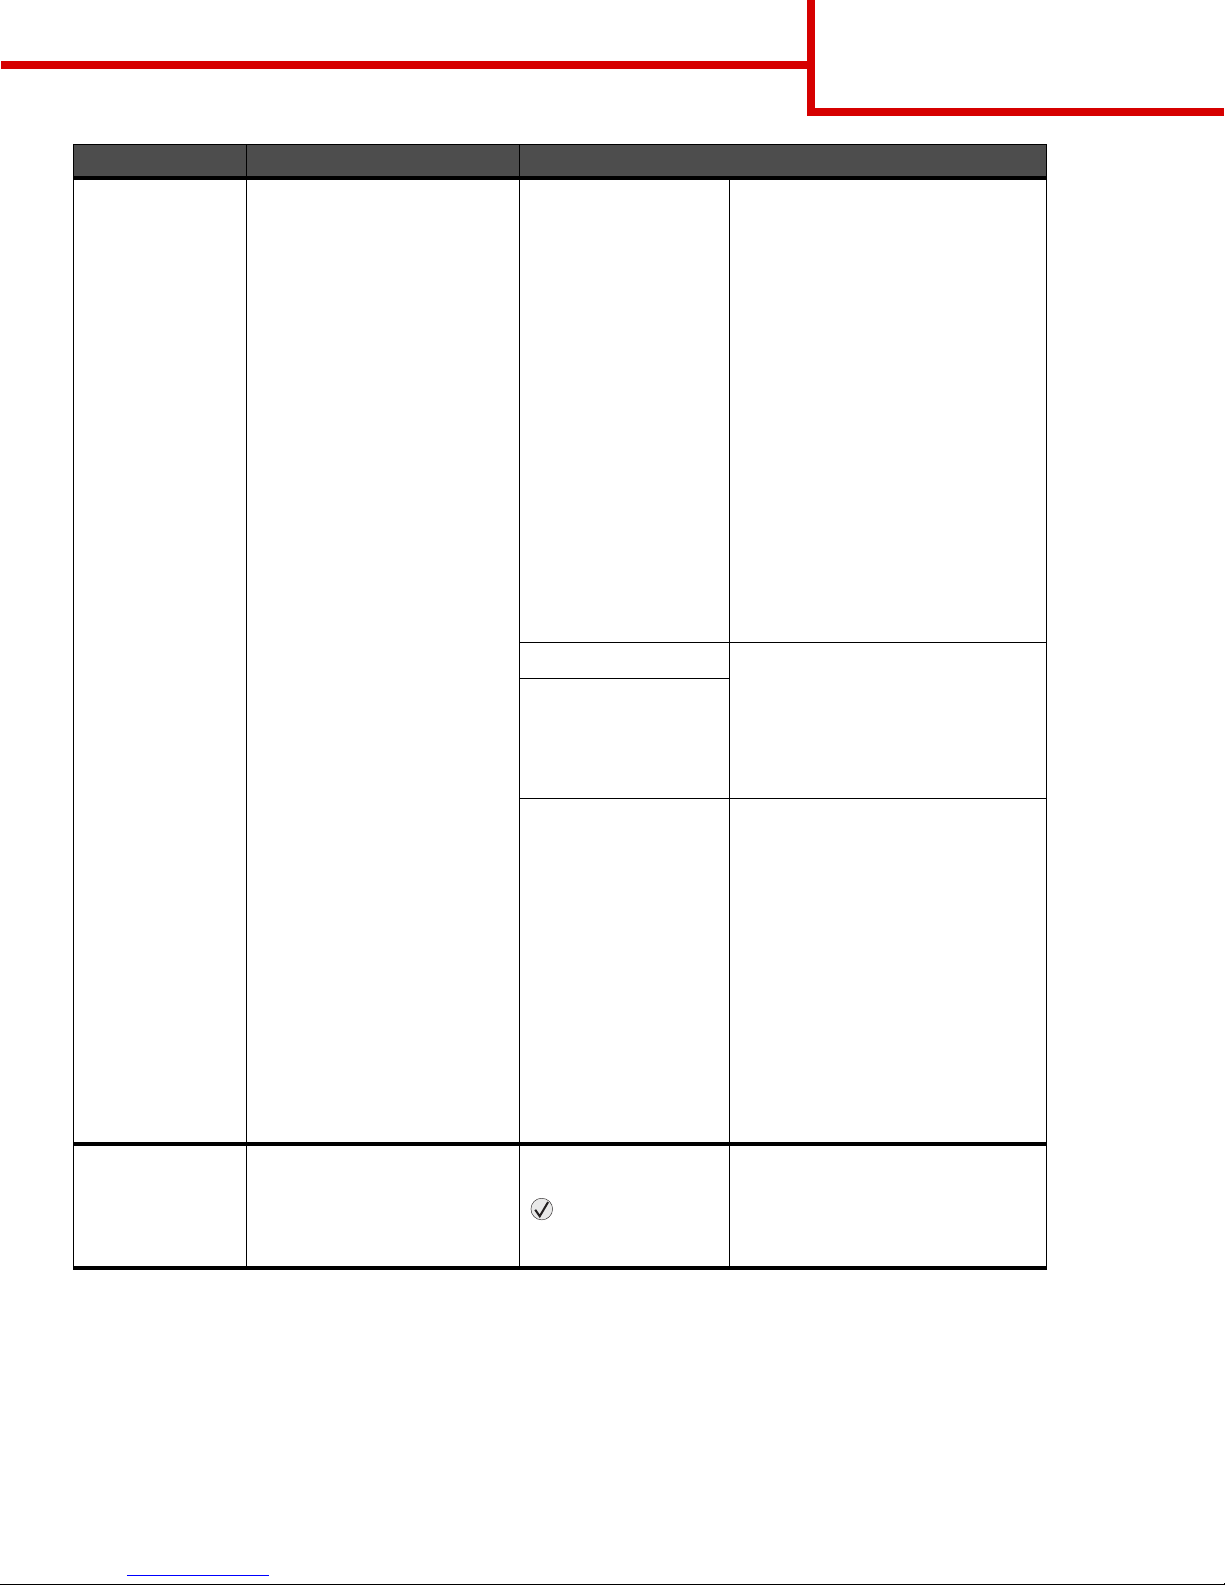
Manual Color To let users customize the
RGB or CMYK color
conversions applied to each
object on the printed page.
Color conversion of the data
specified using RGB
combinations can be
customized based on object
type (text, graphics, or image)
through the printer operator
panel.
RGB Image sRGB Display*—Applies a color
conversion table to produce output
that approximates the colors
displayed on a computer monitor.
sRGB Vivid—Increases color
saturation for the sRGB Display
color conversion table. Preferred
for business graphics and text.
Display—True Black—Applie s a
color conversion table to produce
output that approximates the
colors displayed on a computer
monitor while using only black
toner for neutral gray colors.
Vivid—Applies a color con versi on
table that produces brighter, more
saturated colors.
Off—No color conversion is
implemented.
RGB Text sRGB Display
sRGB Vivid*
Display—True Black
Vivid
Off
RGB Graphics
CMYK Image
CMYK Text
CMYK Graphics
US CMYK* (country/region-
specific factory default values)—
Applies a color conversion table to
approximate SWOP color output.
Euro CMYK* (country/region-
specific factory default values)—
Applies a color conversion table to
approximate EuroScale color
output.
Vivid CMYK—Increases color
saturation for the US CMYK color
conversion table.
Off—No color conversion is
implemented.
Color Adjust Automatic color adjust will
occur periodically during
printing. Color adjustment
can be manually started by
this operation.
No selections exist for
this operation.
Press
to initiate this
operation.
Menu selection Purpose Values

Color quality guide
Page 4 of 7
Solving color quality problems
This section helps ans wer so me basic color-r elated qu estions and describes ho w some of the features provided
in the Quality Menu can be used to solve typical color problems.
Note: Read the quick reference page entitled “Print quality and troubleshooting guide” which provides
solutions for common print qual ity problems, some of which may affect the color quality of the
printed output.
Frequently asked questions (FAQ) about color printing
What is RGB color?
Red, green, and b lue light c an be added together in various amounts to produce a large range of colors observed
in nature. For example, red and green light can be combined to create yellow light. Televisions and computer
monitors create colors in thi s manner. RGB color is a method of describing color s by indicating the amount of red,
green, and blue light needed to reproduce a particular color.
What is CMYK color?
Cyan, magenta, yellow, and black inks or toners can be printed in various amounts to produce a large range of
colors observed in nature. For example, cyan and yellow can be combined to create green. Printing presses,
inkjet printers, and col or laser printers create co lors in t his manner. CMYK color is a method of describing colors
by indicating the amount of cyan, magenta, yellow, and black needed to reproduce a particular color.
How is color specified in a document to be printed?
Software applicati ons typically specify document color us ing RGB or CMYK color combinations. Additionally , t hey
commonly let users modify the color of each object in a document. Since the procedures to modify colors vary
depending on the application, see the software application Help section for instruction.
How does the printer know what color to print?
When a user prints a document, information describing the type and color of each object in the document is sent
to the printer. The co lor information is passed through color conversion tab les that translate the color into
appropriate amounts of cyan, magent a, y el lo w, and black toner needed t o pro duce the desi red col or. The object
type information lets different color conversion tab les be used for different types of objects. For example, it is
possible to apply one type of color conversion table to text while applying a different color conversion table to
photographic images.
Enhance Fine
Lines
A selection to enable a print
mode preferable for certain
files containing fine line
detail, such as architectural
drawings, maps, electronic
circuit diagrams, and flow
charts.
Enhance Fine Lines is not a
menu item. This setting is
only available on the PCL
emulation driver, PostScript
driver, or on the printer
Embedded Web Server.
On In the driver, enable the check box.
Off* In the driver, disable the check
box.
Menu selection Purpose Values

Color quality guide
Page 5 of 7
Should I use the P ostScript or PCL em ulation driver for the be st color? What driver set tings should I use
for the best color?
The PostScript drive r is strongly recommended f or best color quality. The default settings in the P ost Script driver
provide preferred color quality for the majority of printouts.
Why doesn't the printed color match
the color I see on the computer screen?
The color conversion tables used in Auto Color Correction mode generally approximate the colors of a
standard computer monitor. However, because of technology differences that exist between printers and
monitors, there are many colors that can be generated on a computer screen that cannot be physically
reproduced on a color laser printer . Color match can also be aff ected by monitor v ariations and lighting conditions .
See the response to the question “How can I match a particular color (such as a color in a corporate logo)?” on
page 6 for recommendations on how the printer Color Samples pages may be useful in solving certain
color-matching problems.
The printed page appears tinted. Can I slightly adjust the color?
Sometimes a user may consider printed pages to appear ti nted (f or exa mple, e v erything printed seems to be too
red). This can be cause d by envi ronmental conditions, paper type, lighti ng conditions, or us er preference . In these
instances, Color Balance may be used to create more preferable color. Color Balance provides the user with
the ability to make subtle adjustments to the amount of toner being used in each color plane. Select ing positive
(or negative) values for cyan, magenta, y ello w, and black under the Color Bala nce menu wi ll slight ly inc rease (or
decrease) the amount of toner used f or the chosen col or . F or e xample, if a user belie v es the ov era ll printed page
to be too red, then decreases to both magenta and yellow could potentially improve color preference.
Is it possible to increase the gloss in the printed output?
Obtain additional gloss by printing using the 1200 dpi Print Resolution Setting.
My color transparencies seem dark when projected. Is there anything I can do to improve the color?
This problem most commonly occurs when proj ecting transparencies with reflective overhead projectors. To
obtain the highest projected color quali ty, transmissive overhead proj ectors are recommended. If a reflective
projector must be used, then adjusting Toner Darkness settings to 1, 2, or 3 will lighten the transparency. Be
sure to print on the recommended type of color t ransparen cies. F or more inf ormation, see “Understanding pape r
and specialty media guidelines” in th e User’s Guide on the Software and Documentation CD.
Color Saver must be Off to adjust Toner Darkness.
What is Manual Color Correction?
The color conversion tables applied to each object on the printed page when using the default Auto Color
Correction setting generate preferred color for the majority of documents. Occasionally, a user may want to
apply a different col or tab le mapping. This customization i s accomplished using the Man ual Color men u and the
Manual Color Correction setting.
Manual Color Correction appl ies t he RGB a nd CMYK color con version table mappings as defined in th e Manual
Color menu. Users may select any of five different color conversion tables available for RGB objects
(sRGB Display, Display—True Black, sRGB Vivid, Off, and Vivid) and any of f our diff erent color conv ersion tab les
available for CMYK objects (US CMYK, Euro CMYK, Vivid CMYK, and Off).
Note: The Manual Color Correct ion setting is not useful if the s oftwar e applicatio n does not speci fy colors
with RGB or CMYK combinations, or in certain situations where the software application or the
Color quality guide
Page 6 of 7
computer operating system adjusts the colors specified in the application through color
management.
How can I match a particular color (such as a color in a corporate logo)?
Occasionally, users have a need for the printed color of a particular object to closely match a specific color. A
typical exampl e of thi s is when a u ser is trying to match t he color of a corporate lo go. While instances can occur
in which the printer cannot exactly reproduce the desired color, users should be able to identify adequate color
matches for the ma jority of cases. The Color Samples menu item can provide useful information in helping to
solve this particular type of color-matching problem.
The nine Color Samples values corres pond to color conversion tables in the printer. Selecting any of the Color
Samples values generates a multiple-page printout consisting of hundreds of colored boxes. Either a CMYK or
RGB combination is located on each bo x, depending on the table selected. The observed color of each box is
obtained by passing the CMYK or RGB combination labeled on the box through the selected color conversion
table.
The user can examine the color samples pages and identify the box whose color is the closes t to the desired
color. If the user finds a box whose color is close to the desired color match, but the user would like to scan the
colors in that area in more detail, then t he user can access the Detailed Color Samples by using the printer
Embedded Web Server interface, which is only available on network models.
The color combination labeled on the box can then be used for modifying the color of the object in a software
application. The software application Help section provides instructions for modifying the color of an object.
Manual Color Correction may be necessary to utilize the selected color conversion table for the particular
object.
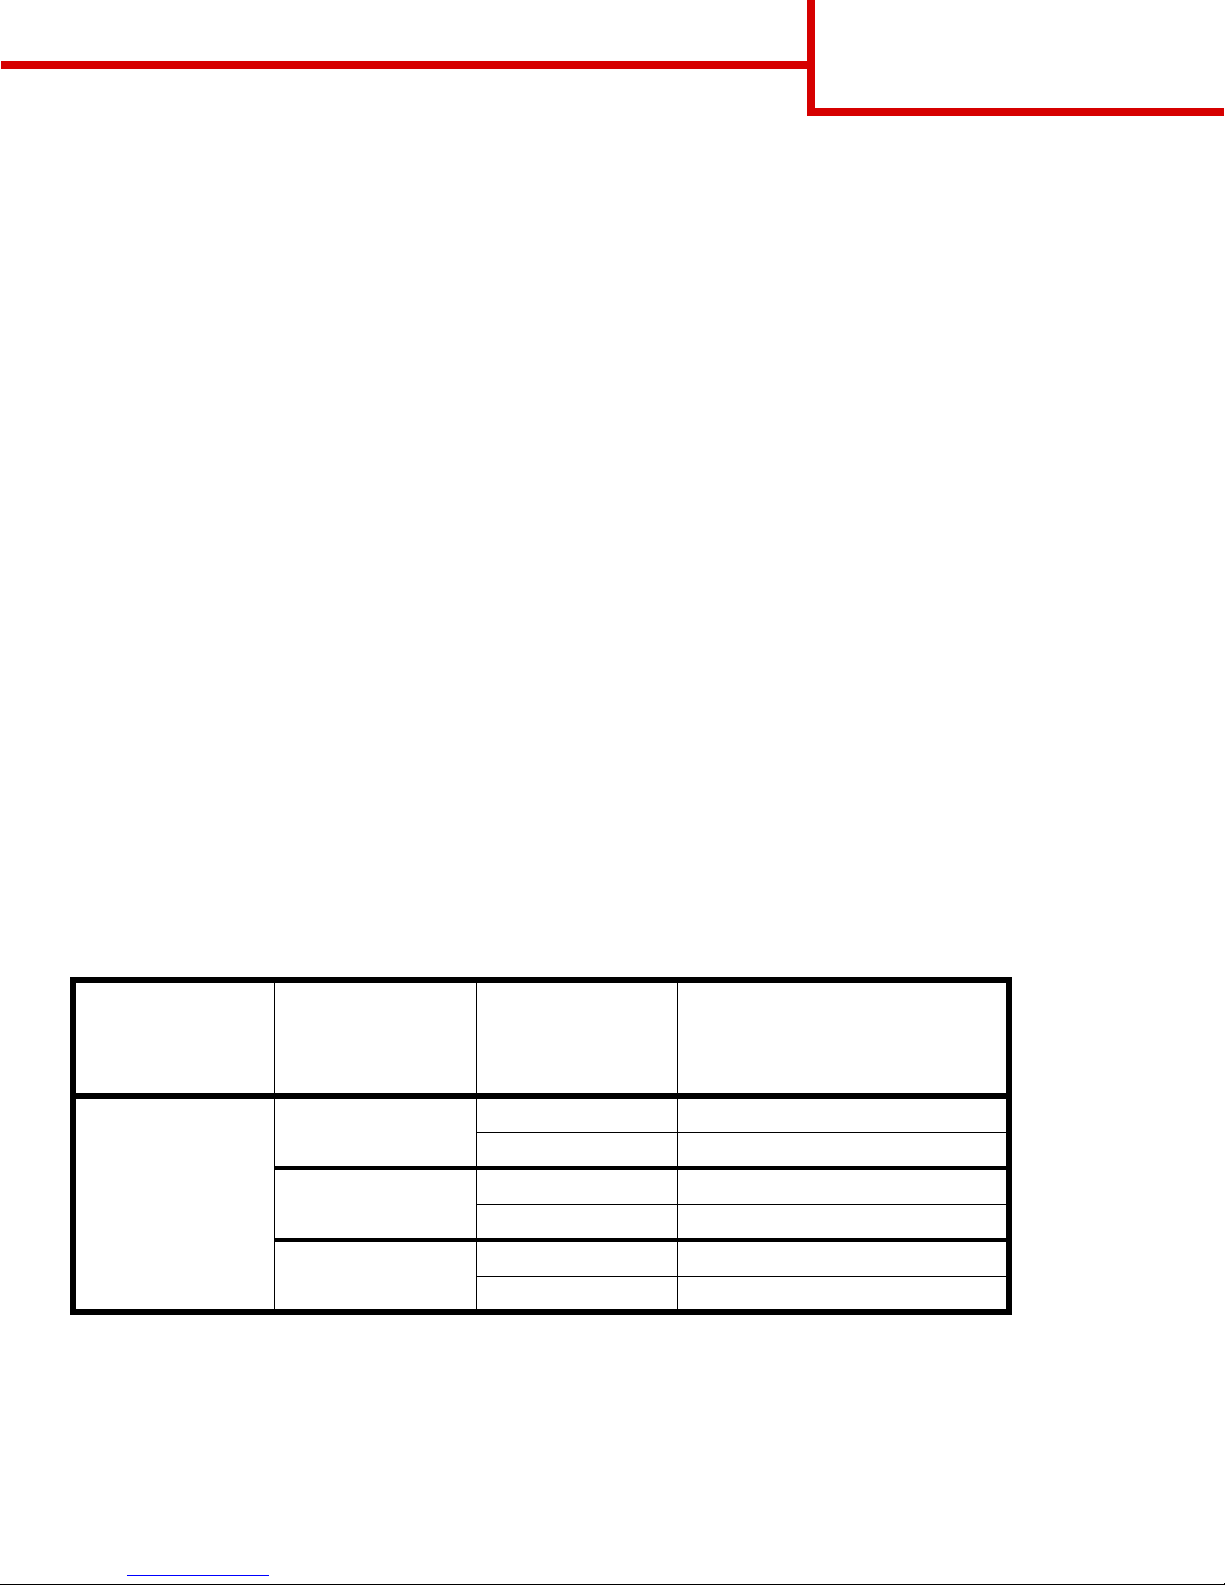
Which Color Samples pages to use for a particular color-matching problem depends on the Color Correction
setting being used (A uto , Off , or Manu al), the typ e of object being printed (te xt, g raphics , or images), and ho w the
color of the object is specifie d in the softw are applicat ion (RGB or CMYK combinati ons). When the printer Color
Correction setting is set to Off , the color is based on the print job information; no color conversion is
implemented. The following table identifies which Color Samples pages to use.
Color
specification of
object being
printed
Classification of
object being
printed
Printer Color
Correction
setting
Color Samples pages to print
and use for color matching
RGB Text Auto sRGB Vivid
Manual Manual Color RGB Text Setting
Graphic Auto sRGB Vivid
Manual Manual Color RGB Graphics Setting
Image Auto sRGB Display
Manual Manual Color RGB Image Setting
 Loading...