

Page 1
Quick Reference
Loading paper
Loading the 250‑ or 550‑sheet tray
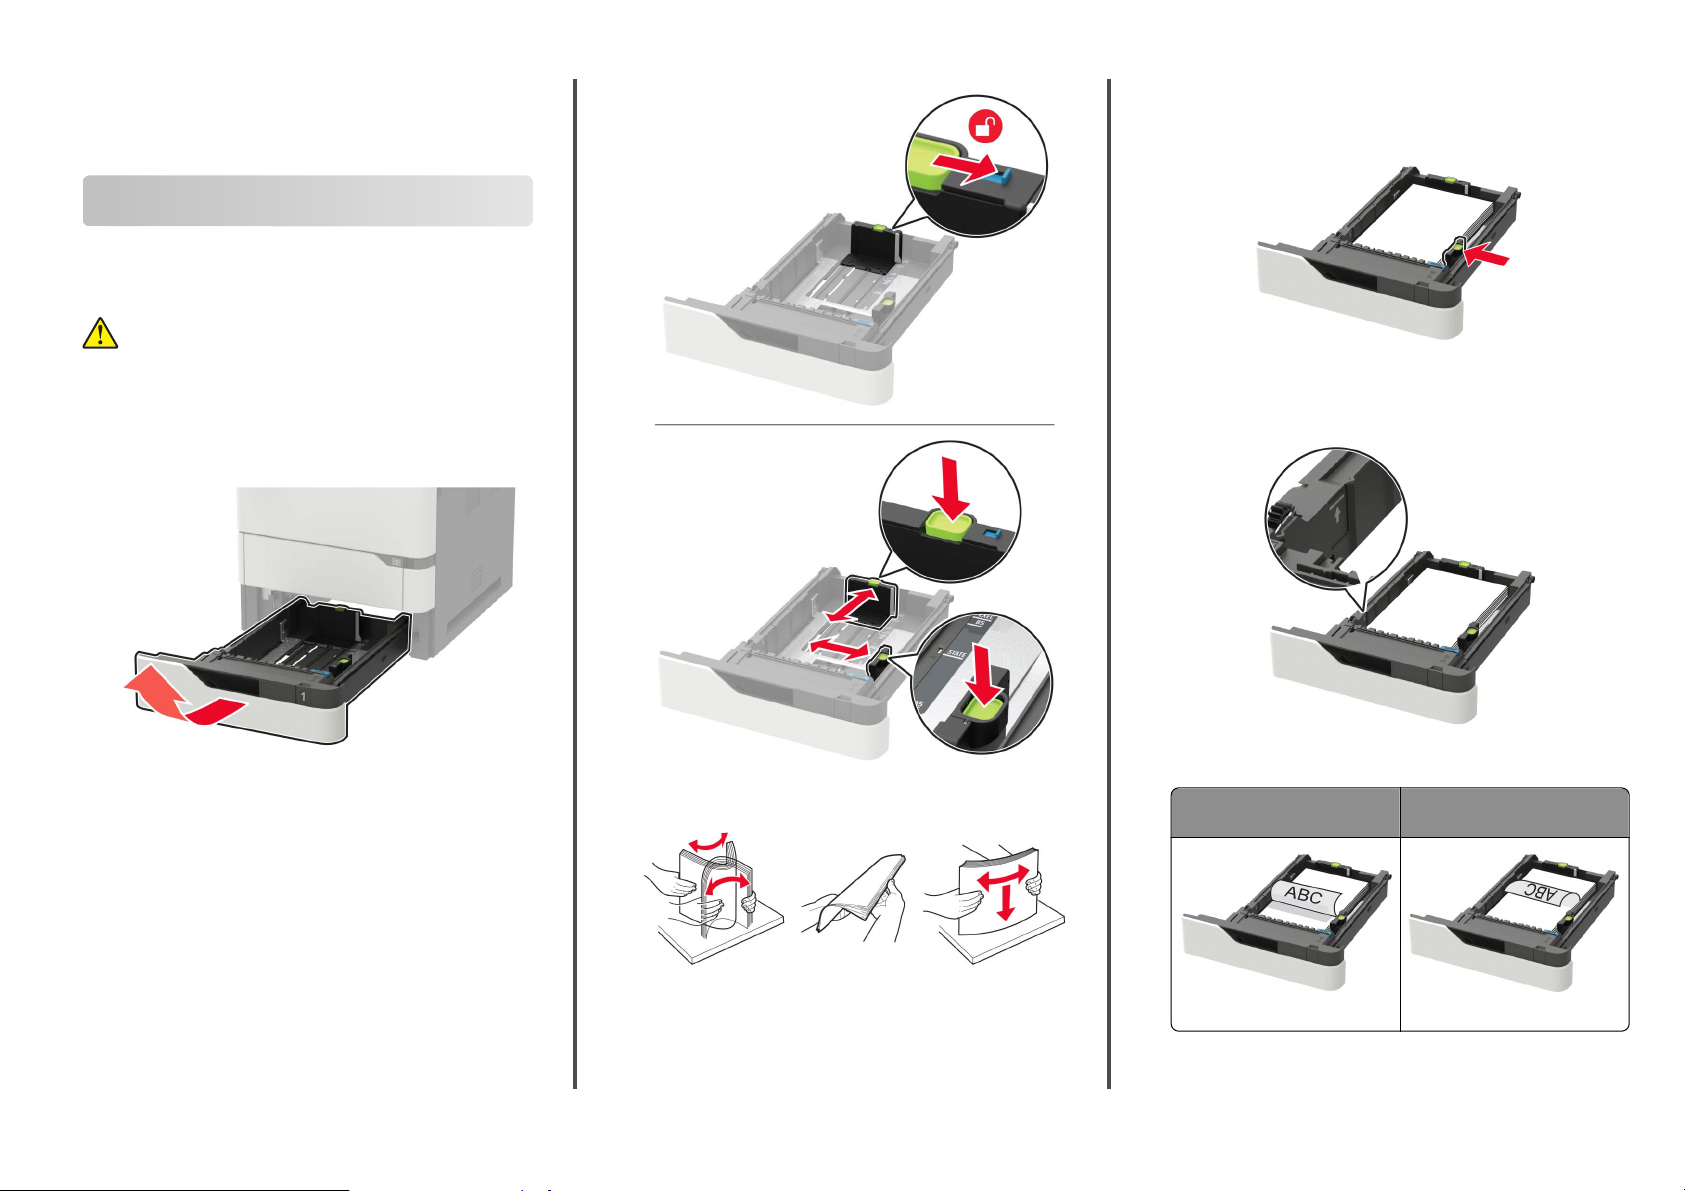
CAUTION—POTENTIAL INJURY: To reduce the risk of
equipment instability, load each tray separately. Keep all
other trays closed until needed.
1
Remove the tray.
Note: To avoid paper jams, do not remove trays while the
printer is busy.
4
Load the paper stack with the printable side facedown, and
then make sure that the side guides fit snugly against the
paper.
•
Do not slide paper into the tray.
•
To avoid paper jams, make sure that the stack height is
below the maximum paper fill indicator.
2
Adjust the guides to match the size of the paper that you are
loading.
Note: Use the indicators on the bottom of the tray to position
the guides.
3
Flex, fan, and align the paper edges before loading.
1
•
Load letterhead depending on whether an optional staple
is installed or not.
finisher
Without an optional staple
finisher
One‑sided printing
With an optional staple finisher
One‑sided printing
Page 2
Without an optional staple
•
When loading prepunched paper, make sure that the holes
on the long edge of the paper are against the right side of
the tray.
•
Load envelopes with the flap side up and against the left
side of the tray.
finisher
Two‑sided printing
One‑sided printing Two‑sided printing
With an optional staple
Two‑sided printing
finisher
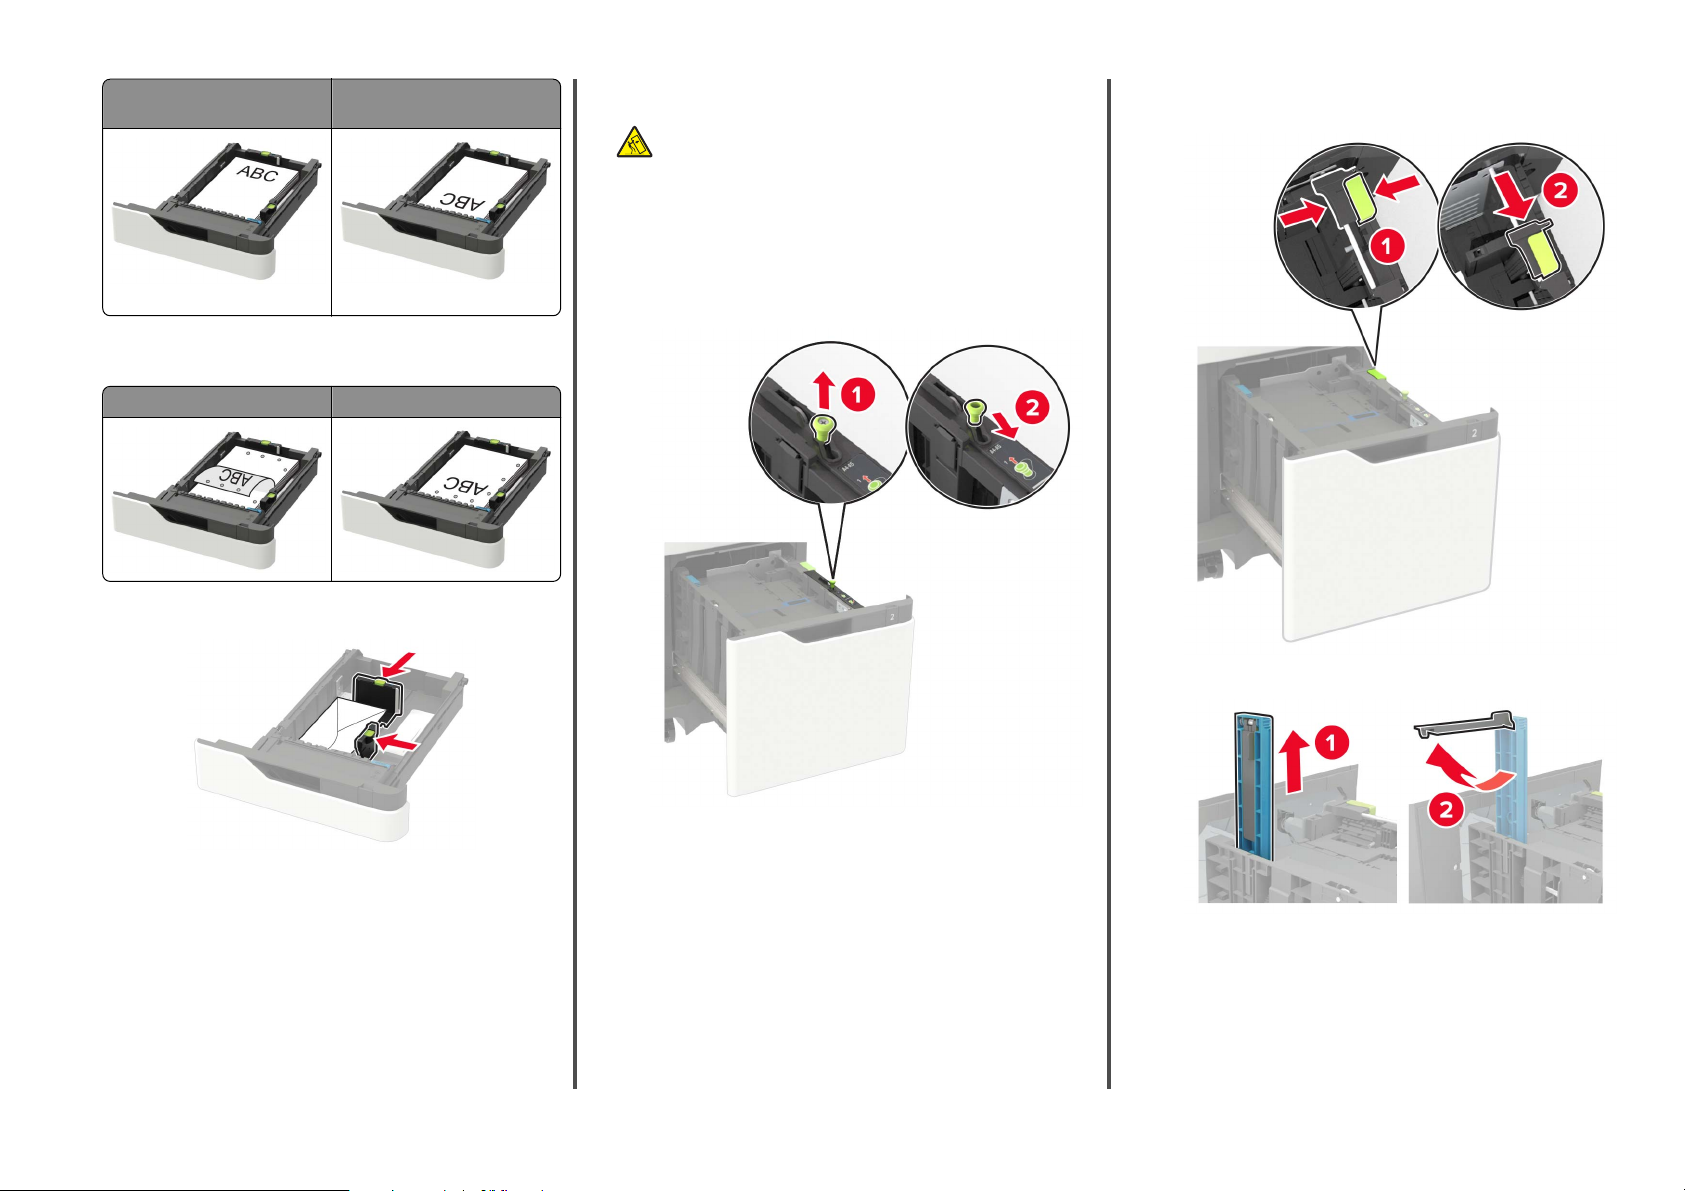
Loading the 2100‑sheet tray
CAUTION—TIPPING HAZARD: To reduce the risk of
equipment instability, load each tray separately. Keep all
other trays closed until needed.
1
Pull out the tray.
2
Adjust the guides.
Loading A5‑size paper
a
Pull up and slide the width guide to the position for A5.
b
Squeeze and slide the length guide to the position for A5
until it clicks into place.
Warning—Potential Damage: Do not use envelopes with
stamps, clasps, snaps, windows, coated linings, or
self
‑
stick adhesives.
5
Insert the tray.
6
From the control panel, set the paper size and paper type to
match the paper loaded.
c
Remove the A5 length guide from its holder.
2
Page 3
d
Insert the guide into its designated slot, and then press until
it clicks into place.
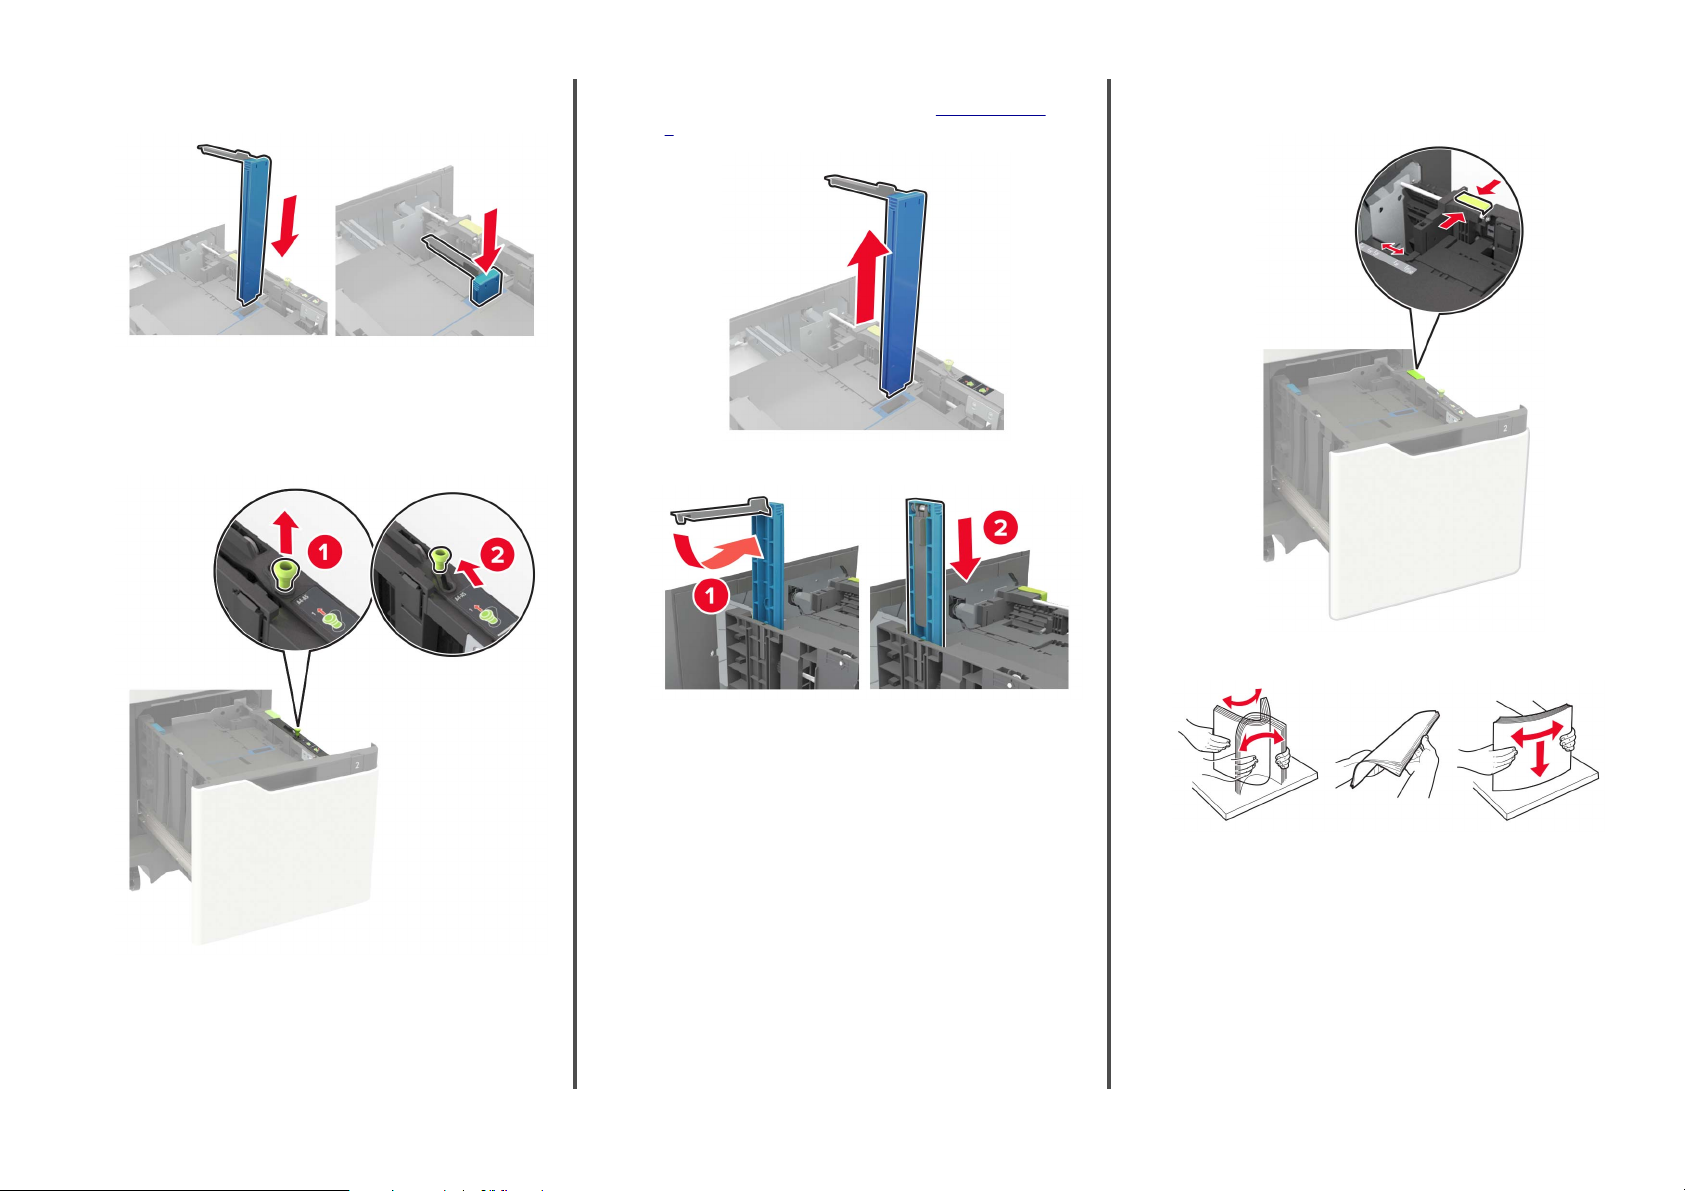
Loading A4‑, letter‑, legal‑, Oficio‑, and folio‑size
paper
a
Pull up and slide the width guide to the correct position for
the size of the paper being loaded.
b
If the A5 length guide is still attached, then remove it. If the
guide is not attached, then proceed to
3.
c
Place the A5 length guide in its holder.
step d on page
d
Squeeze, and then slide the length guide to the correct
position for the size of the paper being loaded.
3
Flex, fan, and align the paper edges before loading.
4
Load the paper stack with the printable side facedown.
•
Load letterhead depending on whether an optional staple
finisher is installed or not.
3
Page 4
Without an optional staple
finisher
With an optional staple finisher
3
Flex, fan, and align the paper edges before loading.
4
Load paper with the printable side faceup.
•
Load letterhead depending on whether an optional staple
is installed or not.
finisher
One‑sided printing One‑sided printing
Two‑sided printing Two‑sided printing
•
When loading prepunched paper, make sure that the holes
on the long edge of the paper are against the right side of
the tray.
One‑sided printing Two‑sided printing
6
From the control panel, set the paper size and paper type to
match the paper loaded.
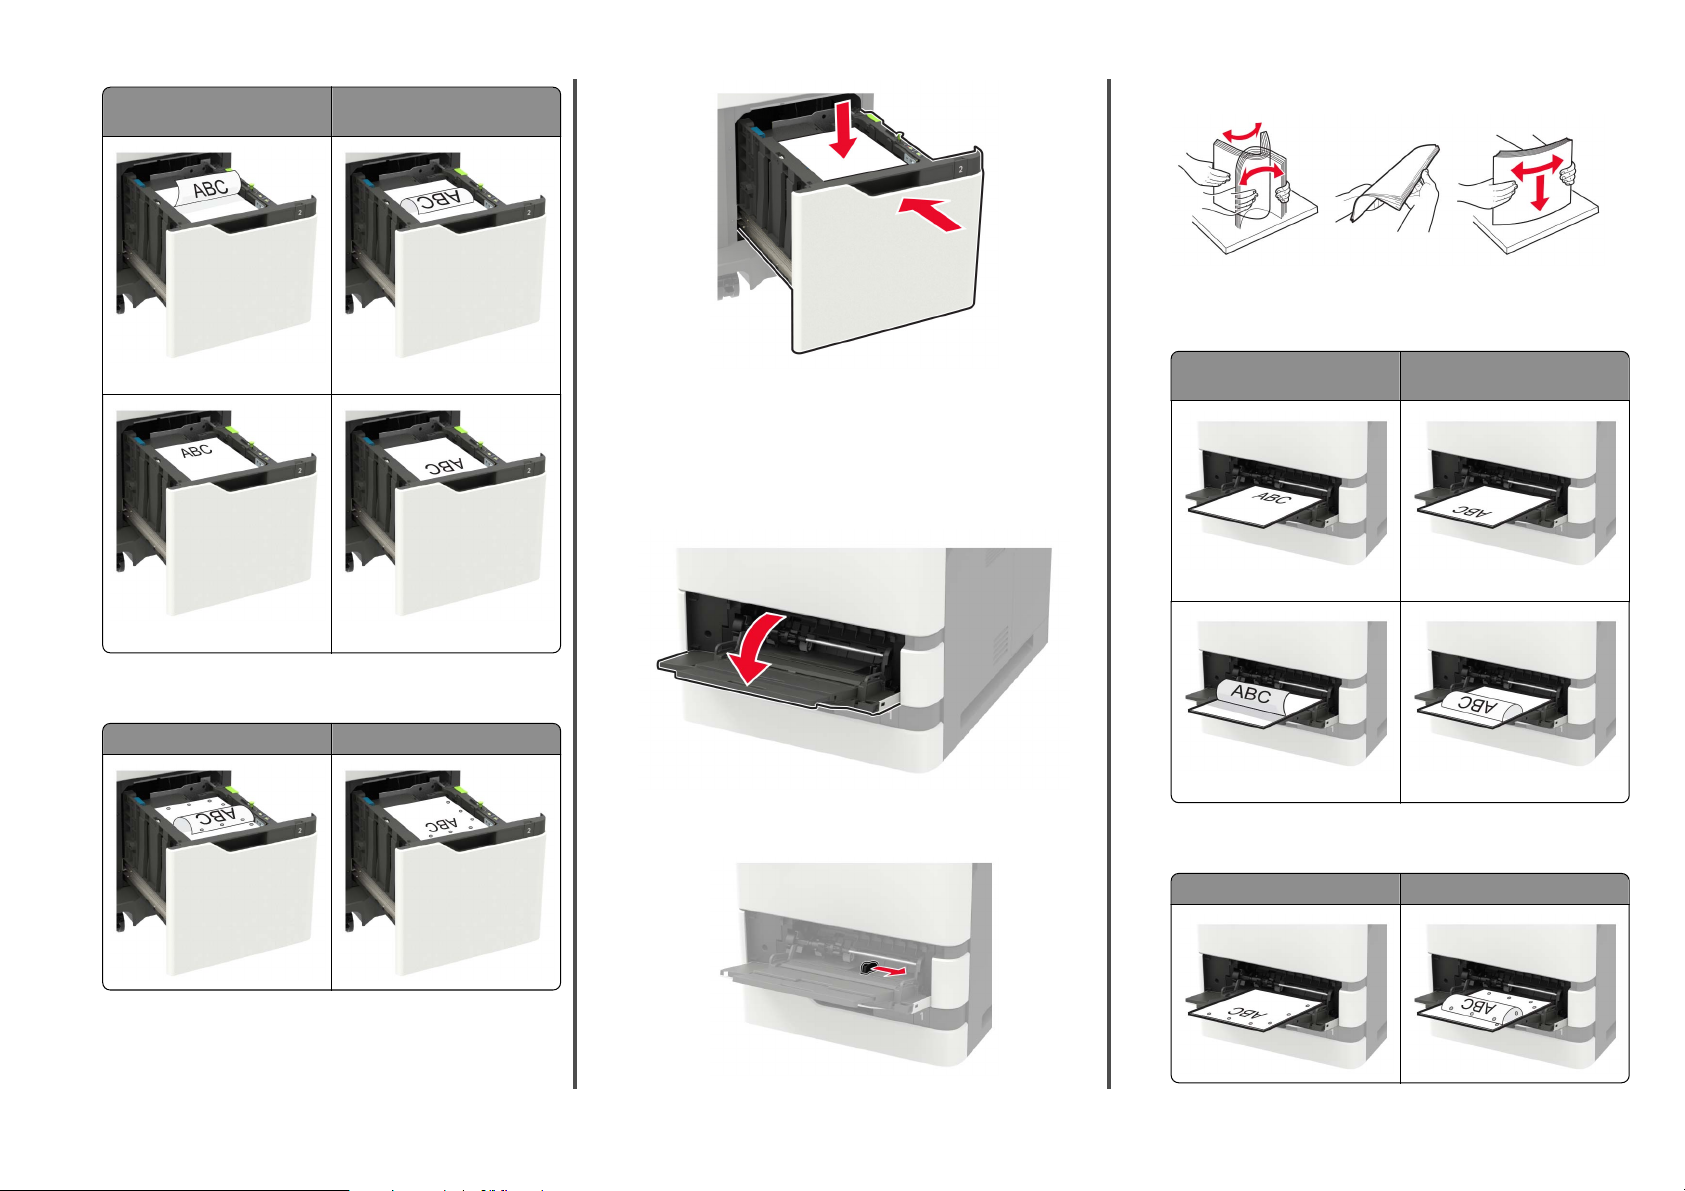
Loading the multipurpose feeder
1
Open the multipurpose feeder.
2
Adjust the guide to match the size of the paper that you are
loading.
Without an optional staple
•
Wh en l oad ing pre pun che d pape r, ma ke s ure th at t he h ole s
on the long edge of the paper are against the right side of
the paper guide.
finisher
One‑sided printing One‑sided printing
Two‑sided printing Two‑sided printing
One‑sided printing Two‑sided printing
With an optional staple finisher
5
Insert the tray.
Note: Press down the paper stack while inserting the tray.
4
Page 5
•
Load envelopes with the flap side down and against the left
side of the paper guide.
Warning—Potential Damage: Do not use envelopes with
stamps, clasps, snaps, windows, coated linings, or
self
‑
stick adhesives.
5
From the control panel, set the paper size and paper type to
match the paper loaded.
Setting the paper size and type
1
From the control panel, navigate to:
Settings > Paper > Tray
select a paper source
For non-touch-screen printer models, press
through the settings.
2
Set the paper size and type.
Configuration
> Paper Size/Type >
to navigate
Printing
Printing from a computer
Note: For labels, card stock, and envelopes, set the paper size
and type in the printer before printing the document.
1
From the document that you are trying to print, open the Print
dialog.
2
If necessary, adjust the settings.
3
Print the document.
5
Select the print job type (Confidential, Repeat, Reserve, or
Verif y).
If the print job is
6
Click OK or Print.
7
From the printer home screen, release the print job.
•
For confidential print jobs, navigate to:
Held jobs > select your user name >
the PIN > select the print job > configure the settings >
Print
•
For other print jobs, navigate to:
Held jobs > select your user name > select the print job >
configure the settings > Print
confidential,
then enter a four
Confidential
‑
digit PIN.
For Macintosh users
1
With a document open, choose File > Print.
If necessary, click the disclosure triangle to see more options.
2
From the print options or Copies & Pages menu, choose Job
Routing.
3
Select the print job type (Confidential, Repeat, Reserve, or
Verif y).
If the print job is
four
‑
digit PIN.
4
Click OK or Print.
5
From the printer home screen, release the print job.
•
For confidential print jobs, navigate to:
Held jobs > select your user name >
the PIN > select the print job > configure the settings >
Print
•
For other print jobs, navigate to:
Held jobs > select your user name > select the print job >
configure the settings > Print
confidential,
then assign a user name and a
Confidential
> enter
> enter
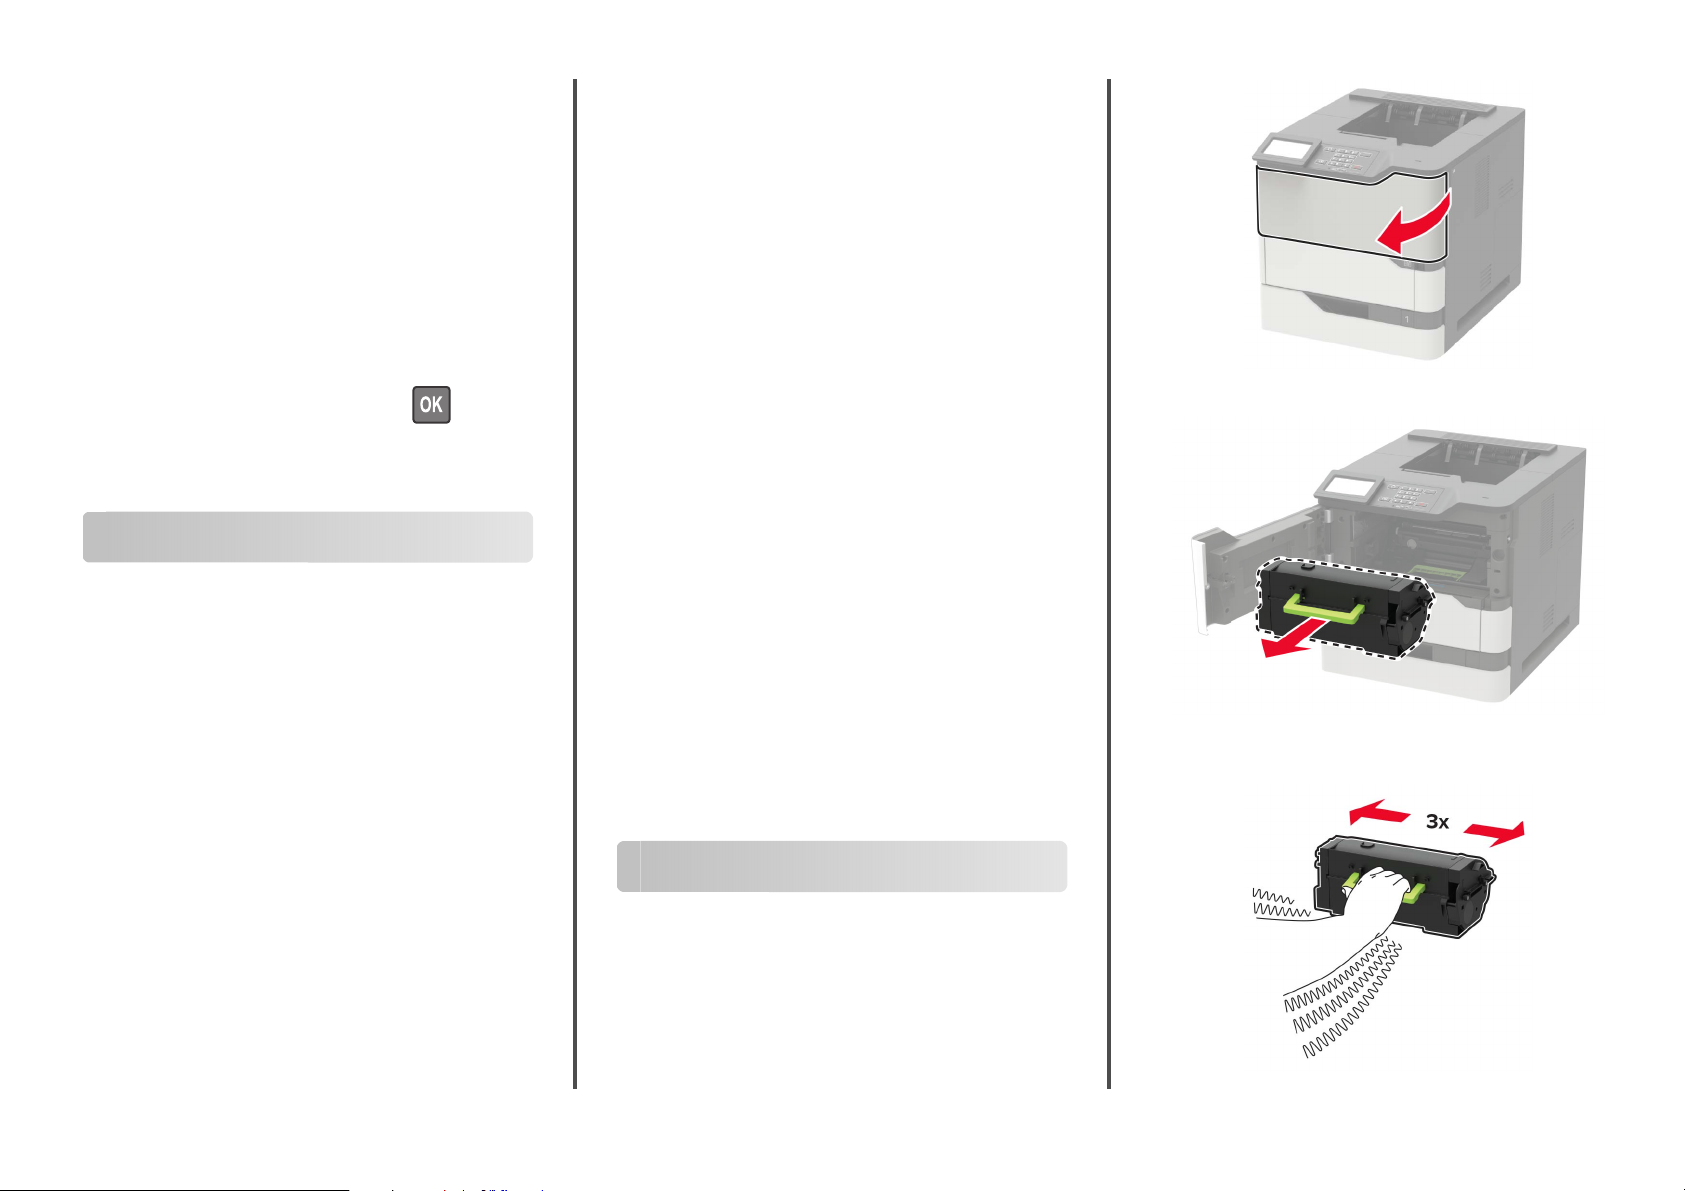
2
Remove the used toner cartridge.
3
Unpack the new toner cartridge, and then shake it to
redistribute the toner.
Printing
confidential
and other held
jobs
For Windows users
1
With a document open, click File > Print.
2
Click Properties, Preferences, Options, or Setup.
3
Click Print and Hold.
4
Select Use Print and Hold, and then assign a user name.
Maintaining the printer
Replacing the toner cartridge
1
Open door A.
Warning—Potential Damage: To prevent damage from
electrostatic discharge, touch any exposed metal frame of
the printer before accessing or touching interior areas of the
printer.
5
Page 6

4
Insert the new toner cartridge.
5
Close the door.
Clearing jams
Avoiding jams
Load paper properly
•
Make sure paper lies flat in the tray.
Correct loading of paper Incorrect loading of paper
•
Do not load too much paper. Make sure the stack height is
below the maximum paper fill indicator.
•
Do not slide the paper into the tray. Load paper as shown in
the illustration.
•
Make sure the guides in the tray or the multipurpose feeder
are properly positioned and are not pressing tightly against the
paper or envelopes.
•
Push the tray firmly into the printer after loading paper.
•
If you are loading prepunched paper for use with the staple
finisher, then make sure the holes on the long edge of the
paper are on the right side of the tray. For more information,
see the “Loading paper and specialty media” section of the
User’s Guide.
Allow the paper to enter the optional mailbox bins
properly
•
Make sure to adjust the bin extender so that the paper size
indicators match the size of the paper used.
Notes:
–
If the bin extender is shorter than the size of the paper
you are printing on, then the paper causes a jam in the
mailbox bin. For example, if you are printing on a legalsize paper and the bin extender is set to letter-size, then
a jam occurs.
–
If the bin extender is longer than the size of the paper
you are printing on, then the edges become uneven and
the paper is not stacked properly. For example, if you are
printing on a letter-size paper and the bin extender is set
to legal-size, then the paper does not stack properly.
•
Do not remove a tray while the printer is printing.
•
Do not load a tray while the printer is printing. Load it before
printing, or wait for a prompt to load it.
6
Page 7

•
If paper needs to be returned to the mailbox bin, then insert
the paper under the bin arm, and then push the paper all the
way back.
•
When Jam Recovery is set to On or Auto, the printer reprints
jammed pages.
Jam locations
6 Finisher or output option rear door
•
Door H
•
Door K
•
Door L
•
Door N
•
Door P
7 Door C
8 Stapler door
•
Door F
•
Door G
Note: If the paper is not under the bin arm, then a jam occurs
due to an
overfilled
bin.
Use recommended paper
•
Use only recommended paper or specialty media.
•
Do not load wrinkled, creased, damp, bent, or curled paper.
•
Flex, fan, and straighten paper or specialty media before
loading it.
•
Do not use paper that has been cut or trimmed by hand.
•
Do not mix paper sizes, weights, or types in the same tray.
•
Make sure the paper size and type are set correctly on the
computer or printer control panel.
•
Store paper per manufacturer recommendations.
Identifying jam locations
Notes:
•
When Jam Assist is set to On, the printer
pages or pages with partial prints after a jammed page has
been cleared. Check your printed output for blank pages.
flushes
blank
Jam locations
1 Finisher or output option bin
2 Standard bin
3 Door A
4 Multipurpose feeder
5 Tra y s
Paper jam in trays
1
Remove the tray.
2
Remove the jammed paper.
Note: Make sure that all paper fragments are removed.
7
Page 8

3
Insert the tray.
Paper jam in door A
1
Open door A.
Warning—Potential Damage: To prevent damage from
electrostatic discharge, touch any exposed metal frame of
the printer before accessing or touching interior areas of the
printer.
2
Remove the toner cartridge.
3
Remove the imaging unit.
4
Pull out the duplex unit.
Warning—Potential Damage: Do not expose the imaging
unit to direct light for more than 10 minutes. Extended
exposure to light may cause print quality problems.
Warning—Potential Damage: Do not touch the
photoconductor drum. Doing so may
future print jobs.
the quality of
aect
8
5
Remove the jammed paper.
Note: Make sure that all paper fragments are removed.
Page 9

6
Insert the duplex unit.
7
Insert the imaging unit.
8
Insert the toner cartridge.
9
Close the door.
Paper jam in door C
1
Open door C.
CAUTION—HOT SURFACE: The inside of the printer
might be hot. To reduce the risk of injury from a hot
component, allow the surface to cool before touching
it.
Warning—Potential Damage: To prevent damage from
electrostatic discharge, touch any exposed metal frame of
the printer before accessing or touching interior areas of the
printer.
2
Remove the jammed paper from any of the following areas:
Note: Make sure that all paper fragments are removed.
•
Fuser area
9
Page 10

•
Below the fuser area
4
Reload paper.
•
Duplex area
3
Close the door.
Paper jam in the standard bin
Remove the jammed paper.
Note: Make sure that all paper fragments are removed.
Paper jam in the multipurpose feeder
1
Remove paper from the multipurpose feeder.
2
Remove the jammed paper.
Note: Make sure that all paper fragments are removed.
3
Flex, fan, and align the paper edges before loading.
Paper jam in the output expander
1
Open door K.
2
Remove the jammed paper.
Note: Make sure that all paper fragments are removed.
10
3
Close the door.
Page 11

Paper jam in the high‑capacity output
expander
1
Open door L.
Paper jam in the 4‑bin mailbox
Paper jam in door N
1
Open door N.
2
Remove the jammed paper.
Note: Make sure that all paper fragments are removed.
3
Close the door.
2
Remove the jammed paper.
Note: Make sure that all paper fragments are removed.
3
Close the door.
Paper jam in the mailbox bin
Remove the jammed paper.
Note: Make sure that all paper fragments are removed.
Paper jam in the staple finisher
Paper jam in door H
1
Open door H.
2
Remove the jammed paper.
Note: Make sure that all paper fragments are removed.
11
Page 12

Paper jam in the staple, hole punch
finisher
Paper jam in door P
1
Open door P.
3
Close the door.
Paper jam in the staple finisher bin
Remove the jammed paper.
Note: Make sure that all paper fragments are removed.
2
Remove the jammed paper.
Note: Make sure that all paper fragments are removed.
3
Close the door.
Paper jam in the staple, hole punch finisher bin
Remove the jammed paper.
Note: Make sure that all paper fragments are removed.
Staple jam in the staple finisher
1
Open door F.
12
Page 13

2
Remove the staple cartridge holder.
3
Remove the loose staples.
4
Press the staples against the metal bracket.
Note: If the staples are at the rear of the cartridge, then
shake the cartridge downward to bring the staples near the
metal bracket.
13
Page 14

5
Insert the staple cartridge holder until it clicks into place.
6
Close the door.
Staple jam in the staple, hole punch
finisher
1
Depending on the staple jam location, open either door F or
door G.
2
Remove the staple cartridge holder.
3
Remove the loose staples.
14
Page 15

4
Press the staples against the metal bracket.
Note: If the staples are at the rear of the cartridge, then
shake the cartridge downward to bring the staples near the
metal bracket.
5
Insert the staple cartridge holder until it clicks into place.
6
Close the door.
15
 Loading...