

Page 1
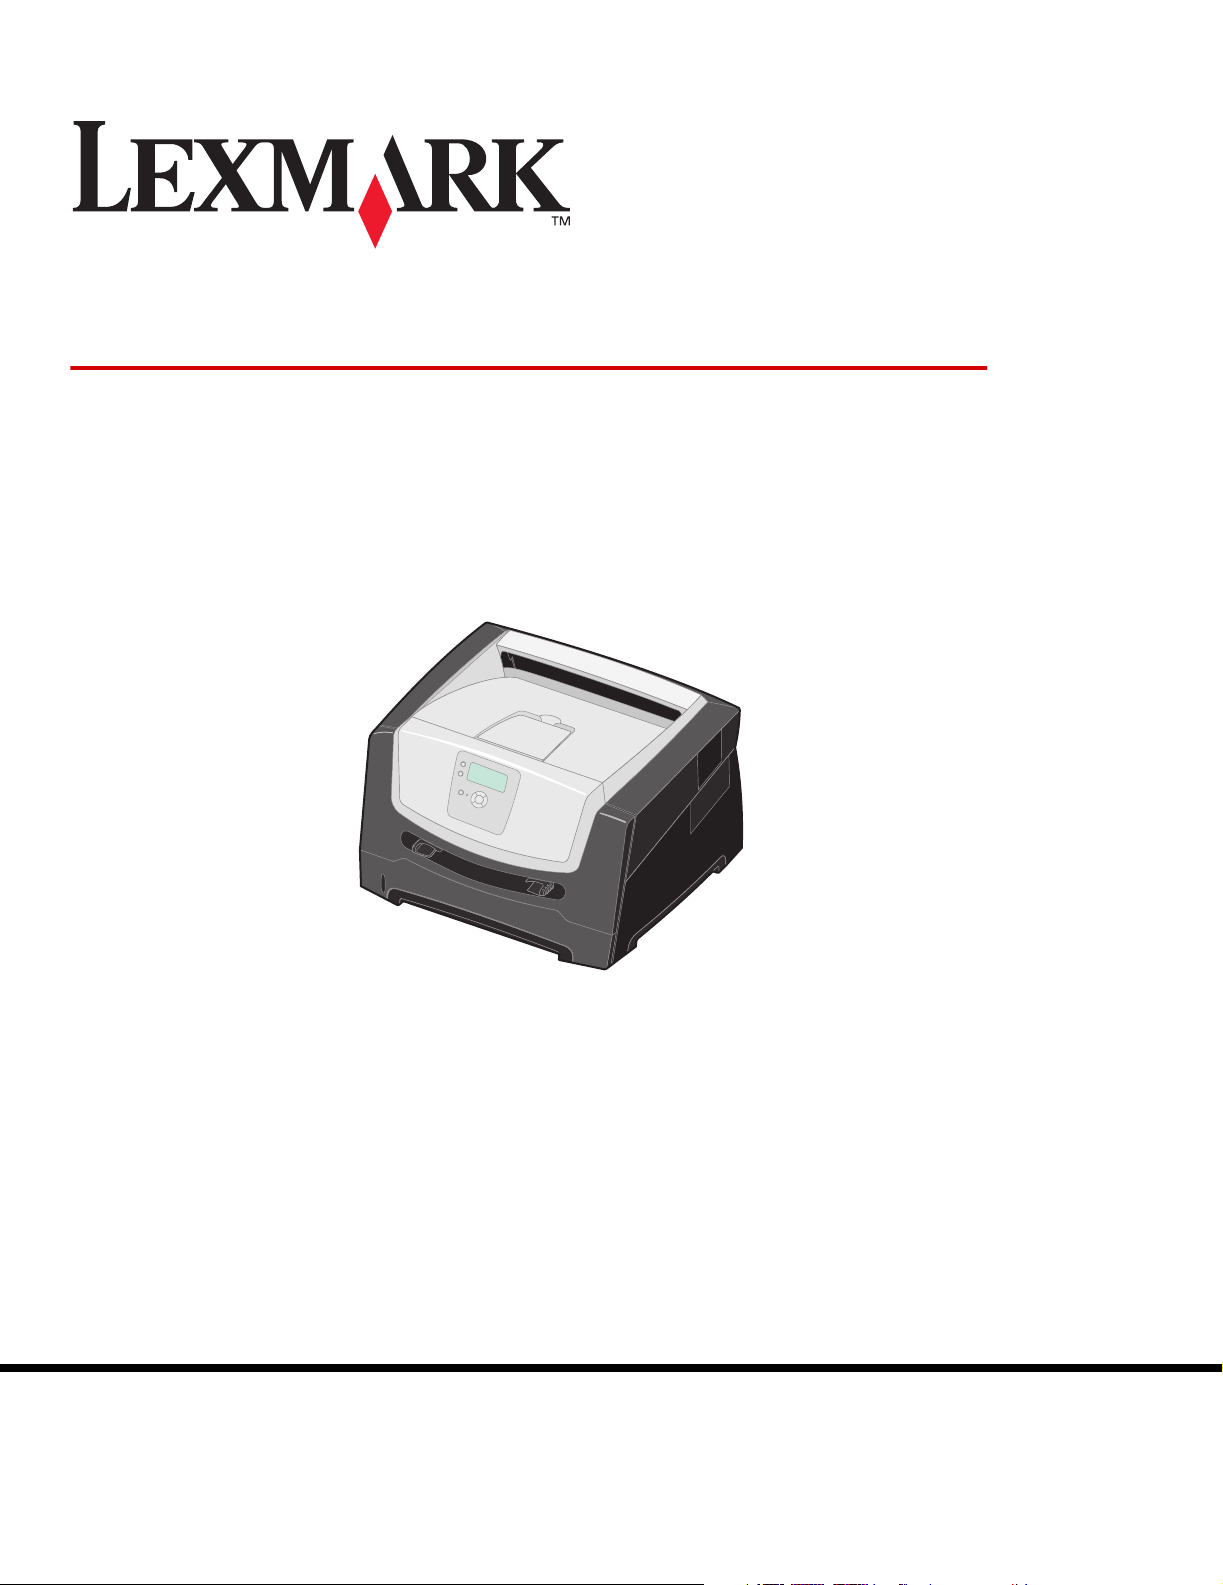
E450dn
Menus and Messages
June 2006
Lexmark and Lexmark with diamond design are trademarks of Lexmark International, Inc.,
registered in the United States and/or other countries.
© 2006 Lexmark International, Inc.
All rights reserved.
740 West New Circle Road
Lexington, Kentucky 40550
www.lexmark.com
Page 2

Edition: June 2006
The following paragraph does not apply to any country where such provisions are inconsistent with local law: LEXMARK
INTERNATIONAL, INC., PROVIDES THIS PUBLICATION “AS IS” WITHOUT WARRANTY OF ANY KIND, EITHER EXPRESS OR
IMPLIED, INCLUDING, BUT NOT LIMITED TO, THE IMPLIED WARRANTIES OF MERCHANTABILITY OR FITNESS FOR A
PARTICULAR PURPOSE. Some states do not allow disclaimer of express or implied warranties in certain transactions; therefore, this
statement may not apply to you.
This publication could include technical inaccuracies or typographical errors. Changes are periodically made to the information herein;
these changes will be incorporated in later editions. Improvements or changes in the products or the programs described may be made
at any time.
Comments about this publication may be addressed to Lexmark International, Inc., Department F95/032-2, 740 West New Circle Road,
Lexington, Kentucky 40550, U.S.A. In the United Kingdom and Eire, send to Lexmark International Ltd., Marketing and Services
Department, Westhorpe House, Westhorpe, Marlow Bucks SL7 3RQ. Lexmark may use or distribute any of the information you supply in
any way it believes appropriate without incurring any obligation to you. To obtain additional copies of publications related to this product,
visit the Lexmark Web site at www.lexmark.com.
References in this publication to products, programs, or services do not imply that the manufacturer intends to make these available in all
countries in which it operates. Any reference to a product, program, or service is not intended to state or imply that only that product,
program, or service may be used. Any functionally equivalent product, program, or service that does not infringe any existing intellectual
property right may be used instead. Evaluation and verification of operation in conjunction with other products, programs, or services,
except those expressly designated by the manufacturer, are the user’s responsibility.
© 2006 Lexmark International, Inc.
All rights reserved.
UNITED STATES GOVERNMENT RIGHTS
This software and any accompanying documentation provided under this agreement are commercial computer software and
documentation developed exclusively at private expense.
2
Page 3

Contents
Contents
Chapter 1: Using printer menus ....................................................................................... 4
Understanding the printer control panel ...........................................................................................................5
Menu Groups ...................................................................................................................................................7
Paper Menu .............................................................................................................................................. 7
Reports ................................................................................................................................................... 12
Settings ................................................................................................................................................... 13
PPDS Menu ............................................................................................................................................22
Security ...................................................................................................................................................23
Network/Ports ......................................................................................................................................... 24
Help ........................................................................................................................................................ 27
Chapter 2: Understanding printer messages ................................................................. 28
Index .................................................................................................................................... 34
3
Page 4

Using printer menus
A number of menus are available to make it easy for you to change printer settings. The diagram shows the menu index on the control
panel, the menus, and items available under each menu. The items in each menu and the values you can select are described in more
detail later in this chapter.
Some menu items or values are displayed only if a specific option is installed on the printer. Other menu items may only be effective for a
particular printer language. You can select these values at any time, but they only affect printer function when you have the optional
equipment or the specified printer language.
Menu
Paper Menu
Reports
Settings
Paper Menu
Default Source
Paper Size/Type
Substitute Size
Paper Texture
Paper Weight
Paper Loading
Custom Types
Universal Setup
Reports
Menu Settings Page
Device Statistics
Network Setup Page
Print Fonts
Print Demo
Settings
Setup Menu
Finishing Menu
Quality Menu
Utilities Menu
PostScript Menu
PCL Emul Menu
Network/Ports
TCP/IP
Standard Network
Standard USB
AppleTalk
PPDS Menu
Job Expiration
Help
Printing Guide
Supplies Guide
Media Guide
Print Defects
Menu Map
Information Guide
Connection Guide
Moving Guide
4
Page 5
Using printer menus
Understanding the printer control panel
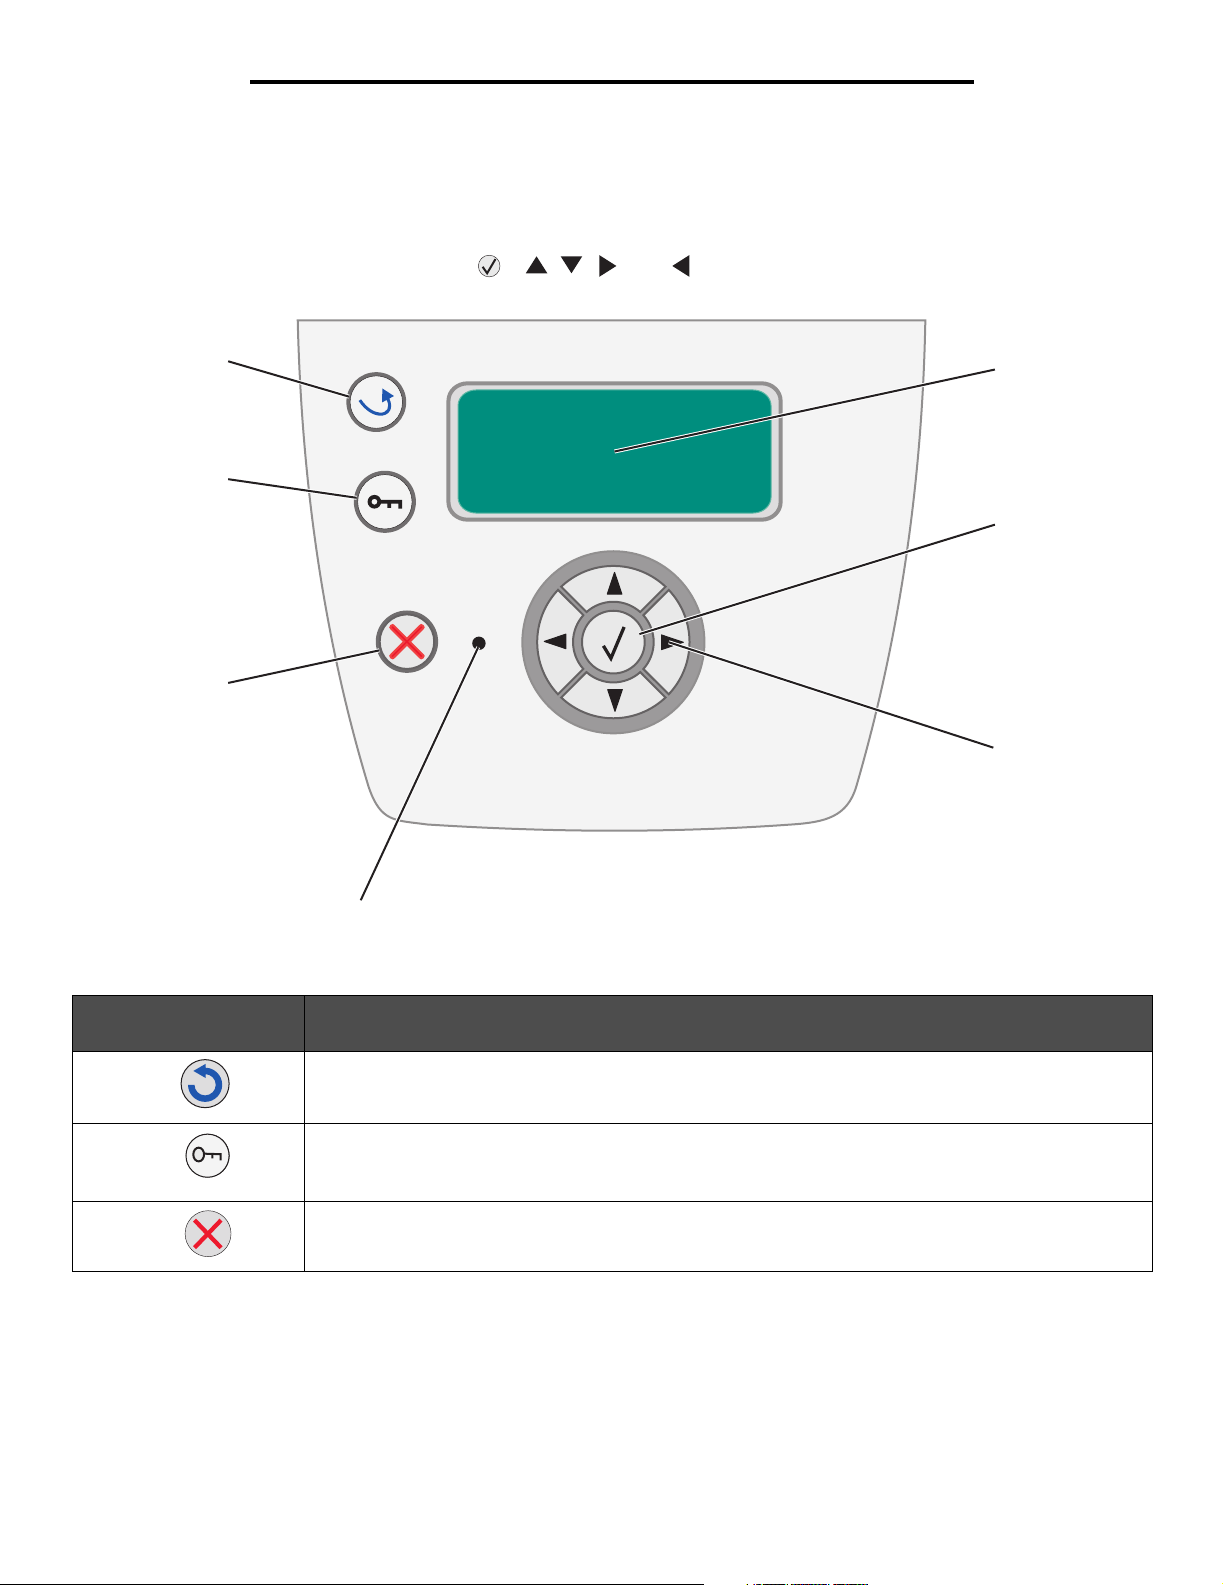
The control panel consists of these items:
• A 4-line, back-lit, gray-scale display that can show both graphics and text
• Eight buttons: Back, Menu, Stop, Select ( ), , , , and
• Indicator light
1
7
2
66
3
5
4
The use of the buttons and the layout of the display panel are described in the following table.
Button or control panel
item
1 Back To return to the last screen viewed.
2 Menu To open the menu index.
3 Stop To stop the mechanical operation of the printer. After pressing Stop, the message Stopping appears.
Function
Note: Changes made on a screen will not be applied if you press the Back button.
Note: The printer must be in the Ready state to access the menu index. A message indicating the menus
are unavailable will appear if the printer is not ready.
When the printer has stopped, the status line in the control panel will show Stopped, and a list of options
will appear.
5
Page 6
Using printer menus
Button or control panel
item
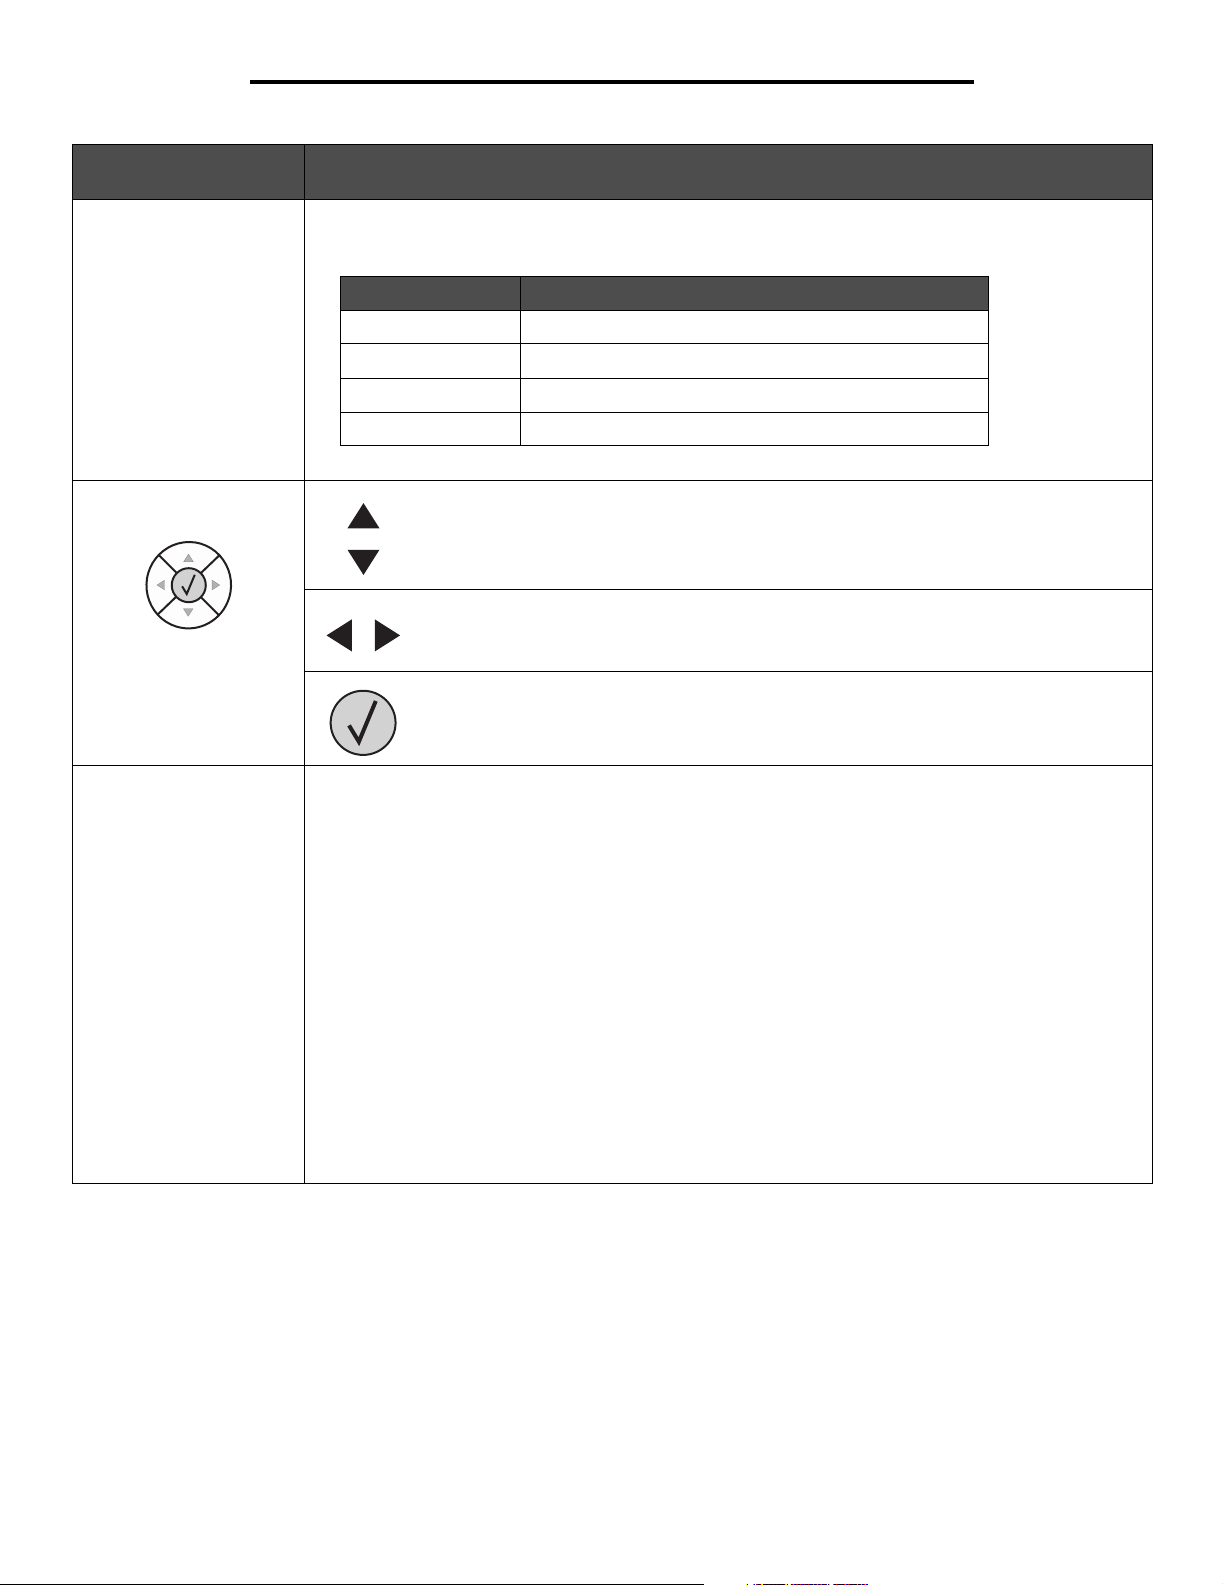
4 Indicator light A two-toned LED is used on the control panel, one color being green and the other being red. The lights
Function
indicate whether the printer power is on, the printer is busy, idle, processing a job, or requires operator
intervention.
Status Indicates
Off Power is off.
Solid green Printer is on, but idle.
Flashing green Printer is warming up, processing data, or printing a job.
Solid red Operator intervention is required.
5 and 6 Navigation
buttons
7 Display The display shows messages and graphics describing the current state of the printer and indicating
possible printer problems you must resolve.
The top line of the display is the header line. If applicable, it will contain the graphic indicating the Back
button can be used. It will also display the current status and the Supplies (Warnings) status. If multiple
warnings are present, each warning will be separated by a comma.
The other three lines of the display are the body of the screen. This is where you view printer status,
supplies messages, Show me screens, and make selections.
The Up and Down buttons are used to move up and down lists.
When navigating through a list using the Up or Down button, the cursor moves one line at a
time. Pressing the Down button at the bottom of the screen changes the screen to the next
whole page.
The Left and Right buttons are used to move within a screen, such as moving from one
menu index item to another. They are also used to scroll through text that will not fit on the
screen.
The Select button is used to initiate action on a selection. Press Select when the cursor is
next to the selection you want, such as following a link, submitting a configuration item, or
to start or cancel a job.
6
Page 7
Using printer menus
Menu Groups
Note: An asterisk (*) next to a value indicates the default setting.
Paper Menu
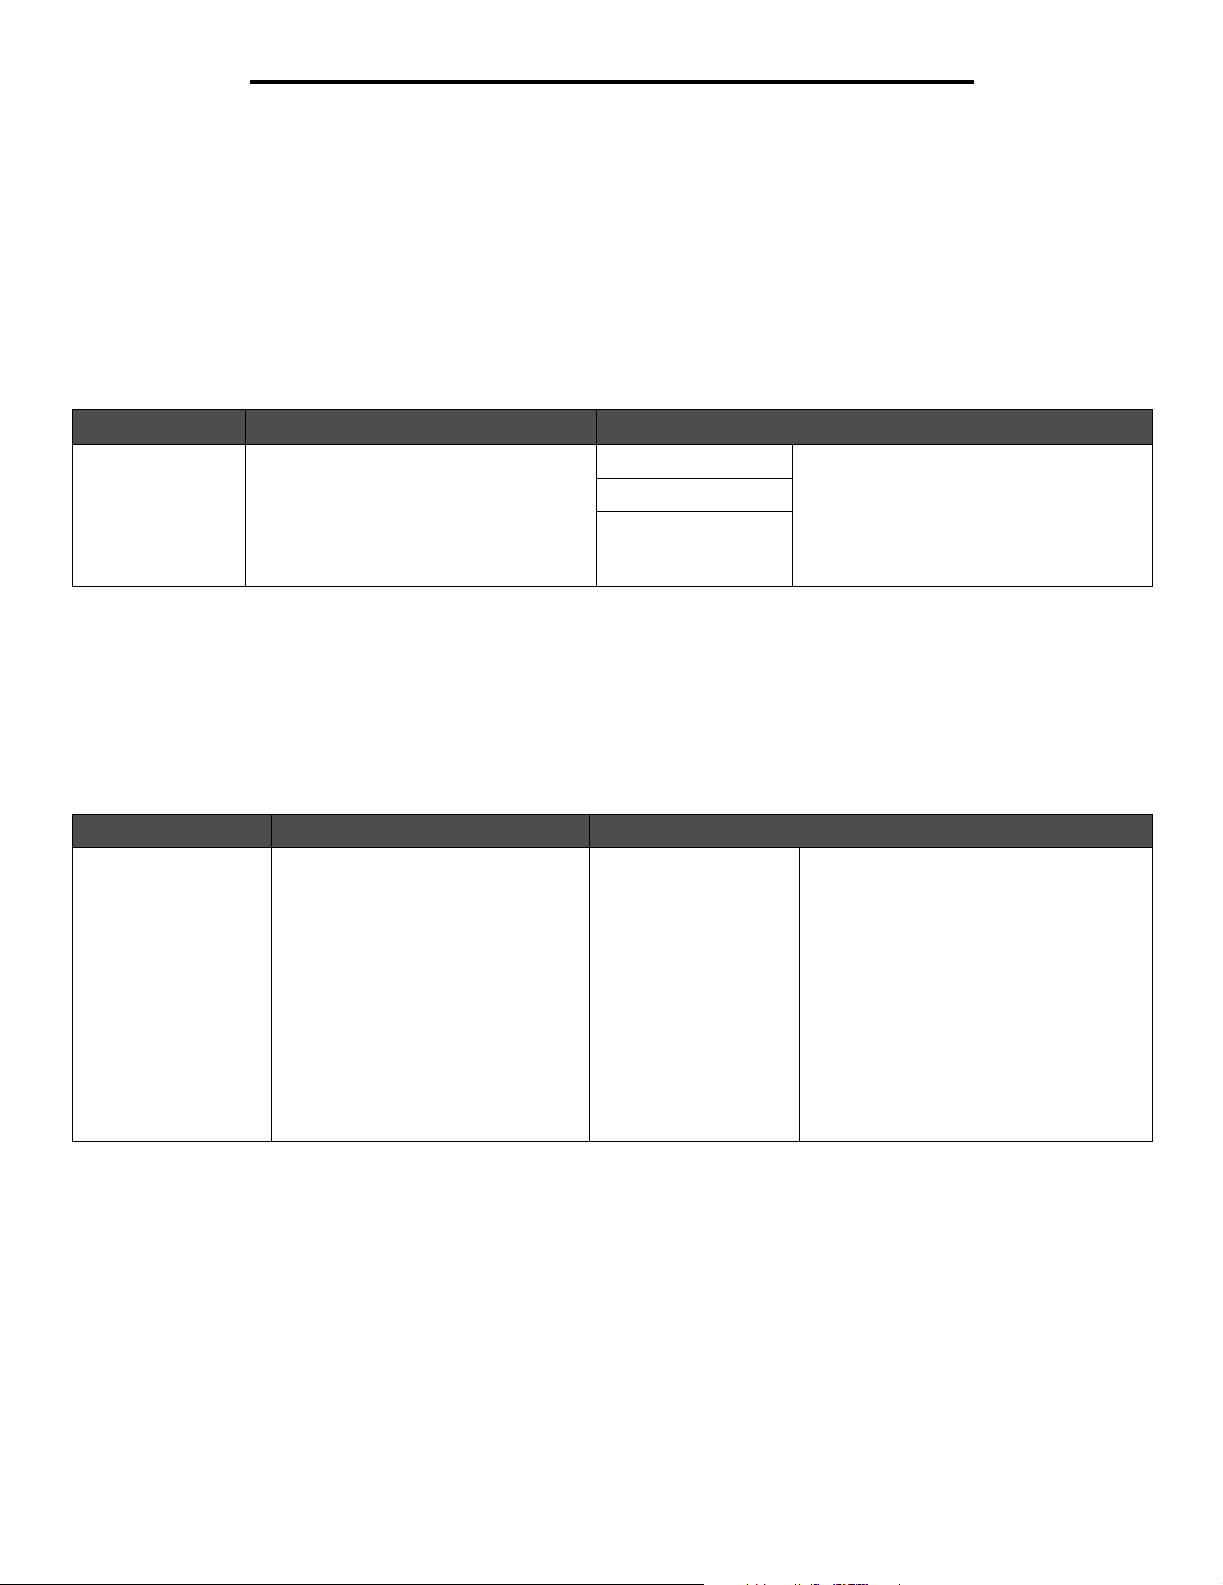
Use the Paper Menu to define the paper loaded in each paper tray, the default paper source, and the output bin.
Default Source
Menu selection Purpose Values
Default Source Identifies the default paper source Tray <x> If you loaded the same size and type of
Manual Paper
Manual Env
paper in two paper sources (and the Paper
Size and Paper Type menu items are
correctly set), the trays are automatically
linked. When one paper source is empty,
paper automatically feeds from the next
linked source.
Paper Size/Type
Note: Only installed paper sources are displayed.
This menu selection is used to set the size and type of media loaded into an input tray. Setting the paper size and type is a two-step
process. In the first menu selection, Size appears in bold letters. After you select the media size, the screen will change, and Ty pe
appears in bold letters. You can then select the media type.
Menu selection Purpose Value s
Tray <x>
Size/Ty p e
Identifies the default paper size for
this paper source
A4* (non-Americas)
A5
A6
JIS B5
Letter* (Americas)
Legal
Executive
Folio
Statement
7 3/4 Envelope
9 Envelope
If you loaded the same size and type of
paper in two paper sources (and the Paper
Size and Paper Type menu items are
correctly set), the trays are automatically
linked. When one paper source is empty,
paper automatically feeds from the next
linked source.
7
Page 8

Using printer menus
Menu selection Purpose Value s
Tray <x>
Size/Type
Manual Paper
Size/Type
Identifies the type of paper installed in
this paper source
Note: If a user-defined name is
available, it appears instead of
Custom Type <x>. If two or more
custom types share the same name,
the name only appears once in the
Paper Type list.
Identifies the paper size being
manually loaded
Plain Paper
Card Stock
Transparency
Labels
Bond
Envelope
Letterhead
Preprinted
Colored Paper
Light Paper
Heavy Paper
Rough/Cotton Paper
Custom Type <x>
A4* (non-Americas)
A5
A6
JIS B5
Letter* (Americas)
Legal
Executive
Folio
Statement
Universal
Use this menu item to:
• Optimize print quality for the specified
paper.
• Select paper sources through your
software application by selecting type
and size.
• Automatically link paper sources. Any
sources containing the same type and
size of paper are automatically linked
by the printer if you have set the Paper
Size and the Paper Type to the correct
values.
Manual Paper
Size/Type
Manual Envelope
Size/Type
Manual Envelope
Size/Type
Identifies the paper type being
manually loaded
Identifies the envelope size being
manually loaded
Identifies the envelope type being
manually loaded
Plain Paper
Card Stock
Transparency
Labels
Bond
Letterhead
Preprinted
Colored Paper
Light Paper
Heavy Paper
Rough/Cotton Paper
Custom Type <x>
7 3/4 Envelope
9 Envelope
10 Envelope* (US)
DL Envelope* (non-US)
C5 Envelope
B5 Envelope
Other Envelope
Envelope*
Custom Type <x>
8
Page 9
Using printer menus
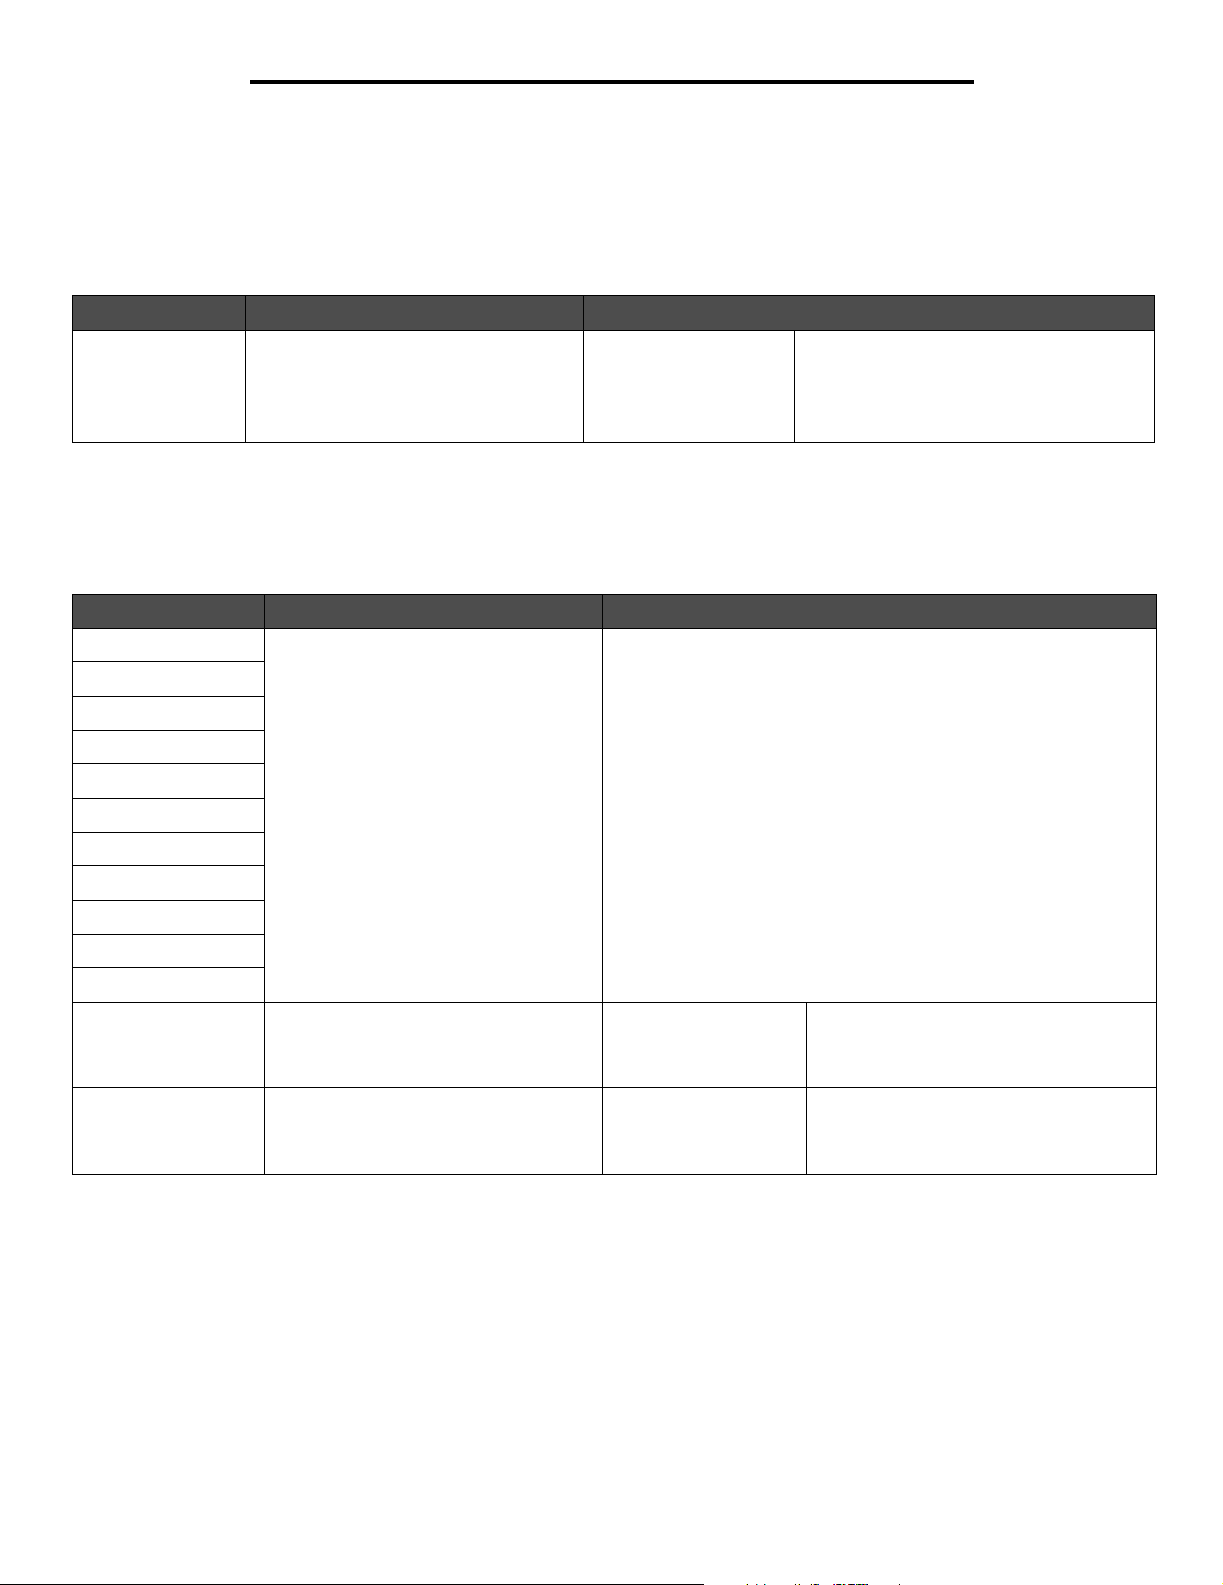
Substitute Size
This menu selection is used to determine whether the printer can substitute another size paper if the requested paper size is not currently
installed in any of the printer input sources. If, for example, Substitute Size is set to Letter/A4, and only letter size paper is installed in the
printer. When a request is received to print on A4 paper, the printer will substitute letter for A4 and print the job instead of displaying a
change paper request.
Menu selection Purpose Value s
Substitute Size Substitutes the specified paper size if
the requested size is not loaded
Off
Statement/A5
Letter/A4
All Listed*
The All Listed value indicates that all
available substitutions are allowed.
Paper Texture
This menu selection is used to set the media texture for each of the defined media types. This allows the printer to optimize the print
quality for the specified media.
Menu selection Purpose Values
Plain Texture Identifies the texture of the media loaded
Transparency Texture
Labels Texture
Bond Texture
Envelope Texture
Letterhead Texture
Preprinted Texture
Colored Texture
Light Texture
in a specific input source
Smooth
Normal*
Rough
Heavy Texture
Rough/Cotton Texture
Card Stock Texture Identifies the texture of the card stock
loaded in a specific input source
Custom <x> Texture Identifies the texture of the custom
media loaded in a specific input source
Smooth
Normal*
Rough
Smooth
Normal*
Rough
9
Shown if Card Stock is supported in the
specified input source.
Shown if the custom type is supported in
the specified input source.
Page 10

Using printer menus
Paper Weight
This menu selection is used to set the paper weight for each of the defined media types. This allows the printer to optimize the print
quality for the media weight.
Menu selection Purpose Values
Plain Weight Identifies the weight of the media loaded
Transparency Weight
Labels Weight
Bond Weight
Envelope Weight
Letterhead Weight
Preprinted Weight
Colored Weight
Light Weight
Heavy Weight
Rough/Cotton Weight
Card Stock Weight Identifies the weight of the card stock
Custom <x> Weight Identifies the weight of the custom
in a specific input source
loaded in a specific input source
media loaded in a specific input source
Light
Normal*
Heavy
Light
Normal*
Heavy
Light
Normal*
Heavy
Shown if Card Stock is supported in the
specified input source.
Shown if the custom type is supported in
the specified input source.
Paper Loading
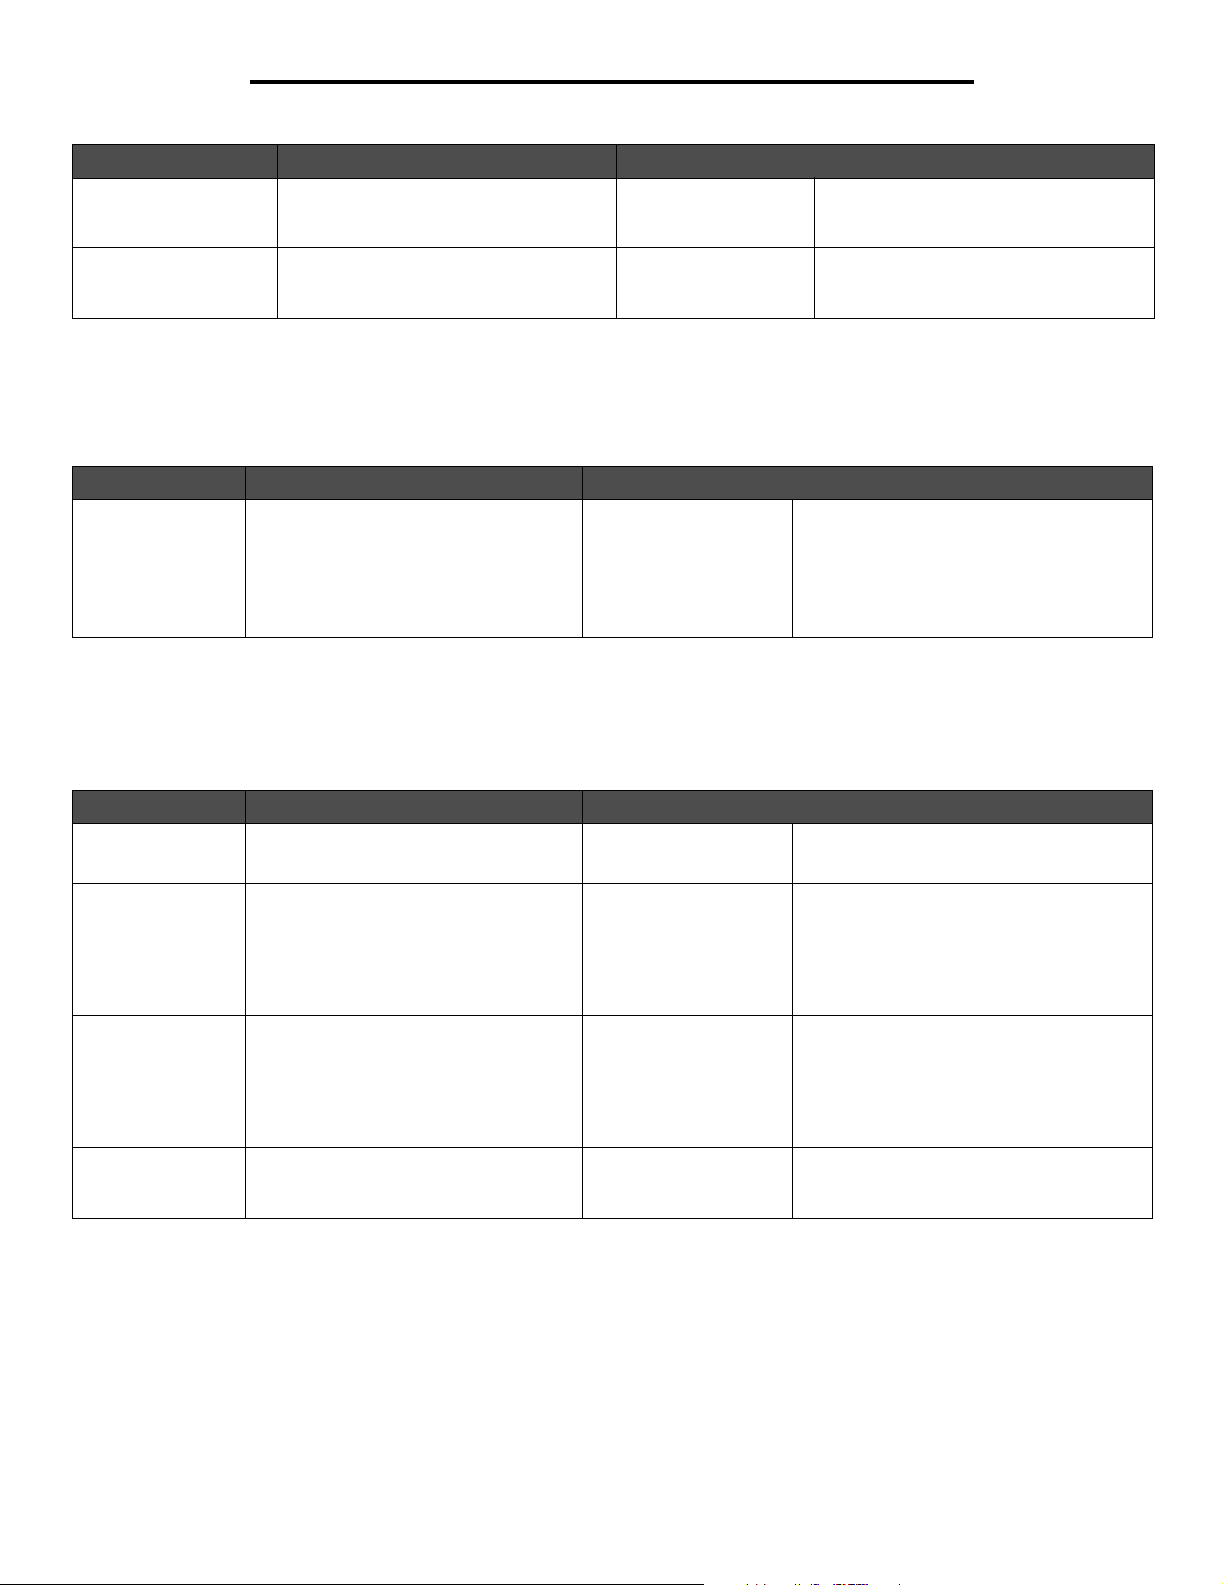
This menu selection is used to set the loading orientation for each paper type. This lets you load an input source with preprinted media,
and then notify the printer that the media is loaded for duplex printing. You can then use your application software to indicate simplex
printing. When simplex printing is selected, the printer automatically inserts blank pages to print the simplex job correctly.
Note: Paper Loading is only available if a duplex unit is installed.
Menu selection Purpose Val ues
Labels Loading Properly handles preprinted paper
Bond Loading
Letterhead Loading
Preprinted Loading
Colored Loading
Light Loading
Heavy Loading
Rough/Cotton Loading
whether the job is a duplexed or singlesided job
Duplex
Off*
10
Page 11
Using printer menus
Menu selection Purpose Val ues
Card Stock Loading Properly handles preprinted card stock
whether the job is a duplexed or singlesided job
Custom <x> Loading Properly handles preprinted custom
paper whether the job is a duplexed or
single-sided job
Duplex
Off*
Duplex
Off*
Shown if Card Stock is supported in the
specified input source.
Shown if the custom type is supported in
the specified input source.
Custom Types
This menu selection is used to define a name for each custom paper type. You can assign names using a utility such as MarkVision
Professional or from the control panel.
Menu selection Purpose Value s
Custom Type <x> Specifies the type of paper associated
with each Custom Type available in the
Paper Type menu
Paper*
Card Stock
Transparency
Labels
Envelope
The custom type media must be supported
in the input source you designate in order
to assign a user-defined name.
Once the name is assigned, the name
(truncated to 16 characters) will be
displayed instead of Custom Type x.
Universal Setup
This menu selection is used to specify the height and width of the Universal Paper Size. By specifying the height and width for Universal
Paper Size, the printer will use the Universal setting exactly like other paper sizes, including support for duplex and n-up.
Menu selection Purpose Value s
Units of Measure Determines the unit of measure used to
enter the Universal Height and Width
Portrait Width Sets the portrait width of the universal
media
Note: If the value set exceeds the
maximum width, the printer will use the
maximum value allowed in inches or
millimeters.
Portrait Height Sets the portrait height of the universal
media
Note: If the value set exceeds the
maximum height, the printer will use the
maximum value allowed in inches or
millimeters.
Feed Direction Specifies the feed direction Short Edge*
Inches* (US)
Millimeters* (non-US)
3 inches to 14.17 inches
in 0.01 inch increments*
(US)
76 mm to 360 mm in 1
mm increments* (nonUS)
3 inches to 14.17 inches
in 0.01 inch increments*
(US)
76 mm to 360 in 1 mm
increments* (non-US)
Long Edge
Inches is the US default; Millimeters is the
international default.
Shows either inches or mm from Units of
Measure setting; 8.5 inches is the US
default, and 216 mm is the international
default.
Shows either inches or mm from Units of
Measure setting; 14 inches US default, and
355 mm is the international default.
Long Edge is only shown if the longest
edge is shorter than the Maximum Physical
Width of the printer.
11
Page 12
Using printer menus
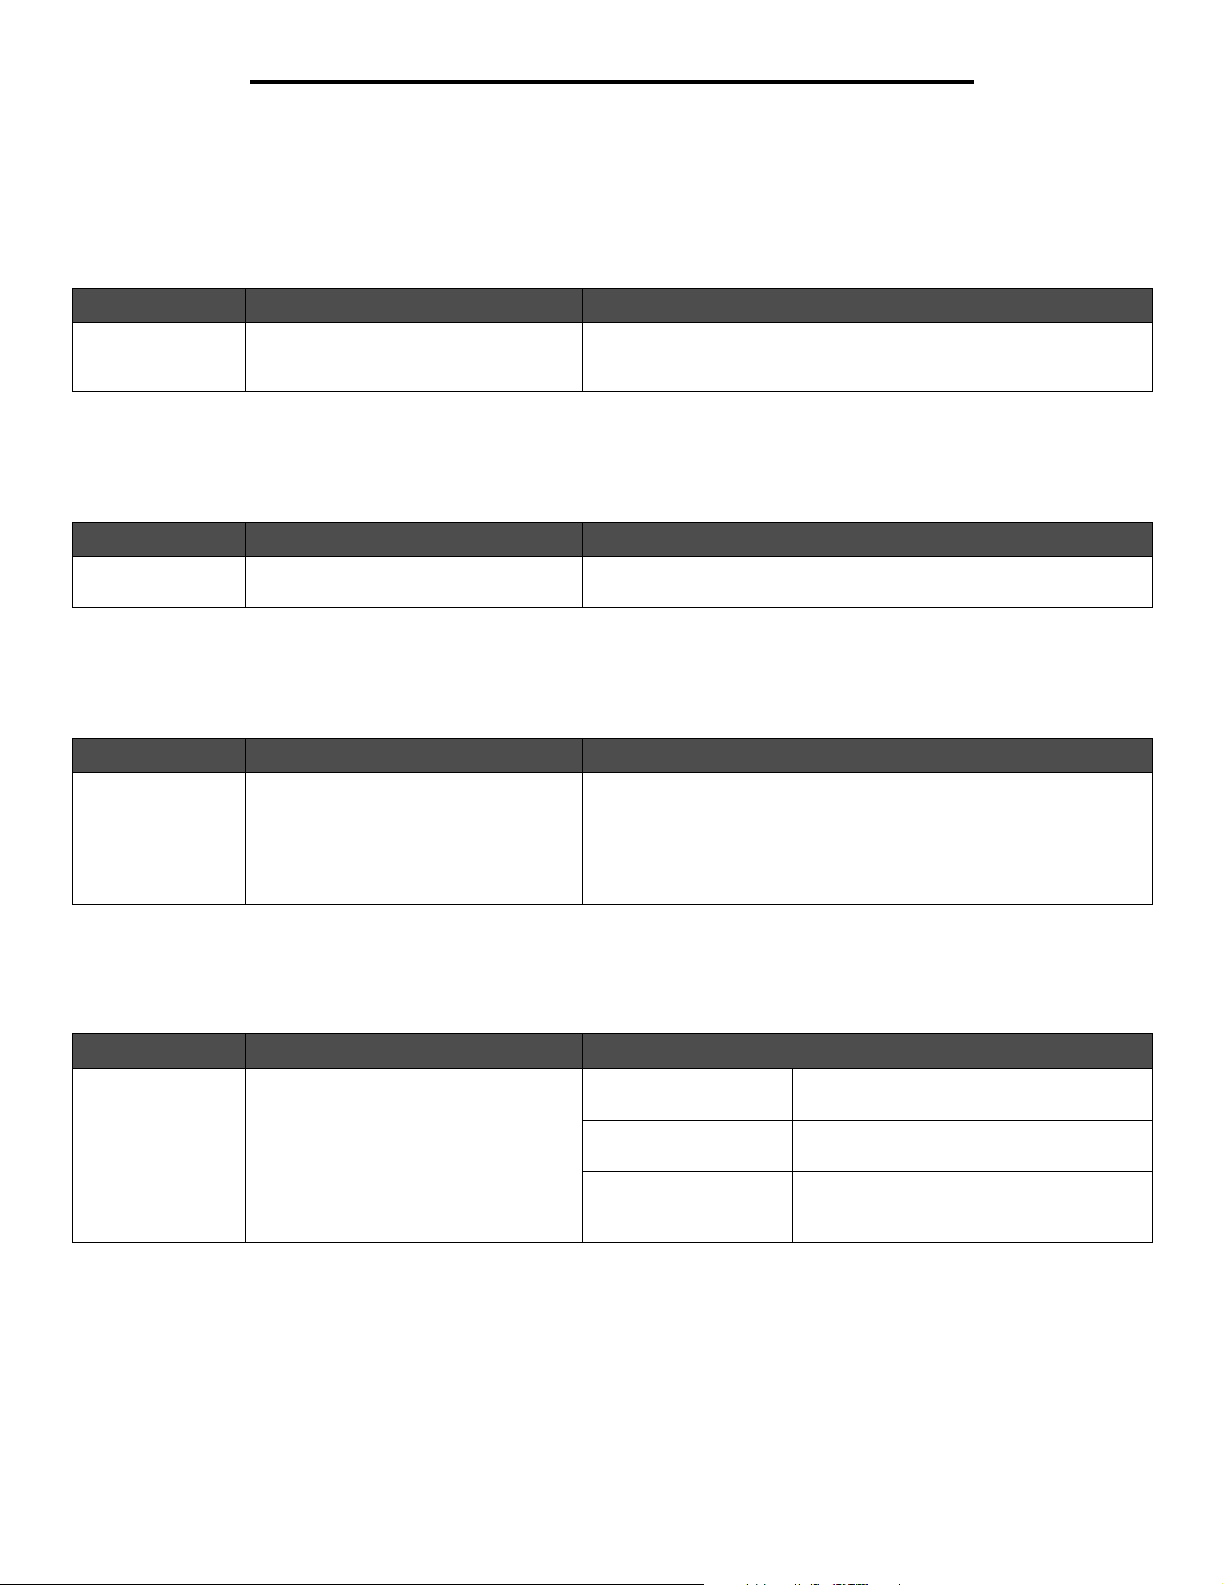
Reports
Menu Settings Page
This menu selection prints a menu settings page.
Menu selection Purpose Value s
Menu Settings
Page
Prints information relating to the default
printer settings and verifies that printer
options are installed correctly
After selecting this item, the page will print and the printer will return to
Ready.
Device Statistics
This menu selection displays the printer statistics.
Menu selection Purpose Value s
Device Statistics Prints information relating to the printer
statistics
After selecting this item, the page will print and the printer will return to
Ready.
Network Setup Page
This menu selection prints a network setup page.
Menu selection Purpose Value s
Network Setup
Page
Prints information relating to network
settings and verifies the network
connection
Note: This page also provides
information that helps you configure for
network printing.
After selecting this item, the page will print, and the printer will return
to Ready.
Print Fonts
This menu selection prints a list of the fonts stored in the printer.
Menu selection Purpose Value s
Print Fonts Prints a sample of all the fonts available
for the selected printer language
PCL Fonts Prints a sample of all printer fonts available
PS Fonts Prints a sample of all printer fonts available
PPDS Fonts Prints a sample of all printer fonts available
12
for PCL emulation
for PostScript emulation
for PPDS emulation. Only available if
PPDS emulation is active
Page 13
Using printer menus
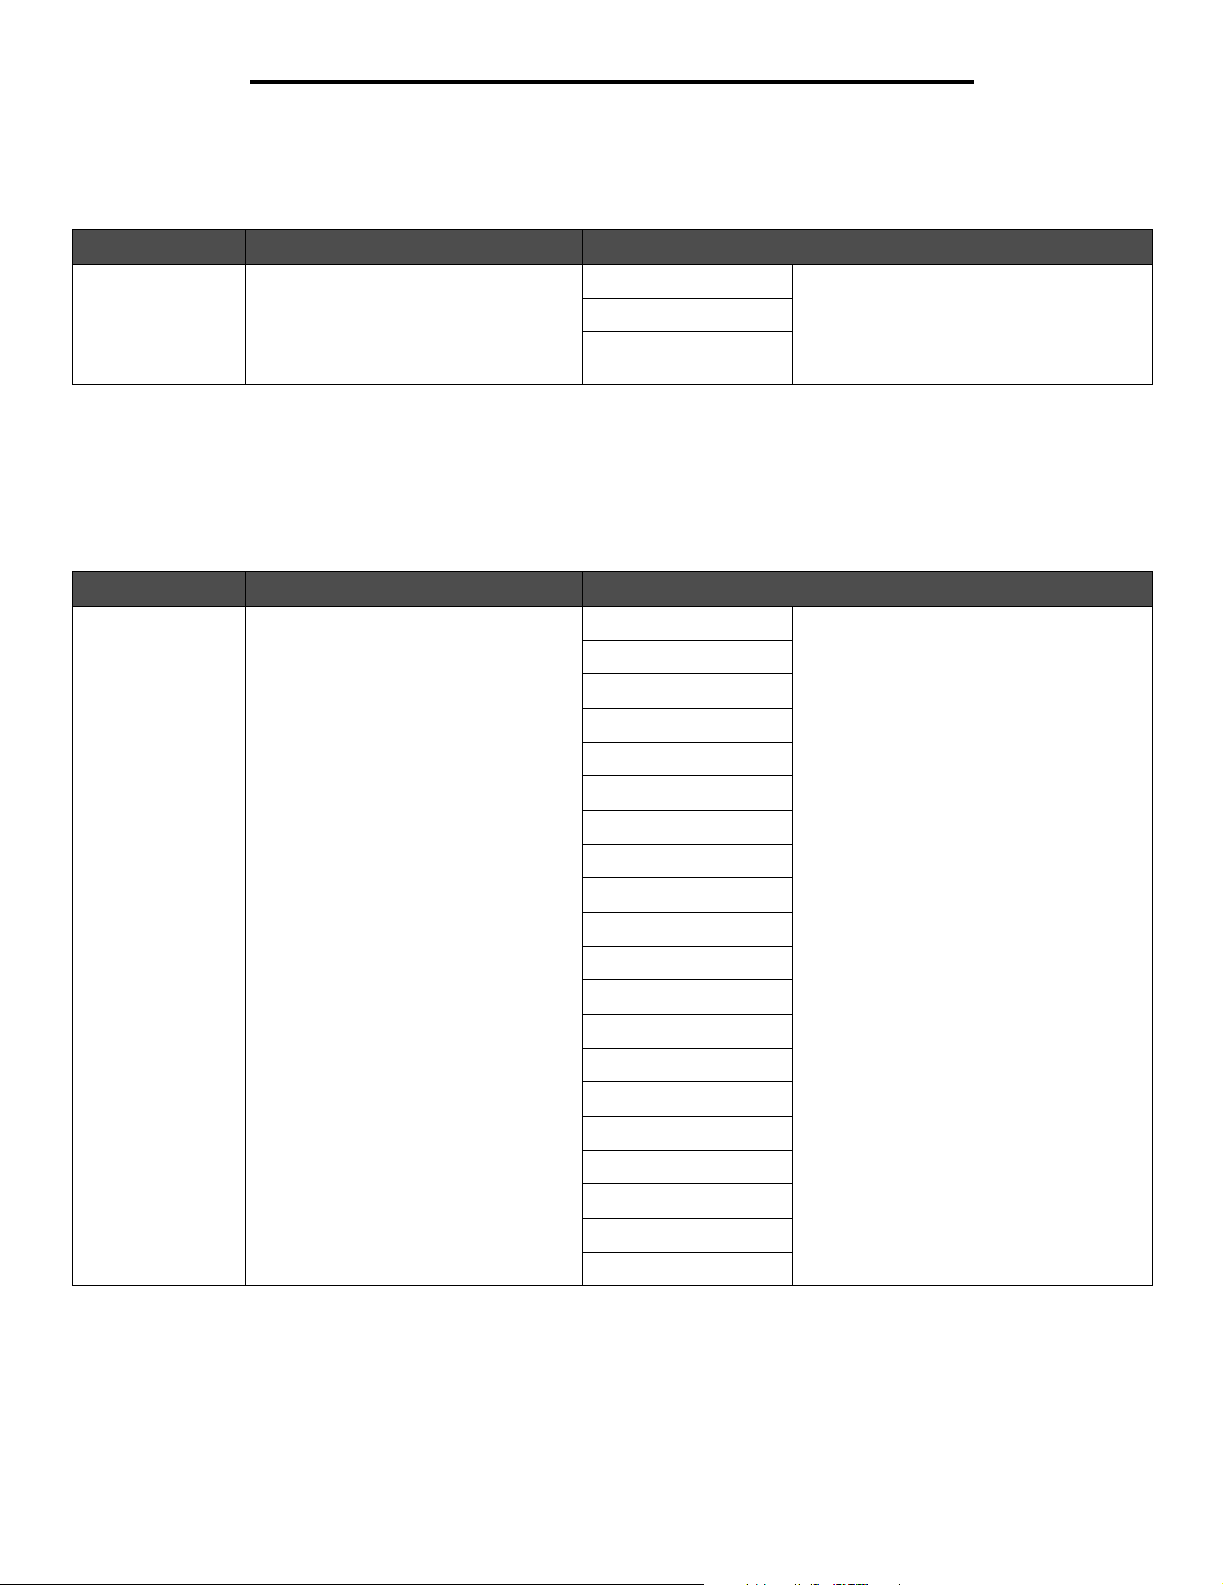
Print Demo
This menu selection shows a list of demonstration pages that are available.
Menu selection Purpose Value s
Print Demo Prints a demonstration page Demo Page After selecting this item, the page will print,
PPDS Info
[List of resident demo
pages]
and the printer will return to Ready.
Note: PPDS Info Only available if PPDS
emulation is active.
Settings
Setup Menu
Use this menu selection to configure a variety of printer features.
Menu selection Purpose Value s
Display Language Determines the language of the text
displayed on the control panel
English Note: All values may not be available.
Français
Deutsch
Italiano
Español
Dansk
Norsk
Nederlands
Svenska
Por tuguês
Suomi
Russian
Polski
Magyar
Tu r k i s h
Czech
Simplified Chinese
Traditional Chinese
Korean
Japanese
13
Page 14
Using printer menus
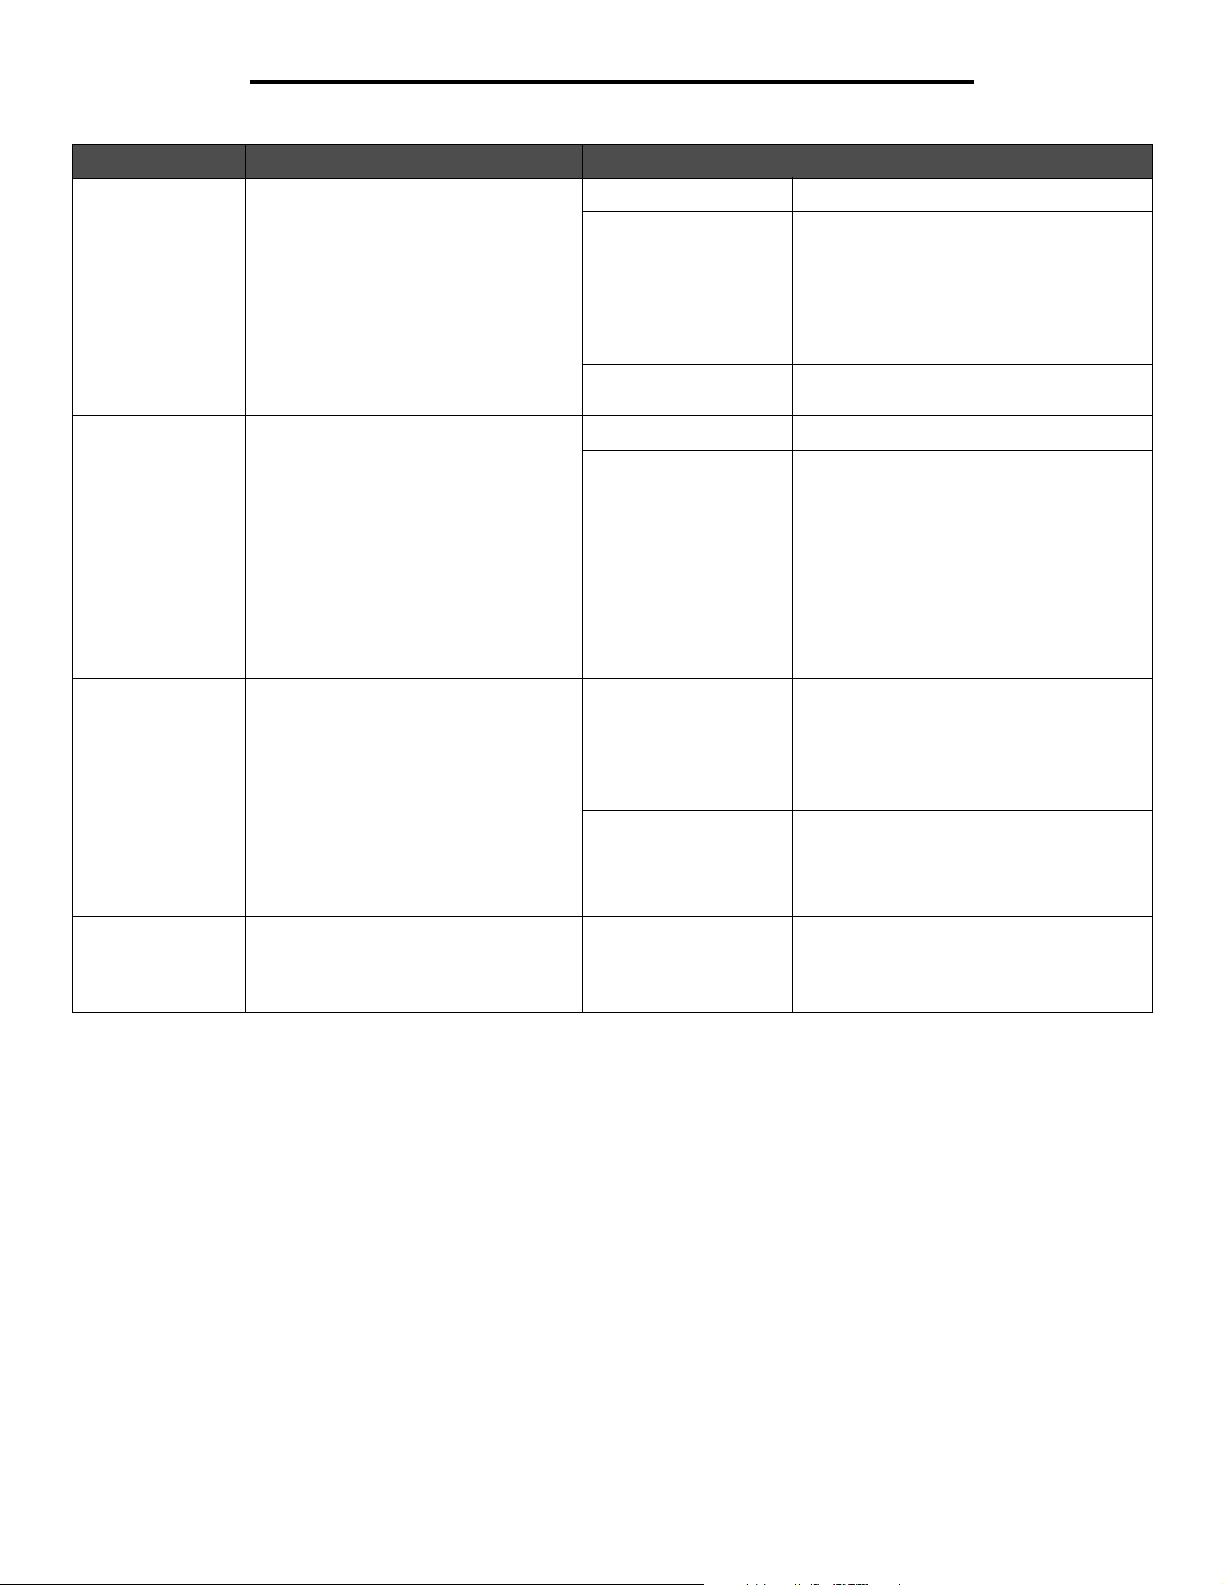
Menu selection Purpose Value s
Eco-Mode The printer minimizes waste (toner,
paper, energy) while maintaining
acceptable print quality.
Quiet Mode The printer operates quietly by printing
output at a slower speed.
Power Saver Specifies the amount of time (in
minutes) the printer waits after a job is
printed before it goes into a reduced
power state
Off* No changes in operation are made.
Energy The following options are changed:
• Duplex is turned off.
• LCD panel’s power indicator LED and
backlight remain off.
• Ready mode is disabled.
• Advance start command is ignored.
Energy/Paper Same options as Energy option, except
Duplex is turned on.
Off* No changes in operation are made.
On The following options are changed:
• LCD panel’s power indicator LED
remains illuminated when in Ready
state and blinks when in Busy state
• All print jobs print at half speed.
• Fuser standby mode is enabled.
• Advance start command is ignored.
Note: The engine prints at half speed in
all resolutions.
Disabled This value does not appear unless Energy
Conserve is set to Off. For more
information, see the User’s Guide on the
Software and Documentation CD.
Note: Disabled is not a valid choice with
Energy Conserve set to On.
Toner Alarm Controls whether the printer sounds an
alarm when the printer requires operator
intervention
1...240 Auto power saver is enabled. Select a
Off
On*
value to control how long the control panel
backlight stays on, and how long the Ready
message is displayed before the Power
Saver message appears.
Off—Printer will display a warning and
continue printing pages.
On*—Printer will display a warning and
stop printing pages.
14
Page 15

Using printer menus
Menu selection Purpose Value s
Timeouts Specifies the amount of time (in
seconds) the printer waits to return to
the home screen, receive an end-of-job
message, or receive additional bytes of
data from the computer
Note: Wait Timeout is only available
when you use PostScript emulation. This
menu value has no effect on PCL
emulation print jobs.
Print Recovery Specifies whether the printer continues
from certain offline situations, reprints
jammed pages, or waits until the entire
page is processed and ready to be
printed
Screen Timeout:
15–300
(30*)
Print Timeout:
Disabled
1–255
(90*)
Wait Timeout:
Disabled
15...65535 (40*)
Network Job Timeout:
0–255
(90*)
Auto Continue:
Disabled*
5–255
15–300—Specifies the amount of time the
printer waits before returning to the home
screen.
30* is the default setting.
Disabled—Disables Print Timeout.
1–255—Specifies the amount of time the
printer waits for an end-of-job message
before canceling the remainder of the print
job.
Note: When the timer expires, any partially
formatted page still in the printer is printed,
and other input ports are examined to see if
data exists.
90* is the default setting.
Disabled—Disables Wait Timeout.
15...65535—Specifies the amount of time
the printer waits for additional data before it
cancels the job.
40* is the default setting.
0–255—Specifies the amount of time the
printer waits before returning to the home
screen.
90* is the default setting.
Lets the printer automatically continue from
certain offline situations when not resolved
within the specified time period.
5–255—Specifies the amount of time the
printer waits.
Jam Recovery:
On
Off
Auto*
Page Protect:
Off*
On
Specifies whether the printer reprints
jammed pages.
On—Printer reprints jammed pages.
Off—Printer does not reprint jammed
pages.
Auto*—Printer reprints a jammed page
unless the memory required to hold the
page is needed for other printer tasks.
Successfully prints a page that may
otherwise generate Complex Page errors.
Off*—Prints a partial page of data if
memory is insufficient to process the entire
page.
On—Ensures that an entire page is
processed before it prints.
Note: If, after selecting On, you still cannot
print the page, you may also have to
reduce the size and number of fonts on the
page, or increase the installed printer
memory.
Note: For most print jobs, you do not need
to select On. When On is selected, printing
may be slower.
15
Page 16
Using printer menus
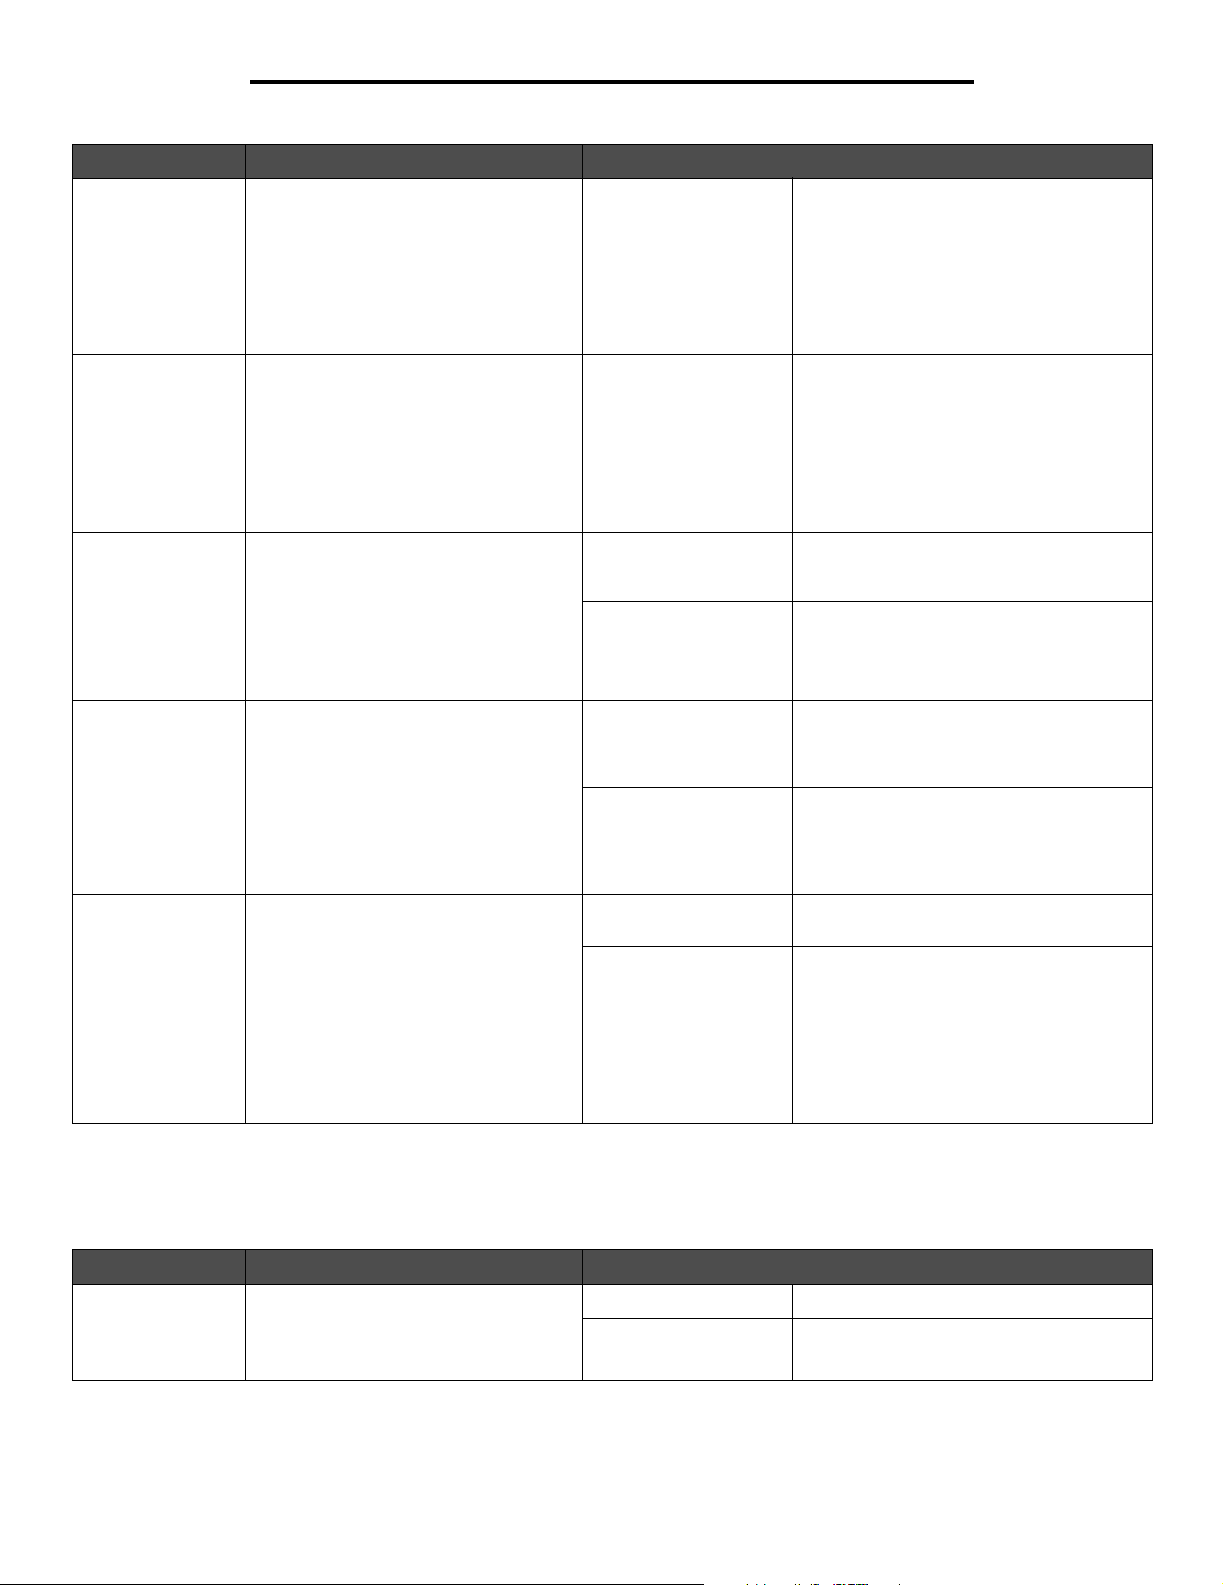
Menu selection Purpose Value s
Printer Language Specifies the default printer language
used to communicate data from the
computer to the printer
Note: Setting a printer language as the
default does not prevent a software
application from sending print jobs that
use the other language.
Print Area Modifies the logical and physical
printable area
Download Target Specifies the storage location for
downloaded resources.
Storing downloaded resources in flash
memory is permanent storage rather
than the temporary storage that RAM
provides. The resources remain in the
flash memory even when the printer is
turned off.
Resource Save Specifies what the printer does with
downloaded resources, such as fonts
and macros stored in RAM, if the printer
receives a job that requires more
memory than is available
PCL Emulation*
PS Emulation
PPDS Emulation
Normal*
Fit to Page
Whole Page
RAM* All downloaded resources are
Flash All downloaded resources are
Off* Printer retains downloaded resources only
On Printer retains all downloaded resources
PCL emulation—Uses a PCL interpreter
for incoming host communications.
PostScript emulation—Uses a PS
interpreter for incoming host
communications.
PPDS emulation—Uses a PPDS
interpreter for incoming host
communications.
Note: The Whole Page setting only affects
pages printed using PCL 5 interpreter. This
setting has no effect on pages printed
using the PCL XL or PostScript
interpreters. If you try to print any data in
the non-printable area defined by Normal
Print Area, the printer will clip the image at
the boundary defined by the Normal
defined printable area.
automatically stored in printer memory
(RAM).
automatically stored in flash memory.
until memory is needed. It then deletes
those resources associated with the
inactive printer language.
for all printer languages during language
changes and printer resets. If the printer
runs out of memory, 38 Memory Full
appears.
Page Protect Successfully prints a page that may
otherwise generate Complex Page
errors
If, after selecting On, you still cannot
print the page, you may also have to
reduce the size and number of fonts on
the page, or increase the installed
printer memory.
For most print jobs, you do not need to
select On. When On is selected, printing
may be slower.
Off* Prints a partial page of data if memory is
On Ensures that an entire page is processed
Finishing Menu
Use this menu selection to define how the printer delivers the printed output.
Menu selection Purpose Value s
Duplex Sets duplexing as the default for all print
jobs
Note: Select Duplex from the printer
driver to duplex only specific jobs.
Off* Prints on one side of the paper
On Prints on both sides of the paper
insufficient to process the entire page
before it prints
16
Page 17
Using printer menus
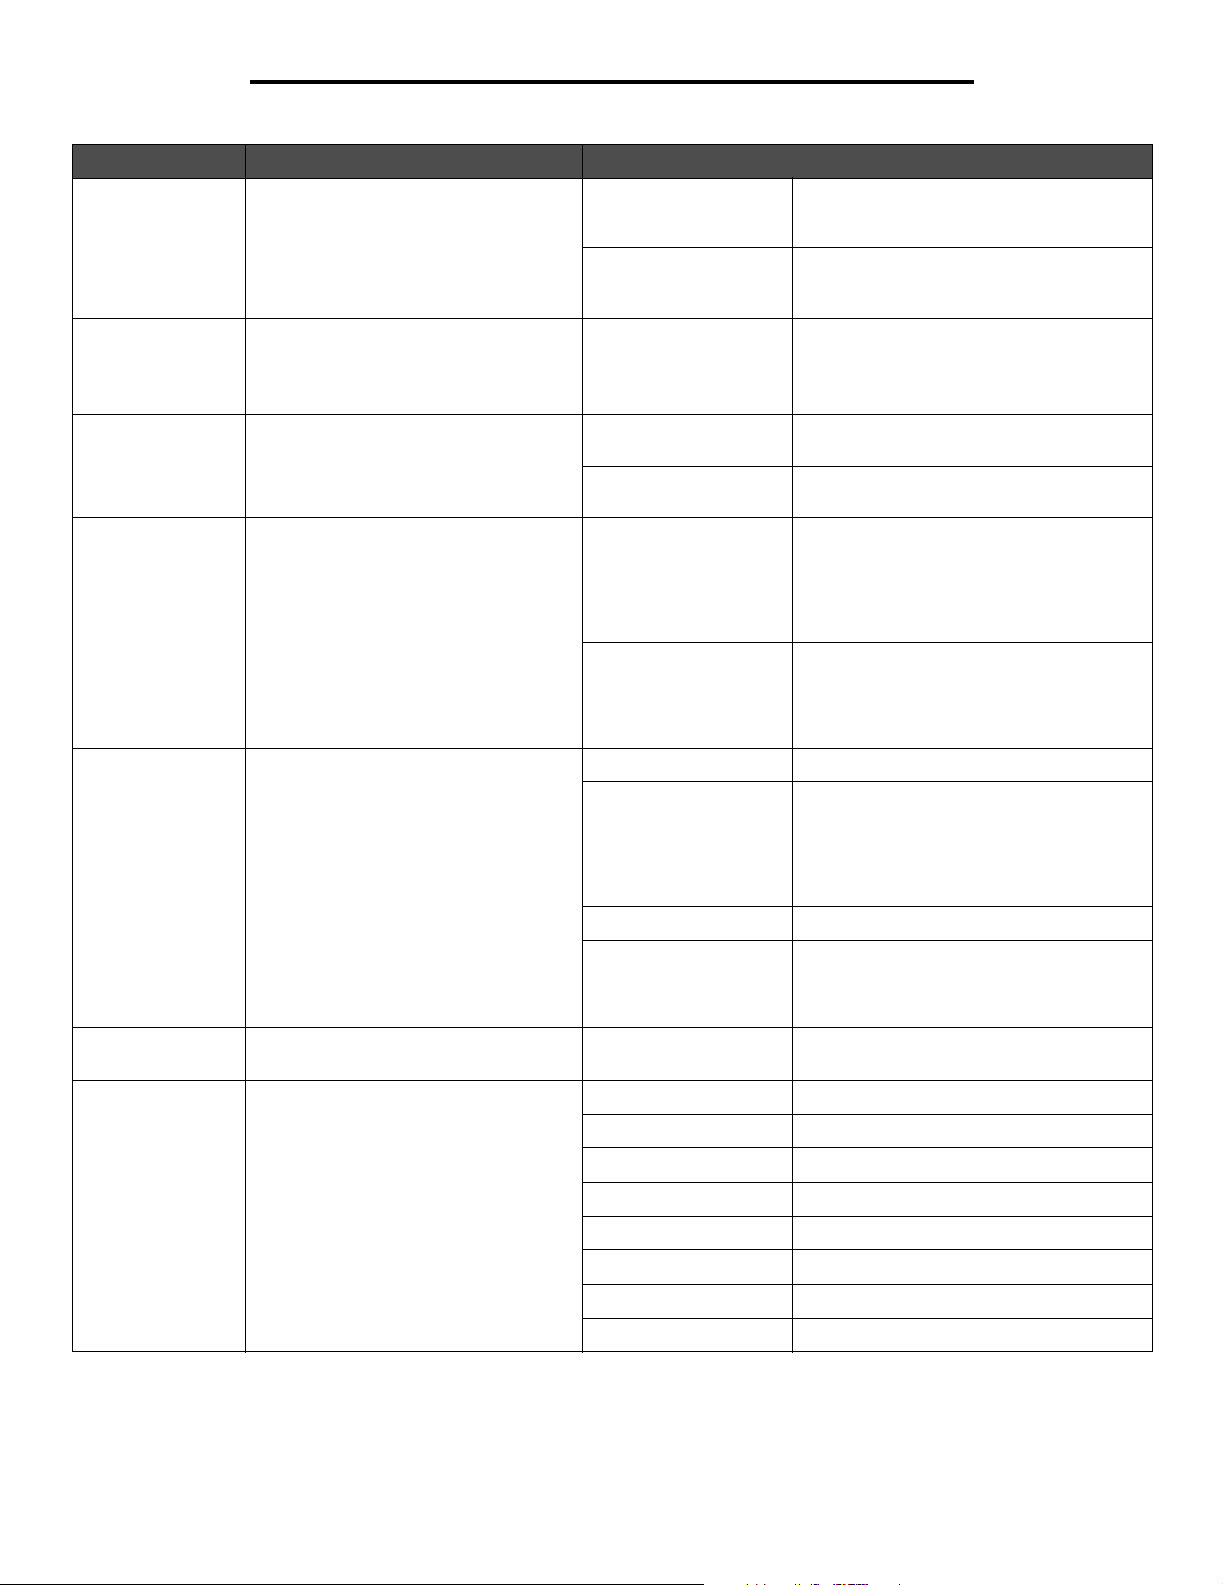
Menu selection Purpose Value s
Duplex Bind Defines the way duplexed pages would
be bound, and how the printing on the
back of the sheet (even-numbered
pages) is oriented in relation to the
printing on the front (odd-numbered
pages)
Copies Sets the number of copies you want for
the printer default value
Note: Set the number of copies required
for a specific job from the printer driver.
Blank Pages Specifies whether to include application-
generated blank pages as part of your
printed output
Collation Keeps the pages of a print job stacked in
sequence when printing multiple copies
of the job
Separator Sheets Inserts blank separator sheets between
jobs, between multiple copies of a job, or
between each page of a job
Long Edge* Assumes binding along the long edge of
the page (left edge for portrait orientation
and top edge for landscape orientation)
Short Edge Assumes binding along the short edge of
the page (top edge for portrait orientation
and left edge for landscape orientation)
1...999 (1*) Values selected from the printer driver
always override values selected from the
control panel.
Do Not Print* Does not print application-generated blank
pages as part of your job.
Print Prints application-generated blank pages
as part of your job.
Off* Prints each page of a job the number of
times specified by the Copies menu item.
For example, if you set Copies to 2, and
send three pages to print, the printer prints
page 1, page 1, page 2, page 2, page 3,
page 3.
On Prints entire job the number of times
specified by the Copies menu item. For
example, if you set Copies to 2, and send
three pages to print, the printer prints page
1, page 2, page 3, page 1, page 2, page 3.
None* Does not insert separator sheets.
Between Copies Inserts a blank sheet between each copy of
a job. If Collation is Off, a blank page is
inserted between each set of printed pages
(all page 1’s, all page 2’s, and so on). If
Collation is On, a blank page is inserted
between each collated copy of the job.
Separator Source Specifies the paper source that holds
separator sheets
Multipage Print Prints multiple-page images on one side
of a sheet of paper. Also called n-up or
Paper Saver
Between Jobs Inserts a blank sheet between jobs.
Between Pages Inserts a blank sheet between each page
of a job. This is useful if you are printing
transparencies or want to insert blank
pages in a document for notes.
Tray <x> (Tray 1*) Selects separator sheets from the specified
tray
Off* Prints 1 page image per side
2 Up Prints 2 page images per side
3 Up Prints 3 page images per side
4 Up Prints 4 page images per side
6 Up Prints 6 page images per side
9 Up Prints 9 page images per side
12 Up Prints 12 page images per side
16 Up Prints 16 page images per side
17
Page 18
Using printer menus
Menu selection Purpose Value s
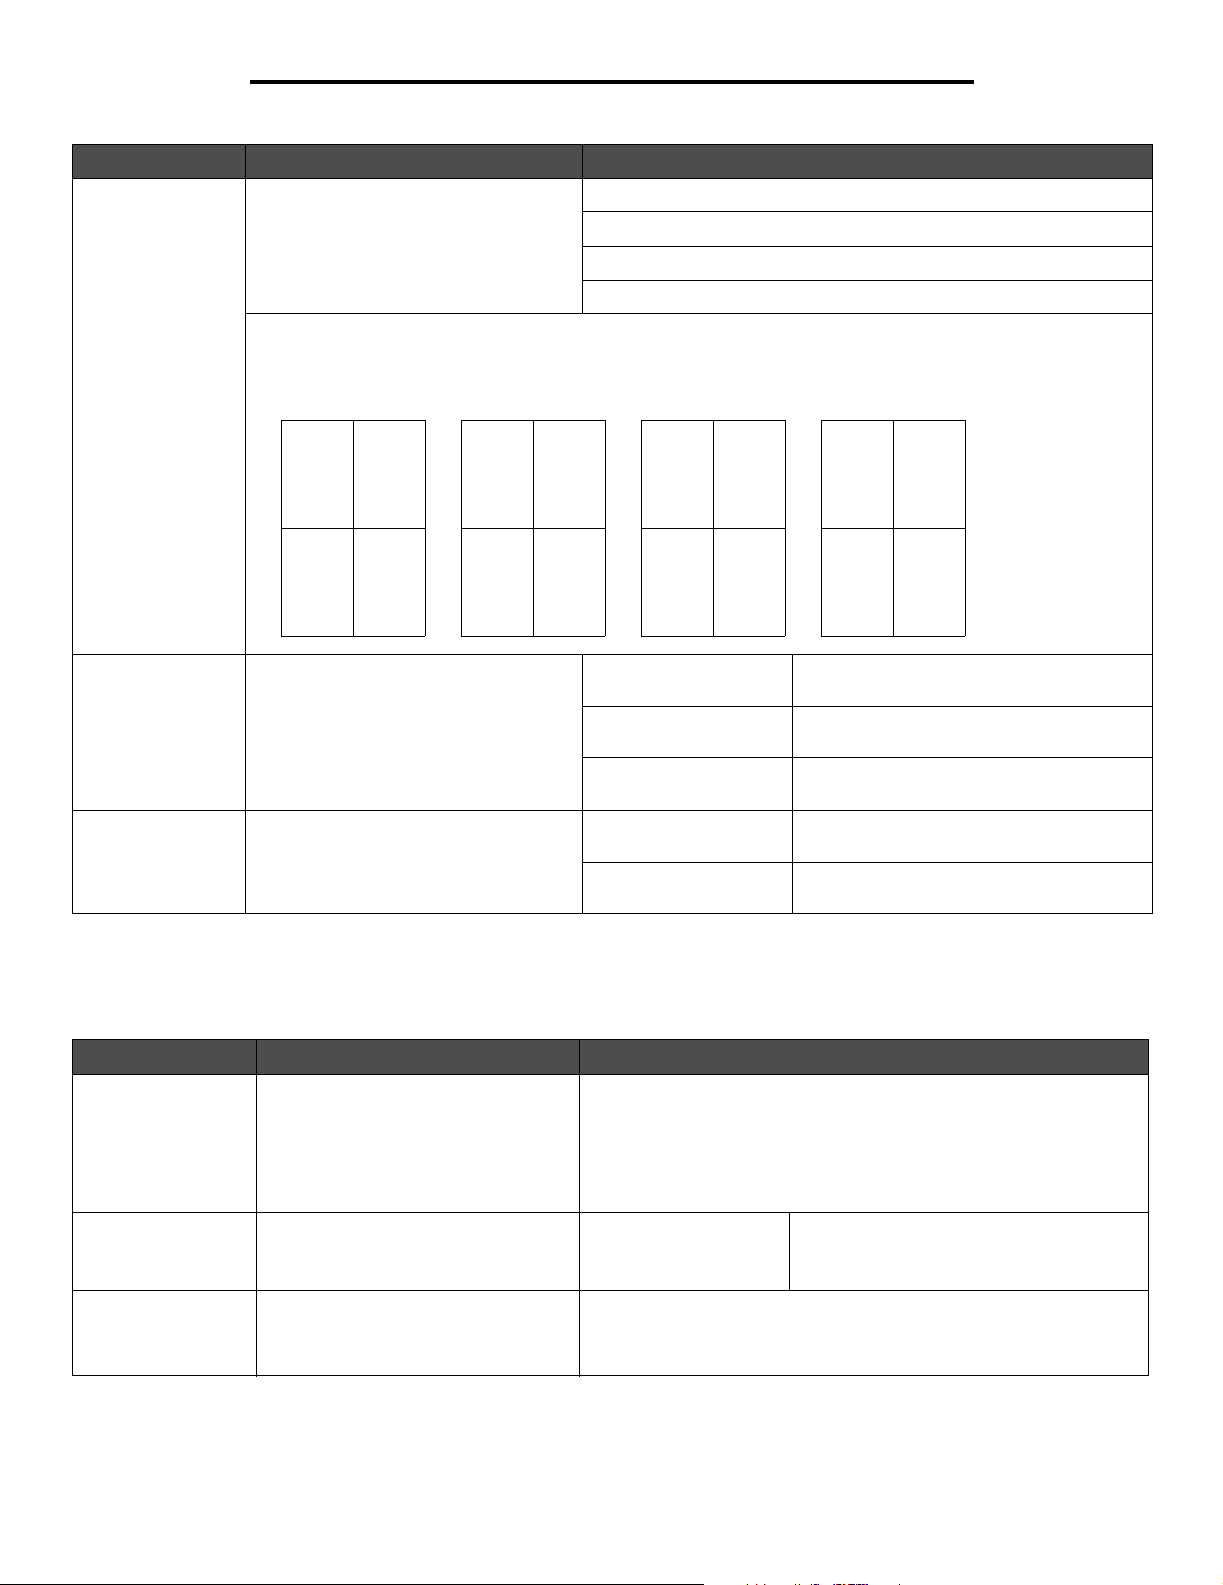
Multipage Order Determines the positioning of multiple
Multipage View Determines the orientation of a multiple-
page images when using Multipage Print
The positioning depends on the number
of images and whether the images are
portrait or landscape in orientation.
For example, if you select 4-Up multipage printing and portrait orientation, the results differ depending on the
Multipage Order value you select:
Horizontal
Order
21
43
page sheet
Ver tical
Order
Horizontal*
Ver tic al
Reverse Horizontal
Reverse Vertical
Reverse
Horizontal Order
31
42
Auto* Lets the printer choose between portrait
Long Edge Sets the long edge of the paper as the top
Short Edge Sets the short edge of the paper as the top
12
34
Reverse
Vertical Order
13
24
and landscape orientation.
of the page (landscape)
of the page (portrait)
Multipage Border Prints a border around each page image
when using Multipage Print
None* Does not print a border around each page
image
Solid Prints a solid line border around each page
image
Quality Menu
Use this menu selection to change settings that affect print quality and save toner.
Menu selection Purpose Val ues
Print Resolution Selects printed output resolution 300 dpi
600 dpi
1200 dpi
1200 Image Q
2400 Image Q*
Toner Darkness Lightens or darkens printed output 1–10 8* is the default setting.
Select a lower number to lighten the printed
output or save toner.
Small Font Enhancer Enhances the quality of small fonts Off*
Fonts Only
Fonts/Images
18
Page 19
Using printer menus
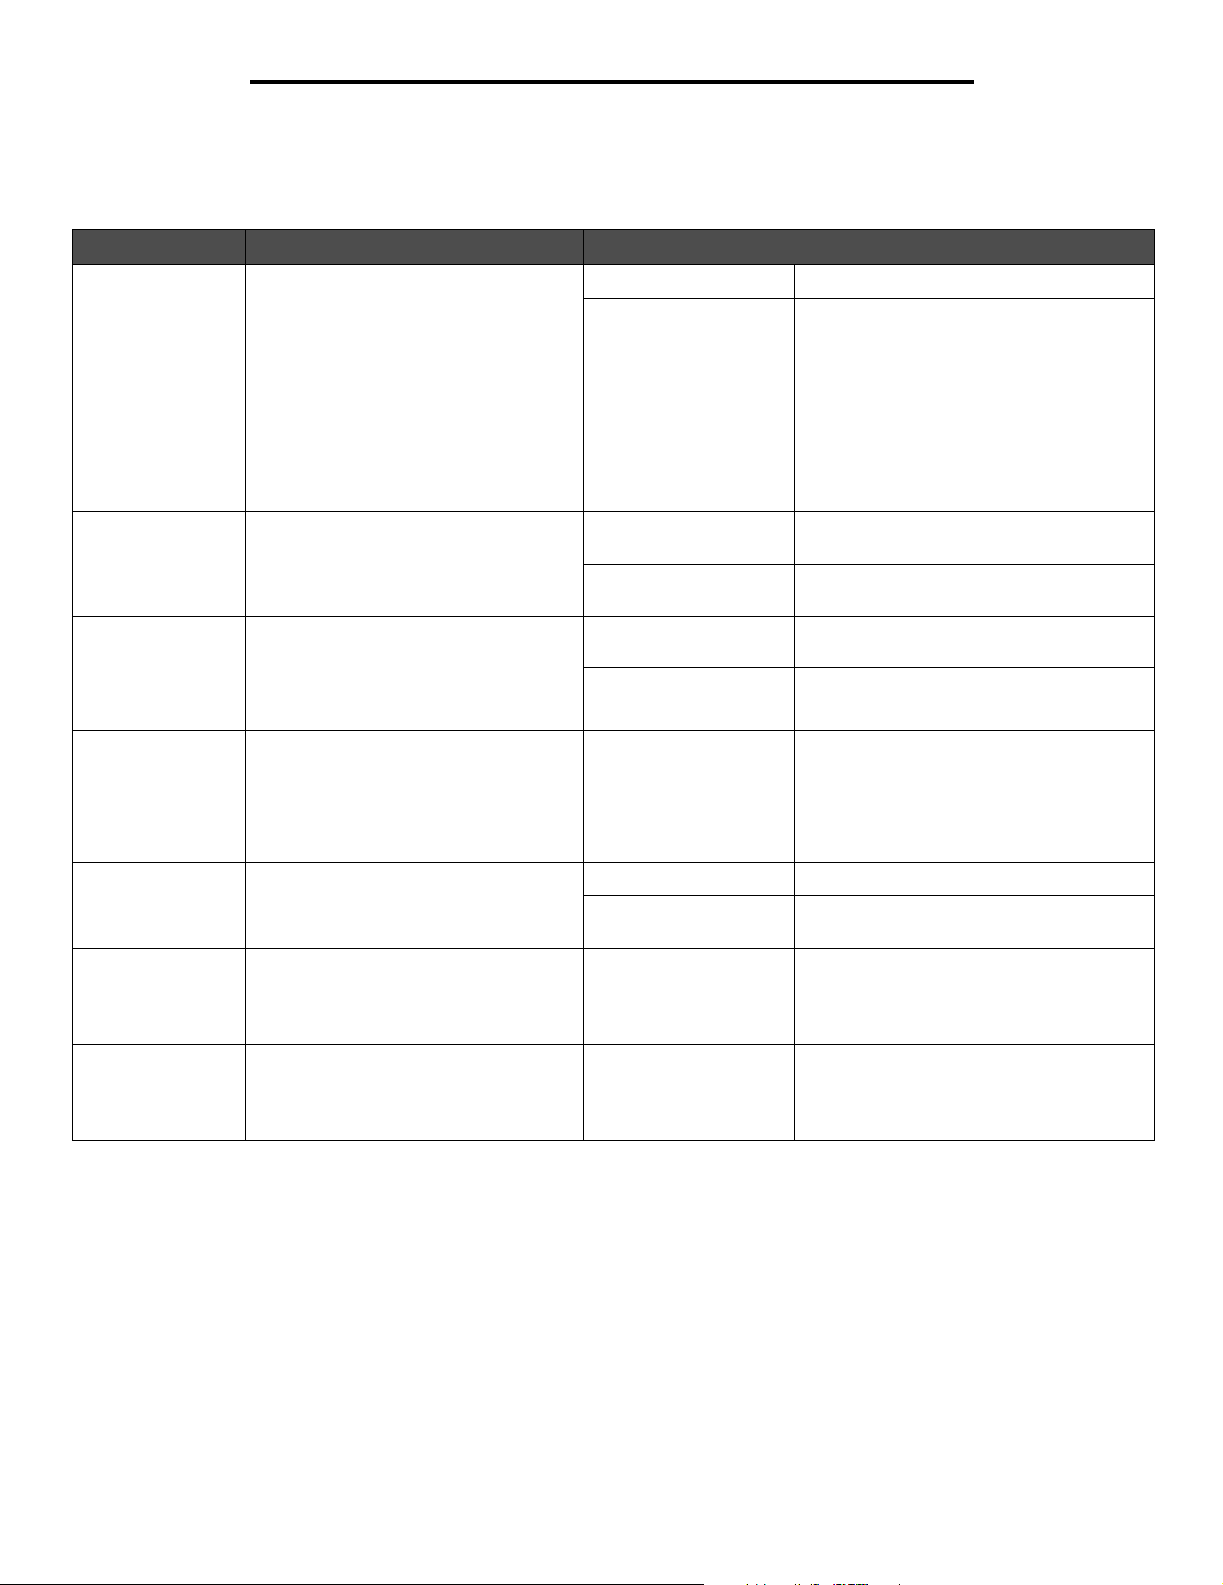
Utilities Menu
Use this menu selection to change printer settings, remove jobs, set up printer hardware, and troubleshoot printer problems.
Menu selection Purpose Value s
Factory Defaults Returns printer settings to the factory
default values
Format Flash Formats the flash memory card
Note: This option is only available if a
flash memory card is installed, is not
write protected, and is not defective.
Defragment Flash Reclaims any fragmented space on the
flash memory card
Note: This option is only available if a
flash memory card is installed, is not
write protected, and is not defective.
Hex Trace Helps isolate the source of a print job
problem
Do Not Restore* User-defined settings remain.
Restore Now All menu items are returned to the factory
default values except:
• Display Language.
• All settings in the Parallel Menu,
Network Menu, and USB Menu.
• Resources residing in flash memory or
on the hard disk.
Note: All downloaded resources (fonts,
macros, and symbol sets) in printer
memory (RAM) are deleted.
No* No changes are made to the flash memory
card.
Yes Clears the contents of the flash memory
card
No* No changes are made to the flash memory
card.
Yes Defragments the flash memory card
Activate With Hex Trace active, all data sent to the
printer is printed in hexadecimal and
character representation. Control codes
are not executed.
Note: To exit Hex Trace, turn the printer off,
or reset the printer from the Job Menu.
Coverage
Estimator
LCD Contrast Adjusts the contrast of the control panel
LCD Brightness Adjusts the brightness of the control
Provides an estimate of the percent
coverage of toner on a page. The
estimate is printed on the page
display
panel display
Off* Percent coverage is not printed.
On Prints the estimated percentage of
coverage.
1 - 10 5* is the default setting.
A higher value will make the display appear
lighter, a lower value makes the display
appear darker.
1 - 10 5* is the default setting.
A higher value increases the brightness of
the display, a lower value decreases the
brightness of the display.
19
Page 20
Using printer menus
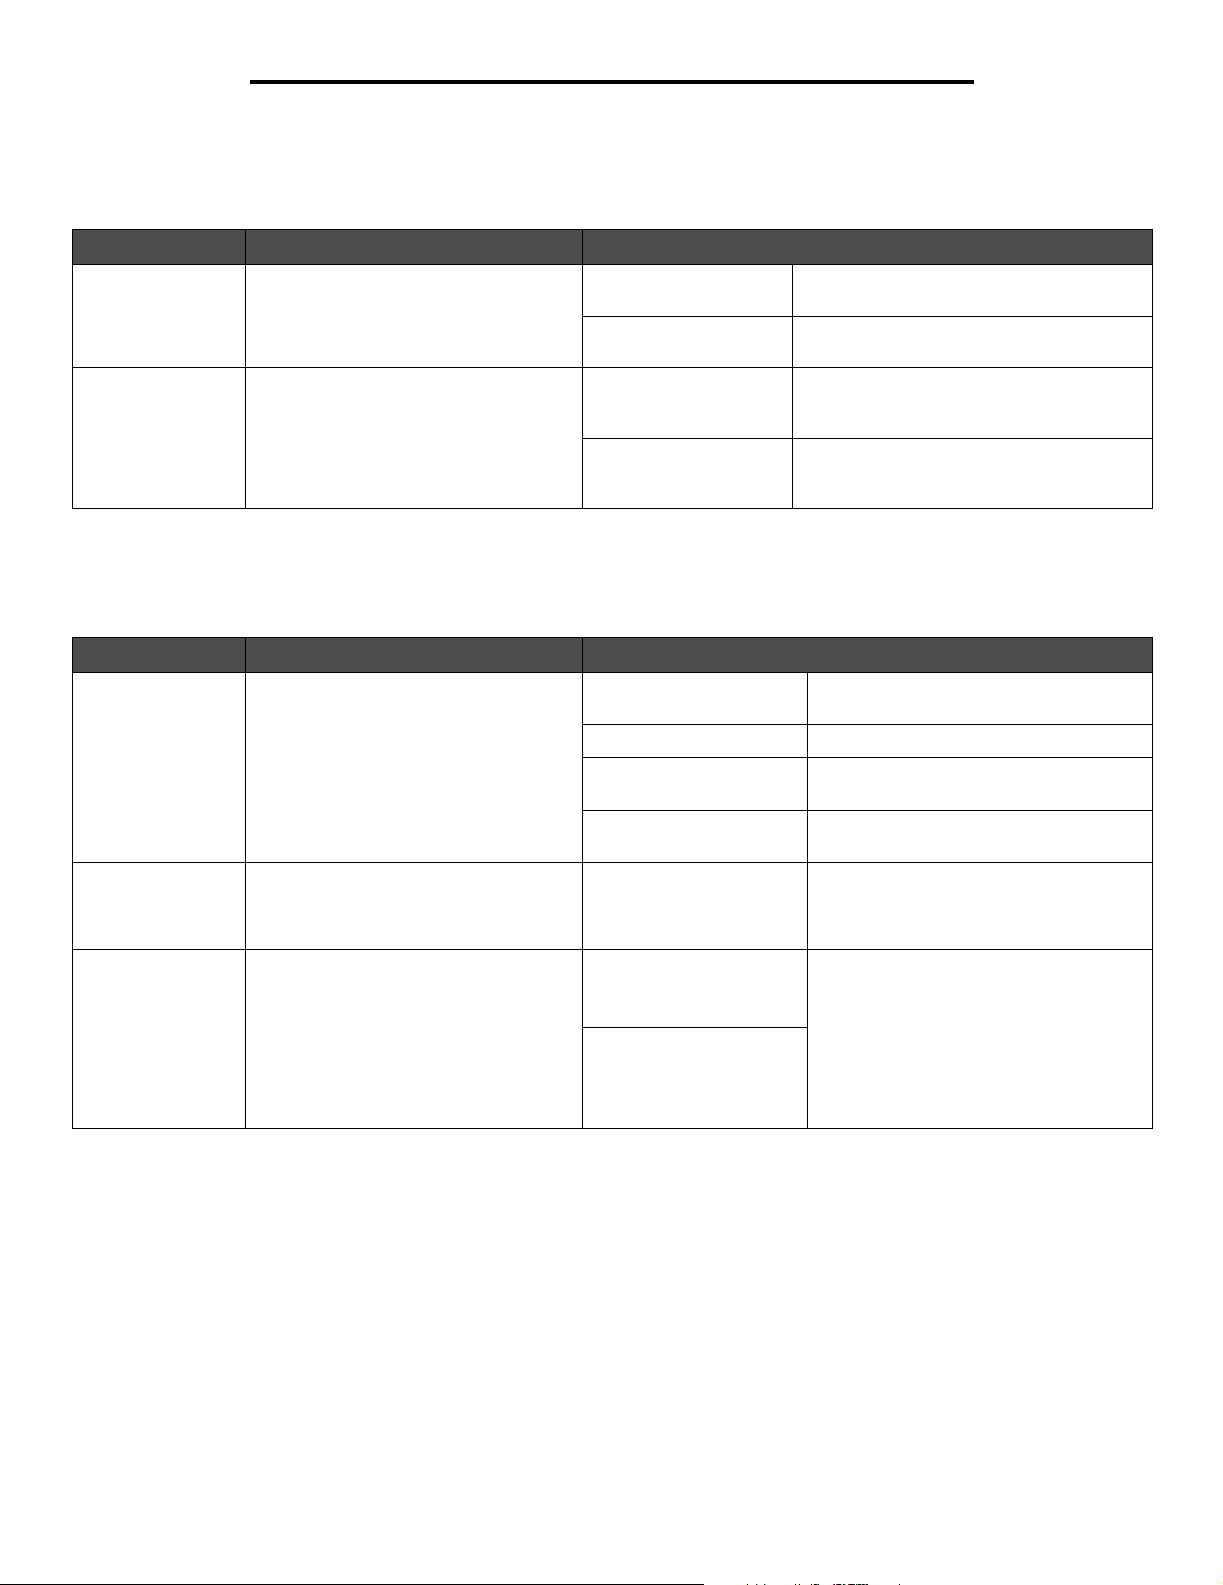
PostScript Menu
Use this menu selection to change printer settings that affect jobs using the PostScript printer language.
Menu selection Purpose Value s
Print PS Error Prints a page defining the PostScript
emulation error when an error occurs
Font Priority Establishes the font search order.
Font Priority is only displayed when a
formatted flash is installed, is neither
defective nor Read/Write or Write
protected, and Job Buffer Size is not set
to 100%.
Off* Discards the print job without printing an
error message.
On Prints an error message before it discards
the job.
Resident* Printer searches printer memory for the
requested font before searching flash
memory.
Flash Printer searches the flash memory for the
requested font before searching printer
memory.
PCL Emul Menu
Use this menu selection to change printer settings that affect jobs using the PCL emulation printer language.
Menu selection Purpose Value s
Font Source Determines the set of fonts displayed in
the Font Name menu item
Resident* Displays all fonts resident in printer RAM
when the printer ships from the factory
Flash Displays all fonts stored in flash memory
Download Displays all fonts downloaded to printer
RAM
All Displays all fonts available to the printer
from all sources
Font Name Identifies a specific font from the
specified font source
Symbol Set Determines the symbol set for a
specified font name
R0 Courier* The font name and font ID for all fonts in
10U PC-8* (US)
(country/region-specific
factory default values)
12U PC-850* (non-US)
(country/region-specific
factory default values)
the selected font source are displayed.
The font source abbreviation is R for
resident, F for flash, and D for download.
A symbol set is a set of alphabetic and
numeric characters, punctuation, and
special symbols used when printing with
a selected font. Symbol sets support the
different requirements for languages or
specific applications, such as math
symbols for scientific text. Only the
symbol sets supported for the selected
font name are displayed.
20
Page 21
Using printer menus
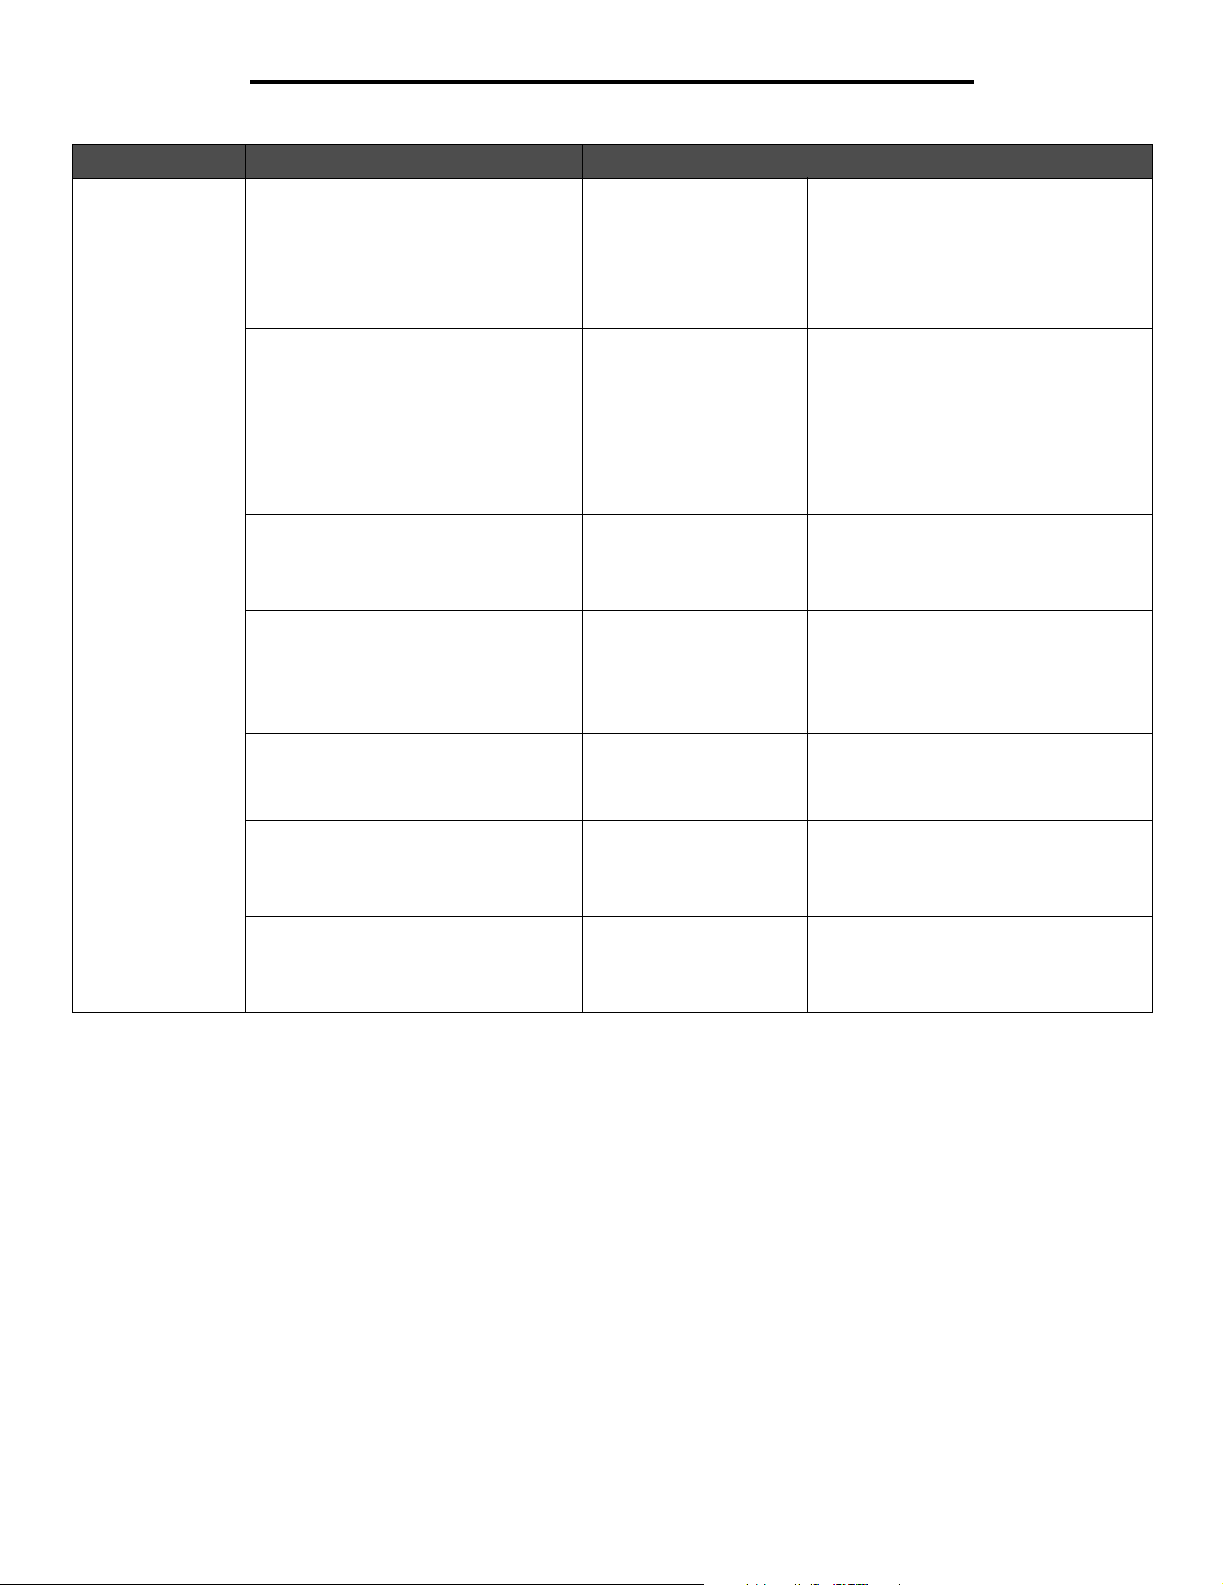
Menu selection Purpose Value s
PCL Emulation
Settings
Specifies the font pitch for scalable
monospaced fonts
Specifies the font pitch for scalable
monospaced fonts
Determines how text and graphics are
oriented on the page
Determines the number of lines that
print on each page
Sets the width of the logical page for A4
size paper
Point Size:
1...1008
in increments of 0.25
points) (*12)
Pitch:
0.08–100.00 (10*)
Orientation:
Por trait*
Landscape
Lines per Page:
1–255
60* (Americas)
64* (non-Americas)
A4 Width:
198 mm*
203 mm
Point size refers to the height of the
characters in the font. One point equals
approximately 1/72 of an inch. You can
select point sizes from 1 to 1008 in
increments of 0.25 points.
Point Size is only displayed for
typographic fonts.
Pitch refers to the number of fixed-space
characters in a horizontal inch of type.
You can select a pitch from 0.08 to 100
characters per inch (cpi) in increments of
0.01 cpi. For nonscalable monospaced
fonts, the pitch is displayed but cannot be
changed.
Note: Pitch is only displayed for fixed, or
monospaced, fonts.
Portrait prints text and graphics parallel to
the short edge of the paper.
Landscape prints text and graphics
parallel to the long edge of the paper.
The printer sets the amount of space
between each line (vertical line spacing)
based on the Lines per Page, Paper Size,
and Orientation menu items. Select the
correct Paper Size and Orientation before
changing Lines per Page.
Note: The 203 mm setting makes the
logical page wide enough to print eighty
10-pitch characters.
Specifies whether the printer
automatically performs a carriage return
after a line feed control command
Specifies whether the printer
automatically performs a line feed after a
carriage return control command
Auto CR after LF:
Off*
On
Auto LF after CR:
Off*
On
Off—Printer does not perform a carriage
return after a line feed control command.
On—Printer performs a carriage return
after a line feed control command.
Off—Printer does not perform a line feed
after a carriage return control command.
On—Printer performs a line feed after a
carriage return control command.
21
Page 22
Using printer menus
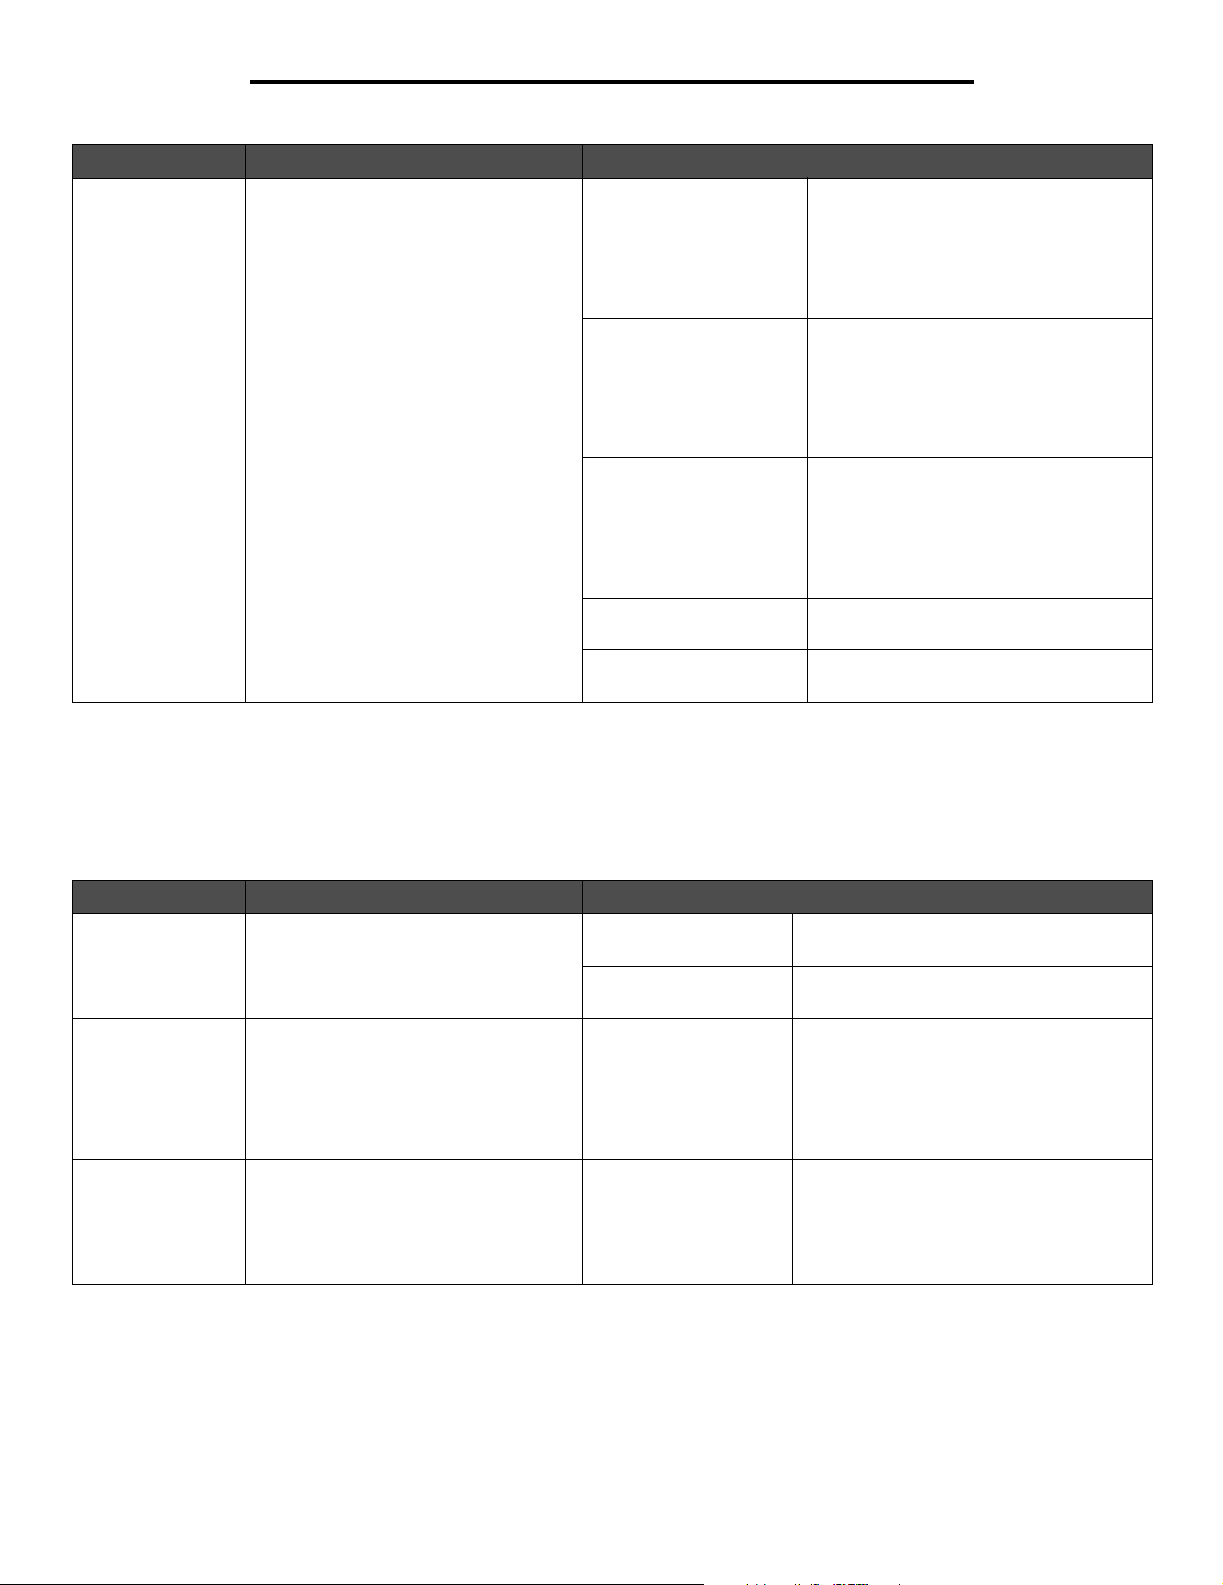
Menu selection Purpose Value s
Tray Renumber Configures the printer to work with
printer drivers or applications that use
different source assignments for the
paper trays
Note: See the Technical Reference for
more information about assigning
source numbers.
PPDS Menu
Assign Tray [x]:
Off*
None
0–199
Assign Man Paper:
Off*
None
0–199
Assign Man Env:
Off*
None
0–199
View Factory Def Displays the factory default value
Restore Defaults Select Yes to return all tray assignments
Off—Printer uses factory default paper
source assignments.
None—Paper source ignores the Select
Paper Feed command.
0–199—Select a numeric value to assign
a custom value to a paper source.
Off—Printer uses factory default paper
source assignments.
None—Paper source ignores the Select
Paper Feed command.
0–199—Select a numeric value to assign
a custom value to a paper source.
Off—Printer uses factory default paper
source assignments.
None—Paper source ignores the Select
Paper Feed command.
0–199—Select a numeric value to assign
a custom value to a paper source.
assigned to each paper source
to factory default values.
Use the PPDS Menu to change printer settings that only affect jobs using the PPDS emulation printer language.
Note: The PPDS MENU is only displayed after the PPDS emulator has been activated.
Menu selection Purpose Value s
Orientation Determines how text and graphics are
oriented on the page
Lines per Page Determines the number of lines that
print on each page
Lines per Inch Determines the number of lines that
print per vertical inch
Portrait* Prints text and graphics parallel to the short
edge of the paper
Landscape Prints text and graphics parallel to the long
edge of the paper
1...255 (64*) The printer sets the amount of space
between each line (vertical line spacing)
based on the Lines per Inch, Lines per
Page, Paper Size, and Orientation menu
items. Select the correct Paper Size and
Orientation before changing Lines per
Page.
.25...30 (6*) The printer sets the amount of space
between each line (vertical line spacing)
based on the Lines per Inch, Lines per
Page, Paper Size, and Orientation menu
items. Select the correct Paper Size and
Orientation before changing Lines per Inch.
22
Page 23
Using printer menus
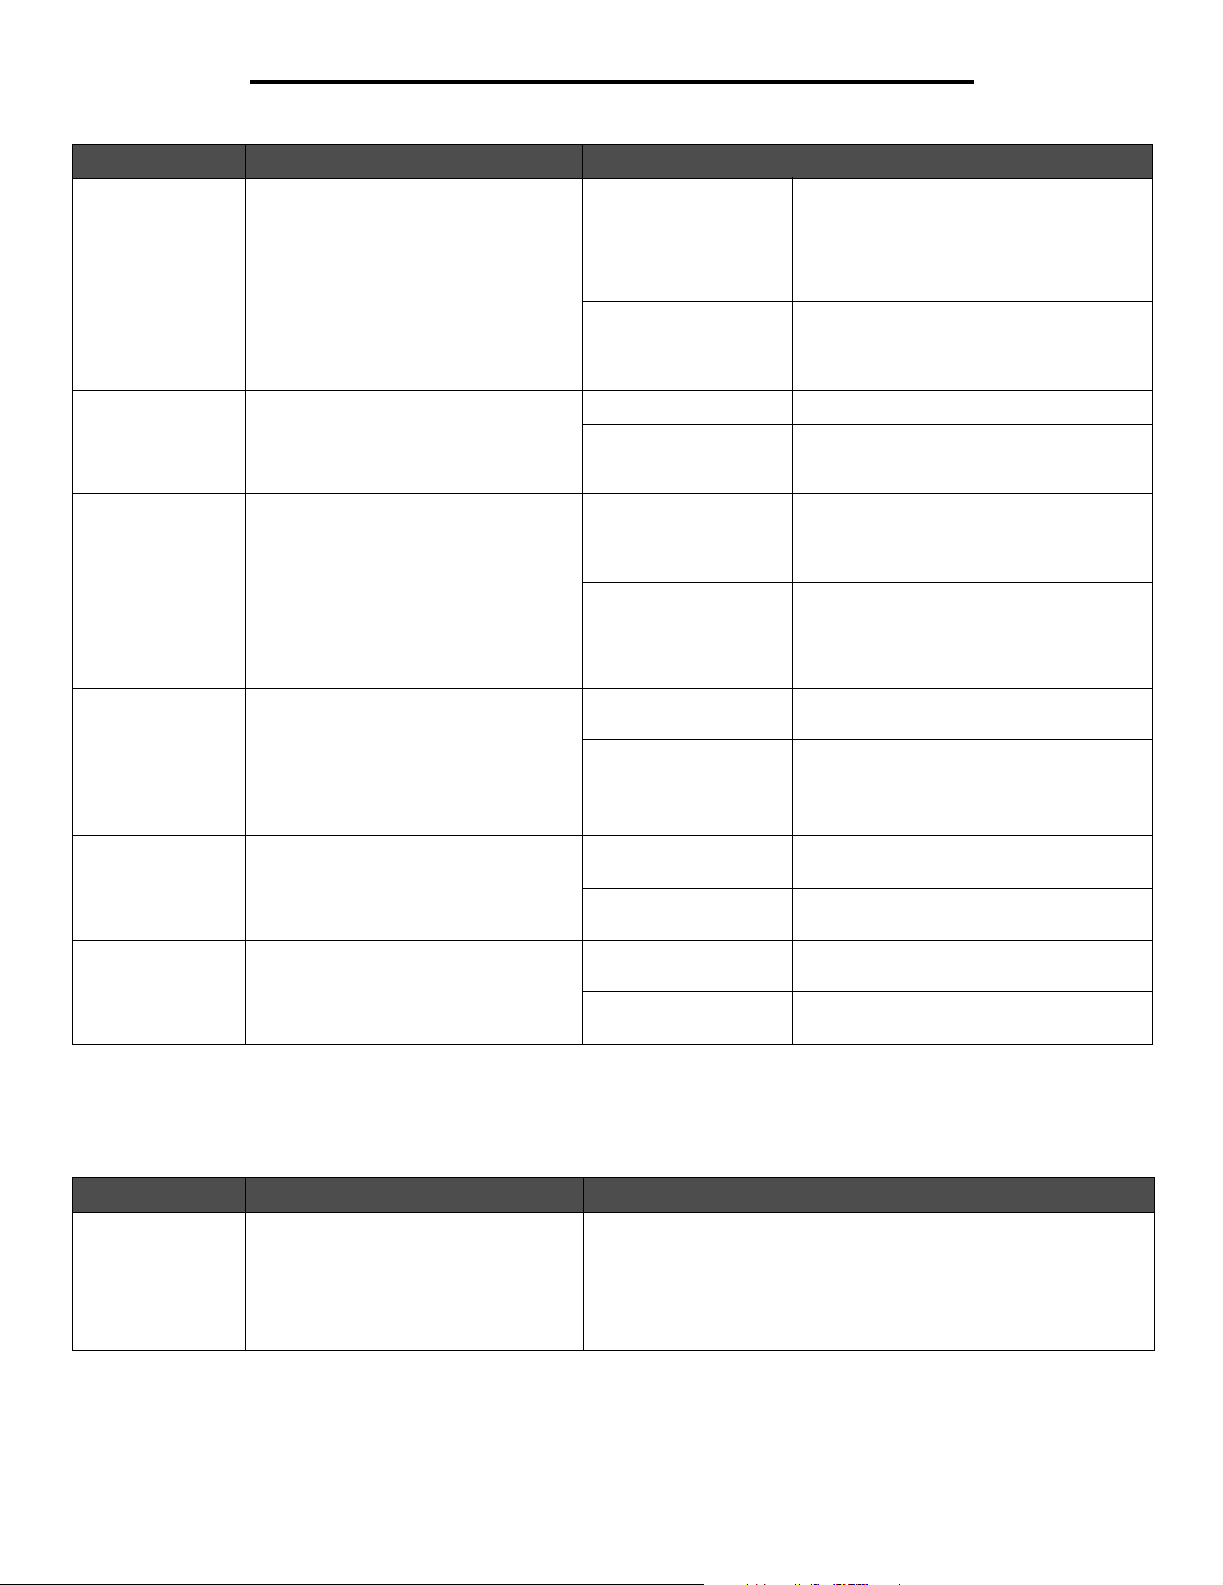
Menu selection Purpose Value s
Page Format Affects how the printer interprets the
margins set from software applications
Character Set Determines which code page to use to
print PPDS jobs
Best Fit Determines whether to perform a font
best fit search if the requested font
cannot be found
Tray 1 Renumber Configures your printer to work with
printer drivers or applications that use
different source assignments for the
paper trays
This menu item is only displayed when
Tray 2 is installed.
Auto CR after LF Specifies whether the printer
automatically performs a carriage return
after a line feed control command
Print* Printer measures the margin settings from
the inside edge of the left unprintable area
and the bottom of the top unprintable area.
The left and top margin areas on the print
job are equal to the software margins
setting plus the unprintable area.
Whole Printer measures margin settings form the
top left edge of the paper. The left and top
margins areas on the print job are equal to
the software margins settings.
1 The standard code pages are used.
2* The addresses from Value 1 change to
represent characters and symbols used in
non-US English languages.
Off Printer stops printing when a requested
font cannot be found. An error message is
posted indicating the font could not be
found.
On* Printer continues even though it was not
able to locate a requested font. Instead, the
printer tries to select another font that best
matches the characteristics of the
requested font.
Off* Print jobs are printed from the requested
source.
Tray 2 Print job requests for Tray 2 are converted
to requests for Tray 1.
Print job requests for Tray 1 are converted
to requests for Tray 2.
Off* Printer does not perform a carriage return
after a line feed control command.
On Printer performs a carriage return after a
line feed control command.
Auto LF after CR Specifies whether the printer
automatically performs a line feed after a
carriage return control command
Off* Printer does not perform a line feed after a
On Printer performs a line feed after a carriage
Security
This menu selection is used to set security levels on individual print jobs.
Menu selection Purpose Value s
Job Expiration Limits the amount of time a confidential
job stays in the printer before it is
deleted
Off*
1 hour
4 hours
24 hours
1 week
23
carriage return control command.
return control command.
Page 24
Using printer menus
Network/Ports
TCP/IP
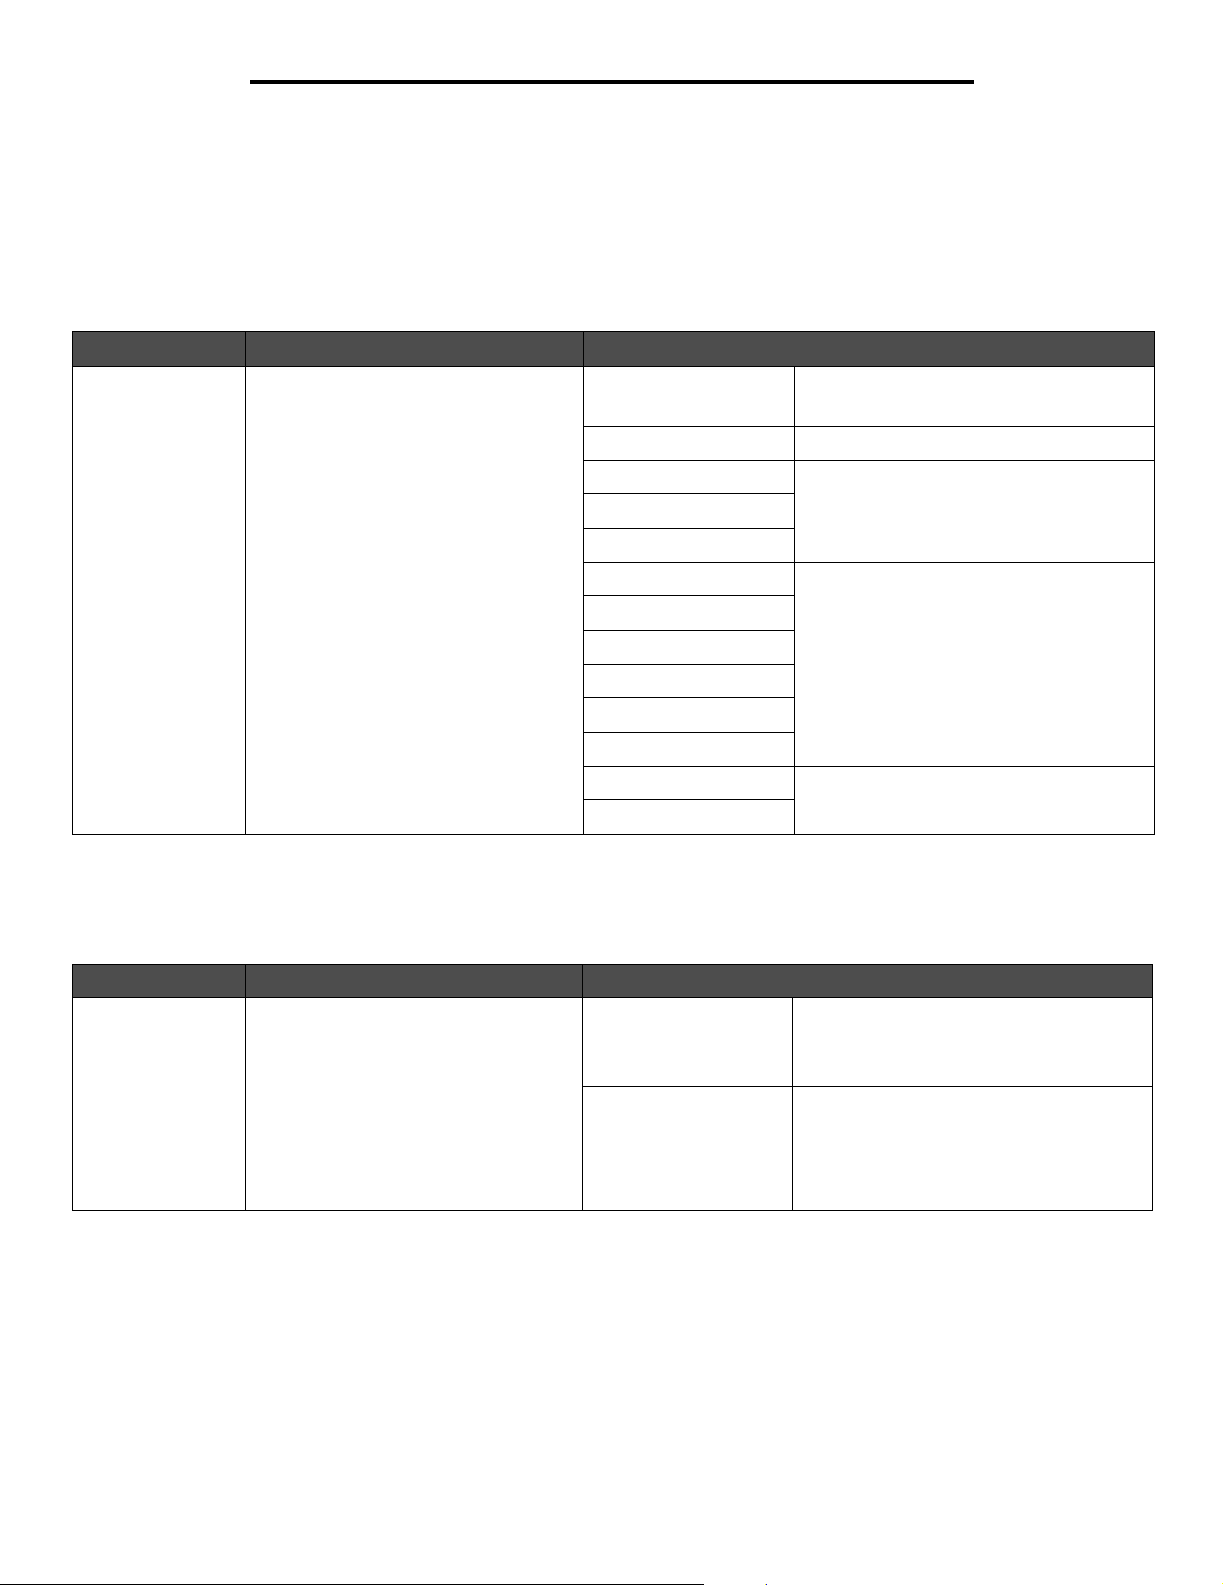
This menu section is used to view and change the Transmission Control Protocol/Internet Protocol settings.
Note: This menu is not displayed for non-network models.
Menu selection Purpose Value s
TCP/IP Sets the network option to
TCP/IP (Transmission Control Protocol/
Internet Protocol)
Activate On*
Off
View Hostname View only
Address 4 field IP address
Netmask
Gateway
Enable DHCP On*
Enable RARP
Enable BOOTP
AutoIP
Enable FTP/TFTP
HTTP Server Enabled
WINS Server Address 4 field IP address
DNS Server Address
Off
Standard Network
Use this menu selection to change printer settings affecting jobs sent to the printer through a network port (Standard Network).
Menu selection Purpose Value s
PCL SmartSwitch Configures the printer so it automatically
switches to PCL emulation when a print
job received through the network port
requires it, regardless of the default
printer language
On* Printer examines data on the network
Off Printer does not examine the incoming
24
interface and selects PCL emulation if the
data indicates that is the required printer
language.
data. The printer uses PostScript emulation
to process the job if PS SmartSwitch is On,
or uses the default printer language
specified in the Setup Menu if PS
SmartSwitch is Off.
Page 25
Using printer menus
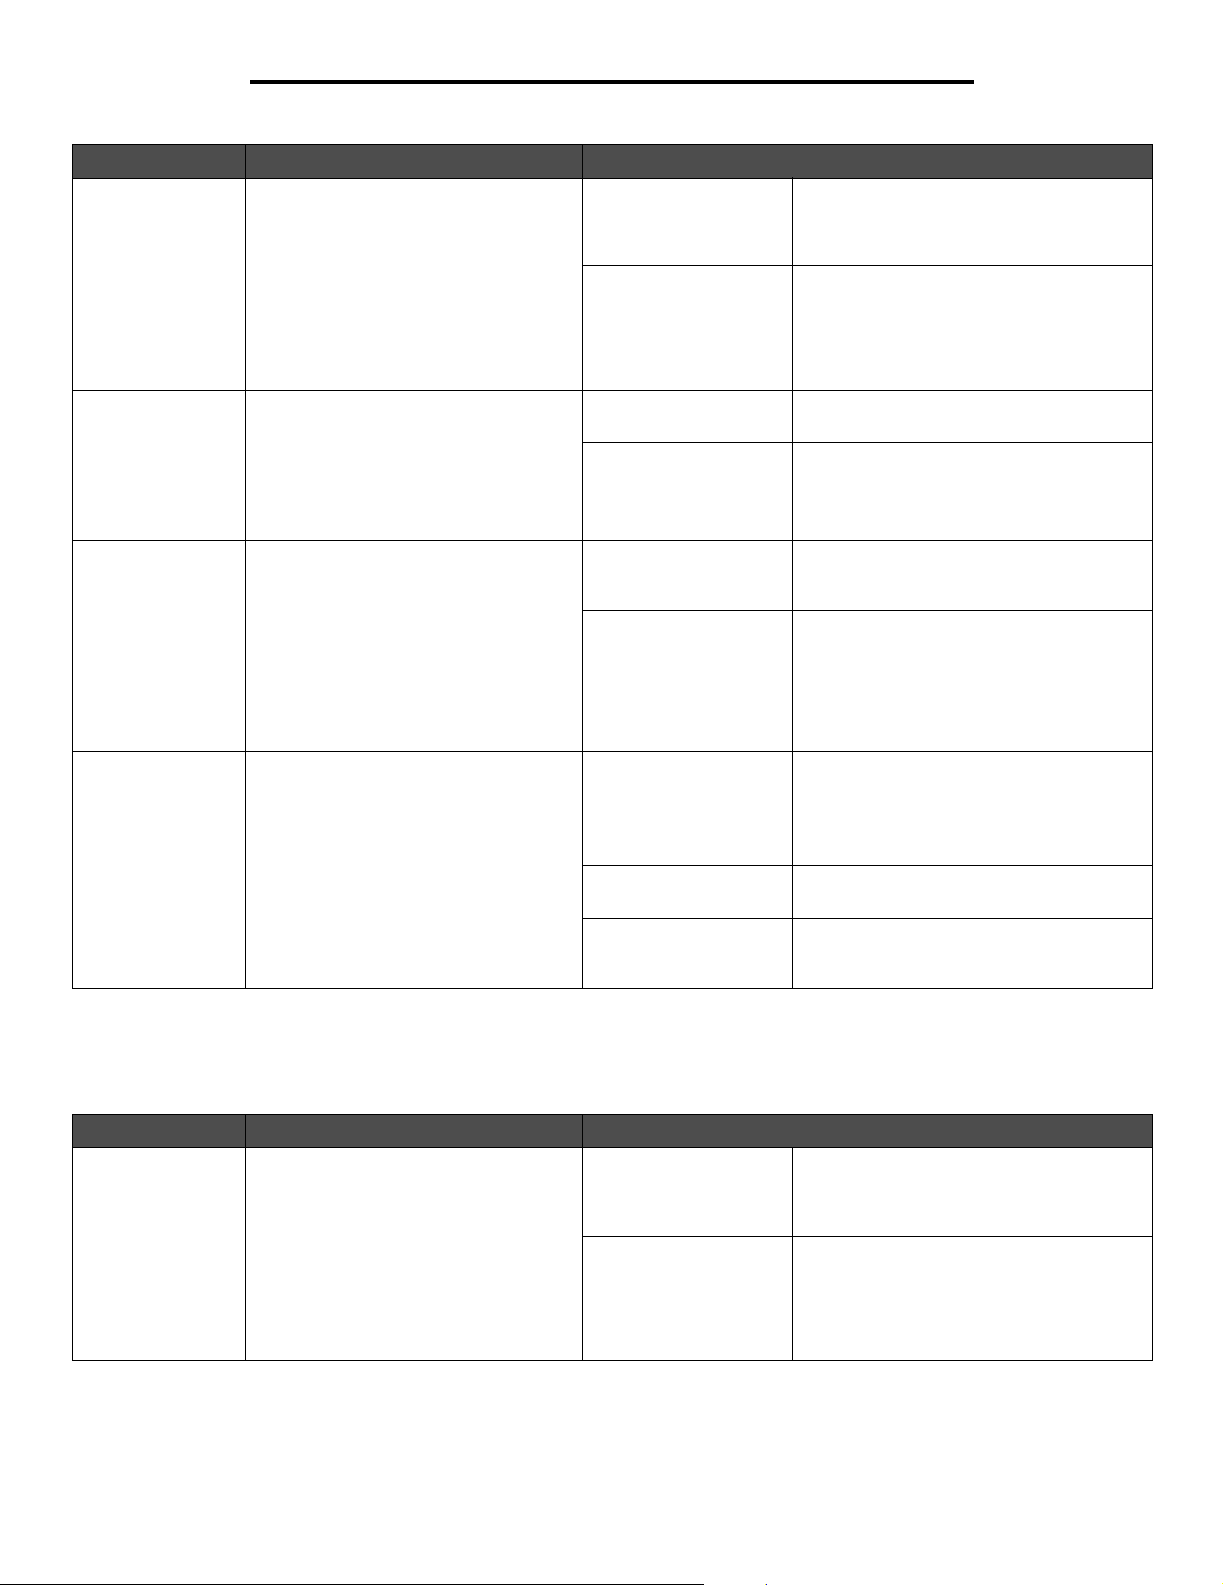
Menu selection Purpose Value s
PS SmartSwitch Configures the printer so it automatically
switches to PostScript emulation when a
print job received through the network
port requires it, regardless of the default
printer language
NPA Mode Specifies whether the printer performs
the special processing required for
bidirectional communication, following
the conventions defined in the Network
Printing Alliance (NPA) Protocol
Note: Changing this menu item
automatically resets the printer.
Network Buffer Configures the size of the network input
buffer
Note: Changing the Network Buffer
menu item automatically resets the
printer.
Mac Binary PS Configures the printer to process
Macintosh binary PostScript print jobs
On* Printer examines data on the network
Off Printer does not examine the incoming
Off The printer will not perform any NPA
Auto* Printer examines the incoming data to
Auto* Printer automatically calculates the
3K to maximum
size allowed
(1k increments)
On Printer processes raw binary PostScript
Off Printer filters PostScript print jobs using
interface connection and selects
PostScript emulation if the data indicates
that is the required printer language.
data. The printer uses PCL emulation to
process the job if PCL SmartSwitch is On,
or uses the default printer language
specified in the Setup Menu if PCL
SmartSwitch is Off.
processing.
determine the format. If the incoming data
is not NPA packets, the information is
passed to the printer as non-NPA.
Network Buffer size (recommended
setting).
User specifies the Network Buffer size. The
maximum size depends on the amount of
memory in the printer, the size of the other
link buffers, and whether Resource Save is
set to On or Off. To maximize the range for
the Network Buffer size, disable or reduce
the size of the parallel, and USB buffers.
print jobs from computers using the
Macintosh operating system.
Note: This setting often causes Windows
print jobs to fail.
standard protocol.
Auto* Printer processes print jobs from
computers using either Windows or
Macintosh operating systems.
Standard USB
Use this menu selection to change printer settings affecting a Universal Serial Bus (USB) port.
Menu selection Purpose Value s
PCL SmartSwitch Configures the printer so it automatically
switches to PCL emulation when a print
job received through the USB port
requires it, regardless of the default
printer language
On* Printer examines the data on the USB port
and selects PCL emulation if the data
indicates that is the required printer
language.
Off Printer does not examine the incoming
data. The printer uses PostScript emulation
to process the job if PS SmartSwitch is On,
or uses the default printer language
specified in the Setup Menu if PS
SmartSwitch is Off.
25
Page 26
Using printer menus
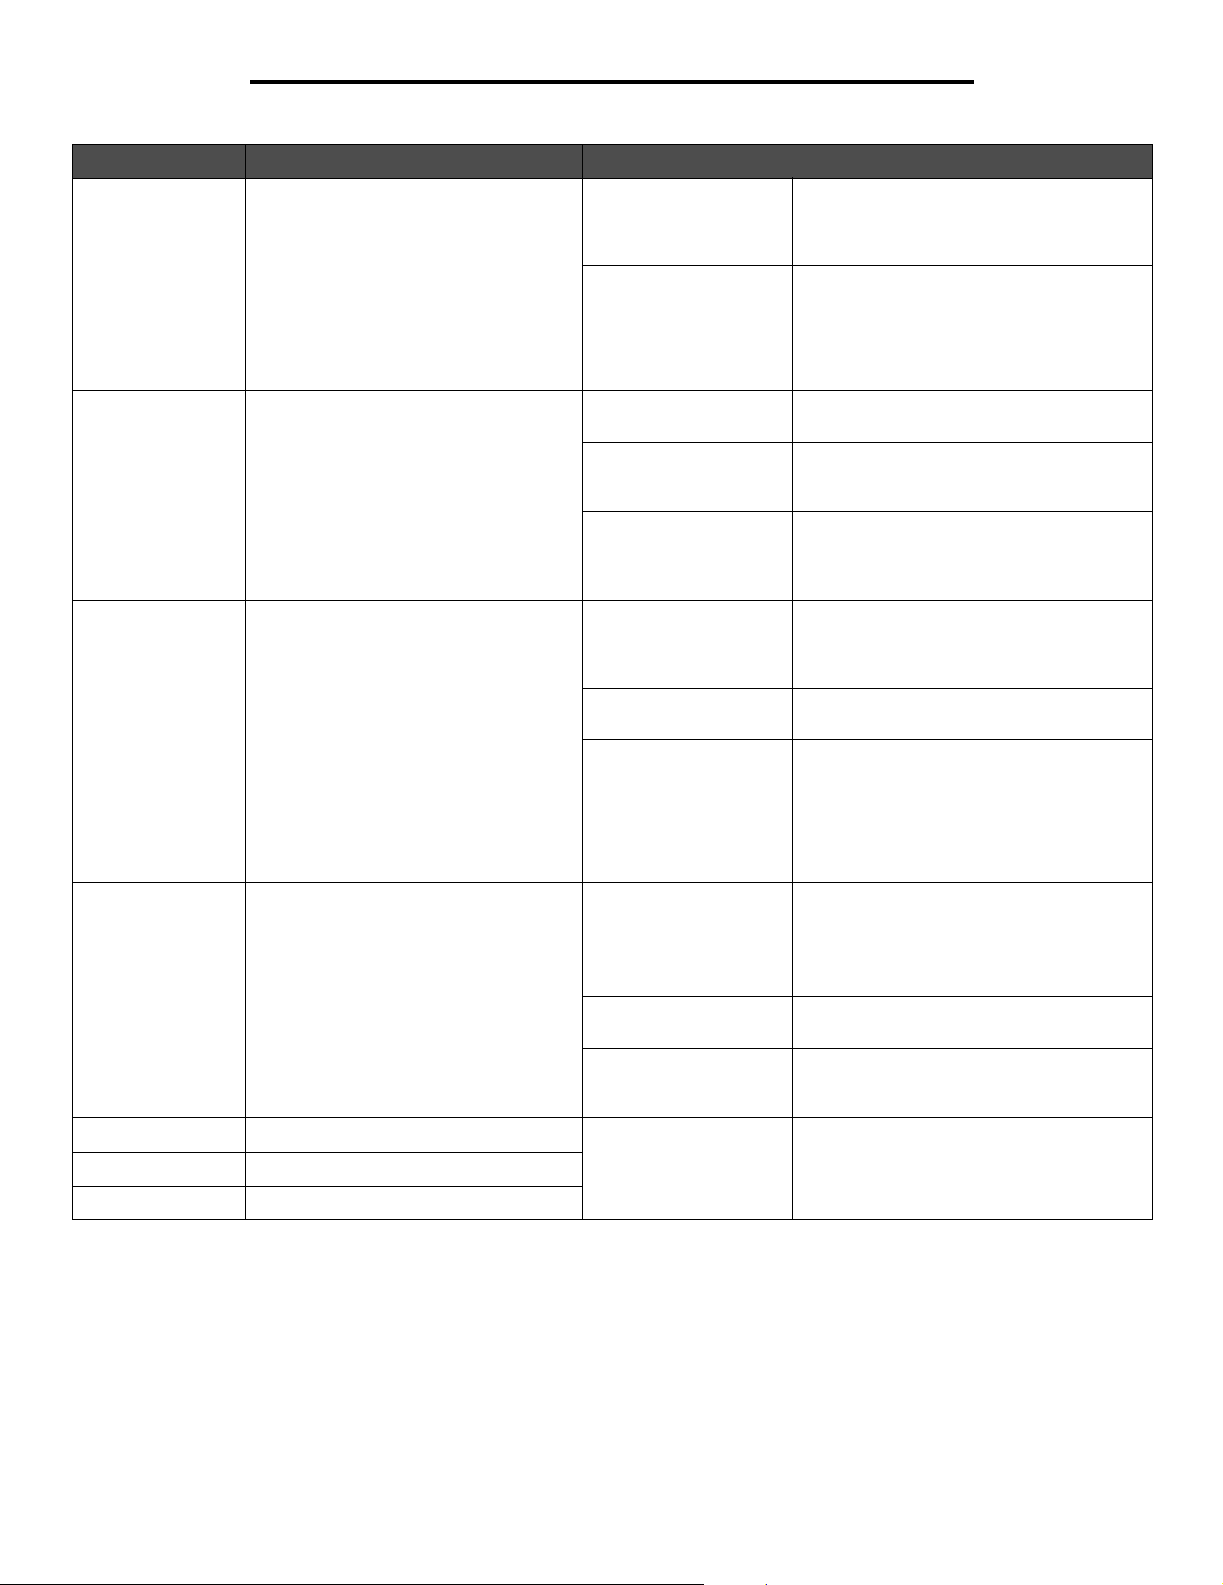
Menu selection Purpose Value s
PS SmartSwitch Configures the printer so it automatically
switches to PostScript emulation when a
print job received through the USB port
requires it, regardless of the default
printer language
NPA Mode Specifies whether the printer performs
the special processing required for
bidirectional communication, following
the conventions defined in the Network
Printing Alliance (NPA) Protocol
Note: Changing this menu item
automatically resets the printer.
USB Buffer Configures the size of the USB input
buffer
Note: Changing the USB Buffer menu
item automatically resets the printer.
On* Printer examines data on the USB interface
Off Printer does not examine the incoming
Off The printer will not perform any NPA
On All data received by the printer must be in
Auto* Printer examines the incoming data to
Disabled Job buffering is disabled. Any jobs already
Auto* Printer automatically calculates the USB
3K to maximum size
allowed
and selects PostScript emulation if the data
indicates that is the required printer
language.
data. The printer uses PCL emulation to
process the job if PCL SmartSwitch is On,
or uses the default printer language
specified in the Setup Menu if PCL
SmartSwitch is Off.
processing.
NPA packets. Any non-packet data
received will be rejected as bad.
determine the format. If the incoming data
is not NPA packets, the information is
passed to the printer as non-NPA.
buffered on the disk are printed before
normal processing of incoming jobs
resumes.
Buffer size (recommended setting).
User specifies the USB Buffer size. The
maximum size depends on the amount of
memory in the printer, the size of the other
link buffers, and whether Resource Save is
set to On or Off. To maximize the range for
the USB Buffer size, disable or reduce the
size of the parallel, and network buffers.
Mac Binary PS Configures the printer to process
Macintosh binary PostScript print jobs
ENA Address Sets the USB port ENA Address 4 field IP address Shown only if an ENA is attached through
ENA Netmask Sets the USB port ENA Netmask
ENA Gateway Sets the USB port ENA Gateway
Off Printer processes raw binary PostScript
print jobs from computers using the
Macintosh operating system.
Note: This setting often causes Windows
print jobs to fail.
On Printer filters PostScript print jobs using
standard protocol.
Auto* Printer processes print jobs from
computers using either Windows or
Macintosh operating systems.
the USB port.
26
Page 27
Using printer menus
AppleTalk
Use this menu selection to view or change the printer AppleTalk settings.
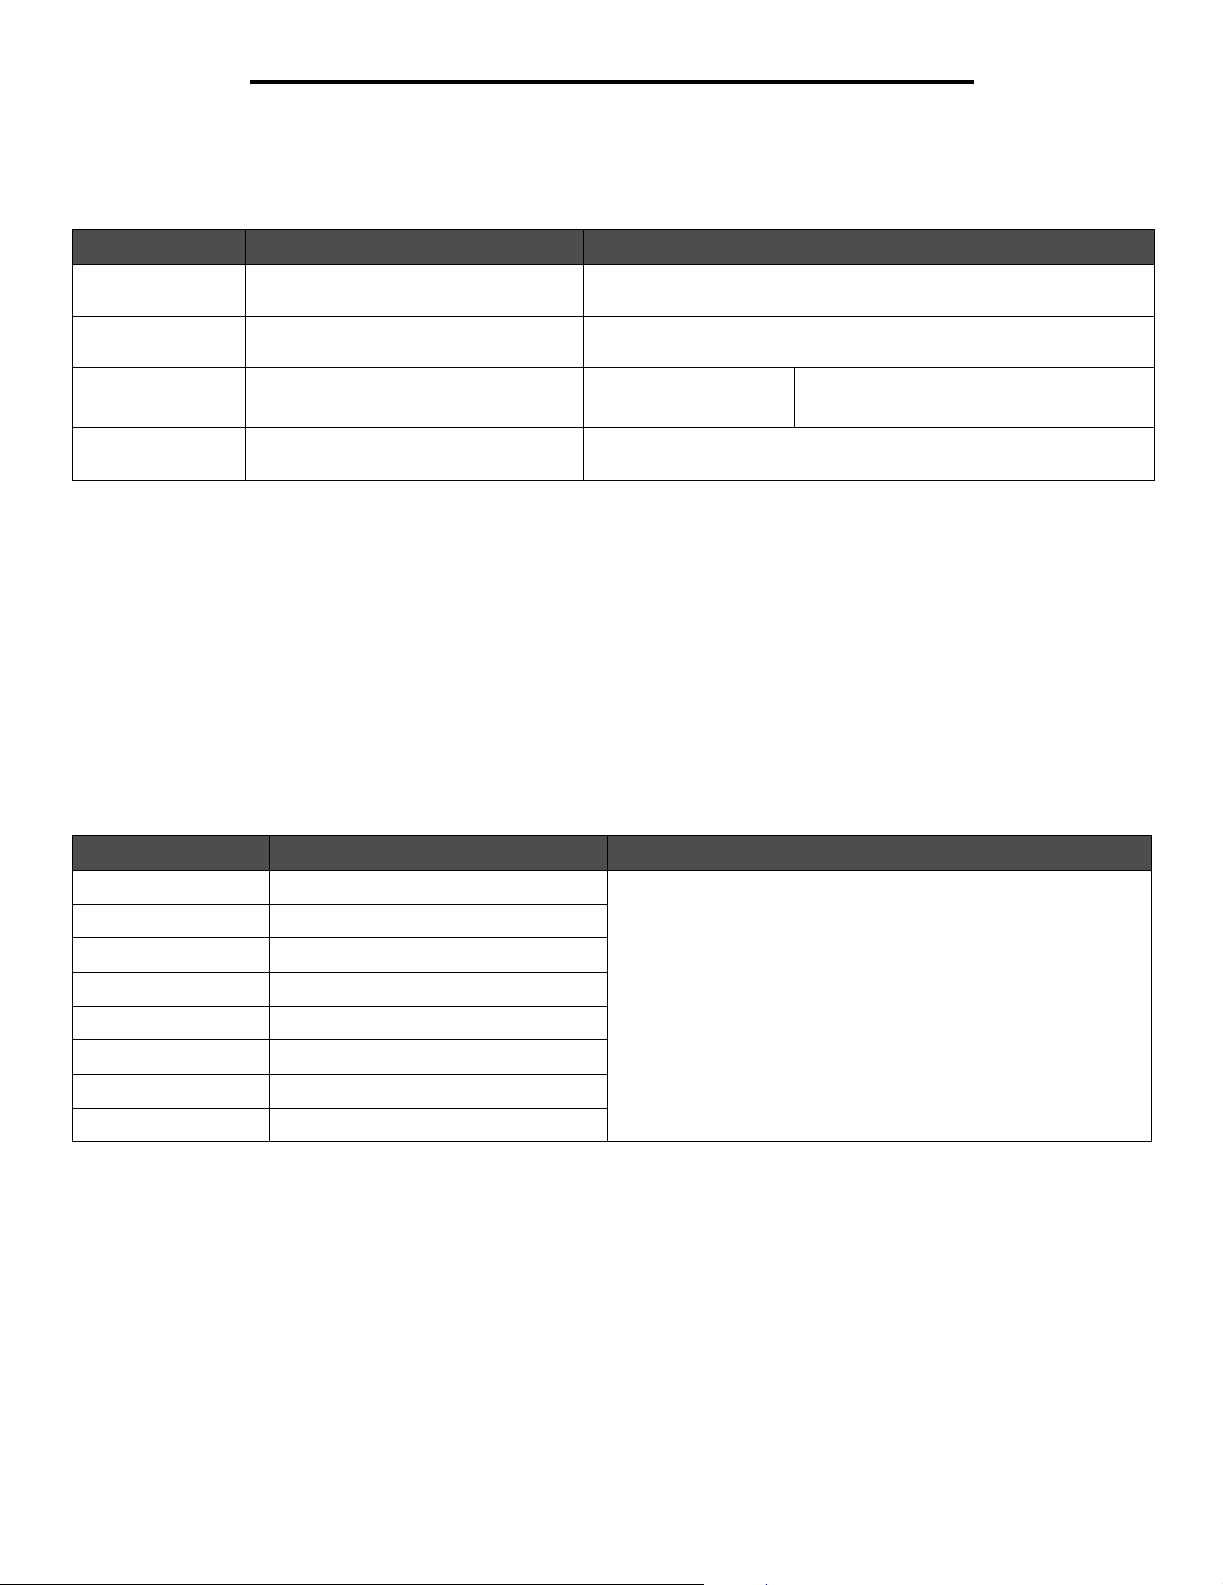
Menu selection Purpose Value s
View Name Displays the assigned AppleTalk name Selecting View Name displays the AppleTalk name on the control
View Address Displays the assigned AppleTalk
address
Activate Activates or deactivates the AppleTalk
feature
Set Zone * Provides a list of zones from network Default will be default zone for the network. If no default zone exists on
panel.
Selecting View Address displays the AppleTalk address on the
control panel.
On
Off
the network, the * will be the default.
On—Activates the AppleTalk feature.
Off—Deactivates the AppleTalk feature.
Help
This menu selection is used to print some or all of the resident Help Menu Pages. These pages contain information about printer
connectivity, print quality, paper tips, and supplies.
Note: If the control panel is set to another language, the document will be printed in English.
The Help Pages can be printed in the following languages.
English German Spanish Norwegian Swedish Finnish Polish
French Italian Danish Dutch Portuguese Russian
Menu selection Purpose Values
Printing Guide Prints the Printing Guide topic. After selecting this item, the Help menu topic will print, and the
Supplies Guide Prints the Supplies Guide topic.
Media Guide Prints the Media Guide topic.
Print Defects Prints the Print Defect sheet.
Menu Map Prints the Menu Map topic.
Information Guide Prints the Information Guide topic.
Connection Guide Prints the Connection Guide topic.
Moving Guide Prints the Moving Guide topic.
printer will return to Ready.
27
Page 28
Understanding printer messages
The printer operator panel displays messages describing the current state of the printer and indicates possible printer problems you must
resolve. This topic provides a list of all printer messages, explains what they mean, and tells you how to clear the messages.
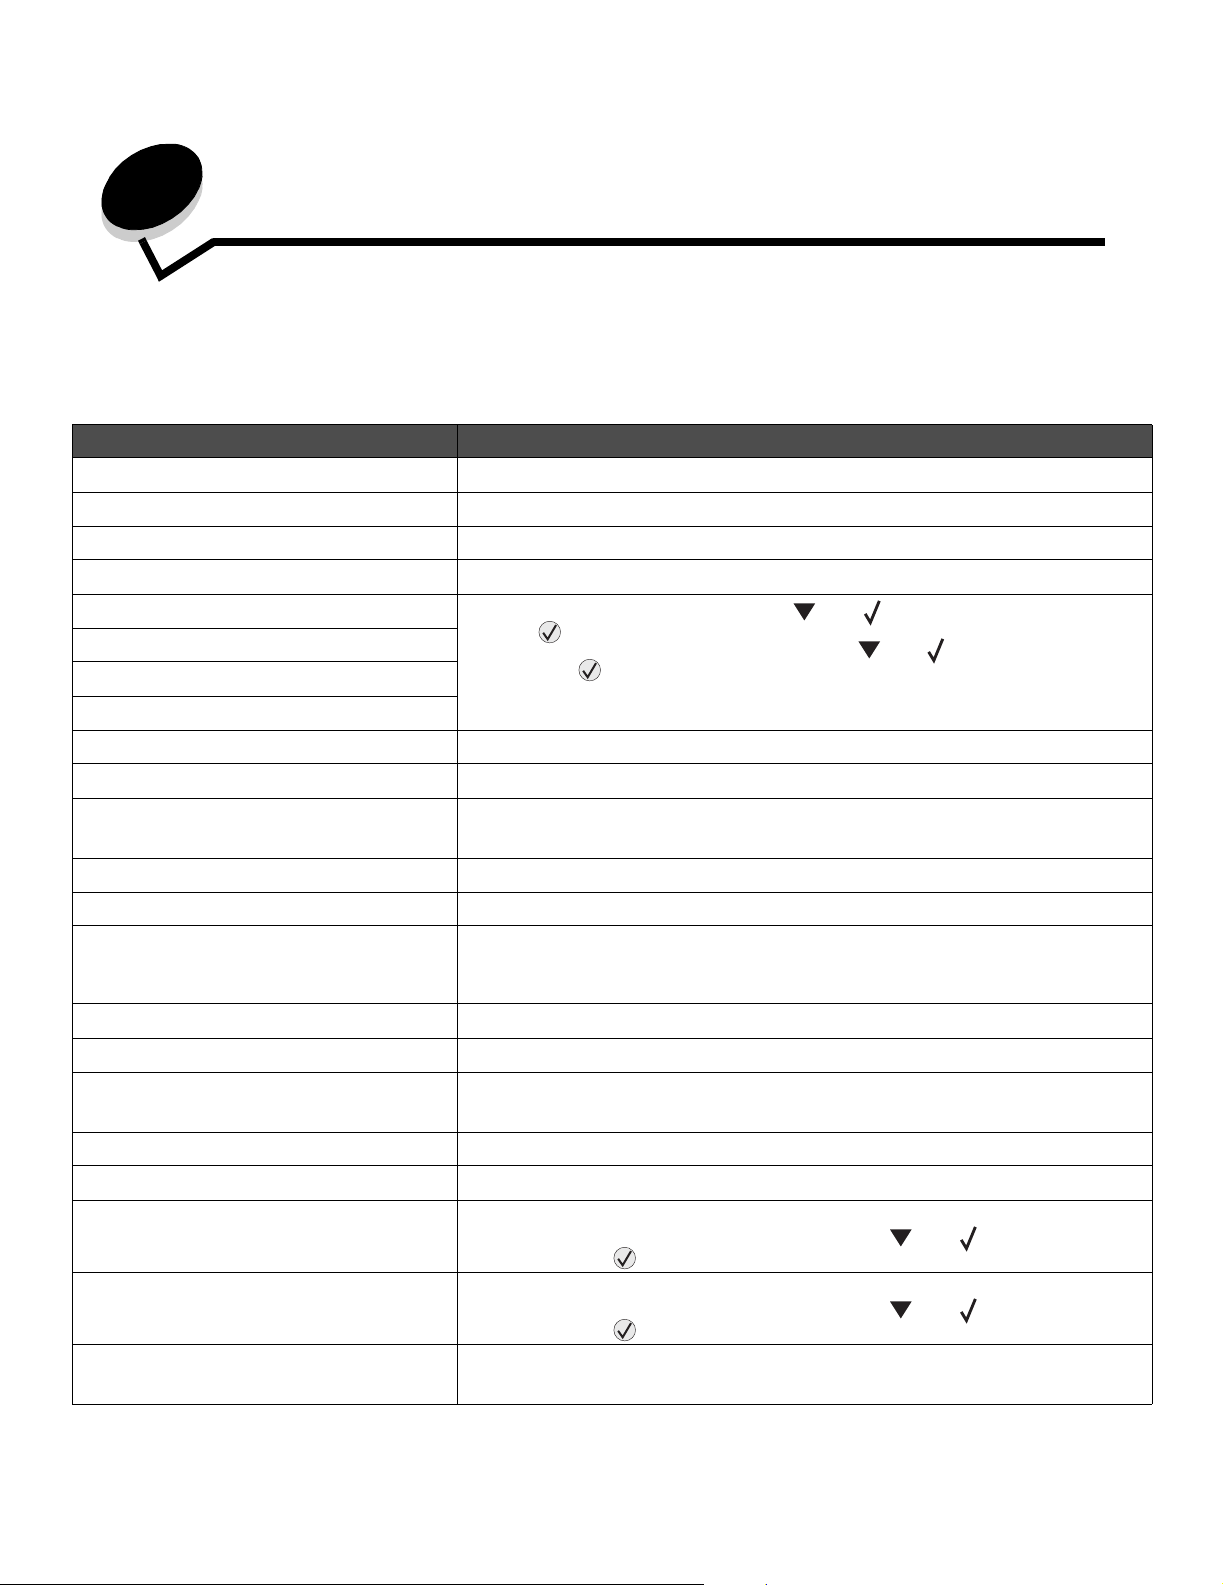
The following table lists the messages in alphanumerical order. You can also locate a message using the index.
Message Action
Activating Menu Changes Wait for the message to clear.
Busy Wait for the message to clear, or cancel the print job.
Cancel not available Wait for the message to clear.
Cancelling Wait for the message to clear.
Change <src> <Custom Type Name> • If you have changed the media, press until Continue appears, and then
Change <src> <Custom String>
Change <src> <size>
Change <src> <type> <size>
Close door <x> Close the specified door to clear the message.
Copies Enter the desired number of copies.
Defragmenting Flash DO NOT POWER OFF Warning: Do not turn the printer off while this message is displayed.
Deleting Wait for the message to clear.
Disabling DLEs Wait for the message to clear.
Disabling Menus Wait for the message to clear.
Enabling Menus Wait for the message to clear.
Flushing buffer Wait for the message to clear.
Formatting Flash DO NOT POWER OFF Warning: Do not turn the printer off while this message is displayed.
Insert print cartridge Insert the print cartridge to clear the message.
Insert Tray <x> Insert the specified tray into the printer.
press .
• To print on media currently in the printer, press until Continue appears, and
then press .
• Change the print media orientation.
• Cancel the current job.
Wait for the message to clear.
Note: While the menus are disabled, you cannot change the printer settings from the
operator panel.
Wait for the message to clear.
Internal System Error
Reload Bookmarks
Internal System Error, Reload
Security Certificates
Invalid Network Code Download valid code to the internal print server.
• Reload the Bookmarks.
• To clear the message and continue printing, press until Continue appears,
and then press .
• Reload the Security Certificates.
• To clear the message and continue printing, press until Continue appears,
and then press .
Note: You can download network code while this message is displayed.
28
Page 29
Understanding printer messages
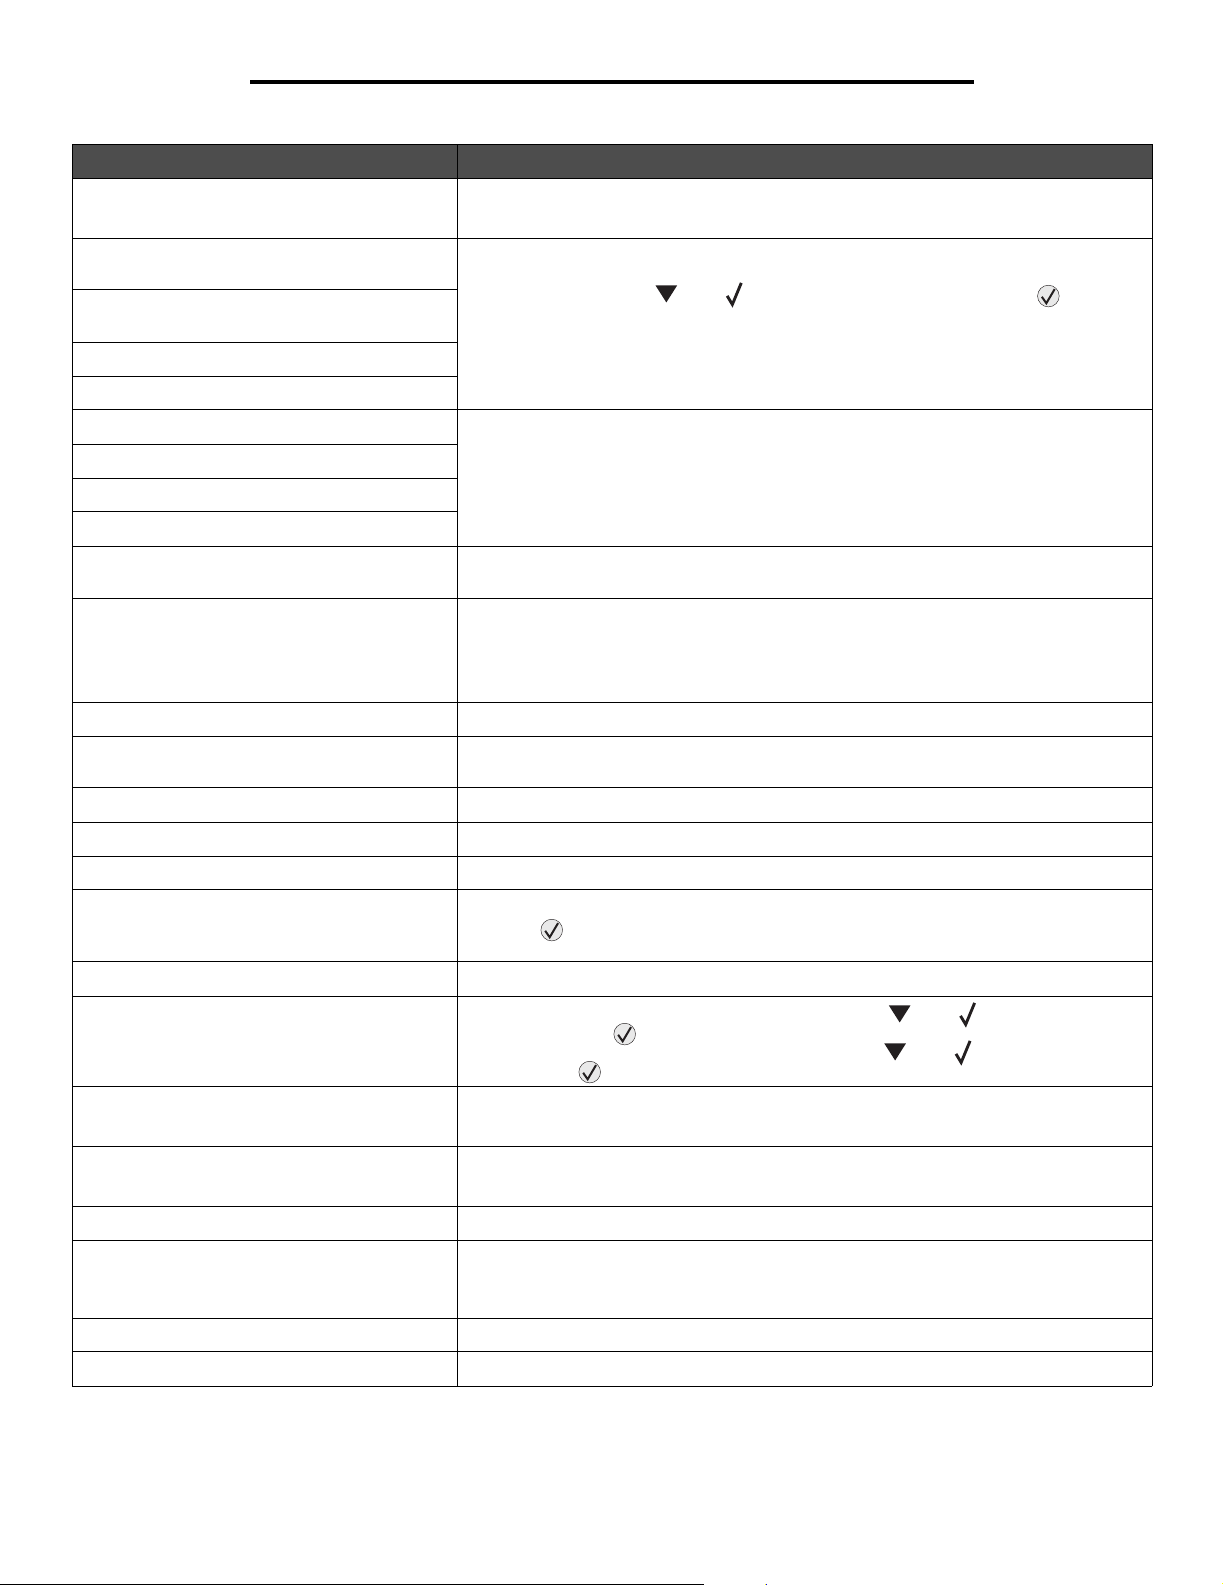
Message Action
Invalid Engine Code Download valid engine code to the printer.
Note: You can download engine code while this message is displayed.
Load manual feeder with
<Custom Type>
Load manual feeder with
<Custom String>
Load manual feeder with <size>
Load manual feeder with <size> <type>
Load <src> with <Custom Type Name> • Load the input source with the correct type and size media.
Load <src> with <Custom String>
Load <src> <size>
Load <src> <type> <size>
Maintenance Replace the maintenance items and, if necessary, reset the printer maintenance
Menus are Disabled The printer menus are disabled. You cannot change the printer settings from the
Network A network interface is the active communication link.
Network <x>, <y> A network interface is the active communication link, where <x> represents the active
No held jobs Wait for the message to clear.
• Load the specified paper in the manual feed tray or multipurpose feeder.
• To ignore the manual feed request and print on paper already installed in one of the
input sources, press until Continue appears, and then press .
If the printer finds a tray that has paper of the correct type and size, it feeds paper
from that tray. If the printer cannot find a tray with the correct paper type and size, it
prints on whatever paper is installed in the default input source.
• Cancel the current job.
• Cancel the current job.
counter.
operator panel.
Note: You can still cancel a job, print a confidential job, or print a held job.
Contact your system support person.
communication link, and <y> represents the channel.
No jobs to cancel Wait for the message to clear.
Parallel A parallel interface is the active communication link.
Power Saver • Send a job to print.
• Press to warm the printer to normal operating temperature and display the
Ready message.
Printing Wait for the message to clear.
Printer busy
Continue
Quit
Programming System Code Warning: Do not turn the printer off while this message is displayed.
Programming Flash Warning: Do not turn the printer off while this message is displayed.
Ready Send a job to print.
Remote Management Active
DO NOT POWER OFF
Remove paper from std bin Remove the paper from the standard bin.
Resetting the Printer Wait for the message to clear.
• To read the information from the USB drive, press until Continue appears,
and then press .
• To cancel the information retrieval process, press until Quit appears, and
then press .
Wait for the message to clear and the printer to reset.
Wait for the message to clear.
The printer settings are being configured, and the printer was taken offline to ensure it
is not currently printing and processing jobs.
Wait for the message to clear.
29
Page 30
Understanding printer messages
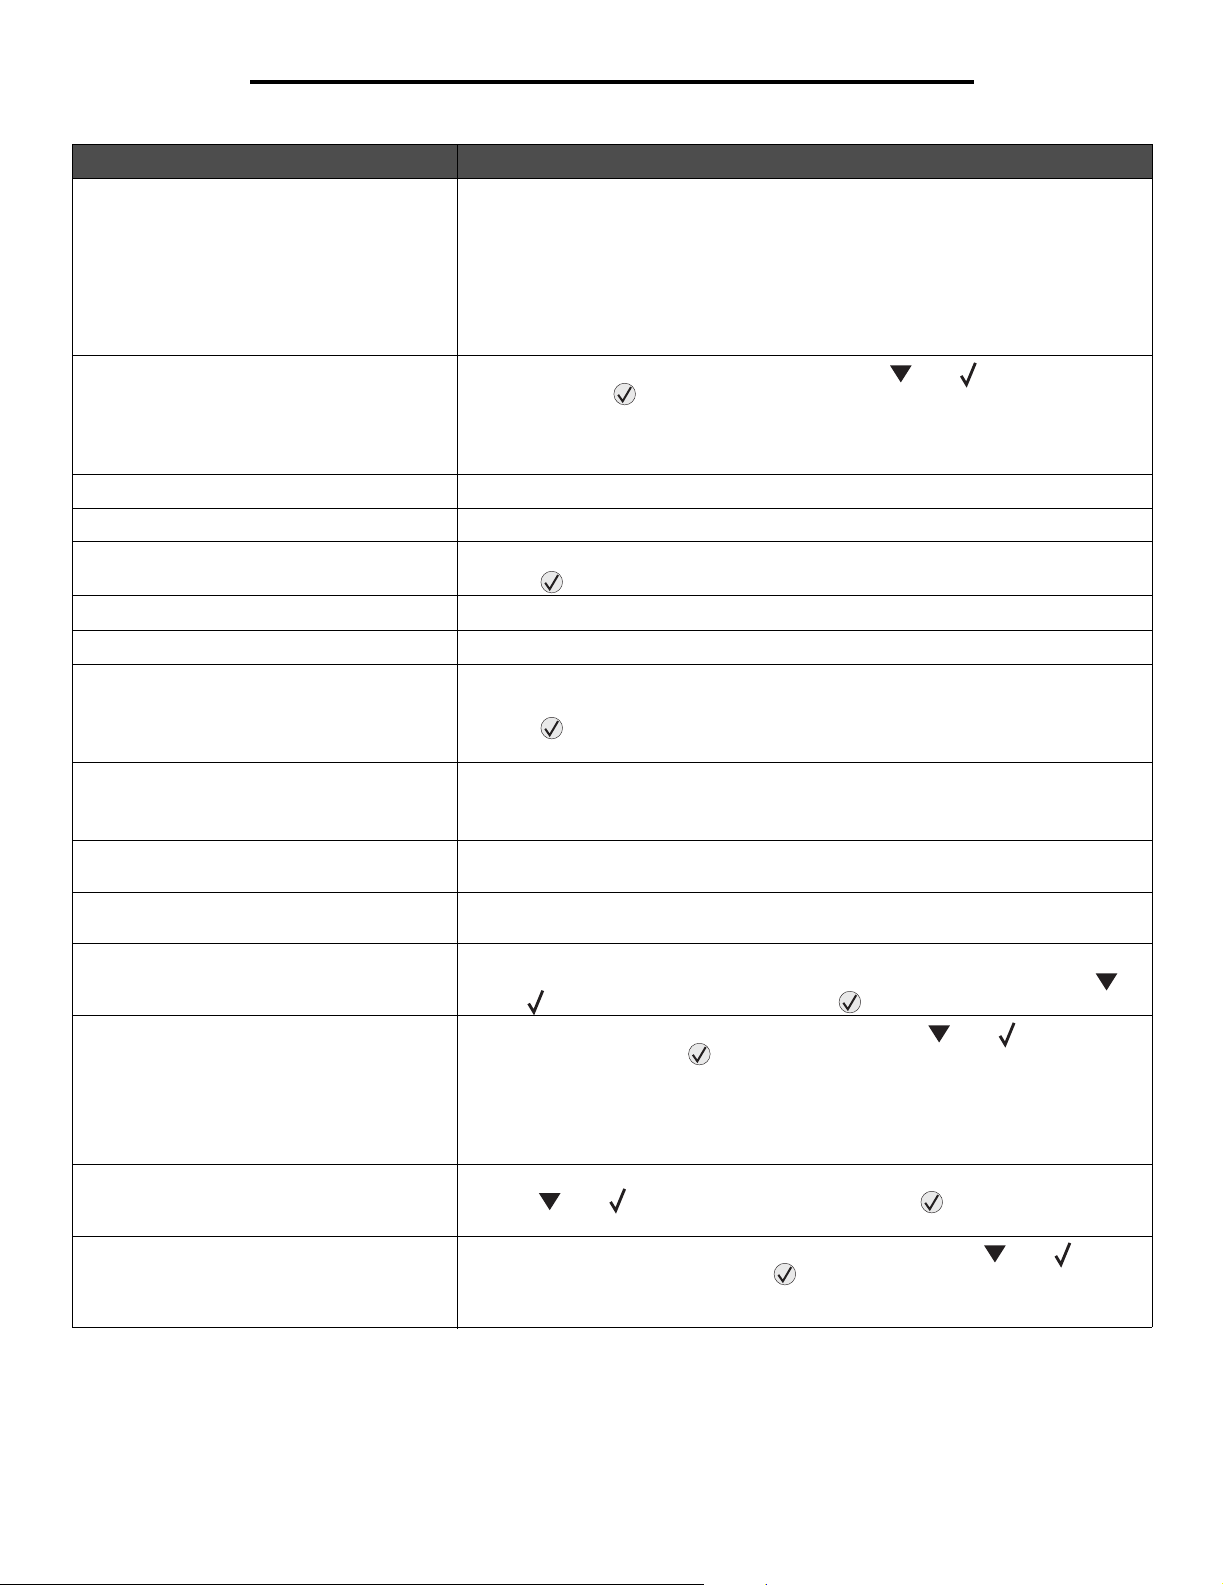
Message Action
Restoring Factory Defaults Wait for the message to clear.
Note: When factory default settings are restored:
• All downloaded resources (fonts, macros, symbol sets) in the printer memory are
deleted.
• All menu settings return to the factory default setting except:
– The Display Language setting in the Setup Menu.
– All settings in the Parallel Menu, Network Menu, Infrared Menu, LocalTalk Menu,
USB Menu, and Fax Menu.
Some held jobs were deleted • To clear the message and continue printing, press until Continue appears,
Submitting selection Wait for the message to clear.
Toner Empty • Replace the toner cartridge.
Toner Low • Replace the toner cartridge.
USB The printer is processing data through the specified USB port.
and then press .
The printer frees memory by deleting the oldest held job and continues deleting
held jobs until there is enough printer memory to process the job.
• Cancel the current job.
• Press to clear the message and continue printing.
View supplies Displays the current level of all printer supplies.
Waiting The printer has received a page of data to print, but is waiting for an End of Job
1565 Emul Error Load Emul Option The printer automatically clears the message in 30 seconds, and then disables the
31 Replace defective or missing toner
cartridge
32 Replace unsupported print
cartridge
34 Short Paper • Load the appropriate media in the selected source.
35 Insufficient memory to support
Resource Save feature
37 Insufficient memory to collate job • To print the portion of the job already stored and begin collating the rest of the job,
command, a Form Feed command, or additional data.
• Press to print the contents of the buffer.
• Cancel the current job.
download emulator on the firmware card.
Download the correct download emulator version from the Lexmark Web site.
Insert or replace the toner cartridge.
Install a toner cartridge that is the correct type and capacity for this printer.
• To clear the message and print the job using a different paper source, press
until Continue appears, and then press .
• To disable Resource Save and continue printing, press until Continue
appears, and then press .
• To enable Resource Save after you get this message:
– Make sure the link buffers are set to Auto, then exit the menus to activate the link
buffer changes.
– When Ready is displayed, enable Resource Save.
• Install additional memory.
press until Continue appears, and then press .
• Cancel the current job.
37 Insufficient memory for Flash
Memory Defragment operation
• To stop the defragment operation and continue printing, press until
Continue appears, and then press .
• Delete fonts, macros, and other data in printer memory.
• Install additional printer memory.
30
Page 31
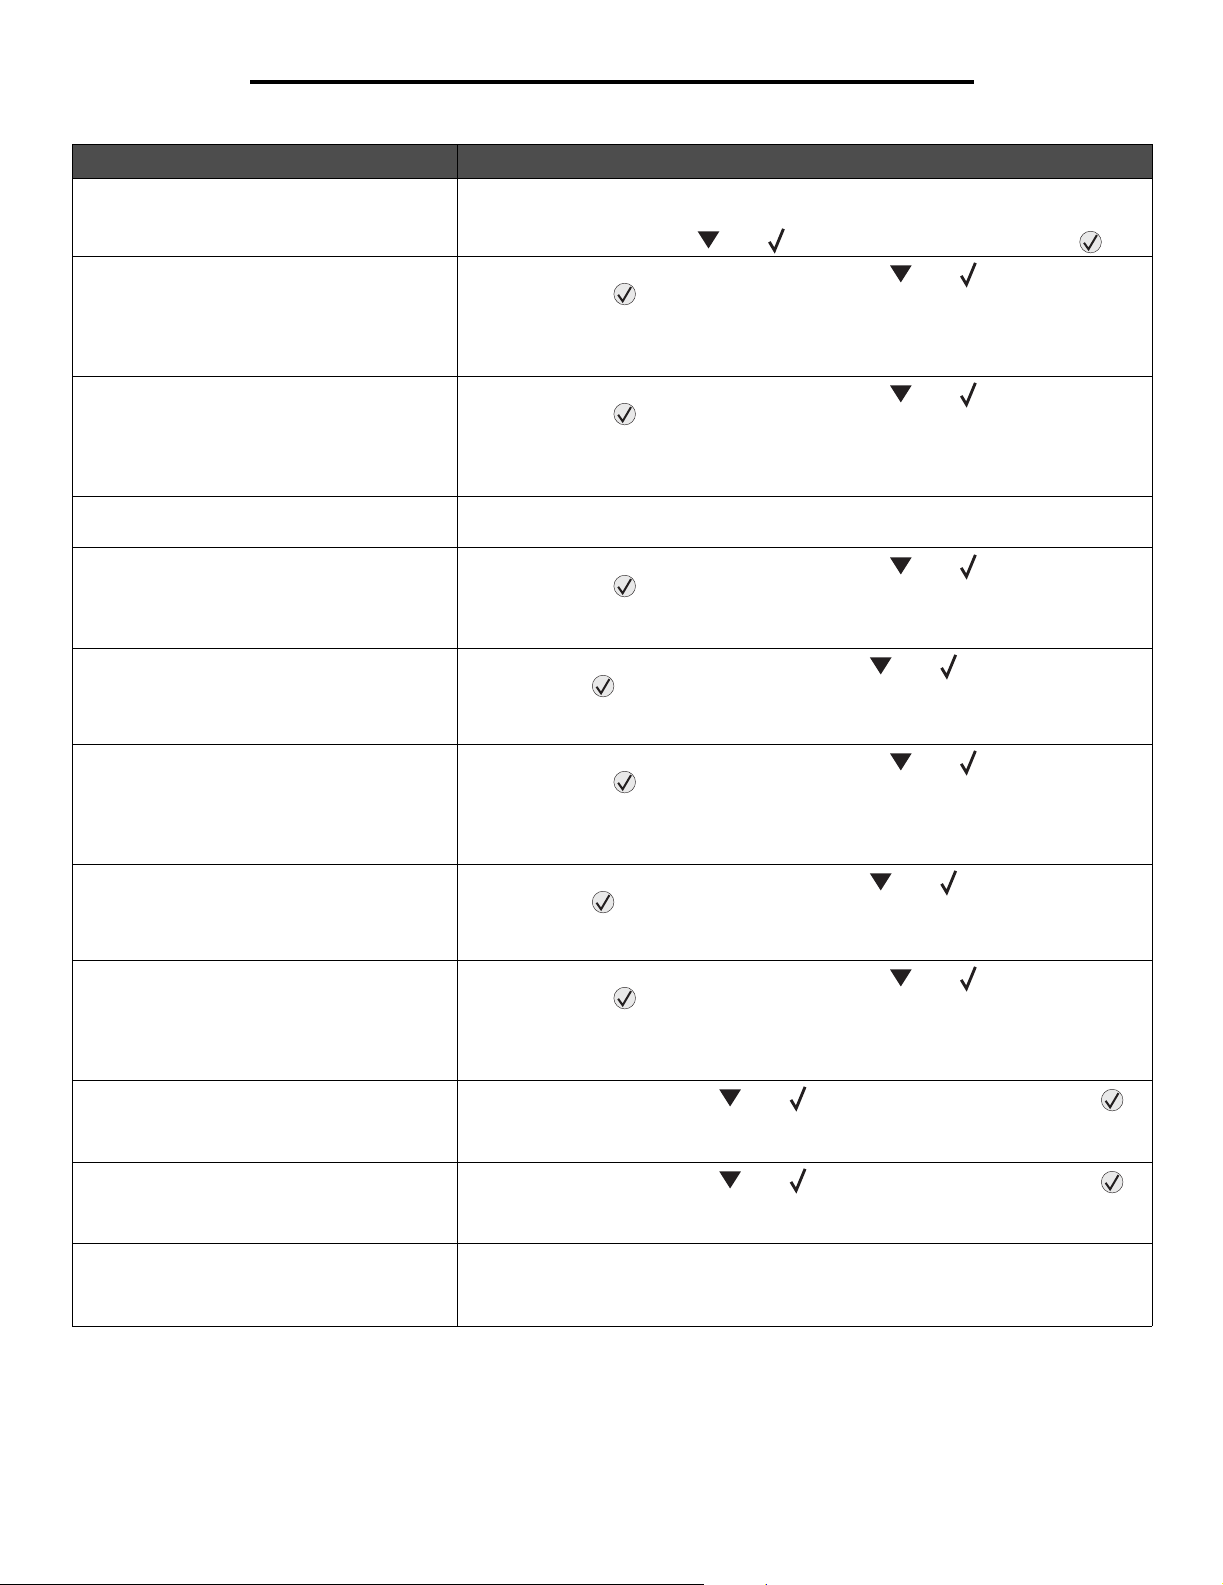
Understanding printer messages
Message Action
37 Insufficient memory, some held
jobs were lost
38 Memory Full • To clear the message and continue printing, press until Continue appears,
39 Page is too complex to print • To clear the message and continue printing, press until Continue appears,
Message 42.xy Cartridge region
mismatch
50 PPDS font error • To clear the message and continue printing, press until Continue appears,
51 Defective flash detected To clear the message and continue printing, press until Continue appears,
52 Not enough free space in flash
memory for resources
The printer was unable to restore some or all of the confidential or held jobs on the
hard disk.
To clear the message, press until Continue appears, and then press .
and then press .
The job may not print correctly.
• Cancel the current job.
• Install additional printer memory.
and then press .
The job may not print correctly.
• Cancel the current job.
• Install additional printer memory.
Install a toner cartridge that matches the printer's region number. For more
information, see the User's Guide on the Software and Documentation CD.
and then press .
The job may not print correctly.
• Cancel the current job.
and then press .
You must install different flash memory before you can download any resources to
flash.
• To clear the message and continue printing, press until Continue appears,
and then press .
Downloaded fonts and macros not previously stored in flash memory are deleted.
• Delete fonts, macros, and other data stored on the flash memory.
• Install a larger capacity flash memory card.
53 Unformatted flash detected To clear the message and continue printing, press until Continue appears,
54 Standard network software error • To clear the message and continue printing, press until Continue appears,
56 Standard parallel port disabled • To clear the message, press until Continue appears, and then press .
56 Standard USB port disabled • To clear the message, press until Continue appears, and then press .
58 Too many flash options installed 1 Turn off and unplug the printer.
and then press .
You must format the flash memory before you can store any resources on it. If the
error message remains, the flash memory may be defective and require replacing.
and then press .
The job may not print correctly.
• Program new firmware for the network interface.
• Reset the printer.
The printer discards any data received through the parallel port.
• Make sure the Parallel Buffer menu item is not set to Disabled.
The printer discards any data received through the USB port.
• Make sure the USB Buffer menu item is not set to Disabled.
2 Remove the excess flash memory.
3 Plug in the printer, and turn it on.
31
Page 32
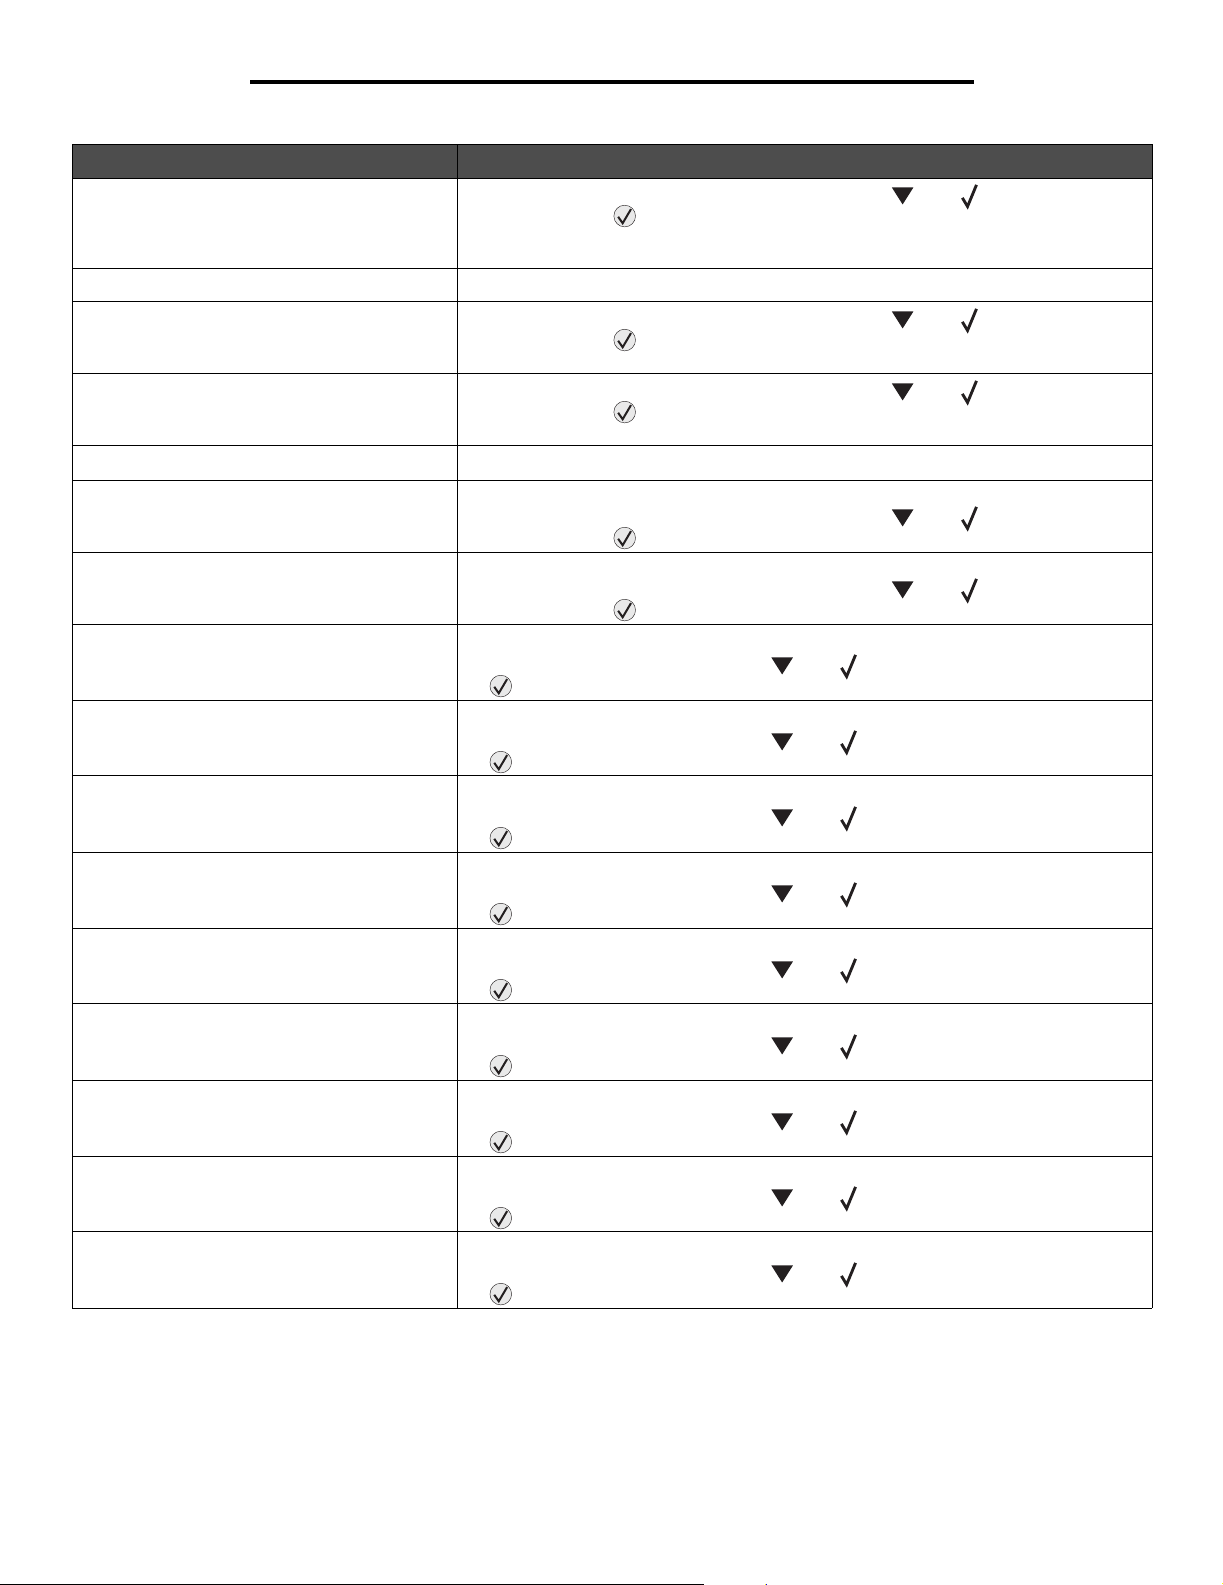
Understanding printer messages
Message Action
80 Scheduled maintenance advised • To clear the message, and continue printing, press until Continue appears,
84 Insert PC unit Insert the photoconductor unit.
84 PC Unit life warning • To clear the message, and continue printing, press until Continue appears,
84 Replace PC unit • To clear the message, and continue printing, press until Continue appears,
84 PC unit abnormal • Replace the photoconductor unit.
88 Toner is low • Replace the toner cartridge.
88 Replace toner • Replace the toner cartridge.
200.yy Paper jam 1 Clear the paper path.
201.yy Paper jam 1 Clear the paper path.
202.yy Paper jam 1 Clear the paper path.
and then press .
• Replace the maintenance items and if necessary, reset the printer maintenance
counter.
and then press .
• Replace the photoconductor unit.
and then press .
• Replace the photoconductor unit.
• To clear the message, and continue printing, press until Continue appears,
and then press .
• To clear the message, and continue printing, press until Continue appears,
and then press .
2 After clearing the paper path, press until Continue appears, and then press
to resume printing.
2 After clearing the paper path, press until Continue appears, and then press
to resume printing.
2 After clearing the paper path, press until Continue appears, and then press
to resume printing.
231.yy Paper jam 1 Clear the paper path.
2 After clearing the paper path, press until Continue appears, and then press
to resume printing.
233.yy Paper jam 1 Clear the paper path.
2 After clearing the paper path, press until Continue appears, and then press
to resume printing.
234.yy Paper jam 1 Clear the paper path.
2 After clearing the paper path, press until Continue appears, and then press
to resume printing.
235.yy Paper jam 1 Clear the paper path.
2 After clearing the paper path, press until Continue appears, and then press
to resume printing.
241 Paper jam 1 Clear the paper path.
2 After clearing the paper path, press until Continue appears, and then press
to resume printing.
242 Paper jam 1 Clear the paper path.
2 After clearing the paper path, press until Continue appears, and then press
to resume printing.
32
Page 33
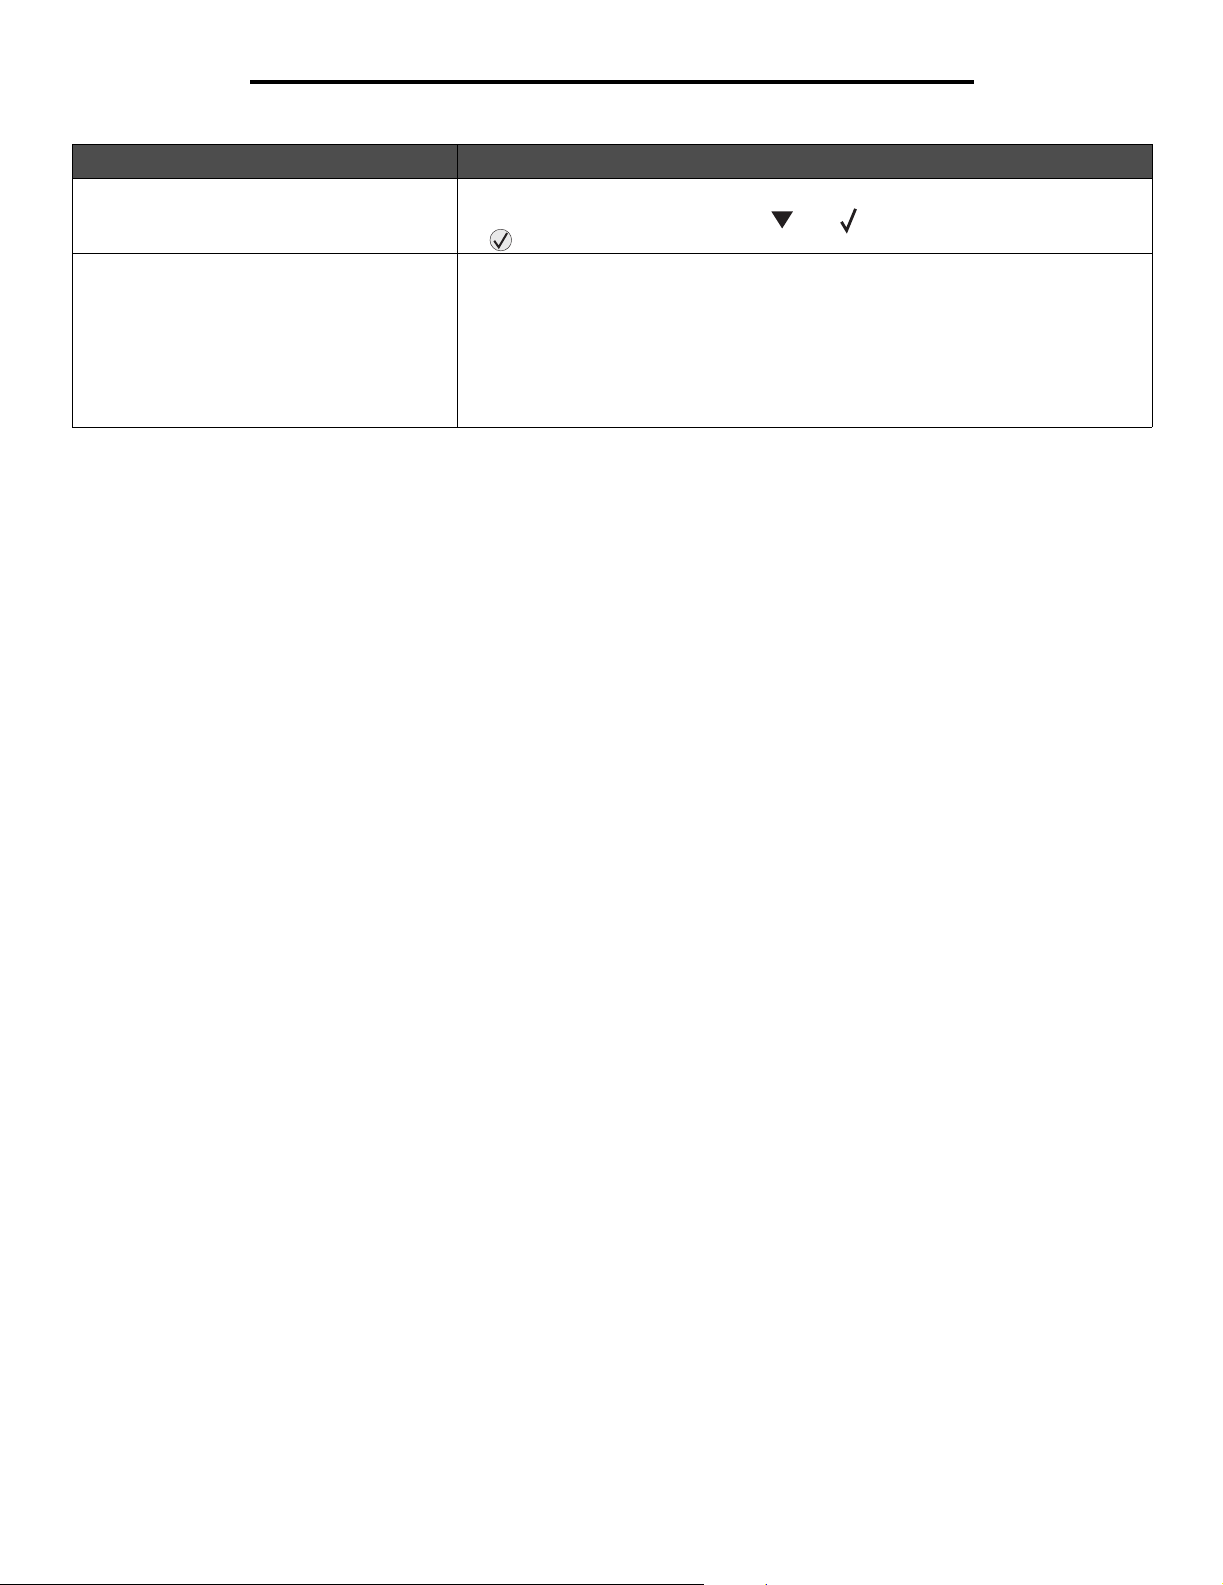
Understanding printer messages
Message Action
251 Paper jam 1 Clear the paper path.
2 After clearing the paper path, press until Continue appears, and then press
to resume printing.
900–999 Service <message> 1 Turn the printer off.
2 Unplug the power cord from the wall.
3 Check all cable connections.
4 Plug in the power cord.
5 Turn the printer back on.
If the service message recurs, call for service, and report the message number and
description of the problem.
33
Page 34

Index
Numerics
1565 Emul Error Load Emul Option 30
200.yy Paper jam 32
201.yy Paper jam 32
202.yy Paper jam 32
231.yy Paper jam 32
241.yy Paper jam 32
242.yy Paper jam 32
243.yy Paper jam 32
244.yy Paper jam 32
245.yy Paper jam 32
250.yy Paper jam 33
31 Replace defective or missing toner cartridge 30
37 Insufficient memory, some held jobs were lost 31
38 Memory Full 31
51 Defective flash detected 31
52 Not enough free space in flash memory for
resources 31
53 Unformatted flash detected 31
54 Standard network software error 31
56 Standard parallel port disabled 31
56 Standard USB port disabled 31
58 Too many flash options installed 31
80 Scheduled maintenance 32
84 Insert PC unit 32
84 PC unit abnormal 32
84 PC Unit life warning 32
84 Replace PC unit 32
88 Replace toner 32
88 Toner is low 32
900–999 Service 33
C
Cancel not available 28
Cancelling Job 28
Change 28
Change src, Custom Type Name, load orientation 28
Close door 28
Collation, enabling 17
complex page errors 16
Connection Guide, help 27
Copies 28
Copies, specifying number 17
Coverage Estimator 19
Custom Paper Type 11
custom paper type 11
D
Default Source 7
Defragmenting Flash 28
Deleting 28
Device Statistics 12
diagram, menu 4
directory printing 13
Disabling DLEs 28
Disabling Menus 28
Display Language 13
display panel 6
Download Target (Setup Menu) 16
downloaded resources
storing 16
duplex binding 17
duplex enabling 16
A
Activate, AppleTalk 27
Activating Menu Changes 28
AppleTalk 27
Auto CR after LF (PCL Emul Menu) 23
Auto LF after CR (PCL Emul Menu) 23
B
Back button 5
Blank Pages 17
Busy 28
button
back 5
menu 5
stop 5
E
Emulation Settings, PCL 21
ENA Address, USB 26
ENA Gateway, USB 26
ENA Netmask, USB 26
Enabling Menus 28
F
Factory Defaults 19
Feed Direction 11
Finishing Menu 16
flash memory
setting as download target 16
Flushing buffer 28
Font Name, PCL 20
34
Page 35

Index
font printing 12
Font Priority (PostScript Menu) 20
Font Source, PCL 20
fonts
priority 20
Formatting Flash 28
H
hard disk
setting as download target 16
help
Connection Guide 27
Information Guide 27
Media Guide 27
Menu Map 27
Moving Guide 27
Print Defects 27
Supplies Guide 27
Help Menu 27
help, Printing Guide 27
Hex Trace 19
I
Information Guide, help 27
Insert print cartridge 28
Insert Tray <x> 28
Internal System Error Reload Bookmarks 28
Internal System Error, Reload Security Certificates 28
Invalid Engine Code 29
Invalid Network Code 28
J
Job Expiration 23
L
language, display 13
language, printer 16
LCD Brightness 19
LCD Contrast 19
Lines per Page (PCL Emul Menu) 22
Load Manual <Custom String> 29
Load Manual <Custom Type> 29
Load Manual <size> 29
Load Manual <size> <type> 29
Load, src with, Custom String 29
Load, src with, Custom Type Name 29
Load, src, size 29
Load, src, type, size 29
loading paper 10
M
Mac Binary PS, network 25
Mac Binary PS, USB 26
Maintenance 29
Manual Envelope Size 8
Manual Envelope Type 8
Manual Paper Size 8
Manual Paper Type 8
Media Guide, help 27
Menu button 5
menu diagram 4
Menu Map, help 27
Menu Settings Page 12
Menus are Disabled 29
Moving Guide, help 27
Multipage Border 18
Multipage Order 18
Multipage Print 17
Multipage View 18
N
Network Buffer 25
Network interface 29
network option 24
Network Ports 24
Network Setup Page 12
No held jobs 29
No jobs to cancel 29
NPA Mode, network 25
NPA Mode, USB 26
O
operator panel 5
Orientation (PCL Emul Menu) 22
P
Page Protect (Setup Menu) 16
panel, display 6
panel, operator 5
Paper Loading 10
paper menu 7
Paper Size 7
Paper Texture 9, 10
Paper Type 7
paper type, custom 11
Parallel interface 29
PCL Emul Menu
Auto CR after LF 23
Auto LF after CR 23
Lines per Page 22
Orientation 22
Tray Renumber 23
PCL emulation
automatic carriage return 23
automatic line feed 23
lines per page 22
orientation 22
tray renumber 23
PCL emulation settings 21
PCL font name 20
PCL font source 20
35
Page 36

Index
PCL Menu 20
PCL SmartSwitch, network 24
PCL SmartSwitch, USB 25
PCL symbol set 20
PCL tray renumber 22
PDF Menu 20
Portrait Height 11
Portrait Width 11
PostScript emulation
font priority 20
PostScript Menu 20, 22
Font Priority 20
Power Saver 14, 29
Print Area 16
Print Defects, help 27
Print Directory 13
Print Fonts 12
Print PS Error 20
Print Recovery 15
Print Resolution 18
Printer busy 29
Printer Language 16
Printing 29
Printing Guide, help 27
Programming Flash 29
Programming System Code 29
PS emulation
See PostScript emulation
PS SmartSwitch, network 25
PS SmartSwitch, USB 26
Q
Quality Menu 18
Submitting selection 30
Substitute Size 9
Supplies Guide, help 27
Symbol Set, PCL 20
T
TCP/IP 24
Textured Paper 9, 10
Timeouts 15
Toner Darkness 18
Toner Empty 30
Toner Low 30
Tray <x> Size 7
Tray <x> Type 8
Tray Renumber (PCL Emul Menu) 23
Tray Renumber, PCL 22
U
Units of Measure 11
Universal Paper Size 11
USB 30
USB Buffer 26
Utilities Menu 19
V
View Address, AppleTalk 27
View Name, AppleTalk 27
View supplies 30
W
Waiting 30
R
Ready 29
Remote Management Active 29
Remove paper from standard output bin 29
Reports 12
Resetting the Printer 29
Resource Save 16
Restoring Factory Defaults 30
S
saving power 14
Security 23
Separator Sheets 17
Separator Source 17
Set Zone, AppleTalk 27
settings 13
Setup Menu 13
Download Target 16
Page Protect 16
Some held jobs were lost 30
standard network 24
Stop button 5
36
 Loading...