

Page 1
N5 Wireless
Adapter
Getting Started
Page 2

Edition: August 2002
The following paragraph does not apply to any country
where such provisions are inconsistent with local law:
LEXMARK INTERNATIONAL, INC., PROVIDES THIS
PUBLICATION “AS IS” WITHOUT WARRANTY OF ANY KIND,
EITHER EXPRESS OR IMPLIED, INCLUDING, BUT NOT
LIMITED TO, THE IMPLIED WARRANTIES OF
MERCHANTABILITY OR FITNESS FOR A PARTICULAR
PURPOSE. Some states do not allow disclaimer of express or
implied warranties in certain transactions; therefore, this
statement may not apply to you.
This publication could include technical inaccuracies or
typographical errors. Changes are periodically made to the
information herein; these changes will be incorporated in later
editions. Improvements or changes in the products or the
programs described may be made at any time.
Comments about this publication may be addressed to
Lexmark International, Inc., Department F95/032-2, 740 West
New Circle Road, Lexington, Kentucky 40550, U.S.A. In the
United Kingdom and Eire, send to Lexmark International Ltd.,
Marketing and Services Department, Westhorpe House,
Westhorpe, Marlow Bucks SL7 3RQ. Lexmark may use or
distribute any of the information you supply in any way it
believes appropriate without incurring any obligation to you.
You can purchase additional copies of publications related to
this product by calling 1-800-553-9727. In the United Kingdom
and Eire, call +44 (0) 8704 440 044 . In othe r coun tries , con tact
your point of purchase.
References in this publication to products, programs, or
services do not imply that the manufacturer intends to make
these available in all countries in which it operates. Any
reference to a product, program, or service is not intended to
state or imply that only that product, program, or service may
be used. Any functionally equivalent product, program, or
service that does not infringe any existing intellectual property
right may be used instead. Evaluation and verification of
operation in conjunction with other products, programs, or
services, except those expressly designated by the
manufacturer, are the user’s responsibility.
Lexmark and Lexmark with diamond design are trademarks of
Lexmark International, Inc., registered in the United States
and/or other countries.
Other trademarks are the property of their respective owners.
© Copyright 2002 Lexmark International, Inc. All rights
reserved.
UNITED STATES GOVERNMENT RESTRICTED RIGHTS
This software and documentation are provided with
RESTRICTED RIGHTS. Use, duplication or disclosure by the
Government is subject to restrictions as set forth in
subparagraph (c)(1)(ii) of the Rights in Technical Data and
Computer Software clause at DFARS 252.227-7013 and in
applicable FAR provisions: Lexmark International, Inc.,
Lexington, KY 40550.
Federal Communications Commission (FCC) compliance
information statement
The Lexmark N5 Wireless Adapter has been tested and found
to comply with the limits for a Class B digital device, pursuant to
Part 15 of the FCC Rules. Operation is subject to the following
two conditions: (1) this device may not cause harmful
interference, and (2) this device must accept any interference
received, including interference that may cause undesired
operation.
The FCC Class B limits are designed to provide reasonable
protection against harmful interference in a residential
installation. This equipment generates, uses and can radiate
radio frequency energy and, if not installed and used in
accordance with the instructions, may cause harmful
interference to radio communications. However, there is no
guarantee that interference will not occur in a particular
installation. If this equipment does cause harmful interference
to radio or television reception, which can be determined by
unplugging the equipment and then plugging it back in, the
user is encouraged to try to correct the interference by one or
more of the following measures:
• Reorient or relocate the receiving antenna.
• Increase the separation between the equipment and
receiver.
• Connect the equipment into an outlet on a circuit different
from that to which the receiver is connected.
• Consult your point of purchase or service r epresentativ e for
additional suggestions.
A minimum separation of 20 cm ( 8 inches ) must be
maintained between the antenna and any persons for this
device to satisfy the RF exposure requirements of the FCC.
The manufacturer is not responsible for any radio or television
interference caused by using other than recommended cables
or by unauthorized change s o r m odifi cat ions t o t hi s eq uipme nt.
Unauthorized changes or modifications could void the user’s
authority to operate this equipment.
Note: T o assur e compliance with FCC regulations f or a Class B
computing device, use a prop erly shielded and g roun ded cab l e
such as Lexmark part number 12A2405 for USB attach. Use of
a substitute cable not properly shielded and grounded may
result in a violation of FCC regulations.
Any questions regarding this compl iance inf ormation statement
should be directed to Director of Lexmark Technology and
Services, Lexmark International, Inc., 740 West New Circle
Road, Lexington, KY 40550, (859) 232-3000.
Industry Canada compliance statement
This Class B digital apparatus meets all requirements of the
Canadian Interference-Causing Equipment Regulations.
This device complies with Industry Canada specification RSS-
210. Operation is subject to the following two conditions: (1)
this device may not cause interference, and (2) this device
must accept any interference received, including interference
that may cause undesired operation of the device.
To prevent radio interference to the licensed service, this
device is intended to be operated indoors and away from
windows to provide maximum shielding. Equipment (or its
transmit antenna) that is installed outdoors is subject to
licensing.
The installer of this radio equipment must ensure that the
antenna is located or pointed such that it does not emit RF
fields in excess of Health Canada limits for the general
population; consult Safety Code 6, obtainable from Health
Canada’s Web site www.hc-sc.gc.ca/rpb.
Avis de conformité aux normes d’Industrie Canada
Cet appareil numérique de la classe B respecte toutes les
exigences du Règlement sur le matériel brouilleur du Canada.
This device complies with Industry Canada specification RSS-
210. Operation is subject to the following two conditions: (1)
this device may not cause interference, and (2) this device
must accept any interference received, including interference
that may cause undesired operation of the device.
To prevent radio interference to the licensed service, this
device is intended to be operated indoors and away from
windows to provide maximum shielding. Equipment (or its
transmit antenna) that is installed outdoors is subject to
licensing.
The installer of this radio equipment must ensure that the
antenna is located or pointed such that it does not emit RF
Placeholder tex
fields in excess of Health Canada limits for the general
population; consult Safety Code 6, obtainable from Health
Canada’s Web site www.hc-sc.gc.ca/rpb.
European Community (EC) directives conformity
This product is in conformity with the protection requirements
of EC Council directives 89/336/EEC, 73/23/EEC, and 1999/5/
EC on the approximation and harmonization of the laws of the
Member States relating to electromagnetic compatibility and
safety of electrical equipment designed for use within certain
voltage limits and on radio equipment and telecommunications
terminal equipment.
A declaration of conformity with the requirements of the
directives has been signed by the Director of Manufacturing
and Technical Support, Lexmark International, S.A., Boigny,
France.
This product satisfies the Class B l imits of EN 55022 and saf ety
requirements of EN 60950.
ed
Ne
-
t
a
French tr
ns
on
ti
a
l
Page 3

The United Kingdom Telecommunications Act 1984
This apparatus is approved under the approval number NS/G/
1234/J/100003 for the indirect connections to the public
telecommunications systems in the United Kingdom.
Safety information
• Use only the Lexmark power supply provided with this
product or an authorized Lexmark replacement power
supply.
• Connect the power cord to an electrical outlet that is near
the product and easily accessible.
• Refer service or repairs, other than those described in the
manual, to a professional service person.
Page 4

Contents
Introduction................................................................................................................................ ......... 2
Setup.................................................................................................................................................... 2
Set up your adapter on the network.................................................................................................. 7
Configure your Lexmark inkjet printer............................................................................................ 12
Configure your Lexmark laser printer............................................................................................. 17
Troubleshooting................................................................................................................................ 22
An indicator light is not on.................................................................................................................................... 23
The Lexmark Printer Adapter software installation screen does not appear....................................................... 23
I can not find the network settings of my computer’s wireless adapter................................................................ 24
My MAC address is not listed on the Select your N5 Wireless Adapter screen .................................................. 24
My network is not listed on the Connect to the network (automatic) screen........................................................ 24
I do not know the hexadecimal format of my WEP key ....................................................................................... 24
Setup was not successful (My printer was not found on the network)................................................................. 25
iii
Page 5

The Lexmark printer software installation screen does not appear...................................................................... 25
An error message appears.. ...... ....... ...... ....... ...... ....... ...... ....... ...................................... ....... .... ............................ 25
There is not a Network button on the Results: No Printer Attached screen......................................................... 25
My network printer does not appear in the list of available printers ..................................................................... 26
There is not an Install Selected Printer button on the Network Configuration screen.......................................... 26
My network printer does not print......................................................................................................................... 27
How Do I...?........................................................................................................................................ 28
Change the computer’s network settings ............................................................................................................. 28
Print a test page ................................................................................................................................................... 28
Uninstall the printer software................................................................................................................................ 28
Manually configure the network printer ................................................................................................................ 29
Select the network printer port ............................................................................................................................. 31
Check the printer status ....................................................................................................................................... 31
Reset the adapter................................................................................................................................................. 32
Contact Lexmark .................................................................................................................................................. 32
Glossary............................................................................................................................................. 33
Statement of Limited Warranty........................................................................................................ 34
iv
Page 6

Lexmark confidential until announced
Introd ucti on
Thank you for purchasing the LexmarkTM N5 Wireless
Adapter!
The adapter makes it easy for you to:
• Share your printer between two or more network
computers.
• Locate your printer anywhere in your home or office.
You no longer need to locate the printer next to a host
computer or make sure a host computer is powered
on before sending your print job from a remote
location.
• Quickly transfer information.
Your new adapter has the capability to transfer
information at up to 11Mbps.
Setup
For setup, you need:
• The Lexmark N5 Wireless Adapter
• An existing 802.11b Wireless Ethernet network
• A network- capable Lexmark printer
To find out if your printer is network-capable or for
other printer-specific information, refer to the
documentation that came with your printer or visit our
Web site at www.lexmark.com.
• The Lexmark Printer Adapter software CD
• The printer software CD that came with your printer
• A computer with a CD-ROM drive
The computer must be connected to the network,
have TCP/IP active and running, and have one of the
following operating systems:
– Windows 98
– Windows Me
– Windows 2000
– Windows XP
1
Getting Started
Page 7
Lexmark confidential until announced
)
Step 1:Select a location for
your adapter
Choosing the correct location for your new adapter is vital to
ensuring that it provides you with the quality of service you
expect.
Make sure the location is:
• Firm, level, and stable
• Within the appropriate range for your access point if
your network has an infrastructure configuration
• Large enough to accommodate a printer attached to
the adapter
• Away from the direct airflow of air conditioners,
heaters, or ventilators
• Free of temperature or humidity extremes and
fluctuations
• Clean, dry, and free of dust
• Away from direct sunlight
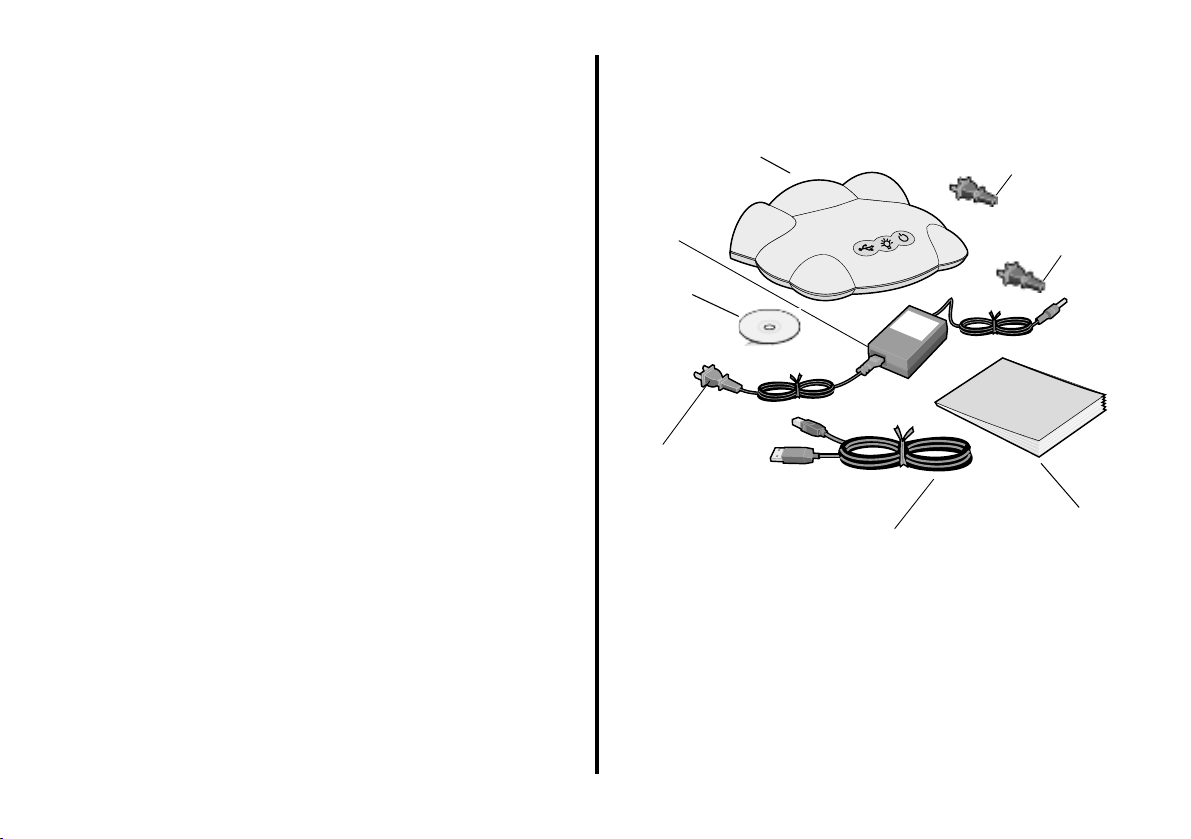
Step 2:Unpack your adapter
Lexmark N5
Wireless Adapter
Power
supply
exmark
rinter
dapter
oftware CD
US power
plug adapter
eho
ac
Pl
Art
USB cable
e
d
l
Australian/New
Zealand power plug
adapter
r
Continental
European
power plug
adapter
Getting
Started
(this book
Getting Started
If any items are missing or you need a different power plug
adapter for your geography, contact Lexmark (see page 31).
2
Page 8
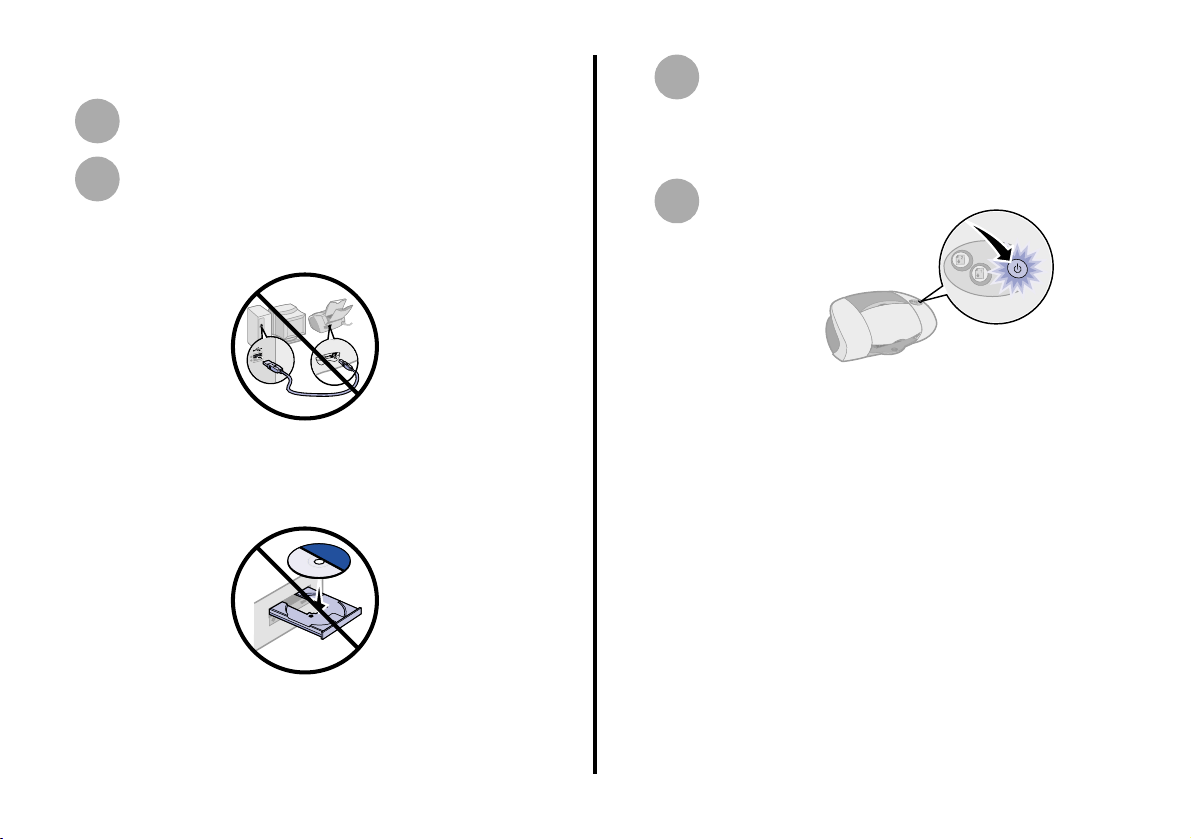
Step 3:Prepare your printer
Unpack and set up your printer. For help, refer
1
to the instructions that came with your printer.
To help configure your printer on the network:
2
– Do not connect your printer to your
computer; however , if you have already done
so, disconnect the USB or parallel cable.
– Do not install the printer software; however , if
you have already done so, you do not need
to uninstall it.
Place the printer next to your adapter.
3
Note: If necessary, disconnect the printer
power supply, and then reconnect it at its
new location.
Make sure the printer power light is on.
4
Note: Your printer may look different from the
one shown.
3
Getting Started
Page 9
Lexmark confidential until announced
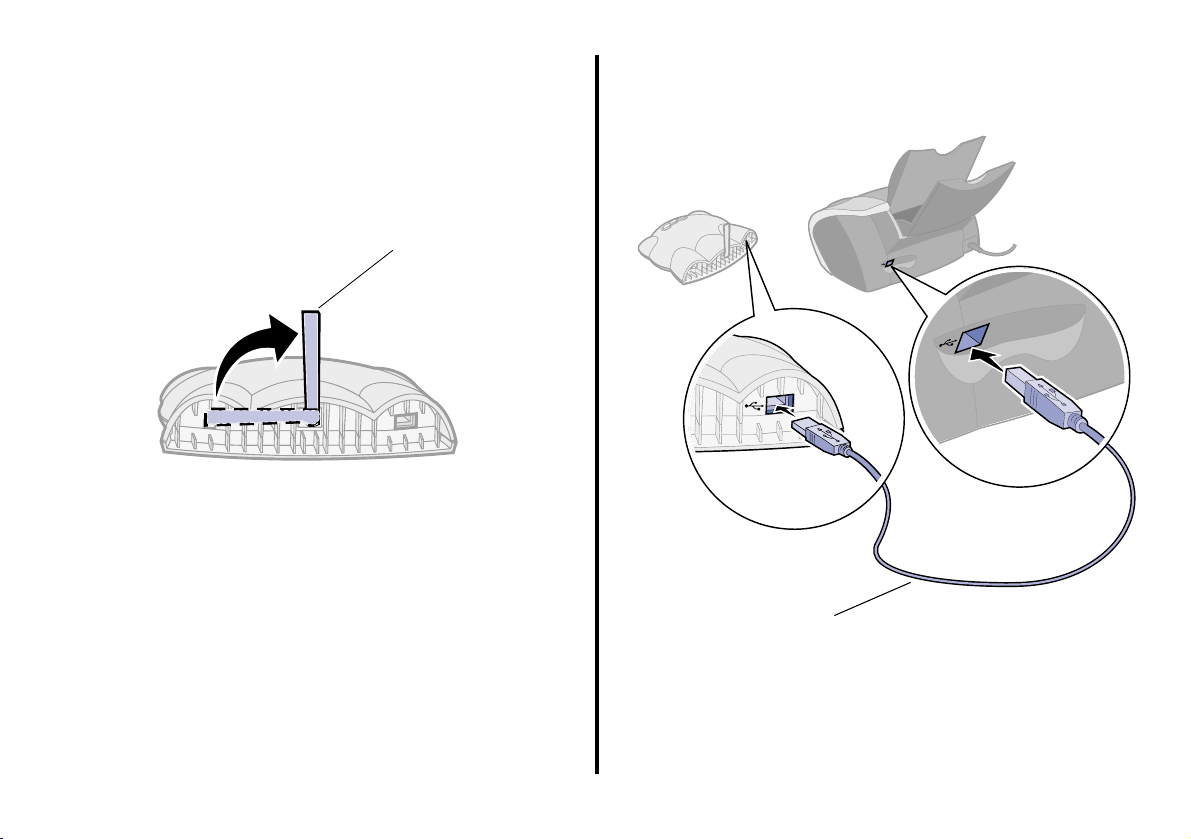
Step 4:Raise the adapter
antenna
Antenna
Step 5:Connect your adapter
to your printer
USB cable
Note: Rotate the antenna clockwise from the back.
Getting Started
Note: Your printer may look different from the one
shown.
4
Page 10
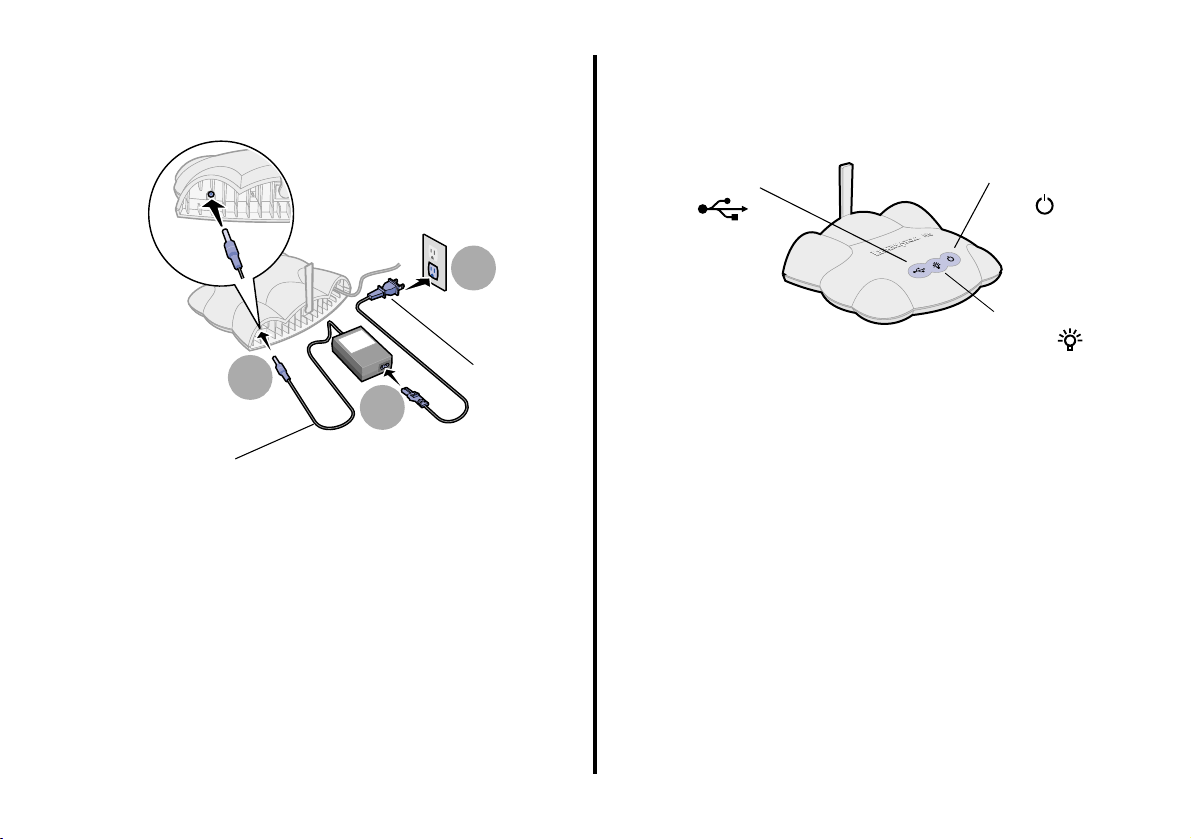
Step 6:Connect your adapter
Step 7:Make sure all indicator
power suppl y
3
1
2
Power supply
If necessary, replace the US power plug adapter with the
correct power plug adapter for your geography.
US
power
plug
adapter
lights are on
USB light
If, after 30 seconds, one or more of the indicator lights are
not on or blinking, see page 22.
Note: The Network li nk li ght blinks to indic ate any
network activity in the area.
Power light
Network link light
5
Getting Started
Page 11
Lexmark confidential until announced
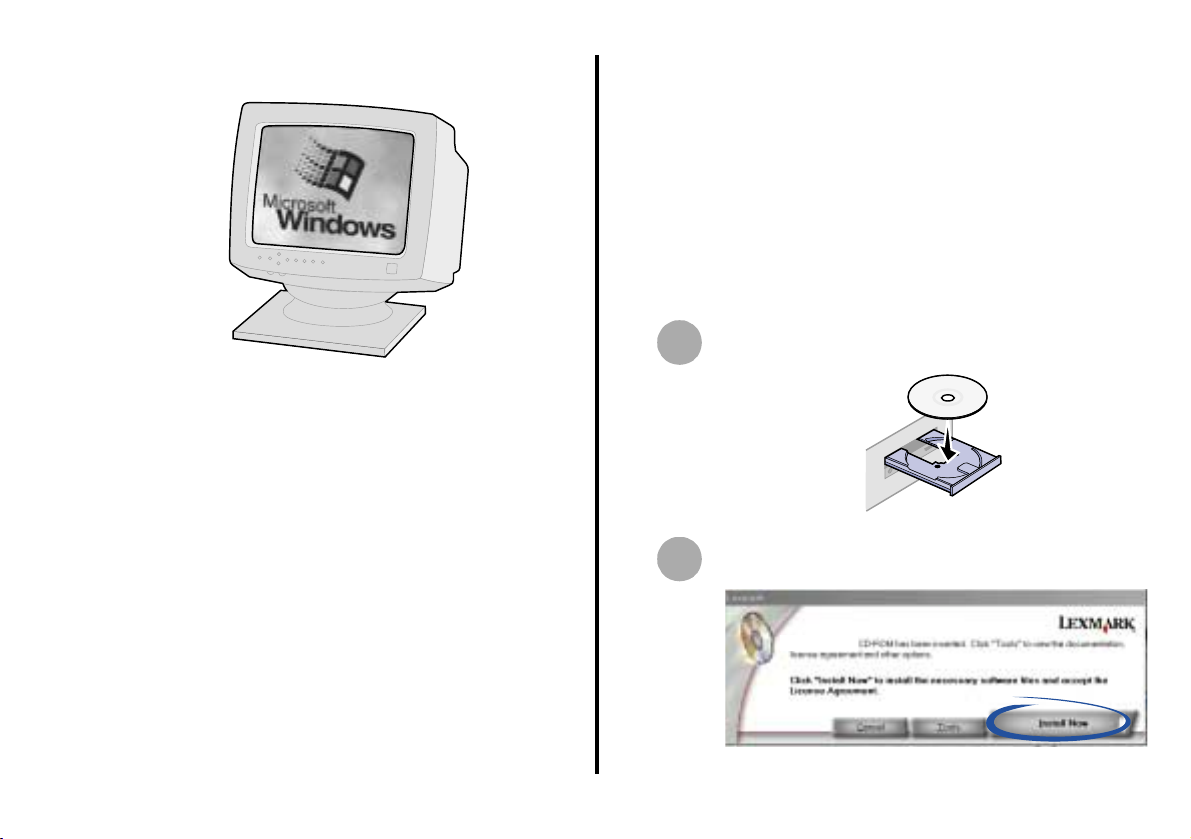
Step 8:T urn on y our computer Step 9:Set up your adapter on
the network
Your adapter must establish communication with either a
remote host if your network has an ad hoc configuration or
an access point if your network has an infrastructure
configuration.
If you have any questions about the software screens and
messages that appear during setup, see Troubleshooting,
beginning on page 21, or click Help on the software screen.
Insert the Lexmark Printer Adapter software CD
1
as shown.
Windows 98
Windows Me
Windows 2000
Windows XP
When the software installation screen appears,
2
click Install Now.
Getting Started
The Lexmark Printer Adapter
6
Page 12
Lexmark confidential until announced
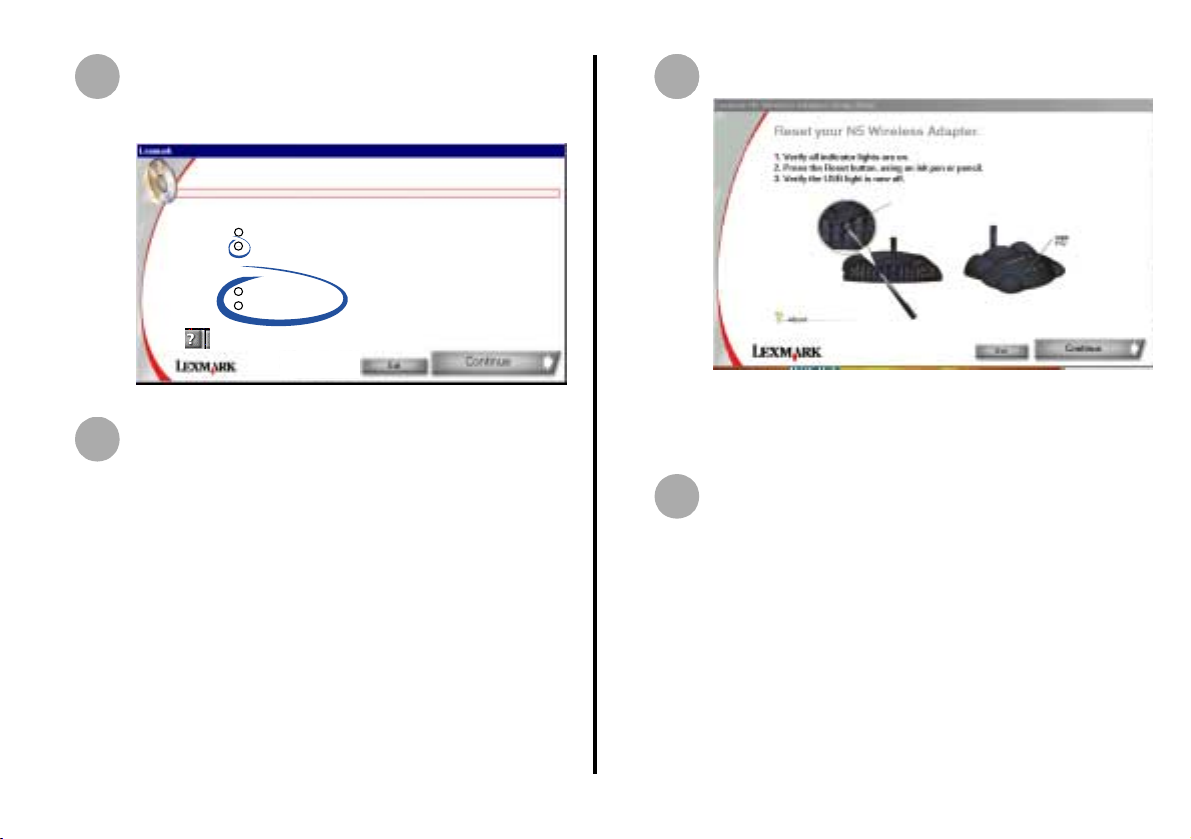
Select Lexmark N5 Wireless Adapter and the
3
type of printer you connected the adapter to in
Step 5 on page 4.
Select adapter and printer type
Select which adapter you are i nstalling
Lexmark N1 Ethernet Adapter
Lexmark N5 Wireless Adapter
Select which printer type i s attached
Inkjet
Laser
For more key information.
Which printers are supported?
Click Continue.
4
Follow the instructions on your screen to reset
35
your adapter to the factory defaults.
Note:When the USB light goes out momentarily,
the adapter has been properly reset to the
factory defaults.
Click Continue.
6
7
Getting Started
Page 13
Lexmark confidential until announced
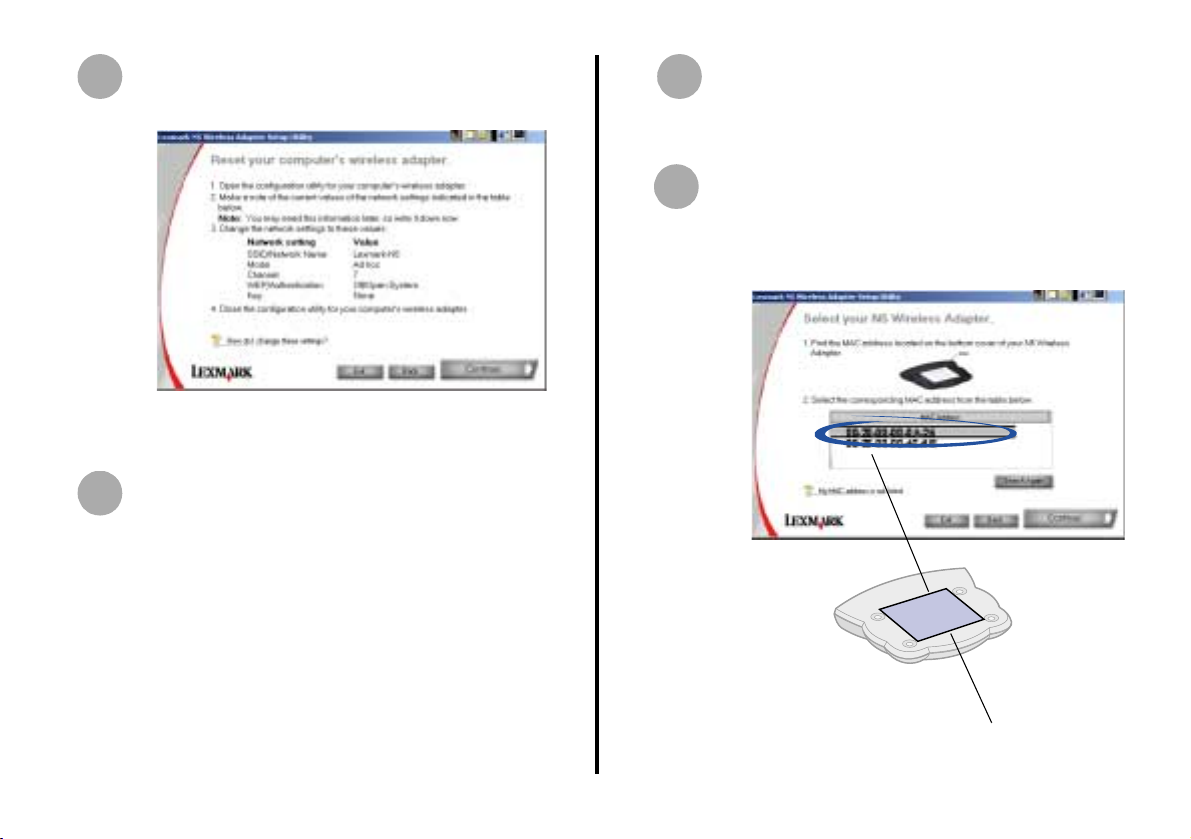
Follow the instructions on your screen to change
7
the values of your computer’s wireless adapter
network settings.
Do not exit the Lexmark Printer Adapter software.
You need to have both utilities active at this time.
Use the space below to write down the current
8
values of the network settings. You may need to
refer to them later.
SSID/Network name __________________
Mode ______________________________
Channel ____________________________
WEP/Authentication __________________
Key________________________________
Return to the Lexmark Printer Adapter software
9
after all settings have been changed and the
configuration utility for your computer’s wireless
adapter has been closed.
If there is only one printer adapter on your
10
network, continue with step 12 on page 9.
If there are two or more printer adapters on your
network, select your adapter from the list of
available network devices.
Your adapter is the
device whose MAC
address matches the
MAC address on the
bottom cover of your
adapter.
MAC address
Getting Started
8
Page 14
Lexmark confidential until announced
Click Continue.
11
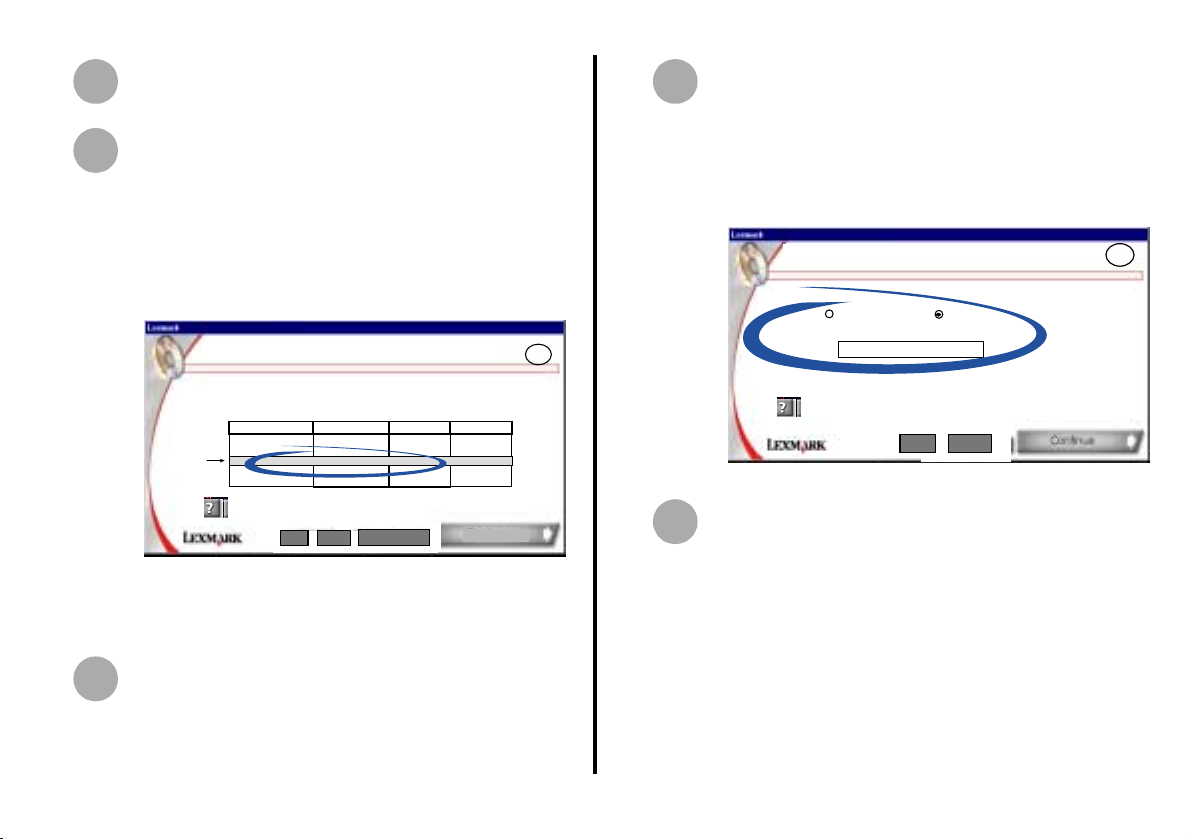
Select the network to which you want to connect
12
your printer.
Note: If the network to which you want to
connect your printer is the same network
to which your computer was connected,
you may want to refer to the values you
wrote down in step 7 on page 8.
Join the network
Setup your wireless printer adapter.
You are connected to the N5 adapter at address 00-20-00-00-0A-47
Find the network that you wish to have this adapter join from the list below and
select connect.
(ed: selection is
highlighted, do
not show N5)
SSID
John's Infrastructure None 8
default Infrasturcture None 5
home Infrastr ucture Yes 9
If your adapter is not listed
If your network is not listed.
Mode Encryption Channel
Advanced
Back Exit
Manual Select io n
Note: If your network is not listed, click Advanced
to manually select your network settings.
Connect
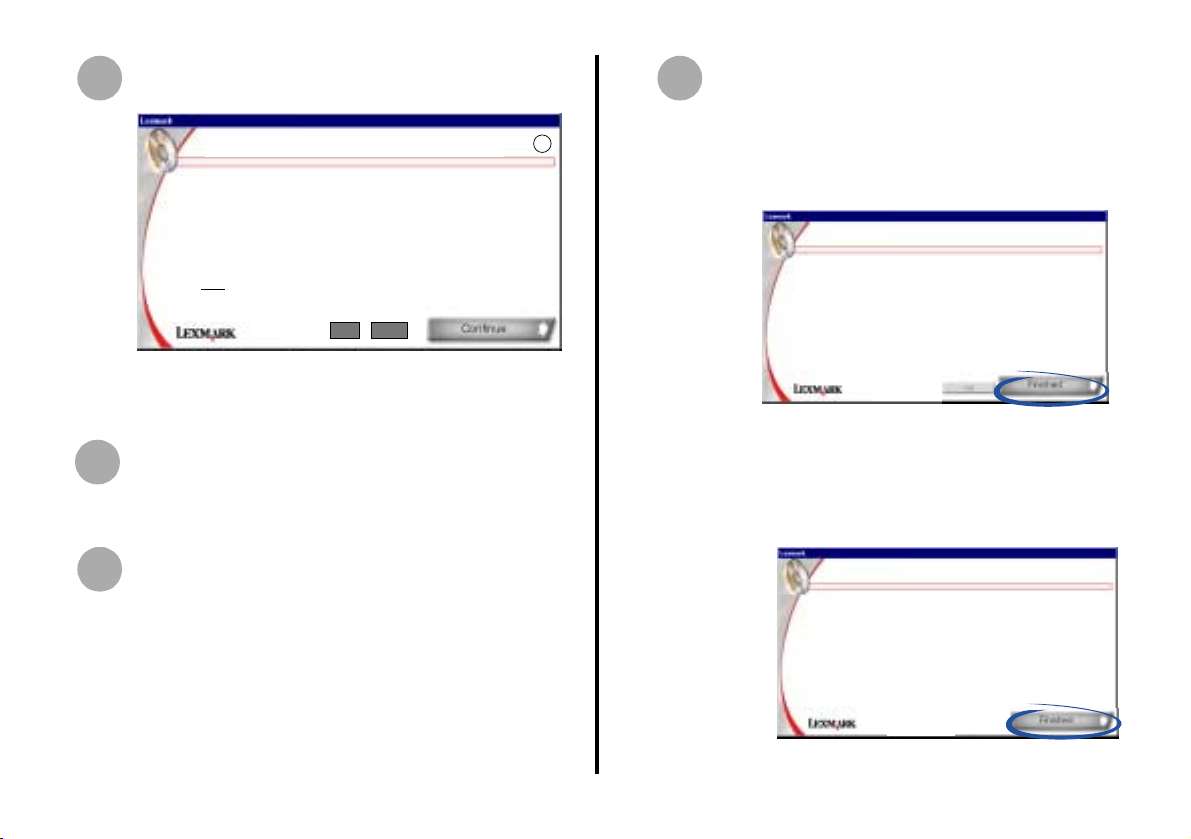
If you do not have WEP security enabled for your
13
network, continue with step 15 on page 10.
If your network is secured, select the encryption
bit and enter the WEP Key on the Network
Security screen.
Network Security.
Enter WEP information
The network that you selected requires a security key.
40/64 bit 128 bit
4
Click Continue.
14
WEP Key
Note: Key must be hexidecimal. Passphrases not supported
For more key information.
Back Exit
6
Click Connect.
11
9
Getting Started
Page 15
Lexmark confidential until announced
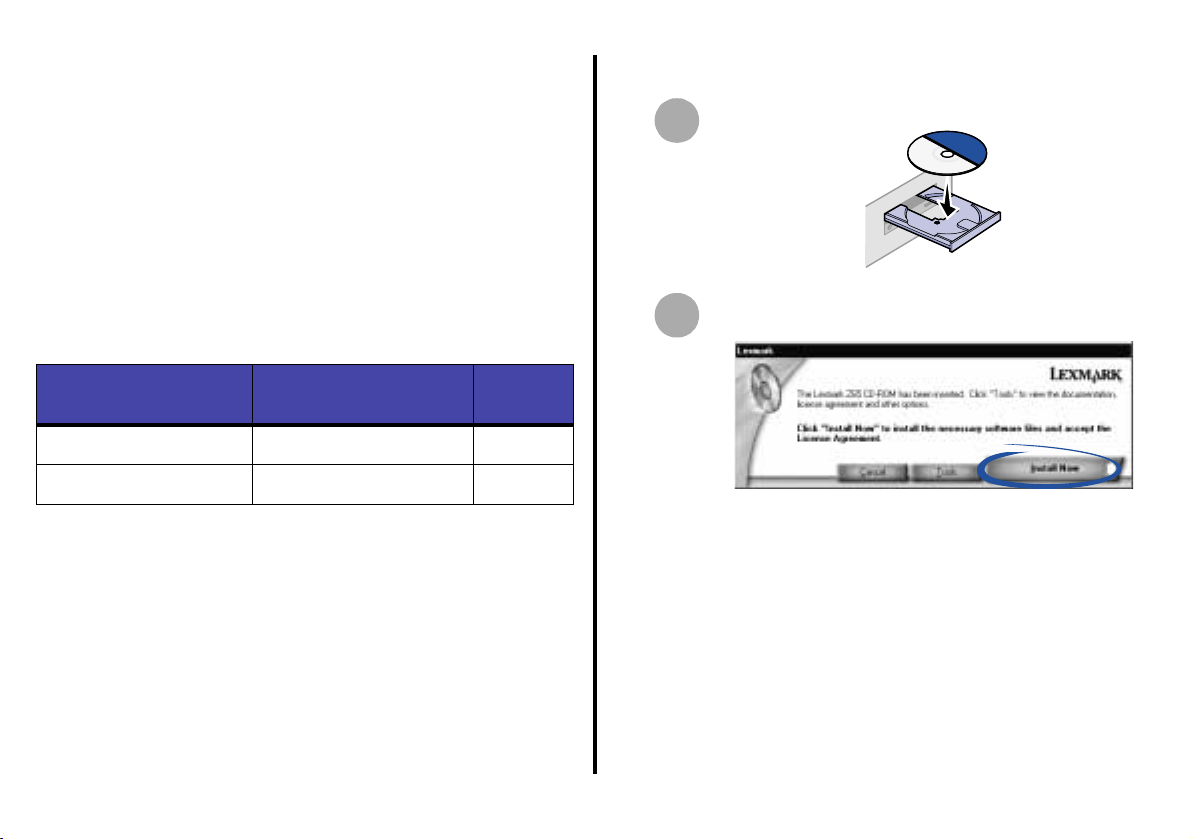
Follow the instructions on your screen to restore
15
the original network settings.
Return to your network settings
Reset your computer’s wireless adapter.
Using your comp uter’s wireless network utility, change the network settings to the
1.
values that you saved when you started or to new network values th at yo u ha ve
selected where the N5 adapter is connected.
Your wireless printer adapter has been set to:
SSID = value from screen 4 or 5
Press continue when the compute r has returne d to the network w h e re
mode = value from screen 4 or 5
the N5 adapter has been placed.
channel = value from screen 4 or 5
encryption = value from screen 6
2. After you reset your computer’s wireless adapter, press continue to
complete the setup of your wireless printer adapter.
Back Exit
Do not exit the Lexmark Printer Adapter software.
You need to have both utilities active at this time.
Return to the Lexmark Printer Adapter software
16
after all settings have been restored and the
configuration utility for your computer’s wireless
adapter has been closed.
Click Continue.
17
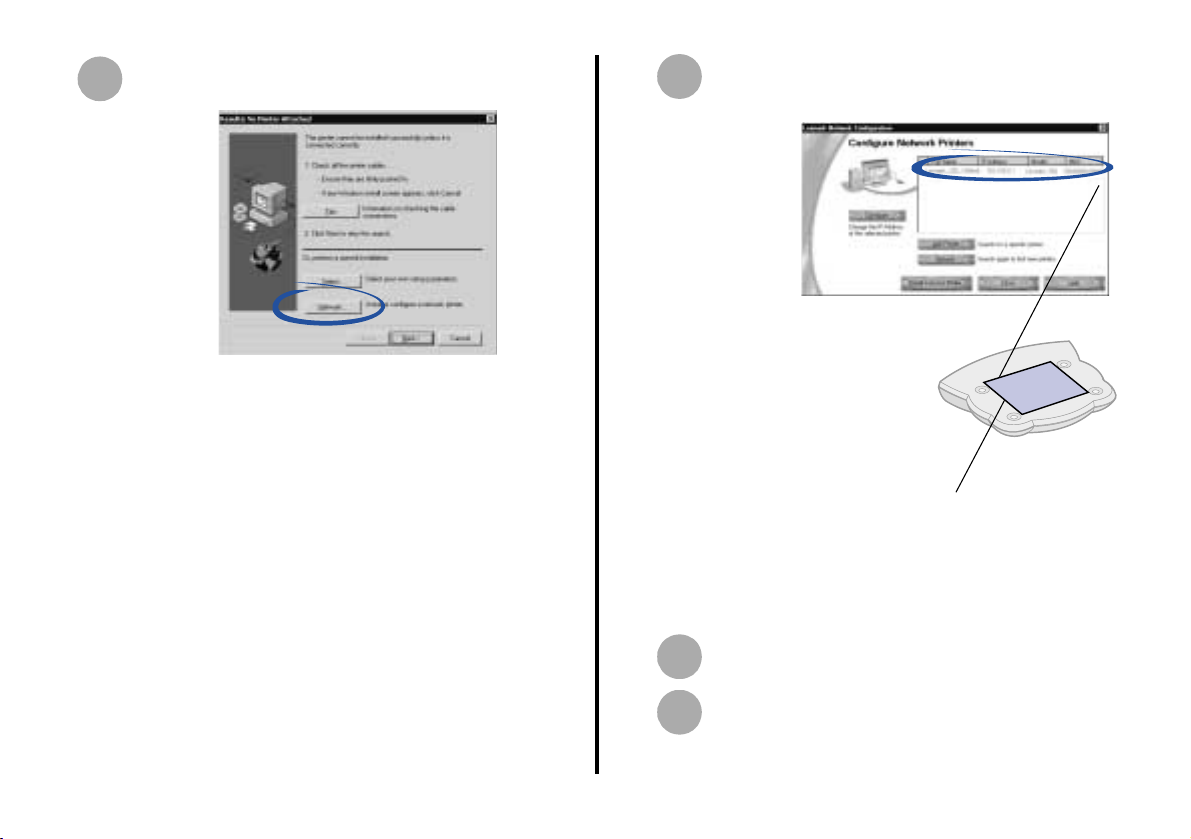
You are finished setting up your adapter on the
18
network.
– If you connected your adapter to an inkjet
7
printer, click Finished, and then continue with
Configure your Lexmark inkjet printer on
page 11.
Continue setup with printer driver
Finish the printer setup using the printer CD or inst alled printer software as indicated in the
printer adapter getting started manual.
– If you connected your adapter to a laser printer,
a network port for your laser printer is created.
Click Finished, and then continue with
Configure your Lexmark laser printer on
page 16.
A network printer port is defined
Wireless setup is complete. A ne twork printer port has been creat ed that contains the
name of the printer and the last 6 digits of the MAC address similar to the following:
Lexmark_E320_003 5D0
If your printer driver is already installed, go to section XXX of the adapter getting started
manual for instructions on connecting your printer to the network port.
If the printer has not been installed, install the printer to the network port following the
instructions that came with your printer.
Getting Started
10
Page 16
Lexmark confidential until announced
Step 10:Configure your
Lexmark inkjet p rinter
Use the printer software to help configure your network inkjet
printer. If you have not already installed this software, locate
the CD that came with your printer now.
Choose a procedure from the following table to install your
printer software and configure your network printer.
If you have questions about the software screens and
messages that appear during installation, see
Troubleshooting beginning on page 21.
Procedure
Inkjet 1 No 11
Inkjet 2 Yes 13
Note: Your screens may look different from the
ones shown in this book.
Printer software
previously installed? Page
Inkjet 1 (software not previousl y installed)
Insert the printer software CD as shown.
1
When the Lexmark printer software installation
2
screen appears, click Install Now.
11
Getting Started
Page 17
Lexmark confidential until announced
From the Results: No Printer Attached screen,
3
click Network.
Note: If the Results: No Printer Attached
screen does not appear, continue with
step 6 on page 12.
From the Network Configuration screen, select
4
your network printer from the list of available
printers.
Y our network printer is
the one whose MAC
address matches the
MAC address on the
bottom cover of your
adapter.
MAC address
Note: If your network printer is
<Unconfigured>, see Manually
configure the network printer on page
28, and then continue with step 5.
Getting Started
12
Click Install Selected Printer.
5
Follow the instructions on your screen to
6
complete software installation.
Page 18
Lexmark confidential until announced
You are finished setting up your computer to work with your
network inkjet printer; however, the printer software must be
installed on each computer that uses the network printer.
To set up other computers on your network, continue with the
following instructions:
Insert the printer software CD.
1
When the Lexmark printer software installation
2
screen appears, click Install or Install Now.
If the printer software was previously installed on
this computer, you are prompted to update the
existing driver or install another copy of the driver.
Select Install another copy of the driver only if
you plan to print to multiple printers of the same
model. For example, you might have a Lexmark
Z65 locally attached and another Lexmark Z65 on
your network. If you choose to Install another
copy of the driver, make sure you change your
printer selection whenever you want to print to the
network printer.
Continue with step 3 on page 12.
3
Inkjet 2 (software previously installed)
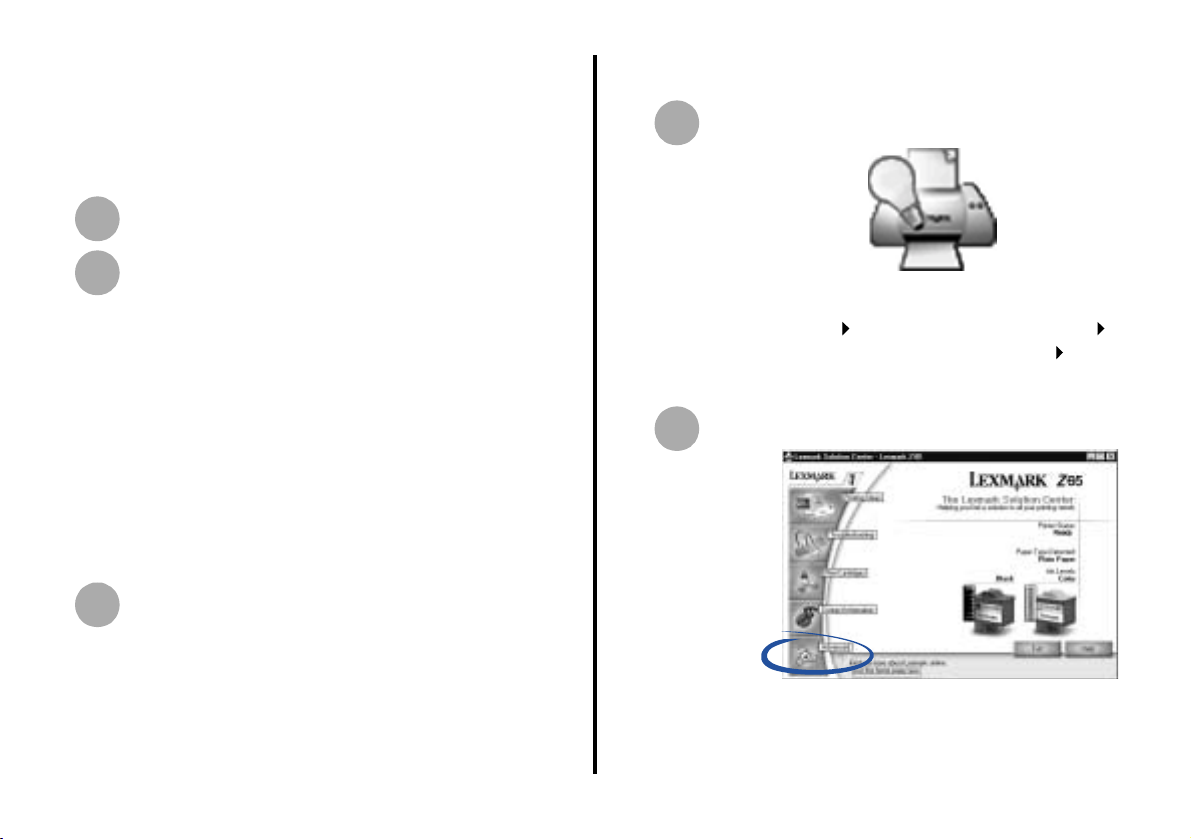
From your desktop, double-click the Lexmark
1
Solution Center icon.
Note: If the icon is not on your desktop, click
Start Programs or All Programs the
name of y our Le xmark pri nter Lexmark
Solution Center.
From the Lexmark Solution Center screen, click
2
the Advanced tab.
13
Getting Started
Page 19
Lexmark confidential until announced
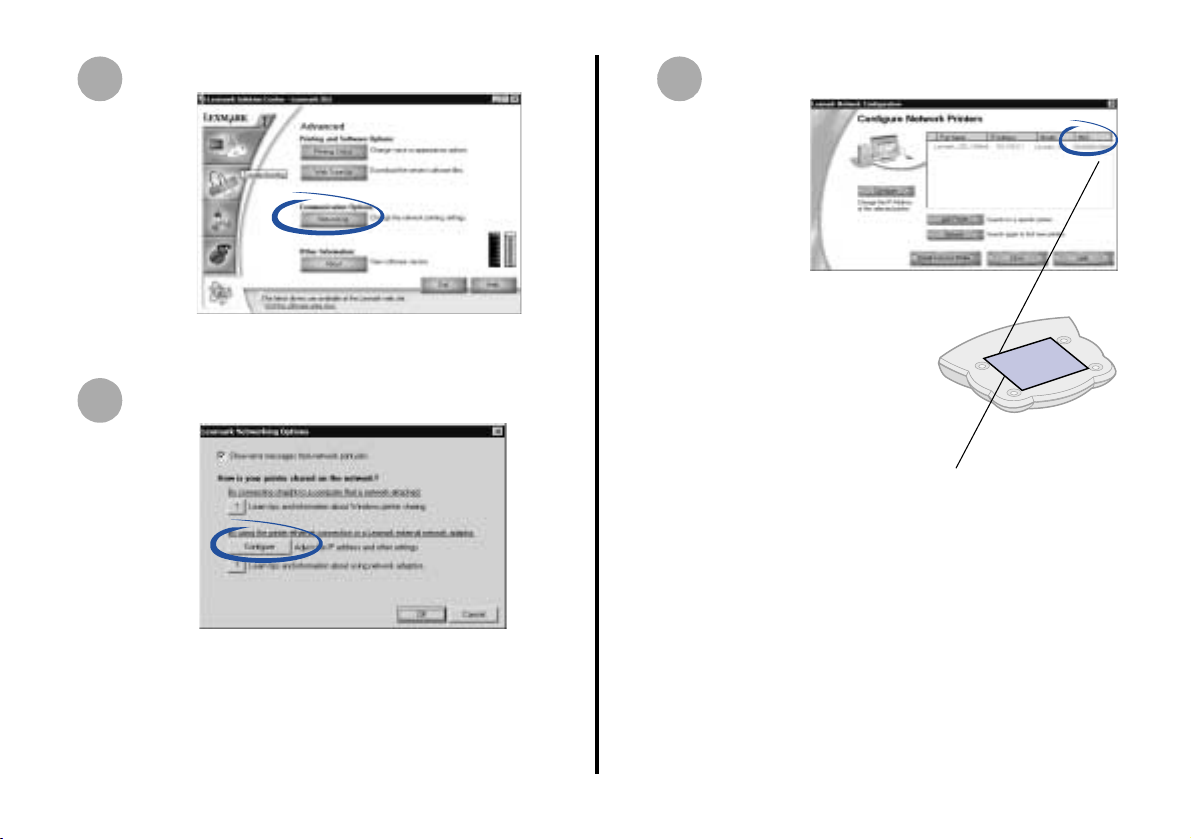
From the Advanced window, click Networking.
3
From the Networking Options screen, click
4
Configure.
On the Network Configuration screen, find your
5
network printer in the list of available printers.
Y our network printer is
the one whose MAC
address matches the
MAC address on the
bottom cover of your
adapter.
MAC address
Getting Started
14
Page 20
Lexmark confidential until announced
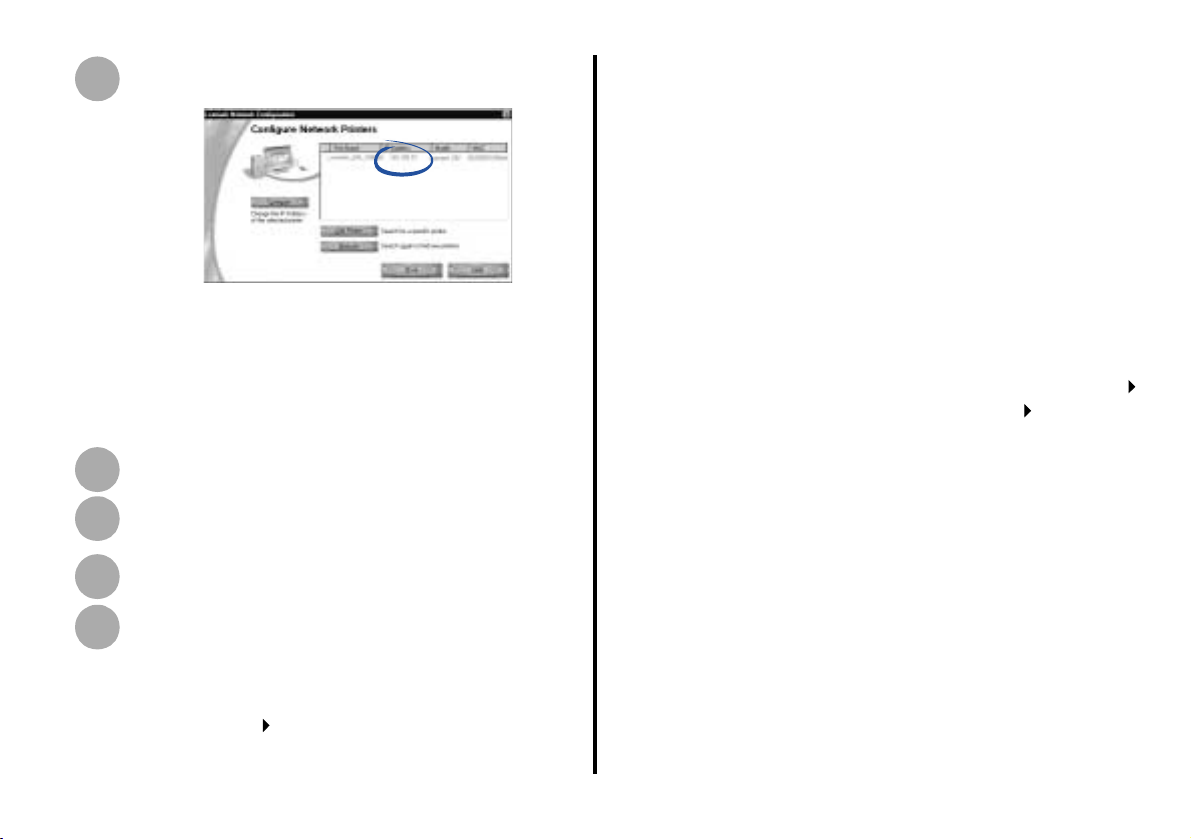
V erify that an IP address is listed for your network
6
printer.
Note: If there is not an IP address listed or your
network printer is <Unconfigured>, see
Manually configure the network
printer on page 28, and then continue
with step 7.
Click Close.
7
From the Networking Options screen, click
8
Cancel.
Exit the Lexmark Solution Center.
9
Select the network printer port.
10
Windows 98/Me/2000
c Make sure Set as Default is selected and
Use Printer Offline is not selected, and then
click Properties.
d Click the Details or Port tab.
e From the Print to the following port: menu,
select the printer port that consists of the
printer name followed by the last six
characters of the adapter MAC address (for
example, Lexmark_Z65_1008e8).
f Click OK.
Windows XP
a From the Start menu, click Control Panel
Printers and Other Hardware Printers and
Faxes.
b Click the Ports tab.
c From the list of ports, select the one that
consists of the printer name followed by the
last six characters of the adapter MAC
address (for example,
Lexmark_Z65_1008e8).
d Click Apply.
e Click OK.
a From the Start menu, click
Settings Printers.
b Right-click the icon for your network printer.
You are finished setting up your computer to work with your
network inkjet printer; however, the printer software must be
installed on each computer that uses the network printer.
15
Getting Started
Page 21

Lexmark confidential until announced
To set up other computers on your network, continue with the
following instructions:
Insert the printer software CD.
1
When the Lexmark printer software installation
2
screen appears, click Install or Install Now.
If the printer software was previously installed on
this computer, you are prompted to update the
existing driver or install another copy of the driver.
Select Install another copy of the driver only if
you plan to print to multiple printers of the same
model. For example, you might have a Lexmark
Z65 locally attached and another Lexmark Z65 on
your network. If you choose to Install another
copy of the driver, make sure you change your
printer sele ction wh ene ver you w ant to pri nt to the
network printer.
Continue with step 3 on page 12.
3
Step 10:Configure your
Lexmark laser printer
Use the printer software to help configure your network laser
printer. If you have not already installed this software, locate
the CD that came with your printer now.
Choose a procedure from the following table to install your
printer software and configure your network printer.
Printer software
Procedure
Laser 1 No 17
Laser 2 Yes 19
previously installed?
Page
Getting Started
16
Page 22

Lexmark confidential until announced
Laser 1 (software not pre viously installed)
Follow the instructions for your operating system.
Windows 98/Me
1 Launch the drivers CD that shipped with your printer.
2 Click
3 Click
4 Select your network printer from the list and LPT1
5 Click
6 When installation completes, click
7 Restart the computer.
8 From the Start menu, click Settings Printers.
9 Right-click the icon for your network printer.
10 Make sure Set as Default is selected and Use Printer
11 From the Details tab, select the printer port that
Printer Software.
Agree on the License Agreement.
from the pull-down menu.
Finish.
OK.
Offline is not selected, and then click Properties.
consists of the printer name followed by the last six
characters of the adapter MAC address (for example,
Lexmark_Z65_1008e8).
Note: If there is not a printer port that corresponds
to the adapter MAC address, see Manually
configure the network printer on page 28.
12 Click Apply.
13 Click Spool Settings.
14 Make sure the selection for bi-directional support is
not selected.
15 Click
You are finished setting up your computer to work with your
network laser printer; however, the printer software must be
installed on each computer that uses the network printer.
To set up other computers on your network, repeat step 1
through step 15 for each computer.
OK.
Note: If the printer software was previously
installed on the computer, you are prompted
to update the existing driver or install
another copy of the driver. Select Install
another copy of the driver only if you plan
to print to multiple printers of the same
model. For example, you might have a
Lexmark Z65 locally attached and another
Lexmark Z65 on your network. If you choose
to Install another c opy of the driver, make
sure you change your printer selection
whenever you want to print to the network
printer.
17
Getting Started
Page 23

Lexmark confidential until announced
Windows 2000/XP
1 Launch the drivers CD that shipped with your printer.
2 Click
3 Click
4 Select your network printer from the list and LPT1
5 Click
6 When installation completes, click
7 Restart the computer.
8 From the Start menu, click Settings Printers.
9 Right-click the icon for your network printer.
10 Make sure Set as Default is selected and Use Printer
11 F rom the Ports tab, select the printer port that
12 Make sure the selection for bi-directional support is
13 Click
Printer Software.
Agree on the License Agreement.
from the pull-down menu.
Finish.
OK.
Offline is not selected, and then click Properties.
consists of the printer name followed by the last six
characters of the adapter MAC address (for example,
Lexmark_Z65_1008e8).
Note: If there is not a printer port that corresponds
to the adapter MAC address, see Manually
configure the network printer on page 28.
not selected.
OK.
You are finished setting up your computer to work with your
network laser printer; however, the printer software must be
installed on each computer that uses the network printer.
To set up other computers on your network, repeat step 1
through step 13 for each computer.
Note: If the printer software was previously
installed on the computer, you are prompted
to update the existing driver or install
another copy of the driver. Select Install
another copy of the driver only if you plan
to print to multiple printers of the same
model. For example, you mi ght have a
Lexmark Z65 locally attached and another
Lexmark Z65 on your network. If you choose
to Install another copy of the driver, make
sure you change your printer selection
whenever you want to print to the network
printer.
Getting Started
18
Page 24

Lexmark confidential until announced
Laser 2 (software prev iousl y installed)
Follow the instructions for your operating system.
Windows 98/Me
1 From the Start menu, click Settings Printers.
2 Right-click the icon for your network printer.
3 Make sure Set as Default is selected and Use Printer
Offline is not selected, and then click Properties.
4 From the Details tab, select the printer port that
consists of the printer name followed by the last six
characters of the adapter MAC address (for example,
Lexmark_Z65_1008e8).
Note: If there is not a printer port that corresponds
to the adapter MAC address, see Manually
configure the network printer on page 28.
5 Click Apply.
6 Click Spool Settings.
7 Make sure the selection for bi-directional support is
not selected.
8 Click
OK.
You are finished setting up your computer to work with your
network laser printer; however, the printer software must be
installed on each computer that uses the network printer.
To set up other computers on your network, repeat step 1
through step 15 on page 17 for each computer.
Note: If the printer software was previously
installed on the computer, you are prompted
to update the existing driver or install
another copy of the driver. Select Install
another copy of the driver only if you plan
to print to multiple printers of the same
model. For example, you might have a
Lexmark Z65 locally attached and another
Lexmark Z65 on your network. If you choose
to Install another c opy of the driver, make
sure you change your printer selection
whenever you want to print to the network
printer.
19
Getting Started
Page 25

Lexmark confidential until announced
Windows 2000/XP
1 From the Start menu, click Settings Printers.
2 Right-click the icon for your network printer.
3 Make sure Set as Default is selected and Use Printer
Offline is not selected, and then click Properties.
4 From the Ports tab, select the printer port that
consists of the printer name followed by the last six
characters of the adapter MAC address (for example,
Lexmark_Z65_1008e8).
Note: If there is not a printer port that corresponds
to the adapter MAC address, see Manually
configure the network printer on page 28.
5 Make sure the selection for bi-directional support is
not selected.
6 Click
OK.
You are finished setting up your computer to work with your
network laser printer; however, the printer software must be
installed on each computer that uses the network printer.
To set up other computers on your network, repeat steps 1
through 13 on page 18 for each computer.
Note: If the printer software was previously
installed on the computer, you are prompted
to update the existing driver or install
another copy of the driver. Select Install
another copy of the driver only if you plan
to print to multiple printers of the same
model. For example, you mi ght have a
Lexmark Z65 locally attached and another
Lexmark Z65 on your network. If you choose
to Install another copy of the driver, make
sure you change your printer selection
whenever you want to print to the network
printer.
Getting Started
20
Page 26

Lexmark confidential until announced
Troubleshooting
For this problem: See page:
An indicator light is not on or blinking 22
The Lexmark Printer Adapter software
installation screen does not appear
I can not find the network settings of my
computer’s wireless adapter
My MAC address is not listed on the Select
your N5 Wireless Adapter screen
My network is not listed on the Connect to the
network (automatic) screen
I do not know the hexadecimal format of my
WEP key
Setup was not successful (My printer was not
found on the network)
The Lexmark printer software installation
screen does not appear
An error message appears 24
22
23
23
23
23
24
24
For this problem: See page:
My network printer does not appear in the list
of available printers
There is not an Install Selected Printer button
on the Network Configuration screen
My network printer does not print 26
25
25
There is not a Network button on the Results:
No Printer Attached screen
24
21
Getting Started
Page 27

Lexmark confidential until announced
An indicator light is not on
If this indicator
light is not on:
Power Adapter power supply is connected
USB USB cable connecting the adapter to
Network link • Access point is powered on.
Make sure the:
properly .
the printer is secure and the printer is
on.
Note: This light blinks to indicate USB
activity.
• Access point is configured for your
adapter.
• Adapter is within the appropriate
range for your access point.
• Network is operating properly. For
additional help, refer to your network
documentation or contact your
network administrator.
Note: This light blinks to indicate any
wireless network activity detected
by the adapter.
The Lexmark Pr inter Adapter softwar e
installation screen does not appear
1 Close all open software applications.
2 Restart your computer.
3 Reinsert the Lexmark Printer Adapter software CD.
– If the software installation screen appears,
continue with step 2 on page 6.
– If not, continue with the following steps:
a From your desktop, double-click My
Computer.
b Double-click the CD-ROM drive icon.
c If necessary, double-click setup.exe.
d Continue with step 2 on page 6.
Note: See page 5 to locate the indicator lights.
Getting Started
22
Page 28

Lexmark confidential until announced
I can not find the network se ttings of my computer’s wireless adapter
A wireless adapter configuration utility is provided with your
computer’s wireless adapter hardware. You can use this
utility to select the wireless communication data for your
network.
Generally , an icon for the utility can be found in the toolbar or
selected from the Start menu.
Once the utility is launched, click on the the appropriate tab
to view or change the wireless communication settings.
Note: Many wireless adapter configuration utilities
have a search feature to simplify network
selection.
My MA C ad dress i s not li sted on the Select your N5 Wireless Adapter screen
• Verify that all three lights on the adapter are on.
• Verify that you pressed the Reset button on the back
of the adapter, and waited until the USB light stopped
blinking.
• If you manually entered the SSID, verify the value
Lexmark-N5 was entered correctly. The SSID is
case-sensitive, and there should be no extraneous
spaces.
• Click Search Again or Back to return to the previous
screen and re-enter the data.
My network is not listed on the Connect to the network (a utomatic) sc reen
• The network settings of some ad hoc or closed
system wireless networks may not display. Click
Advanced to manually select the network settings.
• Make sure the network is operating properly. For help,
refer to your network documentation or contact your
network administrator.
I do not know the hexa decimal f ormat of my WEP key
• Go to another device on your network and note the
selections for key and number of bits.
• 40/64 bit keys contain 5 alphanumeric characters
(0 through 9, A through F) and 128 bit keys contain
10.
• If your network uses a pass-phrase, refer to the
documentation that came with your access point.
23
Getting Started
Page 29
Lexmark confidential until announced
Setup was not successful (My printer was not found on the ne tw ork)
• Verify the network status of your computer’s wireless
adapter. If the network is not active, you did not
reconnect to the network. Click Back to return to the
previous screen.
• If the computer appears on the network, but the
printer does not, go to step 9 on page 6, and repeat
the install process.
• If you can see the Lexmark-N5 network using the
wireless search feature, it is likely the printer adapter
never connected with your network. Go to step 9 on
page 6, and repeat the install process.
The Lexmark printer software installation screen does not appear
1 Close all open software applications.
2 Restart your computer.
3 Reinsert the printer software CD.
– If the Lexmark printer software installation
screen appears, continue with step 3 on page
12.
– If not, continue with the following steps:
b Double-click the CD-ROM drive icon.
c If necessary, double-click setup.exe.
d Continue with step 3 on page 12.
An error message appears
Follow the instructions on any error message that appears on
your computer screen. Click the ? or Help button for
additional information.
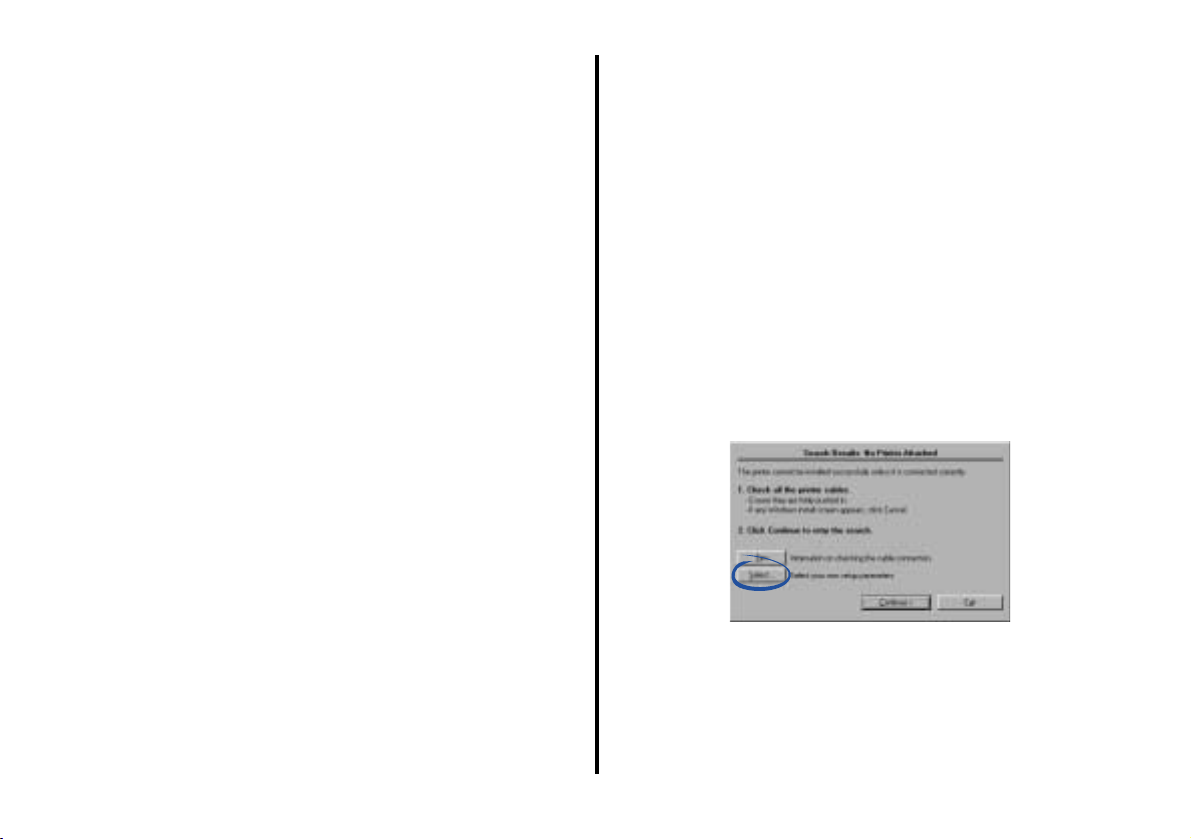
There is not a Netw ork b utton on th e Results: No Pr inte r Att ach ed scre en
1 From the Search Results: No Printer Attached screen,
click Select.
a From your desktop, double-click My
Getting Started
Computer.
24
Page 30
Lexmark confidential until announced
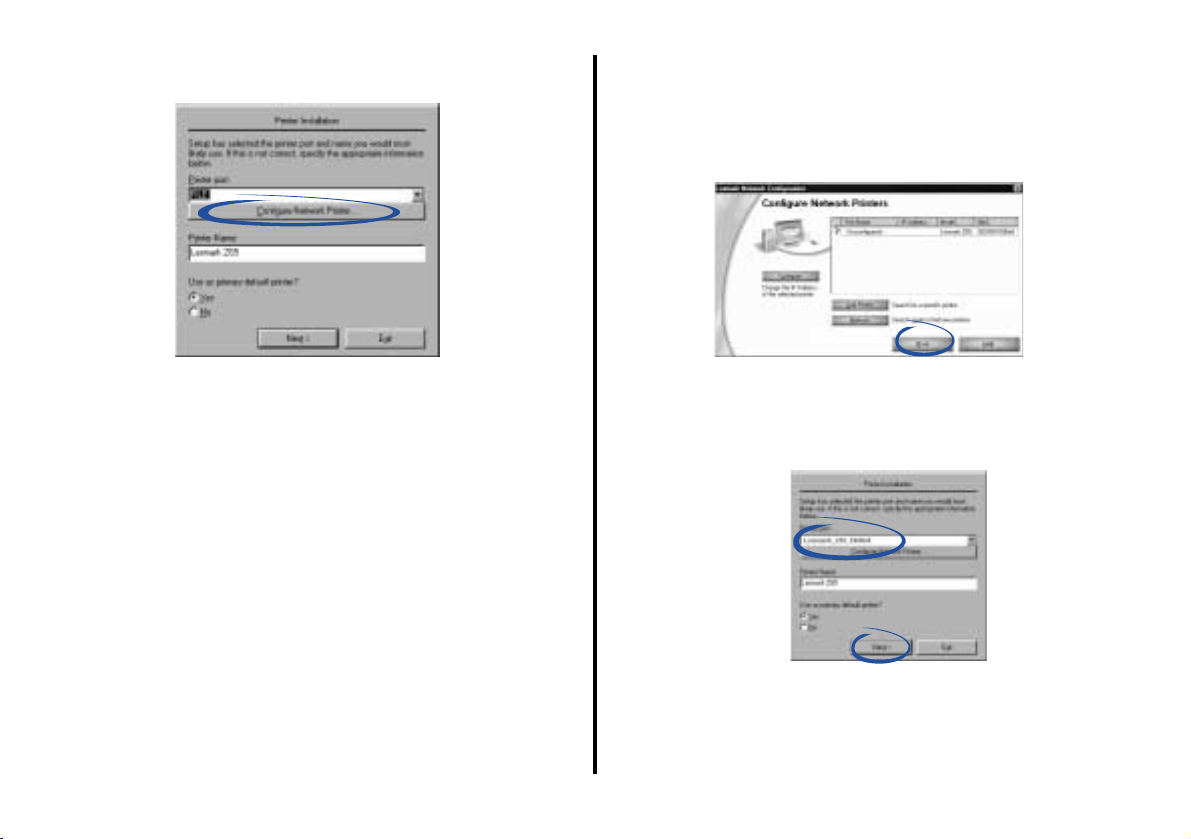
2 From the Printer Installation screen, click Configure
Network Printer.
3 Continue with step 4 on page 12.
My network printer does not appear in the list of available printers
• Unplug the adapter power supply, and then plug it in
again.
• Make sure all cables to the printer, adapter, electrical
outlet, and network connection are secure (pages 4
through 5).
• Click Refresh.
• If your network printer is on a remote subnet, click
Add Printer, and then follow the instructions on your
screen.
• Restart the comput er.
There is not an Install Selected Printer button on the Netw ork C onfiguration screen
1 From the Network Configuration screen, click Close.
2 From the Printer Installation screen, select your
printer port from the pull-down menu, and then click
Next.
3 Follow the instructions on your screen to complete
software installation.
25
Getting Started
Page 31

Lexmark confidential until announced
My network printer does not print
• Make sure all cables to the printer, adapter, electrical
outlet and network connection are secure (pages 4
through 5).
• Make sure all indicator lights are on (page 5).
• Check the printer status (page 30).
• Make sure the network is operating properly.
Refer to your network documentation or contact your
network administ rator.
• Make sure the printer software is installed on the
computer you are sending the print job from (page 11
(inkjet) or page 16 (laser)).
Note: You must install the printer software on each
computer that uses the network printer.
• Make sure your network printer has been assigned an
IP address.
– If your adapter is connected to an inkjet printer,
check the Network Configuration screen to
verify an IP address is listed. For help
accessing the Network Configuration screen,
follow steps 1 through 4 on pages 13 and 14.
If there is not an IP address listed for your
network printer, see Manually configure the
network printer on page 28.
– If your adapter is connected to a laser printer,
run the Laser Configuration Utility on the
Lexmark Printer Adapter software CD that
shipped with your adapter. For help, see Laser
printers on page 29.
• Make sure you have selected the correct printer port
for the network printer. For help selecting the network
printer port, see page 30.
• Restart the computer.
• Make sure there is not a problem with the printer
itself.
a Disconnect the printer from the adapter.
b Attach the printer directly to your computer
with a USB or parallel cable.
If you are able to print when the printer is directly
attached, there may be a problem with your network.
Refer to your network documentation or contact your
network administrator.
• Uninstall and then reinstall the printer software.
(page 27)
If the printer still does not print, refer to your printer
documentation for help.
Getting Started
26
Page 32

Lexmark confidential until announced
How Do I...?
Use this chapter to find out how to perform common tasks
related to your adapter and network printer
To find out how to: See page:
Change the computer’s network settings 27
Print a test page 27
Uninstall the printer software 27
Manually configure the network printer 28
Select the network printer port 30
Check the printer status 30
Reset the adapter 31
Contact Lexmark 31
.
Change the computer’s network sett ings
A wireless adapter configuration utility is provided with your
computer’s wireless adapter hardware. You can use this
utility to sele ct the wireless communication data for your
network.
Generally , an icon f or the utility can be found in the toolbar or
selected from the Start menu.
Once the utility is launched, click on the the appropriate tab
to view or change the wireless communication settings.
Note: Many wireless adapter configuration utilities
have a search feature to simplify network
selection.
Print a test p age
1 From the Start menu, click Settings Printers.
2 From the Printers folder, right-click the icon for your
network printer.
3 Select Properties from the sidebar menu.
4 From the General tab, click Print Test Page.
27
Getting Started
Page 33
Lexmark confidential until announced
Uninstall the printer software
Inkjet printers
1 From the Start menu, click Programs or All
Programs the name of your Lexmark printer
Lexmark Uninstall.
2 Follow the instructions on your screen.
Note: To reinstall the printer software, restart your
computer, and then follow the instructions on
page 11.
Laser printers
Refer to the instructions that came with your printer.
Note: To reinstall the printer software, restart your
computer, and then follow the instructions on
page 17.
Manually configure the netw ork print er
Your printer software automatically configures your network
printer. However, following are some instances when you
may need to configure it manually.
• You manually assigned IP addresses for other
network devices.
• You want to assign a specific IP address.
• You want to use your network printer on a remote
subnet.
Follow the instructions for your printer type.
Inkjet printers
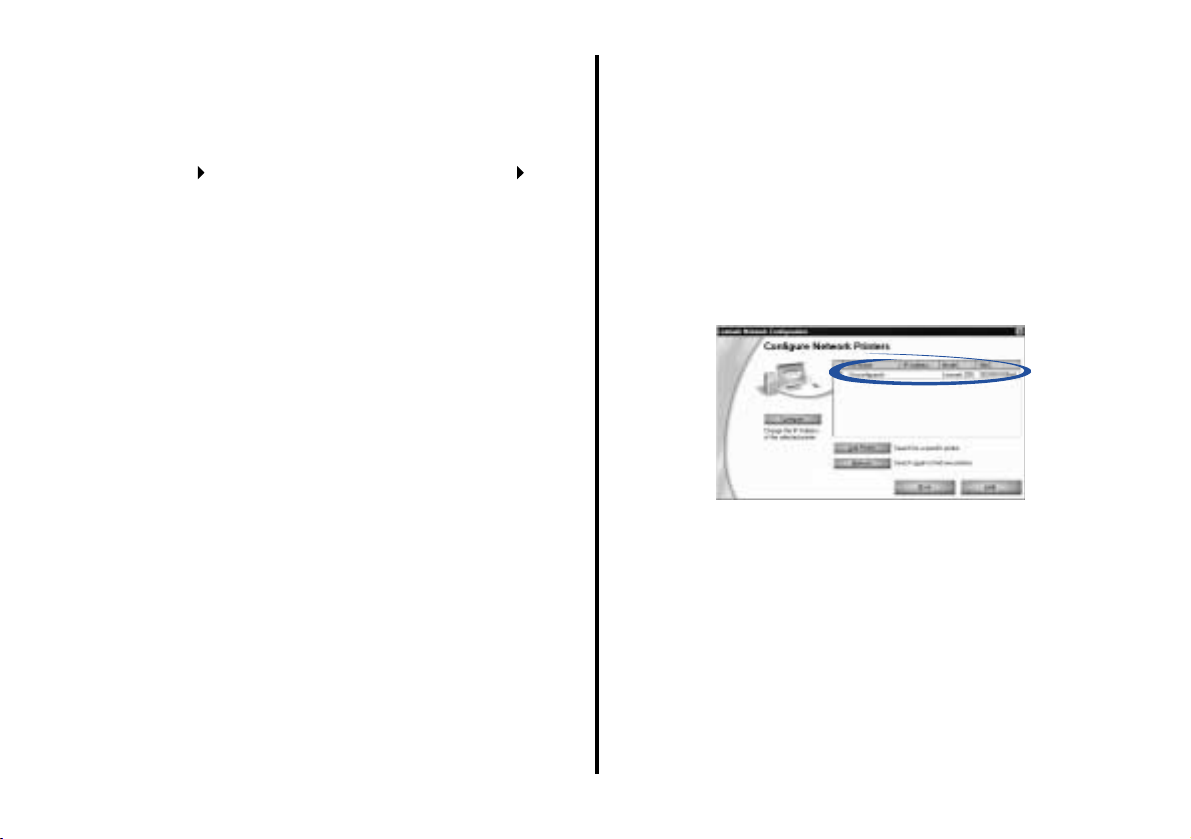
1 From the Network Configuration screen, select your
<Unconfigured> network printer.
• Your network printer is <Unconfigured>.
• There is not an IP address listed for your network
printer on the screen that lists the available printers.
Getting Started
28
Page 34
Lexmark confidential until announced
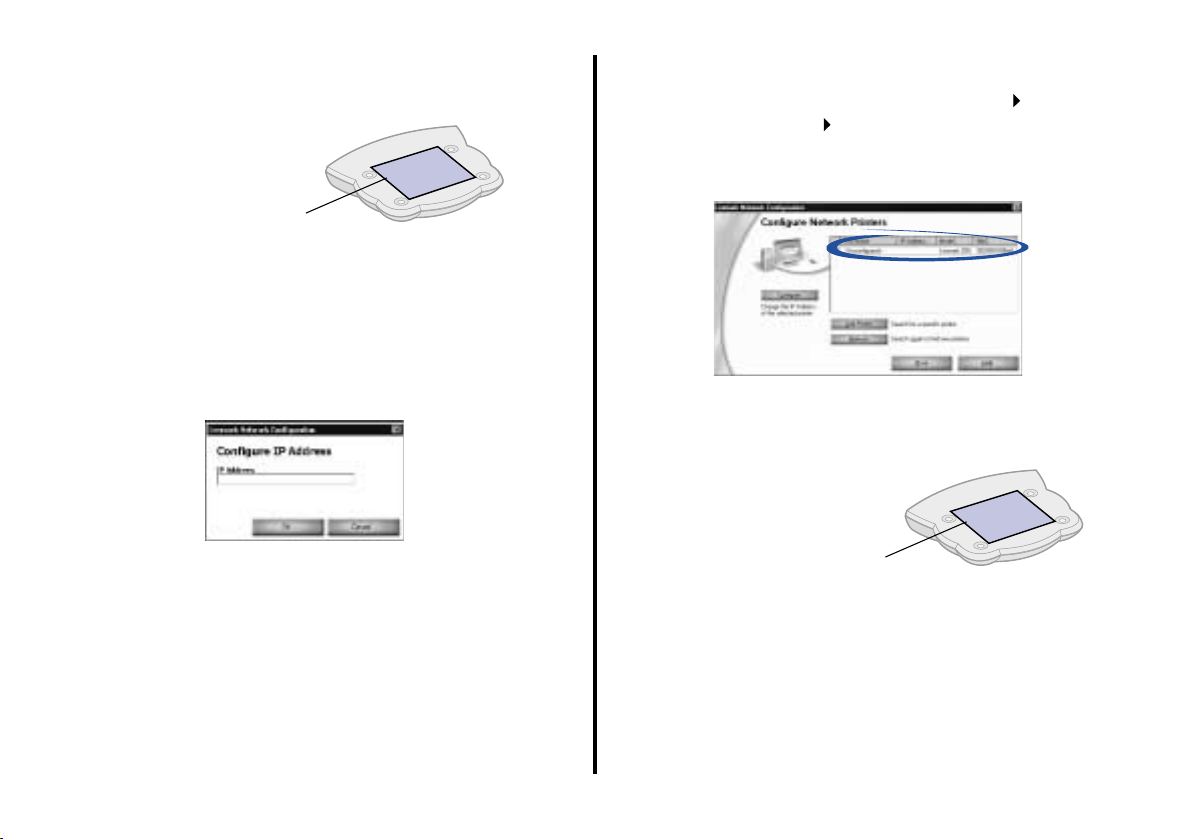
Your network printer is the one whose MAC address
matches the MAC address on the bottom cover of
your adapter.
MAC address
Note: If you want to print to a network printer on a
remote subnet, click Add Printer and follow
the instructions on your screen.
2 Click Refresh.
3 Click Configure.
4 Enter an IP address that is valid for your network.
For help, refer to your network documentation or
contact your network administrator.
5 Click OK.
6 Continue with step 5 on page 12 (software not
previously installed) or step 7 on page 15 (software
previously installed).
Laser printers
1 From the Start menu, click Programs Lexmark
Printer Adapter Laser Configuration Utilit y.
2 From the Network Configuration screen, select your
<Unconfigured> network printer.
Your network printer is the one whose MAC address
matches the MAC address on the bottom cover of
your adapter.
MAC address
Note: If you want to print to a network printer on a
remote subnet, click Add Printer and follow
the instructions on your screen.
3 Click Refresh.
4 Click Configure.
29
Getting Started
Page 35
Lexmark confidential until announced
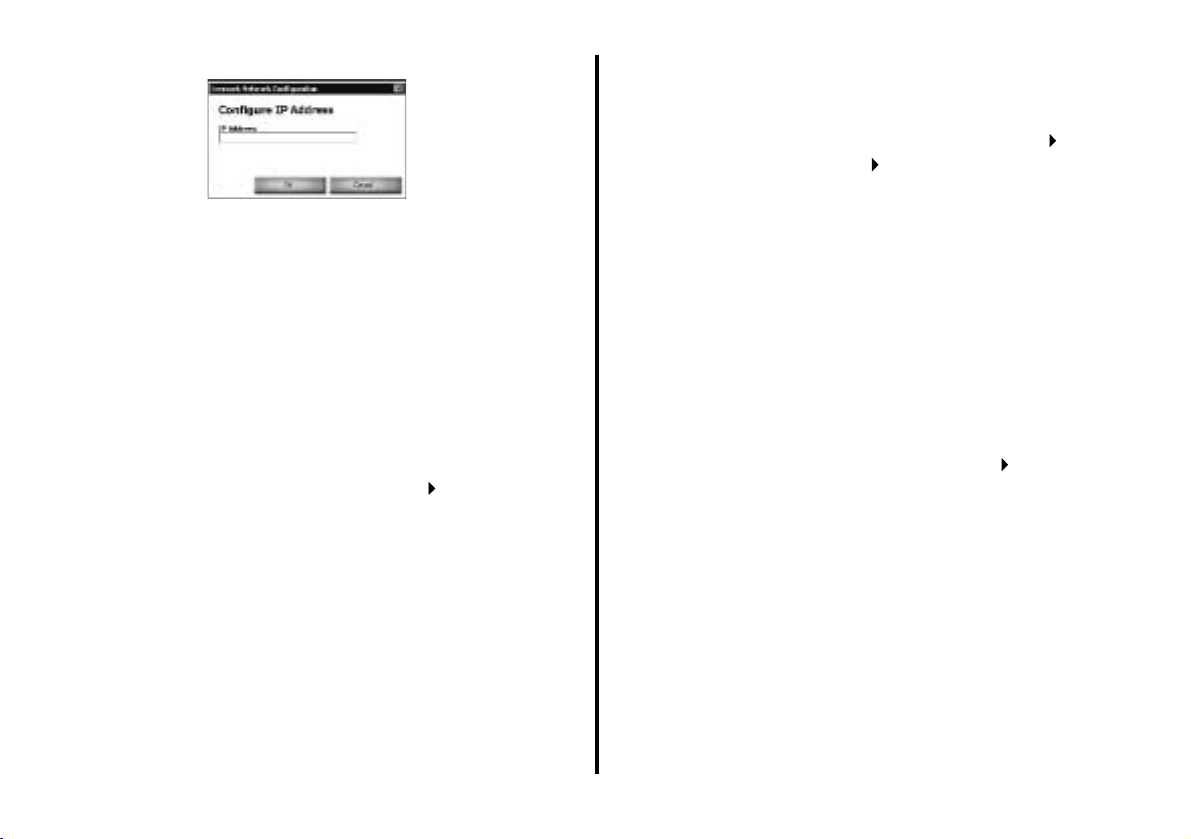
5 Enter an IP address that is valid for your network.
For help, refer to your network documentation or
contact your network administrator.
6 Click OK.
7 Click Close.
8 Select the network printer port. For help, see page 30.
Select the network print er port
Windows 98/Me/2000
1 From the Start menu, click Settings Printers.
2 From the Printers folder, right-click the icon for your
network printer.
3 Click Properties.
4 Click the Details or Port tab.
5 From the pull-down menu labeled Print to the
following port:, select the printer port that consists of
the printer name followed by the last six characters of
the adapter MAC address (for example,
Lexmark_Z65_1008e8).
6 Click OK.
Windows XP
1 From the Start menu, click Control Panel Printers
and Other Hardware Printers and Faxes.
2 Click the Ports tab.
3 From the list of ports, select the one that consists of
the printer name followed by the last six characters of
the adapter MAC address (for example,
Lexmark_Z65_1008e8).
4 Click Apply.
5 Click OK.
Check the pr inter s tatus
1 From the Start menu, click Settings Printers.
2 From the Printers folder, right-click the icon for your
network printer.
3 Make sure Set as Default is selected and Use Printer
Offline is not selec ted .
Getting Started
30
Page 36

Lexmark confidential until announced
Reset the adapter
If you encounter problems during setup or later decide to
move your adapter to a different network, you may need to
reset the adapter.
To reset the adapter:
1 Verify all indicator lights are on (page 5).
2 Press the Reset button using a pen or pencil.
3 Verify the USB light goes out momentarily.
Contact Lexmark
Visit our Web site at www.lexmark.com to:
• Receive technical suppor t .
• Register your adapter.
Other ways to contact our Customer Support Center:
• From the Lexmark Solution Center, click Contact
Information Customer Support.
• Insert the printer software CD that came with your
printer into your CD-ROM drive, and then click
Contact Lexmark Technical Support.
• Insert the Lexmark N5 Adapter Setup Utility software
CD into your CD-ROM drive, and then click Contact
Lexmark Technical Support.
31
Getting Started
Page 37

Lexmark confidential until announced
Glossary
Ad hoc: An 802.11b networking framework in which devices
or stations communicate directly with each other, without the
use of an access point (AP). Ad-hoc mode is also referred to
as peer-to-peer mode or an Independent Basic Service Set
(IBSS).
Authentication: The process of identifying an individual,
usually based on a username and password. Also, one of
your computer’s wireless adapter network settings.
Channel: A communications path between two computers or
devices. Also, one of your computer’s wireless adapter
network settings.
DHCP: Dynamic Host Configuration Protocol, a p rotocol for
assigning dynamic IP addre sses to devices on a network .
With dynamic addressing, a device can have a different IP
address every time it connects to the network. This means
that a new device can be added to a network without the
hassle of manually assigning it a unique IP address.
Infrastructure: An 802.11b networking framework in which
devices communicate with each other by first going through
an Access Point (AP). In infrastructure mode, wireless
devices can communicate with each other or can
communicate with a wired network.
IP address: A number that identifies each device connected
to the network. For example, 157.184.0.1.
Key: A password needed to decipher encoded data. Also,
one of your computer’s wireless adapter network settings.
MAC address: A 12-character identifier that is unique for
each network hardware device. For example,
00.02.00.10.08.e8.
Mode: The particular networking framework (Ad hoc or
Infrastructure) that your network devices are operating in.
Also, one of your computer’s wireless adapter network
settings.
network-capable printer: A Lexmark printing device that
does not need to be locally attached to a computer. When
connected to a network it can be accessed by any computer
on the same network.
Network name: see SSID.
printer port: Windows terminology for a physical or logical
connection to a printer. For example:
• LPT1 indicates the printer is attached to a physical
parallel port with a parallel cable.
• USB001 indicates the printer is attached to a physical
USB port with a USB cable.
• Lexmark_Z65_1008e8 indicates a logical connection
to the printer across your network.
subnet: A portion of a network that shares a common
address component. On TCP/IP networks, subnets are
defined as all devices whose IP addresses have the same
Getting Started
32
Page 38

prefix. For example, all devices with IP addresses that start
with 192.168.0 would typically be part of the same subnet.
SSID: Service Set Identifier (SSID), one of your computer’s
wireless adapter network settings, is also referred to as a
Network Name because essentially, it is a name that
identifies a wireless network.
The SSID is a 32-character unique identifier that acts as a
password when a mobile device tries to connect to the BSS
(Basic Service Set). The SSID differentiates one WLAN from
another, so all access points and all devices attempting to
connect to a specific WLAN must use the same SSID. A
device will not be permitted to join the BSS unless it can
provide the unique SSID. Because an SSID can be sniffed in
plain text from a packet it does not supply any security to the
network.
TCP/IP: The Transmission Control Protocol (TCP) and the
Internet Protocol (IP) are protocols that let different types of
computers communicate with each other. The internet is
based on this suite of protocols.
WEP: Wired Equivalent Privacy (WEP), one of your
computer’s wireless adapter network settings, is a security
protocol for wireless local area networks (WLANs) defined in
the 802.11b standard.
Lexmark confidential until announced
WEP provides security by encrypting data over radio waves
so that it is protected as it is transmitted from one end point
to another.
33
Getting Started
Page 39

Statement of Limited War r anty
Lexmark International, Inc. Lexington, KY
This limited warranty applies to the United States. For
customers outside the U.S., refer to the country-specific
warranty information that came with your product.
This limited warranty applies to this product only if it was
originally purchased for your use, and not for resale, from
Lexmark or a Lexmark remark eter, referred to in this statement
as “Remarketer.”
Limited warranty
Lexmark warrants that this product:
• Is manufactured from new parts, or new and serviceable
used parts, which perform like new parts
• Is, during normal use, free from defects in material and
workmanship
If this product does not function as warranted during the
warranty period, contact a Rem ark eter o r Lexmark for repair or
replacement (at Lexmark's option).
If this product is a featur e or o ption, th is statem ent app l ies only
when that feature or optio n is used w ith the pr oduct for which it
was designed. To obtain warranty service, you may be requi red
to present the feature or option with the product.
If you transfer this product to another user, warranty service
under the terms of this statement is available to that user for
the remainder of the war ra nty pe riod. You should transfer proo f
of original purchase and this statement to that user.
Limited warranty service
The warranty period starts on the date of original purchase as
shown on the purchase receipt. The warranty period ends 12
months later.
To obtain warranty service you may be required to present
proof of original purchase. You may be required to deliver your
product to the Remarketer or Lexmark, or ship it prepaid and
suitably packaged to a Lexmark designated location. You are
responsible for loss of, or damage to , a prod uct in transit to the
Remarketer or the designated location.
When warranty service involves the exchange of a product or
part, the item replaced becomes the property of the
Remarketer or Lexmark. The replacement may be a new or
repaired item. The replacement item assumes the remaining
warranty period of the original product.
Replacement is not available to you if the product you present
for exchange is defaced, altered, in need of a repair not
included in warranty service, damaged beyond repair, or if the
product is not free of a ll lega l obli gations , restrictions , lien s, and
encumbrances.
Before you present this product f or warr anty service, remov e all
print cartridges, programs, data, and rem o vable storage media
(unless directed otherwise by Lexmark).
For further explanation of your warranty alternatives and the
nearest Lexmark authorized servicer in your area, contact
Lexmark at (407) 563-4600, or on the World Wide Web at
www.lexmark.com.
Remote technical support is provided for this product
throughout its warranty period. F or pro ducts no long er co vered
by a Lexmark warranty, technical support may not be available
or only be available for a fee.
Extent of limited warranty
We do not warrant uninterrupted or error-free operation of any
product.
Warranty service does not include repair of failures caused by:
• Modification or attachments
• Accidents or misuse
• Unsuitable physical or operating environment
• Maintenance by anyone other than Lexmark or a Lexmark
authorized servicer
• Operation of a product beyond the limit of its duty cycle
• Use of printing media outside of Lexmark specifications
• Supplies (such as ink) not furnished by Lexmark
• Products, components, parts, materials, software, or
interfaces not furnished by Lexmark
TO THE EXTENT PERMITTED BY APPLICABLE LAW,
NEITHER LEXMARK NOR ITS THIRD PARTY SUPPLIERS
OR REMARKETERS MAKE ANY OTHER WARRANTY OR
CONDITION OF ANY KIND, WHETHER EXPRESS OR
IMPLIED, WITH RESPECT TO THIS PRODUCT, AND
SPECIFICALLY DISCLAIM THE IMPLIED WARRANTIES OR
CONDITIONS OF MERCHANTABILITY, FITNESS FOR A
PARTICULAR PURPOSE, AND SATISFACTORY QUALITY.
ANY WARRANTIES THAT MAY NOT BE DISCLAIMED
UNDER APPLICABLE LAW ARE LIMITED IN DURATION TO
THE WARRANTY PERIOD. NO WARRANTIES, EXPRESS
OR IMPLIED, WILL APPLY AFTER THIS PERIOD. ALL
INFORMATION, SPECIFICATIONS, PRICES, AND
SERVICES ARE SUBJECT TO CHANGE AT ANY TIME
WITHOUT NOTICE.
Limitation of liability
Your sole remedy under this limited warranty is set forth in this
document. For any claim concerning performance or
nonperformance of Lexmark or a Remarketer for this product
under this limited warranty, you may recover actual damages
up to the limit set forth in the following paragraph.
Lexmark's liability for actual damages from any cause
whatsoever will be limited to the amount you paid for the
product that caused the damages. This limitation of liability will
not apply to claims by you for bodily injury or damage to real
property or tangible personal property for which Lexmark is
legally liable. IN NO E VENT W ILL LE XMARK BE L IABLE F OR
ANY LOST PROFITS, LOST SAVINGS, INCIDENTAL
DAMAGE, OR OTHER ECONOMIC OR CONSEQUENTIAL
DAMAGES. This is true even if you advise Lexmark or a
Remarketer of the possibility of such damages. Lexmark is not
liable for any claim by you based on a third party claim.
This limitation of remedies also applies to claims against any
Suppliers and Remarketers of Lexmark. Lexmark's and its
Suppliers' and Remarketers' limitations of remedies are not
cumulative. Such Suppliers and Remarketers are intended
beneficiaries of this limitation.
Additional rights
Some states do not allow limitations on how long an implied
warranty lasts, or do not allow the exclusion or limitation of
incidental or consequential damages, so the limitations or
exclusions contained above may not apply to you.
This limited warranty gives you specific legal rights. You may
also have other rights that vary from state to state.
Page 40

P/N 12J0120 EC 2J0010 Printed in USA 09/02
Lexmark and Lexmark with diamond sign are trademarks of Lexmark International, Inc., registered in the
United States and/or other countries.
Lexington, Kentucky 40550, USA
© 2002 Lexmark International, Inc. 740 West New Circle Road,
www.lexmark.com
Page 41

IMPORTANT NOTE:
Federal Communications Commission (FCC) Radiation Exposure Statement
This equipment complies with FCC radiation exposure limits set forth for an
uncontrolled environment. In order to avoid the possibility of exceeding the FCC radio frequency
exposure limits, human proximity to the antenna shall not be less than 20 cm (8 inches) during normal
operation.
This transmitter must not be co-located or operating in conjunction with any other antenna or
transmitter.
This equipment has been tested and found to comply with the limits for a Class B digital device,
pursuant to Part 15 of the FCC Rules. These limits are designed to provide reasonable
protection against harmful interference in a residential installation. This equipment generates,
uses and can radiate radio frequency energy and, if not installed and used in accordance with
the instructions, may cause harmful interference to radio communications. However, there is
no guarantee that interference will not occur in a particular installation. If this equipment does
cause harmful interference to radio or television reception, which can be determined by turning
the equipment off and on, the user is encouraged to try to correct the interference by one of the
following measures:
- Reorient or relocate the receiving antenna.
- Increase the separation between the equipment and receiver.
- Connect the equipment into an outlet on a circuit different from that
to which the receiver is connected.
- Consult the dealer or an experienced radio/TV technician for help.
FCC Caution:To assure continued compliance, (example - use only shielded interface cables
when connecting to computer or peripheral devices). Any changes or modifications not
expressly approved by the party responsible for compliance could void the user's authority to
operate this equipment.
This device complies with Part 15 of the FCC Rules. Operation is subject to the
following two conditions: (1) This device may not cause harmful interference, and (2) this
device must accept any interference received, including interference that may cause
undesired operation.
This transmitter must not be co-located or operating in conjunction with any other antenna or
transmitter.
41
Page 42

R&TTE Compliance Statement
This equipment complies with all the requirements of the DIRECTIVE 1999/5/EC OF THE
EUROPEAN PARLIAMENT AND THE COUNCIL of 9 March 1999 on radio equipment and
telecommunication terminal Equipment and the mutual recognition of their conformity (R&TTE).
The R&TTE Directive repeals and replaces in the directive 98/13/EEC (Telecommunications Terminal
Equipment and Satellite Earth Station Equipment) As of April 8, 2000.
Safety
This equipment is designed with the utmost care for the safety of those who install and use it. However,
special attention must be paid to the dangers of electric shock and static electricity when working with
electrical equipment. All guidelines of this manual and of the computer manufacturer must therefore be
allowed at all times to ensure the safe use of the equipment.
EU Countries intended for use
The ETSI version of this device is intended for home and office use in Austria, Belgium, Denmark,
Finland, France(with Frequency channel restrictions), Germany, Greece, Iceland, Ireland, Italy,
Luxembourg, Netherlands, Norway, Portugal, Spain, Sweden, Switzerland and United Kingdom.
The ETSI version of this device is also authorized for use in EFTA member states Iceland,
Liechtenstein, Norway and Switzerland.
EU Countries Not intended for use
None.
Potential restrictive use
France: Only channels 10,11,12, and13
42
 Loading...