

Page 1
Instruction Manual
ThermoClock
RL851
Page 2
---------- English
GB
---------- Français
F
---------- Español
E
---------- Português
P
---------- Italiano
IT
---------- Deutsch
D
---------- Nederlands
NL
Page 3
Introduction
Congratulations! You have just acquired the Calendar/Alarm Clock ThermoClock® RL851,
from Lexibook®.
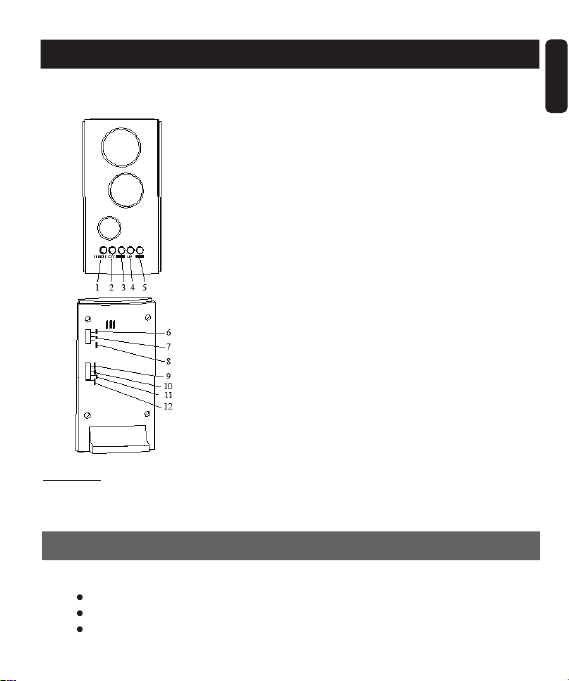
On the front of the equipment:
1 - Snooze On. Up Timer / DoOn and Off
2 - ºC / ºF Conversion
3 - 12/24 Hours Conversion. Down Mode (Decrease the item values for
Hour,Minute, Year, Month and Day)
4 - Up Mode (Increase the item values for Hour, Minute, Year, Month and Day)
5 - Mode Conversion
On the back of the equipment:
6 - Alarm On
7 - Alarm with Snooze On
8 - Alarm with Snooze Off
9 - Alarm Setting
10 - Time and Date setting
11 - Up Timer and Down Timer Setting
12 - Normal Time Display
WARNING
Before switching the unit on, remove the protective battery strip. Should the unit not
switch on, remove and replace the batteries, this will reset the machine.
Batterie
Changing Batterie:
Open the cover of the battery compartment at the back of the unit.
Insert 1 x CR2025 batterie ensuring the polarities are correctly aligned.
Close the battery compartment.
English
Copyright © Lexibook 2004 1
Page 4
English
No function is associated with the UP button.
A: Presentation of the equipment
Current time displayed on the top display, the display at the centre shows the
month, date, day of the week, and the lower display shows the temperature.
Keep pressed down the MODE button to display the time set for the alarm.
No function is associated with the UP button.
Press on DOWN to select the following display mode: 12 or 24-hour clock.
Press on ºC/ºF to select the following display mode: Temperature in Centigrade
(Cº) or Fahrenheit (Fº).
Press on SNOOZE to stop the alarm and the stopwatch once these are in use.
B: Setting the time
Position the selection button at the back of the equipment on T.SET.
Press on MODE to set the hours, minutes, year, month and date: The parameter to
be modified will blink on the display, use the
decrease the value of the parameter. The day of the week is automatically identified.
Place the selection button back to NORMAL.
C: Setting and stopping the alarm
Position the selection button at the back of the equipment on AL.SET. The
parameter to be modified will blink.
Press on MODE to set the hours, minutes, and the duration of the snooze function:
Press the UP or DOWN button to increase or decrease the value of the parameter;
the repetition of the snooze function is between 1 and 60 minutes.
Place the selection button back to NORMAL.
Slide the selection button to the AL.ON position in order to activate the alarm, the
Z
symbol will show on the top display. If you want the alarm to sound
Z
again, place the selection button on
Once the alarm sounds, press on SNOOZE to stop momentarily the alarm, the
symbol will blink on the display
To exit the alarm mode, slide the selection button to the AL.OFF position, the
symbols and will disappear from the display.
D: Stopwatch and countdown function
Place the selection button on the TIMER position, the word TIMER will show on
the lower part of the top display. The maximum count either up or down is 29:59:59
Press on MODE, then on UP or DOWN to set the hours, minutes and seconds.
Functions and settings
Z
Z
Z
UP or DOWN buttons to increase or
SNZ.
Z
Copyright © Lexibook 2004 2
Page 5

Press twice on SNOOZE to trigger the countdown function, and only once to start
the stopwatch.
To stop both press again on SNOOZE.
Resetting the stopwatch (Forward counting):
Make the display show 0:00:00 by pressing several times on the MODE button.
Press on SNOOZE to start the stopwatch function.
Resetting the countdown (backward counting): Press on MODE to display
29:59:59.
To stop the “Stopwatch” function, place the selection button back to NORMAL.
Warranty
This product is covered by our standard 2-year manufacturer warranty.
In the case of any fault, please return the unit to your original place of purchase or the address
below for replacement or repair. A copy of your sales receipt or other proof of purchase must
be provided. This warranty does not cover damage or faults occurring through misuse,
damage or abuse. This does not affect your statutory rights.
Returns/Warranty address: Lexibook UK Limited
Freephone Help Line: 0808 100 3015
Web: http://www.lexibook.com and https://my.lexibook.com
Email: infouk@lexibook.com
PO Box 66
Bordon
Hants
GU35 0ZN
England
English
Copyright © Lexibook 2004 3
Page 6

Introduction
Félicitations ! Vous venez dʼacheter le Réveil Calendrier
Lexibook®.
Français
Sur la face avant de lʼappareil :
1 - Arrêt du Snooze. Arrêt et mise en marche du chronomètre
2 - Conversion °C/°F
3 - Conversion de l'heure 12/24. Mode Down (diminue la valeur de l'heure, des
minutes, de l'année, du mois et du jour)
4 - Mode Up ( augmente les valeurs de l'heure, des minutes, de l'année, du mois
et du jour)
5 - Changement de mode
Sur la face arrière de lʼappareil :
6 - Mise en marche de l'alarme
7- Mise en marche de l'alarme avec le snooze
8 - Arrêt de l'alarme
9 - Réglage de l'alarme
10 - Réglage de l'heure et de la date
11 - Réglage du chronomètre et du compte à rebours
12 - Positionnement mode Normal
ATTENTION
Avant la première mise en marche de l'appareil, retirer la languette de protection des
piles. Si l'appareil ne s'allume pas, enlever puis remettre les piles pour effectuer sa
réinitialisation.
ThermoClock®, RL851, de
Pile
Changement des piles :
Ouvrir le couvercle du compartiment à piles situé au dos de lʼappareil.
Insérez 1 pile CR 2025 en respectant le sens des polarités.
Copyright © Lexibook 2004 4
Page 7
Refermer le compartiment à piles.
Sélection et réglages
A : Présentation de l'appareil
Indication de lʼheure actuelle sur lʼaffichage supérieur, lʼaffichage central indique le
mois, la date, le jour de la semaine et lʼaffichage inférieur, la température.
Maintenez la touche MODE enfoncée pour afficher l'heure d'alarme.
Aucune fonction nʼest associée à UP.
Appuyez sur DOWN pour choisir lʼaffichage : 12 ou 24 heures.
Appuyez sur ºC/ºF pour choisir lʼaffichage : degrés Celcius (C°) ou Farenheit (°F).
Appuyer sur SNOOZE pour arrêter lʼalarme et le chronomètre lorsquʼils sont
enclenchés.
B : Réglage de lʼheure
Positionnez le sélecteur au dos de lʼappareil sur T.SET.
Appuyez sur MODE pour régler les heures, les minutes, lʼannée, le mois, la date : la
donnée à modifier clignote et utilisez les touches UP ou DOWN pour augmenter
ou diminuer la valeur de la donnée. Le jour de la semaine est automatiquement
déterminé.
Repositionnez le sélecteur sur NORMAL.
C : Réglage et arrêt de lʼalarme
Positionnez le sélecteur au dos de lʼappareil sur AL.SET : la donnée à modifier
clignote.
Appuyez sur MODE pour régler les heures, les minutes, la durée du snooze.
Appuyez sur UP ou DOWN pour augmenter ou diminuer la valeur de la donnée ; la
répétition du snooze est comprise entre 1 et 60 minutes.
Repositionnez le sélecteur sur NORMAL.
Faites coulisser le sélecteur sur la position AL.ON pour enclencher lʼalarme, le
symbole apparaît sur lʼaffichage supérieur. Si vous souhaitez faire répéter
lʼalarme, positionnez le sélecteur sur la position
Lorsque lʼalarme sonne, appuyez sur SNOOZE pour lʼarrêter momentanément,
le symbole clignote à lʼécran.
Pour arrêter le mode alarme, positionnez le sélecteur sur AL.OFF, les symboles
Z
Z
Z
et disparaissent.
Z
SNZ.
Français
Copyright © Lexibook 2004 5
Page 8

D : Chronomètre et compte à rebours.
Positionnez le sélecteur sur la position TIMER , TIMER sʼaffiche en bas de
lʼaffichage supérieur. Le décompte maximal croissant/décroissant est 29:59:59.
Appuyez sur MODE puis sur UP ou DOWN pour régler les heures, les
minutes, les secondes. Appuyez deux fois sur
Français
compte à rebours et une seule pour démarrer la fonction du chronomètre.
Pour arrêter le chronomètre ou le compte à rebours, appuyez sur SNOOZE.
Remise à zéro du chronomètre (décompte croissant) :
Faîtes sʼafficher 0:00:00 en appuyant plusieurs fois sur la touche
appuyez sur la touche
Remise à zéro du compte à rebours (décompte décroissant) : appuyez sur MODE
pour afficher 29 :59 :59.
Pour arrêter la fonction « Chronomètre », positionnez le sélecteur sur
NORMAL.
SNOOZE pour démarrer la fonction de chronomètre.
SNOOZE pour démarrer la fonction de
Garantie
Ce produit est couvert par notre garantie de deux ans.
Pour toute mise en œuvre de la garantie ou de service après-vente, vous devez vous
adresser à votre revendeur muni de votre preuve d'achat. Notre garantie couvre les
vices de matériel ou de montage imputables au constructeur à l'exclusion de toute
détérioration provenant du non-respect de la notice d'utilisation ou de toute
intervention intempestive sur l'article (telle que démontage, exposition à la chaleur ou
à l'humidité…).
FAX : + 33 (0)1 73 23 23 04
Site Internet : http://www.lexibook.com
MODE,
Copyright © Lexibook 2004 6
Page 9

Introducción
¡Enhorabuena! Acaba de adquirir el reloj despertador ccalendario ThermoClock® RL851,
de Lexibook
En la parte frontal del aparato:
1 - Snooze On.
2 - ºC / ºF selección
3 - 12/24 Hours selección. Down Modo (para disminuir la hora, los minutos,
segundos, el mes y la fecha)
4 - Up Modo (para incrementar la hora, los minutos, segundos, el mes y la
fecha)
5 - Mode función
En la parte trasera del aparato:
6 - Activar la alarma
7 - Alarma con Snooze
8 - Alarma con snooze off
9 - Configurar la alarma
10 - Configurar la hora y la fecha
11 - Configurar el cronómetro
12 - Modo Normal
ATENCIÓN
Antes de poner en marcha el aparato, retire la lengüeta de protección de las pilas. Si el
aparato no se enciende, quite las pilas para realizar una reinicialización.
Pilas
Cambio de las pilas:
Abra la tapa del compartimento de pilas situado en el dorso del aparato.
Inserte 1 pila CR2025 respetando el sentido de las polaridades.
Cierre el compartimento de pilas.
Copyright © Lexibook 2004 7
Español
Page 10

Funciones y configuraciones
A: Presentación del aparato
La hora actual se muestra en la pantalla superior, la pantalla central muestra el
mes, la fecha, el día de la semana y en la pantalla inferior se muestra temperatura.
Mantenga pulsado el botón MODE para visualizar la hora fijada para la alarma.
No hay ninguna función asociada con el botón UP.
Pulse el botón DOWN para seleccionar los modos siguientes de visualización: 12 o
24 horas.
Español
Pulse el botón ºC/ºF para seleccionar los modos siguientes de visualización:
Temperatura en grados centígrados (Cº) o Fahrenheit (Fº).
Pulse el botón SNOOZE para detener la alarma y el cronómetro cuando estén
activados.
B: Cómo configurar la hora
Coloque el botón de selección de la parte trasera del aparato en la posición T.SET
Pulse en MODE para configurar la hora, los minutos, segundos, el mes y la fecha:
El parámetro a modificar parpadeará en la pantalla, use los botones UP o DOWN
para incrementar o disminuir el valor del parámetro. El día de la semana se definirá
automáticamente.
Vuelva a colocar el botón de selección en la posición NORMAL.
C: Cómo configurar y apagar la alarma
Coloque el botón de selección de la parte trasera del aparato en la posición
AL.SET. El parámetro a modificar parpadeará.
Pulse en MODE para configurar la hora, los minutos y la duracion de la funcion
"repeticion de alarma”.
Pulse el boton UP o DOWN incrementar o disminuir el valor del parametro; la
repeticion de funcion "repeticion de alarma" puede establecerse para entre 1 y 60
minutos.
Vuelva a colocar el botón de selección en la posición NORMAL.
Mueva el botón de selección de la parte trasera del aparato a la posición AL.ON
para activar la alarma, el símbolo aparecerá en la pantalla superior. Si desea
que la alarma vuelva a sonar, coloque el botón de selección en la posición SNZ.
Una vez que haya sonado la alarma, pulse el botón SNOOZE para detener
momentáneamente la alarma, el símbolo parpadeará en la pantalla.
Para salir del modo de alarma, mueva el botón de selección de la parte trasera del
aparato a la posición AL.OFF, los símbolos y desaparecerán de la pantalla.
8
Z
Z
Z
Z
Copyright © Lexibook 2004
Page 11

D: Función de cronómetro y cuenta atrás.
Coloque el botón de selección de la parte trasera del aparato en la posición
TIMER, la palabra TIMER aparecerá en la pantalla superior. La cuenta máxima
hacia delante o hacia atrás es de 29:59:59.
Pulse en MODE y a continuación en UP o DOWN para configurar la hora, los
minutos y los segundos. Pulse dos veces en SNOOZE para activar la función de
cuenta atrás y una sola vez para iniciar el cronómetro.
Para detener ambas funciones, pulse de nuevo una sola vez en SNOOZE.
Cómo poner a cero el cronómetro (cuenta hacia delante):
Haga que la pantalla muestre 0:00:00 pulsando varias veces el botón MODE. Pulse
en SNOOZE para activar la función del cronómetro.
Cómo poner a cero la cuenta atrás (cuenta hacia atrás): Pulse el botón MODE para
mostrar 29:59:59.
Para salir de la función “Cronómetro” vuelva a colocar el botón de selección en la
posición NORMAL.
Garantía
Este producto queda cubierto por nuestra garantía de dos años.
Para cualquier aplicación de la garantía o del servicio de postventa, debe dirigirse a su
proveedor con el comprobante de compra. Nuestra garantía cubre los defectos de material o
de montaje atribuibles al constructor, excepto cualquier deterioro que sea consecuencia
del no respeto de las instrucciones de uso o de cualquier intervención imprudente sobre el
artículo (como el desmontaje, la exposición al calor o a la humedad...).
FAX : + 34 91 548 92 33
Sitio Web : http://www.lexibook.com
Español
Copyright © Lexibook 2004 9
Page 12

Introdução
Parabéns! Acabou de adquirir o Relógio ThermoClock® RL851 com Calendário e
Despertador, da Lexibook®.
Parte da frente do produto:
1 - Snooze On.
2 - ºC / ºF Modo
3 - 12/24 Hours Modo. Down Modo (para diminuir horas, minutos, ano, mês
e data)
4 - Up Modo (para aumentar horas, minutos, ano, mês e data)
5 - Função modo
Português
Parte de trás do produto:
6 - Para activar o despertador
7 - Despertador - Snooze on
8 - Despertador - Snooze off
9 - Acertar o despertador
10 - Acertar as horas e data
11 - Acertar o cronometro
12 - Modo normal
CUIDADO
Antes da primeira utilização do aparelho, retire a patilha de protecção das pilhas. Se o
aparelho não se acender, retire e volte a colocar as pilhas para efectuar o seu reinício.
Troca das pilhas:
Troca das pilhas:
Abra a tampa do compartimento das pilhas situado na parte posterior do aparelho.
Insira 1 pilha CR2025 respeitando os sentidos das polaridades.
Volte a fechar o compartimento das pilha
Pilas
Copyright © Lexibook 2004 10
Page 13

Funções e características
A: Apresentação do equipamento
As horas em vigor são apresentadas no ecrã superior, o mês, data e dia da
semana é apresentado no ecrã central e a temperatura é apresentada no ecrã
inferior.
Mantenha premido o botão MODE para ver as horas do despertador.
O botão UP não está associado a qualquer função.
Prima DOWN para escolher os seguintes modos de apresentação das horas: 12 ou
24-horas.
Prima C/F para escolher os seguintes modos de apresentação da temperatura:
Em Celsius (Cº) ou Fahrenheit (Fº).
Prima SNOOZE para desligar o despertador e o cronómetro quando estes
estiverem a ser utilizados.
B: Acertar as horas
Coloque o botão de selecção que se encontra na parte de trás do equipamento
em T.SET.
Prima o botão MODE para acertar as horas, minutos, ano, mês e data: Os
parâmetros que vão ser alterados estarão a piscar no ecrã. Utilize os botões
UP ou DOWN para aumentar ou diminuir o valor dos parâmetros. O dia da semana
será identificado automaticamente.
Volte a colocar o botão de selecção em NORMAL.
C: Acertar e desligar o despertador
Coloque o botão de selecção que se encontra na parte de trás do equipamento em
AL.SET. Os parâmetros a ser modificados começarão a piscar.
Prima o botão MODE para acertar as horas, minutos e a duração da função de
repetição do alarme do despertador (snooze):
Prima os botões UP ou DOWN para aumentar ou diminuir o valor dos parâmetros;
a repetição da função
Volte a colocar o botão de selecção em NORMAL.
Faça deslizar o botão de selecção para a posição AL.ON para activar o
despertador. Aparecerá o símbolo no ecrã superior. Se desejar que o
despertador volte a tocar, coloque o botão de selecção em
Quando o despertador tocar, prima o botão SNOOZE para parar a
momentaneamente o despertador. O símbolo começará a piscar no ecrã.
SNOOZE varia entre 1 e 60 minutos.
Z
Z
SNZ.
Português
Copyright © Lexibook 2004 11
Page 14

Para sair do modo do despertador, faça deslizar o botão de selecção para a
posição AL.OFF. Os símbolos e desaparecerão do ecrã.
D: Função do cronómetro e contagem decrescente.
Coloque o botão de selecção na posição TIMER. Aparecerá a palavra TIMER na
parte inferior do ecrã superior. A contagem máxima, seja no modo crescente ou
decrescente, é de 29:59:59.
Prima o botão MODE. De seguida prima UP ou DOWN para acertar as horas,
minutos e segundos. Prima duas vezes o botão SNOOZE para iniciar a função da
decrescente ou prima apenas uma vez para iniciar a função do cronómetro.
contagem
Para parar qualquer uma das funções, prima novamente o botão SNOOZE.
Para colocar o cronómetro em 0:00:00. (Contagem crescente):
Para que o ecrã apresente o cronómetro em 0:00:00, prima várias vezes o botão
Português
MODE. Prima SNOOZE para começar a função do cronómetro.
Para colocar a função de contagem decrescente em 29:59:59 (Contagem
decrescente): Prima o botão
contagem decrescente em 29:59:59.
Para parar a função do cronómetro (“Stopwatch”), volte a colocar o botão de
selecção em
Volte a colocar o botão de selecção em NORMAL.
NORMAL.
Z
Z
MODE para que o ecrã apresente a função da
Garantia
Este produto está coberto pela nossa garantia de dois anos.
Para validação da garantia ou da assistência após venda, deve dirigir-se ao seu revendedor
munido da sua prova de compra. A nossa garantia cobre os defeitos de material ou de
montagem imputáveis ao construtor com exclusão de toda a deterioração proveniente do não
respeito das instruções de utilização ou de qualquer intervenção intempestiva sobre o artigo
(tal como desmontagem, exposição a calor ou a humidade…).
Assistência técnica:
Fax serviço após venda : + 21 204 91 17
Site Internet : http://www.lexibook.com
Endereço : Armazém Lexibook
Parque Industrial do Barreiro
Rua 48 - Armazém 25-25A
2835 Lavradio
Telefone : 21 206 13 48
Copyright © Lexibook 2004 12
Page 15

Introduzione
Congratulazioni! Avete appena acquistato lʼOrologio Calendario/Sveglia ThermoClock®
RL851 di Lexibook®
Sulla parte frontale dellʼapparecchio:
1 - Snooze On.
2 - ºC / ºF Modo
3 - 12/24 Hours Modo. Down Modo (per diminuire il valore del ore, minuti,
anno, mese e giorno)
4 - Up Modo (per aumentare il valore del ore, minuti, anno, mese e giorno)
5 - Mode funzioni
Sulla parte posteriore dellʼapparecchio:
6 - Per attivare la sveglia
7 - Per attivare la sveglia com snooze
8 - Per attivare la sveglia com snooze off
9 - Impostazione della sveglia
10 - Per impostare le ore e il giorno
11 - Per impostare le cronometro
12 - Normal funzione
ATTENZIONE
Prima di utilizzare lʼapparecchio, levare la linguetta di protezione delle pile. Se
lʼapparecchio non si accende, togliere e rimettere le pile per effettuare la sua
reinizializzazione.
Pile
Sostituzione delle pile :
Aprire il coperchio del comparto pile sul retro dellʼapparecchio.
Inserire 1 pile CR2025 rispettando il senso della polarità.
Richiudere il comparto.
Copyright © Lexibook 2004 13
Italiano
Page 16

Funzioni e impostazioni
A: Presentazione dellʼapparecchio
Il display superiore mostra lʼora attuale, il display centrale mostra la data ed il giorno
della settimana, mentre il display inferiore mostra la temperatura.
Mantenere la pressione sul tasto MODE per visualizzare lʼora impostata per la
sveglia.
Nessuna funzione è associata al tasto UP.
Premere DOWN per selezionare la seguente modalità del display: 12 o 24 ore.
Premere ºC/ºF per selezionare la seguente modalità del display: temperatura in
gradi Centigradi (Cº) o Fahrenheit (Fº).
Premere SNOOZE per interrompere la sveglia e il cronometro quando sono in uso.
B: Impostazione dellʼora
Posizionare il tasto di selezione situato sulla parte posteriore dellʼapparecchio su
T.SET.
Premere MODE per impostare le ore, i minuti, lʼanno, il mese e il giorno; il
parametro da modificare lampeggerà sul display: servirsi dei tasti
Italiano
aumentare o diminuire il valore del parametro. Il giorno della settimana viene
identificato automaticamente.
Riportare il tasto di selezione su NORMAL.
C: Impostazione e interruzione della sveglia
Posizionare il tasto di selezione situato sulla parte posteriore dellʼapparecchio su
AL.SET Il parametro da modificare inizierà a lampeggiare.
Premere MODE per impostare le ore, i minuti e la durata della funzione snooze:
Premere il tasto UP o DOWN per aumentare o diminuire il valore del parametro; la
ripetizione della funzione snooze va da 1 a 60 minuti.
Riportare il tasto di selezione su NORMAL.
Per attivare la sveglia far scorrere il tasto di selezione su AL.ON; sul display
superiore apparirà il simbolo . Per far suonare nuovamente la sveglia,
posizionare il tasto di selezione su
Quando la sveglia suona, premere SNOOZE per interromperla
momentaneamente: il simbolo lampeggerà a display.
Per uscire dalla modalità di sveglia, far scorrere il tasto di selezione sulla posizione
AL.OFF: i simboli e scompariranno dal display.
UP o DOWN per
SNZ.
Z
Z
Z
Z
Copyright © Lexibook 2004 14
Page 17

D: Funzione cronometro e conto alla rovescia.
Posizionare il tasto di selezione su TIMER: sulla parte inferiore del display
superiore apparirà la scritta TIMER. La lunghezza massima del conteggio, sia alla
rovescia che in avanti è di 29:59:59.
Premere MODE, quindi UP o DOWN per impostare le ore, i minuti e i secondi.
Premere due volte SNOOZE per innestare la funzione di conto alla rovescia, una
sola volta per avviare la funzione cronometro.
Per interrompere entrambi premere nuovamente SNOOZE.
Resettare la funzione cronometro (contatempo):
fare in modo che a display venga visualizzato 0:00:00 premendo diverse volte il
tasto MODE. Premere SNOOZE per avviare il cronometro.
Resettare il conto alla rovescia: premere MODE per visualizzare a display
29:59:59.
Per interrompere la funzione cronometro (“Stopwatch”), riportare il tasto di selezione
su NORMAL.
Garanzia
Questo prodotto è coperto dalla nostra garanzia di due anni.
Per
ottenere la garanzia o il servizio post-vendita, rivolgetevi al vostro rivenditore
presentando la vostra prova dʼacquisto. La nostra garanzia copre difetti del materiale o
legati al montaggio imputabili al costruttore ad eccezione di qualsiasi deterioramento dovuto
al mancato rispetto delle istruzioni dʼuso o a qualsiasi intervento intempestivo sullʼarticolo
(quali smontaggio, esposizione al calore oppure allʼumidità...).
Assistenza tecnica :
FAX : 02-2050 94 34
Sito Internet : http://www.lexibook.com
Italiano
Copyright © Lexibook 2004 15
Page 18

eileitung
Herzlichen Glückwunsch! Sie haben soeben den ThermoClock® RL851 Kalender-Wecker
von Lexibook® erworben.
Auf der Vorderseite des Geräts:
1 - Snooze On.
2 - ºC / ºF funktion
3 - 12/24 Hours funktion. Down Position (Um Stunden, Minuten, Jahreszahl,
Monat und das datum einzustellen)
4 - Up Position (Um Stunden, Minuten, Jahreszahl, Monat und das datum
einzustellen)
5 - Mode Position
Auf der Rückseite des Geräts:
6 - Alarm On
7 - Alarm mit Snooze On
8 - Alarm mit Snooze Off
9 - Alarmeinstellung
10 - Zeit-und Datumeinstellung
Deutsch
11 - Stoppuhreinstellung
12 - Normal Position
ACHTUNG
Vor der ersten Inbetriebnahme des Gerätes die Schutzfolie von den Batterien
entfernen. Wenn das Gerät sich nicht einschaltet, die Batterien erst entnehmen und
dann wieder einlegen um es zurückzusetzen.
Batterie
Batteriewechsel:
Deckel des Batteriegehäuses auf der Rückseite des Weckers öffnen.
1 X CR2025-Batterie unter Berücksichtigung der Polung einlegen.
Deckel des Batteriegehäuses wieder schließen.
Copyright © Lexibook 2004 16
Page 19

Funktionen und Einstellungen
A: Beschreibung des Geräts
Die aktuelle Uhrzeit wird im oberen Display angezeigt, in der Mitte des Displays
erscheinen Monat, Datum und Wochentag. Im unteren Teil des Displays wird die
Temperatur angezeigt.
Halten Sie den MODE Knopf gedrückt, bis die Zeiteinstellung für den Alarm
erscheint.
Der UP-Knopf steht mit keiner Funktion in Verbindung.
Drücken Sie DOWN, um folgende Display-Betriebsart auszuwählen: 12- oder 24Stunden-Alarm.
Drücken Sie auf ºC/ºF, um folgenden Display-Modus auszuwählen:
Temperaturangabe in Grad Celsius(Cº) oder in Grad Fahrenheit (Fº).
Drücken Sie auf SNOOZE, um das Alarmsignal und die Stoppuhr auszuschalten,
sobald diese in Funktion sind.
B: Zeiteinstellung
Stellen Sie den Select-Knopf auf der Rückseite des Geräts auf T.SET.
Drücken Sie auf MODE, um Stunden, Minuten, Jahreszahl, Monat und das Datum
einzustellen: die jeweilige Eingabe, die bearbeitet wird, blinkt dann auf dem Display
auf. Benutzen Sie die
höher oder niedriger einzustellen. Der Wochentag wird automatisch erkannt.
Stellen Sie den Select-Knopf wieder auf NORMAL zurück.
C: Einstellen und Ausschalten der Alarmfunktion
Stellen Sie den Select-Knopf auf der Rückseite des Geräts auf AL.SET. Der Wert,
der geändert werden soll, blinkt dann auf.
Drücken Sie auf MODE, um Stunden, Minuten und Dauer der Snooze-Funktion
(Schlaffunktion) einzustellen:
Drücken Sie auf den UP oder DOWN Knopf, um die Werte höher oder niedriger
einzustellen; die Wiederholung der Schlaffunktion liegt zwischen 1 und 60 Minuten.
Stellen Sie den Select-Knopf wieder auf NORMAL zurück.
Bringen Sie den Select-Knopf in die AL.ON Position, um den Alarm zu aktivieren,
im oberen Teil des Displays erscheint dann das Symbol . Wenn Sie wünschen,
dass das Alarmsignal wiederholt wird, stellen Sie den Select-Knopf auf
UP oder DOWN Knöpfe, um die entsprechenden Werte
SNZ.
Deutsch
Copyright © Lexibook 2004 17
Page 20

Sobald das Alarmsignal ertönt, drücken Sie auf SNOOZE, um es momentan
auszuschalten. Das Symbol leuchtet dann im Display auf.
Um den Alarm-Modus zu verlassen, bringen Sie den Select-Knopf in die AL.OFF
Position. Daraufhin verschwinden die Symbole und vom Display.
D: Stoppuhr- und Countdown-Funktion.
Bringen Sie den Select-Knopf in die TIMER Position. Daraufhin erscheint das Wort
TIMER auf dem unteren Teil des oberen Displays. Der höchste Messwert, sei es
nach oben oder nach unten, beträgt 29:59:59.
Drücken Sie auf MODE, dann auf UP oder DOWN, um Stunden, Minuten und
Sekunden einzustellen. Drücken Sie zweimal auf SNOOZE, um den CountdownTimer auszulösen oder einmal um die Stoppuhr zu aktivieren.
Um beide anzuhalten, drücken Sie nochmals auf SNOOZE.
Neueinstellung der Stoppuhr (Vorwärtszählung):
Drücken Sie solange auf den MODE Knopf, bis auf dem Display 0:00:00 erscheint.
Drücken Sie auf SNOOZE,, um die Stoppuhr-Funktion zu aktivieren.
Neueinstellung der Countdown-Funktion (Rückwärtszählung): Drücken Sie auf
MODE bis 29:59:59 auf dem Display erscheint.
Um die Stoppuhr-Funktion auszuschalten, bringen Sie den Select-Knopf wieder
indie NORMAL Position.
Z
Z
Z
Z
Garantie
Wir Gewährleisten 2 Jahre Garantie auf dieses Produkt.
Deutsch
Um Garantie- oder Kundendienstansprüche geltend zu machen, wenden Sie sich bitte mit
Ihrem Kaufbeleg (Kassenzettel) an Ihren Händler. Unsere Garantie deckt Material- und
Fertigungsfehler des Herstellers, mit Ausnahme von Schäden, die auf die Nichteinhaltung der
Bedienungsanleitung oder auf unsachgemäße Eingriffe an dem Produkt zurückzuführen sind
(Zerlegung, mangelnder Schutz vor Hitze oder Feuchtigkeit ...).
Fax Technischer Kundendienst : 06341 982 1439
Website : http://www.lexibook.com
Copyright © Lexibook 2004 18
Page 21

Inleiding
Gefeliciteerd! Je hebt net de Kalender/Alarm-klok ThermoClock® RL851 van Lexibook®
aangeschaft.
Vooraan op het toestel:
1 - Snooze On.
2 - ºC / ºF functie
3 - 12/24 Hours functie. Down Modus (Instellen van de uren, minuten, jaar,
maand en datum)
4 - Up Modus (Instellen van de uren, minuten, jaar, maand en datum)
5 - Mode functie
Achteraan op het toestel:
6 - Alarm On
7 - Alarm - Snooze on
8 - Alarm - Snooze off
9 - Instellen van het alarm
10 - Instellen van het uren en datum
11 - Instellen van het chronometer
12 - Normal functie
OPGELET
Verwijder het beschermingsklepje van de batterijen voordat u het toestel voor het eerst
in gebruik neemt. Als het toestel niet werkt, verwijder dan de batterijen en plaats ze
vervolgens opnieuw om een reset uit te voeren.
Batterijen
Batterijen vervangen:
Open het batterijvak op de rug van het apparaat.
Installeer 1 X CR2025-batterijen met de polen aan de juiste kant.
Sluit het batterijvak terug af.
Copyright © Lexibook 2004 19
Nederlands
Page 22

Functies en instellingen
A: Presentatie van het toestel
Huidige tijd afgebeeld op het bovenste scherm, het scherm in het midden toont de
maand, datum, dag van de week, en het onderste scherm toont de temperatuur.
Hou de MODE-toets ingedrukt om de tijd voor de alarminstelling weer te geven op
het scherm.
Er is geen functie verbonden met de UP-toets.
Druk op DOWN om de volgende displaymodus te selecteren: 12 of 24 uur klok.
Druk op ºC/ºF om de volgende displaymodus te selecteren: Temperatuur in
Celsius (Cº) of Fahrenheit (Fº).
Druk op SNOOZE om het alarm en de chronometer te stoppen eens deze zijn
gebruikt
B: Instellen van de tijdl
Plaats de selectietoets aan de achterkant van het toestel op T.SET
Druk op MODE om de uren, minuten, jaar, maand en datum in te stellen: De aan te
passen parameter zal op het scherm flikkeren, gebruik de UP of DOWN-toetsen om
de waarde van de parameter te verhogen of te verlagen. Het herkent automatisch de
dag van de week.
Plaats de selectietoets aan de achterkant terug op NORMAL.
C: Instellen en stoppen van het alarm
Plaats de selectietoets aan de achterkant van het toestel op AL.SET De aan te
passen parameter zal flikkeren.
Druk op MODE om de uren, minuten en de duur van de snooze-functie in te stellen:
Druk op de UP of DOWN -toets om de waarde van de parameter te verhogen of te
verlagen, de herhaling van de snooze-functie ligt tussen 1 en 60 minuten.
Nederlands
Plaats de selectietoets aan de achterkant terug op NORMAL.
Schuif de selectietoets in de AL.ON-positie om het alarm te activeren, het
symbool verschijnt nu bovenaan het scherm. Indien je verkiest dat het alarm
opnieuw afgaat, plaats de selectietoets op
Eens het alarm afgaat, druk op SNOOZE om het alarm onmiddellijk te stoppen,
het symbool zal op het scherm flikkeren.
Om de alarmmodus te verlaten, schuif de selectietoets in de AL.OFF-positie, de
symbolen en zullen van het scherm verdwijnen.
Z
Z
Z
Z
SNZ.
Copyright © Lexibook 2004 20
Page 23

D: Chronometer en aftelfunctie.
Plaats de selectietoets op de TIMER-positie, het woord TIMER zal onderaan het
bovenste scherm verschijnen. De maximale optelling en aftelling is 29:59:59.
Druk op MODE, en daarna op UP of DOWN om de uren, minuten en seconden
in te stellen. Druk tweemaal op “Snooze” om de aftelfunctie te starten, en druk
slechts eenmaal om de chronometer te starten.
Om beide te stoppen, druk opnieuw op SNOOZE.
Herinstellen van de chronometer (voorwaarts tellen):
Zorg ervoor dat het scherm 0:00:00 aantoont door verschillende malen op de
MODE-toets te drukken. Druk op SNOOZE om de chronometerfunctie te starten.
Herinstellen van het aftellen (terug tellen): Druk op MODE om 29:59:59 weer te
geven op het display.
Om de "chronometer"-functie te stoppen, plaats de selectietoets terug op
NORMAL.
Garantie
Dit product is gedekt door onze tweejarige garantie.
Om een beroep te doen op de garantie of de dienst na verkoop moet u zich met
uw aankoopbewijs wenden tot de verkoper. Onze garantie dekt materiële gebreken of
constructiefouten die toe te schrijven zijn aan de fabrikant, met uitzondering van om het even
welke beschadiging die voortvloeit uit het niet naleven van de gebruiksaanwijzing of uit foutief
gebruik (zoals demontering, blootstelling aan warmte of vocht, ...)
FAX technische bijstand : + 33 (0)1 73 23 23 04
Website: http://www.lexibook.com
RL851IM0194
Nederlands
Copyright © Lexibook 2004 21
 Loading...