

Page 1
1
RPB010BB
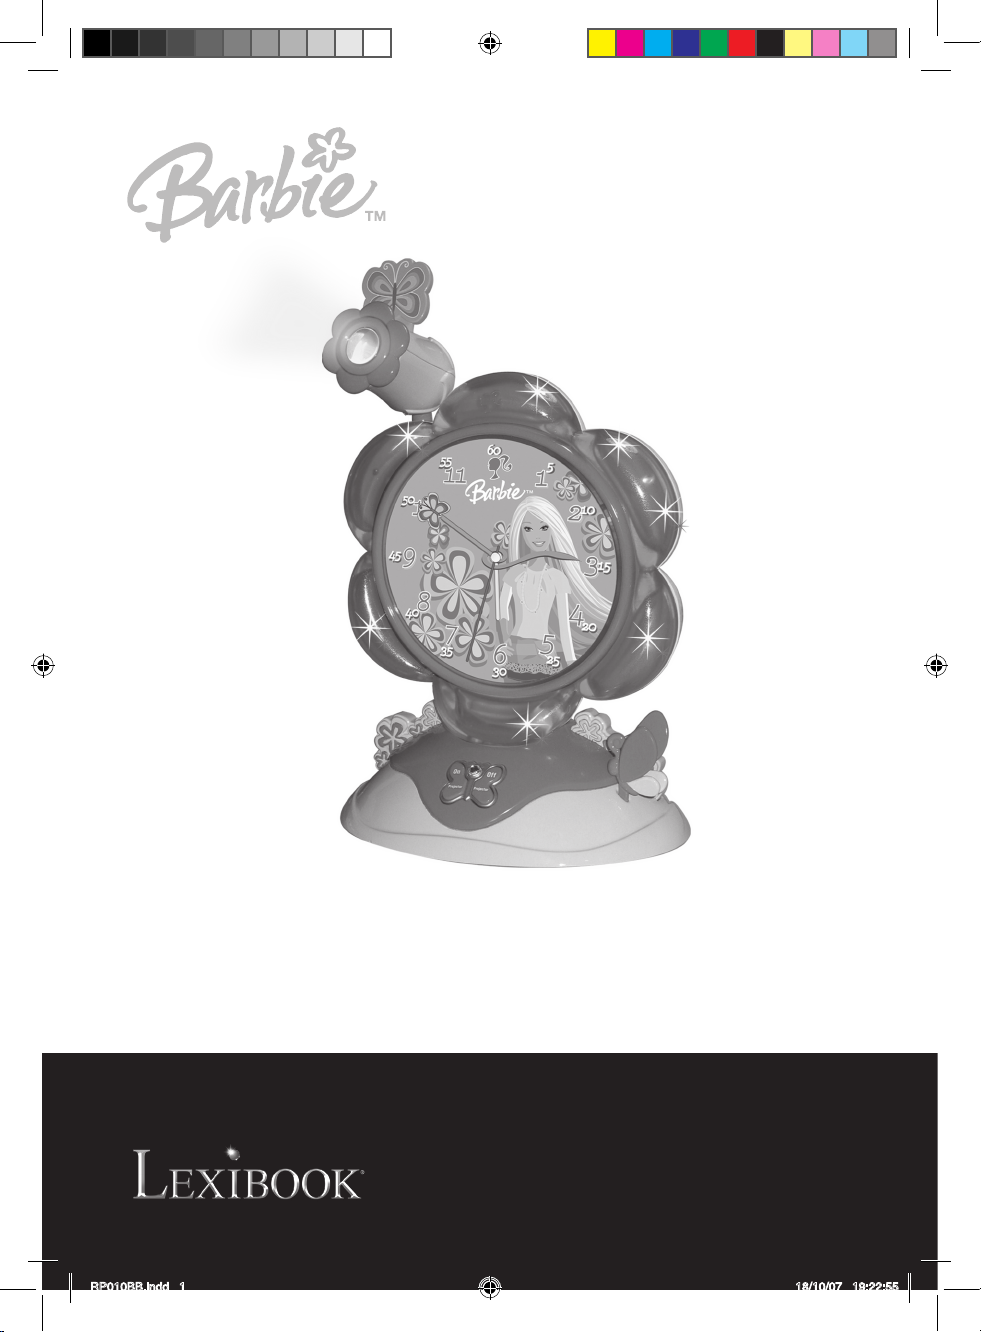
BARBIE ANALOGUE PROJECTOR CLOCK
RÉVEIL PROJECTEUR BARBIE
OWNER’S MANUAL
GUIDE D’UTILISATION
RP010BB.indd 1 18/10/07 19:22:55
Page 2
2
MISE EN GARDE : AFIN DE RÉDUIRE LES RISQUES D’ÉLECTROCUTION, NE
PAS ENLEVER LE COUVERCLE (NI L’ARRIÈRE). NE CONTIENT AUCUNE PIÈCE POUVANT ÊTRE
RÉPARÉE NI REMPLACÉE PAR L’UTILISATEUR. CONFIER TOUTE RÉPARATION À UN
TECHNICIEN QUALIFIÉ.
MISE EN GARDE
RISQUE D’ÉLECTROCUTION
NE PAS OUVRIR
TENSION DANGEREUSE :
Les symboles de l’éclair et de la pointe
de èche dans un triangle permettent
d’alerter l’utilisateur de la présence
de ‘tension dangereuse’ non isolée à
l’intérieur de l’appareil, ce qui constitue
un risque d’électrocution.
PRODUIT FONCTIONNANT SUR L’ÉLECTRICITÉ :
Ce produit n’est pas recommandé pour les enfants de moins de cinq (5) ans. Comme pour tous les
produits électriques, vous devez user de prudence en manipulant et en utilisant cet appareil an
d’éviter tout risque d’électrocution. Convient aux enfants de plus de 5 ans.
RISQUE DE SUFFOCATION – Contient des pièces et des matériaux d’emballage de petite taille. Ce
produit n’est pas conçu pour les enfants de moins de cinq (5) ans.
• Vous devez jeter tous les matériaux servant à attacher ou emballer le
produit, si ceux-ci ne font pas partie intégrante de celui-ci.
• Veuillez conserver ces renseignements pour toute référence ultérieure.
• Ceci n’est pas un jouet.
0- 5
1. Lisez ces instructions. Conservez ces instructions. Suivez toutes les instructions. Respectez toutes
les mises en garde.
2. N’utilisez pas ce produit près de l’eau ni des endroits humides.
3. N’utilisez qu’un linge doux et sec pour nettoyer l’appareil. Débranchez cet appareil avant de
procéder au nettoyage.
4. Ne bloquez pas les ouvertures d’aération du boîtier. Installez l’appareil selon les instructions du
fabricant.
5. N’installez pas cet appareil près des sources de chaleur telles que plinthes électriques, cuisinières,
ou autres (même les amplicateurs).
6. Ne tentez pas d’outrepasser la mesure de sécurité de la che polarisée ou de la prise de terre. Une
che polarisée possède deux broches, dont l’une est plus large que l’autre. Une che avec prise de
terre possède deux broches plates et une troisième broche ronde pour la prise de terre. La broche
plus large et la troisième broche constituent des mesures de sécurité importantes visant à vous
protéger. Si vous ne pouvez insérer complètement la che dans la prise, faites appel à un électricien
qui changera votre prise murale désuète. Cet appareil doit être alimenté qu’avec le type d’alimentation
indiqué sur sa plaque signalétique.
MESURES DE SÉCURITÉ
AVERTISSEMENT
ATTENTION :
Le point d’exclamation à
l’intérieur du triangle permet
d’alerter l’utilisateur de la
présence d’instructions
d’opération et d’entretien
importantes accompagnant
le produit.
INSTRUCTIONS RELATIVES À LA SÉCURITÉ
Français
RP010BB.indd 2 18/10/07 19:23:20
Page 3
3
7. Vous devez acheminer les ls d’alimentation de façon à ce qu’ils ne soient pas pincés ni écrasés
par des objets placés par-dessus, ni par des gens qui risqueraient de les piétiner. Portez une attention
particulière aux ches, aux prises murales et aux points précis où ils sortent de l’appareil.
8. N’utilisez pas de xations/accessoires qui ne sont pas recommandées par le fabricant.
9. Débranchez cet appareil pendant les orages ou si vous prévoyez ne pas l’utiliser pendant une
longue période de temps.
10. Conez tout appel de service à un centre de service autorisé. Vous aurez besoin de placer un
appel de service si l’appareil a été endommagé de quelque façon que ce soit, par exemple, si la che
d’alimentation est endommagée, si du liquide a été échappé ou si des objets sont tombés dans le
boîtier, si celui-ci a été exposé à la pluie ou à l’humidité, s’il ne fonctionne pas normalement ou s’il
a été échappé. Ne tentez pas de réparer cet appareil car en retirant le boîtier, vous risqueriez d’être
exposé à des voltages dangereux et d’autres risques.
11. Cet appareil ne doit pas être exposé aux éclaboussures et vous ne devez pas placer d’objets
remplis de liquides tels que des vases par-dessus. Ou n’insérez jamais d’objets à travers les
ouvertures de ventilation de l’appareil.
12. Utilisez uniquement avec un chariot, support, trépied, xation ou table recommandés par le
fabricant ou vendus avec ce produit. Si vous utilisez un chariot, prenez garde lorsque vous déplacez
l’ensemble chariot/appareil pour éviter toute blessure causée par son renversement.
13. Ne surchargez pas les prises de courant. N’utilisez que la source d’alimentation indiquée sur la
plaque signalétique de l’appareil.
14. N’utilisez que des pièces de remplacement recommandées par le fabricant.
15. Vous ne pouvez installer le produit au mur que si cela est recommandé par le fabricant.
Suivez les méthodes indiquées dans le guide d’utilisation.
16. Lorsque des travaux d’entretien ou de réparation ont été effectués sur l’appareil, demandez au
technicien d’effectuer des vérications sécuritaires.
Le Réveil Projecteur Barbie fonctionne avec un adaptateur secteur pour le projecteur et 1 pile de type
LR6/AA (non incluse) pour l’horloge.
MISE EN GARDE : An de prévenir les risques d’électrocution, appariez la broche large de la che à
la fente large de la prise et insérez jusqu’au fond.
1. Ouvrez le couvercle du compartiment à piles situé à l’arrière de l’horloge en utilisant un tournevis.
2. Insérez 1 pile de type LR6/AA (non incluse) en respectant le sens des polarités indiqué au fond du
compartiment à piles.
3. Refermez le compartiment à piles et resserrez la vis.
5. Branchez l’adaptateur du réveil à une prise d’alimentation électrique.
SOURCES D’ALIMENTATION
PRÉCAUTIONS RELATIVES AUX PILES
Le remplacement des piles doit être effectué par un adulte. Ne mélangez pas les vieilles piles
avec des neuves. Ne mélangez pas les piles alcalines, standard (carbone de zinc) et
rechargeables (nickel-cadmium). Ne court-circuitez pas les bornes de contact. Ne rechargez
pas les piles non rechargeables. Veuillez retirer les piles mortes. N’utilisez que des piles de type
et de capacité équivalents. Insérez les piles en respectant le sens des polarités. Jetez les piles
mortes de manière écologique. Ne jetez pas les piles dans un feu, car elles risquent d’exploser
ou de couler. Ne pas utiliser de piles rechargeables. Retirer les accumulateurs du jeu avant de le
recharger.
ATTENTION : si le produit présente un mauvais fonctionnement ou subit des décharges
électrostatiques, enlevez puis remettez les piles.
Français
RP010BB.indd 3 18/10/07 19:23:20
Page 4
4
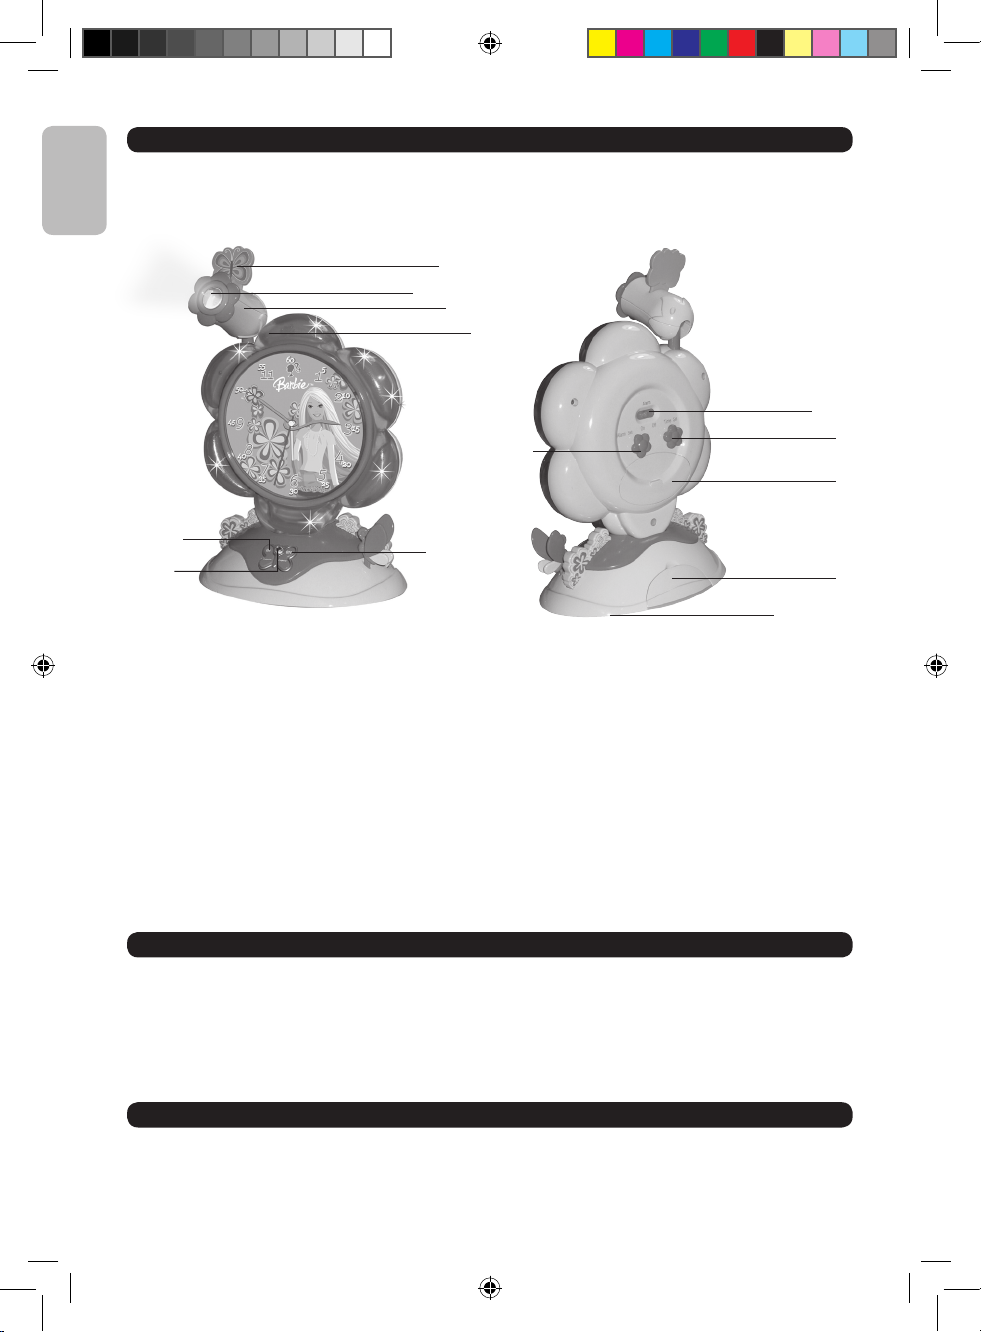
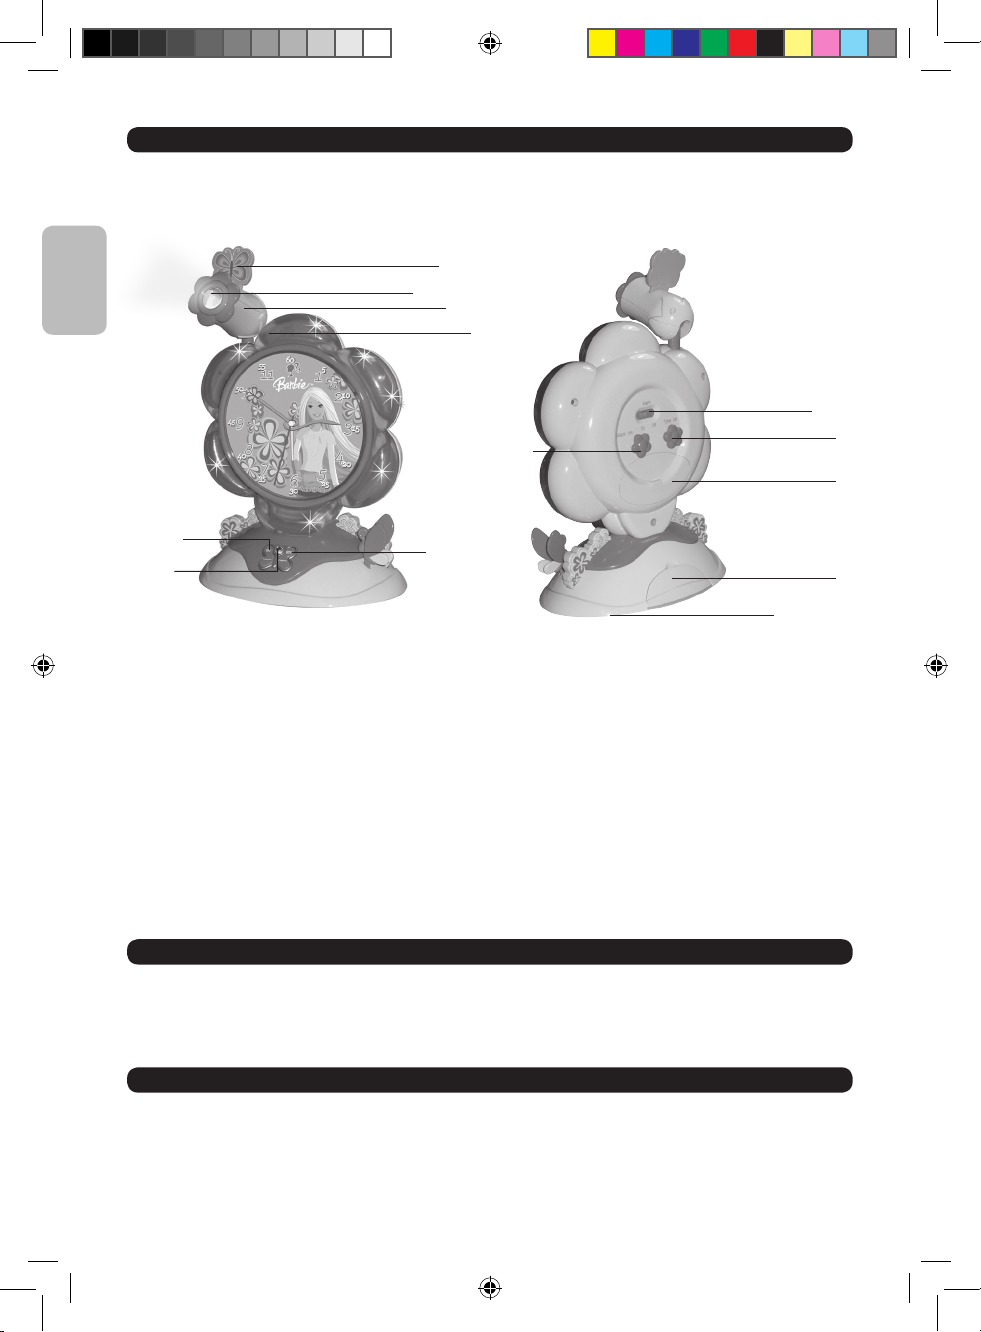
EMPLACEMENT DES TOUCHES ET DESCRIPTION
1
2
3
4
7
6
5
8
10
9
11
12
13
1. Cartouche Barbie (3 cartouches interchangeables)
2. Bouton de mise au point
3. Projecteur
4. Veilleuse
5. Touche « On » du projecteur
6. Touche « Off » du projecteur
7. Touche « On/ Off » de la veilleuse (touche Fun)
8. Commutateur « On/ Off » de l’alarme – Pour activer ou désactiver l’alarme.
9. Molette de réglage de l’alarme - Pour régler l’heure de l’alarme, tournez la molette jusqu’à
l’obtention de l’heure d’alarme souhaitée.
10. Molette de réglage de l’heure - Pour régler l’heure, tournez la molette jusqu’à l’heure exacte.
11. Compartiment de la pile (non incluse)
12. Espace de rangement des cartouches Barbie
13. Entrée adaptateur secteur (sous l’appareil)
1. Insérez la cartouche Barbie de votre choix dans le projecteur.
2. Appuyez sur le bouton On en forme d’aile de papillon situé sur la face avant de l’horloge pour
allumer le Projecteur.
3. Ajustez l’angle de projection et le bouton de mise au point jusqu’à ce que l’image apparaisse
nettement sur le mur ou le plafond.
4. Appuyez sur le bouton Off en forme d’aile de papillon pour éteindre le projecteur.
FONCTION PROJECTEUR
1. Appuyez sur la touche Fun située sur la base de l’horloge pour allumer la veilleuse.
2. Appuyez une nouvelle fois sur la touche pour éteindre la veilleuse.
FONCTION VEILLEUSE
Français
RP010BB.indd 4 18/10/07 19:23:24
Page 5
5
GARANTIE
Ce produit est couvert par notre garantie de deux ans. Pour toute mise en œuvre de la garantie ou de
service après-vente, vous devez vous adresser à votre revendeur muni de votre preuve d’achat. Notre
garantie couvre les vices de matériel ou de montage imputables au constructeur à l’exclusion de toute
détérioration provenant du non-respect de la notice d’utilisation ou de toute intervention intempestive
sur l’article (telle que démontage, exposition à la chaleur ou à l’humidité…). Note : Veuillez garder ce
mode d’emploi, il contient d’importantes informations. Le contenu de ce mode d’emploi peut changer
sans préavis. Aucune partie de ce mode d’emploi ne doit être reproduite sans le consentement écrit
du fabricant.
LEXIBOOK S.A,
2, avenue de Scandinavie,
91953 Courtaboeuf Cedex France
Assistance technique : 0892 23 27 26
(0,34 € TTC/Min),
www.lexibook.com
Informations sur la protection de l’environnement
Tout appareil électrique usé est une matière recyclable et ne devrait pas faire partie des ordures ménagères! Nous vous
demandons de bien vouloir nous soutenir en contribuant activement au ménagement des ressources et à la protection de
l’environnement en déposant cet appareil dans sites de collecte (si existants).
Français
RP010BB.indd 5 18/10/07 19:23:25
Page 6
6
CAUTION: TO REDUCE THE RISK OF ELECTRIC SHOCK, DO NOT REMOVE COVER (OR BACK).
NO USER-SERVICEABLE PARTS INSIDE. REFER SERVICING TO QUALIFIED SERVICE
PERSONNEL.
CAUTION
RISK OF ELECTRIC SHOCK
DO NOT OPEN
DANGEROUS VOLTAGE:
The lightning ash with arrowhead
symbol within an equilateral triangle is
intended to alert the user to the
presence of uninsulated dangerous
voltage within the product’s enclosure
that may be of sufcient magnitude
to constitute a risk of electric shock to
persons.
Not recommended for children under 5 years of age. As with all electric products, precautions
should be observed during handling and use to prevent electric shock.
Choking Hazard–Small Parts and Packaging Materials. Not for children
under 5 years.
• All materials for fastening or packing purposes are not part of the unit
and should be discarded for children’s safety.
• Please keep all information for future reference.
• This is not a toy.
1. Read these instructions. Keep these instructions. Follow all instructions. Heed all warnings.
2. Do not use this unit near water.
3. Clean only with a dry cloth. Unplug this product from the wall before cleaning.
4. Do not block any ventilation openings. Install in accordance with manufacturer’s instructions.
5. Do not install near any heat sources such as radiators, heat registers, stoves or other apparatus
(including ampliers) that produce heat.
6. Do not defeat the safety purpose of the polarized or grounding-type plug. A polarized plug has two
blades with one wider than the other. A grounding-type plug has two blades and a third grounding
prong. The wide blade or the third prong are provided for your safety. If the provided plug does not t
into your outlet, consult an electrician for replacement of the obsolete outlet. This product should be
operated only from the type of power source indicated on the marking label.
7. Protect the power cord from being walked on or pinched particularly at plugs, convenience
receptacles, and the point where they exit from the unit.
8. Only use attachments/accessories specied by the manufacturer.
9. Unplug this unit during lightning storms or when unused for long periods of time.
10. Refer all servicing to qualied service personnel. Servicing is required when the unit has been
damaged in any way, such as the following: the power-supply cord or plug has been damaged; liquid
has been spilled or objects have fallen into the unit; and/or the unit has been exposed to rain or
moisture, does not operate normally, has changed its performance or has been dropped. Do not
attempt to service this product yourself as opening or removing covers may expose you to dangerous
voltage or other hazards.
SAFETY PRECAUTIONS
CAUTION–ELECTRICALLY OPERATED PRODUCT:
ATTENTION:
The exclamation point within
an equilateral triangle is
intended to alert the user to
the presence of important
operating and maintenance
(servicing) instructions in the
literature accompanying the
appliance.
SAFETY INSTRUCTIONS
0- 5
ENGLISH
RP010BB.indd 6 18/10/07 19:23:26
Page 7
7
11. This unit should not be exposed to dripping or splashing water and no object lled with liquids such
as vases should be placed on the unit. Never push objects of any kind into this unit through any
openings.
12. Use only with the cart, stand, tripod, bracket or table specied by the manufacturer, or sold with
the apparatus. When a cart is used, use caution when moving the cart/apparatus combination to avoid
injury from tip-over.
13. Do not overload wall outlet. Use only power source as indicated.
14. Use replacement parts as specied by the manufacturer.
15. The product may be mounted to a wall only if recommended by the manufacturer.
16. Upon completion of any service or repairs to this product, ask the service technician to perform
safety checks.
The Barbie Projector Alarm Clock operates using a DC adaptor for the projector and
1 X LR6/AA battery (non included) for the clock.
CAUTION: To prevent electric shock, match the wide blade of the plug to the wide slot and fully insert.
1. Using a screwdriver, open the battery compartment cover located at the back of the clock.
2. Install 1 X LR6/AA battery (non included), taking care to observe the polarity markings inside the
battery compartment.
3. Close the battery compartment and tighten the screw.
4. Plug the clock’s DC adaptor into an electrical power outlet.
POWER SOURCES
BATTERY PRECAUTIONS
• Replacement of batteries must be done by an adult.
• Do not mix old and new batteries.
• Do not mix alkalin, standard (carbon-zinc) or rechargeable (nickel-cadmium) batteries.
• The supply terminals are not to be short-circuited.
• Exhausted batteries are to be removed.
• Non-rechargeable batteries should not to be recharged.
• Only batteries of the equivalent type are to be used.
• Batteries are to be inserted with the correct polarity.
• Dispose of batteries properly.
• Do not dispose of batteries in re; batteries may explode or leak.
• Do not use rechargeable batteries.
• Rechargeable batteries are to be removed before being charged.
WARNING: If the unit malfunctions or receives an electrostatic shock, remove the battery and
replace it again.
ENGLISH
RP010BB.indd 7 18/10/07 19:23:26
Page 8
8
OPERATING INSTRUCTIONS
8
10
9
11
12
13
1. Barbie projection (3 interchangeable rells)
2. Focus knob
3. Projector
4. Night-light
5. Projector “On” button
6. Projector “Off” button
7. Night Light “On/Off” key (Fun button)
8. Alarm switch (“On/Off”)
9. Alarm setting thumbwheel - To set the alarm, turn the alarm setting thumbwheel until little red
hand indicates the correct time.
10. Time setting thumbwheel - To set the time, turn the time setting thumbwheel until the hands
show the correct time.
11. Battery compartment (battery non included)
12. Barbie projections stowage compartment
13. DC Plug (under the unit)
1. Insert a Barbie projection in the projector.
2. Press the buttery-shaped On button located on the front of the clock to switch on the projector.
3. Adjust the angle of the projector and rotate the focus knob to rotate the projection to the right angle.
4. Press the buttery-shaped Off button to switch off the projector.
PROJECTOR FUNCTION
1. Press the Fun button located on the base of the clock to switch on the night light.
2. Press the button again to switch off the night light.
NIGHT LIGHT FUNCTION
1
2
3
4
7
6
5
ENGLISH
RP010BB.indd 8 18/10/07 19:23:30
Page 9
9
WARRANTY
NOTE: Please keep this instruction manual, it contains important information. This product is covered
by our two-year warranty. To make use of the warranty or the after-sales service, please contact your
retailer and supply proof of purchase. Our warranty covers material or installation-related defects
attributable to the manufacturer, with the exception of wear caused by failure to respect the
instructions for use or any unauthorized work on the equipment (such as dismantling, exposure to heat
or damp, etc.).
LEXIBOOK UK ltd,
Unit 10 Peterseld Industrial Estate,
Bedford Road, Peterseld, Hampshire,
GU32 3QA, United Kingdom,
Freephone helpline: 0808 100 3015,
http://www.lexibook.com
Environmental Protection
Unwanted electrical appliances can be recycled and should not be discarded along with regular household waste! Please
actively support the conservation of resources and help protect the environment by returning this
appliance to a collection centre (if available).
ENGLISH
RP010BB.indd 9 18/10/07 19:23:30
Page 10

10
PRECAUCIÓN: PARA REDUCIR EL RIESGO DE DESCARGA ELÉCTRICA, NO RETIRE LA
CUBIERTA (O PARTE TRASERA). NO HAY PIEZAS EN EL INTERIOR SUSCEPTIBLES DE SER
MANIPULADAS POR EL USUARIO. EN CASO DE AVERÍA, SOLICITE ASISTENCIA TÉCNICA DE
PERSONAL CUALIFICADO.
PRECAUCIÓN
RIESGO DE DESCARGA
ELÉCTRICA
NO ABRIR
TENSIÓN PELIGROSA:
El símbolo del rayo dentro de un
triángulo equilátero, advierte al usuario
de la presencia de tensiones
peligrosas, sin aislamiento, en el
interior del equipo, que pueden ser de
magnitud suciente como para
constituir un riesgo de descarga
eléctrica para las personas.
No recomendado para niños menores de 5 años. Como con todos los productos eléctricos,
para prevenir descargas eléctricas deben observarse las precauciones adecuadas durante la
manipulación y el uso. Edades: 5+
Peligro de asxia –Piezas pequeñas y material del embalaje.
No adecuado para niños menores de 5 años
• Los materiales de sujeción o con nes de embalaje no forman parte
del equipo y deben ser retirados por la seguridad del niño.
• Conserve toda la información para consultas futuras.
• Esto no es un juguete.
1. Lea estas instrucciones.
2. Guarde estas instrucciones.
3. Respete todas las advertencias.
4. Siga todas las instrucciones.
5. No utilice este equipo cerca de agua.
6. Límpielo únicamente con un paño húmedo.
7. No bloquee ninguna abertura de ventilación. Instálelo siguiendo las instrucciones del fabricante.
8. El producto debe colocarse apartado de fuentes de calor, como radiadores, calentadores, estufas u
otros productos (incluyendo amplicadores) que generen calor.
9. No anule la función de seguridad del enchufe polarizado o de tipo con toma de tierra. Un enchufe
polarizado tiene dos conectores planos, uno más ancho que el otro. Un enchufe con toma de tierra
tiene dos conectores más una tercera borna para tierra. El conector plano más ancho o la tercera
borna se proporcionan para su seguridad. Si el enchufe suministrado no encaja en su enchufe de red,
consulte con un electricista para que sustituya el enchufe de tipo obsoleto.
10. Proteja el cable de alimentación para evitar que se pise o se pille, particularmente en las zonas de
los enchufes, enchufes auxiliares y en el lugar por el que sale el cable del equipo.
11. Utilice únicamente los complementos o accesorios especicados por el fabricante.
INSTRUCCIONES DE SEGURIDAD
¡PRECAUCIÓN! PRODUCTO CON FUNCIONAMIENTO ELÉCTRICO:
ATENCIÓN:
El signo de exclamación
dentro de un triángulo
equilátero advierte al
usuario de la existencia de
instrucciones importantes
de mantenimiento (revisión)
y funcionamiento en la
literatura que acompaña al
equipo.
INSTRUCCIONES DE SEGURIDAD
0- 5
ESPAÑOL
RP010BB.indd 10 18/10/07 19:23:30
Page 11

11
12. Desenchufe este equipo durante las tormentas eléctricas o cuando no se vaya a utilizar durante
un periodo largo de tiempo.
13. Confíe todas las reparaciones a personal de reparación cualicado. Es necesaria la reparación de
la unidad cuando haya sufrido cualquier daño, como los siguientes: el cable de alimentación ha sido
dañado; ha caído agua o algún objeto al interior del equipo; la unidad ha estado expuesta a la lluvia o
a la humedad, no funciona normalmente, se ha modicado su funcionamiento o se ha caído.
14. No exponga el equipo a goteras o salpicaduras, y no coloque sobre él objetos con líquidos, como
por ejemplo vasos.
15. No sobrecargue el enchufe de red de la pared. Utilice solo una alimentación eléctrica con las
características indicadas.
16. Utilice las piezas de recambio especicadas por el fabricante.
El Proyector y Reloj Despertador Barbie funciona con un adaptador CC para el proyector y 1 pila
LR6/AA (no incluida) para el reloj.
PRECAUCIÓN: Para prevenir posibles descargas eléctricas, insertar completamente en el enchufe la
clavija ancha dentro de la ranura ancha.
1. Abrir la tapa del compartimento de las pilas, que se encuentra en la parte posterior de la unidad,
utilizando un destornillador.
2. Instalar 1 pila LR6/AA (no incluida), siguiendo las indicaciones sobre polaridad situadas dentro del
compartimento.
3. Cerrar el compartimiento de las pilas y apretar el tornillo.
4. Enchufar el adaptador CC del reloj a una toma de corriente.
FUENTES DE ALIMENTACIÓN
No utilice pilas recargables en este equipo. No intente nunca recargar pilas no recargables; para
cargar las pilas recargables, antes retírelas del juguete; las pilas recargables deben recargarse
siempre bajo la supervisión de un adulto; no mezcle pilas de distinto tipo, o pilas nuevas con
pilas usadas; utilice únicamente pilas del tipo recomendado o equivalentes; colocar siempre las
pilas en la posición correcta, de acuerdo con la polaridad indicada en el compartimento; retire
del juguete las pilas gastadas; no permita que entren en contacto eléctrico los terminales de la
alimentación. Si prevé que el juguete no va a utilizarse durante un periodo largo de
tiempo, retire las pilas. Cuando el sonido se hace débil o el juego no responde adecuadamente es
señal de que debe sustituir las pilas.
ADVERTENCIA: Si la unidad no funciona bien o recibe una descarga electrostática, retira las
pilas y vuele a colocarlas.
ESPAÑOL
RP010BB.indd 11 18/10/07 19:23:31
Page 12

12
POSICIÓN DE LOS CONTROLES
8
10
9
11
12
13
1. Proyección de Barbie (3 recambios)
2. Botón de enfoque
3. Proyector
4. Luz nocturna
5. Botón de encendido “On” del proyector
6. Botón de apagado “Off” del proyector
7. Tecla “On/Off” de luz nocturna (Botón Divertido)
8. Interruptor de la alarma (“On/Off”)
9. Rueda de programación de alarma - Para programar la alarma, gire la rueda de ajuste de la
alarma hasta que la manecilla roja pequeña indique la hora deseada.
10. Rueda de puesta en hora - Para ajustar la hora, gire la rueda de ajuste de la hora hasta que las
manecillas se sitúen en la hora correcta.
11. Compartimento de las pilas (las pilas no están incluidas)
12. Compartimiento para guardar las proyecciones de Barbie
13. Enchufe CC (debajo de la unidad)
1. Colocar una proyección de Barbie en el proyector.
2. Para encender el proyector, pulsar el botón “On” con forma de mariposa situado en la parte frontal
del reloj.
3. Ajustar el ángulo del proyector y girar el botón de enfoque para colocar la proyección en el ángulo
deseado.
4. Pulsar el botón “Off” con forma de mariposa para apagar el proyector.
FUNCIONAMIENTO DEL PROYECTOR
1. Pulsar el botón Divertido situado en la base del reloj para encender la luz nocturna.
2. Pulsar este botón de nuevo para apagar la luz nocturna.
FUNCIONAMIENTO DE LA LUZ NOCTURNA
1
2
3
4
7
6
5
ESPAÑOL
RP010BB.indd 12 18/10/07 19:23:34
Page 13

13
GARANTÍA
Este producto está cubierto por nuestra garantía de dos años. Para hacer uso de esta
garantía o del servicio post-venta, debe de dirigirse al lugar de compra provisto con la
prueba de haber realizado la misma. Nuestra garantía cubre los vicios de material o del
montaje imputable al fabricante con la exclusión de cualquier deterioro proveniente del no respeto del
modo de uso o de la intervención inadecuada sobre el artículo (tales como
desmontaje, exposición al calor o a la humedad…). Se recomienda conservar el embalaje
para cualquier referencia futura. Guarde este manual de instrucciones en un lugar seguro, ya que
contiene información importante. El contenido de este manual está sujeto a cambios sin previo aviso.
No podrá reproducirse ninguna parte de este manual, en ninguna forma, sin la previa autorización por
escrito del fabricante.
Lexibook Ibérica S.L,
C/ de las Hileras 4, 4° dpcho 14,
28013 Madrid, España
Servicio consumidores: 91 548 89 32.
http://www.lexibook.com
Advertencia para la protección del medio ambiente
¡Los aparatos eléctricos desechados son reciclables y no deben ser eliminados en la basura doméstica! Por ello pedimos
que nos ayude a contribuir activamente en el ahorro de recursos y en la protección del medio ambiente entregando este
aparato en los centros de colección (si existen).
ESPAÑOL
RP010BB.indd 13 18/10/07 19:23:34
Page 14

14
CUIDADO: PARA REDUZIR O RISCO DE CHOQUES ELÉCTRICOS, NÃO RETIRE A COBERTURA
(OU PARTE TRASEIRA). NÃO EXISTEM PEÇAS NO INTERIOR QUE POSSAM SER REPARADAS
PELO UTILIZADOR. CONSULTE PESSOAL QUALIFICADO PARA PROCEDER À REPARAÇÃO.
VOLTAGEM PERIGOSA:
O relâmpago com a seta dentro de um
triângulo equilátero serve para alertar
o utilizador da presença de voltagem
perigosa sem isolamento no interior do
produto, que pode ser de magnitude
suciente para constituir risco de
choque eléctrico.
Não recomendado a crianças com menos de 5 anos de idade. Tal como em qualquer produto
eléctrico, deverá ter certas precauções durante o manuseamento e utilização, para prevenir
choques eléctricos. Para idades superiores a 5 anos.
Perigo de asxia - Contém peças pequenas e materiais de
empacotamento. Não adequado a crianças com menos de 5 anos de
idade.
• Todos os materiais de aperto e empacotamento não fazem parte da
unidade e deverão ser deitados fora, para segurança da criança.
• Queira guardar toda a informação para futuras referências.
• Isto não é um brinquedo.
1. Leia estas instruções.
2. Guarde estas instruções.
3. Preste atenção a todos os avisos.
4. Siga todas as instruções.
5. Não utilize esta unidade perto da água.
6. Limpe apenas com um pano seco.
7. Não bloqueie as entradas da ventilação. Instale de acordo com as instruções do fabricante.
8. Não instale perto de fontes de calor, como radiadores, registadores de calor, fogões ou outros
aparelhos (incluindo amplicadores) que produzam calor.
9. Não tente fazer pressão numa cha polarizada ou de ligação à terra. Uma cha polarizada tem
dois dentes, um mais largo do que o outro. Uma cha de ligação à terra tem dois dentes e um terceiro
dente de ligação à terra. O terceiro dente mais largo serve para sua segurança. Se a cha fornecida
não couber na sua tomada, consulte um electricista para substituir a tomada obsoleta.
10. Proteja o o da alimentação de pisadelas ou dobras, especialmente na cha, receptáculo de
suporte e o ponto de onde saem da unidade.
11. Use apenas acessórios especicados pelo fabricante.
PRECAUÇÕES DE SEGURANÇA
CUIDADO! PRODUTO OPERADO ELECTRONICAMENTE:
ATENÇÃO:
O ponto de exclamação
dentro de um triângulo
equilátero serve para alertar
o utilizador da presença de
instruções importantes de
utilização e manutenção
(reparação) a acompanhar a
unidade.
INSTRUÇÕES DE SEGURANÇA
0- 5
CUIDADO
RISCO DE CHOQUE ELÉCTRICO
NÃO ABRIR
PORTUGUÊS
RP010BB.indd 14 18/10/07 19:23:35
Page 15

15
12. Desligue esta unidade da tomada durante trovoadas, ou quando não a utilizar durante longos
períodos de tempo.
13. Consulte pessoal qualicado para proceder a qualquer reparação. A unidade tem de ser reparada
quando for danicada de algum modo, como: danos no o ou na cha, derrames de líquidos ou
quedas de objectos em cima da unidade e/ou exposição da unidade à chuva ou humidade e caso o
desempenho da unidade tenha mudado ou diminuído.
14. Esta unidade não deve ser exposta a pingos ou derrames de água, nem deve colocar objectos
com água, como vasos, por cima da unidade.
15. Não sobrecarregue a tomada. Utilize apenas a fonte de alimentação conforme indicado.
16. Use peças sobressalentes, conforme especicado pelo fabricante.
O Relógio Despertador com Projector da Barbie funciona com um adaptador DC para o projector e 1
pilha LR6/AA (não incluída) para o relógio.
CUIDADO: Para evitar choques eléctricos, coloque o dente largo da cha na ranhura larga da tomada
e insira-o por completo.
1. Com uma chave de fendas, abra a tampa do compartimento das pilhas, que se encontra na parte
traseira do relógio.
2. Coloque 1 pilha LR6/AA (não incluída), tendo o cuidado de prestar atenção aos sinais da polaridade existentes dentro do compartimento das pilhas.
3. Feche o compartimento das pilhas e aperte o parafuso.
4. Ligue o adaptador DC do relógio na tomada eléctrica.
FONTES DE ALIMENTAÇÃO
Não utilize pilhas não recarregáveis. As pilhas não recarregáveis não deverão ser recarregadas.
As pilhas recarregáveis deverão ser retiradas do brinquedo antes de serem recarregadas e só
deverão ser recarregadas sob a supervisão de um adulto. Não misture diferentes tipos de pilhas
ou pilhas novas com pilhas usadas. Só deverá utilizar pilhas do mesmo tipo ou de um tipo
equivalente às recomendadas. As pilhas deverão ser colocadas com a polaridade correcta.
Deverá retirar as pilhas gastas do brinquedo. Não coloque os terminais em curto-circuito. Não
atire as pilhas para o fogo. Retire as pilhas caso não utilize a unidade durante um longo período
de tempo. Quando o som car fraco ou o jogo não responder, pense em substituir as pilhas.
AVISO: Se a unidade não funcionar correctamente ou apanhar um choque electrostático, retire as
pilhas e volte a colocá-las.
PORTUGUÊS
RP010BB.indd 15 18/10/07 19:23:36
Page 16

16
LOCALIZAÇÃO DOS CONTROLOS
8
10
9
11
12
13
1. Projecção da Barbie (3 cargas permutáveis)
2. Botão de focagem
3. Projector
4. Luz nocturna
5. Botão “On” (ligar) do projector
6. Botão “Off” (desligar) do projector
7. Botão de ligar/desligar a luz nocturna (botão divertido)
8. Interruptor do despertador (“On/Off”)
9. Botão de acerto do despertador - Para acertar o alarme, rode o botão do alarme até que a mão
vermelha pequena indique as horas correctas.
10. Botão de acerto das horas - Para acertar as horas, rode o botão de acerto das horas até que as
mãos apresentem as horas correctas.
11. Compartimento das pilhas (pilhas não incluídas)
12. Compartimento de armazenamento das projecções da Barbie
13. Entrada DC (debaixo da unidade)
1. Insira a projecção da Barbie no projector.
2. Prima o botão de ligar em forma de borboleta, que se encontra na parte dianteira do relógio, para
ligar o projector.
3. Ajuste o ângulo do projector e rode o botão de focagem para rodar a projecção para o ângulo
correcto.
4. Prima o botão de desligar em forma de borboleta para desligar o projector.
FUNÇÃO DO PROJECTOR
1. Prima o botão divertido, que se encontra na base do relógio, para ligar a luz nocturna.
2. Prima novamente o botão para desligar a luz nocturna.
FUNÇÃO DE ILUMINAÇÃO NOCTURNA
1
2
3
4
7
6
5
PORTUGUÊS
RP010BB.indd 16 18/10/07 19:23:39
Page 17

17
GARANTIA
Este produto está coberto pela nossa garantia de dois anos. Para qualquer reclamação de garantia
ou serviço após venda, é favor contactar o seu fornecedor local com a sua prova de compra. A nossa
garantia cobre todos os defeitos de fabrico ou de montagem imputáveis ao fabricante mas não cobre
a deterioração pelo não respeito do Manual de Instruções ou mau manuseamento do produto (tal
como exposição ao calor ou humidade ou desmantelamento do produto). Recomenda-se que guarde
a caixa para uma futura referência. Guarde este manual de instruções num local seguro, pois contém
informações importantes. O conteúdo deste manual está sujeito a alterações sem aviso. Nenhuma
parte deste manual pode ser reproduzida de nenhuma maneira sem o consentimento expresso por
escrito do fabricante.
LEXIBOOK Electronica Lda,
Quinta dos Loios,
Praceta José Domingos dos Santos,
6B-8ª, 2835-343 Lavradio-Barreiro,
Portugal
Apoio Técnico: 212 06 1 348,
http://www.lexibook.com
Indicações para a protecção do meio ambiente
Aparelhos eléctricos antigos são materiais que não pertencem ao lixo doméstico! Por isso pedimos para que nos apoie,
contribuindo activamente na poupança de recursos e na protecção do ambiente ao entregar este aparelho nos pontos de
recolha, caso existam.
PORTUGUÊS
RP010BB.indd 17 18/10/07 19:23:39
Page 18

18
ATTENZIONE: PER RIDURRE IL RISCHIO DI SCOSSA ELETTRICA, NON RIMUOVERE IL
COPERCHIO (O LA PARTE POSTERIORE). ALL’INTERNO NON SONO PRESENTI PARTI CHE
RICHIEDONO MANUTENZIONE DA PARTE DELL’UTENTE. PER LA MANUTENZIONE,
RIVOLGERSI UNICAMENTE A PERSONALE QUALIFICATO.
VOLTAGGIO PERICOLOSO:
Il simbolo del fulmine racchiuso in un
triangolo equilatero è utilizzato per
avvertire l’utilizzatore della presenza di
elementi ad alto voltaggio non isolati
all’interno dell’apparecchio che
costituiscono un pericolo di scossa
elettrica per le persone.
Non adatto a bambini di età inferiore a 5 anni. Come nel caso di tutti i prodotti elettrici, bisogna
prendere le dovute precauzioni durante l’uso per evitare scosse elettriche. Età: 5+
Pericolo di soffocamento. Piccole parti ei materiali da imballaggio. Non adatto a bambini di età inferiore a 5 anni.
• Tutti i materiali di ssazione e di imballaggio non fanno parte
dell’apparecchio e vanno gettati per la sicurezza dei bambini.
• Conservare tutte le informazioni per eventuali riferimenti futuri.
• Questo non è un giocattolo.
1. Leggere attentamente le istruzioni.
2. Conservare le presenti istruzioni.
3. Osservare tutti gli avvertimenti.
4. Seguire tutte le istruzioni.
5. Non utilizzare questo apparecchio in prossimità dell’acqua.
6. Pulire unicamente con un panno asciutto.
7. Non bloccare le aperture di ventilazione. Installare secondo le istruzioni del produttore.
8. Non installare vicino a sorgenti di calore quali radiatori, caloriferi, fornelli o altri apparati (compresi
amplicatori) che producono calore.
9. Non bypassare i dispositivi di sicurezza delle spine polarizzate o di messa a terra. Una spina
polarizzata presenta due lame di cui una più ampia dell’altra. Una spina di messa a terra presenta due
lame ed un dente di messa a terra. La lama ampia o il terzo dente sono forniti per la vostra sicurezza.
Nel caso in cui la spina fornita non si adattasse alla vostra presa, rivolgersi ad un elettricista per la
sostituzione della presa vecchia.
10. Proteggere il cavo di alimentazione evitando che venga schiacciato o pinzato, in particolare in
corrispondenza delle spine, dei ricettacoli e dei punti di uscita dall’apparecchio.
11. Servirsi unicamente di accessori indicati dal produttore.
PRECAUZIONI DI SICUREZZA
ATTENZIONE! PRODOTTO FUNZIONANTE A ELETTRICITÀ:
ATTENZIONE:
Il punto esclamativo
racchiuso in un
triangolo equilatero serve
ad avvisare l’utente della
presenza, nel manuale che
accompagna l’apparecchio,
di istruzioni particolarmente
importanti di uso e
manutenzione.
ISTRUZIONI DI SICUREZZA
0- 5
ATTENZIONE
PERICOLO DI SCOSSA ELETTRICA
NON APRIRE
ITALIANO
RP010BB.indd 18 18/10/07 19:23:40
Page 19

19
12. Scollegare l’apparecchio dalla rete elettrica durante temporali o in caso di mancato utilizzo per
lunghi periodi di tempo.
13. Afdare qualsiasi operazione di manutenzione a personale qualicato. La manutenzione è
necessaria quando l’apparecchio è stato danneggiato in qualsiasi modo, ad esempio: il cavo o la
spina di alimentazione sono stati danneggiati; liquidi o altri oggetti sono caduti nell’apparecchio;
l’apparecchio è stato esposto a pioggia o umidità, non funziona normalmente, presenta prestazioni
diverse o è stata lasciata cadere.
14. Questo apparecchio non dev’essere esposto a gocce o schizzi d’acqua e bisogna evitare di porre
oggetti contenenti liquidi, ad esempio vasi, sull’apparecchio stesso.
15. Non sovraccaricare la prese a muro. Servirsi unicamente dell’alimentazione come indicato.
16. Utilizzare le parti di ricambio indicate dal produttore.
L’Orologio Sveglia con Proiettore Barbie funziona con un adattatore DC per il proiettore e 1 batteria
LR6/AA (non in dotazione) per l’orologio.
ATTENZIONE: Per impedire shock elettrici, abbinare la parte larga della spina alla fenditura larga e
inserire completamente.
1. Con un cacciavite, aprire il coperchio del vano batterie collocato nella parte posteriore dell’orologio.
2. Inserire 1 batteria LR6/AA (non in dotazione), osservando attentamente le indicazioni di polarità
contenute all’interno del vano batterie.
3. Chiudere il vano batterie e serrare la vite.
4. Inserire l’adattatore DC dell’orologio nella presa di corrente.
FONTI DI ALIMENTAZIONE
Non servirsi di batterie non ricaricabili. Le batterie non ricaricabili non devono essere ricaricate; le
batterie ricaricabili devono essere tolte dal giocattolo prima di essere ricaricate; le batterie
ricaricabili devono essere caricate unicamente con la supervisione di un adulto; non mischiare
differenti tipi di batterie o batterie nuove e usate; utilizzare unicamente batterie del tipo
raccomandato o equivalenti; inserire le batterie rispettando le polarità; rimuovere le batterie
esaurite dal giocattolo; non cortocircuitare i terminali di alimentazione. Non buttare le batterie nel
fuoco. Rimuovere le batterie se non si usa il gioco per molto tempo. Sostituire le batterie quando il
suono diventa debole o il gioco non funziona.
AVVERTENZA: in caso di malfunzionamento dell’apparecchio o di scariche elettrostatiche,
spegnere e riaccendere il giocattolo. Se ciò dovesse risultare inefcace, togliere le batterie e
inserirle nuovamente.
ITALIANO
RP010BB.indd 19 18/10/07 19:23:40
Page 20

20
POSIZIONE DEI COMANDI
8
10
9
11
12
13
1. Proiezione Barbie (3 rell intercambiabili)
2. Manopola messa a fuoco
3. Proiettore
4. Luce notturna
5. Pulsante “On” proiettore
6. Pulsante “Off” proiettore
7. Tasto “On/Off” luce notturna (Pulsante divertimento)
8. Interruttore sveglia (“On/Off”)
9. Rotellina impostazione sveglia - Per impostare la sveglia, ruotare la rotellina no a quando la
lancetta rossa indica l’ora corretta.
10. Rotellina impostazione ora - Per impostare l’ora, ruotare la rotellina no a quando le lancette
segnano l’ora esatta.
11. Vano batterie (batteria non in dotazione)
12. Vano proiezioni Barbie
13. Spina DC (sotto l’unità)
1. Inserire una proiezione Barbie nel proiettore.
2. Premere il pulsante On a forma di farfalla posizionato sulla parte anteriore dell’orologio per
accendere il proiettore.
3. Regolare l’angolo del proiettore e ruotare la rotella della messa a fuoco per ruotare la posizione
all’angolo corretto.
4. Premere il pulsante Off a forma di farfalla per spegnere il proiettore.
FUNZIONE PROIETTORE
1. Premere il pulsante divertimento posizionato sulla base dell’orologio per accendere la luce notturna.
2. Premere nuovamente il pulsante per spegnere la luce notturna.
FUNZIONE LUCE NOTTURNA
1
2
3
4
7
6
5
ITALIANO
RP010BB.indd 20 18/10/07 19:23:44
Page 21

21
GARANZIA
Questo prodotto è coperto dalla nostra garanzia di due anni. Per usufruire della garanzia o del servizio
post-vendita, rivolgersi al rivenditore muniti della relativa prova d’acquisto. La garanzia copre i difetti
del materiale o del montaggio imputabili al costruttore, a esclusione dei danni dovuti all’inosservanza
del manuale d’uso o a ogni intervento improprio sul prodotto (smontaggio, esposizione al calore o
all’umidità…). NOTA: conservare il presente libretto d’istruzioni in quanto contiene informazioni
importanti. Si raccomanda di conservare la confezione per qualsiasi riferimento futuro. I contenuti di
questo manuale sono soggetti a cambiamenti senza obbligo di preavviso. È proibita la riproduzione
completa o parziale e con ogni mezzo di questo manuale, senza l’espresso consenso scritto del
produttore.
Lexibook Italia S.r.l,
Via Eustachi, 45, 20129
Milano, Italia
Servizio consumatori : 022040 4959
(Prezzo di una chiamata locale).
http://www.lexibook.com
Avvertenze per la tutela dell’ambiente
Gli apparecchi elettrici vecchi sono materiali pregiati, non rientrano nei normali riuti domestici! Preghiamo quindi i gentili
clienti di contribuire alla salvaguardia dell’ambiente e delle risorse e di consegnare il presente apparecchio ai centri di
raccolta competenti, qualora siano presenti sul territorio.
ITALIANO
RP010BB.indd 21 18/10/07 19:23:44
Page 22

22
VORSICHT: ZUR VERMEIDUNG DER GEFAHR VON ELEKTRISCHEN SCHLÄGEN, ENTFERNEN
SIE DIE GERÄTEABDECKUNG (UND RÜCKSEITE) NICHT. KEINE VOM NUTZER ZU WARTENDEN
TEILE IM INNEREN DES GERÄTS. ÜBERLASSEN SIE DIE WARTUNG QUALIFIZIERTEM
FACHPERSONAL.
GEFÄHRLICHE STROMSPANNUNG:
Der Blitz und die Pfeilspitze im
Dreieckist ein Warenzeichen, das
Sie auf “gefährliche Stromspannung”
im Inneren des Produkts und auf die
Gefahr eines elektrischen Schlags
aufmerksam macht.
Nicht geeignet für Kinder unter 5 Jahre. WIE BEI ALLEN ELEKTROPRODUKTEN SIND
WÄHREND DER BEDIENUNG SICHERHEITSVORKEHRUNGEN ZU TREFFEN, UM
ELEKTRISCHE SCHLÄGE ZU VERMEIDEN. Ab 5 Jahre
Erstickungsgefahr - Kleinteile und Verpackungsmaterial. Nicht geeignet für Kinder unter 5 Jahre.
• Die Teile für die Befestigung und die Verpackung gehören nicht um
Gerät und müssen zur Sicherheit von Kindern entsorgt werden.
• Bewahren Sie diese Informationen für künftige Nachschlagezwecke auf.
• Es handelt sich nicht um ein Spielzeug.
1. Lesen Sie diese Anleitungen.
2. Bewahren Sie diese Anleitungen auf.
3. Beachten Sie alle Warnhinweise.
4. Befolgen Sie alle Bedienungsanweisungen.
5. Verwenden Sie dieses Gerät nicht in der Nähe von Wasser.
6. Reinigen Sie das Gerät nur mit einem trockenen Tuch.
7. Blockieren Sie die Belüftungsöffnungen nicht. Nehmen Sie die Installation entsprechend der
Herstelleranweisungen vor.
8. Stellen Sie das Gerät nicht in der Nähe von Wärmequellen, wie Radiatoren, Heizkörpern, Öfen und
ähnlichen Produkten auf (darunter Verstärker), die Wärme abstrahlen könnten.
9. Beschädigen Sie die Sicherheitsvorrichtung des geerdeten Stecker bitte nicht. Bei einem geerdeten
Erdungsstecker ist ein Stecker breiter als der andere. Ein geerdeter Stecker hat zwei Stecker und
einen Erdungsstift. Der breite Stecker bzw. der dritte Stift dienen Ihrer Sicherheit. Sollte ein Stecker
nicht in Ihre Steckdose passen, lassen Sie die veraltete Steckdose von einem Fachelektriker
austauschen.
10. Verlegen Sie das Kabel stolperfrei und so, dass es nicht gequetscht werden kann, insbesondere
am Steckdoseneingang und am Kabelausgang des Geräts.
11. Verwenden Sie nur vom Hersteller empfohlene Zusatzgeräte / Zubehör.
SICHERHEITSHINWEISE
VORSICHT! ELEKTROPRODUKT:
WARNUNG:
Das Ausrufezeichen im
gleichschenkligen Dreieck
ist ein Warnzeichen, das Sie
auf wichtige dem Produkte
beigefügte Betriebs- und
Wartungsanleitungen
aufmerksam macht.
SICHERHEITSHINWEISE
0- 5
CAUTION
VORSICHT
ELEKTROSCHLAGGEFAHR
NICHT ÖFFNEN
DEUTSCH
RP010BB.indd 22 18/10/07 19:23:44
Page 23

23
12. Trennen Sie das Gerät während Gewitter bzw. wenn Sie es über einen längeren Zeitraum nicht
verwenden von der Stromquelle.
13. Überlassen Sie Wartungsarbeiten dem Kundendienst. Der Kundendienst muss herangezogen
werden, wenn das Gerät in folgender Weise beschädigt worden ist: Wenn das Stromkabel oder der
Stecker beschädigt sind. Wenn Flüssigkeit oder Gegenstände in das Produkt eingedrungen sind.
Wenn das Gerät Flüssigkeit oder Feuchtigkeit ausgesetzt worden ist, nicht normal arbeitet, die
Leistung sich verändert oder wenn es herunter gefallen ist.
14. Das Gerät darf keinen tropfenden, spritzenden bzw. Objekten, die mit Flüssigkeiten gefüllt sind,
ausgesetzt werden. Zum Beispiel dürfen keine Vasen auf dem Produkt abgestellt werden.
15. Überlasten Sie die Wandsteckdose nicht. Verwenden Sie nur die angegebene Stromquelle.
16. Verwenden Sie nur vom Hersteller empfohlene Ersatzteile.
Der Barbie Projektionswecker wird mit einem Gleichstromadapter für den Projektor und einer LR6/AA
Batterie (nicht enthalten) für die Uhr betrieben.
ACHTUNG: Um einen Stromschlag zu vermeiden, richten Sie den breiten Kontaktstift des Steckers
auf die breite Kerbe aus und schieben Sie die Stifte des Steckers vollständig in die Steckdose.
1. Öffnen Sie die Batteriefachabdeckung auf der Rückseite der Uhr mit einem Schraubendreher.
2. Legen Sie eine LR6/AA Batterie (nicht enthalten) ein und achten Sie dabei auf die Markierungen für
die korrekte Polarität im Batteriefach.
3. Schließen Sie das Batteriefach und ziehen Sie die Schraube fest.
4. Verbinden Sie den Gleichstromadapter der Uhr mit einer Steckdose.
STROMVERSORGUNG
Verwenden Sie keine nicht wiederauadbaren Batterien. Nicht wieder auadbare Batterien können
nicht aufgeladen werden. Auadbare Batterien müssen vor der Auadung aus dem Spielzeug
genommen werden. Batterien dürfen nur unter Aufsicht eines Erwachsenen aufgeladen werden.
Unterschiedliche Batterietypen bzw. alte und neue Batterien dürfen nicht gemischt werden. Es
dürfen nur solche Batterien verwendet werden, die gleichwertig zum empfohlenen Batterietyp
sind. Die Batterien müssen korrekt entsprechend der Polaritätsmarkierungen eingelegt werden.
Leere Batterien müssen aus dem Spielzeug genommen werden. Die Anschlüsse dürfen nicht
kurz geschlossen werden. Batterien niemals ins Feuer werfen. Entfernen Sie die Batterien, wenn
Sie das Spielzeug für längere Zeit nicht benutzen. Wenn der Sound schwächer wird oder das
Spielzeug anfängt, nicht mehr direkt zu reagieren, deutet dieses ebenfalls darauf hin, dass es Zeit
wird, neue Batterien einzusetzen. WARNUNG: Bei Fehlfunktionen des Geräts bzw. bei
elektrostatischer Auadung drücken Sie die Zurücksetz-Taste. Sollte der Fehler anhalten, nehmen
Sie die Batterien heraus und legen Sie wieder ein.
DEUTSCH
RP010BB.indd 23 18/10/07 19:23:45
Page 24

24
POSITIONEN DER BEDIENTASTEN
8
10
9
11
12
13
1. Barbie-Projektion (3 austauschbare Projektionsbilder)
2. Fokus-Drehknopf
3. Projektor
4. Nachtlicht
5. Projektor „Ein”- Taste
6. Projektor „Aus”- Taste
7. Nachtlicht „Ein/Aus” -Taste (Spaß-Taste)
8. Schalter zum Ein-und Ausschalten des Weckers („Ein/Aus”)
9. Drehknopf zum Einstellen der Weckzeit - Um die Weckzeit einzustellen, drehen Sie das Drehrad
zum Einstellen der Weckzeit solange, bis die kleine rote Hand die gewünschte Zeit anzeigt.
10. Drehknopf zum Einstellen der Zeit - Um die Uhrzeit zu stellen, drehen Sie das Drehrad zum
Einstellen der Uhrzeit solange, bis die Hand die gewünschte Zeit anzeigt.
11. Batteriefach (Batterien nicht enthalten)
12. Fach zum Aufbewahren der Barbie Projektionsbilder
13. Gleichstromstecker (unter der Einheit)
1. Schieben Sie ein Barbie-Projektionsbild in den Projektor.
2. Drücken Sie die schmetterlingsförmige Ein-Taste auf der Vorderseite der Uhr, um den Projektor
einzuschalten.
3. Stellen Sie den Winkel des Projektors ein und drehen Sie den Fokus-Drehknopf, um die Projektion
in den richtigen Winkel zu drehen.
4. Drücken Sie die schmetterlingsförmige Aus-Taste, um den Projektor auszuschalten.
PROJEKTORFUNKTION
1. Drücken Sie die Spaß-Taste auf der Basis der Uhr, um das Nachtlicht einzuschalten.
2. Drücken Sie die Taste noch einmal, um das Nachtlicht auszuschalten.
NACHTLICHTFUNKTION
1
2
3
4
7
6
5
DEUTSCH
RP010BB.indd 24 18/10/07 19:23:48
Page 25

25
GARANTIE
Die Garantiezeit für dieses Gerät beläuft sich auf 2 Jahre. Um die Garantie oder den Kundendienst
in Anspruch zu nehmen, setzen Sie sich bitte mit Ihrem Händler oder Lieferanten in Verbindung oder
senden Sie das Gerät an die unten angegebene Adresse ein. Fügen Sie Ihren Kaufbeleg bei. Unsere
Garantie bezieht sich auf Material- und Verarbeitungsfehler des Herstellers, nicht jedoch auf Verschleiß, Nichteinhaltung der Anleitungen, unautorisierte Arbeiten am Gerät und dessen Bestandteilen
(Demontage, Hitze, Dampf usw.). Hinweis: Wir empfehlen, dass Sie die Originalverpackung für
spätere Zwecke aufbewahren. Bewahren Sie diese Bedienungsanleitung an einem sicheren Ort auf,
da sie wichtige Informationen enthält. Haftungsausschluss Wir verbessern unsere Produkte, deren
Farben und Produktdetails ständig, daher kann Ihr Produkt leicht von der Abbildung auf der Verpackung abweichen.
http://www.lexibook.com
Hinweise zum Umweltschutz
Elektronische Geräte können aufbereitet werden und dürfen nicht im Haushaltsmüll entsorgt werden. Bitte unterstützen Sie
die Wiederaufbereitung und schützen Sie die Umwelt, indem Sie Altgeräte entsprechend der Umweltschutzbestimmungen
entsorgen bzw. abgeben.
DEUTSCH
RP010BB.indd 25 18/10/07 19:23:48
Page 26

26
OPGELET: OM HET RISICO TOT ELEKTRISCHE SCHOKKEN TE VERMINDEREN, MAG JE HET
VOORPANEEL (OF ACHTERPANEEL) NIET VERWIJDEREN. GEEN VERVANGINGSONDERDELEN
BINNENIN HET TOESTEL. LAAT REPARATIE/ONDERHOUD UITVOEREN DOOR
GEKWALIFICEERD REPARATIEPERSONEEL
GEVAARLIJKE VOLTAGE:
De bliksemits met het
pijlsymbool,binnenin een gelijkzijdige
driehoek, is bedoeld om de gebruiker
attent te maken op de aanwezigheid
van niet-geisoleerde gevaarlijke voltage
binnenin de behuizing van het toestel,
dat mogelijk voldoende is om een
elektrische schok aan personen toe te
brengen.
Nicht geeignet für Kinder unter 5 Jahre. WIE BEI ALLEN ELEKTROPRODUKTEN SIND
WÄHREND DER BEDIENUNG SICHERHEITSVORKEHRUNGEN ZU TREFFEN, UM
ELEKTRISCHE SCHLÄGE ZU VERMEIDEN. Ab 5 Jahre
OPMERKINGEN:
• Dit toestel mag niet voor langere perioden gebruikt worden in zeer
warme
of vochtige ruimtes, daar dit schade kan veroorzaken.
• Blootstelling aan direct zonlicht zoals in een wagen kan leiden tot
vervorming van het toestel en/of slechte werking.
Gebruik en bewaar dit toestel niet op plaatsen met veel stof of zand.
1. Lesen Sie diese Anleitungen.
2. Bewahren Sie diese Anleitungen auf.
3. Beachten Sie alle Warnhinweise.
4. Befolgen Sie alle Bedienungsanweisungen.
5. Verwenden Sie dieses Gerät nicht in der Nähe von Wasser.
6. Reinigen Sie das Gerät nur mit einem trockenen Tuch.
7. Blockieren Sie die Belüftungsöffnungen nicht. Nehmen Sie die Installation entsprechend der
Herstelleranweisungen vor.
8. Stellen Sie das Gerät nicht in der Nähe von Wärmequellen, wie Radiatoren, Heizkörpern, Öfen und
ähnlichen Produkten auf (darunter Verstärker), die Wärme abstrahlen könnten.
9. Beschädigen Sie die Sicherheitsvorrichtung des geerdeten Stecker bitte nicht. Bei einem geerdeten
Erdungsstecker ist ein Stecker breiter als der andere. Ein geerdeter Stecker hat zwei Stecker und
einen Erdungsstift. Der breite Stecker bzw. der dritte Stift dienen Ihrer Sicherheit. Sollte ein Stecker
nicht in Ihre Steckdose passen, lassen Sie die veraltete Steckdose von einem Fachelektriker
austauschen.
VEILIGHEIDSMAATREGELEN
WAARSCHUWING
ATTENTIE:
Het uitroepingsteken
binnenin een gelijkzijdige
driehoek is bedoeld om de
gebruiker attent te maken
op de aanwezigheid van
belangrijke instructies
omtrent de werking of het
onderhoud (reparatie), in de
bijgeleverde handleiding
van dit toestel.
VEILIGHEIDSMAATREGELEN
0- 5
OPGELET
RISICO TOT ELEKTRISCHE SCHOK
NIET OPENEN
NEDERLANDS
RP010BB.indd 26 18/10/07 19:23:49
Page 27

27
10. Verlegen Sie das Kabel stolperfrei und so, dass es nicht gequetscht werden kann, insbesondere
am Steckdoseneingang und am Kabelausgang des Geräts.
11. Verwenden Sie nur vom Hersteller empfohlene Zusatzgeräte / Zubehör.
12. Trennen Sie das Gerät während Gewitter bzw. wenn Sie es über einen längeren Zeitraum nicht
verwenden von der Stromquelle.
13. Überlassen Sie Wartungsarbeiten dem Kundendienst. Der Kundendienst muss herangezogen
werden, wenn das Gerät in folgender Weise beschädigt worden ist: Wenn das Stromkabel oder der
Stecker beschädigt sind. Wenn Flüssigkeit oder Gegenstände in das Produkt eingedrungen sind.
Wenn das Gerät Flüssigkeit oder Feuchtigkeit ausgesetzt worden ist, nicht normal arbeitet, die
Leistung sich verändert oder wenn es herunter gefallen ist.
14. Das Gerät darf keinen tropfenden, spritzenden bzw. Objekten, die mit Flüssigkeiten gefüllt sind,
ausgesetzt werden. Zum Beispiel dürfen keine Vasen auf dem Produkt abgestellt werden.
15. Überlasten Sie die Wandsteckdose nicht. Verwenden Sie nur die angegebene Stromquelle.
16. Verwenden Sie nur vom Hersteller empfohlene Ersatzteile.
De Barbie Projectiewekker werkt met een gelijkstroomadapter voor de projector en met een 1 X LR6/
AA-batterij (niet inbegrepen) voor de klok.
OPGEPAST: plaats de contactpin in het contact en duw de pin volledig in het contact om een
elektrische schok te voorkomen.
1. Open het batterijcompartiment aan de achterkant van de klok met behulp van een
schroevendraaier.
2. Plaats 1 x LR6/AA-batterij (niet inbegrepen) en let op de polariteitsaanduiding in het
batterijcompartiment.
3. Sluit het batterijcompartiment en maak de schroef vast.
4. Stop de gelijkstroomadapter van de klok in een stopcontact.
STROOMBRONNEN
Geen oplaadbare batterijen gebruiken. Niet-heroplaadbare batterijen kunnen niet worden
heropgeladen. Haal de accu’s uit het spel, alvorens ze op te laden. De accu’s alleen opladen in
het bijzijn van een volwassene. Gebruik geen batterijen of accu’s van een verschillend type, dan
wel nieuwe en oude door elkaar. Dit spel mag alleen worden gebruikt met deze specieke
batterijen. Plaats de batterijen en accu’s met de polen in de juiste richting. Lege batterijen en
accu’s moeten uit het speelgoed worden gehaald. Voorkom kortsluiting met de zijkanten van de
batterijen en de accu’s. Gooi geen batterijen in open vuur. Verwijder de batterijen wanneer het
speelgoed voor langere tijd niet wordt gebruikt.
WAARSCHUWING: Indien het toestel slecht werkt of een electrische schok ondergaat,
verwijder de batterijen en.
NEDERLANDS
RP010BB.indd 27 18/10/07 19:23:49
Page 28

28
PLAATS VAN DE BESTURINGSELEMENTEN
8
10
9
11
12
13
1. Barbieprojectie (3 verwisselbare vullingen)
2. Focusknop
3. Projector
4. Nachtlicht
5. Knop projector “Aan”
6. Knop projector “Uit”
7. Nachtlichttoets “Aan/Uit” (plezierknop)
8. Wekkerschakelaar (“Aan/Uit”)
9. Duimwiel wekkerinstelling - Draai het wekkerinstellingsduimwiel tot het kleine rode handje de
juiste tijd laat zien om de wekker in te stellen.
10. Duimwiel tijdsinstelling - Draai het tijdsinstellingsduimwiel tot de handjes de juiste tijd laten zien
om de tijd in te stellen.
11. Batterijcompartiment (batterij niet inbegrepen)
12. Laadcompartiment Barbieprojecties
13. Gelijkstroomcontact (onder de klok)
1. Stop een Barbieprojectie in de projector.
2. Druk op de vlinderknop “Aan” op de voorzijde van de klok om de projector aan te schakelen.
3. Pas de hoek van de projector aan en draai de focusknop om de projectie in de goede hoek te
zetten.
4. Druk de vlinderknop “Uit” om de projector uit te schakenen.
PROJECTORFUNCTIE
1. Druk op de plezierknop aan de voet van de klok om het nachtlicht aan te schakelen.
2. Druk opnieuw op de knop om het nachtlicht uit te schakelen.
NACHTLICHTFUNCTIE
1
2
3
4
7
6
5
NEDERLANDS
RP010BB.indd 28 18/10/07 19:23:52
Page 29

29
GARANTIE
Dit product heeft een garantie van 2 jaar. Om de garantie of naverkoopdienst te gebruiken, gelieve
contact op te nemen met je verkoper met een aankoopbewijs of zend het toestel terug naar
ondervermeld adres met een aankoopbewijs. Onze garantie dekt schade aan materialen of
installatie-betreffende schade met betrekking tot de fabrikant, met uitzondering van slijtage
veroorzaakt door het niet navolgen van de richtlijnen voor het gebruik van dit toestel of door
niet-geautoriseerde herstellingen aan het toestel (zoals demontage, blootstelling aan hitte of
vochtigheid, enz.). Opmerking: Het is aangeraden alle verpakkingsmaterialen te bewaren als
referentiemateriaal voor later. Bewaar deze gebruikshandleiding op een veilige plaats daar het
belangrijke informatie bevat. Omwille van ons voortdurend streven naar verbetering, is het mogelijk
dat kleuren en details van het product lichtjes verschillen van deze die op de verpakking zijn
afgebeeld.
http://www.lexibook.com
Milieubescherming
Niet langer bruikbare electrische apparaten kunnen gerecycleerd worden en mogen niet weggegooid worden met het
gewone huisvuil! Gelieve actief de bescherming van bronnen te ondersteunen en deel te nemen in de bescherming van het
milieu door dit toestel terug te zenden naar een verzamelcentrum (indien aanwezig).
©2007 Mattel, Inc.
©2007 LEXIBOOK®
IM code: RP010BBIM0437
NEDERLANDS
RP010BB.indd 29 18/10/07 19:23:53
 Loading...