

Page 1

Portable CD/MP3 player
with AM/FM stereo radio
RRaaddiioo ppoorrttaattiivvee AAMM//FFMM
ssttéérrééoo aavveecc lleecctteeuurr CCDD//MMPP33
OWNER’S MANUAL
GGUUIIDDEE DD’’UUTTIILLIISSAATTIIOONN
RCD170BB
RCD170BB_02IM0449.qxd:CD2849.QXD 27/10/09 17:13 Page 1
Page 2

2
CAUTION: TO REDUCE THE RISK OF ELECTRIC SHOCK, DO NOT
REMOVE COVER (OR BACK). NO USER-SERVICEABLE PARTS INSIDE.
REFER SERVICING TO QUALIFIED SERVICE PERSONNEL.
WARNING: TO REDUCE THE RISK OF FIRE OR ELECTRIC SHOCK, DO
NOT EXPOSE THIS APPLIANCE TO RAIN OR MOISTURE.
CAUTION
RISK OF ELECTRIC SHOCK
DO NOT OPEN
DANGEROUS VOLTAGE:
The lightning flash with arrowhead symbol within an
equilateral triangle is intended to alert the user to the
presence of uninsulated dangerous voltage within the
product’s enclosure that may be of sufficient magnitude to
constitute a risk of electric shock to persons.
ATTENTION:
The exclamation point within an equilateral triangle is
intended to alert the user to the presence of important
operating and maintenance (servicing) instructions in the
literature accompanying the appliance.
DANGER:
Invisible and hazardous laser radiation when open and
interlock failed or defeated. Avoid direct exposure to beam.
LASER SAFETY: This unit employs a laser. Only qualified service
personnel should attempt to service this dev ice due to possi ble
eye injury.
CAU TION :
USE OF CON TROL S, A DJUS TMENTS OR
PE RFOR MANC E P ROCEDUR E H EREI N M AY RESU LT IN
HAZARDOUS RADIATION EXPOSURE.
SAFETY PRECAUTIONS
English
RCD170BB_02IM0449.qxd:CD2849.QXD 27/10/09 17:13 Page 2
Page 3

1. Read these instructions.
2. Keep these instructions.
3. Heed all warnings.
4. Follow all instructions.
5. Do not use this unit near water.
6. Clean only with a dry cloth.
7. Do not block any ventilation
openings. Install in accordance
with manufacturer’s instructions.
8. Do not install near any heat
sources such as radiators,
heat registers, stoves or other
apparatus (including amplifiers)
that produce heat.
9. Do not defeat the safety
purpose of the polarized or
grounding-type plug. A
polarized plug has two blades
with one wider than the other.
A grounding-type plug has two
blades and a third grounding
prong. The wide blade or the
third prong are provided for
your safety. If the provided
plug does not fit into your
outlet, consult an electrician for
replacement of the obsolete
outlet.
10. Protect the power cord from
being walked on or pinched
particularly at plugs,
convenience receptacles, and
the point where they exit from
the unit.
11. Only use attachments/
accessories specified by the
manufacturer.
12. Unplug this unit during
lightning storms or when
unused for long periods of
time.
13. Refer all servicing to qualified
service personnel. Servicing is
required when the unit has
been damaged in any way,
such as the following: the
power-supply cord or plug has
been damaged; liquid has
been spilled or objects have
fallen into the unit; and/or the
unit has been exposed to rain
or moisture, does not operate
normally, has changed its
performance or has been
dropped.
14. This unit should not be
exposed to dripping or
splashing water and no object
filled with liquids such as vases
should be placed on the unit.
15. Do not overload wall outlet.
Use only power source as
indicated.
16. Use replacement parts as
specified by the manufacturer.
17. The product may be mounted
to a wall only if recommended
by the manufacturer.
18. Upon completion of any
service or repairs to this
product, ask the service
technician to perform safety
checks.
3
English
SAFETY INSTRUCTIONS
RCD170BB_02IM0449.qxd:CD2849.QXD 27/10/09 17:13 Page 3
Page 4
4
WARNING:
• Please keep all information for future reference.
• This is not a toy.
NOTES:
• Please avoid using this unit in places of high temperature or humidity
over prolonged periods of time as damage may occur.
• Exposure to direct sunlight in places such as car interiors may cause
the unit to become warped and/or lead to malfunctioning.
• Avoid using or storing this unit in dusty or sandy locations.
• Do not place a naked flame source such as lighted candles on or near
the product.
PROTECT YOUR FURNITURE
This model is equipped with non-skid rubber “feet” to prevent the product
from moving when you operate the controls. These “feet” are made from
non-migrating rubber material specially formulated to avoid leaving any
marks or stains on your furniture. However certain types of oil based
furniture polishes, wood preservatives or cleaning sprays may cause the
rubber “feet” to soften and leave marks or a rubber residue on your furniture.
To prevent any damage to your furniture, we strongly recommend that you
purchase small self-adhesive felt pads, available at hardware stores and
home improvement centers everywhere, and apply these pads to the bottom
of the rubber “feet” before you place the product on fine wooden furniture.
English
RCD170BB_02IM0449.qxd:CD2849.QXD 27/10/09 17:13 Page 4
Page 5
5
English
UNPACKING AND SET UP
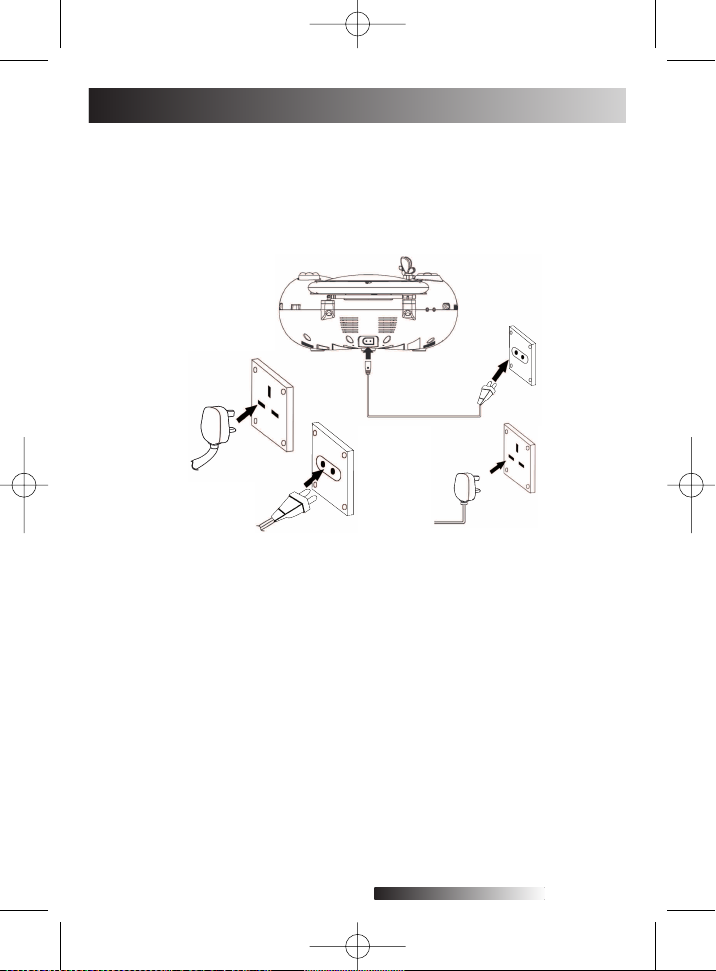
Note: 2 power cords are included: 1 x UK AC Power cord and 1 x
European/French AC Power cord.
• Carefully remove the main unit and the AC Power cords from the display
carton. Remove all the packing material from the unit. Remove any
decorative or descriptive labels from the front or top of the cabinet. Do
not remove any labels from the back or bottom of the cabinet.
• Carefully remove any small strips of tape that may have been used to
prevent the CD door from opening in transit.
• Unwind the AC Power cord and extend it to its full length.
• This unit was shipped with a dummy CD transit card in the CD player.
This dummy CD prevents the laser pick up from moving during shipment.
This card must be removed before you can insert your own CDs. Lift the
CD Door OPEN Tab to open the CD door. Carefully remove the dummy
CD from the player and discard it. Close the CD door.
• Place the unit on a flat, level surface such as a table, desk, counter, shelf,
etc, convenient to a 230V 50Hz AC outlet, out of direct sunlight, and
away from sources of excess heat, dust, moisture, or strong
magnetic fields.
GETTING STARTED
• Operate controls and switches as described in the manual.
• Before turning on the power, make certain that the AC Power cord is
properly installed.
• Store your CDs in a cool area to avoid damage from heat.
• When moving the unit, be sure to first disconnect the AC Power cord.
PREPARATION FOR USE
RCD170BB_02IM0449.qxd:CD2849.QXD 27/10/09 17:13 Page 5
Page 6

1
2
4
3
5
6
7
8
9
10
11
12
13
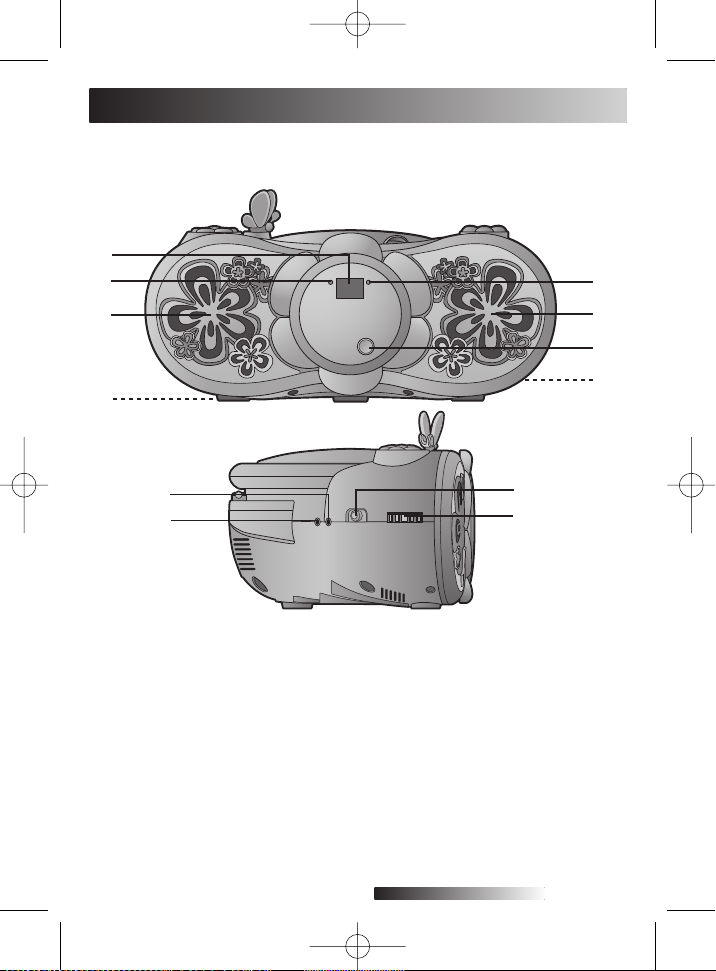
1. FM Telescopic Antenna
2. CD Compartment
3. SKIP/SEARCH Button
4. PLAY/PAUSE Button
5. SKIP/SEARCH Button
6. STOP ( ) Button
7. MODE Button
8. 10+ Button
9. Carrying Handle
10. BarbieTMLED Indicator
11. BAND (AM/FM/
FM ST.) Switch
12. TUNING Control
13. CD Door OPEN Tab
Top of Unit
LOCATION OF CONTROLS
English
RCD170BB_02IM0449.qxd:CD2849.QXD 27/10/09 17:13 Page 6
Page 7
7
English
3
4
2
1
6
5
7
8
1. Display
2. POWER Indicator
3. Left Speaker
4. Battery Compartment (Bottom
of Unit)
5. FM ST. Indicator
6. Right Speaker
7. GEMSTONE FUN Button
8. AC Power Jack
(Rear of Unit)
9. HEADPHONE Jack
10. AUX IN Jack
11. FUNCTION (AUX/RADIO/
OFF/CD) Switch
12. VOLUME Control
Front/Side of Unit
10
9
12
11
LOCATION OF CONTROLS (CONTINUED)
RCD170BB_02IM0449.qxd:CD2849.QXD 27/10/09 17:13 Page 7
Page 8

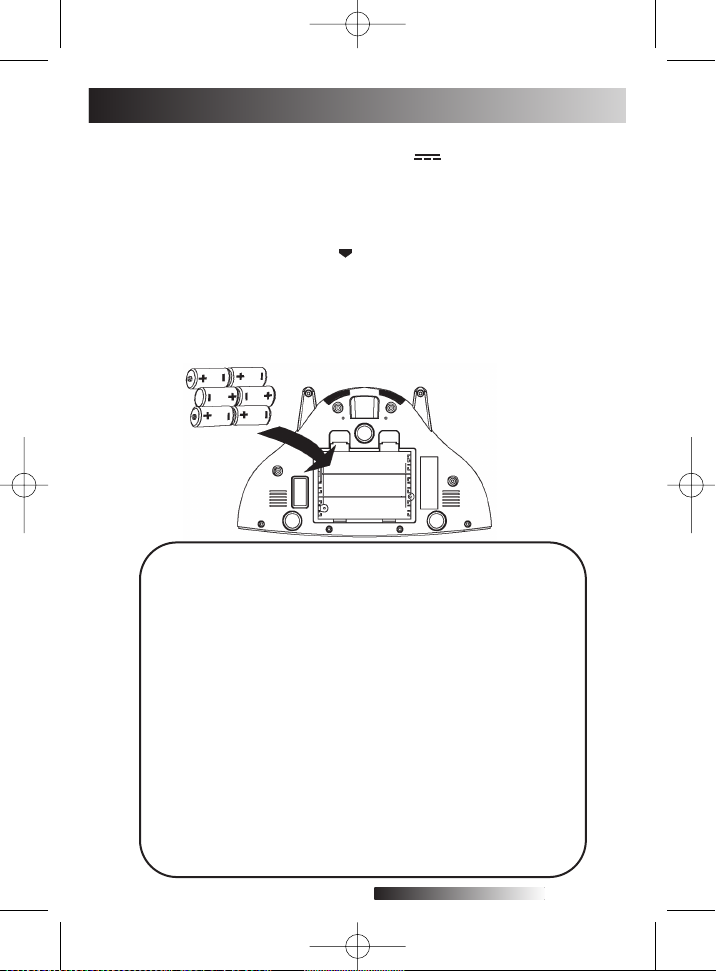
This boombox requires either six (6) “C” size batteries (not included) or an
AC power cord (included).
BATTERY INSTALLATION
1. Remove the Battery Compartment door on the bottom of the unit by
pressing down on the marks and then sliding it open.
2. Insert
six (6) “C” size batteries (not included)
according to the polarity
diagram inside the Battery Compartment (as shown below). Alkaline
batteries are recommended for the longest playing time.
3. Replace the Battery Compartment door.
BATTERY PRECAUTIONS
* Replacement of batteries mustt be done by an adult.
* Do not mix old and new batteries.
* Do not mix alkaline, standard (carbon-zinc) or
rechargeable (nickel-cadmium) batteries.
* The supply terminals are not to be short-circuited.
* Non-rechargeable batteries are not to be recharged.
* Exhausted batteries are to be removed.
* Only batteries of the equivalent type are to be used.
* Batteries are to be inserted with the correct polarity.
* Dispose of batteries properly.
* Do not dispose of batteries in fire; batteries may explode of leak.
* Do not use rechargeable batteries.
* Rechargeable batteries are to be removed before being charged.
WARNING: Mal-function or loss of memory may be caused by
strong frequency interference or electrostatic discharge. Should any
abnormal function occur, remove the batteries and insert them again.
POWER SOURCES
English
RCD170BB_02IM0449.qxd:CD2849.QXD 27/10/09 17:13 Page 8
Page 9
9
English
AC OPERATION
To operate the unit using AC power, connect the small end of the AC power
cord to the AC power jack on the rear of the unit and insert the plug into an
AC outlet having AC 230V ~, 50Hz only. The batteries are automatically
disconnected when the AC adapter is used.
CAUTION:
• When not using AC power, disconnect the AC power cord from the wall
outlet and from the unit by pulling the plug (not the cord).
• Do not touch the AC power cord with wet hands.
• Fully insert the plug without exposing any part of the blade.
POWER SOURCES (CONTINUED)
NOTE: The socket-outlet shall be installed near the equipment and shall be
easily accessible.
WARNING: Mal-function or loss of memory may be caused by strong
frequency interference or electrostatic discharge. Should any abnormal
function occur, unplug the AC/DC adapter from the mains socket and replug
it again.
RCD170BB_02IM0449.qxd:CD2849.QXD 27/10/09 17:13 Page 9
Page 10
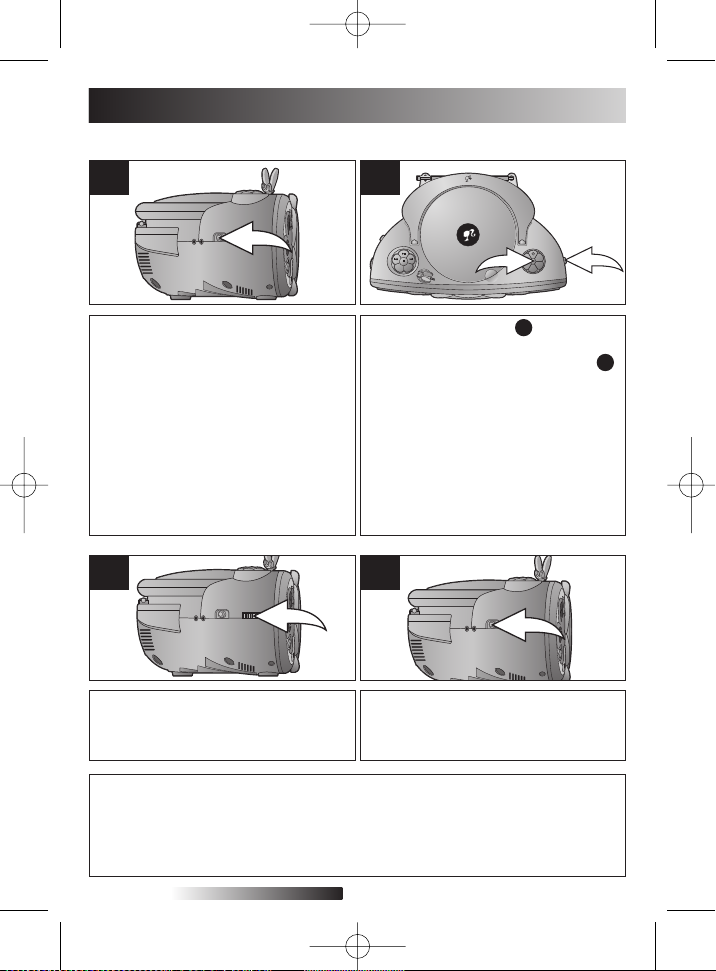
Slide the BAND switch 1 to select AM,
FM or FM ST. (Stereo). Tune a desired
station by turning the TUNING control 2 .
NOTES:
• If you select FM ST. and you tune to a
FM S te re o st ation, the FM ST.
indicator will light.
• If you are listening to a weak FM
Ster eo st at ion, you can usually
improve the reception by sliding the
BAND switch from FM ST. to FM (the
sound will now be in mono).
Slide the FUNCTION switch to the
RADIO position to turn the unit on and
se lec t Rad io m ode ; the P OWER
indicator will light.
1
1
2
2
Adjust the VOLUME control as desired.
3
To turn the radio off, slide the
FUNCTION switch to the OFF position;
the POWER indicator will turn off.
4
LISTENING TO THE RADIO
10
ANTENNAS
AM–This unit has a built-in ferrite rod antenna, which provides adequate reception
in most areas. If reception is weak, turn the unit to improve reception.
FM–The FM Telescopic Antenna is for FM reception only. If reception is weak,
adjust the length and the angle of the antenna.
OPERATION
English
RCD170BB_02IM0449.qxd:CD2849.QXD 27/10/09 17:13 Page 10
Page 11
11
English
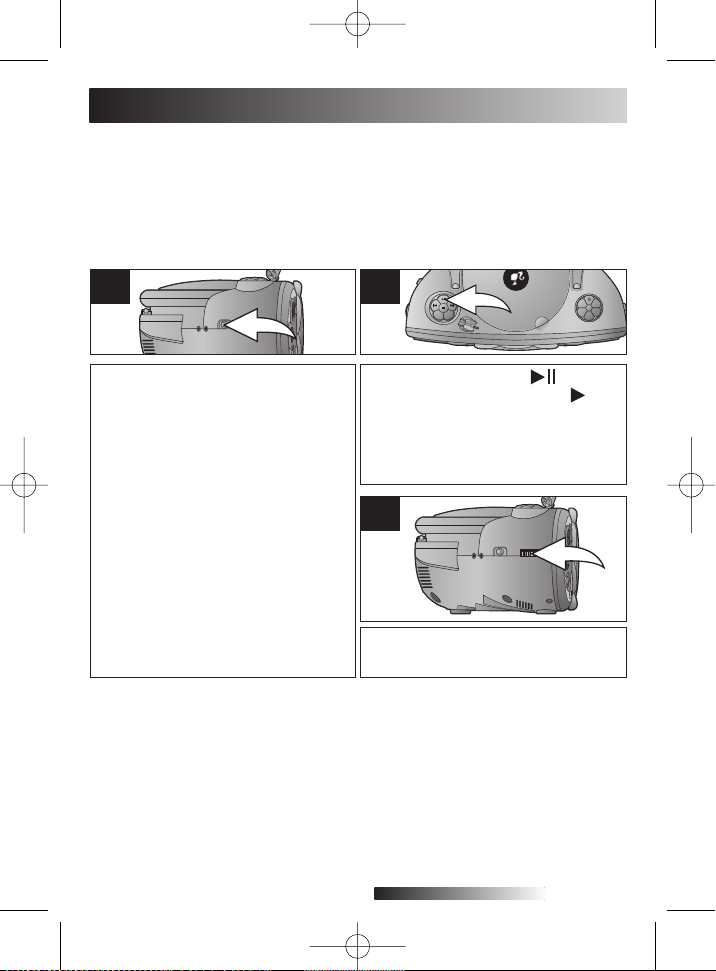
To play a CD:
1. Move the FU NCTION selector to
CD/MP3. The display briefly reads "- -
-" to count (and afterwards show) the
number of tracks stored on the CD. If
you see "no" instead, either a CD has
not been inserted or the appliance
cannot read it.
2. Open the CD compartment by briefly
pushing the OPEN/CLOSE area. The
display reads "- - -".
3. Place the CD on the spindle, the label
pointing upwards.
4. Close the compartment. The disk will
revolve a couple of times and the
display will show the number of tracks
on it.
1
Press the PLAY/PAUSE button to
start replay. The display shows and
the track number.
Then the appliance will start playing all
tracks one after the other. After the
last one it will stop.
2
TO INSERT AND PLAY A CD
CONTINUED ON THE NEXT PAGE
OPERATION (CONTINUED)
• The appliance is designed to play back MP3 and other audio CDs. You will be
made aware of functions that differ depending on whether a MP3 or other audio
CD is played.
• "MP3" being shown on the display is telling you that you are playing a MP3 CD.
Adjust the VOLUME control as desired.
3
RCD170BB_02IM0449.qxd:CD2849.QXD 27/10/09 17:13 Page 11
Page 12

OPERATION (CONTINUED)
12
2
1
4
Selecting tracks
To select a title, it is of no relevance
whether the CD is playing or stopped.
• To select the next track: Press
once.
• To go to the beginning of a track:
Press once.
• To select the previous title: Press
twice.
Finding a track section
Use this function to find certain section
of a specific title. When you have found
the part you searched for, simply
release the button you were pressing.
• Forward search: Keep button
pressed while the track is playing.
• Backward search: Keep button
pressed while the track is playing.
Skipping the next 10 tracks
• To go 10 tracks forward, briefly press
button 10+ once.
Note
- When playing MP3 CDs, use this
function to quickly select the next
folder.
Once you have selected another
folder, ALBUM and the flashing
folder number will be briefly shown
on the display. This will be followed
by "001" and the first track in the
selected folder will be played.
- You cannot select and play MP3 files
stored in sub-folders. The appliance
will only play tracks from the CD root
("flat") or first-level folders.
English
RCD170BB_02IM0449.qxd:CD2849.QXD 27/10/09 17:13 Page 12
Page 13

13
6
5
To turn the unit off, slide the FUNCTION
switch to the OFF position; the POWER
indicator will turn off.
7
1. Press STOP to stop playback.
Never open the CD compartment
while the CD is still playing!
2. Open the CD compartment by briefly
pushing the OPEN/CLOSE area.
3. Hold the CD by its edge and carefully
remove it from the spindle (gently
pushing your thumb onto the spindle
may help).
4. Close the CD compartment to keep
out any dust.
Basic CD player functions
Pausing and resuming playback
• To pause playback: While playing a
CD press PLAY/PAUSE . The
display shows a flashing . Press
the button again to resume playback
at the point where you paused it.
• To stop playback: Press the STOP
button. Pressing PLAY/PAUSE
will start playing the first track.
OPERATION (CONTINUED)
English
RCD170BB_02IM0449.qxd:CD2849.QXD 27/10/09 17:13 Page 13
Page 14
CD PLAYBACK NOTES:
• The appliance is designed to play back MP3 and other audio CDs. You will be
made aware of functions that differ depending on whether a MP3 or other audio
CD is played.
• "MP3" being shown on the display is telling you that you are playing a MP3 CD.
• If a disc is inserted incorrectly, dirty, damaged or not present at all, “no” will appear
in the display.
• Although this unit can read CD-R and CD-RW discs, in addition to normal CDs,
the playability of those discs may be affected by the type of software that was
used to create the discs, as well as the blank media you are using. 100%
playability cannot be guaranteed. This is not an indication of a problem with this
unit.
AUX IN Jack
By using a home audio connection cable (not included), you can listen to
an external audio unit through this unit’s speakers. Before making any
connections, turn off the power to all equipment.
Slide the FUNCTION switch to AUX to turn the unit on and select AUX
mode. Plug a connection cable (not included) between the AUX or LINE
OUT jack on the external audio unit and this unit's AUX IN jack (side of the
unit). (Do not connect it to this unit's HEADPHONE jack.) Turn on the
external audio unit and start playback; the external unit's output sound will
be heard through this unit's speakers. Rotate the VOLUME control to
adjust the volume level as desired.
To turn the unit off, remove the plug from the AUX IN jack, then slide the
Function switch to OFF.
OPERATION (CONTINUED)
English
RCD170BB_02IM0449.qxd:CD2849.QXD 27/10/09 17:13 Page 14
Page 15

4. Press the MODE button again. REP
ALL will remain on the display - the
entire CD will be repeated.
15
1. Start CD replay.
2. Press the MODE button once.
3. The display reads REP - the current
track will be repeated.
1 2
REPEAT AND RANDOM PLAY
5. Press the MODE button the third time.
The display reads RANDOM - tracks
will be played in a random order.
6. Pressing the MODE button yet again
will quit the repeat function and random
play.
3
Note:
If you are currently playing a MP3 CD, between REP and REP ALL you have
the added option of repeating all tracks in a folder. The display will therefore
read ALBUM.
OPERATION (CONTINUED)
• The repeat function lets you play a certain track or the entire CD again.
• Random play lets an internal random generator set the order in which the tracks
are played.
English
RCD170BB_02IM0449.qxd:CD2849.QXD 27/10/09 17:13 Page 15
Page 16

2. Press or to select a track.
3. Press MODE again.
"P02" will be shown on the display.
4. Repeat steps 2 and 3 to select further
tracks.
5. To play your track sequence press
PLAY/PAUSE .
PROG remains displayed in the right
top edge.
16
1. Press the MODE button.
"PROG" and "P01" will flash on the
display.
2
1
3
2
4
TO PROGRAM THE MEMORY (UP TO 20 TRACKS)
NOTES:
• To quit the programming mode press STOP once.
• Pressing STOP twice, changing the mode, turning off the appliance or
removing the CD will clear the track sequence you programmed.
• The REP and REP ALL functions are also available when playing your
own track sequence.
OPERATION (CONTINUED)
You can program and play track sequences of up to 20 tracks.
To program a track sequence...
• ... the CD compartment must contain a CD,
• ... playback must be stopped and
• ... the mode selector must be set to CD/MP3.
1
2
1
3
3
English
RCD170BB_02IM0449.qxd:CD2849.QXD 27/10/09 17:13 Page 16
Page 17

17
Press the GEMSTONE FUN button on
the front of your Boombox.
See wh at you
can do w ith
your G EMSTON E
FUN bu tton!
BarbieTMhas a surprise just for you!
Just follow the instructions below and
see what you can do with your
GEMSTONE FUN button!
SURPRISE! Your BarbieTMLED indicator
will flash in alternating colors of red and
blue for 10 seconds.
Step 1
Step 1
Step 2
OPERATION (CONTINUED)
English
RCD170BB_02IM0449.qxd:CD2849.QXD 27/10/09 17:13 Page 17
Page 18

CARING FOR COMPACT DISCS
• Treat the compact disc carefully. Handle the
compact disc only by its edges. Never allow your
fingers to come in contact with the shiny,
unprinted side of the compact disc.
• Do not attach adhesive tape, stickers, etc. to
the compact disc label.
• Clean the compact disc periodically with a soft, lint-free, dry cloth. Never
use detergents or abrasive cleaners to clean the compact disc. If
necessary, use a CD cleaning kit.
• If a disc skips or gets stuck on a section of the compact disc, it is probably
dirty or damaged (scratched).
• When cleaning the compact
disc, wipe in straight lines from
the center of the compact disc
to the outer edge of the
compact disc. Never wipe in
circular motions.
• This unit is designed to play
only compact discs bearing the identification logo as shown
here. Other discs may not conform to the CD standard and
may not play properly.
• Compact Discs should be stored in their cases after each
use to avoid damage.
• Do not expose compact discs to direct sunlight, high humidity, high
temperatures or dust, etc. Prolonged exposure or extreme temperatures
can warp the compact disc.
• Do not stick or write anything on either side of the compact disc. Sharp
writing instruments, or the ink, may damage the surface.
CARE OF THE CABINET
If the cabinet becomes dusty, wipe it with a soft, dry dust cloth. Do not use
any wax, polish sprays or abrasive cleaners on the cabinet.
CAUTION
Never allow any water or other liquids to get inside the unit while cleaning.
B
E
N
Z
E
N
E
S
o
l
u
t
i
o
n
n
e
t
t
o
y
a
n
t
e
CARE AND MAINTENANCE
English
RCD170BB_02IM0449.qxd:CD2849.QXD 27/10/09 17:13 Page 18
Page 19
19
SYMPTOM CAUSE SOLUTION
CD will not play. FUNCTION switch not Set FUNCTION switch
set to CD. to CD.
Disc inserted incorrectly. Reinsert disc correctly.
AC power cord Check AC power cord
not connected. connection.
CD skips while CD compartment Close CD compartment.
playing and/or not closed.
erratic playback. Disc inserted incorrectly. Reinsert disc correctly.
Dirty or defective Try another disc.
disc.
Moisture Wipe disc with soft
condensation cloth.
on disc.
AM or FM, poor Station is not tuned Retune the AM or FM
or no sound. properly. broadcast station.
FM: Antenna is not Reorient FM
properly adjusted. antenna.
AM: Unit is not pos- Rotate unit until best
itioned correctly. reception is obtained.
FUNCTION switch not Set FUNCTION switch
set to RADIO. to RADIO.
Volume at minimum. Increase volume.
If you experience a problem with this unit, check the chart below
before calling for service.
TROUBLESHOOTING GUIDE
English
RCD170BB_02IM0449.qxd:CD2849.QXD 27/10/09 17:13 Page 19
Page 20
20
NOTE: Please keep this instruction manual, it contains important information.
This product is covered by our one-year warranty. To make use of the warranty
or the after-sales service, please contact your retailer and supply proof of
purchase. Our warranty covers material or installation-related defects
attributable to the manufacturer, with the exception of wear caused by failure
to respect the instructions for use or any unauthorised work on the equipment
(such as dismantling, exposure to heat or damp, etc).
LEXIBOOK UK ltd, Wimbledon Village Business Centre, Thornton House,
Thornton Road, Wimbledon, London SW19 4NG, United Kingdom, Helpline:
0808 100 3015, http://www.lexibook.com
©2009 Barbie, Inc. All rights Reserved.
©2009 LEXIBOOK®
WARRANTY
Environmental Protection
Unwanted electrical appliances can be recycled and should not be
discarded along with regular household waste! Please actively support
the conservation of resources and help protect the environment by
returning this appliance to a collection centre (if available).
English
Made in China
This product is not a toy
WARNING: Prolonged use at full power of this
product might damage the ear of the user.
RCD170BB_02IM0449.qxd:CD2849.QXD 27/10/09 17:13 Page 20
Page 21
21
MISE EN GARDE : AFIN DE RÉDUIRE LES RISQUES D’ÉLECTROCUTION,
NE PAS ENLEVER LE COUVERCLE (NI L'ARRIÈRE). NE CONTIENT
AUCUNE PIÈCE POUVANT ÊTRE RÉPARÉE NI REMPLACÉE PAR
L'UTILISATEUR. CONFIER TOUTE RÉPARATION À UN TECHNICIEN
QUALIFIÉ.
MISE EN GARDE
RISQUE D’ÉLECTROCUTION
NE PAS OUVRIR
TENSION DANGEREUSE :
Les symboles de l'éclair et de la pointe de flèche
dans un triangle permettent d'alerter l'utilisateur de
la présence de ‘tension dangereuse’ non isolée à
l'intérieur de l'appareil, ce qui constitue un risque
d'électrocution.
ATTENTION :
Le point d'exclamation à l'intérieur du triangle
permet d'alerter l'utilisateur de la présence
d'instructions d'opération et d'entretien importantes
accompagnant le produit.
DANGER :
Présence de radiation laser dangereuse lorsque
cet appareil est ouvert et le dispositif de
verrouillage, annulé. Évitez toute exposition
directe au faisceau du laser.
SÉCURITÉ RELATIVE AU LASER : Cet appareil utilise un laser. À
cause des risques de blessures oculaires, seul le personnel de service
qualifié doit effectuer les tests et réparations sur cet appareil.
MIS E EN GA RDE :
L’UTIL ISAT ION D E COM MAND ES, D E
RÉGLAGES OU LA PERFORMANCE DE PROCÉDURES DÉCRITES
DANS LES P RÉSE NTES P EUT V OUS EX POSE R À DES
RADIATIONS DANGEREUSES.
MESURES DE SÉCURITÉ
Français
RCD170BB_02IM0449.qxd:CD2849.QXD 27/10/09 17:14 Page 21
Page 22

AVERTISSEMENT :
• Veuillez conserver ces renseignements pour toute référence ultérieure.
• Ceci n’est pas un jouet.
NOTES :
• Evitez d'utliser cet appareil dans des lieux chauds ou humides sur de
trop longues périodes de temps pour ne pas l'endommager.
• L'exposition à la lumière directe du soleil, à l'intérieur d'une voiture par
exemple, risque de déformer l'appareil et/ou d'endommager son
fonctionnement.
• Evitez d'utiliser ou de stocker cet appareil dans des endroits poussiéreux
ou sablonneux.
• Ne placez pas de source de flamme, comme des bougies allumées, sur
ou près du produit.
1. Lisez ces instructions.
2. Conservez ces instructions.
3. Respectez toutes les mises en
garde.
4. Suivez toutes les instructions.
5. N'utilisez pas ce produit près de
l'eau ni des endroits humides.
6. N'utilisez qu'un linge doux et
sec pour nettoyer l’appareil.
7. Ne bloquez pas les ouvertures
d’aération du boîtier. Installez
l’appareil selon les instructions
du fabricant.
8. N’installez pas cet appareil
près des sources de chaleur
telles que plinthes électriques,
cuisinières, ou autres (même
les amplificateurs).
9. Ne tentez pas d'outrepasser la
mesure de sécurité de la fiche
polarisée ou de la prise de
terre. Une fiche polarisée
possède deux broches, dont
l’une est plus large que l’autre.
Une fiche avec prise de terre
possède deux broches plates
et une troisième broche ronde
pour la prise de terre. La
broche plus large et la
troisième broche constituent
des mesures de sécurité
importantes visant à vous
protéger. Si vous ne pouvez
insérer complètement la fiche
dans la prise, faites appel à un
électricien qui changera votre
prise murale désuète.
10. Vous devez acheminer les fils
d'alimentation de façon à ce
qu'ils ne soient pas pincés ni
écrasés par des objets placés
par-dessus, ni par des gens
qui risqueraient de les piétiner.
Portez une attention
particulière aux fiches, aux
prises murales et aux points
précis où ils sortent de
l'appareil.
11. N'utilisez pas de fixations/
accessoires qui ne sont pas
recommandées par le fabricant.
12. Débranchez cet appareil
pendant les orages ou si vous
prévoyez ne pas l’utiliser
pendant une longue période
de temps.
13. Confiez tout appel de service à
un centre de service autorisé.
Vous aurez besoin de placer
un appel de service si
l’appareil a été endommagé de
quelque façon que ce soit, par
exemple, si la fiche
d’alimentation est
endommagée, si du liquide a
été échappé ou si des objets
sont tombés dans le boîtier, si
celui-ci a été exposé à la pluie
ou à l’humidité, s’il ne
fonctionne pas normalement
ou s’il a été échappé.
14. Cet appareil ne doit pas être
exposé aux éclaboussures et
vous ne devez pas placer
d’objets remplis de liquides tels
que des vases par-dessus.
15. Ne surchargez pas les prises
de courant. N’utilisez que la
source d’alimentation indiquée
sur la plaque signalétique de
l’appareil.
22
INSTRUCTIONS RELATIVES À LA SÉCURITÉ
Français
RCD170BB_02IM0449.qxd:CD2849.QXD 27/10/09 17:14 Page 22
Page 23
16. N’utilisez que des pièces de
remplacement recommandées
par le fabricant.
17. Vous ne pouvez installer le
produit au mur que si cela est
recommandé par le fabricant.
Suivez les méthodes indiquées
dans le guide d’utilisation.
18. Lorsque des travaux
d’entretien ou de réparation
ont été effectués sur
l’appareil, demandez au
technicien d’effectuer des
vérifications sécuritaires.
23
PROTÉGEZ VOS MEUBLES
Cet appareil est doté de “pieds” de caoutchouc antidérapants qui
empêchent l’appareil de bouger lorsque vous utilisez les commandes. Ces
“pieds” sont faits de caoutchouc formulé spécifiquement pour ne pas laisser
de marques noires ou de taches sur vos meubles. Cependant, certains
meubles en bois traité avec un poli à meubles à base d’huile, un préservatif
pour le bois ou de nettoyants en vaporisateur peuvent amollir les “pieds” de
caoutchouc et laisser des marques ou des résidus de caoutchouc sur le
meuble. Afin d’éviter d’endommager vos meubles, nous vous
recommandons fortement que vous utilisiez des coussinets de feutre
autocollants, disponibles dans la plupart des quincailleries et que vous les
colliez sous les “pieds” de caoutchouc avant d’installer l’appareil sur un
meuble en bois.
AVERTISSEMENT :
• Veuillez conserver ces renseignements pour toute référence ultérieure.
• Ceci n’est pas un jouet.
NOTES :
• Evitez d'utliser cet appareil dans des lieux chauds ou humides sur de
trop longues périodes de temps pour ne pas l'endommager.
• L'exposition à la lumière directe du soleil, à l'intérieur d'une voiture par
exemple, risque de déformer l'appareil et/ou d'endommager son
fonctionnement.
• Evitez d'utiliser ou de stocker cet appareil dans des endroits poussiéreux
ou sablonneux.
• Ne placez pas de source de flamme, comme des bougies allumées, sur
ou près du produit.
Français
RCD170BB_02IM0449.qxd:CD2849.QXD 27/10/09 17:14 Page 23
Page 24

COMMENT DÉBUTER
• Ne faites fonctionner les commandes et interrupteurs de l’appareil qu’en
suivant les directives de ce guide.
• Avant de mettre l’appareil en marche, assurez-vous que le fil
d’alimentation CA soit installé adéquatement.
• Stockez vos CD dans un endroit frais afin d’éviter les dommages causés
par la chaleur.
• Lorsque vous déplacez l’appareil, assurez-vous au préalable de
débrancher le fil d’alimentation CA.
DÉBALLAGE ET INSTALLATION
Remarque: cet appareil est fourni avec un câble d'alimentation secteur
Europe/France et un câble d'alimentation secteur UK.
• Retirez soigneusement l’appareil et les cordons d'alimentation CA de la
boîte et de l’emballage. Retirez le matériel d’emballage de l’appareil.
Retirez les étiquettes descriptives et décoratives autocollantes apposées
à l’avant et sur le dessus de l’appareil. Ne retirez aucune étiquette qui
se trouve à l’arrière de l’appareil.
• Retirez les petites bandes de ruban autocollant servant à bloquer
l’ouverture de la porte du CD pendant le transport.
• Déroulez le cordon d’alimentation CA et déployez-le à sa pleine
longueur.
• Cet appareil contient une carte de transport en forme de CD dans le
plateau du disque. Cette carte empêche le capteur du faisceau laser de
se déplacer en transit. Cette carte doit être retirée avant d’insérer un CD.
Appuyez sur l’endroit en retrait sur la porte du CD afin de l’ouvrir.
Retirez délicatement le CD cartonné et jetez-le. Refermez la porte du
compartiment à CD.
• Déposez l'appareil sur une surface stable telle qu’une table, bureau ou
tablette, près d'une prise de courant de 230V 50Hz CA et éloignez-le de
la lumière directe du soleil, des sources de chaleur, de poussière,
d'humidité et des champs magnétiques puissants.
PRÉPARATIFS AVANT L’UTILISATION
Français
RCD170BB_02IM0449.qxd:CD2849.QXD 27/10/09 17:14 Page 24
Page 25

1. Antenne FM télescopique
2. Compartiment du CD
3. Touche de SAUT/
RECHERCHE VERS
L’AVANT
4. Touche de LECTURE/
PAUSE
5. Touche de SAUT/
RECHERCHE VERS
L’ARRIÈRE
6. Touche d’ARRÊT ( )
7. Touche MODE
8. Touche 10+
9. Poignée de transport
10. Voyant à DEL de Barbie
TM
11. Commutateur des BANDES
(AM/FM/FM ST.)
12. Commande de
SYNTONISATION
13. Languette d’OUVERTURE de
la porte du CD
25
1
2
4
3
5
6
7
8
9
10
11
12
13
Panneau supérieur
EMPLACEMENT DES COMMANDES
Français
RCD170BB_02IM0449.qxd:CD2849.QXD 27/10/09 17:14 Page 25
Page 26

3
4
2
1
6
5
7
8
1. Affichage
2. Voyant de MISE EN/
HORS FONCTION
3. Haut-parleur de gauche
4. Compartiment des piles
(sous l’appareil)
5. Voyant du FM ST.
6. Haut-parleur de droite
7. Prise d’alimentation CA
(arrière de l’appareil)
8. AC Power Jack
(Rear of Unit)
9. Prise de CASQUE D’ÉCOUTE
10. Prise d’ENTRÉE AUXILIAIRE
11. Commutateur des
FONCTIONS(AUX/RADIO/
HORS FONCTION/CD)
12. Commande de VOLUME
Avant/Côté de l’appareil
10
9
12
11
EMPLACEMENT DES COMMANDES (SUITE)
Français
RCD170BB_02IM0449.qxd:CD2849.QXD 27/10/09 17:14 Page 26
Page 27
Cette radio portative nécessite six (6) piles ‘C’ (non incluses) ou le
cordon d’alimentation CA (inclus).
INSTALLATION DES PILES
1. Retirez la porte du compartiment des piles, situé sous l’appareil, en
appuyant sur les inscriptions , puis ouvrez-la.
2. Insérez six (6) piles ‘C’ (non incluses), en respectant le schéma de la
polarité à l’intérieur du compartiment des piles (tel qu’indiqué
ci-dessous). Pour maximiser la durée de fonctionnement de
l’appareil, nous recommandons d’utiliser des piles alcalines.
3. Replacez la porte du compartiment des piles.
27
PRÉCAUTIONS RELATIVES AUX PILES
* Le remplacement des piles doit être effectué par un adulte.
* Ne mélangez pas les vieilles piles avec des neuves.
* Ne mélangez pas les piles alcalines, standard (carbone de zinc)
et rechargeables (nickel-cadmium).
* Ne court-circuitez pas les bornes de contact.
* Ne rechargez pas les piles non rechargeables.
* Veuillez retirer les piles mortes.
* N’utilisez que des piles de type et de capacitééquivalents.
* Insérez les piles en respectant le sens des polarités.
* Jetez les piles mortes de manière écologique.
* Ne jetez pas les piles dans un feu, car elles risquent d’exploser
ou de couler.
* Ne pas utiliser de piles rechargeables. Retirer les accumulateurs
du produit avant de les recharger.
AVERTISSEMENT : D’importantes interférences électromagnétiques
ou des décharges électrostatiques peuvent provoquer un
dysfonctionnement ou une perte de données. Si l’appareil ne
fonctionne pas correctement, enlevez puis remettez la pile.
SOURCES D’ALIMENTATION
Français
RCD170BB_02IM0449.qxd:CD2849.QXD 27/10/09 17:14 Page 27
Page 28

28
FONCTIONNEMENT SUR LA TENSION CA
Pour utiliser l’appareil sur la tension CA, raccordez la petite extrémité du
cordon d’alimentation CA à la prise d’alimentation CA située à l’arrière de
l’appareil et insérez la fiche dans une prise CA dotée de la tension
AC 230V ~, 50Hz, 60 Hz seulement. Les piles sont mises automatiquement
hors fonction lorsque vous utilisez l’adaptateur secteur CA.
REMARQUE : La fiche CA incluse avec l’appareil est polarisée afin de
réduire les risques d’électrocution. Si la fiche CA ne peut être insérée
correctement dans une prise d’alimentation CA non polarisée, ne limez pas
et ne coupez pas la broche plus large. L’utilisateur a la responsabilité de
remplacer toute prise de courant désuète.
ATTENTION :
• Lorsque vous n’utilisez pas l’alimentation CA, débranchez le cordon
d’alimentation CA de la prise de courant murale et de l’appareil en tirant
sur la fiche (et non sur le cordon).
• Ne touchez pas le cordon d’alimentation CA si vos mains sont humides.
• Insérez complètement la fiche dans la prise en vous assurant
qu’aucune partie des broches ne soit exposée.
SOURCES D’ALIMENTATION (SUITE)
Français
AVERTISSEMENT : D’importantes interférences électromagnétiques ou
des décharges électrostatiques peuvent provoquer un dysfonctionnement
ou une perte de données. Si l’appareil ne fonctionne pas correctement,
enlevez puis remettez la pile.
NOTE : La prise électrique à laquelle l’appareil est branché doit être
installée près de l’équipement et doit toujours être facilement accessible.
RCD170BB_02IM0449.qxd:CD2849.QXD 27/10/09 17:14 Page 28
Page 29

Gl iss ez le c omm uta te ur d es
FONCTIO NS situé sur le dessus de
l’appareil à la position RADIO afin de
mettre la radio en marche et choisir le
mode de la radio. Le voyant de MISE
EN/HORS FONCTION s’allumera.
1
1
2
2
Ajustez la commande de VOLUME au
niveau désiré.
3
Pour mettre la radio hors fonction, glissez
l’interrupteur des FONCTIONS à la
position ‘OFF’ (hors fonction); le voyant
‘MISE EN/HORS FONCTION’ s’éteindra.
4
ÉCOUTER LA RADIO
29
ANTENNES
AM–Cet appareil possède une antenne AM en ferrite interne, qui procure une réception
adéquate dans la plupart des régions. Si la réception est faible, tournez tout l’appareil
afin d’améliorer la réception.
FM–L’antenne FM télescopique ne sert qu’à la réception du FM. Si la réception est
faible, ajustez la longueur et l’angle de l’antenne.
FONCTIONNEMENT
Sélectionnez la bande désirée, AM, FM ou
FM ST. (stéréo) en glissant le sélecteur
des ban de s BANDE 1 à la pos it ion
désirée. Syntonisez la station radio de
votre choix en tournant la commande de
syntonisation 2 .
REMARQUES :
• Si v ou s ch oisissez le FM ST. et
syntonisez une station FM stéréo, le
voyant FM ST. s’allumera.
• Si vous écoutez une station FM stéréo
faible, vous po uv ez ha bituell em ent
amélior er la réce ption en g lissant
l’interrupteur des BANDES de FM ST. à
FM (le son sera maintenant maintenant
à mono).
Français
RCD170BB_02IM0449.qxd:CD2849.QXD 27/10/09 17:14 Page 29
Page 30

Pour lire un CD :
1. Glissez le commutateur de fonctions
sur la position CD/MP3. L’éc ra n
affiche brièvement "- - -" pour compter
(et ensuite afficher) le nombre de
pistes enregistré sur le CD. Si, à la
place, « no » s’affiche, soit le CD n’a
pas été inséré soit il ne peut pas être
lu.
2. Ouvrez le couvercle du compartiment
du CD e n soulevant la la nguette
d’ou ve rt ure de la porte du CD.
L’écran affiche "- - -".
3. Placez le CD sur le moyeu du centre
(côté de l’étiquette) vers le haut.
4. Refer me z le couvercle du
compartiment du CD. Le disque va
tourner une ou deux fois et l’écran va
afficher le nombre de pistes du CD.
1
5. Appuyez sur le bouton PLAY/PAUSE
pour commencer la lecture.
L’écran affiche ainsi que le nombre
de pistes.
L’appareil va ensuite lire toutes les
pistes, l’une après l’autre. Il s’arrêtera
après la dernière piste.
2
Ajustez la commande de volume au
niveau désiré.
3
INSÉRER ET JOUER UN DISQUE COMPACT
SUITE À LA PAGE SUIVANTE
FONCTIONNEMENT (SUITE)
Français
RCD170BB_02IM0449.qxd:CD2849.QXD 27/10/09 17:14 Page 30
Page 31

3130
Français
FONCTIONNEMENT (SUITE)
2
1
4
Choisir une piste :
Vous pouvez choisir une piste lorsque
le CD est en cours de lecture ou à
l’arrêt.
• Pour choisir la piste suivante :
appuyez une fois sur .
• Pour revenir au début de la piste :
appuyez une fois sur .
• Pour choisir la piste précédente :
appuyez deux fois sur .
Pour effectuer une recherche sur
une piste :
Utilisez cette fonction lorsque vous
souhaitez effectuer une recherche vers
l’avant ou l’arrière à travers l’une des
pistes.
• Recherche arrière : maintenez le
bouton enfoncé au cours de la
lecture de la piste.
• Recherche avant : maintenez le
bouton enfoncé au cours de la
lecture de la piste.
Sauter les 10 pistes suivantes :
• Pour sauter 10 pistes, appuyez
rapidement sur le bouton 10+
Note
- S’il s’agit d’un CD MP3, utilisez cette
fonction pour sélectionner
rapidement le prochain fichier. Une
fois que vous avez choisi un autre
fichier, ALBUM et le numéro du
fichier s’afficheront rapidement à
l’écran. Cela sera suivi de « 001 » et
le lecture de la première piste du
fichier sélectionné commencera.
- Vous ne pouvez pas sélectionner et
lire les fichiers MP3 enregistrés dans
des sous-dossiers.
L’appareil ne lira que les pistes
enregistrées sur la source principale du
CD ou dans les fichiers de premier
niveau.
RCD170BB_02IM0449.qxd:CD2849.QXD 27/10/09 17:14 Page 31
Page 32

Pour mettre l’appareil hors fonction,
glissez le commutateur des FONCTIONS
à la position de MISE HORS FONCTION;
le voyant de MISE EN/HORS FONCTION
s’éteindra.
FONCTIONNEMENT (SUITE)
EFFECTUER UNE PAUSE DE
LA LECTURE
Français
6
5
7
RETIRER LE CD
1. Appuyez sur STOP pour arrêter la
lecture. N'ouvrez jamais le
compartiment du CD en cours de
lecture !
2. Ouvrez le compartiment du CD en
soulevant la languette d’ouverture de
la porte du CD.
3. Tenez le CD par les côtés et retirez-le
délicatement du moyeu du centre
(appuyez délicatement avec le pouce
sur le moyeu du centre peut vous
aider).
4. Fermez le compartiment du CD pour
maintenir la poussière à l’écart.
Les fonctions de base du lecteur CD :
• Mettre en pause : pendant la lecture
du CD, appuyez sur PLAY/PAUSE
. L’écran affiche par
intermittence. Appuyez une nouvelle
fois sur le bouton pour reprendre la
lecture là où vous l’aviez arrêtée.
• Mettre en arrêt : appuyez sur la touche
arrêt . A l’appui de la touche
PLAY/PAUSE , la lecture du CD
reprendra depuis lé début .
RCD170BB_02IM0449.qxd:CD2849.QXD 27/10/09 17:14 Page 32
Page 33

33
Français
NOTES SE RAPPORTANT À LA LECTURE DES CD :
• L'appareil peut lire les CD et les CD MP3. Vous serez informé des fonctions
qui diffèrent à la lecture d'un CD MP3 ou d'un CD.
• Si l'appareil est en train de lire un CD MP3, alors "MP3" s'affiche à l'écran.
• Si le disque est inséré incorrectement, s’il est sale, endommagé ou
simplement absent, l’indication ‘no’ apparaîtra à l’affichage.
• Même si ce lecteur CD portatif peut lire les disques CD-R et CD-RW, en plus
des CD standard, il est possible que la lecture des disques CD-R et CD-RW
soit affectée par le type de logiciel utilisé pour créer les disques ainsi que par
la qualité et l’état des supports vierges que vous utilisez. La lecture ne peut
être garantie à 100%. Ceci n’indique pas une défectuosité de l’appareil.
PRISE D’ENTRÉE AUXILIAIRE
En utilisant un câble de raccord audio (non inclus), vous pouvez entendre
le son d’un appareil audio externe à travers les haut-parleurs de cet
appareil. Avant d’effectuer les raccords, mettez tous vos composants hors
fonction.
Glissez le commutateur des FONCTIONS à la position AUX pour mettre
l’appareil en marche et choisir le mode AUX (composant auxiliaire).
Branchez un câble de raccord (non inclus) entre la prise AUX ou la
SORTIE DE LIGNE (‘line out’) du composant audio externe et la prise
d’ENTRÉE AUXILIAIRE (‘aux in’) de cet appareil; il est situé sur le côté de
l’appareil. (Ne pas raccorder le composant externe à travers la prise de
CASQUE D’ÉCOUTE de cet appareil.) Mettez le composant externe en
marche et commencez la lecture; le son du composant externe sortira à
travers les haut-parleurs de cet appareil. Tournez la commande de
VOLUME afin d’ajuster le volume au niveau désiré.
Pour mettre l’appareil hors fonction, retirez la fiche de la prise d’ENTRÉE
AUXILIAIRE, puis glissez le commutateur des FONCTIONS à la position
HORS FONCTION.
FONCTIONNEMENT (SUITE)
RCD170BB_02IM0449.qxd:CD2849.QXD 27/10/09 17:14 Page 33
Page 34

REPETER LA LECTURE D'UNE PISTE OU JOUER LES PISTES
AU HASARD
FONCTIONNEMENT (SUITE)
Français
4. Appuyez une nouvelle fois sur la
touche MODE. REP ALL s’affiche à
l’écran – le CD tout entier sera répété.
1. Commencez la lecture du CD.
2. Appuyez une fois sur la touche
MODE.
3. L’écran affiche REP – la piste en
cours de lecture sera répétée.
1 2
5. Appuyez sur la touche MODE une
troisième fois. L’écran affiche
RANDOM – la lecture des pistes
s’effectuera au hasard.
6. Appuyez une nouvelle fois sur la
touche MODE pour quitter le mode
répétition.
3
Note:
Si le CD en cours de lecture est un CD MP3, entre REP et REP ALL, vous
avez la possibilité de répéter toutes les pistes contenues dans un même
fichier. L’écran affiche alors ALBUM.
• La fonction répétition vous permet de répéter la lecture d’une piste ou de tout le
CD.
• La lecture au hasard laisse un générateur interne choisir l’ordre de lecture des
pistes du CD.
1
RCD170BB_02IM0449.qxd:CD2849.QXD 27/10/09 17:14 Page 34
Page 35

35
Français
PROGRAMMER LA MÉMOIRE (JUSQU’À 20 PISTES)
FONCTIONNEMENT (SUITE)
2. Appuyez sur ou pour choisir
une piste.
3. Appuyez sur la touche MODE une
nouvelle fois. « P02 » s’affiche à
l’écran.
4. Répétez les étapes 2 et 3 pour choisir
d’autres pistes.
5. Pour écouter votre séquence appuyez
sur PLAY/PAUSE . « PROG »
s’affiche dans le coin supérieur droit.
1. Appuyez sur la touche MODE.
« PROG » and « P01 » clignotent.
2
1
3
2
4
NOTES:
• Pour sortir du mode programmation appuyez une fois sur la touche
STOP .
• Si vous appuyez deux fois sur la touche STOP , si vous changez de
mode, si vous éteignez l’appareil ou si vous retirez le CD, la séquence
programmée s’effacera.
• Les fonctions REP et REP ALL fonctionnent également au cours de la
lecture de votre séquence programmée.
Pour programmer une séquence…
To program a track sequence...
• …le compartiment à CD doit contenir un CD,
• …la lecture du CD doit être arrêtée et
• …le commutateur de fonctions doit être sur CD/MP3.
1
2
1
3
3
RCD170BB_02IM0449.qxd:CD2849.QXD 27/10/09 17:14 Page 35
Page 36

See wh at you
can do w ith
your G EMSTON E
FUN bu tton!
Step 1
Step 1
Step 2
Appuie sur le bouton de la PIERRE
PRÉCIEUSE AMUSANTE situé à l’avant
de ta radio Boombox
.
Barbie
TM
a une petite surprise pour toi ! Suis
simplement les instructions ci-dessous et
regarde ce que tu peux faire avec ton bouton de
PIERRE PRÉCIEUSE AMUSANTE !
SURPRISE ! Ton voyant à DEL de
Barbie
TM
clignotera en rouge et en bleu
en alternance pendant dix secondes.
FONCTIONNEMENT (SUITE)
Français
Phase 2
Phase 1
Regarde ce que tu
peux faire en appuyant
sur ce precieux
bouton!
RCD170BB_02IM0449.qxd:CD2849.QXD 27/10/09 17:14 Page 36
Page 37

37
Français
ENTRETIEN DES DISQUES COMPACTS
• Manipulez vos disques avec soin. Tenez les
disques compacts par les rebords. Ne laissez
pas vos doigts entrer en contact avec la surface
brillante et non imprimée du disque.
• Ne collez pas de ruban autocollant et autres
autocollants sur la surface de l’étiquette du disque.
• Nettoyez le disque régulièrement à l’aide d’un
chiffon doux et sec, libre de toute charpie. N’utilisez jamais de détergents
ni de solutions de nettoyage abrasives pour nettoyer le disque. Au besoin,
utilisez une trousse de nettoyage pour DC.
• Si la lecture d’un disque saute ou fige sur une section du disque compact,
il est probablement sale ou
endommagé (égratigné).
• Lorsque vous nettoyez un
disque compact, essuyez-le en
lignes droites, depuis le centre
du disque compact jusqu’au
rebord extérieur de celui-ci. Ne
l’essuyez jamais en pratiquant
des mouvements circulaires.
• Cet appareil a été conçu pour ne jouer que des disques
compacts affichant le logo d’identification ci-contre. D’autres
disques peuvent ne pas être conformes à la norme des CD
et être incapables de jouer correctement.
• Pour éviter d’être endommagés, les disques compacts devraient être
stockés dans leurs boîtiers originaux après chaque utilisation.
• N’exposez pas les disques compacts à la lumière directe du soleil, aux
degrés d’humidité et de température élevés, à la poussière, etc. Toute
exposition prolongée à des niveaux de température élevés risque de tordre
le disque compact.
• Ne collez pas d’étiquettes et n’écrivez rien sur l’un ou l’autre des côtés du
disque compact. Les instruments d’écriture pointus ou l’encre risquent
d’endommager la surface du disque.
ENTRETIEN DU BOÎTIER DE L’APPAREIL
Lorsque le boîtier devient sale, essuyez-le avec un chiffon non abrasif. N’utilisez
pas de cires, de polis en vaporisateur ni de nettoyants abrasifs sur le boîtier.
MISE EN GARDE
Ne laissez pas d’eau pénétrer à l’intérieur de l’appareil pendant le nettoyage.
B
E
N
Z
E
N
E
S
o
l
u
t
i
o
n
n
e
t
t
o
y
a
n
t
e
SOIN ET ENTRETIEN
RCD170BB_02IM0449.qxd:CD2849.QXD 27/10/09 17:14 Page 37
Page 38

38
GUIDE DE DÉPANNAGE
Si l'appareil affiche un problème, consultez le guide de dépannage
ci-dessous avant de placer un appel de service.
Français
RCD170BB_02IM0449.qxd:CD2849.QXD 27/10/09 17:14 Page 38
Page 39

39
Français
GARANTIE
Note : Veuillez garder ce mode d’emploi, il contient d’importantes
informations. Le contenu de ce mode d’emploi peut changer sans préavis.
Aucune partie de ce mode d’emploi ne doit être reproduite sans le
consentement écrit du fabricant.
Ce produit est couvert par notre garantie de un an. Pour toute mise en
oeuvre de la garantie ou du service après-vente, vous devez vous adresser
à votre revendeur muni de votre preuve d’achat. Notre garantie couvre les
vices de matériel ou de montage imputables au constructeur à l’exclusion
de toute détérioration provenant du non-respect de la notice d’utilisation ou
de toute intervention intempestive sur l’article (telle que démontage,
exposition à la chaleur ou à l’humidité…).
©2009 Barbie, Inc. All rights Reserved.
©2009 LEXIBOOK®
LEXIBOOK S.A, 2, avenue de Scandinavie, 91953 Courtaboeuf Cedex
France
Assistance technique : 0892 23 27 26 (0,34 € TTC/Min), www.lexibook.com
Fabriqué en Chine
Informations sur la protection de l'environnement
Tout appareil électrique usé est une matière recyclable et ne devrait
pas faire partie des ordures ménagères! Nous vous demandons de
bien vouloir nous soutenir en contribuant activement au
ménagement des ressources et à la protection de l'environnement en
déposant cet appareil dans sites de collecte (si existants).
Ce produit n'est pas un jouet
AVERTISSEMENT : A pleine puissance l’écoute prolongée du
produit peut endommager l’oreille de l’utilisateur.
RCD170BB_02IM0449.qxd:CD2849.QXD 27/10/09 17:14 Page 39
Page 40

PRECAUCIÓN:
PARA REDUCIR EL RIESGO DE DESCARGA ELÉCTRICA, NO RETIRE LA
CUBIERTA (O PARTE TRASERA). NO HAY PIEZAS EN EL INTERIOR
SUSCEPTIBLES DE SER MANIPULADAS POR EL USUARIO. EN CASO DE
AVERÍA, SOLICITE ASISTENCIA TÉCNICA DE PERSONAL CUALIFICADO.
ADVERTENCIA:
Para evitar el riesgo de descargas eléctricas, no exponga este equipo a la lluvia o a la
humedad.
PRECAUCIÓN
RIESGO DE DESCARGA
ELÉCTRICA
NO ABRIR
TENSIÓN PELIGROSA:
El símbolo del rayo dentro de un triángulo equilátero,
advierte al usuario de la presencia de tensiones
peligrosas, sin aislamiento, en el interior del equipo, que
pueden ser de magnitud suficiente como para constituir un
riesgo de descarga eléctrica para las personas.
ATENCIÓN:
El signo de exclamación dentro de un triángulo equilátero
advierte al usuario de la existencia de instrucciones
importantes de mantenimiento (revisión) y funcionamiento
en la literatura que acompaña al equipo.
PELIGRO:
Radiación láser invisible y peligrosa si se abre el equipo
con el bloqueo de seguridad defectuoso o anulado éste.
Evite la exposición directa al rayo láser.
SEGURIDAD LÁ SER: Esta unid ad emplea un láser. Solamen te
personal de reparación cualificado debe intentar reparar este equipo, ya
que hay peligro de daño a los ojos.
PR ECAU CIÓN : E L U SO DE C ONT ROLE S, AJUS TES O
PROCEDIMIENTOS DE FUNCIONAMIENTO NO DESCRITOS AQUÍ,
PUED EN R ESULTAR EN UNA EXPOSICIÓN A LA RADIA CIÓN
PELIGROSA.
PRECAUCIONES DE SEGURIDAD
Español
RCD170BB_02IM0449.qxd:CD2849.QXD 27/10/09 17:14 Page 40
Page 41

41
Español
1. Lea estas instrucciones.
2. Guarde estas
3. instrucciones. Respete
4. todas las advertencias.
5. Siga todas las instrucciones.
6. No utilice este equipo cerca de
agua. Límpielo únicamente
con un paño húmedo.
7. No bloquee ninguna abertura de
ventilación. Instálelo siguiendo
las instrucciones del fabricante.
8. El producto debe colocarse
apartado de fuentes de calor,
como radiadores, calentadores,
estufas u otros productos
(incluyendo amplificadores) que
generen calor.
9. No anule la función de seguridad
del enchufe polarizado o de tipo
con toma de tierra. Un enchufe
polarizado tiene dos conectores
planos, uno más ancho que el
otro. Un enchufe con toma de
tierra tiene dos conectores más
una tercera borna para tierra. El
conector plano más ancho o la
tercera borna se proporcionan
para su seguridad. Si el enchufe
suministrado no encaja en su
enchufe de red, consulte con un
electricista para que sustituya el
enchufe de tipo obsoleto.
10. Proteja el cable de
alimentación para evitar que
se pise o se pille,
particularmente en las zonas
de los enchufes, enchufes
auxiliares y en el lugar por el
que sale el cable del equipo.
11. Utilice únicamente los
complementos o accesorios
especificados por el fabricante.
12. Desenchufe este equipo
durante las tormentas
eléctricas o cuando no se vaya
a utilizar durante un periodo
largo de tiempo.
13. Confíe todas las reparaciones
a personal de reparación
cualificado. Es necesaria la
reparación de la unidad
cuando haya sufrido cualquier
daño, como los siguientes: el
cable de alimentación ha sido
dañado; ha caído agua o algún
objeto al interior del equipo; la
unidad ha estado expuesta a
la lluvia o a la humedad, no
funciona normalmente, se ha
modificado su funcionamiento
o se ha caído.
14. No exponga el equipo a goteras
o salpicaduras, y no coloque
sobre él objetos con líquidos,
como por ejemplo vasos.
15. No sobrecargue el enchufe de
red de la pared. Utilice solo
una alimentación eléctrica con
las características indicadas.
16. Utilice las piezas de recambio
especificadas por el fabricante.
17. El producto puede montarse
en una pared solo cuando así
lo recomiende el fabricante
18. Después de que se realice
cualquier inspección o
reparación a este producto,
solicite al servicio técnico que
realice las comprobaciones de
seguridad.
INSTRUCCIONES DE SEGURIDAD
RCD170BB_02IM0449.qxd:CD2849.QXD 27/10/09 17:14 Page 41
Page 42

ADVERTENCIA:
• Conserve toda la información para consultas futuras.
• Esto no es un juguete.
NOTAS:
• Evite utilizar este equipo en lugares con alta temperatura o humedad
durante periodos de tiempo prolongados, ya que puede sufrir daños.
• La exposición a la luz directa del sol en lugares como el interior de un
vehículo, pueden hacer que la carcasa de la unidad se deforme y que
se produzcan daños al sistema electrónico.
• Evite utilizar el equipo durante tormentas o en lugares con mucho polvo
o con arena.
• No coloque objetos con llamas desnudas, tales como velas, sobre el
producto o cerca del mismo.
PROTEJA SUS MUEBLES
Este modelo está equipado con “pies” de goma antideslizante para evitar
que la unidad se mueva cuando maneje los controles. Esto “pies” están
fabricados con un material de goma no migratorio formulado especialmente
para evitar dejar marcas o manchas en sus muebles. Sin embargo, cierto
tipo de ceras para muebles, conservantes de la madera o sprays de
limpieza, que utilizan aceites, pueden hacer que los "pies" de goma se
ablanden y dejen marcas o un residuo de goma en el mueble. Para evitar
cualquier daño a los muebles, le aconsejamos vivamente que adquiera
pequeñas piezas de fieltro autoadhesivo, disponibles en ferreterías y en
tiendas bricolaje o de artículos para el hogar, y coloque esas piezas en la
parte inferior de los “pies” de goma antes de colocar la unidad sobre un
mueble de madera de calidad.
Español
RCD170BB_02IM0449.qxd:CD2849.QXD 27/10/09 17:14 Page 42
Page 43

43
Español
DESEMBALADO Y PUESTA A PUNTO
Nota: incluye 2 cables de alimentación: 1 cable CA para el Reino Unido
y 1 cable CA para Francia/Europa.
• Retire con cuidado la unidad principal y los cables de alimentación CA
de la pantalla. Retire del equipo todo el material del embalaje. Retire
cualquier etiqueta descriptiva o decorativa de la parte frontal o de la
parte superior de la carcasa. No quite las etiquetas situadas en las
superficies posterior o inferior de la carcasa.
• Retire con cuidado las pequeñas cintas de plástico que pueden haberse
utilizado para evitar que se abra la puerta de la unidad CD durante el
traslado.
• Desenrolle el cable de alimentación de red CA y extiéndalo en toda su
longitud.
• La unidad se suministra con un CD simulado introducido en el
reproductor de CD para su transporte. Este CD simulado evita que el
lector láser se mueva durante el traslado de la unidad. Este CD debe
retirarse antes de introducir cualquier CD real. Levante la lengüeta de
apertura del CD para abrir el compartimento del CD. Retire con cuidado
el CD simulado de la unidad reproductora y deséchelo. Cierre la puerta
del CD.
• Coloque la unidad en una superficie lisa, como una mesa, escritorio,
mostrador, estantería, etc. próxima a un enchufe de pared de 230 VCA,
50 Hz, apartado de la luz directa del sol, y lejos de fuentes de calor
excesivo, de polvo, humedad o campos magnéticos fuertes.
PREPARACIÓN DE LA UNIDAD
• Maneje los controles e interruptores de la unidad tal como se especifica
en este manual.
• Antes de encender la unidad, asegúrese de que el cable de alimentación
de red CA esté correctamente instalado.
• Almacene sus discos CD en un lugar fresco para evitar que se estropeen
con el calor.
• Cuando traslade el equipo, asegúrese de desconectar primero el cable
de red CA.
PREPARACIÓN PARA EL USO
RCD170BB_02IM0449.qxd:CD2849.QXD 27/10/09 17:14 Page 43
Page 44

Español
1
2
4
3
5
6
7
8
9
10
11
12
13
1. Antena telescópica de FM
2. Compartimento para el CD
3. Botón SKIP/SEARCH
4. Botón PLAY/PAUSE
5. Botón SKIP/SEARCH
6. Botón STOP
7. Botón MODE
8. Botón 10+.
9. Asa para transporte
10. Indicador LED Barbie
TM
11. Conmutador de banda
(AM/FM/FM ST.)
12. Control sintonización
13. Lengüeta para apertura de la
puerta del CD
Parte superior de la unidad
SITUACIÓN DE LOS CONTROLES
RCD170BB_02IM0449.qxd:CD2849.QXD 27/10/09 17:14 Page 44
Page 45

45
Español
3
4
2
1
6
5
7
8
1. Pantalla
2. Indicador de encendido
3. Altavoz izquierdo
4. Compartimento de las pilas
(parte inferior de la unidad)
5. Indicador FM ST.
6. Altavoz derecho
7. Botón GEMSTONE FUN
8. Conector de red eléctrica CA
(Parte posterior de la unidad)
9. Conector auriculares
10. Conector entrada de audio
11. Interruptor de función
(AUX/RADIO/ OFF/CD)
12. Control de volumen
VISTAS LATERAL Y FRONTAL DEL EQUIPO
10
9
12
11
SITUACIÓN DE LOS CONTROLES (CONTINUACIÓN)
RCD170BB_02IM0449.qxd:CD2849.QXD 27/10/09 17:14 Page 45
Page 46

Español
PRECAUCIÓN:
• Cuando no se esté utilizando la alimentación CA, desconecte el enchufe
de la pared y de la unidad tirando del enchufe (no del cable).
• No toque el cable de red CA con las manos húmedas.
• Introduzca el enchufe completamente, de manera que no queden partes
de las clavijas expuestas.
Este Boombox funciona con seis (6) pilas de tamaño C (no incluidas) o
bien con el cable de conexión a la red eléctrica CA (incluido).
INSTALACIÓN DE LAS PILAS
1. Retirar la puerta del compartimento de las pilas, situado en la parte
inferior del equipo, presionando hacia abajo las marcas y
deslizándola hacia fuera.
2. Introducir seis (6) pilas tamaño C (no incluidas) en la posición
adecuada de acuerdo con las marcas de polaridad que se muestran
en el interior del compartimento de las pilas (ver más abajo). Para una
mayor duración, se recomienda utilizar pilas alcalinas.
3. Vuelva a colocar la puerta del compartimento de las pilas.
No utilice pilas recargables en este equipo. No intente nunca
recargar pilas no recargables; para cargar las pilas recargables,
antes retírelas del juguete; las pilas recargables deben recargarse
siempre bajo la supervisión de un adulto; no mezcle pilas de
distinto tipo, o pilas nuevas con pilas usadas; utilice únicamente
pilas del tipo recomendado o equivalentes; colocar siempre las
pilas en la posición correcta, de acuerdo con la polaridad indicada
en el compartimento; retire del juguete las pilas gastadas; no
permita que entren en contacto eléctrico los terminales de la
alimentación. Si prevé que el juguete no va a utilizarse durante un
periodo largo de tiempo, retire las pilas. Cuando el sonido se
hace débil o el juego no responde adecuadamente es señal de
que debe sustituir las pilas. ¡ADVERTENCIA! Interferencias
fuertes de señales de radio o descargas electrostáticas pueden
provocar un mal funcionamiento de la unidad o que se pierda el
contenido de la memoria. En caso de que se produzca un
funcionamiento anormal, retire y vuelva a colocar las pilas.
ALIMENTACIÓN ELÉCTRICA
RCD170BB_02IM0449.qxd:CD2849.QXD 27/10/09 17:14 Page 46
Page 47

47
Español
FUNCIONAMIENTO CON LA RED CA
Para hacer funcionar el equipo con la red eléctrica CA, conectar el extremo
pequeño del cable CA al conector de CA situado en la parte posterior de la
unidad, y enchufar el otro extremo del cable a un enchufe de pared de AC
230V ~, 50 Hz. Las pilas quedan desconectadas automáticamente cuando
se utiliza la conexión de red CA.
¡ADVERTENCIA! Interferencias fuertes de señales de radio o descargas
electrostáticas pueden provocar un mal funcionamiento de la unidad o que
se pierda el contenido de la memoria. En caso de que se produzca un
funcionamiento anormal, desenchufe el adaptador CA/CC de la toma de
red y vuelva a enchufarlo de nuevo.
PRECAUCIÓN:
• Cuando no se esté utilizando la alimentación CA, desconecte el enchufe
de la pared y de la unidad tirando del enchufe (no del cable).
• No toque el cable de red CA con las manos húmedas.
• Introduzca el enchufe completamente, de manera que no queden partes
de las clavijas expuestas.
ALIMENTACIÓN ELÉCTRICA (CONTINUACIÓN)
NOTA: El enchufe CA suministrado está polarizado para minimizar el
riesgo de descarga eléctrica. Si el enchufe CA no encaja en el enchufe CA
no polarizado, no lime o corte la hoja ancha. Es responsabilidad del usuario
hacer que un electricista sustituya el enchufe obsoleto.
NOTA: La toma de corriente deberá estar instalada cerca del aparato y
estar fácilmente accesible durante su utilización.
RCD170BB_02IM0449.qxd:CD2849.QXD 27/10/09 17:14 Page 47
Page 48

Español
Desplaza el interruptor FUNCION a la
po sició n RA DI O pa ra enc en der el
equipo y seleccionar el modo de radio;
se iluminará el indicador de encendido.
Ajusta el control de volumen a tu gusto.
Para apagar la radio, desplaza el
interruptor de función a la posición OFF;
el indicador de encendido se apagará.
PARA ESCUCHAR LA RADIO
ANTENNAS
AM–Esta unidad incorpora una antena de núcleo de ferrita que proporciona una
recepción adecuada en la mayoría de las zonas. Si la recepción es débil, gira el
equipo hasta obtener una señal clara.
FM–La antena telescópica es únicamente para recepción de FM. Si la recepción
es débil, ajusta la longitud y orientación de la antena.
FUNCIONAMIENTO
Desplaza el selector de BANDA 1 para
seleccionar AM, FM o FM ST. (estéreo).
Sintoniza la emisora de radio deseada
girando del mando de sintonización 2.
NOTAS:
• Si seleccionas FM ST. y la emisora
seleccionada emite en estéreo, se
iluminará el indicador FM ST.
• Si la señal recibida de la emisora es
débil, puedes mejorar la recepción
desplazando el selector de banda de
la posición FM ST. a la posición FM
(la emisora se oirá en modo mono ).
1
2
1
1
2
2
3
4
RCD170BB_02IM0449.qxd:CD2849.QXD 27/10/09 17:14 Page 48
Page 49

49
Español
1. Coloque el selector de FUNCIÓN en
CD/MP3.
La pantalla mostrará brevemente “--
-“ para contar (y mostrarlo después)
el número de pistas almacenadas en
el CD. Si por el cont ra ri o en la
pantalla se muestra “no”, el CD no
está colocado o bien el equipo no
puede leerlo.
2. Abra el com pa rt imento del CD
pulsando brevemente sobre la zona
OPEN/CLOSE. La pantalla mostrará
“---“.
3. Coloque el CD sobre el eje con el
lado de la etiqueta hacia arriba.
4. Cierre el compartimiento del CD. El
disco dará un par de vueltas y en la
pantalla se mostrará el número de
pistas que contiene.
5. Pulse el botón P LAY/PAUSE
(REPRODUCIR /PAUSA) para
que comience la reproducción. La
pantalla muestra y el número de
pista.
Lueg o, el equipo co menzará a
reproducir todas las pistas una después
de otra. De sp ué s de la última se
detendrá.
Ajusta el volumen a tu gusto.
PARA INTRODUCIR Y REPRODUCIR UN CD
OPERACIÓN (CONTINUACIÓN)
1
2
3
RCD170BB_02IM0449.qxd:CD2849.QXD 27/10/09 17:14 Page 49
Page 50

2
1
4
Selección de pistas
Para seleccionar un título no importa si
el CD se está reproduciendo o está
detenido.
• Para seleccionar la siguiente pista:
Pulse una vez.
• Para ir al comienzo de una pista:
Pulse una vez.
• Para seleccionar el título anterior:
Pulse dos veces.
Para buscar una sección de una
pista
Utilice esta función para encontrar
determinado pasaje de un título
específico.
Cuando haya encontrado la parte que
buscaba, simplemente suelte el botón
que estaba pulsando.
• Búsqueda hacia delante: Mantenga
pulsado el botón mientras se está
reproduciendo la pista.
• Búsqueda hacia atrás: Mantenga
pulsado el botón mientras se está
reproduciendo la pista.
Saltar las 10 siguientes pistas
• Para desplazarse 10 pistas hacia
delante, pulse una vez brevemente
el botón 10+.
Nota
- Al reproducir discos MP3, utilice esta
función para pasar rápidamente a la
siguiente carpeta.
Una vez que haya seleccionada otra
carpeta,en la pantalla se mostrará
ALBUM y parpadeará brevemente el
número de carpeta. A continuación
se mostrará “001” y se reproducirá la
primera pista de la carpeta
seleccionada.
- No puede seleccionar ni reproducir
archivos MP3 almacenados en
subcarpetas. El equipo solo
reproducirá pistas que estén en el
directorio principal del CD o en las
carpetas de primer nivel.
OPERACIÓN (CONTINUACIÓN)
Español
RCD170BB_02IM0449.qxd:CD2849.QXD 27/10/09 17:14 Page 50
Page 51

51
Para pagar el equipo, coloca el interruptor
de función en la posición OFF; el indicador
de encendido se apagará.
OPERACIÓN (CONTINUACIÓN)
6
5
7
Para retirar el CD
1. Pulse STOP para detener la
reproducción. Nunca abra el
compartimento del CD mientras el
CD esté todavía en reproducción.
2. Abra el compartimento del CD
pulsando brevemente sobre la zona
OPEN/CLOSE.
3. Sujete el CD por el borde y retírelo
con cuidado del eje (pulse
suavemente con el pulgar sobre el
eje para facilitar la extracción del
disco).
4. Cierre el compartimento del CD para
mantenerlo libre de polvo.
Funciones básicas del reproductor
de CD:
Pausa y continuación de la reproducción
• Para hacer una pausa en la
reproducción: Mientras se está
reproduciendo un CD, pulse
PLAY/PAUSE (REPRODUCIR
/PAUSA) . La pantalla mostrará
parpadeando. Pulse de nuevo el
botón para continuar con la
reproducción a partir del lugar en que
se ha hecho la pausa.
• Para detener la reproducción: Pulse
el botón STOP . Si se pulsa
PLAY/PAUSE (REPRODUCIR
/PAUSA) se comenzará la
reproducción de la primera pista.
Español
RCD170BB_02IM0449.qxd:CD2849.QXD 27/10/09 17:14 Page 51
Page 52

NOTAS SOBRE LA REPRODUCCIÓN DE DISCOS CD:
• El equipo está diseñado para reproducir discos MP3 y otros discos compactos de
audio. Se le indicarán aquellas funciones que actúan de manera distinta
dependiendo de si se reproduce un disco de MP3 u otro tipo disco de audio.
• Cuando se reproduce un disco de MP3, en la pantalla se muestra “MP3”.
• Si se introduce un disco incorrectamente o si está dañado o sucio, o en caso de
que se intente reproducir sin estar el disco introducido, se mostrará en la pantalla
“no”.
• Aunque este equipo puede leer discos CD-R y CD-RW, además de los discos CD
normales, la reproducción de ese tipo de discos puede verse afectado por el tipo
de software utilizado para crear los discos, así como por el tipo de disco que se
está utilizando. No se garantiza al 100% que puedan ser reproducidos. Esto no
indica que exista un problema con el equipo.
Entrada AUX IN
Utilizando un conector de audio doméstico (no incluido), puedes escuchar
a través de los altavoces del equipo el sonido de una unidad externa.
Antes de realizar cualquier conexión, apaga todos los equipos.
Desplaza el interruptor de función a la posición AUX para encender el
equipo y escuchar el sonido del equipo externo. Conecta un cable de
audio (no incluido) entre el conector AUX IN (lateral de la unidad) y el
conector AUX o LINE OUT del equipo externo. (No lo conectes al conector
para auriculares de este equipo.) Enciende el equipo externo y haz que
comienza a reproducir el sonido; el sonido se oirá a través de los
altavoces del equipo. Gira el control de volumen para ajustarlo a tu gusto.
Para apagar la unidad, retira el conector de la entrada AUX IN y coloca
luego el interruptor de función en la posición OFF.
OPERACIÓN (CONTINUACIÓN)
Español
RCD170BB_02IM0449.qxd:CD2849.QXD 27/10/09 17:14 Page 52
Page 53

53
OPERACIÓN (CONTINUACIÓN)
4. Pulse el botón MODO de nuevo. En la
pantalla se mostrará REP ALL y se
repetirá el disco completo.
1. Comience a reproducir un CD.
2. Pulse el botón MODO una vez.
3. La pantalla mostrará REP y la pista
actual se repetirá.
1 2
REPRODUCCIÓN CON REPETICIÓN Y ALEATORIA
5. Pulse el botón MODO por tercera vez.
La pantalla mostrará RANDOM y las
pistas se reproducirán en orden
aleatorio.
6. Si pulsa MODE una vez más, se
anulará la función repetir o la función de
reproducción aleatoria.
3
NOTA:
Si se está reproduciendo actualmente un CD MP3 tiene la opción añadida,
entre REP y REP ALL, de repetir todas las pistas de una carpeta. La pantalla,
por tanto, mostrará ALBUM.
• La función repetición le permite reproducir repetidamente una pista o el disco
completo.
• La función reproducción aleatoria hace que las pistas se reproduzcan en orden
aleatorio.
Español
RCD170BB_02IM0449.qxd:CD2849.QXD 27/10/09 17:14 Page 53
Page 54

PARA PROGRAMAR LA MEMORIA (HASTA 20 PISTAS)
OPERACIÓN (CONTINUACIÓN)
2. Pulse o para seleccionar una
pista.
3. Pulse de nuevo MODE.
En la pantalla se mostrará “P02”
4. Repita los pasos 2 y 3 para
seleccionar
5. Para reproducir la secuencia
programada pulse PLAY/PAUSE
(REPRODUCCIÓN/PAUSA) . En
el borde superior de la pantalla se
mostrará PROG.
1. Pulse el botón MODE.
En la pantalla parpadearán “PROG” y
“P01".
2
1
3
2
4
NOTA:
• Para salir del modo de programación, pulse STOP una vez.
• Si pulsa dos veces STOP , o cambia de modo, apaga el equipo o retira
el CD, se borrará la secuencia de pistas programada.
• Las funciones REP y REP ALL están disponibles
Puede programar hasta un máximo de 20 pistas para reproducirlas en ese orden.
Para programar una secuencia de pistas…
• ... el compartimento de CD debe contener un disco.
• ... la reproducción debe estar detenida, y
• ... el selector de FUNCIÓN debe estar en CD/MP3.
1
2
1
3
3
Español
RCD170BB_02IM0449.qxd:CD2849.QXD 27/10/09 17:14 Page 54
Page 55

Step 1
Step 1
Step 2
See wh at you
can do w ith
your G EMSTON E
FUN bu tton!
55
Pulsa el botón GEMSTONE FUN
situado en la parte frontal de tu
Boombox.
¡Barbie
T
M
tiene una sorpresa reservada para ti!
¡Simplemente sigue las instrucciones más
abajo y descubre lo que puedes hacer con el
botón GEMSTONE FUN!
¡SORPRESA! El indicador LED
BarbieTM se iluminará alternando
los colores rojo y azul durante 10
segundos.
OPERACIÓN (CONTINUACIÓN)
¡Descubre lo que
puedes hacer con
el botón
GEMSTONE FUN!
Paso 2
Paso 1
Español
RCD170BB_02IM0449.qxd:CD2849.QXD 27/10/09 17:14 Page 55
Page 56

CUIDADO DE LOS DISCOS COMPACTOS
• Trata con cuidado los discos compactos.
Sostén los discos sólo por sus bordes. Nunca
dejes que tus dedos entren en contacto con la
superficie brillante, en la cara no impresa del
disco compacto.
• No coloques cinta adhesiva, pegatinas, etc.
sobre la etiqueta del disco compacto.
• Limpia el disco compacto periódicamente con un paño suave, seco y sin
pelusa. Nunca uses detergentes limpiadores o abrasivos para limpiar el
disco compacto. Si es necesario, usa un kit de limpieza de discos CD.
• Si un disco salta o se queda repitiendo una misma parte, probablemente
esté sucio o dañado (rayado).
• Al limpiar el disco compacto,
frota en línea recta desde el
centro del disco hacia el
borde. Nunca frotes con
movimiento circular.
• Este equipo está diseñado
para reproducir solo discos que lleven el logotipo de
identificación que se muestra aquí. Otros discos pueden
no ser conformes con el estándar de CD y no ser
reproducidos correctamente.
• Los discos compactos deben almacenarse en sus estuches después de
su uso para evitar que se dañen.
• No expongas el disco a la luz directa del sol, a altas temperaturas, a la
humedad, al polvo, etc. La exposición prolongada a temperaturas
extremas puede hacer que se deforme el disco.
• No pegues ni escribas nada en ninguna de las caras de los discos
compactos. Los instrumentos afilados, o la tinta, pueden dañar la
superficie.
CUIDADO DE LA CARCASA
Si la carcasa acumula polvo, límpiala con un trapo suave y seco. No utilices
cera, sprays abrillantadores o detergentes abrasivos sobre la carcasa.
PRECAUCIÓN
Nunca dejes que entre agua u otro líquido en el interior del equipo mientras
lo limpias.
B
E
N
Z
E
N
E
S
o
l
u
t
i
o
n
n
e
t
t
o
y
a
n
t
e
CUIDADO Y MANTENIMIENTO
Español
RCD170BB_02IM0449.qxd:CD2849.QXD 27/10/09 17:14 Page 56
Page 57

57
SÍNTOMA CAUSA SOLUCIÓN
Si tienes algún problema con el equipo, antes de mandarlo a
reparar comprueba la siguiente tabla.
GUÍA PARA RESOLUCIÓN DE PROBLEMAS
No se
reproduce
el CD.
El CD salta o
se reproduce
de manera
errática.
Poco o ningún
sonido con
AM o FM.
El interruptor de
función no está en la
posición CD,.
Disco incorrectamente
insertado.
Colocar interruptor de
función en CD.
Cable de red CA
no conectado.
Colocar correctamente
el disco.
Comprobar la conexión
del cable de red CA.
Compartimiento del CD
abierto.
Disco incorrectamente
colocado.
Disco sucio o
defectuoso.
Humedad,
condensación
en el disco.
Emisora no sintonizada
correctamente.
FM: Antena no
ajustada correctamente.
AM: Unidad no
posicionada
correctamente.
El interruptor de función
no está en posición
RADIO.
Cerrar el
compartimiento del CD.
Colocar correctamente
el disco.
Intentar con otro disco.
Limpiar el disco con
un paño suave.
Volver a sintonizar la
emisora de radio.
Reorientar la antena de
FM.
Girar el equipo hasta
obtener la óptima
recepción.
Colocar el interruptor
de función en RADIO.
Español
RCD170BB_02IM0449.qxd:CD2849.QXD 27/10/09 17:14 Page 57
Page 58

Se recomienda conservar el embalaje para cualquier referencia futura.
Guarde este manual de instrucciones en un lugar seguro, ya que contiene
información importante. El contenido de este manual está sujeto a cambios sin
previo aviso. No podrá reproducirse ninguna parte de este manual, en ninguna
forma, sin la previa autorización por escrito del fabricante.
Este producto está cubierto por nuestra garantía de un año. Para efectuar
alguna reclamación en garantía o solicitar alguna reparación después de
haber adquirido el producto, póngase en contacto con su distribuidor y
preséntele una prueba de compra. Nuestra garantía cubre cualquier defecto
de material o mano de obra que pudieran ser imputables al fabricante, a
excepción de cualquier tipo de daños resultantes de la no observación de las
instrucciones de uso o de cualquier modificación no autorizada efectuada en
el aparato (tales como desmontaje, exposición al calor o humedad, etc.).
©2009 Barbie, Inc. All rights Reserved.
©2009 LEXIBOOK®
Lexibook Ibérica S.L, C/ de las Hileras 4, 4° dpcho 14, 28013 Madrid, España
Servicio consumidores: 902 102 191. http://www.lexibook.com
GARANTÍA
Advertencia para la protección del medio ambiente
¡Los aparatos eléctricos desechados son reciclables y no deben ser
eliminados en la basura doméstica! Por ello pedimos que nos ayude a
contribuir activamente en el ahorro de recursos y en la protección del
medio ambiente entregando este aparato en los centros de colección
(si existen).
Volumen al mínimo. Aumentar el volumen.
Español
Fabricado en China
Este producto no es juguete
AVISO: La utilización excesiva de este
producto con el volumen al máximo puede
dañar sus oídos.
RCD170BB_02IM0449.qxd:CD2849.QXD 27/10/09 17:14 Page 58
Page 59

59
CUIDADO: PARA REDUZIR O RISCO DE CHOQUES ELÉCTRICOS, NÃO
RETIRE A COBERTURA (OU PARTE TRASEIRA). NÃO EXISTEM PEÇAS
NO INTERIOR QUE POSSAM SER REPARADAS PELO UTILIZADOR.
CONSULTE PESSOAL QUALIFICADO PARA PROCEDER À
REPARAÇÃO.
AVISO: Para reduzir o risco de choques eléctricos, não exponha esta
unidade à chuva ou humidade.
CUIDADO
RISCO DE CHOQUE ELÉCTRICO
NÃO ABRIR
VOLTAGEM PERIGOSA:
O relâmpago com a seta dentro de um triângulo equilátero
serve para alertar o utilizador da presença de voltagem
perigosa sem isolamento no interior do produto, que pode
ser de magnitude suficiente para constituir risco de
choque eléctrico.
ATENÇÃO:
O ponto de exclamação dentro de um triângulo equilátero
serve para alertar o utilizador da presença de instruções
importantes de utilização e manutenção (reparação) a
acompanhar a unidade.
PERIGO:
Existe radiação a laser invisível e perigosa quando aberto,
ou quando o sistema de fecho tiver algum defeito. Evite a
exposição ao raio.
SEGURANÇA DO LASER: Esta unidade utiliza um laser. Só pessoal
qualificado deverá tentar reparar este aparelho, devido a lesões
oculares.
CUIDAD O: A UTIL IZAÇÃO DE C ONTROLO S, AJ USTE S OU
PROCESSOS DE DESEMPENHOS AQUI APRESENTADOS PODEM
DAR ORIGEM A UMA EXPOSIÇÃO PERIGOSA A RADIAÇÃO.
PRECAUÇÕES DE SEGURANÇA
Português
RCD170BB_02IM0449.qxd:CD2849.QXD 27/10/09 17:14 Page 59
Page 60

1. Leia estas instruções.
2. Guarde estas instruções.
3. Preste atenção a todos os
avisos.
4. Siga todas as instruções.
5. Não utilize esta unidade perto
da água.
6. Limpe apenas com um pano
seco.
7. Não bloqueie as entradas da
ventilação. Instale de acordo
com as instruções do
fabricante.
8. Não instale perto de fontes de
calor, como radiadores,
registadores de calor, fogões
ou outros aparelhos (incluindo
amplificadores) que produzam
calor.
9. Não tente fazer pressão numa
ficha polarizada ou de ligação
à terra. Uma ficha polarizada
tem dois dentes, um mais
largo do que o outro. Uma
ficha de ligação à terra tem
dois dentes e um terceiro
dente de ligação à terra. O
terceiro dente mais largo serve
para sua segurança. Se a ficha
fornecida não couber na sua
tomada, consulte um
electricista para substituir a
tomada obsoleta.
10. Proteja o fio da alimentação de
pisadelas ou dobras,
especialmente na ficha,
receptáculo de suporte e o ponto
de onde saem da unidade.
11. Use apenas acessórios
especificados pelo fabricante.
12. Desligue esta unidade da
tomada durante trovoadas, ou
quando não a utilizar durante
longos períodos de tempo.
13. Consulte pessoal qualificado
para proceder a qualquer
reparação. A unidade tem de
ser reparada quando for
danificada de algum modo,
como: danos no fio ou na ficha,
derrames de líquidos ou
quedas de objectos em cima
da unidade e/ou exposição da
unidade à chuva ou humidade
e caso o desempenho da
unidade tenha mudado ou
diminuído.
14. Esta unidade não deve ser
exposta a pingos ou derrames
de água, nem deve colocar
objectos com água, como
vasos, por cima da unidade.
15. Não sobrecarregue a tomada.
Utilize apenas a fonte de
alimentação conforme
indicado.
16. Use peças sobressalentes,
conforme especificado pelo
fabricante.
17. O produto só pode ser montado
numa parede, se isso for
recomendado pelo fabricante.
18. Após o final da reparação deste
aparelho, peça ao técnico para
efectuar as verificações de
segurança.
INSTRUÇÕES DE SEGURANÇA
Português
RCD170BB_02IM0449.qxd:CD2849.QXD 27/10/09 17:14 Page 60
Page 61

61
AVISO:
• Queira guardar toda a informação para futuras referências.
• Isto não é um brinquedo.
NOTAS:
• Evite utilizar a unidade em locais com altas temperaturas ou humidade
durante um período prolongado de tempo, pois pode dar origem a
danos.
• A exposição à luz directa do sol em locais como o interior dos
automóveis pode deformar a unidade, ou causar um mau
funcionamento.
• Evite usar ou guardar esta unidade em locais com pó ou areia.
• Não coloque fontes de chamas nuas, como velas acesas, em cima ou
perto do produto.
PROTEJA A SUA MOBÍLIA
Este modelo vem equipado com “pés” de borracha antiderrapantes para
prevenir que o produto escorregue quando estiver a utilizar os controlos.
Estes “pés” são feitos de borracha antiderrapante criada especialmente
para não deixar marcas ou nódoas na sua mobília. No entanto, certos tipos
de óleo para mobília, produtos de limpeza ou de brilho podem fazer com
que os "pés" de borracha fiquem mais moles, deixando marcas ou resíduos
de borracha na sua mobília. Recomendamos fortemente que compre
pequenos adesivos de feltro, disponíveis em qualquer loja de ferragens e
centros de produtos para o lar, e que aplique estes adesivos na parte
inferior dos "pés" de borracha antes de colocar o produto em cima da sua
mobília.
Português
RCD170BB_02IM0449.qxd:CD2849.QXD 27/10/09 17:14 Page 61
Page 62

DESEMPACOTAR E MONTAR
Nota: Estão incluídos 2 fios da alimentação: 1 fio da alimentação AC
para o Reino Unido e 1 fio de alimentação AC para a Europa/França.
• Retire cuidadosamente a unidade principal e os fios da alimentação do
ecrã. Retire todo o material de empacotamento da unidade. Retire
quaisquer etiquetas decorativas ou descritivas da parte dianteira e
superior da estrutura. Não retire as etiquetas na parte traseira ou inferior.
• Retire com cuidado as pequenas fitas adesivas que possam ter sido
usadas para impedir que a porta do compartimento do CD se abrisse
durante o transporte.
• Estique o fio da alimentação AC por completo.
• Esta unidade vem com um CD de cartão no interior do leitor de CDs. Este
CD de cartão impede que o sistema do laser se mova durante o
transporte. Este cartão tem de ser retirado antes de inserir os seus CDs.
Levante a porta do compartimento do CD com a aba OPEN. Retire
cuidadosamente o CD de cartão do leitor e deite-o fora. Feche a porta
do compartimento do CD.
• Coloque a unidade numa superfície plana e nivelada, como uma mesa,
secretária, balcão, prateleira, etc., perto de uma tomada AC de 230 V 50
Hz, afastada da luz directa do sol e de fontes de excesso de calor, pó,
humidade ou campos magnéticos fortes.
INICIAR
• Utilize os controlos e interruptores conforme descrito no manual.
• Antes de ligar a energia, certifique-se de que o fio da alimentação AC
está correctamente instalado.
• Guarde os seus CDs em locais frescos, para evitar danos devido ao
calor.
• Quando mover a unidade, certifique-se de que desliga primeiro o fio da
alimentação AC.
PREPARAÇÃO PARA UTILIZAÇÃO
Português
RCD170BB_02IM0449.qxd:CD2849.QXD 27/10/09 17:14 Page 62
Page 63

1
2
4
3
5
6
7
8
9
10
11
12
13
63
1. Antena telescópica FM
2. Compartimento do CD
3. Botão de SALTAR/PROCURAR
4. Botão de REPRODUZIR/PAUSA
5. Botão de SALTAR/PROCURAR
6. Botão de PARAR (I)
7. Botão de MODE
8. Botão de 10+
9. Pega de transporte
10. Indicador LED da BarbieTM
11. Interruptor da BANDA
(AM/FM/FM ST.)
12. Controlo da SINTONIZAÇÃO
13. Aba de abertura da porta do
CD (OPEN)
Parte Superior da Unidade
LOCALIZAÇÃO DOS CONTROLOS
Português
RCD170BB_02IM0449.qxd:CD2849.QXD 27/10/09 17:14 Page 63
Page 64

1. Ecrã
2. Indicador da ENERGIA
3. Coluna esquerda
4. Compartimento das pilhas
(parte inferior da unidade)
5. Indicador FM ST.
6. Coluna direita
7. Botão “GEMSTONE FUN”
8. Entrada da alimentação AC
(parte traseira da unidade)
9. Entrada dos
AUSCULTADORES
10. Entrada AUX IN
11. Interruptor das FUNÇÕES
(AUX / RÁDIO / DESLIGADO /
CD)
12. Controlo do VOLUME
Parte Dianteira/Lateral da Unidade
LOCALIZAÇÃO DOS CONTROLOS (CONTINUAÇÃO)
Português
3
4
2
1
6
5
7
8
10
9
12
11
RCD170BB_02IM0449.qxd:CD2849.QXD 27/10/09 17:14 Page 64
Page 65

65
Esta aparelhagem funciona com seis (6) pilhas de tamanho “C” (não
incluídas) ou um fio da alimentação AC (incluído).
COLOCAÇÃO DAS PILHAS
1. Retire a tampa do compartimento das pilhas, que se encontra na parte
inferior da unidade, premindo as marcas e fazendo-a deslizar.
2. Coloque seis (6) pilhas de tamanho “C” (não incluídas), de acordo com a
polaridade apresentada no interior do compartimento das pilhas
(conforme apresentado abaixo). Recomendamos a utilização de pilhas
alcalinas para um maior tempo de utilização.
3. Volte a colocar a tampa do compartimento das pilhas.
Não utilize pilhas não recarregáveis. As pilhas não recarregáveis
não deverão ser recarregadas. As pilhas recarregáveis deverão ser
retiradas do brinquedo antes de serem recarregadas e só deverão
ser recarregadas sob a supervisão de um adulto. Não misture
diferentes tipos de pilhas ou pilhas novas com pilhas usadas. Só
deverá utilizar pilhas do mesmo tipo ou de um tipo equivalente às
recomendadas. As pilhas deverão ser colocadas com a polaridade
correcta. Deverá retirar as pilhas gastas do brinquedo. Não coloque
os terminais em curto-circuito. Não atire as pilhas para o fogo.
Retire as pilhas caso não utilize a unidade durante um longo
período de tempo. Quando o som ficar fraco ou o jogo não
responder, pense em substituir as pilhas. ATENÇÃO: Uma
descarga electrostática ou frequências fortes podem dar origem a
um mau funcionamento ou perda de memória. Caso ocorra algum
funcionamento anormal, retire e volte a colocar as pilhas.
FONTES DE ALIMENTAÇÃO
Português
RCD170BB_02IM0449.qxd:CD2849.QXD 27/10/09 17:14 Page 65
Page 66

Tomada AC
Ficha AC
OPERAÇÃO AC
Para utilizar a unidade com a alimentação AC, ligue a extremidade
pequena do fio da alimentação AC à entrada da alimentação AC na parte
traseira da unidade e ligue a ficha a uma tomada AC apenas de AC
230V ~, 50 Hz. As pilhas são desligadas automaticamente quando utilizar
o adaptador AC.
CUIDADO:
• Quando não usar a alimentação AC, desligue o fio da alimentação AC da
tomada e da unidade, puxando a ficha (não o fio).
• Não toque no fio da alimentação AC com as mãos molhadas.
• Insira por completo a ficha, sem deixar exposta de fora qualquer parte do
dente.
FONTES DE ALIMENTAÇÃO (CONTINUAÇÃO)
ATENÇÃO : Uma descarga electrostática ou frequências fortes podem dar
origem a um mau funcionamento ou perda de memória. Caso ocorra algum
funcionamento anormal, desligue o adaptador AC/DC da tomada e volte a
ligá-la.
Português
NOTA: A ficha AC fornecida com a unidade é polarizada, para ajudar a
minimizar a possibilidade de choques eléctricos. Se a ficha AC não couber
numa tomada AC não polarizada, não lime ou corte o dente largo. É da
responsabilidade do utilizador pedir a um electricista que substitua a
tomada obsoleta.
NOTA: A tomada deverá estar instalada perto do equipamento e deverá
ser facilmente acessível.
RCD170BB_02IM0449.qxd:CD2849.QXD 27/10/09 17:14 Page 66
Page 67

Faça deslizar o interruptor da BANDA
para es co lh er AM, FM ou FM ST.
(estéreo). Sintonize a estação desejada,
rodando o botão da SINTONIZAÇÃO .
NOTAS:
• Se escolher FM ST. e sintonizar uma
estação FM estéreo, o indicador FM
ST. acende.
• Se estiver a escutar uma estação FM
com um sinal fraco, pode melhorar a
recepção, desliza ndo o interruptor
BANDA de FM ST. para FM (o som
passa a ser em mono).
ANTENAS
AM–Esta unidade tem uma antena de haste em ferrite incorporada, que fornece
uma recepção adequada em grande parte das áreas. Se a recepção ficar fraca,
vire a unidade para melhorar a recepção.
FM–A antena telescópica FM serve apenas para a recepção FM. Se a recepção
ficar fraca, ajuste o tamanho e o ângulo da antena.
67
Fa ça de sliza r o int er rup tor d as
FUNÇÕES para a posição RÁDIO, para
ligar a unidade e escolher o modo do
rádio. O indicador da ENERGIA liga..
Ajuste o controlo do VOLUME,
conforme desejado.
Para desligar o rádio, faça deslizar o
interruptor das FUNÇÕES para a posição
OFF (desligado). O indicador da
ALIMENTAÇÃO desliga.
OUVIR RÁDIO
FUNCIONAMENTO
1
2
Português
1
1
2
2
3
4
RCD170BB_02IM0449.qxd:CD2849.QXD 27/10/09 17:14 Page 67
Page 68

INSERIR E REPRODUZIR UM CD
CONTINUA NA PÁGINA SEGUINTE
FUNCIONAMENTO (CONTINUAÇÃO)
Português
Para reproduzir um CD:
1. Mova o selec to r da FU NÇ ÃO
(FUNCTION) para CD/MP3. O ecrã
apresenta brevemente “---” para
contar (e mostrar posteriormente) o
número de faixas guardadas no CD.
Se, em vez disso, vir “no” o CD não
foi inserido, ou o aparelho não o
consegue reproduzir.
2. Abra o comparti me nt o d o C D,
premindo a área de ABRIR/FECHAR
(OPEN/CLOSE). O ecrã apresenta “-
--”.
3. Coloque o CD no eixo rotativo, com a
etiqueta virada para cima.
4. Feche o c ompartimento. O d isco
começa a girar e o ecrã apresenta o
número de faixas existentes.
1
5. Prima o botão PLAY/PAUSE
para começar a reprodução. O ecrã
apresenta e o número da faixa.
De seguida, o aparelho começa a
reproduzir todas as faixas seguidas.
Após reproduzir a última, pára.
2
Ajuste o controlo do VOLUME conforme
desejado.
3
RCD170BB_02IM0449.qxd:CD2849.QXD 27/10/09 17:14 Page 68
Page 69

6968
Português
2
1
4
Seleccionar as faixas
• Para seleccionar um título, não
importa se o CD está a ser
reproduzido ou parado.
• Para seleccionar a faixa seguinte:
Prima .
• Para voltar ao início da faixa:
Prima .
• Para seleccionar o título anterior:
Prima duas vezes.
Encontrar uma parte da faixa
Use esta função para encontrar uma
certa secção de um título específico.
Quando tiver encontrado a parte que
procurava, basta deixar de premir o
botão que estava a premir.
• Procurar para a frente: Mantenha
premido o botão enquanto a
faixa estiver a ser reproduzida.
• Procurar para trás: Mantenha
premido o botão enquanto a
faixa estiver a ser reproduzida.
Saltar as 10 faixas seguintes
• Para avançar 10 faixas, basta premir
o botão 10+.
Nota
- Quando reproduzir CDs de MP3,
use esta função para seleccionar
rapidamente a pasta seguinte.
Quando tiver seleccionado outra
pasta, ÁLBUM e o número da pasta
a piscar serão apresentados
brevemente no ecrã. A isto,
seguir-se-á “001” e a primeira faixa
na pasta seleccionada será
reproduzida.
- Não pode seleccionar nem
reproduzir ficheiros de MP3
guardados em subpastas. O
aparelho só reproduz faixas da raiz
do CD (“horizontal”) ou pastas de
primeiro nível.
FUNCIONAMENTO (CONTINUAÇÃO)
RCD170BB_02IM0449.qxd:CD2849.QXD 27/10/09 17:14 Page 69
Page 70

Português
Para desligar a unidade, faça deslizar o
interruptor das FUNÇÕES para a posição
OFF (desligado). O indicador da
ALIMENTAÇÃO desliga-se.
CONTINUA NA PÁGINA SEGUINTE
6
5
7
Retirar o CD
1. Prima STOP para parar a
reprodução. Nunca abra o
compartimento do CD enquanto o CD
ainda estiver a ser reproduzido!
2. Abra o compartimento do CD,
premindo a área de ABRIR/FECHAR
(OPEN/CLOSE).
3. Segure o CD pelas suas
extremidades e retire-o
cuidadosamente do eixo (premir
suavemente o eixo com o polegar
pode ajudar).
4. Feche o compartimento do CD para
evitar a entrada de pó.
Funções básicas do leitor de CD
Para fazer uma pausa na reprodução:
Enquanto estiver a reproduzir um CD,
prima PLAY/PAUSE . O ecrã
apresenta um a piscar. Prima de
novo o botão para continuar a
reprodução a partir do ponto em que
parou.
Para parar a reprodução: Prima o botão
STOP . Se premir PLAY/PAUSE
, começa a reproduzir a primeira
faixa.
RCD170BB_02IM0449.qxd:CD2849.QXD 27/10/09 17:14 Page 70
Page 71

71
Português
NOTAS ACERCA DA REPRODUÇÃO DO CD
• O aparelho foi criado para reproduzir MP3 e outros CDs de áudio. Ser-lhe-ão
explicadas as funções que diferem, dependendo se está a reproduzir um MP3 ou
outro CD de áudio.
• Se aparecer “MP3" no ecrã, significa que está a reproduzir um CD de MP3.
• Se um disco for inserido incorrectamente, sujo ou danificado, ou não tiver nada
gravado, aparece a mensagem “no” no ecrã.
• Apesar desta unidade conseguir ler CD-Rs e CD-RWs, para além dos CDs
normais, a reprodução destes discos pode ser afectada pelo tipo de software que
foi usado para criar os discos, bem como os meios que está a usar. Não podemos
garantir a reprodução a 100%. Não se trata de um problema na unidade.
Entrada AUX IN
Com um cabo de ligação para sistemas de música domésticos (não
incluído), pode ouvir áudio proveniente de uma fonte externa, através das
colunas desta unidade. Antes de fazer quaisquer ligações, desligue a
alimentação de todos os equipamentos.
Faça deslizar o interruptor das FUNÇÕES para AUX para ligar a unidade
e escolha o modo AUX. Ligue um cabo de ligação (não incluído) entre a
entrada AUX ou LINE OUT da fonte externa de áudio e a entrada AUX IN
desta unidade (na parte lateral da unidade). (Não a ligue à entrada dos
AUSCULTADORES desta unidade.) Ligue a fonte externa de áudio e a
reprodução começa. O som proveniente da fonte externa de áudio será
ouvido através das colunas desta unidade. Rode o controlo do VOLUME
para ajustar o nível do volume, conforme desejado.
Para desligar a unidade, retire a ficha da entrada AUX IN e faça deslizar
o interruptor das FUNÇÕES para OFF (desligado).
FUNCIONAMENTO (CONTINUAÇÃO)
RCD170BB_02IM0449.qxd:CD2849.QXD 27/10/09 17:14 Page 71
Page 72

Português
REPETIÇÃO E REPRODUÇÃO ALEATÓRIA
FUNCIONAMENTO (CONTINUAÇÃO)
4. Prima de novo o botão MODE. O ecrã
apresenta REP ALL: Todo o CD será
repetido.
1. Inicie a repetição do CD.
2. Prima uma vez o botão MODE.
3. O ecrã apresenta REP: A faixa actual
será repetida.
1 2
5. Prima o botão MODE uma terceira vez.
O ecrã apresenta RANDOM: As faixas
serão reproduzidas aleatoriamente.
6. Se voltar a premir mais uma vez o botão
MODE, sairá da função de repetição e
da reprodução aleatória.
3
NOTAS:
Se estiver a reproduzir um CD de MP3, entre REP e REP ALL, terá a opção
de repetir todas as faixas numa pasta. Assim, o ecrã apresenta ÁLBUM.
• A função de repetição permite-lhe reproduzir uma certa faixa ou todo o CD de
novo.
• A reprodução aleatória permite que um gerador aleatório interno defina a ordem
em que as faixas são reproduzidas.
RCD170BB_02IM0449.qxd:CD2849.QXD 27/10/09 17:14 Page 72
Page 73

73
Português
PARA PROGRAMAR A MEMÓRIA (ATÉ 20 FAIXAS)
FUNCIONAMENTO (CONTINUAÇÃO)
2. Prima ou para seleccionar
uma faixa.
3. Prima MODE de novo.
“P02” é apresentado no ecrã.
4. Repita os passos 2 e 3 para
seleccionar mais faixas.
5. Para reproduzir a sua sequência de
faixas, prima PLAY/PAUSE .
PROG permanece na extremidade
superior direita do ecrã.
1. Prima o botão MODE.
“PROG” e “P01” começam a piscar no
ecrã.
2
1
3
2
4
NOTA:
• Para sair do modo de programação, prima o botão STOP .
• Se premir o botão STOP duas vezes, mudar o modo, desligar o
aparelho ou retirar o CD, apaga a sequência de faixas que programou.
• As funções REP e REP ALL também se encontram disponíveis quando
reproduzir a sua própria sequência de faixas.
Pode programar e reproduzir sequências de faixas até 20 faixas.
Para programar uma sequência de faixas…
• … O compartimento do CD tem de conter um CD,
• … a função de reprodução tem de estar parada e
• … o selector do modo tem de estar definido para CD/MP3.
1
2
1
3
3
RCD170BB_02IM0449.qxd:CD2849.QXD 27/10/09 17:14 Page 73
Page 74

See wh at you
can do w ith
your G EMSTON E
FUN bu tton!
Step 1
Step 1
Step 2
Português
Prime o botão GEMSTONE FUN na
parte dianteira da tua Boombox.
A BarbieTMtem uma surpresa para ti!
Basta seguires as instruções
apresentadas abaixo e verás o que
podes fazer com o teu botão
“GEMSTONE FUN!
SURPRESA! O indicador LED da
BarbieTMcomeça a piscar alternando as
cores entre vermelho e azul durante 10
segundos.
FUNCIONAMENTO (CONTINUAÇÃO)
Vê o que
p
odes fazer
com o teu botao
GEMSTONE
FUN
Passo 2
Passo 1
RCD170BB_02IM0449.qxd:CD2849.QXD 27/10/09 17:14 Page 74
Page 75

75
Português
CUIDADOS A TER COM OS CDs
• Trate os CDs com cuidado. Segure-os apenas
pelas extremidades. Nunca permita que os
seus dedos entrem em contacto com o lado
brilhante sem impressão do CD.
• Não cole fita adesiva, autocolantes, etc. na
etiqueta do CD.
• Se um disco saltar ou ficar preso numa secção do CD, é capaz de estar
sujo ou danificado (riscado).
• Quando limpar o CD, limpe em linhas a direito, a partir do centro do CD
até à extremidade exterior. Nunca limpe em movimentos rotativos.
• Esta unidade foi criada para reproduzir apenas CDs com o logótipo de
identificação apresentado ao
lado. Outros discos podem
não estar em conformidade
com o padrão para CDs e
podem não funcionar
correctamente.
• Os CDs deverão ser
guardados nas suas caixas após cada utilização, para
evitar danos.
• Não exponha os CDs à luz directa do sol, muita humidade,
altas temperaturas, pó, etc. A exposição prolongada a
temperaturas extremas pode deformar o CD.
• Não cole nem escreva nada em nenhum dos lados do CD. Os
instrumentos de escrita afiados, ou a tinta, podem danificar a superfície.
CUIDADOS A TER COM A ESTRUTURA
Se a estrutura ficar suja, limpe-a com um pano para o pó suave e seco. Não
use cera, sprays de polir ou produtos de limpeza abrasivos.
CUIDADO
Nunca permita que a água ou outros líquidos entrem na unidade enquanto
estiver a proceder à limpeza.
B
E
N
Z
E
N
E
S
o
l
u
t
i
o
n
n
e
t
t
o
y
a
n
t
e
CUIDADOS E MANUTENÇÃO
RCD170BB_02IM0449.qxd:CD2849.QXD 27/10/09 17:14 Page 75
Page 76

SINTOMA CAUSA SOLUÇÃO
Se tiver algum problema com esta unidade, verifique a tabela
apresentada abaixo antes de contactar o centro de apoio.
GUIA DE RESOLUÇÃO DE PROBLEMAS
O CD não
toca.
O CD salta
enquanto está
a ser
reproduzido
e/ou
reprodução
com erros.
Sintonização
AM ou FM
fraca ou sem
som..
O interruptor das
FUNÇÕES pode não
estar em CD.
O disco foi inserido
incorrectamente.
Coloque o interruptor
das FUNÇÕES em CD.
O fio da alimentação AC
não está ligado.
Volte a colocar o disco
correctamente.
Verifique se o fio da
alimentação AC está ligado.
O compartimento do CD
não está fechado.
O disco foi inserido
incorrectamente.
Sujidade ou disco
defeituoso.
Condensação de
humidade no disco.
A estação não está bem
sintonizada.
FM: A antena não está
ajustada correctamente.
AM: A unidade não está
posicionada
correctamente.
O interruptor das
FUNÇÕES não está em
RÁDIO.
Feche o compartimento do
CD.
Volte a colocar o disco
correctamente.
Tente outro disco.
Limpe o disco com um
pano suave.
Volte a sintonizar a
estação AM ou FM.
Reoriente a antena FM.
Rode a unidade até obter
uma melhor sintonização.
Coloque o interruptor das
FUNÇÕES em RÁDIO.
O volume está no mínimo.
Português
Aumente o volume.
RCD170BB_02IM0449.qxd:CD2849.QXD 27/10/09 17:14 Page 76
Page 77

77
Português
Recomenda-se que guarde a caixa para uma futura referência. Guarde este
manual de instruções num local seguro, pois contém informações importantes.
O conteúdo deste manual está sujeito a alterações sem aviso. Nenhuma parte
deste manual pode ser reproduzida de nenhuma maneira sem o
consentimento expresso por escrito do fabricante.
Este produto é abrangido pela nossa garantia de 1 ano. Para utilizar a garantia
ou o serviço pós-venda, por favor, contacte o seu revendedor e apresente
uma prova de compra. A nossa garantia cobre defeitos de material ou de
mão-de-obra atribuídos ao fabricante, com a excepção de desgaste causado
pelo não respeito das instruções de utilização ou qualquer trabalho não
autorizado no equipamento (como desmontar, expor ao calor ou humidade,
etc.).
©2009 Barbie, Inc. All rights Reserved.
©2009 LEXIBOOK®
LEXIBOOK Electronica Lda, Quinta dos Loios, Praceta José Domingos
dos Santos, 6B-8ª, 2835-343 Lavradio-Barreiro, Portugal,
http://www.lexibook.com
GARANTIA
Indicações para a protecção do meio ambiente
Aparelhos eléctricos antigos são materiais que não pertencem ao lixo
doméstico! Por isso pedimos para que nos apoie, contribuindo
activamente na poupança de recursos e na protecção do ambiente ao
entregar este aparelho nos pontos de recolha, caso existam.
Fabricado na China
Este produto não é um brinquedo.
ATENCAO: A utilização excessiva deste produto, com o volume no
máximo, pode causar lesões auriculares.
RCD170BB_02IM0449.qxd:CD2849.QXD 27/10/09 17:14 Page 77
Page 78

Italiano
ATTENZIONE: PER RIDURRE IL RISCHIO DI SCOSSA ELETTRICA, NON
RIMUOVERE IL COPERCHIO (O LA PARTE POSTERIORE). ALL’INTERNO NON
SONO PRESENTI PARTI CHE RICHIEDONO MANUTENZIONE DA PARTE
DELL’UTENTE. PER LA MANUTENZIONE, RIVOLGERSI UNICAMENTE A
PERSONALE QUALIFICATO.
AVVERTENZA:
Per ridurre il rischio d’incendio o di scossa elettrica, evitare di esporre l’apparecchio alla
pioggia o all’umidità.
ATTENZIONE
PERICOLO DI SCOSSA
ELETTRICA
NON APRIRE
VOLTAGGIO PERICOLOSO:
LIl simbolo del fulmine racchiuso in un triangolo equilatero
è utilizzato per avvertire l'utilizzatore della presenza di
elementi ad alto voltaggio non isolati all'interno
dell'apparecchio che costituiscono un pericolo di scossa
elettrica per le persone.
ATTENZIONE:
Il punto esclamativo racchiuso in un triangolo equilatero
serve ad avvisare l'utente della presenza, nel manuale che
accompagna l'apparecchio, di istruzioni particolarmente
importanti di uso e manutenzione.
PERICOLO:
Presenza di raggi laser invisibili e pericolosi quando
aperto, in caso di guasto o aggiramento del blocco di
sicurezza. Evitare l'esposizione diretta al raggio.
SICUREZZA CONTRO IL LASER: questo apparecchio fa uso di un
sistema laser. Il dispositivo deve essere sottoposto a manutenzione
unicamente da parte di personale qualificato per via dei possibili danni
alla vista.
ATTENZIONE: L’USO DEI COMANDI, DELLE REGOLAZIONI O DI
PR OCED URE DESC RIT TE NEL PRESE NTE MAN UALE PUÒ
PORTARE ALL'ESPOSIZIONE A RADIAZIONI PERICOLOSE.
PRECAUZIONI DI SICUREZZA
RCD170BB_02IM0449.qxd:CD2849.QXD 27/10/09 17:14 Page 78
Page 79

79
Italiano
1) Leggere attentamente le
istruzioni.
2) Conservare le presenti
istruzioni.
3) Osservare tutti gli avvertimenti.
4) Seguire tutte le istruzioni.
5) Non utilizzare questo
apparecchio in prossimità
dell’acqua.
6) Pulire unicamente con un
panno asciutto.
7) Non bloccare le aperture di
ventilazione. Installare
secondo le istruzioni del
produttore.
8) Non installare vicino a sorgenti
di calore quali radiatori,
caloriferi, fornelli o altri
apparati (compresi
amplificatori) che producono
calore.
9) Non bypassare i dispositivi di
sicurezza delle spine
polarizzate o di messa a terra.
Una spina polarizzata presenta
due lame di cui una più ampia
dell'altra. Una spina di messa a
terra presenta due lame ed un
dente di messa a terra. La
lama ampia o il terzo dente
sono forniti per la vostra
sicurezza. Nel caso in cui la
spina fornita non si adattasse
alla vostra presa, rivolgersi ad
un elettricista per la
sostituzione della presa
vecchia.
10) Proteggere il cavo di
alimentazione evitando che
venga schiacciato o pinzato,
in particolare in corrispondenza
delle spine, dei ricettacoli e dei
punti di uscita dall'apparecchio.
11) Servirsi unicamente di accessori
indicati dal produttore.
12) Scollegare l'apparecchio dalla
rete elettrica durante temporali
o in caso di mancato utilizzo
per lunghi periodi di tempo.
13) Affidare qualsiasi operazione di
manutenzione a personale
qualificato. La manutenzione è
necessaria quando
l'apparecchio è stato
danneggiato in qualsiasi modo,
ad esempio: il cavo o la spina
di alimentazione sono stati
danneggiati; liquidi o altri
oggetti sono caduti
nell'apparecchio; l'apparecchio
è stato esposto a pioggia o
umidità, non funziona
normalmente, presenta
prestazioni diverse o è stata
lasciata cadere.
14) Questo apparecchio non
dev'essere esposto a gocce o
schizzi d'acqua e bisogna
evitare di porre oggetti
contenenti liquidi, ad esempio
vasi, sull'apparecchio stesso.
ISTRUZIONI DI SICUREZZA
RCD170BB_02IM0449.qxd:CD2849.QXD 27/10/09 17:14 Page 79
Page 80

Italiano
NOTA BENE:
• Evitare di utilizzare l'apparecchio in luoghi ad elevata temperatura o
umidità per periodi di tempo prolungati in quanto si potrebbero verificare
danni.
• L’esposizione alla luce diretta del sole in luoghi quali gli interni di un'auto,
può far deformare l’apparecchio e/o causare un malfunzionamento.
• Evitare di utilizzare o di riporre l’apparecchio in ambienti polverosi o
sabbiosi.
• Non mettere una fiamma viva, ad es. una candela accesa, sopra o vicino
al prodotto.
15) Non sovraccaricare la prese a
muro. Servirsi unicamente
dell'alimentazione come
indicato.
16) Utilizzare le parti di ricambio
indicate dal produttore.
17) Il prodotto può essere installato
a parete solo se indicato dal
produttore.
18) Al termine di qualsiasi
operazione di manutenzione o
di riparazione del prodotto,
chiedere al tecnico di
effettuare verifiche di
sicurezza.
PROTEZIONE DEI MOBILI
Questo modello è dotato di piedini in gomma antiscivolo per evitare che il
prodotto si muova quando vengono utilizzati i comandi. Questi piedini sono
composti da un tipo di gomma formulato specificamente per evitare che
lasci segni o macchie sui mobili. Tuttavia, determinati tipi di cere per mobili
basate su olio, prodotti conservativi del legno o spray pulenti possono
causare un “ammorbidimento” dei piedini che possono dunque lasciare
segni o residui di gomma sui mobili.
Per evitare danni ai mobili, si raccomanda di acquistare dei feltrino adesivi,
disponibili in ogni negozio di ferramenta e di prodotti per la casa, e applicarli
sotto ai piedini di gomma prima di appoggiare il prodotto su mobili in legno
pregiato.
AVVERTENZA:
• Conservare tutte le informazioni per eventuali riferimenti futuri.
• Questo non è un giocattolo.
RCD170BB_02IM0449.qxd:CD2849.QXD 27/10/09 17:14 Page 80
Page 81

81
Italiano
PER COMINCIARE
• Servirsi di comandi e interruttori come descritto nel manuale.
• Prima di accendere l'alimentazione assicurarsi che il cavo di
alimentazione CA sia installato adeguatamente.
• Riporre i CD in un luogo fresco per evitare che vengano danneggiati dal
calore.
• Quando si sposta il dispositivo, assicurarsi di scollegare innanzitutto il
cavo di alimentazione.
ESTRAZIONE DEL PRODOTTO DALLA CONFEZIONE E IMPOSTAZIONE
Nota: Sono allegati 2 cavi di alimentazione 1 cavo di alimentazione
CA standard britannico e 1 cavo di alimentazione CA standard
francese/europeo.
• Togliere con attenzione l’unità principale e i cavi di alimentazione dalla
confezione. Rimuovere tutti i materiali di imballaggio dall'apparecchio.
Rimuovere qualsiasi etichetta decorativa o descrittiva dalla parte
anteriore o superiore del corpo del prodotto. Non rimuovere le etichette
presenti sulla parte posteriore o inferiore.
• Rimuovere con cura il nastro che può essere stato utilizzato per
evitareche lo sportellino del CD si aprisse nel trasporto.
• Srotolare il cavo di alimentazione per tutta la sua lunghezza.
• L'apparecchio è fornito con una scheda CD contenuta nel lettore CD
stesso. Questa impedisce al pickup laser di spostarsi durante il trasporto.
Questa scheda va rimossa prima di inserire i CD. Sollevare la linguetta
OPEN dello sportellino CD per aprire lo sportello stesso. Rimuovere il
finto CD dal lettore e gettarlo. Chiudere lo sportello CD.
• Posizionare l'apparecchio su una superficie piana quale un tavolo, una
scrivania, un ripiano, uno scaffale, ecc. che sia comodo vicino ad una
presa CA da 230V 50 Hz, lontano dalla luce diretta del sole e da
sorgenti di calore, polvere, umidità o forti campi magnetici.
PREPARAZIONE PER L’USO
RCD170BB_02IM0449.qxd:CD2849.QXD 27/10/09 17:14 Page 81
Page 82

1
2
4
3
5
6
7
8
9
10
11
12
13
1. Antenna FM telescopica
2. Scomparto CD
3. Tasto SKIP/SEARCH
4. Tasto PLAY/PAUSE
5. Tasto SKIP/SEARCH
6. Tasto STOP ( )
7. Tasto MODE
8. Tasto 10+.
9. Maniglia di trasporto
10. Indicatore a LED di Barbie™
11. Interruttore di banda
(AM/FM/FM ST.)
12. Comando di sintonia
13. Linguetta OPEN di apertura
dello sportello CD
Parte superiore dell'apparecchio
DISPOSIZIONE DEI COMANDI
Italiano
RCD170BB_02IM0449.qxd:CD2849.QXD 27/10/09 17:14 Page 82
Page 83

3
4
2
1
6
5
7
8
10
9
12
11
83
Italiano
1. Display
2. Indicatore di alimentazione
POWER
3. Altoparlante sinistro
4. Scomparto batterie
(parte inferiore dell'apparecchio)
5. Indicatore FM ST.
6. Altoparlante destro
7. Tasto GEMSTONE FUN
8. Jack di alimentazione CA
( parte posteriore
dell'apparecchio )
9. Jack CUFFIE
10. Jack AUX IN
11. Interruttore FUNZIONE
(AUX/RADIO/OFF/CD)
12. Comando VOLUME
Parte anteriore/laterale dell'apparecchio
DISPOSIZIONE DEI COMANDI (Continua)
RCD170BB_02IM0449.qxd:CD2849.QXD 27/10/09 17:14 Page 83
Page 84

Italiano
Questo apparecchio richiede o sei (6) batterie “C” (non incluse) o un cavo
di alimentazione CA (incluso).
INSTALLAZIONE DELLE BATTERIE
1. Rimuovere lo sportello dello scomparto batterie posto nella parte
inferiore dell'apparecchio premendo i segni [] e facendolo scorrere.
2. Inserire sei (6) batterie “C” (non incluse) rispettando lo schema delle
polarità che si trova all'interno dello scomparto batterie (come illustrato).
Le batterie carine sono raccomandate in quanto garantiscono la
maggiore durata.
3. Riposizionare lo sportello dello scomparto batterie.
Non servirsi di batterie non ricaricabili. Le batterie non ricaricabili
non devono essere ricaricate; le batterie ricaricabili devono essere
tolte dal giocattolo prima di essere ricaricate; le batterie ricaricabili
devono essere caricate unicamente con la supervisione di un
adulto; non mischiare differenti tipi di batterie o batterie nuove e
usate; utilizzare unicamente batterie del tipo raccomandato o
equivalenti; inserire le batterie rispettando le polarità; rimuovere le
batterie esaurite dal giocattolo; non cortocircuitare i terminali di
alimentazione. Non buttare le batterie nel fuoco. Rimuovere le
batterie se non si usa il gioco per molto tempo. Sostituire le
batterie quando il suono diventa debole o il gioco non funziona.
ATTENZIONE: Una forte interferenza di frequenza o scariche
elettrostatiche possono causare malfunzionamenti o perdite di
memoria. Se si dovessero verificare funzionamenti anormali,
togliere e reinserire le batterie.
FONTI DI ALIMENTAZIONE
RCD170BB_02IM0449.qxd:CD2849.QXD 27/10/09 17:14 Page 84
Page 85

85
Italiano
FUNZIONAMENTO DI RETE (CA)
Per utilizzare l'apparecchio servendosi dell’alimentazione di rete, collegare
il capo piccolo del cavo di alimentazione all’apposito jack posto a livello
della parte posteriore dell'apparecchio e inserire la spina in una presa AC
230V ~, 50 Hz. Quando l'adattatore CA è in uso, le batterie vengono
automaticamente scollegate.
ATTENZIONE: Una forte interferenza di frequenza o scariche
elettrostatiche possono causare malfunzionamenti o perdite di memoria.
Se si dovessero verificare funzionamenti anormali, oppure staccare
l’adattatore CA/CC dalla presa di corrente e reinserirlo.
ATTENZIONE:
• quando non si utilizza l'alimentazione CA, scollegare il cavo dalla presa a
muro e dall'apparecchio tirando la spina (non il cavo stesso).
• Non toccare il cavo di alimentazione CA con le mani bagnate.
• Inserire bene la spina senza lasciare esposta la lama.
FONTI DI ALIMENTAZIONE (continua)
NOTA BENE: la spina CA fornita con l'apparecchio è polarizzata per
aiutare a minimizzare il rischio di scossa elettrica. Nel caso in cui la spina
non si adattasse ad una presa non polarizzata, non limare o tagliare la lama
larga. È responsabilità dell'utente chiamare un elettricista per sostituire la
presa obsoleta.
NOTA: La presa di corrente deve essere vicina al dispositivo e facilmente
accessibile.
RCD170BB_02IM0449.qxd:CD2849.QXD 27/10/09 17:14 Page 85
Page 86

Far scorrere l'interruttore d i banda
BAND per selezionare AM, FM O FM
ST. (Stereo). Sincronizzare la radio sulla
stazione desiderata girando l'apposito
comando TUNING .
NOTE:
• Se si selezio na FM ST . e ci si
sintonizza su una stazione FM Stereo,
l'indicatore FM ST. si illumina.
• Se si ascolta una stazione radio FM
Stereo dal segnale debole, si può
solitamente migliorare la ricezione
facend o scorrere l'interrutt or e di
banda BA ND da FM ST. a FM (il
suono ora sarà in mono).
Italiano
CONTINUA ALLA PAGINA SUCCESSIVA
Far scorrere l'interruttore FUNCTION su
RADIO per accendere l'apparecchio e
selezionare la modalità radio; l'indicatore
di alimentazione POWER si illumina.
Regolare il comando del VOLUME come
desiderato.
Per spegnere la radio, far scorrere
l'interruttore FUNCTION su OFF;
l'indicatore di alimentazione POWER si
spegne.
ASCOLTARE LA RADIO
ANTENNE
AM–Questo apparecchio è dotato di un'antenna a filo in ferrite incorporata, che fornisce
un'adeguata ricezione nella maggior parte delle zone. Se la ricezione è debole, girare
l'apparecchio per migliorarla.
FM–L’antenna telescopica FM serve unicamente alla ricezione FM. Se la ricezione è
debole, regolare la lunghezza e l'angolazione dell'antenna
USO
1
2
1
1
2
2
3
4
RCD170BB_02IM0449.qxd:CD2849.QXD 27/10/09 17:14 Page 86
Page 87

87
Italiano
Regolare il VOLUME come desiderato.
INSERIRE E RIPRODURRE UN CD
CONTINUA ALLA PAGINA SUCCESSIVA
USO (continua)
Pe r ascoltare un CD:
1. Spostare il selettore di FUNZIONE su
CD/M P3 . Su l disp la y si leg ge
brevemente "- - -" per contare (e poi
most ra re ) il nume ro di tracce
memorizzate sul CD. Se invece si
vede "no", il CD non è stato inserito
oppure il dispositivo non lo legge.
2. Aprir e il vano CD spingendo
brevemente la zona OPEN/CLOSE.
Sul display si legge "- - -".
3. Posizionare il CD sul mandrino, con
l’etichetta rivolta verso l’alto.
4. Chiudere il vano. Il disco gira un paio
di volte e sul display compare il
numero delle tracce.
1
5. Premere il tasto PLAY/PAUSE
per iniziare l’ascolto. Sul display
comparano e il numero della
traccia.
Poi il dispositivo inizia a riprodurre
tutte le tracce una dopo l’altra. Dopo
l’ultima si ferma.
2
3
RCD170BB_02IM0449.qxd:CD2849.QXD 27/10/09 17:14 Page 87
Page 88

2
1
4
Selezionare tracce
Per selezionare un titolo, non importa
se il CD è in ascolto o se è fermo.
• Per selezionare la traccia
successiva: Premere una volta.
• Per andare all’inizio di una traccia:
Premere una volta.
• Per selezionare il titolo precedente:
Premere due volte.
Trovare una sezione della traccia
Usare questa funzione per trovare una
sezione di un titolo specifico. Quando si
è trovata la parte che si cerca,
rilasciare semplicemente il pulsante che
si sta premendo.
• Ricerca in avanti: Tenere premuto il
pulsante quando la traccia è in
ascolto.
• Ricerca indietro: Tenere premuto il
pulsante quando la traccia è in
ascolto.
Saltare le 10 tracce successive
• Per andare avanti di 10 tracce,
premere brevemente il pulsante 10+
una volta.
Note
- Nell’ascoltare CD MP3, usare questa
funzione per selezionare
rapidamente la cartella successiva.
Una volta selezionata un’altra
cartella, ALBUM e il numero della
cartella lampeggiante compaiono
brevemente sullo display. Questo
sarà seguito da "001" e sarà
riprodotta la prima traccia nella
cartella selezionata.
- Non si possono selezionare e
ascoltare file MP3 memorizzati in
sottocartelle. Il dispositivo riproduce
solo tracce dall’indirizzo principale
del CD ("flat") o da cartelle di primo
livello.
USO (continua)
Italiano
RCD170BB_02IM0449.qxd:CD2849.QXD 27/10/09 17:14 Page 88
Page 89

89
Per spegnere l'apparecchio, far scorrere
l'interruttore FUNCTION su OFF;
l'indicatore di alimentazione POWER si
spegne.
USO (continua)
6
5
7
Togliere il CD
1. Premere STOP per interrompere
l’ascolto. Non aprire mai il vano CD
mentre il CD è ancora in ascolto!
2. Aprire il vano CD premendo
brevemente la zona OPEN/CLOSE.
3. Tenere il CD dai bordi e toglierlo con
attenzione dal mandrino (spingere
delicatamente con il pollice sul
mandrino può aiutare).
4. Chiudere il vano CD per tenere
lontana la polvere.
Funzioni di base de l le ttore CD
Mettere in pausa e riprendere l’ascolto
• Per mettere in pausa: Durante
l’ascolto di un CD premere
PLAY/PAUSE. Il display lampeggia.
Premere di nuovo il pulsante per
riprendere l’ascolto nel punto in cui è
stato interrotto.
• Per interrompere l’ascolto: Premere il
pulsante STOP. Premendo
PLAY/PAUSE il CD ricomincia dalla
prima traccia.
Italiano
RCD170BB_02IM0449.qxd:CD2849.QXD 27/10/09 17:14 Page 89
Page 90

NOTE CIRCA LA RIPRODUZIONE DI CD:
• Il dispositivo è progettato per ascoltare MP3 e altri CD audio. Saranno indicate le
funzioni che differiscono quando si ascolta un MP3 o un altro CD audio.
• Quando compare "MP3" sul display significa che si sta ascoltando un CD MP3.
• Se un disco viene inserito in maniera scorretta, è sporco, danneggiato, o non è
presente affatto, a display apparirà la scritta “no”.
• Nonostante questo apparecchio sia in grado di leggere i dischi CD-R E CD-RW,
oltre ai normali CD, la riproducibilità di questi dischi può dipendere dal tipo di
software che è stato usato per creare il disco stesso, oltre al media vergine che è
stato usato. Non è possibile garantire il 100% della riproducibilità. Questo non è
indice di un problema dell'apparecchio.
Jack AUX IN
Servendosi di un cavo home audio (non incluso), è possibile ascoltare un
dispositivo audio esterno tramite gli altoparlanti dell'apparecchio. Prima di
effettuare qualsiasi collegamento, spegnere l'alimentazione di tutto
l'impianto.
Far scorrere l'interruttore FUNCTION su AUX per accendere l'apparecchio
e selezionare la modalità AUX. Inserire un cavo di collegamento (non
incluso) tra il jack AUX o LINE OUT del dispositivo audio esterno e il jack
AUX IN di questo apparecchio (posto lateralmente). (Non collegarlo al jack
CUFFIE dell'apparecchio) accendere il dispositivo audio esterno e avviare
la riproduzione; il suono proveniente dal dispositivo esterno viene
ascoltato tramite il altoparlanti dell'apparecchio. Ruotare il comando del
VOLUME per regolare il livello del volume come desiderato.
Per spegnere l'apparecchio, rimuovere la spina dal jack AUX IN, quindi far
scorrere l'interruttore FUNCTION su OFF.
USO (continua)
Italiano
RCD170BB_02IM0449.qxd:CD2849.QXD 27/10/09 17:14 Page 90
Page 91

91
RIPETIZIONE E ASCOLTO CASUALE
USO (continua)
Italiano
4. Premere di nuovo il pulsante MODE.
REP ALL rimane sul display – l’intero
CD sarà ripetuto.
1. Avviare l’ascolto del CD.
2. Premere una volta il pulsante MODE.
3. Sul display compare REP – la traccia
corrente sarà ripetuta.
1 2
5. Premere il pulsante MODE per la terza
volta. Sul display compare RANDOM –
le tracce saranno riprodotte in ordine
casuale.
6. Premendo di nuovo il pulsante MODE si
esce dalla funzione di ripetizione e
ascolto casuale.
3
Nota:
Se state ascoltando un CD MP3, tra REP e REP ALL avete la funzione
aggiuntiva di ripetere tutte le tracce di una cartella. Sul display si legge quindi
ALBUM.
• La funzione ripetizione consente di ascoltare di nuovo una certa traccia o l’intero
CD.
• Random play consente ad un generatore interno casuale di impostare l’ordine in
cui si ascoltano le tracce.
RCD170BB_02IM0449.qxd:CD2849.QXD 27/10/09 17:14 Page 91
Page 92

PROGRAMMAZIONE DELLA MEMORIA (FINO A 20 TRACCE)
USO (continua)
Italiano
2. Premere o selezionare una traccia.
3. Premere nuovamente MODE.
"P02" compare sul display.
4. Ripetere i passaggi 2 e 3 per
selezionare ulteriori tracce.
5. Per ascoltare la sequenza di tracce
premere PLAY/PAUSE. PROG
rimane visualizzato sul bordo in alto a
destra.
1. Premere il pulsante MODE.
"PROG" e "P01" lampeggiano sul
display.
2
1
3
2
4
NOTE:
• Per uscire dalla modalità di programmazione premere una volta STOP.
• Premendo STOP due volte, cambiando la modalità, spegnendo il
dispositivo o togliendo il CD la sequenza di tracce programmata sarà
cancellata.
• Le funzioni REP e REP ALL sono disponibili anche durante l’ascolto
della propria sequenza di tracce.
Si possono programmare e ascoltare una sequenza fino a 20 tracce.
Per programmare una sequenza di tracce...
• ... il vano CD deve contenere un CD,
• ... l’ascolto deve essere interrotto e
• ... il selettore di modalità deve essere impostato su CD/MP3.
1
2
1
3
3
RCD170BB_02IM0449.qxd:CD2849.QXD 27/10/09 17:14 Page 92
Page 93

See wh at you
can do w ith
your G EMSTON E
FUN bu tton!
Step 1
Step 1
Step 2
93
Premere il tasto GEMSTONE FUN posto
sulla parte anteriore del vostro
Boombox.
Barbie
T
M
ha una sorpresa per voi! Seguite le
istruzioni e guardate cosa potete fare con il
vostro tasto GEMSTONE FUN!
SORPRESA! L'indicatore a LED di
Barbie™ lampeggia alternando i colori
rosso e blu per 10 secondi.
USO (continua)
Guarda cosa
p
uoi fare con il
tuo tasto
GEMSTONE FUN!
Fase 2
Fase 1
Italiano
RCD170BB_02IM0449.qxd:CD2849.QXD 27/10/09 17:14 Page 93
Page 94

CURA DEI COMPACT DISC
• Trattare i compact disc con cura. Maneggiare il
compact disc solo per i bordi. Non lasciare che
le dita vengano a contatto con il lato luminoso e
non stampato del compact disc.
• Non attacca il nastro adesivo, adesivi, ecc.
all'etichetta del compact disc.
• Pulire periodicamente i compact disc con un panno morbido e asciutto.
Mai servirsi di detergenti o di prodotti abrasivi per pulire i compact disc.
Se è necessario, utilizzare di un kit di pulizia per CD.
• Se un disco salta o si blocca in una sezione del compact disc, è
probabilmente sporco o danneggiato (graffiato).
• Al momento di pulire i compact
disc, passarli in linea retta
partendo dal centro e andando
verso l'esterno. Mai passare
con movimenti circolari.
• Questo apparecchio è
progettato per la riproduzione
di compact disc che portano il logo identificativo mostrato
qui. Altri dischi potrebbero non essere conformi agli
standard CD e potrebbero non suonare correttamente.
• I CD vanno riposti nelle loro confezioni dopo ogni uso per
evitare danni.
• Non esporre i compact disc alla luce diretta del sole, a elevata umidità, a
temperature alte o polvere, ecc. Un'esposizione prolungata a
temperature estreme può deformare il disco.
• Non incollare o scrivere niente su nessun lato del compact disc. Strumenti
appuntiti per la scrittura o l'inchiostro possono danneggiare la superficie.
CURA DEL CORPO DELL’APPARECCHIO
Se l'apparecchio si impolvera, pulirlo con un panno per la polvere morbido e
asciutto. Non utilizzare cere, spray lucidanti o detersivi abrasivi
sull'apparecchio.
ATTENZIONE
Non permettere che acqua o altri liquidi penetrino nell'apparecchio durante la
pulizia.
B
E
N
Z
E
N
E
S
o
l
u
t
i
o
n
n
e
t
t
o
y
a
n
t
e
CURA E MANUTENZIONE
Italiano
RCD170BB_02IM0449.qxd:CD2849.QXD 27/10/09 17:14 Page 94
Page 95

95
Nel caso in cui si dovessero verificare problemi, verificare lo
schema sottostante prima di chiamare il servizio di assistenza.
GUIDA ALLA RISOLUZIONE DEI PROBLEMI
SINTOMO CAUSA SOLUZIONE
Il CD non
suona
Il CD salta
durante la
riproduzione
e/o si
sperimenta
una
riproduzione
erratica.
AM o FM,
suono scarso
o assente
L'interruttore FUNCTION
non è impostato su CD.
Disco inserito in maniera
scorretta.
Impostare l'interruttore
FUNCTION su CD.
Cavo di alimentazione
non collegato.
Inserire nuovamente il
disco in maniera corretta.
Verificare il collegamento del
cavo di alimentazione.
Lo scomparto CD non è
chiuso.
Disco inserito in maniera
scorretta.
Disco sporco o difettoso.
Condensa sul disco.
La stazione non è
sintonizzata bene.
FM: l’antenna non è
ben regolata.
AM: l'apparecchio non è
posizionato correttamente.
Il tasto FUNCTION non è
impostato su RADIO.
Chiudere lo scomparto CD.
Inserire nuovamente il
disco in maniera corretta.
Provare un altro disco.
Pulire il disco con un
panno morbido.
Risintonizzare la stazione
AM o FM.
Orientare nuovamente
l'antenna FM.
Ruotare l'apparecchio fino
a ottenere la migliore
ricezione.
Impostare il tasto
FUNCTION su RADIO.
Volume al minimo.
Alzare il volume.
Italiano
RCD170BB_02IM0449.qxd:CD2849.QXD 27/10/09 17:14 Page 95
Page 96

NOTA: conservare il presente libretto d’istruzioni in quanto contiene
informazioni importanti. Si raccomanda di conservare la confezione per
qualsiasi riferimento futuro. I contenuti di questo manuale sono soggetti a
cambiamenti senza obbligo di preavviso. È proibita la riproduzione completa o
parziale e con ogni mezzo di questo manuale, senza l’espresso consenso
scritto del produttore.
Questo prodotto è coperto dalla nostra garanzia di 1 anno. Per usufruire della
garanzia o del servizio post-vendita, contattare il rivenditore e fornire la prova
d’acquisto. La nostra garanzia copre difetti legati a materiali o montaggio
attribuibili al costruttore, ad eccezione dell’usura causata dal mancato rispetto
delle istruzioni per l’uso o da operazioni non autorizzate sull’apparecchiatura
(ad es. smontaggio, esposizione a calore o umidità, ecc).
©2009 Barbie, Inc. All rights Reserved.
©2009 LEXIBOOK®
Lexibook Italia S.r.l, Via Eustachi, 45, 20129 Milano, Italia
Servizio consumatori : 022040 4959 (Prezzo di una chiamata locale).
http://www.lexibook.com
NOTA BENE
Avvertenze per la tutela dell’ambiente
Gli apparecchi elettrici vecchi sono materiali pregiati, non rientrano
nei normali rifiuti domestici! Preghiamo quindi i gentili clienti di
contribuire alla salvaguardia dell’ambiente e delle risorse e di
consegnare il presente apparecchio ai centri di raccolta competenti,
qualora siano presenti sul territorio.
96
Italiano
Fabbricato in China
Questo prodotto non è un giocattolo.
AVVERTENZA: l’uso eccessivo di questo prodotto al massimo del
volume potrebbe danneggiare l’udito.
RCD170BB_02IM0449.qxd:CD2849.QXD 27/10/09 17:14 Page 96
Page 97

97
VORSICHT: ZUR VERMEIDUNG DER GEFAHR VON ELEKTRISCHEN
SCHLÄGEN, ENTFERNEN SIE DIE GERÄTEABDECKUNG (UND
RÜCKSEITE) NICHT. KEINE VOM NUTZER ZU WARTENDEN TEILE IM
INNEREN DES GERÄTS.
ÜBERLASSEN SIE DIE WARTUNG QUALIFIZIERTEM FACHPERSONAL.
WARNUNG: Zur Vermeidung der Brandgefahr bzw. von Elektroschocks
setzen Sie das Gerät weder Regen noch Feuchtigkeit aus.
WARNUNG
VORSICHT
ELEKTROSCHLAGGEFAHR
NICHT ÖFFNEN
GEFÄHRLICHE STROMSPANNUNG
Der Blitz und die Pfeilspitze im Dreieckist ein
Warenzeichen, das Sie auf "gefährliche Stromspannung"
im Inneren des Produkts und auf die Gefahr eines
elektrischen Schlags aufmerksam macht.
WARNUNG:
Das Ausrufezeichen im gleichschenkligen Dreieck ist ein
Warnzeichen, das Sie auf wichtige dem Produkte
beigefügte Betriebs- und Wartungsanleitungen
aufmerksam macht.
GEFAHR:
Unsichtbare Laserstrahlung bei geöffnetem Gerät oder
defekter Verriegelung. Sehen Sie nicht in den Laserstrahl.
LASERSICHERHEIT: EDIESES GERÄT IST MIT EINEM LASER
AUSGESTATTET. ÜBERLASSEN SIE REPARATUREN QUALIFIZIERTEM
FACHPERSONAL, DA AUGENVERLETZUNGSGEFAHR BESTEHT.
VO RSI CHT : D IE A BWEIC HEN DE V ERW ENDUN G DE R RE GLE R,
EINSTELLUNGEN ODER LEISTUNGSVORGABEN KANN ZUR FREISETZUNG
GEFÄHRLICHER STRAHLEN FÜHREN.
SICHERHEITSHINWEISE
Deutsch
RCD170BB_02IM0449.qxd:CD2849.QXD 27/10/09 17:14 Page 97
Page 98

1. Lesen Sie diese Anleitungen.
2. Bewahren Sie diese
Anleitungen auf.
3. Beachten Sie alle Warnhinweise.
4. Befolgen Sie alle
Bedienungsanweisungen.
5. Verwenden Sie dieses Gerät
nicht in der Nähe von Wasser.
6. Reinigen Sie das Gerät nur mit
einem trockenen Tuch.
7. Blockieren Sie die
Belüftungsöffnungen nicht.
Nehmen Sie die Installation
entsprechend der
Herstelleranweisungen vor.
8. Stellen Sie das Gerät nicht in der
Nähe von Wärmequellen, wie
Radiatoren, Heizkörpern, Öfen
und ähnlichen Produkten auf
(darunter Verstärker), die
Wärme abstrahlen könnten.
9. Beschädigen Sie die
Sicherheitsvorrichtung des
geerdeten Stecker bitte nicht.
Bei einem geerdeten
Erdungsstecker ist ein Stecker
breiter als der andere. Ein
geerdeter Stecker hat zwei
Stecker und einen Erdungsstift.
Der breite Stecker bzw. der
dritte Stift dienen Ihrer
Sicherheit. Sollte ein Stecker
nicht in Ihre Steckdose passen,
lassen Sie die veraltete
Steckdose von einem
Fachelektriker austauschen.
10. Verlegen Sie das Kabel
stolperfrei und so, dass es
nicht gequetscht werden kann,
insbesondere am
Steckdoseneingang und am
Kabelausgang des Geräts.
11. Verwenden Sie nur vom
Hersteller empfohlene
Zusatzgeräte / Zubehör.
12. Trennen Sie das Gerät
während Gewitter bzw. wenn
Sie es über einen längeren
Zeitraum nicht verwenden von
der Stromquelle.
13. Überlassen Sie
Wartungsarbeiten dem
Kundendienst. Der
Kundendienst muss
herangezogen werden, wenn
das Gerät in folgender Weise
beschädigt worden ist:
Wenn das Stromkabel oder
der Stecker beschädigt sind.
Wenn Flüssigkeit oder
Gegenstände in das Produkt
eingedrungen sind. Wenn das
Gerät Flüssigkeit oder
Feuchtigkeit ausgesetzt
worden ist, nicht normal
arbeitet, die Leistung sich
verändert oder wenn es
herunter gefallen ist.
SICHERHEITSHINWEISE
Deutsch
RCD170BB_02IM0449.qxd:CD2849.QXD 27/10/09 17:14 Page 98
Page 99

99
14. Das Gerät darf keinen
tropfenden, spritzenden bzw.
Objekten, die mit
Flüssigkeiten gefüllt sind,
ausgesetzt werden. Zum
Beispiel dürfen keine Vasen
auf dem Produkt abgestellt
werden.
15. Überlasten Sie die
Wandsteckdose nicht.
Verwenden Sie nur die
angegebene Stromquelle.
16. Verwenden Sie nur vom
Hersteller empfohlene
Ersatzteile.
17. Dieses Produkt kann an eine
Wand nur in Übereinstimmung
mit den Empfehlungen des
Herstellers montiert werden.
18. Bitten Sie den
Kundendienstmitarbeiter nach
Abschluss von Service- oder
Reparaturarbeiten
Sicherheitsüberprüfungen
vorzunehmen.
SCHÜTZEN SIE IHRE MÖBEL
Dieses Modell ist mit rutschfesten Gummifüßen ausgestattet, damit das
Produkt nicht verrutscht, während Sie die Regler bedienen. Diese Füße
bestehen aus einem haltenden Material, das keine Markierungen oder
Flecken auf Ihren Möbeln hinterlässt. Allerdings könnten bestimmte
Möbelpolituren auf Ölbasis, Holzpflegemittel oder Reinigungssprays die
Füße aufweichen, d. h., es gibt Flecken oder Gummirückstände auf dem
Möbel. Um Beschädigungen Ihrer Möbel zu vermeiden, empfehlen wir, dass
Sie kleine selbstklebende Filzpolster kaufen, die im Haushaltswarenhandel
erhältlich sind, und diese Polster unten an den Gummifüßen befestigen,
bevor Sie das Produkt auf Holzmöbeln abstellen.
WARNUNG:
• Bewahren Sie diese Informationen für künftige Nachschlagezwecke auf.
• Es handelt sich nicht um ein Spielzeug.
HINWEISE:
• Bitte verwenden Sie dieses Produkt nicht über einen längeren Zeitraum
bei hohen Temperaturen oder starker Feuchtigkeit; das Gerät könnte
beschädigt werden.
• Setzen Sie das Gerät keiner direkten Sonneneinstrahlung, zum Beispiel im
Fahrzeug aus; das Gerät könnte sich verbiegen und/oder beschädigt werden.
• Bewahren Sie dieses Gerät nicht unter sandigen oder staubigen
Bedingungen auf.
• Stellen Sie keine Gegenstände mit offenen Flammen wie z. B.
brennende Kerzen auf oder in die Nähe des Produktes.
Deutsch
RCD170BB_02IM0449.qxd:CD2849.QXD 27/10/09 17:14 Page 99
Page 100

AUSPACKEN UND EINRICHTEN
Hinweis: 2 Netzkabel sind im Lieferumfang enthalten: 1 x GB
AC-Netzkabel und 1 x Europäisches/Französisches AC-Netzkabel.
• Entfernen Sie vorsichtig die Haupteinheit und die AC-Netzkabel vom
Display. Entfernen Sie das gesamte Verpackungsmaterial. Entfernen
Sie alle Deko- oder Beschreibungsetiketten am und auf dem Gehäuse.
Entfernen Sie keine Etiketten von der Geräterückseite oder vom Geräteboden.
• Entfernen Sie vorsichtig den schmalen Klebestreifen, der eventuell als
Transportsicherung für die CD-Tür angebracht worden ist.
• Wickeln Sie das Wechselstromkabel vollständig ab.
• Das Gerät wird mit einer Dummy-CD-Karte im CD-Player versendet.
Diese Dummy-CD dient als Transportsicherung für die Laseraufnahme.
Diese Karte muss herausgenommen werden, bevor eigene CDs eingelegt
werden können. Heben Sie den CD-Türöffner an, um das CD-Fach zu
öffnen. Nehmen Sie die Dummy-CD vorsichtig aus dem Player und
entsorgen Sie sie. Schließen Sie das CD-Fach.
• Stellen Sie das Hauptgerät auf eine stabile, ebene Oberfläche, wie einen
Tisch, einen Schreibtisch, ein Regal in der Nähe einer WS-Steckdose so
auf, dass es weder direkter Sonneneinstrahlung, noch Wasser,
Feuchtigkeit, Hitze, Staub, Schmutz, Vibrationen oder starken
Magnetfeldern ausgesetzt ist.
100
ERSTE SCHRITTE
• Bedienen Sie die Regler und Schalter, wie in diesem Handbuch erläutert.
• Vergewissern Sie sich, bevor Sie das Gerät einschalten, dass es der
Netzstecker korrekt eingesteckt ist.
• Bewahren Sie Ihre CDs an einem kühlen Ort auf, um Beschädigungen
aufgrund von Hitze zu vermeiden.
• Ziehen Sie den Stromstecker, bevor Sie das Gerät bewegen.
VOR DER INBETRIEBNAHME
Deutsch
RCD170BB_02IM0449.qxd:CD2849.QXD 27/10/09 17:14 Page 100
 Loading...