

Page 1

Spider-Man
TM
Flat Screen TV
TELEVISÃO LCD DE 15’’ DO SPIDER-MAN
User guide
Manual de Instruções
LCD1SP
Page 2

2
Page 3

CONTENTS
Important Safety Instructions ......................................................................................................................4
TV
Power Source .............................................................................................................................................6
Cable Connections .....................................................................................................................................6
Location of Controls....................................................................................................................................7
Preparation .................................................................................................................................................8
Basic Operation ..........................................................................................................................................8
The On-Screen Menu .................................................................................................................................9
Retractable Stand .....................................................................................................................................12
Troubleshooting ........................................................................................................................................13
Specications ...........................................................................................................................................13
3
Page 4
IMPORTANT SAFETY INSTRUCTIONS
CAUTION
RISK OF ELECTRIC SHOCK
DO NOT OPEN
CAUTION: TO REDUCE THE RISK OF ELECTRIC SHOCK, DO NOT REMOVE COVER (OR BACK).
NO USER-SERVICEABLE PARTS INSIDE. REFER SERVICING TO QUALIFIED SERVICE
PERSONNEL.
The lightning ash with arrowhead symbol within an
equilateral triangle is intended to alert the user to the
presence of uninsulated dangerous voltage within
the product’s enclosure that may be of
sufcient magnitude to constitute a risk of electric
shock to persons.
The exclamation point within an equilateral triangle
is intended to alert the user to the presence of
important operating and maintenance (servicing)
instructions in the literature accompanying the
appliance.
DANGER: Invisible and hazardous laser radiation
when open and interlock failed or defeated. Avoid
direct exposure to beam.
WARNING: TO REDUCE THE RISK OF FIRE OR ELECTRIC
SHOCK, DO NOT EXPOSE THIS APPLIANCE TO RAIN OR
MOISTURE.
WARNING: TO REDUCE THE RISK OF FIRE OR
ELECTRIC SHOCK, AND ANNOYING INTERFERENCE, USE
THE RECOMMENDED ACCESSORIES ONLY...
CAUTION-ELECTRICALLY OPERATED PRODUCT
Not recommended for children under 8 years of age. As with all electric products, precautions should be observed during handling and use
to prevent electric shock.
ATTENTION TO PARENTS
This product must be periodically examined for conditions that may
result in the risk of re, electric shock or injury to persons and, if such
conditions are present, this product should not be used until properly
repaired.SURGE PROTECTORS:
It is recommended to use a surge protector for AC connection.
Lightning and power surges ARE NOT covered under warranty for this
product.
PLEASE READ BEFORE OPERATING THIS EQUIPMENT.
Before using the unit, be sure to read all operating instructions
carefully. Please note that these are general precautions and may not
pertain to your unit. For example, this unit may not have the capability
to be connected to an outdoor antenna.
1. Read these instructions.
All the safety and operating instructions should be read before the
product is operated.
2. Keep these instructions.
The safety and operating instructions should be retained for future
reference.
3. Heed all warnings.
All warnings on the product and in the operating instructions should
be adhered to.
4. Follow all instructions
All operating and use instructions should be followed.
5. Do not use this apparatus near water.
Do not use this product near water and moisture, for example: near a
bathtub, washbowl, kitchen sink or laundry tub; in a wet basement; or
near a swimming pool.
6. Clean only with dry cloth.
Unplug this product from the wall outlet before cleaning. Do not use
liquid cleaners or aerosol cleaners. It may damage the screen. Use a
dry cloth for cleaning only.
7. Do not block any ventilation openings. Install in accordance
with the manufacturer’s instructions.
Slots and openings in the cabinet and in the back or bottom are
provided for ventilation, to ensure reliable operation of the product
and to protect it from overheating. These openings must not be
blocked or covered. The openings should never be blocked by placing
the product on a bed, sofa, rug or other similar surface. This product
should never be placed near or over a radiator or heat source.
This product should not be placed in a built-in installation such as
a bookcase or rack unless proper ventilation is provided or the
manufacturer’s instructions have been adhered to.
WARNING
USE UNDER SUPERVISION OF AN ADULT DUE TO LONG CORD
This unit has a long AC cord or other long cord that can easily be
tripped on or pulled on, causing injury, Please make sure it is
arranged so it will not drape over a tabletop, etc. Where it can be
pulled on by children or tripped over accidentally.
Manufactured under license from Dolby Laboratories. Dolby and the
double-D symbol are trademarks of Dolby Laboratories.
8. Do not install near any heat sources such as radiators, heat
registers, stoves, or other apparatus (including ampliers) that
produces heat.
9. Do not defeat the safety purpose of the polarized or grounding
type plug. A polarized plug has two blades with one wider than
the other. A grounding type plug has two blades and a third
grounding prong. The wide blade or the third prong is provided
for your safety. If the provided plug does not t into your outlet,
consult an electrician for replacement of the obsolete outlet.
4
Page 5

10. Protect the power cord from being walked on or pinched
ANTENNA
LEAD IN
WIRE
ANTENNA
DISCHARGE UNIT
(NEC SECTION 810-20)
GROUNDING CONDUCTORS
(NEC SECTION 810-21)
GROUND CLAMPS
NEC-NATIONAL ELECTRICAL CODE
ELECTRIC
SERVICE
EQUIPMENT
GROUND
CLAMP
POWER SERVICE GROUNDING
ELECTRODE SYSTEM
(NEC ART 250, PARTH)
particularly at plugs, convenience receptacles, and the point
where they exit from the apparatus.
11. Only use attachments/accessories specied by the
manufacturer.
12. Use only with the cart, stand, tripod, bracket, or table
specied by the manufacturer, or sold with the apparatus. When
a cart is used, use caution when moving the cart/apparatus
combination to avoid injury from tip-over.
An appliance and cart combination should be moved with care.
Quick stops, excessive force and uneven surfaces may cause the
appliance and cart combination to overturn.
PORTABLE CART WARNING
(Symbol provided by RETAC)
SC126A
13. Unplug this apparatus during lightning storms or when
unused for long periods of time.
To protect your product from a lightning storm, or when it is left
unattended and unused for long periods of time, unplug it from the
wall outlet and disconnect the antenna or cable system. This will
prevent damage to the product due to lightning and power-line surges.
14. Refer all servicing to qualied service personnel. Servicing is
required when the apparatus has been damaged in any way, such
as power-supply cord or plug is damaged, liquid has been spilled
or objects have fallen into the apparatus, the apparatus has been
exposed to rain or moisture does not operate normally, or has
been dropped.
15. Power source
This product should be operated only from the type of power source
indicated on the marking label. If you are not sure of the type of power
supply to your home, consult your appliance dealer or local power
company. For products intended to operate from battery power, or
other sources, refer to the operating instructions.
16. Power lines
An outside antenna system should not be located in the vicinity of
overhead power lines or other electric light or power circuits, or where
it can fall into such power lines or circuits. When installing an outside
antenna system, extreme care should be taken to keep from touching
such power lines or circuits as contact with them might be fatal.
17. Overloading
Do not overload wall outlets and extension cords as this can result in
a risk of re or electric shock.
18. Object and liquid entry
Never push objects of any kind into this product through openings as
they may touch dangerous voltage points or short out parts that could
result in re or electric shock. Never spill or spray any type of liquid on
the product.
19. Outdoor antenna grounding
If an outside antenna is connected to the product, be sure the antenna
system is grounded so as to provide some protection against voltage
surges and built up static charges. Section 810 of the National Electric
Code ANSI/NFPA 70 provides information with respect to proper
grounding of the mast and supporting structure, grounding of the
leading wire to an antenna discharge product, size of grounding
conductors, location of antenna-discharge product, connection to
grounding electrodes and requirements for grounding electrodes.
EXAMPLE OF ANTENNA GROUNDING AS PER
NATIONAL ELECTRICAL CODE
20. Service
Do not attempt to service this product yourself as opening or removing
covers may expose you to dangerous voltage or other hazards. Refer
all servicing to qualied service personnel.
21. Replacement parts
When replacement parts are required, be sure the service technician
uses replacement parts specied by the manufacturer or those that
have the same characteristics as the original parts. Unauthorized
substitutions may result in re or electric shock or other hazards.
22. Safety check
Upon completion of any service or repairs to this product, ask the
service technician to perform safety checks to determine that the
product is in proper operating condition.
23. Wall or ceiling mounting
The product should be mounted to a wall or ceiling only as recommended by the manufacturer.
24. Damage requiring service
Unplug the product from the wall outlet and refer servicing to qualied
service personnel under the following conditions.
a) When the power-supply cord or plug is damaged.
b) If liquid has been spilled or objects have fallen into the product.
c) If the product has been exposed to rain or water.
d) If the product does not operate normally by the following operating
instructions. Adjust only those controls that are covered by the
operating instructions, as an adjustment of other controls may
result in damage and will often require extensive work by a qualied
technician to restore in the product to its normal operation.
e) If the product has been dropped or the cabinet has been damaged.
f) When the product exhibits a distinct change in performance-this
indicates a need for service.
25. Note to CATV system installer
This reminder is provided to call the CATV system installer’s
attention to Article 820-40 of the NEC that provides guidelines for
proper grounding and, in particular, species that the cable ground
shall be connected to the grounding system of the building, as close
to the point of cable entry as practical.
Warning
1) To reduce the risk of re or electric shock, do not expose this
apparatus to rain or moisture.
2) The apparatus shall not be exposed to dripping or splashing and
that no objects lled with liquids, such as vases, shall be placed on
the apparatus.
3) The disconnected device (appliance inlet) shall remain readily
operable.
PRECAUTION WITH TV:
When displaying a still image.
A still image may cause permanent damage to the TV screen.
• Do not display a still image on the LCD panel for more than 2 hours
as it can cause screen image retention. This image retention is also
known as “screen burn”. To avoid such image retention, reduce the
degree of brightness and contrast of the screen when displaying a
still image.
5
Page 6
• Watching the LCD TV in 16:9 format for a long period of time may
From external unit's AV OUTPUT jacks
AV connection cable
ext ernal uni t
TNAOEDIV-SSENOHPNIOIDUA-CP
AV IN
VIDEO LRSCART
ToA UD IO IN jacks
external unit
Connection cable
S-VID EO IN
From extern al unit's A UDIO OUTPUT jacks
TNAOEDIV-SSENOHPNIOIDUA-CPAGV
AV IN
VIDEO LRSCART
DC IN
TNAOEDIV-SSENOHPNIOIDUA-CPAGV
AVIN
VIDEO LRSCART
DC IN
ANT.75
TNAOEDIV-SSENOHPNIOIDUA-CPAGV
AVIN
VIDEO LRSCART
DC IN
ANT.75
INCO MING CATV C ABLE
ext er na l uni t
From VCR/DVR RF OUTPUT JACK
TNAOEDIV-SSENOHP
AV IN
VIDEO LRSCART
leave traces of borders displayed on the top, bottom and centre of
the screen caused by the difference of light emission on the screen.
Damages caused by the above effect are not covered by the
Warranty.
• Displaying still images from Video games and PC for longer than a
certain period of time may produce partial after-images. To prevent
this effect, reduce the “brightness” and “contrast” when displaying
still images.
NOTE ON TV:
The TFT LCD panel uses sophisticated technology to produce.
However, there may be few bright or dark pixels on the screen.
These pixels will have no impact on the performance of the product.
NOTES ON CLEANING:
Use a soft, dry cloth for cleaning
For stubborn dirt, soak the cloth in a weak detergent solution, wring
well and wipe. Use a dry cloth to wipe it dry. If you use a chemicalsaturated cloth to clean the unit, follow that product’s instructions.
Warning: Cleaning and adjustment of lenses and /or other
components of playback mechanism should be performed by a
qualied service technician.
TV SECTION
1. Connect the cable, satellite or incoming antenna to the VHF/UHF
IN jack on the rear of the VCR/DVR.
2. Connect a 75 ohm coaxial cable from the external unit’s 75 ohm
OUT jack to the ANT jack on the bottom of the TV.
3. Set the SOURCE of the TV to TV mode.
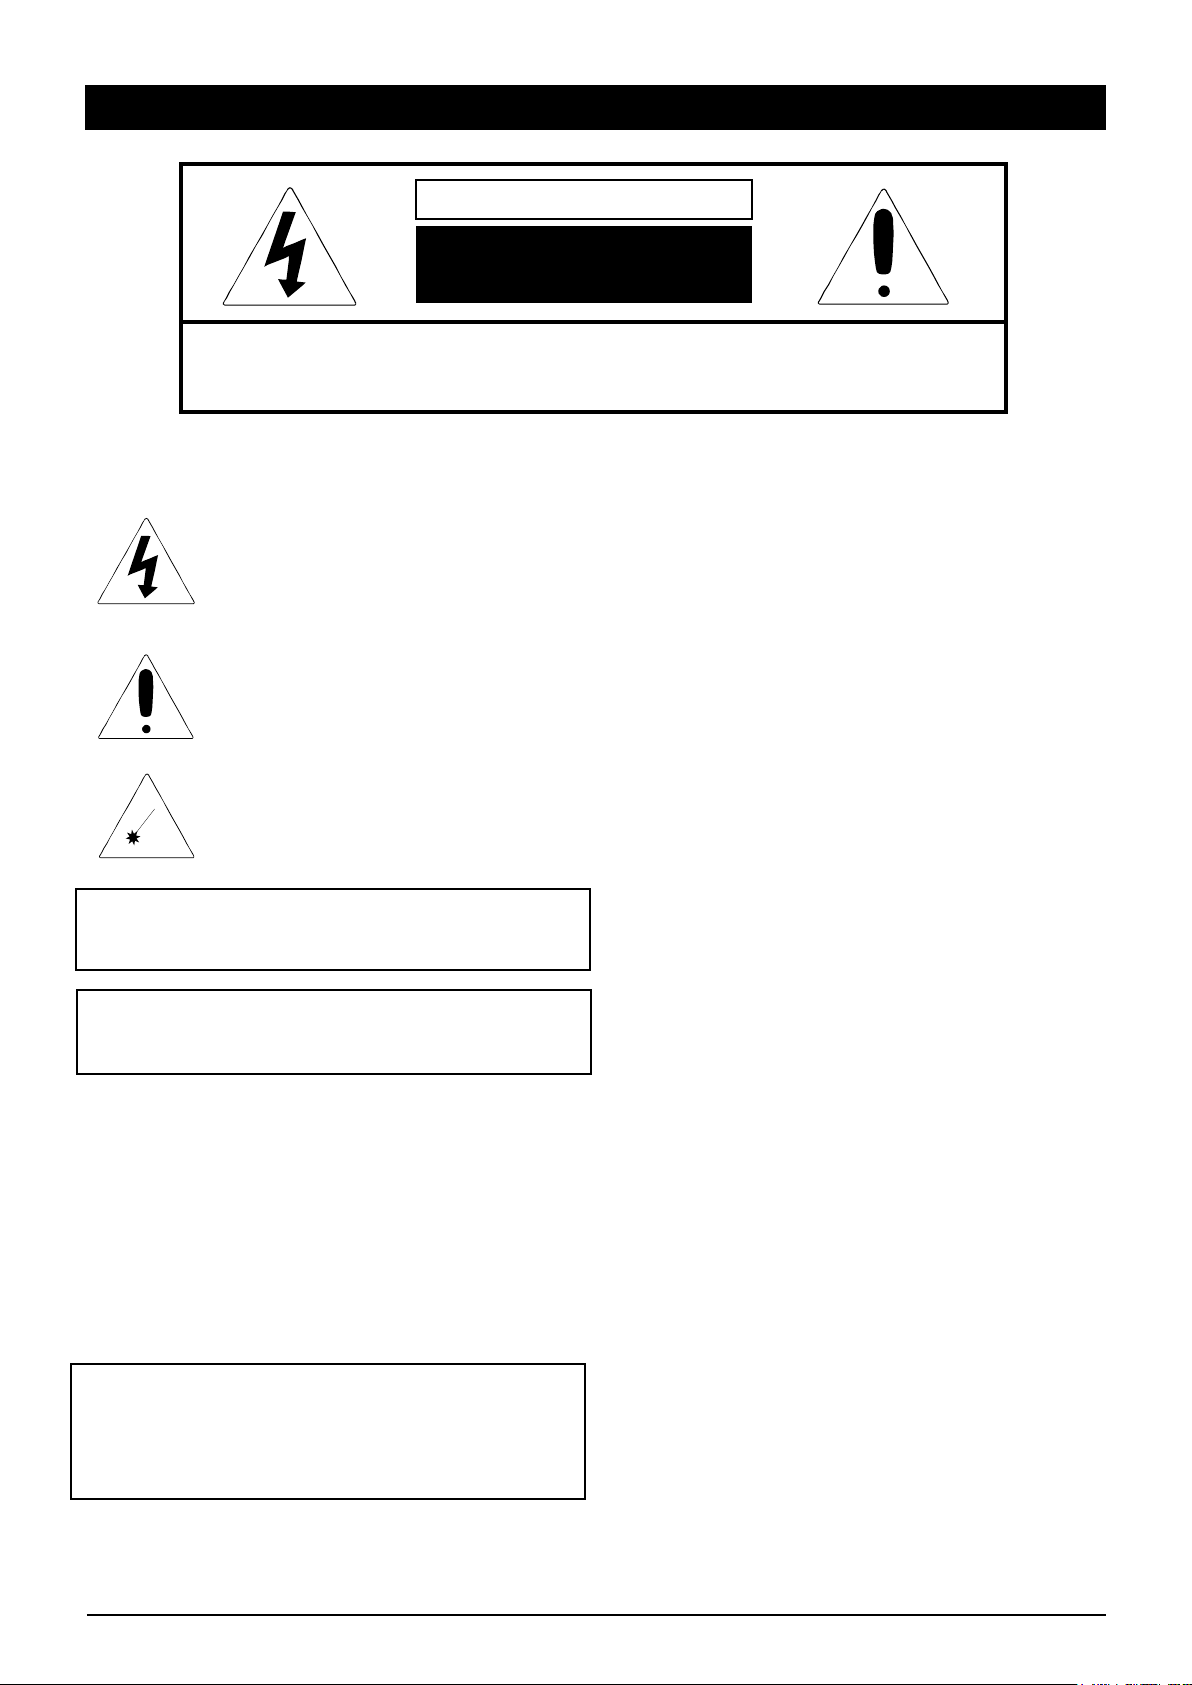
CONNECTION USING AUDIO/VIDEO CABLES:
Follow the instructions below to connect an external unit, such as a
VCR/DVR/DVD player to your unit using Audio/Video cables.
(CABLES INCLUDED)
1. Connect the left and right audio connection cable from the
external unit’s AUDIO OUTPUT jacks to the AUDIO IN jacks of
the TV. Connect the video cable from the external unit’s VIDEO
output jack to the VIDEO IN jack of the TV.
2. Set the SOURCE of the TV to AV mode.
TV - POWER SOURCE
1. Insert the small plug of AC cord to the AC/DC adapter.
2. Insert the DC plug on AC/DC adapter to the TV.
3. Insert the AC plug of the AC cord into a conveniently located AC
outlet having AC~ 100-240V, 50/60Hz.
TV-CABLE CONNECTIONS
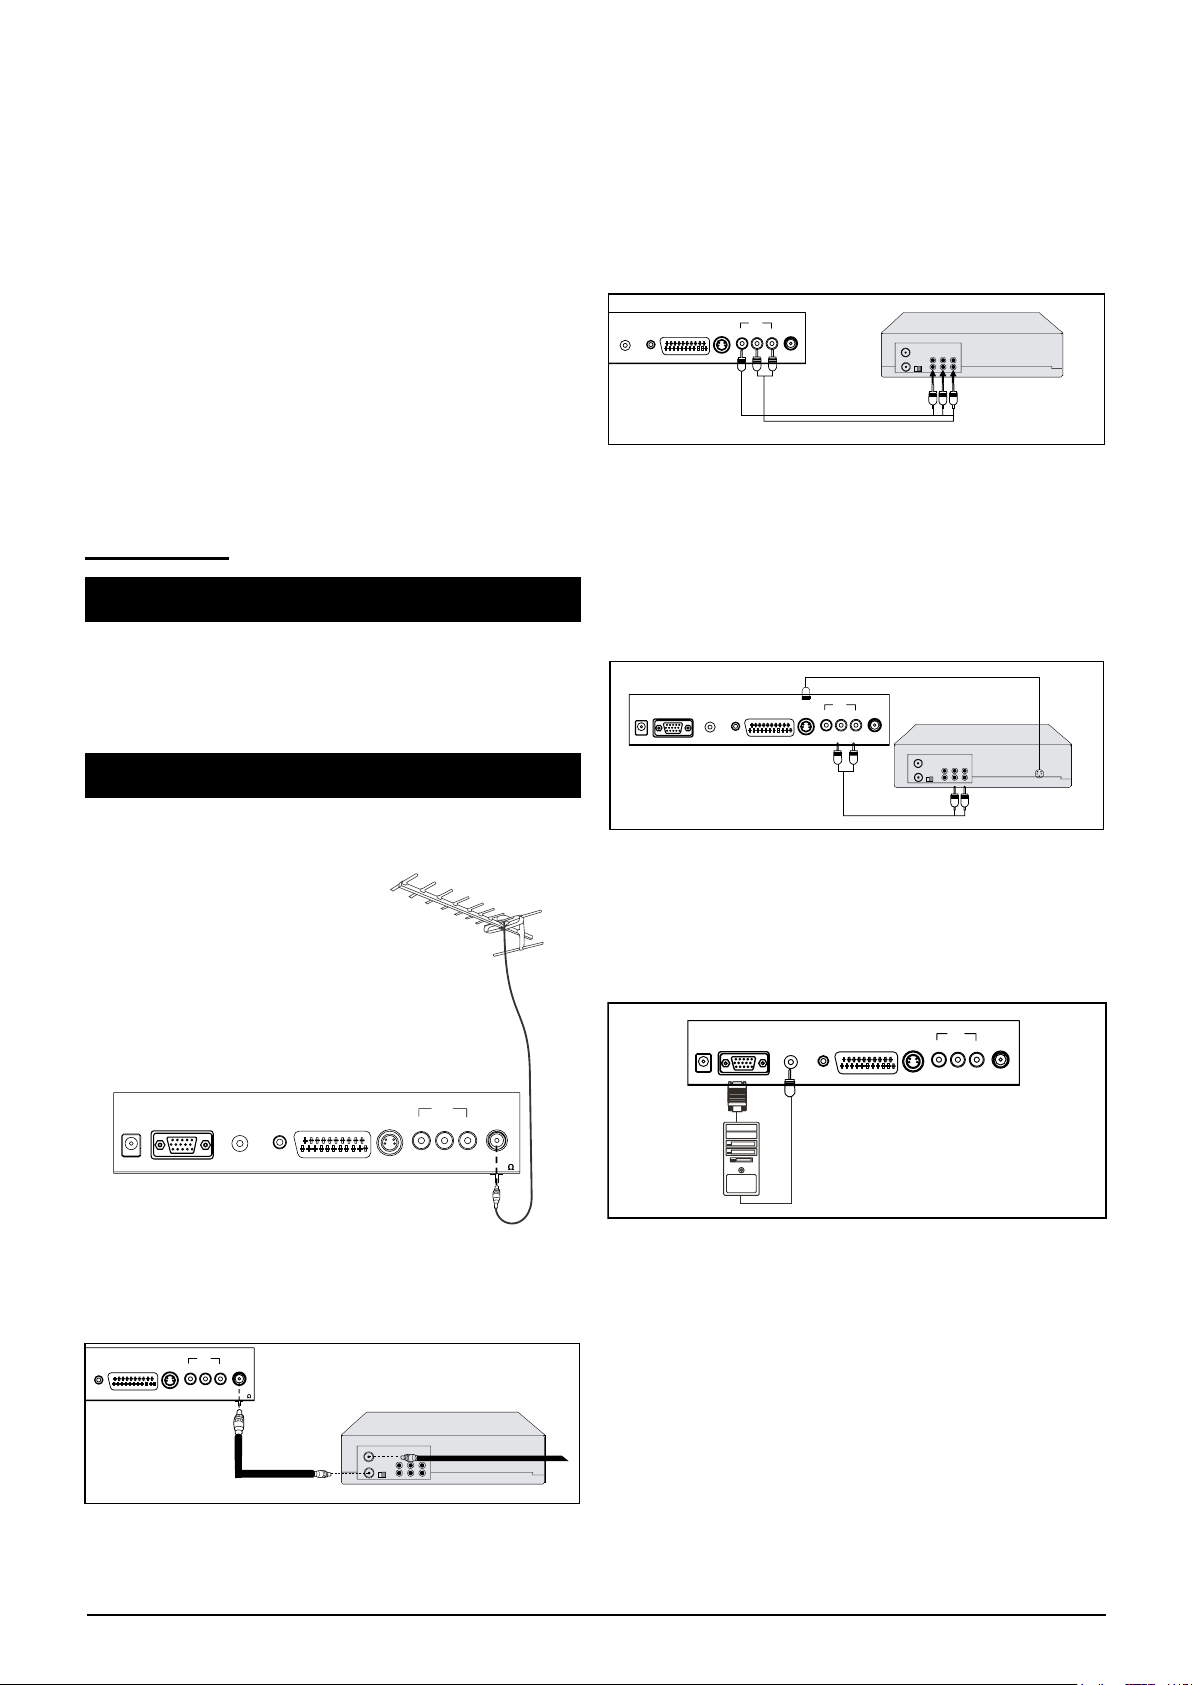
CONNECTING AN ANTENNA:
To connect an antenna, plug the antenna into the antenna input jack.
CONNECTION USING S-VIDEO CABLE:
Follow the instructions below to connect an external unit by S-VIDEO
connection cable. (CABLES NOT INCLUDED.)
1. Connect the left and right audio cable from the external unit’s
AUDIO OUTPUT jacks to the TV’s AUDIO IN jacks.
2. Connect the external unit’s S-VIDEO OUTPUT jack to the TV’s
SVIDEO IN jack.
3. Set the SOURCE of the TV to S-VIDEO mode.
CONNECTION USING VGA CABLE (CABLES NOT
INCLUDED):
CONNECTION USING COAXIAL CABLE:
Follow the instructions below to connect an external unit, such as a
VCR or DVR (DVD Recorder) to your unit using a 75 ohm coaxial
cable. (CABLES NOT INCLUDED.)
Using a VGA 15 pin D-SUB connection cable (not included) to
connect the VGA output jack on the PC to the TV’s VGA input jack.
Using a 3.5mm stereo mini jack connection cable (not included) to
connected the PC AUDIO OUTPUT/PHONE jack on the PC to the TV’s
PC AUDIO IN jack. Set the SOURCE of TV to PC mode.
6
Page 7
TNAOEDIV-SSENOHPNIOIDUA-CPAGV
AVIN
VIDEO LRSCART
DC IN
CONNECTION USING SCART CABLE (CABLE NOT
TNAOEDIV-SSENOHPNIOIDUA-CPAGV
AVIN
VIDEO LRSCART
DC IN
EXTERNAL UNIT
INCOMING CATV
CABLE (VCR)
2 3 4 5 6 7
1
TNAOEDIV-SSENOHPNIOIDUA-CPAGV
AVIN
VIDEO LRSCART
DC IN
10
9
8
11 12 13 14 15 16
P+
TV/AV POWER
RECALLRECALLRECALL TXT/TV
MENU
V+
CA
NCE
L
TX
T
-C
HO
L
D
MIX
S
IZ
E
T
XT
-
Y
I
N
D
EX
T
X
T
-G
RE
V
E
A
L
TX
T
-R
OSD
S
WA
P
NI
C
AM/A2
1
2
3
4
5
6
17
18
16
19
20
21
22
23
24
25
7
8
9
10
11
12
13
14
15
INCLUDED):
1. Connect the cable, satellite or incoming antenna to the VHF/UHF
IN jack on the rear of the VCR or DVD recorder.
2. Connect the SCART cable (not included) from the external unit’s
SCART jack.
3. Set the SOURCE of TV to SACRT mode.
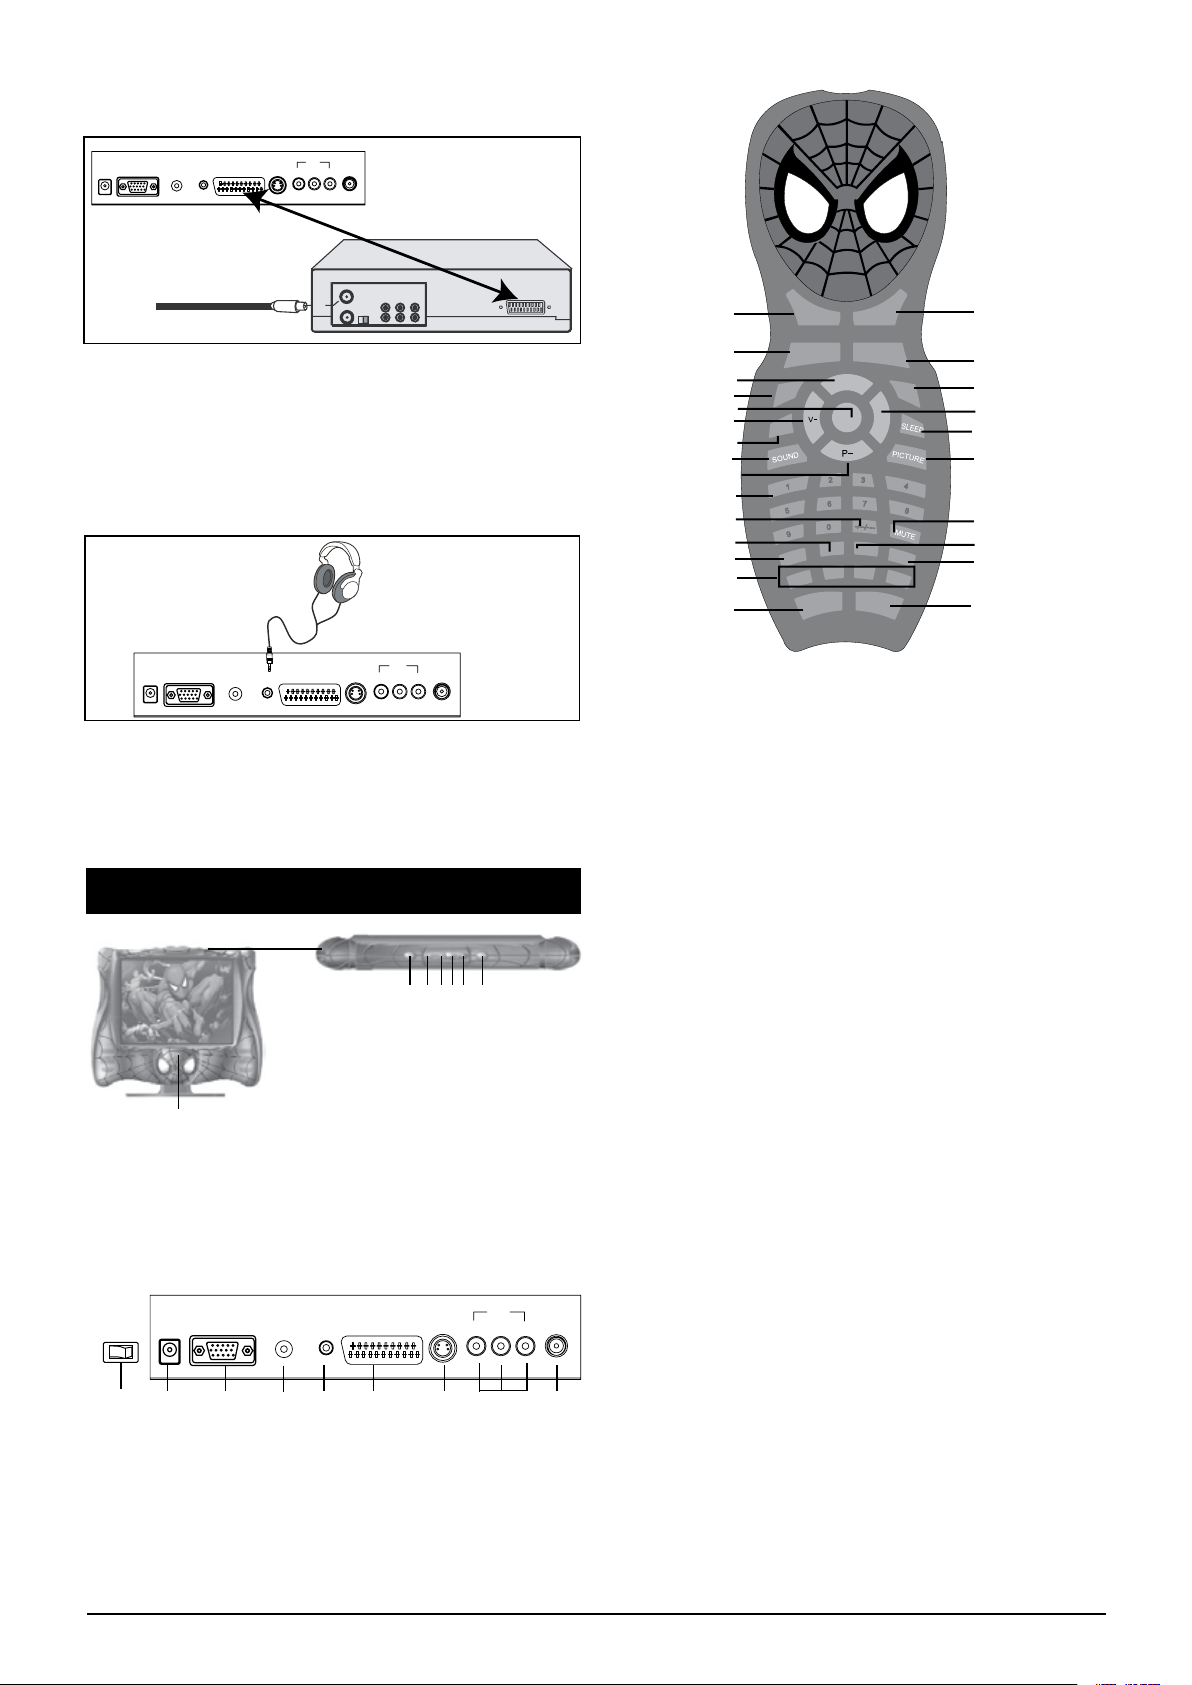
CONNECTION USING HEADPHONE: (HEADPHONE NOT
INCLUDED)
1. TV/AV: Enter in SOURCE setting menu.
2. RECALL: Return to previous TV channel (in TV mode only).
For private listening, connect headphone (not included) into the
PHONES jack of TV. The speakers will be disconnected when
headphone are inserted into the jack.
NOTE: When the headphone is connected, the MUTE button on the
remote handset will not work.
3. P+: Channel up/Move the cursor in setting menu to up position.
4. OSD: On Screen Display.
5. MENU: Enter settings’ menu.
6. V- : Volume down/Move the cursor in setting menu to the left.
7. SWAP: SWAP channels between source channel and target
channel.
8. SOUND: Press repeatedly to select the presetting sound effect
TV - LOCATION OF CONTROLS
modes.
9. P-: Channel down/Move the cursor in setting menu downwards.
10. Numeric buttons (0-9): Enter the channel number for direct
channel access.
11. -/--/---: Press repeatedly to select 1-3 digit of program number for
direct channels access.
12. INDEX: In Teletext mode, press this button to display the Teletext
index page.
13. REVEAL: Some of Teletext pages are linked with several
secondary pages. Press this button repeatedly to view the
secondary pages as desired.
14. TXT-R, TXT-G, TXT-Y and TXT-C buttons: Press to activate the
corresponding functions shows on the lower side of the Teletext
1. POWER: Turns the TV POWER On or Off (standby)
2 MENU: Enter to setting menus
3. V-: Volume down
4. V+: Volume up
5. P-: Channel down
6. P+: Channel up
7. MODE: Enter to SOURCE setting menus
page.
15. MIX: Press to displaying the TV picture and Teletext page on the
screen simultaneously. Press again to exit.
16. POWER: Press to turn the TV On or OFF (Standby).
17. TXT/TV: Press to activate theTeletext mode, press again to
exit.(Operation in TV mode only)
18. NICAM/A2: Press repeatedly to select Stereo, Dual I or Dual
II.(Functions depends on the audio signal broadcasting from TV
8. Main Power ON/OFF Switch
9. DC IN: DC input jack
10. VGA: VGA input jack
11. PC-AUDIO IN: Stereo audio input jack for PC.
12. PHONES: Phones jack
13. SCART: Scart jacks
14. S-VIDEO: S-Video input jack
15. AV IN: Audio (Left & Right) and Composite Video input jacks
16. ANT: Antenna input jack
station)
19. V+: Volume up/Move the cursor in the setting menu to the right.
20. SLEEP: Press repeatedly to activate the sleep function and sleep
timer setting.
21. PICTURE: Press repeatedly to select the presetting picture
modes.
22. MUTE: Mute ON/OFF.
23. SIZE: Press once to display the upper half of the Teletext page to
the full screen. Press again to display the lower half of the Teletext
page to the full screen. Press again to exit.
24. CANCEL: Press to exit from Teletext mode.
25. HOLD: Press to hold on the Teletext page.
7
Page 8
TV - PREPARATION
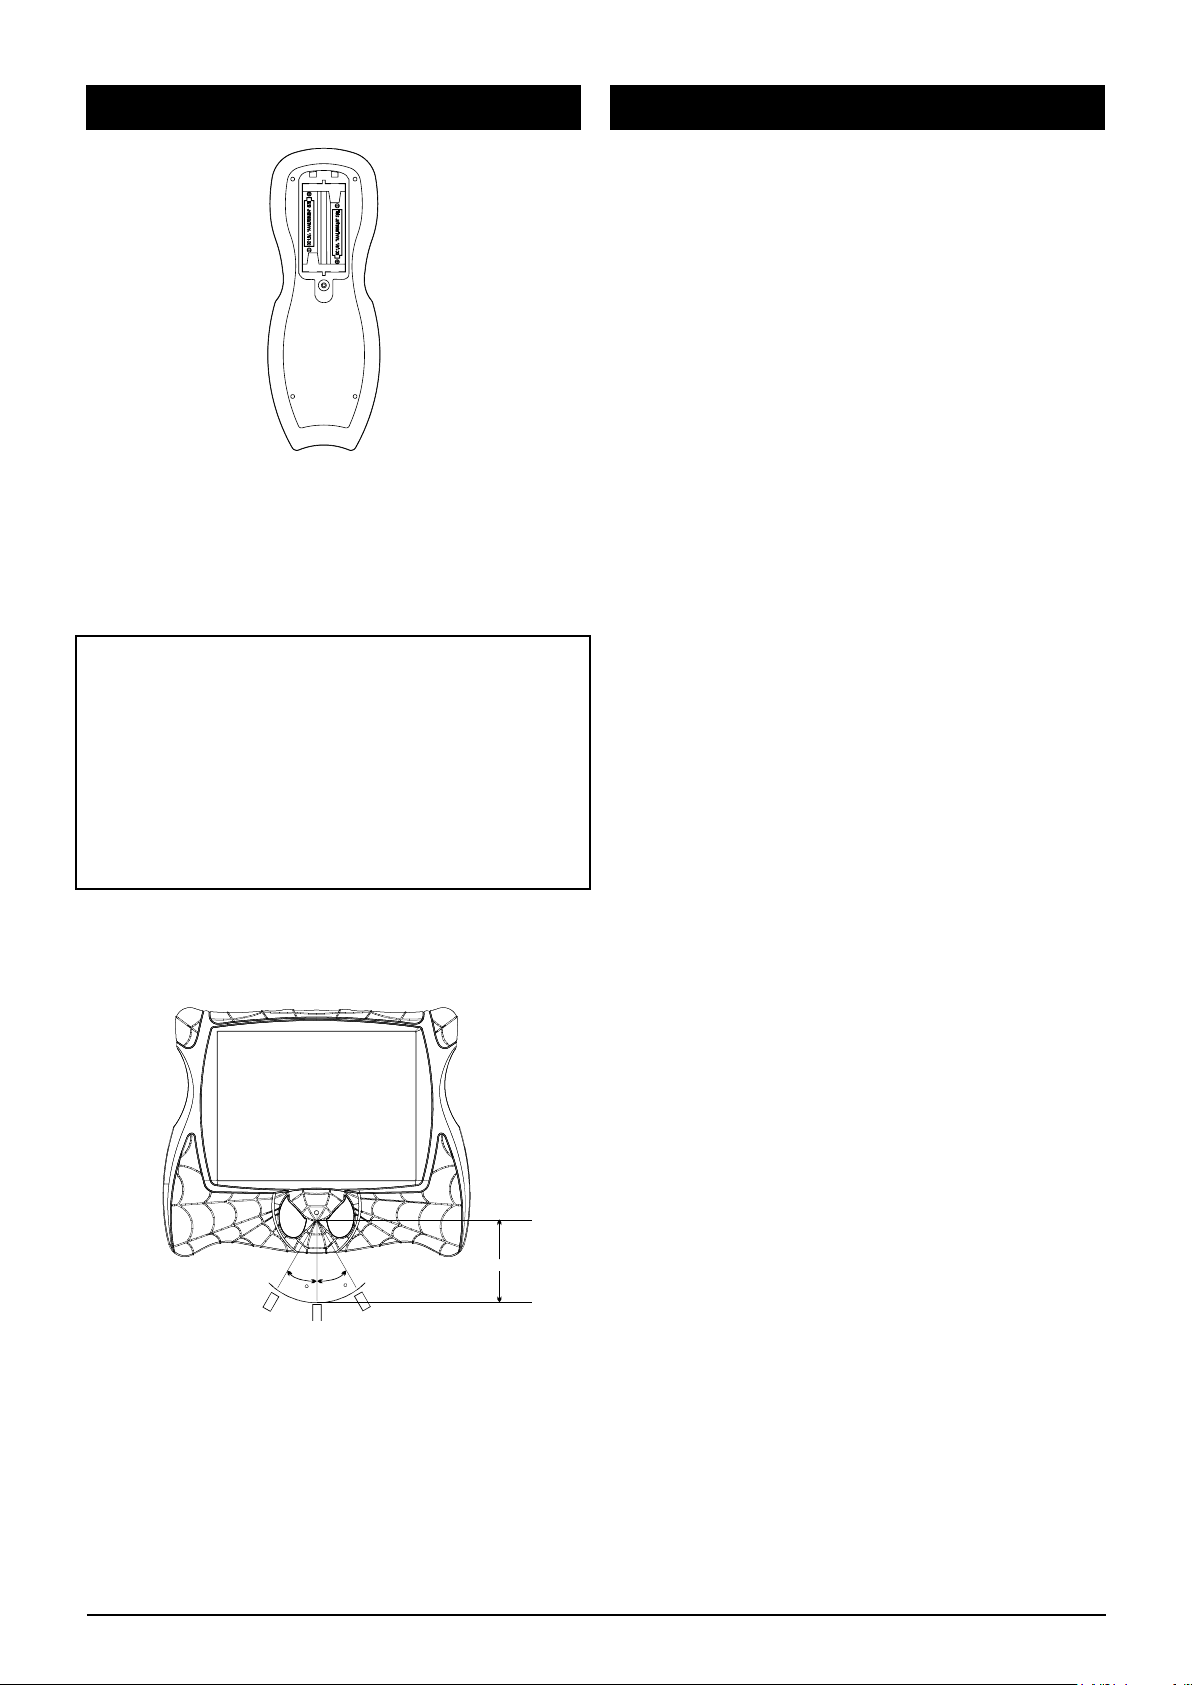
30
30
Approx. 24 feet (8 meters)
TV - BASIC OPERATION
Power ON/OFF
1. Press the Main Power Switch on the rear of TV to ON position to
power on(Standby) the unit.
2. Press the Power button on the TV or remote control to power
ON/OFF (Standby) the unit from Standby mode.
3. If long period of time will not used the TV. Power off the TV by
press the Main Power Switch to OFF position.
NOTE: The TV will be power OFF automatically in approx. 5 minutes if
no TV signal is received. This feature is to protect the TV and save energy.
To power on the TV again, simply press the POWER button again.
SOUND MODE SELECTION
Press the SOUND button repeatedly to select the preset sound
modes as desired.
1. Remove the screw and open the battery compartment cover.
2. Install two (2) DC 1.5V “AAA” size batteries as the polarity
diagram (+/- signs) inside the battery compartment.
3. Replace the battery compartment cover and screw.
BATTERY PRECAUTIONS
Follow these precautions when using batteries in this device:
Do not use rechargeable batteries. Non-rechargeable batteries are
not to be recharged. Rechargeable batteries are to be removed from
the toy before being charged. Rechargeable batteries are only to be
charged under adult supervision. Different types of batteries or new
and used batteries are not to be mixed. Only batteries of the same or
equivalent type as recommended are to be used. Batteries are to be
inserted with the correct polarity. Exhausted batteries are to be
removed from the toy. The supply terminals are not to be short
circuited. Do not throw batteries into a re. Remove the batteries if
you are not going to use the game for a long period of time.
WARNING: If the unit malfunctions or receives an electrostatic shock,
remove the batteries and insert them again.
EFFECTIVE DISTANCE OF THE REMOTE CONTROL
TRANSMITTER
Approx. 24 feet (8 meters)
PICTURE MODE SELECTION
Press the PICTURE button repeatedly to select the preset picture
modes as desired.
CHANNEL SELECTION
• Press the P+ or P- buttons to select a preset channel as desired.
• For direct channels access:
1. Channel number 1-9: Press the “-/--/---” button once and enter
the channel number by press the numeric keys on the remote
handset.
2. Channel number 10-99: Press the “-/--/---” button twice and enter
the channel number by press the numeric keys on the remote
handset.
3. Channel number 100-125: Press the “-/--/---” button three times
and enter the channel number by press the numeric keys on the
remote handset.
VOLUME SETTING
Press the V+ or V- buttons to adjust the sound level as desired.
MUTE
Press to turn off the sound, the TV’s sound will be silenced and MUTE
will appear on the screen. Press this button again or one of V+ or V-
buttons twice to turn the sound back.
SOURCE SETTING
1. Press the MODE button on the TV or the TV/AV button on the
remote handset to enter to SOURCE setting menu.
2. Press the P+ or P- buttons to select the source to TV, AV,
S-VIDEO, SCART or PC as desired.
3. Press the V+ button to conrm the selection.
NOTE:
When there is an obstacle between the TV and the transmitter, the
transmitter may not operate.
When direct sunlight, an incandescent lamp, uorescent lamp or any
other strong light shines on the REMOTE SENSOR of the unit, the
remote operation may be unstable.
AUTO SEARCHING
The method is designed to quickly search and automatically store the
available TV stations located in your area:
1. Power ON the TV and set the SOURCE to TV mode as above.
2. Press the MENU button to enter to setting menu.
3. Press the P- button repeatedly to highlight the icon of CHANNEL,
the CHANNEL setting menu will appear on the screen. Press V+
button to enter to the setting menu.
4. Press the P- button repeatedly to highlight AUTO SCAN.
5. Press the V+ button to start searching and the unit will
automatically scan over through all the channels and store the
active channels into the TV.
SKIP:
The noisy/unwanted channels can be removed from the TV’s memory
by using the SKIP function as follows:
1. Select the noisy/unwanted TV channel by pressing the P+/Pbuttons.
2. Press the MENU button.
3. Press the P- button repeatedly until the CHANNEL icon is
highlighted.
4. Press the V+ button to highlight SOURCE.
5. Press the P- button repeatedly until SKIP is highlighted.
6. Press the V+ button to change the SKIP state from OFF to ON.
8
Page 9

7. Press the MENU button twice to exit the menu. The noisy/
HU
E
COLOR TONE
STANDARD
ADJUST
ADJUST
NICAM/A2
STEREO
unwanted TV station will no longer be shown when skipping
through the channels using the P+/P- buttons.
8. Repeat the same procedures to deleted all the nosily/unwanted
stations as desired.
TELETEXT:
Most set channels carry “Teletext”, pages of written information that
provide information such like:
• Sports results.
• Subtitles for the hard of hearing.
• Television programme times.
• News bulletins and weather forecasts.
The Teletext pages are organized according to six categories as the
gure:
A B C D
E
F
A: Selected page number.
B: Broadcasting station identity.
C: Current page number or search status.
D: Date and time.
E: Text.
F: Status information.
TV - ON-SCREEN MENU
SETTING Menus
Press the MENU button to enter the setting menu (press again to
exit). Press the P+/P-/V+/ V- buttons to highlight the function within
the menu you want to set. Press the V+ button to conrm the
selection. Press the P+/P- buttons to toggle the sub-menu options.
TV MODE
In TV mode, there are 5 main setting menus:
PICTURE- for picture quality setting.
• Press the MENU button, the PICTURE setting menu will appear
on screen.
• Press the V+ button to highlight CONTRAST, and then press the
P+/P- buttons repeatedly until the desired setting is highlighted
(CONTRAST, BRIGHTNESS, HUE, SATURATION, SHARPNESS,
COLOR TEMP or PICTURE MODE).
• Press the V+/V- buttons repeatedly to adjust the setting.
• When COLOR TONE is selected, press the V+/V- buttons
repeatedly to select the color temperature to WARM, COOL or
NORMAL.
• When PICTURE MODE is selected, press the V+/V- buttons
repeatedly to select the picture mode to BRIGHT, PERSONAL,
NORMAL or SOFT.
NOTES: HUE will not functioning in TV mode.
Operations of Teletext:
• Press the P+/P- to select a preset channel providing the Teletext
service.
• Press the TXT/TV button on the remote handset to activate the
Teletext mode. To return to normal TV mode, press the TXT/TV
button again or press CANCEL button.
• In the section “F” above gure shows, there will be four
different control functions identify by different colours. Press the
corresponding colour buttons on the remote handset to activate
the corresponding functions. TXT-R button for Red, TXT-G button
for Green, TXT-Y button for Yellow and TXT-C button for Cyan.
For an example, if “P-” on the Teletext page section “F” shows
in Red, press the TXT-R button to enter to the previous Teletext
page. If “P+” on the Teletext page section “F” shows in Green,
press the TXT-G button to enter to the next Teletext page.
• In Teletext mode, press MIX button to display TV and Teletext
page on the screen simultaneously. To exit, press MIX button
again.
• In Teletext mode, press the SIZE button once to display the upper
half of the Teletext page to the full screen. Press the SIZE button
again to display the lower half of the Teletext page to the full
screen. To exit, press the SIZE button again.
• Some of Teletext pages are linked with several secondary
pages; the secondary pages are displayed in sequence. Press
the REVEAL button repeatedly to view the secondary pages as
desired. Press the HOLD button to freeze the current page (icon
of lock will appear on the screen). To exit from the freeze mode,
press this button again (icon of lock will disappear on the screen).
• To enter to the desired number Teletext page in Teletext mode,
enter the three digit of page number by the numeric buttons on
the remote handset. (All the three digit of the page number should
be entering, for an example, if the page number is “003”. Press
the buttons “0” + “0” + “3”).
• In Teletext mode, press the INDEX button to display the index
page.
SOUND- for sound quality setting
• Press the MENU button, and then press the P- button repeatedly
to highlight the SOUND icon, the sound setting menu will appear
on screen.
• Press the V+ button to highlight BASS, then press the P+/ P-
buttons repeatedly to select BASS, TREBLE, BALANCE, SOUND
MODE or NICAM/A2.
• Press the V+/ V- buttons repeatedly to adjust the setting.
• When SOUND MODE is selected, press the V+/V- buttons
repeatedly to select the sound effect mode to THEATER,
ODEUM, NEWS or PERSONAL.
• When NICAM/A2 is selected, press V+/V- buttons repeatedly to
select MONO, STEREO or DUAL I or DUAL II (depending on the
type of audio signal broadcasted from your TV station).
NOTES:
• Make sure the TV signal reception is good. Otherwise, the
information of Teletext may not be displayed or corruptions.
• If any broken character appears while Teletext is being viewed,
make sure that the Teletext language is identical with the
language in the setup menu. If both languages are different,
select the same language with Teletext language on the setup
menu.
9
Page 10

ON
WEST
BLUE SCREENBLUE SCREEN
TXT LANGUAGETXT LANGUAGE
ADJUST
MOV
E
HU
E
COLOR TONE
STANDARD
ADJUST
CHANNEL- for tuning your TV.
AUTO SCAN
COLOR .SY
S
L
SECAM
ON
S
OUND .SY
S
MANUA
L
40.00MHZ
40.00MHZ
SKI
P
FINE
ADJUST
• Press the MENU button, and then press the P+/P- buttons until
the CHANNEL icon is highlighted. The channel setting menu will
appear on screen.
• Press the V+ button to highlight AUTO SCAN, then press the P+/
P- buttons until the desired setting is highlighted: AUTO SCAN,
CHANNEL, COLOR.SYS, SOUND SYS., SKIP, MANUAL or FINE.
• Press the V+/V- buttons repeatedly to adjust the setting.
• When CHANNEL is selected, you can select the channel number
by press V+/V- buttons repeatedly.
• When SKIP is selected, press the V+ repeatedly to turn the
current channel skip ON or OFF.
• When AUTO SCAN is selected, press the V+ button to start
searching and the unit will automatically scan over through all the
channels and stored the active channels into the TV.
• When COLOR .SYS is selected, press the V+/V- buttons
repeatedly to select SECAM, AUTO or PAL. (The TV color system
in UK and German is PAL, in France is Secam, if you are not sure
what is the color system in your area, set it to AUTO)
• When SOUND.SYS is selected, press the V+/V- buttons
repeatedly to select B/G; I; D/K; L. (the sound system in UK is I,
in German is B/G, in France is L. If your are not sure what is the
sound system in your area, press the V+/V- buttons repeatedly
unit the clear sound was be heard.)
• When MANUAL is selected. Press the V+ button to search the
next available TVchannel at upper frequency, press the V- button
the to search the next availableTV channel at lower frequency.
The new channel will be stored in the TV memory automatically.
• When FINE is selected, press the V+/V- buttons repeatedly to
adjust the reception of the current TV channel.
OSD (On Screen Display)
• Press the MENU button, and then press the P- button repeatedly
to highlight the OSD icon, the OSD setting menu will appear on
screen.
• Press the V+ button to highlight LANGUAGE, then press the
P+/P- buttons repeatedly to select LANGUAGE, H-POSITION,
V-POSITION, DURATION, or HALFTONE.
• Press the V+/V- buttons repeatedly to adjust the setting.
• When LANGUAGE is selected, press the V+/V- buttons
repeatedly to select the language as desired.
AV, S-VIDEO or SCART MODE
These modes have 4 main setting menus:
PICTURE- for picture quality setting.
• Press the MENU button, the PICTURE setting menu will appear
on screen.
• Press the V+ button to highlight CONTRAST, and then press the
P+/P- buttons repeatedly until the desired setting is highlighted
(CONTRAST, BRIGHTNESS, HUE, SATURATION, SHARPNESS,
COLOR TONE or PICTURE MODE).
• Press the V+/V- buttons repeatedly to adjust the setting.
• When COLOR TONE is selected, press the V+/V- buttons
repeatedly to select the color temperature to WARM, COOL or
NORMAL.
• When PICTURE MODE is selected, press the V+/V- buttons
repeatedly to select the picture mode to BRIGHT, PERSONAL,
NORMAL or SOFT.
FUNCTION
• Press the MENU button, and then press the P- button repeatedly
to highlight the icon of FUNCTION. The function setting menu will
appear on the screen.
• Press the V+ button to highlight the RESET, then press the P+/Pbuttons repeatedly to select RESET, BLUE SCREEN or TXT
LANGUAGE.
• Press the V+/V- buttons repeatedly to adjust the setting.
• When BLUE SCREEN is selected, you can set the blue screen on
or off by press V+/V- buttons repeatedly. If set to on, the screen
will turn to blue when no signals or weak signals receptions. If set
to off, the blue screen will not come on.
• When TXT LANGUAGE is selected, press the V+/V- buttons
repeatedly to select the Teletext language to WEST, EAST,
RUSSIAN, ARABIC, FARSI or AUTO.
SOUND- for sound quality setting
• Press the MENU button, and then press the P- button repeatedly
to highlight SOUND. The sound setting menu will appear on
screen.
• Press the V+ button to highlight BASS, then press the P+/
P- buttons repeatedly to select BASS, TREBLE, BALANCE or
SOUND MODE.
• Press the V+/ V- buttons repeatedly to adjust the setting.
• When SOUND MODE is selected, press the V+/V- buttons
repeatedly to select the sound effect mode toTHEATER, ODEUM,
NEWS or PERSONAL.
NOTE: In AV, S-VIDEO or SCART mode, the NICAM/A2 can not be
chosen.
10
Page 11

ADJUST
NICAM/A2
STEREO
ON
WEST
BLUE SCREENBLUE SCREEN
TXT LANGUAGETXT LANGUAGE
ADJUST
FUNCTION
MOV
E
P
C
H-POSITION
-
V-POSITION
CLOCK
PHASE
AUTO
ADJUST
ADJUST
NICAM/A2
STEREO
• Press the MENU button, and then press the P- button repeatedly
to highlight the icon of FUNCTION. The function setting menu will
appear on the screen.
• Press the V+ button to highlight the RESET, then press the P+/Pbuttons repeatedly to select RESET, BLUE SCREEN or TXT
LANGUAGE.
• Press the V+/V- buttons repeatedly to adjust the setting.
• When BLUE SCREEN is selected, you can set the blue screen on
or off by press V+/V- buttons repeatedly. If set to on, the screen
will turn to blue when no signals or weak signals receptions. If set
to off, the blue screen will not come on.
• When TXT LANGUAGE is selected, press the V+/V- buttons
repeatedly to select the Teletext language to WEST, EAST,
RUSSIAN, ARABIC, FARSI or AUTO.
PC MODE
In PC mode, there are 4 main setting menus:
PC- for picture quality settings.
• Press the MENU button, the PC setting menu will appear on
screen.
• Press the V+ button to highlight CONTRAST, and then press the
P+/P- buttons repeatedly to select CONTRAST, BRIGHTNESS,
H-POSITION, V-POSITION, CLOCK, PHASE or COLOR MODE .
• Press V+/V- buttons repeatedly to adjust the setting.
• When AUTO is selected. Press the V+/V-buttons to start setting,
the TV will set the CLOCK, PHASE and position to the best
condition automatically.
• When COLOR MODE is selected. Press the V+/V- buttons to set
the preset color mode to NORMAL, WARM, COOL, SRGB or
USER. In the USER setting, press the P+/P- buttons to select
USER-R, USER-G or USER-B, then press the V+/V- buttons to
adjust the color as desired.
OSD (On Screen Display)
• Press the MENU button, and then press the P- button repeatedly
to highlight the icon of OSD; the OSD setting menu will appear
on screen.
• Press the V+ button to highlight LANGUAGE, then press the
P+/P- buttons repeatedly to select LANGUAGE, H-POSITION,
V-POSITION, DURATION, or HALFTONE.
• Press the V+/V- buttons repeatedly to adjust the setting.
• When LANGUAGE is selected, press the V+/V- buttons
repeatedly to select the language as desired.
SOUND- for sound quality setting
• Press the MENU button, and then press the P- button repeatedly
to highlight SOUND, the sound setting menu will appear on
screen.
• Press the V+ button to highlight BASS, then press the
P+/ P- buttons repeatedly to select BASS, TREBLE, BALANCE or
SOUND MODE.
• Press the V+/ V- buttons repeatedly to adjust the setting.
• When SOUND MODE is selected, press the V+/V- buttons
repeatedly to select the sound effect mode to THEATER,
ODEUM, NEWS or PERSONAL.
NOTE: In PC mode, the NICAM/A2 can not be chosen.
FUNCTION
• Press the MENU button, and then press the P- button repeatedly
to highlight FUNCTION, the function setting menu will appear on
screen.
• Press the V+ button to highlight RESET, and then press the P+/P-
buttons repeatedly to select RESET or BLUE SCREEN.
• Press the V+/V- buttons repeatedly to adjust the setting.
• When BLUE SCREEN is selected, you can set the blue screen on
or off by press V+/V- buttons repeatedly. If set to on, the screen
will turn to blue when no signals or weak signals receptions. If set
to off, the blue screen will not come on.
NOTE: In PC mode, the TXT LANGUAGE can not be chosen.
11
Page 12

ON
WEST
BLUE SCREENBLUE SCREEN
TXT LANGUAGETXT LANGUAGE
ADJUST
OSD (On Screen Display)
MOV
E
15
0
5
0
• Press the MENU button, and then press the P- button repeatedly
to highlight OSD; the OSD setting menu will appear on screen.
• Press the V+ button to highlight LANGUAGE, then press the
P+/P- buttons repeatedly to select LANGUAGE, H-POSITION,
V-POSITION, DURATION, or HALFTONE.
• Press the V+/V- buttons repeatedly to adjust the setting.
• When LANGUAGE is selected, press the V+/V- buttons
repeatedly to select the language as desired.
WALL MOUNTING TIPS
This TV can be mounted on wall using a VESA compliant wall-mount
bracked kit.(You can buy the bracket in the shop you buy the TV)
Before mounting the TV on the wall, the stand must be removed from
the bottom of TV.
1. Power off the unit by the main power switch on the rear of TV.
2. Disconnect all the cables from the TV.
3. Place the TV on a clean and soft surface, as the gure on left.
4. Unscrew and remove the two screws from the rear cabinet as the
gure on left.
5. Pull out the stand from the TV.
6. Unscrew and remove the 4 pcs mounting screws from the rear
cabinet as the gure on left. Do not remove any other screws from
the TV.
7. Fix hanging wheel and screws on the back of TV as the gure on
left.
Remove the 2 M4x 12 screws
from the stand
Pull out the
stand
TV - RETRACTABLE STAND
NOTE:
The maximum tilt angle is 15 degrees in the backward direction.
Please do not tilt the TV outside the specied range. Using excessive
force to tilt the TV may cause permanent damage to the mechanical
part of the stand.
NOTE:
To avoid damaging the screen, never touch the screen or used liquid
cleaners or aerosol cleaners to clean the screen. Use a dry cloth only.
Remove the 4
screws (M4X12)
Fix hanging whee l
and screws
8. Connect wall bracket to the wall.
a) Mark the location of hole on the wall.
b) Make hole on the marked location using drill.
c) Fix anchors on each hole on the wall.
d) Connect bracket to the wall with screws after tting the anchors
into the bracket holes.
9. Lift the TV to the socket of the wall bracket.
NOTE: Above illustrates and instructions only for reference. For
details, please refer to the Installation Instruction Manual of the Wall
Mount Bracket.
12
Page 13

TV - TROUBLESHOOTING
WARRANTY
Symptom Check
No sound and no picture • Check whether the Power
indictor on the TV panel is lit.
If it is not lit, check the
connections between the
AC/DC adaptor and the TV or
the connections between the
AC/DC adaptor and AC outlet.
No picture but the sound is
normal
Normal picture but no sound • Sound level may be too low,
Picture with snow/noise • Try other channels.
No color • Try other channels.
Remote handset doesn’t
operate
• The pictures may be too dark,
increase the brightness and
contrast level.
increase the sound level.
• Check the antenna connection.
• Increase the level of
saturation.
• Aim the remote handset to
the remote sensor on the front
panel.
• Replace new batteries.
• Check if the batteries were
installed according to the
polarity (+/- signs).
This product is covered by our two-year warranty.
For warranty requirements or after sales service, please contact your
local retailer with your proof of purchase.
Our warranty covers all manufacturer defaults but does not cover
deterioration due to non-respect of the Instruction Manual or bad
handling of the product (like sun or water exposure or dismantling of
the product).
Environmental Protection
Unwanted electrical appliances can be recycled and should not be
discarded along with regular household waste! Please actively support the
conservation of resources and help protect the environment by returning
this appliance to a collection centre (if available).
TV - SPECIFICATIONS
GENERAL:
Power source: AC/DC adaptor:
INPUT: AC~ 100~240V, 50/60Hz, 1.5A MAX.
OUTPUT: DC 12V 4.0A
Speaker output power............................................................3 Wattsx2
Resolution..............................................................................1024x768
Contrast ration...............................................................................450:1
Responsible time...................................................................... ....16ms
Brightness..............................................................................250cd/m2
Vertical frequency for PC input.................................................60-70Hz
Dimensions.................................................47.3(W)x41.6(H)x7.2(D)cm
ACCESSORIES:
Remote handset..............................................................................1 pc
Remote handset batteries (AAA)...................................................2 pcs
Owner’s manual.............................................................................1 set
AC/DC adaptor................................................................................1 pc
AC cord for AC/DC adaptor.............................................................1 pc
NOTE: The design and structure is subject to change without
notice.
13
Page 14

ÍNDICE
Instruções Importantes sobre Segurança............................................................................................... 15
TV
Fonte de Alimentação ............................................................................................................................. 17
Conexões de Cabo ................................................................................................................................. 17
Localização dos Controles .................................................................................................................... 18
Preparação ............................................................................................................................................. 18
Operação Básica .................................................................................................................................... 19
Menu na Tela .......................................................................................................................................... 20
Suporte Retrátil ...................................................................................................................................... 23
Resolução de Problemas ....................................................................................................................... 24
Características Técnicas ....................................................................................................................... 24
14
Page 15

INSTRUÇÕES IMPORTANTES SOBRE SEGURANÇA
CUIDADO
RISCO DE CHOQUE ELÉTRICO
NÃO ABRA
CUIDADO: PARA REDUZIR O RISCO DE CHOQUES ELÉTRICOS, NÃO RETIRE A COBERTURA (OU
PARTE TRASEIRA). NÃO EXISTEM PEÇAS NO INTERIOR QUE POSSAM SER REPARADAS PELO
USUÁRIO. SOLICITE ASSITÊNCIA TÉCNICA A PESSOAL TÉCNICO QUALIFICADO.
O relâmpago com a seta dentro de um triângulo equilátero
serve para alertar o usuário sobre a presença de voltagem
perigosa sem isolamento no interior do produto, que pode
ser de magnitude suciente para constituir risco de choque
elétrico.
O ponto de exclamação dentro de um triângulo equilátero
serve para alertar o usuário sobre a presença de instruções
importantes de operação e manutenção que acompanham
a unidade.
PERIGO: Existe radiação invisível e perigosa quando o
sistema interloque é anulado ou falha. Evite a exposição
direta ao feixe.
AVISO: PARA REDUZIR O RISCO DE CHOQUES ELÉTRICOS, NÃO
EXPONHA ESTA UNIDADE À CHUVA OU UMIDADE.
AVISO: PARA REDUZIR O RISCO DE FOGO OU CHOQUES ELÉTRICOS
E INTERFERÊNCIAS DESAGRADÁVEIS, USE APENAS OS ACESSÓRIOS
RECOMENDADOS
CUIDADO - PRODUTO ELÉTRICO
Não recomendado para crianças com menos de 8 anos de idade. Como todos
os outros produtos elétricos, precauções devem ser tomadas durante o seu
manuseamento e utilização para prevenir choques elétricos.
AVISO AOS PAIS
Este produto deve ser vericado periodicamente a m de identicar condições
que resultem no risco de incêndio , choque elétrico ou lesões a pessoas e, se
tais condições estiverem presentes, este produto não deve ser utilizado até ser
apropriadamente reparado.
PROTETORES CONTRA SURTOS:
Recomendamos o uso proteção contra surtos na conexão AC.
AVISO
USE SOB A SUPERVISÃO DE UM ADULTO, DEVIDO AO CABO LONGO. Esta
unidade possui um cabo de força longo que pode ser facilmente puxado, ou
sobre o qual pessoas podem tropeçar, sofrendo lesões. Garanta que este seja
colocado de modo a não car pendurado sobre uma mesa, etc., onde possa
ser puxado facilmente por crianças e onde exista a possibilidade de alguém
tropeçar acidentalmente.
Fabricado sob licença da Dolby Laboratories. Dolby e o símbolo duplo D são
marcas registradas da Dolby Laboratories.
FAVOR LER ANTES DE UTILIZAR ESTE EQUIPAMENTO.
Antes de utilizar a unidade, garanta que todas as instruções de operação sejam
lidas cuidadosamente. Observe que estas geralmente são precauções gerais
e que podem não ser sempre pertinentes à sua unidade. Por exemplo, esta
unidade pode, ou não, ter a possibilidade de ser ligada a uma antena externa
1. Leia estas instruções.
Todas as instruções de funcionamento e segurança devem ser lidas antes de
utilizar o produto.
2. Guarde estas instruções.
As instruções de funcionamento e segurança devem ser guardadas para
futuras consultas.
3. Siga todos os avisos.
Todos os avisos no produto e nas instruções de uso devem ser cumpridos.
4. Siga todas as instruções.
Todas as instruções de uso e operação devem ser seguidas.
5. Não utilize este aparelho próximo à água.
Não utilize este produto perto de água ou fontes de umidade como, por
exemplo, banheiras, lavatórios, pias de cozinha, tanque de roupas, em porões
úmidos ou perto de uma piscina.
6. Limpe apenas com um pano seco.
Desconecte o produto da tomada antes de limpá-lo. Não utilize detergentes
líquidos ou aerossóis. Estes podem danicar a tela. Utilize apenas um pano
seco para limpar
7. Não bloqueie nenhuma entrada de ventilação. Realize a instalação de
acordo com as instruções do fabricante.
As fendas e aberturas no gabinete, no fundo ou na parte traseira, servem
para a ventilação, assegurando o bom funcionamento do produto e evitando
superaquecimento. Estas aberturas não devem ser bloqueadas ou cobertas.
Devido a isso, não coloque o produto sobre uma cama, sofá, tapete ou outras
superfícies semelhantes. Este produto nunca deve ser colocado próximo ou
sobre um radiador ou outra fonte de calor. Este produto não deve ser colocado
em uma instalação embutida, tais como uma estante, a não ser que esta
proporcione ventilação adequada ou permita o cumprimento das instruções do
fabricante
8. Não coloque próximo a qualquer fonte de calor, tais como, radiadores,
fogões ou outros aparelhos (incluindo amplicadores) que produzam
calor.
9. Não anule o objetivo de segurança de plugue polarizado ou do tipo
aterramento. Um plugue polarizado possui duas lâminas, sendo uma mais
larga que a outra. O plugue tipo aterramento possui duas lâminas e um
terceiro pino de aterramento. A lâmina mais larga ou a terceira lâmina é
fornecida para sua segurança. Se o plugue fornecido não encaixar em sua
tomada, consulte um eletricista para troca da tomada obsoleta.
10. Proteja o cabo de força para que ninguém pise sobre este ou seja
amassado, particularmente nos plugues, tomadas e no ponto onde estes
saem do aparelho.
11. Use somente conexões/acessórios especicados pelo fabricante.
12. Use somente com o carrinho, pedestal, tripé, suporte ou mesa
especicada pelo fabricante ou vendido com o aparelho. Quando um
carrinho é utilizado, tenha cautela ao mover a combinação decarrinho/
aparelho a m de evitar lesão devido à inclinação.
Uma combinação de aparelho e carrinho deve ser movida com cuidado.
Paradas repentinas, força excessiva e superfícies desniveladas podem
fazer com que o aparelho e o carrinho virem.
AVISO DE CARRINHO PORTÁTIL
(Símbolo fornecido pela RETAC)
SC126A
15
Page 16

13. Desconecte o aparelho da tomada durante tempestades com raios ou
quando não for utilizado por períodos longos.
Para proteger o seu produto contra raios, ou quando deixá-lo sem supervisão
ou sem uso durante um longo período de tempo, desconecte-o da tomada e
desconecte a antena ou sistema a cabo. Isto irá prevenir danos no produto
devidos a raios e sobrecargas da linha da eletricidade.
14. Solicite serviços a pessoal técnico qualicado. Serviço é requerido
quando o aparelho for danicado de alguma maneira, como, por
exemplo, quando o cabo de força ou plugue é danicado, líquido tiver
sido derramado ou objetos tiverem caído no aparelho, o aparelho tiver
sido exposto à chuva ou umidade, o aparelho não operar normalmente,
ou se o aparelho tiver caído.
15. Alimentação
Este produto deverá ser utilizado apenas com o tipo de alimentação indicado
na etiqueta das especicações. Se você não tiver certeza sobre tipo de
alimentação utilizado em sua casa, consulte o seu revendedor, ou a empresa
de eletricidade local. Para produtos que tenham sido criados para funcionarem
a pilhas, ou outras fontes de energia, consulte o manual de operação
16. Linhas de eletricidade
Um sistema antena externa não deverá estar localizado próximo ou acima de
linhas da eletricidade ou de outros circuitos elétricos ou de energia, ou onde
possa cair em cima de tais linhas de eletricidade ou circuitos. Ao instalar um
sistema de antena externa, extremo cuidado deve ser tomado a m evitar tocar
em tais linhas ou circuitos elétricos, pois o contato com estes pode ser fatal.
17. Sobrecarga
Não sobrecarregue tomadas e extensões, pois isto pode dar origem ao risco de
incêndio ou de choque elétrico.
18. Entrada de líquidos e objetos
Nunca empurre nenhum tipo de objetos para dentro deste produto através
das aberturas, pois estes podem tocar em pontos com voltagem perigosa,
ou causar curto em partes, podendo dar origem a fogo ou choques elétricos.
Nunca derrame ou pulverize nenhum tipo de líquido no produto
19. Aterramento da antena externa
Se uma antena externa estiver conectada ao produto, garanta que o sistema da
antena esteja aterrado, de forma a fornecer alguma proteção contra
sobrecargas de voltagem e cargas estáticas. A seção 810 do Código Nacional
Elétrico ANSI/NFPA 70 fornece informações sobre ao aterramento adequado
do mastro e estrutura de apoio, conexão do o condutor a um produto de
descarga da antena, tamanho dos condutores de aterramento, localização do
produto de descarga da antena, ligação a eletrodos de aterramento e requerimentos para os eletrodos de aterramento.
22. Vericação de segurança
Após terminar quaisquer reparos neste produto, peça ao técnico que efetuou
os reparos que faça uma vericação de segurança, a m de determinar se o
produto se encontra em condições de operação apropriadas.
23. Montagem na parede ou teto
O produto pode ser montado em uma parede ou teto, somente conforme
recomendado pelo fabricante.
24. Danos que necessitem de reparos
Desligue o produto da tomada e solicite assistência a um técnico qualicado
nas seguintes condições:
a) Quando o cabo de força ou plugue tiver sido danicado.
b) Se entrar líquido ou qualquer objeto cair dentro do produto.
c) Se o produto for exposto à chuva ou à água.
d) Se o produto não funcionar normalmente ao seguir as instruções de
operação. Ajuste apenas os controles que sejam abrangidos nas instruções
de operação, pois um ajuste de outros controles pode dar origem a danos e
costumam requerer um reparo extenso por parte de um técnico qualicado
para fazer com que o produto opere normalmente
e) Se o produto cair, ou se a estrutura tiver sido danicada
f) Quando o produto apresentar uma alteração distinta no desempenho. Isto
indica a necessidade de reparos.
25. Nota para o técnico de instalação do sistema CATV
Esta nota serve para lembrar o técnico de instalação do sistema CATV do Artigo 820-40 do NEC, que fornece orientação para um aterramento apropriado,
e, em especial, especica que o cabo de aterramento deverá ser ligado ao
sistema de ligação de aterramento edifício, o mais próximo possível do ponto
da entrada do cabo.
Aviso
1) Para reduzir o risco de fogo ou choque elétrico, não exponha este aparelho
à chuva ou umidade.
2) O aparelho não deverá ser exposto a respingos ou borrifos e não coloque
objetos contendo líquidos, como vasos, sobre o aparelho.
3) O aparelho desligado (entrada do aparelho) deverá permanecer pronto para
ser utilizado
PRECAUÇÕES COM A TV:
Quando estiver uma imagem parada estiver sendo apresentada:
Imagens paradas podem causar danos permanentes à tela da TV.
• Não apresente uma imagem parada na tela LCD durante mais de 2 horas,
pois isso pode causar uma retenção da imagem na tela. Esta retenção
da imagem também é conhecida como “queimadura na tela”. Para evitar
tal retenção de imagem, reduza o nível de luminosidade e contraste da tela
ao apresentar uma imagem parada.Assistir a TV LCD no formato de 16:9
durante um longo período de tempo pode deixar marcas das bordas
apresentadas na parte superior, inferior central da tela causada pela
diferença da emissão de luz na tela. Os danos causados por este efeito não
são cobertos pela garantia.
EXEMPLO DE ATERRAMENTO DE ANTENA CONFORME O CÓDIGO
ELÉTRICO NACIONAL
20. Reparos
Não tente reparar este produto sozinho, pois abrir ou retirar as coberturas pode
expô-lo a uma voltagem perigosa ou a outros perigos. Solicite assistência a
técnicos qualicados
21. Peças sobressalentes
Quando precisar de peças sobressalentes, certique-se de que os técnicos
realizando o serviço usem peças de reposição especicadas pelo fabricante ou
que tenham as mesmas características que as peças originais. As substituições
não autorizadas podem causar fogo, choques elétricos ou outros tipos de
perigos.
• A apresentação de imagens paradas de jogos de vídeo e de computador
durante mais que um determinado período de tempo pode dar origem a
resíduos de imagens parciais. Para impedir este efeito, reduza o brilho e o
contraste ao apresentar a ver imagens paradas.
NOTA SOBRE A TELEVISÃO:
O painel TFT LCD usa uma tecnologia sosticada para apresentar imagens.
No entanto, podem aparecer alguns pixels brilhantes ou escuros na tela. Estes
pixels não têm impacto no desempenho do produto.
16
Page 17

SEÇÃO DA TV
ANT.75
TNAOEDIV-SSENOHPNIOIDUA-CPAGV
AVIN
VIDEO LRSCART
DC IN
ANT.75
INCO MING CATV C ABLE
ext er na l uni t
From VCR/DVR RF OUTPUT JACK
TNAOEDIV-SSENOHP
AV IN
VIDEO LRSCART
From external unit's AV OUTPUT jacks
AV connection cable
ext ernal uni t
TNAOEDIV-SSENOHPNIOIDUA-CP
AV IN
VIDEO LRSCART
TNAOEDIV-SSENOHPNIOIDUA-CPAGV
AVIN
VIDEO LRSCART
DC IN
ToA UD IO IN jacks
external unit
Connection cable
S-VID EO IN
From extern al unit's A UDIO OUTPUT jacks
TNAOEDIV-SSENOHPNIOIDUA-CPAGV
AV IN
VIDEO LRSCART
DC IN
TNAOEDIV-SSENOHPNIOIDUA-CPAGV
AVIN
VIDEO LRSCART
DC IN
TNAOEDIV-SSENOHPNIOIDUA-CPAGV
AVIN
VIDEO LRSCART
DC IN
EXTERNAL UNIT
INCOMING CATV
CABLE (VCR)
TV – FONTE DE ALIMENTAÇÃO
1. Insira o plugue pequeno do cabo de força no adaptador AC/DC.
2. Insira o plugue DC no adaptador AC/DC da TV.
3. Insira o plugue AC do cabo AC em uma tomada AC com AC 100-240V,
50/60Hz.
Para as chas de AUDIO IN
A partir das chas
de AUDIO OUTPUT
da unidade externa
unidade externa
Cabo de ligação
TV – CONEXÕES DE CABO
Ligar uma antena:
Para ligar uma antena, ligue a cha da antena na entrada da antena.
CONEXÃO COM UM CABO COAXIAL:
Siga as instruções apresentadas abaixo para ligar uma unidade externa, como
um VCR ou DVR (DVD Recorder), à sua unidade, usando um cabo coaxial de 75
ohm. (CABOS NÃO INCLUÍDOS).
1. Conecte o cabo de áudio da esquerda e direita provenientes dos conectores
AUDIO OUTPUT (saída de áudio) das unidades externas aos conectores
AUDIO IN da TV.
2. Conecte o conector S-VIDEO OUTPUT da unidade externa ao conector
SVIDEO da TV.
3. Ajuste a FONTE da TV ao modo S-VIDEO.
CONEXÃO UTILIZANDO CABO VGA (CABOS NÃO INCLUÍDOS)
Com um cabo D-SUB VGA de 15 pinos (não incluído), conecte o conector de
saída VGA do computador ao conector de entrada VGA da televisão. Com um
cabo de conexão com mini conector de 3,5 mm estéreo (não incluído), ligue o
conector PC AUDIO OUTPUT/PHONE no computador ao conector PC
AUDIO IN na televisão. Congure a FONTE na televisão para o modo PC.
CONEXÃO UTILIZANDO UM CABO SCART (CABO NÃO INCLUÍDO.)
unidade externa
unidade externa
A partir da FICHA DE SAÍDA VCR/DVR RF
entrada CATV
cabo (VCR)
1. Conecte o cabo, satélite ou entrada de antena ao conector VHF/UHF IN
localizado na parte traseira do VCR/DVR.
2. Conecte um cabo coaxial de 75 ohm proveniente do conector OUT de 75
ohm da unidade externa ao conector ANT localizada na parte inferior da TV.
3. Ajuste a FONTE da TV ao modo TV.
CONEXÃO UTILIZANDO CABOS DE ÁUDIO/VIDEO
Siga as instruções abaixo para conectar uma unidade externa, tais como um
1. Conecte o cabo, satélite ou entrada de antena ao conector VHF/UHF IN
localizado na parte traseira do VCR ou DVD Recorder.
2. Conecte um cabo SCART (NÃO INCLUÍDO) proveniente da unidade externa
ao conector SCART.
VCR/DVR/DVD à sua unidade utilizando os cabos de Áudio/vídeo (CABOS
INCLUÍDOS)
Fichas AV OUTPUT da unidade externa
Cabo de ligação AV
unidade externa
CABO DE ENTRADA
CATV (VCR)
3. Ajuste a FONTE da TV ao modo TV.
CONEXÃO UTILIZANDO FONE DE OUVIDO: (FONES DE OUVIDO NÃO
INCLUÍDOS)
1. Conecte o cabo de conexão de áudio esquerdo e direito proveniente dos
conectores de ÁUDIO OUTPUT da unidade externa aos conectores AUDIO
IN da TV. Conecte o cabo de vídeo proveniente do conector de saída VIDEO
da unidade externa ao conector VIDEO IN da TV.
2. Ajuste a FONTE da TV ao modo AV.
CONEXÃO UTILIZANDO UM CABO S-VIDEO:
Siga as instruções apresentadas abaixo para ligar uma unidade externa com um
cabo de ligação S-VIDEO. (CABOS NÃO INCLUÍDOS.)
Para ouvir música privativamente, ligue os fones de ouvido (não incluídos)ao
conector PHONES na televisão. As caixas acústicas são desligadas quando os
fones de ouvido são inseridos no conector.
NOTA: Quando os fones de ouvido estiverem ligados, o botão MUTE (sem
som) no controle remoto não funciona.
17
Page 18

2 3 4 5 6 7
1
TNAOEDIV-SSENOHPNIOIDUA-CPAGV
AVIN
VIDEO LRSCART
DC IN
10
9
8
11 12 13 14 15 16
P+
TV/AV POWER
RECALLRECALLRECALL TXT/TV
MENU
V+
CA
NCE
L
TX
T
-C
HO
L
D
MIX
S
IZ
E
T
XT
-
Y
I
N
D
EX
T
X
T
-G
RE
V
E
A
L
TX
T
-R
OSD
S
WA
P
NI
C
AM/A2
1
2
3
4
5
6
17
18
16
19
20
21
22
23
24
25
7
8
9
10
11
12
13
14
15
TV – LOCALIZAÇÃO DOS CONTROLES
1. POWER: Liga e desliga a televisão
(modo Standby)
2. MENU: Entra nos menus de conguração
3. V-: Diminui o volume
4. V+: Aumenta o volume
5. P-: Desce um canal
6. P+: Sobe um canal
7. MODE: Entra nos menus de conguração
de FONTE
8. Interruptor de ligar/desligar (ON/OFF) a alimentação.
9. DC IN:Conector de entrada DC
10. VGA: Conector de entrada VGA
11. PC-AUDIO IN: Entrada de áudio estéreo para PC.
12. PHONES: Entrada dos fones de ouvido
13. SCART: conector SCART.
14. S-VIDEO: Conector de entrada S-Video
15. AV IN: Conector de entrada de áudio (esquerda e direita) e vídeo compósito
16. ANT: Conector de entrada da antena
12. INDEX: No modo de teletexto, prima este botão para ver a página inicial do
teletexto.
13. REVEAL: Algumas páginas do teletexto estão ligadas a várias páginas
secundárias. Prima este botão repetidamente para ver as páginas
secundárias, conforme desejado.
14. Botões TXT-R, TXT-G, TXT-Y e TXT-C: Prima estes botões para activar
as funções correspondentes apresentadas no canto inferior da página do
teletexto.
15. MIX: Prima para ver a imagem da televisão e a página do teletexto em
simultâneo no ecrã. Prima novamente para sair.
16. POWER: Pressione este botão para ligar e desligar (Standby) a televisão.
17.TXT/TV: Prima para activar o modo do teletexto. Prima novamente para sair
(Funcionamento apenas no modo de televisão)
18.NICAM/A2: Prima repetidamente para escolher Estéreo, Dual I ou Dual II.
(As funções dependem da transmissão do sinal de áudio da estação de
televisão)
19. V+: Aumenta o volume/Move o cursor no menu de congurações para a
direita.
20. SLEEP: Pressione repetidamente para ativar a função de desligamento
automático e a conguração do timer do desligamento automático.
21. PICTURE: Pressione repetidamente para selecionar os modos de imagem
pré-congurados.
22. MUTE: Liga e desliga o som.
23. SIZE: Prima uma vez para ver a parte superior da página de teletexto no
ecrã por completo. Prima novamente para ver a parte inferior da página de
teletexto no ecrã por completo. Prima novamente para sair.
24. CANCEL: Prima para sair do modo de teletexto.
25. HOLD: Prima e mantenha premido na página de teletexto.
TV – PREPARAÇÃO
1. Remova o parafuso e abra a tampa do compartimento das pilhas.
2. Coloque duas (2) pilhas “AAA” DC de 1,5V, conforme o diagrama de
polaridade apresentado no interior do compartimento das pilhas.
3. Recoloque a tampa do compartimento das pilhas e aperte o parafuso.
PRECAUÇÕES RELACIONADAS ÀS PILHAS
Siga estas precauções ao utilizar as pilhas neste dispositivo.
Não utilize pilhas recarregáveis. As pilhas não recarregáveis não devem ser
recarregadas. As pilhas recarregáveis deverão ser retiradas do aparelho antes
de serem recarregadas e só deverão ser recarregadas sob a supervisão de
1. TV/AV: Entra no menu de conguração de FONTE.
2. RECALL: Volta ao canal de televisão anteriormente visto (apenas no modo
TV).
3. P+: Sobe um canal/Move o cursor no menu de conguração para a posição
superior.
4. OSD: Apresentação Na Tela.
5. MENU: Serve para entrar no menu de conguração.
6. V- : Diminui o volume / Move o cursor no menu de conguração para a
esquerda.
7. SWAP: Alterna entre os canais fonte e alvo.
8. SOUND: Pressione repetidamente para selecionar os modos de efeitos
sonoros predenidos.
9. P-: Desce um canal/Move o cursor no menu de conguração para baixo.
10. Botões numéricos (0-9): Insere o número do canal para acessar direta
mente o canal.
11. -/--/---: Pressione repetidamente para selecionar 1-3 dígito do número do
programa para o acesso de canaletas direto.
um adulto. Não misture diferentes tipos de pilhas ou pilhas novas com pilhas
usadas. Só use pilhas do mesmo tipo ou de um tipo equivalente às recomendadas. As pilhas deverão ser colocadas com a polaridade correta. Pilhas gastas
devem ser removidas do aparelho. Não coloque os terminais em curto. Não
jogue as pilhas em fogo. Retire as pilhas caso a unidade não seja utilizada
durante um longo período de tempo.
AVISO: Se a unidade não funcionar corretamente ou receber um choque eletrostático, remova as pilhas e insira-as novamente.
18
Page 19

DISTÂNCIA EFETIVA DO TRANSMISSOR DO CONTROLE REMOTO
30
30
Cerca de (8 metros)
Aproximadamente 8 metros
NOTAS:
Quando houver um obstáculo entre a televisão e o transmissor, o transmissor
pode não funcionar.
Quando luz direta do sol, uma lâmpada incandescente, uorescente, ou
qualquer outra luz forte brilhar no SENSOR REMOTO da unidade, a operação
do controle remoto pode ser instável.
TV – OPERAÇÃO BÁSICA
LIGAR E DESLIGAR
1. Prima o interruptor de ligar na parte traseira da televisão para ON, para ligar
(Modo de espera) a unidade.
2. Prima o botão Power na televisão ou no telecomando para ligar e desligar a
televisão (modo de espera) a partir do modo de espera.
3. Se não utilizar a televisão durante um longo período de tempo, desligue-a,
premindo o interruptor de ligar a energia para OFF.
NOTA: A televisão desliga automaticamente após cerca de 5 minutos se
nenhum sinal de TV for recebido. Esta função serve para proteger a televisão e
para poupar energia. Para ligar a TV novamente, basta pressionar novamente
o botão POWER.
2. Pressione os botões P+ ou P- para selecionar a fonte: TV, AV, S-VIDEO,
SCART ou PC, conforme desejado.
3. Pressione o botão V+ para conrmar a escolha.
BUSCA AUTOMÁTICA
Este método foi criado para procurar rapidamente e salvar automaticamente as
estações de televisão existentes na sua área:
1. Ligue a televisão e escolha a FONTE para o modo TV, conforme
apresentado acima.
2. Pressione o botão MENU para entrar no menu de congurações.
3. Pressione repetidamente o botão P- para destacar o ícone do CANAL.
Pressione o botão V+ para entrar no menu de congurações.
4. Pressione repetidamente o botão P- para destacar AUTO SCAN (BUSCA
AUTOMÁTICA).
5. Pressione o botão V+ para começar a busca e a unidade irá procurar e
salvar automaticamente todos os canais ativos na TV.
SKIP:
Os canais com interferência/indesejados podem ser retirados da memória da
TV, usando a função SKIP do seguinte modo:
1. Escolha os canais com interferência/indesejados, pressionando os botões
P+/P-.
2. Pressione o botão MENU.
3. Pressione repetidamente o botão P- até que ícone do CANAL seja
destacado.
4. Pressione o botão V+ para destacar a FONTE (SOURCE).
5. Pressione repetidamente o botão P- até que SKIP seja destacado
6. Pressione o botão V+ para mudar o estado de SKIP de OFF (desligado)
para ON (ligado).
7. Pressione duas vezes o botão MENU para sair do menu. A emissora com
interferência/indesejada não mais será apresentada ao correr os canais
com os botões P+/P-.
SELEÇÃO DO MODO DE SOM
Pressione o botão SOUND repetidamente para selecionar modos de som
predenidos, conforme desejado.
SELEÇÃO DO MODO DE IMAGEM
Pressione o botão PICTURE repetidamente para selecionar modos de imagem
predenidos, conforme desejado.
SELEÇÃO DE CANAL
• Pressione os botões P+ ou P- para selecionar um canal predenido,
conforme desejado.
• Para acessar diretamente os canais:
1. Canal Número 1-9: Pressione uma vez o botão “-/--/---” e insira o número do
canal, pressionando os botões de números no controle remoto
2. Canal Número 10-99: Pressione duas vezes o botão “-/--/---” e insira o
número do canal, pressionando os botões de números no controle remoto.
3. Canal Número 100-125: Pressione três vezes o botão “-/--/---” e insira o
número do canal, pressionando os botões de números no controle remoto.
AJUSTE DE VOLUME
Pressione os botões V+ ou V- para ajustar o nível de som conforme desejado.
DESLIGAR O SOM (MUTE)
Pressione o botão MUTE para desligar o som. A TV deixa de transmitir o som e
a palavra MUTE aparece na tela. Pressione novamente este botão, ou um dos
botões V+ ou V- duas vezes para voltar a ouvir o som.
CONFIGURAÇÃO DA FONTE
1. Pressione o botão MODE na televisão, ou o botão TV/AV no controle remoto
para entrar no menu de conguração da FONTE.
8. Repita os mesmos procedimentos para apagar todas as emissoras com
interferência/indesejadas, conforme desejado.
Teletexto
Grande parte dos canais tem páginas de “Teletexto” com informação escrita
como:
• Resultados desportivos.
• Legendas para pessoas com problemas auditivos.
• Horário da programação da televisão.
• Notícias e previsões meteorológicas.
As páginas de teletexto estão organizadas de acordo com seis categorias,
conforme a imagem:
A B C D
E
F
A: Número da página escolhida.
B: Identicação da estação de transmissão.
C: Número da página actual ou estado da busca.
D: Data e horas.
E: Texto.
F: Informação do estado.
19
Page 20

HU
E
COLOR TONE
STANDARD
ADJUST
ADJUST
NICAM/A2
STEREO
Operações do Teletexto:
• Prima P+/P- para escolher um canal predenido que tenha serviço de
teletexto.
• Prima o botão TXT/TV no telecomando para activar o modo de teletexto.
Para voltar ao modo normal de televisão, prima novamente o botão TXT/TV,
ou prima o botão CANCEL.
• A secção “F” apresentada acima mostra que existem quatro funções
de controlo diferentes, com diferentes cores. Prima os botões da cor
correspondente no telecomando para activar as funções correspondentes. O
botão TXT-R é vermelho, o botão TXT-G é verde, o botão TXT-Y é amarelo
e o botão TXT-C é azul. Por exemplo, se “P-“ na página de teletexto na
secção “F” mostrar a vermelho, prima o botão TXT-R para entrar na página
de teletexto anterior. Se “P+“ na página de teletexto na secção “F” mostrar a
verde, prima o botão TXT-G para entrar na página de teletexto seguinte.
• No modo de teletexto, prima o botão MIX para ver televisão e a página de
teletexto em simultâneo no ecrã. Para sair, prima novamente o botão MIX.
• No modo de teletexto, prima uma vez o botão SIZE para ver a parte superior
da página de teletexto no ecrã por completo. Prima novamente o botão SIZE
para ver a parte inferior da página de teletexto no ecrã por completo. Para
sair, prima novamente o botão SIZE.
• Algumas das páginas de teletexto estão ligadas a várias páginas
secundárias. As páginas secundárias são apresentadas em sequência.
Prima o botão REVEAL repetidamente para ver as páginas secundárias,
conforme desejado. Prima o botão HOLD para manter a página actual
(aparece o ícone de bloqueio no ecrã). Para sair do modo de página
bloqueada, prima novamente este botão (o ícone de bloqueio desaparece
do ecrã).
• Para entrar na página de teletexto do número desejado no modo de
teletexto, insira os três dígitos do número da página com os botões
numéricos no telecomando. (Todos os três dígitos do número da página
deverão ser inseridos. Por exemplo, se o número da página é o “003”, prima
os botões “0” + “0” + “3”).
• No modo de teletexto, prima o botão INDEX para ver a página do índice.
SOUND- Serve para congurar a qualidade do som
• Pressione o botão MENU e, a seguir, pressione repetidamente o botão
P- para destacar o ícone SOUND. O menu de conguração do som aparece
na tela.
• Pressione o botão V+ para destacar BASS (graves). A seguir, pressione
repetidamente os botões P+/ P- para selecionar BASS (graves), TREBLE
(agudos), BALANCE (proporção), SOUND MODE (modo de som) ou
NICAM/A2.
• Pressione repetidamente os botões V+/ V- para ajustar as congurações.
• Quando SOUND MODE (modo do som) for selecionado, pressione
repetidamente os botões V+/V- para selecionar o modo de efeito sonoro:
THEATER(teatro), ODEUM (odeum), NEWS (notícias) ou PERSONAL
(pessoal).
• Quando NICAM/A2 for escolhido, pressione repetidamente os botões
V+/V- para selecionar entre MONO, STEREO (estéreo) ou DUAL I ou DUAL
II (dependendo do tipo de sinal de áudio transmitido pela sua emissora de
TV).
Notas:
• Certique-se de que a recepção do sinal da televisão é boa, caso contrário,
a informação do teletexto pode não ser apresentada, ou ser apresentada
com falhas.
• Se aparecer algum carácter com falhas quando estiver a ver o teletexto,
certique-se de que a língua do teletexto é idêntica à língua no menu de
conguração, conforme apresentado na página 23. Se as línguas forem
diferentes, escolha a mesma língua para a língua de teletexto no menu de
congurações.
TV – MENU NA TELA
MENUS DE CONFIGURAÇÃO
Pressione o botão MENU para entrar no menu de conguração (Pressione
novamente para sair). Pressione os botões P+/P-/V+/ V- para destacar a função
dentro do menu que deseja congurar. Pressione o botão V+ para conrmar a
seleção. Pressione os botões P+/P- para alternar entre as opções no sub-menu.
MODO TV
No modo de TV, existem 5 menus principais de conguração:
PICTURE- Serve para congurar a qualidade de imagem.
• Pressione o botão MENU. O menu de conguração PICTURE aparecerá na
tela.
• Pressione o botão V+ para destacar CONTRAST (CONTRASTE) e, a seguir,
pressione repetidamente os botões P+/P- até que a conguração desejada
seja destacada (CONTRAST (contraste), BRIGHTNESS (brilho), HUE
(tonalidade), SATURATION (saturação), SHARPNESS (nitidez), COLOR
TEMP (temperatura da cor) ou PICTURE MODE (modo de imagem)).
• Pressione repetidamente os botões V+/V- para ajustar as congurações.
• Quando selecionar COLOR TONE,for selecionada, pressione repetidamente
os botões V+/V- para selecionar a temperatura de cor: WARM (quente),
COOL (fresca) ou NORMAL.
• Quando PICTURE MODE for selecionado, pressione repetidamente os
botões V+/V- para selecionar o modo de imagem: BRIGHT (claro),
PERSONAL (pessoal), NORMAL ou SOFT (suave).
NOTA: HUE (tonalidade) não funciona no modo de televisão.
CHANNEL- Serve para sintonizar a sua televisão.
• Pressione o botão MENU e então pressione os botões P+/P- até que o
ícone CHANNEL seja destacado. O menu de conguração do canal aparece
na tela.
• Pressione o botão V+ para destacar AUTO SCAN. A seguir, pressione
os botões P+/P- até que a conguração desejada seja destacada: AUTO
SCAN (busca automática) , CHANNEL (canal), COLOR.SYS (sistema de
cores), SOUND SYS., SKIP (saltar), MANUAL ou FINE.
• Pressione repetidamente os botões V+/V- para ajustar a conguração.
• Quando CHANNEL (canal) é selecionado, é possível selecionar o número
do canal pressionando repetidamente os botões V+/V-.
• Quando SKIP (saltar) é escolhido, prima o botão V+ repetidamente para
desligar ou ligar o canal actual.
• Quando escolher AUTO SCAN, prima o botão V+ para começar a busca
e a unidade procura automaticamente todos os canais e guarda os canais
activos na televisão.
• Quando escolher COLOR .SYS, prima os botões V+/V- repetidamente para
escolher SECAM, AUTO ou PAL. (O sistema de cor da televisão no Reino
Unido e na Alemanha é PAL, em França é Secam. Se não tem a certeza do
seu sistema de cor na sua área, escolha a opção AUTO).
• Quando escolher SOUND.SYS, prima os botões V+/V- repetidamente para
escolher B/G; I; D/K; L. (o sistema de som no Reino Unido é I, na Alemanha
é B/G, em França é L. Se não tem a certeza do sistema de som na sua
área, prima os botões V+/V- repetidamente até ouvir o som correctamente.)
• Quando escolher MANUAL, prima o botão V+ para procurar o canal
seguinte disponível numa frequência superior. Prima o botão V- para
procurar o canal seguinte disponível numa frequência inferior. O novo canal
de televisão é guardado automaticamente na memória da televisão.
• Quando escolher FINE, prima repetidamente os botões V+/V- para ajustar a
recepção do canal actual de televisão.
20
Page 21

FUNÇÃO
ON
WEST
BLUE SCREENBLUE SCREEN
TXT LANGUAGETXT LANGUAGE
ADJUST
AUTO SCAN
COLOR .SY
S
L
SECAM
ON
S
OUND .SY
S
MANUA
L
40.00MHZ
40.00MHZ
SKI
P
FINE
ADJUST
MOV
E
HU
E
COLOR TONE
STANDARD
ADJUST
ADJUST
NICAM/A2
STEREO
• Prima o botão MENU e depois prima repetidamente o botão P- para realçar
o ícone FUNCTION. O menu de conguração da função aparece no ecrã.
• Prima o botão V+ para realçar RESET. De seguida, prima os botões P+/Prepetidamente para escolher RESET (reiniciar), BLUE SCREEN (ecrã azul)
ou TXT LANGUAGE (língua do texto).
• Prima repetidamente os botões V+/V- para ajustar a conguração.
• Quando escolher BLUE SCREEN, pode ligar ou desligar o ecrã azul,
premindo repetidamente os botões V+/V-. Se escolher a opção ligada, o
ecrã ca azul quando não houver sinal, ou se houver um sinal fraco de
recepção. Se escolher a opção desligada, o ecrã azul não aparece.
• Quando escolher TXT LANGUAGE, prima repetidamente os botões V+/Vpara escolher a língua do teletexto para WEST (ocidental), EAST (oriental),
RUSSIAN (russo), ARABIC (árabe), FARSI (persa) ou AUTO.
MODO AV, S-VIDEO ou SCART
Estes modos possuem 4 menus de conguração principais:
PICTURE- para a conguração da qualidade de imagem.
• Pressione o botão MENU. O menu de conguração PICTURE (imagem)
aparece no tela.
• Pressione o botão V+ para destacar a opção CONTRAST (contraste) e
pressione repetidamente os botões P+/P- até que a conguração
desejada seja destacada (CONTRAST (contraste), BRIGHTNESS (brilho),
HUE (tonalidade), SATURATION (saturação), SHARPNESS (nitidez),
COLOR TEMP (temperatura da cor) ou PICTURE MODE (modo de
imagem).
• Pressione repetidamente os botões V+/V- para ajustar as congurações.
• Quando COLOR TONE for selecionado, pressione repetidamente os botões
V+/V- para selecionar a temperatura da cor: WARM (quente), COOL (fria)
ou NORMAL.
• Quando PICTURE MODE é selecionada, pressione repetidamente os
botões V+/V- para selecionar o modo de imagem: BRIGHT (lbrilhante),
PERSONAL (pessoal), NORMAL ou SOFT (suave).
OSD (Apresentação Na Tela)
• Pressione o botão MENU e, a seguir, pressione repetidamente o botão
P- para destacar o ícone OSD. O menu de conguração OSD aparece na
tela.
• Pressione o botão V+ para destacar LANGUAGE (idioma). A seguir,
pressione repetidamente os botões P+/P- para selecionar LANGUAGE
(idioma), H-POSITION (posição H), V-POSITION (posição V), DURATION
(duração) ou HALFTONE (meio tom).
• Pressione repetidamente os botões V+/V- para ajustar a conguração.
• Quando LANGUAGE é selecionado, pressione repetidamente os botões
V+/V- para selecionar o idioma desejado.
SOUND- Serve para congurar a qualidade do som
• Pressione o botão MENU e, a seguir, pressione repetidamente o botão
P- para destacar a opção SOUND (som). O menu de conguração do som
aparece na tela.
• Pressione o botão V+ para destacar a opção BASS (graves) e, a seguir,
pressione repetidamente os botões P+/ P- para selecionar BASS (graves),
TREBLE (agudos), BALANCE (proporção) ou SOUND MODE (modo do
som).
• Pressione repetidamente os botões V+/ V- para ajustar a conguração.
• Quando SOUND MODE for selecionado, pressione repetidamente os botões
V+/V- para selecionar o modo de efeito sonoro: THEATER (teatro), ODEUM
(odeum), NEWS (notícias) ou PERSONAL (pessoal).
NOTA:
No modo AV, o modo S-VIDEO ou SCART, NICAM/A2 não pode ser escolhido.
21
Page 22

FUNÇÃO
MOV
E
ON
WEST
BLUE SCREENBLUE SCREEN
TXT LANGUAGETXT LANGUAGE
ADJUST
P
C
H-POSITION
-
V-POSITION
CLOCK
PHASE
AUTO
ADJUST
ADJUST
NICAM/A2
STEREO
ON
WEST
BLUE SCREENBLUE SCREEN
TXT LANGUAGETXT LANGUAGE
ADJUST
• Prima o botão MENU e, de seguida, prima repetidamente o botão P- para
realçar o ícone FUNCTION. O menu de conguração da função aparece no
ecrã.
• Prima o botão V+ para realçar RESET. De seguida, prima os botões P+/Prepetidamente para escolher RESET (reiniciar), BLUE SCREEN (ecrã azul)
ou TXT LANGUAGE (língua do texto).
• Prima repetidamente os botões V+/V- para ajustar a conguração.
• Quando escolher BLUE SCREEN, pode ligar ou desligar o ecrã azul,
premindo repetidamente os botões V+/V-. Se escolher a opção ligada, o
ecrã ca azul quando não houver sinal, ou se houver um sinal fraco de
recepção. Se escolher a opção desligada, o ecrã azul não aparece.
• Quando escolher TXT LANGUAGE, prima repetidamente os botões V+/Vpara escolher a língua do teletexto para WEST (ocidental), EAST (oriental),
RUSSIAN (russo), ARABIC (árabe), FARSI (persa) ou AUTO.
SOUND- Serve para congurar a qualidade do som
• Pressione o botão MENU e, a seguir, pressione repetidamente o botão
P- para destacar a opção SOUND (som). O menu de conguração do som
aparece na tela.
• Pressione o botão V+ para destacar a opção BASS (baixos) e, a seguir,
pressione repetidamente os botões P+/ P- para selecionar BASS (baixos),
TREBLE (agudos), BALANCE (proporção) ou SOUND MODE (modo do
som).
• Pressione repetidamente os botões V+/ V- para ajustar a conguração.
• Quando SOUND MODE é selecionado, pressione repetidamente os botões
V+/V- para selecionar o modo de efeito sonoro: THEATER (teatro), ODEUM
(odeum), NEWS (notícias) ou PERSONAL (pessoal).
NOTA: No modo PC, NICAM/A2 não pode ser escolhido.
OSD (Apresentação Na Tela)
• Pressione o botão MENU e, a seguir, pressione repetidamente o botão
P- para destacar o ícone OSD. O menu de conguração OSD aparece na
tela.
• Pressione o botão V+ para destacar LANGUAGE (idioma). A seguir,
pressione repetidamente os botões P+/P- para selecionar LANGUAGE
(ldioma), H-POSITION (posição H), V-POSITION (posição V), DURATION
(duração) ou HALFTONE (meio tom).
• Pressione repetidamente os botões V+/V- para ajustar a conguração.
• Quando LANGUAGE é selecionado, pressione repetidamente os botões
V+/V- para selecionar o idioma desejado.
PC MODE (MODO COMPUTADOR)
No modo PC, existem 4 menus de conguração principais:
PC- Serve para congurar a qualidade de imagem.
• Pressione o botão MENU. O menu de conguração PC aparece na tela.
• Pressione o botão V+ para destacar CONTRAST (contraste) e, a seguir,
pressione repetidamente os botões P+/P- para selecionar CONTRAST
(contraste), BRIGHTNESS (brilho), H-POSITION (posição H), V-POSITION
(posição V), CLOCK (relógio), PHASE (fase) ou COLOR MODE
(temperatura da cor).
• Pressione repetidamente os botões V+/V- para ajustar as congurações.
• Quando escolher AUTO, prima os botões V+/V- para começar a
conguração. A televisão acerta o RELÓGIO, FASE e escolhe
automaticamente a melhor condição.
• Quando escolher COLOR MODE, prima os botões V+/V- para denir o
modo de cor predenido para NORMAL, WARM (quente), COOL (frio),
SRGB ou USER (utilizador). Na conguração USER, prima os botões P+/P-
para escolher USER-R, USER-G ou USER-B e prima os botões V+/V- para
ajustar a cor, conforme desejado.
FUNÇÃO
• Pressione o botão MENU e, a seguir, pressione repetidamente o botão P-
para destacar a opção FUNCTION. O menu de conguração da função
aparece na tela.
• Pressione o botão V+ para destacar a opção RESET. A seguir, pressione
repetidamente os botões P+/P- para selecionar RESET (reiniciar) ou BLUE
SCREEN.
• Pressione repetidamente os botões V+/V- para ajustar as congurações.
• Quando escolher BLUE SCREEN, pode ligar ou desligar o ecrã azul,
premindo repetidamente os botões V+/V-. Se escolher a opção ligada, o
ecrã ca azul quando não houver sinal, ou se houver um sinal fraco de
recepção. Se escolher a opção desligada, o ecrã azul não aparece.
NOTA: No modo PC, TXT LANGUAGE não pode ser escolhido.
22
Page 23

OSD (Apresentação Na Tela)
MOV
E
15
0
5
0
• Pressione o botão MENU e, a seguir, pressione repetidamente o botão P-
para destacar o ícone OSD. O menu de conguração OSD aparece na tela.
• Pressione o botão V+ para destacar LANGUAGE (língua). A seguir,
pressione repetidamente os botões P+/P- para selecionar LANGUAGE
(língua), H-POSITION (posição H), V-POSITION (posição V), DURATION
(duração) ou HALFTONE (meio tom).
• Pressione repetidamente os botões V+/V- para ajustar a conguração.
• Quando LANGUAGE for selecionada, pressione repetidamente os botões
V+/V- para selecionar o idioma desejado.
TV – SUPORTE RETRÁTIL
Nota:
O ângulo máximo de inclinação é de 15 graus para trás. Não incline a televisão
além da faixa especicada. Se força excessiva for exercida para inclinar a
televisão podem ocorrer danos permanentes na parte mecânica do suporte.
DICAS PARA MONTAR NA PAREDE
Esta televisão pode ser montada na parede, usando um kit de xação
VESA compatível. (Pode comprar o suporte na loja onde comprou a
televisão). Antes de montar a televisão na parede, a base tem de ser
retirada da parte inferior da televisão.
1. Desligue a unidade no interruptor principal na parte traseira da
televisão.
2. Desligue todos os cabos da televisão.
3. Coloque a sua televisão numa superfície suave e limpa, conforme
apresentado à esquerda.
4. Desaperte e retire os dois parafusos da estrutura traseira,
conforme apresentado à esquerda.
5. Retire a base da televisão.
6. Desaperte e retire os 4 parafusos de montagem da parte traseira
da estrutura, conforme apresentado à esquerda. Não retire
quaisquer outros parafusos da televisão.
7. Fixe a roda de suporte e os parafusos na parte traseira da
televisão, conforme apresentado à esquerda.
Retire os 2 parafusos
M4x12 da base
Retire a base
NOTA:
Para evitar danicar a tela, nunca toque a tela nem utilize produtos de limpeza
líquidos ou aerossóis para limpeza da tela. Use apenas um pano seco.
Retire os 4
parafusos (M4x12)
Fixe a roba de suporte
e os parafusos
8. Encoste o suporte de parede à parede.
a) Marque o local do orifício na parede.
b) Faça um orifício no local marcado com um berbequim.
c) Coloque os apoios em cada orifício na parede.
d) Coloque o suporte na parede e xe-o com parafusos, após
colocar os apoios nos orifícios de suporte.
9. Levante a televisão até ao encaixe do suporte de parede.
23
Page 24

NOTA: Em cima encontram-se ilustrações e instruções apenas para
referência. Para mais detalhes, consulte o Manual de Instruções de
Instalação do Suporte de Parede.
TV – ESPECIFICAÇÕES
GERAL:
Alimentação: Adaptador AC/DC:
ENTRADA: AC~ 100/240V, 50/60Hz , 1,5A MAX.
SAÍDA: DC 12V 4,0A
Energia de saída das colunas
Resolução
Taxa de contraste
Tempo de resposta
Luminosidade
Frequência vertical para entrada do PC
Dimensões (polegadas)
3 Wattsx2
1024x768
450:1
16ms
250cd/m2
60-70Hz
43.3(W)x41.6(H)x7.2(D)cm
TV – RESOLUÇÃO DE PROBLEMAS
Não há som nem imagem erique se o indicador de
Não há imagem, mas o som é
normal
A imagem é normal, mas não há
som
A imagem tem pontinhos ou
interferências
Não há cor • Tente outros canais.
O controle remoto não funciona • Aponte o controle remoto para o
alimentação no painel da televisão
está aceso. Se não estiver, verique
as conexões entre o adaptador
AC/DC e a TV, ou as conexões entre
o adaptador AC/DC e a tomada AC.
• As imagens podem estar muito
escuras. Aumente o nível de brilho e
contraste.
• O nível do som pode estar muito
baixo. Aumente o volume do som.
• Tente outros canais.
• Verique a conexão da antena.
• Aumente o nível de saturação.
sensor remoto no painel dianteiro.
• Coloque pilhas novas.
• Verique se as pilhas foram
colocadas com a polaridade correta
(sinais +/- )
ACESSÓRIOS
Controle Remoto
Pilhas do controle remoto (AAA)
Manual de Instruções
Adaptador AC/DC
Nota: O design e estrutura estão sujeitos a alterações sem aviso prévio.
1 unidade
2 unidades
1 conjunto
1 unidade
1 unidade
GARANTIA
Este produto tem a garantia de dois anos.
Para que a garantia seja válida dirija-se ao seu revendedor munido de uma
prova de compra. Esta garantia cobre os defeitos de fabrico ou de montagem,
à excepção de toda deterioração proveniente da má utilização do produto
(como desmontagem, calor ou humidade) e o não resapeito pelo manual de
instruções do mesmo.
Indicações para a protecção do meio ambiente
Aparelhos eléctricos antigos são materiais que não pertencem ao lixo
doméstico! Por isso pedimos para que nos apoie, contribuindo activamente
na poupança de recursos e na protecção do ambiente ao entregar este
aparelho nos pontos de recolha, caso existam.
LEXIBOOK Electronica Lda, Quinta dos Loios, Praceta José
Domingos dos Santos, 6B-8ª, 2835-343 Lavradio-Barreiro, Portugal
Apoio Técnico: 212 06 1 348,
IM code: LCD1SPIM0287
24
 Loading...