

Page 1
7” Lexibook® DVD Player
www.lexibook.com
1 2
3
4
5
6 7 8
9 0
10+
VOL -
VOL+
REPEAT
SEARCH
TITLE
ENTER
RETURN
ST E P
SUB T IT L E
AN G L E
AUD IO
MEN U
SE TU P
AB
DISP L AY
ZOOM
MUTE
SOURCE
Lecteur DVD 7” Lexibook®
Lector DVD 7” Lexibook®
DVDP1_07IM1353_30Aug_V09.indd 1 30/08/2013 4:19 PM
Instruction manual
Mode d’emploi
Manual de instrucciones
DVDP1_07
Page 2

DVDP1_07IM1353_30Aug_V09.indd 2 30/08/2013 4:19 PM
Page 3
English
Safety instructions
RISK OF ELECTRIC SHOCK
CAUTION: TO REDUCE THE RISK OF ELECTRIC SHOCK. DO NOT REMOVE COVER
(OR BACK). NO USER SERVICEABLE PARTS INSIDE. REFER SERVICING TO
QUALIFIED SERVICE PERSONNEL.
The graphic symbols on the back cover of the set mean the following:
DANGEROUS VOLTAGE:
The lightning ash with arrowhead symbol within an equilateral triangle is
intended to alert the user to the presence of uninsulated ‘dangerous voltage’
within the product’s enclosure that may be of sufcient magnitude to constitute
a risk of electric shock to persons.
WARNING:
The exclamation point within an equilateral triangle is intended to alert the
user to the presence of important operating and maintenance (servicing)
instructions in the literature accompanying the appliance.
WARNING:
• To reduce the risk of re or electric shock, do not expose this appliance to rain or
moisture.
• The apparatus shall not be exposed to dripping or splashing and that no objects lled
with liquids, such as vases, shall be placed on the apparatus.
• The mains plug is used as the disconnect device, the disconnect device shall remain
readily operable.
• In order to disconnect the apparatus from the mains completely, the mains plug should
be disconnected from the mains socket outlet completely.
DANGER
LASER SAFETY
This unit employs an optical laser beam system in the CD mechanism,
designed with built in safeguards. Do not attempt to disassemble, refer to
qualied service personnel. Exposure to this invisible laser light beam may be
harmful to the human eye.
CAUTION
DO NOT OPEN
3
DVDP1_07IM1353_30Aug_V09.indd 3 30/08/2013 4:19 PM
Page 4

English
THIS IS A CLASS-1 LASER PRODUCT. USE OF CONTROLS, OR ADJUSTMENTS
OR PROCEDURES OTHER THAN THOSE SPECIFIED HEREIN, MAY RESULT IN
HAZARDOUS LASER LIGHT BEAM EXPOSURE.
Invisible laser radiation when open and interlock failed or defeated. Avoid direct exposure
to laser beam.
Manufactured under license from Dolby Laboratories ‘Dolby’, ‘Pro Logic’ and the double-D
symbol are trademarks of Dolby Laboratories. Condential unpublished works.© 19921997 Dolby Laboratories, lnc. All rights reserved.
This product incorporates copy protection technology that is protected by U.S. and foreign
patents, including patent numbers 5,315,448 and 6,836,549, and other intellectual
property rights. The use of Macrovision’s copy protection technology in the product must
be authorized by Macrovision. Reverse engineering or disassembly is prohibited.
4
DVDP1_07IM1353_30Aug_V09.indd 4 30/08/2013 4:19 PM
Page 5

English
IMPORTANT SAFETY INSTRUCTIONS
1. Read these instructions.
2. Keep these instructions.
3. Heed all warnings.
4. Follow all instructions.
5. Do not use this unit near water.
6. Clean only with a dry cloth.
7. Do not block any ventilation openings. Install in accordance with manufacturer’s
instructions.
8. Do not install near any heat sources such as radiators, heat registers, stoves or other
apparatus (including ampliers) that produce heat.
9. Do not defeat the safety purpose of the polarized or grounding-type plug. A polarized
plug has two blades with one wider than the other. A grounding-type plug has two
blades and a third grounding prong. The wide blade or the third prong is provided for
your safety. If the provided plug does not t into your outlet, consult an electrician for
replacement of the obsolete outlet.
10. Protect the power cord from being walked on or pinched particularly at plugs,
convenience receptacles, and the point where they exit from the unit.
11. Only use attachments / accessories specied by the manufacturer.
12. Unplug this unit during lightning storms or when unused for long periods of time.
13. Refer all servicing to qualied service personnel. Servicing is required when the unit
has been damaged in any way, such as the following: the power-supply cord or plug
has been damaged; liquid has been spilled or objects have fallen into the unit;
and / or the unit has been exposed to rain or moisture, does not operate normally, has
changed its performance or has been dropped.
14. Do not overload wall outlet. Use only power source as indicated.
15. Use replacement parts as specied by the manufacturer.
16. Upon completion of any service or repairs to this product, ask the service technician to
perform safety checks.
17. The product must not be used if it has been exposed to rain or immersed in or sub-
jected to liquid spills.
18. If you experience problems with the DC car adaptor, check the fuse and if necessary,
change it (2A). Always replace the fuse with the same type and rating. If the fuse has
blown, check all connections and inspect the cord for any damage. If the fuse blows
repeatedly, take the car adaptor to your local retail store. Do not replace the fuse with
a higher rating as it may damage the player.
5
DVDP1_07IM1353_30Aug_V09.indd 5 30/08/2013 4:19 PM
Page 6
English
Installation
Unpacking the device
When unpacking, ensure that the following elements are included:
1 x portable DVD player
1 x remote control (CR2025 lithium type battery already inside)
1 x AC / DC adaptor
1 x car adaptor
1 x earphones
1 x instruction manual
WARNING: All packaging materials, such as tape, plastic sheets, wire ties and tags are
not part of this product and should be discarded.
Portable DVD player description
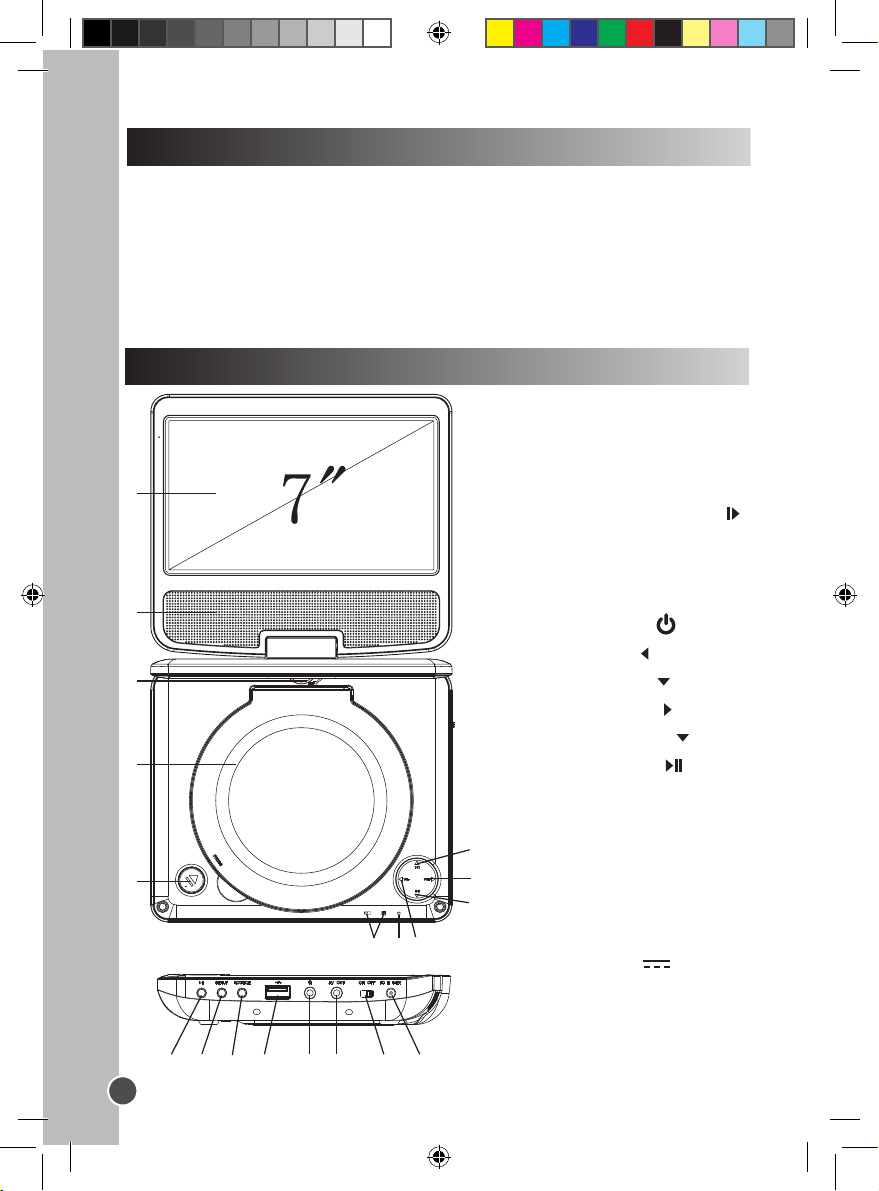
1. LCD screen
2. Speaker
3. Screen swivel
1
2
3
4
5
6
8
7
4. Disc compartment
5. Disc compartment open button
6. Charge indicator:
- Red LED light - charging
- Green LED light - fully charged
7. Power LED indicator
8. LEFT/VOL- button
9. DOWN/NEXT button
10. RIGHT/VOL+ button
11. UP/PREVIOUS button
12. PLAY/PAUSE button
13. SETUP button
14. SOURCE button
11
15. USB port
10
16. Headphone jack
9
17. AV OUT jack
18. ON/OFF switch
19. DC IN jack 9-12V
12 13 14 15 16 17 18 19
6
DVDP1_07IM1353_30Aug_V09.indd 6 30/08/2013 4:19 PM
Page 7
English
Remote control
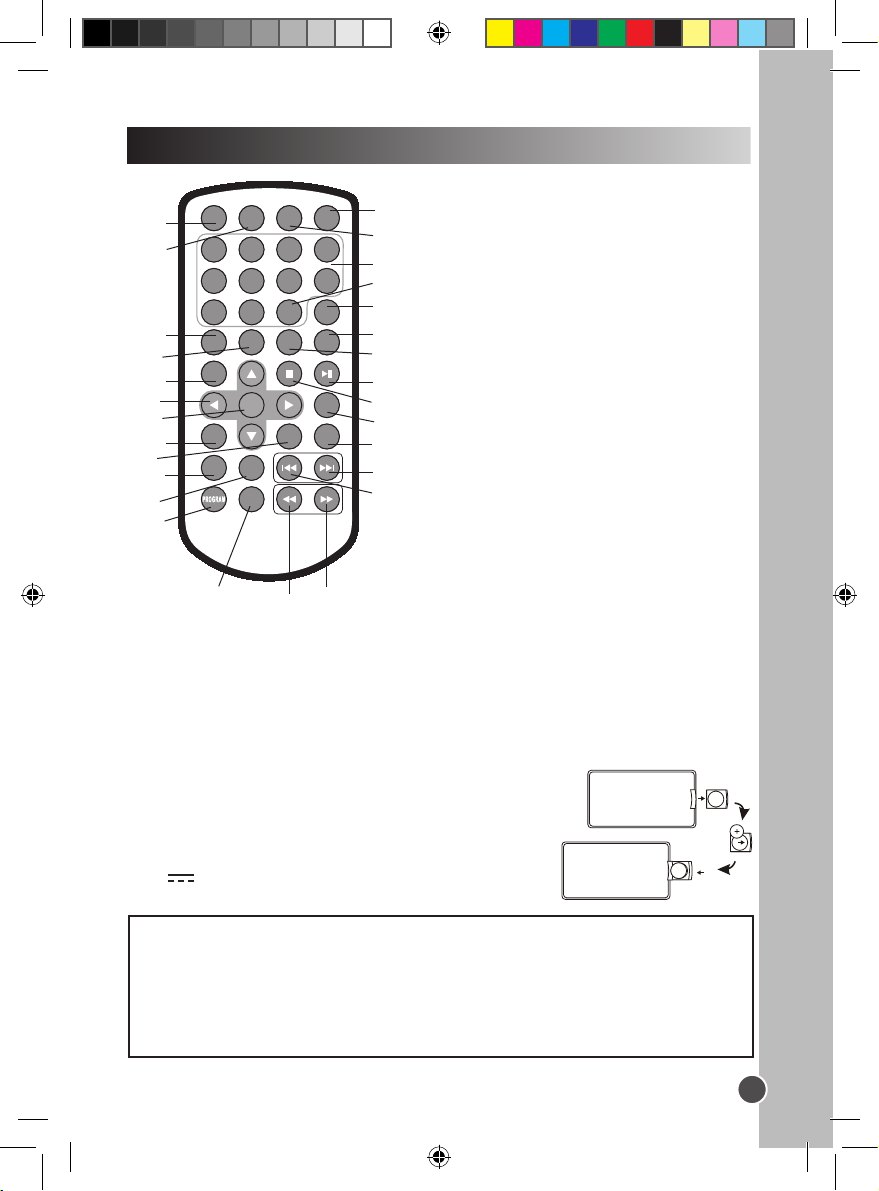
1. ZOOM key
MUTE
10+
AUDI O
VOL -
SOURC E
3
14
4
15
16
17
STEP
18
MENU
19
20
21
RETU RN
22
VOL+
23
25
26
SEAR CH
ZOOM
1
1 2
2
5
6 7 8
9 0
3
SUBTI TLE
TITL E
SETU P
REPE AT
ANG LE
ENTE R
AB
DISPL AY
4
5
6
7
8
24
9
10
13
11
12
27
28
2. SEARCH key
3. SUBTITLE key
4. ANGLE key
5. TITLE key
6. Direction keys UP/DOWN/LEFT/RIGHT
7. ENTER key
8. SETUP key
9. REPEAT key
10. AB key
11. PROGRAM key
12. DISPLAY key
13. SOURCE key
14. MUTE key
15. Numeric keys (0-9)
16. 10+ key
17. STEP key
18. MENU key
19. AUDIO key
20. PLAY/PAUSE key
21. STOP key
22. RETURN key
23. VOL+ key
24. VOL- key
25. NEXT key
26. PREVIOUS key
27. FORWARD key
28. BACKWARD key
Battery information
The rst time you use the remote control, remove the battery tab located at the rear of
the unit.
Battery replacement
1. Open the battery compartment cover by pressing the
unlock switch to the right and then sliding the battery
holder out.
2. Remove the used battery and insert one lithium CR2025
3V type battery (included) as illustrated.
3. Slide the battery cover in until it clicks rmly into place.
Non-rechargeable batteries are not to be recharged. Rechargeable batteries are
to be removed from the product before being charged. Rechargeable batteries are
only to be charged under adult supervision. Different types of batteries or new and
used batteries are not to be mixed. Only batteries of the same or equivalent type as
recommended are to be used. Batteries are to be inserted with the correct polarity.
Exhausted batteries are to be removed from the product. The supply terminals are not
to be short circuited. Do not throw batteries into a re. Remove the batteries if you are
not going to use the product for a long period of time.
7
DVDP1_07IM1353_30Aug_V09.indd 7 30/08/2013 4:19 PM
Page 8
English
WARNING: Malfunction or loss of memory may be caused by strong frequency
interference or electrostatic discharge. Should any abnormal function occur, remove the
battery and insert it again.
Corrosion, oxidation, battery-leakage and any other gradually acidic defect of this
nature will invalidate the guarantee.
Using the remote control
• Effective distance between the remote control and DVD player remote sensor is three
metres.
• When direct sunlight, an incandescent lamp, uorescent lamp or any other strong light
shines on the remote sensor of the unit, the remote operation may be unstable.
• When the battery becomes weak, the operating distance of the remote control reduces
signicantly and you need to replace the battery.
Charging the built-in lithium battery
Your DVD player is equipped with a built-in rechargeable lithium battery.
Fully charge the battery before using it for the rst time.
1. Plug the AC / DC or car adaptor into the jack on the back of the DVD player and insert
the plug into a mains wall socket or car cigarette lighter. When the unit is turned on, the
power indicator is red.
2. Once you connect the unit to the AC/DC adaptor or car adaptor, the lithium battery will
be charged.
3. When the battery is being charged, the battery indicator ashes green.
4. When the battery is fully charged, the indicator becomes red.
CHARGING TIME / PLAYBACK TIME
Charging time
Playback time
Approx. 3 to 4 hours
Note:
• The playback time may vary based on pattern usages of the DVD player.
• Only use the adaptor supplied with the DVD player. Do not use any other adaptor.
• The socket-outlet should be installed near the equipment and should be easily
accessible.
WARNING: Malfunction or loss of memory may be caused by strong frequency
interference or electrostatic discharge. Should any abnormal function occur, unplug the
AC / DC adaptor from the mains socket and plug it back in.
8
DVDP1_07IM1353_30Aug_V09.indd 8 30/08/2013 4:19 PM
Approx. 1½ to 2 hours
Page 9
English
Power connection
Use the AC / DC adaptor (AC ~ 100V-240V 50 / 60Hz) or the car adaptor to connect the
portable DVD player to a main socket. Make sure the remote control battery has been
inserted as shown in the Remote Control section.
Headphones connection
On the right side of the unit is a headphones socket, suitable for any normal earphones.
When the headphones are in use, the speakers are turned off.
CAUTION: Too high volume, especially when using headphones, can damage your
hearing. For this reason, please turn the volume down before connecting the headphones.
Note:
• Please switch off the DVD player before you make any connections.
• Before using this product for the rst time, please remove the static label from the LCD
screen.
NOTICE!
When rotating the display, please open the display rst and make the angle be as 120˚
above, then rotate the display by 180˚clockwise or by 90˚ counterclockwise. Otherwise the
CD door and the middle shell are easy to be scratched.
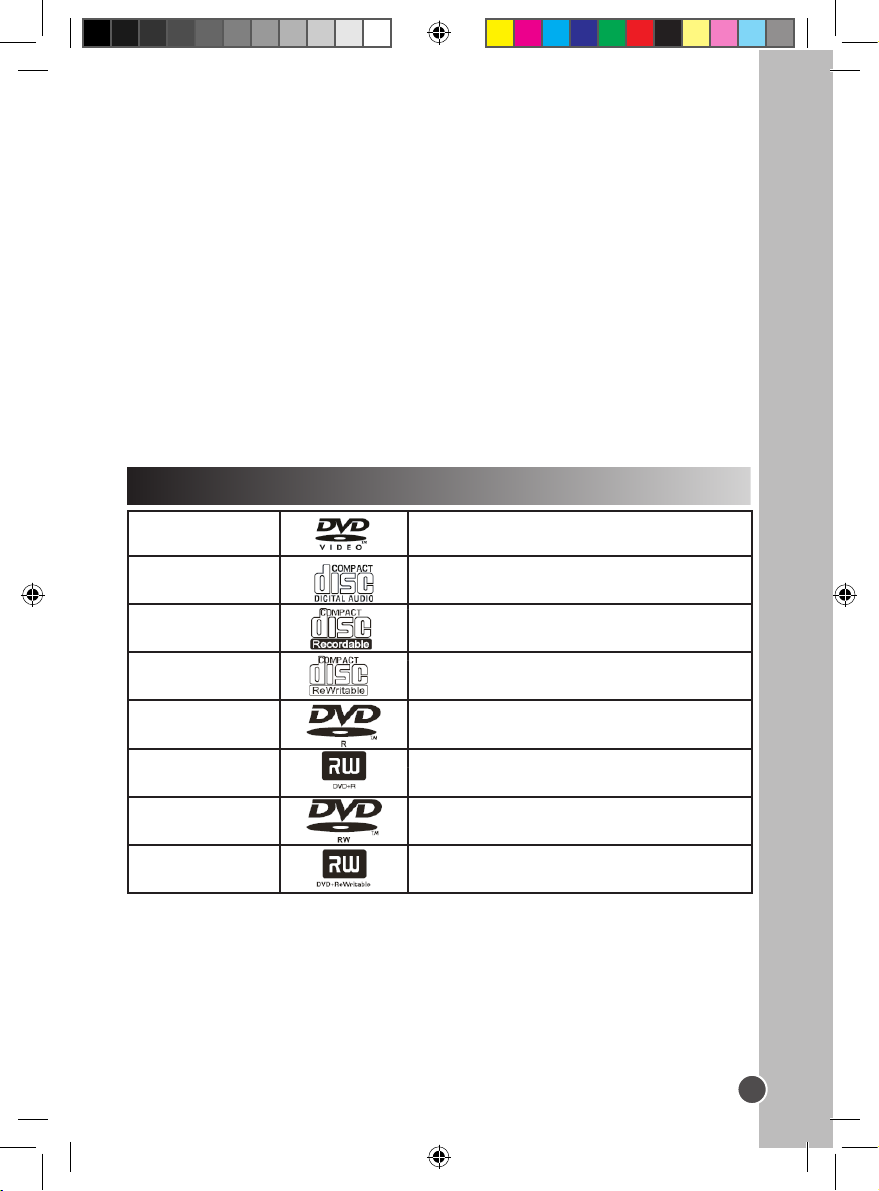
Disc types
DVD
CD AUDIO
CD-R
CD-RW
DVD-R
DVD+R
DVD-RW
DVD+RW
Note:
• The portable DVD player is compatible with JPEG format.
• Discs can only be used when they have been correctly recorded.
Audio + Video
Audio
Audio or Video
Audio or Video
Audio or Video
Audio or Video
Audio or Video
Audio or Video
9
DVDP1_07IM1353_30Aug_V09.indd 9 30/08/2013 4:19 PM
Page 10
English
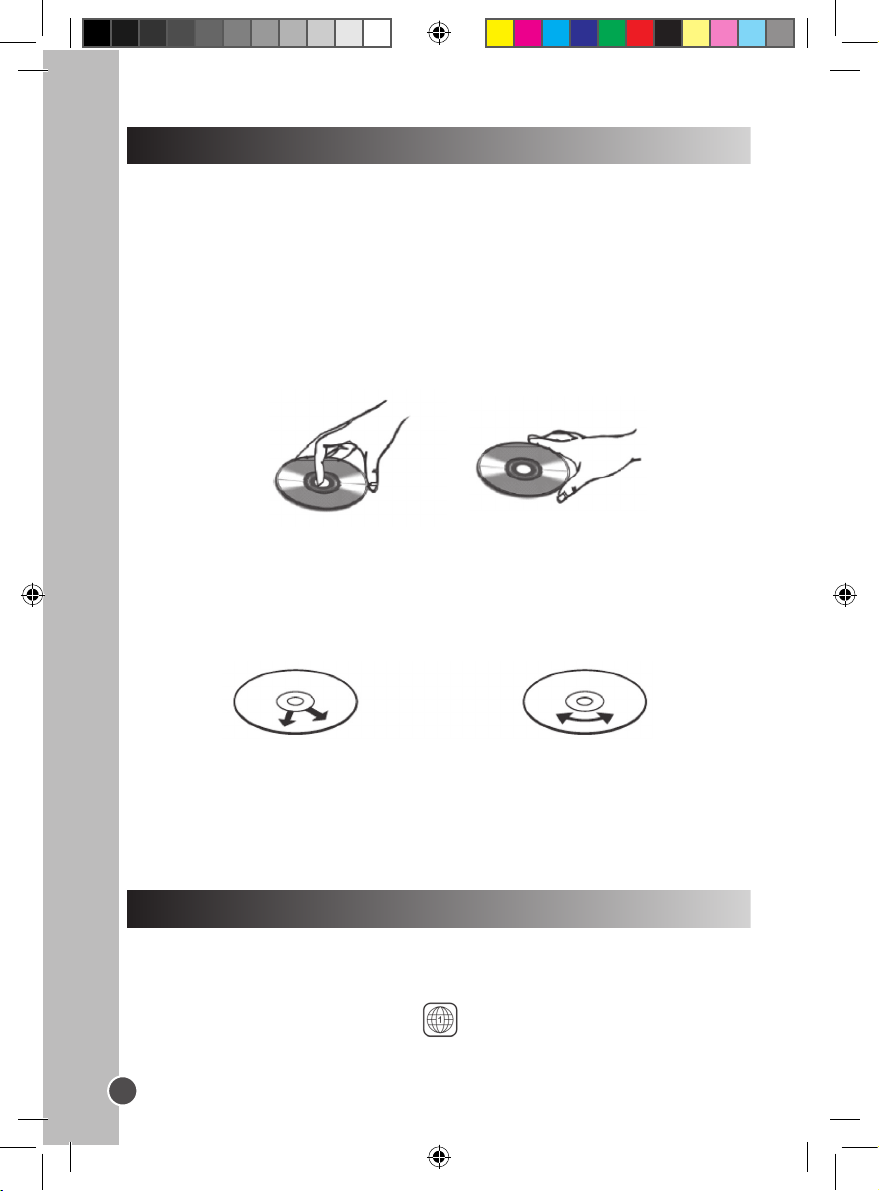
Disc maintenance
Caring for discs (A)
• Do not touch the shiny surface of the disc or bend the disc.
• Never use solvents such as benzene or other strong chemical cleaners since these
could damage the unit’s nish.
• It is important that no liquid reaches the inside of the unit.
• Remove the disc from the case by holding it at the edges while pressing the centre hole
lightly.
• Place the disc into the tray with the label facing up.
• A dirty disc may not play correctly. If a disc becomes dirty, wipe it with a soft cloth in a
straight line from centre to edge.
• Avoid exposure to direct sunlight, temperature extremes, and moisture.
• Treat the disc carefully. Handle the disc only by its edges. Never allow your ngers to
contact the shiny, unprinted side of the disc.
.
(A)
Clean the discs (B)
• Do not attach adhesive tape, stickers, etc. to the disc label.
• Clean the disc periodically with a soft, lint-free, dry cloth. Never use detergents or
abrasive cleaners to clean the disc. If necessary, use a CD cleaning kit.
• If a disc skips or gets stuck on a section of the disc, it is probably dirty or damaged
(scratched).
• When cleaning the disc, wipe in straight lines from the centre of the disc to the outer
edge of the disc. Never wipe in circular motions.
(B)
Correct
• Discs should be stored in their cases after each use to avoid damage.
• Do not expose discs to direct sunlight, high temperatures or dust, etc.
• Prolonged exposure or extreme temperatures can warp the disc.
• Do not stick or write anything on either side of the disc. Sharp writing instruments, or ink,
may damage the surface.
Incorrect
Region management information
This DVD Player is designed and manufactured to respond to the Region Management
Information that is recorded on a DVD disc. If the Region number described on the DVD
disc does not correspond to the Region number of this DVD Player, this DVD player
cannot play that disc.
The Region number of this DVD player is (USA, Canada, East Pacic Islands).
10
DVDP1_07IM1353_30Aug_V09.indd 10 30/08/2013 4:19 PM
Page 11
English
Key functions
IMPORTANT NOTE: The functions described below are mainly only available for DVD
discs unless specied otherwise, i.e. audio CD. The on-screen messages and operations
may be different for other type of discs.
Play / Stop
1. Slide the POWER switch to the ON position and then open the lid of the DVD player.
2. Press the button on the player to open the disc tray.
3. Hold the disc without touching either of its surfaces and place it on the tray with the
printed title face up (for a Double-sided DVD Disc, put the disc with label A / 1 up).
4. Close the tray; the disc will load automatically.
If it is a DVD disc, the main menu or the title page will be displayed. Use the direction
keys / / / of the remote control or of the device to select the desired option, and
then press the PLAY key or the ENTER key to conrm.
• If it is a CD, the rst track will play automatically.
• If it is a CD containing les saved in folders, use the direction keys of the remote
control to select a folder or les and press the ENTER key to select and open it.
5. Press the STOP key if you want to stop the disc playback. You can resume playback
by pressing the PLAY key . Playback will resume at the location where you have
pressed the STOP key .
6. Press the STOP key twice to cancel the resume function and completely stop the
disc.
Volume
Note : Maximum volume is on whenever DVD player turns on.
Press the VOL+ or VOL- keys to increase or decrease the volume. To work, you will have
to keep on pressing the buttons for about one second.
Pause
1. Press the key to pause the DVD or CD playback.
2. Press the key again to resume playback.
Fonctions des touches
Previous / Next
During DVD or CD playback, press the key to return to the beginning of the previous
chapter or track. Or press the key to move to the beginning of the next chapter or
track.
Notes: To use and keys on the DVD player, press and hold the UP and DOWN
keys. To work, you will have to keep on pressing the buttons for about one second.
Scan Forward / Backward
Press the key to search forward and the key to search backward. Press either key
repeatedly during playback to change the search speed: ‘2X’, ‘4X’, ‘8X’ and ‘20X’ and
normal playback
Note: Press the key at any moment to resume to normal speed.
Mute
Press the MUTE key to silence the player. Press the MUTE key again to turn the sound
on.
11
DVDP1_07IM1353_30Aug_V09.indd 11 30/08/2013 4:19 PM
Page 12

English
Other functions
DVD Menu
During DVD playback, press the MENU key on the remote control to go to the DVD main
menu. Use the direction keys to select the desired option and press the ENTER key to
conrm.
Repeat Mode and A-B Repeat
This function is available for DVD and audio CD but with different effects.
1. For DVD disc playback, press the REPEAT key once to repeat the current chapter;
twice to repeat the current title; and three times to repeat the entire disc.
2. For CD playback, press the REPEAT key once to repeat the current track, and twice to
repeat the whole disc (repeat all tracks).
3. Press the key repeatedly to cancel the repetition.
4. To repeat a segment of the DVD or CD while in playback mode, press the A-B key once
to set the start of the repeat; twice to signal the end of the repeat; and three times to
turn the repeat off.
Subtitle
Press the SUBTITLE key repeatedly to turn on and change the subtitle language shown
on screen.
Note: Number of subtitles available depends on the DVD disc.
Audio
• During DVD playback, press the AUDIO key to change the audio language of the DVD
disc (if this function is available with the disc). Press the AUDIO key repeatedly to
change the language.
• During audio CD playback, press the AUDIO key repeatedly to select ‘Stereo’, ‘Left’, or
‘Right’.
Search
You can jump to a specic time location, track, chapter or title.
1. Press the SEARCH key to enter the search mode.
• DVD – a title, a chapter or specic time of a title.
• CD – a track, specic time of a track or specic time of the disc.
2. Use the numeric keys to enter the desired title, chapter, time or track.
3. Press the ENTER key and the player will jump to the target location immediately.
Title
To search for a specic title on a DVD / audio CD, press the TITLE key and use the
direction keys to select a title. Press the ENTER key to start playing the title.
Display
Press the DISPLAY key to show the time and status information on the screen (elapsed
time, remaining title, elapsed chapter, remaining chapter …). Press this key repeatedly to
hide the information.
Zoom
Press the ZOOM key repeatedly to select zoom levels 2 - 4 and 1/2 - 1/4 or turn this
feature off.
Angle
1. If a DVD disc contains multi-angle feature, the viewing angles may be selected.
2. During playback, press the ANGLE key repeatedly to select the desired viewing angle.
Note: The number of viewing angles depends on the disc.
12
DVDP1_07IM1353_30Aug_V09.indd 12 30/08/2013 4:19 PM
Page 13

English
Step
1. Press the STEP key once to pause the video. Press this key again to move one video
frame up. (The video is in pause mode the whole time.)
2. To resume, press PLAY.
Return
Press this key to back to a previous page/option.
Program
To program the order of play:
1. Press the PROGRAM key.
2. Use the numeric keys to enter the title and chapter for a DVD, or just the chapter for a
VCD or an audio CD.
3. Use the direction keys to move to the next setting.
4. Select ‘Play’ to start playing the programmed order and press the ENTER key to con-
rm. (If you select ‘Clear Program’ the player will use the order of play on the disc.)
DVD settings
The portable DVD player provides four setting menus: ‘System’, Language’, ‘Standby’,
and ‘Video’.
1. To enter the setting menus page, press the SETUP key.
2. Use the / keys to select a menu.
3. Use the direction keys to navigate through the menus and select the available options.
Press the ENTER key to conrm your settings.
4. To exit, press the SETUP key at any time.
System setup
TV System
1. Use the / keys to select ‘TV System’ and press .
2. Use the / to select:
PAL – Use this setting if you have a TV with PAL (phase alternating line) system.
NTSC – Use this setting if you have a TV with NTSC (national television system committee) system.
3. Press the ENTER key to conrm.
Power Resume
Select this option to turn the last memory on or off.
1. Use the / keys to select ‘Power resume’ and press .
2. Use the / to select ‘On’ or ‘Off’.
3. Press the ENTER key to conrm.
Note: By default, this option is off.
TV Type
1. Use the / keys to select ‘TV Type’ and press .
2. Use the / keys to select:
• ‘4.3LB’ – Use this setting if you have a normal TV to display a wide-screen picture.
• ‘4.3PS’ – Use this setting if you have normal TV with a non-wide-screen picture.
• ‘16:9’ – Use this setting if you have a wide-screen TV.
3. Press the ENTER key to conrm your selection.
13
DVDP1_07IM1353_30Aug_V09.indd 13 30/08/2013 4:19 PM
Page 14

English
Language setup
Press the SETUP key, and use the / keys to highlight ‘Language’. Then press the
key to enter the settings.
Note: Use the key to return to the previous menu.
Language
1. Use the / keys to select:
• Language
• Subtitle
• MPEG4 Subtitle
• Audio
• DVD menu
2. Press and then use the / keys to select a language.
3. Press the ENTER key to conrm your selection.
Standby setup
Press the SETUP key, and use the / keys to highlight ‘Auto Standby’. Then press the
key to enter the settings.
Note: Use the key to return to the previous menu.
Standby
The screen enters standby mode when there are no remote control or panel key operation
within 3 to 4 hours.
1. Press the / keys to select:
• Off
• 3 hours
• 4 hours
2. Press ENTER to conrm.
Video setup
Press the SETUP key, and use the / keys to highlight ‘Video’. Then press the key to
enter the settings.
Note: Use the key to return to the previous menu.
1. Press the / keys to select:
• Brightness
• Contrast
• Hue
• Saturation
• Sharpness
2. Press , then / keys to modify the settings.
3. Press ENTER to conrm.
Rating Setting
The parental control feature allows parents to prevent their children from watching
inappropriate material on a DVD. The player will deny access to the DVD contents if the
DVD’s rating is over PG-13. Tounlock the parental control function, you will have to enter
the 4-digits curity password (the default code is 0000),and press the ENTER button.
14
DVDP1_07IM1353_30Aug_V09.indd 14 30/08/2013 4:19 PM
Page 15
English
CD – additional functions
Repeat - Select this option using the direction keys and press the ENTER key repeatedly
to select repeat ‘Rep 1’, ‘Rep All’ or turn this function ‘Off’.
Picture CD
Picture CD
1. Load a picture CD into the tray. Use the / keys to select the “JPEG” option and press
ENTER. The player displays the pictures in a list.
2. To view the list of folders and photos stored on the CD, press the key.
3. Use the / keys to select a folder, then press the ENTER key to start browsing
through the les.
4. Use the / keys to select a photo, then press the ENTER key to launch a slide show
of the pictures.
5. Press the MENU key to view photo thumbnails. Press again to go back to the list.
6. Press to pause and / or resume the slide show.
7. Press / on the remote control to skip to the next picture or return to the previous
picture.
8. Use the direction keys to ip or rotate the pictures.
Note: During the slide show:
• The numeric keys can also be used to directly input the number corresponding to a
photo. For numbers over 10 i.e. 12, press the 10+ key and then the number 2.
You can press the key at any time to go back to the list of pictures.
• Press the DISPLAY key to show the le type and photo number i.e. ‘Track 14 / 59’.
• Press the ZOOM key repeatedly to enlarge the picture.
15
DVDP1_07IM1353_30Aug_V09.indd 15 30/08/2013 4:19 PM
Page 16
English
USB
1. Insert the USB in the USB port.
2. Use the direction keys to select ‘Audio’, ‘JPEG’, ‘Video’ or ‘E-Book’ and press the
ENTER key to conrm.
3. If the player automatically starts playing the Video, Audio or Picture les, press the
STOP key to view the le menu and select the les you wish to play.
4. For all other functions refer to the instructions earlier in this manual for playing DVD,
Audio or picture les.
Specications
GENERAL
Power source AC ~ 100V-240V 50 / 60Hz
DC 9V 1A
Power consumption < 10W
Built-in Li-ion battery Lithium battery – 7.4V / 1000mAh
External dimensions (LxWxH) 175 x 160 x 35 mm
Screen size 178mm (7 inches)
Weight 882.5g (excluding batteries)
Operating temperature 5°C to 35°C (41°F to 95°F)
Operating position Horizontal
Operating humidity 5% to 90%
SYSTEM
Laser Semiconductor laser wave length 650nm
Signal system PAL / NTSC
S / N more than 80 dB
Dynamic range more than 85 dB
Frequency response 20Hz to 20kHz (1 dB)
OUTPUT
Composite video 1.0V P-P 75ohm negative sync
Audio output (Analogy) 0.5Vrms 600 ohm
AC / DC ADAPTOR
Input AC 100V-240V~ 50 / 60Hz
Output DC 9V 1000mA
16
DVDP1_07IM1353_30Aug_V09.indd 16 30/08/2013 4:19 PM
Page 17

English
Troubleshooting
Problem Solution
The player does not turn on.
- Check the power connection.
- The battery may be empty. Recharge the battery.
No picture on the screen.
No sound.
The player does not play the
inserted disc.
The remote control does not
operate properly or the player
does not respond properly to
the remote control.
Low quality picture.
The player’s keys don’t
operate properly.
- Check the battery power.
- If the player is connected to other devices (TV or
audio amplier), check the connections.
- Make sure the connected devices operate properly.
- Check the unit’s volume.
- Make sure the disc is properly inserted.
- Clean the disc.
- Make sure there are no obstacles between the
remote control and the player’s remote sensor.
- Make sure to aim the remote control at the remote
sensor on the front panel of the player.
- Check the remote control’s battery and replace it if
necessary.
- Make sure to use the remote control within three
metres of the remote sensor.
- Check the disc for dirt and scratches.
- Shut down the player, wait 10 seconds, and restart
the unit.
- Power surges or other electrical phenomena may
cause malfunction. Shut down the player, wait ten
seconds, and restart the unit.
Maintenance
To prevent re or shock hazard, disconnect your unit from the AC power source when
cleaning. The nish on your unit may be cleaned with a dust cloth and cared for as other
furniture. Use a soft, clean cloth moistened with plain, lukewarm water to clean the
exterior of the unit. Use caution when cleaning and wiping the plastic parts. Mild soap
and a damp cloth may be used on the front panel.
Warranty
This product is covered by our 6-month warranty.
For any claim under the warranty or after sale service, please contact your distributor and
present a valid proof of purchase. Our warranty covers any manufacturing material and
workmanship defect, with the exception of any deterioration arising from the
non-observance of the instruction manual or from any careless action implemented on
this item (such as dismantling, exposition to heat and humidity, etc.). It is recommended to
keep the packaging for any further reference.
DVDP1_07IM1353_30Aug_V09.indd 17 30/08/2013 4:19 PM
17
Page 18

English
In a bid to keep improving our services, we could implement modication on the colours
and the details of the product shown on the packaging.
NOTE: Please keep this instruction manual, it contains important information.
Reference: DVDP1_07
Designed and developed in Europe – Made in China, Dong Guan
©2013 LEXIBOOK®
Lexibook America
C/O NATIXIS Pramex International
1251 Avenue of the Americas, 34th Fl.
New York, NY10020
U.S.A.
Toll free number: +1-866-654-7008
E-mail: support@lexibook.com
www.lexibook.com
FCC statement
This device complies with Part 15 of the FCC Rules. Operation is subject
to the following two conditions: (1) This device may not cause harmful
interference, and (2) This device must accept any interference received,
including interference that may cause undesired operation.
Warning: Changes or modications to this unit not expressly approved by the
party responsible for compliance could void the user’s authority to operate the
equipment.
NOTE: This equipment has been tested and found to comply with the limits for a Class B
digital device, pursuant to Part 15 of the FCC Rules. These limits are designed to provide
reasonable protection against harmful interference in a residential installation. This
equipment generates, uses and can radiate radio frequency energy and, if not installed
and used in accordance with the instructions, may cause harmful interference to radio
communications.
However, there is no guarantee that interference will not occur in a particular installation.
If this equipment does cause harmful interference to radio or television reception, which
can be determined by turning the equipment off and on, the user is encouraged to try to
correct the interference by one or more of the following measures:
- Reorient or relocate the receiving antenna.
- Increase the separation between the equipment and the receiver.
- Connect the equipment into an outlet on a circuit different from that to which the receiver
is connected.
- Consult the dealer or an experienced radio/TV technician for help.
WARNING: Prolonged use at
full power of this product might
damage the ear of the user.
Environmental Protection
Unwanted electrical appliances can be recycled and should not be discarded along with regular household
waste! Please actively support the conservation of resources and help protect the environment by
returning this appliance to a collection centre (if available).
This product
is not a toy.
18
DVDP1_07IM1353_30Aug_V09.indd 18 30/08/2013 4:19 PM
Page 19

Français
Mesures de sécurité
RISQUE DE CHOC ÉLECTRIQUE
ATTENTION : AFIN DE RÉDUIRE LES RISQUES DE CHOC ÉLECTRIQUE, NE
RETIREZ PAS LE CAPOT SUPÉRIEUR (NI INFÉRIEUR). LE PRODUIT NE CONTIENT
AUCUNE PIÈCE RÉPARABLE PAR L’UTILISATEUR. CONFIEZ TOUTE RÉPARATION À
UN TECHNICIEN QUALIFIÉ.
Les symboles au dos du produit ont les signications suivantes :
TENSION DANGEREUSE :
Les symboles de l’éclair et de la pointe de èche dans un triangle permettent
d’alerter l’utilisateur de la présence de « tension dangereuse » non isolée à
l’intérieur de l’appareil, ce qui constitue un risque d’électrocution.
ATTENTION :
Le point d’exclamation dans un triangle équilatéral sert à alerter l’utilisateur sur
d’importantes instructions d’utilisation et de maintenance (entretien) dans le
mode d’emploi fourni avec l’appareil.
AVERTISSEMENT :
• Pour réduire les risques d’incendie ou de choc électrique, n’exposez pas cet appareil à
la pluie, ni à l’humidité.
• Cet appareil ne doit pas être exposé à des éclaboussures, ni à des égouttements. Aucun
objet rempli de liquide, tel qu’un vase, ne doit être placé sur l’appareil.
• Le cordon d’alimentation sert de dispositif de coupure de l’alimentation et doit donc
toujours rester facilement accessible.
• An de débrancher complètement l’appareil du secteur, débranchez complètement la
che de son cordon d’alimentation de la prise secteur.
DANGER
SÉCURITÉ CONCERNANT LE LASER
Cet appareil est pourvu d’un dispositif à rayon laser optique dans le
mécanisme de lecture, conçu avec des protections intégrées. N’essayez pas
de le démonter, faites appel à un technicien qualié. L’exposition à un rayon
laser invisible peut être dangereuse pour l’œil humain.
ATTENTION
NE PAS OUVRIR
19
DVDP1_07IM1353_30Aug_V09.indd 19 30/08/2013 4:19 PM
Page 20

Français
CECI EST UN PRODUIT LASER DE CLASSE 1. L’UTILISATION DE COMMANDES,
DE RÉGLAGES OU DE PROCÉDURES AUTRES QUE CEUX SPÉCIFIÉS DANS LES
PRÉSENTES PEUT PROVOQUER UNE EXPOSITION DANGEREUSE AU RAYON
LASER.
Rayonnement laser invisible lorsque l’appareil est ouvert ou que le dispositif de fermeture
est défectueux ou rendu inopérant. Évitez toute exposition directe au rayon laser.
Fabriqué sous licence de Dolby Laboratories. « Dolby », « Pro Logic » et le symbole du
double-D sont des marques déposées de Dolby Laboratories. Travaux condentiels non
publiés. © 1992-1997 Dolby Laboratories, lnc. Tous droits réservés.
Ce produit comporte une technologie de protection contre la copie protégée par des
brevets déposés aux États-Unis et dans d’autres pays, dont les numéros de brevets 5 315
448 et 6 836 549, ainsi que d’autres droits de propriété intellectuelle. L’utilisation de cette
technologie Macrovision de protection contre la copie dans un produit doit être autorisée
par Macrovision. La rétroingénierie et le démontage sont interdits.
20
DVDP1_07IM1353_30Aug_V09.indd 20 30/08/2013 4:19 PM
Page 21

Français
INSTRUCTIONS DE SÉCURITÉ IMPORTANTES
1. Lisez les présentes instructions.
2. Conservez les présentes instructions.
3. Prenez en compte tous les avertissements.
4. Respectez toutes les instructions.
5. N’utilisez pas l’appareil près de l’eau.
6. Nettoyez-le uniquement avec un chiffon sec.
7. Ne bouchez aucun orice de ventilation. Installez-le en respectant les instructions du
fabricant.
8. Ne placez pas l’appareil près de sources de chaleur, telles que radiateurs, grilles de
distribution de chauffage, réchaud, ou tout autre appareil (y compris les
amplicateurs) produisant de la chaleur.
9. Ne remettez pas en cause l’objectif de sécurité d’une che polarisée ou d’une
che de mise à la terre. Une che polarisée comporte deux broches, dont l’une est
plus large que l’autre. Une che de mise à la terre comporte deux bornes plus une
troisième broche de mise à la terre. La broche la plus large et la troisième broche sont
conçues pour votre sécurité. Si la che fournie ne s’enche pas dans les prises de
votre habitation, contactez un électricien pour qu’il remplace les prises obsolètes.
10. Veillez à protéger le cordon d’alimentation an qu’on ne marche pas dessus et qu’il ne
soit pas pincé, notamment au niveau des prises, multiprises et à l’endroit où il sort de
l’appareil.
11. Utilisez uniquement des accessoires/pièces préconisés par le fabricant.
12. Débranchez l’appareil pendant les orages et pour les périodes d’inutilisation
prolongées.
13. Toutes les réparations doivent être effectuées par un technicien qualié. Il faut faire
réparer l’appareil s’il est endommagé de quelque manière que ce soit, par exemple :
si son cordon d’alimentation ou sa che est endommagé, si du liquide a été renversé
sur l’appareil, si des objets sont tombés dessus, et/ou s’il a été exposé à la pluie ou à
l’humidité, s’il ne fonctionne pas normalement, si ses performances ont changées ou
s’il est tombé.
14. Ne surchargez pas la prise murale. Utilisez uniquement la source d’alimentation
comme indiqué.
15. Utilisez les pièces de rechange spéciées par le fabricant.
16. Après toute opération d’entretien ou réparation effectuée sur ce produit, demandez au
technicien de procéder à des vérications de sécurité.
17. N’utilisez pas l’appareil s’il a été exposé à la pluie, immergé dans du liquide ou soumis
à des déversements liquides.
18. Si vous rencontrez des problèmes avec l’adaptateur DC pour voiture, vériez l’état du
fusible et changez-le si nécessaire (2A). Remplacez toujours le fusible par un fusible
de même type et de même calibre. Si le fusible a grillé, vériez tous les
branchements et inspectez le cordon d’alimentation pour vérier qu’il n’est pas
endommagé. Si le fusible grille de manière répétée, apportez l’adaptateur voiture à
votre revendeur local. Ne remplacez pas le fusible par un fusible de calibre supérieur,
car cela risque d’endommager l’appareil.
21
DVDP1_07IM1353_30Aug_V09.indd 21 30/08/2013 4:19 PM
Page 22

Français
Installation
Déballage de l’appareil
Lorsque vous déballez l’appareil, assurez-vous qu’il y a bien toutes les pièces suivantes :
1 lecteur DVD portable
1 télécommande (pile au lithium incluse, déjà dans la télécommande)
1 adaptateur AC/DC
1 adaptateur voiture
1 paire d’écouteurs
1 mode d’emploi
AVERTISSEMENT: Tous les matériaux d’emballage, comme le scotch, les feuilles en
plastique, les celles et les étiquettes ne font pas partie de ce produit et doivent être jetés.
Description du lecteur DVD portable
1. Écran LCD
2. Haut-parleur
3. Pivot
1
2
3
4
5
6
8
7
4. Plateau DVD
5. Touche pour ouvrir le plateau DVD
6. Témoins de la batterie :
- La LED rouge s’allume pendant la
recharge.
- La LED verte s’allume quand la batterie
est complètement rechargée.
7. LED de mise sous tension
8. Touche GAUCHE / VOL-
9. Touche BAS / SUIVANT
10. Touche DROIT / VOL+
11. Touche HAUT / PRÉCÉDENT
12. Touche LECTURE / PAUSE
13. Touche SETUP (RÉGLAGES)
14. Touche SOURCE
11
15. Port USB
16. Prise casque
10
17. Prise AV OUT (AUDIO / VIDÉO)
9
18. Interrupteur ON / OFF (MARCHE /
ARRÊT)
19. Prise d’alimentation DC IN 9-12V
12 13 14 15 16 17 18 19
22
DVDP1_07IM1353_30Aug_V09.indd 22 30/08/2013 4:19 PM
Page 23

Français
Télécommande
1. Touche ZOOM
MUTE
10+
AUDI O
VOL -
SOURC E
3
14
4
15
16
17
STEP
18
MENU
19
20
21
RETU RN
22
VOL+
23
25
26
SEAR CH
ZOOM
1
1 2
2
5
6 7 8
9 0
3
SUBTI TLE
TITL E
SETU P
REPE AT
ANG LE
ENTE R
AB
DISPL AY
4
5
6
7
8
24
9
10
13
11
12
27
28
2. Touche SEARCH (RECHERCHE)
3. Touche SUBTITLE (SOUS-TITRES)
4. Touche ANGLE
5. Touche TITLE (TITRES)
6. Touches directionnelles HAUT / BAS /
GAUCHE / DROITE
7. Touche ENTER (CONFIRMER)
8. Touche SETUP (RÉGLAGES)
9. Touche REPEAT (RÉPÉTITION)
10. Touche AB
11. Touche PROGRAM (PROGRAMME)
12. Touche DISPLAY (AFFICHER)
13. Touche SOURCE
14. MUTE (SOURDINE)
15. Touches numériques (0-9)
16. Touche 10+
17. Touche STEP
18. Touche MENU
19. Touche AUDIO
20. Touche LECTURE / PAUSE
21. Touche STOP
22. Touche RETURN (RETOUR)
23. Touche VOL+
24. Touche VOL-
25. Touche SUIVANT
26. Touche PRÉCÉDENT
27. Touche BALAYAGE AVANT
28. Touche BALAYAGE ARRIÈRE
Information concernant la pile
La première fois que vous utilisez la télécommande, retirez la languette protégeant la pile
située à l’arrière de la télécommande.
Changer la pile
1. Poussez le loquet de verrouillage vers la droite, puis faites
glisser le support de la pile pour l’ouvrir.
2. Retirez la pile usagée et insérez une pile au lithium
CR2025 3V (fournie), comme montré.
3. Faites glisser le support de la pile dans son réceptacle
jusqu’à ce qu’il se verrouille en place avec un déclic.
Ne rechargez pas des piles non rechargeables. Retirez les batteries rechargeables du
produit avant de les recharger. Les batteries doivent absolument être rechargées sous
la supervision d’un adulte. Ne mélangez pas des piles/batteries de types différents, ou
des piles/batteries neuves et usagées. Utilisez uniquement des piles/batteries du type
préconisé ou d’un type équivalent. Respectez les polarités des piles/batteries quand
vous les insérez. Il faut retirer les piles/batteries usagées du jouet. Ne court-circuitez
pas les bornes d’alimentation. Ne jetez pas les piles/batteries dans un feu. Retirez
toujours les piles/batteries si vous n’utilisez pas l’appareil pour une longue période.
23
DVDP1_07IM1353_30Aug_V09.indd 23 30/08/2013 4:19 PM
Page 24

Français
AVERTISSEMENT : Des dysfonctionnements ou effacements de la mémoire peuvent
être provoqués par de fortes interférences ou des décharges électrostatiques. En cas de
fonctionnement anormal, retirez la pile et réinsérez-la.
La corrosion, l’oxydation, du liquide s’écoulant de la pile et tout autre problème
d’acidication graduelle de même nature annulent la garantie.
Utilisation de la télécommande
• La distance efcace entre la télécommande et le capteur du lecteur DVD est de 3
mètres.
• Si le capteur de l’appareil est exposé à la lumière directe du soleil, d’une lampe à
incandescence ou uorescente, ou de tout autre type de lumière très brillante, le
fonctionnement de la télécommande sera instable.
• Quand la pile commence à être usée, la distance opérationnelle de la télécommande
se réduit signicativement. Vous devez alors changer la pile.
Charger la batterie-lithium intégrée
Votre lecteur DVD portable est équipé d’une batterie au lithium intégrée.
Chargez complètement la batterie avant la première utilisation.
1. Branchez l’adaptateur AC/DC ou l’adaptateur voiture sur la prise arrière du lecteur
DVD et insérez la che de son cordon d’alimentation dans une prise secteur
murale ou l’allume-cigare de la voiture. Quand l’appareil est sous tension, l’indicateur
d’alimentation rouge est allumé.
2. Une fois que vous avez branché l’appareil sur l’adaptateur AC/DC ou sur un
adaptateur voiture, la batterie au lithium se recharge.
3. Quand la batterie est en recharge, le témoin de la batterie clignote en vert.
4. Quand la batterie est complètement rechargée, le témoin devient rouge.
TEMPS DE CHARGE / AUTONOMIE
Durée d’une Recharge
Autonomie
Environ 3 à 4 heures
Remarque :
• L’autonomie varie en fonction de l’utilisation du lecteur DVD.
• Utilisez uniquement les adaptateurs fournis avec le lecteur DVD. N’utilisez aucun autre
adaptateur.
• La prise doit être installée près de l’appareil et être facilement accessible.
AVERTISSEMENT : Des dysfonctionnements ou effacements de la mémoire peuvent
être provoqués par de fortes interférences ou des décharges électrostatiques. En cas de
dysfonctionnement, débranchez l’adaptateur AC/DC de la prise secteur et rebranchez-le.
24
DVDP1_07IM1353_30Aug_V09.indd 24 30/08/2013 4:19 PM
Environ 1h30 à 2 heures
Page 25

Français
Branchement sur l’alimentation
Branchez l’adaptateur AC/DC (AC ~ 100V-240V 50/60Hz) ou l’adaptateur voiture sur le
lecteur DVD et sur une prise d’alimentation. Assurez-vous que la pile de la télécommande
est insérée conformément aux instructions de la section « Télécommande ».
Connexion des écouteurs
Il y a une prise pour écouteurs sur le côté droit du lecteur DVD portable, elle convient
pour tous les écouteurs standards. Quand les haut-parleurs sont en fonctionnement, les
écouteurs sont désactivés.
AVERTISSEMENT : Un volume trop élevé, notamment si vous utilisez des écouteurs,
peut nuire à votre audition. C’est pourquoi vous devez baisser le volume avant de
connecter les écouteurs.
Remarque :
• Éteignez le lecteur DVD avant d’effectuer une connexion, quelle qu’elle soit.
• Avant d’utiliser ce produit pour la première fois, retirez la pellicule antistatique de l’écran
LCD.
ATTENTION !
L’écran peut pivoter de 180° dans le sens des aiguilles d’une montre et de 90° dans le
sens contraire des aiguilles d’une montre. Avant de le tourner, ouvrez d’abord l’écran à un
angle de 120° par rapport au lecteur, faute de quoi le tiroir CD et le boîtier central risquent
d’être rayés.
Types de Disques
DVD
CD AUDIO
CD-R
CD-RW
DVD-R
DVD+R
DVD-RW
DVD+RW
Remarque :
• Le lecteur DVD est compatible avec le format JPEG.
• Vous ne pouvez utiliser que des disques qui ont été correctement enregistrés.
DVDP1_07IM1353_30Aug_V09.indd 25 30/08/2013 4:19 PM
Audio + Vidéo
Audio
Audio ou Vidéo
Audio ou Vidéo
Audio ou Vidéo
Audio ou Vidéo
Audio ou Vidéo
Audio ou Vidéo
25
Page 26

Français
Entretien des disques
Entretenez vos disques (A)
• Ne touchez pas la surface brillante des disques. Ne courbez pas les disques.
• N’utilisez pas de solvants, tels que du benzène, ni d’autres nettoyants chimiques
agressifs, car ils risquent d’endommager le revêtement de l’appareil.
• Il est important de veiller à ce qu’aucun liquide ne pénètre dans l’appareil.
• Retirez les disques de leur boitier en les tenants par leur bord tout en appuyant
légèrement sur le trou central.
• Placez un disque sur le plateau avec la sérigraphie dirigée vers le haut.
• Si un disque est sale, il risque de ne pas pouvoir être lu correctement. Si un disque est
sale, essuyez-le avec un chiffon doux en procédant du centre vers l’extérieur en ligne
droite.
• Évitez d’exposer les disques à la lumière directe du soleil, à des températures extrêmes
ou à l’humidité.
• Manipulez les disques précautionneusement. Tenez les disques uniquement par leur
bord. Ne mettez jamais vos doigts en contact avec la surface brillante non sérigraphiée
des disques.
.
(A)
Nettoyez les disques (B)
• Ne mettez jamais de ruban adhésif, d’autocollant, etc. sur la face sérigraphiée d’un
disque.
• Nettoyez les disques régulièrement avec un chiffon sec, doux et ne peluchant pas.
N’utilisez jamais de détergent, ni de nettoyant abrasif pour nettoyer un disque. Si
nécessaire, utiliser un kit de nettoyage pour CD.
• Si un disque saute ou reste bloqué sur une section, c’est qu’il est sans doute sale ou
détérioré (rayé).
• Quand vous nettoyez un disque, essuyez en suivant des lignes partant du centre
et allant vers le bord extérieur du disque. N’essuyez jamais avec des mouvements
circulaires.
(B)
Correct
Incorrect
• Rangez les disques dans leur boitier après chaque utilisation an d’éviter de les
endommager.
• N’exposez pas les disques à la lumière directe du soleil, à des températures élevées, à
la poussière, etc.
• Une exposition prolongée ou des températures extrêmes risquent de déformer les
disques.
• Ne collez rien et n’écrivez pas sur les faces des disques. Les instruments d’écriture et
l’encre peuvent endommager leurs surfaces.
• Si un disque saute ou reste bloqué sur une section, c’est qu’il est sans doute sale ou
détérioré (rayé).
• Quand vous nettoyez un disque, essuyez en suivant des lignes partant du centre
et allant vers le bord extérieur du disque. N’essuyez jamais avec des mouvements
circulaires.
26
DVDP1_07IM1353_30Aug_V09.indd 26 30/08/2013 4:19 PM
Page 27

Français
Codes régionaux
Ce lecteur DVD est conçu et fabriqué pour prendre en compte les codes régionaux
enregistrés sur les DVD. Si le code régional inscrit sur le boitier d’un DVD ne correspond
pas au code régional de ce lecteur DVD, celui-ci ne pourra pas lire le DVD en question.
Le code régional de ce lecteur DVD est (États-Unis, Canada, Îles du Pacique Oriental).
Fonctions des touches
REMARQUE IMPORTANTE : Presque toutes les fonctions décrites ci-dessous ne sont
disponibles que pour les DVD, sauf indication contraire (CD audio). Les messages
s’afchant à l’écran et les fonctions peuvent différer pour les autres types de disques.
Lecture / Stop
1. Faites glisser l’interrupteur d’ALIMENTATION sur la position « ON » (marche), puis
soulevez l’écran de l’appareil.
2. Appuyez sur la touche de l’appareil pour ouvrir le plateau de lecture.
3. Prenez un disque sans toucher aucune de ses surfaces et placez-le sur le plateau de
lecture, face sérigraphiée vers le haut (pour les DVD double face, placez le disque la
marque A/1 dirigée vers le haut).
4. Refermez le plateau, le lecteur charge le disque automatiquement.
Si vous avez placé un DVD, le menu principal ou le menu titre s’afche. À l’aide des
touches de directions / / / de la télécommande ou de l’appareil, sélectionnez
les options désirées, puis appuyez sur la touche LECTURE ou sur la touche ENTER
pour conrmer.
• S’il s’agit d’un CD, le lecteur lit automatiquement la première plage.
• Si le CD contient des chiers enregistrés dans des dossiers, utilisez les touches de
directions de la télécommande pour sélectionner un dossier ou un chier, puis appuyez
sur la touche ENTER pour l’ouvrir ou le lire.
5. Appuyez sur la touche STOP pour arrêter la lecture du disque. Vous pouvez
reprendre la lecture en appuyant sur la touche . La lecture reprend à l’endroit où
vous l’avez arrêtée en appuyant sur la touche STOP .
6. Appuyez deux fois sur la touche STOP pour annuler cette fonction de reprise de la
lecture à un point donné et arrêter complètement le disque.
Volume
Note : Le volume est au maximum lorsque le lecteur DVD s’allume.
Appuyez sur les touches VOL+ ou VOL- pour augmenter ou diminuer le volume. Pour
que cela fonctionne, vous devrez maintenir les boutons appuyés pendant environ une
seconde.
Pause
1. Appuyez sur la touche pour mettre la lecture d’un CD ou d’un DVD sur pause.
2. Appuyez à nouveau sur la touche pour reprendre la lecture.
Précédent / Suivant
Pendant la lecture d’un DVD ou d’un CD, appuyez sur la touche pour retourner au
début du chapitre ou de la plage précédent(e). Ou appuyez sur la touche pour passer
au début du chapitre ou de la plage suivant(e).
Notes : Pour utiliser les touches et du lecteur DVD, appuyez longuement sur les
touches HAUT et BAS . Pour que cela fonctionne, vous devrez maintenir les boutons
appuyés pendant environ une seconde.
Balayage avant / Arrière
Appuyez sur la touche ou pour effectuer une recherche vers l’avant ou vers l’arrière.
Appuyez plusieurs fois sur une de ces touches pendant la lecture pour modier la vitesse
de recherche : « 2X », « 4X », « 8X », « 20X » ou vitesse de lecture normale.
Fonctions des touches
27
DVDP1_07IM1353_30Aug_V09.indd 27 30/08/2013 4:19 PM
Page 28

Français
Remarque : Appuyez sur la touche quand vous voulez reprendre la lecture à la
vitesse normale.
Sourdine
Appuyez sur la touche MUTE (SOURDINE) pour couper le son. Appuyez à nouveau sur
la touche MUTE (SOURDINE) pour rétablir le son.
Autres fonctions
Menu DVD
Pendant la lecture d’un DVD, appuyez sur la touche MENU de la télécommande pour
activer le menu principal du DVD. Avec les touches de directions, sélectionnez les options
désirées, puis appuyez sur la touche ENTER pour conrmer.
Mode répétition et répétition A-B
Cette fonction est disponible pour les DVD et les CD audio, mais avec des effets
différents.
1. Pour la lecture d’un DVD, appuyez une fois sur la touche REPEAT (RÉPÉTITION) pour
répéter le chapitre en cours, deux fois pour répéter le titre en cours, et trois fois pour
répéter le disque en entier.
2. Pour la lecture d’un CD audio, appuyez une fois sur la touche REPEAT (RÉPÉTITION)
pour répéter la plage en cours et deux fois pour répéter le disque en entier (répétition
de toutes les plages).
3. Appuyez sur cette touche plusieurs fois pour annuler la fonction de répétition.
4. Pour répéter un passage d’un DVD ou d’un CD pendant la lecture, appuyez une fois
sur la touche A-B pour dénir un point de départ, deux fois pour dénir la n du
passage et trois fois pour éteindre cette fonction.
Sous-titres
Appuyez plusieurs fois sur la touche SUBTITLE (SOUS-TITRES) pour activer l’afchage
des sous-titres à l’écran ou changer de sous-titres.
Remarque : le nombre de sous-titres disponibles dépend de votre DVD.
Audio
• Pendant la lecture d’un DVD, appuyez sur la touche AUDIO pour changer la langue
audio (cette fonction n’est pas forcément disponible sur tous les DVD). Appuyez
plusieurs fois sur la touche AUDIO pour changer de langue.
• Pendant la lecture d’un CD, appuyez plusieurs fois sur la touche AUDIO pour
sélectionner un mode : Stéréo, Gauche ou Droit.
Recherche
Vous pouvez accéder directement à un temps de lecture, une plage, un chapitre ou un
titre.
1. Appuyez sur la touche SEARCH pour entrer dans le mode recherche.
• DVD – un titre, un chapitre ou un temps spécique d’un titre.
• CD – une plage, un temps spécique d’une plage ou du disque.
2. Avec les touches numériques, entrez le temps, le titre, la plage ou le chapitre désiré.
3. Appuyez sur la touche ENTER, le lecteur accède directement à la cible désirée.
Titre
Pour recherchez un titre spécique sur un DVD ou sur un CD audio, appuyez sur la
touche TITLE (TITRE) et sélectionnez un titre avec les touches de directions. Appuyez sur
ENTER pour lancer la lecture du titre sélectionné.
Afcher
Appuyez sur la touche DISPLAY (AFFICHER) pour afcher à l’écran des informations de
durée et d’état (durée écoulée, titres restants, chapitres déjà lus, chapitres restants, etc.).
Appuyez sur cette touche plusieurs fois pour ne plus afcher ces informations à l’écran.
Zoom
Appuyez sur la touche ZOOM plusieurs fois pour sélectionner un niveau de zoom compris
entre 2 - 4 et 1/2 - 1/4 ou pour éteindre cette fonction.
28
DVDP1_07IM1353_30Aug_V09.indd 28 30/08/2013 4:19 PM
Page 29

Français
Angle
1. Si un disque DVD contient des séquences lmées sous différents angles, les angles de
vue peuvent être sélectionnés.
2. Durant la lecture, appuyez sur la touche ANGLE de manière répétée pour sélectionner
l’angle de vue désiré.
Note : Le nombre de vue dépend du disque.
Step
1. Appuyez sur la touche STEP une fois pour mettre sur pause la vidéo. Appuyez une
nouvelle fois pour avancer d’une image vidéo.
2. La vidéo reste en mode pause jusqu’à ce que vous appuyez sur la touche LECTURE.
Return (Retour)
Appuyez sur cette touche pour revenir à la page ou option précédente.
Programme
Pour programmer un ordre de lecture :
1. Appuyez sur la touche PROGRAM.
2. Avec les touches numériques, saisissez un titre ou un chapitre pour un DVD ou un
chapitre pour un VCD ou un CD audio.
3. Utilisez les touches de directions pour passer au paramètre suivant.
4. Sélectionnez « Lecture » pour lancer la lecture dans l’ordre programmé et appuyez sur
ENTER pour conrmer. (Si vous sélectionnez « Effacer le programme », la lecture se
fait dans l’ordre prévu sur le disque).
Réglages DVD
Ce lecteur DVD offre quatre menus conguration : « Système », « Langue », « Standby »,
(en veille), et « Video ».
1. Pour accéder aux menus de conguration, vous devez arrêter la lecture du disque
(appuyez pour cela sur la touche une ou deux fois).
2. Pour entrer dans la page des menus de conguration, appuyez sur la touche SETUP
(RÉGLAGES).
3. Sélectionner un menu avec les touches / .
4. Avec les touches de directions, naviguez dans les menus et sélectionnez les options
disponibles. Appuyez sur la touche ENTER pour conrmer vos réglages.
5. Vous pouvez appuyer sur la touche SETUP à tout moment pour quitter.
Réglage du système
Appuyez sur la touche SETUP (RÉGLAGES) et utilisez les touches / pour mettre
« Système » en surbrillance. Puis appuyez sur la touche pour accéder aux réglages
correspondants.
Remarque : appuyez sur la touche pour revenir au menu précédent.
Système TV
1. Utilisez les touches / pour sélectionner « Système TV », puis appuyez sur .
2. Utilisez les touches / pour sélectionner :
- PAL - Utilisez ce réglage si votre télévision est équipée du système PAL (phase alternat-
ing line).
- NTSC - Utilisez ce réglage si votre télévision est équipée du système NTSC (national
television system committee).
Reprise d’alimentation
Cette fonction sert à activer ou désactiver la dernière mémoire.
1. Utilisez les touches / pour sélectionner « Power resume », puis appuyez sur .
2. Utilisez les touches / pour sélectionner « On » ou « Off » (Oui / Non).
3. Appuyez sur la touche ENTER pour conrmer votre sélection.
29
DVDP1_07IM1353_30Aug_V09.indd 29 30/08/2013 4:19 PM
Page 30

Français
Format
1. Sélectionnez « Format » avec les touches / , puis appuyez sur .
2. Utilisez les touches pour sélectionner :
• 4:3PS : Utilisez ce réglage pour afcher une image large si vous êtes équipé d’un téléviseur standard.
• 4:3LB : Utilisez ce réglage pour afcher une image standard si vous êtes équipé d’un
téléviseur standard.
• 16:9 : Utilisez ce réglage si vous êtes équipé d’un téléviseur avec un écran large.
3. Appuyez sur la touche ENTER pour conrmer votre sélection.
Réglages par défaut
Réinitialisez les réglages d’usine du lecteur :
1. Sélectionnez « Par défaut » à l’aide des touches / .
2. Appuyez sur la touche ENTER, puis sélectionnez « Rétablir ».
Réglage de la langue
Appuyez sur la touche SETUP (RÉGLAGES) et utilisez les touches / pour mettre
« Langue » en surbrillance. Puis appuyez sur la touche pour accéder aux réglages
correspondants.
Remarque : Appuyez sur la touche pour revenir au menu précédent.
Langue
1. Utilisez les touches / pour sélectionner :
• Langue
• Sous-titres
• Sous-titres MPEG4
• Audio
• Menu DVD
2. Appuyez sur , puis sélectionner une langue avec les touches / .
3. Appuyez sur la touche ENTER pour conrmer votre sélection.
Réglagesen veille
Appuyez sur la touche SETUP (RÉGLAGES) et utilisez les touches / pour mettre
« Audio » en surbrillance. Puis appuyez sur la touche pour accéder aux réglages
correspondants.
Remarque : Appuyez sur la touche pour revenir au menu précédent.
Fonction veille
L’écran de l’appareil se met en veille lorsqu’aucune action n’a lieu sur la télécommande ou
sur l’appareil pendant un certain temps.
1. Utilisez les touches / pour sélectionner :
• Off (Non)
• 3 heures
• 4 heures
2. Appuyez sur la touche ENTER pour conrmer votre sélection.
Réglages vidéo
Appuyez sur la touche SETUP (RÉGLAGES) et utilisez les touches / pour mettre
« Vidéo » en surbrillance. Puis appuyez sur la touche pour accéder aux réglages
correspondants.
Remarque : Appuyez sur la touche pour revenir au menu précédent.
30
DVDP1_07IM1353_30Aug_V09.indd 30 30/08/2013 4:19 PM
Page 31

Français
1. Utilisez les touches / pour sélectionner :
• Luminosité
• Contraste
• Couleurs
• Saturation
• Netteté
2. Appuyez ensuite sur , puis sur les touches / pour modier le réglage.
3. Appuyez sur la touche ENTER pour conrmer votre sélection.
Contrôle parental
La fonction de contrôle parental permet aux parents d’empêcher leurs enfants de visionner
les contenus inappropriés d’un DVD. Le lecteur interdira l’accès au contenu d’un DVD
s’il a été classé dans une catégorie supérieure à PG-13. Pour déverrouiller la fonction de
contrôle parental, saisissez le mot de passe à quatre chiffres (le mot de passe par défaut
est : « 0000 »), puis appuyez sur la touche ENTER.
CD – fonctions supplémentaires
Répétition – Sélectionnez cette option avec les touches de directions, puis appuyez sur
la touche ENTER plusieurs fois pour sélectionner « Rep un », « Rep tout » ou « Off »
(Désactiver) pour éteindre cette fonction.
CD photos
CD photo
1. Chargez un CD photo sur le plateau. A l’aide des touches / sélectionner l’option
« JPEG », puis appuyez sur ENTER. Le lecteur afche les images sous forme de liste.
2. Pour visualiser la liste des dossiers et photos enregistrés sur le CD, appuyez sur la
touche .
3. Avec les touches / , sélectionnez un dossier, puis appuyez sur la touche ENTER
pour commencer à naviguer dans les chiers.
4. Avec les touches / , sélectionnez une photo, puis appuyez sur la touche ENTER
pour lancer le diaporama photos.
5. Appuyez sur la touche MENU pour afcher les miniatures. Appuyez à nouveau sur la
touche pour revenir à la liste.
6. Appuyez sur pour mettre le diaporama sur pause et/ou le relancer.
7. Appuyez sur les touches / de la télécommande pour passer à la photographie
suivante ou revenir à la photographie précédente.
8. Utilisez les touches de directions pour faire pivoter ou retourner l’afchage des
photographies.
Remarque : Pendant le diaporama,
• Vous pouvez saisir directement le nombre correspondant à une photographie avec les
touches numériques. Pour les nombres supérieurs à 10, par exemple 12, appuyez sur
la touche 10+, puis sur la touche 2.
Vous pouvez appuyer sur la touche à tout moment pour revenir à la liste des
photographies.
• Appuyez sur la touche DISPLAY (AFFICHER) pour afcher le type de chier et le
numéro de la photographie, par exemple « Photo 14 / 59 ».
• Appuyez plusieurs fois sur la touche ZOOM pour agrandir l’afchage de la
photographie.
31
DVDP1_07IM1353_30Aug_V09.indd 31 30/08/2013 4:19 PM
Page 32

Français
USB
1. Insérez une clé USB dans le port USB.
2. Avec les touches de direction, sélectionnez « Audio », « JPEG », « Video » ou
« E-Book », puis appuyez sur la touche ENTER pour conrmer.
3. Si le lecteur commence automatiquement à lire des chiers audio, vidéo ou des chiers
de photos, appuyez sur la touche STOP pour visualiser le menu des chiers et
sélectionnez les chiers que vous désirez lire.
4. Pour toutes les autres fonctions, reportez-vous aux instructions précédemment fournies
dans ce mode d’emploi concernant la lecture des DVD et des chiers audio ou photo.
Spécications
SPÉCIFICATIONS GÉNÉRALES
Alimentation AC ~ 100V-240V 50 / 60Hz
DC 9V 1A
Puissance consommée <10W
Batterie Li-ion intégrée Batterie lithium – 7,4V / 1000mAh
Dimensions externes (L x l x H) 175 x 160 x 35 mm
Taille de l’écran 178mm (7 pouces)
Poids 882,5g (sans la batterie)
Températures de fonctionnement de 5°C à 35°C (41°F - 95°F)
Position d’utilisation Horizontale
Taux d’humidité de fonctionnement de 5% à 90%
SYSTÈME
Laser Semi-conducteur, longueur d’onde 650nm
Standard vidéo PAL / NTSC
Rapport Signal/bruit > 80 dB
Plage dynamique > 85 dB
Fréquence de réponse de 20Hz à 20kHz (1 dB)
SORTIES
Vidéo composite 1.0V P-P 75 ohms sync. négative
Sortie audio (Analogique) 0,5V rms - 600 ohms
ADAPTATEUR AC/DC
Entrée AC 100V-240V~ 50 / 60Hz
Sortie DC 9V 1000mA
32
DVDP1_07IM1353_30Aug_V09.indd 32 30/08/2013 4:19 PM
Page 33

Français
Dépannage
Problème Solution
Le lecteur ne s’allume pas.
Pas d’image à l’écran.
Pas de son.
Le lecteur ne lit pas le disque
inséré.
La télécommande ne
fonctionne pas correctement
ou le lecteur ne répond pas
correctement aux signaux de
la télécommande.
Image de mauvaise qualité.
Les touches du lecteur ne
fonctionnent pas
correctement.
- Vériez que l’appareil est correctement branché sur
l’alimentation électrique.
- La batterie est peut être déchargée, rechargez-la.
- Vériez que la batterie n’est pas déchargée.
- Si le lecteur est relié à d’autres équipements
(téléviseur ou amplicateur audio), vériez les
connexions.
- Vériez que les équipements connectés au lecteur
fonctionnent correctement.
- Vériez le volume de l’appareil.
- Vériez que le disque a été correctement inséré dans
le lecteur.
- Nettoyez le disque.
- Vériez qu’il n’y a pas d’obstacles entre le capteur du
lecteur et la télécommande.
- Veillez à pointer la télécommande en direction du
panneau frontal du lecteur.
- Contrôlez la pile de la télécommande et remplacez-la
si nécessaire.
- Veillez à utiliser la télécommande à moins de 3
mètres du capteur du lecteur.
- Vériez que le disque n’est pas sale, ni rayé.
- Éteignez le lecteur, attendez 10 minutes, puis
redémarrez-le.
- Des surtensions ou d’autres phénomènes
électriques peuvent provoquer des
dysfonctionnements.
- Éteignez le lecteur, attendez 10 minutes, puis
redémarrez-le.
Entretien
An d’éviter les risques d’incendie ou de choc électrique, débranchez l’appareil de
l’alimentation en courant alternatif quand vous le nettoyez. Nettoyez le revêtement de
votre appareil avec un chiffon antipoussières et prenez-en soin comme des autres
appareils. Nettoyez l’extérieur de l’appareil avec un chiffon propre humidié avec de
l’eau tiède sans additif. Faites attention quand vous nettoyez et essuyez les pièces en
plastique. Pour nettoyer le panneau frontal, vous pouvez utiliser un chiffon humidié et du
savon doux.
Garantie
Ce produit est couvert par notre garantie de 6 mois.
Pour toute mise en œuvre de la garantie ou du service après-vente, veuillez vous
adresser à votre revendeur muni d’une preuve d’achat valide. Notre garantie couvre les
défauts de fabrication et de matériaux à l’exclusion de toute détérioration provenant du
non-respect du mode d’emploi ou d’une manipulation négligente de ce produit (telle que
le démonter, l’exposer à la chaleur ou à l’humidité, etc.). Il est recommandé de conserver
l’emballage pour consultation ultérieure.
33
DVDP1_07IM1353_30Aug_V09.indd 33 30/08/2013 4:19 PM
Page 34

Français
An de toujours améliorer nos services, nous pouvons être amenés à modier les
couleurs ou les détails du produit représentés sur l’emballage.
REMARQUE : Veuillez garder ce mode d’emploi, il contient d’importantes informations.
Référence : DVDP1_07
Conçu et développé en Europe – Fabriqué en Chine, Dong Guan
©2013 LEXIBOOK®
LEXIBOOK S.A,
2, avenue de Scandinavie,
91953 Courtaboeuf Cedex
France
Assistance technique : 0892 23 27 26 (0,34 € TTC/Min)
www.lexibook.com
AVERTISSEMENT : Une utilisation
prolongée à pleine puissance de
ce produit peut léser l’audition de
l’utilisateur.
Ce produit n’est
pas un jouet.
Déclaration FCC
Cet appareil est conforme à l’article 15 du règlement de la FCC. Son fonctionnement
doit satisfaire aux deux conditions suivantes : (1) Cet appareil ne doit pas provoquer
d’interférence nuisible, et (2) Cet appareil doit accepter toutes les interférences reçues, y
compris les interférences pouvant affecter son fonctionnement.
Avertissement : Les changements et modications apportés à cet appareil n’ayant pas
été expressément approuvés par la partie responsable de la conformité peuvent annuler
l’autorisation faite à l’utilisateur d’utiliser cet appareil.
REMARQUE : Cet appareil a été soumis à des tests qui ont attesté de sa conformité aux
limites d’émission d’énergie des appareils numériques de la classe B dénies au chapitre
15 des réglementations de la FCC (Federal Communications Commission). Ces limites
sont conçues pour offrir une protection raisonnable contre les interférences nuisibles dans
le cadre d’installations résidentielles. Cet équipement génère, utilise et peut émettre de
l’énergie radioélectrique ; s’il n’est pas installé et utilisé conformément aux instructions
fournies, il peut causer des interférences nuisibles aux communications radio.
Cependant, il n’est pas garanti qu’il ne puisse y avoir des interférences dans une
installation spécique.
Si cet appareil crée des interférences nuisibles qui affectent la réception radio ou
télévision, ce qui peut être déterminé en le mettant hors tension et sous tension,
l’utilisateur est invité à essayer de les éliminer d’une ou de plusieurs des manières
suivantes :
- Modier l’orientation de l’antenne de réception.
- Éloigner l’appareil du récepteur.
- Brancher l’appareil sur une prise électrique située sur un circuit différent de celui sur
lequel est branché le récepteur
- Pour obtenir une assistance complémentaire, contacter le point de vente ou un
technicien radio/TV expérimenté.
Protection de l’Environnement
Les appareils électriques dont vous ne voulez plus doivent être recyclés, ne les jetez pas avec les déchets
ménagers habituels ! Veuillez soutenir activement la préservation des ressources et aider à protéger
l’environnement en rapportant cet appareil à un centre de collecte (s’il en existe).
34
DVDP1_07IM1353_30Aug_V09.indd 34 30/08/2013 4:19 PM
Page 35

Español
Instrucciones relacionadas con la seguridad
¡PRECAUCIÓN!
RIESGO DE ELECTROCUCIÓN
¡PRECAUCIÓN! PARA REDUCIR EN LO POSIBLE CUALQUIER RIESGO DE
ELECTROCUCIÓN, NO DESMONTE LA TAPA (O EL PANEL TRASERO) DE ESTE
APARATO. EN SU INTERIOR NO EXISTEN PIEZAS QUE PUEDAN SER SUSTITUIDAS
O REPARADAS POR EL USUARIO. CONFÍE CUALQUIER REPARACIÓN QUE SEA
NECESARIA A PERSONAL TÉCNICO CUALIFICADO.
Los símbolos grácos presentes en el panel posterior del aparato signican lo siguiente:
TENSIÓN PELIGROSA:
El símbolo del rayo con punta de echa, dentro de un triángulo equilátero,
es una señal de advertencia que le indica la presencia de “voltaje peligroso”
no aislado en el interior de este aparato y que puede ser lo sucientemente
intenso como para suponer un riesgo de electrocución para las personas.
SEGURIDAD RELACIONADA CON LOS PRODUCTOS DE TIPO LÁSER
Este aparato utiliza un sistema óptico por haz de láser para el mecanismo
del reproductor de CD que cuenta con protecciones integradas. No intente
desarmar el aparato, confíe cualquier trabajo de reparación a personal técnico
cualicado. La exposición al haz de luz láser invisible puede ser perjudicial
para el ojo humano.
¡ADVERTENCIA!
• Para reducir en lo posible cualquier riesgo de incendio o de electrocución, no exponga
este aparato a la lluvia o humedad.
• Evite salpicar o derramar líquidos sobre el aparato y procure no colocar sobre el mismo
objetos que contengan líquidos, como por ejemplo jarrones de ores.
• El enchufe de corriente eléctrica se utiliza como dispositivo de desconexión. Por lo
tanto, deberá asegurarse de que dicho dispositivo permanece siempre en perfectas
condiciones de funcionamiento y accesible en todo momento.
• Para desconectar completamente el aparato de la red eléctrica, deberá extraerse
totalmente el enchufe de la toma de corriente.
¡PELIGRO!
SEGURIDAD RELACIONADA CON LOS PRODUCTOS DE TIPO LÁSER
Este aparato utiliza un sistema óptico por haz de láser para el mecanismo
del reproductor de CD que cuenta con protecciones integradas. No intente
desarmar el aparato, confíe cualquier trabajo de reparación a personal
técnico cualicado. La exposición al haz de luz láser invisible puede ser
perjudicial para el ojo humano.
NO ABRIR
35
DVDP1_07IM1353_30Aug_V09.indd 35 30/08/2013 4:19 PM
Page 36

Español
ESTE APARATO ESTÁ CONSIDERADO COMO PRODUCTO LÁSER DE CLASE 1.
LA UTILIZACIÓN DE MANDOS, IMPLEMENTACIÓN DE AJUSTES O LA EJECUCIÓN
DE PROCEDIMIENTOS DE UNA MANERA DISTINTA A LA AQUÍ INDICADA PODRÍA
TENER COMO CONSECUENCIA LA EXPOSICIÓN A RADIACIONES PELIGROSAS
PROCEDENTES DEL HAZ DE LUZ LÁSER.
Peligro de emisión de radiaciones láser invisibles si se abre y falla o se anula el
dispositivo de seguridad del aparato. Evite cualquier exposición directa al haz del láser.
Fabricado bajo licencia de Dolby Laboratories. “Dolby”, “Pro Logic” y el símbolo de la
Doble D son marcas comerciales de Dolby Laboratories. Obras condenciales sin
publicar. © 1992-1997 Dolby Laboratories, lnc. Reservados todos los derechos.
Este producto incorpora tecnología de protección contra copias cuya propiedad
industrial está protegida por patentes estadounidenses y extranjeras; incluidas las
patentes número 5.315.448 y 6.836.549, así como por otros derechos de propiedad
intelectual. La utilización de la tecnología de protección contra copias de Macrovision en
este producto deberá contar con la debida autorización de Macrovision. Queda prohibido
cualquier tipo de ingeniería inversa o su desmontaje.
36
DVDP1_07IM1353_30Aug_V09.indd 36 30/08/2013 4:19 PM
Page 37

Español
INSTRUCCIONES IMPORTANTES DE SEGURIDAD
1. Lea estas instrucciones.
2. Conserve estas instrucciones.
3. Preste atención a todas las advertencias.
4. Siga todas las instrucciones.
5. No utilice este aparato en la proximidad de agua.
6. Límpielo únicamente con un paño seco.
7. Procure no obstruir las aberturas de ventilación del aparato. Instale el aparato
conforme a las instrucciones proporcionadas por el fabricante.
8. No instale el aparato cerca de ninguna fuente de calor, como por ejemplo radiadores,
acumuladores térmicos, hornillas u otros electrodomésticos (incluyendo
amplicadores) que emitan calor.
9. No desarticule los dispositivos de seguridad del enchufe con toma de tierra ni altere la
polaridad del mismo. Un enchufe con polaridad ja posee dos patillas, siendo una más
ancha que la otra. Un enchufe con toma de tierra posee dos patillas convencionales
y una tercera de toma de tierra. La patilla más ancha o tercera patilla se incorpora en
el enchufe para mayor seguridad del usuario. Si el enchufe suministrado no encaja
en su toma de corriente, solicite a un electricista que la sustituya por otra de un tipo
adecuado.
10. El cable de conexión a la red eléctrica deberá tenderse de manera que no pueda
pisarse ni ser perforado. Deberá prestar atención en particular a la parte de los
enchufes, conectores múltiples y al punto por donde el cable sale del aparato.
11. Utilice únicamente aquellos adaptadores o accesorios especicados por el fabricante.
12. Desenchufe el aparato del suministro eléctrico durante tormentas eléctricas o cuando
no vaya a utilizarlo durante periodos prolongados.
13. Confíe cualquier reparación que sea necesario realizar en el aparato a personal
técnico cualicado. Será necesario llevar a reparar el aparato si ha sufrido cualquier
tipo de daño; como por ejemplo, si el cable o enchufe de alimentación están
dañados, se ha derramado líquido en el aparato o se han introducido objetos en
el mismo, se ha expuesto el aparato a la lluvia o humedad, el aparato no funciona
normalmente, se observan diferencias en su funcionamiento, o bien, si se ha dejado
caer.
14. No sobrecargue la toma de corriente. Utilice únicamente el tipo de alimentación
eléctrica indicado.
15. Asegúrese de utilizar únicamente piezas de repuesto especicadas por el fabricante.
16. Una vez completada cualquier operación de mantenimiento o reparación en el
aparato, solicite al técnico de servicio que lleve a cabo las comprobaciones de
seguridad pertinentes para así garantizar que el producto está en perfectas
condiciones de funcionamiento.
17. No use el producto si ha sido expuesto a la lluvia, sumergido en líquidos o salpicados
por los mismos.
18. Si tuviera problemas con el adaptador de corriente continua (C.C.) para conexión a
automóviles, compruebe el fusible (2 A) y sustitúyalo en caso necesario. Sustituya
siempre el fusible por otro del mismo tipo y amperaje. Si se ha fundido el fusible,
compruebe todas las conexiones y examine el cable de alimentación por si
presentara daños. Si el fusible se funde de manera reiterada, lleve el adaptador para
conexión a automóviles a su distribuidor local para que lo revisen. No sustituya el
fusible por otro de mayor amperaje, ya que podría dañar el reproductor.
37
DVDP1_07IM1353_30Aug_V09.indd 37 30/08/2013 4:19 PM
Page 38

Español
Instalación
Desembalaje del aparato
Cuando desembale el aparato, asegúrese de que los siguientes elementos están
presentes en el paquete:
1 reproductor de DVD portátil;
1 mando a distancia (con una pila de litio de tipo CR2025 instalada en su interior);
1 adaptador de corriente;
1 adaptador para conexión al automóvil;
1 par de auriculares;
1 manual de instrucciones.
¡ADVERTENCIA! Todos los elementos utilizados para el embalaje, como por ejemplo cintas, recubrimientos plásticos, ataduras metálicas y etiquetas no forman parte del aparato
y deberán desecharse.
Descripción del reproductor de DVD portátil
1. Pantalla LCD
2. Altavoces
3. Conexión giratoria de la pantalla
1
2
3
4
5
6
8
7
4. Compartimiento del disco
5. Botón apertura de puerta de DVD
6. Indicador de carga:
- LED rojo encendido durante la carga.
- LED verde encendido completamente
cargada.
7. Testigo LED de encendido
8. Botón A LA IZQUIERDA/VOL-
9. Botón ABAJO/SIGUIENTE
10. Botón A LA DERECHA/VOL+
11. Botón ARRIBA/ANTERIOR
12. Botón REPRODUCCIÓN/PAUSA
13. Botón SETUP (CONFIGURACIÓN)
14. Botón SOURCE (FUENTE)
11
15. Puerto USB
10
16. Conector de salida para auriculares
9
17. Toma AV OUT
18. ON/OFF switch
19. Toma DC IN 9-12V (Entrada de
corriente continua)
12 13 14 15 16 17 18 19
38
DVDP1_07IM1353_30Aug_V09.indd 38 30/08/2013 4:19 PM
Page 39

Español
Mando a distancia
1. Botón ZOOM
2. Botón SEARCH
MUTE
10+
AUDI O
VOL -
SOURC E
3
4
STEP
MENU
RETU RN
VOL+
3. Botón SUBTITLE (subtítulo)
14
4. Botón ANGLE (ángulo)
5. Botón TITLE (selección de Título)
15
6. Botón de desplazamiento hacia Arriba/
16
Abajo/a la Izquierda/Derecha
17
7. Botón ENTER
8. Botón SETUP (Conguración de parametros)
18
9. Botón REPEAT (Repetición)
19
10. Botón AB (selección de repetición A a B)
11. Botón PROGRAM
20
12. Botón DISPLAY (Visualización en pantalla)
21
13. Botón SOURCE (Fuente)
22
14. Botón MUTE (Desactivación del sonido)
23
15. Botones numéricos (0-9)
16. Botón 10+
25
17. Botón STEP
26
18. Botón MENU
19. Botón AUDIO (Sonido)
SEAR CH
ZOOM
1
1 2
2
5
6 7 8
9 0
3
SUBTI TLE
TITL E
SETU P
REPE AT
ANG LE
ENTE R
AB
DISPL AY
4
5
6
7
8
24
9
10
11
13
20. Botón Reproducción
21. Botón Parada
22. Botón RETURN
12
27
28
23. Botón VOL+
24. Botón VOL-
25. Botón Siguiente
26. Botón Anterior
27. Botón Avance
28. Botón Retroceso
Información relacionada con las pilas
La primera vez que vaya a utilizar el mando a distancia, retire la lengüeta de protección
de la pila situada en la parte trasera del mando.
Sustitución de las pila
1. Abra la tapa del compartimento de la pila desplazando hacia la
derecha el interruptor de desbloqueo y, a continuación, deslice
el soporte de la pila para extraerlo del mando.
2. De estar instalada, retire del aparato la pila agotada e instale
una pila nueva de litio de 3 V de tipo botón, referencia
CR2025 (incluida) de la manera indicada en la ilustración.
3. A continuación, deslice hacia dentro la tapa de la pila hasta
encajarla rmemente en su sitio. Sonará un chasquido para
indicar que la tapa ha encajado correctamente.
No se deben intentar cargar aquellas pilas que no sean recargables. Las pilas recargables
deberán retirarse del producto antes de cargarlas. Las pilas recargables deberán recargarse
únicamente bajo la supervisión de un adulto. No deberán mezclarse diferentes tipos de pilas, ni
tampoco pilas nuevas con otras usadas. Utilice únicamente pilas del mismo tipo o equivalentes
a las recomendadas. Inserte las pilas observando la polaridad correcta. Deberán retirarse del
producto las pilas agotadas. No cortocircuite los terminales de alimentación. No arroje las pilas al
fuego. Retire las pilas del producto si no va a utilizarlo durante periodos prolongados.
39
DVDP1_07IM1353_30Aug_V09.indd 39 30/08/2013 4:19 PM
Page 40

Español
¡ADVERTENCIA!
sucientemente fuerte podrán provocar el funcionamiento anormal del aparato o la
pérdida de los datos almacenados en su memoria. En caso de observarse algún
funcionamiento anormal del aparato, retire y vuelva a instalar las pilas.
La presencia de corrosión, óxido, fuga de ácido de las pilas o cualquier otro defecto acídico
progresivo de este tipo invalidará automáticamente la garantía proporcionada con el producto.
Utilización del mando a distancia
• El alcance efectivo entre el mando a distancia y el sensor de captación de señal del
reproductor de DVD es de tres metros.
• Cuando los rayos del sol o la luz procedente de una bombilla, uorescente o cualquier
otro tipo de luz intensa incidan sobre el sensor de captación de señal del aparato, es
posible que el mando a distancia no funcione correctamente.
• Cuando la pila esté descargada, la distancia de funcionamiento del mando a distancia
se verá reducida de manera notable y, por lo tanto, será necesario sustituir la pila.
Las descargas electrostáticas o interferencias de una frecuencia
Cómo cargar la pila de litio incorporada
Su reproductor de DVD lleva integrado una pila de litio recargable.
Asegúrese de cargar totalmente la pila antes de usar el aparato por primera vez.
1. Enchufe el conector del adaptador de corriente o adaptador para automóviles en
su entrada correspondiente situada en la parte posterior del reproductor de DVD y
conecte el enchufe a una toma de corriente mural, o bien a la toma para encendedor
de un automóvil. Al encender el aparato, el indicador de encendido se iluminará en rojo.
2. Una vez conectado el aparato al adaptador de corriente o al adaptador para
automóviles, se iniciará la carga de la pila de litio.
3. Mientras la pila esté cargando, el testigo de carga de la pila parpadeará en verde.
4. Una vez que la pila esté totalmente cargada, el testigo se iluminará en rojo.
TIEMPO DE CARGA/TIEMPO DE REPRODUCCIÓN
Tiempo de carga
Tiempo de reproducción
Aprox. entre 3 y 4 horas
Nota:
• El tiempo de reproducción podrá variar en función de cómo se utilice el reproductor de DVD.
• Utilice únicamente el adaptador de corriente suministrado con el reproductor de DVD. No
utilice ningún otro adaptador.
• La toma de corriente deberá estar instalada cerca del aparato y estar fácilmente
accesible durante su utilización.
¡ADVERTENCIA! Las descargas electrostáticas o interferencias de una frecuencia
sucientemente fuerte podrán provocar el funcionamiento anormal del aparato o la pérdida
de los datos almacenados en su memoria. En caso de observarse algún funcionamiento
anormal, desenchufe del suministro eléctrico el adaptador de corriente y vuelva a enchufarlo.
40
DVDP1_07IM1353_30Aug_V09.indd 40 30/08/2013 4:19 PM
Aprox. entre 1,5 y 2 horas
Page 41

Español
Conexión a la red eléctrica
Utilice el adaptador de corriente (110 – 240 VCA, 50/60 Hz) o el adaptador para automóviles para conectar el reproductor de DVD portátil a una toma de corriente mural, o
bien a la toma del encendedor de un automóvil. Asegúrese de que la pila del mando a
distancia ha sido instalada de la manera indicada en la sección correspondiente al Mando
a distancia.
Conexión de los auriculares
El lateral derecho del aparato cuenta con una salida para auriculares de tipo estándar.
Cuando se conecten los auriculares, se desactivará automáticamente el sonido de los
altavoces.
¡PRECAUCIÓN! La utilización del aparato a un nivel de volumen excesivo (especialmente cuando se utilizan auriculares) podrá dañar su capacidad auditiva. Por este
motivo, asegúrese de bajar el volumen del aparato antes de conectar los auriculares.
Nota:
• Asegúrese de apagar el reproductor de DVD antes de efectuar conexiones en el mismo.
• Antes de utilizar el aparato por primera vez, asegúrese de retirar la etiqueta estática de
la pantalla LCD.
¡NOTA IMPORTANTE!
Cuando desee girar la pantalla, abra primero la pantalla e inclínela a un ángulo de 120˚
tal y como se muestra en la ilustración superior. A continuación, gire la pantalla 180˚ a la
derecha o 90˚ a la izquierda. De no seguirse estas instrucciones, podría arañar la tapa
del compartimento del CD y la carcasa intermedia.
Tipos de discos
DVD
CD AUDIO
CD-R
CD-RW
DVD-R
DVD+R
DVD-RW
DVD+RW
Nota:
• El reproductor de DVD portátil es compatible con discos en formato JPEG.
• El aparato sólo reconocerá aquellos discos que estén correctamente grabados.
DVDP1_07IM1353_30Aug_V09.indd 41 30/08/2013 4:19 PM
Audio y Vídeo
Audio
Audio o Vídeo
Audio o Vídeo
Audio o Vídeo
Audio o Vídeo
Audio o Vídeo
Audio o Vídeo
41
Page 42

Español
Mantenimiento de los discos
Cuidado de los discos (A)
• Procure no tocar la supercie brillante del disco ni doblar el disco en modo alguno.
• Nunca utilice disolventes tales como benceno u otros productos químicos fuertes, ya que
éstos podrían dañar el acabado del aparato.
• Es especialmente importante que ningún líquido penetre en el aparato.
• Retire los discos de su caja sujetándolos por sus cantos al tiempo que presiona
ligeramente el botón central de la caja.
• Coloque el disco en la bandeja de inserción, con la etiqueta orientada hacia arriba.
• Es posible que un disco sucio no pueda reproducirse correctamente. En caso de que
el disco se ensucie, límpielo con un paño suave siguiendo un movimiento rectilíneo,
empezando desde el centro del disco y desplazándose hacia el borde del mismo.
• Evite exponer los discos a la acción directa de los rayos del sol, ni tampoco a
temperaturas extremas o entornos húmedos.
• Trate los discos con el debido cuidado. Sujete los discos únicamente por sus cantos.
Evite siempre que sus dedos toquen la supercie brillante del disco que no lleva etiqueta.
(A)
Limpieza de los discos (B)
• No coloque cinta adhesiva, pegatinas, etc. sobre la etiqueta del disco.
• Limpie el disco periódicamente con un paño seco y suave que no suelte pelusas. Nunca
utilice detergentes ni limpiadores abrasivos para limpiar los discos. De ser necesario
utilice, un kit de limpieza para CD.
• En caso de que un disco salte o quede permanentemente atascado en una de sus
pistas, será probable que esté sucio o dañado (arañado).
• Cuando limpie los discos, hágalo utilizando un movimiento rectilíneo empezando desde
el centro del disco y desplazándose hacia el borde del mismo. Nunca los limpie
siguiendo un movimiento circular.
(B)
Correct
Incorrect
• Para evitar que puedan dañarse, los discos deberán guardarse en su correspondiente
caja o estuche después de su utilización.
• No exponga los discos a la acción directa de los rayos del sol, ni a altas temperaturas o
entornos polvorientos, etc.
• Una exposición prolongada a la acción de los rayos del sol o a altas temperaturas
podría deformar el disco.
• No pegue ni escriba nada en ninguna de las caras del disco, ya que unos instrumentos
de escritura alados o la tinta podrían dañar la supercie de las mismas.
Información sobre la gestión de regiones geográcas
Este reproductor de DVD ha sido diseñado y fabricado para responder en función a la
información sobre gestión de regiones geográcas grabada en los discos DVD. Si el
código de región geográca de cierto disco DVD no coincide con el código para que el
que este reproductor de DVD ha sido diseñado, el aparato no podrá reproducir dicho
disco.
El código de región geográca estipulado para este reproductor de DVD es el
(EEUU, Canadá, islas del Pacíco oriental).
42
DVDP1_07IM1353_30Aug_V09.indd 42 30/08/2013 4:19 PM
Page 43

Español
Funciones de los diferentes botones
NOTA IMPORTANTE: las funciones descritas a continuación estarán mayormente
disponibles para discos DVD a menos que se especique lo contrario; es decir, para CD
de audio. Los mensajes que se muestran en la pantalla y las funciones disponibles podrán
ser diferentes para otros tipos de discos.
Reproducción/Parada
1. Desplace el botón de encendido hasta la posición “ON” (encendido) y abra la tapa del
reproductor de DVD.
2. Pulse el botón de apertura
de discos.
3. Sostenga el disco por sus bordes, procurando no tocar ninguna de sus caras y
colóquelo en la bandeja de inserción con su cara impresa orientada hacia arriba (en
el caso de un DVD de doble cara, coloque el disco con la etiqueta A/1 orientada hacia
arriba).
4. Cierre la bandeja y el disco se cargará de forma automática.
Si el disco introducido es un DVD, la pantalla mostrará la página de Menú o de Título.
Utilice los botones de desplazamiento / / / del mando a distancia o los situados
en el aparato para seleccionar la opción deseada y, a continuación, pulse el botón de
Reproducción o bien el botón de Aceptación/Conrmación (ENTER) para conrmar
su selección.
• Si por el contrario se trata de un CD, se reproducirá automáticamente la primera pista
del mismo.
• En el caso de un CD que incluya archivos guardados en carpetas, utilice los botones de
desplazamiento del mando de control para seleccionar una carpeta o ciertos archivos y,
a continuación, pulse el botón de Aceptación/Conrmación (ENTER) para seleccionar y
abrir los elementos seleccionados.
5. Pulse el botón de Parada si desea detener la reproducción del disco. Podrá reanudar
la reproducción pulsando el botón de Reproducción . La reproducción se reanudará
desde el mismo punto en que se detuvo tras haber pulsado el botón de Parada .
6. Pulse dos veces el botón de Parada para cancelar la función de reanudación y
detener totalmente la reproducción del disco.
Volumen
Nota: Siempre que se enciende el lector de DVD, el volumen está a su máximo nivel.
Pulse los botones VOL+ o VOL- para aumentar o disminuir el nivel de volumen. Para funccionar, tiene que mantener los botones pulsados durante uno segundo.
Pausa
1. Pulse el botón para causar la reproducción del DVD o CD.
2. Pulse de nuevo el botón para reanudar la reproducción.
Anterior / Siguiente
Durante la reproducción de un DVD o CD, pulse el botón para volver al principio del
capítulo o de la pista anterior. De manera alternativa, pulse el botón para volver al
principio del capítulo o de la pista siguiente.
Notas: Para usar los botones y del lector de DVD, mantenga presionados los
botones SUBIR y BAJAR . Para funccionar, tiene que mantener los botones pulsados
durante uno segundo.
Búsqueda hacia delante / hacia atrás
Pulse el botón para efectuar una búsqueda hacia delante, o bien el botón para
efectuar una búsqueda hacia atrás en el disco introducido en el aparato. Pulse
reiteradamente cualquiera de estos botones durante la reproducción para cambiar la
velocidad de búsqueda conforme a la secuencia siguiente: “2X”, “4X”, “8X”, “20X” y de
vuelta a la velocidad de reproducción normal.
del reproductor para que se abra la bandeja de inserción
Fonctions des touches
43
DVDP1_07IM1353_30Aug_V09.indd 43 30/08/2013 4:19 PM
Page 44

Español
Nota: pulse en cualquier momento el botón para restablecer la velocidad de
reproducción normal.
Desactivación del sonido
Pulse el botón “MUTE” para desactivar el sonido del reproductor. Vuelva a pulsar el botón
“MUTE” para reactivar el sonido.
Funciones complementarias
Menú de DVD
Durante la reproducción de un DVD, pulse el botón de selección de MENÚ en el mando a
distancia para acceder al menú principal de DVD. Utilice los botones de desplazamiento
para seleccionar la opción deseada y, a continuación, pulse el botón de Aceptación/Conrmación (ENTER) para conrmar su selección.
Modo de repetición y función de repetición de A a B
Esta función estará disponible tanto para discos DVD como CD de audio, aunque con
diferentes efectos.
1. En caso de que se esté reproduciendo un DVD, pulse una sola vez el botón “REPEAT”
(repetición) para repetir la reproducción del capítulo actual; púlselo dos veces para
repetir la reproducción del título actual y tres veces para repetir la totalidad del disco.
2. En el caso de un CD de audio, pulse una sola vez el botón “REPEAT” (repetición) para
repetir la reproducción de la pista actual y púlselo dos veces para repetir la reproducción
de la totalidad del disco (Repeat all tracks [repetir todas las pistas]).
3. Pulse reiteradamente dicho botón para cancelar la función de repetición.
4. Si desea repetir un determinado segmento del DVD o CD mientras se encuentra en el
modo de reproducción, pulse una sola vez el botón A-B para iniciar el punto desde donde
desea que se inicie la repetición, dos veces para indicar el punto donde debe nalizar la
reproducción y tres veces para desactivar la función de repetición.
Subtítulo
Pulse reiteradamente el botón “SUBTITLE” (subtítulo) para activar y cambiar el idioma del
subtítulo que se muestra en la pantalla.
Nota: el número de subtítulos disponibles dependerá del DVD.
Audio
• Durante la reproducción de un DVD, pulse el botón “AUDIO” para cambiar el idioma de
audio del DVD (siempre que esta función esté disponible en el disco). Pulse
reiteradamente el botón “AUDIO” para cambiar el idioma.
• Durante la reproducción de un CD de audio, pulse reiteradamente el botón “AUDIO” para
alternar la salida del sonido entre los modos “Estéreo”, “altavoz izquierdo” o “altavoz
derecho”.
Búsqueda
Mediante esta función, podrá saltar hasta una sección determinada de la reproducción del
disco, o bien hasta una pista, capítulo, o título determinados.
1. Pulse el botón “SEARCH” para acceder al modo de búsqueda.
• DVD: un título, capítulo o intervalo temporal especíco de un título.
• CD: una pista, un intervalo temporal especíco de una pista o un intervalo temporal
especíco del disco.
2. Utilice los botones numéricos para introducir el número de capítulo, título, pista o
intervalo de reproducción deseado.
3. Pulse el botón de Aceptación/Conrmación (ENTER) y el reproductor saltará inmediata-
mente a la ubicación seleccionada.
Título
Para buscar un determinado título en un DVD o CD de audio, pulse el botón “TITLE” (título)
y, a continuación, utilice los botones de desplazamiento para seleccionar un título. Pulse el
botón de Aceptación/Conrmación (ENTER) para iniciar la reproducción de dicho título.
44
DVDP1_07IM1353_30Aug_V09.indd 44 30/08/2013 4:19 PM
Page 45

Español
Pantalla
Pulse el botón “DISPLAY” (pantalla) para visualizar en la pantalla información sobre el
intervalo y estado actual de reproducción (tiempo transcurrido, títulos aún por reproducir,
capítulo reproducido, capítulo por reproducir…). Pulse reiteradamente este botón para
ocultar la información.
Función ZOOM (ampliación)
Pulse reiteradamente el botón “ZOOM” para seleccionar entre los diferentes niveles de
ampliación (2 a 4 y 1/2 a 1/4), o bien para desactivar esta función.
Angle (Ángulo)
1. Si un disco DVD posee la opción de reproducción con ángulos múltiples, se puede
seleccionar su visualización.
2. Durante la reproducción, presione el botón ANGLE repetidamente para seleccionar el
ángulo de visualización deseado.
Nota: El número de ángulos de visualización depende del disco.
Step (Paso)
1. Presione el botón STEP una vez para pausar el vídeo. Presione este botón de nuevo
para mover un fotograma hacia arriba. (El video se encuentra en todo momento en el
modo de pausa.)
2. Para reanudar la reproducción, presione REPRODUCCIÓN.
Return (Volver)
Presione este botón para volver a una página/opción anterior
Programación
Esta función se utiliza para programar la secuencia de reproducción:
1. Pulse el botón de promoción “PROGRAM”.
2. Utilice los botones numéricos para introducir el número correspondiente al título y
capítulo de un DVD, o tan sólo el capítulo en el caso de un disco VCD o CD de audio.
3. Utilice los botones de desplazamiento para acceder al parámetro siguiente.
4. Seleccione “Reproducir” para iniciar la reproducción conforme a la secuencia pro-
gramada y pulse el botón de Aceptación/Conrmación (ENTER) para conrmar su
selección. (Se selecciona la opción “Borrar programación” (Clear Program), el
reproductor seguirá la secuencia reproducción normal del disco.)
Parámetros de DVD
El reproductor de DVD portátil cuenta con cuatro menús de conguración: “Sistema”, “Idioma”, “Ajuste en espera” y “Video”.
1. Para acceder a la página de menús de conguración, pulse el botón de
“ Conguración” (SETUP).
2. Utilice los botones de desplazamiento / para seleccionar un menú.
3. Utilice los botones de desplazamiento para recorrer los menús y seleccionar las
opciones disponibles. Pulse el botón de Aceptación/Conrmación (ENTER) para
guardar los parámetros congurados en la memoria del aparato.
4. Para abandonar dicho menú, pulse en cualquier momento el botón de “Conguración”
(SETUP).
Conguración sistema
Sistema TV
1. Utilice los botones de desplazamiento / para seleccionar la opción “Sistema TV” y,
a continuación, pulse el bóton .
45
DVDP1_07IM1353_30Aug_V09.indd 45 30/08/2013 4:19 PM
Page 46

Español
2. Utilice los botones de desplazamiento / para seleccionar:
• PAL – Use esta conguración si su aparato de TV posee sistema PAL (línea de fase
alternada).
• NTSC – Use esta conguración si su aparato de TV posee un sistema NTSC (Comisión nacional de sistema de televisión).
3. Presione la tecla ENTER para conrmar su selección.
Reanudar energía
Esa función se usa para activar o desactivar la última memoria.
1. Utilice los botones de desplazamiento / para seleccionar la opción “Power Resume” y, a continuación, pulse el bóton .
2. Utilice los botones de desplazamiento / para seleccionar ‘Act.’ or ‘Des.’.
3. Presione la tecla ENTER para conrmar su selección.
Pantalla TV
1. Utilice los botones de desplazamiento / para seleccionar la opción “Pantalla TV”
y, a continuación, pulse el botón .
2. Utilice los botones de desplazamiento / para seleccionar entre los siguientes
menús:
• “4.3LB”: Utilice este ajuste si posee un televisor normal y desea visualizar la imagen
en modo de televisor de pantalla ancha.
• “4.3PS”: Utilice este ajuste si posee un televisor normal y no desea visualizar la
imagen en modo de televisor de pantalla ancha.
• “16:9” –Utilice este ajuste si posee un televisor de pantalla ancha.
3. Pulse el botón de Aceptación/Conrmación (ENTER) para conrmar su selección.
Conguración del idioma
Pulse el botón de “Conguración” (SETUP) y utilice los botones de desplazamiento
/ para resaltar la opción “Idioma”. Seguidamente, pulse el botón para acceder a los
parámetros de conguración disponibles.
Nota: utilice el botón para regresar al menú anterior.
Idioma
1. Utilice los botones de desplazamiento / para seleccionar entre los siguientes menús:
• Idioma
• Subtítulo
• MPEG4 Subtítulos
• Audio
• Menú de DVD
2. Pulse el botón y, a continuación, utilice los botones de desplazamiento / para
seleccionar un idioma de entre los disponibles.
3. Pulse el botón de Aceptación/Conrmación (ENTER) para conrmar su selección.
Conguración de vídeo
Pulse el botón de “Conguración” (SETUP) y utilice los botones de desplazamiento /
para resaltar la opción “Vídeo”. Seguidamente, pulse el botón para acceder a los
parámetros de conguración disponibles.
Nota: utilice el botón para regresar al menú anterior.
1. Presione los botones
• Brillo
• Contraste
• Color (Tonalidad)
• Saturación
• Nitidez
2. Presione el botón, y después
3. Presione ENTER para conrmar.
46
DVDP1_07IM1353_30Aug_V09.indd 46 30/08/2013 4:19 PM
/
para seleccionar:
/
para modicar la conguración.
Page 47

Español
Conguración de los parámetros de audio
Pulse el botón de “Conguración” (SETUP) y utilice los botones de desplazamiento /
para resaltar la opción “Audio”. Seguidamente, pulse el botón para acceder a los
parámetros de conguración disponibles.
Nota: utilice el botón para regresar al menú anterior.
Standby (En espera)
La pantalla entra en modo de espera cuando no se realiza ninguna operación con el
mando a distancia o con los botones del panel durante un periodo de tiempo de entre 3 y
4 horas.
1. Utilice los botones de desplazamiento
• Desactivar
• 3 horas
• 4 horas
2. Presione la tecla ENTER para conrmar su selección.
/
para seleccionar:
Clasicación de programas
La función de control parental permite a los padres impedir que sus hijos vean material
inapropiado incluido en un DVD. El aparato impedirá el acceso al contenido del DVD
si la clasicación del mismo es para mayores de 13 años acompañados (PG-13). Para
desbloquear la función de control parental, será necesario introducir una contraseña de
seguridad de 4 cifras (la contraseña por defecto es 0000) y pulsar el botón de “Aceptación/
Conrmación” (ENTER).
CD – Funciones complementarias
Repetición (Repeat): seleccione esta opción utilizando los botones de desplazamiento y,
a continuación, pulse reiteradamente el botón de Aceptación/Conrmación (ENTER) para
seleccionar entre las opciones “Rep 1” (Repetir una), “Repetir todas” o “Desactivar” esta
función.
CD de fotos
CD de fotos
1. Inserte un CD de fotos en la bandeja del reproductor. Use los botones / para
seleccionar la opción “JPEG” y presione ENTER. El lector muestra las imágenes en una
lista.
2. Si desea visualizar la lista de carpetas y fotografías incluidas en el CD, pulse el botón .
3. Utilice los botones de desplazamiento / para seleccionar una carpeta y, a
continuación, pulse el botón de Aceptación/Conrmación (ENTER) para comenzar a
explorar los archivos contenidos en la misma.
4. Utilice los botones de desplazamiento / para seleccionar una fotografía y, a
continuación, pulse el botón de Aceptación/Conrmación (ENTER) para iniciar una
presentación de diapositivas con las imágenes seleccionadas.
5. Presione el botón MENU para ver las fotos en miniatura. Presiónelo de nuevo para volver
a la lista.
6. Pulse el botón para pausar y/o reanudar la presentación de diapositivas.
7. Pulse el botó o en el mando a distancia para pasar a la siguiente fotografía o
volver a la fotografía anterior.
47
DVDP1_07IM1353_30Aug_V09.indd 47 30/08/2013 4:19 PM
Page 48

Español
8. Utilice los botones desplazamiento para voltear o girar las fotografías.
Nota: Durante la presentación de diapositivas:
• Si lo desea, podrá utilizar los botones numéricos para introducir directamente el número
correspondiente a una foto. En el caso de números superiores a 10; p. ej. 12, pulse el
botón 10+ y, seguidamente, el número 2.
Asimismo, podrá pulsar en cualquier momento el botón para volver a la lista de
fotografías.
• Durante la presentación de diapositivas, pulse el botón de “Visualización en pantalla”
(DISPLAY) para que se muestre información sobre el tipo de archivo y número de
fotografías, p. ej. “Pista 14 de 59”.
•
Pulse reiteradamente el botón de Ampliación/Reducción (ZOOM) para ampliar o reducir una
imagen.
Tarjetas de memoria USB
1. Inserte rmemente una tarjeta USB en su correspondiente puerto, en la ranura
prevista a tal efecto en el aparato.
2. Utilice los botones de desplazamiento para seleccionar entre las opciones “Audio”,
“JPEG”, “Video” o “E-Book” y, a continuación, pulse el botón de Aceptación/
Conrmación (ENTER) para conrmar su selección.
3. Si el reproductor comienza a reproducir automáticamente los archivos de Vídeo,
Audio o Fotos, pulse el botón de Parada para que se muestre el menú de archivos
y seleccionar los archivos que desee reproducir.
4. Para cualquier otra función, consulte las instrucciones proporcionadas anteriormente
en este manual referentes a la reproducción de archivos de DVD, Audio Foto.
Especicaciones
DATOS GENERALES
Alimentación eléctrica 110 – 240 VCA, 50/60 Hz
9 VCC 1 A
Consumo eléctrico < 10W
Pila de ión de litio incorporada Pila de litio: 7,4 V/1.000 mAh
Dimensiones externas (largo x ancho x alto) 175 x 160 x 35 mm
Tamaño de la pantalla 178 mm (7 pulgadas)
Peso 882,5 g (sin pilas)
Temperatura ambiente en funcionamiento De 5 a 35 °C (de 41 a 95 °F)
Posición de funcionamiento Horizontal
Nivel de humedad ambiente en funcionamiento del 5 al 90%
SISTEMA
Láser Láser semiconductor de una longitud de onda de 650 nm
Sistema de señales PAL/NTSC
Relación señal/ruido Superior a 80 db
Espectro dinámico Superior a 85 db
SALIDA DE SEÑAL
Video compuesto 1,0 V P-P 75 ohmios - sincronización negativa
Salida de audio (analógica) 0,5 V rms - 600 ohmios
ADAPTADOR DE CORRIENTE
Entrada 100 – 240 VCA ~ 50/60 Hz
Salida 9 VCC 1.000mA
48
DVDP1_07IM1353_30Aug_V09.indd 48 30/08/2013 4:19 PM
Page 49

Español
Guía de resolución de problemas
Problema Solución
El reproductor no se
enciende.
No hay imagen en la pantalla.
No hay sonido.
El reproductor no consigue
reproducir el disco insertado.
El mando a distancia no
funciona correctamente,
o bien el reproductor no
responde correctamente a las
señales del mando a
distancia.
La pantalla muestra una
imagen de baja calidad.
Los botones del reproductor
no funcionan correctamente.
- Compruebe la conexión de alimentación eléctrica.
- Es posible que la pila esté agotada. Recargue la pila.
- Compruebe el nivel de carga de la pila.
- Si el reproductor está conectado a otro dispositivo
(televisor o amplicador de audio), compruebe las
conexiones correspondientes.
- Asegúrese de que los dispositivos conectados
funcionan correctamente.
- Compruebe el volumen del aparato.
- Asegúrese de que el disco está insertado
correctamente.
- Limpie el disco.
- Asegúrese de que no hay obstáculos entre el mando
a distancia y el sensor de recepción situado en el
reproductor.
- Asegúrese de dirigir correctamente el mando a
distancia hacia el sensor de captación de señal
situado en el panel frontal del reproductor.
- Compruebe la pila del mando a distancia y
sustitúyala de ser necesario.
- Asegúrese de utilizar el mando a distancia desde
menos de tres metros del sensor de captación de
señal del reproductor.
- Compruebe que el disco no esté sucio ni arañado.
- Apague el reproductor, espere 10 segundos y vuelva
a encenderlo.
- Las subidas de tensión u otros fenómenos eléctricos
pueden causar el funcionamiento anormal del
aparato. Apague el reproductor, espere diez
segundos y vuelva a encenderlo.
Mantenimiento
Para evitar riesgos de incendio o electrocución, desconecte el aparato del suministro
eléctrico mientras procede a su limpieza. El acabado de su aparato puede limpiarse con
una bayeta, de la misma manera utilizada para limpiar sus otros muebles. Para limpiar
el exterior del aparato, utilice un paño limpio y suave, ligeramente humedecido con agua
clara y tibia. Tenga cuidado al limpiar los elementos de plástico del aparato. Si lo desea,
podrá utilizar un tipo de jabón suave y un paño humedecido para limpiar el panel frontal.
Garantía
Este producto está cubierto por nuestra garantía de 6 meses.
Para efectuar cualquier reclamación en garantía o solicitud de reparación posventa, le
rogamos que se ponga en contacto con su distribuidor y le presente un comprobante
válido de compra. Nuestra garantía cubre aquellos defectos de material o mano de obra
que sean imputables al fabricante, a excepción de todo aquel deterioro que se produzca
como consecuencia de la no observación de las indicaciones señaladas en el manual
DVDP1_07IM1353_30Aug_V09.indd 49 30/08/2013 4:19 PM
49
Page 50

Español
de instrucciones o de toda intervención improcedente en el aparato (como por ejemplo,
desmontaje, exposición al calor o humedad, etc.). Se recomienda conservar el embalaje
para poder utilizarlo como referencia futura.
En nuestro continuo afán de optimización de servicios, podremos implementar
modicaciones en los colores y detalles del producto mostrado en el embalaje.
NOTA: por favor conserve este manual de instrucciones, ya que contiene informaciones
importantes.
Referencia: DVDP1_07
Diseñado y desarrollado en Europa - Fabricado en Dong Guan, China
©2013 LEXIBOOK®
Declaración de cumplimiento de la normativa FCC
Este aparato cumple con la Parte 15 de la normativa FCC (Federal Communication
Commission, Comisión Federal de Comunicaciones) estadounidense. Su funcionamiento
está sujeto a las siguientes dos condiciones: (1) este aparato no puede causar
interferencias perjudiciales, y (2) este aparato debe aceptar cualquier interferencia que
reciba, incluidas las interferencias que pueda causar un funcionamiento no deseado.
Advertencia: Cualquier cambio o modicación a esta unidad no expresamente aprobado
por la parte responsable del cumplimiento podría revocar la autoridad del usuario para
utilizar el equipo.
NOTA: Este equipo ha sido sometido a pruebas y se ha comprobado que cumple con
los límites establecidos para un dispositivo digital de Clase B, según la Parte 15 de
la normativa FCC. Dichos límites están diseñados para proporcionar una protección
razonable contra interferencias perjudiciales en una instalación residencial. Este
equipamiento genera, utiliza y puede irradiar energía de radiofrecuencia y, si no se instala
y utiliza de acuerdo con las instrucciones, puede provocar interferencias perjudiciales
para las comunicaciones por radio.
Sin embargo, no existe garantía de que dichas interferencias no se vayan a producir en
una instalación concreta.
Si este equipamiento no provoca interferencias perjudiciales para la recepción de la señal
de radio o televisión, lo cual se puede comprobar apagando y volviendo a encender el
equipo, se aconseja al usuario que intente corregir las interferencias mediante una o
varias de las siguientes medidas:
- Reoriente o cambie de lugar la antena receptora.
- Aumente la separación entre el equipamiento y el receptor.
- Conecte el equipamiento a una toma de corriente en un circuito eléctrico diferente del
circuito al que esté conectado el receptor.
- Consulte con su distribuidor o con un técnico con experiencia en la reparación de
aparatos de radio/televisión si necesita más ayuda.
España
Servicio atención al cliente: 902 760 049
www.lexibook.com
¡ADVERTENCIA! La utilización prolongada de este aparato a un nivel
de volumen excesivo podría dañar la
capacidad auditiva del usuario.
Precauciones para la protección del medioambiente
¡Al nal de su vida útil, los aparatos eléctricos pueden reciclarse y no deberán desecharse junto con los desperdicios
domésticos! Le rogamos que apoye activamente la conservación de los recursos naturales y contribuya a la
protección del medioambiente desechando este aparato eléctrico en un centro de reciclaje autorizado (si lo hay) al
nal de su vida útil.
50
Este producto no
es un juguete.
IM code: DVDP1_07IM1353
DVDP1_07IM1353_30Aug_V09.indd 50 30/08/2013 4:19 PM
Page 51

FRANCE
LEXIBOOK S.A,
Mon avis compte
91953 Courtaboeuf Cedex
2, avenue de Scandinavie,
DVDP1_07
YOUR OPINION MATTERS / VOTRE AVIS COMPTE
produits encore meilleurs! Merci de bien vouloir remplir ce coupon en français ou en anglais et de nous le retourner à l’adresse suivante :
Help us make products better than ever! Please fill out the following form in English or in French, and return it to / Aidez-nous à rendre nos
Reference of product / Référence du produit
Name of product / Nom du produit:
Date of purchase / Date de l’achat : ____/_____/_____
First name/Prénom : Last name/Nom de famille :
Store / Enseigne :
Birth Date of the user / Date de naissance de l’utilisateur de ce produit : ____/_____/_____
City/Ville :
Address/Adresse :
Zip code/Code Postal : Country/Pays :
Average/Moyen
Phone/Téléphone : Email :
What is your overall impression of the product? / Vous trouvez le produit globalement :
Very satisfactory/Très satisfaisant Satisfactory/Satisfaisant
Please feel free to leave your comments here / Vous pouvez à présent utiliser l’espace suivant pour nous donner vos remarques :
Disappointing/Décevant Very disappointing/Très décevant
Conformément aux articles 34 et suivants de la loi « Informatique et Libertés » du 6 janvier 1978, vous disposez d'un droit d'accès, de modification,
de rectification et de suppression des données qui vous concernent. Vous pouvez l'exercer sur simple demande à notre adresse. Si vous ne souhaitez
pas que ces données soient utilisées à des fins de prospection commerciale, veuillez cocher ici :
Find all our new products / Retrouvez toute notre actualité: http://www.lexibook.com
DVDP1_07IM1353_30Aug_V09.indd 51 30/08/2013 4:19 PM
Page 52

FRANCE
91953 Courtaboeuf Cedex
2, avenue de Scandinavie,
Mon avis compte,
LEXIBOOK S.A,
Affranchir
ici
DVDP1_07IM1353_30Aug_V09.indd 52 30/08/2013 4:19 PM
 Loading...