

Page 1

Français
English
Português
Español
Italiano
Deutsch
Nederlands
Ελληνικά
105(W)x150(H)mm
Français
).42/$5#4)/.
Ton nouvel appareil photographique avec zoom de 35 mm et 50 mm et flash intégré est
idéal pour t’initier à la photographie. Il fonctionne avec des pellicules 24 x 36 mm (Film
standard 35 mm) et le rembobinage et l’enroulement sont manuels. Bien que cet appareil
soit très facile à utiliser, lis bien les instructions ci-dessous pour être en mesure
rapidement de prendre des photos de ‘pros’.
°,!$³#/56%24%$%4/.!00!2%),0(/4/
!,)-%.4!4)/.
Cet appareil photo fonctionne avec 1 pile alcaline LR6 de 1,5V (non incluse). ,APPAREIL
PHOTODOITÐTREALIMENTÏPARLINTERMÏDIAIREDESPILESSPÏCIFIÏESUNIQUEMENT
1. DECLENCHEUR
2. ZOOM MANUEL DE 35 OU 50 MM
3. FLASH ELECTRONIQUE
4. OBJECTIF
5. FENTES POUR CORDON
6. BOUTON D’ACTIVATION DU FLASH
7. LUMIERE D’ACTIVATION DU FLASH
8. VISEUR
9. COMPARTIMENT DU FILM
10. PORTE ARRIERE
11. FENETRE DE LA PELLICULE
12. EMPLACEMENT POUR INSERER
LA PELLICULE
13. MOLETTE DE REMBOBINAGE
DU FILM
14. COMPTEUR PHOTO
15. MOLETTE POUR ENGAGER LE FILM
16. BOUTON DE SECURITE DE
REMBOBINAGE
17. COMPARTIMENT A PILE
18. MOLETTE D’AVANCEMENT DU FILM
19. CRANS D’ENTRAÎNEMENT DU FILM
20. BOUTON D’OUVERTURE DE LA
PORTE ARRIERE
1
Zoom Camera
APPAREIL PHOTO ZOOM
CJ210Serie
INSTRUCTION MANUAL
MODE D'EMPLOI
Page 2
3
1. Ouvrir la porte du compartiment à piles (17) situé en dessous de l’appareil.
2. Installer la pile alcaline LR6 en respectant le sens des polarités indiqué au fond du
compartiment à piles.
3. Refermer le compartiment à piles.
4. Mettre le jeu en marche.
Ne pas utiliser de piles rechargeables. Ne pas recharger les piles non rechargeables.
Retirer les accumulateurs du jeu avant de les recharger. Ne charger les accumulateurs
que sous la surveillance d'un adulte. Ne pas mélanger différents types de piles ou
accumulateurs, ou des piles et accumulateurs neufs et usagés. Les piles et
accumulateurs doivent être mis en place en respectant la polarité. Les piles et
accumulateurs usagés doivent être enlevés du jouet. Les bornes d'une pile ou d'un
accumulateur ne doivent pas être mises en court-circuit. Ne pas jeter les piles au feu.
Retirer les piles en cas de non utilisation prolongée. Lorsque le son s’affaiblit ou que le
jeu ne réagit plus, pensez à changer les piles. Si votre appareil présente un
dysfonctionnement, ôtez les piles du compartiment et remettez les directement,
cette opération vous permet d’effectuer le mode RESET sur votre produit.
CHARGEMENT DU FILM
1- Poussez le bouton d'ouverture (20) pour ouvrir la porte arrière (10).
2- Insérez une pellicule standard 35 mm dans le compartiment du film (9).
Insérez la languette du film sur les crans d’enroulement du film (19) et sur la molette pour
engager le film (15). Tournez la molette d'avancement du film (18) et assurez vous que le
film soit inséré dans les crans de passage du film (19).
2
3- Fermez la porte arrière (10).
4- Tournez la molette d’avancement du film (18) et ensuite appuyez sur le déclencheur
(1).
Répétez l'étape jusqu'à ce que le compteur photo (14) indique "1". Vous êtes désormais
prêt à prendre des photos.
PRISE DE VUE
À l’extérieur par temps ensoleillé, regardez à travers le viseur et cadrez votre photo. De
meilleures photos sont prises lorsque le soleil est au dessous ou derrière vous et non
derrière le sujet.
UTILISATION DU FLASH
À l’intérieur, la nuit et par temps nuageux vous devrez utilisez le flash.
Glissez l'interrupteur du flash (6) sur la position ‘ON’ près du
symbole flash. Attendre que l'indicateur de disponibilité du flash
(7) soit allumé. Vous êtes désormais prêt à prendre une photo avec flash.
Attention : Ne jamais prendre en photo une personne ou un animal trop prêt car cela
causerait des problèmes de vue.
Note : Glissez l’interrupteur du flash (6) en position ‘OFF’ lorsque vous n’utilisez pas le
flash pour conserver l’énergie des batteries.
FONCTION ZOOM
Le zoom est de 35 à 50 mm. Tourner le zoom (2) légèrement vers
la gauche pour un angle large. Tourner le+
vers la droite pour avoir un plan plus rapproché.
Appuyez sur le déclencheur (1) pour prendre
une photo. Ensuite, avancez la molette
d’avancement du film (18) jusqu’à ce que vous
ne puissiez aller plus loin. Vous pouvez désormais prendre une autre photo.
DECHARGEMENT DE LA PELLICULE
1- Lorsque la pellicule est terminée, poussez le bouton de rembobinage (16) jusqu’à ce
qu’il soit bien enfoncé.
Normal Rembobinage
Page 3

5
2- Sortez la poignée de la molette de rembobinage du film (13) et tournez la dans le sens
des aiguilles d'une montre, sans forcer pour rembobiner la totalité du film.
3- Poussez le bouton d'ouverture de la porte arrière pour ouvrir la porte arrière (20) et
sortir le film. Ne pas sortir le film si vous êtes exposés directement au soleil.
PROBLÈMES ET SOLUTIONS
4
Problème
Le déclencheur ne fonctionne pas.
Le film n’avance pas.
La molette pour engager le film ne tourne
pas au moment d’avancer le film.
Les photos sont floues.
Les photos sont trop sombres.
Les photos sont embrouillées.
Photos partielles.
Sujets coupés de la photo ou mal centrés.
Lumière d’activation du flash éteinte.
Lumière d’activation du flas h lente à
s’allumer.
Solution
Le film n’est pas avancé pour la prochaine
pose. Le f ilm n ’a pas été inséré
correctement.
Le film est déjà avancé et la photo n’a pas
encore été prise ou vous êtes à la fin du
film.
Le film n’a pas été inséré co rrectement.
Insérez-le à nouveau.
La caméra n’est pas tenue fermement ou le
sujet a bougé.
Il n’y a pas assez de lumière sur le sujet.
Activez le flash ou utilisez un film ISO 400
ou 800.
Les lentilles sont sales. Nettoyez-les avec
un nettoyant à lentilles.
Des mains, doigts ou cordon devant les
lentilles lors de la prise de vue.
Bien cadrer le sujet de la photo au milieu
du viseur.
Le flash n’est pas activé, la pile est faible
ou a été installée incorrectement.
La pile est faible et doit être remplacée.
Le flash ne fonctionne pas.
Les photos prises en utilisant le flash sont
trop sombres.
Les photos prises en utilisant le flash sont
trop éclairées.
Les batteries ont une durée de vie très
courte.
Aucun film ou pile n’a été inséré. Le flash
n’a pas été activé ou la pile est faible.
Le sujet est au-delà de la portée du flash
ou la photo a été prise avant que la lumière
d’activation du flash ne s’allume.
Le sujet est trop près.
Le flash est constamment activé ou vous
n’utilisez pas des piles alcalines.
RANGEMENT DE L'APPAREIL PHOTO
Lorsque l'appareil photo n'est pas utilisé :
- Ne pas soumettre l'appareil photo à des chocs ou à des vibrations.
- Ne pas soumettre l'appareil photo à des températures trop élevées.
- Rangez l'appareil photo dans son étui dans un endroit frais et sec à l’abri de la
poussière et des produits chimiques.
GARANTIE
NOTE : Veuillez garder ce mode d’emploi, il contient d’importantes informations.
Ce produit est couvert par notre garantie de 2 ans.
Pour toute mise en œuvre de la garantie ou de service après vente, vous devez vous
adresser à votre revendeur muni de votre preuve d’achat. Notre garantie couvre les vices
de matériel ou de montage imputables au constructeur à l’exclusion de toute
détérioration provenant du non-respect de la notice d’utilisation ou de toute intervention
intempestive sur l’article (telle que démontage, exposition à la chaleur ou à l’humidité …).
ENTRETIEN
1. Pour nettoyer le jeu, utilisez uniquement un chiffon doux légèrement imbibé d’eau, à
l’exclusion de tout produit détergent.
2. Ne pas exposer le jeu à la lumière directe du soleil ni à toute autre source de chaleur.
3. Ne pas le mouiller.
4. Ne pas le démonter, ni le laisser tomber.
Il est recommandé de conserver l’emballage pour toute référence ultérieure. Dans un
souci constant d’amélioration, nous pouvons être amenés à modifier les couleurs et les
détails du produit présenté sur l’emballage.
Référence : CJ210Serie
Conçu en Europe - Fabriqué en Chine
Inf orma tion s su r la pro tect ion de l'en viro nnem ent :
Tout a ppar eil élec triq ue usé est une mati ère recy clab le e t ne devrai t pa s fa ire part ie
des ordu res ména gère s! N ous vou s de mand ons de bien vou loir nou s soute nir en
con trib uant act ivement au ména geme nt des resso urce s et à la p rotectio n de
l'e nviro nne ment en dépo sant ce t ap pareil d ans des site s de co llec te ( si e xistant s).
Page 4

7
2. Install the 1 AA alkaline batteries observing carefully the polarity indicated at the
bottom of the battery compartment.
3. Close back the battery compartment.
Do not use rechargeable batteries. Non-rechargeable batteries are not to be recharged.
Remove the storage batteries before recharging. Recharge storage batteries under adult
supervision. Do not mix different types of battery and storage battery, or new and old
batteries or storage batteries. Insert batteries and storage batteries according to the
polarity. Remove used storage batteries from game. Do not short-circuit the battery or
storage battery terminals. Keep batteries away from fire. If game remains unused for an
extended period, remove batteries. Only batteries of the same or equivalent type as
recommended are to be used.
WARNING: If the unit malfunctions or receives an electrostatic shock, switch the unit off
and on again using the ON/OFF button. If this proves to be ineffective, remove the
batteries and/or perform the Reset procedure.
LOADING THE FILM
1- Push the back door latch down (20) to open the back door (10).
2- Insert a roll of 35mm film in the film chamber (9).
Slide the film strip on the film installation roller (15) and the film spool notches (19). Turn
the film advance wheel (18) ensuring that the film is inserted correctly into the gears of
the film spool notches (19).
6
English
INTRODUCTION
Your new camera with 35 mm & 50 mm zoom and integrated flash is ideal to introduce
you to photography. It works with all films type 24 x 36 mm (Standard film 35 mm) and
the winding and rewinding are manual. Even though this camera is very easy to use, read
carefully the instructions below to use its functions like a pro!
DISCOVER YOUR CAMERA
POWER SUPPLY
This camera works with 1 alkaline 1.5V 2.25 Ah batteries type AA (not included).
This game must be powered using only the specified batteries.
1. Open the battery compartment cover (17) located under the camera.
1. SHUTTER RELEASE BUTTON
2. 35 OR 50 MM MANUAL ZOOM
3. ELECTRONIC FLASH
4. LENS
5. WRIST STRAP SLOT
6. FLASH SWITCH
7. FLASH READY LIGHT
8. VIEWFINDER
9. FILM CHAMBER
10. BACK DOOR
11. FILM WINDOW
12. FILM PLACEMENT AREA
13. FILM REWIND CRANK
14. PHOTO COUNTER
15. FILM INSTALLATION ROLLER
16. FILM REWIND BUTTON
17. BATTERY COMPARTMENT
18. FILM ADVANCE WHEEL
19. FILM SPOOL NOTCHES
20. BACK DOOR LATCH
Page 5

98
3- Close the back cover (10).
4- Turn the film advance wheel (18) and press the shutter release button (1).
5- Repeat step 4 until the photo counter (14) indicates "1". You are now ready to take
pictures.
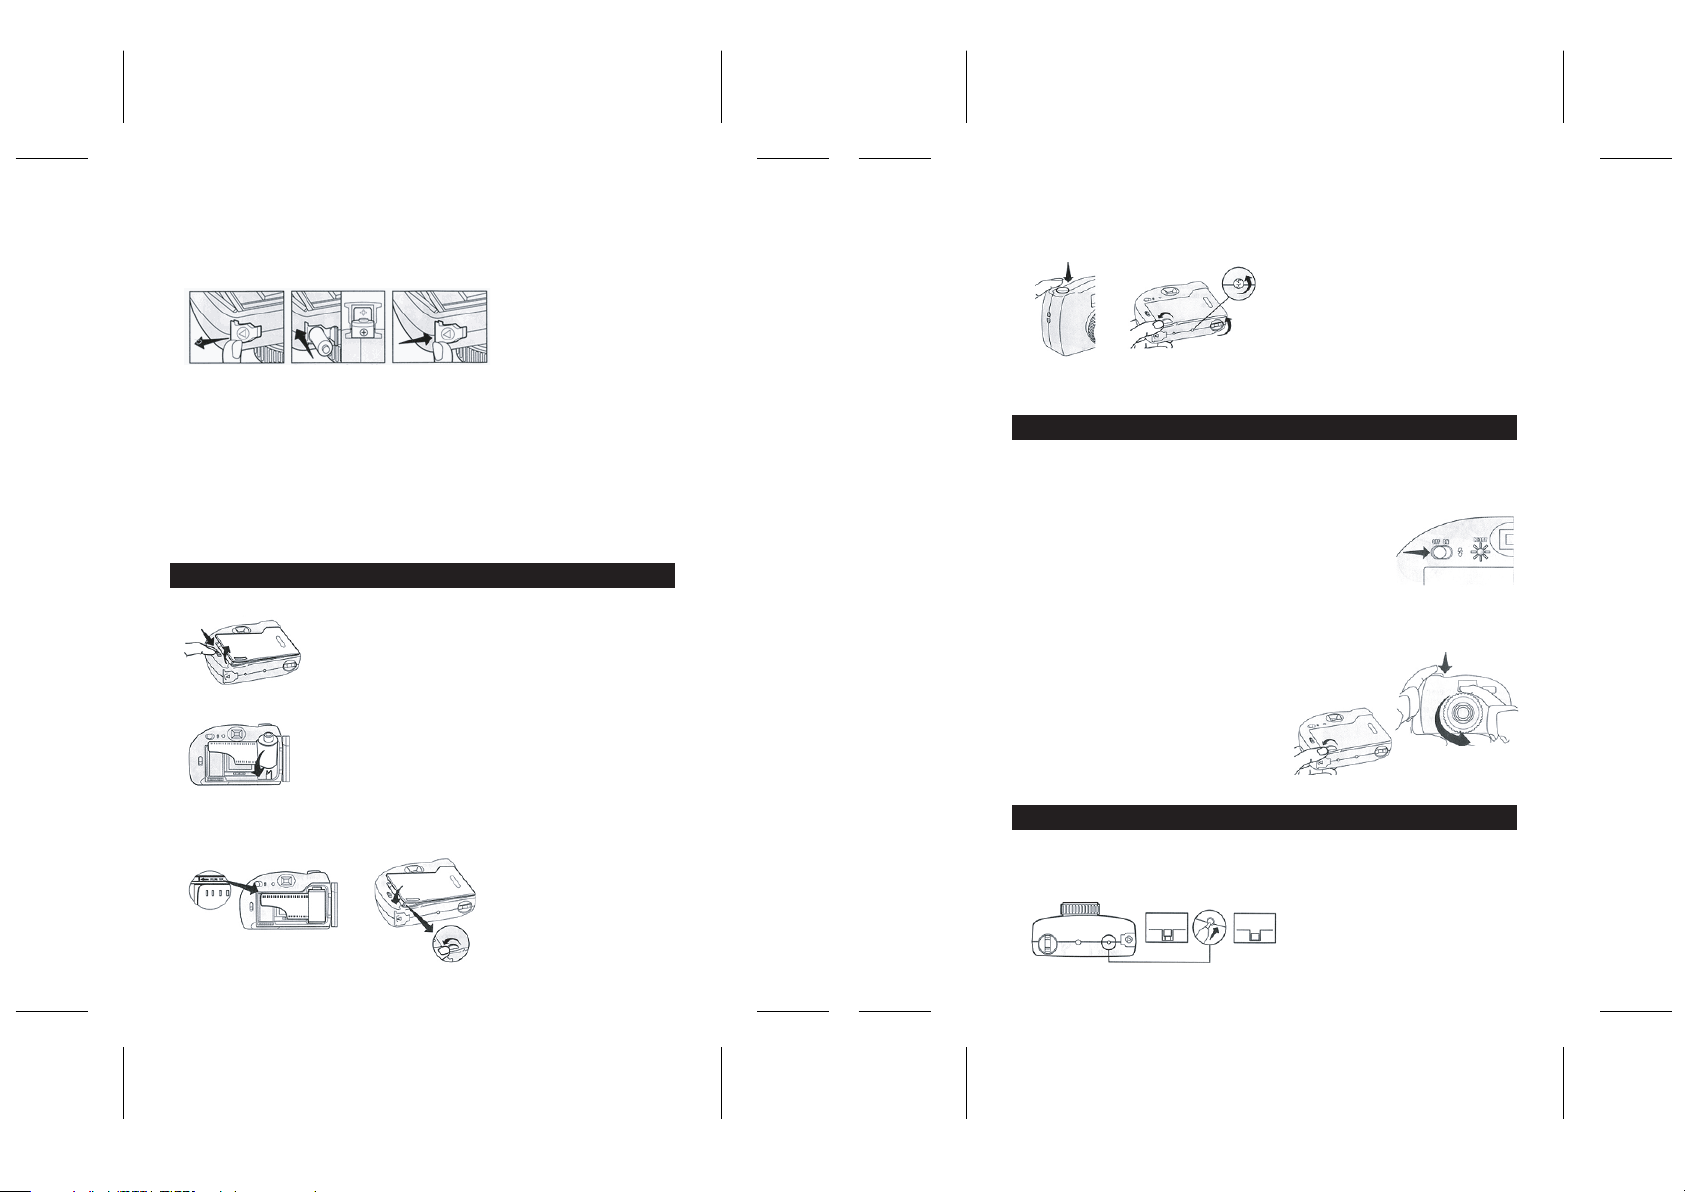
4!+).'0)#452%3
Outside on bright sunny days, look through the viewfinder (8) and compose your picture.
Best pictures are taken when the sun is over or behind you and not behind the subject.
53).'4(%&,!3(
Indoors, at night or on cloudy days, you will need to use the flash. Slide the flash switch
(6) to the ‘ON’ position and wait until the ready light (7) is lit. You
are now ready to take a picture using the flash.
Warning: Never take a picture too close to a person or an animal
as it may cause vision problems.
Note: Slide the flash switch (6) to the ‘OFF’ position when you are
not using the flash to preserve battery life.
ZOOM FUNCTION
The zoom has a 35 to 50 mm range. Turn the zoom (2)
slightly to the left to obtain a large angle. Turn the zoom
towards the right to get a close up view. Press on
the shutter release button (1) to take a picture.
Then, turn the film advance wheel (18) until it
stops. You may now take your next picture.
REWINDING AND UNLOADING THE FILM
1- When the last picture has been taken or the film is finished, press the film rewind
button (16).
.ORMAL Rewind
2- Keeping the film rewind button (16) pressed, flip out the handle of the film rewind crank
(13) and turn it clockwise to rewind the film. Keep turning until no pressure is felt.
3- Push the back cover release button (20) to open the back door cover (10) and remove
the film. Do not remove the film when you are exposed to direct sunlight.
02/",%-3!.$3/,54)/.3
Problem
The trigger does not work.
The film does not advance.
The photo counter of the rewind crank does
not turn when advancing the film.
The pictures are blurry.
The pictures are too dark.
The pictures are foggy.
Partial pictures.
Subjects off centre or cut off.
Flash ready light off.
The flash ready light turns on very slowly.
Solution
The film is not advanced to the next picture
or has not been loaded properly.
The film is already advanced and the
picture has not been taken yet or you are at
the end of the roll.
The film was not loaded properly. Reload
the film.
The camera is not held firmly or the subject
moved.
There is not enough light around the
subject. Turn on the flash or use a ISO 400
or 800 film.
The lens is dirty. Clean them using a lens
cleaner.
Hands, fingers or strap were in front of the
lens when the picture was taken.
Frame main subjects in the centre of the
viewfinder.
The flash is not turned on, the battery is
low or was installed incorrectly.
The battery is weak and should be
replaced.
Page 6

11 10
The flash does not work.
The pictures taken using the flash are too
dark.
The pictures taken using the flash are too
bright.
The battery has a short life.
No film or battery. Battery installed
incorrectly. The flash is not turned on or the
battery is weak.
The subject is beyond the flash range or
the picture was taken before the ready light
was on.
The subject is too close.
The flash is never turned off or another
type of batteries than alkaline is used.
CAMERA CARE
When the camera is not in use:
- Do not cause shocks or vibrations to the camera.
- Do not expose your camera to high temperatures.
- Store your camera into its case and in a dry location away from dust and chemicals.
WARRANTY
NOTE: Please keep this instruction manual, it contains important information.
This product is covered by our 2-year warranty.
For any claim under the warranty or after sale service, please contact your distributor and
present a valid proof of purchase. Our warranty covers any manufacturing material and
workmanship defect, with the exception of any deterioration arising from the
non-observance of the instruction manual or from any careless action implemented on
this item (such as dismantling, exposition to heat and humidity, etc.). It is recommended
to keep the packaging for any further reference.
CARE INSTRUCTIONS
To clean the unit, use only a dry cloth; do not use any detergent product.
Do not expose the unit to direct sunlight or to any other source of heat.
Do not dismantle or drop.
Do not get wet.
It is recommended to keep the packaging for any further reference.
In a bid to keep improving our services, we could implement modification on the colours
and the details of the product shown on the packaging.
Ref : CJ210Serie
Designed and developed in Europe - Made in China
Português
INTRODUÇÃO
A sua nova câmara com um zoom de 35 mm & 50 mm e flash integrado é ideal para ser
apresentado ao mundo da fotografia. Funciona com todo o tipo de rolo de 24 x 36 mm
(rolo padrão de 35 mm) e o avanço ou retrocesso deste é manual. Apesar desta câmara
ser muito fácil de utilizar, leia com atenção as instruções apresentadas abaixo, para que
possa utilizar as funções como um profissional!
DESCUBRA A SUA CÂMARA
PILHAS
O aparelho funciona com 1 pilha alcalina AA de 1,5 V (não incluída). Este brinquedo
funciona somente com as pilhas indicadas.
1. Usar uma chave de fenda para abrir o compartimento da pilha (17) situado em um dos
lados do aparelho.
2. Colocar a pilha alcalina AA seguindo as indicações localizadas dentro do
compartimento.
1. BOTÃO DISPARADOR
2. ZOOM de 35mm e 50mm.
3. FLASH
4. LENTE
5. RANHURA PARA A ALÇA DE PULSO
6. FLASH COM INTERRUPTOR.
7. LUZ PARA ACTIVAÇÃO DO FLASH.
8. VISOR
9. COMPARTIMENTO DO FILME.
10. TAMPA TRASEIRA.
11. JANELA PARA VER O FILME
12. ÁREA DE COLOCAÇÃO DO FILME.
13. ROLO DE REBOBINAGEM FINAL DO
FILME.
14. CONTADOR DE POSES
15. ROLO PARA A INSTALAÇÃO DO
FILME
16. BOTÃO DE REBOBINAGEM.
17. COMPARTIMENTO DA PILHA.
18. ROLO DE COLOCAÇÃO DO FILME.
19. GUIAS DO ROLO
20. FECHADURA DA TAMPA TRASEIRA.
Environm ental Protection:
Unwanted electr ical appliances can be recy cled and should not be discarde d along
with reg ular household wast e! Please activ ely support the con serv ation of resourc es
and help protect the en vironmen t by returning this app liance to a col lect ion centre
(if available).
Page 7

13
3. Fechar o compartimento da pilha.
Não utilizar pilhas recarregáveis. Não recarregue pilhas não recarregáveis. Retirar os
acumuladores do brinquedo antes de os recarregar. Não carregar os acumuladores sem
ser sob vigilância de um adulto. Não misturar diferentes tipos de pilhas ou
acumuladores, ou pilhas e acumuladores novos e gastos. As pilhas e os acumuladores
devem ser colocados no lugar respeitando-se a polaridade. As pilhas e acumuladores
gastos devem ser retirados do brinquedo. Os terminais de uma pilha ou de um
acumulador não devem ser colocadas em curto-circuito. Não atirar as pilhas ao fogo.
Retirar as pilhas em caso de não - utilização prolongada. Assim que o som falhar ou o
brinquedo não reagir, pense em trocar de pilhas.
Se o seu aparelho apresentar uma disfunção, tire as pilhas do compartimento e
volte a colocá-las directamente, esta operação permite-lhe efectuar o modo RESET
no seu produto.
INSTALAÇÃO DO FILME
1- Apertar o botão da tampa da parte traseira (20) para abri-la (10).
2- Colocar un filme regular de 35mm dentro do compartimento do filme (9).
Colocar o filme dentro da fenda do rolo (15), girar o rolo de colocação do filme (18) e
comprovar que o filme encontra-se correctamente colocado dentro dos cortes de
passagem do filme (19).
12
3- Fechar a tampa traseira (10).
4- Girar o rolo de colocação do filme (18) e apertar o botão disparador (1).
5- Repetir o passo 3 até que o contador de poses (14) indique « 1 ». Agora a máquina
está pronta para fazer fotografias.
TIRAR FOTOGRAFIAS
No exterior, num dia de sol, olhe pelo visor (8) e crie a sua fotografia. As melhores
fotografias são tiradas quando o sol estiver por cima ou por detrás de si e não por detrás
do objecto.
UTILIZAR O FLASH
No interior, à noite ou em dias nublados, terá de utilizar o flash.
Levar o interruptor do flash até a posição que mostra o símbolo (6).
Esperar até a luz do flash acender (7). A máquina encontra-se
pronta para fazer fotografias usando o flash.
Advertência : nao tirar fotografias a curta distância de pessoas
ou animais porque pode provocar danos aos olhos.
Nota: Faça deslizar o interruptor do flash (6) para a posição “OFF” quando não utilizar o
flash, para preservar o tempo de utilização das pilhas.
ZOOM FUNCTION
O zoom tem um alcance de 35 a 50 mm. Girar o zoom
para a esquerda (2) para obter um ângulo maior. Girar o zoom
para a direita para obter um primeiro plano. Prima
o obturador (1) para tirar uma fotografia. De
seguida, rode a roda de avanço do rolo (18)
até parar. Agora pode tirar a fotografia seguinte.
REBOBINAR E RETIRAR O ROLO
1- Ao finalizar o filme, apertar o botão de rebobinagem o filme (16).
Normal Rebobinar
Page 8

15
2- Tirar para fora da manivela do rolo de rebobinagem do filme (13) e girá-la no sentido
das agulhas do relogio, sem forzá-la quando chegar ao final do filme.
3- Apertar o botão de abertura da tampa traseira (20) para abri-la (10) e levar o filme para
revelar sem demora. Não retire o rolo quando estiver exposto à luz directa do sol.
PROBLEMAS E SOLUÇÕES
14
Problema
O obturador não funciona.
O rolo não avança.
O contador de fotografias não roda quando
avanço o rolo.
As imagens estão desfocadas.
As imagens estão muito escuras.
As imagens estão enubladas.
As imagens ficaram cortadas.
Os objectos não ficam centrados.
A luz de indicação do flash pront o está
desligada.
A luz de indi cação do flash pronto liga
muito lentamente.
Solução
O rolo não avançou para a fotografia
seguinte, ou não foi bem colocado.
O rolo já foi avançado e ainda não tirou a
fotografia ou já está no fim do rolo.
O rolo não foi bem colocado. Volte a
colocar bem o rolo.
A câmara não foi bem segura ou o objecto
moveu-se.
Não existe luz suficiente à volta do objecto.
Utilize o flash ou um rolo ISO 400 ou 800.
A lente está suja. Limpe a lente com um
produto especial.
Colocou a mão, os dedos ou a alça à
frente da lente quando tirou uma fotografia.
Coloque os objectos principais no centro
do visor.
O flash não está ligado, as pilhas estão
fracas ou foram colocadas
As pilhas estão fracas e deverão ser
substituídas.
O flash não funciona.
As fotografias tiradas com flash ficaram
muito escuras.
As fotografias tiradas com o flash ficaram
muito claras.
As pilhas têm um tempo de utilização muito
curto.
Não há rolo ou pilhas na câmara. As pilhas
foram colocadas incorrectamente. O flash
não está ligado ou as pilhas estão fracas.
O objecto está para além do alcance do
flash ou a imagem foi tirada antes da luz do
flash pronto ter ligado.
O objecto estava muito próximo.
O flash nunca é desligado ou utiliza um
outro tipo de pilhas sem ser alcalinas.
CUIDADOS COM A MÁQUINA
Quando a máquina não esteja sendo usada :
Não submeter a máquina a golpes ou vibrações.
Não submeter a máquina a altas temperaturas.
Colocar a máquina dentro de seu estojo em lugar seco, livre de pó e produtos químicos.
GARANTIA
NOTA : Aconselha-se que guarde este manual de instruções, pois ele contém informações
importantes. Este produto está coberto pela nossa garantia durante dois anos.
Para qualquer serviço coberto pela garantia ou assistência após venda, deve dirigir-se ao
seu revendedor acompanhado da respectiva prova de compra. A nossa garantia cobre os
defeitos de origem ou montagem imputáveis ao fabricante, excluindo toda a deterioração
resultante do desrespeito das instruções de utilização ou de toda a intervenção intempestiva
sobre o artigo (como seja desmontagem, exposição ao calor ou à humidade...).
MANUTENÇÃO
Para limpar a máquina, utilize apenas um pano macio ligeiramente embebido em água,
não utilizando qualquer produto detergente.
2. Não exponha a máquina à luz directa do sol nem a qualquer outra fonte de calor.
3. Não o molhe.
4. Não o desmonte, nem o deixe cair.
Recomenda-se que conserve a embalagem para qualquer referência posterior.
Numa constante busca de melhoramentos, nós podemos estar sujeitos a ter de
modificaras cores e os detalhes do produto apresentado na embalagem.
Ref : CJ210Serie
Criado e desenvolvido na Europa - Fabricado na China
Indicações para a protecção do meio ambiente
Aparelhos eléctricos antigos são materiais que não pertencem ao lixo doméstico! Por
isso pedimos para que nos apoie, contribuindo activamente na poupança de recursos e
na protecção do ambiente ao entregar este aparelho nos pontos de recolha, caso
existam.
Page 9

17
compartimiento.
3. Cierre el compartimiento de pilas.
No utilice pilas recargables. No intente recargar las pilas no recargables. Retire los
acumuladores del juego antes de cambiarlos. Cambie los acumuladores solamente bajo
la supervisión de un adulto. No mezcle diferentes tipos de pilas o acumuladores, o pilas
y acumuladores nuevos y usados. Las pilas y los acumuladores deben ser instalados
respetando el sentido de la polaridad. Las pilas y los acumuladores gastados deben ser
quitados del aparato. Los terminales de una pila o de un acumulador no se deben poner
en cortocircuito. No tirar las pilas al fuego. Retirar las pilas en caso de no utilizar el
aparato durante un periodo de tiempo prolongado. Cuando el sonido se debilita o el
juego no responde, piense en cambiar las pilas.
Si el aparato presenta un disfuncionamiento, quite las pilas del compartimento y
vuelva a ponerlas directamente, esta operación permitirá efectuar el modo RESET
en el aparato.
COLOCACIÓN DEL CARRETE
1- Pulsa el botón (20) para abrir la tapadera posterior de la cámara (10).
2- Introduce un carrete normal de 35mm dentro del compartimiento de carrete (9).
Coloca la película dentro de la abertura del pitón de arrastre, gira el rodillo de avance de
película (15) y asegúrate que la película ha sido colocada correctamente en la ruedecilla
dentada de arrastre de la película (19).
16
Español
INTRODUCCIÓN
Su nueva cámara, equipada con zoom de 35 mm y 50 mm y un flash integrado, es ideal
para iniciarse en el mundo de la fotografía. La máquina admite todo tipo de película de
24 x 36 mm (película estándar de 35 mm), y el avance de película, así como el
rebobinado, son manuales. Aunque la cámara es muy fácil de manejar, lee atentamente
las instrucciones que siguen para poder utilizar sus funciones como un profesional!
CONOCE TU CÁMARA
INSTALACION DE LA PILA
El aparato funciona con 1 pila alcalina “AA” de 1,5 V (no incluida).
Este juguete solamente deberá de utilizar las pilas especificadas.
1. Utiliza un destornillador para abrir el compartimiento de pilas, situado en el lateral del
aparato.
2. Coloca la pila alcalina “AA” siguiendo las polaridades indicadas en el interior del
1. BOTÓN DISPARADOR
2. TELEOBJETIVO 35mm y 50mm.
3. FLASH
4. LENTES
5. ENGANCHE PARA EL CORDÓN
DE LA MUÑECA
6. FLASH CON INTERRUPTOR.
7. LUZ PARA ACTIVACIÓN DEL FLASH.
8. VISOR
9. COMPARTIMIENTO DE CARRETE
10. TAPA DE LA CÁMARA.
11. VENTANILLA PARA VER LA
PELÍCULA.
12. ESPACIO PARA LA COLOCACIÓN
DEL CARRETE.
13. MANIVELA PARA REBOBINAR LA
PELÍCULA.
14. CONTADOR DE IMÁGENES
15. RODILLO PARA COLOCAR LA
PELÍCULA.
16. BOTÓN DE REBOBINADO.
17. COMPARTIMIENTO DE PILA.
18. PALANCA DE AVANCE DE PELÍCULA.
19. GUÍAS DE INSERCIÓN DEL ROLLA
20. CIERRE DE LA TAPADERA DE LA
CÁMARA.
Page 10

1918
3- Cierra la tapadera (10).
4- Gira la palanca de avance de película (18) y pulsar el disparador (1).
5- Repite el punto 4 hasta que en el contador de película (12) indique « 1 ». Ahora está
lista para tomar fotografías.
0!2!(!#%2&/4/'2!&·!3
En exteriores, con días soleados, mira a través del visor (8) y selecciona el encuadre para
tu foto. Las fotografías mejores se obtienen con el sol encima o detrás de ti, y no detrás
de los objetos o personas que vas a fotografiar.
53/$%,&,!3(
En interiores, por la noche, o en días nublados, necesitarás utilizar
el flash. Coloca el interruptor del Flash (6) en la posición que
muestra en símbolo de flash. Espera a que el indicador se
ilumine (7). Ahora está lista para tomar fotografías con flash.
!VISO No tomes fotografías de animales o personas muy cerca,
esto puede causar problemas visuales.
.OTAPara no malgastar las pilas, desplaza el interruptor del flash (6) a la posición “OFF”
cuando no vayas a usar el flash.
&5.#)¼.$%4%,%/"*%4)6/
El teleobjetivo dispone de un alcance de 35 a 50 mm. Mueve
el teleobjetivo (2) ligeramente hacia la izquierda
para obtener un ángulo más grande. Mueve
el teleobjetivo hacia la derecha para obtener
una imagen de cerca. Pulsa en el disparador
(1) para hacer la fotografía. Gira entonces la
rueda de avance de la película (18) hasta que se detenga. Ya puedes sacar otra
fotografía.
2%"/").!$/9#!-")/$%2/,,/
1- Cuando se acabe la película, pulsa el botón de seguridad para rebobinar la película
(16).
.ORMAL 2EBOBINADO
2- Saca la manivela para rebobinar la película (13) y gira en el sentido del reloj, sin forzar
una vez que se llegue al final de la película
3
Pulsa el botón (20) para abrir la tapadera de la cámara (10) y extraer la película. No
saques el rollo fotográfico cuando estés expuesto a la luz directa del sol.
02/",%-!39353/,5#)¼.
0ROBLEMA
El disparador no funciona.
La película no avanza.
El contador de fotografías, en la manivela
de rebobinado, no gira cuando hago
avanzar la película.
Las fotografías salen borrosas.
Las fotografías salen muy oscuras.
Las fotografías salen como si hubiera
niebla.
Me salen fotografías medio tapadas.
La persona o cosa sale descentrada o
cortada.
3OLUCIØN
No has hecho avanzar el rollo después de
la anterior toma, o bien el rollo está mal
colocado.
Puede que ya hayas hecho avanzar la
película sin sacar ninguna fotografía
después, o que se haya terminado el rollo.
El rollo no está correctamente colocado.
Vuelve a colocar el rollo.
No has sujetado la cámara con firmeza o
bien se ha movido la persona o cosa que
querías fotografiar.
No hay suficiente luz en la escena. Usa el
flash o bien utiliza una película ISO 400 o
800.
Las lentes están sucias. Límpialas con un
paño para lentes y un líquido especial para
lentes si es necesario.
Has tapado el objetivo con las manos, los
dedos o el cordón, mientras sacabas la
fotografía.
Sitúa la persona o cosa que quieres
fotografiar en el centro del visor.
Page 11

21 20
CUIDA DE TU CÁMARA
Cuando no utilices la cámara. No des golpes ni causes vibraciones a la cámara.
Evita colocar la cámara en lugares con temperaturas altas. Coloca la cámara dentro de
su funda, en un lugar seco y alejado del polvo y de productos químicos.
GARANTIA
NOTA: Guarde este modo de empleo, contiene importante información. Este producto
está cubierto por nuestra garantía de 2 años.
Para hacer uso de la garantía o del servicio postventa, debe dirigirse al lugar de compra
provisto de la prueba de la compra (ticket). Nuestra garantía cubre los vicios del material
o del montaje imputables al fabricante con la exclusión del deterioro proveniente del no
respeto del manual de instrucciones o de cualquier intervención inadecuada del artículo
(tales como el desmontaje, exposición al calor o a la humedad…).
MANTENIMIENTO
1. Para limpiar el aparato, utilice únicamente un trapo ligeramente embebido en agua, sin
ningún tipo de detergente.
2. No exponga el juego a la luz directa del sol o de cualquier fuente de calor.
3. No lo moje.
4. No lo desmonte ni lo deje caer.
Recomendamos conservar el embalaje para toda referencia posterior. En una constante
dedicación por la mejora de nuestros productos, nos podemos ver obligados a modificar
los colores y los detalles del producto presentados en este embalaje.
Ref : CJ210Serie Diseñado y desarrollado en Europa - Fabricado en China
Italiano
INTRODUZIONE
La nuova macchina fotografica con zoom da 35 mm & 50 mm e flash integrato è ideale
per introdurvi al mondo della fotografia. Funziona con tutti i tipi di pellicola 24 x 36 mm
(pellicola standard 35 mm) e l’avvolgimento e lo svolgimento sono manuali. Anche se
questa macchina fotografica è molto semplice da usare, occorre leggere attentamente le
istruzioni qui di seguito per sfruttarne tutte le funzionalità in modo professionale!
ALLA SCOPERTA DELLA MACCHINA FOTOGRAFICA
INSTALLAZIONE BATTERIE
L’unita’ lavora con una batteria alcalina AA da 1,5 V (non fornite).
Questo gioco deve utilizzare solo batterie specificate.
1. Con un cacciavite aprire lo sportellino del compartimento batterie (17) situato sul lato
dell’unita’.
2. Inserire le batterie AA seguendo le polarita’ come mostrato all’interno del
compartimento.
1. GRILLETTO
2. ZOOM DA 35mm E 50mm.
3. FLASH
4. OBIETTIVO
5. PASSANTE PER CINTURINO DA POLSO
6. FLASH CON INTERRUTTORE.
7. LUCE PER ATTIVARE IL FLASH.
8. MIRINO
9. COMPARTIMENTO RULLINO.
10. PORTA POSTERIORE.
11. FINESTRA PER VEDERE LA
PELLICOLA.
12. AREA DI APPOGGIO PELLICOLA.
13. RULLO DI RIAVVOLGIMENTO
PELLICOLA.
14. CONTATORE FOTO.
15. RULLO DI INSERIMENTO PELLICOLA.
16. BOTTONE DI RIAVVOLGIMENTO.
17. COMPARTIMENTO BATTERIA.
18. RULLO DI AVVOGIMENTO PELLICOLA.
19. DISPOSITIVO DI TRASCINAMENTO
DELLA PELLICOLA
20. CHIUSURA PORTA POSTERIORE.
La luz de flash preparado no se enciende.
La luz de flash preparado se enciende muy
despacio.
El flash no funciona.
Las fotografías con flash salen demasiado
oscuras.
Las fotografías con flash salen demasiado
claras.
La pila dura muy poco.
El flash no está conectado, o la pila está
gastada o mal colocada.
La pila está gastada y debe ser sustituida.
No hay rollo o no hay pila. La pila está mal
colocada. No has conectado el flash o la
pila está gastada.
El persona está fuera del alcance del flash,
o la fotografía se ha tomado antes de que
la luz de flash preparado se haya
encendido.
La persona está demasiado cerca.
Dejas conectado continuamente el flash, o
bien n o usas pilas alcalinas, como se
recomienda.
¡Ad vert enci a pa ra la p rotec ció n de l me dio ambi ent e!
Los apa rato s el éctrico s de sech ados son rec icla ble s y no d eben ser el imin ados en
la basura doméstica! Por ello pedimos que nos ayude a contribuir activamente en
el ahor ro d e rec ursos y en la p rote cció n de l medio amb ient e en treg ando este
apa rato en los centros de c ole cció n (s i ex iste n).
Page 12

23
3. Richiudere il compartimento batterie.
Non utilizzare pile ricaricabili. Le batterie non ricaricabili non devono essere ricaricate.
Togliere gli accumulatori dal gioco prima di ricaricarli. Ricaricare gli accumulatori sotto la
sorveglianza di un adulto. Non mescolare diversi tipi di pile o accumulatori, o pile e
accumulatori nuovi e usati. Le pile e gli accumulatori devono essere inseriti rispettando la
polarità. Le pile e gli accumulatori usati devono essere tolti dal gioco. I terminali di una
pila o di un accumulatore non devono essere messi in corto circuito. Non gettare le pile
nel fuoco. Togliere le pile in caso di non-utilizzo prolungato.Quando il suono si affievolisce
o il gioco non funziona più, pensate a cambiare le pile.
Se il vostro apparecchio presenta una disfunzione, togliete le pile dallo scomparto e
rimettetele direttamente; questa operazione vi permetterà di effettuare la modalità
RESET sul vostro prodotto.
INSTALLAZIONE RULLINO
1- Premere il bottone dello sportello posteriore (20) per aprire la porta posteriore (10).
2- Inserire un rullino da 35 mm standard nello scompartimento del rullino (9).
Inserire la pellicola nella fessura di avvolgimento pellicola, girare il rullo di avvolgimento
pellicola (18) e assicurarsi che la pellicola sia correttamente inserita nei dentini di
scorrimento (19).
22
3- Chiudere lo sportello posteriore (10).
4- Girare il rullo di avvolgimento pellicola (18) e premere il grilletto (1).
Ripetere l’operazione al punto 3 fino a quando il contatore delle foto (14) indichera’
<<1>>. Ora e’ ora pronto per fare le fotografie.
SCATTARE FOTOGRAFIE
All’aperto in giornate luminose e soleggiate, guardate attraverso il mirino (8) e scattate la
fotografia. Le foto migliori si scattano quando il sole è al di sopra oppure alle spalle di chi
scatta e non alle spalle del soggetto.
UTILIZZO DEL FLASH
Al coperto, di notte o in giornate nuvolose, sarà necessario utilizzare
il flash.Muovere l’interruttore del flash (6) sulla posizione che indica
il simbolo del flash. Attendere fino a quando l’indicatore del
flash si accende (7). La macchina e’ ora pronta per fare le foto con
il flash. Attenzione : mai prendere una foto troppo ravvicinata ad una persona o ad un
animale, potrebbe avere effetti collaterali.
Nota: Fate scorrere l’interruttore del flash (6) in posizione ‘OFF’ (spento) per risparmiare
le batterie.
FUNZIONAMENTO DELLO ZOOM
Lo zoom ha una variabilita’ da 35 a 50 mm. Girare leggermente
lo zoom verso sinistra (2) per ottenere un angolo maggiore di
visuale. Girare lo zoom verso destra per avere un
campo piu’ ravvicinato.
Premere sul pulsante di apertura dell’otturatore
(1) per scattare una foto. Quindi ruotare la rotella
di avanzamento della pellicola (18) finché si
ferma. Ora è possibile scattare la foto successiva.
RIAVVOLGERE E TOGLIERE LA PELLICOLA
1. Quando il rullino e’ finito, premere il bottone di sicurezza per riavvolgere la pellicola
(16).
Normale Riavvolgere
Page 13

2. Tirare fuori la manovella del rullo di riavvolgimento (13) e girare in senso orario, senza
forzare quando si e’ raggiunta la fine della pellicola.
3. Premere il bottone per l’apertura dello sportello posteriore (20) per aprire il portello (10)
e prendere il rullino. Non togliere la pellicola alla luce diretta del sole.
PROBLEMI E SOLUZIONI
24 25
Problema
Lo scatto non funziona.
La pellicola non si avvolge.
Il contatore delle foto sulla rotella di
riavvolgimento non gira quando si avvolge
la pellicola.
Le foto sono sfuocate.
Le foto sono troppo scure.
Le foto sono velate.
Foto parziali.
Soggetti scentrati o tagliati.
Flash pronto luce spenta.
Soluzione
La pellicola non è stata avvolta per lo
scatto della foto successiva o non è stata
inserita in modo corretto.
La pellicola è già avvolta e la foto non è
stata ancora scattata oppure si è arrivati
alla fine del rullino.
La pellicola non è stata inserita in modo
corretto. Inserire nuovamente la pellicola.
La macchina fotografica non è stata tenuta
saldamente o il soggetto si è mosso.
Non c’è luce sufficiente intorno al soggetto.
Accendere il flash o usare una pellicola 400
o 800 ISO.
L’obiettivo è sporco. Pulirlo utilizzando un
detergente specifico.
Mani, dita o cinturino erano davanti
all’obiettivo quando è stata scattata la foto.
Inquadrare i soggetti principali al centro del
mirino.
Il flash non è acceso, la batteria è esaurita
o inserita in modo non corretto.
La spia di flash pronto si accende molto
lentamente.
Il flash non funziona.
Le foto scattate con il flash sono troppo
buie.
Le foto scattate con il flash sono troppo
chiare.
La batteria ha durata breve.
La batteria è in esaurimento e deve essere
sostituita.
Mancano pellicola o batteria. Batteria
installata in modo non corretto. Flash non
acceso o batteria in esaurimento.
Il soggetto è al di fuori del raggio di azione
del flash o la foto è stata scattata prima
dell’accensione della spia flash pronto.
Il soggetto è troppo vicino.
Il flash non viene mai spento oppure non
vengono utilizzate batterie alcaline.
CURA DELLA MACCHINA FOTOGRAFICA
Quando la macchina non viene utilizzata. Non provocare urti o vibrazioni alla macchina
fotografica. Non esporre la macchina fotografica ad elevate temperature. Riporre la
macchina fotografica dentro alla sua custodia in luogo asciutto e protetto da polvere o
agenti chimici.
GARANTIA
NOTA: Conservate queste istruzioni d’uso, esse contengono importanti informazioni.
Questo prodotto è coperto dalla nostra garanzia per 24 mesi.
Per ottenere la garanzia o il servizio post-vendita, rivolgetevi al vostro rivenditore
presentando la vostra prova d’acquisto. La nostra garanzia copre difetti del materiale o
difetti legati al montaggio imputabili al costruttore ad eccezione di qualsiasi
deterioramento dovuto al mancato rispetto delle istruzioni d’uso o a qualsiasi intervento
intempestivo sull’articolo (quali smontaggio, esposizione al calore oppure all’umidità...).
MANUTENZIONE
1. Per pulire il gioco , utilizzate unicamente uno straccio morbido leggermente imbevuto
d’acqua , con l’esclusione di qualsiasi prodotto detergente.
2. Non esporre il gioco alla luce diretta del sole nè ad altre fonti di calore.
3. Non bagnarlo.
4. Non smontarlo, nè lasciarlo cadere.
Si raccomanda di conservare l’imballo per qualsiasi uletriore referenza.
Sotto il costante impegno a migliorare, possiamo essere portati a modificare i colori e i
dettagli del prodotto presenti sulla confezione.
Ref : CJ210Serie Progettato e sviluppato in Europa - Fabbricato in China
Avve rten ze per la t utel a de ll’ ambi ente
Gli app arec chi elet tric i ve cch i so no m ater iali pre giat i, non rien tran o ne i norma li
rif iuti dom esti ci! Preg hiam o q uind i i gent ili cli enti di cont ribu ire alla salvag uardia
del l’am bien te e delle riso rse e di conseg nare il prese nte app arecchio ai cent ri d i
rac colt a co mpet enti, q ualo ra s iano pre sent i su l t erri tori o.
Page 14

27
3. Batterienfach schliessen.
Keine aufladbaren Batterien benutzen. Nicht wiederaufladbare Batterien dürfen nicht
aufgeladen werden. Die Akkumulatoren vor dem Aufladen aus dem Gerät entfernen. Die
Akkumulatoren nur unter Aufsicht eines Erwachsenen aufladen. Nicht verschiedene Arten
von Batterien und Akkumulatoren, oder neue und gebrauchte Batterien gleichzeitig
gebrauchen. Beim Einlegen von Batterien und Akkumulatoren auf die Polaritäten achten.
Gebrauchte Batterien und Akkumulatoren sollen dem Gerät entnommen werden. Die
Batterie- oder Akkumulatorenklemmen nicht in Kurzschluss setzen. Keine Batterien ins
Feuer werfen. Im Falle eines längeren Nichtbenutzens die Batterien herausnehmen.
Bitte denken Sie daran, die Batterien zu wechseln, wenn der Ton schwächer wird oder
das Gerät nicht mehr reagiert. Sollte Ihr Gerät eine Funktionsstörung aufweisen, die
Batterien ihrem Fach entnehmen und sie gleich wieder einlegen; auf diese Weise
aktivieren Sie den RESET-Modus Ihres Geräts.
LADUNG DES FILMES
1- Den Öffnungsknopf der Hintertür (20) drücken um die Hintertür (10) zu öffnen.
2- Ein standard 35mm Film in dem Filmfach (9) einfügen.
Filmende in der Wicklungsspalte einführen (15), Vorwärtzgansknopf drehen, und sicher
stellen dass der Film richtig in den Rasten eingefügt ist.
3- Hintertür (10) schliessen.
4- Drehen Sie den Vorwärtzgangknopf (18) und drücken Sie auf dem Auslöser (1).
26
Deutsch
EINLEITUNG
Deine neue Kamera mit 35 mm & 50 mm Zoom und integriertem Blitz ist die ideale
Einführung in die Welt der Fotografie. Die Kamera arbeitet mit allen 24 x 36 mm Filmtypen
(Standard 35 mm-Film) und der Filmtransport vor und zurück erfolgt manuell. Auch
wenn diese Kamera sehr einfach zu bedienen ist, lies bitte die folgenden Anleitungen
genau durch, damit Du Deine Kamera wie ein Profi bedienen kannst!
ENTDECKE DEINE KAMERA
STROMVERSORGUNG
Das Fotoapparat funktionniert mit 1 alkalin AA 1,5V Batterienfach (nicht inbegriffen).
Dieses Fotoapparat darf ausschliesslich mit angezeigte Batterie versorgt sein.
1. Die Tür des Batterienfaches (17) auf der Seite des Apparates öffnen.
2. Die Batterie (LR6) einrichten, mit Achtung auf Plus und Minus Angaben im
1. AUSLÖSER
2. 35mm UND 50mm ZOOM
3. BLITZLICHT
4. LINSE
5. SCHLITZ FÜR DIE HANDSCHLAUFE
6. BLITZLICHTSCHALTER
7. LICHT FÜR
AUSLÖSUNGSBEREITSCHAFFT DES
BLITZLICHTES
8. BILDSUCHER
9. FILMFACH
10. HINTERTÜR
11. FENSTER FÜR ANSICHT DES FILMES
12. FILMSTELLE
13. DREHKNOPF FÜR RÜCKWÄRTZGANG
DES FILMES
14. FOTO ZÄHLER
15. DREHKNOPF FÜR EINFÜHRUNG DES
FILMES
16. WICKLUNGSKNOPF
17. BATTERIENFACH
18. DREHKNOPF FÜR VORWÄRTZGANG
DES FILMES
19. FILMTRANSPORTSPULE
20. FALLE FÜR ÖFFNUNG DER HINTERTÜR
Page 15

2928
Stufe 3 wiederholen, bis der Fotozähler (14) die Ziffer « 1 » zeigt. Sie sind jetzt bereit zu
fotografieren.
"),$%2!5&.%(-%.
Schaue an hellen, sonnigen Tagen im Freien durch den Bildsucher (8) und richte Deine
Aufnahme ein. Die besten Bilder entstehen dann, wenn die Sonne über oder hinter Dir
und nicht hinter dem Fotoobjekt steht.
$%.",)4:6%27%.$%.
In Räumen, nachts und bei bedecktem Himmel, musst Du den Blitz
verwenden. Gleiten Sie den Blitzlichtknopf (6) bis auf die Stelle
die ein Blitzlicht Symbol zeigt. Warten, bis der
Bereitschaftsanzeiger des Blitzlichtes (7) leuchtet. Jetzt sind Sie
bereit mit Blitzlicht zu fotografieren.
Achtung: Mensche oder Tiere nie von zu Nahe fotografieren, um Sicht Probleme zu
vermeiden.
Hinweis: Wenn Du den Blitz nicht verwendest, schiebe den Blitzschalter (6) in die
Position 'OFF', um Batterieleistung zu sparen.
ZOOM FUNKTION
Der zoom ist von 35 bis 50mm. Den Zoom (2) leicht nach
links drehen für breiter Winkel. Den Zoom nach rechts
drehen um nähere Sicht zu erhalten. Um ein Bild
aufzunehmen, drückst Du den Auslöser (1).
Drehe dann das Filmtransportrad (18) so weit,
bis der Film einrastet. Jetzt kannst Du das
nächste Bild aufnehmen.
DEN FILM ZURÜCKSPULEN UND HERAUSNEHMEN
1- Wenn der Film am Ende ist, drücken Sie auf dem Sicherheitsknopf(16) um den Film zu
wickeln.
2- Nehmen sie den Griff des Wicklungsknopfes des Filmes (13) heraus, und drehen Sie
Uhrenweise ohne Gewalt um den ganzen Film zu wickeln.
Normal Rewind
3- Drücken Sie auf dem Öffnungsknopf der Hintertür (20) um Hintertür (10) zu öffnen und
dann den film wegnehmen und sur Entwicklung so bald wie möglich bringen. Bitte
nimmt den Film nicht heraus, während er der direkten Sonneneinstrahlung
ausgesetzt ist.
PROBLEMAS Y SU SOLUCIÓN
Problem
Der Auslöser funktioniert nicht.
Der Film spult nicht vor.
Der Bildzähler der Transportspule dreht
sich nicht, wenn der Film vorgespult wird.
Die Bilder haben Flecken.
Die Bilder sind zu dunkel.
Die Bilder sind verschwommen.
Teilbilder.
Teile des Bildes sind abgeschnitten.
Das Blitzbereitschaftslicht leuchtet nicht.
Das Bereitschafslicht des Blitzes schaltet
nur langsam ein.
Lösung
Der Film wurde nicht zum nächsten Bild
transportiert bzw. wurde er nicht richtig
eingelegt.
Der Film wurde bereits transportiert, aber
es wurde keine Aufnahme gemacht oder
das Ende der Filmrolle ist erreicht.
Die Filmrolle wurde nicht korrekt eingelegt.
Lege den Film erneut ein.
Die Kamera wurde nicht richtig festgehalten
oder das Fotoobjekt hat sich bewegt.
Der Bereich um das Fotoobjekt war zu
dunkel. Schalte den Blitz ein oder
verwende einen ISO 400 oder 800 Film.
Die Linse ist schmutzig. Reinige sie mit
einem Linsenreiniger.
Während der Aufnahme befanden sich die
Hände, Finger oder der Gurt vor der Linse.
Dein Fotoobjekt muss sich in der Mitte des
Bildsuchers befinden.
Der Blitz ist nicht eingeschaltet, die Batterie
ist schwach oder nicht richtig eingelegt.
Die Batterie ist schwach und muss
ausgetauscht werden.
Page 16

31 30
AUFRÄUMUNG DES FOTOAPPARATES
Wenn das Apparat nicht in Gebrauch ist :
Das Apparat nicht and Schocks oder Schwingungen unterstellen. Das Apparat nicht and
zu höhe Temperaturen unterstellen. Räumen Sie das Apparat in seinem Etui in einer
frische und trockene Stelle, geschützt von Staub und chemische Mitteln.
GARANTIE
ANMERKUNG: Diese Bedienungsanleitung enthält wichtige Informationen, bewahren Sie sie
bitte sorgfältig auf. Auf dieses Gerät werden 2 Jahre Garantie gewährt.
Um eine optimale Bearbeitung zu gewährleisten, wenden Sie sich bitte mit Ihrem
Einkaufsbeleg an Ihren Fachhändler. Unter die Garantie fallen Material- sowie
Produktionsfehler, die bei der Herstellung entstanden sind. Nicht unter die Garantie fallen
Beschädigung durch unsachgemäße Handhabung, falsche Bedienung bei Nichtbeachtung
der Bedienungsanleitung, Beschädigungen durch Hitze, Feuchtigkeit, etc.
WARTUNG
1. Um das Gerät zu reinigen, nur einen leicht mit Wasser befeuchteten Lappen benutzen,
der keine Spuren von Reinigungsmitteln enthält.
2. Setzen Sie das Gerät weder direkter Sonnenbestrahlung noch anderen Wärmequellen aus.
3. Lassen Sie es nicht nass werden.
4. Bitte versuchen Sie nicht, das Gerät auseinander zu nehmen und lassen Sie es nicht fallen.
Für jegliche spätere Bezugnahme bitte die Verpackung aufheben. Da wir stets um eine
Optimierung unserer Produkte bemüht sind, behalten wir uns eventuelle Farb- und
Detailänderungen des auf der Verpackung dargestellten Produkts vor.
Ref : CJ210Serie In Europa konzipiert - In China hergestellt
Nederlands
INLEIDING
Jouw nieuw fototoestel met 35 mm & 50 mm zoom en ingebouwde flits is ideaal om jou
bekend te maken met fotografie. Het werkt met alle soorten filmrolletjes 24 x 36 mm
(Standaard filmrol 35 mm) en het opwinden en terugspoelen is manueel. Zelfs al is dit
fototoestel makkelijk te gebruiken, gelieve de onderstaande richtlijnen grondig te lezen
om zodoende de functies als een professioneel te kunnen hanteren!
ONTDEK JOUW FOTOTOESTEL
INSTALLATIE VAN DE BATTERIJ
De camera werkt op een AA alkaline batterij van 1,5 Volt (niet inbegrepen).
Bij deze camera alleen specifieke batterijen gebruiken.
1. Gebruik een schroevendraaier om de deur van het batterijencompartiment (17) open te
maken, aan de zijkant van de camera.
2. Plaats de AAalkaline batterij volgens de polariteit, zoals aangegeven in het
compartiment.
3. Sluit het battterijencompartiment.
1. DRUKKNOP OM FOTO’S TE MAKEN.
2. 35 EN 50 MM ZOOM.
3. FLITSER.
4. LENS
5. POLSBANDGLEUF
6. FLITSSCHAKELAAR.
7. FLITSINDICATOR.
8. BEELDZOEKER
9. FILM COMPARTIMENT.
10. ACHTERKLEPJE.
11. RAAM VOOR BEKIJKEN FILM.
12. RUIMTE VOOR PLAATSING FILM.
13. FILMTERUGSPOELROL.
14. INDICATOR VOOR AANTAL FOTO’S.
15. FILMINSTALLATIEROL.
16. TERUGSPOELKNOP.
17. BATTERIJENCOMPARTIMENT.
18. FILMOPWINDROL.
19. SLEUVEN VOOR HET GELEIDEN VAN
DE FILM.
20. SLUITING ACHTERKLEPJE.
Der Blitz funktioniert nicht.
Die mit dem Blitz aufgenommenen Bilder
sind zu dunkel.
Die mit dem Blitz aufgenommenen Bilder
sind zu hell.
Die Batterie ist schwach.
Kein Film oder keine Batterie. Die Batterie
ist nicht richtig eingelegt. Der Blitz ist nicht
eingeschaltet oder die Batterie ist schwach.
Das Fotoobjekt befindet sich außerhalb der
Kamerareichweite oder die Aufnahme
wurde gemacht, bevor das
Bereitschaftslicht sich eingeschaltet hat.
Das Fotoobjekt ist zu nah.
Der Blitz wurde nicht abgeschaltet oder es
werden keine Alkaline-Batterien verwendet.
Hinweise zum Umweltschutz
Alt -Ele ktro gerä te s ind Werts toff e, s ie g ehör en d aher nicht in d en H ausm üll!
Wir möc hten Sie daher bitt en, uns mit Ihre m ak tiv en B eitr ag b ei d er
Res sourc ens chon ung und beim Um welt schu tz z u un ter stüt zen und dies es Gerä t
bei den (falls vorhanden) eingerichteten Rücknahmestellen abzugeben.
Page 17

33
Gebruik geen oplaadbare batterijen. Niet-heroplaadbare batterijen kunnen niet worden
heropgeladen. Haal de accu’s altijd uit het toestel alvorens ze op te laden. De accu’s
mogen enkel onder toezicht van een volwassene worden opgeladen. Gebruik geen
batterijen en accu's van verschillende types of nieuwe en gebruikte batterijen en accu's
door elkaar. Houd bij het plaatsen van de batterijen en accu's rekening met de polariteit.
Haal lege batterijen en accu's uit het toestel. Zorg ervoor dat de polen van de batterij of
de accu niet worden kortgesloten. Gooi batterijen nooit in het vuur. Haal ze uit het toestel
als u van plan bent het langere tijd niet te gebruiken. Wanneer de geluidssterkte afneemt
of het toestel niet meer reageert, is de kans groot dat de batterij leeg is.
Als het toestel niet naar behoren werkt, verwijdert u best de batterij en plaatst u
deze meteen terug; hierdoor wordt het toestel gereset.
INSTALLEREN VAN FILM
1- Druk op de sluiting van het achterklepje (20) om het klepje (10) te openen.
2- Doe een 35 mm (standaard) film in het filmcompartiment (9).
Plaats het in de filmopwindruimte, draai de filmopwindrol (15) een beetje om te kijken of
de film goed geplaatst is.
3- Sluit het achterklepje (10).
4- Draai de filmopwindrol (18) een beetje en druk op de drukknop (1).
32
Herhaal stap 4 totdat indicator (14) voor aantal foto’s <1> aangeeft. Je bent nu klaar om
foto’s te maken.
FOTO'S NEMEN
In de open lucht op zonnige dagen, kijk door de beeldzoeker (8) en stel je foto samen. De
beste foto's worden genomen als de zon boven of achter jou staat en niet achter het
voorwerp.
DE FLITS GEBRUIKEN
Binnenshuis, 's nachts of op bewolkte dagen, moet je de flits gebruiken.
Schuif de flitsschakelaar (6) naar de positie waarbij je het
flitssymbool ziet.Wacht tot de flitsindicator (7) oplicht. De
camera is nu klaar om een foto met flitser te nemen.
Waarschuwing : neem nooit een foto van dichtbij van een
persoon of dier, het kan oogproblemen veroorzaken.
Opmerking: Schuif de flitsschakelaar (6) in de "UIT"-positie wanneer je de flits niet
gebruikt. Dit zal de batterijen uitsparen.
ZOOMFUNCTIE
De zoom heft een 35 tot 50 mm bereik.Om te vergroten ,
draai de zoom (2) naar links.Om te verkleinen, draai
naar rechts.Druk op de ontspanner (1) om een
foto te nemen. Draai daarna aan het
filmtransportwieltje (18) tot het stopt. Je kan nu
je volgende foto nemen.
TERUGSPOELEN EN UITNEMEN VAN EEN FILMROL
1- Zodra de film op is, druk op de beschermknop om de film (16) terug te spoelen.
2- Duw de handel uit de filmterugspoelrol (13) en draai voorzichtig kloksgewijs tot aan het
einde van de film.
Normaal Terugspoelen
Page 18

3- Druk op de sluiting van het achterklepje (20) om het klepje te openen, en neem de film
eruit om het zo snel mogelijk te laten ontwikkelen. Neem het filmrolletje niet uit het
fototoestel in direct zonlicht.
PROBLEMEN EN OPLOSSINGEN
34 35
Probleem
De trekker werkt niet.
De filmrol spoelt niet door.
De fototeller op de terugspoelknop draait
niet wanneer de film wordt doorgespoeld.
De foto's zijn onscherp.
De foto's zijn te donker.
De foto's zijn troebel.
Gedeeltelijke foto's.
Voorwerpen staan niet in het midden of zijn
weggelaten.
Het lampje "flits klaar" brandt niet.
Oplossing
De filmrol is niet vooruitgespoeld naar de
volgende foto of werd verkeerd ingestoken.
De filmrol is reeds doorgespoeld en je hebt
de foto nog niet genomen of je bent aan
het eind van de filmrol.
De filmrol werd verkeerd ingestoken. Steek
de filmrol opnieuw in het toestel.
Het fototoestel werd niet stil gehouden of
het voorwerp bewoog.
Er is onvoldoende licht rond het voorwerp.
Zet de flits aan of gebruik een ISO 400 of
800 filmrolletje.
De lens is vuil. Reinig deze met een
lensreiniger.
Handen, vingers of het draaglusje
belemmerden de lens tijdens het nemen
van de foto.
Plaats de voornaamste voorwerpen in het
midden van de beeldzoeker.
De flits staat niet aan, de batterij is zwak of
was verkeerd ingestoken.
Het lampje "flits klaar" komt traag aan.
De flits werkt niet.
De foto's met flits zijn te donker.
De foto's met flits zijn te helder.
De batterij heeft een korte levenduur.
De batterij is zwak en moet vervangen
worden.
Er is geen film of batterij in het toestel.
Batterij is verkeerd ingestoken. De flits
staat niet aan of de batterij is zwak.
Het voorwerp ligt buiten het bereik van de
flits of de foto werd genomen alvorens het
lampje "flits klaar" brandde.
Het voorwerp staat te dicht.
De flits werd nooit aangezet of er werd een
ander type batterij gebruikt dan alkaline.
ZORG VOOR JE CAMERA
Wanneer de camera niet in gebruik is :
- Stel de camera niet bloot aan schokken of trillingen
- De camera niet blootstellen aan hoge temperaturen.
- Plaats de camera in de doos, in een droge omgeving vrij van stof en chemicalien.
GARANTIE
OPMERKING: houd deze handleiding zorgvuldig bij, zij bevat belangrijke informatie.
Dit fototoestel wordt gedekt door een garantie van 2 jaar.
Om een beroep te kunnen doen op de garantie of de dienst na verkoop, moet u zich met
uw aankoopbewijs wenden tot de verkoper. De garantie dekt materiaal- en
constructiefouten die toe te schrijven zijn aan de fabrikant, dus niet de schade die
voortvloeit uit de niet-naleving van de handleiding of uit foutief gebruik (demontering,
blootstelling aan hitte of vocht, enz.)
ONDERHOUD
1. Gebruik voor het schoonmaken van het toestel enkel een zachte en lichtjes met water
bevochtigde doek; schoonmaakmiddelen zijn uit den boze.
2. Stel het toestel niet bloot aan rechtstreeks zonlicht of aan een hittebron.
3. Zorg dat het toestel niet nat wordt.
4. Haal het toestel niet uit elkaar en laat het niet vallen.
Gelieve de originele verpakking bij te houden voor eventuele latere raadpleging.
Ten gevolge van de technische evolutie kunnen de kleuren en details van het product
afwijkingen vertonen ten opzichte van de verpakking.
Ref : CJ210Serie
Design und Entwicklung in Europa - Made in China
Richtlijnen voor milieubescherming
Geb ruik te e lekt roni sche app ara ten horen ni et t huis in het hui safv al !
Wij vra gen u da arom een bij dra ge a an d e be sche rmi ng v an o ns m ilie u t e le veren
en dit apparaat op de voorziene verzamelplaatsen af te geven.
Page 19

37
Μην χρησιµοποιείτε επαναφορτιζόµενες µπαταρίες. Οι µη επαναφορτιζόµενες µπαταρίες
δεν πρέπει να επαναφορτίζονται. Αφαιρέστε τους συσσωρευτές από το παιχνίδι πριν τους
επαναφορτίσετε. Μην φορτίζετε τους συσσωρευτές χωρίς την επιτήρηση ενήλικου ατόµου.
Μην ανακατεύετε διάφορα είδη µπαταριών ή συσσωρευτών, ή καινούργιες και
µεταχειρισµένες µπαταρίες ή συσσωρευτέ. Οι µπαταρίες και οι συσσωρευτές πρέπει να
τοποθετούνται τηρώντας τη σωστή πολικότητα. Οι µεταχειρισµένοι συσσωρευτές πρέπει
να αφαιρούνται από το παιχνίδι. Οι πόλοι µιας µπαταρίας ή ενός συσσωρευτή δεν πρέπει
να βραχυκυκλώνονται. Μην πετάτε τις µπαταρίες στη φωτιά. Αφαιρέστε τις µπαταρίες σε
περίπτωση που δεν χρησιµοποιήσετε το παιχνίδι για µεγάλο χρονικό διάστηµα.Όταν ο
ήχος εξασθενήσει ή το παιχνίδι δεν αντιδρά άλλο, σκεφτείτε να αντικαταστήσετε τις
µπαταρίες.
Αν η συσκευή σας παρουσιάζει µια δυσλειτουργία, αφαιρέστε τις µπαταρίες και
επανατοποθετήστε τες αµέσως, µε τον τρόπο αυτό έχετε τη δυνατότητα να κάνετε
RESET (να επαναφέρετε στην αρχική κατάσταση) στη συσκευή.
ΕΓΚΑΤΑΣΤΑΣΗ ΤΟΥ ΦΙΛΜ ΚΑΙ ΠΡΟΕΤΟΙΜΑΣΙΑ ΦΩΤΟΓΡΑΦΗΣΗΣ
1- Πατήστε το κουµπί της πίσω πόρτας (20) για να ανοίξει η πίσω πόρτα (10).
2- Τοποθετήστε ένα στάνταρτ 35mm φιλµ µέσα στην θήκη (9).
βάλτε το φιλµ µέσα στην σχισµή τυλίγµατος, γυρίστε το ρολό τυλίγµατος του φιλµ (18) και
σιγουρέψτε ότι το φιλµ είναι σωστά τοποθετηµένο στις εγκοπές.
3- Κλείστε την πίσω πόρτα (10).
4- Γυρίστε το ρολό τυλίγµατος του φιλµ (18) και πατήστε την σκανδάλη (1).
36
Ελληνικά
ΕΙΣΑΓΩΓΗ
Η νέα σας φωτογραφική µηχανή µε ζουµ 35 mm και 50 mm και ενσωµατωµένο φλας είναι
ιδανική για να σας µυήσει στον κόσµο της φωτογραφίας. Λειτουργεί µε όλα τα φιλµ τύπου
24 x 36 mm (Συνηθισµένο φιλµ 35 mm), και η προώθηση και επαναφορά γίνεται µε το
χέρι. Αν και αυτή η φωτογραφική µηχανή είναι πολύ εύκολη στη χρήση της, διαβάστε
προσεκτικά τις παρακάτω οδηγίες, για να µπορείτε να χρησιµοποιείτε τις λειτουργίες της
σαν επαγγελµατίες!
ΑΝΑΚΑΛΥΨΤΕ ΤΗ ΦΩΤΟΓΡΑΦΙΚΗ ΣΑΣ ΜΗΧΑΝΗ
ΜΠΑΤΑΡΙΕΣ
Η µονάδα χρησιµοποιεί 1 αλκαλική µπαταρία AA των 1,5 V (δεν συµπεριλαµβάνονται). Το
παιχνίδι λειτουργεί µόνο µε συγκεκριµένων προδιαγραφών µπαταρίες.
1. Χρησιµοποιείστε ένα κατσαβίδι για να ανοίξετε το πορτάκι της θήκης της µπαταρίας που
βρίσκετε στα πλάγια της µονάδας.
2. Τοποθετήστε την ΑΑ αλκαλική µπαταρία µε φορά πολικότητας σύµφωνα µε το σχέδιο
που φαίνεται στην θήκη.
3. Κλείστε την θήκη της µπαταρίας.
1. ΣΚΑΝΔΑΛΗ
2. 35mm ΚΑΙ 50mm ΖΟΥΜ.
3. ΦΛΑΣ
4. ΦΑΚΟΣ
5. ΕΓΚΟΠΗ ΓΙΑ ΛΟΥΡΙ ΧΕΡΙΟΥ
6. ΦΛΑΣ ΜΕ ΔΙΑΚΟΠΤΗ
7. ΦΩΣ ΓΙΑ ΕΝΕΡΓΟΠΟΙΗΣΗ ΤΟΥ ΦΛΑΣ
8. ΣΚΟΠΕΥΤΡΟ
9. Η ΘΗΚΗ ΤΟΥ ΦΙΛΜ.
10. ΠΙΣΩ ΠΟΡΤΑ.
11. ΠΑΡΑΘΥΡΟ ΓΙΑ ΝΑ ΒΛΕΠΕΤΕ ΤΟ ΦΙΛΜ.
12. ΧΟΡΟΣ ΤΟΠΟΘΕΤΗΣΗΣ ΤΟΥ ΦΙΛΜ .
13. ΡΟΛΟ ΑΝΑΔΙΠΛΩΣΗΣ ΤΟΥ ΦΙΛΜ.
14. ΜΕΤΡΗΤΗΣ ΦΩΤΟΓΡΑΦΙΩΝ
15. ΡΟΛΟ ΕΓΚΑΤΑΣΤΑΣΗΣ ΤΟΥ ΦΙΛΜ.
16. ΚΟΥΜΠΙ ΑΝΑΔΙΠΛΩΣΗΣ.
17. ΘΗΚΗ ΜΠΑΤΑΡΙΑΣ.
18. ΡΟΛΟ ΤΥΛΙΓΜΑΤΟΣ ΤΟΥ ΦΙΛΜ.
19. ΕΓΚΟΠΕΣ ΠΡΟΩΘΗΣΗΣ ΤΟΥ ΦΙΛΜ.
20. ΚΛΕΙΔΑΡΙΑ ΤΗΣ ΠΙΣΩ ΠΟΡΤΑΣ
Page 20

39
38
Προώθησ
Επαναφορά
3- Πατήστε το κουµπί της πίσω πόρτας (20) για να ανοίξει η πίσω πόρτα (10) και βγάλτε
έξω το φιλµ που πρέπει να το εµφανίσετε το συντοµότερο δυνατόν. Μη βγάλετε το φιλµ
κάτω από τον ήλιο.
ΠΡΟΒΛΗΜΑΤΑ ΚΑΙ ΛΥΣΕΙΣ ΤΟΥΣ
Πρόβληµα
Το κουµπί λήψης δεν λειτουργεί.
Το φιλµ δεν προχωρά.
Ο µετρητής φωτογραφιών του µοχλού
επαναφοράς δεν γυρίζει όταν προχωρά το
φιλµ.
Οι φωτογραφίες είναι θολές.
Οι φωτογραφίες είναι πολύ σκοτεινές.
Οι φωτογραφίες είναι συγκεχυµένες.
"Κοµµένες" φωτογραφίες.
Τα θέµατα δεν είναι κεντραρισµένα ή είναι "
κοµµένα".
Η φωτεινή ένδειξη του έτοιµου φλας είναι
σβηστή.
Λύση
Το φιλµ δεν έχει προχωρήσει στην επόµενη
φωτογραφία ή δεν έχει φορτωθεί σωστά.
Το φιλµ έχει ήδη προχωρήσει και η
φωτογραφία δεν έχει ακόµη τραβηχτεί ή
είστε στο τέλος του καρουλιού.
Το φιλµ δεν φορτώθηκε σωστά.
Ξαναφορτώστε το φιλµ.
Η φωτογραφική µηχανή δεν κρατήθηκε
σταθερά ή το θέµα κινήθηκε.
Ο φωτισµός γύρω από το θέµα δεν είναι
αρκετός. Ανοίξτε το φλας ή χρησιµοποιήστε
φιλµ ISO 400 ή 800.
Ο φακός είναι λερωµένος. Καθαρίστε τον µε
καθαριστικό φακών.
Όταν τραβήξατε τη φωτογραφία, είχατε το
χέρι, το δάχτυλο ή το λουρί µπροστά στον
φακό.
Καδράρετε το κύριο θέµα σας στο κέντρο
του σκοπεύτρου.
Το φλας δεν έχει ενεργοποιηθεί, ή η
µπαταρία είναι πεσµένη ή δεν έχει
τοποθετηθεί σωστά.
Επαναλάβετε το βήµα 3 µέχρι ο µετρητής των φωτογραφείων (14) να δήξει « 1 ». Είστε
τώρα έτοιµος να τραβήξετε φωτογραφίες.
ΛΗΨΗ ΦΩΤΟΓΡΑΦΙΩΝ
Σε εξωτερικό χώρο, τις ηλιόλουστες µέρες, κοιτάξτε µέσα από το σκόπευτρο (8) και "
συνθέστε" τις φωτογραφίες σας. Οι καλύτερες φωτογραφίες βγαίνουν όταν ο ήλιος
βρίσκεται πάνω από εσάς ή πίσω σας, και όχι πίσω από το θέµα σας.
ΧΡΗΣΗ ΤΟΥ ΦΛΑΣ
Σε εσωτερικό χώρο, τη νύχτα ή τις συννεφιασµένες µέρες, θα χρειαστεί
να χρησιµοποιήσετε το φλας. Τοποθετήστε τον διακόπτη του φλας
στην θέση που δείχνει το σύµβολο του φλας (6). Περιµένετε
µέχρι να ανάψει η ένδειξη του φλας (7). Είστε τώρα έτοιµος να
τραβήξετε φωτογραφίες µε φλας.
Προειδοποίηση : Πότε µην τραβήξετε κοντινές φωτογραφίες ενός ανθρώπου ή ζώου,
υπάρχει πιθανότητα να δηµιουργηθούν προβλήµατα όρασης.
Σηµείωση: Όταν δεν χρησιµοποιείτε το φλας, να έχετε τον διακόπτη του φλας (6) στη
θέση ‘OFF’, γιατί έτσι παρατείνεται η ζωή της µπαταρίας.
ΛΕΙΤΟΥΡΓΙΑ ΤΟΥ ΖΟΥΜ
Το ζουµ έχει ακτίνα από 35 έως 50 mm. Γυρίστε ελαφρά προς
τα αριστερά το ζουµ (2) για να έχετε ευρεία γωνία.
Γυρίστε προς τα δεξιά το ζουµ για να έχετε
κοντινό πλάνο.
Για να βγάλετε φωτογραφία, πατήστε το κουµπί
ελευθέρωσης του κλείστρου (1). Μετά, γυρίστε
τον τροχό προώθησης του φιλµ (18) µέχρι να σταµατήσει. Μπορείτε
τώρα να βγάλετε την επόµενη φωτογραφία σας.
ΕΠΑΝΑΦΟΡΑ ΚΑΙ ΦΟΡΤΩΣΗ ΤΟΥ ΦΙΛΜ
1- Όταν το φιλµ τελειώσει πατήστε το κουµπί ασφαλείας για να αναδιπλωθεί το φιλµ (16).
2- Πιέστε την λαβή του ρολού αναδίπλωσης (13) και γυρίστε µε την φορά των δεικτών του
ρολογιού, χωρίς να υπερβάλετε όταν φτάσετε στο τέλος του φιλµ.
Page 21

40 41
ΦΡΟΝΤΙΔΑ ΤΗΣ ΚΑΜΕΡΑΣ
Όταν η κάµερα δεν χρησιµοποιείται.Μην προκαλείτε ξαφνικό τίναγµα ή κραδασµούς στην
κάµερα. Μην υποβάλετε την κάµερα σε υψηλές θερµοκρασίες.
Τοποθετήστε την κάµερα στην θήκη της και σε ξηρό περιβάλλον, προφυλαγµένη από
σκόνη και χηµικά.
ΕΓΓΥΗΣΗ
ΣΗΜΕΙΩΣΗ: Φυλάγετε το παρόν εγχειρίδιο χρήσης διότι περιέχει σηµαντικές πληροφορίες.
Το προϊόν αυτό καλύπτεται από την 2ετή εγγύησή µας.
Για να µπορέσετε να χρησιµοποιήσετε την εγγύηση ή την εξυπηρέτηση, πρέπει να
απευθυνθείτε στον µεταπωλητή σας προσκοµίζοντας την απόδειξη αγοράς του παιχνιδιού.
Η εγγύησή µας καλύπτει τα υλικά ελαττώµατα ή τα ελαττώµατα συναρµολόγησης που
εναπόκεινται στον κατασκευαστή κατ’ εξαίρεση κάθε ζηµιάς η οποία προκλήθηκε από τη
µη τήρηση του εγχειριδίου χρήσης ή από κάθε άτοπη επέµβαση πάνω στη συσκευή (
όπως αποσυναρµολόγηση, έκθεση της συσκευής στη θερµότητα ή στην υγρασία…).
ΣΥΝΤΗΡΗΣΗ
1. Για να καθαρίσετε το παιχνίδι, χρησιµοποιήστε µόνο ένα απαλό και ελαφρώς βρεγµένο
µε νερό πανάκι, χωρίς κανένα απορρυπαντικό προϊόν.
2. Μην εκθέτετε το παιχνίδι στην άµεση ηλιακή ακτινοβολία ή σε άλλη πηγή θερµότητας.
3. Μη βρέχετε το παιχνίδι.
4. Μην το αποσυναρµολογείτε ή το αφήνετε να πέσει.
Σας συνιστούµε να φυλάξετε τη συσκευασία για κάθε µελλοντική αναφορά.
Τα χρώµατα και οι λεπτοµέρειες του παιχνιδιού, που παρουσιάζεται στη συσκευασία,
δύναται να τροποποιηθούν, λόγω της συνεχούς βελτίωσης του προϊόντος.
Η φωτεινή ένδειξη του έτοιµου φλας ανάβει
πολύ αργά.
Το φλας δεν λειτουργεί.
Οι φωτογραφίες που τραβιούνται µε φλας
είναι πολύ σκοτεινές.
Οι φωτογραφίες που τραβιούνται µε φλας
είναι πολύ φωτεινές.
Η µπαταρία έχει µικρή διάρκεια ζωής.
Η µπαταρία είναι αδύνατη και θα πρέπει να
αντικατασταθεί.
Δεν υπάρχει φιλµ ή µπαταρία. Η µπαταρία
δεν έχει τοποθετηθεί σωστά. Το φλας δεν
είναι ενεργοποιηµένο ή η µπαταρία είναι
αδύνατη.
Το θέµα βρίσκεται µακρύτερα από την
εµβέλεια του φλας ή η φωτογραφία έχει
τραβηχτεί πριν ανάψει η ένδειξη του έτοιµου
φλας.
Το θέµα βρίσκεται πολύ κοντά.
Το φλας δεν απενεργοποιείται ποτέ ή δεν
χρησιµοποιείται αλκαλική µπαταρία.
Contactez-nous
Contact us
LEXIBOOK S.A
2, avenue de Scandinavie
91953 Courtaboeuf Cedex
France
Assistante technique : 0892 23 27 26 (0,34` TTC/Min)
LEXIBOOK UK Limited
Unit 10 Petersfield Industrial Estate
Bedford Road, Petersfield
Hampshire, GU32 3QA
United Kingdom
Freephone helpline: 0808 100 3015
LEXIBOOK Electronica Lda
Quinta dos Loios
Praceta José Domingos dos Santos, 6B-8A
2835-343 Lavradio-Barreiro
Portugal
Apoio técnico: 21 206 13 48
Lexibook Ibérica S.L
C/ de las Hileras 4, 4° dpcho 14
28013 Madrid
España
Servicio consumidores: 91 548 89 32.
Lexibook Italia S.r.l
Via Eustachi, 45
20129 Milano
Italia
Servizio consumatori : 022040 4959
(Prezzo di una chiamata locale).
www.lexibookjunior.com
Ref: CJ210Serie
© 2006 LEXIBOOK®
Designed in Europe – Made in China
Conçu en Europe – Fabriqué en Chine
Ref: CJ210SerieIMO286
Υποδείξεις για την προστασία του περιβάλλοντος
Οι παλιές ηλεκτρικές συσκευές είναι πολύτιµα υλικά και συνεπώς δεν έχουν θέση στα
οικιακά απορρίµµατα! Θα θέλαµε λοιπόν να σας παρακαλέσουµε να µας υποστηρίξετε
συµβάλλοντας ενεργά στην προστασία των πρώτων υλών και του
περιβάλλοντος παραδίδοντας τη συσκευή αυτή στις υπηρεσίες ανακύκλωσης - εφόσον
υπάρχουν.
Ref : CJ210Serie
Υποδείξεις για την προστασία του περιβάλλοντος
 Loading...