

Page 1
Page 2
Page 3

CAUTION: TO REDUCE THE RISK OF ELECTRIC SHOCK. DO NOT REMOVE COVER (OR
BACK).
NO USER SERVICEABLE PARTS INSIDE. REFER SERVICING TO QUALIFIED SERVICE
PERSONNEL.
The graphic symbols on the back cover of the set mean the following:
The lightning flash with arrowhead symbol within an equilateral triangle is
intended to alert the user to the presence of uninsulated "dangerous voltage"
within the product's enclosure that may be of sufficient magnitude to constitute
a risk of electric shock to persons.
The exclamation point within an equilateral triangle is intended to alert the
user to the presence of important operating and maintenance (servicing) instructions in the literature accompanying the appliance.
WARNING :
• To reduce the risk of fire or electric shock, do not expose this appliance to rain or
moisture.
• The apparatus shall not be exposed to dripping or splashing and that no objects filled
with liquids, such as vases, shall be placed on the apparatus.
• The mains plug is used as the disconnect device, the disconnect device shall remain
readily operable.
• In order to disconnect the apparatus from the mains completely, the mains plug should
be disconnected from the mains socket outlet completely.
INSTALLATION
LOCATE the receiver in the room where direct light does not strike the screen. Total darkness
or a reflection on the picture screen can cause eyestrain. Soft and indirect lighting is recommended for comfortable viewing.
ALLOW enough space between the receiver and the wall to permit proper ventilation.
AVOID excessive warm locations to prevent possible damage to the cabinet or component
failure.
CONNECTION
This TV receiver can be connected to AC: 220-240V~ 50Hz .
AUTOMATIC DEGAUSSING
All colour television receivers are sensitive to magnetic influences, usually caused by either
moving the receiver from one place to another or using certain electrical appliances near the
receiver. This residual magnetism as it is called, sometimes causes distortion which gives rise
to "blotchy" areas of colour in the picture. To avoid these effects the receiver incorporates an
automatic degaussing circuit which operates for a short while immediately each time the
receiver is switched on using the mains switch. This circuit removes any residual magnetism in
the metal parts of the picture tube and therefore ensures that each time the receiver is switched
lifelike. If the set is moved or faced in a different direction, the mains switch must be switched
off at least 10 minutes in order that the automatic degaussing circuit operates properly.
Page 4
CAUTION
Never tamper with any components inside your set, or any other adjustment controls not
mentioned in this manual. All television receivers are high voltage instruments. Your PICTURE
TUBE is a highly vacuum. If broken, glass fragments will be violently expelled. Scratching,
Chipping or undue pressure is dangerous and should be avoided. When you clean the PICTURE
TUBE FACE or CABINET, the power cord should be removed from the wall socket then wipe the
receiver with a dry soft cloth. All "inside work" on your receiver must only be performed only
by the Professional Service Personnel.
DANGER
LASER SAFETY
This unit employs an optical laser beam system in the CD
mechanism,designed with built in safeguards. Do not attempt
to disassemble, refer to qualified service personnel.
Exposure to this invisible laser light light beam may be harmful
to the human eye.
Invisible laser radiation when open
and interlock failed or defeated.
avoid direct exposure to laser beam.
THIS IS A CLASS-1 LASER PRODUCT. USE OF CONTROLS,
OR ADJUSTMENTS OR PROCEDURES OTHER THAN THOSE
SPECIFIED HEREIN, MAY RESULT IN HAZARDOUS LASER LIGHT BEAM EXPOSURE.
ENGLISH
Manufactured under license from Dolby Laboratories “Dolby”,”Pro Logic”and the double-D
symbol are trademarks of Dolby Laboratories. Confidential unpublished works.© 1992-1997
Dolby Laboratories,lnc.All rights reserved.
3
Page 5

This product incorporates copyright protection technology that is protected by U.S. patents and other intellectual property rights. Use of this copyright protection technology
must be authorized by Macrovision, and is intended for home and other limited viewing
uses only unless otherwise authorized by Macrovision. Reverse engineering or disassembly is prohibited.”
Instructions on environment protection
Do not dispose of this product in the usual household garbage at the end of its life
cycle; hand it over at a collection point for the recycling of electrical and electronic
appliances. The symbol on the product, the instructions for use or the packing will
inform about the methods for disposal.
The materials are recyclable as mentioned in its marking. By recycling, material
recycling or other forms of re-utilization of old appliances, you are making an
important contribution to protect our environment.
Please inquire at the community administration for the authorized disposal location.
4
Page 6
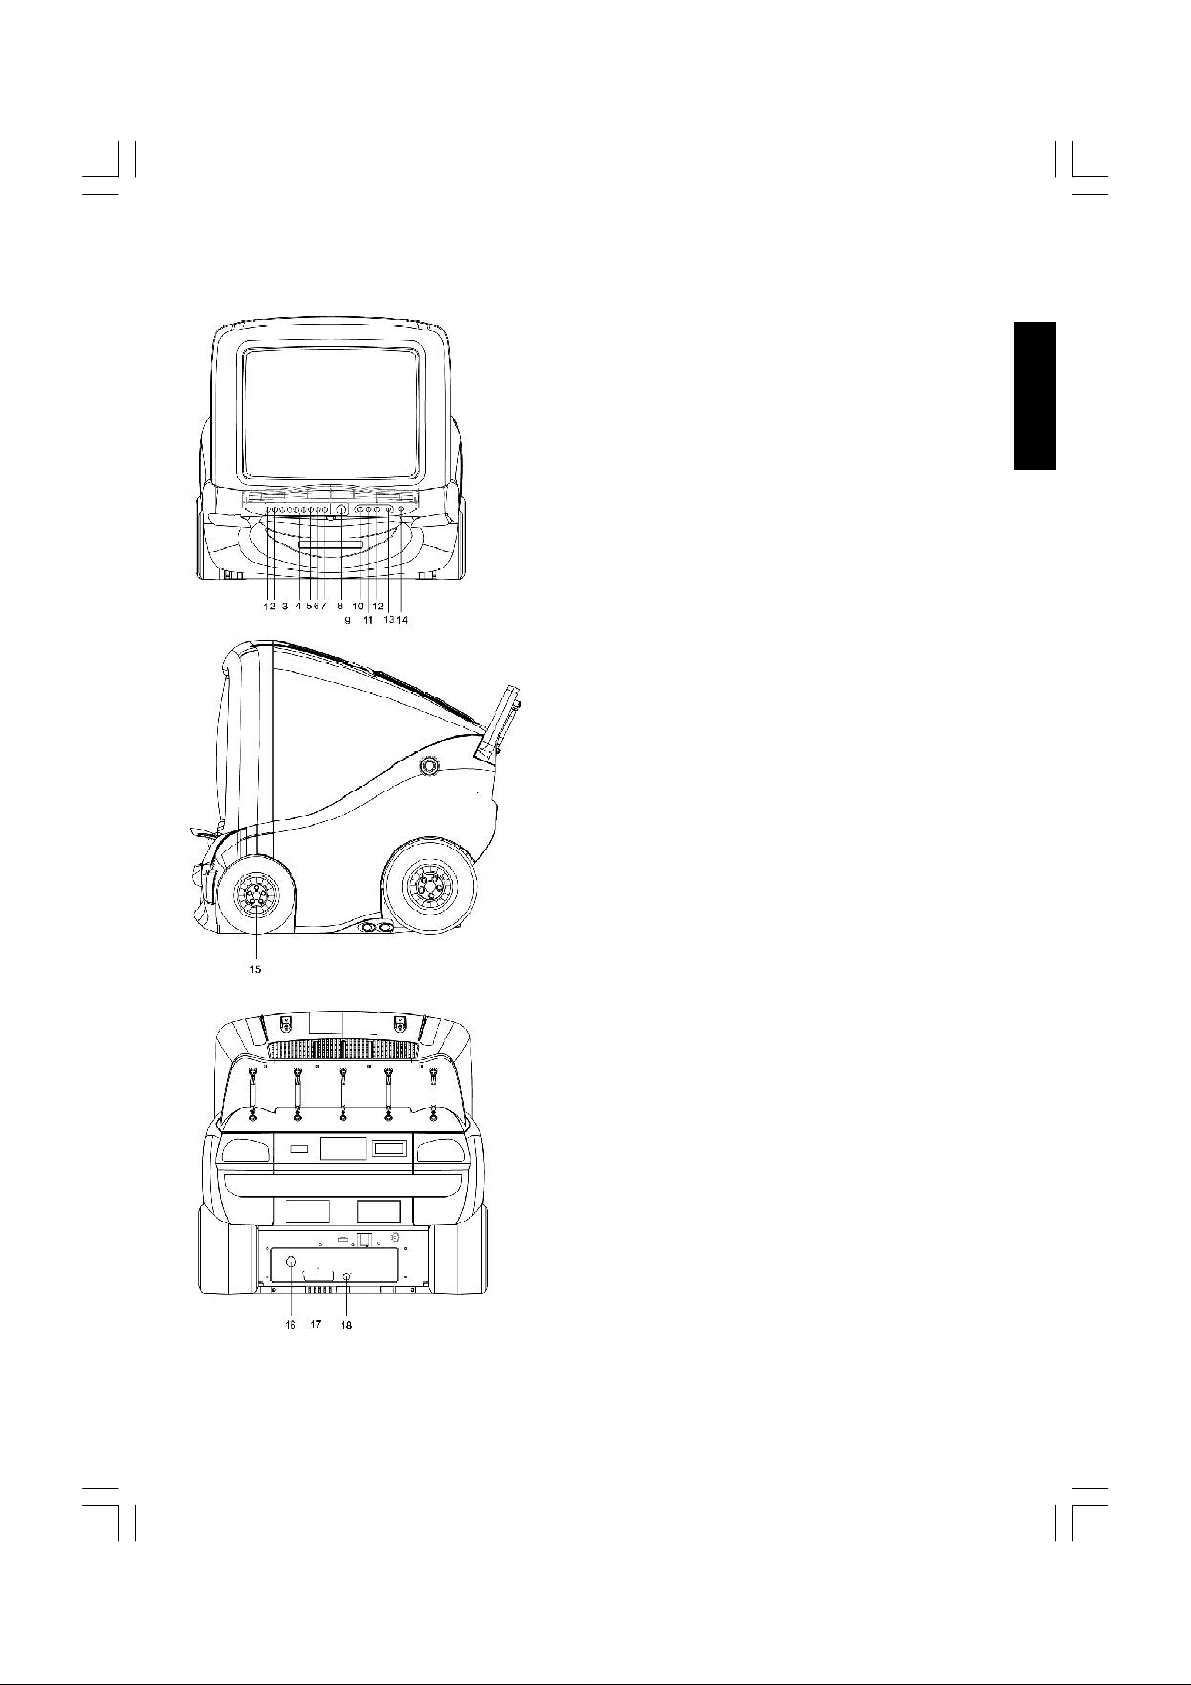
LOCATION OF CONTROLS
1. TV/AV/DVD Button
2. Menu Button
3. Volume +/- Button
4. Channel Up/Down Button
5. Play Button
6. Stop Button
7. Eject Button
8. Power Button
9. DVD Tray
10. Front Audio (R) Input (AV 2)
11. Front Audio (L) Input (AV 2)
12. Front Video Input (AV 2)
13. Earphone Jack
14. Remote Sensor
ENGLISH
15. Speaker
16. 75 ohm Antenna Socket
17. Scart connector (AV 1)
18. Audio digital Out Socket (For DVD only)
5
Page 7
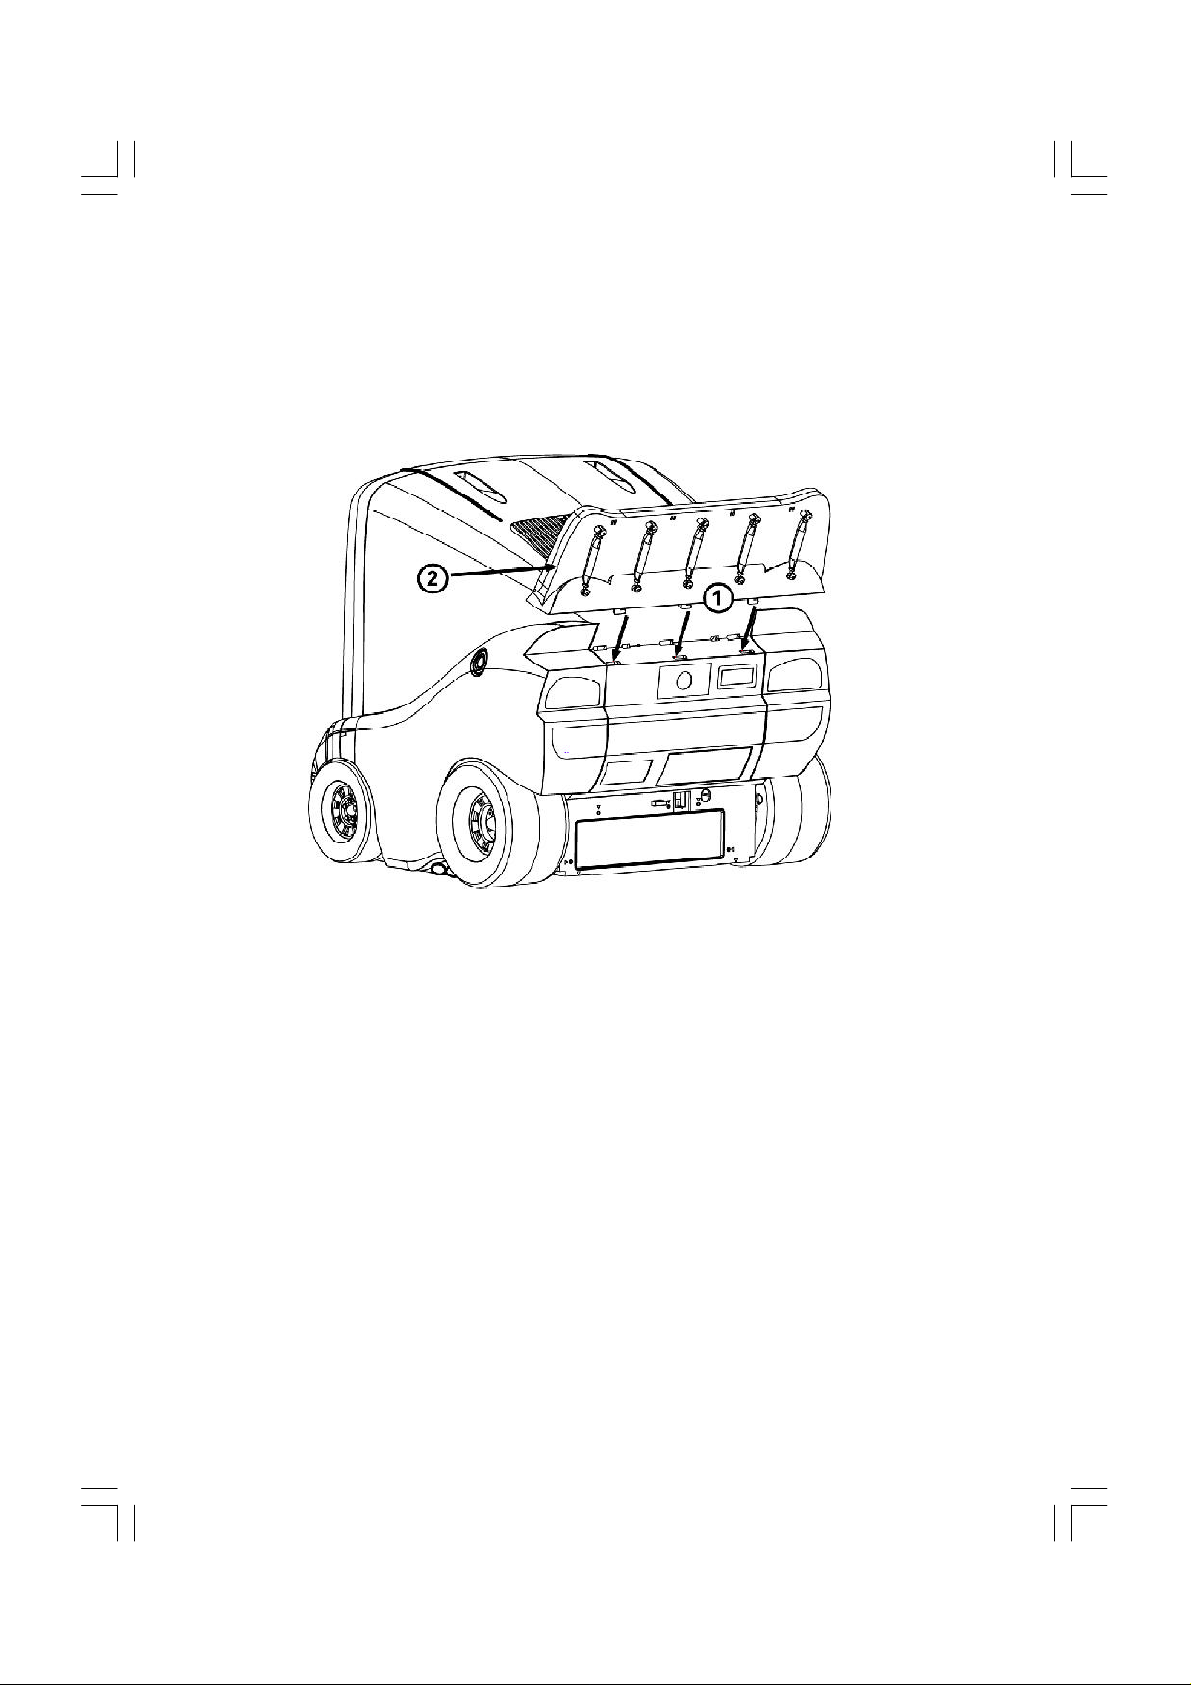
1. Insert the holes
2. Push toward the direction.
6
Page 8
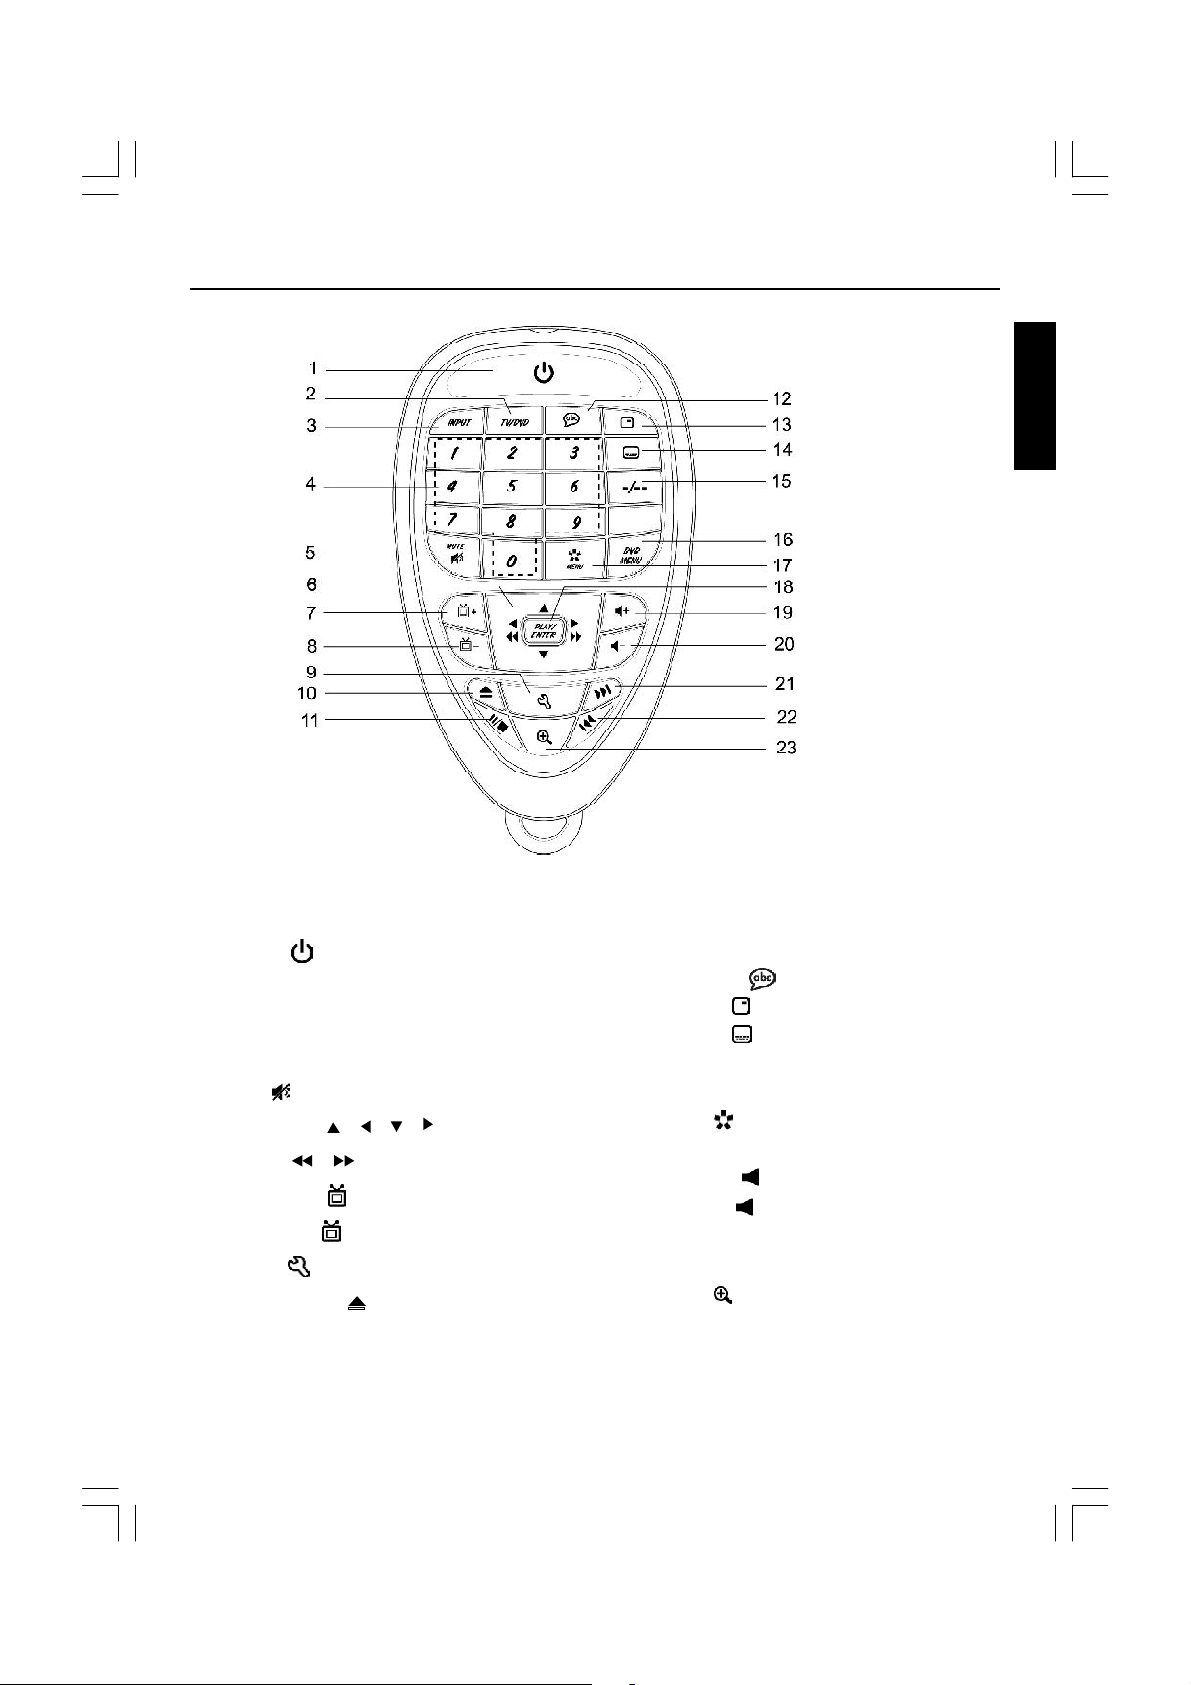
REMOTE CONTROL
ENGLISH
1. Power ( ) Button
2. TV/DVD Button
3. INPUT Button
4. Numeric (0~9) Buttons
5. Mute ( ) Button
6. Navigation ( , , , )/
Search ( , ) Button
7. Channel + ( ) Button
8. Channel - ( ) Button
9. Set up ( ) Button
10. Open/Close ( ) Button
11. Pause / Stop (;/< ) Button
12. Language ( ) Button
13. Display ( ) Button
14. Subtitle ( ) Button
15. Two or Three Digital program Button
16. DVD MENU Button
17. Menu ( ) Button
18. Play Enter Button
19. Volume+ ( +) Button
20. Volume- ( -) Button
21. Skip (:) Button
22. Skip (9) Button
23. Zoom ( ) Button.
7
Page 9
REMOTE CONTROL
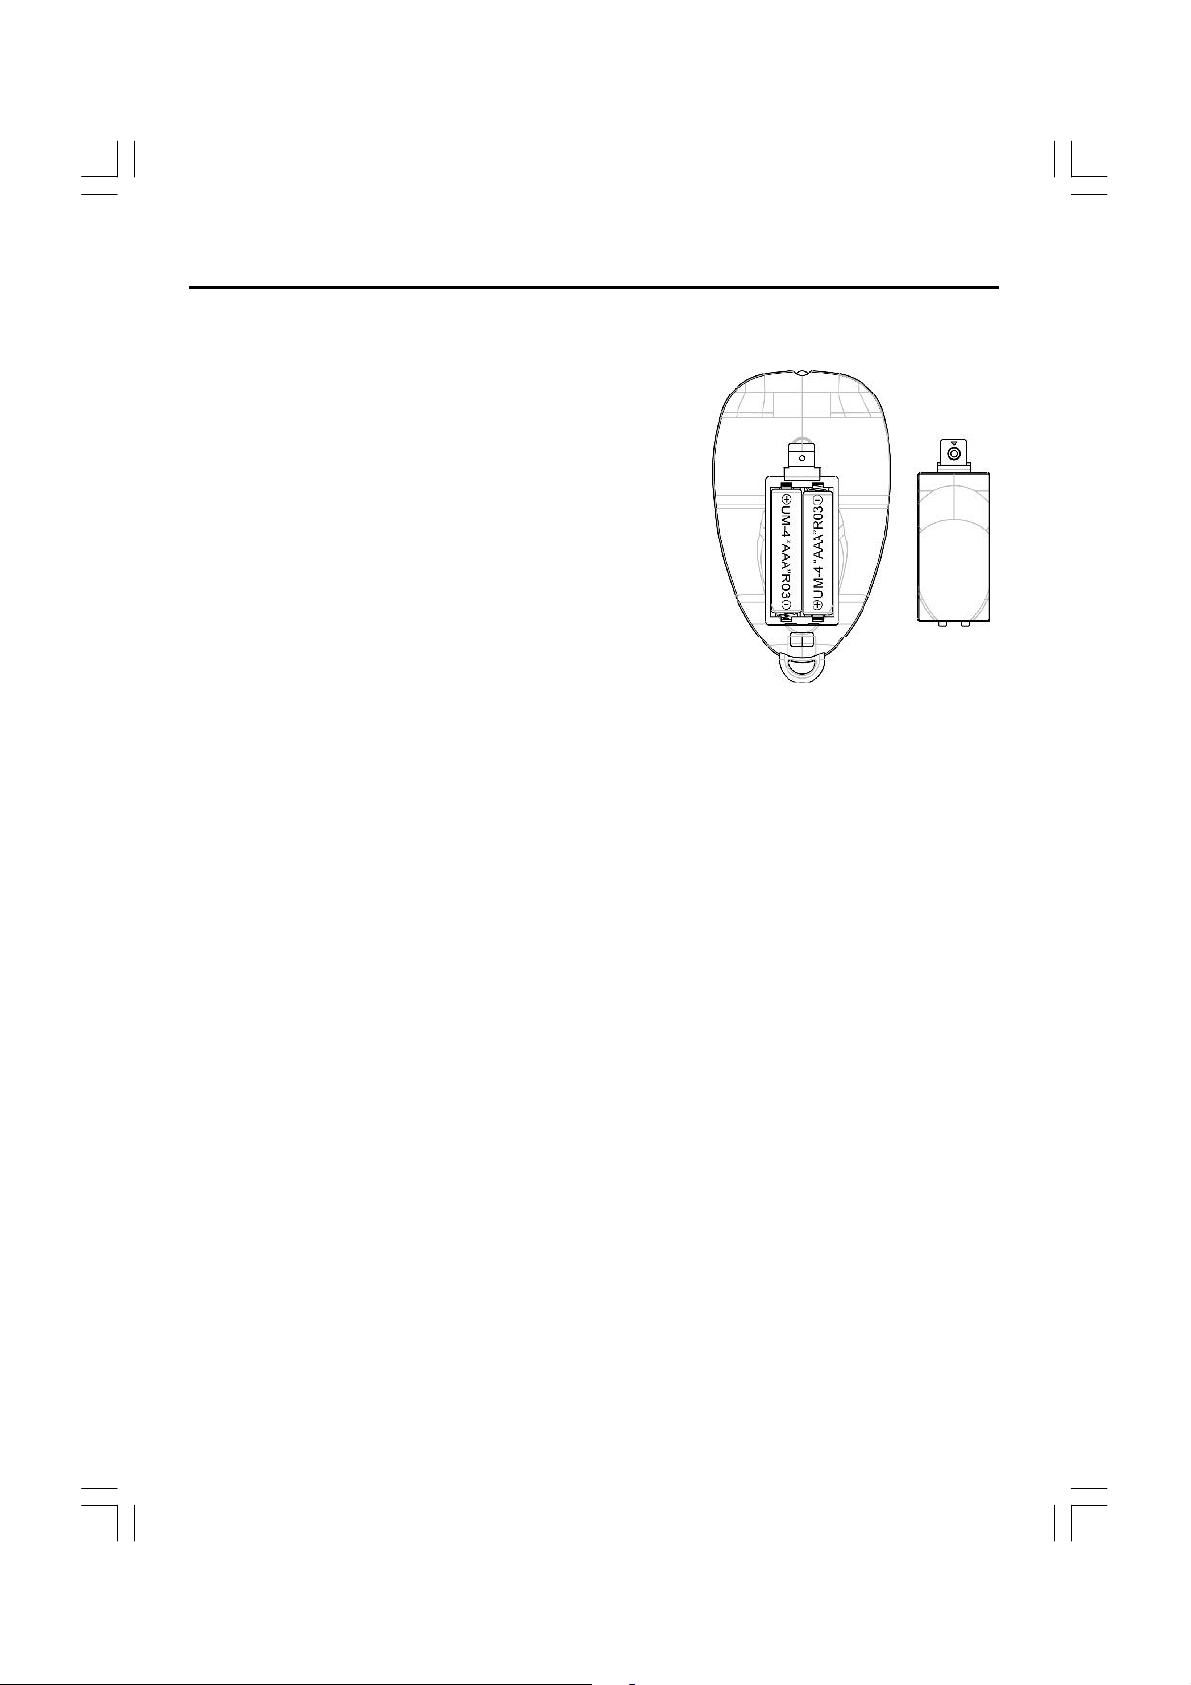
Before using the remote control, batteries must first be installed.
HOW TO INSTALL BATTERIES
1. Loosen the screw to open the battery
compartment cover.
2. Install two (2) “AAA” batteries (not included) into each
remote, paying attention to the polarity diagram in the
battery compartment.
3. Screw the battery compartment cover on the battery
compartment.
CAUTION:
1. Only adults should replace batteries.
2. Do not mix old and new batteries.
3. Do not mix different types of batteries. Do not mix alkaline, standard (carbon-zinc), or
rechargeable (nickel-cadmium) batteries.
4. Use only fresh batteries of the required size and recommended type.
5. Dispose of old batteries promptly and properly. Do not burn or bury them.
6. If you do not plan to use your unit for a prolonged period, remove the batteries. Batteries
can leak chemicals than can harm electronic parts.
7. Replace the batteries when the unit stops operating properly.
8. To avoid damage caused by leakage of the battery fluid, replace the batteries once every
two years regardless of how much the unit has been used during that time.
9. Old batteries can cause damage to the unit and will void the warranty.
10. Be sure to observe polarity as indicated in the battery compartment. Improper placement
of batteries may damage the unit.
8
Page 10
OPERATING THE TELEVISION RECEIVER
Connect your TV aerial to the aerial input socket located on the back of the TV.
Push the Main Power Switch, Power Indicator will be illuminated. After a few seconds the TV
screen will light up. Should white dots appear on the screen the TV will require tuning into the
available TV stations in your area.
Pre-setting the TV stations into the Memory
(Note: Preset tuning can only be carried out in TV Mode)
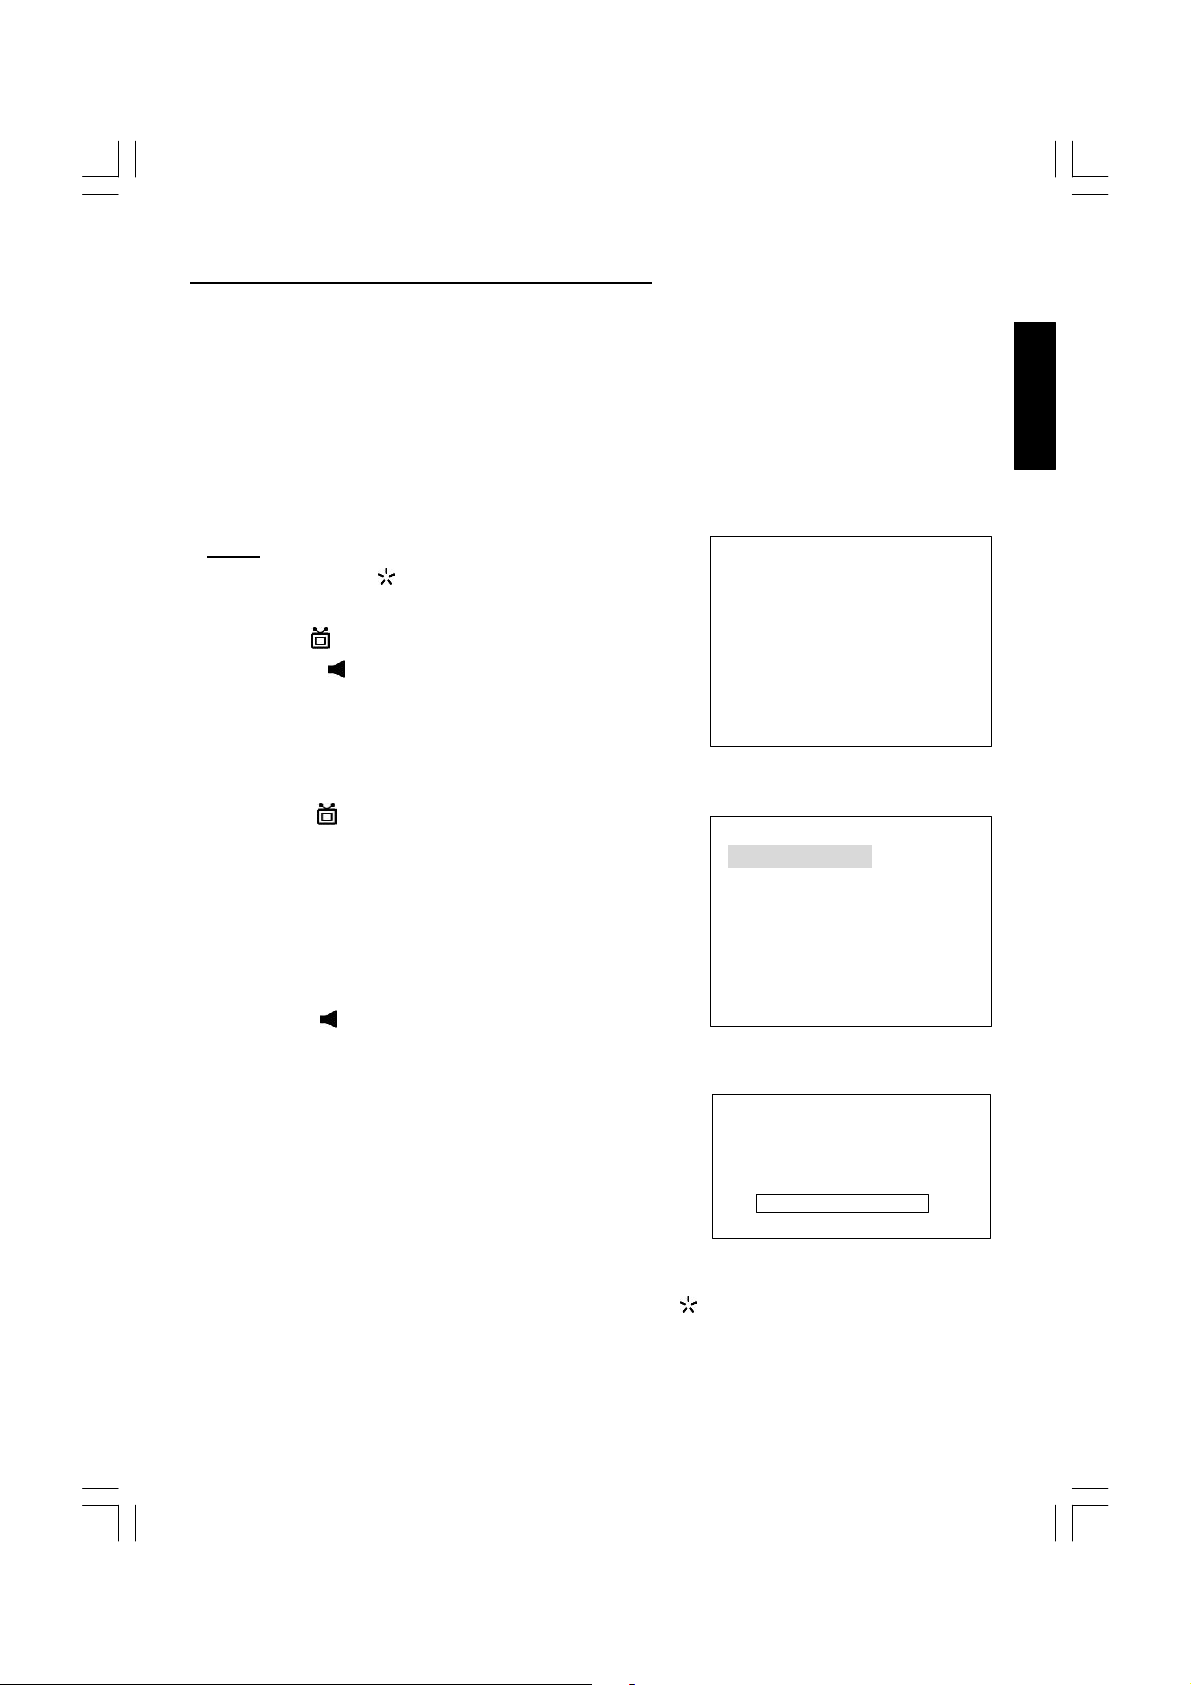
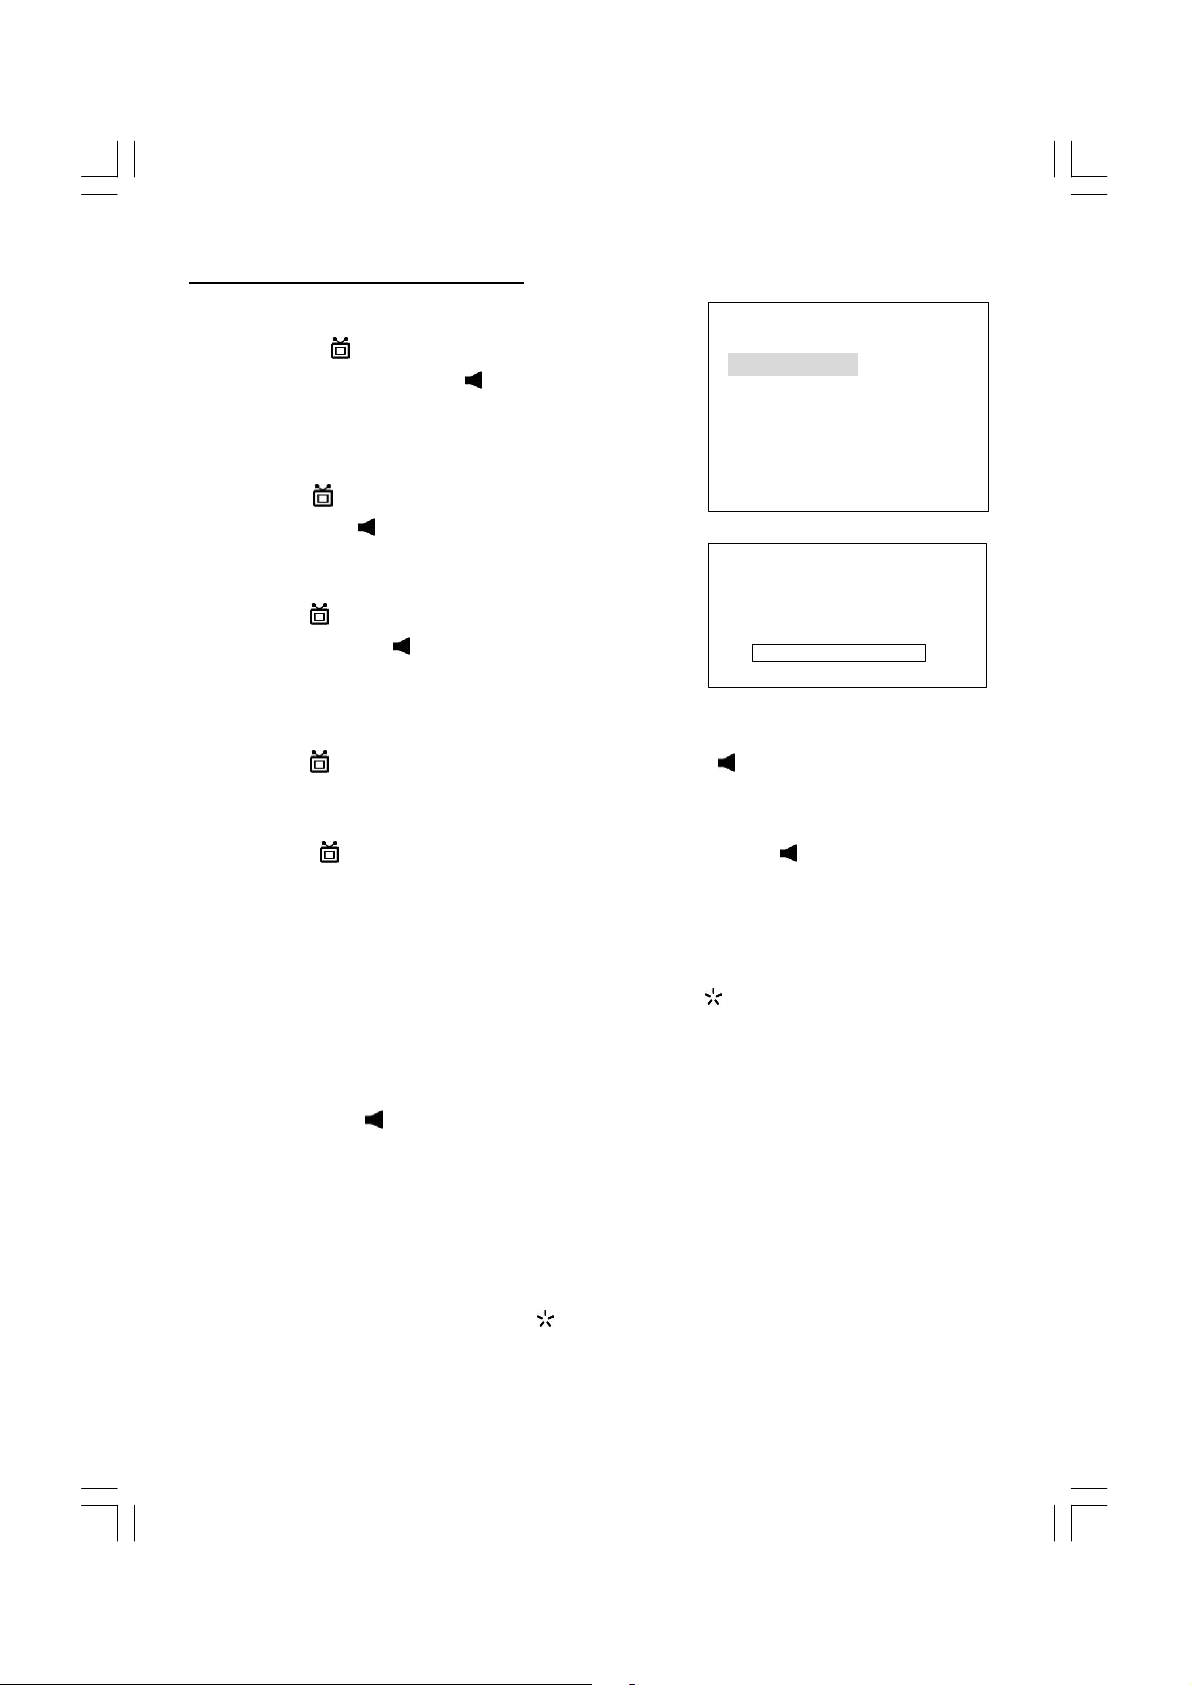
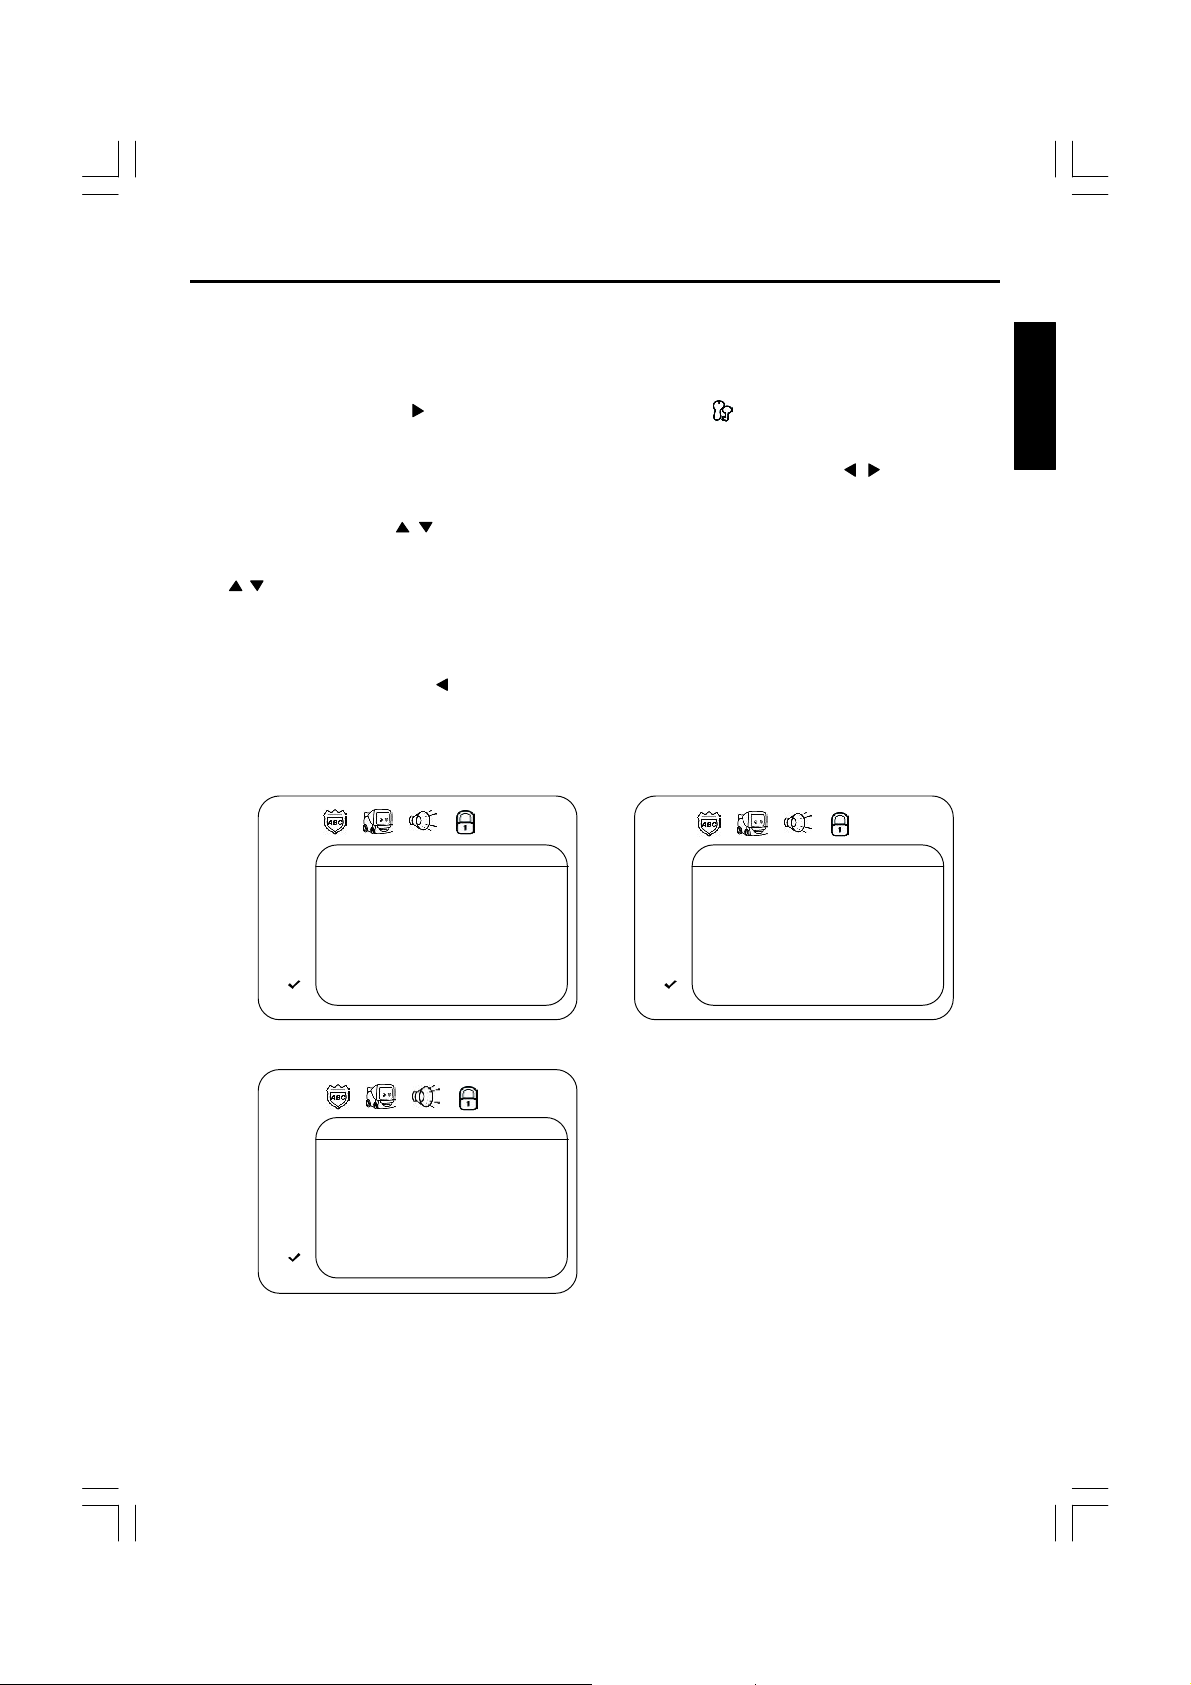
1.TUNE
• Press the MENU ( ) button four times to
select the TUNE mode as show in FIG.1
• Press the “ +/-” button to select the SOUND
then press “ +/-” button to change the
FIG.1
desired sound system BG or L.
AUTO SEARCH
• Press the “ +/-” button to select the AUTOO
SEARCH as shown in FIG. 2
FIG.2
• Press the “ +/-” button to start the automatic scanning processes,the scanning
starting from VHF to UHF and the TV stations will automatic store into memory as
shown in FIG. 3
FIG.3
ENGLISH
TUNE
AUTO SEARCH
SEARCH
BAND VHF-L
FINE TUNE
COLOUR AUTO
SOUND L
SKIP OFF
PROGRAM 1
TUNE
AUTO SEARCH
SEARCH
BAND VHF-L
FINE TUNE
COLOUR AUTO
SOUND L
SKIP OFF
PROGRAM 1
AUTO SEARCH
VHF-L
• When scanning is completed, the set will
tune to lowest program and show lowest
program number on the screen.
• If want to stop auto search function to press MENU ( ) button.
-|||||||||| +
9
Page 11
OPERATING THE TELEVISION
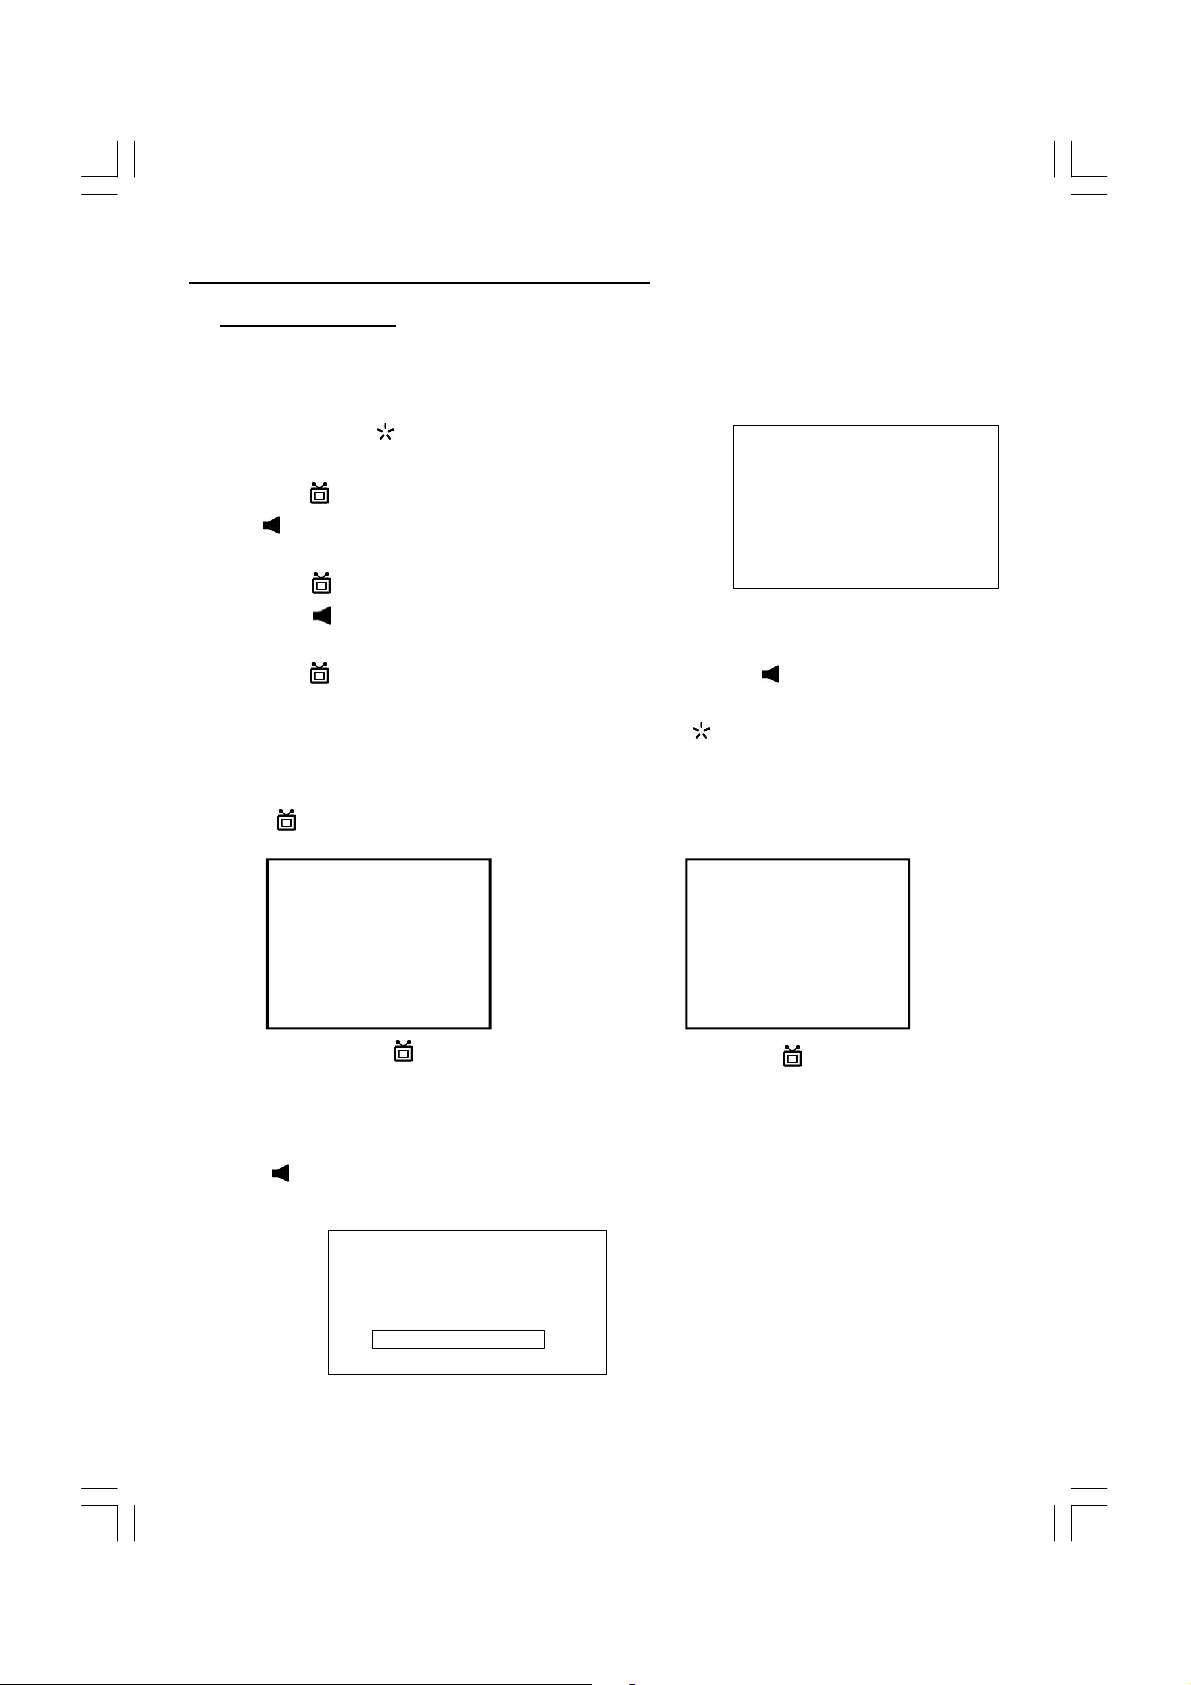
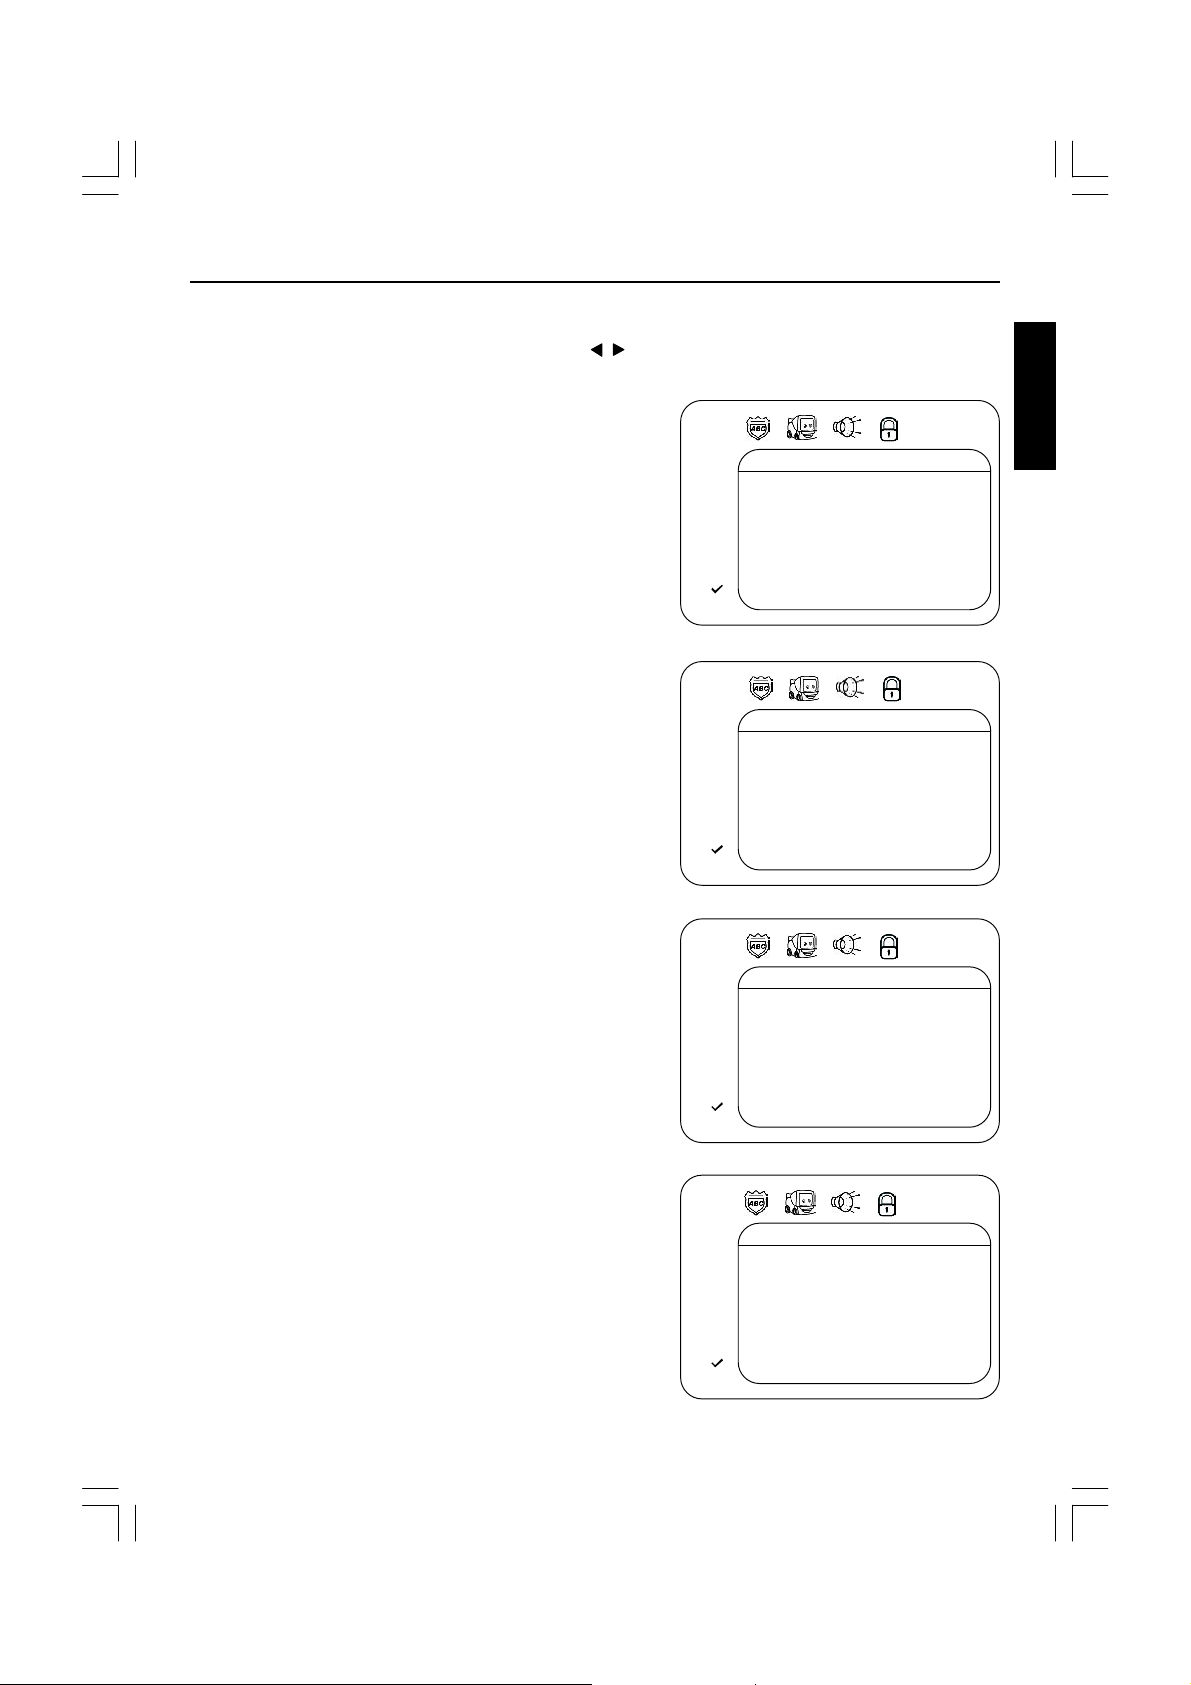
SEARCH(Manual)
1) Press the “ +/-” button to select the
PROGRAM. then press the “ +/-”button or
numeric button to select the desired Program number.
2) Press the “ +/-”button to select the BAND.
FIG.4
TUNE
AUTO SEARCH
SEARCH
BAND VHF-L
FINE TUNE
COLOUR AUTO
SOUND L
SKIP OFF
PROGRAM 1
then press the “ +/-” button to select
VHF-L,VHF-H and UHF.
3) Press the “ +/-” button to select the
COLOUR
then press “ +/-” button to change
FIG.5
SEARCH
VHF-L
-|||||||||| +
the desired colour system AUTO,PAL,
N3.58, N4.43, SECAM.
4) Press the “ +/-” button to select the SOUND then press “ +/-” button to change the
desired sound system BG or L.
5) Press the “ +/-” button to select the SEARCH then press the “ +/-” button to start the
station search. The TV screen will show the tuning and when the first station received is
located, the tuning will stop and stored automatically. Repeat steps 1,2,3,4 to search the
next TV station. as shown in FIG.4, FIG.5.
• If want to stop search(manual) funtion to press MENU ( ) button.
Notes:
• If ghost / noisy stations have been stored when using the AUTO SEARCH method these
stations can be removed from the channel list by entering the SKIP Mode shown in the TUNE
menu. Press the “ +/-” button and change the OFF state to ON. Press the MENU button to
return to normal viewing. The unwanted station will be removed from the channel list when
you change TV channels and cannot be viewed.
• The SKIPPED station can be restored by re entering the TUNE menu and changing the SKIP
ON status to OFF.
• To exit the TUNE mode press MENU ( ) button two times.
10
Page 12
OPERATING THE TELEVISION
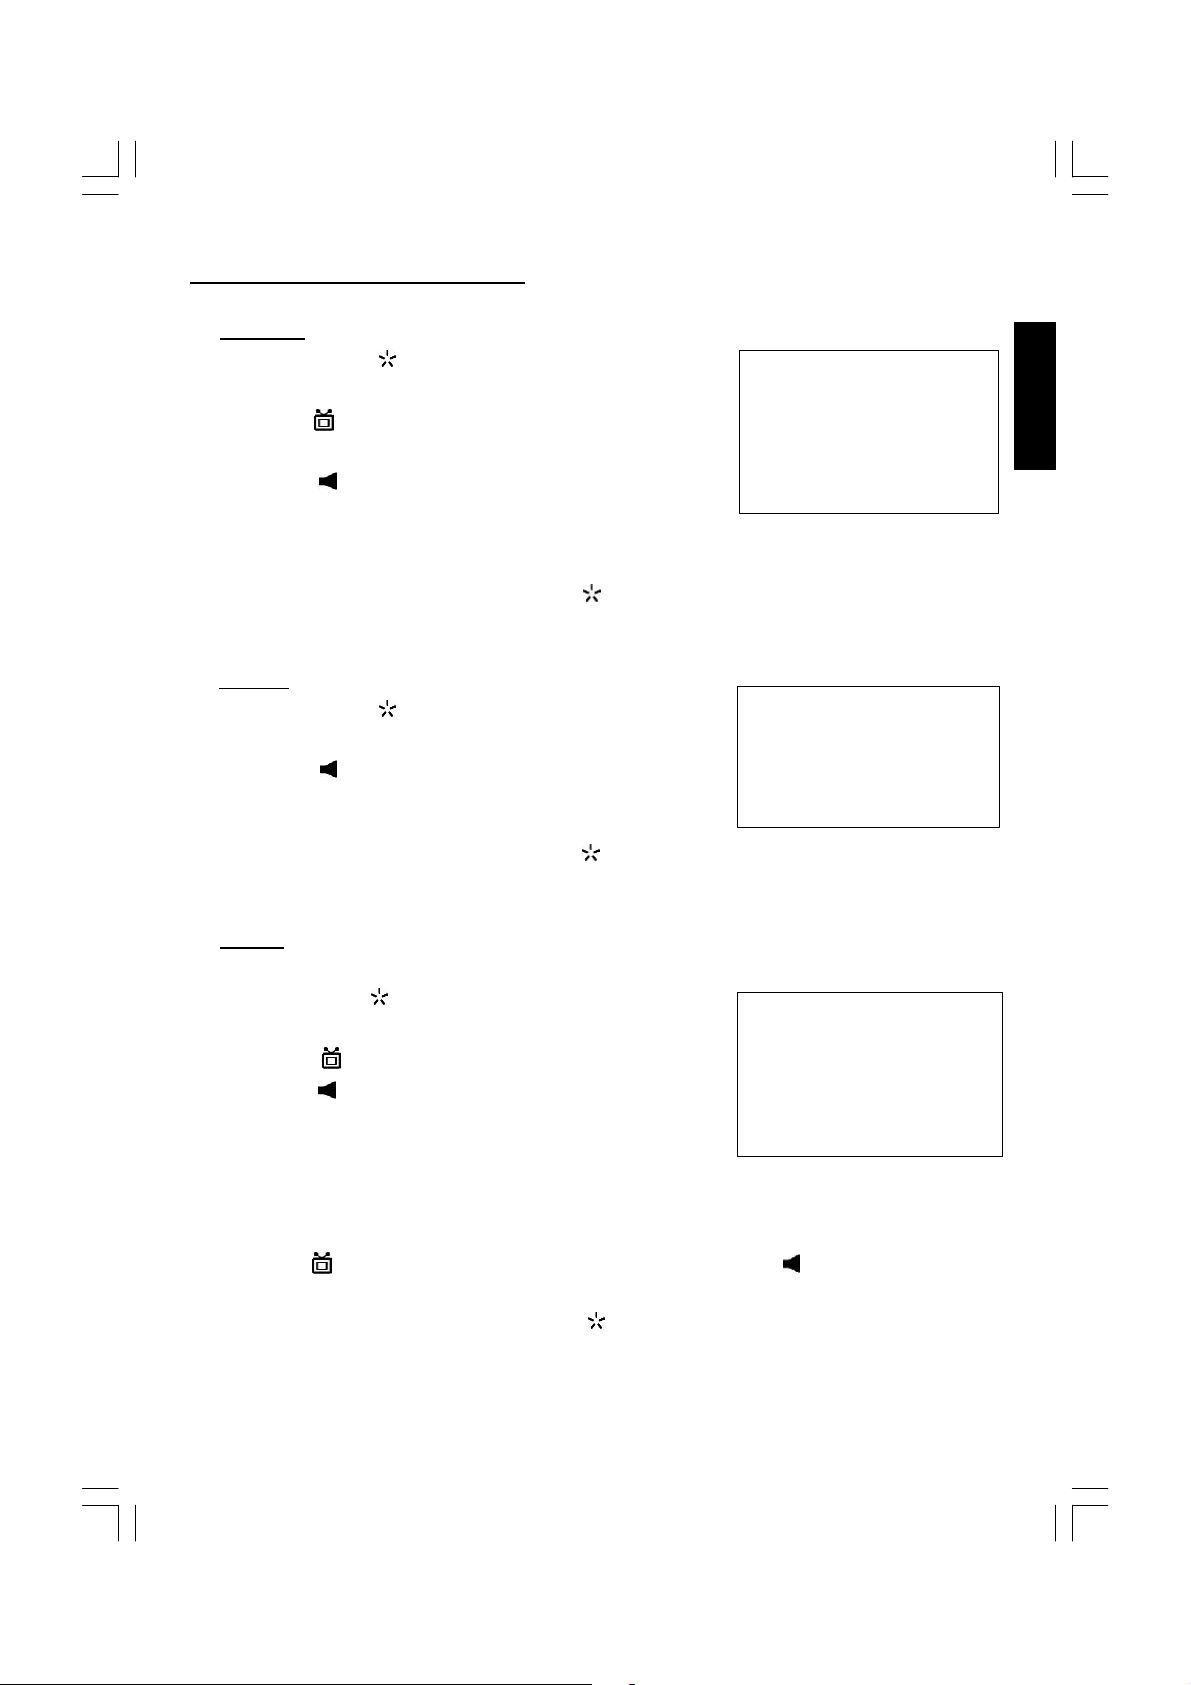
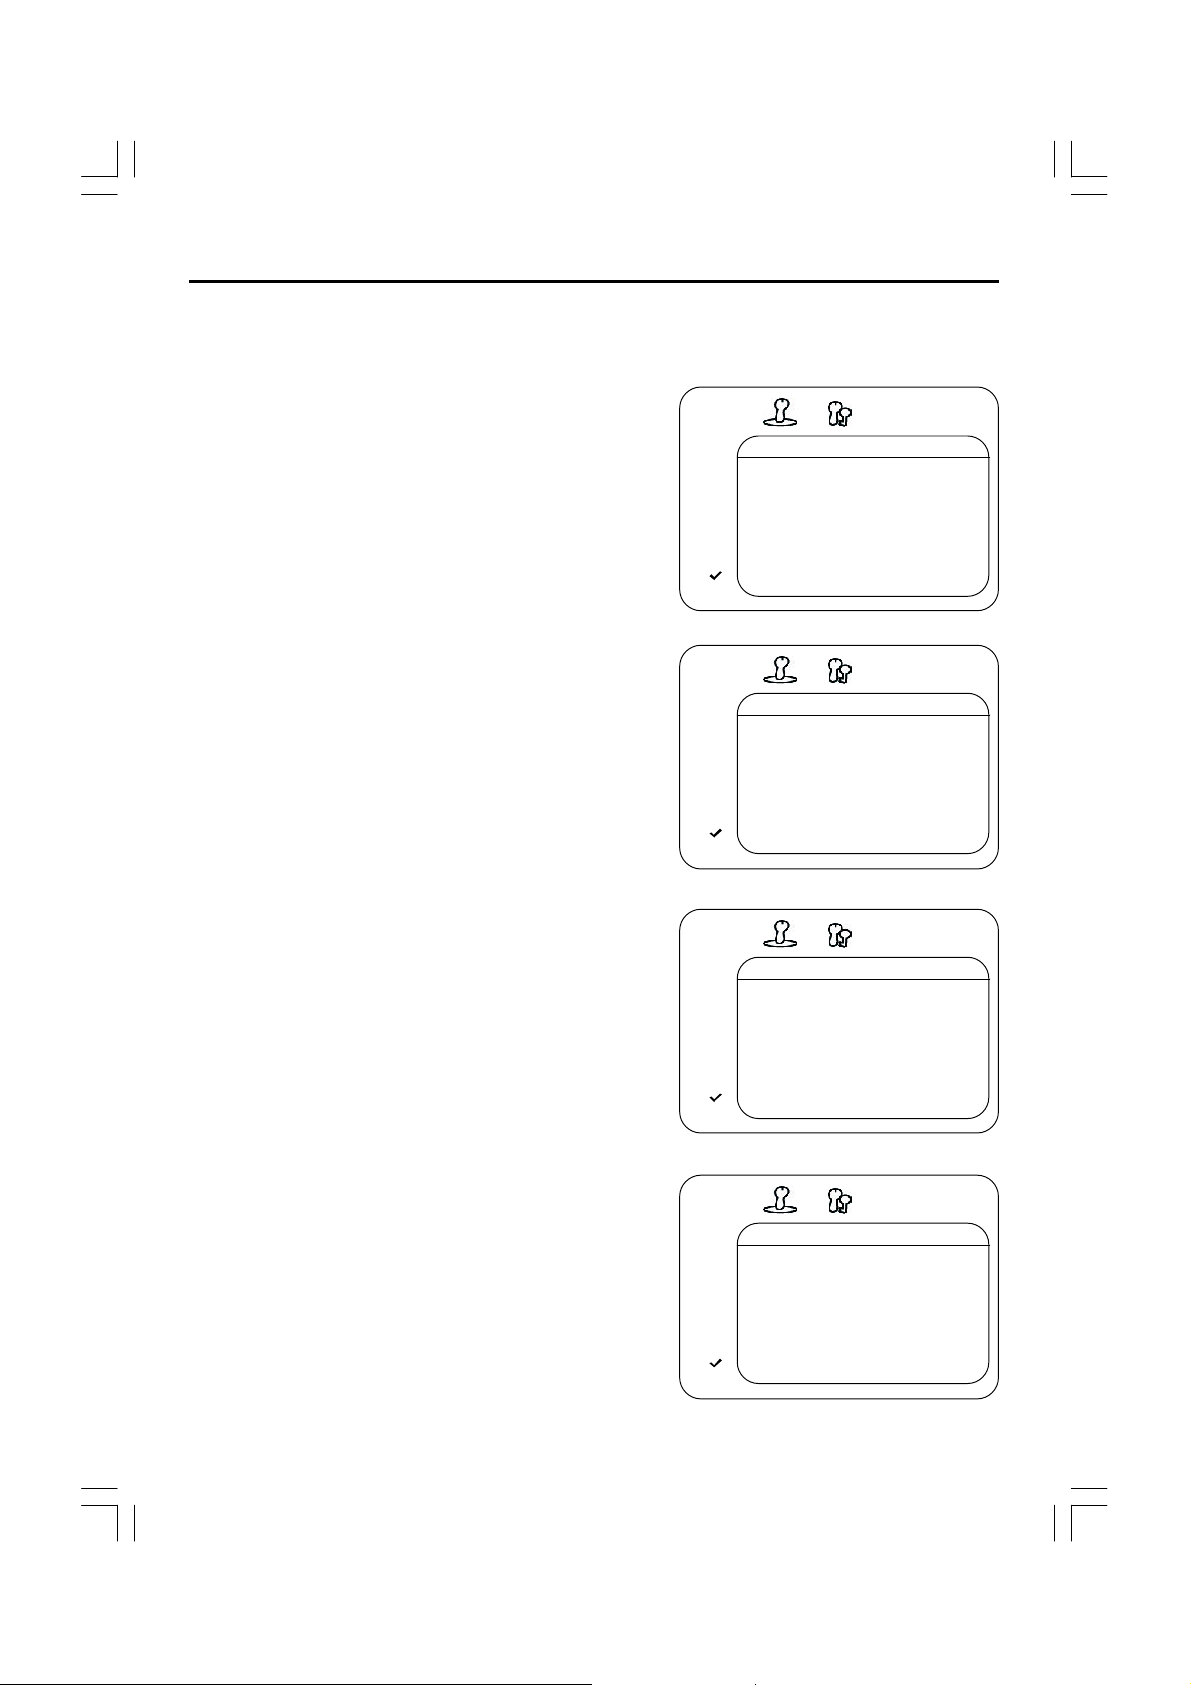
2. PICTURE
• Press the MENU ( ) button to select the PICTURE
mode as show in FIG.6.
• Press the “ +/-” button to select the BRIGHTNESS/
COLOUR/CONTRAST/SHARPNESS/HUE
• Press the “ +/-” button to adjust the desired level,
The steps can be adjust from 0~63.
• HUE item for NTSC system only, the level setting can
be adjust from “-31” to “+31”.
• To exit the PICTURE mode press the MENU ( ) button
five times.
3. SOUND
• Press the MENU ( ) button two times to select the
SOUND mode as show in FIG.7
• Press the “ +/-” button to adjust the level of the
Volume. The level setting can be adjust from “0” to
“63”.
• To exit the SOUND mode press the MENU ( ) button
four times.
FIG.6
FIG.7
PICTURE
BRIGHTNESS 32
COLOUR 32
CONTRAST 32
SHARPNESS 32
HUE 0
SOUND
VOLUME 10
ENGLISH
4. SETUP
LANG.
• Press the MENU ( ) button three times to select the
SETUP mode, as shown in FIG.8
• Press the “ +/-” button to select the LANG.then
press the “ +/-” button to select the desired language ENGLISH, RUSSIAN, DUTCH, ITALIAN,
GERMAN, FRENCH, SPANISH, PORTUGUESE,
ARABIC, FARSI, or TURKISH.
BLUE BACK
• Press the “ +/-” button to select the BLUE BACK and press the “ +/-” button to adjust the
blue Back-ground ON or OFF.
• To exit the SETUP mode press the MENU ( ) button three times.
FIG.8
SETUP
LANG. ENGLISH
BLUE BACK ON
11
Page 13
OPERATING THE TELEVISION RECEIVER
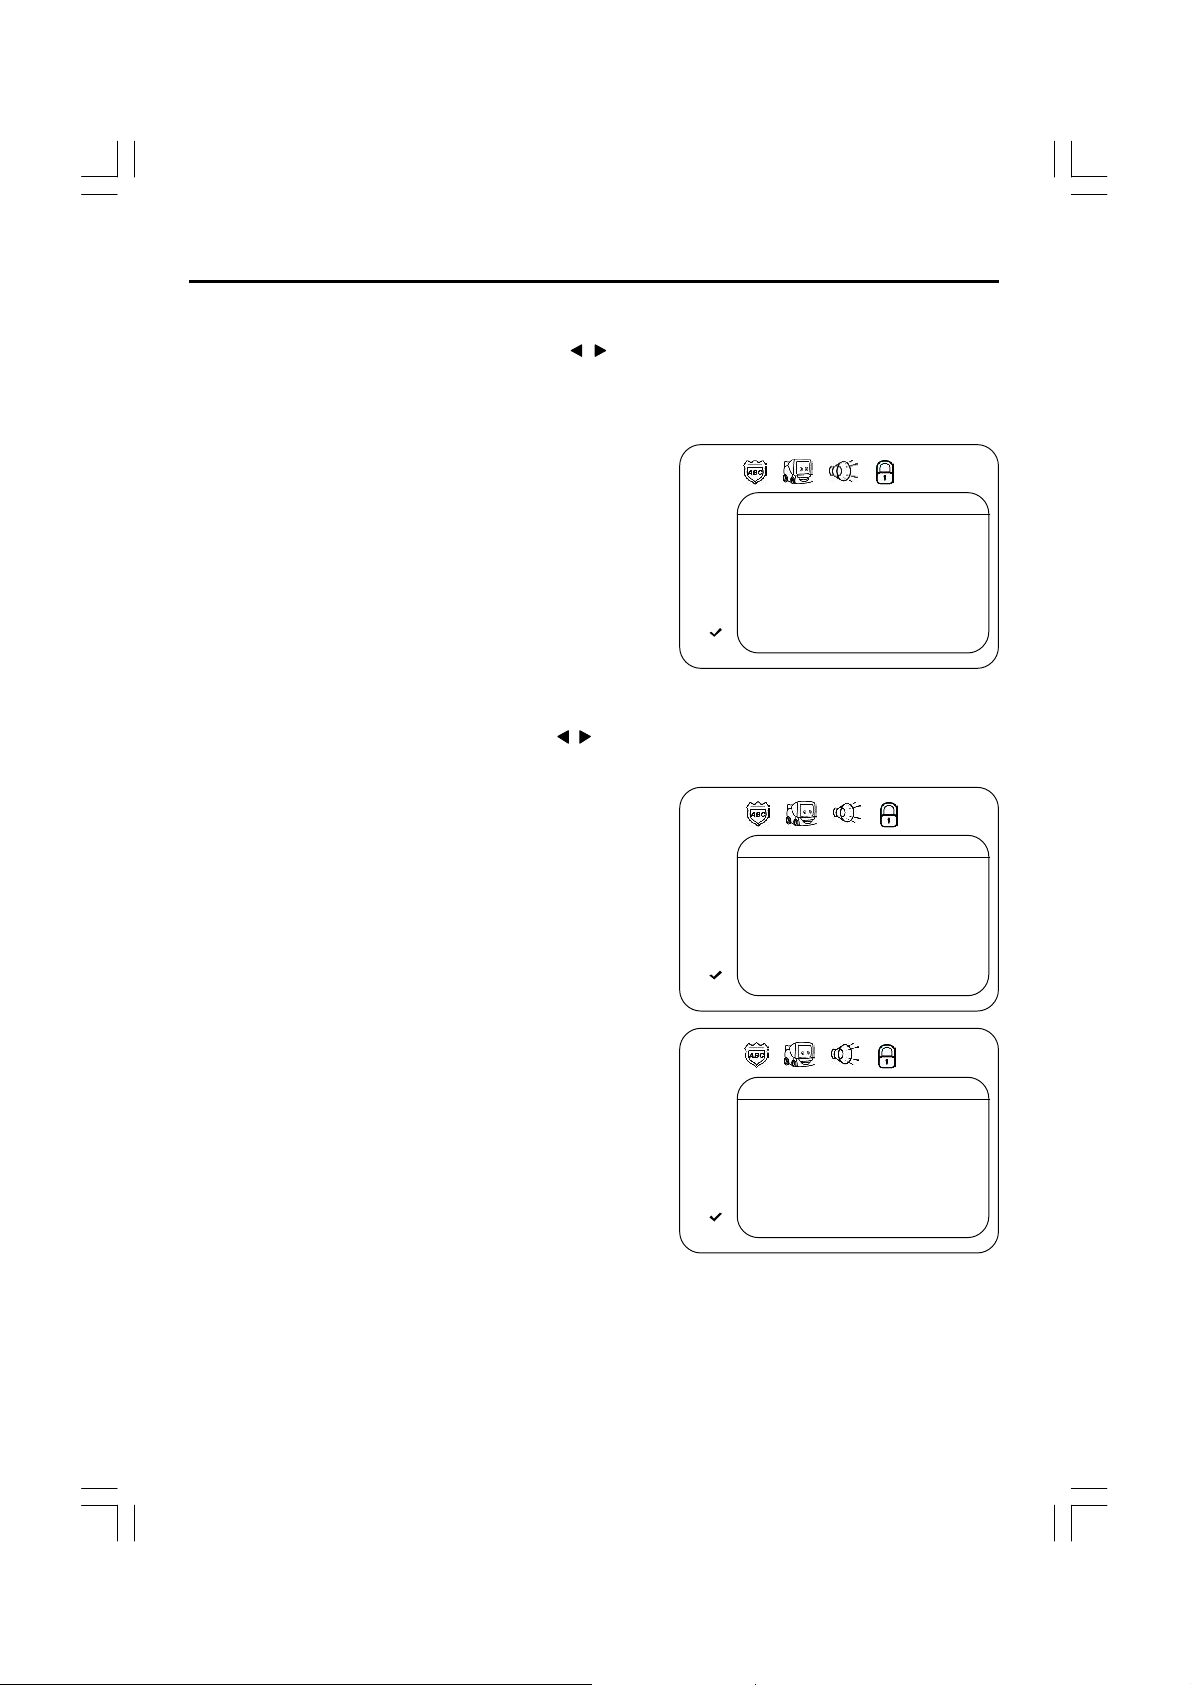
5. PROG.EXCHANGE
After stored TV stations by AUTO SEARCH or MANUAL SEARCH, the position of TV program
can be exchange by the following method:
• Press the MENU ( ) button five times to select the
PROG.EXCHANG mode as shown in FIG.9
• Press the “ +/-” button to select PROG I then press
the “ +/-” button or numeric button to select the
disired program number to be exchange.
• Press the “ +/-” button to select the PROG II then
press the “ +/-” button or numeric button to select
the disired program number to be exchange.
• Press the “ +/-” button to select the EXCHANG then press the “ +/-” button. the position of
PROG I program number and PROG II program number will be exchanged.
• To exit the PROG. EXCHANGE mode press the MENU ( ) button.
CHANNEL SELECT AND VOLUME CONTROL
1) Press +/- buttons to select TV station. (TV Mode Only)
FIG.9
PROG. EXCHANGE
PROG. I 1
PROG II 5
EXCHANGE
0 249
Press CHANNEL." -" on the main unit,
the program no. will appear on the top
right corner and change from higher
no. to lower no.
2) Press +/ - button to adjust sound level.
VOLUME
-|||||||||| + 10
12
Press CHANNEL. " +"on the main unit, the
program no. will change from lower no. to
higher no.
Page 14

OPERATING WITH REMOTE CONTROL
TO SELECT TV STATION USING THE PROGRAM NUMBERS:
• Program Number Up and Down
Press the " + " or " -" button to select a higher or lower program number..
• 0 - 9 Digital Button
To select TV stations using program numbers 0 - 9, selecting program number will be
shown in the right corner of the top of screen in green colour.
For example:
Press "9" digit button to select program "9".
• Two Digital Program Number
To select TV station using program numbers "10" - "99".
For example: selecting program “12”
* Press the button "-/-- " ,on screen will show “--”.
*Then press the number "1" button, on screen will show "1-"
* Then press the number "2" button, channel "12" will show.
• Three Digital Program Number
To select TV station using program numbers “100”- “249”.
For example: selecting program “123”
* Press the button "-/-- " twice,on screen will show “---”.
* Then press the number "1" button, on screen will show "1--"
* Then press the number "2" button, channel "12-" will show.
* Then press the number "3" button, channel "123" will show.
ENGLISH
POWER Button
l Press the “ ” button to switch the picture and sound ON/OFF the picture and sound.
MUTE Button
l Press the Mute button to switch OFF the sound,press once again to switch ON the sound.
INPUT Button
• Press the INPUT Button to select AV mode,Press again back to TV mode.
TV AV1 AV2
TV/DVD Button
l Press the TV/DVD mode button to select DVD mode. Press again to go back to TV mode.
(There will be a few seconds delay before entering the DVD mode).
AUTO POWER-OFF FUNCTION
• When the TV is in TV or AV(video) mode and it’s without a signal for about 8 minutes, it will
automatically power off(standby mode) to save the energy.
13
Page 15
OPERATING YOUR DVD
BASIC OPERATION
1. Press “TV/AV/DVD” button on the unit or press the TV/DVD direct key on the remote handset
to turn ON DVD.
2. Press “OPEN / CLOSE (EJECT)” ( ) button to load disc in disc tray.
3. Press “OPEN / CLOSE” ( ) button to close the tray.
• Hold the disc without touching either of its surfaces, position it with the printed title side
facing up.
Play Discs
1. Press the OPEN/CLOSE ( ) button on the front panel and load the Disc on the tray.
The label side should be facing upwards. For a Double-sided DVD Disc, put the disc with label
A/1 up.
2. Press the OPEN/CLOSE ( ) button again to close the tray and the disc will be loaded.
3. The Disc will be played automatically.
• If it is a DVD disc, it will show the Menu/Title Page on the screen.
• If it is a CD, it will play from the first.
4. Press the STOP button, if you want to stop the Disc playback You can resume playback by
pressing the PLAY button and it will start at the location where you have pressed stopped
(Resume Play).
5. Press the STOP Button twice to stop playback completely and return to the start.
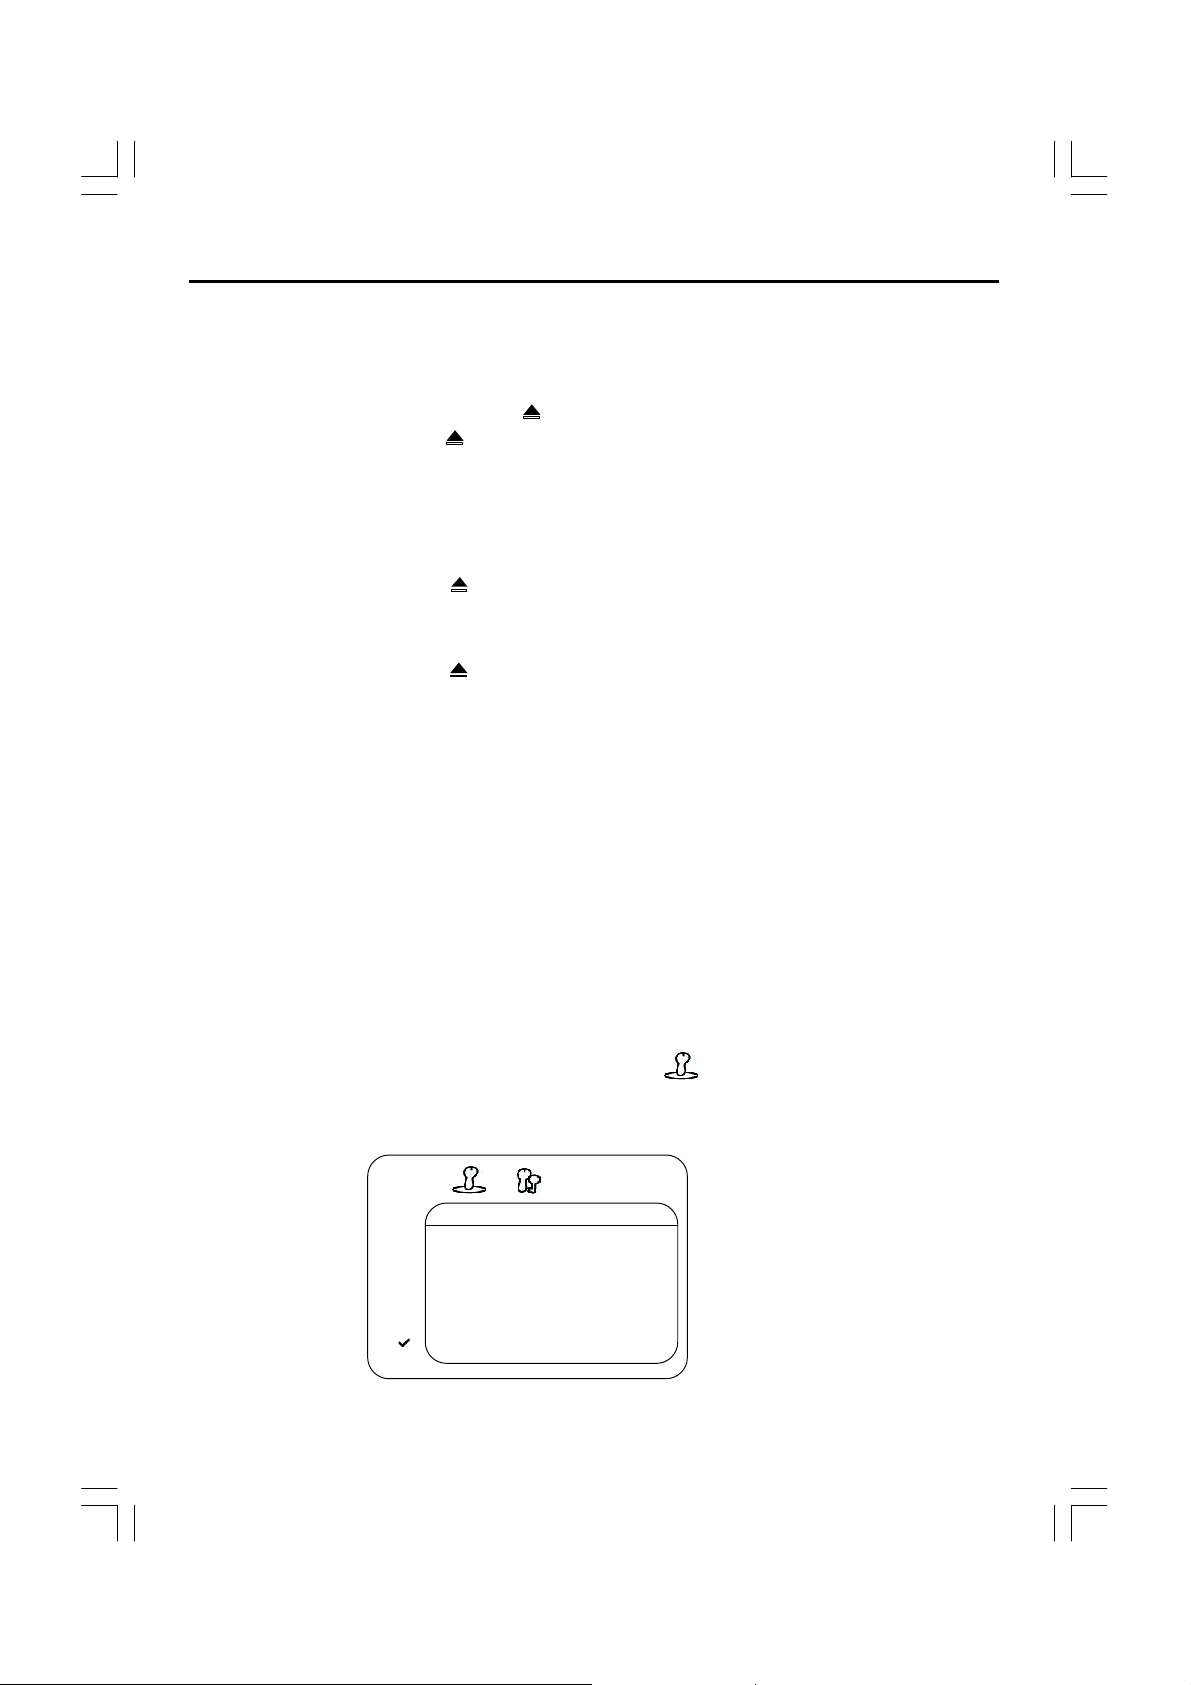
TO ACCESS THE QUICK START MENUS:
To access the Quick Start menus, which will allow you to change the three most popular settings,
perform the following:
1. While in the DVD is in Stop mode, press the SETUP button to enter the Setup Menu.
2. Press the PLAY/ENTER button to select Quick setup( ).
3. Continue with steps 4-5 in the next section.
QUICK START MENU
QUICK SETUP
PLAYER MENU ENGLISH
TV ASPECT
TV TYPE PAL
< >
DOLBY DIGITAL ON
< >
4:3 LETTER BOX
14
Page 16
OPERATING YOUR DVD
TO ACCESS THE MAI N MENUS :
To access the four main menus, perform the following:
1. While in the DVD Stop mode, press the SETUP button to enter the Setup Menu.
2. Press the Navigation ( ) button to select the Main menus ( ), then press the PLAY/ENTER
button.
3. Select one of the Setup icons at the top of the screen using the Navigation ( , ) buttons, then
press the PLAY/ENTER button to select it.
4. Use the Navigation ( , ) buttons to select one of the setup options, then press the PLAY/
ENTER button to select it or change the setting. If there are more options, use the Navigation
( , ) buttons to select the desired option and press PLAY/ENTER button to confirm.
5. Press the SETUP button to exit setu p.
TO RETURN TO THE PREV IOUS MEN U,
simply press the Navigation ( ) button.
MAIN MENU
ENGLISH
LANGUAGE
AUDIO LANG ENGLISH
SUBTITLE ENGLISH
DISC MENU ENGLISH
< >
PLAYER MENU ENGLISH
< >
AUDIO
DRC ON
DOLBY DIGITAL ON
DOWN SAMPLING ON
< >
< >
DISPLAY
TV ASPECT 4:3 PAN&SCAN
< >
< >
15
Page 17
OPERATING YOUR DVD
QUICK START MENU:
Access the Quick Start menu as described on page 15, then select/change the setup option as
described on page 16.
PLAYER MENU OPTION:
Select the PLAYER MENU to choose the desired
language(English, French , Spanish, German, Italian,
Portuguese, Nederland).
QUICK SETUP
PLAYER MENU ENGLISH
TV ASPECT 4:3 LETTER BOX
TV TYPE PAL
< >
DOLBY DIGITAL ON
< >
TV ASPECT OPTION:
Select 4:3 PS (Panscan), 4:3 Letterbox or 16:9 wide.
See page 18 for details.
TV TYPE OPTION:
Select the TV TYPE to choose the desired
PAL or N TSC system.
DOLBY DIGITAL OPTION:
When using the coaxial digital output, select ON to
turn the Dolby Digital ON or OFF to turn Do lby
Digital off.
QUICK SETUP
PLAYER MENU ENGLISH
TV ASPECT 4:3 LET TER BOX
TV TYPE PAL
< >
DOLBY DIGITAL ON
< >
QUICK SETUP
PLAYER MENU ENGLISH
TV ASPECT 4:3 LETTER BOX
TV TYPE P AL
< >
DOLBY DIGITAL ON
< >
QUICK SETUP
PLAYER MENU ENGLISH
TV ASPECT 4:3 LETTER BOX
TV TYPE PAL
< >
DOLBY DIGITAL ON
< >
16
Page 18
OPERATING YOUR DVD
LANGUAGE SETUP MENU:
Select the Language icon using the Navigation ( , ) buttons, press the PLAY/ENTER button and
then select/change the setup option as described on page 17.
AUDIO LANG
Select the language the DVD will be played back in.
The DVD must be recorded in the selected language,
otherwise the default language of the DVD will be
played.
SUBTITLE
Select the language the Subtitle will be in. The DVD
must be recorded in the selected language, otherwise
the default language of the DVD will be shown. Select
Off to turn off the subtitle.
DISC MENU
Select the lang uage the DISC MENU will be in. The
DVD’s DISC MENU must b e made in the selected
language, otherwise the default language of the
DVD will be shown.
LANGUAGE
AUDIO L ANG ENGLISH
SUBTITLE ENGLISH
DISC MENU ENGLISH
< >
PLAYER MENU ENGLISH
< >
LANGUAGE
AUDIO LANG ENGLISH
SUBTITLE ENGLISH
DISC MENU ENGLISH
< >
PLAYER MENU ENGLISH
< >
LANGUAGE
AUDIO LANG ENGLISH
SUBTITLE ENGLISH
DISC MENU ENGLISH
< >
PLAYER MENU ENGLISH
< >
ENGLISH
PLAYER MENU
Select the language for the PLAYER MENU will be in
(English, French , Spanish, German, Italian,
Portuguese, Nederland).
LANGUAGE
AUDIO LANG ENGLISH
SUBTITLE ENGLISH
DISC MENU ENGLISH
< >
PLAYER MENU ENGLISH
< >
17
Page 19
OPERATING YOUR DVD
DISPLAY SETUP MENU:
Select the Display icon using the Navigation ( , ) buttons, then select/change the setup option
as described on page 18.
TV ASPECT
4:3PS: Select when the unit is connected to a con-
vention al TV. Video material formatted in the Pan Scan
style is played back in that style (the left and right
edges are cut off).
4:3 LETTERBOX: Select when the unit is connected
to a normal TV. Wide-screen images are shown on
the screen with a black band at the top or bottom.
16:9 WIDE: Select when the unit is connected to a
widescreen TV.
AUDIO SETUP MEN U:
Select the Audio icon using the Navigation ( , ) buttons, then select/change the setup option
as described on page 18.
DRC
Select ON to turn the DRC (Dynamic R ange
Compression) on or OFF to turn DRC off. Dynamic
Range Compression will compress the dynamic range
of the DVD’s audio track.
DOLBY DIGITAL AND DOWN SAMPLING
When using the coaxial digital output, select ON to
turn the Dolby Digital on or OFF to turn Dolby Digital
off.
When using the coaxial digital output, select ON to
turn the Down Sampling on or OFF to turn Down
Sampling off.
When downsampling is ON, the digital output will be
sampling at 48K even if the original audio is encoding
in 96K for DVD.
DISPLAY
TV ASPECT 4:3 PAN&SCAN
< >
< >
AUDIO
DRC ON
DOLBY DIGITAL ON
DOWN SAMPLING ON
< >
< >
AUDIO
DRC ON
DOLBY DIGITAL ON
DOWN SAMPLING ON
< >
< >
PARENTAL
The Parental option enables parents to prevent their child ren from watching inappropriate material
on a DVD. It reads the ratings for programmin g, then denies access to programming if the program’s
rating meets the limitations you selected. In this case, the user will have to enter a 4-digits security
password, then press ENTER button (password 1369).
18
Page 20

DVD BASIC OPERATION
IMPORTANT NOTE S:
• A symbol will appear at the upper right corner on the TV screen during operation if you try to
access a function that is not available on the disc.
• Some discs may take a few seconds to load.
• Always hold the disc without touching either of its surfaces. When inserting a disc, position
it with the printed title side facing up, align it with the guides and place it in its proper position.
• It is important that you read the manual that accompanies the DVD disc as there are features
that are on this DVD player that cannot be used with certain DVDs. There are also extra
features that are different for each DVD disc, so they are not explained in this owner’s manual.
PLAYBA CK OF A DVD
1. Press “TV/AV/DVD” button on the unit or press the TV/DVD direct key on the remote handset
to turn ON DVD.
2. Press the OPEN/CLOSE ( ) button to open the disc tray. Insert a disc with the label side facing
up on the disc tray.
3. Press the OPEN/CLOSE ( ) button to close the disc tra y. After loading, the menu screen of the
DVD should appear. Use the Navigation ( , , , ) buttons o select the desired option and the
PLAY/ENTER button to select it; playback will start immediately.
4. To stop playback, press the STOP ( ) button. Because the unit will remember where you
stopped, simply press the PLAY/ENTER button to resume playback where you left off. If the
STOP ( ) button is pressed twice, the unit will stop completely.
NOTES:
• If a MENU appears on the TV screen, press the Navigation ( , , , ) buttons to select the
desired option/item, then press the PLAY/ENTER button. Please make sure to refer to the disc’s
jacket or case for additional information.
• Resuming playback may not work on all discs.
ENGLISH
CHAPTER SEARCH
Use this feature to directly go to a specific chapter.
Press the DISPLAY button twice, followed by the Number buttons (i.e. for number 12, press “1”,
“2”) to directly go to a chapter; playback will start immediately.
DVD MENU
Press the MEN U button, and the Main Menu of the disc will appear. Use the Navigation ( , , , )
buttons to select the desired option, and then press th e PLAY/ENTER button. This is not available
on all discs.
19
Page 21

DVD BA SIC OPE RATION(CONTINU ED)
SKIP
Press the SKIP ( ) button to advance the DVD to the beginning of the next chapter.
Press the SKIP ( ) button to move the DVD to the beginning of the previous chapters.
SEARCH
During playback, press either the SEARCH ( ) button or SEARCH ( ) button to move th e DVD
forward or backward at double (x2) speed to locate a specific section. Repeatedly press these
buttons and the speed will increase to x4, x8, x16 and resume normal playback.
The DVD will move forward or backward at high speed until the PLAY/ENTER button is pressed
again; normal playback will resume at that point.
DISPLAY
While playing a DVD, press the DISPLAY button once to view the title, elapsed title time and
remaining title time. Press a second time to view the chapter, elapsed chapter time and remain ing
chapter time. Press a third time to view the layer setting (“L0” for layer 0, “L1” for layer 1). Press
a fourth time to turn the display off.
PAUSE/STOP( / )
Press the PAUSE/STOP ( / ) button once to pause the picture. Press the PLAY/ENTER button
again to resume normal playback.
Press the PAUSE/STOP ( / ) button twice to stop the playback.Press the PLAY/ENTER button
again to start playback from the beginning.
SUBTITLE
Press the SUBTITLE button to change the subtitle language .
Note: Number of subtitle available de pends on the DVD disc.
LANGUAGE(AUDIO)
Press LANGUAGE button to change the Audio channel. Th is function is applicable for DVD and CD
audio but with different effects.
ZOOM
This function is applicable for DVD. user can enlarge a static picture or a moving picture by
pressing the ZOOM button. there are 3 levels of zooming(2x,3x and 4x) and they can be achieved
one by one through subseqient key press on the zoom key.
Note: user can select the portion of the picture to be enlarged by using the direction button
( , , , )
20
Page 22

CD BASIC OPE RATION
PLAYBA CK OF A CD
1. Press “TV/AV/DVD” button on the unit or press the TV/DVD direct key on the remote handset
to turn ON DVD.
2. Press the OPEN/CLOSE button to open the disc tray. Insert a disc with the label side facing
up on the disc tray.
3. Press the OPEN/CLOSE button to close the disc tray. After loading, playback will start
automa tically.
4. Press the STOP ( ) button on main unit or press PAUSE/STOP ( / ) button on remote control
twice to stop playback.
FORWARD( ) / REVERSE( )
1. Each press of the Search ( ) or ( ) button will increase the search as follows:
x 2 — > x 4 — > x 8 — > x16 — > Resume Normal Playback
2. Press the PLAY/ENTER button to resume normal playback.
DISPLAY
While playing a CD, press the DISPLAY button once to view the track, elapsed track time and
remaining track time. Press a second time to view the di sc elapsed time and remaining time. Press
a third time to turn the display off.
ENGLISH
SELECTING TRACKS USING THE NUMBE R BUTTONS
Press the Number buttons corresponding to the track number you would like to play, and the unit
will playback the desired track automatically.
SELECTING TRACKS USING THE SKIP BUTTONS
During playback, press the SKIP( ) or ( ) button to select a track to be played.
21
Page 23
PICTURE CD OPERATION
PLAYBA CK OF A PICTURE CD
1. Press “TV/AV/DVD” button on the unit or press the TV/DVD direct key on the remote handset
to turn DVD.
2. Press the Open/Close button to open the disc tray. Insert a picture CD with the label side facing
up on the disc tray.
3. Press the OPEN /CLOSE button to close the disc tray. After loading, the F OLDER/PIC TURE menu
will appear on the TV screen . Press the Navigation ( , ) buttons to select the desired folder/
track.
4. Press the PLAY/ENTER button to confirm. Press the Navigation ( , ) buttons to select the
desired picture; the image preview of the picture will appear in the image preview area. Press
the PLAY/ENTER button to play the picture. You can also use the number button to enter a 3 digit number to select the desired picture, playback will start automatically. Press the
STOP ( ) button on main unit or press PAUSE/STOP ( / ) button on remote control twice to
stop playback.
5. To select other folders, press Navigation ( , ) button to select “- -” followed by press the
PLAY/ENTER button to go back to select the folders and use the Navigation ( , ) button to
select the desired folder again.
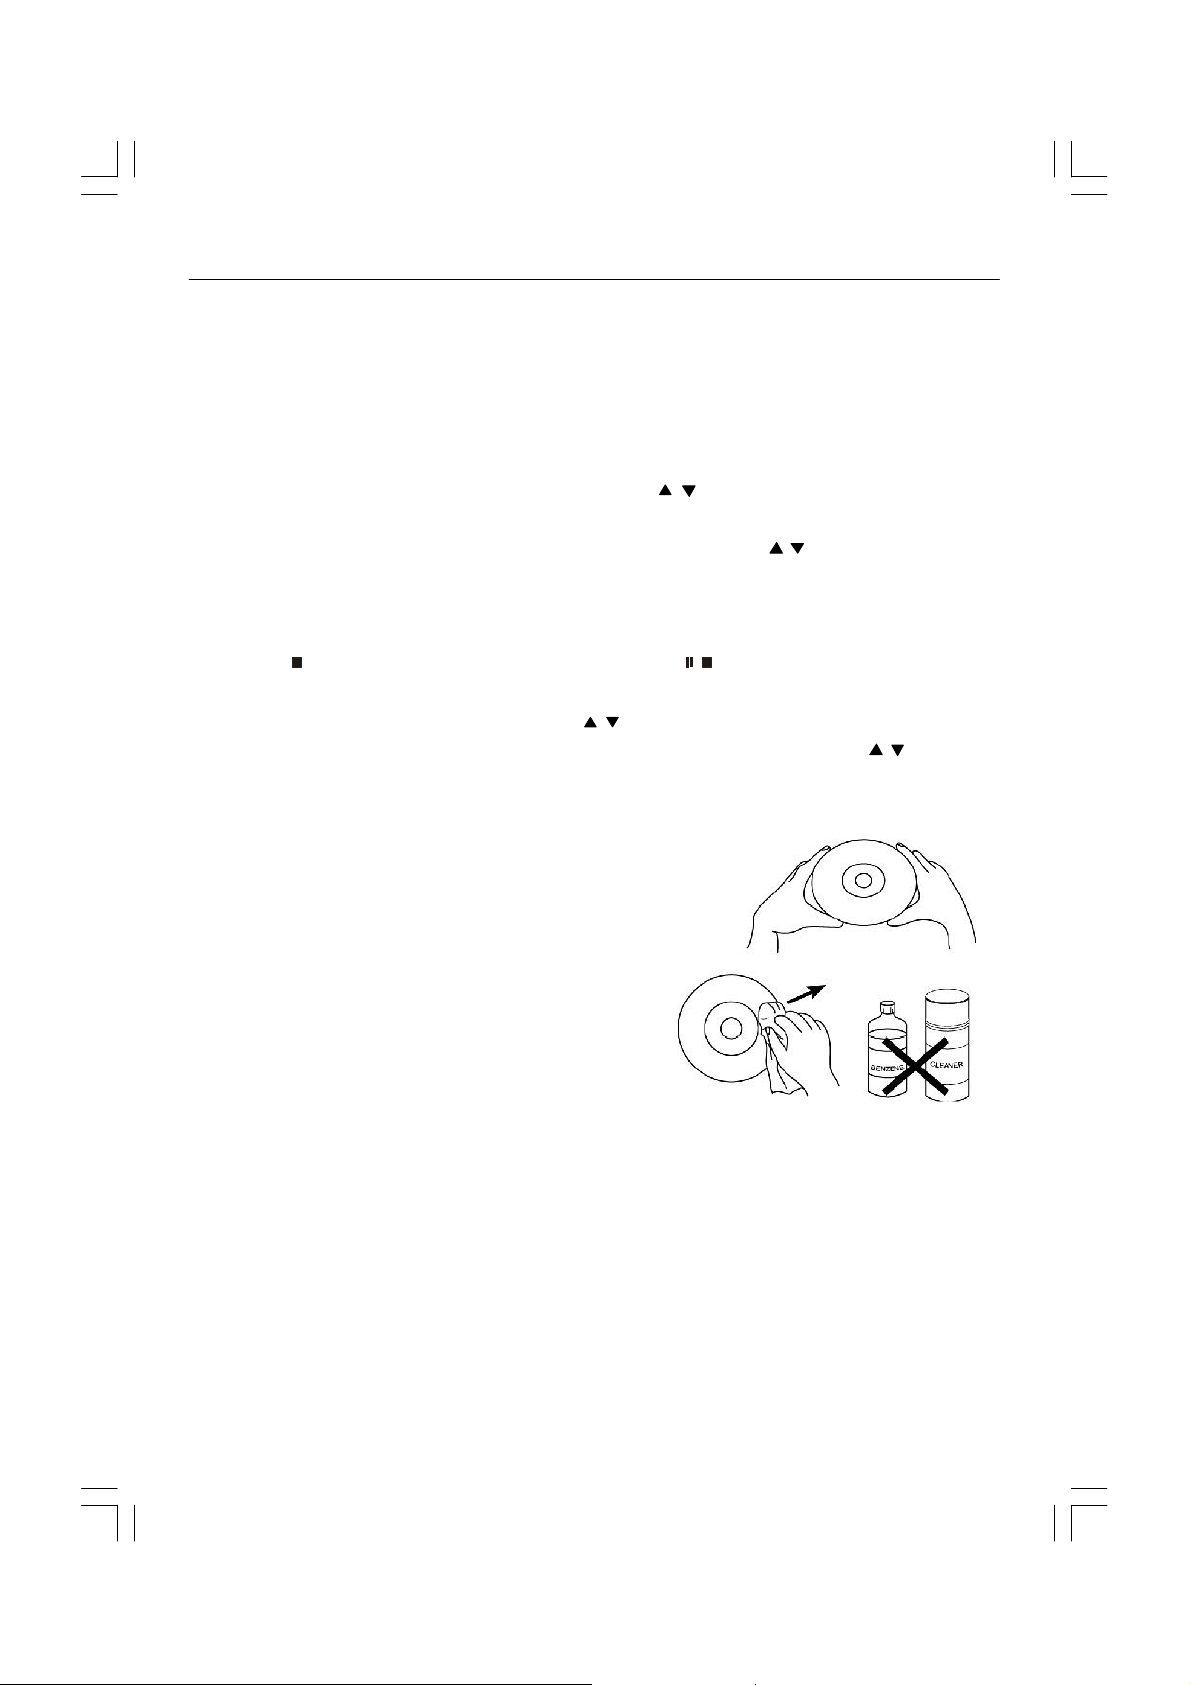
Caring for Discs
• Treat the disc carefully. Handle the disc only by
its edges. Never allow your fingers to come in
contact with the shiny, unprinted side of the disc.
• Do n ot attach adhesive tape, stickers, etc. to the
disc label.
• Clean the disc periodically with a soft, lint-free,
dry cloth. Never use detergents or abrasive
cleaners to clean the disc. If necessary, use a
CD cleaning kit.
• If a disc skips or gets stu ck on a section of the disc, it is probably dirty or damaged (scratched).
• When cleaning the disc, wipe in straight lines from the center of the disc to the outer edge of
the disc. Never wipe in circular motions.
• Discs should be stored in their cases after each use to avoid damage.
• Do not expose discs to direct sunlight, high humidity, high temperatures or dust, etc.
Prolonged exposure or extreme temperatures can warp the disc.
• Do not stick or write anything on either side of the disc. Sharp writing instruments, or the
ink, may damage the surface.
22
Page 24
ABOUT DISCS
The region number for this DVD Player is :
See the following page for information regarding region numbers.
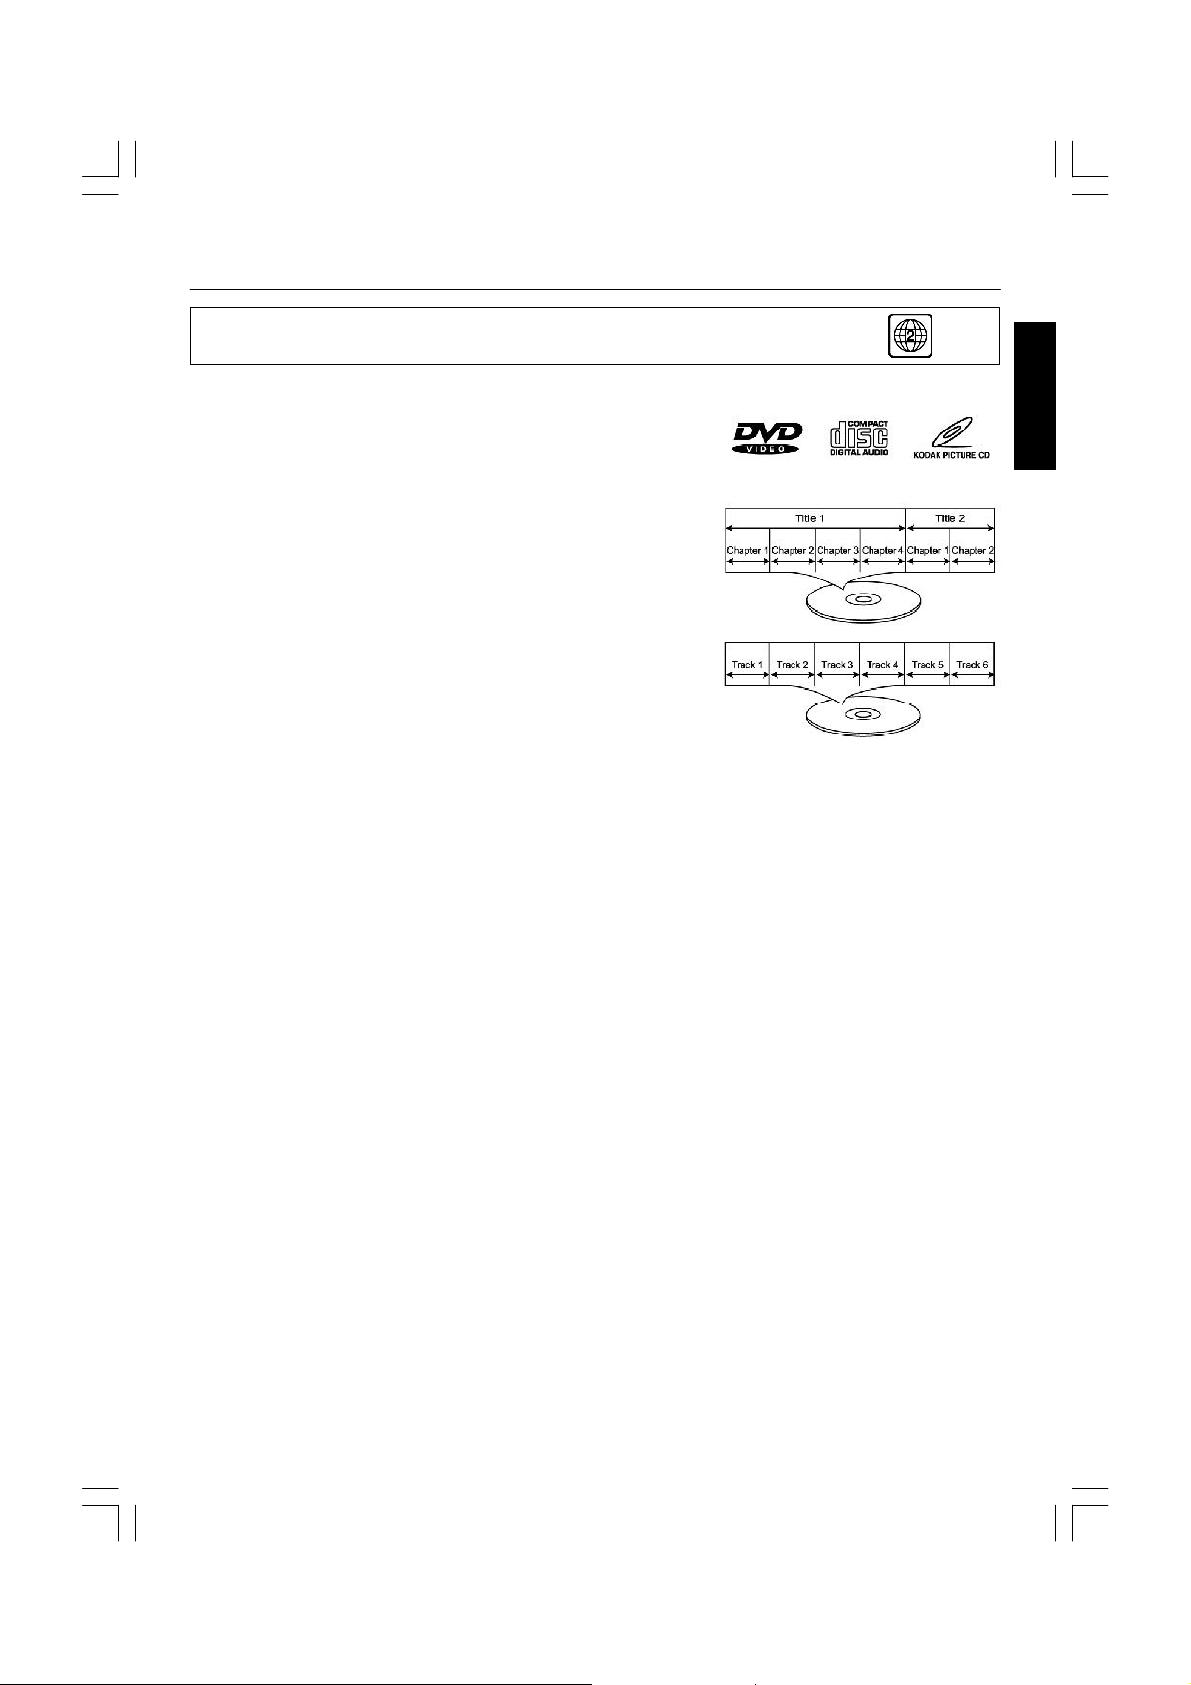
PLAY ABLE DISCS:
The following discs can be played back on this DVD player:
DISC TYPES:
DVD
Data on most DVDs is divided into sections called “titles”
and then into subsections called “chapters”, each of which
is given a title or chapter number. Some features of this
DVD player will not operate with some DVD discs as they
are preset. If a function you selected does not run as
desired, refer to the manual accompanying the DVD disc.
AUIDO CD
Data on an audio CD is divided into sections called
“tracks”, each of which is given a track number.
IMPORTANT:
It is important that you read the manual that accompanies the DVD discs, as there are features
that are on the DVD player that cannot be used with certain D VDs. There are also extra features on
the DV D disc that are different for each DVD disc, so they are not explained in this owner’s manual.
This player conforms to the NTSC and PAL color systems. However, if you are in the
USA, leave this setting on NTSC. If incorrectly set to PAL, the TV picture will roll
vertically. In this case, simply turn the DVD off, and then back on.
Notes on Copyright:
It is forbidden by law to copy, broadcast, show, broadcast on cable, play in public and rent
copyrighted material without permission. DVD video discs are copy protected, and any recordings
made from these discs will be distorted. This product incorporates copyright protection technology that is protected by method claims of certai n U.S. patents and other intellectual property rights
owners. Use of this copyright protection technology must be au thorized by Macrovisi on Corporati on,
and is intended for home and other limited viewing uses only unless otherwise authorized by
Macrovision Corporation. Reverse engineering or disassembly is prohibited.
Region Management Information:
This DVD Player is designed and manufactu red to respond to the Region Management Information
that is recorded on a DVD disc. If the Region number described on the DVD disc does not correspond to the Region number of this DVD player, this DVD player cannot play that disc. Y ou may not
be able to play back some DVD video on this player if they are purchased from outside your
geographic area or made for business purposes. When you try to playback an unauthorized
disc, “Region Error” appears on the TV screen.
ENGLISH
23
Page 25

TROUBLESHOOTING
Your television is designed to give you trouble-free performance for many years. If you have
a problem with your TV, try the solutions listed below.
There is no picture or sound, or the TV doesn’t turn on.
• Make sure the TV is plugged in.
• Make sure the MUTE is not set.
• Make sure the POWER is on.
• Make sure a headphone is not inserted.
• If there is neither picture nor sound, unplug the TV for 30 seconds, then plug it in and try
again.
There is no picture or sound on some UHF channels.
• Try another station. If the other stations are OK, it may be a station problem.
• Check that the antenna is connected & adjusted correctly, in good working order and has
no broken wires.
• See if anything is interfering with the antenna signal.
• Make sure the AIR/CABLE setting is correct.
The sound is OK, but the picture is poor.
• Try another station. If the other stations are OK, it may be a station problem.
• Check that the antenna is connected & adjusted correctly, in good working order and has
no broken wires.
There is poor reception on some channels.
• Try another station. If the other stations are OK, it may be a station problem.
• Check that the antenna is connected & adjusted correctly, in good working order and has
no broken wires.
Cannot tune to a cable channel.
• Make sure the AIR/CABLE setting is correct.
• The channel may not be programmed into memory.
The picture rolls, slants, shows lines, is grainy, has poor color, or has ghosts.
• Try another station. If the other stations are OK, it may be a station problem.
• Check that the antenna is connected & adjusted correctly, in good working order and has
no broken wires.
• See if anything is interfering with the antenna signal.
The remote control does not work.
• Make sure the TV is plugged in.
• Make sure there are fresh batteries in the remote control.
• Make sure there is nothing blocking the remote control signal.
24
Page 26

CARE & MAIN TENANCE
This television receiver represents a fine example of electronic engineering and construction.
As such it should be treated with care. We offer the following suggestions so you will enjoy this
product for the years to come.
Keep it dry. If water should get on it, wipe if off
immediately. Water contains minerals that can
corrode electronic circuits.
Do not store in hot areas. High temperatures can
shorten the life of electronic devices, damage
batteries, and can even distort or melt certain plastics.
Do not drop your product. This will likely result in
failure to operate. Circuit boards can crack and the
cases may not survive the impact. Handling your
product roughly will shorten its useful life.
Do not use or store in areas of high level of dirt or
dust. The electronic parts may be contaminated or
will wear prematurely.
ENGLISH
Do not use harsh chemicals or strong cleaning
solvents to clean your unit. You need only wipe
it with a slightly moist, never wet cloth.
Always make sure any batteries used are fresh and
are of the correct type. Old or almost-dead batteries
are also dangerous.
A worn out battery can leak chemicals which will
damage the electronic circuits.
25
Page 27

SPECIFICATIONS
TV SECTION
Receiving Channels
VHF
L
VHF
H
UHF CH 21- 69
Tuner Type 250 Channel , VS TUNING
DVD SECTION
Laser Wave length 655nm
Laser power : Class 1
Signal System PAL/NTSC output
Digital audio output Coaxial digital output; pin jack
Headphone Stereo in DVD mode
GENERAL SECTION
AC Power Input AC 220-240V~ 50 Hz
AC Power Consumption 74W
Speaker 3” 78mm 8oh m x 2
Audio Output 1.5 W + 1.5 W
Dimensions L488 x W444 x H435 (mm_
Net Weight 11.9 kg
CH 2 - 4
CH 5 - 12
Mono in TV mode
v Design and specifications are subject to change without notice.
It is not a toy and not for children under 8 years old
26
Page 28

PRECAUCI ÓN
RIESGO DE ELECTROCUCIÓ N
NO ABRIR
ADVERTENCIA: PARA REDUCIR EL RIESGO DE ELEC TROCUCIÓ N, NO ABRA EL CHASIS.
NO HAY COMPONENTES ÚTILES PARA EL USUARIO EN EL INTERIOR DE LA UNIDAD,
ACUDA A PERSONAL TÉ CNICO CUALIFICADO.
Los símbolos gráficos situado en la parte trasera significan lo siguiente:
El relámpago con punta de flecha dentro de un triángulo equilátero advierte
al usuario de la presencia de “volta je peligroso” no aislado dentro del
chasis del producto, que puede ser de la magnitud suficiente para
presentar un riesgo de electrocución a personas.
El punto de exclama ción dentro de un triángulo equilatero advierte al usuario
sobre la importancia de utilizar y mantener esta unidad de acuerdo con
estas instrucciones de uso.
ATE NCIÓ N:
• Para evitar riesgos de incendio o electrocución, no exponga este aparato a la
lluvia o humedad.
• El aparato no debe exponerse al goteo o salpicaduras, tampoco deben colocarse
sobre el equipo objetos con líquidos, como jarrones.
• El enchuf e de corriente se usa como dispositivo de desconexión, el dispositivo
de desconexión seguirá listo para el uso.
• Para desconectar el aparato de la toma por completo, el enchufe debe
desconectarse totalmente de la corriente.
INSTALACIÓ N
EMPLACE el receptor en la habitación y evite que los rayos directos solares apunten
directamente a la pantalla. La oscuridad total o reflejos en la imagen de la pantalla pueden
provocar vista cansada. Se recomienda una iluminación indirecta y suave para un visionado
más comodo.
ASEGÚRESE de que hay espacio suficiente entre el receptor y la pared para permitir una
ventilación apropiada.
EVITE lugares demasiado calurosos para prevenir posibles daños en la unidad o fallos en los
componentes.
CONEXIÓ N
Este receptor de TV se puede conectar a CA: 220-240V~ 50Hz .
Page 29

LIMPIEZA AUTOMÁ TICA (DEGAUSSING)
Todos los receptores de televisión a color son sensibles a las influencias mágneticas,
normalmente provocadas por el movimiento del receptor de un lado a otro o al utilizar
componentes electrónicos cerca del receptor. Este magnetismo residual, en ocasiones puede
causar distorsiones y puede llevar a aumentar las zonas con manchas de color en la imagen.
Para evitar este efecto el receptor incorpora un circuito automático de limpieza automática o
degaussing que funciona inmediatamente durante un corto período cada vez que el receptor
cambia o se utiliza el interruptor de la red de suministro. El circuito elimina cualquier tipo de
magnetismo residual en las partes metálicas del tubo de la imagen y por lo tanto asegura una
imagen de mayor calidad. Si cambia el emplazamiento de la unidad, el interruptor de red de
suministro debe apagarse al menos 10 minutos para que la función de limpieza automática
funcione correctamente.
ADVERTENCIA
No maneje indebidamente ninguno de los componentes internos de la unidad o lleve a cabo
cualquier otro ajuste que no se mencione en este manual. Todos los receptores de televisión
son dispositivos de alto voltaje.En caso de qu e el TUBO DE IMAGEN se rompa, éste expulsará
fragmentos de cristal de forma violenta. Debe evitar transportarlo, arañar o presionar de forma
indebida ya que esto podría ser peligroso. Cuando limpie la suciedad, introduzca un objeto o
caigan gotas de agua sobre la PARTE FRONTAL DEL TUBO DE LA IMAGEN, deberá
desenchufar el cable de corriente y a continuación limpiar el receptor con una gamuza suave y
seca. La limpieza interior deberá llevarse a cabo por personal técnico cualificado.
PELIGRO
Radiación láser invisible cuando
está abierto y los bloqueos
han fallado o se han forzado. Evite
la exposición directa al láser.
2
SEGURIDAD LÁSER
Esta unidad usa un rayo láser óptico en el mecanismo CD,
disenado con protecciones integradas. No intente desmontarlo;
diríjalo a personal de servicio cualificado.
La exposición a este rayo láser de luz invisible puede ser perjudicial
para el ojo humano.
PRODUCTO LÁSER DE CLASE 1. EL USO DE CONTROLES,
AJUSTES O REALIZACIÓ N DE PROCEDIMIENTOS
DISTINTOS A LOS AQUí ESPECIFICADOS PUEDE
RESULTAR EN UNA EXPOSICIÓ N PELIGROSA A LUZ
LÁSER.
Page 30

PRODUCTO LÁ SER
CLASE 1
Fabricado bajo la licencia de Dolby Laboratories “Dolby”, ”Pro Logic” y el símbolo doble-D son
marcas registradas de Dolby Laboratories. Obras confidenciales sin publicar.© 1992-1997
Dolby Laboratories,lnc. Todos los derechos reservados.
Este producto incorpora una tecnología de protección de copyright que está protegida
por patentes de EE.UU y otros propietarios de los derechos de la propiedad intelectual.
Si desea utilizar esta tecnología de protección de copyright, debe ser autorizado por
Macrovision Corporation, y está reservado al uso doméstico y otros visionados
limitados a menos que haya sido autorizado por Macrovision Corporation. Está
prohibida la ingeniería inversa o el desmontaje.
Instrucciones sobre la protección del medio ambiente
No deseche este producto en la basura doméstica cuando éste ya no sirva,
deséchelo en un punto de recogida de dispositivos electrónicos o eléctricos. El
símbolo en este producto, las instrucciones de uso o el embalaje le informarán
sobre como desechar la unidad.
Los materiales como se mencionan con su símbolo son reciclables. Si desecha
materiales reciclables u otros materiales que pueden ser reutilizables, estará
aportando una importante contribucción a la protección del medio ambiente.
Acuda al centro comunitatio para el emplazamiento autorizado de desechos.
ESPAÑOL
3
Page 31

LOCALIZACIÓ N DE LOS CONTROLES
1. Botón de TV/AV/DVD
2. Botón de Menú
3. Botón de volumen +/-
4. Botó n de canal Arriba/Abajo
5. Botón de Reproducción
6. Botón de Stop
7. Botón de Expulsión
8. Botón de Corriente
9. Bandeja de DVD
10. Entrada frontal (AV 2) de Audio (D)
11. Entrada frontal (AV 2) de Audio (I)
12. Entrada frontal (AV 2) de Video
13. Toma de entrada de Auriculares
14. Sensor del Mando a distancia
15. Altavoces
16. Ranura para antena de 75 ohm
17. Entrada euroconector (AV 1)
18. Ranura salida de audio Digital (sólo
para DVD)
4
Page 32

1. Inserte los agujeros
2. Empuje hacia la dirección.
ESPAÑOL
5
Page 33

MANDO A DISTANCIA
1. Botón de Corriente ( )
2. Botón de TV/DVD
3. Botón de ENTRADA
4. Botones Numéricos (0-9)
5. Botón de Silencio ( )
6. Botón de Navegación ( , , , )/
Botón de Búsqueda ( , )
7. Botón de Canal + ( )
8. Botón de Canal – ( )
9. Botón de Configuración ( )
10. Botón de Abrir/Cerrar ( )
11. Botón de Pausa/Stop (<)
6
12. Botón de Idioma ( )
13. Botón de Pantalla ( )
14. Botón de Subtítulos ( )
15. Botón de Programación de dos o
tres dígitos
16. Botón de MENÚ de DVD
17. Botón de Menú ( )
18. Botón de Intro Reproducción
19. Botón de Volumen + ( +)
20. Botón de Volumen – ( -)
21. Botón de Salto (:)
22. Botón de Salto (9)
23. Botón de Zoom ( )
Page 34

MANDO A DIST ANCIA
Antes de utilizar el mando a distancia se deben insertar las baterías
CÓ MO INSTALAR LAS BATERÍAS
1. Afloje el tornillo para abrir la
cubierta del compartimento de las
baterías.
2. Inserte dos baterías (2) ¨AAA¨ (no
incluidas) en cada mando a
distancia, preste especial atención
al diagrama de polaridad del
compartimento de las baterías.
3. Apriete la cubierta del
compartimento de las baterías
ADVERTENCIA :
1. Sólo los adultos deben substituir las baterías.
2. No mezcle baterías viejas o gastadas con las nuevas.
3. No mezcle baterías alcalin as, estándar (carbono-zinc) o recargables (níquel-cadmio)
.
4. Utilice únicamente baterías nuevas del tamaño requerido y el tipo recomendado.
5. Deseche apropiadamente las baterías, no las queme ni entierre.
6. Si no va a utilizar la un idad durante un largo período, quite las baterías. Las baterías
pueden perder substancias químicas que pueden dañar los componenetes
electrónicos.
7. Subtituya las baterías cuando éstas dejen de funcionar apropiadamente.
8. Para evitar daños causados por pérdidas de los fluidos de las baterías, cambie las
baterías cada dos años a no ser que la unidad se haya estado utilizando durante ese
período.
9. Las baterías ya gastadas pueden provocar daños en la unidad y anularán la garantía.
10. Asegúrese de que las baterías se h an insertado de acuerdo con el diagrama de
polaridad, el emplazamiento inadecuado de las baterias podría provocar daños en la
unidad.
ESPAÑOL
7
Page 35

FUNCIONAMIENTO DEL RECEPTOR DE TELEVISIÓ N
Conecte la antena de TV a la entrada de antena situada en la parte trasera de la TV.
Pulse el botón de encendido principal y el indicador de energía se iluminará. Tras unos
segundos la pantalla de TV se encenderá.
Si en la pantalla aparece niebla, deberá sintonizar la TV en
uno de los canales disponibles en la zona donde se encuentra.
Configuración de los canales de TV en la memoria
(Nota: la configuración sólo puede realizarse en Modo
TV)
1.SINTONIZACIÓ N
• Pulse el botón MENÚ ( ) cuatro veces para seleccionar el
modo SINTONIZACIÓ N, como aparece en la Figura 1.
• Pu lse el botón “ +/-” para sel eccionar SON IDO y a
continuación pulse “ +/-” para seleccionar el sistema
de sonido que desee, BG o L.
BÚ SQUEDA AUTOMÁ TICA
• Pu lse “ +/-” para seleccionar AUTO SEARCH
(BÚSQUEDA AUTOMÁTICA), co mo aparece en la
Figura 2.
• Pul se el botón “ +/-” para iniciar la búsqueda
automática de VHF y UHF. Los canales de TV se irán
almacenan do automáticamente en la memoria, tal y
como se muestra en la Figura 3.
SINTONIZACIÓ N
BÚSQUEDA AUTOMÁTICA
BÚSQUEDA
BANDA VHF-L
MELODÍA BUENA
COLOR AUTO
SONIDO L
SALTO APAGADO
PROGRAMA 1
FIG.1
SINTONIZACIÓ N
BÚSQUEDA AUTOMÁTICA
BÚSQUEDA
BANDA VHF-L
MELODÍA BUENA
COLOR AUTO
SONIDO L
SALTO APAGADO
PROGRAMA 1
FIG.2
• Tra s completarse la búsqueda, el equipo se sintonizará
en el canal más bajo y su número aparecerá en la
pantalla.
• Si desea detener la función de búsqueda automática,
pulse el botón MENÚ ( ).
8
BÚ SQUEDA AUTOMÁTICA
VHF-L
-|||||||||| +
FIG.3
Page 36

FUNCIONAMIENTO DE LA TELEVISIÓ N
BÚ SQUEDA (MANUAL)
1) Pulse “ +/-” para seleccionar PROGRAM (CANAL).
y a continaución use “ +/-” o los botones numéricos
para seleccionar el canal deseado.
2) Pulse “ +/-” para seleccionar BANDA y a continuación
pulse “ +/-” para seleccionar VHF-L,VHF-H o UHF.
3) Pulse “ +/-” para seleccionar COLOR y a continuación
pulse “ +/-” para seleccionar el sistema de color qu e
SINTONIZACIÓ N
BÚSQUEDA AUTOMÁTICA
BÚSQUEDA
BANDA VHF-L
MELODÍA BUENA
COLOR AUTO
SONIDO L
SALTO APAGADO
PROGRAM 1
FIG.4
desee de entre AUTO,PAL, N3.58, N4.43 y SECAM.
4) Pulse “ +/-” para seleccion ar SONIDO y a continuación
BÚ SQUEDA
“ +/-” para seleccionar el sistema de sonido que desee
entre BG y L.
5) Pulse “ +/-” para seleccionar BÚ SQU EDA
VHF-L
-|||||||||| +
y a continuación pulse “ +/-” para iniciar la búsqueda
de canales. La pantalla mostrará el proceso de sintonización.
FIG.5
Cuando localice el primer canal recibido, el proceso de
sintonización se detentrá y dicho canal se almacenará automáticamente. Repita los pasos 1
al 4 para buscar el siguiente canal, tal y como se muestra en las Figuras 4 y 5.
• Para deten er la búsqueda manual pulse MENÚ ( ).
ESPAÑOL
Notas:
• Si se han almacenado canales fantasma o con ruido al utilizar el método de BÚSQUEDA
AUTOMÁTICA, éstos pueden elimin arse de la lista. Para ello, entre en el modo SALTO en el
menú TUNE y pulse “ +/-” para cambiar el estado de OFF a ON. Pulse el botón MENÚ ( )
para volver a la visulalización normal. Cuando cambie de canal de TV se eliminará el canal no
deseado de la lista.
• El canal desechado puede restaurarse entrando en el menú TUNE y cambiando el estado del
modo SKIP a OFF.
• Para salir del modo T UNE, pulse el botón MEN Ú ( ).
9
Page 37

FUNCIONAMIENTO DE LA TELEVISIÓ N
2. IMAGEN
• Pu lse MENÚ ( ) para seleccionar el modo IMAGEN,
como se muestra en la Figura 6.
• Pu lse “ +/-” para seleccionar BRILLO, COLOR,
CONTRASTE, N ITIDEZ o SATURACIÓN.
• Pu lse “ +/-” para ajustar el nivel de 0 a 63.
• El elemento HUE funciona únicamente con el sistema NTSC,
y puede configurarse “-31” y “+31”.
• Para salir del modo IMAGEN pulse MENÚ ( ) cinco veces.
3. SONIDO
• Pu lse MENÚ ( ) dos veces para seleccionar el SON IDO,
como se muestra en la Figura 7.
• Pul se “ +/-” para ajustar el volumen entre 0 y 63.
• Para salir del modo SONIDO pulse MEN Ú ( ) cuatro veces.
4. CONFIGURACIÓ N
IDIOMA
• Pul se MENÚ ( ) tres veces para seleccionar el modo
CONFIGURACIÓ N, como se muestra en la Figura 8.
• Presio ne el botón de “ +/-” para seleccionar el IDIOMA.
A continuación, presione el botón de “ +/-” para seleccionar
el idioma desea do:ESPAÑOL, INGLÉS, HOLANDÉS, ITALIANO,
ALEMÁN, FRANCÉS, PORTUGUES.
FONDO AZUL
• Pu lse “ +/-” para seleccionarFONDO AZUL y “ +/-” para
activar o desactivar dicha función.
• Para salir d el modo CONFIGURACIÓ N pulse MEN Ú ( )
tres veces.
IMAGEN
BRILLO 32
COLOR 32
CONTRASTE 32
NITIDEZ 32
SATURACIÓ N. 0
FIG.6
SONIDO
VOLUMEN 10
FIG.7
CONFIGURACIÓ N
IDIOMA INGLÉS
FONDO AZUL ACTIVAR
FIG.8
10
Page 38

FUNCIONAMIENTO DEL RECEPTOR DE TELEVISIÓ N
5. INTERCAMBIO DE CANALES
Una vez almacenados los canales de TV mediante la búsqueda manual o automática, la
posición de cada uno
de ellos puede modificarse de la siguiente manera:
• Pulse MENÚ ( ) cinco veces para seleccionar el modo
INTERCAMBIO DE CANALES, tal y como se muestra en l
a Figura 9.
• Pu lse “ +/-” para seleccionar PROG I (CANAL 1) y a
continuación pulse “ +/-” o un botón numérico para
seleccionar el número del canal que desea cambiar.
• Pu lse “ +/-” para seleccionar PROG II (CANAL 2) y a
continuación pulse “ +/-” o un botón numérico para seleccionar el número del segundo
canal que desea cambiar.
• Pul se “ +/-” para seleccionar INTERCAMBIO y a continuación pulse “ +/-”. Las posiciones
de PROG I y de PROG II se in tercambiarán.
• Para salir del modo PROG. INTERCAMBIO pulse MENÚ ( ).
SELECCIÓ N DEL CANAL Y C ONTROL DEL VOLUMEN
1) Pulse “ +/-” para seleccionar los canales de TV (sólo en modo TV).
INTERCAMBIO DE CANALES
CANAL 1 1
CANAL 2 5
INTERCAMBIO
FIG.9
0 249
ESPAÑOL
Pulse “ -” en la unidad principal. El número
del canal aparecerá en la esquina superior
derecha y cambiará al siguiente canal.
2) Pulse “ +/-” para ajustar el volumen.
Pulse “ +” en la unidad principal y
cambiará al canal anterior.
VOLUMEN.
-|||||||||| + 10
11
Page 39

FUNCIONAMIENTO DEL MANDO A DISTANCIA
CÓ MO SELECCIONAR UN CANAL DE TV:
• Boton es Canal siguiente (P+) y Canal anterior (P-).
Pulse “ + “ o “ -” para seleccionar el canal siguiente y el canal anterior, respectivamente.
• Boton es digitales 0-9.
Al seleccionar un canal de TV con los botones 0-9, el número del mismo aparecerá en la
esquina superior derecha de la pantalla en color verde.
Por ejemplo:
Pulse el botón “9” para seleccionar el canal 9.
• N úmero de canal de dos dígitos.
Para seleccionar un canal de TV entre “10” y “99”,
como por ejemplo el canal “12”:
* Pulse el botón “-/-- “, y la pantalla mostrará el símbolo “--”.
* Pulse el botón “1”, y la pantalla mostrará “1-”
* Pulse el botón “2”, y aparecerá el canal número “12”.
• N úmero de canal de tres dígitos.
Para seleccionar un canal de TV entre “100” y “249”, como por ejemplo el canal 123:
* Pulse “-/-- “ dos veces, y la pantalla mostrará el símbolo “--”.
* Pulse el botón “1”, y la pantalla mostrará “1--”.
* Pulse el botón “2”, y la pantalla mostrará “12-“.
* Pulse el botón “3”, y aparecerá el canal “123”.
Botón ENCENDIDO ( )
l Pulse este botón ( ) para encender y apagar el equipo.
Botón SILENCIO ( )
l Pulse este botón ( ) para desactivar el sonido. Púlselo de nuevo para reestablecerlo.
Botón ENTRADA
l Pulse este botón para seleccionar el modo VIDEO.
TV AV1 AV2
Púlselo de nuevo para volver al modo TV.
Botón TV/DVD
l Pulse este botón para seleccionar el modo DVD. Vu elva a pulsarlo para volver al modo TV
(tardará unos segundos en entrar en el modo DVD).
FUNCIÓ N DE APAGADO AUTOMÁTICO
l Cuando la TV se halle en modo TV o AV (vídeo) y no reciba ninguna señal durante 8
minutos, el equipo se apagará automáticamente (entrará en modo de reposo), con el fin de
ahorrar energía.
12
Page 40

FUNCIONAMIENTO DEL DVD
FUNCIONAMIENTO BÁ SICO
1. Presione el botón de “TV/A V/DVD” en la unidad o presione la tecla directa de TV/DVD en el
mando a distan cia para encender el DVD.
2. Presione el ABRIR/CERRAR ( ) para cargar el disco en la bandeja.
3. Presione ABRIR/CERRAR ( ) para cerrar la bandeja.
• Coja el disco sin tocar ninguna de sus superficies, insértelo con la cara de la parte impresa
cara arriba.
Reproducción de los discos
1. Presione el botón ABRIR/CERRAR ( ) en el panel frontal para cargar el disco en la bandeja.
La parte impresa debe aparecer con la cara del disco DVD hacia arriba.
2. Presione de Nuevo el botón de ABRIR/CERRAR ( ) para cerrar la bandeja, a continuación
se cargará el disco.
3. El disco se reproducirá automáticamente.
• Si es u n disco DVD, aparecerá la página de Título/Menú en la pantalla.
• Si es un disco CD, se reproducirá automáticamente.
4. Presione el botón de STOP, si quiere detener la reproducción del disco DVD, podrá volver a
la reproducción si presiona el botón de REPRODUCCIÓ N, la unidad comenzará la
reproducción desde el momento en que detuvo la reproducción (Volver Reproducción).
5. Presione dos veces el botón de STOP para detener completamente la reproducción y volver
al menú de inicio.
ESPAÑOL
CÓ MO ACCEDER A LOS MEN ÚS DE INICIO RÁPIDO
Para acceder a los menús de inicio rápido, que le permiten cambiar tres de los ajustes más
populares, siga las instrucciones que aparecen a continuación:
1. Mientras qu e el DVD está en modo STOP, presione el botón de CONFIGURACIÓ N para entrar
en el Menú de Configuración .
2. Presione el botón de REPRODUCCIÓ N /INTRO para seleccionar configuración Rápida ( ).
3. Continúe con los pasos 4-5 que aparecen en la siguiente sección.
MENÚ DE INICIO RÁ PIDO
CONFIGURACIÓ NRÁPIDA
MENÚ REPRODUCTOR INGLÉS
ASPECTO TV 4:3 BUZÓ N
< >
TYPO TV PAL
< >
DOLBY DIGITAL ENCENDIDO
13
Page 41

FUNCIONAMIENTO DEL DVD
CÓ M ACCEDER A LOS MENÚS P RINCIPALES:
Para acceder a los cuatro menús principales, lleve a cabo lo siguiente:
1. Mientras el reprod uctor de DVD está en modo Stop, presione el botón de CON FIGURACIÓ N
( ) para entrar en el Menú de Configuración.
2. Presione el Botón de Navegación ( ) para seleccionar los menús principales ( ), a
continua ción presione el botón de REPRODUCCIÓ N/INTRO.
3. Seleccione uno de los iconos de Configuración situados en la parte superior de la pantalla
utilizando los botones de Navegación ( , ), a continuación presione el botón de
REPRODUC CIÓN/INTRO para seleccionarlo.
4. Utilice los botones de Navegación ( , ) para seleccionar una de las opciones de
configuración , a continuación presione el botón de REPRODU CCIÓ N/INTRO para seleccionarlo
o bien cambiar la configuración. Si hay más opciones, utilice el botón de Navegación ( , )
para seleccionar la opción deseada y presione el botón de REPRODUCCIÓ N/INTRO para
confirmar.
5. Presione el botón de CONFIGURACIÓ N para salir de la configuración.
CÓ MO VOLVER AL MENÚ ANTERIOR,
Simplemente presione el botón de Navegación ( ) .
14
IDIOMA
IDIOMA AUDIO INGLÉ S
SUBTÍTULOS INGLÉS
MENÚ DISCO INGLÉS
< >
< >
MENÚ REPRODUCTOR INGLÉS
AUDIO
DRC ENCENDIDO
DOLBY DIGITAL ENCENDIDO
< >
MUESTREO DE BAJOS ENCENDIDO
< >
MENÚ PRINCIPAL
PANTALLA
ASPECTO TV 4:3 PAN&SCAN
< >
< >
Page 42

FUNCIONAMIENTO DEL DVD
MENÚ DE INICIO RÁ PIDO
Siga los pasos descritos en la página 14 para acceder al menú QUICK START y seleccione o
cambie las opciones de configuraicón como se describe en la página 15.
MENÚ DEL REPRODUCTOR
Seleccione MEN Ú DEL REPRODU CTOR para
escoger el idioma que desee (inglés, francés,
español, alemán, italiano, portugués u holandes).
< >
APARIENCIA DE LA TV
Seleccione el ancho 4:3 PS (Panscan), 4:3 Letterbox
o 16:9. Para más información vaya a la página 17
< >
CONFIGURACIÓ N RÁPIDA
MENÚ DEL REPRODUCTOR INGLÉS
ASPECTO TV 4:3 BUZÓ N
TYPO TV PAL
< >
DOLBY DIGITAL ENCENDIDO
CONFIGURACIÓ N RÁPIDA
MENÚ DEL REPRODUCTOR INGLÉS
ASPECTO TV 4:3 BUZÓ N
TYPO TV PAL
< >
DOLBY DIGITAL ENCENDIDO
ESPAÑOL
TIPO DE TV
Seleccione TV TYPE para escoger el sistema PAL
o NTSC, según lo desee.
OPCIÓ N DOLBY DIGITAL
Cuando use la salida digital coaxial, seleccione ON
para activar la función Dolby Digital y OFF, para
desactivarla.
CONFIGURACIÓ N RÁPIDA
MENÚ DEL REPRODUCTOR INGLÉS
ASPECTO TV 4:3 BUZÓ N
< >
TYPO TV PAL
< >
DOLBY DIGITAL ENCENDIDO
CONFIGURACIÓ N RÁPIDA
MENÚ DEL REPRODUCTOR INGLÉS
ASPECTO TV 4:3 BUZÓ N
< >
TYPO TV PAL
< >
DOLBY DIGITAL ENCENDIDO
15
Page 43

FUNCIONAMIENTO DEL DVD
MENÚ DE CONFIGURACIÓ N DEL IDIOMA
Seleccione el icono idioma con los botones de Navegación ( , ), y use REPRODUCIR/
SELECCIONAR para seleccionar o cambiar la configuración de las opciones como se describe
en la página 16.
IDIOMA
IDIOMA D EL AUDIO
Seleccione el idioma del DVD.
El DVD deberá incluir el idioma seleccionado,
o de lo contrario se reproducirá el idioma
establecido por defecto.
IDIOMA DEL AUDIO INGLÉS
SUBTÍTULOS INGLÉS
MENÚ DEL DISCO INGLÉS
< >
< >
MENU DEL REPRODUCTOR INGLÉS
SUBTÍTULOS
Seleccione el idioma de los subtítulos. El DVD
deberá incluir el idioma seleccionado, o de lo
contrario se seleccionará el idioma establecido
por defecto. Seleccione OFF para desactivar los
subtítulos.
MENÚ DEL DIS CO
Seleccione el idioma del Menú del disco. Este
debe incluir el idioma seleccionado, o de lo
contrario se utilizará el idioma establecido
por defecto.
MENU DEL REPRODUCTOR
Seleccione el idioma del Menú del reproductor.
Los idiomas disponibles son inglés, francés,
español, alemán, italiano, portugués y holandés.
IDIOMA
IDIOMA DEL AUDIO INGLÉS
SUBTÍTULOS INGLÉS
MENÚ DEL DISCO INGLÉS
< >
< >
MENU DEL REPRODUCTOR INGLÉS
IDIOMA
IDIOMA DEL AUDIO INGLÉS
SUBTÍTULOS INGLÉS
MENÚ DEL DISCO INGLÉS
< >
< >
MENU DEL REPRODUCTOR INGLÉS
IDIOMA
IDIOMA DEL AUDIO INGLÉS
SUBTÍTULOS INGLÉS
MENÚ DEL DISCO INGLÉS
< >
< >
MENU DEL REPRODUCTOR INGLÉS
16
Page 44

FUNCIONAMIENTO DEL DVD
MENÚ DE CONFIGURACIÓ N DE LA PANTALLA
Seleccione el icono Display con los botones de Navegación ( , ) y seleccione o cambie la
configuración de las opciones como se muestra en la página 17.
APARIENCIA DE LA TV
4:3PS: Seleccione esta opción si la unidad está
conectada a una TV convencional.
Los archivos de vídeo con formato Pan Scan
se reproducen en esta modalidad (los
márgenes izquierdo y derecho aparecen
cortados).
4:3 LETTERBOX: Seleccione esta opción si la
unidad está conectada a una TV normal. Las
imágenes de pantalla panorámica aparecerán en
con una banda negra en la parte superior o inferior.
< >
PANTALLA
APARIENCIA DE LA TV
4:3 PAN&SCAN
< >
AUDIO
ESPAÑOL
ANCHO 16:9: Seleccione esta opción si la
unidad está conectada a una TV panorámica.
DRC ENCENDIDO
DOLBY DIGIT AL ENCENDIDO
< >
MUESTREO DE BAJOS ENCENDIDO
< >
MENÚ DE CONFIGURACIÓ N DEL AUD IO
Seleccione el icono Audio con los botones de
Navegación ( , ) y seleccione o cambie la
configuración de las opciones como se muestra
en la página 17.
DRC
Seleccione ON para activar el DRC (Dynamic Range
Compression, Compresión de rango dinámica) y OFF,
< >
AUDIO
DRC ENCENDIDO
DOLBY DIGITAL ENCENDIDO
MUESTREO DE BAJOS ENCENDIDO
< >
para desactivarlo. El DRC actuará comprimiendo el
rango dinámico de la pista de audio de DVD.
DOLBY DIGITAL Y MUESTREO DE BAJOS
Cuando utilice la salida digital coaxial, seleccione ON para activar la opción Dolby Digital y OFF,
para desactivarla.
De la misma manera, seleccione ON para acitvar Down Sampling y OFF, para desactivarla.
Cuando esta opción se encuentre activa, la salida digital muestreará a 48K, incluso si el audio
original codifica a 96K para el DVD.
17
Page 45

CONTROL PARENTA L
La opción de control parental permite a los padres evitar que los niños vean en el DVD material
inapropiado. Esta opción lee el nivel de programación, a continuación deniega el acceso a la
programación si el nivel de programación supera las restricciones que el usuario ha
seleccionado. En este caso, el usuario debe utilizar un código de seguridad de 4 dígitos, a
continuación deberá presionar el botón de INTRO (código 1369).
FUNCIONAMIENTO BÁ SICO DEL DVD
NOTAS IMPORTANTES:
• Si intenta acceder a una función que no se encuentra disponible en el disco, aparecerá un
símbolo en la esquina superior derecha de la pantalla del televisor.
• Es posible que algunos discos tarden unos segundos en cargarse.
• Coja el disco sin tocar ninguna de las dos caras y, al introducirlo, coloque la cara con el título
impreso mirando hacia arriba, alinéelo con las guías y colóquelo en la posición correcta.
• Es muy importante que lea el manual que se incluye con el disco, ya que algunas de las
características de este reproductor no son compatibles con determinados DVD. Además,
existen ciertas funciones adicionales que varían de unos discos a otros y que, por tanto, no
se explican en este manual de usuario.
CÓ MO REPRODUCIR U N DVD
1. Pulse el botón TV/AV/DVD en el equipo o bien en el mando a distancia para activar el modo
DVD.
2. Pulse el botón ABRIR/CERRAR ( ) para abrir la bandeja e inserte un disco con la cara
impresa mirando hacia arriba.
3. Pulse el botón ABRIR/CERRAR ( ) de nuevo para cerrar la bandeja. Cuando el disco se
haya cargado, aparecerá la pantalla del menú del DVD. Use los botones de Navegación
( , , , ) para escoger la opción que desee y pulse REPRODUCIR/ACEPTAR para
seleccionarla. La reproducción comenzará inmediatamente.
4. Para detener la reproducción, pulse DETENER (<). La unidad recordará dónde se detuvo la
reproducción, por lo que para reanudarla desde donde la dejó sólo tiene que pulsar
REPRODUCIR/ACEPTAR. Si pulsa DETEN ER dos veces, la unidad se detendrá por completo.
NOTAS:
• Cua ndo en la pantalla de TV aparezca un menú, pulse los botones de ( , , , ) para
seleccionar los elementos y opciones que desee y a continuación pulse REPRODUCIR/
ACEPTAR. Para más información consulte la carcasa del disco.
• Es posible que la opción de reanudar la reproducción no esté disponible en determinados
discos.
18
Page 46

FUNCIONAMIENTO BÁ SICO DEL DVD
BÚSQUEDA POR CAP ÍTULOS
Puede utilizar esta función para ir directamente a un capítulo determinado.
Pulse el botón MOSTRAR dos veces seguido de los botones Numéricos para ir directamente a
un determinado capítulo (por ejemplo: para el capítulo 12, pulse “1”, “2”). La reproducción se
iniciará inmediatamente.
EL MENÚ DEL DVD
Pulse el botón MENÚ y aparecerá en pantalla el Menú principal del disco. Use los los botones de
( , , , ) para seleccionar la opción que desee y a continuación pulse REPRODUCIR/
ACEPTAR. Esta opción no está disponible en algunos DVD.
FUNCIONAMIENTO BÁ SICO DEL DVD (CONTINU ACIÓ N)
SALTO
Pulse SALTO (:) para avanzar hasta el comienzo del siguiente capítulo.
Pulse SALTO (9) para retroceder hasta el comienzo del capítulo anterior.
BÚSQUEDA
Pulse los botones BÚSQUEDA (8) y BÚ SQUEDA (7) durante la reproducción para avanzar y
retroceder en el DVD a doble velocidad (x2) hasta una sección determinada. Vuelva a pulsar
estos botones repetidamente y la velocidad aumentará a x4, x8 y x16, para por último volver a
la velocidad de reproducción normal.
El avance o el retroceso rápidos continuarán hasta que vuelva a pulsar el botón REPRODUCIR/
ACEPTAR. Al hacerlo, volverá a la velocidad de reproducción normal.
ESPAÑOL
MOSTRAR
Durante la reproducción del DVD, pulse el botón MOSTRAR una sola vez para ver el títu lo, el
tiempo de reproducción y el tiempo restante. Vuelva a pulsarlo para ver el capítulo, el tiempo de
reproducción y el tiempo restante de dicho capítulo. Pulse una tercera vez para ver la
configuración de la capa (“L0” para la capa 0, “L1” para la capa 1). Por último, pulse una cuarta
vez para ocultar la función.
PAUSA /DETENER ( / )
Pulse PAUSA/DETENER ( / ) una sola vez para pausar la reproducción. Vuelva a pulsarlo
para reanudarla.. Pulse PAUSA/DETENER ( / ) dos veces para detener la reproducción. Pulse
REPRODUCIR/ACEPTAR para iniciar la reproducción desde el principio.
SUBTÍTULOS
Pulse el botón SUBTÍTULOS para cambiar el idioma de los subtítul os.
Nota: el número de idiomas disponible varía en fun ción de cada DVD.
19
Page 47

IDIOMA (AUDIO)
Pulse IDIOMA para cambiar el canal de au dio. Esta función es aplicable tanto en DVD como en
CD, aunque con diferentes efectos en cada uno de ellos.
ZOOM
Esta función es aplicable en DVD, y permite al usuario agrandar una imagen estática o en
movimiento al pulsar el botón ZOOM. Hay tres niveles de zoom disponibles (2x, 3x, y 4x), que
se obtienen pulsando dicho botón varias veces.
Nota: el usuario puede seleccionar el segmento de imagen que desea agrandar con los
botones de dirección ( , , , ).
REPRODUCCIÓ N DEL CD
1. Presione el botón de “TV/AV/DVD” en el mando a distancia para encender la unidad.
2. Presione el botón de ABRIR/CERRAR para abrir la bandeja del CD. Inserte u n disco en la
bandeja del disco. Introduzca el disco con la cara de la superficie impresa en la parte de
arriba.
3. Presione el botón de ABRIR/CERRAR para cerrar la bandeja de l disco. Tras cargarse, la
reproducción se iniciará de forma automática.
4. Presione el botón de Stop ( ) en la unidad principal o presione dos veces el botón de
PAUSA/STOP ( / ) en el mando a distancia para detener la reproducción.
ADELANTE( ) / A TRÁS ( )
1. Cada vez que presione el botón de Búsqueda ( ) o ( ) , éste aumentará la velocidad de
búsqueda como se muestra a continuación:
2x — > 4x — > 8x— > 16x — > Volver a Reproducción Normal
2. Presione el botón de REPRODUCCIÓ N/INTRO para volver a la reproducción normal.
PANTALLA
Cuando se esté reproduciendo un CD, presione una vez el botón de PANTALLA para ver la
pista, tiempo transcurrido, tiempo restante de la pista. Presione por segunda vez para ver el
tiempo restante y tiempo transcurrido del disco. Presione por tercera vez apagar la pantalla.
SELECCIÓ N DE PISTAS UTILIZANDO LOS BOTONES NUMÉRIC OS
Presione los botones numéricos correspondientes al número de la pista que desee reproducir,
la unidad reproducirá la pista elegida de forma automática.
SELECCIÓ N DE PISTAS UTILIZA NDO LOS BOTONES DE SA LTO
Durante la reproducción, presione el botón de SALTO ( ) o ( ) para seleccionar la pista que
desee reproducir.
20
Page 48

FUNCIONAMIENTO DEL CD DE IMÁ GENES
REPRODUCCIÓ N DE UN CD DE IMÁ GENES
1. Presione el botón de “TV/AV/DVD” en el mando a distancia para encender la unidad.
2. Presione el botón de Abrir/Cerrar compartimento de CD p ara abrir la bandeja del disco.
Inserte el CD de imágenes con la cara de la superficie impresa en la parte de arriba.
3. Presione el botón de Abrir/Cerrar compartimento de CD para cerrar la bandeja del disco. Tras
cargarse, el menú de CARPETA/ARCHIVO aparecerá en la pantalla de la TV. Presion e los
botones de Navegación ( , ) para seleccionar la carpeta/pista deseada.
4. Presione el botón de REPROD UCCIÓ N/INTRO para confirmar. Presione los botones de
Navegación ( , ) para seleccionar las imagen deseada, la vista de la imagen de la foto
aparecerá en el área de vista previa. Presione el botón de REPRODUCCIÓN/INTRO para
reproducir la imagen. También puede utilizar el botón numérico para insertar un número de 3
dígitos para seleccionar la imagen deseada, la reproducción comenzará de forma automática.
Presione el botón de STOP ( ) en la unidad principal o presione dos veces el botón de ( / ) en
el mando a distancia para detener la reproducción.
5. Para seleccionar otras carpetas, presione los botones de Navegación ( , ) para
seleccionar “- -” a continuación presione el botón de REPRODUCCIÓ N/INTRO para volver para
seleccionar las carpetas y utilice los botones de Navegación ( , ) para seleccionar de nuevo
la carpeta deseada.
ESPAÑOL
Cuidado de los Discos
• Trate e l disco cuidadosamente. Coja el disco por
los extremos. Nunca ponga los dedos en contacto
con la superficie del disco no impresa.
• No pegu e en el disco cinta adhesiva, pegatinas, etc.
• Limpie el disco de forma periódica, con una gamuza
suave, seca y limpia. Nunca utilice detergentes o
limpiadores abrasivos para limpiar le disco. Si es
necesario, utilice el kit de limpieza para CD.
• Si un disco salta o se bloquea en una sección del
disco, es probable que esté sucio o dañado (rayado)
• Cuando limpie el disco, límpielo del centro a la parte exterior de forma lineal, nunca en
movimientos circulares.
• Para evitar daños, los discos deberán de guardarse en las cubiertas despues de su uso.
• N o exponga los discos a rayos directos solares, alto nivel de humedad, altas temperatures o
polvo, etc. La exposición prolongada o las temperatures extremas pueden dañar el disco.
• N o pegue o escriba nada en ninguna de las caras del disco, no utilice instrumentos de
escritura afilados, o tinta, esto podría dañar la superficie.
21
Page 49

LOS DISCOS
El código regional de este reproductor de DVD es:
Para más información sobre los códigos regionales consulte la siguiente página.
DISCOS COMPATIBLES:
Los discos compatibles con este reproductor son los
siguientes:
TIPOS DE DISCOS:
DVD
En la mayoría de los DVD la información está dividida en
secciones llamadas títulos y en subsecciones denominadas
capítulos, todos ellos numerados. Algunas características
de este reproductor no funcionan en determinados DVD tal
y como están configuradas. En este caso, consulte el
manual del disco para más información.
CD DE AUDIO
La información almacenada en un CD de audio está dividida en secciones denominadas pistas,
las cuales están numeradas.
IMPORTANTE:
Es importante que lea el manual del reproductor,
ya que determinadas funciones de éste no son compatibles
con algunos DVD. Además, existen ciertas funciones adicionales
de los DVD que varían según el tipo de disco, y que no se
explican en este manual.
Este reproductor se ajusta a los sistemas de color NTSC y PAL. Sin embargo, si se
encuentra en EE.UU., es aconsejable que lo configure en NTSC. Si se configura en
PAL incorrectamente, la imagen de TV aparecerá en vertical. Si esto sucede,
apague el reproductor y vuelva a encenderlo.
Notas sobre la propiedad intelectual:
La copia, difusión, muestra, difusión por cable, reproducción en público y alquiler sin
autorización de material protegido por la ley de propiedad intelectual es ilegal. Los DVD
incorporan protección contra copia, por lo que toda grabación que se haga de ellos aparecerá
distorsionada. Este producto incorpora tecnología de protección de la propiedad intelectual
protegida por las reclamaciones de método de los dueños ciertas patentes estadounidenses y
otros derechos sobre la propiedad intelectual. Macrovision Corporation debe autorizar el uso
de esta tecnología, la cual está limitada a su uso doméstico y a otros usos específicos, a no
ser que se reciba la autorización pertinente de Macrovision Corporation. No está permitido
modificar ni desmontar este aparato.
22
Page 50

Información sobre la gestión regional:
Este reproductor de DVD está diseñado y fabricado para adecuarse a la información de gestión
regional incluida en el DVD. Si el código regional especificado en el DVD no se corresponde con
el código regional de este reproductor, éste no podrá reproducir el disco. Es posible que este
aparato no pueda reproducir determinados DVD adquiridos fuera del área geográfica donde se
encuentra o grabados con fines comerciales. En caso de que intente reproducir un disco no
autorizado, la pantalla de TV mostrará el mensaje “Region error” (Error de región).
GUÍA DE SOLUCIÓ N DE PROBLEMAS
La televisión se ha diseñado para para que funcione sin causar problemas durante un largo
período.
Si experimenta algún problema con la TV, intente lo siguiente.
No hay imagen o sonido, o la TV no se enciende
• Asegúrese de que la TV está en cendida.
• Asegúrese de qu e el modo SILENCIO no está activado.
• Asegúrese de que el botón de corriente está conectado.
• Asegúrese de que los auriculares n o están insertados en la toma de entrada.
• Si no hay imagen ni sonido, desenchufe la TV durante 30 segundos, a continuación enchúfelo
de nuevo.
No hay imagen o sonido en algunos canales UHF
• Inten te otra estación. Si el resto de las estaciones funcionan correctamente, entonces se
tratará de un problema de la estación.
• Compru ebe que la antena está correctamente conecta y los cables no están rotos.
• Asegúrese de que no h ay nada interfiriendo en la señal de la antena.
• Asegúrese de el CABLE/ANTENA está instalado correcta mente.
El sonido funciona correctamente pero la imagen tiene una calidad muy pobre
• Inten te otra estación, si el resto de las estaciones funcionan correctamente, entonces se
tratará de un problema de la estación.
• Asegúr ese de que la antena esté conectada y ajustada correctamente y que no hay ningún
cable roto.
Hay una recepción muy pobre en algunos canales
• Inten te otra estación, si el resto de las estaciones funcionan correctamente, entonces se
tratará de un problema de la estación.
• Asegúr ese de que la antena esté conectada y ajustada correctamente y que no hay ningún
cable roto.
No se puede sintonizar un canal por cable
• Asegúrese de el CABLE/ANTENA está instalado correcta mente.
•Puede qu e el canal no se haya programado en la memoria.
ESPAÑOL
23
Page 51

GUÍA DE SOLUCIÓ N DE PROBLEMAS
Los ángulos de la imagen, líneas y puntos de visionado, están borrosos, tienen un
color muy pobre o aparecen con manchas.
• Inten te otra estación, si el resto de las estaciones funcionan correctamente, entonces se
tratará de un problema de la estación.
• Asegúr ese de que la antena esté conectada y ajustada correctamente y que no hay ningún
cable roto.
• Asegúrese de que no h ay nada interfiriendo en la señal de la antena.
El mando a distancia no funciona.
• Asegúrese de que la TV está conectada.
• Asegúrese de que las baterías del mando a distancia no estén gastadas.
• Asegúrese de que no h ay nada interfiriendo en la señal de la antena.
24
Page 52

CUIDADOS Y MANTENIMIENTO
El receptor de esta televisión representa un gran ejemplo de ingeniería y pieza electrónica.
Por ello se debe tratar con cuidado. A continuación, le mostramos algunos consejos para
alargar la duración de este producto.
Mantenga la unidad en un lugar seco. Si se derrama agua en la
unidad, límpiela rápidamente. El agua contiene min erales que
pueden corromper los circuitos electrónicos.
No guarde la unidad en zonas calurosas. Las altas temperaturas
pueden acortar la vida de los dispositivos electrónicos, dañar las
baterías o incluso estropear o derretir algunos componentes de
plástico.
No arroje o deje caer la unidad. Esto podría resultar en un fallo en
el funcionamiento. La placa de circuitos pueden rajarse y el
chasis pueden no aguantar el impacto. El manejo violento de la
unidad puede acortar la vida de la unidad.
No utilice o guarde la unidad en zonas donde pueda haber
suciedad o polvo. Los componentes electrónicos se podrían
contaminar o desgastarse antes de tiempo.
ESPAÑOL
No utilice limpiadores químicos abrasivos o disolventes para
limpiar la unidad. Tan solo necesita limpiarlo con una gamuza
ligeramente húmeda pero nunca mojada.
Asegúrese siempre de que las baterías que está utilizando son
nuevas y son del tipo adecuado. Utilizar baterías viejas o apenas
gastadas también pueden ser peligroso.
Las pilas agotadas pueden perder substancias química s que
pueden dañar los circuitos electrónicos.
25
Page 53

ESPECIFICACIONES TÉ CNICAS
TELEVISIÓ N
Canales de recepción
CANALES VHFL 2 - 4
CANALES VHFH 5 - 12
CANALES UHF 21- 69
Tipo de sintonizador 250 canales, SINTONIZACIÓ N VS
DVD
Longitud de la onda láser 655nm
Potencia del láser Clase 1
Sistema de señal Salida PAL/NTSC
Salida de audio digital Salida digital coaxial, pin jack
Auriculares Estéreo en modo DV D
Mono en modo TV
ESPECIFICACIONES GENERALES
Entrada de energía de AC AC 220-240V~ 50 Hz
Consumo de energía de AC 74W
Altavoz 3” 78mm 8ohm x 2
Salida de audio 1.5 W + 1.5 W
Dimensiones 488 x 444 x 435 (mm)
Peso neto 11.9 Kg
El diseño y las especificaciones están sujetos a modificaciones sin previo aviso.
Este reproductor no es un juguete. No debe ser utilizado por niños menores de 8
añ os.
26
Page 54

ATTENTION
RISQUE D’ELECTROCUTION
NE PAS OUVRIR
ATTENTION: POUR REDUIRE LES RISQUES D’ELECTROCUTION. NE RE TIREZ PAS LE
COUVERCLE (OU L’AR RIERE).
CET APPAREIL NE CONTIENT AUCUNE PIECES RE PARABLES P AR L’UTILISATEUR. FAITES
APPEL AU PERSONNEL D’UN SERVICE QUALIFIE.
Les symboles à l’arrière du châssis de l’appareil signifient:
Ce symbole éclair fléché, dans un triangle équilatéral, avertit l’usager de la
présence d’une tension non isolée dangereuse dans l’enceinte du produit d’une
amplitude suffisante pour constituer un risque d’électrocution sur l’individu.
Le point d’exclamation dans un triangle équilatéral avertit l’usager de la présence
de consignes importantes pour le fonctionnement ou l’entretien (maintenance)
dans la documentation qui accompagne l’appareil.
AVERTISSEMENT:
• Pour réduire les risques d’incendie et d’électrocution, n’exposez pas cet appareil à la pluie ou
à l’humidité.
• L’appareil ne doit pas être exposé aux projections ou aux éclaboussures et aucun objet
rempli de liquide, comme un vase, ne doit être posé sur l’appareil.
• La prise principale est utilisée comme coupe circuit qui doit rester fonctionnel à tout moment.
• Afin de débrancher complètement l’appareil de l’alimentation principale, la prise principale de
l’appareil doit être entièrement débra nchée de la prise murale.
INSTALLATION
LOCALISEZ le récepteur dans un endroit de la pièce où la lumière ne viendra pas directement
sur l’écran. La pénombre totale ou un reflet sur l’image peut vous fatiguer les yeux. Les
éclairages doux et indirects sont recommandés pour une visualisation confortable.
LAISSEZ assez d’espace entre le récepteur et le mur afin d’assurer une bonne ventilation.
EVITEZ les emplacements exposés aux fortes chaleurs pour éviter tout dommages éventuels
sur le châssis ou pour éviter tout dysfonctionnement des parties internes.
BRANCHEMENT
Ce récepteur TV peut être branché sur une alimentation CA. 220V-240V~50Hz
Page 55

DÉMAGNÉ TISATION AUTOMATIQUE
Tous les récepteurs de télévisions sont sensibles aux interférences magnétiques, provoquées
soit par le fait de déplacer le récepteur d’un endroit à un autre ou par l’utilisation d’appareils
électriques à proximité du récepteur. Ce magnétisme «résiduel», souvent nommé ainsi, peut
parfois provoquer une distorsion qui provoque ensuite des zones de couleurs ‘’floues’’ sur
l’image. Pour éviter ces effets, le récepteur incorpore un circuit de démagnétisation qui
fonctionne pendant un court moment à chaque fois que le récepteur est allumé avec
l’interrupteur d’alimentation principale. Ce circuit annule tout magnétisme résiduel des parties
métalliques dans le tube de l’image et est ainsi garantir que chaque fois que le récepteur est
allumé, l’image affichée aura une apparence réelle, sans distorsion}. Si l’appareil est déplacé ou
change d’orientation, l’interrupteur d’alimentation doit être éteint au moins 10 minutes afin
d’assurer un bon fonctionnement du circuit automatique de démagnétisation.
ATTENTION:
Ne jamais toucher aux composants à l’intérieur de votre téléviseur ou ne faites jamais de
réglages des commandes qui ne sont pas mentionnés dans ce manuel. Tous les récepteurs de
télévision sont des instruments à haute tension. Le TUBE IMAGE est grandement évacué. S’il
est cassé, des morceaux de verre seront violement projeté. Les rayures, les écaillages ou les
fortes pressions sont dangereuses et doivent être évitées. Lorsque vous nettoyez la FACE du
TUBE IMAGE ou le CHASSIS, le cordon d’alimentation doit être retiré du mur, vous pourrez
ensuite essuyer le récepteur avec un chiffon doux. Tout travaux «interne» dans votre
récepteur doit être uniquement effectué par du Personnel de Service qualifié.
DANGER
Radiation laser invisible si ouvert et si
dispositif de sécurité déjouée. Evitez
l’exposition directe au rayon laser.
2
SECURITE LASER
Cette unité utilise un système de rayon laser optique situé dans
le mécanisme du lecteur CD conçu avec des dispositifs de
sécurité intégrés.
Ne tentez pas de déjouer ce dispositif de sécurité.
Référez-vous uniquement au personnel de service qualifié.
PRODUIT LASER CLASSE – 1 L’UTILISATION DES
COMMANDES, DES REGLAGES OU DES PERFORMANCES
DES PROCEDURES AUTRES QUE CELLES SPECIFIESD
DANS DUDIT DOCUMENT PEUT RESULTER EN UN RIDQUE
D’EXPOSITION AUX RADIATIONS LASER
Page 56

CLASSE 1
PRODUIT LASER
Fabriqué sous licence des Laboratoires Dolby”, ”Pro Logic” et le double-D.
Les symboles sont des marques déposées des Laboratoires Dolby. Travaux confidentiels non
publiés © 1992-1997
Dolby Laboratories,lnc. Tous droits réservés.
Ce produit comporte une technologie de protection des droits d’auteur protégé par des
brevets aux États-Unis et d’autres droits relatifs à la propriété industrielle. L’utilisation de
cette technologie de protection des droits d’auteur doit être autorisée par Macrovision et
est destinée uniquement à des utilisations familiales ainsi qu’à d’autres visualisations
restreintes, sauf autorisation contraire de Macrovisison. Le désassemblage ou le
démontage du produit est interdit.
Instructions pour la protection de l’environnement
Ce produit ne devrait pas être mis dans les déchets ménagers à la fin de son
existence mais doit être remis à un point de ralliement pour des produits
électroménagers et électroniques. Les symboles sur le produit, les
instructions d’utilisation ou l’emballage vous informeront des possibilités de
recyclage. Les matériaux sont recyclables comme indiqué sur l’emballage. En
recyclant les matières recyclables ou en réutilisant des appareils ménagers
anciens, vous contribuez grandement à la protection de l’environnement.
Veuillez vous renseigner auprès de l’administration de votre commune pour
les déchetteries qui recyclent.
FRANÇAIS
3
Page 57

LOCALISATION DES COMMANDES
1. Bouton TV/AV/DVD
2. Bouton Menu
3. Bouton Volume +/-
4. Bouton chaînes haut/bas
5. Bouton Lecture
6. Bouton Arrêt
7. Bouton Eject
8. Bouton Alimentation
9. Plateau disque
10. Entrée avant (Droite) audio (AV2)
11. Entrée avant (Gauche) audio (AV2)
12. Entrée vidéo avant
13. Prise écouteurs
14. Capteur télécommande
15. Haut-parleur
16. Prise antenne 75 Ohm
17. Connecteur Péritel (AV 1)
18. Prise de sortie numérique audio
(pour les DVD uniquement)
4
Page 58

1. Insérez les trous
2. Poussez vers la direction.
FRANÇAIS
5
Page 59

TELECOMMANDE
1. Bouton Alimentation ( )
2. Bouton TV/DVD
3. Bouton ENTREE
4. Boutons numerates (0-9)
5. Bouton Silencieux ( )
6. Bouton de navigation ( , , , ) /
recherche ( , )
7. Bouton chaînes + ( )
8. Bouton chaînes - ( )
9. Bouton Configuration ( )
10. Bouton Ouvrir/Fermer ( )
11. Bouton Pause/Arrêt (;/< )
6
12. Bouton langue ( )
13. Bouton Affichage ( )
14. Bouton Sous-titre ( )
15. Bouton Deux ou Trois programmes
16. Bouton MENU DVD
17. Bouton Menu ( )
18. Bouton Lecture Entrée
19. Bouton V OL+ ( +)
20. Bouton VOL- ( -)
21. Bouton saut (:)
22. Bouton saut (9)
23. Bouton Zoom ( )
Page 60

TELECOMMANDE
Avant d’utiliser la télécommande, vous devez d’abord installer les piles.
COMMENT INSTALLER LES PILES
1. Desserrez les vis pour ouvrir le couvercle
du compartiment des piles.
2. Installez deux piles “AA” (non fournies)
dans la télécommande, respectez les
polarités indiquées dans le
compartiment a piles.
3. Vissez les vis du couvercle du compartiment a piles.
ATTENTION:
1. Seuls les adultes peuvent remplacer les piles.
2. Ne mélangez pas des piles neuves et usagées.
3. Ne mélangez pas les piles de différents types. Ne mélangez pas les piles alcalines, standard
(carbone zinc) ou les piles rechargeables (nickel cadmium).
4. Utilisez uniquement des piles neuves de la taille requise et du type recommandé.
5. Jetez rapidement les anciennes piles dans un endroit approprié. Ne les brûlez pas ou ne les
enterrez pas.
6. Si vous prévoyez de ne pas utiliser l’unité pendant longtemps, retirez les piles. Les piles
peuvent fuir et les produits chimiques qui s’y trouvent peuvent provoquer des dommages sur
les parties électroniques.
7. Remplacez les piles quand l’unité ne fonctionne plus correctement.
8. Pour éviter les dommages provoquer par la fuite du liquide provenant des piles, remplacez
les piles une fois tous les deux ans quelque soit la fréquence d’utilisation de la télécommande
durant cette période.
9. Les piles usagées peuvent provoquer des dommages à l’unité et annuleront la garantie.
10. Assurez-vous de respecter les polarités comme c’est indiqué dans le compartiment des
piles. Si les piles sont mal placées dans le compartiment, l’un ité sera peut-être endommagée.
FRANÇAIS
7
Page 61

FONCTIONNEMENT DU RECEPTEUR DE TELEVISION
Connecter l’antenne du téléviseur à la fiche pour antenne située à l’arrière du téléviseur.
En foncer l’interrupteur principal, L’indicateur de marche s’allume. Au bout de quelques
secondes l’écran s’allume. Si des points blancs apparaissent sur l’écran, rechercher les
stations de télévision disponibles dans la zone.
Enregistrer les stations TV dans la mémoire
(Note: l’enregistr ement de stations TV ne peut être effectué qu’e mode TV)
1.TUNE
• Appu yer sur MENU ( ) quatre fois pour sélectionner le
mode TU NE comme i ndiqué sur la FIG.1
• Appu yer sur “ +/-” pour sélectionner le SON puis
appuyer sur “ +/-” pour cha nger le système de son BG
ou L.
RECHERCHE AU TO
• Ap puyer sur “ +/-” pour sélectionner RECHERCHE AUTO
comme indiqué dans la FIG. 2
• Appu yer sur “ +/-” pour démarrer le balayage
automatique, le balayage de VHF à UHF et les stations TV
sont automatiquement stockées dans la mémoire, comme
indiqué dans la FIG. 3
• U ne fois le balayage terminé, le réglage se fixe sur le
premier programme et indique le plus petit numéro de
programme sur l’écran.
• Pour désactiver la fonction de recherche auto, appuyer
sur MENU ( ).
TUNE
RECHERCHE AUTO
RECHERCHE
BANDE VHF-L
AJUSTEMENT TUNE
COLEUR AUTO
SON L
SAUT OFF
PROGRAMME 1
FIG.1
TUNE
RECHERCHE AUTO
RECHERCHE
BANDE VHF-L
AJUSTEMENT TUNE
COLEUR AUTO
SON L
SAUT OFF
PROGRAMME 1
FIG.2
RECHERCHE AUTO
VHF-L
-|||||||||| +
FIG.3
8
Page 62

FONCTIONNEMENT DE LA TELEVISION
RECHERCHE (Manuelle)
1) Appuyer sur “ +/-” pour sélectionn er PROGRAMME.
Puis appuyer sur “ +/-” ou les touches numériques
pour sélectionner le numéro de programme souhaité.
2) Appuyer sur “ +/-” pour sélectionner BANDE. Puis
appuyer sur “ +/-” pour sélectionner VHF-L,VHF-H
et U HF.
3) Appuyer sur “ +/-” pou r sélectionner COLEUR, puis
TUNE
RECHERCHE AUTO
RECHERCHE
BANDE VHF-L
AJUSTEMENT TUNE
COLEUR AUTO
SON L
SAUT OFF
PROGRAMME 1
FIG.4
appuyer sur “ +/-” pour changer le système de couleur
AUTO,PAL, N3.58, N4.43, SECAM.
4) Appuyer sur “ +/-” pou r sélectionner SON, puis
appuyer sur “ +/-” pour changer le système de son
RECHERCHE
VHF-L
-|||||||||| +
BG ou L.
FIG.5
5) Appuyer sur “ +/-” pour sélectionner RECHERCHE
puis sur “ +/-” pour démarrer la recherche des stations.
L’écran de TV indique l’état de la recherche et la première
station reçu est localisée, le recherche s’arrête et la station est enregistrée automatiquement.
Répéter les étapes 1,2,3,4 pour chercher la station TV suivante, comme indiqué dans les FIG.4,
FIG.5.
FRANÇAIS
• Pour désa ctiver la fonction de recherche (manuelle), appuyer sur MENU ( ).
Notes:
• Si des stati ons brouillées sont enregistrées avec la méthode de RECHERCHE AUTO, les
supprimer de la liste de chaînes en entrant en mode SAUT dans le menu TUNE. Appuyer
sur “ +/-” et changer de OFF à ON. Appuyer sur MENU ( ) pou retourner en affichage
normal. Les stations indésirables seront retirées de la lise des chaînes lorsque la chaîne
est changée et que la suivante ne peut être lue.
• Les stations SAUTEES peuvent être retrouvées en entrant dans le menu TUNE et en mettant
SAUT sur OFF.
• Pou r sortir du mode TUNE, appuyer sur MENU ( ) deux fois.
9
Page 63

FONCTIONNEMENT DE LA TELEVISION
2. IMAGE
• Ap puyer sur MENU ( ) pour sélectionner le mode IMAGE
comme indiqué FIG.6.
• Ap puyer sur “ +/-” pour sélectionner LU MINOSITE/
COLEUR/CONTRASTE/P RECISION/TEINTE
• Appu yer sur “ +/-” pour régler le niveau souhaité, de
IMAGE
LUMINOSITE 32
COLEUR 32
CONTRASTE 32
PRECISION 32
TEINTE 0
0 à 63.
• L’élément T EINTE est pour le système N TSC uni quement,
le niveau de réglage s’étend de “-31” à “+31”.
• Pou r sortir du mode IMAGE appuyer sur MENU ( ) cinq fois.
3. SON
• Appu yer sur MENU ( ) deux fois pour sélectionner le mode
SON mode comme i ndiqué FIG.7
• Appu yer sur “ +/-” pour régler le Volume. Le niveau de
volume s’étend de “0” à “63”.
• Pou r sortir du mode SON appuyer sur MEN U ( ) quatre fois.
SON
VOLUME 10
4. CONFIGURATION
LANG.
• Appu yer sur MENU ( ) trois fois pour sélectionner le mode
CONFIGURATION, comme indiqué dans la FIG.8
• Appu yez sur le bouton “ +/-” pour sélectionner la LANG.
puis appuyez sur le bouton “ +/-” pour sélection ner la
langue désirée: ANGLAIS, HOLLANDAIS, ITALIEN,
ALLEMAND, FRAN CAIS, ESPAGNOL, PORT UGAIS
Fonds bleu
CONFIGURATION
LANG. ANGLAIS
FONDS BLEU ON
• Appu yer sur “ +/-” pour sélectionner FONDS BLEU et
appuyer sur “ +/-” pour activer ON ou désactiver OFF
le fonds bleu.
• Pou r sortir du mode CONFIGURATION, appuyer sur MENU ( ) trois fois.
FIG.6
FIG.7
FIG.8
10
Page 64

FONCTIONNEMENT DU RECEPTEUR DE TELEVISION
5. CHANGEMENT PROG.
Une fois les stations TV enregistrées avec la RECHERCHE AUTO ou MANUELLE, la position des
programmes TV peut être changée de la façon suivante :
• Appu yer sur MENU ( ) cinq fois pour sélectionner le mode
CHANGEMENT PROG. comme indiqué dans la FIG.9
• App uyer sur “ +/-” pour sélectionner PROG I puis
appuyer sur “ +/-” ou les touches numériques pour
sélectionner le numéro du programme à changer.
• Ap puyer sur “ +/-” pour sélectionner PROG II puis
appuyer sur “ +/-” ou les touches numériques pour
sélectionner le numéro du programme à changer.
• Appu yer sur “ +/-” pour sélectionner CHAN GER puis
appuyer su r “ +/-”. La position du programme PROG I et du programme PR OG II sera
intervertie.
• Pou r sortir du mode CHANGEMENT PROG. appuyer sur MENU ( ).
SELECTION DES CHAINES ET REGLAGE DU VOLU ME
1) Appuyer sur “ +/-” pour sélectionner une station TV. (en mode TV uniquement)
CHANGEMENT PROG
PROG I 1
PROG II 5
CHANGER
FIG.9
FRANÇAIS
0 249
Appuyer sur “ -” sur l’appareil princi pal, le
numéro du programme apparaît en haut à
droite et change du plus élevé au plus bas.
2) Appuyer sur “ +/-” pou r régler le niveau du son.
Appuyer sur “ +” sur l’a ppareil principal, le
numéro du programme apparaît en haut à
droite et change du plus bas au plus haut.
VOLUME
-|||||||||| + 10
11
Page 65

FONCTIONNEMENT DE LA TELECOMMANDE
POUR SÉL ECTIONNER U NE STATION TV A VEC LES NUMEROS DE PROGRA MME :
• Incrémentation des numéros de programme
Appuyer sur “ +“ ou “ -” pour sélectionner un numéro de programme plus haut ou plus
bas.
• T ouches numériques 0 - 9
Les stations TV sélectionnées avec les numéros de programme 0 - 9 s’affichent en haut à
droite de l’écran en vert.
Par exemple:
Appuyer sur “9” pour sélectionner le programme”9".
• N uméros de programme à deux chiffres
Pour sélectionner une station TV ayant un numéro entre «10» et «99».
Par exemple: pour sélection ner le programme “12”
* Appuyer sur “-/-- “ , l’écran indique “--”.
* Puis appuyer sur la touche “1”, l’écran indique “1-”
* Puis appuyer sur la touche “2”, la chaîne “12” s’affiche.
• N uméros de programme à trois chiffres
Pour sélectionner une station TV ayant un numéro entre “100” et “249”.
Par exemple: pour sélectionner le programme “123”
* Appuyer sur ‘-/-- “ deux fois, l’écran indique “--”.
* Appuyer sur la touche “1”, l’écran indique “1--”
* Appuyer sur la touche ‘2” , la chaîne “12-” s’affiche.
* Appuyer sur la touche “3”, la chaîne “123” s’affiche.
MARCHE ( )
• Appu yer sur pour activer/ désactiver l’image et le son.
MUET ( )
• Appu yer sur Muet ( ) pour désactiver le son,appuyer à nouveau pour le réactiver.
ENTREE
• App uyer sur ENTREE pour sélectionner le mode AV ,
appuyer à nouveau pour revenir en mode TV.
TV/DVD
• Appu yer sur TV/DVD pour sélectionner le mode DVD. Appuyer à nouveau pour revenir en
mode TV. (quelques secondes s’écoulent avant le mode DVD ne soit effectif).
FONCTION ARRET AUTO
• Lorsque le téléviseur est en mode TV ou AV(vidéo) et ne reçoit aucun signal pendant 8
minutes, il s’éteint automatiquemen t (mode veille) par économie d’énergie.
TV AV1 AV2
12
Page 66

FAIRE FONCTIONNER VOTRE DVD
FONCTIONNEMENT DE BA SE DU DVD
1. Appuyez sur le bouton TV/AV/DVD sur l’unité ou appuyez sur la touche TV/DVD directement
sur la télécommande pour allumer le DV D.
2. Appuyez sur le bouton OUVRIR/FERMER ( ) pour charger un disque su r le plateau du
disque.
3. Appuyez sur le bouton OUVRIR/FERMER ( ) pour fermer le plateau du disque.
Tenez le disque sans toucher à aucune de ses surfaces, positionnez-le avec le titre imprimé
vers le haut.
Lire un disque
1. Appuyez sur le bouton OUVRIR/FERMER ( ) sur le panneau avant et chargez le disque sur
le plateau. L’étiquette doit être placée vers le haut. Pour les disque DVD à double faces, placez
le disque avec l’étiquette AV1 vers le haut.
2. Appuyez de nou veau sur le bouton OUVRIR/FERMER ( ) pour fermer le plateau du disque
et le disque sera chargé.
3. Le disque démarrera automatiquement.
Si c’est un disque DVD, la page Menu/titre s’affichera à l’écran.
Si c’est un CD, la lecture commencera à la première piste.
4. Appuyez sur le bouton ARRET si vous souhaitez arrêter la lecture du disque. Vous pouvez
reprendre la lecture du disque en appuyant sur le bouton PLAY, la lecture commencera au
dernier endroit où vous vous êtes arrêté. (reprise de la lecture).
5. Appuyez deux fois sur le bouton STOP (< ) pour arrêter complètement la lecture et retourner
au début.
FRANÇAIS
POUR ACCEDER LE MENU DE DEMA RRAGE RAPIDE:
Pour accéder aux menus de démarrage rapide, ce qui vous permettra de changer les trois
réglages les plus communs, effectuez les manipulations suivantes:
1. Lorsque le DV D est en mode Arrêt, appuyez sur le bouton CONFIGURATION pour entrer dans
le menu de configuration.
2. Appuyez su r le bouton PLAY/ENTER pour sélectionner Configuration Rapide ( ).
3. Continuez avec les étapes 4-5 de la section suivante.
MENU DE DEMARRAGE RAPIDE
CONFIG RAPIDE
MENU LECTEUR ANGLAIS
ASPECT TV 4:3 BOITE A LETTRE
< >
< >
TYPE TV PAL
DOLBY DIGITAL ON
13
Page 67

FAIRE FONCTIONNER VOTRE DVD
POUR A CCEDER AUX MENUS P RINCIP AUX:
Pour accéder aux quatre pages principales du menu, effectuez les manipulations suivantes:
1. Lorsque le DVD est en mode Arrêt, appuyez sur le bouton CONFIGURATON ( ) pour entrer
dans le menu de configuration.
2. Appuyez sur le bouton ( ) pour sélectionner les menus principaux ( ) puis appuyez sur le
bouton PLAY/ENTER.
3. Sélectionnez les icônes de Configuration en haut de l’écran en utilisant les boutons de
navigations ( , ) puis appuyez sur le bouton PLAY/ENTER pour le sélectionner.
4. Utilisez les boutons de navigations ( , ) pour sélectionner les options de configuration puis
appuyez sur le bouton PLAY/ENETR pour la sélectionner ou pour changer le réglage. S’il y a
encore d’autres options, utilisez les boutons de navigations ( , ) pour sélectionner l’option
désirée et appuyez sur le bouton PLAY/ENTER pour confirmer.
5. Appuyez sur le bouton CONFIGURATION pou r sortir de la configuration.
POUR RETOURN ER AU MENU PR ECEDENT,
appuyez simplement sur le bouton de navigation ( ).
MENU PRINCIPAL
14
LANGUE
LANG AUDIO ANGLAIS
SOUS-TITRE ANGLAIS
MENU DISQUE ANGLAIS
< >
< >
MENU LECTEUR ANGLAIS
AUDIO
DRC ON
DOLBY DIGITAL ON
DOWN SAMPLING ON
< >
< >
AFFICHAGE
ASPECT TV 4:3 PAN&SCAN
< >
< >
Page 68

FONCTIONNEMENT DU LECTEUR DVD
MENU DEMA RRAGE RAP IDE :
Accéder au menu de démarrage rapide comme décrit page 14, puis sélectionner/changer
l’option de réglage comme décrit page 15.
OPTION MENU LECTEUR :
Sélectionner le MEN U LECTEUR pour choisir une
langue (anglais, français, espagnol, allemand, italien,
portugais, néerlandais)
OPTION FORMAT TV :
Sélectionner 4:3 PS (Panscan), 4:3 Boîte à lettre ou
large 16:9.
Voir page 17 pour plus de détails.
OPTION TYPE TV :
Sélectionner TYPE TV pour choisir le système PAL
ou NTSC.
CONFIG RAPIDE
MENU LECTEUR ANGLAIS
ASPECT TV 4:3 BOITE A LETTRE
< >
TYPE TV PAL
< >
DOLBY DIGITAL ON
CONFIG RAPIDE
MENU LECTEUR ANGLAIS
ASPECT TV 4:3 BOITE A LETTRE
< >
TYPE TV PAL
< >
DOLBY DIGITAL ON
CONFIG RAPIDE
FRANÇAIS
OPTION DOLBY DIGITAL:
Avec une sortie numérique coaxiale, sélectionner
ON pour activer le Dolby Digital o u OFF pour le
désactiver.
MENU LECTEUR ANGLAIS
ASPECT TV 4:3 BOITE A LETTRE
< >
TYPE TV PAL
< >
DOLBY DIGITAL ON
CONFIG RAPIDE
MENU LECTEUR ANGLAIS
ASPECT TV 4:3 BOITE A LETTRE
< >
TYPE TV PAL
< >
DOLBY DIGITAL ON
15
Page 69

FONCTIONNEMENT DU LECTEUR DVD
MENU CONFIGURATION LA NGUE :
Sélectionner l’icône de langue avec les touches de Navigation ( , ), appuyer sur LECTURE /
ENTRER puis sélectionner/changer l’op tion de réglage comme décrit page 16.
LANG AUDIO
Sélectionne la langue de lecture du DVD.
Le DVD doit être enregistré dans la langue
sélectionnée, autrement, le DVD est lu dans la
langue par défaut.
SOUS-TITRE
Sélectionner la langue de sous-titre. Le DVD doit
avoir été enregistré dans la langue choisie,
autrement la langue affichée est la langue par
défaut du DVD. Sélectionner Off pour désativer
le sous-titre
LANGUE
LANG AUDIO ANGLAIS
SOUS-TITRE ANGLAIS
MENU DISQUE ANGLAIS
< >
< >
MENU LECTEUR ANGLAIS
LANGUE
LANG AUDIO ANGLAIS
SOUS-TITRE ANGLAIS
MENU DISQUE ANGLAIS
< >
< >
MENU LECTEUR ANGLAIS
MENU DISQUE
Sélectionner la langue du MENU DISQUE. Le
MENU DISQUE du DVD doit avoir été fait dans
la langue sélectionnée, autrement la langue
affichée est la langue par défaut du DVD.
MENU LECTEUR
Sélectionner la langue d u MENU LECTEUR
(anglais, français, espagnol, allemand, italien,
portugais, néerlandais).
16
LANGUE
LANG AUDIO ANGLAIS
SOUS-TITRE ANGLAIS
MENU DISQUE AN GLAIS
< >
< >
MENU LECTEUR ANGLAIS
LANGUE
LANG AUDIO ANGLAIS
SOUS-TITRE ANGLAIS
MENU DISQUE ANGLAIS
< >
< >
MENU LECTEUR ANGLAIS
Page 70

FONCTIONNEMENT DU LECTEUR DVD
AFFICHAGE DU MENU CONFIGURATION :
Sélectionner l’icône d’affichage en utilisant les touches de Navigation ( , ), puis sélectionner/
changer l’option de configuration comme décrit page 17.
FORMAT TV
4:3 PS : Sélectionner lorsque l’appareil est connecté
à un téléviseur conventionnel. Le matériel vidéo
formaté an style Pan Scan est lu dans ce style (les
bords droit et gauche sont coupés).
4:3 BOITE A LETTRE : Sélection ner lorsque l’appareil
est connecté à un téléviseur normal. Les images
écran large sont affichées avec des bandes noires
en haut ou en bas.
16:9 LARGE : Sélectionner lorsque l’a ppareil est
connecté à un téléviseur écran large.
MENU CONFIGURATION AUDIO :
Sélectionner l’icône Audio en utilisant les touches de
Navigation ( , ), puis sélectionner/changer l’option de
configuration comme décrit page 17.
< >
< >
AFFICHAGE
ASPECT TV 4:3 PAN&SCAN
< >
AUDIO
DRC ON
DOLBY DIGITAL ON
DOWN SAMPLING ON
< >
FRANÇAIS
DRC
Sélectionner ON pour activer le DRC (Compression
de portée dynamique) ou OFF pour le désactiver. La
Compression de portée dynamique compresse la
portée dynamiqu e de la piste audio du DVD.
< >
AUDIO
DRC ON
DOLBY DIGITAL ON
DOWN SAMPLING ON
< >
DOLBY DIGITAL ET DOWN SA MPLING
Avec une sortie numérique coaxiale, sélectionner ON
pour activer le Dolby Digital ou OFF pour le désactiver.
Avec une sortie numérique coaxiale, sélectionner ON
pour activer le Down Sampling ou OFF pour le désactiver.
Lorsque le downsampling est activé, la sortie numérique est échantillonnée à 48K même si
l’audio original est codé en 96K pour les DVD.
17
Page 71

RESTRICTION PARENTALE
La fonction du Contrôle Parental permet aux parents d’éviter que leurs enfants regardent des
programmes TV qui ne leur sont pas destinés. Cette fonction lit les restrictions des programmes
puis refuse l’accès aux programmes si leurs restrictions sont dans les limitations que vous
avez sélectionnées. Dans ce cas, l’utilisateur devra entrer un mot de passe à 4 chiffres puis
appuyez sur le bouton ENTER (mot de passe 1369).
OPERATIONS DE BASE SUR DVD
NOTES IMPOR TANTES:
• U n symbole apparaît dans l’angle en haut à gauche de l’écran en cours d’opération si la
fonction demandée n’est pas disponible sur le disque.
• Cert ains disques peuvent mettre quelques secondes à charger.
• Toujours tenir les disques sans toucher les surfaces. Lors de l’insertion d’un disque, le
positionner avec la partie imprimée vers le haut, l’aligner dans les rainures le mettre en bonne
position.
• Il est important de lire les livrets accompagnant les DVD car certaines fonctions de ce lecteur
DVD ne peuvent pas être utilisées sur certains DVD. Certaines fonctions optionnelles peuvent
être différentes pour chaque DVD, elles ne sont donc pas expliquées dans ce manuel.
LECTURE D’UN DVD
1. Appuyer sur “TV/AV/D VD”sur l’appareil ou sur TV/DVD sur la télécommande pour activer le
DVD.
2. Appuyer sur OPEN/CLOSE ( ) pour ouvrir le plateau à disque. Insérer un disque avec le
label vers le haut.
3. Appuyer sur OPEN/C LOSE ( ) pour fermer le plateau. Une fois le disque chargé, l’écran de
menu du DVD doit apparaître. Avec les touches de Navigation ( , , , ) sélectionner
l’option souhaitée et LECTURE/ENTRER pour sélectionner ; la lecture commence
immédia tement.
4. Pour arrêter la lecture, appuyer sur STOP (<). L’appareil mémorise l’endroit où la lecture a
été arrêtée, il suffit d’appuyer sur LECTURE/ENTRER pour recommencer la lecture à l’endroit
où elle avait été arrêtée. Une deuxième pression sur STOP (<) arrête complètement l’appareil.
NOTES:
• Si un MENU apparaît sur l’écran, appuyer sur les touches de Navigation ( , , , ) pour
sélectionner l’option ou élément souhaité, puis appuyer sur LECTURE/ENTRER. Consulter le
boîtier du disque pour plus d’informations.
• Le retour à la lecture peut ne pas fonctionner sur tous les disques.
18
Page 72

OPERATIONS DE BASE SUR DVD
RECHERCHE CHA PITRE
Utiliser cette option pour aller directement sur un chapitre.
Appuyer deux fois sur la touche AFFICHAGE, puis appuyer sur les touches numériques (i.e.
pour le numéro 12, appuyer sur “1”, “2”) pour atteindre directement un chapitre ; la lecture
démarre immédi atement.
MENU DVD
Appuyer sur la touche MENU pour afficher le menu principal du disque. Utiliser les touches de
Navigation ( , , , ) pour sélectionner l’option souhaitée, puis appuyer sur LECTURE/
ENTRER. Cette fonction n’est pas disponible sur tous les disques.
OPERATIONS DE BASE SUR DVD (SUITE)
SAUT
Appuyer sur SAUT (:) pour avancer le DVD au début du chapitre suivant.
Appuyer sur SAUT (9) pour revenir au début du chapitre précédent.
RECHERCHE
En cours de lecture, appuyer sur les touches RECHERCHE (8) ou (7) pour avancer ou revenir
en arrière à double (x2) vitesse pour trouver une section précise. Appuyer à plusieurs reprises
sur ces touches pour augmenter la vitesse x4, x8, x16 puis revenir à la lecture normale.
Le DVD reste en avance ou retour rapides jusqu’à une nouvelle pression sur la touche
LECTURE/ENTRER ; le lectu re normal recommence alors.
FRANÇAIS
AFFICHAGE
En cours de lecture de DVD, appuyer sur la touche AFFICHAGE une fois pour voir le titre en
cours de lecture, le temps écoulé sur le titre et le temps restant. Appuyer une seconde fois
pour voir le chapitre, le temps écoulé sur le chapitre et le temps restant. Appuyer une troisième
fois pour voir les réglages de niveau (“L0” pou r niveau 0, “L1” pour niveau 1). Appuyer une
quatrième fois pour désactiver l’affichage.
PAUSE/STOP (;/<)
Appuyer sur PAUSE/STOP (;/<) une fois pour mettre l’image en pause. Appuyer sur
LECTURE/ENTRER à nouveau pour revenir à la lecture normale.
Appuyer sur PAUSE/STOP (;/<) deux fois pour arrêter la lecture. Appuyer sur LECTURE/
ENTRER pour recommencer la lecture au début.
SOUS-TITRE
Appuyer sur SOUS-TITRE pour changer la langue de sous-titre.
Note : le nombre de sous-titres disponibles dépend de chaque DVD.
19
Page 73

LANGUE (AUDIO)
Appuyer sur LANGUE pour changer le canal audio. Cette fonction est applicable aux DVD et CD
audio mais avec des attributs différents.
ZOOM
Cette fonction est applicable aux DVD. L’utilisa teur peut élargir une image statique ou mobile en
appuyant sur la touche ZOOM. Il y a 3 niveau de zoom (2x, 3x et 4x) atteignables un par un en
appuyant successivement sur la touche zoom.
Note : l’utilisateur peut sélectionner la portion de l’image à élargir en utilisant les touches de
direction. ( , , , )
FONCTIONNEMENT DE BASE DU CD
LECTURE D’UN CD
1. Appuyez sur le bouton TV/AV/DVD sur l’unité ou appuyez sur la touche TV/DVD directement
sur la télécommande pour allumer le DV D.
2. Appuyez sur le bouton OUVRIR/FERMER pour ouvrir le plateau du disque. Insérez le disque
avec l’étiquette vers le haut sur le plateau du disque.
3. Appuyez sur le bouton OUVRIR/FERMER pour fermer le plateau du disque. Après le
chargement, la lecture démarrera automatiquement.
4. En mode Arrêt ( ), appuyez deux fois sur PAUSE/ARRET ( / ) sur l’unité sur la
télécommande pour arrêter la lecture.
AVANCE ( ) /RETOUR ( )
1. A chaque fois que vous appuyez sur Recherche ( ) ou ( ), la vitesse augmentera
comme ce qui suit: x 2 — > x 4 — > x 8 — > x16 — > Reprendre la lecture Normale
2. Appuyer sur le bouton PLAY/ENTER pour reprendre la lecture normale.
AFFICHAGE
Lorsque vous lisez un CD, appuyez une fois sur le bouton AFFICHAGE pour visualiser la piste,
le temps écoulé de la piste et le temps restant de la piste. Appuyez une deuxième fois pour
visualiser le temps écoulé du disque et le temps restant. Appuyez une troisième fois pour
éteindre l’affichage.
SELECTIONNER LES PISTE S AVEC LES BOUTONS NUMERIQUES
Appuyez sur les boutons numérotés correspondant au numéro de la piste que vous souhaitez
lire et l’unité la lira automatiquement.
SELECTIONNER LES PISTES A VEC LES BOUTONS SAUT
Pendant la lecture, appuyez sur les boutons ( ) ou ( ) pour sélectionner la piste à lire
20
Page 74

FONCTIONNEMENT D’UN CD D’IMAGE
LECTURE D’UN CD D’IMAGE
1. Appuyez sur le bouton TV/AV/DVD sur l’unité ou appuyez sur la touche DVD/TV directement
sur la télécommande pour allumer le DV D.
2. Appuyez sur le bouton OUVRIR/FERMER pour ouvrir le plateau du disque. Insérez un disque
Photo avec l’étiquette vers le haut sur le plateau du disque.
3. Appuyez sur le bouton OUVRIR/FERMER pour fermer le plateau du disque. Après le
chargement, le menu DOSSIER/IMAGE apparaîtra sur l’écran du TV. Appu yez sur les boutons
( , ) pour sélectionner le dossier/piste désiré.
4. Appuyez sur le bouton PLAY/ENTER pour confirmer. Appuyez sur le bouton ( , ) pour
sélectionner l’image désirée, l’aperçu de l’image apparaîtra dans la zone de prévisualisation
des images. Appuyez sur le bouton PLAY/ENTER pour lire l’image. Vous pouvez appuyer sur
les boutons numérotés pour entrer un numéro à 3 chiffres pour sélectionner l’image désirée,
la lecture démarrera automatiquement. Appuyez sur le bouton Arrêt ( ) sur l’unité principale
ou appuyez deux fois sur PAUSE/ARRET ( / ) sur la télécommande pour arrêter la lecture.
5. Pour sélectionner les autres dossiers, appuyez sur les boutons ( , ) pour sélectionner ‘’-, ’’ , ensuite appuyez sur le bouton PLAY/ENTER pour revenir en arrière pour sélectionner les
dossiers, utilisez les boutons de navigations ( , ) pour sélectionner le dossier désiré de
nouveau.
Entretien des disques
• Manipulez les disques avec soin. Tenez le disque
uniquement par les bords. Pour les garder propres,
ne touchez pas la surface brillante et non imprimée
du disque.
• N e collez rien ou n’écrivez rien sur l’étiquette du
disque.
• Nettoyez les disqu es régulièrement avec un chiffon
doux, qui n’est pas en lin et sec. Ne jamais utiliser de
détergents ou de nettoyants abrasifs pour nettoyer le
disque. Si nécessaire, utilisez un kit de nettoyage spécial pour CD.
• Si un disque saute ou se coince sur un segment, il est probablement sale ou endommagé
(rayé).
• Pour nettoyer un disque, passez un chiffon en lignes droites du centre du disque vers les
bords du disque. Ne jamais nettoyer en cercle.
• Les disqu es doivent être rangés dans leurs boites après chaque utilisation pour éviter les
dommages.
• N ’exposez pas les disques à la lumière directe du soleil, à l’humidité excessive, aux
températures extrêmes, à la poussière etc.… L’exposition prolongée aux températures
extrêmes voilera le disque.
•Ne collez rien ou n’écrivez rien sur aucune des surfaces du disque. Les stylos pointus ou
l’encre pourrait endommager la surface.
21
FRANÇAIS
Page 75

SUR LES DISQUES
Le numéro de zone de ce disque est :
Voir la page suivante pour des informations sur les numéros de zone
DISQUES LISIBLES :
Les disques suivant peuvent être lus sur ce lecteur DVD:
TYPES DE DISQUES
DVD
Les données sur la plupart des DVD sont divisées en
sections appelées ‘’titres’’ et en sous-sections
appelées ‘’chapitres’’, chacune ayant un numéro de
titre ou de chapitre. Certaines fonctions de ce lecteur
ne fonctionnent pas sur certains DVD comme elles ont
été programmées. Si une fonction sélectionnée ne
fonctionne pas comme souhaité, consulter la plaquette
accompagnant le CD.
CD AUDIO
Les données sur un CD audio sont divisées en sections appelées ‘’pistes’’, chacune ayant un
numéro de piste.
IMMPORTANT
Il est important de lire le manuel accompagna nt les DVD, car certaines fonctions du lecteur DVD
ne peuvent pas être utilisées sur certains DVD. Il y a également certaines fonctions optionnelles
différentes pour chaque DVD, qui ne sont donc pas présentées dans ce manuel.
Ce lecteur est conforme aux systèmes de couleur NTCS et PAL. Mais si vous
résidez aux Etats-Unis, laissez le réglage sur NTCS. Un mauvais réglage sur PAL
peut donner une image qui défile verticalement. Dans ce cas, éteindre simplement
le DVD puis le rallumer.
Notes sur le droit de copie :
Il est interdit par la loi de copier, diffuer, montrer, diffuser sur câble, représenter en public ou
louer sans permission du matériel protégé contre la copie. Les disques DVD sont protégés
contre la copie, et tout enregistrement de ces DVD sera brouillé. Ce produit contient une
technologie de protection copyright protégée par la méthode de plainte de certains brevets
américains et détenteurs de propriété intellectuelle. L’utilisation de cette technologie doit être
autorisée par Macrovision Corporation, et est conçu pour l’utilisation familiale ou en cercle
restreint uniquement à moins d’autorisation contraire de Macrovision Corporation. Le
changement des technologies ou le désassemblage sont interdits.
22
Page 76

Informations sur la gestion des zones
Ce lecteur DVD est conçu et fabriqué pour répondre aux information de gestion de zone
inscrites sur les DVD. Si le numéro de zone inscrit sur le DVD ne correspond pas à celui du
lecteur, le lecteur n e peut pas lire le DVD. Certains DVD peuvent ne pas être lisibles sur ce
lecteur s’ils ont été achetés dans une autre zone géographique ou fabriqués dans un but
commercial. Si vous essayez de lire un disque non autorisé, le message ‘’Erreur zone’’
s’affiche sur l’écran du téléviseur.
GUIDE DE DEPANNAGE
Votre télévision est conçue pour vous offrir un fonctionnement sans problèmes pendant de
longues années. Si vous rencontrez un problème avec votre TV, essayez les solutions
indiquées ci-dessous.
Il n’y a pas d’image ou de son ou la TV ne s’allume pas.
• Assurez-vous que la TV est branchée.
• Assu rez-vous que le bouton MUTE (Muet) n’est pas enclenché.
• Assu rez-vous que le bouton POWER est enclenché.
• Assurez-vous que les écouteurs ne sont pas branchés.
• S’il n’y a pas d’images ni de son, débranchez la TV pendant 30 secondes puis rebranchez le
et ressayez.
Il n’y a pas d’image ou de son sur certaines chaînes UHF.
• Essayez un e autre station. Si les autres stations sont OK, c’est peut-être un problème
inhérent à la station.
• Vérifiez que l’antenne est branchée et correctement réglée, qu’elle est bon état et qu’il n’y a
pas de fils rompus.
• Regardez s’il n ’y a rien qui interfère avec le signal de l’antenne.
• Assu rez-vous que le réglage AIR/CABLE est bien correct.
Le son est OK mais s’image est de faible qualité.
• Essayez un e autre station. Si les autres stations sont OK, c’est peut-être un problème
inhérent à la station.
• Vérifiez que l’antenne est branchée et correctement réglée, qu’elle est en bon état et qu’il n’y
a pas de fils rompus.
La réception est faible sur certaines chaînes.
• Essayez un e autre station. Si les autres stations sont OK, c’est peut-être un problème
inhérent à la station.
• Vérifiez que l’antenne est branchée et correctement réglée, qu’elle est en bon état et qu’il n’y
a pas de fils rompus.
FRANÇAIS
23
Page 77

GUÍA DE SOLUCIÓ N DE PROBLEMAS
Impossible de se régler sur une chaîne câblée.
• Assu rez-vous que le réglage AIR/CABLE est bien correct.
• La ch aîne n’est peut-être pas programmée dans la mémoire.
L’image roule, est déviée, indique des lignes, est granuleuse, la couleur est
mauvaise ou il y a des ombres.
• Essayez un e autre station. Si les autres stations sont OK, c’est peut-être un problème
inhérent à la station.
• Vérifiez que l’antenne est branchée et correctement réglée, qu’elle est en bon état et qu’il n’y
a pas de fils rompus.
• Regardez s’il n ’y a rien qui interfère avec le signal de l’antenne.
La télécommande ne fonctionne pas.
• Assurez-vous que la TV est branchée.
• Assu rez-vous que les piles sont bien neuves dans la télécommande.
• Assu rez-vous que rien ne bloque le signal de la télécommande.
24
Page 78

ENTRETIEN & MAINTENANCE
Ce récepteur de télévision représente un bon exemple d’ingénierie et de construction
électronique. En tant que tel il doit être traité avec soin. Nous vous offrons les suggestions
suivantes afin de profiter de cet appareil pendant plusieurs années.
Conservez-le au sec. Si de l’eau venait à tomber dessus,
essuyez-le immédiatement. L’eau contient des minéraux qui
peuvent provoquer de la corrosion sur les circuits électroniques.
Ne le rangez pas dans des endroits aux températures élevées.
Les températures élevées peuvent réduire la durée de vie des
appareils électroniques, endommager les piles et peut même
tordre ou faire fondre certains plastiques.
Ne jetez pas par terre cet appareil. Sinon il est presque certain
qu’il ne fonctionnera plus ensuite. Les tableaux des circuits
pourraient être fissures et les cas peuvent ne survivraient pas
l’impact. Manipuler votre appareil brusquement, réduira sa durée
de vie.
FRANÇAIS
N’utilisez pas ou ne rangez pas dans des endroits avec
beaucoup de poussière ou de saleté. Les composants
électroniques pourraient êtres contaminés et seront abîmés
prématurément.
N’utilisez pas d’agents chimiques ou de nettoyants agressifs pour
nettoyer votre unité. Vous pouvez juste la nettoyer avec un linge
humidifié, jamais mouillé.
Vérifiez toujours que les piles que vous utilisez sont bien neuves
et du type recommandé. Les vieilles piles ou presque
complètement usagées sont également dangereuses.
Des piles usagées peuvent fuir et endommager les circuits
électroniques.
25
Page 79

CARACTERISTIQUES TECHNIQUES
TELEVISEUR
Canaux de réception
VHFL CH 2 - 4
VHFH CH 5 - 12
UHF CH 21- 69
Type de tuner 250 Chaînes, T UNING VS
DVD
Longueur d’ondes laser 655nm
Puissance laser : Classe 1
Système de signal sortie PAL/NTSC
Sortie audio numérique Sortie numérique coaxiale ; fiche en
pointe
Ecouteurs Mode DVD entrée stéréo
Mode TV entrée mono
GENERAL
Alimentation AC AC 220-240V~ 50 Hz
Consommation 74W
Haut-parleurs 3” 78mm 8ohm x 2
Sortie audio 1.5 W + 1.5 W
Dimensions L488 x W444 x H435 (mm)
Poids net 11.9 Kg
Dessin et caractéristiques peuvent être sujets à des modifications sans notification préalable.
Cet appareil n’est pas un jouet. Ne convient pas aux enfants de moins de 8 ans
26
0211-12093-20
 Loading...