

Page 1

Levenhuk GoTo telescopes
SkyMatic
SkyMatic
SkyMatic
User Manual
Návod k použití
Инструкция по эксплуатации
Посібник користувача
135 GTA
105 GT MAK
127 GT MAK
Radost zaostřit
Приближает с удовольствием
Наближує з радістю
Page 2

Page 3
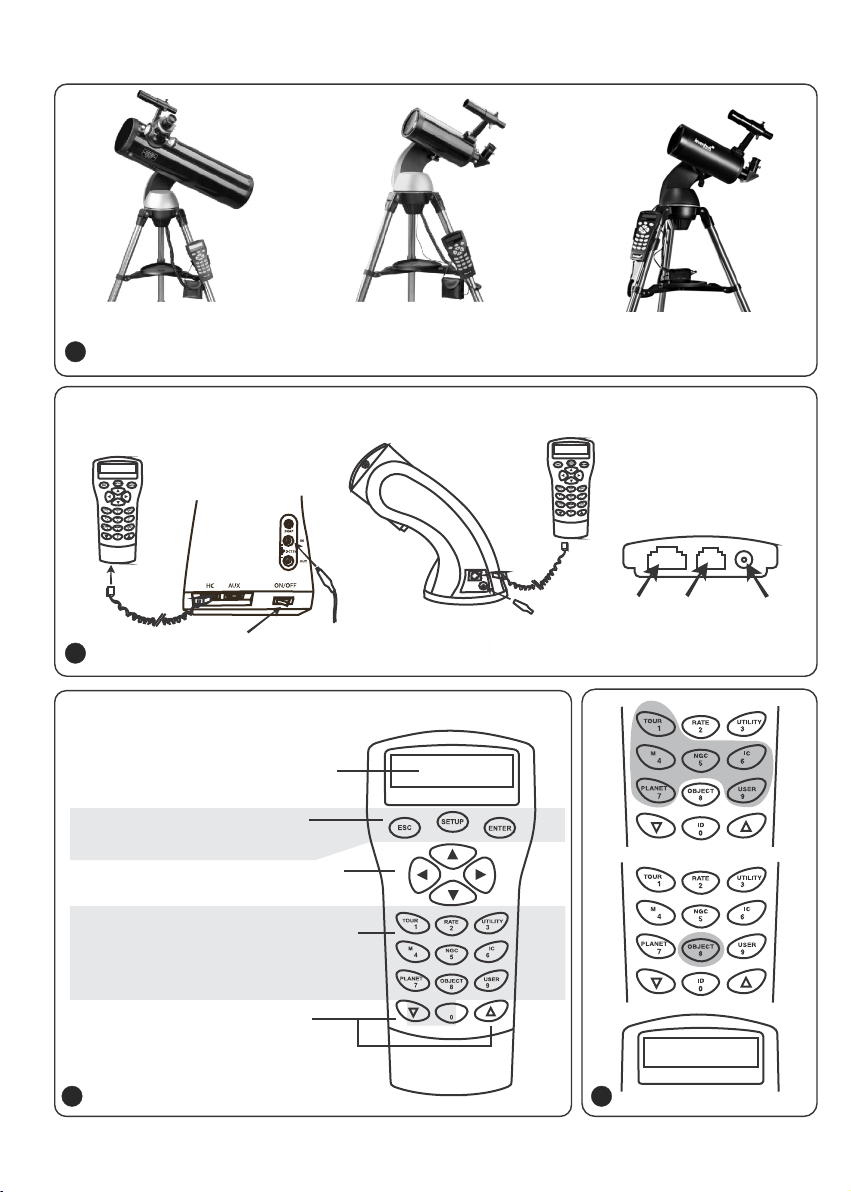
SkyMatic 135 GTA SkyMatic 105 GT MAK
1
SkyMatic 127 GT MAK
Multi-function mount / Multifunkční montáž
Многофункциональная монтировка
Багатофункціональне кріплення
2
Переключатель / Перемикач
Function keys / Funkční klávesy
/ Клавиши режима / Клавіші напрямків
Switch/ Vypínač
Display/Displej
/ Экран / Дисплей
/Функциональные клавиши
/ Функціональні клавіші
Direction keys / Směrové klávesy
Numeric keys / Numerické klávesy
/ Клавиши двойного назначений
/ Цифрові клавіші
AutoTracking mount / Samonaváděcí montáž / Монтировка
с автоматическим трекингом / Багатофункціональне кріплення
Power cable / Napájecí kabel
Переключатель /
Кабель живлення
RJ-45 RJ-12 1 2V DC jack
Konektor 12V DC
Питание
Кабель живлення
Scroll keys / Navigační klávesy
/ Клавиши прокрутки
/ Цифрові клавіші
3 4
1
Page 4
SynScan Firmware Loader
SynScan Firmware Loader
Firmware File:
5
SynScan Firmware Loader
Firmware File:
1.0
Update
Update
SynScan Firmware Loader
Update
Update
HC. Version
1.0
HC. Version
Browse
Browse
6
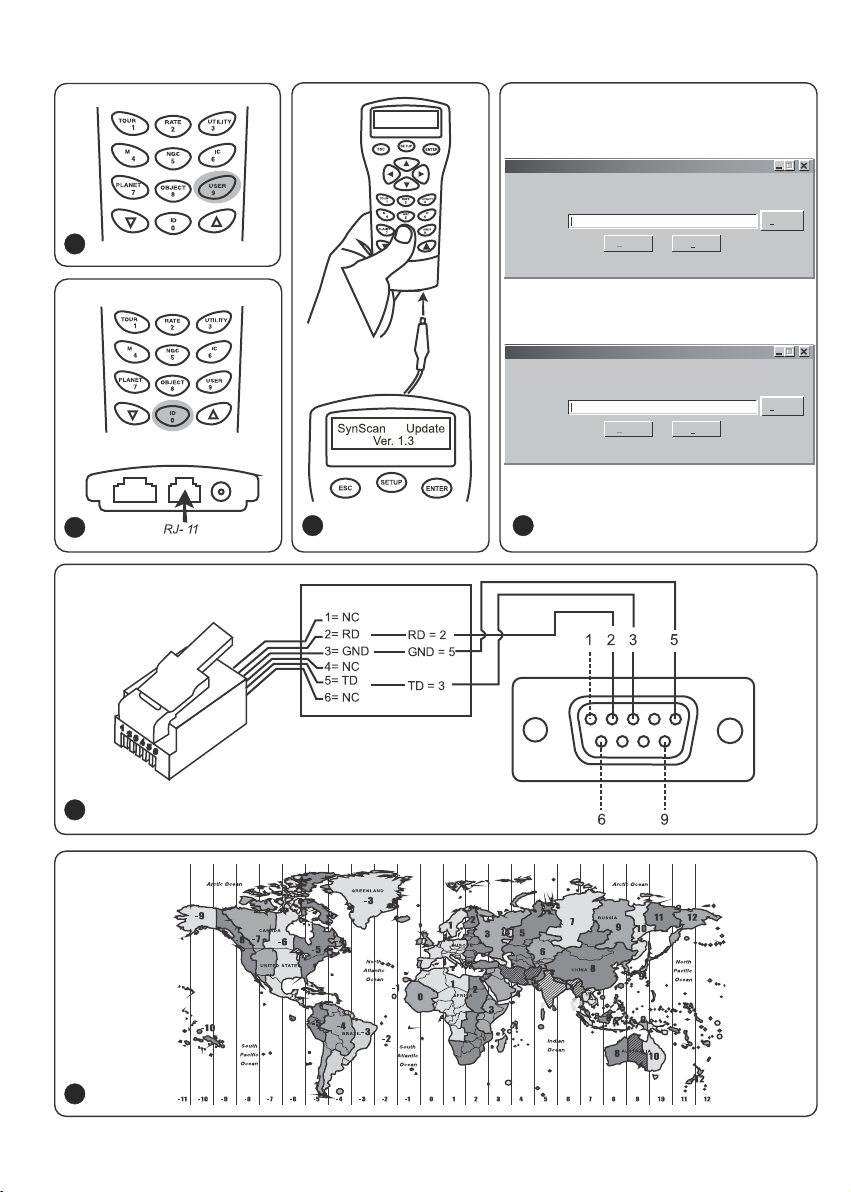
RJ-11 connector
Diagram připojení:
Коннектор RJ-11
Схема з'єднань:
9
10
7 8
Rear view of the DB9 connector
Zadní pohled na konektor Db9
Вид сзади — DB9 6 штекеров
Вигляд ззаду з'єднувача DB9
2
Page 5

Levenhuk GoTo telescopes
EN
Congratulations!
Congratulations on your purchase of a high-quality Levenhuk SkyMatic GoTo telescope! This series
includes modern state of the art optical instruments that allow you to easily navigate across the
celestial sphere and find exactly what you need in no time at all! Easy-to-use controls provide
you with a simple way to locate desired objects and begin your observations at the touch of a
button. The expansive database includes coordinates of over 42,900 objects. Even an
inexperienced stargazer can learn all the functions after a few observations.
If this is your first GoTo telescope, congratulations on making this first step into the world of
amateur stargazing.
Take some time to familiarize yourself with the night sky and learn to recognize the major stars
and constellations. With a little practice, a little patience, and a reasonably dark sky away from
city lights, you’ll find your telescope to be a never-ending source of wonder, joy and exploration.
These instructions will help you set up, properly use, and care for your telescope. Please read
them thoroughly before getting started.
CAUTION! Never look directly at the Sun – even for an instant – through your telescope or
finderscope without a professionally made solar filter that completely covers the front of
the instrument, or permanent eye damage may result. To avoid damage to the internal
parts of your telescope, make sure the front end of the finderscope is covered with
aluminum foil or another non-transparent material. Children should use the telescope
under adult supervision only.
All parts of the telescope will arrive in one box. Be careful when unpacking it. We recommend
keeping the original shipping containers. In the event that the telescope needs to be shipped to
another location, having the proper shipping containers will help ensure that your telescope
survives the journey intact. Make sure all the parts are present in the packaging. Be sure to
check the box carefully, as some parts are small. No tools are needed other than those provided.
All screws should be tightened securely to eliminate flexing and wobbling, but be careful not to
overtighten them, as that may strip the threads.
During assembly (and anytime, for that matter), do not touch the surfaces of the optical
elements with your fingers. The optical surfaces have delicate coatings on them that can easily
be damaged if touched. Never remove mirrors from their housing, or the product warranty will
be null and void.
3
Page 6

Assembling the telescope
Spread the tripod legs apart to stand the tripod upright and attach the accessory tray.
Adjust the height of the tripod as needed. Place the mount atop the tripod head and secure it in
place with a clamping screw.
Loosen the focuser thumbscrew and remove the plastic cap. Insert the 25mm eyepiece into the
focuser. Remove the dust cap from the front of the telescope.
Assemble the finderscope: slide the base of your finderscope into a dovetail mount on the
telescope tube and lock it in place with a thumbscrew.
Connect the hand controller by plugging it into the corresponding port at the lower part of the
mount.
Put eight AA batteries into the battery box, matching the polarity indicated. Plug the battery box
into the appropriate port at the lower part of the mount.
CAUTION!
When not connected to a power source, only altitude coordinates may be adjusted. Do not
attempt to adjust azimuth coordinates, or the telescope warranty will be null and void.
Any adjustments to azimuth coordinates should only be performed with a hand controller,
or the navigation mechanism may be broken.
1
Power requirements
To use a SkyMatic telescope, it has to be connected to a 1A, 11V–15V DC power source. Make sure
the power cable is properly plugged into the 12V DC jack on the mount.
2
SynScan™ AZ hand controller
The hand controller cable has an 8-pin RJ-45 connector on one end and a 6-pin RJ-12 on the
other. Plug the RJ-45 connector into the hand controller and the other end into the mount. There
are three ports at the base of SynScan™ AZ. The middle one is used to connect your telescope to
a computer or any other device with an RS-232 connector. The 12V DC jack on the hand
controller allows you to browse the database or update the software without having to connect
the device to a telescope.
SynScan™ AZ gives you direct control over the telescope navigation and access to an expansive
database of celestial objects. The hand controller has a 16-character backlit display with a
scrolling function.
The keypad may be divided into four groups.
3
4
Page 7

Function keys
Function keys are located at the top of the hand controller, directly below the display.
ESC key may be used to cancel a command or to go up the menu tree. SETUP key may be used to
quickly access the Setup menu. ENTER key may be used to confirm selections and commands.
Direction keys
Direction keys give you complete control over your telescope. When automatically navigating to
the object, these keys are temporarily blocked. They may be used for telescope alignment,
centering on a celestial object and manual navigation. The left and right keys are also used to
control the display cursor when entering data.
Scroll keys
Scroll keys may be used to navigate the menu tree on the display.
Numeric keys
These keys have two functions: numeric entry of coordinates and quick navigation.
TOUR key activates an automatic tour across the observed region of the celestial sphere.
RATE key changes the rotation rate of the servo motors when navigating with direction keys.
There are 10 rates in total, from 0 (lowest) to 9 (fastest).
UTILITY key opens the utility functions, e.g. Show Position, Display Time, etc.
USER key opens the user-created database (up to 25 user-defined objects).
ID key identifies the currently observed object.
NGC, IC, M, PLANET and OBJECT keys open the corresponding catalogue in the database.
First setup
Make sure the mount is leveled. Point your telescope at a bright star or a star cluster. Connect
the hand controller to the mount.
For Auto-Tracking telescopes: power up your telescope by plugging it into a 12V DC power source.
For multi-function telescopes: simply power it up with the ON/OFF switch.
When the hand controller is connected, its display will show the current version number (Version
Screen). Press ENTER. A health warning regarding solar observations will be displayed. If you have
already read this warning, you can press ESC to continue.
If you are not using the hand controller for 30 seconds, it will enter the sleeping mode, the red
LED will be dimmed and the keypad backlight will be switched off. Upon pressing any key, the
sleeping mode will be cancelled.
Enter the longitude and latitude of your current location (in that order) with numeric keys.
Use scroll keys to scroll through cardinal directions: W for west, E for east, N for north and S for
south.
By using the left and right direction keys, you can scroll between the latitude and longitude.
Pressing ENTER will confirm your entry. Data should be entered in the following format: 123° 04’
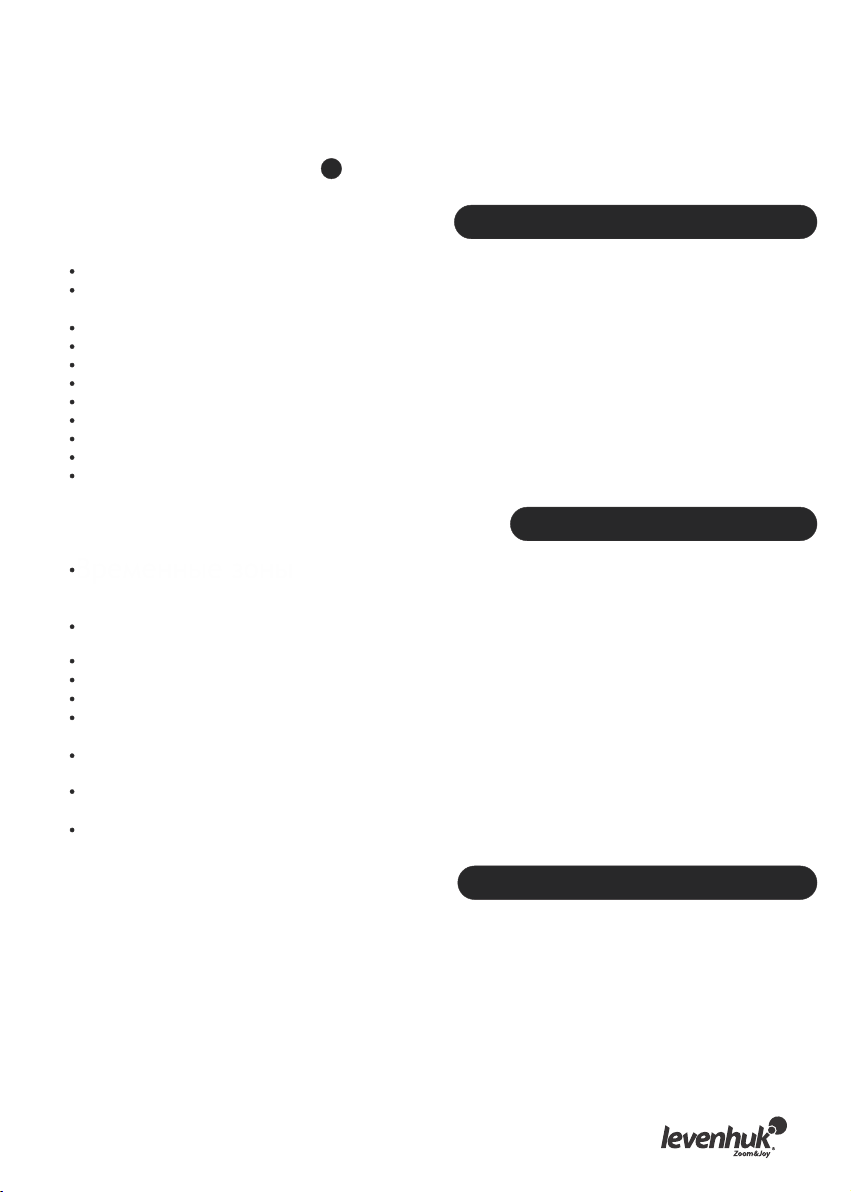
W 49° 09’ N. Select your time zone by entering the hours and minutes using scroll and numeric
keys (+ for east, - for west). The PST time zone (e.g.) should look like this: -08:00.
5
Page 8

Press ENTER to confirm your entry. Enter the current date in mm/dd/yyyy format with numeric
keys. Press ENTER to confirm your entry. Enter the current local time in 24-hour format (2PM =
1400 hrs.). Press ENTER to confirm and move on to setting the daylight savings time. If you want
to correct your entry, press ESC to go back to the previous setting and ENTER to make
corrections.
Upon entering the daylight savings time, a “DAYLIGHT SAVING?” message will be displayed. Use
scroll keys to choose the correct answer and press ENTER to confirm.
When you are finished with these settings, a “Begin alignment?” message will appear on display.
Press 1 or ENTER to begin alignment. Press 2 or ESC to cancel the procedure.
Star alignment
Before your telescope can navigate the expanse of the universe, you have to align it by two or
three known stars. As you know, Earth rotates about its axis during the day. That is why the stars
appear to be moving across the night sky following a curve. When your telescope is being
aligned, it memorizes a map of the celestial sphere and the movement of stars. This alignment
can be performed at any time during your observations (just select Alignment in Setup menu).
There are two methods of star alignment: brightest star alignment and two-star alignment. If this
is your first observation, it is recommended to begin with the brightest star alignment. Before
proceeding, make sure that the finderscope is properly aligned with the telescope tube.
Brightest star alignment
When choosing an alignment setting on the screen of your SynScan™ AZ, scroll to the Brightest
Star Align option. Press ENTER to confirm the selection. The next message – “Select Region” – will
appear, with eight options of azimuth cardinal directions, i.e. N, NE, E, SE, S, SW, W, NW. Each
direction covers a span of 90° along the azimuth, with North at 0° (or 360°), East at 90°, South
at 180° and West at 270°.
NE direction, for instance, covers an area from 0° to 90°.
Direction
Northeast
Southeast
Southwest
Northwest
After you have selected the cardinal direction, the hand controller will create a list of stars of
at least 1.5 stellar magnitude, which may be observed in that direction. Stars that are located
outside the 10°–75° range along the R.A. axis and stars of less than 1.4 stellar magnitude will
not be listed.
Degree span along the azimuth
315°-45°
East
45°-135°
90°-180°
South
135°-225°
180°-270°
West
225°-315°
270°-360°
The information on the alignment star will be displayed on the screen. The first line will tell you
its name and magnitude.
The second line will tell you its approximate location. Let’s assume Arcturus was chosen as the
alignment star. Its magnitude is 0.0, its location is 88.1° E and 24.1° along the R.A. axis.
6
Page 9

The telescope will not turn to point at the first alignment star automatically, so you will have to
do this manually, using the direction keys. You can increase the rotation rate of the servo motor
by pressing the RATE key and scrolling through available options (0 is the slowest, 9 is the
fastest).
Make sure that the star is centered in the field of view (you can use direction keys to center it)
and press ENTER to confirm. Next, you will be prompted to choose a secondary alignment star
from a list. Use scroll keys to choose the second star, and your telescope will automatically turn
to point at the chosen star. Your hand controller will beep once the telescope has finished
rotating. Do not try to adjust anything until you hear the beep. The only command that will be
recognized by SynScan™ AZ at this time is ESC. Center the second star in the field of view with
direction keys. If the alignment has been done properly, the screen will display the “Alignment
Successful” message.
If something has gone wrong, the “Alignment Failed” message will be displayed, and the process
has to be repeated. You can cancel the alignment process at any time by pressing the ESC key.
Two-star alignment
This process is similar to the brightest star alignment, with one exception: it is done without
choosing the azimuth direction.
Choose the 2-Star Align option in the Star Alignment menu with scroll keys. Press ENTER to
confirm the selection.
A list of stars that are visible in your region will appear. Use scroll keys to select one as the
primary alignment star. The telescope will not turn to point at the first alignment star
automatically.
You have to do it manually, using the direction keys, so it is easier to choose a star that you are
familiar with. Center the first star it in the field of view with direction keys.
Press ENTER to confirm the selection. Another list will appear for you to choose a secondary
alignment star. Use scroll keys to choose a star and press ENTER to confirm. The telescope will
automatically turn to point at the second star. Center it in the field of view with direction keys.
Press ENTER to confirm. If the alignment has been done properly, the “Alignment Successful”
message will be displayed. If something has gone wrong, the “Alignment Failed” message will
appear, and the process has to be repeated.
For best results, choose stars that are at least 60° apart, since the greater the distance between
the stars, the more precise the alignment. Choosing the stars with the same R.A. coordinates will
yield even better results.
Pointing Accuracy Enhancement
Any of the above methods should give sufficient accuracy for your observations. However, if you
require additional precision, you may find the Pointing Accuracy Enhancement (PAE) option of
your SynScan™ AZ extremely useful. You can use this function in 85 different regions of the
celestial sphere, which should be enough to cover all of it. Make sure that the region is already
mapped by SynScan™ AZ before proceeding with PAE.
7
Page 10

Center the currently observed object in the field of view (you can skip this step, if this is already
done).
Press and hold the ESC key for two seconds. The “Re-center” message and the name of the
reference object will appear on the display. The object name will blink three times. If you are
using planetarium software for navigation, the “Last goto object” message will appear instead.
Make sure that the reference object is still centered in your field of view and press ENTER.
If you do not wish to save the result, you can press ESC to cancel the operation. Once you press
ENTER, the information on current precision will be recorded and the region map will be updated
accordingly.
From now on, you should notice an increase in pointing precision within this region.
The results of alignment and PAE will be stored in your hand controller and will not be erased on
shutdown.
You may have to repeat the star alignment in the following cases:
1. The telescope hasn’t been returned to its initial position before shutdown.
2. Some of the settings of the telescope and the mount were changed.
Exercise caution when changing accessories, otherwise you might have to realign your
instrument. When turning the hand controller on during your next stargazing session, make sure
you enter the time from the same source, i.e. if you were using your watch to read the time, you
should use the same watch for reference again.
Object database
This GoTo telescope comes with an expansive database of over 42,900 objects, including their
coordinates.It includes the information from the following catalogues:
Solar system, which includes the seven planets and the Moon.
Named stars, which includes 212 well-known stars.
NGC, which includes 7840 brightest deep-sky objects.
IC, which includes 5386 stars and deep-sky objects.
Messier, which includes 110 objects, catalogued by C. Messier.
Caldwell, which includes 109 objects, catalogued by P. Caldwell-Moore.
Binary stars, which includes 55 well-known binary stars.
Variable stars, which includes 20 variable stars.
SAO, which includes 29,523 stars.
Selecting the object
Now that your telescope is aligned, you can begin your observations. There are five ways for you
to choose the object to observe:
TOUR key
Pressing the TOUR key will take you on a tour of the night sky, choosing the brightest and the
most beautiful deep-sky objects. You can scroll through the list of chosen stars with scroll keys.
Press ENTER to confirm your selection. The coordinates of this object will be displayed. Press
ENTER again, and your telescope will automatically locate the object.
4
8
Page 11

M, NGC, IC keys
By pressing M, NGC, IC keys you will open the corresponding catalogue of celestial objects. Input
the number of the object you wish to observe with numeric keys.
Press ENTER and you will see the coordinates of the object on the display. Use scroll keys to see
the information on the object, including its size, magnitude and the corresponding constellation.
Press ENTER again, and your telescope will automatically locate the object.
PLANET key
The PLANET key opens up the Solar system database. Use scroll keys to choose the desired planet
and press enter to confirm your selection. After looking at the coordinates on the screen, press
ENTER again, and your telescope will point at the object.
USER key
The USER key opens up the user-created database. You can input the new object coordinates or
choose an object that you have already saved (for more info, see User database section).
OBJECT key
The OBJECT key grants you access to the full database of over 42,900 celestial objects.
Utility menu
Utility functions are a simple way to control your SynScan™ AZ directly.
SHOW POSITION will give you the coordinates of the currently observed object.
SHOW INFORMATION will show you the current settings of local and sidereal time, and the
information on software versions of the database and SynScan™ AZ. If the hand controller is
connected to the mount, it will also show you the current version of the motor firmware.
PARK SCOPE will bring the telescope tube to the initial (Home) position or memorize the current
position as Home.
PAE gives you access to the Pointing Accuracy Enhancement function.
CLEAR PAE DATA will delete all the PAE data.
GPS allows you to obtain information from the SynScan™ AZ GPS receiver.
Setup menu
This menu allows you to change the current settings of telescope location, date, time and
alignment. To access the setup menu, you can either press the SETUP key, or scroll through the
menu to the SETUP section.
Here is a list of all the functions available in Setup menu:
DATE allows you to change the current date.
TIME allows you to change the current time.
OBSERVING SITE allows you to change the current location.
DAYLIGHT SAVINGS allows you to change the current daylight savings settings.
ALIGNMENT allows you to perform the star alignment procedure once more.
AUTO SELECT will tell your hand controller to automatically choose the stars for star alignment.
SORT BY will tell your hand controller to compile a list of currently visible stars for manual
selection by the user. The stars will be listed either alphabetically or by their stellar magnitude.
BACKLASH allows you to input a value for backlash compensation on each rotation axis. For
precise navigation of your telescope it is important that this value is equal to or greater than the
actual backlash on the axes. The default value is 0 degrees, 0 arcminutes, 0 arcseconds (0d 00’
00’’). Use numeric keys to input the values and move to the next digit with the right direction
key. Calibrate the R.A. axis first. Press ENTER to confirm and calibrate the Dec. axis.
SID. RATE activates the Sidereal tracking rate.
9
Page 12

LUNAR RATE activates the Lunar tracking rate.
SOLAR RATE activates the Solar tracking rate.
STOP TRACKING immediately stops the current tracking.
SET SLEW LIMITS allows you to set up the rotation limits on your mount about its vertical axis.
Setting these limits will prevent any impacts and collisions of your telescope tube and the
mount. The rotation range depends on the actual telescope-mount combination used.
HANDSET SETTING allows you to adjust the display brightness, keypad backlight and alarm
volume of your hand controller. Use the right and left direction keys to adjust.
FACTORY SETTING allows you to roll any changes you have made back to the factory settings.
User database
You can store up to 25 objects in the user database.
5
Saving an object in the database
Use scroll keys to choose the “Object Catalog” in the main menu. Press ENTER to confirm the
selection. Choose the "Select User Defined" option and press ENTER. You can also open this
database by pressing the USER key.
The first option in the submenu is “Recall Object”. This will give you access to the previously
saved objects. Use scroll keys to choose “Edit Objects” and press ENTER.
The telescope is capable of storing the coordinates in two formats: R.A./Dec. and Alt/Az.
Press 1 to choose the R.A./Dec. format, or 2 for Alt/Az format.
SynScan™ AZ will display either the R.A./Dec. or the Alt/Az coordinates of the currently observed
objects by default. This is a sample of what the R.A./Dec. format should read: "22h46.1m +90
00’”. This stands for 22 hours and 46.1 minutes right ascension and 90 degrees declination.
You can change the coordinates with numeric and scroll keys.
With the left and right direction key you can choose between the values to edit. Press ENTER to
save the entered coordinates. If there is no star at the given coordinates, the hand controller
will not save the data. Correct your entry and press ENTER to confirm.
To save the coordinates in Alt/Az coordinates, just point your telescope at a desired object and
press ENTER to confirm. Upon saving the coordinates, the user object ID will be displayed.
Use scroll keys to select the number you want and press ENTER to confirm.
“View object” message will be displayed, along with the saved user object ID. Press ENTER to
locate the object, press ESC to save another object.
When saving the object, you cannot use the previously used ID. Make sure that you know which
user object IDs are taken, before saving a new object.
Choosing an object from the user database
Open the user database (see the instructions above). Choose the “Recall Object” option and
press ENTER. Use scroll keys to choose the object you want to observe.
Press ENTER to see the coordinates of that object. Press ENTER again to have your telescope
navigate to it.
If no object has been saved under a given number, the hand controller will not react. In this
case, use scroll keys again to choose a different object. If you are trying to observe an object
that is currently below horizon, the “Below Horizon!!” warning will be displayed on the screen
and you will be prompted to choose a different object.
10
Page 13

Identifying the unknown object
Your telescope can identify an object, at which it is currently pointing.
To do this, either press the ID key on the keypad or use scroll keys to choose the IDENTIFY
command in the main menu and press ENTER. SynScan™ AZ will display a list of the nearby
objects, as well as the distance from the object to the reticule center.
Scroll through the objects using scroll keys. Press ESC at any time to cancel the command.
6
Connecting to a computer
Your telescope can even be operated through a Stellarium software. To do this, you just have to
plug it into a computer. Make sure that the telescope is properly aligned before proceeding. You
should only plug it into a computer after checking the alignment. Use the cable supplied in the
kit.
Make sure that you use the cable provided, as any error in a substitute may damage your hand
controller or computer.
Once plugged in, you can operate your telescope from a computer.
Make sure to follow the instructions and remember to shut down the computer software before
you unplug the cable.
System requirements
Hand controller firmware 3.0 or later.
Windows 95 or higher.
An RS-232C port on the computer.
The SynScan™ AZ connector cable (supplied in the kit).
7.5~15V/100mA power source. The adapter cord should be tip positive to match the polarity of
the device.
By default, the transfer rate between the hand controller and the PC is set to 115 Kbps. The RS232C port on your PC may not support such high transfer rate. If you are unable to update the
SynScan™ AZ firmware, you can easily change the transfer rate by pressing the SETUP key, while
your hand controller is plugged into a power source. This will lower the transfer rate to 9.6 Kbps.
Upon doing this, a “Lo” icon should appear in the bottom right corner on the display. Now, try
updating the firmware again. Keep in mind that lowering the transfer rate will increase the
update time (up to 4 minutes).
Updating your SynScan™ AZ:
Connect your hand controller to a PC. The RJ-11 connector should go into the middle port on the
SynScan™ AZ, while the DB9 connector should go into the RS-232 port on the computer.
Press and hold the 0 and 8 keys simultaneously, then plug your hand controller into a power
source.
7
11
Page 14

Your hand controller will beep to confirm that the connection has been established.
Run the SynScanFirmwareLoader application on your PC. The “HC. Version” button in the
application window will show you the current version of hardware, firmware and database of
your hand controller.
These numbers are just for your information, and will not be required for the update.
Press “Browse” and locate the “SynScanVXXXXAZ.ssf” file on your hard drive. Press "Update” to
begin updating the firmware.
You can see the update progress below “Update” and “HC. Version” buttons.
Upon finishing the update, the “Update complete” message will appear on the screen. This
process should take about 30 seconds, although if you are using a USB-RS232 adapter, this may
take longer. Congratulations on the successful update of the SynScan™ firmware!
8
If you receive the "Can not connect to a SynScan hand control" message during the update, make
sure that your hand controller is properly connected to the PC.
Close any applications that may be using the RS-232 port and try again.
If you receive the "Firmware update failed…" message, restart the hand controller by unplugging
it from the power supply and plugging it back in. Try running the update again. By default, the
transfer rate between the hand controller and the PC is set to 115 Kbps. The RS-232C port on
your PC may not support such high transfer rate. If you are unable to update the SynScan
firmware, you can easily change the transfer rate by pressing the SETUP key, while your hand
controller is plugged into a power source.
This will lower the transfer rate to 9.6 Kbps. Upon doing this, a “Lo” icon should appear in the
bottom right corner on the display. Now, try updating the firmware again. Keep in mind that this
procedure will also increase the update time (up to 4 minutes).
SETUP MODE
Date
Time
Observ. Site
Daylight Saving Alignment
Brightest
Star Align.
2-Star
Align
Alignment Stars
Auto Select
Sort by Backlash
Tracking
Sidereal Rate
Lunar Rate
Solar Rate
Stop Tracking
Set Slew Limits
Handset Setting
Factory Setting
MAIN MENU
UTILITY FUNC.
Show Position
Show Information
Time Version
Temperature
Power
Voltage
Park Scope
PAE
Clear PAE Data
GPS
PC Direct Mode
OBJECT CATALOG TOUR
Solar System
Mercury
Venus
Mars
Jupiter
Saturn
Uranus
Neptune
Pluto
Moon
Named Star
Messier Catalogue
IC Catalog
NGC Catalog
Caldwell Catalog
SAO Catalogue
Double Star
Variable Star
User defined
Edit Object
Recall Object
12
IDENTIFY
Page 15

Specifications
SkyMatic 135 GTA
SkyMatic 105 GT MAK
SkyMatic 127 GT MAK
Optical design
Reflector
Maksutov-Cassegrain
Maksutov-Cassegrain
Objective lens diameter
130 mm
102 mm
127 мм
Focal length; aperture
650 mm; f/5
1300 mm; f/12.8
1500 мм; f/11,8
Highest practical power
260x
204x
250x
Resolution threshold
0.92 arcseconds
1.18 arcseconds
1.1 arcseconds
Eyepiece
1.25'' SUPER10 &
SUPER25
1.25'' SUPER10 &
SUPER25
1.25" SUPER10 &
SUPER25
Finderscope
6x30
6x30
6x30
Mount type
AZ 114 GT; AZ SynScan
AZ 114 GT; AZ SynScan
AZ 114 GT; AZ SynScan
Tripod
stainless steel; 24-44.3
in. (630-1125 mm)
stainless steel; 24-44.3
in. (630-1125 mm)
stainless steel; 24.8–45.3
in (630–1150 mm)
Name
PC ASCII
command
SynScan controller
Information
Echo
Kx
Kx
Checks the connection to PC
Goto Az-Alt
B12AB, 4000
#
Sends ten characters. B = Command, 12AB = Az
coordinates, comma, 4000 = Alt coordinates. If the
command conflicts with preset limits, it will not be
executed
Goto RА-Dec
R34B, 12CE
#
The finderscope has to be aligned. If the command
conflicts with preset limits, it will not be executed
Get Az-Alt
Z
12AB, 4000#
Returns ten characters. 12AB = Azimuth
coordinates, comma, 4000
Power supply
Motor type
Resolution
Slew rate
1A, 11 ~ 15V DC (tip positive) DC
servo motors 1.8°
0.144 arcseconds or 9,024,000 steps/rev (AZ-80)
0 = 1.0x, 1 = 2.0x, 2 = 16x, 3 = 32x, 4 = 64x, 5 = 128x
6 = 400x, 7 = 500x, 8 = 600x, 9 = 800x
Tracking rate
Tracking mode
Alignment method
Pointing accuracy
Database
sidereal, lunar, solar
dual-axis tracking
brightest star alignment, two-star alignment
up to 10 arcminutes
25 user-defined objects M, NGC, IC and SAO catalogues,
totaling in 42,900 objects
Connection diagram:
9
To operate the SkyMatic GoTo telescope from a computer, you have to connect it to a PC through
an RS-232 port. After this, you can use any planetarium software available today to send
commands to your telescope.
The transfer rate of SynScan™ AZ to PC connection is 9600 bps, without parity or stop bits. All the
commands from your PC are transferred using the binary scaling technique.
13
Page 16

Get RA-Dec
E
34AB, 12CE#
The finderscope has to be aligned
Cancel Goto
M
#
Is Goto in
Progress
L
0# or 1#
0 = No, 1 = Yes. “0” is the ASCII zero character
Is Alignment
Complete
J
0# or 1#
0 = No, 1 = Yes
HC version
V
22
Two bytes represent Version 2.2
Stop/Start
Tracking
Tx x = 0
(tracking off)
x = 1 (Alt-Az
on) x = 2
(EQ-N) x = 3
(EQ-S)
#
Alt-Az tracking requires alignment
32-bit goto RADec
r34AB0500,1
2CE0500
#
32-bit get RADec
e
34AB0500,
12CE0500#
The last two characters should always be zero
32-bit goto AzmAlt
b34AB0500,1
2CE0500
#
32-bit get AzmAlt
z
34AB0500,
12CE0500#
The last two characters should always be zero
Additional commands
Setting the tracking rate via Rs232:
1. Multiply the required tracking rate (arcseconds/seconds) by 4. For instance, if you want to
track an object at 120 arcseconds/second (approx. 8 times more than sidereal rate), then
TRACKRATE should be 480.
2. Divide TRACKRATE into two bytes, so that TRACKRATE = TrackRateHighByte*256 +
TrackRateLowByte. E.g. if TRACKRATE = 480, then TrackRateHighByte = 1, TrackRateLowByte =
224.
3. To set the tracking rate, send the following 8-byte command:
a. Positive Az tracking: 80, 3, 16, 6, TrackRateHighByte, TrackRateLowByte, 0, 0
b. Negative Az tracking: 80, 3, 16, 7, TrackRateHighByte, TrackRateLowByte, 0, 0
c. Positive Alt tracking: 80, 3, 17, 6, TrackRateHighByte, TrackRateLowByte, 0, 0
d. Negative Alt tracking: 80, 3, 17, 7, TrackRateHighByte, TrackRateLowByte, 0, 0
4. Hand controller returns “35”.
Sending a slow-Goto command via Rs232:
1. Convert the angular position into a 24-bit number. E.g. if the desired angular position is 220°,
then POSITION_24BIT = (220/360)*224 = 10,252,743.
2. Divide POSITION_24BIT into three bytes, so that POSITION_24BIT = PosHighByte * 65536 +
PosMedByte *256 + PosLowByte. E.g. if POSITION_24BIT = 10,252,743, then PosHighByte = 156,
PosMedByte = 113, PosLowByte = 199.
3. Send the following 8-byte command:
a. Az slow Goto: 80, 4, 16, 23, PosHighByte, PosMedByte, PosLowByte, 0
b. Alt slow Goto: 80, 4, 17, 23, PosHighByte, PosMedByte, PosLowByte, 0
4. Hand controller returns “35”.
Resetting the Alt and Az positions
14
Page 17
1. Convert the angular position into a 24-bit number (see “Slow-Goto command”).
2. Send the following 8-byte command:
a. Set Az position: 80, 4, 16, 4, PosHighByte, PosMedByte, PosLowByte, 0 b. Set Alt position: 80,
4, 17, 4, PosHighByte, PosMedByte, PosLowByte, 0
3. Hand controller returns “35”.
10
Batteries safety instructions
Always purchase the correct size and grade of battery most suitable for the intended use.
Always replace the whole set of batteries at one time; taking care not to mix old and new ones,
or batteries of different types.
Clean the battery contacts and also those of the device prior to battery installation.
Make sure the batteries are installed correctly with regard to polarity (+ and -).
Remove batteries from equipment that is not to be used for an extended period of time.
Remove used batteries promptly.
Never attempt to recharge primary batteries as this may cause leakage, fire, or explosion.
Never short-circuit batteries as this may lead to high temperatures, leakage, or explosion.
Never heat batteries in order to revive them.
Remember to switch off devices after use.
Keep batteries out of the reach of children, to avoid risk of ingestion, suffocation, or poisoning.
Care and maintenance
Never, under any circumstances, look directly at the Sun through this device without a special
filter, or look at another bright source of light or at a laser, as this may cause PERMANENT
RETINAL DAMAGE and may lead to BLINDNESS.
Take necessary precautions when using the device with children or people who have not read or
who do not fully understand these instructions.
Do not try to disassemble the device on your own for any reason, including to clean the mirror.
For repairs and cleaning of any kind, please contact your local specialized service center.
Protect the device from sudden impact and excessive mechanical force.
Do not touch the optical surfaces with your fingers. To clean the telescope exterior, use only
special cleaning wipes and special optics cleaning tools from Levenhuk.
Store the device in a dry, cool place away from hazardous acids and other chemicals, away from
heaters, open fire and other sources of high temperatures.
Replace the dust cap over the front end of the telescope whenever it is not in use. This prevents
dust from settling on the mirror or lens surfaces.
Seek medical advice immediately if a small part or a battery is swallowed.
Levenhuk Limited Warranty
All Levenhuk telescopes, microscopes, binoculars and other optical products, except for accessories, carry
a lifetime warranty against defects in materials and workmanship. All Levenhuk accessories are warranted
to be free of defects in materials and workmanship for six months from date of retail purchase. Levenhuk will
repair or replace such product or part thereof which, upon inspection by Levenhuk, is found to be defective in
materials or workmanship. As a condition to the obligation of Levenhuk to repair or replace such product, the
product must be returned to Levenhuk together with proof of purchase satisfactory to Levenhuk.
This warranty does not cover consumable parts, such as batteries.
A Return Authorization (RA) Number must be obtained in advance of return. Contact the local Levenhuk branch
to receive the RA number to be displayed on the outside of your shipping container. All returns must be
accompanied by a written statement setting forth the name, address and telephone number of the owner,
15
Page 18

including a description of any claimed defects. Parts or products for which replacement is made will become
the property of Levenhuk.
The customer will be responsible for all costs of transportation and insurance to and from Levenhuk or its
authorized dealers and will be required to prepay such costs.
Levenhuk will use reasonable efforts to repair or replace any product covered by this warranty within thirty
days of receipt. If a repair or replacement will require more than thirty days, Levenhuk will notify the
customer accordingly. Levenhuk reserves the right to replace any product that has been discontinued from its
product line with a new product of comparable value and function.
This warranty does not apply to any defects or damages resulting from alteration, modification, neglect,
misuse, usage of improper power sources, damage in transportation, abuse, or any cause other than normal
use, or to malfunction or deterioration due to normal wear.
Levenhuk disclaims all warranties, express or implied, whether of merchantability or fitness for a particular
use, except as expressly set forth herein. The sole obligation of Levenhuk under this limited warranty will be
to repair or replace the covered product, in accordance with the terms set forth herein. Levenhuk disclaims
liability for any loss of profits, loss of information, or for any general, special, direct, indirect or
consequential damages which may result from breach of any warranty, or arising out of the use or inability to
use any Levenhuk product. Any warranties which are implied and which cannot be disclaimed will be limited in
duration to a term of six months for accessories from the date of retail purchase.
Some states/provinces do not allow the exclusion or limitation of incidental or consequential damages, so the
above limitations and exclusions may not apply to you. This warranty gives you specific legal rights, and you
may have other rights which vary from state to state or province to province.
Levenhuk reserves the right to modify or discontinue any product without prior notice.
NOTE: This warranty is valid to USA and Canadian customers who have purchased this product from an
authorized Levenhuk dealer in the USA or Canada. Warranty outside the USA or Canada is valid only to
customers who purchased from an authorized Levenhuk dealer in the specific country or international
distributor. Please contact them for any warranty service.
If warranty problems arise, or if you need assistance in using your product, contact the local Levenhuk branch:
Levenhuk Worldwide:
USA: www.levenhuk.com
Canada: www.levenhuk.ca
Czech Republic: www.levenhuk.cz
Netherlands: www.levenhuk.nl
Poland: www.levenhukoptics.pl
Russia: www.levenhuk.ru
Ukraine: www.levenhuk.ua
EU: www.levenhuk.eu
Purchase date ___________________________________ Signature ________________________________ Stamp
16
Page 19

Teleskopy Levenhuk GoTo
CZ
Blahopřejeme!
Blahopřejeme vám k nákupu vysoce kvalitního teleskopu Levenhuk SkyMatic GoTo! V této řadě
jsou zastoupeny moderní optické přístroje, které vám umožňují snadno se zorientovat na
nebeské sféře a doslova okamžitě najít přesně to, co hledáte. Snadno použitelné ovládací prvky
vám nabízejí jednoduchý způsob, jak nalézt požadované objekty a pouhým stisknutím tlačítka
zahájit svá pozorování. V obsáhlé databázi jsou uvedeny souřadnice více než 42 900 objektů. I
nezkušený astronom se všechny funkce naučí používat během pouhých několika pozorování.
Jedná-li se o váš první teleskop SkyMatic GoTo, blahopřejeme vám k prvnímu kroku do světa
amatérské astronomie.
Věnujte čas seznámení se s noční oblohou a naučte se rozpoznávat známé hvězdy a souhvězdí. S
trochou praxe, určitou dávkou trpělivosti a při dostatečně tmavé obloze daleko od světel města
se váš teleskop stane nevyčerpatelným zdrojem úžasu, radosti a poznatků.
Tento návod vám ukáže, jak teleskop sestavit, správně používat a pečovat o něj. Proto si jej
nejprve důkladně pročtěte.
VÝSTRAHA! Nikdy – ani na okamžik - se přes teleskop nebo pointační dalekohled (hledáček)
nedívejte přímo do slunce, aniž byste použili odborně vyrobený solární filtr, který bude
zcela překrývat objektiv přístroje. Nedodržením tohoto pokynu se vystavujete nebezpečí
trvalého poškození zraku. Abyste zabránili poškození vnitřních součástí svého teleskopu,
zakryjte čelní stranu pointačního dalekohledu (hledáčku) hliníkovou fólií nebo jiným
neprůhledným materiálem. Děti by měly teleskop používat pouze pod dohledem dospělé
osoby.
Všechny součásti teleskopu jsou dodávány v jediné krabici. Při jejím vybalování postupujte
opatrně. Doporučujeme vám uschovat si originální přepravní obaly. V případě, že bude potřeba
teleskop přepravit do jiného místa, mohou správné přepravní obaly pomoci předejít poškození
teleskopu při přepravě. Přesvědčte se, zda jsou v obalu všechny součásti. Obsah důkladně
zkontrolujte, neboť některé součásti jsou malé. Kromě nástrojů, jež jsou součástí dodávky,
nepotřebujete žádné jiné pomůcky. Abyste vyloučili deformace a viklání, musejí být všechny
šrouby pevně utaženy, ale dbejte na to, abyste je nepřetáhli, neboť může dojít ke stržení závitů.
Během montáže (ani nikdy jindy) se svými prsty nedotýkejte povrchu optických součástí. Povrchy
optických prvků jsou potaženy speciální choulostivou vrstvou, kterou lze při doteku snadno
poškodit. Zrcadla nikdy nevyjímejte z jejich pouzdra; nedodržení tohoto pokynu má za následek
neplatnost záruky.
17
Page 20

Sestavení teleskopu
Nohy stativu roztáhněte tak, aby bylo stativ možno vzpřímeně postavit, a připevněte k němu
přihrádku na příslušenství.
Dle potřeby nastavte výšku stativu. Na hlavu stativu položte montáž a pomocí upínacího šroubu ji
zajistěte na místě.
Uvolněte křídlatý šroub na okulárovém výtahu a sejměte plastové víčko. Do okulárového výtahu
vložte okulár 25 mm. Z čela teleskopu sejměte ochranný kryt.
Sestavte pointační dalekohled: základnu pointačního dalekohledu zasuňte do rybinového spoje na
tubusu dalekohledu a pomocí křídlatého šroubu jej upevněte ve správné poloze.
Zasunutím do příslušného portu ve spodní části montáže připojte ruční ovladač.
Do skříňky na baterie vložte osm baterií typu AA, přitom dbejte na dodržení vyznačené polarity.
Skříňku s bateriemi připojte k příslušnému portu v dolní části montáže.
VÝSTRAHA!
Při odpojení od zdroje napájení lze nastavoval pouze souřadnice nadmořské výšky.
Nepokoušejte se upravovat souřadnice azimutu, mohlo by dojít k zneplatnění záruky.
Jakékoli úprav\y azimutu by se měly provádět výhradně pomocí ručního ovladače, v
opačném případě může dojít k poškození navigačního mechanismu.
1
Požadavky na napájení
Při použití musí být teleskop SkyMatic připojen k napájecímu zdroji o parametrech 1A, 11—15V.
Přesvědčte se, zda je napájecí kabel řádně připojen k zásuvce 12 V DC na montáži.
2
Ruční ovladač SynScan™ AZ
Kabel ručního ovladače je na jednom konci opatřen konektorem RJ-45 s osmi kolíky a na druhém
konektorem RJ-12 se šesti kolíky. Konektor RJ-45 připojte k ručnímu ovladači a druhý konec k
montáži. Ve spodní části ovladače SynScan™ AZ jsou tři porty. Prostřední z nich se používá k
připojení teleskopu k libovolnému zařízení s konektorem RS-232. Konektor 12V DC na ručním
ovladači vám umožňuje procházet databázi nebo provádět aktualizaci software, aniž byste
museli zařízení připojovat k teleskopu.
SynScan™ AZ vám umožňuje plnou kontrolu nad navigací teleskopu a přístup k rozsáhlé databázi
nebeských objektů. Ruční ovladač má podsvícený displej se 16 znaky a s funkcí rolování.
Klávesnici lze rozdělit do čtyř skupin.
3
18
Page 21

Funkční klávesy
Funkční klávesy se nacházejí v horní části ovladače, přímo pod displejem.
Klávesu ESC můžete použít ke zrušení příkazu nebo k přechodu o úroveň výše v hierarchii
nabídky. Klávesa SETUP slouží k rychlému přístupu do nabídky Setup (Nastavení). Klávesa ENTER
slouží k potvrzení vybraných možností a příkazů.
Směrové klávesy
Směrové klávesy vám dávají úplnou kontrolu nad teleskopem. Při automatickém navádění
směrem k objektu se tyto klávesy dočasně zablokují. Lze je použít k seřízení teleskopu, jeho
vycentrování na nebeský objekt a k ruční navigaci. Levá a pravá klávesa se dále používá k
ovládání kurzoru na displeji při zadávání dat.
Navigační klávesy
Navigační klávesy slouží k navigaci stromem nabídky na displeji.
Numerické klávesy
Tyto klávesy mají dvojí funkci: numerické zadání souřadnic a rychlou navigaci.
Klávesa TOUR aktivuje automatické procházení pozorovanou oblastí nebeské sféry.
Klávesa RATE mění rychlost otáčení servomotorů při navádění pomocí směrových kláves. K
dispozici je celkem 10 rychlostí, od 0 (nejpomalejší) po 9 (nejrychlejší).
Klávesa UTILITY otevírá pomocné funkce, např. zobrazení polohy, času apod.
Klávesa USER otevírá databázi vytvořenou uživatelem (až 25 uživatelem definovaných objektů).
Klávesa ID slouží k identifikaci aktuálně pozorovaného objektu.
Klávesy NGC, IC, M, PLANET a OBJECT otevírají odpovídající katalog v databázi.
První nastavení
Ujistěte se, že je montáž ve stabilní poloze. Zaměřte teleskop na jasnou hvězdu nebo
hvězdokupu. K montáži připojte ruční ovladač.
U teleskopů s automatickým naváděním: teleskop zapněte připojením ke zdroji napájení 12V DC.
U multifunkčních teleskopů: prostě je zapněte pomocí vypínače ON/OFF.
Po připojení ručního ovladače se zobrazí číslo aktuální verze (obrazovka s verzí). Stiskněte
klávesu ENTER. Zobrazí se bezpečnostní výstraha týkající se pozorování Slunce. Po přečtení této
výstrahy můžete pokračovat stisknutím klávesy ESC.
Nepoužíváte-li ruční ovladač po dobu 30 sekund, přejde do režimu spánku. Červená LED dioda
pohasne a vypne se podsvícení displeje. Režim spánku lze zrušit stisknutím libovolné klávesy.
Pomocí numerických kláves zadejte zeměpisnou délku a šířku své aktuální polohy (v tomto
pořadí).
K procházení světových stran použijte navigační klávesy: W označuje západ, E východ, N sever a
S jih.
Pomocí pravé a levé směrové klávesy můžete přecházet mezi zeměpisnou šířkou a délkou.
Zvolenou nebo zadanou položku potvrdíte pomocí klávesy ENTER. Údaje se musí zadávat v
následujícím formátu: 123° 04' W 49° 09' N. Zadáním hodin a minut pomocí navigačních a
19
Page 22

numerických kláves zvolte své časové pásmo (+ pro východ, — pro západ). Např. časové pásmo
PST by se mělo zadat v následující podobě: -08:00. Svou volbu potvrďte stisknutím klávesy
ENTER. Pomocí numerických kláves zadejte aktuální datum ve formátu mm/dd/rrrr. Svou volbu
potvrďte stisknutím klávesy ENTER. Zadejte aktuální lokální čas ve 24-hodinovém formátu.
Stisknutím klávesy ENTER potvrďte zadání a přejděte na nastavení letního času. Chcete-li své
zadání opravit, stisknutím klávesy ESC přejděte na předchozí nastavení a pak klávesou ENTER
potvrďte provedené opravy.
Po zadání letního času se zobrazí zpráva “DAYLIGHT SAVING?” Pomocí navigačních kláves zvolte
správnou odpověď a stisknutím klávesy ENTER ji potvrďte.
Po provedení tohoto nastavení se na displeji zobrazí zpráva “Begin alignment?”
Stisknutím klávesy 1 nebo ENTER zahájíte proces ustavení. Stisknutím klávesy 2 nebo ESC tento
proces zrušíte.
Polární ustavení
Dříve než svým teleskopem budete moci procházet hlubiny vesmíru, musíte jej ustavit podle
dvou nebo tří známých hvězd. Jak víte, Země se během dne otáčí kolem své osy. Proto se zdá,
jakoby se hvězdy během noci po noční obloze pohybovaly po křivce. Jakmile svůj teleskop
ustavíte, zapamatuje si mapu nebeské sféry i pohyb hvězd. Tuto kalibraci lze provést i kdykoli
během pozorování (prostě v nabídce Setup zvolte položku Alignment).
Existují dvě metody kalibrace podle polohy hvězd: kalibrace podle nejjasnější hvězdy a kalibrace
podle dvou hvězd. Jedná-li se o vaše první pozorování, doporučujeme začít s ustavením podle
nejjasnější hvězdy. Dříve, než budete pokračovat, ujistěte se, zda je hledáček řádně seřízen
vůči tubusu teleskopu.
Kalibrace podle nejjasnější hvězdy
Při výběru metody kalibrace na obrazovce svého ovladače SynScan™ AZ přejděte rolováním na
možnost Brightest Star Align. Stisknutím klávesy ENTER potvrďte volbu. Zobrazí se další zpráva —
"Select Region", nabízející osm volitelných možností hlavních horizontálních směrů (azimut), tj.
N, NE, E, SE, S, SW, W, NW. Každý směr pokrývá rozpětí 90° podél horizontu, přičemž sever má
azimut 0° (nebo 360°), východ 90°, jih 180° a západ 270°.
Například směr NE pokrývá oblast od 0° do 90°.
Směr
severovýchod (NE)
jihovýchod (SE)
jihozápad (SW)
severozápad (NW)
Rozsah ve stupních podle azimutu
315°-45°
45°-135°
východ
90°-180°
135°-225°
jih
180°-270°
225°-315°
západ
270°-360°
Po provedení volby hlavního směru vytvoří ruční ovladač seznam hvězd o hvězdné velikosti
minimálně 1,5, které lze v tomto směru pozorovat. Hvězdy nacházející se mimo rozsah 10°–75°
podle osy rektascenze a hvězdy o nižší hvězdné velikosti než 1,4 nebudou v seznamu uvedeny.
Na displeji se zobrazí informace o hvězdě, podle níž se bude provádět ustavení. Na prvním
řádku bude uveden její název a velikost.
20
Page 23

Na druhém řádku bude uvedena její přibližná poloha. Předpokládejme, že za hvězdu, podle níž
se provádí ustavení, byl zvolen Arktur. Jeho hvězdná velikost je 0,0, poloha je 88,1° E a 24,1°
podle osy rektascenze.
Teleskop se nebude směrem k první hvězdě, podle níž se provádí ustavení, otáčet automaticky,
nastavení musíte provést ručně, pomocí směrových kláves. Rychlost otáčení servomotoru
můžete zvýšit stisknutím klávesy RATE a zvolením jedné z nabízených možností (0 je
nejpomalejší, 9 nejrychlejší).
Ujistěte se, že je hvězda ve středu zorného pole (k vycentrování můžete použít směrové
klávesy) a stisknutím klávesy ENTER volbu potvrďte. Následně budete vyzváni k tomu, abyste ze
seznamu vybrali sekundární hvězdu, podle níž se bude kalibrace provádět. Pomocí navigačních
kláves zvolte druhou hvězdu a váš teleskop se automaticky nastaví na vybranou hvězdu. Jakmile
teleskop ukončí otáčení, váš ruční ovladač vydá jedno pípnutí. Dokud neuslyšíte toto pípnutí,
nepokoušejte se nic nastavovat. Jediný příkaz, na který bude SynScan™ AZ v tuto chvíli
reagovat, je ESC. Pomocí směrových kláves nastavte druhou hvězdu do středu zorného pole.
Pokud byla kalibrace provedena správně, na displeji se zobrazí hlášení „Alignment Successful“.
V případě, že kalibrace neproběhla správně, zobrazí se zpráva „Alignment Failed“ a celý proces
se musí opakovat. Stisknutím klávesy ESC můžete proces kalibrace kdykoli přerušit.
Kalibrace podle dvou hvězd
Tento proces je podobný jako v případě kalibrace podle nejjasnější hvězdy, s jednou výjimkou:
provádí se bez volby azimutu.
V nabídce Star Alignment vyberte pomocí navigačních kláves možnost 2-Star Align. Stisknutím
klávesy ENTER potvrďte volbu.
Zobrazí se seznam hvězd viditelných ve vašem regionu. Pomocí navigačních kláves si vyberte
jednu z nich, která se použije jako primární hvězda, podle níž se bude provádět ustavení.
Teleskop se k této první hvězdě, podle níž se bude provádět ustavení, nenavede automaticky.
Zaměření teleskopu budete muset provést ručně pomocí směrových kláves, je tedy jednodušší
zvolit si hvězdu, kterou dobře znáte. Pomocí směrových kláves nastavte první hvězdu do středu
zorného pole.
Stisknutím klávesy ENTER potvrďte volbu. Zobrazí se další seznam s nabídkou druhé hvězdy,
podle níž se má provádět ustavení. Pomocí navigačních kláves zvolte některou hvězdu ze
seznamu a stisknutím klávesy ENTER ji potvrďte. Teleskop se na druhou hvězdu navede
automaticky. Pomocí směrových kláves ji nastavte do středu zorného pole.
Stisknutím klávesy ENTER nastavení potvrďte. Pokud byla kalibrace provedena správně, na
displeji se zobrazí hlášení „Alignment Successful“. V případě, že kalibrace neproběhla správně,
zobrazí se zpráva „Alignment Failed“ a celý proces se musí opakovat.
Nejlepších výsledků dosáhnete, zvolíte-li hvězdy, které jsou od sebe vzdáleny alespoň 60°, neboť
čím větší je vzdálenost mezi hvězdami, tím přesnější je ustavení. Ještě lepších výsledků lze
dosáhnout volbou hvězd se stejnými souřadnicemi na ose rektascenze.
21
Page 24

Zvýšení přesnosti pointace
Kterákoli ze shora uvedených metod by měla zajistit dostatečnou přesnost pro vaše pozorování.
Pokud však vyžadujete ještě vyšší přesnost, může pro vás být mimořádně užitečná funkce zvýšení
přesnosti pointace (PAE), kterou SynScan™ AZ nabízí. Tuto funkci můžete použít v 85 různých
oblastech na nebeské sféře, což by mělo stačit k jejímu úplnému pokrytí. Před použitím funkce
PAE se ujistěte, že je daná oblast již zmapována ovladačem SynScan™ AZ.
Nastavte aktuálně pozorovaný objekt do středu zorného pole (pokud již ve středu je, můžete
tento krok přeskočit).
Stiskněte a na dobu dvou sekund podržte klávesu ESC. Na displeji se zobrazí zpráva „Re-center“ a
název referenčního objektu. Název objektu třikrát zabliká. Pokud k navádění používáte software
planetárium, zobrazí se místo něj zpráva „Last goto object“. Ujistěte se, zda je referenční
objekt stále ve středu zorného pole a stiskněte ENTER.
Pokud nechcete výsledek uložit, můžete stisknutím klávesy ESC operaci zrušit. Po stisknutí
klávesy ENTER se zaznamenají údaje o aktuální přesnosti a mapa oblasti se příslušným způsobem
aktualizuje.
Od tohoto okamžiku byste měli pozorovat zvýšení přesnosti pointace v dané oblasti.
Výsledky kalibrace a PAE se uloží ve vašem ručním ovladači a při vypnutí nedojde k jejich ztrátě.
Kalibraci podle hvězd bude možná nutné opakovat v následujících případech:
1. Teleskop se před vypnutím nevrátil do své výchozí polohy.
2. Některá nastavení teleskopu a montáže se změnila.
Při výměně příslušenství postupujte opatrně, abyste nemuseli provádět opakovanou kalibraci
svého přístroje. Když budete svůj ruční ovladač zapínat při příštím pozorování, zadávejte časový
údaj ze stejného zdroje, tj. pokud jste k odečtu času používali své hodinky, měli byste jako zdroj
referenčního časového údaje použít stejné hodinky.
Databáze objektů
Tento naváděný (GoTo) teleskop se dodává s rozsáhlou databází více než 42 900 objektů, včetně
jejich souřadnic.
Obsahuje informace z následujících katalogů:
Sluneční soustava, obsahující údaje o sedmi planetách a Měsíci.
Seznam pojmenovaných hvězd, obsahující 212 známých hvězd.
Katalog NGC, který obsahuje 7840 nejjasnějších objektů hlubokého vesmíru.
Katalog IC, který obsahuje 5 386 hvězd a objektů hlubokého vesmíru.
Katalog Messier, obsahující 110 objektů klasifikovaných C. Messierem.
Katalog Caldwell, obsahující 109 objektů klasifikovaných P. Caldwellem-Moorem.
Seznam dvojhvězd, obsahující 55 známých dvojhvězd.
Seznam proměnných hvězd, který obsahuje 20 proměnných hvězd.
Katalog SAO, který obsahuje 29 523 hvězd.
Výběr objektu
Po kalibraci svého teleskopu můžete zahájit vlastní pozorování. Existuje pět způsobů, kterými si
můžete vybrat objekt k pozorování:
4
22
Page 25

Stisknutí klávesy TOUR vás zavede na výpravu po noční obloze, na které se seznámíte s
nejjasnějšími a nejkrásnějšími objekty hlubokého vesmíru. Seznamem vybraných hvězd můžete
procházet pomocí navigačních kláves. Svou volbu potvrďte stisknutím klávesy ENTER. Zobrazí se
souřadnice vybraného objektu. Ještě jednou stiskněte klávesu ENTER a váš teleskop objekt
automaticky lokalizuje.
Po stisknutí kláves M, NGC nebo IC se otevře odpovídající katalog nebeských objektů. Pomocí
numerických kláves zadejte číslo objektu, který chcete pozorovat.
Stiskněte ENTER a na displeji uvidíte souřadnice objektu. Pomocí navigačních kláves zobrazíte
informace o objektu, včetně jeho velikosti, hvězdné velikosti a příslušné souhvězdí. Ještě
jednou stiskněte klávesu ENTER a váš teleskop objekt automaticky lokalizuje.
Klávesa PLANET otevře databázi sluneční soustavy. Pomocí navigačních kláves zvolte
požadovanou planetu a stisknutím klávesy ENTER volbu potvrďte. Po zobrazení souřadnic na
displeji stiskněte znovu ENTER a váš teleskop se navede na požadovaný objekt.
Klávesa USER otevírá databázi vytvořenou uživatelem. Můžete zadat souřadnice nového objektu
nebo zvolit některý objekt, který jste si dříve uložili (další informace naleznete v části textu
věnované uživatelské databázi).
Klávesa OBJECT vám nabízí přístup k úplné databázi více než 42 900 nebeských objektů.
Nabídka pomocných funkcí
Pomocné funkce představují jednoduchý způsob, jak přímo ovládat váš SynScan™ AZ.
Funkce SHOW POSITION vám ukáže souřadnice aktuálně pozorovaného objektu.
Funkce SHOW INFORMATION vám zobrazí aktuální nastavení lokálního a hvězdného (siderického)
času a informace o verzi software databáze a firmware SynScan™ AZ. Je-li ruční ovladač připojen
k montáži, ukáže vám zároveň aktuální verzi firmware elektromotoru.
Funkce PARK SCOPE přesune teleskop do výchozí (domácí) polohy nebo uloží aktuální polohu jako
domácí.
Tlačítko PAE nabízí přístup k funkci zvýšení přesnosti pointace.
Tlačítko CLEAR PAE DATA smaže veškeré údaje týkající se PAE.
Funkce GPS vám umožní získat informace z přijímače GPS zařízení SynScan™ AZ.
Nabídka Setup (Nastavení)
V této nabídce můžete změnit aktuální nastavení polohy teleskopu, datum, čas a hodnoty
ustavení. Do nabídky nastavení lze vstoupit buď stisknutím klávesy SETUP, nebo procházením
nabídky až k položce SETUP.
V následujícím textu je uveden seznam všech funkcí, jež jsou v nabídce Setup k dispozici:
DATE vám umožňuje nastavit aktuální datum.
TIME vám umožňuje nastavit aktuální čas.
OBSERVING SITE vám umožňuje nastavit aktuální polohu.
DAYLIGHT SAVING vám umožňuje měnit aktuální nastavení letního času.
ALIGNMENT vám umožňuje zopakovat postup kalibrace podle hvězd.
AUTO SELECT dá pokyn ručnímu ovladači, aby automaticky vybral objekty pro kalibraci podle
hvězd.
23
Page 26

SORT BY dá pokyn ručnímu ovladači, aby sestavil seznam aktuálně viditelných hvězd, z nichž
může uživatel provést manuální výběr. Seznam hvězd bude uspořádán podle abecedy nebo podle
hvězdné velikosti.
BACKLASH vám umožňuje pro každou rotační osu zadat hodnotu kompenzace mrtvého chodu.
Aby bylo navádění vašeho teleskopu přesné, je důležité, aby tato hodnota byla rovna nebo větší
než skutečný mrtvý chod na jednotlivých osách. Výchozí hodnota je 0 stupňů, 0 úhlových minut,
0 úhlových vteřin 0d 00' 00''). Pomocí numerických kláves zadejte hodnoty a pomocí pravé
směrové klávesy přejděte na další číslici. Nejprve zkalibrujte osu rektascenze. Stisknutím
klávesy ENTER potvrďte a zkalibrujte osu deklinace.
SID. RATE aktivuje rychlost sledování podle siderického času.
LUNAR RATE aktivuje lunární sledovací rychlost.
SOLAR RATE aktivuje sluneční sledovací rychlost.
STOP TRACKING okamžitě zastaví aktuální sledování.
SET SLEW LIMITS vám umožňuje nastavit limity pootáčení montáže podél vertikální osy.
Nastavení těchto limitů zabrání veškerým možným nárazům a kolizím tubusu vašeho teleskopu s
montáží. Rozsah otáčení závisí na použité kombinaci teleskopu a montáže.HANDSET SETTING
vám umožňuje nastavit jas displeje, podsvícení klávesnice a hlasitost výstražné signalizace u
vašeho ručního ovladače. K úpravě použijte pravou a levou směrovou klávesu.
FACTORY SETTING vám umožňuje vrátit veškeré provedené změny zpět na tovární nastavení.
Uživatelská databáze
V uživatelské databázi můžete uložit údaje až o 25 objektech.
5
Uložení objektu v databázi
Pomocí navigačních kláves zvolte v hlavní nabídce položku "Object Catalog“. Stisknutím klávesy
ENTER potvrďte volbu. Zvolte možnost „Select User Defined“ a stiskněte klávesu ENTER. Tuto
databázi můžete také otevřít stisknutím klávesy USER.
První možností v dílčí nabídce je „Recall Object“. Ta vám nabízí přístup k dříve uloženým
objektům. Pomocí navigačních kláves zvolte možnost "Edit Objects" a stiskněte klávesu ENTER.
Teleskop je schopen souřadnice ukládat ve dvou formátech: R.A./Dec. a Alt/Az.
Stisknutím klávesy 1 vyberte formát R.A./Dec., nebo klávesy 2 formát Alt/Az.
SynScan™ AZ zobrazuje jako výchozí hodnoty buď souřadnice R.A./Dec., nebo Alt/Az aktuálně
pozorovaného objektu. Příklad, jak by měl vypadat formát R.A./Dec., je následující: "22h46.1m
+90 00'”. To znamená rektascenzi 22 hodin a 46,1 minut a deklinaci 90 stupňů.
Souřadnice můžete změnit pomocí numerických a navigačních kláves.
Pomocí pravé a levé směrové klávesy můžete vybírat hodnoty, které chcete upravit. Zadané
souřadnice uložíte stisknutím klávesy ENTER. Pokud se na daných souřadnicích nevyskytuje
žádná hvězda, ruční ovladač data neuloží. Zadání opravte a potvrďte stisknutím klávesy
ENTER.Chcete-li souřadnice uložit ve formátu Alt/Az, prostě nastavte teleskop na požadovaný
objekt a stisknutím klávesy ENTER potvrďte údaje. Po uložení souřadnic se zobrazí identifikační
údaj (ID) uživatelského objektu.
Pomocí navigačních kláves zvolte požadované číslo a stisknutím klávesy ENTER údaj potvrďte.
Spolu s ID údajem uživatelského objektu se zobrazí zpráva "View Object". Stisknutím klávesy
ENTER objekt lokalizujete; chcete-li uložit další objekt, stiskněte ESC.
Při ukládání objektu nemůžete použít ID, které bylo použito již dříve. Před ukládáním nového
objektu se přesvědčte, která ID uživatelských objektů jsou již obsazená.
24
Page 27

Výběr objektu z uživatelské databáze
Otevřete uživatelskou databázi (viz pokyny výše). Zvolte možnost “Recall Object“ a stiskněte
ENTER. Pomocí navigačních kláves vyberte objekt, který chcete pozorovat.
Stisknutím klávesy ENTER zobrazíte souřadnice tohoto objektu. Dalším stisknutím tlačítka ENTER
navedete k tomuto objektu teleskop.
Nebyl-li pod uvedeným číslem uložen žádný objekt, ruční ovladač nebude reagovat. V takovém
případě znovu použijte navigační klávesy k výběru jiného objektu. Pokoušíte-li se pozorovat
objekt, který je aktuálně pod horizontem, zobrazí se na obrazovce výstraha „Below Horizon!!“ a
budete vyzváni k tomu, abyste si vybrali jiný objekt.
Identifikace neznámého objektu
Váš teleskop umí identifikovat objekt, na který je právě zaměřen.
Stačí, když stisknete klávesu ID na klávesnici nebo pomocí navigačních kláves zvolíte příkaz
IDENTIFY v hlavní nabídce a stisknete ENTER. SynScan™ AZ zobrazí seznam blízkých objektů a
vzdálenost objektu ke středu nitkového kříže.
Pomocí navigačních kláves lze procházet jednotlivé objekty. Stisknutím klávesy ESC můžete
příkaz kdykoli zrušit.
6
Připojení k počítači
Váš teleskop lze ovládat i pomocí software Stellarium. Stačí jej připojit k počítači. Dříve, než
budete pokračovat, ujistěte se, zda je teleskop řádně ustaven. K počítači byste jej měli připojit
až po kontrole ustavení. Použijte kabel, který je součástí soupravy.
Používejte výhradně dodaný kabel, neboť jakákoli závada náhražky by mohla vést k poškození
ručního ovladače nebo počítače.
Po připojení můžete svůj teleskop ovládat z počítače.
Postupujte podle pokynů a před odpojením kabelu nezapomeňte počítač vypnout.
Systémové požadavky
Firmware ručního ovladače verze 3.0 nebo novější.
Windows 95 nebo vyšší.
Port RS-232C na počítači.
Připojovací kabel SynScan™ AZ (je součástí dodávky).
Napájení 7,5~15V/100mA. Kabel adaptéru by měl mít kladný pól na hrotu, aby měl shodnou
polaritu s ovladačem.
Výchozí hodnota přenosové rychlosti mezi ručním ovladačem a osobním počítačem je nastavena
na 115 Kbps. Port RS-232C na vašem počítači možná tak vysokou přenosovou rychlost
nepodporuje. Nejste-li schopni aktualizovat firmware SynScan™ AZ, můžete přenosovou rychlost
snadno změnit stisknutím klávesy SETUP při současném připojení vašeho ručního ovladače ke
zdroji napájení. Tím se přenosová rychlost sníží na 9,6 Kbps. Jakmile dojde ke snížení rychlosti,
měla by se v pravém dolním rohu displeje objevit ikona “Lo”. Nyní se pokuste firmware znovu
aktualizovat. Nezapomeňte na to, že snížením přenosové rychlosti se prodlouží doba aktualizace
(až na 4 minuty).
25
Page 28

Způsob aktualizace vašeho ovladače SynScan™ AZ:
Svůj ruční ovladač připojte k počítači. Konektor RJ-11 by se měl zasunout do prostředního portu
na SynScan™ AZ, zatímco konektor DB9 by se měl připojit k portu RS232 na počítači.
Současně stiskněte a podržte klávesy 0 a 8, pak svůj ruční ovladač připojte k napájecímu zdroji.
Ruční ovladač pípnutím potvrdí navázání spojení.
Na displeji se objeví zpráva “SynScan™ Update Ver. x.x”.
Na svém osobním počítači spusťte aplikaci SynScanFirmwareLoader. Tlačítko „HC. Version“ v
aplikaci zobrazí aktuální verzi hardware, firmware a databáze ve vašem ručním ovladači.
Tyto údaje jsou pouze pro vaši informaci a při aktualizaci nejsou zapotřebí.
Stiskněte tlačítko “Browse” a na pevném disku vyhledejte soubor “SynScanVXXXXAZ.ssf”.
Stisknutím tlačítka „Update“ spusťte aktualizaci firmware.
Pod tlačítky „Update“ a „HC. Version“ můžete sledovat postup aktualizace.
Po dokončení aktualizace se na obrazovce zobrazí zpráva „Update complete“. Tento proces by
měl trvat cca 30 sekund, ale pokud používáte adaptér USB-RS232, může trvat o něco déle.
Gratulujeme vám k úspěšné aktualizaci firmware SynScan™!
Pokud se v průběhu aktualizace zobrazí zpráva „Cannot connect to a SynScan hand control“,
zkontrolujte, zda je ruční ovladač řádně připojen k počítači.
Zavřete všechny aplikace, které mohou využívat port RS-232 a pokus opakujte.
Pokud se vám zobrazí zpráva „Firmware update failed...“, odpojením od zdroje napájení a
znovuzapojením restartujte ruční ovladač. Zkuste aktualizaci provést znovu. Výchozí hodnota
přenosové rychlosti mezi ručním ovladačem a osobním počítačem je nastavena na 115 Kbps. Port
RS-232C na vašem počítači možná tak vysokou přenosovou rychlost nepodporuje. Pokud nelze
provést aktualizaci firmware
SynScan, můžete přenosovou rychlost snadno změnit stisknutím klávesy SETUP při současném
připojení vašeho ručního ovladače ke zdroji napájení.
Tím se přenosová rychlost sníží na 9,6 Kbps. Jakmile dojde ke snížení rychlosti, měla by se v
pravém dolním rohu displeje objevit ikona “Lo”. Nyní se pokuste firmware znovu aktualizovat.
Nezapomeňte na to, že tento postup zároveň prodlouží dobu aktualizace (až na 4 minuty).
8
7
26
Page 29

SETUP MODE
SkyMatic 135 GTA
SkyMatic 105 GT MAK
SkyMatic 127 GT MAK
Optická konstrukce
Zrcadlový (reflektor)
Maksutov-Cassegrain
Maksutov-Cassegrain
Průměr objektivu:
130 mm
102 mm
127 mm
Ohnisková
vzdálenost, apertura
650 mm; f/5
1300 mm; f/12.8
1500 mm; f/11,8
Nejvyšší praktické
zvětšení
260x
204x
250x
(REŽIM NASTAVENÍ)
Date (Datum)
Time (Čas)
Observ. Site
(Pozorovací stanoviště)
Daylight Saving Alignment
(Nastavení letního času)
Brightest Star Align
(Kalibrace podle nejjasnější
hvězdy)
2-Star Align
(Kalibrace podle dvou hvězd)
Alignment Stars
(Hvězdy pro ustavení)
Auto select (Automatická
volba)
Sort by Backlash (Třídit podle
mrtvého chodu)
Tracking (Sledování)
Sidereal Rate (Siderická rychlost)
Lunar Rate (Lunární rychlost)
Solar Rate (Solární rychlost)
Stop Tracking (Zastavit sledování)
Set Slew Limits (Nastavit limity
krokování)
Handset Setting (Nastavení
přenosné části)
Factory Setting (Tovární nastavení)
UTILITY FUNC.
(POMOCNÉ FUNKCE)
Show Position
(Ukázat polohu)
Show Information
(Ukázat informace
Time Version (Verze)
Temperature (Teplota)
Power (Výkon)
Voltage (Napětí)
Park Scope (Rozsah zaparkování)
PAE
Clear PAE Data
(Vymazat údaje PAE)
GPS
PC Direct Mode
MAIN MENU (HLAVNÍ NABÍDKA)
TOUR
(PROHLÍDKA)
OBJECT CATALOG
(KATALOG OBJEKTŮ)
Solar System
(Sluneční soustava)
Mercury (Merkur)
Venus (Venuše)
Mars
Jupiter
Saturn
Uranus (Uran)
Neptune (Neptun)
Pluto
Moon (Měsíc)
Named Star (Pojmenovaná hvězda)
Messier Catalogue (Katalog Messier)
IC Catalog (Katalog IC)
NGC Catalog (Katalog NGC)
Caldwell Catalog (Katalog Caldwell)
SAO Catalogue (Katalog SAO)
Double Star (Dvojhvězda)
Variable Star (Proměnná hvězda)
User defined (Uživatelská definice)
Edit Object (Upravit objekt)
Recall Object (Vyvolat objekt)
IDENTIFY
(IDENTIFIKOVAT)
Specifikace
Diagram připojení:
Specifikace
Napájení
Typ motoru
Rozlišení
Kroková rychlost
Rychlost sledování
Režim sledování
Způsob kalibrace
Přesnost pointace
Databáze
9
1A, 11 ~ 15V DC (kladný pól na hrotu)
stejnosměrné servomotory 1,8°
0,144 úhlových vteřin nebo 9,024,000 kroků/ot. (AZ-80)
0 = 1,0x, 1 = 2,0x, 2 = 16x, 3 = 32x, 4 = 64x, 5 = 128x
6 = 400x, 7 = 500x, 8 = 600x, 9 = 800x
siderická, lunární, solární
sledování ve dvou osách
kalibrace podle nejjasnější hvězdy a kalibrace podle dvou hvězd.
až 10 úhlových minut
25 uživatelem definovaných objektů, katalogy M, NGC, IC a SAO,
celkem 42 900 objektů
27
Page 30

Název
Příkaz ASCII z PC
Odezva
ovladače
Informace
Echo
Kx X#Zkontroluje připojení k PC
Goto Az-Alt
B12AB, 4000
#
Odešle deset znaků. B = Příkaz,
12AB = souřadnice Az, čárka, 4000 =
souřadnice Alt. Je-li příkaz v konfliktu s
přednastavenými limity, nebude proveden
Get Az-Alt
Z
12AB, 4000#
Pošle zpět deset znaků
12AB = horizontální souřadnice (azimut),
čárka, 4000 = souřadnice nadm. výšky, #
Get RA-Dec
E
34AB, 12CE#
Je nutné provést seřízení hledáčku
Cancel Goto
M
#
Is Goto in Progress
L
0# or 1#
0 = Ne, 1 = Ano. “0” je nulový ASCII znak
Is Alignment
Complete
J
0# or 1#
0 = Ne, 1 = Ano
HC version
V
22
Dva byty představují verzi 2.2
Stop/Start Tracking
Tx x = 0 (tracking off)
x = 1 (Alt-Az on) x = 2
(EQ-N) x = 3 (EQ-S)
#
Tracking Alt-Az vyžaduje kalibraci
32-bit goto RA-Dec
r34AB0500,12CE0500
#
32-bit get RA-Dec
e
34AB0500,
12CE0500#
Dva poslední znaky by vždy měly být nulové
32-bit goto Azm-Alt
b34AB0500,12CE0500
#
32-bit get Azm-Alt
z
34AB0500,
12CE0500#
Dva poslední znaky by vždy měly být nulové
Práh rozlišení
0,92 úhlové vteřiny
1,18 úhlové vteřiny
1,1 úhlové vteřiny
Okulár
1.25'' SUPER10 & SUPER25
1.25'' SUPER10 & SUPER25
1.25'' SUPER10 & SUPER25
Hledáček
6x30
6x30
6x30
Typ montáže
AZ 114 GT; AZ SynScan
AZ 114 GT; AZ SynScan
AZ 114 GT; AZ SynScan
Stativ
nerezová ocel; 630 mm –
1150 mm
nerezová ocel; 630 mm –
1150 mm
nerezová ocel; 630 mm –
1150 mm
Chcete-li naváděný teleskop Skymatic GoTo ovládat z počítače, musíte jej připojit pomocí portu
RS-232. Po připojení můžete k odesílání příkazů na svůj počítač použít jakýkoli software s
emulací planetária.
Přenosová rychlost mezi ovladačem SynScan™ AZ a počítačem je 9600 bps, bez parity nebo stop
bitů. Veškeré příkazy z vašeho PC se přenášejí pomocí metody binárního zápisu.
Nastavení rychlosti sledování přes RS232:
1. Požadovanou rychlost trackingu (úhlové vteřiny/sekundy) vynásobte 4. Chcete-li například
objekt sledovat rychlostí 120 úhlových vteřin za sekundu (cca 8x rychleji než siderická rychlost),
měla by být hodnota TRACKRATE 480.
2. TRACKRATE rozdělte do dvou bytů tak, aby TRACKRATE = TrackRateHighByte*256 +
TrackRateLowByte. pokud např. TRACKRATE = 480, then TrackRateHighByte = 1,
TrackRateLowByte = 224.
3. Chcete-li nastavit rychlost sledování, odešlete následující 8-bytový příkaz:
a. Pozitivní Az sledování: 80, 3, 16, 6, TrackRateHighByte, TrackRateLowByte, 0, 0
b. Negativní Az sledování: 80, 3, 16, 7, TrackRateHighByte, TrackRateLowByte, 0, 0
28
Page 31

c. Pozitivní Alt sledování: 80, 3, 17, 6, TrackRateHighByte, TrackRateLowByte, 0, 0
d. Negativní Alt sledování: 80, 3, 17, 7, TrackRateHighByte, TrackRateLowByte, 0, 0
4. Odezva ručního ovladače je “35”.
Odeslání příkazu pomalého navádění (slow-Goto) přes Rs232:
1. Úhlovou polohu konvertujte na 24-bitové číslo. Např. pokud je požadovaná úhlová poloha
220°, pak POSITION_24BIT = (220/360)*224 = 10,252,743.
2. Hodnotu POSITION_24BIT rozdělte na tři byty tak, aby POSITION_24BIT = PosHighByte * 65536 +
PosMedByte *256 + PosLowByte. Pokud např. POSITION_24BIT = 10,252,743, then PosHighByte =
156, PosMedByte = 113, PosLowByte = 199.
3. Odešlete následující 8-bytový příkaz:
a. Pomalé Az navádění (Az slow Goto): 80, 4, 16, 23, PosHighByte, PosMedByte, PosLowByte, 0
a. Pomalé Alt navádění (Alt slow Goto): 80, 4, 17, 23, PosHighByte, PosMedByte, PosLowByte, 0
4. Odezva ručního ovladače je “35”.
Nulování poloh Alt a Az
1. Proveďte konverzi úhlové polohy na 24-bitové číslo (viz příkaz "Slow-Goto")
2. Odešlete následující 8-bytový příkaz:
a. Nastavení Az polohy: 80, 4, 16, 4, PosHighByte, PosMedByte, PosLowByte, 0 b. Nastavení Alt
polohy: 80, 4, 17, 4, PosHighByte, PosMedByte, PosLowByte, 0
3. Odezva ručního ovladače je “35”.
10
Bezpečnostní pokyny týkající se baterií
Vždy nakupujte baterie správné velikosti a typu, které jsou nejvhodnější pro zamýšlený účel.
Při výměně vždy nahrazujte celou sadu baterií a dbejte na to, abyste nemíchali staré a nové
baterie, případně baterie různých typů.
Před instalací baterií vyčistěte kontakty na baterii i na přístroji.
Ujistěte se, zda jsou baterie instalovány ve správné polaritě (+ resp. -).
V případě, že zařízení nebudete delší dobu používat, vyjměte z něj baterie.
Použité baterie včas vyměňujte.
Baterie se nikdy nepokoušejte dobíjet, mohlo by dojít k úniku obsahu baterie, požáru nebo k
explozi.
Baterie nikdy nezkratujte, mohlo by to vést ke zvýšení teploty, úniku obsahu baterie nebo k
explozi.
Baterie se nikdy nepokoušejte oživit zahříváním.
Po použití nezapomeňte přístroj vypnout.
Baterie uchovávejte mimo dosah dětí, abyste předešli riziku spolknutí, vdechnutí nebo otravy.
Péče a údržba
Nikdy, za žádných okolností, se tímto přístrojem bez speciálního filtru nedívejte přímo do
slunce, jiného jasného světelného zdroje nebo laseru, neboť hrozí nebezpečí TRVALÉHO
POŠKOZENÍ SÍTNICE a případně i OSLEPNUTÍ.
Při použití tohoto přístroje dětmi nebo osobami, které tento návod nečetly nebo s jeho obsahem
nebyly plně srozuměny, přijměte nezbytná preventivní opatření.
Z žádného důvodu se nepokoušejte přístroj rozebírat, a to ani za účelem vyčištění zrcadla. S
opravami veškerého druhu se obracejte na své místní specializované servisní středisko.
Přístroj chraňte před prudkými nárazy a nadměrným mechanickým namáháním.
Nedotýkejte se svými prsty povrchů optických prvků. K vyčištění vnějších částí teleskopu
používejte výhradně speciální čisticí ubrousky a speciální nástroje k čištění optiky dodávané
společností Levenhuk.
29
Page 32

Přístroj ukládejte na suchém, chladném místě, mimo dosah nebezpečných kyselin nebo jiných
chemikálií, topných těles, otevřeného ohně a jiných zdrojů vysokých teplot.
Pokud teleskop nepoužíváte, zakryjte jeho čelní stranu prachovým víčkem. Tím zabráníte
usazování prachu na povrchu zrcadla nebo čoček.
Při náhodném požití malé součásti nebo baterie ihned vyhledejte lékařskou pomoc.
Mezinárodní záruka
Na veškeré teleskopy, mikroskopy, triedry a další optické výrobky značky Levenhuk, s výjimkou příslušenství,
se poskytuje celoživotní záruka pokrývající vady materiálu a provedení. Na veškeré příslušenství značky
Levenhuk se poskytuje záruka toho, že je dodáváno bez jakýchkoli vad materiálu a provedení, a to po dobu
dvou let od data zakoupení v maloobchodní prodejně. Společnost Levenhuk provede opravu či výměnu výrobku
nebo jeho části, u nichž se po provedení kontroly společností Levenhuk prokáže výskyt vad materiálu nebo
provedení. Nezbytnou podmínkou toho, aby společnost Levenhuk splnila svůj závazek provést opravu nebo
výměnu takového výrobku, je předání výrobku společně s dokladem o nákupu vystaveným ve formě uspokojivé
pro Levenhuk.
Tato záruka se nevztahuje na spotřební součásti, jako jsou například baterie.
Ke všem vráceným výrobkům musí být přiloženo písemné prohlášení, na němž bude uvedeno jméno, adresa a
telefonní číslo majitele výrobku, včetně popisu veškerých reklamovaných závad. Součásti nebo výrobky, za něž
bude poskytnuta výměna, se stávají majetkem společnosti Levenhuk.
Zákazník je povinen předem uhradit veškeré náklady na dopravu a pojištění do společnosti Levenhuk, případně k
jejím autorizovaným dealerům, a zpět.
Společnost Levenhuk vyvine přiměřené úsilí k tomu, aby výrobek, na nějž se vztahuje tato záruka, opravila nebo
vyměnila do 30 dnů od jeho obdržení. V případě, že bude oprava nebo výměna trvat déle než 30 dní, bude o tom
společnost Levenhuk zákazníka informovat. Společnost Levenhuk si vyhrazuje právo jakýkoli výrobek, jehož
výroba byla zastavena, nahradit novým výrobkem srovnatelné hodnoty a funkce.
Tato záruka se nevztahuje na závady nebo poškození vyplývající z pozměňování, úprav, nedbalosti, nesprávného
použití, použití nevhodných zdrojů napájení, poškození při dopravě, nedodržení pokynů, případně z jakékoliv
jiné příčiny mimo rozsah běžného užívání, nebo z důvodu poruchy či zhoršení funkčnosti v důsledku běžného
opotřebení.
Společnost Levenhuk odmítá jakékoliv jiné záruky, výslovně uvedené i mlčky předpokládané, týkající se
obchodovatelnosti nebo vhodnosti pro konkrétní účel, kromě těch, jež jsou výslovně uvedeny v této omezené
záruce. Jediným závazkem společnosti Levenhuk v rámci této omezené záruky bude provedení opravy nebo
výměny výrobku, na který se tato záruka vztahuje, a to v souladu s podmínkami v ní uvedenými. Společnost
Levenhuk nepřebírá odpovědnost za žádné ušlé zisky, ztrátu informací, ani za žádné všeobecné, speciální, přímé,
nepřímé či následné škody, jež mohou vyplynout z porušení jakékoliv záruky, případně nastat v důsledku užívání
nebo nemožnosti použití jakéhokoliv výrobku značky Levenhuk. Veškeré mlčky předpokládané záruky, jež nelze
vyloučit, budou časově omezeny na období dvou let v případě příslušenství, a to vždy od data zakoupení v
maloobchodní prodejně.
Společnost Levenhuk si vyhrazuje právo provádět bez předchozího upozornění úpravy jakéhokoliv výrobku,
případně zastavit jeho výrobu.
Záruka mimo území USA nebo Kanady platí pouze pro zákazníky, kteří provedli nákup u autorizovaného dealera
společnosti Levenhuk v příslušné zemi nebo od mezinárodního distributora. S veškerými záručními opravami se
obracejte na tyto subjekty.
V případě problémů s uplatněním záruky, nebo pokud budete potřebovat pomoc při používání svého výrobku,
obraťte se na místní pobočku společnosti Levenhuk:
Levenhuk ve světě:
USA: www.levenhuk.com
Kanada: www.levenhuk.ca
Česká republika: www.levenhuk.cz
Nizozemsko: www.levenhuk.nl
Polsko: www.levenhukoptics.pl
Rusko: www.levenhuk.ru
Ukrajina: www.levenhuk.ua
EU: www.levenhuk.eu
Datum nákupu ___________________________________ Podpis __________________________________ Razítko
30
Page 33

Телескопы Levenhuk с автонаведением
RU
Поздравляем!
Поздравляем вас с приобретением высококачественного телескопа с автонаведением
Levenhuk SkyMatic GoTo! Телескопы этой линейки — это современные устройства, которые
помогут вам легко отыскивать объекты (планеты, туманности, звездные скопления,
галактики и пр.) в ночном небе и наслаждаться ими. Ручное управление позволяет навести
телескоп на определенный объект и даже совершить путешествие по небу с помощью
нажатия одной кнопки. Удобное меню обеспечивает переход по более чем 42 900 объектам.
Даже неопытный астроном может легко освоить все разнообразие функций этого устройства
всего за несколько сеансов наблюдения.
Если у вас никогда раньше не было телескопа, мы рады пригласить вас в мир любительской
астрономии. Уделите некоторое время, чтобы ознакомиться с ночным небом и научиться
узнавать звезды в основных созвездиях. Немного практики, немного терпения и достаточно
темное небо вдали от городских огней — и вы увидите, что ваш телескоп является
бесконечным источником удивления, приключений и отдыха.
Данная инструкция поможет вам разобраться с настройкой телескопа, а также с правилами
его надлежащего использования и обслуживания. Настоятельно рекомендуем полностью
прочесть инструкцию перед началом работы с телескопом.
ВНИМАНИЕ!
Во избежание повреждения глаз никогда, даже на мгновение, не смотрите на Солнце в
телескоп или искатель без профессионального солнечного апертурного фильтра,
закрывающего переднюю часть прибора. При этом лицевая часть искателя должна быть
закрыта алюминиевой фольгой или другим непрозрачным материалом для
предотвращения повреждения внутренних частей телескопа
Все части телескопа поставляются в одной коробке. Распаковывая телескоп, будьте
аккуратны и осторожны. Рекомендуем сохранить упаковку: использование оригинальной
упаковки во время перевозки гарантирует целостность и сохранность инструмента.
Убедитесь в наличии всех частей комплекта поставки. Внимательно осмотрите коробку, так
как некоторые детали имеют малые размеры и могут затеряться. В комплект поставки
входят все инструменты, необходимые для работы с телескопом, дополнительные
инструменты не требуются. Во время сборки телескопа все винты должны быть надежно
затянуты для исключения колебаний. ВНИМАНИЕ! НЕ ПЕРЕТЯНИТЕ ВИНТЫ, ЧТОБЫ НЕ
СОРВАТЬ РЕЗЬБУ!
В процессе сборки и во время использования телескопа НЕ КАСАЙТЕСЬ пальцами линз
телескопа, искателя или окуляра. Оптические поверхности имеют тонкое покрытие, которое
легко повредить при касании. НЕ ВЫНИМАЙТЕ зеркала из корпусов, так как это аннулирует
гарантийное соглашение.
31
Page 34

Сборка телескопа с автонаведением
Раздвиньте опоры штатива (треноги) до полного раскрытия и установите лоток для
аксессуаров. Выдвиньте опоры штатива на нужную высоту. Установите основание вилки
телескопа на штатив, вставьте и затяните стяжной винт в нижнюю часть основания вилки.
Ослабьте барашковый винт на конце фокусировочного узла и снимите защитную
пластиковую крышку. Вставьте окуляр с малым увеличением (25 мм) в фокусер. Снимите
защитную крышку с объектива телескопа.
Установите искатель: вставьте кронштейн искателя в крепление «ласточкин хвост»,
расположенный на трубе телескопа, и закрепите его барашковым винтом.
Подключите пульт управления, вставив телефонный разъем его кабеля в контактное гнездо,
расположенное в нижней части вилки телескопа.
Установите 8 батареек класса AA в блок батарей. Подключите блок батарей к разъему,
расположенному в основании вилки.
ВНИМАНИЕ!
При отсутствии электропитания оптическую трубу телескопа с автонаведением
можно наводить вручную только по высоте, а по азимуту (влево-вправо)
категорически запрещено (теряется гарантия). Если питание есть, то управлять
телескопом необходимо только с помощью пульта управления — в противном случае
ориентация телескопа по звездам будет нарушена.
1
Питание
SkyMatic питается от источника постоянного тока 11-15В, способного выдавать постоянный
ток минимум 1 ампер. Правильно подключите шнур питания в гнездо 12В DC на монтировке.
Ручное управление
Кабель ручного управления снабжен разъемом RJ-45 с восемью штекерами с одной стороны
и разъемом RJ-12 с шестью штекерами с другой стороны. Вставьте разъем RJ-45 в ручное
управление, а RJ-12 — в гнездо на монтировке. Средний порт в нижней части ручного
управления используется для соединения телескопа с компьютером или другими
устройствами через RS-232. Порт питания дает пользователям возможность использовать
SynScan™ AZ без подключения к телескопу для поисков в базе данных и для обновления ПО.
Ручное управление обеспечивает непосредственный доступ к управлению всеми
движениями телескопа и к базе данных с большим набором предустановленных объектов.
Ручное управление снабжено 16-символьным двухстрочным дисплеем с подсветкой
и прокруткой текста. Все функциональные клавиши делятся на 4 основные группы.
32
3
2
Page 35

Клавиши режима
Клавиши режима расположены сверху, рядом с ЖК-дисплеем:
Клавиша ESC используется для отмены команды или возврата на предыдущий уровень.
Клавиша SETUP обеспечивает быстрый переход в меню настроек (Setup).
Клавиша ENTER используется для выбора функций и пунктов меню, а также
для подтверждения выполнения команд.
Клавиши направления
Клавиши направления обеспечивают вам полный контроль над телескопом с автонаведением
почти на любом шаге выполнения команд. Эти клавиши блокируются, когда телескоп
поворачивается к объекту. Они обычно используются для первичного выравнивания,
центрирования объектов в окуляре и ручного наведения. Левую и правую клавишу
направления можно также использовать для перемещения курсора при вводе данных в
ручное управление.
Клавиши прокрутки
Клавиши прокрутки вверх и вниз позволяют листать меню или опции.
Клавиши двойного назначения
Эти клавиши находятся в середине нижней части пульта ручного управления и выполняют
две функции: ввод данных и быстрый переход.
Клавиша TOUR переключает вас на предустановленный тур по ночному небу (в зависимости
от видимых на небе объектов).
Клавиша RATE изменяет скорость поворота нажатием клавиш направления. Существует 10
скоростей: от 0 (самой медленной) до 9 (самой быстрой).
Клавиша UTILITY переводит вас к функциям Show Position («Показать положение»), Display
Time («Показать время») и т.п.
Клавиша USER обеспечивает доступ к базе пользовательских координат (до 25 координат).
Клавиша ID идентифицирует объект, на который в данный момент направлен телескоп.
Клавиши NGC, IC, M, PLANET и OBJECT обеспечивают прямой переход в соответствующую
базу данных.
Настройка
Убедитесь, что монтировка установлена ровно. Наведите телескоп с автонаведением на
яркую звезду или группу звезд. С помощью кабеля, идущего в комплекте, подключите
ручное управление к монтировке.
Для телескопов с автотрекингом: чтобы включить питание, подсоедините к гнезду на
монтировке источник питания постоянного тока 12В.
Для многофункциональных телескопов: просто переведите переключатель питания в
положение ON («ВКЛ»).
33
Page 36

При включении ручного управления экран показывает номер версии (Version Screen).
Нажмите ENTER. Появится предупреждение о наблюдении Солнца только с правильным
оборудованием. Если вы уже читали это сообщение, нажмите ESC, чтобы перейти
к следующему шагу.
Если ручное управление находится в режиме ожидания более 30 секунд, красный индикатор
станет тусклее, а подсветка клавиш выключится. При нажатии любой кнопки индикатор и
подсветка загораются снова.
С помощью цифровой клавиатуры введите текущие значения долготы и широты телескопа;
вводите сначала долготу, потом широту. Клавишами прокрутки выберите W (запад)
или E (восток) и N (север) или S (юг). Нажимая левую и правую клавиши направления,
вы перейдете к предыдущему или следующему числу. Для подтверждения ввода нажмите
ENTER. Данные следует вводить в таком формате: 123 04' W 49 09'N. Укажите вашу
временную зону в часах и минутах с помощью клавиш прокрутки и цифровой клавиатуры(+
для востока, — для запада). Таким образом, если вы находитесь в московском времени,
следует ввести +04:00. Для подтверждения нажмите ENTER. Введите дату в формате
мм/дд/гггг с цифровой клавиатуры. Для подтверждения нажмите ENTER. Введите текущее
местное время в 24-часовом формате (например, 14:00). Нажмите ENTER. Нажмите ESC для
перехода к предыдущему экрану или снова нажмите ENTER, чтобы перейти к установке
летнего времени.
После ввода текущего времени на экране появится сообщение DAYLIGHT SAVING?
(«Установить летнее время?»). С помощью клавиш прокрутки выберите нужное значение и
нажмите ENTER.
После установки летнего времени появится сообщение Begin alignment?
(«Начать выравнивание?»). Нажмите 1 или ENTER, чтобы начать процедуру выравнивания.
Чтобы отменить выравнивание и перейти в главное меню, нажмите 2 или ESC.
Если вы ошиблись при вводе данных, нажмите ESC для перехода к предыдущему меню, а
затем ENTER, чтобы начать настройку заново.
Выравнивание по звезде
Чтобы телескоп с автонаведением правильно наводился на небесные тела, его сначала надо
выровнять по двум или трем известным звездам. Так как Земля непрерывно вращается
вокруг своей оси, кажется, что небесные тела движутся в небе по дуге. С нужной
информацией телескоп может воспроизвести модель неба и движение небесных тел.
Выравнивание по звезде можно сделать в любое время во время наблюдения, выбрав опцию
Alignment («Выравнивание») в разделе Setup Mode («Режим настройки») главного меню.
Телескоп с автонаведением можно выровнять двумя способами: по самой яркой звезде или
по двум звездам. Если вы впервые пользуетесь телескопом и не знакомы с небесными
объектами, рекомендуем начать с выравнивания по самой яркой звезде. Прежде чем
проводить выравнивание, убедитесь, что искатель правильно настроен.
Выравнивание по самой яркой звезде
Когда на дисплее отображен экран опции выравнивания, с помощью клавиш прокрутки
выберите Brightest Star Align («Выравнивание по самой яркой звезде»). Нажмите ENTER.
Появится сообщение Select Region: («Выберите регион») и 8 вариантов деления по азимуту:
север, северо-восток, восток, юго-восток, юг и т.д. Каждое деление охватывает
90° по азимуту. Таким образом, при выборе северо-востока деление покроет диапазон от 0
до 90°по азимуту, при этом север равен 0° или 360°, восток — 90°, юг — 180°, а запад —
270°.
34
Page 37

Северо-восточное небо
Направление
Восточное небо
Юго-восточное небо
Южное небо
Юго-западное небо
Западное небо
Северо-западное небо
После того как деление выбрано, ручное управление вычислит и составит список звезд,
расположенных в этом регионе, со звездной величиной более 1,5. Звезды и планеты ниже
10 и выше 75 градусов по оси восхождения или со звездной величиной менее 1,4 будут
отфильтрованы.
Название звезды выравнивания и ее звездная величина выводится в первой строке
дисплея.
Ее примерное положение можно посмотреть во второй строке. Например, если в качестве
звезды выравнивания выбран Арктур, его звездная величина составляет 0.0, а положение —
88.1° к востоку и 24,1° над горизонтом.
На первую звезду выравнивания монтировка не поворачивается автоматически.
Для ручного наведения и последующего центрирования звезды в окуляре используйте
клавиши направления. Скорость поворота можно изменять с помощью клавиши RATE:
нажмите ее, а затем выберите значение от 0 (медленнее всего) до 9 (быстрее всего).
Когда звезда отцентрирована в окуляре, появится список объектов для выбора второй
звезды выравнивания. На этот раз ручное управление повернет монтировку автоматически.
Когда поворот на объект завершен, прозвучит сигнал. Не пытайтесь регулировать телескоп
до этого сигнала. В процессе поворота телескоп реагирует только на клавишу ESC. Снова
отцентрируйте объект в окуляре. Если обе звезды выравнивания правильно выровнены, на
дисплее появится сообщение Alignment Successful («Выравнивание прошло успешно»). Если
нет — появится сообщение Alignment Failed («Выравнивание не удалось»), и потребуется
провести выравнивание еще раз. Из процесса выравнивания можно выйти в любой момент,
нажав ESC.
Диапазон по азимуту
315°-45°
45°-135°
90°-180°
135°-225°
180°-270°
225°-315°
270°-360°
Выравнивание по двум звездам
Процедура выравнивания по двум звездам напоминает выравнивание по самой яркой звезде,
только ручное управление не будет предлагать выбор направление по азимуту для яркой
звезды. Ниже приводится пошаговое описание процедуры выравнивания по двум звездам:
При выборе опции выравнивания, выберите 2-Star Align («Выравнивание по двум звездам») с
помощью клавиш прокрутки. Нажмите ENTER.
Появится список звезд вашего небо для выбора первой звезды выравнивания. С помощью
клавиш прокрутки выберите самую знакомую звезду и нажмите ENTER.
Телескоп не поворачивается автоматически на первую выбранную звезду выравнивания. С
помощью клавиш направления наведите телескоп на объект вручную. Теперь смотрите в
окуляр и отрегулируйте телескоп таким образом, чтобы объект был отцентрирован в поле
зрения окуляра. Нажмите ENTER. Теперь телескоп выведет список объектов для выбора
второй звезды выравнивания. С помощью клавиш прокрутки выберите вторую звезду и
нажмите ENTER. Телескоп автоматически начнет поворачиваться к выбранному объекту.
35
Page 38

Когда он остановится, отрегулируйте его с помощью клавиш направления так, чтобы звезда
была центрирована в перекрестье искателя. Отцентрируйте объект в поле зрения окуляра, и
нажмите ENTER. Если обе звезды правильно выровнены, на дисплее появится сообщение
"Alignment Successful" («Выравнивание прошло успешно»). Если нет — появится сообщение
"Alignment Failed" («Выравнивание не удалось»), тогда надо провести выравнивание вновь.
Выбирайте две звезды, которые находятся на расстоянии не менее 60 градусов друг от
друга. Чем больше расстояние между звездами выравнивания, тем выше точность
выравнивания. Выбор двух звезд с одинаковой высотой по оси восхождения даст еще
лучший результат.
Улучшение точности наведения
Оба метода наведения по звезде обеспечивают выравнивание, подходящее для любых
наблюдения. Для приложений, требующих сверхвысокой точности в определенной части
неба, телескоп предлагает опцию Pointing Accuracy Enhancement («Улучшение точности
наведения»). Ее можно применить в 85 секторах неба, покрывая таким образом весь
небесный свод. Убедитесь, что план сектора, где находится выбранная звезда, уже имеется
в телескопе перед выполнением PAE:
С помощью клавиш направления отцентрируйте последний объект перехода, затем
перейдите к следующему шагу (этот шаг можно пропустить, если объект уже
отцентрирован).
Нажмите и удерживайте клавишу ESC в течение 2-х секунд. На дисплее ручного управления
появится сообщение "Re-center" ("Центрировать снова") и три раза мигнет наименование
эталонного объекта. Если команда перехода поступает от планетария, то вместо
наименования объекта на дисплее появится сообщение "Last goto object" («Последний
объект перехода»). Убедитесь, что эталонный объект все еще в центре поля зрения, и
нажмите ENTER.
Если вы не хотите сохранять результат, нажмите ESC для отмены операции. После нажатия
ENTER телескоп запишет уровень точности наведения и пересчитает модель неба. Теперь
точность наведения в данной части неба должна сильно возрасти.
Результаты выравнивания по звезде и PAE хранятся в ручном управлении даже после
отключения питания.
Вам может потребоваться провести повторное выравнивание по звезде в следующих
случаях:
1. Телескоп не был переведен в исходное положение перед выключением питания.
2. Настройки телескопа или монтировки изменились.
Смена аксессуаров приемлема, если делается с особой осторожностью. Когда вы включите
ручное управление в следующий раз, убедитесь, что время, введенное при исходной
настройке, вводится теперь по тому же источнику. Например, если вы в прошлый раз ввели
время, сверяясь с наручными часами, сейчас время следует вводить также по наручным
часам.
36
Page 39

Каталог объектов
Телескоп с автонаведением поставляется с обширной базой, содержащей координаты более
42 900 объектов, а также информацию о них. Данная база включает в себя следующие
каталоги:
Солнечная система — остальные 7 планет нашей Солнечной системы и Луна.
Именованные звезды — список 212 наиболее известных звезд из базы данных.
NGC — 7 840 самых ярких звезд глубокого космоса из Нового исправленного каталога.
IC – 5 386 обычных звезд и объектов глубокого космоса из Индексного каталога.
Messier — полный список 110 объектов Мессье.
Caldwell — полный список 109 объектов Колдуэлла.
Двойные звезды — 55 известных двойных звезд.
Переменные звезды — 20 известных переменных звезд.
SAO — 29 523 звезд.
Выбор объекта
Итак, телескоп с автонаведением выровнен, и вы можете приступить к наблюдениям.
Существует пять способов выбора небесного тела для наблюдения:
TOUR («ТУР») — данная клавиша отправляет вас в предустановленный тур по небу. Будут
автоматически выбраны самые яркие и красивые объекты глубокого космоса. Листайте их с
помощью клавиши прокрутки вниз. Выберите объект, нажав ENTER. На дисплее появятся
координаты этого объекта. После повторного нажатия ENTER телескоп начнет
поворачиваться к объекту.
M, NGC, IC — эти клавиши обеспечивают доступ к самым популярным каталогом небесных
тел. В каждом каталоге имеется определенное количество объектов. С помощью цифровых
клавиш выберите объект, введя его номер. Нажав ENTER, вы увидите на дисплее
координаты этого объекта. Общую информацию (размер, величину, созвездие) можно
увидеть, нажимая клавиши прокрутки. После повторного нажатия ENTER телескоп начнет
поворачиваться к объекту.
4
PLANET («ПЛАНЕТЫ») — эта клавиша быстрого доступа перемещает вас прямо в подменю
«Планеты» базы данных. С помощью клавиш прокрутки листайте планеты нашей Солнечной
системы. Нажав ENTER, вы увидите на дисплее их координаты, а после повторного нажатия
ENTER телескоп с автонаведением начнет поворачиваться к планете.
USER («ПОЛЬЗОВАТЕЛЬ») — эта клавиша переведет вас в базу данных, которую вы создали
самостоятельно. Вы можете ввести новое местонахождение или просмотреть объекты,
сохраненные ранее (см. «Использование пользовательской базы данных»).
OBJECT («ОБЪЕКТ») переводит вас в раздел Objects Catalog («Каталог объектов»), который
обеспечивает доступ к более чем 42 900 небесных объектов.
37
Page 40

Служебные функции
Служебные функции — это полезные средства для прямого управления телескопом. SHOW
POSITION («Показать положение») — выводит координаты небесной точки, на которую в
данный момент нацелен телескоп.
SHOW INFORMATION («Показать информацию») — в этом подменю можно проверить местное
время, местное сидерическое время, версию оборудования и ПО, версию базы данных
ручного управления. Если ручное управление подключено к монтировке, это меню также
выводит версию привода.
PARK SCOPE («Фиксировать трубу») — эта функция переводит телескоп в исходное
положение (Home) или запоминает текущее положение как исходное.
PAE — функция улучшения точности наведения.
CLEAR PAE DATA («Стереть данные РАЕ») — позволяет удалить все сохраненные данные
улучшения точности наведения.
GPS — позволяет получать информацию с GPS-приемника.
Функции настройки
Функции настройки позволяют менять любые настройки местонахождения, времени, даты и
выравнивания. Для доступа в меню функций настройки нажмите клавишу SETUP на
клавиатуре или листайте клавишами прокрутки меню до раздела SETUP.
Ниже перечислены доступные функции:
DATE («Дата») — позволяет изменить дату, введенную при исходной настройке.
TIME («Время») — позволяет изменить текущее время.
OBSERVING SITE («Место наблюдения») — позволяет изменить текущее местонахождение.
DAYLIGHT SAVINGS («Летнее время») — позволяет изменить установки летнего времени.
ALIGNMENT («Выравнивание») — позволяет провести выравнивание по звезде.
AUTO SELECT («Автоматический выбор») — при выборе этой опции ручное управление
отфильтровывает звезды, которые не годятся для выравнивания по звезде.
SORT BY («Сортировать по») — позволяет ручному управлению сформировать список звезд
выравнивания и вывести их в алфавитном порядке или по звездной величине.
BACKLASH («Мертвый ход») — эта функция позволяет вам выставить значение для каждой
оси, чтобы компенсировать мертвый ход. Для лучшей точности наведения важно, чтобы
значение обратного хода равнялось или превышало действительный мертвый ход между
передачами. По умолчанию выставлено значение 0 d 00' 00" (0 градусов, 0 угловых минут и 0
угловых секунд). С помощью цифровых клавиш введите нужное значение и нажмите правую
(RIGHT) клавишу направления, чтобы передвинуть курсор к следующей позиции. Сначала
введите значения прямого восхождения. Нажмите ENTER, чтобы перейти к значению
склонения.
SID. RATE («Звездная скорость») – активирует звездный трекинг (трекинг по двум осям).
LUNAR RATE («Лунная скорость») – активирует лунный трекинг (трекинг по двум осям).
SOLAR RATE («Солнечная скорость») – активирует солнечный трекинг (трекинг по двум
осям).
STOP TRACKING («Остановить трекинг») – мгновенно останавливает трекинг.
SET SLEW LIMITS («Установить границы поворота») — позволяет выставить границы поворота
монтировки по оси высоты. Установка таких границ предотвращает столкновение оптической
трубы с монтировкой. Диапазон границ поворота зависит от монтировки и от оптической
трубы, установленной на этой монтировке.
HANDSET SETTING («Настройки дистанционного управления») — это подменю позволяет
регулировать яркость ЖК-дисплея, яркость подсветки и громкость сигнала. Увеличивайте
или уменьшайте значение с помощью правой или левой клавиши направления.
FACTORY SETTING («Заводские установки») — это подменю позволяет сбросить настройки
ручного управления, восстановив заводские установки.
38
Page 41

Использование пользовательской базы данных
Телескоп с автонаведением позволяет сохранить до 25 объектов в пользовательскую базу
данных.
5
Запись объекта в базу
С помощью клавиш прокрутки выберите Object Catalog («Каталог объектов») в главном
меню. Нажмите ENTER. Выберите в списке опцию Select User Defined («Выбрать
пользовательский») и нажмите ENTER. В меню User Defined («Пользовательский») можно
также попасть, нажав клавишу быстрого доступа USER («Пользователь»).
Первая доступная опция в каталоге объектов — Recall Object («Вызвать объект»). Здесь
можно просматривать ранее сохраненные объекты. С помощью клавиш прокрутки листайте
список до пункта Input Coordi («Ввести координаты»), затем нажмите ENTER.
Телескоп сохраняет пользовательские объекты в двух форматах — R.A./Dec (Пр. восх./скл.)
и Alt/Az (Альт-азимутальный). Для выбора формата R.A./Dec нажмите 1, для выбора
формата Alt/Az нажмите 2.
По умолчанию телескоп выводит на дисплей R.A./Dec или Alt/Az координаты той точки, на
которую нацелен телескоп. Координаты R.A./Dec выглядят так: "22h46.1m +90 00'",
что означает 22 часа и 46.1 минуты по оси прямого восхождения и +90° 00' по оси склонения.
Изменить координаты можно с помощью цифровой клавиатуры и клавиш прокрутки.
С помощью правой и левой клавиши направления перемещайте курсор к соседней позиции.
Чтобы сохранить данные, нажмите ENTER. Если введенных координат R.A./Dec не
существует, при нажатии кнопки ENTER ручное управление не реагирует. Проверьте данные
и введите правильные координаты.
Чтобы сохранить объект или местоположение в формате Alt/Az, сначала наведите телескоп
на нужную точку и получите значение Alt/Az, затем нажмите ENTER, чтобы сохранить его.
Когда координаты сохранены, на дисплее появится номер пользовательского объекта.
С помощью клавиш прокрутки введите нужный вам номер и нажмите ENTER.
На дисплее появится сообщение View Object? («Наблюдать объект?») и введенный номер
пользовательского объекта. Для перехода к объекту нажмите ENTER, а для возврата в меню
ввода координат (Input Coordinate) нажмите ESC.
Номер пользовательского объекта может быть уже занят ранее. Если вы не знаете точно,
какие номера свободны, сначала проверьте их, вызвав сохраненные пользовательские
объекты.
Вызов пользовательского объекта
См. шаги 1-4 раздела «Запись объекта в базу», чтобы попасть в меню User Defined
(«Пользовательский»). Выберите Recall Object («Вызов объекта») и нажмите ENTER. С
помощью клавиш прокрутки листайте пользовательские объекты, пока не найдете нужный.
Нажмите ENTER, чтобы посмотреть координаты этого объекта. После повторного нажатия
ENTER телескоп начнет поворачиваться на данный объект.
Если выбран пустой номер, ручное управление не реагирует. С помощью клавиш прокрутки
выберите другой номер. Если вызванный объект находится за горизонтом, на дисплее
появится сообщение Below Horizon!! («За горизонтом!»), и ручное управление автоматически
вернется в меню вызова объекта.
39
Page 42

Идентификация неизвестного объекта
SynScan™ AZ умеет идентифицировать неизвестный объект, на который в данный момент
нацелен телескоп.
Для идентификации объекта нажмите клавишу ID или с помощью клавиш прокрутки
выберите IDENTIFY («Идентифицировать») в главном меню, затем нажмите ENTER. Ручное
управление выведет на дисплей список ближайших известных объектов, а также
расстояние до объекта от точки, на которую нацелен телескоп. Просмотрите эти объекты с
помощью клавиш прокрутки. Чтобы выйти из этой меню, нажмите ESC.
6
Связь с компьютером
Еще одна функция SynScan™ AZ — возможность подключаться к компьютеру через
специальный кабель. Убедитесь, что телескоп выровнен. Подсоедините кабель RS-232 к
разъему RJ-11 на ручном управлении и к COM-порту компьютера. Используйте только
кабель RS-232, идущий в комплекте, иначе можно повредить компьютер или пульт ручного
управления. Если вы используете свой кабель, убедитесь, что в COM-порт компьютера идут
только штекеры 2, 3 и 5. Как только связь установлена, телескоп будет под полным
контролем компьютера. Окончив наблюдение, выполните инструкции приложения по
разрыву связи с телескопом. Не отсоединяйте пульт до того, как закроете приложение на
компьютере, иначе приложение может зависнуть.
Системные требования
Ручное управление — версия 3.0. или выше.
Windows95 или более новая версия.
COM-порт для связи с RS-232C.
Кабель для подключения к компьютеру, идущий в комплекте к SynScan™ AZ.
Источник питания переменного тока с выходом 7.5~15V/100mA. Вилка должна быть
диаметром 2.1мм, положительная.
По умолчанию, скорость обмена данными между ручным управлением и компьютером
установлена на 115kbps. Порт RS-232C на некоторых компьютерах может не поддерживать
такую высокую скорость. Если через несколько попыток обновление все еще не удается
провести, можно сократить скорость обмена данными, нажав клавишу SETUP на ручном
управлении (после того, как вставлен шнур питания). Скорость упадет до 9.6 kbps. В нижнем
правом углу ЖК-дисплея появится надпись Lo. Теперь можно выполнить ту же процедуру
обновления, только она займет больше времени (около 240 секунд).
Обновление ручного управления SynScan™ AZ:
Вставьте разъем RJ-11 кабеля для связи с компьютером в среднее гнездо на ручном
управлении — до щелчка (тогда разъем встал на место). Вставьте другой конец кабеля
(разъем DB9) в порт RS-232 на компьютере.
Нажмите и удерживайте клавиши 0 и 8 одновременно, затем вставьте
в ручное управление шнур питания.
Ручное управление издаст сигнал,
подтверждая успешный запуск. На дисплее появится сообщение SynScan™ Update Ver. x.x
(«Обновление SynScan™ вер. x.x»)
7
40
Page 43

Запустите приложение SynScanFirmwareLoader на компьютере. Кнопка HC. Version
показывает номер версии оборудования, прошивки и базы данных ручного управления.
Эти данные только для вашего сведения, для обновления они не потребуются.
Нажмите Browse и выберите в папке SynScan файл SynScanVXXXXAZ.ssf. Нажмите Update,
чтобы начать загрузку новой прошивки.
Статус обновления можно посмотретьпод кнопками Update и HC. Version.
По окончании загрузки появится сообщение Update Complete («Обновление завершено»).
Ручное управление SynScan™ обновлено. Обычно обновление занимает около 30 секунд,
однако при использовании адаптера USB-RS232 Update может понадобиться больше
времени.
Если появилось сообщение Can not connect to SynScan Firmware Loader hand control («Не
удается подключиться к ручному управлению SynScan»), проверьте подключение кабеля и
сам кабель. Убедитесь, что все в порядке. Закройте все приложения, которые могли бы
занимать порт RS-232,и попробуйте снова. Если появилось сообщение Firmware update
failed… («Не удается обновлить прошивку»), перезапустите ручное управление, вынув шнур
питания и снова вставив его. Повторите процедуру обновления. По умолчанию, скорость
обмена данными между ручным управлением SynScan™ и компьютером установлена на
115kbps.
8
Порт RS-232C на некоторых компьютерах может не поддерживать такую высокую скорость.
Если через несколько попыток обновление все еще не удается провести, можно сократить
скорость обмена данными, нажав клавишу SETUP на ручном управлении (после того, как
вставлен шнур питания). Скорость упадет до 9.6 kbps. В нижнем правом углу ЖК-дисплея
появится надпись Lo. Теперь следует повторить процедуру обновления, только она займет
больше времени (~240 секунд).
41
Page 44

Спецификация
SkyMatic 135 GTA
SkyMatic 105 GT MAK
SkyMatic 127 GT MAK
Конструкция
Рефлектор
Максутов-Кассегрен
Максутов-Кассегрен
Апертура
130 мм
102 мм
127 мм
Фокусное расстояние
650 мм; f/5
1300 мм; f/12,8
1500 мм; f/11,8
Макс. увеличение
260x
204x
250x
Разрешение
0.92 угл. сек.
0.92 угл. сек.
1.1 угл. сек.
Окуляр
1.25'' SUPER10 &
SUPER25
1.25'' SUPER10 &
SUPER25
1.25" SUPER10 &
SUPER25
Искатель
6x30
6x30
6x30
Монтировка
AZ 114 GT; AZ SynScan
AZ 114 GT; AZ SynScan
AZ 114 GT; AZ SynScan
Тренога
сталь; 630-1150 мм
сталь; 630-1150 мм
сталь; 630-1150 мм
Название
Команда
ASCII на ПК
Ответ
ручного
управления
Примечание
Echo (Эхо)
Kx
Kx
Полезно для проверки связи с ПК
Goto Azm-Alt (Переход
на альт.- аз.)
B12AB,
4000
#
отсылается 10 символов. B=Команда,
12AB=азимут, запятая, 4000=Alt. Если
команда конфликтует с границами
поворота, никакого действия не
будет выполнено
Источник питания
Тип привода
Разрешение
Скорость поворота
от 11 до 15 V DC 1Amp (положит.)
cервоприводы переменного тока
0.8923 угл.сек. или 1,452,425 шагов/об (AZ-80)
0 = 1.0X, 1 = 2.0X, 2 = 16X, 3 = 32X, 4 = 64X, 5 = 128X
6 = 400X, 7 = 500X, 8 = 600X, 9 = 800X
Скорость трекинга
Режим трекинга
Метод выравнивания
звездная, лунная, солнечная
трекинг по двум осям
выравнивание по самой яркой звезде, выравнивание по двум
звездам.
Точность наведения
База данных
до 10 угл.мин.
25 пользовательских объектов. Полные каталоги M, NGC, IC и
SAO — итого 42,900 объектов
Диаграмма подключения:
9
Технические характеристики
Телескопы с автонаведением SkyMatic предназначены для управления компьютером через
порт RS-232 и кабель RS-232. После подключения к компьютеру им можно управлять
с помощью большинства популярных планетариев. SynScan™ AZ будет обмениваться данными
с компьютером на скорости 9600 бит/сек, без стоповых битов и битов четности. Углы
передаются через 16 бит и шестнадцатиразрядный ASCII.
42
Page 45

Goto RА-Dec (Переход на
пр.восх./скл.)
R34B, 12CE
#
Труба искателя должна быть
выровнена. Если команда конфликтует
с границами поворота, никакого
действия не будет выполнено
Get Azm-Alt
(Получить альт-аз.)
Z
12AB, 4000#
возвращается 10 символов,
12AB=азимут, запятая, 4000=Alt, #
Get RA-Dec (Получить
пр.восх./ скл.)
E
34AB, 12CE#
Труба искателя должна быть выровнена
Cancel Goto (Отменить
переход)
M
#
Is Goto in Progress (Переход в процессе)
L
0# or 1#
0=нет, 1=да: “0” — нулевой символ
ASCII
Is Alignment Complete
(Выравнивание
завершено)
J
0# or 1#
0=нет, 1=да
HC version (Версия HC)
V
22
два байта V2.2
Stop/Start Tracking
(Остановить/начать
трекинг)
Tx x= 0
(трекинг
выкл.)
x= 1 (Alt-Az
вкл.)
x= 2 (EQ-N)
x= 3 (EQ-S)
x = 2 (EQ-N)
#
Альтаз. трекинг требует выравнивания
32-bit goto RA-Dec
(Переход на пр.восх./
скл. 32- бит.)
r34AB0500,1
2CE0500
#
32-bit get RA-Dec
(Получить пр.восх./
скл. 32-бит.)
e
34AB0500,
12CE0500#
Два последних символа всегда
нулевые.
Два последних символа
всегда нулевые.
b34AB0500,1
2CE0500
#
32-bit get Azm-Alt (Получить альт.-аз.32-бит
z
34AB0500,
12CE0500#
Два последних символа всегда
нулевые.
Отсылка скорости трекинга в ручное управление через RS232:
1. Умножьте требуемую скорость трекинга (угл.сек./сек.) на 4. Например: желаемая
скорость трекинга — 120 угл.сек./сек. (примерно в 8 раз больше звездной скорости),
следовательно TRACKRATE = 480.
2. Разделите TRACKRATE на два байта: TRACKRATE = TrackRateHighByte*256 +
TrackRateLowByte. Например: TRACKRATE = 480, тогда TrackRateHighByte = 1,
TrackRateLowByte = 224.
3. Чтобы отослать скорость трекинга, отправьте следующие 8 байтов:
a. Положительный трекинг по азимуту: 80, 3, 16, 6, TrackRateHighByte, TrackRateLowByte, 0, 0
b. Отрицательный трекинг по азимуту: 80, 3, 16, 7, TrackRateHighByte, TrackRateLowByte, 0, 0
c. Положительный трекинг по высоте: 80, 3, 17, 6, TrackRateHighByte, TrackRateLowByte, 0, 0
d. Отрицательный трекинг по высоте: 80, 3, 17, 7, TrackRateHighByte, TrackRateLowByte, 0, 0
4. От ручного управления вернется сообщение 35.
Дополнительные команды
43
Page 46

Отсылка команды slow-Goto (медленный переход) в ручное управление через RS232:
1. Преобразуйте угловое положение в 24-битное число. Например: если желаемое
положение 220°, то POSITION_24BIT = (220/360)*224 = 10,252,743.
2. Разделите POSITION_24BIT на три байта: POSITION_24BIT = PosHighByte * 65536 +
PosMedByte *
256 + PosLowByte. Например: PosHighByte = 156, PosMedByte = 113, PosLowByte = 199.
3. Отправьте следующие 8 байтов:
a. Медленный переход по азимуту: 80, 4, 16, 23, PosHighByte, PosMedByte, PosLowByte, 0 b.
Медленный переход по высоте: 80, 4, 17, 23, PosHighByte, PosMedByte, PosLowByte, 0
4. От ручного управления вернется число 35. Сброс положений по азимуту или высоте:
1. Преобразуйте угловое положение в 24-битное число, как и в предыдущем примере.
2. Отправьте следующие 8 байтов:
a. Установить положение по азимуту: 80, 4, 16, 4, PosHighByte, PosMedByte, PosLowByte, 0 b.
Установить положение по высоте: 80, 4, 17, 4, PosHighByte, PosMedByte, PosLowByte, 0
3. От ручного управления вернется число 35.
10
Использование элементов питания
Всегда используйте элементы питания подходящего размера и соответствующего типа.
При необходимости замены элементов питания меняйте сразу весь комплект, не
смешивайте старые и новые элементы питания и не используйте элементы питания разных
типов одновременно.
Перед установкой элементов питания очистите контакты элементов и контакты в корпусе
прибора.
Устанавливайте элементы питания в соответствии с указанной полярностью (+ и -).
Если прибор не используется длительное время, следует вынуть из него элементы питания.
Оперативно вынимайте из прибора использованные элементы питания.
Не пытайтесь перезаряжать гальванические элементы питания - они могут протечь,
воспламениться или взорваться.
Никогда не закорачивайте полюса элементов питания – это может привести к их перегреву,
протечке или взрыву.
Не пытайтесь нагревать элементы питания, чтобы восстановить их работоспособность.
Выключайте прибор после использования.
Храните элементы питания в недоступном для детей месте, чтобы избежать риска их
проглатывания, удушья или отравления.
Уход и хранение
Никогда не смотрите в прибор на Солнце или область рядом с ним без специального
фильтра, а также на другой источник яркого света или лазерного излучения. ЭТО ОПАСНО
ДЛЯ ЗРЕНИЯ И МОЖЕТ ПРИВЕСТИ К СЛЕПОТЕ!
Будьте внимательны, если пользуетесь прибором вместе с детьми или людьми, не
знакомыми с инструкцией.
Не разбирайте прибор (в том числе и для очистки зеркал). Сервисные и ремонтные работы
могут проводиться только в специализированном сервисном центре.
Оберегайте прибор от резких ударов и чрезмерных механических воздействий.
Не касайтесь пальцами поверхностей линз. Для внешней очистки телескопа используйте
специальную салфетку и специальные чистящие средства, например оригинальные
средства для чистки оптики компании Levenhuk.
Храните прибор в сухом прохладном месте, недоступном для влияния кислот или других
активных химических веществ, вдали от отопителей (бытовых, автомобильных) и от
открытого огня и других источников высоких температур.
44
Page 47

Когда прибор не используется, всегда надевайте на него пылезащитную крышку. Это
защищает поверхность линз и зеркал от попадания пыли.
Если деталь прибора или элемент питания были проглочены, срочно обратитесь за
медицинской помощью.
Международная гарантия
Продавец гарантирует соответствие качества приобретенного вами изделия компании Levenhuk
требованиям технической документации при соблюдении потребителем условий и правил
транспортировки, хранения и эксплуатации изделия.
Компания Levenhuk гарантирует отсутствие дефектов в материалах конструкции и дефектов
изготовления изделия.
В течение гарантийного периода покупатель может вернуть неисправное изделие продавцу либо в
Сервисный центр компании Levenhuk. Компания Levenhuk по своему усмотрению отремонтирует или
бесплатно заменит неисправное изделие.
Претензии по качеству изделия не принимаются при отсутствии правильно оформленного
гарантийного талона или при наличии исправлений в нем, а также при непредъявлении данного
неисправного изделия. Гарантия не распространяется на дефекты, не связанные с дефектами
материала или изготовления, на случаи, когда, по мнению компании, изделие употреблялось не
по назначению, а также когда:
изделие имеет механические повреждения, царапины, сколы, трещины и повреждения оптики;
изделие вышло из строя в результате ударов, сжатия, растяжения корпуса;
дефекты или неисправности возникли при или вследствие неправильной эксплуатации, хранения
или транспортировки изделия;
изделие разбиралось или ремонтировалось лицом, не имеющим на то соответствующих полномочий.
Гарантия не распространяется на комплектующие с ограниченным сроком использования, элементы
питания и прочее.
Компания Levenhuk оставляет за собой право вносить любые изменения или прекращать производство
изделия без предварительного уведомления.
Срок гарантии: на аксессуары — 6 (шесть) месяцев со дня покупки, на остальные изделия —
пожизненная гарантия. Храните гарантийный талон вместе с чеком.
По вопросам гарантийного обслуживания вы можете обратиться в ближайшее представительство
компании Levenhuk.
Представительства компании Levenhuk:
США: www.levenhuk.com
Канада: www.levenhuk.ca
Чехия: www.levenhuk.cz
Нидерланды: www.levenhuk.nl
Польша: www.levenhukoptics.pl
Россия: www.levenhuk.ru
Украина: www.levenhuk.ua
Европа: www.levenhuk.eu
Дата продажи _________________________________ Подпись __________________________________ Печать
45
Page 48

Телескопи Levenhuk GoTo
UA
Вітаємо!
Вітаємо з покупкою високоякісного телескопа Levenhuk SkyMatic GoTo! Ця лінійка включає
надсучасні оптичні інструменти, що дозволяють легко переміщатися небесною сферою та
знаходити точно те, що потрібно, майже не витрачаючи часу! Легкі у використанні елементи
управління забезпечують простий спосіб розташовування бажаних об'єктів і початку
спостережень доторком кнопки. Розширювана база даних містить координати більше 42 900
об'єктів. Навіть малодосвідчений астроном після кількох спостережень може вивчити усі
функції.
Якщо це ваш перший телескоп GoTo, то вітаємо з першим кроком у світі любительського
спостереження зірок.
Виділіть трохи часу, щоб ознайомитися з нічним небом і навчитися розпізнавати основні зорі
та сузір'я. З недовгою практикою, невеликим терпінням та достатньо темним небом без
міських ліхтарів, ваш телескоп стане нескінченним джерелом чудес, радості та досліджень.
Ці інструкції допоможуть вам налаштувати, належно використовувати та піклуватися про свій
телескоп. Будь ласка, старанно їх прочитайте до початку роботи.
ПОПЕРЕДЖЕННЯ! Ніколи не дивіться прямо на Сонце – навіть на мить - через телескоп
або видошукач без спеціального професійного сонячного фільтра, який повністю
покриває передню частину приладу, бо це може спричинити незворотнє пошкодження
очей. Для уникнення пошкоджень внутрішніх частин телескопа, переконайтеся, що
передня частина видошукача покрита алюмінієвою фольгою або іншим непрозорим
матеріалом. Діти повинні використовувати телескоп тільки під наглядом дорослих.
Усі частини телескопа доставляються в одній упаковці. Розпаковуйте обережно.
Рекомендуємо зберігати оригінальне упакування для транспортування. У випадку, якщо
телескоп потребує транспортування в інше місце, таке належне упакування допоможе
телескопу завершити переміщення неушкодженим. Переконайтеся, що в упаковці присутні
усі частини. Старанно перевіряйте упаковку, оскільки деякі частини дуже маленькі. Крім
наданих, інші інструменти непотрібні. Усі гвинти потрібно надійно затягнути, щоб виключити
згинання і биття, але будьте обережні, щоб не затягнути надмірно, оскільки це може зірвати
нарізь.
Під час збірки (і в будь-який інший час) не торкайтеся поверхонь оптичних елементів
пальцями. При неуважному поводженні оптичні поверхні з чутливим покриттям можна легко
пошкодити. Ніколи не виймайте дзеркала з їх рам, бо це анулює гарантію на виріб.
46
Page 49

Збірка телескопа
Розставте ніжки триноги до повного розкриття та встановіть лоток для аксесуарів.
Встановіть потрібну висоту триноги. Розмістіть пристрій поверху головки триноги і закріпіть
її за допомогою зажимного гвинта.
Послабте гвинт з рифленою головкою фокусувача та зніміть пластикову кришку. Вставте
окуляр 25 мм в фокусувач. Зніміть кришку від пилу з передньої частини телескопа.
Зберіть видошукач: вставте основу видошукача в кріплення типу «ластівчин хвіст» на трубі
телескопа та зафіксуйте його гвинтом з рифленою головкою.
Приєднайте ручне управління, увімкнувши його у відповідний порт у нижній частині
кріплення.
Вкладіть вісім батарей АА у відділення для батарей з відповідною полярністю. Увімкніть
відділення для батарей у відповідний порт у нижній частині кріплення.
ПОПЕРЕДЖЕННЯ!
Без з'єднання з джерелом живлення можна налаштовувати лише координати висоти.
Не намагайтеся налаштовувати координати азимуту, оскільки це анулює гарантію на
виріб. Будь-яке налаштування координат азимуту повинно виконуватися лише ручним
управлінням, бо в іншому випадку може зламатися навігаційний механізм.
1
Вимоги до живлення
Для використання телескопа SkyMatic приєднайте його до джерела живлення 1 А, 11–15 В
постійного струму. Переконайтеся, що кабель живлення належно увімкнений у рознім 12 В
постійного струму на кріпленні.
2
Ручне управління
Кабель ручного управління має 8-контактний з'єднувач RJ-45 з одного кінця, та 6-контактний
RJ-12 — з іншої. Увімкніть з'єднувач RJ-45 в ручне управління, а інший кінець — в кріплення.
В основі SynScan™ AZ є три порти. Середній порт використовується для з'єднування вашого
телескопа з комп'ютером або будь-яким пристроєм зі з'єднувачем RS-232. Гніздо 12 В
постійного струму на ручному управлінні дозволяє переглядати базу даних або обновляти
програмне забезпечення без приєднання пристрою до телескопа.
SynScan™ AZ надає пряме управління над навігацією телескопа та доступ до розширеної бази
даних небесних об'єктів. У ручного контролера є 16-символьний дисплей з підсвіткою та
функцією прокручування.
Клавіатура можна поділити на чотири групи.
3
47
Page 50

Функціональні клавіші
Функціональні клавіші розташовані зверху ручного управління, одразу нижче дисплея.
Клавішу ESC можна використовувати для відміни команди або переходу вверх по дереву
меню. Клавішу SETUP можна використовувати для швидкого доступу до меню Setup
(Налаштування). Клавішу ENTER можна використовувати для підтвердження вибору і команд.
Клавіші напрямків
Клавіші напрямків забезпечують повне управління телескопом. При автоматичному переході
до об'єкту ці клавіші блокуються. Їх можна використовувати для вирівнювання, центрування
на небесному об'єкті та ручній навігації телескопа. Ліві і праві клавіші також
використовуються для управління курсором дисплею при вводі даних.
Клавіші прокрутки
Клавіші прокрутки можна використовувати для навігації по дереву меню на дисплеї.
Цифрові клавіші
Ці клавіші мають дві функції: числовий ввід координат і швидка навігація.
клавіша TOUR (Огляд) активує автоматичний огляд по регіону спостереження небесної
сфери.
клавіша RATE (Швидкість) змінює швидкість обертання сервомоторів при навігації за
допомогою клавіш напрямків. Загалом є 10 швидкостей: від 0 (найменша) до 9 (найшвидша).
клавіша UTILITY (Утиліти) відкриває функції утиліт, наприклад, Show Position (Показати
положення), Display Time (Показати час), і т. д.
клавіша USER (Користувач) відкриває базу даних, створену користувачем (до 25
користувацьких об'єктів).
клавіша ID (Ідентифікатор) визначає поточний об'єкт спостереження.
клавіші NGC, IC, M, PLANET (Планета) та OBJECT (Об'єкт) відкриває відповідний каталог бази
даних.
Перше налаштування
Переконайтеся, що кріплення вирівняно. Наведіть свій телескоп на яскраву зірку або зоряне
скупчення. Приєднайте ручне управління до кріплення.
Для телескопів з автостеженням: включіть свій телескоп, увімкнувши його у джерело
живлення 12 В постійного струму.
Для багатофункціональних телескопів: просто включіть його перемикачем ON/OFF
(Вкл./Викл.).
Коли ручне управління приєднано, його дисплей покаже номер поточної версії (Version
Screen — Екран версії). Натисніть ENTER (Ввід). З'явиться повідомлення про шкоду здоров'ю
при спостереженні сонця. Якщо ви вже читали це попередження, то для продовження
можете натиснути ESC (Вихід).
Якщо ви не використовуєте ручне управління впродовж 30 секунд, він увійде в сплячий
режим, червоний світлодіод потьмяніє, а підсвітка клавіатури вимкнеться. Після натискання
будь-якої клавіші, сплячий режим буде відмінено.
48
Page 51

Введіть довготу і широту вашого поточного розташування (у вказаному порядку) за
допомогою цифрових клавіш.
Використовуйте клавіші прокрутки для прокрутки по основним напрямкам: W — на захід, E —
на схід, N — на північ і S — на південь.
Використовуючи клавіші вліво і вправо, можна прокручувати широту і довготу.
Натиснувши ENTER (Ввід), ви підтвердите свій вибір. Дані повинні вводитися в наступному
форматі: 123° 04' W 49° 09' N. Оберіть свою часову зону, ввівши години і хвилини за
допомогою клавіш прокрутки і цифрових клавіш (+ для сходу, — для заходу). Часова зона
стандартного тихоокеанського часу (наприклад), повинна виглядати так: -08:00.
Натисніть ENTER (Ввід), щоб підтвердити свій вибір. Введіть поточну дату у форматі
мм/дд/рррр за допомогою цифрових клавіш. Натисніть ENTER (Ввід), щоб підтвердити свій
вибір. Введіть поточний місцевий час у 24-годинному форматі (2 PM = 1400 год.). Натисніть
ENTER (Ввід) для підтвердження і перейдіть до встановлення літнього часу. Якщо хочете
виправити свій запис, натисніть ESC (Вихід), щоб перейти до попереднього налаштування,
або ENTER (Ввід), щоб внести зміни.
Після введення літнього часу, з'явиться повідомлення «DAYLIGHT SAVING?» (Літній час?).
Використовуйте клавіші прокрутки для вибору правильної відповіді, і натискайте ENTER
(Ввід) для підтвердження.
Після того, як закінчені ці налаштування, на дисплеї з'явиться повідомлення «Begin
alignment?» (Розпочати вирівнювання?).
Щоб розпочати вирівнювання, натисніть 1 або ENTER (Ввід). Для відміни процедури,
натисніть 2 або ESC (Вихід).
Вирівнювання на зорі
Перед тим, як вашим телескопом можна буде спостерігати розширення всесвіту, потрібно
його вирівняти по двом або трьом відомим зіркам. Як ви знаєте, Земля обертається вдень
навколо свої осі. Тому здається, що зірки переміщаються по нічному небу по кривій. Коли
ваш телескоп вирівнюється, він запам'ятовує карту небесної сфери та рух зірок. Таке
вирівнювання можна провести в будь-який час протягом спостережень (просто оберіть
Alignment (Вирівнювання) в меню Setup (Налаштування)).
Є два методи вирівнювання за зорями: вирівнювання за найяскравішою зіркою та
вирівнювання за двома зірками. Якщо це ваше перше спостереження, рекомендуємо
розпочати із вирівнювання за найяскравішою зіркою. Перед тим, як продовжити,
переконайтеся, що видошукач належним чином вирівняно з трубою телескопа.
Вирівнювання за найяскравішою зіркою
При виборі налаштування вирівнювання на екрані вашого SynScan™ AZ, прокрутіть до опції
Brightest Star Align (Вирівняти за найяскравішою зіркою). Натисніть ENTER (Ввід), щоб
підтвердити свій вибір. З'явиться наступне повідомлення – «Select Region» (Обрати регіон) з
вісьмома варіантами основних напрямків азимуту, тобто N (Північ), NE (Північний схід), E
(Схід), SE (Південний схід), S (Південь), SW (Південний захід), W (Захід), NW (Північний
захід). Кожен напрямок покриває діапазон 90° вздовж азимуту, починаючи з півночі на 0°
(або 360°), сходу на 90°, півдня на 180° та заходу на 270°.
Північно-східний напрямок, наприклад, покриває ділянку від 0° до 90°.
49
Page 52

Напрямок
Північний схід
Південний схід
Південь
Південно-південний схід
Північний захід
Після вибору основного напрямку ручне управління створює перелік зірок щонайменше
зоряної величини 1,5, які спостерігаються в тому напрямку. Зорі, розташовані поза
діапазоном 10°–75° вздовж осі прямого піднесення, та зорі зоряної величини менше 1,4 не
будуть включені в перелік.
На екрані з'явиться інформація по зорі вирівнювання. Перша лінійка вкаже її назву і
величину.
Друга лінійка вкаже її приблизне розташування. Припустімо, в якості зорі вирівнювання був
вибраний Арктур. Його величина — 0,0, розташування — 88,1° східної довготи та 24,1°
вздовж осі прямого піднесення.
Телескоп не повернеться автоматично в напрямку на точку першої зорі вирівнювання, тому
прийдеться це зробити вручну, використовуючи клавіші напрямків. Швидкість обертання
сервомоторів можна збільшити, натискаючи клавішу RATE (Швидкість) та прокручуючи
доступні варіанти (0 — найповільніша, 9 — найшвидша).
Переконайтеся, що зірка відцентрована в полі зору (для її центрування можна
використовувати клавіші напрямків), та натисніть ENTER (Ввід) для підтвердження. Далі вас
попросять обрати вторинну зірку для вирівнювання з переліку. Використовуйте клавіші
прокрутки, щоб обрати другу зірку, і ваш телескоп автоматично повернеться в точку обраної
зірки. Ваше ручне управління подасть один сигнал по завершенню обертання телескопа. Не
намагайтеся нічого налаштовувати, доки не почуєте сигнал. Єдина команда, яку розпізнає
SynScan™ AZ в цей час — це ESC (Вихід). Відцентруйте другу зірку в полі зору за допомогою
клавіш напрямків. Якщо вирівнювання проведено належним чином, на екрані з'явиться
повідомлення «Alignment Successful» (Вирівнювання успішне).
Якщо щось пішло неправильно, з'явиться повідомлення «Alignment Failed» (Вирівнювання
невдале), і процес прийдеться повторити. Ви можете відмінити процес в будь-який момент,
натиснувши клавішу ESC (Вихід).
Градусний діапазон по азимуту
315°-45°
Схід
45°-135°
90°-180°
135°-225°
180°-270°
Захід
225°-315°
270°-360°
Вирівнювання по двом зорям
Цей процес схожий на вирівнювання за найяскравішою зіркою, з одним виключенням: він
проводиться без обирання напрямку азимуту.
Оберіть опцію 2-Star Align (Вирівнювання по 2 зіркам) в меню Star Alignment (Вирівнювання по
зорям) за допомогою клавіш прокрутки. Натисніть ENTER (Ввід), щоб підтвердити свій вибір.
З'явиться перелік зірок, видимий у вашому регіоні. Використовуючи клавіші прокрутки,
оберіть одну первинну зірку для вирівнювання. Телескоп не повернеться на точку першої
зірки для вирівнювання автоматично.
Це потрібно буде зробити вручну, використовуючи клавіші напрямків, тому простіше обрати
зірку, з якою ви знайомі. Відцентруйте першу зірку в полі зору за допомогою клавіш
напрямків.
Натисніть ENTER (Ввід), щоб підтвердити свій вибір. З'явиться інший перелік для обрання
вторинної зірки для вирівнювання. Використовуйте клавіші прокрутки для вибору зірки і
натискайте ENTER (Ввід) для підтвердження. Телескоп автоматично повернеться на точку
другої зірки. Відцентруйте її в полі зору за допомогою клавіш напрямків.
50
Page 53

Натисніть ENTER (Ввід) для підтвердження. Якщо вирівнювання проведено належним чином,
з'явиться повідомлення «Alignment Successful» (Вирівнювання успішне). Якщо щось пішло
неправильно, з'явиться повідомлення «Alignment Failed» (Вирівнювання невдале), і процес
прийдеться повторити.
Для найкращих результатів обирайте зірки, які знаходяться на відстані принаймні у 60°,
оскільки чим більша відстань між зірками, тим точніше вирівнювання. Обираючи зірки з
однаковими координатами прямого піднесення навіть покращить результати.
Покращення точності наведення
Будь-який з вищезгаданих методів повинен давати достатню точність для ваших
спостережень. Проте, якщо вам потрібна додаткова точність, дуже корисною буде опція
Pointing Accuracy Enhancement (PAE) (Покращення точності наведення — ПТН) вашого
SynScan™ AZ. Цю функцію можна використати для 85 різних регіонів небесної сфери, що буде
достатньо для покриття її усієї. Перед тим, як продовжувати з PAE (ПТН), перевірте, чи цей
регіон уже відображений у SynScan™ AZ.
Відцентруйте об'єкт поточного спостереження в полі зору (якщо це вже зроблено, просто
пропустіть цей крок).
Натисніть і потримайте клавішу ESC (Вихід) впродовж двох секунд. На дисплеї з'явиться
повідомлення «Re-center» (Перецентрувати) та назва зразкового об'єкту. Назва об'єкту
помигає тричі. Якщо для навігації ви використовуєте програмне забезпечення планетарію,
натомість з'явиться повідомлення «Last goto object» (Останній відвіданий об'єкт).
Переконайтеся, що зразковий об'єкт все ще відцентрований у вашому полі зору, та натисніть
ENTER (Ввід).
Якщо ви не хочете зберігати результат, то можете натиснути ESC (Вихід), щоб відмінити
операцію. Як тільки ви натискаєте ENTER (Ввід), інформація про поточну точність буде
записана, а карта регіону буде відповідно оновлена.
Від цього часу ви повинні зауважувати збільшення точності в межах цього регіону.
Результати вирівнювання та PAE (ПТН) зберігатимуться у вашому ручному управлінні і не
стиратимуться після виключення.
Можливо, у наступних випадках потрібно повторити вирівнювання по зіркам:
1. Перед вимкненням телескоп не повернувся в початкове положення.
2. Були змінені деякі налаштування телескопу та кріплення.
При зміні аксесуарів будьте обережні, в іншому випадку може виникнути потреба у
перевирівнюванні вашого приладу. При повороті ручного управління впродовж наступної
сесії спостереження зірок переконайтеся, що вводите час з того ж джерела, тобто, якщо ви
використовували наручний годинник для зчитування часу, то, як зразок, потрібно
використовувати той самий годинник.
База даних об'єктів
Даних телескоп GoTo поставляється з розширеною базою даних на 42 900 об'єктів з
координатами.
Також в базу даних включена інформація з наступних каталогів:
Сонячна система з сімома планетами і Місяцем.
Зірки з назвами, що включає 212 відомих зірок.
51
Page 54

NGC (New General Catalogue of Nebulae and Clusters of Stars — Новий загальний каталог
туманностей та скупчень зірок), що включає 7840 найяскравіших об'єктів дальнього космосу.
IC, що включає 5386 зірок та об'єктів дальнього космосу.
Месьє, що включає 110 об'єктів, які додав Ш. Мессьє.
Колдвел, що включає 109 об'єктів, які додав П. Колдвел-Мур.
Подвійні зірки, що включає 55 відомих подвійних зірок.
Перемінні зірки, що включає 20 перемінних зірок.
SAO (Smithsonian Astrophysical Observatory Star Catalog — Зоряний каталог Смітсонівської
Астрофізичної обсерваторії), що включає 29 523 зірки.
Вибір об'єкту
Тепер, коли ваш телескоп вирівняний, можна починати спостереження. Для вибору об'єкта
для спостереження існує п'ять способів:
Натискаючи клавішу TOUR (Огляд), ви перейдете до огляду нічного неба, обираючи
найяскравіші та найгарніші об'єкти дальнього космосу. Ви можете прокрутити перелік
обраних зірок за допомогою клавіш прокрутки. Натисніть ENTER (Ввід), щоб підтвердити свій
вибір. З'являться координати цього об'єкту. Натисніть ENTER (Ввід) знову, і ваш телескоп
автоматично знайде об'єкт.
Натисніть клавіші M, NGC, IC, що відкриє відповідний каталог небесних об'єктів. Введіть
номер об'єкту для спостереження за допомогою цифрових клавіш.
Натисніть ENTER (Ввід) і на дисплеї побачите координати об'єкту. Для перегляду інформації
про об'єкт, включно з його розміром, величиною та відповідним сузір'ям використовуйте
клавіші прокрутки. Натисніть ENTER (Ввід) знову, і ваш телескоп автоматично знайде об'єкт.
Клавіша PLANET (Планета) відкриває базу даних Сонячної системи. Використовуйте клавіші
прокрутки для вибору бажаної планети, і натискайте ENTER (Ввід) для підтвердження
вибору. Після перегляду координат на екрані знову натисніть ENTER (Ввід) і ваш телескоп
спрямується на об'єкт.
Клавіша USER (Користувач) відкриває користувацьку базу даних. Ви можете ввести
координати нового об'єкту або обрати об'єкт, який ви уже зберегли (для детальнішої
інформації див. розділ User database (Користувацька база даних)).
Клавіша OBJECT (Об'єкт) надає доступ до повної бази даних з більше 42 900 небесних
об'єктів.
4
Меню Utility (Утиліти)
Функції утиліт — це простий спосіб управління вашим SynScan™ AZ напряму.
SHOW POSITION (Показати положення) надає координати поточного об'єкту спостереження.
SHOW INFORMATION (Показати інформацію) показує місцевий та зоряний час та інформацію
про версії програмного забезпечення та SynScan™ AZ. Якщо ручне управління приєднане до
кріплення, то воно також покаже поточну версію прошивки мотора.
PARK SCOPE (Зафіксувати телескоп) переведе трубу телескопа в початкове (Home)
положення або запам'ятає поточне положення як Home.
PAE (ПТН) надає доступ до функції Pointing Accuracy Enhancement (Покращення точності
наведення).
CLEAR PAE DATA (Очистити дані ПТН) знищить усі дані PAE (ПТН).
GPS дозволяє отримувати інформацію з GPS-приймача SynScan™ AZ.
52
Page 55

Меню Setup (Налаштування)
Це меню дозволяє змінити поточні налаштування положення телескопа, дати, часу і
вирівнювання. Для доступу до меню налаштування натисніть клавішу SETUP (Налаштування)
або прокрутіть меню до розділу SETUP (Налаштування).
Ось перелік усіх функцій, доступних в меню Setup (Налаштування):
DATE (Дата) дозволяє змінити поточну дату.
TIME (Час) дозволяє змінити поточний час.
OBSERVING SITE (Ділянка спостереження) дозволяє змінити поточне положення.
DAYLIGHT SAVINGS (Літній час) дозволяє змінити поточні налаштування літнього часу.
ALIGNMENT (Вирівнювання) дозволяє виконати процедуру вирівнювання по зіркам ще раз.
AUTO SELECT (Автовибір) передасть команду вашому ручному управлінню автоматично
обирати зірки для вирівнювання по ним.
SORT BY (Сортувати за) передасть команду вашому ручному управлінню створити перелік
видимих на даний момент зірок для ручного вибору користувачем. Зірки будуть посортовані
за алфавітом або за своєю зоряною величиною.
BACKLASH (Мертва хода) дозволяє вводити значення компенсації мертвої ходи по кожній вісі
обертання. Для точної навігації вашого телескопа важливо, щоб це значення було рівне або
більше дійсної мертвої ходи по вісям. Типове значення рівне 0 градусів, 0 кутових мінут, 0
кутових секунд (0 гр. 00' 00''). Для введення значень використовуйте цифрові клавіші, а до
наступної цифри переходьте клавішею напрямку вправо. Спочатку відкалібруйте вісь
прямого піднесення. Натисніть ENTER (Ввід) для підтвердження та відкалібруйте вісь
схилення.
SID. RATE (Зоряна швидкість) активує швидкість зоряного стеження.
LUNAR RATE (Місячна швидкість) активує швидкість Місячного стеження.
SOLAR RATE (Сонячна швидкість) активує швидкість Сонячного стеження.
STOP TRACKING (Зупинити стеження) негайно зупиняє поточне стеження.
SET SLEW LIMITS (Встановити обмеження повороту) дозволяє налаштувати обмеження
повороту на кріпленні навколо вертикальної осі. Налаштування цих обмежень виключить
будь-які удари та зіткнення труби вашого телескопа та кріплення. Діапазон повороту
залежить від дійсної використаної комбінації телескопа та кріплення.
HANDSET SETTING (Налаштування ручного пристрою) дозволяє налаштувати на вашому
ручному управлінні яскравість дисплею, підсвітку клавіатури та гучність тривоги. Для
налаштування використовуйте клавіші напрямків вліво і вправо.
FACTORY SETTING (Заводські налаштування) дозволяють відмінити будь-які зміни, які ви
зробили, замінивши їх на заводські.
Користувацька база даних
В користувацькій базі даних можна зберігати до 25 об'єктів.
5
Зберігання об'єктів в базі даних
Для вибору «Object Catalog» (Каталог об'єктів) в головному меню використовуйте клавіші
прокрутки. Натисніть ENTER (Ввід), щоб підтвердити свій вибір. Оберіть опцію «Select User
Defined» (Обрати користувацьку) та натисніть ENTER (Ввід). Цю базу даних також можна
відкрити, натиснувши клавішу USER (Користувач).
Перша опція підменю — «Recall Object» (Відновити об'єкт). Це надасть вам доступ до
попередньо збережених об'єктів. Використовуйте клавіші прокрутки для вибору «Edit
Objects» (Редагувати об'єкти) і натисніть ENTER (Ввід).
53
Page 56

Телескоп може зберігати координати у двох форматах: R.A./Dec. (Пряме
піднесення/Схилення) та Alt/Az (Висота/Азимут).
Натисніть 1, щоб вибрати формат R.A./Dec. (Пряме піднесення/Схилення), або 2 для
формату Alt/Az (Висота/Азимут).
SynScan™ AZ типово показує координати поточного об'єкта спостереження або в R.A./Dec.
(Пряме піднесення/Схилення), або в Alt/Az (Висота/Азимут). Ось приклад того, як потрібно
читати формат R.A./Dec. (Пряме піднесення/Схилення): «22h46.1m +90 00'». Це відповідає 22
годинам 46,1 мінутам прямого піднесення і 90 градусам схилення.
Координати можна міняти цифровими клавішами та клавішами прокрутки.
Використовуючи клавіші вліво і вправо, можна обирати значення, які потрібно редагувати.
Натисніть ENTER (Ввід), щоб зберегти введені координати. Якщо за даними координатами
зірки нема, ручне управління не збереже даних. Виправте введені дані та натисніть ENTER
(Ввід) для підтвердження.
Для збереження координат у форматі Alt/Az (Висота/Азимут), просто наведіть свій телескоп
на бажаний об'єкт та натисніть ENTER (Ввід) для підтвердження. Після збереження
координат з'явиться ідентифікатор користувацького об'єкта.
Використовуйте клавіші прокрутки для вибору бажаного номера, і натискайте ENTER (Ввід)
для підтвердження.
З'явиться повідомлення «View object» (Подивитися об'єкт) разом з збереженим
ідентифікатором користувацького об'єкту. Натискайте ENTER (Ввід) для знаходження об'єкта,
натискайте ESC (Вихід) для збереження іншого об'єкта.
При збереженні об'єкта неможливо вказувати попередньо використаний ідентифікатор.
Перед збереженням нового об'єкта переконайтеся, що вам відомі зайняті ідентифікатори
користувацьких об'єктів.
Вибір об'єкта з користувацької бази даних
Відкрийте користувацьку базу даних (див. інструкції вище). Оберіть опцію «Recall Object»
(Відновити об'єкт) та натисніть ENTER (Ввід). Для вибору об'єкта, який ви хочете
спостерігати, використовуйте клавіші прокрутки.
Щоб побачити координати цього об'єкта, натисніть ENTER (Ввід). Щоб телескоп перейшов до
цього об'єкта, натисніть ENTER (Ввід) ще раз.
Якщо під вказаним номером не збережено жодного об'єкта, ручне управління не
реагуватиме. В цьому випадку, для вибору іншого об'єкту знову використайте клавіші
прокрутки. Якщо ви намагаєтеся спостерігати об'єкт, який на даний момент знаходиться
нижче горизонту, з'явиться попередження «Below Horizon!!» (Нижче горизонту) і вас
попросять обрати інший об'єкт.
Визначення невідомого об'єкту
Ваш телескоп може визначити об'єкт, на який він зараз спрямований.
Щоб це зробити, натисніть клавішу ID (Ідентифікатор) на клавіатурі або використайте
клавіші прокрутки, щоб обрати команду IDENTIFY (Визначити) в головному меню, після чого
натисніть ENTER (Ввід). В SynScan™ AZ з'явиться перелік ближніх об'єктів, як і відстань від
об'єкта до центра візиру.
Прокручуйте об'єкти за допомогою клавіш прокрутки. Для відміни команди в будь-який
момент натисніть ESC (Вихід).
54
6
Page 57

З'єднання з комп'ютером
Вашим телескопом також можна управляти за допомогою програмного забезпечення. Для
цього достатньо лише увімкнути його у комп'ютер. До початку такої роботи переконайтеся,
що телескоп належно вирівняний. Вмикати телескоп в комп'ютер можна лише після
перевірки вирівнювання. Використовуйте кабель, наданий в комплекті.
Переконайтеся, що використовуєте наданий кабель, оскільки будь-яка помилка при заміні
може пошкодити ваше ручне управління або комп'ютер.
Після вставляння кабелю телескопом можна керувати з комп'ютера.
Дотримуйтеся інструкцій та закривайте комп'ютерне програмне забезпечення до того, як
витягуєте кабель.
Системні вимоги
Прошивка ручного управління версії 3.0 або новіша.
Windows 95 або новіша.
Порт RS-232C на комп'ютері.
З'єднувальний кабель SynScan™ AZ (постачається в комплекті).
Джерело живлення 7,5~15 В/100 мА. Шнур адаптера повинен позитивну полярність на вилці,
щоб відповідати полярності пристрою.
Типово швидкість передачі між ручним управлінням і ПК встановлюється на рівні 115 кбіт/с.
Порт RS-232C на вашому ПК може не підтримувати таку швидкість. Якщо неможливо оновити
прошивку SynScan™ AZ, то можна легко змінити швидкість передачі, натиснувши клавішу
SETUP (Налаштування), поки ручне управління увімкнуте в джерело живлення. Це знизить
швидкість передачі до 9,6 кбіт/с. Після цього повинен з'явитися значок «Lo» (Низька
швидкість) в правому нижньому куті дисплею. Тепер спробуйте знову оновити прошивку.
Пам'ятайте, що пониження швидкості передачі збільшить час оновлення (до 4 хвилин).
Оновлення SynScan™ AZ:
Приєднайте ручне управління до ПК. З'єднувач RJ-11 повинен вмикатися у середній порт
SynScan™ AZ, а з'єднувач DB9 повинен вмикатися в порт RS-232 на комп'ютері.
Натисніть і тримайте одночасно клавіші 0 і 8, після чого увімкніть ручне управління в
джерело живлення.
Ваше ручне управління просигналить підтвердження, що з'єднання встановлено.
На дисплеї з'явиться повідомлення «SynScan™ Update Ver. x.x» (Оновлення SynScan™ Верс.
7
x.x).
Запустіть програму SynScanFirmwareLoader на своєму ПК. Кнопка «HC. Version» (Версія НС) в
програмному вікні покаже поточну версію апаратного забезпечення, прошивки та бази даних
вашого ручного управління.
Ці цифри надаються лише для вашого інформування і не потрібні для оновлення.
Натисніть «Browse» (Переглянути) і знайдіть файл «SynScanVXXXXAZ.ssf» на своєму
жорсткому диску. Натисніть «Update» (Оновити), щоб розпочати оновлення прошивки.
Прогрес оновлення можна спостерігати нижче клавіш «Update» (Оновити) та «HC. Version»
(Версія HC).
55
Page 58

Після закінчення оновлення на екрані з'явиться повідомлення «Update complete» (Оновлення
завершено). Цей процес займає біля 30 секунд, хоча, якщо використовувати адаптер USBRS232, цей процес може зайняти довше. Вітаємо з успішним оновленням прошивки
SynScan™!
Натисніть «Browse» (Переглянути) і знайдіть файл «SynScanVXXXXAZ.ssf» на своєму
жорсткому диску. Натисніть «Update» (Оновити), щоб розпочати оновлення прошивки.
Прогрес оновлення можна спостерігати нижче клавіш «Update» (Оновити) та «HC. Version»
(Версія HC).
Після закінчення оновлення на екрані з'явиться повідомлення «Update complete» (Оновлення
завершено). Цей процес займає біля 30 секунд, хоча, якщо використовувати адаптер USBRS232, цей процес може зайняти довше. Вітаємо з успішним оновленням прошивки
SynScan™!
8
Якщо з'явиться повідомлення «Firmware update failed…» (Невдале оновлення прошивки...),
перезапустіть ручне управління, від'єднавши його від джерела живлення і приєднавши
знову. Спробуйте запустити оновлення знову. Типово швидкість передачі між ручним
управлінням і ПК встановлюється на рівні 115 кбіт/с. Порт RS-232C на вашому ПК може не
підтримувати таку швидкість. Якщо неможливо оновити прошивку SynScan, то можна легко
змінити швидкість передачі, натиснувши клавішу SETUP (Налаштування), поки ручне
управління увімкнуте в джерело живлення. Це знизить швидкість передачі до 9,6 кбіт/с.
Після цього повинен з'явитися значок «Lo» (Низька швидкість) в правому нижньому куті
дисплею. Тепер спробуйте знову оновити прошивку. Пам'ятайте, що ця процедура також
збільшить час оновлення (до 4 хвилин).
ГОЛОВНЕ МЕНЮ
РЕЖИМ НАЛАШТУВАНЬ
Дата
Час
Область спостер.
Літній час Вирівнювання
Дата
Час
Область спостер.
Літній час Вирівнювання
Зірки для вирівнювання
Автовибір
Сортувати по Мертва хода
Стеження
Зоряна швидкість
Місячна швидкість
Сонячна швидкість
Зупинити стеження
ФУНКЦ. УТИЛІТ
Встановити обмеження
повороту
Налаштування ручного
пристрою
Заводські налаштування
КАТАЛОГ ОБ'ЄКТІВ ОГЛЯД
Показати положення
Показати інформацію
Час Версія Температура
Живлення Напруга
Зафіксувати телескоп
PAE
Очистити дані PAE
GPS
Режим управління з ПК
Сонячна система
Меркурій
Венера
Марс
Юпітер
Сатурн
Уран
Нептун
Плутон
Місяць
Зірки з назвами
Каталог Мессье
Каталог IC
Каталог NGC Каталог Колдвел
Каталог SAO Подвійні зірки
Перемінні зірки
Користувацькі зірки
Редагувати об'єкт
Відновити об'єкт
ВИЗНАЧИТИ
56
Page 59

Характеристики
SkyMatic 135 GTA
SkyMatic 105 GT MAK
SkyMatic 127 GT MAK
Оптична конструкція
Рефлектор
Максутов-Кассегрен
Максутов-Кассегрен
Діаметр лінзи об'єктива
130 мм
102 мм
127 мм
Фокусна відстань;
апертура
650 мм; f/5
1300 мм; f/12,8
1500 мм; f/11,8
Найвища практична
потужність
260x
204x
250x
Поріг роздільної
здатності
0,92 кутових секунд
1,18 кутових секунд
1,1 кутових секунд
Окуляр
1.25'' SUPER10 &
SUPER25
1.25'' SUPER10 &
SUPER25
1.25'' SUPER10 &
SUPER25
Видошукач
6x30
6x30
6x30
Тип кріплення
AZ 114 GT; AZ SynScan
AZ 114 GT; AZ SynScan
AZ 114 GT; AZ SynScan
Тринога
HC)
нержавіюча сталь; 630
мм – 1150 мм
нержавіюча сталь; 630
мм – 1150 мм
нержавіюча сталь; 630
мм – 1150 мм
Назва
Команда ASCII
на ПК
Команда
ASCII на ПК
Iнформація
Echo (Ехо)
Kx
Kx
Перевіряє з'єднання з ПК
Goto RА-Dec
(Перейти до прямого
піднесення/схилення
R34B, 12CE
#
Потрібно вирівняти видошукач. Якщо
команда конфліктує з встановленими
обмеженнями, вона не виконуватиметься
Goto Az-Alt (Перейти
до азимуту-висоти)
B12AB, 4000
#
Надсилає десять символів. B = команда,
12AB = координати азимуту, кома, 4000 =
координати висоти. Якщо команда
конфліктує з встановленими обмеженнями
Роздільна здатність
Швидкість повороту
Швидкість стеження
Режим стеження
Метод вирівнювання
Точність наведення
Схема з'єднань:
Живлення
Тип мотору
База даних
9
1 А, 11~15 В постійного струму (позит.)
cервомотори постійного струму 1,8°
0,144 кутових секунд або 9 024 000 кроків/об. (AZ-80)
0 = 1.0x, 1 = 2.0x, 2 = 16x, 3 = 32x, 4 = 64x, 5 = 128x
6 = 400x, 7 = 500x, 8 = 600x, 9 = 800x
зоряна, місячна, сонячна
двовісне стеження
вирівнювання за найяскравішою зіркою, вирівнювання за двома
зірками
до 10 кутових мінут
25 користувацьких об'єктів, каталоги M, NGC, IC та SAO, загалом
42 900 об'єктів
Характеристики
Для роботи з телескопом SkyMatic GoTo через комп'ютер потрібно приєднати його до ПК
через порт RS-232. Після цього можна використовувати будь-яке програмне забезпечення
планетарію, доступне на сьогоднішній день, щоб надсилати команди на ваш телескоп.
Швидкість передачі з'єднання SynScan™ AZ з ПК — 9600 біт/с, без бітів парності чи стопових
бітів. Усі команди від вашого ПК передаються за допомогою техніки двійкової шкали.
57
Page 60

Get Az-Alt (Отримати
азимут-висоту)
Z
12AB,
4000#
Повертає десять символів.
12AB = координати азимуту, кома, 4000
Get RA-Dec (Отримати пряме піднесення/схилення
E
34AB,
12CE#
Потрібно вирівняти видошукач
Cancel Goto
(Відмінити перехід)
M
#
Is Goto in Progress
(Перехід в процесі)
L
0# or 1#
0 = Ні, 1 = Так. «0» є нульовим символом
ASCII
Is Alignment Complete
(Вирівнювання
J
0# or 1#
0 = Ні, 1 = Так
HC version (Версія НС)
V
22
Два байти представляють Версію 2.2
Stop/Start Tracking
(Зупинити/Розпочати
стеження)
Stop/Start
Tracking
(Зупинити/Розп
очати стеження)
x= 3 (EQ-S)
x = 2 (EQ-N)
#
Стеження висоти-азимуту вимагає
вирівнювання
Стеження висотиазимуту вимагає
вирівнювання
r34AB0500,12CE0
500
#
32-bit get RA-Dec
(Получить пр.восх. /
скл. 32-бит.)
e
34AB0500,
12CE0500#
Останніх два символи повинні завжди
бути рівними нулю
Стеження висотиазимуту вимагає
вирівнювання
b34AB0500,12CE
0500
#
Останніх два символи
повинні завжди бути
рівни-ми нулю.
(Получить альт.-аз.
32-бит.)
z
34AB0500,
12CE0500#
Останніх два символи повинні завжди
бути рівними нулю
Додаткові команди
Налаштування швидкості стеження через RS232:
1. Помножити необхідну швидкість стеження (кутові секунди/секунди) на 4. Наприклад,
якщо ви хочете відстежувати об'єкт на 120 кутових секунд/секунду (прибл. у 8 разів більше,
ніж зоряна швидкість), тоді TRACKRATE (Швидкість стеження) повинна бути 480.
2. Розділіть TRACKRATE (Швидкість стеження) на два байта, таким чином, щоб TRACKRATE =
TrackRateHighByte*256 + TrackRateLowByte. Напр., якщо TRACKRATE = 480, тоді
TrackRateHighByte = 1, TrackRateLowByte = 224.
3. Для встановлення швидкості стеження надішліть наступну 8-байтну команду:
a. Позитивне стеження по азимуту: 80, 3, 16, 6, TrackRateHighByte, TrackRateLowByte, 0, 0
b. Негативне стеження по азимуту: 80, 3, 16, 7, TrackRateHighByte, TrackRateLowByte, 0, 0
c. Позитивне стеження по висоті: 80, 3, 17, 6, TrackRateHighByte, TrackRateLowByte, 0, 0
d. Негативне стеження по висоті: 80, 3, 17, 7, TrackRateHighByte, TrackRateLowByte, 0, 0
4. Ручне управління повертає «35».
58
Page 61

Надсилання команди Goto (Перейти) в повільному режимі через RS232:
1. Перетворити кутове положення в 24-бітне число. Напр., якщо бажане кутове положення —
220°, то POSITION_24BIT = (220/360)*224 = 10 252 743.
2. Розділіть POSITION_24BIT на три байти, щоб POSITION_24BIT = PosHighByte * 65536 +
PosMedByte *256 + PosLowByte. Напр., якщо POSITION_24BIT = 10 252 743, то PosHighByte =
156, PosMedByte = 113, PosLowByte = 199.
3. Надішліть наступну 8-байтну команду:
a. Повільний перехід по азимуту: 80, 4, 16, 23, PosHighByte, PosMedByte, PosLowByte, 0
b. Повільний перехід по висоті: 80, 4, 17, 23, PosHighByte, PosMedByte, PosLowByte, 0
4. Ручне управління повертає «35».
Скидання положень висоти та азимуту
1. Перетворити кутове положення в 24-бітне число (див. «Команда повільного переходу»).
2. Надішліть наступну 8-байтну команду:
a. Встановити положення по азимуту: 80, 4, 16, 4, PosHighByte, PosMedByte, PosLowByte, 0 80,
4, 17, 4, PosHighByte, PosMedByte, PosLowByte, 0
3. Ручне управління повертає «35».
10
Інструкції з техніки безпеки по роботі з батареями
Завжди купуйте відповідний розмір та клас батареї, що найбільше відповідає використанню
за призначенням.
Завжди заміняйте увесь комплект батарей одночасно, звертаючи увагу на те, щоб не
змішувати старі та нові батареї або батареї різних типів.
Очистіть контакти батареї та контакти пристрою до встановлення батареї.
Переконайтеся, що батареї встановлюються правильно, відповідно до полярності (+ та -).
Знімайте батареї з обладнання, яке не буде використовуватися впродовж довгого періоду
часу.
Батареї знімайте належним чином.
Ніколи не намагайтеся перезарядити первинні батареї, оскільки це може спричинити витік,
пожежу або вибух.
Ніколи не закорочуйте батареї, оскільки це може призвести до високих температур, витоку
або вибуху.
Ніколи не нагрівайте батареї, щоб відновити їхнє функціонування.
Після використання вимикайте пристрої.
Тримайте батареї поза межами досяжності дітей, щоб уникнути споживання, задухи або
отруєння.
Догляд і підтримка
Ніколи, ні за яких обставин не дивіться через цей пристрій без спеціального фільтра прямо
на Сонце або в його напрямку, на інше яскраве джерело світла чи на лазер, бо це може
спричинити НЕЗВОРОТНЄ ПОШКОДЖЕННЯ СІТКІВКИ і може призвести до СЛІПОТИ.
Вживайте необхідних застережних заходів, коли даєте використовувати пристрій дітям або
людям, які не прочитали чи не повністю зрозуміли дані інструкції.
Не намагайтеся розібрати пристрій власноруч з будь-якої причини, включаючи очищення
дзеркала. Для ремонту і очищення будь-якого виду, будь ласка, зв'яжіться з місцевим
спеціалізованим сервісним центром.
Захистіть пристрій від випадкових ударів та надмірної механічної сили.
Не торкайтеся пальцям оптичних поверхонь. Для очищення зовнішніх поверхонь телескопа
використовуйте лише спеціальні очищувальні серветки та спеціальні очищувальні
інструменти для оптики виробництва компанії Levenhuk.
Зберігайте пристрій в сухому і прохолодному місці, осторонь від небезпечних кислот та
інших хімікатів, далеко від обігрівачів, відкритого вогню та інших джерел високої
температури.
59
Page 62

Заміняйте кришку від пилу на передньому кінці телескопа, коли він не використовується. Це
не дасть пилу осідати на поверхні дзеркал або лінз.
Негайно звертайтеся по медичну допомогу при ковтанні маленьких частин або батареї.
Міжнародна гарантія
Надається пожиттєва гарантія на відсутність дефектів матеріалів та конструкції для усіх телескопів,
мікроскопів, біноклів та інших оптичних продуктів (крім аксесуарів) компанії Levenhuk. Надається
гарантія на відсутність дефектів матеріалів та конструкції всіх аксесуарів компанії Levenhuk впродовж
шести місяців від дати роздрібного продажу. Компанія Levenhuk відремонтує або замінить такий виріб або
його частину, яка після обстеження компанією Levenhuk виявиться з дефектним матеріалом або
конструкцією. В якості умови зобов'язання компанії Levenhuk для ремонту чи заміни такого виробу його
потрібно повернути в компанію Levenhuk разом із доказом покупки, що задовольняє компанію Levenhuk.
Така гарантія не покриває витратні матеріали, такі, як батареї.
Перед поверненням потрібно отримати Return Authorization (RA) Number (Авторизаційний номер
повернення). Сконтактуйтеся з місцевим відділенням Levenhuk, щоб отримати номер RA, який потрібно
вказувати на зовнішній стороні транспортної упаковки. Усі повернення повинні супроводжуватися
письмовою заявою, де вказується ім'я, адреса та телефонний номер власника, включно з описом усіх
заявлених дефектів. Частини чи вироби, для яких проводиться заміна, стають власністю компанії Levenhuk.
Клієнт несе відповідальність за усі транспортні та страхові витрати для доставки та повернення від компанії
Levenhuk чи її уповноважених дилерів і повинен попередньо оплатити такі витрати.
Levenhuk докладе усіх можливих зусиль для ремонту чи заміни будь-якого виробу, що покривається цією
гарантією, в межах тридцяти днів з часу отримання. Якщо ремонт чи заміна потребуватиме більше тридцяти
днів, Levenhuk повідомить про це клієнта належним чином. Levenhuk зберігає за собою право замінити
будь-який виріб, який перестав вироблятися, новим виробом відповідної вартості та функціональності.
Дана гарантія не стосується будь-яких дефектів чи пошкоджень, спричинених зміною, модифікацією,
неуважністю, неправильним використанням, використанням неналежних джерел живленням,
пошкодженням при транспортуванні, зловживанням, чи будь-якою причиною, крім правильного
використання, та несправної роботи чи погіршення роботи внаслідок нормального зношення.
Levenhuk відмовляється від усіх гарантій, явних чи непрямих, щодо товарного вигляду чи відповідності
особливому використанню, крім явно виражених у цьому документі. Єдиним зобов'язанням компанії
Levenhuk за цією обмеженою гарантією є ремонт чи заміна покритого виробу згідно з термінами, вказаними
у цьому документі. Levenhuk відмовляється від відповідальності за будь-яку втрату прибутків, втрату
інформації, за будь-які загальні, особливі, прямі, непрямі чи логічно випливаючих збитків, що можуть
з'явитися через порушення гарантії, використання чи неможливість використання будь-якого виробу
компанії Levenhuk. Будь-які непрямі гарантії, від яких неможливо відмовитися, обмежуються тривалістю на
термін шість місяців для аксесуарів від дати роздрібного продажу.
Levenhuk зберігає за собою право змінювати або знімати з виробництва виріб без попередження.
Гарантія за межами України діє лише для тих клієнтів, які купили у уповноваженого дилера компанії
Levenhuk в Україні чи міжнародного дистриб'ютора. Будь ласка, контактуйте з ними щодо будь-якого
гарантійного обслуговування.
У разі продажу товарів за зразками, поштою, а також у випадках, коли час передачі товару споживачеві не
збігаються, гарантійний строк обчислюється починаючи від дня передачі товару споживачеві, або – від дня
укладення договору купівлі-продажу.
Гарантійне зобов'язання припиняється на загальних підставах, передбачених Цивільним кодексом України.
Якщо у вас з'явилися проблеми або вам потрібна допомога щодо використання виробу, сконтактуйтеся з
місцевим відділенням Levenhuk:
Світові відділення Levenhuk:
США: www.levenhuk.com
Канада: www.levenhuk.ca
Чеська республіка: www.levenhuk.cz
Нідерланди: www.levenhuk.nl
Польща: www.levenhukoptics.pl
Росія: www.levenhuk.ru
Україна: www.levenhuk.ua
ЄС: www.levenhuk.eu
Дата продажу __________________________________ Підпис _________________________________ Печатка
60
Page 63

Page 64

Levenhuk T NG series Telescope Eyepiece Digital Cameras
May be used with any type of telescopes
Okulárové digitální kamery pro teleskopy řady Levenhuk T NG
Vhodné pro práci se všemi typy teleskopů
Цифровые камеры-окуляры для телескопов Levenhuk серия T NG
Подходят для работы со всеми видами телескопов
Цифрові окулярні камеры для телескопів Levenhuk серії T NG
Можуть використовуватися з усіма типами телескопів
Radost zaostřit
Приближает с удовольствием
Наближує з радістю
Levenhuk, Inc. 1935 Brandon Court, Suite A-1
Chicago, IL 60139 USA
Levenhuk® is a registered trademark of Levenhuk, Inc.
© 2006-2014 Levenhuk, Inc. All rights reserved.
20131006
 Loading...