

Page 1
Levenhuk Telescopes
Levenhuk Skyline PRO 80 MAK
Levenhuk Skyline PRO 90 MAK
Levenhuk Skyline PRO 105 MAK
Levenhuk Skyline PRO 127 MAK
Levenhuk Skyline PRO 150 MAK
User Manual
Návod k použití
Инструкция по эксплуатации
Page 2
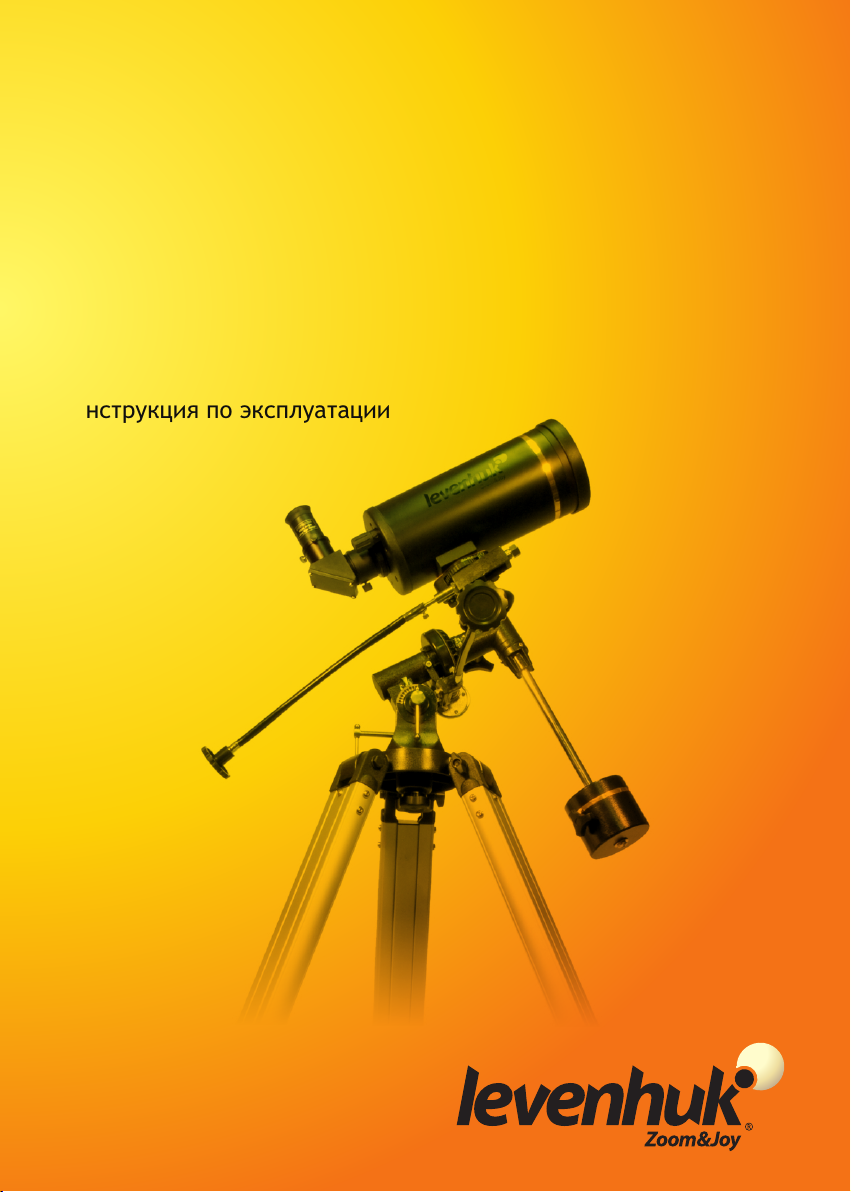
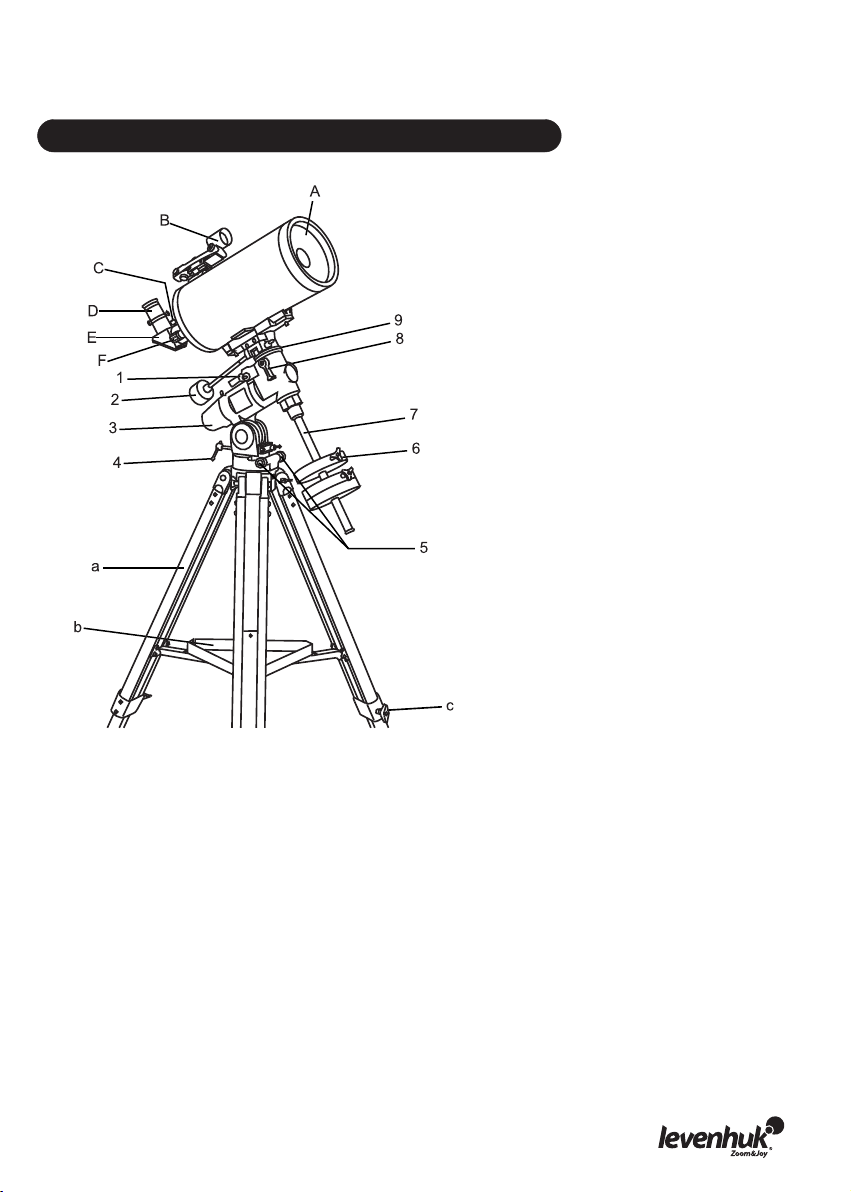
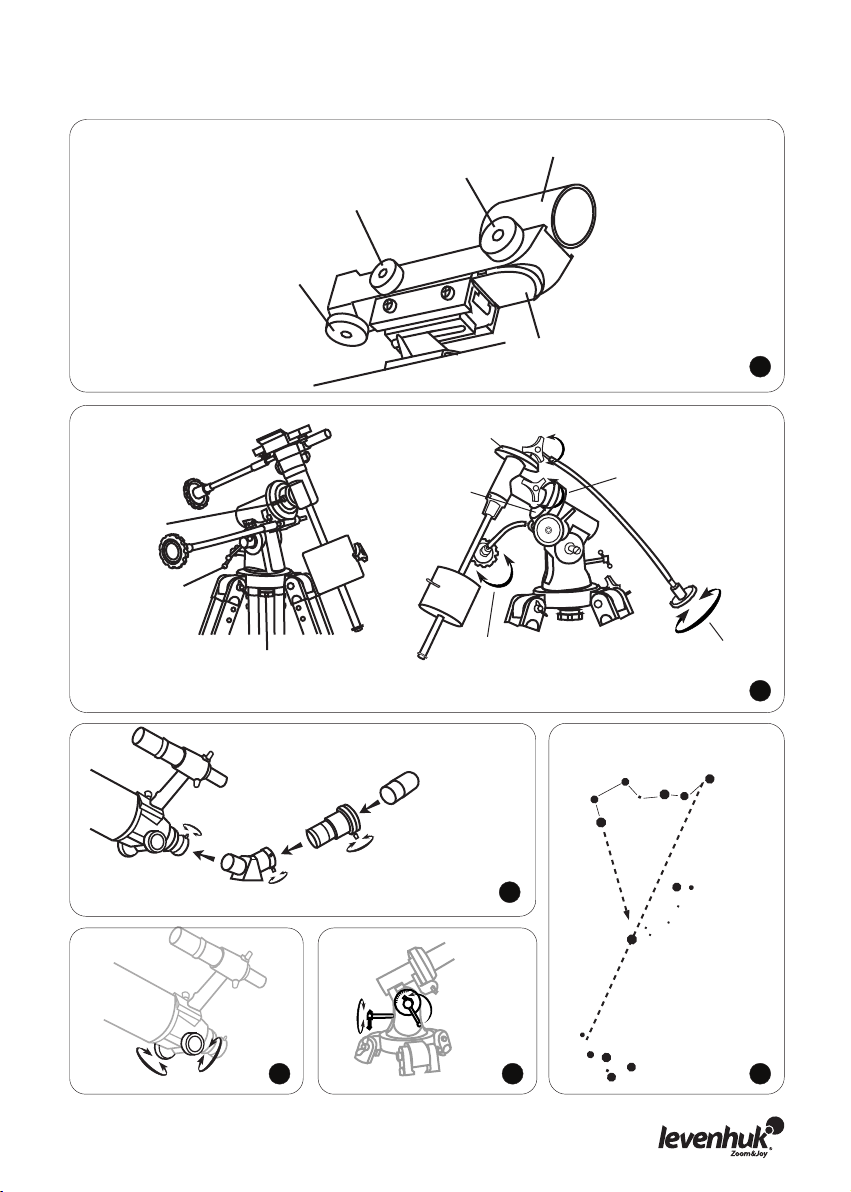
Levenhuk Skyline PRO 80/90 MAK (EQ1)
A.
Dust сap (not shown, remove before
viewing) / Prachové víčko /
Пылезащитная крышка
В.
Red dot finder / Pointační dalekohled /
Искатель с красной точкой
С.
Focuser lock screw / Aretační šroub
okulárového výtahu / Винт фиксации
фокусера
D.
Eyepiece / Okulár / Окуляр
Е.
Diagonal mirror / Diagonální zrcátko /
Диагональное зеркало
F.
Focusing knob / Zaostřovací šroub /
Ручка фокусировки
1.
Dec. slow-motion control / Ovládání jemného nastavení deklinace/ Ручка управления
тонкими движениями по оси склонения
2.
R.A. slow-motion control / Ovládání jemného nastavení rektascenze / Ручка управления
тонкими движениями по оси прямого восхождения
3.
Altitude adjustment T-bolt / Šroub nastavení zeměpisné šířky / Регулировочный винт
полярной оси по широте места наблюдения
4.
Azimuth adjustment knob / Šroub nastavení azimutu / Регулировочный винт по оси азимута
5.
Counterweight / Protiváha / Противовес
6.
Counterweight lock screw / Aretační šroub protiváhy / Винт фиксации противовеса
7.
Counterweight rod / Tyč protiváhy / Ось противовеса
8.
R.A. axis scale / Stupnice osy rektascenze / Шкала оси прямого восхождения
9.
Dec. axis scale / Stupnice osy deklinace / Шкала оси склонения
10.
Dec. lock knob / Aretační šroub osy deklinace / Фиксатор оси склонения
a.
Dec. lock knob / Odkládací přihrádka pro příslušenství / Лоток для аксессуаров
b.
Tripod leg / Noha stativu / Ножка треноги
Page 3
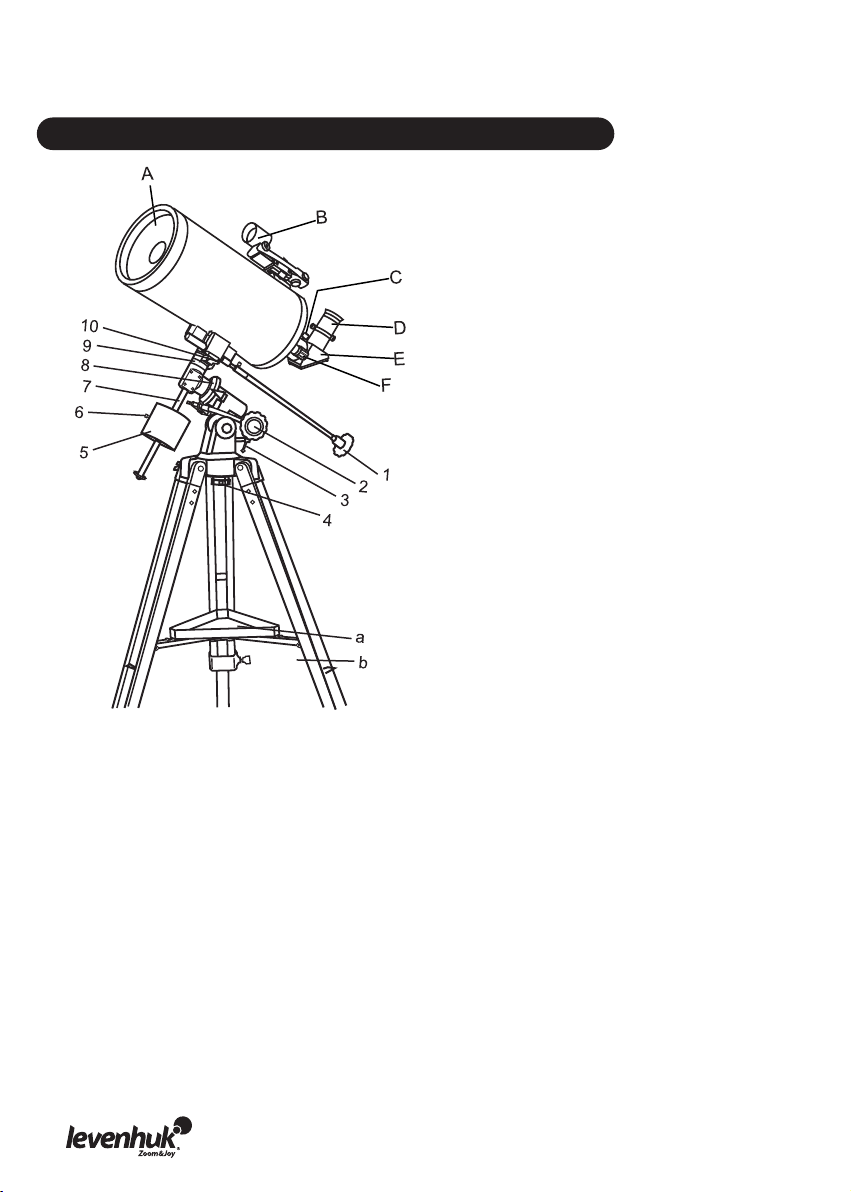
Levenhuk Skyline PRO 105 MAK (EQ2)
A.
Dust сap (not shown, remove before
viewing) / Prachové víčko /
Пылезащитная крышка
В.
Red dot finder / Pointační dalekohled /
Искатель с красной точкой
С.
Focuser lock screw / Aretační šroub
okulárového výtahu / Винт фиксации
фокусера
D.
Eyepiece / Okulár / Окуляр
Е.
Diagonal mirror / Diagonální zrcátko /
Диагональное зеркало
F.
Focusing knob / Zaostřovací šroub /
Ручка фокусировки
1.
R.A. axis scale / Stupnice osy rektascenze / Шкала оси прямого восхождения
2.
Dec. slow-motion control / Ovládání jemného nastavení deklinace / Ручка управления
тонкими движениями по оси склонения
3.
Altitude adjustment T-bolt / Šroub nastavení zeměpisné šířky / Регулировочный винт
полярной оси по широте места наблюдения
4.
Azimuth adjustment knob / Šroub nastavení azimutu / Регулировочный винт по оси азимута
5.
R.A. slow-motion control / Ovládání jemného nastavení rektascenze / Ручка управления
тонкими движениями по оси прямого восхождения
6.
Counterweight / Protiváha / Противовес
7.
Counterweight lock screw / Aretační šroub protiváhy / Винт фиксации противовеса
8.
Counterweight rod / Tyč protiváhy / Ось противовеса
9.
R.A. lock knob / Aretační šroub osy rektascenze / Фиксатор оси прямого восхождения
10.
Dec. axis scale / Stupnice osy deklinace / Шкала оси склонения
11.
Dec. lock knob / Aretační šroub osy deklinace / Фиксатор оси склонения
a.
Accessory tray / Odkládací přihrádka pro příslušenství / Лоток для аксессуаров
b.
Tripod leg / Noha stativu / Ножка треноги
Page 4
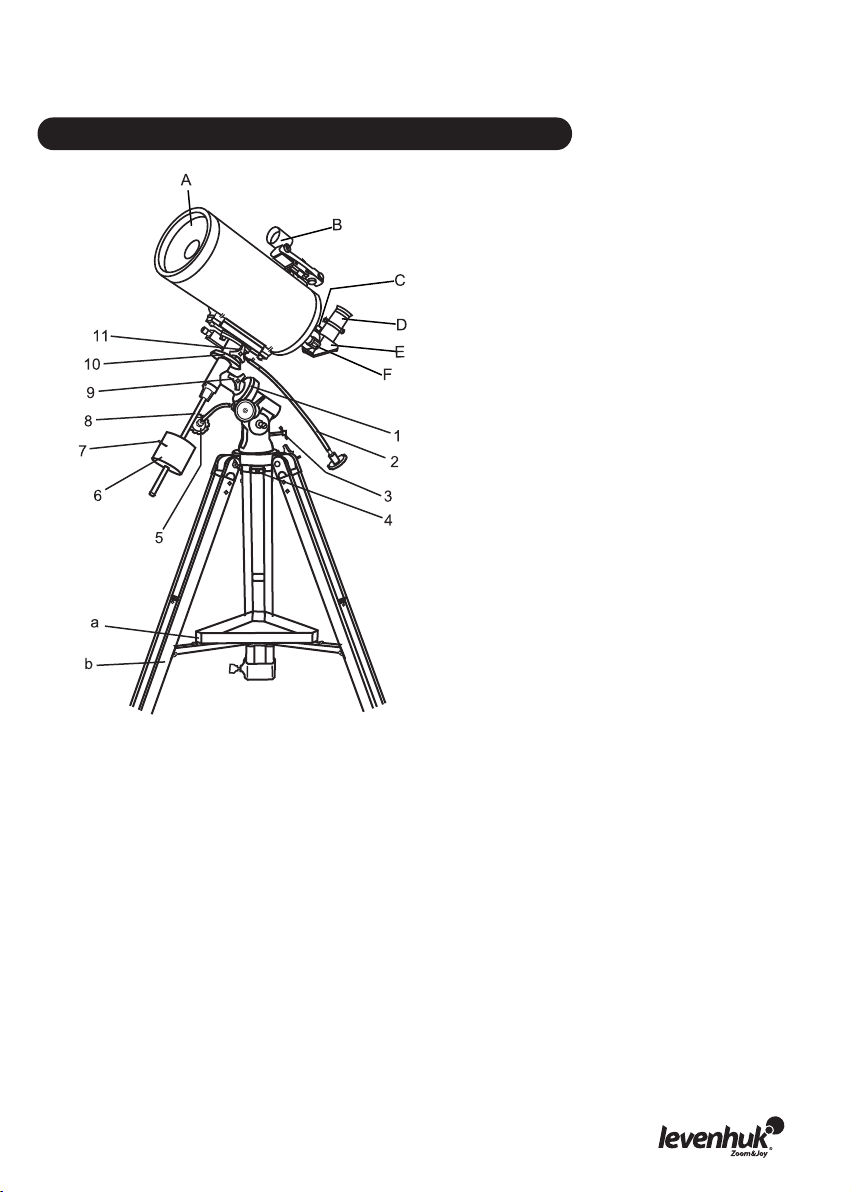
Levenhuk Skyline PRO 127 MAK (EQ3 (3-2))
A
B
C
A.
D
E
F
1
2
3
4
a
b
9
8
7
6
5
c
Dust сap (not shown, remove before
viewing) / Prachové víčko /
Пылезащитная крышка
В.
Red dot finder / Pointační dalekohled /
Искатель с красной точкой
С.
Focuser lock screw / Aretační šroub
okulárového výtahu / Винт фиксации
фокусера
D.
Eyepiece / Okulár / Окуляр
Е.
Diagonal mirror / Diagonální zrcátko /
Диагональное зеркало
F.
Focusing knob / Zaostřovací šroub /
Ручка фокусировки
1.
R.A. lock knob / Aretační šroub osy rektascenze / Фиксатор оси прямого восхождения
2.
Dec. slow-motion control / Ovládání jemného nastavení deklinace / Ручка управления
тонкими движениями по оси склонения
3.
Polarscope / Polární zaměřovací hledáček / Искатель полюса
4.
Altitude adjustment T-bolt / Polární zaměřovací hledáček / Регулировочный винт полярной
оси по широте места наблюдения
5.
Azimuth adjustment knob / Šroub nastavení azimutu / Регулировочный винт по оси азимута
6.
Counterweight lock screw / Aretační šroub protiváhy / Винт фиксации противовеса
7.
Counterweight rod / Tyč protiváhy / Ось противовеса
8.
Dec. lock knob / Aretační šroub osy deklinace / Фиксатор оси склонения
9.
Dec. setting circle / Kruh pro nastavení osy deklinace / Установочный круг склонения
a.
Tripod leg / Noha stativu / Ножка треноги
b.
Accessory tray / Odkládací přihrádka pro příslušenství / Лоток для аксессуаров
c.
Height adjustment clamp / Svorka výškového nastavení / Фиксатор высоты ножек треноги
Page 5
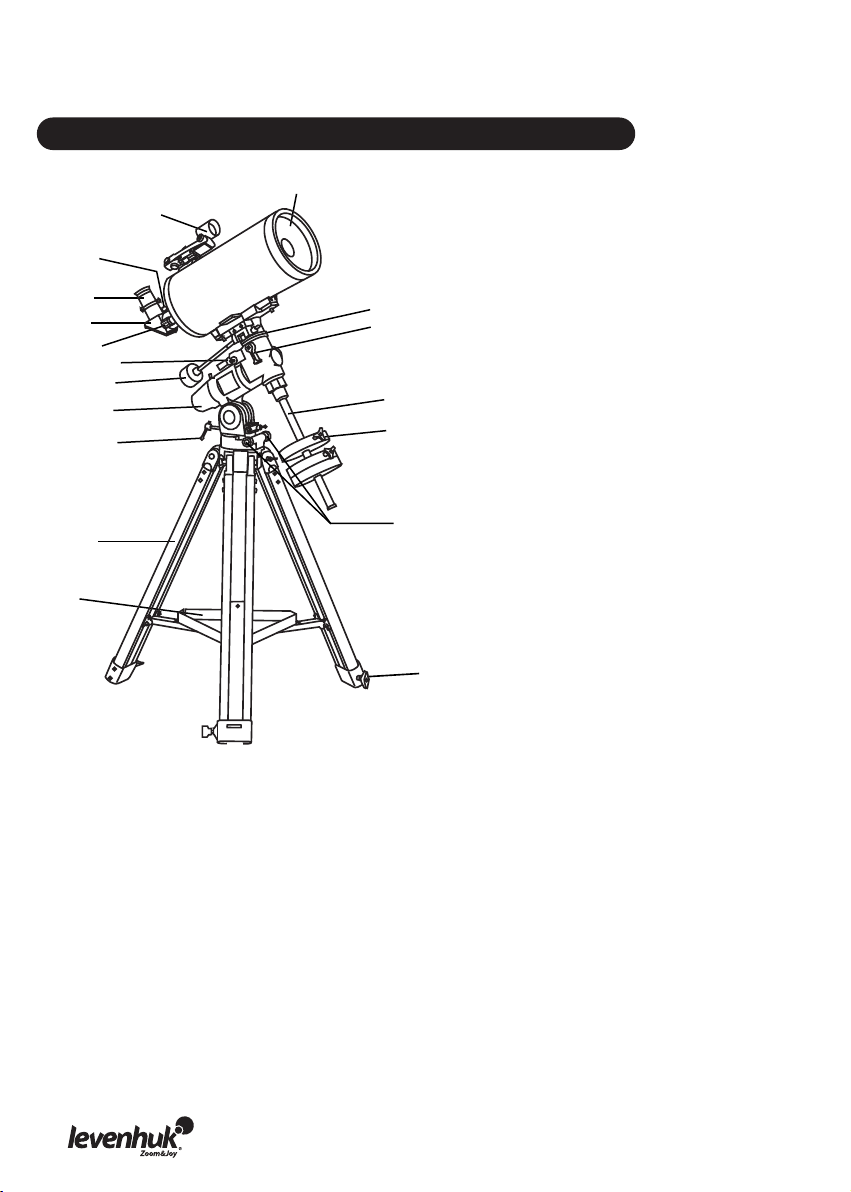
Levenhuk Skyline PRO 150 MAK (EQ5)
A.
Dust сap / Prachové víčko /
Пылезащитная крышка
В.
Red dot finder / Pointační dalekohled /
Искатель с красной точкой
С.
Focuser lock screw / Aretační šroub
okulárového výtahu / Винт фиксации
фокусера
D.
Eyepiece / Okulár / Окуляр
Е.
Diagonal mirror / Diagonální zrcátko /
Диагональное зеркало
F.
Focusing knob / Zaostřovací šroub /
Ручка фокусировки
1.
R.A. lock knob / Aretační šroub osy rektascenze / Фиксатор оси прямого восхождения
2.
Dec. slow-motion control / Ovládání jemného nastavení deklinace / Ручка управления
тонкими движениями по оси склонения
3.
Polarscope / Polární zaměřovací hledáček / Искатель полюса
4.
Altitude adjustment T-bolt / Polární zaměřovací hledáček / Регулировочный винт полярной
оси по широте места наблюдения
5.
Azimuth adjustment knob / Šroub nastavení azimutu / Регулировочный винт по оси азимута
6.
Counterweight lock screw / Aretační šroub protiváhy / Винт фиксации противовеса
7.
Counterweight rod / Tyč protiváhy / Ось противовеса
8.
Dec. lock knob / Aretační šroub osy deklinace / Фиксатор оси склонения
9.
Dec. setting circle / Kruh pro nastavení osy deklinace / Установочный круг склонения
a.
Tripod leg / Noha stativu / Ножка треноги
b.
Accessory tray / Odkládací přihrádka pro příslušenství / Лоток для аксессуаров
c.
Height adjustment clamp / Svorka výškového nastavení / Фиксатор высоты ножек треноги
Page 6
EQ1
EQ2
EQ1
1
2
3
EQ2
4
Page 7
EQ3 (3-2)
EQ5
EQ3 (3-2)
5
6
EQ5
7
8
Page 8
9
11 12
EQ2
EQ3 (3-2)
EQ5
13 14
10
EQ1
15
Page 9
Регулятор яркости ВКЛ/ВЫКЛ
Altitude adjustment knob
Юстировочные винты по высоте
R.A. adjustment
Nastavení rektascenze
Фиксатор оси
прямого
восхождения
Altitude adjustment
(up-down)
Nastavení elevace
(nahoru-dolů)
Регулировка высоты
(вверх-вниз)
Šroub nastavení elevace
Azimuth adjustment knob
Юстировочные винты по азимуту
Brightness control
Šroub nastavení azimutu
Regulátor jasu
R.A. scale
Stupnice rektascenze
Шкала прямого восхождения
Azimuth adjustment (left-right)
Nastavení azimutu (doleva-doprava)
Регулировка азимута (влево-вправо)
Scope / Hledáček / Зрительная труба
Battery compartment cover
Kryt prostoru pro baterii
Крышка батарейного отсека
Dec. adjustment
Nastavení deklinace
Фиксатор оси склонения
R.A. fine adjustment
Jemné nastavení rektascenze
Тонкая регулировка
прямого восхождения
Тонкая регулировка склонения
R.A. adjustment
Nastavení rektascenze
Фиксатор прямого
восхождения
Dec. fine adjustment
Jemné nastavení deklinace
16
17
Ursa Major
Velký vůz
Большая Медведица
Малая Медведица
+
Polaris
Ursa Minor
Malý vůz
Barlow lens
Barlowova čočka
Diagonal mirror
Diagonální zrcátko
Диагональное зеркало
Линза Барлоу
Eyepiece
Okulár
Окуляр
18
Polárka
0
0
1
0
2
0
3
40
50
60
0
7
0
8
90
Полярная звезда
Cassiopeia
Kasiopeja
Кассиопея
19 20 21
Page 10
R.A. adjustment / Kruh nastavení rektascenze / Фиксатор оси прямого восхождения
R.A. settling circle / Dělený kruh rektascenze /
Установочный круг оси прямого восхождения
Arrow / Šipka / Стрелка
22
Right Ascension
Rektascenze
Прямое восхождение
Meridian Line
Poledník
Линия меридиана
Plane of local horizon
Rovina lokálního horizontu
Плоскость местного горизонта
Plane of Celestial Equator / Rovina nebeského rovníku
Focuser
Okulárový výtah
Фокусер
Eyepiece holder
Držák okuláru
Держатель окуляра
Zenith / Zenit / Зенит
Object you are viewing
Pozorovaný objekt
Наблюдаемый объект
Declination
Deklinace
Склонение
Nadir / Nadir / Надир
Плоскость небесного экватора
(удлинитель
Полярная звезда
Extender
Nástavec
Экстендер
фокуса)
/
Polaris
Polárka
T-adapter
T-adaptér
Т-адаптер
Mount aligned on
North Celestial Pole /
Montáž nastavená
na severní nebeský pól /
Монтировка выровнена
на Северный небесный полюс
Latitude / Zeměpisná šířka
Широта
Apparent movement of stars
Zdánlivý pohyb hvězd
Видимое движение звезд
Camera
Fotoaparát
Камера
23
24
Page 11

Levenhuk Skyline PRO Telescopes
Congratulations on your purchase of high-quality Levenhuk telescope!
Levenhuk Skyline PRO telescopes are designed for high-resolution viewing of astronomical
objects. With their precision optics, you will be able to locate and enjoy hundreds of fascinating
celestial objects, including the planets, the Moon, and a variety of deep-sky galaxies, nebulas,
and star clusters.
These instructions will help you set up, properly use, and care for your telescope. Please read
them thoroughly before getting started.
CAUTION! Never look directly at the Sun – even for an instant – through your telescope or
finderscope without a professionally made solar filter that completely covers the front of
the instrument, or permanent eye damage may result. To avoid damage to the internal
parts of your telescope, make sure the front end of the finderscope is covered with
aluminum foil or another non-transparent material. Children should use the telescope
under adult supervision only.
All parts of the telescope will arrive in one box. Be careful when unpacking it. We recommend
keeping the original shipping containers. In the event that the telescope needs to be shipped to
another location, having the proper shipping containers will help ensure that your telescope
survives the journey intact. Make sure all the parts are present in the packaging. Be sure to check
the box carefully, as some parts are small. No tools are needed other than those provided. All
screws should be tightened securely to eliminate flexing and wobbling, but be careful not to
overtighten them, as that may strip the threads.
During assembly (and anytime, for that matter), do not touch the surfaces of the optical elements
with your fingers. The optical surfaces have delicate coatings on them that can easily be damaged
if touched. Never remove any lens assembly from its housing, or the product warranty will be null
and void.
EN
Page 12

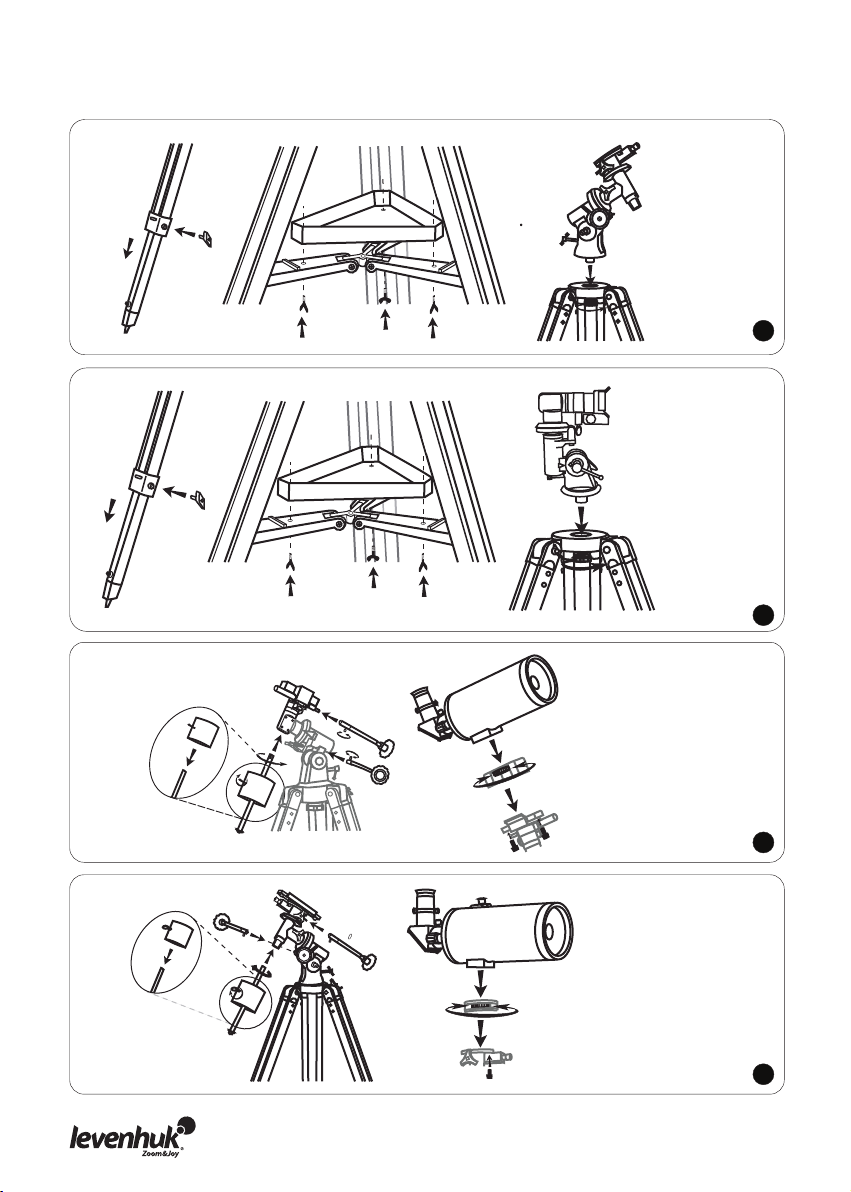
Telescope assembly with the EQ1 and EQ2 mount
Telescope and mount assembly
Slowly loosen the tripod locking knobs and gently pull out the lower section of each tripod leg.
Tighten the locking knobs to hold the legs in place.
Spread the tripod legs apart and stand the tripod upright.
Adjust the height of each tripod leg until the tripod head is properly leveled.
Place the accessory tray on top of the bracket, and lock it in place with thumbscrews.
Attach the equatorial mount to the tripod head.
Attach a counterweight to the counterweight rod. Screw the counterweight rod into the threaded
hole on the end of the declination shaft.
Tighten the counterweight thumbscrew.
Attach slow-motion controls to worm gear mechanisms and lock them in place. It is recommended
to use the longer slow-motion control for the Dec. axis.
Attach the 1/4"-20 adapter to the optical tube by rotating the black-head thumbscrew.
Attach the optical tube to the mount and lock it in place with two locking screws.
2
1
4
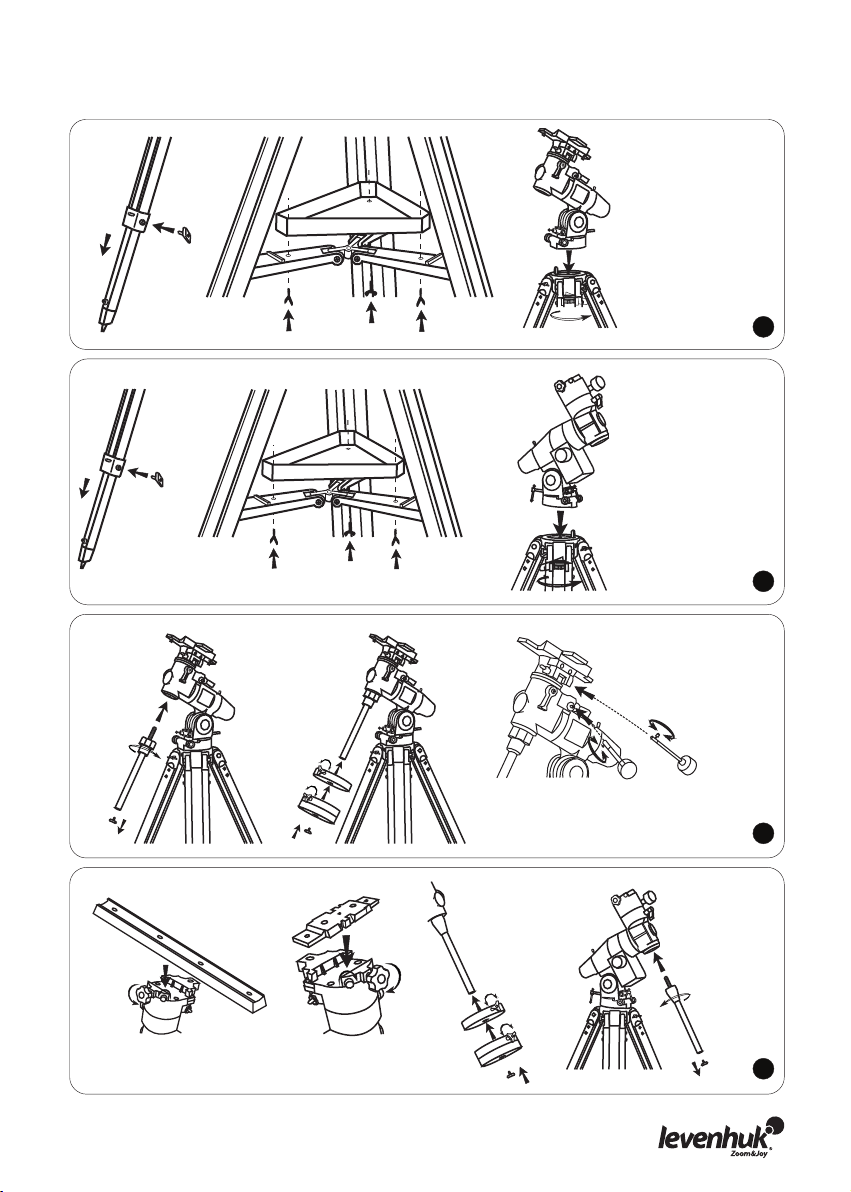
Telescope assembly with the EQ3 (3-2) and EQ5 mount
Telescope and mount assembly
Slowly loosen the tripod locking knobs and gently pull out the lower section of each tripod leg.
Tighten the locking knobs to hold the legs in place.
Spread the tripod legs apart and stand the tripod upright.
Adjust the height of each tripod leg until the tripod head is properly leveled.
Place the accessory tray on top of the bracket, and lock it in place with thumbscrews.
Attach the equatorial mount to the tripod head.
Lock the mount in place with thumbscrews.
Attach a counterweight to the counterweight rod. Screw the counterweight rod into the
threaded hole on the end of the declination shaft.
Tighten the counterweight thumbscrew.
536
FOR EQ3 (3-2) only. Attach slow-motion controls to worm gear mechanisms and lock them in
place. It is recommended to use the longer slow-motion control for the Dec. axis.
FOR EQ5 only. Place the mounting plate (it can either be short or long, depending on the
components supplied) into the bracket and lock it in place with two locking screws. Make sure the
holes on the plate and the mount are aligned.
Attach the 1/4"-20 adapter to the optical tube by rotating the black-head thumbscrew.
Attach the optical tube to the mount and lock it in place with two locking screws.
7
8
9
Page 13

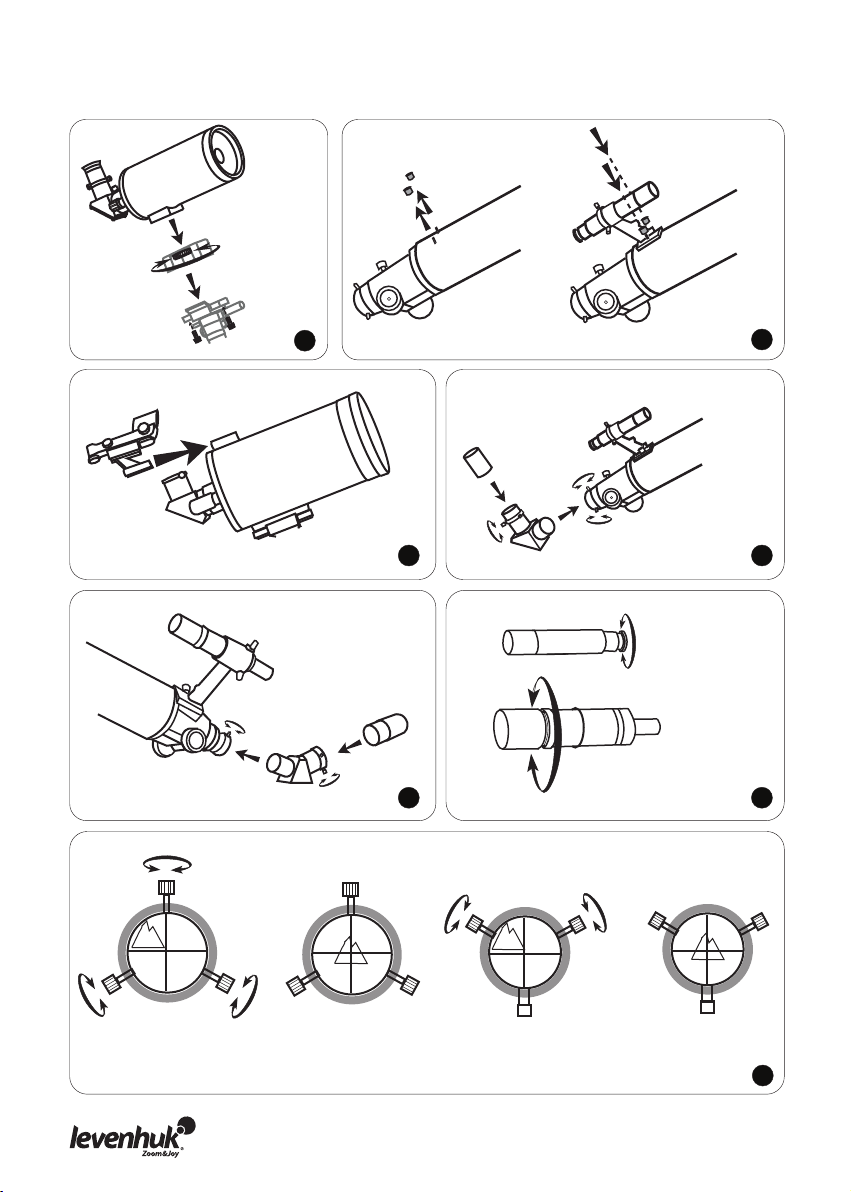
Finderscope assembly
Optical Finderscope
Remove two locking nuts from protruding bolts on the optical tube (close to the focuser).
Attach the finderscope bracket to these bolts on the optical tube and lock it in place with
thumbscrews.
10
Red Dot Finderscope
Insert the finderscope bracket into a holder on the telescope tube and lock it in place with a
thumbscrew.
11
Eyepiece assembly
Unthread the thumbscrews on the focuser tube.
Insert the diagonal mirror into the focuser tube and secure it by retightening the thumbscrews.
Unthread the thumbscrews on the diagonal mirror.
Insert the desired eyepiece into the diagonal mirror and secure it by retightening the
thumbscrews.
13
12
Operating the telescope
Aligning the finderscope
Optical finderscopes are very useful accessories. When they are correctly aligned with the
telescope, objects can be quickly located and brought to the center of the view. Alignment is best
done outdoors in day light when it's easier to locate objects. If it is necessary to refocus your
finderscope, sight it on an object that is at least 500 yards away. For 5x24 and 6x24 finderscopes:
turn the scope end to adjust the focus. For 6x30 finderscopes: loosen the locking ring by
unscrewing it back toward the bracket. The front lens holder can now be turned in and out to
focus. When focus is reached, lock it in position with the locking ring.
14
Choose a distant object that is at least 500 yards away and point the telescope at the object.
Adjust the telescope so that the object is in the center of the view in your eyepiece. Check the
finderscope to see if the object is also centered on the crosshairs.
For 5x24 and 6x24 finderscopes: use three adjustment screws to center the finderscope crosshairs
on the object. For 6x30 finderscopes: adjust two windage screws only.
15
Using the red dot finder
The red dot finder is a zero magnification pointing tool that uses a coated glass window to
superimpose the image of a small red dot onto the night sky. The red dot finder is equipped with a
variable brightness control, azimuth adjustment knob, and altitude adjustment knob. The finder is
powered by a 3-volt lithium battery located underneath at the front. To use the red dot finder,
simply look through the sight tube and move your telescope until the red dot overlaps the object.
Make sure to keep both eyes open when sighting.
16
Page 14

Like all finderscopes, the red dot finder must be properly aligned with the telescope before use.
This is a simple process using the azimuth and altitude adjustment knobs.
Open the battery compartment by pulling down the cover and remove the plastic shipping cover
over the battery.
Turn on the red dot finder by rotating the variable brightness control clockwise until you hear a
click. Continue rotating the control knob to increase the brightness level.
Insert a low power eyepiece into the focuser. Locate a bright object and aim the telescope so that
the object is in the center of the field of view.
With both eyes open, look through the sight tube at the object. If the red dot overlaps the object,
your red dot finder is perfectly aligned. If not, turn its azimuth and altitude adjustment knob until
the red dot overlaps the object.
Balancing the telescope
A telescope should be balanced before each observing session. Balancing reduces stress on the
telescope mount and allows precise slow-motion movements. A balanced telescope is especially
crucial when using the optional clock drive for astrophotography. The telescope should be
balanced after all accessories (eyepiece, camera, etc.) have been attached. Before balancing your
telescope, make sure that your tripod is balanced and on a stable surface. For photography, point
the telescope in the direction you will be taking photos before performing the balancing steps.
R.A. balancing
For best results, adjust the altitude of the mount to between 15º and 30º if possible, by using the
altitude adjustment T-bolt.
Slowly unlock the R.A. and Dec. lock knobs. Rotate the telescope until both the optical tube and
the counterweight rod are horizontal to the ground, and the telescope tube is to the side of the
mount.
Tighten the Dec. lock knob.
Move the counterweights along the counterweight rod until the telescope is balanced and remains
stationary when released.
Tighten the counterweight screws to secure the counterweights.
Dec. balancing
All accessories should be attached to the telescope before balancing around the declination axis.
The R.A. balancing should be done before proceeding with Dec. balancing.
For best results, adjust the altitude of the mount to between 60º and 75º if possible.
Release the R.A. lock knob and rotate around the R.A. axis so that the counterweight rod is in a
horizontal position. Tighten the R.A. lock knob.
Unlock the Dec. lock knob and rotate the telescope tube until it is parallel to the ground.
Slowly release the telescope and determine in which direction it rotates. Loosen the telescope
ring clamps and slide the telescope tube forward or backward between the rings until it is
balanced.
Once the telescope no longer rotates from its parallel starting position, retighten the tube rings
and the Dec. lock knob. Reset the altitude axis to your local latitude.
Page 15

Operating the mount
The mount has controls for both conventional altitude (up-down) and azimuth (left-right)
directions of motion. These two adjustments are suggested for large direction changes and for
terrestrial viewing. To adjust azimuth, loosen the big knob under the mount base and rotate the
mount head about the azimuth axis. Use the altitude adjustment T-bolts to set the required
altitude.
In addition, the mount has R.A. (hour angle) and Dec. controls for polar-aligned astronomical
observing. Loosen the lock knobs to make large direction changes. Use the slow-motion controls
for fine adjustment after the lock knobs have both been locked. An additional scale is included
for the altitude axis. This allows polar alignment at your local latitude.
17
Barlow lens
A Barlow lens increases the magnifying power of an eyepiece, while reducing the field of view. It
expands the cone of the focused light before it reaches the focal point, so that the telescope's
focal length appears longer to the eyepiece. In addition to increasing magnification, the benefits
of using a Barlow lens include improved eye relief, and reduced spherical aberration of the
eyepiece. For this reason, a Barlow plus a lens often outperform a single lens producing the same
magnification. And the best advantage is that a Barlow lens can potentially double the number of
eyepieces in your collection.
18
Focusing
Slowly rotate the focus knobs under the focuser one way or the other until the image in the
eyepiece is sharp. The image usually has to be finely refocused over time, due to small variations
caused by temperature changes, flexures, etc. Refocusing is almost always necessary when you
change an eyepiece, add or remove a Barlow lens.
19
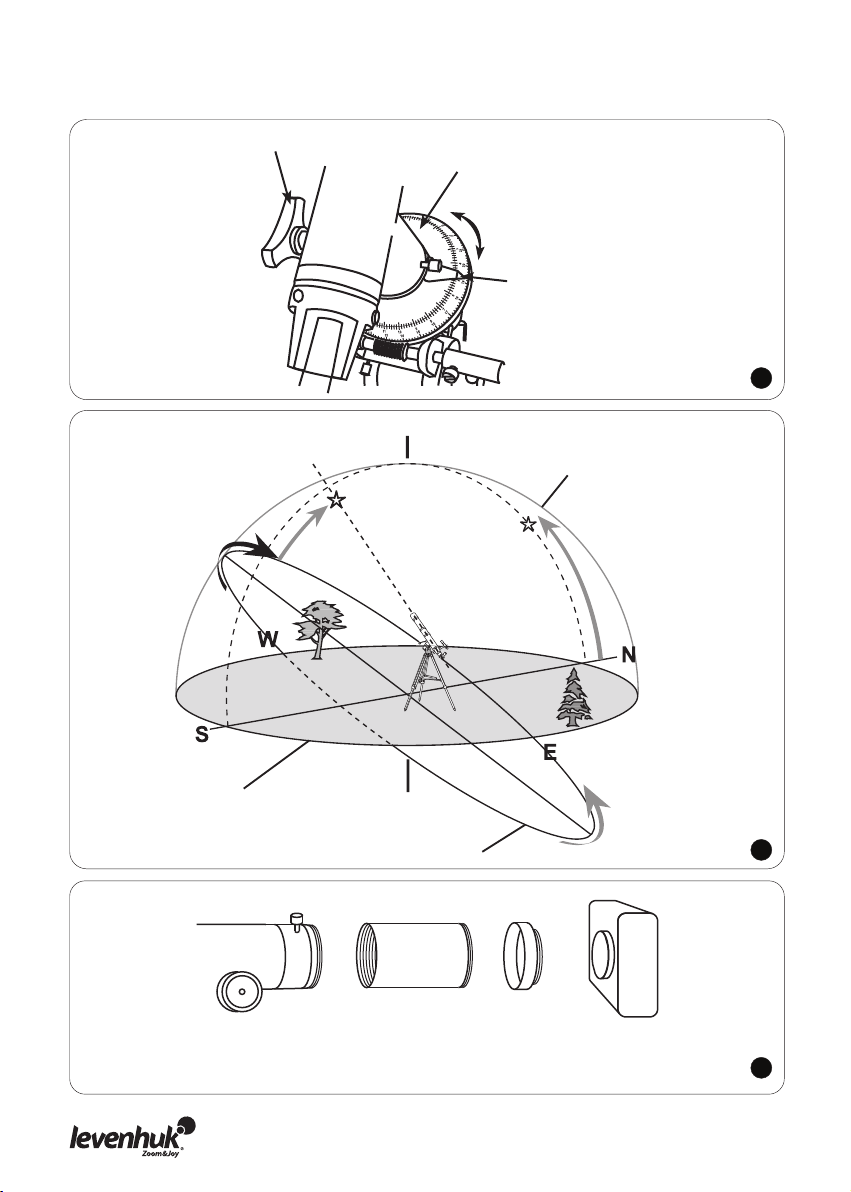
Polar adjustment
In order for your telescope to track objects in the sky you have to align your mount. This means
tilting the head over so that it points to the North (or South) celestial pole. For people in the
Northern Hemisphere this is rather easy as the bright star Polaris is very near the North Celestial
Pole. For casual observing, rough polar alignment is adequate. Make sure your equatorial mount is
leveled and the finderscope is aligned with the telescope before beginning.
Look up your latitude on a map, road maps are good for this purpose. Now look at the side of your
mount head, there you will see a scale running from 0 to 90°. Loosen the mount latch slightly
rotating the lock handle counterclockwise. A thumbscrew located underneath the mount head
pushes the latch plate, thus changing the angle. Turn the screw until the pointer on the latitude
scale is set at the latitude of your observation site.
20
Page 16

Loosen the Dec. lock knob and rotate the telescope tube until the pointer on the setting circle
reads 90°. Retighten the Dec. lock knob. Loosen the azimuth lock knob and move the mount so
that the R.A. axis points roughly at Polaris. Use the two azimuth adjustment knobs above the "N"
to make fine adjustments in azimuth if needed. For more accurate alignment, look through the
finderscope and center the Polaris on the crosshairs using the azimuth and latitude adjustment
knobs.
After a while you will notice your target drifting slowly North or South depending on the direction
of the pole relative to Polaris. To keep the target in the center of the view, turn only the R.A.
slow-motion control.
After your telescope is polar aligned, no further adjustments in the azimuth and latitude of the
mount should be made in the observing session, nor should you move the tripod. Only movements
in R.A. and DEC axis should be made in order to keep an object in the field.
In the Southern Hemisphere you must align the mount to the SCP by locating its position with star
patterns, without the convenience of a nearby bright star. The closest star is the faint 5.5-mag.
Sigma Octantis which is about one degree away. Two sets of pointers which help to locate the SCP
are α and β Crucis (in the Southern Cross) and a pointer running at a right angle to a line
connecting α and β Centauri.
21
Tracking celestial objects
When observing through a telescope, astronomical objects appear to move slowly through the
telescope's field of view. When the mount is correctly polar aligned, you only need to turn the
R.A. slow-motion control to follow or track objects as they move through the field. A R.A. motor
drive can be added to automatically track celestial objects by counteracting the rotation of Earth.
The rotation speed of the R.A. drive matches the rotation rate of Earth for stars to appear
stationary in the telescope eyepiece. Different tracking speeds are also available in some models.
A second drive can be added to give Dec. control which is very useful for astrophotography.
The quickest way to find objects is to learn the constellations and use the finderscope, but if the
object is too faint you may want to use setting circles on an equatorial mount. Setting circles
allow you to locate celestial objects whose celestial coordinates have been determined from star
charts. Your telescope must be Polar aligned and the R.A. setting circle must be calibrated before
using the setting circles. The Dec. setting circle was calibrated at the factory and no additional
calibration is required for it.
The telescope's R.A. setting circle is scaled in hours, from 1 to 24, with small lines in between
representing 10 minute increments. The upper set of numbers applies to observations in the
Northern Hemisphere, while the numbers below them apply to observations in the Southern
Hemisphere.
22
Setting (calibrating) the R.A. setting circle
In order to set your Right Ascension circle you must first find a star in your field of view with
known coordinates. A good one would be the 0.0 magnitude star Vega in the Constellation Lyra.
From a star chart we know the R.A. coordinate of Vega is 18h 36m.
Loosen the R.A. and DEC. lock knobs on the mount and adjust the telescope so that Vega is
centered in the field of view of the eyepiece. Tighten the R.A. and DEC. lock knobs to lock the
mount in place. Now rotate the R.A. setting circle until it reads 18h36m. You are now ready to use
the setting circles to find objects in the sky.
Page 17

Pointing in any direction other than due North requires a combination of R.A. and Dec. positions.
This can be visualized as a series of Dec. arcs, each resulting from the position of rotation around
the R.A. axis. In practice however, the telescope is usually pointed, with the aid of a finderscope,
by loosening both the R.A. and Dec. locks and swiveling the mount around both axes until the
object is centered in the eyepiece. The swiveling is best done by placing one hand on the
telescope tube and the other on the counterweight rod, so that the movement around both axes
is smooth, and no extra lateral force is applied to the axis-bearings. When the object is centered,
make sure the R.A. and Dec. locks are both retightened to hold the object in the field of view and
allow tracking by adjusting R.A. only.
Telescopes with long focal lengths often have a "blind spot" when pointing near the zenith,
because the eyepiece-end of the optical tube bumps into the mount's legs. To avoid this, the tube
can be very carefully slipped up inside the ring clamps. This can be done safely because the tube
is pointing almost vertically, and therefore moving it does not cause a Dec. balance problem. It is
very important to move the tube back to the Dec. balanced position before observing other sky
areas.
Something which can also be a problem is that the optical tube often rotates so that the
eyepiece, finderscope and the focusing knobs are in less convenient positions. The diagonal
mirror can be rotated to adjust the eyepiece. However, to adjust the positions of the finderscope
and focusing knobs, loosen the tube rings holding the telescope tube and gently rotate it. Do this
when you are going to observe an area for while, as it is inconvenient to repeat every time you
briefly go to a new area.
Finally, there are a few things to consider to ensure that you are comfortable during the viewing
session. First is setting the height of the mount above the ground by adjusting the tripod legs. You
must consider the height that you want your eyepiece to be, and if possible plan on sitting on a
comfortable chair or stool. Very long optical tubes need to be mounted higher or you will end up
crouching or lying on the ground when looking at objects near the zenith. However, a short
optical tube can be mounted lower so that there is less movement due to vibration sources, such
as wind. This is something that should be decided before going through the effort of polar
aligning the mount.
23
Camera adapter
To attach a camera to your telescope you may need an adapter to get the camera focused. Some
reflectors require wider motion range than the one allowed by the focuser; some refractors are
designed to be used with diagonal mirrors and thus need a longer focal length when used with
camera.
To achieve that, simply attach an extender to the focuser of your telescope and then attach the
camera with a T-adapter to the extender.
Maintenance
Replace the dust cap over the front end of the telescope whenever it is not in use. This prevents
dust from settling on the mirror or lens surfaces. Be careful when cleaning optics and try not to
damage the coating. Use only special cleaning wipes.
Page 18

Specifications
Levenhuk
Skyline PRO
80 MAK
Levenhuk
Skyline PRO
90 MAK
Levenhuk
Skyline PRO
105 MAK
Levenhuk
Skyline PRO
127 MAK
Levenhuk
Skyline PRO
150 MAK
Optical design
Maksutov-Cassegrain
Objective lens diameter
(aperture), mm
8090105
127
150
Focal length, mm
1000
1250
1300
1500
1800
Luminosity
f/12,5
f/13,9
f/12,8
f/11,8
f/12
Highest practical power, x
160
180
200
250
300
Limiting stellar magnitude
12,0
11,7
12,0
12,5
13,4
Resolution threshold, arcsec.
1,73
1,5
1,3
1,1
0,92
Mount
EQ1
EQ1
EQ2
EQ3 (3-2)
EQ5
Eyepiece
1.25"; 17 mm
& 3.6 mm
1.25";
SUPER10 &
SUPER20
1.25";
SUPER10 &
SUPER20
1.25"; PL10
& PL25
1.25"; 28 mm
Finderscope
red dot
optical 6х30
Tripod
aluminum
Batteries safety instructions
Always purchase the correct size and grade of battery most suitable for the intended use.
Always replace the whole set of batteries at one time; taking care not to mix old and new ones, or
batteries of different types.
Clean the battery contacts and also those of the device prior to battery installation.
Make sure the batteries are installed correctly with regard to polarity (+ and -).
Remove batteries from equipment that is not to be used for an extended period of time.
Remove used batteries promptly.
Never attempt to recharge primary batteries as this may cause leakage, fire, or explosion.
Never short-circuit batteries as this may lead to high temperatures, leakage, or explosion.
Never heat batteries in order to revive them.
Remember to switch off devices after use.
Keep batteries out of the reach of children, to avoid risk of ingestion, suffocation, or poisoning.
Page 19

Care and maintenance
Never, under any circumstances, look directly at the Sun through this device without a special
filter, or look at another bright source of light or at a laser, as this may cause PERMANENT RETINAL
DAMAGE and may lead to BLINDNESS.
Take necessary precautions when using the device with children or people who have not read or
who do not fully understand these instructions.
Do not try to disassemble the device on your own for any reason, including to clean the mirror. For
repairs and cleaning of any kind, please contact your local specialized service center.
Protect the device from sudden impact and excessive mechanical force.
Do not touch the optical surfaces with your fingers. To clean the telescope exterior, use only
special cleaning wipes and special optics cleaning tools from Levenhuk.
Store the device in a dry, cool place away from hazardous acids and other chemicals, away from
heaters, open fire and other sources of high temperatures.
Replace the dust cap over the front end of the telescope whenever it is not in use. This prevents
dust from settling on the mirror or lens surfaces.
Seek medical advice immediately if a small part or a battery is swallowed.
Levenhuk Limited Warranty
All Levenhuk telescopes, cameras for telescopes, microscopes and binoculars are warranted to
be free of defects in materials and workmanship for three years from date of retail purchase. All
Levenhuk accessories are warranted to be free of defects in materials and workmanship for six
months from date of retail purchase. Levenhuk will repair or replace such product or part thereof
which, upon inspection by Levenhuk, is found to be defective in materials or workmanship. As a
condition to the obligation of Levenhuk to repair or replace such product, the product must be
returned to Levenhuk together with proof of purchase satisfactory to Levenhuk.
This warranty does not cover consumable parts, such as batteries.
A Return Authorization (RA) Number must be obtained in advance of return. Contact the local
Levenhuk branch to receive the RA number to be displayed on the outside of your shipping
container. All returns must be accompanied by a written statement setting forth the name,
address and telephone number of the owner, including a description of any claimed defects. Parts
or products for which replacement is made will become the property of Levenhuk.
The customer will be responsible for all costs of transportation and insurance to and from
Levenhuk or its authorized dealers and will be required to prepay such costs.
Levenhuk will use reasonable efforts to repair or replace any product covered by this warranty
within thirty days of receipt. If a repair or replacement will require more than thirty days,
Levenhuk will notify the customer accordingly. Levenhuk reserves the right to replace any product
that has been discontinued from its product line with a new product of comparable value and
function.
Page 20

This warranty does not apply to any defects or damages resulting from alteration, modification,
neglect, misuse, usage of improper power sources, damage in transportation, abuse, or any
cause other than normal use, or to malfunction or deterioration due to normal wear.
Levenhuk disclaims all warranties, express or implied, whether of merchantability or fitness for
a particular use, except as expressly set forth herein. The sole obligation of Levenhuk under this
limited warranty will be to repair or replace the covered product, in accordance with the terms
set forth herein. Levenhuk disclaims liability for any loss of profits, loss of information, or for
any general, special, direct, indirect or consequential damages which may result from breach of
any warranty, or arising out of the use or inability to use any Levenhuk product. Any warranties
which are implied and which cannot be disclaimed will be limited in duration to a term of three
years for telescopes, cameras for telescopes, microscopes and binoculars or six months for
accessories from the date of retail purchase.
Some states/provinces do not allow the exclusion or limitation of incidental or consequential
damages, so the above limitations and exclusions may not apply to you. This warranty gives you
specific legal rights, and you may have other rights which vary from state to state or province to
province.
Levenhuk reserves the right to modify or discontinue any product without prior notice.
NOTE: This warranty is valid to USA and Canadian customers who have purchased this product
from an authorized Levenhuk dealer in the USA or Canada. Warranty outside the USA or Canada
is valid only to customers who purchased from an authorized Levenhuk dealer in the specific
country or international distributor. Please contact them for any warranty service.
If warranty problems arise, or if you need assistance in using your product, contact the local
Levenhuk branch:
Levenhuk Worldwide:
USA: www.levenhuk.com
Czech Republic: www.levenhuk.cz
Russia: www.levenhuk.ru
Ukraine: www.levenhuk.com.ua
EU: www.levenhuk.eu
Purchase date ___________________________ Signature __________________________ Stamp
Page 21

Teleskopy Levenhuk Skyline PRO
CZ
Blahopřejeme!
Blahopřejeme vám k nákupu vysoce kvalitního teleskopu značky Levenhuk!
Teleskopy Levenhuk Skyline PRO jsou určeny k pozorování astronomických objektů při vysokém
rozlišení. Díky jejich přesné optice budete schopni nalézt a užít si pozorování stovek fascinujících
nebeských objektů, včetně planet, Měsíce a různých vzdálených galaxií, mlhovin a hvězdokup.
Tento návod vám ukáže, jak teleskop sestavit, správně používat a pečovat o něj. Proto si jej
nejprve důkladně pročtěte.
VÝSTRAHA! Nikdy – ani na okamžik - se přes teleskop nebo pointační dalekohled (hledáček)
nedívejte přímo do slunce, aniž byste použili odborně vyrobený solární filtr, který bude
zcela překrývat objektiv přístroje. Nedodržením tohoto pokynu se vystavujete nebezpečí
trvalého poškození zraku. Abyste zabránili poškození vnitřních součástí svého teleskopu,
zakryjte čelní stranu pointačního dalekohledu (hledáčku) hliníkovou fólií nebo jiným
neprůhledným materiálem. Děti by měly teleskop používat pouze pod dohledem dospělé
osoby.
Všechny součásti teleskopu jsou dodávány v jediné krabici. Při jejím vybalování postupujte
opatrně. Doporučujeme vám uschovat si originální přepravní obaly. V případě, že bude potřeba
teleskop přepravit do jiného místa, mohou správné přepravní obaly pomoci předejít poškození
teleskopu při přepravě. Přesvědčte se, zda jsou v obalu všechny součásti. Obsah důkladně
zkontrolujte, neboť některé součásti jsou malé. Kromě nástrojů, jež jsou součástí dodávky,
nepotřebujete žádné jiné pomůcky. Abyste vyloučili deformace a viklání, musejí být všechny
šrouby pevně utaženy, ale dbejte na to, abyste je nepřetáhli, neboť může dojít ke stržení závitů.
Během montáže (ani nikdy jindy) se svými prsty nedotýkejte povrchu optických součástí. Povrchy
optických prvků jsou potaženy speciální choulostivou vrstvou, kterou lze při doteku snadno
poškodit. Zrcadla nikdy nevyjímejte z jejich pouzdra; nedodržení tohoto pokynu má za následek
neplatnost záruky.
Page 22

Sestavení teleskopu s montáží EQ1 a EQ2
Montáž teleskopu
Pomalu uvolněte aretační šrouby stativu a opatrně vysuňte spodní část každé nohy stativu.
Utažením šroubů nohy zafixujte v nastavené poloze.
Nohy stativu roztáhněte tak, aby bylo stativ možno vzpřímeně postavit.
Upravte výšku jednotlivých nohou stativu tak, aby byla jeho hlava správně horizontálně
vyvážená.
Odkládací přihrádku na příslušenství položte nahoru na konzolu a zespod ji upevněte pomocí
křídlatého šroubu.
Uložte paralaktickou montáž na hlavici stativu a ji upevněte pomocí křídlatého šroubu.
Lock the mount in place with thumbscrews.
Připevněte protiváhu k tyči protiváhy. Tyč protiváhy zašroubujte do závitového otvoru na konci
hřídele deklinace. Utáhněte křídlatý šroub na protiváze.
Ovládací prvky jemného nastavení připevněte ke šnekovým mechanismům a zajistěte je.
Doporučuje se použít delší ovládací prvek jemného nastavení pro deklinační osu.
K optickému tubusu otáčením křídlatého šroubu s černou hlavou připěvněte redukci ¼“-20.
Optický tubus připvněte k montáži a zajistěte jej dvěma pojistnými šrouby.
2
1
4
Sestavení teleskopu s montáží EQ3 (3-2) a EQ5
Telescope and mount assembly
Pomalu uvolněte aretační šrouby stativu a opatrně vysuňte spodní část každé nohy stativu.
Utažením šroubů nohy zafixujte v nastavené poloze.
Nohy stativu roztáhněte tak, aby bylo stativ možno vzpřímeně postavit.
Upravte výšku jednotlivých nohou stativu tak, aby byla jeho hlava správně horizontálně
vyvážená.
Odkládací přihrádku na příslušenství položte nahoru na konzolu a zespod ji upevněte pomocí
křídlatého šroubu.
Uložte paralaktickou montáž na hlavici stativu a ji upevněte pomocí křídlatého šroubu.
Připevněte protiváhu k tyči protiváhy. Tyč protiváhy zašroubujte do závitového otvoru na konci
hřídele deklinace. Utáhněte křídlatý šroub na protiváze.
536
Pouze pro EQ3 (3-2). Ovládací prvky jemného nastavení připevněte ke šnekovým mechanismům a
zajistěte je. Doporučuje se použít delší ovládací prvek jemného nastavení pro deklinační osu.
Pouze pro EQ5. Vložte montážní desku (může být krátká nebo dlouhá, v závislosti na dodaných
součástech) do držáku a pomocí dvou pojistných šroubů ji upevněte. Ujistěte se, že otvory na
desce a na montáži lícují.
K optickému tubusu otáčením křídlatého šroubu s černou hlavou připěvněte redukci ¼”-20.
Optický tubus připvněte k montáži a zajistěte jej dvěma pojistnými šrouby.
7
8
9
Page 23

Montáž pointačního dalekohledu (hledáčku)
Optický hledáček
Z vyčnívajících šroubů na optickém tubusu (v blízkosti okulárového výtahu) sejměte dvě pojistné
matice.
K těmto šroubům na optickém tubusu připevněte patici hledáčku a zajistěte ji pomocí křídlatých
10
matic.
Hledáček s červenou tečkou
Do držáku na tubusu teleskopu nasaďte patici hledáčku a upevněte jej pomocí křídlatého šroubu.
Montáž okuláru
Odšroubujte křídlaté šrouby na tubusu okulárového výtahu.
Do tubusu okulárového výtahu vložte diagonální zrcátko a utažením křídlatých šroubů je upevněte.
Odšroubujte křídlaté šrouby na diagonálním zrcátku.
Do diagonálního zrcátka zasuňte požadovaný okulár a zajistěte jej utažením křídlatých šroubů.
12 13
Práce s teleskopem
Seřízení pointačního dalekohledu
Optické pointační dalekohledy jsou velmi užitečné příslušenství. Při správném seřízení vzhledem k
teleskopu lze jimi rychle lokalizovat objekty na obloze a umístit je do středu zorného pole.
Seřizování se provádí ve venkovním prostředí za denního světla, kdy se objekty snadněji lokalizují.
Nejprve pointační dalekohled doostřete (je-li to potřeba). Zaměřte pohled na objekt vzdálený
alespoň 500 m. V případě pointačních dalekohledů 5x24 a 6x24: zaostření upravíte otáčením
zakončení pointačního dalekohledu. V případě pointačního dalekohledu 6x30 uvolněte pojistný
kroužek jeho vyšroubováním zpět směrem ke konzole. Nyní lze zaostřovat otáčením držáku
objektivu doleva a doprava. Jakmile dosáhnete ostrého obrazu, zajistěte držák pojistným
kroužkem.
14
11
Při seřizování pointačního dalekohledu si vyberte objekt ve vzdálenosti nejméně 500 m a namiřte
na něj teleskop. Teleskop nastavte tak, aby byl objekt ve středu zorného pole vašeho okuláru. V
pointačním dalekohledu zkontrolujte, zda je objekt vystředěn i na nitkovém kříži. V případě
pointačních dalekohledů 5x24 a 6x24: k vycentrování nitkového kříže na objektu použijte tři
stavěcí šrouby. V případě pointačních dalekohledů 6x30: seřiďte pouze dva šrouby pro nastavení
odměru či náměru.
15
Použití projekčního hledáčku typu Red Dot
Projekční hledáček typu Red Dot je pointační nástroj s nulovým zvětšením, který využívá stínítko k
projekci malého červeného bodu na noční oblohu. Projekční hledáček je vybaven regulací jasu a
šrouby pro nastavení azimutu a elevace. Hledáček je napájen lithiovou baterií o napětí 3V
umístěnou zespod v jeho přední části. Nasměrování teleskopu na objekt pomocí projekčního
Page 24

hledáčku provedete tak, že při pohledu do hledáčku natáčíte tubus, dokud není červená tečka v
zákrytu s požadovaným objektem.
Před použitím se musí projekční hledáček správně seřídit vůči teleskopu. Jedná se o snadný úkon
prováděný pomocí šroubů pro nastavení azimutu a elevace:
Sundejte víčko prostoru s baterií a odstraňte plastový přepravní kryt baterie.
Otočením regulátoru jasu zapněte projekční hledáček; zapnutí je signalizováno cvaknutím. Dalším
otáčením regulátoru zvýšíte úroveň jasu.
Do okulárového výtahu vložte okulár s malým zvětšením. Vyberte si jasný objekt a zaměřte na něj
teleskop tak, aby byl ve středu zorného pole.
Otevřete obě oči a podívejte se na objekt přes hledáček. Pokud se červená tečka překrývá s
objektem, je váš projekční hledáček dokonale seřízený. Není-li tomu tak, otáčejte šrouby pro
nastavení azimutu a elevace, dokud se červená tečka nepřekrývá s objektem.
16
Vyvažování teleskopu
Není-li teleskop vyvážen z předchozího pozorování, musí se nejdříve vyvážit. Vyvážením se snižuje
namáhání montáže a umožňuje přesné ovládání v drobných krocích.
Vyvažování osy rektascenze
Před vyvažováním se ujistěte, zda je teleskop řádně upevněn k montáži.
Jednou rukou přidržte teleskop a druhou uvolněte aretační šrouby osy rektascenze a deklinace.
Teleskopem otáčejte, dokud nebude protiváha horizontálně vůči zemi.
Utáhněte aretační šroub osy deklinace.
Uvolněte křídlatý šroub protiváhy a protiváhu posouvejte po tyči tak dlouho, dokud není teleskop
vyvážený, tj. když jej pustíte, zůstane v klidu.
Utáhněte křídlatý šroub protiváhy. Nyní je váš teleskop dokonale vyvážený.
Vyvažování podle deklinační osy
Ve chvíli, kdy je tyč protiváhy v horizontální poloze vůči zemi, utáhněte aretační šroub osy
rektascenze.
Jednou rukou přidržte teleskop a druhou uvolněte aretační šroub osy deklinace.
Uvolněte kroužky tubusu dalekohledu a posuňte jej dopředu nebo dozadu, dokud není v
rovnováze, i když tubus teleskopu nepřidržujete. Kroužky na tubusu a aretační šroub osy deklinace
utáhněte.
Práce s montáží
Montáž je vybavena ovládacími prvky pro běžné nastavení elevace (nahoru-dolů) a azimutu (vlevovpravo) Tento způsob nastavení se doporučuje pro velké změny směru a při pozorování pozemských
objektů. Chcete-li nastavit azimut, povolte velký knoflík pod patou montáže a otočte hlavou
montáže kolem osy azimutu. K nastavení požadované elevace použijte šrouby s hlavou tvaru T
určené k nastavení této hodnoty.
Page 25

Kromě toho je montáž EQ2 vybavena prvky nastavení rektascenze (hodinový úhel) a deklinace
určenými k astronomickým pozorováním při polárním nastavení teleskopu. Po uvolnění aretačních
knoflíků lze provádět velké změny nastavení směru. K přesnému nastavení můžete po zajištění
obou šroubů použít ovládací prvky jemného nastavení. U osy nastavení elevace je uvedena další
stupnice. Ta umožňuje polární nastavení ve vaší lokální zeměpisné šířce.
17
Barlowova čočka
Barlowova čočka zvyšuje zvětšení okuláru a zároveň zmenšuje zorné pole. Kromě vyššího zvětšení
jsou dalšími výhodami Barlowovy čočky lepší oční reliéf a menší sférická aberace okuláru. Jejím
největším přínosem je to, že může potenciálně zdvojnásobit počet okulárů ve vaší sbírce.
18
Zaostření
Pomalu otáčejte knoflíkem ostření na jednu nebo druhou stranu, dokud není obraz v okuláru ostrý.
V důsledku drobného kolísání způsobeného změnami teploty, průhybem atd. je obraz obvykle po
nějaké době potřeba doostřit. Doostření je téměř vždy potřeba provést při výměně okuláru,
přidání nebo odstranění Barlowovy čočky apod.
19
Polární ustavení
Paralaktická montáž umožňuje kompenzovat zemskou rotaci kolem vlastní osy a při pozorování
snadno kopírovat pohyb nebeských objektů po obloze. K dosažení tohoto cíle se musí osa
rektascenze nastavit podle osy zemské rotace. Tento proces je znám pod názvem „polární
ustavení“.
Podívejte se směrem na sever a najděte Polárku. Vzhledem k tomu, že se nachází v rozmezí 1° od
rotační osy Země (severní nebeský pól), budete svůj teleskop nastavovat vůči této hvězdě.
1. Uvolněte aretační šroub deklinační osy a teleskopem otáčejte tak dlouho, dokud nebude
rovnoběžně s osou rektascenze. Aretační šroub utáhněte. Díky tomu bude snadnější teleskop
orientovat na Polárku.
2. Uvolněte aretační šroub azimutu a otáčejte montáží tak dlouho, dokud nebude tubus i osa
rektascenze mířit na Polárku. Aretační šroub azimutu opět utáhněte. Nemůžete-li Polárku najít,
snažte se teleskop a osu rektascenze namířit přímo na sever.
Po provedení těchto kroků by se během pozorování neměly na montáži provádět žádné další
úpravy azimutu ani zeměpisné šířky, ani byste neměli pohybovat stativem. Aby nedošlo k narušení
nastavení teleskopu, měly by se pohybovat pouze osy deklinace a rektascenze.
Pokud nyní chcete teleskop namířit na nějaký objekt (Měsíc, Jupiter, Saturn), uvolněte aretační
šrouby osy rektascenze a deklinace, namiřte tubus teleskopu na objekt a aretační šrouby opět
utáhněte. Hledáčkem pozorujte objekt a pomocí ovládání jemného nastavení proveďte přesné
zacílení teleskopu. Ujistěte se, že červená tečka ukazuje na objekt. Pozorování zahajte pomocí
okuláru 25 mm a zaostřete obraz. Chcete-li pozorovat detaily Měsíce nebo planet, postupujte
podle následujících jednoduchých pokynů:
20
21
Page 26

Levenhuk
Skyline PRO
80 MAK
Levenhuk
Skyline PRO
90 MAK
Levenhuk
Skyline PRO 105
MAK
Levenhuk
Skyline PRO
127 MAK
Levenhuk
Skyline PRO
150 MAK
Optická konstrukce
Maksutov-Cassegrain
Apertura
8090105
127
150
Ohnisková vzdálenost
1000
1250
1300
1500
1800
Světelnost
f/12,5
f/13,9
f/12,8
f/11,8
f/12
Nejvyšší praktické zvětšení
160
180
200
250
300
Limitní hvězdná velikost
12,0
11,7
12,0
12,5
13,4
Úhlové rozlišení
1,73
1,5
1,3
1,1
0,92
Montáž
EQ1
EQ1
EQ2
EQ3 (3-2)
EQ5
Okulár
1.25"; 17 mm
& 3.6 mm
1.25"; SUPER10
& SUPER20
1.25"; SUPER10
& SUPER20
1.25"; PL10
& PL25
1.25"; 28 mm
Pointační dalekohled
typu Red Dot
6x30
Stativ
hliníkový
T-adaptér a nástavec
Při použití fotoaparátu připevněného k teleskopu může být k jeho zaostření potřeba adaptér.
Některé refraktory jsou určeny k použití s diagonálními zrcátky, a potřebují tedy při práci s
fotoaparátem delší ohniskovou vzdálenost.
Toho lze dosáhnout připojením nástavce k okulárovému výtahu teleskopu a následně připojením
fotoaparátu k nástavci pomocí T-adaptéru.
Údržba
Pokud teleskop nepoužíváte, zakryjte jeho čelní konec prachovým víčkem. Tím zabráníte
usazování prachu na objektivu. Při čištění optiky postupujte opatrně a snažte se nepoškodit
povrchovou vrstvu čoček. Používejte výhradně speciální čisticí ubrousky.
Specifikace
Bezpečnostní pokyny týkající se baterií
Vždy nakupujte baterie správné velikosti a typu, které jsou nejvhodnější pro zamýšlený účel.
Při výměně vždy nahrazujte celou sadu baterií a dbejte na to, abyste nemíchali staré a nové
baterie, případně baterie různých typů.
Před instalací baterií vyčistěte kontakty na baterii i na přístroji.
Ujistěte se, zda jsou baterie instalovány ve správné polaritě (+ resp. -).
V případě, že zařízení nebudete delší dobu používat, vyjměte z něj baterie.
Page 27

Použité baterie včas vyměňujte.
Baterie se nikdy nepokoušejte dobíjet, mohlo by dojít k úniku obsahu baterie, požáru nebo k
explozi.
Baterie nikdy nezkratujte, mohlo by to vést ke zvýšení teploty, úniku obsahu baterie nebo k explozi.
Baterie se nikdy nepokoušejte oživit zahříváním.
Po použití nezapomeňte přístroj vypnout.
Baterie uchovávejte mimo dosah dětí, abyste předešli riziku spolknutí, vdechnutí nebo otravy.
Péče a údržba
Nikdy, za žádných okolností, se tímto přístrojem bez speciálního filtru nedívejte přímo do slunce,
jiného jasného světelného zdroje nebo laseru, neboť hrozí nebezpečí TRVALÉHO POŠKOZENÍ
SÍTNICE a případně i OSLEPNUTÍ.
Při použití tohoto přístroje dětmi nebo osobami, které tento návod nečetly nebo s jeho obsahem
nebyly plně srozuměny, přijměte nezbytná preventivní opatření.
Z žádného důvodu se nepokoušejte přístroj rozebírat, a to ani za účelem vyčištění zrcadla. S
opravami veškerého druhu se obracejte na své místní specializované servisní středisko.
Přístroj chraňte před prudkými nárazy a nadměrným mechanickým namáháním.
Nedotýkejte se svými prsty povrchů optických prvků. K vyčištění vnějších částí teleskopu
používejte výhradně speciální čisticí ubrousky a speciální nástroje k čištění optiky dodávané
společností Levenhuk.
Přístroj ukládejte na suchém, chladném místě, mimo dosah nebezpečných kyselin nebo jiných
chemikálií, topných těles, otevřeného ohně a jiných zdrojů vysokých teplot.
Pokud teleskop nepoužíváte, zakryjte jeho čelní stranu prachovým víčkem. Tím zabráníte
usazování prachu na povrchu zrcadla nebo čoček.
Při náhodném požití malé součásti nebo baterie ihned vyhledejte lékařskou pomoc.
Mezinárodní záruka
Na veškeré teleskopy, fotoaparáty k teleskopům, mikroskopy a triedry značky Levenhuk se
poskytuje záruka toho, že jsou dodávány bez jakýchkoli vad materiálu a provedení, a to po dobu
tří let od data zakoupení v maloobchodní prodejně. Na veškeré příslušenství značky Levenhuk se
poskytuje záruka toho, že je dodáváno bez jakýchkoli vad materiálu a provedení, a to po dobu
dvou let od data zakoupení v maloobchodní prodejně. Společnost Levenhuk provede opravu či
výměnu výrobku nebo jeho části, u nichž se po provedení kontroly společností Levenhuk prokáže
výskyt vad materiálu nebo provedení. Nezbytnou podmínkou toho, aby společnost Levenhuk
splnila svůj závazek provést opravu nebo výměnu takového výrobku, je předání výrobku společně
s dokladem o nákupu vystaveným ve formě uspokojivé pro Levenhuk.
Tato záruka se nevztahuje na spotřební součásti, jako jsou například baterie.
Ke všem vráceným výrobkům musí být přiloženo písemné prohlášení, na němž bude uvedeno
jméno, adresa a telefonní číslo majitele výrobku, včetně popisu veškerých reklamovaných závad.
Součásti nebo výrobky, za něž bude poskytnuta výměna, se stávají majetkem společnosti
Levenhuk.
Zákazník je povinen předem uhradit veškeré náklady na dopravu a pojištění do společnosti
Levenhuk, případně k jejím autorizovaným dealerům, a zpět.
Page 28

Společnost Levenhuk vyvine přiměřené úsilí k tomu, aby výrobek, na nějž se vztahuje tato záruka,
opravila nebo vyměnila do 30 dnů od jeho obdržení. V případě, že bude oprava nebo výměna trvat
déle než 30 dní, bude o tom společnost Levenhuk zákazníka informovat. Společnost Levenhuk si
vyhrazuje právo jakýkoli výrobek, jehož výroba byla zastavena, nahradit novým výrobkem
srovnatelné hodnoty a funkce.
Tato záruka se nevztahuje na závady nebo poškození vyplývající z pozměňování, úprav, nedbalosti,
nesprávného použití, použití nevhodných zdrojů napájení, poškození při dopravě, nedodržení
pokynů, případně z jakékoliv jiné příčiny mimo rozsah běžného užívání, nebo z důvodu poruchy či
zhoršení funkčnosti v důsledku běžného opotřebení.
Společnost Levenhuk odmítá jakékoliv jiné záruky, výslovně uvedené i mlčky předpokládané,
týkající se obchodovatelnosti nebo vhodnosti pro konkrétní účel, kromě těch, jež jsou výslovně
uvedeny v této omezené záruce. Jediným závazkem společnosti Levenhuk v rámci této omezené
záruky bude provedení opravy nebo výměny výrobku, na který se tato záruka vztahuje, a to v
souladu s podmínkami v ní uvedenými. Společnost Levenhuk nepřebírá odpovědnost za žádné ušlé
zisky, ztrátu informací, ani za žádné všeobecné, speciální, přímé, nepřímé či následné škody, jež
mohou vyplynout z porušení jakékoliv záruky, případně nastat v důsledku užívání nebo nemožnosti
použití jakéhokoliv výrobku značky Levenhuk. Veškeré mlčky předpokládané záruky, jež nelze
vyloučit, budou časově omezeny na období tří let v případě teleskopů, fotoaparátů k teleskopům,
mikroskopů a triedrů, nebo šesti měsíců v případě příslušenství, a to vždy od data zakoupení v
maloobchodní prodejně.
Společnost Levenhuk si vyhrazuje právo provádět bez předchozího upozornění úpravy jakéhokoliv
výrobku, případně zastavit jeho výrobu.
Záruka mimo území USA nebo Kanady platí pouze pro zákazníky, kteří provedli nákup u
autorizovaného dealera společnosti Levenhuk v příslušné zemi nebo od mezinárodního distributora.
S veškerými záručními opravami se obracejte na tyto subjekty.
V případě problémů s uplatněním záruky, nebo pokud budete potřebovat pomoc při používání
svého výrobku, obraťte se na místní pobočku společnosti Levenhuk:
Levenhuk ve světě:
USA: www.levenhuk.com
Česká republika: www.levenhuk.cz
Rusko: www.levenhuk.ru
Ukrajina: www.levenhuk.com.ua
EU: www.levenhuk.eu
Datum nákupu ___________________________ Podpis __________________________ Razítko
Page 29

Телескопы Levenhuk Skyline PRO
Поздравляем вас с приобретением высококачественного телескопа Levenhuk!
Телескопы Levenhuk Skyline PRO имеют высокую разрешающую способность благодаря их
качественной оптике вы сможете без труда найти множество астрономических объектов и
насладиться чарующими видами Луны, планет и различных объектов глубокого космоса:
галактик, туманностей и звездных скоплений.
Данная инструкция поможет вам разобраться с настройкой телескопа, а также с правилами
его надлежащего использования и обслуживания. Настоятельно рекомендуем полностью
прочесть инструкцию перед началом работы с телескопом.
ВНИМАНИЕ!
Во избежание повреждения глаз никогда, даже на мгновение, не смотрите на Солнце
в телескоп или искатель без профессионального солнечного апертурного фильтра,
закрывающего переднюю часть прибора. При этом лицевая часть искателя должна
быть закрыта алюминиевой фольгой или другим непрозрачным материалом для
предотвращения повреждения внутренних частей телескопа.
Дети могут пользоваться телескопом только под присмотром взрослых.
Все части телескопа поставляются в одной коробке. Распаковывая телескоп, будьте
аккуратны и осторожны. Рекомендуем сохранить упаковку: использование оригинальной
упаковки во время перевозки гарантирует целостность и сохранность инструмента. Убедитесь
в наличии всех частей комплекта поставки. Внимательно осмотрите коробку, так как
некоторые детали имеют малые размеры и могут затеряться. В комплект поставки входят все
инструменты, необходимые для работы с телескопом, дополнительные инструменты не
требуются. Во время сборки телескопа все винты должны быть надежно затянуты для
исключения колебаний. ВНИМАНИЕ! НЕ ПЕРЕТЯНИТЕ ВИНТЫ, ЧТОБЫ НЕ СОРВАТЬ РЕЗЬБУ!
RU
В процессе сборки и во время использования телескопа НЕ КАСАЙТЕСЬ пальцами линз
телескопа, искателя или окуляра. Оптические поверхности имеют тонкое покрытие, которое
легко повредить при касании. НЕ ВЫНИМАЙТЕ линзы из корпусов, так как это аннулирует
гарантийное соглашение.
Page 30

Сборка телескопа на монтировке EQ1 и EQ2
Сборка монтировки и трубы телескопа
Слегка ослабьте зажимные винты и выдвиньте нижние секции ножек треноги. Закрепите их
фиксирующими винтами в выдвинутом положении.
Раздвиньте ножки треноги и установите ее.
Регулируя высоту ножек, установите треногу так, чтобы ее верхняя площадка приняла
горизонтальное положение.
Установите лоток для аксессуаров и зафиксируйте его винтами.
Установите монтировку на треногу.
Закрепите монтировку с помощью фиксирующего винта.
Наденьте противовес на штангу. Вкрутите штангу в соответствующее отверстие в монтировке.
Затяните винт фиксатора на противовесе.
Установите ручки управления тонкими движениями: наденьте концы ручек на края червячных
передач. Закрепите их, затянув стопорные винты. Рекомендуется установить длинную ручку
на ось склонений, а короткую на ось прямых восхождений.
Присоедините 1/4''-20 переходник к трубе телескопа, вращая винт с черным маховичком.
Закрепите трубу телескопа на монтировке двумя винтами.
2
1
4
Сборка телескопа на монтировке EQ3 (3-2) и EQ5
Сборка монтировки и трубы телескопа
Слегка ослабьте зажимные винты и выдвиньте нижние секции ножек треноги. Закрепите их
фиксирующими винтами в выдвинутом положении.
Раздвиньте ножки треноги и установите ее.
Регулируя высоту ножек, установите треногу так, чтобы ее верхняя площадка приняла
горизонтальное положение.
Установите лоток для аксессуаров и зафиксируйте его винтами.
Установите монтировку на треногу.
Закрепите монтировку с помощью фиксирующего винта.
Наденьте противовес на штангу. Вкрутите штангу в соответствующее отверстие в
монтировке.
Затяните винт фиксатора на противовесе.
536
Только для EQ3 (3-2). Установите ручки управления тонкими движениями: наденьте концы
ручек на края червячных передач. Закрепите их, затянув стопорные винты. Рекомендуется
установить длинную ручку на ось склонений, а короткую на ось пямых восхождений.
Только для EQ5. Поместите планку крепления (короткую или длинную, в зависимости от
комплекта поставки) в паз на монтировке и закрепите ее, затянув два винта фиксации так,
чтобы они попали в отверстия на боковой стороне планки.
Присоедините 1/4''-20 переходник к трубе телескопа, вращая винт с черным маховичком.
Закрепить трубу телескопа на монтировке двумя винтами.
7
8
9
Page 31

Установка искателя
Оптический искатель
Снимите две крепежные гайки с винтов на трубе телескопа (возле фокусера).
Установите держатель искателя на эти винты и закрепите его гайками.
10
Искатель с красной точкой
Установите стойку крепления в разъем на трубе телескопа и затяните фиксирующий винт.
11
Установка окуляра
Ослабьте фиксирующий винт на тубусе фокусера.
Вставьте диагональное зеркало и закрепите его фиксирующим винтом.
Ослабьте фиксирующий винт на диагональном зеркале.
Вставьте выбранный окуляр и затяните фиксирующий винт.
13
12
Использование телескопа
Настройка оптического искателя
Оптические искатели, закрепляемые на оптической трубе, — очень полезные приспособления.
Когда они правильно настроены, объекты легко находить и удерживать в центре поля зрения.
Настройку лучше проводить в дневное время на открытом пространстве. Если нужно
перефокусировать искатель, наведите его на объект, расположенный на расстоянии не менее
500 метров от вас. Для искателей 5х24 и 6х24: вращайте переднюю часть искателя, пока не
получите четкий фокус. Для искателя 6х30: ослабьте кольцо фиксации фокуса, вывинтив его
назад в сторону крепления; затем вращайте переднюю часть искателя, чтобы добиться
нужного фокуса. Сфокусировавшись, затяните кольцо фиксации фокуса.
14
Выберите удаленный объект на расстоянии не менее 500 метров от вас и нацельте на него
телескоп. Отрегулируйте телескоп так, чтобы объект попал в центр поля зрения окуляра.
Убедитесь, что объект, центрированный в трубе телескопа, находится в центре визирной
сетки искателя.
Для искателей 5х24 и 6х24: используя три юстировочных винта, центрируйте визирную сетку
искателя на объекте. Для искателя 6х30 с подпружиниванием: регулируйте только два
маленьких винта.
15
Использование искателя с красной точкой
Искатель с красной точкой имеет нулевое увеличение. В таком искателе светодиод
проецирует красную точку, ориентируясь по которой, вам будет проще наводиться на объекты
на ночном небе. Искатель с красной точкой снабжен регулятором яркости и юстировочными
винтами по азимуту и высоте. Питание осуществляется от 3-вольтовой литиевой батарейки,
расположенной спереди внизу. Чтобы пользоваться искателем, просто смотрите в зрительную
трубу и двигайте трубу телескопа, пока красная точка не совместится с объектом.
16
Page 32

Смотреть следует обоими глазами.
Искатель с красной точкой перед использованием также следует правильно настроить.
Настройка выполняется с помощью юстировочных винтов по азимуту и высоте:
Откройте батарейный отсек, выдвинув его вниз (можно аккуратно зацепить 2 маленьких
выемки) и выньте пластиковый вкладыш.
Включите искатель, повернув регулятор яркости по часовой стрелке до щелчка. Продолжая
вращать регулятор, увеличьте уровень яркости.
Вставьте в фокусер телескопа окуляр малого увеличения. Найдите яркий объект и наведите
телескоп так, чтобы объект оказался в центре поля зрения окуляра.
Открыв оба глаза, смотрите в искатель на объект. Если красная точка указывает точно на
него ― искатель настроен идеально. Если нет, крутите юстировочные винты по азимуту и
высоте до тех пор, пока красная точка не сольется с объектом.
Балансировка телескопа
Телескоп следует балансировать перед каждым сеансом наблюдения. Балансировка
уменьшает вибрации монтировки и повышает точность наведения. Особенно важна
балансировка при использовании часового привода при астрофотографии. Балансировку
следует проводить после того, как установлены все аксессуары (окуляры, камера и т.п.).
Прежде чем балансировать телескоп, убедитесь, что ножки треноги выровнены и телескоп
установлен на ровной поверхности. Для фотографирования нацельте телескоп в нужном
направлении ДО проведения балансировки.
Балансировка по оси прямого восхождения
Чтобы достичь лучшего результата, по возможности отрегулируйте высоту монтировки на
уровень между 15 и 30 градусами с помощью с помощью регулировочного винта полярной оси
по широте места наблюдения. Медленно ослабьте фиксаторы осей прямого восхождения и
склонения. Поворачивайте телескоп, пока оптическая труба и ось противовеса не придут в
параллельное земле положение, а труба телескопа не повернется вбок от монтировки.
Затяните фиксатор оси склонения.
Передвиньте противовес по оси так, чтобы телескоп пришел в равновесие и оставался
неподвижным, если его отпустить.
Затяните винт противовеса, чтобы удержать противовес в новом положении.
Балансировка по оси склонения
Все аксессуары следует устанавливать на телескоп перед балансировкой по оси прямого
восхождения. А балансировку по оси склонения надо проводить после балансировки по оси
прямого восхождения.
Чтобы достичь лучшего результата, по возможности отрегулируйте широту места наблюдения
на уровень между 60 и 75 градусами.
Ослабьте фиксатор оси прямого восхождения и поворачивайте телескоп вокруг оси прямого
восхождения, пока ось противовеса не придет в горизонтальное положение. Затяните
фиксатор оси прямого восхождения.
Ослабьте фиксатор оси склонения и поворачивайте телескоп, пока труба не придет в
параллельное земле положение.
Медленно отпустите телескоп и определите, в каком направлении он поворачивается.
Ослабьте кольца трубы и продвиньте трубу вперед или назад так, чтобы она пришла в
равновесие.
Page 33

Когда телескоп больше не поворачивается из исходного положения (труба параллельна
земле), затяните кольца трубы и фиксатор оси склонения. Восстановите настройки широты
для вашей местности.
Использование монтировки
Монтировка позволяет передвигать трубу телескопа по осям высоты (вверх-вниз) и азимута
(влево-вправо). Для примерной настройки по азимуту используйте большой рифленый
фиксатор, расположенный снизу. Ослабьте фиксатор и поверните верхнюю часть монтировки
вокруг оси азимута. С помощью регулировочного винта полярной оси по широте места
наблюдения выставьте нужную высоту.
Кроме того, у монтировки есть ручки управления тонкими движениями по оси прямого
восхождения (часовой угол) и склонения, которыми удобно пользоваться во время
астрономических наблюдений при установленной полярной оси. Для примерной
(предварительной) настройки положения ослабьте фиксаторы осей и поверните
соответствующие части монтировки. Затем, затянув оба фиксатора, используйте ручки
управления тонкими движениями. Имеющаяся дополнительная шкала для оси высоты
позволяет провести настройку полярной оси для широты вашей местности.
17
Линза Барлоу
Линза Барлоу используется вместе с окулярами для достижения максимального увеличения.
При использовании линзы Барлоу уменьшается поле зрения, а фокусное расстояние
телескопа становится больше (вдвое, если используется линза Барлоу 2х). Помимо
дополнительного увеличения преимущества использования линзы Барлоу заключаются в
улучшенном выносе зрачка и уменьшении сферических искажений в окуляре. Но самое
большое преимущество линзы Барлоу состоит в том, что при том же количестве окуляров в
вашей коллекции вам доступен больший диапазон увеличений.
18
Фокусировка
Медленно поворачивайте ручки фокусировки, пока изображение в окуляре не станет четким.
Время от времени приходится заново фокусировать изображение, так как изменения
температуры, состояния атмосферы и прочих условий влияют на фокус. Практически всегда
требуется повторная фокусировка при смене окуляра или установке/снятии линзы Барлоу.
Установка полярной оси
Чтобы телескоп мог отслеживать астрономические объекты, следует произвести установку
полярной оси. Это означает установить такой наклон верхней части монтировки, чтобы она
указывала на Северный (или Южный) небесный полюс. Для тех, кто находится в Северном
полушарии, это довольно легко, так как очень близко к полюсу расположена яркая Полярная
звезда. Для визуальных наблюдений вполне достаточно грубой установки полярной оси.
Прежде чем ее проводить, убедитесь, что экваториальная монтировка выровнена, а искатель
настроен.
19
Page 34

Найдите на карте широту своей местности. Для этого прекрасно подходят карты дорог.
Посмотрите на верхнюю часть монтировки сбоку — там находится шкала от 0 до 90 градусов.
Ослабьте фиксатор, слегка нажимая на рычаг против часовой стрелки. Снизу верхней части
монтировки есть винт, который давит на язычок фиксатора, меняя угол. Вращайте его, пока
на шкале не будет выставлена широта вашей местности, затем затяните фиксатор.
Ослабьте фиксатор оси склонения и поворачивайте трубу телескопа до тех пор, пока стрелка
на установочном круге не укажет на 90°. Затяните фиксатор оси склонения. Ослабьте
фиксатор по оси азимута и поворачивайте монтировку горизонтально до тех пор, пока ось
прямого восхождения не укажет примерно на Полярную звезду. Если требуется более точная
установка полярной оси, найдите и центрируйте Полярную звезду, глядя в искатель.
Через некоторое время вы заметите, что ваш объект медленно смещается к северу или югу, в
зависимости от направления полюса относительно Полярной звезды.
Чтобы удержать объект в центре поля зрения, поворачивайте только ручку управления
тонкими движениями по оси прямого восхождения.
Когда установка полярной оси проведена, во время сеанса наблюдения больше не надо
регулировать ни азимут, ни широту, а также не следует двигать треногу. Чтобы удержать
объект в поле зрения, надо перемещать телескоп только по оси прямого восхождения или оси
склонения.
В Южном полушарии следует выровнять монтировку на Южный небесный полюс, определив
его положение по карте звездного неба, т.к. рядом с Южным небесным полюсом нет удобной
яркой звезды. Ближайшая к нему звезда — слабая Сигма Октанта звездной величины 5,5,
расположенная на расстоянии примерно в один градус. Определить положение помогут два
ориентира — альфа и бета Южного Креста и точка на середине линии между альфой и бетой
Центавра.
21
20
Отслеживание небесных тел
При наблюдении в телескоп астрономические объекты медленно смещаются в поле зрения
телескопа. Если установка полярной оси проведена правильно, для отслеживания объектов
вам достаточно поворачивать ручку управления тонкими движениями по оси прямого
восхождения. Для автоматического трекинга можно установить электрический привод оси
прямого восхождения. Скорость вращения привода совпадает со скоростью вращения Земли,
поэтому объекты в окуляре телескопа выглядят неподвижными. В некоторых моделях
доступны разные скорости трекинга. Для контроля перемещения по оси склонения можно
добавить второй привод — это очень полезно при фотографировании астрономических
объектов.
Самый быстрый способ найти объект — изучить созвездия и использовать искатель. Но, если
объект слишком слабый или наблюдения проходят в условиях засветки, вы можете
использовать установочные круги. Они позволят вам определить местонахождение небесных
тел, координаты которых взяты из звездных карт. Перед использованием установочных
кругов необходимо провести установку полярной оси и откалибровать установочный круг оси
прямого восхождения. Установочный круг оси склонения настроен на заводе и не требует
дополнительной калибровки.
Установочный круг оси прямого восхождения размечен в часах, от 1 до 24, а маленькие
деления между ними обозначают 10-минутные интервалы. Верхний ряд цифр применяется
для наблюдений в Северном полушарии, а нижний — для наблюдений в Южном полушарии.
22
Page 35

Калибровка установочного круга оси прямого восхождения: чтобы установить круг оси
прямого восхождения, следует сначала найти в поле зрения звезду с известными
координатами. Подходящая звезда — Вега со звездной величиной 0.0 в созвездии Лиры. Из
звездных карт мы знаем, что координата прямого восхождения Веги составляет 18 ч 36 мин.
Ослабьте фиксаторы осей прямого восхождения и склонения на монтировке и поверните
телескоп так, чтобы Вега была центрирована в поле зрения окуляра. Затяните фиксаторы
осей прямого восхождения и склонения для удержания монтировки на месте. Теперь
поворачивайте установочный круг оси прямого восхождения, пока стрелка не укажет на 18 ч
36 мин. Теперь вы готовы использовать установочные круги для поиска небесных тел.
Наведение телескопа в любом направлении, кроме строго северного, требует
комбинирования положений по оси прямого восхождения и оси склонения. Это можно
наглядно представить как ряд дуг по оси склонения, каждая из которых получается из
конкретного положения по оси прямого восхождения. Однако на практике телескоп обычно
направляется с помощью искателя — фиксаторы осей прямого восхождения и склонения
ослабляются, а монтировка поворачивается вокруг обеих осей до тех пор, пока объект не
будет центрирован в поле зрения окуляра. Поворот лучше всего выполнять, положив одну
руку на трубу телескопа, а другую — на ось противовеса, чтобы движение было плавным и на
подшипники осей не оказывалось слишком сильного давления. Когда объект центрирован,
убедитесь, что фиксаторы осей прямого восхождения и склонения затянуты. Чтобы
удерживать объект в поле зрения и отслеживать его, управляйте движением трубы
телескопа только по оси прямого восхождения.
У телескопов с длинным фокусным расстоянием при наведении в область зенита часто
появляется "белое пятно", так как окулярный конец трубы телескопа задевает ножки треноги.
Чтобы избежать этого, трубу следует очень осторожно продвинуть в кольцах вверх. Это
можно сделать без вреда балансировке, так как труба направлена почти вертикально вверх и
ее сдвиг не вызовет смещения по оси склонения. Но очень важно перед наблюдением других
областей неба не забыть сдвинуть трубу обратно в сбалансированное по оси склонения
положение.
Еще одна проблема заключается в следующем: труба телескопа часто вращается так, что
окуляр, искатель и ручки фокусировки становятся в неудобные положения. Для регулировки
окуляра можно повернуть диагональное зеркало. А чтобы отрегулировать положения
искателя и ручек фокусировки, ослабьте кольца трубы и слегка проверните в них трубу. Это
имеет смысл делать, если вы собираетесь долго наблюдать выбранную область неба, но не
стоит этого делать всякий раз, когда вы быстро переходите от одной области неба к другой.
Наконец, чтобы сеанс наблюдения был комфортным, следует позаботиться еще о некоторых
вещах. Прежде всего, установите монтировку на нужную высоту, отрегулировав ножки
треноги. Предусмотрите возможность сидеть на удобном стуле. Очень длинную трубу
телескопа следует устанавливать на большей высоте, чтобы при наблюдении объектов в
зените вам не пришлось сползать на землю. И наоборот, короткую трубу устанавливайте на
меньшей высоте, чтобы источники вибрации (ветер, проезжающие машины и пр.) меньше
влияли на ее движение. Со всем этим следует определиться до установки полярной оси
монтировки.
23
Адаптер для камеры
При подключении камеры прямо к телескопу (для фотографирования в главном фокусе)
иногда может потребоваться экстендер, чтобы камеру можно было сфокусировать. Некоторым
рефлекторам для фокусировки камеры требуется больший ход, чем позволяет фокусер, а
некоторые рефракторы предназначены для использования с диагональным
Page 36

зеркалом, поэтому при использовании только с камерой им требуется удлинение фокусного
Levenhuk
Skyline PRO
80 MAK
Levenhuk
Skyline PRO 90
MAK
Levenhuk
Skyline PRO
105 MAK
Levenhuk
Skyline PRO
127 MAK
Levenhuk
Skyline PRO
150 MAK
Оптическая схема
Максутов-Кассегрен
Диаметр объектива
(апертура), мм
80
90
105
127
150
Фокусное расстояние, мм
1000
1250
1300
1500
1800
Светосила
f/12,5
f/13,9
f/12,8
f/11,8
f/12
Максимальное полезное
увеличение, крат
160
180
200
250
300
Предельная звездная
величина
12,0
11,7
12,0
12,5
13,4
Разрешающая способность
1,73
1,5
1,3
1,1
0,92
Тип монтировки
EQ1
EQ1
EQ2
EQ3 (3-2)
EQ5
Окуляр
17 мм и 3,6
мм
SUPER 10 мм и
SUPER 20 мм
SUPER 10 мм и
SUPER 20 мм
PL 10 мм и
PL 25 мм
28 мм
Искатель
с красной точкой
оптический 6х30
Тренога
алюминиевая
расстояния, особенно при фотографировании близко расположенных объектов. Камеру с
линзой телескопа можно сфокусировать на дальнем объекте (звезде и т.п.), но для
фокусировки близко расположенного объекта (например, птицы) потребуется 2,5'' экстендер
Его легко установить — навинтите его на фокусер, затем с другой стороны навинтите на
экстендер специальный Т-адаптер (для разных видов и марок зеркальных камер используются
свои адаптеры). Это превращает телескоп в "телеобъектив", который вы затем присоединяете
к зеркальной камере как любой другой сменный объектив.
Уход за телескопом
Когда телескоп не используется, всегда надевайте на него пылезащитную крышку. Это
защищает поверхность зеркал и линз от попадания пыли. Не чистите зеркала и линзы, пока не
научитесь обращаться с оптическими поверхностями. Протирайте искатель и окуляры только
специальными чистящими средствами. С окулярами следует обращаться осторожно, не
касаясь оптических поверхностей.
Использование элементов питания
Всегда используйте элементы питания подходящего размера и соответствующего типа.
При необходимости замены элементов питания меняйте сразу весь комплект, не смешивайте
старые и новые элементы питания и не используйте элементы питания разных типов
одновременно.
Page 37

Перед установкой элементов питания очистите контакты элементов и контакты в корпусе
прибора.
Устанавливайте элементы питания в соответствии с указанной полярностью (+ и -).
Если прибор не используется длительное время, следует вынуть из него элементы питания.
Оперативно вынимайте из прибора использованные элементы питания.
Не пытайтесь перезаряжать гальванические элементы питания - они могут протечь,
воспламениться или взорваться.
Никогда не закорачивайте полюса элементов питания – это может привести к их перегреву,
протечке или взрыву.
Не пытайтесь нагревать элементы питания, чтобы восстановить их работоспособность.
Выключайте прибор после использования.
Храните элементы питания в недоступном для детей месте, чтобы избежать риска их
проглатывания, удушья или отравления.
Уход и хранение
Никогда не смотрите в прибор на Солнце или область рядом с ним без специального фильтра,
а также на другой источник яркого света или лазерного излучения. ЭТО ОПАСНО ДЛЯ ЗРЕНИЯ
И МОЖЕТ ПРИВЕСТИ К СЛЕПОТЕ!
Будьте внимательны, если пользуетесь прибором вместе с детьми или людьми, не знакомыми
с инструкцией.
Не разбирайте прибор (в том числе и для очистки зеркал). Сервисные и ремонтные работы
могут проводиться только в специализированном сервисном центре.
Оберегайте прибор от резких ударов и чрезмерных механических воздействий.
Не касайтесь пальцами поверхностей линз. Для внешней очистки телескопа используйте
специальную салфетку и специальные чистящие средства, например оригинальные средства
для чистки оптики компании Levenhuk.
Храните прибор в сухом прохладном месте, недоступном для влияния кислот или других
активных химических веществ, вдали от отопителей (бытовых, автомобильных) и от
открытого огня и других источников высоких температур.
Когда прибор не используется, всегда надевайте на него пылезащитную крышку. Это
защищает поверхность линз и зеркал от попадания пыли.
Если деталь прибора или элемент питания были проглочены, срочно обратитесь за
медицинской помощью.
Международная гарантия
Продавец гарантирует соответствие качества приобретенного вами изделия компании
Levenhuk требованиям технической документации при соблюдении потребителем условий и
правил транспортировки, хранения и эксплуатации изделия.
Компания Levenhuk гарантирует отсутствие дефектов в материалах конструкции.
В течение гарантийного периода покупатель может вернуть неисправное изделие продавцу
либо в Сервисный центр компании Levenhuk. Компания Levenhuk по своему усмотрению
отремонтирует или бесплатно заменит неисправное изделие.
Претензии по качеству изделия не принимаются при отсутствии правильно оформленного
гарантийного талона или при наличии исправлений в нем, а также при непредъявлении
данного неисправного изделия. Гарантия не распространяется на случаи, когда, по мнению
компании, изделие употреблялось не по назначению, а также когда:
Page 38

изделие имеет механические повреждения, царапины, сколы, трещины и повреждения
оптики;
изделие вышло из строя в результате ударов, сжатия, растяжения корпуса;
изделие разбиралось или ремонтировалось лицом, не имеющим на то соответствующих
полномочий.
Гарантия не распространяется на комплектующие с ограниченным сроком использования,
элементы питания и прочее.
Компания Levenhuk оставляет за собой право вносить любые изменения или прекращать
производство изделия без предварительного уведомления.
Срок гарантии: на аксессуары — 6 (шесть) месяцев со дня покупки, на остальные изделия —
3 (три) года со дня покупки. Храните гарантийный талон вместе с чеком.
По вопросам гарантийного обслуживания вы можете обратиться в ближайшее
представительство компании Levenhuk.
Представительства компании Levenhuk
США: www.levenhuk.com
Чехия: www.levenhuk.cz
Россия: www.levenhuk.ru
Украина: www.levenhuk.com.ua
Европа: www.levenhuk.eu
Дата продажи ________________________ Подпись __________________________ Печать
Page 39

Page 40

Levenhuk optics cleaning tools
The Levenhuk series of cleaning tools is all you need to keep your optics clean and
durable, and to maintain its excellent quality.
Prostředky na čištění optiky Levenhuk
Řada čisticích prostředků Levenhuk pomůže zajistit čistotu, dlouhou životnost a
vynikající kvalitu vašich optických přístrojů.
Средства для ухода за оптикой Levenhuk
Серия оригинальных аксессуаров для оптики Levenhuk содержит все необходимое
для ухода за оптическими приборами.
Developed and manufactured for Levenhuk, Ltd., IL 60139 USA.
Levenhuk® is a registered trademark of Levenhuk, Ltd.
Copyright © 2006-2013 Levenhuk Ltd. All rights reserved.
 Loading...