

Page 1
Page 2

T
ABLE OF CONTENTS
CHAPTER 1 INTRODUCTION .............................................................................................1
LevelOne WBR-1101TX Features ...................................................................................1
Package Contents ..............................................................................................................4
Physical Details.................................................................................................................. 5
CHAPTER 2 INSTALLATION............................................................................................... 9
Requirements..................................................................................................................... 9
Procedure ........................................................................................................................... 9
CHAPTER 3 CONFIGURATION ........................................................................................ 11
Overview ..........................................................................................................................11
Configuration Program ..................................................................................................12
Quick Setup Screen ......................................................................................................... 14
Configuration Sub-screens .............................................................................................17
Wireless Screen................................................................................................................ 25
Status Screen.................................................................................................................... 28
Status Sub-Screens .......................................................................................................... 31
CHAPTER 4 PC CONFIGURATION .................................................................................. 40
Overview ..........................................................................................................................40
Windows Clients.............................................................................................................. 40
Macintosh Clients............................................................................................................ 58
Linux Clients.................................................................................................................... 59
Other Unix Systems......................................................................................................... 60
Wireless Station Configuration...................................................................................... 60
CHAPTER 5 DHCP................................................................................................................ 61
Overview ..........................................................................................................................61
What DHCP Does............................................................................................................ 61
Using the LevelOne WBR-1101TX's DHCP Server..................................................... 61
Using another DHCP Server .......................................................................................... 61
To Configure your PCs to use DHCP............................................................................ 62
CHAPTER 6 DIAL-IN (SERIAL PORT)............................................................................. 63
Overview ..........................................................................................................................63
Dial-in Screen................................................................................................................... 63
Modem Properties Screen............................................................................................... 65
Dial -in Users.................................................................................................................... 67
CHAPTER 7 OPTIONS .........................................................................................................71
Overview ..........................................................................................................................71
Password ..........................................................................................................................71
DNS (Domain Name Server............................................................................................ 72
NAT (Network Address Translation) ............................................................................ 72
TFTP................................................................................................................................. 72
Remote Management ......................................................................................................72
Routing Table ..................................................................................................................73
Printer Port...................................................................................................................... 73
CHAPTER 8 ROUTING ........................................................................................................ 75
Overview ..........................................................................................................................75
Routing Screen................................................................................................................. 75
Router Configuration...................................................................................................... 77
Static Routing - Example............................................................................................... 78
CHAPTER 9 ADVANCED INTERNET............................................................................... 80
Overview ..........................................................................................................................80
Advanced Internet Screen ..............................................................................................80
i
Page 3

Special Internet Applications ......................................................................................... 81
URL Filter........................................................................................................................ 84
Virtual Servers.................................................................................................................86
DMZ ................................................................................................................................. 91
CHAPTER 10 ACCESS CONTROL ....................................................................................93
Overview ..........................................................................................................................93
Security Groups Screen ..................................................................................................94
PCs Screen .......................................................................................................................96
Filters Screen ................................................................................................................... 98
APPENDIX A TROUBLESHOOTING ................................................................................ 99
Overview ..........................................................................................................................99
General Problems............................................................................................................ 99
Internet Access.................................................................................................................99
Wireless Access.............................................................................................................. 100
Printing........................................................................................................................... 101
Dial-in Access................................................................................................................. 104
APPENDIX B ABOUT WIRELESS LANS........................................................................ 106
Modes ............................................................................................................................. 106
BSS/ESS.......................................................................................................................... 106
Channels......................................................................................................................... 107
WEP................................................................................................................................ 107
Access Control ............................................................................................................... 108
Wireless LAN Configuration........................................................................................ 108
APPENDIX C AT COMMANDS ........................................................................................109
AT Commands............................................................................................................... 109
Standard AT Commands.............................................................................................. 111
APPENDIX D SPECIFICATIONS .....................................................................................114
LevelOne WBR-1101TX ............................................................................................... 114
PCMCIA Wireless Card ............................................................................................... 115
Copyright 2002. All Rights Reserved.
Document Version: 1.0
P/N:9560FG00A0
All trademarks and trade names are the properties of their respective owners.
ii 1
Page 4
Chapter 1
Introduction
This Chapter provides an overview of the LevelOne WBR-1101TX's features
and capabilities.
Congratulations on the purchase of your new LevelOne WBR-1101TX.
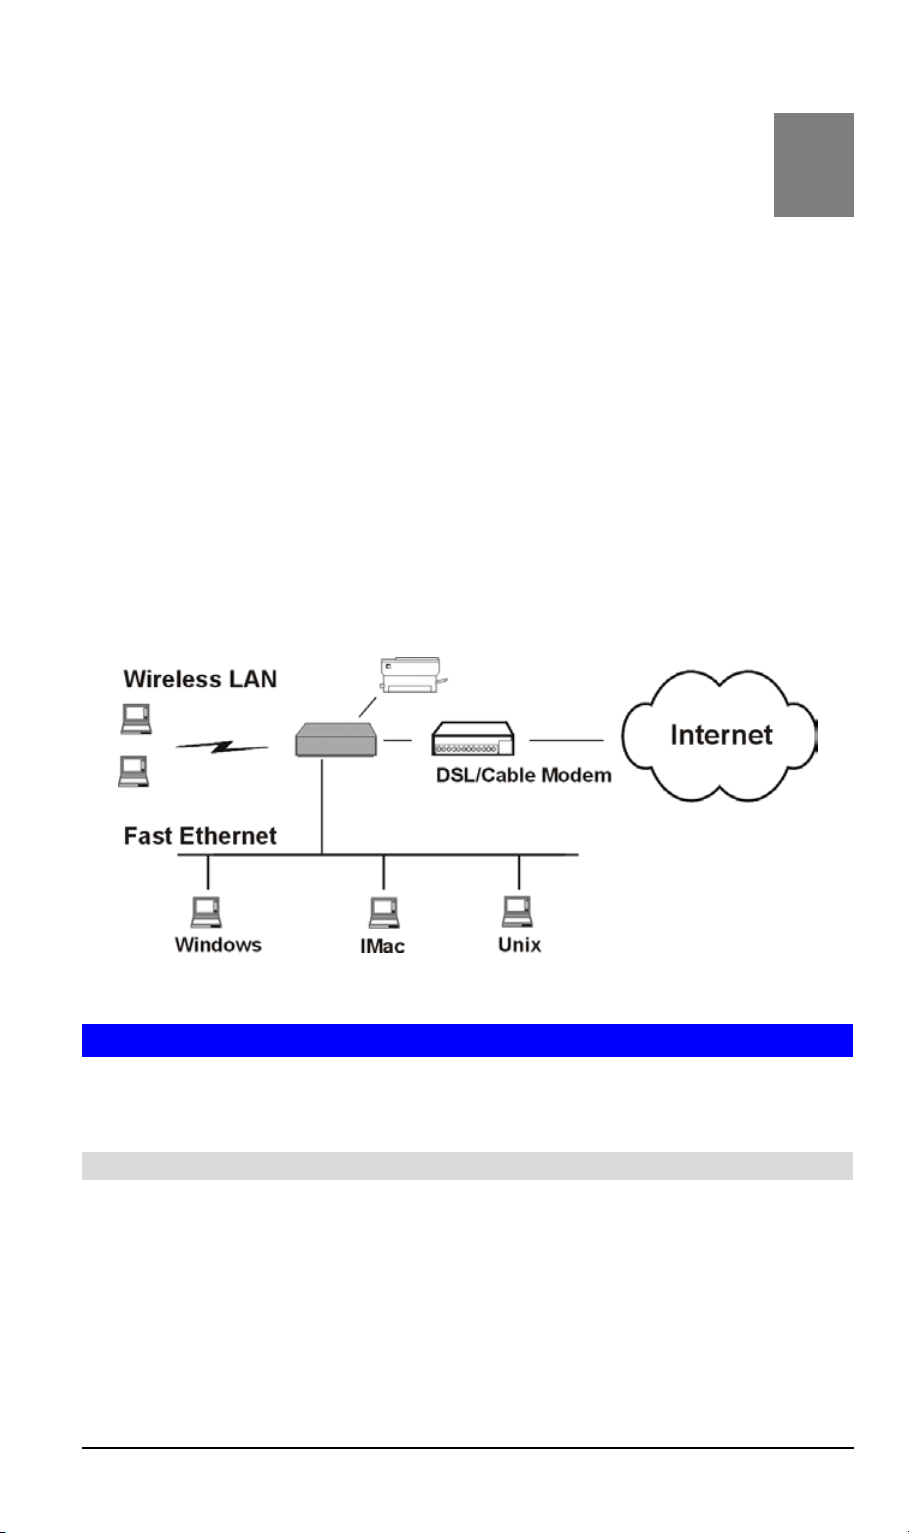
The LevelOne WBR-1101TX is a multi-function device providing the following services:
• Shared Internet Access via a Broadband Modem connected to the WAN (Ethernet) port,
OR via the built-in ISDN TA, OR via an analog modem/ISDN TA connected to the Serial
(RS232) port.
• Wireless LAN Access Point (base station) for equipment compliant with the
IEEE802.11b (DSSS) specifications.
• Network Printer - LAN and WLAN users can share the printer attached to the LevelOne
WBR-1101TX.
• RAS Dial-in Access - Remote users can dial-in to the modem connected to the LevelOne
WBR-1101TX's serial port to connect to the LAN and use the LevelOne WBR-1101TX's
printer and Broadband Internet access.
1
Figure 1: LevelOne WBR-1101TX
LevelOne WBR-1101TX Features
The LevelOne WBR-1101TX incorporates many advanced features, carefully designed to
provide sophisticated functions while being easy to use.
LAN Features
•
Dual LAN ports.
ports. Normally, the "Hub" port is used to connect the LevelOne WBR-1101TX to a
10/100BaseT hub on your LAN. But if desired, the "PC" port can be used to connect the
LevelOne WBR-1101TX directly to your PC, using a standard LAN cable.
DHCP Server Support.
•
address to PCs and other devices upon request. The LevelOne WBR-1101TX can act as a
DHCP Server for devices on your local LAN and WLAN.
The LevelOne WBR-1101TX has two (2) 10/100BaseT Ethernet LAN
Dynamic Host Configuration Protocol provides a dynamic IP
Page 5

LevelOne WBR-1101TX User Guide
•
Multi Segment LAN Support.
via the LevelOne WBR-1101TX's built-in static routing table. If NAT (Network Address
Translation) is disabled, the LevelOne WBR-1101TX will function as a static router.
LANs containing one or more segments are supported,
Internet Access Features
•
Shared Internet Access.
through the LevelOne WBR-1101TX, using only a single external IP Address. The local
(invalid) IP Addresses are hidden from external sources. This process is called NAT (Network Address Translation).
All users on the LAN or WLAN can access the Internet
DSL & Cable Modem Support.
•
port for connecting an DSL or Cable Modem. All popular DSL and Cable Modems are
supported.
•
Built-in ISDN TA.
have broadband access available.
•
Analog Modem Support.
(RS232) port can be used for shared Internet access, or dial-in access to the LAN.
•
PPPoE and PPTP Support.
methods used by ISPs, including PPPoE (PPP over Ethernet) and PPTP (Peer-to-Peer
Tunneling Protocol).
•
Fixed or Dynamic IP Address.
1101TX supports both Dynamic IP Address (IP Address is allocated on connection) and
Fixed IP Address.
Use the built-in ISDN TA for shared Internet access, if you don't yet
The LevelOne WBR-1101TX has a 10BaseT Ethernet
An analog modem or ISDN TA connected to the serial
The WAN port connection supports all common access
On the Internet connection, the LevelOne WBR-
Wireless Features
•
Standards Compliant.
(DSSS) specifications for Wireless LANs.
•
Security Features.
included.
•
Simple Configuration.
quickly and easily.
The LevelOne WBR-1101TX complies with the IEEE802.11b
Support for WEP (Wired Equivalent Privacy) and Access Control is
If the default settings are unsuitable, they can be changed
Network Printing Features
•
Share your Printer.
can be used by all PCs on the LAN.
•
Multiple Operating Systems.
• Windows 95/98/ME
• Windows NT 4.0 or 2000
• Apple Macintosh
• Unix
•
Multi-protocol Support.
• Windows peer-to-peer printing over TCP/IP, using the supplied port driver.
• Windows LPD printing, using a Windows Server running NT 4.0 or Windows 2000
Server. In this situation, no software needs to be installed on the client PCs.
• Unix LPD printing. No additional software needs to be installed.
A printer connected to the LevelOne WBR-1101TX's parallel port
Clients may use any of the following operating systems:
The following printing methods are supported:
2
Page 6

Advanced Internet Functions
•
Virtual Servers.
LAN. The required setup is quick and easy.
•
User-Defined Virtual Servers.
on your LAN by using this feature.
•
Special Internet Applications.
ing, Telephony, Games Servers, and other special-purpose Servers are supported.
•
DMZ.
One (1) PC on your local LAN can be configured to allow unrestricted 2-way
communication with Servers or individual users on the Internet.
•
URL Filter. Use
Wireless LAN users, or the Dial-in user.
•
Internet Access Log.
This feature allows Internet users to access Internet servers on your
Internet users can access non-standard Internet Servers
Internet applications such as Internet Videoconferenc-
the URL Filter to block access to undesirable Web sites by LAN users,
See which Internet connections have been made.
RAS (Remote Access Services)
•
RAS Dial-in.
LevelOne WBR-1101TX and access the LAN, or use the printer connected to the LevelOne WBR-1101TX.
Remote PC users can use their standard Dial-up software to connect to the
Introduction
•
Flexibility.
RAS dial-in.
•
Dial-back Support.
up and re-dial the remote user. Both fixed and roaming options are supported.
Any analog modem or ISDN TA connected to the Serial Port can be used for
For additional security, the Dial-back feature can be used to hang
Configuration & Management
•
Easy Setup.
Remote Management.
•
your LAN. And, if the Internet connection exists, it can also (optionally) be configured via
the Internet.
Use your WEB browser from anywhere on the LAN for configuration.
The LevelOne WBR-1101TX can be managed from any PC on
Security Features
•
Configuration Data
users from modifying the configuration.
•
Access Control Features
ual workstations. And the Access Control log allows the Administrator to see attempted
accesses which have been blocked.
•
Wireless LAN Security
Wireless access control via station address.
•
Firewall Protection.
requests are filtered, thus protecting your network from malicious attacks from external
sources. (This protection is lost if NAT is disabled.)
. Optional password protection is provided to prevent unauthorized
. The LAN Administrator can limit Internet access by individ-
. WEP (Wired Equivalent Privacy) is supported, as well as
All incoming data packets are monitored and all incoming server
3
Page 7

LevelOne WBR-1101TX User Guide
NAT Firewall Protection
The firewall protection provided by the LevelOne WBR-1101TX is an intrinsic side
effect of NAT (Network Address Translation). All users on the LAN share a single
external IP address. From the external viewpoint, there is no network, only a single
device.
For internal users, the LevelOne WBR-1101TX acts as a "transparent proxy server",
translating the multiple internal IP addresses into a single external IP address.
For external requests, any attempt to connect to local resources is blocked. The
LevelOne WBR-1101TX will not "reverse translate" from a external IP address to a
local IP address.
This type of "natural" firewall provides an impregnable barrier against malicious
attacks.
Package Contents
The following items should be included:
• The LevelOne WBR-1101TX Unit
• Power Adapter
• Quick Installation Guide
• CD-ROM containing the on-line manual and Print Port Driver.
If any of the above items are damaged or missing, please contact your dealer immediately.
4
Page 8

Physical Details
Front-mounted LEDs
Power On - Power on.
Off - No power.
Status (Red) On - Error condition.
Off - Normal operation.
Blinking - This LED blinks during start up.
WAN On - If using the WAN port, connection to the Broadband modem is
established. If using the built-in ISDN TA, connection to ISP is established.
Off - No active connection via the WAN or ISDN ports.
Flashing - Data is being transmitted or received via the WAN or ISDN
port.
ISDN On - ISDN "B Channel" (data channel) connection is established.
Introduction
Off - No ISDN "B Channel" (data channel) connection.
Flashing - Data is being transmitted or received via the built-in ISDN TA.
LAN: 10 On - LAN connection is using 10BaseT.
Off - No 10BaseT LAN connection.
Flashing - Data is being transmitted or received via the LAN port.
LAN: 100 On - LAN connection is using 100BaseT.
Off - No 100BaseT LAN connection.
Flashing - Data is being transmitted or received via the LAN port.
Wireless On - Wireless connection available; Wireless Access Point is ready for
use.
Off - No Wireless connection available.
Flashing - Data is transmitted or received via the Wireless access point.
This includes "network traffic" as well as user data.
COM
(Serial Port)
Print Error On - Printer error detected.
Off - Idle or no active device connected to the serial (RS232) port.
Flashing - Data is transmitted or received via the serial (RS232) port.
Off - No printer error detected.
Print ACT On - Connection to printer established.
Off - No connection to printer; printer is Off or Off-line.
Flashing - Data is being transmitted to the printer.
5
Page 9
LevelOne WBR-1101TX User Guide
Rear Panel
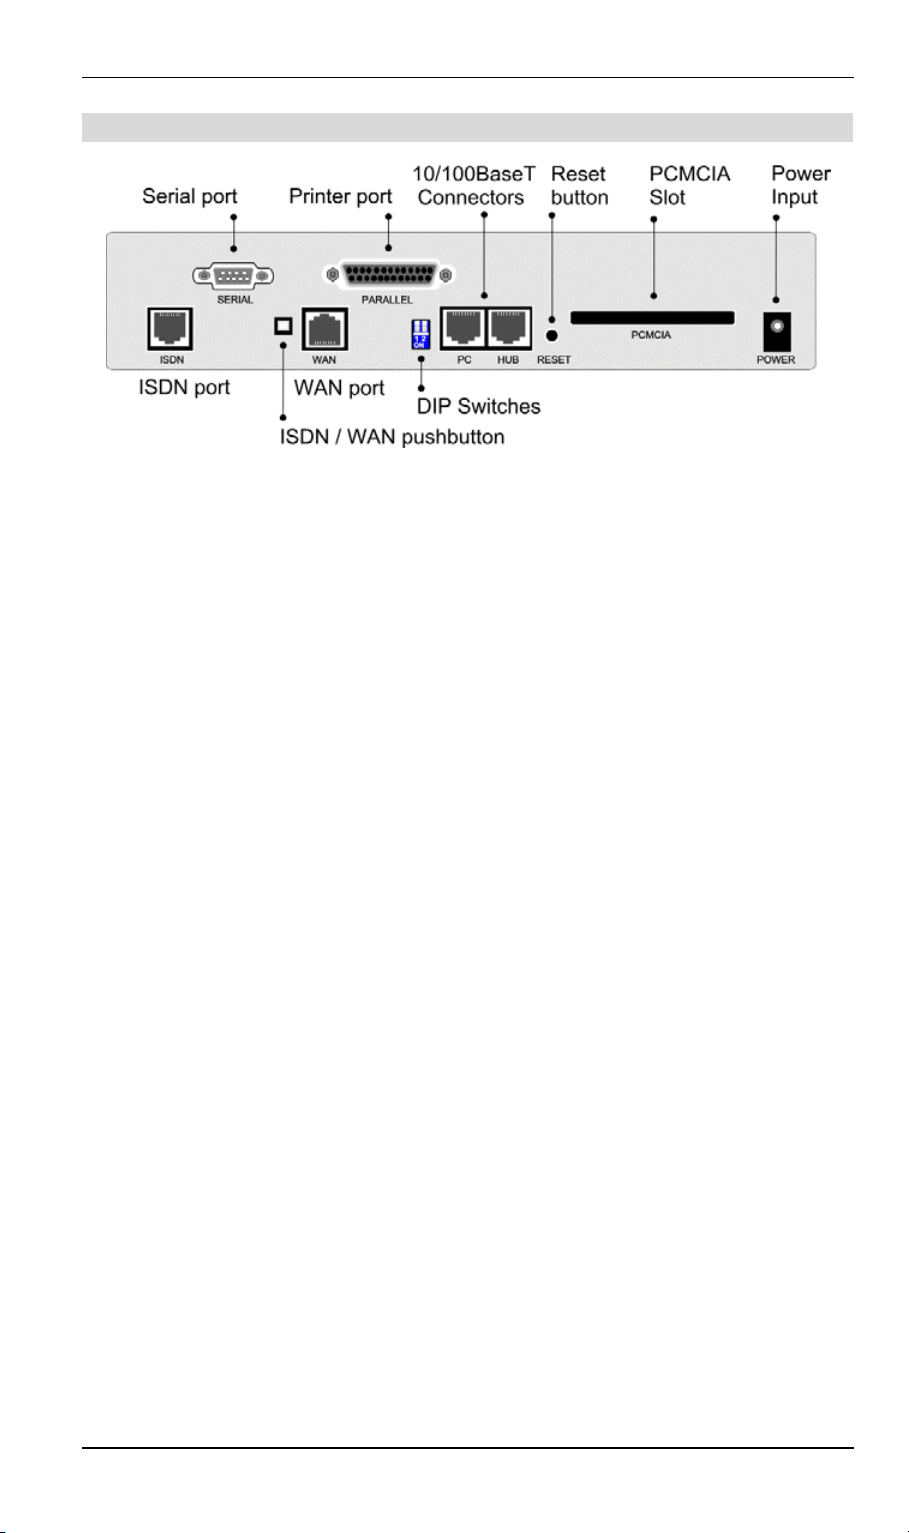
Figure 2: Rear Panel
Printer Port
Serial Port
ISDN Port
ISDN/WAN
Push Button
WAN port
(10BaseT)
DIP switches
PC port
(10/100BaseT)
HUB port
(10/100BaseT)
Standard parallel printer port. If you wish to share a printer, connect
it here.
RS232 Serial Port. If you have an analog modem or ISDN TA,
connect it here.
Connect this port to the S/T connector on your ISDN NT1 (Network
Terminator 1).
ISDN and WAN ports can NOT be used simultaneously !
This button determines which port - the ISDN port or the WAN port
- is active.
• Depressed (in) position - ISDN active
• Extended (out) position - WAN port active
Connect the Broadband Modem here. If your modem came with a
cable, use the supplied cable. Otherwise, use a standard LAN cable.
Refer to the following table.
If connecting directly to your PC (no Hub) use this port and a standard LAN cable (RJ45 connectors).
Use EITHER the PC port OR the Hub port, NOT both.
Use a standard LAN cable (RJ45 connectors) to connect this port to a
10BaseT or 100BaseT hub.
Use EITHER the PC port OR the Hub port, NOT both.
6
Page 10
Introduction
Reset Button
PCMCIA slot
This button has three (3) functions:
• Reboot. When pressed and released, the LevelOne WBR-
1101TX will reboot (restart).
• Diagnostic print-out. If held down for 3 seconds, a diagnostic
print-out will be sent to the attached printer.
• Ensure the printer is ready.
• Both Print LEDs will flash simultaneously during the diag-
nostic printing.
• Clear All Data. This button can also be used to clear ALL data
and restore ALL settings to the factory default values, as described below.
To Clear All Data and restore the factory default values:
1. Power Off.
2. Hold the Reset Button down while you Power On.
3. Keep holding the Reset Button for a few seconds, until the RED
LED has flashed TWICE.
4. Release the Reset Button. The LevelOne WBR-1101TX is now
using the factory default values.
Insert the supplied Wireless PCMCIA card into this slot.
• Ensure the power is OFF before inserting or removing the
PCMCIA Card.
• Do not use any other PCMCIA Card.
Power port
Connect the supplied power adapter here.
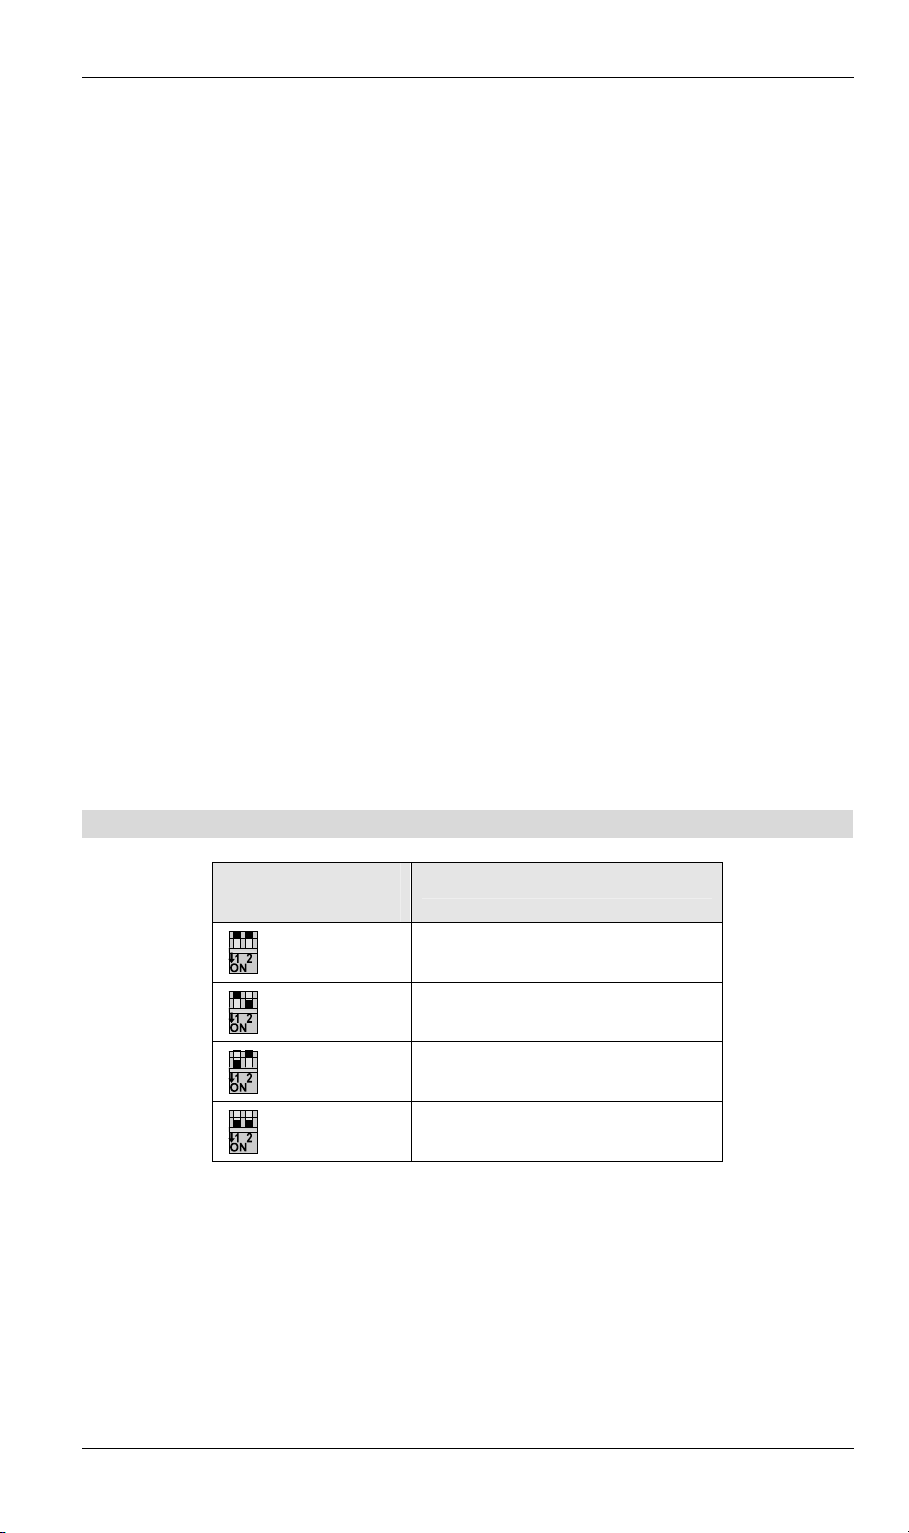
DIP Switches
DIP Switch Setting
1=off
2=off
1=off
2=on
1=on
2=off
1=on
2=on
Restore Default IP Address and Clear Password
If the LevelOne WBR-1101TX's IP Address or password is lost, the following procedure can
be used to recover from this situation.
1. Turn the power to the LevelOne WBR-1101TX OFF.
2. Set DIP switch 1 ON.
3. Turn the power to the LevelOne WBR-1101TX ON.
Description
Normal Operation.
DHCP Server function disabled.
Used to restore Default IP Address
and clear Password (See below).
Normal Operation.
7
Page 11

LevelOne WBR-1101TX User Guide
4. Operate DIP switch 1 in the following sequence (you have 15 seconds to complete the
sequence):
• OFF
• ON
• OFF
5. The LevelOne WBR-1101TX will now reset, and the Red Status LED flash. The following changes will have been made. (Other configuration data is unchanged.)
• IP Address set to its default value of 192.168.0.1
• Network Mask set to 255.255.255.0
• DHCP Server is enabled, and will allocate IP Addresses in the range 192.168.0.2 to
192.168.0.51.
• The password cleared (no password).
6. You can now connect to the LevelOne WBR-1101TX and make any configuration
changes required.
8 9
Page 12
Chapter 2
Installation
This Chapter covers the physical installation of the LevelOne WBR-1101TX.
Requirements
• Ethernet LAN (10/100BaseT) and the TCP/IP protocol.
• For Internet Access, an Internet Access account with an ISP, and one of:
• A DSL or Cable modem (for WAN port usage)
• An ISDN phone line (for the built-in ISDN TA)
• An analog modem (for serial port usage)
• To use the Wireless Access Point, all Wireless devices must be compliant with the
IEEE802.11b specifications.
• For shared access to the attached printer, the following clients are supported:
• Windows 95/98/ME
• Windows NT 4.0, 2000, or XP.
• Apple Macintosh
• Unix (LPD printing)
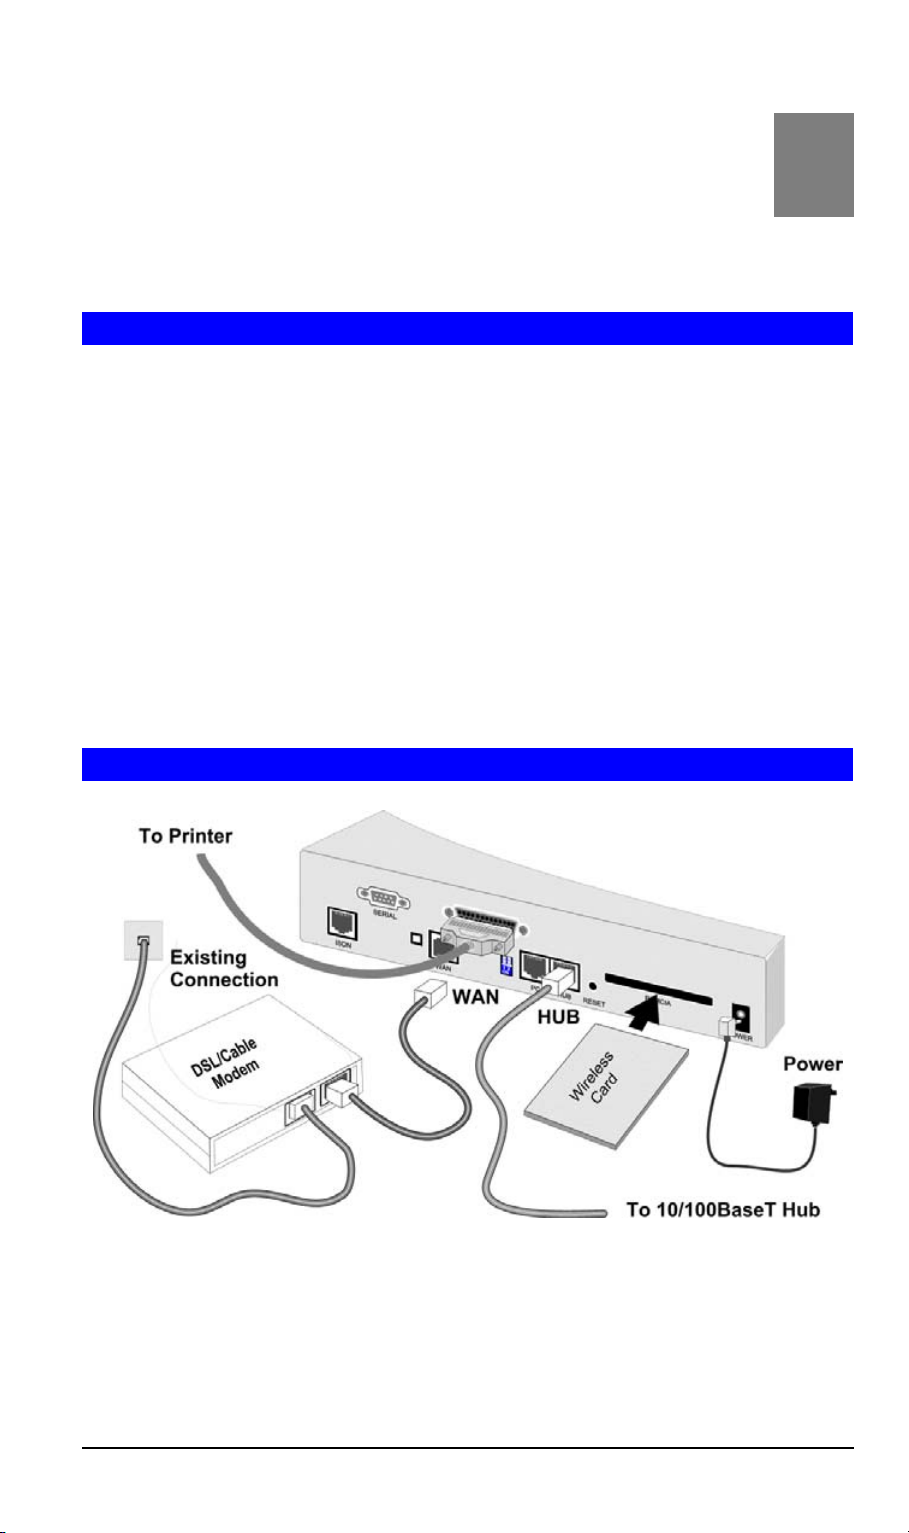
Procedure
2
Figure 3: Installation Diagram
1. Choose an Installation Site
Select a suitable physical location.
Ensure the LevelOne WBR-1101TX and the DSL/Cable modem are powered OFF.
Page 13

LevelOne WBR-1101TX User Guide
2. Insert Wireless PCMCIA card
Ensuring the supplied Wireless PCMCIA card is the right way up, insert it into the slot on
the rear. Push it firmly until it clicks into position.
3. Set the ISDN/WAN Push Button
The ISDN/WAN push button is on the rear panel. Ensure it is set correctly:
Depressed (in) - ISDN port is active.
Extended (out) - WAN port is active.
The WAN port and ISDN ports can NOT be used simultaneously. The ISDN/WAN push button on the rear panel
determines which port is active.
4. Connect WAN cable OR ISDN cable
• If you have a Broadband modem, connect it to the WAN port on the LevelOne WBR-
1101TX. Use the cable supplied with your broadband modem. If no cable was supplied,
use a standard LAN cable.
• If using an ISDN connection, connect the ISDN port on the LevelOne WBR-1101TX to
the S/T connector on your ISDN NT1 (Network Terminator 1).
5. Connect LAN Cable
Connect a standard LAN cable from a 10BaseT or 100BaseT Hub on your LAN to the
"HUB" port on the LevelOne WBR-1101TX.
6. Connect Serial Port Modem (optional)
If you wish to use an Analog modem or external ISDN TA, use a standard serial cable to
connect it to the Serial port on the LevelOne WBR-1101TX.
7. Connect Printer Cable
Use a standard parallel printer cable to connect your printer to the Printer port on the LevelOne WBR-1101TX.
8. Power Up
Connect the supplied power adapter and power up.
Use only the power adapter provided.
9. Check the LEDs
• The Power LED should be ON.
• The Status LED should flash, then turn Off. If it stays on, there is a hardware error.
• One (1) of the LAN LEDs (10 or 100) should be ON.
• The Wireless LED should be ON.
• If the printer is On and On-line, the Print Act LED should be ON.
• If using the WAN port, the WAN LED should be ON. (If it is not, check that the Broad-
band modem is connected and ON.)
If using the ISDN port, the ISDN LED should be OFF. It will not come On until a connection to your ISP is established.
For more information, refer to Front-mounted LEDs in Chapter 1.
10 11
Page 14
Chapter 3
Configuration
This Chapter provides details of the configuration process.
3
Overview
This chapter describes the procedure for:
• Quick setup (Internet access and LAN)
• Wireless access point configuration
• Using the Status screens
PCs on your local LAN may also require configuration. For details, see Chapter 4 - PC Configuration.
Other configuration may also be required, depending on which features and functions of the
LevelOne WBR-1101TX you wish to use. Use the table below to locate detailed instructions
for the required functions.
To Do this: Refer to:
Configure PCs on your LAN. Chapter 4:
PC Configuration
Learn more about using DHCP on the local LAN. Chapter 5:
DHCP
Configure and use the Serial (RS232) port for Dial-in access to your
LAN..
Configure various options:
• Set a password for the LevelOne WBR-1101TX, to protect the
configuration data.
• Disable NAT (Network Address Translation),
• Enable TFTP firmware upgrade feature.
• Configure Remote Management (configure via the Internet)
• Access the Printer Port setup screen.
Configure the LevelOne WBR-1101TX and other routers for a LAN
which already has 1 or more routers.
Use any of the following features:
• Special Internet Applications
• URL Filter
• Virtual Servers
• DMZ
Limit Internet Access by individual workstations. Chapter 10:
Chapter 6:
Dial-in (Serial Port)
Chapter 7:
Options
Chapter 8:
Routing
Chapter 9:
Advanced Internet
Features
Access Control
Page 15
LevelOne WBR-1101TX User Guide
Where use of a certain feature requires that
PCs or other LAN devices be configured, this
is also explained in the relevant chapter.
Configuration Program
The LevelOne WBR-1101TX contains an HTTP server. This enables you to connect to it, and
configure it, using your Web Browser.
Most Browsers should work, provided they support HTML tables and forms.
Preparation
Before attempting to configure the LevelOne WBR-1101TX, please ensure that:
• Your PC can establish a physical connection to the LevelOne WBR-1101TX. The PC and
the LevelOne WBR-1101TX must be directly connected (using the "PC" port on the LevelOne WBR-1101TX) or on the same LAN segment.
• The LevelOne WBR-1101TX must be installed and powered ON.
• If the LevelOne WBR-1101TX's default IP Address (192.168.0.1) is already used by
another device, the other device must be turned OFF until the LevelOne WBR-1101TX is
allocated a new IP Address during configuration.
Connecting to the LevelOne WBR-1101TX
To establish a connection from your PC to the device:
1. After installing the LevelOne WBR-1101TX in your LAN, start your PC. If your PC is
already running, restart it.
2. Start your WEB browser.
3. In the Address box, enter "HTTP://" and the IP Address of the LevelOne WBR-1101TX,
as in this example, which uses the LevelOne WBR-1101TX's default IP Address:
HTTP://192.168.0.1
4. You should then see the Quick Setup screen.
See the following section for details on using this screen.
If you can't connect
If the LevelOne WBR-1101TX does not respond, check the following:
• The LevelOne WBR-1101TX is properly installed, LAN connection is OK,
and it is powered ON.
• Ensure that your PC and the LevelOne WBR-1101TX are on the same network
segment. (If you don't have a router, this must be the case.)
• If your PC is using a fixed IP Address, its IP Address must be within the range
192.168.0.2 to 192.168.0.254 to be compatible with the LevelOne WBR1101TX's default IP Address of 192.168.0.1. Also, the Network Mask must be
set to 255.255.255.0. See Chapter 4 - PC Configuration for details on checking your PC's TCP/IP settings.
12
Page 16
Configuration
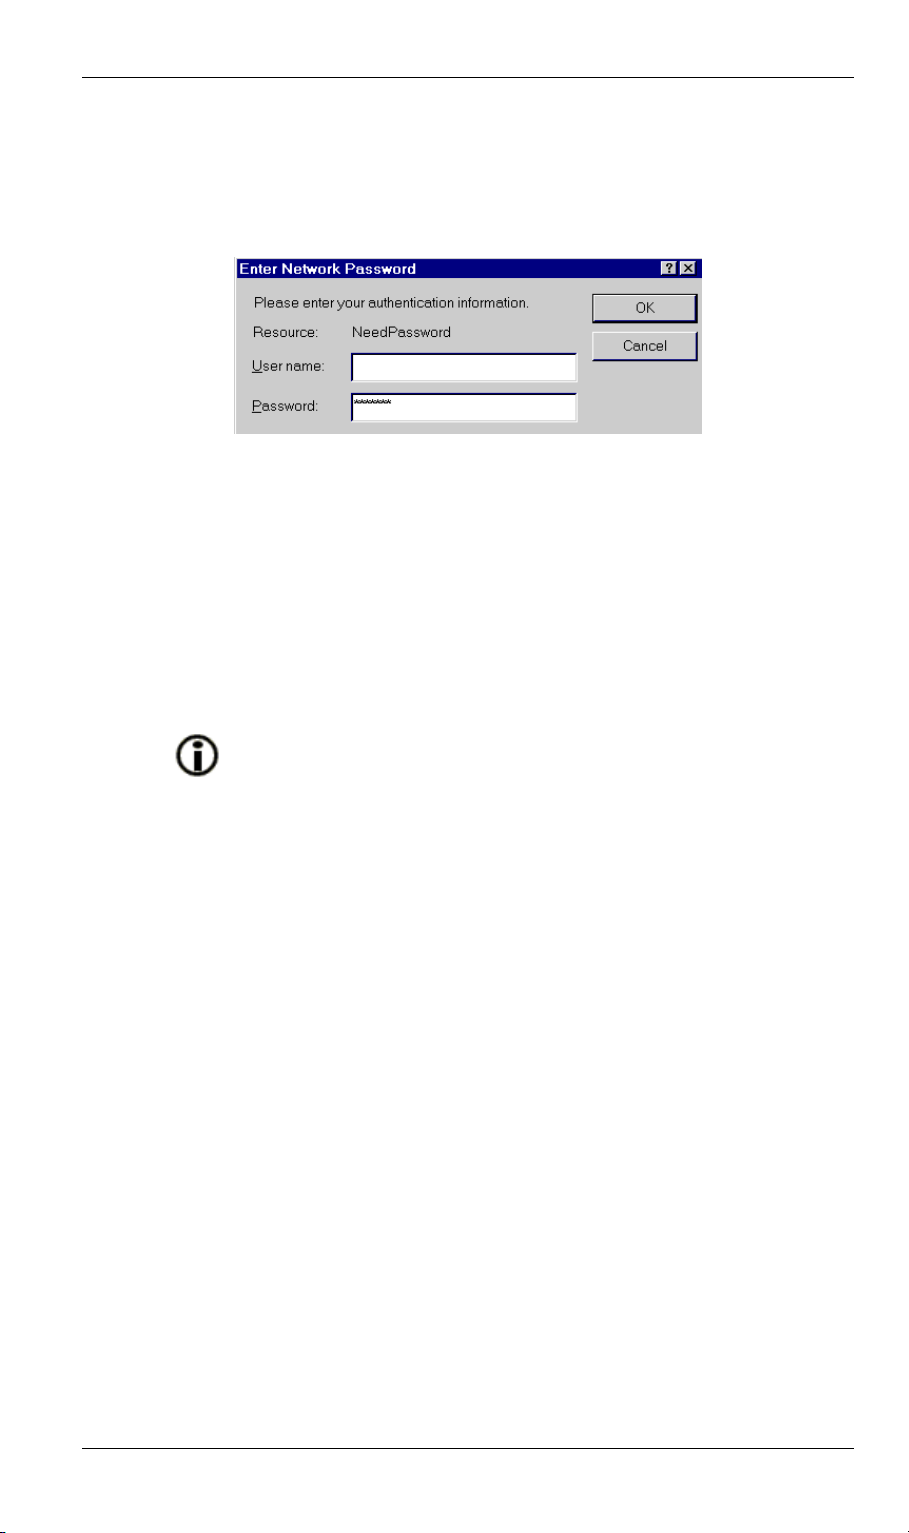
Password
If you have assigned a password to the LevelOne WBR-1101TX (on the Options screen) you
will be prompted for the password, as shown below. (If no password has been set, this dialog
will not appear.)
Figure 4: Password Dialog
• Leave the "User Name" blank.
• Enter the password for the LevelOne WBR-1101TX, as set on the Options screen.
Navigation & Data Input
• Use the menu bar on the left of the screen, and the "Back" button on your Browser, for
navigation.
• Changing to another screen without clicking "Save" does NOT save any changes you may
have made. You must "Save" before changing screens or your data will be ignored.
On each screen, clicking this icon will display
help for that screen.
13
Page 17
LevelOne WBR-1101TX User Guide
Quick Setup Screen
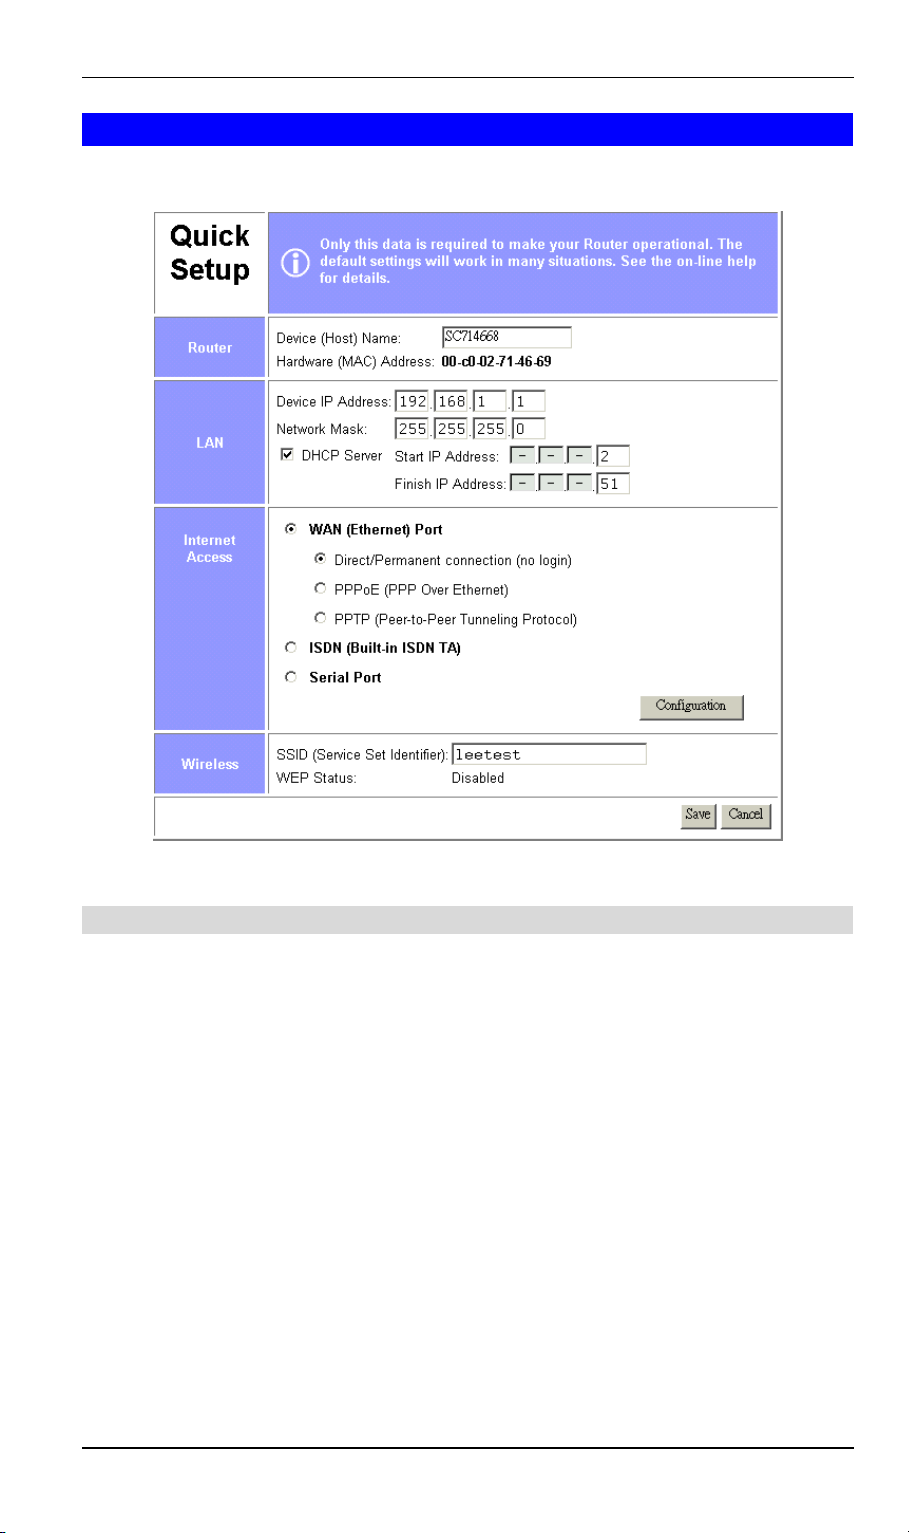
The Quick Setup screen, like the example below, will be displayed when you first connect.
Figure 5: Quick Setup Screen
Quick Setup - Overview
This screen contains all the basic data to make the LevelOne WBR-1101TX operational.
For many users, the default values will be satisfactory, and no changes will be required.
• Router Most users do not need to change these values.
• LAN Settings The settings are suitable for most situations, but should be changed as
necessary to suit your LAN environment.
• WAN (Internet) The settings must be set to match your connection and ISP. The default
values work with most Cable modems and some DSL services. To see full details of the
selected connection method, click the "Configuration" button.
• Wireless To use the Wireless Access Point:
• All Wireless devices should have the same SSID. Either the Wireless Access Point or
the Wireless clients can be changed to ensure this.
• All Wireless devices must have the same settings for WEP (Wired Equivalent Pri-
vacy). By default, WEP on the LevelOne WBR-1101TX is Disabled, so clients also
need to have WEP Disabled.
• See the Wireless Screen section later in this chapter for details of the LevelOne WBR-
1101TX's Wireless screen.
14
Page 18

Configuration Data - Quick Setup Screen
Router
Configuration
Device (Host) Name
Hardware (MAC)
Address
LAN
Device IP Address
Network Mask
DHCP Server
Normally, there is no need to change the default name, but if
your ISP requests that you use a particular "Hostname", enter
it here. This name will be provided to, and recorded by, the
remote DHCP Server.
Also called Network Adapter Address or Physical Address.
This is a low-level identifier for the LevelOne WBR-1101TX,
as seen from the WAN port.
Provide this value to your ISP if requested. If you did not
provide this value when first connected, there is no need to
provide it now.
IP address for the LevelOne WBR-1101TX, as seen from the
local LAN. Use the default value of 192.168.0.1 unless the
address is already in use or your LAN is using a different IP
address range. In the latter case, enter an unused IP Address
from within the range used by your LAN.
The default value 255.255.255.0 is standard for small (class
"C") networks. For other networks, use the Network Mask for
the LAN segment to which the LevelOne WBR-1101TX is
attached. i.e. the same value as the PCs on that LAN segment.
See Chapter 5 for further details about DHCP.
• If Enabled, the LevelOne WBR-1101TX will allocate IP
Addresses to PCs on your LAN. The default and recommended value is Enabled.
• If you are already using a DHCP Server, this setting must
be DISABLED, and the existing DHCP server must be
re-configured as described in Chapter 5 - DHCP.
• The Start IP Address and Finish IP Address fields set
the values used by the DHCP server when allocating IP
Addresses to DHCP clients.
This range also determines the number of DHCP clients
supported. (Maximum is 253.)
15
Page 19

LevelOne WBR-1101TX User Guide
Internet Access
WAN (Ethernet) Port
ISDN (Built-in ISDN TA)
• Select this if using a Broadband modem (e.g. Cable or
DSL) connected to the WAN (Ethernet) port.
• You must also select and configure the correct access
method:
• Direct/Permanent Connection - Select this if your
have an "always on" connection, or your ISP did not
provide the login information (username, password).
• PPPoE (PPP over Ethernet) - Select this ONLY if
your ISP uses PPPoE (PPP over Ethernet) and provides an Account/User name and Password.
• PPTP (Peer-to Peer Tunneling Protocol) - Select
this only enable this checkbox if your ISP uses this
method of login, and has provided you with a "Username" and "Password", as well as the IP address of
the PPTP Server. Note that this does NOT provide a
VPN (Virtual Private Network) connection to another
LAN; it refers only to the login to the ISP.
• You must click the "Configuration" button and
configure the sub-screen for the selected access
method!
See the following sections for details.
• Select this if using the built-in ISDN TA.
• The WAN/ISDN push-button on the rear of this
device must be set to "ISDN".
• You must click the "Configuration" button and
configure the ISDN sub-screen!
See the "ISDN" section later in this chapter for details.
Serial Port
Wireless
SSID
(Service Set Identifier)
• Select this if using an Analog Modem or ISDN TA
connected to the Serial (RS232) Port.
• You must click the "Configuration" button and
configure the Serial Port sub-screen!
See the "Serial Port" section later in this chapter for
details.
To communicate, all Wireless stations MUST use the same
SSID/ESSID. You can either change this value, or change
your client Wireless stations, to ensure this.
The default SSID value for the LevelOne WBR-1101TX is
default.
Note! The SSID is case sensitive.
16
Page 20
Configuration
WEP Status
Buttons
Save
Cancel
This will state "Enabled" or "Disabled".
The default is "Disabled".
• In order to use the LevelOne WBR-1101TX's access
point, the client wireless stations must have the same settings for WEP.
• To change the LevelOne WBR-1101TX's WEP settings,
use the Wireless screen, described in the following section.
Save any data you have entered on this screen. Remember to
save before changing to another screen.
Cancel any changes you have made since the last "Save"
operation.
After saving, you must click the "Configuration"
button and configure the sub-screen which will be
displayed. See the following section for details.
Configuration Sub-screens
This section describes the screens which are displayed when the "Configuration" button (on
the Quick Setup screen) is clicked.
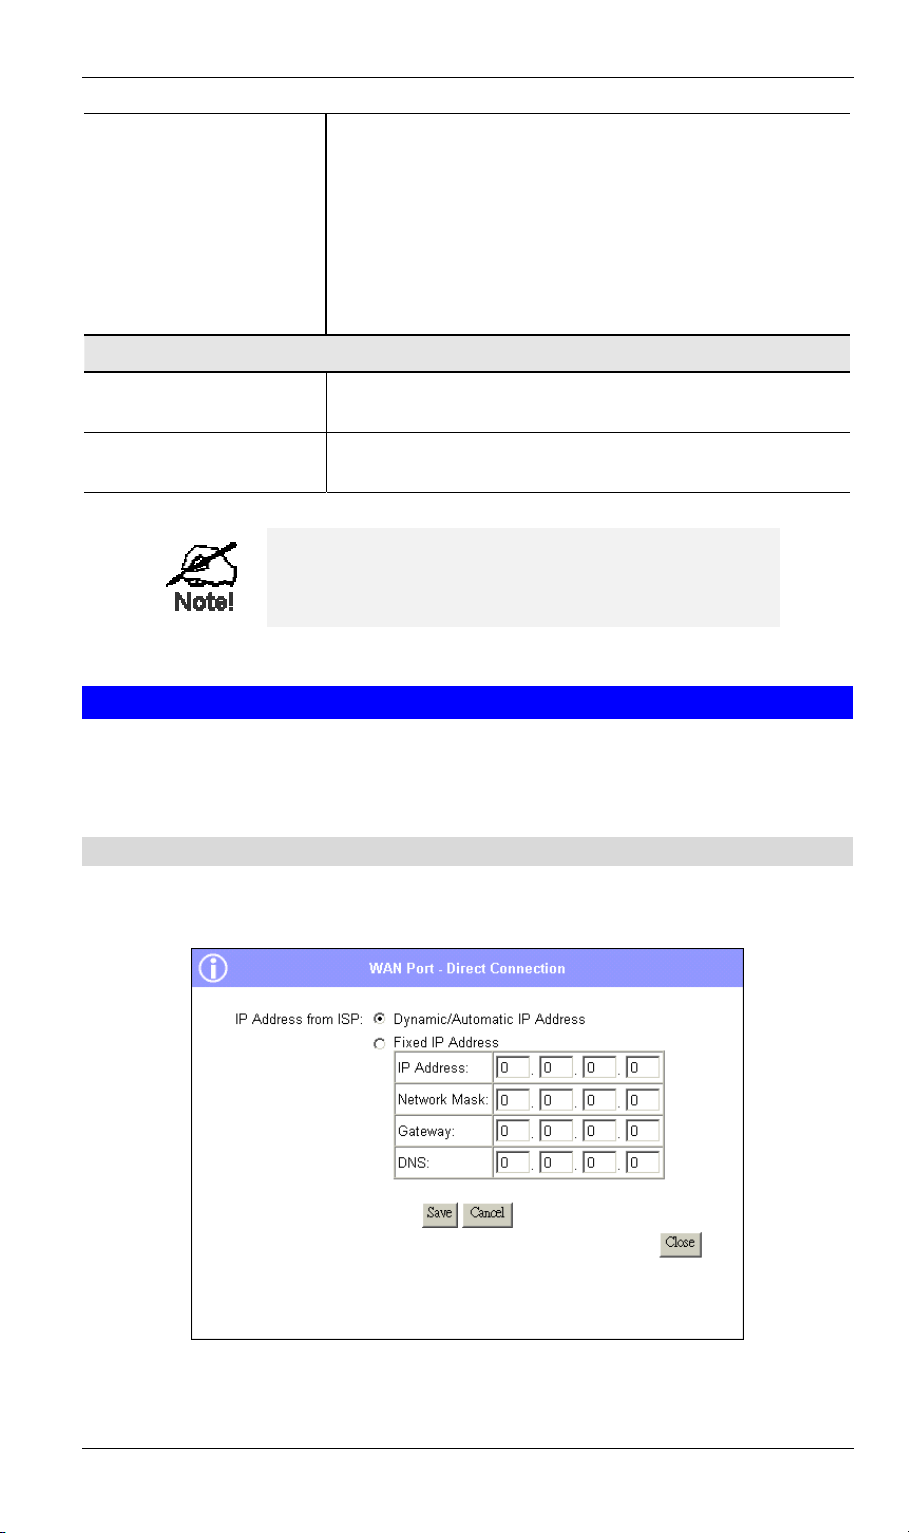
Configuration: WAN Port - Direct connection
The following screen will be displayed if "WAN Port - Direct/Permanent Connection" is
selected (on the Quick Setup screen) and the "Configuration" button is clicked.
Figure 6: Direct Connection screen
17
Page 21

LevelOne WBR-1101TX User Guide
WAN Port - Direct Connection
Dynamic/Automatic
IP Address
Fixed IP Address
This is the default, and the most common.
• Select this if your ISP provides an IP Address automatically,
upon connection.
• If this is selected, do not enter the IP Address, Network
Mask, and Gateway IP Address.
Select this if your ISP has allocated you a fixed IP Address. If
this option is selected, the following data must be entered.
• IP Address.
Enter the IP Address allocated by the ISP.
• Network Mask
This is also supplied by your ISP. It must be compatible with
the IP Address above.(e.g. 255.255.255.0 for a class "C" address).
• Gateway
The address of the router or gateway, as supplied by your
ISP.
• DNS
Enter the DNS (Domain Name Server) IP Address provided
by your ISP. If required, additional DNS entries can be made
on the Options screen.
18
Page 22
Configuration
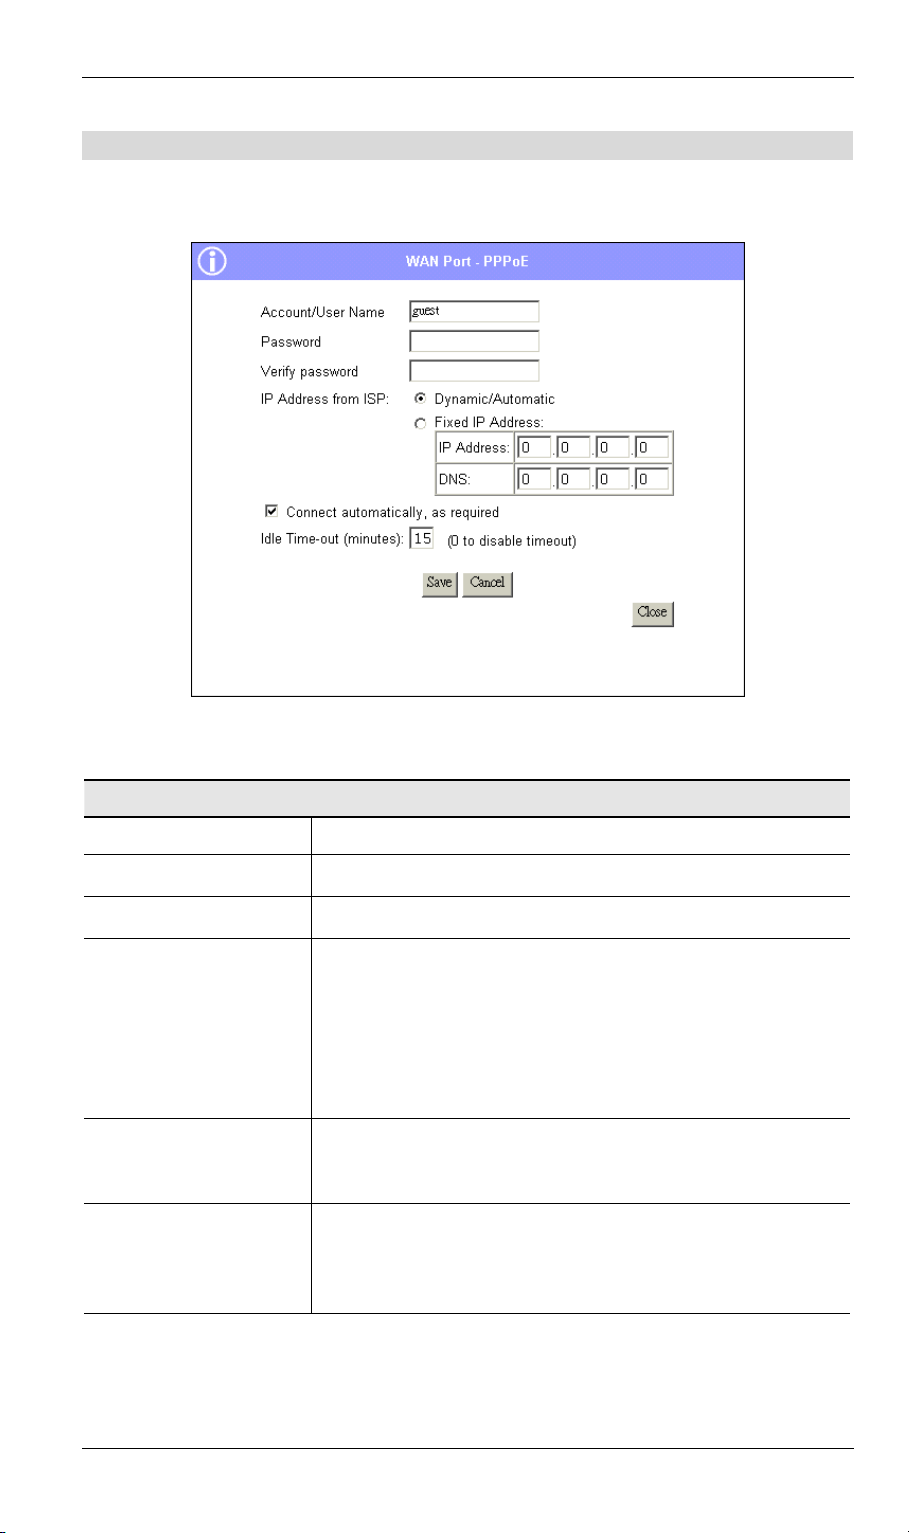
Configuration: WAN Port - PPPoE
The following screen will be displayed if "WAN Port - PPPoE" is selected (on the Quick Setup
screen) and the "Configuration" button is clicked.
WAN Port - PPPoE
Account/User Name
Password
Verify Password
IP Address
provided by ISP
Connect automatically,
as required
Idle Time-out
Figure 7: PPPoE screen
The name of the Internet account provided by your ISP.
Enter the password for the above account
Re-enter the password, to ensure it is correct.
• Normally, this is Dynamic/Automatic; use this setting if
your ISP's data does not mention an IP Address.
• If your ISP did provide an IP Address, select Fixed and
enter the IP address they provided.
Also, enter the DNS (Domain Name Server) IP address.
If required, additional DNS entries can be made on the Op-
tions screen.
• Normally, this should be Enabled.
• .If disabled, you must use the Connect button on the Status
screen to establish a connection.
• If an connection is inactive for longer than this time period,
it will be terminated.
• A value of zero (0) will disable the time-out; the connection
will never be terminated by the LevelOne WBR-1101TX.
19
Page 23
LevelOne WBR-1101TX User Guide
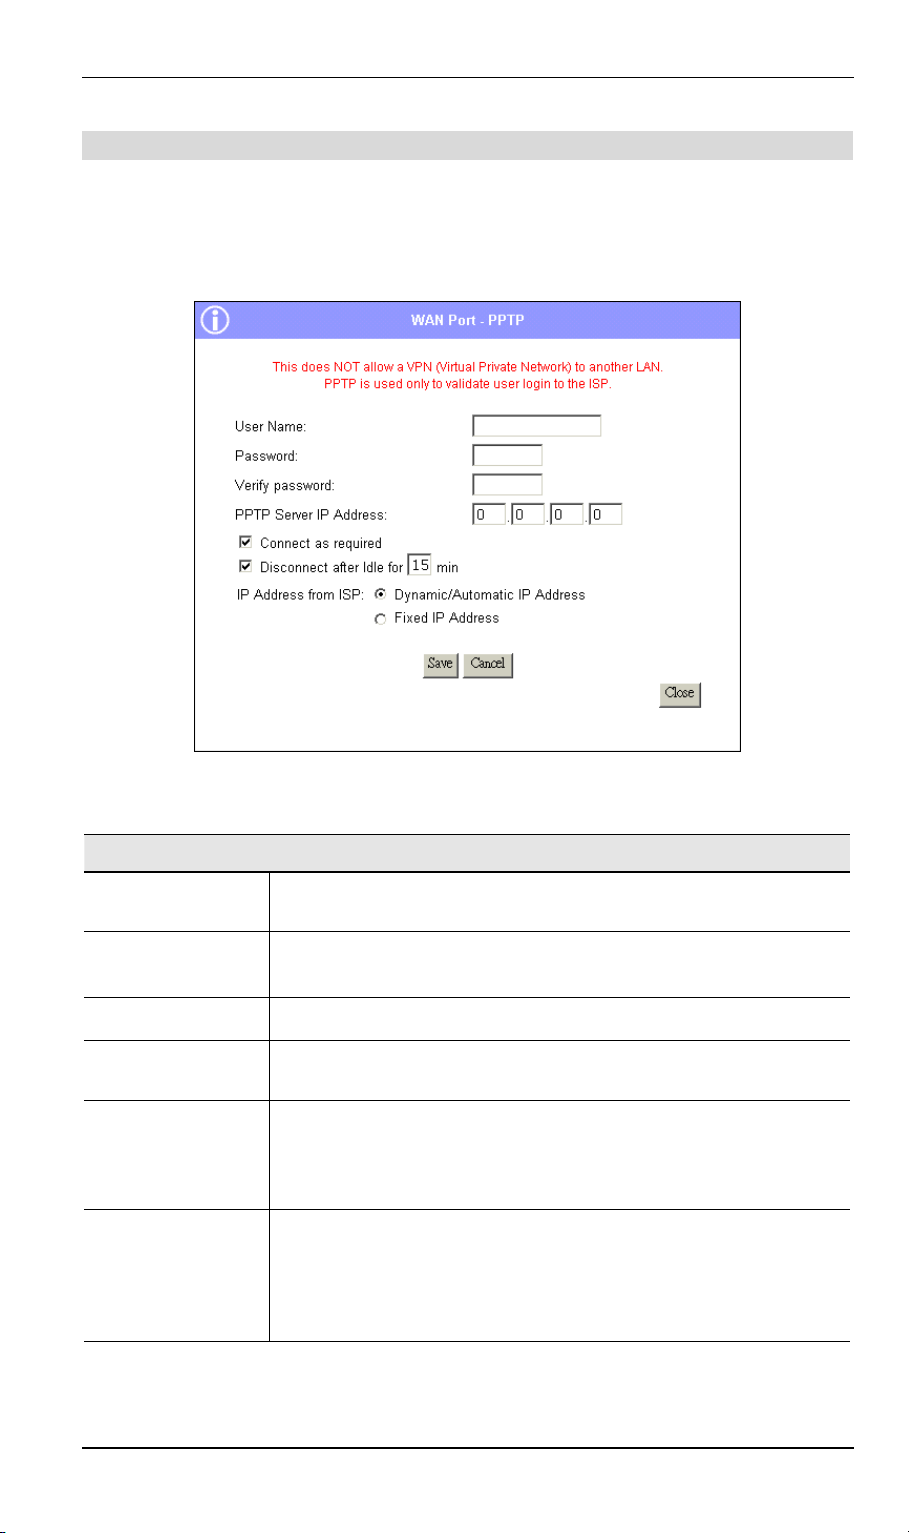
Configuration: WAN Port - PPTP
The following screen will be displayed if "WAN Port - PPTP" is selected (on the Quick Setup
screen) and the "Configuration" button is clicked.
(If using Internet Explorer, the Fixed IP address fields are not displayed unless this option is
selected.)
WAN Port - PPTP
User Name
Password
Verify Password
PPTP Server IP
Address
Connect as
required
Disconnect
Figure 8: PPTP screen
Enter the Username provided by your ISP. This is used to "Login" to
the PPTP Serer.
Enter the password provided by you ISP. This is used to "Login" to
the PPTP Serer.
Re-enter the password provided by you ISP, to ensure it is correct.
Enter the IP Address of the PPTP Server provided by you ISP.
• Check this to have the connection established as required, when
an Internet connection is requested.
• If not checked, a connection must be established using the
"Connect" button on the "Status" screen.
• If checked, an idle connection will be terminated after the time
specified.
• If not checked, a connection will remain in effect until termi-
nated by the remote server, or disconnected using the
"Disconnect" button on the "Status" screen.
20
Page 24
Configuration
IP Address
• Dynamic IP Address (DHCP Client) - Select this if your ISP
provides an IP Address automatically on connection.
• Fixed IP Address - If you have a fixed IP Address (for example,
a Router Account), select this option, and enter the following
values:
• IP Address - Enter the IP Address provided by your ISP.
• Network Mask - Enter the Network Mask to match the IP
Address above. (e.g. 255.255.255.0 for a class "C" address).
• Gateway - Enter the IP Address of the Gateway to match
the IP address above.
• DNS (Domain Name Server) - Enter the IP Address of the
Domain Name Server provided by your ISP.
If required, additional DNS IP Addresses can be entered on
the Options screen.
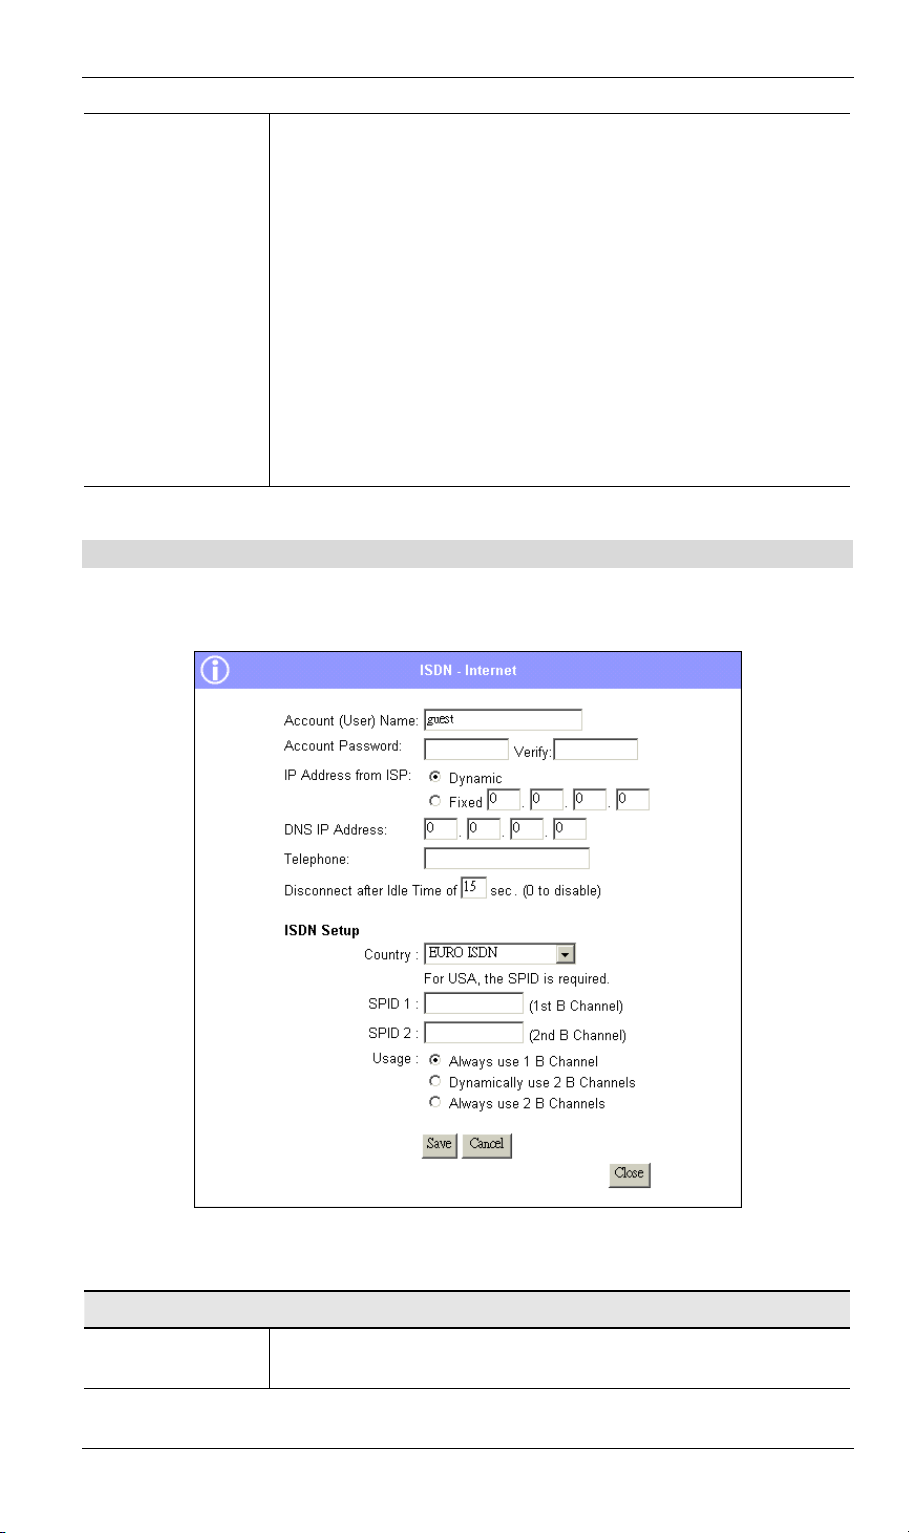
Configuration: ISDN
The following screen will be displayed if "ISDN (Built-in ISDN TA)" is selected (on the
Quick Setup screen) and the "Configuration" button is clicked.
ISDN - Internet
Account/User
Name
Figure 9: ISDN screen
Enter the account name provided by your ISP. This name will be
used to log in to the ISP's server.
21
Page 25
LevelOne WBR-1101TX User Guide
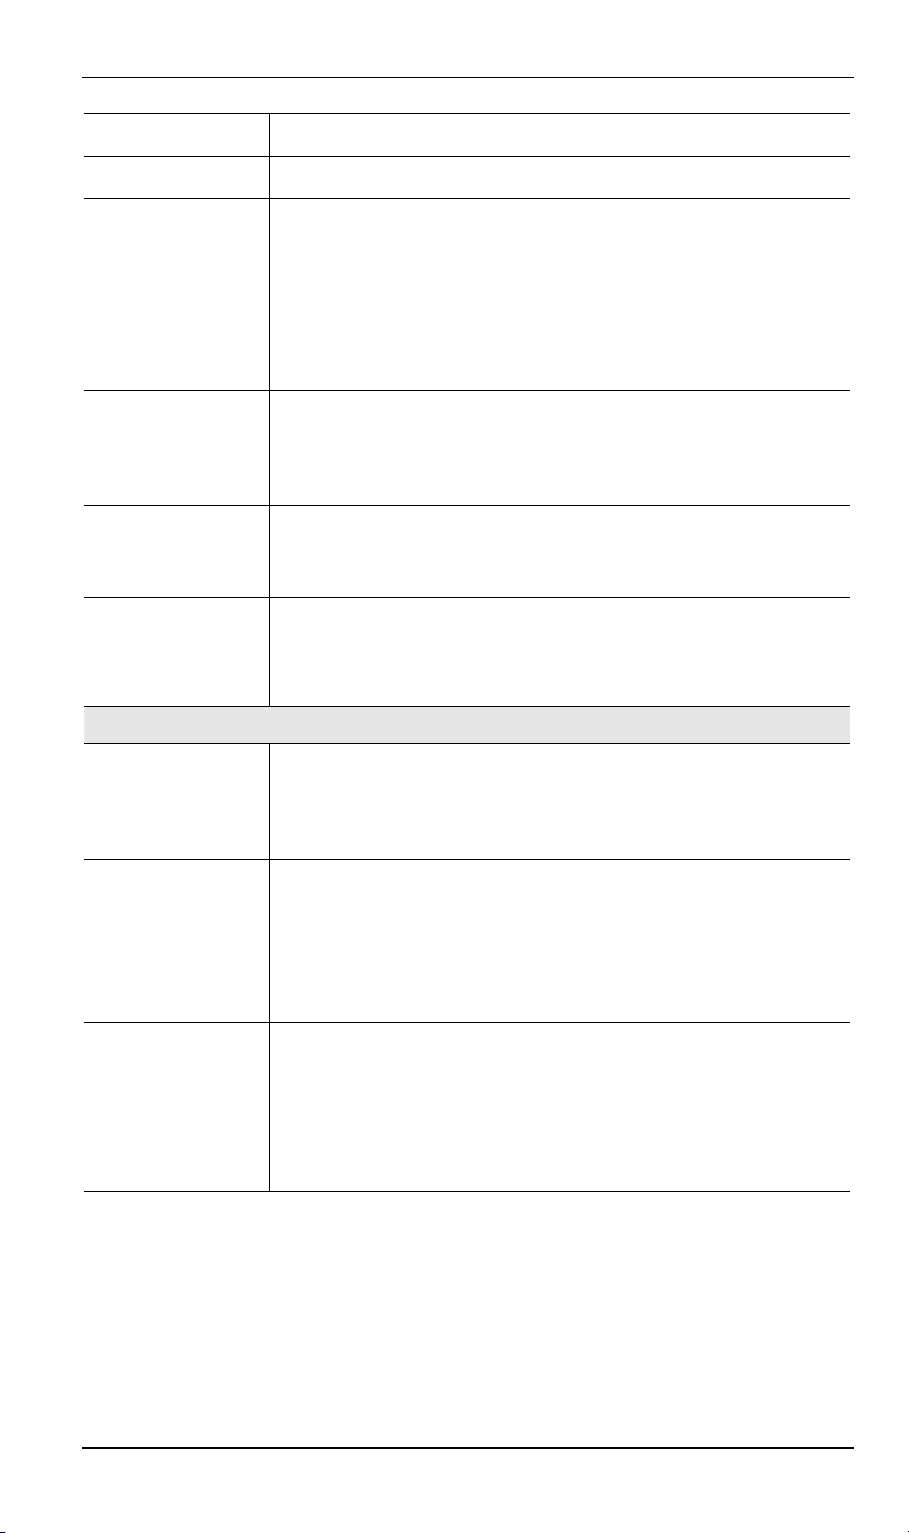
Password
Verify
IP Address from
ISP
DNS IP Address
Telephone
Disconnect after
Idle Time
Enter the current password for the above account
Re-enter the password in the Verify field, to ensure it is correct.
Select the appropriate option:
• Dynamic This is the default, and the most common. Leave this
selected if your ISP allocates an IP Address to the LevelOne
WBR-1101TX upon connection.
• Fixed IP Address Select this if your ISP has allocated you a
fixed IP Address, then enter the IP Address in the fields provided.
• Enter the DNS IP address supplied or recommended by your
ISP.
• If desired, additional DNS entries can be made on the Options
screen.
• Enter the telephone number to dial to connect to your ISP
(Internet Service Provider).
• Use the format described in your modem's user manual.
• The Internet connection will be terminated after being idle for
the time specified.
• A value of zero (0) will disable the Idle time-out; the connection
will never be terminated.
ISDN - Setup
Country
SPID
Usage
• A list of countries is provided.
• Select your country from the drop-down list. Note that the USA
has 4 entries, by Switch type. Your phone company can tell you
what switch type they use.
• In the USA, this data is essential, and is provided by your phone
company.
In other countries, the SPID is normally not used.
• Each B Channel has its own SPID.
• If in the USA, enter the SPID values provided your phone
company.
• Always use 1 B Channels - The 2
nd
B Channel is never used.
• Dynamically use 2 B Channels - If the volume of traffic is low,
1 B Channel is used. When traffic volume is high, 2 B Channels
are used.
• Always use 2 B Channels - Even if the volume of traffic is low,
the connection uses both B channels.
22
Page 26
Configuration
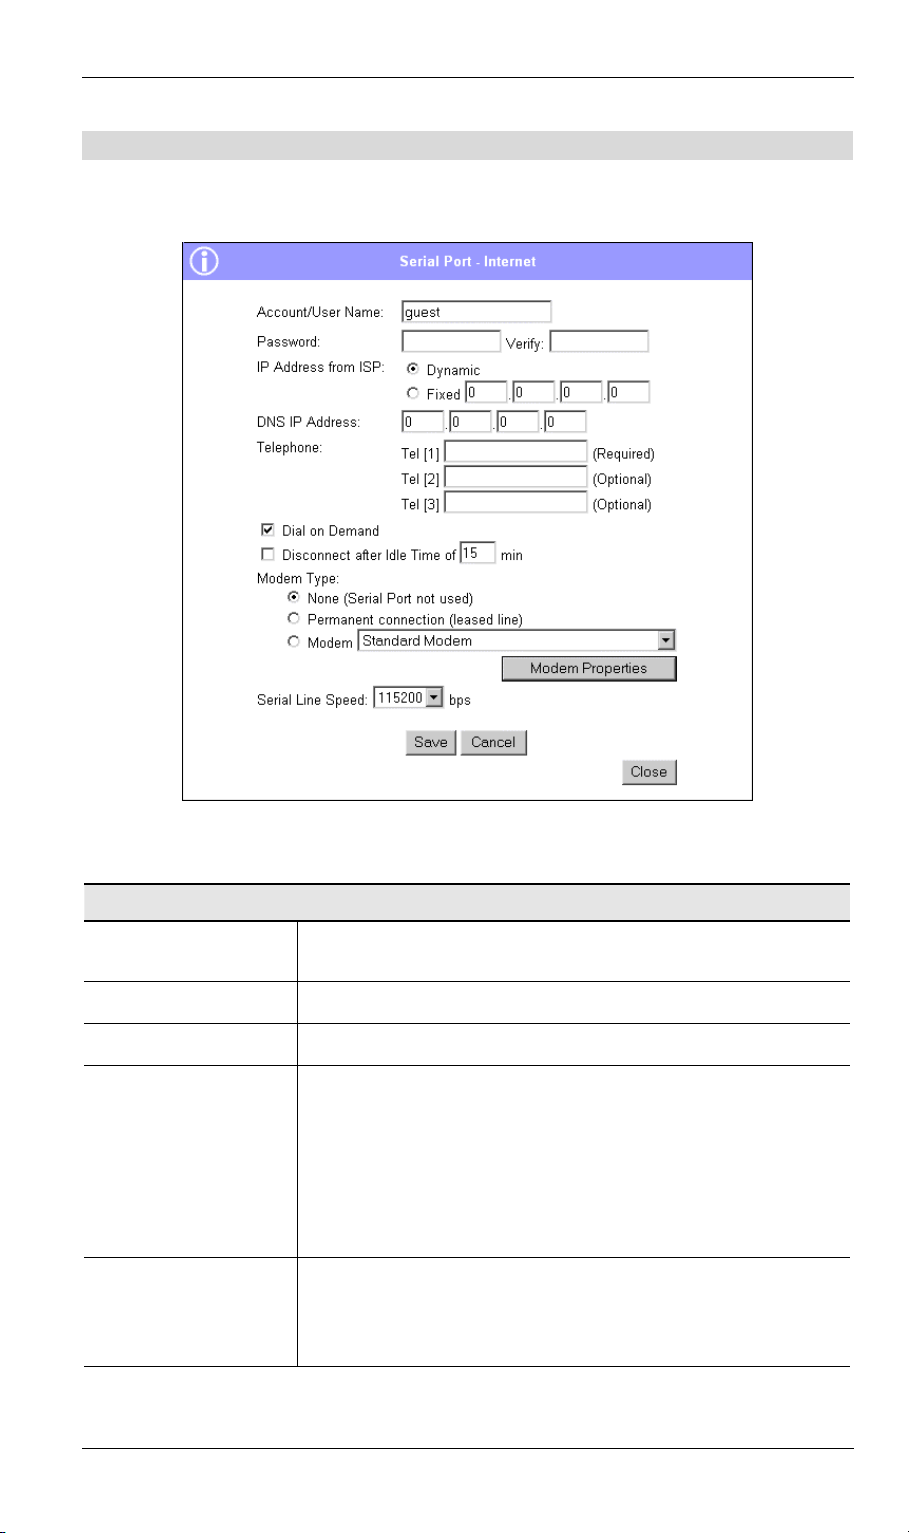
Configuration: Serial Port
The following screen will be displayed if "Serial Port" is selected (on the Quick Setup screen)
and the "Configuration" button is clicked.
Serial Port - Internet
Account/User Name
Password
Verify
IP Address from ISP
DNS IP Address
Figure 10: Serial Port - Internet
Enter the account name provided by your ISP. This name will be
used to log in to the ISP's server.
Enter the current password for the above account
Re-enter the password in the Verify field, to ensure it is correct.
Select the appropriate option:
• Dynamic This is the default, and the most common. Leave
this selected if your ISP allocates an IP Address to the LevelOne WBR-1101TX upon connection.
• Fixed IP Address Select this if your ISP has allocated you a
fixed IP Address, then enter the IP Address in the fields provided.
• Enter the DNS IP address supplied or recommended by your
ISP.
• If desired, additional DNS entries can be made on the Op-
tions screen.
23
Page 27

LevelOne WBR-1101TX User Guide
Telephone
Dial on Demand
Disconnect after Idle
Time
Modem Type
Modem Properties
Serial Line Speed
• If using a Leased Line (permanent connection ), ignore these
fields.
• Otherwise, enter the telephone numbers to dial to connect to
your ISP (Internet Service Provider). The first number is required; the others are optional.
• Enter the telephone numbers using the format described in
your modem's user manual.
• If Checked, the modem will automatically dial the ISP when
an Internet connection is required. (Provided Internet Access
is enabled.)
• If Unchecked, the connection to the ISP must be established
manually, using the "Dial" button on the Serial Port Status
screen.
• If checked, the Internet connection will be terminated after
being idle for the time specified.
• If not checked; the Internet connection will never be termi-
nated.
• Select None, Permanent Connection or Modem to match your
system.
• For Modem:
• If your modem is in the drop-down list, just select it.
• If your modem is not in the list, select "_Standard Mo-
dem" and test to see if this works.
• If "_Standard modem" does not work, select "Other",
then click the Modem Properties button and set these
settings correctly.
See Modem Properties Screen in Chapter 6 for further
details.
• Clicking this button will open the Modem Properties screen
and allow changing of the modem's properties. Normally,
this is not required.
• See Modem Properties Screen in Chapter 6 for further
details.
• Select the speed which is equal to or below the fastest
SERIAL line speed (NOT phone line speed) of your modem.
Available speeds range from 4.8K to 460.8K(bps).
Other Configuration
Once the "Quick Setup" screen and the appropriate "Configuration" sub-screen is completed,
the LevelOne WBR-1101TX is ready for use.
• If you wish to use WEP, or change other Wireless Access Point settings, refer to the
following section.
• Your PCs may require configuration. Refer to Chapter 4 - PC Configuration for details.
• To check the status of the LevelOne WBR-1101TX, and confirm that it is working cor-
rectly, refer to the Status Screen section later in this Chapter.
24
Page 28
Configuration
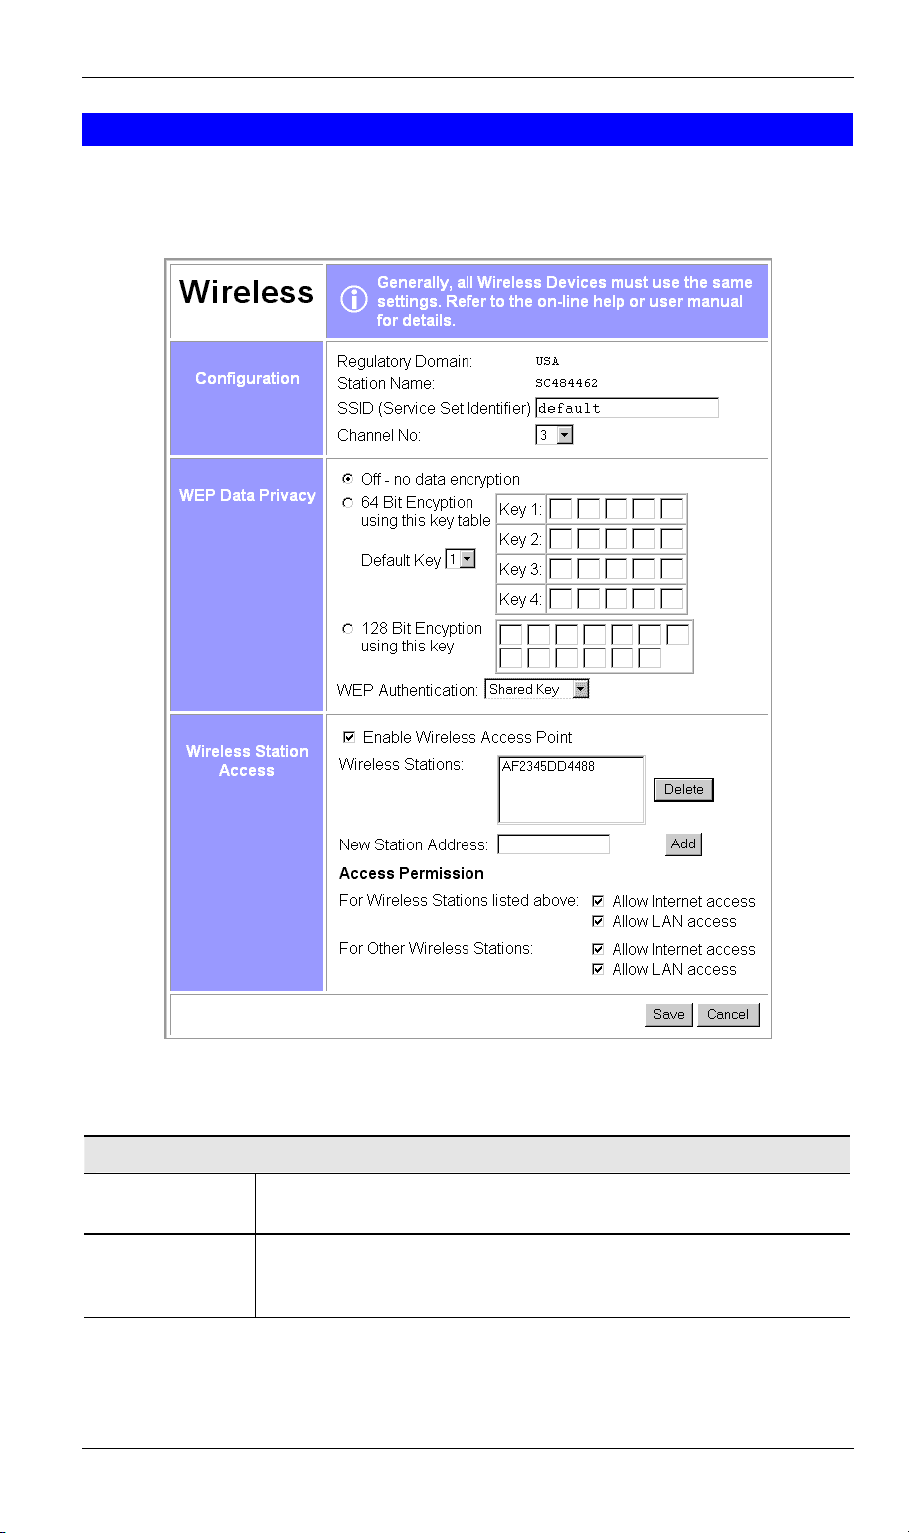
Wireless Screen
The Wireless Access Point settings must match the other Wireless stations. To change the
LevelOne WBR-1101TX's default settings for the Wireless Access Point, use the Wireless link
on the main menu to reach the Wireless screen. An example screen is shown below.
Data - Wireless Screen
Configuration
Regulatory
Domain
Station name
It is illegal to use this device in any location outside of the regulatory
domain.
This is the same as the Device (Host) Name on the WAN screen. On
your PC, some Wireless status screens may display this name as the
Access Point in use.
Figure 11: Wireless Screen
25
Page 29

LevelOne WBR-1101TX User Guide
SSID
(ESSID)
Channel No.
WEP Data Privacy
Off
64 Bit
Encryption
128 Bit
Encryption
To communicate, all Wireless stations MUST use the same
SSID/ESSID.
The default value is default
Note! The SSID is case sensitive.
Select the value you wish to use on your Wireless LAN. If you experience lost connections and/or slow data transfers you may need to
experiment with different channels to see which is the best.
If OFF (default), data is NOT encrypted before being transmitted.
• If selected, data is encrypted, using the default key, before being
transmitted. The receiving station must be set to 64 Bit Encryption, and have the same Key value in the same position in its key
table. Otherwise, it will not be able to decrypt the data.
• Default Key
Select the key you wish to be the default. Transmitted data is
ALWAYS encrypted using the Default Key; the other Keys are for
decryption only.
• Key Table
• This table is used when Encrypting and Decrypting data. All
stations, including this Access Point, always transmit data encrypted using their default key. The key number (1, 2, 3, 4) is
also transmitted. The receiving station will use the key number (1, 2, 3, 4) to determine which key value to use for
decryption. If the key value does not match the transmitting
station, decryption will fail.
• The easiest way to ensure there are no problems is to have
every Station, including the Access Point, use the same key
table (all entries identical). Then, it does not matter which key
is used as the default key.
• If selected, data is encrypted using the key before being transmit-
ted. The receiving station must be set to use 128 Bit Encryption,
and have the same Key value. Otherwise, it will not be able to decrypt the data.
• Key
Enter the key value you wish to use. Other stations must have the
same key.
WEP
Authentication
Select the appropriate value - "Open System" or "Shared Key". Check
your Wireless card's documentation to see what method to use. Some
Wireless cards do not support both methods.
Wireless Station Access
Enable Wireless
Access Point
• If enabled (default), this device can act as a Wireless Access Point.
• If not enabled, no Wireless stations can use this device as a Wire-
less Access Point.
Existing Stations
• This lists the Wireless stations you have entered. If you have not
entered any stations, this list will be empty.
• To delete an entry, select it, and click the "Delete" button. Multi-
ple entries may be selected by hold down the CTRL key while
selecting. (On the Macintosh, use SHIFT instead of CTRL.)
26
Page 30

Configuration
New station
Address
• Use this field to add a new station to the list. Just enter its address
here, and click the "Add" button.
• Use the software supplied with your Wireless unit to determine its
address. The address consists of 12 letters (A..F) and digits (0..9)
like this example:
10F810A81091
The address may be shown with separators ( : or - ) between each
pair of characters.
Do NOT enter the separators ( : or - ) in this field.
Access
Permission
• For Wireless Stations listed above
This setting determines what type of access is available to Wireless stations whose address has been entered in the "Wireless
Stations" list.
• For Other Wireless Stations
This setting determines what type of access is available to Wireless stations whose address is NOT in the "Wireless Stations" list.
• For either category, if neither "Internet" nor "LAN" access is
enabled, Wireless stations are unable to use this Access Point.
Buttons
Delete Delete will delete the selected entry or entries in the list.
Add Add will add the New Station data to the list.
Save Save will save the other data on the screen. This has no effect on the
contents of the Wireless Stations list.
27
Page 31
LevelOne WBR-1101TX User Guide
Status Screen
Use the Status link on the main menu to view this screen.
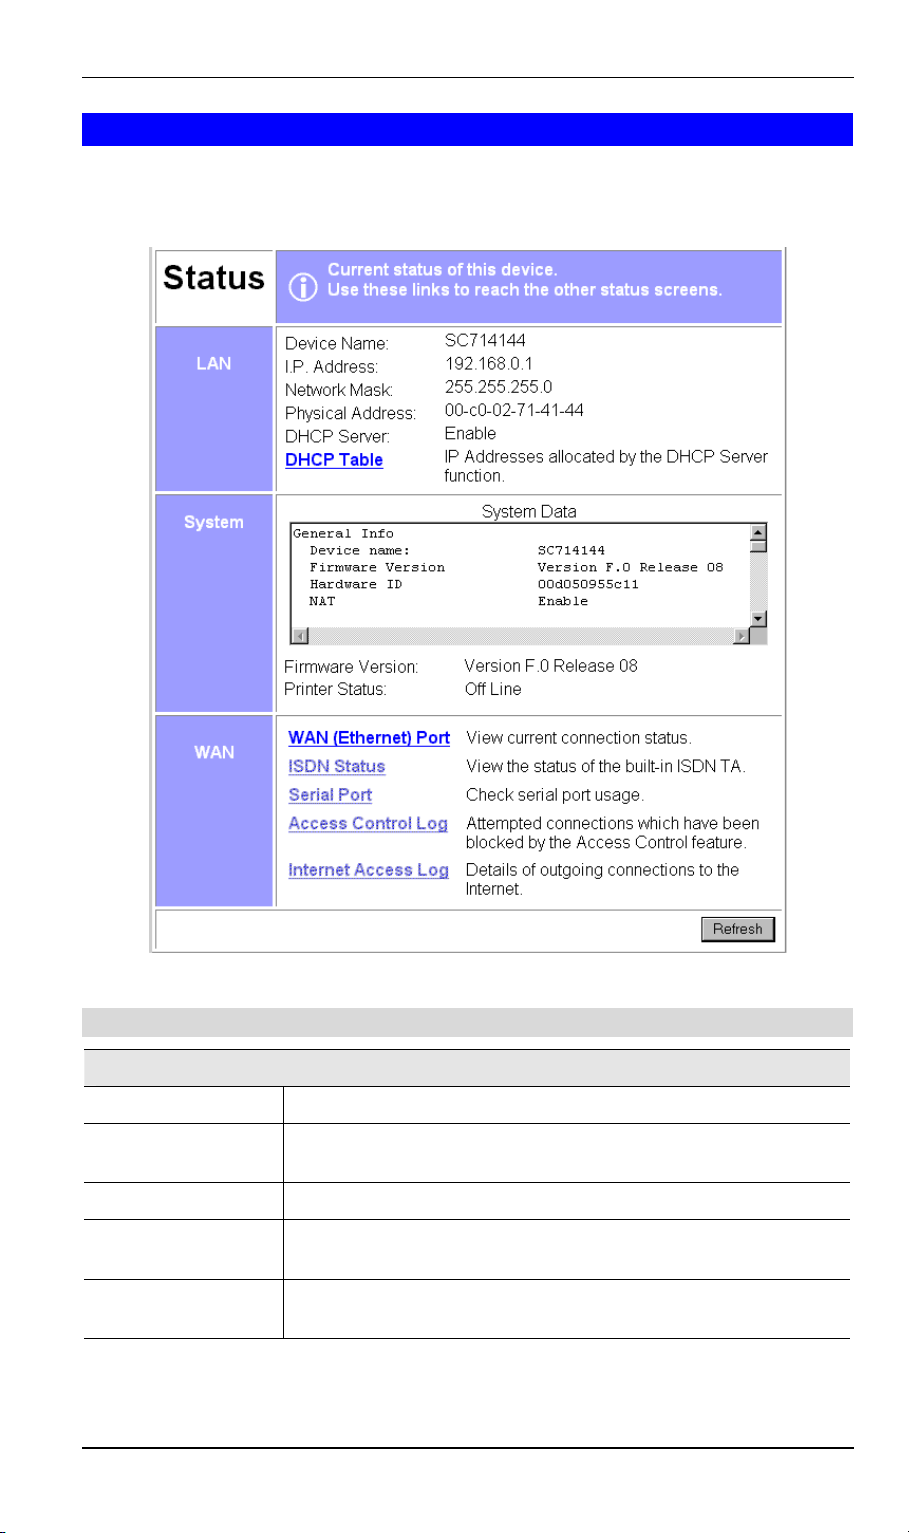
The LAN Status link on the menu will result in a screen like the example below.
Data - Status Screen
LAN
Device Name
IP Address
Network Mask
Physical Address
DHCP Server
This shows the name of the device.
The IP Address of this device, as seen by other devices on the
Internal LAN.
The Network Mask (Subnet Mask) for the IP Address above.
The "Hardware" address of this device, as seen by other devices on
the Internal LAN.
This shows the status of the DHCP Server function. The value will
be "Enabled" or "Disabled".
Figure 12: Status Screen
28
Page 32
Configuration
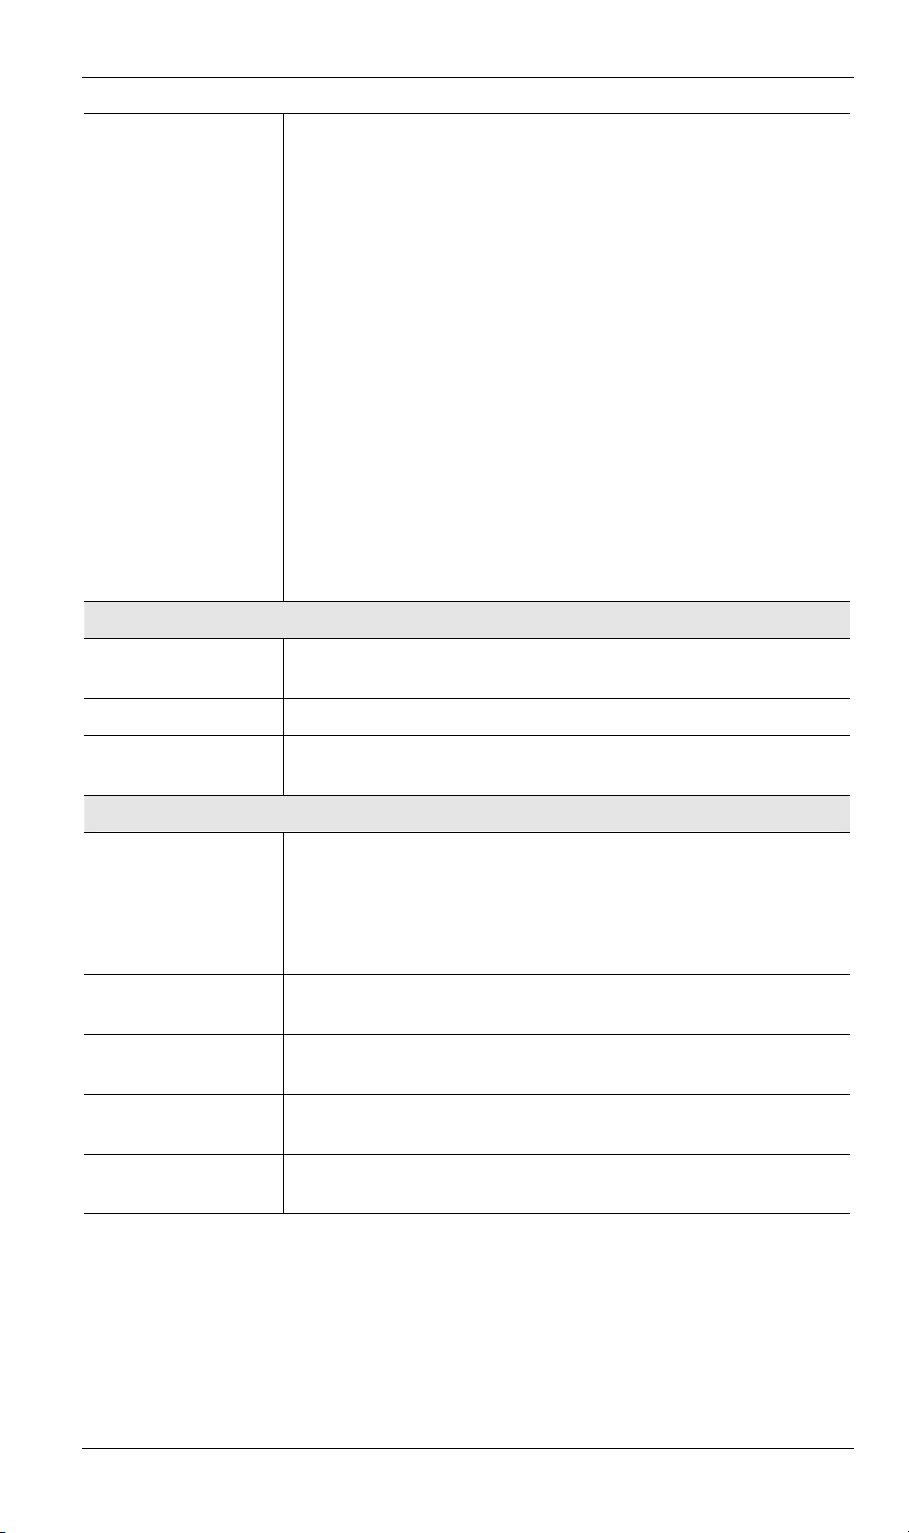
DHCP Table
System
System Data
Use this link to view the IP Addresses which have been allocated to
LAN devices, or the Dial-in user, by the DHCP Server function.
The DHCP Table contains the following data:
• Port - The port which the DHCP client used to access this
device. Possible values are LAN, WLAN (Wireless LAN), and
RS232 (serial port).
• IP Address - The IP Address which has been allocated by the
DHCP server to the DHCP client.
• Physical (Hardware) Address - The Physical Address
(Hardware Address) of the DHCP client which has been allocated this IP Address.
• Status - Possible Status values are "Leased" (the IP Address is
allocated to the device shown) or "Reserved" (the IP Address
is reserved for this device, but not currently allocated).
"Reserved" entries are generated for the Dial-in User, and for any
PCs for which an IP Address has been reserved. An IP Address can
be reserved for a particular PC using the Access Control - PCs
screen. The Access Control feature is described in Chapter 10.
This is identical to the data shown on a "Diagnostic Printout", and
contains all system information.
Firmware Version
Printer Status
WAN Links
WAN (Ethernet)
Port
ISDN
Serial Port
Access Control Log
Internet Access Log
Access Control Log
The version of the firmware currently installed in this device.
This shows the status of the printer. Click the "Refresh Screen"
button to update this information.
View the WAN (Ethernet) status screen. This screen will vary
according to the connection method used (Direct connection or
PPPoE).
See the following sections WAN Status - Direct Connection and
WAN Status - PPPoE for details.
Check the status of the ISDN link, if used. See the following
section for details.
Check the status of the Serial Port. See the following section for
details.
View details of connection attempts which have been blocked. See
below for more information.
View details of outgoing connections to the internet. See below for
more information.
This log shows connection requests which have been blocked by the
Access Control
feature
or the built-in NAT Firewall.
Accesses which have been blocked for other reasons (e.g. URL filter, incorrect dial-in password, incorrect WEP settings on the WLAN) are NOT shown in this log. (The "Internet
29
Page 33

LevelOne WBR-1101TX User Guide
Access Log" can be used to view connection attempts which have been blocked by the URL
filter.)
Data shown in this log is as follows:
• Port - The port used to gain access to this device. Possible values are LAN, WAN,
WLAN (Wireless LAN), and RS232 (serial port).
• Source IP Address - The IP Address of the PC or device whose access request was
blocked.
• Physical Address (Hardware Address) - The hardware address of the PC or device
whose access request was blocked.
• Name - If known, the name of the device whose access was blocked. This name is taken
from the Access Control database. For Wireless devices, the name is obtained from the
Wireless Stations list, and so will always match the Physical (Hardware) address.
• Destination - The destination of the attempted access. Possible values are "Internet",
"LAN" or "WLAN".
• "Internet" indicates an attempt by a LAN user, WLAN user, or dial-in user to access
the Internet using a protocol and/or port number which was blocked.
• "LAN" or "WLAN" indicates a connection attempt from the Internet which was not
allowed. The protocol (TCP or UDP) and port number are shown in braces.
This data is useful if you want the access to be allowed. In this case, you can use this
data to configure the Advanced Internet - User-defined Virtual Servers screen or the
Advanced Internet - Special Applications screen. (In the case of a Special Application,
this log indicates the "Incoming Connection" for the Special Application.)
See Chapter 9 - Advanced Internet for further details of the Virtual Server and Special
Applications features.
Internet Access Log
This log shows details of Internet access by LAN users, WLAN users, or the dial-in user.
Details shown in this log are as follows:
• Source IP Address - The IP Address of the LAN user, WLAN user, or dial-in user
making the connection request.
• Destination - The requested Internet IP Address or URL. Normally, the IP Address will
be shown. But if the URL Filter feature is Enabled, the URL will be displayed.
For details on using the URL Filter, refer to Chapter 9 - Advanced Internet.
• Blocked - This will indicate "Yes" if the connection attempt was blocked by the URL
Filter. Otherwise, this will be blank. See Chapter 9 - Advanced Internet for further details
of the URL Filter feature.
30
Page 34
Configuration
Status Sub-Screens
This section describes the sub-screens which can accessed via links on the main Status screen.
WAN Status - Direct Connection
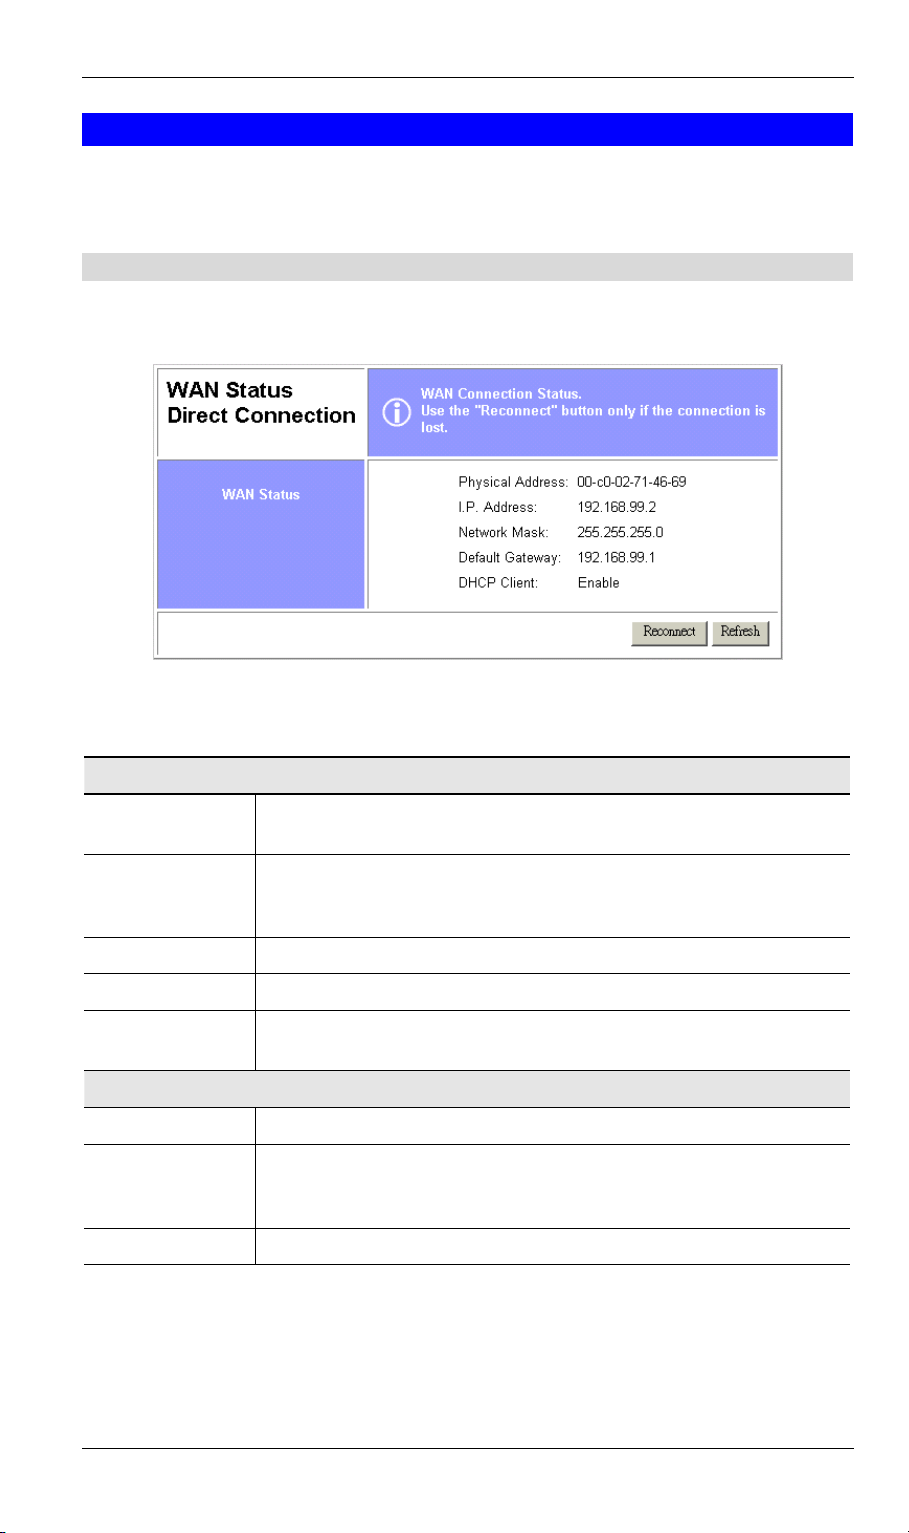
If the WAN (Ethernet) port is not using PPPoE or PPTP, then clicking the WAN Status link on
the Status screen will reveal a screen like the following.
Data
WAN Status
Physical Address
IP Address
Network Mask
Default Gateway
DHCP Client
Buttons
Restart Counters
Reconnect
Figure 13: WAN Status - Direct Connection
The "Hardware" address of this device, as seen by other devices on the
WAN.
The IP Address of this device, as seen by devices on the WAN.
(This device has 2 IP Addresses; one for the local LAN, and another
for the WAN port.)
The Network Mask for the above IP Address.
IP address of the Router/Gateway on the WAN port.
Displays "Enabled" or "Disabled", indicating whether this device is
acting as a DHCP client on the Internet connection.
Set both Firewall counters back to zero (0).
Use this button if the connection seems to have been lost, and no data
is being transferred. (This button has no effect unless acting as a
DHCP Client.)
Refresh
Update the data on screen.
31
Page 35
LevelOne WBR-1101TX User Guide
WAN Status - PPPoE
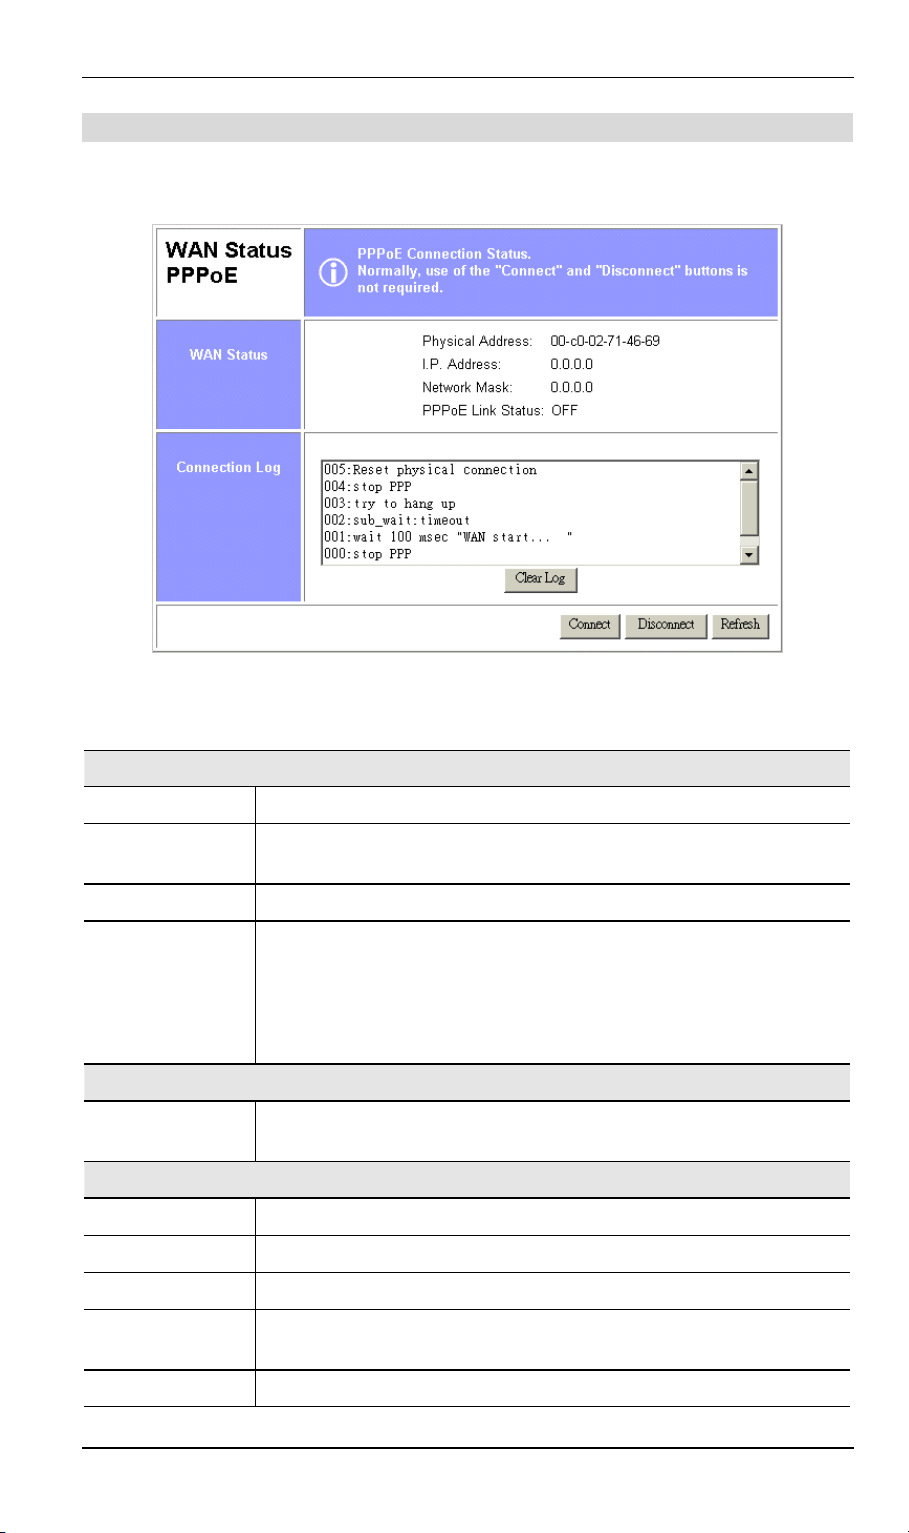
If the WAN (Ethernet) port is using PPPoE, then clicking the WAN Status link on the Status
screen will reveal a screen like the following.
Status Data
WAN Status
Physical Address
IP Address
Network Mask
PPPoE Link
Status
Connection Log
Log Data
Buttons
Restart Counters
Figure 14: WAN Status - PPPoE
"Hardware" address, as seen by other devices on the WAN.
The IP Address of this device, as seen by devices on the WAN.
(This device has another IP address for the local LAN.
The Network Mask (Subnet Mask) for the IP Address above.
This indicates whether or not the connection is currently established.
If the connection does not exist, the Connect button can be used to
establish a connection.
If the connection currently exists, the Disconnect button can be used to
break the connection.
This shows status messages relating to the existing connection. The
most common messages are listed in the following table.
Set both Firewall counters back to zero (0).
Connect
Disconnect
Clear Log
Refresh
If not connected, establish a connection to your ISP
If connected to your ISP, hang up the connection.
Delete all data currently in the Log. This will make it easier to read
new messages.
Contact this device and update the Log data.
32
Page 36
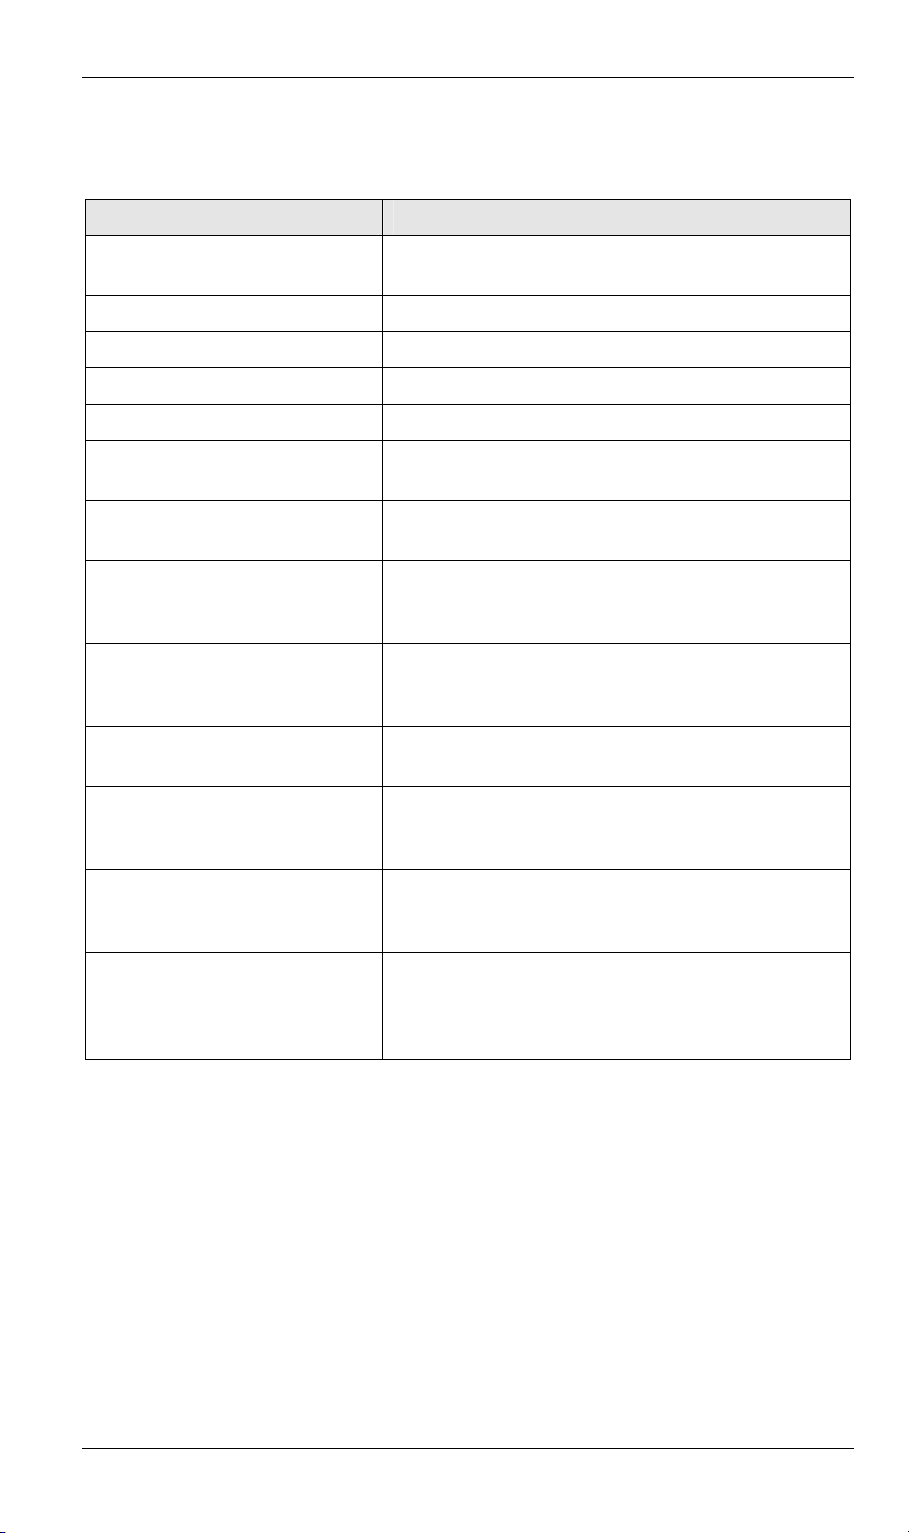
Connection Log Messages
Message Description
Configuration
Connect on
Demand
Connection attempt has been triggered by the "Connect
on Demand" setting.
Manual connection Connection attempt started by the "Connect" button.
Reset physical connection Preparing line for connection attempt.
Connecting to remote server Attempting to connect to the ISP's server.
Remote Server located ISP's Server has responded to connection attempt.
Start PPP Attempting to login to ISP's Server and establish a PPP
connection.
PPP up successfully Able to login to ISP's Server and establish a PPP
connection.
Idle time-out reached The connection has been idle for the time period
specified in the "Idle Time-out" field. The connection
will now be terminated.
Disconnecting The current connection is being terminated, due to
either the "Idle Time-out" above, or "Disconnect"
button being clicked.
Error: Remote Server not found ISP's Server did not respond. This could be a Server
problem, or a problem with the link to the Server.
Error: PPP Connection failed Unable to establish a PPP connection with the ISP's
Server. This could be a login problem (name or password) or a Server problem.
Error: Connection to Server lost The existing connection has been lost. This could be
caused by a power failure, a link failure, or Server
failure.
Error: Invalid or unknown packet
type
The data received from the ISP's Server could not be
processed. This could be caused by data corruption
(from a bad link), or the Server using a protocol which
is not supported by this device.
33
Page 37
LevelOne WBR-1101TX User Guide
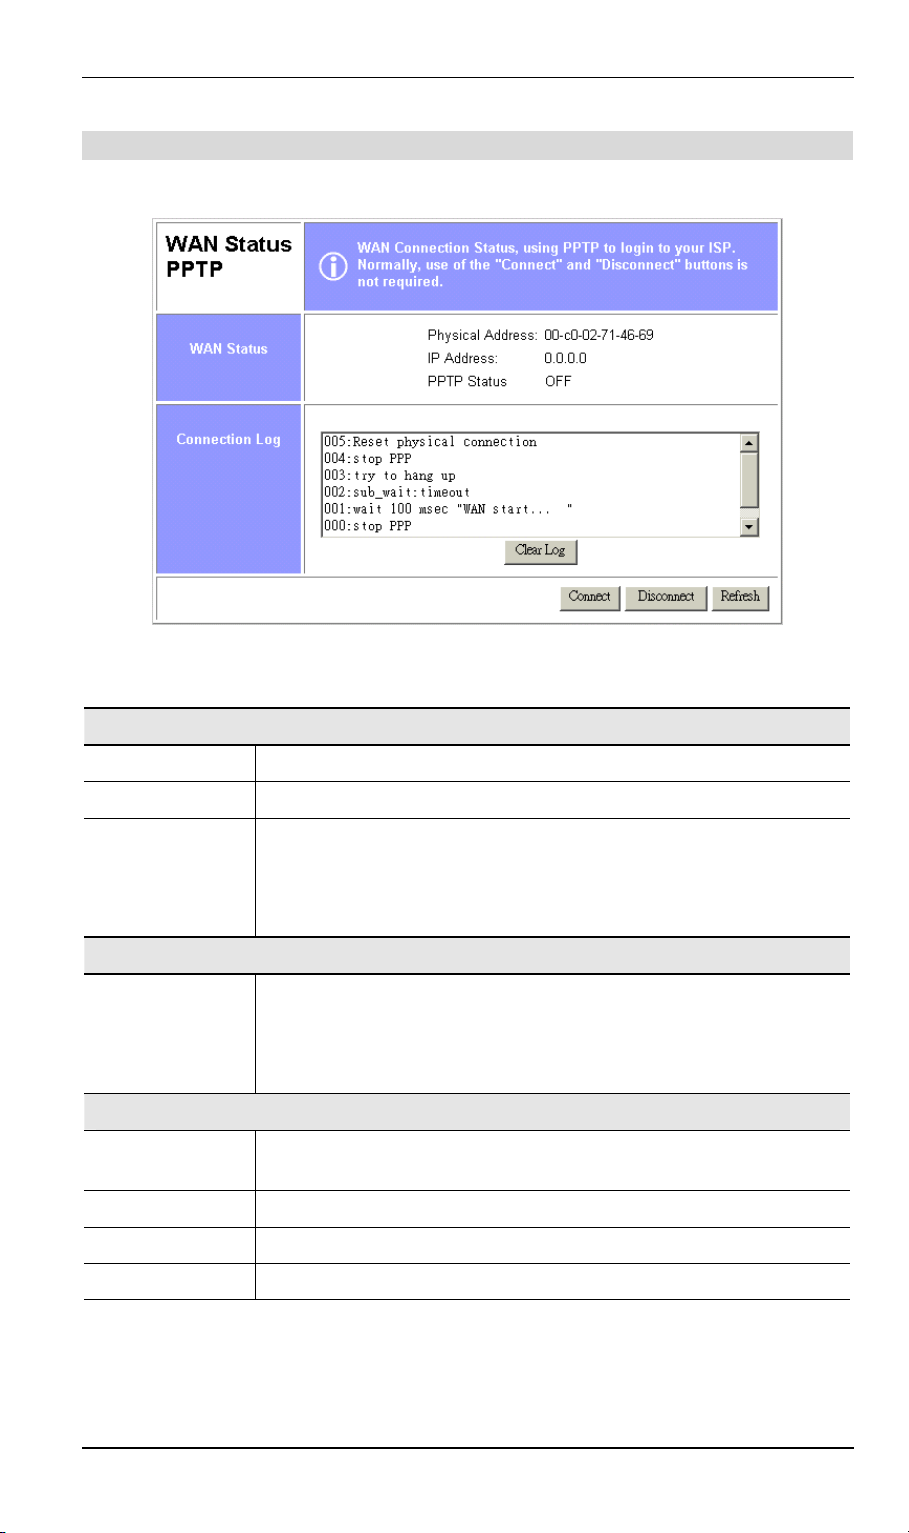
WAN Status - PPTP
If using PPTP to connect to your ISP, the following screen will be displayed.
Figure 15: WAN Status - PPTP
WAN Status
Physical Address
IP Address
PPTP Status
Connection Log
Connection Log
Buttons
Clear Log
Connect
Disconnect
The hardware address of this device, as seen from the Internet.
The IP Address of this device, as seen from the Internet.
This indicates the status of the connection to the PPTP Server.
If the connection does not exist, the Connect button can be used to
establish a connection. If the connection currently exists, the Disconnect button can be used to break the connection.
This log shows detailed information regarding the PPTP connection.
This data is useful for troubleshooting. Otherwise, it can be ignored.
The "Clear Log" button can be used to re-start the log, making new
messages easier to read.
Delete all data currently in the Log. This will make it easier to read
new messages.
If not connected, establish a connection to your ISP.
If connected to your ISP, hang up the connection.
Refresh
Contact this device and update the Log data.
34
Page 38
Configuration
ISDN Status
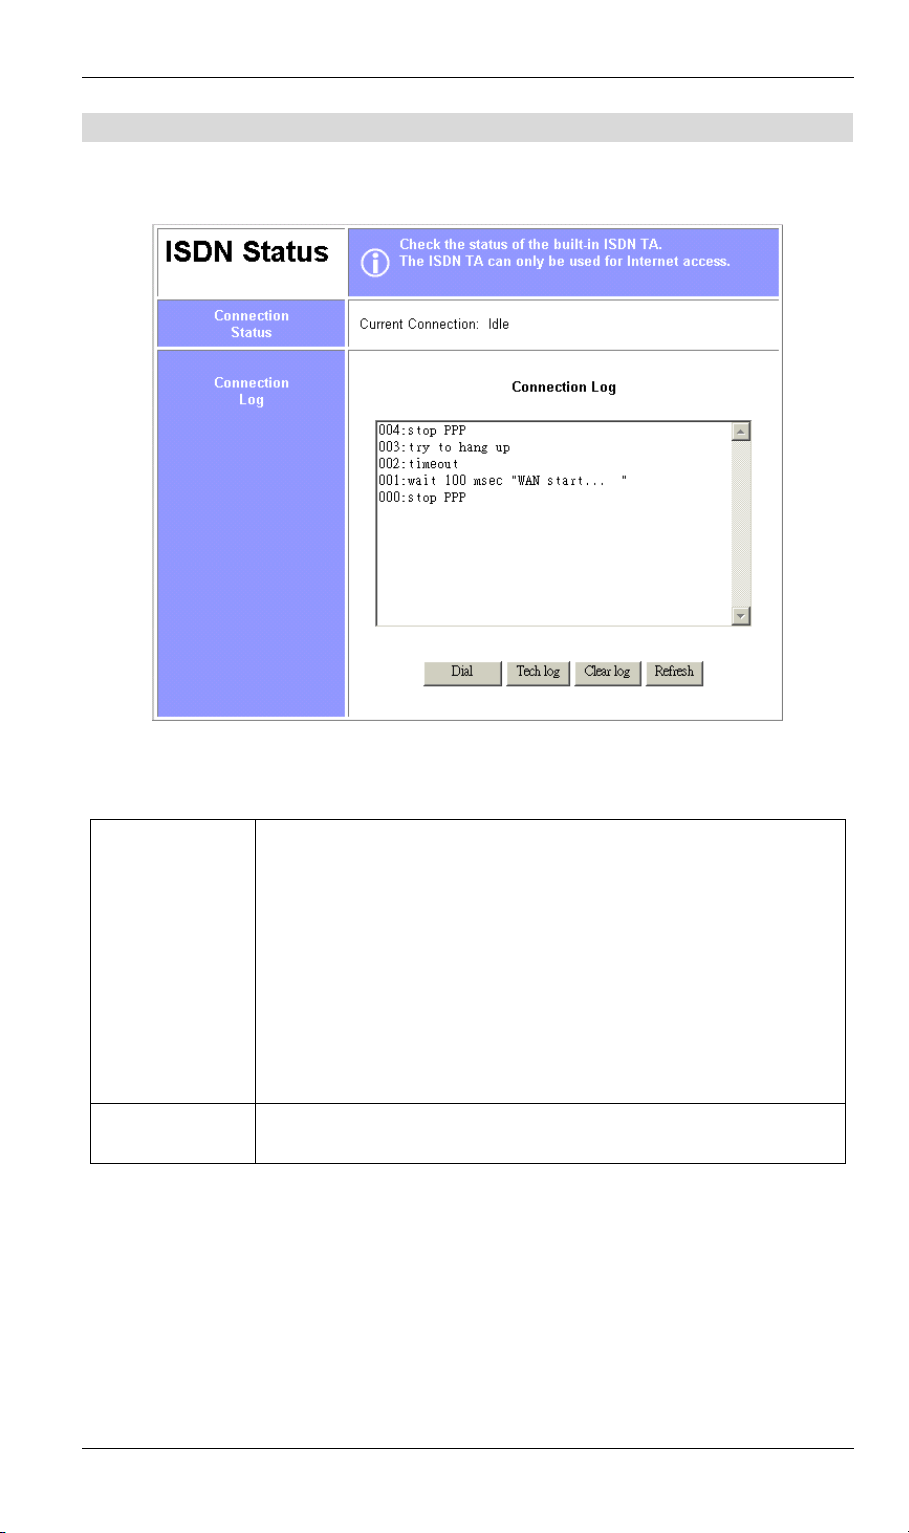
If using the built-in ISDN TA for Internet access, clicking the ISDN link on the Status screen
will display a screen like the following:
Connection Status
Current
Connection
Connection Log
This indicates whether the ISDN Internet Router is Idle, or being used
for Internet Access, LAN-to-LAN connection, or Dial-in.
If a connection exists, the following data is shown:
• Name:
• IP Address
This shows status to the PPP link over the ISDN line.
Common messages are shown in the following table
Figure 16: ISDN Status
For Internet access, the account name is displayed.
For Dial-in, the name of the dial-in user is displayed.
For LAN-to-LAN, the name of the remote device is displayed.
The IP Address used by this device, allocated by the remote device.
This address is provided by the ISP on connection. (Or by the remote ISDN Internet Router, if using LAN-to-LAN.
35
Page 39

LevelOne WBR-1101TX User Guide
Connection Log Messages
Message Description
Dialing Dialing the ISP
Try to establish
The device is trying to connect with the ISP.
physical connection.
Busy error The number dialed was busy.
Physical line is
Physical connection to ISP has been established.
connected
Start PPP A PPP connection is now being established.
PPP up fail The PPP connection could not be established.
PPP up successfully The PPP connection was established successfully.
Stop PPP The PPP connection was terminated. This will occur at the end of
a session, or an error condition.
Idle timer expires The "Idle time-out" has been triggered. (There was no data sent or
received for the duration of the "Idle time" period.)
Buttons
• Dial/Hang Up - Dial your ISP or hang up, depending on whether or not a connection
exists.
• Tech Log - Display ISDN messages, instead of connection messages. This is only to assist
technical support staff.
• Clear Log - Delete existing data in the log. This makes new data easier to read.
• Refresh - Update the Log.
36
Page 40
Configuration
Serial Port Status
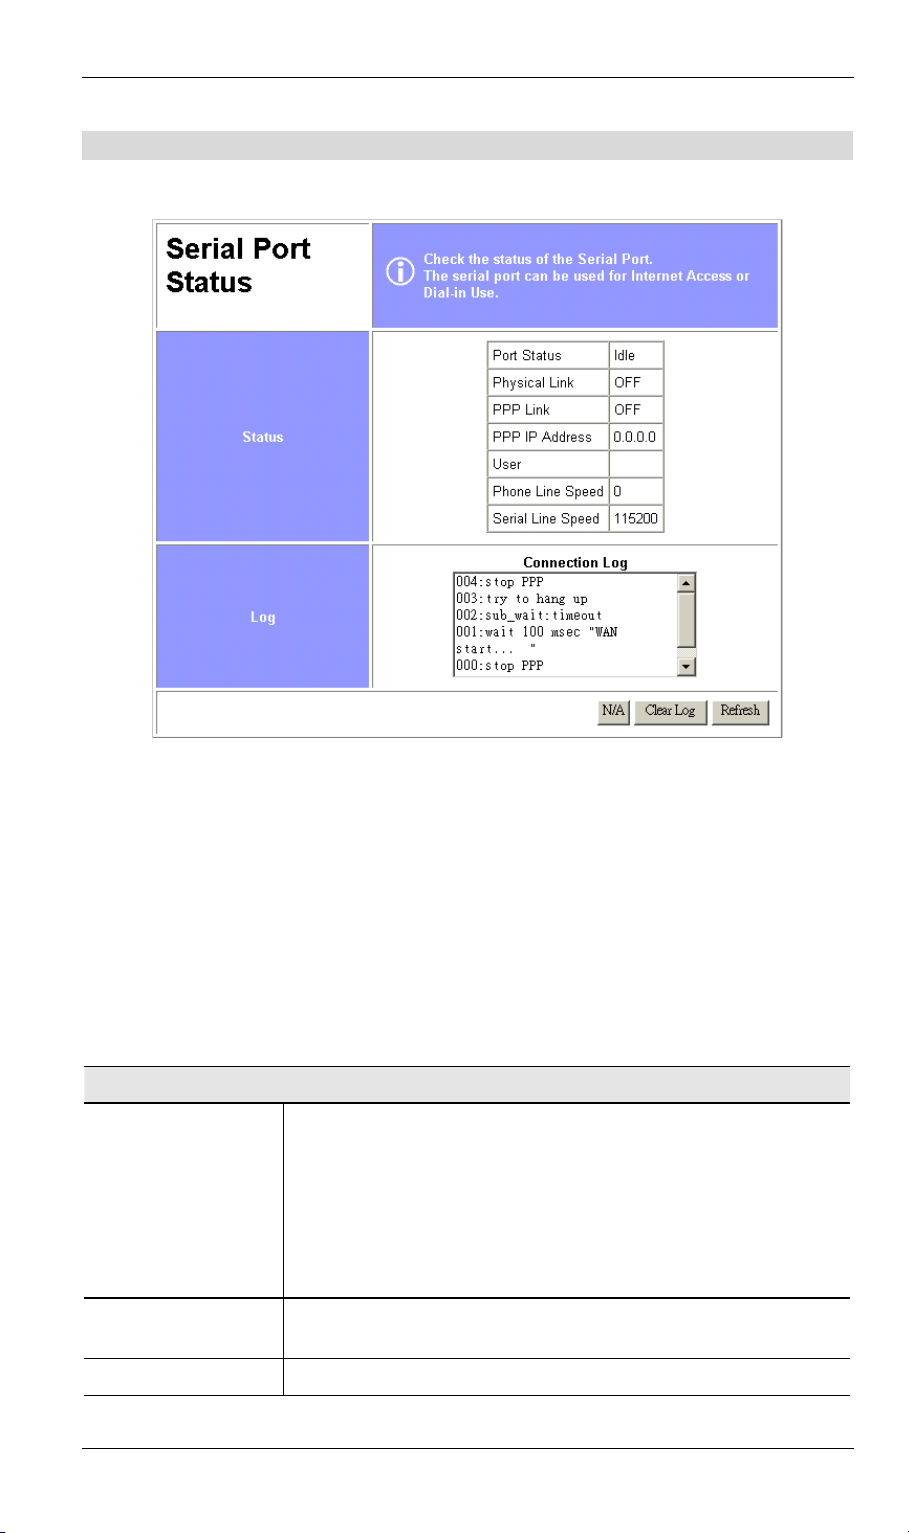
Clicking the Serial Port link on the Status screen will display a screen like the following:
Figure 17: Serial Port Status Screen
Overview
• Status - This section displays the current connection status for the serial port connection.
• Dial/HangUp Button - This button will display Dial if there is no connection and Hang-
up if a connection exists. Use this to dial the ISP, or terminate an existing connection.
If the Serial Port is Disabled, this button will display "N/A".
• Clear Log Button - Clicking this button clears all messages in the log, making new
messages easier to read.
• Refresh Button - Use this to update the data on screen.
Data - Serial Port Status Screen
Status
Port Status
This shows the current port operation. Possible values are:
• Internet Access
• Dial-in
• Idle
• Disabled
"Disabled" indicates neither Internet Access nor Dial-in is Enabled.
Physical Link
PPP Link
If operating, the link will show ON. This means the modem was
able to connect to the number dialed.
If ON, a PPP connection was successfully negotiated.
37
Page 41
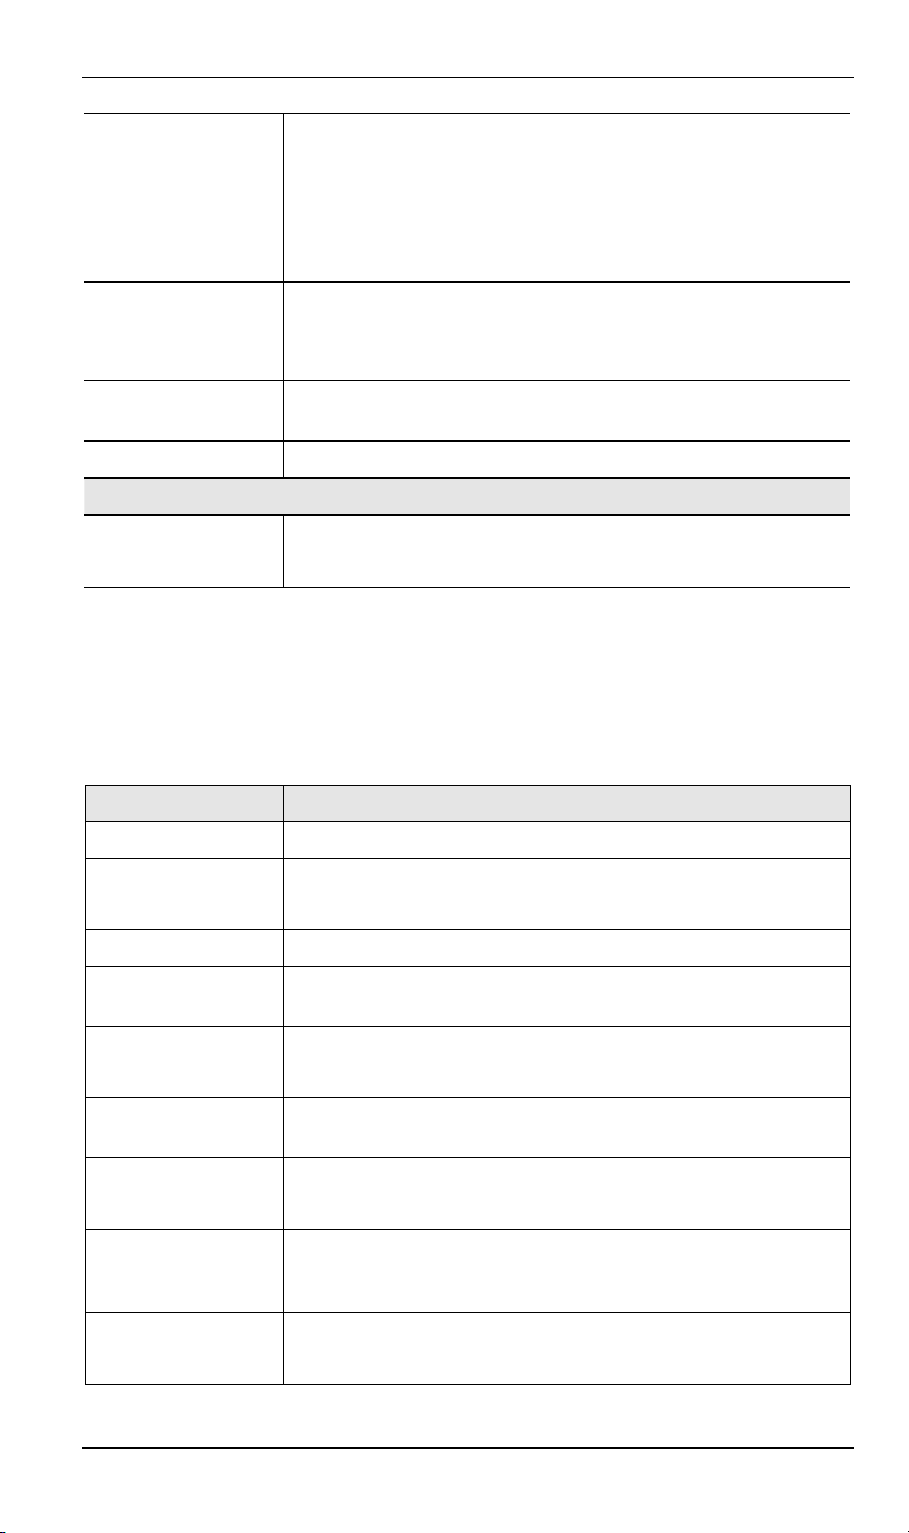
LevelOne WBR-1101TX User Guide
PPP IP Address
This has 2 possible meanings, depending of the type of connection:
• Internet Access - This is the IP Address used by this device,
as seen by Internet users. This address is provided by your ISP.
• Dial-in - This is the IP Address used by the remote user. This
IP Address is allocated by the DHCP Server function in the
LevelOne WBR-1101TX.
User
There are 2 possibilities:
• For Internet Access, this shows the Internet Account name.
• For Dial-in operations, this shows the current user.
Phone Line Speed
The connection speed over the phone line, between your modem
and the number dialed, as reported by your modem.
Serial Line Speed
The connection speed between this device and the modem.
Log
Connection Log
This displays connection details.
See below for a description of the most common items in this log.
Connection Log
This shows the commands sent to the modem, and any status messages returned by the modem.
Note that you must click Refresh to update the information.
The following table lists the common messages, and their meaning.
Message Description
Dialing Dialing the ISP
Try to establish
physical connection.
The device is trying to connect with the ISP, using the modem.
Busy The number dialed was busy.
Physical line is
Physical connection to ISP has been established.
connected
CONNECT nnnnnn Physical connection was successful; nnnnnn indicates the speed of
the serial link as currently configured.
Max phone line speed
nnnnnn bps
DCD low,
DSR low
send "-----"
wait "-----"
nnnnnn is the maximum speed of the modem, according to the
current configuration.
Physical line break, connection lost.
"AT" commands sent to the modem are displayed as they are sent.
Commands in the Script file are also displayed as they are executed.
Start PPP
Having established a physical connection, a PPP connection is now
being established.
38
Page 42

Configuration
PPP up fail The PPP connection could not be established.
PPP up successfully The PPP connection was established successfully.
Stop PPP The PPP connection was terminated. This will occur at the end of a
session, or an error condition.
Try to hang up Attempting to get the modem to hang up.
Time out There was no response from the modem
No carrier
The number dialed did not answer.
No answer
Idle timer expires "Disconnect after Idle Time" is Enabled, and the Time-out period
has been reached. The connection will now be terminated..
No dial tone The modem could not obtain a dial tone.
Set baudrate nnnn
The serial line speed is being set to the speed set in the configuration.
39 40
Page 43

Chapter 4
PC Configuration
This Chapter details the PC Configuration required on the local LAN.
4
Overview
For each PC, the following may to be configured:
• TCP/IP network settings
• Internet Access configuration
• Network printer
• Wireless configuration
Windows Clients
This section describes how to configure Windows clients for:
• Internet access via the LevelOne WBR-1101TX
• Printing using the printer attached to the LevelOne WBR-1101TX.
• Remote Dial-in access to the modem attached to the LevelOne WBR-1101TX's serial
(RS232) port.
The first step is to check the PC's TCP/IP settings.
The LevelOne WBR-1101TX uses the TCP/IP network protocol for all functions, so it is
essential that the TCP/IP protocol be installed and configured on each PC.
TCP/IP Settings
If using the default LevelOne WBR-1101TX settings, and the default
Windows TCP/IP settings, no changes need to be made.
• By default, the LevelOne WBR-1101TX will act as a DHCP Server, automatically provid-
ing a suitable IP Address (and related information) to each PC when the PC boots.
• For all non-Server versions of Windows, the default TCP/IP setting is to act as a DHCP
client.
If using a Fixed (specified) IP address, the following changes are required:
• The Gateway must be set to the IP address of the LevelOne WBR-1101TX
• The DNS should be set to the address provided by your ISP.
If your LAN has a Router, the LAN Administrator must reconfigure the Router itself. Refer to Chapter 8 - Routing
for details.
Page 44
PC Configuration
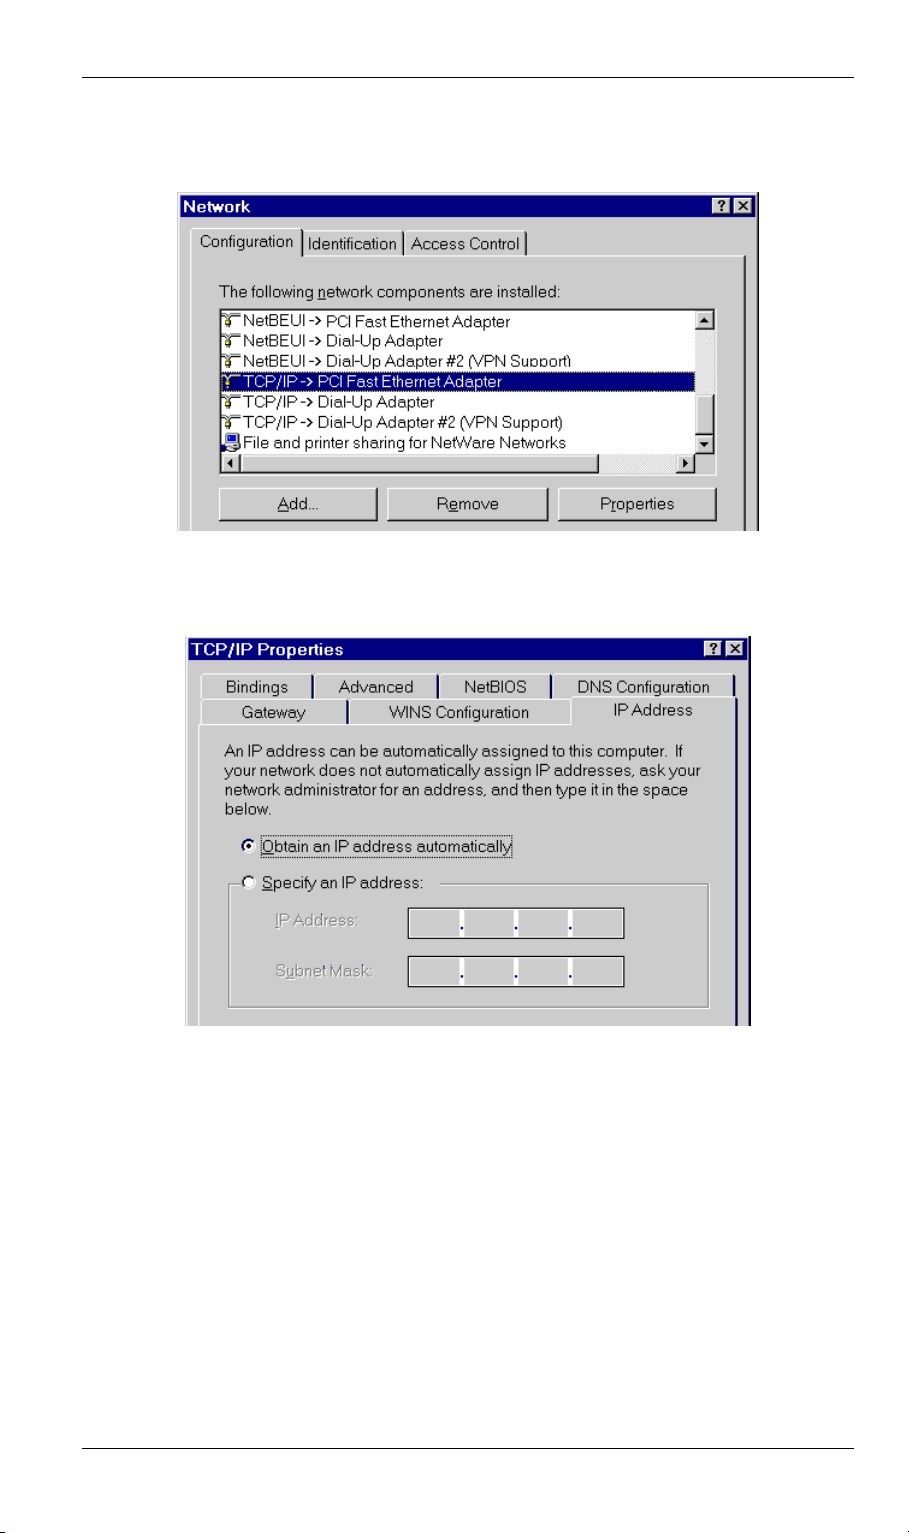
Checking TCP/IP Settings - Windows 9x/ME:
1. Select Control Panel - Network. You should see a screen like the following:
Figure 18: Network Configuration
2. Select the TCP/IP protocol for your network card.
3. Click on the Properties button. You should then see a screen like the following.
Figure 19: IP Address (Win 95)
Ensure your TCP/IP settings are correct, as follows:
Using DHCP
To use DHCP, select the radio button Obtain an IP Address automatically. This is the default
Windows setting. Using this is recommended. By default, the LevelOne WBR-1101TX will
act as a DHCP Server.
Restart your PC to ensure it obtains an IP Address from the LevelOne WBR-1101TX.
Using "Specify an IP Address"
If your PC is already configured, check with your network administrator before making the
following changes:
41
Page 45
LevelOne WBR-1101TX User Guide
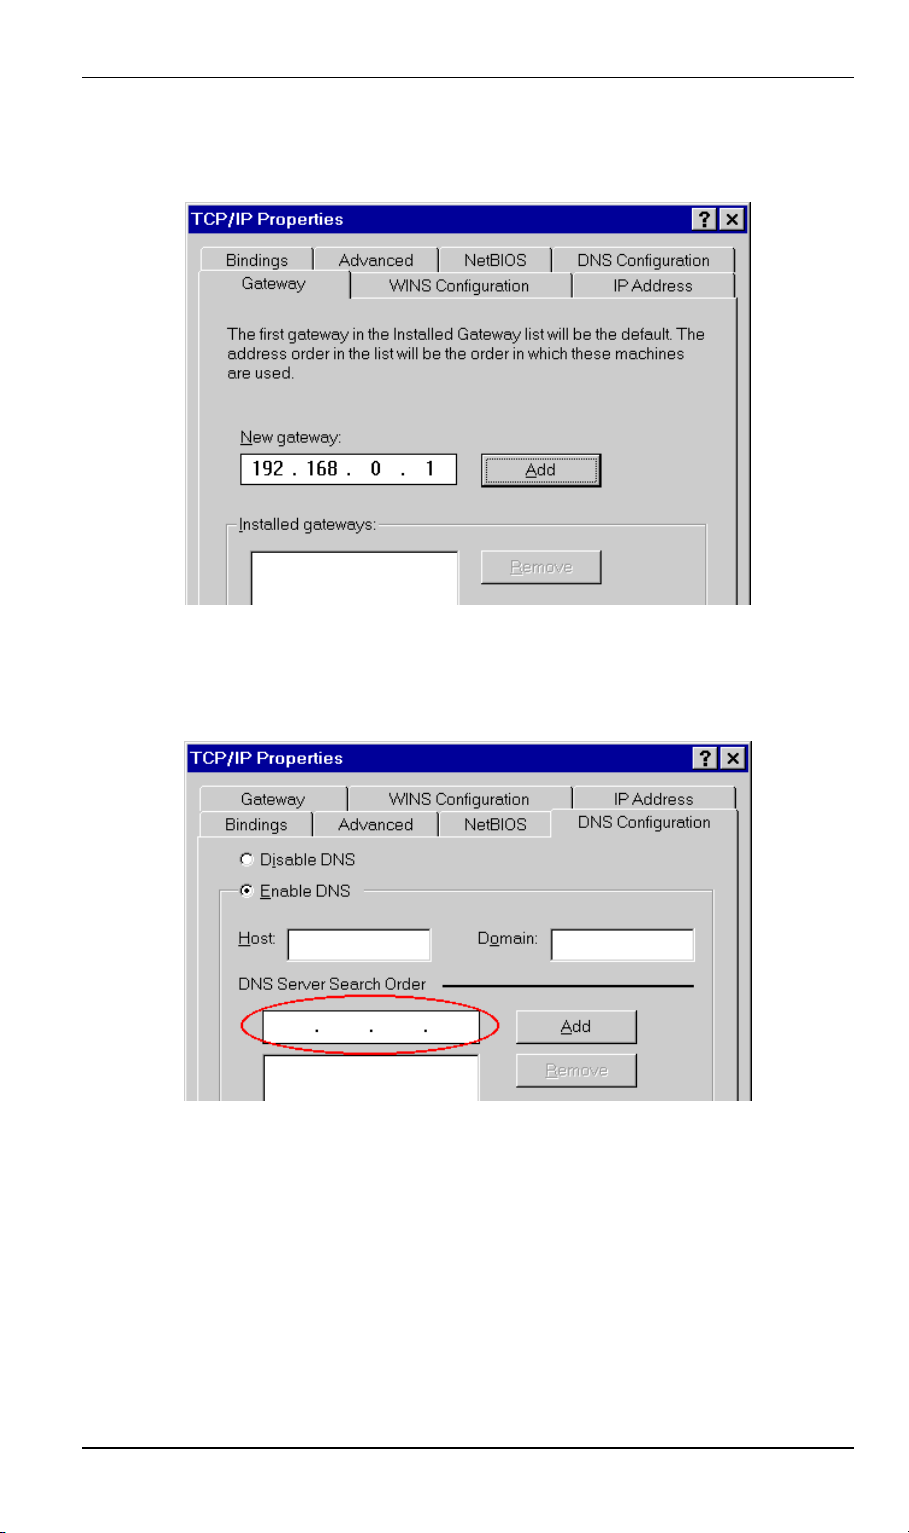
• On the Gateway tab, enter the LevelOne WBR-1101TX's IP address in the New Gateway
field and click Add, as shown below. Your LAN administrator can advise you of the IP
Address they assigned to the LevelOne WBR-1101TX.
Figure 20: Gateway Tab (Win 95/98)
• On the DNS Configuration tab, ensure Enable DNS is selected. If the DNS Server Search
Order list is empty, enter the DNS address provided by your ISP in the fields beside the
Add button, then click Add.
Figure 21: DNS Tab (Win 95/98)
42
Page 46
PC Configuration
Checking TCP/IP Settings - Windows NT4.0
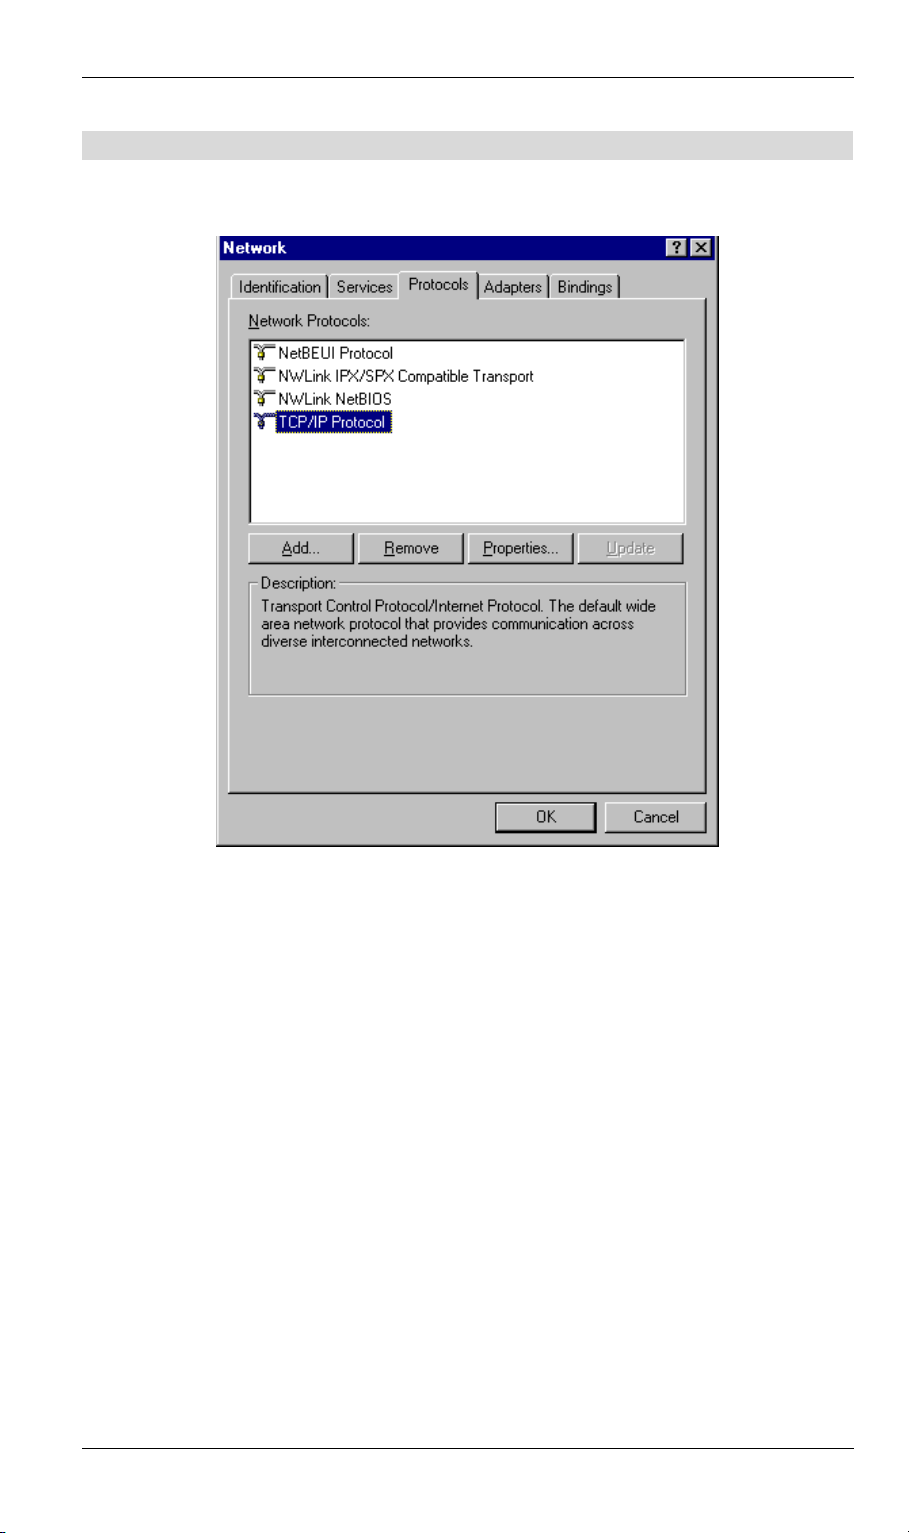
1. Select Control Panel - Network, and, on the Protocols tab, select the TCP/IP protocol, as
shown below.
Figure 22: Windows NT4.0 - TCP/IP
2. Click the Properties button to see a screen like the one below.
43
Page 47
LevelOne WBR-1101TX User Guide
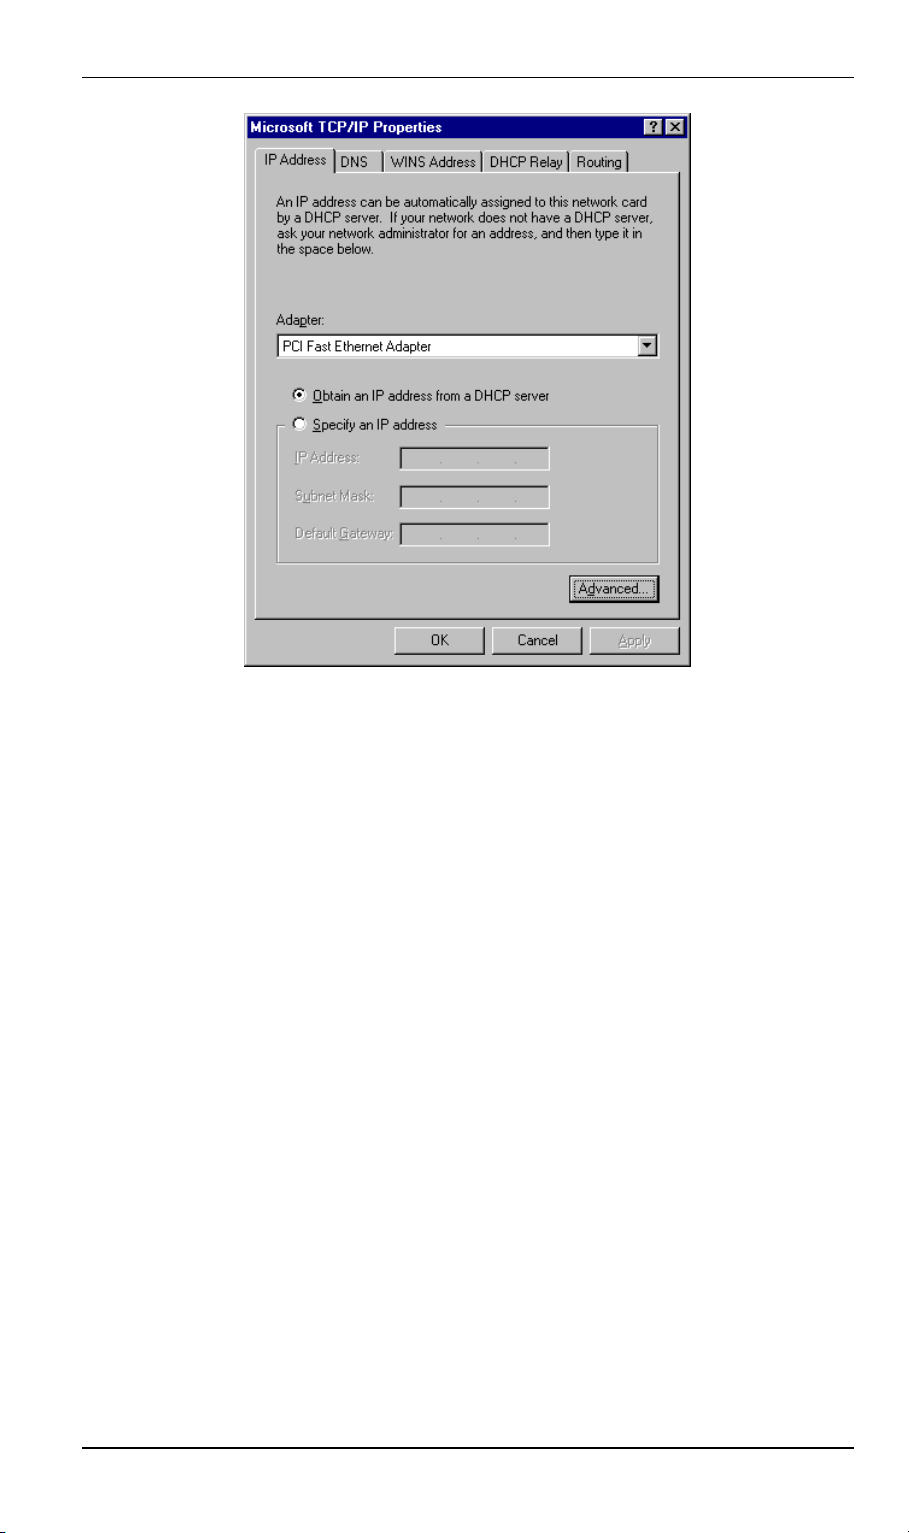
Figure 23: Windows NT4.0 - IP Address
3. Select the network card for your LAN.
4. Select the appropriate radio button - Obtain an IP address from a DHCP Server or Specify
an IP Address, as explained below.
Obtain an IP address from a DHCP Server
This is the default Windows setting. Using this is recommended. By default, the LevelOne
WBR-1101TX will act as a DHCP Server.
Restart your PC to ensure it obtains an IP Address from the LevelOne WBR-1101TX.
Specify an IP Address
If your PC is already configured, check with your network administrator before making the
following changes.
1. The Default Gateway must be set to the IP address of the LevelOne WBR-1101TX. To set
this:
• Click the Advanced button on the screen above.
• On the following screen, click the Add button in the Gateways panel, and enter the
LevelOne WBR-1101TX's IP address, as shown in Figure 24 below.
• If necessary, use the Up button to make the LevelOne WBR-1101TX the first entry in
the Gateways list.
44
Page 48
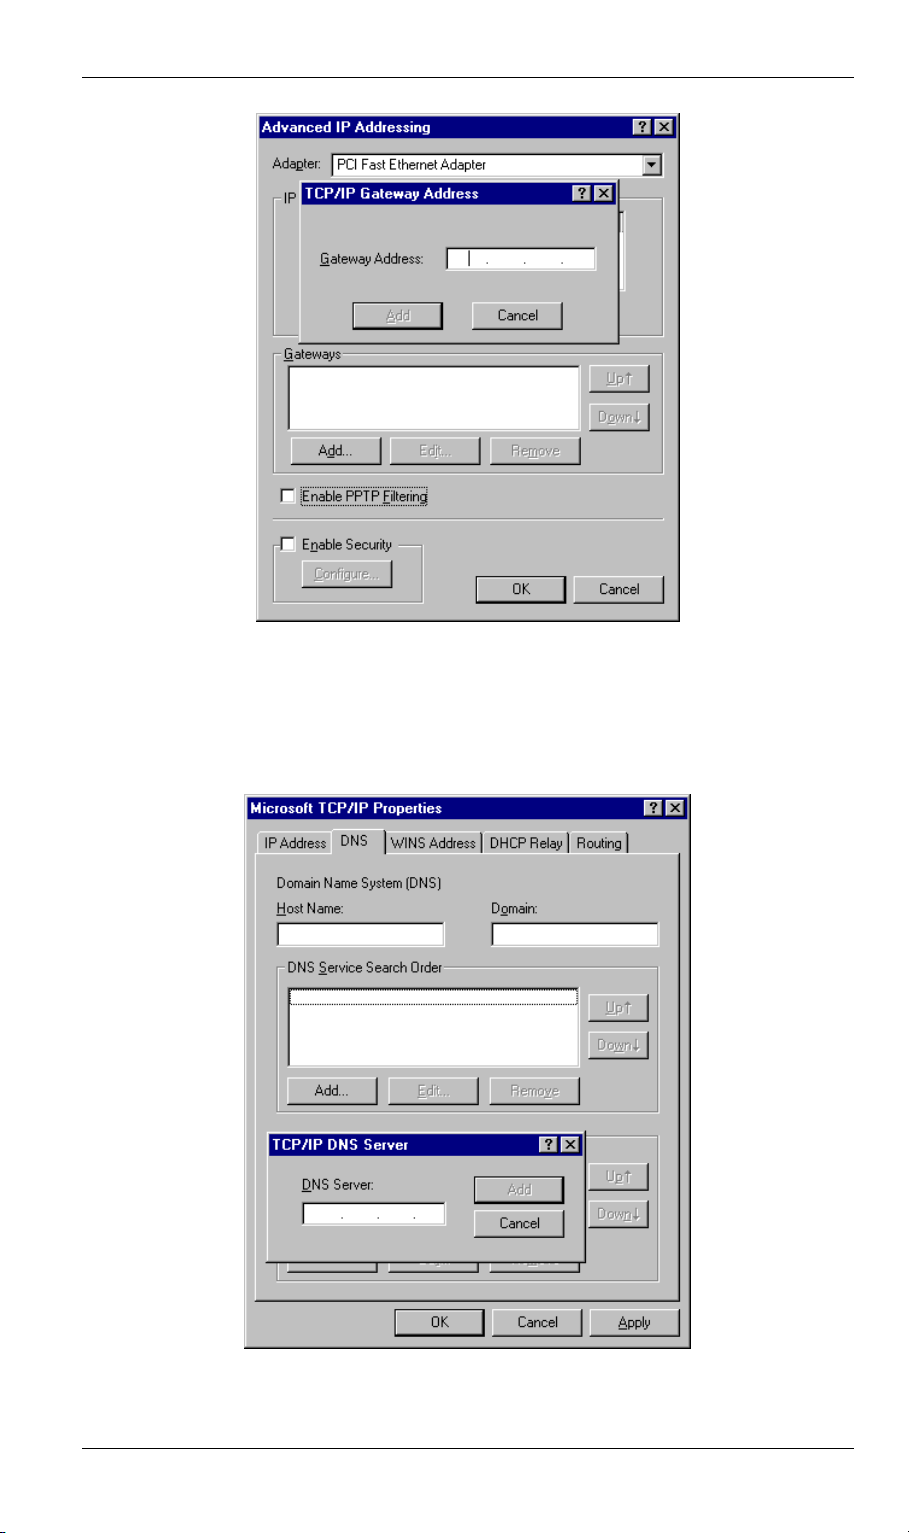
Figure 24 - Windows NT4.0 - Add Gateway
PC Configuration
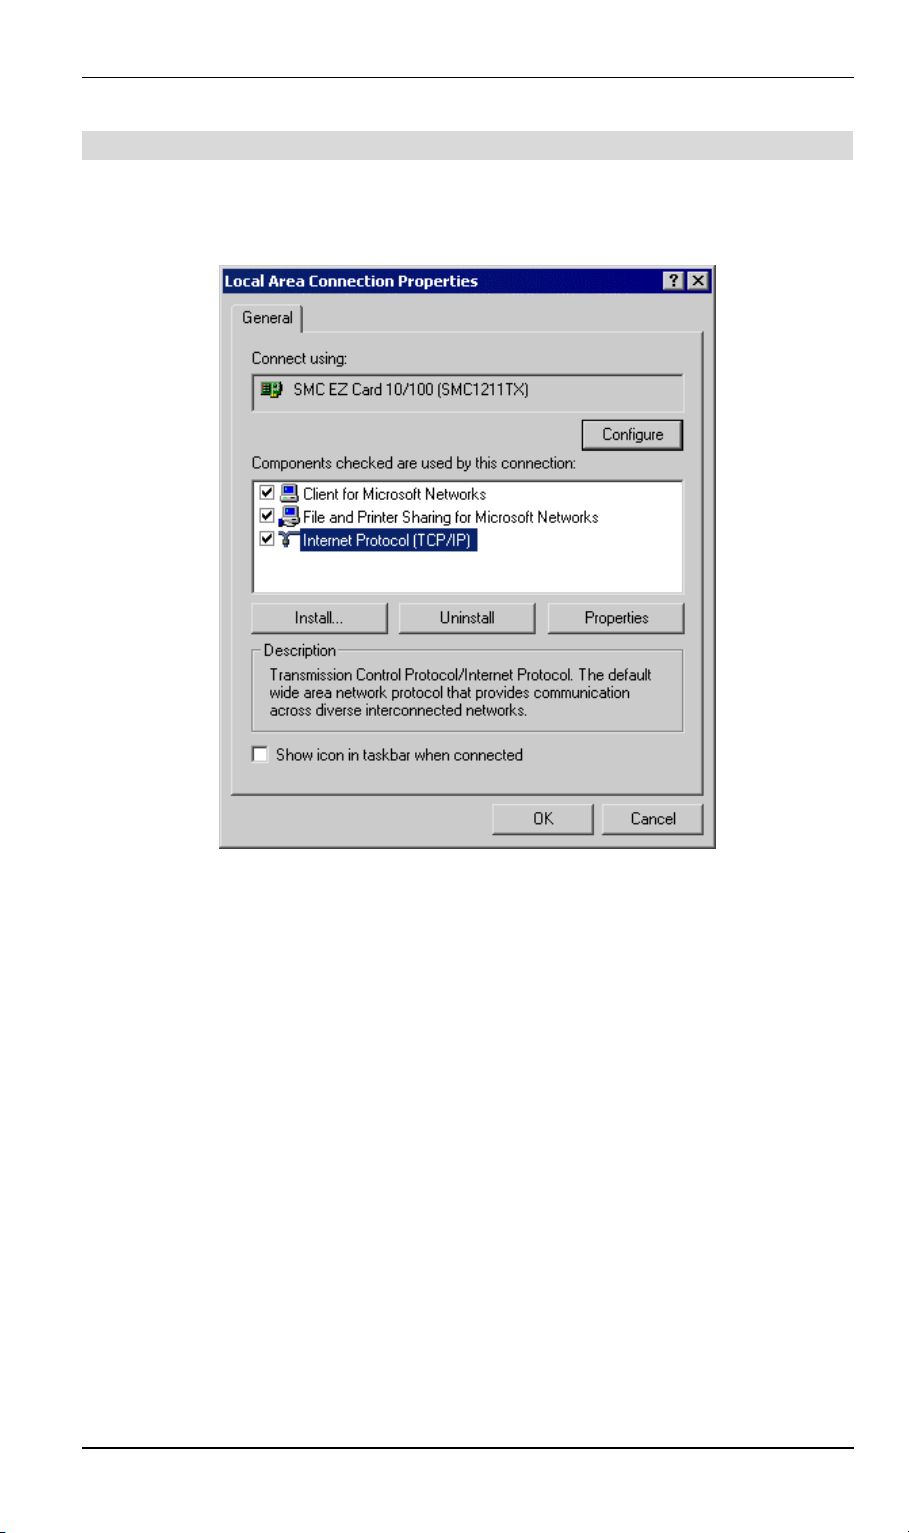
2. The DNS should be set to the address provided by your ISP, as follows:
• Click the DNS tab.
• On the DNS screen, shown below, click the Add button (under DNS Service Search
Order), and enter the DNS provided by your ISP.
Figure 25: Windows NT4.0 - DNS
45
Page 49
LevelOne WBR-1101TX User Guide
Checking TCP/IP Settings - Windows 2000:
1. Select Control Panel - Network and Dial-up Connection.
2. Right - click the Local Area Connection icon and select Properties. You should see a
screen like the following:
Figure 26: Network Configuration (Win 2000)
3. Select the TCP/IP protocol for your network card.
4. Click on the Properties button. You should then see a screen like the following.
46
Page 50
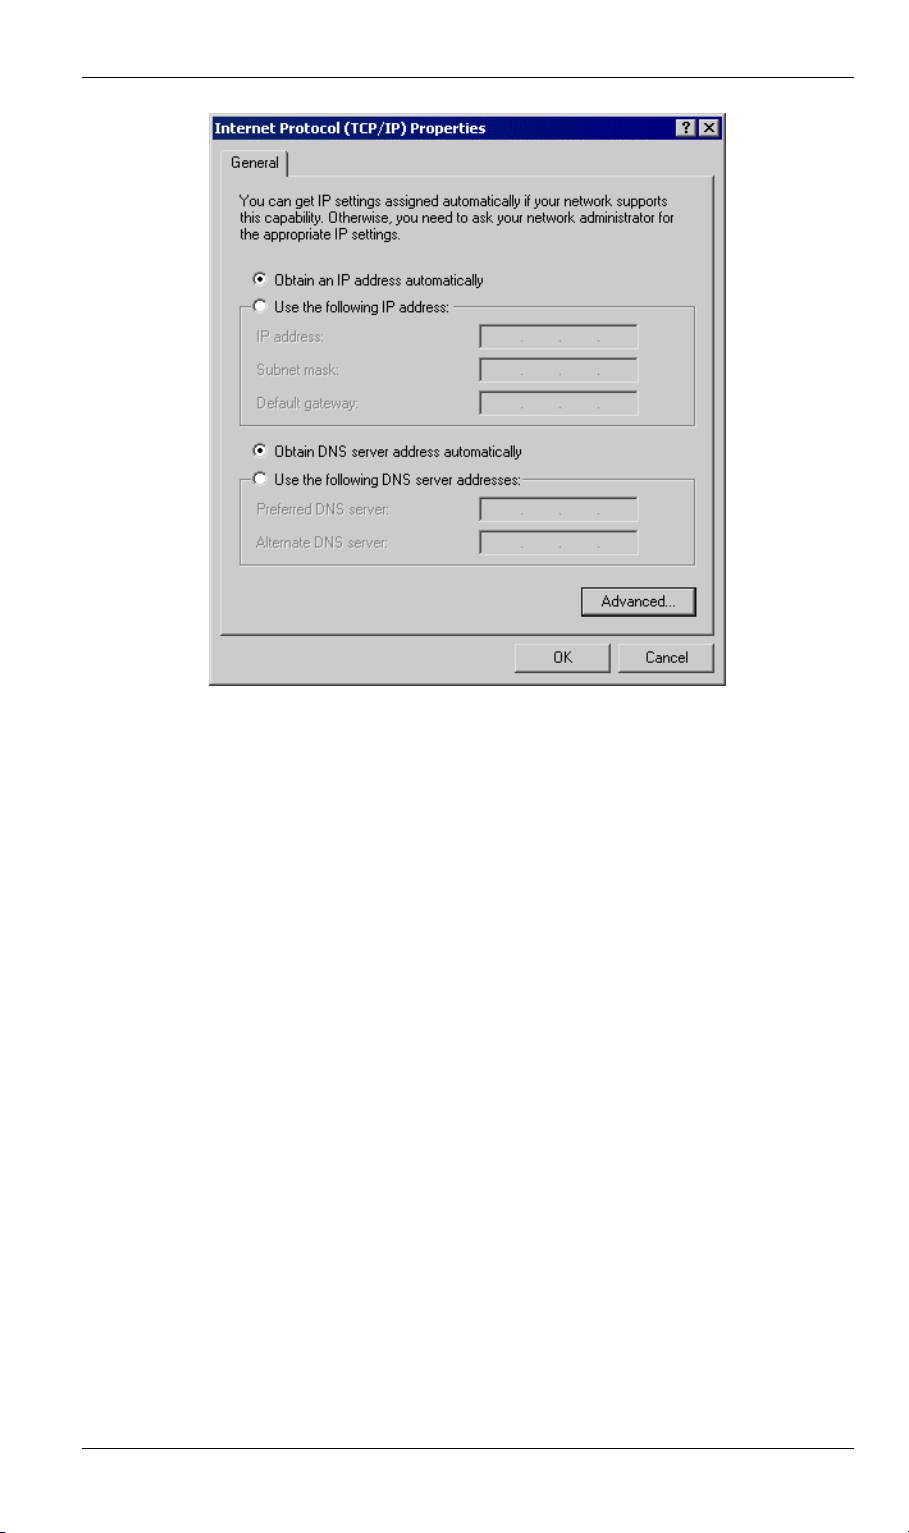
PC Configuration
Figure 27: TCP/IP Properties (Win 2000)
5. Ensure your TCP/IP settings are correct, as described below.
Using DHCP
To use DHCP, select the radio button Obtain an IP Address automatically. This is the default
Windows setting. Using this is recommended. By default, the LevelOne WBR-1101TX will
act as a DHCP Server.
Restart your PC to ensure it obtains an IP Address from the LevelOne WBR-1101TX.
Using a fixed IP Address ("Use the following IP Address")
If your PC is already configured, check with your network administrator before making the
following changes.
• Enter the LevelOne WBR-1101TX's IP address in the Default gateway field and click OK.
(Your LAN administrator can advise you of the IP Address they assigned to the LevelOne
WBR-1101TX.)
• If the DNS Server fields are empty, select Use the following DNS server addresses, and
enter the DNS address or addresses provided by your ISP, then click OK.
47
Page 51
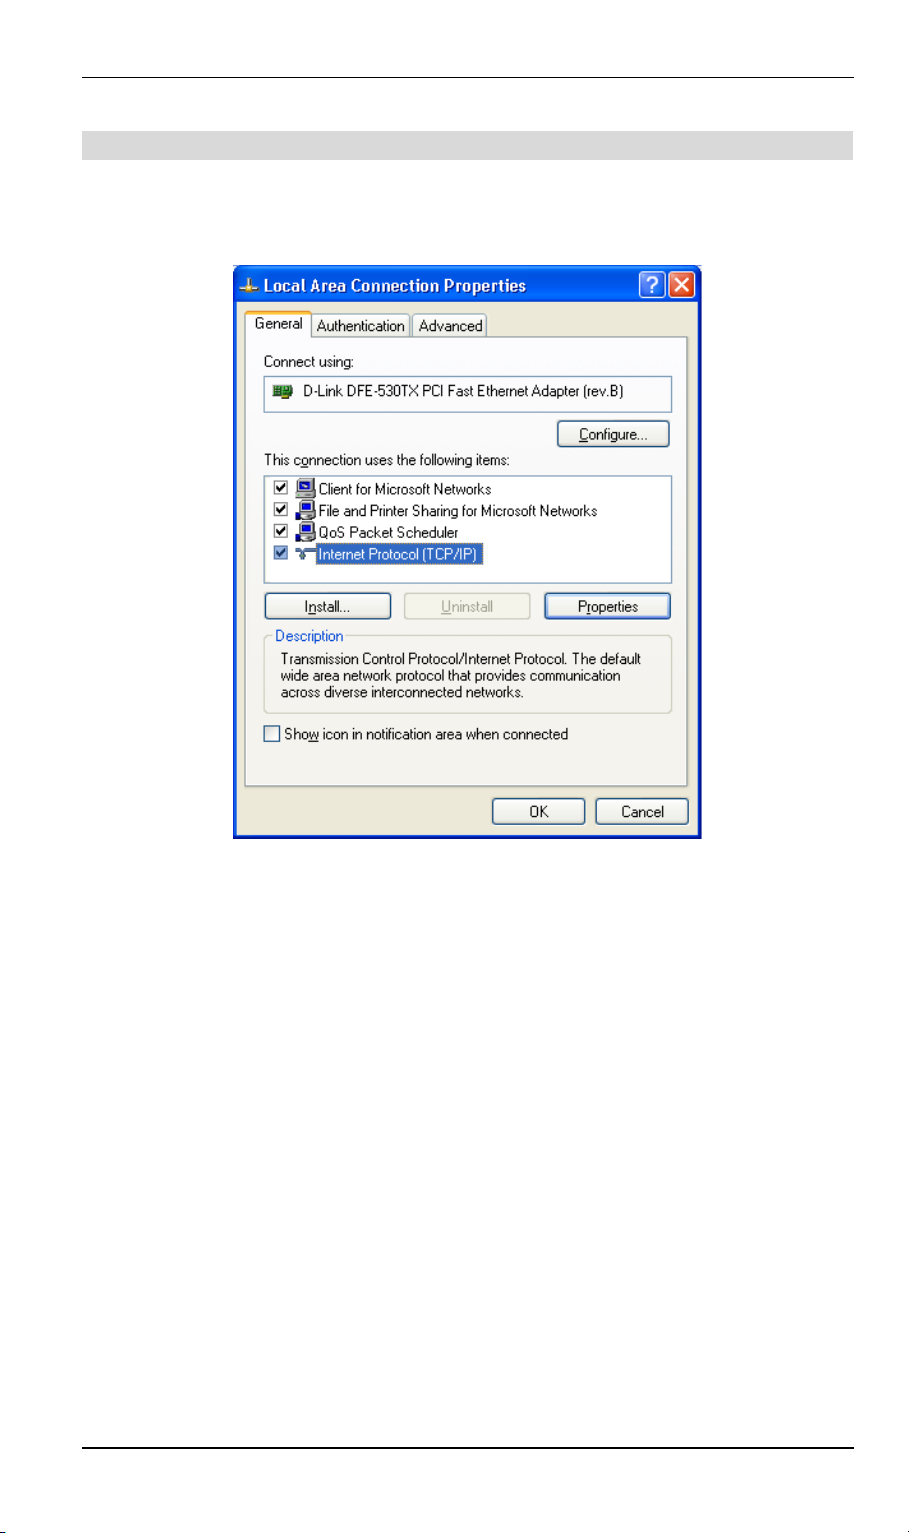
LevelOne WBR-1101TX User Guide
Checking TCP/IP Settings - Windows XP
1. Select Control Panel - Network Connection.
2. Right click the Local Area Connection and choose Properties. You should see a screen
like the following:
Figure 28: Network Configuration (Windows XP)
3. Select the TCP/IP protocol for your network card.
4. Click on the Properties button. You should then see a screen like the following.
48
Page 52
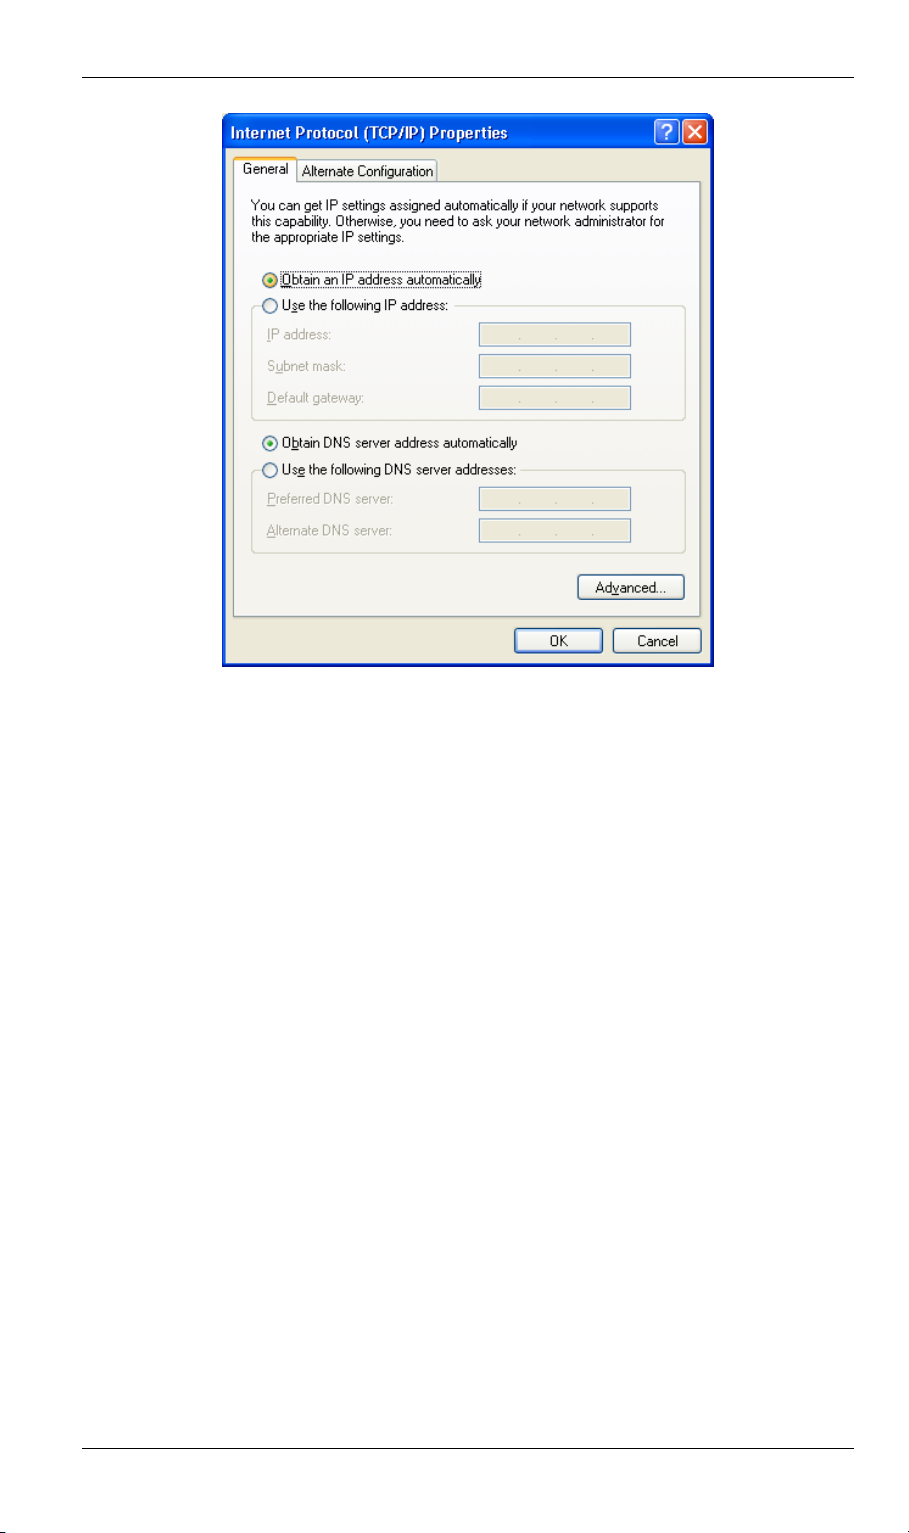
PC Configuration
Figure 29: TCP/IP Properties (Windows XP)
5. Ensure your TCP/IP settings are correct.
Using DHCP
To use DHCP, select the radio button Obtain an IP Address automatically. This is the default
Windows setting. Using this is recommended. By default, the LevelOne WBR-1101TX will
act as a DHCP Server.
Restart your PC to ensure it obtains an IP Address from the LevelOne WBR-1101TX.
Using a fixed IP Address ("Use the following IP Address")
If your PC is already configured, check with your network administrator before making the
following changes.
• In the Default gateway field, enter the LevelOne WBR-1101TX's IP address and click OK.
Your LAN administrator can advise you of the IP Address they assigned to the LevelOne
WBR-1101TX.
• If the DNS Server fields are empty, select Use the following DNS server addresses, and
enter the DNS address or addresses provided by your ISP, then click OK.
49
Page 53

LevelOne WBR-1101TX User Guide
Internet Access
To configure your PCs to use the LevelOne WBR-1101TX for Internet access:
• Ensure that the DSL modem, Cable modem, or other permanent connection is functional.
• Use the following procedure to configure your Browser to access the Internet via the
LAN, rather than by a Dial-up connection.
For Windows 9x/ME/2000
1. Select Start Menu - Settings - Control Panel - Internet Options.
2. Select the Connection tab, and click the Setup button.
3. Select "I want to set up my Internet connection manually, or I want to connect through a
local area network (LAN)" and click Next.
4. Select "I connect through a local area network (LAN)" and click Next.
5. Ensure all of the boxes on the following Local area network Internet Configuration screen
are unchecked.
6. Check the "No" option when prompted "Do you want to set up an Internet mail account
now?".
7. Click Finish to close the Internet Connection Wizard.
Setup is now completed.
For Windows XP
1. Select Start Menu - Control Panel - Network and Internet Connections.
2. Select Set up or change your Internet Connection.
3. Select the Connection tab, and click the Setup button.
4. Cancel the pop-up "Location Information" screen.
5. Click Next on the "New Connection Wizard" screen.
6. Select "Connect to the Internet" and click Next.
7. Select "Set up my connection manually" and click Next.
8. Check "Connect using a broadband connection that is always on" and click Next.
9. Click Finish to close the New Connection Wizard.
Setup is now completed.
Accessing AOL
To access AOL (America On Line) through the LevelOne WBR-1101TX, the AOL for Windows software must be configured to use TCP/IP network access, rather than a dial-up
connection. The configuration process is as follows:
• Start the AOL for Windows communication software. Ensure that it is Version 2.5, 3.0 or
later. This procedure will not work with earlier versions.
• Click the Setup button.
• Select Create Location, and change the location name from "New Locality" to "LevelOne
WBR-1101TX".
• Click Edit Location. Select TCP/IP for the Network field. (Leave the Phone Number
blank.)
• Click Save, then OK.
Configuration is now complete.
• Before clicking "Sign On", always ensure that you are using the "LevelOne WBR-
1101TX" location.
50
Page 54
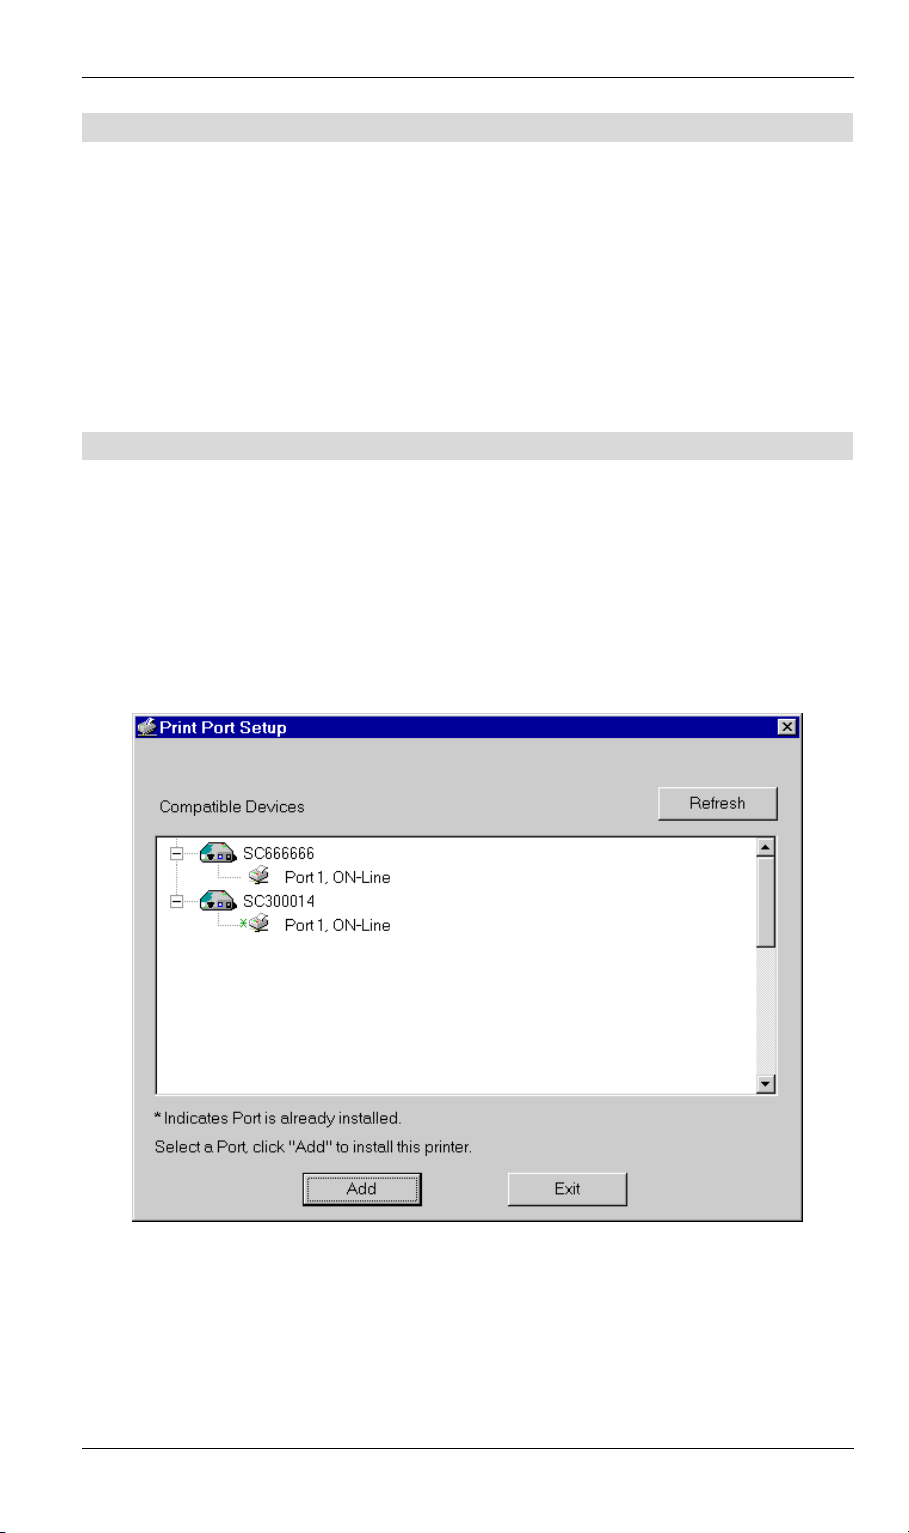
PC Configuration
Printing Setup
The LevelOne WBR-1101TX provides printing support for 2 methods of printing from Windows:
• Print Port Driver. After installing the Print Port Driver, Windows users can print di-
rectly to the LevelOne WBR-1101TX. Print jobs are spooled (queued) on each PC.
The supplied Print Port Driver supports Windows 95/98, Windows ME, Windows NT4.0,
and Windows 2000.
• LPD/LPR Printing. If using Windows NT 4.0 Server or Windows 2000 Server,
LPD/LPR printing can be used. No software needs to be installed on either the Windows
Server or each client PC. Print jobs will be spooled (queued) on the Windows Server, and
can be managed using the standard Windows Server tools.
Print Port Driver Setup
The following procedure is for Windows 95/98, Windows ME, Windows NT4.0, Windows
2000, and Windows XP.
1. Insert the supplied CD-ROM into your drive. If the setup program does not start automatically, run SETUP.EXE in the root folder.
2. At the Setup Type screen, select the correct model.
3. At the Select Components screen, select the Print Port Driver option.
4. Follow the prompts to complete the installation.
5. The Print Port Setup will then run, and the following screen will be displayed.
Figure 30: Print Port Setup
6. Select the desired device and port, and then click the "Add" button.
51
Page 55
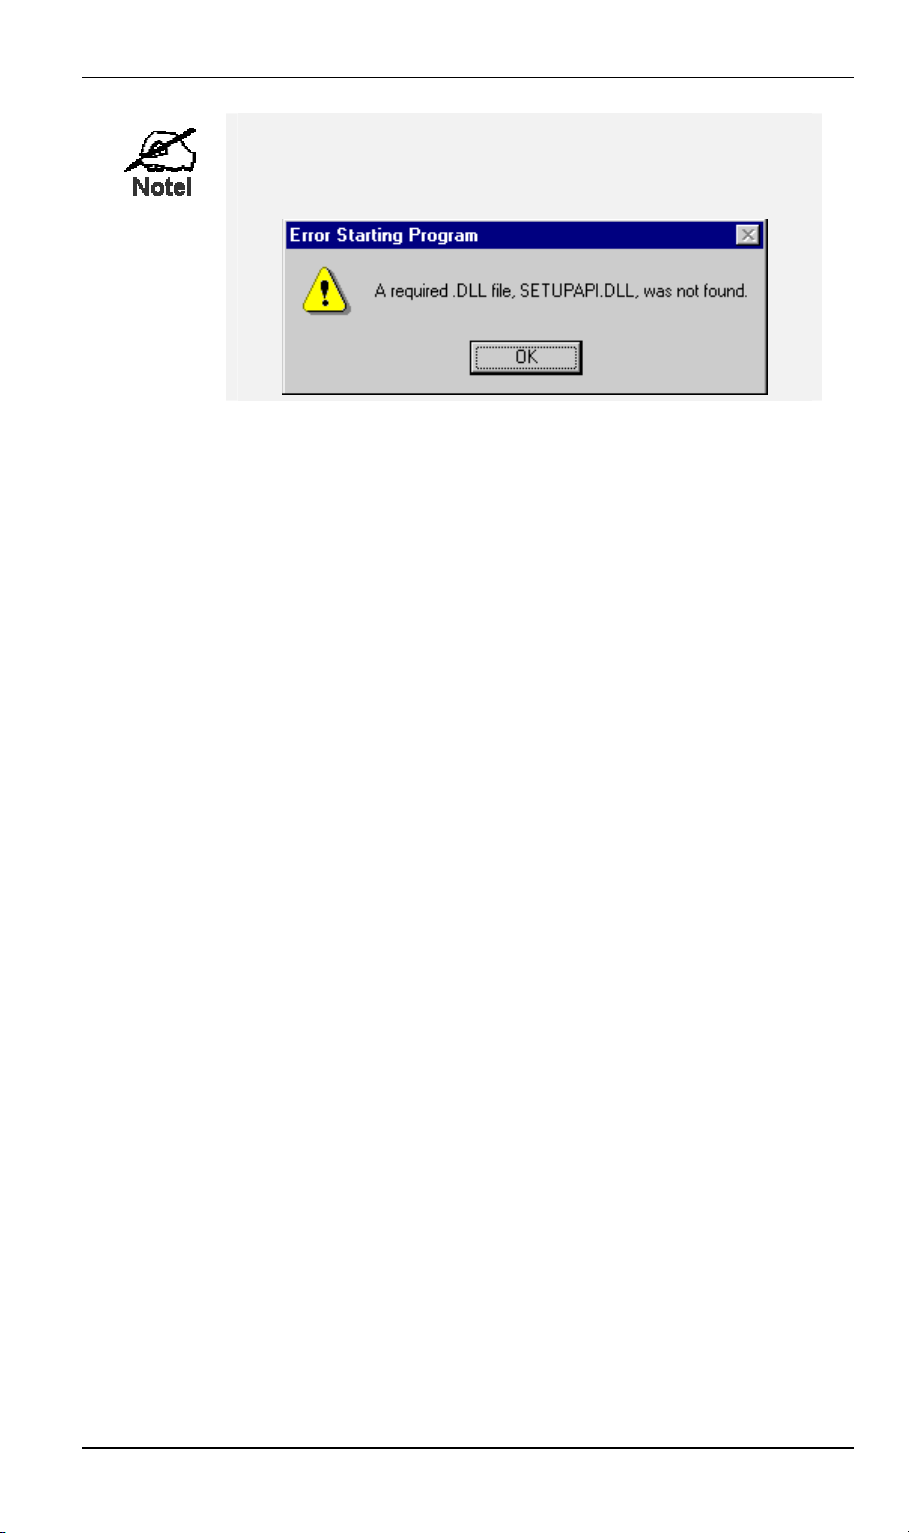
LevelOne WBR-1101TX User Guide
If you see the following error message, either install Internet
Explorer 4 or later, or follow the procedure in the "Trouble
Shooting - Printing" section of Appendix A.
7. A pop-up message will inform you if the port has been created successfully, and then the
Windows Add Printer wizard will start.
• Select the correct Printer Manufacturer and Model, or use the "Have Disk" option if
appropriate.
• If desired, change the Printer name so it indicates the device used (e.g. HP2100 on
SCA43600)
• If prompted about Sharing, do NOT enable Sharing.
8. Installation is now complete. You can now print using this printer.
• To install additional Printers, repeat steps 6 and 7.
• Use the Start menu to run this program in future. The default installation is Start -
Programs - Broadband Internet Router - Add Port.
Management
• Print jobs can be managed like any Windows printer. Open the Printers folder (Start -
Settings - Printers) and double-click any printer to see the current print jobs.
• If the printer attached to the LevelOne WBR-1101TX is changed, just run this program
again, and select the correct printer.
• To delete a port created by this setup program, use the Windows Delete Port facility:
• Right-click any printer in the Printers folder, and select Properties.
• Locate the Delete Port button. This button is on the Details or Ports tab, depending
on your version or Windows.
• If the LevelOne WBR-1101TX's IP Address is changed, and you can no longer print,
delete the port (see procedure above) and re-install it.
Port Options
The options for the Print Port Driver are accessed via the Windows Port Settings button.
Use Start - Settings - Printers to open the Printers folder, then right-click the Printer, and select
Properties. The Port Settings button is on the Details or Port tab, depending on your version
of Windows.
An example screen is shown below:
52
Page 56
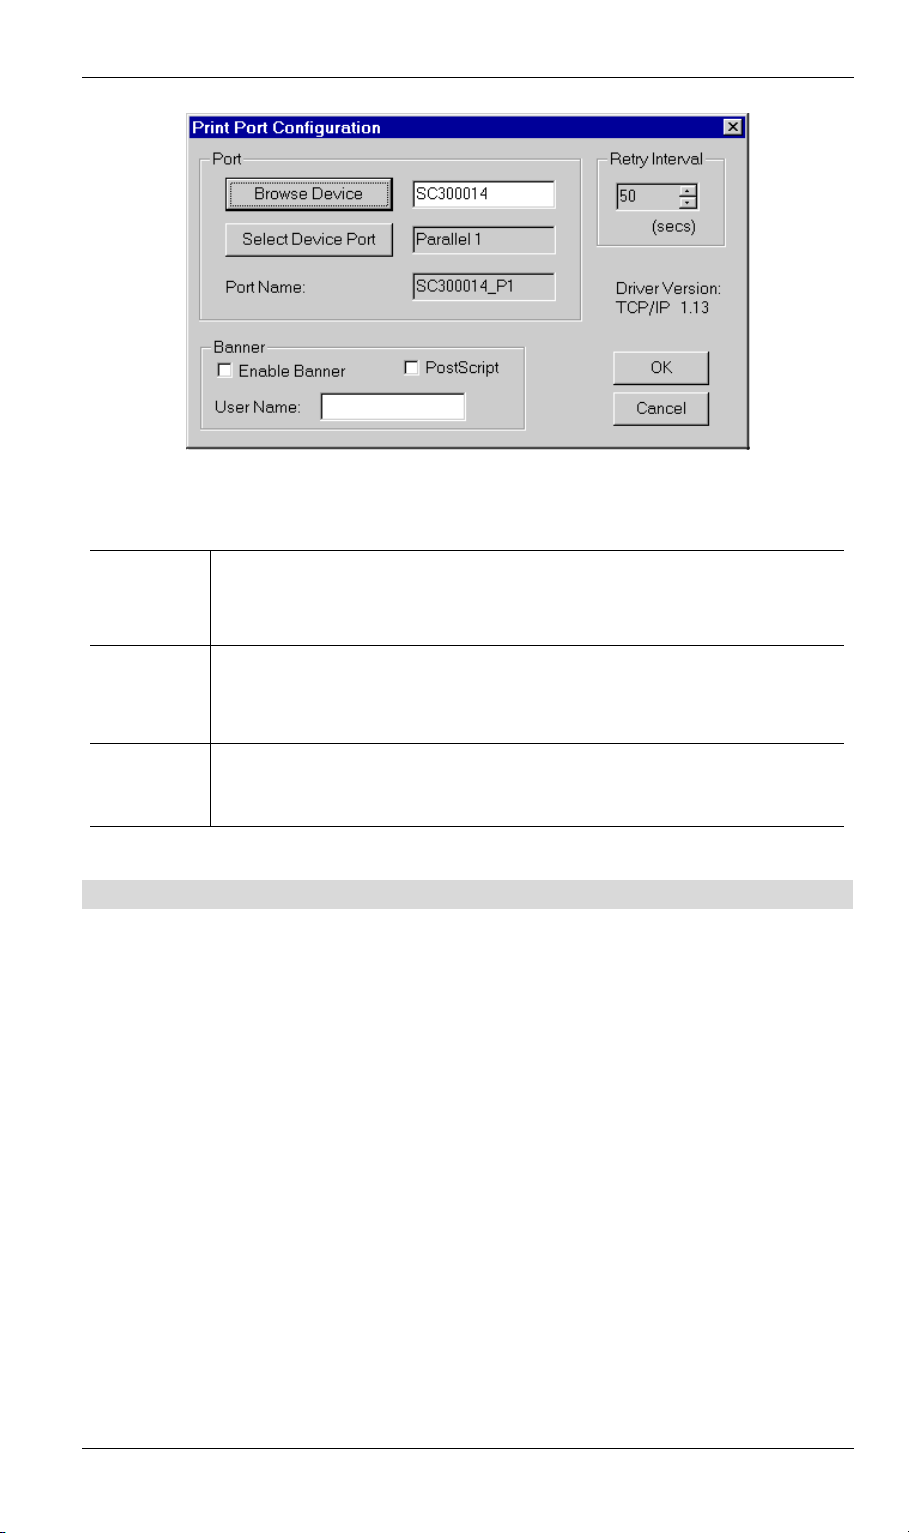
Figure 31: Print Port Configuration
Items shown on this screen are as follows:
Port
If desired, click Browse to select a different device. (The Select Device Port
button is provided to allow this software to work with multi-port models.)
The Port Name is shown in the Printer's Properties.
PC Configuration
Banner
Retry
Interval
Check this option to print a banner page before each print job.
• If using a PostScript Printer, check the PostScript box.
• The User Name will be printed on the banner page.
Sets how often Windows will poll the LevelOne WBR-1101TX to establish
a connection when the printer is busy. Increase this value if you get too
many warning messages.
LPD/LPR Printing
LPD/LPR printing can be used with Windows NT 4.0 Server or Windows 2000. No software
needs to be installed.
Windows NT 4.0 Server Configuration
To use LPD printing, Microsoft TCP/IP Printing must be installed and enabled. This can be
checked using Start-Settings-Control Panel-Network - Services.
To install LPD printing using the LevelOne WBR-1101TX, follow this procedure:
1. Go to Start-Settings-Printer and invoke the Add Printer wizard.
2. When prompted with "This printer will be managed by..", select My Computer and click
Next.
3. Select Add Port…, then select LPR Port and click New Port.
4. In the Dialog requesting Name of Address of server providing lpd, enter the IP address of
the LevelOne WBR-1101TX.
5. For Name of printer or print queue on that server, enter L1
6. Click OK. When returned to the Printer Ports window, simply select Close and then install
your printer driver as usual.
7. When prompted whether or not the printer will be shared, select the Sharing radio button.
53
Page 57
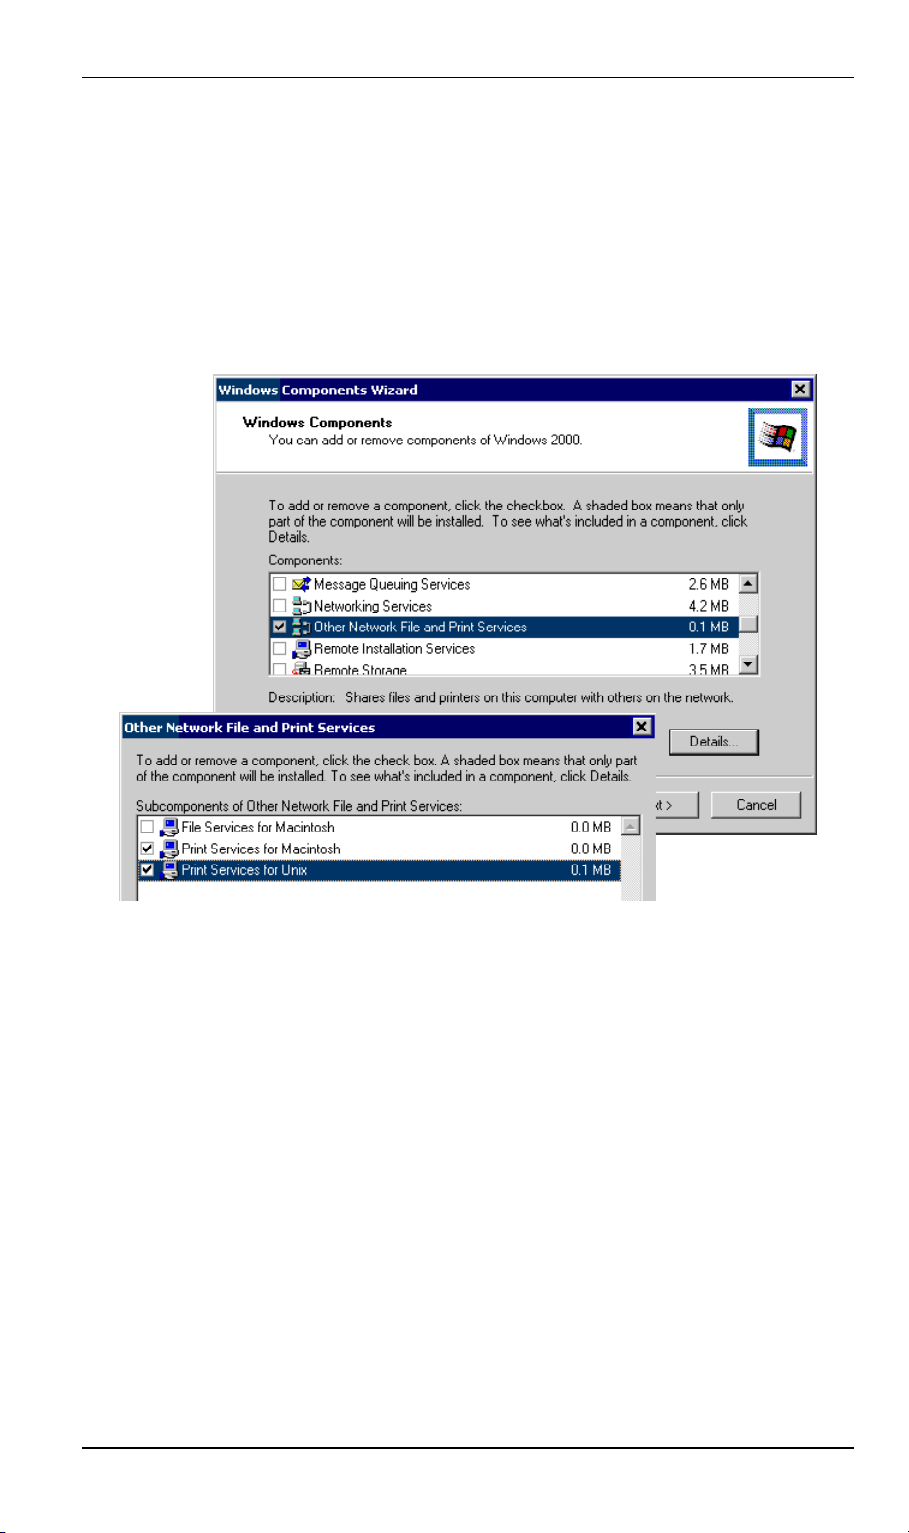
LevelOne WBR-1101TX User Guide
8. In the Shared dialog box, enter the shared printer name. The shared name is how other
users will see this printer. You should advise client PCs of the Server name and this
printer name.
9. Click OK to save and exit.
Windows 2000 Server Configuration
The LPD/LPR Port is not enabled by default. To enable it, use this procedure:
1. In Control Panel, select Add/Remove Programs, then Windows Components.
2. Select Other Network File and Print Services, then click the Details button.
Figure 32: Adding LPD/LPR Port (Win 2000)
3. Enable Print Services for Unix, and click OK.
4. Click Next and complete the Wizard.
Adding the Printer
1. Open your Printers folder, and start the Add Printer Wizard.
2. When prompted, select Local Printer.
3. On the Select the Printer Port screen, select LPR Port, as shown below. Click Next to
continue.
54
Page 58
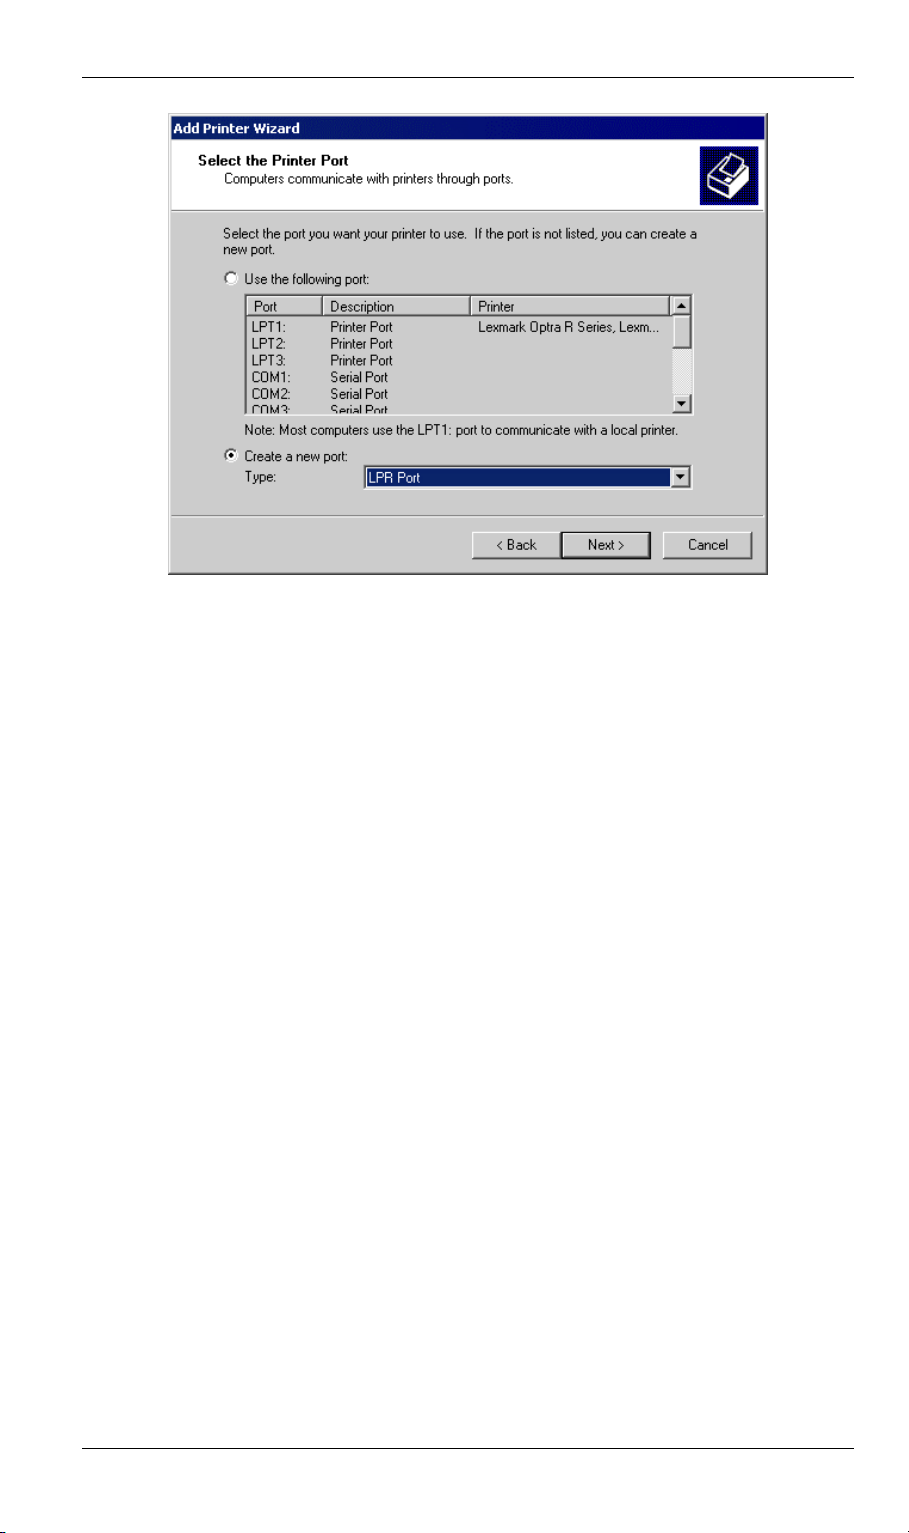
PC Configuration
Figure 33: Windows 2000: Select Port
4. In the Dialog requesting Name of Address of server providing lpd, enter the IP address of
the LevelOne WBR-1101TX.
5. For Name of printer or print queue on that server, enter L1.
6. Click OK, and then Next, and continue the Wizard.
7. At the Select Sharing screen, select the Radio Button for Share As, and enter the shared
printer name. The shared name is how other users will see this printer. You should advise
client PCs of the Server name and this printer name.
8. Complete the Add Printer wizard.
Client PC Setup for LPD/LPR Printing
After configuring the Windows Server, client PCs on the LAN can install the new printer.
The following procedure is for Windows 95/98/ME, Windows NT4.0, and Windows 2000
workstation.
1. Open your Printers folder, and start the Add Printer Wizard.
2. When prompted, select Network Printer.
3. When prompted for Network Path or Queue Name, click the Browse button, and locate the
Server and Printer which your Network Administrator advised you to use.
4. Click OK, then Next.
5. Select the correct printer Manufacturer and Model, as advised by your Network Administrator, and click Next.
6. Follow the prompts to complete the Wizard.
7. The new printer will be listed with any other installed printers, and may be selected when
printing from any Windows application.
55
Page 59
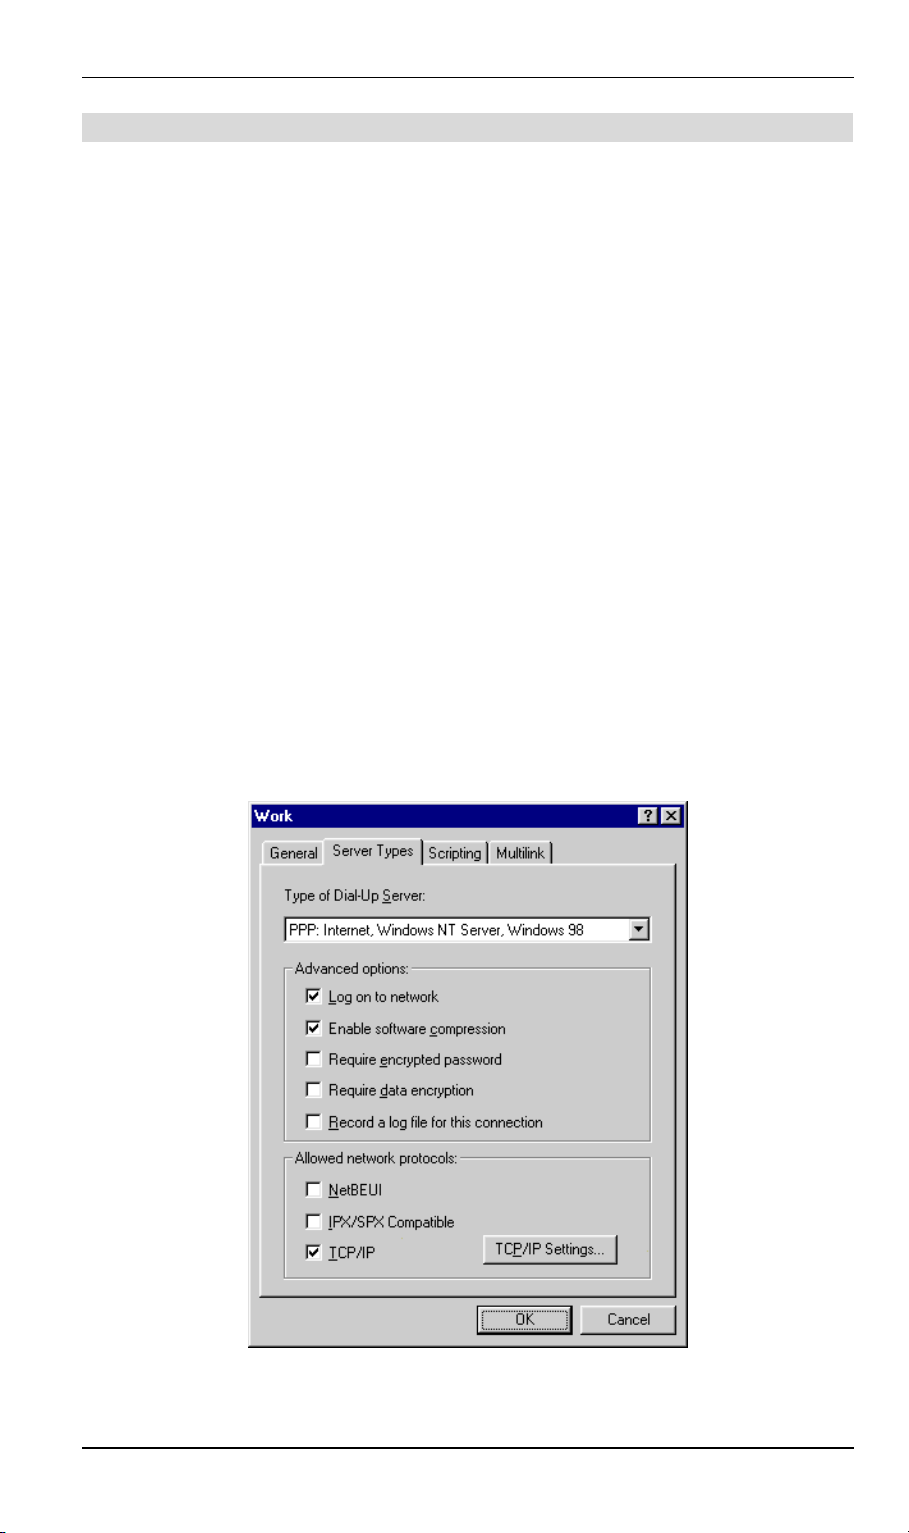
LevelOne WBR-1101TX User Guide
Dial-in Configuration
This section describes how to configure your PC to use the LevelOne WBR-1101TX's RAS
Dial-in feature.
To use the RAS Dial-in feature of the LevelOne WBR-1101TX:
• An Analog Modem or ISDN TA must be connected to the Serial Port on the LevelOne
WBR-1101TX.
• The LevelOne WBR-1101TX's must be configured for Dial-in access, and Dial-in Users
must be created. See Chapter 6 - Dial-in (Serial Port) for details.
• A suitable Dial-up connection must be created on your PC, as described below.
Creating a Dial-in Connection in Windows
You can use the standard Windows Dial-up Networking software normally used for Internet
access. The procedure is as follows:
1. Ensure your modem is installed and working.
2. Select My Computer, then Dial-up Networking.
3. Click Make new Connection, and step through the Wizard.
• Give this connection a suitable name.
• Enter the area code and telephone number to connect to the LevelOne WBR-1101TX.
• Continue the Wizard until completed.
4. The default values for this connection will work with the LevelOne WBR-1101TX's
default values. If necessary, you can adjust the Properties for the connection:
• In the Dial-up Networking window, select the connection.
• Right-click, and select Properties to see a screen like the one below.
Figure 34: Dial-up Networking Properties
56
Page 60

Dial-up Networking Properties
PC Configuration
Log on to network
This setting refers to a logon to a Server on your LAN,
not the login to the LevelOne WBR-1101TX.
This is checked by default, but is not required. Unchecking this option will speed up the login process.
Enable software compression
Normally, this should be checked, but the LevelOne
WBR-1101TX will function with either Checked or
Unchecked.
Required encrypted password The Unchecked state corresponds to the "PAP" setting
on the LevelOne WBR-1101TX's Dial-in screen.
The Checked setting corresponds to the "MSCHAP"
setting on the LevelOne WBR-1101TX's Dial-in screen.
Require data encryption
Network Protocols
TCP/IP Settings
This must NOT be checked.
NetBEUI and IPX/SPX can be disabled.
The default settings should not be changed.
Using the Dial-in Connection
1. In the Dial-up Networking window, double-click the connection to start the dial-in proc-
ess.
2. When prompted for a user name and password, enter the Name and Password assigned to
you (this is done on the LevelOne WBR-1101TX's User Details screen).
3. If the LevelOne WBR-1101TX's Callback feature is enabled, the connection will then be
terminated, and your modem must wait for the incoming call from the LevelOne WBR1101TX's modem.
4. Upon connection, the LevelOne WBR-1101TX will allocate an IP Address to your PC. To
other LAN users and devices, you will appear to be a normal LAN user, but will not be
available via Network Neighborhood.
5. Once connected, you can use the following:
• Printing to the LevelOne WBR-1101TX's printing, using the supplied Print Port
driver.
• Internet access using the LevelOne WBR-1101TX's DSL or Cable modem.
• You can connect to Web, FTP and POP3/SMTP E-Mail Servers on your LAN.
• You can connect to a PC by using "Remote Control" software such as PC Anywhere.
You can NOT use Microsoft Networking services, such
as logging in to a Windows NT/2000 Server, or using
"Network Neighborhood".
57
Page 61

LevelOne WBR-1101TX User Guide
Macintosh Clients
Internet Access
From your Macintosh, you can access the Internet via the LevelOne WBR-1101TX. The
procedure is as follows.
1. Open the TCP/IP Control Panel.
2. Select Ethernet from the Connect via pop-up menu.
3. Select Using DHCP Server from the Configure pop-up menu. The DHCP Client ID field
can be left blank.
4. Close the TCP/IP panel, saving your settings.
Note:
If using manually assigned IP addresses instead of DHCP, the only change required is to
set the Router Address field to the LevelOne WBR-1101TX's IP Address.
Printing
If you wish to share the printer connected to the LevelOne WBR-1101TX, you must use a
LaserWriter or compatible printer.
Installing the Printer
To gain access to the printer connected to the LevelOne WBR-1101TX, follow this procedure:
1. Select Control Panel - Network.
2. Ensure that EtherTalk is selected under AppleTalk Connection.
3. Open Chooser, and select the correct printer type (e.g. LaserWriter 8).
4. From the list of available printers on the right, select the LevelOne WBR-1101TX, then
click Create.
5. The new printer will be created, and can be used like any other printer.
58
Page 62
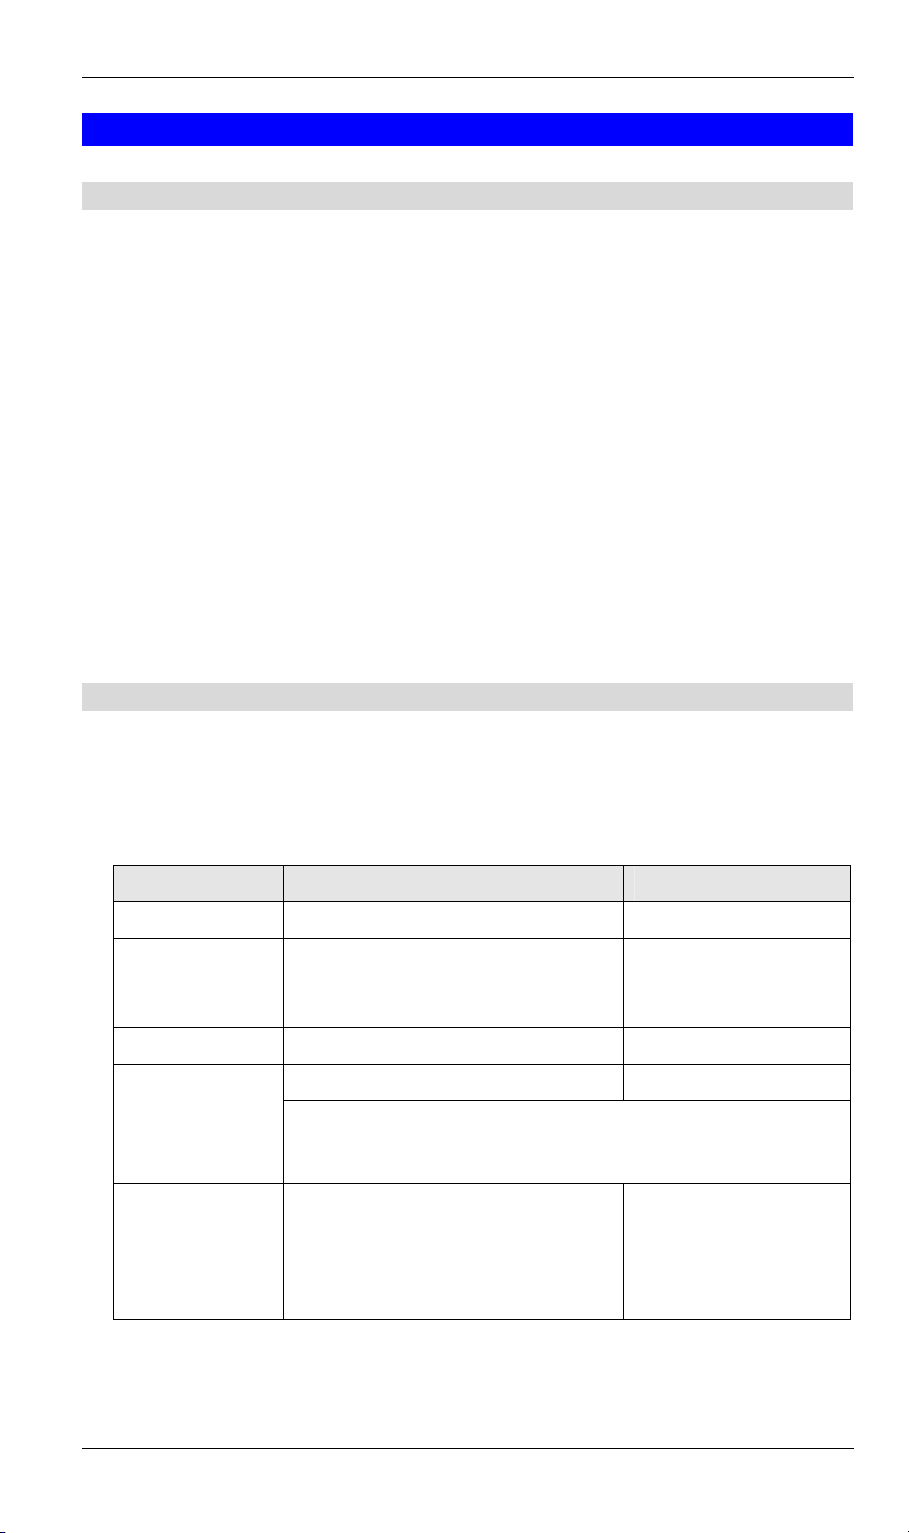
PC Configuration
Linux Clients
Internet Access on Linux
Ensure you are logged in as "root" before attempting any changes.
By default, most Unix installations use a fixed IP Address. If you wish to continue using a
fixed IP Address, make the following changes to your configuration.
• Set your "Default Gateway" to the IP Address of the LevelOne WBR-1101TX.
• Ensure your DNS (Nameserver) settings are correct.
To act as a DHCP Client (recommended)
The procedure below may vary according to your version of Linux and X -windows shell.
1. Start your X Windows client.
2. Select Control Panel - Network
3. Select the "Interface" entry for your Network card. Normally, this will be called "eth0".
4. Click the Edit button, set the "protocol" to "DHCP", and save this data.
5. To apply your changes
• Use the "Deactivate" and "Activate" buttons, if available.
• OR, restart your system.
LPD Printing on Linux
The procedure below may vary according to your version of Linux and X -windows shell.
1. In your X Windows shell, select Control Panel, then Printer Configuration.
2. Select Add. For the printer type, select Remote Unix (lpd) Queue.
3. Use the following data to complete the resulting dialog.
Field Data Example
Name
Spool Directory
File Limit
Remote Host
Remote Queue
4. Save this data, and exit the Printer Configuration. Configuration is now completed, and
the printer is now available for use.
Enter a name for this printer gw_prn
/var/spool/lpd/printer_name
Where printer_name is the "Name"
entry above.
Enter a suitable number. 0 (no limit)
LevelOne WBR-1101TX's IP address 192.168.0.1
Note:
If you have made a host file entry, you can use the name from the
host file instead of the IP Address.
Ln
Where n is the Logical Printer number
(L1, L2, L3). Logical Printers can be
configured on the LevelOne WBR1101TX's Options- Printer Port screen.
/var/spool/lpd/gw_prn
L1
59
Page 63

LevelOne WBR-1101TX User Guide
Other Unix Systems
For Internet Access via the LevelOne WBR-1101TX
• Ensure the "Gateway" field for your network card is set to the IP Address of the LevelOne
WBR-1101TX.
• Ensure your DNS settings are correct.
LPD Printing
To use LPD printing to the LevelOne WBR-1101TX's printer, install an LPD printer using the
standard procedure for your system.
• Use the LevelOne WBR-1101TX's IP Address as the location of the remote host
• Use L1, L2, or L3 for the name of the printer on the remote host.
On the LevelOne WBR-1101TX, the logical printers (L1, L2, and L3) can be configured on
the Options - Printer Port screen.
Wireless Station Configuration
This section applies to all Wireless stations wishing to use the LevelOne WBR-1101TX's
Access Point, regardless of the operating system which is used on the client.
To use the Wireless Access Point in the LevelOne WBR-1101TX, each Wireless Station must
have compatible settings, as follows:
Mode
SSID (ESSID)
WEP By default, WEP on the LevelOne WBR-1101TX is disabled.
The mode must be set to Infrastructure.
This must match the value used on the LevelOne WBR-1101TX. The
default value is default
Note! The SSID is case sensitive.
• If WEP remains disabled on the LevelOne WBR-1101TX, all
stations must have WEP disabled.
• If WEP is enabled on the LevelOne WBR-1101TX, each station
must use the same settings as the LevelOne WBR-1101TX.
60 61
Page 64

Chapter 5
DHCP
This Chapter covers the use of DHCP, using either an existing DHCP Server
or the LevelOne WBR-1101TX's DHCP Server function.
5
Overview
If your LAN does not use DHCP, and you do not wish to use DHCP, you can ignore this
chapter.
What DHCP Does
A DHCP (Dynamic Host Configuration Protocol) server allocates a valid IP address to a
DHCP client (PC or device) upon request.
• The client request is made when the client device boots.
• The DHCP Server provides the Gateway and DNS addresses to the client, as well as
allocating an IP Address.
• Windows 95/98/ME include all the software required to act as a DHCP client. This is the
default Windows setting for TCP/IP. However, Windows uses the term Obtain an IP Ad-
dress automatically instead of "DHCP Client".
• The LevelOne WBR-1101TX can act as a DHCP server.
Using the LevelOne WBR-1101TX's DHCP Server
This is the default setting. The DHCP Server settings are on the LAN screen. On this screen,
you can:
• Enable or Disable the LevelOne WBR-1101TX's DHCP Server function.
• Set the range of IP Addresses allocated to PCs by the DHCP Server function.
You can assign Fixed IP Addresses to some devices
while using DHCP, provided that the Fixed IP Addresses
are NOT within the range used by the DHCP Server.
Using another DHCP Server
You can only use one (1) DHCP Server. If you wish to use another DHCP Server, rather than
the LevelOne WBR-1101TX's, the following procedure is required.
1. Disable the DHCP Server feature in the LevelOne WBR-1101TX. This setting is on the
LAN screen.
2. Configure the DHCP Server to provide the LevelOne WBR-1101TX's IP Address as the
Default Gateway.
Page 65

LevelOne WBR-1101TX User Guide
To Configure your PCs to use DHCP
This is the default setting for TCP/IP under Windows 95/98/ME. See Chapter 4 - Client
Configuration for the procedure to check these settings.
62 63
Page 66
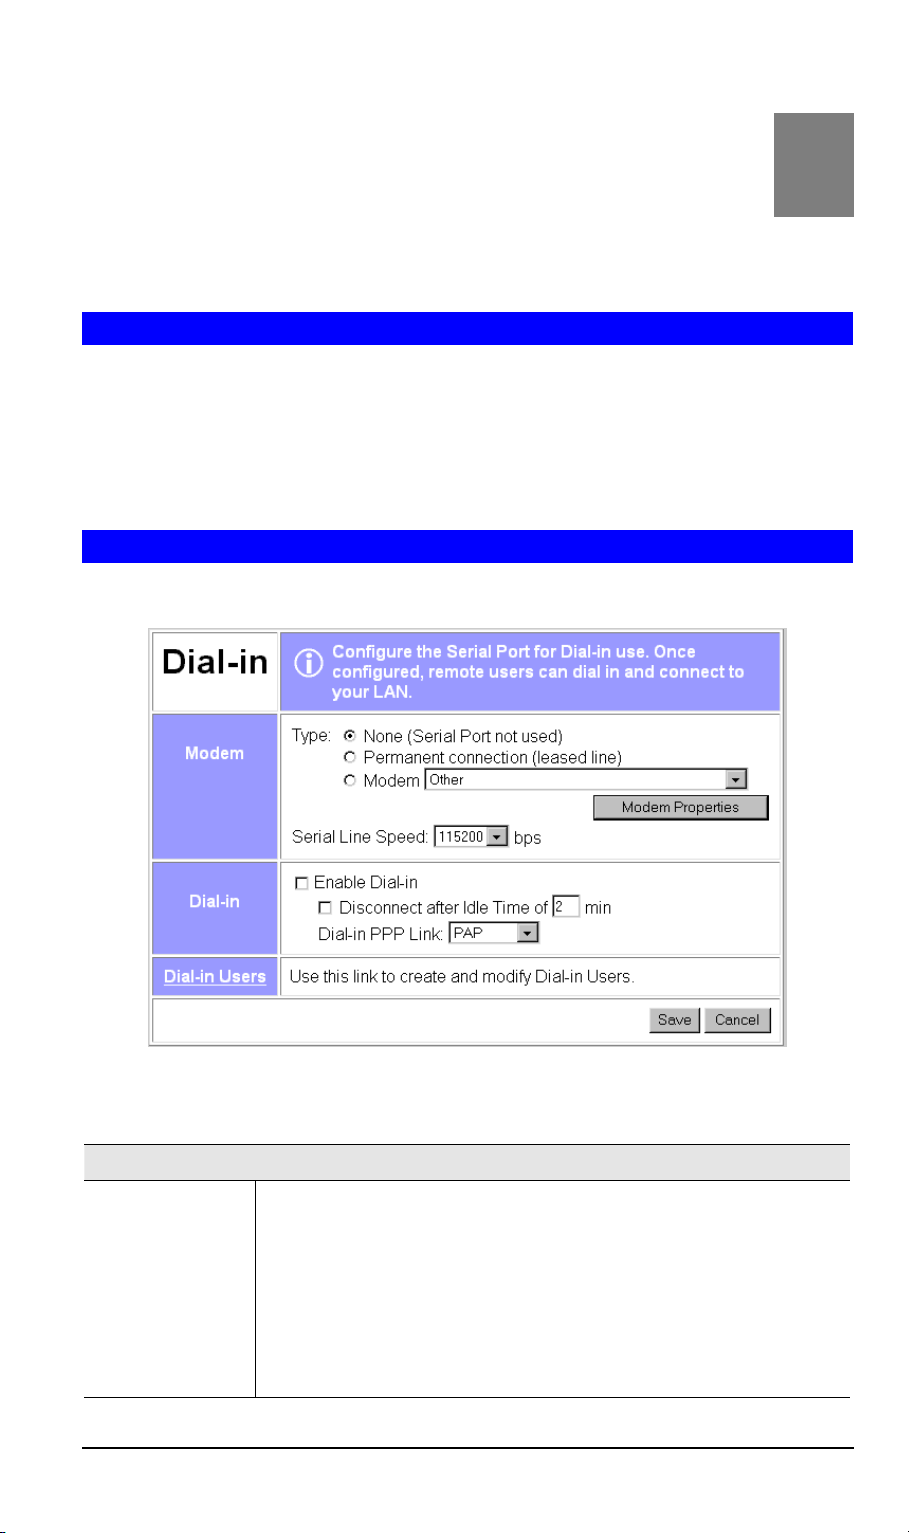
Chapter 6
Dial-in (Serial Port)
This Chapter details using the Serial (RS232) Port for Dial-in use.
6
Overview
The Serial (RS232) port can be used for Internet Access or to provide RAS (Dial-in) access to
your LAN.
• If used for Internet access, the WAN (Ethernet) Port cannot be used.
• Both Internet Access and Dial-in Access can be enabled simultaneously, but if the modem
is in use, a Dial-in user will only get a "busy" signal on their telephone line.
Dial-in Screen
This screen is reached via the Dial-in link on the main menu.
Data - Dial-in Screen
Modem
Type
Select None if nothing is connected to the Serial Port, or you do not
wish use to use the Serial Port.
For Permanent Connection (leased line):
• Ensure the Serial Line Speed is set to match the speed on your
• Ignore the Telephone numbers and "Disconnect after Idle" setting.
For Modem:
Figure 35: Dial-in Screen
leased line.
Page 67

LevelOne WBR-1101TX User Guide
• If your modem is in the drop-down list, just select it.
• If your modem is not in the list, select "_Standard Modem" and
test to see if this works.
• If "_Standard Modem" does not work, select "Other", then click
the Modem Properties button and set these settings correctly. See
the section Modem Properties Screen later in this chapter for further details.
Modem Properties
Serial Line
Speed
Dial-In
Enable Dial-in
Disconnect after
Idle Time
Clicking this button will open the Modem Properties screen and allow
changing of the modem's properties. Normally, this is not required.
See the section Modem Properties Screen later in this chapter for
further details.
Select the speed which is equal to or below the fastest Serial line speed
(NOT Phone line speed) of your modem. Available speeds range from
4.8K to 460.8K (bps).
If checked, this port is available for dial-in access. Otherwise, any
attempt to dial-in will be blocked.
If Internet Access is also enabled, Dial-in users may find it difficult to
connect because the telephone line is in use. Reducing the Disconnect
after Idle Time setting for Internet Access to 1 minute may help.
• See Dial -in Users later in this Chapter for details of creating and
managing dial-in users.
• See the Dial-in section in Chapter 4 - PC Configuration for details
on setting up the remote PC to use the LevelOne WBR-1101TX's
Dial-in facility.
If checked, a Dial-in connection will be terminated after the specified
time-out period. The allowable range is 1-99 minutes.
If preferred, the connection time limit may be set individually for each
user.
Dial-in
PPP Link
Dial-In Users
Dial-in Users
Link
Select the desired security option for log-in:
• PAP has widespread support; almost all communications systems
support it.
• CHAP is more secure than PAP; the password is encrypted before
transmission. If it is selected, the dial-in clients must also support
CHAP in order to connect.
• MS CHAP is the Microsoft version of CHAP, used on Windows
platforms. If all dial-in clients are using Windows 95 or later, you
can choose this option.
• None means no login authentication is performed.
Warning! If you choose "None", anyone can connect; this is a major
security risk.
Use this link to create and manage users for the RAS Dial-in function.
See the Dial-in Users section later in this chapter for details.
64
Page 68
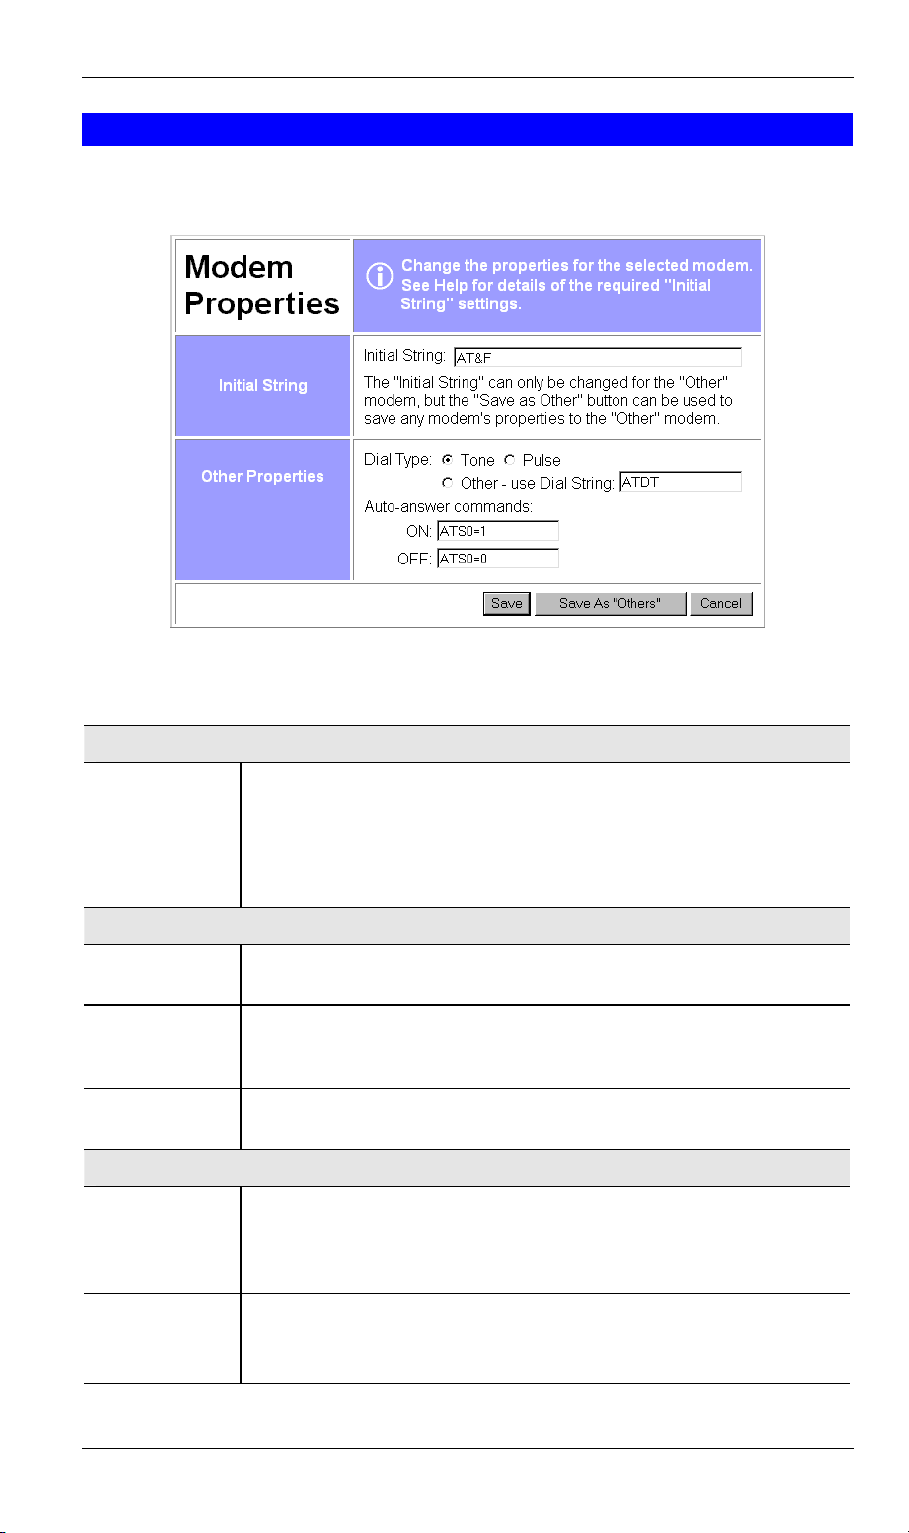
Serial Port
Modem Properties Screen
This screen is displayed when the Modem Properties button on the Dial-in screen (or on the
Serial Port - Internet sub-screen) is clicked. Normally, it is not necessary to use this screen.
Figure 36: Modem Properties Screen
Data - Modem Properties Screen
Initial String
Initial String
Other Properties
Dial Type
Dial String
Auto Answer
Commands
Buttons
Save
This is a series of AT commands used to correctly configure your
modem or ISDN.
• The Initial String can only be changed for the "Other" modem type.
• See Appendix C - AT Commands for further details about the
required Initial String settings and standard AT commands.
Select Tone, Pulse or Other to match your system. For Other, you must
provide the Dial String.
The AT command sent to your modem before dialing. For example,
"ATDT" tells your modem to use Tone Dialing.
Check your modem's documentation to find the correct AT commands.
Enter the command strings which turn the "auto-answer" function in
your modem or ISDN TA ON and OFF.
Save the data on this screen.
Note that if the current modem was not "Other" type, and you changed
the Initial String, you can NOT use "Save". You must use "Save as
Other" instead.
Save as
"Other"
Assign the data shown on screen to the "Other" modem type, regardless
of the modem selected on the Dial-in screen.
You should then select "Other" as the Modem to use.
65
Page 69

LevelOne WBR-1101TX User Guide
Cancel
Reverse any changes since the last "Save" operation.
66
Page 70
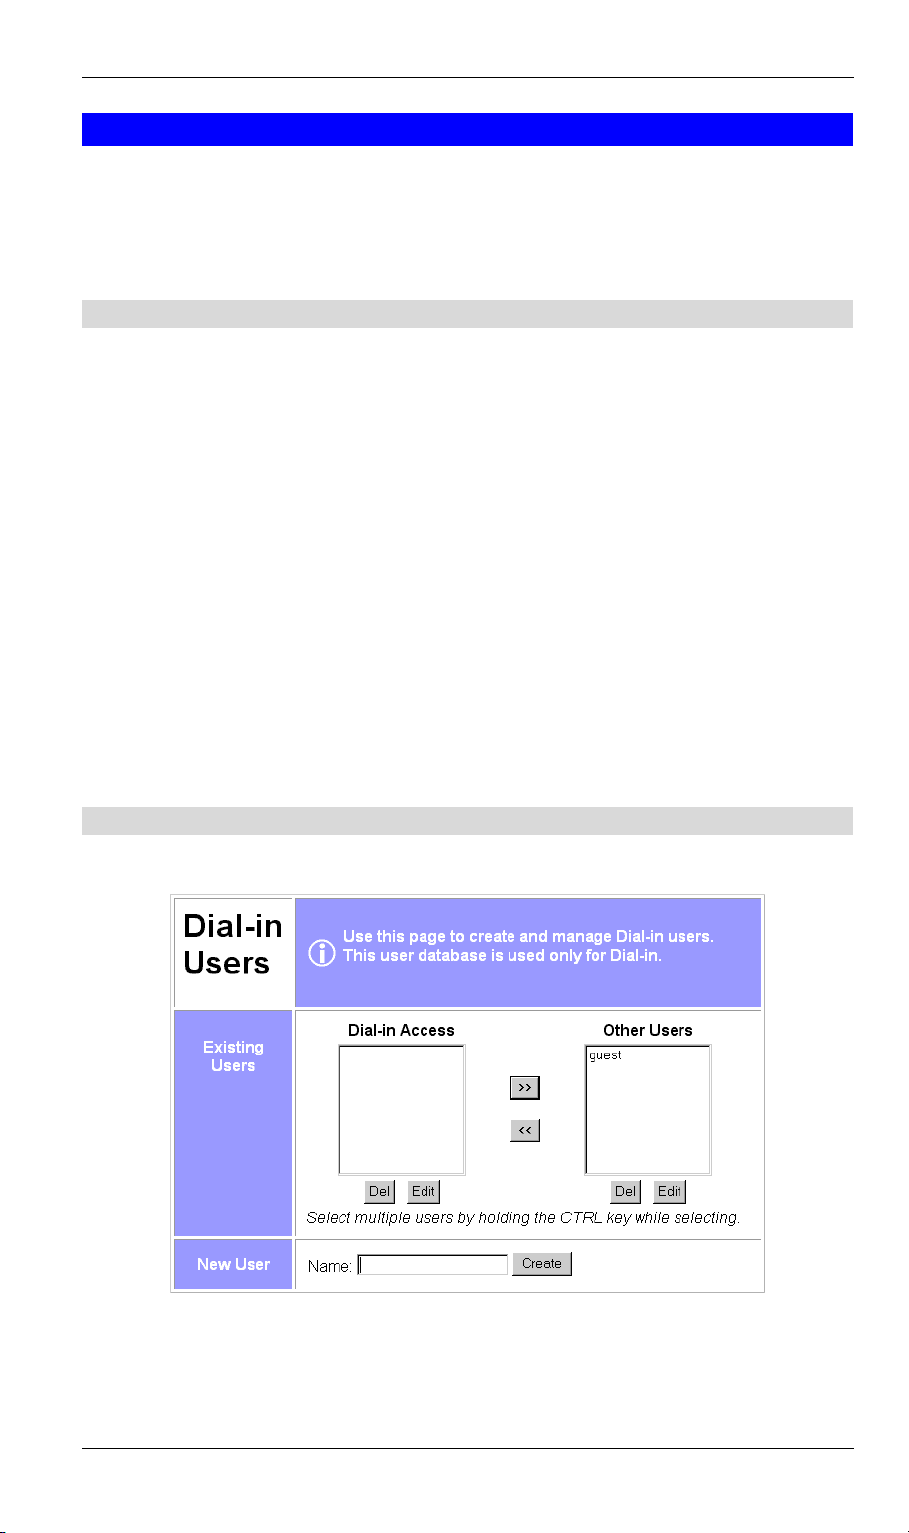
Serial Port
Dial -in Users
This section describes how to create and manage remote users who wish to use the LevelOne
WBR-1101TX's RAS Dial-in facility.
For details of configuring the remote PC to use Dial-in access, refer to Dial-in in Chapter 4 -
Client PC Configuration.
Overview
The LevelOne WBR-1101TX provides the following options to control Dial-in access:
1. Allow access by anyone and everyone.
• If Dial-in PPP link security on the Serial Port screen is set to "None", then the user
name and password is not checked, so anyone who dials in can gain access.
• This creates a major security weakness. It is strongly recommended that this option is
NOT used.
2. All users use the same log-in.
• All Dial-in users can use the existing "guest" user, once Dial-in access is Enabled for
both the Serial port and the guest user.
• A password should be assigned to the "guest" user. By default, there is no password.
3. Each Dial-in user has a separate log-in and password
• This is the recommended approach.
• Each person requiring dial-in access is entered in the LevelOne WBR-1101TX's user
database, using the Dial-in Users and User Details screens.
Dial-in Users Screen
This screen is reached via the Dial-in Users link on the Dial-in screen.
Figure 37: Dial-in Users Screen
67
Page 71

LevelOne WBR-1101TX User Guide
Data - Dial-in Users Screen
Existing Users
Dial-in Access
Other Users
New User
• This lists all users who have Dial-in permission.
• If no users have dial-in permission, this list will be empty.
• Select the user or users you wish to change. Multiple users can be
selected by holding down the CTRL key while selecting. (For the
Macintosh, use the SHIFT key instead of CTRL).
• This lists all users who do not have Dial-in access.
• If you have not created any users, this list will contain the pre-
defined "guest" user.
• Use the "Create" button on this screen to create new users as re-
quired.
• Select the user or users you wish to change. Multiple users can be
selected by holding down the CTRL key while selecting. (For the
Macintosh, use the SHIFT key instead of CTRL).
Name
Buttons
>>
<<
Del
Edit
Create
Use this to create new users as required:
• Enter the name for the new user here.
• Spaces, punctuation, and special characters must NOT be used in
the name.
• User names are case insensitive (case is ignored), so you can not
have 2 names which differ only by case.
• The name can not be changed once the user is created.
Use the " >> " button to remove Dial-in access for any users selected in
the "Dial-in Users" list.
Use the " << " button to allow Dial-in access for any users selected in the
"Other Users" list.
Delete the selected user or users in the list above the button.
Modify the selected user in the list above the button. Only 1 user should
be selected.
This will add a new user to the database.
• Enter the required user name in the "Name" field, then click the
Create button.
• You will then see the "User Details" screen, where you can enter the
other details for this user.
68
Page 72
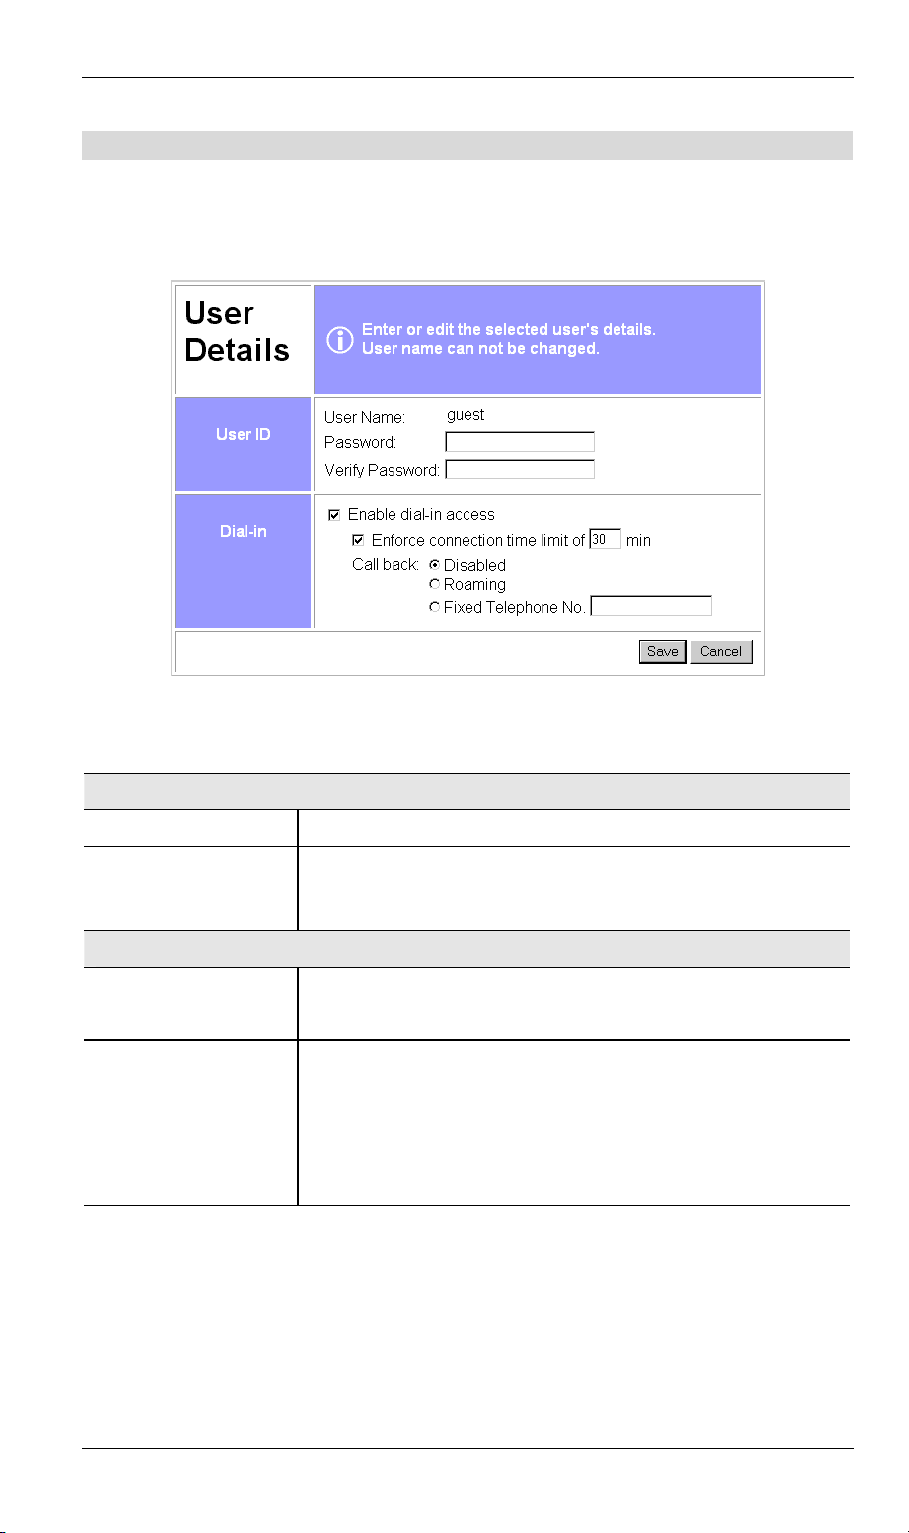
Serial Port
User Details Screen
This screen is displayed in the following situations:
• Either of the Edit buttons on the Dial-in Users screen is used to modify the selected user.
• The Create button on the Dial-in Users screen is used to create a new user.
Figure 38: User Details Screen
Data - User Details Screen
User ID
User Name
Password
Verify Password
Dial-in
Enable dial-in access
Enforce connection
time limit
The user name can not be changed.
The password for the current user. Passwords are case sensitive.
When creating or changing a password, enter it in the Verify
Password field also.
Use this to suspend or enable dial-in access.
This setting can also be changed on the Dial-in Users screen.
If checked, the LevelOne WBR-1101TX will terminate the Dialin connection after the specified period. The time period can be
set from 1 to 999 minutes.
If unchecked, the connection time-out set on the Dial-in screen
will be used. If neither time-out is enabled, the connection must
be terminated by the remote user.
69
Page 73

LevelOne WBR-1101TX User Guide
Call back
Select the desired option:
• Disabled:- The user can simply dial-in; the LevelOne WBR-
1101TX will not hang-up and call back.
• Roaming:- After providing their name and password, the
user is prompted for the call-back number. The LevelOne
WBR-1101TX will then hang up and dial the number provided by the remote user.
• Fixed:- The number entered in the Telephone No. field is
always used as the call-back number. The LevelOne WBR1101TX will accept the incoming call, authenticate the user,
then hang up and dial this number.
• Telephone No:- If Fixed is chosen, a telephone number must
be entered in this field. For the other options, this field is ignored.
70 71
Page 74
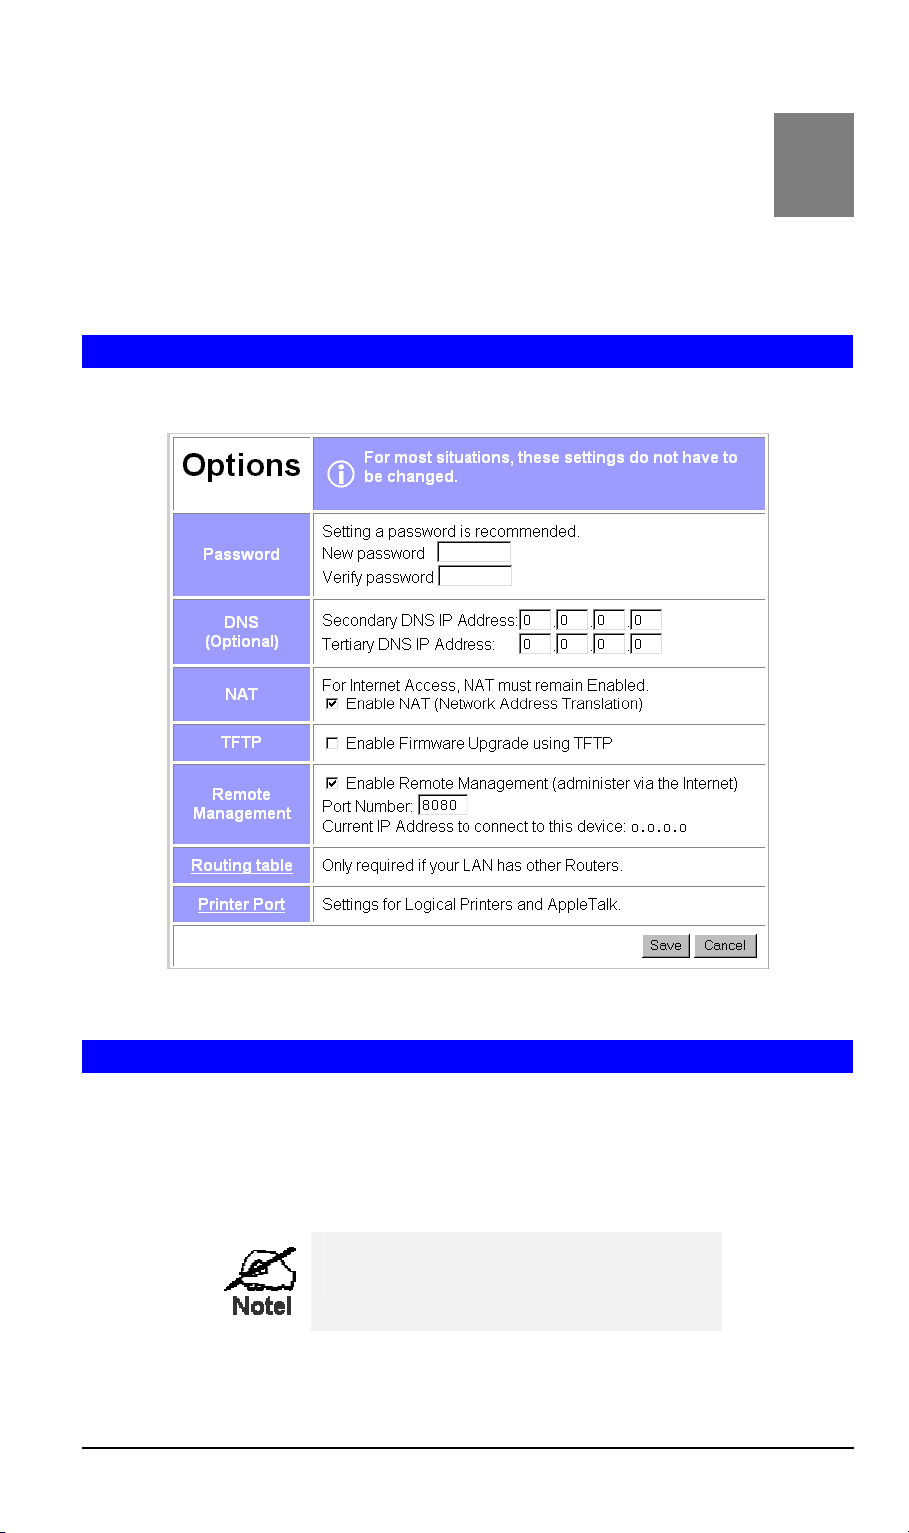
Chapter 7
Options
This Chapter details the options available on the LevelOne WBR-1101TX's
"Options" screen.
Overview
An example Options screen is shown below.
7
Figure 39: Options Screen
Password
Once a password is entered, it is required in order to change the device configuration. Passwords are case sensitive and can be up to 8 alphanumeric characters (no spaces or
punctuation).
To create or change the password, enter the required password in both the New Password and
Verify Password input fields.
When prompted for the password, leave
the "User Name" blank.
Page 75

LevelOne WBR-1101TX User Guide
DNS (Domain Name Server
• These entries are optional. The main DNS (Domain Name Server) is either provided by
your ISP, or entered on the Quick Setup screen.
• If desired, enter any other DNS IP Addresses here. The first available DNS will be used.
NAT (Network Address Translation)
NAT allows PCs on your LAN to share a single external (Internet) IP Address. This IP Address is supplied by your ISP. Use the following to determine whether or nor you need NAT.
• For Internet access, NAT must be left On unless all PCs on your LAN have valid external
IP Addresses.
• If this device is not being used to provide shared Internet access, NAT is not normally
required. With NAT disabled, the LevelOne WBR-1101TX will act as a static router.
• If NAT is disabled, the Firewall protection provided by the LevelOne WBR-1101TX is
lost, and the Advanced Internet features (Virtual Servers, Special Applications, and DMZ)
are no longer available.
TFTP
TFTP (Trivial FTP) can be used to upgrade the firmware in the LevelOne WBR-1101TX.
However, this is not normally required; there is a Windows utility available for this purpose.
Remote Management
This feature allows you to manage the LevelOne WBR-1101TX via the Internet.
Enable Remote
Management
Port Number
Current IP Address
Enable to allow management via the Internet. If Disabled, this
device will ignore management connection attempts from the WAN
port.
Enter a port number between 1024 and 65535 (8080 is recommended). This port number must be specified when you connect
(see below).
Note: The default port number for HTTP (Web) connections is port
80, but using port 80 here will prevent the use of a Web "Virtual
Server" on your LAN. (See Advanced Internet - Virtual Servers)
You must use this IP Address to connect (see below).
This IP Address is allocated by your ISP. But if using a Dynamic
IP Address, this value can change each time you connect to your
ISP. So it is better if your ISP allocates you a Fixed IP Address.
To connect from a remote PC via the Internet
1. Ensure your Internet connection is established, and start your Web Browser.
72
Page 76
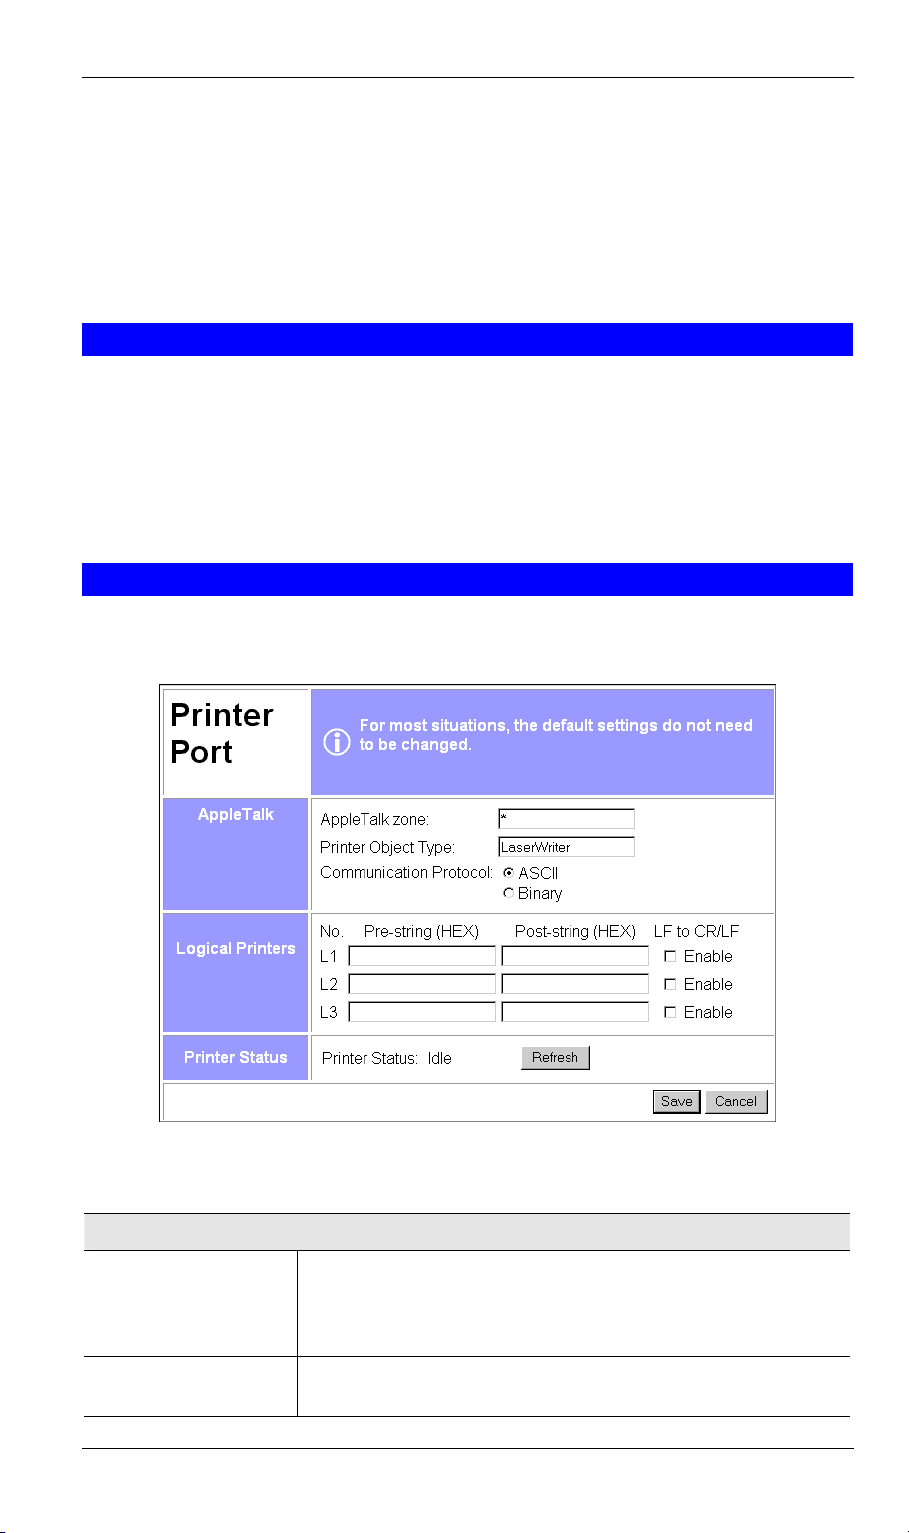
Options
2. In the "Address" bar, enter "HTTP://" followed by the WAN IP Address of the LevelOne
WBR-1101TX. If the port number is not 80, the port number is also required. (After the IP
Address, enter ":" followed by the port number.)
e.g.
HTTP://123.123.123.123:8080
This example assumes the WAN IP Address is 123.123.123.123, and the port number is
8080.
Routing Table
This link provides access to a standard static routing table.
Configuration is only required if your LAN contains other routers.
Refer to Chapter 8 - Routing for further details about Router configuration and using the
Router screen.
Printer Port
This link will reveal the Printer Port screen, as shown below. Most users do not need to
change these settings.
Figure 40: Printer Port Screen
Data - Printer Port Screen
AppleTalk
AppleTalk Zone
Printer Object Type
This determines which Apple systems can gain access to this
printer. The default value is *, which allows access by all systems. If you enter another zone name, only Apple systems in that
zone will be able to access the printer.
Sets the type of printer attached. The default setting is "LaserWriter". Other printers have not been tested, and may not work.
73
Page 77

LevelOne WBR-1101TX User Guide
Communication
Protocol
Logical Printers
No (L1, L2, L3)
Pre-string (HEX)
Post-string (HEX)
LF to CR/LF
Printer Status
Printer Status
You must use the same setting as your Macintosh.
There are 3 Logical Printers (Ports), named L1, L2, and L3.
These names can not be changed, and must be used when selecting the logical printer from your Unix system.
Enter (in HEX) the series of printer commands to be sent to the
attached printer BEFORE each print job.
Enter (in HEX) the series of printer commands to be sent to the
attached printer AFTER each print job.
If checked, Unix-style LF (line feed) characters at the end of each
line will be converted to CR/LF (carriage return/line feed) pairs,
as used in MSDOS and Windows.
This indicates the current status of the printer. Possible values
are:
• Idle
• Printing
• Off-line
• Out of paper
"Refresh" Button
Click this to update the printer status information
74 75
Page 78

Chapter 8
Routing
This Chapter explains the Routing features of the LevelOne WBR-1101TX.
8
Overview
• If you don't have other Routers or Gateways on your LAN, ignore the "Routing" page
completely.
• If the LevelOne WBR-1101TX is only acting as a Gateway for the local LAN segment,
ignore the "Routing" page even if your LAN has other Routers.
• If your LAN has a standard Router (e.g. Cisco) on your LAN, and the LevelOne WBR-
1101TX is to act as a Gateway for all LAN segments, enable RIP (Routing Information
Protocol) and ignore the Static Routing table.
• If your LAN has other Gateways and Routers, and you wish to control which LAN seg-
ments use each Gateway, do NOT enable RIP (Routing Information Protocol). Configure
the Static Routing table instead. (You also need to configure the other Routers.)
• If using Windows 2000 Datacenter Server as a software Router, enable RIP on the Leve-
lOne WBR-1101TX, and ensure the following Windows 2000 settings are correct:
• Open Routing and Remote Access
• In the console tree, select Routing and Remote Access , [server name], IP Routing,
RIP
• In the "Details" pane, right-click the interface you want to configure for RIP version
2, and then click "Properties".
• On the "General" tab, set Outgoing packet protocol to "RIP version 2 broadcast", and
Incoming packet protocol to "RIP version 1 and 2".
Routing Screen
The routing table is accessed by the Routing link on the Options screen.
Using this Screen
Generally, you will use either RIP (Routing Information Protocol) OR the Static Routing
Table, although is it possible to use both methods simultaneously.
Static Routing Table
If RIP is not used, an entry in the routing table is required for each LAN segment on your
Network, other than the segment to which this device is attached.
The other Routers must also be configured. See Router Configuration later in this chapter for
further details and an example.
Page 79
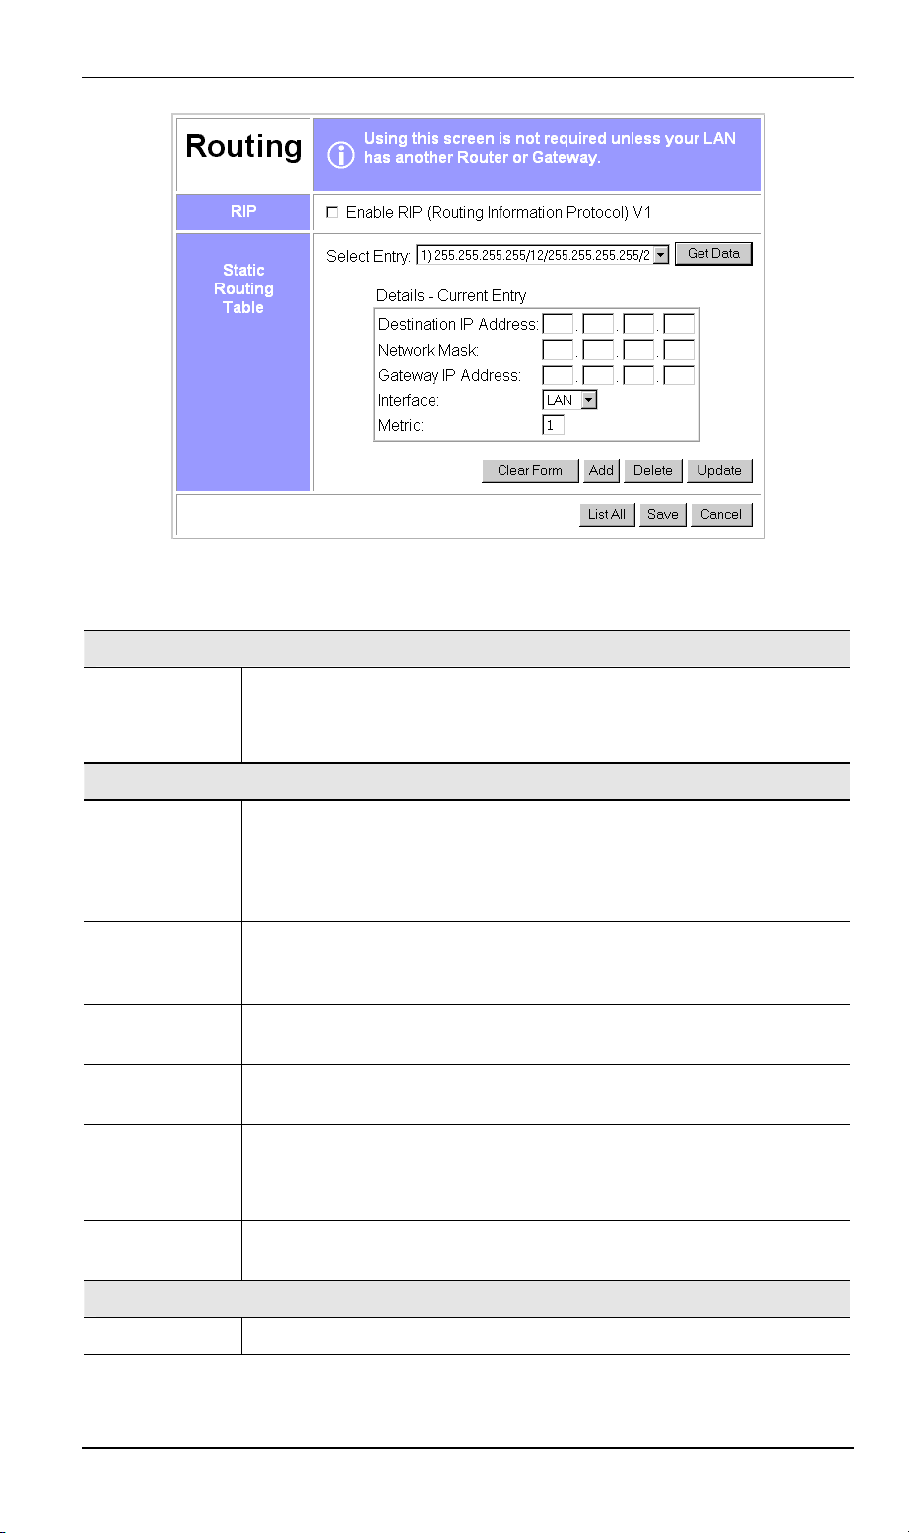
LevelOne WBR-1101TX User Guide
Data - Routing Screen
Figure 41: Routing Screen
RIP
Enable RIP
Check this to enable the RIP (Routing Information Protocol) feature of
the LevelOne WBR-1101TX.
The LevelOne WBR-1101TX supports RIP 1 only.
Static Routing Table
Select Entry
This drop-down list shows all entries in the Routing Table.
• To view or change an entry, select it, then click the Get Data button.
• After making any required changes, click the Update button to save
Destination
IP Address
The network address of the remote LAN segment.
For standard class "C" LANs, the network address is the first 3 fields of
this Destination IP Address. The 4
Network Mask
The Network Mask used on the remote LAN segment. For class "C"
networks, the standard Network Mask is 255.255.255.0
Gateway
IP Address
Interface
The IP Address of the Router on the LAN segment to which this device
is attached. (NOT the router on the remote LAN segment.)
Select the appropriate interface - LAN or WAN from the drop-down list.
Note: The "WAN" interface it only available if NAT (Network Address
Translation) has been disabled on the Options screen.
your changes.
th
(last) field can be left at 0.
Metric
Buttons
Clear Form
The number of routers which must be traversed to reach the remote LAN
segment. The default value is 1.
Clears all data, ready for input of a new entry.
76
Page 80
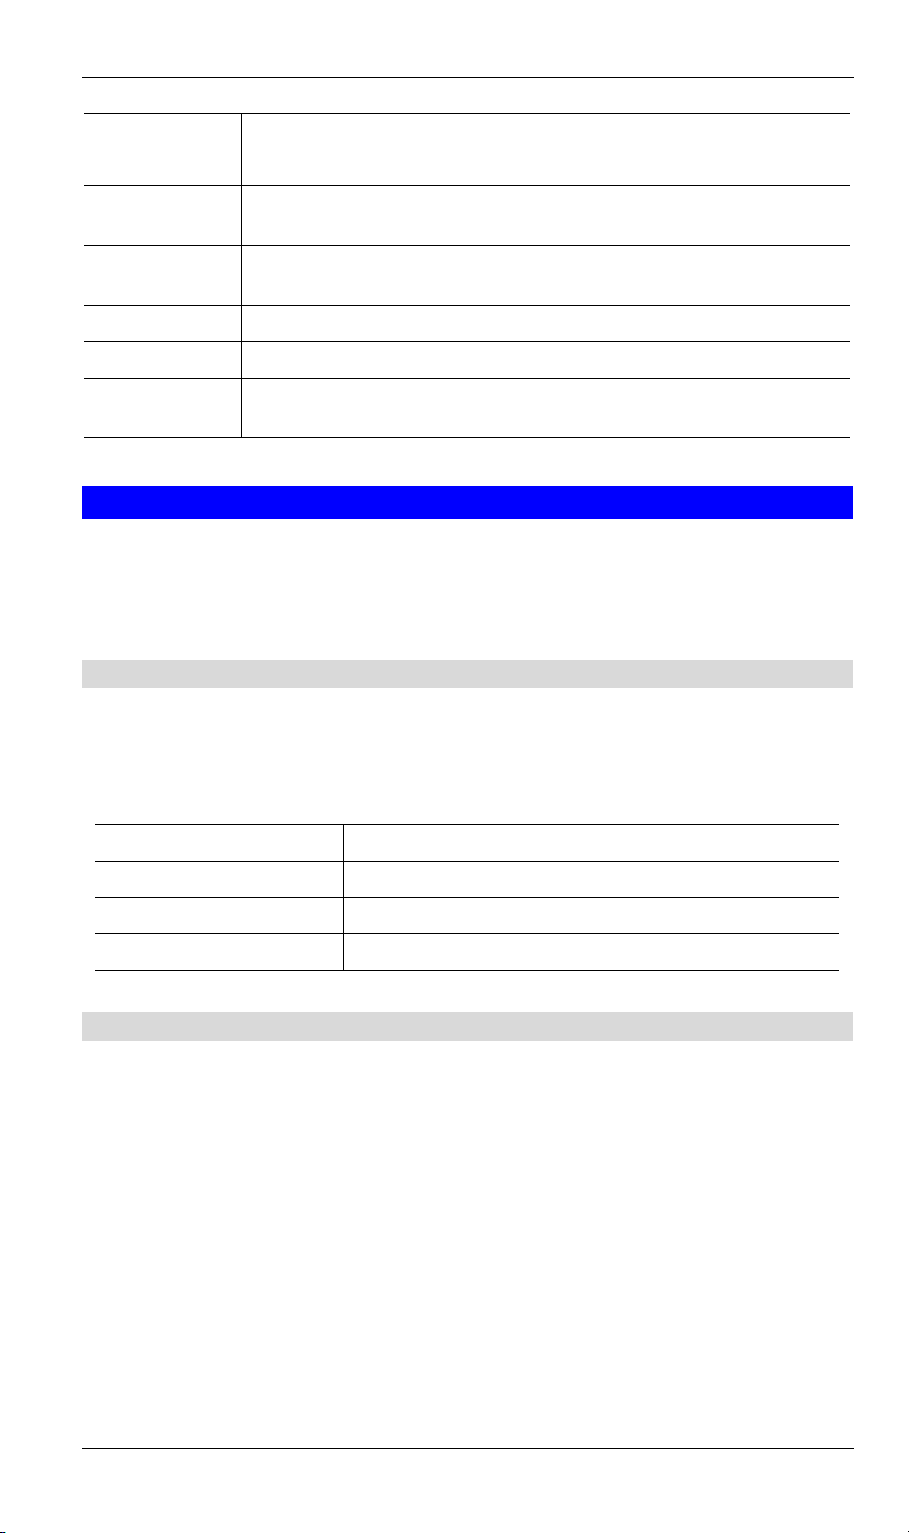
Routing
Add
Delete
Update
List All
Save
Cancel
Add a new entry to the Routing table, using the data shown on screen.
The name shown in the drop-down list is ignored.
Delete the entry selected in the drop-down list, regardless of whether its
details are shown on screen.
Update the entry selected in the drop-down list, using the data shown on
screen.
List all entries in the Routing table.
Save the RIP setting. This has no effect on the Static Routing Table.
Reverse any changes made since the last "submit" operation (i.e. since
clicking any other button).
Router Configuration
It is essential that all IP packets for devices not on the local LAN be passed to the LevelOne
WBR-1101TX, so that they can be forwarded to the Internet. To achieve this, the local LAN
must be configured to use the LevelOne WBR-1101TX as the Default Route or Default Gate-
way.
Local Router
The local router is the Router installed on the same LAN segment as the LevelOne WBR1101TX. This router requires that the Default Route is the LevelOne WBR-1101TX itself.
Typically, routers have a special entry for the Default Route. It should be configured as follows.
Destination IP Address
Network Mask
Gateway IP Address
Metric
Normally 0.0.0.0, but check your router documentation.
Normally 0.0.0.0, but check your router documentation.
The IP Address of the LevelOne WBR-1101TX.
1
Other Routers on the Local LAN
Other routers on the local LAN must use the LevelOne WBR-1101TX's Local Router as the
Default Route. The entries will be the same as the LevelOne WBR-1101TX's local router, with
the exception of the Gateway IP Address.
• For a router with a direct connection to the LevelOne WBR-1101TX's local Router, the
Gateway IP Address is the address of the LevelOne WBR-1101TX's local router.
• For routers which must forward packets to another router before reaching the LevelOne
WBR-1101TX's local router, the Gateway IP Address is the address of the intermediate
router.
77
Page 81
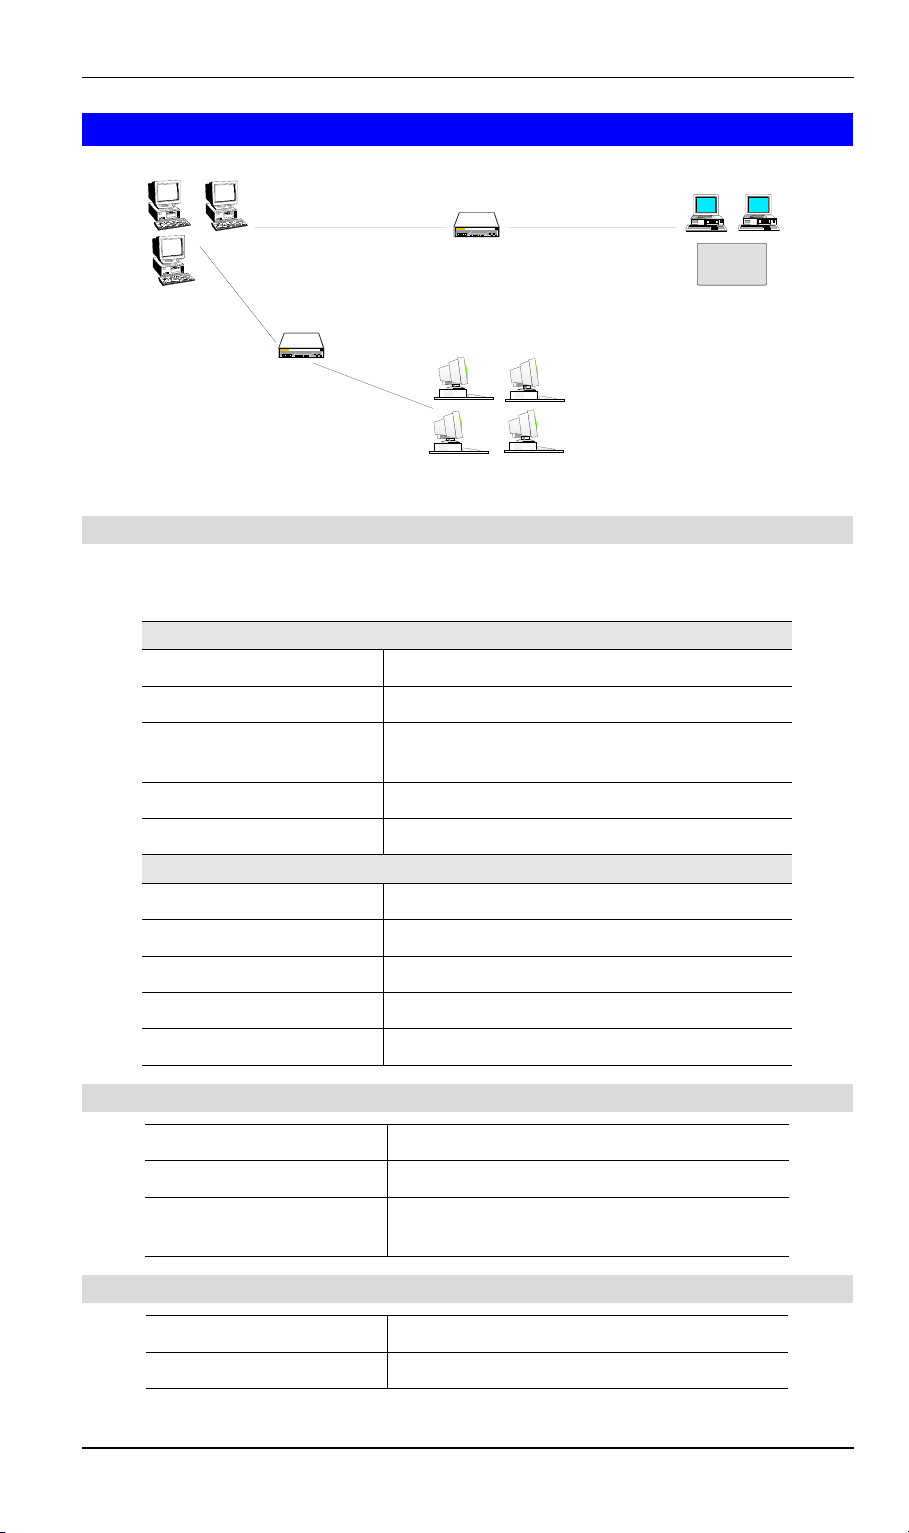
LevelOne WBR-1101TX User Guide
Static Routing - Example
(192.168.1.80)
Router A
(192.168.0.100)
Segment 1
(192.168.1.xx)
Router B
(192.168.1.90) (192.168.2.70)
Segment 0
(192.168.0.xx)
Wireless
Router
(192.168.0.1)
Segment 2
(192.168.2.xx)
Figure 42: Routing Example
For the LevelOne WBR-1101TX's Routing Table
For the LAN shown above, with 2 routers and 3 LAN segments, the LevelOne WBR-1101TX
requires 2 entries as follows.
Entry 1 (Segment 1)
Destination IP Address 192.168.1.0
Network Mask 255.255.255.0 (Standard Class C)
Gateway IP Address 192.168.0.100 (LevelOne WBR-1101TX's
local Router)
Interface LAN
Metric 1
Entry 2 (Segment 2)
Destination IP Address 192.168.2.0
Network Mask 255.255.255.0 (Standard Class C)
Gateway IP Address 192.168.0.100
Interface LAN
Metric 2
For Router A's Default Route
Destination IP Address 0.0.0.0
Network Mask 0.0.0.0
Gateway IP Address 192.168.0.1 (LevelOne WBR-1101TX's IP
Address)
For Router B's Default Route
Destination IP Address 0.0.0.0
Network Mask 0.0.0.0
78
Page 82

Routing
Gateway IP Address 192.168.1.80 (LevelOne WBR-1101TX's local
router)
79 80
Page 83
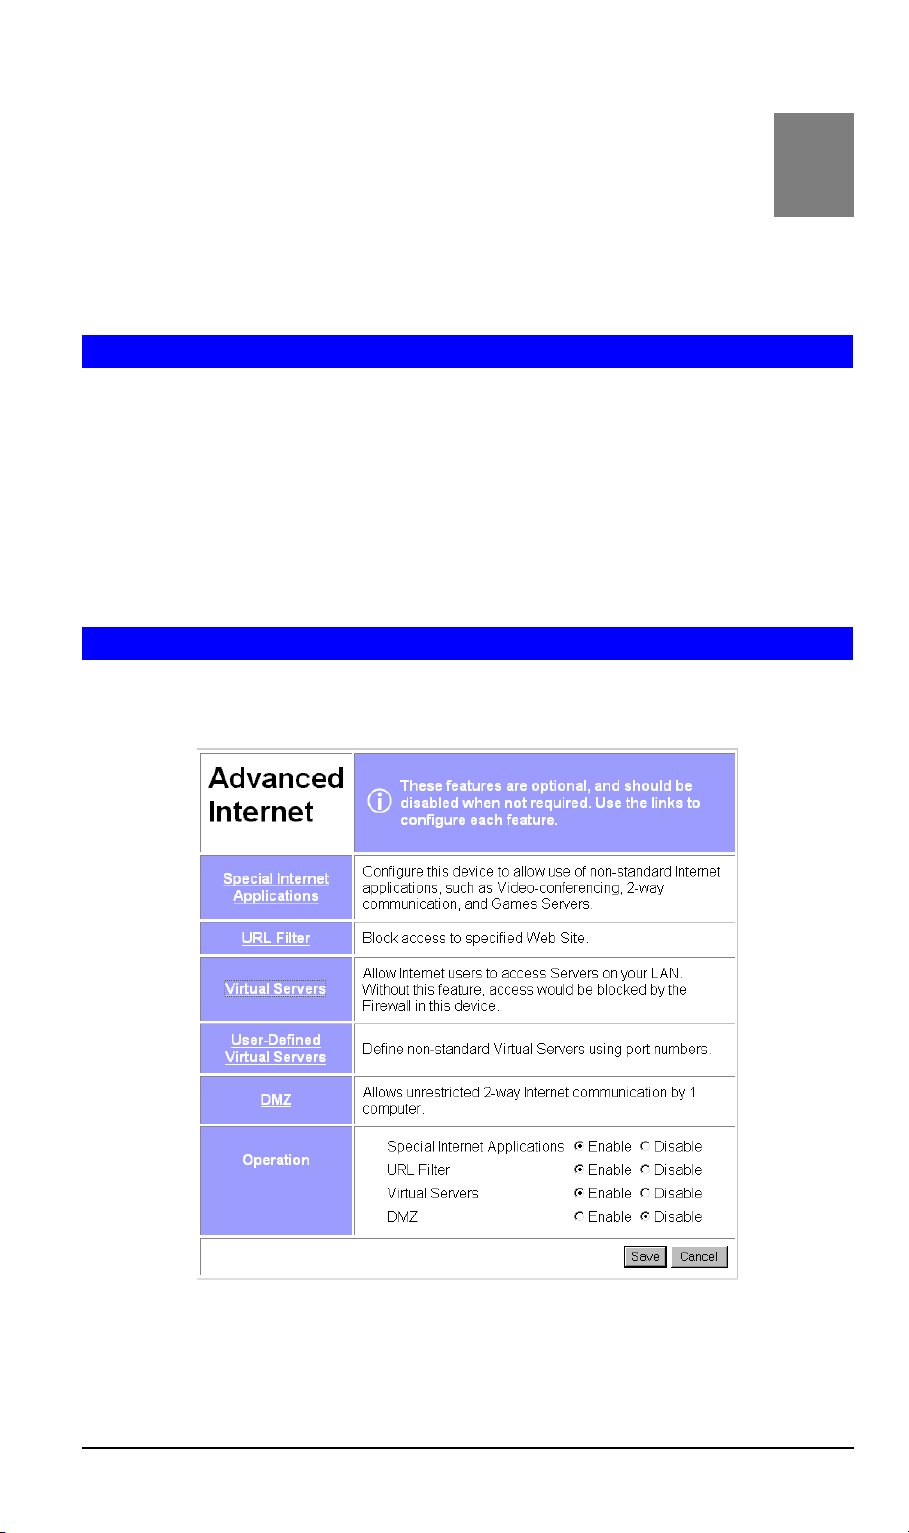
Chapter 9
Advanced Internet
This Chapter explains how to use the LevelOne WBR-1101TX's "Advanced
Internet" features.
Overview
For situations where the LevelOne WBR-1101TX is being used to provide shared Internet
access, the following advanced features are provided.
• Special Internet Applications
• URL Filter
• Virtual Servers
• DMZ
This chapter contains details of the configuration and use of each of these features.
Advanced Internet Screen
This screen provides access to the advanced Internet features, and provides a convenient
overview and control center. An example screen is shown below.
9
Figure 43: Advanced Internet Screen
On this screen, you can enable or disable any required feature.
Page 84
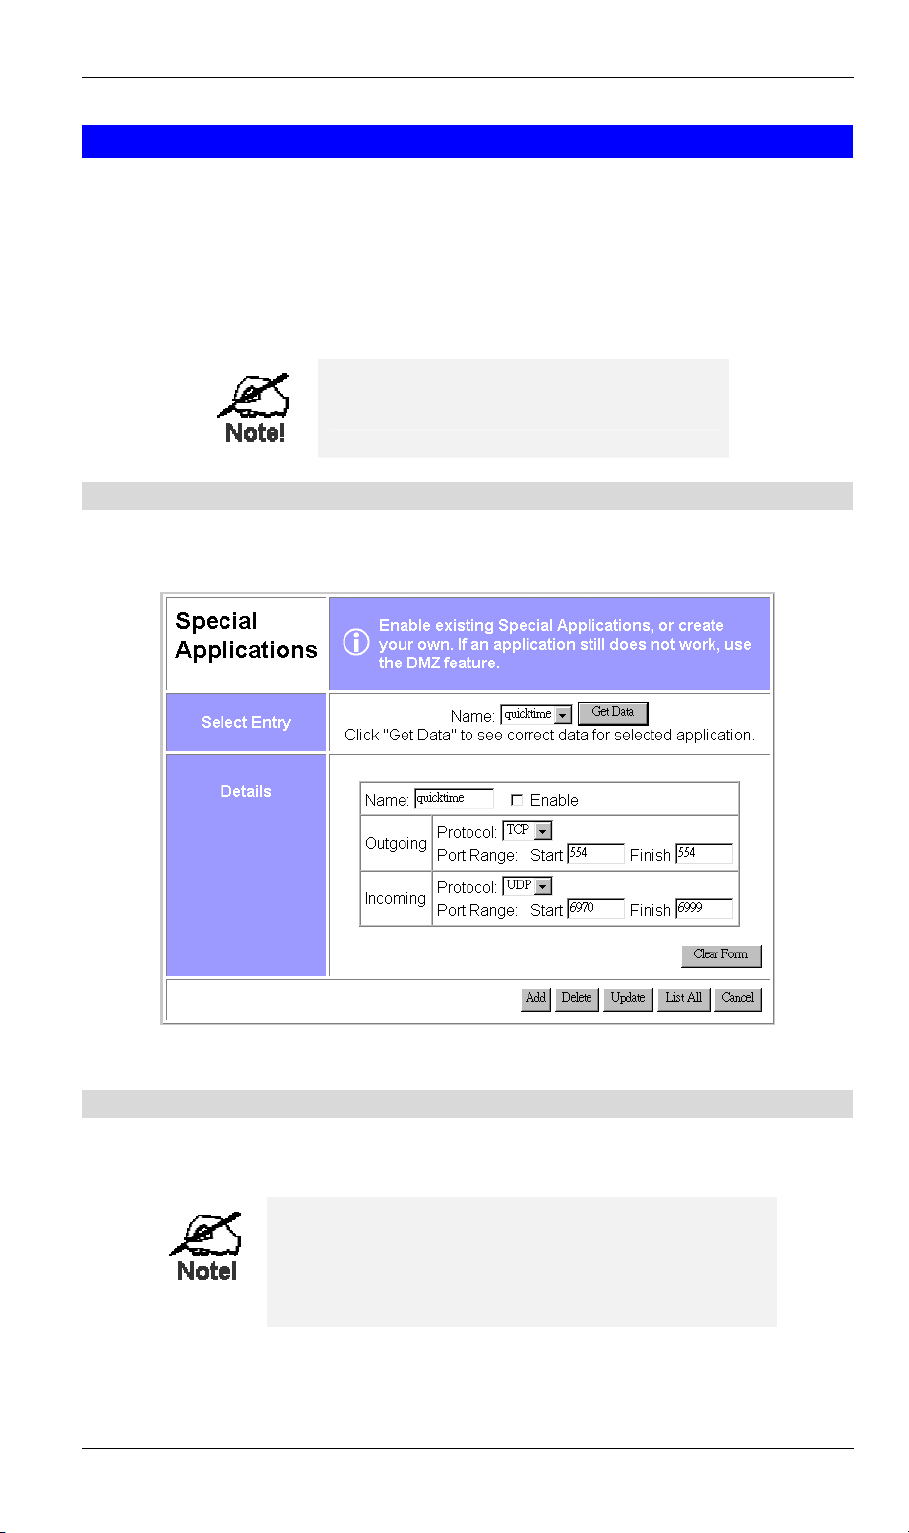
Advanced Internet
Special Internet Applications
This feature is only required if you wish to use Internet applications which require 2-way
communication, multiple connections, or combined TCP/UDP connections.
Examples of such applications are Internet Videoconferencing, Telephony, Games Servers,
and other special-purpose Servers.
Generally, you will become aware of the need for this feature when an Internet application is
unable to function correctly.
At any time, only one (1) PC can use
each Special Application.
Special Applications Screen
This screen can be reached by selecting Special Internet Applications. An example screen is
shown below.
Figure 44: Special Applications Screen
Using a Special Application
• Ensure that Special Applications has been enabled on the Advanced Internet screen.
• Configure the Special Applications screen as required.
Configuration data must be obtained from the
Service/Application provider.
If an application still cannot function correctly, try
using the "DMZ" feature.
Some Special Applications have been defined but not enabled.
81
Page 85
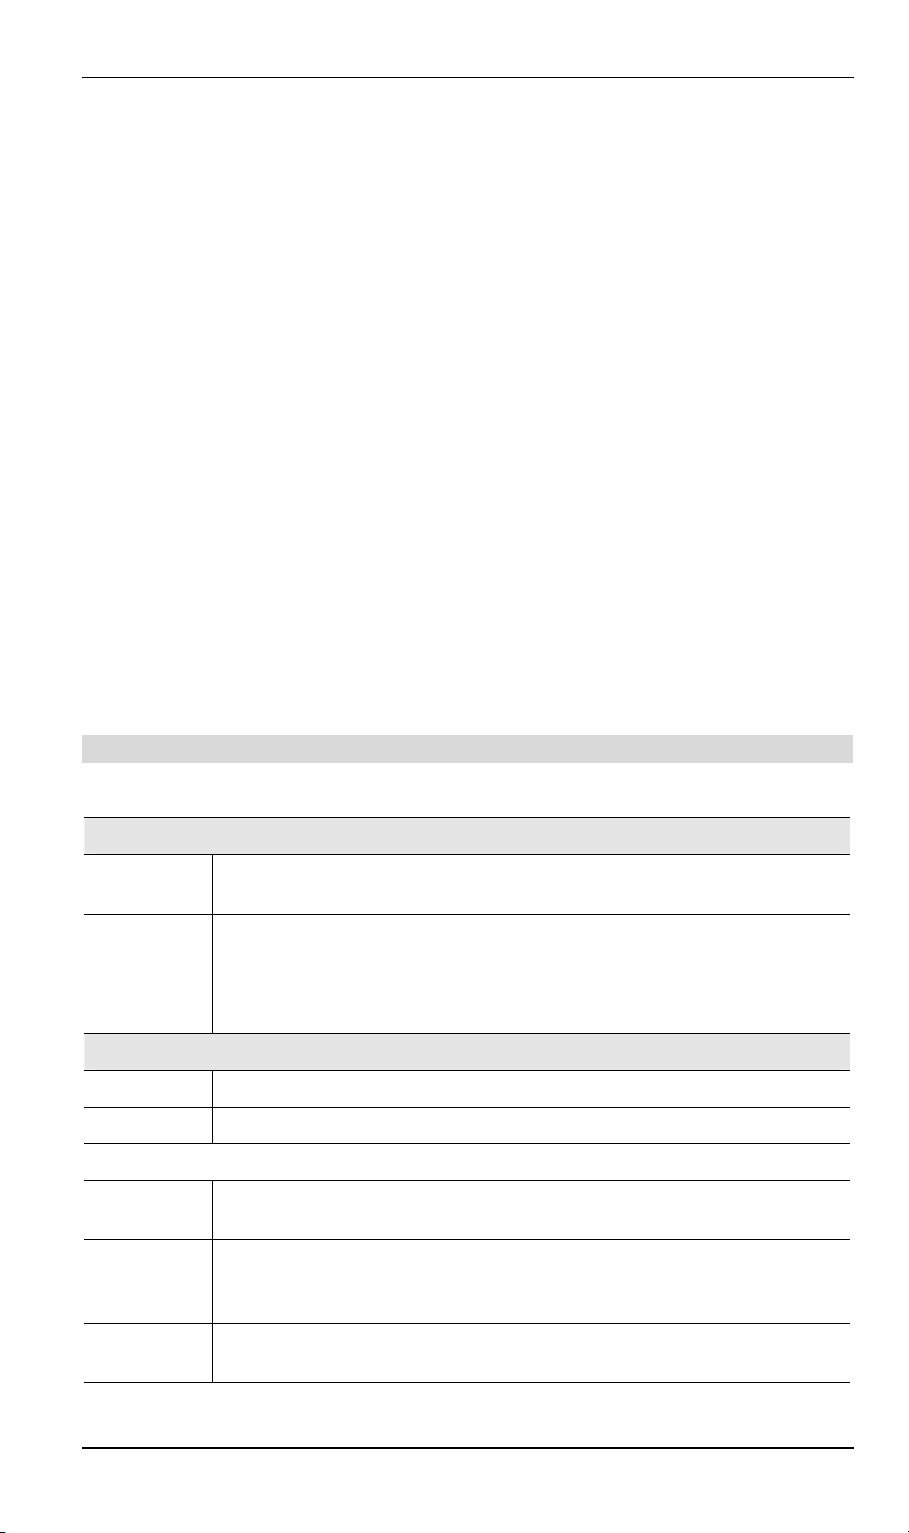
LevelOne WBR-1101TX User Guide
Managing Special Application Entries
Enable
Disable
Disable all
Delete
Modify (Edit)
Create a new entry
1. Select the entry from the drop-down list
2. Click "Get Data"
3. Check the Enable checkbox
4. Click "Update"
As above, but uncheck the Enable checkbox.
On the Advanced Internet screen, you can Enable or Disable the
Special Applications feature.
1. Select the entry from the drop-down list
2. Click "Delete"
1. Select the entry from the drop-down list
2. Click "Get Data"
3. Make any desired changes
4. Click "Update"
1. Click "Clear Form"
2. Enter the required data, as described below.
3. Click "Add".
Data - Special Applications Screen
This data must be obtained from the service provider.
Select Entry
Name
Get Data
Button
Details
Name
Enable
Outgoing
Protocol The protocol (TCP or UDP) used when you connect to the special applica-
Port Range:
Start
This drop-down list shows all Special Applications which have been defined.
After selecting the desired entry, click this button to view its current settings
in the Details section of the screen.
You can then make any changes required. Click the "Update" button to save
your changes.
Enter a descriptive name to identify this application entry.
Use this to Enable or Disable support for this application, as required.
tion service.
The beginning of the range of port numbers used by the application server,
for data you send to it. If the application uses a single port number, enter it
in both the "Start" and "Finish" fields.
Port Range:
Finish
The end of the range of port numbers used by the application server, for data
you send.
82
Page 86

Advanced Internet
Incoming
Protocol The protocol (TCP or UDP) used when the application or service sends data
to you.
Port Range:
Start
Port Range:
Finish
Buttons
Clear Form
Add
Delete
Update
List All
Cancel
The start of the range of port numbers used by the application server when
data is sent to you. If using only one port number, enter it in both the "Start"
and "Finish" fields.
The end of the range of port numbers used by the application server, when
data is sent to you.
Clears all data, ready for input of a new entry.
Add a new entry to the Special Applications database, using the data shown
on screen.
The name shown in the drop-down list is ignored.
Delete the Special Application entry selected in the drop-down list, regardless of whether its details are shown on screen.
Update the Special Application entry selected in the drop-down list, using
the data shown on screen.
List all Special Application entries.
Reverse any changes made since the last "submit" operation (i.e. since
clicking any other button).
83
Page 87

LevelOne WBR-1101TX User Guide
URL Filter
The URL Filter provides a means to block access to undesirable Web sites. The blocking
action applies to all PCs accessing the Internet via the LevelOne WBR-1101TX.
Operation
The URL Filter feature works by matching the "Filter Strings" (text strings) against the requested URL. For example, by inputting the word "bad" in the URL Filter, any URL
containing the letters "bad" in it will be blocked.
Note that if any component of the URL request contains one of the "Filter Strings", that
request will be blocked while the URL Filter is enabled.
URL requests to Web (Internet) Servers include the following components:
• Protocol. For Internet access, the usual protocol is HTTP (shown in your browser as
"HTTP://"). The URL Filter works ONLY with the HTTP protocol. Other protocols, such
as FTP and E-Mail, are not affected by the URL Filter.
• Domain. This is the address of the site (e.g. www.microsoft.com)
• Path. This specifies a certain file on the Server (e.g. /public/docs/index.html )
• Parameters. This is the data which is sent (submitted) to the Server when you submit a
form, such as when you use a search engine to search the Internet.
On a Web page, clicking a link may also submit data to a Server, rather than just request a
file.
All of these components are searched to see if they contain any of the "Filter Strings".
Tips
• To use the URL Filter feature properly, you should try inputting as much of the text for
the given URL as possible. For example, instead of simply using the word "bad," you
could use the full web site name.
• If you do not want to block an entire web site, you can include the path rather than just the
domain. For example, "www.badsite.com/badsection/"
• Be careful when using the URL Filter, as a general word might block access to many other
sites as well as the one that you intend to block.
• You can use the Internet Access Log, accessed from the Status screen, to see which sites
have been blocked by the URL Filter.
84
Page 88
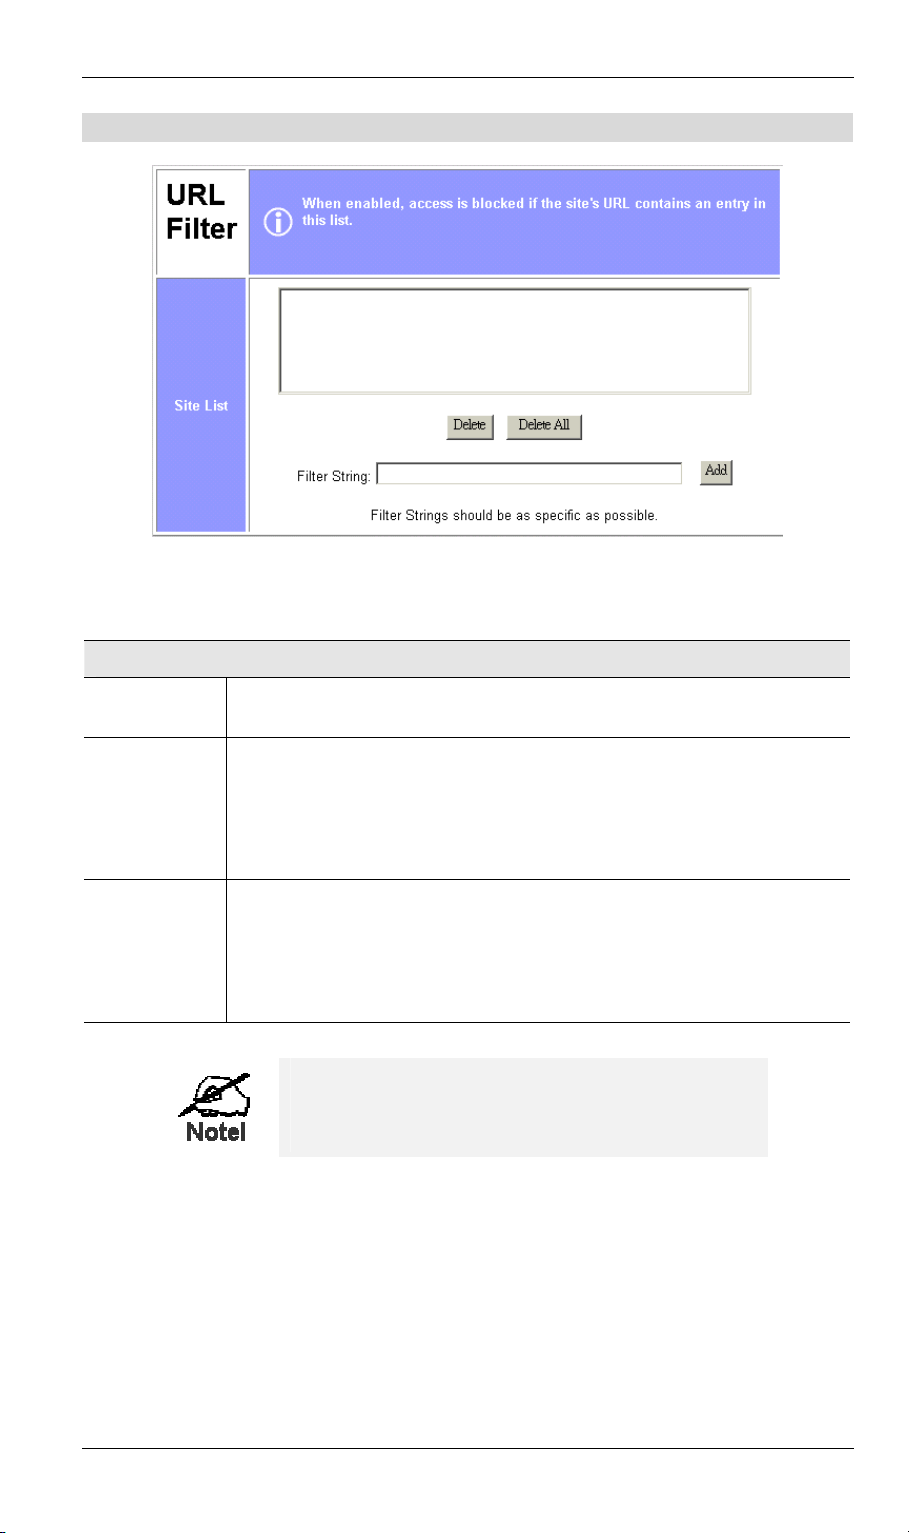
URL Filter Screen
Data - URL Filter Screen
Advanced Internet
Figure 45: URL Filter Screen
Site List
Site List
Filter String
Buttons Delete/Delete All - Use this buttons to delete the selected entry or all
This lists any existing entries. If you have not entered any values, this list
will be empty.
To add an entry to the list, enter it here, and click the "Add" button.
An entry may be a Domain name (e.g. www.trash.com) or simply a string
(e.g. ads/ )
Any URL which contains ANY entry ANYWHERE in the URL will be
blocked.
entries, as required. Multiple entries can be selected by holding down the
CTRL key while selecting. (On the Macintosh, hold the SHIFT key while
selecting.)
Add - Use this to add the current Filter String to the site list.
You can use the Internet Access Log, accessed
from the Status screen, to see which sites have
been blocked by the URL Filter.
85
Page 89
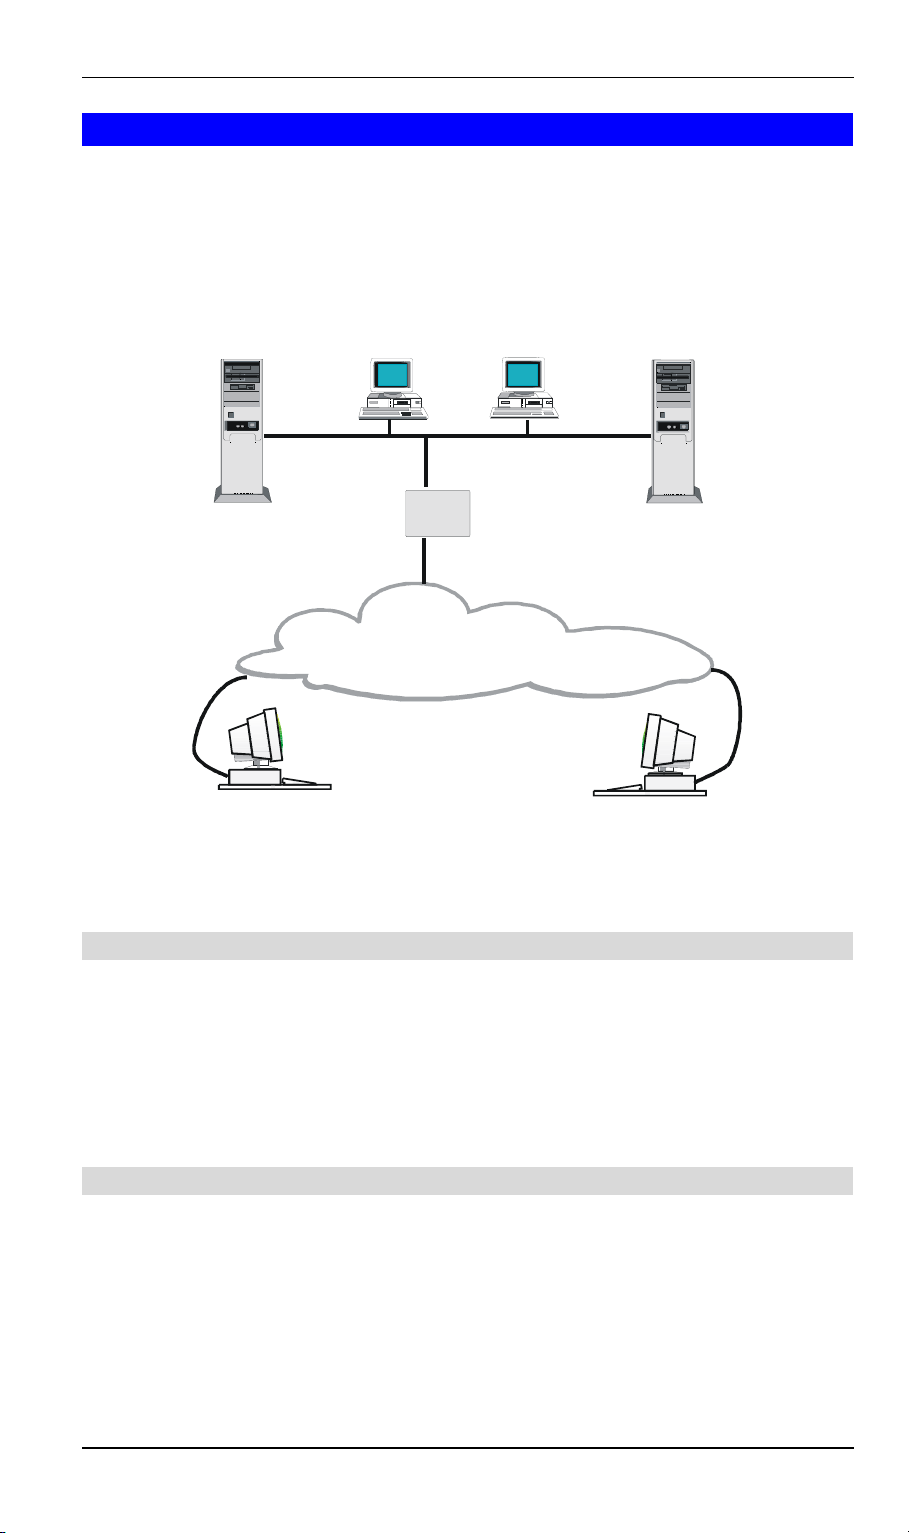
LevelOne WBR-1101TX User Guide
Virtual Servers
This feature allows you to make Servers on your LAN accessible to Internet users. Normally,
Internet users would not be able to access a server on your LAN because:
• Your Server does not have a valid external IP Address.
• Attempts to connect to devices on your LAN are blocked by the firewall in this device.
The "Virtual Server" feature solves these problems and allows Internet users to connect to your
servers, as illustrated below.
192.168.0.1
(LAN IP Address)
Web Server FTP Server
(192.168.0.10)
Wireless
Router
203.70.212.52
(Internet IP Address)
(192.168.0.20)
Internet
Remote PC Remote PC
Using Web Server Using FTP Server
(http://203.70.212.52)
Figure 46: Virtual Servers
IP Address seen by Internet Users
Note that, in this illustration, both Internet users are connecting to the same IP Address, but
using different protocols.
To Internet users, all virtual Servers on your LAN have the same IP Address.
This IP Address is allocated by your ISP.
This address should be static, rather than dynamic, to make it easier for Internet users to
connect to your Servers. If using a Static IP Address, it is entered on the "WAN" screen.
Types of Virtual Servers
The LevelOne WBR-1101TX supports two (2) types of Virtual Servers:
• Pre-defined - Standard server types. The only data required is the IP Address of the server
on your LAN.
• User-defined - Non-standard servers. You must provide additional information about the
server.
(ftp://203.70.212.52)
Note: The TOTAL number of Virtual Servers which can be used at any time is 10.
86
Page 90
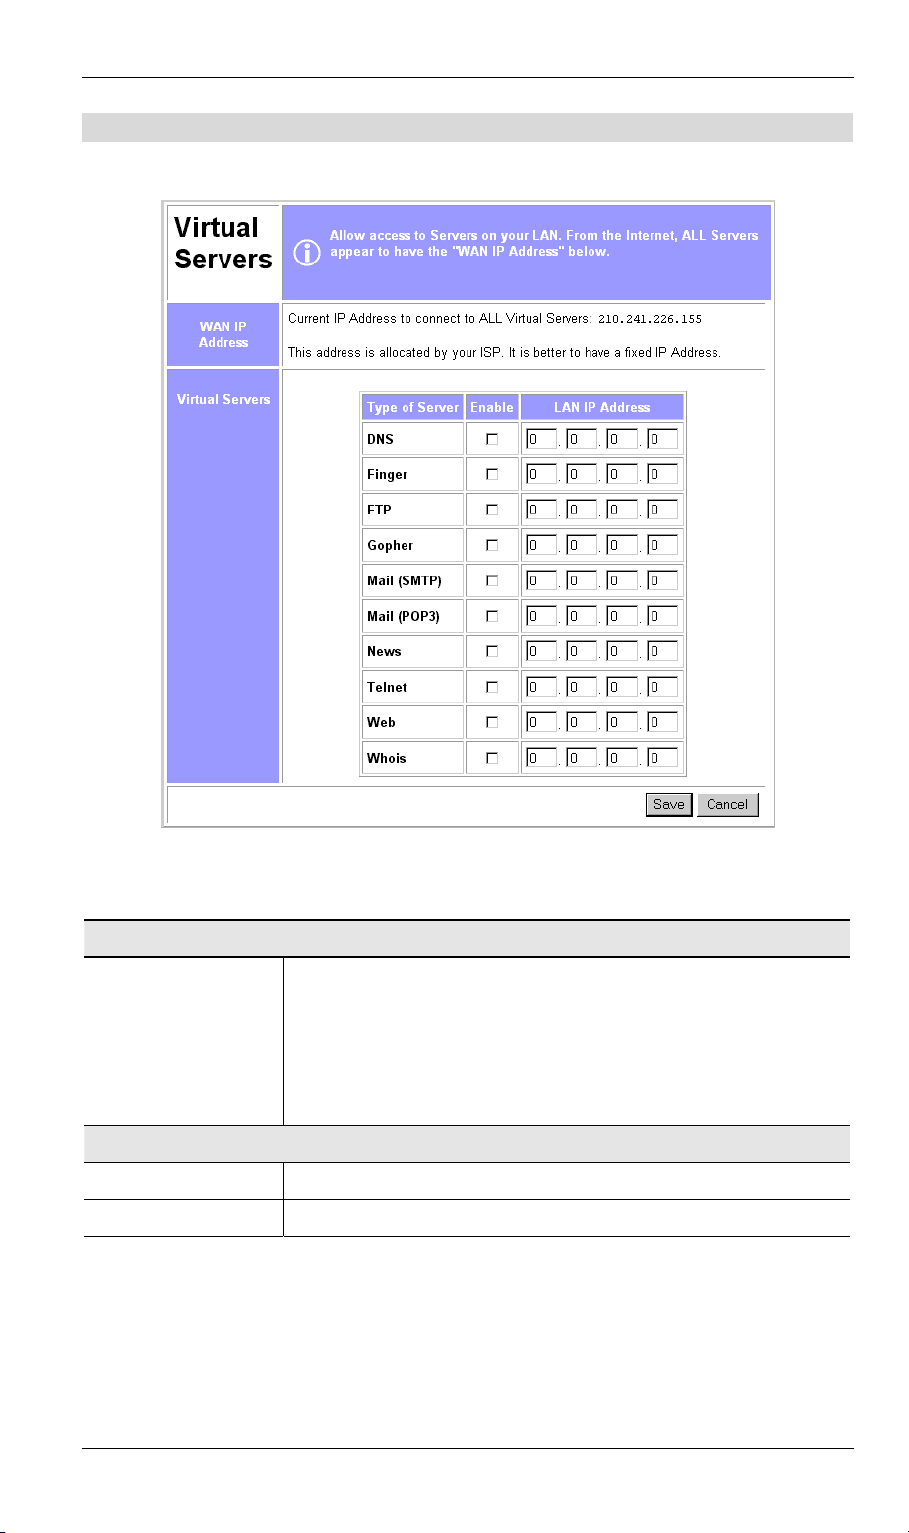
Advanced Internet
Virtual Server Screen
The Virtual Servers screen is reached by the Advanced Internet - Virtual Servers link.
Figure 47: Virtual Server Screen.
Data - Virtual Server Screen
WAN IP Address
Current IP Address
Virtual Servers
Type
Enable
This shows the IP Address which Internet users must use to connect to any of your Virtual Servers.
• To Internet Users, ALL of your Virtual Servers have the same
IP Address.
• This IP Address is allocated by your ISP. It is better to have a
fixed IP Address.
Select the type of Server you wish to use.
Check to enable this Server.
87
Page 91
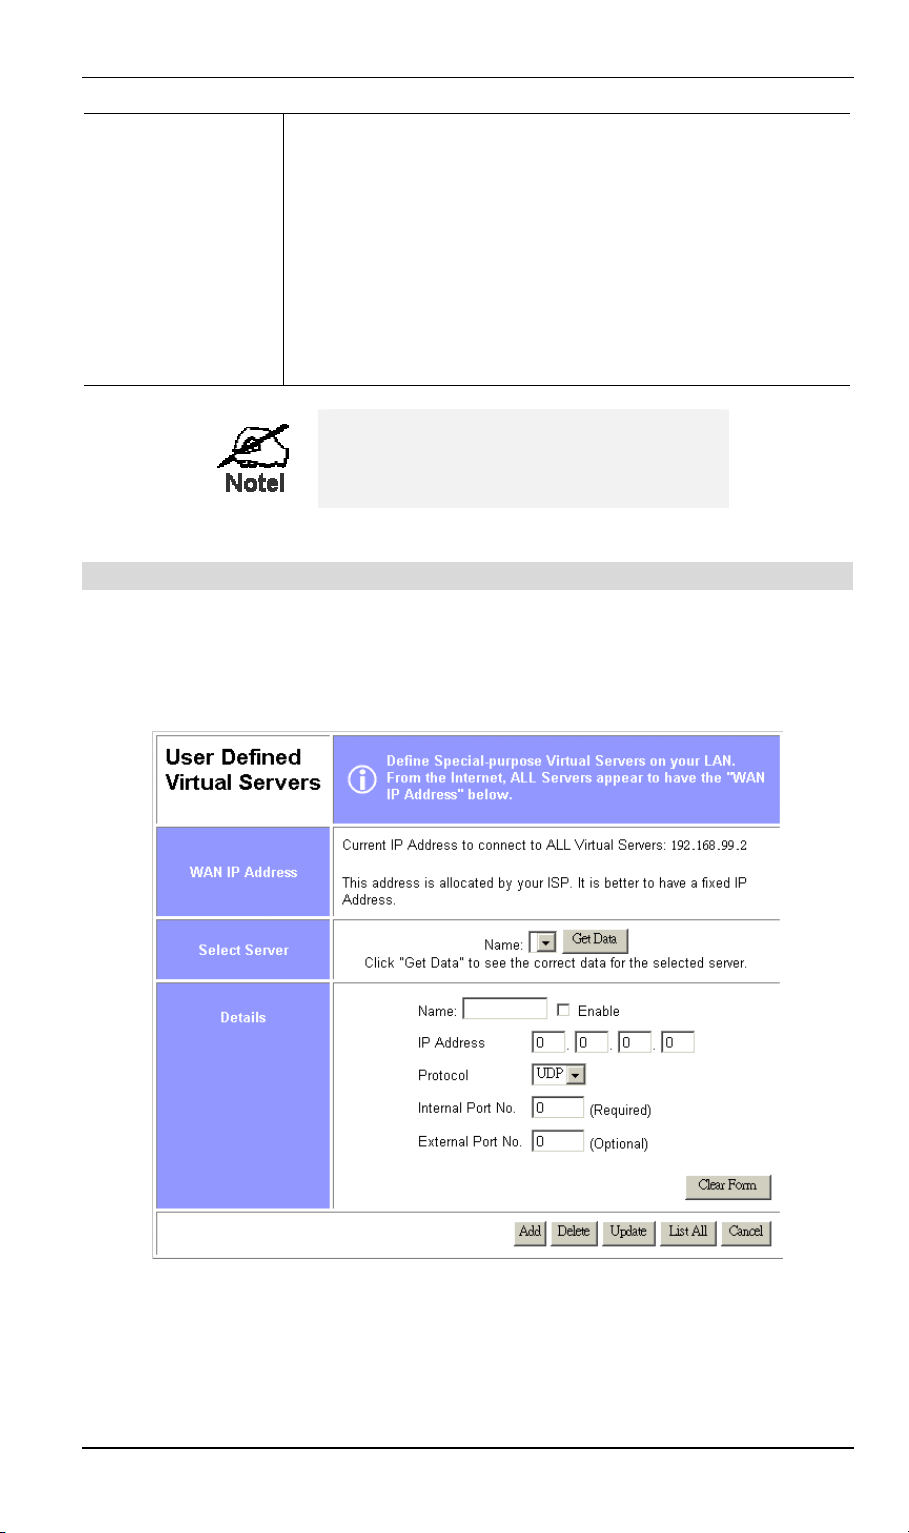
LevelOne WBR-1101TX User Guide
LAN IP Address
• Enter the IP Address of a PC on your LAN.
• You must install and configure the appropriate Server software
on the PC entered here.
• If using DHCP, the LAN IP Address of a PC may change. To
solve this problem, use either of these methods:
• Assign a fixed IP Address to the Server PC, ensuring that
its IP Address is NOT within the address range allocated
by the DHCP Server.
• Reserve an IP Address for the Server PC in the DHCP
Server, using the Access Control - PC screen.
For each entry, the PC must be running
the appropriate Server software.
User Defined Virtual Servers
If the type of Server you wish to use is not listed on the Virtual Servers screen, you can define
it using this feature.
Select Advanced Internet - User Defined Virtual Servers to see a screen like the example
below.
Figure 48: User Defined Virtual Servers
88
Page 92
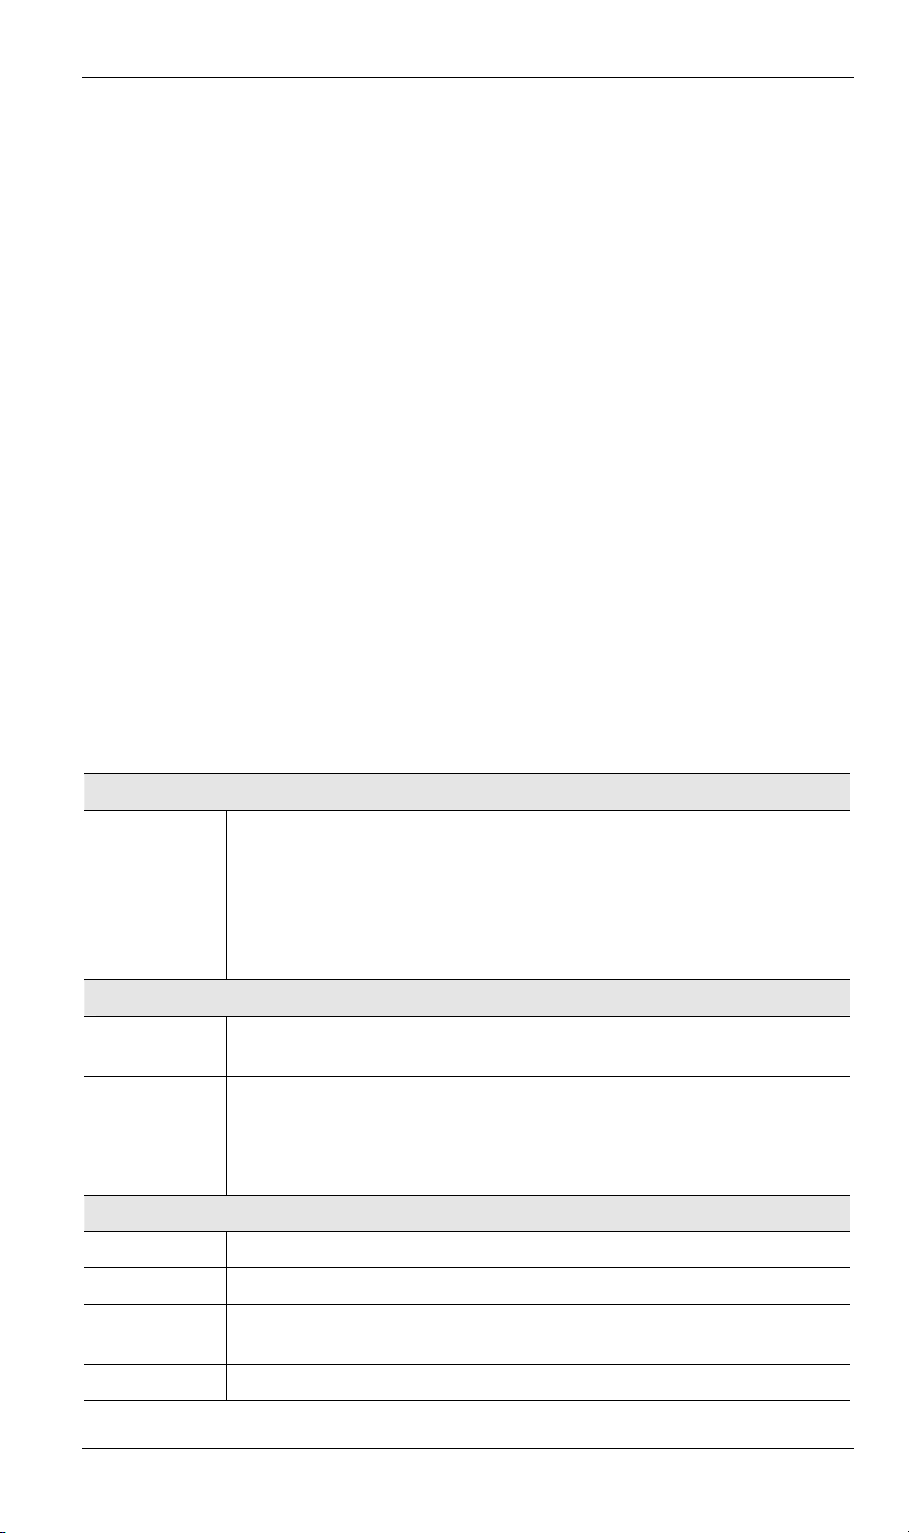
Managing User Defined Virtual Servers
Advanced Internet
Enable a Server
Disable a Server
Disable all Servers
Delete
Modify (Edit)
Create a new entry
1. Select the required entry from the drop-down list
2. Click "Get Data"
3. Check the Enable checkbox
4. Click "Update"
As above, but uncheck the Enable checkbox.
On the Advanced Internet screen, you can Enable or Disable the
Virtual Servers feature.
1. Select the entry from the drop-down list
2. Click "Delete"
1. Select the entry from the drop-down list
2. Click "Get Data"
3. Make any desired changes
4. Click "Update"
1. Click "Clear Form"
2. Enter the required data, as described below.
3. Click "Add".
Data- User Defined Virtual Servers Screen
WAN IP Address
Current IP
Address
Select Server
Name
Get Data
Button
Details
Name
Enable
IP Address
This shows the IP Address which Internet users must use to connect to any
of your Virtual Servers.
• To Internet Users, ALL your Virtual Servers have the same IP Ad-
dress.
• This IP Address is allocated by your ISP. It is better to have a fixed IP
Address.
This lists any Servers you have defined. Click the "Get Data" button to
view the correct data for the selected Server.
After selecting the desired entry, click this button to view its current
settings in the Details section of the screen.
You can then make any changes required. Click the "Update" button to
save your changes.
Enter a descriptive name to identify this Server entry.
Use this to Enable or Disable support for this Server, as required.
The IP Address of the PC on your LAN which is running the Server
software.
Protocol
Select the protocol (TCP or UDP) used by the Server.
89
Page 93
LevelOne WBR-1101TX User Guide
Internal Port
Number
External Port
Number
Buttons
Clear Form
Add
Delete
Update
List All
Cancel
Enter the port number used by the Server to connect to clients.
The port number used by clients when connecting to the Server. This is
normally the same as the Internal Port Number.
If it is different, this device will perform a "mapping" or "translation"
function, allowing the server to use one port address, while clients use a
different port address.
Clears all data, ready for input of a new entry.
Add a new entry, using the data shown on screen.
The name shown in the drop-down list is ignored.
Delete the Virtual Server entry selected in the drop-down list, regardless
of whether its details are shown on screen.
Update the Virtual Server entry selected in the drop-down list, using the
data shown on screen.
List all User-defined Virtual Servers.
Reverse any changes made since the last "submit" operation (i.e. since
clicking any other button).
From the Internet, ALL Virtual Servers have
the IP Address allocated by your ISP, as
shown by the "WAN IP Address".
Connecting to the Virtual Servers
Once configured, anyone on the Internet can connect to your Virtual Servers. They must use
the WAN Port IP Address (the IP Address allocated to this device by your ISP).
e.g.
http://203.70.212.52
ftp://203.70.212.52
It is more convenient if you are using a Fixed IP Address from your ISP, rather than Dynamic.
If using a Fixed IP Address, it is entered on the WAN screen.
90
Page 94
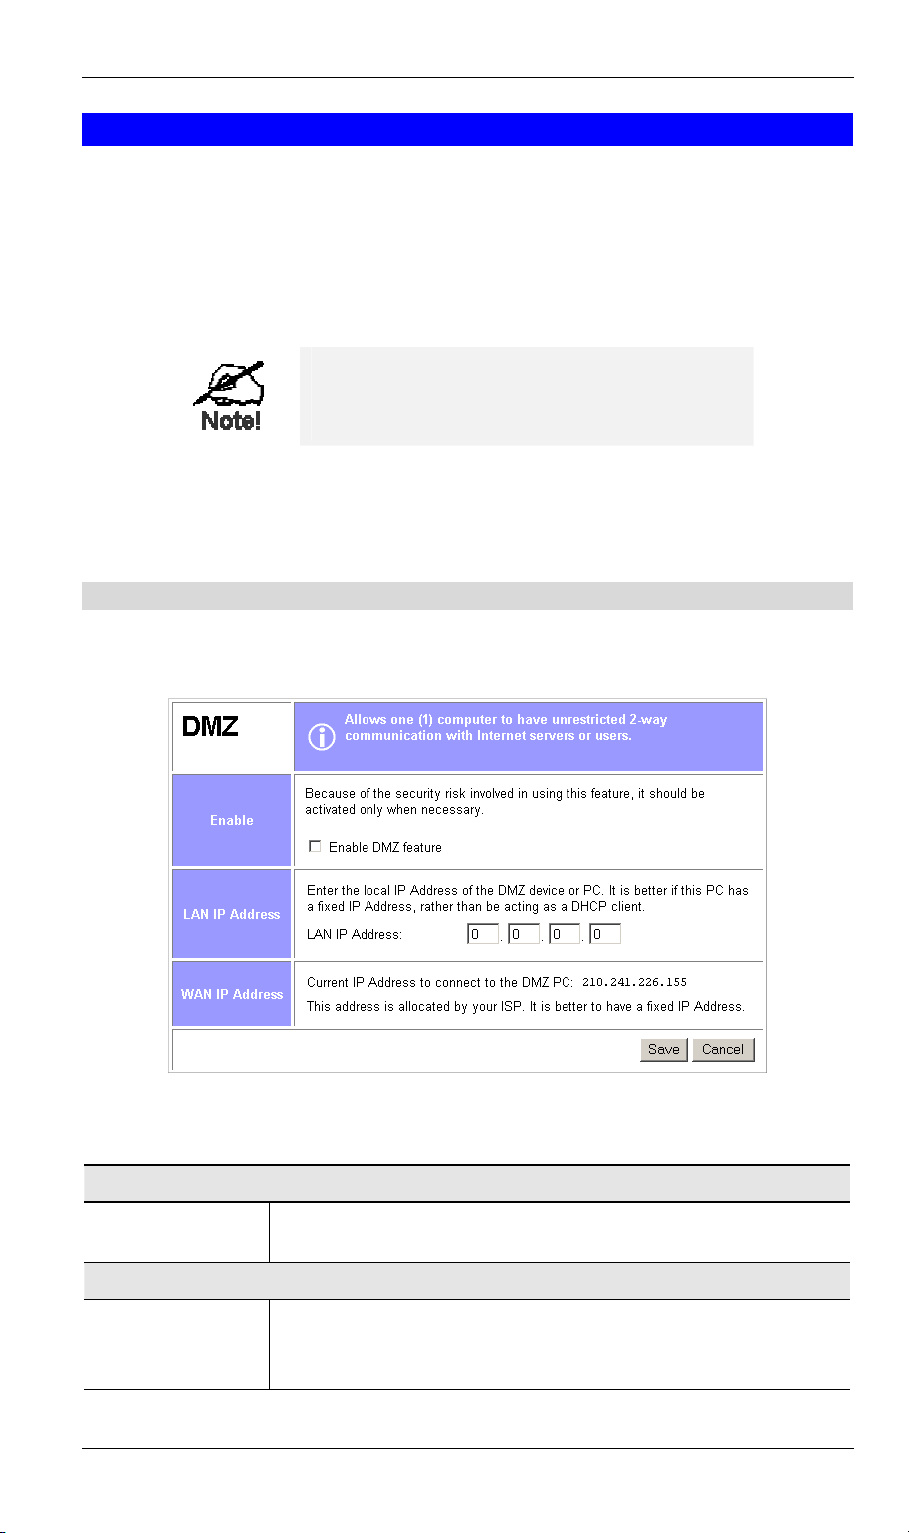
Advanced Internet
g
DMZ
This feature, if enabled, allows one (1) computer on your LAN to be exposed to all users on
the Internet, allowing unrestricted 2-way communication between the "DMZ" PC and other
Internet users or Servers.
This allows connection to special-purpose servers which require proprietary client software, or
2-way user connections such as Video-conferencing, which requires both users to run special
software.
To allow unrestricted access, the Firewall in
this device is disabled, creating a security
risk.
You should use this feature only if the "Special Applications" feature is insufficient to allow an application to function correctly. This feature should be turned
ON only when needed, and left OFF the rest of the time.
DMZ Screen
Select Advanced Internet from the navigation bar, then DMZ. You will see a screen like the
following:
Figure 49: DMZ Screen
Data - DMZ Screen
Enable
Enable DMZ
Feature
Use this to Enable or Disable the DMZ feature. The DMZ feature
should be disabled when not required.
LAN IP Address
LAN IP Address
Enter the IP Address of the PC on your LAN which will become the
"DMZ" PC.
If usin
DHCP, the LAN IP Address of a PC may change. To solve
91
Page 95

LevelOne WBR-1101TX User Guide
this problem, you can use either of these methods:
• Assign a fixed IP Address to the DMZ PC, ensuring that its IP
Address is NOT within the address range allocated by the DHCP
Server.
• Reserve an IP Address for the DMZ PC in the DHCP Server,
using the Access Control - PC screen.
WAN IP Address
WAN IP Address
This is the IP Address that Internet users must use to connect to the
"DMZ" PC.
This IP Address is allocated by your ISP. It is better if you are using
a fixed IP Address, so that it never changes. This will make it easier
for Internet users to connect to you. If using a Static IP Address, it is
entered on the "WAN" screen.
To Internet users, the IP Address of the DMZ computer is the IP Address allocated by your ISP, as
shown by the "WAN IP Address".
92 93
Page 96
Chapter 10
Access Control
This Chapter explains how to configure and use the LevelOne WBR-1101TX's
"Access Control" feature.
10
Overview
The Access Control feature allows administrators to restrict Internet Access by individual PCs.
The process uses "Packet Filtering" to block or discard data packets. By default, no packets are
blocked or discarded.
To use this feature:
• Set the desired restrictions on the "Everyone" group. All PCs are in the "Everyone" group
unless explicitly moved to another group, using the PC screen.
• Set the desired restrictions on the other groups ("Group 1", "Group 2", etc) as needed.
• For each PC you wish to move from the "Everyone" group, enter their details on the PCs
screen, and assign them to the desired group.
You can limit Internet access for ALL PCs without
entering ANY PC data. Simply apply the desired
restrictions to the "Everyone" group.
It is also possible to define your own packet filters, and use these filters in addition to the predefined filters. Defining your own filters is optional.
Access Control Log
This log is accessed from the Access Control Log on the Status screen. It shows the attempted
accesses which have been blocked.
This log can be used to track the operation of the Access Control feature. Data shown in this
log is as follows:
• Port - The port used to gain access to this device. Possible values are LAN, WAN,
WLAN (Wireless LAN), and RS232 (serial port).
• Source IP Address - The IP Address of the PC or device whose access request was
blocked.
• Physical Address (Hardware Address) - The hardware address of the PC or device
whose access request was blocked.
• Name - If known, the name of the device whose access was blocked. This name is taken
from the Access Control database. For Wireless devices, the name is obtained from the
Wireless Stations list, and so will always match the Physical (Hardware) address.
• Destination - The destination of the attempted access. Possible values are "Internet",
"LAN" or "WLAN".
• "Internet" indicates an outgoing connection attempt which was blocked by the Access
Control feature.
• "LAN" or "WLAN" represents an inward connection attempt which was blocked by
the Firewall. These inward connection attempts are not affected by the Access Control
settings.
Page 97
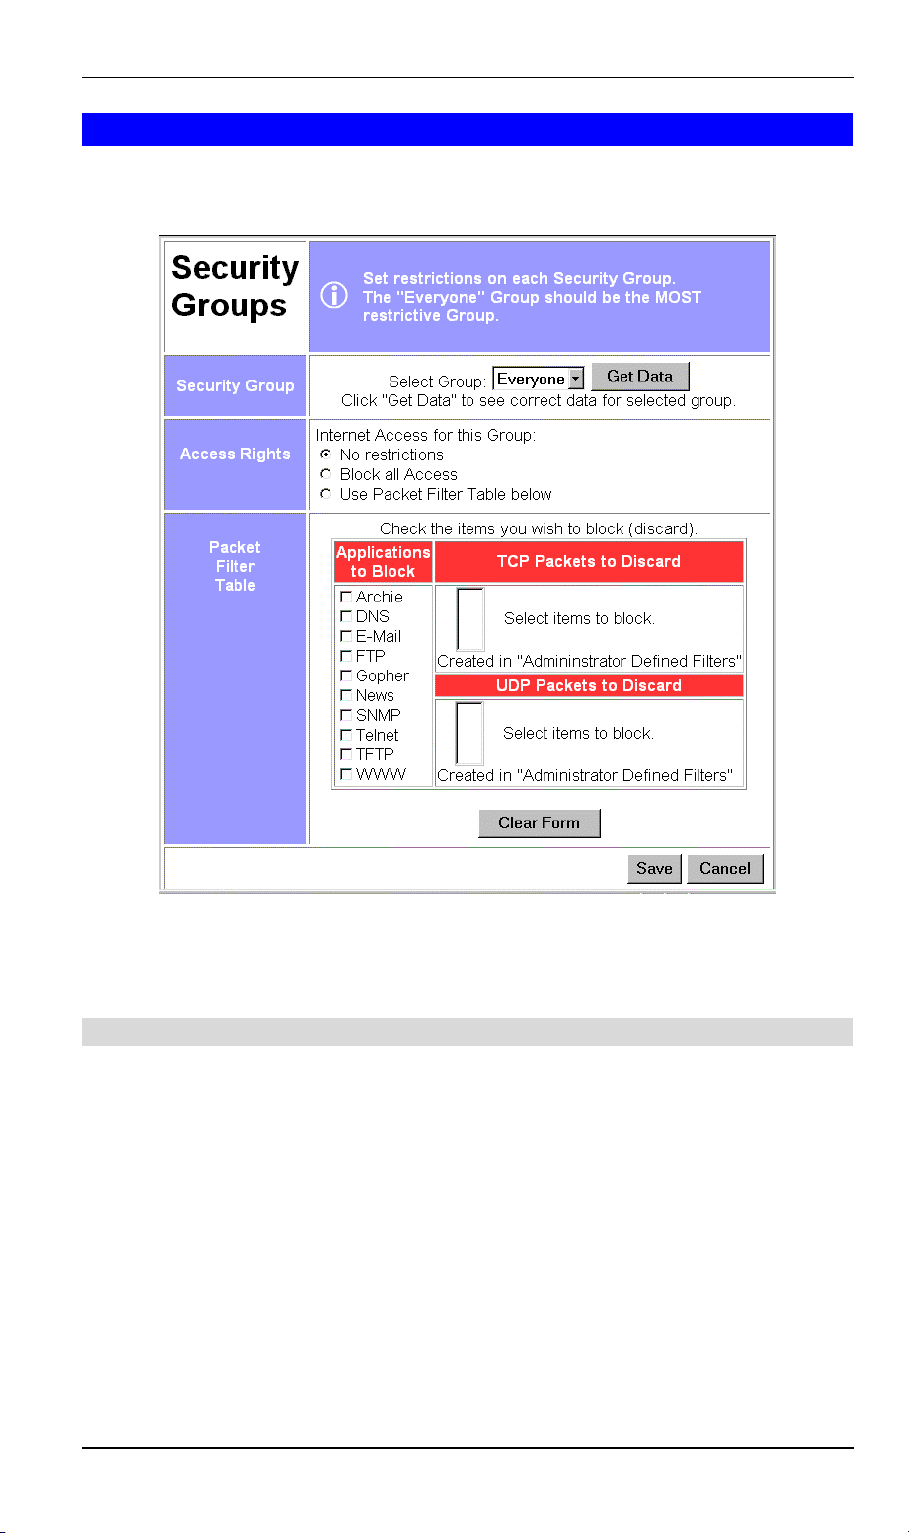
LevelOne WBR-1101TX User Guide
Security Groups Screen
The Security Groups screen is reached from the Access Control link on the navigation bar. An
example screen is shown below.
Figure 50: Security Groups Screen
Note that the Security groups are pre-named "Everyone", "Group 1", "Group 2", "Group 3",
and "Group 4".
Operations
Define Access Rights
for a Security Group
Change Access Rights
for a Security Group
Assign PCs to a
Security Group
1. Select the group from the drop-down box.
2. Enter the required data as described below.
If necessary, click Clear Form to remove the existing information shown on screen.
3. Click the Save button when finished.
1. Select the group from the drop-down box,
2. Click Get Data to view their information
3. Change any fields you wish.
4. Click Save when finished.
All PCs are initially in the "Everyone" group. Use the PCs
screen to move individual PCs to other groups as required.
94
Page 98
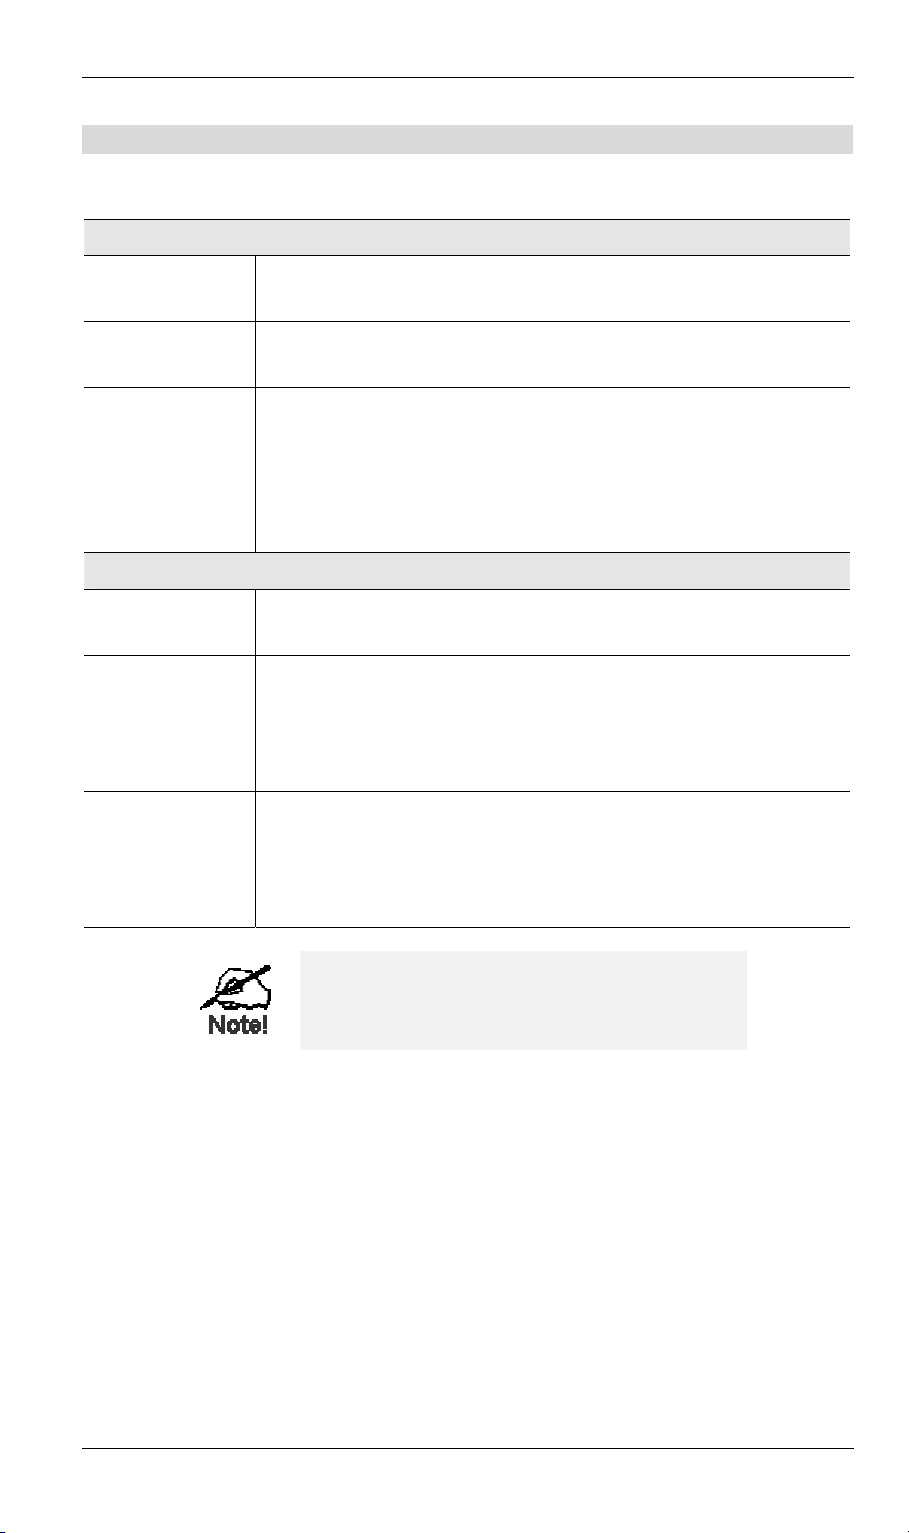
Data - Security Groups Screen
The following data is required.
Access Rights: Internet Access for this Group
Access Control
No restrictions
Block all Access
Use Packet Filter
Table below
Packet Filter Table
Applications
to Block
TCP Packets
to Discard
UDP Packets
to Discard
No packets are blocked. Use this to create an "Unlimited Access"
group, or to temporarily remove restrictions.
Groups members cannot access the Internet at all. Use this to create the
most restrictive group.
Use this to define intermediate levels of access. Using the Packet Filter
table gives you fine control over Internet access.
Simply select the items you wish to block. You can choose from the
pre-defined filters in the Applications to Block column, or your own
filters in the TCP Packets to Discard and UPD Packets to Discard
column.
Any items checked will be blocked. Users will not be able to use the
application.
This lists any TCP filters you have defined on the Filters screen. If no
filters have been defined, this is empty.
Multiple items can be selected (or deselected) by holding down the
Ctrl key while selecting items.
Selected items can NOT be accessed by members of this group.
This lists any UDP filters you have defined on the Filters screen. If no
filters have been defined, this is empty.
Multiple items can be selected (or deselected) by holding down the
Ctrl key while selecting items.
Selected items can NOT be accessed by members of this group.
If you have not defined your own filters, but
wish to do so, refer to "Filters" later in this
chapter.
95
Page 99
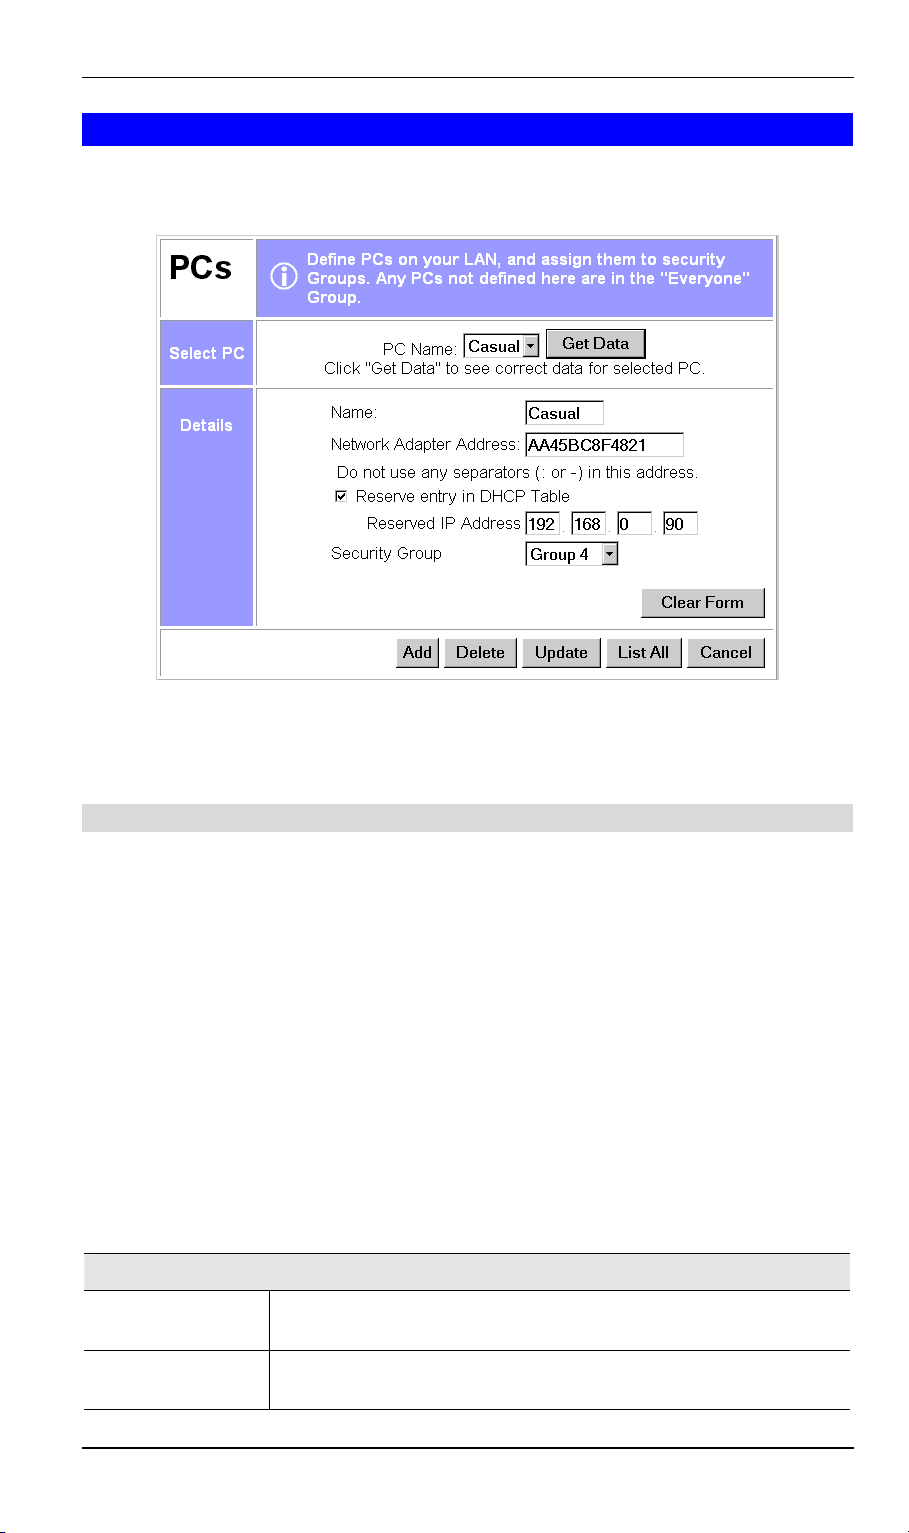
LevelOne WBR-1101TX User Guide
PCs Screen
The PCs screen is reached from the Access Control link on the navigation bar. An example
screen is shown below.
Figure 51: PCs Screen
Note that the drop-down box lists all PCs previously entered. If none have been entered, this
box will be empty.
Operations
Create a new entry
Delete an entry
Modify (Edit)
an entry
Data - PCs Screen
1. Click the "Clear Form" button.
2. Enter the required data, as described below.
3. Click "Add".
Note: The name shown in the drop-down list is ignored.
1. Select the entry from the drop-down list
2. Click "Delete"
1. Select the entry from the drop-down list.
2. Click "Get Data" to view the current data for this entry.
3. Make any desired changes
4. Click "Update"
Select PC
PC Name
Get Data button
This drop-down list shows all entries in the "PC" database. If you
have not made any entries, this list will be empty.
Click this button to view the data for the PC selected in the dropdown list. You can then edit the data.
96
Page 100
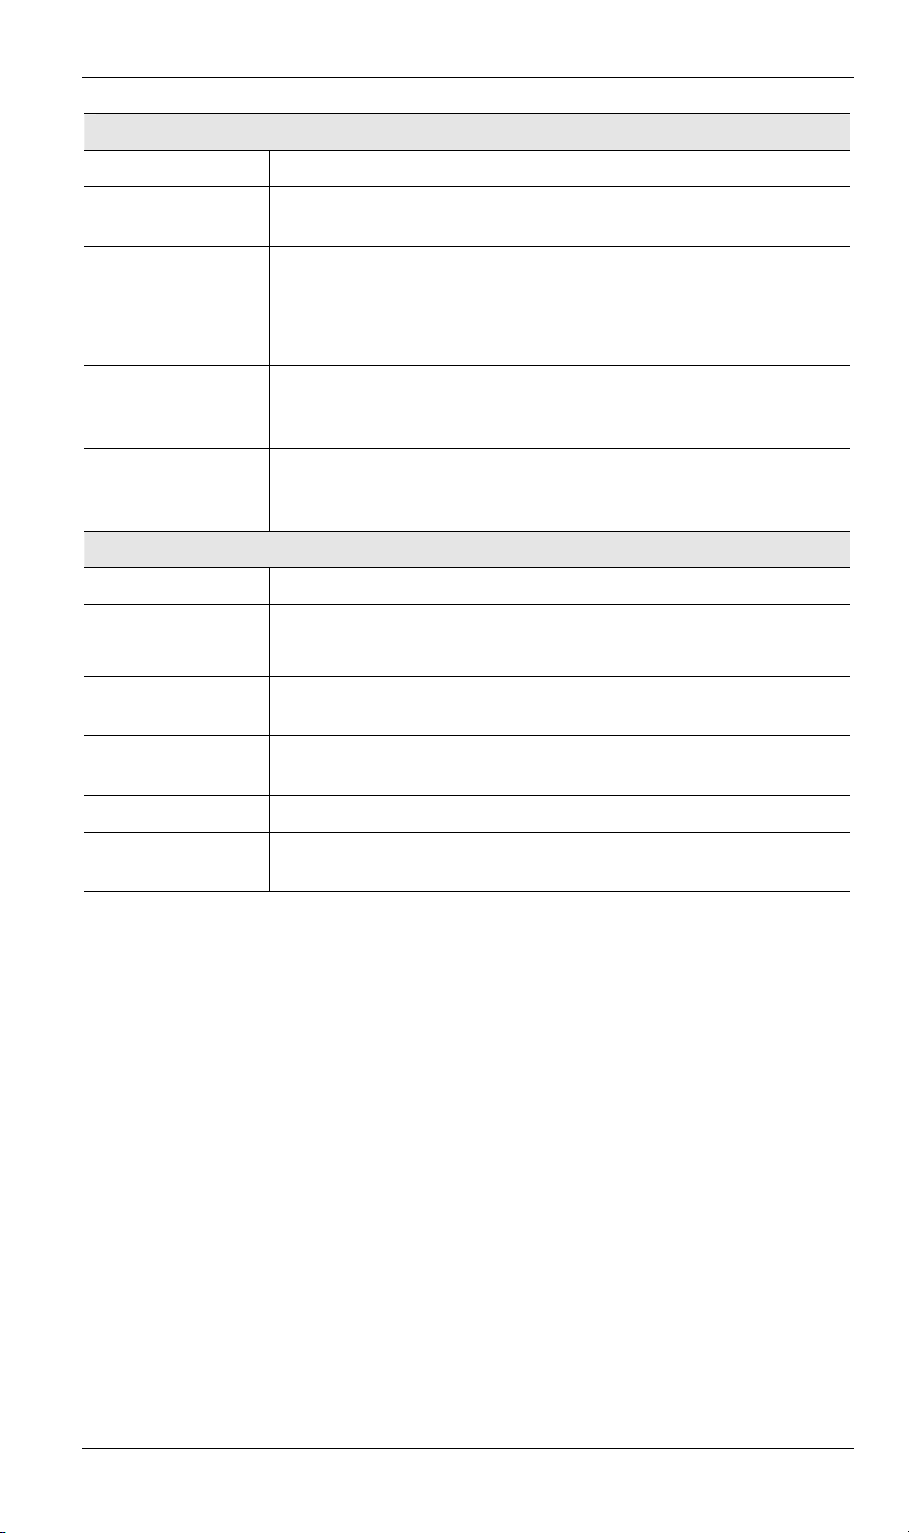
Details
Access Control
PC Name
Network Adapter
Address
Reserve entry in
DHCP Table
Reserved
IP Address
Security Group
Buttons
Clear Form
Add
Delete
Enter a name to identify this PC.
Hardware address for this PC. You can use the Windows "Winipcfg"
program or your LAN management program to find this address.
Check this if you wish to reserve an IP address for this PC. This is
useful if you have to provide the IP Address for other programs or
users.
If this is left unchecked, the following entry can be ignored.
This relates to the entry above. Enter the reserved address here. This
MUST be within the range used by the DHCP server (set on the
Device - Internal LAN Port screen).
Select the security group for this PC. If you only wish to reserve an
IP Address, and are not using the security (access control) features,
simply leave this at "Everyone".
Clears all data, ready for input of a new entry.
Add a new entry, using the data shown on screen.
The name shown in the drop-down list is ignored.
Delete the Virtual Server entry selected in the drop-down list, regardless of whether its details are shown on screen.
Update
List All
Cancel
Update the Virtual Server entry selected in the drop-down list, using
the data shown on screen.
List all User-defined Virtual Servers.
Reverse any changes made since the last "submit" operation (i.e.
since clicking any other button).
97
 Loading...