

LevelOne NVR-1204, NVR-1209, NVR-1216 Administrator's Manual

NVR-1204/1209/1216
Network Video Recorder,
4/9/16-Channel
System Administrator’s Manual
For Version 4.01.14
2014/08/18

Network Video Recorder Administrator’s Manual
2
Legal Notice
Disclaimer
The information contained in this document is intended for general information purposes.
Digital Data Communications GmbH Corporation shall not be liable for errors contained
herein or for incidental or consequential damages arising from the furnishing, performance,
or use of this manual.
The information contained herein is subject to change without notice.
The English version of this document is the official one for all purpose. All the translated
versions are provided as a convenience. Any discrepancies or differences created in the
translations of any other languages are not legally binding.
Copyright
Copyright Digital Data Communications GmbH Corporation All Rights Reserved.
Microsoft® and Windows® are registered trademarks of Microsoft Corporation.
All other product or company names mentioned in this document may be trademarks or
registered trademarks of their respective owners.

Network Video Recorder Administrator’s Manual
3
Regulatory Compliance Information
Federal Communications Commission Statement
This equipment has been tested and found to comply with the limits for
a Class B digital device, pursuant to Part 15 of the FCC Rules. These
limits are designed to provide reasonable protection against harmful
interference in a residential installation. This equipment generates,
uses and can radiate radio frequency energy and, if not installed and used in accordance with
the instructions, may cause harmful interference to radio communications. However, there is
no guarantee that interference will not occur in a particular installation. If this equipment does
cause harmful interference to radio or television reception, which can be determined by
turning the equipment off and on, the user is encouraged to try to correct the interference by
one or more of the following measures:
- Reorient or relocate the receiving antenna.
- Increase the separation between the equipment and receiver.
- Connect the equipment into an outlet on a circuit different from that to which the receiver is
connected.
- Consult the dealer or an experienced radio/TV technician for help.
WARNING: Changes or modifications to the equipment that are not expressly approved by
the responsible party for compliance could void the user’s authority to operate the equipment.
European Community Compliance Statement
This product has been tested and found to comply with the limits for
Class B Information Technology Equipment according to European
Standard EN 55022 and EN 55024. In a domestic environment, this
product may cause radio interference in which cause the user be
require to take adequate measures.

Network Video Recorder Administrator’s Manual
4
About This Manual
Target Audience
This manual is intended for System Administrators who are responsible for installing and
setting up video surveillance system. The reader is expected to know the fundamentals of IP
surveillance system integration and to own the administrative privileges to install and
configure all the devices.
You may also visit http://global.level1.com/ for updates and documents:
Technical Support
If you have any questions during system installation, please feel free to contact our engineers
via http://global.level1.com/
support@level1.com.

Network Video Recorder Administrator’s Manual
5
Table of Contents
1 Legal Notice 2
Disclaimer 2
Copyright 2
Regulatory Compliance Information ............................................................ 3
2 About This Manual 4
Target Audience ................................................................................................. 4
Technical Support .............................................................................................. 4
3 Introduction 11
Product Overview ............................................................................................. 11
NVR Server / Client Architecture .................................................................. 11
Remote Client PC Requirements ................................................................. 12
Supported Video Format ............................................................................... 13
4 Get Started 14
What’s in the Box ............................................................................................. 14
At A Glance ........................................................................................................ 15
NVR-1204/1209/1216 .................................................................. 15
Power Button & Reset Button ...................................................................... 16
Turn On the Device...................................................................... 16
Turn Off the Device ...................................................................... 16
Reset to Factory Default .............................................................. 18
LED Indicators .................................................................................................. 18
5 Installation 19
Prepare the Devices ........................................................................................ 19
Cameras ...................................................................................... 19
Monitor ......................................................................................... 20
USB Devices ............................................................................... 20

Network Video Recorder Administrator’s Manual
6
USB Storage Device .................................................................... 20
Hard Disks ................................................................................... 20
Install the Hard Disks ..................................................................................... 21
NVR-12XX ................................................................................... 21
Network Connection Architecture .............................................................. 23
LAN 1 Port ................................ ................................ ................... 23
Connection Setting Example 1 .................................................... 24
LAN 2 Port ................................ ................................ ................... 24
Connection Setting Example 2 .................................................... 25
Connect the Devices ....................................................................................... 26
NVR-110/120/130 ........................................................................ 26
Quick Setup ....................................................................................................... 27
Step 1: Log in to NVR .................................................................. 27
Step 2: Format the Hard Disks ................................ .................... 27
Step 3: Add Cameras .................................................................. 28
Auto Add 28
Search Cameras 29
6 Local Client Operation 31
Log in to / out of NVR ..................................................................................... 31
Log In ........................................................................................... 31
Change UI language 31
Remember Login Information 31
Set Auto Login 31
Log Out 31
Live Page UI Overview ................................................................................... 32
Input Devices .................................................................................................... 33
Onscreen Keyboard ..................................................................... 33
Mouse Settings ............................................................................ 34
Onscreen Keyboard Settings ....................................................... 34
Set Cameras ...................................................................................................... 35
Add Cameras ............................................................................... 36
Copy Camera Settings ................................................................ 40
Delete Cameras ........................................................................... 41
Change Camera Settings ............................................................ 42
(A) Video Format and Transmission Properties 42
(B) Fine-tune the Image: Brightness/Contrast/Saturation/Hue 43
(C) Motion Settings 44

Network Video Recorder Administrator’s Manual
7
Configure PTZ Presets ................................................................ 45
Open PTZ Panel 45
Manipulate PTZ Movements 45
Go to Preset Points 46
Edit PTZ Preset Tour 47
Device Information .......................................................................................... 48
Network Settings.............................................................................................. 49
IP Settings ................................................................................... 50
Change Port Setting .................................................................... 51
Enable DHCP Server 52
Enable DDNS Service 53
Date & Time ....................................................................................................... 54
Setup Manually ............................................................................ 54
Synchronize with Time Zone ....................................................... 54
E-mail Settings ................................................................................................. 55
Disk Management ............................................................................................ 57
Storage Device Types ................................................................. 57
Format Hard Disks ....................................................................... 58
Storage Settings - Set Recording Deletion Rule ......................... 58
Check Disk Status ....................................................................... 59
Manage Abnormal Disks ............................................................. 60
Schedule Recordings ..................................................................................... 61
Event-Recording File Length ....................................................... 62
Set the Recording Schedule ........................................................ 62
Set the Event Schedule ............................................................... 62
Copy Schedule ............................................................................ 63
Event Management .......................................................................................... 64
Event-Handling Schedule ............................................................ 64
Set Event Rules ........................................................................... 65
Clear Event Rules ........................................................................ 67
Copy Event Rules ........................................................................ 68
Joystick 69
System Log ........................................................................................................ 70
Export System Log ...................................................................... 71
User Group Management............................................................................... 72
Add a Group ................................................................................ 72
Edit / Delete a Group ................................................................... 73
Add a User ................................................................................... 73
Edit / Delete a User ..................................................................... 74

Network Video Recorder Administrator’s Manual
8
Upgrade Firmware ........................................................................................... 75
Backup / Restore Settings ............................................................................ 76
Backup ......................................................................................... 76
Restore ........................................................................................ 77
Customize Live Screen Layout .................................................................... 78
Change Channel Position ............................................................ 78
Change Layout ............................................................................ 78
Execute Sequence Patrol ............................................................ 80
Save a Customized View ............................................................. 80
Set a Default View ....................................................................... 80
Customize System Language ...................................................................... 81
Modify the Wording ...................................................................... 81
Restore the Wording .................................................................... 82
7 Remote Client Operation 83
Access NVR Server ......................................................................................... 83
Find NVR in Your Network ........................................................... 83
Via UPnP Connection .................................................................. 84
Via IP Utility ................................................................................. 85
Log In / Out of NVR ......................................................................................... 86
Log In ........................................................................................... 86
Enter Account & Password 86
Change UI language 86
Remember Login Information 86
Log Out ................................................................ ........................ 86
Accept ActiveX Controls Installation ............................................ 87
Setup Wizard ..................................................................................................... 88
Setup the System ............................................................................................. 89
Set System Name ........................................................................ 89
Set Date & Time .......................................................................... 90
Change Time Zone 90
Change Date and Time 90
Set Daylight Saving 90
Set NTP Server 90
Synchronize with Client Computer’s Time 91
Configure Network Settings ......................................................... 92
Current IP Configurations 92
IP Settings 92

Network Video Recorder Administrator’s Manual
9
Enable DHCP Server 93
Set HTTP Port 94
Enable DDNS Service 94
Set E-mail Notification Service .................................................... 96
Live Screen Event List Setting .................................................... 97
Live Page UI Overview ................................................................................... 98
Set Cameras .................................................................................................... 100
Add Cameras ............................................................................. 100
Copy Camera Settings .............................................................. 104
Delete Cameras ......................................................................... 105
Change Camera Settings .......................................................... 105
(A) Video Format and Transmission Properties 105
(B) Motion Settings 106
(C) Fine-tune the Image: Brightness/Contrast/Saturation/Hue 107
Configure PTZ Preset Points 109
Configure PTZ Preset Tour 110
Configure Fisheye Cameras ....................................................... 111
Set Recording Schedule ............................................................................... 114
Event-Recording File Length ..................................................... 114
Set the Recording Schedule ...................................................... 115
Set the Event Handling Schedule .............................................. 116
Copy Schedule .......................................................................... 116
Event Management ......................................................................................... 117
Set Event Rules ......................................................................... 117
Set System Event rule 117
Set Camera Event rule .............................................................. 118
Response Types ........................................................................ 120
Copy Event Rules ...................................................................... 122
Clear Event Rules ...................................................................... 123
Disk Management .......................................................................................... 124
Format Hard Disks ..................................................................... 124
Set Maximum Recording Days .................................................. 125
Check Disk Status ..................................................................... 125
Upgrade Firmware ......................................................................................... 126
Backup / Restore Settings .......................................................................... 127
Backup ....................................................................................... 127
Restore ...................................................................................... 128
User Group Management............................................................................. 129
Add a Group .............................................................................. 129

Network Video Recorder Administrator’s Manual
10
Edit / Delete a Group ................................................................. 130
Add a User ................................................................................. 131
Account /Password Rules .......................................................... 131
Edit / Delete a User ................................................................... 131
Joystick132
System Log ...................................................................................................... 133
Export System Log .................................................................... 134
Customize Live Screen Layout .................................................................. 135
Add Camera Views to Channels ................................................ 135
Remove Camera Views ............................................................. 135
Execute Sequence Patrol .......................................................... 136
Save a Customized View ........................................................... 136
Set a Default View ..................................................................... 136

Network Video Recorder Administrator’s Manual
11
Introduction
Product Overview
NVR-12XX Series (hereafter referred to as NVR) is a compact and reliable multi-channel
standalone NVR. It features a stable embedded Linux operating system and capabilities of
supporting mega-pixel resolution H.264 streaming, an HDMI output for local display, PTZ
control, scheduled / event-triggered / event speed-up recording, event management,
synchronized playback, time / event-based playback search and video bookmarks. Its smart
Setup Wizard and intuitive user interface allow the system installer to enjoy effortless
installation experience, while making it easy for new users to get acquainted with the
operation by first-time use. Other than the local client, the remote PC client may access the
NVR system simultaneously, and experience user-friendly web interface customized for
browser-based operations.
NVR Server / Client Architecture
In a video surveillance system architecture, NVR serves as service provider, aimed to run
24/7 non-stop a video management service for clients. An NVR Client makes requests for
monitoring video streams or playing back recordings of NVR.
There are two types of NVR clients: Local Client and Remote Client. A client, connecting
from whether a remote computer or from local, will be offered the same functionalities of
NVR.
Local Client: In the local site, the client user directly operates NVR by connecting an HDMI
monitor and a USB mouse to the physical NVR.
Remote Client: Over the TCP/IP network, the Remote Client communicates with NVR
through HTTP Protocol. This client user will have to use a computer with Internet Explorer
to access the NVR web interface, without the need of installing any client program
beforehand. Logging in to NVR is as simple as visiting a website.

Network Video Recorder Administrator’s Manual
12
Remote Client PC Requirements
As NVR itself is a self-contained unit, the table below provides basic guidelines only for
selecting proper hardware for the remote PC client. If your live view display quality is not
satisfactory, please consider computers with more advanced spec as the decoding of
multiple channels requires good hardware for smooth performance (*1).
*1 The quality of video display performance lies not only in the hardware but a few variables.
Please refer to Supported Video Format on page 13 for instructions on how to achieve
ideal video performance.
*2 PC spec requirements are the same for 32-bit and 64-bit systems.
*3 Microsoft Windows operating system has limits on memory and address space,
regardless of the real or virtual memory available on a particular computer.
Please use 64-bit system if your computer has more than 4GB RAM.
*4 Please make sure your operating system is fully patched with the latest service packs.
PC Spec (*2)
Minimum Requirements
CPU Processor
Intel Core 2 Quad 2.66 GHz
RAM
4GB (*3)
Network
Ethernet (1000 Base-T recommended)
Operating System
Windows 7 and Windows 8
(All versions) (*4)
Display Resolution
1080p
Browser
Internet Explorer 9.0 or 10.0

Network Video Recorder Administrator’s Manual
13
Supported Video Format
As 1080p HDMI monitors have become the most extensive display standard used in various
applications, NVR is designed to conform to this standard with its capability of outputting
1080p video stream. Therefore, to reserve as much computing power for NVR unit as
possible, up to four-megapixel H.264 video stream can be displayed on local live screen
and local playback screen.
With a client computer, you may still acquire full support for displaying these types of video
codec – MPEG4, MJPEG and H.264, and up to ten- megapixel video resolution from web
client interface; also, the video stream is recorded at your desired format regardless of the
displayed quality.
Camera Management
Export / Recording
Local
Live View / Playback
Remote
Live View / Playback
Codec
MPEG4
MJPEG
H.264 (*1)
H.264 (*2)
MPEG4
MJPEG
H.264
Resolution
Up to 10M pixels
Up to 4M pixels (*3)
Up to 10M pixels
*1 NVR’s “Auto Add” function will only add H.264 video streams.
*2 H.264 is the only displayable codec for local live view and playback. The channels using
other codec will appear blank, although the recording is proceeding normally.
*3 NVR local live and playback can display up to four-megapixel resolution video. The
channels using higher resolution video stream will appear blank, although the recording is
proceeding normally.

Network Video Recorder Administrator’s Manual
14
Get Started
What’s in the Box
This product package includes the following items:
Item
Description
1
NVR Server x 1
2
Printed quick installation guide x 1
3
AC power adapter x 1
4
Hard disk screws
5
Adapter converter set x 1
This unit contains three types of adapter plugs – UK type, US type and Europe type.
These adapter plugs do not change the voltage, but will only change the shape of
adapter to fit your electrical outlet.
Please detach the plugs, take the plug type you
need and connect it to the AC power adapter.
6
CD

Network Video Recorder Administrator’s Manual
15
At A Glance
NVR-1204/1209/1216
Front Panel
Rear Panel
LED Indicators
USB 2.0 Ports
Reset Button
Power
Button
HDMI Output
LAN 1
LAN 2
Power Connector
Network Video Recorder Administrator’s Manual
16
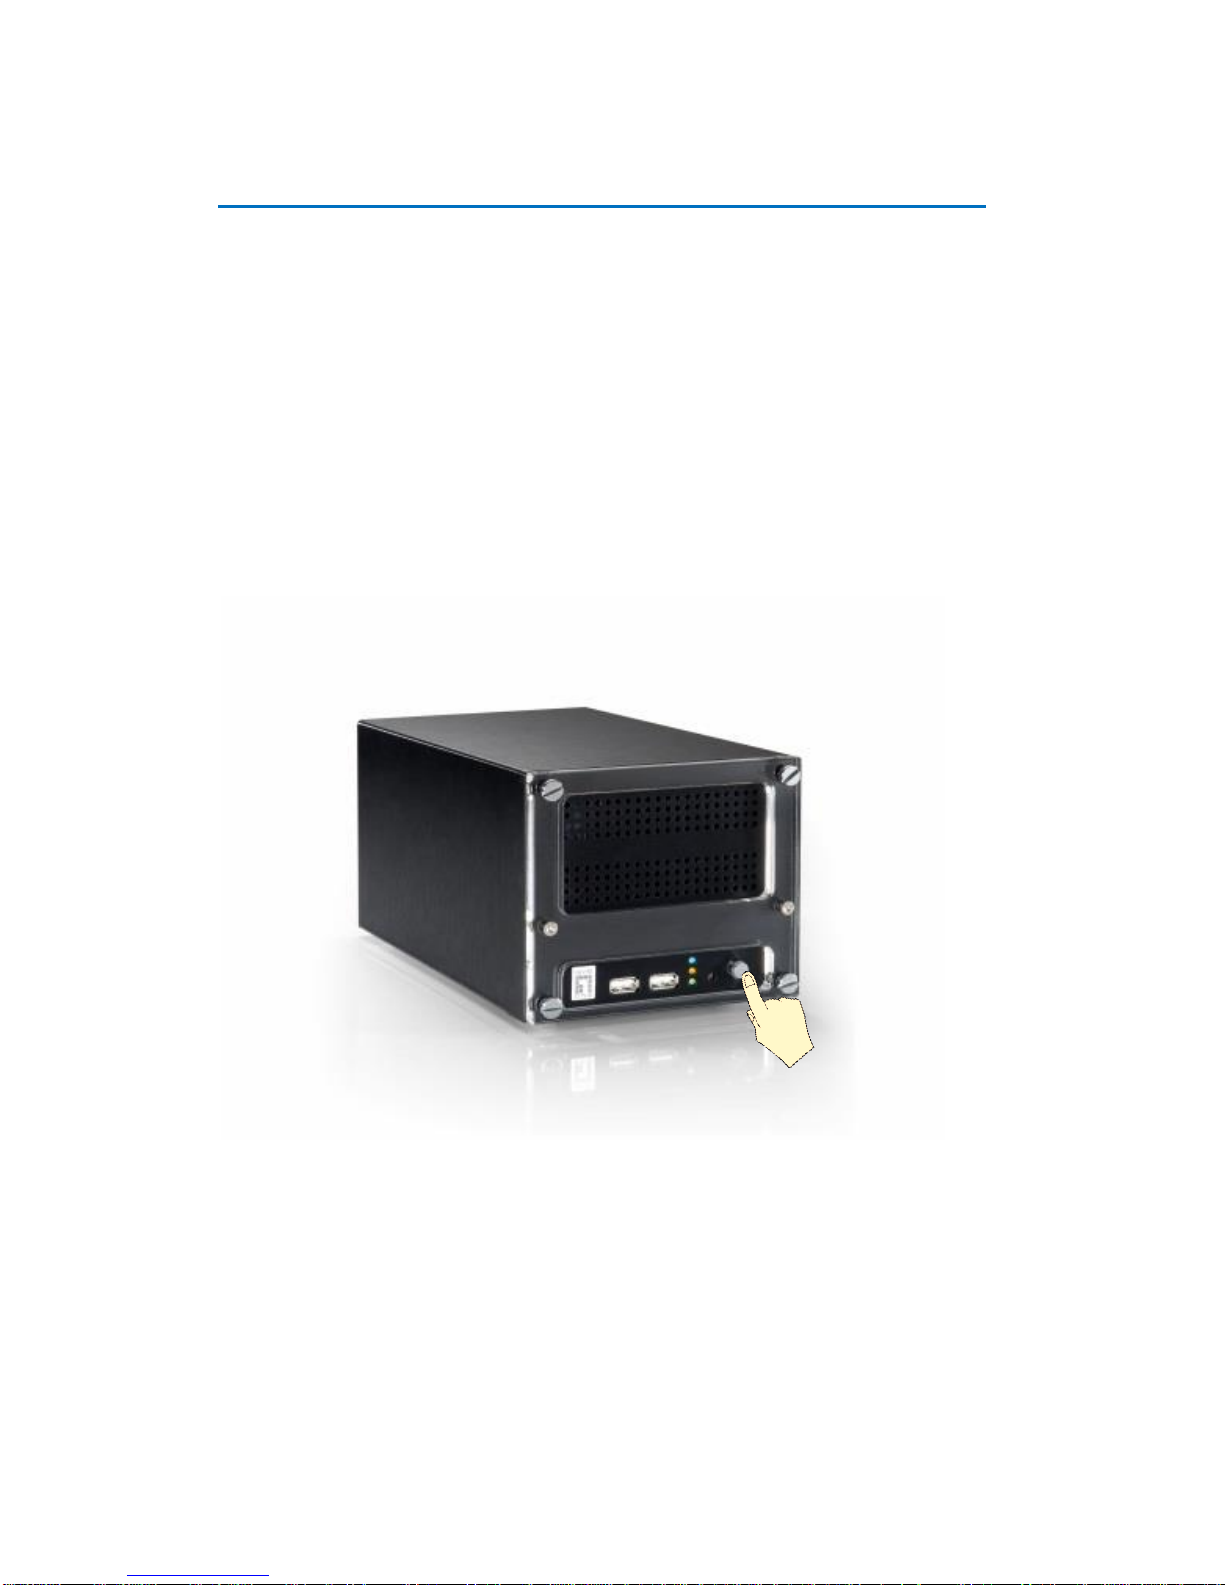
Power Button & Reset Button
You can turn on / off the device with Power Button.
Turn On the Device
Press down the Power Button and release, the Power LED will light up and turn solid blue.
Turn Off the Device
As this unit is powered on, the Power LED and System LED are both lit, and the Power
Button is in pressed state. To turn NVR off, please do the following:

Network Video Recorder Administrator’s Manual
17
1. On Live screen, click Setup Power tab, and click “Shutdown”.
2. The local display screen will turn black, with an information dialogue box showing up.
Please observe the System LED on the front panel, when its orange light is off, you may
press the Power Button to completely shut down the unit.

Network Video Recorder Administrator’s Manual
18
Reset to Factory Default
By resetting this device, all your system settings and system log will return to factory
default. It is strongly recommended that you back up previous settings with Backup function
and export the system logs before resetting to factory default.
1. To begin, please turn off the device first.
2. Press down the Power Button to boot up the device, and immediately press and hold the
Reset Button with a pin or clip, the System LED will light up for about 2~3 seconds, and
you may release the Reset Button as the red light is off.
The device will enter the resetting process immediately and automatically restart.
LED Indicators
The LED indicators on front panel show the current device status:
Item
Indicator Status
Light Color
Description
Power LED
Solid
Blue
The device power is on.
System Status
LED
Lights up for three
seconds after Reset
Button is pressed
Orange
The system resetting process is
initializing.
Solid
The system service is running.
HDD LED
Flashing
Green
The hard disk is in activity.

Network Video Recorder Administrator’s Manual
19
Installation
The installation procedures may vary depending on your site conditions. The procedures
provided in this manual are based on an example consisting of (1) local network, (2) an NVR
unit, (3)Network cameras, (4) a POE network switch and (5) necessary peripherals.
Prepare the Devices
Before starting connecting all the devices together, please read the instructions below to
make sure your devices are ready for NVR system.
Cameras
NVR is able to automatically add the connected cameras then immediately displays their live
streams without your further configurations. Please fulfill the conditions below to make sure
your cameras are ready for NVR Auto Add function:
1. For a camera whose settings have been changed from factory default, make sure
its output stream is H.264 encoder type,
2. The camera’s connection type is Dynamic mode (DHCP Client). You can configure the
this connection settings via Web Configurator.
If your camera is an other brand’s product or you would like to add more streams from a
device, use Search Cameras provided by Camera Setup Wizard.

Network Video Recorder Administrator’s Manual
20
Monitor
The monitor should supports HDMI port and 1080p full HD resolution display.
USB Devices
Please use a USB mouse, keyboard or joystick with a cable.
USB Storage Device
The USB storage device is required for system backup and system log / snapshot / video
export.
NVR supports all FAT/FAT32/EXT2/EXT3/EXT4/NTFS file systems.
Hard Disks
For video recordings, you should install at least ONE certified 3.5-inch SATA hard disk.
Note
Since NVR displays only H.264 stream on local display, any device outputting non-H.264
stream will still be added to NVR system and viewed via the web client interface, while
this channel will appear blank on local monitor.
Network Video Recorder Administrator’s Manual
21
Install the Hard Disks
This system requires at least one hard disk to store video recordings and firmware image
when upgrading system. Please follow the instructions below to install your hard disks in
correct order to make sure the physical disk locations accord with the Disk ID shown in NVR
server’s Storage Device List.
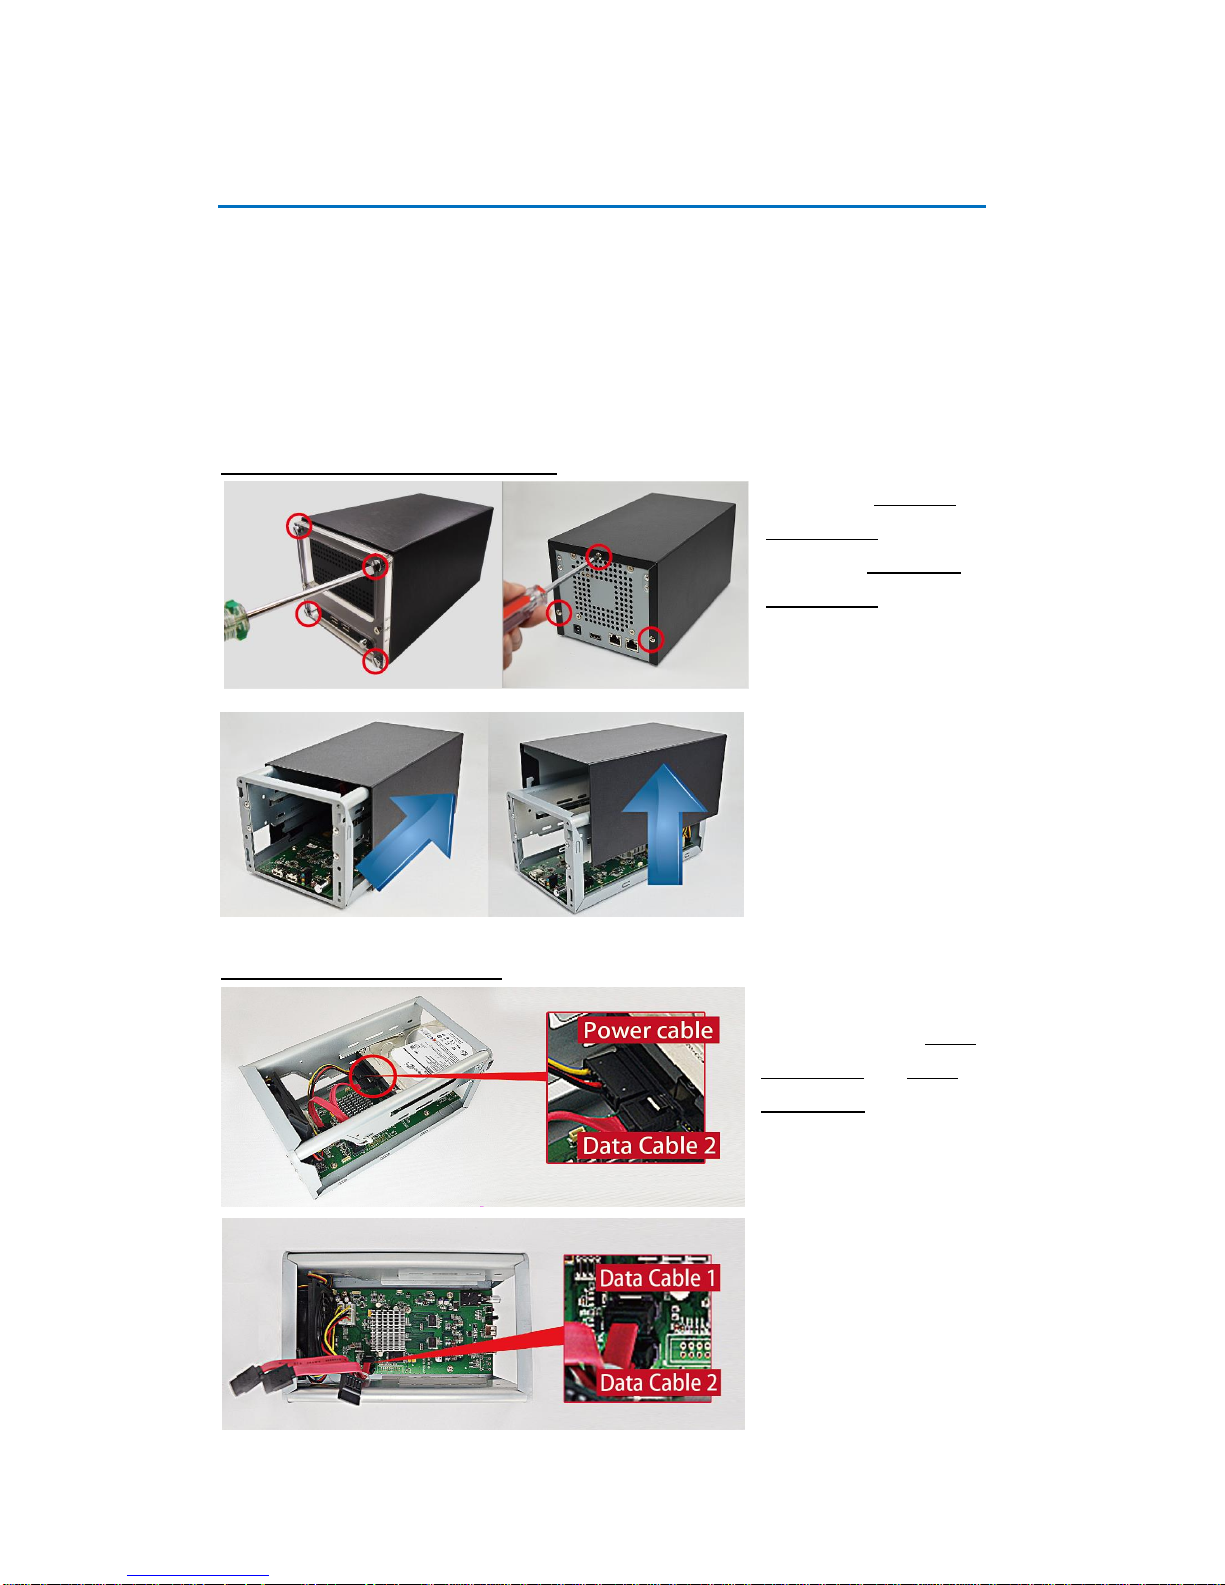
NVR-12XX
Step 1 Remove the Case Cover
Remove the four front
panel screws, and then
remove the three back
panel screws.
Slide the case backward
until it stops, and then lift it
up to remove.
Step 2 Install Disk SATA-2
Insert Disk SATA-2 in the
lower bay, connect SATA
power cable and SATA
data cable 2 to the hard
disk.
Make sure you connect the
correct data cable to the
corresponding disk.

Network Video Recorder Administrator’s Manual
22
Lock Disk
SATA-2 using
disk screws in
this sequence:
ABCD
Step 3 Install Disk SATA-1
Repeat Step1~Step3 to install Disk SATA-1 to the
upper bay. Remember to connect Disk SATA-1 with
SATA data cable 1 shown in the illustration in Step 2.
Step 4 Install the Case Cover Back
Install the case in
reverse order of removal
step (see Step 2), slide
the case cover back until
it clicks. Lock the back
panel and then front
panel with its screws.
Disk SATA-1
Disk SATA-2

Network Video Recorder Administrator’s Manual
23
Network Connection Architecture
When connecting NVR with your network, please make sure you plug the network cable into
the right port.
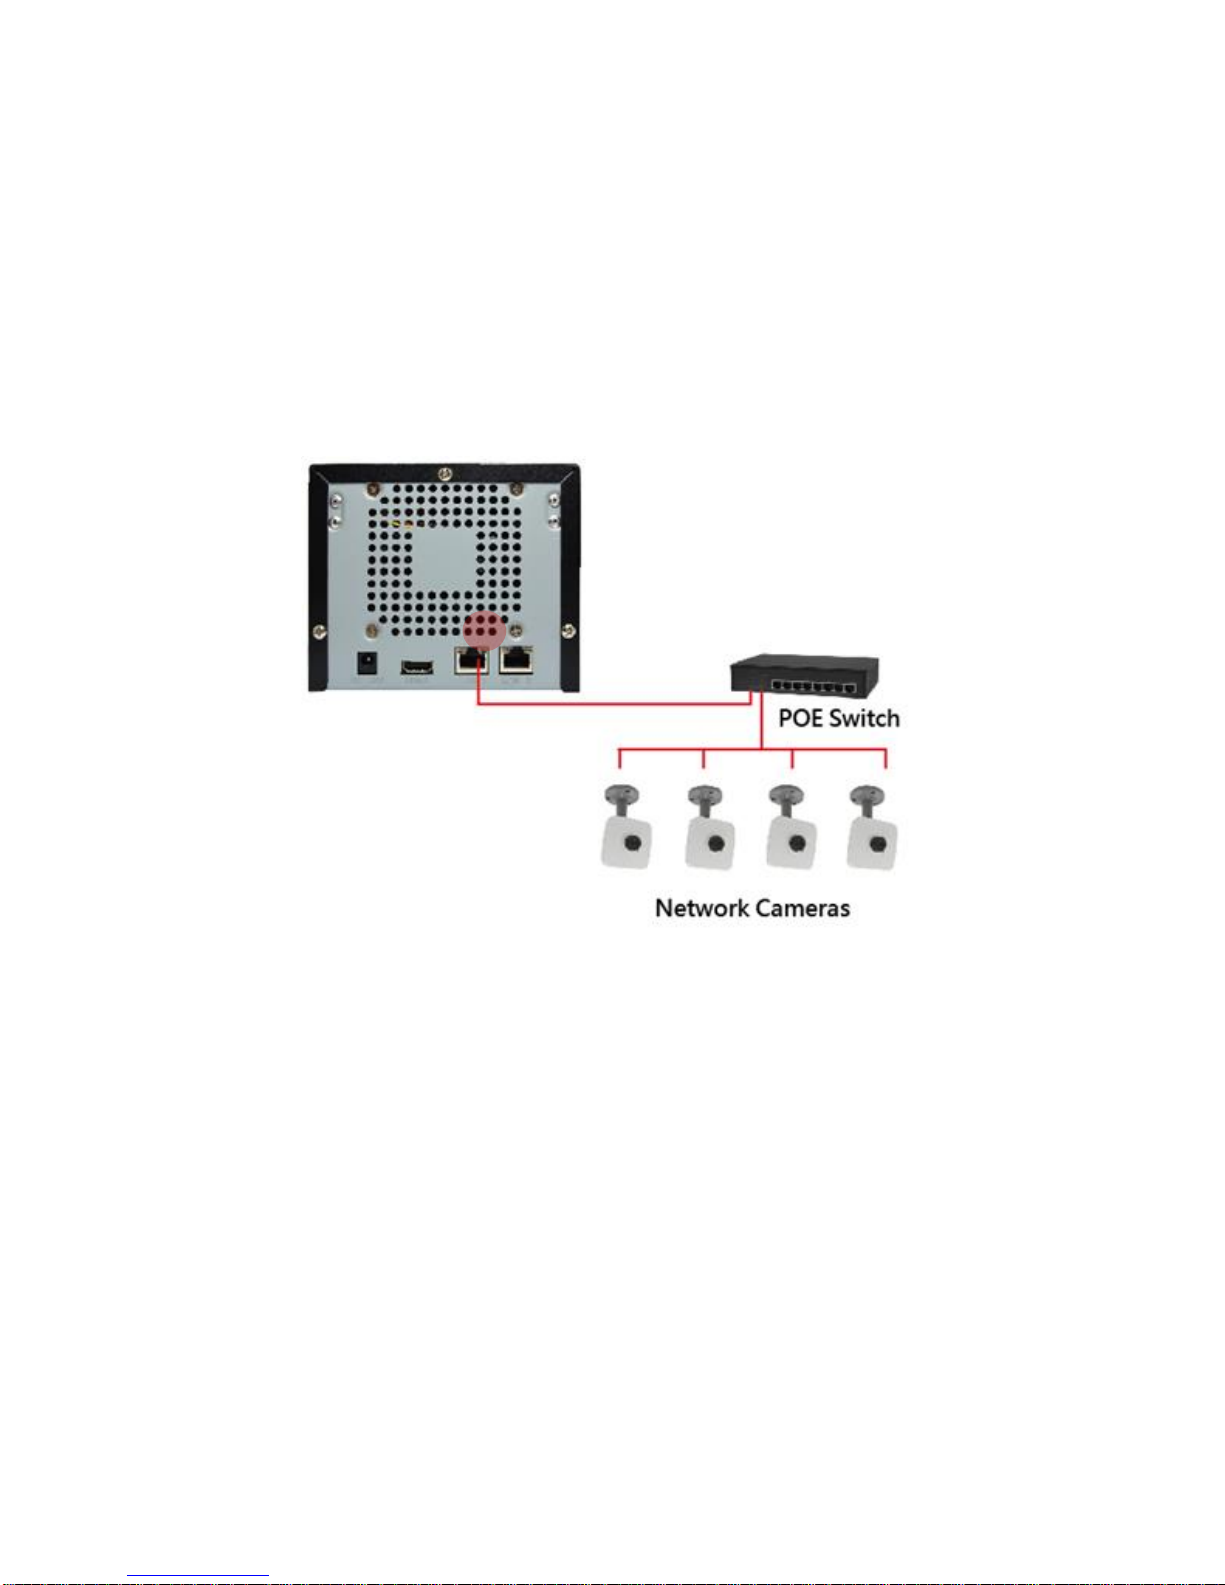
NVR-12XX
LAN 1 Port
LAN 1 port is the default camera port for a typical local network. Via this port, the DHCP
server built in NVR automatically assigns IP addresses to network cameras once they are
connected. With this feature, you do not have to bother arranging the camera IP addresses
on your own. By default, this DHCP server is enabled, so please avoid connecting NVR to a
network where exits another DHCP server via this port.
LAN 1
Port (Camera Port)
Default:
192.168.0.10
LAN 2
Port (WAN Port)
Default:
Dynamic /192.168.1.10
Network Video Recorder Administrator’s Manual
24
Connection Setting Example 1
Below diagram displays an example connection setting using only LAN1 to connect networks
cameras.
In this setting, NVR altogether with cameras are within the same network segment; in the
mean time, there is no need of referencing another DHCP server in this system.
LAN 2 Port
LAN2 port is a typical Ethernet port. You will have to use this port to connect with a different
network segment when your system requires (1) the connection with a remote PC client or
network cameras, (2) the use of event-triggered e-mail service via an external SMTP server
(3) the use of date/time synchronization with external NTP server.
By default, once connecting to a network, it will first try to get an IP address assigned by your
network router from DHCP server. If your network does not assign IP address automatically,
then LAN2 port will assume IP address 192.168.1.10.
192.168.0.101 ~ 192.168.0.104
LAN 1: 192.168.0.10

Network Video Recorder Administrator’s Manual
25
Connection Setting Example 2
The diagram below displays an example connection setting using LAN1 + LAN2 to connect
networks cameras within different network segments.
In this setting, NVR with three cameras are within the same network segment, while there is
another camera locating in another network. In addition, this system requires the connection
with an external SMTP server and a remote client.
LAN1: 192.168.0.10
(e.g.172.16.26.101)
LAN2: DHCP client
(e.g.172.16.26.100)
(EX:192.168.0.101 ~ 192.168.0.103)
SMTP Server
Remote PC Client

Network Video Recorder Administrator’s Manual
26
Connect the Devices
Follow the procedures to connect the devices. These devices are supposed to be connected
in the sequence shown below.
NVR-1204/1209/1 216
1. Connect the HDMI monitor.
2. Connect the USB devices.
3. Attach the network cable to LAN1 port.
4. Attach the network cable to LAN2 port. (Optional, required for remote client
connection)
5. Plug the power adapter into NVR and electricity outlet.
6. Press down Power Button to start the device, the power status LED will turn solid
blue.
7. Connect the network cameras to the switch and power them on.

Network Video Recorder Administrator’s Manual
27
Quick Setup
By the first time you log in to NVR, the Setup Wizard with bring you through the initial setup
process. By finishing the quick setup, you will enter live screen immediately.
Step 1: Log in to NVR
On Login window. Click into the Account and Password fields to enter the default account
information - admin / 123456, then click “Login”.
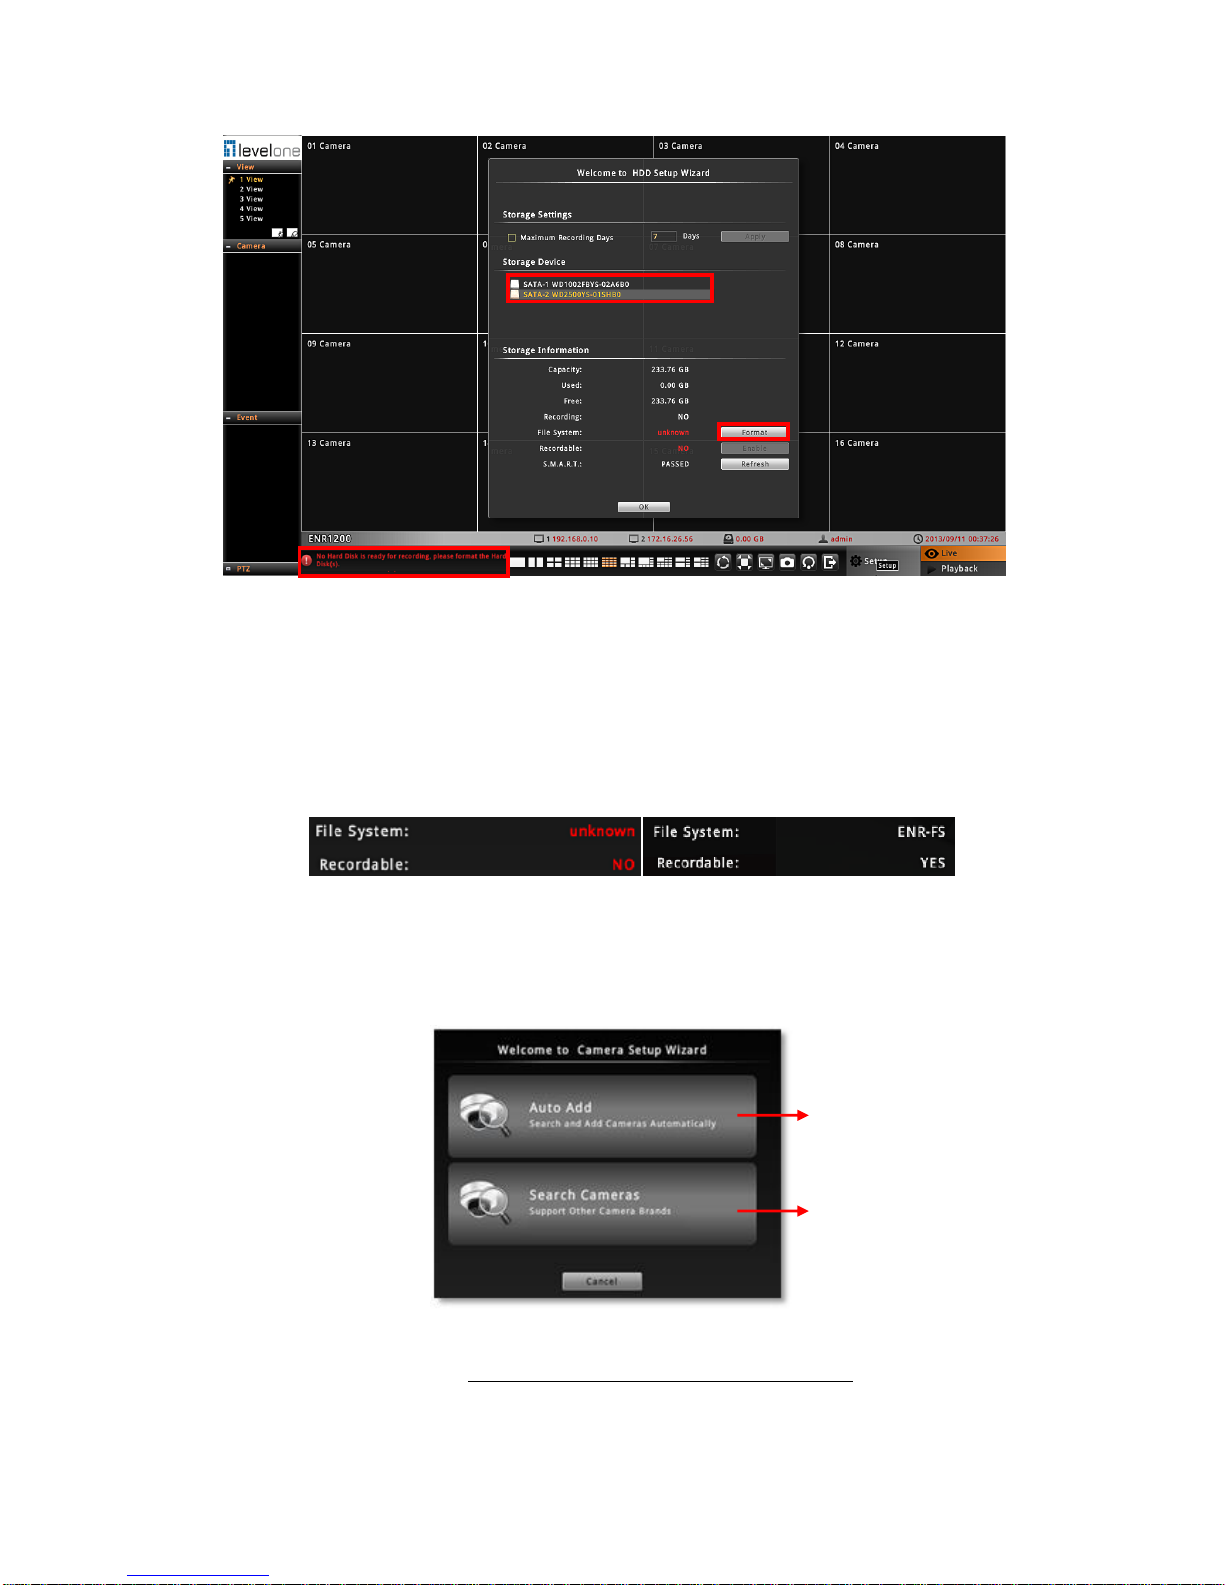
Step 2: Format the Hard Disks
At present, the hard disks you installed in NVR are not ready for recording, they need
formatting before use.
Network Video Recorder Administrator’s Manual
28
On HDD Setup Wizard window, select the unformatted disk and click “Format”. Repeat
this step to format the other disk, and then click “OK”. As NVR has successfully formatted a
hard disk, a message will pop out to notify you. After a successful formatting, the file
system of the disk will show “NVR-FS”, and this disk will immediately become ready for
recording,
(Not Formatted) (Formatted)
Step 3: Add Cameras
Please select Auto Add to automatically add cameras or Search Cameras to select
cameras by yourself.
Auto Add
By using Auto Add function, NVR will add the first detected H.264 streams. Please input the
Account and Password (this user account must be the camera’s root account) to access the
cameras.
Search all the cameras including
supported other brand cameras
within your current network
segment.
This will add detected H.264
video streams and display all
video streams on Live screen
right away

Network Video Recorder Administrator’s Manual
29
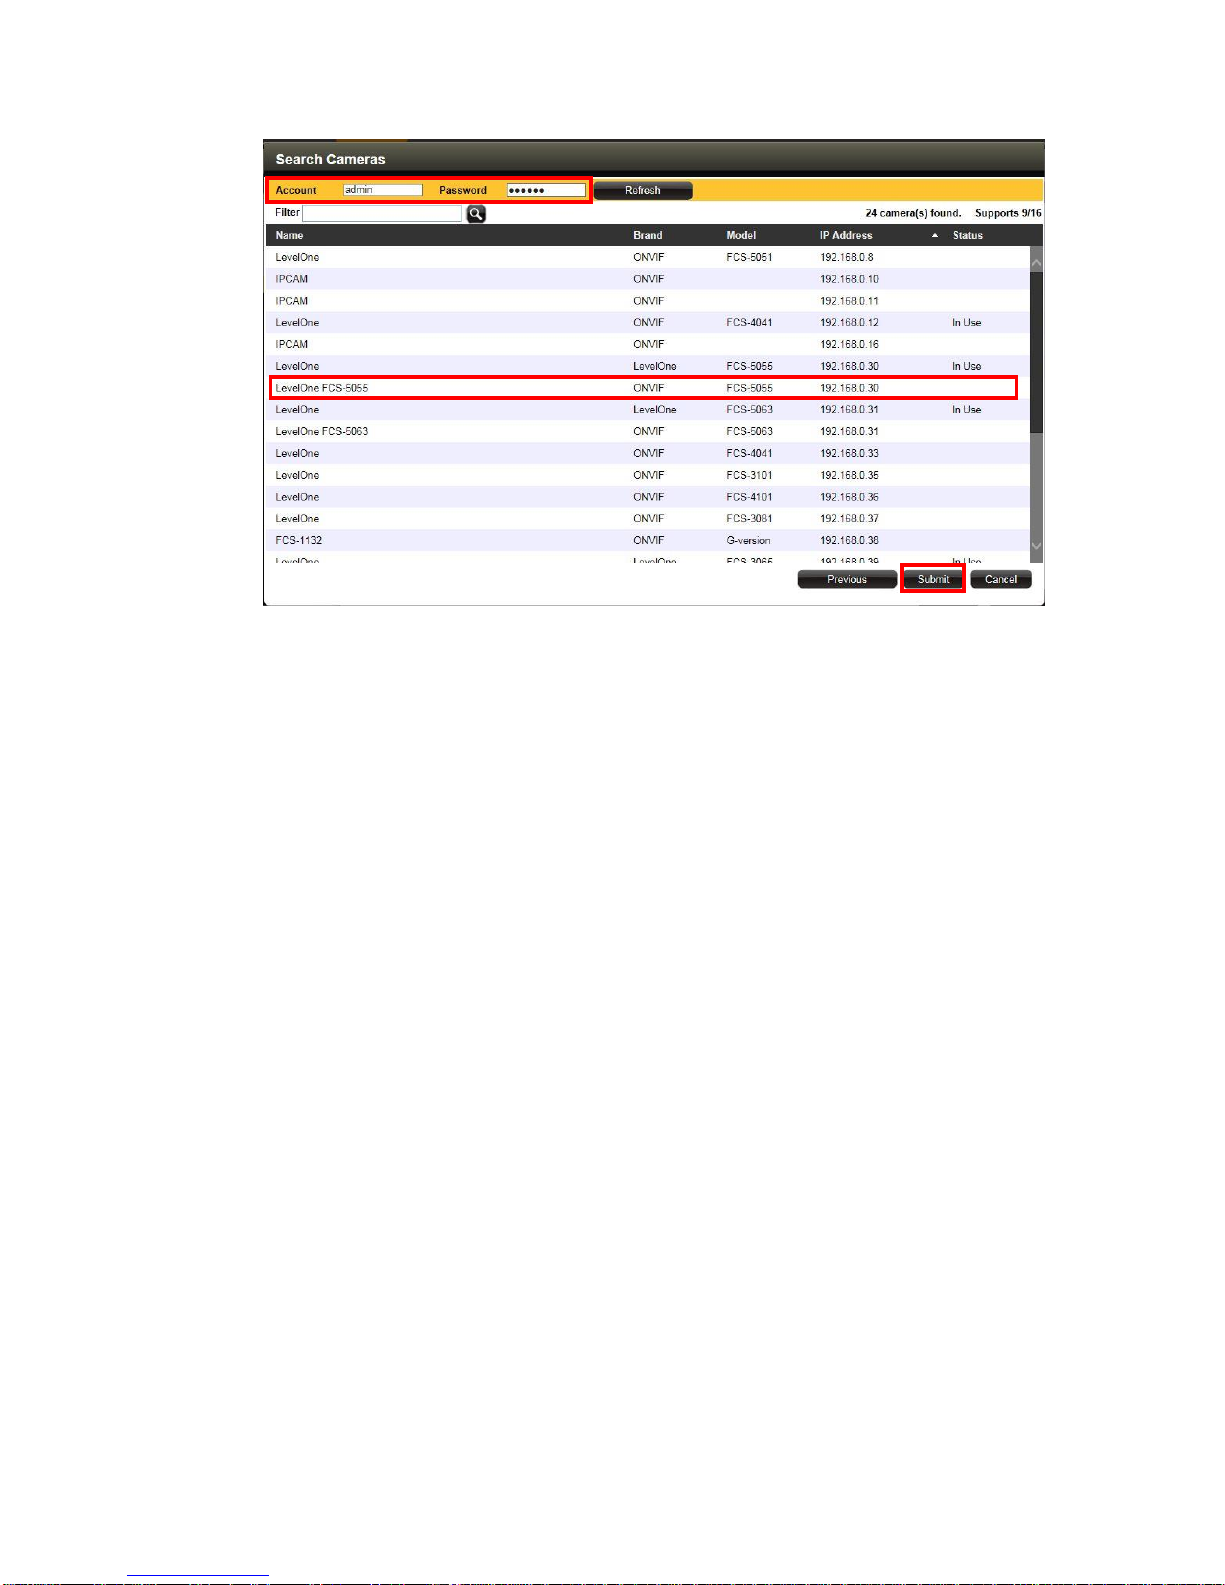
Search Cameras
Search Cameras allows you to select desired cameras and streams from multi-streaming
devices, including other brand cameras.
1. Input the Account and Password to access the cameras (this user account must be the
camera’s root account).
2. Click “Refresh”.
3. Select your desired cameras and click “Submit”. Please note that your clicking order will
decide Live View channels arrangement. For example, you select cameras on the
search list in this order: FCS-3056 FCS-3064 FCS-5055 FCS-5056, which will
exactly become the channel order: 01 Camera 02 Camera 03 Camera 04
Camera
Network Video Recorder Administrator’s Manual
30
 Loading...