

Page 1

Internet Content Inspect or
ICI-1000 / ICI-2000
User Manual
v1.00
Page 2

Important Notice
This user manual is delivered subjected to the following terms and conditions. The copyrights,
intellectual property rights and trade secrets included in this user manual are owned by ICI. The user
manual is provided to ICI customers for the sole purpose of obtaining information with respect to the
installation, implementation and function of the ICI system and should not be used for any other
purpose. The inform ation contained in this user manual is proprietary to ICI and strictly confidential. It
is strictly forbidden to copy, duplicate, reproduce or disclose this user manual or any part of this user
manual without prior written permission from ICI.
The Management Team of Digital Data Communications Asia Ltd
Copyright © LevelOne 201 1
Copyright
The contents of this publication may not be reproduced in any part or as a whole, stored, transcribed
in an information retrieval system, translated into any language, or transmitted in any form or by any
means, mechanical, magnetic, electronic, optical, photocopying, manual, or otherwise, without the
prior written permission of LevelOne
Disclaimer
LevelOne does not assume any liability arising out the application or use of any products, or software
described herein. Neither does it convey any license under its parent rights not the parent rights of
others. LevelOne further reserves the right to make changes in any products described herein without
notice. The publication is subject to change without notice.
Trademarks
LevelOne is a registered trademark of Digital Data Communications Group. Other trademarks
mentioned in this publication are used for identification purposes only and may be properties of their
respective owners.
Page 3

Table of Contents
INTRODUCTION ............................................................................................................................................... 6
WHO NEED THE ICI SYSTEM ...................................................................................................................................... 7
APPLICATION AND IMPLEMENTATION ........................................................................................................................... 8
UNPACKING & INSTALLING ............................................................................................................................ 10
PACKING CHECKLIST ............................................................................................................................................... 10
FRONT PANEL ....................................................................................................................................................... 10
REAR PANEL ......................................................................................................................................................... 10
REQUIREMENT ...................................................................................................................................................... 11
INSTALLATION ....................................................................................................................................................... 11
DEFAULT SETTINGS ................................................................................................................................................ 11
GETTING STARTED ......................................................................................................................................... 12
WEB MANAGEMENT INTERFACE ............................................................................................................................... 12
SYSTEM MAIN PAGE .............................................................................................................................................. 13
ICON BAR ............................................................................................................................................................. 14
MAIN PAGE - TOTAL THROUGHPUT STATISTICAL REPORT .............................................................................................. 15
INTERNET CONTENT RECONSTRUCTION ......................................................................................................... 22
EMAIL ................................................................................................................................................................. 22
POP3 ............................................................................................................................................................. 22
IMAP ............................................................................................................................................................. 26
SMTP (Outgoing) .......................................................................................................................................... 28
Webmail Read............................................................................................................................................... 30
Webmail Sent ................................................................................................................................................ 32
INSTANT MESSAGING & CHAT .................................................................................................................................. 34
Windows Live Messenger (aka MSN) ............................................................................................................ 34
ICQ ................................................................................................................................................................ 39
Yahoo Messenger ......................................................................................................................................... 41
QQ Messenger * ........................................................................................................................................... 43
UT Chat Room ............................................................................................................................................... 48
Skype * .......................................................................................................................................................... 49
Gtalk (in HTTP Gmail) ................................................................................................................................... 50
Internet Relay Chat – IRC .............................................................................................................................. 51
FILE TRANSFER ...................................................................................................................................................... 52
File Transfer Protocol - FTP ........................................................................................................................... 52
Peer to Peer File Sharing – P2P ..................................................................................................................... 54
HTTP .................................................................................................................................................................. 55
HTTP Link ...................................................................................................................................................... 55
HTTP Content ................................................................................................................................................ 57
HTTP Reconstruct .......................................................................................................................................... 59
HTTP Upload/Download ............................................................................................................................... 62
HTTP Video Streaming (FLV Video) ............................................................................................................... 64
HTTP Request ................................................................................................................................................ 66
HTTP Social Network Sites ............................................................................................................................ 68
TELNET ................................................................................................................................................................ 69
OTHERS ............................................................................................................................................................... 71
Online Games ................................................................................................................................................ 71
VoIP (Optional Purchase License) ................................................................................................................. 72
Unknown Connection .................................................................................................................................... 74
SYSTEM SETTING ................................................................................................................................................... 75
Network Setting ............................................................................................................................................ 75
Network Setup .............................................................................................................................................. 76
DNS Setup ..................................................................................................................................................... 81
Page 4

Shutdown and Reboot .................................................................................................................................. 81
System Time Setup ........................................................................................................................................ 82
Filter Setup .................................................................................................................................................... 83
Storage.......................................................................................................................................................... 84
Services ......................................................................................................................................................... 85
Edit Password ............................................................................................................................................... 96
Backup Data.................................................................................................................................................. 97
Disk Space Control ...................................................................................................................................... 101
SYSTEM STATUS .................................................................................................................................................. 102
Port Number ............................................................................................................................................... 102
Online IP ...................................................................................................................................................... 104
Login List ..................................................................................................................................................... 112
Update ........................................................................................................................................................ 113
Maintenance ............................................................................................................................................... 114
Domain ....................................................................................................................................................... 116
SYSTEM TOOLS .................................................................................................................................................... 117
Delete Data ................................................................................................................................................. 117
Authority ..................................................................................................................................................... 119
Storage Alert ............................................................................................................................................... 123
Throughput Alert ........................................................................................................................................ 124
AD Import ................................................................................................................................................... 126
REGISTRATION .................................................................................................................................................... 129
DATA SEARCH ..................................................................................................................................................... 131
Full Text Search ........................................................................................................................................... 131
Similar Search ............................................................................................................................................. 133
Data Search – Conditional or Parameter Search ........................................................................................ 134
Association Search ...................................................................................................................................... 145
Captured File List ........................................................................................................................................ 147
Bookmark .................................................................................................................................................... 148
SEND MAIL SERVICE ............................................................................................................................................. 151
Alert with Content ....................................................................................................................................... 151
Alert Mail Box ............................................................................................................................................. 152
Alert Sensitive File ....................................................................................................................................... 153
Report Management .................................................................................................................................. 154
Event Management .................................................................................................................................... 155
Event Trigger Management ........................................................................................................................ 157
STATISTICAL REPORTS ........................................................................................................................................... 158
Conditional Reports (Single Report) ............................................................................................................ 158
Conditional Report (Group Report) ............................................................................................................. 161
Network Services Usage Report .................................................................................................................. 162
Network Services Usage Weekly Report ..................................................................................................... 163
Top Websites Report ................................................................................................................................... 164
Online Users Report .................................................................................................................................... 165
Last Month Key Word Trend Report ........................................................................................................... 167
Daily Report (Excel Log Report) .................................................................................................................. 168
APPENDIX A: P2P SUPPORTED ..................................................................................................................... 169
APPENDIX B: ONLINE GAMES SUPPORTED ................................................................................................... 170
APPENDIX C: RETRIEVE DATA LOG VIA FTP .................................................................................................. 171
APPENDIX D: FIELD DEFINITION OF FULL-TEXT SEARCH FUNCTION .............................................................. 172
EXTENSION – QUERY SYNTAX DEFINITION ................................................................................................... 176
OVERVIEW ......................................................................................................................................................... 176
TERMS ............................................................................................................................................................... 176
FIELDS ............................................................................................................................................................... 176
TERM MODIFIERS ................................................................................................................................................ 177
Page 5

Wildcard Searches ...................................................................................................................................... 177
Fuzzy Searches ............................................................................................................................................ 177
Proximity Searches ...................................................................................................................................... 178
Range Searches ........................................................................................................................................... 178
Boosting a Term .......................................................................................................................................... 178
BOOLEAN OPERATORS .......................................................................................................................................... 179
AND ............................................................................................................................................................. 179
+ .................................................................................................................................................................. 179
NOT ............................................................................................................................................................. 179
- ................................................................................................................................................................... 180
GROUPING ......................................................................................................................................................... 180
FIELD GROUPING ................................................................................................................................................. 180
ESCAPING SPECIAL CHARACTERS ............................................................................................................................. 180
Page 6

Introduction
LevelOne Internet Content Inspector, ICI empowers your business security and operations teams
by providing granular data m onitor ing and prec ise packet and session reconstruction capabilities. The
solution is designed to combine process and technology into a single effective system for network
forensics. Business can for the first time embrace Web 2.0 and maintain complete visibility and
control, while significantly reducing total cost of ownership through device consolidation. ICI offers
real innovation by enabling unprec e dent ed vis ibi lity and control of applications and content with no
performance degradation. It identify applications accurately - regardless of port, protocol, evasive
tactic or SSL encryption – and scan content to stop threats and prevent data leakage.
It intercepts, captures and reconstruct Internet activities such as Email (POP3, SMTP, IMAP),
Webmail Read and Sent (Yahoo Mail, Gmail, Windows Live Hotmail, Seednet etc.), Instant
Messaging or Chat (Yahoo, Windows Live Messenger or MSN, ICQ, AOL, QQ, UT Chat Room, IRC,
Gtalk, Skype Voice Call Duration Log), HTTP (URL Link, Content, Upload and Download, Vide o
Streaming), File Transfer (P2P File Sharing, FTP), Online Games, VoIP (Yahoo Messenger) and
Webcam (Yahoo Messenger and Windows Live Messenger - MSN), VoIP (RTP Voice Call) and
Telnet sessions. ICI system encourages efficiency, prevents company network resource from abuses
by employees, tracing culprits of information and confidential data leakage, and monitors activities
and online behaviour of employees.
Ethernet LAN interception is an important approach to gather information of communications and
digital evidence. Ethernet LAN interception solutions capture all the traffic on the LAN network and
monitor the Internet activities. It is capable of live intercepting with real time capturing and
decoding/reconstruction, category classifying, behaviour analysing, data mining, reporting with
statistics etc.
ICI comes with wide variety of management and administrative functions. It provides you various
types of report with Top-Down View. Reports that can be created include Total Throughput Statistical
Report, Network Service Report (Daily, Weekly basis), Top Websites etc. All statistics can be
displayed in per IP Address or per User Account basis.
ICI also provides varieties of search functions. It provides Free Text Search (search by Key Words
with Boolean suppor t), C on dit ion al Sear ch, Similar Search and Association with Rela tions hi p Searc h.
It also comes with Alert and Notification (Throughput, Conditional and Key Words Alert) functions that
allow the network Administrator to setup different alert rules and parameters. This allows alert to be
triggered (email to be sent to Administrator) once the specified content is found in the captured and
reconstructed content.
Page 7

Backup function allows user to back up the captured raw data files or reconstructed contents. User
can setup auto backup to backup these files to external drive (NAS or SAN) through FTP upload
method. Besides, user can opt for manually backup these files by burning them into CD/DVD or even
downloaded them to a local hard drive/PC.
Other functions available are like Bookmark, Capture File List (Comparing the content of two files),
Online IP List, Authority Assignment, Syslog Server etc. Others functions include hashed export
(backup), file content comparison etc.
Who Need the ICI System
• Financial, Banking and Inves tment Organisations where all Internet transactions and
communications need to be archived (Record Keeping).
• Marketing organizations, design house, h igh tec hn ol o g y and R&D firms where critical
confidential information need protected.
• Schools, colleges, institutions and universities that would like to monitor students and staffs
online activities and behaviour.
• Government agencies and ministries such as Police Intelligence, Military Intelligence, Secret
Service Agencies, National Security Agencies, Criminal Investigation Agencies, C o unter
Terrorism Agencies etc.
• Any company or organization that wants to monitor, backup and archive their daily Internet
transaction and data.
Page 8

Application and Implementation
The diagram below is a common ICI application and implementation diagram which can be applied to
any organization networks. ICI uses sniffer technology to sniff or capture network Internet packets
through a port-mirroring capable switch (normally a smart switch or layer 2/3 switch; a HUB can be
used too as HUB broadcast traffic to all ports). It then parses (decodes and reconstructs) the captured
raw data packets, store them in system database and displays the reconstructed data with reports in
original and readable format in the Web GUI.
Ethernet LAN Organization Network Monitoring and Interception
Page 9
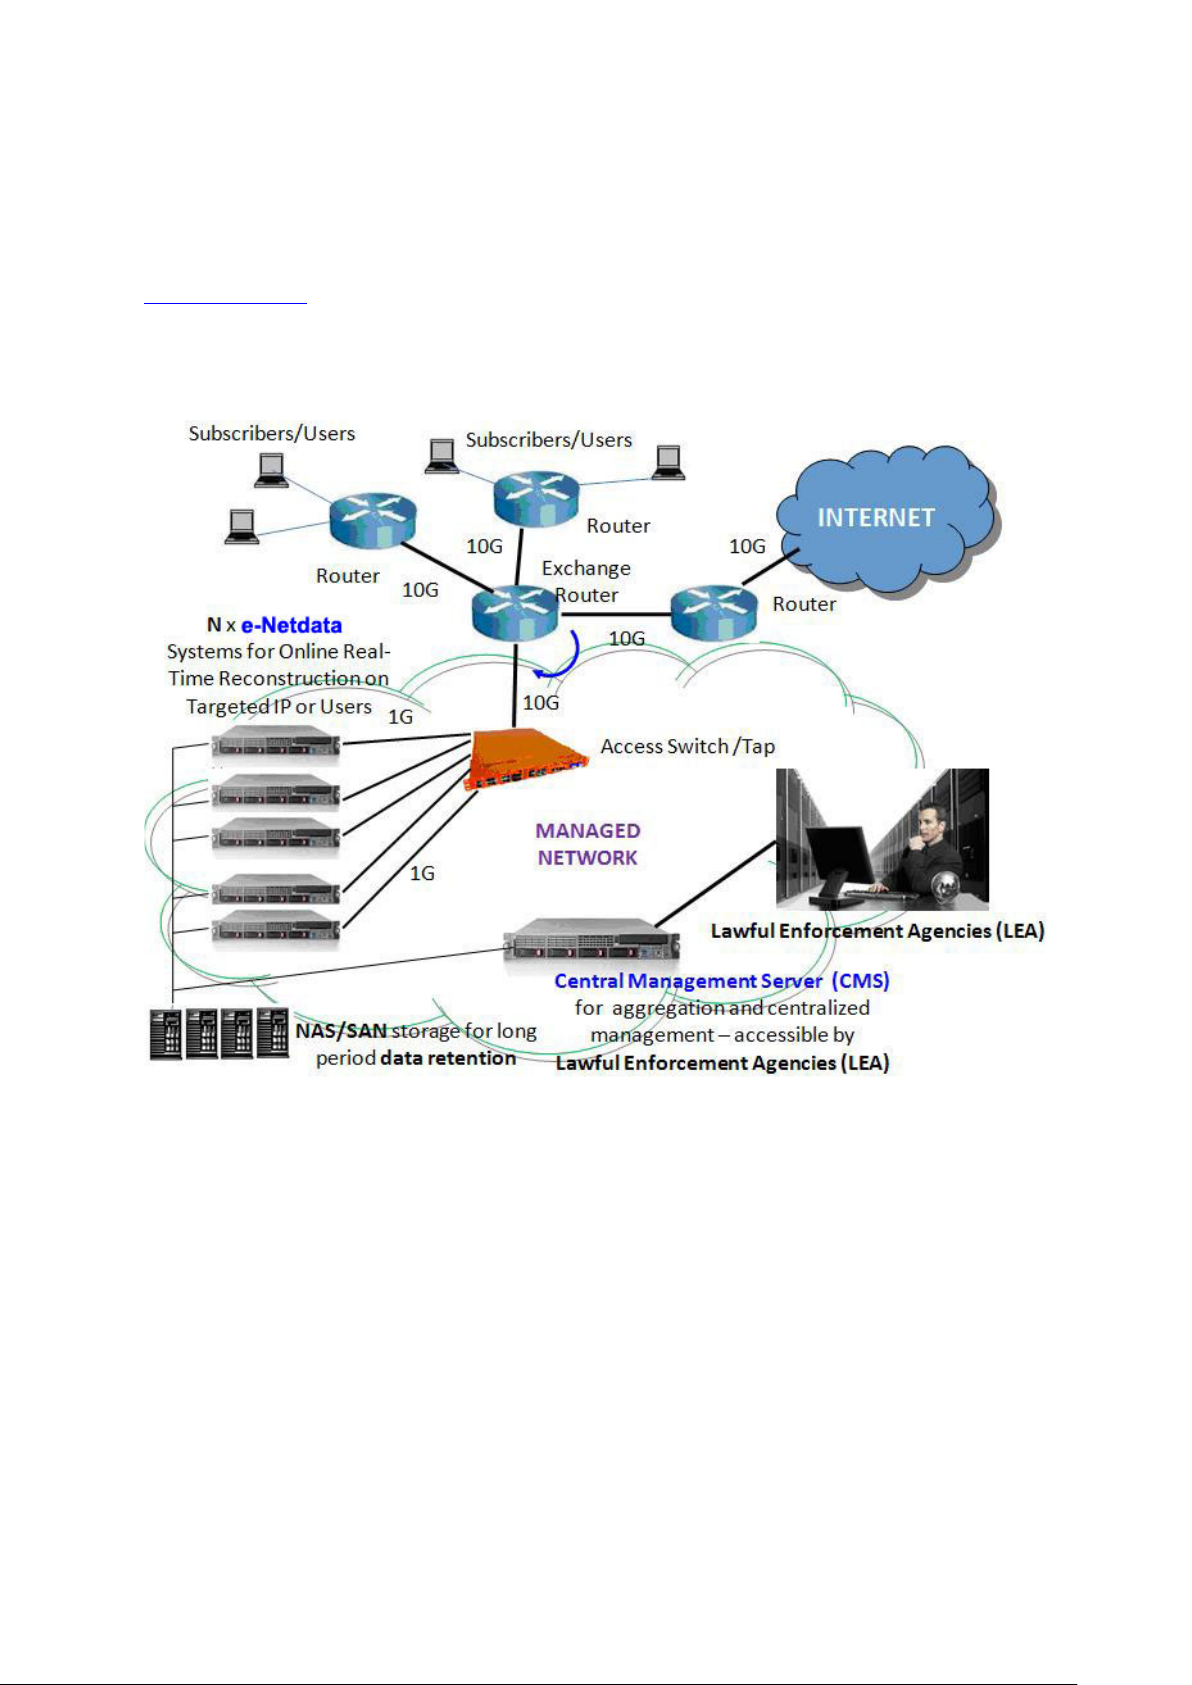
ICI can also be implementation at network with huge volume of traffic throughput such as mass
interception and lawful interception at Telco or ISP networks. This implementation is normally for
lawful enforcement agencies (LEA) such as cyber sec u rit y agenc ies, national security agencies,
criminal investigation bureau, police and military intelligence. Please contact LevelOne sales team for
more details
sales@level1.com
Telco or ISP lawful Internet Interception
Page 10

Unpacking & Installing
1 2 1 2 3 4 5
6
Packing Checklist
19 inch 1U Rack mountable Server x 1
Quick Installation Guide x 1
CD Manual x 1
Mounting Bracket set x 1
Power Cord x 1
Front Panel
1. Power LED
2. HDD LED
Rear Panel
1. Power Socket
2. Power Supply Unit
3. PS/2 KB & Mouse (for local console)
4. VGA Display (for local console)
5. Monitor Ethernet Port
6. Management Ethernet Port
Page 11

Requirement
IP
192.168.1.60
Username
root
Password
000000 (six zero)
In order to get the ICI to capture your network activities successfully, a Port-Mirroring feature on the
network Ethernet switch is must. User can monitor traffic from any source port to a target port for realtime analysis. Attach the ICI to the target port and study the traffic crossing the source port in a
completely unobtrusive manner. Most the Web Smart and fully Managed Layer2 Ethernet switches
support the Port-Mirroring feature
Web Smart or Fully Managed Layer2/3 Switch with Port-Mirroring feature
For the best performance and keep disruption minimal, we introduce the Mirror mode implementation
only which provides the Real-time Reconstruction and keep disruption minimal at the same time. The
captured packets are saved in PCAP format
Installation
1. Connect the power cord to ICI power socket on the rear panel
2. Patch lead between Switch Mirror port and ICI Monitor port
3. Patch lead between Switch port (any available port) and ICI Management port
Default Settings
Note: Internet Explorer (IE ver6, 7 and 8) are recommended web browser for Web GUI management access of ICI system.
Page 12

Getting Started
This chapter shows how to manage the ICI system via standard Web Browser over local network,
also a quick guide about each function button from menu bar, as well as the examples of feature-rich
of report feature.
Web Management Interface
1. Use Internet Explorer (IE) Web Browser to access ICI system web management site. ICI system
uses port 443 for secure web access. Please remember to key in https://x.x.x.x, for example
https://192.168.1.60 (which is the default login).
2. Before you use this system, please make sure you have Java applet installed. Read the
instruction on “Before You Use This System” at the login page.
3. Username: root & Password: 000000 (six zero)
4. Choose your preferred language [Traditional Chinese] or [English] and then click on the login
button.
Note: Internet Explorer (IE ver6, 7 and 8) are recommended web browser for Web GUI management acc ess of ICI system.
Page 13

System Main Page
The navigation icon bar is on the top section of the Web Management GUI. ICI Homepage provides
information on the Total Throughput Statistical Report (as shown in diagram below) with Top-Down
and Drilled-Down capabilities.
Page 14

Icon Bar
Icon
Function
EMAIL RECORD
CHAT
RECORD
FILE TRANSFER
OTHERS
HTTP
TELNET RECORD
RECORD
RECORD
RECORD
Icon
Function
SYSTEM S
SYSTEM TOOLS
RE
GIS
DATA SEARCH
ALERT SERVICE
REPORT
TER
TATUS
SYSTEM S
ETTING
HOMEPAGE/LOGOUT
Page 15

Main Page - Total Throughput Statistical Report
Total Throughput Statistical Report provides Dail y, W eek l y and Total Traffic statistic of different
Internet service categories for the organization network. It shows the total traffic amount usage by the
entire network as well as breaks them out into different service categories. Online User List will show
the List of users (IP Address and Account).
Mail Report allows Administrator to send different reports such as Total Throughput Statistical Report,
Online IP List etc. to the specific Email account immediately or either by hour l y, dail y, weekl y or
monthly basis as shown below.
Page 16

Example 1:
Click on the Email - POP3 Quantity of Daily Traffic, it will List down the entire POP3 Emails in the
database.
Page 17

Example 2:
Click on the HTTP – HTTP Content weekly traffic throughput (KB), it will display the bar chart of the
HTTP Content traffic for the entire week (7 days). By clicking bar chat (specific day), it will lead you to
that day details content.
Page 18

Example 3:
Click on the Daily Traffic – Summary Report, it will pop out Statistical Report List window and you can
select to click Throughput Statistical Report or Top N report. Click on the Top N, it will display the
User Daily Traffic Top N by Listing the top user IP with information such as Who is?, Throughput (KB)
and Statistical Report which includes Protocol Daily, Weekly and Summary Report.
Page 19
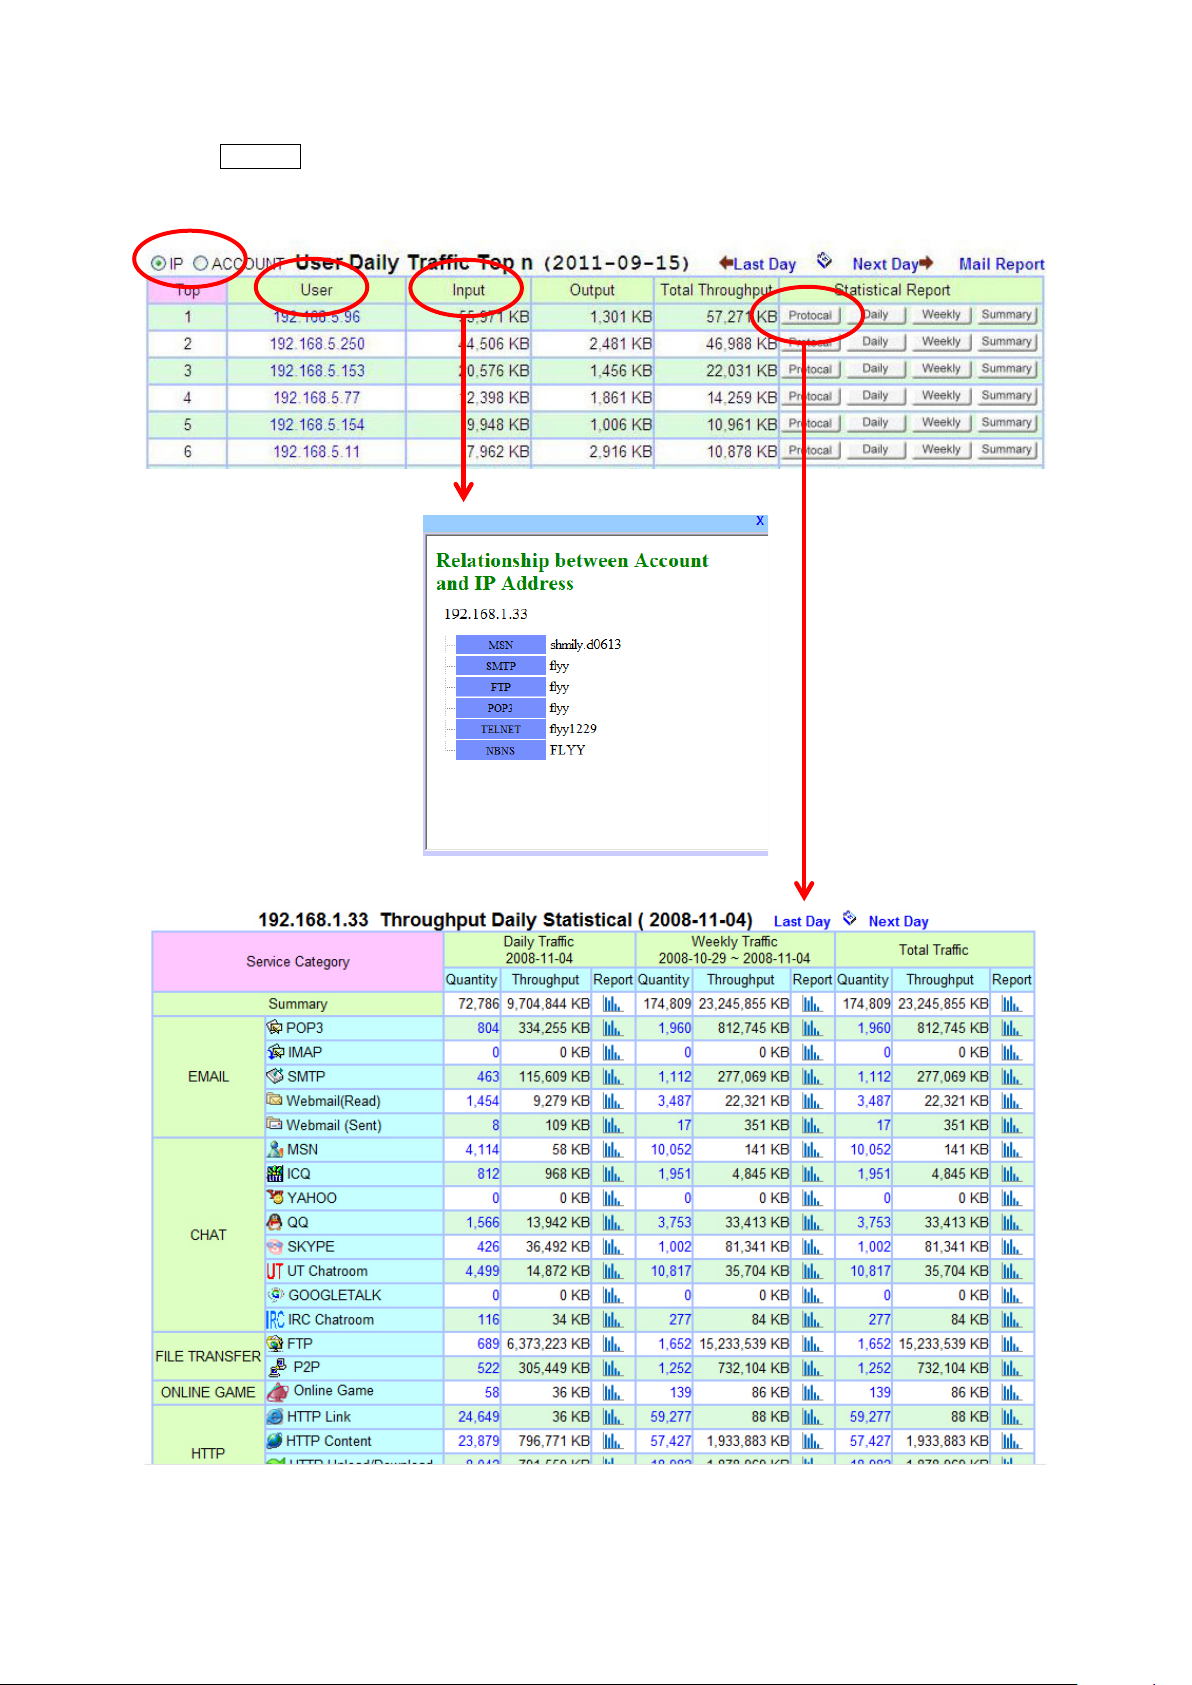
Click on Who is ? This will display the user (IP) relationship with username, user login etc. Click on
Protocol, it will display all applications and throughput (KB) used by this user (IP).
Page 20

Besides generating report by IP, Administrator can also generate report by Account basis.
Page 21

Click on the Daily, Weekly or Summary Statistical Report of the particular user (IP), it will pop out a
window display statistical on bar chart.
Page 22

Internet Content Reconstruction
ICI system captures and reconstructs Email content back to its original content view format. Various
Email protocol types supported are as follow:
1. POP3 (Incoming)
2. IMAP (Incoming)
3. SMTP (Outgoing)
4. Webmail (Read)
5. Webmail (Sent)
POP3
Post Office Protocol 3 or POP3 (Incoming) Email obtainable information includes Date-Time, Account
(with IP/MAC), Sender, Receiver, CC, Subject with Email content (with attachment if any) and Size.
Features in this POP3 GUI:
• POP3: Refresh the page content.
• Delete: Delete the Email (that has been checked or ticked).
• Account List: This section shows all the Email Account List.
• Search: Search for Email based on the specified parameters such as Date, Time, IP, Receiver,
Sender, CC, Subject and Account.
Page 23

• Source, Destination IP Address and MAC Address by pointing the mouse to the account column.
• Display the number of record per page
•
•
•
•
• [•] Source Code: Shows the Email source and path.
• [•] Convertor: Convert the subject name to another language to be readable. T his conver t or
• Subject: Click on Email subject to view the content of the Email.
Checkbox: Check or tick the checkbox for deleting
Attachment: This symbol shows there is attachment in the Email
Shows the IP address
Forward Email: Forward the Email to a specific Email account
coverts the character in different coding formats such as zh-ch (Chinese), zh-sg (Singapore), zhtw (Taiwan), en (English), utf-8, JP (Japanese).
Page 24

• Similar Search: Search for Email with similar content
•
Whois: Provide information of Source and Destination IP and Hostname. It allows you to
search for the IP Address information through the Internet.
Page 25
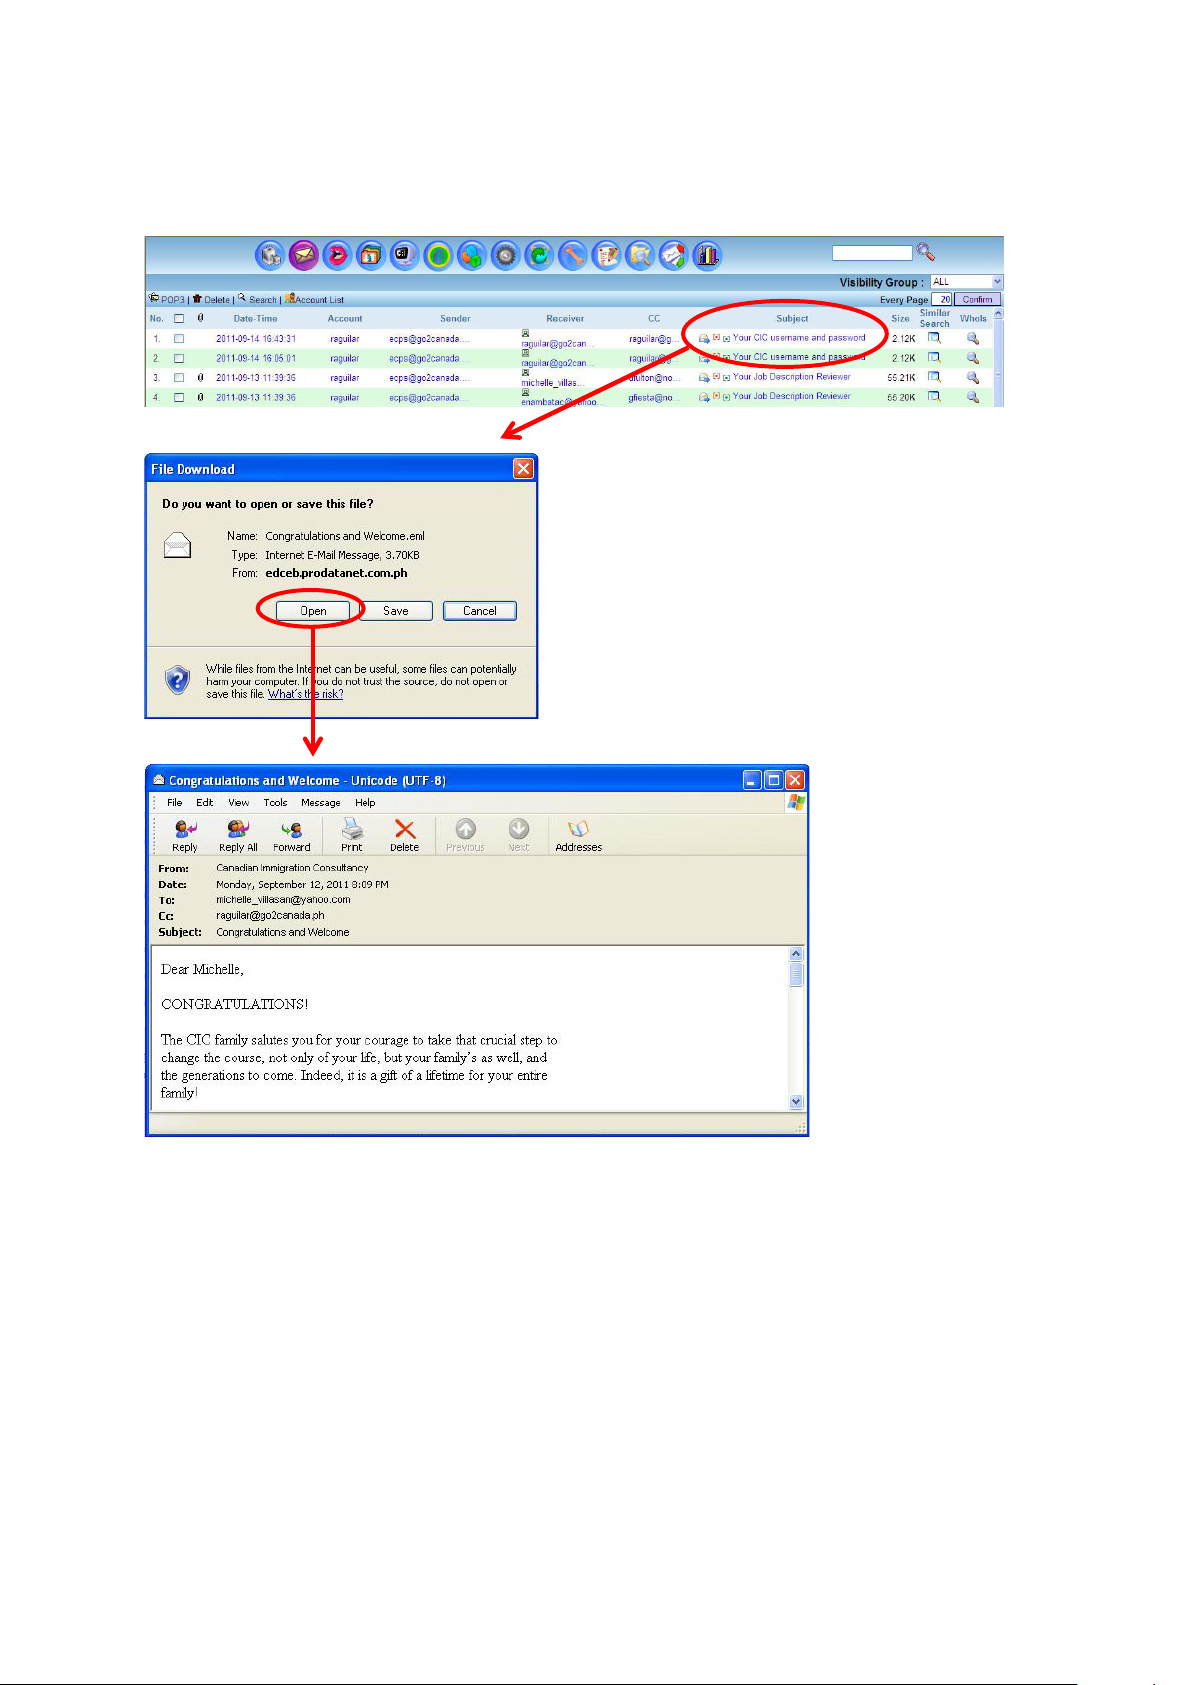
View Email Content
Click on the Email subject and Administrator can choose to open and view the Email content or save
it into the hard drive of the Administrator PC.
Page 26

IMAP
Internet Message Protocol (IMAP) obtainable information includes Date-Time, Account (with IP/MAC),
Sender, Receiver, CC, Subject with Email content (with attachment if any) and Size.
Features in this IMAP GUI:
• IMAP: Refresh the page content.
• Delete: Delete the Email (that has been checked or ticked).
• Account List: This section shows all the Email Account List. (Refer to 2.1.1)
• Search: Search for Email based on the specified parameters such as Date, Time, IP, Receiver,
Sender, CC, Subject and Account.
• Source, Destination IP Address and MAC Address by pointing the mouse to the account column
• Display the number of record per page
• Checkbox: Check or tick the checkbox for deleting
• Attachment: This symbol shows there is attachment in the Email
• Shows the IP address
• Forward Email: Forward the Email to a specific Email account
• [•] Source Code: Shows the Email source and path.
• [•] Convertor: Convert the subject name to another language to be readable. This convertor
coverts the character in different coding formats such as zh-ch (Chinese), zh-sg (Singapore), zhtw (Taiwan), en (English), utf-8, JP (Japanese).
• Subject: Click on Email subject to view the content of the Email.
• Similar Search: Search for Email with similar content
• Whois: Provide information of Source and Destination IP and Hostname. It allows you to
search for the IP Address information through the Internet.
Page 27

View Email Content
Click on the Email subject and Administrator can choose to open and view the Email content or save
it into the hard drive of the accessing PC.
Page 28

SMTP (Outgoing)
Simple Mail Transfer Protocol or SMTP (Outgoing) obtainable information includes Date-Time,
Account (with IP/MAC), Sender, Receiver, CC, BCC, Subject with Email content ( with attac hment if
any) and Size.
Features in this SMTP GUI:
• SMTP: Refresh the page content.
• Delete: Delete the Email (that has been checked or ticked).
• Account List: This section shows all the Email Account List. (Refer to 2.1.1)
• Search: Search for Email based on the specified parameters such as Date, Time, IP, Receiver,
Sender, CC, Subject and Account.
• Source, Destination IP Addr es s and MAC Addr es s by pointing the mouse to the account column
• Display the number of record per page
• Checkbox: Check or tick the checkbox for deleting
• Attachment: This symbol shows there is attachment in the Email
• Shows the IP address
• Forward Email: Forward the Email to a specific Email account
• [•] Source Code: Shows the Email source and path.
• [•] Convertor: Convert the subject name to another language to be readable. This convertor
coverts the character in different coding formats such as zh-ch (Chinese), zh-sg (Singapore), zhtw (Taiwan), en (English), utf-8, JP (Japanese).
• Subject: Click on Email subject to view the content of the Email.
• Similar Search: Search for Email with similar content
• Whois: Provide information of Source and Destination IP and Hostname. It allows you to
search for the IP Address information through the Internet.
Page 29

View Email Content
Click on the Email [Subject] link and you can choose to open and view the Email content or save it
into the hard drive of your PC.
Page 30

Webmail Read
Webmail supported includes Yahoo Mail, Windows Live Hotmail, Gmail etc. Webmail (Read)
obtainable information includes Date-Time, Account (with IP/MAC), Sender, Subject (with content)
and Webmail Type.
Features in this Webmail (Read) GUI:
• Webmail (Read): Refresh the page content.
• Delete: Delete the Email (that has been checked or ticked).
• Account List: This section shows all the Email Account List. (Refer to 2.1.1)
• Search: Search for Webmail based on the specified parameters such as Date, Time, IP, Receiver,
Sender, CC, Subject and Account.
• Source, Destination IP Address and MAC Address by pointing the mouse to the account column
• Display the number of record per page
• Checkbox: Check or tick the checkbox for deleting
• Attachment: This symbol shows there is attachment in the Email
• Shows the IP address
• Forward Email: Forward the Email to a specific Email account
• [•] Source Code: Shows the Email source and path.
• [•] Convertor: Convert the subject name to another language to be readable. This convertor
coverts the character in different coding formats such as zh-ch (Chinese), zh-sg (Singapore), zhtw (Taiwan), en (English), utf-8, JP (Japanese).
• Subject: Click on Email subject to view the content of the Email.
• Similar Search: Search for Email with similar content
• Whois: Provide information of Source and Destination IP and Hostname. It allows you to
search for the IP Address information through the Internet.
Page 31

View Email Content
Click on the [Subject] link and the following GUI which is the Webmail read content will be displayed.
Page 32

Webmail Sent
Webmail (Sent) obtainable information includes Date-Time, Account (with IP/MAC), Sender,
Password (if available), Receiver, CC, BCC, Subject with Webmail content (with attachment if any)
and Webmail Type.
Features in this Webmail (Sent) GUI:
• Webmail (Sent): Refresh the page content
• Delete: Delete the Email (that has been checked or ticked)
• Pass Show: Shows the login password if available.
• Account List: This section shows all the Email Account List
• Search: Search for Webmail based on the specified parameters such as Date, Time, IP, Receiver,
Sender, CC, BCC, Subject, Webmail Type and Account
• Source, Destination IP Address and MAC Address by pointing the mouse to the account column
• Display the number of record per page
• Checkbox: Check or tick the checkbox for deleting
• Attachment: This symbol shows there is attachment in the Email
• Shows the IP address
• Forward Email: Forward the Email to a specific Email account
• [•] Source Code: Shows the Email source and path.
• [•] Convertor: Convert the subject name to another language to be readable. This convertor
coverts the character in different coding formats such as zh-ch (Chinese), zh-sg (Singapore), zhtw (Taiwan), en (English), utf-8, JP (Japanese).
• Subject: Click on Email subject to view the content of the Email.
• Similar Search: Search for Email with similar content
• Whois: Provide information of Source and Destination IP and Hostname. It allows you to
search for the IP Address information through the Internet.
Page 33

View Email Content
Click on the [Subject] link and the following GUI which is the Webmail sent content will be displayed.
Page 34

Instant Messaging & Chat
Windows Live Messenger (aka MSN)
MSN obtainable information includes Date-Time, Account (with IP/MAC), User Handle (User
Account), Participant Acc ount, Con vers at ion wit h cont ent whic h incl udes file transferred and
MSN webcam (video) session.
Features in this MSN GUI:
• MSN: Refresh the page content.
• Delete: Delete the MSN chat record (that has been checked or ticked).
• Account List: This section shows the MSN Account List. Administrator can download the monthly
chat record (in Excel format) and search for the chat record as shown below.
Page 35

• Search: Search for MSN record based on the specified parameters such as Date, Time, IP, User
Handle, Participants and Ac c ount.
• Display the number of record per page
• Checkbox: Check or tick the checkbox for deleting
• File Transferred: This symbol shows there is file transferred over the MSN
•
•
• Conversation: Click on Conversation to view the chat content.
• Similar Search: Search for chat record with similar content.
Friend List: This will show the entire friend list for the particular MSN account.
Download: Download the MSN chat record.
Page 36

MSN Conversation Content
Click on the [Conver satio n] link and the following GUI will pop up and you can view the whole chat
session content. It i nclud es c hat tex t message, file transferred (which c an b e ope n ed an d do wnlo ade d)
and webcam session reconstructed in ml20 format.
To playback the MSN webcam session, click on the video icon and download the webcam file
(in ml20 format) to your PC and play back using the MSN web recorder tool.
Page 37

MSN Webcam Playback
1. Download and install MSN web recorder 1.0.2 from the following website at
http://ml20rc.msnfanatic.com/download.html
2. Start or execute the MSN web recorder
3. Open ml20 file: File - Open – OPEN and select the file to play
Page 38

4. Click on [Play] to play back the record MSN webcam session
Page 39

ICQ
ICQ Messenger obtainable information includes Date-Time, Account (with IP/MAC), User Handle
(User Account), Participant Account, Conversation with content and Count.
Features in this GUI:
• ICQ: Refresh the page content.
• Delete: Delete the ICQ chat record (that has been checked or ticked)
• Account List: This section shows the ICQ Account List. Administrator can download the monthly
chat record (in Excel format) and search for the chat record as shown below
• Search: Search for ICQ record based on the specified parameters such as Date, Time, IP, User
Handle, Participants and Ac count
• Display the number of record per page
• Checkbox: Check or tick the checkbox for deleting
• File Transferred: This symbol shows there is file transferred over the ICQ
• Friend List: This will show the entire friend list for the particular ICQ account.
• Download: Download the ICQ chat record.
• Conversation: Click on Conversation to view the chat content.
• Similar Search: Search for chat record with similar content.
Page 40

ICQ Conversation
Click on the [Conversation] link, the following conversation window content will pop up and you can
view the entire chatting session and files transferred as shown in the diagram below.
Page 41

Yahoo Messenger
Yahoo Messenger obtainable information includes Date-Time, Account (with IP/MAC), User Handle
(User Account), Participant Account, Conversation (with content), file transferr ed, VOI P and Webcam
session etc.
Features in this GUI:
• YAHOO: Refresh the page content
• Delete: Delete the YAHOO chat record (that has been checked or ticked)
• Account List: This section shows the YAHOO Account List. Administrator can download the
monthly chat record (in Excel format) and search for the chat record as shown below
• Search: Search for YAHOO record based on the specified parameters such as Date, Time, IP,
User Handle, Participants and Account
• Display the number of record per page
• Checkbox: Check or tick the checkbox for deleting
• File Transferred: This symbol shows there is file transferred over the YAHOO
• Friend List: This will show the entire friend list for the particular YAHOO account.
• Download: Download the YAHOO chat record.
• Conversation: Click on Conversation to view the chat content.
• Similar Search: Search for chat record with similar content.
Page 42

Yahoo Messenger Conversation, VOIP and Webcam Sessions
Click on the click the [Conversation] link and the following conversation window will pop up and you
can view the entire text chat session, file transfer, VoIP (audio) and webcam (video) sessions. For
webcam play back, you just need to click on the webcam (video) icon and it will play back the
webcam video. For VoIP pl a y back , you need to follow the instructions as follow.
Yahoo Messenger VoIP Play Back
To play back Yahoo VoIP session, you can click and download the VoIP (audio) file in GIPS format to
your own PC. You must have GIPS Decoder installed on your PC in order to playback the GIPS VoIP
(audio) file.
GIPS Decoder for Yahoo Messenger VoIP Play Back
This software is used to play back recorded Yahoo VOIP audio file (.GIPS file format). GIPS Decoder
is provided and supported by GIPS community.
Note: GIPS Decoder is maintained by GIPS Community. User would be required to purchase GIPS Decoder directly from GIPS
Community in order to play back Yahoo VoIP audio file.
Page 43

QQ Messenger *
QQ chat obtainable information includes Date-time, account (with IP/MAC), user handle (user
account), participant account, conversation with content and count.
* Optional Purchase License – Sniffer Agent for QQ 2010, QQ 2010 only supported by using Sniffer Agent (Sold as Optional
License)
Features in this QQ GUI:
• QQ: Refresh the page content.
• Delete: Delete the QQ chat record (that has been checked or ticked).
• Account List: This section shows QQ Account List. Administrator can download the monthly chat
record (in Excel format) and search for the chat record as shown below. (Refer to 2.2.1)
• Search: Search for QQ record based on the specified parameters such as Date, Time, IP, User
Handle, Participants and Account.
• Display the number of record per page
• Checkbox: Check or tick the checkbox for deleting
• File Transferred: This symbol shows there is file transferred over the QQ
• Friend List: This will show the entire friend list for the particular QQ account.
• Download: Download the QQ chat record.
• Conversation: Click on Conversation to view the chat content.
• Similar Search: Search for chat record with similar content.
Page 44

How to view the encrypted conversation content for QQ?
The captured conversation in QQ is encrypted. This section explains the process on how to use the
QQ cracker to decrypt the information.
Step 1 – Download the QQ cracker
The following diagram shows the steps to download the QQ cracker. Click on Information and a
Window will pop up as shown below.
Click on the icon to download QQ Cracker Tool “setup.zip.”
Step 2 – Install QQ cracker into computer
• Unzip the file and install the QQ cracker tool “setup.exe.”
• Click [Next] to continue.
• Click [Next] to continue. You may want to change to different directory to install the QQ
Cracker Tool.
• Click [Next] to continue and the system will create a Desktop icon on your computer. The
• QQ cracker will then be ready to be installed in your PC system.
• Click [Next] to complete the Installation.
• Click [Finish] and Launch the QQ Cracker 2 Tool.
Page 45

Step 3 – Decrypt the conversation.
At Information Export page, download the conversation file.
Launched QQ Cracker 2 Tool
Function
1 Im
port Encrypted File
2
QQ ID
List
3 Speed Test
4 START
5 PAUSE
6 Range Password character range.
7 Password Length
8 Limit Time
9 Use Dictionary
Password
Pause the process to decrypt.
Password length.
Whether to use dictionary
+
and –
signs. +
QQ
decrypted password informati
Start
the process to decrypt.
Set time limitati
Function Description
means im
cracking capability
on.
port,
- means delete.
on.
(number per sec
attack met
hod.
ond).
Page 46

Process of Decryption:
1. Import QQ conversat ion f iles to decrypt.
2. Select all configurations.
3. Start to decrypt.
4. Look for the decrypted information at QQ ID List.
Information in QQ ID List with password cracked:
QQ Database Update
Click on Information – Update – Create. A Window will pop out and click [OK] to continue.
Page 47

Then click on the radio button [Update]
Click [OK] to continue and the following Window will pop out.
Close the Window and go to Update Information page. This page will show the information of QQ
Database being update.
You may now return to the QQ page and click on the [Conversation]. It will display the content of the
conversation.
Page 48

UT Chat Room
UT Chat Room is popular chat room in Taiwan. UT Chat Room retrievable information includes DateTime, Account, User Handle, Conversation (with content) and count.
Features in this UT Chat Room GUI:
• UT Chat room: Refresh the page content.
• Delete: Delete the UT Chat Room chat record (that has been checked or ticked).
• Account List: This section shows UT Chat Room Account List. Administrator can download the
monthly chat record (in Excel format) and search for the chat record as shown below
• Search: Search for UT Chat Room record based on the specified parameters such as Date, Time,
IP, User Handle, Participants and Account
• Display the number of record per page.
•
•
• Conversation: Click on Conversation to view the chat content.
• Similar Search: Search for chat record with similar content.
Sample Conversation:
Checkbox: Check or tick the checkbox for deleting.
Download: Download the UT Chat Room chat record.
Page 49

Skype *
Skype (Voice Call Log) obtainable information includes Date-Time, account (with IP/MAC), User
Handle (user IP), Participants (peer IP), Conversation (with Voice Call Duration Information) and
count. User can also purchase optional Skype Text Chat Message and Voice Recording Module
(Skype Sniffer Agent for Skype version 4.2 and below). This add on module can record Skype Text
Chat Message by manually installing an Agent software on targeted user PC.
* Skype Sniffer Agent for Content Capturing License sold separately
Features in this Skype GUI:
• Skype: Refresh the page content.
• Delete: Delete the Skype chat record (that has been checked or ticked).
• Account List: This section shows Skype Account List. Administrator can download the monthly
chat record (in Excel format) and search for the chat record as shown below
• Search: Search for QQ record based on the specified parameters such as Date, Time, IP, User
Handle, Participants and Ac c ount
• Display the number of record per page.
• Checkbox: Check or tick the checkbox for deleting.
• Download: Download the Skype chat record
• Conversation: Click on Conversation to view the Skype Voice Call details
• Similar Search: Search for chat record with similar content.
Conversation Sample:
Page 50

Gtalk (in HTTP Gmail)
Gtalk obtainable information includes Date-Time, Account (with IP/MAC), User Handle (user account),
Participant Account, Conversation with content (text and voice call) and count.
Features in this Gtalk GUI:
• GOOGLETALK: Refresh the page content.
• Delete: Delete the Gtalk chat record (that has been checked or ticked).
• Account List: This section shows the Gtalk Account List. Admin can download the monthly chat
record (in Excel format) and search for the chat record as shown below
• Search: Search for Gtalk record based on the specified parameters such as Date, Time, IP, User
Handle, Participants and Account
• Display the number of record per page.
•
•
•
•
• Conversation: Click on Conversation to view the chat content.
• Similar Search: Search for chat record with similar content
Conversation Sample:
Checkbox: Check or tick the checkbox for deleting.
File Transferred: This symbol shows there is file transferred over the Gtalk.
Friend List: This will show all the friend list for the particular Gtalk account
Download: Download the Gtalk chat record.
Page 51

Internet Relay Chat – IRC
IRC obtainable information includes date-time, account (with IP/MAC), user handle (user account),
conversation with content and count.
Features in this IRC GUI:
• IRC: Refresh the page content.
• Delete: Delete the IRC chat record (that has been checked or ticked)
• Account List: This section shows the IRC Account List. Administrator can download the monthly
chat record (in Excel format) and search for the chat record as shown below
• Search: Search for IRC record based on the specified parameters such as Date, Time, IP, User
Handle, Participants and Ac c ount
• Display the number of record per page.
•
•
• Conversation: Click on Conversation to view the chat content.
• Similar Search: Search for chat record with similar content
Sample Conversation:
Checkbox: Check or tick the checkbox for deleting.
Download: Download the IRC chat record.
Page 52

File Transfer
File Transfer Protocol - FTP
FTP obtainable information includes Date-Time, Account (with IP/MAC), Username, Password, Action
(Upload/Download), FTP Server IP, File Name with File Transferred and Whois.
• Features in this FTP GUI:
• FTP: Refresh the page record List.
• Delete: Delete the Email (that has been checked or ticked).
• Pass Show: Display FTP account password.
• Search: Search for FTP record based on the specified parameters such as Date, Time, IP, User,
Action, FTP Server IP, File Name and Account.
• Display the number of record per page.
•
Checkbox: Check or tick the checkbox for deleting.
• Similar Search: Search for FTP record with similar content.
Page 53

• Whois: Provide information of Source and Destination IP and Hostname. It allows you to search
for the IP Address information through the Internet.
Page 54

Peer to Peer File Sharing – P2P
P2P File Sharing obtainable information includes Date-Time, Account (with IP/MAC), P2P Tool Used,
File Name, Last Activated Date-Time, Send Throughput, Received Throughput, Detail (Each
Connection Session, Peer IP, Port Used, Peer Port etc.). P2P protocols supported are Bittorent,
eMule/eDonkey, Gnutella and Fast track.
Features in this P2P GUI:
• P2P: Refresh the page content List.
• Delete: Delete the record that is checked (by clicking the Checkbox and Delete button).
• Search: Search the P2P record based on the specified parameters such as Date, Time, IP, Tool,
File Name and Account.
• Display the number of record per page.
•
• Similar Search: Search for P2P record with similar content.
Checkbox: Records can be deleted by checking the Checkbox and Delete button.
Page 55

HTTP
When the targeted user surfs the Internet (World Wide Web), ICI system will capture and reconstruct
the Web page contents which include HTTP URL Link, HTTP Content and HTTP Reconstruct. ICI
system will also reconstruct files upload/download (HTTP Upload/Download) as well as video steam
(HTTP Video Stream) such as YouTube, Google Video, Metacafe etc.
HTTP Link
HTTP Link provides information of Web Sites accessed which includes Date-Time, Account (with
IP/MAC) and Host (URL/Web Sites Tag). The Web Sites can be accessible by clicking on the
URL/Web Sites Tag with connection to the Internet.
Features in this HTTP GUI:
• HTTP Link: Refresh this page content List.
• Delete: Delete the record that is checked.
• Search: Search the HTTP record based on the specified parameters such as Date, Time, IP, Host
and Account.
• Display the number of record per page.
•
• Similar Search: Search for HTTP Link with similar content.
Checkbox: Records can be deleted by checking the checkbox.
Page 56

• Whois: Provide information of Source and Destination IP and Hostname. Allows you to search for
the IP Address information through the Internet.
Page 57

HTTP Content
HTTP Content obtainable information includes Date-Time, Account (with IP/MAC), URL/Web Sites
Tag with Web Pages Content (consists of html text, java script, flash etc. of the web sites browsed).
Features in this HTTP Content GUI:
• HTTP Content: Click on to refresh the content List.
• Delete: Delete record which is checked.
• Search: Search HTTP Content record based on the specified parameters such as Date, Time, IP,
Content and Account
• Display the number of record per page.
•
• [•] Source Code: Click on the red icon to view the source codes.
•
• Similar Search: Search for HTTP Link with similar content
•
Checkbox: Records can be deleted by checking the Checkbox.
Link: Open the URL link and access the Website.
Whois: Provide information of Source and Destination IP and Hostname. It allows you to
search for the IP Address information through the Internet
Page 58

Source Code: [•]
When click on , the following UI will pop up to display the source code of webpage.
Page 59

HTTP Reconstruct
HTTP Reconstruct function will rebuild/reconstruct the entire web page that has been browsed by
users. The obtainable information includes Date-Time, Account (with IP/MAC) and HTTP Web Page
reconstructed content.
Features in this HTTP Reconstruct GUI:
• HTTP Reconstruct: Click on to refresh the page content List
• Delete: Delete record which is checked
• Search: Search the particular records based on the specified parameters such as Date, Time, IP,
URL and ID
• Display Mode: Display either IP or computer (PC) name on this UI
• Display records per page. Input the number and click on the confirm
button to set up
• Checkbox: Records can be deleted by checking the Checkbox.
• [•] Source Code: Click on the red icon to view the source codes.
Page 60

Sample Reconstructed Web Page
Note:
To view the reconstructed content, firstly, you are required to turn on Web Page Reconstruction
Capturing Module.
Page 61

Then, you are required to start HTTP Reconstruct Proxy Server as the HTTP Reconstruct in
ED2-1.15.0 has been upgraded to use Proxy Service.
You are also required to set your web browser configuration to access from by following proxy setting:
Proxy Address: IP Address of the ICI system, ex: 192.168.1.60
Port: 8888
With the above setting, you will be able to click on the link on the HTTP Reconstruct and view the
reconstructed web page content.
Page 62

HTTP Upload/Download
HTTP Upload/Download obtainable information includes Date-Time, Account (with IP/MAC), Action
(Upload/Download), File Name (with actual file content) and Upload/Download URL Link, Whois etc.
Features in this HTTP Upload/Download GUI
• HTTP Download/Upload: Click on to refresh the page content List
• Delete: Delete record which is checked and ticked
• Search: Search the particular records based on the specified parameters such as Date, Time, IP,
File Name and Account
• Rule Set: Define the file extension which the system reconstructs. There are two settings:
Reconstruct All or Set Manually. Administrator can opt to enter the specific file extension by select
Manual option.
• Display records per page. Input the number and click on the confirm
button to set up
• Checkbox: Records can be deleted by checking the Checkbox
• Similar Search: Search for HTTP Link with similar file name or link
• Whois: Provide information of Source and Destination IP and Hostname. It allows you to
search for the IP Address information through the Internet
Page 63

Sample HTTP Upload/Download
Page 64

HTTP Video Streaming (FLV Video)
HTTP Video Streaming (FLV Video Format) obtainable information includes Date-Time, Account,
Host, File Name, URL link of the video stream and file size. Video Stream supported includes
YouTube, Metacafe etc.
Features in this HTTP Video Streaming GUI:
• Video Stream: Click on to refresh the page content List.
• Delete: Delete record which is checked.
• Search: Search the particular records based on the specified parameters such as Date, Time, IP,
File Name and Account
• Display records per page. Input the number and click on the confirm
button to set up
• Checkbox: Records can be deleted by checking the Checkbox
• Similar Search: Search for HTTP Video with similar file name or link
• Whois: Provide information of Source and Destination IP and Hostname. It allows you to
search for the IP Address information through the Internet
Page 65

Sample HTTP Video Stream
Page 66

HTTP Request
HTTP Request captures pre-defined web pages record such as Host, Content Type, Referrer and
other defined Rules or Definitions. The obtainable information includes Date-Time, Account, Action
and HTTP Link (URL).
Features in this HTTP Request GUI:
• HTTP Request: Click on to refresh the page content List
• Delete: Delete record which is checked
• Search: Search the particular records based on the specified parameters such as Date, Time, IP
and Account
• Display records per page. Input the number and click on the confirm
button to set up
•
•
•
• Rule Set: Setup and Define HTTP Request Capture Rules and Configuration
For example: Setup the Host Type Value.
Checkbox: Records can be deleted by checking the Checkbox
Similar Search: Search for HTTP Video Stream with similar file name or link
Whois: Provide information of Source and Destination IP and Hostname
Page 67

Sample HTTP Request Content:
Page 68

HTTP Social Network Sites
Facebook (Wall, Chat and Games)
Facebook obtainable information includes Facebook Wall, Chat and Games Records. The obtainable
information includes the POST and GET content of Facebook Wall. The GET contents would consist
of the user’s Facebook Homepage content. The POST contents would consist of the users’ Facebook
Posting content.
Facebook (Chat) will show the reconstructed results of chat content between the user and the friend
List in his/her Facebook account. Facebook (Games) will show game played and the reconstructed
Games pages accessed by the users.
HTTP Social Network Sites - Twitter
Twitter obtainable information includes date-time, account, user handle and content. The content
consists of POST and GET data.
HTTP Social Network Sites - Plurk
Plurk obtainable information includes date-time, account, user handle and content. The content
consists of POST and GET data.
Page 69

Telnet
Telnet is an Internet protocol use on Internet and LAN. Telnet clients have been available on most
Unix systems and are available for all platforms. Most network equipment (router, switches etc.) and
OSs with a TCP/IP stack support some kind of Telnet service server for their remote configuration.
Telnet obtainable information in ICI system includes date-time, account (with IP/MAC), username,
password, server IP and session play back.
Features in this Telnet GUI:
• Telnet: Click on to refresh the page content List.
• Delete: Delete record which is checked
• Search: Search the particular records based on the specified parameters such as Date, Time, IP,
File Name and Account
• Display records per page. Input the number and click on the confirm
button to set up
• Checkbox: Records can be deleted by checking the Checkbox
• Similar Search: Search for Telnet session with similar Telnet server etc
• Whois: Provide information of Source and Destination IP and Hostname
Page 70

View the Telnet Session
The following GUI will be popped up when Administrator click the link [Record File]. This GUI acts as
a video player. Administrator can view the process step by step.
Page 71

Others
Online Games
Online Game log obtainable information includes Date-Time, Account (with IP/MAC), Port, Game
Server IP, Server Port and Game Name.
Features in this Online Game GUI:
• Online Game: Refresh the page content List.
• Delete: Delete the record that is checked (by clicking the Checkbox and Delete button).
• Search: Search the Online Game record based on the specified parameters such as
• Date, Time, IP, Port, Game Server IP, Game Server Port, Game Name and ID.
• Display records per page. Input the number and click on the confirm
button to set up
• Checkbox: Records can be deleted by checking the Checkbox
• Similar Search: Search for Online Game record with similar content
Page 72

VoIP (Optional Purchase License)
VoIP Capture and Reconstruction Module is able to capture, decode and reconstruct VoIP sessions
(RTP sessions). It allows the play back of voice calls on network. The supported protoc ols inclu de SI P
(technology that is most commonly used) and H.323. The supported CODECs include G.729, G.711-a
law and G.711-u law, G.723, G.726 and ILBC. Obtainable information includes Date-Time, Account,
Caller Number, Called Number, Mode of VoIP, VoIP Protocol Type, Codec and VoIP Audio File with
play back capability.
Note that this is additional license module.
Features in this VoIP GUI:
• VoIP: Refresh the page content List.
• Delete: Delete the record that is checked (by clicking the Checkbox and Delete button).
• Search: Search the VoIP record based on the specified parameters such as Date, Time, IP, Caller,
Called Number and Account.
• Display records per page. Input the number and click on the confirm
button to set up
• Checkbox: Records can be deleted by checking the Checkbox
Page 73

• Upload VoIP License: Please ensure that you have activated the VoIP license (which is optional
purchase). Upload the VoIP license at Registration GUI. Browse for the VoIP License, licence.txt
and upload for activation. Ensure that you have also st ar ted the VoIP Reconstruction Module at
System Setting – Service – System Services GUI.
Page 74

Unknown Connection
This section will List out the Unknown connections information like source IP, destination IP, source
port, destination port, source MAC, destination MAC, connection size, packets and protocol
(TCP/UDP). This information can be useful for network Administrator to detection unusual
connections.
Features in this Unknown Connection GUI:
• Unknown Connection Lists: Refresh the page content List.
• Delete: Delete record checked (by clicking the Checkbox and Delete button).
• Search: Search the Unknown Connect ion record based on t he specified parameters such as Date,
Time, Source IP, Destination IP, Source Port, Destination Port, Source MAC, Destination MAC
and Protocol.
• Display records per page. Input the number and click on the confirm
button to set up
• Checkbox: Records can be deleted by checking the Checkbox
Page 75

System Setting
Network Setting
• Device Setup: Setup the system operation mode. The next section will give more detail regarding
the operation modes and how to setup the operation mode properly.
• DNS Setup: Setup the Domain Name Server (DNS) IP. The IP can be obtained from your ISP
providers.
• System Power off Setup: Reboot or shut down the system.
• System Time Setup: Defining the system date-time.
Page 76

Network Setup
This section allows the Administrator to setup different modes of operation for the ICI system.
There are basically two parts need to be configured for the network setting. One is the configuration of
management port and the other is configuration of the capture port. These two configurations can
operate together in one NIC card or separately operate in different NIC cards.
There are two operation modes can be configured for the ICI System, however, Mirror Mode is highly
recommended for best performance result.
A. Mirror Mode
B. Bridge Mode (Inline Mode)
Page 77

A. Mirror Mode
In terms of Mirror Mode, it uses two NIC cards to operate. One is for data capturing, and the other is
for system management. The following diagram shows the concept of how this mode is operated. The
NIC card (labelled Number 1) with port “eth0” is connected to the top HUB/Switch to capture the data.
The NIC card (labelled Number 2) with port “eth1” for management (system web/telnet access) can
be connected to the HUB or Switch.
This section illustrates the way of how to set up the Mirror Mode with the following diagrams step by
step:
Step 1: Management Port Setup
1. Select and tick the option “MANAGE”
2. Select the NIC card called “eth0”.
3. Setup the information of IP, Mask IP, Broadcast IP and Gateway IP. Please check with your
network Administrators if you are not sure the IP setting.
4. Click on the button [Transfer] to submit.
Page 78

Set 2: Capture Port Setup
5. Click on the button [Set] on Device eth1 or eth2 or eth3. Only one Ethernet port can be set to
capture the data.
Set 3: Finish Setup
6. Click on the button [Finished], the system will reboot and the network setup is completed.
Page 79

B. Bridge Mode (Inline Mode)
This mode uses two NIC cards to operate in the ICI system. The following diagram shows the concept
of how this mode is operated.
This section illustrates the way to set up the Bridge Mode with the following diagrams step by step:
Step 1: Bridge Setup
1. Select and tick the option “BRIDGE”
2. Select Bridge port 1 and 2 (two NIC cards) as shown on the following diagram.
3. Setup the information of IP, Mask IP, Broadcast IP and Gateway IP. Please check with your
network Administrators if you are not sure about IPs.
4. Click on the button [Transfer] to submit.
Page 80

Set 2: Capture Setup
5. This step produces one visual device called “br0” to manage the data. It is suggested that
Administrator to choose this visual device “br0” to capture the data as well.
Set 3: Finish Setup
6. Click on the button [Finished], the system will reboot and setup the Bridge mode.
Page 81

DNS Setup
Input the primary and secondary DNS provided from your ISP provider; click on the button
[Reset] to set up.
Shutdown and Reboot
Administrator can shut do wn or reboot the system through this GUI.
Page 82

System Time Setup
Administrator can select Manual or Automatic setup for system time.
Manual setup allows Administrator to setup the time zone and system time.
Automatic setup allows Administrator to add additional time server for time synchronization. It also
allows Administrator to setup the time zone. Besides, it allows Administrator to setup the
synchronization time (week, day or hour).
Page 83

Filter Setup
It allows the Administrator to define the List of IPs or Protocols to be captured and stored into the ICI
system database base on tcpdump format.
Some Samples Setup:
Sample 1:
Record all information captured from IP 192.168.1.10
Key in: host 192.168.1.10
Sample 2:
Records all information captured from IP 192.168.1.10 and 192.168.1.20 or 192.168.1.30. Ke y in:
host 192.168.1.10 and (192.168.1.20 or 192.168.1.30)
Sample 3:
Records all Telnet sessions of 192.168.1.10
Key in: tcp port 23 host 192.168.1.10
Page 84

Storage
It shows the hard disk utilization information which includes hard disk capacity, utilization, and
available space (size in Gbytes and %) left. Warning message can be configured to be issued to
Administrator when utilization reaches the threshold. The system memory status and system server
status is also provided here.
Page 85

Services
It consists of 4 sub sections: System Services, Logger Services, Set Logger File Size and Sniffer
Agent Management.
System Services
This section allows the Administrator to setup the system services such as FTP server, packet source
module, syslog server, auto Email retrieval service etc.
Page 86

Service
Function Description
SSH Daemon
FTP Server
Mail Server
Packet
Full Text Service Engine
Packet
System Time Synchronizer
T
hroughput
Account Detection
Source Module
Parsing Module
Alert Service
Packets
(NTP)
Allow SSH Secure
Start
the
reserved raw data
message.
System Mail delivery service.
Allow
ICAP Server Mode (proxy server mode).
capture raw data packets through the mirror
Administrator
files collected. Setup
data
Allow full
Allow
Allow
Auto
Administrator
reservi
text search function,
parsing function
system time synchronization with the NTP server.
throughput alert functi
capture
Shell Client
FTP
server service
to setup
ng functi
AD
account name.
or
File Transfer access.
for downloading of
files,
backup
to switch between Sniffer Mode and
in
order to reserve (keep) raw data
can be configured to allow
on.
on.
ISO file
Allow
search by key word.
or syslog
system to
mode. All
the raw
ow
Syslog Server
Sniffer Agent Management
HTTP Reconstruct Proxy Server
SNMP Read
Firewall Setting
Email Retrieval Service
Community
Syslog
server –
Skype Agent Port Management
Start
this service
Web Page
SNMP service.
Firewall service
ystem.
s
Retrieving Emails
or
IMAP service.
syslog
Rec
onstruction
to all
message collection
for
using
Proxy service
ow only specified
from a
specific Email Account
for HTTP
IP
to access the
through
POP3
Page 87

Packet Source Module
This section allows Administrator to setup the packet source which could be Sniffer Mode (system
default) or ICAP Server Mode (Internet Content Adaption Protocol). Sniffer mode means the system
will utilize the mirror/sniffer mode to capture traffic from the network (port-mirror capable switch or
hub). ICAP mode allows the data to be provided by the ICAP proxy server from the network users
which are connecting to the Internet through the ICAP proxy server. It requires the ICAP proxy server
to be properly configured to send the data to the ICI system for reconstruction.
Besides, this section also allows Administrator to setup raw data reserving function. It allows
Administrator to keep or store the captured raw data in the size of 100MB per raw data files basis. It
also allows the Administrator to define storage size of raw data files. The raw data file reserved is
stored in first in first out basis. New raw data file will replace the old raw data file. These raw data files
reserved can be downloaded by using FTP client (with Console username/password set). The raw
data files are automatically hashed with MD5 checksum to protect the raw data files integrity.
Page 88

Syslog Server Service
This function allows the system to be a syslog message collector. Syslog messages collected from
router, switches, servers and network equipment can be stored inside the ICI system. Administrator
can export or download these syslog messages by using FTP client (with Console
username/password set). Administrator needs to manually calculate the MD5 hashed value from this
GUI before exporting or downloading the syslog message to protect the syslog message integrity.
SNMP Read Community
This section allows the Administrator to set the SNMP Read Community.
Page 89

Firewall Setting
This service allows Administrator to specify the IP address or subnet that has the permission to
access the ICI system.
1. Allow Access by Specific IP Address
2. Allow Access by Subnet
Sniffer Agent Management
If Administrator needs to change the default sniffer agent port, please click the setup button and input
the port to submit.
Page 90

Email Retrieval Service
This section allows the system to retrieve Email from a specific account from an Email Server. This
function will solve the issue on the Email protocols not supported by ICI, such as MAPI/RPC of
Microsoft Exchange Server etc.
Sample Implementation
Administrator setup a specific Email account on the Email server where all the Emails received (by all
Email accounts) will be forwarded to. Then, Administrator can setup the following services where ICI
system will retrieve the Emails (as scheduled) from the specific Email account of Email server.
Page 91

Logger Services
This section allows the Administrator to start or stop the logger services – protocols decoding and
reconstruction.
Page 92

Webmail Capturing Module
This section allows the Administrator to activate or de-activate Webmail (Read and Send) content
search function.
HTTP Link Module
This section allows the Administrator to activate or de-active HTTP Link search function.
HTTP Content Module
This section allows the Administrator to activate or de-activate HTTP Content search function.
Note: Without activating this setup, the system by default will not provide the search function for
Webmail and HTTP Content.
Page 93

Set Logger File Size
This section allows the Administrator to set the file size limit for different Internet services which the
system will reconstruct and stored.
Example:
Set FTP file limit to 10 MB. This means if the FTP download/upload file size is more than 10
MB, the system will not store this file in the system. However, the FTP log will still be obtained.
Page 94

Sniffer Agent Management (Additional Paid Service)
ICI supports QQ 2010 version and Skype text message + VoIP conversation recording through the
implementation of Audit/Sniffer Agent. This Audit/Sniffer Agent needs to be manually pre-installed on
the targeted user’s PC on the network.
Administrator needs to start the Skype Sniffer Agent service at system service setup page.
The Sniffer Agent Management page will List out the local network PC (IP Address) with Skype Agent
installed or not yet installed. Administrator need to select the target PC with the Audit/Sniffer Agent
installed and register it on the ED system. Administrator can refresh this page, delete and search for
local PC using this management GUI.
Besides, Administrator can also update the latest version of Skype Agent once through this GUI.
Page 95

Diagram: Skype Text Chat Message and Voice Call Capture by Sniffer Agent
Diagram: The conversation will contain the text chat and voice call record
Note: Please ensure the Sniffer Agent (purchased) has been installed successfully at target user PC.
Go to Task Manager and verified that decage.exe and s_mo.exe are running.
Page 96

Edit Password
Administrator can change the system console (client console access – by putty or monitor console)
and FTP access password through this GUI. The console account name is default set as “admin” and
not is editable.
Page 97

Backup Data
There are 3 configuration modes for data backup which are Auto Backup, Manual Backup and FTP
Backup.
Auto Backup
Auto Backup will automatically backup the reconstructed data files (DBtag files) into ISO file. It
contains 3 sections: Scheduling, Selection of Backup Modules and Notification.
Auto Backup – Schedule
On this section, the Administrator can setup the schedule to enable the system to start the backup
process automatically at pre-defined date-time. It allows the Administrator to schedule the auto
backup by hour (0-24 Hour of the Day), day (1-31 Day of the Month), week (Sunday-Saturday) and
month (January-December). It also allows the Administrator to upload this auto backup reconstructed
data to FTP server for storage.
Page 98

Auto Backup - Backup Categories
Administrator can select the service categories for backup. Administrator c an also define storage days
of the reconstructed data files (DBtag file) after the backup file (in ISO format) has been created.
Auto Backup – Administrator Notification
Once the system complete the automatic backup (created the ISO file at the specified date-time), the
system can send notification to the defined user Email.
Page 99

Manual Backup
This section allows the Administrator to create backup ISO file manually. Administrator can select the
reconstructed data files (DBtag files) and backup service categories for backup into ISO format before
burning out in to CD/DVD or export into external storage.
Backup ISO files can be burned into CD/DVD or can be exported out or downloaded by FTP Client
(with Console username/password). Backup ISO files can also be deleted.
Page 100

FTP Backup
FTP Backup function allows the Administrator to upload Backup ISO file to a storage server such as
NAS and SAN via FTP upload. It will upload the Backup ISO files created by Auto Backup to the FTP
storage server. Please ensure that the Storage Server to support FTP upload function.
Note: User can opt to purchase Backup Server System from ICI which will allow user to store Backup
ISO file and viewing the Backup ISO file.
Features in this GUI:
1) FTP Host: The FTP server IP address where the backup ISO file is to be sent to
2) User: The FTP username account.
3) Password: The FTP password.
4) Port Number: The FTP port number used to transmit the data
5) Directory: The directory where the backup ISO file is stored.
6) Backup Record: User can download the ISO file after it has been uploaded successfully to
FTP server.
7) ON/OFF is to activate/de-activate the FTP backup function.
8) Click on [Submit] button to save the setting. Click on [Reset] button to clear up all values on
each field.
9) FTP Test: To test the FTP server/storage connection
 Loading...