

Page 1
LevelOne
CamCon Camera Server
FCS-5004 / FCS-5008
User Manual
Page 2

1
TRADEMARKS
CamCon Camera Server
TM
and LevelOne® are trademarks of Digital Data
Communications Co.,Ltd.
Microsoft
®
, Windows® and Internet Explorer® are registered trademarks of
Microsoft Inc. All other brand or product names are trademarks of their
respective companies or organizations.
LIMITED WARRANTY
In no event shall LEVELONE’s liability exceed the price paid for the product from
direct, indirect, special, incidental, or consequential software, or its
documentation. LEVELONE offers no refunds for its products. LEVELONE makes
no warranty or representation, expressed, implied, or statutory, with respect to its
products or the contents or use of this documentation and all accompanying
software, and specifically disclaims its quality, performance, merchantability, or
fitness for any particular purpose. LEVELONE reserves the right to revise or
update its products, software, or documentation without the obligation to notify
any individual or entity.
FCC STATEMENT
The LEVELONE CamCon Camera Server has been tested and found to comply with
the limits for a Class B digital device, pursuant to Part 15 of the FCC Rules. These
limits are designed to provide reasonable protection against harmful interference
in a residential installation. This equipment generates, uses, and can radiate
radio frequency energy and, if not installed and used according to the instructions,
may cause harmful interference to radio communications. However, there is no
guarantee that interference will not occur in a particular installation. If this
equipment does cause harmful interference to radio or television reception, which
is found by turning the equipment off and on, the user is encouraged to try to
correct the interference by one or more of the following measures:
Reorient or relocate the receiving antenna
Increase the separation between the equipment or device
Connect the equipment to an outlet other than the receiver’s
Consult a dealer or an experienced radio/TV technician for assistance
IMPORTANT NOTE
Read Instructions
Before the unit is operated, please read all the safety and operating instructions.
Power Sources
Only operate this unit with the type of the power source specified by the
manufacturer.
Servicing
Please contact qualified technicians for any service requests. Do not attempt to
service the unit yourself, as opening the cover may expose you to dangerous
voltage and other hazards.
Warning
To prevent fire or shock, do not expose this equipment to rain or moisture.
Do not place heavy items on the unit.
Copyright 2002-2003, All Rights Reserved.
Page 3

2
Contents
Part I CamCon Camera Server ……………………………….. 5
1.1 About CamCon Camera Server(CCS)......................................... 6
1.2 Features ............................................................................... 7
1.3 System Requirements............................................................. 7
1.4 Package Contents .................................................................. 9
1.5 System Overview................................................................. 10
11.. IInnssttaalllliinngg CCaammCCoonn CCaammeerraa SSeerrvveerr............................................................112
2
2.1 Default Network Configuration of the Server ............................ 12
2.2 Installing the CamCon Camera Server..................................... 12
22.. IInnssttaalllliinngg CCaammCCoonn CCaammeerraa SSooffttwwaarree....................................................117
7
33.. UUssiinngg CCaammCCoonn CCaammeerraa SSeerrvveerr........................................................................221
1
4.1 Entering the Monitoring Page................................................. 21
4.2 Display Mode....................................................................... 23
4.3 Recording Videos ................................................................. 23
4.4 Taking Snapshots................................................................. 23
4.5 Miscellaneous Messages........................................................ 24
4.6 System Warnings ................................................................. 24
4.7 Playback Video Files ............................................................. 25
4.8 Other Function Buttons......................................................... 27
44.. CCoonnffiigguurriinngg CCaammCCoonn CCaammeerraa SSeerrvveerr....................................................228
8
5.1 Accessing the Administration Page.......................................... 28
5.2 System Configuration ........................................................... 30
5.3 Quick Configuration.............................................................. 31
5.4 System Settings .................................................................. 31
5.5 Network Settings ................................................................. 32
5.6 IP Security.......................................................................... 34
5.7 User Management................................................................ 35
5.8 Camera Settings .................................................................. 36
5.9 Recording Settings ............................................................... 37
5.10 Snapshot Settings................................................................ 39
5.11 Event Handling .................................................................... 41
5.12 Event Action Settings ........................................................... 41
5.13 Statistics and Logs ............................................................... 41
5.14 System Tools....................................................................... 42
Page 4

3
55.
.
UUssiinngg CCaammCCoonn WWaattcchheerr//AAddmmiinniissttrraattoorr//BBrroowwsseer
r
445
5
6.1 Using CamCon Watcher......................................................... 45
6.2 Using CamCon Administrator ................................................. 46
6.3 Using CamCon Browser......................................................... 48
66.. CCaammCCoonn CCaammeerraa SSeerrvveerr CClliieenntt VViieewweerr AAccttiivveeXX CCoonnttrrooll449
9
7.1 System Requirements........................................................... 49
7.2 Installation Instruction.......................................................... 49
7.3 Un-installation Instruction..................................................... 49
7.4 Usage ................................................................................ 50
7.5 Object Interface................................................................... 52
7.6 Web Support....................................................................... 52
7.7 Object Interface List............................................................. 55
77.. MMaaiinntteennaannccee..............................................................................................................................558
8
8.1 Shutdown/Restart the Server................................................. 58
8.2 Reset the Administrator Password & Network Settings............... 58
8.3 Update the System .............................................................. 59
8.4 Restore to Factory Defaults ................................................... 59
PPaarrtt IIII CCaammCCoonn MMaannaaggeerr..............................................................................................660
0
11.. OOvveerrvviieeww ooff tthhee CCaammCCoonn MMaannaaggeerr..........................................................661
1
1.1 About CamCon Manager........................................................ 61
1.2 Features ............................................................................. 63
22.. IInnssttaalllliinngg CCaammCCoonn MMaannaaggeerr..............................................................................665
5
33.. UUssiinngg CCaammCCoonn MMaannaaggeerr..........................................................................................667
7
3.1 Start Using CamCon Manager ................................................ 67
3.2 Configure Viewing Page ........................................................ 72
3.3 Other Function Buttons......................................................... 72
3.4 Sorting and Removing Cameras ............................................. 73
3.5 Switching Modes and Changing Username/Password ................. 74
3.6 Adding and Deleting Video Server .......................................... 74
3.7 Modify Multiple CamCon Camera Server System Settings........... 76
3.8 Warning Messages ............................................................... 77
44.. EE--MMaapp FFuunnccttiioonn....................................................................................................................779
9
4.1 Adding a New Map ............................................................... 80
4.2 Deleting a Map .................................................................... 80
4.3 Modifying a Map .................................................................. 80
Page 5

4
4.4
Adding Cameras and GPIO Devices......................................... 81
4.5 Removing Cameras and GPIO Devices..................................... 82
4.6 Adding an Electronic Map Shortcut ......................................... 83
4.7 Removing an Electronic Map Shortcut ..................................... 84
4.8 Viewing Monitoring Cameras.................................................. 85
4.9 Viewing GPIO Devices Status................................................. 86
4.10 Event Handling .................................................................... 88
AAppppeennddiixx AA:: TTeerrmmss aanndd GGlloossssaarryy............................................................................889
9
AAppppeennddiixx BB:: RReeggiisstteerriinngg aa DDyynnaammiicc DDoommaaiinn NNaammee......................991
1
AAppppeennddiixx CC:: CCoonnnneecctt aa PPeerrssoonnaall CCoommppuutteerr ttoo tthhee CCaammCCoonn
CCaammeerraa SSeerrvveerr....................................................................................................................................995
5
AAppppeennddiixx DD:: CCoonnnneeccttiinngg wwiitthh tthhee RRSS--442222//448855PPoorrtt....................998
8
AAppppeennddiixx EE:: CCaammCCoonn AAddmmiinniissttrraattoorr................................................................11000
0
AAppppeennddiixx FF:: UUssiinngg CCaammCCoonn CCaammeerraa SSeerrvveerr wwiitthh IIPP SShhaarriinngg
RRoouutteerr 11001
1
Page 6

5
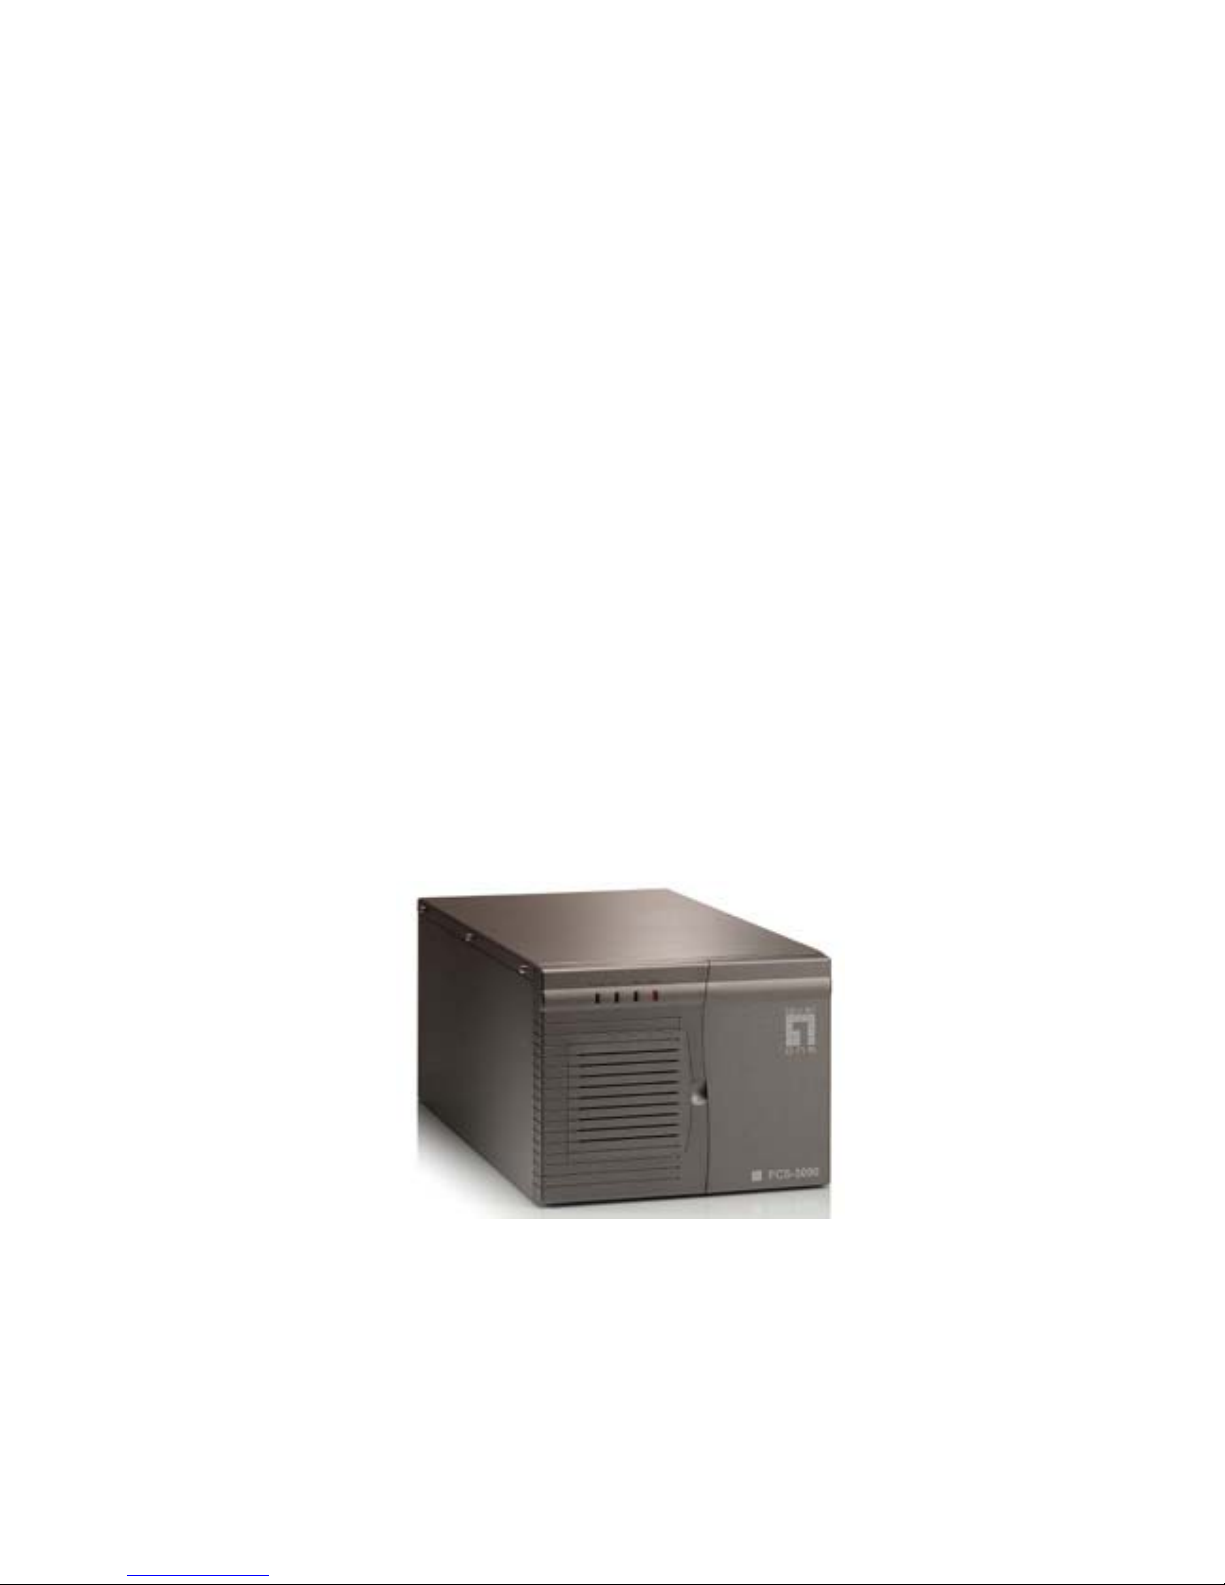
Part I
CamCon Camera Server
FCS-5004
FCS-5008
Page 7

6
1.Overview of CamCon Camera Server
1.1 About CamCon Camera Server(CCS)
CamCon Camera Server is the next generation of digital, modular, and
networked remote surveillance system. Besides providing functions
such as real time monitoring, video recording, snap shooting and video
playback, CCS also enables the expansion of external storage devices
via network connection, making dynamic increase of the storage
capacity extremely easy.
• Digital
Digitalizing remote surveillance systems is the trend of the market
since it provides lots of benefits to the end users. With digitalized
image files, users can now process, store, analyze and utilize enormous
amount of information in the ways which were not possible before.
• Networked
Because of the networked nature of the server, all major tasks,
including monitoring the cameras, administering the server, and
storing image files, can now be performed via the ubiquitous web
browser. In addition, the CCS can be setup to use ADSL and DDNS
services, and allow the administrator to monitor and administer the
server remotely via the Internet.
• Modular
Remote surveillance system’s functions can be modularized to three
major parts: image capturing, data storing, and monitoring. The
combination of a CamCon Camera Server with a remote storage device,
and a remote monitoring center provides a solution that makes the
most effective use of hardware.
• CamCon Camera Server FCS-5004: A 4-Channel Surveillance
Server with management functions.
• CamCon Camera Server FCS-5008: A 8-Channel Surveillance
Server with management functions.
Page 8

7
Note: Unless specified for some reason, the CamCon Camera Server
mentioned below applies to CamCon Camera Server FCS-5004.
Please regard FCS-5008 as a combination of two FCS-5004 plus one
CamCon Manager FCS-9002 software. Please refer to the features of
FCS-5004 and CamCon Manager FCS-9002.
1.2 Features
• Surveillance over IP in a plug and play way
• Operates with a CamCon Manager to create a complete network
surveillance system
• Superior image quality (30 fps max for one camera)
• Supports up to 4 surveillance cameras or PTZ cameras
• Records digital images up to 30 seconds before the alarm is triggered
• Supports 1/16x to 16x playback speed
• Supports multicast mode
• Uses IE (version 5.0 or above) to quickly complete the system
configuration
• Supports remote system software upgrade
1.3 System Requirements
CamCon Camera Server
• Black and white or color camera (NTSC or PAL standard)
• Networking Requirements
RJ-45 Ethernet connection and a dynamic or static IP address
• Client side personal computer requirements:
Pentium II or above desktop or laptop computer
VGA card (Recommended resolution: 1024x768 pixels)
Microsoft Windows 98 SE or above
Internet Explorer version 5.0 or above
Page 9
8
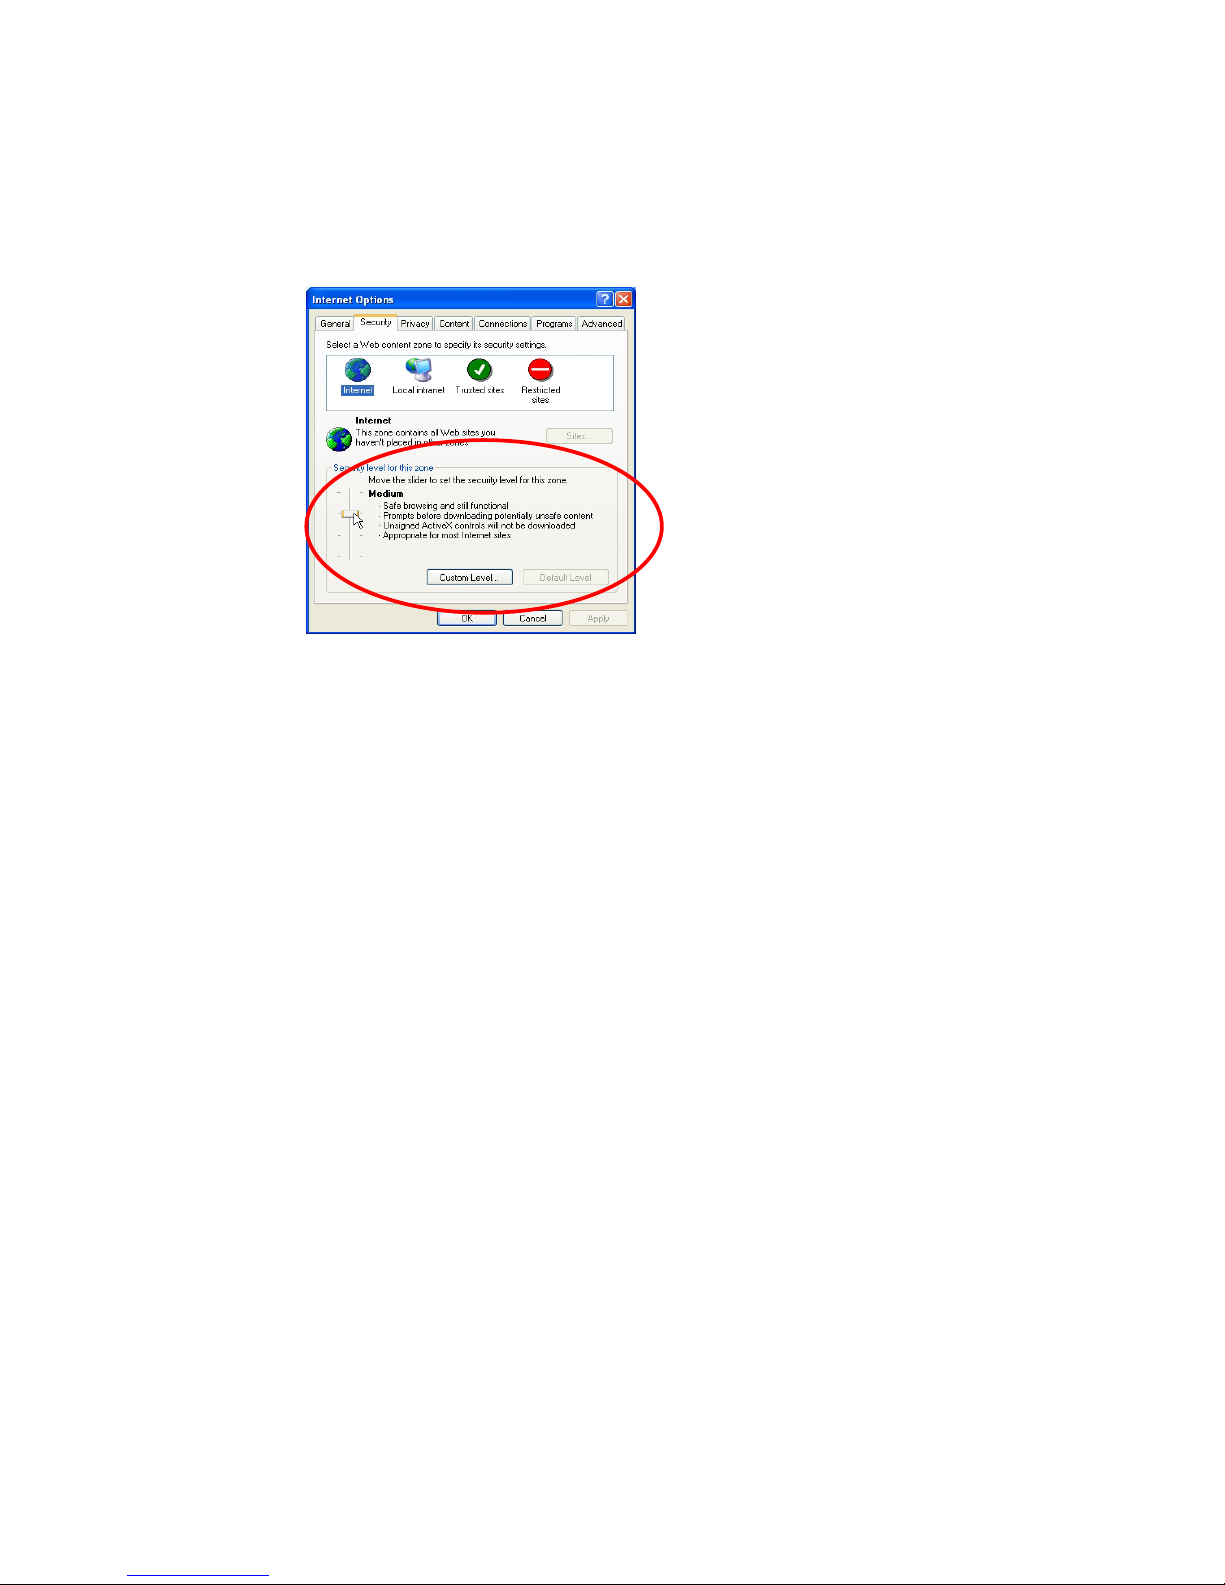
Note: In Internet Options of Internet Explorer, Security level for this
zone has to be set to Medium or lower.
Page 10

9
1.4 Package Contents
CamCon Camera Server
• CamCon Camera Server
• Power Cord
• One CAT-5 Ethernet Cable
• CamCon Administrator/Watcher/Browser (CD-ROM)
Page 11
10
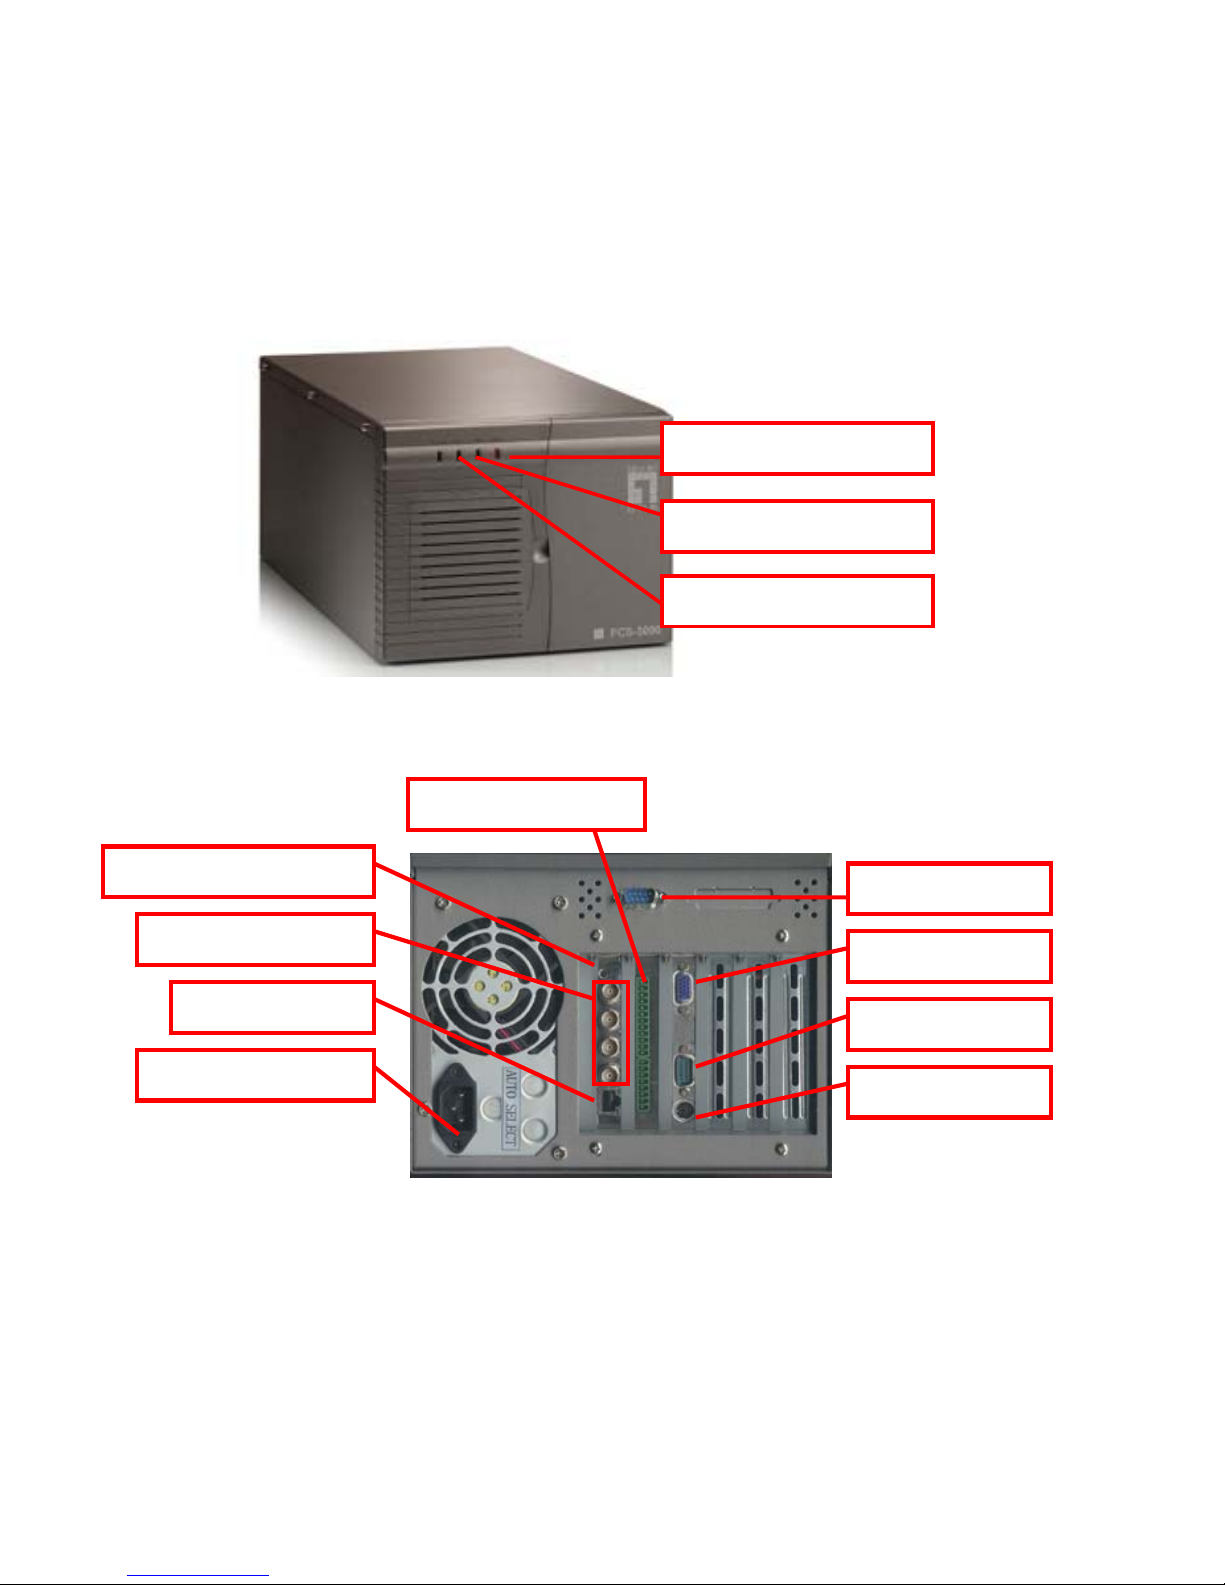
1.5 System Overview
CamCon Camera Server 5004
• Front View
• Rear View
Power Reset Switch
Network Indicator
Power Indicator
RJ-45 Network
GPIO Connector
Video Input Connector
RS-232 Port
Power Connector
VGA Port
RS-422/485 Port
PS/2 Port
Configuration Reset Switch
Page 12

11
Note:
• The “VGA Port” and the “PS/2 port” connectors are used only to
maintain the server.
• Starting from the top, the “Video Input Connectors” are for camera 1 to
camera 4.
• “RS-232 Port” is only used to connect PTZ cameras. Please refer to
Appendix D for further information.
• There are two standards for television communication -- NTSC
(National Television Standards Committee) and PAL (Phase Alternate
Line). Therefore, if the cameras connected to the system have been
replaced, please reboot the system.
Page 13

12
1. Installing CamCon Camera Server
2.1 Default Network Configuration of the Server
By default, the CCS is set up to obtain its IP address and other TCP/IP
network protocol settings from a DHCP server. If no DHCP server is
found on the network, the CamCon Camera Server will use the following
default settings instead:
IP Address: 192.168.0.1
Subnet Mask: 255.255.255.0
Please login in the server with the default administrator account using
the following information:
User name: administrator
Password: admin
If you want to reset the administrator password and network
configuration to the factory default settings, use a sharp object to press
the configuration reset switch located in the front of the server for 5
seconds. You will hear beeps when the reset has been completed.
2.2 Installing the CamCon Camera Server
Connect cameras to the CamCon Camera Server first, and then follow the
instructions to install your server. If you are not familiar with network
settings, consult your Internet service provider (ISP) or network
administrator to get the details of the network configuration.
• Connecting the server to a LAN with DHCP server
i. Please connect the server to the LAN with the enclosed CAT-5
Ethernet cable.
ii. Connect the power cord and turn on the server.
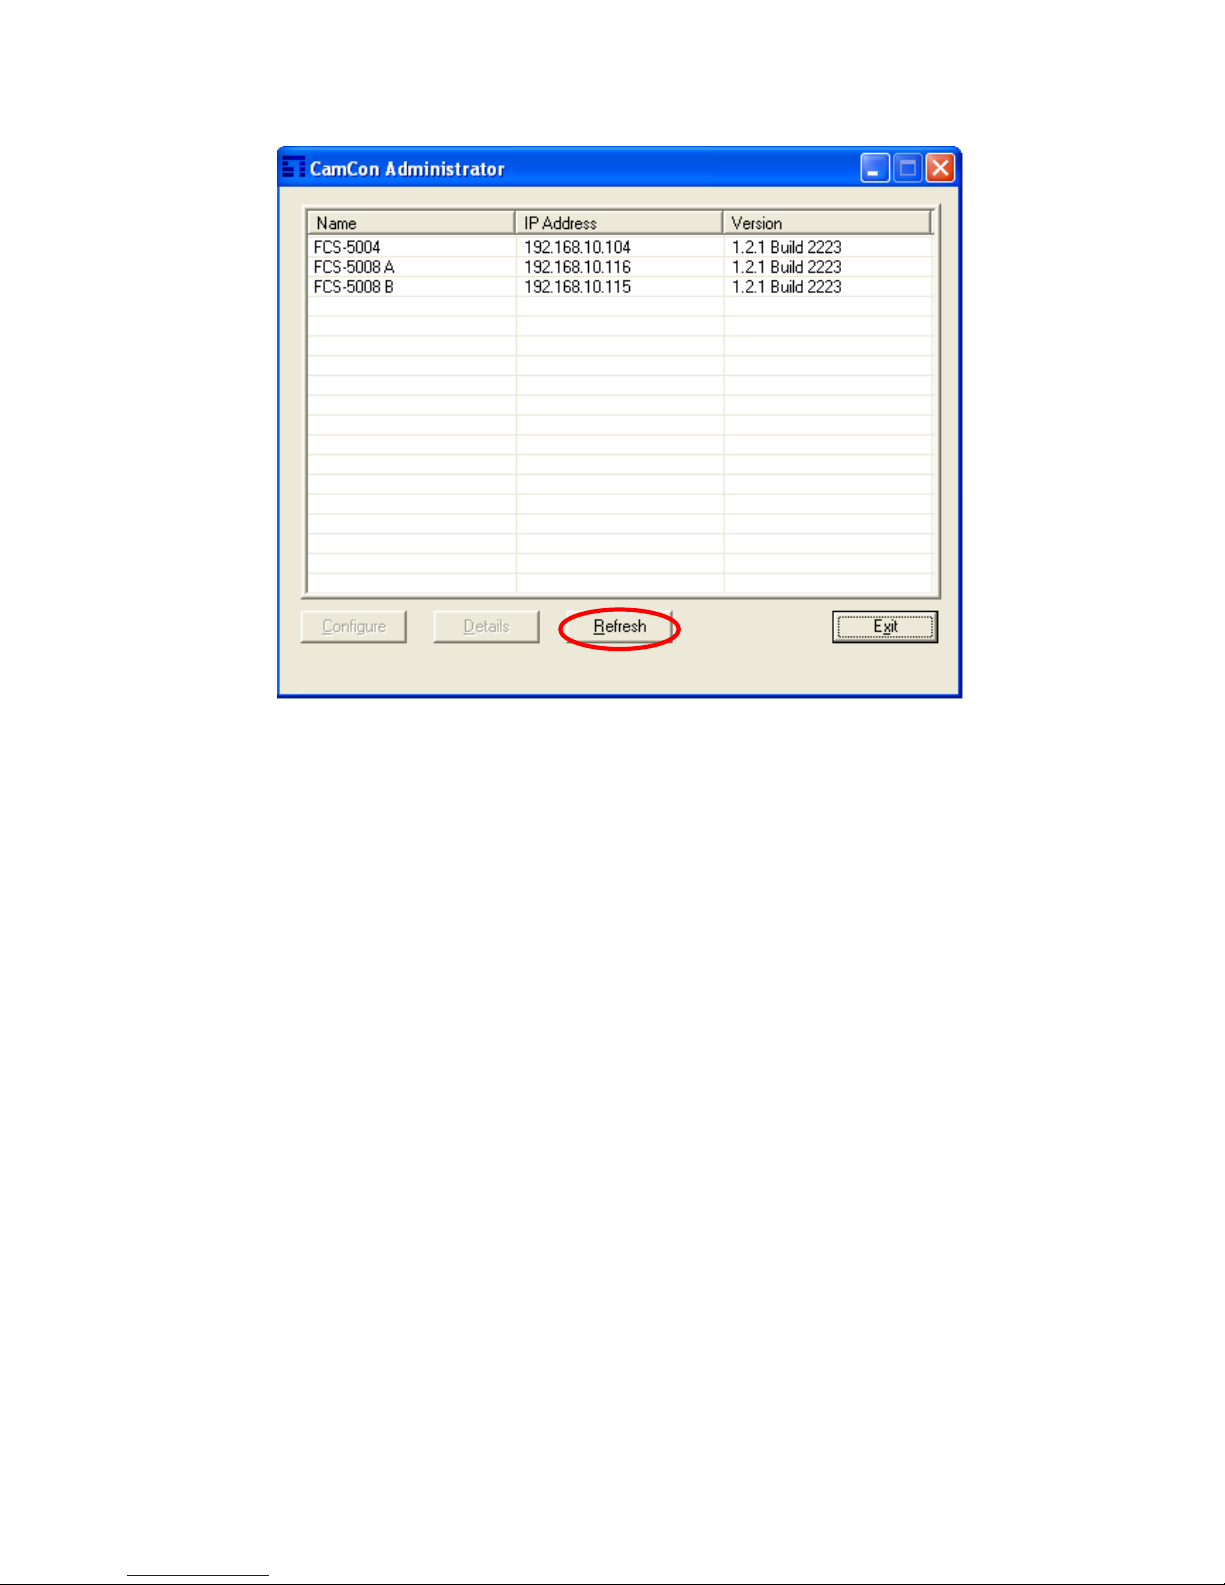
iii. Please run the CamCon Administrator utility in the enclosed
CD-ROM.
Page 14
13
iv. Click on the “Refresh” button located at the bottom of the window.
v. If there are several CamCon Camera Servers in the LAN, choose the
correct device and double click it.
vi. When you connect to the CamCon Camera Server successfully, the
web page will automatically prompt you for the user name and the
password. Please enter the default user name and password:
User name: administrator
Password: admin
• Connecting the server to a LAN by the assigned static IP address
Please connect the CamCon Camera Server to the Hub or Router in the LAN
with the accompanying CAT-5 Ethernet cable.
i. Connect the power cord and turn on the server.
ii. Run the CamCon Administrator utility located in the enclosed
CD-ROM.
Page 15

14
iii. Click on the “Refresh” button, and select the server you wish to
configure.
iv. Click on the “Configure” button to configure the server.
v. Enter the user name and password. (The default password is
“admin”).
Page 16
15
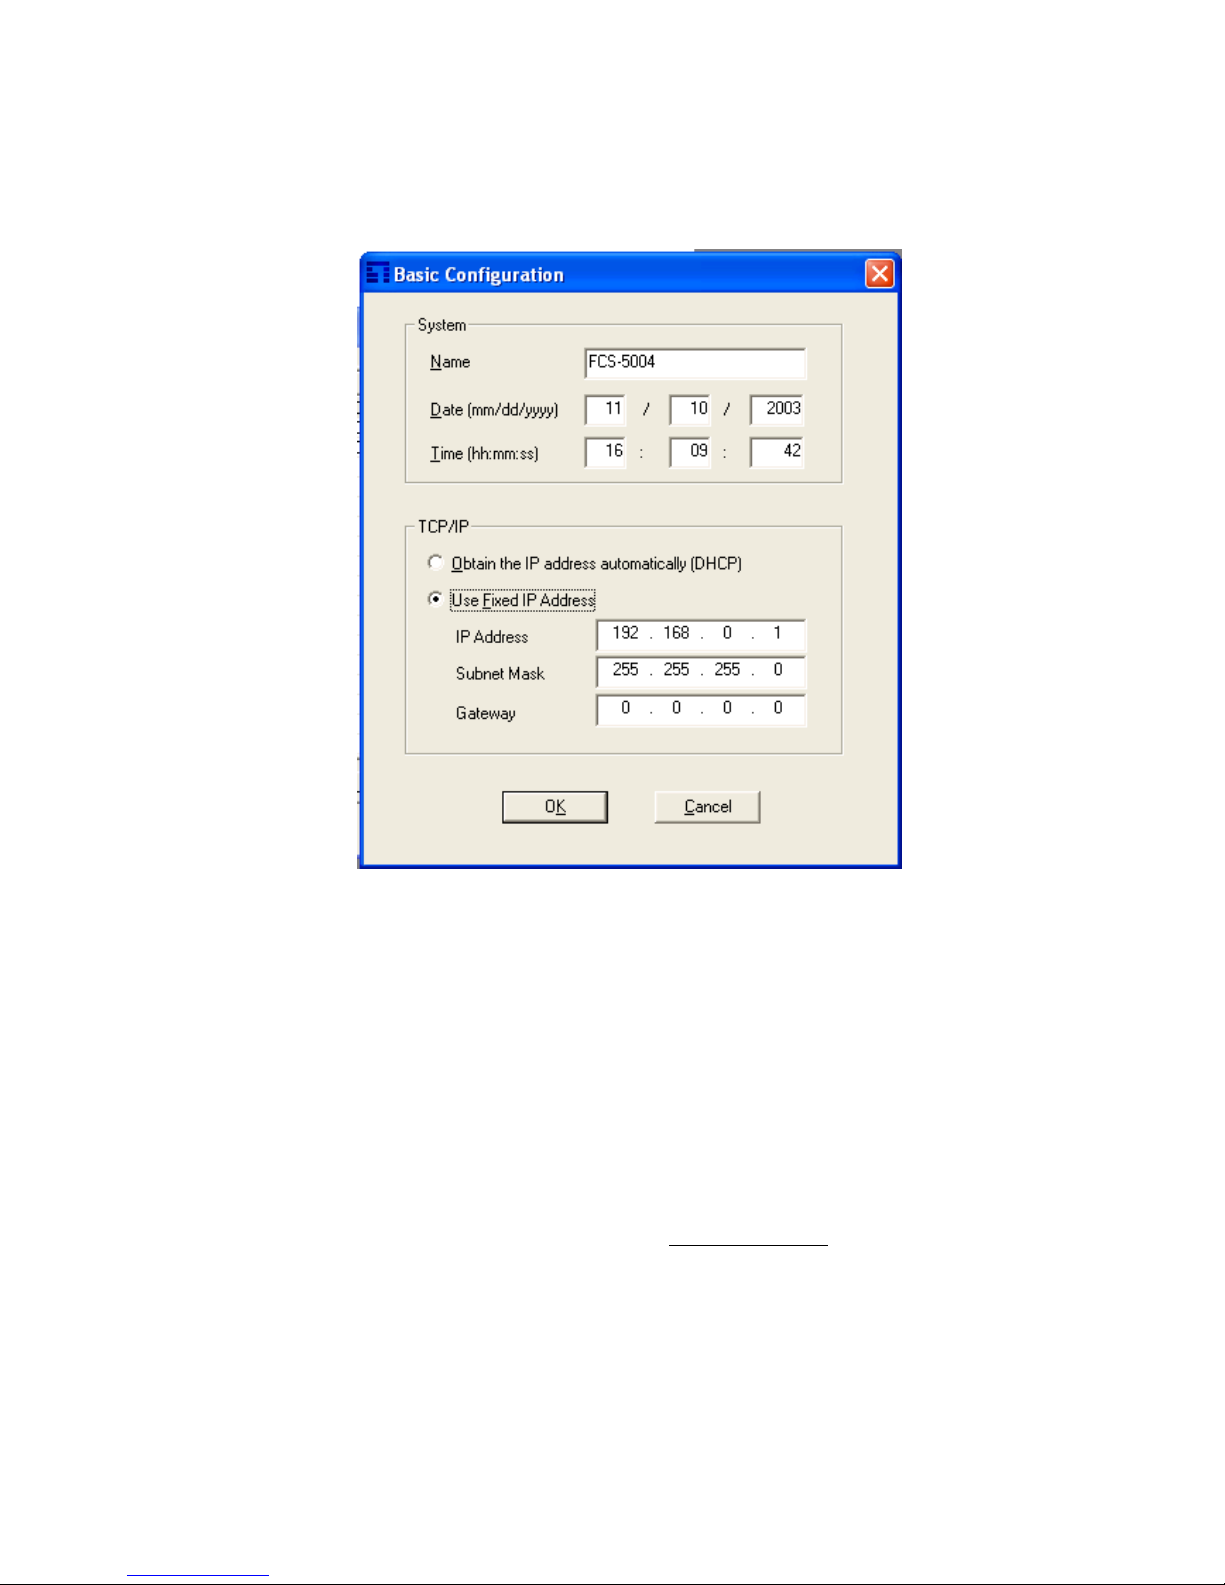
vi. Select “Use Fixed IP Address” and enter the TCP/IP networking
setting.
vii. Click on the “OK” button and restart the server.
viii. Start the web browser and enter the CamCon Camera Server’s IP
address in the location field.
• Connecting to the Internet using ADSL service
i. If the CamCon Camera Server connects to the Internet through ADSL
(i.e. dynamic IP is used), it is recommended that you use the
Dynamic DNS service in order to connect to the CamCon Camera
Server with an easy-to-remember Internet server name. Please
register for an account name on www.dyndns.org
to obtain a user
name, password and a domain name. (For the detailed step-by-step
tutorial, please refer to Appendix B).
ii. Please refer to “Appendix C - Connect a Personal Computer to the
CamCon Camera Server” section to connect the CamCon Camera
Server to the personal computer.
Page 17

16
iii. Click on the setting icon located on the left column of the screen. In
the setup page, choose the “Network Settings” and select the “Use
broadband connection to the Internet (PPPoE)”, and then enter the
correct user name and password to connect to the ADSL.
iv. Check the “Enable Dynamic DNS Service” box, and enter the user
name, password, and host name. Select “dynamic IP address”.
v. Click on the “OK” button and wait a few seconds for the CamCon
Camera Server to apply the new network configuration.
vi. Shut down the server and use a network cable to connect the
CamCon Camera Server and the ADSL modem.
vii. Restore your personal computer’s network settings and restart the
CamCon Camera Server.
viii. Enter the host name you have registered at www.dyndns.org
in the
web browser. When you have completed the settings for the
CamCon Camera Server successfully, you can access the CamCon
Camera Server administration page.
Page 18
17
2.
Installing CamCon Camera Software
Follow the steps below for installing CamCon Browser:
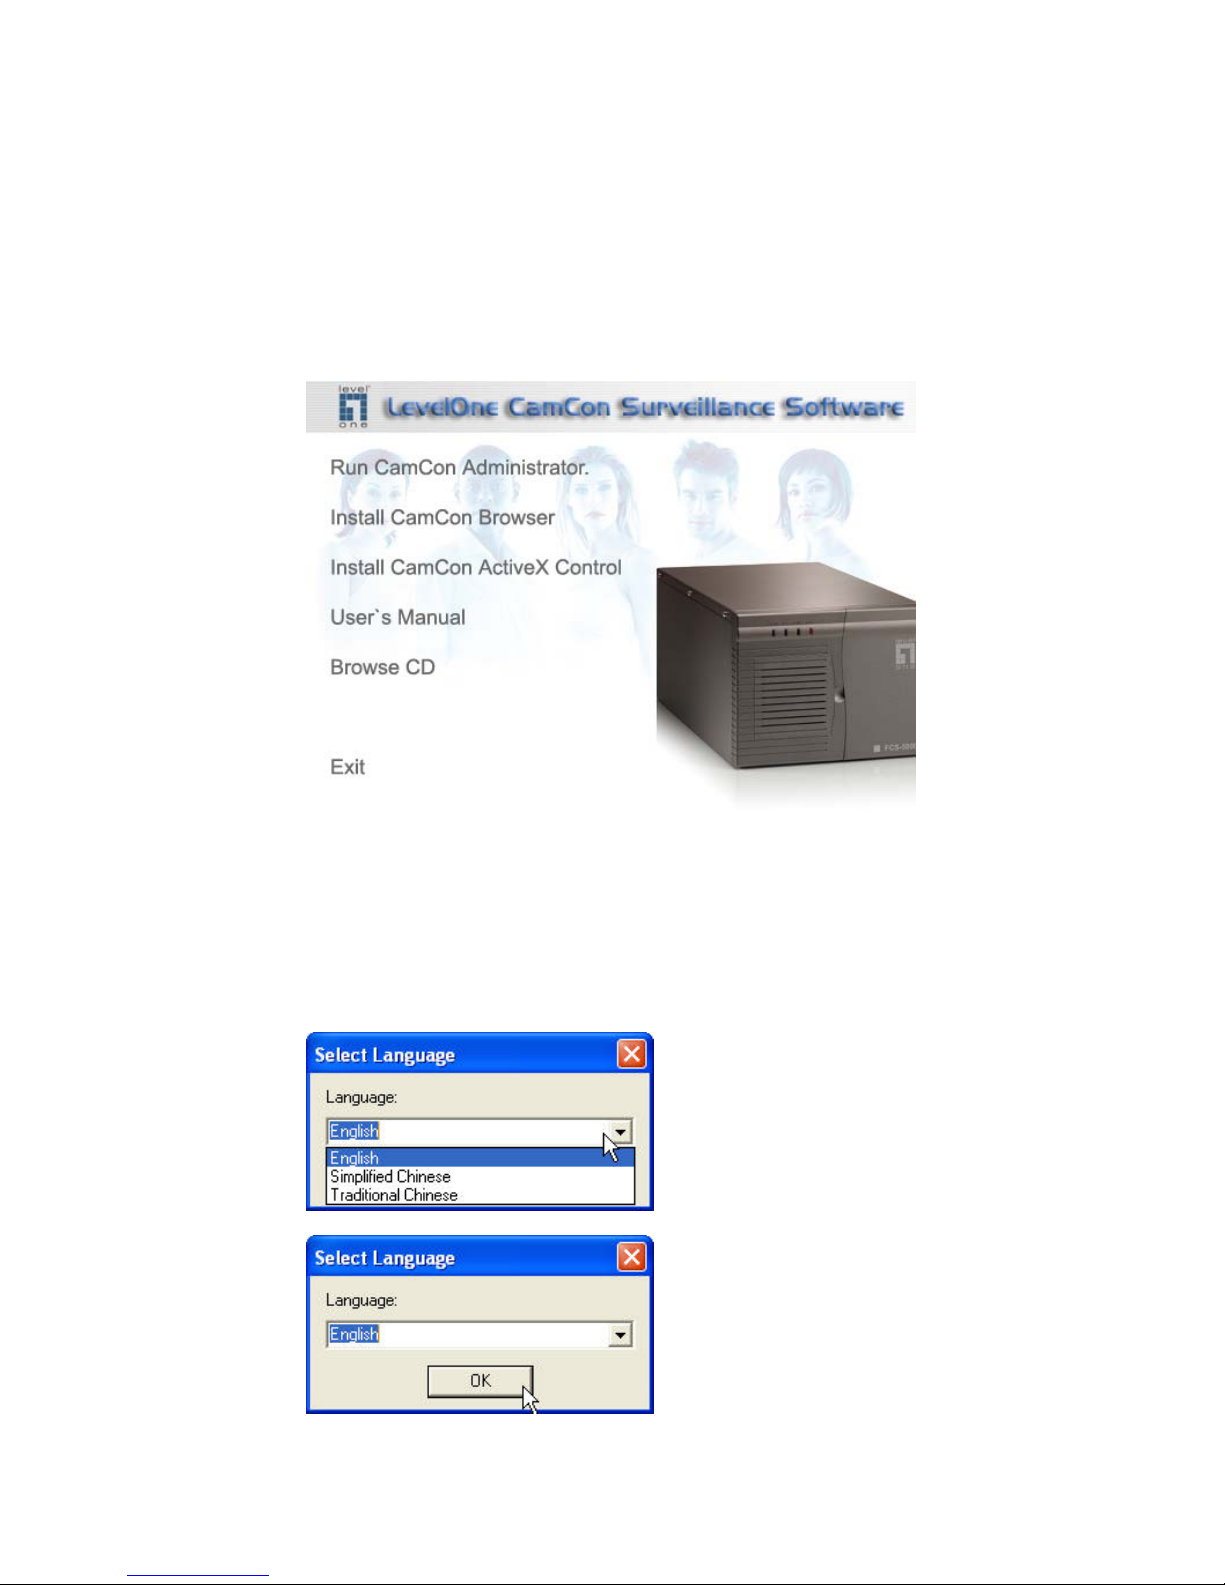
Step 1
Browse the CD-ROM for CamCon Browser installation. Click CamCon
Browser on the screen.
Step 2
Select the language for CCS: English, Simplified Chinese and Traditional
Chinese. Then click OK.
Page 19
18
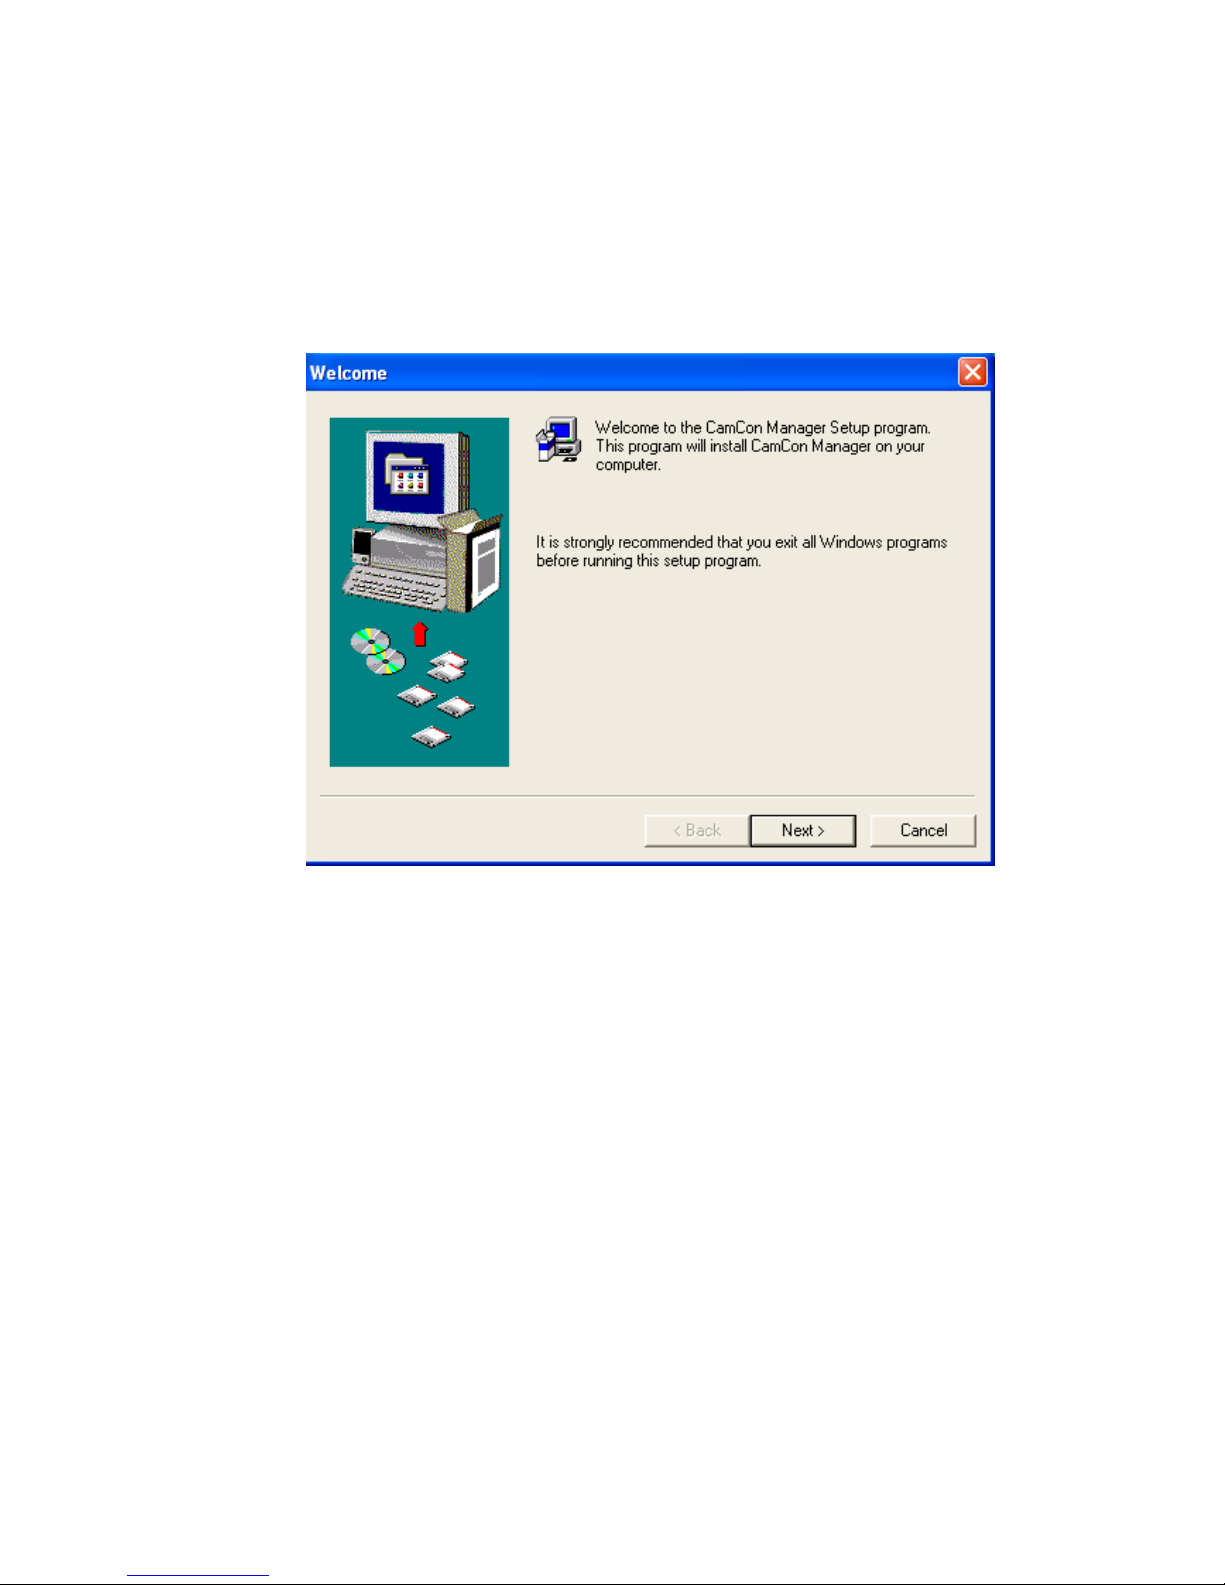
Step 3
Follow the instructions of all pop-up screens and click Next to proceed.
Then click Finish to complete the setup.
Page 20
19
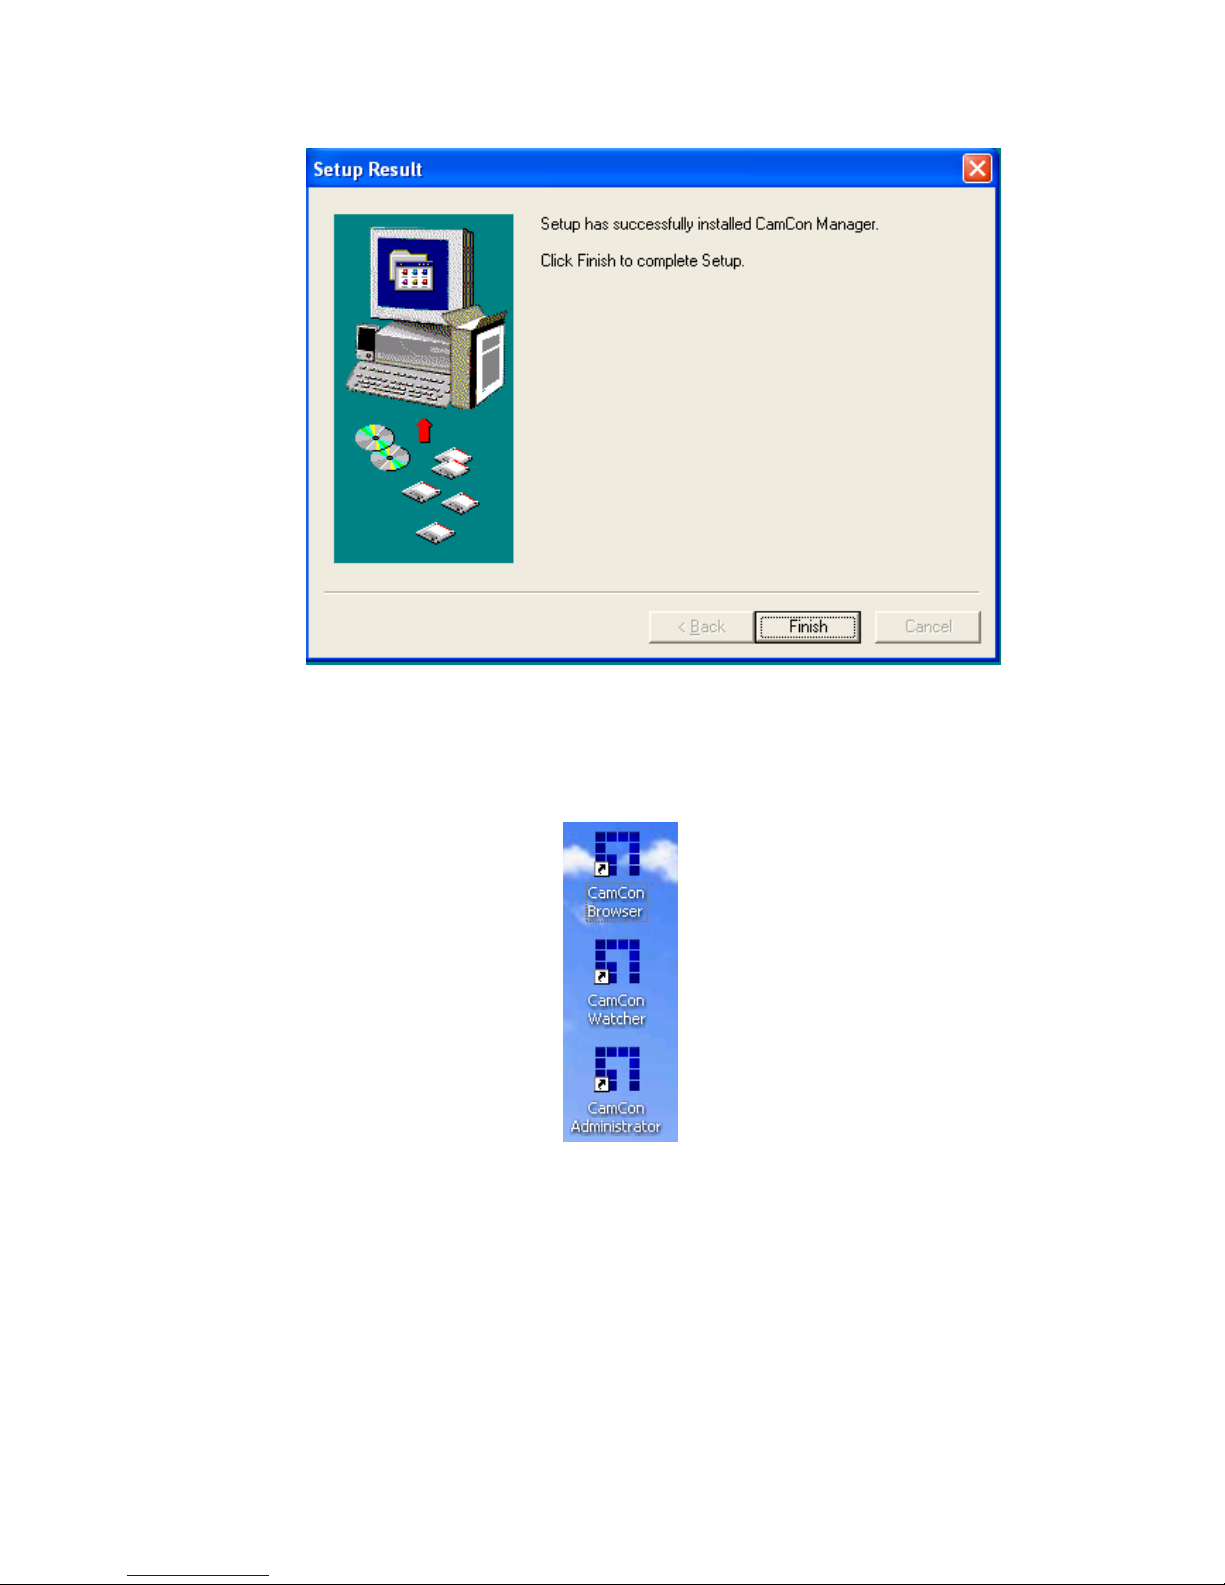
After the setup process, you will find the shortcuts for CamCon Browser,
CamCon Watcher and CamCon Adminstrator. You can then start using
CamCon Camera Server.
Page 21

20
The following table briefly describers the functions of CamCon Browser,
CamCon Watcher and CamCon Administrator. For more detailed
description, please refer to chapters 4-6, Part I of the user manual.
Field Description
CamCon Browser To monitor all cameras of multiple
CamCon Camera Servers
CamCon Watcher To view recorded data of all cameras
CamCon Administrator To find all available CamCon Camera
Servers installed on the system
Page 22
21
3. Using CamCon Camera Server
After you have set up the network settings of the CamCon Camera
Server and successfully connected to the network, you can use the web
browser (Microsoft Internet Explorer version 5.0 or above; version 5.5
is recommended) to view live video and playback the recorded video
files.
4.1 Entering the Monitoring Page
Users can use one of the following ways to access the monitoring
page of the CamCon Camera Server.
• Enter the IP address of the CamCon Camera Server in the web
browser and press Enter.
• Start the accompanying CamCon Administrator utility, and
double click on the listed desired server entry.
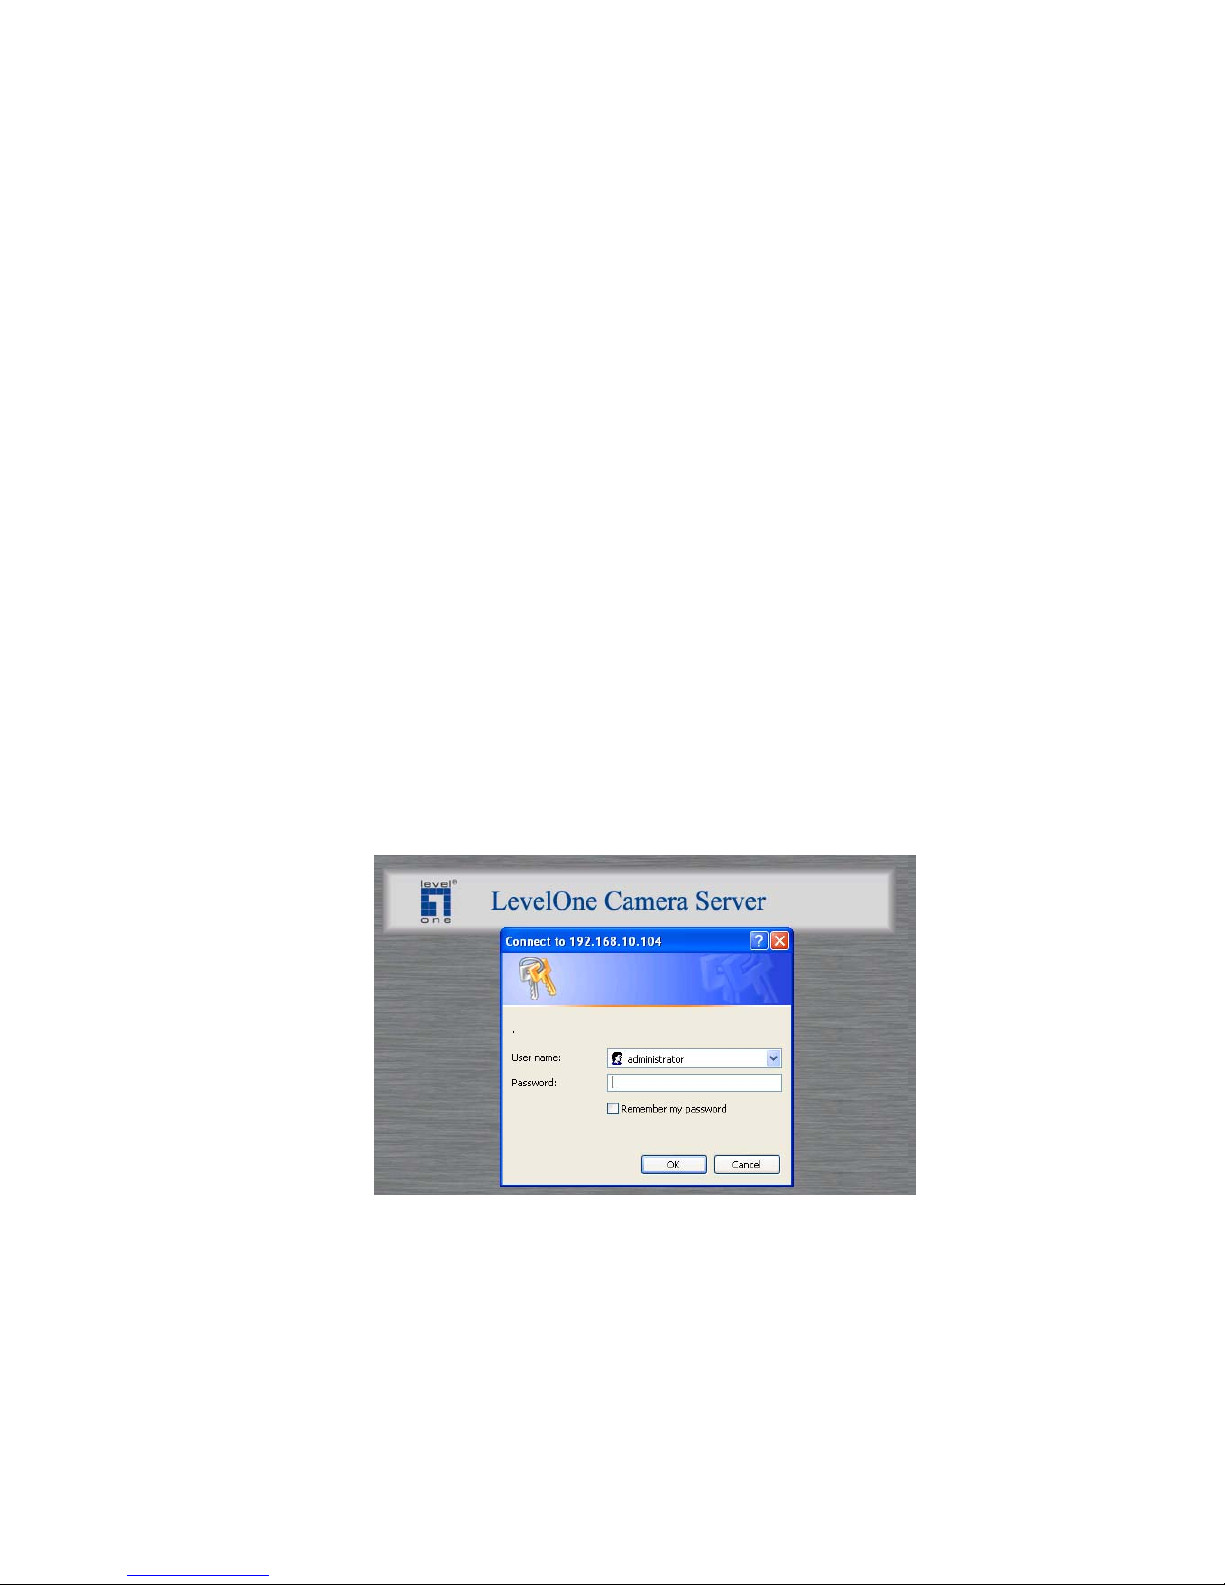
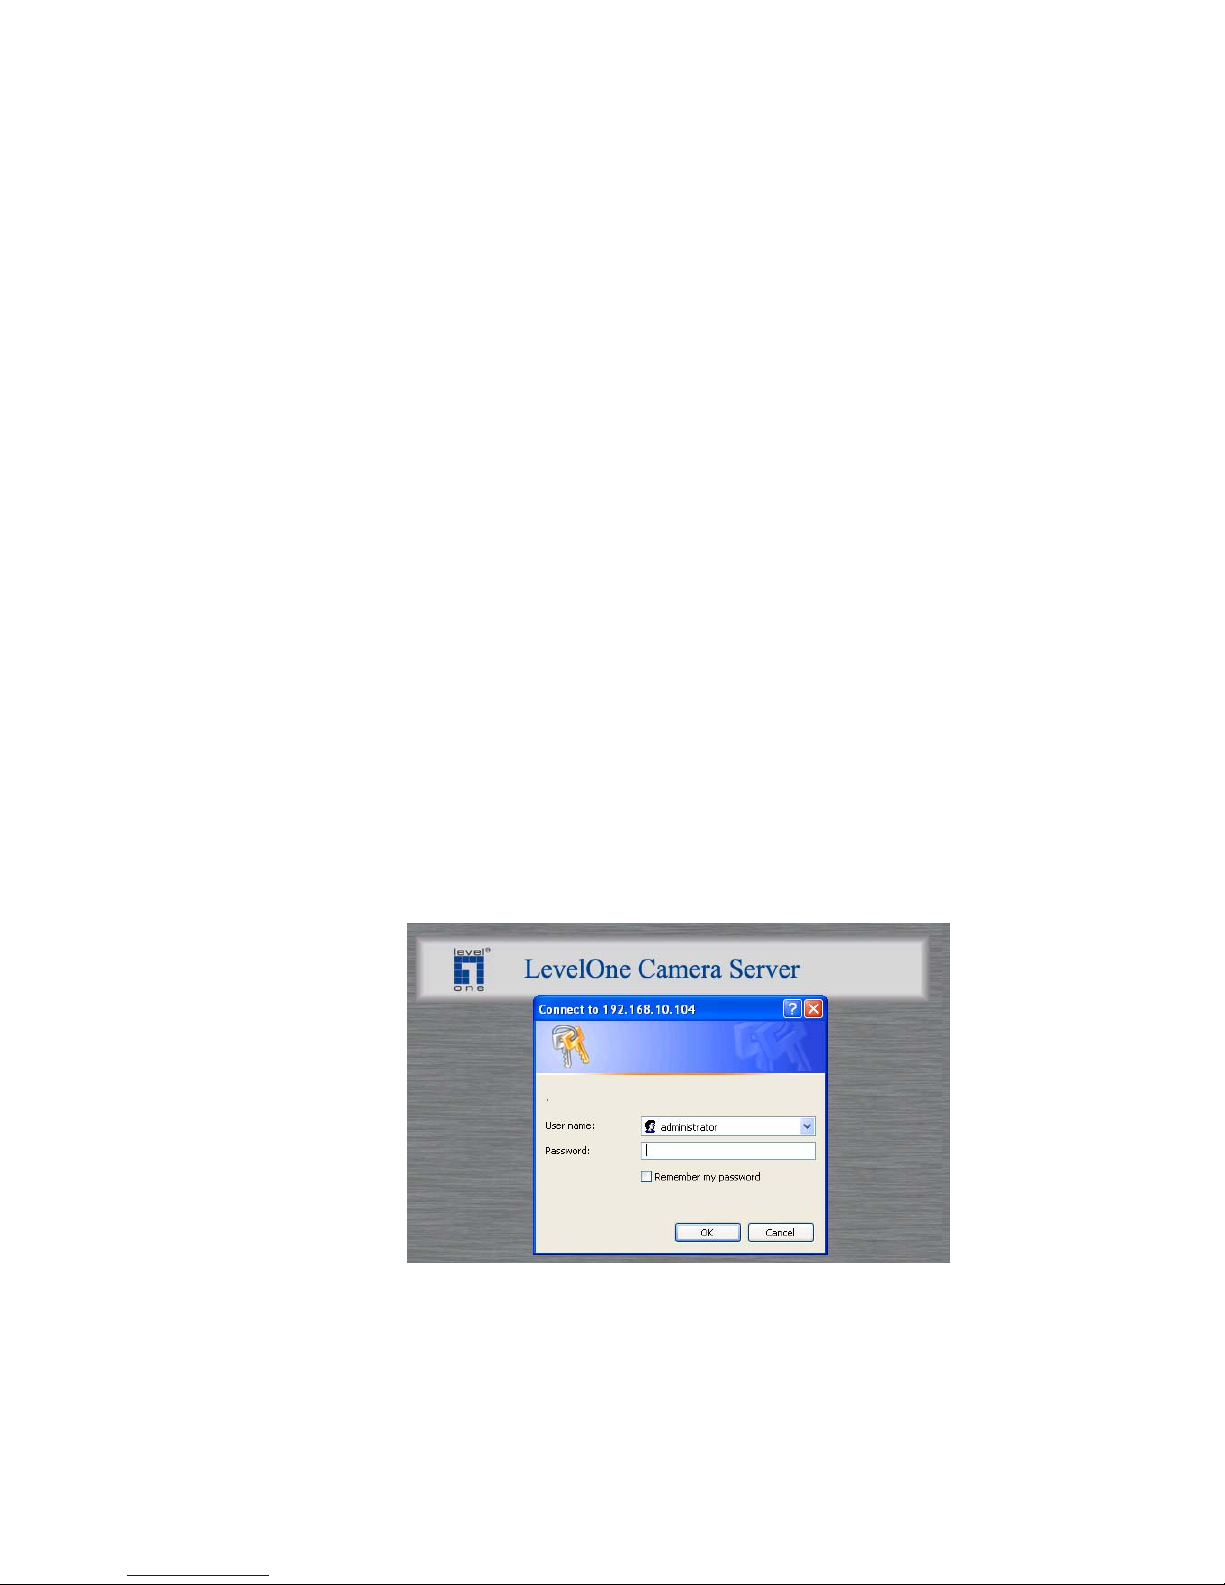
When the browser displays the CamCon Camera Server login page,
enter the user name and password to login to CamCon Camera
Server.
Page 23

22
Upon successful login to the server, the following monitoring page
should be displayed on the screen.
Note: If the monitoring page is displayed improperly, shut down the
anti-virus software first (if any), and then refresh the page.
Page 24
23
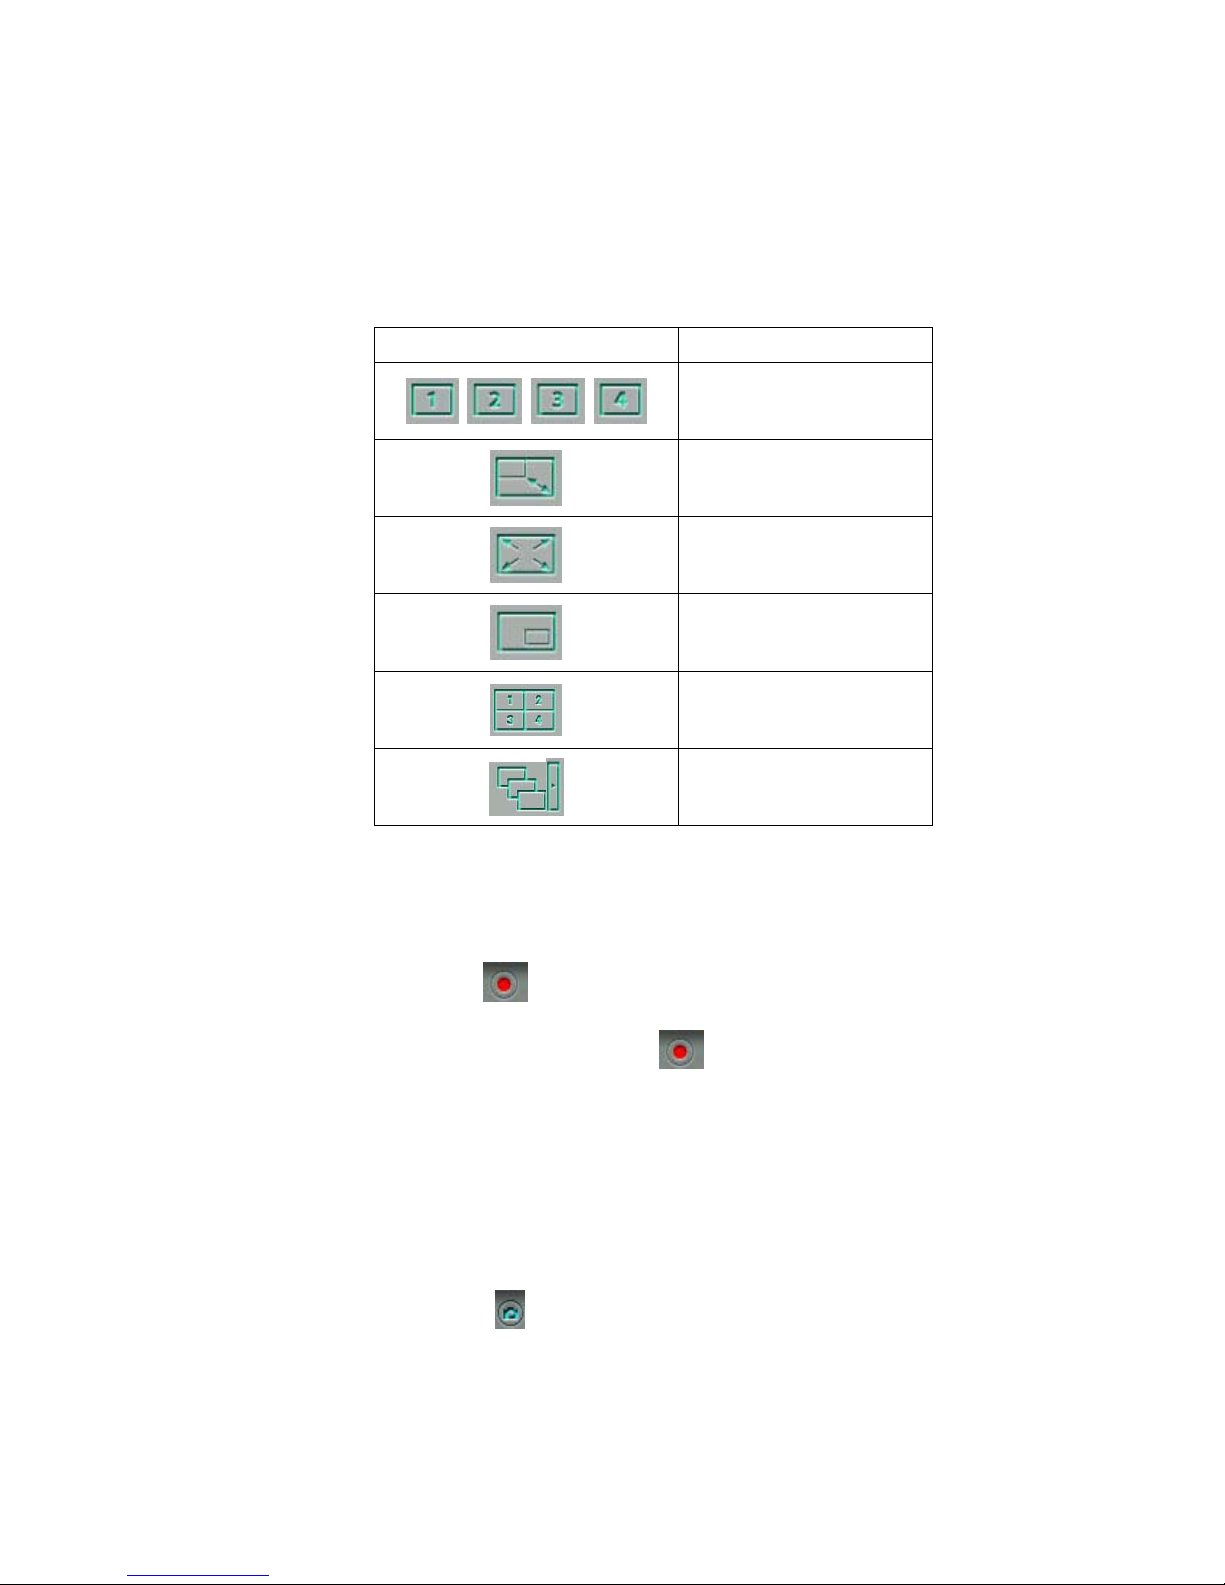
4.2 Display Mode
You can select the desired display mode for the monitoring page.
Field Description
View Single Camera
Adjust Window Size
Full-Screen Mode
Picture in Picture Mode
Quad Mode
Sequential Mode
4.3 Recording Videos
Click on the button to record the selected camera’s live video
to the computer. Click on the
button again to stop the
recording. The recorded files can be saved as ivg or avi format.
Users can play the files with Windows Media Player.
4.4 Taking Snapshots
Click on the button to save a still image file to the computer.
Page 25

24
4.5 Miscellaneous Messages
When the server cannot display live video for a particular camera,
the corresponding video window will display an error message. The
possible messages are listed below:
• Connecting
If Multicast is enabled, it may take longer to establish a
connection.
• Disconnected
Make sure that the network cable between the personal
computer and the server is connected.
• No Signal
Check the camera’s power supply and the connection to the
server.
• No Privilege
The account used to login to the server does not have the
privilege to view the camera, login to the server again using an
account which is authorized to view the cameras.
4.6 System Warnings
When the CamCon Camera Server cannot function normally, the
monitoring page will show a warning icon to inform the system
administrator the current status of the server. Double click the
warning icon to view the detailed description about the warning.
The possible errors include:
• System Error
Some system errors may have occurred, restart the server. If
the server still fails to function normally after rebooting, please
contact the technical support for further assistance.
Page 26
25
• Connection to the Storage Device has been Interrupted
The server fails to send video files to the storage device when
the connection between the server and the storage device is
interrupted. If the connection cannot be resumed in time, the
buffer will overrun and an interruption in the image files stored
will occur.
• Storage Device is almost Full
When the storage device is almost full, the system will generate
this warning message to notify the system administrator of the
condition.
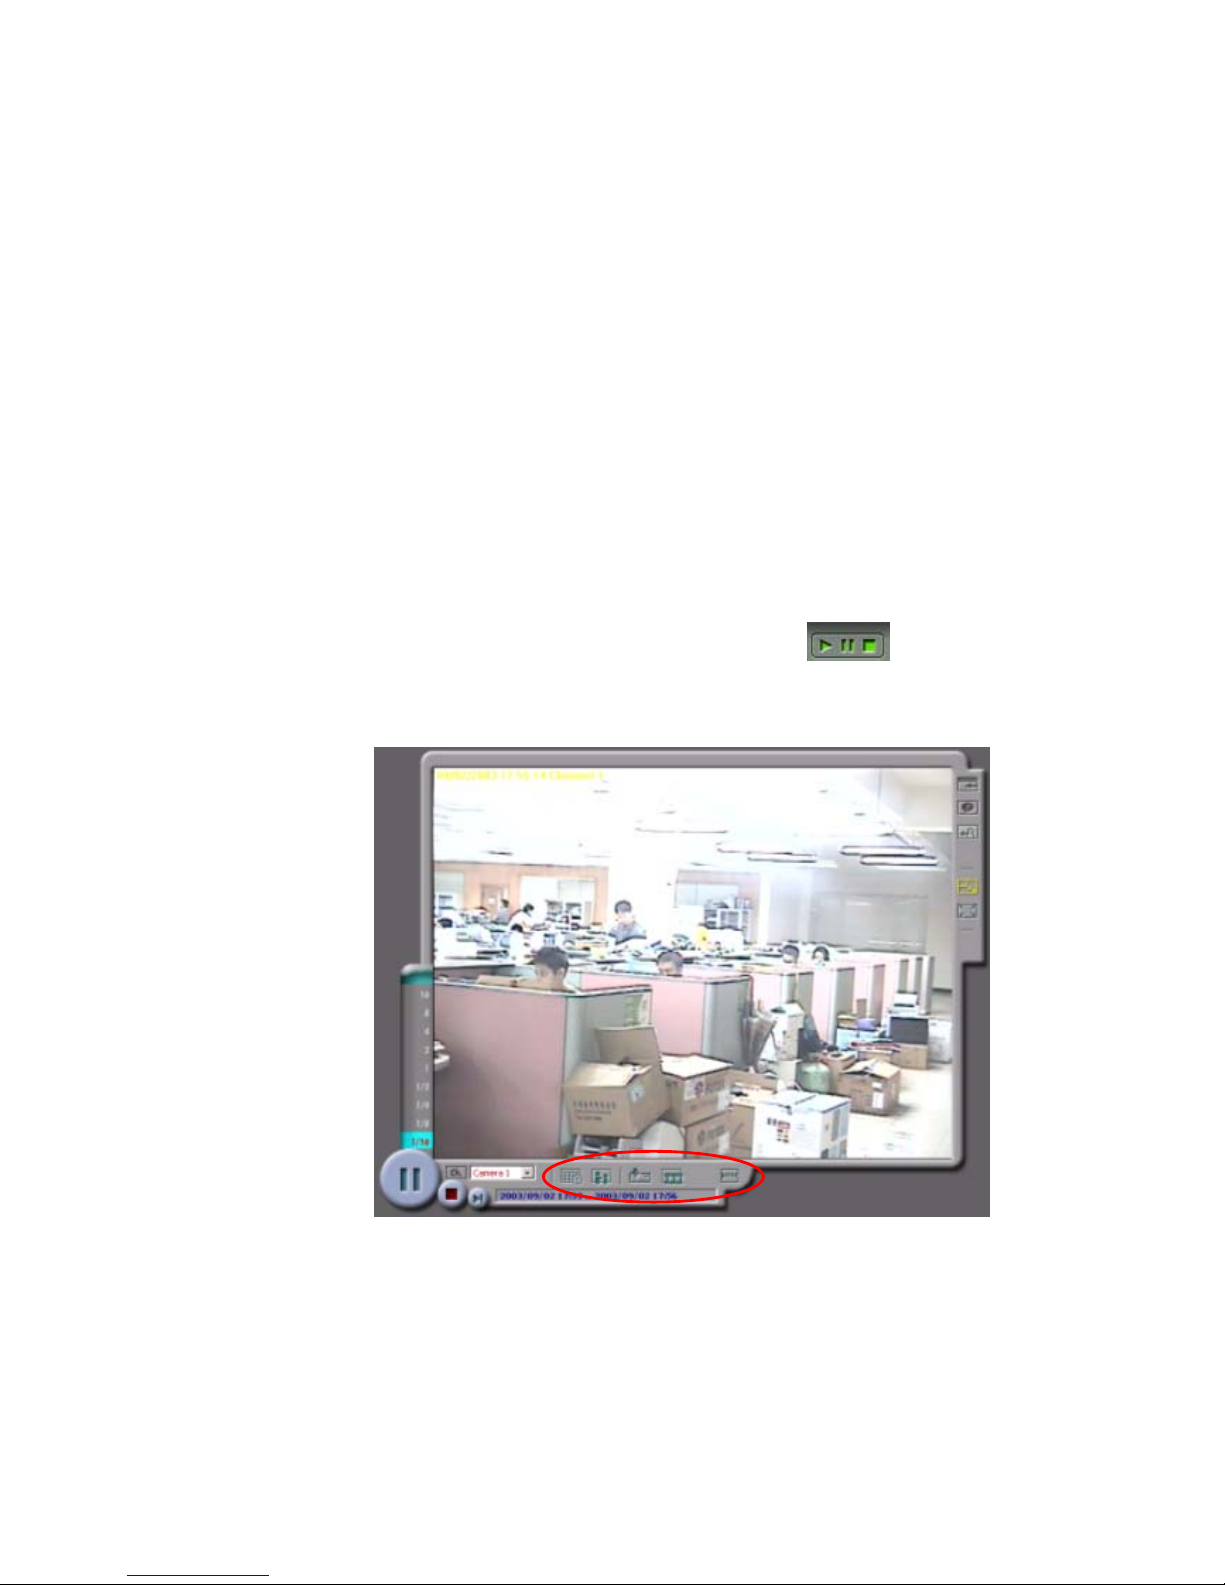
4.7 Playback Video Files
To playback video files recorded, click on the
button to
enter the video playback page. You should see the following
screen:
You can choose the camera you wish to view from the pull-down
menu. For further instructions, please refer to the “Using CamCon
Camera Server – Playback” section.
Page 27
26
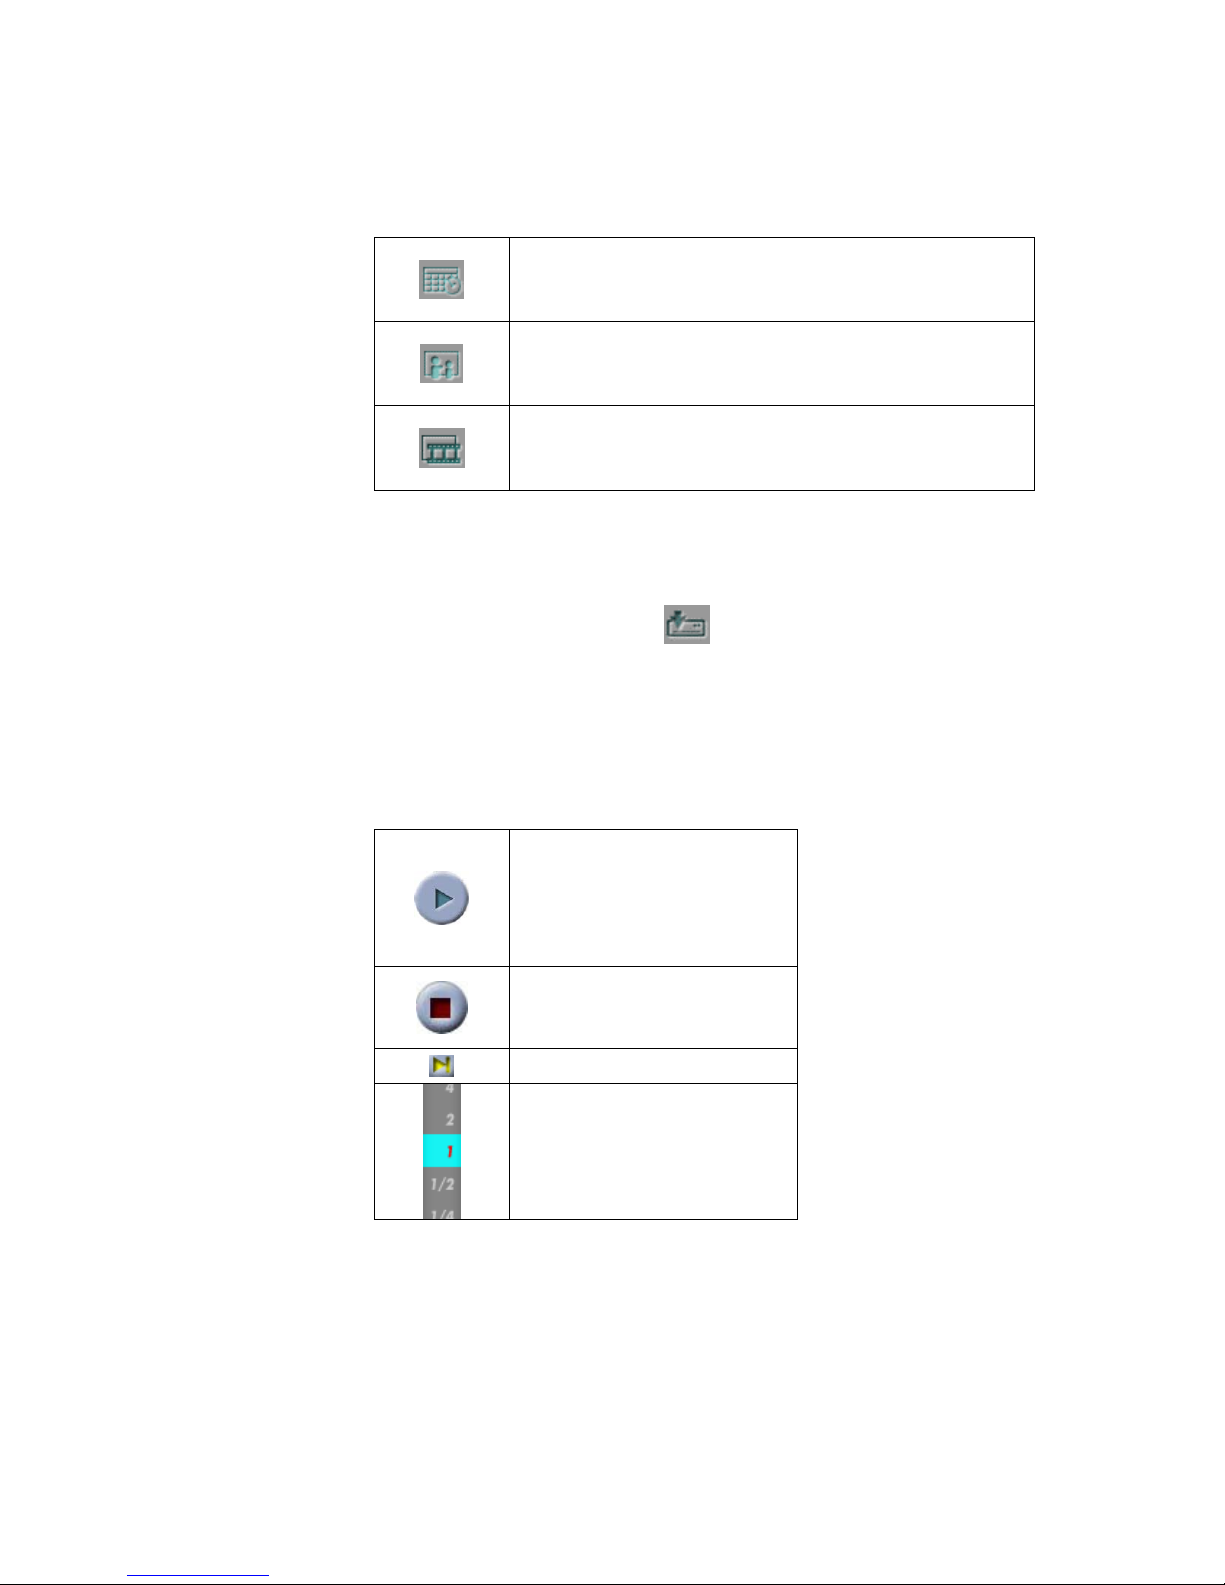
• Select Video Files
You can select the following options to play video files:
Select files stored on the remote storage device by
specified period of time.
Select files recorded due to some certain triggered
events.
Select files stored on this computer.
• Save Video Files
After you have selected the files stored on the remote storage
device, you can click on the
button to store the files to this
computer.
• Play Video Files
You can use the following controls to play the video:
Play
Stop
Frame by Frame Playback
Select Playback Rate
Page 28
27
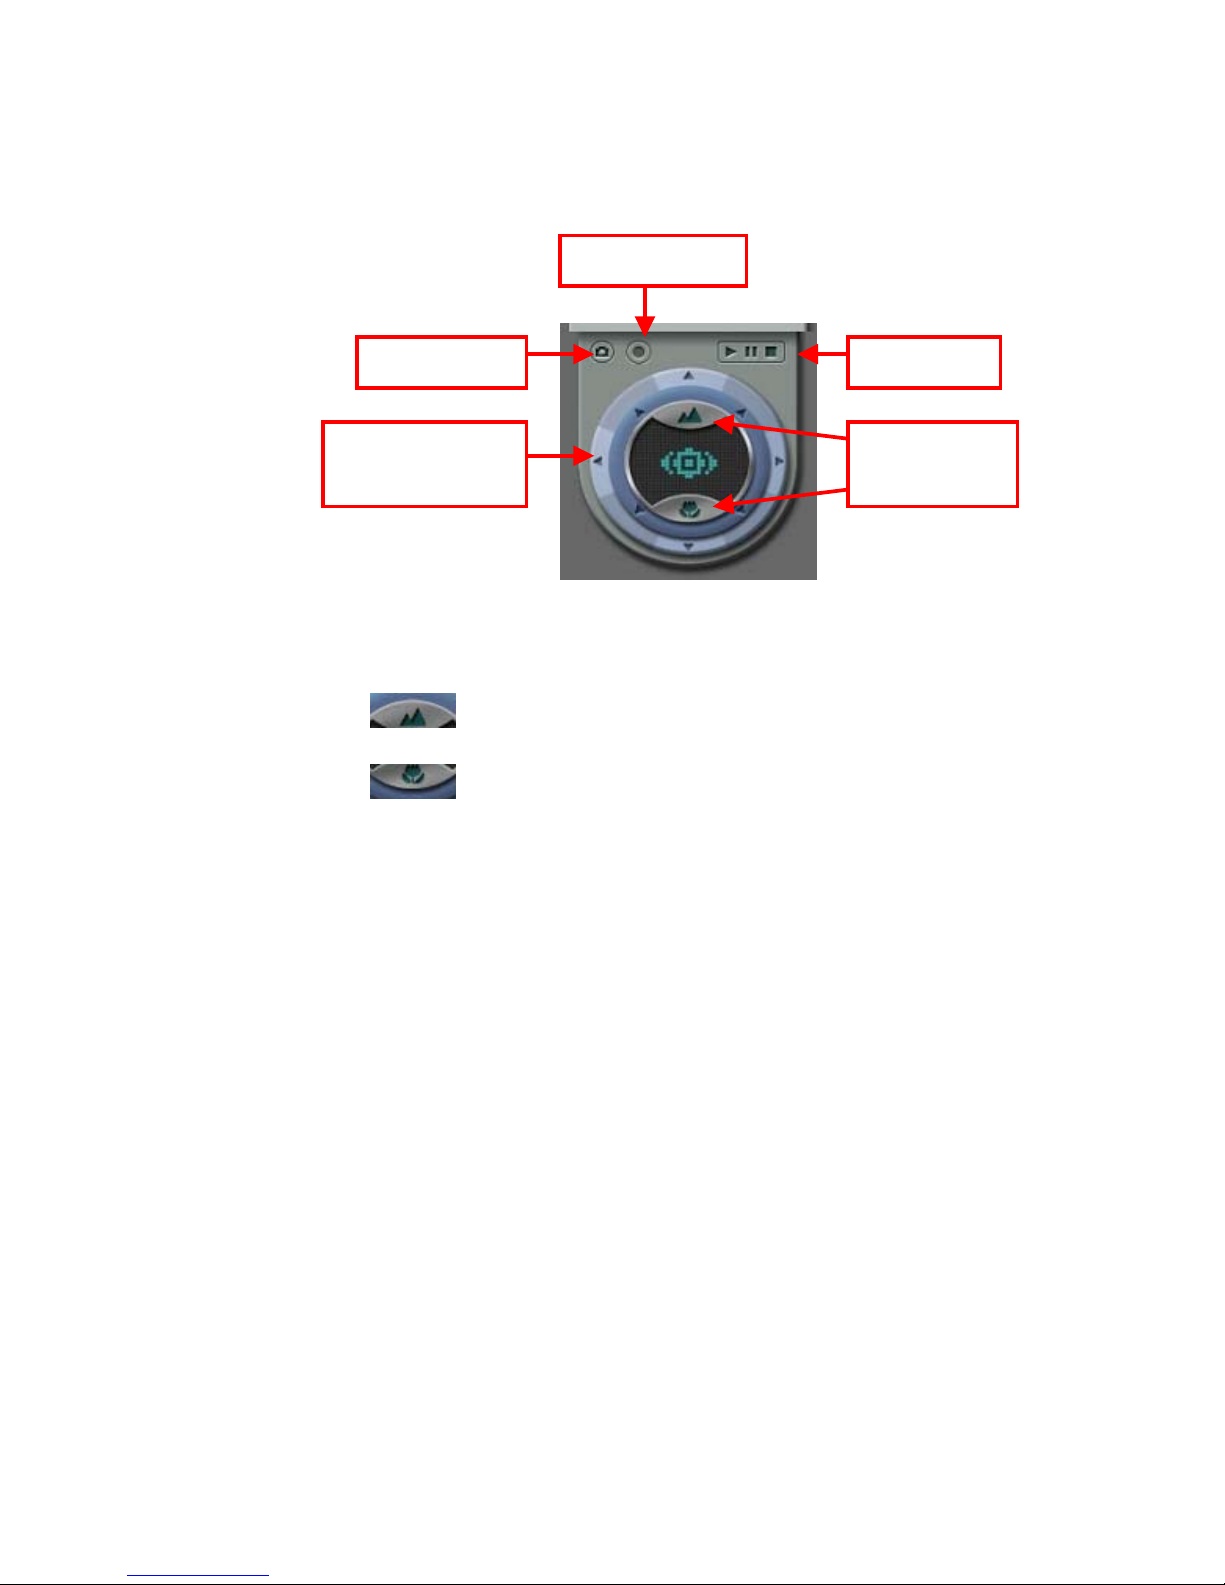
4.8 Other Function Buttons
Functional keys of PTZ camera
1.
: Adjust focusing lenses to minimize scope.
2.
: Adjust focusing lenses to maximize scope.
3. Click other buttons properly can turn PTZ camera lenses.
Playback
Adjust PTZ
Camera Focus
Start Recording
Take Snapshots
Adjust PTZ Camera
Viewing Angle
Page 29
28
4. Configuring CamCon Camera Server
Once you have installed CamCon Camera Server and other hardware,
and connected it to the network, you can use the web browser to
manage CamCon Camera Server (supports only Microsoft Internet
Explorer 5.0 or above; Microsoft Internet Explorer 5.5 is
recommended).
5.1 Accessing the Administration Page
The user can access the CamCon Camera Server administration
page by one of the following methods:
• Enter the IP address of the CamCon Camera Server in the
location bar of the web browser and press Enter.
• Run CamCon Administrator, and double click on the server you
wish to configure in the list of servers acquired.
• When the web browser connects to the CamCon Camera Server
administration page, it will prompt you for the user name and
password of the administrator. Enter the correct information to
continue the administration process.
• The default administrator account information is shown below:
User name: administrator
Password: admin
Page 30

29
• After you have successfully logged in to the server, click on the
located on the left column of the monitoring page to
enter the system configuration page.
Page 31

30
5.2 System Configuration
The System Configuration section comprises eleven sections listed
below:
Camera Settings
System Tools
Statistics & Logs
IP Security
Network Settings
System Settings
Server Name
Software Versi on
Date & Time
Enable Mult icast
Sp ecify DNS Serv er
Enable Dynami c DNS S ervice
Using PPPoE
Using Fixed IP
Using DHCP
All ow All Connection
Allow Connections Only from the List
Deny Connections from the LIst
User Management
Add
Remove
Advanced Sett ings
Edit
Basic Settings
Advanced Video S etti ngs
Add E-Map
PTZ Camera Settings
Disk Tools ( f or V ioG ate-120 only)
Customiz ed Se ttings
Hardware
Restart / Shutdown
Backup / Restore
Active Users
Historical Users
Event Logs
System Update
Quick Configuration
Recording Settings
Enable Recordin g
Dis able Recordi ng
Snapshot Settings
Enable Snapshot
Dis able Sn apshot
Event Handling
Event Type
Event Action Sett ings
Page 32

31
5.3 Quick Configuration
When you start the CamCon Camera Server for the first time, follow
the 9 steps of Quick Configuration to complete basic CamCon
Camera Server system configuration. The 9 steps are:
• Enter the name and description of this server.
• Change the password of the administrator.
• Set up the network configuration.
• Adjust the time settings.
• Add users to access this server.
• Assign the descriptive name for each camera.
• Configure the recording settings.
• Configure the snapshot settings.
• Quick configuration complete.
According to different system configurations, the system setup may
take from 3 minutes to 10 minutes to finish.
Note: It is recommended that you backup these configuration
settings after completing quick configuration to avoid system crash.
5.4 System Settings
You can set up some basic information about the system such as
the server name, date and time. You can also verify the current
software version on this page.
• Server Name
You have to choose a unique server name for the CamCon
Camera Server so that it can be identified quickly on the
network. Server name can contain up to 20 characters,
including the alphanumeric characters, dash (-), underline (_)
and Chinese characters. However, the following characters are
unacceptable:
" , ; \ : | * ? > < ' ` [ ] / %
You can also assign a short description of up to 126 characters
for the CamCon Camera Server, e.g. the administrator’s name,
Page 33

32
department name, or the location of the server. The
description is helpful for users to locate CamCon Camera
Servers reside within the same subnet by CamCon
Administrator software.
• Date and Time
Select the correct time zone according to the location of the
server, and adjust the date and time accordingly. If you enter
invalid date and time settings, you may encounter the following
problems:
If you are using the browser to view the live video, the time
displayed within it will not be the same as the time shown on
the personal computer.
Incorrect date and time information will be displayed when
you try to play the recorded video files or view the event
logs.
5.5 Network Settings
Select the method the CamCon Camera Server uses to connect to
the network, and decide whether to enable the multicast function.
You need to understand the configuration of your network to enter
the correct setting. If you are uncertain about how your server
connects to the external network or you have questions on TCP/IP
settings, contact your network administrator for assistance.
• Obtain IP address settings automatically (DHCP)
Often used in conjunction with cable modem and corporate
networks, the system will obtain IP address and other TCP/IP
information automatically. If your network supports Dynamic
Host Configuration Protocol (DHCP), the CamCon Camera
Server will obtain the IP address and other TCP/IP information
automatically from the DHCP server.
• Assign IP address settings manually
Use the specified IP address setting. Often used in ADSL
permanent connection service. You have to manually specify
the IP address and other settings. If the server’s external
Page 34

33
network uses ADSL service to connect to the Internet, specify
the valid IP address provided by the Internet Service Provider
(ISP). You have to enter the following settings:
- IP address
IP address is a sequence of binary number, normally of 4
sets of digits separated by periods, used to identify a
server on the network.
- Subnet Mask
Subnet Mask is used to group computers belonging to
the same local area network. Similar to IP address, it is
normally represented by 4 sets of digits separated by
periods.
- Gateway
Gateway address generally refers to the IP address of
the node connecting the LAN to the Wide Area Network
(WAN) or the Internet. If you do not wish to set up any
gateway address information, enter 0.0.0.0 as the
gateway address.
• Use broadband connection to the Internet (PPPoE)
PPPoE is often used in dial-up ADSL broadband service. You
have to use the account user name and password provided by
the ISP to connect to the Internet successfully.
• Enable Dynamic DNS service
Note: If you assign IP address settings manually to connect to
the Internet, and also want to enable the dynamic DNS service,
you have to specify a DNS server.
To let Internet users use a domain name to connect to the
CamCon Camera Server, activate the dynamic domain name
service. Apply for an account and register a dynamic domain
name at a dynamic domain name service provider. (For
detailed information, please refer to appendix B). After you
have registered a dynamic domain name and completed the
Page 35

34
setup, the CamCon Camera Server will automatically update the
dynamic IP address information with the service provider’s
server.
• Specify DNS Server
To assign a specific DNS server, enter its IP address here.
• Enable Multicast
Multicast enables the server to send a message to multiple
clients simultaneously.
5.6 IP Security
You can use this function to create a connection list that the system
uses to decide whether to accept or deny connection from a
particular network or specific IP address. You may choose one of
the following options to restrict access to the server:
• Allow all connections (default setting)
All connections to the server will be allowed.
• Allow connections only from the following list
Only the connections made by the computers on the list will be
accepted.
• Deny connections from the following list
The connections made by the computers within the list will be
denied.
Note: When you are setting up the connection lists, make sure
the computer you are using is included in the list of hosts which
allow your computer to make connections. Otherwise the
server will disconnect the connection when you apply the new
setting. Select the proper setting before applying any new
ones.
Page 36

35
5.7 User Management
This function allows you to maintain user accounts and configure
account privileges for effective management of server’s access.
The server can provide services to any authorized user. To
effectively manager different user’s privileges, you have to register
and configure user accounts and account privileges.
The system includes the following built-in account name and
password. You will not be able to delete or rename this account.
User name: administrator
Password: admin
You can create new user if you need to. It is required to provide
the following information to create a new user.
• User name
The user name can contain up to 32 characters. It is
case-insensitive, and double-byte characters (for example,
Chinese, Japanese, Korean, etc.) are acceptable, but cannot
contain the following characters:
" , ; \ : | * ? > < ' ` [ ] / %
• Password
The password can contain up to 16 characters (case-sensitive).
A password longer than 6 characters is more secure for not
being guessed by others.
• Advanced User Settings
You may configure the following permissions to a registered
user account:
Monitoring
Allows the user to view the live video from assigned
cameras.
Page 37

36
Playback
Allows the user to view the recorded video of the assigned
cameras.
Camera PTZ Control
If the attached camera supports PTZ functions, users can
control the Pan/Tilt/Zoom functions of the assigned
camera.
System Administration
The user will have the privilege to change all system
settings.
5.8 Camera Settings
You can perform the following preference settings for the camera:
- Specify camera name (exclude " , ; \ : | * ? > < ' ` [ ] / %)
- Adjust video resolution
- Select image compression ratio
- Adjust capturing frame rate
You can perform the following additional image settings on the
advance video setting page:
- Brightness
- Contrast
- Hues
- Saturation
• P/T/Z Camera
If the camera connecting to the system has the P/T/Z function,
the user can operate it with the control unit on the monitoring
page. To use the P/T/Z function, please configure the following
settings:
- Dome ID
Enter the ID of the P/T/Z camera. Please refer to the user
manual of the camera.
Page 38

37
- Mode
If the Auto mode is selected, the camera will turn clock-wise
automatically. Or you can select Manual mode, and the
camera will stay still unless you control it through the
monitoring page.
- Protocol
Please refer to the camera’s manual and select the proper
protocol. If the protocol that the camera uses is not listed,
please check with the technical support.
Note: The system supports 6 PTZ protocols (DynaColor,
SONY VISCA, Meriti Lilin, Panasonic WV-CS564, Honeywell
GC-655, Honeywell GC-755).
5.9 Recording Settings
Before recording function is enabled, the live video shown on the
web page will not be saved. The recording function should be
enabled to save the video files first and then the video playback
function can be activated. The system supports multiple intervals
scheduled recording function.
• Recording Mode
- Continuous Recording
The system will continuously record the video stream to the
storage.
- Scheduled Recording
The system will start the recording function according to the
specified day, starting time and the ending time. The
system also supports overnight scheduled recording. For
instance, when the user sets the start time for recording as
6 pm on Monday and the end time as 9 am, the system will
automatically defines end time as the following day, i.e.
Page 39

38
Tuesday.
• Storage Settings
To support more reliable storage feature, the system provides
two storages with fault tolerance function. Once the current
storage fails to save files and the idle time runs up, the system
will automatically switch to the other storage and continue the
saving task, so it is guaranteed that the recording or snapshot
taking won’t be interrupted. Please choose one of the following
storage types, and enter respective information according to
the storage type.
- Local
This option allows you to record the file in the attached Hard
disk in the CamCon Camera Server. This feature is for future
upgrading purpose and not available for now.
- NAS
If you choose to use NAS (Network Attached Storage) as the
external storage device, you have to provide its IP address,
a valid user name and the corresponding password to access
the server.
- Windows
If CamCon Camera Server is set to save files to a share
folder on a Windows 2000 server, you have to provide its IP
address, a valid user name and the corresponding password
to access the server.
- Unix/Linux
If you choose to save files to a Unix or Linux server through
NFS service, you have to provide the server’s IP address.
- FTP
If you set the CamCon Camera Server to save files to a FTP
server, you have to provide the server’s IP address, a valid
user name, and the corresponding password to access the
server. If the FTP server uses a particular port, you have to
set the correct port number.
Page 40

39
• Storage Path
Please enter two different paths to store the recorded video files
and snapshot image files respectively for easy management.
Note:
1. If you save the video files using the FTP service, please make
sure you enter a valid existing path. Otherwise you will not be able
to save the files.
2. Both the recorded files and the snapshot files are stored in the
same selected storage path.
• Handling of Storage Space Full
When the available storage space falls under a specified limit,
you can choose one of the following actions:
- Overwrite the oldest recorded files
- Stop saving the newly recorded files
When the “Overwrite the oldest recorded files” option is
selected, your storage device must be able to store at least 2
hours worth of video files, which takes around 5 GB of storage
space.
Note: If you choose to store the files on a FTP server, the system
will not be able to detect the amount of available space on the
FTP server. Therefore, you will not be able to set the limit for
determining storage space full. The system will start
overwriting or stop saving files when there is no available space
on the FTP server.
5.10 Snapshot Settings
To reduce the storage usage, you can select to take snapshot
instead of recording video since it takes less storage space. If you
enable the snapshot function, the system will take snapshot of the
assigned camera on an interval that you’ve specified. The system
supports multiple intervals scheduled snapshot taking function.
Page 41

40
• Snapshot Mode
- Continuous Snapshot
The system will continuously take snapshots.
- Scheduled Snapshot
The system will start taking snapshots according to the day,
starting time and the ending time that you’ve specified.
• Storage Settings
Please enter two different paths to store the recorded video files
and snapshot image files respectively for easy management.
To support more reliable storage feature, the system provides
two storages with fault tolerance function. Once the current
storage fails to save files and the idle time runs up, the system
will automatically switch to the other storage and continue the
saving task, so it is guaranteed that the recording or snapshot
taking won’t be interrupted.
Note:
1. If you save the video files using the FTP service, please
make sure you enter a valid existing path. Otherwise you will
not be able to save the files
2. Both the recorded files and the snapshot files are stored in
the same selected storage path.
• Handling of Storage Space Full
When the available storage space falls under a specified limit,
you can choose one of the following actions:
- Overwrite the oldest snapshot files
- Stop saving the newly snapshot files
Note: If you choose to store the files on a FTP server, the system
will not be able to detect the amount of available space on the
FTP server. Therefore, you will not be able to set the limit for
determining storage space full. The system will start
overwriting or stop saving files when there is no available space
on the FTP server.
Page 42

41
5.11 Event Handling
When an event occurs, the system will automatically trigger
corresponding alarms to react to unusual conditions, and ensure
that the system can correctly capture, record video files. The
events are listed below:
• Motion Detection
• Video Input Loss
• Network Failure
• Hardware Failure
• Storage Connection Failure
• Storage Space Full
• Alarm Input 1, 2, 3, 4
Note: If you choose to store the files on an FTP server, the CamCon
Camera Server will not be able to detect the amount of available
space on the FTP server. Therefore, you will not be able to set the
percentage for the “Storage Space Full” event.
5.12 Event Action Settings
You can perform multiple event actions for a single event, and
connect GPIO devices to generate alarms.
• Recording
• Snapshot
• Alert E-mail
• Alert SMS (Short Message Service)
• Alarm Buzzer
• Alert Client PC Notification
• Alarm Output 1, 2, 3, 4
5.13 Statistics and Logs
You can view a list of active user, historical users and event logs as
a reference for the system administrator or for system diagnostic
purpose.
Page 43

42
• Active Users
Displays information of all currently active users online.
• Historical Users
Displays information of all users who ever logged onto the
system.
• Event Logs
Displays all information, warnings and errors of event logs.
The system provides the backup function of the event logs.
5.14 System Tools
You can use the following system tools to conveniently configure
and manage your CamCon Camera Server.
• System Update
Performs system software updates. Please ensure the
correctness of the update image file before proceeding with
the update. The current settings will remain unchanged
even though the system is upgraded. To update the system
software, download the updated image from the product
support web site.
• Backup/Restore
You can backup your current system settings, user accounts
information to your computer. You can also perform the
restore operation using a previously backed-up file, or reset
the system to its default factory setting.
• Restart/Shutdown
Choose to restart or shutdown the CamCon Camera Server.
If you choose to shutdown the system, please turn off the
power switch located on the back of the CamCon Camera
Server.
• Hardware
Page 44

43
Choose to enable or disable the hardware Configuration Reset
Switch. The default setting is to “Enable”. If it is enabled,
the system administrator account’s password and network
configuration will be reset to their default values when the
user presses down on the reset button for 5 seconds. In
addition, the server will accept all connections if the
configuration reset switch is pressed.
Note:The system reset bottom is located above the Video
Input Connector.
Note: If the configuration reset switch is disabled in the
System Tools – Hardware Settings page, you will not be
able to reset administrator password and network
configuration using this function; in this case, please write
down your administrator password and keep it in a safe place.
• Customized Settings
This option enables you to upload customized personal
settings for the following items:
Electronic Map: The system supports e-map function.
You can upload a particular e-map to identify the
location of each camera by clicking specific buttons on
the e-map.
Full map: You can upload a full map for viewing
the location of all cameras. Upon successful
uploading, an icon
will be shown on the right
of the e-map.
Page 45

44
Channel map: You can also upload a map or
viewing the location of particular cameras. After
uploading, an icon
will be displayed on the
screen which links to the corresponding electronic
map of that camera.
E-map for
viewing
location of all
cameras.
E-map (full
map)
E-map for
viewing location
of particular
cameras.
E-map (Channel
map)
Page 46

45
5. Using CamCon Watcher/Administrator/Browser
If you choose to record image files by the CamCon Camera Server, the
server will automatically save video files (with .ivg as the extension) to
the specified storage device. The video files will have the following
filename format: yyyy-mm-dd hh-mm-ss.ivg. You can connect to the
server and copy the video files to your personal computer and launch
the CamCon Watcher to view the file content.
6.1 Using CamCon Watcher
Double click the CamCon Watcher shortcut to launch the CamCon
Watcher. You should see the following screen:
Playing Video Files
Click the
button and the button to select and delete
the video files you wish to play.
Use the function buttons located on the down left corner of the
screen to play, pause, stop, and skip the video files.
Select the numbers located on the left column of the screen to adjust
the playback speed.
Click on the
button or the button to change the window
Page 47

46
size.
6.2 Using CamCon Administrator
Double click the CamCon Administrator shortcut to launch the
CamCon Administrator. You should see the following screen:
Click on server name and click “Configure”. Enter the
Administrator Name and Password.
Page 48

47
Enter the information for configuration and click OK.
When you click
, the following screen will appear, which
shows the detailed information of the selected CamCon Camera
Server item.
Page 49

48
6.3 Using CamCon Browser
Double click the CamCon Browser shortcut to launch the CamCon
Browser.
Enter the default user name and password to login CamCon
Browser.
User Name: user
Password: user
CamCon Browser is a software which allows you to view multiple
CamCon Camera Servers in your network environment.
But you can`t revise the configuration by using CamCon Browser.
You have to purchase CamCon Manager to achieve that.
Please refer to the section Using CamCon Manager of the user
manual for operation CamCon Browser.
Page 50

49
6. CamCon Camera Server Client Viewer
ActiveX Control
The CamCon Camera Server Client Viewer ActiveX Control is a standard
ActiveX control that uses Microsoft
®
ActiveX and Component Object
Model (COM) technology. This ActiveX control provides the interface
for web page script or other OLE control container program use the
functions of CamCon Camera Server client. Instead of browsing web
page provided by CamCon Camera Server server, this ActiveX control
can help you to easily build up your own client application or client web
page.
7.1 System Requirements
IBM or IBM-compatible PC
Windows 98 SE, Windows ME, Windows 2000, or Windows XP
7.2 Installation Instruction
Run “VGActiveXSetup.exe” to install the software.
After the setup program complete, all files will be installed to:
“[Program Files] \LEVELONE\CamCon Client Viewer Control\”
Note: [Program Files] is the path of Windows Program Files
folder. The typical path is “C:\Program Files”.
The setup program also creates a shortcut of a demo html file. You
can open it to see if this ActiveX control has been installed correctly.
7.3 Un-installation Instruction
To remove this software, please do the following steps:
• Open the Control Panel by choosing Settings from the Start
Page 51

50
Menu.
• Open the "Add/Remove Program" and select "CamCon
Client Viewer ActiveX Control" from the list.
• Click on the "Add/Remove" button and follow the
instructions to complete un-installation.
7.4 Usage
Open “demo.htm” in a web browser to see this ActiveX control in an
html file. Click on the “Start” button to see a demo of the CamCon
Camera Server.
CamCon client Viewer ActiveX Control resides in the so-called
“control panel”. User can manipulate most of CamCon client’s
functions by using the buttons and Windows controls on it. The
following lists the functions / commands available:
• Viewer Mode
You can set the viewer mode to Normal mode (include: 4
camera and single camera), Sequential camera mode, Multiview
Viewer
Mode
Action
Camera
Select
Camera
Start / Stop
Property
page
Snapshot
Record
Control Panel
Page 52

51
(Picture-in-Picture) mode and Play video file mode.
• Select Camera
In Normal mode and Multiview mode, you can choose the
camera you want to see.
• Start / Stop
To start live video or start playing a video file. After the video
playback starts, you can also use this button to stop it.
• Action Camera
You can use this combo-box to choose the camera for snapshot
or recording.
• Snapshot and Recording Function
After you click on these buttons, a dialog box will pop up and
prompt you for the filename to store the snapshot photos or
video clips.
• Property Page
You can use this button to request the property page at runtime.
Control panel can be hidden and invoked in any time. By
clicking on the right mouse button on the client area of this
control panel, a popup menu will show up that allows you to
switch and the control panel display state.
(If the menu-item is checked, it means the control panel is visible;
if it’s not checked, it means the control panel is hidden).
Page 53

52
CamCon Client Viewer ActiveX Control provides an easy way to invoke
its property page dialog, especially during the run-time. (Just click on
the button “Config” in control panel). This property page helps the
user configure the ActiveX control to a friendly user interface without
using a property browser or using a program language. The property
page is the same one that is displayed during the design-time mode.
7.5 Object Interface
CamCon Client Viewer ActiveX Control uses the concept of objects to
expose programming functions. Users can start viewing live video or
other functions of CamCon Camera Server client by issuing a simple
programming statement. The complete list of the programming
interface is described in following section “Object Interface List”.
7.6 Web Support
To let users distribute the ActiveX control on their own web page to
browsing client machine, a “DDC Asia CO.,LTD.” signed cabinet file is
Page 54

53
also included in this package. It can be embedded in a web page by
using the following html tag:
<object classid="clsid:66635D2F-A488-4B6A-A323-3CB36098EE1F"
id="VGCliViewer" width="332" height="310"
<CODEBASE="http://[server url]/VGCliVW.cab#Version=[ver. no]">
<param name="_Version" value="65536">
<param name="_ExtentX" value="8784">
<param name="_ExtentY" value="8202">
<param name="_StockProps" value="0">
<param name="ServerPort" value="80">
<param name="ServerHost" value="192.68.0.1">
<param name="ViewMode" value="0">
<param name="AutoStart" value="0">
<param name="ShowControlPanel" value="1">
<param name="Username" value="guest">
<param name="Password" value="guest">
<param name="CameraView" value="-1">
<param name="SubCameraView" value="0">
</object>
** [server url] is the url path that contains the cabinet file of CamCon
Camera Server Client Viewer ActiveX control.
** [ver. no] is a version string of the form #Version=a,b,c,d.
a: High-order word of the major version of the component available at
the specified URL.
d: Low-order word of the major version of the component available at
the specified URL.
c: High-order word of the minor version of the component available at
the specified URL.
d: Low-order word of the minor version of the component available at
the specified URL.
Note: If a, b, c and d are all set to -1 (#Version=-1,-1,-1,-1), the
component is downloaded from the server if the release date is later
than the installation date on the client computer. If the component is
installed on the client computer and the release date is the same or
earlier than the installation date, only an HTTP header transaction
occurs.
Page 55

54
If the client computer has a newer version of the Viewer installed, no
download will occur.
Page 56

55
7.7 Object Interface List
Properties
[Name] [Range] [Note]
BSTR ServerHost
CamCon Camera Server server
URL
long ServerPort 1 - 65535
CamCon Camera Server server
port
long ViewMode 0 - 3
View Mode:
0: Normal live video
1: Sequential camera live video
2: Multiview live video (Picture in
picture)
3: Playback files
boolean AutoStart
Indicates if this control should
start automatically while being
activated
boolean ShowControlPanel
Indicates if control panel will
displayed
BSTR Username
Username to logon CamCon
Camera Server
BSTR Password [Input-only]
Password to logon CamCon
Camera Server
Long CameraView -1 - 3
Main Camera selection.
The value is depend on the
ViewMode property:
a. In Normal mode: -1 indicates
show 4 camera, 0 – 3 indicates
select viewing camera 1 – camera
4
b. In Multiview mode: -1 is not
allowed, 0 – 3 indicates select
viewing camera 1 – camera 4
c. In other mode, this property is
ignored
long SubCameraView 0 - 3
Sub Camera selection.
The value is only use in Multiview
mode.
Page 57

56
long Language
0 – 2
0: ENG, 1: CHT, 2:
CHS
UI language, currently only
support 3 languages: English,
Traditional Chinese and Simplified
Chinese. This property should not
be set during live video or file
playback running.
boolean LoopFile
Indicates whether to play file
repeatedly.
boolean ShowConfigButton
Indicates whether the
configuration button should be
visible.
Methods
[Name] [Param] [Note]
boolean Start()
Start live video or select file to
playback
void Stop() Stop live video or file playing
void Logout()
Same as method ‘Stop’.
Besides, after this method was
called, current user account will
no more valid.
boolean Snapshot(long
Camera, BSTR Filepath)
Camera: 0 – 3
Filepath: Full file
path to save
snapshot frame.
Take a snapshot of one of camera.
Camera = 0 means 1st camera
view.
long Record(long Camera,
BSTR Filepath)
Camera: 0 – 3
Filepath: Full file
path to save
recording video.
Recording live video of one of
camera. Camera = 0 means 1st
camera view.
boolean IsRecording(long
Camera)
Camera: 0 – 3
Indicate whether the specified
camera is under recording.
Camera = 0 means 1st camera
view.
void StopRecord(long
Camera)
Camera: 0 – 3
Stop recording of specified
camera. Camera = 0 means 1st
camera view.
boolean PlayFile (BSTR Filepath: File path Play a single video file. The
Page 58

57
Filepath) of CamCon Camera
Server video file.
parameter can be ignored. This
method will fail if ActiveX control
is under live streaming or playing
other file. You must stop first
then call this method.
Example:
Start / Stop live video:
First, set the property ServerHost and ServerPort to the URL and port
number of CamCon Camera Server-100 respectively. Assign the viewing
mode to the ViewMode property and simply call Start.
Ex.
VGCliViewer.ServerHost = “172.17.13.73”;
VGCliViewer.ServerPort = 80;
VGCliViewer.ViewMode = 0;
VGCliViewer.Start();
To stop live video, call Stop method in anytime.
Ex.
VGCliViewer.Stop();
Page 59

58
7. Maintenance
CamCon Camera Server has been specially designed to keep running for 24
hours a day, 7 days a week and to be ready at all times. It is also robust
to protect against system crashes caused by power loss. This section
provides a general maintenance overview.
8.1 Shutdown/Restart the Server
To shutdown/restart the server, please open the administration web
page and go to System Tools – Restart page. Follow the
instructions to restart or shutdown the system. If you choose to
shutdown the system, please turn off the power switch located on the
front of the CamCon Camera Server.
8.2 Reset the Administrator Password & Network
Settings
If you accidentally forget the administrator password, you will not be
able to perform any administration work on the server. In this case,
you can reset the administrator password and network configuration to
the factory default.
• Use the tip of a pen to depress the configuration reset button on
the back of the server and hold it for about 5 seconds until the
beep.
• The network configuration will be reset, and you may need to
re-configure some or all of the network settings.
• Use a web browser to connect to CamCon Camera Server.
Enter the System Administration using the following login name
and password. You can then perform system administration.
User name: administrator
Password: admin
Note: If the configuration reset button is disabled on the System
Tools – Hardware Settings page, you will not be able to reset
administrator password and network configuration using this function;
in this case, please write down your administrator password and keep it
Page 60

59
in a safe place.
8.3 Update the System
Enter the System Administration page by a web browser, and have the
system updated in the System Tools – System Update page. Before
updating the system, please make sure that the image file that you are
about to update is the correct version and read through the instruction
carefully.
8.4 Restore to Factory Defaults
To restore the factory default settings, please use a web browser to
connect to CamCon Camera Server. Go to the system Administration
and restore the configurations in the System Tools – Backup/Restore
page.
Page 61

60
Part II
CamCon Manager
FCS-9000
FCS-9002
FCS-9004
Page 62

61
1. Overview of the CamCon Manager
CamCon Manager is a centralized management application designed to
provide centralized management for multiple servers. It is available as an
optional extension. Not only does it enhance the functions of existing
servers, it also eases the task of configuring multiple servers on the network.
Note: Unless specified for some reason, the CamCon Camera Server
mentioned below applies to CamCon Manager FCS-9000 which allows you
to view and modify all the settings of multiple(unlimited) CamCon Camera
Servers.
FCS-9002 allows you to manage two FCS-5004 or FCS-5008.
FCS-9004 allows you to manage four FCS-5004 or FCS-5008.
1.1 About CamCon Manager
• Virtual Surveillance Centre
Using CamCon Manager to connect to all the servers, your
surveillance centre’s location is not restricted to any particular place.
The surveillance centre can be anywhere you choose.
• Managing Unlimited Number of Multiple Cameras
With CamCon Manager, you can now control all the servers on the
network, and simultaneously browse 20 cameras.
• Configurable Viewing Page
The application supports single camera, quad, 9-way, 12-way,
16-way, 20-way, picture in picture, sequential mode, etc. In each
mode you can freely add the cameras you wish to view.
• Effortlessly Configure Multiple Servers
The built-in Apply to All Servers, lets you configure multiple servers
on the network in a single click.
Note:
FCS-9002 can only configure/view maximum 2 servers
Page 63

62
simultaneously, and does not support 20-way viewing mode.
FCS-9004 can only configure/view maximum 4 servers
simultaneously.
Page 64

63
1.2 Features
• Multiple Server Auto Detection
Using the CamCon Manager, any IP surveillance administrator can
easily detect all servers within the local network and manually
include other servers outside the network into the same
management scope.
• Central Configuration for Multiple Server
Should the administrator need to configure various parameters
across all servers, CamCon Manager can save time by universally
setting the updated configuration to all servers within the system.
The administrator can update firmware, set up server time, add or
delete a user, alter network and camera settings, assign video
recording locations across all IP surveillance servers under
management control effortlessly and much more besides.
• Configurable Viewing Page of Selected Cameras
Supervisors can pick up images from any camera within any IP
surveillance server to configure a personal viewing page on demand.
With the feature, specific group monitoring in any surveillance
environment is on call at a click of the mouse. Users can set up a
group-viewing page including any camera highlighting the same
scenario. For example, cash counters, warehouse doors and
network operation centers are some of the places where a
supervisor might need to use a group view.
• E-Map Function
E-Map function enables a convenient handling of multiple cameras
and GPIO (general input and output) devices with a simple
drag-and drop procedure on the electronic map of the area under
detection.
• System Requirements
Pentium III 1GHz(or higher) CPU with at least 128MB of RAM.
(Recommended resolution: 1024x768 pixels)
Page 65

64
• Package Contents
- CamCon Manager CD-ROM x1 (Manual file included)
- KeyPro x 1
Page 66

65
2. Installing CamCon Manager
Please insert the installation CD into the CD-ROM, the system will auto-play
the CD, and you should see the following screen:
3
Please choose Install CamCon Manager to install CamCon Manager software.
Note: When installing CamCon Manager, CamCon Watcher and CamCon
Administrator will be installed as well. Please install the KeyPro before
installing CamCon Manager, or CamCon Manager will not be installed
successfully.
Page 67

66
After running the installation program; you should be see the following
screen:
Follow the on-screen instructions to complete the installation.
Page 68

67
3. Using CamCon Manager
3.1 Start Using CamCon Manager
When the CamCon Manager is installed, the system will automatically
create CamCon Manager, CamCon Administrator, and CamCon
Watcher shortcuts on your desktop.
Please double click on the CamCon Manager shortcut to login to
CamCon Manager. The login screen should look like this:
Page 69

68
Please enter the default username and password to login to CamCon
Manager:
User name: administrator
Password: admin
When you logged in to the CamCon Camera Server for the first time,
the system will automatically search for servers in the same subnet.
Please enter various servers’ administrator passwords to connect to
the servers (The default administrator password for the servers is
“admin”). After the system has finished searching the same subnet
for servers, you can also add additional servers by clicking on the
“Add” button and manually enter the server IP and the administrator
password (CamCon Manager uses the default administrator
username “administrator” to connect to the servers).
Later, when you login to the system again, the system will
automatically connect to various servers, and won’t search for
servers again.
The screen for connecting to the server shown as below:
Page 70

69
Page 71

70
After connected to the server, you should see a screen similar to this:
Display Mode
To suite your needs, you can use the function keys on the left column to
change the display mode.
View Single Camera
Adjust Frame Size
Full-Screen Mode
Sequential Display
Picture in Picture Mode
Page 72

71
Quad Mode
9-way Mode
12-way Mode
16-way Mode
20-way Mode
Double click on the image frame to switch between “Viewing Single
Camera”, “Adjust Frame Size”, and “Full-Screen” modes.
When using Picture in Picture mode, you can freely select up to 3
children cameras. Double click on the child camera will switch the child
camera with the parent camera.
Using sequential mode, you can configure the cameras switching
frequency.
Note: “20-way” mode is supported by FCS-9000 and FCS-9004 only.
Page 73

72
3.2 Configure Viewing Page
You can use the following toolbar to combine various cameras into
one group-viewing page and named the resulting page. Please refer
to the following steps on how to construct a group-viewing page.
• Select an existing page or create a new group-viewing page to
edit.
• Select the image frame of which you wish to change its video
source. The selected frame’s border will be changed to orange.
• Select the desired video source.
• Repeat step 2 and 3 for every desired image frames.
• Click
to give the viewing page a name to finish the editing
process.
• To delete the selected viewing page, click
.
• To modify master settings, click
.
3.3 Other Function Buttons
Add Group Viewing
Delete Current Group Viewing
Modify Page
Page 74

73
3.4 Sorting and Removing Cameras
To arrange the cameras in order, click
. To remove a camera
from the viewing page, select the camera and click
.
Page 75

74
3.5 Switching Modes and Changing
Username/Password
To switch from the administrator mode to user mode, click
(administrator mode). The user mode logo
will appear.
Note: This option is not available for CamCon Browser.
3.6 Adding and Deleting Video Server
You can use this setting to add or delete the servers in the list.
Please click
to enter System Setting.
When the server cannot successfully connect to a particular server,
that server will be marked by a red “x”.
After clicking on the button, please ente
r
the username and password and click on
OK to confirm.
Page 76

75
• Auto Detect
System will start searching for all servers in the same subnet.
• Add
Manually add a server to view and configure by entering the server
IP, port number and the administrator’s password.
• Modify
When you cannot successfully connect to a particular server, you
can change the server’s IP address, port number and the
administrator’s password to restore the connection.
• Delete
Delete the connection data for a particular server. This action will
also terminate the connection between the system and the server.
Page 77

76
3.7 Modify Multiple CamCon Camera Server System
Settings
You can simultaneously change system settings for multiple
connected servers. Click on the
button to open the system
configuration window as follows:
Note:
1. This option is not available for CamCon Browser.
2. The snapshot icon will not be displayed on the page when (i) no
CamCon Camera Servers are connected to the system or (ii) the
users logged on to the system do not have the authorization to view
the selected servers.
You can use the icons on the left column to select the options you
wish to configure. Before saving the settings, please make sure
you’ve selected the servers you intended to configure.
Page 78

77
For the details on changing the server’s various settings, please refer
to the “Configuring CamCon Camera Server” section.
3.8 Warning Messages
When any server cannot operate normally, and the “PC Client
Notification” has been selected, the monitoring page will show a
warning icon
to alert the system administrator to the current
status of the server. Meanwhile, the system will automatically
switch to the screen of the camera, which has triggered the event.
Move the mouse cursor over the warning icon to view a brief message,
or double click on the icon to view the details of the warning message.
Page 79

78
Page 80

79
4. E-Map Function
E-Map function enables a convenient handling of multiple cameras and GPIO
(general input and output) devices with a simple drag-and-drop procedure
on the electronic map of the area under monitoring. With E-map function,
users can:
• upload and modify electronic maps of the monitoring area
• add, remove and monitor cameras and GPIO devices
• create or remove shortcuts for electronic maps
• define the alert system in cases when a motion within the area or a signal
connection is detected etc.
Note: User mode supports viewing monitoring channels and GPIO devices
only.
Click
on the channel-viewing screen to enter the electronic map
mode. A default map of a floor layout will be shown. Users can add or
remove more electronic maps in this mode.
Page 81

80
4.1 Adding a New Map
Click . Enter the name for the map or use the default name.
Then browse to find the electronic map file and click OK.
Note: The maximum resolution of each map uploaded is 1,000x660
pixels. The recommended resolution of the map is 800x600 pixels.
4.2 Deleting a Map
Select a map to be deleted from the pull-down menu and click
.
Click OK to confirm.
4.3 Modifying a Map
To rename or replace a map, select a map from the pull-down menu.
Then click
.
Page 82

81
Enter the new name of the map or replace the map with another file.
Note: When a map is replaced with a smaller size one, all cameras
and GPIO devices previously placed on the screen will be removed.
4.4 Adding Cameras and GPIO Devices
TToo aadddd aa ccaammeerraa,, aallaarrmm iinnppuutt aanndd aallaarrmm oouuttppuutt ddeevviicceess oonn aann
eelleeccttrroonniicc mmaapp,, ddrraagg tthhee ccoorrrreessppoonnddiinngg iiccoonnss ttoo tthhee aapppprroopprriiaattee
llooccaattiioonn oonn tthhee mmaapp..
BBuuttttoonn
DDeessccrriippttiioonn
CCaammeerraa
AAllaarrmm IInnppuutt
AAllaarrmm OOuuttppuutt
SSeelleecctt tthhee aapppprroopprriiaattee ccaammeerraa oorr iitteemm ffoorr eeaacchh ddeevviiccee aanndd cclliicckk OOKK..
Page 83

82
TToo vviieeww tthhee ssttaattuuss ooff tthhee ddeevviicceess,, ddoouubbllee cclliicckk tthhee iiccoonnss oonn tthhee mmaapp..
4.5 Removing Cameras and GPIO Devices
To remove cameras and GPIO devices from a map, drag the
corresponding icons from the map to the trash icon
.
Page 84

83
Click OK to confirm the deletion.
4.6 Adding an Electronic Map Shortcut
TToo aadddd aann eelleeccttrroonniicc mmaapp sshhoorrttccuutt oonn aa mmaapp,, ddrraagg tthhee
iiccoonn ttoo
tthhee aapppprroopprriiaattee llooccaattiioonn oonn tthhee mmaapp..
Page 85

84
SSeelleecctt aann eexxiissttiinngg mmaapp ffrroomm tthhee ppuullll--ddoowwnn mmeennuu,, aanndd tthheenn cclliicckk OOKK..
YYoouu ccaann aallssoo aadddd aa nneeww ffiillee ffoorr mmaapp sshhoorrttccuutt.. CClliicckk CCrreeaattee aa mmaapp
aanndd eenntteerr tthhee mmaapp nnaammee.. TThheenn bbrroowwssee ttoo ffiinndd tthhee ffiillee aanndd cclliicckk OOKK..
4.7 Removing an Electronic Map Shortcut
TToo rreemmoovvee aann eelleeccttrroonniicc mmaapp,, ddrraagg tthhee
icon to .
Page 86

85
4.8 Viewing Monitoring Cameras
To view a monitoring camera, double click
and the monitoring
page will be shown.
Page 87

86
4.9 Viewing GPIO Devices Status
TToo vviieeww tthhee ssttaattuuss ooff GGPPIIOO ddeevviicceess,, cclliicckk
or .
Alarm Input Device
Page 88

87
Alarm Output Device
Page 89

88
4.10 Event Handling
Alerts from cameras or GPIO devices will be activated when an event
takes place, e.g. movement of an object or disconnection of signal is
detected. A
signal will blink to alert that an event has taken
place. Double click the signal to view the system message.
Page 90

89
Appendix A: Terms and Glossary
TCP/IP (Transmission Control Protocol/Internet Protocol)
TCP/IP was originally developed by the Defense Department of the US to allow
dissimilar computers to talk. Today, as many of us know, this protocol is used as
the basis for the Internet. Because it must span such a large distance and cross
multiple, smaller networks, TCP/IP is a routable protocol, meaning it can send
data through a router on its way to its destination. In the long run, this slows
things down a little, but this ability makes it very flexible for large networks
DHCP (Dynamic Host Configuration Protocol)
It’s a method for assigning a permanent Internet Protocol (IP) addresses or on the
fly to individual computers in an organization’s network. Usually is performed by
a DHCP server.
FTP (File Transfer Protocol)
This is a method of moving files from system to system using TCP/IP with FTP
application.
DHCP IP
A dynamic IP address is assigned to your computer by your ISP’s server so that
other computer servers can find your computer when you are connected to the
Internet. This IP address changes because whatever your computer reconnects
to the Internet, a different IP address will be assigned to your machine.
Static IP
It is an IP address assigned to your computer permanently. It’s a series of digits
used to identify your computer and looks something like this: 185.182.12.4
PPPoE (Point-to-Point Protocol over Ethernet)
The Point-to-Point Protocol over Ethernet (PPPoE) feature allows a PPP session to
be initiated on a simple bridging Ethernet connected to the client. The session is
transported over the ATM link via encapsulated Ethernet-bridged frames. The
session can e terminated at either a local exchange carrier central office or an
Internet service provider (ISP) point of presence.
Page 91

90
DNS (Domain Name System)
Domain Name System identifies each computer as a network node on the Internet
using an Internet protocol address system to translate from domain name to IP
address and vice-versa.
DDNS (Dynamic Domain Name System)
Dynamic DNS (DDNS) service enables clients and servers to automatically
register themselves in the database without needing administrators to manually
define records.
Multicast
Multicast is the technique that allows network data from a single source to be
simultaneously transmitted to a selected set of destinations (this set is also called
a host group). One main advantage of multicast is that it saves network
bandwidth by sending only one copy of data over the network.
Page 92

91
Appendix B: Registering a Dynamic Domain
Name
Introduction
Your CamCon Camera Server supports the DDNS service provided by the following
providers: DynDNS, ODS, DHS, and DyNS. For example, you can go to the web
site of DynDNS (http://www.dyndns.org/) and register for a dynamic domain
name. Configure and activate the DDNS service, then the Internet users will be
able to access your CamCon Camera Server via this dynamic domain name.
When the ISP assigns a new WAN IP address, CamCon Camera Server will update
the new address to the DynDNS server automatically.
Registration Procedure
Please follow the steps below to register a dynamic domain name:
Note: This guide is for reference only. If there are any changes, please refer to
the instructions or documents on the web site.
Open the browser and connect to http://www.dyndns.org. Click on “Sign Up
Now” to begin the registration process.
Page 93

92
Page 94

93
Click on “Agree” if you accept the service agreement.
Enter the user name, email address and password to create a DDNS service
account. You will need to enter the same user name and password in the
Network Settings.DDNS Service page of the Disk On-line Server system
administration. Please verify your email address to receive the confirmation
message from the server. Then click on “Create Account” to proceed.
Page 95

94
If the following web page appears on the screen, your account has been
successfully created and a confirmation message has been sent to your -mail
address. Please follow the instructions in the e-mail to activate your account
within 48 hours.
When you have finished the process of confirmation, a new screen will appear and
you can apply for your own dynamic domain name.
Page 96

95
Appendix C: Connect a Personal Computer to
the CamCon Camera Server
Please prepare a crossover Ethernet cable, and connect the computer to the
server.
Please modify your PC’s network settings such that your PC resides in the same
subnet as the CamCon Camera Server. If the CamCon Camera Server’s default
network setting has not been changed, simply modify your PC’s network setting to
the following settings:
IP address: 192.168.0.2
Subnet Mask: 255.255.255.0
Tak e t he Windows XP for example, a step-by-step instruction follows:
Right click on the “My Network Places” shortcut located on the desktop, and
choose “Properties”.
Right click on your network device, and choose “Properties”.
Page 97

96
Highlight the Internet Protocol (TCP/IP), and choose “Properties”.
Setup the IP address and subnet mask fields as the following:
Page 98

97
Restart your personal computer.
Start up your web browser (Internet Explorer), and enter 192.168.0.1 in the
address bar.
If you successfully connect to the CamCon Camera Server, the web page will
automatically prompt you for the user name and the password. Please enter the
default user name and password:
User name: administrator
Password: admin
After authentication, you will see the monitoring page.
Page 99

98
Appendix D: Connecting with the
RS-422/485Port
If you wish to connect the PTZ camera using the RS-422/485 port,you will need
a cable to connect the camera to the server, and you will also need a D-type 9p
connector on the server side.
RS-422/485 Port
2
1
3
4
Page 100

99
RS-422
Pin No. Definition
1 TX -
2 TX +
3 RX +
4 RX -
RS-485
Please cross pin 2 and 3 to D+ and 1 and 4 to D- as shown in the following diagram.
You only need to connect the D+ and D- to the camera to create the connection.
 Loading...