

Digital
Wireless Baby Camera
w/ Online Monitoring
Alimentée d’un
adaptateur testé ENERGY
STAR pour assurer un
environnement plus sain
www.myLevana.com
Model #: LV-TW500
USeRS MaNUaL
1

PRODUCT WARRANTY INFORMATION
Please visit our web site at www.MyLEVANA.com
for information about your product’s warranty.
We take quality very seriously. This is why all of our products come with a one year warranty from the original purchase date against defects in workmanship and materials. If you have warranty or support issues
please contact us using any of the following methods:
Phone: 1.866.946.7828 LEVANA Canada LEVANA USA
Fax: 1.888.771.1701 4080 Montrose Road 60 Industrial Parkway #Z64
Web site: www.myLEVANA.com Niagara Falls, ON Cheektowaga NY
Canada, L2H 1J9 USA 14227
Warranty Terms
1. LEVANA products are guaranteed for a period of one year from the date of purchase against defects in workmanship and materials. This warranty is limited to the repair, replacement or refund
of the purchase price at LEVANA’s option.
2. This warranty becomes void if the product shows evidence of having been misused, mishandled or tampered with contrary to the applicable instruction manual.
3. Routine cleaning, normal cosmetic and mechanical wear and tear are not covered under the terms of this warranty.
4. The warranty expressly provided for herein is the sole warranty provided in connection with the product itself and no other warranty, expressed or implied is provided. LEVANA assumes no
responsibilities for any other claims not specically mentioned in this warranty.
5. This warranty does not cover the shipping cost, insurance or any other incidental charges.
6. You MUST call LEVANA before sending any product back for repair. You will be sent a Return Authorization form with return instructions. When returning the product for warranty service, please
pack it carefully in the original box with all supplied accessories, and enclose your original receipt or copy, and a brief explanation of the problem (include RA #).
7. This warranty is valid only in Canada and the continental U.S.
8. This warranty cannot be re-issued.
DISCLAIMERS
Graphic Symbol Explanation
The lightning ash with arrowhead symbol, within an equilateral triangle, is intended to alert the user to the presence of
insinuated “dangerous voltage” within the product’s enclosure that may be of sucient magnitude to constitute a risk of
electric shock to persons.
The exclamation point within an equilateral triangle is intended to alert the user to the presence of important operating
maintenance (servicing) instructions in the literature accompanying the appliance.
Never place this baby monitor near water. Placing any electronic near sinks, toilets, bath tubs, or swimming pools is
incredibly dangerous and can create shock hazards for yourself or your child.
This digital baby monitor does not take the place of adult supervision.
CAUTION
RISK OF ELECTRIC SHOCK, DO NOT OPEN
TO REDUCE THE RISK OF ELECTRIC SHOCK, DO NOT REMOVE THE COVER (BACK).
NO USER SERVICEABLE PARTS INSIDE. REFER SERVICING TO QUALIFIED SERVICE PERSONNEL.

INTRODUCTION
Digital Wireless Baby Camera
w/ Online Monitoring
Congratulations on your purchase of the LV-TW500! You’ve just taken a step to help ensure your child’s safety as well as ensure that you will not
miss out on any special moments of your child’s life. This innovative digital wireless baby camera allows you to view your baby from anywhere
in the world as long as your computer or smart phone is connected to the Internet. Working parents can view their baby from the oce and
grandparents can watch their grandchild grow.
The included video software allows you to record precious moments, detect motion, as well as take photos. Please take a few minutes to read
this manual so you can enjoy the LV-TW500 to its full potential. If you have any questions about your product, please visit www.myLEVANA.com
for tips, tricks, and troubleshooting information.
Note: This device is not MAC compatible
TABLE OF CONTENTS
TITLE PAGE ................................................................................................................ 1
PRODUCT WARRANTY INFORMATION ........................................................................... 2
DISCLAIMERS ............................................................................................................ 2
INTRODUCTION ......................................................................................................... 3
TABLE OF CONTENTS ................................................................................................... 3
WHAT’S INCLUDED ..................................................................................................... 4
OPTIONAL ACCESSORIES ............................................................................................. 4
FEATURES ................................................................................................................. 4
FCC STATEMENT ........................................................................................................ 5
AVOIDING SIGNAL DISRUPTION ................................................................................... 5
KNOWING YOUR BABY CAMERA ................................................................................... 6
KNOWING YOUR USB RECEIVER ................................................................................... 7
8 STEP CHECKLIST ...................................................................................................... 7
STEP 1 - CAMERA SETUP ....................................................................................... 8
Setting up the Baby Camera ......................................................................................... 8
Using the Magnetic Base............................................................................................... 9
Using Batteries .............................................................................................................. 9
Using the Crib Mount ................................................................................................... 10
STEP 2 - CONNECTING THE USB RECEIVER ............................................................... 10
STEP 3 - INSTALLING THE DRIVERS FROM THE CD .................................................... 11
STEP 4 - INSTALLING THE SOFTWARE FROM THE CD .................................................. 12
STEP 5 - PAIRING THE CAMERA AND USB RECEIVER ................................................. 13
STEP 6 - THE BASICS ............................................................................................ 14
Watcher Software Buttons And Connections ................................................................. 15
Viewing Your Baby Through the Computer .................................................................... 16
Recording Sections of Footage and Saving it onto your Computer ................................ 16
Enabling Motion Detection Recording .......................................................................... 17
Footage Save Folder ..................................................................................................... 18
Playback Player Buttons And Connections .................................................................... 19
Snapshot. ...................................................................................................................... 20
Viewing Baby on Other Computers in the House ........................................................... 21
STEP 7 - PORT FORWARDING AND ONLINE VIEWING ............................................... 23
Option 1 ........................................................................................................................ 24
Option 2 ........................................................................................................................ 25
Testing Port Forwarding ................................................................................................ 26
Online Software ............................................................................................................ 27
Mobile Viewing ............................................................................................................. 28
DynDNS Setup ............................................................................................................... 29
Port Forwarding Troubleshooting ................................................................................. 31
STEP 8 - SOFTWARE-IN DEPTH ............................................................................. 32
Options Menu ............................................................................................................... 33
Preferences .................................................................................................................. 33
DynDNS IP Setup .......................................................................................................... 37
Save Recording and Detection Settings ......................................................................... 38
Motion Detection ......................................................................................................... 39
Event Notications ........................................................................................................ 41
Audio Capture Filter ..................................................................................................... 44
Video Capture Filter ...................................................................................................... 45
Video Capture Pin.......................................................................................................... 45
Command Menu ........................................................................................................... 46
View Menu ................................................................................................................... 46
Logs ............................................................................................................................. 47
Playback (Player) File Menu .......................................................................................... 48
“SKYPE“REMOTE MONITORING PROGRAM ................................................................ 49
TROUBLESHOOTING GUIDE ..................................................................................... 50
SPECIFICATIONS ................................................................................................... 51
3
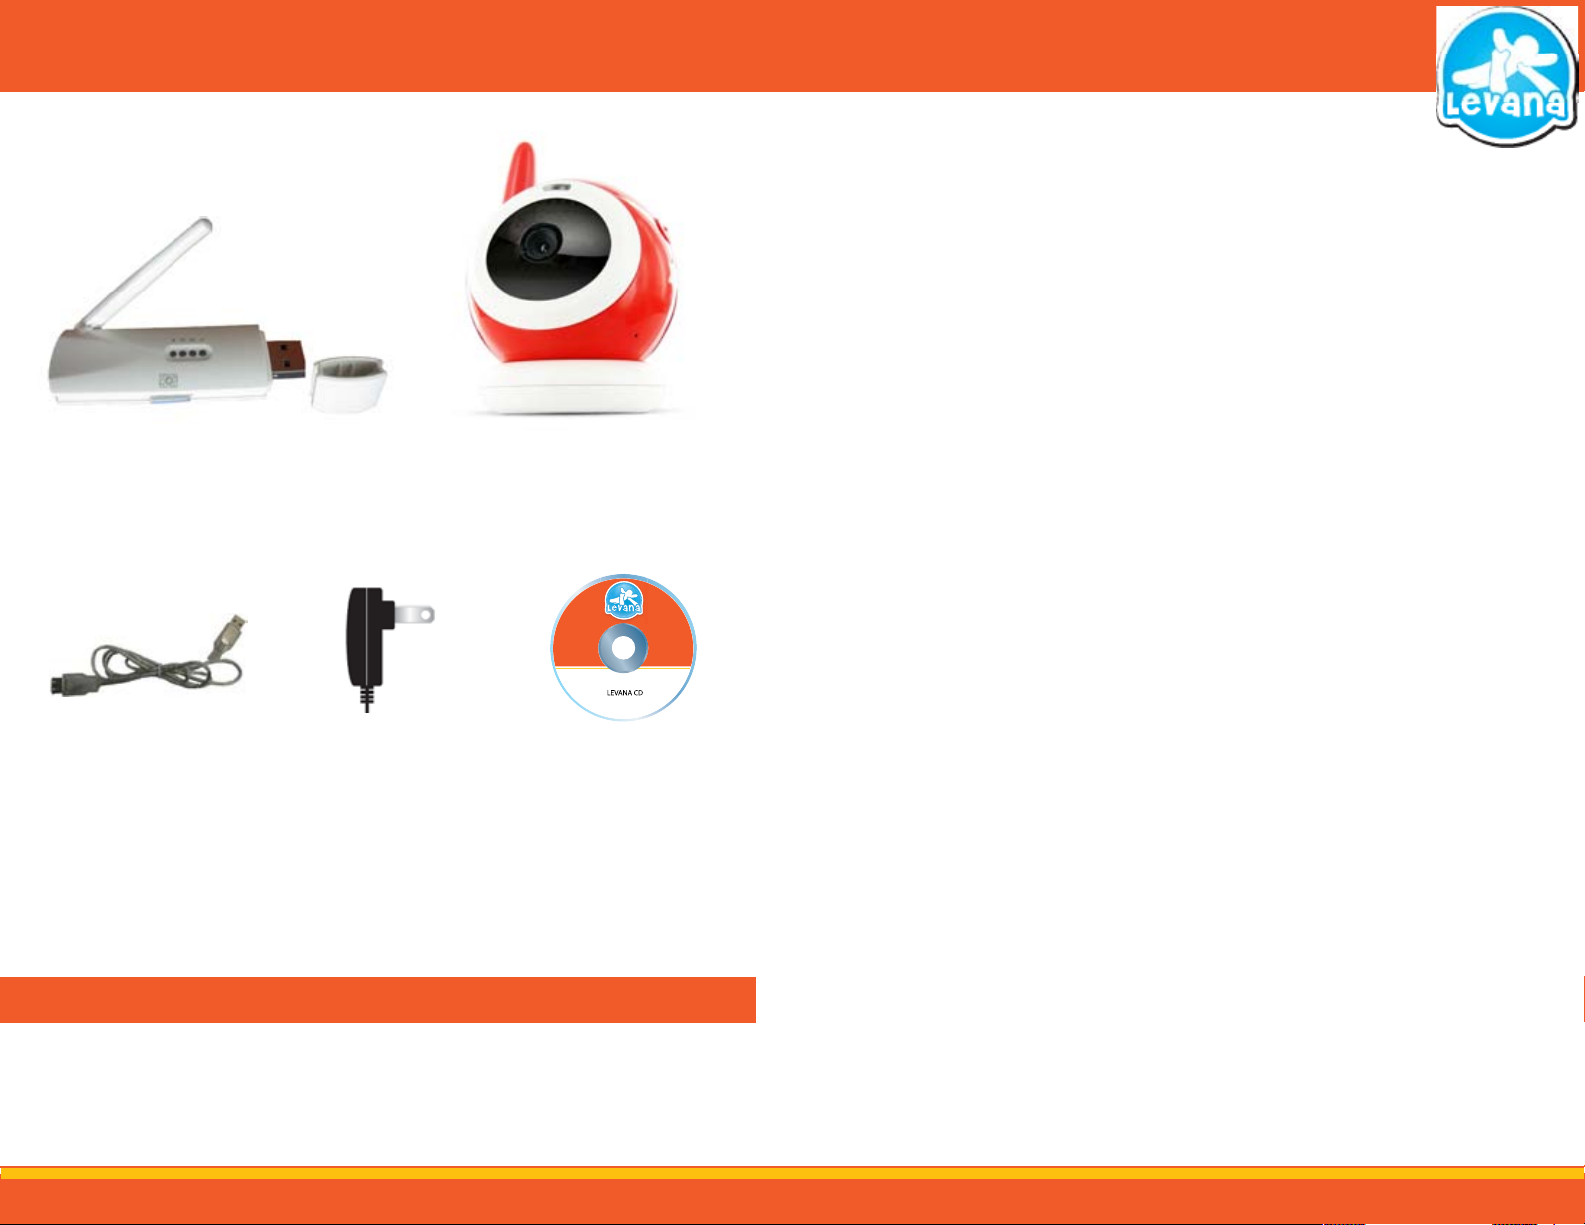
WHAT’S INCLUDED
FEATURES
Completely Private & Interference Free
The digital signal sends clear and secure video of your baby to your computer. Your privacy is completely
protected and Clear Signal Technology ensures that other wireless signals do not aect the great quality of your
video. This TWINKLE series camera provides reliability and security so you never have to worry about static or
interception.
Record Video & Audio of Your Baby
Now you can record footage1 of your baby on your computer and access it whenever you want. Advanced recording helps preserve your child’s special moments for a lifetime. Set dierent recording schedules or just when
motion is detected and review on the computer that was used to record. Setting the motion detection is easy
since there are dierent levels of sensitivity to choose from.
Mobile Monitoring—iPod, iPhone & BlackBerry Compatible
Experience complete freedom with this baby monitoring system that lets you watch live video of your baby from
the convenience of your iPod Touch or smart phone. You can feel more connected to your baby than ever before
and monitor on-the-go easily since no additional setup is required to enjoy this feature.
Wireless USB Receiver
3ft USB Extension Cord 3x Software and Instructional
• Quick Start Guide
• 1 Year Warranty
Adapter for Camera
Wireless Camera
CD Manual
• 24/7 Lifetime Live
Customer Support
FEATURES
Watch Your Child Online—Anywhere
You live in a fast paced world and you embrace it. Feel comforted knowing you can check on your child from
work or away on a business trip. Regardless of where you are in the world, you can watch live video of your baby
on any Internet-accessible computer. You can also give your long distance relatives a chance to see your little
one grow.
Stay Notied with Email Alerts
Stay informed—even when you aren’t at home. Set the camera to automatically send you an email when
movement is detected in your baby’s crib or room, or when the camera loses power—it’s your choice. You can
always be aware of what is happening to your child and ensure that whomever is watching over your child is
doing it properly.
Monitor Day and Night
Built-in night vision allows you to see your baby, even in complete darkness. Infrared LEDs provide a clear image
that shows up on-screen but is undetectable to the human eye and completely safe. See clearly up to
10ft away2.
Soothing Night Light
Scare the monsters away with the touch of a button. The baby camera has a built-in night light that will soothe
your child to sleep. Shining stars provide a comforting glow, so there is no need for your child to be afraid of
the dark.
Password Protection
Ensure only authorized users will be able to view your child online. Create one password for you and up to 3
family and friends to use when watching your baby on the computer. Only Mom, Dad, Grandma and Grandpa
will be able to see what your little one is doing.
A System That Grows With You
Babies aren’t the only thing you can monitor. You have all features of expensive home security systems with the
ability to record, view online and send yourself email alerts. Use your “baby” monitor with elderly parents, pets,
or as a security camera. Your options are endless.
Protecting Your Children and the Planet
This product is compliant with RoHS standards and has an ENERGY STAR® qualied adapter. RoHS is a European
initiative that aims to control the use of hazardous materials in electrical and electronic equipment. Levana is
dedicated to developing products that are safe for children and the environment.
4

FEATURES
Lifetime Live Customer Support
Our customer support team can be reached by phone, by email and live web chat. Our experts will be happy to assist you in
English, French and Spanish.
FCC APPROVED
This equipment has been tested and found to comply with the limits for a Class B digital device, pursuant to Part 15 of
the FCC Rules. These limits are designed to provide reasonable protection against harmful interference in a residential
installation. This equipment generates, uses and can radiate radio frequency energy and, if not installed and used in
accordance with the instructions, may cause harmful interference to radio communications. However, there is no guarantee
that interference will not occur in a particular installation. If this equipment does cause harmful interference to radio or
television reception, which can be determined by turning the equipment o and on, the user is encouraged to try to correct
the interference by one or more of the following measures:
• Reorient or relocate the receiving antenna
• Increase the separation between the equipment and receiver
• Connect the equipment into an outlet on a circuit dierent from that to which the receiver is connected
• Consult the dealer or an experienced radio/TV technician for help
• FCC Label Compliance Statement
• This device complies with Part 15 of the FCC Rules. Operation is subject to the following two conditions:
(1) This device may not cause harmful interference
(2) This device must accept any interference received, including interference that may cause
undesired operation
The manufacturer is not responsible for any radio or TV interference caused by unauthorized modications to this
equipment. Such modications could void the user's authority to operate the equipment.
SIDE NOTES
1. Included software can be setup to upload video clips to an FTP server. This makes viewing recorded footage possible.
Transmitter must be connected to an Internet enabled computer.
2. Night vision range up to 10ft under ideal conditions. Objects at or beyond this range may be partially or completely
obscured, depending on the camera application.
3. Additional cameras sold separately. This system supports four (4) cameras total. Model # LV-TW500-C.
AVOIDING SIGNAL DISRUPTION
Your LV-TW500 uses digital transmission to ensure a clear and consistent picture. The signal also passes easily through
interior walls. However, buildings with metal frames or placing the camera near large metal objects may cause signal
degradation. If reception is poor, moving the camera or receiver may x this problem.
5
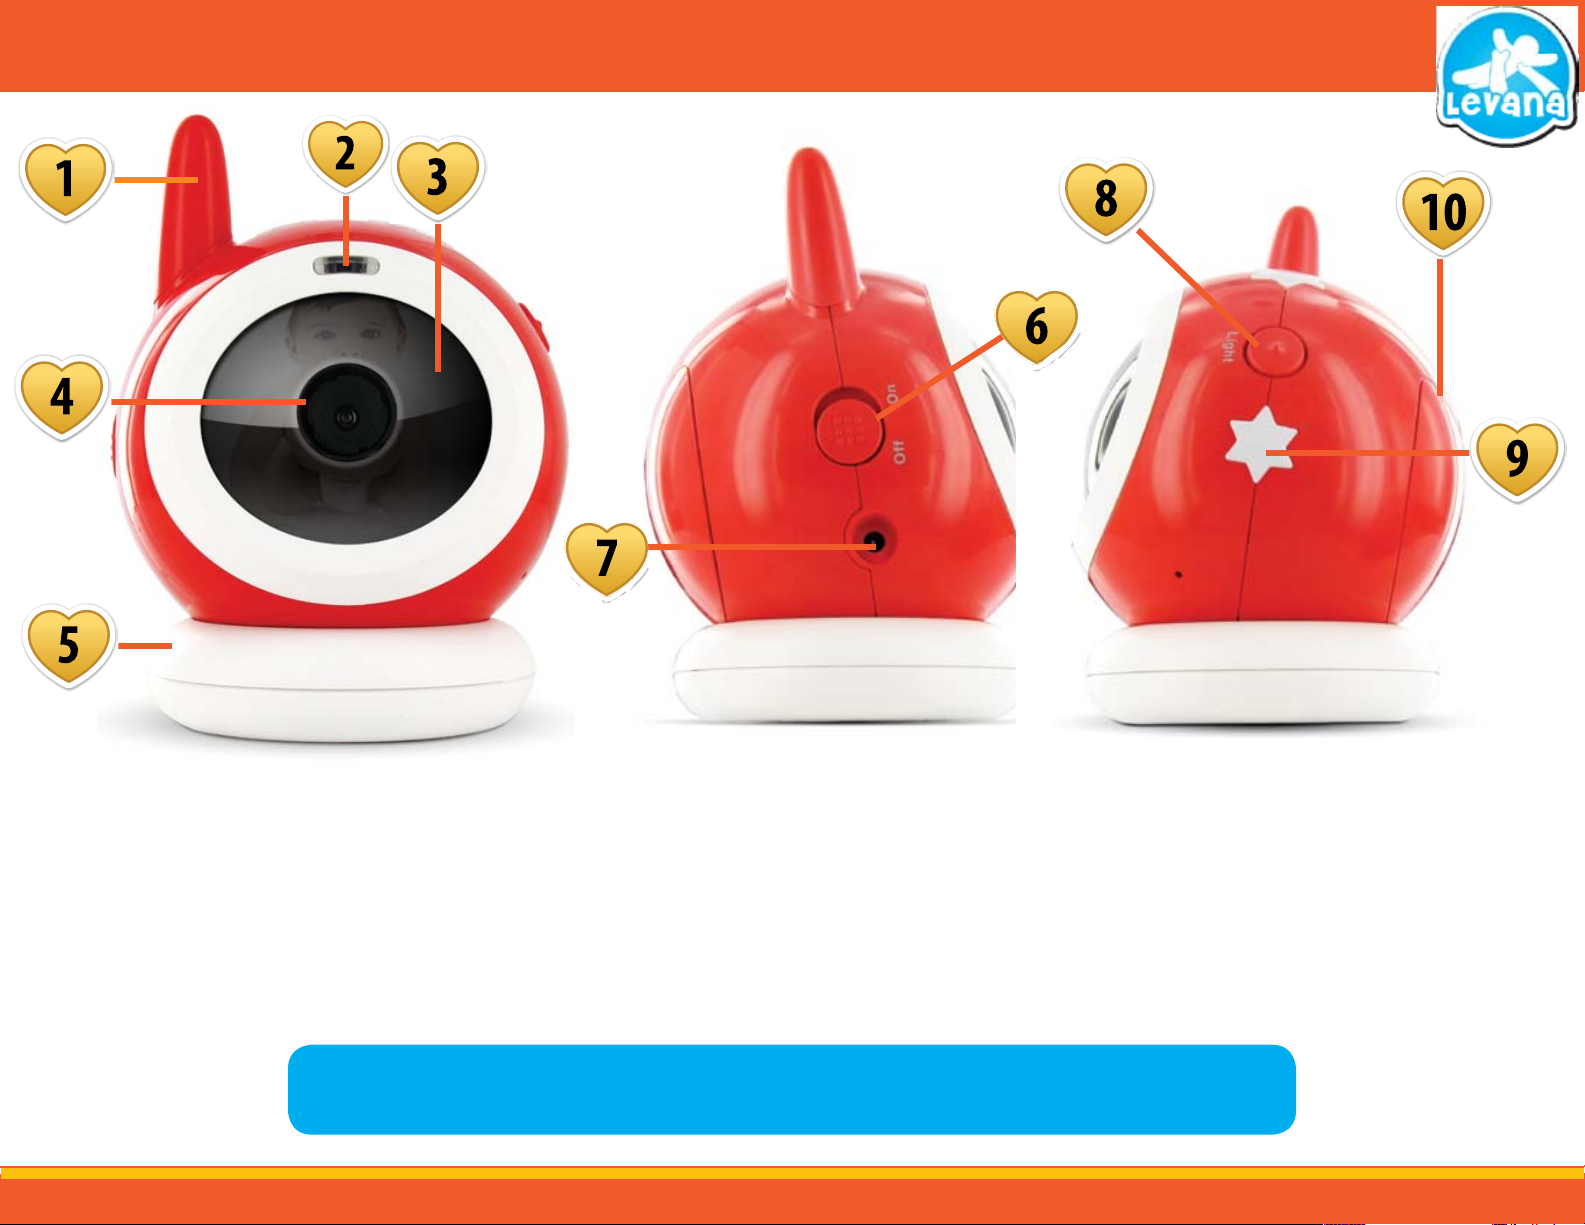
KNOWING YOUR USB BABY CAMERA
1. Antenna: Allows for a stronger connection between your baby camera and USB
receiver
2. Power/Link LED: Indicates that your baby camera is turned on and paired
3. Infrared LEDs: Allows you to view your baby in the dark by turning on LIGHT button
4. Lens: Camera Lens
5. Magnetic Base: Can be adjusted to view at many angles
6. Power Switch: Switching this turns your baby camera on and o
NOTE: Batteries in the camera will last a maximum of 4.5 continuous hours. We recommend using batteries only when necessary. For
best results, use Lithium AAA Batteries or the power adapter.
7. Power Adapter Input: Plug the power adapter into this area
8. Night Light Button: Pressing this button turns on and o the night light and infrared LEDs
on the camera. This also allows you to pair the camera and USB receiver
devices
9. Night Light: The stars light up when the night light button is pressed
10. Battery Compartment: Allows you to have your camera powered by 4 AAA batteries (not included)
6
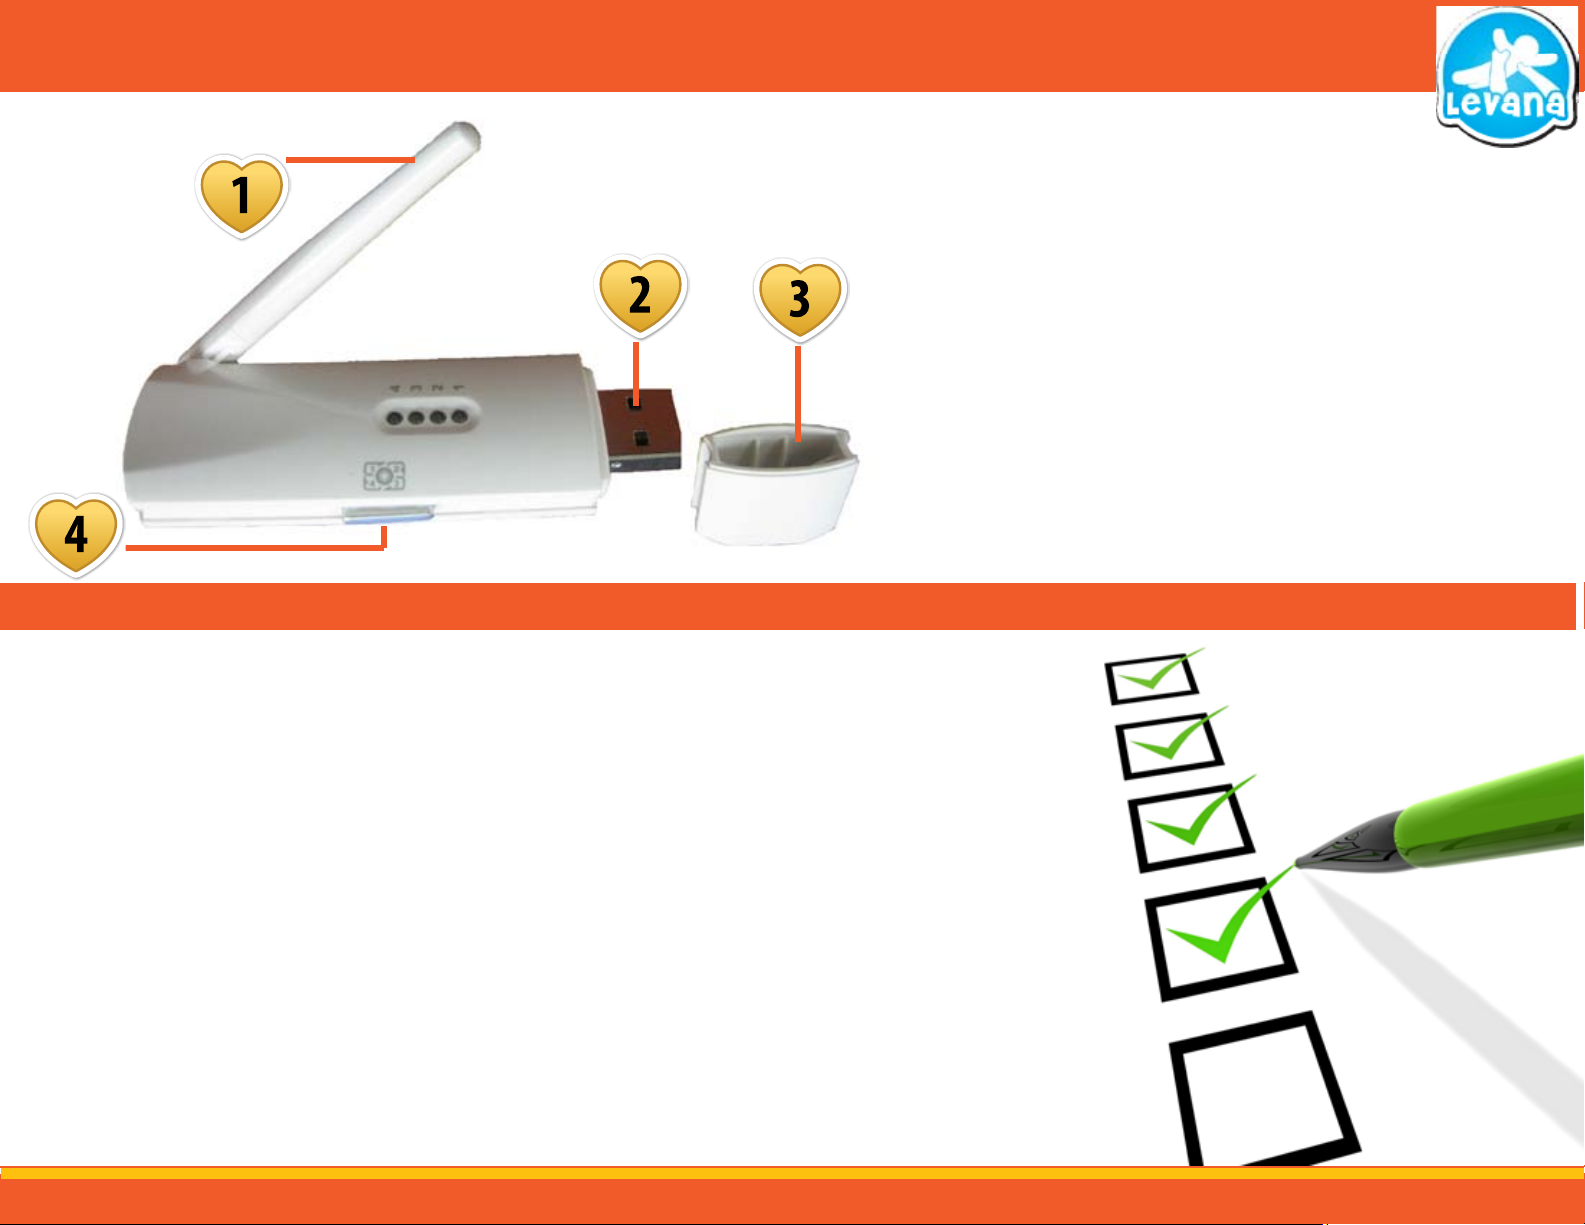
KNOWING YOUR USB RECEIVER
8 STEPS TO USE THE LV-TW500
1. Antenna: Allows for a stronger connection between your
baby camera and USB receiver
2. USB Plug In: This is the part of the USB receiver that plugs into
a USB port on your computer
3. USB Receiver Lid: This is the lid to the USB receiver. It is good to
replace the lid when you are not using
the LV-TW500
4. Pairing Button: This is the button you press to pair the camera to
the USB receiver
Please follow the step by step instructions,
Step 1: Camera Setup
Step 2: Connect the USB Receiver
Step 3: Install the Drivers from the CD
Step 4: Install the software from the CD
Step 5: Pairing the camera and the USB Receiver
Step 6: Knowing the Basics of the Software
Step 7: Port Forwarding and Online Viewing
Step 8: Software - In Depth
Step 9: Remote Monitoring with Skype
7
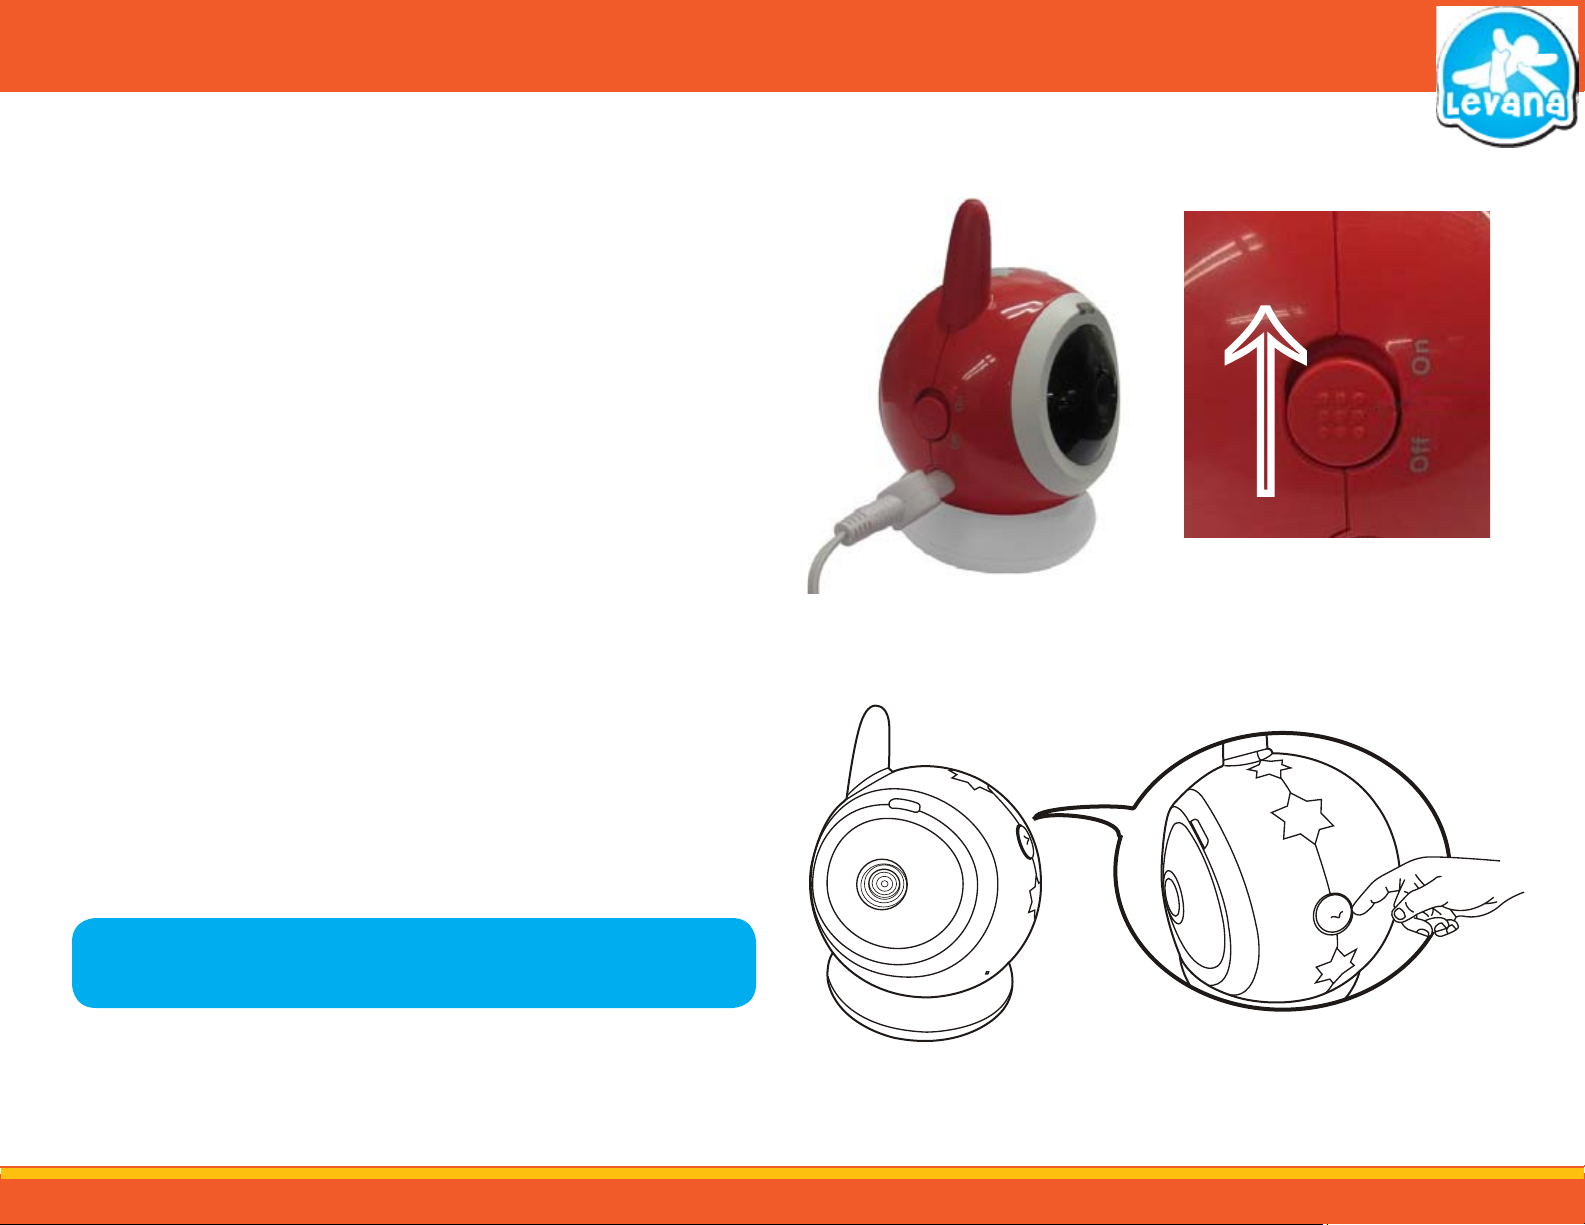
STEP 1 - CAMERA SETUP
Setting up the Baby Camera:
Setting up your LV-TW500 baby camera is simple.
1. If you are plugging the camera in, choose the desired location you would like to place your baby
camera. Make sure it is within 6ft of a power source or an extension cable will be needed.
2. Place the baby camera into the magnetic base or camera mount and adjust the angle so that it is
looking towards the area you would like to monitor.
3. Plug adapter into a power source.
4. Plug the power adapter into the baby camera.
5. Slide the power switch to the ON position.
Using Night Vision:
The camera has eight night vision LEDs so it can see in the dark. This night vision uses the power of
infrared light, which is 100% safe for babies. To turn on the infrared LEDs, you press the “Light” button
on the side of the camera, you will notice a faint red glow in the front of the camera; these are the
LEDs lit up.
Plug Camera In
↑
Night Light
Turn Switch On
↑
Using the Night Light:
1. Press the button on the camera labeled “Light.” This activates the night lights on the camera.
The night light will remain on until the button is pressed again.
NOTE: We do not recommend using batteries with the night light. The battery life will
be less than 2.5 hours with the night light on.
8

STEP 1 - CAMERA SETUP
Using the Magnetic Base:
The camera has an innovative and convenient magnetic base that magnetically holds
the camera securely. This allows you to freely rotate the camera left, right, up and
down with ease:
1. Place the camera and magnetic base on a at surface.
2. Rotate the camera freely and aim it in the direction you would like to monitor.
Avoid placing at an angle over 30 degrees as the camera may fall out. The
magnetic strength is lower over the battery compartment.
NOTE: Use new batteries. Do not mix old batteries with new ones. Remove
the batteries from the camera if you do not plan to use it for an
extended period of time.
Using Batteries:
1. Using a at-head screwdriver, open the battery compartment cover on the back of
the camera.
2. Insert 4 AAA batteries, make sure to insert the batteries according to the "+" and
"-" signs.
3. Close the battery compartment cover and tighten the screw to hold it in place.
4. Slide the POWER switch (below the antenna) to the ON position. The LED on the
front of the camera will light up (red light).
• The LED on the camera will remain red until the batteries lose power.
Change the batteries when the LEDs are red and blinking. Upon startup,
the LED will be red
Magnetic Base
Batteries
9
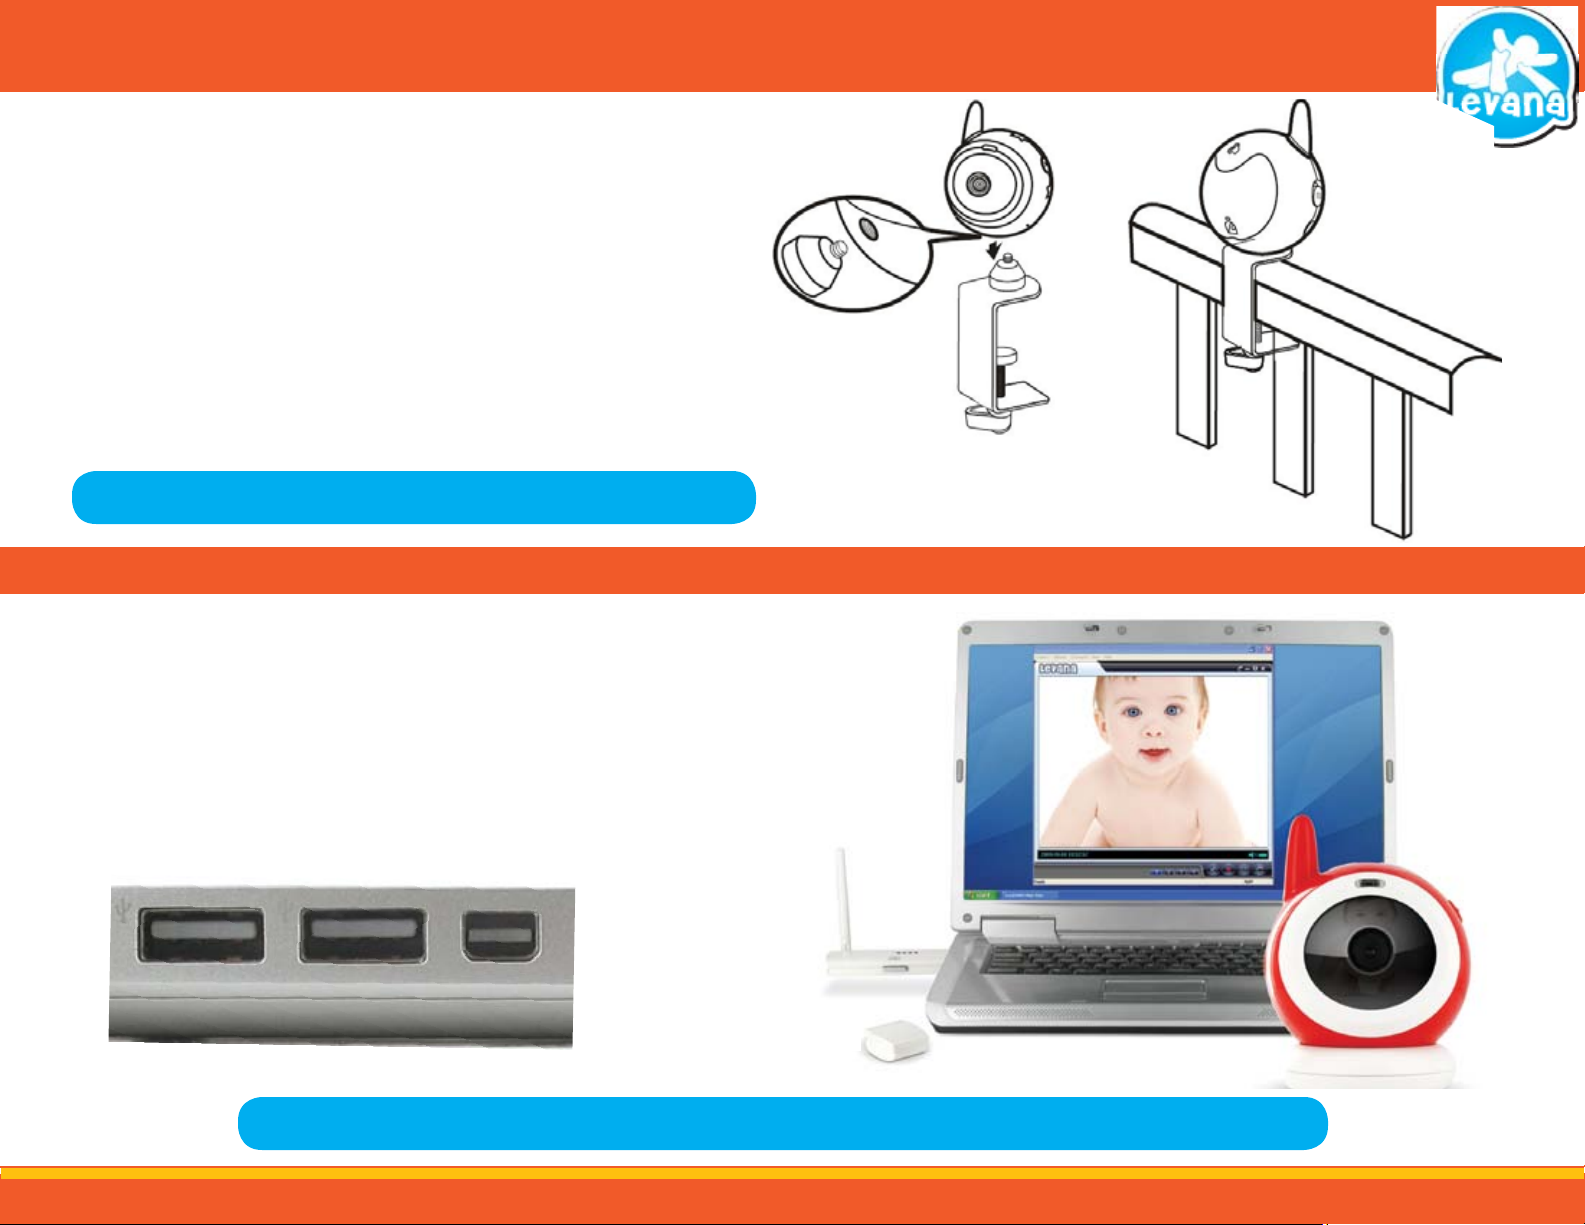
STEP 1 - CAMERA SETUP
Using the Crib Mount (Not included):
1. Remove the camera from the magnetic desk mount. The camera’s mounting hole is
located on the bottom of the camera.
2. Place the camera on the top of the camera mount’s screw and line up the camera’s
mounting hole to the screw. Rotate the camera clockwise to screw the camera onto
the camera mount. Tighten the silver-colored plate knob by turning it
counter-clockwise.
3. Make sure the clamp on the mount is open by turning the larger white knob counterclockwise. Place the clamp over the top of crib and tighten it rmly to the crib by
turning the knob clockwise.
4. Angle the camera to your desired location and tighten the smaller white knob
nearest to the camera to lock it into position.
NOTE: Crib Mount is NOT INCLUDED and can be purchased on www.myLEVANA.com
STEP 2 - CONNECT THE USB RECEIVER
Connecting USB Receiver:
1. Remove the protective lid from the USB receiver.
2. Connect the USB receiver into an open USB port on your computer.
3. You will see a red LED light up on the receiver to show it is connected.
4. Once you have the device connected you are ready to move onto Step 2 and install
the drivers and software.
↑
↑
NOTE: It takes a few seconds for the USB receiver to power up; therefore it takes a few seconds before the lights on the USB receiver turn on.
10

STEP 3 - INSTALL THE DRIVERS FROM THE CD
Driver Installation
The driver needs to be installed so that the baby camera will work to its full potential.
Once the USB receiver is properly connected you can proceed to install the drivers.
To Install the Driver:
1. Insert the included driver CD (Named CD 1), into your computer’s CD drive.
2. Open the CD’s le in from “My Computer”.
3. This will open up to a selection of software to be installed, Double-click the icon
named “DRIVERS” and follow the installation guide.
4. Once installation is complete you will be prompted to restart your computer.
5. Once the computer has restarted, the drivers will be properly installed onto your
computer and you can continue to Step 3 and install the software.
• If you are using Vista an installation control screen may appear, if so,
select “Allow”
Restart Computer Prompt
Select “DRIVERS”
VISTA -Select Allow
11
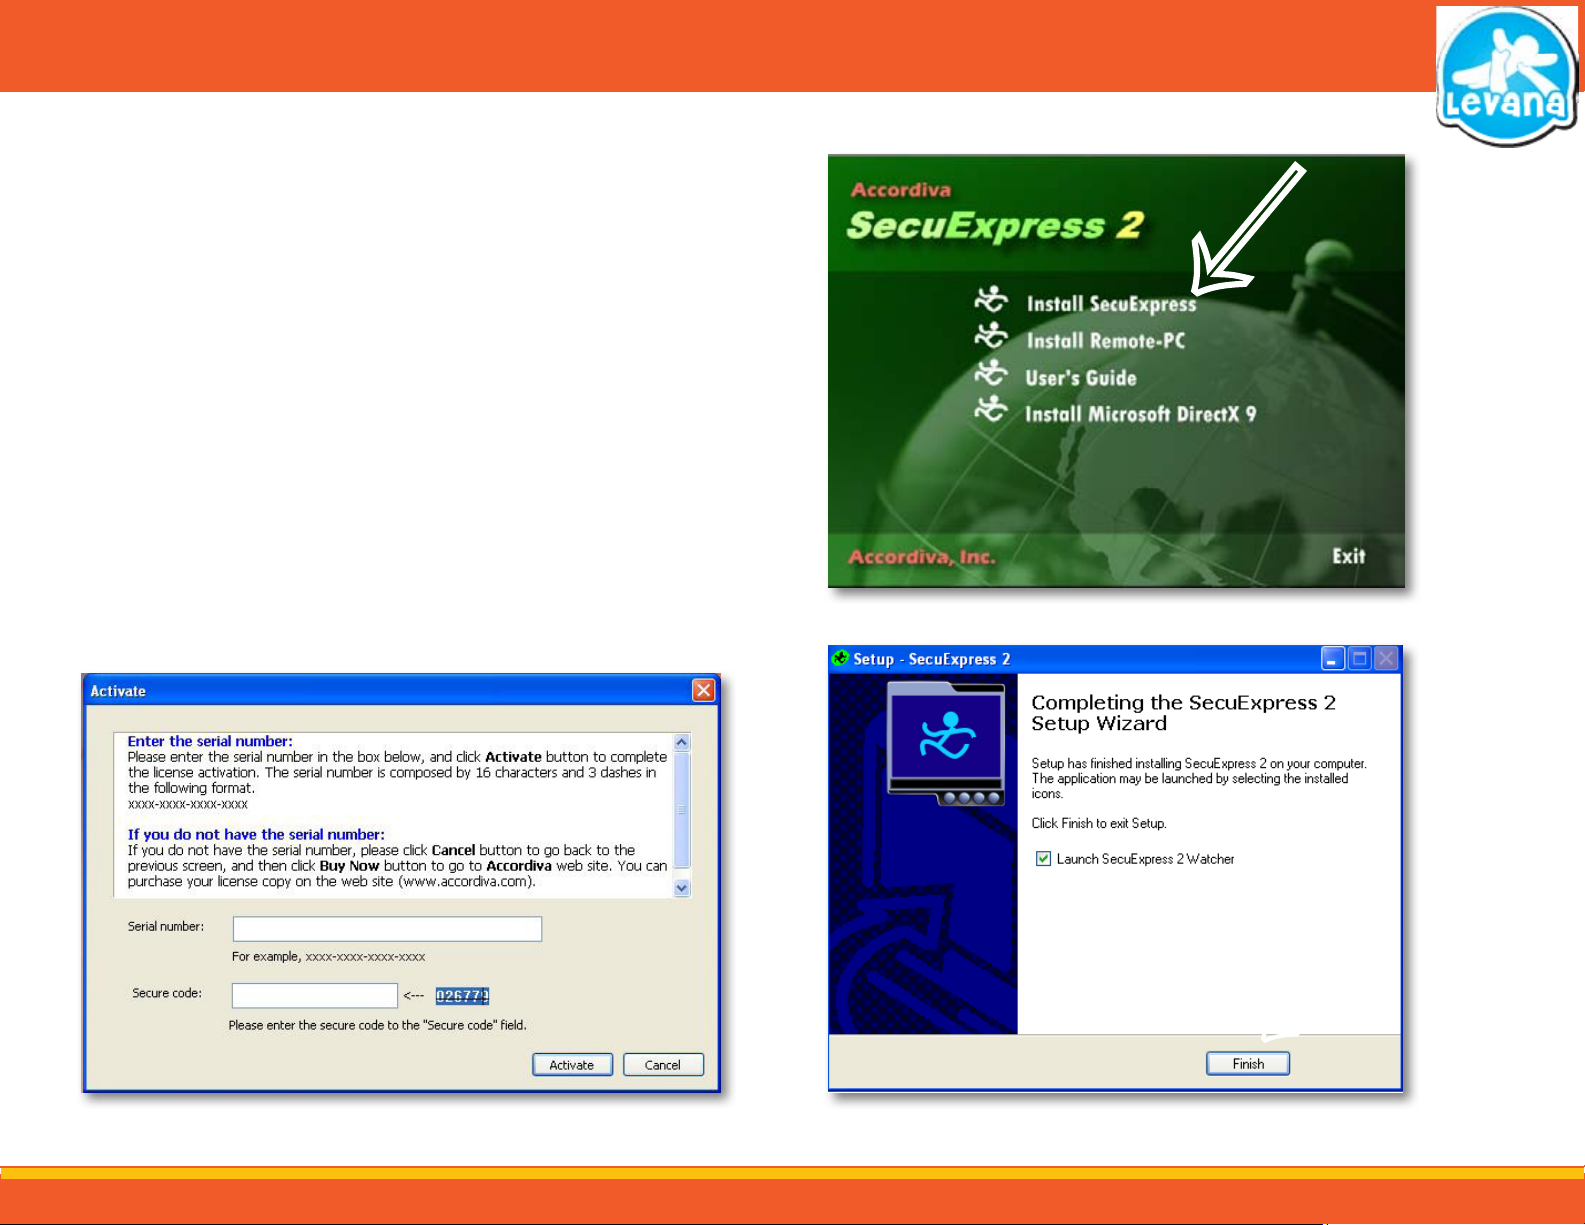
STEP 4 - INSTALL THE SOFTWARE FROM THE CD
The software is what allows you to view your digital wireless baby camera on the computer! It also
allows you to record video, capture snapshots, view online, and alert you if there is motion detected.
The software is what allows you to alter any of the settings for your LV-TW500.
To Install the Live Viewing Software:
1. On the front of the CD, marked CD 2, there is a serial number – make sure you write it down before
you insert software the CD.
2. Insert the included CD, called CD 2 into your computer’s CD drive.
3. Open the CD’s le in from “My Computer”.
4. This will open up to a selection of software to be installed, Double-click the icon named
“SecuExpress” and follow the installation guide.
5. The rst screen gives you the installation options, be sure to select the top option “Install
SecuExpress.”
6. Once installed a completion screen will appear asking if you would like to run SecuExpress 2. If not,
deselect the option and select nish. If you would like to run the program automatically then select
nish.
7. The nal screen will request a serial number. The serial number is the number you wrote down,
from the front of the CD before inserting it into your computer. Make sure to insert the serial number the exact way it is shown on the CD, as the serial number is case sensitive.
Serial Number Insert
Install First option
↑
Finish Installation
↑
12

STEP 5 - PAIRING THE CAMERA AND USB RECEIVER
Setting up USB Receiver
Now that the proper software is installed on your computer, your computer will recognize the USB receiver as soon as it is
plugged into your computer.
To start viewing your camera footage through your computer
1. Make sure the camera is plugged in and turned on.
2. Make sure the USB receiver is plugged into a USB port on your computer.
3. Start the Secuexpress 2 watcher program on your computer.
Note: The LV-TW500 USB receiver is set to automatically nd the baby camera when it is plugged into a
computer. If the receiver does not automatically nd the camera you have to pair the two devices.
Pairing the Receiver to Baby Camera:
Make sure both the camera and the receiver are fairly close to each other (in the same room). The camera should be
powered on.
1. With the USB receiver plugged in to the computer, press the camera selection button on the side to choose which camera
number you want to pair. The LED on top of the receiver will light up next to the camera number to be paired.
2. Press and hold the camera selection button on the side of the USB receiver down. The LED next to camera number that is
pairing will begin to ash for 5 seconds.
3. While the LED is ashing, hold down the night light button on the camera.
• You can also hold the pairing button on the receiver and the Night Light button down at the same time
4. Hold both buttons down for about 5 seconds.
5. When the lights on the camera ash three times the two units will be paired.
↑
↑
13

STEP 6 - THE BASICS
As soon as you Install the software you are able to do the following:
View and get to know the basics of the software
View your baby camera through your computer
Record sections of video footage and save them to your computer
Watch recorded video footage
Take a snapshot of the screen
and save it to your computer
Enable/Disable motion
detection recording
View your baby on other
computers in the house by
using your IP address
14
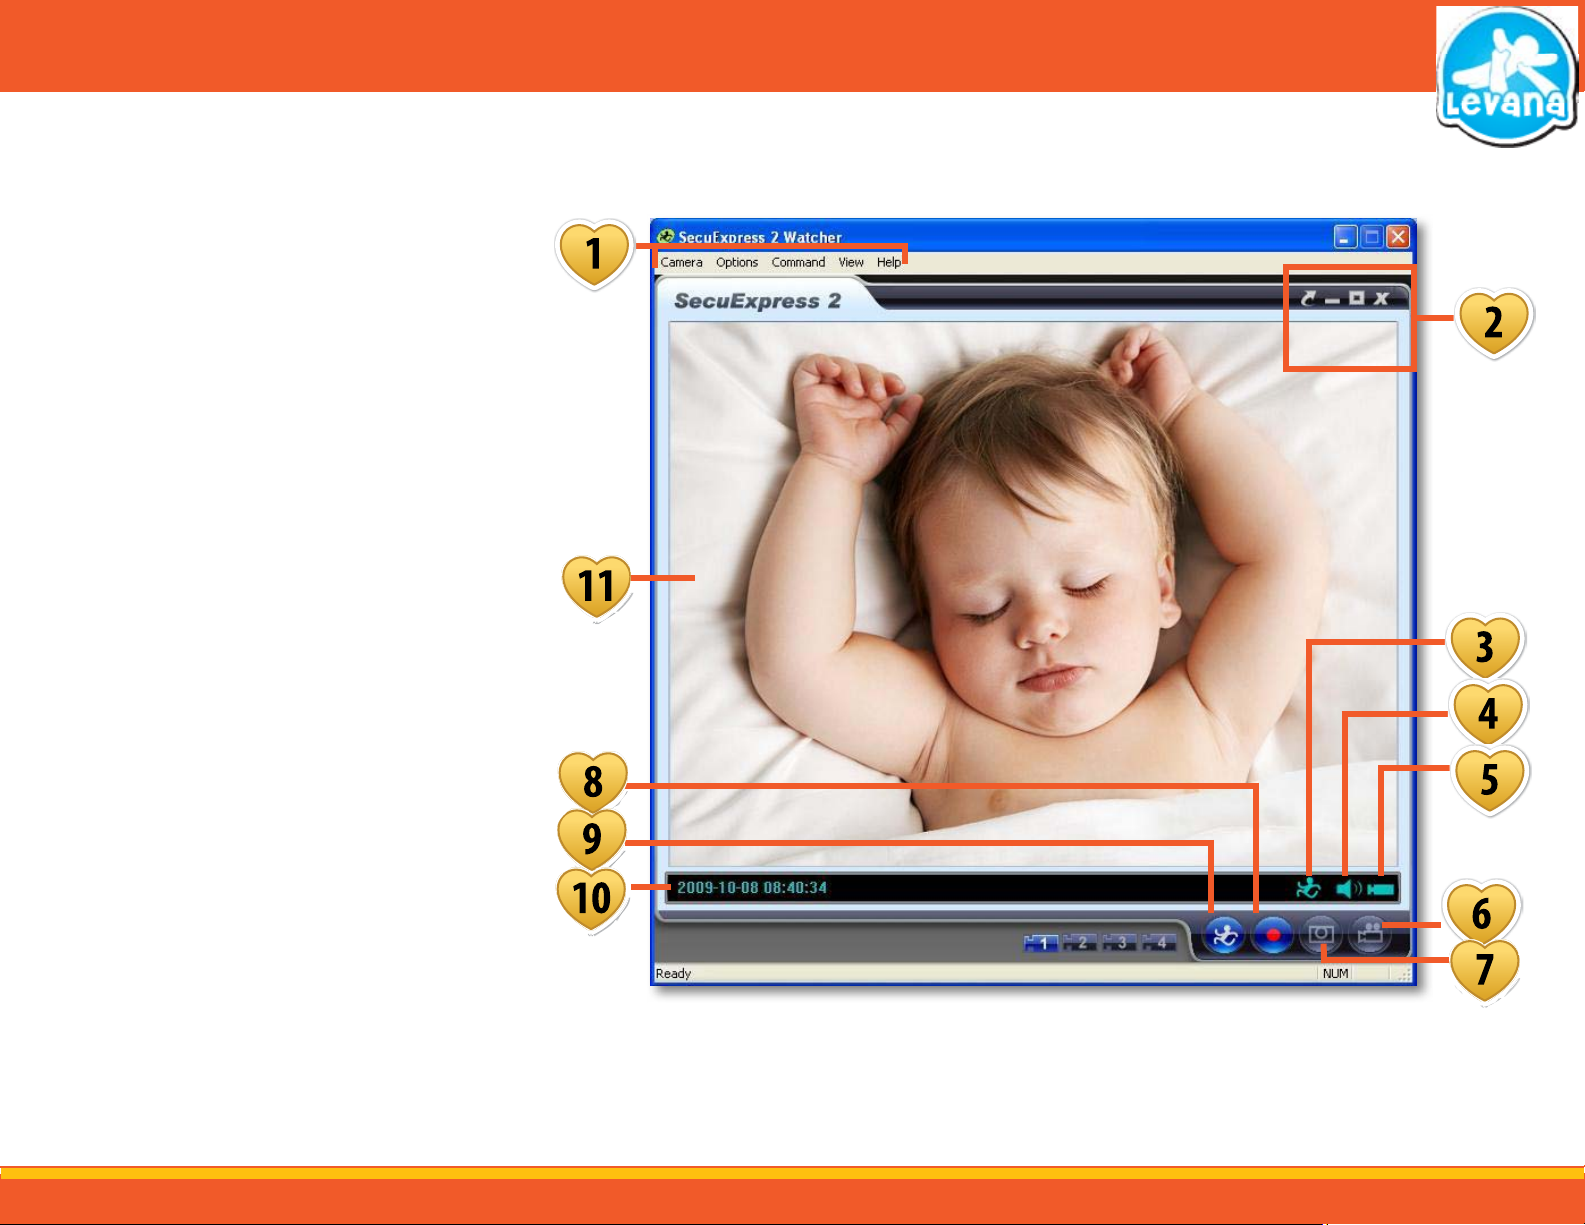
STEP 6 - THE BASICS
WATCHER SOFTWARE BUTTONS AND CONNECTIONS
Now that both your baby camera and USB receiver are paired and the watcher software is installed, you can start using it! This guide will give you the basic information for the software. For more information, see the
SOFTWARE-IN DEPTH section.
1. Upper Menu: The upper menu consists of the Camera,
Options, Command, View and Help
menus
2. Screen Options: Allows you to minimize the screen or go
full screen as well as exit the software
3. Motion: The running man icon indicates if mo-
tion is being detected
4. Sound: The speaker symbol indicates whether
or not a sound device is connected
5. Video Indicator: This indicates whether or not a camera
is connected
6. Search Video: Pressing this prompts a search for
recorded footage and launches the
playback player. For more information
see the PLAYBACK PLAYER guide below
7. Snapshot: Pressing this allows you to take a
snapshot of the video screen and save it
to your computer. For more information
see the SNAPSHOT guide below
8. Record: Pressing this allows you to record video
playing and save it to your computer.
For more information see the RECORDING guide below
9. Motion Detection: Pressing this enables and disables mo-
tion detection
10. Date/Time: This indicates the date and time based
on your computers settings
11. Viewing Screen: This screen displays what your baby
camera is viewing live, double clicking it
will give you a full screen view, double
click again to exit the full screen view
15
STEP 6 - THE BASICS
Viewing your Baby Through the Computer:
Once the baby camera and receiver are paired the camera image should automatically appear on
the screen.
Recording Sections of Footage and Saving it onto your Computer:
The LV-TW500 allows you to record footage onto your computer. The software automatically
saves it in a common area, we recommend leaving the le save location the same.
Record Modes
The software has two dierent modes of recording: Round-the-clock recording and Event
recording. Round-the-clock recording is the default setting which records the video continuously
and Event recording records the video only if motion is detected. You can also choose if you
would like to record audio or not with the recording mode.
To record video/audio footage:
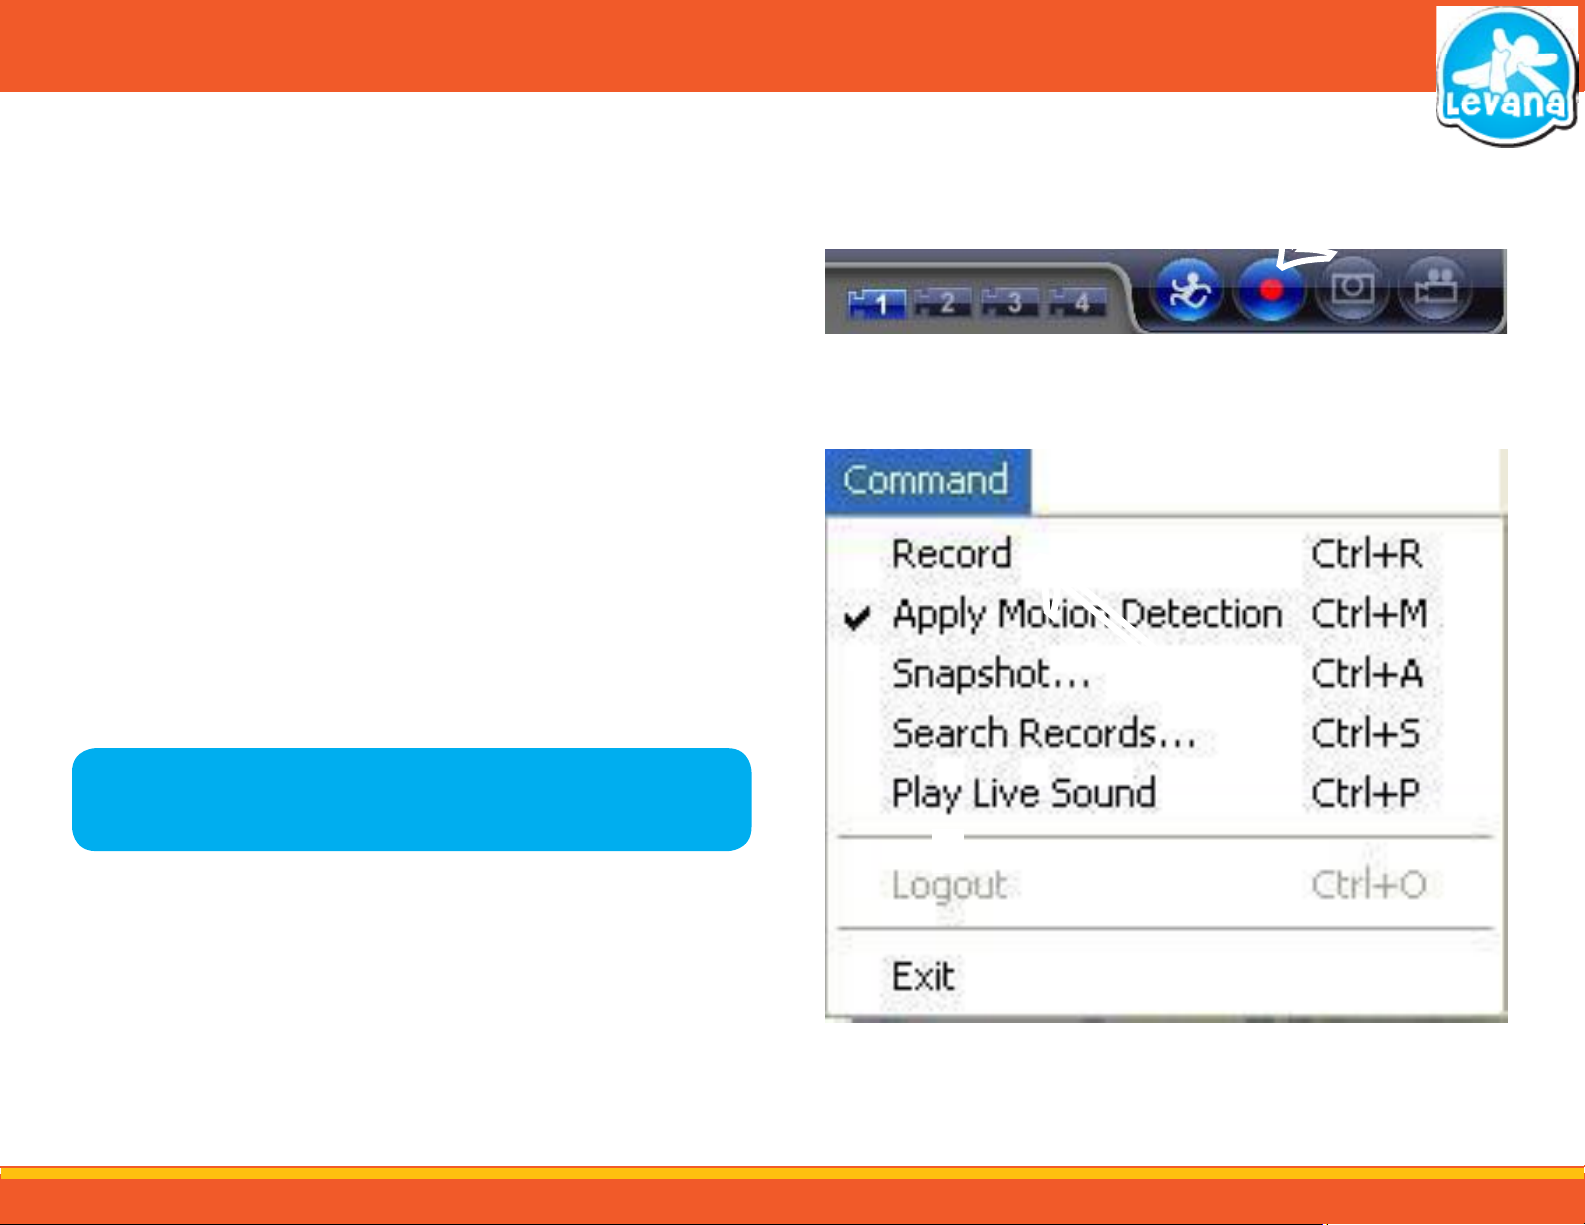
1. Click the “Record” button, when the “Record” button is highlighted in blue the software is
indicating that the footage being viewed on the screen is recording.
2. To stop recording, click on the “Record” button again.
3. You can also start recording by selecting “Command” then “Record” from the upper menu
bar. Selecting “Command” and “Record” again will stop the record.
4. The recorded footage automatically saves to the SecuExpress software folder. We
recommend leaving this at the default settings.
↑
Record Icon
Command Menu Record
↑
NOTE: The software is by default, set to the round the clock recording mode, to start
recording select the record icon.
16
 Loading...