

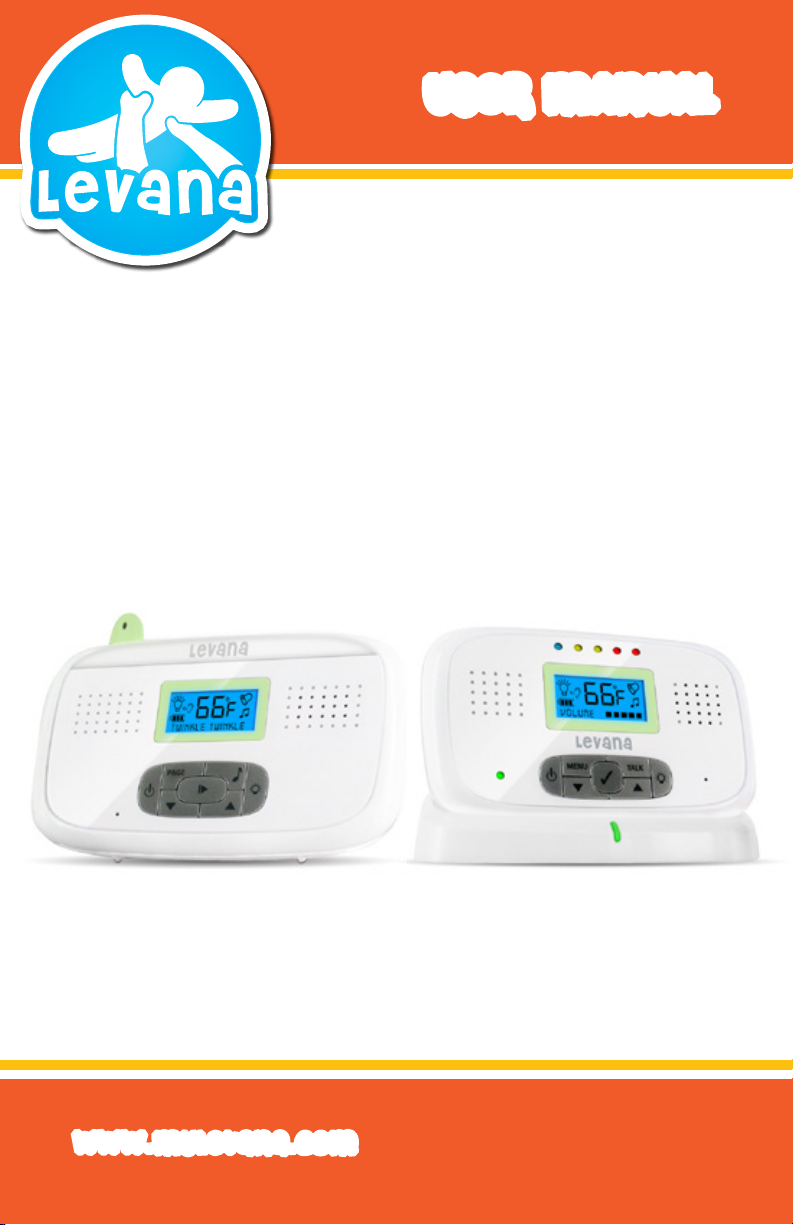
USeR MANUAL
Melody
Digital Audio Monitor
with Talk-to-Baby™ Intercom
www.myLevana.com
Model #: LV-TW200

PRODUCT WARRANTY
INFORMATION
Please visit our web site at www.mylevana.com
for information about your product’s warranty
We take quality very seriously. This is why all of our products come with a one year warranty from the
original purchase date against defects in workmanship and materials. If you have warranty or support
issues please contact us using any of the following methods:
Support: www.mylevana.com/support LEVANA Canada LEVANA USA
Web: www.mylevana.com 4080 Montrose Road 60 Industrial Parkway #Z64
Niagara Falls, ON Cheektowaga NY
Canada L2H 1J9 USA 14227
Warranty Terms
1. LEVANA products are guaranteed for a period of one year from the date of purchase against defects
in workmanship and materials. This warranty is limited to the repair, replacement or refund of the
purchase price at LEVANA’s option.
2. This warranty becomes void if the product shows evidence of having been misused, mishandled or
tampered with contrary to the applicable instruction manual.
3. Routine cleaning, normal cosmetic and mechanical wear and tear are not covered under the terms of
this warranty.
4. The warranty expressly provided for herein is the sole warranty provided in connection with the
product itself and no other warranty, expressed or implied is provided. LEVANA assumes no
responsibilities for any other claims not specically mentioned in this warranty.
5. This warranty does not cover the shipping cost, insurance or any other incidental charges.
6. You MUST call LEVANA before sending any product back for repair. You will be sent a Return
Authorization form with return instructions. When returning the product for warranty service, please
pack it carefully in the original box with all supplied accessories, and enclose your original receipt or
copy, and a brief explanation of the problem (include RA #).
7. This warranty is valid only in Canada and the continental U.S.
8. This warranty cannot be re-issued.
2

TABLE OF CONTENTS
PRODUCT WARRANTY INFORMATION .................................................................. 2
TABLE OF CONTENTS ......................................................................................... 3
WHAT’S INCLUDED ............................................................................................ 4
FEATURES ....................................................................................................... 4
BUTTONS AND CONNECTIONS - PARENT UNIT ....................................................... 6
BUTTONS AND CONNECTIONS - BABY UNIT ........................................................... 8
GETTING STARTED ............................................................................................ 10
ATTACH POWER TO THE BABY UNIT USING THE AC ADAPTER ............................. 10
INSTALLING ALKALINE BATTERIES ................................................................ 10
INSTALLING THE RECHARGEABLE BATTERY IN THE PARENT UNIT ...................... 10
SWITCHING THE UNITS ON AND OFF ............................................................. 10
OPERATION - PARENT UNIT ................................................................................ 11
TURNING THE NIGHT LIGHT ON AND OFF ....................................................... 11
LULLABY SETTINGS ..................................................................................... 11
SENSITIVITY SETTINGS ................................................................................ 11
SOUND ALERT SETTINGS ............................................................................. 12
SETTING THE TEMPERATURE RANGE ............................................................. 12
SETTING THE TEMPERATURE ALERT AND VOLUME .......................................... 12
SETTING THE TEMPERATURE TYPE ................................................................ 13
CLOCK SETTINGS ........................................................................................ 13
SETTING THE FEED TIME .............................................................................. 13
SETTING THE INTERVAL TIME ....................................................................... 13
SETTING THE FEED TIME ALARM ON OR OFF ................................................... 13
TALK TO BABY FUNCTION ............................................................................ 14
LED FLASHLIGHT ....................................................................................... 14
VOLUME .................................................................................................... 14
ENERGY SAVE SWITCH ................................................................................ 14
OPERATION - BABY UNIT .................................................................................... 14
PARENT UNIT PAGE BUTTON ....................................................................... 14
LULLABY SELECTION BUTTON ...................................................................... 15
PLAYING LULLABIES ................................................................................... 15
NIGHT LIGHT BUTTON ................................................................................ 15
PAIRING THE DEVICES ....................................................................................... 15
TROUBLESHOOTING .......................................................................................... 16
SPECIFICATIONS ............................................................................................... 17
FCC APPROVED ................................................................................................ 18
SAFETY INSTRUCTIONS ..................................................................................... 18
3

WHAT’S INCLUDED
Parent Unit
• Recharging Base
• 2 Power Adapters
• User Manual
• 1 Year Warranty
• Lifetime Customer Support
Baby Unit
FEATURES
Superior Digital Wireless Technology
Feel free to take the monitor with you around the house and even outside! Levana’s Digital
Technology ensures that you will always hear clearly and signals remain strong up to 2000
feet away.
Soothe Your Child with the Talk-to-Baby Intercom
Comfort your baby from a distance using the talk-to-baby intercom function. You can hear
and talk to your little one with the press of a button.
Temperature Monitoring to Ensure Safety
Did you accidently leave the baby’s room window open? Many studies indicate that your
baby’s room should be between 61-68° F (16-20° C). You can monitor the temperature in
your baby’s room and know that they are always safe and comfortable.
Comforting Lullabies
The baby unit is programmed with three well-known lullabies to help soothe your child
to sleep.
Programmable Feeding Timer
Program the timer according to your baby’s feeding schedule as a reminder of
feeding time.
4

FEATURES
Soothing Night light
The baby unit has a gentle night light that glows a calming tangerine. You
can turn it on manually, set it to automatic which will turn on whenever your child
becomes restless and makes noise, or control it by remote control from another room.
Rechargeable Monitor for Busy Parents
Simply place the parent unit onto the charging base, and enjoy over eight hours of
continuous audio. The baby unit can be powered by 3 AA batteries (not included) or the
included power adapter.
Built-in LED Flashlight
Built-in LED ashlight on parent unit to help you navigate around your child’s room in the
dark without interrupting sleep.
Energy Saving ECO Mode
Customize your wireless range to t your monitoring needs. Adjust to ECO mode to
conserve energy or LONG mode to monitor from up to 2000 ft away!
VOX
Voice activated technology helps conserve battery life by putting the system into
hibernation mode when sounds are not detected.
Out of Range Warning
An audible alert will let you know if your unit is too far from the baby’s unit and
connectivity has been lost.
LED Volume Levels
Monitor your baby’s audible cries in silence. LEDs accurately indicate the strength of your
baby’s cries.
Battery Low Warnings
On screen display shows your current battery level and indicates battery low warning.
Integrated Belt Clip & Wall Mount
The integrated belt clip and wall mount on the parent unit is both durable and functional
and adapts to your monitoring needs.
Lifetime Customer Support
Our customer support team can be reached by email and via live web chat. Our experts
will be happy to assist you in English, French and Spanish.
5
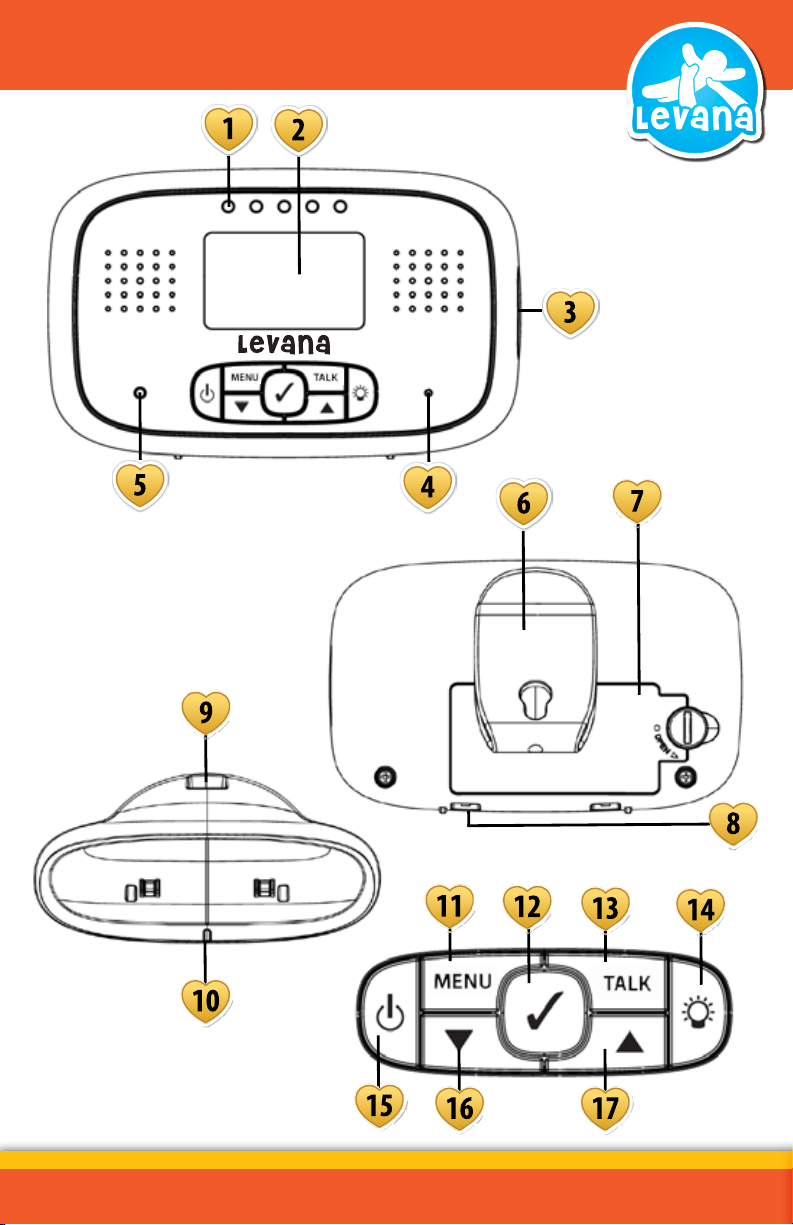
BUTTONS AND CONNECTIONS - PARENT UNIT
6

BUTTONS AND CONNECTIONS - DESCRIPTIONS
Front of Unit
1. Volume Indication LEDs - Indicates the level of volume being
heard in baby’s room
2. LCD Screen - Displays the temperature and current settings
3. LED Flashlight - A LED ashlight to help you nd things in the dark
4. Microphone - Speak into the microphone while holding the talk
back button to talk to your baby
5. Link LED - Solid when there is a link established with the baby unit
Back of Unit
6. Belt Clip/Support Stand - Twist up for belt loop, or twist down for a support stand
7. Battery Cover - Turn lock 90 degrees to lock or unlock the battery cover
8. Charging Points - Connects to charging points to recharge the battery
Charging Base
9. AC Power Input - Plug the AC adapter in here
10. Charging Indicator - Indicates that the parent unit is charging
Parent Unit Button Panel
11. Menu Button - Press to access parent unit menu, where you can
turn ON and OFF features and adjust settings
12. Select Button - Press to select an option
13. Talk Button - Press to talk back to your baby through the baby
unit’s speaker
14. Flashlight Button - Press and hold to turn on the ashlight on the
parent unit
15. Power Button - Press to turn unit ON or OFF
16. Volume Down Button - Press to decrease the volume or move to the
previous menu
17. Volume Up Button - Press to increase the volume or move to the next menu
7
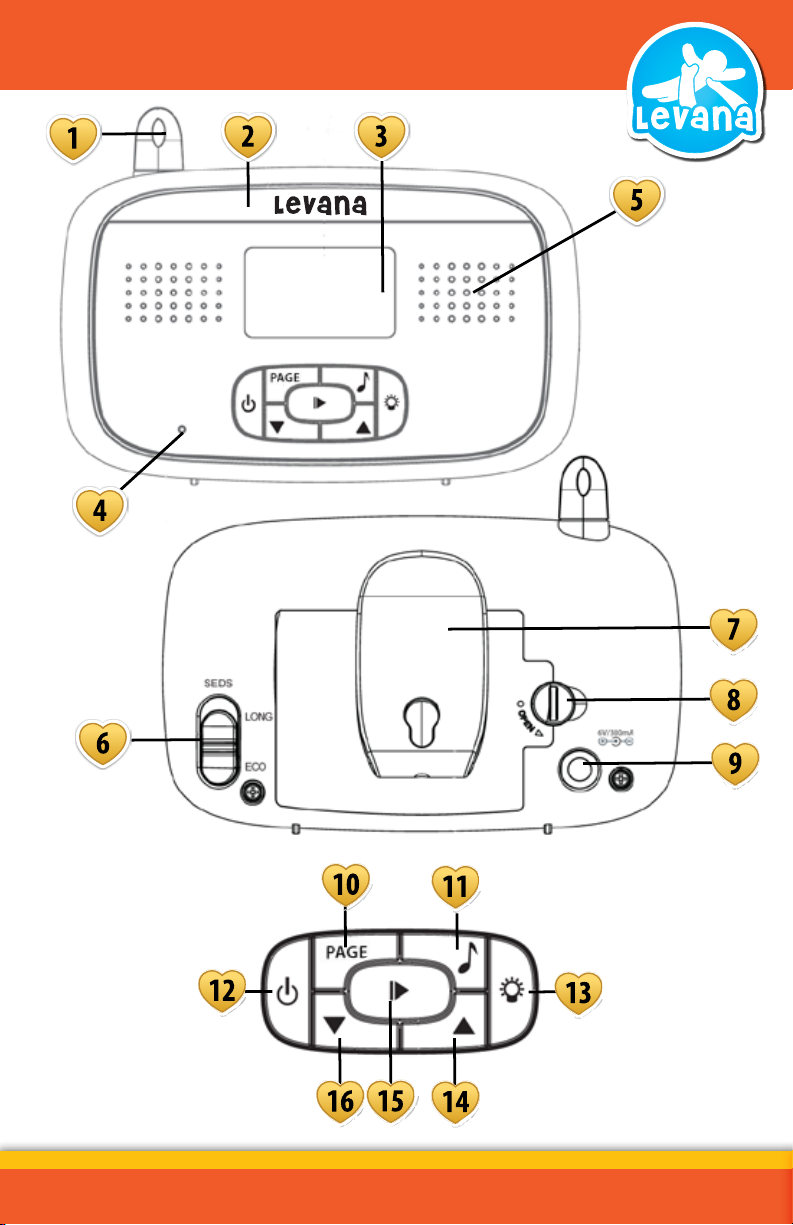
BUTTONS AND CONNECTIONS - BABY UNIT
8

BUTTONS AND CONNECTIONS - DESCRIPTIONS
Front of Unit
1. Antenna - Transmits and receives signals with the
parent unit
2. Night Light - Sooth baby to sleep with a calming night light
3. LCD Screen - Displays the temperature and current settings
4. Microphone - Hear every sound your baby makes with the
internal microphone
5. Speaker - When you talk back to baby your voice will be
projected through this speaker
Back of Unit
6. Energy Save Switch - Reduce range when not necessary and save
energy
7. Belt Clip/Support Stand - Twist up for belt loop, or twist down for a
support stand
8. Battery Cover - Turn lock 90 degrees to lock or unlock the
battery cover
9. AC Power Input - Plug the AC adapter in here
Baby Unit Button Panel
10. Page Button - Press to call parent unit
11. Lullaby button - Press to change lullaby song
12. Power Button - Press to turn unit ON or OFF
13. Night Light Button - Press to turn night light ON or OFF
14. Volume Up Button - Press to increase volume
15. Play/Stop Lullaby Button - Press to play or stop lullabies
16. Volume Down Button - Press to decrease volume
9
GETTING STARTED
Attach Power to the Baby Unit Using the AC adapter
1. Plug one end of the included power adapter into any available wall outlet.
2. Plug the small end of the power adapter into the DC jack on the back of the baby monitor.
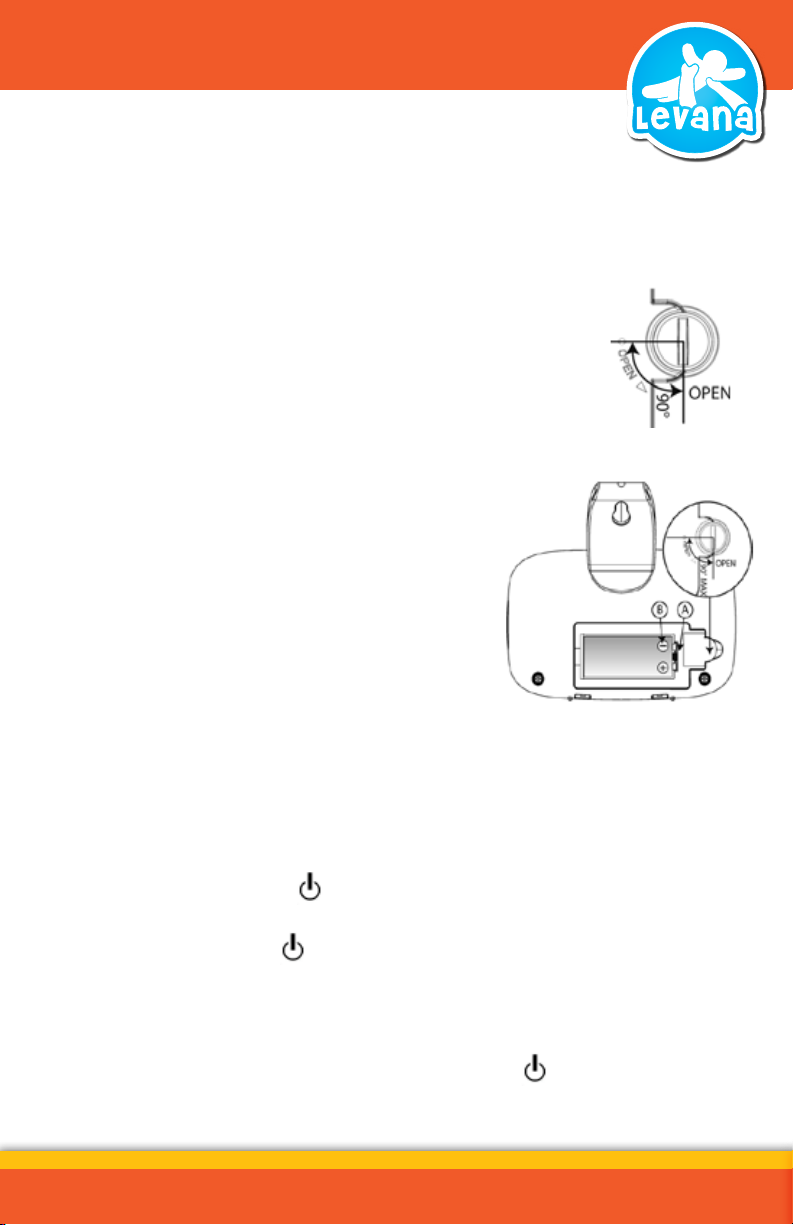
Installing Batteries
1. Use a small at head screwdriver to unlock the battery cover on the
back of the baby unit, taking care not to screw past the ‘open‘ point.
2. Remove the cover and install 3 AA batteries.
3. Replace the battery cover and lock the compartment.
Installing the Rechargeable Battery in the Parent Unit
1. Use a small at head screwdriver to unlock the battery
cover on the back of the baby unit, taking care not to
screw past the ‘open‘ point.
2. Remove the cover and install the battery pack in the
compartment, ensure it ts into the corresponding
recess points. Follow the polarity instructions on the
diagram to the right.
3. Replace the battery cover and lock the compartment
4. Plug one end of the included power adapter into any available wall outlet.
5. Plug the small end of the power adapter into the DC jack on the back of the recharging
base, place the parent unit in the base to charge.
Switching the Units ON and OFF
1. Press the power button on the parent unit, the LCD screen and the sound
indication LED’s on the front of the unit will light up during start up.
2. Press the power button on the baby unit, the LCD screen and night light will light
up during start up.
3. The parent and baby units will automatically pair. If the units do not pair
automatically, see Pairing the Devices on page 15.
4. To power OFF the units, press and hold the power button on the parent and baby
units until the LCD screen goes blank.
10

OPERATION - PARENT UNIT
Many of the monitor features are set and personalized through the main
menu of the parent unit. The select button is used to select an option or menu,
the menu button is used to exit and return to the previous menu.
Turning the Night Light On and O
1. Press the menu button , ‘night light’ will be
displayed. Press the select button to enter the
night light menu.
2. The menu will display your option for the night light, either to turn it On or O,
depending on its current status. Press the select button to choose the setting.
3. Repeat steps 1 and 2 to turn the night light on or o again.
Note: You can also turn the night light on or o using the night light
button
Lullaby Settings
There are 3 lullabies you can play on the baby unit.
1. Press the menu button , and then the down button until ‘Lullaby’ is
displayed, press the select button to enter the menu.
2. Press the down button
either play/stop the lullaby, or scroll to ‘select new’ and press the select button
to choose a particular lullaby. Your choices are Twinkle Twinkle Little Star, Minuet in
G, Londonderry, or play all.
on the front of the baby unit.
to scroll through your options in the lullaby section,
Sensitivity Settings
1. Press the menu button , and then the down button until ‘Sensitivity’ is
displayed, press the select button to enter the menu.
2. Here you have the option of setting the sound sensitivity of the monitor, one bar
being the least sensitive and 5 bars being the most sensitive.
3. Use the down and up buttons to set the sensitivity and press the select
button
to save your preference.
11

OPERATION - PARENT UNIT
Sound Alert Settings
When the volume on the parent unit is set to O, the Sound Alert menu
lets you choose to have an audible alert when noise in the baby’s room becomes loud
enough to reach the red LED indicators.
1. Press the menu button , and then the down button until ‘Sound Alert’ is
displayed, press the select button to enter the menu.
2. The menu will display your option for the sound alert, either to turn it On or O,
depending on its current status. Press select to adjust the setting.
3. To adjust the volume of the alert, press the down button until ‘Volume’ is
displayed and press select
4. Use the up
to save your settings.
and down buttons to adjust the volume, and the select button
Setting the Temperature Range
1. Press the menu button , and then the down button until ‘Temperature’
is displayed, press the select button to enter the menu.
2. The menu will display ‘Set Range’, press select to enter the set range menu.
3. Enter the high temperature limit rst using the up
press select
4. Next, enter the low temperature limit using the up and down buttons,
press select to save and return to the Temperature Menu.
to save.
to enter that menu.
and down buttons,
Setting the Temperature Alert and Volume
1. From the temperature menu, press the down button until ‘Temp Alert’ is
displayed, press select
2. The menu will display your option for the temperature alert, either to turn it On or
O, depending on its current status. Press select to choose the setting.
3. To adjust the volume of the alert, press the down button until ‘Volume’ is
displayed and press select
4. Use the up
the volume, and the select button to save your
settings.
and down buttons to adjust
to enter this menu.
to enter that menu.
12
 Loading...