

Levana Jena Additional Camera User Manual [en, fr, es]
Additional Camera
™
Jena
Caméra supplémentaire
Cámara adicionale
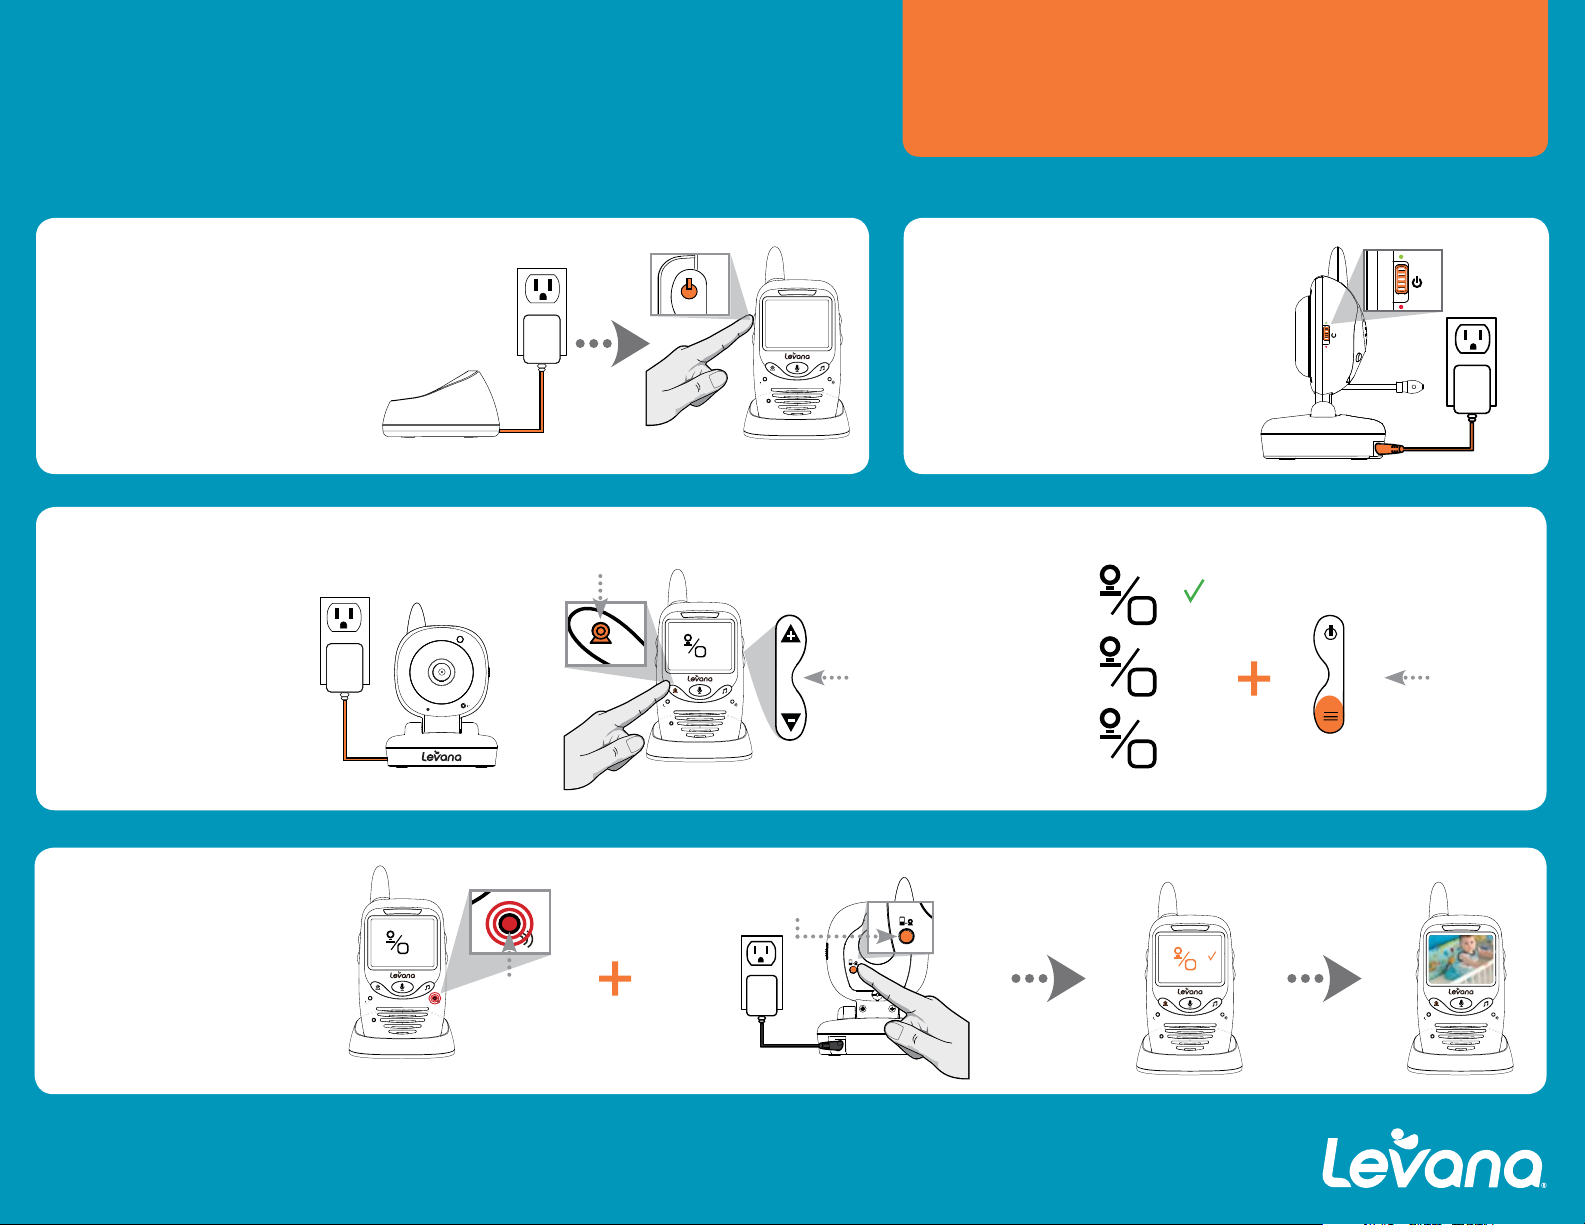
Let’s Get Started! / Commençons! / ¡Empecemos!
For additional product information, please consult our website at / Pour
plus de renseignements sur le produit, consultez notre site Web à / Para
más información sobre el producto, consulte nuestro sitio Web en:
www.mylevana.com/downloads
1.
Pairing additional cameras
Jumeler une caméra supplémentaire
Para sincronizar otras cámaras
3.
Change channel
Changer de canal
Cambiar de canal
Press and hold
Appuyer et maintenir appuyé
Presione sin soltar
2.
Connecting the camera
Connexion de la caméra
Conexión de la camara
C2
` =O
Select a channel
Sélectionnez un canal
Seleccione un canal
C3
C4
Press
Appuyez
Presione
4.
Pairing
Jumeler
Emparejamiento
Press and hold
Appuyer et maintenir appuyé
Presione sin soltar
` =O
` =O
Flashing
Clignote
Presione
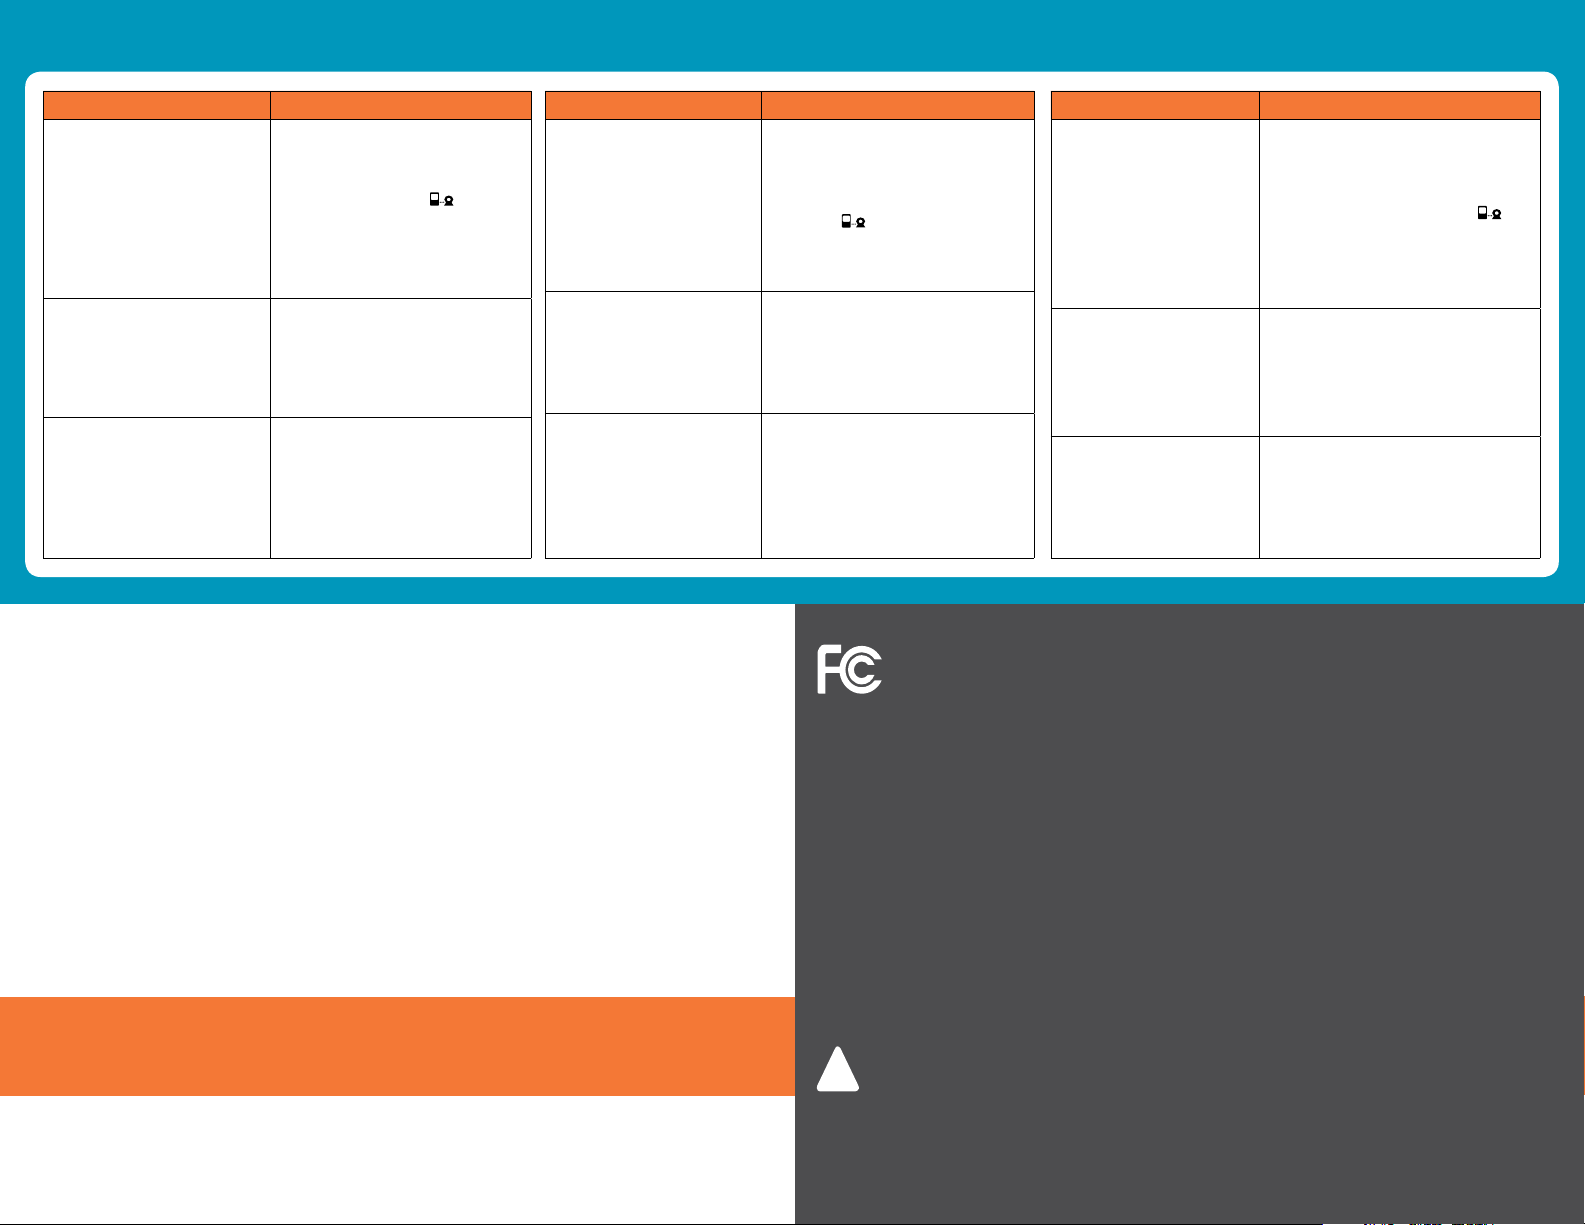
Troubleshooting / Dépannage / Solucion de problemas
ISSUE SOLUTION
If C#...X appears on the
screen.
Grainy video after pairing.
Video frozen when pairing.
DO NOT RETURN THIS
PRODUCT TO THE STORE!
Please contact Customer
Support for assistance.
Product warranty information
We take quality very seriously.
This is why all of our LEVANA®
products come with a oneyear warranty from the original
purchase date against defects
in workmanship and materials.
If you have warranty or support
issues please contact us using any
of the following methods:
Support/Soutien/Servicio
www.mylevana.com/support
For complete warranty
information, please consult the
manual at
www.mylevana.com/downloads
• Ensure camera & monitor are
close together when pairing.
• Once the channel is selected,
press and hold the
button
on the camera to pair.
• Disconnect the power supply
from the camera and repeat
steps 1 to 3.
• Wait a few moments allowing
the image to become clear.
• Switch the monitor to a
dierent channel for a few
seconds, and then return to the
newly paired channel.
• Wait a few moments allowing
the camera and the monitor to
sync.
• Switch the monitor to a
dierent channel for a few
seconds, and then return to the
newly paired channel.
NE RETOURNEZ PAS CE
PRODUIT AU MAGASIN!
Veuillez contacter le soutien à la
clientèle pour de l’aide.
Informations de la garantie du
produit
Nous prenons la qualité très
sérieusement. C’est pourquoi
tous nos produits LEVANA® ont
une garantie d’un an à partir de
la date originale d’achat contre
les défauts de fabrication et
de matériaux. Si vous avez des
questions concernant la garantie
ou le soutien, veuillez nous
contacter en utilisant l’une des
méthodes suivantes:
Online live web chat/
Clavardage en ligne/
Chatear en línea
www.mylevana.com
LEVANA Canada
4080 Montrose Road
Niagara Falls, ON
Canada L2H 1J9
Pour les renseignements complets
de la garantie , veuillez consulter
le manuel à
www.mylevana.com/downloads
QUESTION SOLUTION
Si C#...X apparaît à l’écran.
Vidéo est enneigée après
le jumelage.
Vidéo est figée après le
jumelage.
NO DEVUELVA EL PRODUCTO A
LA TIENDA!
Por favor, contacte Servicio al
Cliente para en asistencia.
Información sobre la garantía del
producto
La calidad es un asunto serio para
nosotros. Por eso, ofrecemos
nuestros productos LEVANA®
con un año de garantía a partir de
la fecha original de compra por
defectos de fabricación y de los
materiales. Si usted tiene problemas
con respecto a la garantía o al
servicio, contáctenos a traves de las
siguientes opciones:
LEVANA USA
60 Industrial
Parkway, Suite #Z64
Cheektowaga, NY
USA 14227
Para obtener información
completa de la garantía, consulte
el manual en
www.mylevana.com/downloads
PROBLEMA SOLUCION
• Assurez-vous que la caméra et
moniteur sont rapprochées lors
du jumelage.
• Une fois le canal est sélectionné,
appuyez et maintenir appuyé le
bouton
de la caméra pour
Si C#...X aparece en la
pantalla.
jumeler.
• Débranchez l’adaptateur de la
caméra et répétez les étapes 1 à 3.
• Attendez quelques instants
permettant à l’image à s’éclaircir.
• Passez à un autre canal pendant
quelques secondes, ensuite
retournez au canal que vous
venez de jumeler.
Video granulado después
de sincronizacion.
• Attendez quelques instants
permettant à la caméra et le
moniteur de synchroniser.
• Passez à un autre canal pendant
quelques secondes, ensuite
retournez au canal que vous
Video congelado durante la
sincronizacion.
venez de jumeler.
This device complies with part 15 of the FCC Rules. Operation
is subject to the following two conditions:
(1) This device may not cause harmful interference.
(2) This device must accept any interference received,
including interference that may cause undesired operation.
FCC WARNING
This equipment has been tested and found to comply with the limits
for a Class B digital device, pursuant to Part 15 of the FCC Rules. These
limits are designed to provide reasonable protection against harmful
interference in a residential installation.
This equipment generates, uses and can radiate radio frequency energy
and, if not installed and used in accordance with the instructions, may
cause harmful interference to radio communications. However, there is
no guarantee that interference will not occur in a particular installation.
If this equipment does cause harmful interference to radio or television
reception, which can be determined by turning the equipment o and
on, the user is encouraged to try to correct the interference by one or
more of the following measures:
• Reorient or relocate the receiving antenna.
• Increase the separation between the equipment and the receiver.
• Connect the equipment into an outlet dierent from that to which
the receiver is connected.
• Consult the dealer or an experienced radio/TV technician for help.
CAUTION: Keep small parts away from children.
ATTENTION: Gardez les petites pièces hors de la portée des enfants.
PRECAUCIÓN: Mantenga las piezas pequeñas fuera del alcance de
!
los niños.
• Please retain your original receipt or a copy for warranty service
• Veuillez conserver votre reçu original ou une copie pour obtenir le service
sous garantie
• Por favor, conserve el recibo original o una copia para el servicio de
la garantía
• Asegurar la cámara y el monitor
están juntos cuando se están
emparejando.
• Una vez seleccionado el canal,
presione sin soltar el botón
de
la cámara para sincronizar.
• Desconecte el adaptador de
corriente de la cámara y repita
pasos del 1 al 3.
• Espere unos momentos, y permita
que la imagen se haga clara.
• Cambiar el monitor a un canal
diferente por algunos segundos y
luego regrese al canal que ha sido
recientemente sincronizado.
• Espere unos minutos y permita que
la cámara y el monitor sincronicen.
• Cambie el monitor a un canal
diferente por unos segundos y
luego regrese al canal que fue
sincronizado recientemente
IC STATEMENT / DÉCLA RATION IC:
This Class B digital apparatus
complies with ICES-003. / Cet
appareil numérique de la classe B
est conforme à la norme NMB-003
du Canada.
This device complies with Industry
Canada licence-exempt RSS 210
standard(s). Operation is subject to
the following two conditions: (1)
this device may not cause
interference, and (2) this device
must accept any interference,
including interference that may
cause undesired operation of the
device.
Le présent appareil est conforme
aux CNR 210 d’Industrie Canada
applicables aux appareils radio
exempts de licence. L’exploitation
est autorisée aux deux conditions
suivantes : (1) l’appareil ne doit
pas produire de brouillage,
et (2) l’utilisateur de l’appareil
doit accepter tout brouillage
radioélectrique subi, même si le
brouillage est susceptible d’en
compromettre le fonctionnement.
Changes or modifications not
expressly approved by the party
responsible for compliance could
void the user’s authority to operate
the equipment.
 Loading...