

Lenovo X24 Pro User Guide

ThinkVision X24 Pro
User Guide
Machine Types: 60E4/65BC

Product numbers
60E4-ECR1-WW
65BC-ECR1-WW
Second Edition (June2016)
© Copyright Lenovo 2016.
LENOVO products
are sold to governmental entities as commercial items as defined by 48 C.F.R. 2.101 with limited and restricted rights
, reproduction and disclosure.
to use
LIMITED AND RESTRICTED RIGHTS NOTICE: If products
pursuant a General Services Administration "GSA" contract
set forth in Contract No. GS-35F-05925.
, data, computer software, and services have been developed exclusively at private expense and
, data, computer software, or services are delivered
, use, reproduction, or disclosure is subject to restrictions

Contents
Safety information . . . . . . . . . . . . . . . . . . . . . . . . . . . . . . . . . . . . . . . . . . . . . . . . . . . . . . . . . . . . . iii
General Safety guidelines. . . . . . . . . . . . . . . . . . . . . . . . . . . . . . . . . . . . . . . . . . . . . . . . . . . . . . . . . . . . . . . . . . . . . . . . . . . . . . . . . . iii
Chapter 1. Getting started . . . . . . . . . . . . . . . . . . . . . . . . . . . . . . . . . . . . . . . . . . . . . . . . . . . . . . . 1-1
Shipping contents . . . . . . . . . . . . . . . . . . . . . . . . . . . . . . . . . . . . . . . . . . . . . . . . . . . . . . . . . . . . . . . . . . . . . . . . . . . . . . . . . . . . . . . 1-1
Product overview . . . . . . . . . . . . . . . . . . . . . . . . . . . . . . . . . . . . . . . . . . . . . . . . . . . . . . . . . . . . . . . . . . . . . . . . . . . . . . . . . . . . . . . 1-2
Types of adjustments. . . . . . . . . . . . . . . . . . . . . . . . . . . . . . . . . . . . . . . . . . . . . . . . . . . . . . . . . . . . . . . . . . . . . . . . . . . . . . . . . . 1-2
Tilt . . . . . . . . . . . . . . . . . . . . . . . . . . . . . . . . . . . . . . . . . . . . . . . . . . . . . . . . . . . . . . . . . . . . . . . . . . . . . . . . . . . . . . . . . . . . . . . . . 1-2
Camera Swivel . . . . . . . . . . . . . . . . . . . . . . . . . . . . . . . . . . . . . . . . . . . . . . . . . . . . . . . . . . . . . . . . . . . . . . . . . . . . . . . . . . . . . . . 1-3
Monitor controls. . . . . . . . . . . . . . . . . . . . . . . . . . . . . . . . . . . . . . . . . . . . . . . . . . . . . . . . . . . . . . . . . . . . . . . . . . . . . . . . . . . . . . 1-6
Cable lock slot. . . . . . . . . . . . . . . . . . . . . . . . . . . . . . . . . . . . . . . . . . . . . . . . . . . . . . . . . . . . . . . . . . . . . . . . . . . . . . . . . . . . . . . . 1-6
Setting up your monitor . . . . . . . . . . . . . . . . . . . . . . . . . . . . . . . . . . . . . . . . . . . . . . . . . . . . . . . . . . . . . . . . . . . . . . . . . . . . . . . . . . 1-7
Connecting and turning on your monitor . . . . . . . . . . . . . . . . . . . . . . . . . . . . . . . . . . . . . . . . . . . . . . . . . . . . . . . . . . . . . . . . 1-7
Registering your option . . . . . . . . . . . . . . . . . . . . . . . . . . . . . . . . . . . . . . . . . . . . . . . . . . . . . . . . . . . . . . . . . . . . . . . . . . . . . . . . . 1-12
Chapter 2. Adjusting and using your monitor . . . . . . . . . . . . . . . . . . . . . . . . . . . . . . . . . . . . . . . . . 2-1
Comfort and accessibility. . . . . . . . . . . . . . . . . . . . . . . . . . . . . . . . . . . . . . . . . . . . . . . . . . . . . . . . . . . . . . . . . . . . . . . . . . . . . . . . . 2-1
Arranging your work area . . . . . . . . . . . . . . . . . . . . . . . . . . . . . . . . . . . . . . . . . . . . . . . . . . . . . . . . . . . . . . . . . . . . . . . . . . . . . 2-1
Positioning your monitor . . . . . . . . . . . . . . . . . . . . . . . . . . . . . . . . . . . . . . . . . . . . . . . . . . . . . . . . . . . . . . . . . . . . . . . . . . . . . . 2-1
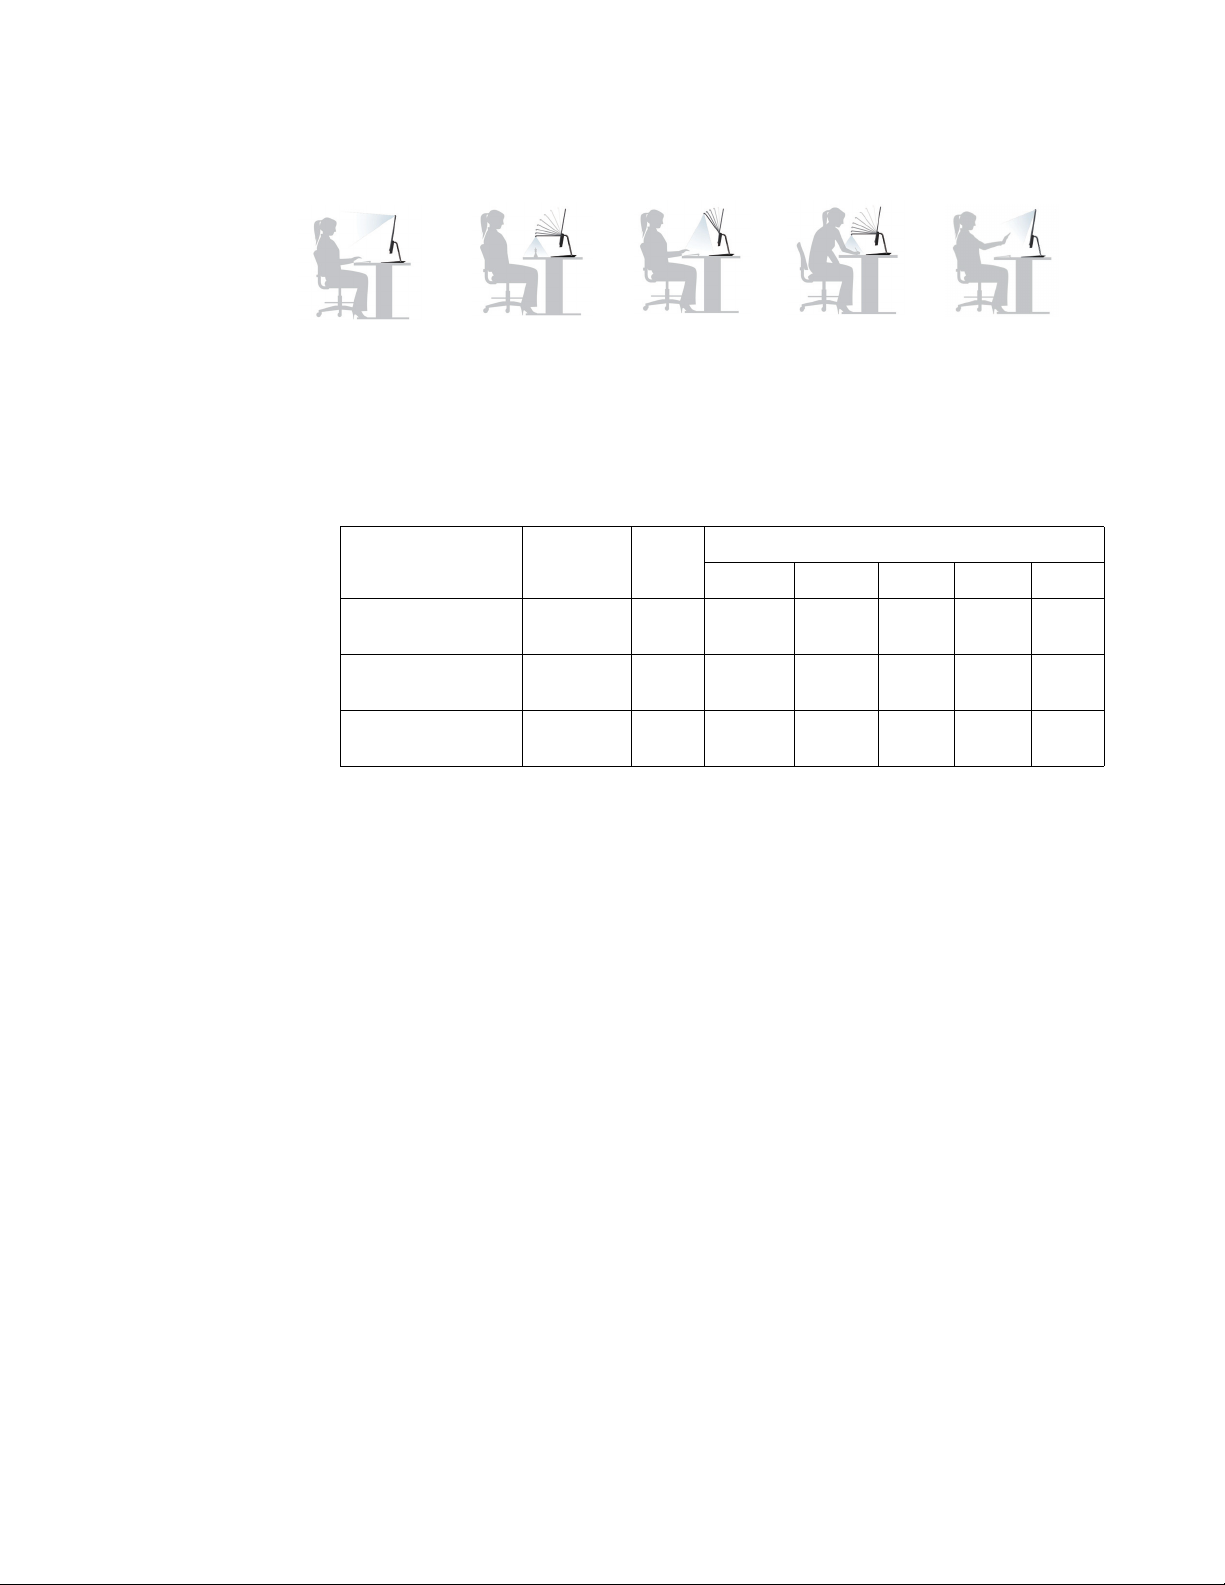
Quick tips for healthy work habits . . . . . . . . . . . . . . . . . . . . . . . . . . . . . . . . . . . . . . . . . . . . . . . . . . . . . . . . . . . . . . . . . . . . . . 2-2
Accessibility information . . . . . . . . . . . . . . . . . . . . . . . . . . . . . . . . . . . . . . . . . . . . . . . . . . . . . . . . . . . . . . . . . . . . . . . . . . . . . . 2-2
Adjusting your monitor image . . . . . . . . . . . . . . . . . . . . . . . . . . . . . . . . . . . . . . . . . . . . . . . . . . . . . . . . . . . . . . . . . . . . 2-3
Using the direct access controls. . . . . . . . . . . . . . . . . . . . . . . . . . . . . . . . . . . . . . . . . . . . . . . . . . . . . . . . . . . . . . . . . . . . . . . . . 2-3
Using the On-Screen Display (OSD) controls . . . . . . . . . . . . . . . . . . . . . . . . . . . . . . . . . . . . . . . . . . . . . . . . . . . . . . . . . . . . . 2-4
Selecting a supported display mode . . . . . . . . . . . . . . . . . . . . . . . . . . . . . . . . . . . . . . . . . . . . . . . . . . . . . . . . . . . . . . . . . . . . . 2-8
Understanding power management . . . . . . . . . . . . . . . . . . . . . . . . . . . . . . . . . . . . . . . . . . . . . . . . . . . . . . . . . . . . . . . . 2-9
Caring for your monitor . . . . . . . . . . . . . . . . . . . . . . . . . . . . . . . . . . . . . . . . . . . . . . . . . . . . . . . . . . . . . . . . . . . . . . . . 2-10
Chapter 3. Reference information . . . . . . . . . . . . . . . . . . . . . . . . . . . . . . . . . . . . . . . . . . . . . . . . . . 3-1
Monitor specifications . . . . . . . . . . . . . . . . . . . . . . . . . . . . . . . . . . . . . . . . . . . . . . . . . . . . . . . . . . . . . . . . . . . . . . . . . . . . . . . . . . . 3-1
Troubleshooting . . . . . . . . . . . . . . . . . . . . . . . . . . . . . . . . . . . . . . . . . . . . . . . . . . . . . . . . . . . . . . . . . . . . . . . . . . . . . . . . . . . . . . . . 3-3
Manually installing the monitor driver . . . . . . . . . . . . . . . . . . . . . . . . . . . . . . . . . . . . . . . . . . . . . . . . . . . . . . . . . . . . . . . . . . 3-5
Installing the monitor driver in Windows 10 . . . . . . . . . . . . . . . . . . . . . . . . . . . . . . . . . . . . . . . . . . . . . . . . . . . . . . . . . . . 3-5
Getting further help . . . . . . . . . . . . . . . . . . . . . . . . . . . . . . . . . . . . . . . . . . . . . . . . . . . . . . . . . . . . . . . . . . . . . . . . . . . . . . . . 3-5
Service information . . . . . . . . . . . . . . . . . . . . . . . . . . . . . . . . . . . . . . . . . . . . . . . . . . . . . . . . . . . . . . . . . . . . . . . . . . . . 3-6
Customer responsibilities . . . . . . . . . . . . . . . . . . . . . . . . . . . . . . . . . . . . . . . . . . . . . . . . . . . . . . . . . . . . . . . . . . . . . . . . . . . . . . 3-6
Service parts . . . . . . . . . . . . . . . . . . . . . . . . . . . . . . . . . . . . . . . . . . . . . . . . . . . . . . . . . . . . . . . . . . . . . . . . . . . . . . . . . . . . . . . . . 3-6
Appendix A. Service and Support . . . . . . . . . . . . . . . . . . . . . . . . . . . . . . . . . . . . . . . . . . . . . . . . . A-1
Registering your option . . . . . . . . . . . . . . . . . . . . . . . . . . . . . . . . . . . . . . . . . . . . . . . . . . . . . . . . . . . . . . . . . . . . . . . . . . . . . . . . . A-1
Online technical support . . . . . . . . . . . . . . . . . . . . . . . . . . . . . . . . . . . . . . . . . . . . . . . . . . . . . . . . . . . . . . . . . . . . . . . . . . . . . . . . A-1
Telephone technical support . . . . . . . . . . . . . . . . . . . . . . . . . . . . . . . . . . . . . . . . . . . . . . . . . . . . . . . . . . . . . . . . . . . . . . . . . . . . . A-1
Appendix B. Notices . . . . . . . . . . . . . . . . . . . . . . . . . . . . . . . . . . . . . . . . . . . . . . . . . . . . . . . . . . . B-1
Recycling information . . . . . . . . . . . . . . . . . . . . . . . . . . . . . . . . . . . . . . . . . . . . . . . . . . . . . . . . . . . . . . . . . . . . . . . . . . . . . . . . . . . B-2
Trademarks . . . . . . . . . . . . . . . . . . . . . . . . . . . . . . . . . . . . . . . . . . . . . . . . . . . . . . . . . . . . . . . . . . . . . . . . . . . . . . . . . . . . . . . . . . . . B-2
Power cords and power adapters . . . . . . . . . . . . . . . . . . . . . . . . . . . . . . . . . . . . . . . . . . . . . . . . . . . . . . . . . . . . . . . . . . . . . . . . . . B-3
Contents ii

ííí
Safety information
General Safety guidelines
For tips to help you use your computer safely, go to:
http://www.lenovo.com/safety
Before installing this product, read the Safety Information.
iii
Chapter 1. Getting started
Micro USB
DP to Mini mDP-DP
DP Adapter
This User’s Guide contains detailed information on the your Flat Panel Monitor. For a quick
overview, please see the Setup Poster that was shipped with your monitor.
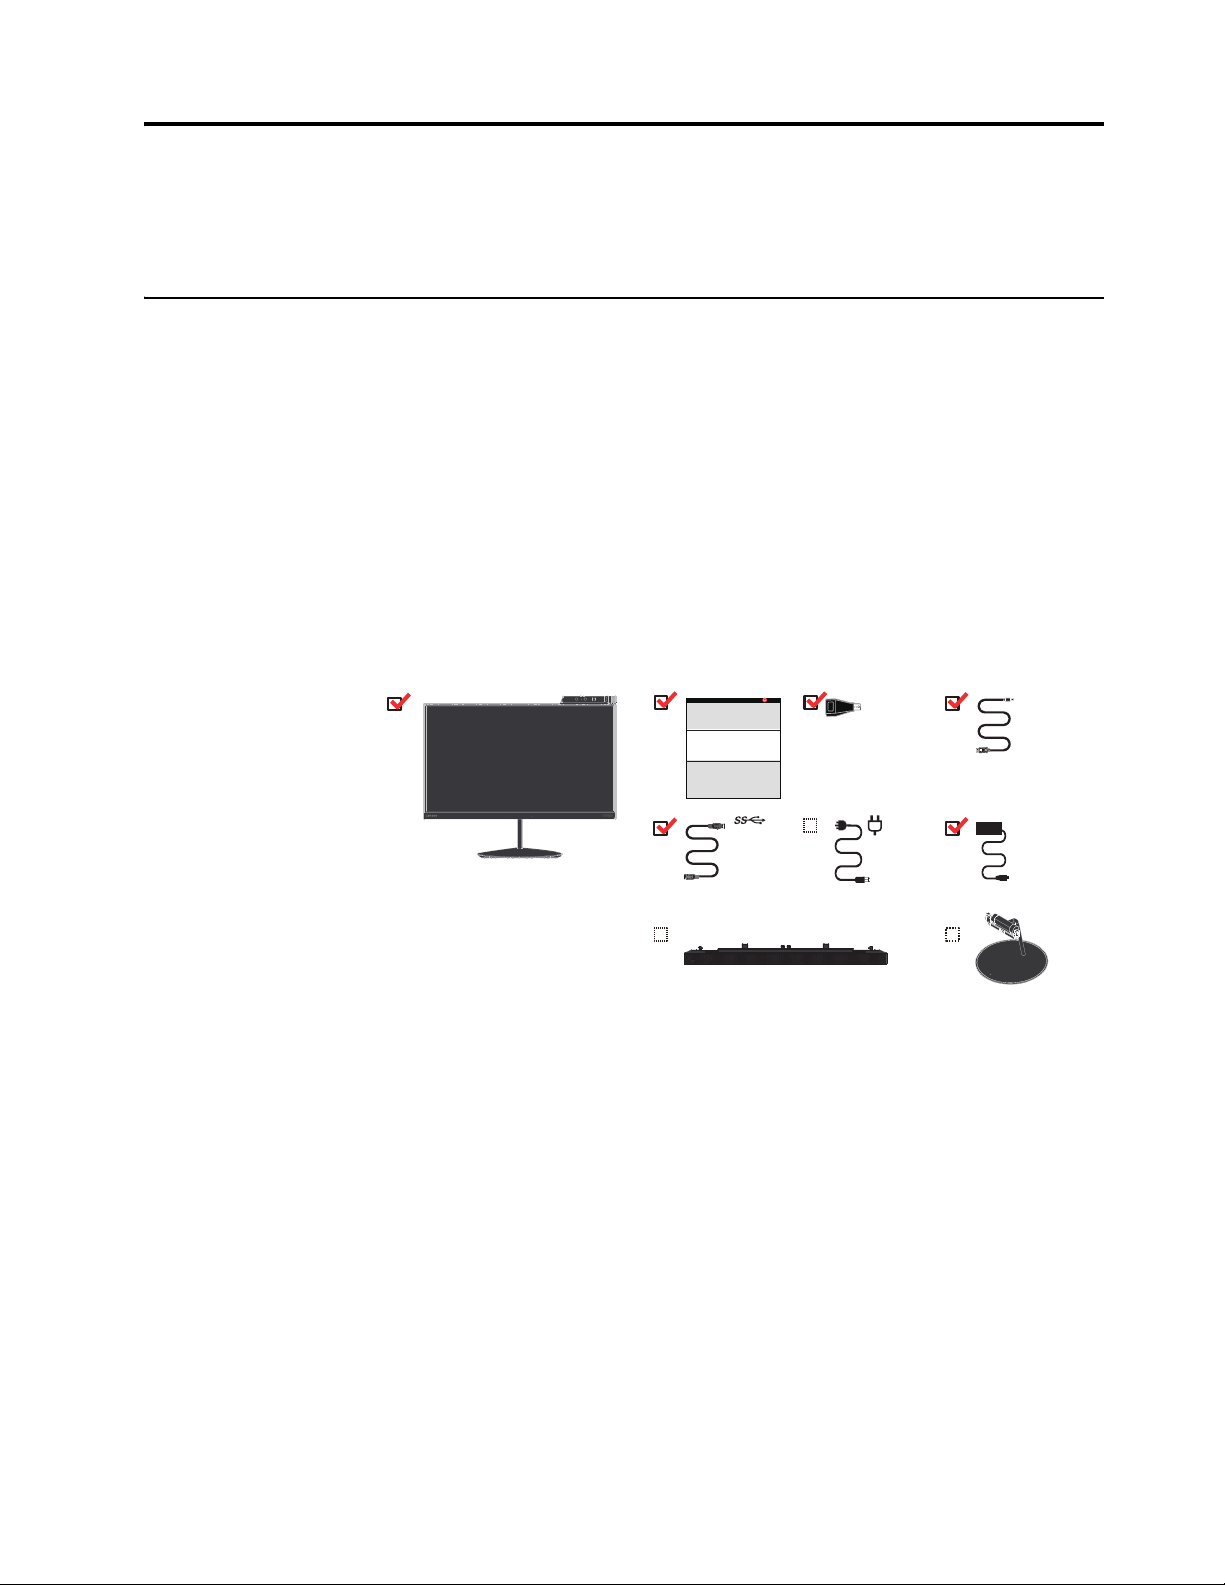
Shipping contents
The product package should include the following items:
• Flat Panel Monitor
• Information Flyer
• DP to Mini DP Adapter
• mDP-DP Cable
• Micro USB Cable
• Power Cord (Optional)
• Power Adapter
• WiGig Bar (Optional)
• Charging stand (Optional)
Chapter 1. 1-1
Product overview
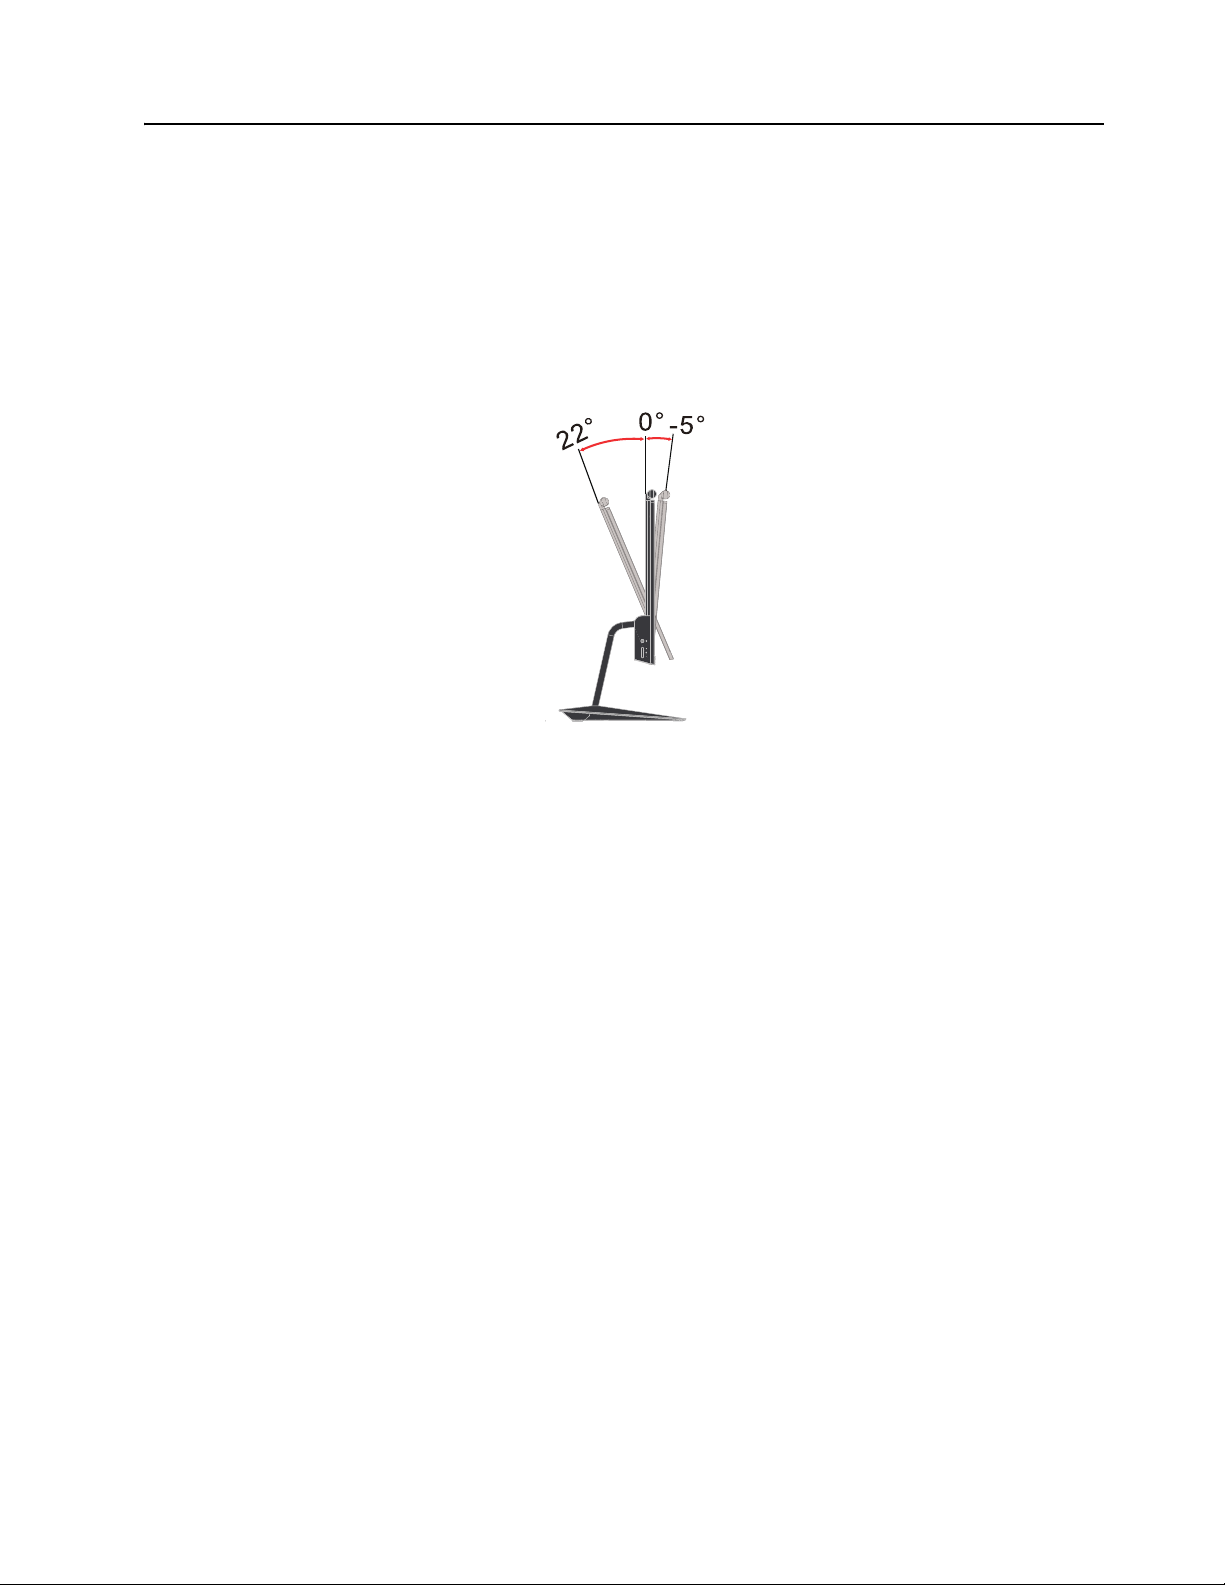
Types of adjustments
Tilt
This section will provide information on adjusting monitor positions, setting user controls, and
using the cable lock slot.
Please see the illustration below for an example of the tilt range.
Please see the illustration below for an example of camera swivel range.
Chapter 1. 1-2
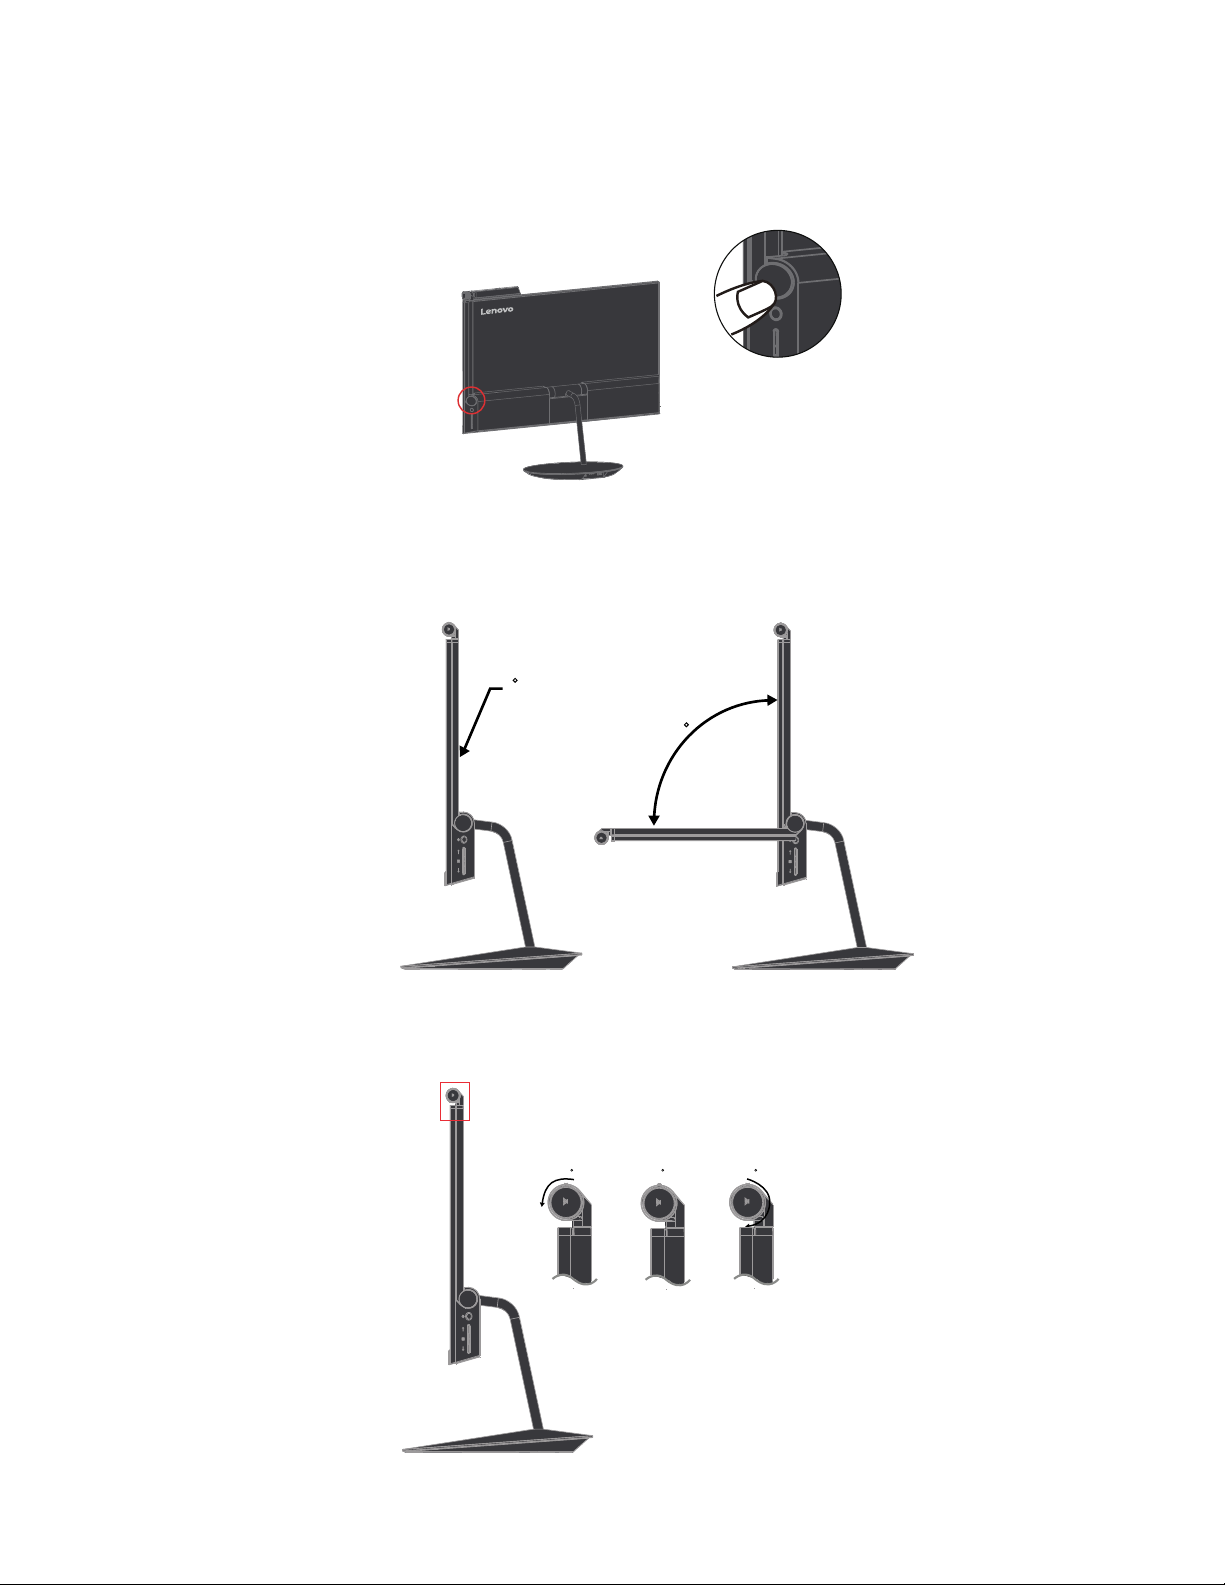
Camera Swivel
90
0
-90
0 180
1. Press this button to pop up the camera module, start to adjust the swivel range.
2. Please see the illustration below for an example of camera swivel ran
Pivot
Tilt
Chapter 1. 1-3
Swivel
90
0
180
3. Open and close the camera cover..
4. Press this key, turn on/off the light of camera.
Chapter 1. 1-4
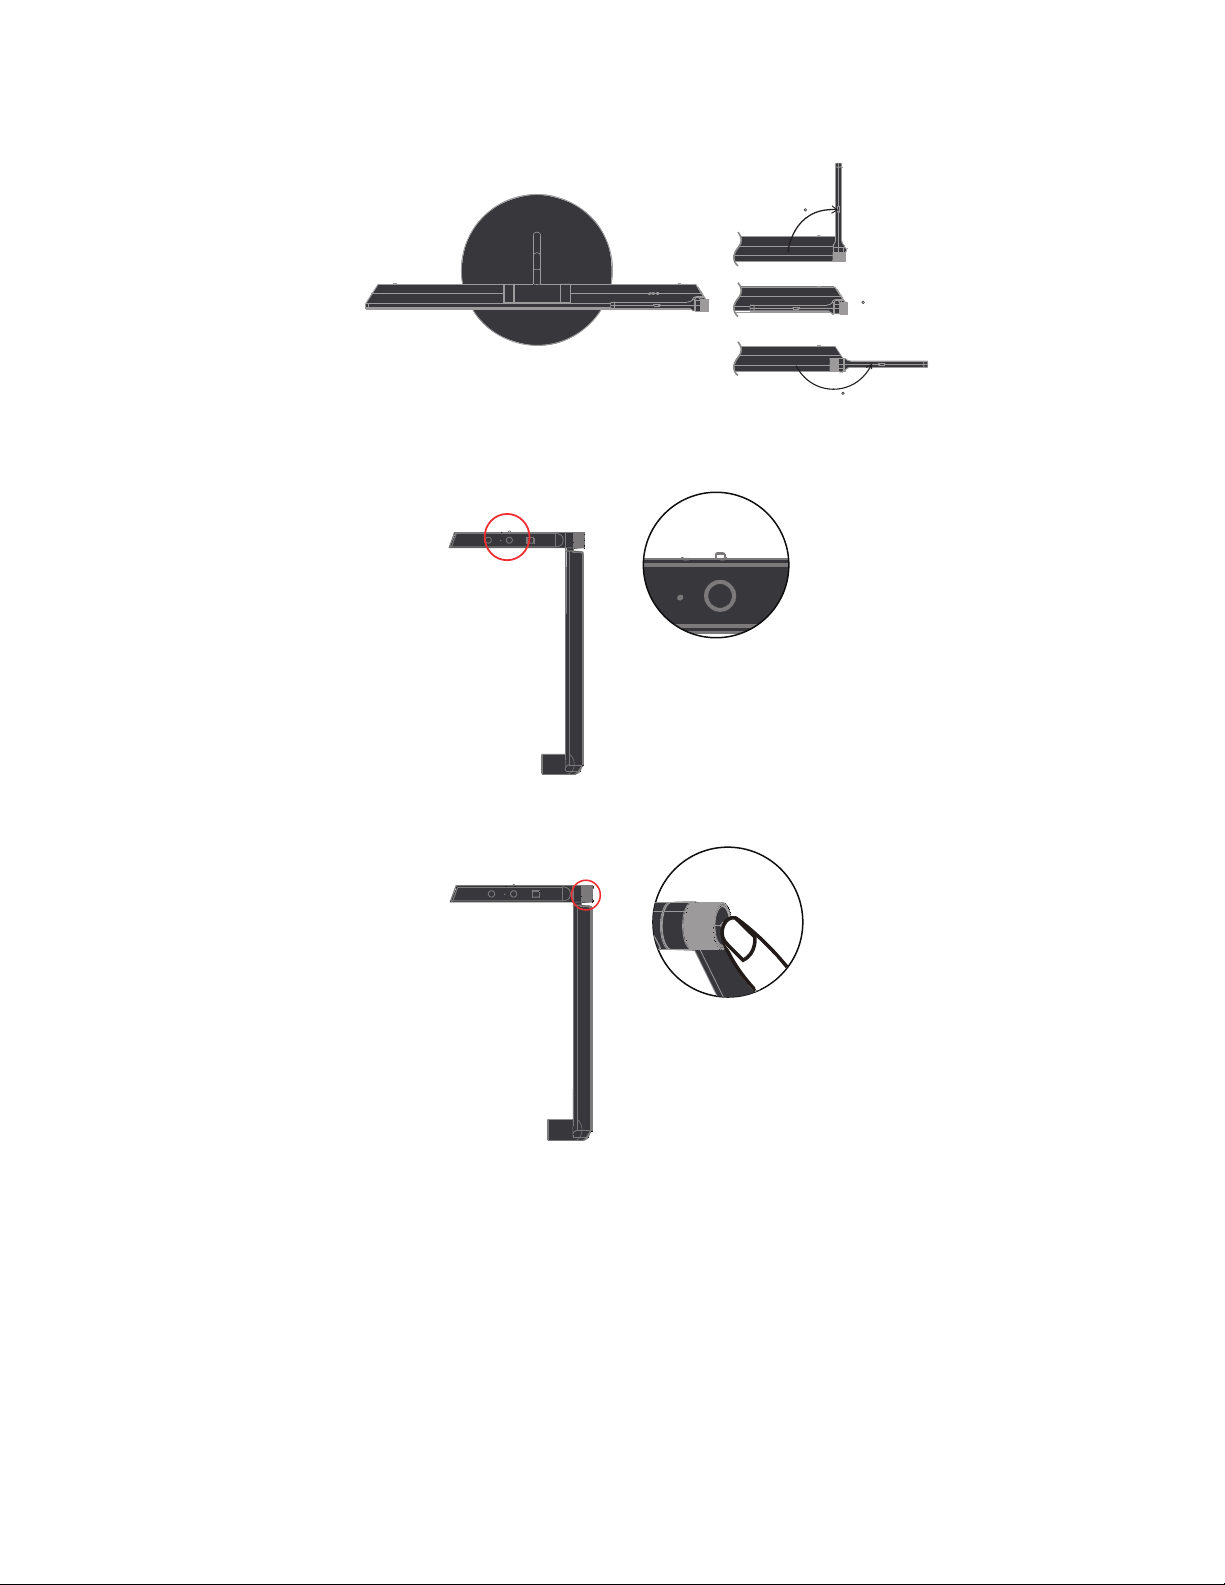
5. Please see the illustration below for working examples with multi-mode camera.
Video conferencing Scanning Task light Desktop video
Gesture
6. Camera function description:
®
a: Camera type: Intel
RealSenseTMCamera SR300(3D Camera)
b: Highest resolution of different mode:
Format Resolution Ratio Nominal frame per second
200 120 60 30 10
Depth(Z),Depth
mode
YUV 4:2:2,Color
mode
IR(I1),Infrared
mode
640*480 4:3
1920*1080 16:9
640*480 4:3
●●●
●●
●●●●
c: When first time to use camera on your PC, need to go to website which show in QSG to
download and install driver on your PC, then can use camera normally.(Attention: when install
driver, make sure camera have already connect to your PC, otherwise the installation will fail)
7. How to connect camera to PC or Laptop
a: When use Mini DP cable to connect to the monitor and under Mini DP source, can only use
video function, if need to use camera must also connect by Micro USB 3.0 Cable.
When use USB-C cable to connect to the monitor and under USB-C source, can use video
b:
& camera directly.
c:[Optional] If user connect the monitor with WiGig bar and under WiGig source, can use
video & camera directly.
Remark: Your PC or Laptop should be compatible with the camera.
Chapter 1. 1-5
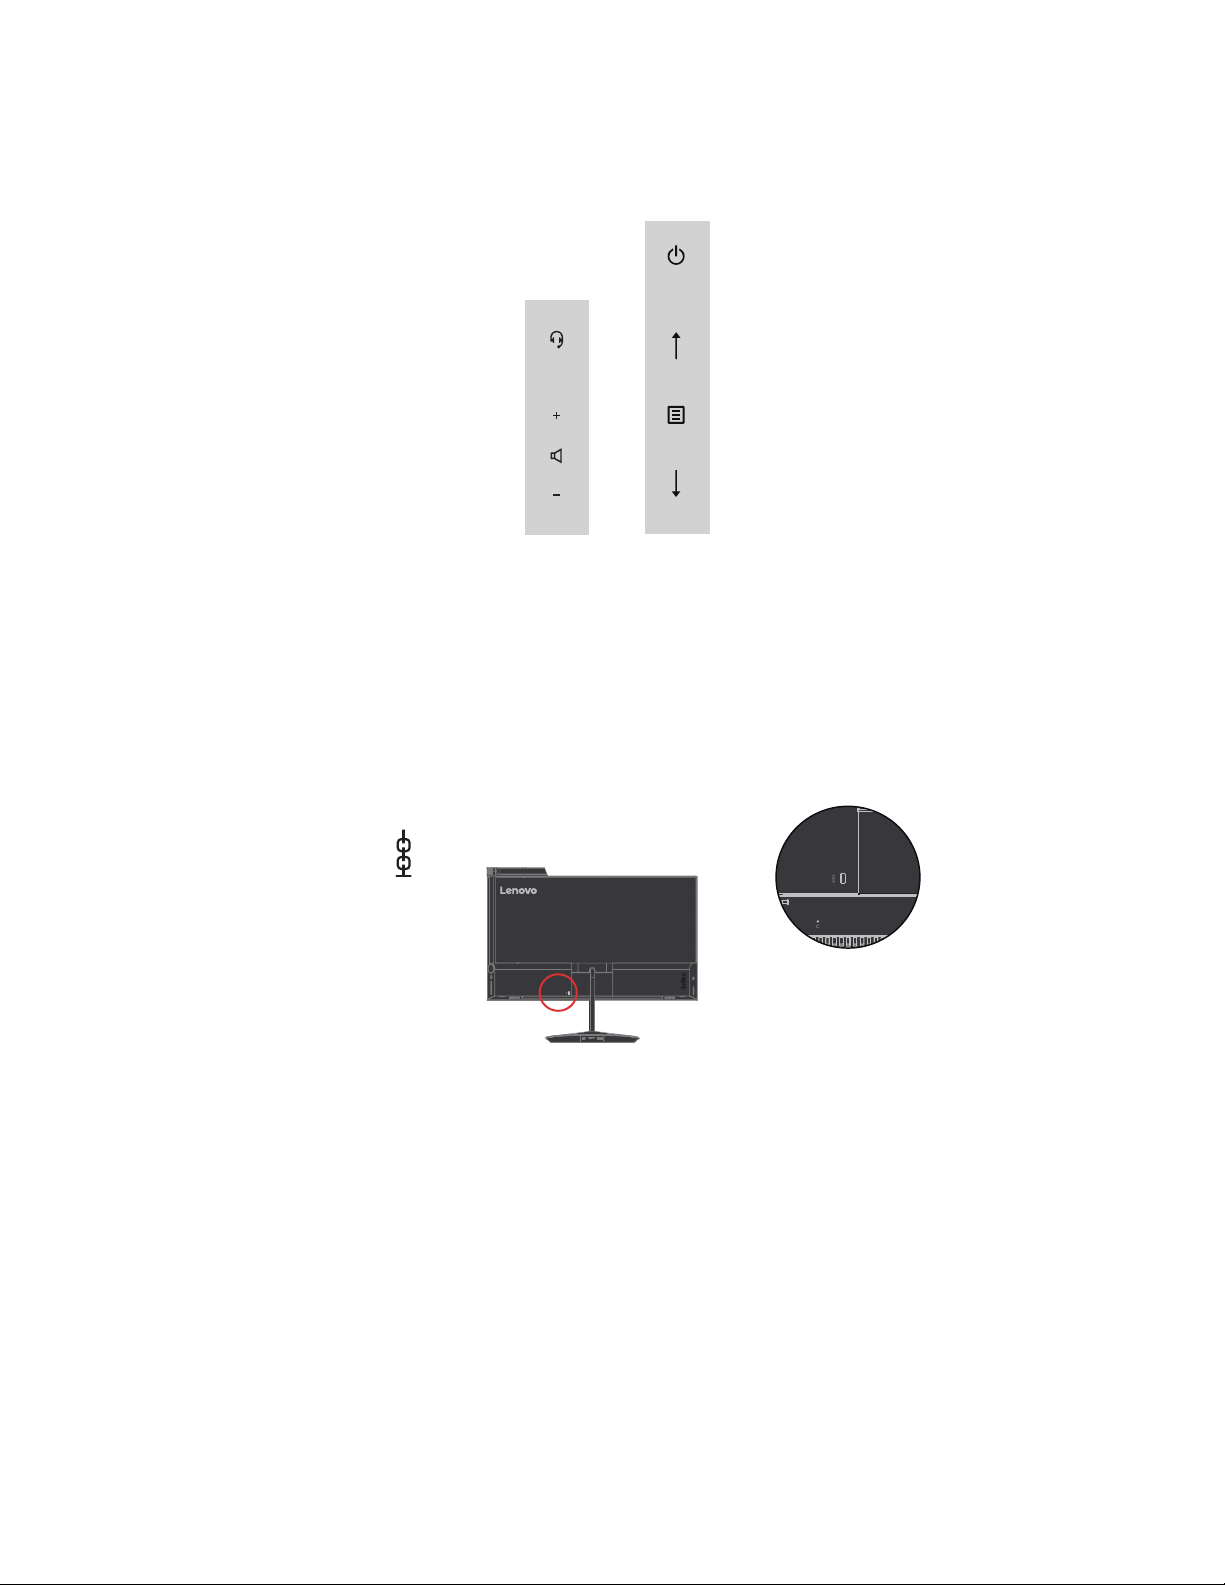
Monitor controls
Your monitor has controls on the side which are used to adjust the display.
For information on how to use these controls, please see "Adjusting your monitor image"on
page 2-3.
Cable lock slot
Your monitor is equipped with a cable lock slot located on the rear of your monitor (in the
lower position).
Chapter 1. 1-6
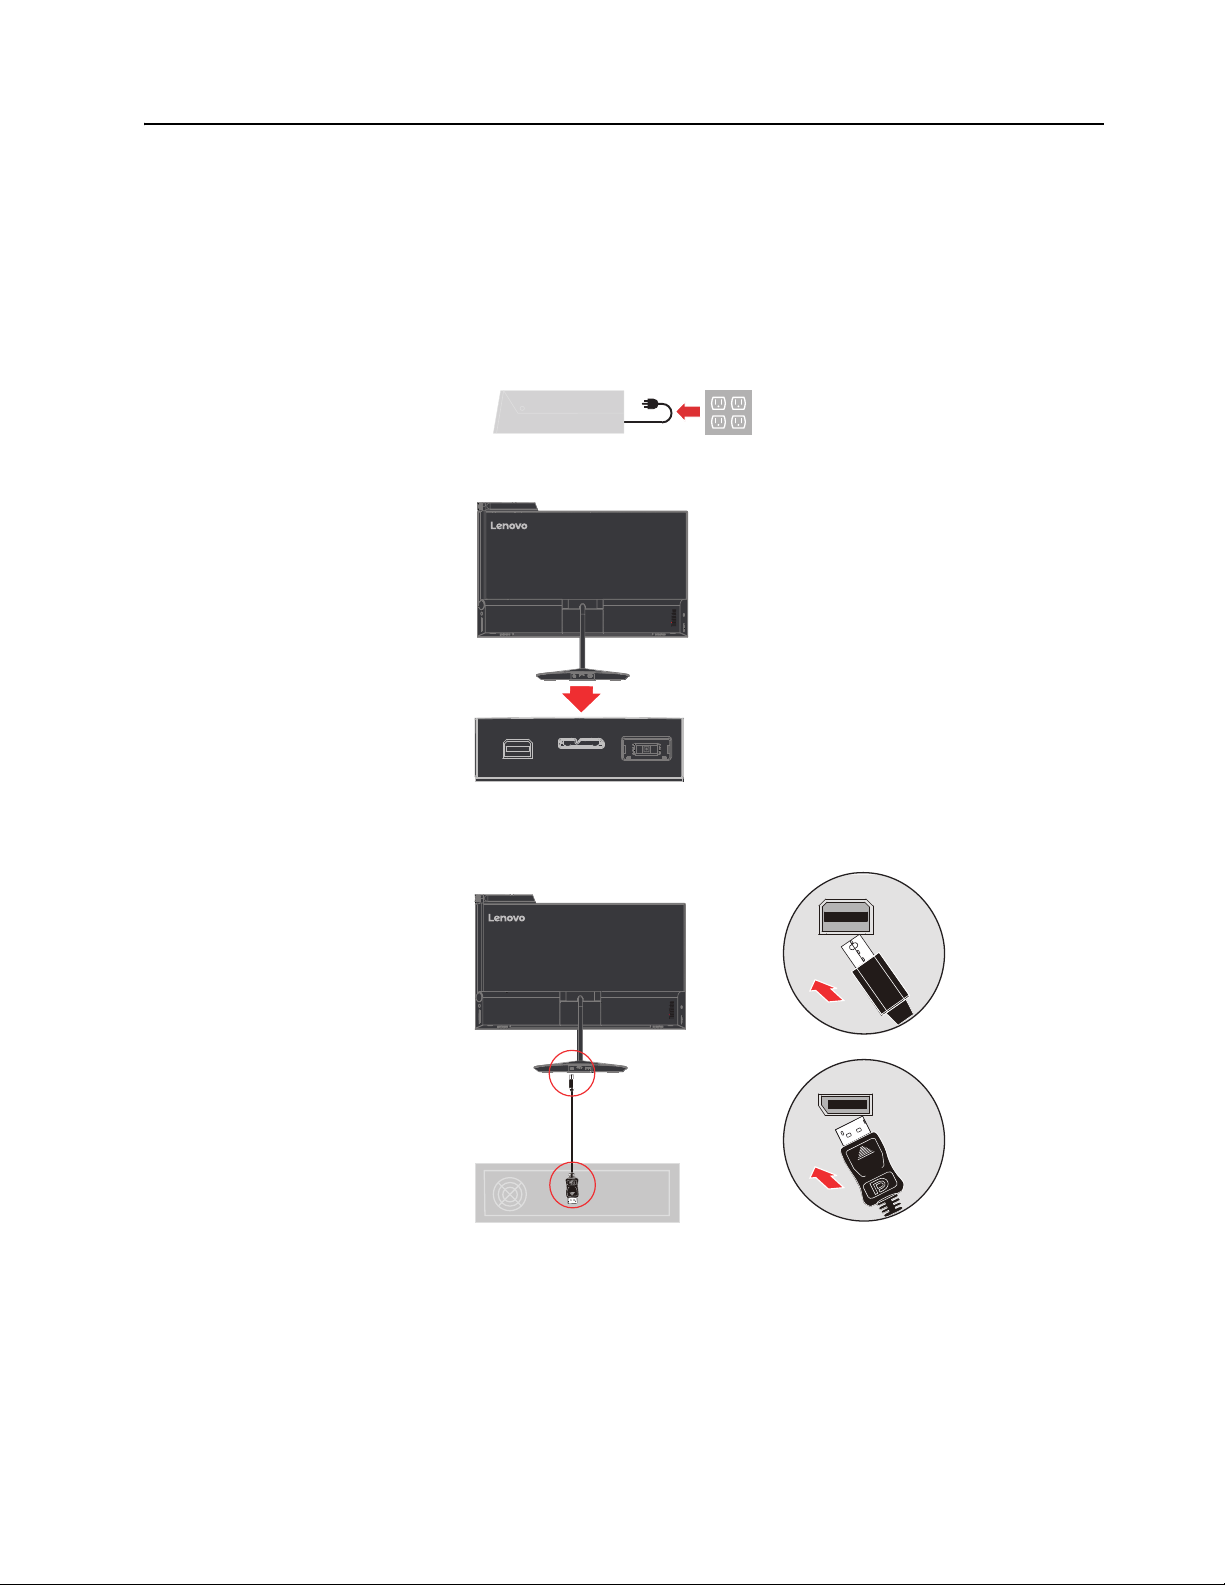
Setting up your monitor
Mini DP
DP
This section provides information on how to set up your monitor.
Connecting and turning on your monitor
Note: Be sure to read the Safety information located on page iii before carrying out this
procedure.
1. Power off your computer and all attached devices, and unplug the computer power cord.
2. Connect the cables according to below icon indication.
3. For the computer with DisplayPort
Chapter 1. 1-7

4. For the computer with Mini DisplayPort.
Mini DP
Micro USB
USB
5. For the computer with USB 3.0 port.
Chapter 1. 1-8
 Loading...