

Page 1

UserGuide
ThinkPadX1Carbon
Page 2

Note:Beforeusingthisinformationandtheproductitsupports,besuretoreadandunderstandthefollowing:
•SafetyandWarrantyGuide
•RegulatoryNotice
•“Importantsafetyinformation”onpagevi
•AppendixE“Notices”onpage147
ThelatestSafetyandWarrantyGuideandtheRegulatoryNoticeareavailableontheLenovoSupportWeb
siteat:
http://www.lenovo.com/UserManual
SecondEdition(January2014)
©CopyrightLenovo2014.
LIMITEDANDRESTRICTEDRIGHTSNOTICE:IfdataorsoftwareisdeliveredpursuantaGeneralServicesAdministration
“GSA”contract,use,reproduction,ordisclosureissubjecttorestrictionssetforthinContractNo.GS-35F-05925.
Page 3

Contents
Readthisfirst..............v
Importantsafetyinformation..........vi
Conditionsthatrequireimmediateaction..vii
Safetyguidelines............vii
Chapter1.Productoverview......1
Locatingcomputercontrols,connectors,and
indicators..................1
Frontview................1
Right-sideview..............3
Left-sideview..............5
Bottomview...............7
Rearview................8
Statusindicators.............9
Locatingimportantproductinformation.....10
Machinetypeandmodelinformation....10
FCCIDandICCertificationinformation...10
CertificateofAuthenticityinformation....11
GenuineMicrosoftlabel.........12
Features.................12
Specifications...............13
Operatingenvironment...........14
Lenovoprograms.............14
AccessingLenovoprogramsontheWindows
7operatingsystem...........15
AccessingLenovoprogramsontheWindows
8.1operatingsystem..........16
Lenovoprogramoverview........17
Chapter2.Usingyourcomputer...19
Registeringyourcomputer..........19
Frequentlyaskedquestions.........19
Usingthemulti-touchscreen.........21
UsingtheAdaptiveKeys...........24
AdaptiveKeysoverview.........25
ModesoftheAdaptiveKeys.......26
FunctionsoftheAdaptiveKeys......27
Fnkeycombinations..........30
Brightnessmanagement.........31
SettingtheAdaptiveKeys........31
Windowskey...............32
UsingtheThinkPadpointingdevice......33
Powermanagement............34
Checkingthebatterystatus........34
Usingtheacpoweradapter........35
Chargingthebattery..........35
Maximizingthebatterylife........36
Managingthebatterypower.......36
Power-savingmodes..........36
Handlingthebattery...........37
Connectingtothenetwork..........38
Ethernetconnections..........39
Wirelessconnections..........39
Presentationsandmultimedia.........43
Changingdisplaysettings........43
Connectingaprojectororanexternal
monitor................44
Settingupapresentation.........45
Usingdualdisplays...........45
Usingaudiofeatures............46
Usingthecamera.............47
Usingcameragestures...........48
Chapter3.Youandyourcomputer..51
Accessibilityandcomfort..........51
Ergonomicinformation..........51
Comfort...............52
Accessibilityinformation.........52
Travelingwithyourcomputer.........53
Traveltips...............53
Travelaccessories...........53
Chapter4.Security..........55
Usingpasswords..............55
Typingpasswords...........55
Power-onpassword...........55
Supervisorpassword..........56
Harddiskpasswords..........57
Solid-statedrivesecurity...........59
Settingthesecuritychip...........60
Usingthefingerprintreader..........61
Noticeondeletingdatafromyoursolid-state
drive...................64
Usingfirewalls...............65
Protectingdataagainstviruses........65
Chapter5.Recoveryoverview....67
RecoveryoverviewfortheWindows7operating
system..................67
Creatingandusingrecoverymedia.....67
Performingbackupandrecoveryoperations.68
UsingtheRescueandRecoveryworkspace.69
Creatingandusingarescuemedium....70
Reinstallingpreinstalledprogramsanddevice
drivers................71
©CopyrightLenovo2014
i
Page 4

Solvingrecoveryproblems........71
RecoveryoverviewfortheWindows8.1operating
system..................72
Refreshingyourcomputer........72
Resettingyourcomputertothefactorydefault
settings................72
Usingtheadvancedstartupoptions....73
RecoveringyouroperatingsystemifWindows
8.1failstostart.............73
Creatingandusingrecoverymedia.....73
Chapter6.Replacingdevices.....75
Staticelectricityprevention..........75
Disablingthebuilt-inbattery.........75
InstallingorreplacingthemicroSIMcard....76
Replacingthebasecover..........77
Replacingthesolid-statedrive........78
ReplacingthewirelessLANcard.......80
InstallingorreplacingthewirelessWANcard...83
Chapter7.Enhancingyour
computer...............87
FindingThinkPadoptions..........87
ThinkPaddocks..............87
Chapter8.Advancedconfiguration..91
Installinganewoperatingsystem.......91
InstallingtheWindows7operatingsystem..91
InstallingtheWindows8.1operatingsystem.92
Installingdevicedrivers...........93
UsingtheThinkPadSetupprogram......93
Mainmenu..............94
Configmenu..............94
DateandTimemenu..........98
Securitymenu.............98
Startupmenu.............102
Restartmenu.............104
UpdatingtheUEFIBIOS.........104
Usingsystemmanagement..........104
Settingmanagementfeatures.......105
Chapter9.Preventingproblems..107
Generaltipsforpreventingproblems......107
Makingsuredevicedriversarecurrent.....108
Takingcareofyourcomputer.........109
Cleaningthecoverofyourcomputer....110
Chapter10.Troubleshooting
computerproblems.........113
Diagnosingproblems............113
Troubleshooting..............113
Computerstopsresponding.......113
Spillsonthekeyboard..........114
Errormessages............114
Errorswithoutmessages.........115
Beeperrors..............116
Memorymoduleproblems........116
Networkingproblems..........117
Problemswiththekeyboardandotherpointing
devices................119
Problemswiththedisplayandmultimedia
devices................119
Fingerprintreaderproblems........123
Batteryandpowerproblems.......123
Asolid-statedriveproblem........126
Asoftwareproblem...........126
Problemswithportsandconnectors....126
Chapter11.Gettingsupport....129
BeforeyoucontactLenovo..........129
Gettinghelpandservice...........129
Usingdiagnosticprograms........130
LenovoSupportWebsite.........130
CallingLenovo.............130
Purchasingadditionalservices........131
AppendixA.Regulatory
Information.............133
Wirelessrelatedinformation.........133
LocationsoftheUltraConnect™wireless
antennas...............134
Locatingwirelessregulatorynotices....135
Exportclassificationnotice..........135
Electronicemissionnotices..........135
FederalCommunicationsCommission
DeclarationofConformity........135
IndustryCanadaClassBemissioncompliance
statement...............136
EuropeanUnion-Compliancetothe
ElectromagneticCompatibilityDirective...136
GermanClassBcompliancestatement...136
KoreaClassBcompliancestatement....137
JapanVCCIClassBcompliancestatement..137
Japancompliancestatementforproducts
whichconnecttothepowermainswith
ratedcurrentlessthanorequalto20Aper
phase................137
Lenovoproductserviceinformationfor
Taiwan................137
Eurasiancompliancemark..........137
AppendixB.WEEEandrecycling
statements.............139
ImportantWEEEinformation.........139
RecyclinginformationforJapan........139
iiUserGuide
Page 5

BatteryrecyclinginformationforBrazil.....140
BatteryrecyclinginformationforTaiwan.....140
BatteryrecyclinginformationfortheEuropean
Union..................141
BatteryrecyclinginformationfortheUnitedStates
andCanada................141
IndiaRoHS................143
TurkishRoHS...............143
UkraineRoHS...............144
AppendixD.ENERGYSTARmodel
information.............145
AppendixC.RestrictionofHazardous
SubstancesDirective(RoHS)....143
EuropeanUnionRoHS...........143
ChinaRoHS................143
AppendixE.Notices.........147
Trademarks................148
©CopyrightLenovo2014
iii
Page 6

ivUserGuide
Page 7
Readthisfirst
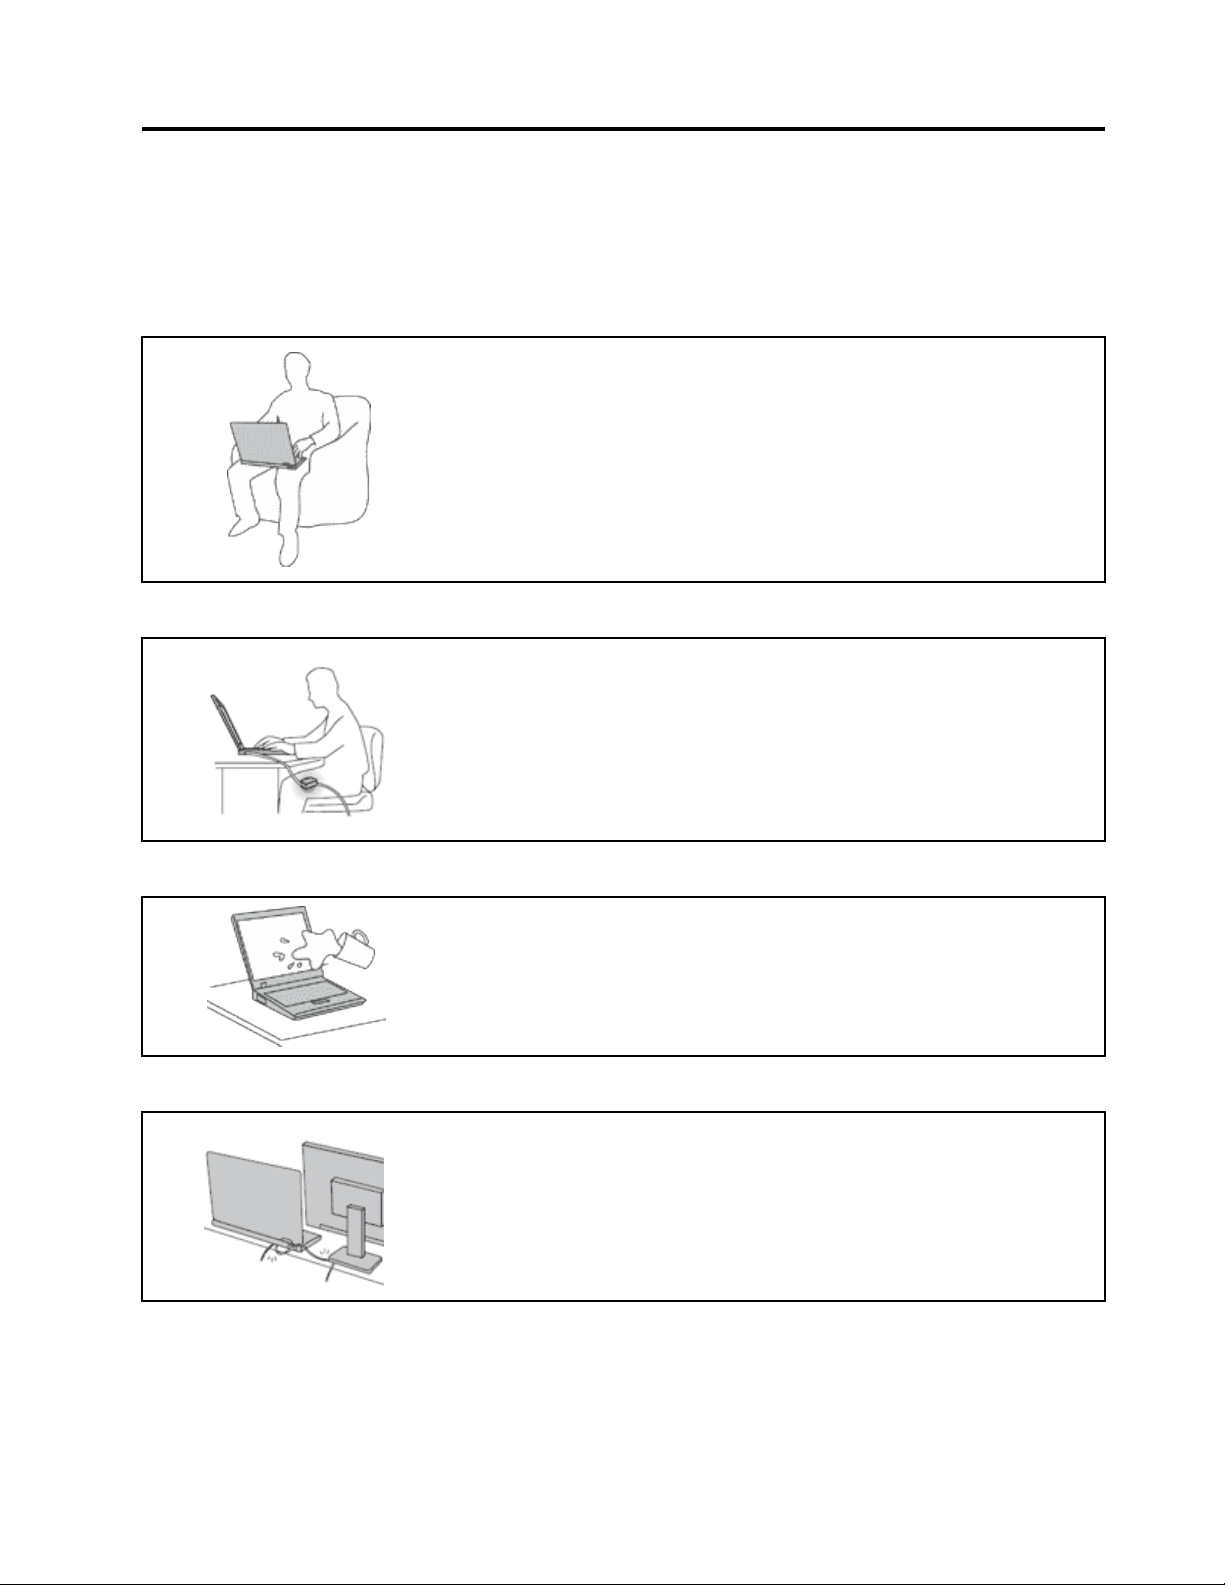
Besuretofollowtheimportanttipsgivenheretogetthemostuseandenjoymentoutofyourcomputer.
Failuretodosomightleadtodiscomfortorinjury,orcauseyourcomputertofail.
Protectyourselffromtheheatthatyourcomputergenerates.
Whenyourcomputeristurnedonorthebatteryischarging,thebase,thepalm
rest,andsomeotherpartsmaybecomehot.Thetemperaturetheyreach
dependsontheamountofsystemactivityandthelevelofchargeinthebattery.
Extendedcontactwithyourbody,eventhroughclothing,couldcause
discomfortorevenaskinburn.
•Avoidkeepingyourhands,yourlap,oranyotherpartofyourbodyin
contactwithahotsectionofthecomputerforanyextendedtime.
•Periodicallytakehandsfromusingthekeyboardbyliftingyourhandsfrom
thepalmrest.
Protectyourselffromtheheatgeneratedbytheacpoweradapter.
Whentheacpoweradapterisconnectedtoanelectricaloutletandyour
computer,itgeneratesheat.
Extendedcontactwithyourbody,eventhroughclothing,maycauseaskin
burn.
•Donotplacetheacpoweradapterincontactwithanypartofyourbody
whileitisinuse.
•Neveruseittowarmyourbody.
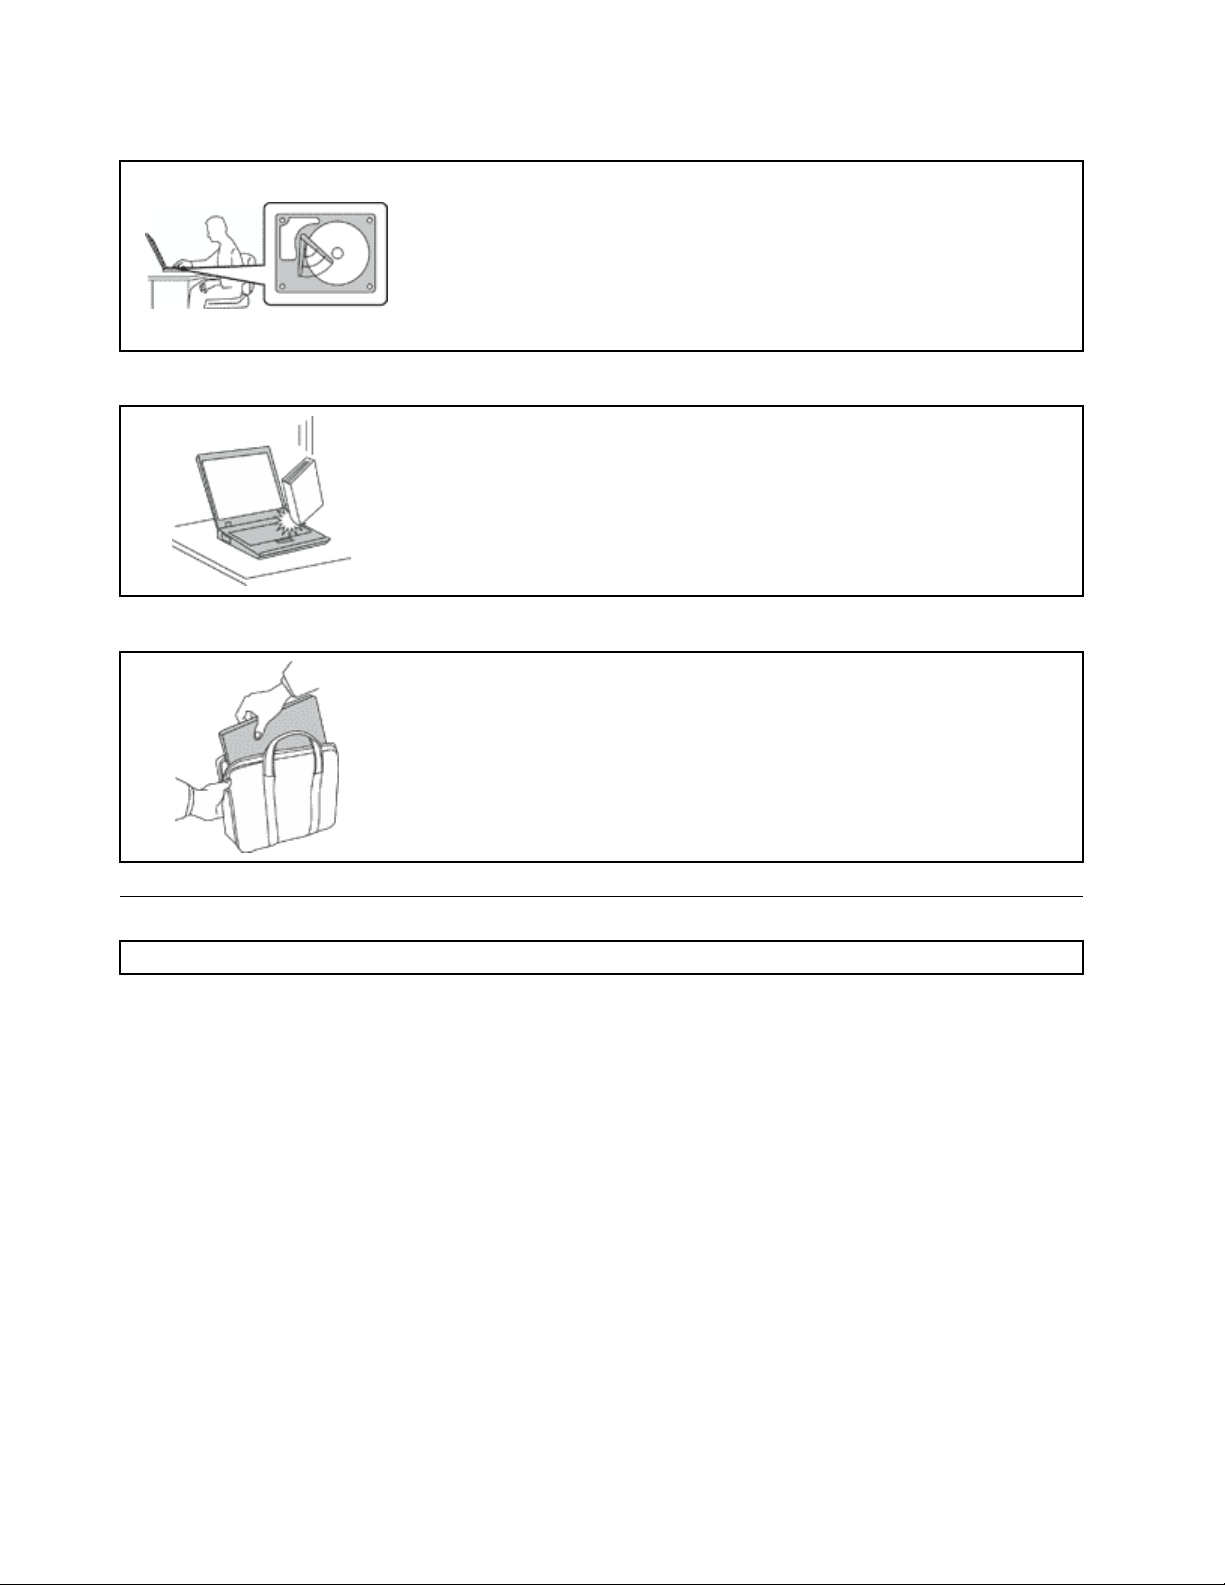
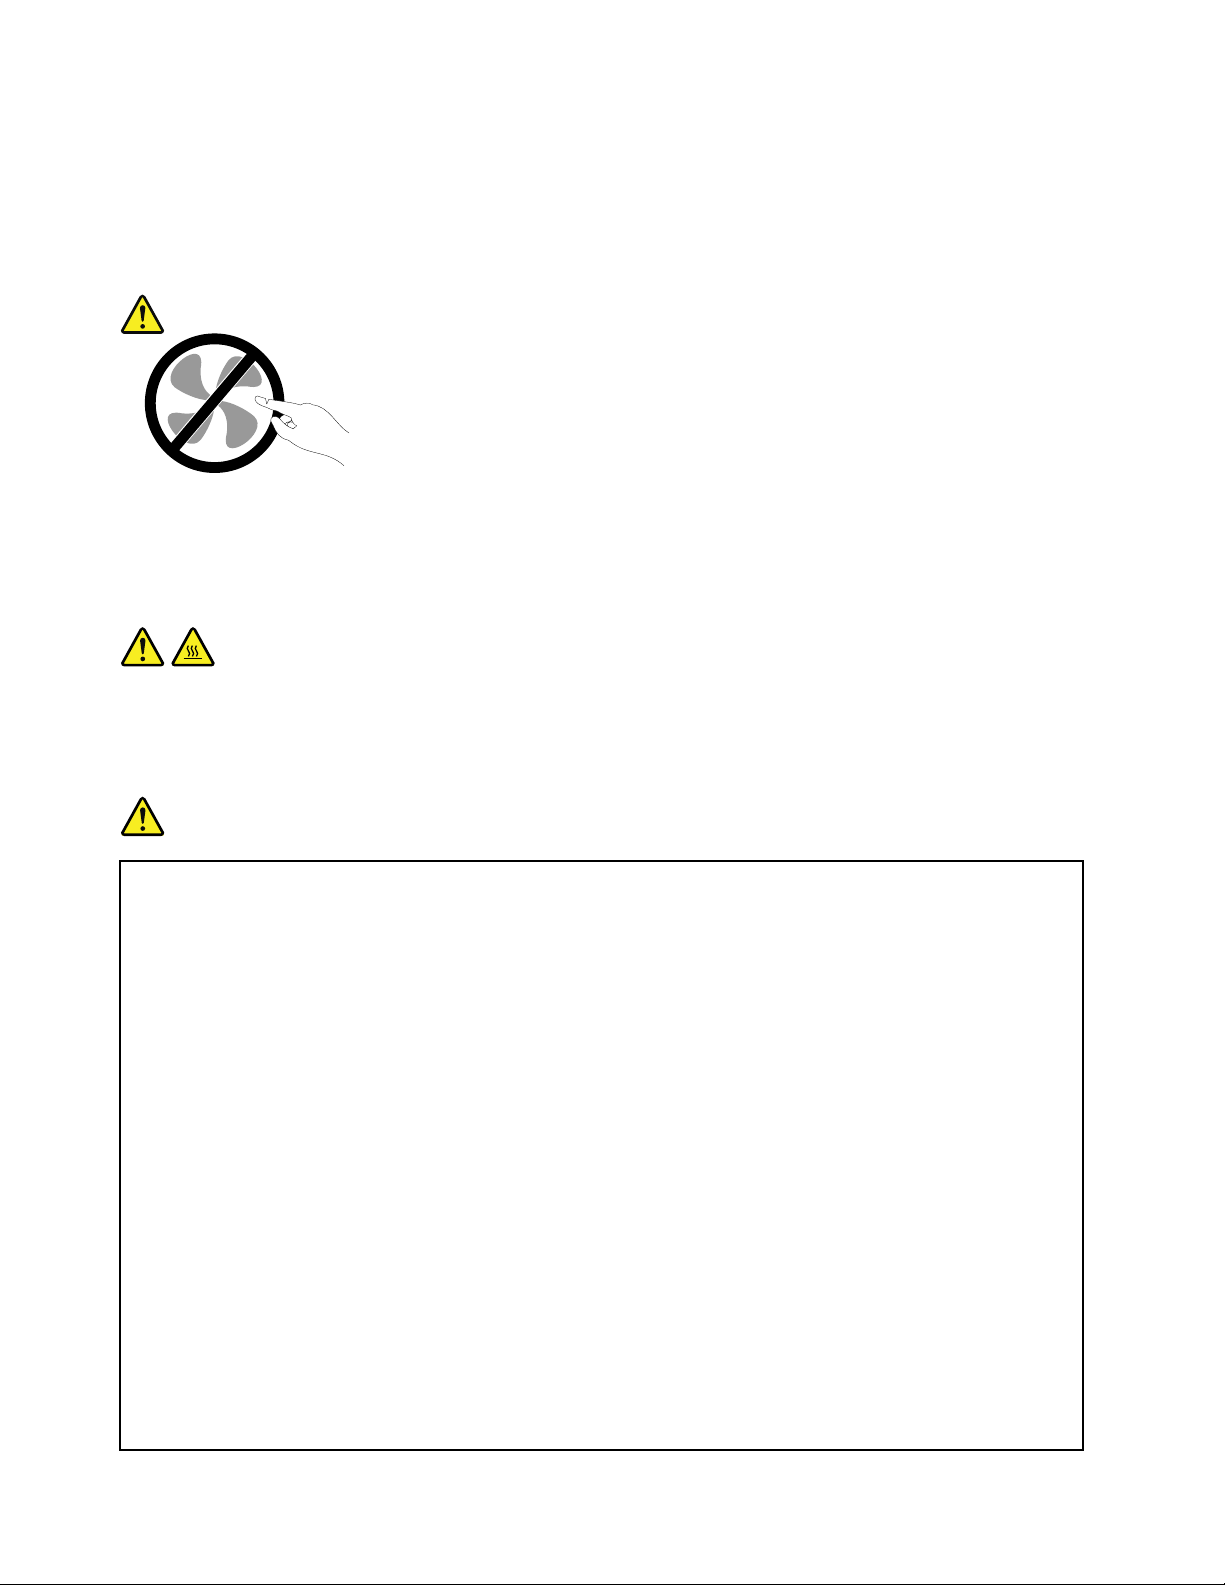
Preventyourcomputerfromgettingwet.
Protectthecablesfrombeingdamaged.
Toavoidspillsandthedangerofelectricalshock,keepliquidsawayfromyour
computer.
Applyingstrongforcetocablesmaydamageorbreakthem.
Routecommunicationlines,orthecablesofanacpoweradapter,amouse,a
keyboard,aprinter,oranyotherelectronicdevice,sothattheycannotbewalked
on,trippedover,pinchedbyyourcomputerorotherobjects,orinanyway
subjectedtotreatmentthatcouldinterferewiththeoperationofyourcomputer.
©CopyrightLenovo2014
v
Page 8
Protectyourcomputeranddatawhenmovingit.
Beforemovingacomputerequippedwithaharddiskdrive,dooneofthe
following,andmakesurethatthepowerbuttonisofforisblinking:
•Turnitoff.
•Putitinsleepmode.
•Putitinhibernationmode.
Thiswillhelptopreventdamagetothecomputer,andpossiblelossofdata.
Handleyourcomputergently.
Donotdrop,bump,scratch,twist,hit,vibrate,push,orplaceheavyobjectson
yourcomputer,display,orexternaldevices.
Carryyourcomputercarefully.
•Useaqualitycarryingcasethatprovidesadequatecushioningandprotection.
•Donotpackyourcomputerinatightlypackedsuitcaseorbag.
•Beforeputtingyourcomputerinacarryingcase,makesurethatitisoff,insleep
mode,orinhibernationmode.Donotputacomputerinacarryingcasewhileit
isturnedon.
Importantsafetyinformation
Note:Readtheimportantsafetyinformationfirst.
Thisinformationcanhelpyousafelyuseyournotebookcomputer.Followandretainallinformationincluded
withyourcomputer.Theinformationinthisdocumentdoesnotalterthetermsofyourpurchaseagreement
ortheLenovo
WarrantyGuidethatcomeswithyourcomputer.
Customersafetyisimportant.Ourproductsaredevelopedtobesafeandeffective.However,personal
computersareelectronicdevices.Powercords,poweradapters,andotherfeaturescancreatepotential
safetyrisksthatcanresultinphysicalinjuryorpropertydamage,especiallyifmisused.Toreducethese
risks,followtheinstructionsincludedwithyourproduct,observeallwarningsontheproductandinthe
operatinginstructions,andreviewtheinformationincludedinthisdocumentcarefully.Bycarefullyfollowing
theinformationcontainedinthisdocumentandprovidedwithyourproduct,youcanhelpprotectyourself
fromhazardsandcreateasafercomputerworkenvironment.
Note:Thisinformationincludesreferencestopoweradaptersandbatteries.Inadditiontonotebook
computers,someproducts(suchasspeakersandmonitors)shipwithexternalpoweradapters.Ifyouhave
suchaproduct,thisinformationappliestoyourproduct.Inaddition,computerproductscontainacoin-sized
internalbatterythatprovidespowertothesystemclockevenwhenthecomputerisunplugged,sothe
batterysafetyinformationappliestoallcomputerproducts.
®
LimitedWarranty.Formoreinformation,see“WarrantyInformation”intheSafetyand
viUserGuide
Page 9

Conditionsthatrequireimmediateaction
Productscanbecomedamagedduetomisuseorneglect.Someproductdamageisseriousenough
thattheproductshouldnotbeusedagainuntilithasbeeninspectedand,ifnecessary,repairedby
anauthorizedservicer.
Aswithanyelectronicdevice,paycloseattentiontotheproductwhenitisturnedon.Onveryrare
occasions,youmightnoticeanodororseeapuffofsmokeorsparksventfromyourproduct.Oryou
mighthearsoundslikepopping,crackingorhissing.Theseconditionsmightmerelymeanthatan
internalelectroniccomponenthasfailedinasafeandcontrolledmanner .Or ,theymightindicate
apotentialsafetyissue.However,donottakerisksorattempttodiagnosethesituationyourself.
ContacttheCustomerSupportCenterforfurtherguidance.ForalistofServiceandSupportphone
numbers,seethefollowingWebsite:
http://www.lenovo.com/support/phone
Frequentlyinspectyourcomputeranditscomponentsfordamageorwearorsignsofdanger.
Ifyouhaveanyquestionabouttheconditionofacomponent,donotusetheproduct.Contact
theCustomerSupportCenterortheproductmanufacturerforinstructionsonhowtoinspectthe
productandhaveitrepaired,ifnecessary.
Intheunlikelyeventthatyounoticeanyofthefollowingconditions,orifyouhaveanysafety
concernswithyourproduct,stopusingtheproductandunplugitfromthepowersourceand
telecommunicationlinesuntilyoucanspeaktotheCustomerSupportCenterforfurtherguidance.
•Powercords,plugs,poweradapters,extensioncords,surgeprotectors,orpowersuppliesthatare
cracked,broken,ordamaged.
•Signsofoverheating,smoke,sparks,orfire.
•Damagetoabattery(suchascracks,dents,orcreases),dischargefromabattery,orabuildupofforeign
substancesonthebattery.
•Acracking,hissingorpoppingsound,orstrongodorthatcomesfromtheproduct.
•Signsthatliquidhasbeenspilledoranobjecthasfallenontothecomputerproduct,thepowercordor
poweradapter.
•Thecomputerproduct,powercord,orpoweradapterhasbeenexposedtowater.
•Theproducthasbeendroppedordamagedinanyway.
•Theproductdoesnotoperatenormallywhenyoufollowtheoperatinginstructions.
Note:Ifyounoticetheseconditionswithaproduct(suchasanextensioncord)thatisnotmanufacturedfor
orbyLenovo,stopusingthatproductuntilyoucancontacttheproductmanufacturerforfurtherinstructions,
oruntilyougetasuitablereplacement.
Safetyguidelines
Alwaysobservethefollowingprecautionstoreducetheriskofinjuryandpropertydamage.
Serviceandupgrades
DonotattempttoserviceaproductyourselfunlessinstructedtodosobytheCustomerSupportCenteror
yourdocumentation.OnlyuseaServiceProviderwhoisapprovedtorepairyourparticularproduct.
Note:Somecomputerpartscanbeupgradedorreplacedbythecustomer.Upgradestypicallyare
referredtoasoptions.ReplacementpartsapprovedforcustomerinstallationarereferredtoasCustomer
ReplaceableUnits,orCRUs.Lenovoprovidesdocumentationwithinstructionswhenitisappropriatefor
customerstoinstalloptionsorreplaceCRUs.Y oumustcloselyfollowallinstructionswheninstallingor
replacingparts.TheOffstateofapowerindicatordoesnotnecessarilymeanthatvoltagelevelsinsidea
©CopyrightLenovo2014
vii
Page 10
productarezero.Beforeyouremovethecoversfromaproductequippedwithapowercord,alwaysmake
surethatthepoweristurnedoffandthattheproductisunpluggedfromanypowersource.Ifyouhave
anyquestionsorconcerns,contacttheCustomerSupportCenter.
Althoughtherearenomovingpartsinyourcomputerafterthepowercordhasbeendisconnected,the
followingwarningsarerequiredforyoursafety.
CAUTION:
Hazardousmovingparts.Keepfingersandotherbodypartsaway.
CAUTION:
BeforereplacinganyCRUs,turnoffthecomputerandwaitthreetofiveminutestoletthecomputer
coolbeforeopeningthecover.
Powercordsandpoweradapters
DANGER
Useonlythepowercordsandpoweradapterssuppliedbytheproductmanufacturer.
Thepowercordsshallbesafetyapproved.ForGermany,itshallbeH05VV-F,3G,0.75mm
better.Forothercountries,thesuitabletypesshallbeusedaccordingly.
Neverwrapapowercordaroundapoweradapterorotherobject.Doingsocanstressthecordin
waysthatcancausethecordtofray,crack,orcrimp.Thiscanpresentasafetyhazard.
Alwaysroutepowercordssothattheywillnotbewalkedon,trippedover,orpinchedbyobjects.
Protectpowercordsandpoweradaptersfromliquids.Forinstance,donotleaveyourpowercord
orpoweradapternearsinks,tubs,toilets,oronfloorsthatarecleanedwithliquidcleansers.
Liquidscancauseashortcircuit,particularlyifthepowercordorpoweradapterhasbeenstressed
bymisuse.Liquidsalsocancausegradualcorrosionofpowercordterminalsand/ortheconnector
terminalsonapoweradapter,whichcaneventuallyresultinoverheating.
Alwaysconnectpowercordsandsignalcablesinthecorrectorderandensurethatallpowercord
connectorsaresecurelyandcompletelypluggedintoreceptacles.
Donotuseanypoweradapterthatshowscorrosionattheacinputpinsorshowssignsof
overheating(suchasdeformedplastic)attheacinputpinsoranywhereonthepoweradapter.
2
,or
Donotuseanypowercordswheretheelectricalcontactsoneitherendshowsignsofcorrosionor
overheatingorwherethepowercordappearstohavebeendamagedinanyway.
viiiUserGuide
Page 11
Topreventpossibleoverheating,donotcoverthepoweradapterwithclothingorotherobjects
whenthepoweradapterispluggedintoanelectricaloutlet.
Extensioncordsandrelateddevices
Ensurethatextensioncords,surgeprotectors,uninterruptiblepowersupplies,andpowerstripsthatyouuse
areratedtohandletheelectricalrequirementsoftheproduct.Neveroverloadthesedevices.Ifpowerstrips
areused,theloadshouldnotexceedthepowerstripinputrating.Consultanelectricianformoreinformation
ifyouhavequestionsaboutpowerloads,powerrequirements,andinputratings.
Plugsandoutlets
DANGER
Ifareceptacle(poweroutlet)thatyouintendtousewithyourcomputerequipmentappearstobe
damagedorcorroded,donotusetheoutletuntilitisreplacedbyaqualifiedelectrician.
Donotbendormodifytheplug.Iftheplugisdamaged,contactthemanufacturertoobtain
areplacement.
Donotshareanelectricaloutletwithotherhomeorcommercialappliancesthatdrawlargeamounts
ofelectricity;otherwise,unstablevoltagemightdamageyourcomputer,data,orattacheddevices.
Someproductsareequippedwithathree-prongedplug.Thisplugfitsonlyintoagrounded
electricaloutlet.Thisisasafetyfeature.Donotdefeatthissafetyfeaturebytryingtoinsertitinto
anon-groundedoutlet.Ifyoucannotinserttheplugintotheoutlet,contactanelectricianforan
approvedoutletadapterortoreplacetheoutletwithonethatenablesthissafetyfeature.Never
overloadanelectricaloutlet.Theoverallsystemloadshouldnotexceed80percentofthebranch
circuitrating.Consultanelectricianformoreinformationifyouhavequestionsaboutpowerloads
andbranchcircuitratings.
Besurethatthepoweroutletyouareusingisproperlywired,easilyaccessible,andlocatedclose
totheequipment.Donotfullyextendpowercordsinawaythatwillstressthecords.
Besurethatthepoweroutletprovidesthecorrectvoltageandcurrentfortheproductyouare
installing.
Carefullyconnectanddisconnecttheequipmentfromtheelectricaloutlet.
Powersupplystatement
DANGER
Neverremovethecoveronapowersupplyoranypartthathasthefollowinglabelattached.
©CopyrightLenovo2014
ix
Page 12

Hazardousvoltage,current,andenergylevelsarepresentinsideanycomponentthathasthislabel
attached.Therearenoserviceablepartsinsidethesecomponents.Ifyoususpectaproblemwith
oneoftheseparts,contactaservicetechnician.
Externaldevices
CAUTION:
DonotconnectordisconnectanyexternaldevicecablesotherthanUSBcableswhilethecomputer
powerison;otherwise,youmightdamageyourcomputer.T oavoidpossibledamagetoattached
devices,waitatleastfivesecondsafterthecomputerisshutdowntodisconnectexternaldevices.
Generalbatterynotice
DANGER
PersonalcomputersmanufacturedbyLenovocontainacoin-cellbatterytoprovidepowerto
thesystemclock.Inaddition,manymobileproducts,suchasnotebookcomputers,utilizea
rechargeablebatterypacktoprovidesystempowerwheninportablemode.Batteriessuppliedby
Lenovoforusewithyourproducthavebeentestedforcompatibilityandshouldonlybereplaced
withapprovedparts.
Neverattempttoopenorserviceanybattery.Donotcrush,puncture,orincineratebatteriesor
shortcircuitthemetalcontacts.Donotexposethebatterytowaterorotherliquids.Onlyrecharge
thebatterypackstrictlyaccordingtoinstructionsincludedintheproductdocumentation.
Batteryabuseormishandlingcancausethebatterytooverheat,whichcancausegassesorflame
to“vent”fromthebatterypackorcoin-cellbattery.Ifyourbatteryisdamaged,orifyounoticeany
dischargefromyourbatteryorthebuildupofforeignmaterialsonthebatteryleads,stopusingthe
batteryandobtainareplacementfromthebatterymanufacturer.
Batteriescandegradewhentheyareleftunusedforlongperiodsoftime.Forsomerechargeable
batteries(particularlyLithiumIonbatteries),leavingabatteryunusedinadischargedstatecould
increasetheriskofabatteryshortcircuit,whichcouldshortenthelifeofthebatteryandalsocan
poseasafetyhazard.DonotletrechargeableLithium-Ionbatteriescompletelydischargeorstore
thesebatteriesinadischargedstate.
Noticeforlithiumcoin-cellbattery
DANGER
Dangerofexplosionifbatteryisincorrectlyreplaced.
Donot:
•Throworimmerseintowater
•Heattomorethan100°C(212°F)
•Repairordisassemble
Disposeofthebatteryasrequiredbylocalordinancesorregulations.
ThefollowingstatementappliestousersinthestateofCalifornia,U.S.A.
CaliforniaPerchlorateInformation:
xUserGuide
Page 13

Productscontainingmanganesedioxidelithiumcoin-cellbatteriesmaycontainperchlorate.
PerchlorateMaterial-specialhandlingmayapply,See
www.dtsc.ca.gov/hazardouswaste/perchlorate
Noticeforbuilt-inrechargeablebattery
DANGER
Donotattempttoreplacetheinternalrechargeablelithiumbatteries.ContactLenovoSupportfor
factoryreplacement.
Heatandproductventilation
DANGER
Computers,acpoweradapters,andmanyaccessoriescangenerateheatwhenturnedonandwhen
batteriesarecharging.Notebookcomputerscangenerateasignificantamountofheatduetotheir
compactsize.Alwaysfollowthesebasicprecautions:
•Whenyourcomputeristurnedonorthebatteryischarging,thebase,thepalmrest,andsome
otherpartsmaybecomehot.Avoidkeepingyourhands,yourlap,oranyotherpartofyour
bodyincontactwithahotsectionofthecomputerforanyextendedlengthoftime.Whenyou
usethekeyboard,avoidkeepingyourpalmsonthepalmrestforaprolongedperiodoftime.
Yourcomputergeneratessomeheatduringnormaloperation.Theamountofheatdependson
theamountofsystemactivityandthebatterychargelevel.Extendedcontactwithyourbody,
eventhroughclothing,couldcausediscomfortorevenaskinburn.Periodicallytakebreaks
fromusingthekeyboardbyliftingyourhandsfromthepalmrest;andbecarefulnottouse
thekeyboardforanyextendedlengthoftime.
•Donotoperateyourcomputerorchargethebatterynearflammablematerialsorinexplosive
environments.
•Ventilationslots,fansand/orheatsinksareprovidedwiththeproductforsafety,comfort,and
reliableoperation.Thesefeaturesmightinadvertentlybecomeblockedbyplacingtheproducton
abed,sofa,carpet,orotherflexiblesurface.Neverblock,cover,ordisablethesefeatures.
•Whentheacpoweradapterisconnectedtoanelectricaloutletandyourcomputer,itgenerates
heat.Donotplacetheadapterincontactwithanypartofyourbodywhileusingit.Neverusethe
acpoweradaptertowarmyourbody.Extendedcontactwithyourbody,eventhroughclothing,
maycauseaskinburn.
Foryoursafety,alwaysfollowthesebasicprecautionswithyourcomputer:
•Keepthecoverclosedwheneverthecomputerispluggedin.
•Regularlyinspecttheoutsideofthecomputerfordustaccumulation.
•Removedustfromventsandanyperforationsinthebezel.Morefrequentcleaningsmightbe
requiredforcomputersindustyorhigh-trafficareas.
•Donotrestrictorblockanyventilationopenings.
•Donotoperateyourcomputerinsidefurniture,asthismightincreasetheriskofoverheating.
•Airflowtemperaturesintothecomputershouldnotexceed35°C(95°F).
©CopyrightLenovo2014
xi
Page 14

Electricalcurrentsafetyinformation
DANGER
Electriccurrentfrompower,telephone,andcommunicationcablesishazardous.
Toavoidashockhazard:
•Donotuseyourcomputerduringalightningstorm.
•Donotconnectordisconnectanycablesorperforminstallation,maintenance,orreconfiguration
ofthisproductduringanelectricalstorm.
•Connectallpowercordstoaproperlywiredandgroundedelectricaloutlet.
•Connecttoproperlywiredoutletsanyequipmentthatwillbeattachedtothisproduct.
•Wheneverpossible,useonehandonlytoconnectordisconnectsignalcables.
•Neverturnonanyequipmentwhenthereisevidenceoffire,water,orstructuraldamage.
•Donotuseyourcomputeruntilallinternalpartsenclosuresarefastenedintoplace.Neveruse
thecomputerwheninternalpartsandcircuitsareexposed.
DANGER
Connectanddisconnectcablesasdescribedinthefollowingprocedureswheninstalling,moving,
oropeningcoversonthisproductorattacheddevices.
Toconnect:
1.T urneverythingOFF .
2.First,attachallcablestodevices.
3.Attachsignalcablestoconnectors.
4.Attachpowercordstooutlets.
5.T urndevicesON.
Thepowercordmustbedisconnectedfromthewalloutletorreceptaclebeforeinstallingallother
electricalcablesconnectedtothecomputer.
Thepowercordmaybereconnectedtothewalloutletorreceptacleonlyafterallotherelectrical
cableshavebeenconnectedtothecomputer.
Todisconnect:
1.T urneverythingOFF .
2.First,removepowercordsfromoutlets.
3.Removesignalcablesfromconnectors.
4.Removeallcablesfromdevices.
Liquidcrystaldisplaynotice
CAUTION:
Theliquidcrystaldisplay(LCD)ismadeofglass,androughhandlingordroppingthecomputercan
causetheLCDtobreak.IftheLCDbreaksandtheinternalfluidgetsintoyoureyesoronyour
hands,immediatelywashtheaffectedareaswithwaterforatleast15minutes;ifanysymptomsare
presentafterwashing,getmedicalcare.
Note:Forproductswithmercury-containingfluorescentlamps(forexample,non-LED),thefluorescentlamp
intheliquidcrystaldisplay(LCD)containsmercury;disposeofaccordingtolocal,state,orfederallaws.
Usingheadphonesorearphones
Ifyourcomputerhasbothaheadphoneconnectorandanaudio-outconnector,alwaysusetheheadphone
connectorforheadphones(alsocalledaheadset)orearphones.
xiiUserGuide
Page 15

CAUTION:
Excessivesoundpressurefromearphonesandheadphonescancausehearingloss.Adjustmentof
theequalizertomaximumincreasestheearphoneandheadphoneoutputvoltageandthesound
pressurelevel.Therefore,toprotectyourhearing,adjusttheequalizertoanappropriatelevel.
Excessiveuseofheadphonesorearphonesforalongperiodoftimeathighvolumecanbedangerousifthe
outputoftheheadphoneorearphoneconnectorsdonotcomplywithspecificationsofEN50332-2.The
headphoneoutputconnectorofyourcomputercomplieswithEN50332-2Subclause7.Thisspecification
limitsthecomputer’smaximumwidebandtrueRMSoutputvoltageto150mV.T ohelpprotectagainst
hearingloss,ensurethattheheadphonesorearphonesyouusealsocomplywithEN50332-2(Clause7
limits)forawidebandcharacteristicvoltageof75mV.UsingheadphonesthatdonotcomplywithEN
50332-2canbedangerousduetoexcessivesoundpressurelevels.
IfyourLenovocomputercamewithheadphonesorearphonesinthepackage,asaset,thecombinationof
theheadphonesorearphonesandthecomputeralreadycomplieswiththespecificationsofEN50332-1.
Ifdifferentheadphonesorearphonesareused,ensurethattheycomplywithEN50332-1(Clause6.5
LimitationValues).UsingheadphonesthatdonotcomplywithEN50332-1canbedangerousdueto
excessivesoundpressurelevels.
Additionalsafetyinformation
Plasticbagnotice
DANGER
Plasticbagscanbedangerous.Keepplasticbagsawayfrombabiesandchildrentoavoiddanger
ofsuffocation.
Chokinghazardnotice
CHOKINGHAZARD–Productcontainssmallparts.
Keepawayfromchildrenunderthreeyears.
PolyvinylChloride(PVC)cableandcordnotice
Manypersonalcomputerproductsandaccessoriescontaincords,cablesorwires,suchaspowercordsor
cordstoconnecttheaccessorytoapersonalcomputer.Ifthisproducthassuchacord,cableorwire,then
thefollowingwarningapplies:
WARNING:Handlingthecordonthisproductorcordsassociatedwithaccessoriessoldwiththisproduct
willexposeyoutolead,achemicalknowntotheStateofCaliforniatocausecancer,andbirthdefectsor
otherreproductiveharm.Washhandsafterhandling.
Savetheseinstructions.
©CopyrightLenovo2014
xiii
Page 16

xivUserGuide
Page 17
Chapter1.Productoverview
Thischapterprovidesinformationaboutthelocationsofconnectors,locationsofimportantproductlabels,
computerfeatures,specifications,operatingenvironment,andpreinstalledprograms.
•“Locatingcomputercontrols,connectors,andindicators”onpage1
•“Locatingimportantproductinformation”onpage10
•“Features”onpage12
•“Specifications”onpage13
•“Operatingenvironment”onpage14
•“Lenovoprograms”onpage14
Locatingcomputercontrols,connectors,andindicators
Thissectionintroducesthecomputerhardwarefeaturestogiveyouthebasicinformationyouwillneed
tostartusingthecomputer.
Note:Y ourcomputermightlookdifferentfromtheillustrationsinthistopic.
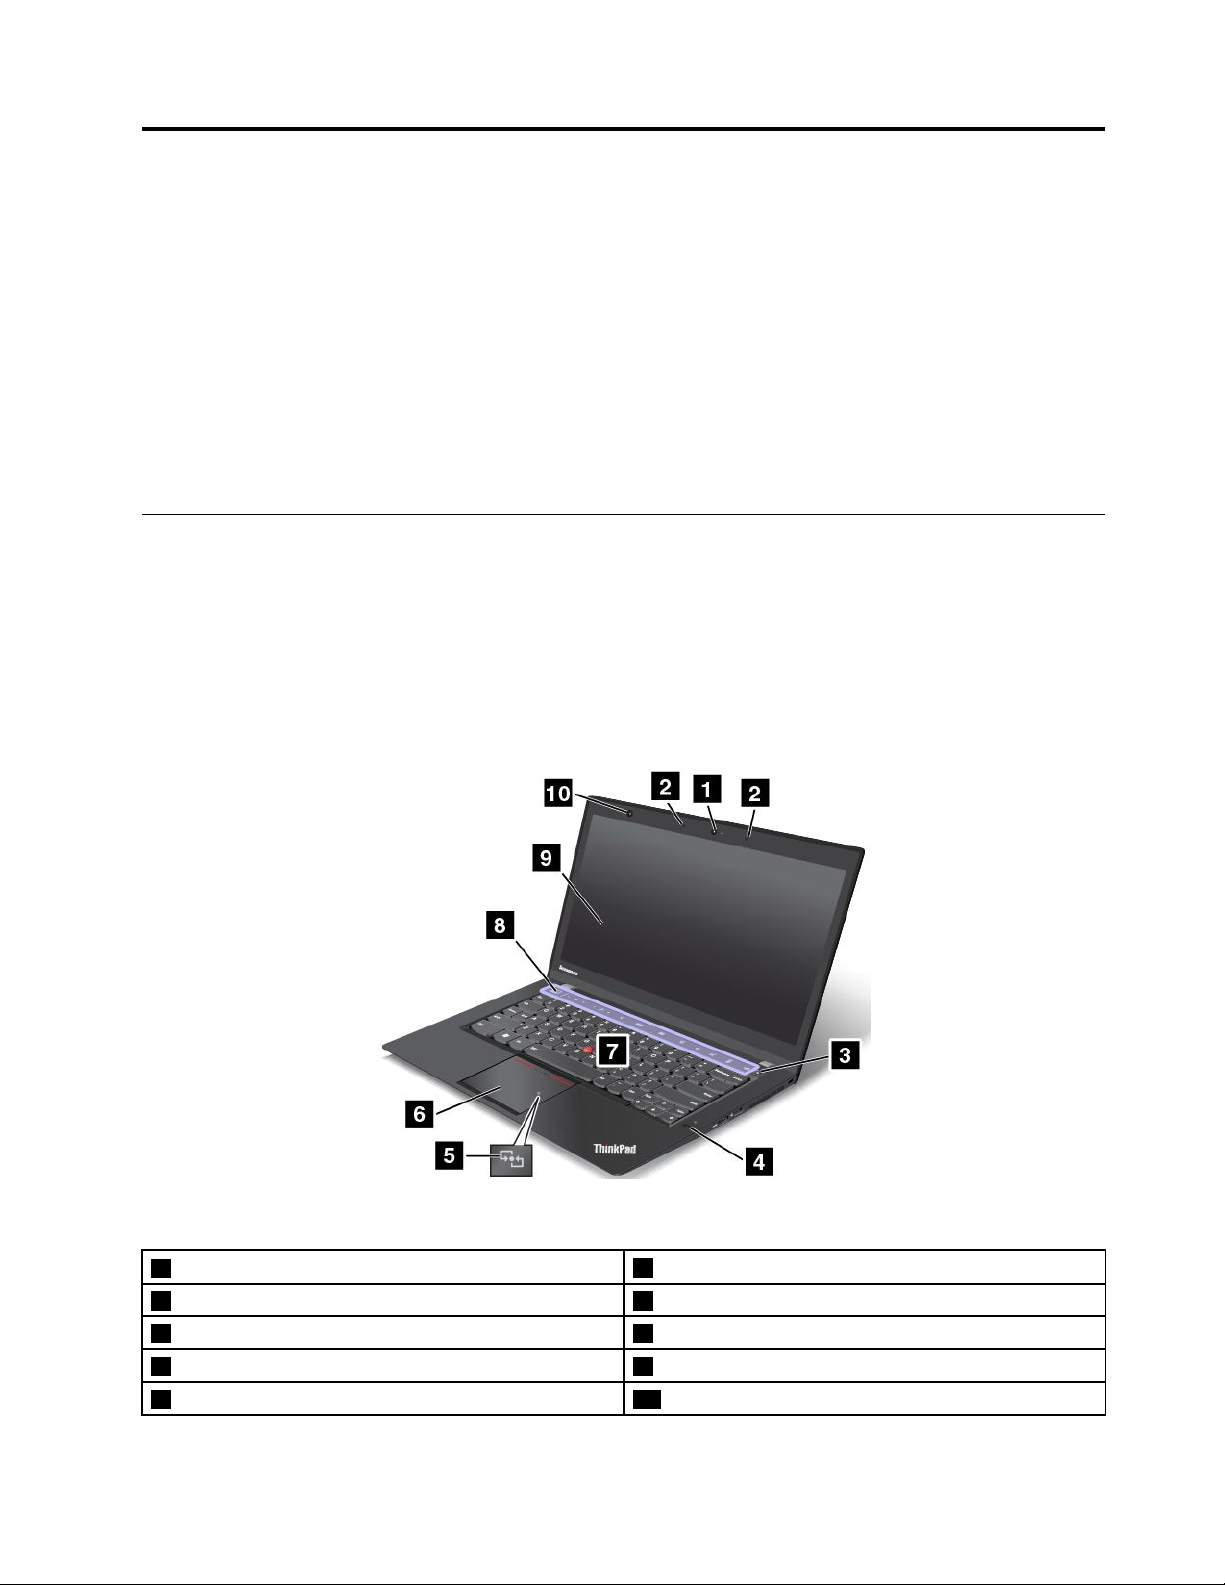
Frontview
Figure1.Frontview
1 Camera
2 Microphones 7 TrackPoint
3 Powerbutton 8 AdaptiveKeys
4 Fingerprintreader
5 NFClogo(onsomemodels)
©CopyrightLenovo2014
6 ThinkPad
9 Screen(multi-touchscreenonsomemodels)
10 Ambientlightsensor
®
trackpad
®
pointingstick
1
Page 18

1 Camera
Usethecameratotakepicturesorholdavideoconference.Formoreinformation,see“Usingthecamera”
onpage47.
2 Microphones
Thebuilt-inmicrophonescapturesoundandvoicewhenusedwithaprogramcapableofhandlingaudio.
3 Powerbutton
Usethepowerbuttontoturnonthecomputer.
Toturnoffthecomputer,usetheStartmenushutdownoptionontheMicrosoft
®
Windows
®
7operating
system.FortheWindows8.1operatingsystem,movethepointertothetop-rightorbottom-rightcornerof
thescreentodisplaythecharms.ThenclickSettings➙Power➙Shutdown.
Ifyourcomputerstopsrespondingandyoucannotturnitoff,pressandholdthepowerbuttonforfour
secondsormore.Ifthecomputerstillisnotresponding,removetheacpoweradapterandusethe
emergency-resetholetoresetthecomputer.See“Bottomview”onpage7.
Youalsocanprogramthepowerbuttonsothatbypressingthepowerbuttonyoucanturnoffthecomputer
orputthecomputerintosleeporhibernationmode.Toachievethis,youneedtochangeyourpowerplan
settings.Tochangethepowerplansettings,dothefollowing:
•ForWindows8.1:Gotothedesktopscreen.Right-clickthebattery-statusiconintheWindows
notificationarea,clickPowerOptions➙Choosewhatthepowerbuttondoes,andthensetthe
powerplanasyoudesired.
•ForWindows7:StartthePowerManagerprogramandthenclickthePowerPlantab.Forinstructionson
howtostartthePowerManagerprogram,see“AccessingLenovoprogramsontheWindows7operating
system”onpage15.
4 Fingerprintreader
Fingerprintauthenticationtechnologyprovidessimpleandsecureuseraccessbyassociatingyourfingerprint
withpasswords.Formoreinformation,see“Usingthefingerprintreader”onpage61.
5 NFClogo(onsomemodels)
Ifthereisanear-field-communication(NFC)logoontheThinkPadtrackpad,itindicatesthatyourcomputer
supportstheNFCfeature.Formoreinformation,see“UsingtheNFCconnection”onpage43.
ThinkPadpointingdevice
6 TrackPointpointingstick
7 ThinkPadtrackpad
ThekeyboardcontainstheLenovouniqueThinkPadpointingdevices.Pointing,selecting,anddraggingare
allpartofasingleprocessthatyoucanperformwithoutmovingyourfingersfromatypingposition.For
moreinformation,see“UsingtheThinkPadpointingdevice”onpage33.
8 AdaptiveKeys
YourcomputerhasarowofAdaptiveKeystohelpyouworkeasilyandeffectively.TheiconsontheAdaptive
Keyschangedynamicallydependingontheapplicationyouareusing.Formoreinformation,see“Usingthe
AdaptiveKeys”onpage24.
9 Screen(multi-touchscreenonsomemodels)
Formoreinformation,see“Usingthemulti-touchscreen”onpage21.
2UserGuide
Page 19
10 Ambientlightsensor
Theambientlightsensordetectsthesurroundinglightconditions.Thenthecomputeradjuststhescreen
brightnessandkeyboardbacklightaccordingly.
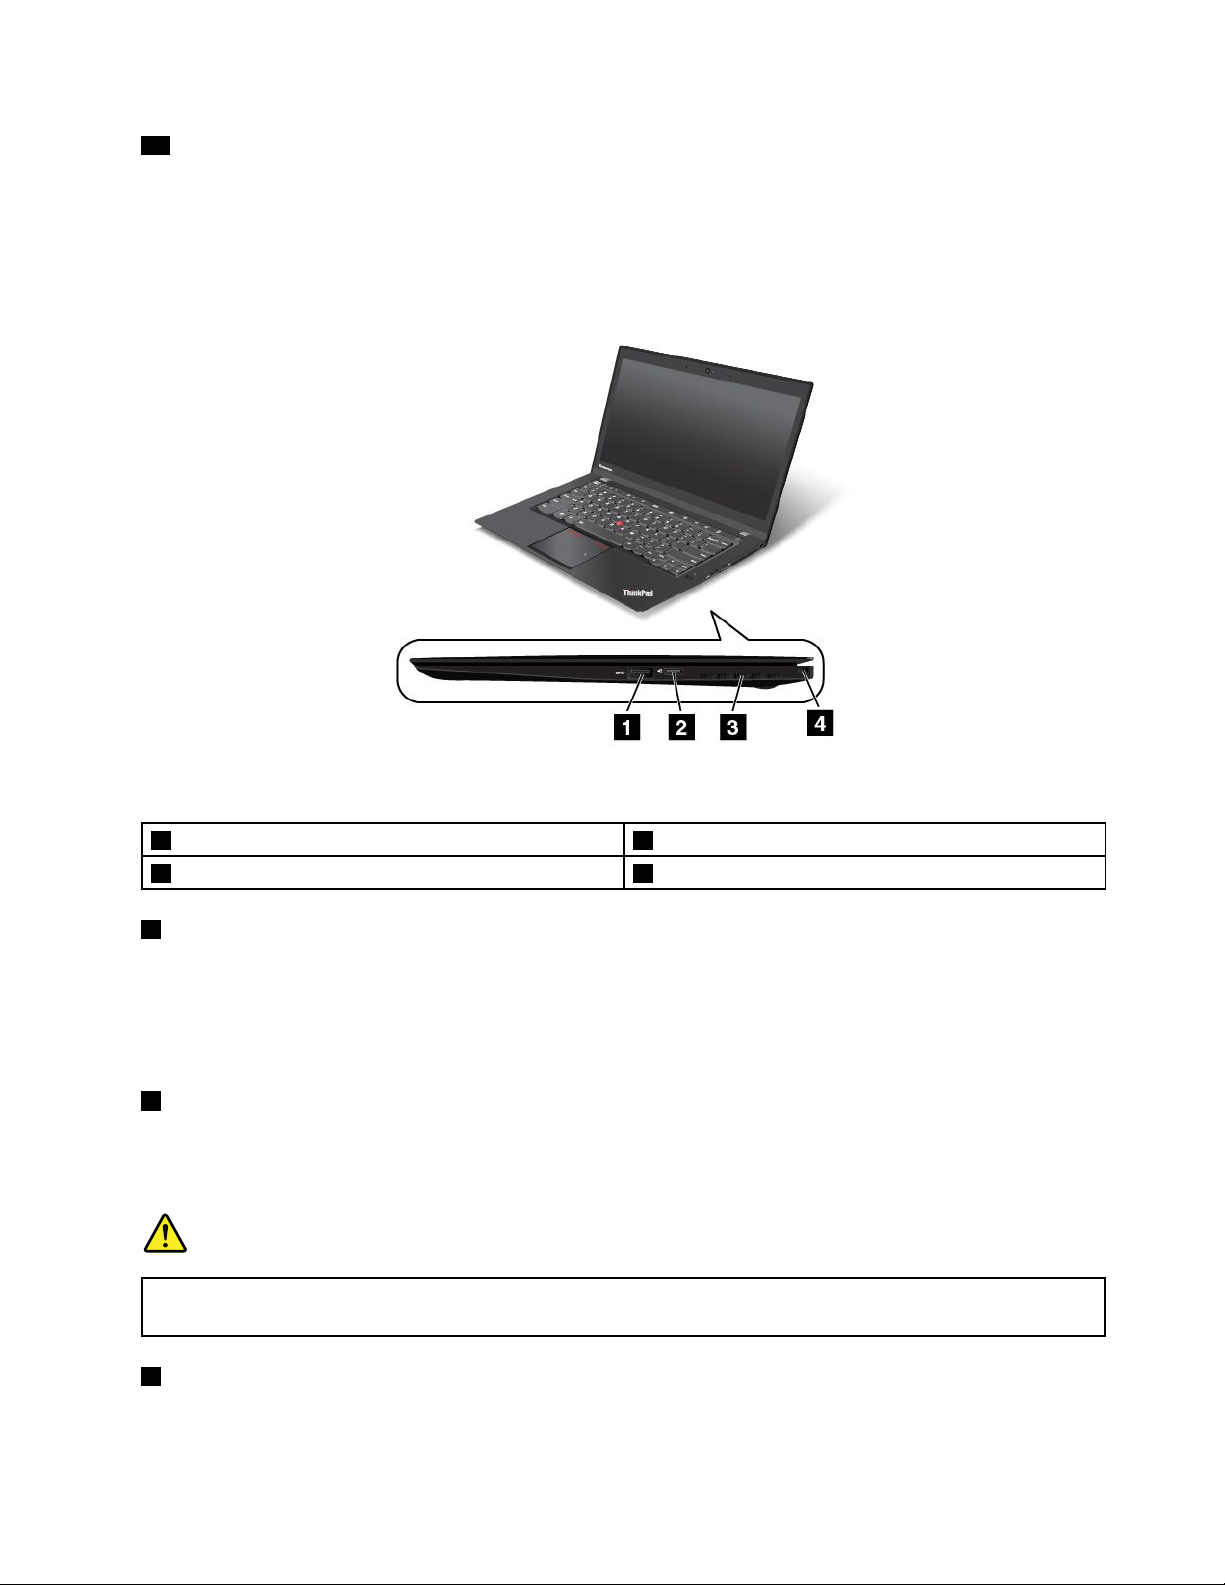
Right-sideview
Figure2.Right-sideview
1 USB3.0connector
2 Ethernetextensionconnector
1 USB3.0connector
3 Fanlouvers
4 Security-lockslot
TheUniversalSerialBus(USB)3.0connectorisusedforconnectingUSB-compatibledevices,suchasa
USBprinteroradigitalcamera.
Attention:WhenyouattachaUSBcabletotheUSB3.0connector,ensurethattheUSBmarkisfacing
upward.Otherwisetheconnectormightbedamaged.
2 Ethernetextensionconnector
TheEthernetextensionconnectoronyourcomputerisnotastandardEthernetconnector.UsetheEthernet
extensionadapterthatcomeswithyourcomputertoconnectthecomputertoalocalareanetwork(LAN).
Formoreinformation,see“Ethernetconnections”onpage39.
DANGER
Toavoidtheriskofelectricalshock,donotconnectthetelephonecabletotheEthernetextension
adapter.
3 Fanlouvers
Thefanlouversandinternalfanenableairtocirculateinthecomputerandtoensurepropercooling,
especiallythecoolingofthemicroprocessor.
Chapter1.Productoverview3
Page 20

Note:Toensureproperairflow,donotplaceanyobstaclesinfrontofthefanlouvers.
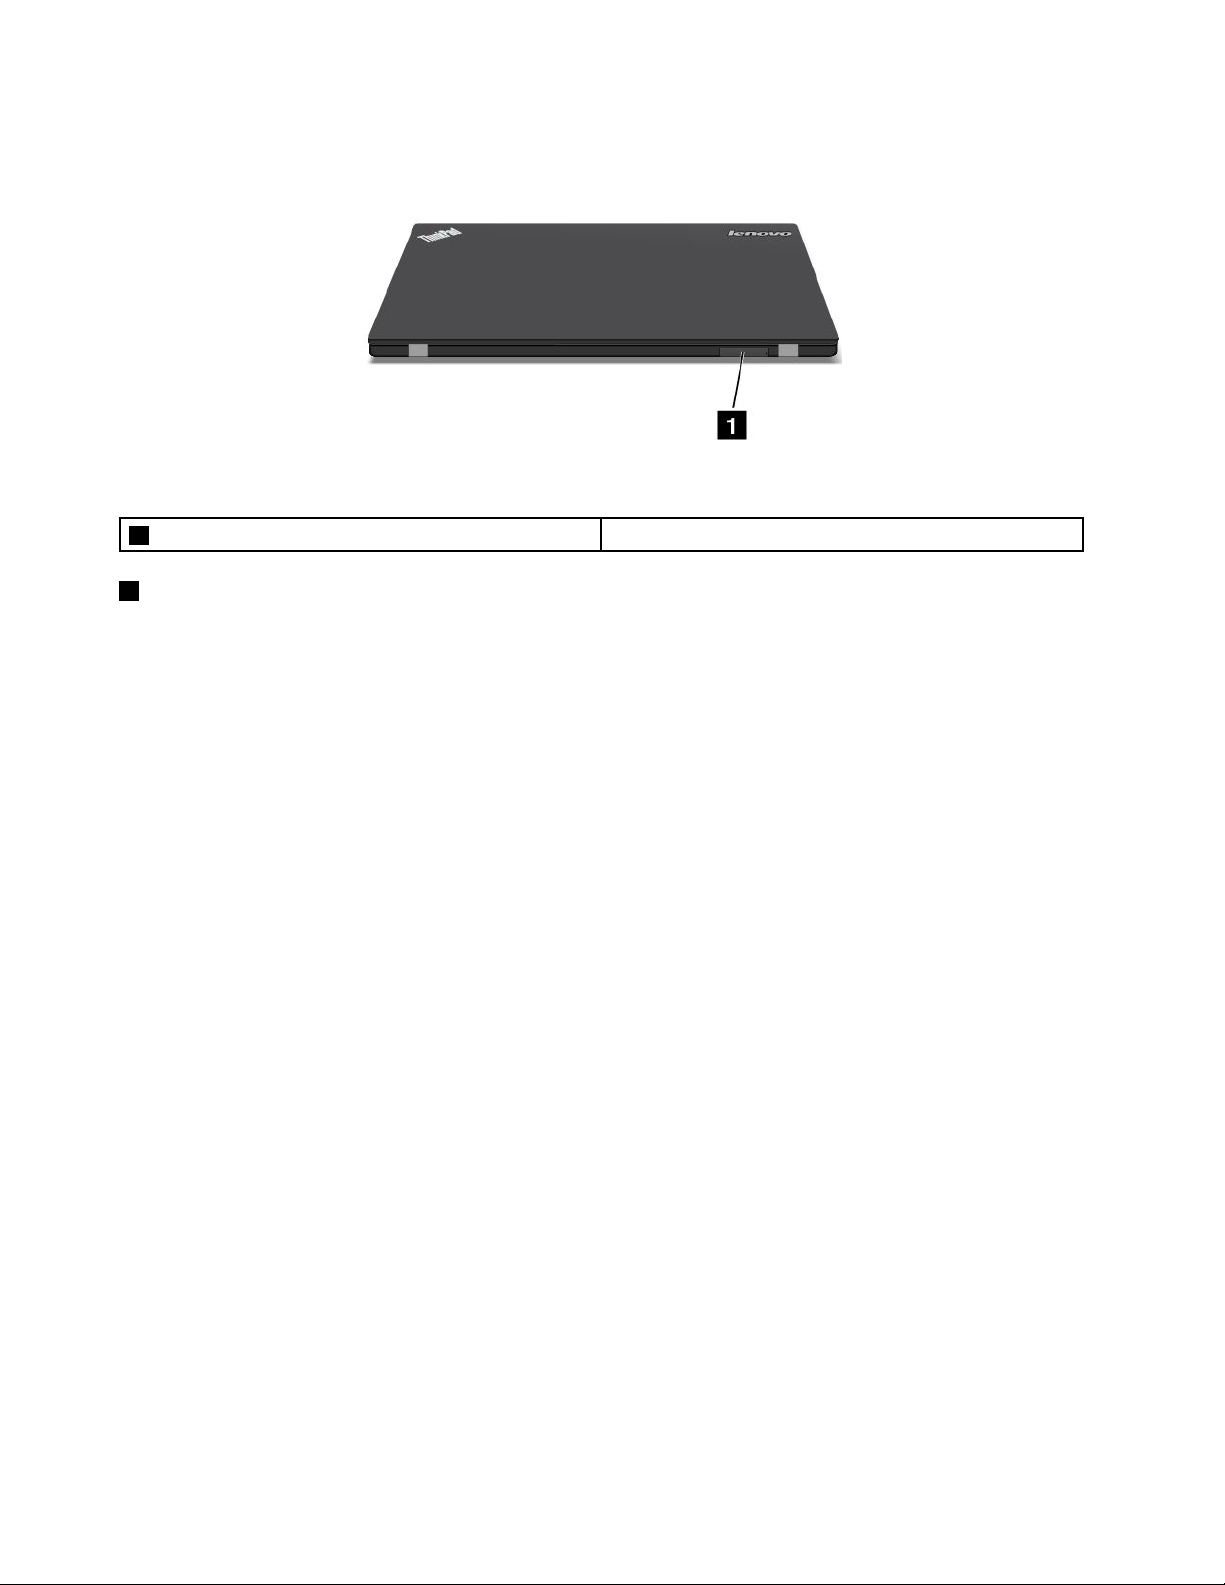
4 Security-lockslot
Toprotectyourcomputerfromtheft,youcanpurchaseasecuritycablelockthatfitsthesecurity-lock
slottolockthecomputertoastationaryobject.
Note:Y ouareresponsibleforevaluating,selecting,andimplementingthelockingdeviceandsecurity
feature.Lenovomakesnocomments,judgments,orwarrantiesaboutthefunction,quality,orperformance
ofthelockingdeviceandsecurityfeature.
4UserGuide
Page 21
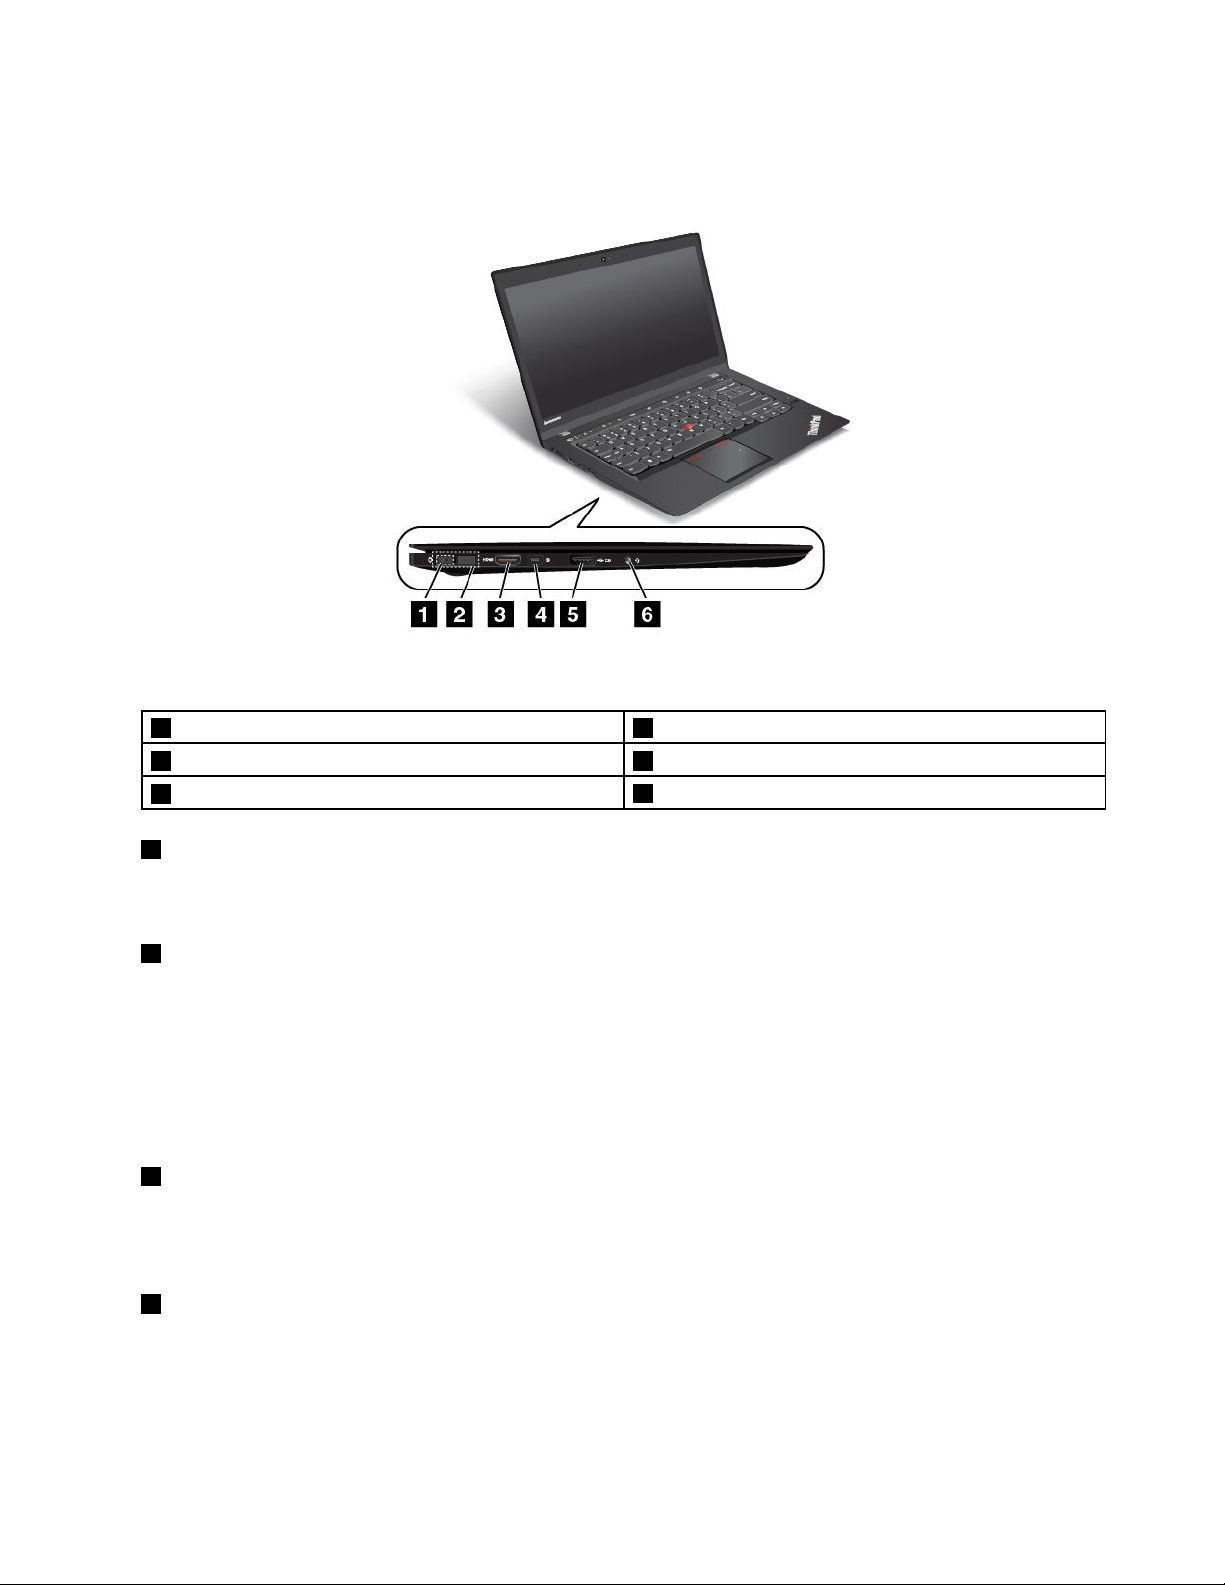
Left-sideview
Figure3.Left-sideview
1 Powerconnector 4 MiniDisplayPort
2 LenovoOneLinkconnector 5 Always-onUSB3.0connector
3 HDMI™connector
1 Powerconnector
6 Audioconnector
®
connector
Whentheacpoweradapterisconnectedtotheacpowerconnector,theacpoweradapterprovidespower
tothecomputerandchargesthebattery.
2 LenovoOneLinkconnector
WhenasupportedThinkPadOneLinkDockorThinkPadOneLinkProDockoptionisconnectedtothe
LenovoOneLinkconnector,theoptioncannotonlyextendthecomputercapabilitiesbutalsoprovidepower
tothecomputerandchargethebattery.
TousetheLenovoOneLinkconnector,youneedtoremovetheconnectorcoverfromtheLenovoOneLink
connectorfirst.Ensurethatyoukeeptheconnectorcover.ReattachittotheLenovoOneLinkconnector
whenyouarenotusingtheLenovoOneLinkconnector.
3 HDMI™connector
High-DefinitionMultimediaInterface(HDMI)connectorisadigitalaudioandvideointerfacethatcan
connectacompatibledigitalaudiodeviceorvideomonitor,suchasaDVDplayerorahigh-definition
digitaltelevision(HDTV).
4 MiniDisplayPort
®
connector
UsetheMiniDisplayPortconnectortoconnectyourcomputertoacompatibleprojector,externalmonitor,or
high-definitiontelevision.Formoreinformation,see“UsingtheMiniDisplayPortconnector”onpage45.
Chapter1.Productoverview5
Page 22

5 Always-onUSB3.0connector
TheAlways-onUSB3.0connectorisusedforconnectingUSB-compatibledevices,suchasaUSBprinteror
adigitalcamera.
Bydefault,theAlways-onUSB3.0connectorenablesyoutochargesomemobiledigitaldevicesand
smartphonesinthefollowingsituations:
•Whenyourcomputerisonorinsleepmode
•Whenyourcomputerisinhibernationmodeoristurnedoff,butconnectedtoacpower
Ifyouwanttochargethesedeviceswhenthecomputerisinhibernationmodeoristurnedoff,andthe
computerisnotconnectedtoacpower,dothefollowing:
•ForWindows8.1:PresstheWindowskeytogototheStartscreen.ClickLenovoSettings➙Power.
ThenselecttheEnableUSBchargefromthecomputerbatteryevenwhenthecomputerisoffcheck
boxunderAlways-onUSB.
•ForWindows7:StartthePowerManagerprogramandclicktheGlobalPowerSettingstab.Then
selecttheEnableUSBchargefromthecomputerbatteryevenwhenthecomputerisoffcheck
box,andclickOKorApply.
Attention:WhenyouattachaUSBcabletothisconnector,ensurethattheUSBmarkisfacingupward.
Otherwisetheconnectormightbedamaged.
6 Audioconnector
Connectheadphonesoraheadsetthathasa3.5-mm(0.14-inch),4-poleplugtotheaudioconnectorto
listentothesoundfromthecomputer.
Notes:
•Ifyouareusingaheadsetwithafunctionswitch,forexample,aheadsetforaniPhonemobiledigital
device,donotpressthisswitchwhileusingtheheadset.Ifyoupresstheswitch,theheadsetmicrophone
willbedisabled,andtheintegratedmicrophonesonthecomputerwillbeenabledinstead.
•Theaudioconnectordoesnotsupportaconventionalmicrophone.Formoreinformation,see“Using
audiofeatures”onpage46.
6UserGuide
Page 23
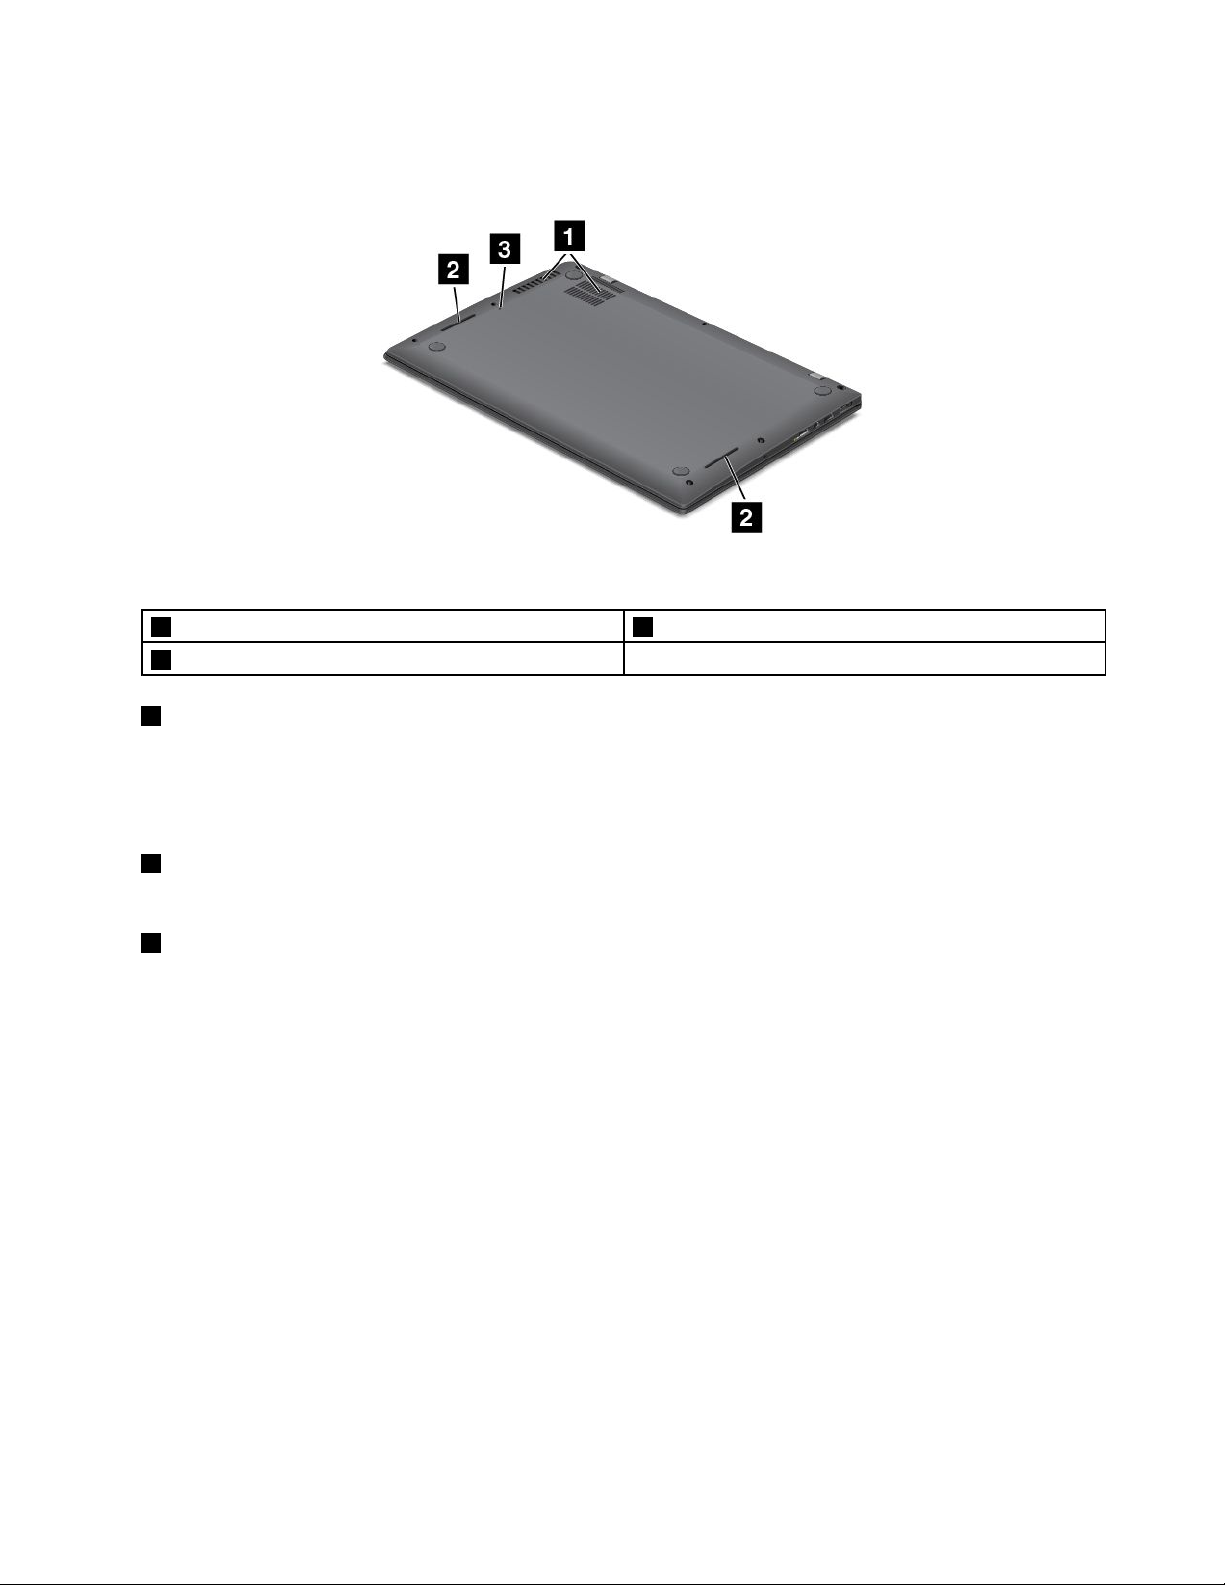
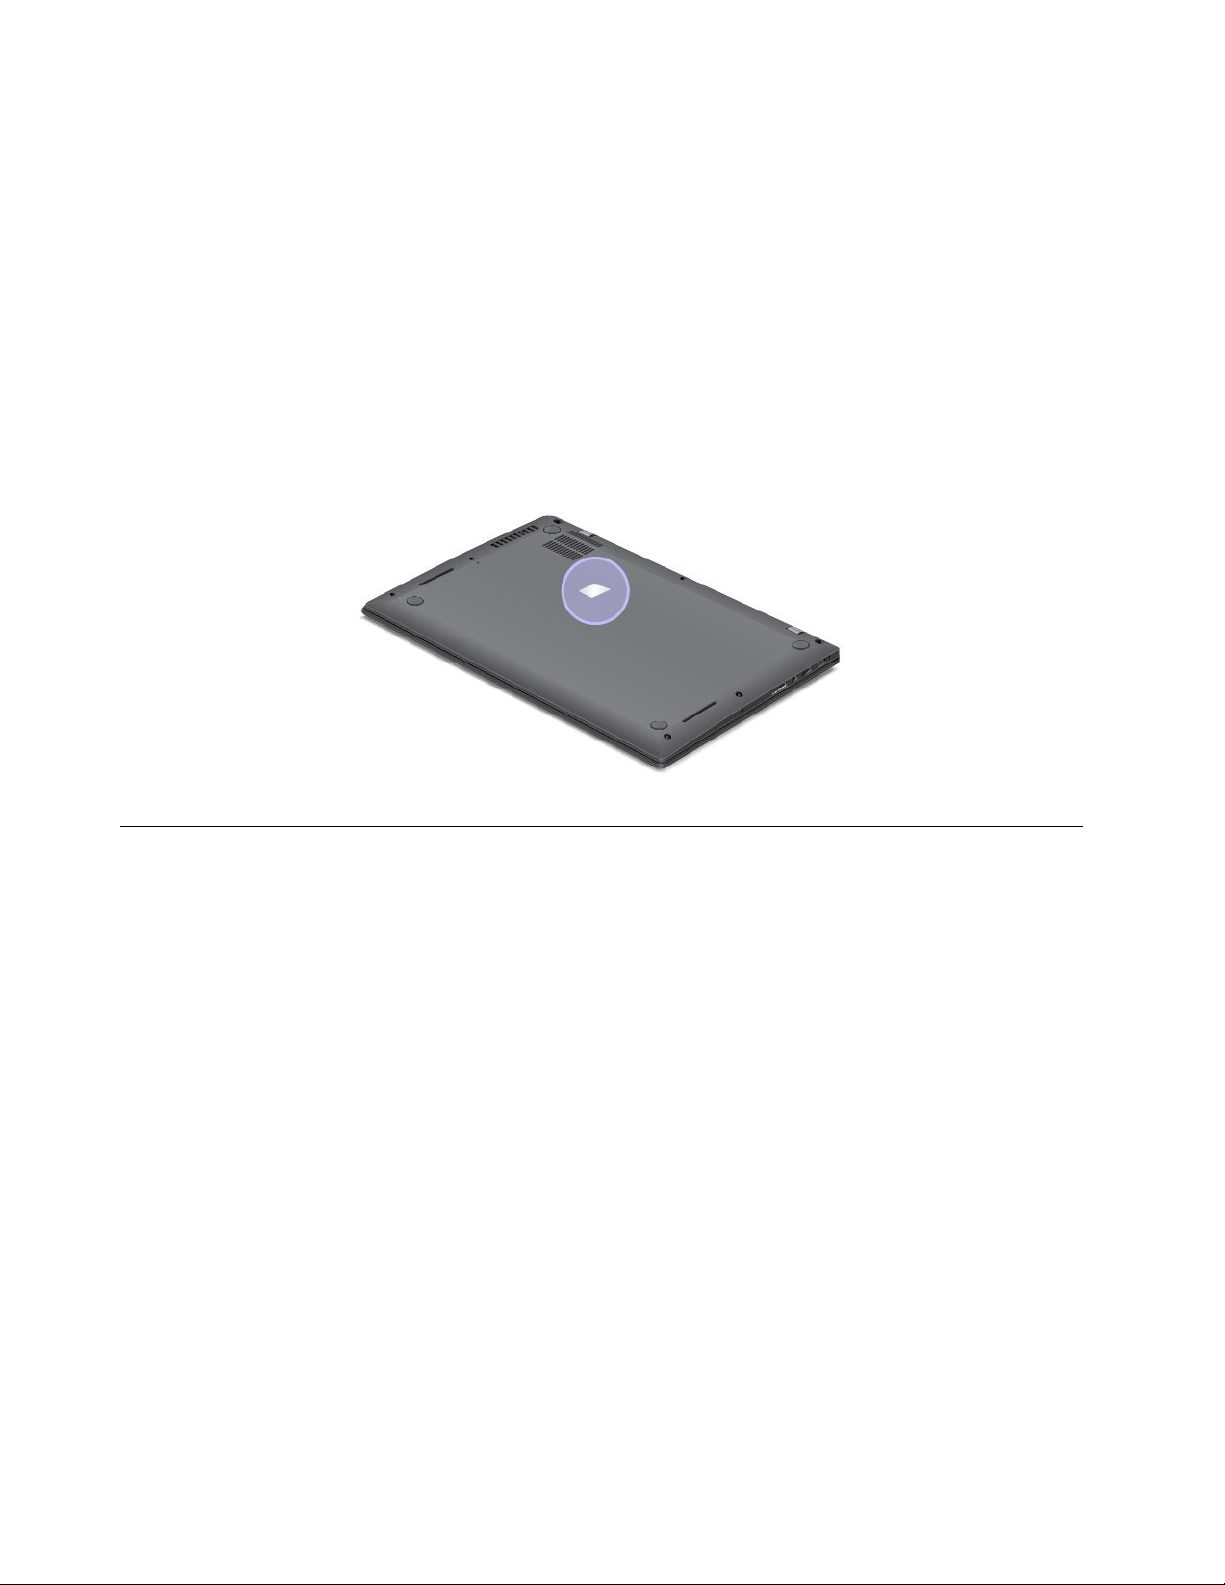
Bottomview
Figure4.Bottomview
1 Fanlouvers 3 Emergency-resethole
2 Speakers
1 Fanlouvers
Thefanlouversandinternalfanenableairtocirculateinthecomputerandtoensurepropercooling,
especiallythecoolingofthemicroprocessor.
Note:Toensureproperairflow,donotplaceanyobstaclesinfrontofthefanlouvers.
2 Speakers
Yourcomputerisequippedwithapairofstereospeakers.
3 Emergency-resethole
Ifthecomputerstopsrespondingandyoucannotturnitoffbypressingthepowerbutton,removetheac
poweradapterandinsertastraightenedpaperclipintotheemergency-resetholetoresetthecomputer.
Chapter1.Productoverview7
Page 24
Rearview
Figure5.Rearview
1 Micro-SIM-cardtray(onsomemodels)
1 Micro-SIM-cardtray(onsomemodels)
Ifyourcomputersupportsthewirelesswideareanetwork(WAN)feature,amicroSubscriberIdentification
Module(SIM)cardmightberequiredtoestablishwirelessWANconnections.Dependingonthecountryor
regionofdelivery,amicroSIMcardmightbealreadyinstalledinthemicro-SIM-cardtray.
Note:EnsurethatyouuseamicroSIMcard.Donouseastandard-sizedSIMcard.Thestandard-sized
SIMcardisnotcompatible.
ToinstallorreplacethemicroSIMcard,see“InstallingorreplacingthemicroSIMcard”onpage76.
8UserGuide
Page 25
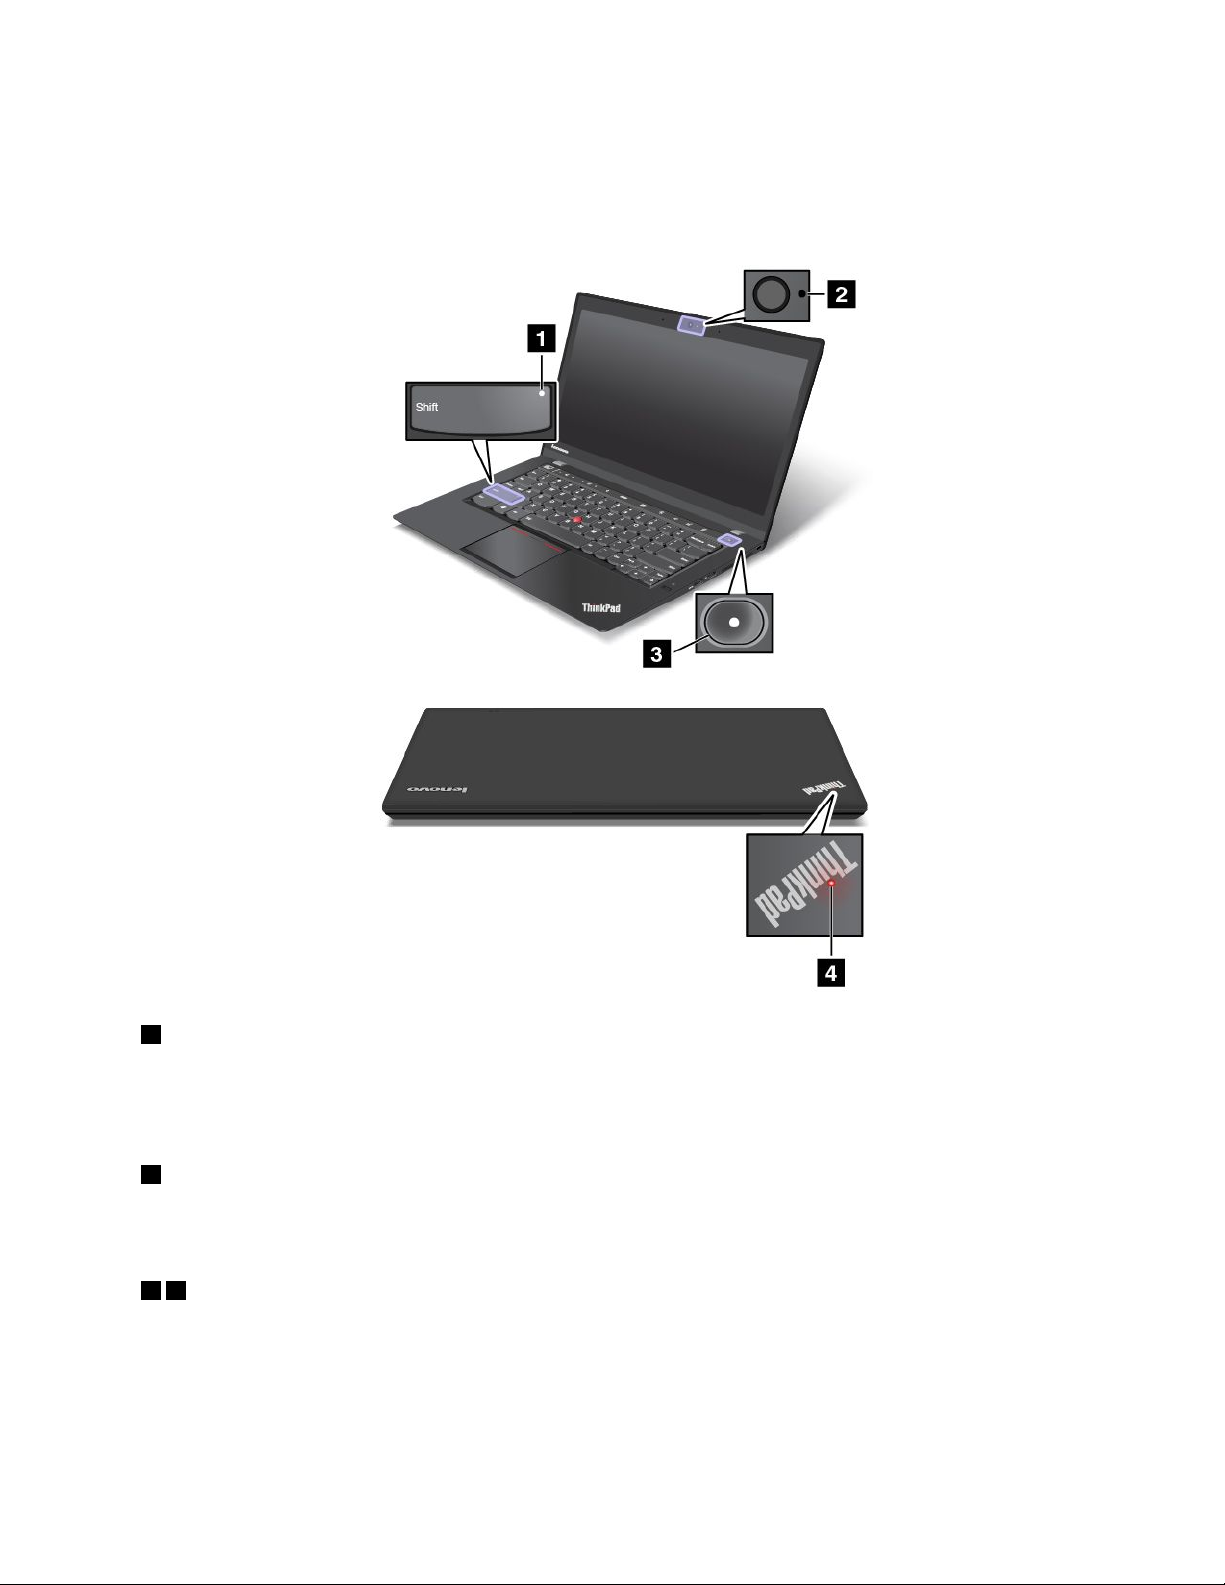
Statusindicators
Thestatusindicatorsshowthecurrentstatusofyourcomputer.
Note:Yourcomputermighthaveslightvariationsfromthefollowingillustrations.
1 CapsLockindicator
•On:CapsLockmodeisturnedon.Youcantypeallalphabeticcharacters(A-Z)inuppercasewithout
pressingtheShiftkey.ToturnofftheCapsLockmode,presstheleftShiftkeytwice.
•Off:CapsLockmodeisturnedoff.T oturnonCapsLockmode,presstheleftShiftkeytwice.
2 Camera-statusindicator
•On:Thecameraisturnedon.
•Off:Thecameraisturnedoff.
3 4 S
ystem-statusindicators
TheindicatorintheThinkPadlogoandtheindicatorinthecenterofthepowerbuttonshowthesystem
statusofthecomputer.
•Blinkthreetimes:Thecomputerisinitiallyconnectedtopower.
•On:Thecomputerison(innormalmode).
Chapter1.Productoverview9
Page 26
•Blinkfast:Thecomputerisenteringsleeporhibernationmode.
•Blinkslowly:Thecomputerisinsleepmode.
•Off:Thecomputerisofforinhibernationmode.
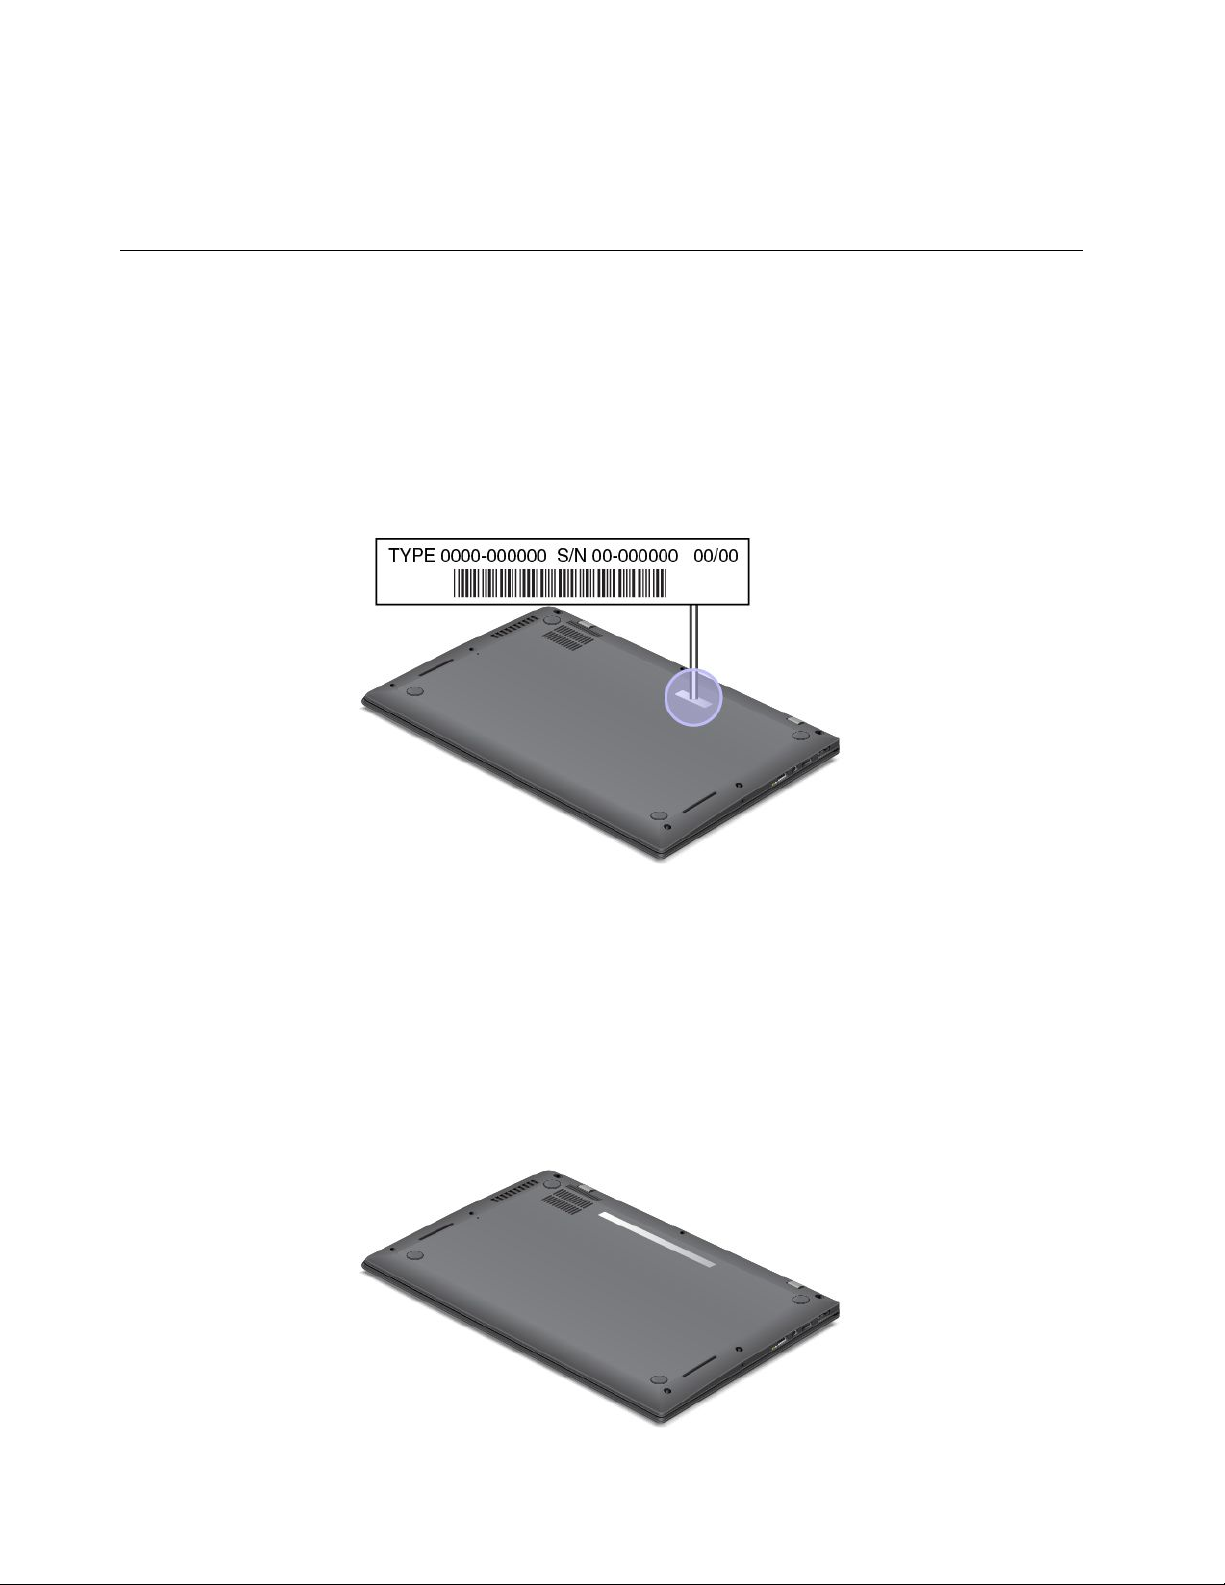
Locatingimportantproductinformation
Thissectionprovidesinformationtohelpyoulocatethemachinetypeandmodellabel,theFCCIDandIC
Certificationlabel,theWindowsCertificateofAuthenticitylabel,andtheGenuineMicrosoftlabel.
Machinetypeandmodelinformation
Themachinetypeandmodellabelidentifiesyourcomputer.WhenyoucontactLenovoforhelp,themachine
typeandmodelinformationhelpssupporttechnicianstoidentifyyourcomputerandprovidefasterservice.
Thefollowingfigureshowsthelocationofthemachinetypeandmodelofyourcomputer.
FCCIDandICCertificationinformation
ThereisnoFCCIDorICCertificationnumberforthewirelesscommunicationcardsshownontheenclosure
ofthecomputer.Onsomemodels,LenovoprovidesyoutheinformationaboutthelocationoftheFCCID
andICCertificationnumberlabelonthecomputerbasecover.
ThefollowingfigureshowstheinformationaboutthelocationsoftheFCCIDandICCertificationnumber
labels.
10UserGuide
Page 27
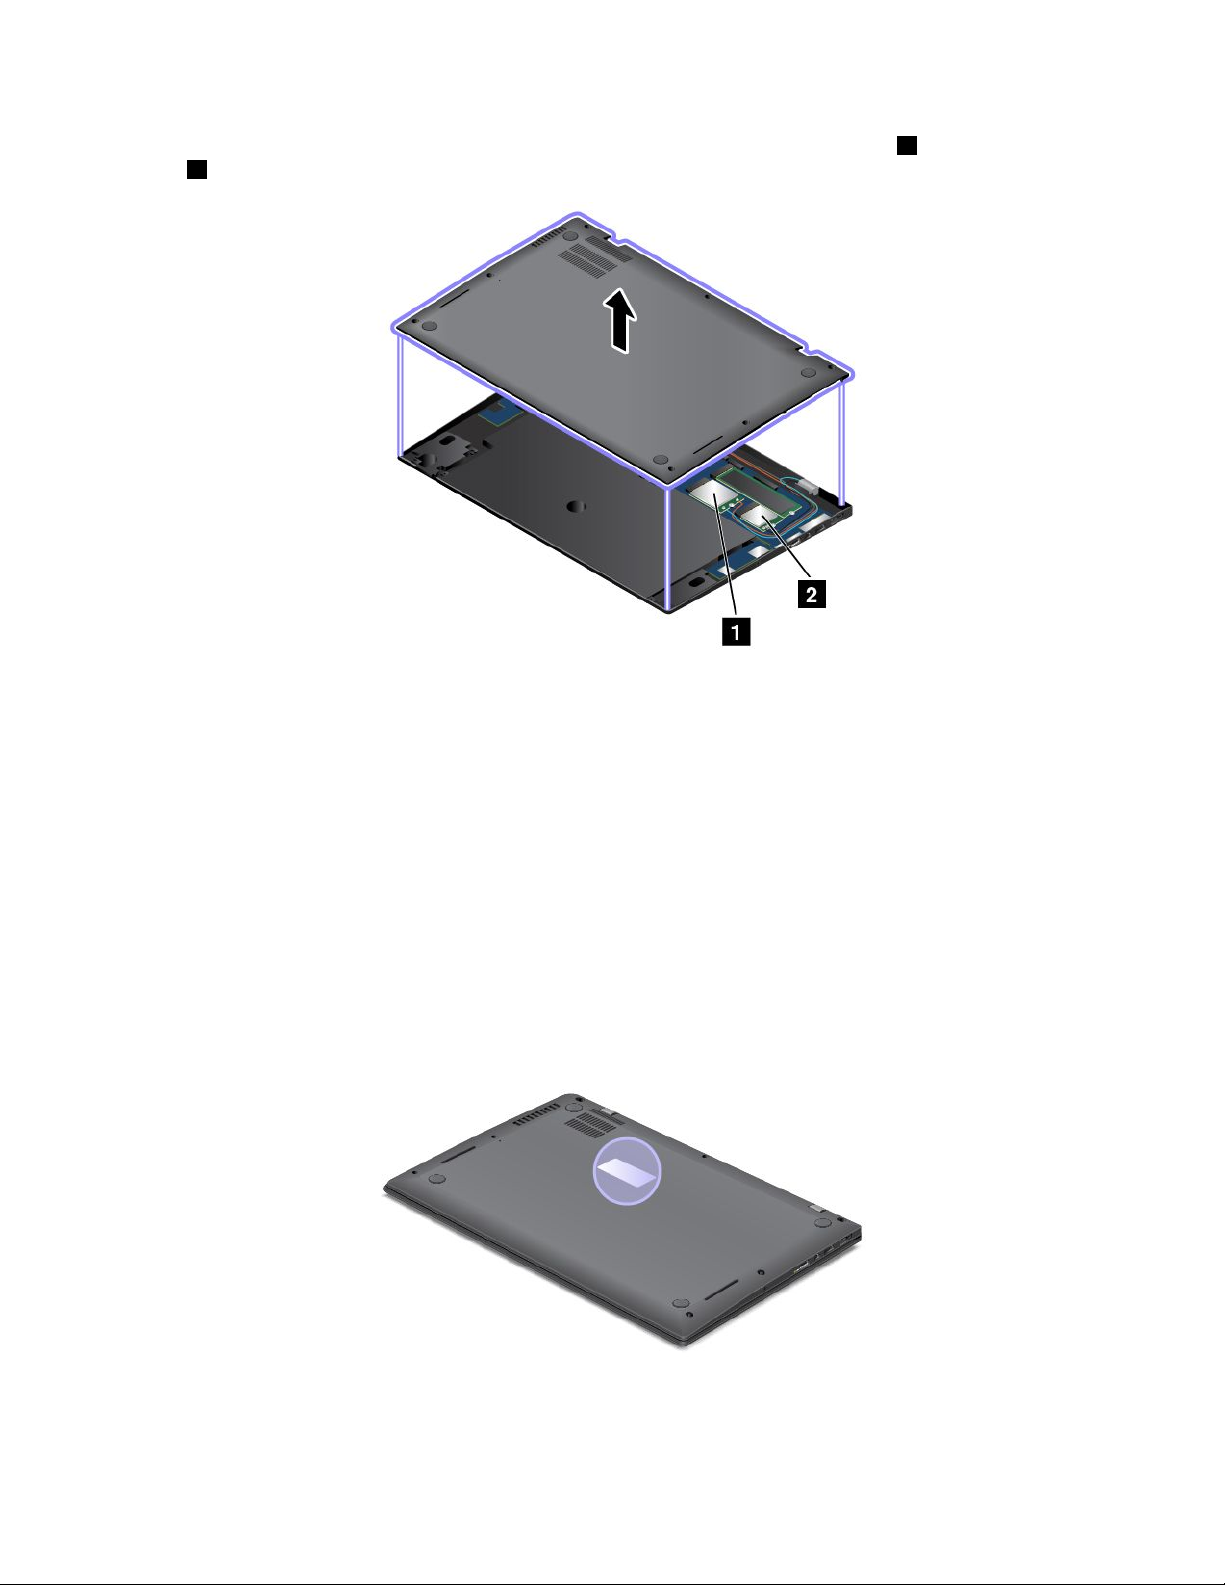
TheFCCIDandICCertificationnumberlabelsareaffixedonthewirelessWANcard 1 andwirelessLAN
card
2 installedinyourcomputer.
Note:UseonlyLenovo-authorizedwirelesscommunicationcardsforthecomputer.Ifyouinstallan
unauthorizedwirelesscommunicationcardthatisnotapprovedforuseinyourcomputer,anerrormessage
willbedisplayedandthecomputerwillbeepwhenyouturnonthecomputer.
CertificateofAuthenticityinformation
TheCertificateofAuthenticitylabelisprovidedonmodelsthatarelicensedtouseaWindows7
operatingsystem.ThelicensedWindowsversionandproductkeyassociatedwiththecomputerareprinted
onthislabel.Recordthisinformationandkeepitinasafeplace.Youmightneedthesenumberstostart
yourcomputerorreinstalltheWindows7operatingsystem.
FormoreinformationabouttheCertificateofAuthenticitylabel,goto:
http://www.microsoft.com/en-us/howtotell/Hardware.aspx
ThefollowingfigureshowsthelocationoftheCertificateofAuthenticitylabelonthecomputercover.
Chapter1.Productoverview11
Page 28
GenuineMicrosoftlabel
TheGenuineMicrosoftlabelisprovidedonmodelsthatarelicensedtouseaWindows8.1operating
system.TheversionoftheWindows8.1operatingsystemisprintedonthelabel.Ifyourcomputermodelis
licensedtousetheWindows8.1Prooperatingsystem,thatlicensealsopermitsyoutousetheWindows
7ProfessionaloperatingsysteminplaceoftheWindows8.1Prooperatingsystemifyouprefer.Lenovo
computersthatarelicensedforusewithaWindows8.1operatingsystemareshippedwiththeWindows8.1
licensekeydigitallyencodedintothecomputerhardware.Dependingonthecomputermodel,theGenuine
Microsoftlabelcanbeonthecomputercover,underthebattery,oronthepoweradapter.
FormoreinformationabouttheGenuineMicrosoftlabel,goto:
http://www.microsoft.com/en-us/howtotell/Hardware.aspx
ThefollowingfigureshowsthelocationoftheGenuineMicrosoftlabelonthecomputerbasecover.
Features
Thistopicprovidesinformationaboutthecomputerfeatures.
Microprocessor
•Toviewthemicroprocessorinformationofyourcomputer,dothefollowing:
–ForWindows8.1:Gotothedesktopscreen,movethepointertothetop-rightorbottom-rightcornerof
thescreentodisplaythecharms.ThenclickSettings➙PCinfo.
–ForWindows7:ClickStart,right-clickComputer,andthenclickProperties.
Memory
•Doubledatarate3lowvoltagesynchronousdynamicrandomaccessmemory(DDR3LVSDRAM)
Storagedevice
•M.2solid-statedrive
Display
•Colordisplaywiththethin-filmtransistor(TFT)technology
•Displaysize:355.6mm(14inches)
•Displayresolution:2560-by-1440or1600-by-900,dependingonthemodel
•Brightnesscontrol
12UserGuide
Page 29

•Camera
•Microphones
•Multi-touchtechnology(onsomemodels)
AdaptiveKeyboard
•5-rowkeyboardwithbacklightfunction
•AdaptiveKeys
•ThinkPadTrackPointpointingdeviceandtrackpad
Interface
•Audioconnector
•LenovoOneLinkconnector
•Externalmonitorconnectors(HDMIandMiniDisplayPortconnectors)
•Always-onUSB3.0connector
•USB3.0connector
•Ethernetextensionconnector
GPSandwirelessfeatures
•GlobalPositioningSystem(GPS)satellitereceiver(onmodelswithwirelessWAN)
•IntegratedBluetooth
•IntegratedwirelessLAN
•IntegratedwirelessWAN(onsomemodels)
•NFC(onsomemodels)
Securityfeature
•Fingerprintreader
Specifications
Size
•WideQuadHighDefinition(WQHD)modelswiththetouchfeature:
–Width:331mm(13.03inches)
–Depth:227.1mm(8.94inches)
–Height:13.9mmto20.15mm(0.55inchto0.79inch)
•WQHDmodelswithoutthetouchfeature:
–Width:331mm(13.03inches)
–Depth:226.5mm(8.92inches)
–Height:13.2mmto19.2mm(0.52inchto0.76inch)
•HighDefiniton(HD)Plusmodels:
–Width:331mm(13inches)
–Depth:226.8mm(8.92inches)
–Height:13.6mmto19.65(0.54inchto0.77inch)
Chapter1.Productoverview13
Page 30

Heatoutput
•45W(154Btu/hr)maximum
•65W(222Btu/hr)maximum
Powersource(acpoweradapter)
•Sine-waveinputat50to60Hz
•Inputratingoftheacpoweradapter:100to240Vac,50to60Hz
Batterystatus
•Forthepercentageofremainingbatterypower,gotothedesktopscreenandcheckthebattery-status
iconintheWindowsnotificationarea.
Operatingenvironment
Thissectionprovidesinformationabouttheoperatingenvironmentofthecomputer.
Environment
•Maximumaltitudewithoutpressurization:3048m(10000ft)
•Temperature
–Ataltitudesupto2438m(8000ft)
–Operating:5.0°Cto35.0°C(41°Fto95°F)
–Storage:5.0°Cto43.0°C(41°Fto109°F)
–Ataltitudesabove2438m(8000ft)
Maximumtemperaturewhenoperatingundertheunpressurizedcondition:31.3°C(88°F)
Note:Whenyouchargethebattery,itstemperaturemustbeatleast10°C(50°F).
•Relativehumidity:
–Operating:8%to95%atwetbulb:23℃(73℉)
–Storage:5%to95%atwetbulb:27℃(81℉)
Ifpossible,placeyourcomputerinawell-ventilatedanddryareawithoutdirectexposuretosunshine.
Attention:
•Keepelectricalappliancessuchasanelectricfan,radio,high-poweredspeakers,airconditioner,and
microwaveovenawayfromyourcomputer.Thestrongmagneticfieldsgeneratedbyelectricalappliances
candamagethemonitoranddataonthesolid-statedriveorsolid-statedrive.
•Donotplaceanybeveragesontopoforbesidethecomputerorotherattacheddevices.Ifliquidisspilled
onorinthecomputeroranattacheddevice,ashortcircuitorotherdamagemightoccur.
•Donoteatorsmokeoveryourkeyboard.Particlesthatfallintoyourkeyboardcancausedamage.
Lenovoprograms
YourcomputercomeswithLenovoprogramstohelpyouworkeasilyandsecurely.Theavailableprograms
mightvarydependingonthepreinstalledWindowsoperatingsystem.
TolearnmoreabouttheprogramsandothercomputingsolutionsofferedbyLenovo,goto:
http://www.lenovo.com/support.
14UserGuide
Page 31

AccessingLenovoprogramsontheWindows7operatingsystem
OntheWindows7operatingsystem,youcanaccessLenovoprogramsfromeithertheLenovo
ThinkVantage
®
ToolsprogramorfromControlPanel.
AccessingLenovoprogramsfromtheLenovoThinkVantageT oolsprogram
ToaccessLenovoprogramsfromtheLenovoThinkVantageToolsprogram,clickStart➙AllPrograms➙
LenovoThinkVantageT ools.Thendouble-clickaprogramicontoaccesstheprogram.
Note:IfaprogramiconisdimmedinthenavigationwindowoftheLenovoThinkVantageToolsprogram,it
indicatesthatyouneedtomanuallyinstalltheprogram.T omanuallyinstalltheprogram,double-clickthe
programicon.Then,followtheinstructionsonthescreen.Whentheinstallationprocesscompletes,the
programiconwillbeactivated.
Thefollowingtableliststheprogramsandthecorrespondingiconnamesonthenavigationwindowofthe
LenovoThinkVantageToolsprogram.
Note:Dependingonthemodel,someoftheprogramsmightnotbeavailable.
Table1.ProgramsintheLenovoThinkVantageToolsprogram
ProgramIconname
AccessConnections™InternetConnection
ClientSecuritySolutionEnhancedSecurity
CommunicationsUtilityWebConferencing
FingerprintManagerProFingerprintReader
LenovoQuickCastLenovoQuickCast
LenovoQuickControlLenovoQuickControl
LenovoSolutionCenterSystemHealthandDiagnostics
MobileBroadbandConnect3GMobileBroadband
PasswordManagerPasswordVault
PowerManager
RecoveryMediaFactoryRecoveryDisks
RescueandRecovery
SystemUpdate
®
PowerControls
EnhancedBackupandRestore
UpdateandDrivers
AccessingLenovoprogramsfromControlPanel
ToaccessLenovoprogramsfromControlPanel,clickStart➙ControlPanel.Thendependingonthe
programyouwanttoaccess,clickthecorrespondingsectionandthenclickthecorrespondinggreentext.
Note:IfyoucannotfindtheprogramyouneedinControlPanel,openthenavigationwindowoftheLenovo
ThinkVantageToolsprogramanddouble-clickthecorrespondingdimmedicontoinstalltheprogramyou
need.Then,followtheinstructionsonthescreen.Whentheinstallationprocesscompletes,theprogram
iconwillbeactivated,andyoucanfindtheprograminControlPanel.
ThefollowingtableliststheprogramsandthecorrespondingsectionsandgreentextsinControlPanel.
Notes:
•Dependingonthemodel,someoftheprogramsmightnotbeavailable.
Chapter1.Productoverview15
Page 32

•TheLenovoQuickCastprogramandtheLenovoQuickControlprogramarenotlistedinControlPanel.
UsetheLenovoThinkVantageToolsprogramtoaccessthem.
Table2.ProgramsinControlPanel
Program
AccessConnections
ClientSecuritySolutionSystemandSecurityLenovo-EnhancedSecurity
CommunicationsUtilityHardwareandSoundLenovo-WebConferencing
FingerprintManagerPro
LenovoSolutionCenterSystemandSecurityLenovo-SystemHealthand
MessageCenterPlus
MobileBroadbandConnect
PasswordManager
PowerManager
RecoveryMedia
RescueandRecovery
SystemUpdateSystemandSecurity
ControlPanelsectionGreentextinControlPanel
NetworkandInternet
SystemandSecurity
HardwareandSound
Programs
NetworkandInternet
SystemandSecurity
UserAccountsandFamilySafety
HardwareandSound
SystemandSecurity
SystemandSecurity
SystemandSecurity
Lenovo-InternetConnection
Lenovo-FingerprintManagerPro
or
Lenovo-NotebookFingerprint
Reader
Diagnostics
MessagesfromLenovo
Lenovo-3GMobileBroadband
Lenovo-PasswordVault
Lenovo-PowerControls
Lenovo-FactoryRecoveryDisks
Lenovo-EnhancedBackupand
Restore
Lenovo-UpdateandDrivers
AccessingLenovoprogramsontheWindows8.1operatingsystem
IfyourcomputerispreinstalledwiththeWindows8.1operatingsystem,toaccessLenovoprograms,
presstheWindowskeytogototheStartscreen.ClickaLenovoprogramtolaunchit.Ifyoucannotfind
theprogramyouneed,movethepointertothetop-rightorbottom-rightcornerofthescreentodisplaythe
charms.ThenclicktheSearchcharmtosearchforthedesiredprogram.
YourcomputersupportsthefollowingLenovoprograms:
•FingerprintManagerPro
•LenovoCompanion
•LenovoQuickCast
•LenovoQuickControl
•LenovoSettings
•LenovoSolutionCenter
•LenovoSupport
•LenovoT ools
•PasswordManager
•SystemUpdate
Note:ThePasswordManagerprogramisnotpreinstalledonWindows8.1computers.Youcandownload
thePasswordManagerprogramfromtheLenovoSupportWebsitehttp://www.lenovo.com/support.
16UserGuide
Page 33

Lenovoprogramoverview
ThistopicprovidesinformationaboutsomeLenovoprograms.
Note:Dependingonthemodel,someoftheprogramsmightnotbeavailable.
•AccessConnections(Windows7)
TheAccessConnectionsprogramisaconnectivityassistantprogramforcreatingandmanaginglocation
profiles.EachlocationprofilestoresallthenetworkandInternetconfigurationsettingsneededfor
connectingtoanetworkinfrastructurefromaspecificlocationsuchasahomeoranoffice.
Byswitchingbetweenlocationprofilesasyoumoveyourcomputerfromplacetoplace,youcanquickly
andeasilyconnecttoanetworkwithnoneedtomanuallyreconfigureyoursettingsandrestartthe
computereachtime.
•ClientSecuritySolution(Windows7)
TheClientSecuritySolutionprogramprotectsyourcomputerbysecuringclientdataanddeflecting
securitybreachattempts.Italsocanhelpmanageyourpasswords,recoveraforgottenpassword,
monitorsecuritysettingsonyourcomputer,andsuggesthowtoenhancethecomputersecurity.
•CommunicationsUtility(Windows7)
TheCommunicationsUtilityprogramenablesyoutoconfiguresettingsfortheintegratedcameraand
audiodevices.
•LenovoThinkVantageT ools(Windows7)
TheLenovoThinkVantageT oolsprogramhelpsyouworkmoreeasilyandsecurelybyprovidingeasy
accesstovariousprogram,suchasFingerprintManagerPro,LenovoSolutionCenter,andsoon.
•MessageCenterPlus(Windows7)
TheMessageCenterPlusprogramautomaticallydisplaysmessagestoinformyouaboutimportantnotices
fromLenovo,suchasalertsonsystemupdatesandalertsonconditionsthatrequireyourattention.
•MobileBroadbandConnect(Windows7)
TheMobileBroadbandConnectprogramenablesyoutoconnectthecomputertothemobilebroadband
networkthroughasupportedwirelessWANcard.
•PowerManager(Windows7)
ThePowerManagerprogramprovidesconvenient,flexible,andcompletepowermanagementforthe
computer.Itenablesyoutoadjustyourcomputerpowersettingstoachievethebestbalancebetween
performanceandpowersaving.
•RecoveryMedia(Windows7)
TheRecoveryMediaprogramenablesyoutorestorethecontentsofthesolid-statedrivetothefactory
defaultsettings.
•RescueandRecovery(Windows7)
TheRescueandRecoveryprogramisaone-buttonrecoveryandrestoresolution.Itincludesasetof
self-recoverytoolstohelpyoudiagnosecomputerproblems,gethelp,andrecoverfromsystemcrashes,
evenifyoucannotstarttheWindowsoperatingsystem.
•LenovoCompanion(Windows8.1)
ThroughtheLenovoCompanionprogram,youcangettheinformationabouttheaccessoriesforyour
computer,viewblogsandarticlesaboutyourcomputer,andcheckforotherrecommendedprograms.
•LenovoSettings(Windows8.1)
TheLenovoSettingsprogramenablesyoutoenhanceyourcomputingexperiencebyturningyour
computerintoaportablehotspot,configuringcameraandaudiosettings,optimizingyourpowersettings,
andcreatingandmanagingmultiplenetworkprofiles.
Chapter1.Productoverview17
Page 34

•LenovoSupport(Windows8.1)
TheLenovoSupportprogramenablesyoutoregisteryourcomputerwithLenovo,checkthecomputer
healthconditionandbatterystatus,downloadandviewusermanuals,getthewarrantyinformationof
yourcomputer,andexplorehelpandsupportinformation.
•LenovoTools(Windows8.1)
TheLenovoT oolsprogramhelpsyouworkmoreeasilyandsecurelybyprovidingeasyaccesstovarious
program,suchasFingerprintManagerPro,LenovoSolutionCenter,andsoon.
•FingerprintManagerPro(Windows7andWindows8.1)
Ifyourcomputercomeswithafingerprintreader,theFingerprintManagerProprogramenablesyou
toenrollyourfingerprintandassociateitwithyourWindowspassword.Asaresult,thefingerprint
authenticationcanreplaceyourpasswordandenablesimpleandsecureuseraccess.
•LenovoQuickCast(Windows7andWindows8.1)
TheLenovoQuickCastprogramprovidesyouwithaquickandeasywaytosendfilesanduniform
resourcelocators(URLs)betweentwodevices.
•LenovoQuickControl(Windows7andWindows8.1)
TheLenovoQuickControlprogramenablesyoutocontrolyourcomputerremotelythroughyour
smartphone,suchascontrollingthepointer,changingprojectionsettings,andmanagingforeground
applicationsandwindows.
•LenovoSolutionCenter(Windows7andWindows8.1)
TheLenovoSolutionCenterprogramenablesyoutotroubleshootandresolvecomputerproblems.It
combinesdiagnostictests,systeminformationcollection,securitystatus,andsupportinformation,along
withhintsandtipsforoptimalsystemperformance.
•PasswordManager(Windows7andWindows8.1)
ThePasswordManagerprogramautomaticallycapturesandfillsinauthenticationinformationfor
WindowsprogramsandWebsites.
•S
ystemUpdate(Windows7andWindows8.1)
TheSystemUpdateprogramenablesyoutokeepthesoftwareonthecomputerup-to-dateby
downloadingandinstallingsoftwarepackages,includingThinkVantageprograms,devicedrivers,Unified
ExtensibleFirmwareInterface(UEFI)basicinput/outputsystem(BIOS)updates,andotherthird-party
programs.
18UserGuide
Page 35

Chapter2.Usingyourcomputer
Thischapterprovidesinformationonusingsomeofthecomputercomponents.
•“Registeringyourcomputer”onpage19
•“Frequentlyaskedquestions”onpage19
•“Usingthemulti-touchscreen”onpage21
•“UsingtheAdaptiveKeys”onpage24
•“UsingtheThinkPadpointingdevice”onpage33
•“Powermanagement”onpage34
•“Connectingtothenetwork”onpage38
•“UsingtheNFCconnection”onpage43
•“Presentationsandmultimedia”onpage43
•“Usingaudiofeatures”onpage46
•“Usingthecamera”onpage47
Registeringyourcomputer
Whenyouregisteryourcomputer,informationisenteredintoadatabase,whichenablesLenovotocontact
youincaseofarecallorothersevereproblem.Inaddition,somelocationsofferextendedprivilegesand
servicestoregisteredusers.
WhenyouregisteryourcomputerwithLenovo,youalsowillreceivethefollowingbenefits:
•QuickerservicewhenyoucallLenovoforhelp
•Automaticnotificationoffreesoftwareandspecialpromotionaloffers
ToregisteryourcomputerwithLenovo,dooneofthefollowing:
•Gotohttp://www.lenovo.com/registerandfollowtheinstructionsonthescreentoregisteryourcomputer.
•ConnectyourcomputertotheInternetandregisteryourcomputerthroughapreinstalledregistration
program:
–ForWindows8.1:OpentheLenovoSupportprogram,clickRegistration,andthenfollowthe
instructionsonthescreentoregisteryourcomputer.
–ForWindows7:ThepreinstalledLenovoProductRegistrationprogramlaunchesautomaticallyafteryou
haveusedyourcomputerforatime.Followtheinstructionsonthescreentoregisteryourcomputer.
Frequentlyaskedquestions
ThistopicprovidesafewtipsthatwillhelpyouoptimizetheuseofyourThinkPadnotebookcomputers.
Toensurethatyoureceivethebestperformancefromyourcomputer,browsethefollowingWebpagetofind
informationsuchasaidsfortroubleshootingandanswerstofrequentlyaskedquestions:
http://www.lenovo.com/support/faq
CanIgetmyuserguideinanotherlanguage?
•Todownloadtheuserguideinanotherlanguage,gotohttp://www.lenovo.com/support.Thenfollow
theinstructionsonthescreen.
©CopyrightLenovo2014
19
Page 36

HowdoIusebatterypowermoreeffectivelywhenIamonthego?
•Toconservepower,ortosuspendoperationwithoutexitingprogramsorsavingfiles,see“Power-saving
modes”onpage36.
•Toachievethebestbalancebetweenperformanceandpowersaving,changepowerplansettings.
See“Managingthebatterypower”onpage36.
•Ifyourcomputerwillbeturnedoffforanextendedperiodoftime,followtheinstructionsin“Disabling
thebuilt-inbattery”onpage75todisabletheinternalbuilt-inbatterysoastopreventbatterypower
fromdraining.
HowdoIsecurelydisposeofdatastoredonthesolid-statedrive?
•StudyChapter4“Security”onpage55tofindouthowyoucanprotectyourcomputerfromtheftand
unauthorizeduse.
•UsethePasswordManagerprogramtoprotectthedatastoredonyourcomputer.Formoreinformation,
seethehelpinformationsystemoftheprogram.
•Beforeyoudisposeofthedataonthesolid-statedrive,besuretoreadthetopic“Noticeondeletingdata
fromyoursolid-statedrive”onpage64.
HowdoIgetconnectedindifferentlocations?
•Totroubleshootawirelessnetworkingissue,gotohttp://www.lenovo.com/support/faq.
•TakeadvantageofthenetworkingfeaturesprovidedbytheAccessConnectionsprogram(onthe
Windows7operatingsystem)orLocationAwarenessintheLenovoSettingsprogram(ontheWindows
8.1operatingsystem).
•Tolearnmoreaboutusingthewirelessfeaturesofyourcomputer,referto“Wirelessconnections”on
page39.
•Totravelmoreconfidently,besuretocheckthetipsin“Travelingwithyourcomputer”onpage53.
•Tapthewirelessicon
intheFunctionmodetoenableordisablethewirelessfeatures.Formore
informationonhowtodisplaytheFunctionmode,see“AdaptiveKeysoverview”onpage25.
HowdoIgivepresentationsorattachanexternalmonitor?
•Ensurethatyoufollowtheprocedureinthetopic“Usinganexternalmonitor”onpage44.
•WiththeExtenddesktopfunction,youcandisplayoutputonboththecomputerdisplayandtheexternal
monitor.See“Usingdualdisplays”onpage45.
Ihavebeenusingthecomputerforsometimealready,anditisgettingslower.WhatshouldIdo?
•Followthe“Generaltipsforpreventingproblems”onpage107.
•Diagnoseproblemsyourselfbyusingthepreinstalleddiagnosticsoftware.See“Diagnosingproblems”on
page113.
•Arecoverytoolisprovidedonyourcomputersolid-statedrive.Formoreinformation,seeChapter5
“Recoveryoverview”onpage67.
CanIchangetheWindows8.1startupbehaviortoopeneitherthedesktoportheStartscreen?
•OntheWindows8.1operatingsystem,youcansetthecomputertoopeneitherthedesktoportheStart
screenbydefault.Tosetthedefaultstartupscreen,dothefollowing:
1.Onthedesktop,moveyourpointertothetaskbaratthebottomofthescreenandright-clickon
thetaskbar.
2.ClickProperties.TheTaskbarandNavigationpropertieswindowisdisplayed.
20UserGuide
Page 37

3.OntheNavigationtab,locatetheStartscreensection,andthendooneofthefollowing:
–Tosetthedesktopasyourdefaultstartupscreen,selectWhenIsigninorcloseallappsona
screen,gotothedesktopinsteadofStartsoacheckisvisible.
–TosettheStartscreenasyourdefaultstartupscreen,removethecheckfromtheWhenIsignin
orcloseallappsonascreen,gotothedesktopinsteadofStartcheckbox.
4.ClickOKtosavethenewsetting.
ThisfeatureisnotavailableontheWindows8operatingsystem.
Printthefollowingsectionsandkeepthemwithyourcomputerincaseyouareunabletoaccessthis
onlinehelpwhennecessary.
•“Installinganewoperatingsystem”onpage91
•“Computerstopsresponding”onpage113
•“Powerproblems”onpage124
Usingthemulti-touchscreen
Thistopicprovidesinstructionsonhowtousethemulti-touchscreenthatisavailableonsomemodels.
Commontouchgesturesandmouseactions
Thefollowingtablelistssomecommontouchgesturesandthecorrespondingmouseactionsthatis
applicabletotheWindows7operatingsystemandWindows8.1operatingsystem.
Note:Yourcomputerscreenmightlookdifferentfromthefollowingillustrations.
Tasks
Toopenanapplicationorperform
anactiononanopenapplication,
suchasCopy,Save,andDelete,
dependingontheapplication
Toscrollthroughitems,suchaslists,
pages,andphotos
TomoveanobjectDraganitemtothedesiredlocation.
Touchgestures(touchmodelsonly)
Tap.
Slide.
Mouseactions
Click.
Scrollthemousewheel,movethe
scrollbar,orclickthescrollarrow.
Click,hold,anddraganitem.
Chapter2.Usingyourcomputer21
Page 38

Tasks
Tozoomout
Touchgestures(touchmodelsonly)
Movetwofingersclosertogether.
Mouseactions
PresstheCtrlkeywhilescrollingthe
mousewheelbackward.
Tozoomin
Torotateanitem
ToopenamenuwithmultipleoptionsTapandhold. Double-click.
Movetwofingersfartherapart.
Puttwoormorefingersonan
item,andthenrotateyourfingers
(supportedonlyonsomemodels).
PresstheCtrlkeywhilescrollingthe
mousewheelforward.
Iftheapplicationsupportsrotation,
clicktherotationicon.
TouchgesturesandmouseactionsforWindows8.1operatingsystems
Thefollowingtablelistssometouchgesturesandthecorrespondingmouseactionssupportedbythe
Windows8.1operatingsystems.
Note:Yourcomputerscreenmightlookdifferentfromthefollowingillustrations.
22UserGuide
Page 39

Tasks
Todisplaythecharmsthatcontain
systemcommands,suchasStart,
Settings,Search,Share,and
Devices
Touchgestures(touchmodelsonly)
Swipeinfromtherightedge.
Mouseactions
Movethepointertothebottom-right
ortop-rightcornerofyourscreen.
Tocyclethroughandswitchtoopen
applications
Toviewtherecentlyusedapplications
orselectanactiveapplicationfrom
thelist
ToviewallapplicationsontheStart
screen
TocustomizetilesontheStartscreen,
oruninstallanapplication
Swipeinfromtheleftedge.
Swipeinandoutontheleftedge.
•Swipeuptothetopedge.
•Tapthedownwardarrow( )
locatednearthebottom-leftcorner
oftheStartscreen.
•Swipeinfromthetoporbottom
edge,
Movethepointertothetop-leftcorner
ofyourscreen,andthenclick.Keep
clickingtocyclethroughtheopen
applications.
Movethepointertothetop-leftcorner
ofthescreen,andthenmovethe
pointerdownwardalongtheleftedge.
Tomakeaselection,clickthedesired
application.
Clickthedownwardarrow(
)
locatednearthebottom-leftcornerof
theStartscreen.
•Right-clickablankareaonthe
Startscreen,clickCustomize,and
thenclickthedesiredicon.
•Right-clickthedesiredicon.
tapCustomize,andthentapthe
desiredicon.
•Pressandholdthedesiredicon.
Chapter2.Usingyourcomputer23
Page 40

Tasks
Toviewtheapplicationcommandson
anopenapplication,suchasCopy,
Save,andDelete,dependingonthe
application
Touchgestures(touchmodelsonly)
Swipeinfromthetoporbottomedge.
Mouseactions
Right-clickanopenapplication.
Toclosethecurrentapplication
Swipeinfromthetopedgetothe
bottom.
Movethepointertothetopedgeof
thescreen,clickandholdtheleft
buttononyourmouse,thenmovethe
pointertothebottomofthescreen.
Releasetheleftbuttonwhenyou
reachthebottomofthescreen.
Tipsonusingthemulti-touchscreen
•Themulti-touchscreenisaglasspanelcoveredwithaplasticfilm.Donotapplypressureorplaceany
metallicobjectonthescreen,whichmightdamagethetouchpanelorcauseittomalfunction.
•Donotusefingernails,glovedfingers,orinanimateobjectsexcepttheapproveddigitizerpenforinputon
thescreen.
•Regularlycalibratetheaccuracyofthefingerinputtoavoidadiscrepancy.
Tipsoncleaningthemulti-touchscreen
•Turnoffthecomputerbeforecleaningthemulti-touchscreen.
•Useadry,soft,andlint-freeclothorapieceofabsorbentcottontoremovefingerprintsordustfromthe
multi-touchscreen.Donotapplysolventstothecloth.
•Gentlywipethescreenusingatop-downmotion.Donotapplyanypressureonthescreen.
UsingtheAdaptiveKeys
YourcomputerhasarowofAdaptiveKeystohelpyouworkeasilyandeffectively.
24UserGuide
Page 41

AdaptiveKeysoverview
ThefollowingillustrationshowsthelocationoftheAdaptiveKeys 1 .TheiconsoftheAdaptiveKeyschange
dynamicallybasedontheapplicationyouareusing.
TheAdaptiveKeysprovidethefollowingmodestofunctionindifferentsituations:
•Homemode
•Web-browsermode
•Web-conferencemode
•Functionmode
•Lay-flatmode
IfyoulaunchanapplicationthattheAdaptiveKeyboardrecognizes,theAdaptiveKeyschangeautomatically
totheappropriatemodesforusingthatapplication.
YoualsocancyclethroughtheavailablemodesbytappingtheFnkey.Thefollowingillustrationshows
thelocationoftheFnkey
1 .
Youcancustomizetheorderinwhichthemodesaredisplayedandwhichmodesareavailablewhenyou
cyclethroughthemodeswiththeFnkey.TheHomemodeandFunctionmodearealwaysavailable.
Chapter2.Usingyourcomputer25
Page 42

Dependingonyourneeds,youcancustomizetheAdaptiveKeysbyremovingWeb-browsermodeand
Web-conferencemodefromthecyclelistwhenyoutaptheFnkey.TheLay-flatmodeisavailableonlywhen
youopenyourcomputerdisplayto180degreesfromtherelativepositionofthekeyboard.
Formoreinformation,see“ModesoftheAdaptiveKeys”onpage26.
ModesoftheAdaptiveKeys
ThistopicprovidesinformationonthemodesoftheAdaptiveKeys.
Homemode
Bydefault,theHomemodeisdisplayedandactivewhenyourcomputerenterstheWindowsoperating
system.
ThefollowingillustrationshowstheiconsdisplayedintheHomemode.Formoreinformation,see“Functions
oftheAdaptiveKeys”onpage27.
Web-browsermode
WhenyoulaunchaWebbrowserthattheAdaptiveKeyboardrecognizes(forexample,theInternetExplorer
Webbrowser,theChrome™browser,ortheFirefoxWebbrowser),theAdaptiveKeysautomaticallychange
totheWeb-browsermode,providingfunctionsspecificallyforusingaWebbrowser.
®
ToviewthelistofapplicationsthatchangetheAdaptiveKeystotheWeb-browsermode,dothefollowing:
1.T apthesettingsicon
2.ClickModeSettings➙AdvancedSettings➙AutoChangeApplications,andthenmovethepointer
overtheautochangeapplicationassociatedwiththeWeb-browsermode.
ThefollowingillustrationshowstheiconsdisplayedintheWeb-browsermode.Formoreinformation,
see“FunctionsoftheAdaptiveKeys”onpage27.
Web-conferencemode
WhenyoulaunchaVoice-over-Internet-Protocol(VoIP)applicationthattheAdaptiveKeyboardrecognizes,
theAdaptiveKeysautomaticallychangetotheWeb-conferencemode,providingfunctionsspecifically
forusingaVoIPapplication.
ToviewthelistofapplicationsthatchangetheAdaptiveKeystotheWeb-conferencemode,dothefollowing:
1.T apthesettingsicon
2.ClickModeSettings➙AdvancedSettings➙AutoChangeApplications,andthenmovethepointer
overtheautochangeapplicationassociatedwiththeWeb-conferencemode.
ThefollowingillustrationshowstheiconsdisplayedintheWeb-conferencemode.Formoreinformation,
see“FunctionsoftheAdaptiveKeys”onpage27.
intheFunctionmode.TheAdaptiveKeyboardSettingswindowopens.
intheFunctionmode.AdaptiveKeyboardSettingswindowopens.
26UserGuide
Page 43

Functionmode
Whenyouturnonthecomputer,theFunctionmodeisdisplayedandactivebeforethecomputerentersthe
Windowsoperatingsystem.F1throughF12providethesamefunctionsastheF1throughF12keysona
traditionalkeyboard.IfyouareusinganapplicationthatsupportstheF1throughF12functions,youcan
usetheFnkeytocycletotheFunctionmodewheneveryouneedit.
ThefollowingillustrationshowstheiconsdisplayedintheFunctionmode.Formoreinformation,see
“FunctionsoftheAdaptiveKeys”onpage27.
Lay-flatmode
IfLay-flatmodeisenabled,theAdaptiveKeysautomaticallychangetotheLay-flatmodewhenyouputyour
computerdisplayto180degreesfromtherelativepositionofthekeyboardasshown.
TheLay-flatmodeprovidesaspecialsetofAdaptiveKeysthataredesignedtohelpyoushareinformation
onthescreenwithapersonsittingacrossfromyouor90degreestoyourleftorright.
Bydefault,theLay-flatmodeisenabled.TodisabletheLay-flatmode,dothefollowing:
1.T apthesettingsicon
intheFunctionmode.AdaptiveKeyboardSettingswindowopens.
2.ClickModeSettings➙AdvancedSettings➙LayFlatmode,andthenfollowtheinstructionson
thescreen.
ThefollowingillustrationshowstheiconsdisplayedintheLay-flatmode.Formoreinformation,see
“FunctionsoftheAdaptiveKeys”onpage27.
FunctionsoftheAdaptiveKeys
ThistopicintroducesthefunctionsoftheAdaptiveKeys.
Note:SomeAdaptiveKeysareavailableonlyinaspecificmode.
Table3.FunctionsoftheAdaptiveKeys
AdaptiveKeysFunctions
Fnkey
•SwitchesamongtheavailableAdaptiveKeysmodeswhenyoutaptheFnkey.
•InitiatestheQuick-accessmodewhenyoutapandholdtheFnkey.IfyoureleasetheFnkey,
theAdaptiveKeysreturntothemodebeforeyourtaptheFnkey.
SettingaQuick-accessmodeenablesyoutoquicklydisplayyourdesiredmodeoftheAdaptive
Keyswithnoneedtoswitchamongthevariousmodes.Bydefault,theQuick-accessmode
issettodisplaytheFunctionmode,however,youcanchangethedefaultsettingofthe
Quick-accessmode.
TochangethesettingoftheQuick-accessmode,dothefollowing:
Chapter2.Usingyourcomputer27
Page 44

Table3.FunctionsoftheAdaptiveKeys(continued)
AdaptiveKeysFunctions
1.Tapthesettingsicon intheFunctionmode.TheAdaptiveKeyboardSettingswindow
opens.
2.ClickModeSettings➙AdvancedSettings,andthenfollowtheinstructionsonthescreen
tosettheQuick-accessmodeasyoudesired.
Volumecontrols
•
:Decreasesthespeakervolume.
•
:Mutesthespeakers.Whenthespeakersaremuted,theredspeaker-muteindicator
turnson.
:Increasesthespeakervolume.
•
Brightnesscontrols
:Darkensthecomputerdisplay.
•
:Turnsthecomputerdisplaytothelowestbrightness(notfullblack)whenyoutapandhold
•
theiconforabouttwoseconds.Whenthecomputerdisplayissettothelowestbrightness,
theredlow-brightnessindicator
:Brightensthecomputerdisplay.
•
Microphonecontrols
:Decreasesvolumeofmicrophoneinput.
•
turnson.
•
:Mutesmicrophoneinput.Whenthemicrophonesaremuted,theredmicrophone-mute
indicator
:Increasesvolumeofmicrophoneinput.
•
•Windows8.1:OpenstheSearchcharm.
•Windows7:OpensWindowsSearch.
Viewstheprogramsthatyouhaveopened.
Viewsalltheprogramsinstalledonyourcomputer.
OpenstheWindowsSnippingTool.
GoesbackonepageintheWebbrowser.
RefreshesthecurrentpageoftheWebbrowser.
AddsanewtabintheWebbrowserwindow.
turnson.
28UserGuide
Page 45

Table3.FunctionsoftheAdaptiveKeys(continued)
AdaptiveKeysFunctions
Changesthemicrophonenoise-cancellationsensitivity.
Therearethreekindsofnoise-cancellationsensitivity:
•
:Onlymyvoice
•
:Normal
•
:Multiplevoices
Turnsonorturnsoffthecamera.
Whenthecameraisturnedoff,theredcamera-offindicator
turnson.
•Changescameramodeswhenyoutaptheicon.
•OpenstheCameraSettingsscreenwhenyoutapandholdtheiconforabouttwoseconds.
Formoreinformation,seetheCameraSettingsscreen.
Enablesordisablesthewirelessfeatures.
Toenableordisablethewirelessfeatures,thefollowingdevicedriversmustbeinstalledonyour
computerbeforehand:
•PowerManagementDriver
•OnScreenDisplayUtility
•Wirelessdevicedrivers
Todownloadthelatestdevicedrivers,see“Installingdevicedrivers”onpage93.
Note:OntheWindows7operatingsystem,whenthewirelessfeaturesaredisabled,thered
wireless-offindicator
turnson.Toenablethewirelessfeatures,taptheiconagain.
Formoreinformation,see“Wirelessconnections”onpage39.
Switchesthedisplayoutputlocationbetweenthecomputerdisplayandanexternalmonitorby
tappingtheiconandselectingoneofthefollowingoptions:
•Computerdisplayonly
•Computerdisplayandexternalmonitor(sameimage)
•Computerdisplayandexternalmonitor(extendeddesktopfunction)
•Externalmonitoronly
Formoreinformation,see“Presentationsandmultimedia”onpage43.
Controlsthekeyboardbacklight.
Taptheicontocyclethroughthefollowingkeyboardbacklightmodes:
•Normal:Turnonthekeyboardbacklightinlowbrightnesslevel.
•Bright:Turnonthekeyboardbacklightinhighbrightnesslevel.
•Off:Turnoffthekeyboardbacklight.
OpenstheAdaptiveKeyboardSettingswindow.
Formoreinformation,see“SettingtheAdaptiveKeys”onpage31.
Chapter2.Usingyourcomputer29
Page 46

Table3.FunctionsoftheAdaptiveKeys(continued)
AdaptiveKeysFunctions
Rotatesthescreenclockwise.Eachtimeyoutaptheicon,thecomputerscreenrotates90degrees.
•Opensthepredefinedcloudapplicationasdefinedinthecloudsettingswhenyoutaptheicon.
•OpenstheCloudSettingsscreenwhenyoutapandholdtheiconforabouttwoseconds.
Note:Bydefault,whenyoutaptheiconforthefirsttime,theCloudSettingsscreenisdisplayed.
YoucanselectthecloudserviceontheCloudSettingsscreen.Thenexttimeyoutaptheicon,the
selectedcloudapplicationopens.
Formoreinformation,seetheon-screeninstructionsontheCloudSettingsscreen.
•Enablesordisablesthevoice-recognitionfunctionwhenyoutaptheicon.Thevoice-recognition
functionenablesyoutocontrolsomeapplicationsordictatetextsusingyourvoice.
Whenthevoice-recognitionfunctionisturnedon,thegreenvoice-recognitionindicator
on.Toturnoffthevoice-recognitionfunction,taptheiconagain.
Note:Thevoicerecognitionsoftwareissupportedincertainsystemlanguages.Ifyoursystem
languagedoesnotsupportthevoice-recognitionfunction,whenyoutaptheiconyouwillseea
messageexplainingthatthesoftwareisnotsupportedonyourcomputer.
•OpenstheVoiceRecognitionscreenwhenyoutapandholdtheiconforabouttwoseconds.
Formoreinformation,seetheVoiceRecognitionscreen.Tousevoicecommands,refertothe
SetupGuideposterthatcomeswithyourcomputer.
•Enablesordisablesthecamera-gesturesfunctionwhenyoutaptheicon.Youcanusecamera
gesturestoperformsometasksusingsimplehandgesturesinsteadofusingthekeyboard
ormouse.
Whenthecamera-gesturesfunctionisturnedon,thegreencamera-gesturesindicator
on.T oturnoffthefunction,taptheiconagain.
•OpenstheCameraGesturessettingsscreenwhenyoutapandholdtheiconforabouttwo
seconds.
Note:Bydefault,whenyoutaptheiconforthefirsttime,CameraGesturessettingsscreenis
displayed.YoucancustomizetheCameraGesturessettings.Thenexttimeyoutaptheicon,the
camera-gesturesfunctionisenabled.
Formoreinformation,see“Usingcameragestures”onpage48.
turns
turns
Fnkeycombinations
ThistopicintroducessomeFnkeycombinationsforsomeconventionalkeysnotfoundonthekeyboard
ofyourcomputer.
TousetheFnkeycombinations,tapandholdtheFnkey.WhentheQuick-accessmodeisactive,press
thedesiredkey.
Note:EnsurethattheQuick-accessmodeissettodisplaytheFunctionmode.Formoreinformation,referto
thefunctionsoftheFnkeyin“FunctionsoftheAdaptiveKeys”onpage27.
YourcomputersupportsthefollowingFnkeycombinationsaslistedinthetable.
30UserGuide
Page 47

Table4.Fnkeycombinations
Fnkey
combination
Fn+B
Fn+I
Fn+K
Fn+P
Fn+SHasthesamefunctionastheSysRqkeyontheconventionalkeyboard.
Fn+T
Fn+E
Fn+H
Fn+4Putsthecomputertosleepmode.Toresumenormaloperation,pressthepowerbutton.
Function
HasthesamefunctionastheBreakkeyonaconventionalkeyboard.
HasthesamefunctionastheInsertkeyonaconventionalkeyboard.
HasthesamefunctionastheScrLKkeyontheconventionalkeyboard.
HasthesamefunctionasthePausekeyontheconventionalkeyboard.
HasthesamefunctionasthePrtSckeyonaconventionalkeyboard.
HasthesamefunctionastheEndkeyonaconventionalkeyboard.
HasthesamefunctionastheHomekeyonaconventionalkeyboard.
Brightnessmanagement
Toconservepower,theAdaptiveKeysbecomedimgraduallywhenapresenceoranactivityisnotdetected
foraperiodoftime.However,whenapresenceoranactivityisdetected,theAdaptiveKeysbecome
brightimmediately.
TheAdaptiveKeysbrightnessprofileisasfollows:
•100%brightnesswhenapresenceoranactivityisdetected
•50%brightnesswhenapresenceoranactivitynotdetectedforthreeminutes
•0%brightnesswhenapresenceoranactivitynotdetectedfor10minutes
TowakeuptheAdaptiveKeys,dooneofthefollowing:
•TapanyoftheAdaptiveKeys.
•Pressanykeyonthekeyboard.
•UsetheTrackPointpointingstickorthetrackpad.
•Usethemouseifavailable.
SettingtheAdaptiveKeys
YoucandothefollowingtocustomizetheAdaptiveKeyssettings:
•ModifytheorderinwhichtheAdaptiveKeysmodesaredisplayedwhenyoutaptheFnkey.
•RemovetheWeb-browsermodeandtheWeb-conferencemodefromtheAdaptiveKeyscyclesequence
whenyoutaptheFnkey.
•SetwhichAdaptiveKeysmodetouseasthequick-accessmode
•Choosewhichapptolaunchwhenyoutapthecloudicon.
TosettheAdaptiveKeys,dothefollowing:
1.OpentheAdaptiveKeyboardSettingwindowbydoingoneofthefollowing:
•Tapthesettingsicon
•OpentheLenovoSettingsprogram,andthenclickAdaptiveKeyboard.
•GotoControlPanel,andthenclickHardwareandSound➙AdaptiveKeyboard➙Change
Settings.
intheFunctionmode.
Chapter2.Usingyourcomputer31
Page 48

2.FollowtheinstructionsonthescreentosettheAdaptiveKeys.
Windowskey
OntheWindows7operatingsystem,presstheWindowskey 1 toopentheStartmenu.OntheWindows
8.1operatingsystem,presstheWindowskeytoswitchbetweenthecurrentworkspaceandtheStartscreen.
YoualsocanusetheWindowskeytogetherwithanotherkeytoachieveotherfunctions.Formore
information,refertothehelpinformationsystemoftheWindowsoperatingsystem.
32UserGuide
Page 49

UsingtheThinkPadpointingdevice
TheThinkPadpointingdeviceconsistsofapointingstick 1 onthekeyboardandthetrackpad 2 .The
wholetrackpadisanactiveareasensitivetofingermovement.Theleftclickzones
5 workastheleftandrightmousebuttonsonaconventionalmouse.Thescrollzone 4 enablesyouto
scrollWebpagesordocumentsinanydirection.
3 andrightclickzones
UsingtheT rackPointpointingstick
TousetheTrackPointpointingstick,applypressuretothenonslipcaponthepointingstickinanydirection
paralleltothekeyboard.Thenyoucanmovethepointer.Butthepointingstickitselfdoesnotmove.The
speedatwhichthepointermovesdependsonthepressureyouapplytothepointingstick.
Usingthemulti-touchtrackpad
TheThinkPadtrackpadofyourcomputersupportsmulti-touchwithwhichyoucanzoomin,zoomout,or
scrollonthescreenwhilebrowsingtheInternetorreadingoreditingadocument.
Formoreinformationonhowtousethetrackpad,seethehelpinformationsystemofthetrackpad.
CustomizingtheThinkPadpointingdevice
YoucancustomizetheThinkPadpointingdevicetoachievetheextendedfunctionsoftheThinkPad
pointingdevice.
TocustomizetheThinkPadpointingdevice,dothefollowing:
1.GotoControlPanel.
2.ClickHardwareandSound➙Mouse➙ThinkPad.
3.Followtheinstructionsonthescreen.
Chapter2.Usingyourcomputer33
Page 50

Replacingthecap
Thecap
oftime,youcanreplacethecapwithanewone.
1 onthetopoftheTrackPointpointingstickisremovable.Afteryouusethecapforaperiod
Note:TheTrackPointcapusedinyourcomputerhasgrooves
EnsurethatyoureplacetheT rackPointcapwithacorrectonethathassuchgrooves.
a asshowninthefollowingillustration.
Powermanagement
Whenyouneedtouseyourcomputerawayfromelectricaloutlets,youdependonbatterypowertokeep
yourcomputerrunning.Differentcomputercomponentsconsumepoweratdifferentrates.Themoreyou
usethepower-intensivecomponents,thefasteryouconsumebatterypower.
SpendmoretimeunpluggedwithThinkPadbatteries.Mobilityhasrevolutionizedbusinessbyenabling
youtotakeyourworkwhereveryougo.WithThinkPadbatteries,youwillbeabletoworklongerwithout
beingtiedtoanelectricaloutlet.
Checkingthebatterystatus
Thebattery-statusiconintheWindowsnotificationareadisplaysthepercentageofbatterypowerremaining.
Therateatwhichyouusebatterypowerdetermineshowlongyoucanusethebatteryofyourcomputer
betweencharges.Becauseofdifferentuserhabitsandneeds,itisdifficulttopredicthowlongabattery
chargewilllast.Therearetwomainfactors:
•Howmuchenergyisstoredinthebatterywhenyoubegintowork.
•Thewayyouuseyourcomputer.Forexample:
–Howoftenyouaccessthesolid-statedrive.
–Howbrightyoumakethecomputerdisplay.
–Howoftenyouusethewirelessfeatures.
Tocheckfordetailedbatterystatusinformation,dothefollowing:
•ForWindows8.1:StarttheLenovoSettingsprogramandclickPower.
•ForWindows7:StartthePowerManagerprogramandclicktheBatterytab.
34UserGuide
Page 51

EnablingthebatteryalarmontheWindows7operatingsystem
FortheWindows7operatingsystem,youcanprogramyourcomputersothatwhenthebatterypowerfalls
belowacertainlevel,threeeventsoccur:thealarmgoesoff,amessageisdisplayed,andtheLCDis
turnedoff.
Toenablethebatteryalarm,dothefollowing:
1.StartthePowerManagerprogram.
2.ClicktheGlobalPowerSettingstab.
3.ForLowbatteryalarmorCriticallylowbatteryalarm,setthepercentageofthepowerlevelandset
theaction.
Note:Ifyourcomputerenterssleeporhibernationmodewhenthebatteryislow,butthealarmmessage
hasnotyetbeendisplayed,themessagewillbedisplayedwhenthecomputerresumes.Toresumenormal
operation,whenthemessageisdisplayed,clickOK.
Usingtheacpoweradapter
Thepowertorunyourcomputercancomeeitherfromthelithium-ion(Li-ion)built-inbattery,orfromac
powerthroughtheacpoweradapter.Whileyouuseacpower,thebatterychargesautomatically.
Theacpoweradapterthatcomeswithyourcomputerhastwobasiccomponents:
•Thetransformerpackthatconvertsacpowerforusewiththecomputer.
•Thepowercordthatplugsintotheacoutletandintothetransformerpack.
Attention:Usinganimproperpowercordmightseverelydamageyourcomputer.
Connectingtheacpoweradapter
Toconnecttheacpoweradapter,dothefollowing:
Note:Ensurethatyouperformtheactionsintheorderinwhichtheyarelisted.
1.Plugtheacpoweradapterintoanelectricaloutlet.
2.Connectthepowercordtothetransformerpack.
3.Connecttheacpoweradaptertotheacpowerconnectorofthecomputer.
Tipsforusingtheacpoweradapter
•Whentheacpoweradapterisnotinuse,disconnectitfromtheelectricaloutlet.
•Donotbindthepowercordtightlyaroundtheacpoweradaptertransformerpackwhenitisconnectedto
thetransformer.
•Beforeyouchargethebattery,makesurethatitstemperatureisatleast10°C(50°F).
•Youcanchargethebatterywhentheacpoweradapterisconnectedtothecomputer.Youneedto
chargethebatteryinanyofthefollowingsituations:
–WhenthebatteryiconintheWindowsnotificationareashowsalowpercentageofbatterypower
remaining.
–Whenthebatteryhasnotbeenusedforalongtime.
Chargingthebattery
Whenyoucheckbatterystatusandfindthatthepercentageofpowerremainingisloworwhenthepower
alarmalertsyouthattheremainingpowerislow,youneedtochargeyourbattery.
Chapter2.Usingyourcomputer35
Page 52

Ifanacoutletisconvenient,plugtheacpoweradapterintotheoutlet,andthenplugitintoacpower
connectorofthecomputer.Thebatterywillbefullychargedinaboutthreetosixhours.Thechargingtimeis
affectedbythebatterysizeandthephysicalenvironment.Youcancheckthebatterychargingstatusatany
timethroughthebattery-statusiconintheWindowsnotificationarea.
Note:Tomaximizethelifeofthebattery,thecomputerdoesnotstartrechargingthebatteryiftheremaining
powerisgreaterthan95%.
Maximizingthebatterylife
Tomaximizethelifeofthebattery,dothefollowing:
•Usethebatteryuntilthechargeiscompletelydepleted.
•Rechargethebatterycompletelybeforeusingit.Y oucanseewhetherthebatteryisfullychargedfromthe
battery-statusiconintheWindowsnotificationarea.
•Alwaysusepower-savingmodes,suchassleepmode,andhibernationmode.
Managingthebatterypower
Toachievethebestbalancebetweenperformanceandpowersaving,adjustyourpowerplansettings.
Toaccesspowerplansettings,dothefollowing:
•ForWindows8.1:Gotothedesktopscreen,right-clickthebattery-statusiconintheWindowsnotification
area,andthenclickPowerOptions.ThenclickChangeplansettingsthatisnexttoyourpowerplan.
•ForWindows7:StartthePowerManagerprogramandthenclickthePowerPlantab.Forinstructionson
howtostartthePowerManagerprogram,see“AccessingLenovoprogramsontheWindows7operating
system”onpage15.
Formoreinformation,refertothehelpinformationsystemoftheprogram.
Power-savingmodes
Thereareseveralmodesthatyoucanuseatanytimetoconservepower.Thissectionintroduceseach
modeandgivestipsontheeffectiveuseofbatterypower.
•Screenblankmode(forWindows7only)
Thecomputerdisplayrequiresconsiderablebatterypower.Toturnoffthepowertothedisplayandmake
thecomputerenterscreenblankmode,right-clickthebatterygaugeiconintheWindowsnotificationarea
andselectPoweroffdisplay.
•Sleepmode
Insleepmode,yourworkissavedtomemory,andthenthesolid-statedriveandthecomputerdisplayare
turnedoff.Whenyourcomputerwakesup,yourworkisrestoredwithinseconds.
Dependingonthemodel,yourcomputermightsupportthe30DayStandbyfunction.Whenthisfunction
isenabled,thecomputerconsumesevenlesspowerinsleepmodeandtakesonlysecondstoresume
normaloperationwhenyoupressthepowerbutton.Formoreinformationaboutthe30DayStandby
function,dothefollowing:
–ForWindows8.1:OpentheLenovoSettingsprogramandclickPower➙30DayStandby.
–ForWindows7:RefertothehelpinformationsystemofthePowerManagerprogram.Forinstructions
onhowtostartthePowerManagerprogram,see“Lenovoprograms”onpage14.
Toputyourcomputerintosleepmode,pressFn+4ordothefollowing:
–ForWindows8.1:Movethepointertothebottom-rightcornerofthescreentobringupthecharms.
ThenclickSettings➙Power➙Sleep.
–ForWindows7:UsetheStartmenushutdownoption.
36UserGuide
Page 53

•Hibernationmode
Byusingthismode,youcanturnoffyourcomputercompletelywithoutsavingfilesorexitingany
programsthatarerunning.Whenthecomputerentershibernationmode,allopenprograms,folders,and
filesaresavedtothesolid-statedrive,andthenthecomputerturnsoff.
Ifyouputyourcomputerintohibernationmodewiththewake-upfunctiondisabled,thecomputerdoes
notconsumeanypower.Thewake-upfunctionisdisabledbydefault.Ifyouputyourcomputerinto
hibernationmodewiththewake-upfunctionenabled,thecomputerconsumesasmallamountofpower.
Toenablethewake-upfunction,dothefollowing:
1.GotoControlPanelandclickS
2.ClickAdministrativeTools.
3.ClickTaskScheduler.Ifyouarepromptedforanadministratorpasswordorconfirmation,typethe
passwordorprovideconfirmation.
4.Fromtheleftpane,selectthetaskfolderforwhichyouwanttoenablethewake-upfunction.The
scheduledtasksaredisplayed.
5.Clickascheduledtask,andthenclicktheConditionstab.
6.UnderPower,selectthecheckboxforWakethecomputertorunthistask.
Toputthecomputerintohibernationmode,changeyourpowerplansettingsbydoingthefollowing:
–ForWindows8.1:Gotothedesktopscreen.Right-clickthebattery-statusiconintheWindows
notificationarea,clickPowerOptions➙Choosewhatthepowerbuttondoes,andthenfollowthe
instructionsonthescreen.
–ForWindows7:StartthePowerManagerprogramandthenclickthePowerPlantab.Thenfollow
theinstructionsonthescreen.ForinstructionsonhowtostartthePowerManagerprogram,see
“Lenovoprograms”onpage14.
•Wirelessoff
Whenyouarenotusingthewirelessfeatures,suchasBluetoothorwirelessLAN,turnthemoff.Thiswill
helpconservepower.Toturnoffthewirelessfeatures,tapthewirelessicon
ystemandSecurity.
intheFunctionmode.
Note:OntheWindows7operatingsystem,whenthewirelessfeaturesaredisabled,theredwireless-off
indicator
turnson.
Handlingthebattery
ThissystemsupportsonlybatteriesspeciallydesignedforthisspecificsystemandmanufacturedbyLenovo
oranauthorizedbuilder.Thesystemdoesnotsupportunauthorizedbatteriesorbatteriesdesignedforother
systems.Ifanunauthorizedbatteryorabatterydesignedforanothersystemisinstalled,thesystemwill
notcharge.
Attention:Lenovohasnoresponsibilityfortheperformanceorsafetyofunauthorizedbatteries,and
providesnowarrantiesforfailuresordamagearisingoutoftheiruse.
DANGER
Donotattempttodisassembleormodifythebatterypack.
Attemptingtodosocancauseanexplosion,orliquidleakagefromthebatterypack.
AbatterypackotherthantheonespecifiedbyLenovo,oradisassembledormodifiedbattery
packisnotcoveredbythewarranty.
Chapter2.Usingyourcomputer37
Page 54

DANGER
Iftherechargeablebatterypackisincorrectlyreplaced,thereisdangerofanexplosion.Thebattery
packcontainsasmallamountofharmfulsubstances.T oavoidpossibleinjury:
•ReplaceonlywithabatteryofthetyperecommendedbyLenovo.
•Keepthebatterypackawayfromfire.
•Donotexposeittoexcessiveheat.
•Donotexposeittowaterorrain.
•Donotshort-circuitit.
•Storeitinacooldryplace.
•Keepitawayfromchildren.
Thebatterypackisaconsumablesupply.Ifyourbatterybeginstodischargetooquickly,replacethe
batterypackwithanewoneofthetyperecommendedbyLenovo.Formoreinformationonreplacingthe
batterypack,contactyourCustomerSupportCenter.
DANGER
Donotdrop,crush,puncture,orsubjecttostrongforces.Batteryabuseormishandlingcancause
thebatterytooverheat,whichcancausegassesorflameto“vent”fromthebatterypackor
coin-cellbattery.Ifyourbatteryisdamaged,orifyounoticeanydischargefromyourbatteryorthe
buildupofforeignmaterialsonthebatteryleads,stopusingthebatteryandobtainareplacement
fromthebatterymanufacturer.
DANGER
Onlyrechargethebatterypackstrictlyaccordingtoinstructionsincludedintheproduct
documentation.
DANGER
Donotputthebatterypackintrashthatisdisposedofinlandfills.Whendisposingofthebattery,
complywithlocalordinancesorregulationsandyourcompany'ssafetystandards.
DANGER
Thereisadangerofanexplosionifthecoin-cellbatteryisincorrectlyplaced.Thelithiumbattery
containslithiumandcanexplodeifitisnotproperlyhandled,ordisposedof.Replaceonlywitha
batteryofthesametype.Toavoidpossibleinjuryordeath,donot:(1)throworimmerseintowater,
(2)allowittoheattomorethan100°C(212°F),or(3)attempttorepairordisassembleit.Disposeof
itasrequiredbylocalordinancesorregulationsandyourcompany'ssafetystandards.
Connectingtothenetwork
YourcomputerhasoneormorenetworkcardsthatenableyoutoconnectyourcomputertotheInternet
orothernetworkconnections.
38UserGuide
Page 55

Ethernetconnections
Youcanconnectyourcomputertoalocalnetworkorabroadbandconnectionbyusingthebuilt-inEthernet
featureofthecomputer.
DANGER
Toavoidtheriskofelectricalshock,donotconnectthetelephonecabletotheEthernetextension
adapter.
ThefollowingfigureshowshowtoconnectyourcomputertoaLANusingtheEthernetextensionadapter
thatcomeswithyourcomputer.
Note:T ousetheEthernetextensionadapter,youneedtoremovetheconnectorcoverfromtheEthernet
extensionadapterfirst.Ensurethatyoukeeptheconnectorcover.ReattachittotheEthernetextension
adapterwhenyouarenotusingtheEthernetextensionadapter.
TheEthernetextensionadapterhastwoindicatorsthatshowthestatusofthenetworkconnection.Whenthe
upper-leftindicatorissolidgreen,itindicatesthatthecomputerconnectstoaLANandasessionwiththe
networkisavailable.Whentheupper-rightindicatorblinksyellow,itindicatesthatdataisbeingtransmitted.
Wirelessconnections
Wirelessconnectionisthetransferofdatawithouttheuseofcablesbutbymeansofradiowavesonly.
Attention:
•Ifyouwanttousethewirelessfeaturesonanairplane,checkthewirelessserviceswiththeairlinebefore
boardingtheairplane.
•Iftherearerestrictionsontheuseofcomputerwirelessfeaturesonanairplane,youneedtodisablethe
wirelessfeaturesofyourcomputerbeforeboarding.
Dependingonthewirelessdevicesinstalledonyourcomputer,youmightbeabletousethefollowing
wirelessnetworks:
•WirelessLANconnection
•WirelessWANconnection
•Bluetoothconnection
Chapter2.Usingyourcomputer39
Page 56

•NFCconnection
UsingthewirelessLANconnection
AwirelessLANcoversarelativelysmallgeographicarea,suchasanofficebuildingorahouse.Devices
basedonthe802.11standardscanconnecttothistypeofnetwork.
Yourcomputercomeswithabuilt-inwirelessnetworkcardandaconfigurationutilitytohelpyouestablish
wirelessconnectionsandmonitortheconnectionstatus.Thisenablesyoutostayconnectedtoyournetwork
whileyouareattheoffice,inameetingroom,orathome,withnoneedforawiredconnection.
ToestablishawirelessLANconnection,dothefollowing:
ForWindows8.1:
1.T apthewirelessicon
howtodisplaytheFunctionmode,see“AdaptiveKeysoverview”onpage25.
2.Dooneofthefollowing:
Note:EnsurethatAirplanemodeissettooff.
•Moveyourpointertothetop-rightorbottom-rightcornertodisplaythecharms,clickSettings,then
clickthewireless-network-connection-statusicon.Alistofavailablewirelessnetworksisdisplayed.
•Gotothedesktopscreen,thenclickthewireless-network-connection-statusiconintheWindows
notificationarea.Alistofavailablewirelessnetworksisdisplayed.
3.Double-clickanetworktoconnecttoit.Providerequiredinformationifneeded.
ForWindows7:
1.T apthewirelessicon
howtodisplaytheFunctionmode,see“AdaptiveKeysoverview”onpage25.
2.Clickthewireless-network-connection-statusiconintheWindowsnotificationarea.Alistofavailable
wirelessnetworksisdisplayed.
3.Double-clickanetworktoconnecttoit.Providerequiredinformationifneeded.
Ifyouneedtoconnecttodifferentwirelessnetworksindifferentlocations,usethefollowingsoftwareto
managemultiplenetworkprofilessothatthecomputerautomaticallyconnectstoanavailablenetworkwhen
thelocationchanges:
•ForWindows8.1:OpentheLenovoSettingsprogramandclickLocationAwareness.Formore
information,see“AccessingLenovoprogramsontheWindows8.1operatingsystem”onpage16.
•ForWindows7:UsetheAccessConnectionsprogram.Formoreinformation,see“AccessingLenovo
programsontheWindows7operatingsystem”onpage15.
intheFunctionmodetoenablethewirelessfeatures.Formoreinformationon
intheFunctionmodetoenablethewirelessfeatures.Formoreinformationon
TipsforusingthewirelessLANfeature
Toachievethebestconnection,usethefollowingguidelines:
•PlaceyourcomputersothatthereareasfewobstaclesaspossiblebetweenthewirelessLANaccess
pointandthecomputer.
•Openyourcomputerlidtoanangleofslightlymorethan90degrees.
•Ifyouusethewirelessfeature(the802.11standards)ofyourcomputersimultaneouslywithaBluetooth
option,thedatatransmissionspeedcanbedelayedandtheperformanceofthewirelessfeaturecanbe
degraded.
40UserGuide
Page 57

CheckingthewirelessLANconnectionstatus
YoucancheckthewirelessLANconnectionstatusthroughthewireless-network-connection-statusiconin
theWindowsnotificationarea.Themorebarsencompassed,thebetterthesignalis.
FortheWindows7operatingsystem,youalsocanchecktheAccessConnectionsgauge,theAccess
Connectionsstatusicon,ortheAccessConnectionswirelessstatusiconintheWindowsnotificationarea.
AccessConnectionsgaugestatus:
•
•
Powertothewirelessradioisoffornosignal.
Powertothewirelessradioison.Thesignalstrengthofthewirelessconnectionispoor.To
improvesignalstrength,moveyourcomputerclosertothewirelessaccesspoint.
•
Powertothewirelessradioison.Thesignalstrengthofthewirelessconnection
ismarginal.
•
Powertothewirelessradioison.Thesignalstrengthofthewirelessconnection
isexcellent.
AccessConnectionsiconstatus:
•
Nolocationprofileisactiveornoneexists.
Currentlocationprofileisdisconnected.
•
Currentlocationprofileisconnected.
•
Wirelessstatusiconstatus
•
Powertothewirelessradioisoff.
•
Powertothewirelessradioison.Noassociation.
•
Powertothewirelessradioison.Nosignal.
Powertothewirelessradioison.Thesignalstrengthofthewirelessconnectionisexcellent.
•
Powertothewirelessradioison.Thesignalstrengthofthewirelessconnectionismarginal.
•
Powertothewirelessradioison.Thesignalstrengthofthewirelessconnectionispoor.T oimprove
•
signalstrength,moveyourcomputerclosertothewirelessaccesspoint.
UsingthewirelessWANconnection
WirelessWANwhichusescellularnetworksfordatatransmission,enablesyoutoestablishwireless
connectionsoverremotepublicorprivatenetworks.Theseconnectionscanbemaintainedoveralarge
geographicalarea,suchasacityoranentirecountry,byuseofmultipleantennasitesorsatellitesystems
maintainedbywirelessserviceproviders.
SomeThinkPadnotebookcomputerscomewithabuilt-inwirelessWANcardintegratedwithsomewireless
WANtechnologies,suchas1xEV-DO,HSPA,3G,GPRS,orLTE.Byusingthebuilt-inwirelessWANcardand
theconfigurationutilitythatcomeswithyourcomputer,youcanestablishwirelessWANconnectionsand
monitortheconnectionstatus.
Note:ThewirelessWANserviceisprovidedbyauthorizedserviceprovidersinsomecountries.
TipsforusingthewirelessWANfeature
Toachievethebestconnection,usethefollowingguidelines:
•Keepyourcomputerawayfromyourbody.
Chapter2.Usingyourcomputer41
Page 58

•Placeyourcomputeronaflatsurfaceandopenyourcomputerlidtoanangleofslightlymorethan
90degrees.
•Placeyourcomputerawayfromconcreteorbrickwallsthatmightdampencellularsignals.
•Bestreceptionwillbeavailablenearwindowsandotherlocationswherecellularphonereceptionisthe
strongest.
CheckingthewirelessWANconnectionstatus
YoucancheckthewirelessWANconnectionstatusthroughthewireless-network-connection-statusiconin
theWindowsnotificationarea.Themorebarsencompassed,thebetterthesignalis.
FortheWindows7operatingsystem,youalsocanchecktheAccessConnectionsgauge,theAccess
Connectionsstatusicon,ortheAccessConnectionswirelessstatusiconintheWindowsnotificationarea.
AccessConnectionsgaugestatus:
•
•
•
•
AccessConnectionsiconstatus:
•
•
•
Wirelessstatusiconstatus:
•
•
•
•
•
•
Nosignal
Weaksignal
Mediumsignal
Strongsignal
Nolocationprofileisactiveornoneexists.
Currentlocationprofileisdisconnected.
Currentlocationprofileisconnected.
PowertotheWANradioisoff
Noassociation
Nosignal
Weaksignal
Mediumsignal
Strongsignal
UsingtheBluetoothconnection
Bluetoothcanconnectdevicesashortdistancefromoneanother,andiscommonlyusedforconnecting
peripheraldevicestoacomputer,transferringdatabetweenhand-helddevicesandapersonalcomputer,or
remotelycontrollingandcommunicatingwithdevicessuchasmobilephones.
Dependingonthemodel,yourcomputermightsupporttheBluetoothfeature.Totransferdatathrough
theBluetoothfeature,dothefollowing:
1.EnsurethattheBluetoothfeatureisenabled.
•IfyouareusingtheWindows8.1operatingsystem,theBluetoothfeatureisenabledbydefault.
•IfyouareusingtheWindows7operatingsystem,toenabletheBluetoothfeature,tapthewireless
icon
instructionsonthescreen.FormoreinformationonhowtodisplaytheFunctionmode,see“Adaptive
Keysoverview”onpage25.
42UserGuide
intheFunctionmodetoenableordisablethewirelessfeatures,andthenfollowthe
Page 59

2.Locatethedatayouwanttosendandright-clickthedata.
Note:IfyouareusingtheWindows8.1operatingsystem,gotothedesktopscreenfirst,locatethedata
youwanttosend,andthenright-clickthedata.
3.SelectSendTo➙BluetoothDevices.
4.SelectaBluetoothdevice,andthenfollowtheinstructionsonthescreen.
Note:Ifyouusethewirelessfeature(the802.11standards)ofyourcomputersimultaneouslywitha
Bluetoothoption,thedatatransmissionspeedcanbedelayedandtheperformanceofthewirelessfeature
canbedegraded.
Formoreinformation,refertotheWindowshelpinformationsystemandtheBluetoothhelpinformation
system.
UsingtheNFCconnection
NFCisahigh-frequencyandshort-rangewirelesscommunicationstechnology.Dependingonthe
model,yourcomputermightcomewithanNFCcard.ByusingtheNFCfeature,youcanestablishradio
communicationsbetweenyourcomputerandanotherNFC-enableddeviceoveradistancenomorethana
fewcentimeters.BeforeyouusetheNFCfeature,ensurethattheNFCdeviceoptionissettoEnabled
intheThinkPadSetupprogram.See“Securitymenu”onpage98.
Bydefault,theNFCfeatureisenabled.IfyouhavedisabledtheNFCfeature,dothefollowingtoenable
theNFCfeature:
•FortheWindows7operatingsystem:
1.StarttheThinkPadSetupprogram.See“UsingtheThinkPadSetupprogram”onpage93.
2.SelectSecurity➙I/OPortAccess.
3.SettheNFCdeviceoptiontoEnabled.
•FortheWindows8.1operatingsystem:
1.Gotothedesktopandmovethepointertothetop-rightorbottom-rightcornerofthescreentobring
upthecharms.ThenclickSettings➙ChangePCsettings➙Network➙Radiodevices.
2.SlidetheNFCswitchtotherighttoenabletheNFCfeature.
YoucanusetheNFCfeaturewithNFCsupportedprograms,suchastheLenovoQuickControlprogramor
theLenovoQuickCastprogram.
Presentationsandmultimedia
Youcanconnectyourcomputertoaprojectortogivepresentationsoryoucanconnectyourcomputer
toanexternalmonitortoexpandyourworkspace.
Changingdisplaysettings
Youcanchangethedisplaysettings,suchasthedisplayresolution,fontsize,andsoon.
Tochangethedisplaysettings,dothefollowing:
1.OpenControlPanelandclickAppearanceandPersonalization.
2.ClickDisplayforfurtherconfiguration.
3.ClickApply.Thechangewilltakeeffectafteryoulogoff.
Chapter2.Usingyourcomputer43
Page 60

Connectingaprojectororanexternalmonitor
Thistopicprovidesinformationaboutconnectingaprojectororanexternalmonitor.
Usinganexternalmonitor
Note:Whenyouconnectanexternalmonitor,avideointerfacecablewithaferritecoreisrequired.
Yourcomputercansupportamaximumvideoresolutionofupto2560x1440orupto1600x900,provided
thattheexternalmonitoralsosupportsthatresolution.Formoreinformationabouttheexternalmonitor,refer
tothemanualsprovidedwiththeexternalmonitor.
Youcansetanyresolutionforeitherthecomputerdisplayortheexternalmonitor.Whenyouusebothatthe
sametime,theresolutionofbothisthesame.Ifyousetahigherresolutionforthecomputerdisplay,you
canseeonlypartofthescreenatatime.YoucanseeotherpartsbymovingtheimagewiththeTrackPoint
pointingdeviceoranotherpointingdevice.
IntheDisplaySettingswindow,youcanmovethedisplayoutputtothecomputerdisplay,theexternal
monitor,orboth.
Connectinganexternalmonitor
Toconnectanexternalmonitor,dothefollowing:
1.ConnecttheexternalmonitortotheMiniDisplayPortconnectorofyourcomputer.
2.Connecttheexternalmonitortoanelectricaloutlet.
3.T urnontheexternalmonitor.
4.T apthedisplay-modeicon
youtoswitchbetweenviewingoutputontheexternalmonitor,thecomputermonitor,orbothmonitors.
Note:Ifyourcomputercannotdetecttheexternalmonitor,right-clickanywhereonthedesktop,then
selectScreenresolution.ClicktheDetectbutton.
Settingtheexternalmonitortype
Tosettheexternalmonitortype,dothefollowing:
1.Connecttheexternalmonitortoyourcomputer,andthenconnectthemonitortoanelectricaloutlet.
2.T urnontheexternalmonitor.
3.Right-clickanywhereonthedesktop,andthenclickScreenresolution.
Note:Ifyourcomputercannotdetecttheexternalmonitor,clicktheDetectbutton.
4.SelecttheexternalmonitorandsetResolution.
5.ClickAdvancedSettings.
6.ClicktheMonitortab.Checkthemonitorinformationtomakesurethatthemonitortypeiscorrect.Ifit
is,clickOKtoclosethewindow;otherwiseproceedwiththefollowingsteps.
7.Ifmorethantwomonitortypesaredisplayed,selectGenericPnPMonitororGenericNon-PnP
Monitor.
8.ClickProperties.Ifyouarepromptedforanadministratorpasswordorconfirmation,typethepassword
orprovideconfirmation.
9.ClicktheDrivertab.
10.ClickUpdateDriver.
11.ClickBrowsemycomputerfordriversoftware,andthenclickLetmepickfromalistofdevice
driversonmycomputer.
intheFunctionmodetochangethedisplayoutputlocation.Thisenables
44UserGuide
Page 61

12.CleartheShowcompatiblehardwarecheckbox.
13.Selectthecorrectmanufacturerandmodelfortheexternalmonitor.Ifyoucannotfindyourmonitoron
thelist,stoptheinstallationofthisdriverandusethedrivershippedwithyourmonitor.
14.Afterupdatingthedriver,clickClose.
Changingthecolorsettings
Tochangethecolorsettings,dothefollowing:
1.Right-clickanywhereonthedesktop,andthenclickScreenresolution.
2.ClickAdvancedSettings,andthenselecttheColorManagementtab.
3.ClickColorManagement,andthenselecttheAdvancedtab.
4.Changethecolorsettingsasyoudesired,andthenclickClose.
Considerationsforconnectinganexternalmonitor
•Wheninstallinganoperatingsystem,youmustinstallthedisplaydriverforyourmonitorthatisprovided
withthecomputer,andthemonitorINFfilethatisprovidedwiththeexternalmonitor.
•Ifyousetaresolutionhigherthantheresolutionyouareusingonthecomputermonitor,andusean
externalmonitorthatdoesnotsupportthatresolution,takeadvantageofthevirtualscreenfunction,
whichenablesyoutodisplayonlyapartofthehigh-resolutionscreenimageyourcomputerproduces.
YoucanseeotherpartsoftheimagebymovingthescreenwiththeT rackPointpointingdeviceoranother
pointingdevice.
•Iftheexternalmonitoryouareusingisoutdated,theresolutionandtherefreshratemightbelimited.
UsingtheMiniDisplayPortconnector
YourcomputerhasaMiniDisplayPortconnector,whichisadigitaldisplayinterfaceforconnectionto
variousexternaldevices,suchasCathodeRayTube(CRT)monitors,LCDmonitors,projectors,oreven
high-definitiontelevisions.Thiscompactconnectorenablesaplug-and-playsetupandsupportsadapters
thatcanplugintoDVI,videographicsarray(VGA),orHDMIconnectors.
TheMiniDisplayPortconnectorofyourcomputersupportsaudioaswellasvideostreaming.
Settingupapresentation
Todisplayinformationandmakepresentations,youcanconnectadataprojectortoyourcomputerthrough
theMiniDisplayPortconnectoronyourcomputerbyusingaLenovoMini-DisplayPorttoVGAAdapterCable.
TheLenovoMini-DisplayPorttoVGAAdapterCableisavailableasoptionat
http://www.lenovo.com/essentials
Note:Itmaytakeseveralsecondsbeforetheprojectordisplaystheimage.Ifyoudonotseeyourdesktop
displayedafter60seconds,tapthedisplay-modeicon
displayoutputlocations.
Yourprojectormighthaveoneormoreaudio-inputconnectors.Toprojectsound,youneedtoattach
thecomboaudioconnectoronyourcomputertotheseconnectors,usinganaudiocable(commercially
available).
intheFunctionmodetoswitchbetweendifferent
Usingdualdisplays
ThissectionintroducestheDuplicateandExtenddesktopfunctionsthatenableyoutodisplayoutputon
boththecomputerdisplayandanexternalmonitor.
Chapter2.Usingyourcomputer45
Page 62

UsingtheDuplicateorExtenddesktopfunction
WiththeDuplicatedesktopfunction,youcandisplaythesameoutputonboththecomputerdisplayand
anexternaldisplay.YoualsocandisplaydifferentdesktopimagesoneachmonitorwiththeExtend
desktopfunction.
YoucanusetheDuplicateorExtenddesktopfunctionwithoutchanginganysettings.Ifthefunctiondoes
notwork,refertothefollowingtopiconhowtoenabletheDuplicateorExtenddesktopfunction.
EnablingtheDuplicateorExtenddesktopfunction
ToenabletheDuplicateorExtenddesktopfunction,dothefollowing:
1.Connecttheexternalmonitortoyourcomputer;andthenconnectthemonitortoanelectricaloutlet.
2.T urnontheexternalmonitor.
3.T apthedisplay-modeicon
Tochangetheresolutionforeachmonitor,dothefollowing:
1.Right-clickanywhereonthedesktop,andclickScreenresolution.
2.ClicktheMonitor-1icon,whichisfortheprimarydisplay(thecomputerdisplaybydefault).
3.Settheresolutionfortheprimarydisplay.
4.ClicktheMonitor-2icon,whichisforthesecondarydisplay(theexternaldisplaybydefault).
5.Settheresolutionforthesecondarydisplay.
6.ClickAdvancedsettingsandsetupthecolorqualityontheMonitortab.
7.ClickOKtoapplythechanges.
ConsiderationsforusingtheExtenddesktopfunction
•InExtenddesktopmode,onlytheprimarydisplayshowsDOSfull-screen,andtheotherdisplayis
blackedout.
•IfyourcomputerhastheIntelgraphicscard,youcandesignatetheprimarydisplaybydoingthefollowing:
1.Right-clickanywhereonthedesktopandselectScreenResolution.
2.ClickthedesireddisplayimageandselecttheMakethismymaindisplaycheckbox.
3.ClickOK.
•WhenanapplicationusingDirectDraworDirect3Disrunninginfull-screenmode,onlytheprimarydisplay
showstheoutput.
intheFunctionmode,andthenselectDuplicateorExtend.
•YoucannotusethedisplayswitchingfunctionwhenyouareinExtenddesktopmode.
Usingaudiofeatures
Yourcomputerisequippedwiththefollowingitems:
•Built-inmicrophones
•Built-inspeakers
•Comboaudioconnector,3.5mm(0.14inch)indiameter
Yourcomputeralsohasanaudiochipthatenablesyoutoenjoyvariousmultimediaaudiofeatures,such
asthefollowing:
•CompliantwithIntelHighDefinitionAudio
46UserGuide
Page 63

•PlaybackofMusicalInstrumentDigitalInterface(MIDI)andMovingPictureExpertsGroupAudioLayer-3
(MP3)files
•Recordingandplaybackofpulse-codemodulation(PCM)andWaveformAudioFileFormat(WAV)files
•Recordingfromvarioussoundsources,suchasaheadsetattached
Thefollowingtableshowsthesupportedfunctionsfortheaudiodevicesattachedtotheconnectorsonyour
computerorThinkPadOneLinkDock.
Table5.Audiofeaturelist
Connector
Comboaudioconnectoron
thecomputer
Comboaudioconnector
onthesupportedThinkPad
OneLinkDock
Headsetwitha3.5mm
(0.14–inch),4-poleplug
Headphoneand
microphonefunctions
supported
Headphoneand
microphonefunctions
supported
Conventional
headphones
Headphonefunction
supported
Headphonefunction
supported
Conventional
microphone
Notsupported
Notsupported
Toconfigurethemicrophoneforoptimalsoundrecording,usetheRealtekHDAudioManagerprogram.To
starttheprogram,gotoControlPanelandclickHardwareandSound➙RealtekHDAudioManager.
Usingthecamera
Ifyourcomputerhasacamera,youcanusethecameratopreviewyourvideoimageandtakeasnapshot
ofyourcurrentimage.
Tostartthecamera,dothefollowing:
•ForWindows8.1,dooneofthefollowing:
–Tapthecameraicon
Web-conferencemode,see“AdaptiveKeysoverview”onpage25.
–ClickCamerafromtheStartscreen.
•ForWindows7,dooneofthefollowing:
intheWeb-conferencemode.Formoreinformationonhowtodisplaythe
–Tapthecameraicon
intheWeb-conferencemode.Formoreinformationonhowtodisplaythe
Web-conferencemode,see“AdaptiveKeysoverview”onpage25.
–StarttheCommunicationsUtilityprogram.See“AccessingLenovoprogramsontheWindows7
operatingsystem”onpage15.
Whenthecameraisstarted,thegreencamera-in-useindicatorturnson.
Youalsocanusetheintegratedcamerawithotherprogramsthatprovidefeaturessuchasphotographing,
videocapturing,andvideoconferencing.Tousetheintegratedcamerawithotherprograms,openoneofthe
programsandstartthephotographing,videocapturing,orvideoconferencingfunction.Then,thecamera
startsautomaticallyandthegreencamera-in-useindicatorturnson.
Formoreinformationonusingthecamerawithaprogram,refertothehelpinformationsystemoftheprogram.
Configuringcamerasettings
Youcanconfigurethecamerasettingstomeetyourneeds,suchasadjustingthequalityofthevideooutput.
Chapter2.Usingyourcomputer47
Page 64

Toconfigurethecamerasettings,dothefollowing:
•ForWindows8.1,dooneofthefollowing:
–Configurethecamerasettingsdirectlyfromtheprogramthatisusingthecamera.Formoreinformation,
seethehelpinformationsystemoftheprogram.
–ClickLenovoSettingsfromtheStartscreen.ThenclickCamera.Followtheinstructionsonthe
screentoconfigurethecamerasettingsasdesired.
•ForWindows7:StarttheCommunicationsUtilityprogramandconfigurethecamerasettingsasdesired.
Usingcameragestures
Cameragesturesprovideanewwayofinteractingwithyourcomputer.Y oucanusecameragesturesto
performsometasksusingsimplehandgesturesinsteadofusingthekeyboardormouse.
Toturnonthecamera-gesturesfunction,tapthecamera-gesturesicon
intheWeb-conferencemode.
FormoreinformationonhowtodisplaytheWeb-conferencemode,see“AdaptiveKeysoverview”onpage
25.Whenthecamera-gesturesfunctionisturnedon,thegreencamera-gestureindicator
turnson.To
turnoffthefunction,taptheiconagain.
Thefollowingtablelistssomeexamplesofcameragesturesandthecorrespondingfunctions.
Notes:
•Somecameragesturesareavailableonlyforcertainapplications.
•Ensurethatyourhandiswithinthecameraviewsothatthecameracancaptureyourhandgestures.
•Whenyouareusingthecameragestures,maintainadistanceof0.5–2meters(19.69–78.74inches)
betweenthecameraandyourhand.
•Yourcomputermightlookdifferentfromthefollowingillustrations.
Table6.Samplecameragestures
Cameragestures
ActionsFunctions
Openyourhand,putit
infrontofthecamera,
andthenswipeyourhand
leftward.
Openyourhand,putit
infrontofthecamera,
andthenswipeyourhand
rightward.
•Nextpage
•Nexttrack
•Nextphoto
•Nextslide
•Previouspage
•Previoustrack
•Previousphoto
•Previousslide
Supportedapps
•PortableDocument
Format(PDF)or
electronicbooks
(ebooks)
•Mediaplayers
•Pictureviewers
•PowerPoint
•PDForebooks
•Mediaplayers
•Pictureviewers
•PowerPoint
®
48UserGuide
Page 65

Table6.Samplecameragestures(continued)
Cameragestures
ActionsFunctions
Openyourhand,putit
infrontofthecamera,
andthentapagainstthe
computerdisplay.
Supportedapps
Pauseorplay.Mediaplayers
Raiseyourfist,and
thenmoveitupwardor
downward.
Openyourhand,and
thenraiseitinfrontofthe
camera.
Moveyourfistupwardto
increaseordownwardto
decreasethevolume.
Enablehand-tracking.
Whenthehand-tracking
functionisenabled,you
cancontrolthepointerby
movingyourhand.
Mediaplayers
•PDForebooks
•Pictureviewers
•PowerPoint(available
onlyinfull-screenmode)
Formoreinformationonhowtousecameragestures,dothefollowing:
•RefertotheinstructionsontheCameraGesturessettingsscreen.T oaccesstheCameraGestures
settingsscreen,dothefollowing:
–Tapthesettingsicon
intheHomemode,andthenclickCameraGestures.TheCameraGestures
settingsscreenopens.
–Tapandholdthecamera-gesturesicon
intheWeb-conferencemodeforabouttwoseconds.
TheCameraGesturessettingsscreenopens.
•RefertotheSetupGuideposterthatcomeswithyourcomputer.
Configuringcameragesturessettings
Youcanconfigurethefollowingcameragesturessettingstomeetyourneeds:
•Turnonorturnofftheon-screenvisualfeedbackwhenagestureisdetected.
•Turnonorturnoffthesoundfeedbackwhenagestureisdetected.
•Automaticallyturnoffthecameraifnogestureisdetected.
Toconfigurethecameragesturessettings,right-clickthecamera-gesturesiconintheWindowsnotification
area,andthenfollowtheinstructionsonthescreentoconfigurethesettingsasyoudesired.
Chapter2.Usingyourcomputer49
Page 66

50UserGuide
Page 67

Chapter3.Youandyourcomputer
Thischapterprovidesinformationaboutaccessibility,comfort,andtravelingwithyourcomputer.
•“Accessibilityandcomfort”onpage51
•“Travelingwithyourcomputer”onpage53
Accessibilityandcomfort
Goodergonomicpracticeisimportanttogetthemostfromyourpersonalcomputerandtoavoiddiscomfort.
Arrangeyourworkplaceandtheequipmentyouusetosuityourindividualneedsandthekindofwork
thatyouperform.Inaddition,usehealthyworkhabitstomaximizeyourperformanceandcomfortwhile
usingyourcomputer.
Thefollowingtopicsprovideinformationaboutarrangingyourworkarea,settingupyourcomputer
equipment,andestablishinghealthyworkhabits.
Lenovoiscommittedtoprovidingthelatestinformationandtechnologytoourcustomerswithdisabilities.
Refertoouraccessibilityinformationwhichoutlinesoureffortsinthisarea.See“Accessibilityinformation”
onpage52.
Ergonomicinformation
Workinginthevirtualofficemightmeanadaptingtofrequentchangesinyourenvironment.Forexample,
adaptingtothesurroundinglightsources,properseating,andtheplacementofyourcomputerhardware,
canhelpyouimproveyourperformanceandachievegreatercomfort.
Thefollowingexampleshowssomeoneinaconventionalsetting.Evenwhennotinsuchasetting,youcan
followmanyofthesetips.Developgoodhabits,andtheywillserveyouwell.
Generalposture:Makeminormodificationsinyourworkingposturetodetertheonsetofdiscomfort
causedbylongperiodsofworkinginthesameposition.Frequent,shortbreaksfromyourworkalsohelp
topreventminordiscomfortassociatedwithyourworkingposture.
©CopyrightLenovo2014
51
Page 68

Display:Positionthedisplaytomaintainacomfortableviewingdistanceof510-760mm(20-30inches).
Avoidglareorreflectionsonthedisplayfromoverheadlightingoroutsidesourcesoflight.Keepthedisplay
screencleanandsetthebrightnesstolevelsthatenableyoutoseethescreenclearly.
Headposition:Keepyourheadandneckinacomfortableandneutral(vertical,orupright)position.
Chair:Useachairthatgivesyougoodbacksupportandseatheightadjustment.Usechairadjustmentsto
bestsuityourdesiredposture.
Armandhandposition:Ifavailable,usechairarmrestsoranareaonyourworkingsurfacetoprovide
weightsupportforyourarms.Keepyourforearms,wrists,andhandsinarelaxedandneutral(horizontal)
position.Typewithasofttouchwithoutpoundingthekeys.
Legposition:Keepyourthighsparalleltothefloorandyourfeetflatonthefloororonafootrest.
Whatifyouaretraveling?
Itmightnotbepossibletoobservethebestergonomicpracticeswhenyouareusingyourcomputerwhile
onthemoveorinacasualsetting.Regardlessofthesetting,trytoobserveasmanyofthesetipsas
possible.Sittingproperlyandusingadequatelighting,forexample,willhelpyoumaintaindesirablelevels
ofcomfortandperformance.
Questionsaboutvision?
ThevisualdisplayscreensofThinkPadnotebookcomputersaredesignedtomeetthehigheststandards
andtoprovideyouwithclear,crispimagesandlarge,brightdisplaysthatareeasytosee,yeteasyonthe
eyes.Ofcourse,anyconcentratedandsustainedvisualactivitycanbetiring.Ifyouhavequestionsoneye
fatigueorvisualdiscomfort,consultavisioncarespecialistforadvice.
Comfort
Observethefollowingguidelinestoachievegreatercomfortandimproveperformance.
Activesittingandrestbreaks:Thelongeryousitandworkwithyourcomputer,themoreimportantitisto
observeyourworkingposture.Follow“Ergonomicinformation”onpage51andpractice“activesitting”to
avoiddiscomfortassociatedwithyourworkingpostures.Makingminorvoluntaryposturalchangesand
takingshortfrequentworkbreaksarethekeyingredientsforhealthycomputing.Y ourcomputerislightand
mobile;youcaneasilyrepositionyourworkingsurfacetoaccommodatemanyposturemodifications.
Workareasetupoptions:Familiarizeyourselfwithallofyourofficefurnituresothatyouknowhowtoadjust
yourworksurface,seat,andotherworktoolstoaccommodateyourpreferencesforcomfort.Ifyourwork
areaisnotinanofficesetting,besuretotakespecialnoteofemployingactivesittingandtakingwork
breaks.ManyThinkPadproductsolutionsareavailabletohelpyoumodifyandexpandyourcomputerto
bestsuityourneeds.Y oucanfindsomeoftheseoptionsathttp://www.lenovo.com/essentials.Exploreyour
optionsfordockingsolutionsandexternalproductsthatprovidetheadjustabilityandfeaturesthatyouwant.
Accessibilityinformation
Lenovoiscommittedtoprovidingpeoplewithdisabilitiesgreateraccesstoinformationandtechnology.
Asaresult,thefollowinginformationprovideswaystohelpusersthathavehearing,vision,andmobility
limitationsgetthemostoutoftheircomputerexperience.
Assistivetechnologiesenableuserstoaccessinformationinthemostappropriateway.Someofthese
technologiesarealreadyprovidedinyouroperatingsystem.Otherscanbepurchasedthroughvendors,or
accessedthroughtheWorldWideWebhttp://www.lenovo.com/healthycomputing.
52UserGuide
Page 69

Assistivetechnologies
SomeaccessibilitytechnologiesareavailablethroughtheAccessibilityOptionsprogram.Depending
onyouroperatingsystem,thenumberofaccessibilityoptionsavailablevaries.Ingeneral,accessibility
optionsenhancethewayuserswithhearing,vision,ormobilitylimitationsnavigateandusetheircomputer.
Forexample,someusersmightnothavethefinemotorskillsrequiredtouseamouseorselectkey
combinations.Otherusersmightrequirelargerfontsorhigh-contrastdisplaymodes.Insomecases,
magnifiersandbuilt-inspeechsynthesizersareavailable.Fordetailedinformationabouteachofthese
features,consulttheMicrosofthelpinformationsystem.
TousetheAccessibilityOptionsprogram,openControlPanelandclickEaseofAccess➙Easeof
AccessCenter.
Screen-readertechnologies
Screen-readertechnologiesareprimarilyfocusedonsoftwareprograminterfaces,helpinformationsystems,
andavarietyofonlinedocuments.However,inthecasewhereascreenreadercannotreaddocuments,
thedocumentmustfirstgothroughaconversionprocess.OnesolutionconvertsAdobePDFfilesintoa
formatthatisreadbythescreen-readerprograms.ThissolutionisaWeb-basedserviceprovidedbyAdobe
SystemsIncorporated.Throughhttp://access.adobe.com,AdobePDFdocumentscanbeconvertedto
HTMLorplaintextinmanylanguages.OneconversionoptionconvertsPDFdocumentsontheInternet.A
secondoptionenablesuserstosubmittheURLofanAdobePDFfilethroughe-mailtoconvertittoHTMLor
ASCIItext.AdobePDFfilesonalocalsolid-statedrive,localCD-ROM,orLANalsocanbeconvertedby
attachingtheAdobePDFfiletoane-mailmessage.
Travelingwithyourcomputer
Thistopicprovidesinformationtohelpyouworkwithyourcomputerwhenyouaretraveling.
Traveltips
Usethefollowingtraveltipstotravelmoreconfidentlyandefficientlywithyourcomputer.
•Althoughitissafetoallowyourcomputertogothroughthex-raymachinesatairportsecuritystations,it
isimportanttokeepyoureyesonthecomputeratalltimestopreventtheft.
•Considerbringinganelectricaladapterforuseinanairplaneorautomobile.
•Ifyoucarryanacpoweradapter,detachtheaccordfromittoavoiddamagingthecord.
Traveltipsonairplanes
Ifyoucarryyourcomputerintoanairplane,takenoteofthefollowingtips:
•Ifyouintendtouseyourcomputerorwirelessservices(suchasInternetandBluetooth),checkwiththe
airlineforrestrictionsandavailabilityofservicesbeforeboardingtheairplane.Iftherearerestrictions
ontheuseofcomputerswithwirelessfeaturesontheairplane,youmustabidebythoserestrictions.If
necessary,disablewirelessfeaturesbeforeboarding.
•Becarefulabouttheseatinfrontofyouonairplanes.Angleyourcomputerdisplaysothatitdoesnotget
caughtwhenthepersoninfrontofyouleansback.
•Whentakingoff,remembertoturnoffyourcomputerorputitintohibernationmode.
Travelaccessories
Thefollowingisachecklistofitemstoconsiderpackingwhenyouaregoingtotravel:
•ThinkPadacpoweradapter
•MiniDisplayPorttoHDMIadapter
Chapter3.Y ouandyourcomputer53
Page 70

•Mini-DisplayPorttoVGAAdapterCable
•Externalmouse,ifyouareaccustomedtousingone
•Ethernetextensionadapter
•Ethernetcable
•Aqualitycarryingcasethatprovidesadequatecushionandprotection
•Externalstoragedevice
Ifyouaretravelingtoanothercountry,youmightwanttoconsideranacpoweradapterforthecountryto
whichyouaretraveling.
Topurchasetravelaccessories,gotohttp://www.lenovo.com/accessories.
54UserGuide
Page 71

Chapter4.Security
Thischapterprovidesinformationabouthowtoprotectyourcomputerfromtheftandunauthorizeduse.
•“Usingpasswords”onpage55
•“Solid-statedrivesecurity”onpage59
•“Settingthesecuritychip”onpage60
•“Usingthefingerprintreader”onpage61
•“Noticeondeletingdatafromyoursolid-statedrive”onpage64
•“Usingfirewalls”onpage65
•“Protectingdataagainstviruses”onpage65
Usingpasswords
Youcanhelppreventyourcomputerfromunauthorizedusebyusingpasswords.Onceyousetapassword,
apromptisdisplayedonthescreeneachtimeyouturnonthecomputer.Enteryourpasswordattheprompt.
Youcannotusethecomputerunlessyoutypethecorrectpassword.
Ifyouhavesetapower-onpassword,asupervisorpassword,oraharddiskpassword,itunlocks
automaticallywhenthecomputerresumesfromsleepmode.
Note:IfaWindowspasswordhasbeenset,youwillbepromptedtoenterit.
Typingpasswords
Whenthisiconisdisplayed,typeapower-onpasswordorasupervisorpassword.
Whenthisiconisdisplayed,typeauserharddiskpassword.Totypeamasterharddiskpassword,
pressF1.Whentheiconchangesto
Note:Toreturntotheicon
,pressF1again.
,typethemasterharddiskpassword
Power-onpassword
Youcansetapower-onpasswordtohelpprotectyourcomputeragainstaccessbyunauthorizedusers.
Ifyousetapower-onpassword,thepasswordpromptisdisplayedonthescreenwheneveryouturnonthe
computer.Youmustenterthecorrectpasswordtostartusingthecomputer.
Setting,changing,orremovingapower-onpassword
Beforeyoustart,printtheseinstructions.
Toset,change,orremoveapower-onpassword,dothefollowing:
1.Restartthecomputer.Whenthelogoscreenisdisplayed,pressF1tostarttheThinkPadSetupprogram.
2.SelectSecurity➙Password➙Power-onPasswordbyusingthedirectionalkeys.
©CopyrightLenovo2014
55
Page 72

3.Dependingonyourneed,dooneofthefollowing:
•Tosetapassword,dothefollowing:
a.IntheEnterNewPasswordfield,typeadesiredpasswordandpressEnter.
b.IntheConfirmNewPasswordfield,retypethepasswordandpressEnter.
•Tochangeapassword,dothefollowing:
a.IntheEnterCurrentPasswordfield,typethecurrentpower-onpasswordandpressEnter.
b.IntheEnterNewPasswordfield,typethenewpower-onpasswordandpressEnter;thenretype
thepasswordintheConfirmNewPasswordfieldandEnter.
•Toremoveapassword,dothefollowing:
a.IntheEnterCurrentPasswordfield,typethecurrentpower-onpasswordandpressEnter.
b.LeavetheEnterNewPasswordandConfirmNewPasswordfieldsblank.PressEntertwice.
4.ASetupNoticewindowisdisplayed.PressEntertocontinue.
5.PressF10.ASetupConfirmationwindowisdisplayed.SelectYestosavetheconfigurationchanges
andexittheThinkPadSetupprogram.
Note:Y oumightwanttorecordyourpasswordandstoreitinasafeplace.Otherwise,ifyouforgetthe
password,youhavetotakeyourcomputertoaLenovoreselleroramarketingrepresentativetohave
thepasswordcanceled.
Supervisorpassword
ThesupervisorpasswordprotectsthesysteminformationstoredintheThinkPadSetupprogram.Ifyouhave
setasupervisorpassword,noonecanchangetheconfigurationofthecomputerwithoutthepassword.It
providesthefollowingsecurityfeatures:
•Ifonlyasupervisorpasswordisset,apasswordpromptisdisplayedwhenyoutrytostarttheThinkPad
Setupprogram.UnauthorizeduserscannotaccesstheThinkPadSetupprogramwithoutthepassword.
•Thesystemadministratorcanusethesupervisorpasswordtoaccessacomputereveniftheuserofthat
computerhassetapower-onpassword.Thesupervisorpasswordoverridesthepower-onpassword.
•Ifbothasupervisorpasswordandapower-onpasswordareset,youcandothefollowingonlyifyou
havethesupervisorpassword:
–Changingordeletingthepower-onpassword
–Changingordeletingthesupervisorpassword
–Changingdateandtime
–Specifyingtheminimumlengthforpower-onpasswordandharddiskpassword
–Changingthesettingforthesecuritychip
–Erasingthefingerprintdata
–Enablingordisablingthefollowingfeatures:
–WakeonLANandFlashoverLAN
–LockUEFIBIOSSettings
–Passwordatunattendedboot
–BootDeviceListF12Option
–BootOrderLock
–FlashBIOSUpdatingbyEnd-Users
–Internalnetworkdevice
56UserGuide
Page 73

–Internalwirelessdevice
–InternalBluetoothdevice
–InternalNetworkOptionROM
–InternalwirelessWANdevice
–Securitymode
–Fingerprintreaderpriority
Notes:
•ThesystemadministratorcansetthesamesupervisorpasswordonmanyThinkPadnotebookcomputers
tomakeadministrationeasier.
•WhenLockUEFIBIOSSettingsoptionisenabled,allBIOSsettingscannotbechanged.Tochange
thesettings,asupervisorpasswordisrequired.
Setting,changing,orremovingasupervisorpassword
Beforeyoustart,printtheseinstructions.
Onlyasystemadministratorcanset,change,orremoveasupervisorpassword.Toset,change,orremovea
supervisorpassword,dothefollowing:
1.Restartthecomputer.Whenthelogoscreenisdisplayed,pressF1tostarttheThinkPadSetupprogram.
2.SelectSecurity➙Password➙SupervisorPasswordbyusingthedirectionalkeys.
3.Dependingonyourneeds,dooneofthefollowing:
•Tosetapassword,dothefollowing:
a.IntheEnterNewPasswordfield,typeadesiredpasswordandpressEnter.
b.IntheConfirmNewPasswordfield,retypethepasswordandpressEnter.
•Tochangeapassword,dothefollowing:
a.IntheEnterCurrentPasswordfield,typethecurrentsupervisorpasswordandpressEnter.
b.IntheEnterNewPasswordfield,typethenewsupervisorpasswordandpressEnter;thenretype
thepasswordintheConfirmNewPasswordfieldandpressEnter.
•Toremoveapassword,dothefollowing:
a.IntheEnterCurrentPasswordfield,typethecurrentsupervisorpasswordandpressEnter.
b.LeavetheEnterNewPasswordandConfirmNewPasswordfieldsblank.PressEntertwice.
4.ASetupNoticewindowisdisplayed.PressEntertocontinue.
5.PressF10.ASetupConfirmationwindowisdisplayed.SelectYestosavetheconfigurationchanges
andexittheThinkPadSetupprogram.
Note:Y oumightwanttorecordyourpasswordandstoreitinasafeplace.Thenexttimeyouopenthe
ThinkPadSetupprogram,youwillbepromptedtotypeyoursupervisorpasswordtoproceed.Ifyouforget
yoursupervisorpassword,Lenovocannotresetyourpassword.YoumusttakeyourcomputertoaLenovo
reselleroraLenovomarketingrepresentativetohavethesystemboardreplaced.Proofofpurchaseis
required,andafeewillbechargedforpartsandservice.
Harddiskpasswords
Thefollowingtwotypesofharddiskpasswordscanhelpprotecttheinformationstoredonthesolid-state
drive:
•Userharddiskpassword
Chapter4.Security57
Page 74

Ifauserharddiskpasswordhasbeenset,butnomasterharddiskpasswordhasbeen,theusermust
entertheuserharddiskpasswordtoaccessfilesandapplicationsonthesolid-statedrive.
•Masterharddiskpassword
Themasterharddiskpasswordalsorequiresauserharddiskpassword.Themasterharddiskpassword
isusuallysetandusedbyasystemadministrator.Itenablestheadministratortoaccessanysolid-state
driveinasystemlikeamasterkey.Theadministratorsetsthemasterpassword;thenassignsauser
passwordforeachcomputerinthenetwork.Theusercanthenchangetheuserpasswordasdesired,but
theadministratorstillcangetaccessbyusingthemasterpassword.
Whenamasterharddiskpasswordisset,onlytheadministratorcanremovetheuserharddiskpassword.
Settingaharddiskpassword
Beforeyoustart,printtheseinstructions.
Tosetaharddiskpassword,dothefollowing:
1.Restartthecomputer.Whenthelogoscreenisdisplayed,pressF1tostarttheThinkPadSetupprogram.
2.SelectSecurity➙Password➙HarddiskxPasswordbyusingthedirectionalkeys.
3.Apasswordwindowisdisplayed.YouarepromptedtoselectUserorUser+Master.SelectUserif
youwanttosetonlyoneharddiskpassword.SelectUser+Masterifyouwanttosetauserharddisk
passwordandamasterharddiskpassword,forexampleifyouareanadministratororasupervisor.
•IfyouselectUser,dothefollowing:
a.Whenawindowfortypingthenewpasswordopens,typeyournewpasswordintheEnterNew
PasswordfieldandpressEnter.
b.IntheConfirmNewPasswordfield,retypethepasswordyoujustenteredandpressEnter.
•IfyouselectUser+Master,dothefollowing:
a.First,setauserharddiskpassword.Whenamessagewindowpromptsyoutosettheuserhard
diskpassword,pressEntertocontinue.TypeyournewuserharddiskpasswordintheEnter
NewPasswordfieldandpressEnter.RetypethepasswordintheConfirmNewPassword
fieldandpressEnter.
b.Then,setamasterharddiskpassword.Whenamessagewindowpromptsyoutosetthemaster
harddiskpassword.PressEntertocontinue.Typeyournewmasterharddiskpasswordinthe
EnterNewPasswordfieldandpressEnter.RetypethepasswordintheConfirmNewPassword
fieldandpressEnter.
4.ASetupNoticewindowisdisplayed.PressEntertocontinue.
5.PressF10.ASetupConfirmationwindowisdisplayed.SelectYestosavetheconfigurationchanges
andexittheThinkPadSetupprogram.
Thenexttimeyouturnonyourcomputer,typetheuserormasterharddiskpasswordtostartyourcomputer
andaccesstheoperatingsystem.
Changingorremovingaharddiskpassword
Tochangeorremovetheharddiskpassword,dothefollowing:
•IfyouareinUser+Masterharddiskmode,youcanselecteitherUserHDPorMasterHDPtochange
thepassword,dependingonyourneeds.
–IfyouselectUserHDPmode,followthefollowingstepstochangetheuserharddiskpassword:
1.T ypethecurrentuserharddiskpasswordintheEnterCurrentPasswordfieldandpressEnter.
2.T ypethenewpasswordintheEnterNewPasswordfieldandpressEnter;thenretypethe
passwordintheConfirmNewPasswordfieldandpressEnter.
58UserGuide
Page 75

3.ASetupNoticewindowisdisplayed.PressEnteragaintocontinue.Theuserharddiskpassword
ischanged.
Note:TheharddiskpasswordcannotberemovedinUserHDPmode.
–IfyouselectMasterHDPmode,followthefollowingstepstochangethemasterharddiskpassword:
1.T ypethecurrentmasterharddiskpasswordintheEnterCurrentPasswordfieldandpressEnter.
2.T ypethenewmasterharddiskpasswordintheEnterNewPasswordfieldandpressEnter;then
retypethenewpasswordyoujustenteredintheConfirmNewPasswordfieldandpressEnter.
3.ASetupNoticewindowisdisplayed.PressEntertocontinue.Themasterharddiskpasswordis
changed.
Note:IfyouleavetheEnterNewPasswordandConfirmNewPasswordfieldsblankandpressEnter
twice,boththeuserandmasterharddiskpasswordsareremoved.
•IfyouareinUserharddiskmode,followthefollowingstepstochangetheuserharddiskpassword:
1.Followsteps1through7in“Settingaharddiskpassword”onpage58,typingyourpasswordto
starttheThinkPadSetupprogram.
2.T ypethecurrentuserharddiskpasswordintheEnterCurrentPasswordfieldandpressEnter.
3.T ypethenewpasswordintheEnterNewPasswordfieldandpressEnter;thenretypethenew
passwordintheConfirmNewPasswordfieldandpressEnter.
4.ASetupNoticewindowisdisplayed.PressEnteragaintocontinue.Theuserharddiskpasswordis
changed.
Note:IfyouleavetheEnterNewPasswordandConfirmNewPasswordfieldsblankandpressEnter
twice,theuserharddiskpasswordisremoved.
Tipsonusingtheharddiskpasswords
•YoucansettheminimumlengthofaharddiskpasswordthroughtheSecuritymenu.
•Ifyousetaharddiskpasswordofoversevencharacters,thesolid-statedrivecanbeusedonlywitha
computerthatcanrecognizeaharddiskpasswordofoversevencharacters.Ifyoutheninstallthe
solid-statedriveinacomputerthatcannotrecognizeaharddiskpasswordthatcontainsmorethan
sevencharacters,youcannotaccessthedrive.
•Recordyourpasswordandstoreitinasafeplace.Ifyouforgettheuserharddiskpassword,orbothuser
andmasterharddiskpasswords,Lenovocannotresetyourpasswordsorrecoverdatafromthesolid-state
drive.YoumusttakeyourcomputertoaLenovoreselleroramarketingrepresentativetohavethe
solid-statedrivereplaced.Proofofpurchaseisrequired,andafeewillbechargedforpartsandservice.
Solid-statedrivesecurity
Toprotectpasswordsfromunauthorizedsecurityattacks,refertothefollowingtipstomaximizesecurity:
•Setapower-onpasswordaswellasaharddiskpasswordforyourinternalsolid-statedrive.Refertothe
proceduresin“Power-onpassword”onpage55and“Harddiskpasswords”onpage57.Forsecurity,
alongerpasswordisrecommended.
•ToprovidereliablesecurityfortheUEFIBIOS,usethesecuritychipandasecurityapplicationwitha
TrustedPlatformModulemanagementfeature.Referto“Settingthesecuritychip”onpage60.
Note:TheWindows7andWindows8.1operatingsystemssupporttheTPMmanagementfeature.
•IfanEncryptionsolid-statedriveisinstalledinyourcomputer,besuretoprotectthecontentsofyour
computermemoryfromunauthorizedaccessesbyuseofdriveencryptionsoftware,suchasMicrosoft
WindowsBitLocker
®
DriveEncryption,whichissupportedintheUltimateandEnterpriseeditionsof
Chapter4.Security59
Page 76

theWindows7operatingsystemandWindows8.1operatingsystem.See“UsingWindowsBitLocker
DriveEncryption”onpage60.
•Beforeyoudisposeof,sell,orhandoveryourcomputer,deletedatastoredonit.Formoreinformation,
referto“Noticeondeletingdatafromyoursolid-statedrive”onpage64.
Thesolid-statedrivebuiltintoyourcomputercanbeprotectedbytheUEFIBIOS.
UsingWindowsBitLockerDriveEncryption
Tohelpprotectyourcomputeragainstunauthorizedaccess,usethedriveencryptionsoftware,suchas
WindowsBitLockerDriveEncryption.
WindowsBitLockerDriveEncryptionisanintegralsecurityfeatureofWindows7andWindows8.1operating
systems.ItissupportedintheUltimateandEnterpriseeditionsoftheWindows7andProfessionaland
EnterpriseeditionsoftheWindows8.1operatingsystem.Itcanhelpyouprotecttheoperatingsystemand
datastoredonyourcomputer,evenifyourcomputerislostorstolen.BitLockerworksbyencryptingalluser
andsystemfiles,includingtheswapandhibernationfiles.
BitLockerusesaTrustedPlatformModuletoprovideenhancedprotectionforyourdataandtoensureearly
bootcomponentintegrity.AcompatibleTPMisdefinedasaV1.2TPM.
TochecktheBitLockerstatus,gotoControlPanel,andclickS
Encryption.
FormoreinformationaboutWindowsBitLockerDriveEncryption,seethehelpinformationsystemofthe
Windowsoperatingsystem,orsearchfor“MicrosoftWindowsBitLockerDriveEncryptionStep-by-Step
Guide”ontheMicrosoftWebsite.
Encryptionsolid-statedrive
SomemodelscontaintheEncryptionsolid-statedrive.Thisfeaturehelpstoprotectyourcomputeragainst
securityattacksonmedia,NANDflash,ordevicecontrollersbyuseofahardwareencryptionchip.Forthe
efficientuseoftheencryptionfeature,setaharddiskpasswordfortheinternalstoragedevice.
ystemandSecurity➙BitLockerDrive
Settingthesecuritychip
Strictsecurityrequirementsareimposedonnetworkclientcomputersthattransferconfidentialinformation
electronically.Dependingontheoptionsyouordered,yourcomputermighthaveanembeddedsecuritychip,
acryptographicmicroprocessor.WiththesecuritychipandClientSecuritySolution,youcandothefollowing:
•Protectyourdataandsystem
•Strengthenaccesscontrols
•Securecommunications
Settingthesecuritychip
ThechoicesofferedontheSecurityChipsubmenuundertheSecuritymenuofThinkPadSetupareas
follows:
•SecurityChipSelection:SelectDiscreteTPMorIntelPTT.
•SecurityChip:Activate,inactivate,ordisablethesecuritychip.
•SecurityReportingOptions:Enableordisableeachsecurityreportingoption.
•ClearSecurityChip:Cleartheencryptionkey.
Beforeyoustart,printtheseinstructions.
60UserGuide
Page 77

TosetanitemontheSecurityChipsubmenu,dothefollowing:
1.Restartthecomputer.Whenthelogoscreenisdisplayed,pressF1tostarttheThinkPadSetupprogram.
2.SelectSecurity➙SecurityChipbyusingthedirectionalkeys.
3.PressEnter.TheSecurityChipsubmenuopens.
4.Movetoanitemyouwanttosetbyusingthedirectionalkeys.Whentheitemishighlighted,pressEnter.
5.Setotheritemsthatyouwanttoset.
6.PressF10.ASetupConfirmationwindowisdisplayed.SelectYestosavetheconfigurationchanges
andexittheThinkPadSetupprogram..
Tosetthesecuritychip,youhavetostartClientSecuritySolution,andfollowtheinstructionsonthescreen.
Note:IfClientSecuritySolutionisnotpreinstalledonyourcomputer,downloadandinstallitfrom
http://www.lenovo.com/support.Thenfollowtheinstructionsonthescreen.
Tipsonusingthesecuritychip
•EnsurethatthesupervisorpasswordhasbeensetinThinkPadSetup.Otherwiseanyonecanchangethe
settingsforthesecuritychip.
•IfyouareusingClientSecuritySolution,handlethesecuritychipbydoingthefollowing:
–Donotclearthesecuritychip.Ifyoudo,thefunctionsassignedtothekeyswillbeerased.
–Donotdisablethesecuritychip.Ifyoudo,ClientSecuritySolutionwillnotwork.
•Ifthesecuritychipisremovedorreplaced,oranewonehasbeenadded,thecomputerwillnotstart.You
willhearfourcyclesoffourbeepseach,oryouwillseeerrormessage0176or0192.
•Ifthesecuritychipisinactiveordisabled,theClearSecurityChipoptionwillnotbedisplayed.
•Whenyouclearthesecuritychip,turnoffyourcomputerandthenturnitonagainafteryousetthe
securitychiptoActive.Otherwise,theClearSecurityChipoptionisnotdisplayed.
Usingthefingerprintreader
Dependingonthemodel,yourcomputermighthaveafingerprintreader.Fingerprintauthenticationcan
replaceyourpasswords,suchastheWindowspassword,power-onpassword,andharddiskpassword.In
thisway,youcanlogontoyourcomputersimplyandsecurely.
Toenablefingerprintauthentication,enrollyourfingerprintsfirst.Duringtheenrollment,thefingerprintsare
associatedwiththeWindowspasswordautomatically.T oassociateyourfingerprintswithyourpower-on
passwordandharddiskpassword,manuallycreateaconnection.
Enrollingyourfingerprints
Toenrollyourfingerprints,dothefollowing:
1.StarttheFingerprintManagerProprogram.ForinstructionsonhowtostarttheFingerprintManagerPro
program,see“Lenovoprograms”onpage14.
2.EntertheWindowspasswordasrequired.
3.Clicktheiconforthefingerthatyouwanttoenroll,andconstantlyswipeyourcorrespondingfinger
acrossthefingerprintreaderuntiltheenrollmentcompletes.Formoreinformation,see“Swipingyour
fingeroverthefingerprintreader”onpage62.
4.ClickFinish.Yourfingerprintisenrolledsuccessfully.
Note:Itisrecommendedthatyouenrollmorethanonefingerprintincaseofanyinjuriestoyourfingers.
Chapter4.Security61
Page 78

Swipingyourfingeroverthefingerprintreader
Toswipeyourfingeroverthefingerprintreader,dothefollowing:
1.Placethetopjointofyourfingeronthesensor.
2.Applylightpressureandswipeyourfingertowardyouacrossthereaderinonesmoothmotion.Donot
liftyourfingerwhenyouareswipingit.
62UserGuide
Page 79

Indicatorbehaviorofthefingerprintreader
IndicatorbehaviorDescription
Green
Amber
Thefingerprintreaderisreadyforswiping.
Thefingerprintcannotbeauthenticated.
Associatingyourfingerprintswithyourpower-onpasswordandharddiskpassword
Toassociateyourfingerprintswithyourpower-onpasswordandharddiskpassword,dothefollowing:
1.T urnoffandthenturnonthecomputer.
2.Whenprompted,swipeyourfingeroverthefingerprintreader.
3.Enteryourpower-onpassword,harddiskpassword,orbothasrequired.Theconnectioniscreated.
Whenyoustartthecomputeragain,youcanuseyourfingerprintstologontothecomputerwithnoneedto
enteryourWindowspassword,power-onpassword,andharddiskpassword.
Attention:Ifyoualwaysuseyourfingerprinttologontothecomputer,youmightforgetyourpasswords.
Writedownyourpasswords,andkeeptheminasafeplace.Ifyouforgetyourpower-onpassword,youmust
takeyourcomputertoaLenovoauthorizedserviceroramarketingrepresentativetohavethepassword
canceled.Ifyouforgetyourharddiskpassword,Lenovocannotresetyourpasswordorrecoverdata
fromthesolid-statedrive.Y oumusttakeyourcomputertoaLenovoauthorizedserviceroramarketing
representativetohavethesolid-statedrivereplaced.Proofofpurchaseisrequired,andafeewillbecharged
forpartsandservice.
Settingthefingerprintreader
YoucansetthefingerprintreaderintheFingerprintManagerProprogram.Youalsocanchangesome
advancedsettingsintheThinkPadSetupprogram.
TochangethesettingsintheFingerprintManagerProprogram,clickSettingsontheprogrammaininterface.
TochangethesettingsintheThinkPadSetupprogram,see“UsingtheThinkPadSetupprogram”onpage93.
YoucansetthefollowingconfigurationsintheThinkPadSetupprogram:
•PredesktopAuthentication:Enablesordisablesfingerprintauthenticationbeforetheoperatingsystem
isloaded.
•ReaderPriority:Definesthepriorityforthefingerprintreadersifanexternalfingerprintreaderisattached.
Chapter4.Security63
Page 80

•SecurityMode:Specifiesthesettingsofthesecuritymode.
•PasswordAuthentication:Enablesordisablesthepasswordauthentication.
Note:ThisitemisdisplayedonlyifHighsecuritymodeisenabled.
•ResetFingerprintData:Selectthisitemtoeraseallofthefingerprintdatastoredineithertheinternal
orexternalfingerprintreader.
Maintainingthefingerprintreader
Thefollowingactionscoulddamagethefingerprintreaderorcauseitnottoworkproperly:
•Scratchingthesurfaceofthereaderwithahard,pointedobject.
•Scrapingthesurfaceofthereaderwithyourfingernailoranythinghard.
•Usingortouchingthereaderwithadirtyfinger.
Ifyounoticeanyofthefollowingconditions,gentlycleanthesurfaceofthereaderwithadry,soft,lint-free
cloth:
•Thesurfaceofthereaderisdirtyorstained.
•Thesurfaceofthereaderiswet.
•Thereaderoftenfailstoenrollorauthenticateyourfingerprint.
Ifyourfingerhasanyofthefollowingconditions,youmightnotbeabletoregisterorauthenticateit:
•Yourfingeriswrinkled.
•Yourfingerisrough,dry,orinjured.
•Yourfingerisdry.
•Yourfingerisstainedwithdirt,mud,oroil.
•Thesurfaceofyourfingerisdifferentfromwhenyouenrolledyourfingerprint.
•Yourfingeriswet.
•Afingerisusedthathasnotbeenenrolled.
Toimprovethesituation,trythefollowing:
•Cleanorwipeyourhandstoremoveanyexcessdirtormoisturefromthefingers.
•Enrollanduseadifferentfingerforauthentication.
•Ifyourhandsaredry,applylotiontothem.
Formoreinformationonhowtousethefingerprintreader,refertothehelpsystemoftheFingerprint
ManagerProprogram.
Noticeondeletingdatafromyoursolid-statedrive
Someofthedatastoredonthesolid-statedrivemightbesensitive.Handingyourcomputeroverto
someoneelsewithoutdeletingtheinstalledsoftware,suchasoperatingsystemsandapplicationsoftware,
mightevenviolatelicenseagreements.Besuretodeletedatastoredonthesolid-statedrivebeforeyou
disposeof,sell,orhandoveryourcomputer.
Youcanusethefollowingmethodstodeletedatafromthesolid-statedrive:
•MovethedatatotheRecycleBin,andthenemptytheRecycleBin.
•Deletethedata.
64UserGuide
Page 81

•Formatyoursolid-statedrive,usingthesoftwareforinitializingit.
•UsetherecoveryprogramprovidedbyLenovotobringthesolid-statedrivebacktothefactorydefault
settings.
Theseoperations,however,onlychangethefilelocationofthedata;theydonotdeletethedataitself.In
otherwords,thedataretrievalprocessingisdisabledunderanoperatingsystemsuchasWindowsoperating
system.Thedataisstillthere,eventhoughitseemstobelost.Thus,itissometimespossibletoreadthe
databyuseofspecialsoftwarefordatarecovery.Thereisariskthatpeopleofbadfaithmightreadand
misusethecriticaldataonthesolid-statedrivesforunexpectedpurposes.
Topreventleakageofdata,itisimportantthatyoudeleteallthedatafromthesolid-statedrivewhen
youdisposeof,sell,orhandoveryourcomputer.Y oucandestroythedataphysicallybysmashingthe
solid-statedrivewithahammer,ormagneticallybymeansofstrongmagneticpower,thusmakingthedata
unreadable.Butitisrecommendedthatyouusethesoftware(payware)orservice(payservice)developed
forthatpurpose.Theprocessmighttakeseveralhours.
Fordisposingofdataonthesolid-statedrive,LenovoprovidestheDriveEraseUtilityforResettingthe
CryptographicKeyandErasingtheSolidStateDrivetool.
IfanEncryptionsolid-statedriveissupportedandinstalledinyourcomputer,youcanlogicallydisposeofall
thedataonthedriveinashorttimebyerasingthecryptographickey.Thedataencryptedwiththeoldkeyis
notphysicallyerasedbutremainsonthedrive;however,itcannotbedecryptedwithouttheoldkey.This
featurealsoisavailablewiththeDriveEraseUtilityforResettingtheCryptographicKeyandErasingtheSolid
StateDrivetool.Gotohttp://www.lenovo.com/supporttodownloadthetool.
Usingfirewalls
Ifyoursystemispreinstalledwithafirewallprogram,itprotectsagainstcomputerInternetsecuritythreats,
unauthorizedaccesses,intrusions,andInternetattacks.Italsoprotectsyourprivacy.
Formoreinformationabouthowtousethefirewallprogram,refertothehelpinformationsystemthat
comeswiththeprogram.
Protectingdataagainstviruses
Yourcomputerispreinstalledwithanantivirusprogramsoyoucandetectandeliminateviruses.The
antivirusprogramisdesignedtohelpyoudetectandeliminateviruses.
Lenovoprovidesafullversionofantivirussoftwareonyourcomputerwithafree30-daysubscription.After
30days,youmustrenewthelicensetocontinuereceivingtheantivirussoftwareupdates.
Formoreinformationabouthowtouseyourantivirussoftware,refertothehelpinformationsystemof
yourantivirussoftware.
Chapter4.Security65
Page 82

66UserGuide
Page 83

Chapter5.Recoveryoverview
Thischapterprovidesinformationabouttherecoverysolutions.
•“RecoveryoverviewfortheWindows7operatingsystem”onpage67
•“RecoveryoverviewfortheWindows8.1operatingsystem”onpage72
RecoveryoverviewfortheWindows7operatingsystem
ThissectionprovidesinformationabouttherecoverysolutionsprovidedbyLenovoontheWindows7
operatingsystem.
Notes:
•Thereareavarietyofmethodstochoosefromwhenconsideringhowtorecoverintheeventofa
software-relatedorhardware-relatedproblem.Somemethodsvarydependingonthetypeofyour
operatingsystem.
•Theproductontherecoverymediamightbeusedonlyforthefollowingpurposes:
–Restoretheproductpreinstalledonyourcomputer
–Reinstalltheproduct
–ModifytheproductusingtheAdditionalFiles
Topreventpotentialperformancerisksorunexpectedbehaviorthatmightbecausedbythenewsolid-state
drivetechnology,itisrecommendedthatyouuseoneofthefollowingback-upsoftwareprograms:
•ThinkVantageRescueandRecoveryversion4.3orlater
•AcronisTrueImage2010orlater
•ParagonBackup&Recovery10Suiteorlater,ParagonBackup&Recovery10Homeorlater
Creatingandusingrecoverymedia
Youcanuserecoverymediatorestorethesolid-statedrivetothefactorydefaultsettings.Recoverymedia
areusefulifyoutransferthecomputertoanotherarea,sellthecomputer,recyclethecomputer,orputthe
computerinanoperationalstateafterallothermethodsofrecoveryhavefailed.Asaprecautionarymeasure,
itisimportanttocreaterecoverymediaasearlyaspossible.
Note:Therecoveryoperationsyoucanperformusingrecoverymediavarydependingontheoperating
systemfromwhichtherecoverymediawerecreated.Therecoverymediamightcontainabootmedium
andadatamedium.YourMicrosoftWindowslicensepermitsyoutocreateonlyonedatamedium,soitis
importantthatyoustoretherecoverymediainasafeplaceafteryouhavemadethem.
Creatingrecoverymedia
Thissectionprovidesinstructionsonhowtocreaterecoverymedia.
Note:OntheWindows7operatingsystem,youcancreaterecoverymediausingdiscsorexternalUSB
storagedevices.
TocreaterecoverymediaontheWindows7operatingsystem,clickStart➙AllPrograms➙Lenovo
ThinkVantageTools➙FactoryRecoveryDisks.Then,followtheinstructionsonthescreen.
©CopyrightLenovo2014
67
Page 84

Usingrecoverymedia
OntheWindows7operatingsystem,youcanuserecoverymediatorestorethecomputertothefactory
defaultsettingsonly.Youcanuserecoverymediatoputthecomputerinanoperationalstateafterall
othermethodsofrecoveryhavefailed.
Attention:Whenyouuserecoverymediatorestorethecomputertothefactorydefaultsettings,allthefiles
currentlyonthesolid-statedrivewillbedeletedandreplacedbythefactorydefaultsettings.
TouserecoverymediaontheWindows7operatingsystem,dothefollowing:
1.Dependingonthetypeofyourrecoverymedia,connectthebootmedium(memorykeyorotherUSB
storagedevice)tothecomputer,orinsertthebootdiscintotheopticaldrive.
2.RepeatedlypressandreleasetheF12keywhenturningonthecomputer.WhentheBootMenuwindow
opens,releasetheF12key.
3.SelectthedesiredstartupdeviceandpressEnter.Therestoreprocessbegins.
4.Followtheinstructionsonthescreentocompletetheoperation.
Notes:
1.Afterrestoringyourcomputertothefactorydefaultsettings,youmighthavetoreinstalldevicedrivers
forsomedevices.See“Reinstallingpreinstalledprogramsanddevicedrivers”onpage71.
2.SomecomputerscomewithMicrosoftOfficepreinstalled.Ifyouneedtorecoverorreinstallyour
MicrosoftOfficeprograms,youmustusetheMicrosoftOfficeCD.Thesediscsareprovidedonlywith
computerspreinstalledwithMicrosoftOffice.
Performingbackupandrecoveryoperations
TheRescueandRecoveryprogramenablesyoutobackupallyoursolid-statedrivecontentsincludingthe
operatingsystem,datafiles,softwareprograms,andpersonalsettings.Youcandesignatewherethe
RescueandRecoveryprogramstoresthebackup:
•Inaprotectedareaofyoursolid-statedrive
•OnanattachedexternalUSBharddiskdrive
•Onanetworkdrive
•Onrecordablediscs(arecordableopticaldriveisrequiredforthisoption)
Afteryouhavebackedupthecontentsonthesolid-statedrive,youcanrestorethecompletecontentsofthe
solid-statedrive,restoreonlytheselectedfiles,orrestoreonlytheWindowsoperatingsystemandprograms.
Performingabackupoperation
ToperformabackupoperationusingtheRescueandRecoveryprogramontheWindows7operating
system,dothefollowing:
1.FromtheWindowsdesktop,clickStart➙AllPrograms➙LenovoThinkVantageT ools➙Enhanced
BackupandRestore.TheRescueandRecoveryprogramopens.
2.IntheRescueandRecoverymainwindow,clicktheLaunchadvancedRescueandRecoveryarrow.
3.ClickBackupyourharddriveandselectbackupoperationoptions.Then,followtheinstructionson
thescreentocompletethebackupoperation.
Performingarecoveryoperation
ToperformarecoveryoperationusingtheRescueandRecoveryprogramontheWindows7operating
system,dothefollowing:
68UserGuide
Page 85

1.FromtheWindowsdesktop,clickStart➙AllPrograms➙LenovoThinkVantageT ools➙Enhanced
BackupandRestore.TheRescueandRecoveryprogramopens.
2.IntheRescueandRecoverymainwindow,clicktheLaunchadvancedRescueandRecoveryarrow.
3.ClicktheRestoreyoursystemfromabackupicon.
4.Followtheinstructionsonthescreentocompletetherecoveryoperation.
FormoreinformationaboutperformingarecoveryoperationfromtheRescueandRecoveryworkspace,see
“UsingtheRescueandRecoveryworkspace”onpage69.
UsingtheRescueandRecoveryworkspace
TheRescueandRecoveryworkspaceresidesinaprotected,hiddenareaofyoursolid-statedrivethat
operatesindependentlyfromtheWindowsoperatingsystem.Itenablesyoutoperformrecoveryoperations
evenifyoucannotstarttheWindowsoperatingsystem.Youcanperformthefollowingrecoveryoperations
fromtheRescueandRecoveryworkspace:
•Rescuefilesfromyoursolid-statedriveorfromabackup
TheRescueandRecoveryworkspaceenablesyoutolocatefilesonyoursolid-statedriveandtransfer
themtoanetworkdriveorotherrecordablemedia,suchasaUSBdeviceoradisc.Thissolutionis
availableevenifyoudidnotbackupyourfilesorifchangesweremadetothefilessinceyourlastbackup
operation.YoualsocanrescueindividualfilesfromaRescueandRecoverybackuplocatedonyourlocal
solid-statedrive,aUSBdevice,oranetworkdrive.
•Restoreyoursolid-statedrivefromaRescueandRecoverybackup
Ifyouhavebackedupyoursolid-statedriveusingtheRescueandRecoveryprogram,youcanrestorethe
solid-statedrivefromaRescueandRecoverybackup,evenifyoucannotstarttheWindowsoperating
system.
•Restoreyoursolid-statedrivetothefactorydefaultsettings
TheRescueandRecoveryworkspaceenablesyoutorestorethecompletecontentsofyoursolid-state
drivetothefactorydefaultsettings.Ifyouhavemultiplepartitionsonyoursolid-statedrive,youhave
theoptiontorestorethefactorydefaultsettingstotheC:partitionandleavetheotherpartitionsintact.
BecausetheRescueandRecoveryworkspaceoperatesindependentlyfromtheWindowsoperating
system,youcanrestorethefactorydefaultsettingsevenifyoucannotstarttheWindowsoperating
system.
Attention:Ifyourestorethesolid-statedrivefromaRescueandRecoverybackuporrestorethesolid-state
drivetothefactorydefaultsettings,allfilesontheprimarysolid-statedrivepartition(usuallydriveC:)willbe
deletedintherecoveryprocess.Ifpossible,makecopiesofimportantfiles.Ifyouareunabletostartthe
Windowsoperatingsystem,youcanusetherescuefilesfeatureoftheRescueandRecoveryworkspaceto
copyfilesfromyoursolid-statedrivetoothermedia.
TostarttheRescueandRecoveryworkspace,dothefollowing:
1.Makesurethatthecomputeristurnedoff.
2.RepeatedlypressandreleasetheF11keywhenturningonthecomputer.Whenyouhearbeepsor
seealogoscreen,releasetheF11key.
3.IfyouhavesetaRescueandRecoverypassword,typeyourpasswordwhenprompted.TheRescue
andRecoveryworkspaceopensafterashortdelay.
Note:IftheRescueandRecoveryworkspacefailstoopen,see“Solvingrecoveryproblems”onpage71.
4.Dooneofthefollowing:
•Torescuefilesfromyoursolid-statedriveorfromabackup,clickRescuefilesandfollowthe
instructionsonthescreen.
Chapter5.Recoveryoverview69
Page 86

•Torestoreyoursolid-statedrivefromaRescueandRecoverybackuportorestoreyoursolid-state
drivetothefactorydefaultsettings,clickRestoreyoursystemandfollowtheinstructionsonthe
screen.
FormoreinformationaboutthefeaturesoftheRescueandRecoveryworkspace,clickHelp.
Notes:
1.Afterrestoringyoursolid-statedrivetothefactorydefaultsettings,youmighthavetoreinstalldevice
driversforsomedevices.See“Reinstallingpreinstalledprogramsanddevicedrivers”onpage71.
2.SomecomputerscomewithMicrosoftOfficepreinstalled.Ifyouneedtorecoverorreinstallyour
MicrosoftOfficeprograms,youmustusetheMicrosoftOfficeCD.Thesediscsareprovidedonlywith
computerspreinstalledwithMicrosoftOffice.
Creatingandusingarescuemedium
Witharescuemedium,suchasadiscoraUSBharddiskdrive,youcanrecoverthecomputerfromfailures
thatpreventyoufromgainingaccesstotheRescueandRecoveryworkspaceonyoursolid-statedrive.
Notes:
1.Therecoveryoperationsyoucanperformusingarescuemediumvarydependingontheoperating
system.
2.Therescuedisccanbestartedinalltypesofopticaldrives.
Creatingarescuemedium
TocreatearescuemediumontheWindows7operatingsystem,dothefollowing:
1.FromtheWindowsdesktop,clickStart➙AllPrograms➙LenovoThinkVantageT ools➙Enhanced
BackupandRestore.TheRescueandRecoveryprogramopens.
2.IntheRescueandRecoverymainwindow,clicktheLaunchadvancedRescueandRecoveryarrow.
3.ClicktheCreateRescueMediaicon.TheCreateRescueandRecoveryMediawindowopens.
4.IntheRescueMediaarea,selectthetypeoftherescuemediumyouwanttocreate.Y oucancreatea
rescuemediumusingadisc,aUSBharddiskdrive.
5.ClickOKandfollowtheinstructionsonthescreentocreatearescuemedium.
Usingarescuemedium
Thissectionprovidesinstructionsonhowtousetherescuemediumyouhavecreated.
•Ifyouhavecreatedarescuemediumusingadisc,usethefollowinginstructionstousetherescuemedium:
1.T urnoffyourcomputer.
2.RepeatedlypressandreleasetheF12keywhenturningonthecomputer.WhentheBootMenu
windowisdisplayed,releasetheF12key.
3.IntheBootMenuwindow,selectthedesiredopticaldriveasthefirstbootdevice.Then,insertthe
rescuediscintotheopticaldriveandpressEnter.Therescuemediumstarts.
•IfyouhavecreatedarescuemediumusingaUSBharddiskdrive,usethefollowinginstructionsto
usetherescuemedium:
1.AttachtheUSBharddiskdrivetooneoftheUSBconnectorsonyourcomputer.
2.RepeatedlypressandreleasetheF12keywhenturningonthecomputer.WhentheBootMenu
windowopens,releasetheF12key.
3.IntheBootMenuwindow,selecttheUSBharddiskdriveasthefirstbootdeviceandpressEnter.
Therescuemediumstarts.
70UserGuide
Page 87

Whentherescuemediumstarts,theRescueandRecoveryworkspaceopens.Thehelpinformationfor
eachfeatureisavailablefromtheRescueandRecoveryworkspace.Followtheinstructionstocomplete
therecoveryprocess.
Reinstallingpreinstalledprogramsanddevicedrivers
Yourcomputerhasprovisionsthatenableyoutoreinstallselectedfactory-installedprogramsanddevice
drivers.
Reinstallingpreinstalledprograms
Toreinstallselectedprograms,dothefollowing:
1.T urnonyourcomputer.
2.GototheC:\SWTOOL Sdirectory.
3.OpentheAPPSfolder.Thefoldercontainsseveralsubfoldersnamedforthevariouspreinstalled
applications.
4.Openthesubfolderfortheprogramyouarereinstalling.
5.Double-clickSetup,andthenfollowtheon-screenstepstoreinstalltheprogram.
Reinstallingpreinstalleddevicedrivers
Attention:Whenyoureinstalldevicedrivers,youarechangingthecurrentconfigurationofyourcomputer.
Reinstalldevicedriversonlywhenitisnecessarytocorrectaproblemwithyourcomputer.
Toreinstalladevicedriverforafactory-installeddevice,dothefollowing:
1.T urnonyourcomputer.
2.GototheC:\SWTOOL Sdirectory.
3.OpentheDRIVERSfolder.Thefoldercontainsseveralsubfoldersnamedforthevariousdevices
installedinyourcomputer(forexample,AUDIOandVIDEO).
4.Openthesubfolderforthedevice.
5.Reinstallthedevicedriverbyoneofthefollowingmethods:
•Inthesubfolderforthedevice,lookforatextfile(afilewiththeextension.txt).Thetextfilecontains
informationonhowtoreinstallthatdevicedriver.
•Ifthesubfolderforthedevicecontainsafileofsetupinformation(afilewiththeextension.inf),you
canusetheAddNewHardwareprogram(intheWindowsControlPanel)toreinstallthedevicedriver.
Notalldevicedriverscanbereinstalledbyuseofthisprogram.IntheAddNewHardwareprogram,
whenpromptedforthedevicedriveryouwanttoinstall,clickHaveDiskandBrowse.Thenselect
thedevicedriverfilefromthedevicesubfolder.
•Inthesubfolderforthedevice,lookfortheexecutablefile(afilewiththeextension.exe).Double-click
thefile,andfollowtheinstructionsonthescreen.
Attention:Ifyouneedupdateddevicedriversforyourcomputer,donotdownloadthemfromtheWindows
UpdateWebsite.ObtainthemfromLenovo.Formoreinformation,see“Makingsuredevicedriversare
current”onpage108.
Solvingrecoveryproblems
IfyouareunabletoaccesstheRescueandRecoveryworkspaceortheWindowsenvironment,doone
ofthefollowing:
•UsearescuemediumtostarttheRescueandRecoveryworkspace.See“Creatingandusingarescue
medium”onpage70.
Chapter5.Recoveryoverview71
Page 88

•Userecoverymediaifallothermethodsofrecoveryhavefailedandyouneedtorestorethesolid-state
drivetothefactorydefaultsettings.See“Performingbackupandrecoveryoperations”onpage68.
Note:IfyouareunabletoaccesstheRescueandRecoveryworkspaceortheWindowsenvironmentfroma
rescuemediumorrecoverymedia,youmightnothavetherescuedevice(adisc,aUSBharddiskdrive,or
otherexternaldevices)setasthefirstbootdeviceinthestartupdevicesequence.Youmustfirstmakesure
thatyourrescuedeviceissetasthefirstbootdeviceinthestartupdevicesequenceintheSetupUtility
program.See“Startupmenu”onpage102fordetailedinformationabouttemporarilyorpermanently
changingthestartupdevicesequence.FormoreinformationabouttheSetupUtilityprogram,see“Usingthe
ThinkPadSetupprogram”onpage93.
Itisimportanttocreatearescuemediumandasetofrecoverymediaasearlyaspossibleandstorethem
inasafeplaceforfutureuse.
RecoveryoverviewfortheWindows8.1operatingsystem
ThissectionprovidesinformationabouttherecoverysolutionsfortheWindows8.1operatingsystem.
AWindowsrecoveryimageispreinstalledintherecoverypartitiononyourcomputer.TheWindowsrecovery
imageenablesyoutorefreshyourcomputer,orresetyourcomputertothefactorydefaultsettings.
YoucancreaterecoverymediaasbackupsorreplacementfortheWindowsrecoveryimage.Withthe
recoverymedia,youcantroubleshootandfixtheproblemsonyourcomputerevenifyoucannotstartthe
Windows8.1operatingsystem.Itisrecommendedthatyoucreaterecoverymediaasearlyaspossible.For
moreinformation,see“Creatingandusingrecoverymedia”onpage73.
Refreshingyourcomputer
Ifyourcomputerdoesnotperformwellandtheproblemmightbecausedbyarecentlyinstalledprogram,
youcanrefreshyourcomputerwithoutlosingyourpersonalfilesorchangingyoursettings.
Attention:Ifyourefreshyourcomputer,theprogramsthatcamewithyourcomputerandtheprogramsthat
youinstalledfromWindowsStorewillbereinstalled,butallotherprogramswillberemoved.
Torefreshyourcomputer,dothefollowing:
1.Moveyourpointertothetop-rightorbottom-rightcornerofthescreentodisplaythecharms.Click
Settings➙ChangePCsettings➙Updateandrecovery➙Recovery.
2.IntheRefreshyourPCwithoutaffectingyourfilessection,clickGetstarted.
3.Followtheinstructionsonthescreentorefreshyourcomputer.
Resettingyourcomputertothefactorydefaultsettings
Ifyouwanttorecycleyourcomputerorjuststartover,youcanresetyourcomputertothefactorydefault
settings.Resettingthecomputerwillreinstalltheoperatingsystem,reinstallalltheprogramsthatcamewith
yourcomputer,andresetallthesettingstothefactorydefaultsettings.
Attention:Ifyouresetthecomputertothefactorydefaultsettings,allyourpersonalfilesandsettingswillbe
deleted.Toavoiddataloss,makeabackupcopyofallthedatathatyouwanttokeep.
Toresetyourcomputertothefactorydefaultsettings,dothefollowing:
1.Moveyourpointertothetop-rightorbottom-rightcornerofthescreentodisplaythecharms.Click
Settings➙ChangePCsettings➙Updateandrecovery➙Recovery.
2.IntheRemoveeverythingandreinstallWindowssection,clickGetstarted.ThenclickNextto
confirmtheoperation.
72UserGuide
Page 89

3.Dependingonyourneeds,dooneofthefollowing:
•Toperformaquickformat,clickJustremovemyfilestostarttheprocess.Theprocesswilltake
severalminutes.
•Toperformacompleteformat,clickFullycleanthedrivetostarttheprocess.Theprocesswill
takeseveralhours.
4.Followtheinstructionsonthescreentoresetyourcomputertothefactorydefaultsettings.
Usingtheadvancedstartupoptions
Withtheadvancedstartupoptions,youcanchangethefirmwaresettingsofthecomputer,changethe
startupsettingsoftheWindowsoperatingsystem,startthecomputerfromanexternaldevice,orrestorethe
Windowsoperatingsystemfromasystemimage.
Tousetheadvancedstartupoptions,dothefollowing:
1.Moveyourpointertothetop-rightorbottom-rightcornerofthescreentodisplaythecharms.Click
Settings➙ChangePCsettings➙Updateandrecovery➙Recovery.
2.IntheAdvancedstartupsection,clickRestartnow➙Troubleshoot➙Advancedoptions.
3.Selectadesiredstartupoption,thenfollowtheinstructionsonthescreen.
RecoveringyouroperatingsystemifWindows8.1failstostart
TheWindowsrecoveryenvironmentonyourcomputeriscapableofoperatingindependentlyfromthe
Windows8.1operatingsystem.Thisenablesyoutorecoverorrepairtheoperatingsystemevenifthe
Windows8.1operatingsystemfailstostart.
Aftertwoconsecutivefailedbootattempts,theWindowsrecoveryenvironmentstartsautomatically.Then
youcanchooserepairandrecoveryoptionsbyfollowingtheinstructionsonthescreen.
Note:Ensurethatyourcomputerisconnectedtoacpowerduringtherecoveryprocess.
Creatingandusingrecoverymedia
YoucancreaterecoverymediaasbackupsfortheWindowsrecoveryenvironmentandtheWindows
recoveryimage.Ifyoucannotstartthecomputer,youcanuserecoverymediatotroubleshootandfixthe
problemsonyourcomputer.
Itisrecommendedthatyoucreaterecoverymediaasearlyaspossible.Onceyoucreaterecoverymedia,
keeptheminasafeplaceanddonotusethemtostoreotherdata.
Creatingrecoverymedia
Tocreaterecoverymedia,youneedaUSBdrivewithatleast8GBofstorage.TherequiredUSBcapacity
dependsonthesizeoftherecoveryimage.
Attention:CreatingrecoverymediawilldeleteanythingstoredontheUSBdrive.Toavoiddataloss,makea
backupcopyofallthedatathatyouwanttokeep.
Tocreaterecoverymedia,dothefollowing:
Note:Ensurethatyourcomputerisconnectedtoacpower.
1.Moveyourpointertothetop-rightorbottom-rightcornerofthescreentodisplaythecharms,and
clickSearch.
2.T yperecoveryintheSearchfield.ThenclickCreatearecoverydrive.
Chapter5.Recoveryoverview73
Page 90

3.ClickYesintheUserAccountControlwindowtoallowtheRecoveryMediaCreatorprogramtostart.
4.EnsurethatyouselecttheCopytherecoverypartitionfromthePCtotherecoverydrive.option.
ThenclickNext.
Important:IfyoucleartheCopytherecoverypartitionfromthePCtotherecoverydrive.option,
youwillcreaterecoverymediawithouttherecoverypartitioncontent.Y oustillcanstartthecomputer
fromtherecoverymedia,butyoumightbeunabletorecoveryourcomputeriftherecoverypartitionon
yourcomputerisdamaged.
5.ConnectaproperUSBdrivethenclickNext.
6.ClickCreateintheRecoveryDrivewindow.Thecreationoftherecoverymediastarts.
7.Whenthecreationoftherecoverymediafinishes,dooneofthefollowing:
•Tokeeptherecoverypartitiononyourcomputer,clickFinish.
•Todeletetherecoverypartitiononyourcomputer,clickDeletetherecoverypartition.
Attention:Ifyoudeletetherecoverypartitiononyourcomputer,dokeeptherecoverymediaina
safeplace.TheWindowsrecoveryimagewillnotbestoredinyourcomputeranymore,andyouwill
needtherecoverymediatorefreshorresetyourcomputer.
8.RemovetheUSBdrive.Therecoverymediaarecreatedsuccessfully.
Usingrecoverymedia
Ifyoucannotstartyourcomputer,orifyoucannotstarttheWindowsrecoveryimageonyourcomputer,use
recoverymediatorecoveryourcomputer.
Touserecoverymedia,dothefollowing:
Note:Ensurethatyourcomputerisconnectedtoacpower.
1.T urnonorrestartthecomputer.BeforetheWindowsoperatingsystemstarts,repeatedlypressF12.The
BootMenuwindowopens.
2.Selecttherecoverydriveasthebootdevice.
3.Selectapreferredlanguageandthenselectapreferredkeyboardlayout.
4.ClickTroubleshoottodisplaytheoptionalrecoverysolutions.
5.Selectacorrespondingrecoverysolutionaccordingtoyoursituation.Forexample,selectResetyour
PCifyouwanttoresetyourcomputertothefactorydefaultsettings.
FormoreinformationabouttherecoverysolutionsprovidedbytheWindows8.1operatingsystem,goto:
http://go.microsoft.com/fwlink/?LinkID=263800
74UserGuide
Page 91

Chapter6.Replacingdevices
Thischaptercontainsthefollowingitems:
•“Staticelectricityprevention”onpage75
•“Disablingthebuilt-inbattery”onpage75
•“InstallingorreplacingthemicroSIMcard”onpage76
•“Replacingthebasecover”onpage77
•“Replacingthesolid-statedrive”onpage78
•“ReplacingthewirelessLANcard”onpage80
•“InstallingorreplacingthewirelessWANcard”onpage83
Staticelectricityprevention
Staticelectricity,althoughharmlesstoyou,canseriouslydamagecomputercomponentsandoptions.
Improperhandlingofstatic-sensitivepartscancausedamagetothepart.Whenyouunpackanoptionor
aCRU,donotopenthestatic-protectivepackagethatcontainsthepartuntiltheinstructionsdirectyou
toinstallthepart.
WhenyouhandleoptionsorCRUs,orperformanyworkinsidethecomputer,takethefollowingprecautions
toavoidstatic-electricitydamage:
•Limityourmovement.Movementcancausestaticelectricitytobuilduparoundyou.
•Alwayshandlecomponentscarefully.Handleadapters,memorymodules,andothercircuitboardsbythe
edges.Nevertouchexposedcircuitry.
•Preventothersfromtouchingcomponents.
•Whenyouinstallastatic-sensitiveoptionorCRU,touchthestatic-protectivepackagethatcontainsthe
parttoametalexpansion-slotcoverorotherunpaintedmetalsurfaceonthecomputerforatleasttwo
seconds.Thisreducesstaticelectricityinthepackageandyourbody.
•Whenpossible,removethestatic-sensitivepartfromthestatic-protectivepackageandinstallthepart
withoutsettingitdown.Whenthisisnotpossible,placethestatic-protectivepackageonasmooth,
levelsurfaceandplacethepartonthepackage.
•Donotplacethepartonthecomputercoverorothermetalsurface.
Disablingthebuilt-inbattery
Youneedtodisablethebuilt-inbatteryinthefollowingsituations:
•Yourcomputerwillbeturnedoffforanextendedperiodoftime.
•ThemicroSIMcardneedstobereplaced.
Todisablethebuilt-inbattery,dothefollowing:
1.Disconnecttheacpoweradapterandallcablesfromthecomputer.
2.Restartthecomputer.WhentheThinkPadlogoisdisplayed,pressF1tostarttheThinkPadSetup
program.
3.GotoConfig➙Power➙DisableBuilt-inBattery.
4.PressEnter.ASetupConfirmationwindowisdisplayed.
©CopyrightLenovo2014
75
Page 92

5.ClickYesintheSetupConfirmationwindow.Thebuilt-inbatteryisdisabledandthecomputerturnsoff.
Waitforafewminutestoletthecomputercool.
Thebuilt-inbatterywillbeenabledautomaticallywhenthecomputerisconnectedtoanacpoweradapter.
InstallingorreplacingthemicroSIMcard
Beforeyoustart,printtheseinstructions.
Note:Dependingonthemodel,yourcomputermightlookslightlydifferentfromtheillustrationsinthistopic.
MicroSIMcardisasmallplasticcardwithintegratedcircuit(IC)chipmountedononesideofthecard.
IfyourcomputersupportswirelessWANconnections,yourcomputermightrequireamicroSIMcardto
establishwirelessWANconnections.Dependingonthecountryorregionofdelivery,youmightneedto
purchaseamicroSIMcardoramicroSIMcardispartoftheshippingcontentsthatcomewithyourcomputer.
ToinstallorreplacethemicroSIMcard,dothefollowing:
1.Disablethebuilt-inbattery.See“Disablingthebuilt-inbattery”onpage75.
2.Locatethemicro-SIM-cardtrayattherearsideofthecomputer.
3.Insertastraightenedpaperclipintotheholeinthemicro-SIM-cardtray
ejects.Then,slidethemicro-SIM-cardtrayoutofthecomputer
2 .
1 .Themicro-SIM-cardtray
4.IfyouareinstallingamicroSIMcard,gotostep5.IfyouarereplacingamicroSIMcard,gentlytakethe
oldmicroSIMcardoutofthetrayfirst.
76UserGuide
Page 93

5.InstallanewmicroSIMcardintothetray.
Note:EnsurethatyouuseamicroSIMcard.Donouseastandard-sizedSIMcard.Thestandard-sized
SIMcardisnotcompatible.
6.Insertthetrayintothecomputer.
7.Reconnecttheacpoweradapterandallcables.
Replacingthebasecover
Beforeyoustart,printtheseinstructions.
Note:Dependingonthemodel,yourcomputermightlookslightlydifferentfromtheillustrationsinthistopic.
Toreplacethebasecover,dothefollowing:
1.Disablethebuilt-inbattery.See“Disablingthebuilt-inbattery”onpage75.
2.Closethecomputerdisplay,andturnthecomputerover.
Chapter6.Replacingdevices77
Page 94

3.Removethescrews 1 andloosenthescrews 2 thatsecurethebasecover.Thenremovethebase
cover
4.Reinstallthenewbasecover 1 ,tightenthescrews 2 ,andthenreinstallthescrews 3 .
3 .
5.T urnthecomputeroveragain.Connecttheacpoweradapterandallcables.
Replacingthesolid-statedrive
Beforeyoustart,printtheseinstructions.
Note:Dependingonthemodel,yourcomputermightlookslightlydifferentfromtheillustrationsinthistopic.
Attention:Thesolid-statedriveisverysensitive.Incorrecthandlingcancausedamageandpermanentloss
ofdata.Observethefollowingguidelines:
78UserGuide
Page 95

•Replacethesolid-statedriveonlyifyouupgradeitorhaveitrepaired.Theconnectorsandslotofthe
solid-statedrivearenotdesignedforfrequentchangesorreplacement.
•Donotdropthesolid-statedriveorsubjectittophysicalshocks.Putthesolid-statedriveonamaterial,
suchassoftcloth,thatabsorbsanyphysicalshocks.
•Donotapplypressuretothecoverofthesolid-statedrive.
•Donottouchtheconnector.
•Beforeremovingthesolid-statedrive,makeabackupcopyofalltheinformationonit,andthenturn
offthecomputer.
•Neverremovethesolid-statedrivewhilethecomputerisoperating,insleepmode,orinhibernationmode.
Toreplacethesolid-statedrive,dothefollowing:
1.Disablethebuilt-inbattery.See“Disablingthebuilt-inbattery”onpage75.
2.Closethecomputerdisplay,andturnthecomputerover.
3.Removethebasecover.See“Replacingthebasecover”onpage77.
4.Removethescrewthatsecuresthesolid-statedrive.
5.Removethesolid-statedrive.
Chapter6.Replacingdevices79
Page 96

6.Installthenewsolid-statedrive.
7.Installthescrewtosecurethenewsolid-statedrive.
8.Reinstallthebasecover.
9.T urnoverthecomputerandconnecttheacpoweradapterandallcables.
ReplacingthewirelessLANcard
Beforeyoustart,printtheseinstructions.
Note:Dependingonthemodel,yourcomputermightlookslightlydifferentfromtheillustrationsinthistopic.
DANGER
Duringelectricalstorms,donotconnectthecabletoordisconnectitfromthetelephoneoutlet
onthewall.
DANGER
Electriccurrentfrompower,telephone,andcommunicationcablesishazardous.Toavoidshock
hazard,disconnectthecablesbeforeopeningthecoverofthisslot.
80UserGuide
Page 97

Attention:BeforeyoustartinstallingthewirelessLANcard,touchametaltableoragroundedmetalobject.
Thisactionreducesanystaticelectricityfromyourbody.Staticelectricitycoulddamagethecard.
ToreplacethewirelessLANcard,dothefollowing:
1.Disablethebuilt-inbattery.See“Disablingthebuilt-inbattery”onpage75.
2.Closethecomputerdisplay,andturnthecomputerover.
3.Removethebasecover.See“Replacingthebasecover”onpage77.
4.Ifatoolisprovidedwiththenewcardtohelpyoudisconnectcables,usethetooltodisconnectthe
cablesfromtheoldcard.Ifnosuchatoolisprovided,holdthecableconnectorwithyourfingersand
gentlydisconnecteachcablefromtheoldcard.
5.RemovethescrewthatsecuresthewirelessLANcard.
Chapter6.Replacingdevices81
Page 98

6.CarefullyremovethewirelessLANcardoutoftheslot.
7.AlignthenotchededgeofthenewwirelessLANcardwiththekeyintheslot.Thencarefullyinsertthe
cardintotheslotatanangleofabout20degrees.
8.InstallthescrewtosecurethenewwirelessLANcardinplace.
82UserGuide
Page 99

9.ConnecttheantennacablestothenewwirelessLANcard.Ensurethatyouattachthegraycabletothe
connectormarked2onthecard,andtheblackcabletotheconnectormarked1onthecard.
10.Reinstallthebasecover.
11.T urnthecomputeroveragain.Connecttheacpoweradapterandallcables.
InstallingorreplacingthewirelessWANcard
Beforeyoustart,printtheseinstructions.
Note:Dependingonthemodel,yourcomputermightlookslightlydifferentfromtheillustrationsinthistopic.
DANGER
Duringelectricalstorms,donotconnectthecabletoordisconnectitfromthetelephoneoutlet
onthewall.
DANGER
Electriccurrentfrompower,telephone,andcommunicationcablesishazardous.Toavoidshock
hazard,disconnectthecablesbeforeopeningthecoverofthisslot.
Attention:BeforeyoustartinstallingthewirelessWANcard,touchametaltableoragroundedmetalobject.
Thisactionreducesanystaticelectricityfromyourbody.Staticelectricitycoulddamagethecard.
SomecomputersmightcomewithawirelessWANcard.ToinstallorreplacethewirelessWANcard,
dothefollowing:
1.Disablethebuilt-inbattery.See“Disablingthebuilt-inbattery”onpage75.
2.Closethecomputerdisplay,andturnthecomputerover.
3.Removethebasecover.See“Replacingthebasecover”onpage77.
4.IfyouareinstallingawirelessWANcard,gotostep5.IfyouarereplacingawirelessWANcard,dothe
followingtoremovetheoldcardfirst.
Chapter6.Replacingdevices83
Page 100

a.Ifatoolisprovidedwiththenewcardtohelpyoudisconnectcables,usethetooltodisconnectthe
cablesfromtheoldcard.Ifnosuchatoolisprovided,holdthecableconnectorwithyourfingers
andgentlydisconnecteachcablefromtheoldcard.
b.RemovethescrewthatsecuresthewirelessWANcard.
c.CarefullyremovethewirelessWANcardoutoftheslot.
84UserGuide
 Loading...