

Page 1

UserGuide
ThinkPadE550,E555,andE550c
Page 2

Note:Beforeusingthisinformationandtheproductitsupports,besuretoreadandunderstandthefollowing:
•Safety,Warranty,andSetupGuide
•RegulatoryNotice
•“Importantsafetyinformation”onpagevi
•AppendixF“Notices”onpage151
ThelatestSafety,Warranty,andSetupGuideandtheRegulatoryNoticeareavailableontheLenovo
SupportWebsiteat:
http://www.lenovo.com/UserManuals
®
FifthEdition(July2016)
©CopyrightLenovo2014,2016.
LIMITEDANDRESTRICTEDRIGHTSNOTICE:IfdataorsoftwareisdeliveredpursuanttoaGeneralServices
Administration“GSA”contract,use,reproduction,ordisclosureissubjecttorestrictionssetforthinContractNo.
GS-35F-05925.
Page 3

Contents
Readthisfirst..............v
Importantsafetyinformation..........vi
Conditionsthatrequireimmediateaction..vii
Safetyguidelines............vii
Serviceandupgrades..........vii
Powercordsandpoweradapters.....viii
Extensioncordsandrelateddevices.....ix
Plugsandoutlets.............ix
Powersupplystatement..........ix
Externaldevices.............x
Generalbatterynotice...........x
Noticeforremovablerechargeablebattery...x
Noticefornon-rechargeablecoin-cellbattery..xi
Heatandproductventilation........xi
Electricalcurrentsafetyinformation....xii
Lasersafetyinformation.........xiii
Liquidcrystaldisplay(LCD)notice.....xiii
Usingheadphonesorearphones......xiii
Additionalsafetyinformation.......xiv
Chapter1.Productoverview......1
Locatingcomputercontrols,connectors,and
indicators..................1
Frontviewformodelswitha2Dcamera....1
Frontviewformodelswitha3Dcamera....3
Right-sideview..............5
Left-sideview..............6
Bottomview...............8
Statusindicators.............9
Locatingimportantproductinformation.....10
Machinetypeandmodelinformation....10
FCCIDandICCertificationinformation...10
LabelsfortheWindowsoperatingsystems..11
Computerfeatures.............12
Computerspecifications...........13
Operatingenvironment...........13
Lenovoprograms.............14
AccessingLenovoprograms.......14
AnintroductiontoLenovoprograms....14
Chapter2.Usingyourcomputer...17
Registeringyourcomputer..........17
Frequentlyaskedquestions.........17
GettinghelpabouttheWindowsoperating
system..................19
Specialkeys...............19
ThinkPadpointingdevice..........22
UsingtheThinkPadpointingdevice....22
Trackpadtouchgestures.........27
CustomizingtheThinkPadpointingdevice..28
Replacingthecapofpointingstick.....28
Powermanagement............29
Usingtheacpower...........29
Checkingthebatterystatus........30
Chargingthebattery..........30
Maximizingthebatterylife........30
Managingthebatterypower.......30
Power-savingmodes..........31
Handlingthebattery...........31
Connectingtothenetwork..........33
Ethernetconnections..........33
Wirelessconnections..........33
Usinganexternaldisplay..........35
Connectinganexternaldisplay......36
Choosingadisplaymode........36
Changingdisplaysettings........37
Usingaudiofeatures............37
Usingthecamera.............38
Usingtheopticaldrive...........38
Usingaflashmediacard...........39
Insertingaflashmediacard........39
Removingaflashmediacard.......39
Chapter3.Enhancingyour
computer...............41
FindingThinkPadoptions..........41
ThinkPadOneLinkDock...........41
ThinkPadOneLinkProDock.........42
Chapter4.Youandyourcomputer..45
Accessibilityandcomfort..........45
Ergonomicinformation..........45
Comfort...............46
Accessibilityinformation.........46
Travelingwithyourcomputer.........49
Traveltips...............49
Travelaccessories...........49
Chapter5.Security..........51
Usingpasswords..............51
Typingpasswords...........51
Power-onpassword...........51
Supervisorpassword..........52
Harddiskpasswords..........53
©CopyrightLenovo2014,2016
i
Page 4

Harddisksecurity.............55
Usingthefingerprintreader..........56
Noticeondeletingdatafromyourstoragedrive..58
Usingfirewalls...............59
Protectingdataagainstviruses........59
Chapter6.Advancedconfiguration..61
Installinganewoperatingsystem.......61
InstallingtheWindows7operatingsystem..61
InstallingtheWindows8.1orWindows10
operatingsystem............62
Installingdevicedrivers...........63
UsingtheThinkPadSetupprogram......63
Mainmenu..............64
Configmenu..............64
DateandTimemenu..........69
Securitymenu.............69
Startupmenu.............73
Restartmenu.............75
UpdatingtheUEFIBIOS.........75
Usingsystemmanagement..........75
Chapter7.Preventingproblems...77
Generaltipsforpreventingproblems......77
Makingsuredevicedriversarecurrent.....78
Takingcareofyourcomputer.........79
Cleaningthecoverofyourcomputer....80
Chapter8.Troubleshootingcomputer
problems...............83
Diagnosingproblems............83
Troubleshooting..............83
Computerstopsresponding.......83
Spillsonthekeyboard..........84
Errormessages............84
Errorswithoutmessages.........86
Beeperrors..............87
Memorymoduleproblems........88
Networkingproblems..........88
Problemswiththekeyboardandotherpointing
devices................90
Problemswiththedisplayandmultimedia
devices................90
Fingerprintreaderproblems........96
Batteryandpowerproblems.......96
Problemswithdrivesandotherstorage
devices................99
Asoftwareproblem...........100
Problemswithportsandconnectors....101
Chapter9.Recoveryoverview...103
RecoveryoverviewfortheWindows7operating
system..................103
Creatingandusingarecoverymedia....103
Performingbackupandrecovery
operations..............104
UsingtheRescueandRecovery
workspace..............105
Creatingandusingarescuemedium....106
Reinstallingpreinstalledprogramsanddevice
drivers................107
Solvingrecoveryproblems........108
RecoveryoverviewfortheWindows8.1operating
system..................108
Refreshingyourcomputer........108
Resettingyourcomputertothefactorydefault
settings................109
Usingtheadvancedstartupoptions....109
RecoveringyouroperatingsystemifWindows
8.1failstostart.............109
Creatingandusingrecoverymedia.....109
RecoveryoverviewfortheWindows10operating
system..................111
Resettingyourcomputer.........111
Usingadvancedstartupoptions......111
RecoveringyouroperatingsystemifWindows
10failstostart.............111
CreatingandusingarecoveryUSBdrive..111
Chapter10.Replacingdevices...113
Staticelectricityprevention..........113
Replacingthebattery............113
Replacingthekeyboard...........115
Replacingthestoragedrive.........120
Replacingtheopticaldrive..........123
Replacingamemorymodule.........126
Replacingthecoin-cellbattery........128
Chapter11.Gettingsupport....131
BeforeyoucontactLenovo..........131
Gettinghelpandservice...........131
Usingdiagnosticprograms........132
LenovoSupportWebsite.........132
CallingLenovo.............132
Purchasingadditionalservices........133
AppendixA.Regulatory
information.............135
LocationoftheUltraConnectwirelessantennas..135
Wirelessrelatedinformation.........135
Wireless-radiocomplianceinformation...137
Locatingwirelessregulatorynotices....137
Certificationrelatedinformation........137
Exportclassificationnotice..........137
iiUserGuide
Page 5

Electronicemissionnotices..........137
FederalCommunicationsCommission
DeclarationofConformity........137
IndustryCanadaClassBemissioncompliance
statement...............138
EuropeanUnion-Compliancetothe
ElectromagneticCompatibility(EMC)Directive
orRadioEquipmentDirective.......138
GermanClassBcompliancestatement...139
Class1laserproductcompliance
statement...............139
KoreaClassBcompliancestatement....140
JapanVCCIClassBcompliancestatement..140
Japancompliancestatementforproducts
whichconnecttothepowermainswith
ratedcurrentlessthanorequalto20Aper
phase................140
Japannoticeforacpowercord......140
Lenovoproductserviceinformationfor
Taiwan................140
Eurasiancompliancemark..........140
Brazilaudionotice.............140
AppendixB.WEEEandrecycling
information.............141
ImportantWEEEinformation.........141
RecyclinginformationforChina........141
RecyclinginformationforJapan........142
RecyclinginformationforBrazil........142
BatteryrecyclinginformationforTaiwan.....143
BatteryrecyclinginformationfortheEuropean
Union..................143
BatteryrecyclinginformationfortheUnitedStates
andCanada................144
AppendixC.RestrictionofHazardous
Substances(RoHS)Directive...145
EuropeanUnionRoHS...........145
TurkishRoHS...............145
UkraineRoHS...............145
IndiaRoHS................145
ChinaRoHS................146
AppendixD.ENERGYSTARmodel
information.............147
AppendixE.Trademarks......149
AppendixF.Notices.........151
©CopyrightLenovo2014,2016
iii
Page 6

ivUserGuide
Page 7

Readthisfirst
Besuretofollowtheimportanttipsgivenheretogetthemostuseandenjoymentoutofyourcomputer.
Failuretodosomightleadtodiscomfortorinjury,orcauseyourcomputertofail.
Protectyourselffromtheheatthatyourcomputergenerates.
Whenyourcomputeristurnedonorthebatteryischarging,thebase,thepalm
rest,andsomeotherpartsmaybecomehot.Thetemperaturetheyreach
dependsontheamountofsystemactivityandthelevelofchargeinthebattery.
Extendedcontactwithyourbody,eventhroughclothing,couldcause
discomfortorevenaskinburn.
•Avoidkeepingyourhands,yourlap,oranyotherpartofyourbodyin
contactwithahotsectionofthecomputerforanyextendedtime.
•Periodicallytakehandsfromusingthekeyboardbyliftingyourhandsfrom
thepalmrest.
Protectyourselffromtheheatgeneratedbytheacpoweradapter.
Whentheacpoweradapterisconnectedtoanelectricaloutletandyour
computer,itgeneratesheat.
Extendedcontactwithyourbody,eventhroughclothing,maycauseaskin
burn.
•Donotplacetheacpoweradapterincontactwithanypartofyourbody
whileitisinuse.
•Neveruseittowarmyourbody.
Preventyourcomputerfromgettingwet.
Protectthecablesfrombeingdamaged.
Toavoidspillsandthedangerofelectricalshock,keepliquidsawayfromyour
computer.
Applyingstrongforcetocablesmaydamageorbreakthem.
Routecommunicationlines,orthecablesofanacpoweradapter,amouse,a
keyboard,aprinter,oranyotherelectronicdevice,sothattheycannotbewalked
on,trippedover,pinchedbyyourcomputerorotherobjects,orinanyway
subjectedtotreatmentthatcouldinterferewiththeoperationofyourcomputer.
©CopyrightLenovo2014,2016
v
Page 8

Protectyourcomputeranddatawhenmovingit.
Beforemovingacomputerequippedwithaharddiskdriveorhybriddrive,do
oneofthefollowing:
•Turnoffthecomputer.
•Putthecomputerinsleepmode.
•Putthecomputerinhibernationmode.
Thiswillhelptopreventdamagetothecomputer,andpossiblelossofdata.
Handleyourcomputergently.
Donotdrop,bump,scratch,twist,hit,vibrate,push,orplaceheavyobjectson
yourcomputer,display,orexternaldevices.
Carryyourcomputercarefully.
•Useaqualitycarryingcasethatprovidesadequatecushioningandprotection.
•Donotpackyourcomputerinatightlypackedsuitcaseorbag.
•Beforeputtingyourcomputerinacarryingcase,makesurethatitisoff,insleep
mode,orinhibernationmode.Donotputacomputerinacarryingcasewhileit
isturnedon.
Importantsafetyinformation
Note:Readtheimportantsafetyinformationfirst.
Thisinformationcanhelpyousafelyuseyournotebookcomputer.Followandretainallinformationincluded
withyourcomputer.Theinformationinthisdocumentdoesnotalterthetermsofyourpurchaseagreement
ortheLenovoLimitedWarranty.Formoreinformation,see“WarrantyInformation”intheSafety,Warranty,
andSetupGuidethatcomeswithyourcomputer.
Customersafetyisimportant.Ourproductsaredevelopedtobesafeandeffective.However,personal
computersareelectronicdevices.Powercords,poweradapters,andotherfeaturescancreatepotential
safetyrisksthatcanresultinphysicalinjuryorpropertydamage,especiallyifmisused.Toreducethese
risks,followtheinstructionsincludedwithyourproduct,observeallwarningsontheproductandinthe
operatinginstructions,andreviewtheinformationincludedinthisdocumentcarefully.Bycarefullyfollowing
theinformationcontainedinthisdocumentandprovidedwithyourproduct,youcanhelpprotectyourself
fromhazardsandcreateasafercomputerworkenvironment.
Note:Thisinformationincludesreferencestopoweradaptersandbatteries.Inadditiontonotebook
computers,someproducts(suchasspeakersandmonitors)shipwithexternalpoweradapters.Ifyouhave
suchaproduct,thisinformationappliestoyourproduct.Inaddition,computerproductscontainacoin-sized
internalbatterythatprovidespowertothesystemclockevenwhenthecomputerisunplugged,sothe
batterysafetyinformationappliestoallcomputerproducts.
viUserGuide
Page 9

Conditionsthatrequireimmediateaction
Productscanbecomedamagedduetomisuseorneglect.Someproductdamageisseriousenough
thattheproductshouldnotbeusedagainuntilithasbeeninspectedand,ifnecessary,repairedby
anauthorizedservicer.
Aswithanyelectronicdevice,paycloseattentiontotheproductwhenitisturnedon.Onveryrare
occasions,youmightnoticeanodororseeapuffofsmokeorsparksventfromyourproduct.Oryou
mighthearsoundslikepopping,crackingorhissing.Theseconditionsmightmerelymeanthatan
internalelectroniccomponenthasfailedinasafeandcontrolledmanner .Or,theymightindicate
apotentialsafetyissue.However,donottakerisksorattempttodiagnosethesituationyourself.
ContacttheCustomerSupportCenterforfurtherguidance.ForalistofServiceandSupportphone
numbers,seethefollowingWebsite:
http://www.lenovo.com/support/phone
Frequentlyinspectyourcomputeranditscomponentsfordamageorwearorsignsofdanger.
Ifyouhaveanyquestionabouttheconditionofacomponent,donotusetheproduct.Contact
theCustomerSupportCenterortheproductmanufacturerforinstructionsonhowtoinspectthe
productandhaveitrepaired,ifnecessary.
Intheunlikelyeventthatyounoticeanyofthefollowingconditions,orifyouhaveanysafety
concernswithyourproduct,stopusingtheproductandunplugitfromthepowersourceand
telecommunicationlinesuntilyoucanspeaktotheCustomerSupportCenterforfurtherguidance.
•Powercords,plugs,poweradapters,extensioncords,surgeprotectors,orpowersuppliesthatare
cracked,broken,ordamaged.
•Signsofoverheating,smoke,sparks,orfire.
•Damagetoabattery(suchascracks,dents,orcreases),dischargefromabattery,orabuildupofforeign
substancesonthebattery.
•Acracking,hissingorpoppingsound,orstrongodorthatcomesfromtheproduct.
•Signsthatliquidhasbeenspilledoranobjecthasfallenontothecomputerproduct,thepowercordor
poweradapter.
•Thecomputerproduct,powercord,orpoweradapterhasbeenexposedtowater.
•Theproducthasbeendroppedordamagedinanyway.
•Theproductdoesnotoperatenormallywhenyoufollowtheoperatinginstructions.
Note:Ifyounoticetheseconditionswithaproduct(suchasanextensioncord)thatisnotmanufacturedfor
orbyLenovo,stopusingthatproductuntilyoucancontacttheproductmanufacturerforfurtherinstructions,
oruntilyougetasuitablereplacement.
Safetyguidelines
Alwaysobservethefollowingprecautionstoreducetheriskofinjuryandpropertydamage.
Serviceandupgrades
DonotattempttoserviceaproductyourselfunlessinstructedtodosobytheCustomerSupportCenteror
yourdocumentation.OnlyuseaServiceProviderwhoisapprovedtorepairyourparticularproduct.
Note:Somecomputerpartscanbeupgradedorreplacedbythecustomer.Upgradestypicallyare
referredtoasoptions.ReplacementpartsapprovedforcustomerinstallationarereferredtoasCustomer
ReplaceableUnits,orCRUs.Lenovoprovidesdocumentationwithinstructionswhenitisappropriatefor
customerstoinstalloptionsorreplaceCRUs.Y oumustcloselyfollowallinstructionswheninstallingor
replacingparts.TheOffstateofapowerindicatordoesnotnecessarilymeanthatvoltagelevelsinsidea
productarezero.Beforeyouremovethecoversfromaproductequippedwithapowercord,alwaysmake
©CopyrightLenovo2014,2016
vii
Page 10

surethatthepoweristurnedoffandthattheproductisunpluggedfromanypowersource.Ifyouhave
anyquestionsorconcerns,contacttheCustomerSupportCenter.
Althoughtherearenomovingpartsinyourcomputerafterthepowercordhasbeendisconnected,the
followingwarningsarerequiredforyoursafety.
CAUTION:
Hazardousmovingparts.Keepfingersandotherbodypartsaway.
CAUTION:
Beforeyouopenthecomputercover,turnoffthecomputerandwaitseveralminutesuntilthe
computeriscool.
Powercordsandpoweradapters
DANGER
Useonlythepowercordsandpoweradapterssuppliedbytheproductmanufacturer.
Thepowercordsshallbesafetyapproved.ForGermany,itshallbeH05VV-F,3G,0.75mm
better.Forothercountries,thesuitabletypesshallbeusedaccordingly.
Neverwrapapowercordaroundapoweradapterorotherobject.Doingsocanstressthecordin
waysthatcancausethecordtofray,crack,orcrimp.Thiscanpresentasafetyhazard.
Alwaysroutepowercordssothattheywillnotbewalkedon,trippedover,orpinchedbyobjects.
Protectpowercordsandpoweradaptersfromliquids.Forinstance,donotleaveyourpowercord
orpoweradapternearsinks,tubs,toilets,oronfloorsthatarecleanedwithliquidcleansers.
Liquidscancauseashortcircuit,particularlyifthepowercordorpoweradapterhasbeenstressed
bymisuse.Liquidsalsocancausegradualcorrosionofpowercordterminalsand/ortheconnector
terminalsonapoweradapter,whichcaneventuallyresultinoverheating.
Alwaysconnectpowercordsandsignalcablesinthecorrectorderandensurethatallpowercord
connectorsaresecurelyandcompletelypluggedintoreceptacles.
Donotuseanypoweradapterthatshowscorrosionattheacinputpinsorshowssignsof
overheating(suchasdeformedplastic)attheacinputpinsoranywhereonthepoweradapter .
2
,or
Donotuseanypowercordswheretheelectricalcontactsoneitherendshowsignsofcorrosionor
overheatingorwherethepowercordappearstohavebeendamagedinanyway.
viiiUserGuide
Page 11

Extensioncordsandrelateddevices
Ensurethatextensioncords,surgeprotectors,uninterruptiblepowersupplies,andpowerstripsthatyouuse
areratedtohandletheelectricalrequirementsoftheproduct.Neveroverloadthesedevices.Ifpowerstrips
areused,theloadshouldnotexceedthepowerstripinputrating.Consultanelectricianformoreinformation
ifyouhavequestionsaboutpowerloads,powerrequirements,andinputratings.
Plugsandoutlets
DANGER
Ifareceptacle(poweroutlet)thatyouintendtousewithyourcomputerequipmentappearstobe
damagedorcorroded,donotusetheoutletuntilitisreplacedbyaqualifiedelectrician.
Donotbendormodifytheplug.Iftheplugisdamaged,contactthemanufacturertoobtain
areplacement.
Donotshareanelectricaloutletwithotherhomeorcommercialappliancesthatdrawlargeamounts
ofelectricity;otherwise,unstablevoltagemightdamageyourcomputer,data,orattacheddevices.
Someproductsareequippedwithathree-prongedplug.Thisplugfitsonlyintoagrounded
electricaloutlet.Thisisasafetyfeature.Donotdefeatthissafetyfeaturebytryingtoinsertitinto
anon-groundedoutlet.Ifyoucannotinserttheplugintotheoutlet,contactanelectricianforan
approvedoutletadapterortoreplacetheoutletwithonethatenablesthissafetyfeature.Never
overloadanelectricaloutlet.Theoverallsystemloadshouldnotexceed80percentofthebranch
circuitrating.Consultanelectricianformoreinformationifyouhavequestionsaboutpowerloads
andbranchcircuitratings.
Besurethatthepoweroutletyouareusingisproperlywired,easilyaccessible,andlocatedclose
totheequipment.Donotfullyextendpowercordsinawaythatwillstressthecords.
Besurethatthepoweroutletprovidesthecorrectvoltageandcurrentfortheproductyouare
installing.
Carefullyconnectanddisconnecttheequipmentfromtheelectricaloutlet.
Powersupplystatement
DANGER
Neverremovethecoveronapowersupplyoranypartthathasthefollowinglabelattached.
Hazardousvoltage,current,andenergylevelsarepresentinsideanycomponentthathasthislabel
attached.Therearenoserviceablepartsinsidethesecomponents.Ifyoususpectaproblemwith
oneoftheseparts,contactaservicetechnician.
©CopyrightLenovo2014,2016
ix
Page 12

Externaldevices
CAUTION:
DonotconnectordisconnectanyexternaldevicecablesotherthanUSBand1394cableswhilethe
computerpowerison;otherwise,youmightdamageyourcomputer.T oavoidpossibledamageto
attacheddevices,waitatleastfivesecondsafterthecomputerisshutdowntodisconnectexternal
devices.
Generalbatterynotice
DANGER
BatteriessuppliedbyLenovoforusewithyourproducthavebeentestedforcompatibilityand
shouldonlybereplacedwithapprovedparts.AbatteryotherthantheonespecifiedbyLenovo,ora
disassembledormodifiedbatteryisnotcoveredbythewarranty.
Batteryabuseormishandlingcancauseoverheat,liquidleakage,oranexplosion.Toavoidpossible
injury,dothefollowing:
•Donotopen,dissemble,orserviceanybattery.
•Donotcrushorpuncturethebattery.
•Donotshort-circuitthebattery,orexposeittowaterorotherliquids.
•Keepthebatteryawayfromchildren
•Keepthebatteryawayfromfire.
Stopusingthebatteryifitisdamaged,orifyounoticeanydischargeorthebuildupofforeign
materialsonthebatteryleads.
Storetherechargeablebatteriesorproductscontainingtherechargeablebatteriesatroom
temperature,chargedtoapproximately30to50%ofcapacity.Werecommendthatthebatteriesbe
chargedaboutonceperyeartopreventoverdischarge.
Donotputthebatteryintrashthatisdisposedofinlandfills.Whendisposingofthebattery,comply
withlocalordinancesorregulations.
Noticeforremovablerechargeablebattery
DANGER
Onlyrechargethebatterystrictlyaccordingtoinstructionsincludedintheproductdocumentation.
Ifthebatteryisincorrectlyreplaced,thereisdangerofanexplosion.Thebatterycontainsasmall
amountofharmfulsubstance.
xUserGuide
Page 13

Noticefornon-rechargeablecoin-cellbattery
DANGER
Ifthecoin-cellbatteryisincorrectlyreplaced,thereisdangerofanexplosion.Thebatterycontains
asmallamountofharmfulsubstance.
Donotheattomorethan100°C(212°F).
ThefollowingstatementappliestousersinthestateofCalifornia,U.S.A.
CaliforniaPerchlorateInformation:
Productscontainingmanganesedioxidelithiumcoin-cellbatteriesmaycontainperchlorate.
PerchlorateMaterial-specialhandlingmayapply,See
www.dtsc.ca.gov/hazardouswaste/perchlorate
Heatandproductventilation
DANGER
Computers,acpoweradapters,andmanyaccessoriescangenerateheatwhenturnedonandwhen
batteriesarecharging.Notebookcomputerscangenerateasignificantamountofheatduetotheir
compactsize.Alwaysfollowthesebasicprecautions:
•Whenyourcomputeristurnedonorthebatteryischarging,thebase,thepalmrest,andsome
otherpartsmaybecomehot.Avoidkeepingyourhands,yourlap,oranyotherpartofyour
bodyincontactwithahotsectionofthecomputerforanyextendedlengthoftime.Whenyou
usethekeyboard,avoidkeepingyourpalmsonthepalmrestforaprolongedperiodoftime.
Yourcomputergeneratessomeheatduringnormaloperation.Theamountofheatdependson
theamountofsystemactivityandthebatterychargelevel.Extendedcontactwithyourbody,
eventhroughclothing,couldcausediscomfortorevenaskinburn.Periodicallytakebreaks
fromusingthekeyboardbyliftingyourhandsfromthepalmrest;andbecarefulnottouse
thekeyboardforanyextendedlengthoftime.
•Donotoperateyourcomputerorchargethebatterynearflammablematerialsorinexplosive
environments.
•Ventilationslots,fansand/orheatsinksareprovidedwiththeproductforsafety,comfort,and
reliableoperation.Thesefeaturesmightinadvertentlybecomeblockedbyplacingtheproducton
abed,sofa,carpet,orotherflexiblesurface.Neverblock,cover,ordisablethesefeatures.
•Whentheacpoweradapterisconnectedtoanelectricaloutletandyourcomputer,itgenerates
heat.Donotplacetheadapterincontactwithanypartofyourbodywhileusingit.Neverusethe
acpoweradaptertowarmyourbody.Extendedcontactwithyourbody,eventhroughclothing,
maycauseaskinburn.
Foryoursafety,alwaysfollowthesebasicprecautionswithyourcomputer:
•Keepthecoverclosedwheneverthecomputerispluggedin.
•Regularlyinspecttheoutsideofthecomputerfordustaccumulation.
•Removedustfromventsandanyperforationsinthebezel.Morefrequentcleaningsmightbe
requiredforcomputersindustyorhigh-trafficareas.
•Donotrestrictorblockanyventilationopenings.
©CopyrightLenovo2014,2016
xi
Page 14

•Donotoperateyourcomputerinsidefurniture,asthismightincreasetheriskofoverheating.
•Airflowtemperaturesintothecomputershouldnotexceed35°C(95°F).
Electricalcurrentsafetyinformation
DANGER
Electriccurrentfrompower,telephone,andcommunicationcablesishazardous.
Toavoidashockhazard:
•Donotuseyourcomputerduringalightningstorm.
•Donotconnectordisconnectanycablesorperforminstallation,maintenance,orreconfiguration
ofthisproductduringanelectricalstorm.
•Connectallpowercordstoaproperlywiredandgroundedelectricaloutlet.
•Connecttoproperlywiredoutletsanyequipmentthatwillbeattachedtothisproduct.
•Wheneverpossible,useonehandonlytoconnectordisconnectsignalcables.
•Neverturnonanyequipmentwhenthereisevidenceoffire,water,orstructuraldamage.
•Disconnecttheattachedpowercords,battery,andallthecablesbeforeyouopenthedevice
covers,unlessinstructedotherwiseintheinstallationandconfigurationprocedures.
•Donotuseyourcomputeruntilallinternalpartsenclosuresarefastenedintoplace.Neveruse
thecomputerwheninternalpartsandcircuitsareexposed.
DANGER
Connectanddisconnectcablesasdescribedinthefollowingprocedureswheninstalling,moving,
oropeningcoversonthisproductorattacheddevices.
Toconnect:
1.TurneverythingOFF.
2.First,attachallcablestodevices.
3.Attachsignalcablestoconnectors.
4.Attachpowercordstooutlets.
5.TurndevicesON.
Thepowercordmustbedisconnectedfromthewalloutletorreceptaclebeforeinstallingallother
electricalcablesconnectedtothecomputer.
Thepowercordmaybereconnectedtothewalloutletorreceptacleonlyafterallotherelectrical
cableshavebeenconnectedtothecomputer.
DANGER
Duringelectricalstorms,donotperformanyreplacementanddonotconnectordisconnectthe
telephonecablefromthetelephoneoutletonthewall.
Todisconnect:
1.TurneverythingOFF.
2.First,removepowercordsfromoutlets.
3.Removesignalcablesfromconnectors.
4.Removeallcablesfromdevices.
xiiUserGuide
Page 15

Lasersafetyinformation
CAUTION:
Whenlaserproducts(suchasCD-ROMdrives,DVDdrives,3Dcameras,fiberopticdevices,or
transmitters)areinstalled,notethefollowing:
•Donotremovethecovers.Removingthecoversofthelaserproductcouldresultinexposureto
hazardouslaserradiation.Therearenoserviceablepartsinsidethedevice.
•Useofcontrolsoradjustmentsorperformanceofproceduresotherthanthosespecifiedherein
mightresultinhazardousradiationexposure.
DANGER
SomelaserproductscontainanembeddedClass3Blaserdiode.Notethefollowing:
Laserradiationwhenopen.Donotstareintothebeam,donotviewdirectlywithoptical
instruments,andavoiddirectexposuretothebeam.
DANGER
Noticesfor3Dcamera:
•Donotattempttoopenanyportionof3Dcamera.
•Therearenouserserviceablepartswiththe3Dcamera.
•Modificationorserviceofthe3Dcamera,specificallytheIRlaserprojectormightcausethe
emissionstoexceedClass1.
Liquidcrystaldisplay(LCD)notice
CAUTION:
TheLCDismadeofglass,androughhandlingordroppingthecomputercancausetheLCDtobreak.
IftheLCDbreaksandtheinternalfluidgetsintoyoureyesoronyourhands,immediatelywash
theaffectedareaswithwaterforatleast15minutes;ifanysymptomsarepresentafterwashing,
getmedicalcare.
Note:Forproductswithmercury-containingfluorescentlamps(forexample,non-LED),thefluorescentlamp
intheliquidcrystaldisplay(LCD)containsmercury;disposeofaccordingtolocal,state,orfederallaws.
Usingheadphonesorearphones
CAUTION:
Excessivesoundpressurefromearphonesandheadphonescancausehearingloss.Adjustmentof
theequalizertomaximumincreasestheearphoneandheadphoneoutputvoltageandthesound
pressurelevel.Therefore,toprotectyourhearing,adjusttheequalizertoanappropriatelevel.
Excessiveuseofheadphonesorearphonesforalongperiodoftimeathighvolumecanbedangerousifthe
outputoftheheadphoneorearphoneconnectorsdonotcomplywithspecificationsofEN50332-2.The
headphoneoutputconnectorofyourcomputercomplieswithEN50332-2Subclause7.Thisspecification
limitsthecomputer’smaximumwidebandtrueRMSoutputvoltageto150mV.Tohelpprotectagainst
hearingloss,ensurethattheheadphonesorearphonesyouusealsocomplywithEN50332-2(Clause7
limits)forawidebandcharacteristicvoltageof75mV.UsingheadphonesthatdonotcomplywithEN
50332-2canbedangerousduetoexcessivesoundpressurelevels.
©CopyrightLenovo2014,2016
xiii
Page 16

IfyourLenovocomputercamewithheadphonesorearphonesinthepackage,asaset,thecombinationof
theheadphonesorearphonesandthecomputeralreadycomplieswiththespecificationsofEN50332-1.
Ifdifferentheadphonesorearphonesareused,ensurethattheycomplywithEN50332-1(Clause6.5
LimitationValues).UsingheadphonesthatdonotcomplywithEN50332-1canbedangerousdueto
excessivesoundpressurelevels.
Additionalsafetyinformation
Plasticbagnotice
DANGER
Plasticbagscanbedangerous.Keepplasticbagsawayfrombabiesandchildrentoavoiddanger
ofsuffocation.
Glasspartsnotice
CAUTION:
Somepartsofyourproductmaybemadeofglass.Thisglasscouldbreakiftheproductisdropped
onahardsurfaceorreceivesasubstantialimpact.Ifglassbreaks,donottouchorattempttoremove
it.Stopusingyourproductuntiltheglassisreplacedbytrainedservicepersonnel.
Savetheseinstructions.
xivUserGuide
Page 17

Chapter1.Productoverview
Thischapterprovidesinformationaboutlocationsofconnectors,locationsofimportantproductlabels,
computerfeatures,specifications,operatingenvironment,andpreinstalledprograms.
Thischaptercontainsthefollowingtopics:
•“Locatingcomputercontrols,connectors,andindicators”onpage1
•“Locatingimportantproductinformation”onpage10
•“Computerfeatures”onpage12
•“Computerspecifications”onpage13
•“Operatingenvironment”onpage13
•“Lenovoprograms”onpage14
Locatingcomputercontrols,connectors,andindicators
Thissectionintroducesthecomputerhardwarefeaturestogiveyouthebasicinformationyouneedto
startusingthecomputer.
Frontviewformodelswitha2Dcamera
Figure1.Frontviewformodelswitha2Dcamera
1Microphones22Dcamera
3T rackPoint
5Numerickeypad
7Fingerprintreader(availableonsomemodels)8TrackPointbuttons(availableonsomemodels)
©CopyrightLenovo2014,2016
®
pointingstick4Powerbutton
6System-statusindicator
1
Page 18

9Trackpad10Media-cardslot
11Speakers
1Microphones
Themicrophonescapturesoundandvoicewhenusedwithaprogramcapableofhandlingaudio.
22Dcamera
Usethecameratotakepicturesorholdavideoconference.Formoreinformation,see“Usingthecamera”
onpage38.
ThinkPadpointingdevice
3T rackPointpointingstick
8T rackPointbuttons(availableonsomemodels)
9Trackpad
ThekeyboardcontainstheLenovouniqueThinkPad
®
pointingdevice.Pointing,selecting,anddraggingare
allpartofasingleprocessthatyoucanperformwithoutmovingyourfingersfromatypingposition.For
moreinformation,see“UsingtheThinkPadpointingdevice”onpage22
4Powerbutton
.
Pressthepowerbuttontoturnonthecomputerorputthecomputerintosleepmode.Forhowtoturnoffthe
computer,see“Frequentlyaskedquestions”onpage17.
Ifyourcomputeriscompletelyunresponsive,youcanturnoffthecomputerbypressingandholdingthe
powerbuttonforfourormoreseconds.Ifthecomputercannotbeturnedoff,see“Computerstops
responding”onpage83
formoreinformation.
Youalsocandefinewhatthepowerbuttondoes.Forexample,bypressingthepowerbutton,youcanturn
offthecomputerorputthecomputerintosleeporhibernationmode.Tochangewhatthepowerbutton
does,dothefollowing:
1.GotoControlPanel,thenchangetheviewofControlPanelfromCategorytoLargeiconsorSmallicons.
2.ClickPowerOptions➙Choosewhatthepowerbuttonsdo.
3.Followtheinstructionsonthescreen.
5Numerickeypad
Usethenumerickeypadtoinputnumbersquickly.
6System-statusindicator
TheilluminateddotontheThinkPadlogofunctionsasasystem-statusindicator.Formoreinformation,see
“Statusindicators”onpage9.
7Fingerprintreader(availableonsomemodels)
Fingerprintauthenticationprovidessimpleandsecureuseraccessbyassociatingyourfingerprintwitha
password.Formoreinformation,see“Usingthefingerprintreader”onpage56.
10Media-cardslot
Yourcomputerhasamedia-cardslot.Insertyourflashmediacardintothemedia-cardslottoreadthedata
onthecard.Formoreinformation,see“Usingaflashmediacard”onpage39.
2UserGuide
Page 19

11Speakers
Yourcomputerisequippedwithapairofstereospeakers.
Frontviewformodelswitha3Dcamera
Figure2.Frontviewformodelswitha3Dcamera
13Dcamera
3Colorcamera
5Microphones6T rackPointpointingstick
7Powerbutton8Numerickeypad
9System-statusindicator10Fingerprintreader(availableonsomemodels)
11TrackPointbuttons(availableonsomemodels)
13Media-cardslot
13Dcamera
2Infraredcamera
3Colorcamera
4Infraredlaserprojector
Somemodelscomeswitha3Dcamera
1.Consistedofaninfraredcamera2,acolorcamera3,andan
2Infraredcamera
4Infraredlaserprojector
12Trackpad
14Speakers
infraredlaserprojector4,the3Dcameraenablesyoutointeractwithyourcomputereasilyandconveniently.
The3Dcamerasupportsallfunctionsofa2Dcamera.Usethe3Dcameratotakepicturesorholdavideo
conference.Formoreinformation,see“Usingthecamera”onpage38.
5Microphones
Themicrophonescapturesoundandvoicewhenusedwithaprogramcapableofhandlingaudio.
Chapter1.Productoverview3
Page 20

ThinkPadpointingdevice
6T rackPointpointingstick
11T rackPointbuttons(availableonsomemodels)
12Trackpad
ThekeyboardcontainstheLenovouniqueThinkPadpointingdevice.Pointing,selecting,anddraggingareall
partofasingleprocessthatyoucanperformwithoutmovingyourfingersfromatypingposition.Formore
information,see“UsingtheThinkPadpointingdevice”onpage22.
7Powerbutton
Pressthepowerbuttontoturnonthecomputerorputthecomputerintosleepmode.Forhowtoturnoffthe
computer,see“Frequentlyaskedquestions”onpage17.
Ifyourcomputeriscompletelyunresponsive,youcanturnoffthecomputerbypressingandholdingthe
powerbuttonforfourormoreseconds.Ifthecomputercannotbeturnedoff,see“Computerstops
responding”onpage83formoreinformation.
Youalsocandefinewhatthepowerbuttondoes.Forexample,bypressingthepowerbutton,youcanturn
offthecomputerorputthecomputerintosleeporhibernationmode.Tochangewhatthepowerbutton
does,dothefollowing:
1.GotoControlPanel,thenchangetheviewofControlPanelfromCategorytoLargeiconsorSmallicons.
2.ClickPowerOptions➙Choosewhatthepowerbuttonsdo.
3.Followtheinstructionsonthescreen.
8Numerickeypad
Usethenumerickeypadtoinputnumbersquickly.
9System-statusindicator
TheilluminateddotontheThinkPadlogofunctionsasasystem-statusindicator.Formoreinformation,see
“Statusindicators”onpage9.
10Fingerprintreader(availableonsomemodels)
Fingerprintauthenticationprovidessimpleandsecureuseraccessbyassociatingyourfingerprintwitha
password.Formoreinformation,see“Usingthefingerprintreader”onpage56
13Media-cardslot
.
Yourcomputerhasamedia-cardslot.Insertyourflashmediacardintothemedia-cardslottoreadthedata
onthecard.Formoreinformation,see“Usingaflashmediacard”onpage39.
14Speakers
Yourcomputerisequippedwithapairofstereospeakers.
4UserGuide
Page 21

Right-sideview
Figure3.Right-sideview
1Comboaudioconnector2Opticaldrive(availableonsomemodels)
3USB2.0connector
5LenovoOneLinkconnector
1Comboaudioconnector
4acpowerconnector
Connectaheadphonesoraheadsetthathasa3.5-mm(0.14-inch)4-poleplugtotheaudioconnectorto
listentothesoundfromthecomputer.
Notes:
•Ifyouareusingaheadsetwithafunctionswitch,donotpressthisswitchwhileusingtheheadset.If
youpressit,theheadsetmicrophonewillbedisabled,andtheintegratedmicrophonesonthecomputer
willbeenabledinstead.
•Thecomboaudioconnectordoesnotsupportaconventionalmicrophone.Formoreinformation,see
“Usingaudiofeatures”onpage37.
2Opticaldrive(availableonsomemodels)
Usetheopticaldrivetoreadorburnopticaldiscs.
3USB2.0connector
TheUniversalSerialBus(USB)2.0connectorisusedforconnectingUSB-compatibledevices,suchasa
USBprinteroradigitalcamera.
Note:WhenyouattachaUSBcabletothisUSBconnector,ensurethattheUSBmarkisfacingupward.
Otherwisetheconnectormightgetdamaged.
Chapter1.Productoverview5
Page 22

4acpowerconnector
5LenovoOneLinkconnector
Whentheacpoweradapterisconnectedtotheacpowerconnector,itprovidespowertothecomputer
andchargesthebattery.WhenasupportedThinkPadOneLinkDockorThinkPadOneLinkProDockis
connectedtotheLenovoOneLinkconnector,itcannotonlyextendthecomputercapabilitiesbutalso
provideacpowertothecomputerandchargethebattery.
TousetheLenovoOneLinkconnector,removetheconnectorcoverfromtheLenovoOneLinkconnectorfirst.
Note:Ensurethatyoukeeptheconnectorcover.ReattachittotheLenovoOneLinkconnectorwhen
youarenotusingtheLenovoOneLinkconnector.
Left-sideview
Figure4.Left-sideview
1Security-lockslot
3Ethernetconnector
5High-definitionmultimediainterface(HDMI™)
connector
7AlwaysOnUSB3.0connector
1Security-lockslot
2Fanlouvers
4Videographicsarray(VGA)connector
6USB3.0connector
Toprotectyourcomputerfromtheft,purchaseasecuritycablelockthatfitsthissecurity-lockslottolock
yourcomputertoastationaryobject.
Note:Youareresponsibleforevaluating,selecting,andimplementingthelockingdeviceandsecurity
feature.Lenovomakesnocomments,judgments,orwarrantiesaboutthefunction,quality,orperformance
ofthelockingdeviceandsecurityfeature.
6UserGuide
Page 23

2Fanlouvers
Thefanlouversandtheinternalfanenableairtocirculateinthecomputertoensurepropercooling,
especiallythecoolingofthemicroprocessor.
Note:T oensureproperairflow,donotplaceanyobstacleinfrontofthefanlouvers.
3Ethernetconnector
Connectthecomputertoalocalareanetwork(LAN)withtheEthernetconnector.
DANGER
Toavoidtheriskofelectricalshock,donotconnectthetelephonecabletotheEthernetconnector.
YoucanonlyconnectanEthernetcabletothisconnector.
TheEthernetconnectorhastwoindicatorsthatshowthestatusofthenetworkconnection.Whenthegreen
indicatorison,itindicatesthatthecomputerisconnectedtoaLANandasessionwiththenetworkis
available.Whentheindicatorblinksyellow,dataisbeingtransmitted.
Note:IfthecomputerisconnectedtoasupportedThinkPadOneLinkDockorThinkPadOneLinkProDock,
usetheEthernetconnectoronthedocktoconnecttoaLANinsteadoftheoneonthecomputer.
4VGAconnector
UsetheVGAconnectortoconnectthecomputertoaVGA-compatiblevideodevice,suchasaVGAmonitor.
5HDMIconnector
UsetheHDMIconnectortoconnectthecomputertoanHDMI-compatibleaudiodeviceorvideomonitor,
suchasahigh-definitiontelevision(HDTV).
Note:IfyouconnectthecomputertoasupportedThinkPadOneLinkDock,usetheHDMIconnectoron
thedock,nottheoneonthecomputer.
6USB3.0connector
TheUSB3.0connectorisusedforconnectingUSB-compatibledevices,suchasaUSBprinteroradigital
camera.
Note:WhenyouattachaUSBcabletothisUSBconnector,ensurethattheUSBmarkisfacingupward.
Otherwisetheconnectormightgetdamaged.
7AlwaysOnUSB3.0connector
Bydefault,theAlwaysOnUSBconnectorenablesyoutochargesomemobiledigitaldevicesand
smartphonesinthefollowingsituations:
•Whenyourcomputerisonorinsleepmode
•Whenyourcomputerisinhibernationmodeoristurnedoff,butconnectedtoacpower
Ifyouwanttochargethesedeviceswhenyourcomputerisinhibernationmodeoristurnedoff,andthe
computerisnotconnectedtoacpower,dothefollowing:
•ForWindows
®
7:StartthePowerManagerprogram,clicktheGlobalPowerSettingstab,andthen
followtheinstructionsonthescreen.
•ForWindows8.1andWindows10:StarttheLenovoSettingsprogram,clickPOWER,andthenfollow
theinstructionsonthescreen.
Chapter1.Productoverview7
Page 24

Forinstructionsonhowtostarttheprograms,see“AccessingLenovoprograms”onpage14.
Note:WhenyouattachaUSBcabletothisUSBconnector,ensurethattheUSBmarkisfacingupward.
Otherwisetheconnectormightgetdamaged.
Bottomview
Figure5.Bottomview
1Battery2Memory-upgradeslots
3Storagedrive
1Battery
4Wireless-LAN-cardslot
Useyourcomputerwithbatterypowerwheneveracpowerisunavailable.
2Memory-upgradeslots
Youcanincreasetheamountofmemoryinyourcomputerbyinstallingamemorymoduleinthe
memory-upgradeslot.MemorymodulesareavailableasoptionsfromLenovo.
3Storagedrive
Dependingonthemodel,thecomputermighthavealarge-capacity,customer-upgradableharddiskdrive
thatcanmeetvariousstoragedemands.
Somemodelshaveasolid-statedrivefordatastorage.Thesolid-statedrivemakesyourcomputerlight,
small,andfast.
Somemodelsareequippedwithahybriddrive,whichisastoragedevicethatcombinesNANDflash
solid-statememorywithharddiskdrivetechnology.
Note:Thehiddenservicepartitionisthereasonwhythereislessfreespacethanexpectedonyourstorage
drive.Thisreductionismorenoticeableonthesolid-statedrivebecauseofitssmallercapacity.
4Wireless-LAN-cardslot
YourcomputermighthaveawirelessLANcardinstalledinthisslotsothatyoucanestablishwireless
LANconnections.
8UserGuide
Page 25

Statusindicators
Thestatusindicatorsshowthecurrentstatusofyourcomputer.
1FnLockindicator
TheFnLockindicatorshowsthestatusofFnLockfunction.Formoreinformation,see“Specialkeys”
onpage19.
2Speaker-muteindicator
Whenthespeaker-muteindicatorison,thespeakersaremuted.
3Microphone-muteindicator
Whenthemicrophone-muteindicatorison,themicrophonesaremuted.
4Camera-statusindicator
Whenthecamera-statusindicatorison,thecameraisinuse.
56System-statusindicators
Theilluminateddots,oneintheThinkPadlogoontheouterlidofyourcomputerandtheotheronthepalm
rest,showthesystemstatusofyourcomputer:
•Blinksforthreetimes:Thecomputerisinitiallyconnectedtopower.
•On:Thecomputerison(innormalmode).
Chapter1.Productoverview9
Page 26

•Off:Thecomputerisofforinhibernationmode.
•Blinksfast:Thecomputerisenteringhibernationmode.
•Blinksslowly:Thecomputerisinsleepmode.
Locatingimportantproductinformation
Thissectionprovidesinformationtohelpyoulocatethefollowinglabelsthatcontainimportantproduct
information:
Machinetypeandmodelinformation
Themachinetypeandmodellabelidentifiesyourcomputer.WhenyoucontactLenovoforhelp,themachine
typeandmodelinformationhelpssupporttechnicianstoidentifyyourcomputerandprovidefasterservice.
Thefollowingfigureshowsthelocationofthemachinetypeandmodelofyourcomputer.
FCCIDandICCertificationinformation
TheFCCandICCertificationinformationisidentifiedbyalabellocatedonthecomputerbasecoveras
showninthefollowingfigure.
10UserGuide
Page 27

Forapreinstalledwirelessmodule,thislabelidentifiestheactualFCCIDandICcertificationnumberforthe
wirelessmoduleinstalledbyLenovo.
Note:Donotremoveorreplaceapreinstalledwirelessmodulebyyourself.Formodulereplacement,you
mustcontactLenovoservicefirst.Lenovoisnotresponsibleforanydamagecausedbyunauthorized
replacement.
LabelsfortheWindowsoperatingsystems
Windows7CertificateofAuthenticity:ComputermodelspreinstalledwiththeWindows7operating
systemhaveaCertificateofAuthenticitylabelaffixedtothecomputercoverorinsidethebattery
compartment.TheCertificateofAuthenticityisyourindicationthatthecomputerislicensedforaWindows7
productandispreinstalledwithaWindows7genuineversion.Insomecases,anearlierWindowsversion
mightbepreinstalledunderthetermsoftheWindows7Professionallicensedowngraderights.Printedon
theCertificateofAuthenticityistheWindows7versionforwhichthecomputerislicensedandtheProduct
ID.TheProductIDisimportantincaseyouneedtoreinstalltheWindows7operatingsystemfromasource
otherthanaLenovoproductrecoverydiscset.
Windows8,Windows8.1,andWindows10GenuineMicrosoftlabel:Dependingonyourgeographic
location,thedatewhenyourcomputerwasmanufactured,andtheversionofWindows8,Windows8.1,
orWindows10thatispreinstalled,yourcomputermighthaveaGenuineMicrosoftlabelaffixedtoits
cover.Seehttp://www.microsoft.com/en-us/howtotell/Hardware.aspxforillustrationsofthevarioustypes
ofGenuineMicrosoftlabels.
•InthePeople’sRepublicofChina,theGenuineMicrosoftlabelisrequiredonallcomputermodels
preinstalledwithanyversionofWindows8,Windows8.1,orWindows10.
•Inothercountriesandregions,theGenuineMicrosoftlabelisrequiredonlyoncomputermodelslicensed
forWindows8Pro,Windows8.1Pro,orWindows10Pro.
TheabsenceofaGenuineMicrosoftlabeldoesnotindicatethatthepreinstalledWindowsversionisnot
genuine.FordetailsonhowtotellwhetheryourpreinstalledWindowsproductisgenuine,refertothe
informationprovidedbyMicrosoftathttp://www.microsoft.com/en-us/howtotell/default.aspx.
UnlikeWindows7products,therearenoexternal,visualindicatorsoftheProductIDorWindowsversionfor
whichthecomputerislicensed.Instead,theProductIDisrecordedinthecomputerfirmware.Whenevera
Windows8,Windows8.1,orWindows10productisinstalled,theinstallationprogramchecksthecomputer
firmwareforavalid,matchingProductIDtocompletetheactivation.
Chapter1.Productoverview11
Page 28

Insomecases,anearlierWindowsversionmightbepreinstalledunderthetermsoftheWindows8Pro,
Windows8.1Pro,orWindows10Prolicensedowngraderights.
Computerfeatures
Thistopicliststhefeaturesofyourcomputer.
Toviewthesystempropertiesofyourcomputer,dothefollowing:
•ForWindows7:ClickStartandright-clickComputer.ThenclickProperties.
•ForWindows8.1:Fromthedesktop,movethepointertothetop-rightorbottom-rightcornerofthescreen
tobringupthecharms.ThenclickSettings➙PCinfo.
•ForWindows10:doeitherofthefollowing:
–OpentheStartmenu,andthenclickSettings➙System➙About.
–Right-clicktheStartbutton.ThenselectSystem.
Memory
•Doubledatarate3lowvoltagesynchronousdynamicrandomaccessmemorymodules(DDR3LVSDRAM)
Storagedevice
•2.5-inchformfactor,7-mmor9.5-mmheightharddiskdrive(availableonsomemodels)
•2.5-inchformfactor,7-mmheightsolid-statedrive(availableonsomemodels)
•2.5-inchformfactor,7-mmheighthybriddrive(availableonsomemodels)
Display
ThecolordisplayusestheThinFilmTransistor(TFT)technology.
•Displaysize:15.6inches(396.2mm)
•Displayresolution:
–LCD:Upto1366x768or1920x1080,dependingonthemodel
–Externalmonitor:Upto2048x1536
•Brightnesscontrol
Keyboard
•6-rowkeyboard
•ThinkPadpointingdevice(T rackPointpointingdeviceandtrackpad)
•Functionkeys
•Numerickeypad
Interface
•4-in-1–digital-media-cardreader
•acpowerconnector
•Comboaudioconnector
•Externalmonitorconnectors(VGAconnectorandHDMIconnector)
•LenovoOneLinkconnector
•OneAlwaysOnUSB3.0connector
12UserGuide
Page 29

•OneUSB2.0connector
•OneUSB3.0connector
•RJ45Ethernetconnector
•Integratedmicrophones
•2Dcameraor3Dcamera,dependingonthemodel
Note:The3Dcameraisaninfraredlaserdevice.
Opticaldrive(availableonsomemodels)
•Multi-Burnerdrive
Wirelessfeatures
•IntegratedwirelessLAN
•IntegratedBluetooth
Securityfeatures
•Fingerprintreader(availableonsomemodels)
Computerspecifications
Thissectionliststhephysicalspecificationsforyourcomputer.
Size
•Width:377mm(14.84inches)
•Depth:255mm(10.04inches)
•Height:27.1mm(1.07inches)or28.9mm(1.14inches)
Heatoutput
•45W(154Btu/hr)maximumor65W(222Btu/hr)maximum(dependingonthemodel)
Powersource(acpoweradapter)
•Sine-waveinputat50to60Hz
•Inputratingoftheacpoweradapter:100to240Vac,50to60Hz
Operatingenvironment
Thissectionprovidesinformationabouttheoperatingenvironmentofyourcomputer.
Environment:
•Maximumaltitudewithoutpressurization:3048m(10000ft)
•Temperature
–Ataltitudesupto2438m(8000ft)
–Operating:5.0°Cto35.0°C(41°Fto95°F)
–Storage:5.0°Cto43.0°C(41°Fto109°F)
–Ataltitudesabove2438m(8000ft)
–Maximumtemperaturewhenoperatingundertheunpressurizedcondition:31.3°C(88°F)
Chapter1.Productoverview13
Page 30

Note:Whenyouchargethebattery,itstemperaturemustbeatleast10°C(50°F).
•Relativehumidity:
–Operating:8%to80%
–Storage:5%to95%
Ifpossible,placeyourcomputerinawell-ventilatedanddryareawithoutdirectexposuretosunshine.
Attention:
•Keepelectricalappliancessuchasanelectricfan,radio,airconditioner,andmicrowaveovenaway
fromthecomputer.Thestrongmagneticfieldsgeneratedbytheseappliancescandamagethemonitor
anddataontheharddiskdriveorhybriddrive.
•Donotplaceanybeveragesontopoforbesidethecomputerorotherattacheddevices.Ifliquidisspilled
onorinthecomputeroranattacheddevice,ashortcircuitorotherdamagemightoccur.
•Donoteatorsmokeoveryourkeyboard.Particlesthatfallintoyourkeyboardcancausedamage.
Lenovoprograms
YourcomputercomeswithLenovoprogramstohelpyouworkeasilyandsecurely.
Note:Theavailableprogramsaresubjecttochangewithoutnotice.
TolearnmoreabouttheprogramsandothercomputingsolutionsofferedbyLenovo,goto:
http://www.lenovo.com/support
AccessingLenovoprograms
ToaccessLenovoprogramsonyourcomputer,dothefollowing:
•ForWindows7andWindows10:
1.ClicktheStartbuttontoopentheStartmenu.Locateaprogrambytheprogramname.
2.IftheprogramisnotdisplayedontheStartmenu,clickAllprograms(Windows7)orAllapps
(Windows10)todisplayallprograms.
3.Ifyoustilldonotfindtheprogramintheprogramlist,searchfortheprograminthesearchbox.
•ForWindows8.1:
1.PresstheWindowskeytoopentheStartscreen.Locateaprogrambytheprogramname.
2.IftheprogramisnotdisplayedontheStartscreen,clickthearrowicontoopentheAppsscreen.
3.IfyoustilldonotfindtheprogramontheAppsscreen,searchfortheprograminthesearchbox.
Note:IfyouareusingtheWindows7operatingsystem,someLenovoprogramsarereadytobeinstalled.
Youcannotfindtheseprogramsthroughtheabovemethodsunlessyouhaveinstalledthemfirst.Toinstall
theseLenovoprograms,accesstheLenovoPCExperienceprogram,clickLenovoT ools,andthenfollow
theinstructionsonthescreen.
AnintroductiontoLenovoprograms
ThistopicprovidesabriefintroductiontoLenovoprograms.Dependingonyourcomputermodel,someof
theprogramsmightnotbeavailable.
14UserGuide
Page 31

AccessConnections™
(Windows7)
ActiveProtectionSystem™
(Windows7,Windows8.1,and
Windows10)
AutoScrollUtility
(Windows7andWindows8.1)
CommunicationsUtility
(Windows7)
FingerprintManagerPro,
LenovoFingerprintManager,or
TouchFingerprintManager
(Windows7andWindows8.1)
HotkeyFeaturesIntegration
(Windows7,Windows8.1,and
Windows10)
LenovoCompanion
(Windows8.1andWindows10)
TheAccessConnectionsprogramisaconnectivityassistantprogramfor
creatingandmanaginglocationprofiles.Eachlocationprofilestoresallthe
networkandInternetconfigurationsettingsneededforconnectingtoanetwork
infrastructurefromaspecificlocationsuchasahomeoranoffice.
Byswitchingbetweenlocationprofilesasyoumoveyourcomputerfromplace
toplace,youcanquicklyandeasilyconnecttoanetworkwithnoneedto
manuallyreconfigureyoursettingsandrestartthecomputereachtime.
TheActiveProtectionSystemprogramprotectsyourinternalstoragedrive(such
asharddiskdrive)whentheshocksensorinsideyourcomputerdetectsa
conditionthatcoulddamagethedrive,suchassystemtilt,excessivevibration,
orshock.
Theinternalstoragedriveislessvulnerabletodamagewhenitisnotoperating.
Thisisbecausewhentheinternalstoragedriveisnotoperating,thesystem
stopsitfromspinning,andmightalsomovethereadandwriteheadsofthe
drivetoareasthatdonotcontaindata.
Assoonastheshocksensorsensesthattheenvironmentisstableagain
(minimalchangeinsystemtilt,vibration,orshock),itturnsontheinternal
storagedrive.
Thisprogramenhancesyourexperiencewithwindowoperation.Thewindow
positionofaforegroundapplicationisautomaticallyadjusted.Thescrollbaron
auserinterfaceisalsoautomaticallyadjusted.
TheCommunicationsUtilityprogramenablesyoutoconfiguresettingsforthe
integratedcameraandaudiodevices.
Ifyourcomputercomeswithafingerprintreader,theFingerprintManagerPro
program,LenovoFingerprintManagerprogram,orT ouchFingerprintManager
programenablesyoutoenrollyourfingerprintandassociateitwithyour
passwords.Asaresult,fingerprintauthenticationcanreplaceyourpasswords
andenablesimpleandsecureuseraccess.
HotkeyFeaturesIntegrationisautilitypackagethatenablesyoutoselectand
installutilityprogramsspecificallyforthespecialkeysandbuttonsonyour
computer.Thespecialkeysandbuttonsaredesignedtomeetaccessibilityand
usabilityrequirements.Installingrelatedutilityprogramsenablesfullfunctionality
ofthespecialkeysandbuttons.
Yoursystem’sbestfeaturesshouldbeeasytoaccessandunderstand.With
Companion,theyare.
UseLenovoCompaniontodothefollowing:
•Optimizeyourcomputer’sperformance,monitoryourcomputer’shealth,
andmanageupdates.
•Accessyouruserguide,checkwarrantystatus,andviewaccessories
customizedforyourcomputer.
•Readhow-toarticles,exploreLenovoforums,andstayup-to-dateon
technologynewswitharticlesandblogsfromtrustedsources.
LenovoCompanionisfilledwithexclusiveLenovocontenttohelpyoulearn
aboutwhatyoucandowithyourcomputer.
Chapter1.Productoverview15
Page 32

LenovoPCExperience
(Windows7,Windows8.1,and
Windows10)
LenovoSettings
(Windows8.1andWindows10)
LenovoSolutionCenter
(Windows7,Windows8.1,and
Windows10)
MobileBroadbandConnect
(Windows7andWindows10)
MessageCenterPlus
(Windows7)
PasswordManager
(Windows7andWindows8.1)
PowerManager
(Windows7)
RecoveryMedia
(Windows7andWindows10)
RescueandRecovery
®
(Windows7)
SystemUpdate
(Windows7andWindows8.1)
TheLenovoPCExperienceprogramhelpsyouworkmoreeasilyandsecurelyby
providingeasyaccesstovariousprograms,suchasActiveProtectionSystem
andLenovoSolutionCenter.
Note:OntheWindows10operatingsystem,thisprogramcannotbefoundfrom
theallprogramlistorsearchbox.Toaccessthisprogram,gotoControlPanel.
ViewControlPanelbyCategory,clickHardwareandSound➙Devicesand
Printers,andthendouble-clickthedevicewithyourcomputername.
TheLenovoSettingsprogramenablesyoutoenhanceyourcomputing
experiencebyturningyourcomputerintoaportablehotspot,configuring
cameraandaudiosettings,optimizingyourpowersettings,andcreatingand
managingmultiplenetworkprofiles.
TheLenovoSolutionCenterprogramenablesyoutotroubleshootandresolve
computerproblems.Itcombinesdiagnostictests,systeminformationcollection,
securitystatus,andsupportinformation,alongwithhintsandtipsforoptimal
systemperformance.
TheMobileBroadbandConnectprogramenablesyoutoconnectthecomputer
tothemobilebroadbandnetworkthroughasupportedwirelessWANcard.
TheMessageCenterPlusprogramautomaticallydisplaysmessagestoinform
youaboutimportantnoticesfromLenovo,suchasalertsonsystemupdates
andalertsonconditionsthatrequireyourattention.
ThePasswordManagerprogramautomaticallycapturesandfillsin
authenticationinformationforWindowsprogramsandWebsites.
ThePowerManagerprogramprovidesconvenient,flexible,andcompletepower
managementforthecomputer.Itenablesyoutoadjustyourcomputerpower
settingstoachievethebestbalancebetweenperformanceandpowersaving.
TheRecoveryMediaprogramenablesyoutorestorethecontentsofthehard
diskdrivetothefactorydefaultsettings.
TheRescueandRecoveryprogramisaone-buttonrecoveryandrestore
solution.Itincludesasetofself-recoverytoolstohelpyoudiagnosecomputer
problems,gethelp,andrecoverfromsystemcrashes,evenifyoucannotstart
theWindowsoperatingsystem.
TheSystemUpdateprogramenablesyoutokeepthesoftwareonthecomputer
up-to-datebydownloadingandinstallingsoftwarepackages,includingdevice
drivers,UnifiedExtensibleFirmwareInterface(UEFI)basicinput/outputsystem
(BIOS)updates,andotherthird-partyprograms.
16UserGuide
Page 33

Chapter2.Usingyourcomputer
Thischapterprovidesinformationaboutusingsomeofthecomputercomponents.
Thischaptercontainsthefollowingtopics:
•“Registeringyourcomputer”onpage17
•“Frequentlyaskedquestions”onpage17
•“Specialkeys”onpage19
•“UsingtheThinkPadpointingdevice”onpage22
•“Powermanagement”onpage29
•“Connectingtothenetwork”onpage33
•“Usinganexternaldisplay”onpage35
•“Usingaudiofeatures”onpage37
•“Usingthecamera”onpage38
•“Usingtheopticaldrive”onpage38
•“Usingaflashmediacard”onpage39
Registeringyourcomputer
Whenyouregisteryourcomputer,informationisenteredintoadatabase,whichenablesLenovotocontact
youincaseofarecallorothersevereproblem.Inaddition,somelocationsofferextendedprivilegesand
servicestoregisteredusers.
WhenyouregisteryourcomputerwithLenovo,youalsowillreceivethefollowingbenefits:
•QuickerservicewhenyoucallLenovoforhelp
•Automaticnotificationoffreesoftwareandspecialpromotionaloffers
ToregisteryourcomputerwithLenovo,gotohttp://www.lenovo.com/registerandfollowtheinstructionson
thescreentoregisteryourcomputer.
IfyouareusingaWindows7operatingsystem,youalsocanregisteryourcomputerthroughthepreinstalled
LenovoProductRegistrationprogram.Theprogramlaunchesautomaticallyafteryouhaveusedyour
computerforaperiodoftime.Followtheinstructionsonthescreentoregisteryourcomputer.
Frequentlyaskedquestions
Thefollowingareafewtipsthatwillhelpyouoptimizetheuseofyourcomputer.
Toensurethatyoureceivethebestperformancefromyourcomputer,gotothefollowingWebpagetofind
informationsuchasaidsfortroubleshootingandanswerstofrequentlyaskedquestions:
http://www.lenovo.com/support/faq
CanIgetmyuserguideinanotherlanguage?
•Todownloadtheuserguideinanotherlanguage,gotohttp://www.lenovo.com/support.Thenfollow
theinstructionsonthescreen.
©CopyrightLenovo2014,2016
17
Page 34

Howtoturnoffmycomputer?
•ForWindows7:OpentheStartmenu,thenclickShutdown.
•ForWindows8.1:Dooneofthefollowing:
–GototheStartscreenbypressingtheWindowskey,clickthepowericoninthetop-rightcorner
ofthescreen,thenclickShutdown.
–Moveyourpointertothetop-rightorbottom-rightcornerofthescreentodisplaythecharms.Then
clickSettings➙Power➙Shutdown.
Note:Y oualsocanopentheSettingscharmbypressingthesettingskey
•ForWindows10:OpentheStartmenu,click
Power,andthenclickShutdown.
.
HowdoIaccessControlPanel?
•ForWindows7:OpentheStartmenu,thenclickControlPanel.
•ForWindows8.1:PresstheWindowskeytoopentheStartscreen,clickthearrowicon
toopen
theAppsscreen,andthenclickControlPanel.
•ForWindows10:Right-clicktheStartbutton,thenclickControlPanel.
Howtousethebatterypowermoreeffectively?
•Toconservepower,ortosuspendoperationwithoutexitingprogramsorsavingfiles,see“Power-saving
modes”onpage31.
•Toachievethebestbalancebetweenperformanceandpowersaving,createandapplypowerplans.
See“Managingthebatterypower”onpage30
•Ifyourcomputerwillbeturnedoffforanextendedperiodoftime,youcanpreventbatterypower
fromdrainingbyremovingthebattery.Lookformoreinformationaboutusingthebatteryin“Power
management”onpage29
.
Concernedaboutsecurityorneedtosecurelydisposeofdatastoredonyourstoragedrive?
•StudyChapter5“Security”onpage51tofindouthowyoucanprotectyourcomputerfromtheftand
unauthorizeduse.
•UsethePasswordManagerprogramtoprotectthedatastoredonyourcomputer.Fordetails,seethe
helpinformationsystemoftheprogram.
•Beforeyoudisposeofthedataonthestoragedrive,besuretoread“Noticeondeletingdatafrom
yourstoragedrive”onpage58
.
Needtogivepresentationsorattachanexternalmonitoroften?
•Ensurethatyoufollowtheprocedureinthetopic“Connectinganexternaldisplay”onpage36
•WiththeExtenddesktopfunction,youcandisplayoutputonboththecomputerdisplayandanexternal
monitor.
Youhavebeenusingyourcomputerforsometimealready,anditisgettingslower?
•Followthe“Generaltipsforpreventingproblems”onpage77
.
•Diagnoseproblemsyourselfbyusingthepreinstalleddiagnosticsoftware.See“Diagnosingproblems”
onpage83.
•CheckforrecoverysolutionsinChapter9“Recoveryoverview”onpage103.
18UserGuide
.
Page 35

CanIchangetheWindows8.1startupbehaviortoopeneitherthedesktoportheStartscreen?
OntheWindows8.1operatingsystem,youcansetthecomputertoopeneitherthedesktoportheStart
screenbydefault.Tosetthedefaultstartupscreen,dothefollowing:
1.Onthedesktop,moveyourpointertothetaskbaratthebottomofthescreenandright-clickonthe
taskbar.
2.ClickProperties.TheTaskbarandNavigationpropertieswindowisdisplayed.
3.OntheNavigationtab,locatetheStartscreensection,andthendooneofthefollowing:
•Tosetthedesktopasyourdefaultstartupscreen,selectWhenIsigninorcloseallappsona
screen,gotothedesktopinsteadofStartsoacheckisvisible.
•TosettheStartscreenasyourdefaultstartupscreen,removethecheckfromtheWhenIsigninor
closeallappsonascreen,gotothedesktopinsteadofStartcheckbox.
4.ClickOKtosavethenewsetting.
ThisfeatureisnotavailableontheWindows8operatingsystem.
Printthefollowingsectionsandkeepthemwithyourcomputerincaseyouareunabletoaccessthis
onlinehelpwhennecessary.
•“Installinganewoperatingsystem”onpage61
•“Computerstopsresponding”onpage83
•“Powerproblems”onpage97
GettinghelpabouttheWindowsoperatingsystem
TheWindowshelpinformationsystemprovidesyouwithdetailedinformationaboutusingtheWindows
operatingsystemtohelpyougetthemostofyourcomputer.ToaccesstheWindowshelpinformation
system,dooneofthefollowing:
•ForWindows7:OpentheStartmenu,andthenclickHelpandSupport.
•ForWindows8.1:Moveyourpointertothetop-rightorbottom-rightcornerofthescreentodisplay
thecharms.ThenclickSettings➙Help.Additionally,theWindows8.1operatingsystemprovidesa
Help+TipsapplicationthatyoucanopenfromtheStartscreenorAppsscreen.
•ForWindows10:OpentheStartmenu,andthenclickGetStarted.Additionally,youcansearchfrom
thetaskbartofindhelp,apps,files,settings,andsoon.
Specialkeys
Yourcomputerhasseveralspecialkeystohelpyouworkmoreeasilyandeffectively.
Chapter2.Usingyourcomputer19
Page 36
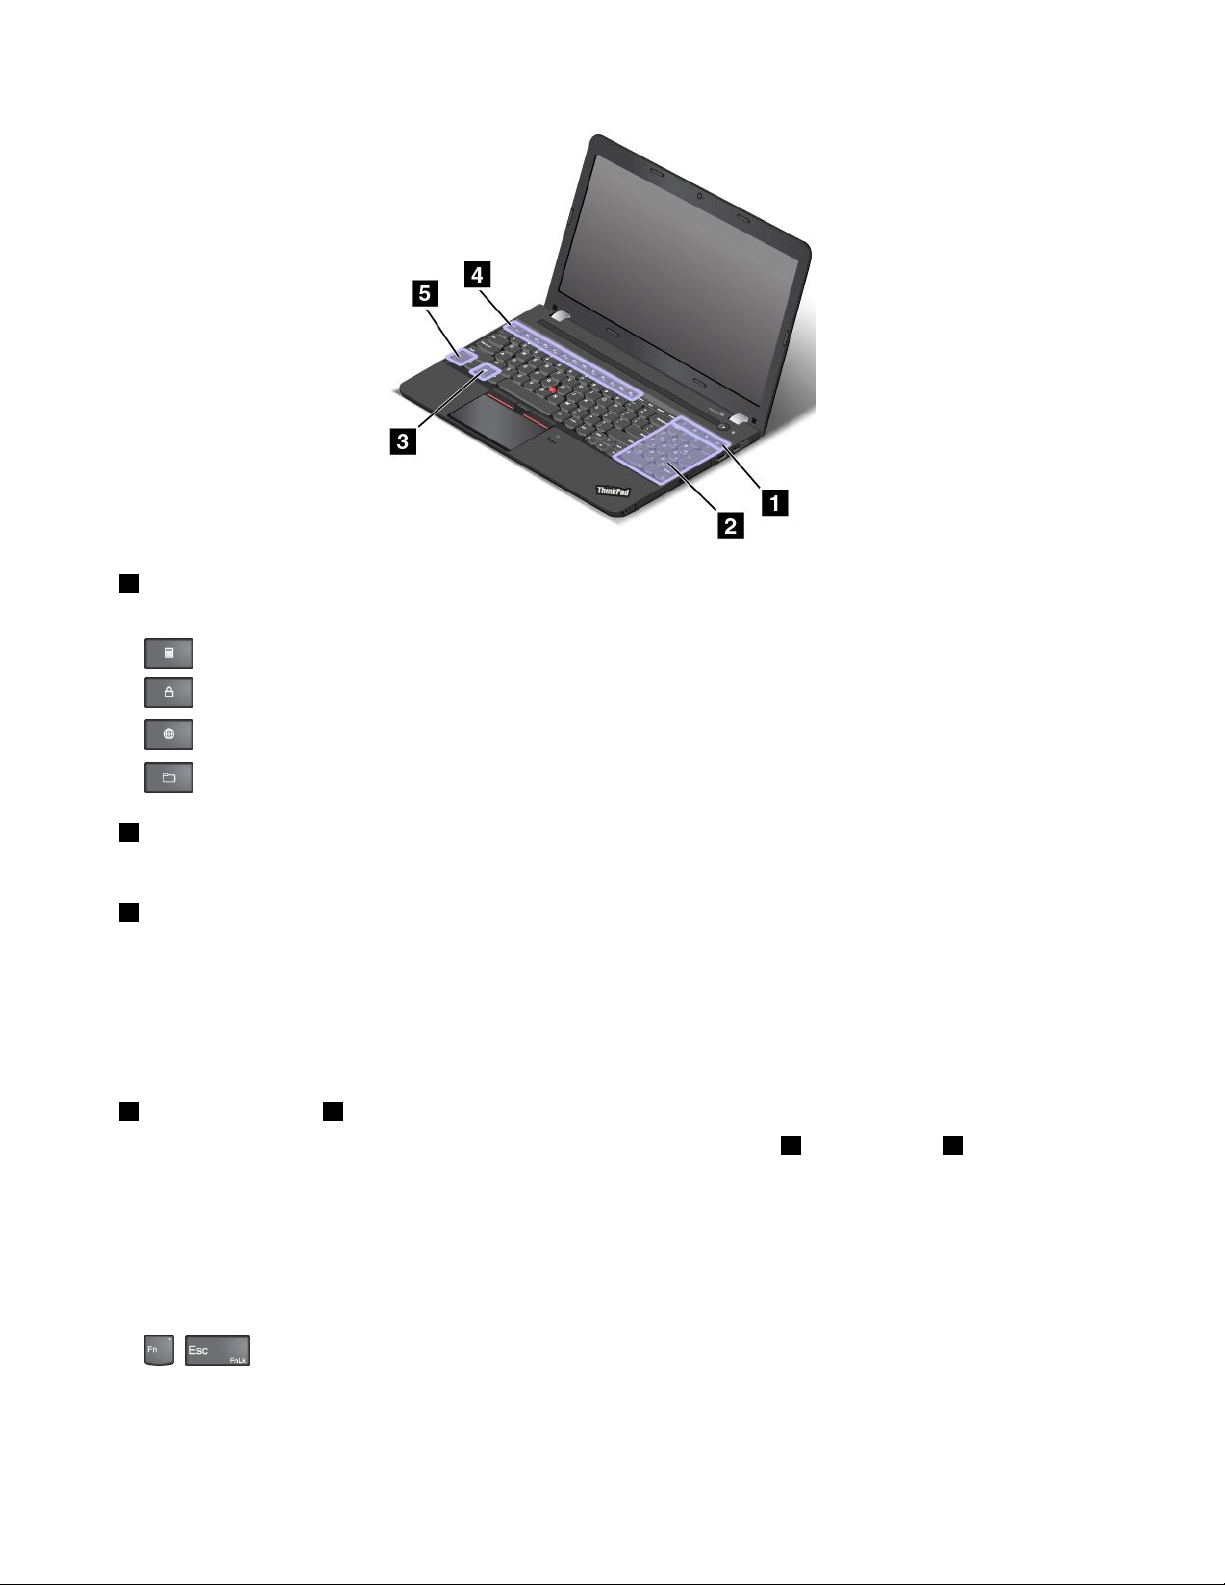
1Additionalshortcutkeys
Yourcomputermighthavefouradditionalshortcutkeys:
•:Launchescalculator
•:Locksoperatingsystem
•:Opensthedefaultbrowser
•:OpensComputer
2Numerickeypad
Youcanusethisnumerickeypadtoinputnumbersquickly.
3Windowskey
ForWindows7andWindows10:PresstheWindowskeytoopentheStartmenu.
ForWindows8.1:PresstheWindowskeytoswitchbetweenthecurrentworkspaceandtheStartscreen.
ForinformationaboutusingtheWindowskeywithotherkeys,refertothehelpinformationsystemofthe
Windowsoperatingsystem.
4Functionkeysand5Fnkey
Thekeyboardhasseveralspecialkeys,whichconsistofthefunctionkeys4andtheFnkey5.
YoucanconfiguretheFnkeyandfunctionkeysintheKeyboardPropertieswindowbydoingthefollowing:
1.GotoControlPanel,thenchangetheviewofControlPanelfromCategorytoLargeiconsorSmallicons.
2.ClickKeyboard.IntheKeyboardPropertieswindow,clicktheFnandfunctionkeysorThinkPad
F1–F12keystab.
3.Selecttheoptionsofyourpreference.
•+:EnablesordisablestheFnLockfunction.
WhentheFnLockfunctionisdisabled:TheFnLockindicatorisoff(defaultmode).T oinitiatethe
specialfunctionprintedasanicononeachkey,pressthefunctionkeydirectly.ToinputF1-F12,press
theFnkeyandthecorrespondingfunctionkey.
20UserGuide
Page 37
WhentheFnLockfunctionisenabled:TheFnLockindicatorturnson.ToinputF1-F12,pressthe
functionkeysdirectly.T oinitiatethespecialfunctionprintedasanicononeachkey,presstheFnkey
andthecorrespondingfunctionkey.
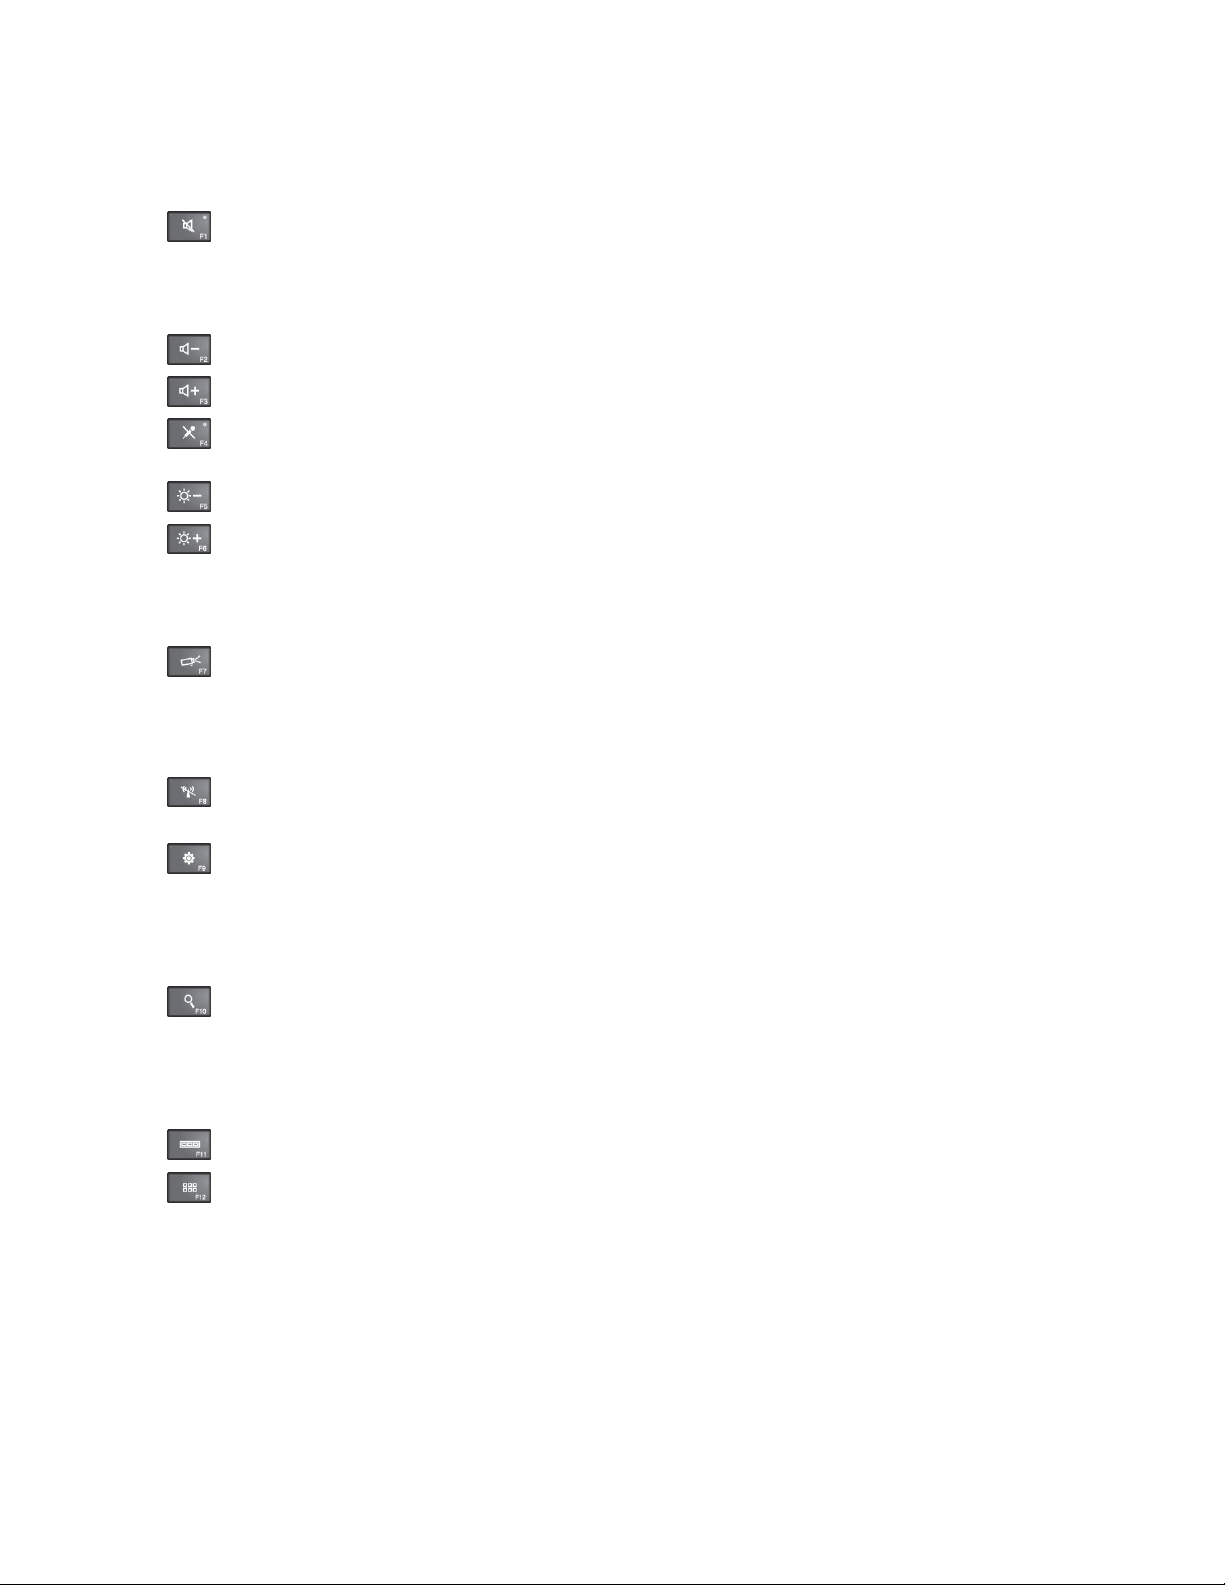
•
:Mutesorunmutesthespeakers.Whenthespeakersaremuted,thespeaker-muteindicatorturns
on.
Ifyoumutethesoundandturnoffyourcomputer,thesoundwillremainmutedwhenyouturnonyour
computeragain.T oturnonthesound,pressF1,F2,orF3.
•
:Decreasesthespeakervolume.
•:Increasesthespeakervolume.
•:Mutesorunmutesthemicrophones.Whenthemicrophonesaremuted,themicrophone-mute
indicatorturnson.
•:Darkensthedisplay.
•:Brightensthedisplay.
Youcantemporarilychangethecomputerdisplaybrightnessbypressingthetwokeys.Tochangethe
defaultbrightnesslevel,right-clickthebattery-statusiconintheWindowsnotificationarea.Thenclick
Adjustscreenbrightnessandmakechangesasdesired.
•:Switchesthedisplayoutputlocationbetweenthecomputerdisplayandanexternaldisplay.For
moreinformation,referto“Usinganexternaldisplay”onpage35.
Note:Toswitchbetweenthecomputerdisplayandanexternalmonitor,theWindows+Pkeycombination
alsoisavailable.
•:Enablesordisableswirelessfeatures.Formoreinformationaboutthewirelessfeatures,referto
“Wirelessconnections”onpage33
.
•:
–Windows7:OpensControlPanel.
–Windows8.1:OpenstheSettingscharm.
–Windows10:OpenstheSettingswindow.
•:
–Windows7:OpensWindowsSearch.
–Windows8.1:OpenstheSearchcharm.
–Windows10:OpenstheCortana
•
•
:Viewstheprogramsthatyouhaveopened.
:
®
searchbox.
–Windows7:OpensComputer.
–Windows8.1andWindows10:Viewsalltheprograms.
•Fn+B:HasthesamefunctionastheBreakkey.
•Fn+P:HasthesamefunctionasthePausekey.
•Fn+S:HasthesamefunctionastheSysRqkey.
•Fn+K:HasthesamefunctionastheScrLKkey.
Chapter2.Usingyourcomputer21
Page 38
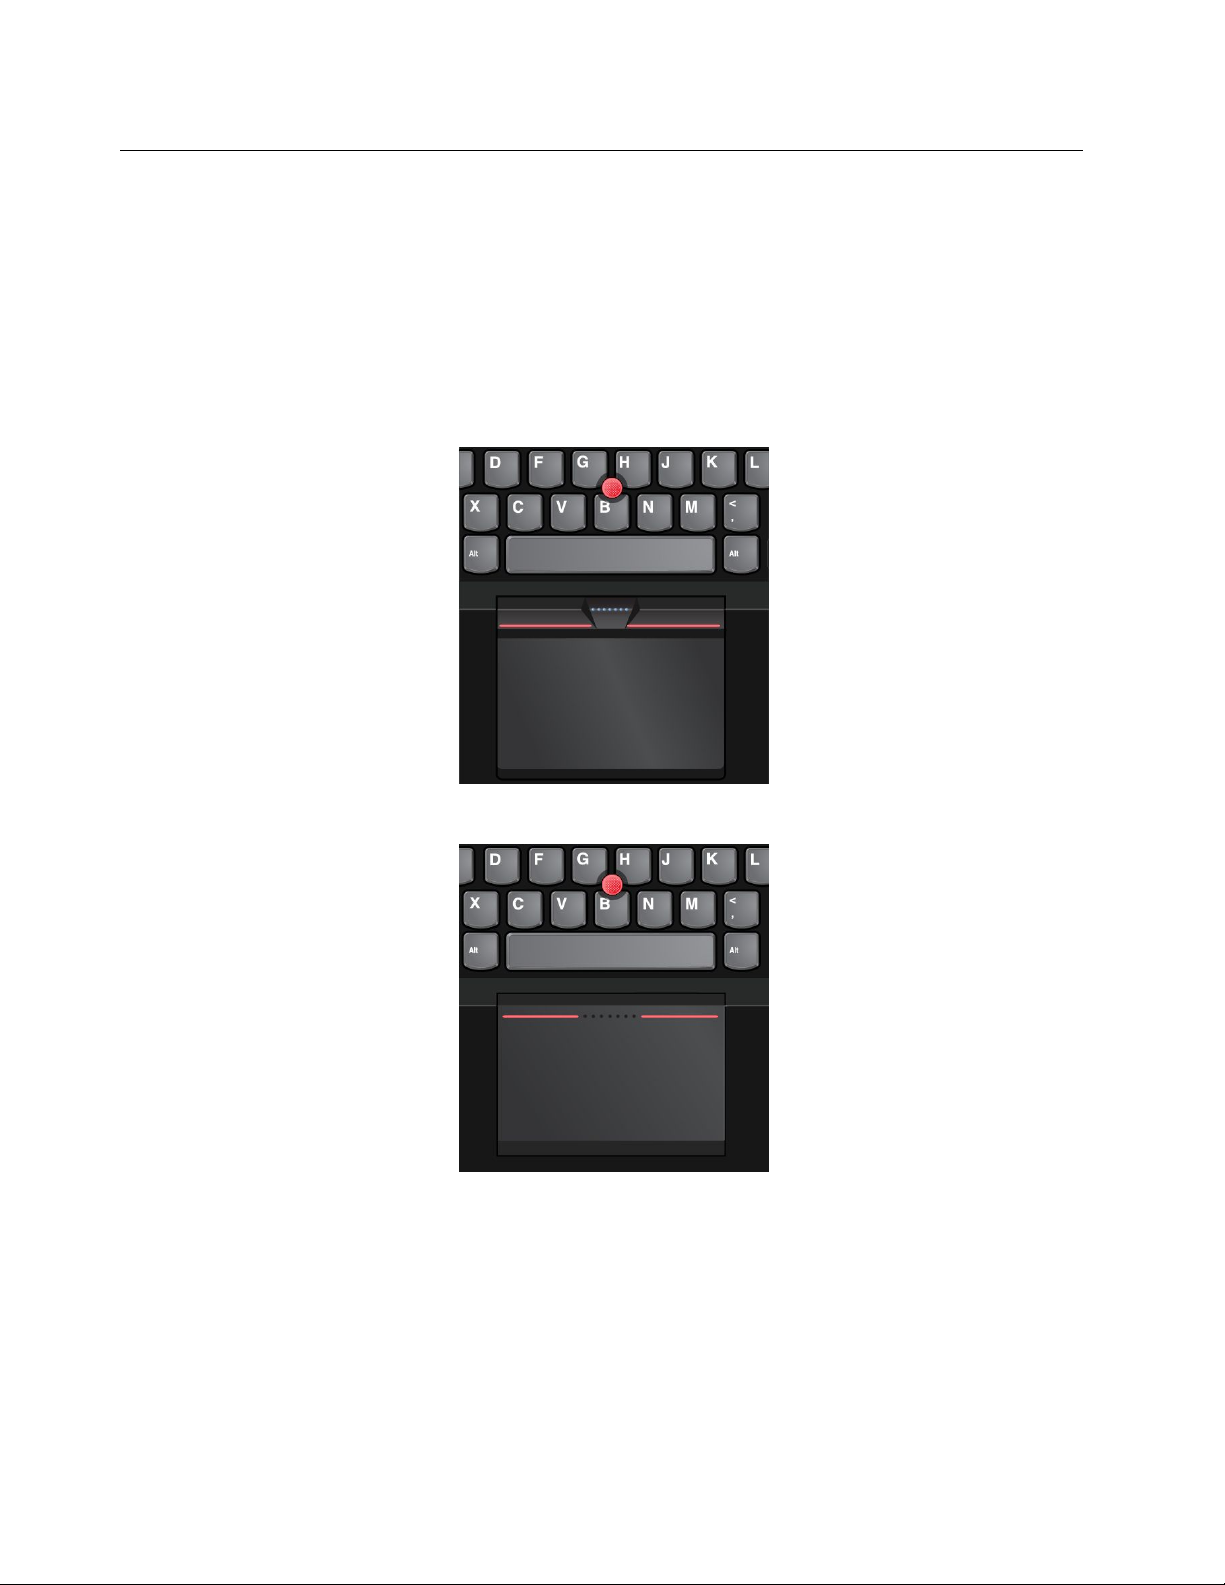
ThinkPadpointingdevice
TheThinkPadpointingdeviceenablesyoutoperformallthefunctionsofatraditionalmouse,suchas
movingthepointer,left-clicking,right-clicking,andscrolling.WiththeThinkPadpointingdevice,youalso
canperformavarietyoftouchgestures,suchasrotatingandzoominginorout.
UsingtheThinkPadpointingdevice
Dependingonthemodel,thepointingdeviceonyourcomputermightlooklikeeitherofthefollowing
illustrations.Clickthecorrespondinglinktolearnmoreabouthowtousethepointingdevice.
•“ThinkPadpointingdevicewithTrackPointbuttons”onpage23
•“ThinkPadpointingdevicewithoutTrackPointbuttons”onpage25
22UserGuide
Page 39
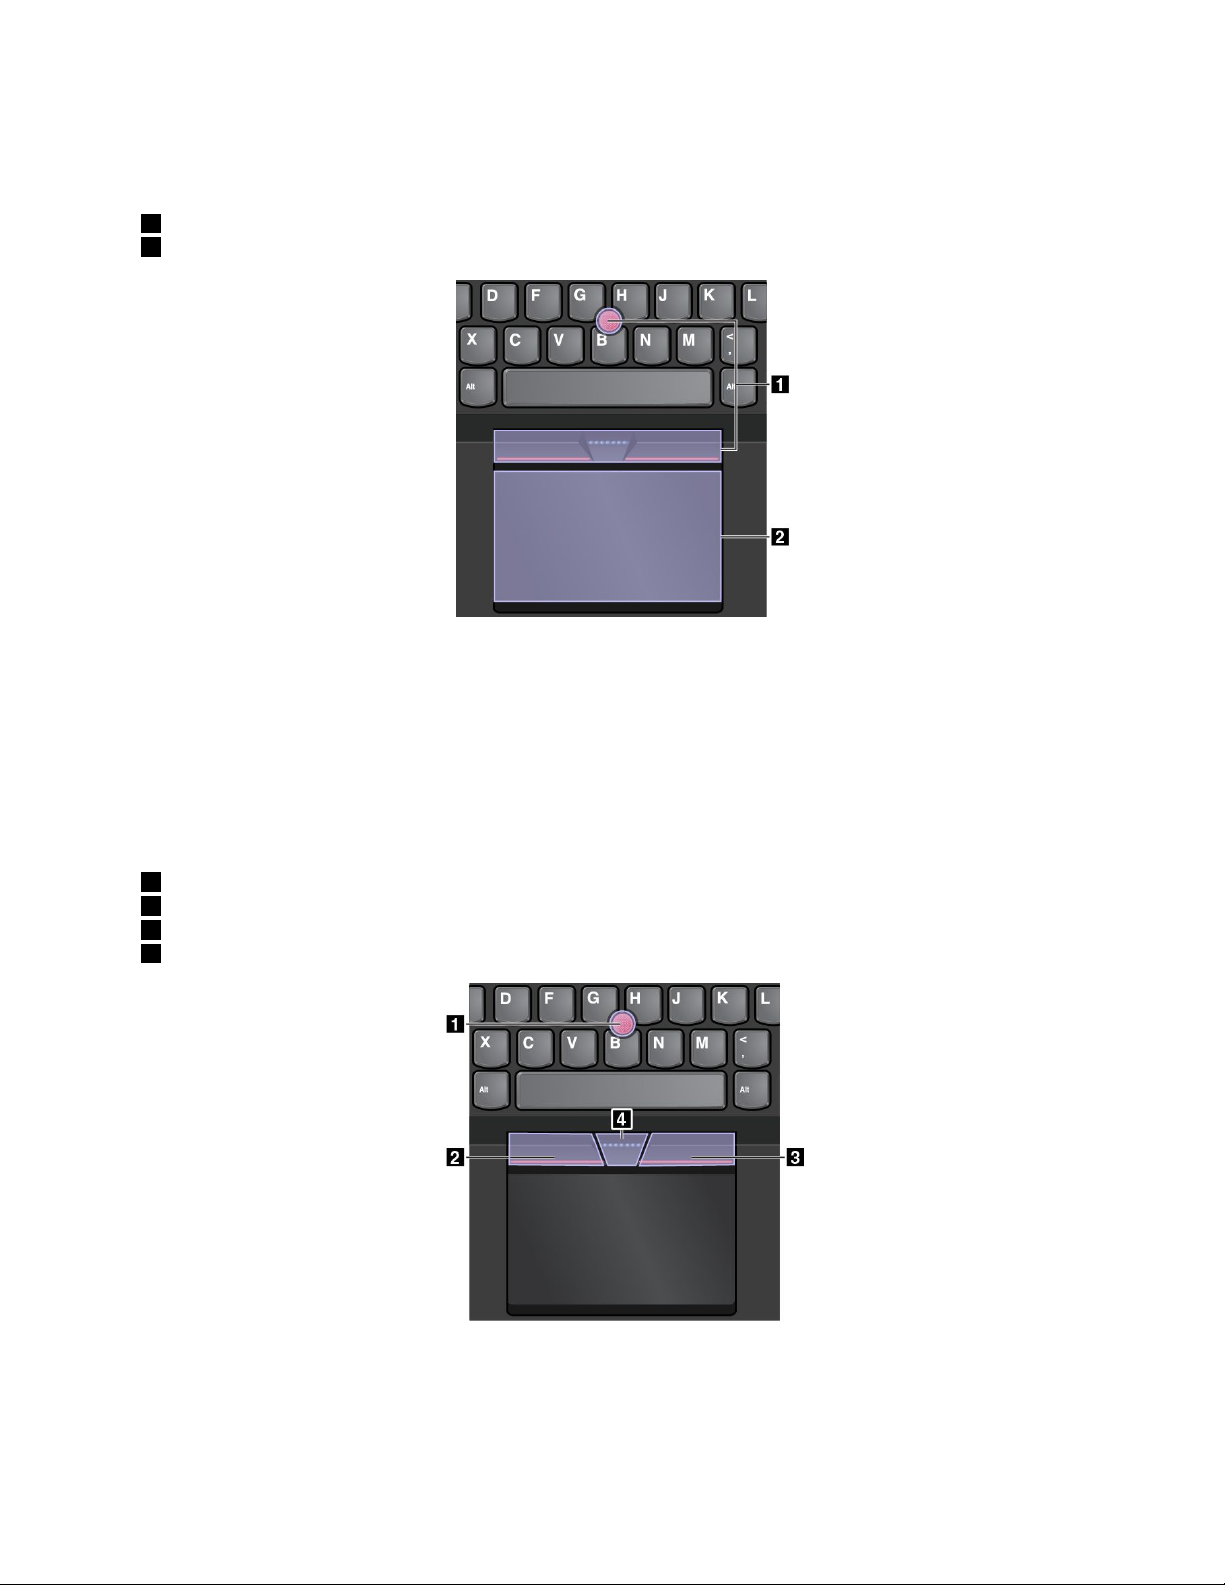
ThinkPadpointingdevicewithT rackPointbuttons
ThistypeofThinkPadpointingdeviceconsistsofthefollowingcomponents:
1T rackPointpointingdevice
2Trackpad
Bydefault,boththeTrackPointpointingdeviceandthetrackpadareactivewiththetouchgesturesenabled.
Tochangethesettings,see“CustomizingtheThinkPadpointingdevice”onpage28
.
TrackPointpointingdevice
TheTrackPointpointingdeviceenablesyoutoperformallthefunctionsofatraditionalmouse,suchas
pointing,clicking,andscrolling.
TheT rackPointpointingdeviceconsistsofaTrackPointpointingstickandasetofT rackPointbuttons:
1T rackPointpointingstick
2Left-clickbutton(primary-clickbutton)
3Right-clickbutton(secondary-clickbutton)
4Scrollbar
TousetheTrackPointpointingdevice,refertothefollowinginstructions:
Note:Placeyourhandsinthetypingpositionanduseyourindexfingerormiddlefingertoapplypressureto
thepointing-sticknonslipcap.Useeitherthumbtopresstheleft-clickbuttonorright-clickbutton.
Chapter2.Usingyourcomputer23
Page 40
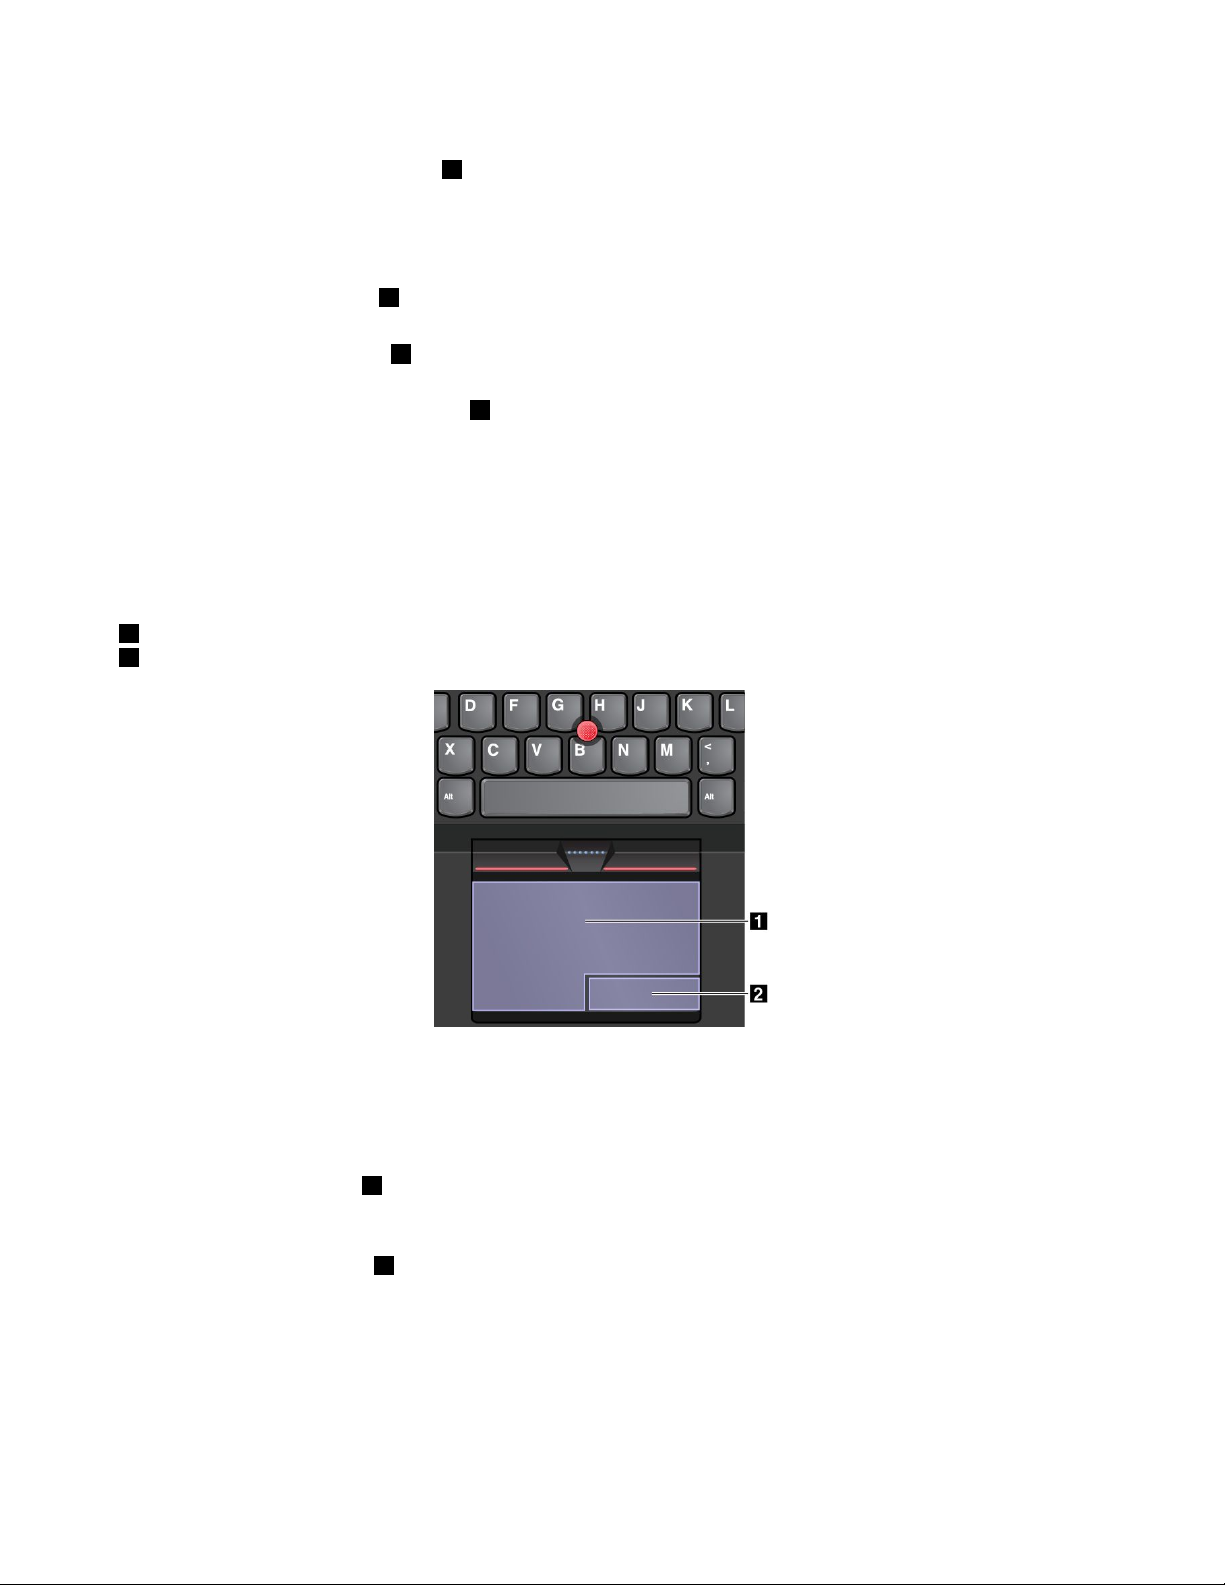
•Point
UsetheTrackPointpointingstick
1tomovethepointeronthescreen.T ousethepointingstick,apply
pressuretothepointing-sticknonslipcapinanydirectionparalleltothekeyboard.Thepointermoves
accordinglybutthepointingstickitselfdoesnotmove.Thespeedatwhichthepointermovesdepends
ontheamountofpressureyouapplytothepointingstick.
•Left-click
Presstheleft-clickbutton
2toselectoropenanitem.
•Right-click
Presstheright-clickbutton3todisplayashortcutmenu.
•Scroll
Pressandholdthedottedscrollbar4whileapplyingpressuretothepointingstickintheverticalor
horizontaldirection.Thenyoucanscrollthroughthedocument,Website,orapps.
Trackpad
Theentiretrackpadissensitivetofingertouchandmovement.Youcanusethetrackpadtoperformallthe
pointing,clicking,andscrollingfunctionsofatraditionalmouse.
Thetrackpadcanbedividedintotwozones:
1Left-clickzone(primary-clickzone)
2Right-clickzone(secondary-clickzone)
Tousethetrackpad,refertothefollowinginstructions:
•Point
Slideonefingeracrossthesurfaceofthetrackpadtomovethepointeraccordingly.
•Left-click
Presstheleft-clickzone
1toselectoropenanitem.
Youalsocantapanywhereonthesurfaceofthetrackpadwithonefingertoperformtheleft-clickaction.
•Right-click
Presstheright-clickzone2todisplayashortcutmenu.
Youalsocantapanywhereonthesurfaceofthetrackpadwithtwofingerstoperformtheright-clickaction.
•Scroll
Puttwofingersonthetrackpadandmovethemintheverticalorhorizontaldirection.Thisactionenables
youtoscrollthroughthedocument,Website,orapps.Ensurethatyoupositionyourtwofingersslightly
apartfromeachother.
24UserGuide
Page 41
Withthetrackpad,youalsocanperformavarietyoftouchgestures.Forinformationaboutusingthetouch
gestures,see“Trackpadtouchgestures”onpage27
.
Ifthetrackpadsurfaceisstainedwithoil,turnoffthecomputerfirst.Thengentlywipethetrackpadsurface
withasoftandlint-freeclothmoistenedwithlukewarmwaterorcomputercleaner.
ThinkPadpointingdevicewithoutT rackPointbuttons
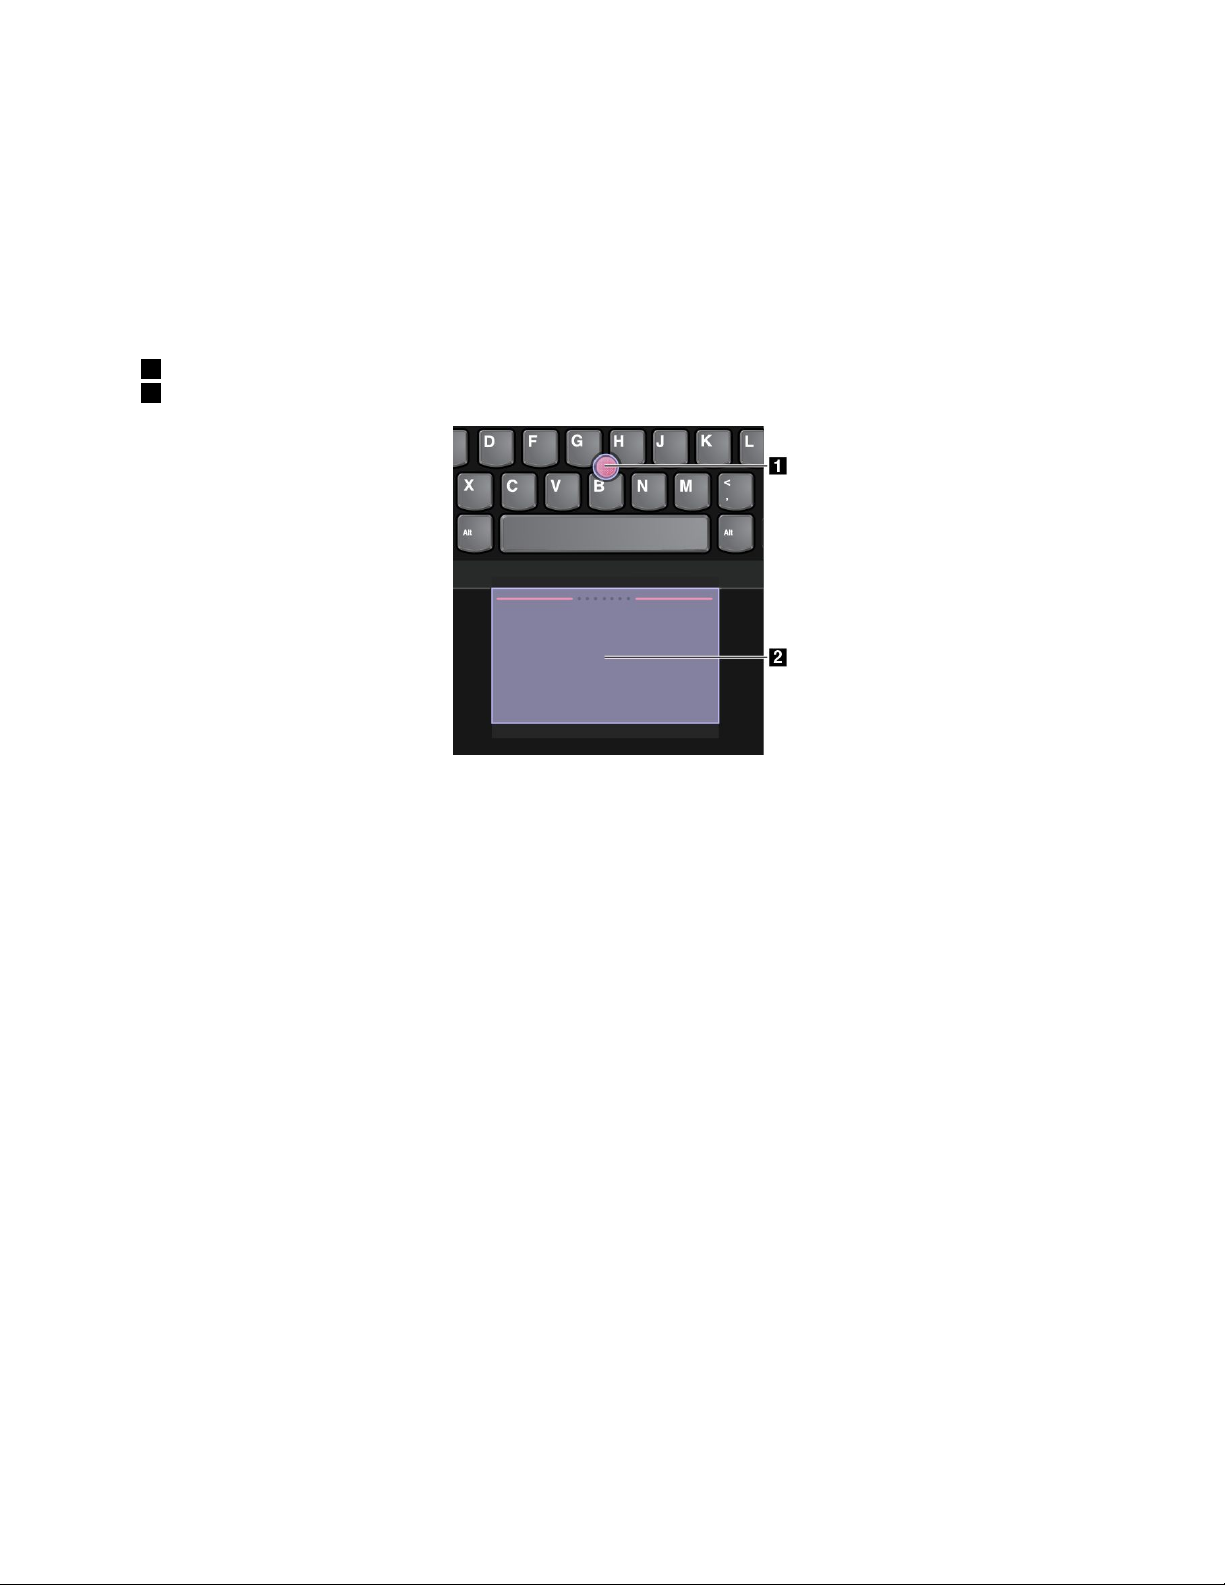
ThistypeofThinkPadpointingdeviceconsistsofthefollowingcomponents:
1Pointingstick
2Trackpad
Dependingonyourpreference,youcanusethepointingdeviceinoneofthefollowingmodes:
•TrackPointmode
•Trackpadmode
•ClassicT rackPointmode
Tochangeamodeforthepointingdevice,see“CustomizingtheThinkPadpointingdevice”onpage28
Note:Bydefault,theTrackPointmodeandtheT rackpadmodearebothenabled.Youcanuseeither
oneofthem.
TrackPointmode
IntheTrackPointmode,usethepointingsticktomovethepointer,andusethetrackpadtoperformother
actionssuchasleft-click,right-click,andscroll.
Youalsocanusethetrackpadtoperformavarietyoftouchgestures.Forinformationaboutusingtouch
gestures,see“Trackpadtouchgestures”onpage27.
.
Chapter2.Usingyourcomputer25
Page 42
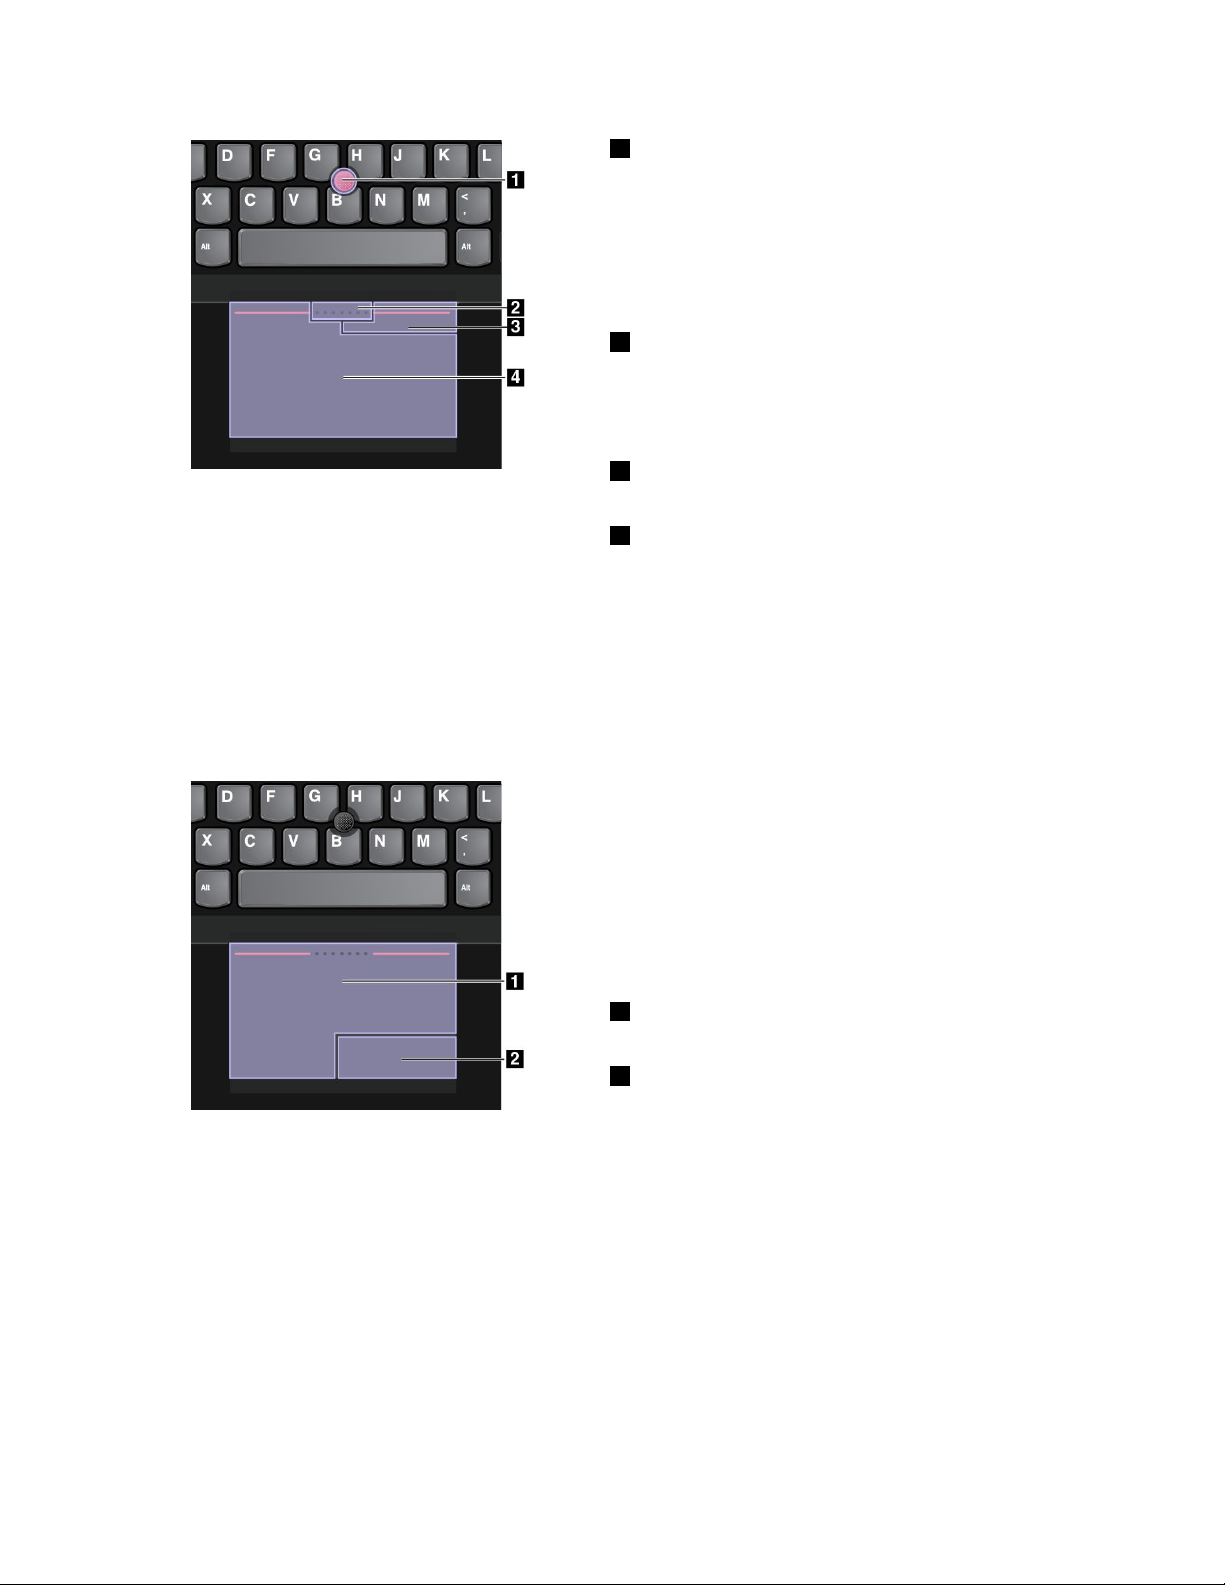
1Point
Usethepointingsticktomovethepointeronthescreen.
Tousethepointingstick,applypressuretothepointing
sticknonslipcapinanydirectionparalleltothekeyboard.
Thepointermovesaccordinglybutthepointingstickitself
doesnotmove.Thespeedatwhichthepointermoves
dependsontheamountofpressureyouapplytothe
pointingstick.
2Scroll
Pressandholdthedottedscrollingbarwhileapplying
pressuretothepointingstickintheverticalorhorizontal
direction.Thenyoucanscrollthroughthedocument,
Website,orapps.
3Right-click
Presstheright-clickzonetodisplayashortcutmenu.
4Left-click
Presstheleft-clickzonetoselectoropenanitem.
Trackpadmode
IntheTrackpadmode,usethetrackpadtoperformalltheactions,suchaspoint,left-click,right-click,
andscroll.
Youalsocanusethetrackpadtoperformavarietyoftouchgestures.Forinformationaboutusingtouch
gestures,see“Trackpadtouchgestures”onpage27.
Point
Slideonefingeracrossthesurfaceofthetrackpadto
movethepointeraccordingly.
Scroll
Puttwofingersonthetrackpadandmovetheminthe
verticalorhorizontaldirection.Thenyoucanscroll
throughthedocument,Website,orapps.Ensurethatyou
positionyourtwofingersslightlyapartfromeachother.
1Left-click
Presstheleft-clickzonetoselectoropenanitem.
2Right-click
Presstheright-clickzonetodisplayashortcutmenu.
Ifthetrackpadsurfaceisstainedwithoil,turnoffthecomputerfirst.Thengentlywipethetrackpadsurface
withasoftandlint-freeclothmoistenedwithlukewarmwaterorcomputercleaner.
ClassicTrackPointmode
IntheClassicT rackPointmode,usethepointingsticktomovethepointer,andusethetrackpadtoperform
otheractionssuchasleft-click,right-click,andscroll.
Note:ComparedwiththeTrackPointmode,theClassicTrackPointmodeenlargestheright-clickzoneso
thattheright-andleft-clickzonesonthetrackpadaredividedequally.However,thetouchgesturesare
disabledandcannotbeusedintheClassicT rackPointmode.
26UserGuide
Page 43
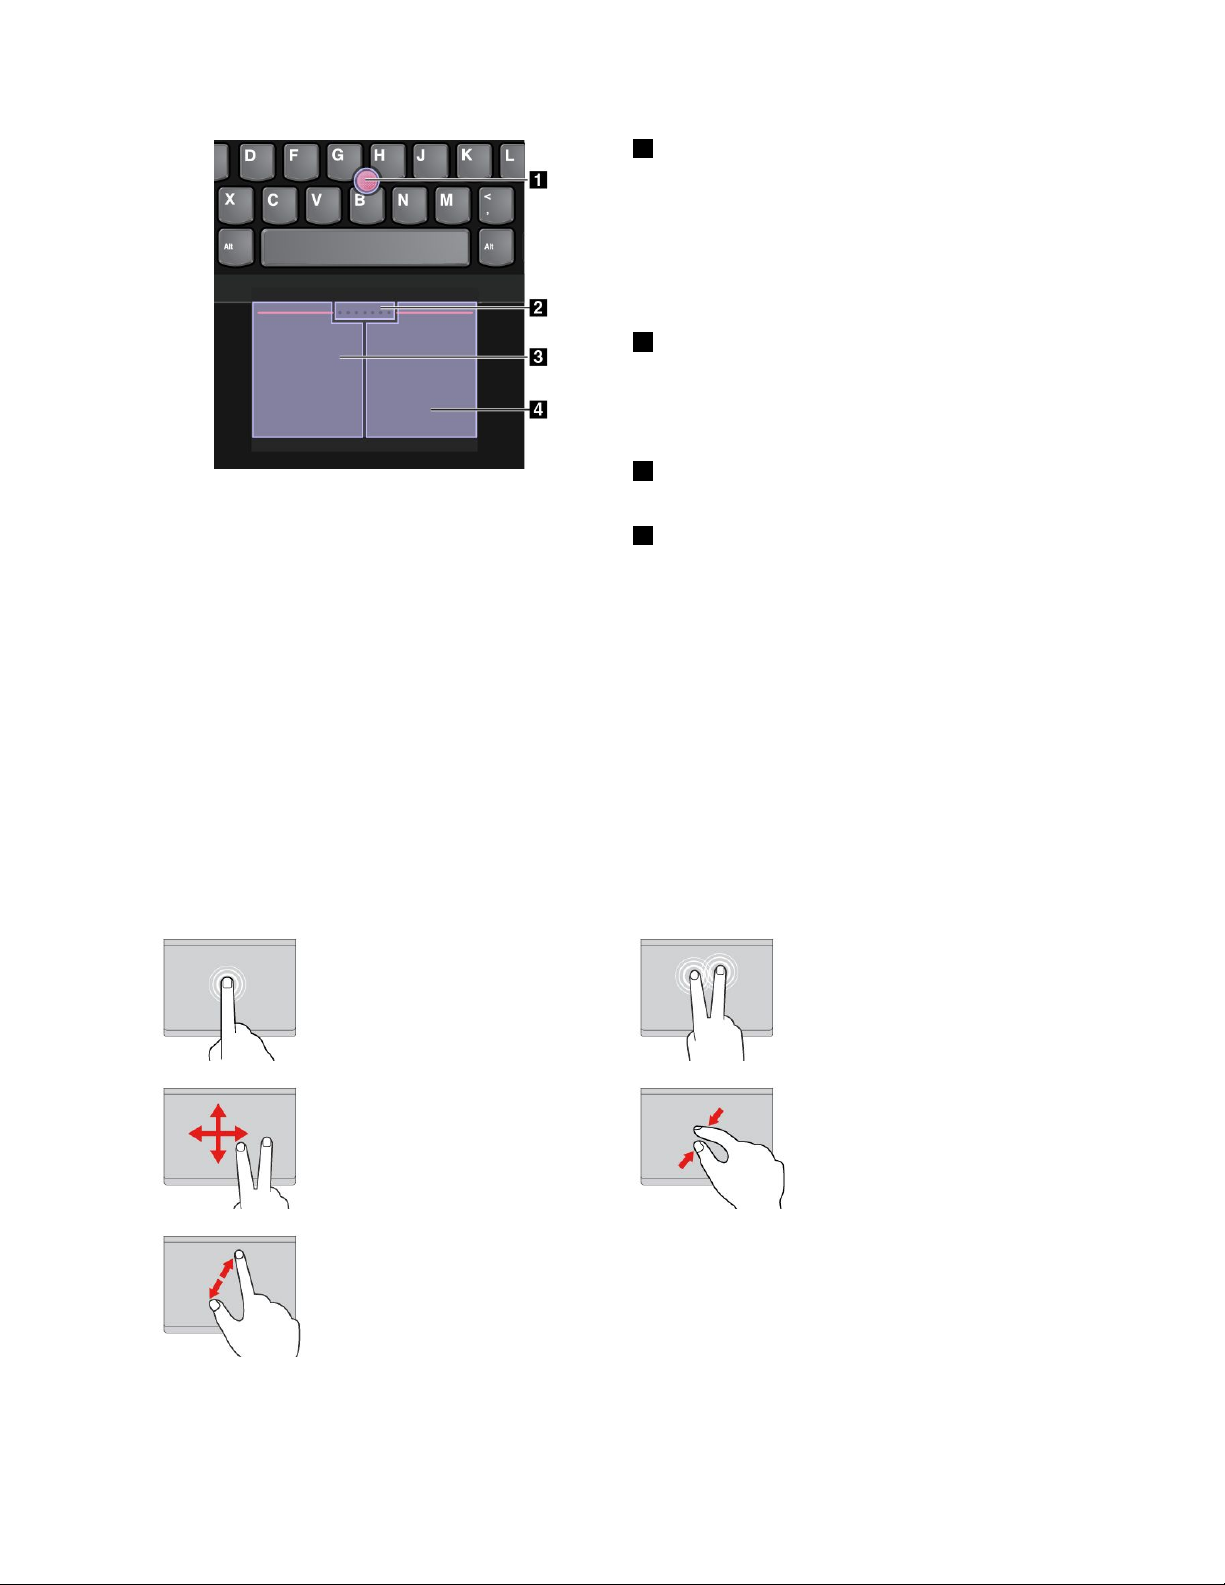
1Point
Usethepointingsticktomovethepointer.T ousethe
pointingstick,applypressuretothenonslipcaponthe
pointingstickinanydirectionparalleltothekeyboard.
Thepointermovesaccordinglybutthepointingstickitself
doesnotmove.Thespeedatwhichthepointermoves
dependsontheamountofpressureyouapplytothe
pointingstick.
2Scroll
Pressandholdthedottedscrollingbarwhileapplying
pressuretothepointingstickintheverticalorhorizontal
direction.Thenyoucanscrollthroughthedocument,
Website,orapps.
3Left-click
Presstheleft-clickzonetoselectoropenanitem.
4Right-click
Presstheright-clickzonetodisplayashortcutmenu.
Trackpadtouchgestures
Theentiretrackpadsurfaceissensitivetofingertouchandmovement.Y oucanusethetrackpadtoperform
thesamepointandclickactionsasyouwouldusingatraditionalmouse.Youalsocanusethetrackpad
toperformavarietyoftouchgestures.
Thefollowingsectionintroducessomefrequentlyusedtouchgesturessuchastapping,dragging,and
scrolling.Formoregestures,seethehelpinformationsystemoftheThinkPadpointingdevice.
Notes:
•Whenusingtwoormorefingers,ensurethatyoupositionyourfingersslightlyapart.
•SomegesturesarenotavailableifthelastactionwasdonefromtheTrackPointpointingdevice.
•Somegesturesareonlyavailablewhenyouareusingcertainapps.
Tap
Tapanywhereonthetrackpad
withonefingertoselectoropen
anitem.
Two-fingerscroll
Puttwofingersonthetrackpad
andmovethemintheverticalor
horizontaldirection.Thisaction
enablesyoutoscrollthroughthe
document,Website,orapps.
Two-fingerzoomin
Puttwofingersonthetrackpad
andmovethemfartherapartto
zoomin.
Two-fingertap
Tapanywhereonthetrackpadwith
twofingerstodisplayashortcut
menu.
Two-fingerzoomout
Puttwofingersonthetrackpadand
movethemclosertogethertozoom
out.
ThefollowingsectionintroducessometouchgesturesontheWindows8.1operatingsystem.
Chapter2.Usingyourcomputer27
Page 44
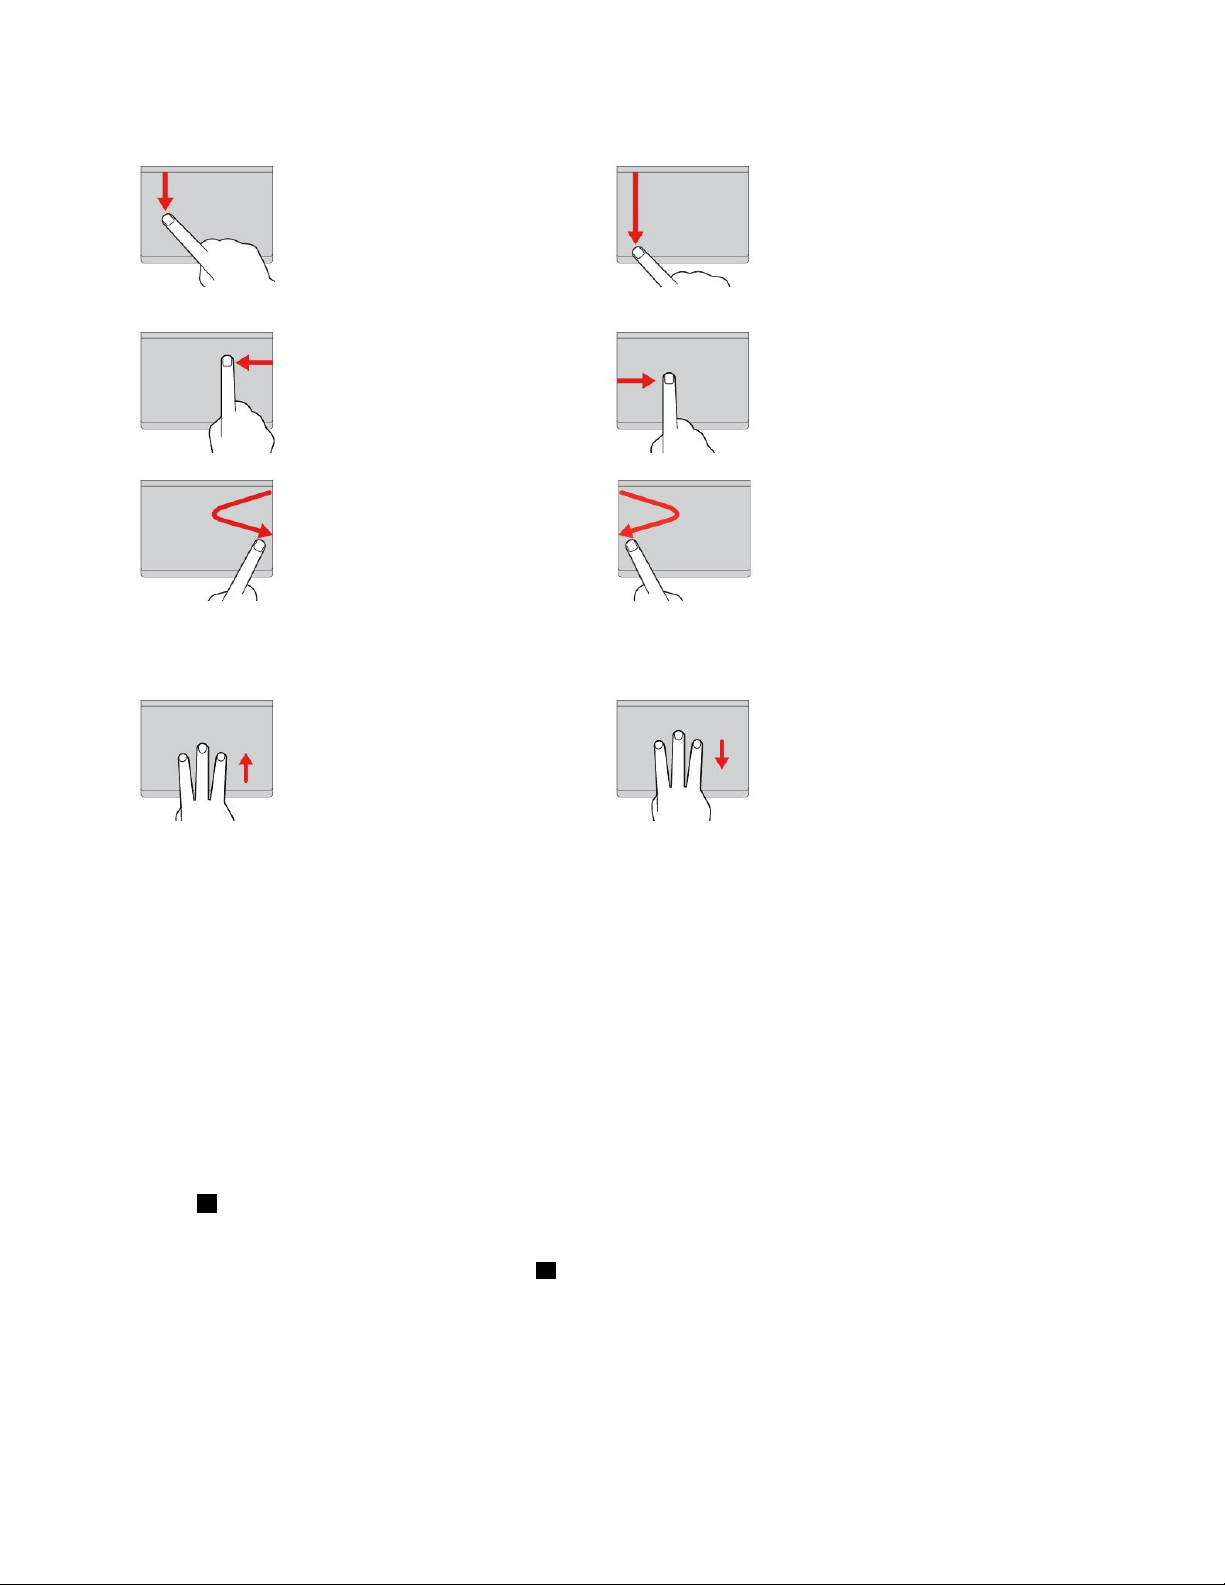
Swipefromthetopedge
FromtheStartscreenorthe
currentapp,swipeinfrom
thetopedgeofthetrackpad
withonefingertodisplaythe
commandmenu.
Swipefromtherightedge
Swipeinfromtherightedgeof
thetrackpadwithonefingerto
displaythecharms.
Swipefromthetoptothebottom
edge
Swipefromthetoptothebottom
edgeofthetrackpadwithone
fingertoclosethecurrentapp.
Performingthisgestureonthe
desktopclosesthedesktopand
displaystheStartscreen.
Swipefromtheleftedge
Swipeinfromtheleftedgeofthe
trackpadwithonefingertoshow
thepreviouslyusedapp.
Swipeinandoutfromtheright
edge
Swipeinandoutfromtheright
edgeofthetrackpadwithone
fingertohidethecharms.
Swipeinandoutfromtheleft
edge
Swipeinandoutfromtheleftedge
ofthetrackpadwithonefingerto
displayallthecharms.
ThefollowingsectionintroducessometouchgesturesontheWindows10operatingsystem.
Swipethreefingersup
Putthreefingersonthetrackpad
andmovethemuptoopenthe
taskviewtoseeallyouropen
windows.
Swipethreefingersdown
Putthreefingersonthetrackpad
andmovethemdowntoshowthe
desktop.
CustomizingtheThinkPadpointingdevice
YoucancustomizetheThinkPadpointingdevicesoyoucanuseitmorecomfortablyandefficiently.For
example,youcanchoosetoenabletheTrackPointpointingdevice,thetrackpad,orboth.Youalsocan
disableorenablethetouchgestures.
TocustomizetheThinkPadpointingdevice,dothefollowing:
1.GotoControlPanel.
2.ClickHardwareandSound➙Mouse.TheMousePropertieswindowisdisplayed.
3.IntheMousePropertieswindow,followtheinstructionsonthescreentocompletethecustomization.
Replacingthecapofpointingstick
Thecap1ontheendofthepointingstickisremovable.Afteryouusethecapforaperiodoftime,you
mightconsiderreplacingthecapwithanewone.
Note:Ensurethatyouuseacapwithgroovesaasshowninthefollowingillustration.
28UserGuide
Page 45
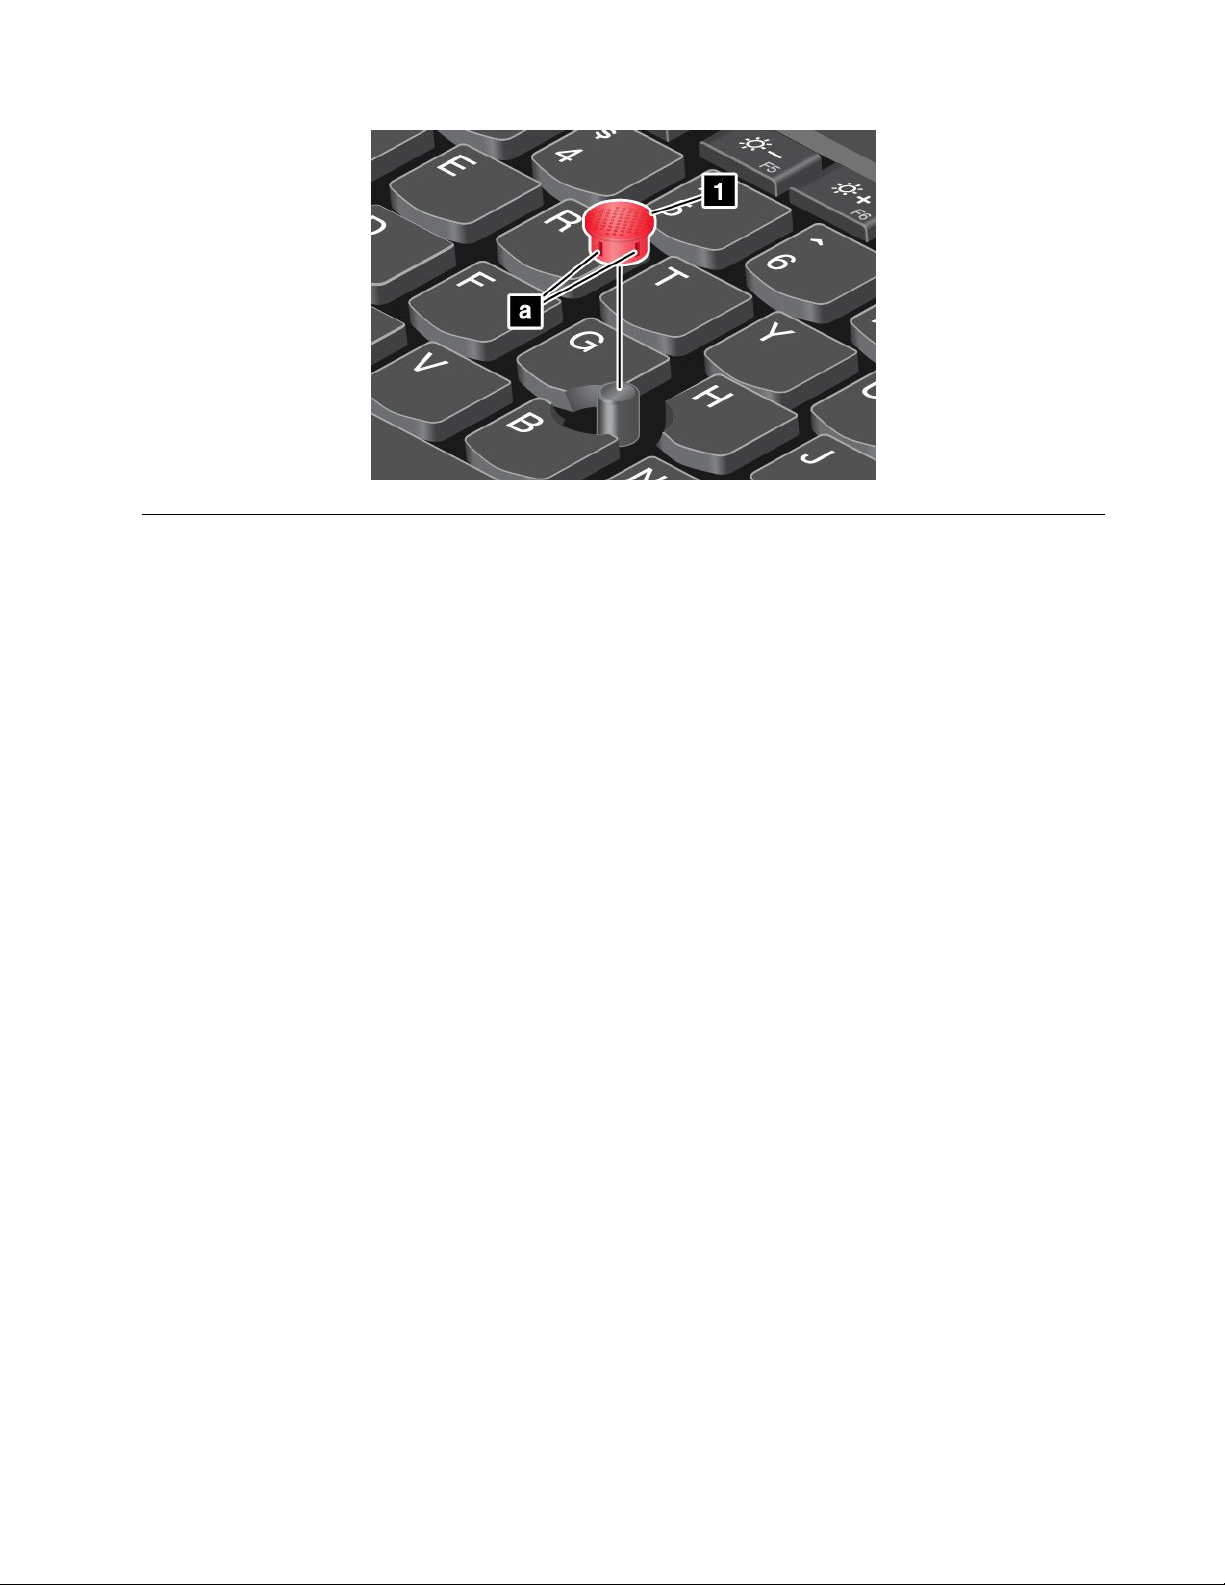
Powermanagement
Whenyouuseyourcomputerawayfromelectricaloutlets,youdependonbatterypowertokeepyour
computerrunning.Differentcomputercomponentsconsumepoweratdifferentrates.Themoreyouusethe
power-intensivecomponents,thefasteryouconsumebatterypower.
SpendmoretimeunpluggedwithThinkPadbatteries.Mobilityhasrevolutionizedbusinessbyenabling
youtotakeyourworkwhereveryougo.WithThinkPadbatteries,youwillbeabletoworklongerwithout
beingtiedtoanelectricaloutlet.
Usingtheacpower
Thepowertorunyourcomputercancomeeitherfromthebatteryorfromacpower.Whileyouuseac
power,thebatterieschargeautomatically.
Yourcomputercomeswithanacpoweradapterandapowercord.
•acpoweradapter:Convertsacpowerfornotebookcomputeruse.
•Powercord:Connectstheacoutletandtheacpoweradapter.
Connectingtoacpower
Toconnectthecomputertoacpower,dothefollowing:
Attention:Usinganimproperpowercordmightcauseseveredamagetoyourcomputer.
Note:Ensurethatyouperformtheactionsintheorderinwhichtheyarelisted.
1.Connectthepowercordtotheacpoweradapter.
2.Connecttheacpoweradaptertothepowerconnectorofthecomputer.
3.Connectthepowercordintoanelectricaloutlet.
Tipsforusingtheacpoweradapter
•Whentheacpoweradapterisnotinuse,disconnectitfromtheelectricaloutlet.
•Donotbindthepowercordtightlyaroundtheacpoweradaptertransformerpackwhenitisconnectedto
thetransformer.
•Beforeyouchargethebatteries,makesurethattheirtemperatureisatleast10°C(50°F).
•Youcanchargethebatterieswhentheacpoweradapterisconnectedtothecomputer.Youneedto
chargethebatteriesinanyofthefollowingsituations:
Chapter2.Usingyourcomputer29
Page 46

–WhenthebatteryiconintheWindowsnotificationareashowsalowpercentageofbatterypower
remaining.
–Whenthebatterieshavenotbeenusedforalongtime
Checkingthebatterystatus
Moveyourpointertothebattery-statusiconintheWindowsnotificationareatocheckthebatterystatus.
Thebattery-statusicondisplaysthepercentageofbatterypowerremainingandhowlongyoucanuse
yourcomputerbeforeyoumustchargethebattery.
Therateatwhichyouusebatterypowerdetermineshowlongyoucanusethebatteriesofyourcomputer
betweencharges.Becauseofdifferentuserhabitsandneeds,itisdifficulttopredicthowlongabattery
chargewilllast.Therearetwomainfactors:
•Howmuchenergyisstoredinthebatterywhenyoubegintowork.
•Thewayyouuseyourcomputer.Forexample:
–Howoftenyouaccessthestoragedrive.
–Howbrightyoumakethecomputerdisplay.
–Howoftenyouusethewirelessfeatures.
Chargingthebattery
Itisrecommendedthatyouchargethebatteryorreplaceitwithachargedbatterywhenthebatterypower
remainingislow.Forexample:
•Whenyoufindthatthepercentageofpowerremainingislow.
•Whenthepoweralarmalertsyou
Ifanacoutletisconvenient,plugtheacpoweradapterintoit,andtheninserttheconnectorintothe
computer.Thebatterywillbefullychargedinaboutthreetosixhours.Thechargingtimeisaffectedbythe
batterysizeandthephysicalenvironment.Y oucancheckthebatterychargingstatusatanytimethroughthe
battery-statusiconintheWindowsnotificationarea.
Note:Tomaximizethelifeofthebattery,thecomputerdoesnotstartrechargingthebatteryiftheremaining
powerisgreaterthan95%.
Maximizingthebatterylife
Tomaximizethelifeofthebattery,dothefollowing:
•Rechargethebatterycompletelybeforeusingit.Y oucanseewhetherthebatteryisfullychargedfromthe
battery-statusiconintheWindowsnotificationarea.
•Alwaysusepower-savingmodes,suchassleepmodeandhibernationmode.
Managingthebatterypower
Toachievethebestbalancebetweenperformanceandpowersaving,adjustyourpowerplansettings.
Toadjustpowerplansettings,dothefollowing:
1.GotoControlPanel,thenchangetheviewofControlPanelfromCategorytoLargeiconsorSmallicons.
2.ClickPowerOptions.
3.Followtheinstructionsonthescreen.
Formoreinformation,refertothehelpinformationsystemoftheprogram.
30UserGuide
Page 47

Power-savingmodes
Thereareseveralmodesthatyoucanuseatanytimetoconservepower.Thissectionintroduceseach
modeandgivestipsontheeffectiveuseofbatterypower.
•Screenblankmode(forWindows7only)
Thecomputerdisplayrequiresconsiderablebatterypower.Toturnoffthepowertothedisplayandmake
thecomputerenterscreenblankmode,right-clickthebattery-gaugeiconinthewindowsnotificationarea
andselectPoweroffdisplay.
•Sleepmode
Insleepmode,yourworkissavedtomemory,andthenthestoragedriveandthecomputerdisplayare
turnedoff.Whenyourcomputerwakesup,yourworkisrestoredwithinseconds.
Toputyourcomputerintosleepmode,dothefollowing:
–ForWindows7:OpentheStartmenu,thenclickthearrownexttotheShutdownbutton.Click
Sleepfromthemenudisplayed.
–ForWindows8.1:GototheStartscreenbypressingtheWindowskey
,thenclickSleep.
–ForWindows10:OpentheStartmenu,click
•Hibernationmode
Byusingthismode,youcanturnoffyourcomputercompletelywithoutsavingfilesorexitingany
programsthatarerunning.Whenthecomputerentershibernationmode,allopenprograms,folders,and
filesaresavedtothestoragedevices,andthenthecomputerturnsoff.
Toputthecomputerintohibernationmode,dothefollowing:
–ForWindows7:OpentheStartmenu,thenclickthearrownexttotheShutdownbutton.Click
Hibernatefromthemenudisplayed.
–ForWindows8.1andWindows10:Definewhatthepowerbuttondoesfirst,thenpressthepower
buttontoputthecomputerintohibernationmode.
Ifyouputyourcomputerintohibernationmodewiththewake-upfunctiondisabled,thecomputerdoes
notconsumeanypower.Thewake-upfunctionisdisabledbydefault.Ifyouputyourcomputerinto
hibernationmodewiththewake-upfunctionenabled,thecomputerconsumesasmallamountofpower.
Toenablethewake-upfunction,dothefollowing:
1.GotoControlPanelandclickSystemandSecurity.
2.ClickAdministrativeTools.
3.ClickTaskScheduler.Ifyouarepromptedforanadministratorpasswordorconfirmation,typethe
passwordorprovideconfirmation.
4.Fromtheleftpane,selectthetaskfolderforwhichyouwanttoenablethewake-upfunction.The
scheduledtasksaredisplayed.
5.Clickascheduledtask,andthenclicktheConditionstab.
6.UnderPower,selectthecheckboxforWakethecomputertorunthistask.
•Wirelessoff
Whenyouarenotusingthewirelessfeatures,suchasBluetoothorwirelessLAN,turnthemoff.Thishelps
Power,andthenclickSleep.
,clickthepowericon
conservepower.Toturnoffthewirelessfeatures,pressthewireless-radioscontrolkey.
Handlingthebattery
ThissystemsupportsonlybatteriesspeciallydesignedforthisspecificsystemandmanufacturedbyLenovo
oranauthorizedbuilder.Thesystemdoesnotsupportunauthorizedbatteriesorbatteriesdesignedforother
Chapter2.Usingyourcomputer31
Page 48

systems.Ifanunauthorizedbatteryorabatterydesignedforanothersystemisinstalled,thesystemwill
notcharge.
Attention:Lenovohasnoresponsibilityfortheperformanceorsafetyofunauthorizedbatteries,and
providesnowarrantiesforfailuresordamagearisingoutoftheiruse.
Note:Ifanunauthorizedbatteryisinstalled,thefollowingmessagewillbedisplayed:“Thebatteryinstalled
isnotsupportedbythissystemandwillnotcharge.PleasereplacethebatterywiththecorrectLenovo
batteryforthissystem.”
DANGER
Donotattempttodisassembleormodifythebattery.
Attemptingtodosocancauseanexplosion,orliquidleakagefromthebattery.
AbatteryotherthantheonespecifiedbyLenovo,oradisassembledormodifiedbatteryisnot
coveredbythewarranty.
DANGER
Iftherechargeablebatteryisincorrectlyreplaced,thereisdangerofanexplosion.Thebattery
containsasmallamountofharmfulsubstances.Toavoidpossibleinjury:
•ReplaceonlywithabatteryofthetyperecommendedbyLenovo.
•Keepthebatteryawayfromfire.
•Donotexposeittoexcessiveheat.
•Donotexposeittowaterorrain.
•Donotshort-circuitit.
•Storeitinacooldryplace.
•Keepitawayfromchildren.
Thebatteryisaconsumablesupply.Ifyourbatterybeginstodischargetooquickly,replacethebattery
withanewoneofthetyperecommendedbyLenovo.Formoreinformationaboutreplacingthebattery,
contactyourCustomerSupportCenter.
DANGER
Donotdrop,crush,puncturethebattery,ormakeitsubjecttostrongforces.Batteryabuseor
mishandlingcancausethebatterytooverheat,whichcancausegassesorflameto“vent”fromthe
batteryorcoin-cellbattery.Ifyourbatteryisdamaged,orifyounoticeanydischargefromyour
batteryorthebuildupofforeignmaterialsonthebatteryleads,stopusingthebatteryandobtaina
replacementfromthebatterymanufacturer.
DANGER
Onlyrechargethebatterystrictlyaccordingtoinstructionsincludedintheproductdocumentation.
32UserGuide
Page 49

DANGER
Donotputthebatteryintrashthatisdisposedofinlandfills.Whendisposingofthebattery,comply
withlocalordinancesorregulationsandyourcompany'ssafetystandards.
DANGER
Thereisadangerofanexplosionifthecoin-cellbatteryisincorrectlyplaced.Thelithiumbattery
containslithiumandcanexplodeifitisnotproperlyhandled,ordisposedof.Replaceonlywitha
batteryofthesametype.T oavoidpossibleinjuryordeath,donot:(1)throworimmerseintowater,
(2)allowittoheattomorethan100°C(212°F),or(3)attempttorepairordisassembleit.Disposeof
itasrequiredbylocalordinancesorregulationsandyourcompany'ssafetystandards.
Connectingtothenetwork
YourcomputerhasoneormorenetworkcardsthatenableyoutoconnectyourcomputertotheInternet
andothernetworkconnections.
Ethernetconnections
Youcanconnectyourcomputertoalocalnetworkorabroadbandconnectionbyusingthebuilt-inEthernet
featureofthecomputer.
DANGER
YourcomputerhasanEthernetconnector.T oavoidtheriskofelectricalshock,donotconnect
thetelephonecabletotheEthernetconnector.
Wirelessconnections
Wirelessconnectionisthetransferofdatawithouttheuseofcablesbutbymeansofradiowavesonly.
InAirplanemode,allwirelessfeaturesaredisabled.TodisableAirplanemode,dothefollowing:
•ForWindows8.1:Swipeinfromtherightedgeofthescreentodisplaythecharms,tapSettings➙
ChangePCsettings➙Network,andthenslidethecontrolforAirplanemodetotheleft.
•ForWindows10:OpentheStartmenuandthenclickSettings.IfSettingsisnotdisplayed,clickAll
appstodisplayallprograms,thenclickSettings➙Network&Internet➙Airplanemode,andthen
slidethecontrolforAirplanemodetotheleft.
Dependingonthewirelessdevicesinstalledonyourcomputer,youmightbeabletousethefollowing
wirelessnetworks:
•Wireless-LANconnection
•Wireless-WANconnection
•Bluetoothconnection
UsingthewirelessLANconnection
Awirelesslocalareanetwork(LAN)coversarelativelysmallgeographicarea,suchasanofficebuildingora
house.Devicesbasedonthe802.11standardscanconnecttothistypeofnetwork.
Chapter2.Usingyourcomputer33
Page 50

Yourcomputercomeswithabuilt-inwirelessnetworkcardandaconfigurationutilitytohelpyouestablish
wirelessconnectionsandmonitortheconnectionstatus.Thisenablesyoutostayconnectedtoyournetwork
whileyouareattheoffice,inameetingroom,orathome,withnoneedforawiredconnection.
Toestablishawireless-LANconnection,dothefollowing:
1.Clickthewireless-network-connection-statusiconintheWindowsnotificationarea.Alistofavailable
wirelessnetworksisdisplayed.
2.Double-clickanetworktoconnecttoit.Providerequiredinformationifneeded.
Thecomputerautomaticallyconnectstoanavailablewirelessnetworkwhenthelocationchanges.Formore
information,refertotheWindowshelpinformationsystem.
TipsforusingthewirelessLANfeature
Toachievethebestconnection,usethefollowingguidelines:
•PlaceyourcomputersothatthereareasfewobstaclesaspossiblebetweenthewirelessLANaccess
pointandthecomputer.
•Openyourcomputerlidtoanangleofslightlymorethan90degrees.
•Ifyouusethewirelessfeature(the802.11standards)ofyourcomputersimultaneouslywithaBluetooth
option,thedatatransmissionspeedcanbedelayedandtheperformanceofthewirelessfeaturecanbe
degraded.
Checkingthewireless-LANconnectionstatus
Youcancheckthewireless-LANconnectionstatusthroughthewireless-network-connection-statusiconin
theWindowsnotificationarea.Themorebarsencompassed,thebetterthesignalis.
FortheWindows7operatingsystem,youalsocanchecktheAccessConnectionsgauge,theAccess
Connectionsstatusicon,ortheAccessConnectionswirelessstatusiconintheWindowsnotificationarea.
AccessConnectionsgauge:
•Powertothewirelessradioisoffornosignal.
•Powertothewirelessradioison.Thesignalstrengthofthewirelessconnectionispoor.To
improvesignalstrength,moveyourcomputerclosertothewirelessaccesspoint.
•Powertothewirelessradioison.Thesignalstrengthofthewirelessconnection
ismarginal.
•Powertothewirelessradioison.Thesignalstrengthofthewirelessconnection
isexcellent.
AccessConnectionsstatusicon:
•Nolocationprofileisactiveornoneexists.
•Currentlocationprofileisdisconnected.
•Currentlocationprofileisconnected.
AccessConnectionswirelessstatusicon
•Powertothewirelessradioisoff.
•Powertothewirelessradioison.Noassociation.
•Powertothewirelessradioison.Nosignal.
34UserGuide
Page 51

•Powertothewirelessradioison.Thesignalstrengthofthewirelessconnectionisexcellent.
•Powertothewirelessradioison.Thesignalstrengthofthewirelessconnectionismarginal.
Powertothewirelessradioison.Thesignalstrengthofthewirelessconnectionispoor.T oimprove
•
signalstrength,moveyourcomputerclosertothewirelessaccesspoint.
UsingtheBluetoothconnection
Bluetoothcanconnectdevicesthatareashortdistancefromoneanother.Itiscommonlyusedfor
connectingperipheraldevicestoacomputer,transferringdatabetweenhand-helddevicesandapersonal
computer,orremotelycontrollingandcommunicatingwithdevicessuchasmobilephones.
Dependingonthemodel,yourcomputermightsupporttheBluetoothfeature.T otransferdatathrough
theBluetoothfeature,dothefollowing:
Note:Ifyouusethewirelessfeature(the802.11standards)ofyourcomputersimultaneouslywitha
Bluetoothoption,thedatatransmissionspeedcanbedelayedandtheperformanceofthewirelessfeature
canbedegraded.
1.EnsurethattheBluetoothfeatureisenabled.
•ForWindows7:Pressthewireless-radioscontrolkeyandturnontheBluetoothfeature.
•ForWindows8.1:
a.Moveyourpointertothetop-rightorbottom-rightcornerofthescreentodisplaythecharms.
b.ClickSettings➙ChangePCsettings➙PCanddevices➙Bluetooth.
c.TurnontheBluetoothfeature.
•ForWindows10:Dooneofthefollowing:
–OpentheStartmenuandthenclickSettings.IfSettingsisnotdisplayed,clickAllappstodisplay
allprograms,thenclickSettings➙Devices➙Bluetooth.TurnontheBluetoothfeature.
–OpentheStartmenuandthenclickSettings.IfSettingsisnotdisplayed,clickAllappsto
displayallprograms,thenclickSettings➙Network&Internet➙Airplanemode.T urnon
theBluetoothfeature.
2.Right-clickthedatathatyouwanttosend.
3.SelectSendTo➙BluetoothDevices.
4.SelectaBluetoothdevice,andthenfollowtheinstructionsonthescreen.
Formoreinformation,refertotheWindowshelpinformationsystemandtheBluetoothhelpinformation
system.
Usinganexternaldisplay
Youcanuseanexternaldisplaysuchasaprojectororamonitortogivepresentationsortoexpandyour
workspace.Thistopicintroduceshowtoconnectanexternaldisplay,choosedisplaymodes,andchange
displaysettings.
Yourcomputersupportsthefollowingvideoresolution,providedthattheexternalmonitoralsosupportsthat
resolution.
•Upto1920x1200,withanexternaldisplayconnectedtotheVGAconnector
•Upto4096x2304,withanexternaldisplayconnectedtotheHDMIconnector
Formoreinformationabouttheexternaldisplay,refertothemanualsprovidedwithit.
Chapter2.Usingyourcomputer35
Page 52

Connectinganexternaldisplay
Youcanuseeitherawireddisplayorawirelessdisplay.ThewireddisplaycanbeconnectedtotheHDMI
orVGAconnectorbyacable.ThewirelessdisplaycanbeaddedthroughtheWirelessDisplay(Wi-Di)
orMiracast
•Connectingawireddisplay
Note:Whenyouconnectanexternalmonitor,avideointerfacecablewithaferritecoreisrequired.
1.Connecttheexternaldisplaytoanappropriatevideoconnectoronyourcomputer,suchasthe
2.Connecttheexternaldisplaytoanelectricaloutlet.
3.Turnontheexternaldisplay.
Ifyourcomputercannotdetecttheexternaldisplay,dothefollowing:
–ForWindows7andWindows8.1:Right-clickonthedesktop,thenclickScreenresolution➙Detect.
–ForWindows10:Right-clickonthedesktop,thenclickDisplaysettings➙Detect.
•Connectingawirelessdisplay
Note:Touseawirelessdisplay,ensurethatbothyourcomputerandtheexternaldisplaysupportthe
Wi-DiorMiracastfeature.T ouseawirelessdisplay,ensurethatbothyourcomputerandtheexternal
displaysupporttheWi-DiorMiracastfeature.TheWi-Difeatureisnotavailableoncomputersinstalled
withtheWindows7operatingsystemandIntelCeleron
–ForWindows7
–ForWindows8.1
–ForWindows10
®
function.
VGAconnectororHDMIconnector.
®
microprocessor.
OpentheStartmenuandclickDevicesandPrinters➙Addadevice
1.Moveyourpointertothetop-rightorbottom-rightcornerofthescreentodisplaythecharms.
2.ClickDevices➙Projector➙Addawirelessdisplay.
3.Selectthedesiredwirelessdisplayandfollowtheinstructionsonthescreen.
Dooneofthefollowing:
–OpentheStartmenuandthenclickSettings.IfSettingsisnotdisplayed,clickAllappstodisplay
allprograms,thenclickSettings➙Devices➙Connecteddevices➙Addadevice.
–Clicktheactioncentericon
wirelessdisplayandfollowtheinstructionsonthescreen.
Formoreinformation,seethehelpinformationsystemsoftheWindowshelpoperatingsystem.
intheWindowsnotificationarea.ClickConnect.Selectthedesired
Choosingadisplaymode
Youcandisplayyourdesktopandappsonthecomputerdisplay,theexternaldisplay,orboth.Tochoose
howtodisplaythevideooutput,pressthedisplay-modeswitchingkey
modeyouprefer.
Therearefourdisplaymodes:
•Disconnect:Displaysthevideooutputonlyonyourcomputerscreen.
Note:Dependingonthesituation,youmightseeDisconnect,PCscreenonly,Computeronly,or
Disconnectprojector.
•Duplicate:Displaysthesamevideooutputonbothyourcomputerscreenandanexternaldisplay.
36UserGuide
andthenselectadisplay
Page 53

•Extend:Extendsthevideooutputfromyourcomputerdisplaytoanexternaldisplay.Y oucandragand
moveitemsbetweenthetwodisplays.
•Projectoronly:Showsthevideooutputonlyonanexternaldisplay.
Note:Dependingonthesituation,youmightseeProjectoronlyorSecondscreenonly.
Note:IfyoushowDOSorprogramsusingDirectDraworDirect3D
®
infull-screenmode,onlythemain
displayshowsthevideooutput.
Changingdisplaysettings
Youcanchangethesettingsforboththecomputerdisplayandtheexternaldisplay.Forexample,you
candefinewhichoneisthemaindisplayandwhichoneisthesecondarydisplay.Youalsocanchange
theresolutionandorientation.
Tochangedisplaysettings,dothefollowing:
1.Right-clickonthedesktopandselectScreenResolutionorDisplaysettings.
2.Selectthedisplaythatyouwanttoconfigure.
3.Changedisplaysettingsasyouwant.
Note:Ifyousetahigherresolutionforthecomputerdisplaythantheexternaldisplay,onlypartofthescreen
canbeshownontheexternaldisplay.
Usingaudiofeatures
Yourcomputerisequippedwiththefollowingitems:
•Speakers
•Microphones
•Comboaudioconnector,3.5mm(0.14inch)indiameter
Yourcomputeralsohasanaudiochipthatenablesyoutoenjoyvariousmultimediaaudiofeatures,such
asthefollowing:
•CompliantwithIntel
®
HighDefinitionAudio
•PlaybackofMusicalInstrumentDigitalInterface(MIDI)andMovingPictureExpertsGroupAudioLayer-3
(MP3)files
•Recordingandplaybackofpulse-codemodulation(PCM)andWaveformAudioFileFormat(WAV)files
•Recordingfromvarioussoundsources,suchasaheadsetattached
Thefollowingtableshowswhichfunctionsoftheaudiodevicesattachedtotheconnectorsonyour
computer,theThinkPadOneLinkDock,ortheThinkPadOneLinkProDockaresupported.
Table1.Audiofeaturelist
Connector
Comboaudioconnector
Comboaudioconnector
ontheThinkPadOneLink
DockorThinkPadOneLink
ProDock
Headsetwitha3.5–mm,
4-poleplug
Headphoneand
microphonefunctions
supported
Headphoneand
microphonefunctions
supported
ConventionalheadphoneConventionalmicrophone
Headphonefunction
supported
Headphonefunction
supported
Notsupported
Notsupported
Chapter2.Usingyourcomputer37
Page 54

Configuringforsoundrecording
Toconfigurethemicrophoneforoptimalsoundrecording,usetheSmartAudioprogram.Tostartthe
program,gotoControlPanelandclickHardwareandSound➙SmartAudio.
Usingthecamera
Dependingonthemodel,yourcomputercomeswitha2Dcameraora3Dcamera.The3Dcameraworks
withcertainthird-partyapps,suchasappsprovidedbyIntel.Theperformanceparametersofthe3Dcamera
varydependingontheappyouuse.Tolearnhowtousethe3Dcamerawithaspecificappandtoviewthe
performanceparameters,searchfortherelatedinformationfromtheIntelWebsite.
Tostartthecameraandconfigurethecamerasettings,dothefollowing:
•ForWindows8.1:ClickCamerafromtheStartscreen.
•ForWindows7:OpentheCommunicationsUtilityprogram.
•ForWindows10:OpentheStartmenu,andclickCamerafromtheallappslist.
Whenthecamerastarts,thegreencamera-in-useindicatorturnson.
Youalsocanusetheintegratedcamerawithotherprogramsthatprovidefeaturessuchasphotographing,
videocapturing,andvideoconferencing.Tousethecamerawithotherprograms,openoneoftheprograms
andstartthephotographing,videocapturing,orvideoconferencingfunction.Then,thecamerastarts
automaticallyandthegreencamera-in-useindicatorturnson.Formoreinformationaboutusingthecamera
withaprogram,refertothehelpinformationsystemoftheprogram.
Configuringcamerasettings
Youcanconfigurethecamerasettingstomeetyourneeds,suchasadjustingthequalityofthevideooutput.
Toconfigurethecamerasettings,dothefollowing:T oconfigurethecamerasettings,dothefollowing:
•ForWindows7:StarttheCommunicationsUtilityprogramandconfigurethecamerasettingsasdesired.
•ForWindows8.1:Dooneofthefollowing:
–Configurethecamerasettingsdirectlyfromtheprogramthatisusingthecamera.Fordetails,seethe
helpinformationsystemoftheprogram.
–ClickLenovoSettingsfromtheStartscreen.ThenclickCamera.Followtheinstructionsonthe
screentoconfigurethecamerasettingsasdesired.
•ForWindows10:Dooneofthefollowing:
–OpentheCameraapp,clickthesettingsiconintheupper-rightcorner.Followtheinstructionsonthe
screentoconfigurethecamerasettingsasdesired.
–ClickLenovoSettingsfromtheStartmenu.ThenclickCamera.Followtheinstructionsonthe
screentoconfigurethecamerasettingsasdesired.
Usingtheopticaldrive
Note:YourcomputeronlysupportstheMulti-Burnerdrive.
Multi-Burnerdrive
ThisdrivecanreadDVD-ROMdiscs,DVD-Rdiscs,DVD-RAMdiscs,DVD-RWdiscs,andalltypesofCDs,
suchasCD-ROMdiscs,CD-RWdiscs,CD-Rdiscs,andaudioCDs.Inaddition,itcanrecordonDVD-R
discs,DVD-RWdiscs,typeIIDVD-RAMdiscs,CD-RWstandardandhighspeeddiscs,andCD-Rdiscs.
38UserGuide
Page 55

Usingaflashmediacard
Yourcomputerhasonemediacardreaderslot.
Themediacardreaderslotsupportsthefollowingfourtypesofcards:
•MultiMediaCard(MMC)
•SecureDigitaleXtended-Capacity(SDXC)card
•SecureDigital(SD)card
•SecureDigitalHigh-Capacity(SDHC)card
Note:Yourcomputerdoesnotsupportthecontentprotectionforrecordablemedia(CPRM)featurefor
theSDcard
Attention:Whiletransferringdatatoorfromaflashmediacard,suchasanSDcard,donotputyour
computerintosleeporhibernationmodebeforethedatatransfercompletes;otherwise,yourdatacould
becomedamaged.
Insertingaflashmediacard
Attention:Beforeyoustartinstallingaflashmediacard,touchametaltableoragroundedmetalobject.
Thisactionreducesanystaticelectricityfromyourbody.
Toinsertaflashmediacard,dothefollowing:
1.Locatetheappropriatetypeofslotforyourcard.See“Locatingcomputercontrols,connectors,and
indicators”onpage1.
2.Ensurethatthemetalcontactsarefacingdownandpointingtowardtothecardslot.
3.Pressthecardfirmlyintothecardslot.
Iftheplug-and-playfeatureisnotenabled,dothefollowing:
1.GotoControlPanel.
2.ClickHardwareandSound.
3.ClickDeviceManager.Ifyouarepromptedforanadministratorpasswordorconfirmation,typethe
passwordorprovideconfirmation.
4.FromtheActionmenu,selectAddlegacyhardware.TheAddHardwareWizardstarts.
5.Followtheinstructionsonthescreen.
Removingaflashmediacard
Attention:
•Stopalltheactivitiesinvolvingthecardbeforeremovingit.Otherwise,dataonthecardmightbe
damagedorlost.
•Donotremoveacardwhilethecomputerisinsleepmodeorhibernationmode.Otherwise,thesystem
mightnotrespondwhenyoutrytoresumeoperation.
Toremoveaflashmediacard,dothefollowing:
1.ClickthetriangulariconintheWindowsnotificationareatoshowhiddenicons.
2.Right-clicktheSafelyRemoveHardwareandEjectMediaicon.
3.SelectthecorrespondingitemtoejectthecardfromtheWindowsoperatingsystem.
4.Pressthecardtoejectitfromyourcomputer.
Chapter2.Usingyourcomputer39
Page 56

5.Removethecardandstoreitsafelyforfutureuse.
Note:IfyoudonotremovethecardfromyourcomputerafteryouejectthecardfromtheWindowsoperating
system,thecardcannolongerbeaccessed.Toaccessthecard,youmustremoveitfirst,theninsertitagain.
40UserGuide
Page 57
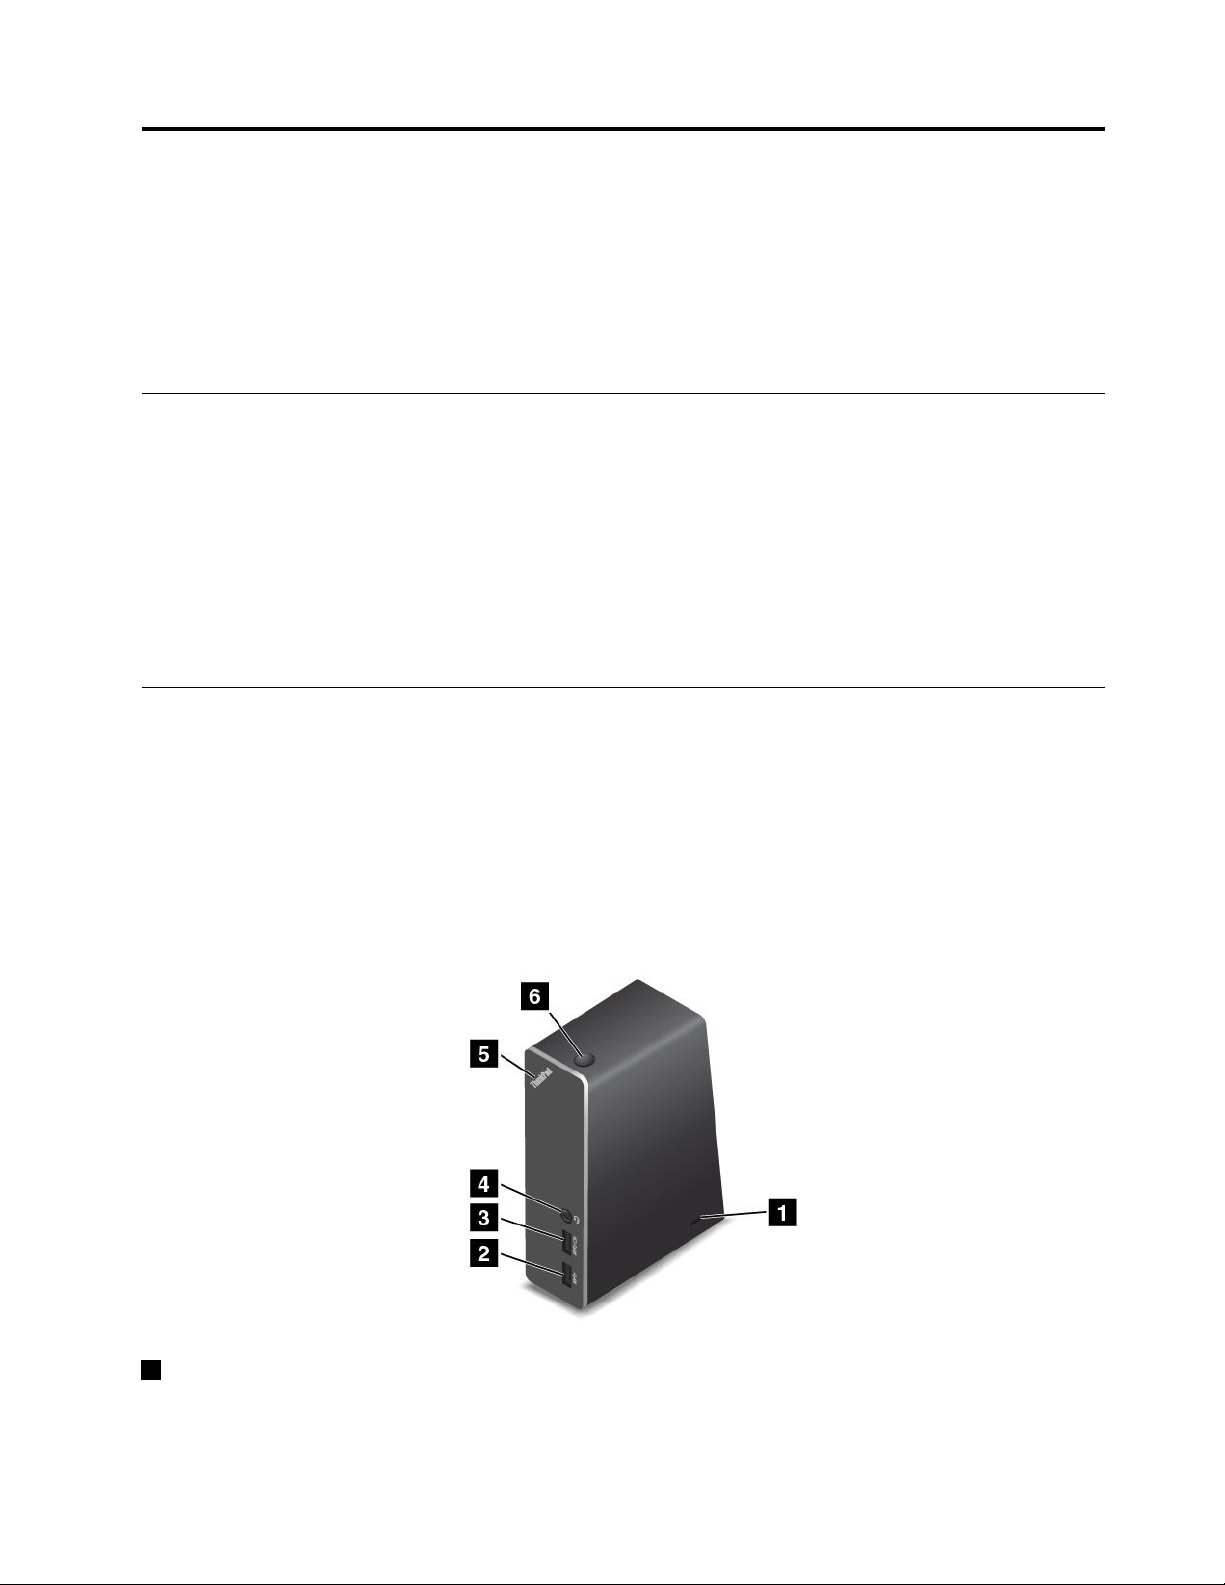
Chapter3.Enhancingyourcomputer
Thischapterprovidesinstructionsonhowtousehardwaredevicestoexpandyourcomputercapabilities.
•“FindingThinkPadoptions”onpage41
•“ThinkPadOneLinkDock”onpage41
•“ThinkPadOneLinkProDock”onpage42
FindingThinkPadoptions
Ifyouwanttoexpandthecapabilitiesofyourcomputer,Lenovohasanumberofhardwareaccessories
andupgradestomeetyourneeds.Optionsincludememorymodules,storagedevices,networkcards,port
replicators,batteries,poweradapters,printers,scanners,keyboards,mice,andmore.
YoucanshopatLenovo24hoursaday,7daysaweekdirectlyovertheWorldWideWeb.Allyouneedisan
Internetconnectionandacreditcard.
ToshopatLenovo,goto:
http://www.lenovo.com/accessories/services/index.html
ThinkPadOneLinkDock
Dependingonthemodel,yourcomputermightsupporttheThinkPadOneLinkDock(hereafterreferredtoas
thedock).Attachyourcomputertothedocktoexpandtheworkingcapability.
Thistopicprovidesbasicinformationaboutthedock.Fordetailedinformationaboutusingthedock,refer
tothedocumentationthatcomeswiththedock.
Note:Dependingonthemodel,yourdockmightlookslightlydifferentfromtheillustrationsinthistopic.
Frontview
1Security-lockslot:Toprotectyourdockfromtheft,youcanpurchaseasecuritycablelock,suchas
aKensington-stylecablelock,thatfitsthissecurity-lockslottolockyourdocktoadesk,table,orother
non-permanentfixture.
©CopyrightLenovo2014,2016
41
Page 58
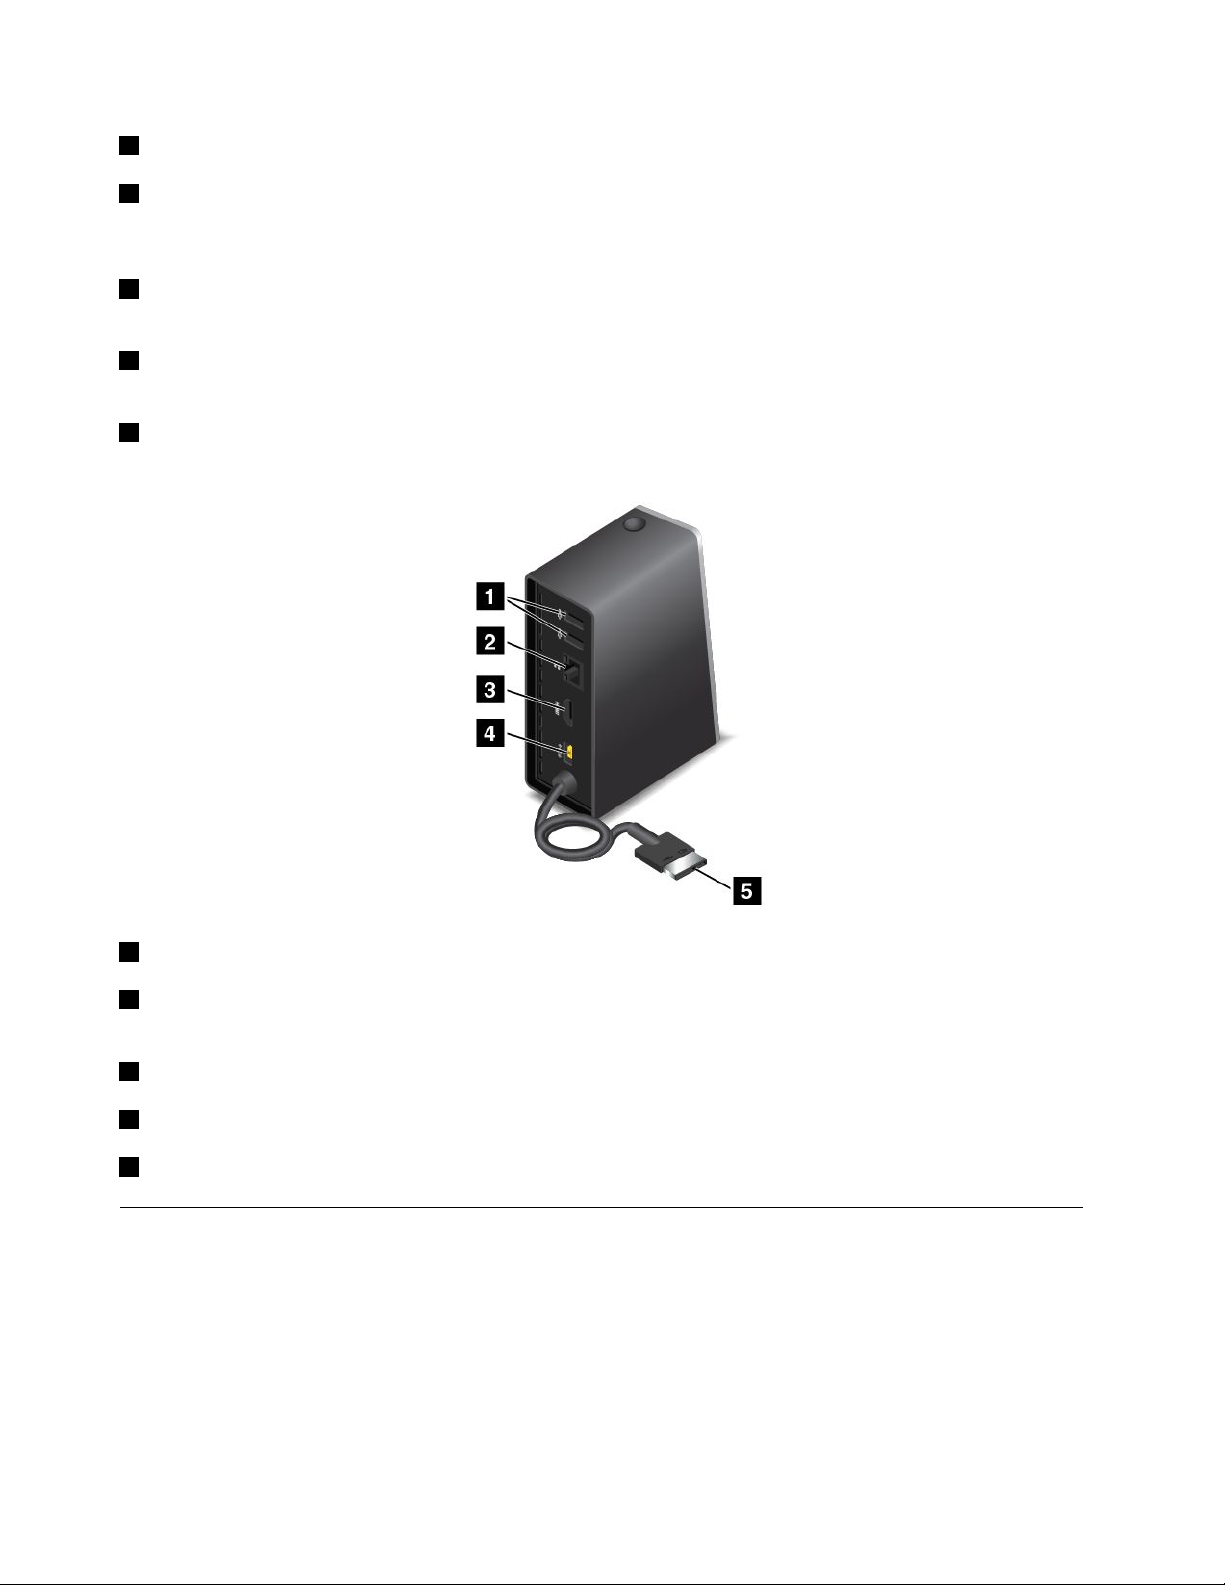
2USB3.0connector:UsedtoconnectdevicesthatarecompatiblewithUSB3.0andUSB2.0.
3AlwaysOnUSBconnector:Bydefault,theAlwaysOnUSBconnectorenablesyoutochargesome
mobiledigitaldevicesandsmartphonesnomatterwhenyourcomputerisinsleepmode,hibernationmode,
orisoff.Formoreinformation,refertothedocumentationthatcomeswiththedock.
4Comboaudioconnector:Usedtoconnectheadphonesoraheadsetthathasa3.5-mm(0.14-inch),
4-poleplug.
5System-statusindicator:TheindicatorontheilluminatedThinkPadlogofunctionsthesameastheones
onthecomputer.Fordetails,see“Statusindicators”onpage9.
6Powerbutton:Thepowerbuttononthedockfunctionsthesameastheoneonthecomputer.
Rearview
1USB2.0connector:UsedtoconnectdevicesthatarecompatiblewithUSB2.0.
2Ethernetconnector:UsedtoconnectthedocktoanEthernetLAN.Theindicatorsonthisconnector
havethesamefunctionastheonesonthecomputer.
3HDMIconnector:UsedtoconnectadigitalaudiodeviceorvideomonitorthatiscompatiblewithHDMI.
4Powerconnector:Usedtoconnecttheacpoweradapter.
5LenovoOneLinkconnector:ConnecttheLenovoOneLinkconnectortothecomputer.
ThinkPadOneLinkProDock
Dependingonthemodel,yourcomputermightsupporttheThinkPadOneLinkProDock(hereafterreferredto
asthedock).Attachyourcomputertothedocktoexpandtheworkingcapability.
Thistopicprovidesbasicinformationaboutthedock.Fordetailedinformationaboutusingthedock,refer
tothedocumentationthatcomeswiththedock.
Note:Dependingonthemodel,yourdockmightlookslightlydifferentfromtheillustrationsinthistopic.
42UserGuide
Page 59
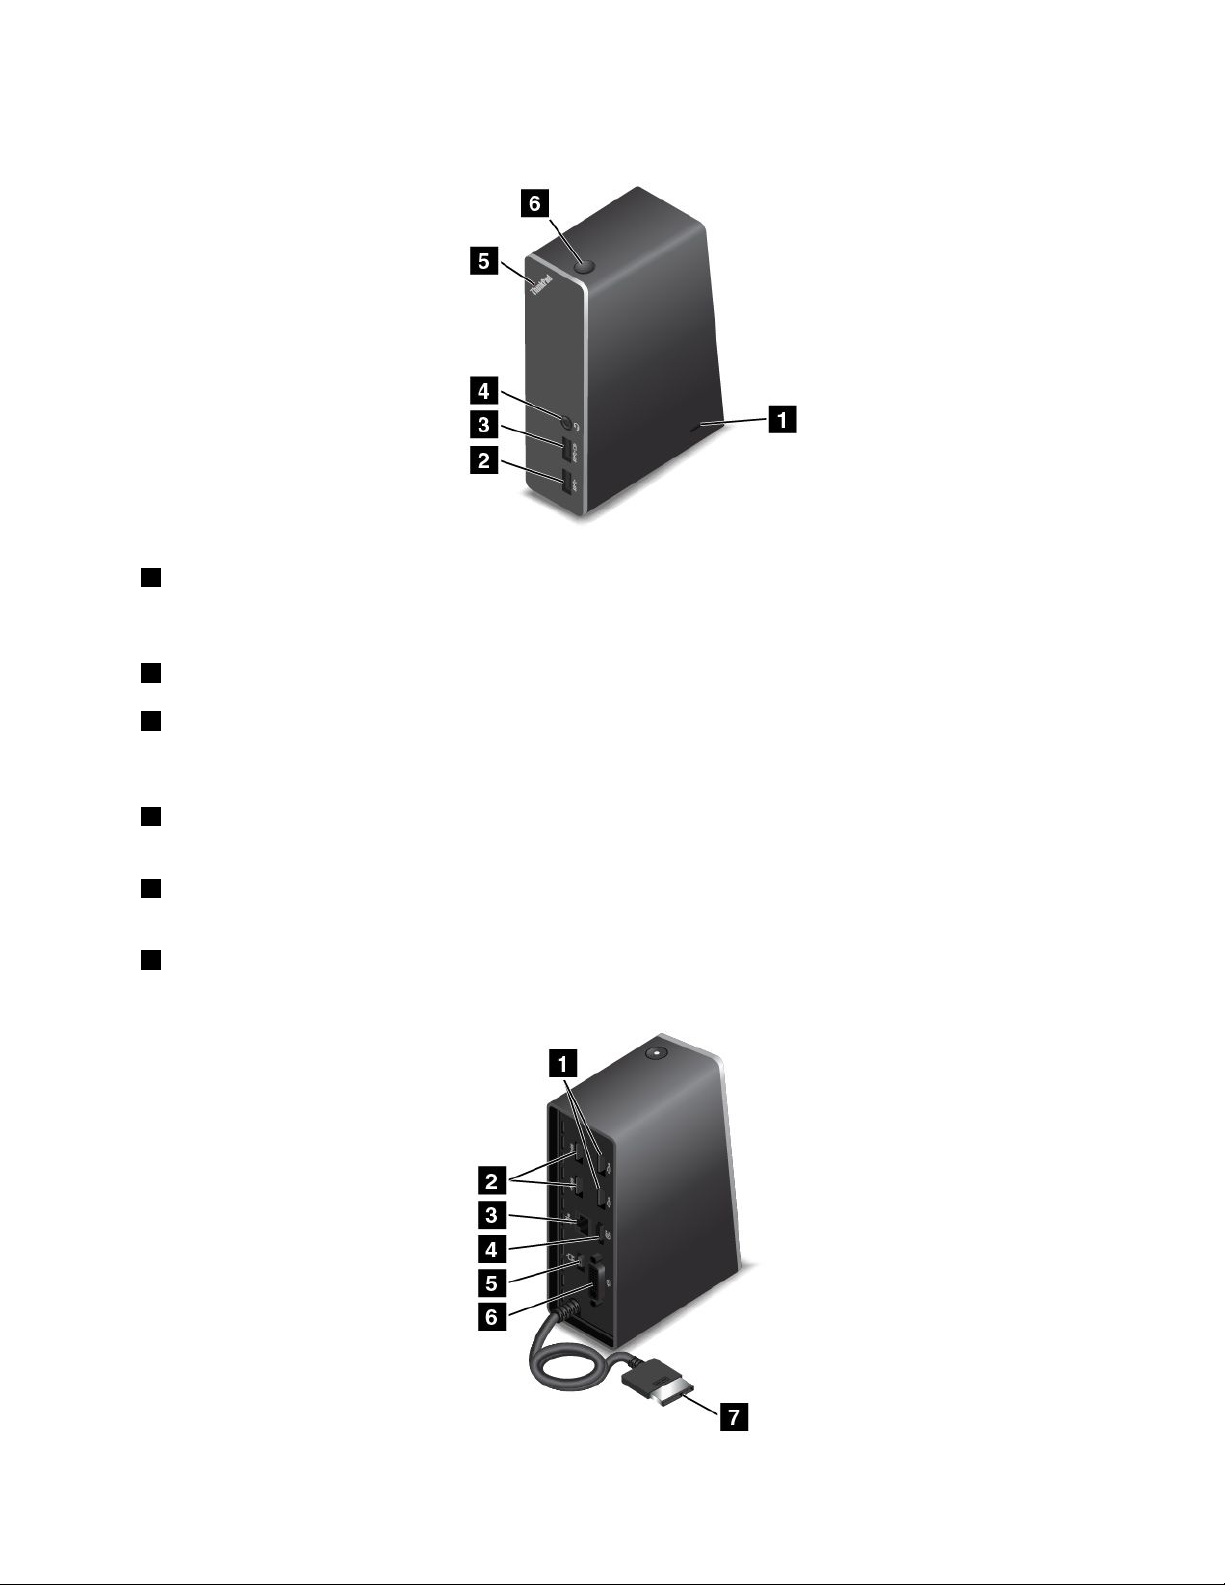
Frontview
1Security-lockslot:Toprotectyourdockfromtheft,youcanpurchaseasecuritycablelock,suchas
aKensington-stylecablelock,thatfitsthissecurity-lockslottolockyourdocktoadesk,table,orother
non-permanentfixture.
2USB3.0connector:UsedtoconnectdevicesthatarecompatiblewithUSB3.0andUSB2.0.
3AlwaysOnUSBconnector:Bydefault,theAlwaysOnUSBconnectorenablesyoutochargesome
mobiledigitaldevicesandsmartphonesnomatterwhenyourcomputerisinsleepmode,hibernationmode,
orisoff.Formoreinformation,refertothedocumentationthatcomeswiththedock.
4Comboaudioconnector:Usedtoconnectheadphonesoraheadsetthathasa3.5-mm(0.14-inch),
4-poleplug.
5System-statusindicator:TheindicatorontheilluminatedThinkPadlogofunctionsthesameastheones
onthecomputer.Fordetails,see“Statusindicators”onpage9.
6Powerbutton:Thepowerbuttononthedockfunctionsthesameastheoneonthecomputer.
Rearview
Chapter3.Enhancingyourcomputer43
Page 60

1USB2.0connectors:UsedtoconnectdevicesthatarecompatiblewithUSB2.0.
2USB3.0connectors:UsedtoconnectdevicesthatarecompatiblewithUSB3.0andUSB2.0.
3Ethernetconnector:UsedtoconnectthedocktoanEthernetLAN.Theindicatorsonthisconnector
havethesamefunctionastheonesonthecomputer.
4DisplayPort
®
connector:Usedtoattachahigh-performancemonitor,adirect-drivemonitor,orother
devicesthatuseaDisplayPortconnector.
5Powerconnector:Usedtoconnecttheacpoweradapter.
6DVIconnector:UsedtoconnectamonitorthatsupportsDigitalVisualInterface(DVI)connection.
Note:TheDVIconnectorprovidesadigitalinterfaceonly.Thisconnectorcanonlybeusedwithacomputer
thatsupportsDVIconnection.
ToconnectaDVImonitor,dothefollowing:
•Turnoffthecomputer.
•ConnecttheDVImonitortotheDVIconnector.Thenconnectthemonitortoanelectricaloutlet.
•TurnontheDVImonitorandthenthecomputer.
7LenovoOneLinkconnector:ConnecttheLenovoOneLinkconnectortothecomputer.
44UserGuide
Page 61
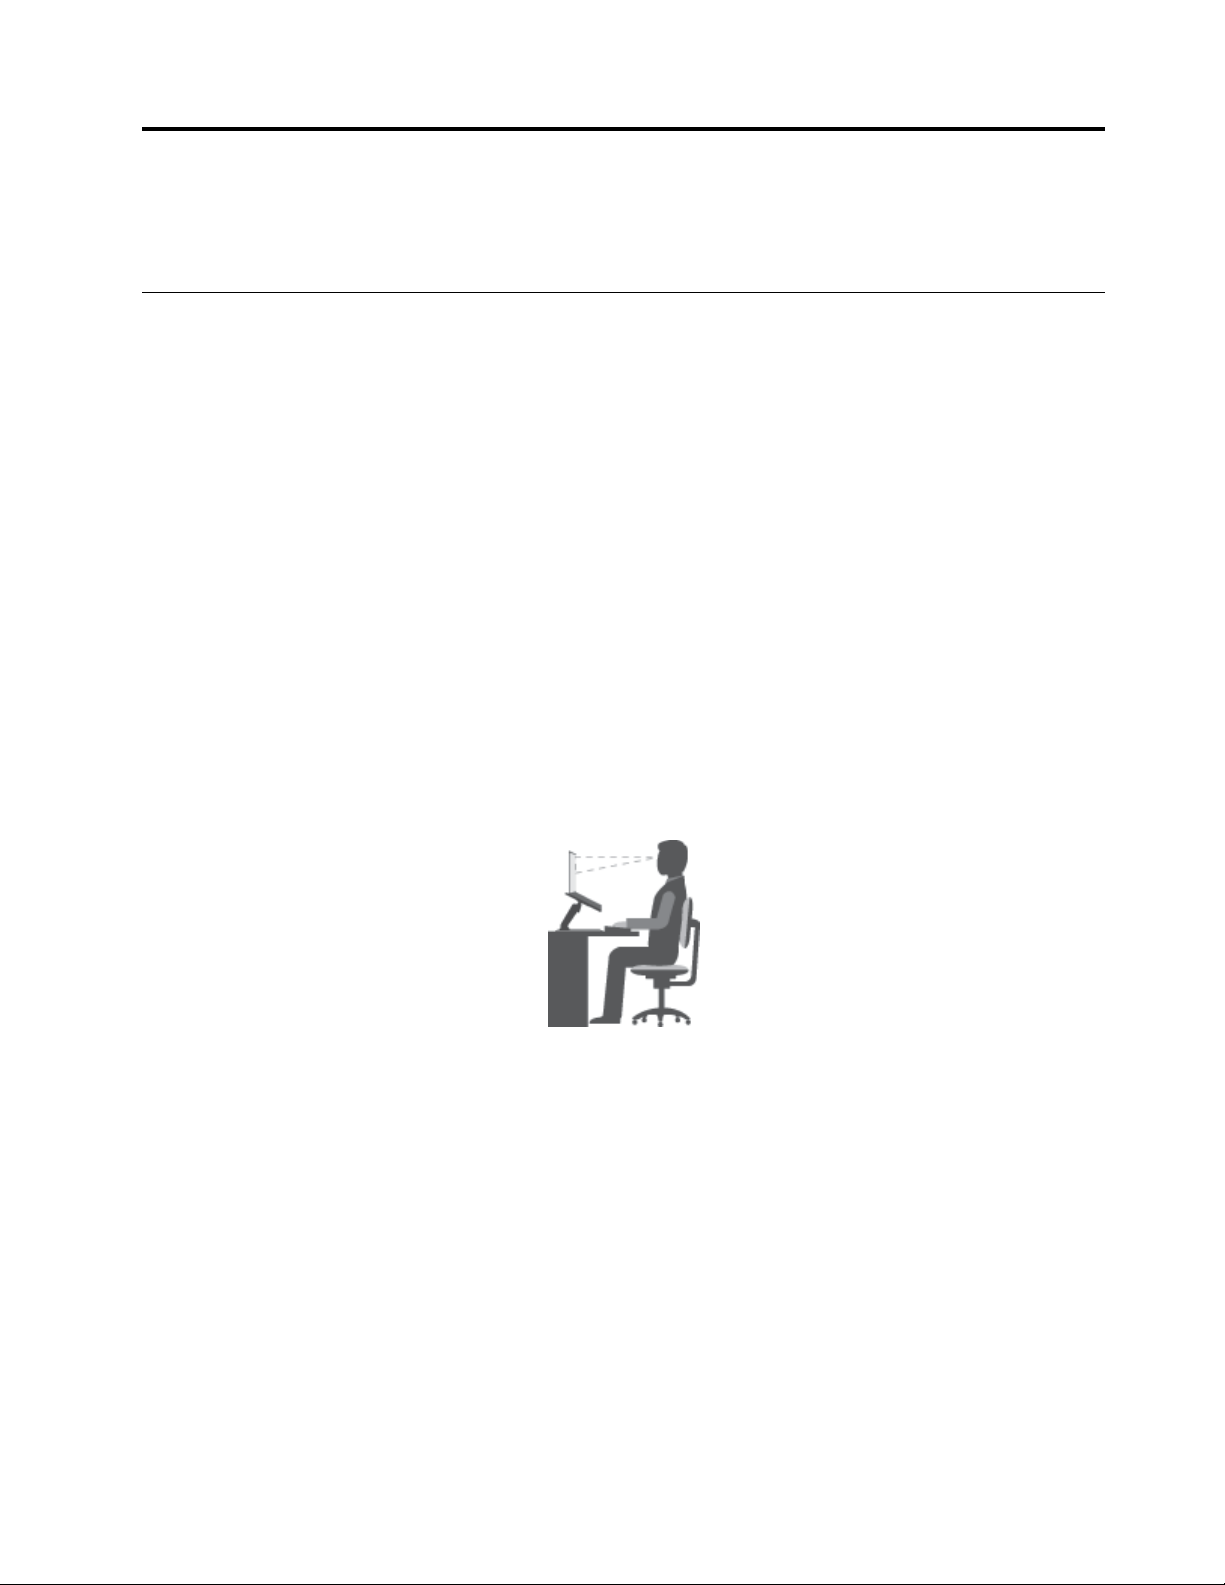
Chapter4.Youandyourcomputer
Thischapterprovidesinformationaboutaccessibility,comfort,andtravelingwithyourcomputer.
Accessibilityandcomfort
Goodergonomicpracticeisimportanttogetthemostfromyourpersonalcomputerandtoavoiddiscomfort.
Arrangeyourworkplaceandtheequipmentyouusetosuityourindividualneedsandthekindofwork
thatyouperform.Inaddition,usehealthyworkhabitstomaximizeyourperformanceandcomfortwhile
usingyourcomputer.
Thefollowingtopicsprovideinformationaboutarrangingyourworkarea,settingupyourcomputer
equipment,andestablishinghealthyworkhabits.
Lenovoiscommittedtoprovidingthelatestinformationandtechnologytoourcustomerswithdisabilities.
Refertotheaccessibilityinformationthatoutlinesoureffortsinthisarea.See“Accessibilityinformation”
onpage46
Ergonomicinformation
Workinginthevirtualofficemightmeanadaptingtofrequentchangesinyourenvironment.Forexample,
adaptingtothesurroundinglightsources,properseating,andtheplacementofyourcomputerhardware,
canhelpyouimproveyourperformanceandachievegreatercomfort.
.
Thisexampleshowssomeoneinaconventionalsetting.Evenwhennotinsuchasetting,youcanfollow
manyofthesetips.Developgoodhabits,andtheywillserveyouwell.
Generalposture:Makeminormodificationsinyourworkingposturetodetertheonsetofdiscomfort
causedbylongperiodsofworkinginthesameposition.Frequent,shortbreaksfromyourworkalsohelp
topreventminordiscomfortassociatedwithyourworkingposture.
Display:Positionthedisplaytomaintainacomfortableviewingdistanceof510-760mm(20-30inches).
Avoidglareorreflectionsonthedisplayfromoverheadlightingoroutsidesourcesoflight.Keepthedisplay
screencleanandsetthebrightnesstolevelsthatenableyoutoseethescreenclearly.PressF5orF6
toadjustdisplaybrightness.
Headposition:Keepyourheadandneckinacomfortableandneutral(vertical,orupright)position.
Chair:Useachairthatgivesyougoodbacksupportandseatheightadjustment.Usechairadjustmentsto
bestsuityourdesiredposture.
©CopyrightLenovo2014,2016
45
Page 62

Armandhandposition:Ifavailable,usechairarmrestsoranareaonyourworkingsurfacetoprovide
weightsupportforyourarms.Keepyourforearms,wrists,andhandsinarelaxedandneutral(horizontal)
position.Typewithasofttouchwithoutpoundingthekeys.
Legposition:Keepyourthighsparalleltothefloorandyourfeetflatonthefloororonafootrest.
Whatifyouaretraveling?
Itmightnotbepossibletoobservethebestergonomicpracticeswhenyouareusingyourcomputer
whileonthemoveorinacasualsetting.Regardlessofthesetting,trytoobserveasmanyofthetipsas
possible.Sittingproperlyandusingadequatelighting,forexample,willhelpyoumaintaindesirablelevels
ofcomfortandperformance.
Questionsaboutvision?
ThevisualdisplayscreensofThinkPadnotebookcomputersaredesignedtomeetthehigheststandards
andtoprovideyouwithclear,crispimagesandlarge,brightdisplaysthatareeasytosee,yeteasyonthe
eyes.Ofcourse,anyconcentratedandsustainedvisualactivitycanbetiring.Ifyouhavequestionsoneye
fatigueorvisualdiscomfort,consultavision-carespecialistforadvice.
Comfort
Observethefollowingguidelinestoachievegreatercomfortandimproveperformance.
Activesittingandrestbreaks:Thelongeryousitandworkwithyourcomputer,themoreimportantitisto
observeyourworkingposture.Follow“Ergonomicinformation”onpage45andpractice“activesitting”to
avoiddiscomfortassociatedwithyourworkingpostures.Makingminorvoluntaryposturalchangesand
takingshortfrequentworkbreaksarethekeyingredientsforhealthycomputing.Y ourcomputerislightand
mobile;youcaneasilyrepositionyourworkingsurfacetoaccommodatemanyposturemodifications.
Workareasetupoptions:Familiarizeyourselfwithallofyourofficefurnituresothatyouknowhowtoadjust
yourworksurface,seat,andotherworktoolstoaccommodateyourpreferencesforcomfort.Ifyourwork
areaisnotinanofficesetting,besuretotakespecialnoteofemployingactivesittingandtakingworkbreaks.
ManyThinkPadproductsolutionsareavailabletohelpyoumodifyandexpandyourcomputertobestsuit
yourneeds.Youcanfindsomeoftheseoptionsathttp://www.lenovo.com/accessories/services/index.html.
Exploreyouroptionsfordockingsolutionsandexternalproductsthatprovidetheadjustabilityandfeatures
thatyouwant.
Accessibilityinformation
Lenovoiscommittedtoprovidinguserswhohavehearing,vision,andmobilitylimitationswithgreater
accesstoinformationandtechnology.Thissectionprovidesinformationaboutthewaystohelpthese
usersgetthemostoutoftheircomputerexperience.Youalsocangetthemostup-to-dateaccessibility
informationfromthefollowingWebsite:
http://www.lenovo.com/accessibility
Keyboardshortcuts
Thefollowingtablecontainskeyboardshortcutsthatcanhelpmakeyourcomputereasiertouse.
Note:Dependingonyourkeyboard,someofthefollowingkeyboardshortcutsmightnotbeavailable.
KeyboardshortcutFunction
Windowslogokey+U
RightShiftforeightseconds
OpenEaseofAccessCenter
TurnonorturnoffFilterKeys
46UserGuide
Page 63

KeyboardshortcutFunction
ShiftfivetimesTurnonorturnoffStickyKeys
NumLockforfivesecondsTurnonorturnoffToggleKeys
LeftAlt+LeftShift+NumLock
LeftAlt+LeftShift+PrtScn(orPrtSc)TurnonorturnoffHighContrast
TurnonorturnoffMouseKeys
Formoreinformation,gotohttp://windows.microsoft.com/,andthentypeanyofthefollowingkeywords
forsearching:keyboardshortcuts,keycombinations,shortcutkeys.
EaseofAccessCenter
EaseofAccessCenterontheWindowsoperatingsystemenablesuserstoconfiguretheircomputersto
suittheirphysicalandcognitiveneeds.
TouseEaseofAccessCenter,dothefollowing:
1.GotoControlPanel,andensurethatyouviewControlPanelbyCategory.
2.ClickEaseofAccess➙EaseofAccessCenter.
3.Usethetoolsbyfollowingtheinstructionsonthescreen.
EaseofAccessCentermainlyincludesthefollowingtools:
•Magnifier
Magnifierisausefulutilitythatenlargestheentirescreenorpartofthescreensothatyoucansee
theitemsbetter.
•Narrator
Narratorisascreenreaderthatreadswhatisdisplayedonthescreenaloudanddescribeseventslike
errormessages.
•On-ScreenKeyboard
Ifyouprefertotypeorenterdataintoyourcomputerwithoutusingaphysicalkeyboard,youcanuse
On-ScreenKeyboard.On-ScreenKeyboarddisplaysavisualkeyboardwithallthestandardkeys.You
canselectkeysusingthemouseoranotherpointingdevice,oryoucantaptoselectthekeysifyour
computersupportsmulti-touchscreen.
•HighContrast
HighContrastisafeaturethatheightensthecolorcontrastofsometextandimagesonyourscreen.Asa
result,thoseitemsaremoredistinctandeasiertoidentify.
•Personalizedkeyboard
Adjustkeyboardsettingstomakeyourkeyboardeasiertouse.Forexample,youcanuseyourkeyboard
tocontrolthepointerandmakethekeyboardeasiertotypecertainkeycombinations.
•Personalizedmouse
Adjustmousesettingstomakeyourmouseeasiertouse.Forexample,youcanchangethepointer
appearanceandmakeyourmouseeasiertomanagewindows.
SpeechRecognition
SpeechRecognitionenablesyoutocontrolyourcomputerbyvoice.
Usingonlyyourvoice,youcanstartprograms,openmenus,clickobjectsonthescreen,dictatetextinto
documents,andwriteandsende-mails.Everythingyoudowiththekeyboardandmousecanbedonewith
onlyyourvoice.
Chapter4.Y ouandyourcomputer47
Page 64

TouseSpeechRecognition,dothefollowing:
1.GotoControlPanel,andensurethatyouviewControlPanelbyCategory.
2.ClickEaseofAccess➙SpeechRecognition.
3.Followtheinstructionsonthescreen.
Screen-readertechnologies
Screen-readertechnologiesareprimarilyfocusedonsoftwareprograminterfaces,helpinformationsystems,
andvariousonlinedocuments.Foradditionalinformationaboutscreenreaders,seethefollowing:
•UsingPDFswithscreenreaders:
http://www.adobe.com/accessibility.html?promoid=DJGVE
•UsingtheJAWSscreenreader:
http://www.freedomscientific.com/jaws-hq.asp
•UsingtheNVDAscreenreader:
http://www.nvaccess.org/
Screenresolution
Youcanmakethetextandimagesonyourscreeneasiertoreadbyadjustingthescreenresolutionofyour
computer.
Toadjustthescreenresolution,dothefollowing:
•ForWindows7andWindows8.1:
1.Right-clickanemptyareaofthedesktopandselectScreenresolution.
2.Followtheinstructionsonthescreen.
•ForWindows10:
1.Right-clickanemptyareaofthedesktopandselectDisplaysettings➙Advanceddisplaysettings.
2.SelectyourpreferredsettingunderResolution.
Note:Settingaresolutiontoolowmightpreventsomeitemsfromfittingonthescreen.
Customizableitemsize
Youcanmaketheitemsonyourscreeneasiertoreadbychangingtheitemsize.
•Tochangetheitemsizetemporarily,usetheMagnifiertoolinEaseofAccessCenter.See“Easeof
AccessCenter”onpage47.
•Tochangetheitemsizepermanently,dothefollowing:
–Changethesizeofalltheitemsonyourscreen.
1.GotoControlPanel,andensurethatyouviewControlPanelbyCategory.
2.ClickAppearanceandPersonalization➙Display.
3.Changetheitemsizebyfollowingtheinstructionsonthescreen.
4.ClickApply.Thischangewilltakeeffectthenexttimeyoulogintotheoperatingsystem.
–ChangethesizeoftheitemsonaWebpage.
PressandholdCtrl,andthenpresstheplus-signkey(+)toenlargeortheminus-signkey(-)to
reducethetextsize.
–Changethesizeoftheitemsonthedesktoporawindow.
Note:Thisfunctionmightnotworkonsomewindows.
48UserGuide
Page 65

Ifyourmousehasawheel,pressandholdCtrl,andthenscrollthewheeltochangetheitemsize.
Industry-standardconnectors
Yourcomputerprovidesindustry-standardconnectorsthatenableyoutoconnectassistivedevices.
Formoreinformationaboutthelocationandfunctionoftheconnectors,see“Locatingcomputercontrols,
connectors,andindicators”onpage1.
Documentationinaccessibleformats
Lenovoprovideselectronicdocumentationinaccessibleformats,suchasproperlytaggedPDFfilesor
HyperTextMarkupLanguage(HTML)files.Lenovoelectronicdocumentationisdevelopedtoensure
thatvisuallyimpaireduserscanreadthedocumentationthroughascreenreader.Eachimageinthe
documentationalsoincludesadequatealternativetextsothatvisuallyimpaireduserscanunderstandthe
imagewhentheyuseascreenreader.
Travelingwithyourcomputer
Thistopicprovidesinformationtohelpyouworkwithyourcomputerwhenyouaretraveling.
Traveltips
Usethefollowingtraveltipstotravelmoreconfidentlyandefficientlywithyourcomputer.
•Althoughitissafetoallowyourcomputertogothroughthex-raymachinesatairportsecuritystations,it
isimportanttokeepyoureyesonthecomputeratalltimestopreventtheft.
•Considerbringinganelectricaladapterforuseinanairplaneorautomobile.
•Ifyoucarryanacpoweradapter,detachtheaccordfromittoavoiddamagingthecord.
Traveltipsonairplanes
Ifyoucarryyourcomputerintoanairplane,takenoteofthefollowingtips:
•Ifyouintendtouseyourcomputerorwirelessservices(suchasInternetandBluetooth),checkwiththe
airlineforrestrictionsandavailabilityofservicesbeforeboardingtheairplane.Iftherearerestrictions
ontheuseofcomputerswithwirelessfeaturesontheairplane,youmustabidebythoserestrictions.If
necessary,enabletheAirplanemodebeforeboarding.IntheAirplanemode,allwirelessfeaturesare
disabled.Toenabletheairplanemode,dothefollowing:
–ForWindows8.1:Swipeinfromtherightedgeofthescreentodisplaythecharms,tapSettings➙
ChangePCsettings➙Network,andthenslidethecontrolforAirplanemodetotheright.
–ForWindows10:OpentheStartmenuandthenclickSettings.IfSettingsisnotdisplayed,clickAll
appstodisplayallprograms,thenclickSettings➙Network&Internet➙Airplanemode,andthen
slidethecontrolforAirplanemodetotheright.
•Becarefulabouttheseatinfrontofyouonairplanes.Angleyourcomputerdisplaysothatitdoesnotget
caughtwhenthepersoninfrontofyouleansback.
•Whentakingoff,remembertoturnoffyourcomputerorputitintohibernationmode.
Travelaccessories
Thefollowingisachecklistofitemstoconsiderpackingwhenyouaregoingtotravel:
•ThinkPadacpoweradapter
•Externalmouse,ifyouareaccustomedtousingone
•Ethernetcable
Chapter4.Y ouandyourcomputer49
Page 66

•Extrabattery,charged
•Aqualitycarryingcasethatprovidesadequatecushionandprotection
•Externalstoragedevice
Ifyouaretravelingtoanothercountry,youmightwanttoconsideranacpoweradapterforthecountryto
whichyouaretraveling.
Topurchasetravelaccessories,gotohttp://www.lenovo.com/accessories.
50UserGuide
Page 67
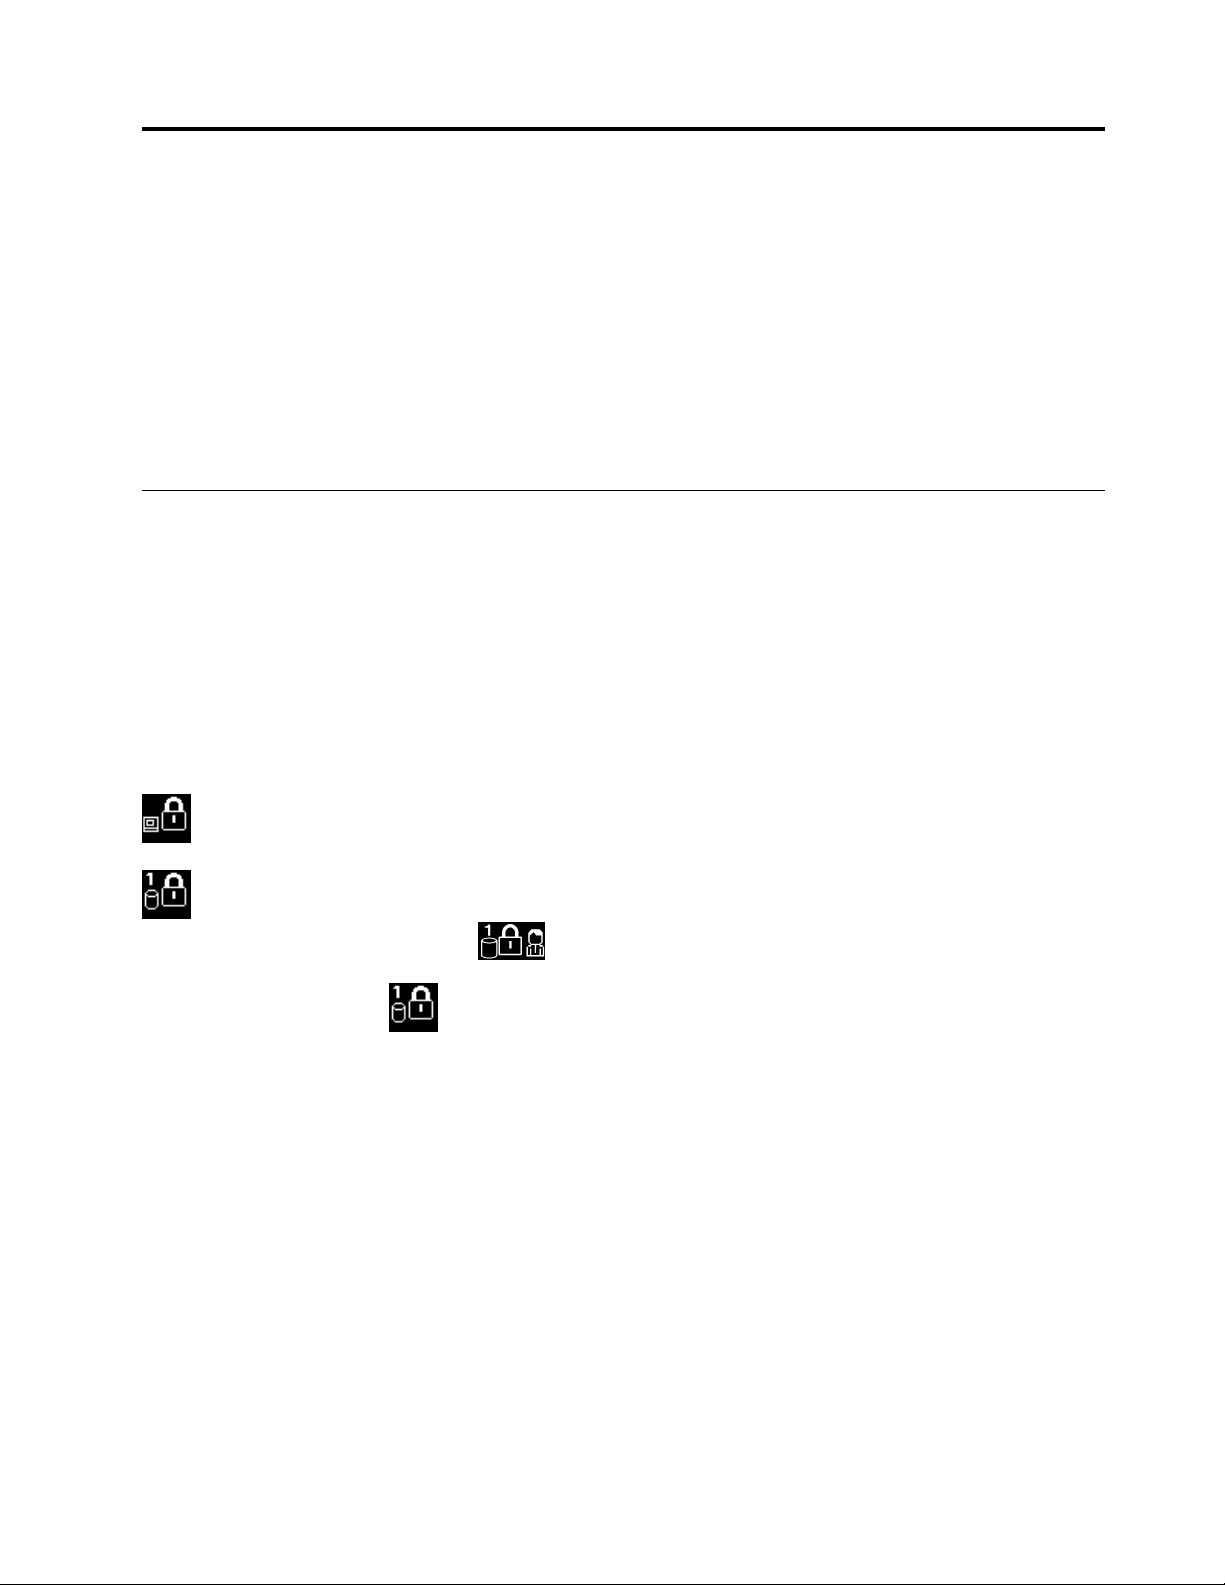
Chapter5.Security
Thischapterprovidesinformationabouthowtoprotectyourcomputerfromtheftandunauthorizeduse.
•“Usingpasswords”onpage51
•“Harddisksecurity”onpage55
•“Usingthefingerprintreader”onpage56
•“Noticeondeletingdatafromyourstoragedrive”onpage58
•“Usingfirewalls”onpage59
•“Protectingdataagainstviruses”onpage59
Usingpasswords
Youcanhelppreventyourcomputerfromunauthorizedusebyusingpasswords.Onceyousetapassword,
apromptisdisplayedonthescreeneachtimeyouturnonthecomputer.Enteryourpasswordattheprompt.
Youcannotusethecomputerunlessyoutypethecorrectpassword.
Ifyouhavesetapower-onpassword,asupervisorpassword,oraharddiskpassword,itunlocks
automaticallywhenthecomputerresumesfromsleepmode.
Note:IfaWindowspasswordhasbeenset,youwillbepromptedtoenterit.
Typingpasswords
Whenthisiconisdisplayed,typeapower-onpasswordorasupervisorpassword.
Whenthisiconisdisplayed,typeauserharddiskpassword.Totypeamasterharddiskpassword,
pressF1.Whentheiconchangesto
Note:Toreturntotheicon
,pressF1again.
,typethemasterharddiskpassword
Power-onpassword
Youcansetapower-onpasswordtohelpprotectyourcomputeragainstunauthorizedaccess.
Ifyousetapower-onpassword,thepasswordpromptisdisplayedonthescreenwheneveryouturnonthe
computer.Youmustenterthecorrectpasswordtostartusingthecomputer.
Setting,changing,orremovingapower-onpassword
Beforeyoustart,printtheseinstructions.
Toset,change,orremoveapower-onpassword,dothefollowing:
1.Restartyourcomputer.Whenthelogoscreenisdisplayed,pressF1tostarttheThinkPadSetup
program.
2.SelectSecurity➙Password➙Power-onPasswordbyusingthedirectionalkeys.
3.Dependingonyourneed,dooneofthefollowing:
©CopyrightLenovo2014,2016
51
Page 68

•Tosetapassword,dothefollowing:
a.IntheEnterNewPasswordfield,typeadesiredpasswordandpressEnter.
b.IntheConfirmNewPasswordfield,retypethepasswordandpressEnter.
•Tochangeapassword,dothefollowing:
a.IntheEnterCurrentPasswordfield,typethecurrentpower-onpasswordandpressEnter.
b.IntheEnterNewPasswordfield,typethenewpower-onpasswordandpressEnter;thenretype
thepasswordintheConfirmNewPasswordfieldandPressEnter.
•Toremoveapassword,dothefollowing:
a.IntheEnterCurrentPasswordfield,typethecurrentpower-onpasswordandpressEnter.
b.LeavetheEnterNewPasswordandConfirmNewPasswordfieldsblank.PressEntertwice.
4.ASetupNoticewindowisdisplayed.PressEntertocontinue.
5.PressF10.ASetupConfirmationwindowisdisplayed.SelectY estosavetheconfigurationchanges
andexit.
Note:Y oumightwanttorecordyourpasswordandstoreitinasafeplace.Otherwise,ifyouforgetthe
password,youhavetotakeyourcomputertoaLenovoreselleroramarketingrepresentativetohave
thepasswordcanceled.
Supervisorpassword
ThesupervisorpasswordprotectsthesysteminformationstoredintheThinkPadSetupprogram.Ifyouhave
setasupervisorpassword,noonecanchangetheconfigurationofthecomputerwithoutthepassword.It
providesthefollowingsecurityfeatures:
•Ifonlyasupervisorpasswordisset,apasswordpromptisdisplayedwhenyoutrytostarttheThinkPad
Setupprogram.UnauthorizeduserscannotaccesstheThinkPadSetupprogramwithoutthepassword.
•Thesystemadministratorcanusethesupervisorpasswordtoaccessacomputereveniftheuserofthat
computerhassetapower-onpassword.Thesupervisorpasswordoverridesthepower-onpassword.
•Ifbothasupervisorpasswordandapower-onpasswordareset,youcandothefollowingonlyifyou
havethesupervisorpassword:
–Changingordeletingthepower-onpassword
–Changingordeletingthesupervisorpassword
–Changingdateandtime
–Specifyingtheminimumlengthforpower-onpasswordandharddiskpassword
–Erasingthefingerprintdata
–Enablingordisablingthefollowingfeatures:
–WakeonLANandFlashoverLAN
–LockUEFIBIOSSettings
–Passwordatunattendedboot
–BootDeviceListF12Option
–BootOrderLock
–FlashBIOSUpdatingbyEnd-Users
–Internalnetworkdevice
–Internalwirelessdevice
–InternalBluetoothdevice
–InternalNetworkOptionROM
52UserGuide
Page 69

–Securitymode
–Fingerprintreaderpriority
Notes:
•ThesystemadministratorcansetthesamesupervisorpasswordonmanyThinkPadnotebookcomputers
tomakeadministrationeasier.
•WhenLockUEFIBIOSSettingsoptionisenabled,allBIOSsettingscannotbechanged.Tochange
thesettings,asupervisorpasswordisrequired.
Setting,changing,orremovingasupervisorpassword
Beforeyoustart,printtheseinstructions.
Onlyasystemadministratorcanset,change,orremoveasupervisorpassword.Toset,change,orremovea
supervisorpassword,dothefollowing:
1.Restartyourcomputer.Whenthelogoscreenisdisplayed,pressF1tostarttheThinkPadSetup
program.
2.SelectSecurity➙Password➙SupervisorPasswordbyusingthedirectionalkeys.
3.Dependingonyourneeds,dooneofthefollowing:
•Tosetapassword,dothefollowing:
a.IntheEnterNewPasswordfield,typeadesiredpasswordandpressEnter.
b.IntheConfirmNewPasswordfield,retypethepasswordandpressEnter.
•Tochangeapassword,dothefollowing:
a.IntheEnterCurrentPasswordfield,typethecurrentsupervisorpasswordandpressEnter.
b.IntheEnterNewPasswordfield,typethenewsupervisorpasswordandpressEnter;thenretype
thepasswordintheConfirmNewPasswordfieldandpressEnter.
•Toremoveapassword,dothefollowing:
a.IntheEnterCurrentPasswordfield,typethecurrentsupervisorpasswordandpressEnter.
b.LeavetheEnterNewPasswordandConfirmNewPasswordfieldsblank.PressEntertwice.
4.ASetupNoticewindowisdisplayed.PressEntertocontinue.
5.PressF10.ASetupConfirmationwindowisdisplayed.SelectY estosavetheconfigurationchanges
andexit.
Note:Y oumightwanttorecordyourpasswordandstoreitinasafeplace.Thenexttimeyouopenthe
ThinkPadSetupprogram,youwillbepromptedtotypeyoursupervisorpasswordtoproceed.Ifyouforget
yoursupervisorpassword,Lenovocannotresetyourpassword.Y oumusttakeyourcomputertoaLenovo
reselleroraLenovomarketingrepresentativetohavethesystemboardreplaced.Proofofpurchaseis
required,andafeewillbechargedforpartsandservice.
Harddiskpasswords
Thefollowingtwotypesofharddiskpasswordscanhelpprotecttheinformationstoredontheharddiskdrive:
•Userharddiskpassword
Ifauserharddiskpasswordhasbeenset,butnomasterharddiskpasswordhasbeen,theusermust
entertheuserharddiskpasswordtoaccessfilesandapplicationsontheharddiskdrive.
•Masterharddiskpassword
Themasterharddiskpasswordalsorequiresauserharddiskpassword.Themasterharddiskpassword
isusuallysetandusedbyasystemadministrator.Itenablestheadministratortoaccessanyharddisk
Chapter5.Security53
Page 70

driveinasystemlikeamasterkey.Theadministratorsetsthemasterpassword;thenassignsauser
passwordforeachcomputerinthenetwork.Theusercanthenchangetheuserpasswordasdesired,but
theadministratorstillcangetaccessbyusingthemasterpassword.
Whenamasterharddiskpasswordisset,onlytheadministratorcanremovetheuserharddiskpassword.
Settingaharddiskpassword
Beforeyoustart,printtheseinstructions.
Tosetaharddiskpassword,dothefollowing:
1.Restartyourcomputer.Whenthelogoscreenisdisplayed,pressF1tostarttheThinkPadSetup
program.
2.SelectSecurity➙Password➙Harddisk1Passwordbyusingthedirectionalkeys.
3.Apasswordwindowisdisplayed.YouarepromptedtoselectUserorUser+Master.SelectUserif
youwanttosetonlyoneharddiskpassword.SelectUser+Masterifyouwanttosetauserharddisk
passwordandamasterharddiskpassword,forexampleifyouareanadministratororasupervisor.
•IfyouselectUser,dothefollowing:
a.Whenawindowfortypingthenewpasswordopens,typeyournewpasswordintheEnterNew
PasswordfieldandpressEnter.
b.IntheConfirmNewPasswordfield,retypethepasswordyoujustenteredandpressEnter.
•IfyouselectUser+Master,dothefollowing:
a.First,setauserharddiskpassword.Whenamessagewindowpromptsyoutosettheuserhard
diskpassword,pressEntertocontinue.TypeyournewuserharddiskpasswordintheEnter
NewPasswordfieldandpressEnter.RetypethepasswordintheConfirmNewPassword
fieldandpressEnter.
b.Then,setamasterharddiskpassword.Whenamessagewindowpromptsyoutosetthemaster
harddiskpassword.PressEntertocontinue.Typeyournewmasterharddiskpasswordinthe
EnterNewPasswordfieldandpressEnter.RetypethepasswordintheConfirmNewPassword
fieldandpressEnter.
4.ASetupNoticewindowisdisplayed.PressEntertocontinue.
5.PressF10.ASetupConfirmationwindowisdisplayed.SelectY estosavetheconfigurationchanges
andexit.
Thenexttimeyouturnonyourcomputer,typetheuserormasterharddiskpasswordtostartyourcomputer
andaccesstheoperatingsystem.
Changingorremovingaharddiskpassword
Tochangeorremovetheharddiskpassword,dothefollowing:
•IfyouareinUser+Masterharddiskmode,youcanselecteitherUserHDPorMasterHDPtochange
thepassword,dependingonyourneeds.
–IfyouselectUserHDPmode,followthefollowingstepstochangetheuserharddiskpassword:
1.TypethecurrentuserharddiskpasswordintheEnterCurrentPasswordfieldandpressEnter.
2.TypethenewpasswordintheEnterNewPasswordfieldandpressEnter;thenretypethe
passwordintheConfirmNewPasswordfieldandpressEnter.
3.ASetupNoticewindowisdisplayed.PressEnteragaintocontinue.Theuserharddiskpassword
ischanged.
Note:TheharddiskpasswordcannotberemovedinUserHDPmode.
–IfyouselectMasterHDPmode,followthefollowingstepstochangethemasterharddiskpassword:
54UserGuide
Page 71

1.TypethecurrentmasterharddiskpasswordintheEnterCurrentPasswordfieldandpressEnter.
2.TypethenewmasterharddiskpasswordintheEnterNewPasswordfieldandpressEnter;then
retypethenewpasswordyoujustenteredintheConfirmNewPasswordfieldandpressEnter.
3.ASetupNoticewindowisdisplayed.PressEntertocontinue.Themasterharddiskpasswordis
changed.
Note:IfyouleavetheEnterNewPasswordandConfirmNewPasswordfieldsblankandpressEnter
twice,boththeuserandmasterharddiskpasswordsareremoved.
•IfyouareinUserharddiskmode,followthefollowingstepstochangetheuserharddiskpassword:
1.Followsteps1through7in“Settingaharddiskpassword”onpage54,typingyourpasswordtoget
accesstotheThinkPadSetupprogram.
2.TypethecurrentuserharddiskpasswordintheEnterCurrentPasswordfieldandpressEnter.
3.TypethenewpasswordintheEnterNewPasswordfieldandpressEnter;thenretypethenew
passwordintheConfirmNewPasswordfieldandpressEnter.
4.ASetupNoticewindowisdisplayed.PressEnteragaintocontinue.Theuserharddiskpasswordis
changed.
Note:IfyouleavetheEnterNewPasswordandConfirmNewPasswordfieldsblankandpressEnter
twice,theuserharddiskpasswordisremoved.
Tipsonusingtheharddiskpasswords
•YoucansettheminimumlengthofaharddiskpasswordthroughtheSecuritymenu.
•Ifyousetaharddiskpasswordofoversevencharacters,theharddiskdrivecanbeusedonlywitha
computerthatcanrecognizeaharddiskpasswordofoversevencharacters.Ifyoutheninstallthe
harddiskdriveinacomputerthatcannotrecognizeaharddiskpasswordthatcontainsmorethan
sevencharacters,youcannotaccessthedrive.
•Recordyourpasswordandstoreitinasafeplace.Ifyouforgettheuserharddiskpassword,orbothuser
andmasterharddiskpasswords,Lenovocannotresetyourpasswordsorrecoverdatafromtheharddisk
drive.Y oumusttakeyourcomputertoaLenovoreselleroramarketingrepresentativetohavethehard
diskdrivereplaced.Proofofpurchaseisrequired,andafeewillbechargedforpartsandservice.
Notes:TheeDrivestoragedrivesorTrustedComputingGroup(TCG)Opal-compliantstoragedrivesprovide
self-encryptioncapabilitiestosecureyourdata.
•IfaTCGOpal-compliantstoragedriveandaTCGOpalmanagementsoftwareprogramareinstalled,and
theTCGOpalmanagementsoftwareprogramisactivated,theharddiskpasswordisnotavailable.
•IfaneDrivestoragedriveisinstalledinyourcomputer,andyourcomputerispreinstalledwiththe
Windows8.1orWindows10operatingsystem,theharddiskpasswordisnotavailable.
Harddisksecurity
Toprotectpasswordsfromunauthorizedsecurityattacks,refertothefollowingtipstomaximizesecurity:
•Setapower-onpasswordaswellasaharddiskpasswordforyourinternalstoragedrive.Refertothe
proceduresin“Power-onpassword”onpage51and“Harddiskpasswords”onpage53.Forsecurity,
alongerpasswordisrecommended.
•IfaDiskEncryptionstoragedriveisinstalledinyourcomputer,besuretoprotectthecontentsofyour
computermemoryfromunauthorizedaccessesbyuseofdriveencryptionsoftware,suchasMicrosoft
WindowsBitLocker
•Beforeyoudisposeof,sell,orhandoveryourcomputer,deletethedatastoredonit.Formoreinformation,
referto“Noticeondeletingdatafromyourstoragedrive”onpage58.
®
DriveEncryption.See“UsingWindowsBitLockerDriveEncryption”onpage56
Chapter5.Security55
.
Page 72

TheharddiskdrivebuiltintoyourcomputercanbeprotectedbyUEFIBIOS.
UsingWindowsBitLockerDriveEncryption
Tohelpprotectyourcomputeragainstunauthorizedaccess,usethedriveencryptionsoftware,suchas
WindowsBitLockerDriveEncryption.
WindowsBitLockerDriveEncryptionisanintegralsecurityfeatureofsomeeditionsoftheWindows
operatingsystem.Itcanhelpyouprotecttheoperatingsystemanddatastoredonyourcomputer,even
ifyourcomputerislostorstolen.BitLockerworksbyencryptingalluserandsystemfiles,includingthe
swapandhibernationfiles.
BitLockerusesaTrustedPlatformModuletoprovideenhancedprotectionforyourdataandtoensureearly
bootcomponentintegrity.AcompatibleTPMisdefinedasaV1.2TPM.
TochecktheBitLockerstatus,gotoControlPanel,andclickSystemandSecurity➙BitLockerDrive
Encryption.
FormoreinformationaboutWindowsBitLockerDriveEncryption,seethehelpinformationsystemofthe
Windowsoperatingsystem,orsearchfor“MicrosoftWindowsBitLockerDriveEncryptionStep-by-Step
Guide”ontheMicrosoftWebsite.
DiskEncryptionharddiskdriveandEncryptionsolid-statedrive
SomemodelscontaintheDiskEncryptionharddiskdriveorEncryptionsolid-statedrive.Thisfeaturehelps
toprotectyourcomputeragainstsecurityattacksonmedia,NANDflash,ordevicecontrollersbyuseofa
hardwareencryptionchip.Fortheefficientuseoftheencryptionfeature,setaharddiskpasswordforthe
internalstoragedevice.
Usingthefingerprintreader
Dependingonthemodel,yourcomputermighthaveafingerprintreader.Fingerprintauthenticationcan
replaceyourWindowspassword.Inthisway,youcanlogintoyourcomputersimplyandsecurely.To
enablefingerprintauthentication,enrollyourfingerprintsfirst.
Enrollingyourfingerprint
Itisrecommendedthatyouenrollmorethanonefingerprintincaseofanyinjuriestoyourfingers.To
enrollyourfingerprints,dothefollowing:
•ForWindows7andWindows8.1
1.StarttheLenovoFingerprintManagerprogram.ForinstructionsonhowtostarttheLenovo
FingerprintManagerprogram,see“Lenovoprograms”onpage14.
2.EntertheWindowspasswordasrequired.
3.Clicktheiconforthefingerthatyouwanttoenroll,andconstantlyswipeyourcorrespondingfinger
acrossthefingerprintreaderuntiltheenrollmentcompletes.
4.ClickFinish.Yourfingerprintisenrolledsuccessfully.
Formoreinformationabouthowtousethefingerprintreader,refertothehelpsystemoftheLenovo
FingerprintManagerprogram.
•ForWindows10
1.OpentheStartmenuandthenclickSettings.IfSettingsisnotdisplayed,clickAllappstodisplayall
programs,thenclickSettings➙Accounts➙Sign-inoptions.
2.Followtheinstructionsonthescreenuntiltheenrollmentcompletes.
Note:Itisrecommendedthatyouenrollmorethanonefingerprintincaseofanyinjuriestoyourfingers.
56UserGuide
Page 73
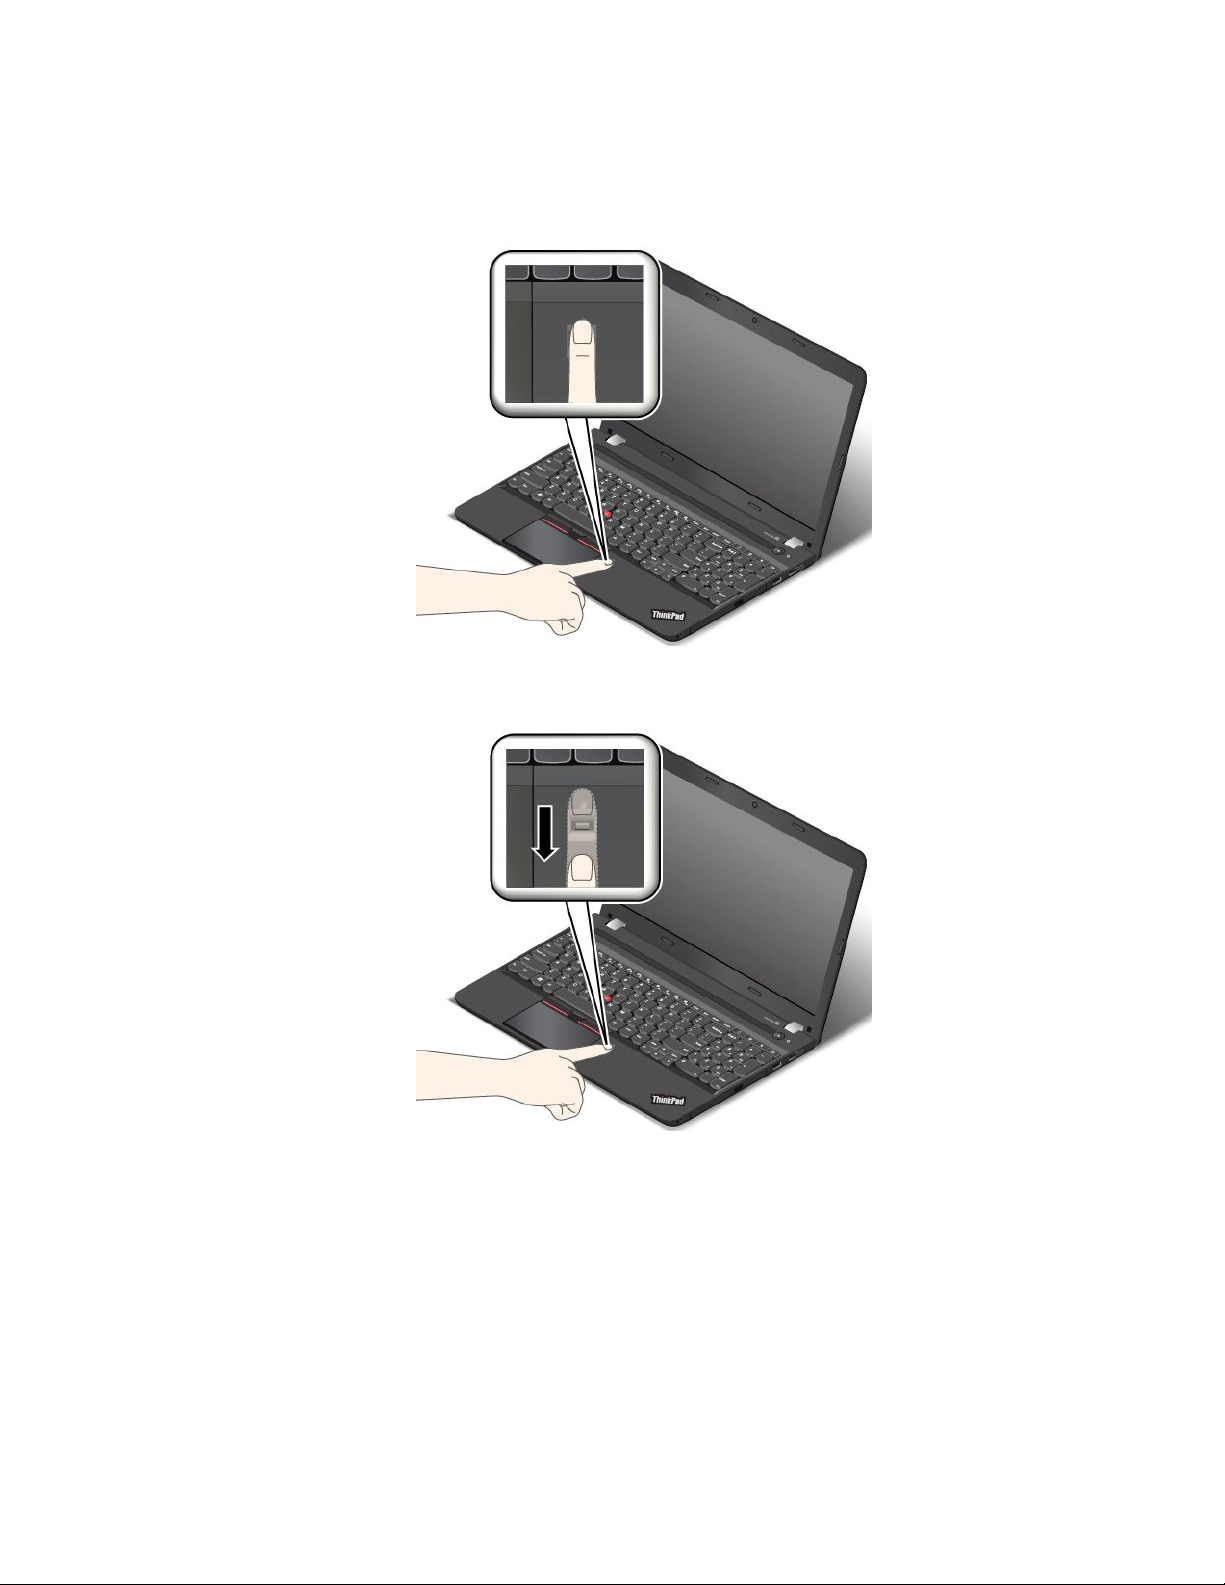
Swipingyourfingeroverthefingerprintreader
Toswipeyourfingeroverthereader,dothefollowing:
1.Placethetopjointofyourfingeronthesensor.
2.Applylightpressureandswipeyourfingertowardyouacrossthereaderinonesmoothmotion.Donot
liftyourfingerwhenyouareswipingit.
Maintainingthefingerprintreader
Thefollowingactionscoulddamagethefingerprintreaderorcauseitnottoworkproperly:
•Scratchingthesurfaceofthereaderwithahard,pointedobject.
•Scrapingthesurfaceofthereaderwithyourfingernailoranythinghard.
•Usingortouchingthereaderwithadirtyfinger.
Ifyounoticeanyofthefollowingconditions,gentlycleanthesurfaceofthereaderwithadry,soft,lint-free
cloth:
•Thesurfaceofthereaderisdirtyorstained.
•Thesurfaceofthereaderiswet.
Chapter5.Security57
Page 74

•Thereaderoftenfailstoenrollorauthenticateyourfingerprint.
Ifyourfingerhasanyofthefollowingconditions,youmightnotbeabletoregisterorauthenticateit:
•Yourfingeriswrinkled.
•Yourfingerisrough,dry,orinjured.
•Yourfingerisstainedwithdirt,mud,oroil.
•Thesurfaceofyourfingerisdifferentfromwhenyouenrolledyourfingerprint.
•Yourfingeriswet.
•Afingerisusedthathasnotbeenenrolled.
Toimprovethesituation,trythefollowing:
•Cleanorwipeyourhandstoremoveanyexcessdirtormoisturefromthefingers.
•Enrollanduseadifferentfingerforauthentication.
•Ifyourhandsaredry,applylotiontothem.
Noticeondeletingdatafromyourstoragedrive
Someofthedatastoredonthestoragedrivemightbesensitive.Handingyourcomputerovertosomeone
elsewithoutdeletingtheloadedsoftware,suchasoperatingsystemsandapplicationsoftware,mighteven
violatelicenseagreements.Besuretodeletedatastoredonthestoragedrivebeforeyoudisposeof,sell,
orhandoveryourcomputer.
Youcanusethefollowingmethodstodeletedatafromthestoragedrive:
•MovethedatatotheRecycleBin,andthenemptytheRecycleBin.
•Deletethedata.
•Formatyourstoragedrive,usingthesoftwareforinitializingit.
•UsetherecoveryprogramprovidedbyLenovotobringthestoragedrivebacktothefactorydefault
settings.
Theseoperations,however,onlychangethefilelocationofthedata;theydonotdeletethedataitself.In
otherwords,thedataretrievalprocessingisdisabledunderanoperatingsystemsuchasWindows.The
dataisstillthere,eventhoughitseemstobelost.Thus,itissometimespossibletoreadthedatabyuseof
specialsoftwarefordatarecovery.Thereisariskthatpeopleofbadfaithmightreadandmisusethecritical
dataonthestoragedriveforunexpectedpurposes.
Topreventleakageofdata,itisimportantthatyoudeleteallthedatafromthestoragedrivewhenyou
disposeof,sell,orhandoveryourcomputer.Y oucandestroythedataphysicallybysmashingthestorage
drivewithahammer,ormagneticallybymeansofstrongmagneticpower,thusmakingthedataunreadable.
Butitisrecommendedthatyouusethesoftware(payware)orservice(payservice)developedforthat
purpose.Theprocessmighttakeseveralhours.
Fordisposingofdataonthesolid-statedrive,LenovoprovidestheDriveEraseUtilityforResettingthe
CryptographicKeyandErasingtheSolidStateDrivetool.Fordisposingofdataontheharddiskdriveor
hybriddrive,LenovoprovidestheSecureDataDisposal™tool.Gotohttp://www.lenovo.com/supportto
downloadthesetools.
IfanEncryptionsolid-statedriveoraDiskEncryptionharddiskdriveoraDiskEncryptionhybriddriveis
supportedandinstalledinyourcomputer,youcanlogicallydisposeofallthedataonthedriveinashort
timebyerasingthecryptographickey.Thedataencryptedwiththeoldkeyisnotphysicallyerasedbut
58UserGuide
Page 75

remainsonthedrive;however,itcannotbedecryptedwithouttheoldkey.Thisfeatureisalsoavailablewith
theDriveEraseUtilityforResettingtheCryptographicKeyandErasingtheSolidStateDrivetool.
Usingfirewalls
Ifyoursystemispreinstalledwithafirewallprogram,itprotectsagainstcomputerInternetsecuritythreats,
unauthorizedaccess,intrusions,andInternetattacks.Italsoprotectsyourprivacy.
Formoreinformationabouthowtousethefirewallprogram,refertothehelpinformationsystemthat
comeswiththeprogram.
Protectingdataagainstviruses
Yourcomputerispreinstalledwithanantivirusprogramsoyoucandetectandeliminateviruses.The
antivirusprogramisdesignedtohelpyoudetectandeliminateviruses.
Lenovoprovidesafullversionofantivirussoftwareonyourcomputerwithafree30-daysubscription.After
30days,youmustrenewthelicensetocontinuereceivingtheantivirussoftwareupdates.
Formoreinformationabouthowtouseyourantivirussoftware,refertothehelpinformationsystemof
yourantivirussoftware.
Chapter5.Security59
Page 76

60UserGuide
Page 77

Chapter6.Advancedconfiguration
Thischapterprovidesthefollowinginformationtohelpyouconfigurethecomputer:
•“Installinganewoperatingsystem”onpage61
•“Installingdevicedrivers”onpage63
•“UsingtheThinkPadSetupprogram”onpage63
Installinganewoperatingsystem
Insomesituations,youmightneedtoinstallanewoperatingsystem.Thistopicprovidesinstructionson
howtoinstallanewoperatingsystem.
InstallingtheWindows7operatingsystem
Beforeyoustart,printtheseinstructions.
Attention:Theprocessofinstallinganewoperatingsystemdeletesallthedataonyourstoragedrive,
includingthedatathatwerestoredinahiddenfolder.
ToinstalltheWindows7operatingsystem,dothefollowing:
1.CopyallthesubdirectoriesandfilesintheC:\SWTOOLSdirectorytoaremovablestoragedevice.
•ThesupplementfilesfortheWindows7operatingsystemareintheC:\SWTOOLS\OSFIXESdirectory.
•ThedevicedriversareintheC:\SWTOOLS\DRIVERSdirectory.
•ThepreinstalledprogramsareintheC:\SWTOOLS\APPSdirectory.
2.StarttheThinkPadSetupprogram.See“UsingtheThinkPadSetupprogram”onpage63.
3.SelectStartup➙BoottodisplaytheBootPriorityOrdersubmenu.
4.Selectthedrivethatcontainstheoperatingsysteminstallationprogram,forexample,USBHDD.
ThenpressEsc.
5.SelectStartup➙UEFI/LegacyBoot.Thendooneofthefollowing:
•ToinstalltheWindows7(32-bit)operatingsystem,selectLegacyOnlyorBoth.
•ToinstalltheWindows7(64-bit)operatingsysteminLegacymode,selectLegacyOnly.
•ToinstalltheWindows7(64-bit)operatingsysteminUEFImode,selectUEFIOnly.
6.PresstheF10keytoexittheThinkPadSetupprogram.
7.InserttheWindows7operatingsysteminstallationDVDintotheopticaldrive,andrestartthecomputer.
Notes:
•IfyouarestartingtheinstallationDVDimagefromanexternalUSBdeviceorifyourcomputerhasan
NVMExpressdriveinstalled,doadditionalconfigurationsbeforeyoustart.Formoreinformation,go
tohttp://www.lenovo.com/support/installwin7viausb3.
•IfanNVMExpressdriveisinstalled,additionaldriversalsoarerequired.Formoreinformation,goto
https://support.microsoft.com/en-us/kb/2990941.
8.RestoretheC:\SWTOOLSdirectorythatyoubackedupbeforeinstallingtheWindows7operatingsystem.
9.Installthedevicedrivers.See“Installingdevicedrivers”onpage63.
©CopyrightLenovo2014,2016
61
Page 78

10.InstalltheWindows7fixmodules.Y oucanfindtheWindows7fixmodulesintheC:\SWTOOLS\OSFIXES\
directory.Formoreinformation,gototheMicrosoftKnowledgeBasehomepageat:
http://support.microsoft.com/
11.Installtheregistrypatches,forexampletheEnablingWakeonLANfromStandbyforENERGYSTAR
patch.Todownloadandinstalltheregistrypatches,gototheLenovoSupportWebsiteat:
http://www.lenovo.com/support
Note:Afterinstallingtheoperatingsystem,donotchangetheinitialUEFI/LegacyBootsettinginthe
ThinkPadSetupprogram.Otherwisetheoperatingsystemwillnotstartcorrectly.
WhenyouinstalltheWindows7operatingsystem,youmightneedoneofthefollowingcountryorregion
codes:
CountryorregionCodeCountryorregionCode
ChinaSC
DenmarkDKNorway
FinlandFI
FranceFR
GermanyGR
ItalyIT
JapanJP
NetherlandsNL
SpainSP
SwedenSV
TaiwanandHongKong
UnitedStatesUS
NO
TC
InstallingtheWindows8.1orWindows10operatingsystem
Beforeyoustart,printtheseinstructions.
Attention:
•Theprocessofinstallinganewoperatingsystemdeletesallthedataonyourinternalstoragedrive,
includingthedatathatwerestoredinahiddenfolder.
•IfyourcomputerisequippedwithbothaharddiskdriveandanM.2solid-statedrive,donotusethe
M.2solid-statedriveasabootabledevice.TheM.2solid-statedriveisusedfor“cache”functionandto
supporttheIntelRapidStartTechnology.
ToinstalltheWindows8.1orWindows10operatingsystem,dothefollowing:
1.StarttheThinkPadSetupprogram.See“UsingtheThinkPadSetupprogram”onpage63.
2.SelectStartup➙BoottodisplaytheBootPriorityOrdersubmenu.
3.Selectthedrivethatcontainstheoperatingsysteminstallationprogram,forexample,USBHDD.
ThenpressEsc.
4.SelectRestartandensurethatOSOptimizedDefaultsisenabled.ThenpresstheF9keytoload
defaultsettings.
5.PresstheFn+F10keytoexittheThinkPadSetupprogram.
6.Connectthedrivethatcontainstheoperatingsysteminstallationprogramtothecomputer,andrestart
thecomputer.
7.Installthedevicedriversandnecessaryprograms.See“Installingdevicedrivers”onpage63.
8.Afterinstallingthedevicedrivers,applyWindowsUpdatetogetthelatestmodules,forexamplethe
securitypatches.
9.Dependingonyourpreference,installLenovoprograms.ForinformationaboutLenovoprograms,
see“Lenovoprograms”onpage14.
62UserGuide
Page 79

Note:Afterinstallingtheoperatingsystem,donotchangetheinitialUEFI/LegacyBootsettinginthe
ThinkPadSetupprogram.Otherwise,theoperatingsystemwillnotstartcorrectly.
WhenyouinstalltheWindows8.1orWindows10operatingsystem,youmightneedoneofthefollowing
countryorregioncodes:
CountryorregionCodeCountryorregionCode
ChinaSC
DenmarkDKNorway
FinlandFI
FranceFR
GermanyGR
ItalyIT
JapanJP
NetherlandsNL
SpainSP
SwedenSV
TaiwanandHongKong
UnitedStatesUS
NO
TC
Installingdevicedrivers
Devicedriveristheprogramthatoperatesaparticularhardwaredeviceofthecomputer.Ifadevicedoes
notperformwelloryouinstallanewdevice,youneedtoinstallorupdatethecorrespondingdevicedriver.
Forexample,ifyouusetheWindows7operatingsystem,tousetheUSB3.0connector,youneedto
downloadandinstalltheUSB3.0driver.
Todownloadthelatestdevicedrivers,dothefollowing:
1.Gotohttp://www.lenovo.com/ThinkPadDrivers.
2.Selectyourproductnametoviewallthedevicedriversforyourcomputer.
3.Selectthedevicedriversyouthatyouneed,andfollowtheinstructionsonthescreen.
Attention:DonotdownloadthedevicedriversfromtheWindowsUpdateWeb.Alwaysdownloadthedevice
driversfrom:
http://www.lenovo.com/ThinkPadDrivers
IfyouusetheWindows7operatingsystem,youalsocanfindthedevicedriversintheC:\SWTOOLS\DRIVERS
directoryonyourstoragedrive.Formoreinformation,see“Reinstallingpreinstalledprogramsanddevice
drivers”onpage107.
UsingtheThinkPadSetupprogram
TheThinkPadSetupprogramenablesyoutoselectvarioussetupconfigurationsforyourcomputerthrough
configuringtheBIOS.
ToconfiguretheBIOSofyourcomputer,dothefollowing:
1.Turnonthecomputer.WhentheThinkPadlogoisdisplayed,pressF1.TheThinkPadSetupprogram
starts.
Note:Ifyouarerequiredtoenterthesupervisorpassword,enterthecorrectpassword.Youalsocan
pressEntertoskipthepasswordpromptandstarttheThinkPadSetupprogram.Ifyoudonotenterthe
password,youcannotchangetheconfigurationsthatareprotectedbythesupervisorpassword.For
moreinformation,referto“Usingpasswords”onpage51
2.Usethecursorkeystoselectatab;orusethecursorkeystolocateanitemandpressEntertoselectit.
Thenasubmenuisdisplayed.
.
Chapter6.Advancedconfiguration63
Page 80

Note:Somemenuitemsaredisplayedonlyifthecomputersupportsthecorrespondingfeatures.
3.Setthevalueofanitembydoingoneofthefollowing:
•PresstheF6keytochangetoahighervalue.
•PresstheF5keytochangetoalowervalue.
Note:Defaultvaluesareinboldface.
4.Tochangeotherconfigurations,presstheEsckeytoexitthesubmenuandreturntotheparentmenu.
5.Whenyoucompletetheconfiguration,presstheF10keytosaveandexit.Youalsocanselectthe
RestarttabintheThinkPadSetupmenu,andrestartyourcomputerwithoneoftheprovidedoptions.
Note:Y oucanpresstheF9keytorestoretothedefaultsettings.
Mainmenu
WhenyouentertheThinkPadSetupprogram,youwillfirstseetheMainmenuasfollows:
•UEFIBIOSVersion
•UEFIBIOSDate(Year-Month-Day)
•EmbeddedControllerVersion
•MEFirmwareVersion
•MachineT ypeModel
•System-unitserialnumber
•Systemboardserialnumber
•AssetT ag
•CPUT ype
•CPUSpeed
•Installedmemory
•UUID
•MACaddress(InternalLAN)
•PreinstalledOSLicense
•UEFISecureBoot
Configmenu
Tochangetheconfigurationofyourcomputer,selecttheConfigtabfromtheThinkPadSetupmenu.
ThefollowingtableliststheConfigmenuitems.Defaultvaluesareinboldface.Themenuitemsmight
changewithoutnotice.Dependingonthemodel,thedefaultvaluemightvary.
Attention:Thedefaultconfigurationsarealreadyoptimizedforyou.Improperchangeoftheconfigurations
mightcauseunexpectedresults.
64UserGuide
Page 81

Table2.Configmenuitems
Menuitem
Network
SubmenuitemSelectionComments
WakeOnLAN
•Disabled
•ACOnly
•ACandBattery
EthernetLANOptionROM
(forLegacyOnlyboot
•Disabled
•Enabled
modeorBothwithLegacy
first)
UEFIIPv4NetworkStack
(forUEFIOnlybootmode
•Disabled
•Enabled
orBothwithUEFIfirst)
UEFIIPv6NetworkStack
(forUEFIOnlybootmode
•Disabled
•Enabled
orBothwithUEFIfirst)
UEFIPXEBootPriority
(forBothwithUEFIfirst
•IPv6First
•IPv4First
bootmode,andIPv6
andIPv4stacksareboth
enabled.)
Enablethecomputerto
poweronwhentheEthernet
controllerreceivesamagic
packet(aspecialnetwork
message).
IfyouselectACOnly,Wake
onLANisenabledonly
whentheacpoweradapter
isattached.
IfyouselectACand
Battery,WakeonLANis
enabledwithanypower
sources.
Notes:
•Themagicpackettype
WakeonLANrequires
acpower.
•TheWakeonLAN
functiondoesnot
workwhenaharddisk
passwordisset.
LoadstheEthernetLAN
OptionROMtoenable
startupfromanintegrated
networkdevice.
EnableordisableInternet
ProtocolVersion4(IPv4)
networkstackfortheUEFI
environment.
EnableordisableInternet
ProtocolVersion6(IPv6)
networkstackforUEFI
environment.
Selectnetworkstack
priorityforUEFIPXEboot.
Chapter6.Advancedconfiguration65
Page 82

Table2.Configmenuitems(continued)
Menuitem
USB
SubmenuitemSelectionComments
USBUEFIBIOSSupport
AlwaysOnUSB
AlwaysOnUSBChargein
BatteryMode
USB3.0Mode
•Disabled
•Enabled
•Disabled
•Enabled
•Disabled
•Enabled
•Disabled
•Enabled
•Auto
Enablesordisablesboot
supportforUSBstorage
devices.
IfyouselectDisabled,
theexternalUSBdevices
cannotbechargedthrough
USBconnectors.
IfyouselectEnabled,the
AlwaysOnUSBconnector
enablesyoutochargesome
mobiledigitaldevicesand
smartphoneswhenthe
computerispoweredoffor
inhibernationmodeonthe
conditionthattheacpower
adapterisconnected.
SettheUSB3.0controller
modefortheportsshared
betweenUSB2.0andUSB
3.0controllers.
IfyouselectAuto,itenables
youtoconnectandroute
appropriateUSB3.0or
USB2.0connectors.
IfyouselectEnabled,it
enablesUSB3.0mode
andallowsUSB3.0tobe
supportedintheoperating
system.
IfyouselectDisabled,it
disablesandhidestheUSB
3.0controller,andUSB3.0
connectorswillworkas
USB2.0connectors.
Keyboard/Mouse
TrackPoint•Disabled
•Enabled
Trackpad•Disabled
•Enabled
Enableordisablethe
built-inTrackPointpointing
device.
Note:Ifyouwanttouse
anexternalmouse,select
Disabled.
Enableordisablethe
built-intrackpad.
Note:Ifyouwanttouse
anexternalmouse,select
Disabled.
66UserGuide
Page 83

Table2.Configmenuitems(continued)
Menuitem
Display
Power
SubmenuitemSelectionComments
BootDisplayDevice
•ThinkPadLCD
•Analog(VGA)
•DigitalonThinkPad
•DisplayonDock
TotalGraphicsMemory
•256MB
•512MB
IntelSpeedStep
technology
CPUPowerManagement
®
•Disabled
•Enabled
•Disabled
•Enabled
IntelRapidStartTechnology
•Disabled
•Enabled
Enterafter:
•Immediately
•1minute
•2minutes
•5minutes
•10minutes
•15minutes
•30minutes
Selectthedisplaydevice
thatistobeactivatedat
boottime.Thisselection
iseffectiveforboottime,
passwordprompt,and
ThinkPadSetup.
Allocatetotalmemory
whichIntelinternalgraphics
deviceshares.
Ifyouselect512MB,the
maximumusablememory
mightbereducedonthe
32-bitoperatingsystem.
Note:Thissub-menuis
onlysupportedinmodels
withanIntelCPU.
SelectthemodeofIntel
SpeedSteptechnologyat
runtime.
•Maximum
Performance:Always
highestspeed
•BatteryOptimized:
Alwayslowestspeed
•Disabled:Noruntime
support,lowestspeed
Note:Thissub-menuis
onlysupportedinmodels
withanIntelCPU.
Enableordisablethe
power-savingfeaturethat
stopsthemicroprocessor
clockautomaticallywhen
therearenocomputer
activities.Normally,itisnot
necessarytochangethe
setting.
Tousethisfeature,aspecial
partitiononthesolid-state
driveisrequired.
Whenenabled,the
computerentersalower
powerstateafterthe
specifiedtimeinsleep
state.Andittakesonly
secondstoresumenormal
operation.
Note:Thissub-menuis
onlysupportedinmodels
Chapter6.Advancedconfiguration67
Page 84

Table2.Configmenuitems(continued)
Menuitem
BeepandAlarm
CPU
SubmenuitemSelectionComments
•1hour
•2hours
•3hours
DisableBuilt-inBattery
(Ifintegratedbatteryis
supported.)
PasswordBeep•Disabled
KeyboardBeep•Disabled
CoreMulti-Processing
EnterTemporarydisablebattery
•Enabled
•Enabled
•Disabled
•Enabled
withanIntelCPU.
forservicingthesystem.
Afterselectingthisitem,the
systemwillbeautomatically
poweredoff,thenreadyto
beserviced.
Note:Thebatterywill
beautomaticallyenabled
whentheACadapteris
reconnected.
Enablethisoptiontohave
abeepsoundwhenthe
systemiswaitingfora
power-on,harddisk,or
supervisorpassword.
Differentbeepswillsound
whentheenteredpassword
matchesordoesnotmatch
theconfiguredpassword.
Enablethisoptionto
haveabeepsound
whenunmanageablekey
combinationarepressed.
IfyouselectEnabled,
additionalexecution
coreunitswithina
microprocessorare
enabled.
68UserGuide
IntelHyper-Threading
Technology
IfyouselectDisabled,only
oneexecutioncoreunit
withinamicroprocessoris
enabled.
Note:Thissub-menumight
besupportedinmodels
withanIntelCPU.
•Disabled
•Enabled
IfyouselectEnabled,
additionalmicroprocessor
threadsareenabled.
Thesethreadsappearas
additionalprocessorsbut
sharesomeresourceswith
theotherthreadswithina
microprocessor.
IfyouselectDisabled,
onlyonethreadwithin
eachexecutioncoreunitis
enabled.
Page 85

Table2.Configmenuitems(continued)
Menuitem
SubmenuitemSelectionComments
Note:Thissub-menumight
besupportedinmodels
withanIntelCPU.
DateandTimemenu
Tochangethedateortimeofyourcomputer,selecttheDate/TimetabfromtheThinkPadSetupmenu.
Thendothefollowing:
1.UsethecursorkeystoselectSystemDateorSystemTime.
2.Typeadateortime.
Securitymenu
Tochangethesecuritysettingsofyourcomputer,selecttheSecuritytabfromtheThinkPadSetupmenu.
ThefollowingtableliststheSecuritymenuitems.Defaultvaluesareinboldface.Themenuitemsmight
changewithoutnotice.Dependingonthemodel,thedefaultvaluemightvary.
Attention:Thedefaultconfigurationsarealreadyoptimizedforyou.Improperchangeoftheconfigurations
mightcauseunexpectedresults.
Table3.Securitymenuitems
Menuitem
Password
SubmenuitemSelectionComments
SupervisorPassword
LockUEFIBIOSSettings
PasswordatUnattended
boot
•Disabled
•Enabled
•Disabled
•Enabled
•Disabled
•Enabled
Referto“Supervisor
password”onpage52
Enableordisablethe
functionthatprotects
itemsinThinkPadSetup
frombeingchangedbya
userwhodoesnothave
thesupervisorpassword.
Bydefault,thisissetto
Disabled.Ifyousetthe
supervisorpasswordand
enablethisfunction,no
onebutyoucanchange
itemsintheThinkPadSetup
program.
Ifyouselectandenable
Passwordatunattended
boot,apasswordprompt
isdisplayedwhenthe
computeristurnedon,
fromeitherapower-off
stateorhibernationstate.
IfyouselectDisabled,
nopasswordpromptis
displayed;thecomputer
goesaheadandloads
theoperatingsystem.
Topreventunauthorized
access,settheuser
.
Chapter6.Advancedconfiguration69
Page 86

Table3.Securitymenuitems(continued)
Menuitem
SubmenuitemSelectionComments
PasswordatRestart•Disabled
•Enabled
PasswordatBootDevice
List
•Disabled
•Enabled
authenticationonthe
operatingsystem.
Ifyouselectandenable
Passwordatrestart,
apasswordpromptis
displayedwhenyourestart
thecomputer.Ifyouselect
Disabled,nopassword
promptisdisplayed;the
computergoesaheadand
loadstheoperatingsystem.
Topreventunauthorized
access,settheuser
authenticationonthe
operatingsystem.
Ifthesecuritypassword
isset,thisoptionisused
tospecifywhetherthe
Securitypasswordmustbe
enteredtodisplaytheF12
bootdevicelist.
SelectEnabledtoprompt
forthesecuritypassword.
PasswordCountExceeded
Error
Power-OnPassword
SetMinimumLength
HardDiskXPassword•Disabled
•Disabled
•Enabled
•Disabled
•Enabled
•Disabled
•xcharacters
(4≤x≤12)
•Enabled
SelectDisabledtoproceed
withoutanyuseraction
required.
SelectEnabledtoshow
thePOST0199errorand
promptfortheSecurity
password.
SelectDisabledtohide
thePOST0199errorand
proceedwithoutanyuser
actionrequired.
Referto“Power-on
password”onpage51.
Specifyaminimumlength
forpower-onpassword
andharddiskpasswords.
Ifyousetthesupervisor
passwordandspecify
aminimumlengthfor
passwords,noonebutyou
canchangethelength.
Referto“Harddisk
passwords”onpage
53.
70UserGuide
Page 87

Table3.Securitymenuitems(continued)
Menuitem
UEFIBIOSUpdateOption
SubmenuitemSelectionComments
FlashBIOSUpdatingby
End-Users
SecureRollBackPrevention
MemoryProtectionExecutionPrevention•Disabled
Virtualization
IntelVirtualization
Technology
•Disabled
•Enabled
IfyouselectEnabled,
alluserscanupdatethe
UEFIBIOS.Ifyouselect
Disabled,onlytheperson
whoknowsthesupervisor
passwordcanupdatethe
UEFIBIOS.
•Disabled
•Enabled
IfyouselectDisabled,you
canflashtheolderversion
UEFIBIOS.
Somecomputerviruses
•Enabled
andwormscausememory
bufferstooverflowby
runningcodewhereonly
dataisallowed.Ifthe
DataExecutionPrevention
featurecanbeusedwith
youroperatingsystem,then
byselectingEnabledyou
canprotectyourcomputer
againstattacksbysuch
virusesandworms.Ifafter
choosingEnabledyoufind
thataprogramdoesnotrun
correctly,selectDisabled
andresetthesetting.
•Disabled
•Enabled
IfyouselectEnabled,a
VirtualMachineMonitor
(VMM)canutilizethe
additionalhardware
capabilitiesprovidedby
VirtualizationTechnology.
IntelVT-dFeature•Disabled
AMD-V™Technology
Note:Thissub-menuis
onlysupportedinmodels
withanIntelCPU.
IntelVT-disIntel
•Enabled
VirtualizationTechnology
forDirectedI/O.When
enabled,aVMMcanutilize
theplatforminfrastructure
forI/Ovirtualization.
Note:Thissub-menuis
onlysupportedinmodels
withanIntelCPU.
•Disabled
•Enabled
WhenyouselectEnabled,
aVMMcanutilizethe
additionalhardware
capabilitiesprovided
byAMDVirtualization
technology.
Chapter6.Advancedconfiguration71
Page 88

Table3.Securitymenuitems(continued)
Menuitem
I/OPortAccess
Anti-Theft
SubmenuitemSelectionComments
EthernetLAN•Disabled
•Enabled
WirelessLAN•Disabled
•Enabled
Bluetooth•Disabled
•Enabled
USBPort
MemoryCardSlot
IntegratedCamera
Microphone•Disabled
ComputraceModule
Activation
•Disabled
•Enabled
•Disabled
•Enabled
•Disabled
•Enabled
•Enabled
•Disabled
•Enabled
•PermanentlyDisabled
Note:Thissub-menuis
onlysupportedinmodels
withanAMDCPU.
IfyouselectEnabled,you
canusetheEthernetLAN
device.
IfyouselectEnabled,
youcanusewirelessLAN
devices.
IfyouselectEnabled,you
canuseBluetoothdevices.
IfyouselectEnabled,you
canuseUSBconnectors.
IfyouselectEnabled,you
canusethememorycard
slots.
IfyouselectEnabled,you
canusetheintegrated
camera.
IfyouselectEnabled,you
canusethemicrophones
(internal,external,or
line-in).
EnableordisabletheUEFI
BIOSinterfacetoactivate
thecomputracemodule.
Computraceisanoptional
monitoringservicefrom
AbsoluteSoftware.
SecureBoot
72UserGuide
SecureBoot
Note:Ifyousetthe
Computracemodule
activationtoPermanently
Disabled,youwillbe
unabletoenablethis
settingagain.
•Disabled
•Enabled
Enableordisablethe
UEFISecureBootfeature.
SelectEnabletoprevent
unauthorizedoperating
systemsfromrunningat
boottime.SelectDisabled
toallowanyoperating
systemstorunatboottime.
Note:ToenableSecure
Boot,youneedtosetthe
startupsettingasUEFI
OnlyandsetCSMSupport
asNo.
Page 89

Table3.Securitymenuitems(continued)
Menuitem
SubmenuitemSelectionComments
PlatformMode
SecureBootMode•StandardMode
ResettoSetupMode
RestoreFactorykeys•Y es
ClearAllSecureBootKeys
•SetupMode
•UserMode
•CustomMode
•Y es
•No
•No
•Y es
•No
Specifythesystem
operatingmode.
Specifythesystem
operatingmode.
Thisoptionisusedtoclear
thecurrentplatformkey
andputthesysteminto
SetupMode.Youcan
installyourownplatform
keyandcustomizethe
SecureBootsignature
databasesinSetupMode.
SecureBootmodewillbe
settoCustomMode.
Thisoptionisusedto
restoreallkeysand
certificatesinSecure
Bootdatabasestofactory
defaults.Anycustomized
SecureBootsettings
willbeerased,andthe
defaultplatformkeywillbe
re-establishedalongwith
theoriginalsignature
databasesincluding
certificatefortheWindows
8.1operatingsystem.
Thisoptionisusedtoclear
allkeysandcertificatesin
SecureBootdatabases.
Youcaninstallyourown
keysandcertificatesafter
selectingthisoption.
Startupmenu
Tochangethestartupsettingsofyourcomputer,selecttheStartuptabfromtheThinkPadSetupmenu.
Attention:
•Afteryouchangethestartupsequence,ensurethatyouselectacorrectdeviceduringacopy,asave,ora
formatoperation.Otherwiseyourdatamightbeerasedoroverwritten.
•IfyouareusingtheBitLockerdriveencryption,donotchangethestartupsequence.BitLockerdrive
encryptionlocksthecomputerfromstartingoncedetectsthechangeofstartupsequence.
Tochangethestartupsequencetemporarilysothatthecomputerstartsfromadesireddrive,dothefollowing:
1.Restartthecomputer.WhentheThinkPadlogoisdisplayed,presstheF12key.
2.Selectthedevicethatyouwantthecomputertostartfrom.
Note:TheBootmenuwillbedisplayedifthecomputercannotstartfromanydevicesortheoperating
systemcannotbefound.
Chapter6.Advancedconfiguration73
Page 90

ThefollowingtableliststheStartupmenuitems.Defaultvaluesareinboldface.Themenuitemsmight
changewithoutnotice.Dependingonthemodel,thedefaultvaluemightvary.
Note:Someitemsaredisplayedonthemenuonlyifthecomputersupportsthecorrespondingfeatures.
Table4.Startupmenuitems
Menuitem
Boot
NetworkBoot
UEFI/LegacyBoot
SelectionComments
•Both
•UEFIOnly
•LegacyOnly
UEFI/LegacyBootPriority
•UEFIFirst
•LegacyFirst
CSMSupport(forUEFIOnly)
•No
•Y es
Selectthebootdevicewhenyou
pressthepowerbuttontoturnonthe
computer.
Selectthebootdevicewhenthe
computerwakesfromLAN.IfWake
OnLANisenabled,anetwork
administratorcanturnonallofthe
computersinaLANremotelybyuse
ofnetworkmanagementsoftware.
Selectsystembootcapability.
•Both:Selectpriorityofboot
optionsbetweenUEFIandLegacy.
•UEFIOnly:Thecomputerwillstart
fromtheUEFI-enabledoperating
system.
•LegacyOnly:Thecomputerwill
bootfromanyoperatingsystem
otherthantheUEFI-enabledone.
Note:IfyouselectUEFIOnly,the
computercannotstartfromthe
bootabledevicesthatdonothavethe
UEFI-enabledoperatingsystem.
BootMode
OptionKeyDisplay
CompatibilitySupportModule(CSM)
isrequiredforstartingthelegacy
operatingsystem.IfyouselectUEFI
Only,CSMSupportisselectable.
ForBothorLegacyOnlymode,CSM
Supportisnotselectable.
•Quick
•Diagnostics
•Disabled
•Enabled
ScreenduringthePOST:
•Quick:TheThinkPadLogoscreen
isdisplayed.
•Diagnostics:Testmessagesare
displayed.
Note:YoucanalsoenterDiagnostic
modebypressingEscduringPOST.
IfyouselectDisabled,thenthe
message“Tointerruptnormalstartup,
pressEnter”isnotdisplayedduring
thePOST.
74UserGuide
Page 91

Table4.Startupmenuitems(continued)
Menuitem
BootDeviceListF12Option
BootOrderLock
SelectionComments
•Disabled
•Enabled
•Disabled
•Enabled
IfyouselectEnabled,theF12key
isrecognizedandtheBootMenu
windowisdisplayed.
IfyouselectDisabled,yourcomputer
willbootusingthedefaultpriority.If
youselectEnabled,yourcomputer
willbootusingthepriorityyouhave
customized.
Restartmenu
ToexittheThinkPadSetupprogramandrestartthecomputer,selectRestartfromtheThinkPadSetupmenu.
Thefollowingsubmenuitemsaredisplayed:
•ExitSavingChanges:Savethechangesandrestartthecomputer.
•ExitDiscardingChanges:Discardthechangesandrestartthecomputer.
•LoadSetupDefaults:Restoretothefactorydefaultsettings.
Note:EnableOSOptimizedDefaultstomeettheWindows8orWindows10certificationrequirement.
Whenyouchangethissetting,someothersettingsarechangedautomatically,suchasCSMSupport,
UEFI/LegacyBoot,SecureBoot,andSecureRollBackPrevention.
•DiscardChanges:Discardthechanges.
•SaveChanges:Savethechanges.
UpdatingtheUEFIBIOS
TheUEFIBIOSisthefirstprogramthatthecomputerrunswhenthecomputeristurnedon.TheUEFIBIOS
initializesthehardwarecomponents,andloadstheoperatingsystemandotherprograms.
YoucanupdatetheUEFIBIOSbystartingyourcomputerfromaflashupdateopticaldiscoraflashupdate
programrunningintheWindowsenvironment.Whenyouinstallanewprogram,adevicedriver,orhardware,
youmightbeinformedtoupdatetheUEFIBIOS.
ForinstructionsonhowtoupdatetheUEFIBIOS,goto:
http://www.lenovo.com/ThinkPadDrivers
Usingsystemmanagement
Thistopicisprimarilyintendedforthenetworkadministrators.
Yourcomputerisdesignedformanageability,sothatyoucanredirectmoreresourcestobettermeet
yourbusinessobjectives.
Thismanageability,knownasTotalCostofOwnership(TCO),enablesyoutoremotelyoperateclient
computersinthesamewayasyouoperateyourowncomputer,suchasturningonaclientcomputer,
formattingaharddiskdriveorhybriddrive,andinstallingaprogram.
Oncethecomputerisconfiguredandoperational,youcanmanageitbyusingthesoftwareandthe
manageabilityfeaturesthatarealreadyintegratedintotheclientcomputerandthenetwork.
Chapter6.Advancedconfiguration75
Page 92

DesktopManagementInterface
TheUEFIBIOSofyourcomputersupportsaninterfacecalledSystemManagementBIOS(SMBIOS)
ReferenceSpecification,version2.7.1.SMBIOSprovidesinformationaboutthehardwarecomponentsof
yourcomputer.ItistheresponsibilityoftheUEFIBIOStoprovideinformationaboutitselfandthedeviceson
thesystemboard.ThisspecificationdocumentsthestandardsforgettingaccesstothisBIOSinformation.
PrebooteXecutionEnvironment
ThePrebooteXecutionEnvironment(PXE)technologymakesthecomputermoremanageablebyenablingthe
computertostartfromaserver.YourcomputersupportsthepersonalcomputerfunctionsthatPXErequires.
Note:TheRemoteInitialProgramLoad(RIPLorRPL)functioncannotbeusedwithyourcomputer.
AssetIDEEPROM
TheAssetIDEEPROMcontainsinformationaboutthecomputerconfigurationandtheserialnumbersof
thekeycomponents.Italsoincludesanumberofblankfieldswhereyoucanrecordinformationabout
theendusersinyournetwork.
76UserGuide
Page 93

Chapter7.Preventingproblems
AnimportantpartofowningaThinkPadnotebookcomputerismaintenance.Withpropercare,youcan
avoidcommonproblems.Thechapterprovidesinformationthatcanhelpyoukeepyourcomputerrunning
smoothly.
•“Generaltipsforpreventingproblems”onpage77
•“Makingsuredevicedriversarecurrent”onpage78
•“Takingcareofyourcomputer”onpage79
Generaltipsforpreventingproblems
•Checkthecapacityofyourharddiskdriveorhybriddrivefromtimetotime.Iftheharddiskdriveorhybrid
drivegetstoofull,theWindowsoperatingsystemwillslowdownandmightproduceerrors.
Tochecktheharddiskdriveorhybriddrivecapacity,dothefollowing:
–Windows7:OpentheStartmenuandclickComputer.
–Windows8.1:OpentheFileExplorerandclickComputer.
–Windows10:OpentheFileExplorerandclickThisPC.
•Emptyyourrecyclebinonaregularbasis.
•Usediskdefragmenttoolregularlyonyourharddiskdriveorhybriddrivetoimprovedataseekand
readtimes.
•Tofreeupdiskspace,uninstallunusedapplicationprograms.
Note:Y oualsomightwanttolookforprogramduplicationoroverlappingversions.
•CleanoutyourInbox,Sent,andTrashfoldersfromyoure-mailclientprogram.
•Backupyourdataatleastonceaweek.Ifcriticaldataispresent,itisagoodideatoperformadaily
backupoperation.Lenovohasmanybackupoptionsavailableforyourcomputer.Rewritableoptical
drivesareavailableformostmachinesandareeasilyinstalled.
•Schedulesystemrestoreoperationstotakeasystemsnapshotperiodically.Formoreinformationabout
systemrestore,seeChapter9“Recoveryoverview”onpage103.
•UpdatedevicedriversandtheUEFIBIOSwhenneeded.
•Profileyourmachineathttp://www.lenovo.com/supporttokeepuptodatewithcurrentdriversand
revisions.
•Keepuptodatefordevicedriversonothernon-Lenovohardware.Youmightwanttoreadthedevice
driverinformationreleasenotespriortoupdatingforcompatibilityorknownissues.
•Keepalogbook.Entriesmightincludemajorhardwareorsoftwarechanges,driverupdates,minorissues
youhaveexperienced,andhowyouresolvedtheminorissues.
•Ifyoueverneedtorunarecoveryonyourcomputertoreturnthepreinstalledcontentsontothemachine,
thefollowingtipsmighthelpalongtheway:
–Removeallexternaldevicessuchastheprinter,keyboard,andsoon.
–Makesurethatyourbatteryischargedandyourcomputerhastheacpowerconnected.
–AccessThinkPadSetupandloadthedefaultsettings.
–Restartthecomputerandstarttherecoveryoperation.
–Ifyourcomputerusesdiscsastherecoverymedia,donotremovethediscfromthedriveuntil
promptedtodoso.
©CopyrightLenovo2014,2016
77
Page 94

•Forsuspectedharddiskdriveorhybriddriveissues,referto“Diagnosingproblems”onpage83andruna
diagnostictestforthedrivebeforeyoucalltheCustomerSupportCenter.Ifyourcomputerdoesnot
startup,downloadthefilestocreateabootableself-testmediumfromhttp://www.lenovo.com/hddtest.
Runthetestandrecordanymessagesorerrorcodes.Ifthetestreturnsanyfailingerrorcodesor
messages,calltheCustomerSupportCenterwiththecodesormessagesandthecomputerinfrontof
you.Atechnicianwillassistyoufurther.
•Ifrequired,youcanfindthecontactinformationabouttheCustomerSupportCenterforyourcountry
orregionathttp://www.lenovo.com/support/phone.WhencallingtheCustomerSupportCenter,make
surethatyouhaveyourmachinemodeltype,serialnumber,andthecomputerinfrontofyou.Also,ifthe
computerisproducingerrorcodes,itishelpfultohavetheerrorscreenonorthemessageswrittendown.
Makingsuredevicedriversarecurrent
Devicedriversareprogramsthatcontaininstructionsfortheoperatingsystemabouthowtooperateor
“drive”acertainpieceofhardware.Eachhardwarecomponentonyourcomputerhasitsownspecificdriver.
Ifyouaddanewcomponent,theoperatingsystemneedstobeinstructedonhowtooperatethatpiece
ofhardware.Afteryouinstallthedriver,theoperatingsystemcanrecognizethehardwarecomponent
andunderstandhowtouseit.
Note:Becausedriversareprograms,likeanyotherfileonyourcomputer,theyaresusceptibletocorruption
andmightnotperformcorrectlyifcorruptionoccurs.
Itisnotalwaysnecessarytodownloadthelatestdrivers.However,youshoulddownloadthelatestdriver
foracomponentifyounoticepoorperformancefromthatcomponentorifyouaddedanewcomponent.
Thismighteliminatethedriverasthepotentialcauseofaproblem.
GettingthelatestdriversfromtheWebsite
YoucandownloadandinstallupdateddevicedriversfromtheLenovoWebsitebydoingthefollowing:
1.Gotohttp://www.lenovo.com/ThinkPadDrivers.
2.Selecttheentryforyourcomputerandthenfollowtheinstructionsonthescreentodownloadand
installnecessarysoftware.
GettingthelatestdriversusingSystemUpdate
TheSystemUpdateprogramhelpsyoukeepthesoftwareonyourcomputerup-to-date.Updatepackages
arestoredonLenovoserversandcanbedownloadedfromtheLenovoSupportWebsite.Updatepackages
cancontainapplications,devicedrivers,UEFIBIOSflashes,orsoftwareupdates.WhentheSystemUpdate
programconnectstotheLenovoSupportWebsite,theSystemUpdateprogramautomaticallyrecognizes
themachinetypeandmodelofyourcomputer,theinstalledoperatingsystem,andthelanguageofthe
operatingsystemtodeterminewhatupdatesareavailableforyourcomputer.TheSystemUpdateprogram
thendisplaysalistofupdatepackagesandcategorizeseachupdateascritical,recommended,oroptionalto
helpyouunderstandtheimportance.Y ouhavecompletecontrolofwhichupdatestodownloadandinstall.
Afteryouselecttheupdatepackagesyouwant,theSystemUpdateprogramautomaticallydownloadsand
installstheupdateswithoutanyfurtherinterventionfromyou.
TheSystemUpdateprogramispreinstalledonyourcomputerandisreadytorun.Theonlyprerequisiteis
anactiveInternetconnection.Youcanstarttheprogrammanually,oryoucanusetheschedulefeature
toenabletheprogramtosearchforupdatesautomaticallyatspecifiedintervals.Youalsocanpredefine
scheduledupdatestosearchbyseverity(criticalupdates,criticalandrecommendedupdates,orallupdates)
sothelistyouchoosefromcontainsonlythoseupdatetypesthatareofinteresttoyou.
FormoreinformationabouthowtousetheSystemUpdateprogram,refertothehelpinformationsystem
oftheprogram.
78UserGuide
Page 95

Takingcareofyourcomputer
Althoughyourcomputerisdesignedtofunctionreliablyinnormalworkenvironments,youneedtouse
commonsenseinhandlingit.Byfollowingtheimportanttipsinthistopic,youwillgetthemostuseand
enjoymentoutofyourcomputer.
Becarefulaboutwhereandhowyouwork
•Storepackingmaterialssafelyoutofthereachofchildrentopreventtheriskofsuffocationfromplastic
bags.
•Keepyourcomputerawayfrommagnets,activatedcellularphones,electricalappliances,orspeakers
(morethan13cmor5inches).
•Avoidsubjectingyourcomputertoextremetemperatures(below5°C/41°Forabove35°C/95°F).
•Someappliances,suchascertainportabledesktopfansorairpurifiers,canproducenegativeions.Ifa
computerisclosetosuchanappliance,andisexposedforanextendedtimetoaircontainingnegative
ions,itmightbecomeelectrostaticallycharged.Suchachargemightbedischargedthroughyourhands
whenyoutouchthekeyboardorotherpartsofthecomputer,orthroughconnectorsonI/Odevices
connectedtoit.Eventhoughthiskindofelectrostaticdischarge(ESD)istheoppositeofadischargefrom
yourbodyorclothingtothecomputer,itposesthesameriskofacomputermalfunction.
Yourcomputerisdesignedandmanufacturedtominimizeanyeffectsofelectrostaticcharge.Anelectrostatic
chargeaboveacertainlimit,however,canincreasetheriskofESD.Therefore,whenusingthecomputer
closetoanappliancethatcanproducenegativeions,givespecialattentiontothefollowing:
•Avoiddirectlyexposingyourcomputertotheairfromanappliancethatcanproducenegativeions.
•Keepyourcomputerandperipheralsasfaraspossiblefromsuchanappliance.
•Whereverpossible,groundyourcomputertofacilitatesafeelectrostaticdischarge.
Note:Notallsuchappliancescauseasignificantelectrostaticcharge.
Begentlewithyourcomputer
•Avoidplacinganyobjects(includingpaper)betweenthedisplayandthekeyboardorthepalmrest.
•Yourcomputerdisplayisdesignedtobeopenedandusedatanangleslightlygreaterthan90degrees.
Donotopenthedisplaybeyond135degrees,asthismightdamagethecomputerhinge.
•Donotturnyourcomputeroverwhiletheacpoweradapterispluggedin.Thiscouldbreaktheadapter
plug.
Carryyourcomputerproperly
•Beforemovingyourcomputer,besuretoremoveanymedia,turnoffattacheddevices,anddisconnect
cordsandcables.
•Whenpickingupyouropencomputer,holditbythebottom.Donotpickuporholdyourcomputerby
thedisplay.
Handlestoragemediaanddrivesproperly
•Ifyourcomputercomeswithanopticaldrive,donottouchthesurfaceofadiscorthelensonthetray.
•WaituntilyouheartheCDorDVDclickintothecenterpivotofthedrivebeforeclosingthetray.
•Wheninstallingthestoragedriveoropticaldrive,followtheinstructionsshippedwithyourhardware,and
applypressureonlywhereneededonthedevice.
•Afteryoureplacetheprimarystoragedrive,reattachthecoverofthedriveslot.
•Whenreplacingthestoragedrive,reattachthecoverofthedriveslot.
Chapter7.Preventingproblems79
Page 96

•Storeyourexternalandremovablestoragedriveoropticaldrivesintheappropriatecontainersor
packagingwhentheyarenotbeingused.
•Beforeyouinstallanyofthefollowingdevices,touchametaltableoragroundedmetalobject.Thisaction
reducesanystaticelectricityfromyourbody.Thestaticelectricitycoulddamagethedevice.
•Whiletransferringdatatoorfromaflashmediacard,suchasanSDcard,donotputyourcomputerin
sleeporhibernationmodebeforethedatatransferiscomplete.Todosomightcausedamagetoyour
data.
Takingcarewhensettingpasswords
•Rememberyourpasswords.Ifyouforgetasupervisororharddiskpassword,Lenovowillnotresetit,
andyoumighthavetoreplaceyoursystemboardorstoragedrive.
Takingcareofthefingerprintreader
Thefollowingactionscoulddamagethefingerprintreaderorcauseitnottoworkproperly:
•Scratchingthesurfaceofthefingerprintreaderwithahard,pointedobject.
•Scrapingthesurfaceofthefingerprintreaderwithyourfingernailoranythinghard.
•Usingortouchingthefingerprintreaderwithadirtyfinger.
Ifyounoticeanyofthefollowingconditions,gentlycleanthesurfaceofthefingerprintreaderwithadry,
soft,lint-freecloth:
•Thesurfaceofthefingerprintreaderisdirtyorstained.
•Thesurfaceofthefingerprintreaderiswet.
•Thefingerprintreaderoftenfailstoenrollorauthenticateyourfingerprint.
Registeringyourcomputer
•RegisteryourThinkPadcomputerwithLenovoathttp://www.lenovo.com/register.Formoreinformation,
see“Registeringyourcomputer”onpage17.
Besurenottomodifyyourcomputer
•OnlyanauthorizedThinkPadrepairtechnicianshoulddisassembleandrepairyourcomputer.
•Donotmodifyortapethelatchestokeepthedisplayopenorclosed.
Cleaningthecoverofyourcomputer
Occasionallycleanyourcomputerbydoingthefollowing:
1.Prepareamixtureofagentlekitchen-usedetergent.Thedetergentmustnotcontainabrasivepowderor
strongchemicalssuchasacidoralkaline.Usefivepartswatertoonepartdetergent.
2.Absorbthediluteddetergentintoasponge.
3.Squeezeexcessliquidfromthesponge.
4.Wipethecoverwiththesponge,usingacircularmotionandtakingcarenottoletanyexcessliquiddrip.
5.Wipethesurfacetoremovethedetergent.
6.Rinsethespongewithcleanrunningwater.
7.Wipethecoverwiththecleansponge.
8.Wipethesurfaceagainwithadry,soft,lint-freecloth.
9.Waitforthesurfacetodrycompletelyandremoveanyfibersfromthecloth.
80UserGuide
Page 97

Cleaningyourcomputerkeyboard
Tocleanthecomputerkeyboard,dothefollowing:
1.Applysomeisopropylrubbingalcoholtoasoft,dust-freecloth.
Note:Avoidsprayingcleanerdirectlyontothekeyboard.
2.Wipeeachkeytopsurfacewiththecloth.Wipethekeysonebyone;ifyouwipeseveralkeysatatime,
theclothmighthookontoanadjacentkeyandpossiblydamageit.Makesurethatnoliquiddripsonto
orbetweenthekeys.
3.Allowtodry.
4.Toremoveanycrumbsordustfrombeneaththekeys,youcanuseacamerablowerwithabrush
orcoolairfromahairdryer.
Cleaningyourcomputerdisplay
Tocleanthecomputerdisplay,dothefollowing:
1.Gentlywipethedisplaywithadry,softlint-freecloth.Ifyouseeascratchlikemarkonyourdisplay,it
mightbeastaintransferredfromthekeyboardortheTrackPointpointingstickwhenthecoverwas
pressedfromtheoutside.
2.Wipeordustthestaingentlywithasoft,drycloth.
3.Ifthestainremains,moistenasoft,lint-freeclothwithwaterora50-50mixtureofisopropylalcoholand
waterthatdoesnotcontainimpurities.
Note:Avoidsprayingcleanerdirectlyontothekeyboard.
4.Wringoutasmuchoftheliquidasyoucan.
5.Wipethedisplayagain;donotletanyliquiddripintothecomputer.
6.Besuretodrythedisplaybeforeclosingit.
Chapter7.Preventingproblems81
Page 98

82UserGuide
Page 99

Chapter8.Troubleshootingcomputerproblems
Thischapterprovidesinformationaboutwhattodoifyouexperienceaproblemwithyourcomputer.
•“Diagnosingproblems”onpage83
•“Troubleshooting”onpage83
Diagnosingproblems
Ifyouexperienceproblemswithyourcomputer,usetheLenovoSolutionCenterprogramasastarting
pointforsolvingthem.
TheLenovoSolutionCenterprogramenablesyoutotroubleshootandresolvecomputerproblems.It
combinesdiagnostictests,systeminformationcollection,securitystatus,andsupportinformation,along
withhintsandtipsforoptimalsystemperformance.
Notes:
•TheLenovoSolutionCenterprogramalsoisavailablefordownloadedat:
http://www.lenovo.com/diags
•IfyouareusingotherWindowsoperatingsystemratherthanWindows7,Windows8.1,orWindows10,
youcanfindthelatestinformationaboutdiagnosticsforyourcomputerat:
http://www.lenovo.com/diagnose
Whenyouaresettingupyourcomputer,theLenovoSolutionCenterprogrampromptsyoutocreaterecovery
media.Y oucanusetherecoverymediatorestoretheharddiskdriveorhybriddrivetothefactorydefault
state.Formoreinformation,see“Creatingandusingarecoverymedia”onpage103.
ToruntheLenovoSolutionCenterprogram,see“AccessingLenovoprograms”onpage14.
Foradditionalinformation,refertotheLenovoSolutionCenterhelpsystem.
Note:IfyouareunabletoisolateandrepairtheproblemyourselfafterrunningLenovoSolutionCenter
program,saveandprintthelogfilescreatedbytheprogram.Youwillneedthelogfileswhenyouspeaktoa
Lenovotechnicalsupportrepresentative.
Troubleshooting
Ifyourcomputerhasanerror,ittypicallydisplaysamessageoranerrorcode,ormakesabeepwhen
youturniton.Whenyouexperienceaproblem,refertothecorrespondingsectionsinthistopictotryto
solvetheproblembyyourself.
Computerstopsresponding
Printtheseinstructionsnowandkeepitwithyourcomputerforreferencelater.
Ifyourcomputeriscompletelyunresponsive(youcannotusetheThinkPadpointingdeviceorthekeyboard),
dothefollowing:
1.PressandholdthepowerbuttononeitheryourcomputerortheconnectedThinkPadOneLinkDockor
ThinkPadOneLinkProDock(hereinaftercalledthedock)untilthecomputerturnsoff.Afterthecomputer
isturnedoff,restartbypressingthepowerbutton.Ifthecomputerdoesnotturnon,continuewithstep2.
©CopyrightLenovo2014,2016
83
Page 100

Note:Donotremovethebatteryandtheacpoweradapterorthebatteryandthedocktoresetthe
computer.
2.Whilethecomputeristurnedoff,removeallpowersourcesfromthecomputer(batteryandtheac
poweradapterorbatteryandthedock).Holddownthepowerbuttonfor10seconds.Plugintheac
poweradapterorthedockwhilekeepingthebatteryoutofthecomputer.Ifthecomputerdoesnotturn
backon,continuewithstep3.
Note:OncethecomputerstartsupandenterstheWindowsenvironment,usethepropershutdown
proceduretoturnthecomputeroff.Oncethecomputerisoff,reattachthebatteryandrestartthe
computer.Ifthecomputerdoesnotstartwiththebatteryreattached,removethebatteryandagain
startwithstep2.Ifthecomputerstartswithacpowerbutdoesnotstartwhenthebatteryisattached,
calltheCustomerSupportCenterforsupport.
3.Whilethecomputerisoff,removeallsourcesofpower(batteryandtheacpoweradapterorbatteryand
thedock).Removeallexternaldevicesthatareattachedtoyourcomputer(keyboard,mouse,printer,
scanner,andsoon).Repeatstep2.Ifstep2isunsuccessful,continuewithstep4.
Note:Thefollowingstepsinvolveremovingstaticsensitivecomponentsfromyourcomputer.Makesure
thatyouareproperlygroundedandremoveallsourcesofpowerattachedtothecomputer.Ifyouare
uncomfortableorunsureaboutremovingcomponents,calltheCustomerSupportCenterforassistance.
4.Whilethecomputerisoff,removeallsourcesofpowerandexternalhardware.Removeanynon-original
memorymoduleaddedtoyourcomputer.Afterremovingtheextramemorymoduleandreinstallingthe
originalmemorymodule,repeatstep2.Ifthecomputerstilldoesnotturnon,consulttheusermanual
forothercustomer-replaceablecomponentsthatareattachedtoyourcomputer.
Ifthecomputerstilldoesnotstartup,calltheCustomerSupportCenterandaCustomerSupportSpecialist
willassistyou.
Spillsonthekeyboard
Withamobilecomputer,thereareincreasedchancesofspillingliquidsonthekeyboard.Becausemost
liquidsconductelectricity,liquidspilledonthekeyboardcouldcreatenumerousshortcircuits,potentially
causingirreparabledamagetoyourcomputer.
Ifyouspillsomethingonyourcomputer:
Attention:Besurethatnoliquidcreatesashortcircuitbetweenyouandtheacpoweradapter(ifinuse).
Althoughyoumightlosesomedataorworkbyturningoffthecomputerimmediately,leavingthecomputer
onmightmakeyourcomputerunusable.
1.Carefullyunplugtheacpoweradapterimmediately.
2.Turnoffthecomputerimmediately.Ifthecomputerdoesnotturnoff,removethebattery.Themore
quicklyyoustopthecurrentfrompassingthroughthecomputerthemorelikelyyouwillreducedamage
fromshortcircuits.
3.Waituntilyouarecertainthatalltheliquidisdrybeforeturningonyourcomputer.
Note:Ifyouwanttoreplaceyourkeyboard,youcanpurchaseanewone.
Errormessages
•Message:0177:BadSVPdata,stopPOSTtask.
Solution:ChecksumofthesupervisorpasswordintheEEPROMisnotcorrect.Thesystemboard
shouldbereplaced.Havethecomputerserviced.
•Message:0183:BadCRCofSecuritySettingsinEFIVariable.EnterThinkPadSetup.
84UserGuide
 Loading...