

Lenovo ThinkCentre 3114, ThinkCentre 3121, ThinkCentre 3123, ThinkCentre 3127 User Guide [en, ar, bg, cs, de, el, es, fr, he, hu, id, it, ko, pl, pt, ro, ru, sk, sl, sr, tr, uk, zc, zh]
Page 1

ThinkCentre
UserGuide
MachineTypes:3114,3121,3123,and3127
Page 2

Note:Beforeusingthisinformationandtheproductitsupports,besuretoreadandunderstandthe
ThinkCentreSafetyandWarrantyGuideandAppendixA“Notices”onpage77.
SecondEdition(December2011)
©CopyrightLenovo2011.
LIMITEDANDRESTRICTEDRIGHTSNOTICE:IfdataorsoftwareisdeliveredpursuantaGeneralServicesAdministration
“GSA”contract,use,reproduction,ordisclosureissubjecttorestrictionssetforthinContractNo.GS-35F-05925.
Page 3

Contents
Importantsafetyinformation.....iii
Chapter1.Productoverview......1
Features..................1
Specications................4
Softwareoverview..............4
SoftwareprovidedwithyourWindows
operatingsystem.............4
Locations..................6
Locatingconnectors,controls,andindicators
onthefrontofyourcomputer........7
Locatingconnectorsandpartsontherearof
yourcomputer..............7
Locatingcomponents...........9
Locatingpartsonthesystemboard.....9
Locatinginternaldrives.........10
Chapter2.Installingorreplacing
hardware...............13
Handlingstatic-sensitivedevices.......13
Installingorreplacinghardware........13
Installingexternaloptions........14
Removingthecomputercover.......14
Removingandreinstallingthefrontbezel..15
InstallingorreplacingaPCIcard......16
Installingorreplacingamemorymodule...19
Installingorreplacingtheopticaldrive...21
Installingorreplacingthecardreader....24
Replacingthebattery..........28
Replacingthepowersupplyassembly...29
Replacingtheheatsinkandfanassembly..31
Replacingthemicroprocessor.......33
Replacingtheprimaryharddiskdrive....35
Replacingthesecondaryharddiskdrive...37
Replacingthefrontfanassembly.....39
Replacingtherearfanassembly......41
ReplacingthefrontaudioandUSB
assembly...............43
Replacingtheinternalspeaker.......44
Replacingthekeyboard.........46
Replacingthemouse..........47
Completingthepartsreplacement.....48
Obtainingdevicedrivers...........49
Basicsecurityfeatures...........49
Integratedcablelock..........49
Padlock...............50
Passwordprotection..........50
Erasingalostorforgottenpassword(clearing
CMOS)................50
Chapter3.Recoveryinformation...53
Creatingandusingrecoverymedia......53
Creatingrecoverymedia.........53
Usingrecoverymedia..........54
Performingbackupandrecoveryoperations...54
Performingabackupoperation......54
Performingarecoveryoperation......55
UsingtheRescueandRecoveryworkspace...55
Creatingandusingarescuemedium......56
Creatingarescuemedium........56
Usingarescuemedium.........56
Installingorreinstallingdevicedrivers.....57
Solvingrecoveryproblems..........58
Chapter4.UsingtheSetupUtility
program................59
StartingtheSetupUtilityprogram.......59
Viewingorchangingsettings.........59
Usingpasswords..............59
Passwordconsiderations.........60
Power-onpassword...........60
Administratorpassword.........60
Setting,changing,ordeletingapassword..60
Enablingordisablingadevice........60
Selectingastartupdevice..........61
Selectingatemporarystartupdevice....61
Viewingorchangingthestartupdevice
sequence...............61
ExitingtheSetupUtilityprogram.......62
Chapter5.Updatingsystem
programs...............63
Usingsystemprograms...........63
Updating(ashing)theBIOSfromadisc....63
Updating(ashing)theBIOSfromyouroperating
system..................64
RecoveringfromaPOSTandBIOSupdate
failure..................64
Chapter6.Troubleshootingand
diagnosticprograms.........67
Basictroubleshooting............67
Diagnosticprograms............68
LenovoSolutionCenter.........68
LenovoThinkVantageT oolbox.......69
©CopyrightLenovo2011
i
Page 4

PC-DoctorforDOS...........69
Cleaningthemouse............70
Opticalmouse.............70
Non-opticalmouse...........70
Chapter7.Gettinginformation,help,
andservice..............73
Informationresources............73
OnlineBooksfolder...........73
LenovoThinkVantageT ools........73
LenovoWelcome............74
AccessHelp..............74
Safetyandwarranty...........74
LenovoWebsite(http://www.lenovo.com)..74
LenovoSupportWebsite.........74
Helpandservice..............75
Usingthedocumentationanddiagnostic
programs...............75
Callingforservice............75
Usingotherservices..........76
Purchasingadditionalservices......76
AppendixA.Notices..........77
Televisionoutputnotice...........78
EuropeanconformanceCEmark.......78
RecyclinginformationforBrazil........78
BatteryrecyclinginformationforT aiwan.....78
BatteryrecyclinginformationfortheEuropean
Union..................78
Trademarks................79
Index..................81
iiThinkCentreUserGuide
Page 5

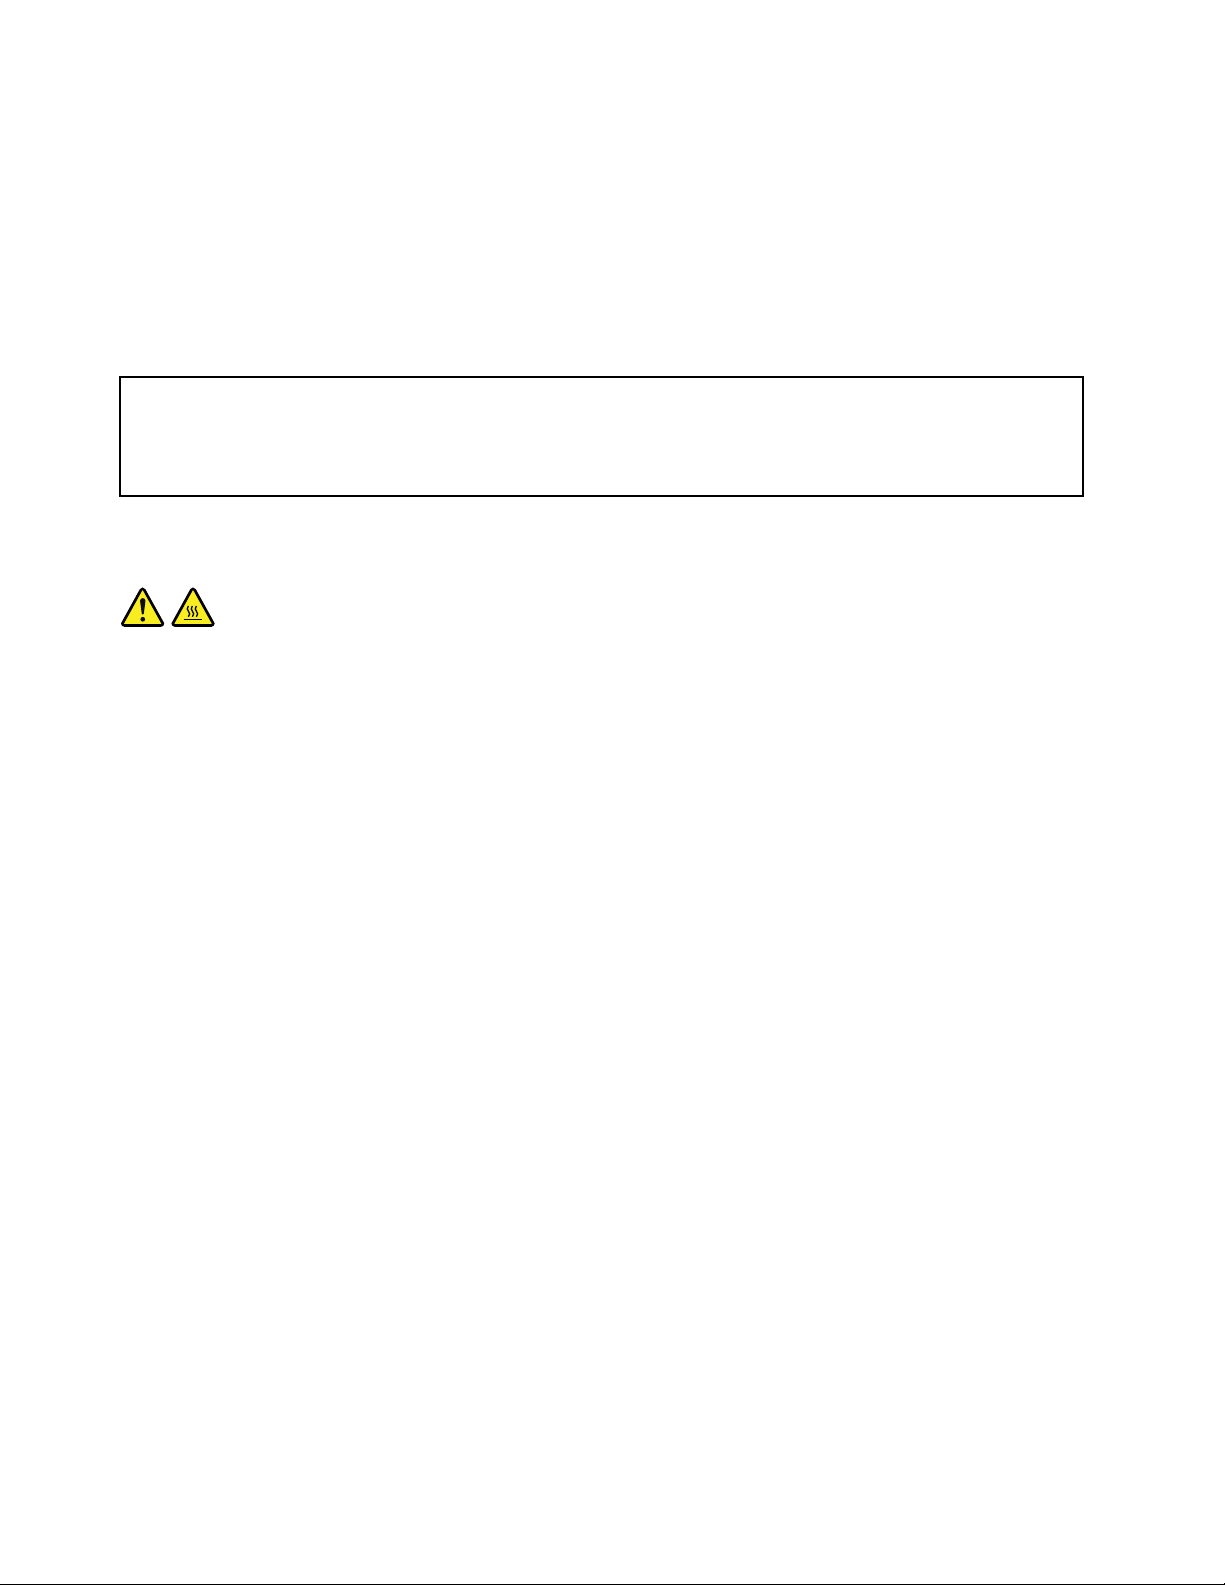
Importantsafetyinformation
CAUTION:
Beforeusingthismanual,besuretoreadandunderstandalltherelatedsafetyinformationforthis
product.RefertotheThinkCentreSafetyandWarrantyGuidethatyoureceivedwiththisproductfor
thelatestsafetyinformation.Readingandunderstandingthissafetyinformationreducestheriskof
personalinjuryandordamagetoyourproduct.
IfyounolongerhaveacopyoftheThinkCentreSafetyandWarrantyGuide,youcanobtainaPortable
DocumentFormat(PDF)versionfromtheLenovo
http://www.lenovo.com/support
®
SupportWebsiteat:
©CopyrightLenovo2011
iii
Page 6

ivThinkCentreUserGuide
Page 7

Chapter1.Productoverview
Thischapterprovidesinformationaboutthecomputerfeatures,specications,softwareprogramsprovided
byLenovo,andlocationsofconnectors,components,partsonthesystemboard,andinternaldrives.
Thischaptercontainsthefollowingtopics:
•“Features”onpage1
•“Specications”onpage4
•“Softwareoverview”onpage4:Thissectionprovidesinformationaboutthesoftwareprogramsprovided
withyourcomputer.
•“Locations”onpage6:Thissectionprovidesinformationtohelpyoulocateyourcomputerconnectors,
components,partsonthesystemboard,andinternaldrives.
:Thissectionprovidesinformationaboutthecomputerfeatures.
:Thissectionliststhephysicalspecicationsforyourcomputer.
Features
Thissectionprovidesinformationaboutthecomputerfeatures.
Systeminformation
Thefollowinginformationcoversavarietyofmodels.Forinformationaboutyourspecicmodel,usethe
SetupUtilityprogram.SeeChapter4“UsingtheSetupUtilityprogram”onpage59
Microprocessor
Yourcomputercomeswithoneofthefollowingmicroprocessors(internalcachesizevariesbymodeltype):
•AMD
•AMDPhenom™IImicroprocessor
•AMDSempron™microprocessor
®
Athlon™IImicroprocessor
.
Memorymodule(s)
Yourcomputersupportsuptofourdoubledatarate3dualinlinememorymodules(DDR3DIMMs).
Internaldrives
•Cardreader(availableinsomemodels)
•Opticaldrive:DVD-ROMorDVD-R(optional)
•SerialAdvancedT echnologyAttachment(SA TA)harddiskdrive
Videosubsystem
•IntegratedgraphicscardfunctioningthroughaVideoGraphicsArray(VGA)connectororaDigitalVisual
Interface(DVI)connector
•PeripheralComponentInterconnect(PCI)Expressx16graphicscardslotonthesystemboardfora
discretegraphicscard
Audiosubsystem
•Integratedhigh-denition(HD)audio
•Headphoneconnectorandmicrophoneconnectoronthefrontpanel
©CopyrightLenovo2011
1
Page 8

•Audioline-inconnector,audioline-outconnector,andmicrophoneconnectorontherearpanel
•Internalspeaker(availableinsomemodels)
Connectivity
10/100/1000MbpsintegratedEthernetcontroller
Systemmanagementfeatures
•Abilitytostorethepower-onself-test(POST)hardwaretestresults
•AdvancedCongurationandPowerInterface(ACPI)
•Automaticpower-onstartup
•DesktopManagementInterface(DMI)
•PrebootExecutionEnvironment(PXE)
•SystemManagement(SM)BasicInput/OutputSystem(BIOS)andSMsoftware
•WakeonLAN(WOL)
•WindowsManagementInstrumentation(WMI)(WMIistheinfrastructureformanagementdataand
operationsonWindowsoperatingsystems.)
Input/Output(I/O)features
•9-pinserialport(onestandardandoneoptional)
•25-pinparallelport(optionalthroughyourPCIcardinsomemodels)
•Ethernetconnector
•PS/2keyboardconnector
•PS/2mouseconnector
•SixUniversalSerialBus(USB)2.0connectors(twoonthefrontpanelandfourontherearpanel;there
mightalsobetwooptionalUSBconnectorsontherearpanel)
•T woaudioconnectorsonthefrontpanel(headphoneconnectorandmicrophoneconnector)
•Threeaudioconnectorsontherearpanel(audioline-inconnector,audioline-outconnector,and
microphoneconnector)
•VGAmonitorconnectorandDVImonitorconnector
Formoreinformation,referto“Locatingconnectors,controls,andindicatorsonthefrontofyourcomputer”
onpage7
and“Locatingconnectorsandpartsontherearofyourcomputer”onpage7.
Expansion
•Oneopticaldrivebay
•Oneslimcardreaderdrivebay
•OnePCIcardslot
•OnePCIExpressx16graphicscardslot
•T woharddiskdrivebays(onestandardandoneoptional)
•T woPCIExpressx1cardslots
Powersupply
Yourcomputercomeswithoneofthefollowingpowersupplies:
•280-wattpowersupplywithmanualvoltage-selectionswitch
2ThinkCentreUserGuide
Page 9

•280-wattautomaticvoltage-sensingpowersupply
•320-wattautomaticvoltage-sensingpowersupply
Securityfeatures
•Apower-onpasswordandanadministratorpasswordtodeterunauthorizeduseofyourcomputer
•Computrace
•Coverpresenceswitch(alsocalledintrusionswitch)(availableinsomemodels)
•EnablingordisablingSATAdevices
•Enablingordisablingtheserialport
•EnablingordisablingUSBconnectors
•Keyboardwithngerprintreader(shippedwithsomemodels)
•Startupsequencecontrol
•Startupwithoutkeyboardormouse
•Supportfortheadditionofanintegratedcablelock(Kensingtonlock.See“Integratedcablelock”on
page49
formoreinformation.)
•Supportfortheadditionofapadlock(see“Padlock”onpage50formoreinformation)
Preinstalledoperatingsystem
YourcomputerispreinstalledwiththeMicrosoft
Operatingsystem(s),certiedortestedforcompatibility
•Linux
®
®
Windows
®
7operatingsystem.
1
(variesbymodeltype)
1.Theoperatingsystem(s)listedherearebeingcertiedortestedforcompatibilityatthetimethispublicationgoesto
press.AdditionaloperatingsystemsmightbeidentiedbyLenovoascompatiblewithyourcomputerfollowingthe
publicationofthismanual.Thislistissubjecttochange.Todetermineifanoperatingsystemhasbeencertiedor
testedforcompatibility,checktheWebsiteoftheoperatingsystemvendor.
Chapter1.Productoverview3
Page 10

Specications
Thissectionliststhephysicalspecicationsforyourcomputer.
Dimensions
Width:175mm(6.89inches)
Height:402mm(15.83inches)
Depth:440mm(17.32inches)
Weight
Maximumcongurationasshipped:11kg(24.25lb)
Environment
•Airtemperature:
Operating:10°Cto35°C(50°Fto95°F)
Non-operating:-40°Cto60°C(-40°Fto140°F)
Non-operating:-10°Cto60°C(14°Fto140°F)(withoutpackage)
•Humidity:
Operating:20%to80%(non-condensing)
Non-operating:20%to90%(non-condensing)
•Altitude:
Operating:-50to10000ft(-15.2to3048m)
Non-operating:-50to35000ft(-15.2to10668m)
Electricalinput
•Inputvoltage:
–Lowrange:
Minimum:100Vac
Maximum:127Vac
Inputfrequencyrange:50to60Hz
Voltage-selectionswitchsetting:115Vac
–Highrange:
Minimum:200Vac
Maximum:240Vac
Inputfrequencyrange:50to60Hz
Voltage-selectionswitchsetting:230Vac
Softwareoverview
Thecomputercomeswithapreinstalledoperatingsystemandseveralsoftwareprogramsprovidedby
Lenovo.
SoftwareprovidedwithyourWindowsoperatingsystem
ThissectionprovidesinformationaboutthesoftwareprovidedwithyourWindowsoperatingsystem.
4ThinkCentreUserGuide
Page 11

SoftwareprovidedbyLenovo
ThefollowingsoftwareprogramsareprovidedbyLenovotohelpyouimproveproductivityandreducethe
costassociatedwithmaintainingyourcomputer.Softwareprogramsprovidedwithyourcomputermight
varydependingonyourmodeltypeandpreinstalledoperatingsystem.
LenovoThinkVantageT ools
TheLenovoThinkVantage
accesstovarioustoolstohelpyouworkmoreeasilyandsecurely.Formoreinformation,see“Lenovo
ThinkVantageTools”onpage73
LenovoWelcome
TheLenovoWelcomeprogramintroducessomeinnovativebuilt-infeaturesofLenovotoyouandguidesyou
throughsomeimportantsetuptaskstohelpyoumakethemostofyourcomputer.
ProductRecovery
TheProductRecoveryprogramenablesyoutorestorethecontentsoftheharddiskdrivetothefactory
defaultsettings.
ThinkVantageRescueandRecovery
TheThinkVantageRescueandRecovery®programisaonebuttonrecoveryandrestoresolutionthat
includesasetofself-recoverytoolstohelpyoudiagnosecomputerproblems,gethelp,andrecoverfrom
systemcrashes,evenifyoucannotstarttheWindowsoperatingsystem.
Note:IftheEnhancedBackupandRestoreiconintheLenovoThinkVantageToolsprogramisdimmed,it
indicatesthatyouneedtoinstalltheRescueandRecoveryprogrammanuallybeforeenablingitsfeatures.T o
installtheRescueandRecoveryprogram,dothefollowing:
1.ClickStart➙AllPrograms➙LenovoThinkVantageT ools,anddouble-clickEnhancedBackup
andRestore.
2.Followtheinstructionsonthescreen.
3.Whentheinstallationprocesscompletes,theEnhancedBackupandRestoreiconisactivated.
®
Toolsprogramguidesyoutoahostofinformationsourcesandprovideseasy
.
PasswordManager
ThePasswordManagerprogramautomaticallycapturesandllsinauthenticationinformationforWindows
applicationsandWebsites.
Note:IfthePasswordVaulticonintheLenovoThinkVantageToolsprogramisdimmed,itindicatesthat
youneedtoinstallthePasswordManagerprogrammanuallybeforeenablingitsfeatures.Toinstallthe
PasswordManagerprogram,dothefollowing:
1.ClickStart➙AllPrograms➙LenovoThinkVantageTools,anddouble-clickPasswordVault.
2.Followtheinstructionsonthescreen.
3.Whentheinstallationprocesscompletes,thePasswordVaulticonisactivated.
PowerManager
ThePowerManagerprogramprovidesconvenient,exible,andcompletepowermanagementforyour
ThinkCentre®computer.ByusingthePowerManagerprogram,youcanadjustyourpowersettingsto
achievethebestbalancebetweensystemperformanceandpowersaving.
ThinkVantageSystemUpdate
TheThinkVantageSystemUpdateprogramhelpsyoukeepthesoftwareonyourcomputerup-to-dateby
downloadingandinstallingsoftwarepackages(ThinkVantageapplications,devicedrivers,BIOSupdates,
andotherthirdpartyapplications).
Chapter1.Productoverview5
Page 12

FingerprintSoftware
TheintegratedngerprintreaderprovidedonsomekeyboardsworkswiththeFingerprintSoftwareprogram
toenableyoutoenrollyourngerprintandassociateitwithyourWindowspassword.Asaresult,ngerprint
authenticationcanreplaceyourpasswordandenablesimpleandsecureuseraccess.Angerprintreader
keyboardisavailablewithcertaincomputersorcanbepurchasedforcomputersthatsupportthisoption.
LenovoSolutionCenter
Note:Dependingonthedatewhenyourcomputerwasmanufactured,yourcomputerispreinstalledwith
eithertheLenovoSolutionCenterprogramortheLenovoThinkVantageToolboxprogramfordiagnostic
purposes.ForadditionalinformationabouttheLenovoThinkVantageT oolboxprogram,see“Lenovo
ThinkVantageToolbox”onpage6
TheLenovoSolutionCenterprogramenablesyoutotroubleshootandresolvecomputerproblems.It
combinesdiagnostictests,systeminformationcollection,securitystatus,andsupportinformation,along
withhintsandtipsformaximumsystemperformance.See“LenovoSolutionCenter”onpage68
information.
.
fordetailed
LenovoThinkVantageT oolbox
Note:Dependingonthedatewhenyourcomputerwasmanufactured,yourcomputerispreinstalledwith
eithertheLenovoSolutionCenterprogramortheLenovoThinkVantageToolboxprogramfordiagnostic
purposes.ForadditionalinformationabouttheLenovoSolutionCenterprogram,see“LenovoSolution
Center”onpage68
TheLenovoThinkVantageToolboxprogramhelpsyoumaintainyourcomputer,improvecomputingsecurity,
diagnosecomputerproblems,getfamiliarwiththeinnovativetechnologiesprovidedbyLenovo,andgetmore
informationaboutyourcomputer.Formoreinformation,see“LenovoThinkVantageToolbox”onpage69
.
.
AdobeReader
TheAdobeReaderprogramisatoolusedtoview,print,andsearchPDFdocuments.
See“OnlineBooksfolder”onpage73
formoreinformationaboutaccessingandviewingthepublications.
Antivirussoftware
Yourcomputercomeswithantivirussoftwarethatyoucanusetodetectandeliminateviruses.Lenovo
providesafullversionofantivirussoftwareonyourcomputerwithafree30-daysubscription.After30days,
youmustrenewthelicensetocontinuereceivingtheantivirussoftwareupdates.
Formoreinformationabouthowtouseyourantivirussoftware,refertothehelpsystemofyourantivirus
software.
Locations
Thissectionprovidesinformationtohelpyoulocateyourcomputerconnectors,components,partson
thesystemboard,andinternaldrives.
Note:Thecomponentsinyourcomputermightlookslightlydifferentfromtheillustrations.
6ThinkCentreUserGuide
Page 13
Locatingconnectors,controls,andindicatorsonthefrontofyour computer
Figure1“Frontconnector,control,andindicatorlocations”onpage7showsthelocationsoftheconnectors,
controls,andindicatorsonthefrontofyourcomputer.
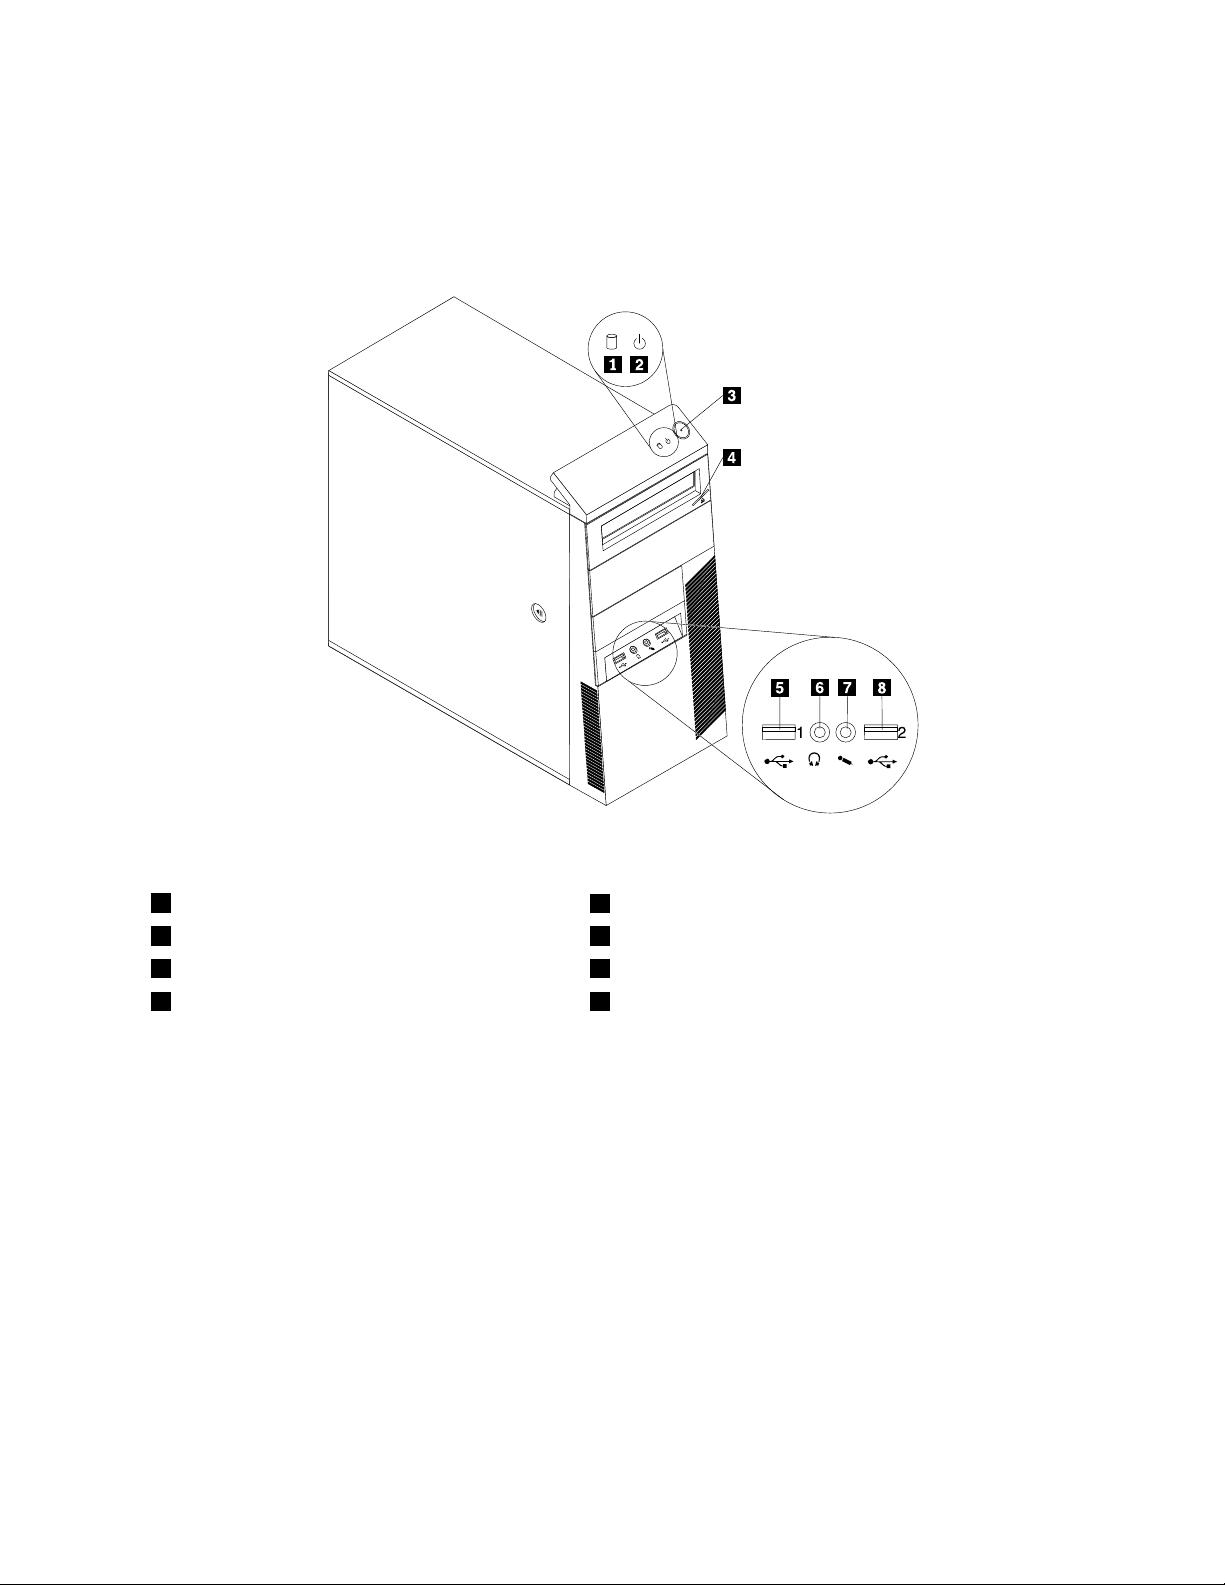
Figure1.Frontconnector,control,andindicatorlocations
1Harddiskdriveactivityindicator
2Powerindicator6Headphoneconnector
3Powerswitch7Microphoneconnector
4Opticaldriveeject/closebutton8USBconnector(USBport2)
5USBconnector(USBport1)
Locatingconnectorsandpartsontherearofyourcomputer
Figure2“Rearconnectorandpartlocations”onpage8showsthelocationsoftheconnectorsandparts
ontherearofyourcomputer.Someconnectorsontherearofyourcomputerarecolor-codedtohelpyou
determinewheretoconnectthecablesonyourcomputer.
Chapter1.Productoverview7
Page 14
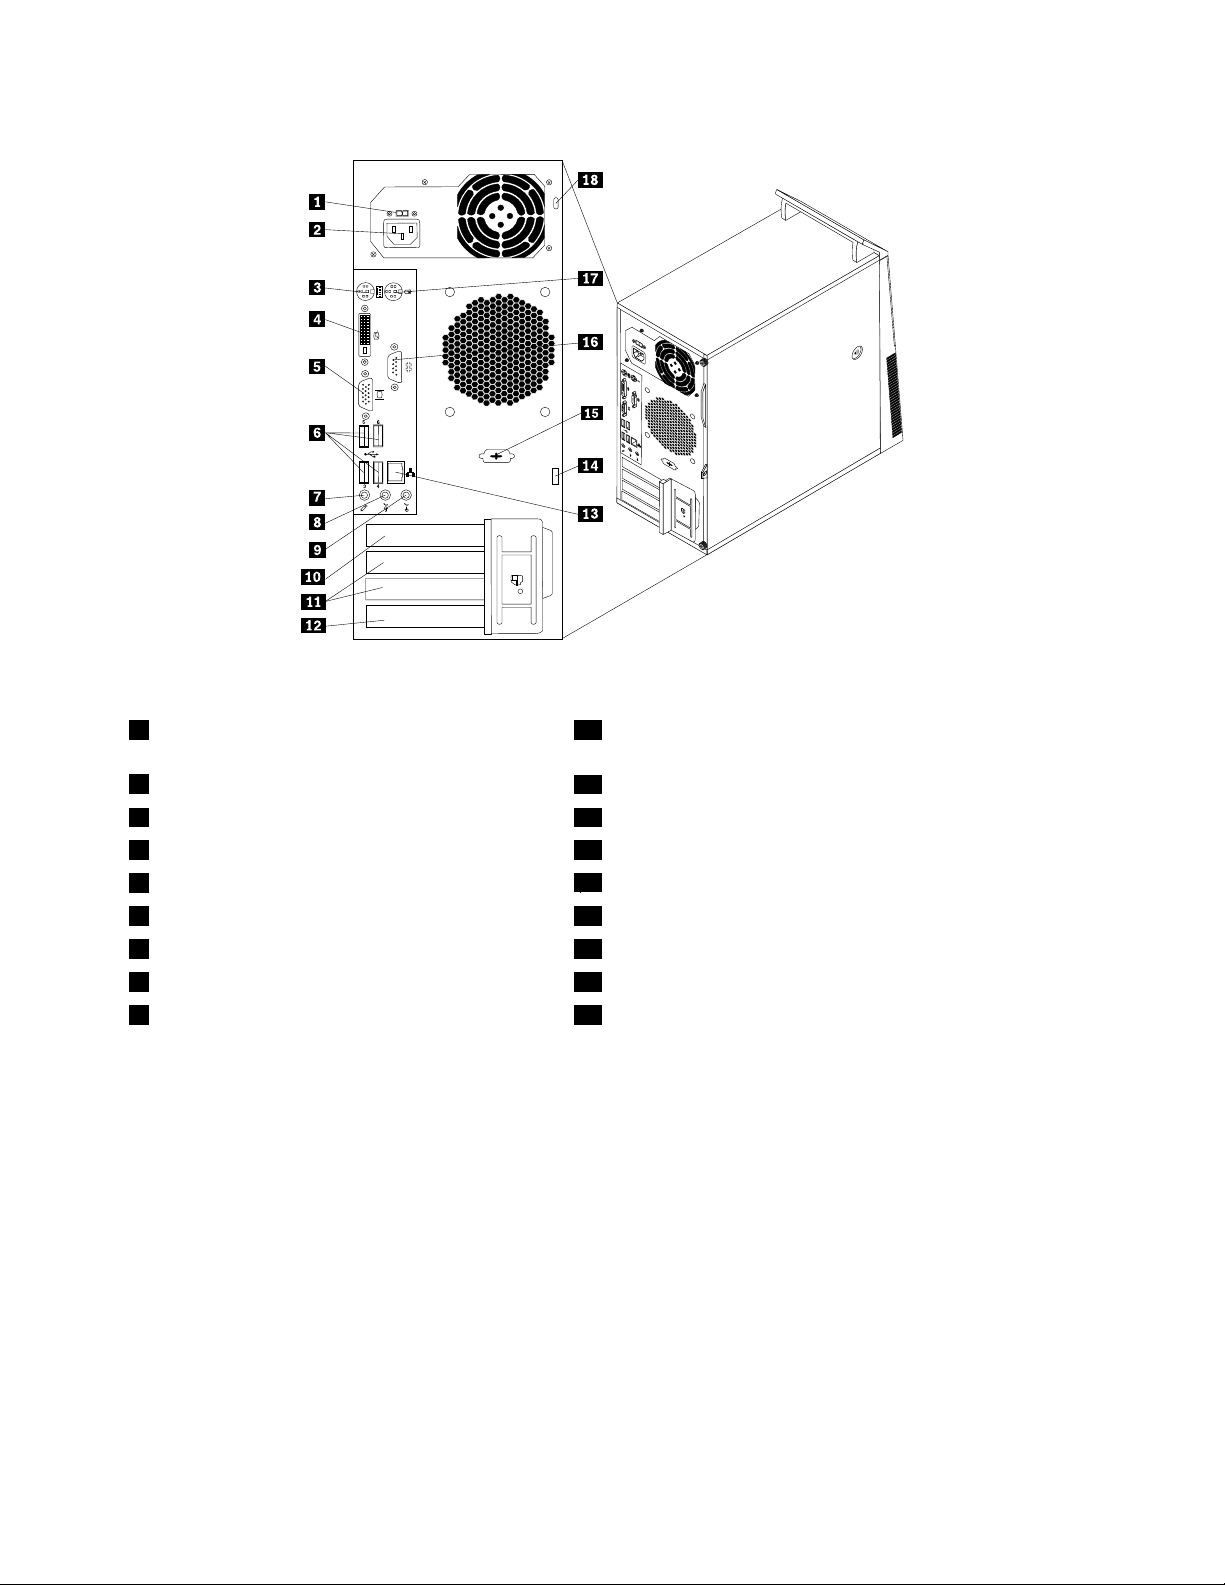
Figure2.Rearconnectorandpartlocations
1Voltage-selectionswitch(availableonsome
10PCIExpressx16graphicscardslot
models)
2Powercordconnector
3PS/2keyboardconnector12PCIcardslot
4DVImonitorconnector13Ethernetconnector
5VGAmonitorconnector
6USBconnectors(USBports3to6)15Optionalserialport
7Microphoneconnector
8Audioline-outconnector
9Audioline-inconnector
11PCIExpressx1cardslots(2)
14Padlockloop
16Serialport
17PS/2mouseconnector
18Integratedcablelock(Kingstonlock)slot
ConnectorDescription
Audioline-inconnector
Usedtoreceiveaudiosignalsfromanexternalaudiodevice,suchasastereo
system.Whenyouattachanexternalaudiodevice,acableisconnectedbetween
theaudioline-outconnectorofthedeviceandtheaudioline-inconnectorof
thecomputer.
Audioline-outconnector
Usedtosendaudiosignalsfromthecomputertoexternaldevices,suchas
poweredstereospeakers(speakerswithbuilt-inampliers),headphones,
multimediakeyboards,theaudioline-inconnectoronastereosystem,orother
externalrecordingdevices.
DVImonitorconnectorUsedtoattachaDVImonitororotherdevicesthatuseaDVImonitorconnector.
Ethernetconnector
UsedtoattachanEthernetcableforalocalareanetwork(LAN).
Note:TooperatethecomputerwithinFCCClassBlimits,useaCategory5
Ethernetcable.
MicrophoneconnectorUsedtoattachamicrophonetoyourcomputerwhenyouwanttorecordsoundor
ifyouusespeech-recognitionsoftware.
8ThinkCentreUserGuide
Page 15
ConnectorDescription
PS/2keyboardconnectorUsedtoattachakeyboardthatusesaPS/2keyboardconnector.
PS/2mouseconnectorUsedtoattachamouse,atrackball,orotherpointingdevicesthatuseaPS/2
mouseconnector.
Serialport
USBconnectorUsedtoattachadevicethatusesaUSBconnector,suchasaUSBkeyboard,
VGAmonitorconnectorUsedtoattachaVGAmonitororotherdevicesthatuseaVGAmonitorconnector .
Usedtoattachanexternalmodem,aserialprinter,orotherdevicesthatusea
9-pinserialport.
aUSBmouse,aUSBscanner,oraUSBprinter.IftheUSBconnectorsonyour
computerarenotenoughforyoutoconnectallyourUSBdevices,youcan
purchaseaUSBhub,whichyoucanusetoconnectadditionalUSBdevices.
Locatingcomponents
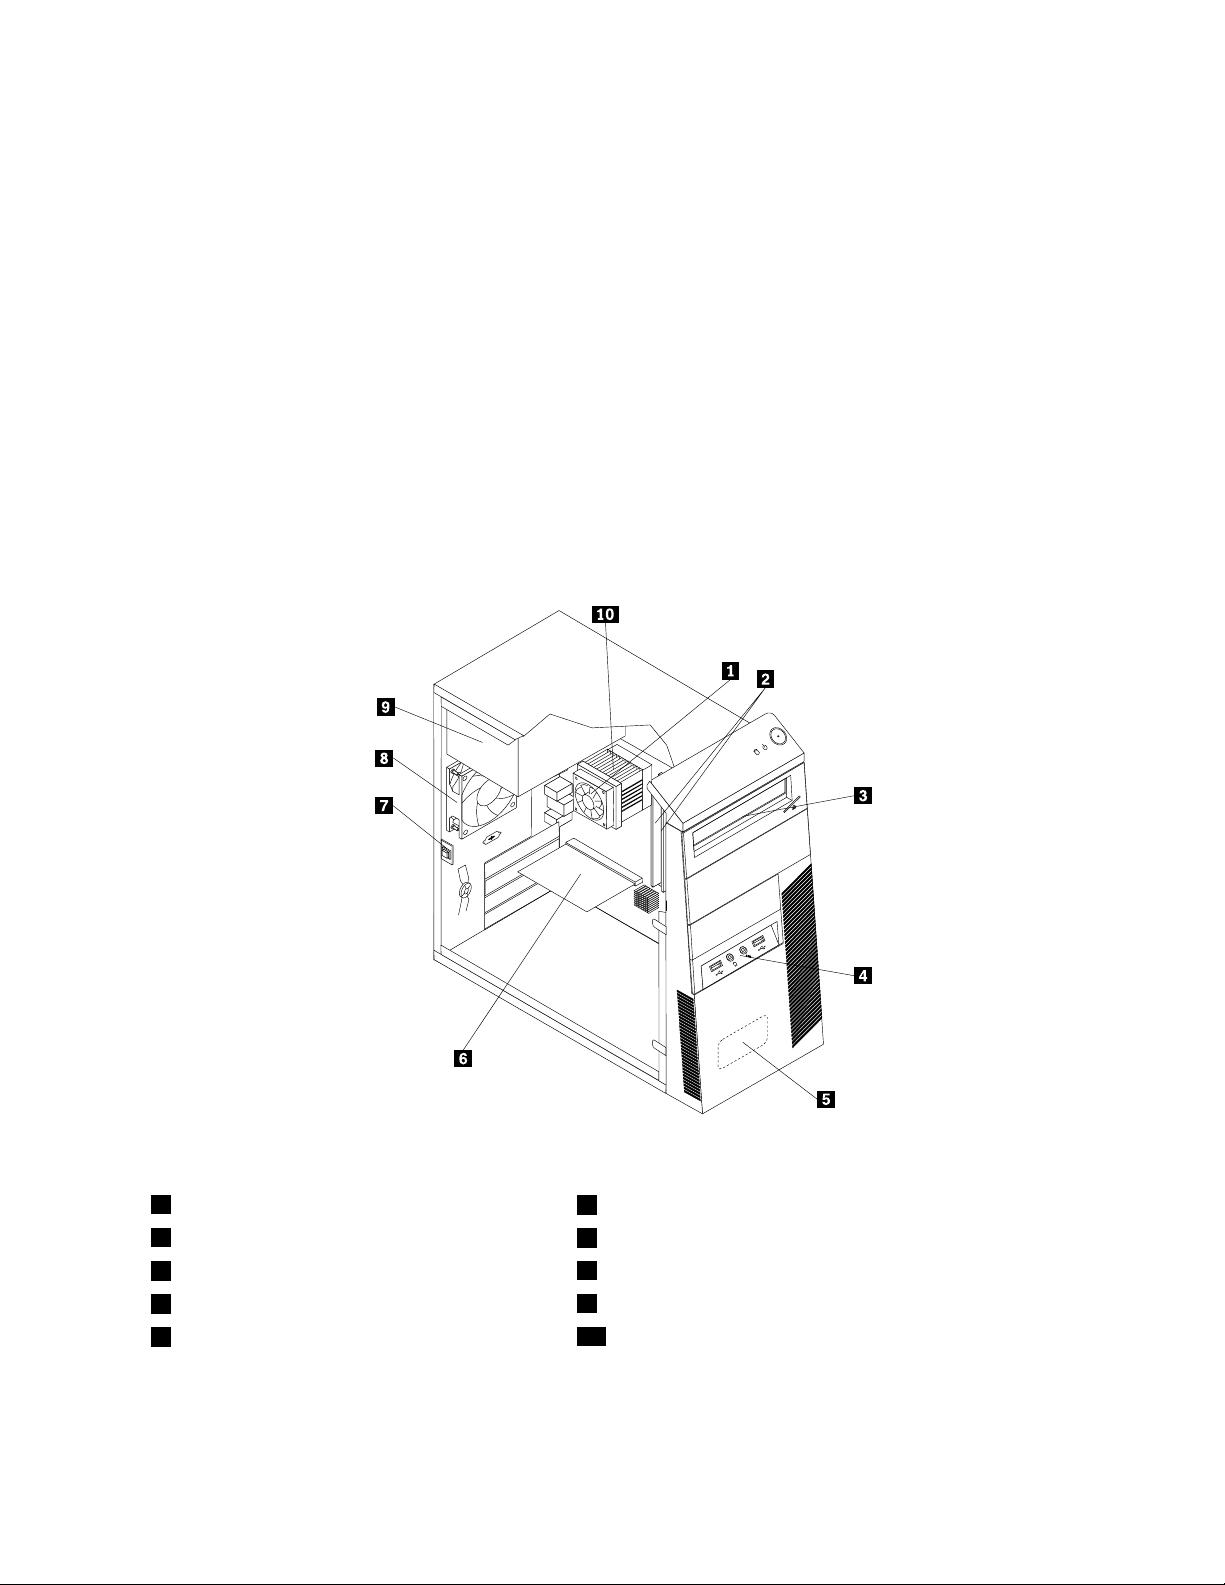
Figure3“Componentlocations”onpage9showsthelocationsofthevariouscomponentsinyourcomputer.
Toremovethecomputercover,see“Removingthecomputercover”onpage14.
Figure3.Componentlocations
1Heatsinkandfanassembly
2Memorymodules
3Opticaldrive
4FrontaudioandUSBassembly
5Internalspeaker(installedinsomemodels)
6PCIcard(installedinsomemodels)
7Coverpresenceswitch(alsocalledintrusionswitch)
8Rearfanassembly
9Powersupplyassembly
10Microprocessor
Locatingpartsonthesystemboard
Figure4“Systemboardpartlocations”onpage10showsthelocationsofthepartsonthesystemboard.
Chapter1.Productoverview9
Page 16
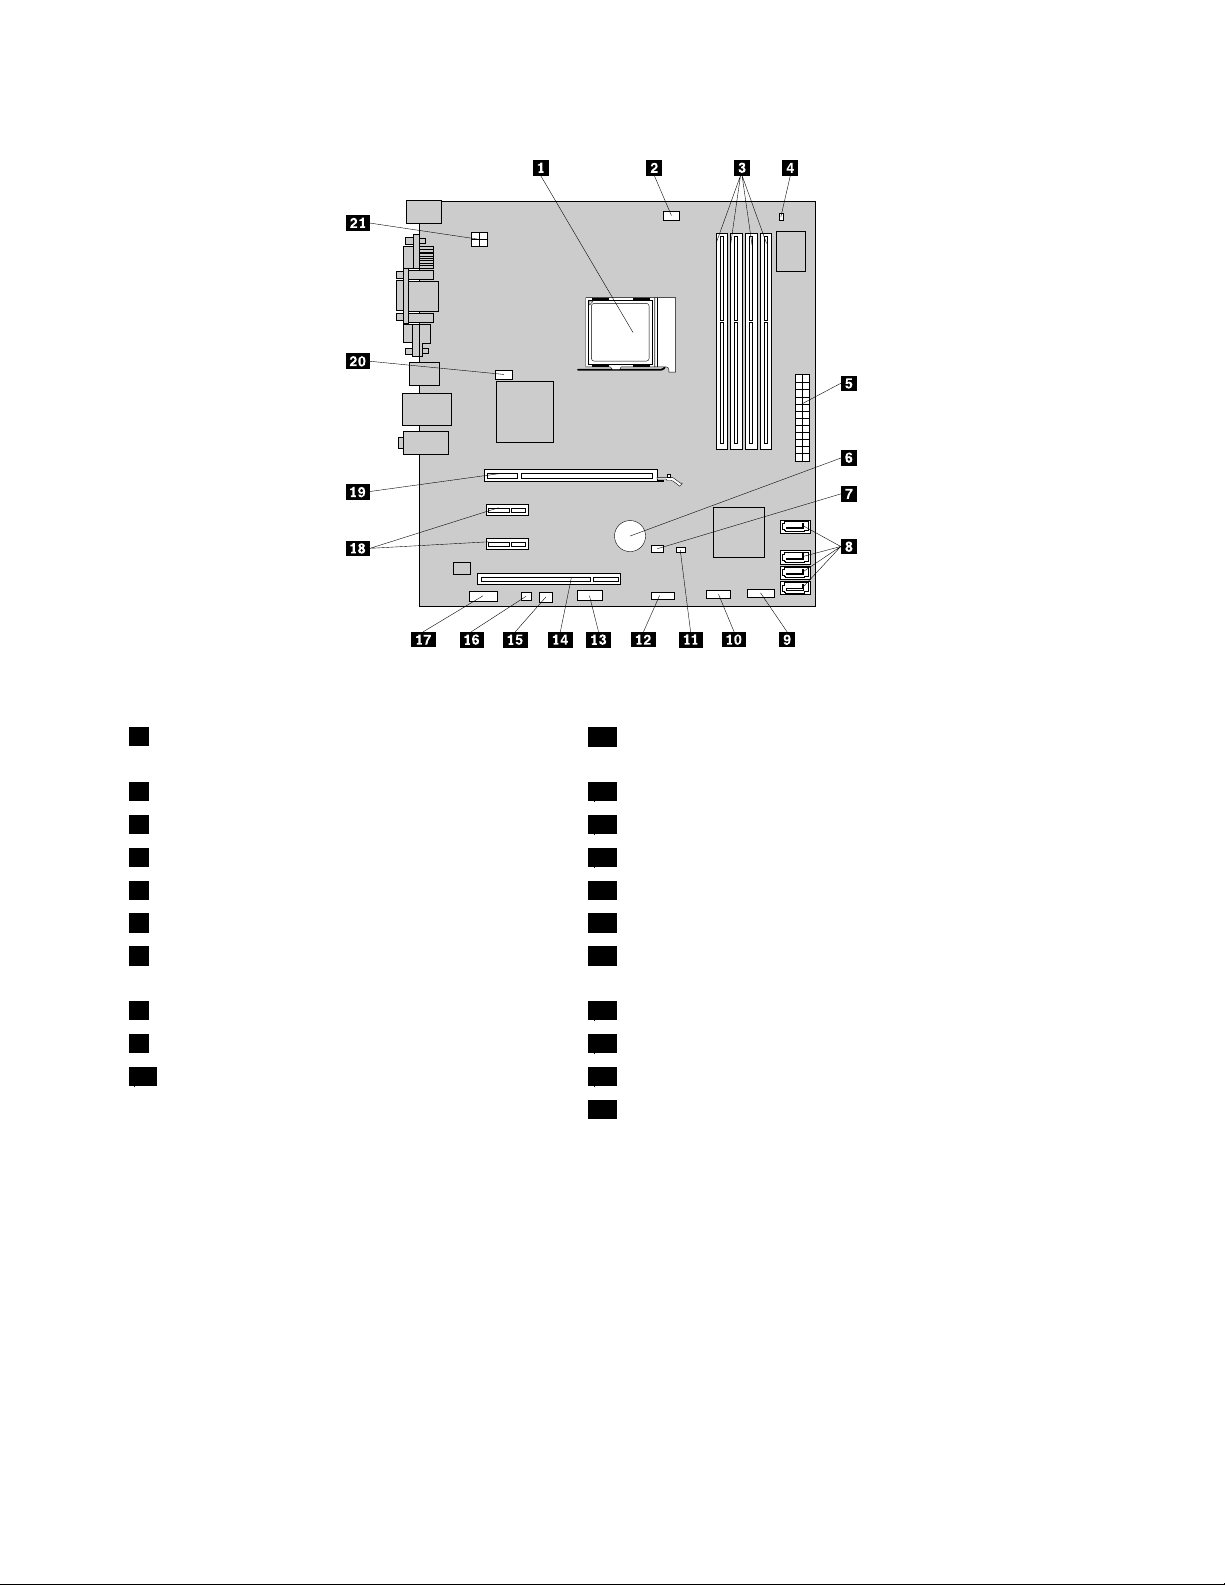
Figure4.Systemboardpartlocations
1Microprocessor
11Coverpresenceswitchconnector(alsocalledintrusion
switchconnector)
2Microprocessorfanconnector
3Memoryslots(4)13Serial(COM2)connector
4Thermalsensorconnector
524-pinpowerconnector
6Battery16Internalspeakerconnector
7ClearCMOS(ComplementaryMetalOxide
12FrontUSBconnector
14PCIcardslot
15Powerfanconnector
17Frontaudioconnector
Semiconductor)/Recoveryjumper
8SA TAconnectors(4)18PCIExpressx1cardslots(2)
9Frontpanelconnector
10FrontUSBconnector20Systemfanconnector
19PCIExpressx16graphicscardslot
214-pinpowerconnector
Locatinginternaldrives
Internaldrivesaredevicesthatyourcomputerusestoreadandstoredata.Y oucanadddrivestoyour
computertoincreasestoragecapacityandenableyourcomputertoreadothertypesofmedia.Internal
drivesareinstalledinbays.Inthismanual,thebaysarereferredtoasbay1,bay2,andsoon.
Wheninstallingorreplacinganinternaldrive,itisimportanttonotethetypeandsizeofthedrivethatyou
caninstallorreplaceineachbayandcorrectlyconnectthecablestothedriveinstalled.Refertothe
appropriatesectionin“Installingorreplacinghardware”onpage13
replaceinternaldrivesforyourcomputer.
forinstructionsonhowtoinstallor
Figure5“Drivebaylocations”onpage11
10ThinkCentreUserGuide
showsthelocationsofthedrivebays.
Page 17
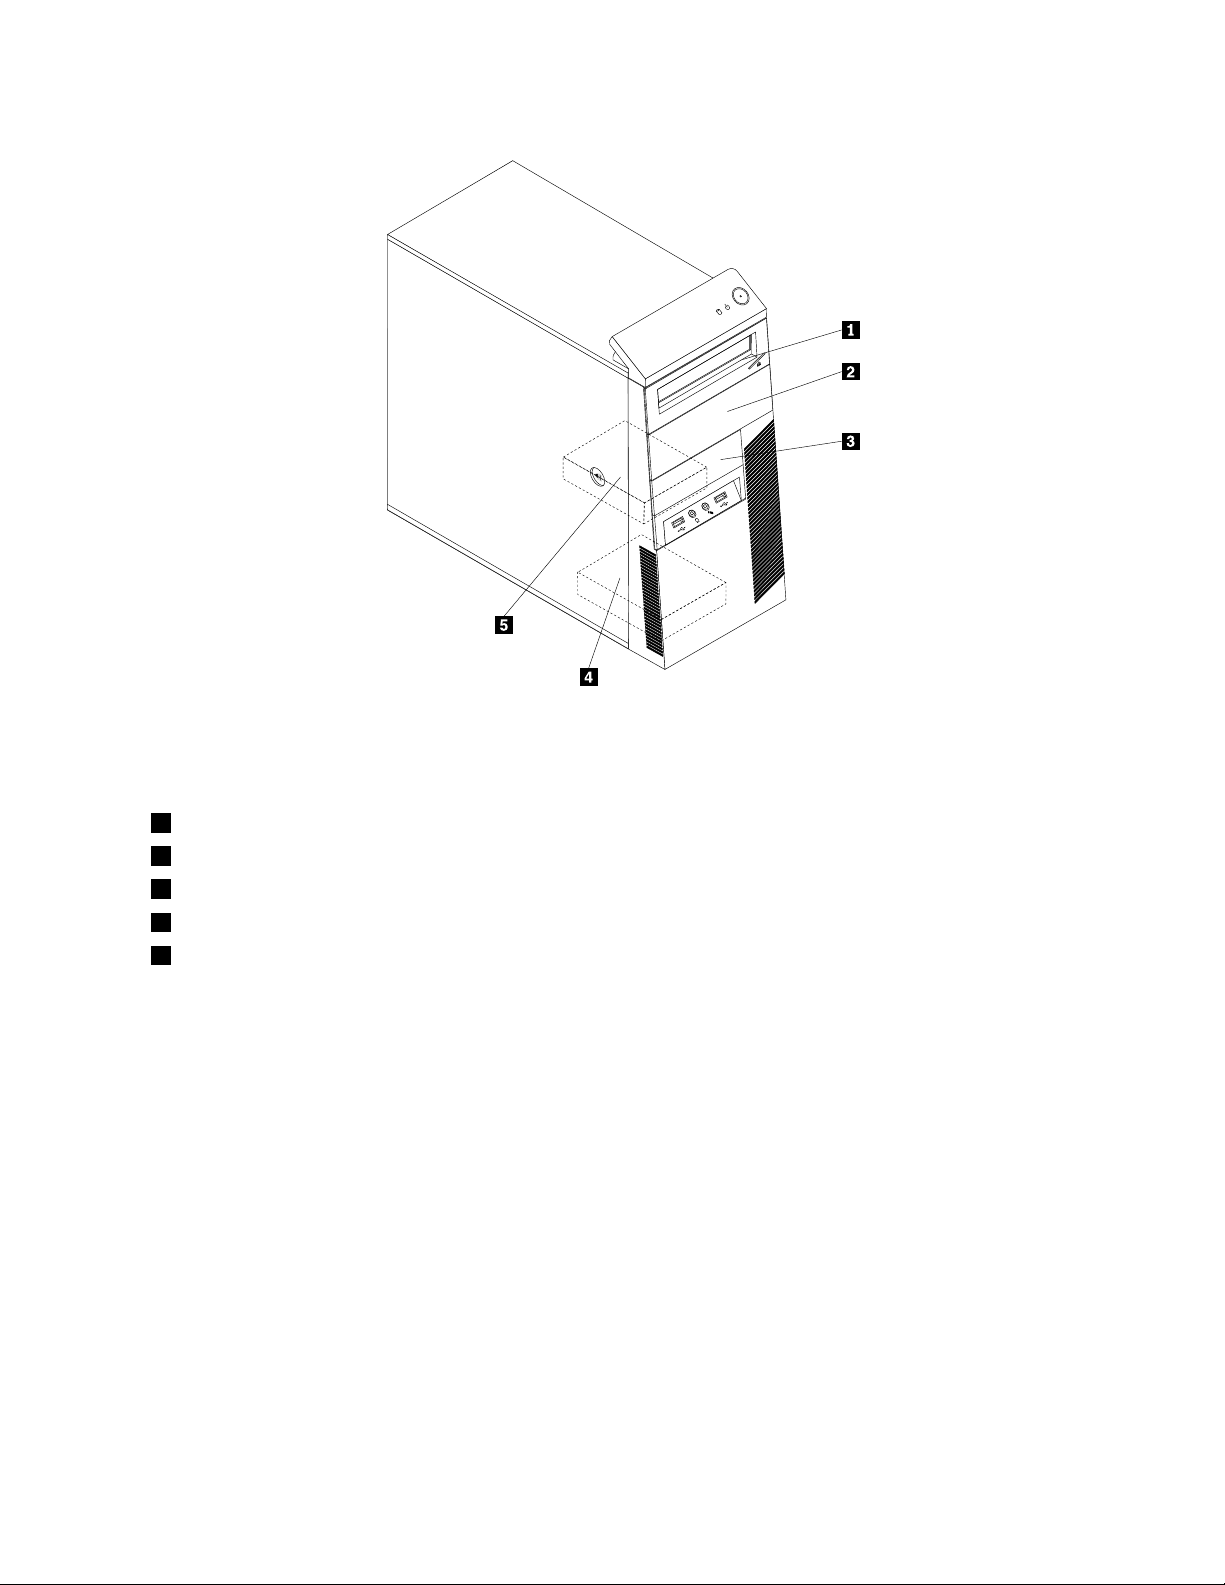
Figure5.Drivebaylocations
1Bay1-Opticaldrivebay(withanopticaldriveinstalledinsomemodels)
2Bay2-Opticaldrivebay
3Bay3-Cardreaderdrivebay
4Bay4-SecondarySA TAharddiskdrivebay
5Bay5-PrimarySAT Aharddiskdrivebay(witha3.5-inchSAT Aharddiskdriveinstalled)
Chapter1.Productoverview11
Page 18

12ThinkCentreUserGuide
Page 19

Chapter2.Installingorreplacinghardware
Thischapterprovidesinstructionsonhowtoinstallorreplacehardwareforyourcomputer.
Thischaptercontainsthefollowingtopics:
•“Handlingstatic-sensitivedevices”onpage13
•“Installingorreplacinghardware”onpage13
•“Obtainingdevicedrivers”onpage49
•“Basicsecurityfeatures”onpage49
Handlingstatic-sensitivedevices
Donotopenthestatic-protectivepackagecontainingthenewpartuntilthedefectiveparthasbeenremoved
fromthecomputerandyouarereadytoinstallthenewpart.Staticelectricity,althoughharmlesstoyou,can
seriouslydamagecomputercomponentsandparts.
Whenyouhandlecomputerpartsandcomponents,taketheseprecautionstoavoidstatic-electricitydamage:
•Limityourmovement.Movementcancausestaticelectricitytobuilduparoundyou.
•Alwayscarefullyhandlethepartsandothercomputercomponents.HandlePCIcards,memorymodules,
systemboards,andmicroprocessorsbytheedges.Nevertouchexposedcircuitry.
•Preventothersfromtouchingthepartsandothercomputercomponents.
•Beforeyoureplaceanewpart,touchthestatic-protectivepackagecontainingthenewparttoametal
expansion-slotcoverorotherunpaintedmetalsurfaceonthecomputerforatleasttwoseconds.This
reducesstaticelectricityfromthepackageandyourbody.
•Removethenewpartfromthestatic-protectivepackageanddirectlyinstallitinthecomputerwithout
placingitonanyothersurface.Ifitishardforyoutodothisinyourspecicsituation,placethe
static-protectivepackageofthenewpartonasmooth,levelsurface,andthenplacethenewparton
thestatic-protectivepackage.
•Donotplacethepartonthecomputercoverorothermetalsurface.
Installingorreplacinghardware
Thissectionprovidesinstructionsonhowtoinstallorreplacehardwareforyourcomputer.Youcanexpand
thecapabilitiesofyourcomputerandmaintainyourcomputerbyinstallingorreplacinghardware.
Attention:
Donotopenyourcomputerorattemptanyrepairbeforereadingandunderstandingthe“Importantsafetyinformation”
intheThinkCentreSafetyandWarrantyGuidethatcamewithyourcomputer.ToobtainacopyoftheThinkCentre
SafetyandWarrantyGuide,goto:
http://www.lenovo.com/support
Notes:
1.UseonlycomputerpartsprovidedbyLenovo.
2.Wheninstallingorreplacinganoption,usetheappropriateinstructionsinthissectionalongwiththe
instructionsthatcomewiththeoption.
©CopyrightLenovo2011
13
Page 20
Installingexternaloptions
Youcanconnectexternaloptionstoyourcomputer,suchasexternalspeakers,aprinter,orascanner.For
someexternaloptions,youmustinstalladditionalsoftwareinadditiontomakingthephysicalconnection.
Wheninstallinganexternaloption,see“Locatingconnectors,controls,andindicatorsonthefrontofyour
computer”onpage7
identifytherequiredconnector.Then,usetheinstructionsthatcomewiththeoptiontohelpyoumakethe
connectionandinstallanysoftwareordevicedriversthatarerequiredfortheoption.
and“Locatingconnectorsandpartsontherearofyourcomputer”onpage7to
Removingthecomputercover
Attention:
Donotopenyourcomputerorattemptanyrepairbeforereadingandunderstandingthe“Importantsafetyinformation”
intheThinkCentreSafetyandWarrantyGuidethatcamewithyourcomputer.ToobtainacopyoftheThinkCentre
SafetyandWarrantyGuide,goto:
http://www.lenovo.com/support
Thissectionprovidesinstructionsonhowtoremovethecomputercover.
CAUTION:
Turnoffthecomputerandwaitthreetoveminutestoletthecomputercoolbeforeremovingthe
computercover.
Toremovethecomputercover,dothefollowing:
1.Removeanymediafromthedrivesandturnoffallattacheddevicesandthecomputer.
2.Disconnectallpowercordsfromelectricaloutlets.
3.Disconnectthepowercords,Input/Outputcables,andanyothercablesthatareconnectedtothe
computer.See“Locatingconnectors,controls,andindicatorsonthefrontofyourcomputer”onpage7
and“Locatingconnectorsandpartsontherearofyourcomputer”onpage7.
4.Removeanylockingdevicethatsecuresthecomputercover,suchasapadlockoranintegratedcable
lock.See“Padlock”onpage50and“Integratedcablelock”onpage49.
5.Removeanyscrewsthatsecurethecomputercover.
14ThinkCentreUserGuide
Page 21
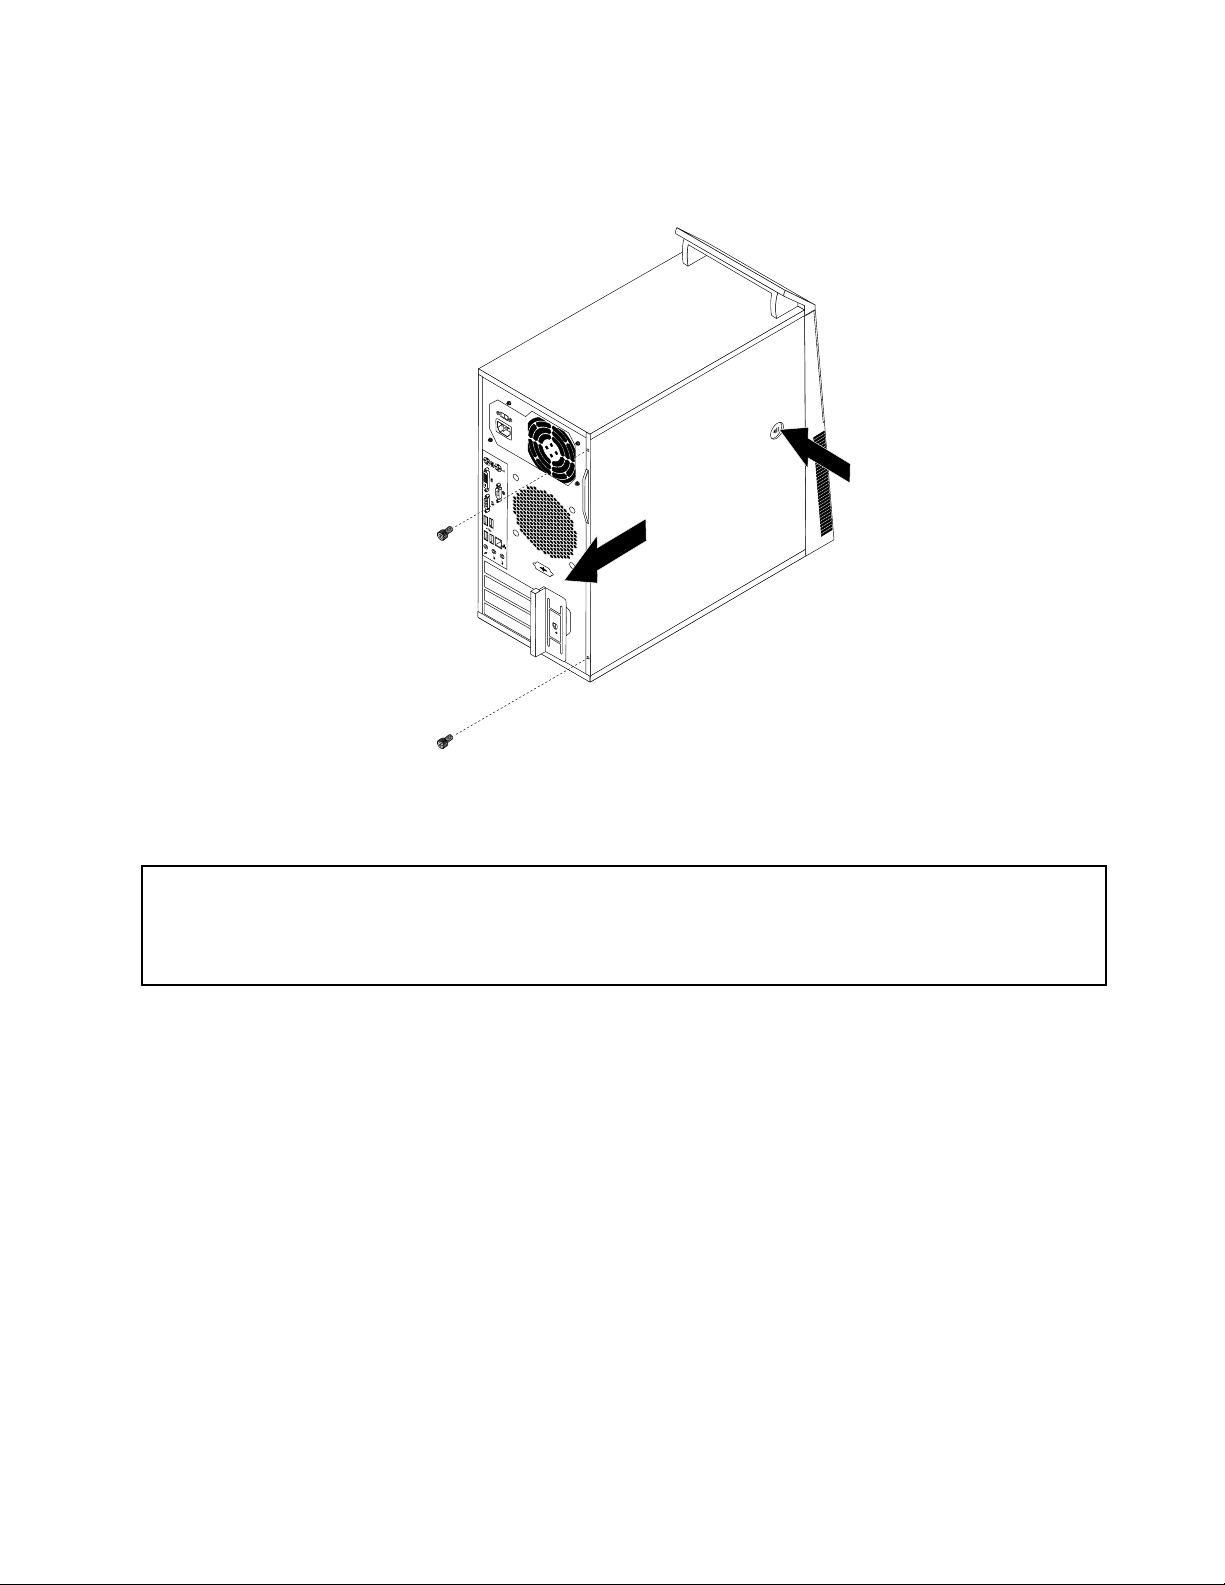
6.Pressthecover-releasebuttononthesideofthecomputerandslidethecovertotherearofthe
computertoremovethecover.
Figure6.Removingthecomputercover
Removingandreinstallingthefrontbezel
Attention:
Donotopenyourcomputerorattemptanyrepairbeforereadingandunderstandingthe“Importantsafetyinformation”
intheThinkCentreSafetyandWarrantyGuidethatcamewithyourcomputer.ToobtainacopyoftheThinkCentre
SafetyandWarrantyGuide,goto:
http://www.lenovo.com/support
Thissectionprovidesinstructionsonhowtoremoveandreinstallthefrontbezel.
Toremoveandreinstallthefrontbezel,dothefollowing:
1.Turnoffthecomputeranddisconnectallpowercordsfromelectricaloutlets.
2.Removethecomputercover.See“Removingthecomputercover”onpage14.
Chapter2.Installingorreplacinghardware15
Page 22
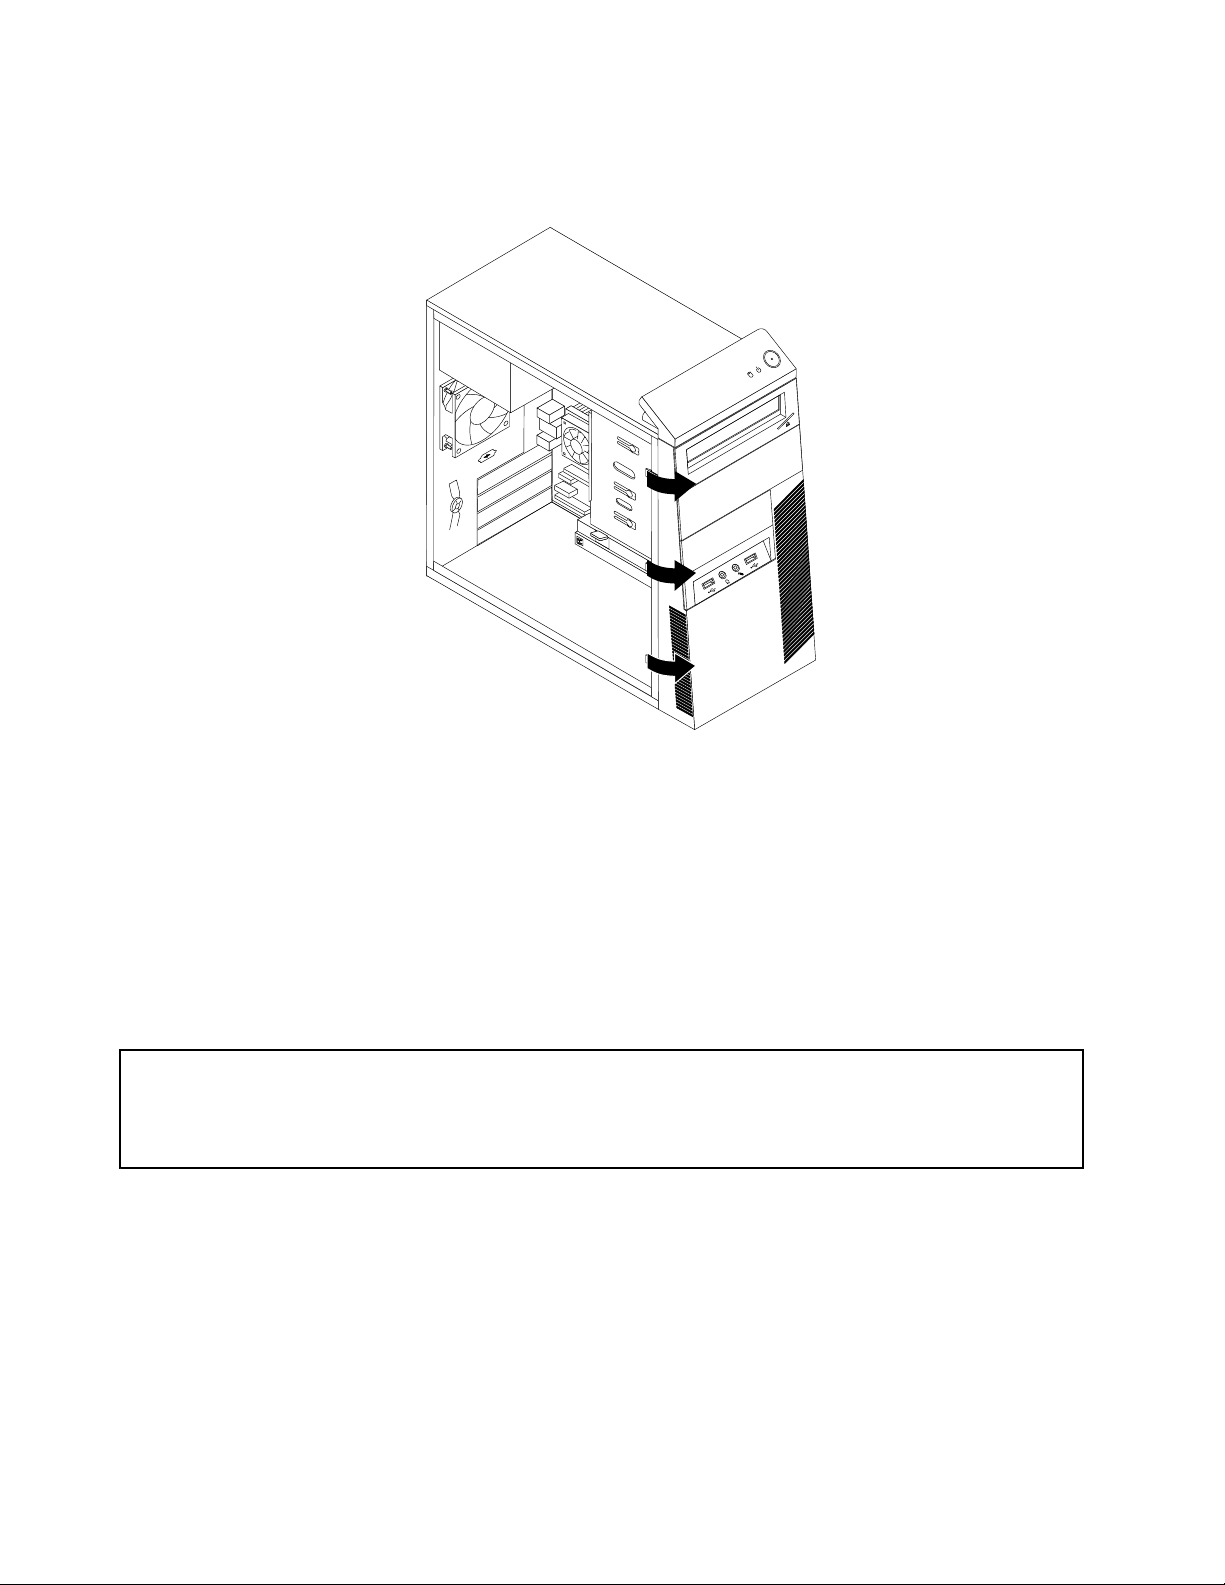
3.Removethefrontbezelbyreleasingthethreeplastictabsontheleftsideandpivotingthefrontbezel
outward.
Figure7.Removingthefrontbezel
4.Toreinstallthefrontbezel,alignthethreeplastictabsontherightsideofthefrontbezelwiththe
correspondingholesinthechassis,thenpivotthefrontbezelinwardsuntilitsnapsintopositionon
theleftside.
Whattodonext:
•T oworkwithanotherpieceofhardware,gototheappropriatesection.
•T ocompletetheinstallationorreplacement,goto“Completingthepartsreplacement”onpage48
.
InstallingorreplacingaPCIcard
Attention:
Donotopenyourcomputerorattemptanyrepairbeforereadingandunderstandingthe“Importantsafetyinformation”
intheThinkCentreSafetyandWarrantyGuidethatcamewithyourcomputer.ToobtainacopyoftheThinkCentre
SafetyandWarrantyGuide,goto:
http://www.lenovo.com/support
ThissectionprovidesinstructionsonhowtoinstallorreplaceaPCIcard.Y ourcomputerhastwostandard
PCIcardslots,onePCIExpressx1cardslot,andonePCIExpressx16graphicscardslot.
ToinstallorreplaceaPCIcard,dothefollowing:
1.Turnoffthecomputeranddisconnectallpowercordsfromelectricaloutlets.
2.Removethecomputercover.See“Removingthecomputercover”onpage14.
16ThinkCentreUserGuide
Page 23
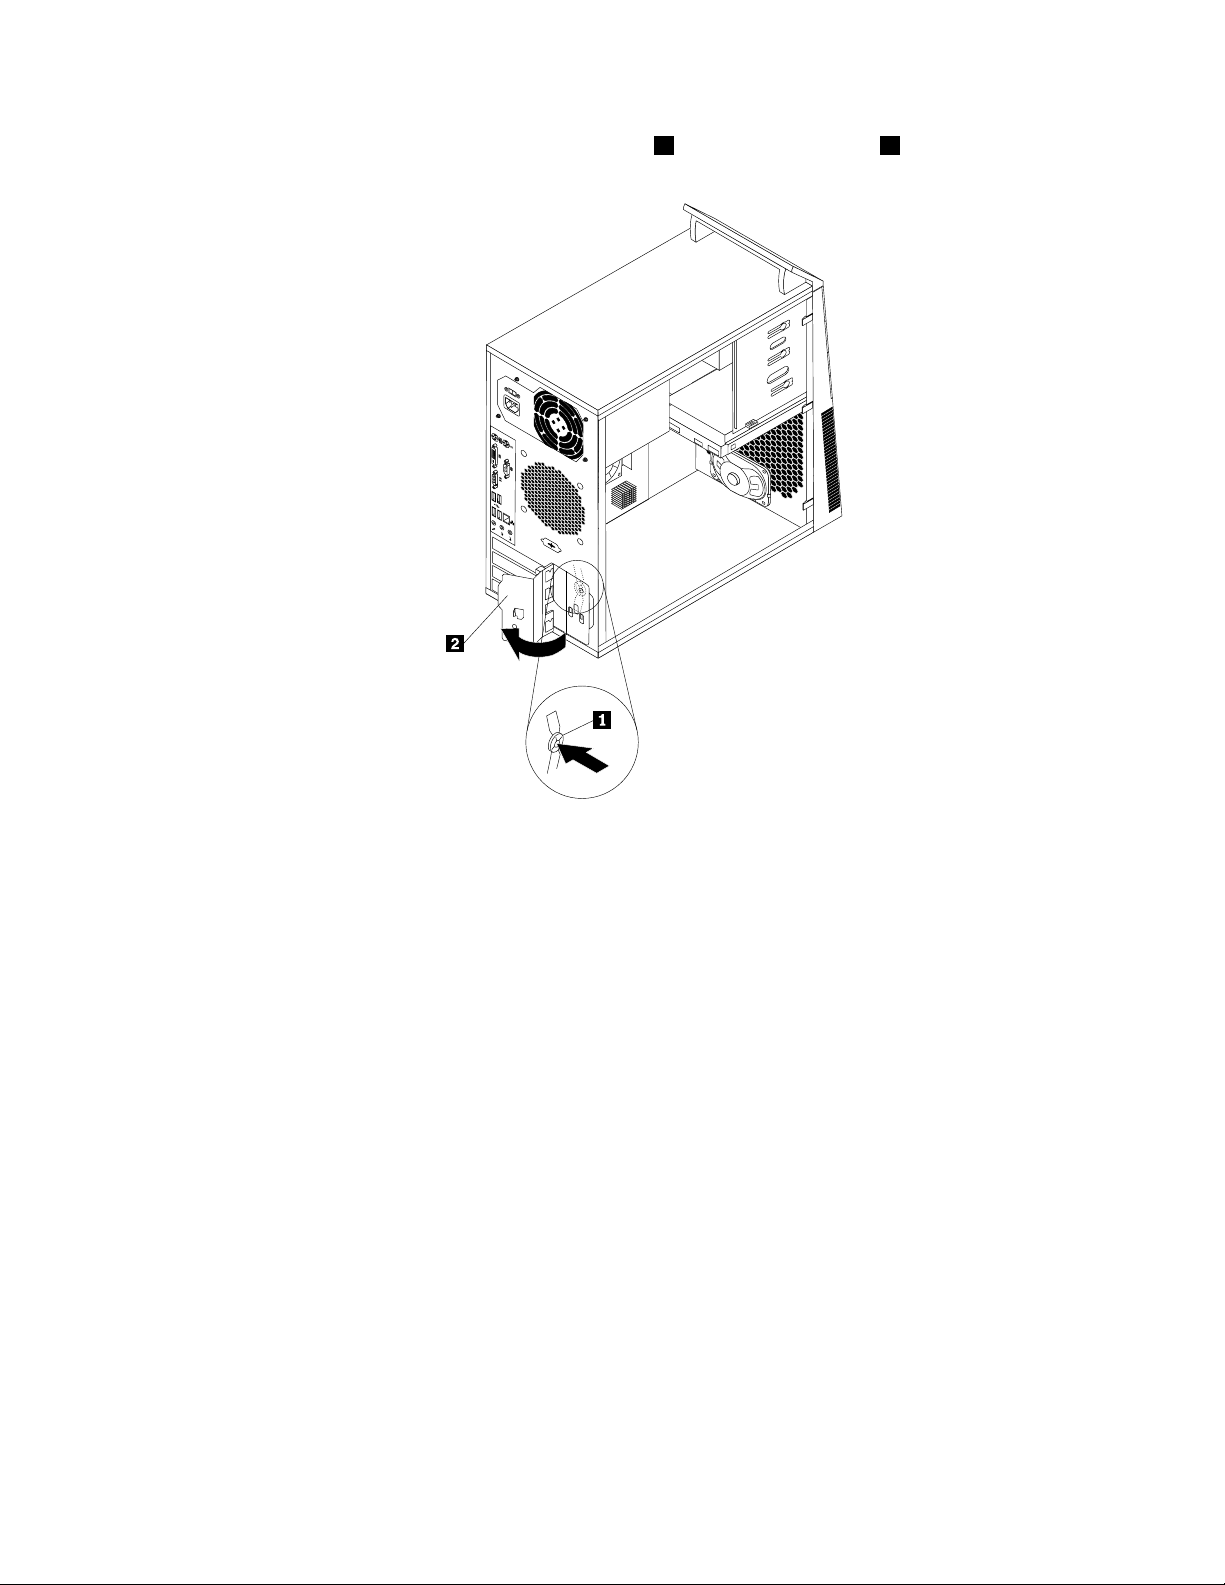
3.Attherearofthecomputer,pressthereleasebutton1toopenthecardlatch2.
Figure8.OpeningthePCIcardlatch
4.DependingonwhetheryouareinstallingorreplacingaPCIcard,dooneofthefollowing:
•IfyouareinstallingaPCIcard,removetheappropriatemetalslotcover.
•IfyouarereplacinganoldPCIcard,grasptheoldcardthatiscurrentlyinstalledandgentlypullit
outoftheslot.
Chapter2.Installingorreplacinghardware17
Page 24
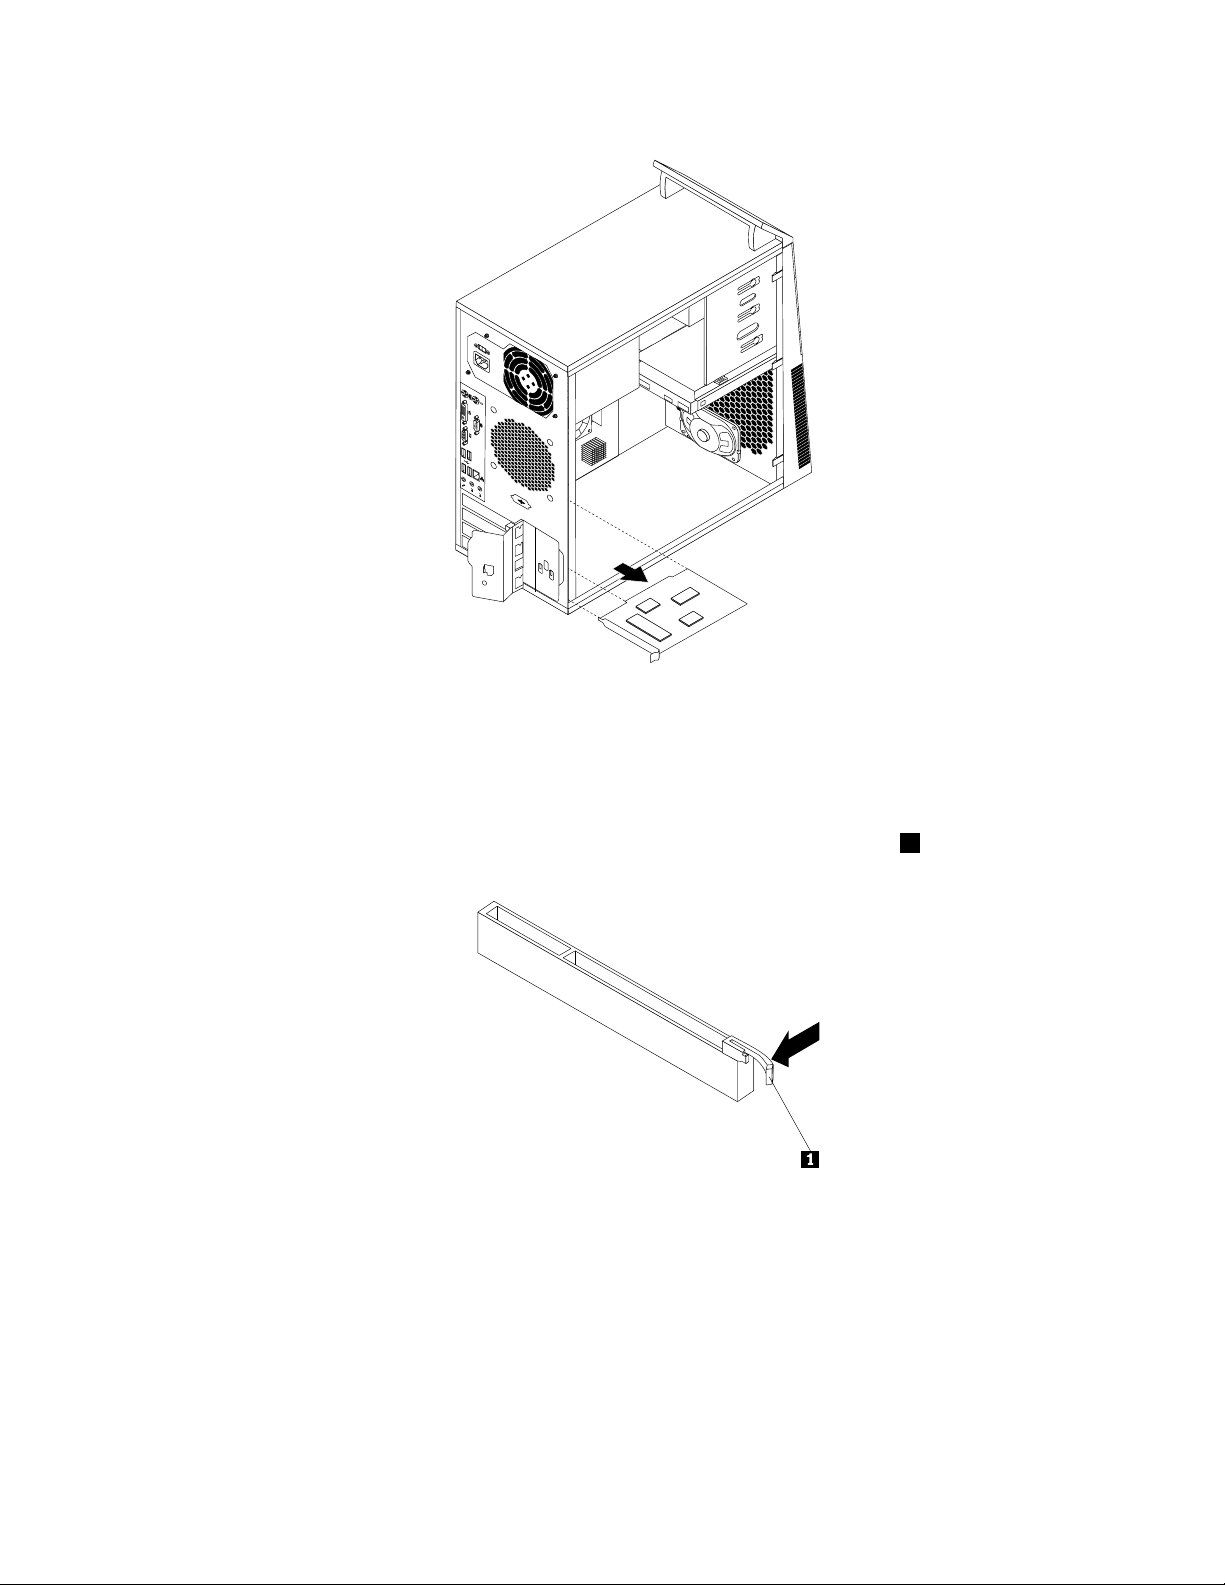
Figure9.RemovingaPCIcard
Notes:
a.Thecardtstightlyintothecardslot.Ifnecessary,alternatemovingeachsideofthecardasmall
amountuntilitisremovedfromthecardslot.
b.Ifthecardisheldinplacebyaretaininglatch,pressthecardretaininglatch1asshownto
disengagethelatch.Graspthecardandgentlypullitoutoftheslot.
5.RemovethenewPCIcardfromitsstatic-protectivepackage.
6.Installthenewcardintotheappropriateslotonthesystemboard.See“Locatingpartsonthesystem
board”onpage9.
Note:IfyouareinstallingaPCIExpressx16graphicscard,makesurethememoryslotretainingclips
areclosedbeforeyouinstallthegraphicscard.
18ThinkCentreUserGuide
Page 25
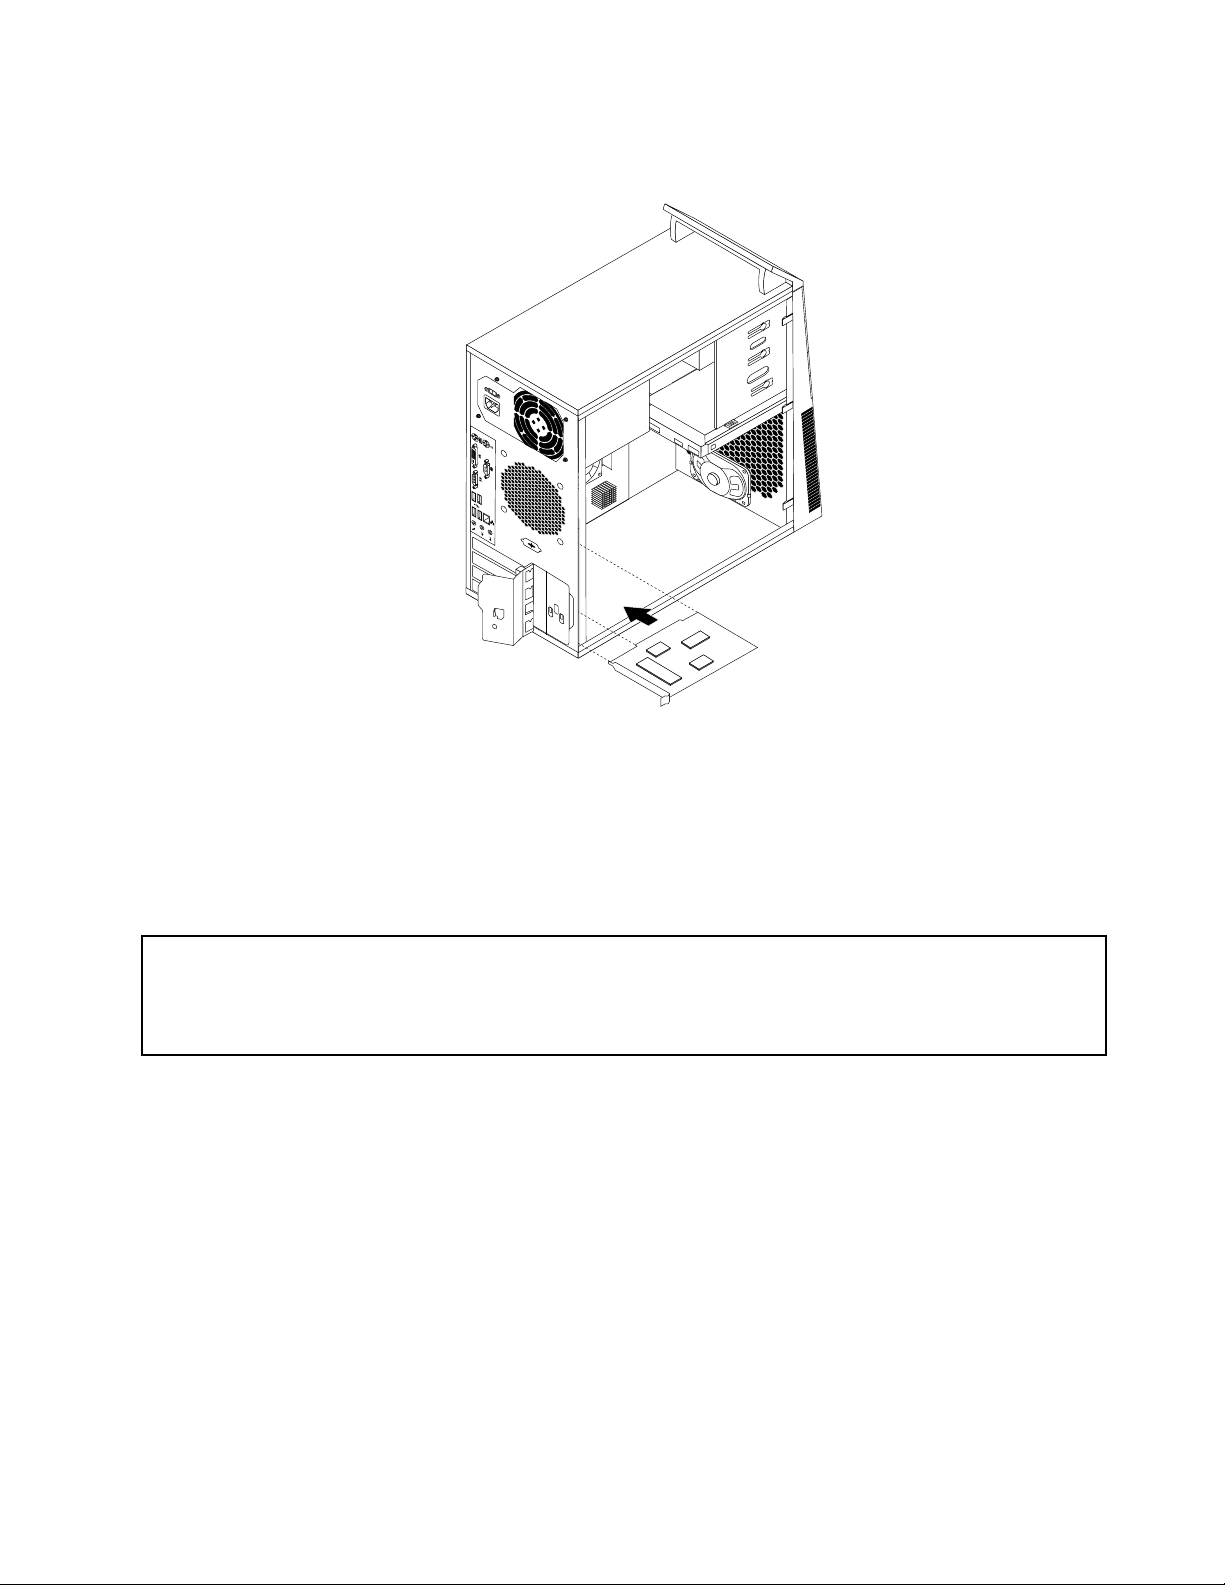
7.PivotthecardlatchtotheclosedpositiontosecurethePCIcard.
Figure10.InstallingaPCIcard
Whattodonext:
•T oworkwithanotherpieceofhardware,gototheappropriatesection.
•T ocompletetheinstallationorreplacement,goto“Completingthepartsreplacement”onpage48.
Installingorreplacingamemorymodule
Attention:
Donotopenyourcomputerorattemptanyrepairbeforereadingandunderstandingthe“Importantsafetyinformation”
intheThinkCentreSafetyandWarrantyGuidethatcamewithyourcomputer.ToobtainacopyoftheThinkCentre
SafetyandWarrantyGuide,goto:
http://www.lenovo.com/support
Thissectionprovidesinstructionsonhowtoinstallorreplaceamemorymodule.
YourcomputerhasfourslotsforinstallingorreplacingDDR3DIMMsthatprovideuptoamaximumof16GB
systemmemory.Wheninstallingorreplacingamemorymodule,use1GB,2GB,or4GBDDR3DIMMs
inanycombinationuptoamaximumof16GB.
Toinstallorreplaceamemorymodule,dothefollowing:
1.Turnoffthecomputeranddisconnectallpowercordsfromelectricaloutlets.
2.Removethecomputercover.See“Removingthecomputercover”onpage14.
3.Laythecomputeronitssideforeasieraccesstothesystemboard.
4.Locatethememoryslots.See“Locatingpartsonthesystemboard”onpage9.
5.Removeanypartsthatmightpreventyouraccesstothememoryslots.Dependingonyourcomputer
model,youmightneedtoremovethePCIExpressx16graphicscardforeasieraccesstothememory
slots.See“InstallingorreplacingaPCIcard”onpage16.
Chapter2.Installingorreplacinghardware19
Page 26
6.Dependingonwhetheryouareinstallingorreplacingamemorymodule,dooneofthefollowing:
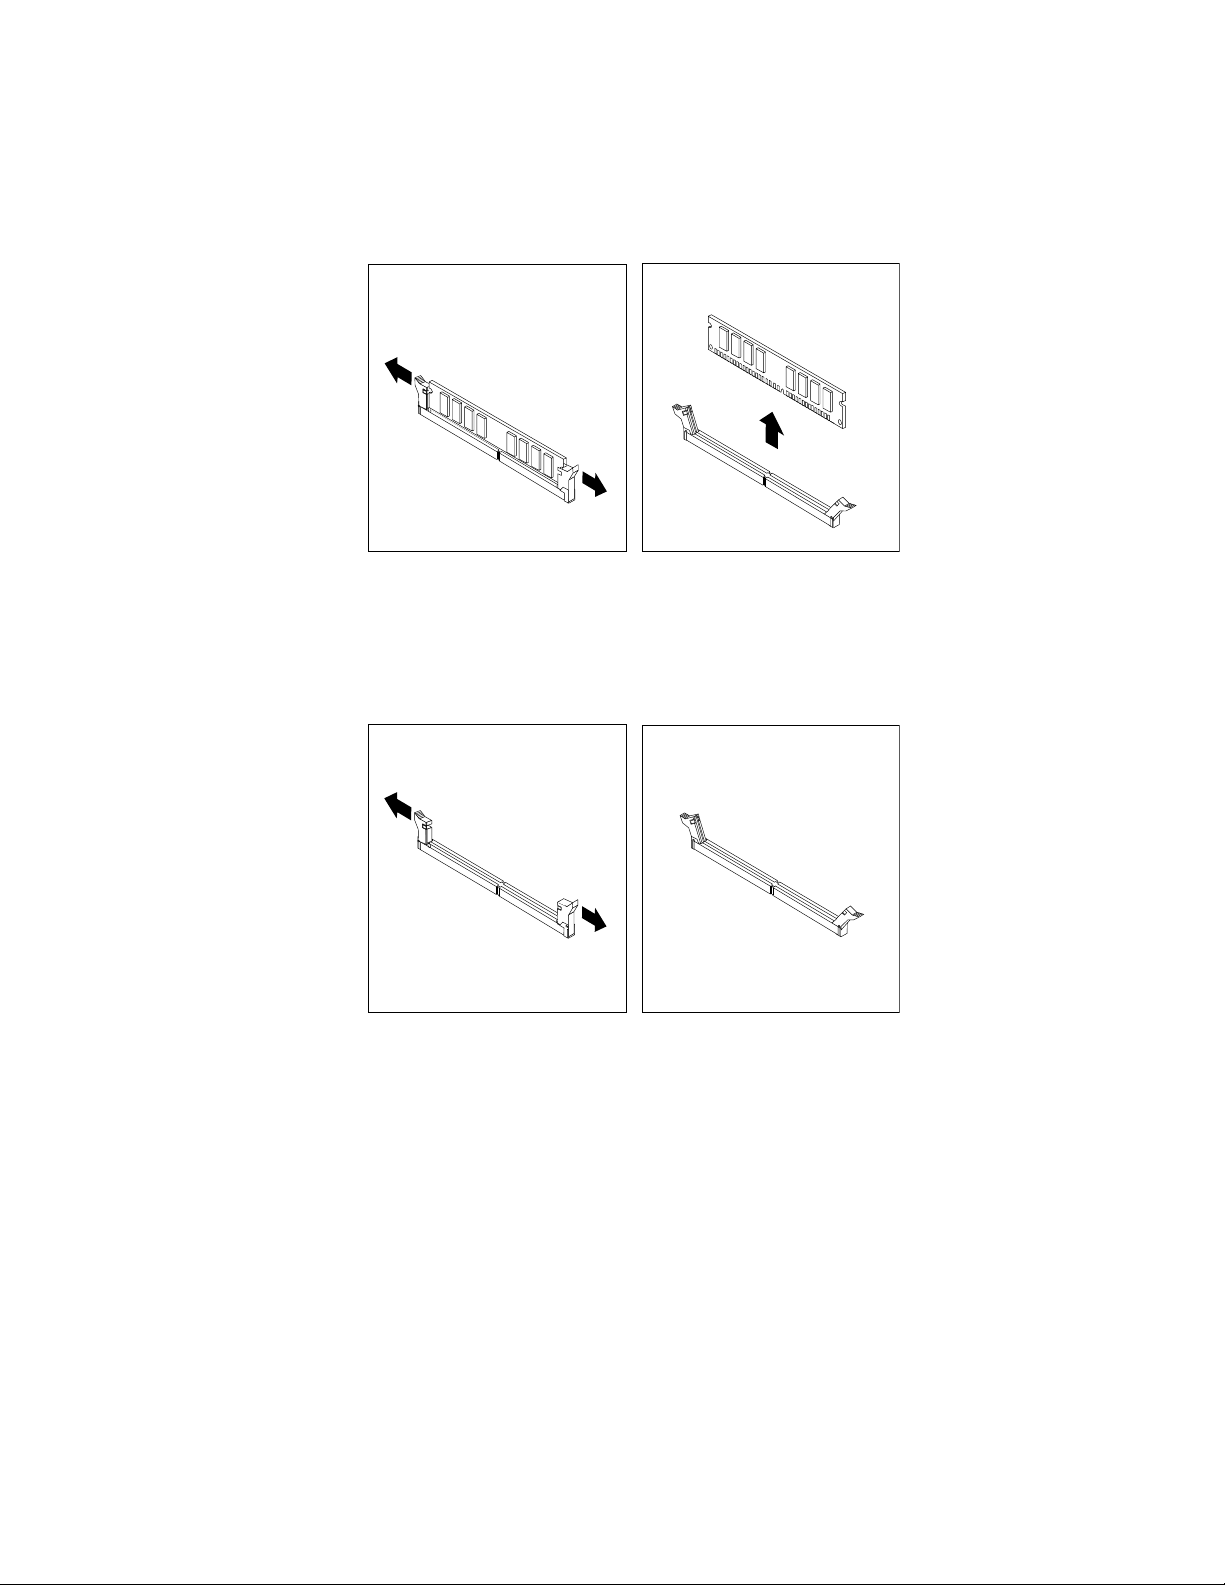
•Ifyouarereplacinganoldmemorymodule,opentheretainingclipsandgentlypullthememory
moduleoutofthememoryslot.
Figure11.Removingamemorymodule
•Ifyouareinstallingamemorymodule,opentheretainingclipsofthememoryslotintowhichyou
wanttoinstallthememorymodule.
Figure12.Openingtheretainingclips
20ThinkCentreUserGuide
Page 27
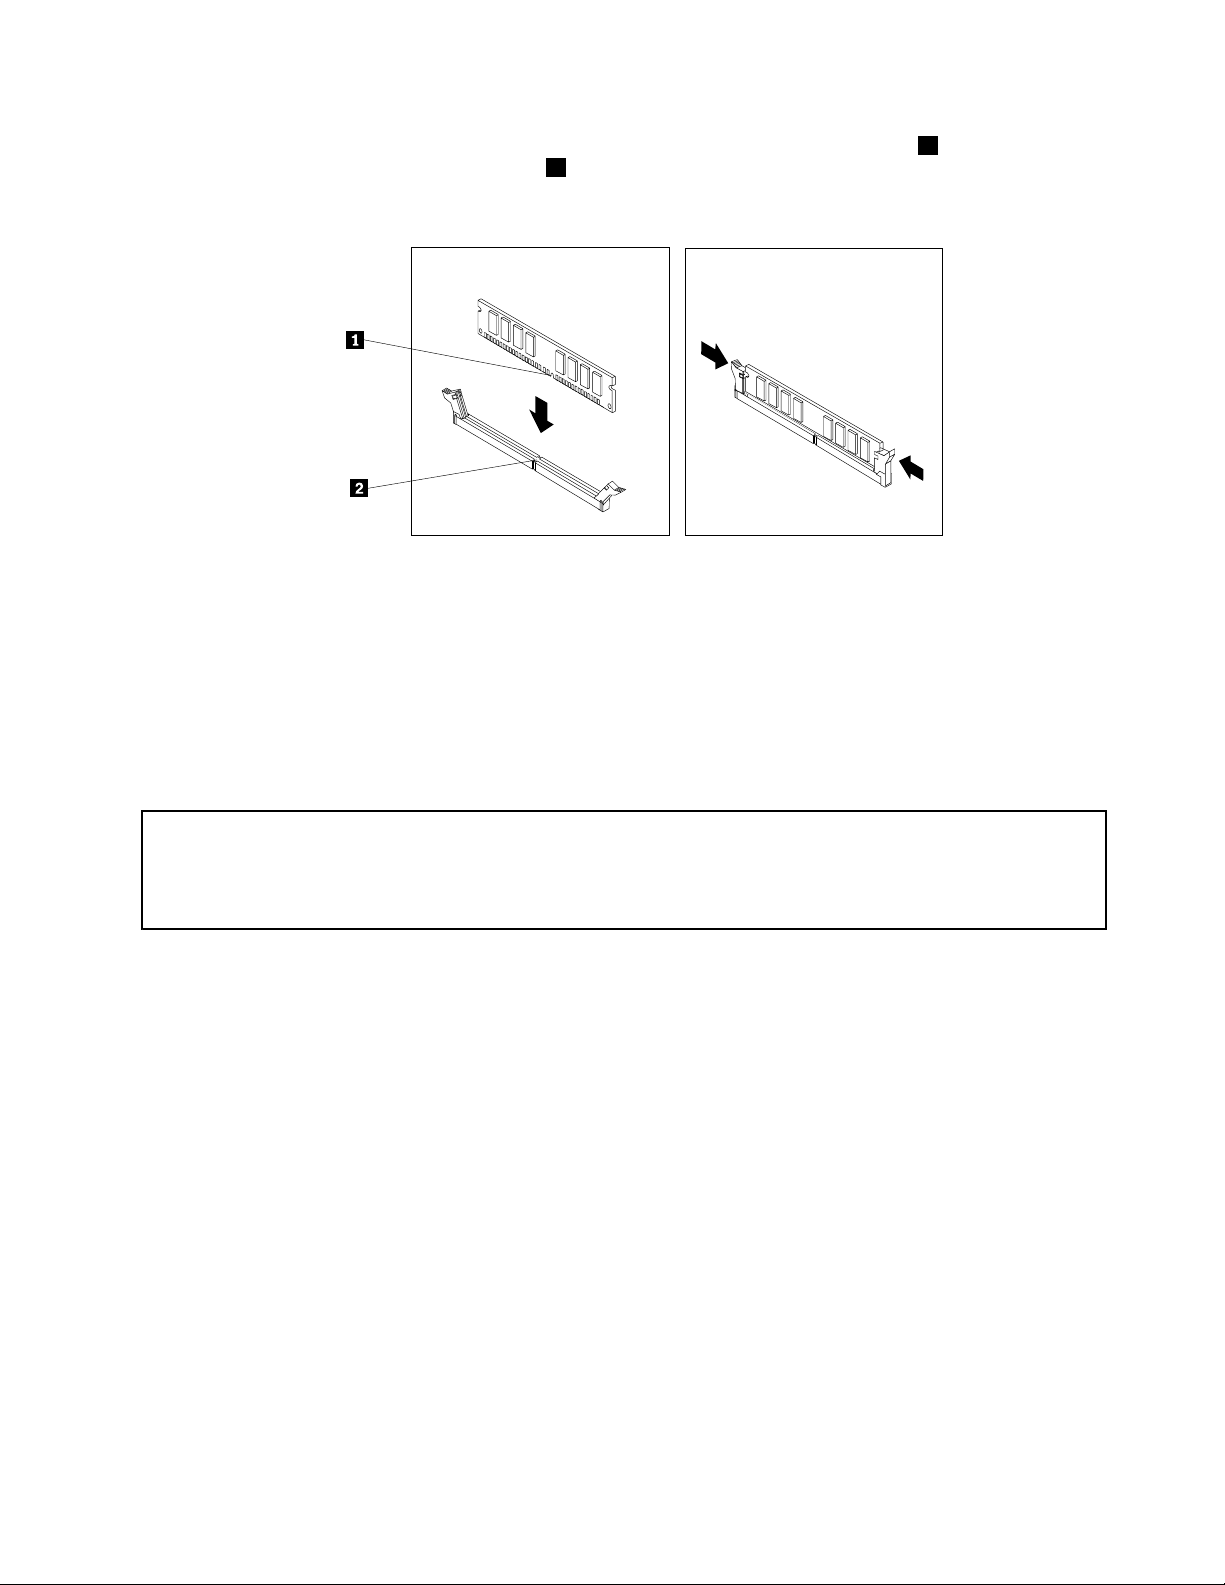
7.Positionthenewmemorymoduleoverthememoryslot.Makesurethatthenotch1onthememory
modulealignscorrectlywiththeslotkey2onthesystemboard.Pushthememorymodulestraight
downintotheslotuntiltheretainingclipsclose.
Figure13.Installingamemorymodule
8.ReinstallthePCIExpressx16graphicscardifyouhaveremovedit.
Whattodonext:
•T oworkwithanotherpieceofhardware,gototheappropriatesection.
•T ocompletetheinstallationorreplacement,goto“Completingthepartsreplacement”onpage48
.
Installingorreplacingtheopticaldrive
Attention:
Donotopenyourcomputerorattemptanyrepairbeforereadingandunderstandingthe“Importantsafetyinformation”
intheThinkCentreSafetyandWarrantyGuidethatcamewithyourcomputer.ToobtainacopyoftheThinkCentre
SafetyandWarrantyGuide,goto:
http://www.lenovo.com/support
Thissectionprovidesinstructionsonhowtoinstallorreplacetheopticaldrive.
Toinstallorreplaceanopticaldrive,dothefollowing:
1.Turnoffthecomputeranddisconnectallpowercordsfromelectricaloutlets.
2.Removethecomputercover.See“Removingthecomputercover”onpage14.
3.Removethefrontbezel.See“Removingandreinstallingthefrontbezel”onpage15.
4.Dependingonwhetheryouareinstallingorreplacinganopticaldrive,dooneofthefollowing:
•Ifyouareinstallingasecondaryopticaldrive,removetheplasticpanelinthefrontbezelforthe
drivebayyouwanttouse.Ifthereisametalstaticshieldinstalledinthedrivebay,removethe
metalstaticshield.
Chapter2.Installingorreplacinghardware21
Page 28
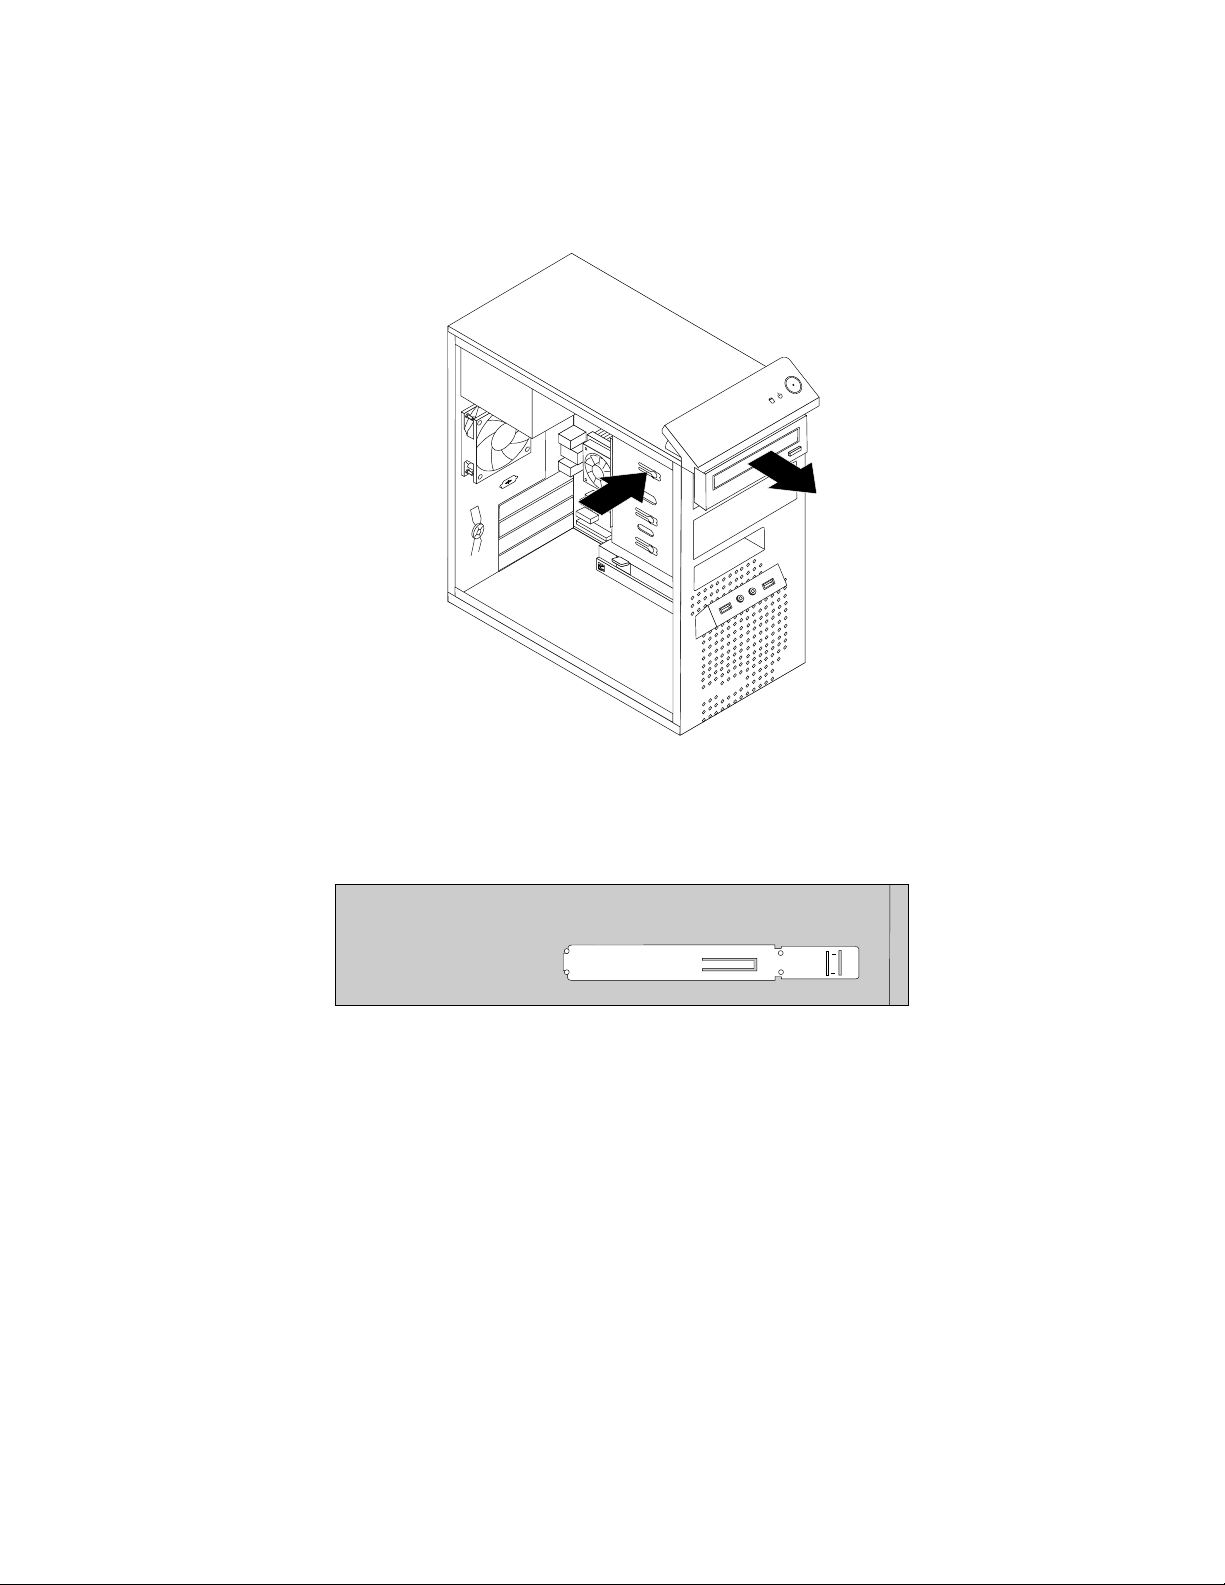
•Ifyouarereplacinganopticaldrive,disconnectthesignalcableandthepowercablefromtherear
oftheopticaldrive,pressthebluereleasebutton,andthenslidetheopticaldriveoutofthefront
ofthecomputer.
Figure14.Removingtheopticaldrive
5.Installtheopticaldriveretaineronthesideofthenewopticaldrive.
Figure15.Installingtheopticaldriveretainer
22ThinkCentreUserGuide
Page 29

6.Slidethenewopticaldriveintothedrivebayfromthefrontofthecomputeruntiltheopticaldrive
snapsintoposition.
Figure16.Installingtheopticaldrive
7.Connectthesignalcableandthepowercabletothenewopticaldrive.
Figure17.Connectingtheopticaldrive
8.Reinstallthefrontbezel.See“Removingandreinstallingthefrontbezel”onpage15.
Whattodonext:
•T oworkwithanotherpieceofhardware,gototheappropriatesection.
•T ocompletetheinstallationorreplacement,goto“Completingthepartsreplacement”onpage48
.
Chapter2.Installingorreplacinghardware23
Page 30

Installingorreplacingthecardreader
Attention:
Donotopenyourcomputerorattemptanyrepairbeforereadingandunderstandingthe“Importantsafetyinformation”
intheThinkCentreSafetyandWarrantyGuidethatcamewithyourcomputer.ToobtainacopyoftheThinkCentre
SafetyandWarrantyGuide,goto:
http://www.lenovo.com/support
Thissectionprovidesinstructionsonhowtoinstallorreplacethecardreader.
Note:Thecardreaderisonlyavailableinsomemodels.Fornewinstallation,see“Installingthecardreader”
onpage24
Installingthecardreader
Toinstallthecardreader,dothefollowing:
1.Removeallmediafromthedrivesandturnoffallattacheddevicesandthecomputer.Then,disconnect
allpowercordsfromelectricaloutletsanddisconnectallcablesthatareconnectedtothecomputer.
2.Removethecomputercover.See“Removingthecomputercover”onpage14.
3.Removethefrontbezel.See“Removingandreinstallingthefrontbezel”onpage15.
4.Locatethecardreaderdrivebay.See“Locatinginternaldrives”onpage10.
5.Pivotthecardreaderretainertotheleftandslideitoutofthechassis.
.Forreplacement,see“Replacingthecardreader”onpage26.
Figure18.Removingthecardreaderretainer
24ThinkCentreUserGuide
Page 31

6.Installthecardreaderretaineronthesideofthenewcardreader.
Figure19.Installingthecardreaderretainer
7.Slidethecardreaderwithretainerintothecardreaderdrivebayuntilitsnapsintoposition.
Figure20.Installingthecardreader
8.ConnectthecardreadercabletoFrontUSBconnector2onthesystemboard.See“Locatingpartson
thesystemboard”onpage9.
Chapter2.Installingorreplacinghardware25
Page 32

9.Reinstallthefrontbezel.See“Removingandreinstallingthefrontbezel”onpage15.
Note:Youmighthavetoremovethecardreadercover
2fromthefrontbezel.Toremovethecardread
cover,pivotthetworetainingclips1thatsecurethecardreadercoveroutwardsandthencompletely
disengagethecardreadercoverfromthefrontbezel.
Figure21.Removingthecardreadercover
Whattodonext:
•T oworkwithanotherpieceofhardware,gototheappropriatesection.
•T ocompletetheinstallationorreplacement,goto“Completingthepartsreplacement”onpage48.
Replacingthecardreader
Toreplacethecardreader,dothefollowing:
1.Removeallmediafromthedrivesandturnoffallattacheddevicesandthecomputer.Then,disconnect
allpowercordsfromelectricaloutletsanddisconnectallcablesthatareconnectedtothecomputer.
2.Removethecomputercover.See“Removingthecomputercover”onpage14.
3.Removethefrontbezel.See“Removingandreinstallingthefrontbezel”onpage15.
4.Locatethecardreader.See“Locatingcomponents”onpage9.
5.DisconnectthecardreadercablefromtheUSBconnectoronthesystemboard.See“Locatingpartson
thesystemboard”onpage9.
26ThinkCentreUserGuide
Page 33

6.Presstheblueretainingcliptoremovethecardreaderoutofthechassis.
Figure22.Removingthecardreader
7.Installthecardreaderretaineronthesideofthenewcardreader.
Figure23.Installingthecardreaderretainer
Chapter2.Installingorreplacinghardware27
Page 34

8.Slidethenewcardreaderintothedrivebayuntilitsnapsintoposition.
Figure24.Installingthecardreader
9.ReconnectthecardreadercabletoFrontUSBconnector2onthesystemboard.See“Locatingparts
onthesystemboard”onpage9.
10.Reinstallthefrontbezel.See“Removingandreinstallingthefrontbezel”onpage15.
11.Tocompletetheinstallationorreplacement,goto“Completingthepartsreplacement”onpage48.
Replacingthebattery
Attention:
Donotopenyourcomputerorattemptanyrepairbeforereadingandunderstandingthe“Importantsafetyinformation”
intheThinkCentreSafetyandWarrantyGuidethatcamewithyourcomputer.ToobtainacopyoftheThinkCentre
SafetyandWarrantyGuide,goto:
http://www.lenovo.com/support
Yourcomputerhasaspecialtypeofmemorythatmaintainsthedate,time,andsettingsforbuilt-infeatures,
suchasparallel-portassignments(conguration).Abatterykeepsthisinformationactivewhenyouturn
offthecomputer.
Thebatterynormallyrequiresnochargingormaintenancethroughoutitslife;however,nobatterylasts
forever.Ifthebatteryfails,thedate,time,andcongurationinformation(includingpasswords)arelost.An
errormessageisdisplayedwhenyouturnonthecomputer.
Refertothe“Lithiumbatterynotice”intheThinkCentreSafetyandWarrantyGuideforinformationabout
replacinganddisposingofthebattery.
Toreplacethebattery,dothefollowing:
1.Turnoffthecomputeranddisconnectallpowercordsfromelectricaloutlets.
2.Removethecomputercover.See“Removingthecomputercover”onpage14.
28ThinkCentreUserGuide
Page 35

3.Locatethebattery.See“Locatingpartsonthesystemboard”onpage9.
4.Removetheoldbattery.
Figure25.Removingtheoldbattery
5.Installanewbattery.
Figure26.Installinganewbattery
6.Reinstallthecomputercoverandconnectthecables.See“Completingthepartsreplacement”on
page48.
Note:Whenthecomputeristurnedonforthersttimeafterreplacingthebattery,anerrormessage
mightbedisplayed.Thisisnormalafterreplacingthebattery.
7.Turnonthecomputerandallattacheddevices.
8.UsetheSetupUtilityprogramtosetthedate,time,andanypasswords.SeeChapter4“UsingtheSetup
Utilityprogram”onpage59
.
Whattodonext:
•T oworkwithanotherpieceofhardware,gototheappropriatesection.
•T ocompletetheinstallationorreplacement,goto“Completingthepartsreplacement”onpage48.
Replacingthepowersupplyassembly
Attention:
Donotopenyourcomputerorattemptanyrepairbeforereadingandunderstandingthe“Importantsafetyinformation”
intheThinkCentreSafetyandWarrantyGuidethatcamewithyourcomputer.ToobtainacopyoftheThinkCentre
SafetyandWarrantyGuide,goto:
http://www.lenovo.com/support
Thissectionprovidesinstructionsonhowtoreplacethepowersupplyassembly.
Althoughtherearenomovingpartsinyourcomputerafterthepowercordhasbeendisconnected,the
followingwarningsarerequiredforyoursafetyandproperUnderwritersLaboratories(UL)certication.
CAUTION:
Chapter2.Installingorreplacinghardware29
Page 36

Hazardousmovingparts.Keepngersandotherbodypartsaway.
CAUTION:
Neverremovethecoveronapowersupplyoranypartthathasthefollowinglabelattached.
Hazardousvoltage,current,andenergylevelsarepresentinsideanycomponentthathasthislabel
attached.Therearenoserviceablepartsinsidethesecomponents.Ifyoususpectaproblemwith
oneoftheseparts,contactaservicetechnician.
Toreplacethepowersupplyassembly,dothefollowing:
1.Turnoffthecomputeranddisconnectallpowercordsfromelectricaloutlets.
2.Removethecomputercover.See“Removingthecomputercover”onpage14.
3.Disconnectthepowersupplyassemblycablesfromthesystemboardandalldrives.See“Locating
partsonthesystemboard”onpage9.
4.Releasethepowersupplyassemblycablesfromthecableclipsandtiesinthechassis.
30ThinkCentreUserGuide
Page 37

5.Laythecomputeronitssideandremovethefourscrewsattherearofthechassisthatsecurethe
powersupplyassembly.
Figure27.Removingthescrewsforthepowersupplyassembly
6.Slidethepowersupplyassemblytothefrontofthecomputerandthenliftitoutofthechassis.
7.Ensurethatthenewpowersupplyassemblyisthecorrectreplacement.
8.Installthenewpowersupplyassemblyintothechassissothatthescrewholesinthepowersupply
assemblyalignwiththoseinthechassis.
9.Installandtightenthefourscrewstosecurethepowersupplyassembly.
Note:UseonlyscrewsprovidedbyLenovo.
10.Reconnectthepowersupplyassemblycablestothesystemboardandeachofthedrives.
11.Securethepowersupplyassemblycableswiththecableclipsandtiesinthechassis.
Whattodonext:
•T oworkwithanotherpieceofhardware,gototheappropriatesection.
•T ocompletetheinstallationorreplacement,goto“Completingthepartsreplacement”onpage48.
Replacingtheheatsinkandfanassembly
Attention:
Donotopenyourcomputerorattemptanyrepairbeforereadingandunderstandingthe“Importantsafetyinformation”
intheThinkCentreSafetyandWarrantyGuidethatcamewithyourcomputer.ToobtainacopyoftheThinkCentre
SafetyandWarrantyGuide,goto:
http://www.lenovo.com/support
Thissectionprovidesinstructionsonhowtoreplacetheheatsinkandfanassembly.
Chapter2.Installingorreplacinghardware31
Page 38

CAUTION:
Theheatsinkandfanassemblymightbeveryhot.Turnoffthecomputerandwaitthreetove
minutestoletthecomputercoolbeforeremovingthecomputercover.
Toreplacetheheatsinkandfanassembly,dothefollowing:
1.Turnoffthecomputeranddisconnectallpowercordsfromelectricaloutlets.
2.Removethecomputercover.See“Removingthecomputercover”onpage14.
3.Laythecomputeronitssideforeasieraccesstothesystemboard.
4.Locatetheheatsinkandfanassembly.See“Locatingpartsonthesystemboard”onpage9.
5.Disconnectanycablesthatmightpreventyouraccesstotheheatsinkandfanassembly.
6.Disconnecttheheatsinkandfanassemblycablefromthemicroprocessorfanconnectoronthesystem
board.See“Locatingpartsonthesystemboard”onpage9.
7.Pivotthehandle1toreleasetheheatsinkandfanassemblyclampandthendisengagetheclampfrom
theplasticretentionbracket.
Figure28.Removingtheheatsinkandfanassembly
8.Liftthefailingheatsinkandfanassemblyoffthesystemboard.
Notes:
a.Youmighthavetogentlytwisttheheatsinkandfanassemblytofreeitfromthemicroprocessor.
b.Whenhandlingtheheatsinkandfanassembly,donottouchthethermalgreaseonthebottomofit.
32ThinkCentreUserGuide
Page 39

9.Positionthenewheatsinkandfanassemblyonthemicroprocessorsocketandthenpositionthe
clampontheplasticretentionbracket.Pivotthehandle1toclamptheheatsinkandfanassemblyto
theplasticretentionbracket.
Figure29.Reinstallingtheheatsinkandfanassembly
10.Connecttheheatsinkandfanassemblycabletothemicroprocessorfanconnectoronthesystem
board.See“Locatingpartsonthesystemboard”onpage9.
11.Reconnectanycablesthathavebeenremoved.
Whattodonext:
•T oworkwithanotherpieceofhardware,gototheappropriatesection.
•T ocompletetheinstallationorreplacement,goto“Completingthepartsreplacement”onpage48
Replacingthemicroprocessor
Attention:
Donotopenyourcomputerorattemptanyrepairbeforereadingandunderstandingthe“Importantsafetyinformation”
intheThinkCentreSafetyandWarrantyGuidethatcamewithyourcomputer.ToobtainacopyoftheThinkCentre
SafetyandWarrantyGuide,goto:
http://www.lenovo.com/support
Thissectionprovidesinstructionsonhowtoreplacethemicroprocessor.
CAUTION:
Theheatsinkandmicroprocessormightbeveryhot.T urnoffthecomputerandwaitthreetove
minutestoletthecomputercoolbeforeremovingthecomputercover.
.
Toreplacethemicroprocessor,dothefollowing:
1.Removeallmediafromthedrivesandturnoffallattacheddevicesandthecomputer.Then,disconnect
allpowercordsfromelectricaloutletsanddisconnectallcablesthatareconnectedtothecomputer.
Chapter2.Installingorreplacinghardware33
Page 40

2.Removethecomputercover.See“Removingthecomputercover”onpage14.
3.Laythecomputeronitssideforeasieraccesstothesystemboard.
4.Locatethesystemboardanddisconnectallcablesconnectedtothesystemboard.See“Locating
partsonthesystemboard”onpage9
.
5.Removetheheatsinkandfanassembly.See“Replacingtheheatsinkandfanassembly”onpage31.
Note:Placetheheatsinkandfanassemblyonitssidesothatthethermalgreaseonthebottomofit
doesnotgetincontactwithanything.
6.Liftthesmallhandle1toreleasethemicroprocessor2securedonthesystemboard.
Figure30.Accessingthemicroprocessor
7.Liftthemicroprocessorstraightupandoutofthemicroprocessorsocket.
Figure31.Removingthemicroprocessor
Notes:
a.Yourmicroprocessorandsocketmightlookdifferentfromtheoneillustrated.
34ThinkCentreUserGuide
Page 41

b.Notetheorientationofthemicroprocessorinthesocket.Y oucanlookforthesmalltriangle1
ononecornerofthemicroprocessor.Thisisimportantwheninstallingthenewmicroprocessor
onthesystemboard.
c.Touchonlytheedgesofthemicroprocessor.Donottouchthegoldcontactsonthebottom.
d.Donotdropanythingontothemicroprocessorsocketwhileitisexposed.Thesocketpinsmustbe
keptascleanaspossible.
8.Makesurethatthesmallhandleisintheraisedposition.
9.Removetheprotectivecoverthatprotectsthegoldcontactsofthenewmicroprocessor.
10.Holdthenewmicroprocessorbyitssidesandalignthesmalltriangleononecornerofthenew
microprocessorwiththecorrespondingsmalltriangleononecornerofthemicroprocessorsocket.
11.Lowerthenewmicroprocessorstraightdownintothemicroprocessorsocketonthesystemboard.
12.Lowerthesmallhandletosecurethenewmicroprocessorinthesocket.
13.Reinstalltheheatsinkandfanassembly.See“Replacingtheheatsinkandfanassembly”onpage31.
14.Reconnectallcablesthatweredisconnectedfromthesystemboard.
Whattodonext:
•T oworkwithanotherpieceofhardware,gototheappropriatesection.
•T ocompletethereplacement,goto“Completingthepartsreplacement”onpage48.
Replacingtheprimaryharddiskdrive
Attention:
Donotopenyourcomputerorattemptanyrepairbeforereadingandunderstandingthe“Importantsafetyinformation”
intheThinkCentreSafetyandWarrantyGuidethatcamewithyourcomputer.ToobtainacopyoftheThinkCentre
SafetyandWarrantyGuide,goto:
http://www.lenovo.com/support
Thissectionprovidesinstructionsonhowtoreplacetheprimaryharddiskdrive.
Toreplacetheprimaryharddiskdrive,dothefollowing:
1.Turnoffthecomputeranddisconnectallpowercordsfromelectricaloutlets.
2.Removethecomputercover.See“Removingthecomputercover”onpage14.
3.Locatetheprimaryharddiskdrive.See“Locatinginternaldrives”onpage10.
4.Disconnectthesignalcableandthepowercablefromtheharddiskdrive.
Chapter2.Installingorreplacinghardware35
Page 42

5.Pressthebluereleasetab1down,slidetheharddiskdrivecage2totherearofthecomputer,and
thenpivotitoutward.
Figure32.Removingtheprimaryharddiskdrive
6.Removetheharddiskdrivecagefromthechassisbyslidingitoutward.
7.Pullonthebluehandle3toreleaseandremovetheharddiskdrivefromthedrivecage.
8.Flexthesidesofthebluebrackettoremovetheharddiskdrivefromthebracket.
9.Toinstallanewharddiskdriveintothebluebracket,exthebracketandalignpin1,pin2,pin3,
andpin4onthebracketwiththecorrespondingholesintheharddiskdrive.Donottouchthecircuit
board5onthebottomoftheharddiskdrive.
Figure33.Installingtheharddiskdriveintothebracket
10.Slidethenewharddiskdriveintothedrivecageuntilitsnapsintoposition.
11.Alignthedrivecagepivotpinwiththeslot1intheupperdrivecageandslidetheharddiskdrive
cageintothechassis.
36ThinkCentreUserGuide
Page 43

12.Connectthesignalcableandthepowercabletothenewharddiskdrive.
13.Pressdownonthemetallatch2andpivotthedrivecageintoplace,andthenslideittothefrontofthe
computeruntilitsnapsintoposition.
Note:Therearetwoarrows,oneontheupperdrivecageandoneontheharddiskdrivecage.The
arrowsarealignedwhentheharddiskdriveisintheproperposition.
Figure34.Installingtheprimaryharddiskdrive
Whattodonext:
•T oworkwithanotherpieceofhardware,gototheappropriatesection.
•T ocompletetheinstallationorreplacement,goto“Completingthepartsreplacement”onpage48.
Replacingthesecondaryharddiskdrive
Attention:
Donotopenyourcomputerorattemptanyrepairbeforereadingandunderstandingthe“Importantsafetyinformation”
intheThinkCentreSafetyandWarrantyGuidethatcamewithyourcomputer.ToobtainacopyoftheThinkCentre
SafetyandWarrantyGuide,goto:
http://www.lenovo.com/support
Note:Dependingonyourmodeltype,yourcomputermightcomewithasecondaryharddiskdrivebayfor
installingorreplacingasecondaryharddiskdrive.
Thissectionprovidesinstructionsonhowtoreplacethesecondaryharddiskdrive.
Toreplacethesecondaryharddiskdrive,dothefollowing:
1.Turnoffthecomputeranddisconnectallpowercordsfromelectricaloutlets.
2.Removethecomputercover.See“Removingthecomputercover”onpage14.
3.Locatethesecondaryharddiskdrive.See“Locatinginternaldrives”onpage10.
4.Disconnectthesignalcableandthepowercablefromtheharddiskdrive.
Chapter2.Installingorreplacinghardware37
Page 44

5.Pressthebluereleasebuttontoreleasetheharddiskdrivecagefromthechassis.
Figure35.Removingthesecondaryharddiskdrive
6.Removetheharddiskdrivecagefromthechassisbysimplyslidingitoutward.
7.Pullonthebluehandletoreleaseandremovetheharddiskdrivefromtheharddiskdrivecage.
8.Flexthesidesofthebluebrackettoremovetheharddiskdrivefromthebracket.
9.Toinstallanewharddiskdriveintothebluebracket,exthebracketandalignpin1,pin2,pin3,
andpin4onthebracketwiththecorrespondingholesintheharddiskdrive.Donottouchthecircuit
board5onthebottomoftheharddiskdrive.
Figure36.Installingtheharddiskdriveintothebracket
10.Slidethenewharddiskdriveintotheharddiskdrivecageuntilitsnapsintoposition.
38ThinkCentreUserGuide
Page 45

11.Installtheharddiskdrivecageintothechassisuntilitsnapsintopositionunderneaththemetaltab.
Makesurethattheharddiskdrivecagereleasebuttonissecuredinthechassis.
Figure37.Installingthesecondaryharddiskdrive
12.Connectthesignalcableandthepowercabletothenewharddiskdrive.
Whattodonext:
•T oworkwithanotherpieceofhardware,gototheappropriatesection.
•T ocompletetheinstallationorreplacement,goto“Completingthepartsreplacement”onpage48.
Replacingthefrontfanassembly
Attention:
Donotopenyourcomputerorattemptanyrepairbeforereadingandunderstandingthe“Importantsafetyinformation”
intheThinkCentreSafetyandWarrantyGuidethatcamewithyourcomputer.ToobtainacopyoftheThinkCentre
SafetyandWarrantyGuide,goto:
http://www.lenovo.com/support
Thissectionprovidesinstructionsonhowtoreplacethefrontfanassembly.
Note:Thefrontfanassemblyisonlyavailableinsomemodels.
Toreplacethefrontfanassembly,dothefollowing:
1.Turnoffthecomputeranddisconnectallpowercordsfromelectricaloutlets.
2.Removethecomputercover.See“Removingthecomputercover”onpage14.
3.Removethefrontbezel.See“Removingandreinstallingthefrontbezel”onpage15.
4.Disconnectthefrontfanassemblycablefromthepowerfanconnectoronthesystemboard.See
“Locatingpartsonthesystemboard”onpage9.
Chapter2.Installingorreplacinghardware39
Page 46

5.Releasethetwotabs1thatattachthefrontfanassemblytothechassisasshownandthencompletely
removethefrontfanfromthechassis.
Figure38.Removingthefrontfanassembly
40ThinkCentreUserGuide
Page 47

6.Insertthetwotabs2ofthenewfrontfanassemblyintothecorrespondingholesinthechassis,and
presstheothertwotabs1throughtheholesuntilthefrontfanassemblyissecuredinplace.
Figure39.Installingthefrontfanassembly
7.Connectthefrontfanassemblycabletothepowerfanconnectoronthesystemboard.
Whattodonext:
•T oworkwithanotherpieceofhardware,gototheappropriatesection.
•T ocompletetheinstallationorreplacement,goto“Completingthepartsreplacement”onpage48.
Replacingtherearfanassembly
Attention:
Donotopenyourcomputerorattemptanyrepairbeforereadingandunderstandingthe“Importantsafetyinformation”
intheThinkCentreSafetyandWarrantyGuidethatcamewithyourcomputer.ToobtainacopyoftheThinkCentre
SafetyandWarrantyGuide,goto:
http://www.lenovo.com/support
Thissectionprovidesinstructionsonhowtoreplacetherearfanassembly.
Toreplacetherearfanassembly,dothefollowing:
1.Turnoffthecomputeranddisconnectallpowercordsfromelectricaloutlets.
2.Removethecomputercover.See“Removingthecomputercover”onpage14.
Chapter2.Installingorreplacinghardware41
Page 48

3.Locatetherearfanassembly.See“Locatingcomponents”onpage9.
4.Disconnecttherearfanassemblycablefromthesystemfanconnectoronthesystemboard.See
“Locatingpartsonthesystemboard”onpage9.
5.Therearfanassemblyisattachedtothechassisbyfourrubbermounts.Removetherearfanassembly
bybreakingorcuttingtherubbermountsandgentlypullingtherearfanassemblyoutofthechassis.
Note:Thenewrearfanassemblywillhavefournewrubbermountsattached.
Figure40.Removingtherearfanassembly
6.Installthenewrearfanassemblybyaligningthenewrubbermountswiththecorrespondingholesinthe
chassisandpushtherubbermountsthroughtheholes.
42ThinkCentreUserGuide
Page 49

7.Pullonthetipsoftherubbermountsuntiltherearfanassemblyissecuredinplace.
Figure41.Installingtherearfanassembly
8.Connecttherearfanassemblycabletothesystemfanconnectoronthesystemboard.
Whattodonext:
•T oworkwithanotherpieceofhardware,gototheappropriatesection.
•T ocompletetheinstallationorreplacement,goto“Completingthepartsreplacement”onpage48.
ReplacingthefrontaudioandUSBassembly
Attention:
Donotopenyourcomputerorattemptanyrepairbeforereadingandunderstandingthe“Importantsafetyinformation”
intheThinkCentreSafetyandWarrantyGuidethatcamewithyourcomputer.ToobtainacopyoftheThinkCentre
SafetyandWarrantyGuide,goto:
http://www.lenovo.com/support
ThissectionprovidesinstructionsonhowtoreplacethefrontaudioandUSBassembly.
ToreplacethefrontaudioandUSBassembly,dothefollowing:
1.Turnoffthecomputeranddisconnectallpowercordsfromelectricaloutlets.
2.Removethecomputercover.See“Removingthecomputercover”onpage14.
3.Removethefrontbezel.See“Removingandreinstallingthefrontbezel”onpage15.
4.LocatethefrontaudioandUSBassembly.See“Locatingcomponents”onpage9.
Chapter2.Installingorreplacinghardware43
Page 50

5.DisconnectthefrontaudioandUSBassemblycablesfromthesystemboard.See“Locatingpartson
thesystemboard”onpage9.
Note:Makesureyounotethelocationsofthecableswhenyoudisconnectthecablesfromthesystem
board.
6.RemovethescrewthatsecuresthefrontaudioandUSBassemblybrackettothechassistoremove
thebracketfromthechassis.
Figure42.RemovingthescrewthatsecuresthefrontaudioandUSBassemblytothechassis
7.RemovethetwoscrewsthatsecurethefrontaudioandUSBassemblytoitsbracketandremovethe
failingfrontaudioandUSBassemblyfromthebracket.
8.InstallanewfrontaudioandUSBassemblyintothebracketandinstallthetwoscrewstosecurethe
frontaudioandUSBassemblytothebracket.
9.InstallthefrontaudioandUSBassemblybracketintothechassisandalignthescrewholeinthe
bracketwiththecorrespondingholeinthechassis.
10.Installthescrewtosecurethebrackettothechassis.
11.ReconnectthefrontaudioandUSBassemblycablestothefrontaudioconnectorandthefrontUSB
connectoronthesystemboard.See“Locatingpartsonthesystemboard”onpage9.
Whattodonext:
•T oworkwithanotherpieceofhardware,gototheappropriatesection.
•T ocompletetheinstallationorreplacement,goto“Completingthepartsreplacement”onpage48.
Replacingtheinternalspeaker
Attention:
Donotopenyourcomputerorattemptanyrepairbeforereadingandunderstandingthe“Importantsafetyinformation”
intheThinkCentreSafetyandWarrantyGuidethatcamewithyourcomputer.ToobtainacopyoftheThinkCentre
SafetyandWarrantyGuide,goto:
http://www.lenovo.com/support
44ThinkCentreUserGuide
Page 51

Thissectionprovidesinstructionsonhowtoreplacetheinternalspeaker.
Note:Theinternalspeakerisonlyavailableinsomemodels.
Toreplacetheinternalspeaker,dothefollowing:
1.Turnoffthecomputeranddisconnectallpowercordsfromelectricaloutlets.
2.Removethecomputercover.See“Removingthecomputercover”onpage14.
3.Locatetheinternalspeakerconnectoronthesystemboard.See“Locatingpartsonthesystemboard”
onpage9.
4.Disconnecttheinternalspeakercablefromthesystemboard.
5.Pushthemetaltab1onthetopoftheinternalspeakeroutwardandslidetheinternalspeakerupward
tocompletelyremoveitfromthechassis.
Figure43.Removingtheoldinternalspeaker
Chapter2.Installingorreplacinghardware45
Page 52

6.Positionthenewinternalspeakerintothefourmetalclips1andpushdownwardontheinternalspeaker
untilitissecuredinplace.
Figure44.Installinganewinternalspeaker
7.Connecttheinternalspeakercabletothesystemboard.See“Locatingpartsonthesystemboard”
onpage9.
Whattodonext:
•T oworkwithanotherpieceofhardware,gototheappropriatesection.
•T ocompletetheinstallationorreplacement,goto“Completingthepartsreplacement”onpage48
Replacingthekeyboard
Attention:
Donotopenyourcomputerorattemptanyrepairbeforereadingandunderstandingthe“Importantsafetyinformation”
intheThinkCentreSafetyandWarrantyGuidethatcamewithyourcomputer.ToobtainacopyoftheThinkCentre
SafetyandWarrantyGuide,goto:
http://www.lenovo.com/support
Thissectionprovidesinstructionsonhowtoreplacethekeyboard.
Toreplacethekeyboard,dothefollowing:
1.Removeallmediafromthedrives.Then,turnoffallattacheddevicesandthecomputer.
2.Disconnectallpowercordsfromelectricaloutlets.
3.Disconnecttheoldkeyboardcablefromthecomputer.
4.Connectanewkeyboardtotheappropriateconnectoronthecomputer.Y ourkeyboardmightbe
connectedtoaPS/2keyboardconnector1oraUSBconnector2.Dependingonwhereyouwant
.
46ThinkCentreUserGuide
Page 53

toconnectyourkeyboard,see“Locatingconnectors,controls,andindicatorsonthefrontofyour
computer”onpage7or“Locatingconnectorsandpartsontherearofyourcomputer”onpage7.
Figure45.Keyboardconnectors
Whattodonext:
•T oworkwithanotherpieceofhardware,gototheappropriatesection.
•T ocompletethereplacement,goto“Completingthepartsreplacement”onpage48.
Replacingthemouse
Attention:
Donotopenyourcomputerorattemptanyrepairbeforereadingandunderstandingthe“Importantsafetyinformation”
intheThinkCentreSafetyandWarrantyGuidethatcamewithyourcomputer.ToobtainacopyoftheThinkCentre
SafetyandWarrantyGuide,goto:
http://www.lenovo.com/support
Thissectionprovidesinstructionsonhowtoreplacethemouse.
Toreplacethemouse,dothefollowing:
1.Removeallmediafromthedrives.Then,turnoffallattacheddevicesandthecomputer.
2.Disconnectallpowercordsfromelectricaloutlets.
3.Disconnecttheoldmousecablefromthecomputer.
4.Connectanewmousetotheappropriateconnectoronthecomputer.Y ourmousemightbeconnected
toaPS/2mouseconnector1oraUSBconnector2.Dependingonwhereyouwanttoconnectyour
mouse,see“Locatingconnectors,controls,andindicatorsonthefrontofyourcomputer”onpage7or
“Locatingconnectorsandpartsontherearofyourcomputer”onpage7
.
Figure46.Mouseconnectors
Chapter2.Installingorreplacinghardware47
Page 54

Whattodonext:
•T oworkwithanotherpieceofhardware,gototheappropriatesection.
•T ocompletethereplacement,goto“Completingthepartsreplacement”onpage48.
Completingthepartsreplacement
Aftercompletingtheinstallationorreplacementforallparts,youneedtoreinstallthecomputercoverand
reconnectcables.Dependingonthepartsyouinstalledorreplaced,youmightneedtoconrmtheupdated
informationintheSetupUtilityprogram.RefertoChapter4“UsingtheSetupUtilityprogram”onpage59
Toreinstallthecomputercoverandreconnectcablestoyourcomputer,dothefollowing:
1.Makesurethatallcomponentshavebeenreassembledcorrectlyandthatnotoolsorloosescrews
areleftinsideyourcomputer.See“Locatingcomponents”onpage9
componentsinyourcomputer.
2.Ifyouhaveremovedthefrontbezel,reinstallit.See“Removingandreinstallingthefrontbezel”on
page15.
3.Makesurethatthecablesareroutedcorrectlybeforereinstallingthecomputercover.Keepcablesclear
ofthehingesandsidesofthecomputerchassistoavoidinterferencewithreinstallingthecomputer
cover.
4.Positionthecomputercoveronthechassissothattherailguidesonthebottomofthecomputer
coverengagetherailsonthechassis.Then,pushthecovertothefrontofthecomputeruntilitsnaps
intoposition.
forthelocationsofvarious
.
Figure47.Reinstallingthecomputercover
5.Installthescrewstosecurethecomputercover.
6.Ifthereisapadlockavailable,lockthecomputercover.See“Padlock”onpage50.
7.Ifthereisanintegratedcablelockavailable,lockthecomputer.See“Integratedcablelock”onpage49.
48ThinkCentreUserGuide
Page 55

8.Reconnecttheexternalcablesandpowercordstothecomputer.See“Locatingconnectorsandparts
ontherearofyourcomputer”onpage7.
9.Toupdateyourconguration,refertoChapter4“UsingtheSetupUtilityprogram”onpage59.
Note:Inmostareasoftheworld,LenovorequiresthereturnofthedefectiveCustomerReplaceableUnit
(CRU).InformationaboutthiswillcomewiththeCRUorwillcomeafewdaysaftertheCRUarrives.
Obtainingdevicedrivers
Youcanobtaindevicedriversforoperatingsystemsthatarenotpreinstalledat
http://www.lenovo.com/support.Installationinstructionsareprovidedinreadmeleswiththedevice-driver
les.
Basicsecurityfeatures
Thereareseveralsecurityoptionsavailabletohelpyoupreventhardwaretheftandunauthorizedaccessto
yourcomputer.Inadditiontophysicallocks,youcanalsopreventunauthorizeduseofyourcomputerbya
softwarelockthatlocksthekeyboarduntilacorrectpasswordistypedin.
Integratedcablelock
Anintegratedcablelock,sometimesreferredtoastheKensingtonlock,canbeusedtosecureyour
computertoadesk,table,orothernon-permanentxture.Thecablelockattachestoasecurityslotatthe
rearofyourcomputerandisoperatedwithakey.Thecablelockalsolocksthecomputercover.SeeFigure
48“Installinganintegratedcablelock”onpage49
computers.YoucanorderanintegratedcablelockfromLenovobysearchingforKensingtonat:
http://www.lenovo.com/support
.Thisisthesametypeoflockusedwithmanynotebook
Note:Makesurethattheintegratedcablelockyouinstalleddoesnotinterferewithothercomputercables.
Figure48.Installinganintegratedcablelock
Chapter2.Installingorreplacinghardware49
Page 56

Padlock
Yourcomputerisequippedwithapadlockloopsothatthecomputercovercannotberemovedwhen
apadlockisinstalled.
Figure49.Installingapadlock
Passwordprotection
Todeterunauthorizeduseofyourcomputer,youcanusetheSetupUtilityprogramtosetapassword.When
youturnonyourcomputer,youarepromptedtotypethepassword.Thecomputercannotbeuseduntil
avalidpasswordistypedin.RefertoChapter4“UsingtheSetupUtilityprogram”onpage59
information.
formore
Erasingalostorforgottenpassword(clearingCMOS)
Thissectionprovidesinstructionsonhowtoerasealostorforgottenpassword,suchasauserpassword.
Toerasealostorforgottenpassword,dothefollowing:
1.Removeallmediafromthedrivesandturnoffallattacheddevicesandthecomputer.Then,disconnect
allpowercordsfromelectricaloutletsanddisconnectallcablesthatareconnectedtothecomputer.
2.Removethecomputercover.See“Removingthecomputercover”onpage14.
3.LocatetheClearCMOS/Recoveryjumperonthesystemboard.See“Locatingpartsonthesystem
board”onpage9.
4.RemoveanypartsanddisconnectanycablesthatmightpreventyouraccesstotheClearCMOS
/Recoveryjumper.
5.Movethejumperfromthestandardposition(pin1andpin2)tothemaintenanceposition(pin2and
pin3).
6.Reinstallanypartsandreconnectanycablesthathavebeenremovedordisconnected.
7.Reinstallthecomputercoverandreconnectthepowercordsforthecomputerandmonitor.See
“Completingthepartsreplacement”onpage48.
50ThinkCentreUserGuide
Page 57

8.Turnonthecomputerandleaveitonforapproximately10seconds.Then,turnoffthecomputerby
holdingthepowerswitchforapproximatelyveseconds.
9.Repeatstep1throughstep4.
10.MovetheClearCMOS/Recoveryjumperbacktothestandardposition(pin1andpin2).
11.Reinstallanypartsandreconnectanycablesthathavebeenremovedordisconnected.
12.Reinstallthecomputercoverandreconnectallcables.See“Completingthepartsreplacement”on
page48
.
13.Turnonthecomputer.Y ourpasswordhasbeenerasedandyoucanusetheSetupUtilityprogramtoset
anewpassword.SeeChapter4“UsingtheSetupUtilityprogram”onpage59
formoreinformation.
Chapter2.Installingorreplacinghardware51
Page 58

52ThinkCentreUserGuide
Page 59

Chapter3.Recoveryinformation
ThischapterprovidesinformationabouttherecoverysolutionsprovidedbyLenovo.
Thischaptercontainsthefollowingtopics:
•“Creatingandusingrecoverymedia”onpage53
•“Performingbackupandrecoveryoperations”onpage54
•“UsingtheRescueandRecoveryworkspace”onpage55
•“Creatingandusingarescuemedium”onpage56
•“Installingorreinstallingdevicedrivers”onpage57
•“Solvingrecoveryproblems”onpage58
Notes:
1.TherecoveryinformationinthischapteronlyappliestothecomputersthathavetheRescueand
RecoveryprogramortheProductRecoveryprograminstalled.IftheEnhancedBackupandRestore
iconintheLenovoThinkVantageToolsprogramisdimmed,itindicatesthatyouneedtoinstall
theRescueandRecoveryprogrammanuallybeforeenablingitsfeatures.T oinstalltheRescueand
Recoveryprogram,dothefollowing:
a.ClickStart➙AllPrograms➙LenovoThinkVantageT ools,anddouble-clickEnhancedBackup
andRestore.
b.Followtheinstructionsonthescreen.
c.Whentheinstallationprocesscompletes,theEnhancedBackupandRestoreiconisactivated.
2.Thereareavarietyofmethodstochoosefromwhenconsideringhowtorecoverintheeventofa
software-orhardware-relatedproblem.Somemethodsvarydependingonthetypeofyouroperating
system.
3.Theproductontherecoverymediamaybeusedonlyforthefollowingpurposes:
•Restoretheproductpreinstalledonyourcomputer
•Reinstalltheproduct
•ModifytheproductusingtheAdditionalFiles
Creatingandusingrecoverymedia
Youcanuserecoverymediatorestoretheharddiskdrivetothefactorydefaultsettings.Recoverymedia
areusefulifyoutransferthecomputertoanotherarea,sellthecomputer,recyclethecomputer,orputthe
computerinanoperationalstateafterallothermethodsofrecoveryhavefailed.Asaprecautionarymeasure,
itisimportanttocreaterecoverymediaasearlyaspossible.
Note:Therecoveryoperationsyoucanperformusingrecoverymediavarydependingontheoperating
systemfromwhichtherecoverymediawerecreated.Therecoverymediamightcontainabootmedium
andadatamedium.YourMicrosoftWindowslicensepermitsyoutocreateonlyonedatamedium,soitis
importantthatyoustoretherecoverymediainasafeplaceafteryouhavemadethem.
Creatingrecoverymedia
ThissectionprovidesinstructionsonhowtocreaterecoverymediaontheWindows7operatingsystem.
Note:OntheWindows7operatingsystem,youcancreaterecoverymediausingdiscsorexternalUSB
storagedevices.
©CopyrightLenovo2011
53
Page 60

TocreaterecoverymediaontheWindows7operatingsystem,clickStart➙AllPrograms➙Lenovo
ThinkVantageTools➙FactoryRecoveryDisks.Then,followtheinstructionsonthescreen.
Usingrecoverymedia
ThissectionprovidesinstructionsonhowtouserecoverymediaontheWindows7operatingsystem.
OntheWindows7operatingsystem,youcanuserecoverymediatorestorethecomputertothefactory
defaultsettingsonly.Youcanuserecoverymediatoputthecomputerinanoperationalstateafterall
othermethodsofrecoveryhavefailed.
Attention:Whenyouuserecoverymediatorestorethecomputertothefactorydefaultsettings,alltheles
currentlyontheharddiskdrivewillbedeletedandreplacedbythefactorydefaultsettings.
TouserecoverymediaontheWindows7operatingsystem,dothefollowing:
1.Dependingonthetypeofyourrecoverymedia,connectthebootmedium(memorykeyorotherUSB
storagedevice)tothecomputer,orinsertthebootdiscintotheopticaldrive.
2.RepeatedlypressandreleasetheF12keywhenturningonthecomputer.WhentheStartupDevice
Menuopens,releasetheF12key.
3.SelectthedesiredstartupdeviceandpressEnter.Therestoreprocessbegins.
4.Followtheinstructionsonthescreentocompletetheoperation.
Notes:
1.Afterrestoringyourcomputertothefactorydefaultsettings,youmighthavetoreinstalldevicedrivers
forsomedevices.See“Installingorreinstallingdevicedrivers”onpage57.
2.SomecomputerscomewithMicrosoftOfceorMicrosoftWorkspreinstalled.Ifyouneedtorecover
orreinstallyourMicrosoftOfceorMicrosoftWorksapplications,youmustusetheMicrosoftOfce
CDorMicrosoftWorksCD.ThesediscsareprovidedonlywithcomputerspreinstalledwithMicrosoft
OfceorMicrosoftWorks.
Performingbackupandrecoveryoperations
TheRescueandRecoveryprogramenablesyoutobackupallyourharddiskdrivecontentsincludingthe
operatingsystem,datales,softwareprograms,andpersonalsettings.Youcandesignatewherethe
RescueandRecoveryprogramstoresthebackup:
•Inaprotectedareaofyourharddiskdrive
•Onthesecondaryharddiskdriveifasecondaryharddiskdriveisinstalledinyourcomputer
•OnanattachedexternalUSBharddiskdrive
•Onanetworkdrive
•Onrecordablediscs(arecordableopticaldriveisrequiredforthisoption)
Afteryouhavebackedupthecontentsontheharddiskdrive,youcanrestorethecompletecontentsofthe
harddiskdrive,restoreonlytheselectedles,orrestoreonlytheWindowsoperatingsystemandapplications.
Performingabackupoperation
ThissectionprovidesinstructionsonhowtoperformabackupoperationusingtheRescueandRecovery
programontheWindows7operatingsystem.
ToperformabackupoperationusingtheRescueandRecoveryprogramontheWindows7operating
system,dothefollowing:
54ThinkCentreUserGuide
Page 61

1.FromtheWindowsdesktop,clickStart➙AllPrograms➙LenovoThinkVantageT ools➙Enhanced
BackupandRestore.TheRescueandRecoveryprogramopens.
2.IntheRescueandRecoverymainwindow,clicktheLaunchadvancedRescueandRecoveryarrow.
3.ClickBackupyourharddriveandselectbackupoperationoptions.Then,followtheinstructionson
thescreentocompletethebackupoperation.
Performingarecoveryoperation
ThissectionprovidesinstructionsonhowtoperformarecoveryoperationusingtheRescueandRecovery
programontheWindows7operatingsystem.
ToperformarecoveryoperationusingtheRescueandRecoveryprogramontheWindows7operating
system,dothefollowing:
1.FromtheWindowsdesktop,clickStart➙AllPrograms➙LenovoThinkVantageT ools➙Enhanced
BackupandRestore.TheRescueandRecoveryprogramopens.
2.IntheRescueandRecoverymainwindow,clicktheLaunchadvancedRescueandRecoveryarrow.
3.ClicktheRestoreyoursystemfromabackupicon.
4.Followtheinstructionsonthescreentocompletetherecoveryoperation.
FormoreinformationaboutperformingarecoveryoperationfromtheRescueandRecoveryworkspace,see
“UsingtheRescueandRecoveryworkspace”onpage55.
UsingtheRescueandRecoveryworkspace
TheRescueandRecoveryworkspaceresidesinaprotected,hiddenareaofyourharddiskdrivethat
operatesindependentlyfromtheWindowsoperatingsystem.Thisenablesyoutoperformrecovery
operationsevenifyoucannotstarttheWindowsoperatingsystem.Y oucanperformthefollowingrecovery
operationsfromtheRescueandRecoveryworkspace:
•RescuelesfromyourharddiskdriveorfromabackupTheRescueandRecoveryworkspaceenables
youtolocatelesonyourharddiskdriveandtransferthemtoanetworkdriveorotherrecordablemedia,
suchasaUSBdeviceoradisc.Thissolutionisavailableevenifyoudidnotbackupyourlesorif
changesweremadetothelessinceyourlastbackupoperation.Y oucanalsorescueindividuallesfrom
aRescueandRecoverybackuplocatedonyourlocalharddiskdrive,aUSBdevice,oranetworkdrive.
•RestoreyourharddiskdrivefromaRescueandRecoverybackupIfyouhavebackedupyourharddisk
driveusingtheRescueandRecoveryprogram,youcanrestoretheharddiskdrivefromaRescueand
Recoverybackup,evenifyoucannotstarttheWindowsoperatingsystem.
•RestoreyourharddiskdrivetothefactorydefaultsettingsTheRescueandRecoveryworkspaceenables
youtorestorethecompletecontentsofyourharddiskdrivetothefactorydefaultsettings.Ifyouhave
multiplepartitionsonyourharddiskdrive,youhavetheoptiontorestorethefactorydefaultsettingstothe
C:partitionandleavetheotherpartitionsintact.BecausetheRescueandRecoveryworkspaceoperates
independentlyfromtheWindowsoperatingsystem,youcanrestorethefactorydefaultsettingsevenif
youcannotstarttheWindowsoperatingsystem.
Attention:IfyourestoretheharddiskdrivefromaRescueandRecoverybackuporrestoretheharddisk
drivetothefactorydefaultsettings,alllesontheprimaryharddiskdrivepartition(usuallydriveC:)willbe
deletedintherecoveryprocess.Ifpossible,makecopiesofimportantles.Ifyouareunabletostartthe
Windowsoperatingsystem,youcanusetherescuelesfeatureoftheRescueandRecoveryworkspaceto
copylesfromyourharddiskdrivetoothermedia.
TostarttheRescueandRecoveryworkspace,dothefollowing:
1.Makesurethecomputeristurnedoff.
Chapter3.Recoveryinformation55
Page 62

2.RepeatedlypressandreleasetheF11keywhenturningonthecomputer.Whenyouhearbeepsor
seealogoscreen,releasetheF11key.
3.IfyouhavesetaRescueandRecoverypassword,typeyourpasswordwhenprompted.TheRescue
andRecoveryworkspaceopensafterashortdelay.
Note:IftheRescueandRecoveryworkspacefailstoopen,see“Solvingrecoveryproblems”onpage58.
4.Dooneofthefollowing:
•T orescuelesfromyourharddiskdriveorfromabackup,clickRescuelesandfollowthe
instructionsonthescreen.
•T orestoreyourharddiskdrivefromaRescueandRecoverybackuportorestoreyourharddiskdrive
tothefactorydefaultsettings,clickRestoreyoursystemandfollowtheinstructionsonthescreen.
FormoreinformationaboutthefeaturesoftheRescueandRecoveryworkspace,clickHelp.
Notes:
1.Afterrestoringyourharddiskdrivetothefactorydefaultsettings,youmighthavetoreinstalldevice
driversforsomedevices.See“Installingorreinstallingdevicedrivers”onpage57.
2.SomecomputerscomewithMicrosoftOfceorMicrosoftWorkspreinstalled.Ifyouneedtorecover
orreinstallyourMicrosoftOfceorMicrosoftWorksapplications,youmustusetheMicrosoftOfce
CDorMicrosoftWorksCD.ThesediscsareprovidedonlywithcomputerspreinstalledwithMicrosoft
OfceorMicrosoftWorks.
Creatingandusingarescuemedium
Witharescuemedium,suchasadiscoraUSBharddiskdrive,youcanrecoverthecomputerfromfailures
thatpreventyoufromgainingaccesstotheRescueandRecoveryworkspaceonyourharddiskdrive.
Notes:
1.Therecoveryoperationsyoucanperformusingarescuemediumvarydependingontheoperating
system.
2.Therescuedisccanbestartedinalltypesofopticaldrives.
Creatingarescuemedium
ThissectionprovidesinstructionsonhowtocreatearescuemediumontheWindows7operatingsystem.
TocreatearescuemediumontheWindows7operatingsystem,dothefollowing:
1.FromtheWindowsdesktop,clickStart➙AllPrograms➙LenovoThinkVantageT ools➙Enhanced
BackupandRestore.TheRescueandRecoveryprogramopens.
2.IntheRescueandRecoverymainwindow,clicktheLaunchadvancedRescueandRecoveryarrow.
3.ClicktheCreateRescueMediaicon.TheCreateRescueandRecoveryMediawindowopens.
4.IntheRescueMediaarea,selectthetypeoftherescuemediumyouwanttocreate.Y oucancreatea
rescuemediumusingadisc,aUSBharddiskdrive,orasecondaryinternalharddiskdrive.
5.ClickOKandfollowtheinstructionsonthescreentocreatearescuemedium.
Usingarescuemedium
Thissectionprovidesinstructionsonhowtousetherescuemediumyouhavecreated.
•Ifyouhavecreatedarescuemediumusingadisc,usethefollowinginstructionstousetherescuemedium:
1.Turnoffyourcomputer.
56ThinkCentreUserGuide
Page 63

2.RepeatedlypressandreleasetheF12keywhenturningonthecomputer.WhentheStartupDevice
Menuopens,releasetheF12key.
3.OntheStartupDeviceMenu,selectthedesiredopticaldriveastherstbootdevice.Then,insert
therescuediscintotheopticaldriveandpressEnter.Therescuemediumstarts.
•IfyouhavecreatedarescuemediumusingaUSBharddiskdrive,usethefollowinginstructionsto
usetherescuemedium:
1.AttachtheUSBharddiskdrivetooneoftheUSBconnectorsonyourcomputer.
2.RepeatedlypressandreleasetheF12keywhenturningonthecomputer.WhentheStartupDevice
Menuopens,releasetheF12key.
3.OntheStartupDeviceMenu,selecttheUSBharddiskdriveastherstbootdeviceandpressEnter.
Therescuemediumstarts.
•Ifyouhavecreatedarescuemediumusingthesecondaryinternalharddiskdrive,setthesecondary
internalharddiskdriveastherstbootdeviceinthestartupdevicesequencetostarttherescuemedium.
See“Selectingastartupdevice”onpage61
Note:Inyourcomputer,thereisasecondaryharddiskdrivebayforyoutoinstallasecondaryharddisk
drive.Youcanpurchaseasecondaryharddiskdrivebyyourself.Ifyouwanttoinstallasecondaryhard
diskdrive,see“Replacingthesecondaryharddiskdrive”onpage37.
Whentherescuemediumstarts,theRescueandRecoveryworkspaceopens.Thehelpinformationfor
eachfeatureisavailablefromtheRescueandRecoveryworkspace.Followtheinstructionstocomplete
therecoveryprocess.
.
Installingorreinstallingdevicedrivers
Beforeinstallingorreinstallingdevicedrivers,makesurethatyouhaveapreinstalledoperatingsystemand
thedocumentationandsoftwaremediaforthedevice.
Devicedriversforfactory-installeddevicesarelocatedonthecomputerharddiskdrive(usuallydriveC:)
intheSWTOOLS\DRIVERSsubdirectory.Thelatestdevicedriversforfactory-installeddevicesarealso
availableathttp://www.lenovo.com/support.Otherdevicedriversareonthesoftwaremediathatcome
withindividualdevices.
Toinstallorreinstallthedevicedriverforafactory-installeddevice,dothefollowing:
1.Turnonthecomputer.
2.UseWindowsExplorerorMyComputertodisplaythedirectorystructureofyourharddiskdrive.
3.GototheC:\SWTOOLSdirectory.
4.OpentheDRIVERSfolder.WithintheDRIVERSfolder,thereareseveralsubfoldersnamedforvarious
devicesinstalledinyourcomputer,suchasAUDIOorVIDEO.
5.Opentheappropriatedevicesubfolder.
6.Dooneofthefollowing:
•Inthedevicesubfolder,lookforaSETUP .exele.Double-clicktheleandfollowtheinstructionson
thescreentocompletetheinstallation.
•Inthedevicesubfolder,lookforaREADME.txtleoralewiththe.txtextension.Thislemightbe
namedaftertheoperatingsystem,suchasWIN98.txt.TheTXTlecontainsinformationabouthowto
installthedevicedriver.Followtheinstructionstocompletetheinstallation.
•Ifthedevicesubfoldercontainsalewiththe.infextensionandyouwanttoinstallthedevice
driverusingtheINFle,refertoyourWindowsHelpandSupportinformationsystemfordetailed
informationabouthowtoinstallthedevicedriver.
Chapter3.Recoveryinformation57
Page 64

Solvingrecoveryproblems
IfyouareunabletoaccesstheRescueandRecoveryworkspaceortheWindowsenvironment,doone
ofthefollowing:
•UsearescuemediumtostarttheRescueandRecoveryworkspace.See“Creatingandusingarescue
medium”onpage56
•Userecoverymediaifallothermethodsofrecoveryhavefailedandyouneedtorestoretheharddisk
drivetothefactorydefaultsettings.See“Creatingandusingrecoverymedia”onpage53.
Note:IfyouareunabletoaccesstheRescueandRecoveryworkspaceortheWindowsenvironmentfrom
arescuemediumorrecoverymedia,youmightnothavetherescuedevice(aninternalharddiskdrive,a
disc,aUSBharddiskdrive,orotherexternaldevices)setastherstbootdeviceinthestartupdevice
sequence.Y oumustrstmakesurethatyourrescuedeviceissetastherstbootdeviceinthestartup
devicesequenceintheSetupUtilityprogram.See“Selectingastartupdevice”onpage61fordetailed
informationabouttemporarilyorpermanentlychangingthestartupdevicesequence.Formoreinformation
abouttheSetupUtilityprogram,seeChapter4“UsingtheSetupUtilityprogram”onpage59
Itisimportanttocreatearescuemediumandasetofrecoverymediaasearlyaspossibleandstorethem
inasafeplaceforfutureuse.
.
.
58ThinkCentreUserGuide
Page 65

Chapter4.UsingtheSetupUtilityprogram
YoucanusetheSetupUtilityprogramtoviewandchangethecongurationsettingsofyourcomputer,
regardlessofwhichoperatingsystemyouareusing.However,theoperatingsystemsettingsmightoverride
anysimilarsettingsintheSetupUtilityprogram.
ThischapterprovidesinformationaboutthefollowingtopicstohelpyouusetheSetupUtilityprogram:
•“StartingtheSetupUtilityprogram”onpage59
•“Viewingorchangingsettings”onpage59
•“Usingpasswords”onpage59
•“Enablingordisablingadevice”onpage60
•“Selectingastartupdevice”onpage61
•“ExitingtheSetupUtilityprogram”onpage62
StartingtheSetupUtilityprogram
ThissectionprovidesinstructionsonhowtostarttheSetupUtilityprogram.
TostarttheSetupUtilityprogram,dothefollowing:
1.Makesureyourcomputeristurnedoff.
2.RepeatedlypressandreleasetheF1keywhenturningonthecomputer.Whenyouhearmultiplebeeps
orseealogoscreen,releasetheF1key.TheSetupUtilityprogramopens.
Note:Ifapasswordhasbeenset,theSetupUtilityprogrammenuwillnotbedisplayeduntilyoutype
thecorrectpassword.Formoreinformation,see“Usingpasswords”onpage59.
Viewingorchangingsettings
TheSetupUtilityprogrammenulistsvariousitemsaboutthesystemcongurationsettings.Toviewor
changethesettings,starttheSetupUtilityprogram.See“StartingtheSetupUtilityprogram”onpage
59.Then,followtheinstructionsonthescreen.
WhenworkingwiththeSetupUtilityprogram,youmustusethekeyboard.Thekeysusedtoperformvarious
tasksaredisplayedatthebottomofeachscreen.
Usingpasswords
ByusingtheSetupUtilityprogram,youcansetapasswordtopreventunauthorizedaccesstoyour
computeranddata.Thefollowingoptionsareavailabletohelpyousetapower-onpasswordoran
administratorpassword:
•SetPower-OnPassword
•SetAdministratorPassword
Youdonothavetosetapasswordtouseyourcomputer.However,usingapasswordimprovescomputing
security.Ifyoudecidetosetapassword,readthefollowingsections.
©CopyrightLenovo2011
59
Page 66

Passwordconsiderations
Apasswordcanbeanycombinationofupto16(1to16)alphabeticandnumericcharacters.Forsecurity
reasons,itisrecommendedtouseastrongpasswordthatcannotbeeasilycompromised.Tosetastrong
password,usethefollowingguidelines:
Note:TheSetupUtilityprogrampasswordsarenotcasesensitive.
•Haveatleasteightcharactersinlength
•Containatleastonealphabeticcharacterandonenumericcharacter
•Notbeyournameoryourusername
•Notbeacommonwordoracommonname
•Besignicantlydifferentfromyourpreviouspasswords
Power-onpassword
Afteryouhavesetapower-onpasswordusingtheSetPower-OnPasswordoption,apasswordpromptis
displayedeachtimeyouturnonthecomputer.Youcannotusethecomputeruntilavalidpasswordistyped
in.Formoreinformationabouthowtosetapassword,see“Setting,changing,ordeletingapassword”
onpage60
.
Administratorpassword
TheSetAdministratorPasswordoptionenablesyoutosetanadministratorpassword,whichdeters
unauthorizedusersfromchangingcongurationsettings.Ifyouareresponsibleformaintainingthesettings
ofseveralcomputers,youmightwanttosetanadministratorpassword.Formoreinformationabouthowto
setapassword,see“Setting,changing,ordeletingapassword”onpage60
.
Afteryouhavesetanadministratorpassword,apasswordpromptisdisplayedeachtimeyoutrytoaccess
theSetupUtilityprogram.Y oucannotaccesstheSetupUtilityprogramuntilavalidpasswordistypedin.
Ifyouhavesetbothapower-onpasswordandanadministratorpassword,youcantypeeitherpassword
touseyourcomputer.However,tochangeanycongurationsettings,youmustuseyouradministrator
password.
Setting,changing,ordeletingapassword
Thissectionprovidesinstructionsonhowtoset,change,ordeleteapassword.
Toset,change,ordeleteapassword,dothefollowing:
1.StarttheSetupUtilityprogram.See“StartingtheSetupUtilityprogram”onpage59.
2.FromtheSetupUtilityprogrammainmenu,selectSecurity➙SetPower-OnPasswordorSet
AdministratorPassword.
3.Followtheinstructionsonthescreentoset,change,ordeleteapassword.
Note:Apasswordcanbeanycombinationofupto16(1to16)alphabeticandnumericcharacters.
Formoreinformation,see“Passwordconsiderations”onpage60.
Enablingordisablingadevice
Thissectionprovidesinstructionsonhowtoenableordisableuseraccesstoadevice.
60ThinkCentreUserGuide
Page 67

SATAControllerWhenthisoptionissettoDisabled,alldevicesconnectedtotheSAT Aconnectors
(suchastheharddiskdriveandtheopticaldrive)aredisabledandwillnotbe
displayedinthesystemconguration.
USBSetupUsethisoptiontosetupUSBconnectors.
Toenableordisableadevice,dothefollowing:
1.StarttheSetupUtilityprogram.See“StartingtheSetupUtilityprogram”onpage59.
2.FromtheSetupUtilityprogrammainmenu,selectDevices.
3.Dependingonthedeviceyouwanttoenableordisable,dooneofthefollowing:
•SelectATADrivesSetup➙SAT AControllertoenableordisablethedevicesconnectedtothe
SATAconnectorsonthesystemboard.
•SelectUSBSetupandfollowtheinstructionsonthescreentoenableordisabletheUSBconnector(s)
ofyourchoice.
4.SelectthedesiredsettingsandpressEnter.
5.PressEsctoreturntotheSetupUtilityprogrammainmenu.YoumighthavetopressEscseveraltimes.
6.PressF10tosavethenewsettingsandexittheSetupUtilityprogram.
Notes:
a.Ifyoudonotwanttosavethenewsettings,selectExit➙DiscardChangesandExit.
b.Ifyouwanttoreturntothedefaultsettings,pressF9orselectExit➙LoadOptimalDefaults.
Selectingastartupdevice
Ifyourcomputerdoesnotstartupfromadevice(suchasaharddiskdriveorthediscinanopticaldrive)as
expected,dooneofthefollowingtoselectthedesiredstartupdevice.
Selectingatemporarystartupdevice
Thissectionprovidesinstructionsonhowtoselectatemporarystartupdevice.Y oucanusetheinstructions
inthissectiontostartupfromanystartupdevice.
Note:Notalldiscsandharddiskdrivesarebootable.
Toselectatemporarystartupdevice,dothefollowing:
1.Turnoffyourcomputer.
2.RepeatedlypressandreleasetheF12keywhenturningonthecomputer.WhentheStartupDevice
Menuopens,releasetheF12key.
3.SelectthedesiredstartupdeviceontheStartupDeviceMenuandpressEnter.
Note:SelectingastartupdeviceontheStartupDeviceMenudoesnotpermanentlychangethestartup
devicesequence.
Viewingorchangingthestartupdevicesequence
Thissectionprovidesinstructionsonhowtovieworpermanentlychangetheconguredstartupdevice
sequence.
Tovieworpermanentlychangetheconguredstartupdevicesequence,dothefollowing:
1.StarttheSetupUtilityprogram.See“StartingtheSetupUtilityprogram”onpage59.
Chapter4.UsingtheSetupUtilityprogram61
Page 68

2.SelectStartup➙PrimaryBootSequence.Readtheinformationdisplayedontherightsideofthe
screen.
3.Selecttherstbootdevice,secondbootdevice,andsoon.
4.PressEsctoreturntotheStartupmenu.Then,selectthedevicesfortheAutomaticBootSequence
andErrorBootSequence.
5.PressEsctoreturntotheSetupUtilityprogrammainmenu.YoumighthavetopressEscseveraltimes.
6.PressF10tosavethenewsettingsandexittheSetupUtilityprogram.
Notes:
a.Ifyoudonotwanttosavethenewsettings,selectExit➙DiscardChangesandExit.
b.Ifyouwanttoreturntothedefaultsettings,pressF9orselectExit➙LoadOptimalDefaults.
ExitingtheSetupUtilityprogram
Afteryounishviewingorchangingsettings,pressEsctoreturntotheSetupUtilityprogrammainmenu.
YoumighthavetopressEscseveraltimes.Then,youcandooneofthefollowing:
•IfyouwanttosavethenewsettingsandexittheSetupUtilityprogram,pressF10.Otherwise,your
changeswillnotbesaved.
•Ifyoudonotwanttosavethenewsettings,selectExit➙DiscardChangesandExit.
•Ifyouwanttoreturntothedefaultsettings,pressF9orselectExit➙LoadOptimalDefaults.
62ThinkCentreUserGuide
Page 69

Chapter5.Updatingsystemprograms
ThischapterprovidesinformationaboutupdatingthePOSTandBIOS,andhowtorecoverfromaPOST
andBIOSupdatefailure.
Thischaptercontainsthefollowingtopics:
•“Usingsystemprograms”onpage63
•“Updating(ashing)theBIOSfromadisc”onpage63
•“Updating(ashing)theBIOSfromyouroperatingsystem”onpage64
•“RecoveringfromaPOSTandBIOSupdatefailure”onpage64
Usingsystemprograms
Systemprogramsarethebasiclayerofsoftwarebuiltintoyourcomputer.Systemprogramsincludethe
POST,theBIOS,andtheSetupUtilityprogram.ThePOSTisasetoftestsandproceduresthatare
performedeachtimeyouturnonyourcomputer.TheBIOSisalayerofsoftwarethattranslatesinstructions
fromotherlayersofsoftwareintoelectricalsignalsthatthecomputerhardwarecanexecute.Youcanuse
theSetupUtilityprogramtovieworchangethecongurationsettingsofyourcomputer.SeeChapter4
“UsingtheSetupUtilityprogram”onpage59
Yourcomputersystemboardhasamodulecalledelectricallyerasableprogrammableread-onlymemory
(EEPROM,alsoreferredtoasashmemory).Y oucaneasilyupdatethePOST,theBIOS,andtheSetup
Utilityprogrambystartingyourcomputerwithasystem-program-updatediscorrunningaspecialupdate
programfromyouroperatingsystem.
fordetailedinformation.
LenovomightmakechangesandenhancementstothePOSTandBIOS.Whenupdatesarereleased,they
areavailableasdownloadablelesontheLenovoWebsiteathttp://www.lenovo.com.Instructionsforusing
thePOSTandBIOSupdatesareavailableinaTXTlethatisincludedwiththeupdateles.Formost
models,youcandownloadeitheranupdateprogramtocreateasystem-program-updatediscoranupdate
programthatcanberunfromtheoperatingsystem.
Updating(ashing)theBIOSfromadisc
Thissectionprovidesinstructionsonhowtoupdate(ash)theBIOSfromadisc.
Note:Y oucandownloadaself-startingbootablediscimage(knownasanISOimage)withthesystem
programupdatestocreateasystem-program-updatedisc.Goto:
http://www.lenovo.com/support
Toupdate(ash)theBIOSfromadisc,dothefollowing:
1.Turnoffyourcomputer.
2.RepeatedlypressandreleasetheF12keywhenturningonthecomputer.WhentheStartupDevice
Menuopens,releasetheF12key.
3.OntheStartupDeviceMenu,selectthedesiredopticaldriveasthestartupdevice.Then,insertthe
discintothisopticaldriveandpressEnter.Theupdatebegins.
4.Whenpromptedtochangetheserialnumber,itissuggestedthatyoudonotmakethischangeby
pressingN.However,ifyoudowanttochangetheserialnumber,pressY,thentypeintheserialnumber
andpressEnter.
©CopyrightLenovo2011
63
Page 70

5.Whenpromptedtochangethemachinetypeandmodel,itissuggestedthatyoudonotmakethis
changebypressingN.However,ifyoudowanttochangethemachinetypeandmodel,pressY,then
typeinthemachinetypeandmodelandpressEnter.
6.Followtheinstructionsonthescreentocompletetheupdate.Aftertheupdateiscompleted,removethe
discfromtheopticaldrive.
Updating(ashing)theBIOSfromyouroperatingsystem
Note:BecauseLenovomakesconstantimprovementstoitsWebsites,theWebpagecontentsaresubject
tochangewithoutnotice,includingthecontentsreferencedinthefollowingprocedure.
Toupdate(ash)theBIOSfromyouroperatingsystem,dothefollowing:
1.Gotohttp://www.lenovo.com/support.
2.Dothefollowingtolocatethedownloadablelesforyourmachinetype:
a.IntheEnteraproductnumbereld,typeyourmachinetypeandclickGo.
b.ClickDownloadsanddrivers.
c.SelectBIOSfromtheReneresultsdrop-downlistboxtoeasilylocatealltheBIOSrelatedlinks.
d.ClicktheBIOSupdatelink.
3.ClicktheTXTlethatcontainstheinstructionsforupdating(ashing)theBIOSfromyouroperating
system.
4.Printtheseinstructions.Thisisveryimportantbecausetheseinstructionswillnotbedisplayedon
thescreenafterthedownloadbegins.
5.Followtheprintedinstructionstodownload,extract,andinstalltheupdate.
RecoveringfromaPOSTandBIOSupdatefailure
IfthepowertoyourcomputerisinterruptedwhilethePOSTandBIOSisbeingupdated,yourcomputer
mightnotrestartcorrectly.Ifthishappens,performthefollowingproceduretorecoverfromthePOSTand
BIOSupdatefailure.ThisprocedureiscommonlycalledBoot-blockRecovery.
1.Removeallmediafromthedrivesandturnoffallattacheddevicesandthecomputer.Then,disconnect
allpowercordsfromelectricaloutletsanddisconnectallcablesthatareconnectedtothecomputer.
2.Removethecomputercover.See“Removingthecomputercover”onpage14.
3.LocatetheClearCMOS/Recoveryjumperonthesystemboard.See“Locatingpartsonthesystem
board”onpage9.
4.RemoveanypartsanddisconnectanycablesthatmightpreventyouraccesstotheClearCMOS
/Recoveryjumper.
5.Movethejumperfromthestandardposition(pin1andpin2)tothemaintenanceposition(pin2and
pin3).
6.Reinstallanypartsandreconnectanycablesthathavebeenremovedordisconnected.
7.Reinstallthecomputercoverandreconnectthepowercordsforthecomputerandmonitor.See
“Completingthepartsreplacement”onpage48.
8.TurnonthecomputerandtheninsertthePOSTandBIOSupdate(ashupdate)discintotheoptical
drive.Therecoverysessionbegins.Therecoverysessionwilltaketwotothreeminutes.Duringthis
time,youwillhearaseriesofbeeps.
9.Aftertherecoverysessioniscompleted,therewillbenovideo,theseriesofbeepswillend,andthe
systemwillautomaticallyturnoff.
10.Repeatstep1throughstep4.
11.Movethejumperbacktothestandardposition(pin1andpin2).
64ThinkCentreUserGuide
Page 71

12.Reinstallanypartsandreconnectanycablesthathavebeenremovedordisconnected.
13.Reinstallthecomputercoverandreconnectpowercordsandallotherexternalcables.See“Completing
thepartsreplacement”onpage48.
14.Turnonthecomputerandremovethediscfromtheopticaldrive.
Chapter5.Updatingsystemprograms65
Page 72

66ThinkCentreUserGuide
Page 73

Chapter6.Troubleshootinganddiagnosticprograms
Thischapterprovidesinformationaboutsomebasictroubleshootinganddiagnosticprograms.Ifyour
computerproblemisnotdescribedinthischapter,seeChapter7“Gettinginformation,help,andservice”on
page73
Thischaptercontainsthefollowingtopics:
•“Basictroubleshooting”onpage67
•“Diagnosticprograms”onpage68
•“Cleaningthemouse”onpage70
Basictroubleshooting
Thefollowingtableprovidessomebasicinformationtohelpyoutroubleshootyourcomputerproblems.
Note:Ifyoucannotsolvetheproblemafterdoingthebasictroubleshooting,havethecomputerserviced.
RefertotheThinkCentreSafetyandWarrantyGuidethatcamewithyourcomputerforthesafetyand
warrantyinformationandthelistofserviceandsupporttelephonenumbers.Youcanalsogetthelatest
serviceandsupporttelephonenumbersandaPDFversionoftheThinkCentreSafetyandWarrantyGuide
fromtheLenovoSupportWebsiteat:
http://www.lenovo.com/support
Thecomputerdoesnotstart
whenyoupressthepower
switch.
Themonitorscreenisblank.
Thekeyboarddoesnotwork.
foradditionaltroubleshootingresources.
SymptomAction
Verifythat:
•Thepowercordiscorrectlyconnectedtotherearofthecomputerandtoa
workingelectricaloutlet.
•Thepowerindicatoronthefrontofthecomputerison.
•Thecomputervoltagematchesthevoltageavailableattheelectricaloutletfor
yourcountryorregion.
Verifythat:
•Themonitorsignalcableiscorrectlyconnectedtothemonitorandtothe
appropriatemonitorconnectoronthecomputer.IfyourcomputerhasaPCI
graphicscardinstalled,besuretousethemonitorconnectoronthegraphics
cardratherthantheintegratedoneonthesystemboard.
•Themonitorpowercordiscorrectlyconnectedtothemonitorandtoaworking
electricaloutlet.
•Themonitoristurnedonandthebrightnessandcontrastcontrolsareset
correctly.
•Thecomputervoltagematchesthevoltageavailableattheelectricaloutletfor
yourcountryorregion.
Verifythat:
©CopyrightLenovo2011
•Thecomputeristurnedon.
•Thekeyboardiscorrectlyconnectedtoanappropriatekeyboardconnector(the
PS/2keyboardconnectororoneoftheUSBconnectors)onthecomputer.
•Nokeysarestuck.
67
Page 74

SymptomAction
Themousedoesnotwork.
Theoperatingsystemdoesnot
start.
Thecomputerbeepsmultiple
timesbeforetheoperating
systemstarts.
Verifythat:
•Thecomputeristurnedon.
•Themouseiscorrectlyconnectedtoanappropriatemouseconnector(thePS/2
mouseconnectororoneoftheUSBconnectors)onthecomputer.
•Themouseisclean.Referto“Cleaningthemouse”onpage70
Verifythatyoulistthedevicewheretheoperatingsystemresidesinthestartup
devicesequence.Usually,theoperatingsystemisontheharddiskdrive.Formore
information,see“Selectingastartupdevice”onpage61
Verifythatnokeysarestuck.
.
.
Diagnosticprograms
Diagnosticprogramsareusedtotesthardwarecomponentsofyourcomputer.Diagnosticprogramscan
alsoreportoperating-system-controlledsettingsthatinterferewiththecorrectoperationofyoursystem.
Youcanusethepreinstalleddiagnosticprogramtodiagnosecomputerproblems,ifyourcomputeris
runningtheWindowsoperatingsystem.
Notes:
1.Dependingonthedatewhenyourcomputerwasmanufactured,yourcomputerispreinstalledwith
eithertheLenovoSolutionCenterprogramortheLenovoThinkVantageToolboxprogramfordiagnostic
purposes.FormoreinformationabouttheLenovoThinkVantageT oolboxprogram,see“Lenovo
ThinkVantageToolbox”onpage69
see“LenovoSolutionCenter”onpage68.
2.YoucanalsodownloadthePC-DoctorforDOSdiagnosticprogramfromhttp://www.lenovo.com/support.
See“PC-DoctorforDOS”onpage69fordetailedinformation.
3.Ifyouareunabletoisolateandrepairtheproblemyourselfafterrunningtheprograms,saveandprint
theloglescreatedbytheprograms.YouwillneedthelogleswhenyouspeaktoaLenovotechnical
supportrepresentative.
.FormoreinformationabouttheLenovoSolutionCenterprogram,
LenovoSolutionCenter
TheLenovoSolutionCenterprogramenablesyoutotroubleshootandresolvecomputerproblems.It
combinesdiagnostictests,systeminformationcollection,securitystatus,andsupportinformation,along
withhintsandtipsformaximumsystemperformance.
Notes:
•TheLenovoSolutionCenterprogramisavailableonlyonmodelspreinstalledwiththeWindows7
operatingsystem.IfyourWindows7modelisnotpreinstalledwiththeprogram,youcandownloadit
fromhttp://www.lenovo.com/diagnose.
•IfyouareusingtheWindowsVistaorWindowsXPoperatingsystem,goto
http://www.lenovo.com/diagnoseforthelatestinformationondiagnosticsforyour
computer.
ToruntheLenovoSolutionCenterprogramontheWindows7operatingsystem,clickStart➙AllPrograms
➙LenovoThinkVantageTools➙SystemHealthandDiagnostics.Followtheinstructionsonthescreen.
Foradditionalinformation,refertotheLenovoSolutionCenterhelpsystem.
68ThinkCentreUserGuide
Page 75

Note:Ifyouareunabletoisolateandrepairtheproblemyourselfafterrunningtheprogram,saveandprint
theloglescreatedbytheprogram.Y ouwillneedthelogleswhenyouspeaktoaLenovotechnical
supportrepresentative.
LenovoThinkVantageT oolbox
TheLenovoThinkVantageToolboxprogramhelpsyoumaintainyourcomputer,improvecomputingsecurity,
diagnosecomputerproblems,getfamiliarwiththeinnovativetechnologiesprovidedbyLenovo,andget
moreinformationaboutyourcomputer.YoucanusethediagnosticsfeatureoftheLenovoThinkVantage
Toolboxprogramtotestdevices,diagnosecomputerproblems,createbootablediagnosticmedia,update
systemdrivers,andviewsysteminformation.
ToruntheLenovoThinkVantageT oolboxprogramontheWindows7operatingsystem,clickStart➙All
Programs➙LenovoThinkVantageTools➙SystemHealthandDiagnostics.Followtheinstructionson
thescreen.
ForadditionalinformationaboutrunningtheLenovoThinkVantageToolboxprogram,refertotheLenovo
ThinkVantageToolboxhelpsystem.
PC-DoctorforDOS
YoucanalsodownloadthelatestversionofthePC-DoctorforDOSdiagnosticprogramfrom
http://www.lenovo.com/support.ThePC-DoctorforDOSdiagnosticprogramrunsindependentlyofthe
Windowsoperatingsystem.UsethePC-DoctorforDOSdiagnosticprogramifyouareunabletostartthe
Windowsoperatingsystem.YoucanrunthePC-DoctorforDOSdiagnosticprogramfromadiagnostic
discthatyoucreated.
Creatingadiagnosticdisc
Thissectionprovidesinstructionsonhowtocreateadiagnosticdisc.
Tocreateadiagnosticdisc,dothefollowing:
1.Downloadaself-startingbootablediscimage(knownasanISOimage)ofthediagnosticprogramfrom:
http://www.lenovo.com/support
2.UseanydiscburningsoftwaretocreateadiagnosticdiscwiththeISOimage.
Runningthediagnosticprogramfromthediagnosticdisc
Thissectionprovidesinstructionsonhowtorunthediagnosticprogramfromthediagnosticdiscthat
youcreated.
Torunthediagnosticprogramfromthediagnosticdiscthatyoucreated,dothefollowing:
1.Makesureyourcomputeristurnedoff.
2.RepeatedlypressandreleasetheF12keywhenturningonthecomputer.WhentheStartupDevice
Menuopens,releasetheF12key.
3.Insertthediagnosticdiscintotheopticaldrive.
4.SelecttheopticaldrivewiththediagnosticdiscasthestartupdeviceandpressEnter.Thediagnostic
programopens.
5.Followtheinstructionsonthescreentorunthedesireddiagnostictest.Foradditionalhelp,press
theF1key.
6.Removethediagnosticdiscfromtheopticaldriveaftercompletingthediagnostictest.
Chapter6.Troubleshootinganddiagnosticprograms69
Page 76

Cleaningthemouse
Thissectionprovidesinstructionsonhowtocleananopticalornon-opticalmouse.
Opticalmouse
Anopticalmouseusesalight-emittingdiode(LED)andanopticalsensortonavigatethepointer.Ifthe
pointeronthescreendoesnotmovesmoothlywiththeopticalmouse,youmightneedtocleanthemouse.
Tocleantheopticalmouse,dothefollowing:
1.Turnoffyourcomputer.
2.Disconnectthemousecablefromthecomputer.
3.Turnthemouseupsidedowntocheckthelens.
a.Ifthereisasmudgeonthelens,gentlycleantheareawithaplaincotton-tippedswab.
b.Ifthereisdebrisinthelens,gentlyblowthedebrisawayfromthearea.
4.Checkthesurfaceonwhichyouareusingthemouse.Ifyouhaveaveryintricatepictureorpattern
beneaththemouse,itmaybedifcultforthedigitalsignalprocessor(DSP)todeterminechanges
inthemouseposition.
5.Reconnectthemousecabletothecomputer.
6.Turnyourcomputerbackon.
Non-opticalmouse
Thefollowingillustrationshowsthecomponentsofanon-opticalmouse.
Note:Theillustrationmightbeslightlydifferentfromyourmouse.
1Retainerring
2Ball
3Plasticrollers
4Ballcage
70ThinkCentreUserGuide
Page 77

Thenon-opticalmouseusesaballtonavigatethepointer.Ifthepointeronthescreendoesnotmove
smoothlywiththemouse,youmightneedtocleanthemouse.
Tocleanthenon-opticalmouse,dothefollowing:
1.Turnoffyourcomputer.
2.Disconnectthemousecablefromthecomputer.
3.Turnthemouseupsidedown.T wisttheretainerring1totheunlockedpositiontorevealtheball.
4.Placeyourhandovertheretainerringandball2,andthenturnthemousebottom-sidedown,sothat
theretainerringandballfalloutintoyourhand.
5.Washtheballinwarm,soapywater.Then,dryitwithacleancloth.
6.Carefullyblowairintotheballcage4todislodgedustandlint.
7.Lookforabuildupofdirtontheplasticrollers3insidetheballcage.Thisbuildupusuallyappearsasa
striperunningacrossthemiddleoftherollers.
8.Iftherollersaredirty,cleanthembyusingacottonswabsoakedinisopropyl(rubbing)alcohol.T urnthe
rollerswithyourngerandcontinueswabbingthemuntilallthedirtisremoved.Besuretherollersare
stillcenteredintheirchannelsafteryoucleanthem.
9.Removeanyswabbersthatmightberemainingontherollers.
10.Reinstalltheballandtheretainerring.Twisttheretainerringtothelockedposition.
11.Reconnectthemousecabletothecomputer.
12.Turnyourcomputerbackon.
Chapter6.Troubleshootinganddiagnosticprograms71
Page 78

72ThinkCentreUserGuide
Page 79

Chapter7.Gettinginformation,help,andservice
Thischapterprovidesinformationabouthelp,service,andtechnicalassistanceforLenovoproducts.
Thischaptercontainsthefollowingtopics:
•“Informationresources”onpage73
•“Helpandservice”onpage75
Informationresources
Youcanusetheinformationinthissectiontoaccessusefulresourcesrelatingtoyourcomputingneeds.
OnlineBooksfolder
TheOnlineBooksfolderpreinstalledonyourcomputercontainstheThinkCentreUserGuide,whichprovides
informationaboutyourcomputertohelpyousetup,use,andmaintainyourcomputer.Itrequiresno
Internetaccesstoviewthepublication.
Toviewthepublication,clickStart➙AllPrograms➙OnlineBooks➙OnlineBooks,thendouble-click
thepublicationforyourcomputer.ThepublicationisalsoavailableontheLenovoSupportWebsiteat:
http://www.lenovo.com/support
Notes:
1.ThepublicationisinPDFversion.Toviewthepublication,youneedtohavetheAdobeReaderprogram
preinstalledonyourcomputer.IftheAdobeReaderprogramhasnotbeeninstalledonyourcomputer,a
messagewillbedisplayedwhenyouattempttoviewthePDFleandyouwillbeguidedthrough
theAdobeReaderinstallation.
2.ThepublicationisavailableinotherlanguagesontheLenovoSupportWebsiteat:
http://www.lenovo.com/support
3.IfyouwanttoinstalladifferentlanguageversionoftheAdobeReaderprogramratherthantheversion
preinstalledonyourcomputer,downloadthedesiredlanguageversionfromtheAdobeWebsiteat:
http://www.adobe.com
LenovoThinkVantageT ools
TheLenovoThinkVantageToolsprogramhelpsyouworkmoreeasilyandsecurelybyprovidingeasyaccess
tovarioustechnologies,suchas:
•LenovoSolutionCenterorLenovoThinkVantageT oolbox
•PasswordManager(availableonsomemodels)
•PowerManager
•ProductRecovery
•RescueandRecovery
•SystemUpdate
ToaccesstheLenovoThinkVantageToolsprogram,clickStart➙AllPrograms➙LenovoThinkVantage
Tools.
©CopyrightLenovo2011
73
Page 80

LenovoWelcome
TheLenovoWelcomeprogramintroducessomeinnovativebuilt-infeaturesofLenovotoyouandguidesyou
throughsomeimportantsetuptaskstohelpyoumakethemostofyourcomputer.
AccessHelp
TheAccessHelpinformationsystemprovidesinformationaboutgettingstarted,doingbasictasks,
customizingsettingsforyourpersonalpreference,protectingdata,expandingandupgrading,and
troubleshooting.
ToopentheAccessHelpinformationsystemontheWindows7operatingsystem,clickStart➙Help
andSupport➙LenovoAccessHelp.
AfteryouhaveopenedtheAccessHelpinformationsystem,usetheleftpaneltomakeaselectionfromthe
ContentstabortheIndextab,orusetheSearchtabtondaparticularwordorphrase.
Safetyandwarranty
TheThinkCentreSafetyandWarrantyGuidethatcamewithyourcomputercontainsinformationabout
safety,warranty,serviceandsupportphonenumbers,CRUs,andothernoticesandinformationresources.
YoucanalsogetthelatestserviceandsupporttelephonenumbersandaPDFversionoftheThinkCentre
SafetyandWarrantyGuidefromtheLenovoSupportWebsiteat:
http://www.lenovo.com/support
Beforeusingtheinformationinthismanualandtheproductitsupports,besuretoreadandunderstandthe
ThinkCentreSafetyandWarrantyGuideandAppendixA“Notices”onpage77
.
LenovoWebsite(http://www.lenovo.com)
TheLenovoWebsiteprovidesup-to-dateinformationandservicestohelpyoubuy,upgrade,andmaintain
yourcomputer.Youcanalsodothefollowing:
•Shopfordesktopandnotebookcomputers,monitors,projectors,upgradesandaccessoriesforyour
computer,andspecialoffers.
•Purchaseadditionalservices,suchassupportforhardware,operatingsystems,softwareprograms,
networksetupandconguration,andcustominstallations.
•Purchaseupgradesandextendedhardwarerepairservices.
•Downloadthelatestdevicedriversandsoftwareupdatesforyourcomputermodel.
•Accesstheonlinemanualsforyourproducts.
•AccesstheLenovoLimitedWarranty.
•Accesstroubleshootingandsupportinformationforyourcomputermodelandothersupportedproducts.
•Findtheserviceandsupportphonenumbersforyourcountryorregion.
•FindaServiceProviderlocatednearyou.
LenovoSupportWebsite
TechnicalsupportinformationisavailableontheLenovoSupportWebsiteat:
http://www.lenovo.com/support
ThisWebsiteisupdatedwiththelatestsupportinformationsuchasthefollowing:
•Driversandsoftware
•Diagnosticsolutions
74ThinkCentreUserGuide
Page 81

•Productandservicewarranty
•Productandpartsdetails
•Userguidesandmanuals
•Knowledgebaseandfrequentlyaskedquestions
Helpandservice
Thissectionprovidesinformationaboutobtaininghelpandservice.
Usingthedocumentationanddiagnosticprograms
Ifyouexperienceproblemswithyourcomputer,seeChapter6“T roubleshootinganddiagnosticprograms”
onpage67.Forinformationaboutadditionalresourcestohelpyoutroubleshootyourcomputerproblems,
see“Informationresources”onpage73
Ifyoususpectasoftwareproblem,seethedocumentationthatcamewiththeoperatingsystemorsoftware
program,includingreadmelesandonlinehelp.
Mostcomputerscomewithasetofdiagnosticprogramsthatyoucanusetohelpyouidentifyhardware
problems.Forinstructionsonhowtousethediagnosticprogramsonyourcomputer,see“Diagnostic
programs”onpage68.
YoucangetthelatesttechnicalinformationanddownloaddevicedriversandupdatesfromtheLenovo
SupportWebsiteat:
http://www.lenovo.com/support
.
Callingforservice
Duringthewarrantyperiod,youcangethelpandinformationfromtheLenovoCustomerSupportCenterby
telephone.
Thefollowingservicesareavailableduringthewarrantyperiod:
•Problemdetermination-Trainedservicepersonnelareavailabletoassistyouwithdetermininga
hardwareproblemanddecidingwhatactionisnecessarytosolvetheproblem.
•Hardwarerepair-Iftheproblemiscausedbyhardwareunderwarranty,trainedservicepersonnelare
availabletoprovidetheapplicablelevelofservice.
•EngineeringChangemanagement-Theremightbechangesthatarerequiredafteraproducthas
beensold.LenovooryourresellerwillmakeselectedEngineeringChanges(ECs)thatapplytoyour
hardwareavailable.
Thefollowingitemsarenotcoveredbythewarranty:
•ReplacementoruseofpartsnotmanufacturedfororbyLenovoornon-warrantedLenovoparts
•Identicationofsoftwareproblemsources
•CongurationoftheBIOSaspartofaninstallationorupgrade
•Changes,modications,orupgradestodevicedrivers
•Installationandmaintenanceofnetworkoperatingsystems(NOS)
•Installationandmaintenanceofapplicationprograms
Refertothesafetyandwarrantyinformationthatisprovidedwithyourcomputerforacompleteexplanation
ofwarrantyterms.Y oumustretainyourproofofpurchasetoobtainwarrantyservice.
Chapter7.Gettinginformation,help,andservice75
Page 82

ForalistoftheLenovoSupportphonenumbersforyourcountryorregion,goto
http://www.lenovo.com/supportandclickSupportphonelistorrefertotheThinkCentreSafetyand
WarrantyGuidethatisprovidedwithyourcomputer.
Note:Theserviceandsupportphonenumbersaresubjecttochangewithoutnotice.Ifthenumberforyour
countryorregionisnotprovided,contactyourLenovoresellerorLenovomarketingrepresentative.
Ifpossible,beatyourcomputerwhenyoucallandhavethefollowinginformationavailable:
•Machinetypeandmodel
•Serialnumbersofyourhardwareproducts
•Descriptionoftheproblem
•Exactwordingofanyerrormessages
•Hardwareandsoftwarecongurationinformation
Usingotherservices
Ifyoutravelwithyourcomputerorrelocateittoacountrywhereyourdesktopornotebookcomputer
machinetypeissold,yourcomputermightbeeligibleforInternationalWarrantyService,whichautomatically
entitlesyoutoobtainwarrantyservicethroughoutthewarrantyperiod.Servicewillbeperformedby
authorizedServiceProviders.
Servicemethodsandproceduresvarybycountry,andsomeservicesmightnotbeavailableinallcountries.
InternationalWarrantyServiceisdeliveredthroughthemethodofservice(suchasdepot,carry-in,or
on-siteservice)thatisprovidedintheservicingcountry.Servicecentersincertaincountriesmightnotbe
abletoserviceallmodelsofaparticularmachinetype.Insomecountries,feesandrestrictionsmight
applyatthetimeofservice.
TodeterminewhetheryourcomputeriseligibleforInternationalWarrantyServiceandtoviewalistofthe
countrieswhereserviceisavailable,gotohttp://www.lenovo.com/support,clickWarranty,andfollow
theinstructionsonthescreen.
FortechnicalassistancewiththeinstallationoforquestionsrelatedtoServicePacksforyour
preinstalledMicrosoftWindowsproduct,refertotheMicrosoftProductSupportServicesWebsiteat
http://support.microsoft.com/directoryoryoucancontacttheCustomerSupportCenter.Somefeesmight
apply.
Purchasingadditionalservices
Duringandafterthewarrantyperiod,youcanpurchaseadditionalservices,suchassupportforhardware,
operatingsystems,andapplicationprograms;networksetupandconguration;upgradedorextended
hardwarerepairservices;andcustominstallations.Serviceavailabilityandservicenamemightvaryby
countryorregion.Formoreinformationabouttheseservices,gototheLenovoWebsiteat:
http://www.lenovo.com
76ThinkCentreUserGuide
Page 83

AppendixA.Notices
Lenovomaynotoffertheproducts,services,orfeaturesdiscussedinthisdocumentinallcountries.Consult
yourlocalLenovorepresentativeforinformationontheproductsandservicescurrentlyavailableinyour
area.AnyreferencetoaLenovoproduct,program,orserviceisnotintendedtostateorimplythatonlythat
Lenovoproduct,program,orservicemaybeused.Anyfunctionallyequivalentproduct,program,orservice
thatdoesnotinfringeanyLenovointellectualpropertyrightmaybeusedinstead.However,itistheuser's
responsibilitytoevaluateandverifytheoperationofanyotherproduct,program,orservice.
Lenovomayhavepatentsorpendingpatentapplicationscoveringsubjectmatterdescribedinthis
document.Thefurnishingofthisdocumentdoesnotgiveyouanylicensetothesepatents.Youcansend
licenseinquiries,inwriting,to:
Lenovo(UnitedStates),Inc.
1009ThinkPlace-BuildingOne
Morrisville,NC27560
U.S.A.
Attention:LenovoDirectorofLicensing
LENOVOPROVIDESTHISPUBLICATION“ASIS”WITHOUTWARRANTYOFANYKIND,EITHEREXPRESS
ORIMPLIED,INCLUDING,BUTNOTLIMITEDTO,THEIMPLIEDWARRANTIESOFNON-INFRINGEMENT ,
MERCHANTABILITYORFITNESSFORAPARTICULARPURPOSE.Somejurisdictionsdonotallow
disclaimerofexpressorimpliedwarrantiesincertaintransactions,therefore,thisstatementmaynotapply
toyou.
Thisinformationcouldincludetechnicalinaccuraciesortypographicalerrors.Changesareperiodically
madetotheinformationherein;thesechangeswillbeincorporatedinneweditionsofthepublication.
Lenovomaymakeimprovementsand/orchangesintheproduct(s)and/ortheprogram(s)describedinthis
publicationatanytimewithoutnotice.
Theproductsdescribedinthisdocumentarenotintendedforuseinimplantationorotherlifesupport
applicationswheremalfunctionmayresultininjuryordeathtopersons.Theinformationcontainedinthis
documentdoesnotaffectorchangeLenovoproductspecicationsorwarranties.Nothinginthisdocument
shalloperateasanexpressorimpliedlicenseorindemnityundertheintellectualpropertyrightsofLenovo
orthirdparties.Allinformationcontainedinthisdocumentwasobtainedinspecicenvironmentsandis
presentedasanillustration.Theresultobtainedinotheroperatingenvironmentsmayvary.
Lenovomayuseordistributeanyoftheinformationyousupplyinanywayitbelievesappropriatewithout
incurringanyobligationtoyou.
Anyreferencesinthispublicationtonon-LenovoWebsitesareprovidedforconvenienceonlyanddonotin
anymannerserveasanendorsementofthoseWebsites.ThematerialsatthoseWebsitesarenotpartof
thematerialsforthisLenovoproduct,anduseofthoseWebsitesisatyourownrisk.
Anyperformancedatacontainedhereinwasdeterminedinacontrolledenvironment.Therefore,theresult
obtainedinotheroperatingenvironmentsmayvarysignicantly.Somemeasurementsmayhavebeen
madeondevelopment-levelsystemsandthereisnoguaranteethatthesemeasurementswillbethesame
ongenerallyavailablesystems.Furthermore,somemeasurementsmayhavebeenestimatedthrough
extrapolation.Actualresultsmayvary.Usersofthisdocumentshouldverifytheapplicabledatafortheir
specicenvironment.
©CopyrightLenovo2011
77
Page 84

Televisionoutputnotice
Thefollowingnoticeappliestomodelsthathavethefactory-installedtelevision-outputfeature.
ThisproductincorporatescopyrightprotectiontechnologythatisprotectedbymethodclaimsofcertainU.S.
patentsandotherintellectualpropertyrightsownedbyMacrovisionCorporationandotherrightsowners.
UseofthiscopyrightprotectiontechnologymustbeauthorizedbyMacrovisionCorporation,andisintended
forhomeandotherlimitedviewingusesonlyunlessotherwiseauthorizedbyMacrovisionCorporation.
Reverseengineeringordisassemblyisprohibited.
EuropeanconformanceCEmark
RecyclinginformationforBrazil
DeclaraçõesdeReciclagemnoBrasil
DescartedeumProdutoLenovoForadeUso
Equipamentoselétricoseeletrônicosnãodevemserdescartadosemlixocomum,masenviadosàpontosde
coleta,autorizadospelofabricantedoprodutoparaquesejamencaminhadoseprocessadosporempresas
especializadasnomanuseioderesíduosindustriais,devidamentecerticadaspelosorgãosambientais,de
acordocomalegislaçãolocal.
ALenovopossuiumcanalespecícoparaauxiliá-lonodescartedessesprodutos.Casovocêpossua
umprodutoLenovoemsituaçãodedescarte,ligueparaonossoSACouencaminheume-mailpara:
reciclar@lenovo.com,informandoomodelo,númerodesérieecidade,amdeenviarmosasinstruções
paraocorretodescartedoseuprodutoLenovo.
BatteryrecyclinginformationforTaiwan
BatteryrecyclinginformationfortheEuropeanUnion
Notice:ThismarkappliesonlytocountrieswithintheEuropeanUnion(EU).
78ThinkCentreUserGuide
Page 85

BatteriesorpackagingforbatteriesarelabeledinaccordancewithEuropeanDirective2006/66/EC
concerningbatteriesandaccumulatorsandwastebatteriesandaccumulators.TheDirectivedeterminesthe
frameworkforthereturnandrecyclingofusedbatteriesandaccumulatorsasapplicablethroughoutthe
EuropeanUnion.Thislabelisappliedtovariousbatteriestoindicatethatthebatteryisnottobethrown
away,butratherreclaimeduponendoflifeperthisDirective.
InaccordancewiththeEuropeanDirective2006/66/EC,batteriesandaccumulatorsarelabeledtoindicate
thattheyaretobecollectedseparatelyandrecycledatendoflife.Thelabelonthebatterymayalso
includeachemicalsymbolforthemetalconcernedinthebattery(Pbforlead,Hgformercury,andCdfor
cadmium).Usersofbatteriesandaccumulatorsmustnotdisposeofbatteriesandaccumulatorsasunsorted
municipalwaste,butusethecollectionframeworkavailabletocustomersforthereturn,recycling,and
treatmentofbatteriesandaccumulators.Customerparticipationisimportanttominimizeanypotential
effectsofbatteriesandaccumulatorsontheenvironmentandhumanhealthduetothepotentialpresenceof
hazardoussubstances.Forpropercollectionandtreatment,goto:
http://www.lenovo.com/lenovo/environment
Trademarks
Lenovo,theLenovologo,RescueandRecovery,ThinkCentre,andThinkVantagearetrademarksofLenovo
intheUnitedStates,othercountries,orboth.
Microsoft,andWindowsaretrademarksoftheMicrosoftgroupofcompanies.
AMD,AMDAthlon,AMDPhenom,AMDSempron,andcombinationsthereofaretrademarksofAdvanced
MicroDevices,Inc.
LinuxisatrademarkofLinusT orvaldsintheUnitedStates,othercountries,orboth.
Othercompany,product,orservicenamesmaybetrademarksorservicemarksofothers.
AppendixA.Notices79
Page 86

80ThinkCentreUserGuide
Page 87

Index
A
arescuemedium,creatingandusing56
AccessHelp74
administratorpassword60
antivirussoftware6
audioline-inconnector8
audioline-outconnector8
audiosubsystem1
B
backupandrecoveryoperations54
basictroubleshooting67
battery,replacing28
Boot-blockRecovery64
C
cablelock,security49
cardreader,installing24
cardreader,replacing26
changing
startupdevicesequence61
cleaningthemouse70
CMOS,clearing50
components,internal9
computercover
removing14
computercover,reinstalling48
connectordescription8
connectors
rear7
connectors,controls,indicators
front7
considerations,password60
creating
andusingarescuemedium56
creatingandusing
recoverymedia53
CRU
completingtheinstallation48
specications10
DVImonitorconnector8
E
environment,operating4
Ethernet2
Ethernetconnector8
exiting,SetupUtilityprogram62
expansion2
externaloptions,installing14
F
failure,recoveringfromaPOSTandBIOSupdate64
features1
ashingtheBIOS63
front
connectors,controls,indicators7
frontaudioandUSBassembly,replacing43
frontbezel
frontbezel,removing15
frontbezel,reinstalling15
frontfanassembly,replacing39
G
getting
help73
information73
service73
H
harddiskdrive,replacing35
heatsinkandfanassembly,replacing31
help
AccessHelp74
andservice75
getting73
D
devicedrivers49
installing57
reinstalling57
devices,handlingstatic-sensitive13
diagnosticprograms,troubleshooting67
diagnosticprograms,using75
documentation,using75
drivers,device49
drives
bays10
©CopyrightLenovo2011
I
importantsafetyinformationiii
information
getting73
importantsafetyiii
resources73
safety74
warranty74
Input/Output(I/O)features2
installing
devicedrivers57
81
Page 88

installingoptions
memorymodule19
PCIcard16
securityfeatures49
internaldrives1
internalspeaker,replacing44
K
keyboard
replacing46
L
LenovoCustomerSupportCenter75
LenovoSolutionCenter68
LenovoThinkVantageToolbox69
LenovoThinkVantageTools73
LenovoWebsite74
LenovoWelcome5
locatingcomponents9
M
media,creatingandusingrecoverymedia53
memorymodule1
installing,replacing19
systemboard19
microphoneconnector8
microprocessor1
replacing33
mouse
cleaning70
non-optical70
opticalmouse70
replacing47
N
non-opticalmouse70
notice,televisionoutput78
notices77
PC-DoctorforDOS69
PCIcard16
installing,replacing16
slots16
physicalspecications4
powersupply
features2
powersupplyassembly,replacing29
power-onpassword60
power-onself-test(POST)63
programs,updatingsystem63
protection,password50
PS/2keyboardconnector9
PS/2mouseconnector9
purchasingadditionalservices76
R
rearconnectors7
rearfanassembly,replacing41
recovering
fromaPOSTandBIOSupdatefailure64
software53
recovery
Boot-blockRecovery64
operations,backupand54
problems,solving58
recoverymedia,creatingandusing53
reinstalling
devicedrivers57
removingcomputercover14
replacing
battery28
cardreader26
harddiskdrive35
heatsinkandfanassembly31
keyboard46
microprocessor33
mouse47
RescueandRecovery53
workspace,RescueandRecovery55
RescueandRecoveryworkspace55
resources,information73
O
OnlineBooksfolder73
operations,backupandrecovery54
opticaldrive,replacing21
opticalmouse70
P
padlock50
partsreplacement,completing48
password
considerations60
erasing50
lostorforgotten50
setting,changing,deleting60
passwordprotection50
82ThinkCentreUserGuide
S
safetyiii
safetyinformation74
security
cablelock49
enablingordisabling60
features3,49
padlock50
selecting
startupdevice61
temporarystartupdevice61
serialport9
service
andhelp75
getting73
Page 89

LenovoCustomerSupportCenter75
services
other76
purchasingadditional76
SetAdministratorPassword60
SetPower-OnPassword60
settings
changing59
viewing59
SetupUtilityprogram59
SetupUtilityprogram,exiting62
SetupUtilityprogram,starting59
software
recovering53
softwareoverview4
solvingrecoveryproblems58
startingtheSetupUtilityprogram59
startupdevice61
sequence,changing61
temporary,selecting61
static-sensitivedevices,handling13
system
management2
programs63
systemboard
connectors10
locatingparts9
location9
memorymodule19
W
warrantyinformation74
Website,Lenovo74
workspace,backupandrecovery55
T
televisionoutputnotice78
temporarystartupdevice61
theBIOS,updating(ashing)63–64
trademarks79
troubleshooting,basic67
troubleshooting,diagnosticprograms67
U
updating
(ashing)theBIOS63
systemprograms63
updating(ashing)theBIOS64
USBconnector9
using
arescuemedium,creatingand56
diagnosticprograms75
documentation75
otherservices76
passwords59
SetupUtilityprogram59
V
VGAmonitorconnector9
videosubsystem1
viewingorchangingsettings59
©CopyrightLenovo2011
83
Page 90

84ThinkCentreUserGuide
Page 91

Page 92

PartNumber:0A94221
PrintedinUSA
(1P)P/N:0A94221
*0A94221*
 Loading...