

Lenovo T22v-20 User Manual

T22v-20 Flat Panel Monitor
User’s Guide
Machine Type: 61FB

Product Number
61FB-MAR6-WW
First Edition (01 2020)
© Copyright Lenovo 2020
All rights reserved.
LENOVO products, data, computer software, and services have been developed exclusively at private expense and are sold to
governmental entities as commercial items as defined by 47 C.F.R. 2.101 with limited and restricted rights to use, reproduction and
disclosure.
LIMITED AND RESTRICTED RIGHTS NOTICE: IF products, data, computer software, or services are delivered pursuant a
General Services Administration "GSA" contract, use, reproduction, or disclosure is subject to restrictions set forth in
Contract No. GS-35F-05925.
© Copyright Lenovo 2020 i

Contents
Product Number ................................................................................................................................................................................................................... i
Contents................................................................................................................................................................................................................................ ii
Safety information ...............................................................................................................................................................................................................iii
Safety and Maintenance Guidelines.................................................................................................................................................................................. iv
Chapter 1 Getting started ............................................................................................................................................................................................ 1-1
Shipping contents ............................................................................................................................................................................................... 1-1
Notice for use ...................................................................................................................................................................................................... 1-1
Product overview ................................................................................................................................................................................................ 1-2
Types of adjustments .......................................................................................................................................................................................... 1-2
User controls ....................................................................................................................................................................................................... 1-3
Cable lock slot...................................................................................................................................................................................................... 1-3
IR-Camera ............................................................................................................................................................................................................ 1-4
Speaker ................................................................................................................................................................................................................ 1-6
Setting up your monitor...................................................................................................................................................................................... 1-7
Connecting and turning on your monitor .......................................................................................................................................................... 1-7
Windows Hello setup (Windows 10 Only) ....................................................................................................................................................... 1-10
Registering your option ..................................................................................................................................................................................... 1-11
Chapter 2 Adjusting and using your monitor ............................................................................................................................................................. 2-1
Comfort and accessibility .................................................................................................................................................................................... 2-1
Arranging your work area ................................................................................................................................................................................... 2-1
Health Administration ......................................................................................................................................................................................... 2-2
Accessibility information ..................................................................................................................................................................................... 2-5
Adjusting your monitor image ............................................................................................................................................................................ 2-6
Using the direct access controls.......................................................................................................................................................................... 2-6
Using the On-Screen Display (OSD) controls ...................................................................................................................................................... 2-7
Selecting a supported display m ode ................................................................................................................................................................ 2-10
Image rotation ................................................................................................................................................................................................... 2-10
Audio description .............................................................................................................................................................................................. 2-11
Understanding power management ............................................................................................................................................................... 2-11
Caring for your monitor .................................................................................................................................................................................... 2-12
Detaching the monitor stand............................................................................................................................................................................ 2-12
Wall Mounting (Optional) ................................................................................................................................................................................. 2-12
Chapter 3 Reference information ............................................................................................................................................................................... 3-1
Monitor specifications ........................................................................................................................................................................................ 3-1
Troubleshooting .................................................................................................................................................................................................. 3-3
Manual image setup ........................................................................................................................................................................................... 3-5
Manually installing the monitor driver ............................................................................................................................................................... 3-5
Manually installing the IR camera driver in Windows 10 .................................................................................................................................. 3-7
Service information ............................................................................................................................................................................................. 3-8
Appendix A. Service and Support .................................................................................................................................................................................. A-1
Registering your option ...................................................................................................................................................................................... A-1
Online technical support .................................................................................................................................................................................... A-1
Telephone technical support ............................................................................................................................................................................. A-1
Worldwide telephone list .................................................................................................................................................................................. A-1
Appendix B. Notices ........................................................................................................................................................................................................B-1
Recycling information ......................................................................................................................................................................................... B-2
Collecting and recycling a disused Lenovo computer or monitor ..................................................................................................................... B-2
Disposing of Lenovo computer components ..................................................................................................................................................... B-2
Trademarks.......................................................................................................................................................................................................... B-3
Turkish statement of compliance ....................................................................................................................................................................... B-4
Ukraine RoHS ...................................................................................................................................................................................................... B-4
India RoHS ........................................................................................................................................................................................................... B-4
Power cords and power adapters ...................................................................................................................................................................... B-4
ii
© Copyright Lenovo 2020

Safety information
General Safety guidelines
For tips to help you use your computer safety, go to:
http://www.lenovo.com/safety
Before installing this product, read the Safety Information.
© Copyright Lenovo 2020 iii

Safety and Maintenance Guidelines
Important Safety Information
The power cord is designed for use with your monitor. To use a different cord, use only a power source and
connection compatible with this monitor.
WARNING: Always connect your monitor, the computer, and other equipment to a grounded (earthed) power
outlet. To reduce the risk of electric shock or damage to your equipment, do not disable the power cord grounding
feature. The grounding plug is an important safety feature.
WARNING: For your safety, be sure that the grounded power outlet you plug the power cord into is easily
accessible to the operator and located as close to the equipment as possible. To disconnect power from the
equipment, unplug the power cord from the power outlet by grasping the plug firmly. Never pull on the cord.
CAUTION: To protect your monitor, as well as your computer, connect all power cords for your computer
and its peripheral devices (such as a monitor, printer, or scanner) to a surge protection device such as a power
strip with surge protection or uninterruptible power supply (UPS). Not all power strips provide surge
protection; the power strips must be specifically labelled as having this ability. Use a power strip whose
manufacturer offers a damage replacement policy, so you can replace your equipment if surge protection fails.
CAUTION: A certified power supply cord has to be used with this equipment. The relevant national installation
and/or equipment regulations shall be considered. A certified power supply cord not lighter than ordinary polyvinyl
chloride flexible cord according to IEC 60227 (designation H05VV-F 3G 0.75mm² or H05VVH2-F2 3G 0.75mm²) shall
be used. An alternative flexible cord is synthetic rubber.
Safety Precautions
■Use only a power source and connection compatible with this monitor, as indicated on the label/back plate
of the monitor.
■Be sure the total ampere rating of the products connected to the outlet does not exceed the current rating of the
electrical outlet, and the total ampere rating of the products connected to the power cord does not exceed the
rating of the power cord. Look on the power label to determine the ampere rating (Amps or A) for each device.
■ Install your monitor near a power outlet that you can easily reach. Disconnect the monitor by grasping the plug
firmly and pulling it from the outlet. Never disconnect the monitor by pulling the cord.
■ Do not allow anything to rest on the power cord. Do not walk on the cord.
■ While using VESA mount application, the AC Inlet must face to down side. Do not face any other position.
Maintenance Guidelines
To enhance the performance and extend the life of your monitor:
■ Do not open your monitor cabinet or attempt to service this product yourself. If your monitor is not operating
properly or has been dropped or damaged, contact your Lenovo authorized dealer, reseller, or service provider.
■ Adjust only those controls that are described in the operating instructions.
■ Turn your monitor off when not in use. You can substantially increase the life expectancy of the monitor by using a
screen saver program and turning off the monitor when not in use.
■ Keep your monitor in a well-ventilated area, away from excessive light, heat, or moisture.
■ Slots and openings in the cabinet are provided for ventilation. These openings must not be blocked or covered.
Never push objects of any kind into cabinet slots or other openings.
■ Unplug the monitor from the power outlet before cleaning. Do not use liquid cleaners or aerosol cleaners.
■ Do not drop the monitor or place it on an unstable surface.
■ When removing the monitor base, you must lay the monitor face down on a soft area to prevent it from getting
scratched, defaced, or broken.
Cleaning the Monitor
The monitor is a high-quality optical device that requires special care when cleaning. To clean the monitor, follow
these steps:
1. Turn off the computer and the monitor.
2. Unplug your monitor from the power outlet before cleaning.
CAUTION: Do not use benzene, thinner, ammonia, or any volatile substance to clean the monitor screen or cabinet.
These chemicals may damage the monitor. Do not use liquid or aerosol cleaners. Never use water to clean an LCD
screen.
3. Wipe the screen with a dry, soft, clean cloth. If the screen requires additional cleaning, use an antistatic screen
cleaner.
4. Dust the monitor housing. Use a damp cloth to clean the cabinet. If the cabinet requires additional cleaning, use a
clean cloth dampened with isopropyl alcohol.
5. Plug in the monitor.
6. Turn on the monitor and the computer.
iv
© Copyright Lenovo 2020
Chapter 1 Getting started
This User’s Guide contains detailed information on the ThinkVision
please see the Setup Poster that was shipped with your monitor.
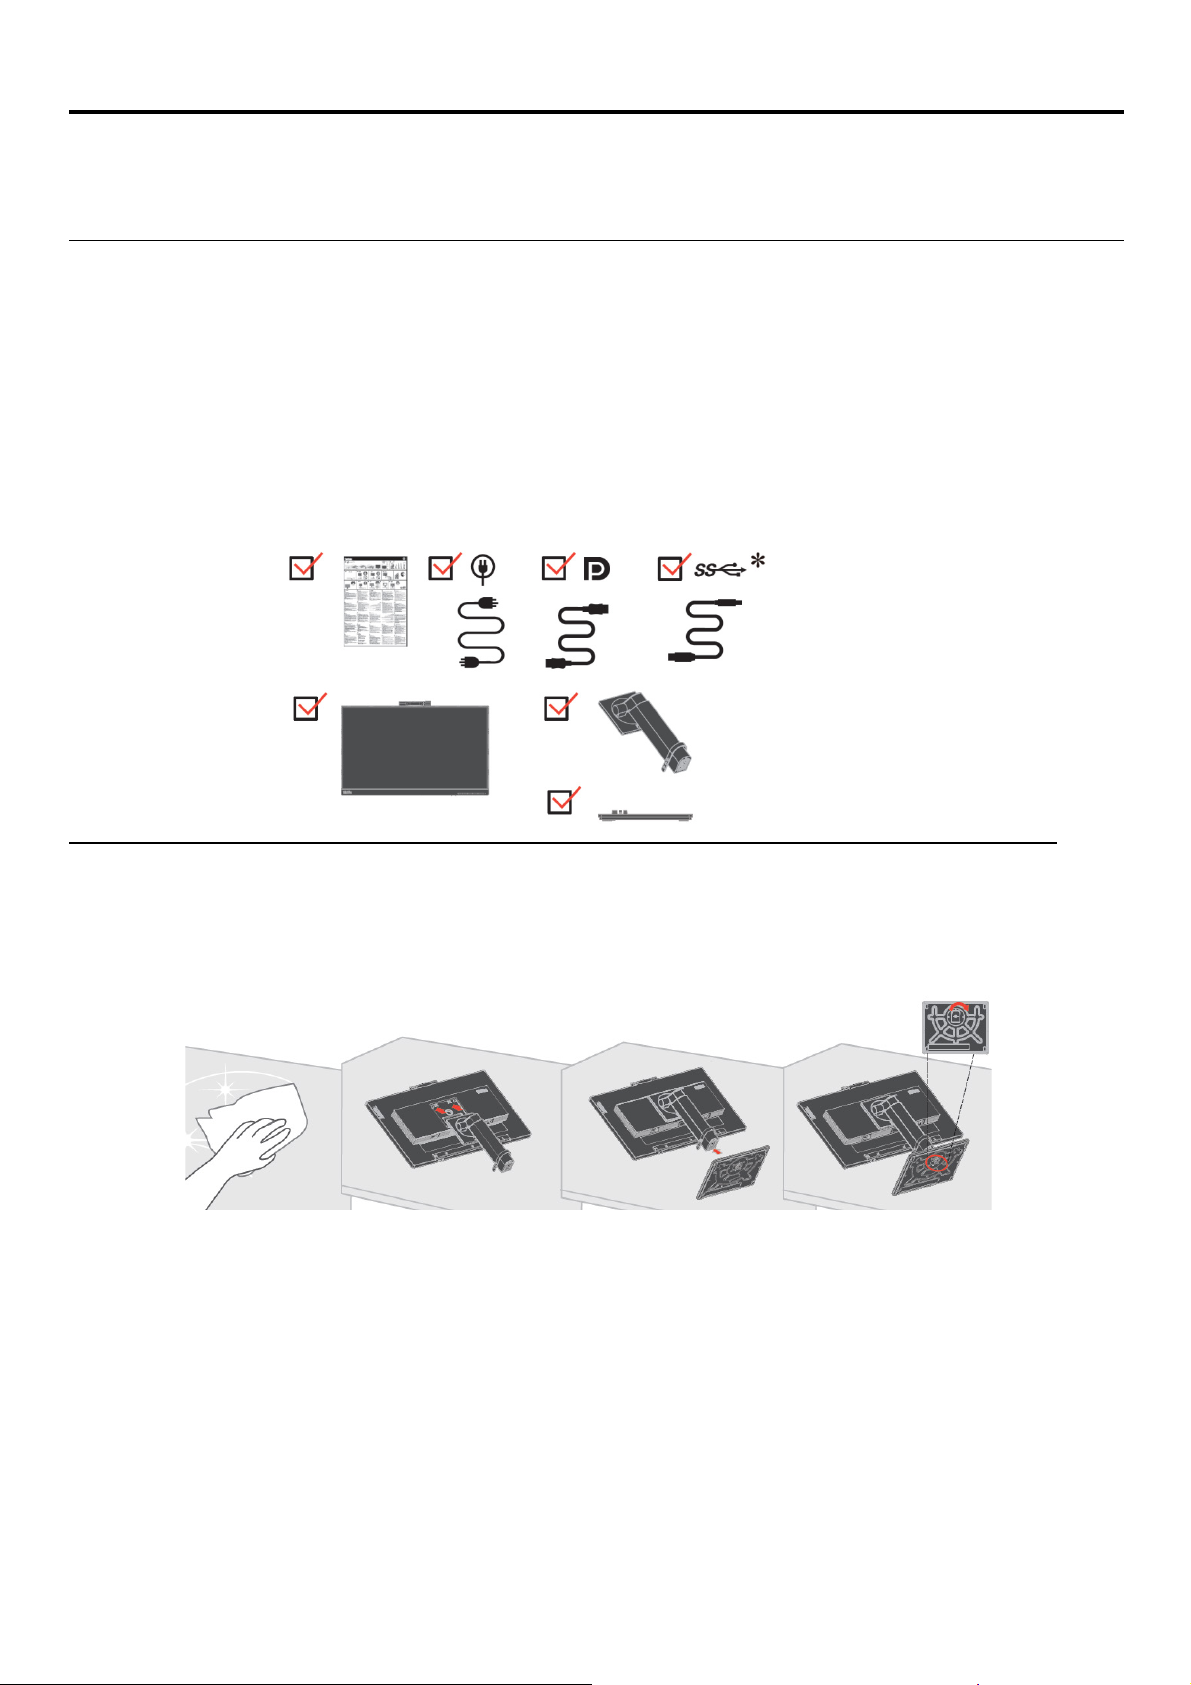
Shipping contents
The product package should include the following items:
● Information Flyer
● Flat Panel Monitor
● Monitor stand
● Monitor base
● DP cable
● Power Cord
● USB A-B Cable
®
T22v-20 Flat Panel Monitor. For a quick overview,
Notice for use
To setup your monitor, please see the illustrations below.
Note: Do not touch the monitor within the screen area. The screen area is glass and can be damaged by
rough handling or excessive pressure.
1. Place your monitor with the screen face down on a soft flat surface.
2. Align the stand assembly bracket to the monitor.
3. Insert the base towards the stand and tighten the thumbscrew.
Note: To attach a VESA mount, please see “Detaching the monitor stand” on page 2-12.
*: Depending on many factors such as the processing capability of peripheral devices, file attributes,
and other factors related to system configuration and operating environments, the actual transfer rate
using the various USB connectors on this device will vary and is typically slower than the data rates
as defined by the respective USB specifications: - 5 Gbit/s for USB 3.1 Gen 1; 10 Gbit/s for USB 3.1
Gen 2 & 20 Gbit/s for USB 3.2.
Chapter 1. Getting started 1-1

Product overview
This section will provide information on adjusting monitor positions, setting user controls, and using the cable lock
slot.
Types of adjustments
Tilt
Please see the illustration below for an example of the tilt range.
Swivel
With the built-in pedestal, you can tilt and swivel the monitor for the most comfortable viewing angle.
Height Adjustment
After pressing the top of the monitor, you can adjust the height of the monitor.
1-2 T22v-20 Flat Panel Monitor User’s Guide

Monitor Pivot
User controls
Your monitor has controls on the front which are used to adjust the display.
- Adjust the monitor height before rotating the monitor screen. (Make sure that the monitor
screen ascent to its highest point and it inclines backward at 35°)
- Then rotate clockwise or anticlockwise until the monitor stops at 90°.
For information on how to use these controls, please see “Adjusting your monitor image” on page 2-6.
Cable lock slot
Your monitor is equipped with a cable lock slot located on the rear of your monitor. Please follow
the instructions that came with the cable lock to attach it.
Chapter 1. Getting started 1-3

IR-Camera
Your monitor has embedded integrated IR Camera Module; it can be used as a normal web-camera.
Slide the camera shutter open or close to enable/disable the camera.
a. Slide to open. b. Slide to close.
Windows hello
After setting up the “Windows hello” application, you can login your Window 10 operating system
with the function of face-recognition.
Note: To set up “windows hello”, please see “Windows Hello setup (Windows 10 Only)” on page 1-10.
1-4 T22v-20 Flat Panel Monitor User’s Guide

Webcam face tracking function
The camera will perform face tracking with Win10, after RS2 version when install special driver,
webcam could search face with windows 10 ROI , then enlarge and centre the face.
Note:
1. Your NB/PC OS should be Win 10 and after RS2 version, don’t support for Win 7or Win10 older
than RS2 version. Propose to upgrade your windows OS to
latest to keep this function stable.
2. To install special driver on NB/PC, you must download it from Lenovo website
https://pcsupport.lenovo.com/us/en/downloads/DS544026 and follow the instructions on page
3-7
“Manually installing the Face tracking driver in Windows 10”for details.
3. Check your CPU of NB/PC to keep high efficiency (Please use adapter instead of internal
Battery when using NB.
4. Sometimes you might find the face can be enlarged, not be centralized when your face is in the
edge of the image that camera captured, please move your face close to centre.
5. If face tracking function is updated, camera driver will be automatically updated via system’s
Windows update when NB/PC is connected to network. Don’t shut down when you run
Windows update and please follow Windows update operation guide.
lease refer to page 2-7 “Using the On-Screen Display (OSD) controls” to know how to
P
Enable/Disable Face Tracking function.
Video/Audio Icon on/off
Connect USB cable from PC/NB to Monitor, set Advanced Settings->Video/Audio Icon on,
Video/Audio ICON will display on left bottom when Camera / Microphone is enable.
Note:
If USB cable is disconnected, Video/Audio ICON in OSD Advanced Settings will gray out.
You can’t select this function.
Chapter 1. Getting started 1-5

Speaker
Your monitor has embedded a pair of speaks with 3W, and it can support DP or HDMI audio
output and USB audio output. The USB cable need plug in when you use USB audio channel
(picture2). DP or HDMI audio output doesn't need USB cable but DP or HDMI cable (picture 1).
Use Volume control button to adjust volume.
Note: To prevent possible hearing damage, do not listen at high volume levels for long periods.
Warning for excessive sound pressure from earphones and headphones.
Excessive sound pressure from earphones and headphones can cause hearing loss.
Adjustment of the equalizer to maximum increases the earphones and headphones output
voltage and therefore the sound pressure level.
1-6 T22v-20 Flat Panel Monitor User’s Guide

Setting up your monitor
This section provides information to help you set up your monitor.
Connecting and turning on your monitor
Note: Be sure to read the Safety Information located in the Flyer before carrying out this procedure.
1. Power off your computer and all attached devices, and unplug the computer power cord.
2. Connect the analog signal cable to the D-SUB connector of the monitor and the other
end on the back of the computer.
3. Connect one end of the DP cable to the DP connector on the back of the computer, and the other
end to the DP connector on the monitor. Lenovo recommends that customers who require to use
the DisplayPort input on their monitor purchase the "Lenovo DisplayPort to DisplayPort cable
0A36537".For more information, go to the
following:www.lenovo.com/support/monitoraccessories
Chapter 1. Getting started 1-7

4. Connect one end of the USB 3.0 cable to the USB connector on the back of the computer,
and the other end to the upstream USB connector on the monitor.
5. Connect the speaker’s audio cable and audio jack of monitor to transfer audio source from
DP, HDMI, or USB.
6. Connect one end of the USB cable to the USB downstream terminal of the monitor, and connect
the other end of the USB cable to an appropriate USB port on your device.
Note: The USB Battery Charging port (with battery symbol) specification 1.2 output
5Vdc/1.5A (typical), 2A (max) and the other standard USB Output 5Vdc/900mA. The USB
downstream port does not provide power while the monitor is switched off.
If there are any * tag, you can consult the comments on page 1-1
1-8 T22v-20 Flat Panel Monitor User’s Guide
 Loading...