

Lenovo P825 User Manual

Lenovo Digital Photo Frame
P825
User's Guide
Ver 1.0

Lenovo Digital Photo Frame P710
1
Statement 2
1. Precautions...............................................................................................................................3
2. Know the DPF .........................................................................................................................4
2.1 Product Presentation ......................................................................................................4
2.2 Use the Remote Control.................................................................................................5
2.3 Connection.....................................................................................................................5
2.4 Connecting to PC with USB Cable................................................................................6
2.5 Interface .........................................................................................................................6
3. Power On .................................................................................................................................7
4. Play Photos ..............................................................................................................................7
4.1 Copy...............................................................................................................................8
4.2 Delete.............................................................................................................................9
4.3 Zoom............................................................................................................................10
4.4 Play Mode....................................................................................................................11
4.5 Slideshow with Music..................................................................................................13
4.6 Ratio.............................................................................................................................13
4.7 Slideshow Interval........................................................................................................14
4.8 Transition Effect...........................................................................................................15
5. Play Music .............................................................................................................................15
5.1 Copy.............................................................................................................................16
5.2 Delete...........................................................................................................................16
5.3 Play Mode....................................................................................................................17
6. Play Movies ...........................................................................................................................17
6.1 Copy.............................................................................................................................18
6.2 Delete...........................................................................................................................19
6.3 Play Mode....................................................................................................................20
7. Settings...................................................................................................................................21
7.1 Storage .........................................................................................................................21
7.2 Photo ............................................................................................................................22
7.3 Music............................................................................................................................22
7.4 Movie...........................................................................................................................23
7.5 Alarm............................................................................................................................24
7.6 System..........................................................................................................................27
8. Others.....................................................................................................................................36
9. Trouble Shooting....................................................................................................................37

Lenovo Digital Photo Frame P710
2
Statement
Thank you for choosing Lenovo products.
Please read the information included in the product package thoroughly and carefully before
use. Lenovo (Beijing) Ltd. WILL NOT BE LIABLE for any damages caused by your failure to
follow the instructions herein or by any misoperation of this product due to your misunderstanding
of the content of this guide.
Lenovo (Beijing) Ltd. has emended and checked the document strictly, but we do not assure
that there is no error or oversight.
The pictures in this document are for your reference purpose only. If any of them are different
from the actual product, please ignore the pictures.
In order to provide better services, Lenovo (Beijing) Ltd. reserves the right to improve and
modify the description and the software program of this product.
Lenovo (Beijing) Ltd. will not be responsible for any data loss caused by malfunction of
hardware and software, repair, and other situations; nor will we be responsible for associated
indirect loss. Please backup your data properly.
The content of this Quick Start Guide is protected by the law of copyright. Without a written
authorization from Lenovo (Beijing) Ltd., you cannot copy, excerpt, transmit through wired or
wireless networks, or translate the User's Guide into any other language.
The content of this User's Guide is subject to change without notice.
"联想", "Lenovo", "Lenovo 联想" are either trademarks or registered trademarks of Lenovo
(Beijing) Limited.
Microsoft and its identification, as well as Windows, Windows2000, Windows XP, Windows
Vista, Windows Media are either registered trademarks or trademarks of Microsoft Corporation in
the United States and/or other countries/territories.
Other products, brands and trade names mentioned in this User's Guide are either trademarks or
registered trademarks of Lenovo or their respective owner.
Copyright
© 2008 Lenovo (Beijing) Limited, all rights are reserved.
Note: In different language versions, this guide will use the English operation interface as
examples.

Lenovo Digital Photo Frame P710
3
Product Accessories
1. Digital Photo Frame
2. Stand
3. Remote Control (battery included)
4. Power Supply Adapter
5. USB Cable
6. CD (Guide)
7. Quick Start Guide
8. Safety Guide
1. Precautions
In order to better protect your product, please read the followings carefully:
(1) Do not drop or put excessive pressure on the Digital Photo Frame.
(2) Do not put excessive pressure directly on the liquid crystal screen.
(3) This product is not waterproofed. To avoid electrical shock, do not expose it to rain or excessive
moisture.
(4) If you need to clean this product, please use soft slightly wet clothes. Never clean it using
alcohol or other liquid cleaner.
(5) Keep the Digital Photo Frame out of direct sunlight, sources of fire and heat.
(6) Make sure you connect the Digital Photo Frame only to technically compatible devices.
Connecting to an incompatible device may cause damage to the Digital Photo Frame or the
storage device.
Lenovo Digital Photo Frame P710
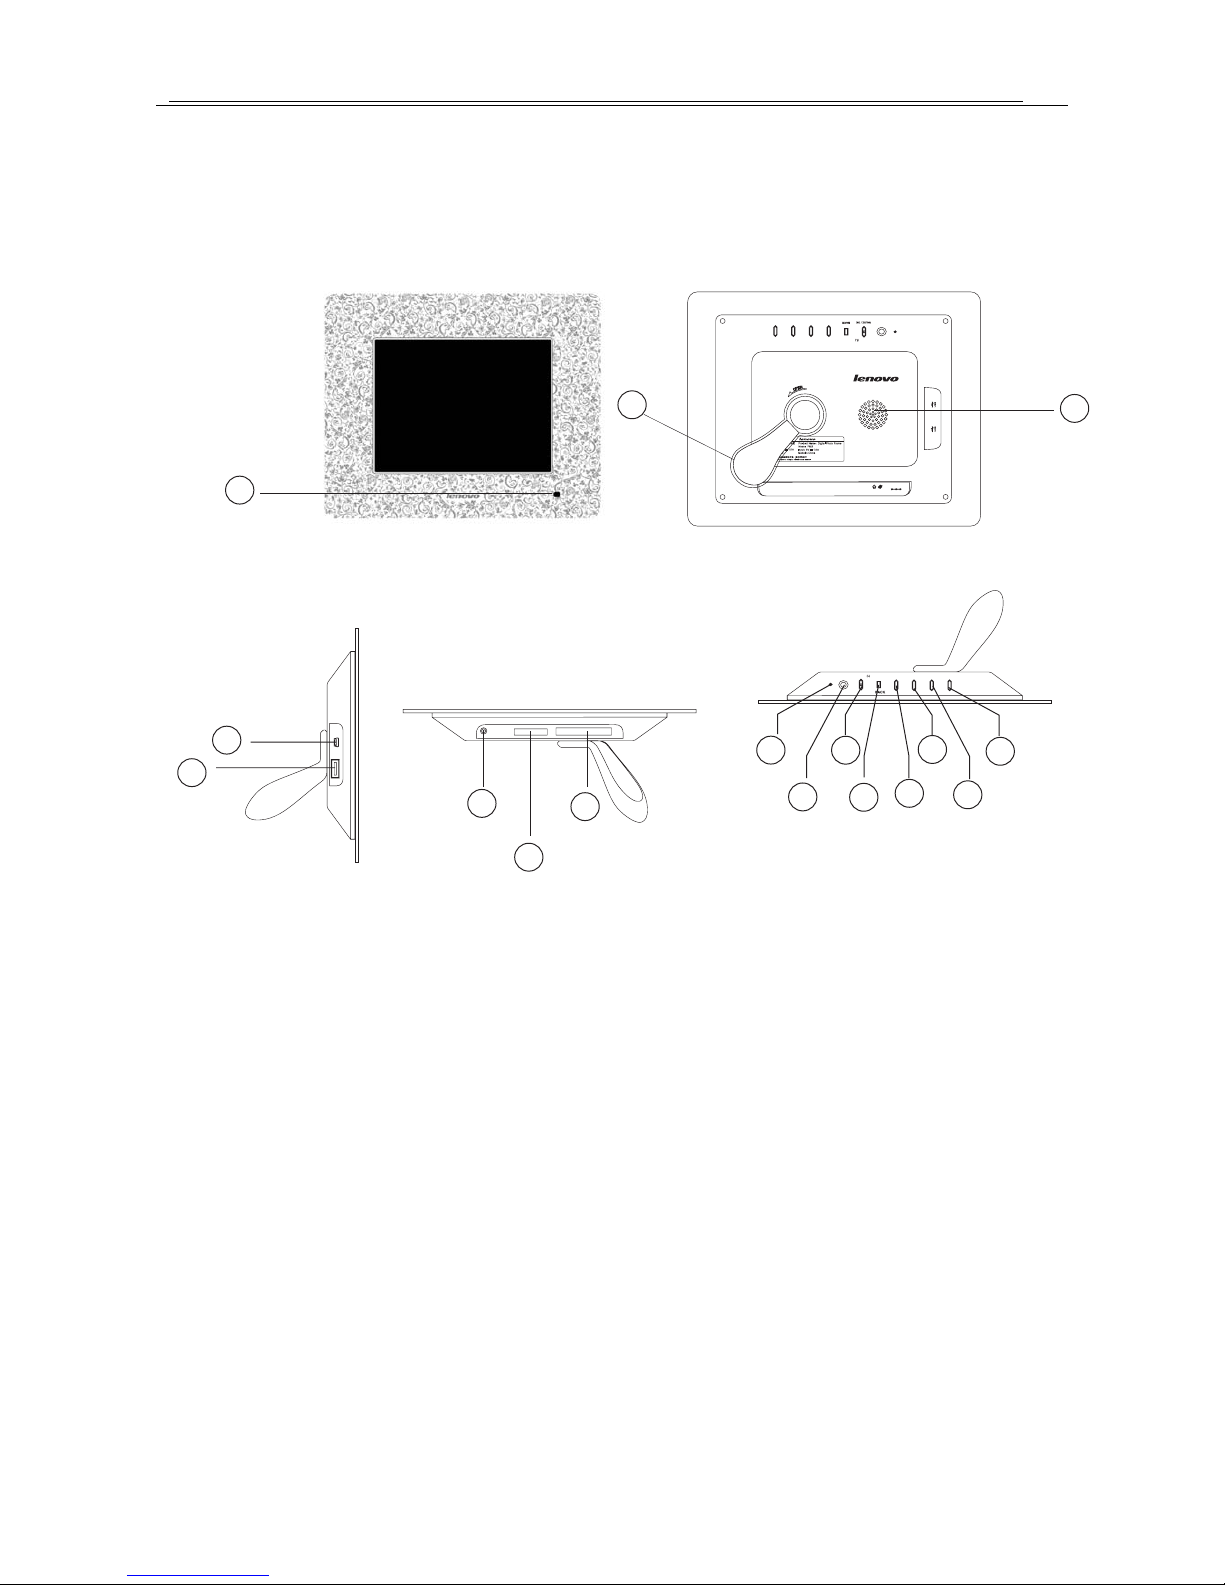
2. Know the DPF
2.1 Product Presentation
USB
USB
DC 9V
SD/MS/MMC
POWER
PREV. NEXTUP
DOWN
CF
SETTINGS
I
G
H
C
B
D
E
A
POWER
PREV.
NEXT
UP
DOWN
PAUSE/OK
SETTINGS
J
K
L
M
O
P
Q
N
J. Power Indicator Light
K. POWER ON/OFF
L. PAUSE/OK/SETTINGS(L) (press and hold
to enter the menu)
M. BACK
N
. UP (move up/increase volume)
O. DOWN (move down/reduce volume)
P. PREV. (move left or previous)
Q. NEXT (move right or next)
A. IR Receiver Window
B. Stand
C. Speaker
D. Standard USB Port
E. Mini USB Port
G. Memory Card Slot(SD/xD/MS/MMC)
H. CF Card Port
I. Power Jack (DC 9V)
4

Lenovo Digital Photo Frame P710
2.2 Use the Remote Control
You can use the Remote Control to operate the Digital Photo Frame.
Here are the buttons and their functions:
(1) Power Off
(2) Mute
(3) Add to/Delete Favorite: add photos to
Favorite/Delete photos from Favorite
(4) Sleep: Enter the sleep mode
(5) Calendar/Time: Display or close
Calendar/Time
(6) Back: Go back to the previous menu
(7) Up: Move up/increase volume
(8) Menu/Setting: Enter setting menu while
playing
(9) Left: Move left or previous
(10) OK/Pause/Play: OK/Play/Pause
(11) Right: Move right or next
(12) Zoom
(13) Down: Move down/reduce volume
(14) Rotation: Rotate a photo left
2.3 Connection
DC 9V
SD/MS/MMC
POWER
PREV. NEXTUP
DOWN
CF
SETTINGS
2.3.1 Compatible Storage Devices
(1) SD/xD/MS/MMC cards
(2) CF Card
(3) Flash Memory Card
2.3.2 Connect Storage Devices
(1) Connect compatible storage devices (a compatible memory card or a USB flash drive).
(2) In a minute, photos saved on the storage device and supported by the Digital Photo Frame will
automatically start playing.
After connecting a storage device, it will take some time to load photos and other files depending on
their size and quantity. To avoid causing damage to your storage device or files, do not unplug the
storage device while file loading.
5
Lenovo Digital Photo Frame P710
2.4 Connecting to PC with USB Cable
The Digital Photo Frame supports Windows 2000/XP/Vista operating systems.
(1) Connect the adapter to the Digital Photo Frame.
(2) Use the USB cable to connect the Digital Photo Frame (Mini USB port) with your computer.
(3) Press POWER button to turn on the Digital Photo Frame.
(4) Your computer will recognize the Digital Photo Frame as a storage device and you can copy
photos onto the Digital Photo Frame or delete them from it.
Note: Do not remove the USB cable or the adapter when copying or deleting.
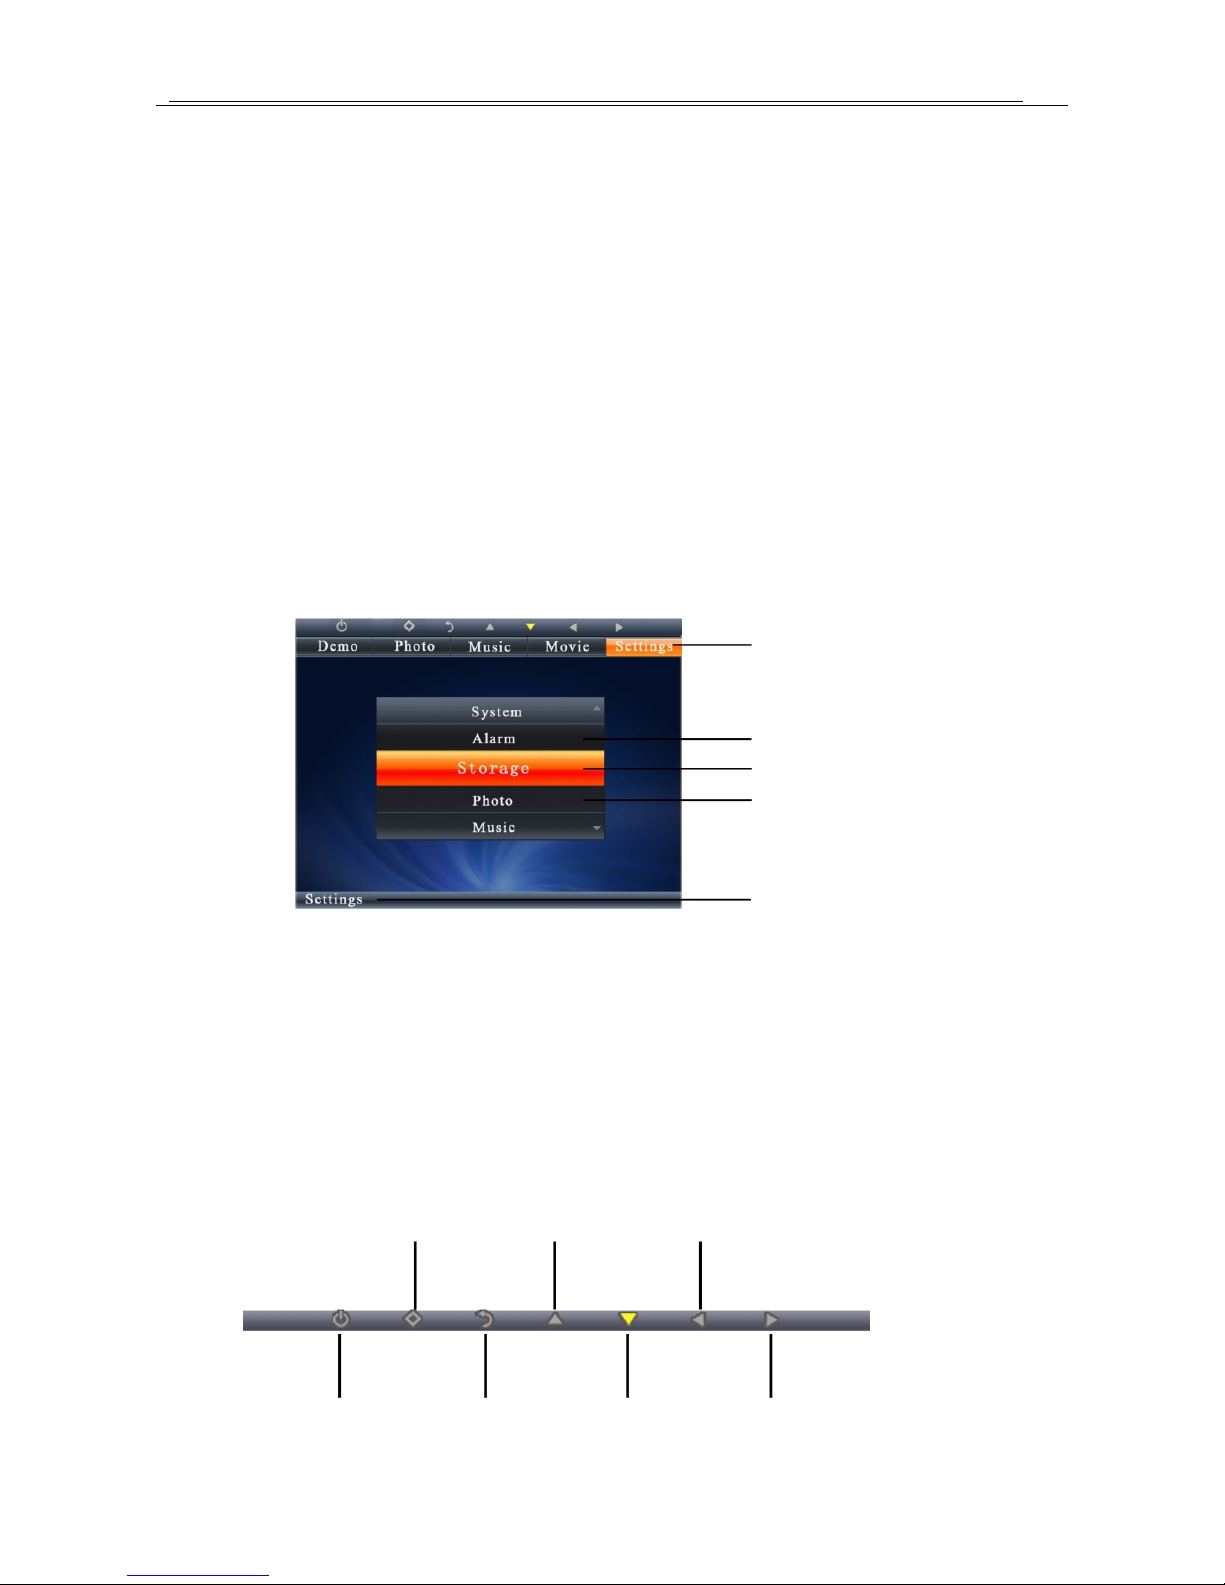
2.5 Interface
2.5.1 Menu
Function Selection
Next Selection
Current Selection
Last Selection
Current operation path
2.5.2 Key Map
When operating on the Digital Photo Frame, you will see key icons on the upper side of the
interface, and the icon corresponding with the functioning key will light up.
To select or change selections, press UP/DOWN/LEFT/RIGHT buttons and press OK to confirm.
Press BACK to go back to the previous menu.
OK/PAUSE
(Press and hold to go to the
function menu)
UP
LEFT
PREV.
6
DOWN
TURN ON/OFF
BACK
Lenovo Digital Photo Frame P710
3. Power On
After plugging in the power supply adapter, press POWER to turn on the Digital Photo Frame.
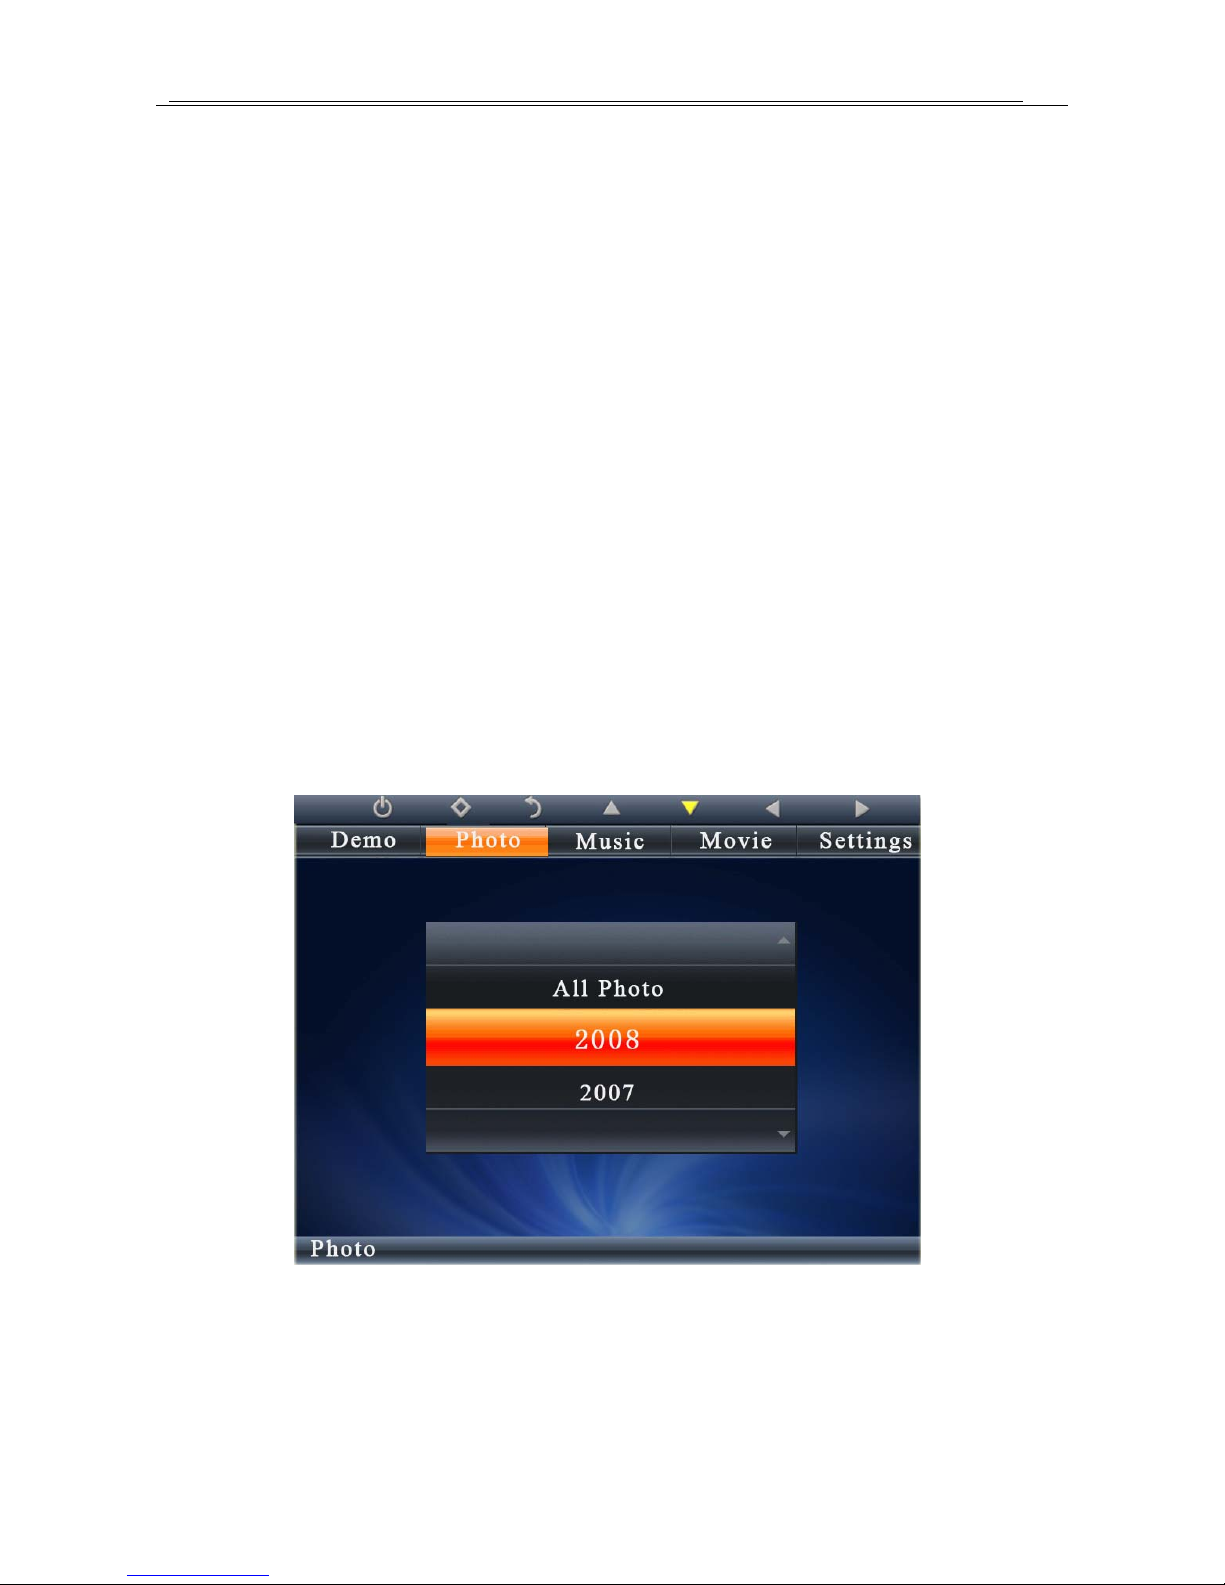
4. Play Photos
After power on, plug in storage device to the Digital Photo Frame. If there are available photos on
the storage device, the Digital Photo Frame will automatically start playing.
Note: This Digital Photo Frame supports JPG format.
How to Select Photos and Play:
(1) Press BACK to enter the main menu, select Photo option.
(2) Press UP/DOWN buttons to select All Photo or a photo file of a certain year.
(3) Press OK to enter the thumbnail interface.
(4) Use UP/DOWN/LEFT/RIGHT buttons to select photos you want to play. Press OK to start
playing.
(5) Pressing OK to enter the Pause mode, the Digital Photo Frame will only show the current photo.
Use LEFT/RIGHT to view the previous or next photo. Press OK again to automatically play
photos.
7

Lenovo Digital Photo Frame P710
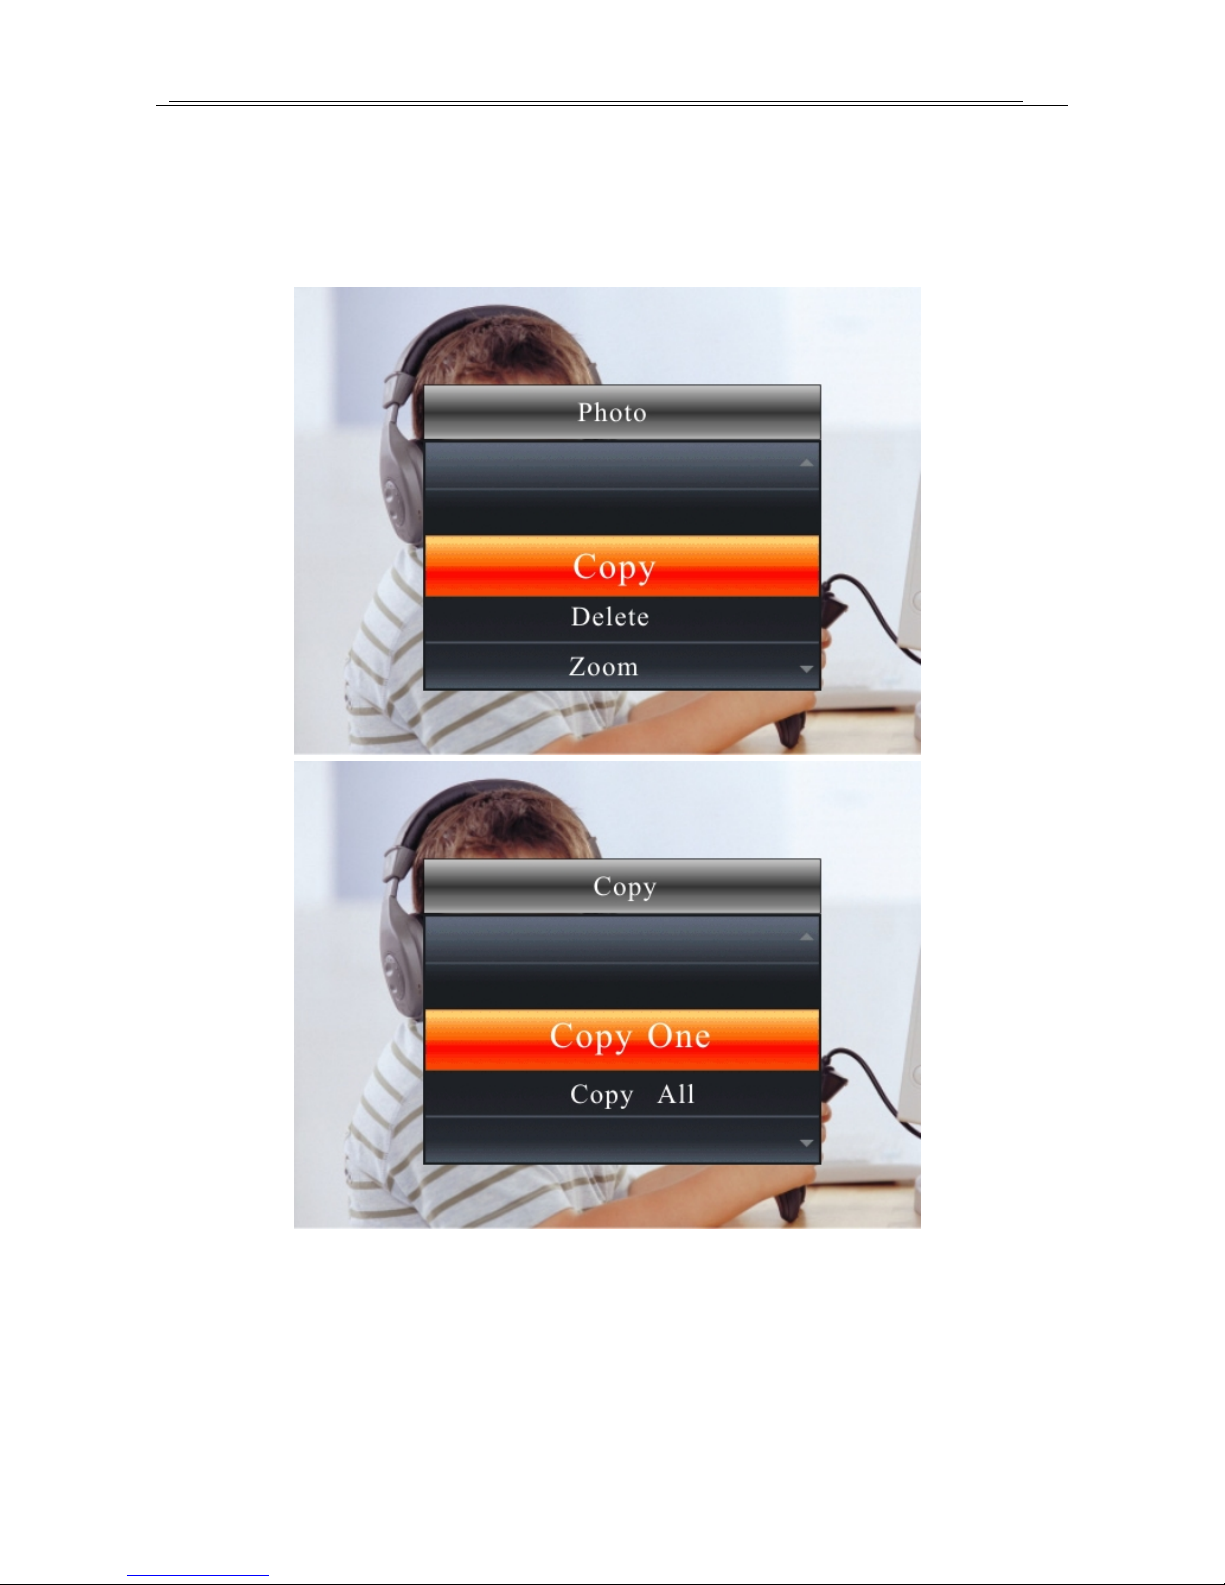
4.1 Copy
While playing photos, press the menu button on the Remote Control or press and hold OK button
on the machine to enter the Photo function menu. Use UP/DOWN buttons to select Copy, press OK
to enter the sub menu.
(1) Select Copy One or Copy All: Copy the current photo (Copy One) or all photos (Copy All).
(2) Select the target storage device.
(3) Press OK to confirm copying and a prompt will appear as follows: Do not Remove Memory
Card While Copying Files!
(4) Select and press OK button to start copying.
8
Lenovo Digital Photo Frame P710
(5) After successfully completed copying, a prompt will appear as follows: Favorite photos have
been compressed before stored, which would retain as many favorite photos as possible. Please
keep your original photos for further printing or editing.
(6) The length of time the Digital Photo Frame takes to complete the copying task depends on the
quantity and the size of your file(s).
4.2 Delete
While playing photos, press the menu button on the Remote Control or press and hold the OK
button on the machine to enter the Photo function menu. Use UP/DOWN buttons to select Delete,
press OK to enter the sub menu.
9

Lenovo Digital Photo Frame P710
(1) Select Delete One or Delete All: Delete the current photo (Delete One) or all photos (Delete
All).
(2) Press OK to confirm the Deleting task, a prompt will appear as follows: Deleting selected
file(s)!
(3) Select and press OK, another prompt will appear as follows: Deleting file(s) permanently!
(4) Select and press OK to start deleting. Select Cancel to quit deleting.
(5) The length of time the Digital Photo Frame takes to complete the deleting task depends on the
quantity and the size of your file(s).
4.3 Zoom
While playing photos, press the menu button on the Remote Control or press and hold OK button
on the machine to enter the Photo function menu.
(1) Select Zoom option in the photo menu.
(2) Press OK to zoom up a photo. After pressing a few times, the size will return to the original
size.
(3) After zoomed up a photo, press UP/DOWN/LEFT/RIGHT to move around.
10

Lenovo Digital Photo Frame P710
4.4 Play Mode
While playing photos, press the menu button on the Remote Control or press and hold OK button
on the machine to enter the Photo function menu. Use UP/DOWN buttons to select Play Mode then
press OK.
Options include: Single (play one photo), Repeat All (repeat all photos) and Random (play
randomly).
Single Play one photo
Repeat All Repeat all photos
Play randomly Randomly play photos
11
 Loading...