

Page 1

Lenovo ideapad
MIIX 310-10ICR
User Guide
Read the safety notices and important tips in the
included manuals before using your computer.
Page 2
Notes
•
Before using the product, be sure to read Lenovo Safety and General Information Guide first.
•
The latest electronic compliance and environmental information are available from the
Lenovo compliance information Web sites.
To view compliance information go to: http://www.lenovo.com/compliance
-
To download environmental information go to: http://www.lenovo.com/ecodeclaration
-
•
Some instructions in this guide may assume that you are using Windows
®
10. If you are
using another Windows operating system, some operations may be slightly different.
If you are using other operating systems, some operations may not apply to you.
The features described in this guide are common to most models. Some features may not
•
be available on your computer or your computer may include features that are not
described in this user guide.
The illustrations in this manual may differ from the actual product. The screenshots of
•
operating system are for reference only. Please refer to the actual product.
Regulatory Notice
For details, refer to Guides & Manuals at http://support.lenovo.com.
•
First Edition (February 2016)
© Copyright Lenovo 2016.
LIMITED AND RESTRICTED RIGHTS NOTICE: If data or software is delivered pursuant to a General
Services Administration “GSA” contract, use, reproduction, or disclosure is subject to restrictions set
forth in Contract No. GS-35F-05925.
Page 3

Contents
Chapter 1. Getting to know your computer..................................................................................... 1
Top view
Left-side view
Right-side view
Bottom view
Rear view
Keyboard dock top view
Keyboard dock left-side view
Keyboard dock right-side view
Chapter 2. Starting to use Windows 10 ......................................................................................... 14
Configuring the operating system for the first time
Operating system interface
Putting the computer to sleep or sh
Task and desktop management
Connecting to a wireless network
Get Started app
Touch screen operation
Chapter 3. Recovery system .......................................................................................................... 22
Chapter 4. Troubleshooting............................................................................................................ 24
Frequently asked questions
Troubleshooting
Trademarks ......................................................................................................................................
......................................................................................................................................................... 1
................................................................................................................................................. 3
.............................................................................................................................................. 4
................................................................................................................................................... 7
........................................................................................................................................................ 8
.............................................................................................................................. 9
.................................................................................................................... 11
................................................................................................................. 11
.............................................................................. 14
........................................................................................................................ 14
utting it down ................................................................................ 16
................................................................................................................. 18
............................................................................................................. 19
............................................................................................................................................ 19
.............................................................................................................................. 20
....................................................................................................................... 24
........................................................................................................................................... 25
28
i
Page 4

Page 5
Chapter 1. Getting to know your computer
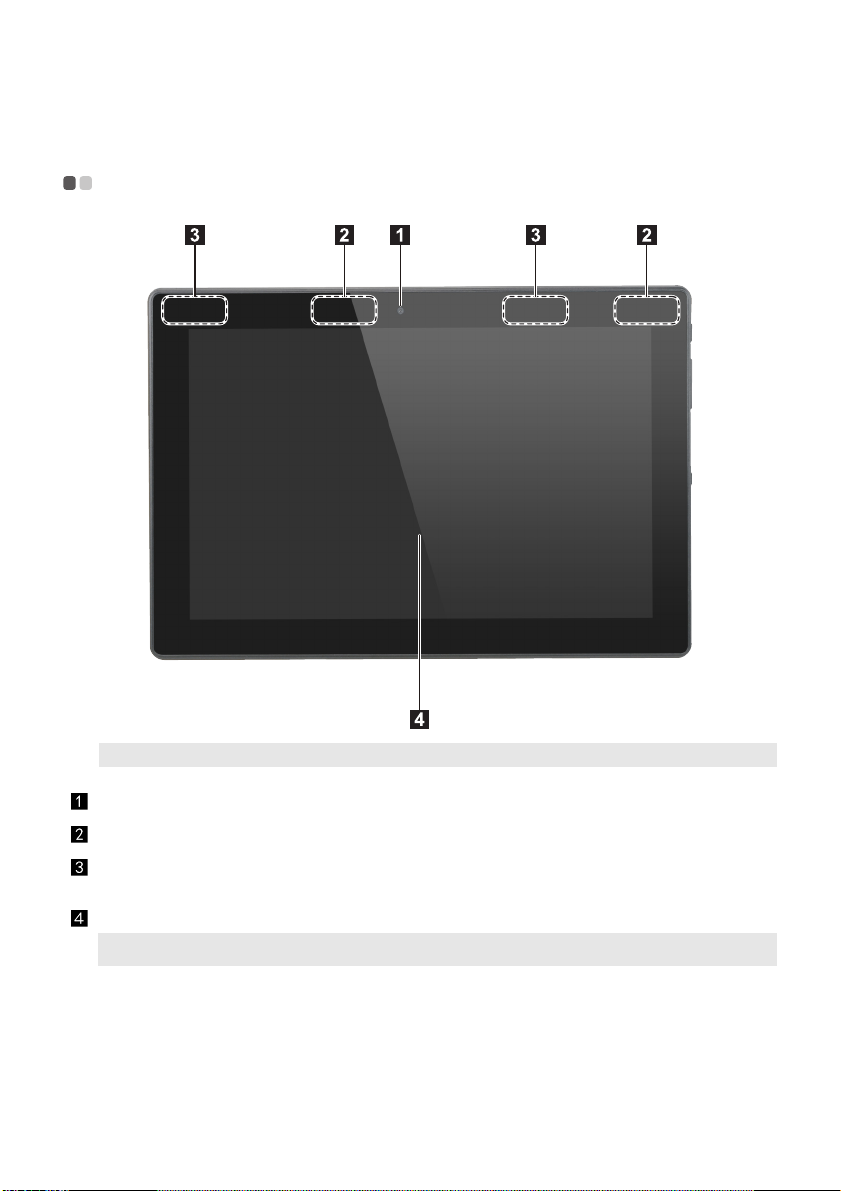
Top view - - - - - - - - - - - - - - - - - - - - - - - - - - - - - - - - - - - - - - - - - - - - - - - - - - - - - - - - - - - - - - - - - - - - - - - - - - - - - - - - - - - - - - - - - - - - - - - - - - - - - - - - - - - - - - - - - - - - - - - - - -
Note: The dashed areas indicate parts that are not visible externally.
Front camera
Wireless LAN antennas
Wireless WAN antennas
(on select models)
Multi-touch screen
Note: For details, see “Touch screen operation” on page 20.
Use the camera for video communication or taking photos.
Connect to a wireless LAN adapter to send and receive wireless radio signals.
Connect to a wireless WAN adapter to send and receive wireless radio signals.
Functions as the visual display as well as touchpad input.
1
Page 6
Chapter 1. Getting to know your computer
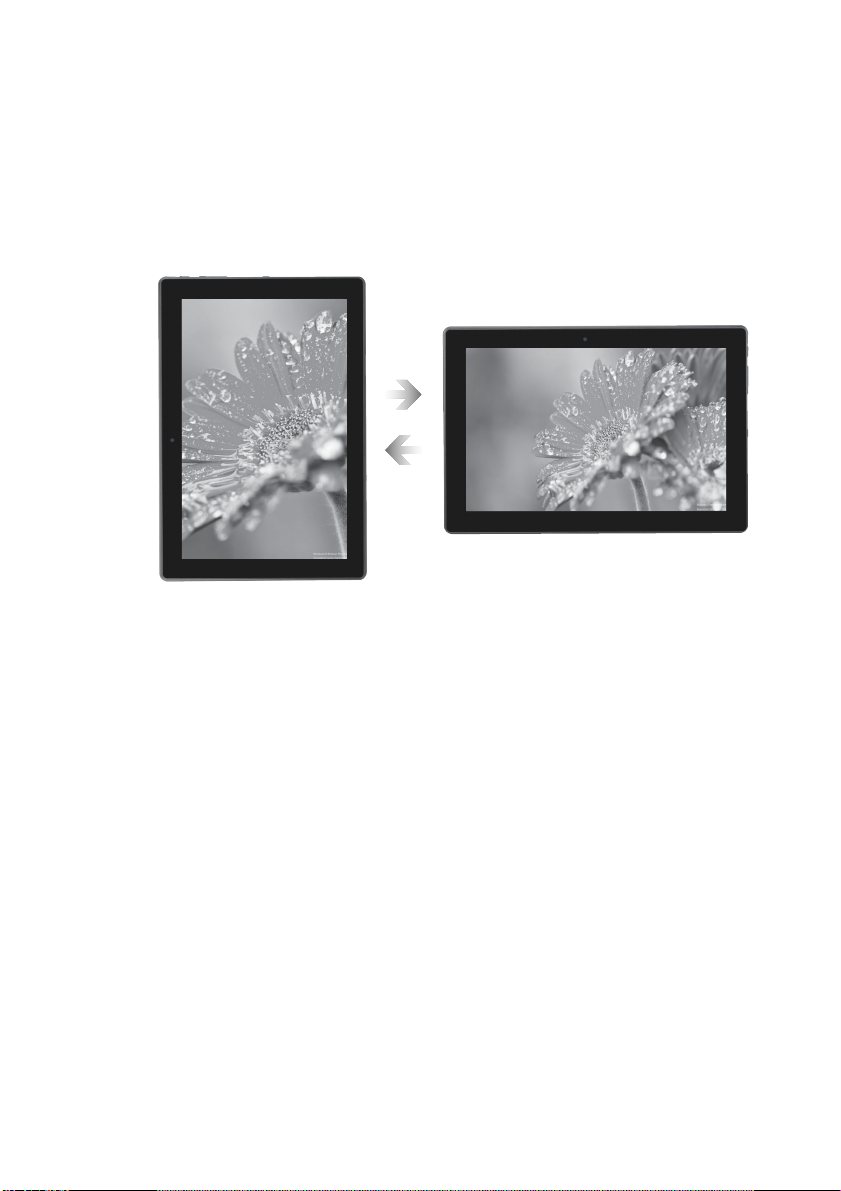
Screen orientation
You can rotate the display panel to your preferred orientation.
The orientation of the display automatically changes (altern
landscape modes) depending on how you hold it.
La
Portrait
ating between portrait and
ndscape
2
Page 7
Chapter 1. Getting to know your computer
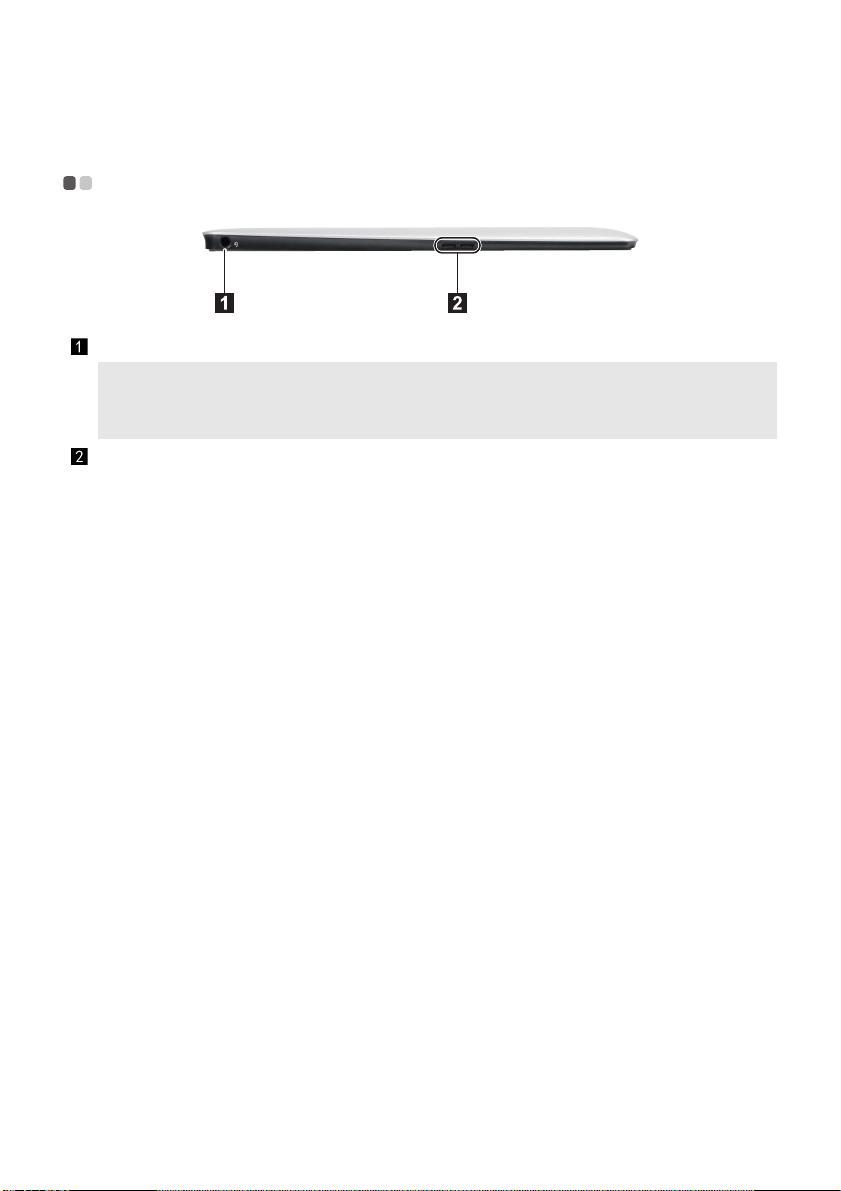
Left-side view - - - - - - - - - - - - - - - - - - - - - - - - - - - - - - - - - - - - - - - - - - - - - - - - - - - - - - - - - - - - - - - - - - - - - - - - - - - - - - - - - - - - - - - - - - - - - - - - - - - - - - - - - - - - - -
Combo audio jack
Notes:
• The combo audio jack does not support conventional microphones.
• The recording function might not be supported if thi
due to different industry standards.
Speaker
Connects to headsets.
Provides audio output.
rd
-party headphones or headsets are connected,
3
Page 8
Chapter 1. Getting to know your computer
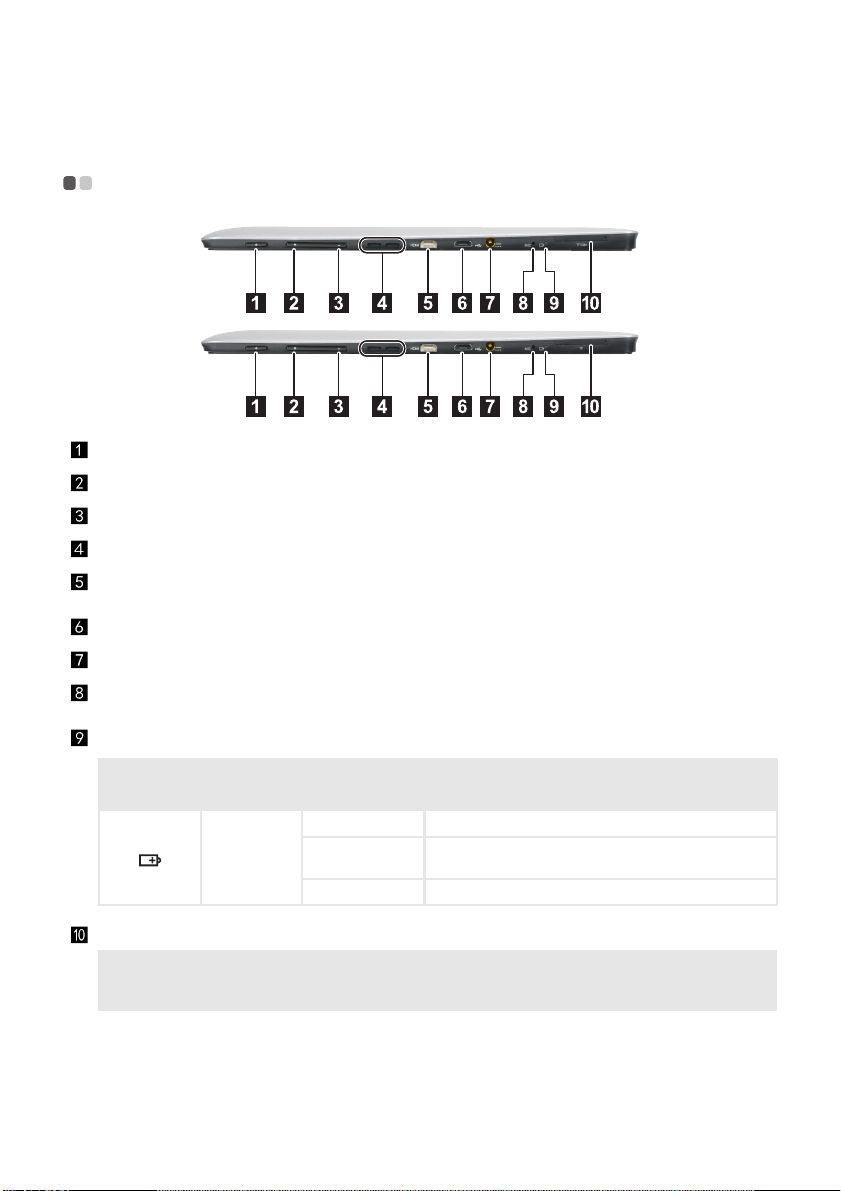
Right-side view - - - - - - - - - - - - - - - - - - - - - - - - - - - - - - - - - - - - - - - - - - - - - - - - - - - - - - - - - - - - - - - - - - - - - - - - - - - - - - - - - - - - - - - - - - - - - - - - - - - - - - - - - -
Power button
Volume up button
Volume down button
Speaker
Micro HDMI port
Micro USB port
AC power adapter jack
Built-in microphone
When the computer is off, press and hold this button to turn on the computer.
Increases the volume level.
Decreases the volume level.
Provides audio output.
Connects to devices with micro HDMI input such as a TV or an
external display.
Connects to USB devices.
Connects to the AC power adapter.
Captures sound which can be used for video conferencing, voice
narration, or audio recording.
Power indicator
Symbol Indicator
Power
Card reader
Notes:
• Select models may not have the micro SIM card slot, please re
• For details, see “Using the card reader” on page 5.
Indicator
status
On (solid red) The tablet is charging.
On (solid amber)
Off The tablet is disconnected from the AC power adapter.
Accept micro SD card (not supplied) and micro SIM card (not supplied).
The tablet is connected to the AC power adapter and is
fully charg
Meaning
ed.
fer to the actual product.
4
Page 9
Using the card reader
Your computer supports the following types of cards:
• Micro Secure Digital (SD) card
• Micro Subscriber Identity Module (SIM) ca
Chapter 1. Getting to know your computer
rd (on select models)
Notes:
• The card tray may have two slots for different types of cards. Insert only o
• Select models may not have the micro SIM card slot, plea
• This card re
• The illustrations are for reference only, please refer to the actual product.
ader does not support SDIO devices (e.g., SDIO Bluetooth and so on.).
se refer to the actual product.
ne card in one slot at a time.
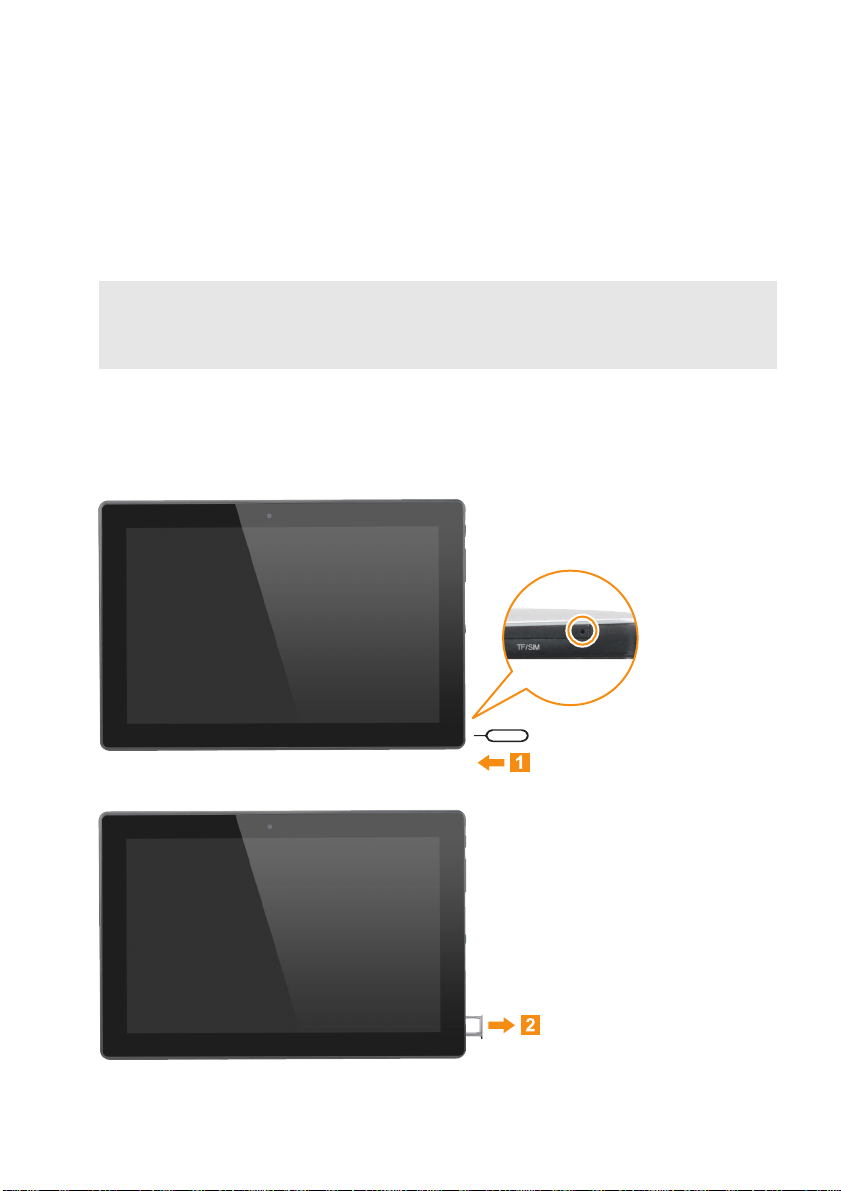
Inserting card(s)
1 Turn off the tablet, and disconnect the AC adapter and any cable(s) from the tablet.
2 Insert a prying pin into the tiny hole on the card tray. Press firmly and push it straight in
until the card tray pops out.
3 Gently pull the card tray out of the card reader.
5
Page 10
Chapter 1. Getting to know your computer
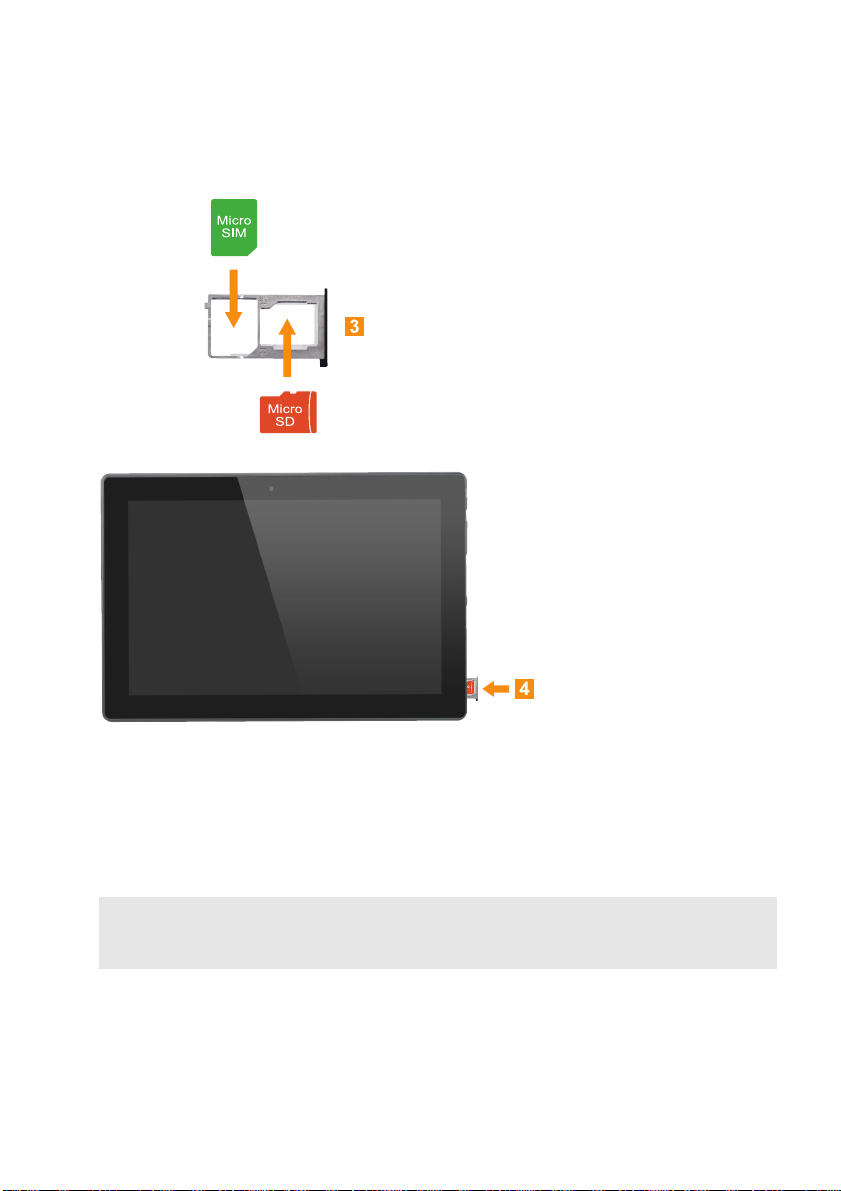
4 Put card(s) in the corresponding slot on the card tray.
5 Reinsert the card tray.
Removing card(s)
1 Turn off the tablet, and disconnect the AC adapter and any cable(s) from the tablet.
2 Insert a prying pin into the tiny hole on the card tray. Press firmly and push it straight in
until the card tray pops out.
3 Gently pull the card tray out of the card reader.
4 Remove card(s) from the card tray, then reinsert the card tray.
Notes:
• Do not insert or remove
• Bef
ore removing the memory card, disable it by using the Windows safely remove hardware and eject
utility to avoid data corruption.
media
cards while the computer is turned on. Doing so may damage the card reader.
6
Page 11
Chapter 1. Getting to know your computer
Bottom view - - - - - - - - - - - - - - - - - - - - - - - - - - - - - - - - - - - - - - - - - - - - - - - - - - - - - - - - - - - - - - - - - - - - - - - - - - - - - - - - - - - - - - - - - - - - - - - - - - - - - - - - - - - - - - - - - -
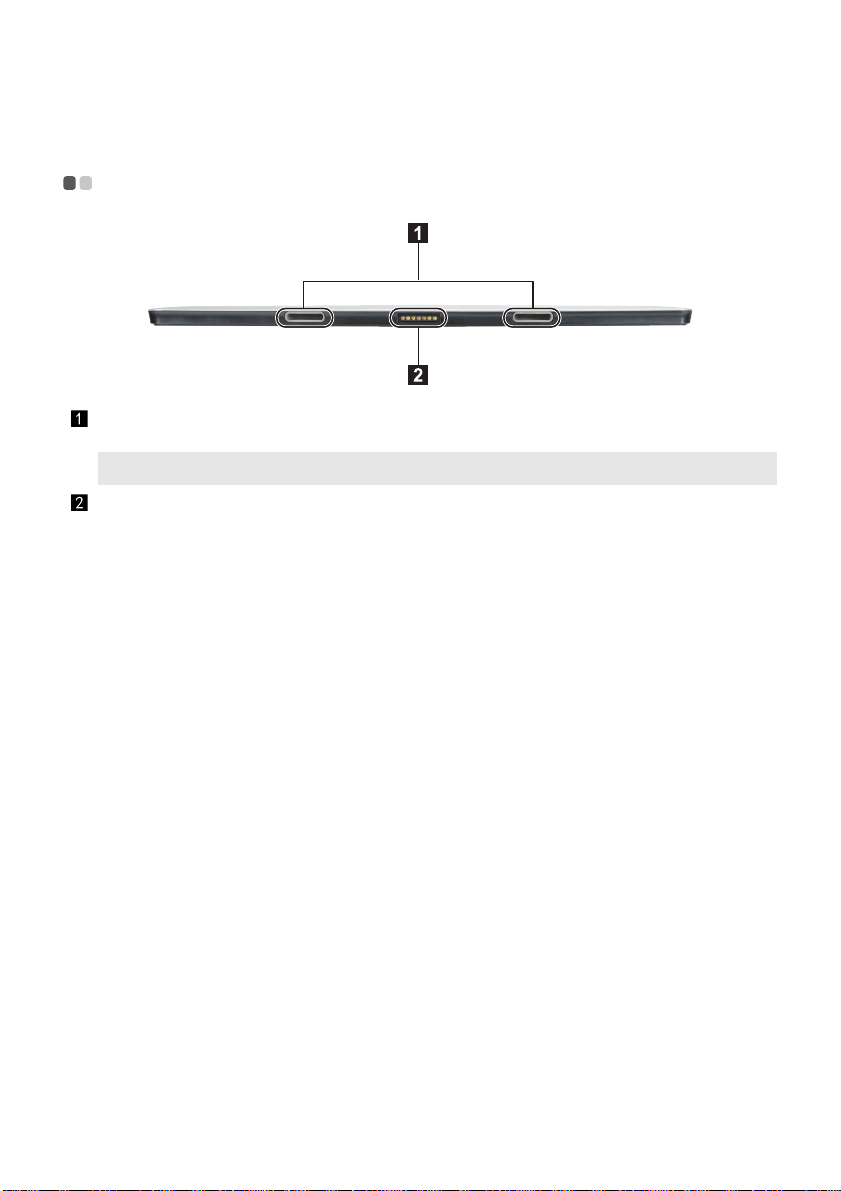
Tablet-keyboard dock
latch
Note: For details, see “Combination of tablet and keyboard dock” on page 12.
Keyboard dock connector
Attaches the tablet to the dock keeping the tablet secured in place.
Connects the tablet to the keyboard dock.
7
Page 12
Chapter 1. Getting to know your computer
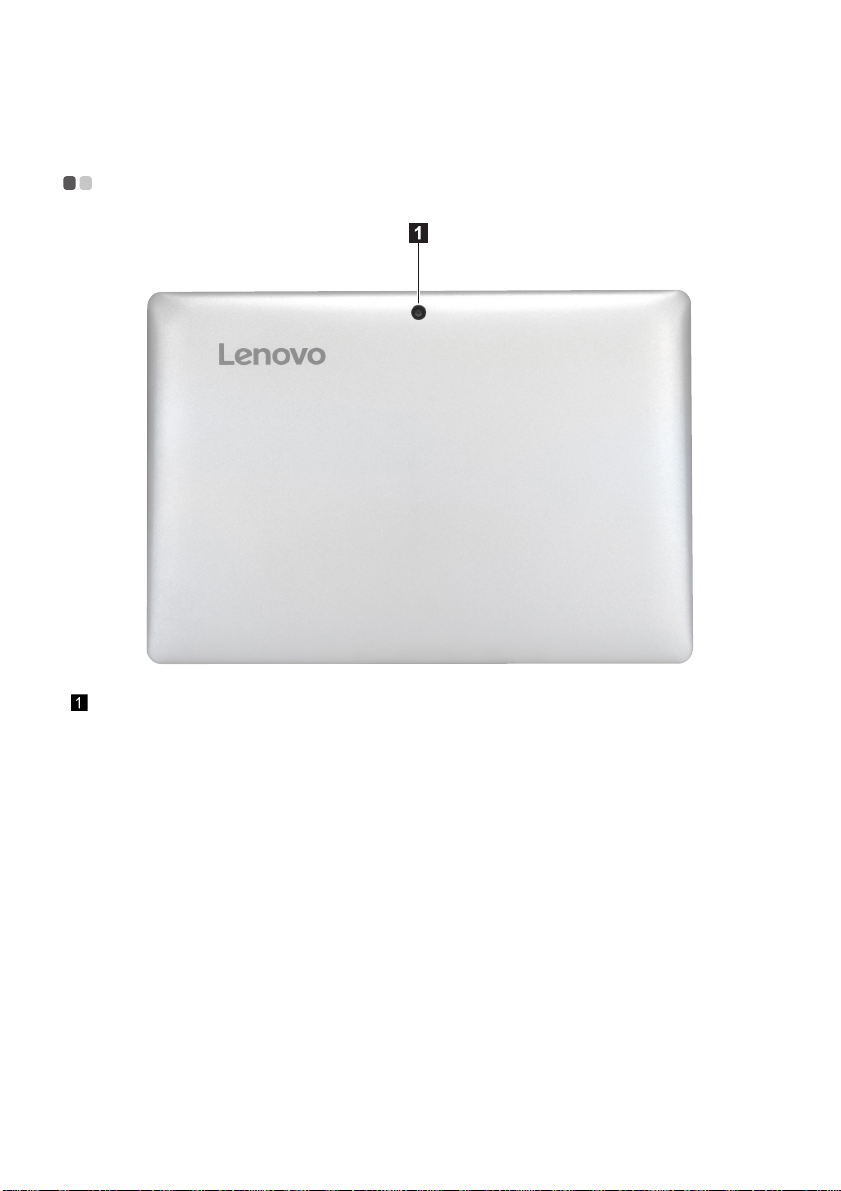
Rear view - - - - - - - - - - - - - - - - - - - - - - - - - - - - - - - - - - - - - - - - - - - - - - - - - - - - - - - - - - - - - - - - - - - - - - - - - - - - - - - - - - - - - - - - - - - - - - - - - - - - - - - - - - - - - - - - - - - - - - - -
Rear camera
Use the camera for video communication or taking photos.
8
Page 13
Chapter 1. Getting to know your computer
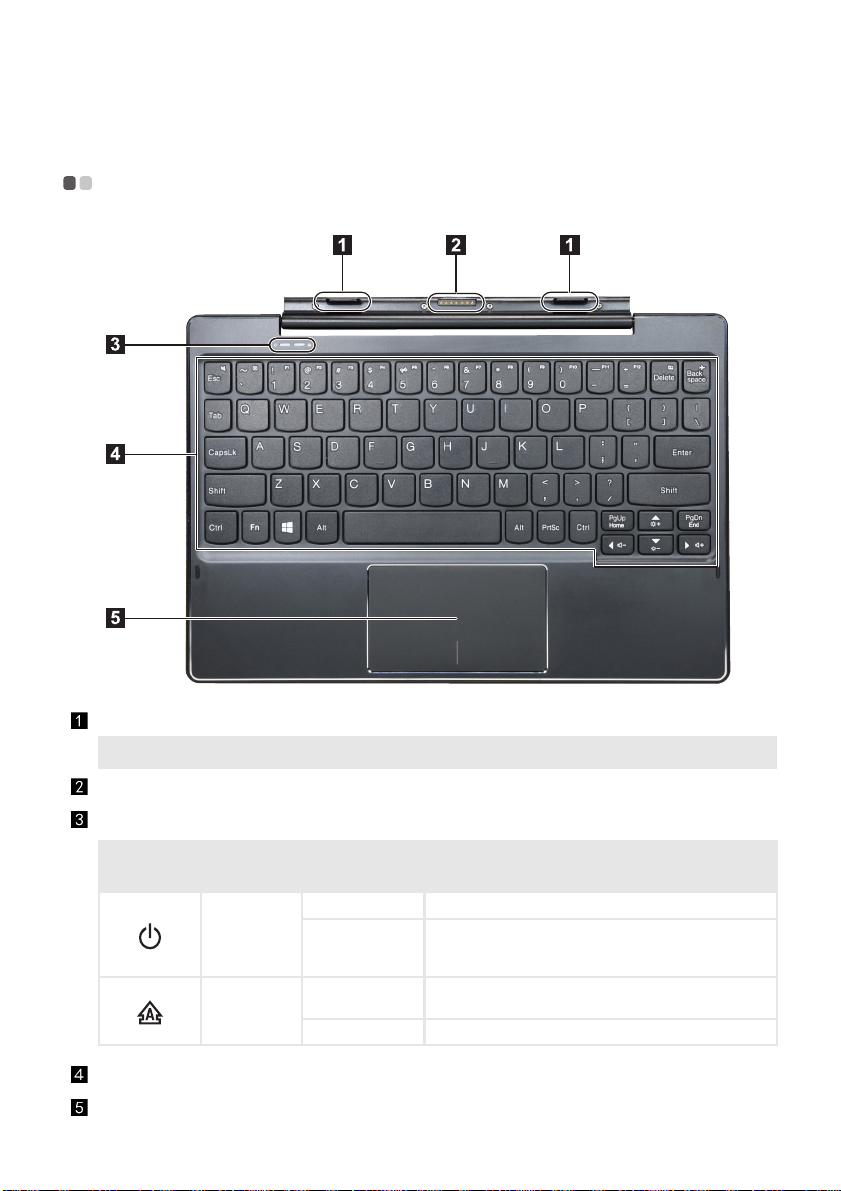
Keyboard dock top view - - - - - - - - - - - - - - - - - - - - - - - - - - - - - - - - - - - - - - - - - - - - - - - - - - - - - - - - - - - - - - - - - - - - - - - - - - - - - - - - - - - -
Tablet-keyboard dock latch
Note: For details, see “Combination of tablet and keyboard dock” on page 12.
Keyboard dock connector
Attaches the tablet to the dock keeping the tablet secured in place.
Connects the tablet to the keyboard dock.
System status indicators
Symbol Indicator
Power
Caps lock
Indicator
status
On (solid white) The computer is powered on.
Off
On (solid white)
Off Uppercase input mode is disabled.
• The computer is in sleep mode, or the display is off.
• The computer is powered off.
• The tablet is detached from the keyboard dock.
Uppercase input mode is ena
are uppercase by default.)
Meaning
Keyboard
Touchpad
9
bled. (All typed letters
Page 14
Chapter 1. Getting to know your computer
a
b
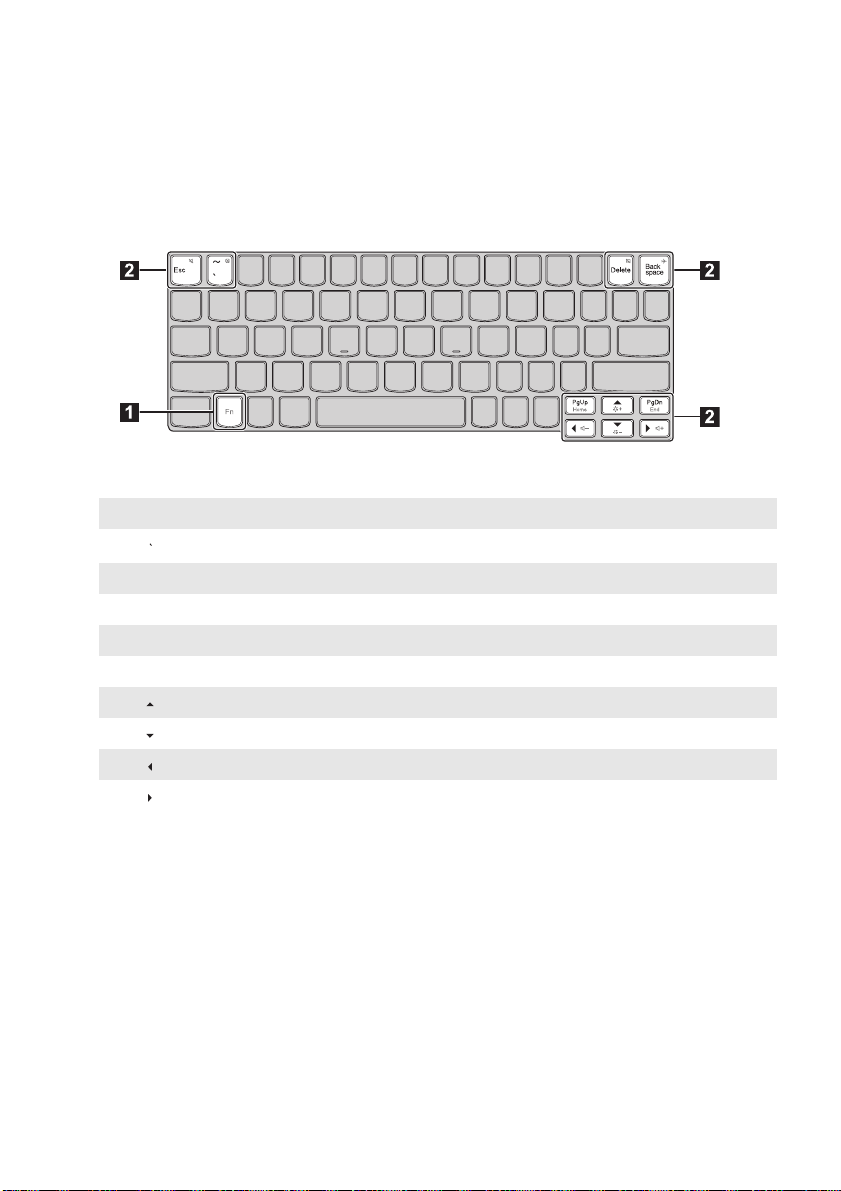
Function key combinations
Through the use of the function keys, you can change operational features instantly. To use this
function, press and hold Fn
Th
e following describes the features of each function key.
Fn + Esc: Mutes/unmutes the sound.
Fn + :
Fn + Delete: Enables/disables the touchpad.
Fn + Backspace:
Fn + PgUp: Activates the home key function.
Fn + PgDn:
Fn + : Increases the display brightness.
Fn +
:
Fn + : Decreases the volume level.
Fn + : In
; then
press one of the function keys
Closes the currently active window.
Enables/disables Airplane mode.
Activates the end key function.
Decreases the display brightness.
creases the volume level.
.
10
Page 15
Chapter 1. Getting to know your computer
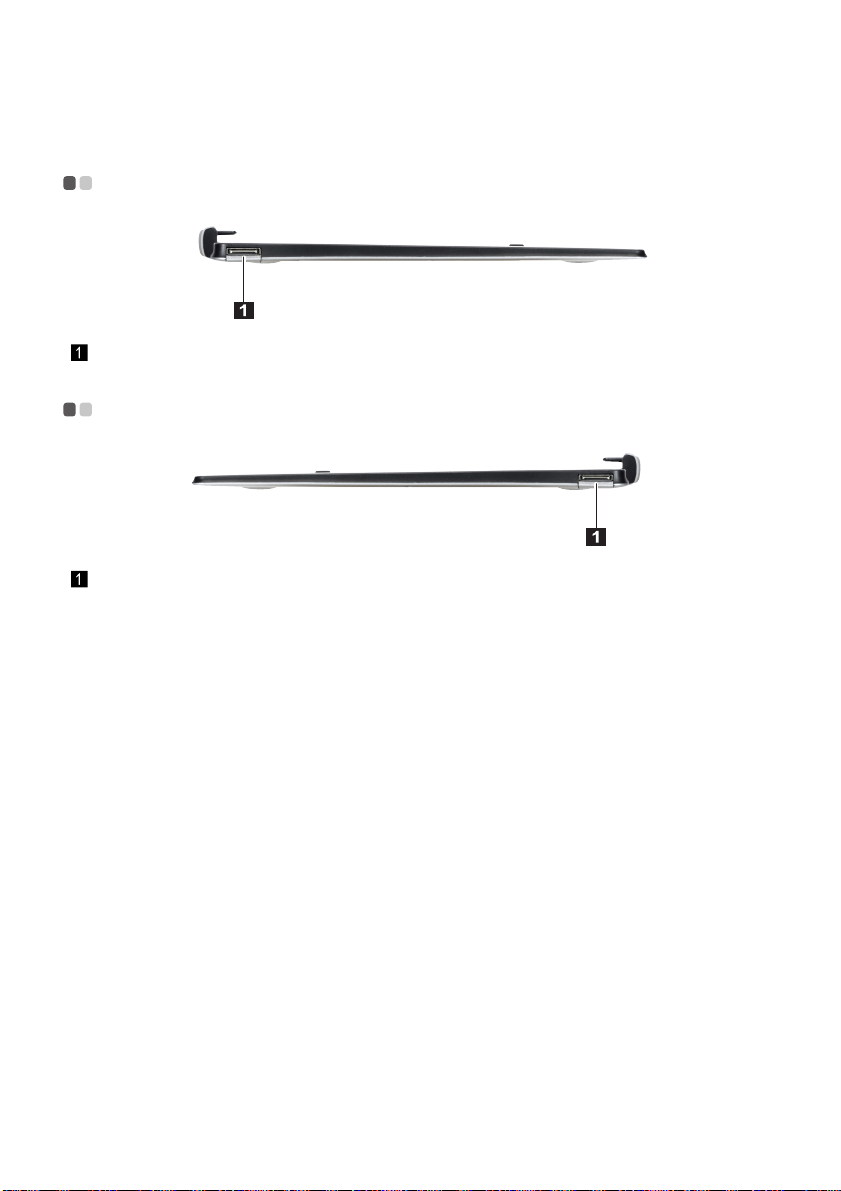
Keyboard dock left-side view - - - - - - - - - - - - - - - - - - - - - - - - - - - - - - - - - - - - - - - - - - - - - - - - - - - - - - - - - - - - - - - - - - - - - - -
USB 2.0 port
Connects to USB devices.
Keyboard dock right-side view - - - - - - - - - - - - - - - - - - - - - - - - - - - - - - - - - - - - - - - - - - - - - - - - - - - - - - - - - - - - - - - - - - - -
USB 2.0 port
Connects to USB devices.
11
Page 16
Chapter 1. Getting to know your computer
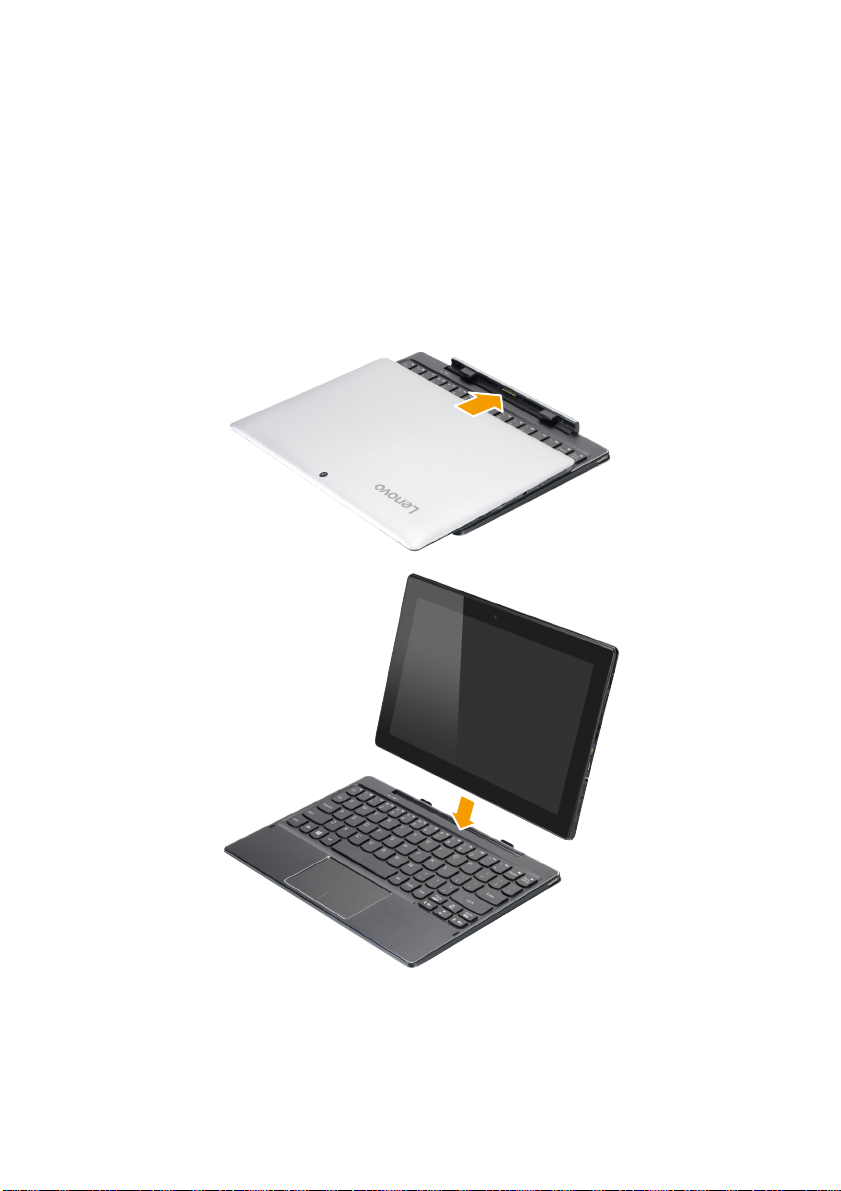
Combination of tablet and keyboard dock
The Lenovo ideapad MIIX 310-10ICR is not only a tablet. It can be combined with a keyboard
dock and used as a notebook computer.
Attaching the tablet
Align the connector of the keyboard dock with the tablet and then attach the tablet in the
direction shown by the arrow.
12
Page 17
Chapter 1. Getting to know your computer
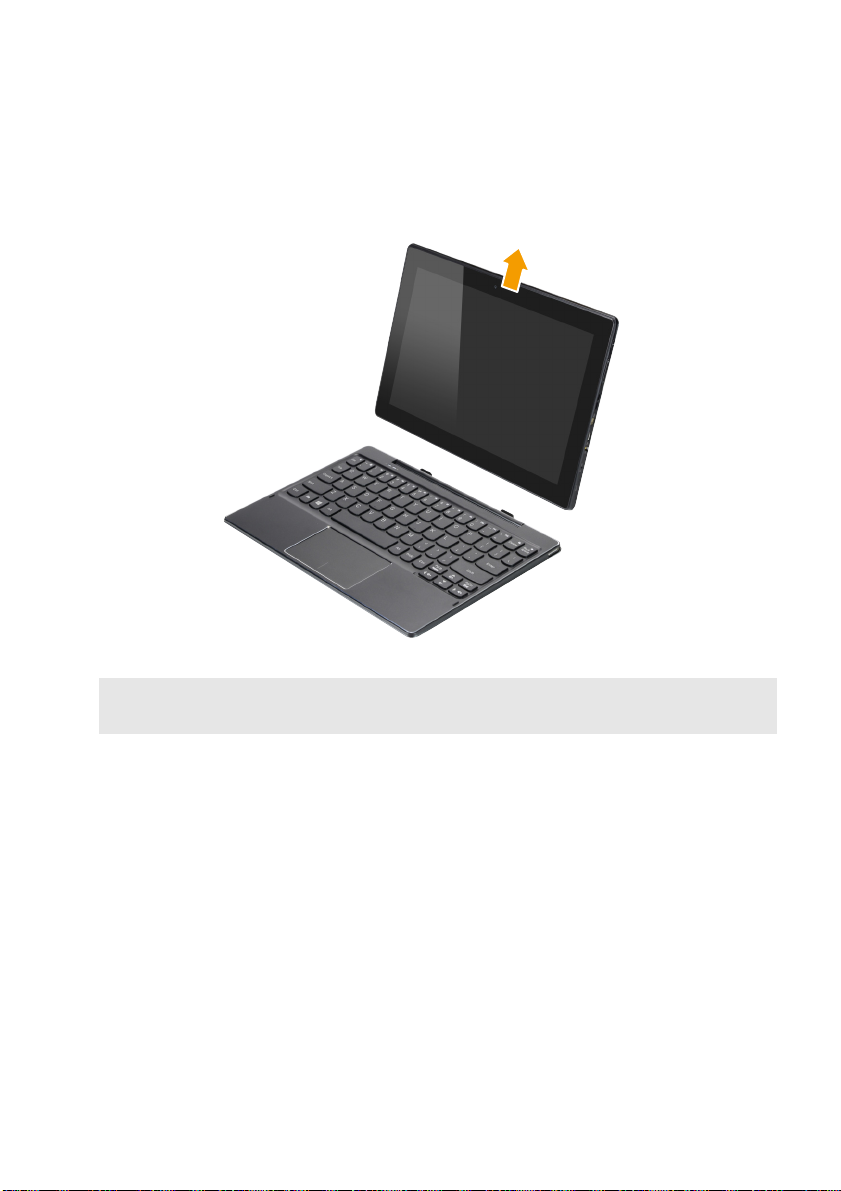
Detaching the tablet
Carefully detaching the tablet in the direction shown by the arrow.
Notes:
areful not to damage the connector when attaching or detaching the tablet.
• Be c
• The il
lustrations above are for reference only, please refer to the actual product.
13
Page 18
Chapter 2. Starting to use Windows 10
Configuring the operating system for the first time - - - - - - - - - - - - - - - - -
You may need to configure the operating system when it is first used.
The configuration process may include the procedures below:
• Accepting the end user license agreement
• Configuring the Internet connection
• Registering the operating system
• Creating a user account
Operating system interface - - - - - - - - - - - - - - - - - - - - - - - - - - - - - - - - - - - - - - - - - - - - - - - - - - - - - - - - - - - - - - - - - - - - - - - - - - - -
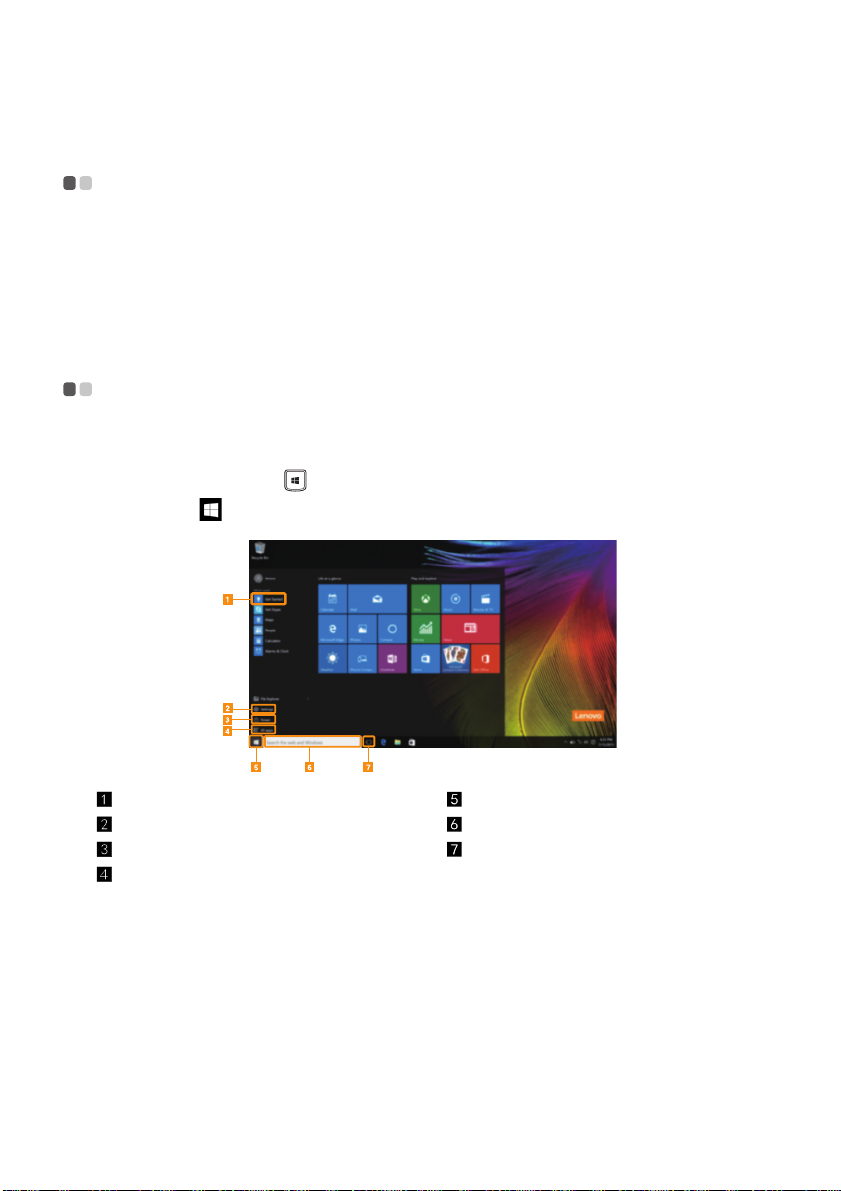
Windows 10 comes with a powerful and useful start menu.
To open the start menu, do one of the following:
• Press the Windows key on the keyboard.
• Select Start
on the lower-left corner of the desktop.
Get Started app
Settings button
Power button
All apps button
Start button
Search box
Task view button
14
Page 19
Chapter 2. Starting to use Windows 10
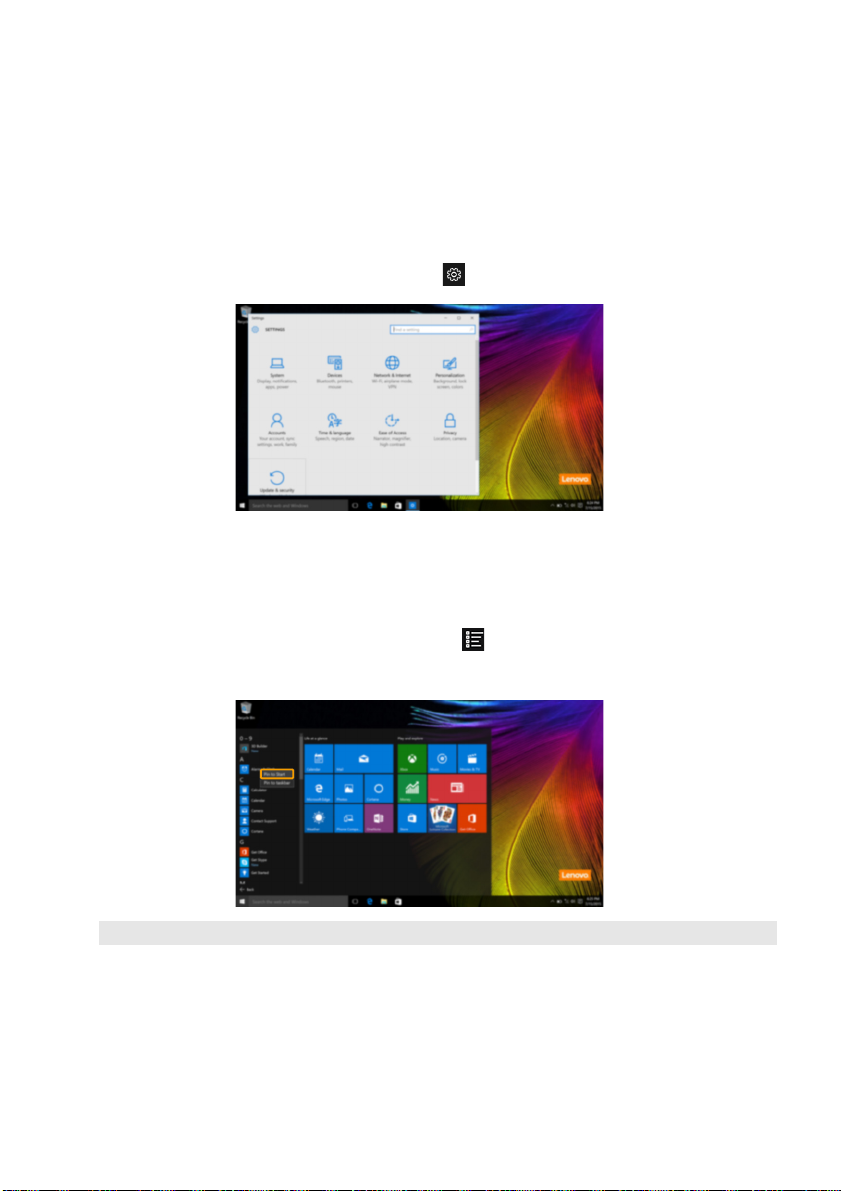
Settings
Settings lets you perform basic tasks. You can also search for more settings with the settings
search box in the upper-right corner.
To open the settings, do the following:
• Open the start menu, and then select Setti
ngs .
Personalize the start menu
You can personalize the start menu with your favorite apps.
To personalize the start menu, do the following:
1 Open the start menu, and then select All apps to display the apps list.
2 Right click the app you want to add to the start menu, and then select Pin to Start.
Note: You can also drag apps from the Most used or All apps columns to add them to the start menu.
15
Page 20
Chapter 2. Starting to use Windows 10
Putting the computer to sleep or shutting it down - - - - - - - - - - - - - - - - - - - -
When you have finished working with your computer, you can put it to sleep or shut it down.
Putting your computer to sleep
If you will be away from your computer for only a short time, put the computer to sleep.
When the computer is in sleep mode, you can quickly wake it to resume use, bypassing the
startup process.
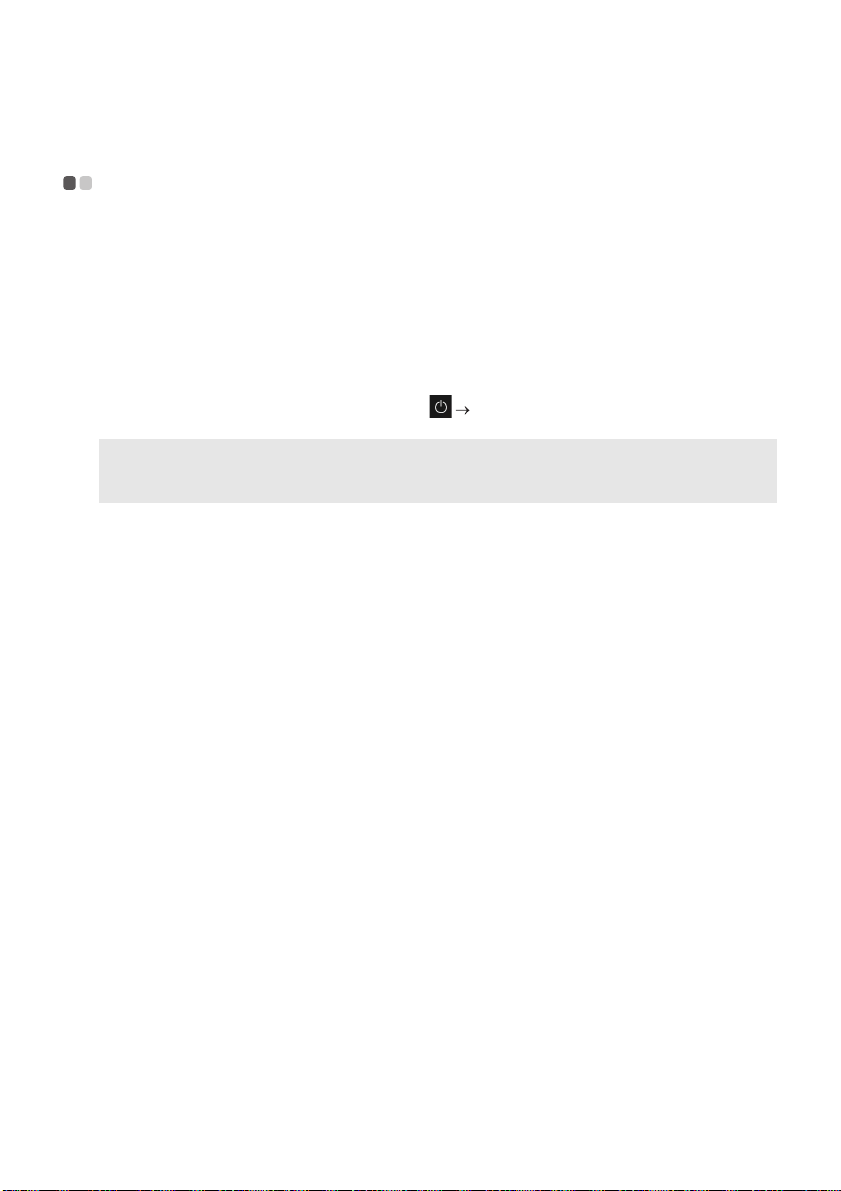
o put the computer to sleep, do one of the following:
T
• Press the Power button.
• Open the start menu, and then select Power
Note: Wait until the power indicator light starts blinking (indicating that the computer is in sleep mode)
before you move your computer. Moving your computer while the hard disk is spinning can damage
the hard disk, causing loss of data.
To
wake the computer, do one of the following:
• Press any key on the keyboard.
• Press the Power button.
Sleep.
16
Page 21
Chapter 2. Starting to use Windows 10
Shutting down the computer
If you are not going to use your computer for a long time, shut it down.
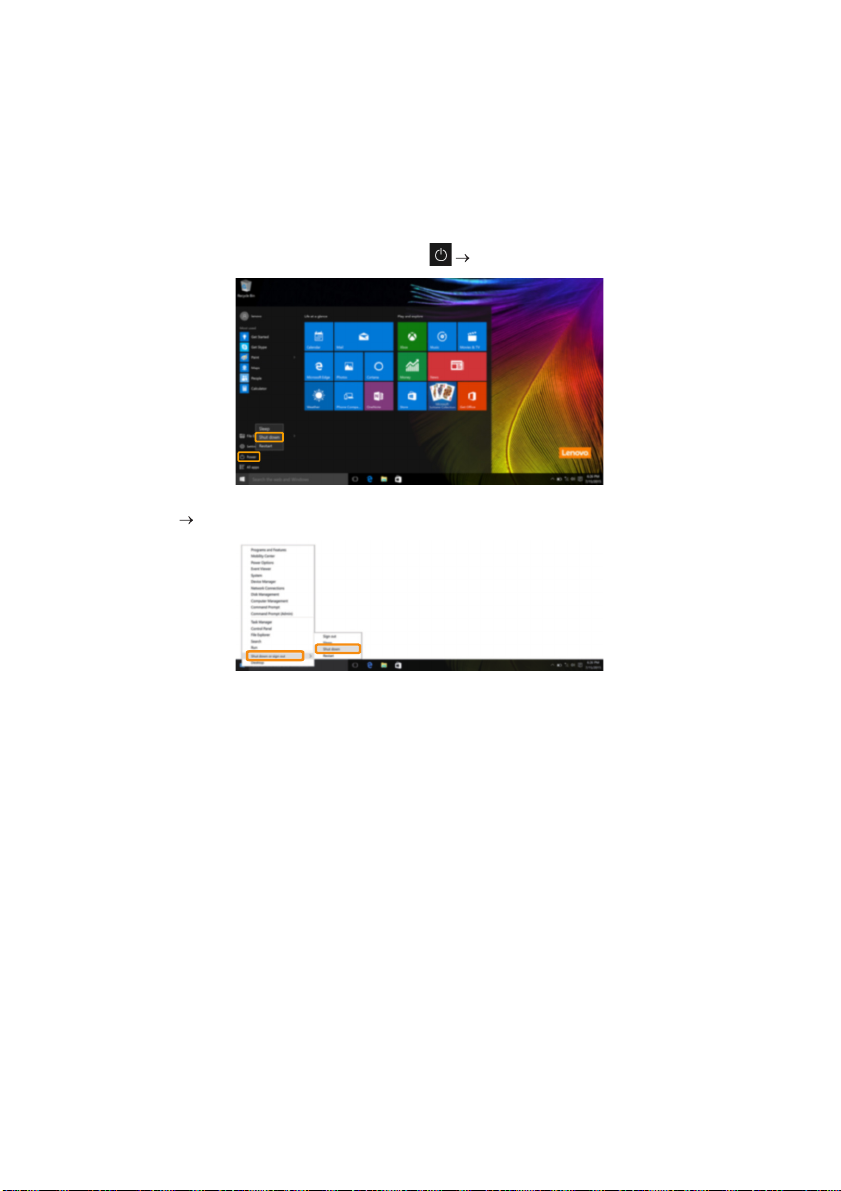
To shut down the computer, do one of the following:
r
• Open the start menu, and then select Powe
Shut down.
• Press and hold or right-click the Start button in the
sign out
Shut
down.
lower-left corner and select Shut down or
17
Page 22
Chapter 2. Starting to use Windows 10
Task and desktop management - - - - - - - - - - - - - - - - - - - - - - - - - - - - - - - - - - - - - - - - - - - - - - - - - - - - - - - - - - - - - - - - - - -
Task view
To open the task view, do one of the following:
• Select the Task view button on the task bar.
• Press the Windows key
• Swiping in from the left edge of the screen.
Virtual desktop management
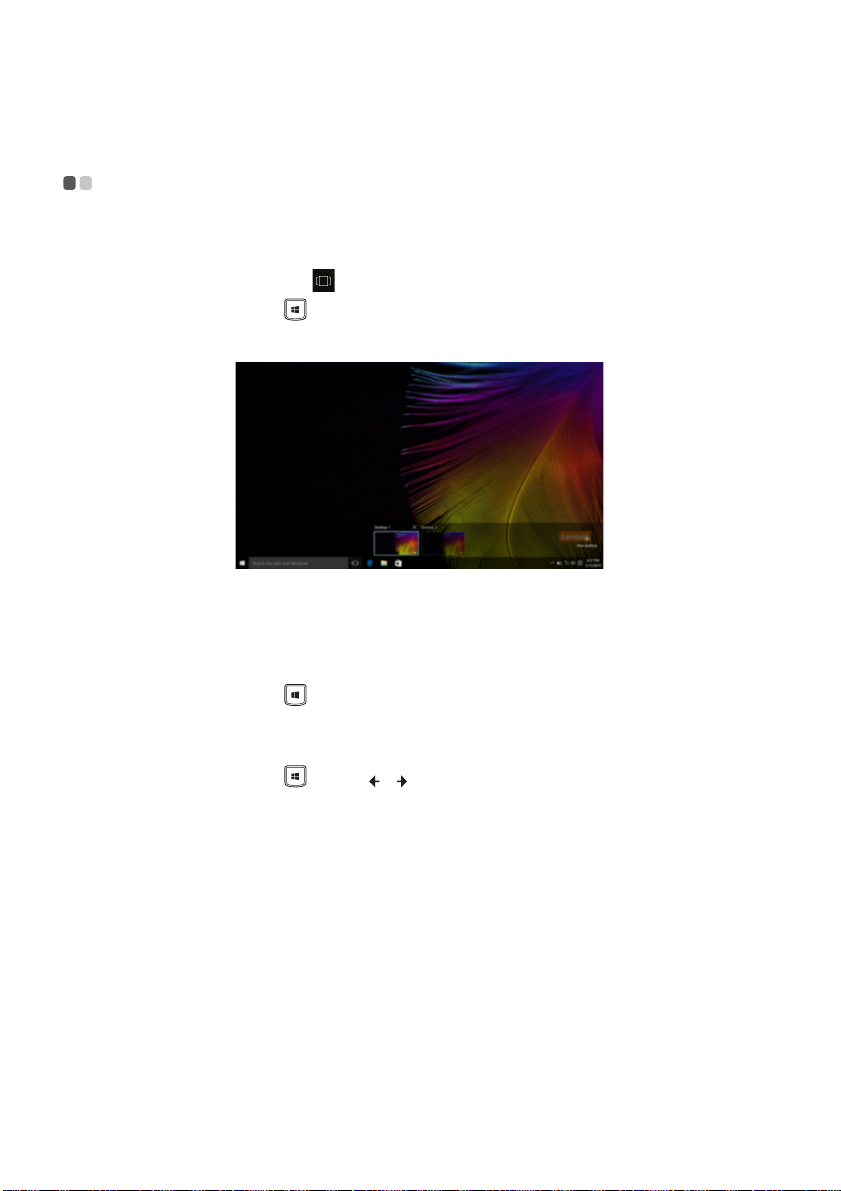
Windows 10 supports the ability to create, manage and switch between virtual desktops.
To create a new virtual desktop, do one of the following:
• Open the task view, and then select New desktop.
• Press the Windows key
To switch between different desktops, do one of the following:
• Open the task view and select the desktop you want active.
• Press the Windows key
+ Tab.
+ C
trl + D.
trl +
+ C
/ to sc
roll through the desktops you’ve created.
18
Page 23
Chapter 2. Starting to use Windows 10
Connecting to a wireless network - - - - - - - - - - - - - - - - - - - - - - - - - - - - - - - - - - - - - - - - - - - - - - - - - - - - - - - - - - - -
Enabling wireless connection
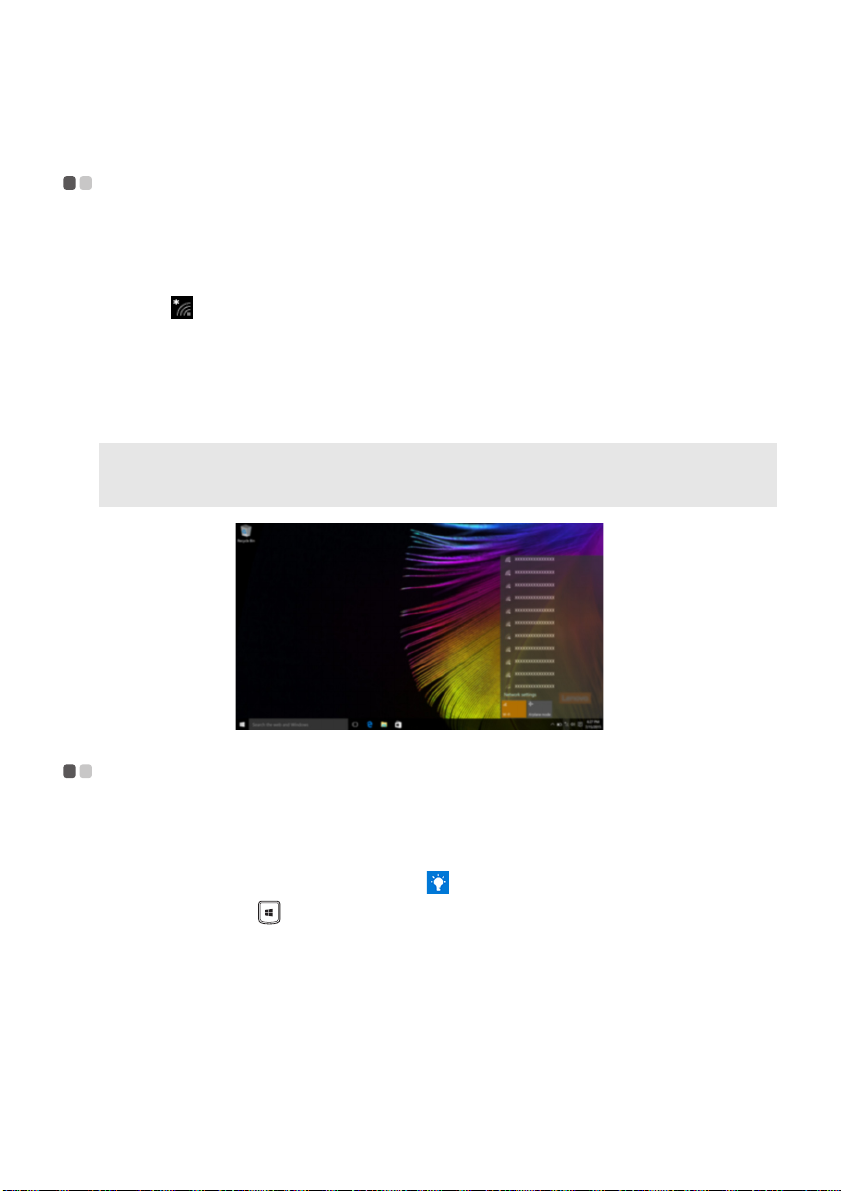
To enable wireless functions, do the following:
1 Press Fn + Backspace to disable airplane mode.
2 Click on the lower-right corner of the task bar to open the network configuration page.
Connecting to a wireless network
After wireless has been enabled, the computer will automatically scan for available wireless
networks and display them in the wireless network list. To connect to a wireless network, click
the network name in the list, and then click Connect.
Note: Some networks require a network security key or passphrase for connection. To connect to one of
those networks, ask the network administrator or the Internet service provider (ISP) for the security
key or passphrase.
Get Started app - - - - - - - - - - - - - - - - - - - - - - - - - - - - - - - - - - - - - - - - - - - - - - - - - - - - - - - - - - - - - - - - - - - - - - - - - - - - - - - - - - - - - - - - - - - - - - - - - - - - - - - - -
Windows 10 also provides the Get Started app to explain the new features of Windows 10. You
can find it on the start menu.
To open the Get Started app, do one of the following:
• Open the start menu and select Get Sta
• Press Windows key + Fn + F1 (depending on your keyboard layout).
rted .
19
Page 24
Chapter 2. Starting to use Windows 10
Touch screen operation - - - - - - - - - - - - - - - - - - - - - - - - - - - - - - - - - - - - - - - - - - - - - - - - - - - - - - - - - - - - - - - - - - - - - - - - - - - - - - - - - - - - -
The display panel can accept inputs like a tablet, using the multi-touch screen, or like a
traditional notebook computer, using the keyboard and touchpad.
Multi-touch gestures
You can touch the screen with one or more fingertips to perform a variety of tasks.
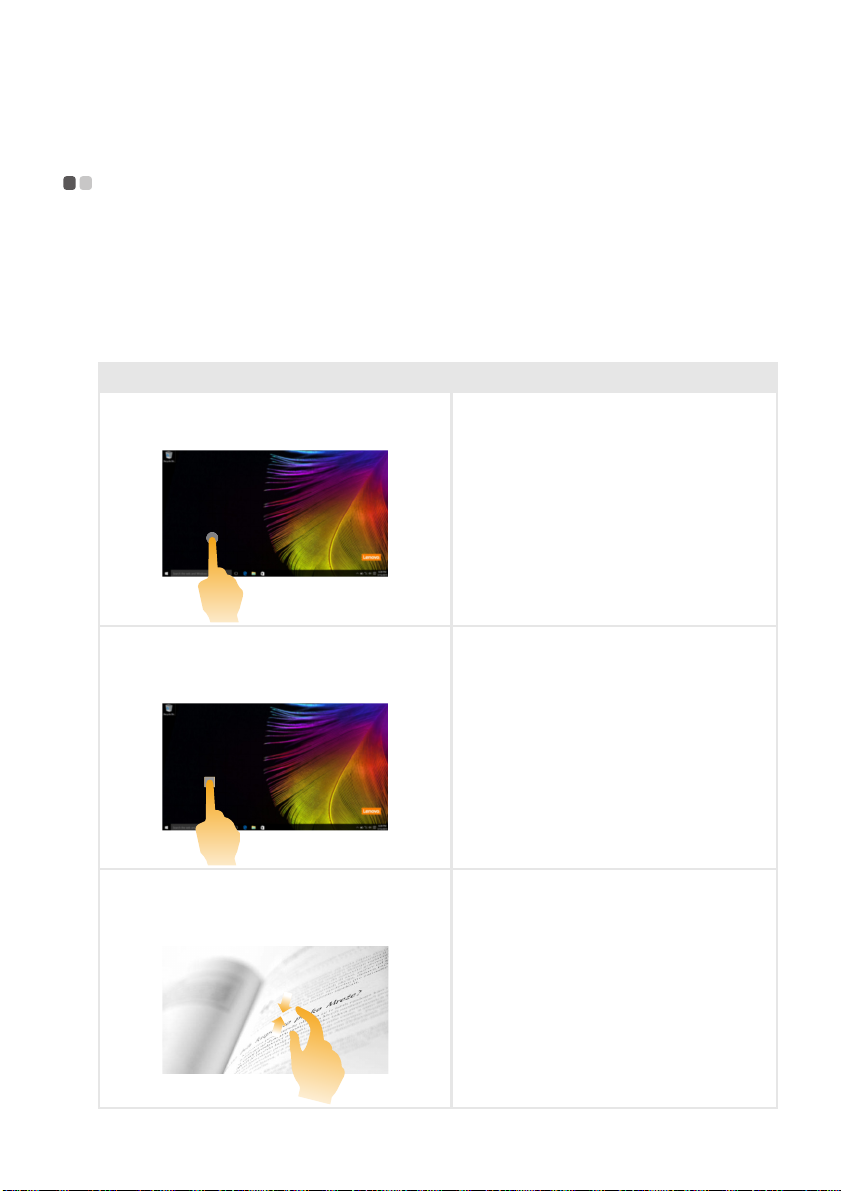
Frequently used gestures Tasks performed
Tap
Tap once on an item.
Performs an action, such as starting an app,
opening a link, or performing a command.
Similar to left-clicking with a mouse.
Press and hold
Press your finger down and leave it there for a
moment.
Enables you to see detailed information
before selecting an action. Can also open a
menu with more options. Similar to rightclicking with a mouse.
Zoom
Move two fingers together or apart while
touching the screen.
Zooms in and out on visual apps, such as
pictures and maps. Can also jump to the
beginning or end of a list.
20
Page 25
(continued)
Frequently used gestures Tasks performed
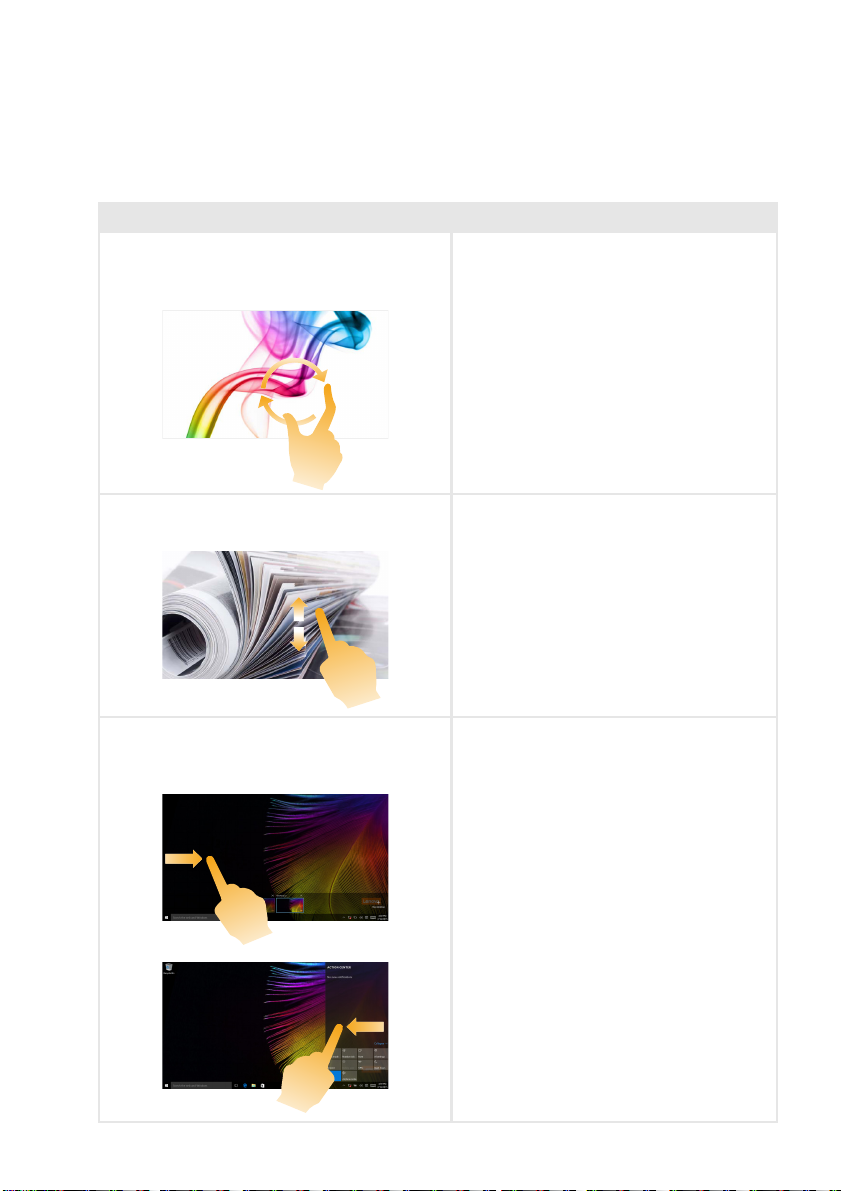
Rotate
Place two or more fingers on an item and then
turn your hand.
Slide
Drag your finger across the screen.
Chapter 2. Starting to use Windows 10
Rotates an object (Note: Not all items can be
rotated, depending upon the app.).
Pans or scrolls through lists and pages. Can
also move an object or be used to draw or
write, depending upon the app. Similar to
pressing and holding to pan and to
scrolling with a mouse.
Swipe
Start from left/right edge of the screen, then
swipe inwards toward the center.
Swiping in from the left edge of the screen
can open the task view.
Swiping in from the right edge of the screen
splays the action center.
di
21
Page 26

Chapter 3. Recovery system
Introduction
Push-button reset is a built-in recovery tool that enables users to restore their operating system
to its original state. This preserves their data and important customizations, without the need to
back up their data in advance.
set fea
The following Push-button re
within Windows:
Refreshing the computer
Fixes software problems by reinstalling the factory default configuration. This preserves the
user’s data, important settings, and any Windows Store apps previously purchased from the
Windows Store.
Resetting the computer
Prepares the computer for recycling or transfer of ownership. This reinstalls the factory default
configuration and returns all user data and applications to the state of their original Out-of-Box
Experience (OOBE).
Using Push-button reset
Push-button reset can be launched using one of the following methods:
• Power button + Volume up button:
- Shut down the computer and wait at least five seconds.
- Press and hold the volume up button and then
Menu appears on the screen.
•Settings:
ttings
- Se
For more instructions, see the Windows Help and Support file on your computer.
Update & security Recovery Advanced startup select Restart now.
tures are available to users from multiple locations
press the Power button, until the Novo
When I purchased my computer, it included a copy of Windows. How can I determine whether the
o
py of Windows is preinstalled by Lenovo?
c
,
On the outside of the sales package of your computer
configuration information for your computer. Check the printed string next to OS. If it contains
Windows or WIN, the copy of Windows was preinstalled by Lenovo.
What is the Recovery Partition?
If your computer is preinstalled with any version of Windows 10, the storage device of your
uter
comp
Windows operating system. In cases of system failure, you can use the Lenovo OneKey Recovery
system or the Windows Reset feature to restore the operating system to its factory status.
Note: The Recovery Partition is not assigned a drive letter and cannot be accessed through Windows File
contains a Recovery Partition. This partition contains the image file of the preinstalled
Explorer.
you should find a label containing
22
Page 27

Chapter 3. Recovery system
I uninstalled a preinstalled software, but there is no significant increase in the free drive space.
The copy of Windows running on your computer may be WIMBoot-enabled. For computers
with WIMBoot-enabled Windows, the majority of files needed for preinstalled software are
installed on the Recovery Partition and won’t be deleted through normal uninstallation.
What happens if I attempt to delete or modify the Recovery Partition?
Attention:
• Do not delete or modify the Recovery Partition on a WIMBoot-enabled computer.
If the Recovery Partition is deleted or modified, you may not be able to restore Windows to the
factory status. For computer models on which WIMBoot is enabled, deleting the Recovery
Partition may cause Windows to fail to start.
How can I determine whether the Windows running on my computer is WIMBoot enabled?
WIMBoot technology is normally enabled on copies of Windows 10 Update running on SSD
(or eMMC) -only computer models. To check your computer,
1 On the start menu, click the Search box.
2 Make sure Settings is selected as the search scope and type Disk Management in the
search box.
3 Click the search result and the Disk Management program starts.
If Wim Boot is labeled on the Windows partition, WIMBoot is enabled on your copy of Windows.
23
Page 28

Chapter 4. Troubleshooting
Frequently asked questions - - - - - - - - - - - - - - - - - - - - - - - - - - - - - - - - - - - - - - - - - - - - - - - - - - - - - - - - - - - - - - - - - - - - - - - - - - -
This section lists frequently asked questions by category.
Finding information
What safety precautions should I follow when using my computer?
The Lenovo Sa
precautions for using your computer. Read and follow all precautions during use.
Where can I find the hardware spec
You can find hardware specifications for your computer
your computer.
Where can I find warranty information?
For detailed warranty information on this machine, please visit below website to check out:
support.lenovo.com/warrantystatus.
Drivers
Where can I find drivers for the various hardware devices of my computer?
You can download the latest device drivers from the Lenovo consumer support website.
Getting help
fety and General Information Guide which came with your computer contains safety
ifications for my computer?
on the printed flyers which came with
How can I contact the customer support center?
See “Chapter 3. Getting help and service” in the Lenovo S
24
afety and General Information Guide.
Page 29

Chapter 4. Troubleshooting
Troubleshooting - - - - - - - - - - - - - - - - - - - - - - - - - - - - - - - - - - - - - - - - - - - - - - - - - - - - - - - - - - - - - - - - - - - - - - - - - - - - - - - - - - - - - - - - - - - - - - - - - - - - - - -
If you do not find your problem here, see Chapter 1. The following section only describes
problems that might negate the need to refer to the more comprehensive information in Chapter 1.
Display problems
When I turn on the
computer, nothing appears
on the screen.
screen is blank, make sure that:
• If the
- The AC power adapter is connected to the computer and
the
power cord is plugged into a working electrical outlet.
- The computer power is on. Press and hold the Power
bu
on for about three seconds for confirmation.
tt
- Press and hold the Power button for about ten seconds to
for
e shut down the computer. Then press the Power button
c
for about three seconds to restart.
• If these items are set correctly and the screen remains blank,
ave the computer serviced.
h
The screen goes blank
while the computer is on.
our power management is enabled. Do one of the following
• Y
to r
esume from sleep mode:
- Press any key on the keyboard.
-Press the Power button.
Sleep problems
The critical low-battery
error message appears,
• The batte
adapter to the computer.
and the computer
immediately turns off.
The computer enters sleep
mode immediately after
Power
-on.
Note: If the battery is charged and the temperature is within range, do the following:
Press the Power button for about three seconds to turn on the computer.
Press and hold the Power button for about ten seconds to force shut down.
Press the Power button for about three seconds again to r
Push-button reset recovery system.
If the problem persists, have the computer serviced.
• Make sur
- The battery is charged.
- The operating temperature is within the acceptable range.
ry power is getting low. Connect the AC power
e that:
See “Chapter
2. Use and care Information” in the Lenovo
Safety and General Information Guide.
estart. Then reset the computer with the
25
Page 30

Chapter 4. Troubleshooting
The computer does not
return fro
m sleep mode
and the computer does
not work.
the computer does not return from sleep mode, it might be
• If
because the battery is depleted.
ur computer is in sleep mode, connect the AC power
• If yo
adapter to th
e computer. Then press the Power button.
• If your computer is powered-off, connect the AC power
adapter to th
e computer. Then press the Power button to
resume operation.
Note: If the system still does not return from sleep mode, your system has stopped responding, and you
cannot turn off the computer; force shut down the computer (Unsaved data may be lost). To force shut
down the computer, press and hold the Power button for about ten seconds or more. If the computer
still does not turn off, remove the AC power adapter.
Display panel problems
The screen is blank. • Do the following:
- If you are using the AC power adapter or the battery, press
(located on the keyboard) to make the screen brighter.
Fn +
- Press the Power button to confirm if the computer is in
ode.
sleep m
- If the problem persists, follow the solution in the next
oblem “The screen is unreadable or distorted.”
pr
The screen is unreadable
distorte
or
d.
Incorrect characters
appear on the screen.
• Make sure that the screen resolution and color quality are
correctly set.
• Is the operating system or programs installed correctly?
are installed and configured correctly, do the following:
If they
Press the Power button for about three seconds to turn on
th
e computer.
Press and hold the Power button for about ten seconds to
rce shut down.
fo
Press the Power button for about three seconds again to
estart. Then reset the computer with the Push-button
r
reset recovery system.
If the problem persists, have the computer serviced.
Sound problems
No sound can be heard
from the speakers even
when the volume is
turned up.
• Make sur
e that:
- The Mute function is off.
- The combo audio jack is not being used.
- Speakers are selected as the playback device.
26
Page 31

Battery problems
Chapter 4. Troubleshooting
Your computer shuts down
before the battery status
icon shows it is empty.
-or-
Your computer operates
after the battery status
icon shows it is empty.
A startup problem
The Microsoft® Windows
operating system does
not start.
Recovery System problems
Failure to restore system
partition to factory default.
Other problems
Your computer does not
respond.
• Recharge the battery.
• For details, see “Recovery system” on page 22.
• The system partition (e.g. the partition size or the drive
capacity of C) has been modified.
• To turn off your computer, press and hold the Power button
for about ten seconds or more. If the computer still does not
respond, remove the AC power adapter.
27
Page 32

Trademarks
The following terms are trademarks or registered trademarks of Lenovo in the United States,
other countries, or both.
Lenovo
ideapad
Microsoft and Windows are trademarks of Microsoft Corporation in the United States, other
countries, or both.
28
Page 33

en-US
Rev. RP01
©Lenovo China 2016
 Loading...