

Page 1
LS2221
Page 2

ii
Contents
Safety information . . . . . . . . . . . . . . . . . . . . . . . . . . . . . . . . . . . . . . . . . . . . . . . . . . . . . . . . . . . . . iii
Chapter1. Getting started . . . . . . . . . . . . . . . . . . . . . . . . . . . . . . . . . . . . . . . . . . . . . . . . . . . . . .1-1
Shipping contents . . . . . . . . . . . . . . . . . . . . . . . . . . . . . . . . . . . . . . . . . . . . . . . . . . . . . . . . . . . . . . . . . . . . . . . . . . . . . . . . . . . . . . . 1-1
Attaching the base and handling your monitor . . . . . . . . . . . . . . . . . . . . . . . . . . . . . . . . . . . . . . . . . . . . . . . . . . . . . . . . . . . . . . 1-1
Product overview . . . . . . . . . . . . . .. . . . . . . . . . . . . . . . . . . . . . . . . . . . . . . . . . . . . . . . . . . . . . . . . . . . . . . . . . . . . . . . . . . . . . . . . 1-2
Adjusting the tilt . . . . . . . . . . . . . . . . . . . . . . . . . . . . . . . . . . . . . . . . . . . . . . . . . . . . . . . . . . . . . . . . . . . . . . . . . . . . . . . . . . . . .1-2
Monitor controls . . . . . . . . . . . . . . . . . . . . . . . . . . . . . . . . . . . . . . . . . . . . . . . . . . . . . . . . . . . . . . . . . . . . . . . . . . . . . . . . . . . . . . 1-2
Cable lock slot . . . . . . . . . . . . . . . . . . . . . . . . . . . . . . . . . . . . . . . . . . . . . . . . . . . . . . . . . . . . . . . . . . . . . . . . . . . . . . . . . . . . . . . 1-3
Setting up your monitor . . . . . . . . . . . . . . . . . . . . . . . . . . . . . . . . . . . . . . . . . . . . . . . . . . . . . . . . . . . . . . . . . . . . . . . . . . . . . . . . . . 1-3
Connecting and turning on your monitor . . . . . . . . . . . . . . . . . . . . . . . . . . . . . . . . . . . . . . . . . . . . . . . . . . . . . . . . . . . . . . . . 1-3
Chapter 2. Adjusting and using your monitor . . . . . . . . . . . . . . . . . . . . . . . . . . . . . . . . . . . . . 2-1
Comfort and accessibility . . . . . . . . . . . . . . . . . . . . . . . . . . . . . . . . . . . . . . . . . . . . . . . . . . . . . . . . . . . . . . . . . . . . . . . . . . . . . . . . 2-1
Arranging your work area . . . . . . . . . . . . . . . . . . . . . . . . . . . . . . . . . . . . . . . . . . . . . . . . . . . . . . . . . . . . . . . . . . . . . . . . . . . . . 2-1
Positioning your monitor . . . . . . . . . . . . . . . . . . . . . . . . . . . . . . . . . . . . . . . . . . . . . . . . . . . . . . . . . . . . . . . . . . . . . . . . . . . . . . . 2-1
Quick tips for healthy work habits . . . . . . . . . . . . . . . . . . . . . . . . . . . . . . . . . . . . . . . . . . . . . . . . . . . . . . . . .
Adjusting your monitor image . . . . . . . . . . . . . . . . . . . . . . . . . . . . . . . . . . . . . . . . . . . . . . . . . . . . . . . . . . . . . . . . . . . . . . . . . . . . 2-3
Using the direct access controls . . . . . . . . . . . . . . . . . . . . . . . . . . . . . . . . . . . . . . . . . . . . . . . . . . . . . . . . . . . . . . . . . . . . . . . . . 2-3
Using the On-Screen Display (OSD) controls . . . . . . . . . . . . . . . . . . . . . . . . . . . . . . . . . . . . . . . . . . . . . . . . . . . . . . . . . . . . . 2-4
Selecting a supported display mode . . . . . . . . . . . . . . . . . . . . . . . . . . . . . . . . . . . . . . . . . . . . . . . . . . . . . . . . . . . . . . . . . . . . . . . 2-7
Understanding power management . . . . . . . . . . . . . . . . . . . . . . . . . . . . . . . . . . . . . . . . . . . . . . . . . . . . . . . . . . . . . . . . . . . . . . . 2-8
Caring for your monitor . . . . . . . . . . . . . . . . . . . . . . . . . . . . . . . . . . . . . . . . . . . . . . . . . . . . . . . . . . . . . . . . . . . . . . . . . . . . . . . . . 2-9
Detaching the monitor stand . . . . . . . . . . . . . . . . . . . . . . . . . . . . . . . . . . . . . . . . . . . . . . . . . . . . . . . . . . . . . . . . . . . . . . . . . . . . . . 2-9
. . . . . . . . . . . . . 2-2
Chapter 3. Reference information . . . . . . . . . . . . . . . . . . . . . . . . . . . . . . . . . . . . . . . . . . . . . . .3-1
Monitor specifications . . . . . . . . . . . . . . . . . . . . . . . . . . . . . . . . . . . . . . . . . . . . . . . . . . . . . . . . . . . . . . . . . . . . . . . . . . . . . . . . . . . . 3-1
Troubleshooting . . . . . . . . . . . . . . . . . . . . . . . . . . . . . . . . . . . . . . . . . . . . . . . . . . . . . . . . . . . . . . . . . . . . . . . . . . . . . . . . . . . . . . . . . 3-3
Manual image setup. . . . . . . . . . . . . . . . . . . . . . . . . . . . . . . . . . . . . . . . . . . . . . . . . . . . . . . . . . . . . . . . . . . . . . . . . . . . . . . . . . . 3-4
Manually installing the monitor driver. . . . . . . . . . . . . . . . . . . . . . . . . . . . . . . . . . . . . . . . . . . . . . . . . . . . . . . . . . . . . . . . . . . 3-5
Installing the monitor driver in Windows 7 . . . . . . . . . . . . . . . . . . . . . . . . . . . . . . . . . . . . . . . . . . . . . . . . . . . . . . . . . . .. 3-5
Installing the monitor driver in Windows Vista . . . . . . . . . . . . . . . . . . . . . . . . . . . . . . . . . . . . . . . . . . . . . . . . . . . . . . . . ..3-6
Installing the monitor driver in Windows XP . . . . . . . . . . . . . . . . . . . . . . . . . . . . . . . . . . . . . . . . . . . . . . . . .. . . . . . . . . . . 3-7
Appendix A. Service and Support . . . . . . . . . . . . . . . . . . . . . . . . . . . . . . . . . . . . . . . . . . . . . . A-1
Telephone technical support . . . . . . . . . . . . . . . . . . . . . . . . . . . . . . . . . . . . . . . . . . . . . . . . . . . . . . . . . . . . . . . . . . . . . . . . . . . . . .A-1
Appendix B. Notices . . . . . . . . . . . . . . . . . . . . . . . . . . . . . . . . . . . . . . . . . . . . . . . . . . . . . . . . . B-1
Recycling information . . . . . . . . . . . . . . . . . . . . . . . . . . . . . . . . . . . . . . . . . . . . . . . . . . . . . . . . . . . . . . . . . . . . . . . . . . . . . . . . . . B-2
Trademarks . . . . . . . . . . . . . . . . . . . . . . . . . . . . . . . . . . . . . . . . . . . . . . . . . . . . . . . . . . . . . . . . . . . . . . . . . . . . . . . . . . . . . . . . . . . . . B-2
Contents
Page 3

iii
Before installing this product, read the Safety information.
DANGER
To avoid shock hazard:
Do not remove the covers.
v
v
Do not operate this product unless the stand is attached.
v Do not connect or disconnect this product during an electrical storm.
v
The power cord plug must be connected to a properly wired and
grounded power outlet.
Any equipment to which this product will be attached must also be
v
connected to properly wired and grounded power outlets.
v
To isolate the monitor from the electrical supply, you must remove
the plug from the power outlet. The power outlet should be easily
accessible.
Handling:
If your monitor weighs more than 18 kg (39.68 lb), it is
v
recommended that it be moved or lifted by two people.
Product Disposal (TFT Monitors):
v
The fluorescent lamp in the liquid crystal display contains mercury;
dispose according to local, state, or federal laws.
The following are safety instruction:
While using VESA mount application, the AC Inlet must face to down side.
v
Do not face any other position.
Lenovo suggests that standard power line provided by Lenovo should be used
otherwise, Lenovo bears no liability for any problem resulting from the use of
the
power line of other manufacturers.
Safety information
Page 4
Chapter 1. Getting started
This User’s Guide contains detailed information on your LCD Monitor. For a
quick overview, please see the Setup Poster that was shipped with your monitor.
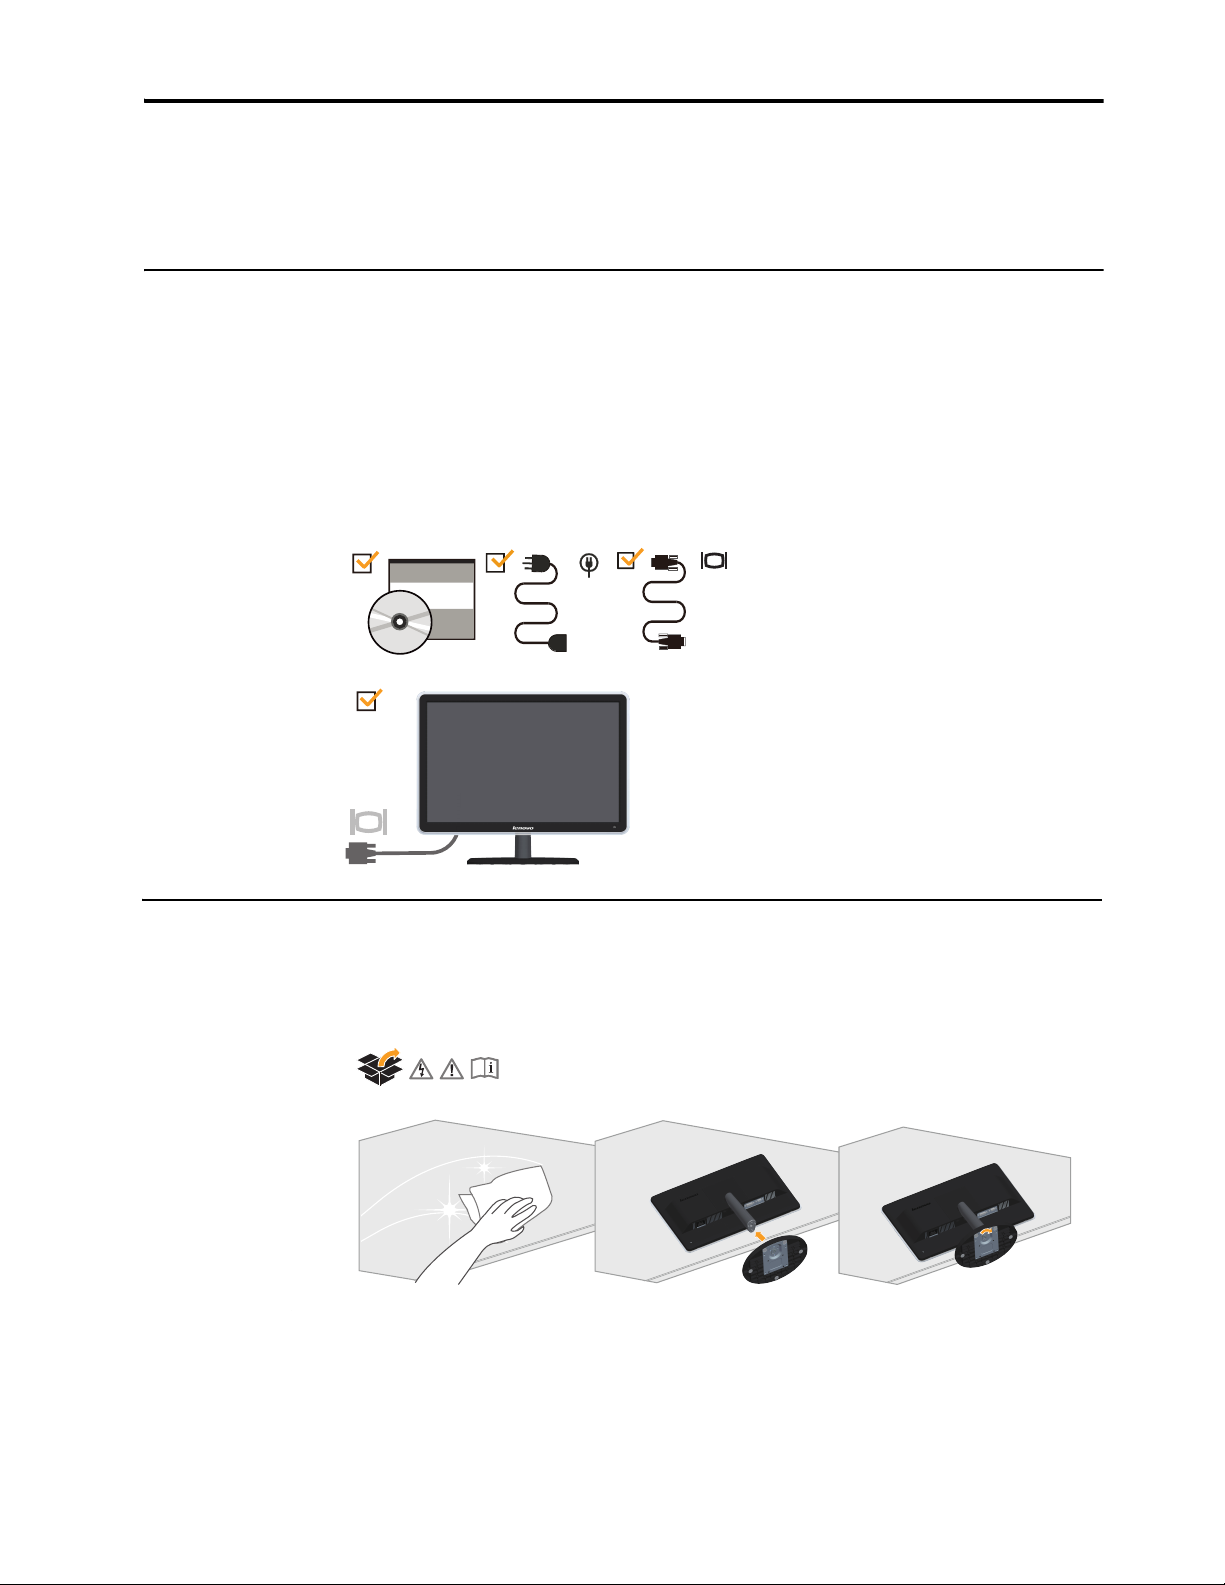
Shipping contents
The product package should include the following items:
• Quick Start and Safety Poster
• Reference and Driver CD
• LCD Monitor
• Power Cord
• Analog Interface Cable
Attaching the base and handling your monitor
To set up your monitor, please see the illustrations below.
Note: Do not touch the monitor within the screen area. The screen area is glass and
can be damaged by rough handling or excessive pressure.
1.Carefully lays the monitor on a flat surface.
2.Assemble the base with the monitor's stand.
3.Tighten the screws clockwise at the bottom of the base.
Note:To attach a VESA mount, please see
"Detaching the monitor stand" on page 2-9.
© Copyright Lenovo 2011. © Chapter 1. 1-1
Page 5
Product overview
This section will provide information on adjusting monitor positions, setting user
controls.
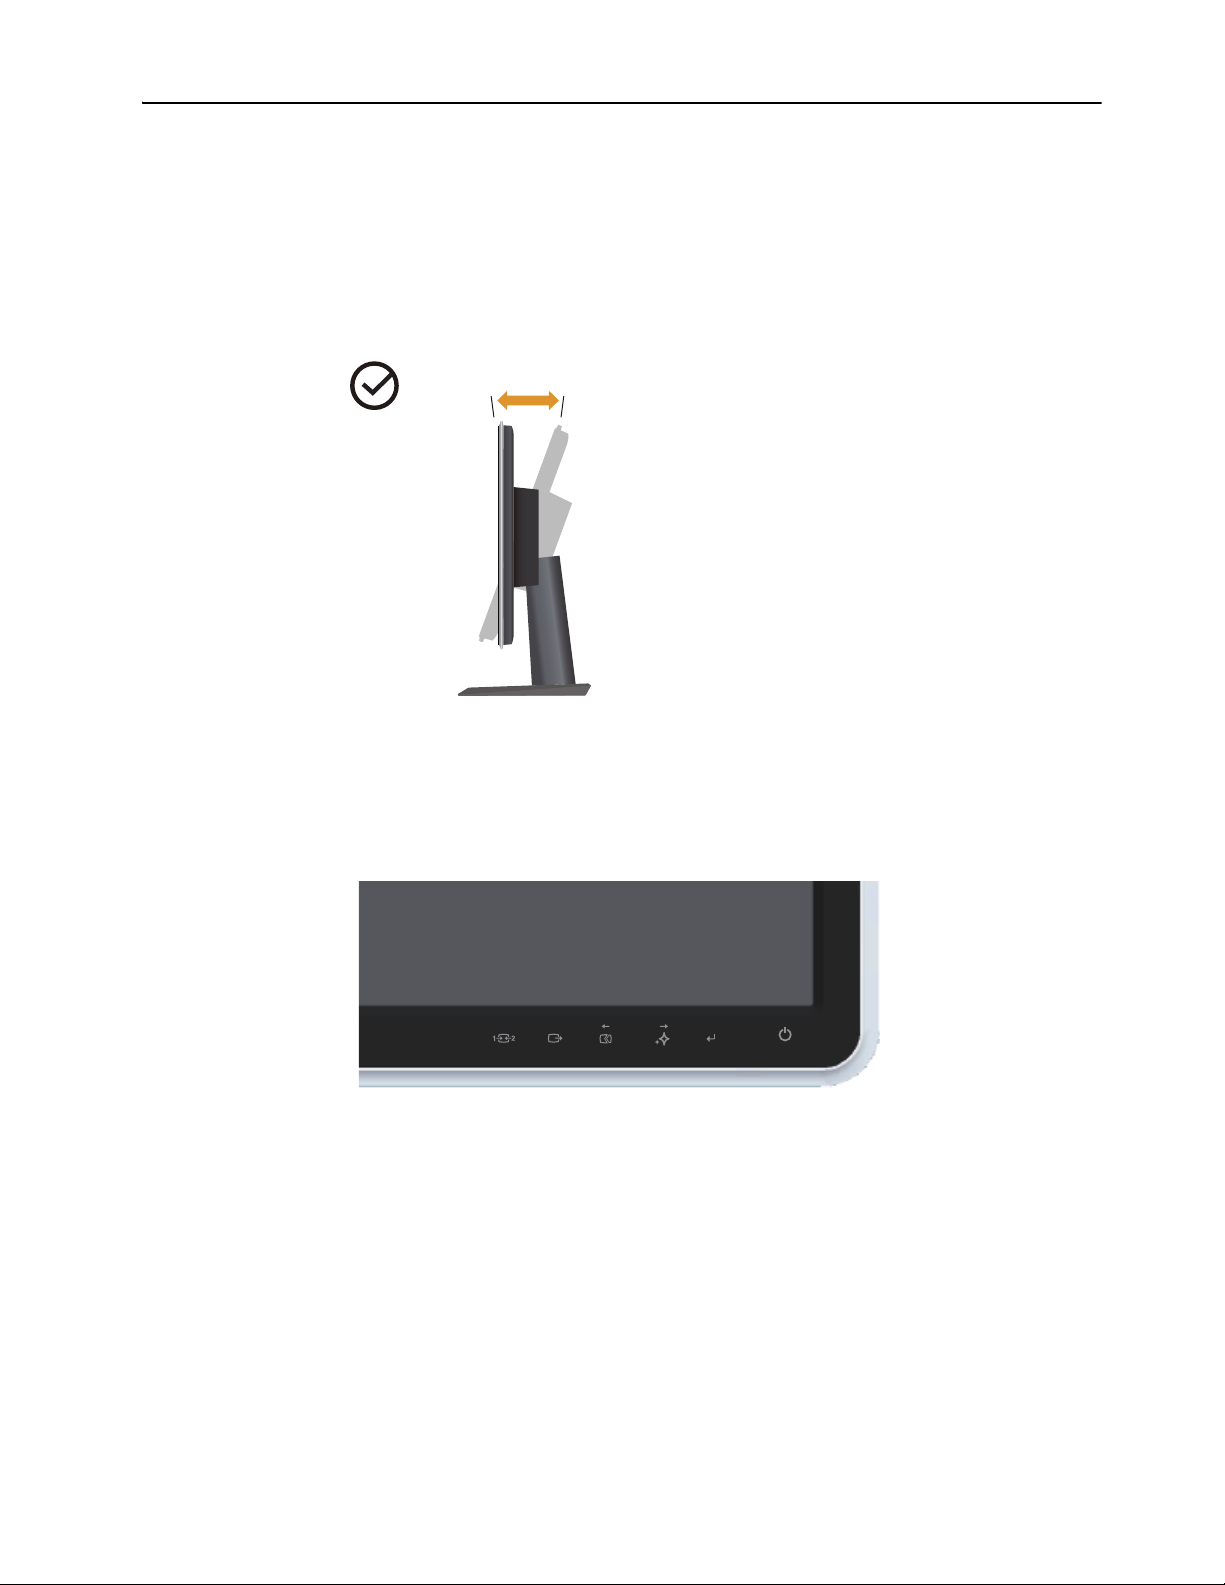
Adjusting the tilt
The illustration below shows the tilt range of the monitor. For more information,
please see “Positioning your monitor” on page 2-1.
Monitor controls
Your monitor has controls on the front which are used to adjust the display.
-5
o
20
o
For information on how to use these controls, please see “Adjusting your monitor
image” on page 2-3.
© Copyright Lenovo 2011. © Chapter 1. 1-2
Page 6
Note:
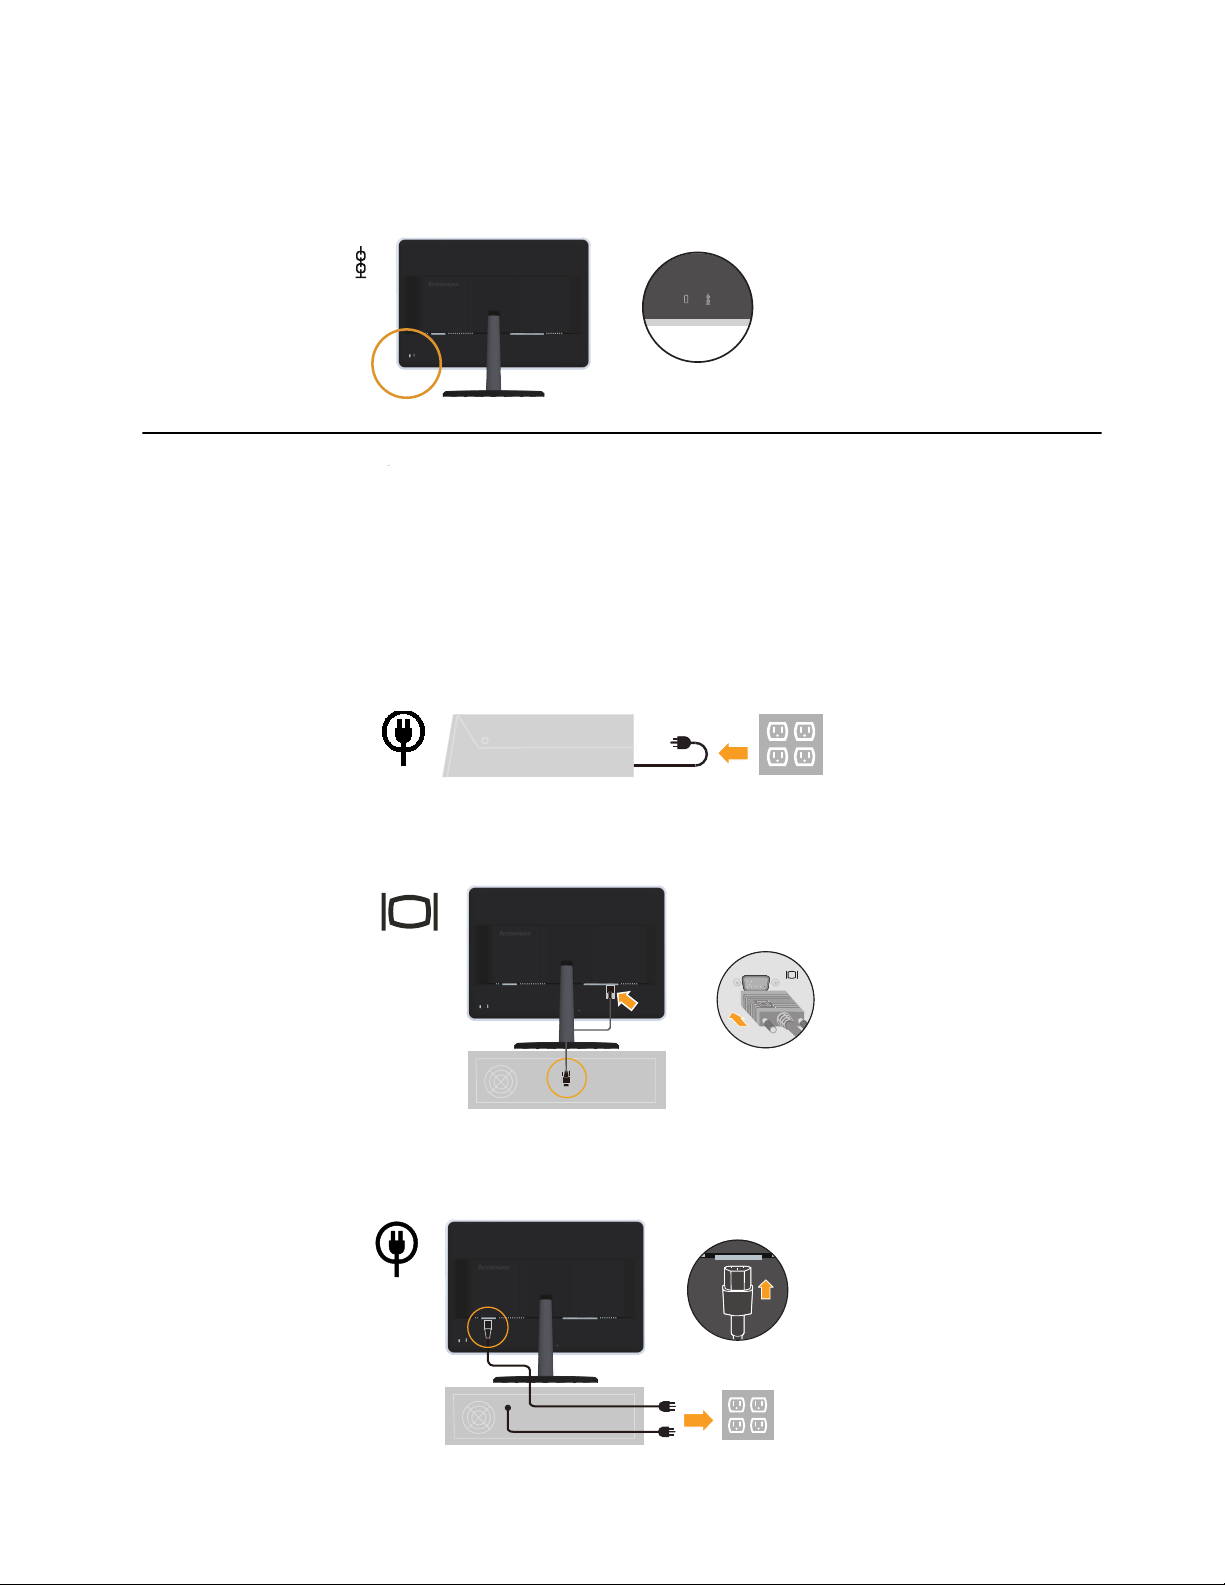
Cable lock slot
Your monitor is equipped with a cable lock slot located on the rear of your monitor (in
the lower position). Please see the instructions that come with the cable lock to learn
how to using it.
Setting up your monitor
This section provides information on how to set up your monitor.
Connecting and turning on your monitor
Be sure to read the Safety information located on page iii before
carrying out this procedure .
1. Power off your computer and all attached devices, and unplug the computer
power cord.
2. Connect the analog signal cable to the video port on the back of the computer.
Note: One end of the signal cable is already pre-attached to your monitor.
Insert the power cord into the monitor, then plug the monitor power cord and the
3.
computer cord into grounded electrical outlets.
© Copyright Lenovo 2011. © Chapter 1. 1-3
Page 7
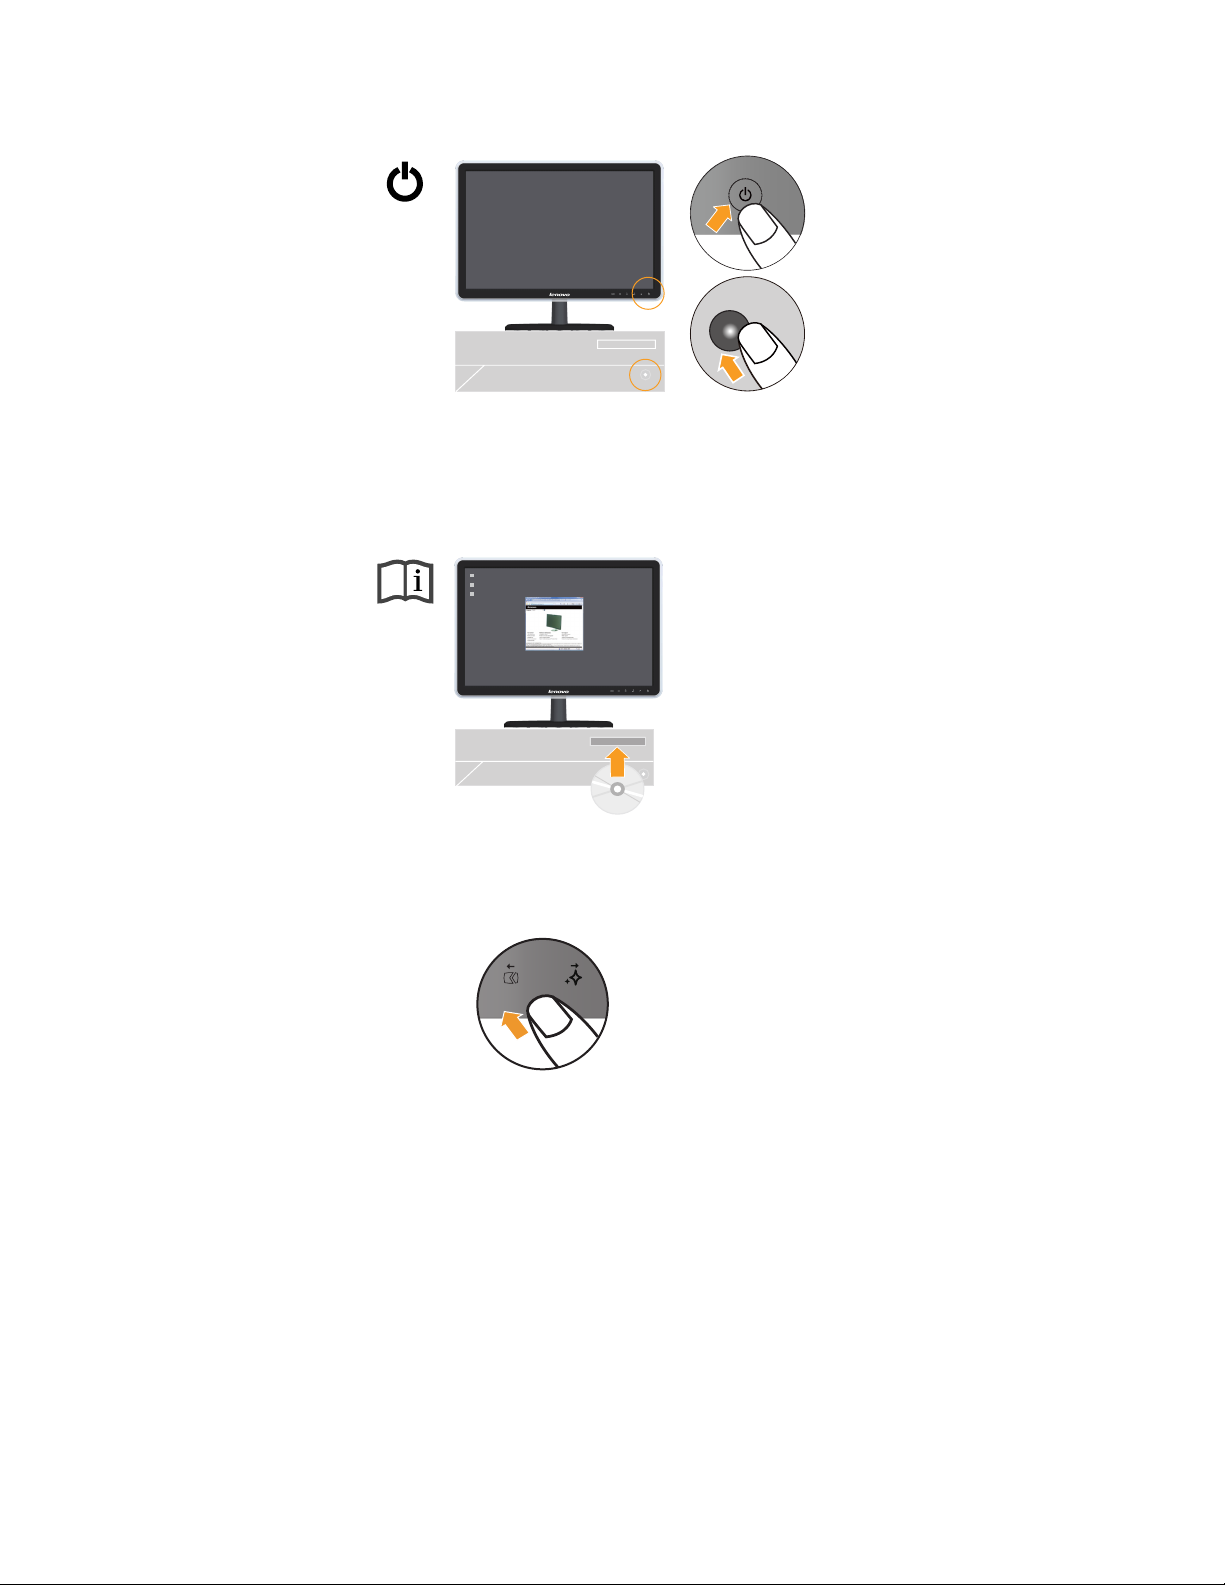
Power on the monitor and the computer.
.
To install the monitor driver, insert the
5.
Reference and Driver CD
, click IInstall
driver, and follow the on-screen instructions.
To optimize your monitor image, press the Automatic Image Setup key.
6.
Automatic image setup requires that the monitor is warmed up for at least 15
minutes. This is not required for normal operation.
Note: If automatic image setup does not establish the image that you prefer, perform
manual image setup. See “Manual image setup” on page 3-4 .
© Copyright Lenovo 2011. © Chapter 1. 1-4
Page 8

Chapter 2. Adjusting and using your monitor
Viewing distance
Monitor height
Tilt
General location
This section will give you information on adjusting and using your monitor.
Comfort and accessibility
Good ergonomic practice is important to get the most from your personal computer
and to avoid discomfort. Arrange your workplace and the equipment you use to suit
your individual needs and the kind of work that you perform. In addition, use
healthy work habits to maximize your performance and comfort while using your
computer. For more detailed information on any of these topics, visit the Healthy
Computing Web site at: http://
Arranging your work area
Use a work surface of appropriate height and available working area to allow you to
work in comfort.
Organize your work area to match the way you use materials and equipment. Keep
your work area clean and clear for the materials that you typically use and place the
items that you use most frequently, such as the computer mouse or telephone, within
the easiest reach.
Equipment layout and setup play a large role in your working posture. The following
topics describe how to optimize equipment setup to achieve and maintain good
working posture.
www.lenovo.com/healthycomputing/.
Positioning your monitor
Position and adjust your computer monitor for comfortable viewing by considering
the following items:
•V
approximately 510mm to 760mm (20 in to 30 in) and can vary depending on
ambient light and time of day. You can achieve different viewing distances by
repositioning your monitor or by modifying your posture or chair position. Use a
viewing distance that is most comfortable for you.
•M
and neutral (vertical, or upright) position. If your monitor does not have height
adjustments, you might have to place books or other sturdy objects under the
base of the monitor to achieve the desired height. A general guideline is to
position the monitor such that the top of the screen is at or slightly below your
eye-height when you are comfortably seated. However, be sure to optimize your
monitor height so the line of site between your eyes and the center the monitor
suits your preferences for visual distance and comfortable viewing when your eye
muscles are in a relaxed state.
•T
•G
The following are some other tips for comfortable viewing of your monitor:
• Use adequate lighting for the type of work you are performing.
: Adjust the tilt of your monitor to optimize the appearance of the screen
content and to accommodate your preferred head and neck posture.
from overhead lighting or nearby windows.
: Optimal viewing distances for monitors range from
: Position the monitor so your head and neck are in a comfortable
: Position your monitor to avoid glare or reflections on the screen
© Copyright Lenovo 2011. © Chapter 2. 2-1
Page 9

• Use the monitor brightness, contrast, and image adjustment controls, if equipped,
Good posture starts with equipment setup
Minor changes in posture can help avoid discomfort
Short, periodic breaks help ensure healthy computing
to optimize the image on your screen to meet your visual preferences.
• Keep your monitor screen clean so you can focus on the screen’s contents.
Any concentrated and sustained visual activity can be tiring for your eyes. Be sure to
periodically look away from your monitor screen and focus on a far object to allow
your eye muscles to relax. If you have questions on eye fatigue or visual discomfort,
consult a vision care specialist for advice.
Quick tips for healthy work habits
The following information is a summary of some important factors to consider to help
you remain comfortable and productive while you use your computer.
•G
setup of your computer equipment have a large effect on your posture while
using your computer. Be sure to optimize the position and orientation of your
equipment by following the tips outlined in “Arranging your work area” on page
2-1 so you can maintain a comfortable and productive posture. Also, be sure to
use the adjustment capabilities of your computer components and office furniture
to best suit your preferences now and as your preferences change over time.
•M
with your computer, the more important it is to observe your working posture.
Avoid assuming any one posture for an extended period of time. Periodically
make minor modifications in your posture to help deter any discomforts that
might arise. Make use of any adjustments that your office furniture or equipment
provide to accommodate changes in posture.
•S
primarily a static activity, it is particularly important to take short breaks from
your work. Periodically, stand up from your work area, stretch, walk for a drink
of water, or otherwise take a short break from using your computer. A short break
from work gives your body a welcome change in posture and helps to ensure you
remain comfortable and productive while you do work.
: The layout of your work area and the
: The longer you sit and work
: Because computing is
© Copyright Lenovo 2011. © Chapter 2. 2-2
Page 10
Adjusting your monitor image
This section describes the control features to adjust your monitor image.
Using the direct access controls
The direct access controls can be used when the On Screen Display (OSD) is not
displayed.
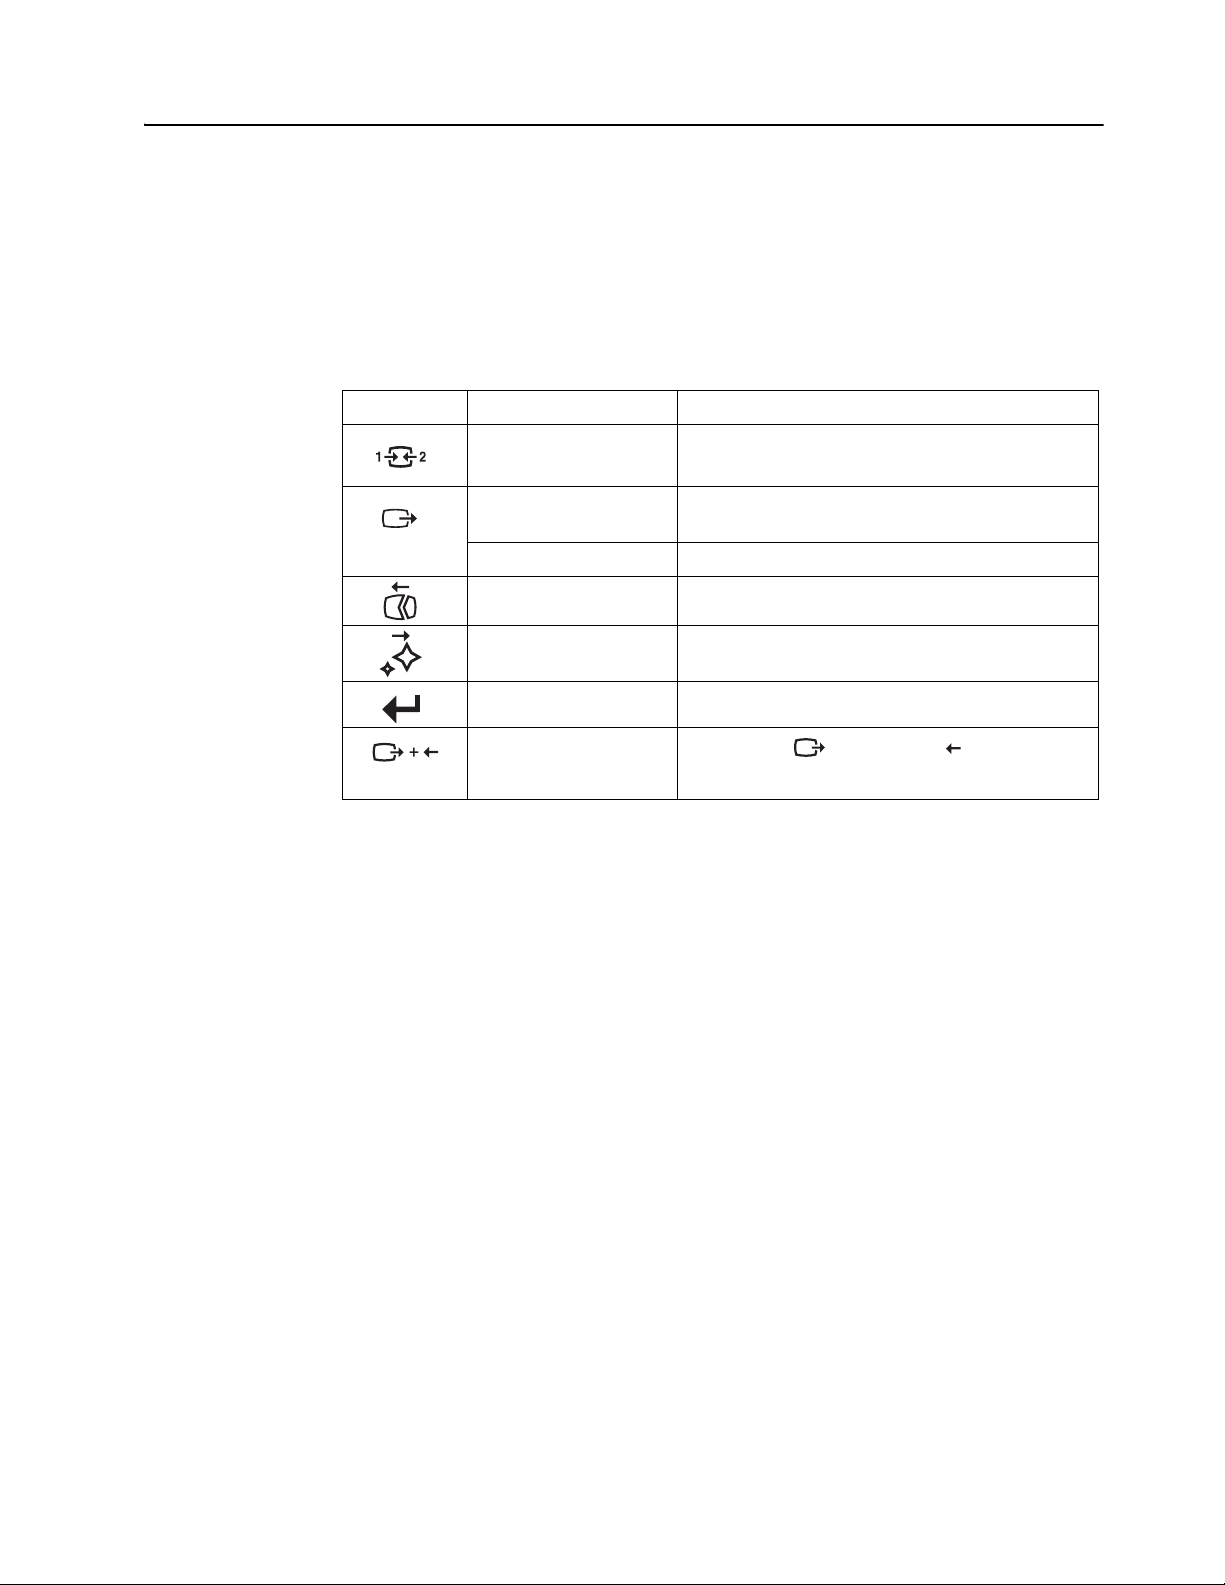
Table 2-1. Direct access controls
Icon Control Description
Input Change Switches the video input source.
DDC-CI Press and hold for 10 seconds to enable or disable
Exit Exit from menu
Image Setup Activates automatic image adjustment.
Screen Prioritization Direct access to Screen Prioritization adjustment.
Menu Enter menu
the DDC-CI function.
Mute setting
Press and hold key, then press key to turn on/off
the touch button volume.
© Copyright Lenovo 2011. © Chapter 2. 2-3
Page 11
Using the On-Screen Display (OSD) controls
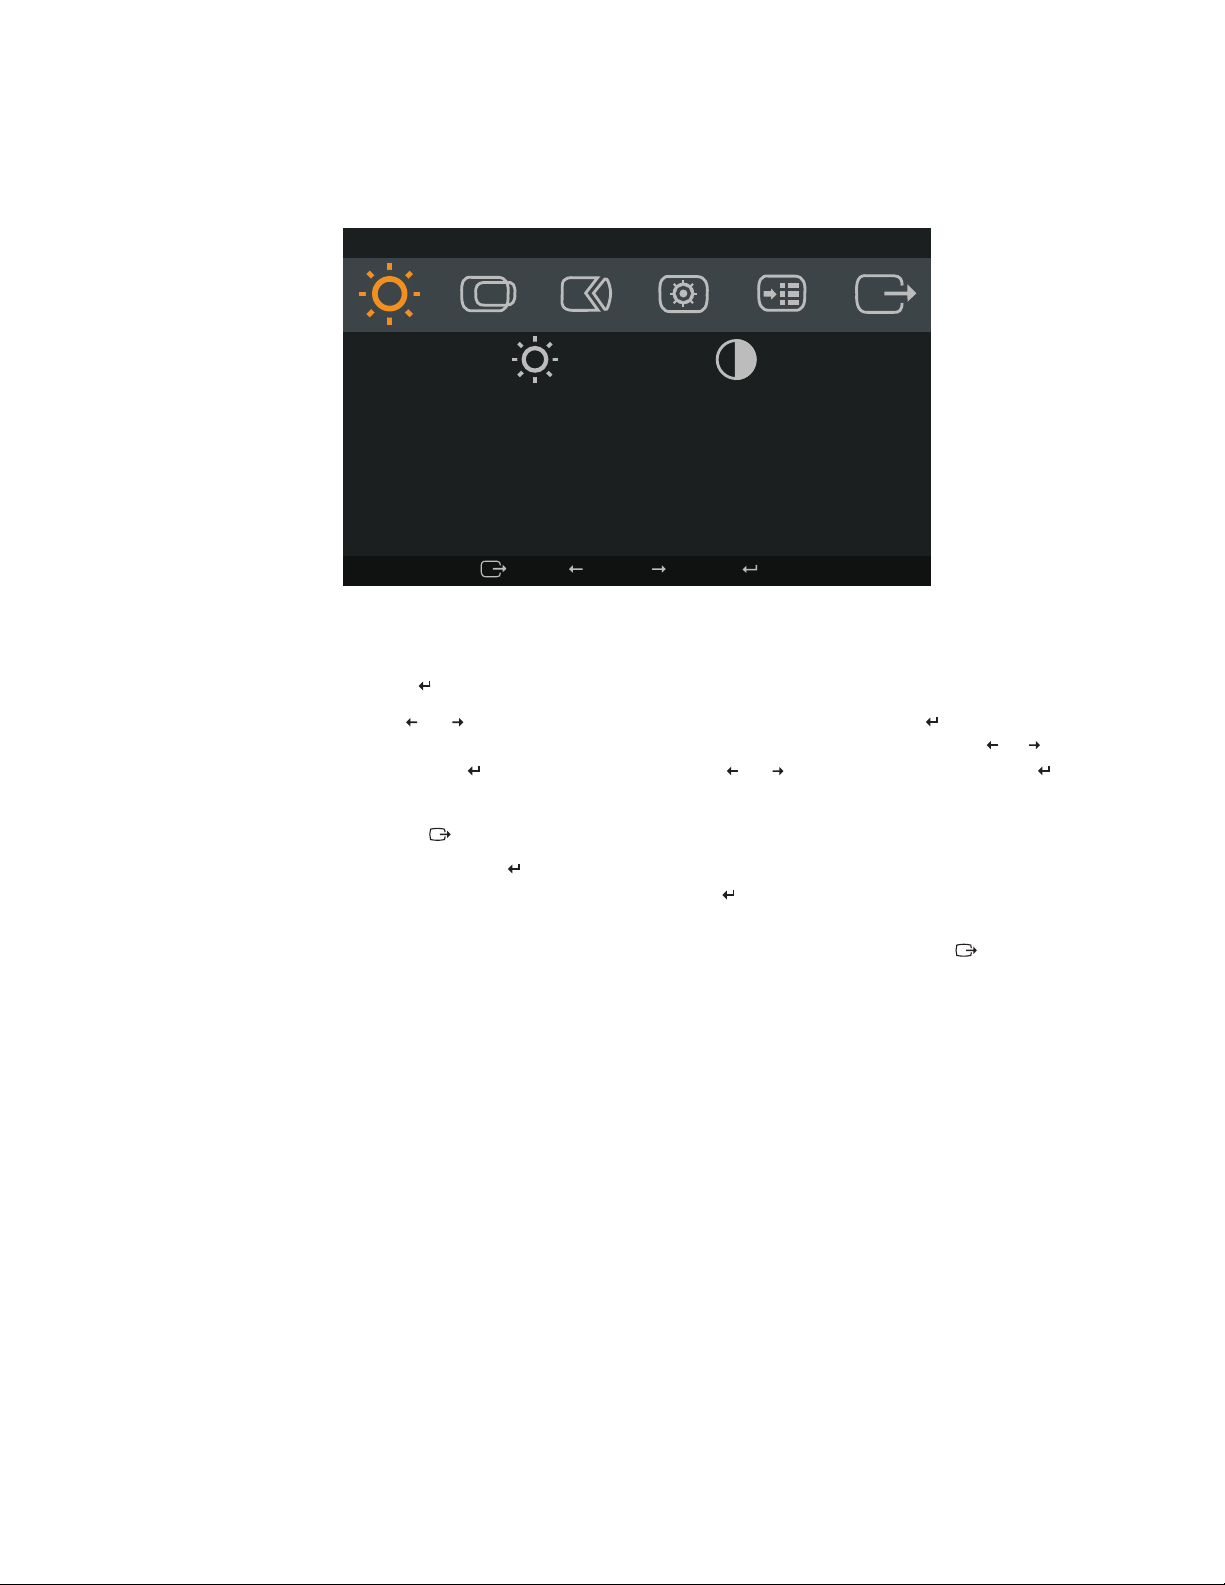
To adjust the settings, the user controls can be viewed through the OSD.
Brig htn ess/C ontra st
Brig ht ne ss C on trast
Exi t Left Ri gh t Ok
To use the controls:
1.
Press to open the main OSD menu.
Use or to move among the icons. Select an icon and press to access that
2.
function. If there is a sub-menu, you can move between options using or ,
then press to select that function. Use or to make adjustments. Press to
save.
3.
Press to move backwards through the sub-menus and exit from the OSD.
4.
Press and hold for 10 seconds to lock the OSD. This will prevent accidental
adjustments to the OSD. Press and hold for 10 seconds to unlock the OSD and
allow adjustments to the OSD.
5.
Enables DDC/CI by default. Use OSD Exit Key, Press and hold the button for 10
seconds to disable / enable DDC/CI function. The words "DDC/CI disable"or
"DDC/CI enable" shows on the screen.
© Copyright Lenovo 2011. © Chapter 2. 2-4
Page 12
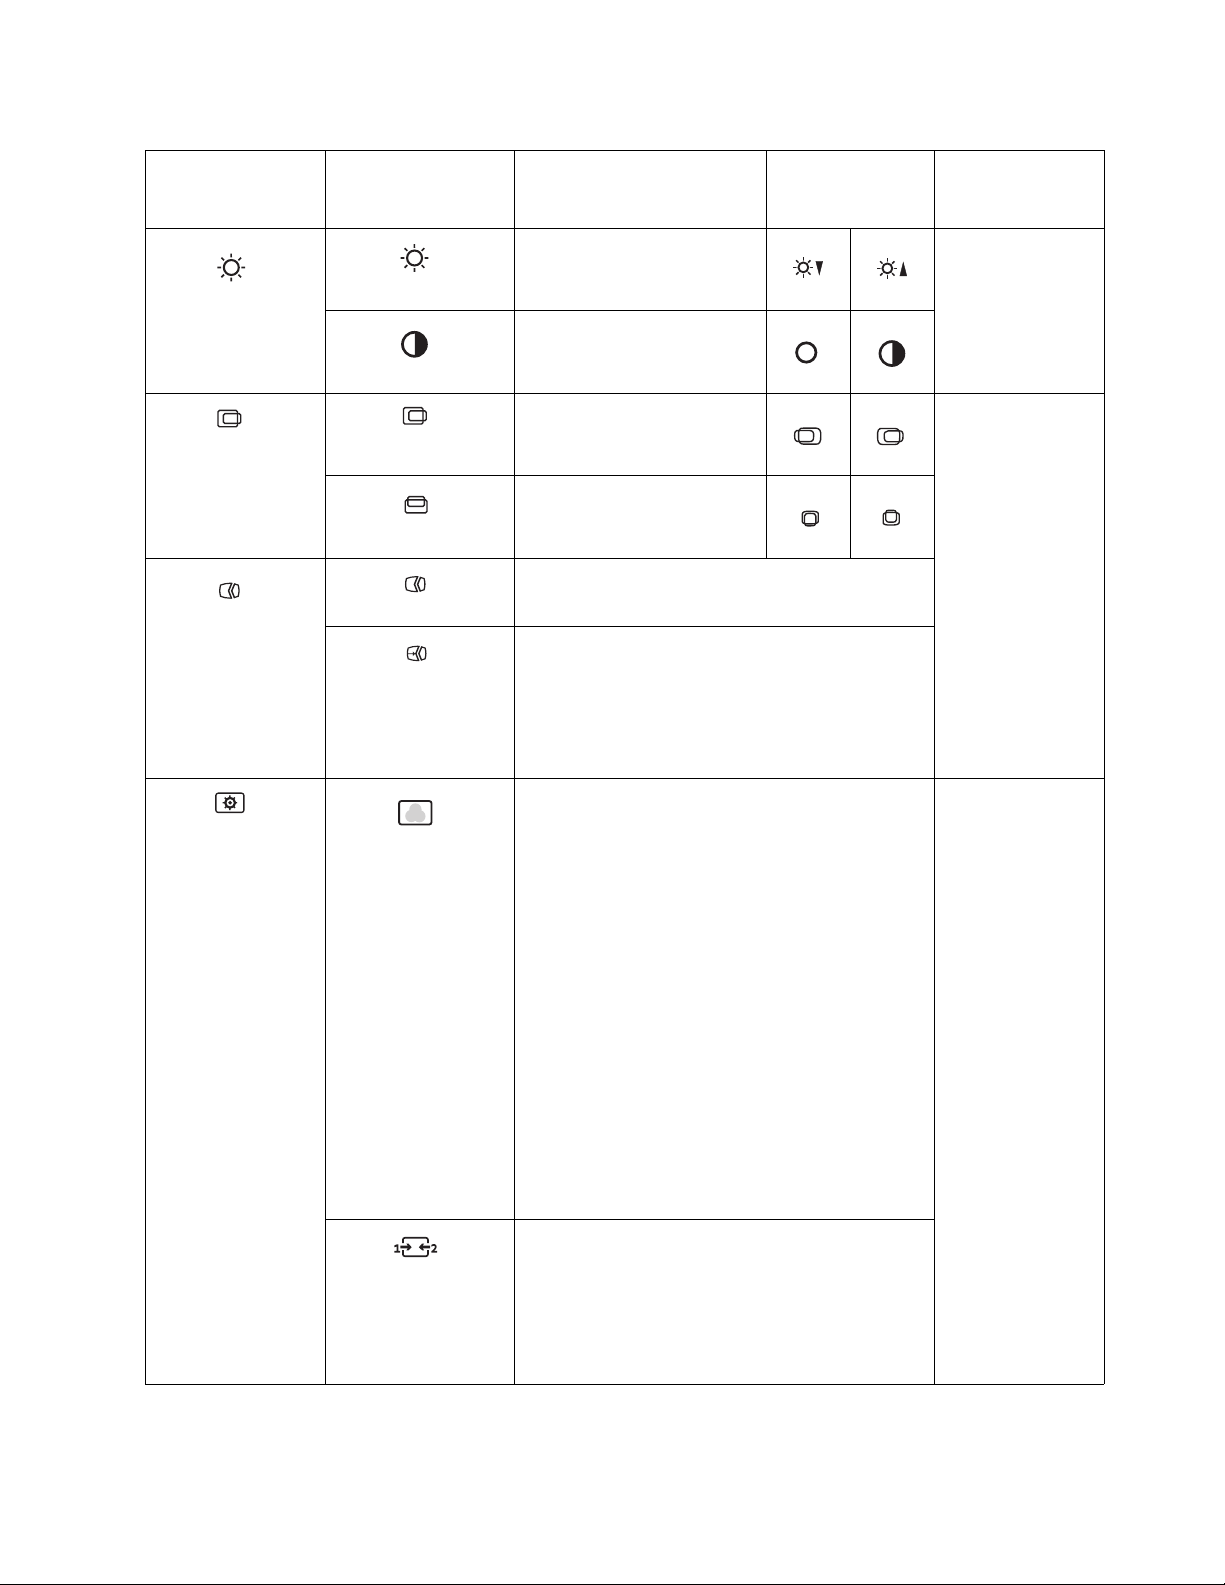
Table 2-2. OSD functions
OSD Icon on Main
Menu Submenu Description
Adjusts overall screen
brightness
Brightness/
Contrast
Brightness
Adjusts difference between
light and dark areas
Contrast
Moves image left or right. Controls Locked -
Image Position
Horizontal Position
Moves image up or
Vertical Position
Optimizes image (size,position,phase and clock).
Image Setup
Automatic
Manually optimizes image. See “Manual image
Manual
setup” on page 3-4.
• Clock
• Phase
• Save
Adjusts intensity of red, green, and blue.
down.
Controls and
Adjustments
(Analog)
Controls and
Adjustments
(Digital)
Same as Analog
not required for
digital input
Same as Analog
Image Properties
Color
Input signal
Preset mode
• Neutral
• sRGB
•
Reddish
• Bluish
Custom
• Red: Increases or decreases the saturation of
’red’ in the image.
• Green: Increases or decreases the saturation of
’green’ in the image.
• Blue: Increases or decreases the saturation of
’blue’ in the image.
• Save: Saves the custom color choices.
This monitor can accept video signals through two
different connectors. Most desktop computers use
a D-SUB connector. Select digital among OSD
Controls when you use DVI connector
•
Selects D-SUB (Analog)
•
Selects DVI(Digital)
© Copyright Lenovo 2011. © Chapter 2. 2-5
Page 13
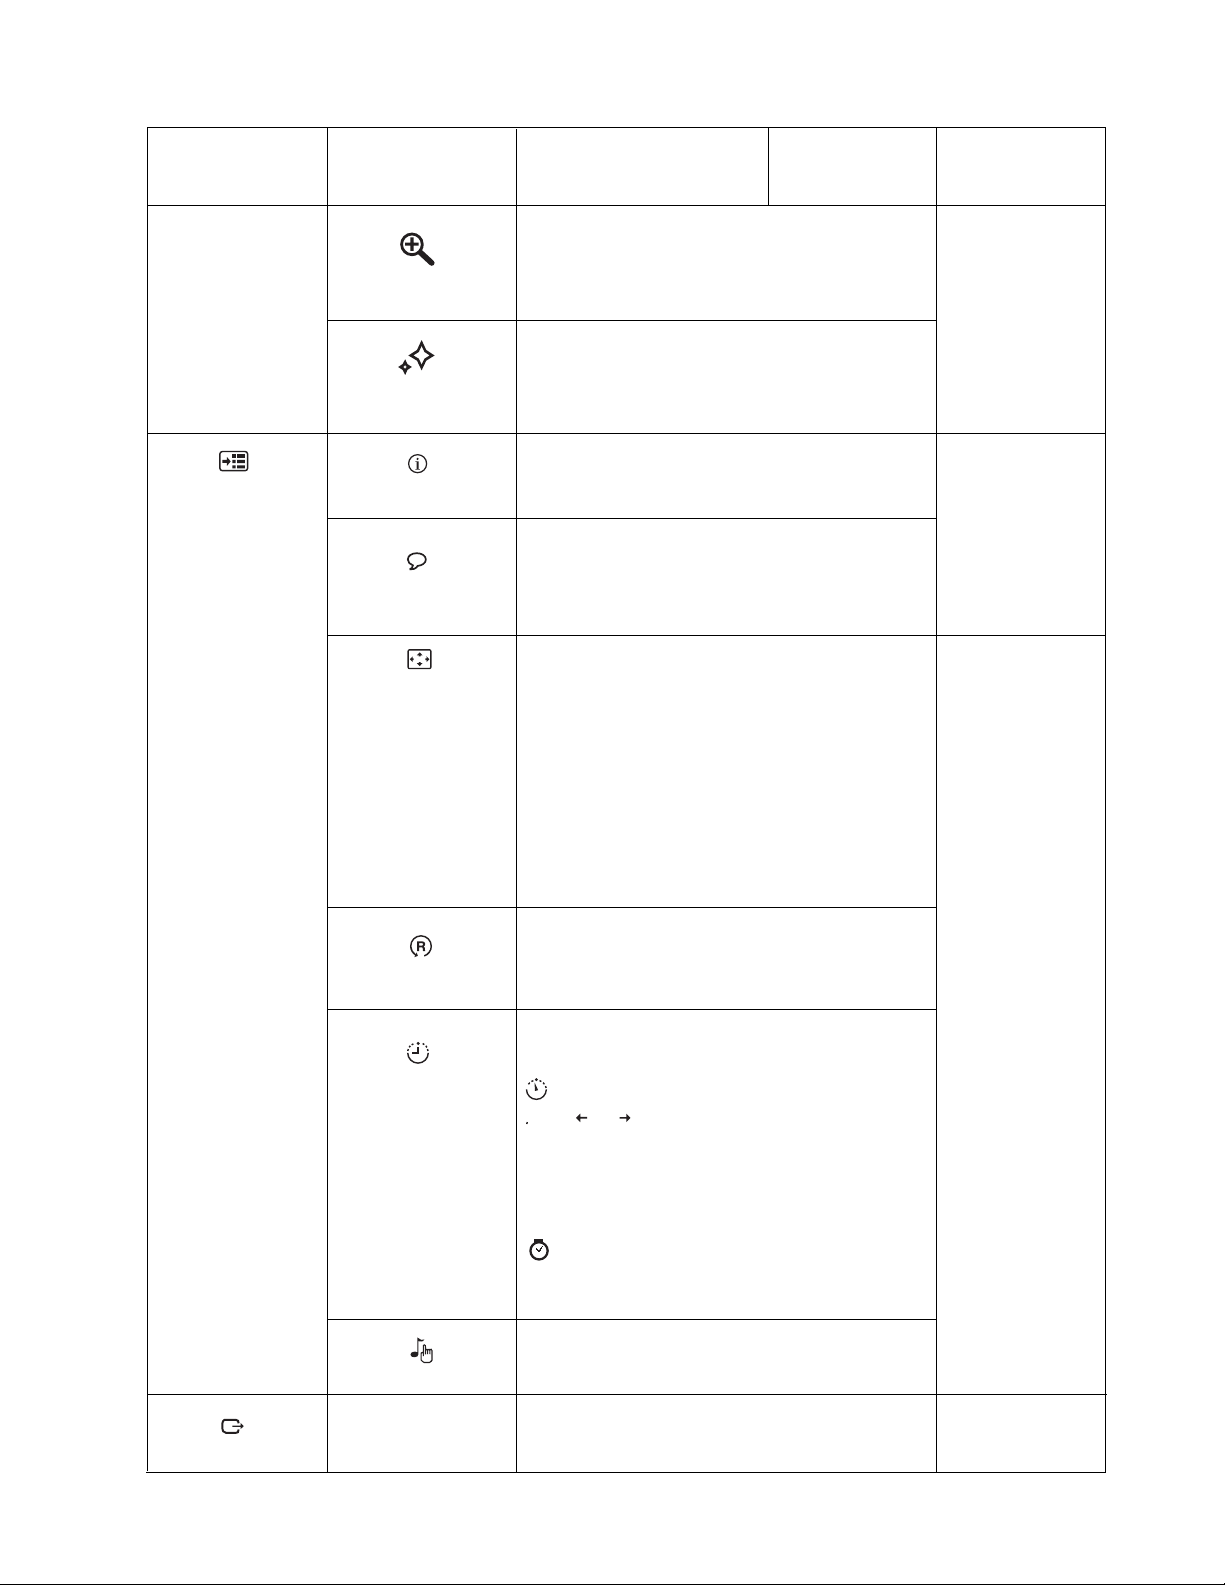
Table 2-2. OSD functions
OSD Icon on Main
Menu Submenu Description
Selects type of scaled image
• Original AR:same aspect ratio with input
signal
• Full Screen :Expand image to full screen.
Screen Prioritization
Text Mode
•
Web pic Mode
•
Video Mode
•
Split-screen Display
•
Shows resolution, refresh rate, and product details.
Note: This screen does not allow any changes to
the settings.
Changes languages of menu.
Note: The language chosen only affects the
language of the OSD. It has no effect on any
software running on the computer.
Adjusts menu location
Default
Default returns the menu position to the default
settings.
Options
Scaling
Screen Prioritization
Information
Language
Position
Controls and
Adjustments
(Analog)
Controls and
Adjustments
(Digital)
Same as Analog
Same as Analog
Same as Analog
Reset
Accessibility
Mute
Custom
• Horizontal: Changes the horizontal position of
the OSD.
• Vertical: Changes the vertical position of the
OSD.
Save: save the custom position choices
Reset monitor to the original settings.
• Cancel
• Reset
Changes button repeat rate and menu time-out
setting.
Button repeat rate:
Select or to change.
• Off
• Default
• Slow
Menu time out: Sets the length of time the
OSD will remain active after the last time a button
is pressed.
• Mute On: Off the monitor's touchkey volume.
• Mute Off: On the monitor's touchkey volume.
Exit from menu.
Exit
© Copyright Lenovo 2011. © Chapter 2. 2-6
Page 14
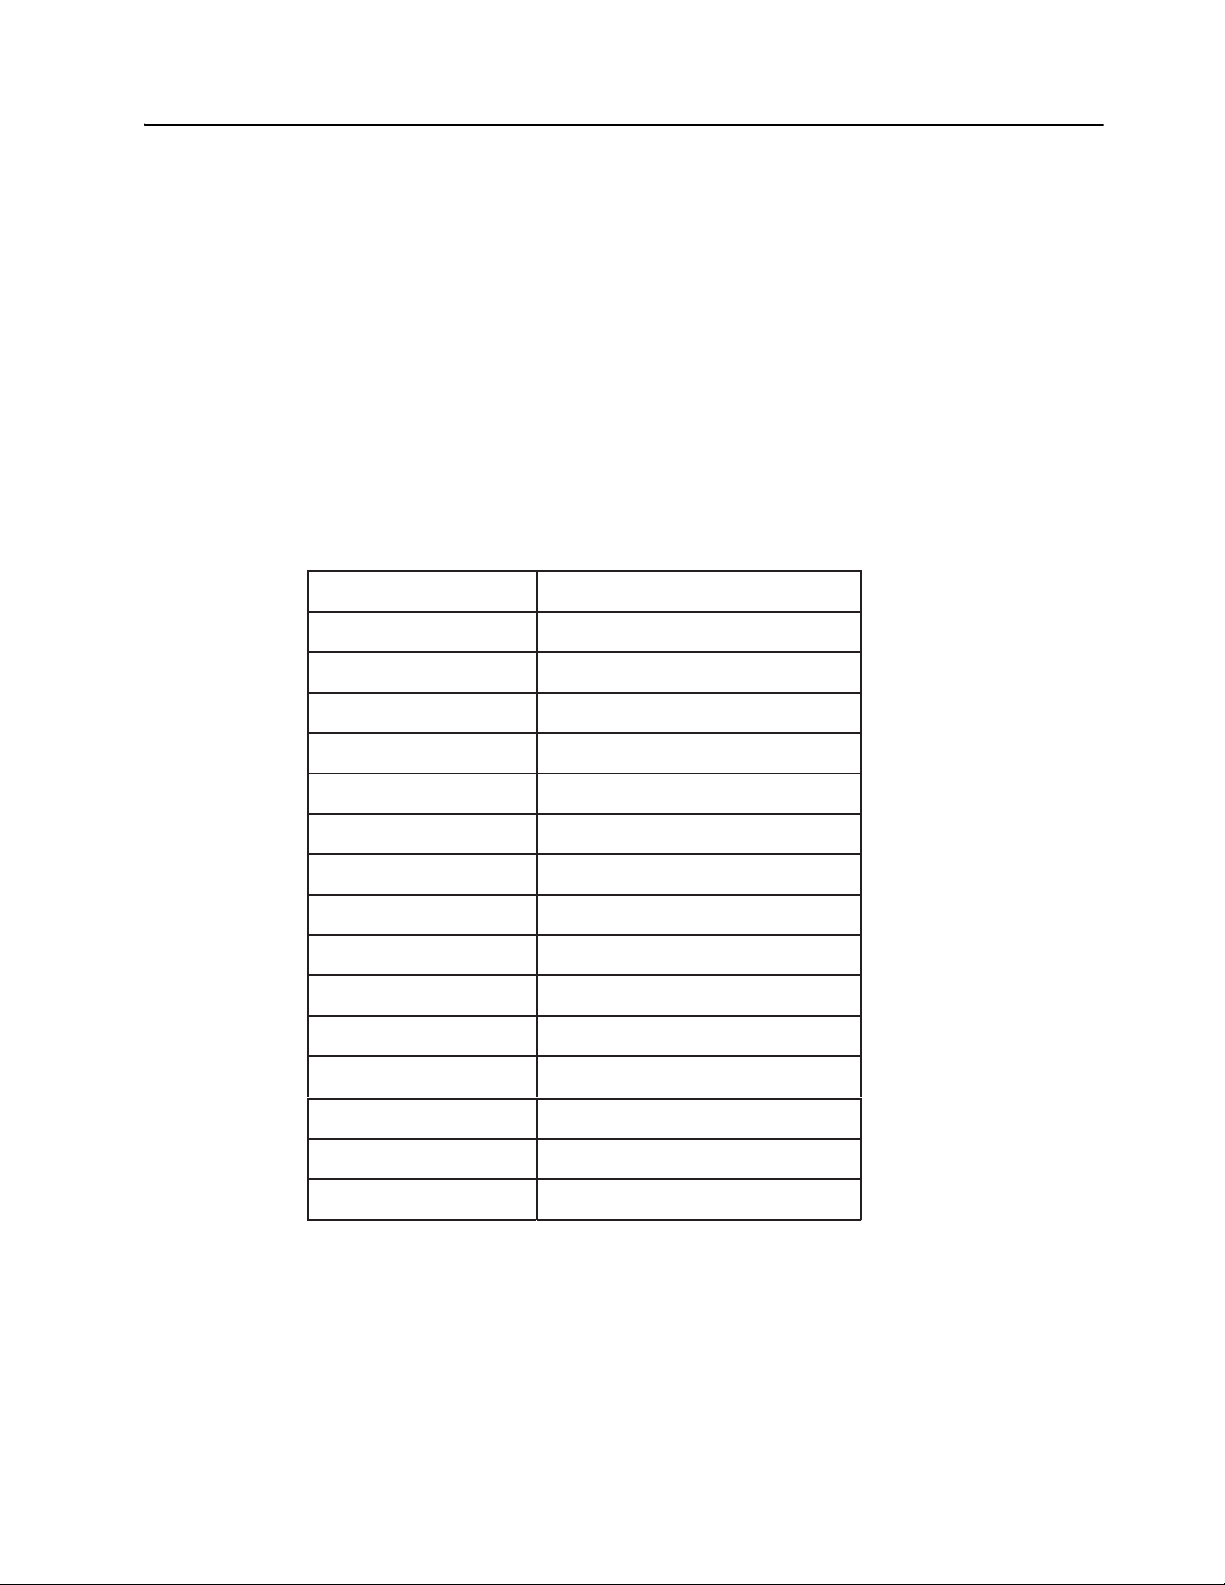
Selecting a supported display mode
The display mode the monitor uses is controlled by the computer. Therefore, refer to
your computer documentation for details on how to change display modes.
The image size, position and shape might change when the display mode changes.
This is normal and the image can be readjusted using automatic image setup and the
image controls.
Unlike CRT monitors, which require a high refresh rate to minimize flicker, LCD or
Flat Panel technology is inherently flicker-free.
Note: If your system has previously been used with a CRT monitor and is currently
configured to a display mode outside the range of this monitor, you may need to reattach the CRT monitor temporarily until you have re-configured the system;
preferably to at 60 Hz, which is the Native Resolution Display mode.
The display modes shown below have been optimized at the factory.
Table 2-3. Factory set display modes
Addressability Refresh rate
640x350 70Hz
640x480 60Hz,72Hz,75Hz
720x400 70Hz
1920x1080
800x600 56Hz,60Hz,72Hz 75Hz
,
832x624 75Hz
1152x864 75Hz
1024x768 60Hz,70Hz,75Hz
1280x768 60Hz
1280x800 60Hz
1280x1024 60Hz,70Hz,75Hz
1440x900 60Hz,75Hz
1600x900
60Hz,75Hz
1680x1050 60Hz
1680x1050 75Hz(only VGA)
1920x1080 60Hz
© Copyright Lenovo 2011. © Chapter 2. 2-7
Page 15
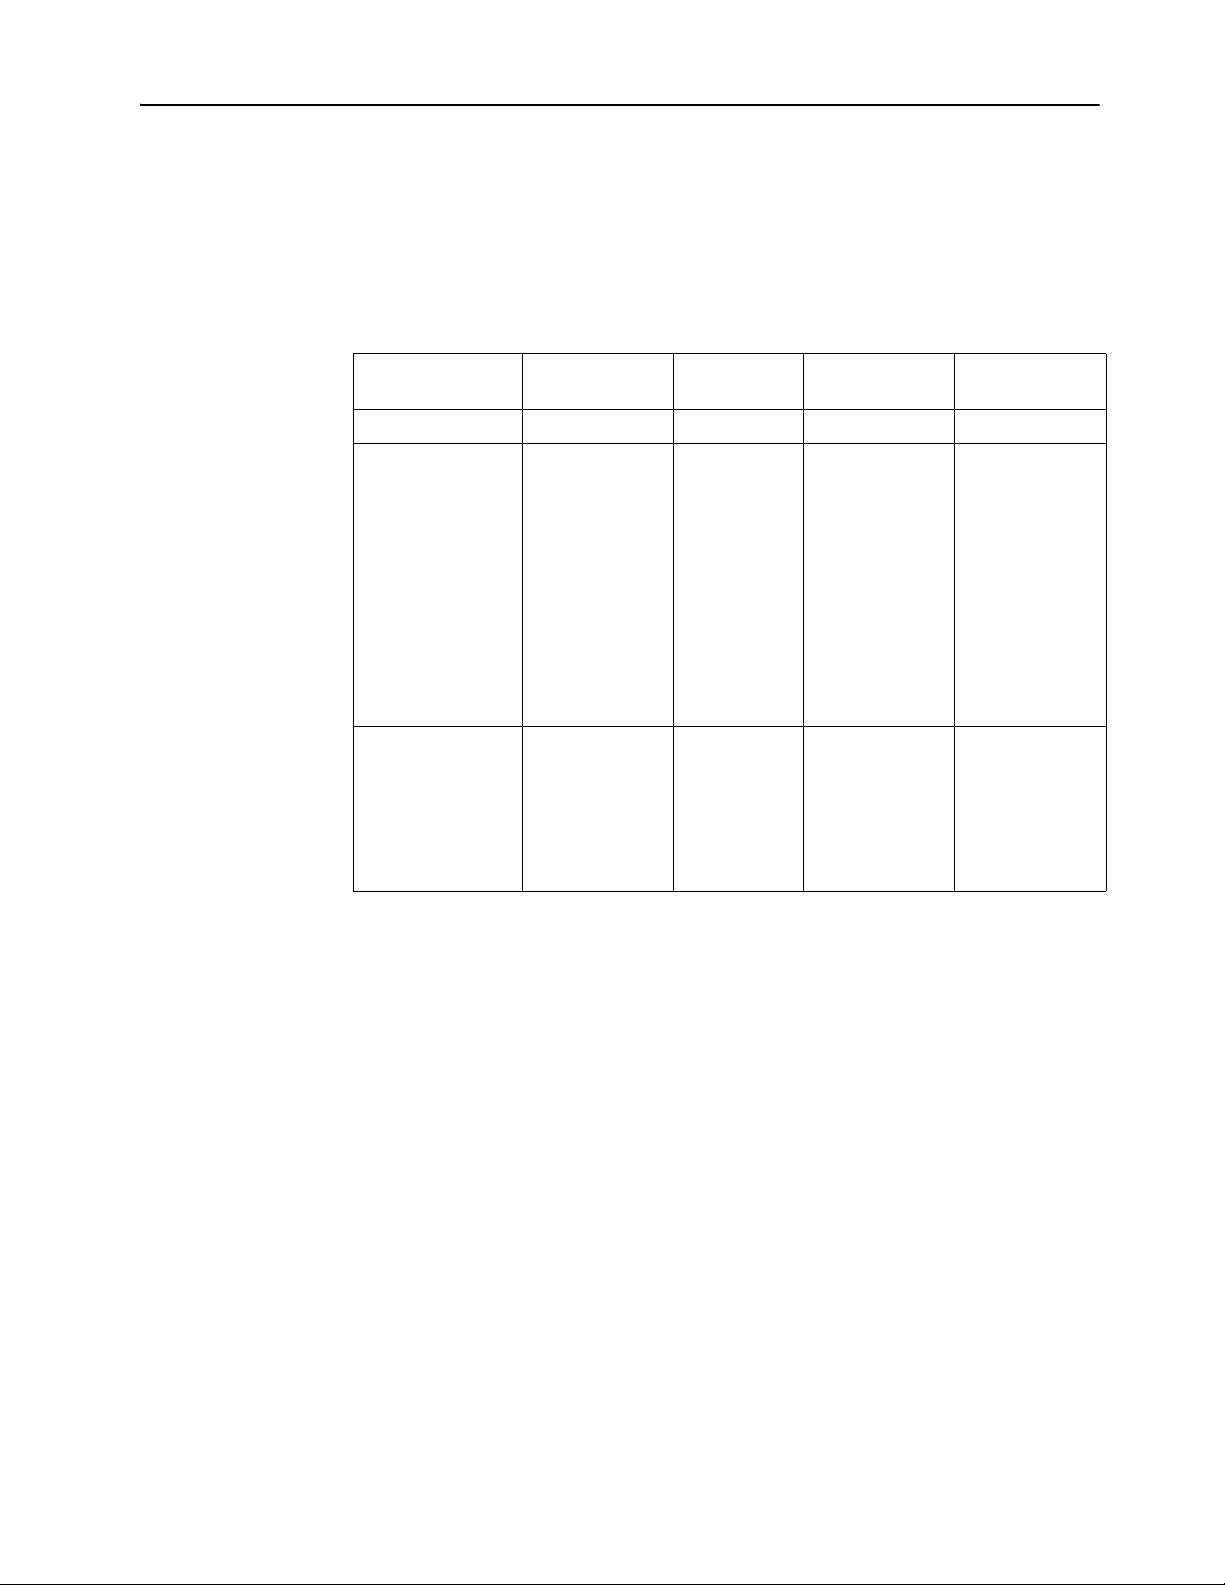
Understanding power management
Power management is invoked when the computer recognizes that you have not used
your mouse or keyboard for a user-definable period. There are several states as
described in the table below.
For optimal performance, switch off your monitor at the end of each working day, or
whenever you expect to leave it unused for long periods during the day.
Table 2-4. Power indicator
State Power Indicator Screen
On Steady white Normal
Standby/Suspend Orange Blank Press a key or
Off Off Blank Press the power
Restoring
Operation Compliance
ENERGY STAR
move the mouse
There may be a
slight delay
before the image
reappears
Note: Standby
also occurs if
there is no image
output to the
monitor
ENERGY STAR
button
There may be a
slight delay
before the image
reappears
© Copyright Lenovo 2011. © Chapter 2. 2-8
Page 16
Caring for your monitor
Be sure to turn off the power before you perform any maintenance on the monitor.
Do not:
• Apply water or liquid directly to your monitor.
• Use solvents or abrasives.
• Use ammable cleaning materials to clean your monitor or any other electrical
equipment.
• Touch the screen area of your monitor with sharp or abrasive items. This type of contact
may cause permanent damage to your screen.
• Use any cleaner which contains an anti-static solution or similar additives. This may
harm the coating of the screen area.
Do:
• Lightly dampen a soft cloth with water and use this to gently wipe the covers and the
screen.
• Remove grease or nger marks with a damp cloth and a little mild
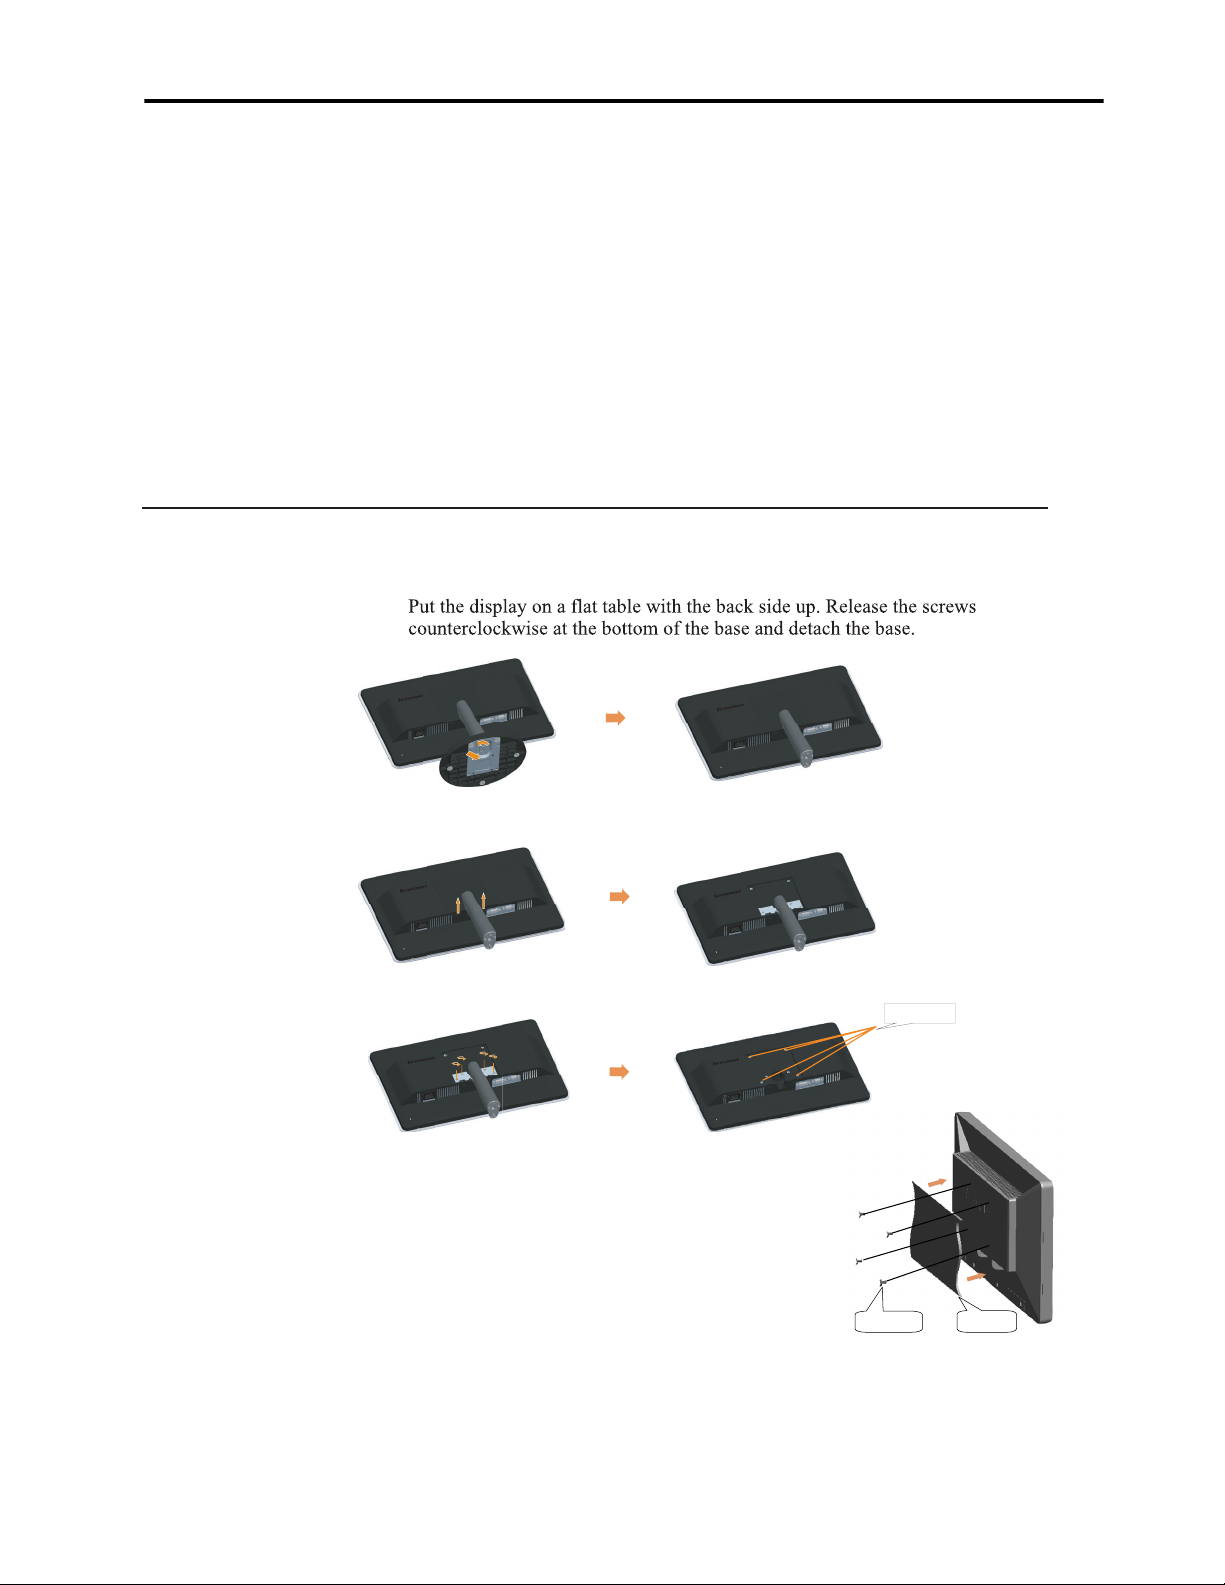
Preparing the monitor for wall-mounting
Detaching the monitor stand:
Step 1:
Step 2: Lift up the cover(as shown), and remove it.
Step 3: Remove the Four screws counterclockwise, take off the bracket, and install the
VESA mounting rack.
VESA holes
LCD wall-mounting instructions:
1. The gap between the installation holes on the back of
the LCD is 100*100 mm. There should have corresponding
position of holes on the wall-mounting plate.
2. The installation holes on the back of the LCD should be of
regular M4 thread. Select the corresponding screws to use.
3. The effective depth of the threaded holes on the back of
the LCD is 8 mm, the length of the thread of the xing
Secure the screws
(4 screws)
Wall-mount the
installation plate
screw is recommended as follows: L = 8 mm + installation plate thickness - (1~2) mm.
4. Remove the base and the support. See descriptions on the above illustration.
5. Insert the screw for xing through the round hole on the wall-mounting plate and screw
it onto the installation hole on the back of the LCD and then tighten it.
6. There are four xing screws.
© Copyright Lenovo 2011. © Chapter 2. 2-9
Page 17
Chapter 3. Reference information
This section contains monitor specifications, instructions to manually install the
monitor driver, troubleshooting information, and service information.
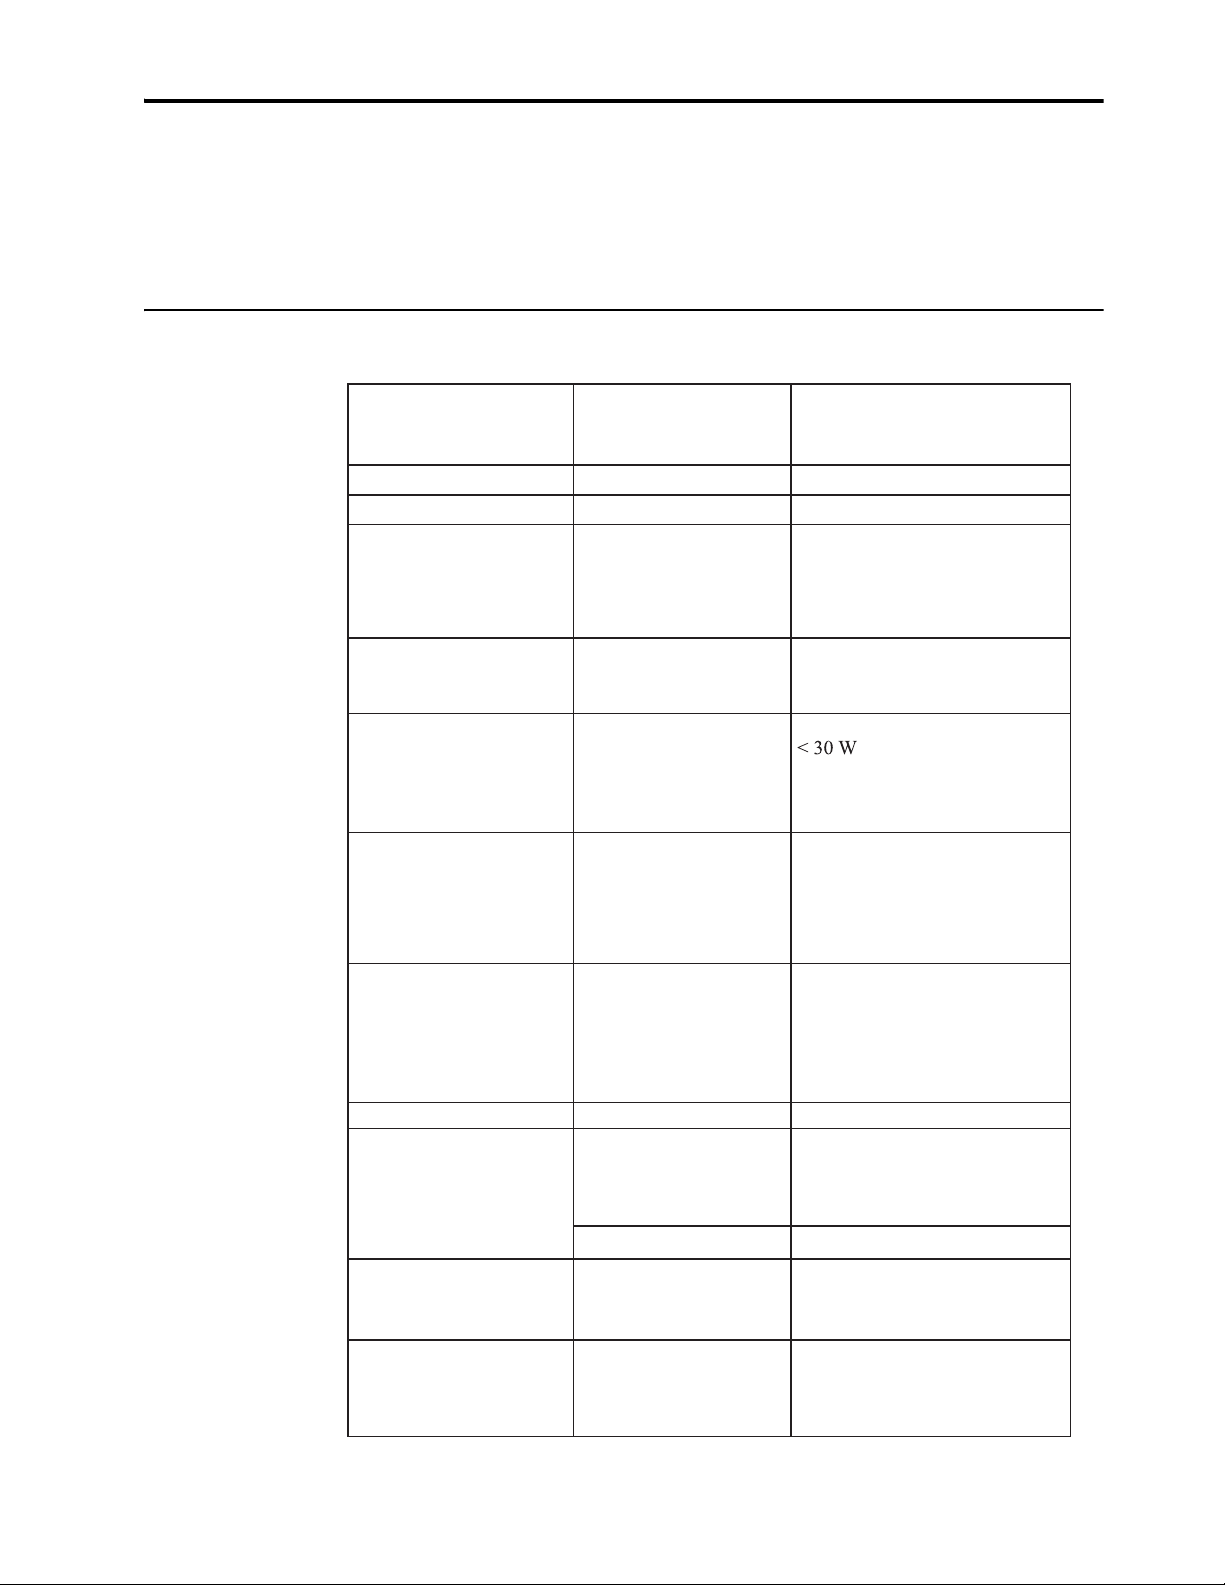
Monitor specifications
Table 3-1. Monitor specications for type-model LS2221wA Wide
Height
Dimensions
Stand Tilt Range: -5
VESA mount Supported 100 mm (3.94 in.)
Image
Power input
Power consumption
Note: Power consumption
gures are for the monitor
and the power supply
combined.
Video input (Analog)
Video input (Digital)
Communications VESA DDC CI
Supported Display Modes
(VESA Standard modes
between noted ranges)
Temperature
Humidity
Depth
Width
Viewable image size
Maximum height
Maximum width
Pixel pitch
Supply voltage
Max supply current
Normal operation
Standby/Suspend
Off
Input signal
Horizontal addressability
Vertical addressability
Clock frequency
Interface
Input Signal
Horizontal addressability
Vertical addressability
Clock frequency
Horizontal frequency
Vertical frequency
Native Resolution 1920x1080 at 60 Hz
Operating
Storage
Shipping
Operating
Storage
Shipping
390.7 mm (15.38 in.)
179.8 mm (7.08 in.)
525.0 mm (20.67 in.)
o
o
, +20
546.8 mm (21.53 in.)
476.64 mm (18.77 in.)
268.11 mm (10.56 in.)
0.248 mm (0.01 in.) (V)
90-264VAC (100~240VAC+/-
10%)
1.5 A
< 1W (Analog), <1W (Digital)
< 0.5W at 100Vac & 240Vac
Analog Direct Drive, 75 ohm
0.7V
1920 pixels (max)
1080 lines (max)
210 MHz
DVI
VESA TMDS (Panel Link
TM
)
1920 pixels (max)
1080 lines (max)
170 MHz
30 kHz - 83 kHz(Pixel clock
<210MHz)
50 kHz - 76 kHz(Pixel clock
<210MHz)
o
0
to 40o C (32o to 104o F)
o
-20
to 60oC (-4o to 140o F)
o
-20
to 60o C (-4o to 140o F)
8% to 80% non-condensing
5% to 95% non-condensing
5% to 95% non-condensing
© Copyright Lenovo 2011. © Chapter 3. 3-1
Page 18
Troubleshooting
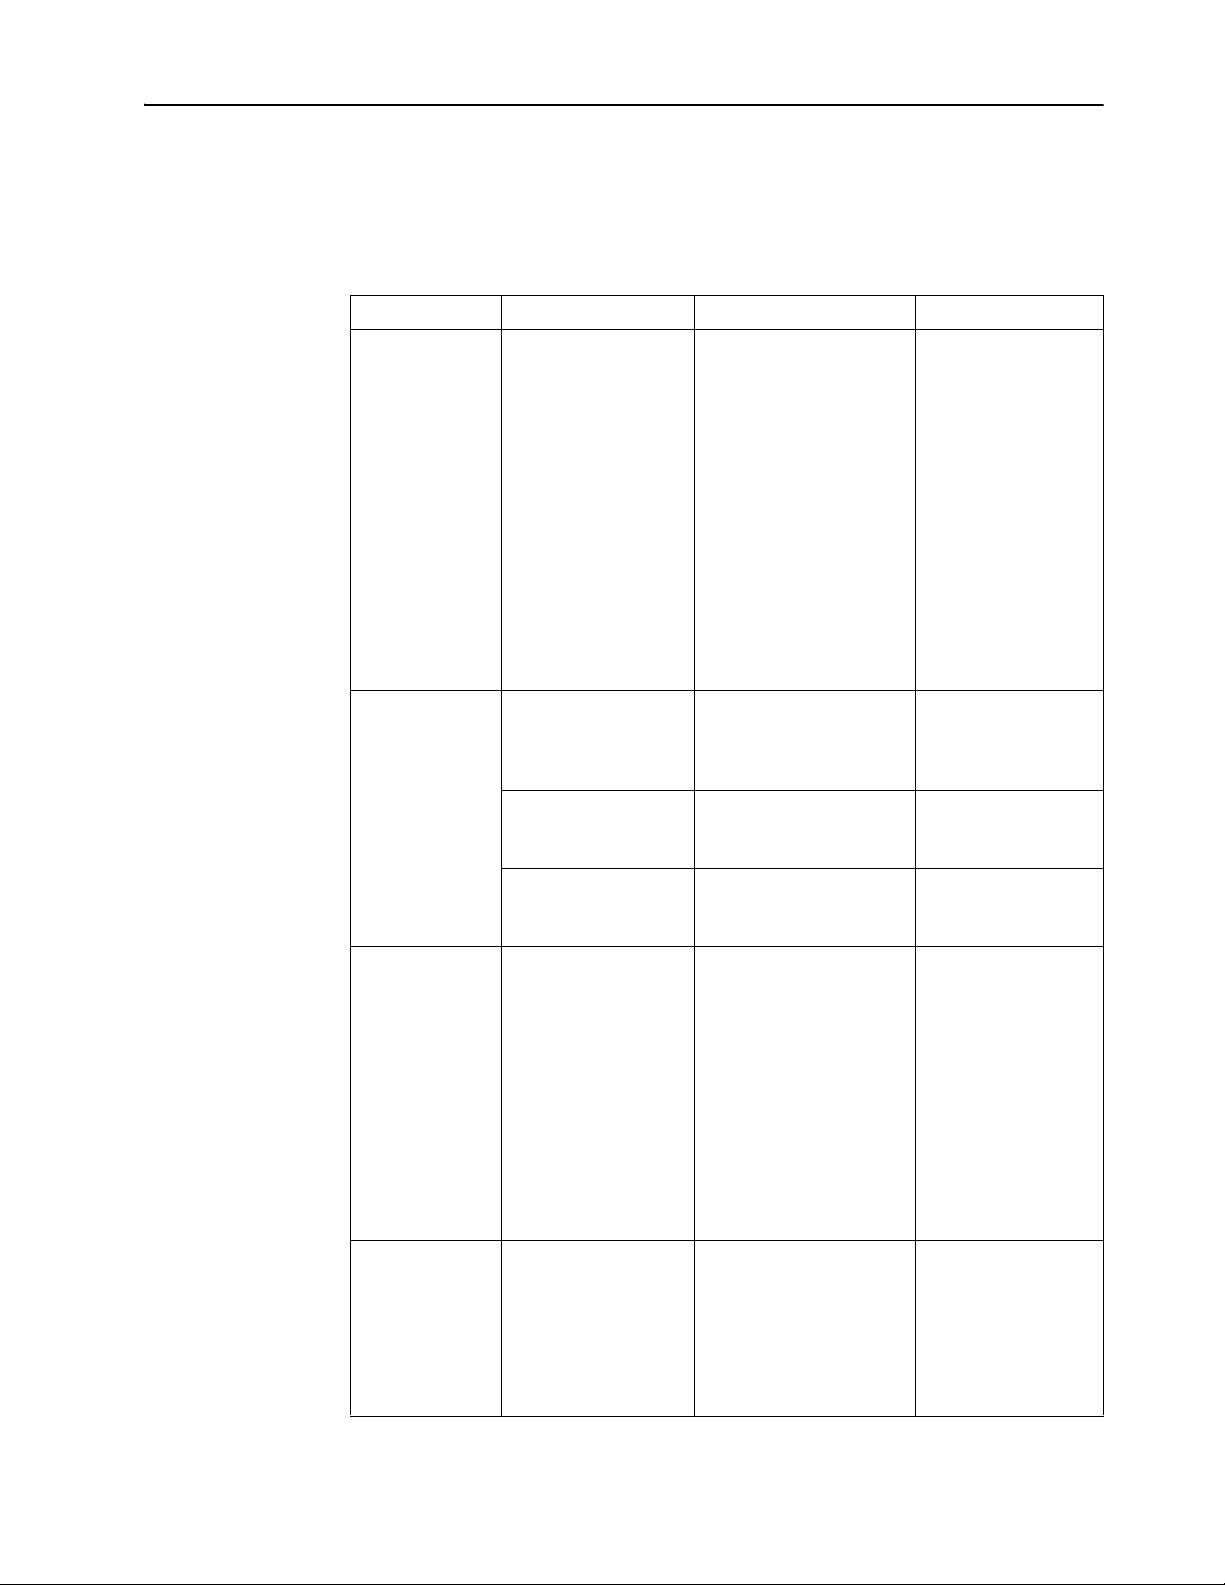
Problem Possible cause Suggested action Reference
If you have a problem setting up or using your monitor, you might be able to solve it
yourself. Before calling your dealer or Lenovo, try the suggested actions that are
appropriate to your problem.
Table 3-2. Troubleshooting
The words "Out
of Range" are
shown on the
screen, and the
power indicator
is flashing green
The image
quality is
unacceptable
The power
indicator is not
lit and there is
no image
Screen is blank
and power
indicator is
steady amber or
flashing green
The system is set to a
display mode which
is not supported by
the monitor
The video signal cable
is not connected with
the monitor or system
completely
The color settings
may be incorrect
The automatic image
setup function was
not performed
• The monitor’s
power switch is
not switched on
• The power cord is
loose or
disconnected
• There is no power
at the outlet
The monitor is in
Standby/Suspend
mode
If you are replacing an
old monitor, reconnect it
and adjust the display
mode to within the
specified range for your
new monitor
If using a Windows
system, restart the system
in safe mode, then select a
supported display mode
for your computer
If these options do not
work, contact the Support
Center
Be sure the signal cable is
firmly plugged into the
system and monitor
Select another color
setting from the OSD
menu
Perform automatic image
setup
• Be sure the power
cord is connected
properly
• Be sure the outlet has
power
• Power on the
monitor
• Try using another
power cord
• Try using another
electrical outlet
• Press any key on the
keyboard or move
the mouse to restore
operation
• Check the Power
Options settings on
your computer
“Selecting a
supported display
mode” on page 2-7
“Connecting and
turning on your
monitor” on page 1-3
“Adjusting your
monitor image” on
page 2-3
“Adjusting your
monitor image” on
page 2-3
“Connecting and
turning on your
monitor” on page 1-3
“Understanding
power management”
on page 2-8
© Copyright Lenovo 2011. © Chapter 3. 3-2
Page 19
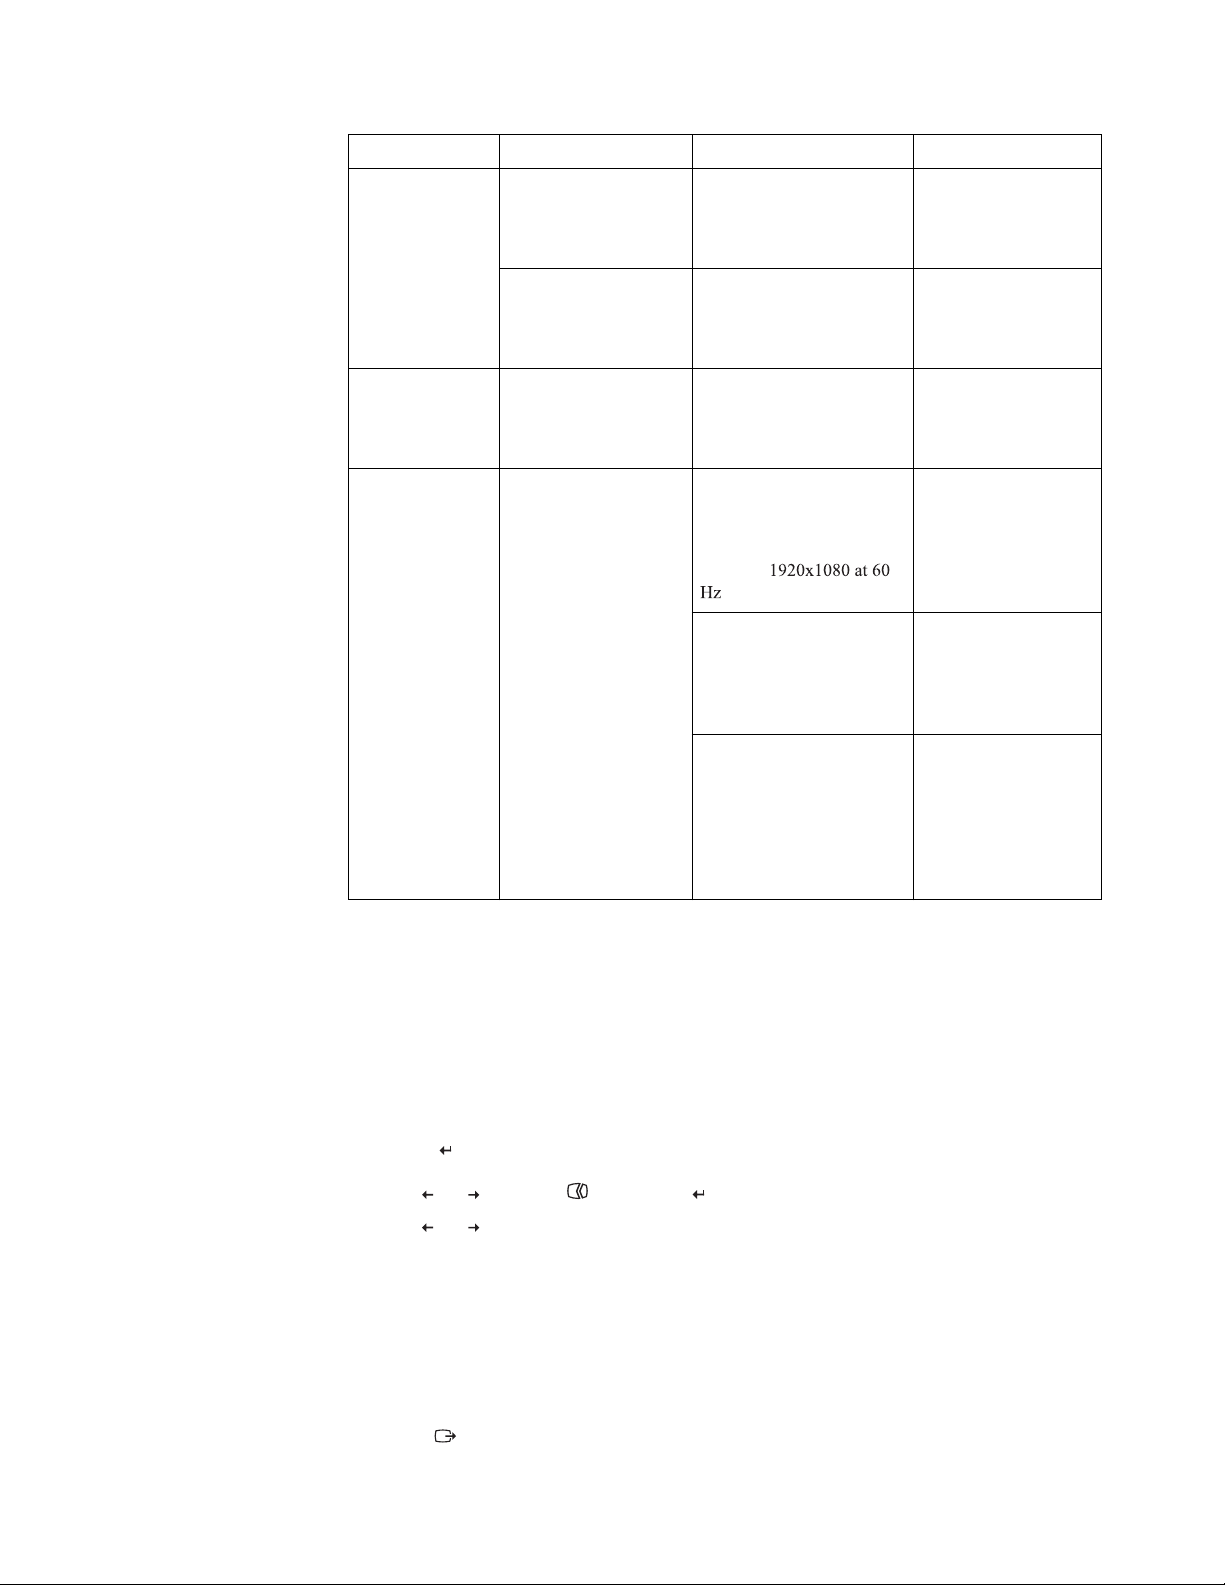
Table 3-2. Troubleshooting
Problem Possible cause Suggested action Reference
The power
indicator is
green, but there
is no image
The video signal cable
is loose or
disconnected from the
system or monitor
Be sure the video cable is
connected with the
system properly
“Connecting and
turning on your
monitor” on page 1-3
One or more of
the pixels appear
discolored
• Fuzzy lines
in text or a
blurry
image
• Horizontal
or vertical
lines
through the
image
The monitor
brightness and
contrast are at the
lowest setting
This is a characteristic
of the LCD
technology and is not
an LCD defect
• Image setup has
not been
optimized
•Your system
Display
Properties setting
have not been
optimized
Adjust the brightness and
contrast setting on the
OSD menu
If there are more than five
pixels missing, contact
the Support Center
Adjust the resolution
settings on your system
to match the native
resolution for this
monitor:
Perform automatic image
setup. If automatic image
setup does not help,
perform manual image
setup
When working in the
native resolution, you
may find additional
improvements by
adjusting the Dots Per
Inch (DPI) setting on your
system
“Adjusting your
monitor image” on
page 2-3
Appendix A,
“Service and
Support,” on page
A-1
“Adjusting your
monitor image” on
page 2-3
“Selecting a
supported display
mode” on page 2-7
See the Advanced
section of your
system’s display
properties
Manual image setup
If automatic image setup does not establish the image that you prefer, perform
manual image setup.
Note: Have your monitor powered on for about 15 minutes, until the monitor warms
up.
1. Press at the bottom of the monitor to open the OSD menu.
2. Use or to select and press to access.
3. Use or to select C
Clock and PPhas
•CClock (pixel frequency) adjusts the number of pixe
horizontal sweep. If the frequency is not correct, the screen shows vertical
stripes and the picture does not have the correct width.
•PPhase adjusts the
phase of the pixel clock signal. With a wrong phase
adjustment, the picture has horizontal disturbances in light picture.
4. When the image
5. Press
© Copyright Lenovo 2011. © Chapter 3. 3-3
no longer looks distorted, save the Clock and Phase adjustments.
to leave the OSD menu.
e adjustment.
ls scanned by one
Page 20

Manually installing the monitor driver
Below are steps for manually installing the monitor driver in Microsoft Windows 7,
Microsoft Windows Vista, Microsoft Windows XP.
Installing the monitor driver in Windows 7
To use the Plug and Play feature in Microsoft Windows 7, do the following:
Note: You must download file from the Reference and Driver CD to use the Plug and
Play feature in Windows 7.
1. Turn off the computer, all attached devices.
2. Ensure that the monitor is connected correctly.
3. Turn on the monitor and then the system unit. Allow your computer to start the
Windows 7 operating system.
4. Open the Display Properties window by clicking Start, Control Panel and
Hardware and Sound icon. and then clicking the Display icon.
5. Click the Change the display settings tab.
6. Click the Advanced Settings icon.
7. Click the Monitor tab.
8. Click the Properties button.
9. Click the Driver tab.
10. Click Update Driver, then click
11. Select Let me pick from a list of device drivers on my computer.
12. Click the Have Disk button. Click the Browse button and navigate to the
following directory:
X:\Monitor Drivers
(where X is the drive letter designator for the CD-ROM drive).
13. Select the file and click the Open butt
button.
14. Select and click Next. The files will be copied from the CD to
hard disk drive.
your
15. Close all open windows and remove the CD.
16. Restart the system. The system will automatically select the maximum refresh
rate and corresponding Color Matching Profiles.
Note: On LCD monitors, unlike CRTs, a faster refresh rate does not improve display
quality. Lenovo recommends using either 1920 x 1080 at a refresh rate of 60 Hz, or 640
x 480 at a refresh rate of 60 Hz.
Browse my computer for driver software.
on. Click the OK
© Copyright Lenovo 2011. © Chapter 3. 3-4
Page 21

Installing the monitor driver in Windows Vista
To use the Plug and Play feature in Microsoft Windows Vista, do the following:
Note: You must download file from the Reference and Driver CD to use the Plug and
Play feature in Windows Vista.
1. Turn off the computer and all attached devices.
2. Ensure that the monitor is connected correctly.
3. Turn on the monitor and then the system unit. Allow your computer to start the
Windows Vista operating system.
4. Click Start, Control Panel and then click the Hardware and Sound icon.
5. Click the Personalization icon.
6. Click the Display Settings icon.
7. Click the Advanced Settings button.
8. Click the Monitor tab.
9. Click the Properties button.
10. Click the Driver tab.
11. Click Update Driver, then click Browse the computer to find the driver
program.
12. Select Pick from the list of device driver program on the computer.
13. Click the Have Disk button. Click the Browse button and navigate to the
following directory:
X:\Monitor Drivers
(where X is the drive letter designator for the CD-ROM drive).
14. Select the file and click the Open button. Click the OK
button.
15. Select
our hard disk drive.
y
and click Next. The files will be copied from the CD to
16. Close all open windows and remove the CD.
17. Restart the system. The system will automatically select the maximum refresh
rate and corresponding Color Matching Profiles.
Note: On LCD monitors, unlike CRTs, a faster refresh rate does not improve display
quality. Lenovo recommends using either 1920 x 1080 at a refresh rate of 60 Hz, or 640
x 480 at a refresh rate of 60 Hz.
© Copyright Lenovo 2011. © Chapter 3. 3-5
Page 22

Installing the monitor driver in Windows XP
To use the Plug and Play feature in Microsoft Windows XP, do the following:
Note: You must download file from the Reference and Driver CD to use the Plug and
Play feature in Windows XP.
1. Turn off the computer and all attached devices.
2. Ensure that the monitor is connected correctly.
3. Turn on the monitor and then the system unit. Allow the system to boot into
Windows XP.
4. Open the Display Properties window by clicking Start, Control Panel and then
double-clicking the Display icon.
5. Click the Settings tab.
6. Click the Advanced button.
7. Click the Monitor tab.
8. Click the Properties button.
9. Click the Drivers tab.
10. Open the Hardware Update Wizard window by clicking on Update Driver.
11. Select Install from a list or Specific location (Advanced) and then click Next.
12. Select Don't search. I will choose the driver to install option and then click Next.
13. Click the Have Disk button. Click on the Browse button and navigate to the
following directory:
X:\Monitor Drivers
(where X is the drive letter designator for the CD-ROM drive).
14. Select the file and click the Open button. Click the OK
button.
15. Select and click Next. The files will be copied from the CD to
your hard disk drive.
16. Close all open windows and remove the CD.
17. Restart the system. The system will automatically select the maximum refresh
rate and corresponding Color Matching Profiles.
Note: On LCD monitors, unlike CRT, a faster refresh rate does not improve display quality.
Lenovo recommends using either 1920 x 1080 at a refresh rate of 60 Hz, or 640 x 480 at a
refresh rate of 60 Hz.
© Copyright Lenovo 2011. © Chapter 3. 3-6
Page 23
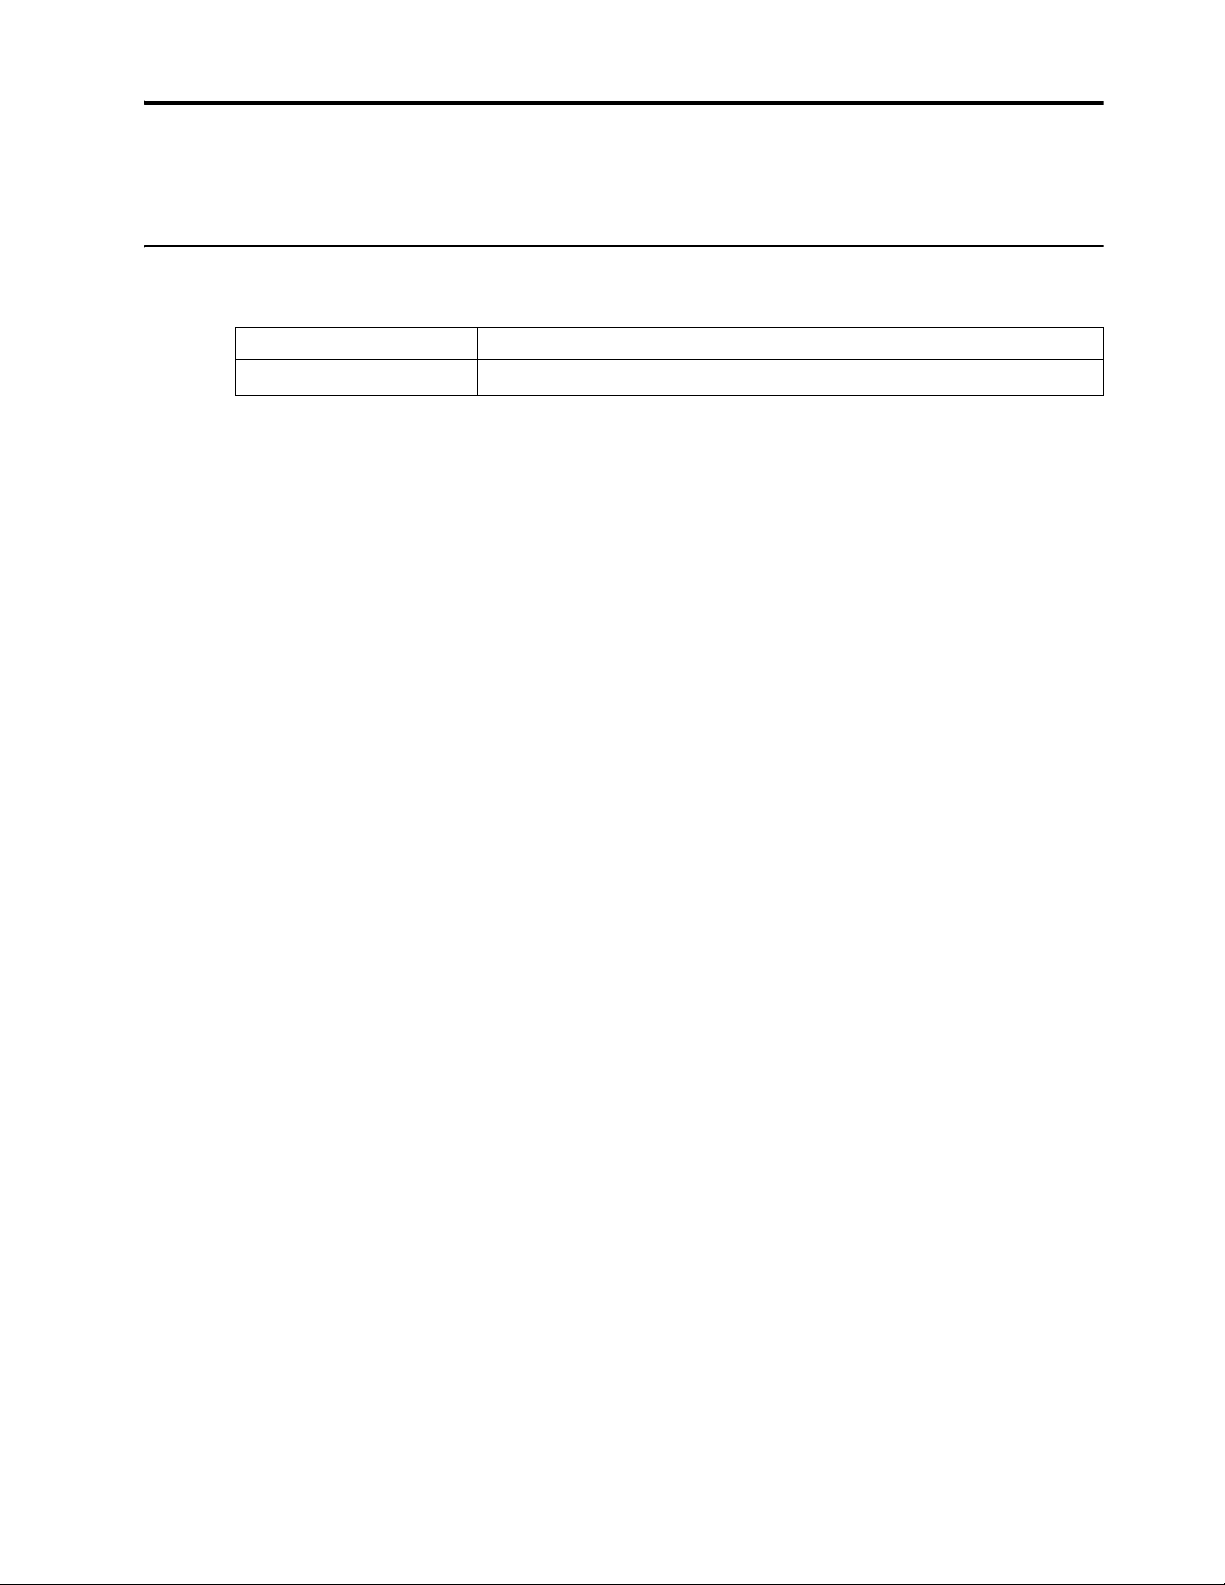
Appendix A. Service and Support
Country or Region Telephone Number
Telephone technical support
China
800-810-8888, (010)82879425
© Copyright Lenovo 2011. © Appendix A. A-1
Page 24

Appendix B. Notices
Any reference to a Lenovo product, program, or service is not intended to state or
imply that only that Lenovo product, program, or service may be used. Any
functionally equivalent product, program, or service that does not infringe any
Lenovo intellectual property right may be used instead. However, it is the user's
responsibility to evaluate and verify the operation of any other product, program, or
service.
This information could include technical inaccuracies or typographical errors.
Changes are periodically made to the information herein; these changes will be
incorporated in new editions of the publication. Lenovo may make improvements
and/or changes in the product(s) and/or the program(s) described in this publication
at any time without notice.
Lenovo may use or distribute any of the information you supply in any way it
believes appropriate without incurring any obligation to you.
Any references in this publication to non-Lenovo Web sites are provided for
convenience only and do not in any manner serve as an endorsement of those Web
sites. The materials at those Web sites are not part of the materials for this Lenovo
product, and use of those Web sites is at your own risk.
Any performance data contained herein was determined in a controlled environment.
Therefore, the result obtained in other operating environments may vary significantly.
Some measurements may have been made on development-level systems and there is
no guarantee that these measurements will be the same on generally available
systems. Furthermore, some measurements may have been estimated through
extrapolation. Actual results may vary. Users of this document should verify the
applicable data for their specific environment.
© Copyright Lenovo 2011. © Appendix B. B-1
Page 25
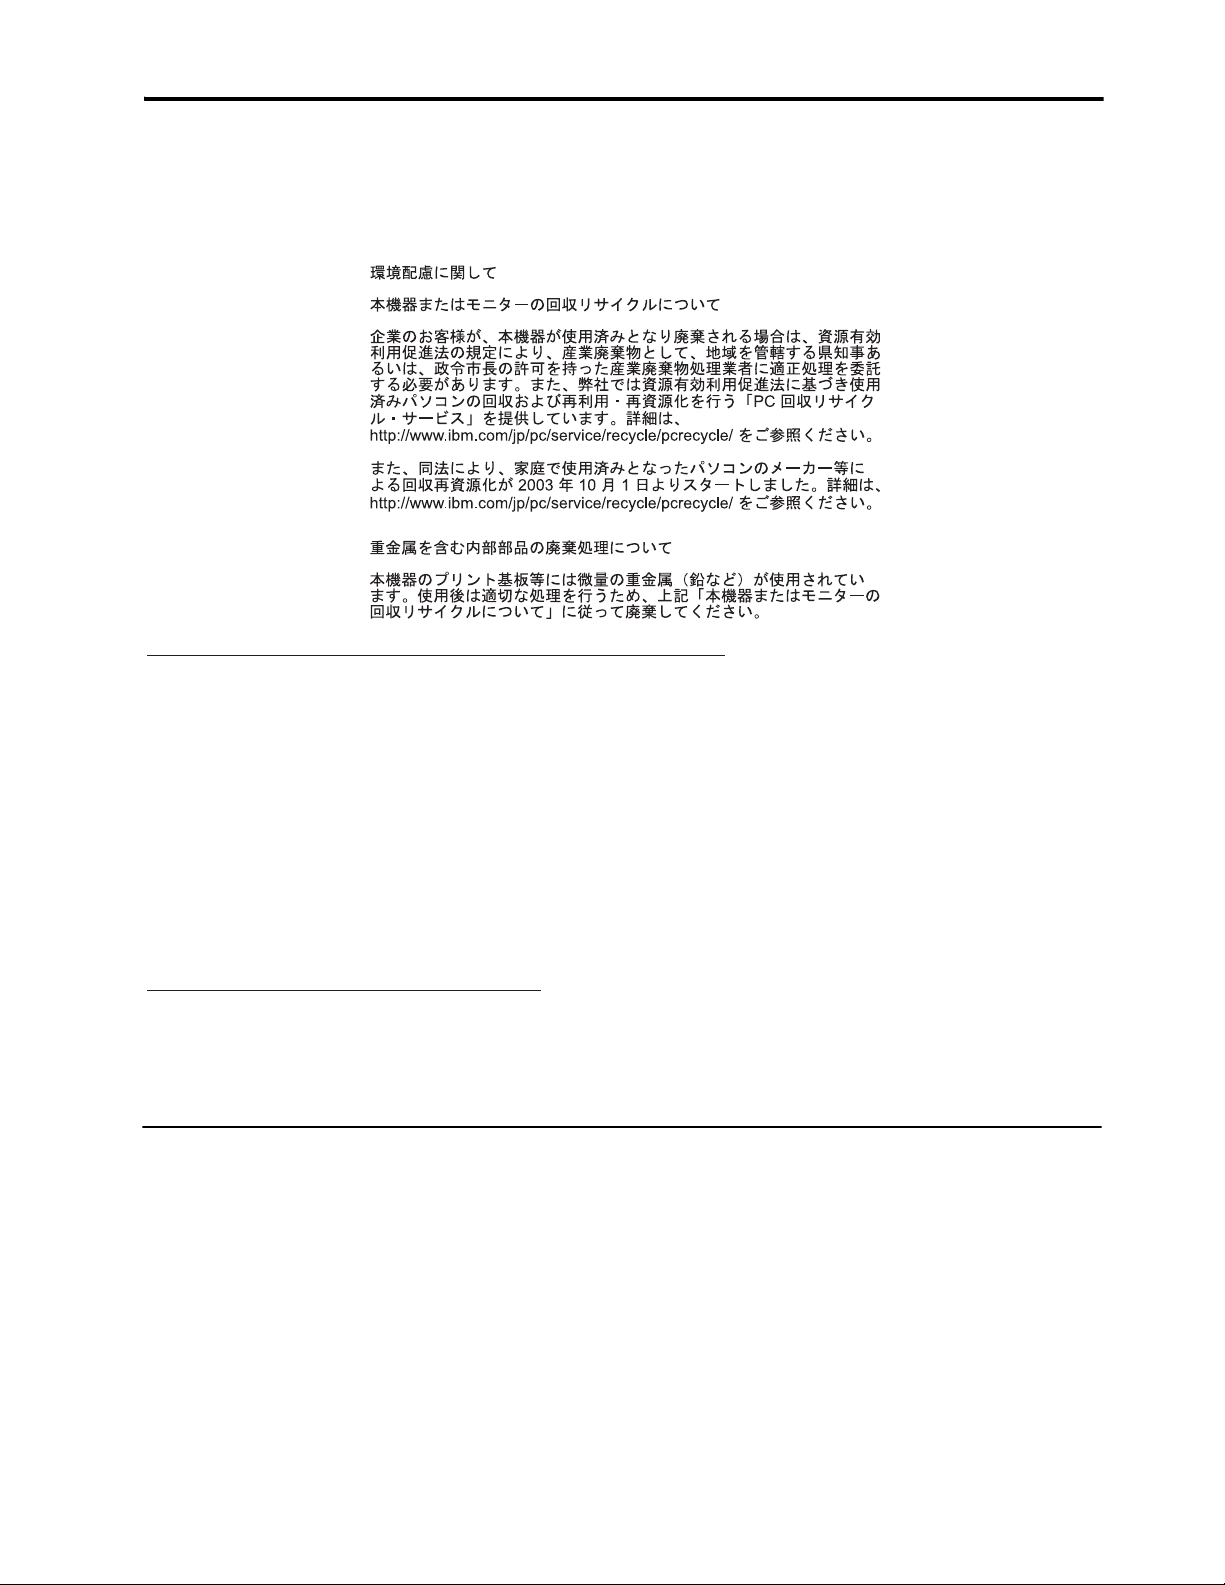
Recycling information
Lenovo encourages owners of information technology (IT) equipment to responsibly recycle their
equipment when it is no longer needed. Lenovo offers a variety of programs and services to assist
equipment owners in recycling their IT products. For information on recycling Lenovo products, go to:
http://www.lenovo.com/lenovo/environment/recycling
Collecting and recycling a disused Lenovo computer or monitor
If you are a company employee and need to dispose of a Lenovo computer or monitor that is the
property of the company, you must do so in accordance with the Law for Promotion of Effective
Utilization of Resources. Computers and monitors are categorized as industrial waste and should be
properly disposed of by an industrial waste disposal contractor certified by a local government. In
accordance with the Law for Promotion of Effective Utilization of Resources, Lenovo Japan provides,
through its PC Collecting and Recycling Services, for the collecting, reuse, and recycling of disused
computers and monitors. For details, visit the Lenovo Web site at www.ibm.com/jp/pc/service/recycle/
pcrecycle/. Pursuant to the Law for Promotion of Effective Utilization of Resources, the collecting and
recycling of home-used computers and monitors by the manufacturer was begun on October 1, 2003. This
service is provided free of charge for home-used computers sold after October 1, 2003. For details, visit
the Lenovo Web site at www.ibm.com/jp/pc/service/recycle/personal/.
Disposing of Lenovo computer components
Some Lenovo computer products sold in Japan may have components that contain heavy metals or other
environmental sensitive substances. To properly dispose of disused components, such as a printed circuit
board or drive, use the methods described above for collecting and recycling a disused computer or
monitor.
Trademarks
The following terms are trademarks of Lenovo in the United States, other countries, or
both:
Lenovo
Lenovo logo
ENERGY STAR and the ENERGY STAR logo are registered US trademarks.
Other company, product, or service names may be trademarks or service marks of
others.
© Copyright Lenovo 2011. © Appendix B. B-2
 Loading...