

Page 1

Read the safety notices and important tips in the
included manuals before using your computer.
Lenovo FLEX 6
FLEX 6-11IGM
User Guide
Read the safety notices and important tips in the
included manuals bef
ore using your computer.
Page 2

Notes
• Before using the product, be sure to read Lenovo Safety and General Information
Guide first.
• The latest electronic compliance and environmental information are available
from the Le
novo compliance information Web sites.
- To view compliance information go to:
http://www.lenovo.com/compliance.
- To download environmental information go to:
http://www.lenovo.com/ecodeclaration.
• Some instructions in this guide may assu
me that you are using Windows® 10.
If you are using another Windows operating system, some operations may be
slightly different. If you are using other operating systems, some operations
may not apply to you.
• The features described in this guide are common to most models. Some
ures may not be available on your computer or your computer may include
feat
features that are not described in this user guide.
• The illustrations in this manual may diff
er from the actual product. The
screenshots of operating system are for reference only. Please refer to the actual
product.
Regulatory Notice
• For details, refer to Guides & Manuals at http://support.lenovo.com.
First Edition (November 2017)
© Copyright Lenovo 2017.
LIMITED AND RESTRICTED RIGHTS NOTICE: If data or software is delivered pursuant to a General
Services Administration “GSA” contract, use, reproduction, or disclosure is subject to restrictions set
forth in Contract No. GS-35F-05925.
Page 3

Contents
Chapter 1. Getting to know your computer ......................................... 1
Top view ..................................................................................................................... 1
Left-side view ............................................................................................................ 8
Right-side view ........................................................................................................ 12
Bottom view ............................................................................................................. 14
Chapter 2. Starting to use Windows 10 ............................................. 15
Configuring the operating system for the first time .......................................... 15
Operating system interfaces .................................................................................. 15
Putting the computer to sleep or shutting it down ............................................ 19
Touch screen operation(on select models) .......................................................... 21
Connecting to a wireless network ........................................................................ 24
Get help from Windows ......................................................................................... 25
Chapter 3. Recovery system ...............................................................26
Push-button reset .................................................................................................... 26
Chapter 4. Troubleshooting ................................................................28
Frequently asked questions ................................................................................... 28
Troubleshooting ...................................................................................................... 30
Trademarks ..........................................................................................33
i
Page 4

Page 5
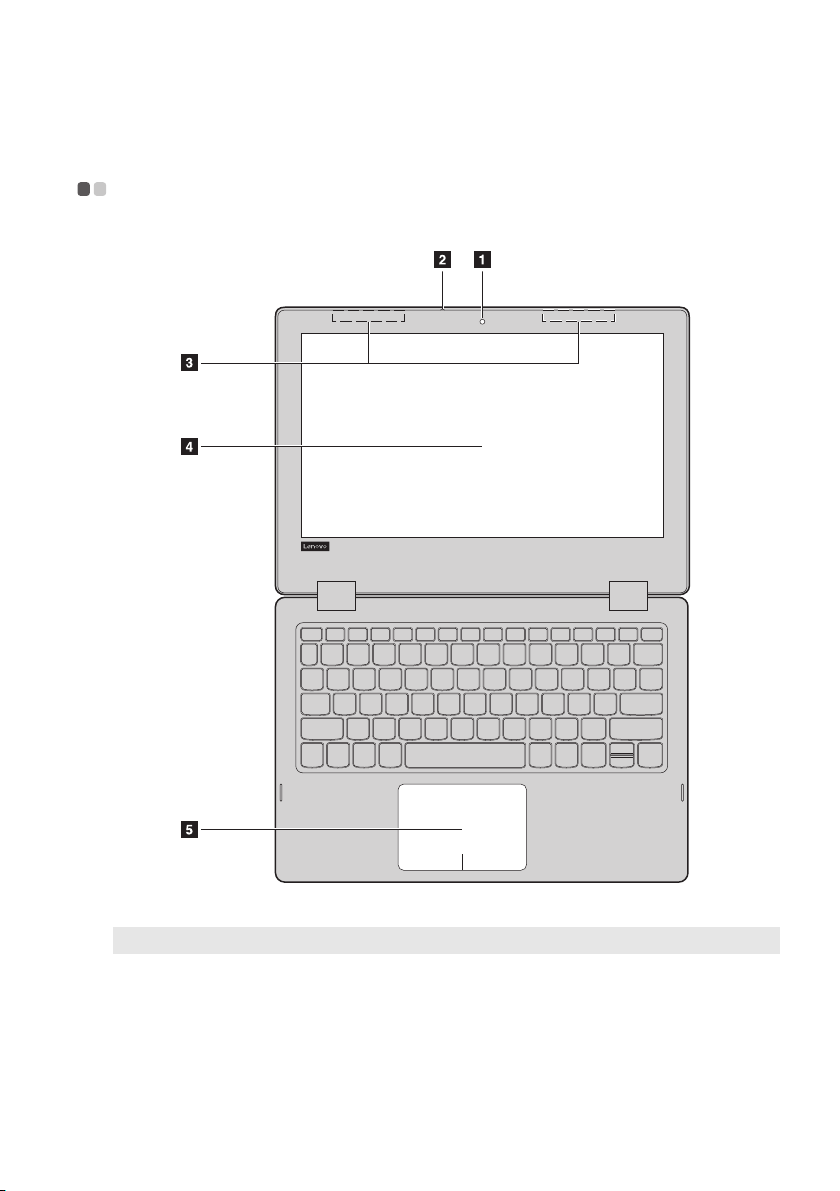
Chapter 1. Getting to know your computer
Top view - - - - - - - - - - - - - - - - - - - - - - - - - - - - - - - - - - - - - - - - - - - - - - - - - - - - - - - - - - - - - - - - - - - - - - - - -
Note: The dashed areas indicate parts that are not visible externally.
Attention:
• When closing the display panel, be careful not
the display panel and the keyboard. Otherwise, the display panel may be damaged.
to leave pens or any other objects in between
1
Page 6

Chapter 1. Getting to know your computer
a Integrated
Use the camera for video communication.
camera
b Built-in
microphone
c Wireless LAN
antennas
d Multi-touch
screen (on select
models)
e Touch pad
Note: You can enable/disable the touch pad by pressing F6 ( ).
Capture sound which can be used for video conferencing,
voice narration, or audio recording.
Connect to a wireless LAN adapter to send and receive
wireless radio signals.
The LCD display with LED backlight provides brilliant
visual output. Multi-touch function is available on this
display.
The touch pad functions as a conventional mouse.
Touch pad: To move the
fingertip over the pad in the direction in which you want
the pointer to move.
Touch pad buttons: The functions of
correspond to those of the left/right mouse button on a
conventional mouse.
pointer on the screen, slide your
the left/right side
2
Page 7

Chapter 1. Getting to know your computer
Using the keyboar
d
Hotkeys
You can access certain system settings quickly by pressing the appropriate
hotkeys.
Mutes/unmutes the sound.
:
Decreases the volume
:
level.
Increases the volume level.
:
Enables/disables
:
microphone.
Enables/disables airplane
:
mode.
Enables/disables camera.
:
Locks the LCD screen.
:
Enables the external
projector or dangles the
:
external display.
Refreshes page.
:
Enables/disables the touch
:
pad.
Note: If you changed the Hotkey Mode from Enabled to Disabled in the BIOS setup utility,
you will need to press the Fn key in combination with the appropriate hotkey.
Decreases display
:
brightness.
Increases display
:
brightness.
3
Page 8
Chapter 1. Getting to know your computer
1
2
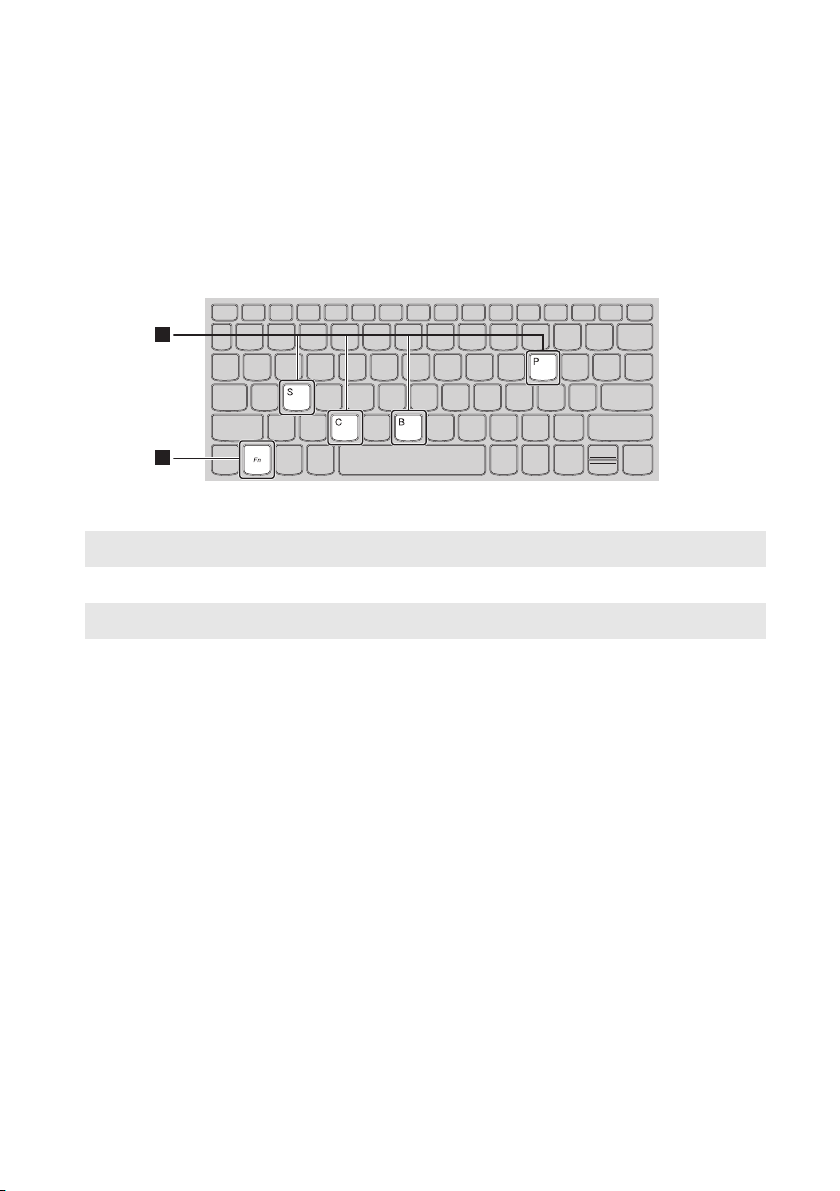
Function key combinations
Through the use of the function keys, you can change operational features
instantly. To use this function, press and hold Fn a, then press one of the
function keys b.
The following describes the features of each function key.
Fn + B: Activates the break function.
Fn + P:
Activates the pause function.
Fn + C: Enables/Disables the scroll lock.
Fn + S: Activates the system request.
4
Page 9

Chapter 1. Getting to know your computer
Positioning the display panel
The display panel can be opened to any angle up to 360 degrees.
Notebook Mode
Suitable for tasks that require a keyboard and mouse (such as creating
documents, writing e-mails, and so on).
5
Page 10
Chapter 1. Getting to know your computer
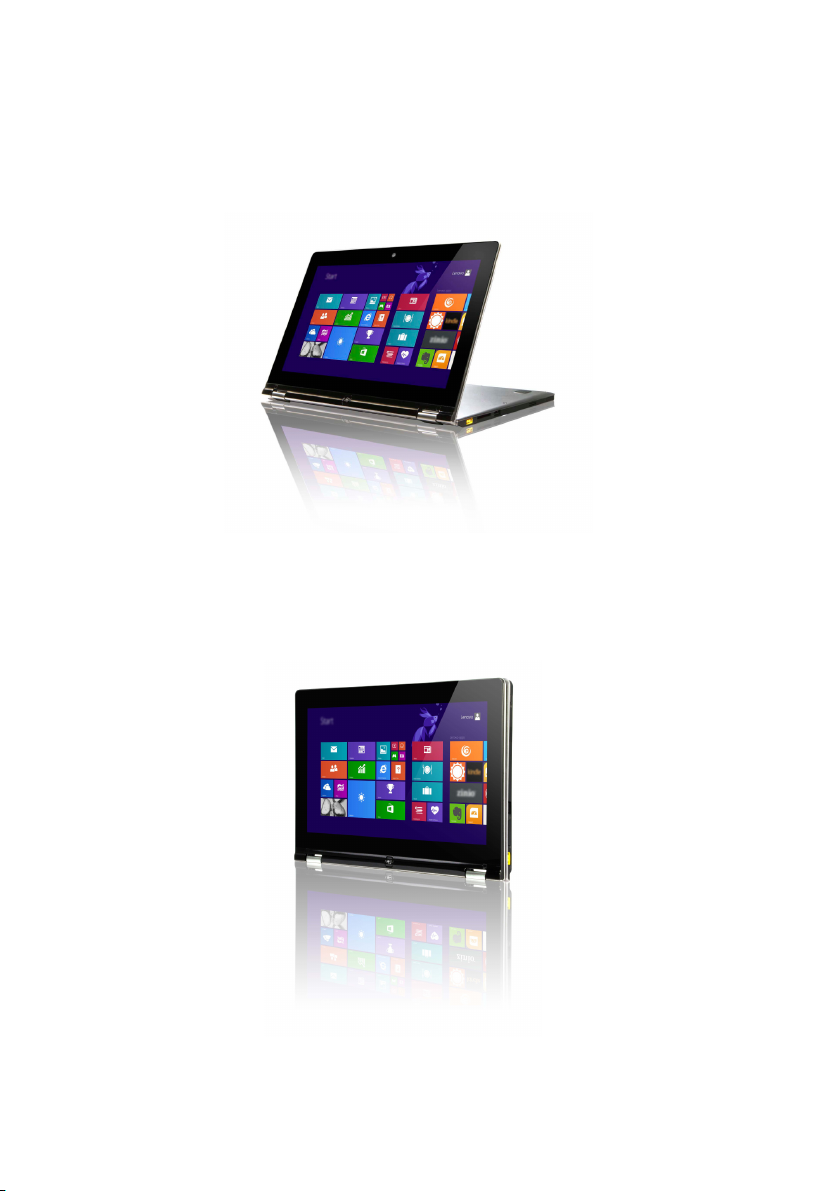
Stand Mode (Theater Mode)
Suitable for tasks that require little or no touch (such as viewing photos or
playing videos).
Tablet Mode
Suitable for tasks that require touching the screen often (such as surfing the
Web, playing games, and so on).
6
Page 11
Chapter 1. Getting to know your computer
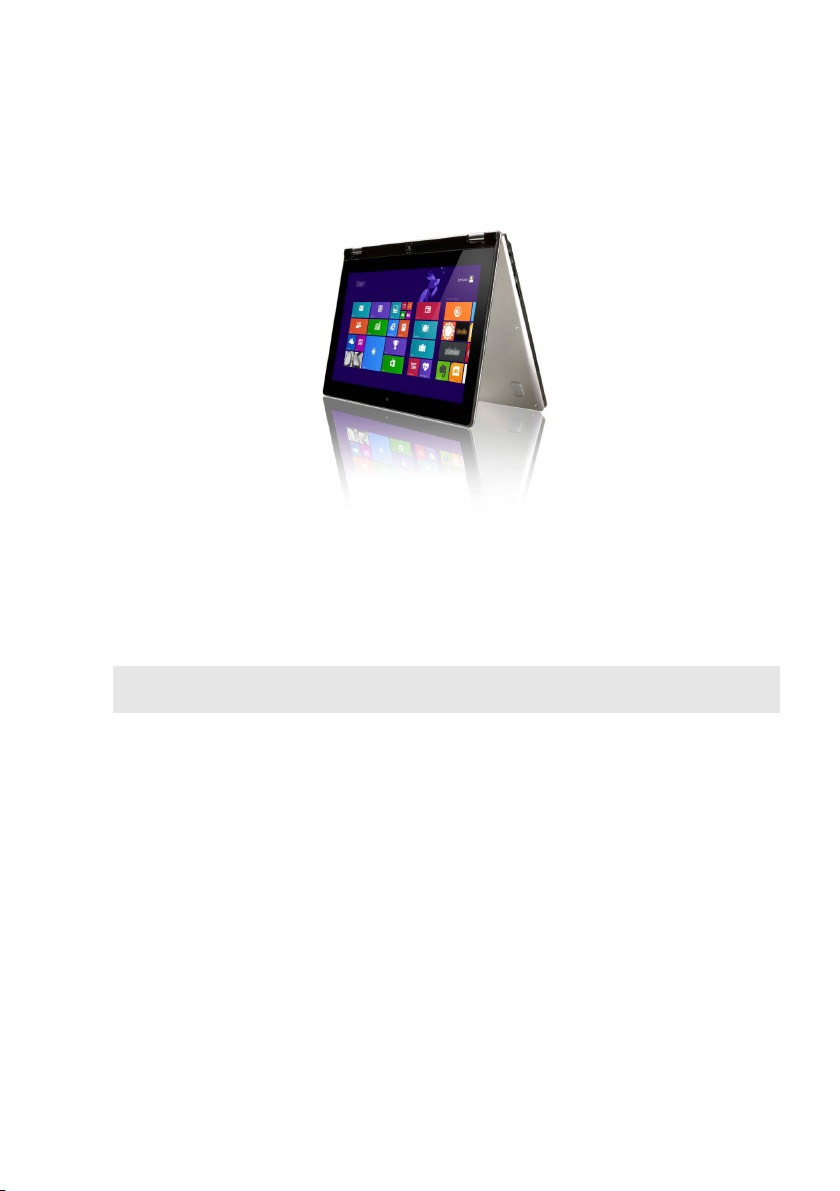
Tent Mode (Presentation Mode)
Suitable for tasks that require limited interaction with the touch screen (such
as displaying graphs or PowerPoint presentations).
Attention:
• Do not open
damaged.
the display with too much force, otherwise the panel or hinges may be
Note: The keyboard and touch pad are automatically locked when the screen is opened
beyond 190 degrees (approximately).
7
Page 12
Chapter 1. Getting to know your computer
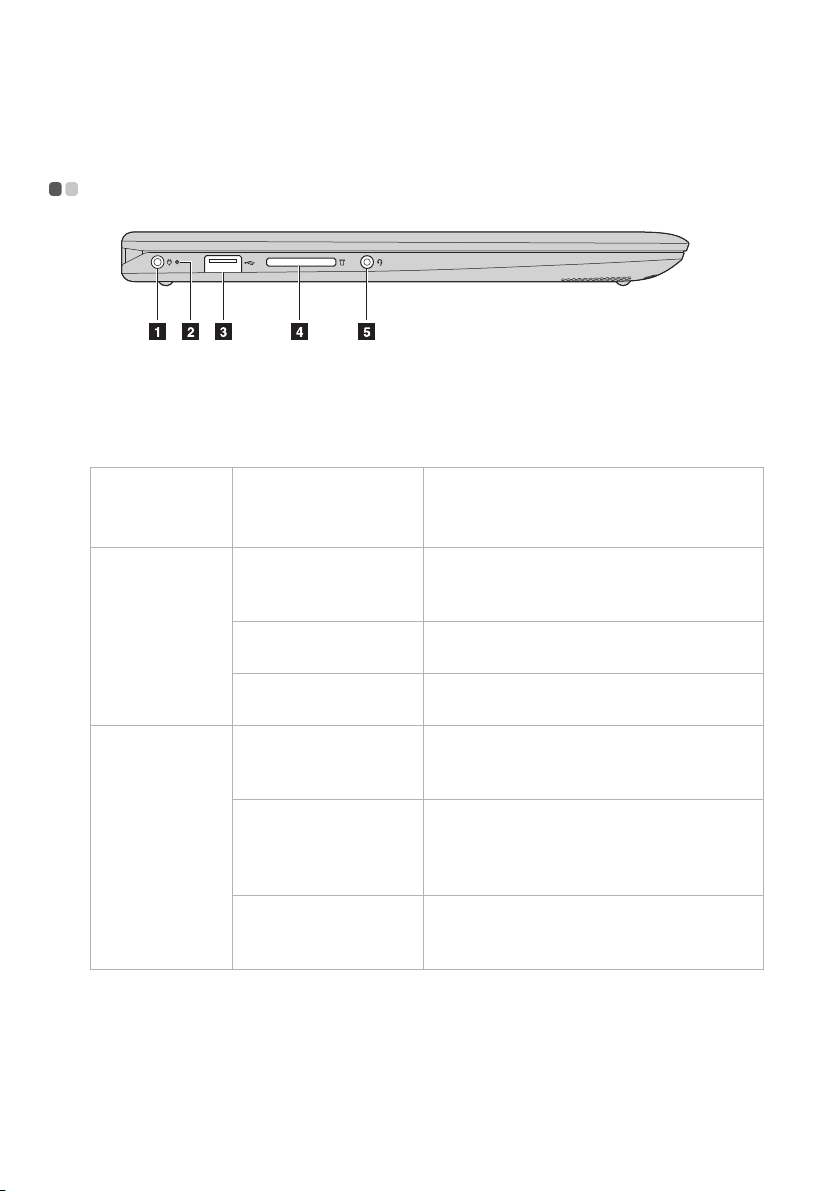
Left-side view - - - - - - - - - - - - - - - - - - - - - - - - - - - - - - - - - - - - - - - - - - - - - - - - - - - - - - - - - - - - - - -
a
AC power adapter
jack
b Battery/Charging
status LED
AC power
LED status Meaning
adapter
status
Off The computer is in sleep mode or turned
Disconnected
Solid amber The battery has between 5% and 20%
Fast blinking amber The battery has between 1% and 5%
Slow blinking amber The battery is being charged. When
Slow blinking white The battery has between 20% and 80%
Connected
Solid white The battery has more than 80% charge,
Connects to the AC power adapter.
off; The battery has more than 20%
charge.
charge.
charge.
battery charge reaches 20%, the blinking
color changes to white.
e and is
charg
battery reaches 80% charge the light will
stop blinking.
charging will continue until the
is fully charged.
still charging. When the
b
attery
8
Page 13

Chapter 1. Getting to know your computer
Notes:
c USB 2.0 port
Note: For details, see “Connecting USB devices” on page 11.
d Memory card slot
Note: For details, see “Using memory cards (not supplied)” on page 13.
e Combo audio
Connects to USB devices.
Insert memory cards (not supplied) here.
Connects to headsets.
jack
• The combo audio jack does not support conventional microphones.
• The recording function may not be supported if third-party headphones or headsets are
connected, due to different industry standards.
9
Page 14
Chapter 1. Getting to know your computer
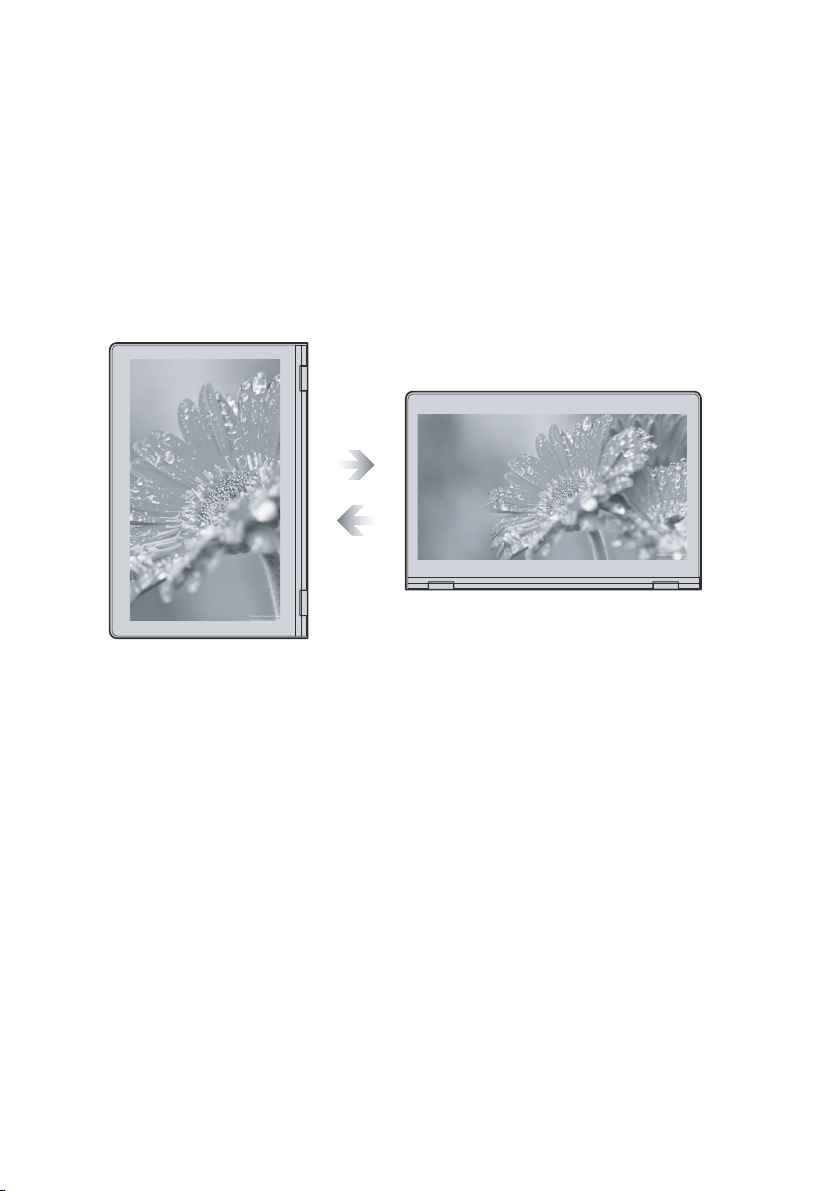
Portrait
Landscape
Screen orientation
You can rotate the display panel to your preferred orientation.
• The orientation of the display automaticall
portrait and landscape modes) depending upon how you hold the
computer.
y changes (alternating between
10
Page 15
Chapter 1. Getting to know your computer
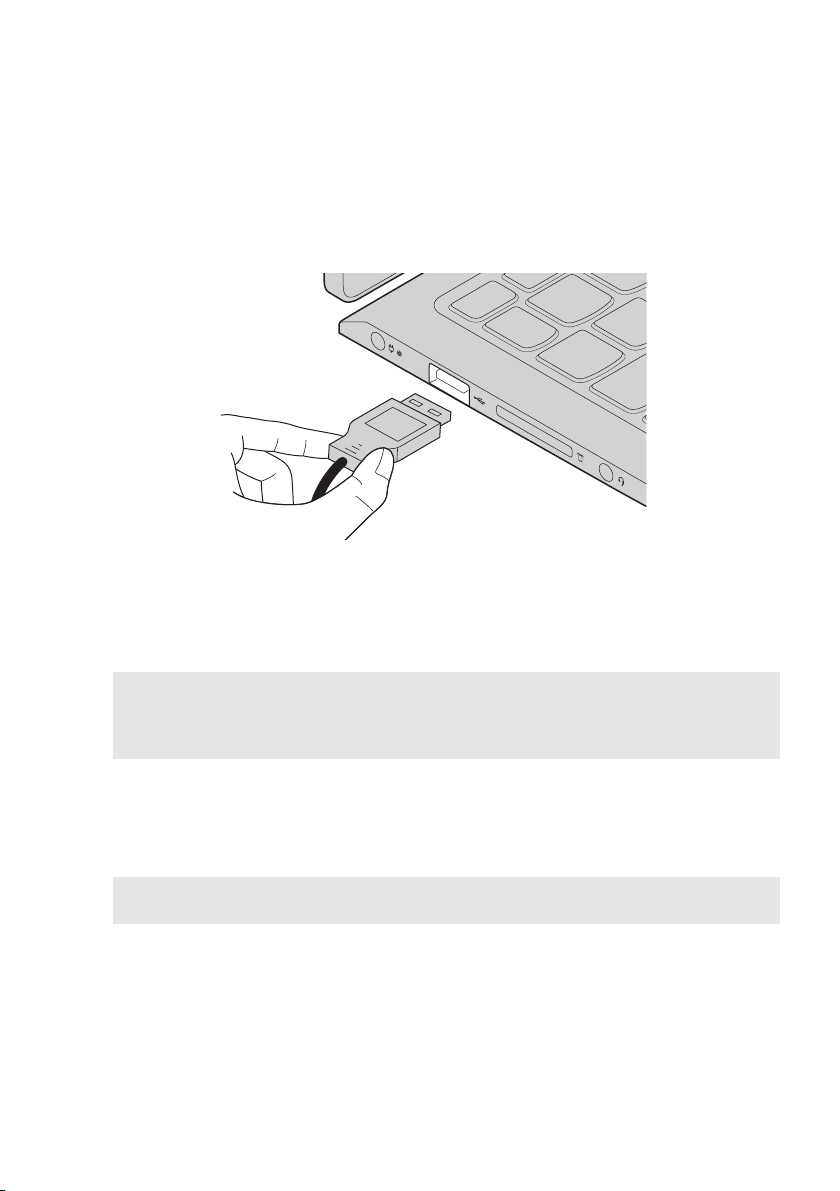
Connecting USB devices
You can connect a USB device to your computer by inserting its USB plug
(Type A) into the USB port on your computer.
The first time you plug a USB device into a particular USB port on your
computer, Windows automatically installs a driver for that device. After the
driver has been installed, you can disconnect and reconnect the device
without performing any additional steps.
Note: Typically, Windows detects a new device after it has been connected, and then installs
the driver automatically. However, some devices may require you to install the driver
before connecting. Check the documentation provided by the device’s manufacturer
before connecting the device.
Before disconnecting a USB storage device, make sure your computer has
finished transferring data to that device. Click the Safely Remove Hardware
and Eject Media icon in the Windows notification area to remove the device
before disconnecting.
Note: If your USB device uses a power cord, connect the device to a power source before
connecting it. Otherwise, the device may not be recognized.
11
Page 16
Chapter 1. Getting to know your computer
Notes:
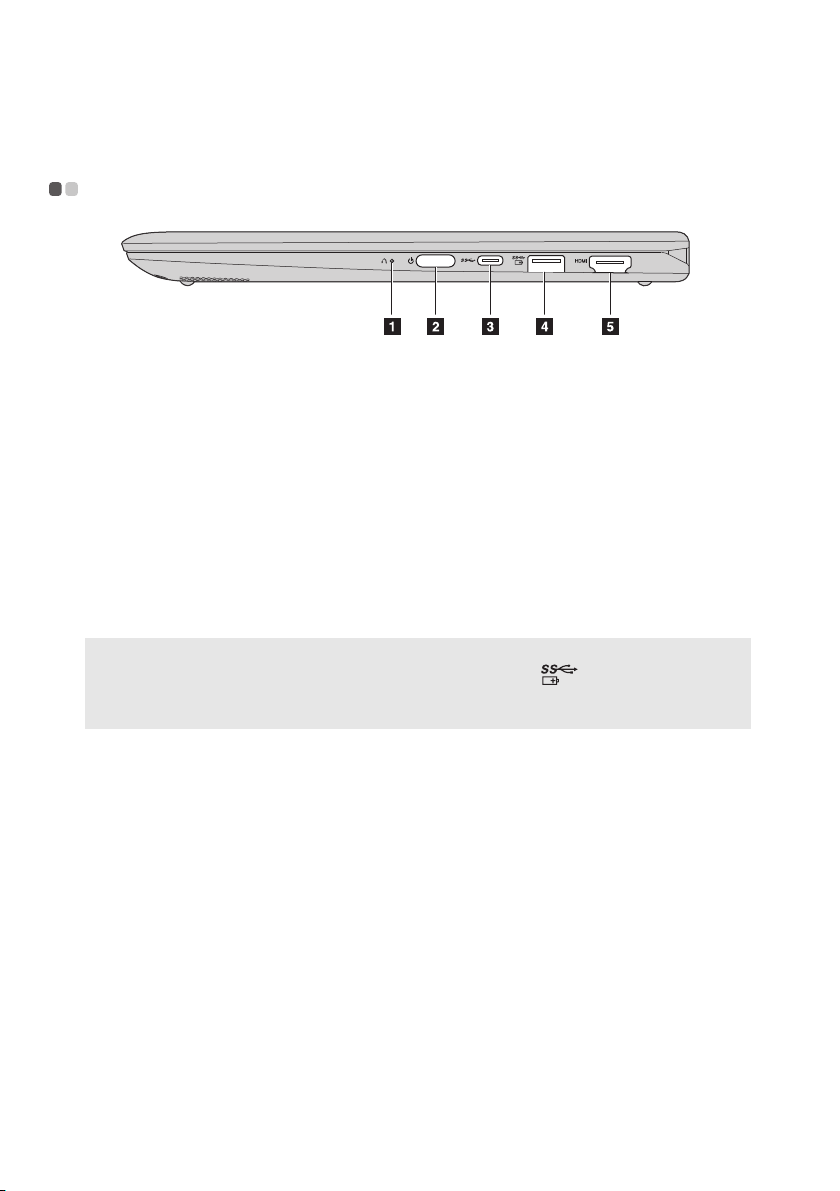
Right-side view - - - - - - - - - - - - - - - - - - - - - - - - - - - - - - - - - - - - - - - - - - - - - - - - - - - - - - - - - - - -
a Novo button
b Power button
c Type-C port
d USB 3.0 port
• If the battery charge is more than 20%, the USB port with a ( ) mark supports
charging of an external USB device, even when the computer is turned off.
• For details, see “C
e HDMI port
When the computer is off, press this button to start the
System Recovery or to enter the boot menu.
Press this button to turn on/off the computer.
When the computer is on, if you press this button, the
computer will enter sleep mode, if you press and hold it
for about 4 seconds, the computer will be turned off, and if
you press and hold it for about 8 seconds, the BIOS settings
will return to its default status.
Type-C port supports:
• USB 3.0 only
Connects to USB devices.
onnecting USB devices” on page 11.
Connects to devices with HDMI input such as a TV or a
display.
12
Page 17

Chapter 1. Getting to know your computer
Notes:
Using memory cards (not supplied)
Your computer supports the following types of memory cards:
• Secure Digital (SD) card
• Secure Digital High Capacity (SDHC) card
•
SD eXtended Capacity (SDXC) card
• MultiMediaCard (MMC)
• Insert only one card in the slot at a time.
• This card reader does not support SDIO devices (e.g., SDIO Bluetooth, etc.).
Inserting a memory card
Insert the memory card until it touches the bottom of the slot.
Removing a memory card
Gently pull the memory card out of the memory card slot.
Note: Before removing the memory card, disable it by using the Windows safely remove
hardware and eject media utility to avoid data corruption.
13
Page 18
Chapter 1. Getting to know your computer
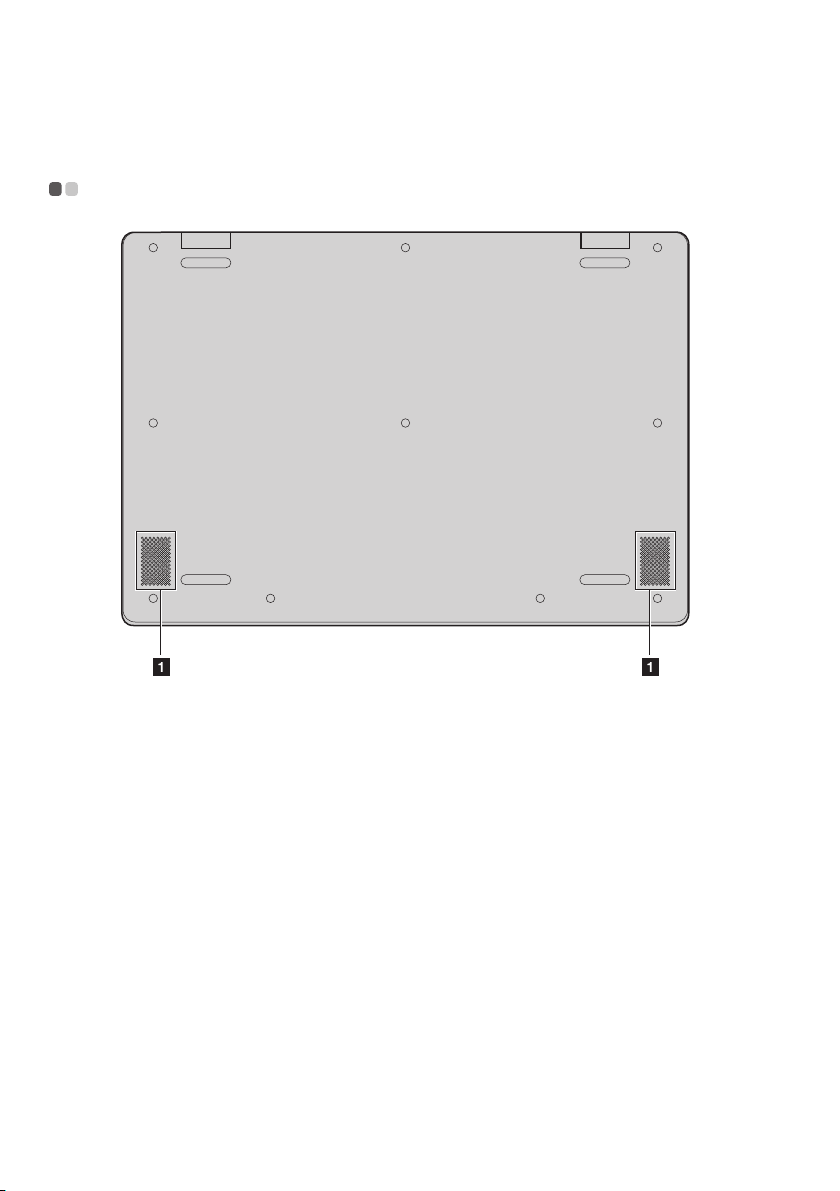
Bottom view - - - - - - - - - - - - - - - - - - - - - - - - - - - - - - - - - - - - - - - - - - - - - - - - - - - - - - - - - - - - - - - - - -
a Speakers
14
Provide audio output.
Page 19
Chapter 2. Starting to use Windows 10
Configuring the operating system for the
first time - - - - - - - - - - - - - - - - - - - - - - - - - - - - - - - - - - - - - - - - - - - - - - - - - - - - - - - - - - - - - - - - - - - - - - - - -
You may need to configure the operating system when it is first used. The
configuration process may include the procedures below:
• Accepting the end user license agreement
• Configuring the Internet connection
• Registering the operating system
• Creating a user account
Operating system interfaces - - - - - - - - - - - - - - - - - - - - - - - - - - - - - - - - - - - - -
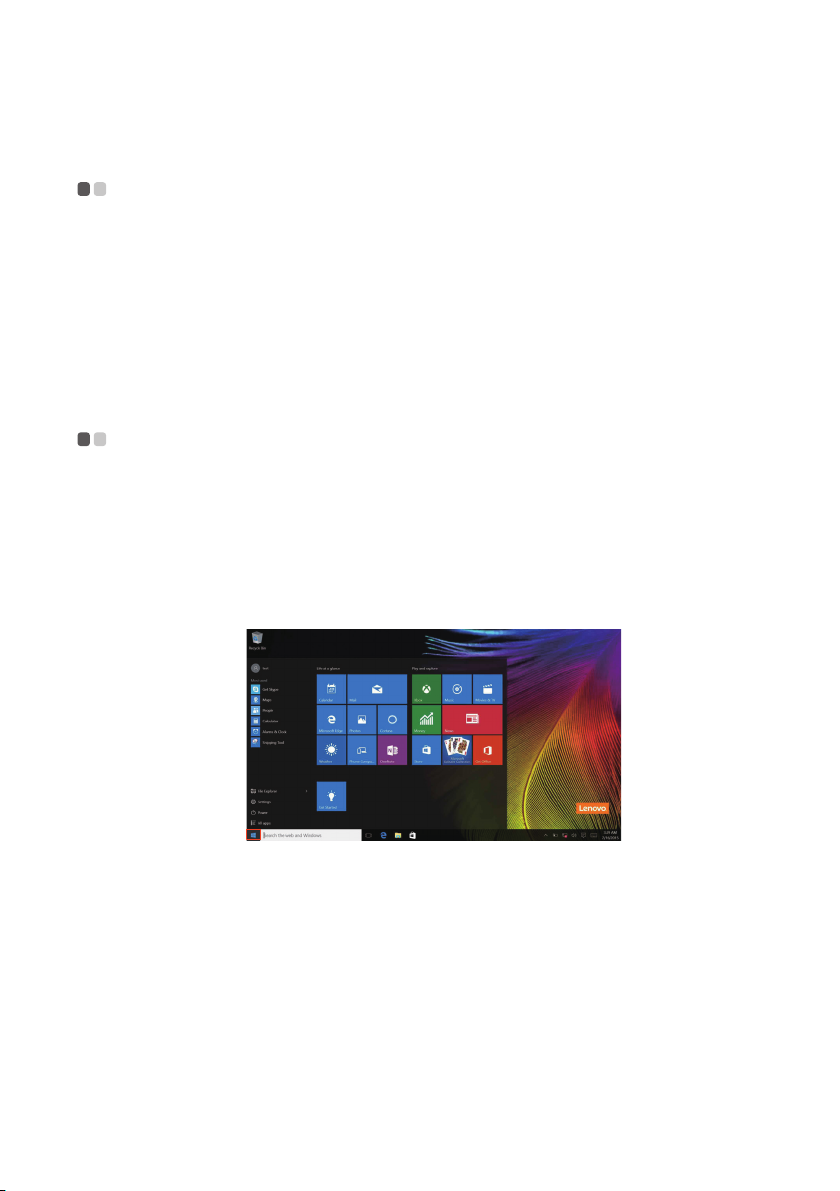
The return of the Start menu
Windows 10 comes with a powerful and useful start menu. To open the start
menu, do one of the following:
• Select the Start button in the lower-left corner, the Start menu is displayed.
• Press the Windows key on the keyboard.
15
Page 20
Chapter 2. Starting to use Windows 10
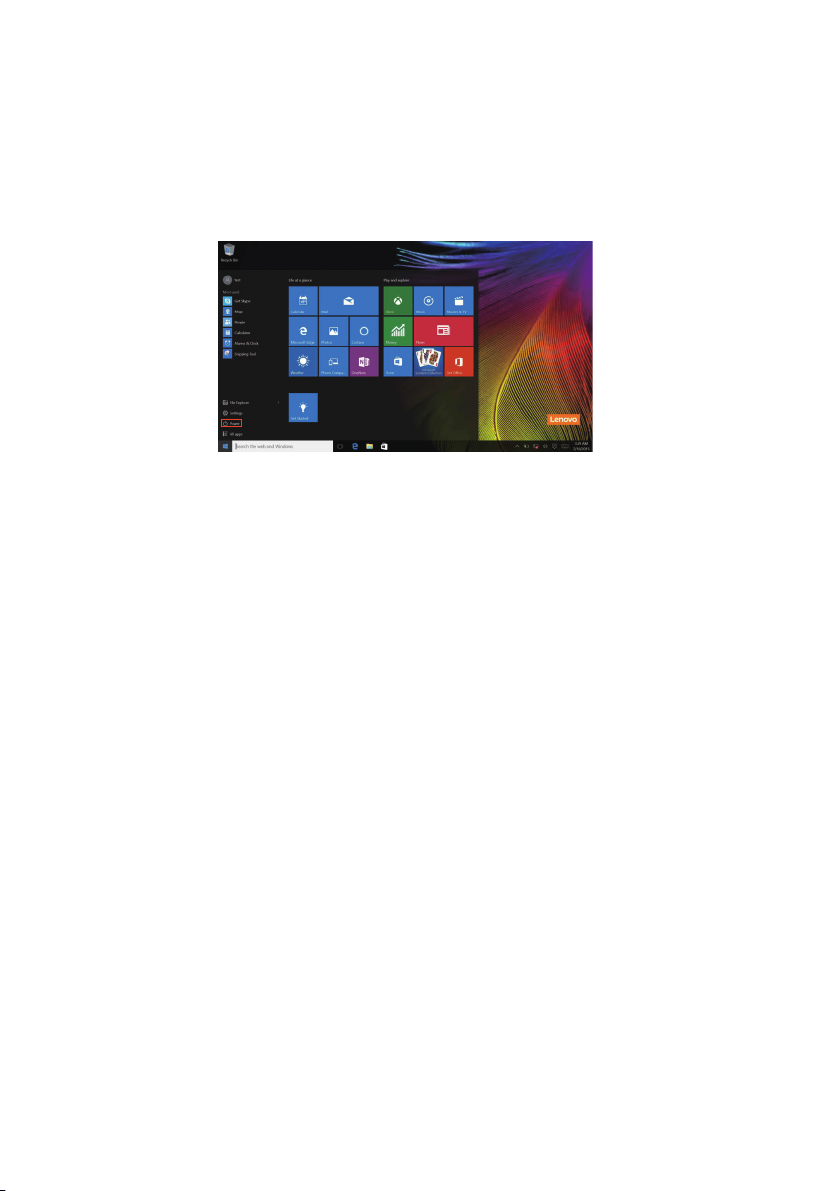
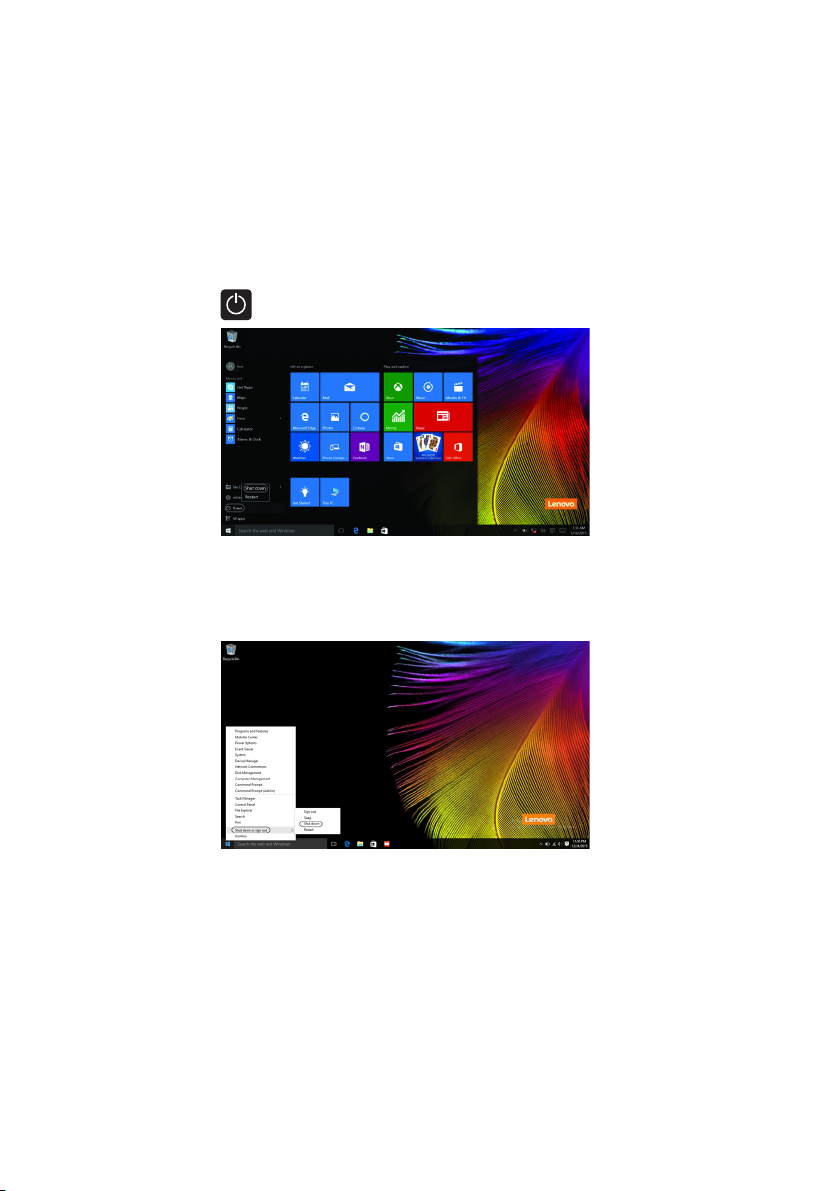
The power button is on the Start menu. Select it and you can choose to shut
down or restart the computer, or put the computer into sleep mode.
Through the Start menu, you can locate all the installed apps or view the
frequently used apps.
16
Page 21
Chapter 2. Starting to use Windows 10
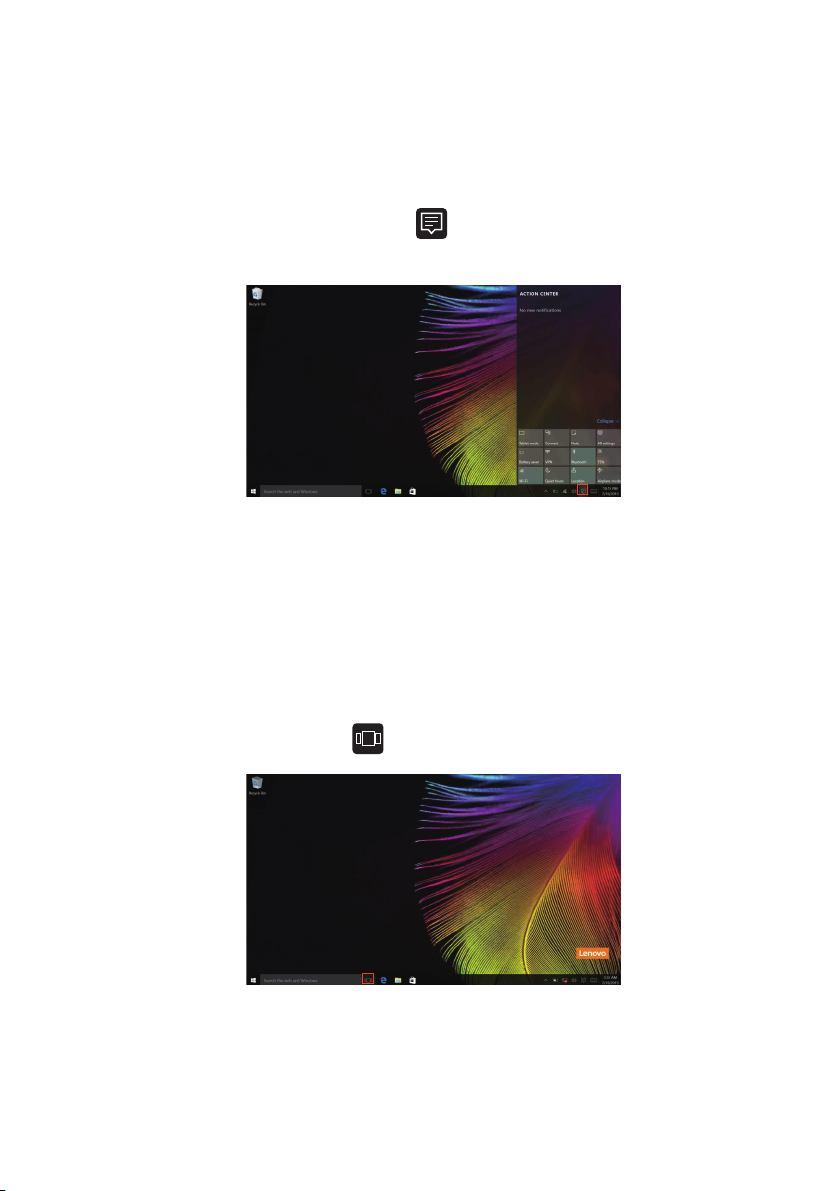
The ACTION CENTER
Select the ACTION CENTER icon on the taskbar and the ACTION
CENTER is displayed.
From the ACTION CENTER, you can examine important notifications from
Windows and your apps. Moreover, you can change common settings
quickly.
Task View in taskbar
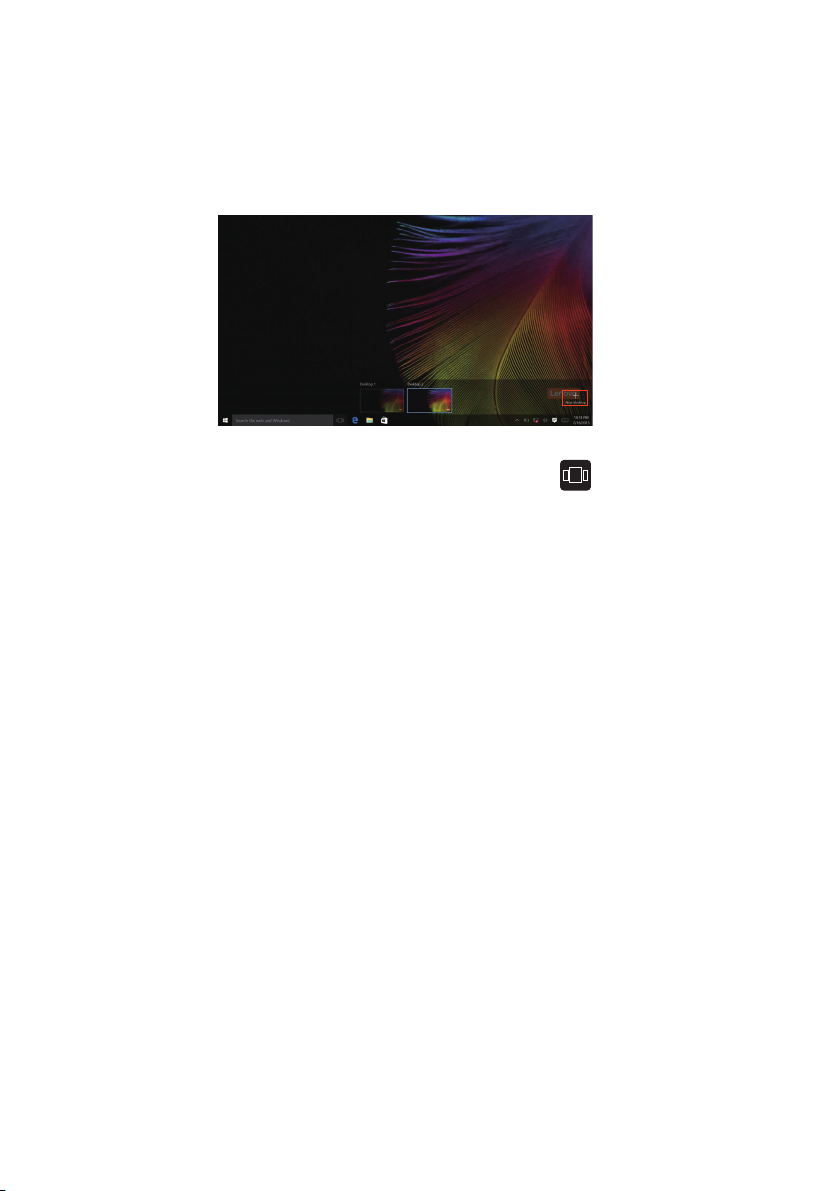
In Windows 10, you can add a new desktop and switch between different
desktops.
To add a new desktop, do the following:
• Click the Task View icon
in the taskbar area.
17
Page 22
Chapter 2. Starting to use Windows 10
•Click New desktop.
To switch between desktops, click the Task View icon , then select your
desired desktop.
18
Page 23

Chapter 2. Starting to use Windows 10
Putting the computer to sleep or shutting
it down - - - - - - - - - - - - - - - - - - - - - - - - - - - - - - - - - - - - - - - - - - - - - - - - - - - - - - - - - - - - - - - - - - - - - - - - - - - -
When you have finished working with your computer, you can put it to sleep
or shut it down.
Putting your computer to sleep
If you will be away from your computer for only a short time, put the
computer to sleep.
When the computer is in sleep mode, you can quickly wake it to resume use,
bypa
ssing the startup process.
To put the computer to sleep, do one of the following:
• Close the display lid.
• Press the Power button.
• Move the cursor to the lower-left corner, and then select the Start button.
Sel
Power Sleep.
ect
Note: Put your computer to sleep before you move it. Moving your computer while the hard
disk drive is spinning can damage the hard disk, causing loss of data.
To wake up the computer, do one of the following:
• Press any key on the keyboard.
• Press the Power button.
19
Page 24
Chapter 2. Starting to use Windows 10
Shutting down the computer
If you are not going to use your computer for a long time, shut it down.
To shut down your computer, do one of the following:
• Move the cursor to the lower-left corner, and then select the Start button.
Select
Power Shut down.
• Right-click the Start button in the lower-left corner and select Shut down or
sign out Shut down.
20
Page 25
Chapter 2. Starting to use Windows 10
Touch screen operation
(on select models) - - - - - - - - - - - - - - - - - - - - - - - - - - - - - - - - - - - - - - - - - - - - - - - - - - - - - - -
The display panel can accept inputs like a tablet, using the multi-touch
screen, or like a traditional notebook computer, using the keyboard and
touch pad.
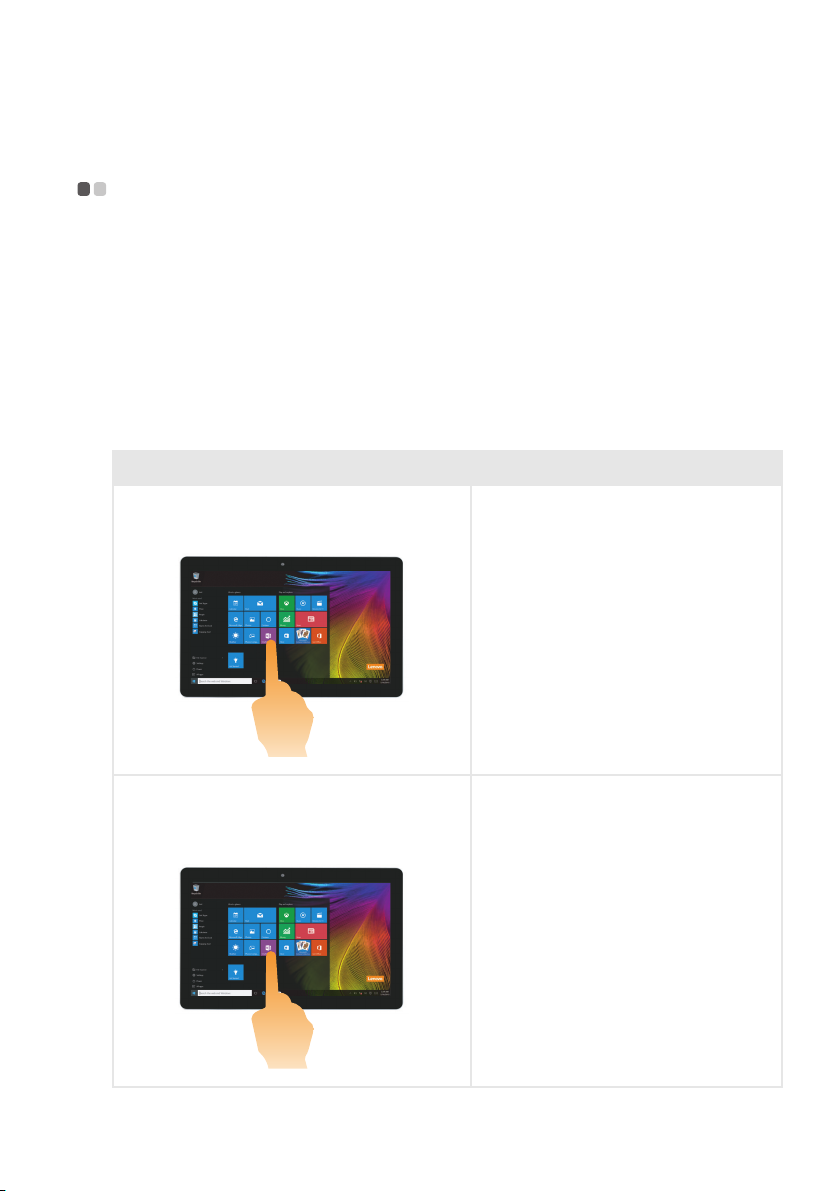
Multi-touch gestures
You can touch the screen with one or more fingertips to perform a variety of
tasks.
Frequently used gestures Tasks performed
Ta p
Tap once on an item.
Performs an action, such as starting
an app, opening a link, or
performing a command. Similar to
left-clicking with a mouse.
Press and hold
Press your finger down and leave it there
moment.
for a
Enables you to see detailed
information before selecting an
action. Can also open a menu with
more options. Similar to rightclicking with a mouse.
21
Page 26
Chapter 2. Starting to use Windows 10
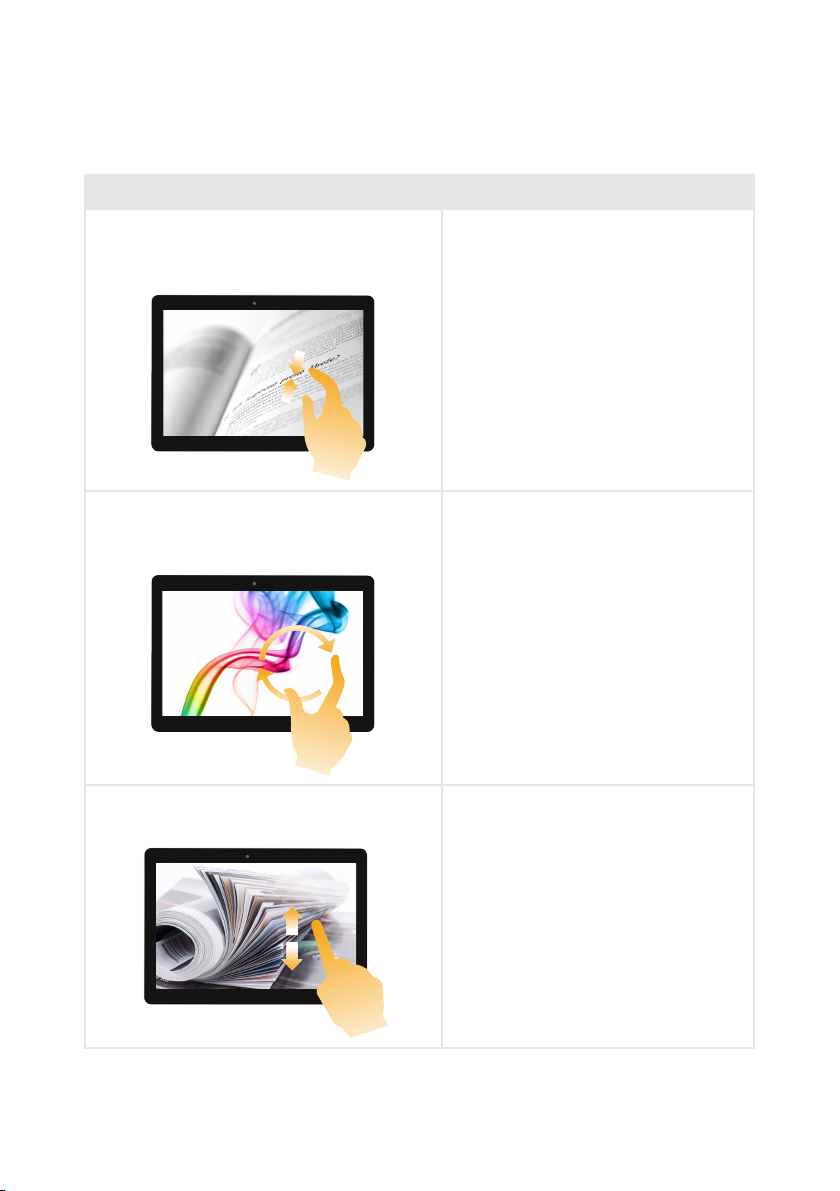
Frequently used gestures Tasks performed
Zoom
Move two fingers together or apart while
touching the screen.
Zooms in and out on visual apps,
such as pictures and maps. Can also
jump to the beginning or end of a list.
Rotate
Place two or more fingers on an item and
rn
then tu
Slide
Drag your finger across the screen.
your hand.
Rotates an object (Note: Not all items
can be rotated, depending upon the
app.).
Pans or scrolls through lists and
pages. Can also move an object or be
used to draw or write, depending
upon the app. Similar to pressing
and holding to pan and to scrolling
with a mouse.
22
Page 27
Chapter 2. Starting to use Windows 10
Frequently used gestures Tasks performed
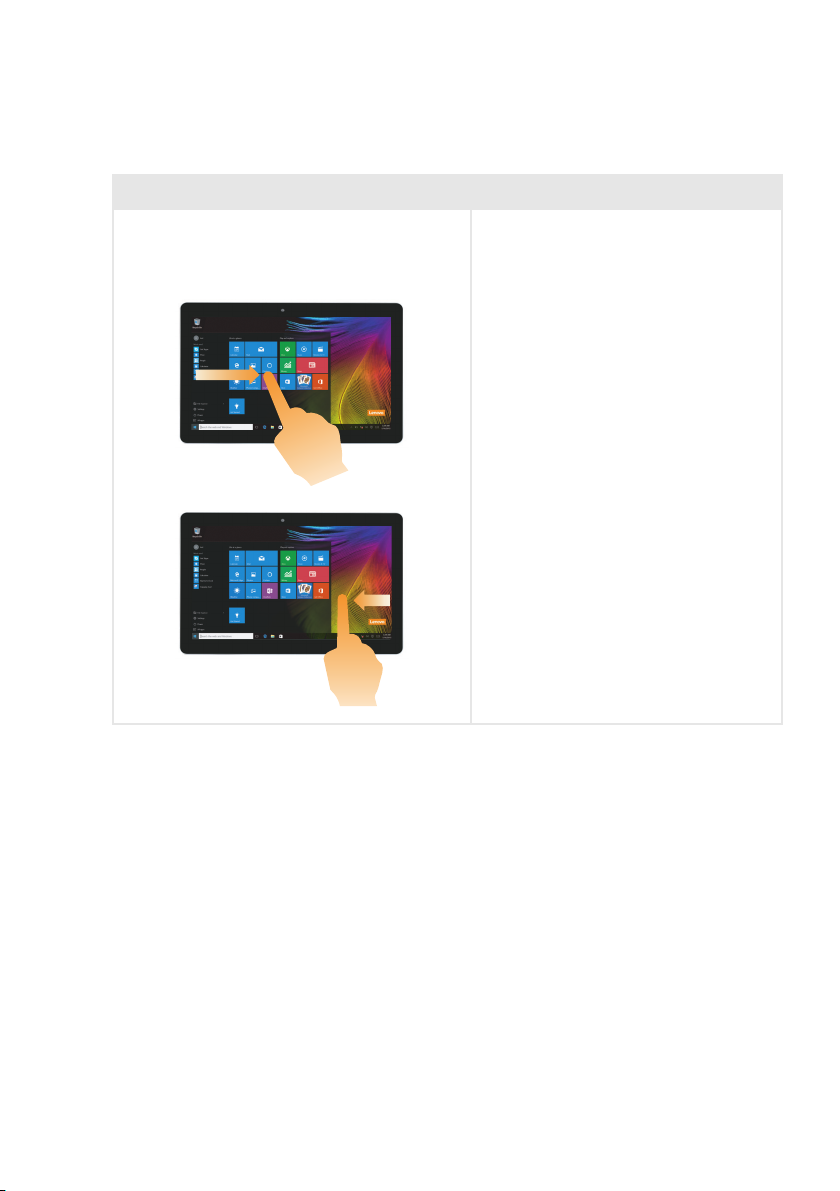
Swipe
Start from any edge of the screen, then
e inwards toward the center.
swip
Swiping in from the left edge can:
• Bring in and open an app currently
running in the
Swipe from the right edge can open
the ACTION CENTER.
background.
23
Page 28
Chapter 2. Starting to use Windows 10
Connecting to a wireless network - - - - - - - - - - - - - - - - - - - - - - - - - - -
Enabling wireless connection
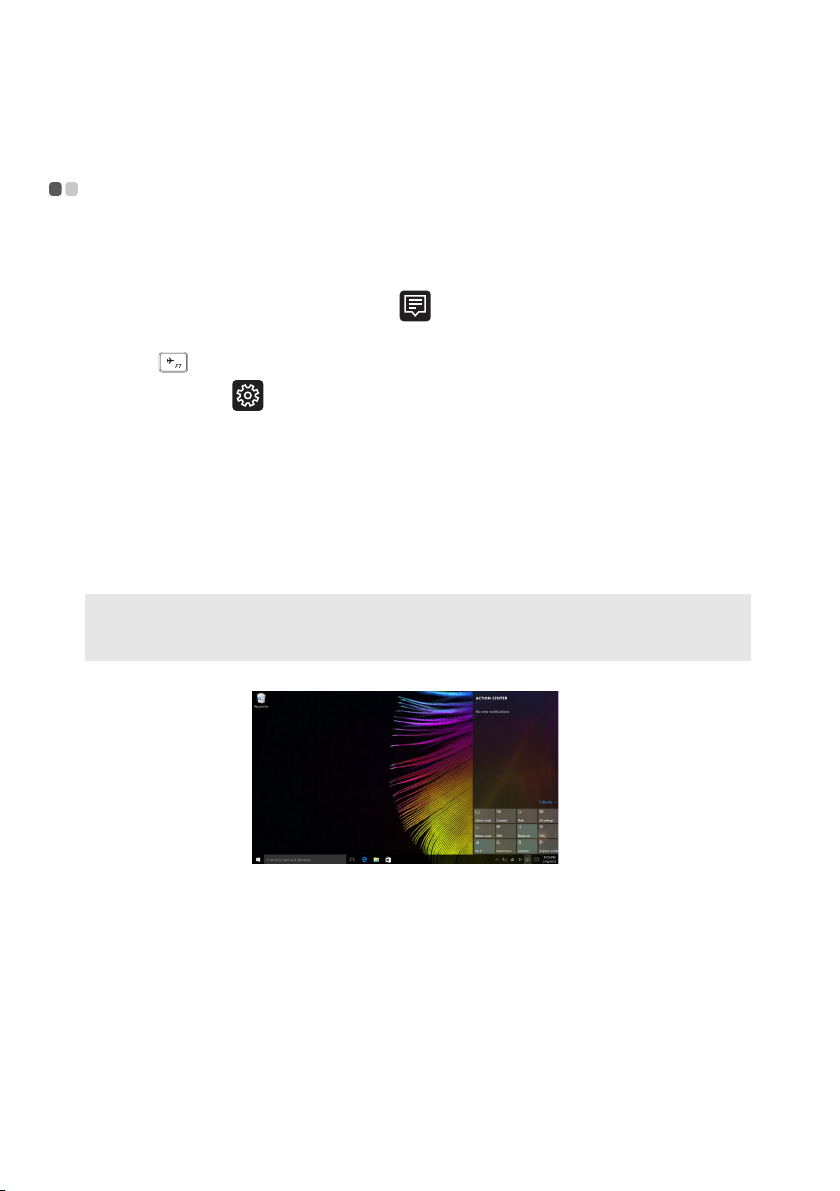
To enable wireless functions, do one of the following:
• Click the ACTION CENTER icon
deselect Airplane mode.
•
Press
•Click Settings
to disable airplane mode.
Network & Internet Airplane mode to open the
network configuration page. Then toggle the airplane mode switch to Off.
Connecting to a wireless network
After wireless has been enabled, the computer will automatically scan for
available wireless networks and display them in the wireless network list. To
connect to a wireless network, click the network name in the list, and then
click Connect.
Note: Some networks require a network security key or passphrase for connection. To
connect to one of those networks, ask the network administrator or the Internet service
provider (ISP) for the security key or passphrase.
in the notification area, and then
24
Page 29

Chapter 2. Starting to use Windows 10
Get help from Windows - - - - - - - - - - - - - - - - - - - - - - - - - - - - - - - - - - - - - - - - - - - - - -
If you have a problem with the operating system, see the Windows Get Help
app. To open it, do the following:
• Move the cursor to the lower-left corner, and then select the Start button.
Sel
ect Get Help from All apps.
25
Page 30

Chapter 3. Recovery system
Push-button reset - - - - - - - - - - - - - - - - - - - - - - - - - - - - - - - - - - - - - - - - - - - - - - - - - - - - - - - -
Push-button reset is a built-in recovery tool that enables users to restore
their operating system to its original state. This preserves their data and
important customizations, without the need to back up their data in advance.
The following Push-button reset featu
multiple locations within Windows:
Refreshing the computer
Fixes software problems by reinstalling the factory default configuration.
This preserves the user’s data, important settings, and any Windows Store
apps previously purchased from the Windows Store.
Resetting the computer
Prepares the computer for recycling or transfer of ownership. This reinstalls
the factory default configuration and returns all user data and applications to
the state of their original Out-of-Box Experience (OOBE).
Using Push-button reset
Push-button reset can be launched using one of the following methods:
• Novo button:
- Shut down the computer and wait at least five seconds. Press the Novo
button
•Settings:
- Se
Restart now.
For more instructions, see the Windows Help and Support file on your
comp
When I purchased my computer, it included a copy of Windows. How can I
determin
On the outside of the sales package of y
label containing configuration information for your computer. Check the
printed string next to OS. If it contains Windows or WIN, the copy of
Windows was preinstalled by Lenovo.
and then select System Recovery.
ttings Update & security Recovery Advanced startup select
uter.
e whether the copy of Windows is preinstalled by Lenovo?
res are available to users from
our computer, you should find a
26
Page 31
Chapter 3. Recovery system
I uninstalled a preinstalled software, but there is no significant increase in the
free drive space.
The copy of Windows running on your computer may be Compact
technology e
nabled. For computers with Compact technology enabled
Windows, the majority of files needed for preinstalled software are
installed on the Recovery Partition and won’t be deleted through normal
uninstallation.
the
How can I determine whether
Windows running on my computer is
Compact technology enabled?
Compact technology is normally enabled on
copies of Windows 10 Update
running on SSD (or eMMC) -only computer models. To check your
computer,
1 Right-
click the Start button in the lower-left corner and select Di
sk
Management.
2 The Disk Management program starts.
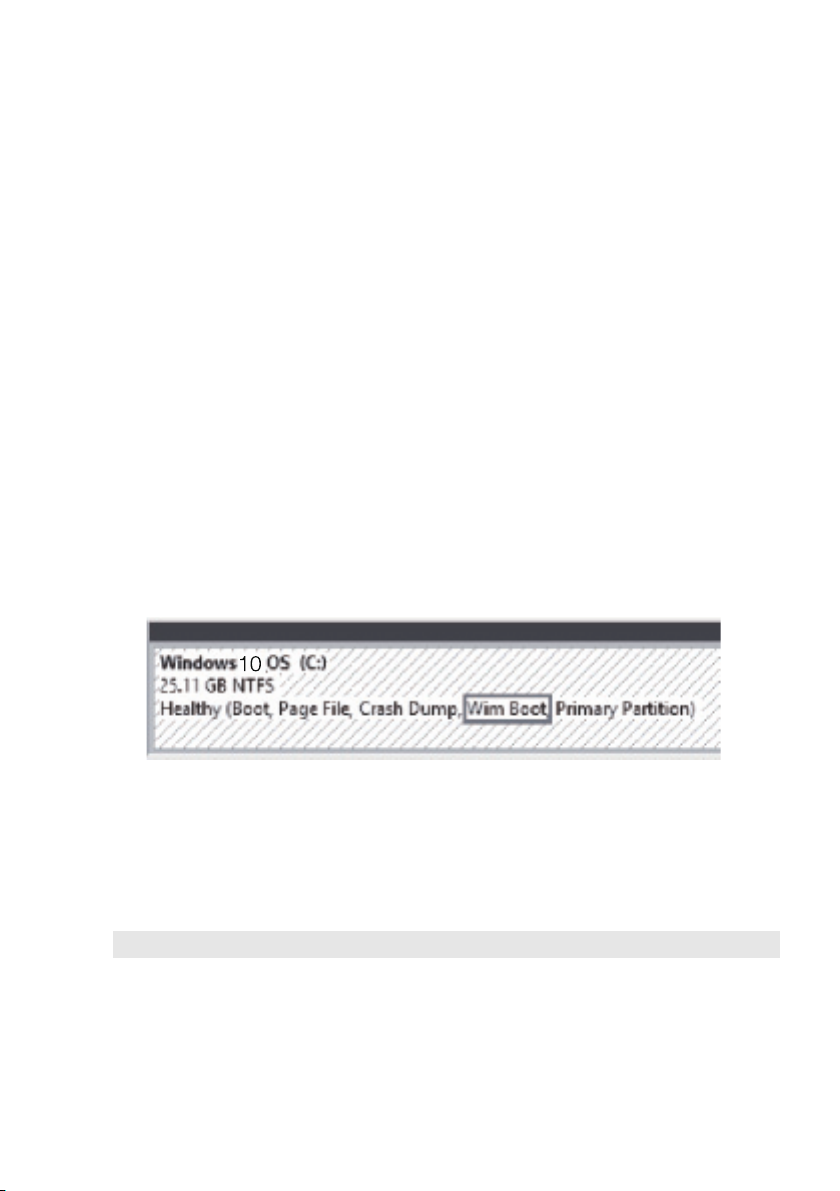
If
Wim Boot is
labeled on the Windows partition (as illustrated), Compact
technology is enabled on your copy of Windows.
Where can I find drivers for the various hardware devices of my computer?
If your computer is preinstalled with a Wi
ndows operating system, first
check the installation program on the D partition of your hard disk (for
select models, on the C partition). If you cannot find the drivers for all the
hardware devices that you need there, download the drivers from the
Lenovo consumer support website.
Note: The Lenovo support Web site contains the latest drivers.
27
Page 32

Chapter 4. Troubleshooting
Frequently asked questions - - - - - - - - - - - - - - - - - - - - - - - - - - - - - - - - - - - - - - - - - - - -
This section lists frequently asked questions by category.
Finding information
What safety precautions should I follow when using my computer?
The Lenovo Safety and
computer contains safety precautions for using your computer. Read and
follow all the precautions when using your computer.
Where can I find the hardware specifications for my computer?
You can find hardware specifications for your computer from within the
Companion (or Len
Where can I find warranty information?
For the warranty applicable to your computer, including the warranty
period and
type of warranty service, see the Lenovo limited warranty.
Drivers and preinstalled software
Where are the installation discs for Lenovo preinstalled software (desktop
software)?
Your computer does not come with
preinstalled software. If you need to reinstall any preinstalled software,
you can find the installation program on the D partition of your hard disk
(for select models, on the C partition). If you cannot find the installation
program there, you can also download it from the Lenovo consumer
support website.
Where can I find drivers for the various hardware devices of my computer?
If your computer is preinstalled with a W
provides drivers for all the hardware devices that you need on the D
partition of your hard disk (for select models, on the C partition). You can
also download the latest device drivers from the Lenovo consumer support
website.
General Information Guide which came with your
ovo PC Manager) app.
installation discs for Lenovo
indows operating system, Lenovo
28
Page 33

Chapter 4. Troubleshooting
BIOS setup util
What is the BIOS setup utility?
The BIOS setup utility is ROM-based software. It displays basic computer
information and
hardware mode, and other preferences.
How can I start the BIOS setup utility?
To start the BIOS setup utility:
1 Shut down
2 Press the
How can I change the boot mode?
There are two boot modes: UEFI and Legacy S
mode, start the BIOS setup utility and set boot mode to UEFI or Legacy
Support on the boot menu.
When do I need to change the boot mode?
The default boot mode for your computer is UEFI mode
install a legacy operating system, such as Windows, Linux or Dos, etc (that
is, any operating system before Windows 8) on your computer, you must
change the boot mode to Legacy Support. The legacy operating system,
such as Windows, Linux or Dos, etc cannot be installed if you don't change
the boot mode.
ity
provides options for setting boot devices, security,
the computer.
Novo button and then select BIOS Setup.
upport. To change the boot
. If you need to
Getting help
How can I contact the customer support center?
See “Chapter 3. Getting help and service” of Len
Information Guide.
ovo Safety and General
29
Page 34

Chapter 4. Troubleshooting
Troubleshooting - - - - - - - - - - - - - - - - - - - - - - - - - - - - - - - - - - - - - - - - - - - - - - - - - - - - - - - - - - - - - - -
Display problems
When I turn on the
computer, nothing appears
on the screen.
When I turn on the
computer, only a white
cursor appears on a blank
screen.
The screen goes blank
while the computer is
Sleep problems
The critical low-battery
error message appears,
and the computer
immediately turns off.
The computer enters sleep
mode immediately after
on.
Power-
on.
• If the screen is blank, make sure that:
- The AC power adapter is connected to the
computer, and the po
working electrical outlet.
- The computer power is on. Press the Power button
again for confirmation.
• If these items are set correctly, and the screen remains
blank, have the computer serviced.
• Restore backed-up files to your Windows
environment or the entire contents of your hard disk
to its original factory contents using Push-button
reset. If you still see only the cursor on the screen,
have the computer serviced.
• Your power management is enabled. Perform the
following to resume from sleep mode:
- Press any key on the keyboard.
• The battery power is getting low. Connect the AC
power adapter to the computer.
• Make sure that:
- The battery is charged.
- The operating temperature is within the acceptable
range. S
the Lenovo Safety and General Information Guide.
“Chapter 2. Use and care Information” in
ee
wer cord is plugged into a
Note: If the battery is charged and the temperature is within range, have the computer
serviced.
30
Page 35

Chapter 4. Troubleshooting
The computer does not
return from sleep mode and
the computer does not
work.
• If your computer is in sleep mode, connect the AC
power adapter to the computer, then press the Power
button.
• If the system still does not return from sleep mode,
your system has stopped responding, and you cannot
turn off the computer; reset the computer. Unsaved
data may be lost. To reset the computer, press and
hold the Power button for eight seconds or more. If
the computer still does not reset, remove the AC
power adapter.
Display panel problems
The screen is blank. • Do the following:
- If you are using the AC power adapter or the
battery
, press F12 ( ) to make the screen brighter.
- If the power indicator is blinking, press the Power
button to resume from
- If the problem persists, follow the solution in the
next problem “The screen is unreadable or
distorted.”
The screen is unreadable or
distorted.
Incorrect characters appear
on
e screen.
th
• Make sure that:
- The screen resolution and color quality are correctly
set.
- The monitor type is correct.
• Is the operating system or programs installed
correctly? If they are installed and configured
correctly, have the computer serviced.
Sound problems
No sound can be heard
from the speakers even
when the volume is turned
up.
• Make sure that:
- The Mute function is off.
- The combo audio jack is not being used.
- Speakers are selected as the playback device.
sleep mode.
31
Page 36

Chapter 4. Troubleshooting
Battery problems
Your computer shuts down
before the battery status
indicator shows empty.
-or-
Your computer operates
after the battery status
icator shows empty.
ind
Other problems
Your computer does not
respond.
The connected external
device does not work.
ry
• Recharge the batte
• To reset your computer, press and hold the Power
button for eight seconds or more. If the computer still
does not respond, remove the AC power adapter.
• Your computer might lock when it enters sleep mode
during a
timer when you are working on the network.
• Do not connect or
cables other than USB while the computer power is
on. Otherwise, you might damage your computer.
• When using high power consumption external
de
external device power adapter. Otherwise, the device
may not be recognized, or the system may shut down
as a result.
communication operation. Disable the sleep
vices, such as an external USB optical drive, use an
.
disconnect any external device
32
Page 37

Trademarks
The following terms are trademarks or registered trademarks of Lenovo in the
United States, other countries, or both.
Lenovo
Microsoft and Windows are trademarks of Micr
States, other countries, or both.
Other company, products, or service names may be trademarks or service marks
of other
s.
osoft Corporation in the United
33
Page 38

en-US
Rev. AA00
©Lenovo China 2017
 Loading...